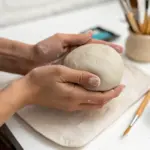
I love how art clay sculpture turns a plain lump of clay into something with personality, texture, and real presence. If you’re craving fresh clay sculpture ideas—from classic forms to playful, artsy twists—these are the projects I keep coming back to in my studio.
Expressive Face Pinch-Pot Sculpture
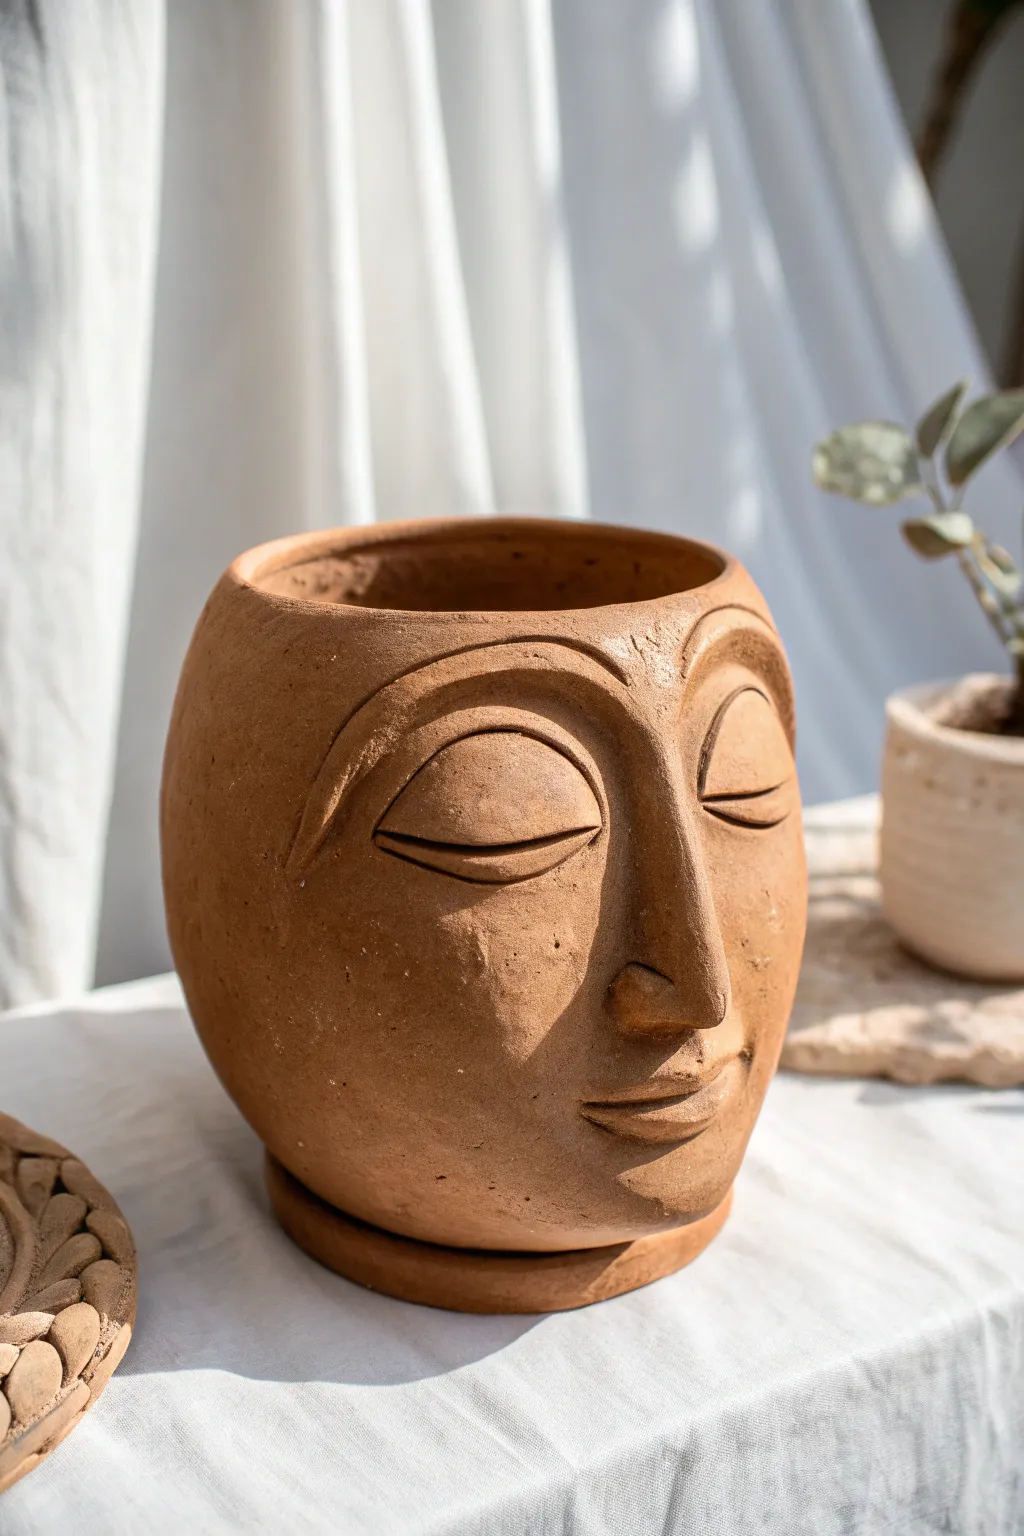
Transform a simple lump of earth into this peaceful, meditative face planter that radiates calm. With smooth terracotta clay and careful modeling, you’ll create a functional vessel featuring gentle curves, closed eyes, and a prominent nose bridge.
Step-by-Step
Materials
- Terracotta clay (or similar earthenware)
- Potter’s wheel (optional, can be hand-built)
- Needle tool
- Loop tool for trimming
- Wooden modeling tools
- Sponge
- Water bowl
- Kiln (for firing)
- Clay wire cutter
Step 1: Forming the Base Vessel
-
Prepare the clay body:
Start by wedging a substantial ball of terracotta clay to remove air bubbles. You’ll want a smooth consistency that holds its shape well without being too stiff. -
Establish the cylinder:
Whether throwing on a wheel or building with coils, create a tall, cylindrical form. Aim for walls that are slightly thicker than a standard mug, about 3/8 inch, to support the upcoming facial features. -
Shape the gentle curve:
Belly out the form slightly in the middle while keeping the rim somewhat narrower. The goal is an organic, head-like shape rather than a straight-sided pipe. -
Smooth the exterior:
Use a rib tool or a smooth sponge to compress the surface. Erase all throwing lines or coil marks; the canvas for the face needs to be perfectly uniform and smooth.
Crack Prevention
If facial features start cracking away as they dry, score deeply and use vinegar slip for a stronger bond, then slow drying down further.
Step 2: Sculpting the Facial Features
-
Map out the features:
Lightly trace a vertical line for the nose and horizontal lines for the eyes using a needle tool. Ensure the spacing feels balanced within the rounded form. -
Build the nose:
Score the center area and attach a triangular coil of clay. Blend the edges seamlessly into the pot’s surface, building up a strong, straight bridge that widens at the bottom. -
Add the brow ridge:
Roll two curved coils and attach them above the eye line to form the eyebrows. These should arc high and connect directly into the top of the nose bridge for a continuous T-shape. -
Define the eyelids:
Create almond-shaped slabs of clay for the eyelids. Score and slip the area, then press them onto the face. They should look heavy and closed, protruding slightly from the surface. -
Refine the eye shape:
Use a wooden modeling tool to deeply incise the line between the eyelid and the brow. This recessed shadow is crucial for defining the anatomy. -
Carve the lash line:
Cut a deep, singular curved line across the bottom of each eyelid slab. This creates the ‘shut eye’ look, separating the upper lid from the cheek area. -
Add the mouth:
Below the nose, shape a small amount of added clay into lips. Keep the expression neutral or slightly smiling. Use a tool to carve the separation line between the lips.
Step 3: Refining and Finishing
-
Smooth the transitions:
I find that using a slightly damp sponge or finger to blur the connection points makes the face look like it’s emerging from the pot, rather than stuck onto it. -
Sharpen the details:
Go back over the eyelids, nostrils, and lips with a finer tool. Clean up any crumbs of clay to ensure crisp, clean lines against the smooth skin areas. -
Create the saucer:
Roll a flat slab of clay and cut a circle slightly wider than the pot’s base. Raise the rim slightly to catch water, smoothing the edges to match the pot’s finish. -
Slow drying:
Cover the piece loosely with plastic to let it dry slowly over several days. Rapid drying can cause the thick added features (like the nose) to crack away from the thin wall. -
Bisque fire:
Once bone dry, fire the piece in a kiln to bisque temperature (usually cone 04 or 06). This prepares it for glazing or final sanding. -
Final texture check:
Since this look is raw terracotta, you likely won’t glaze the outside. Sand any rough spots lightly after firing to achieve that warm, matte skin-like texture.
Drainage Logic
Don’t forget to poke a hole in the bottom of the main pot before firing so your future plant doesn’t drown in standing water.
Place your finished planter in a spot with soft light to highlight the shadows of the sculpted face.


Graceful Bird Sculpture With Feather Texture
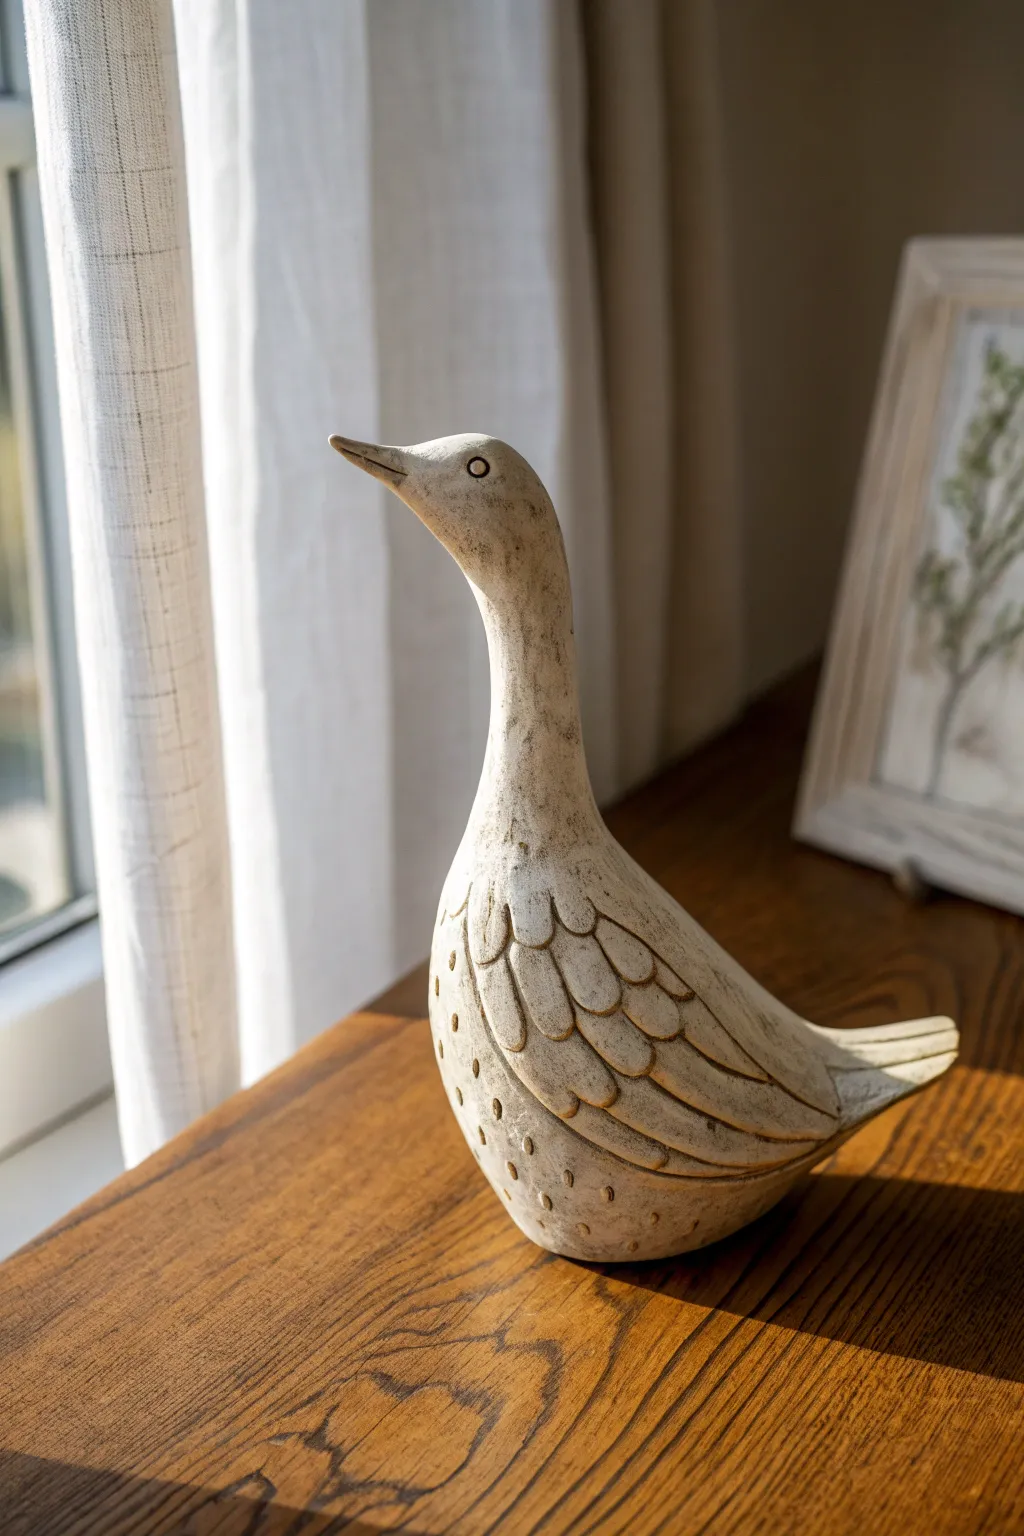
This charming project captures the elegance of a goose with a stylized, elongated neck and a beautifully textured wing. The finished piece features a distressed, creamy-white finish that mimics the look of aged ceramic or weathered wood.
Step-by-Step
Materials
- Air-dry clay or polymer clay (stone or white color)
- Aluminum foil
- Masking tape
- Sculpting wire or armature wire
- Basic sculpting tools (loop tool, needle tool)
- Sponge
- Acrylic paints (Cream/Off-White, Raw Umber/Dark Brown)
- Matte varnish or sealant
- Fine grit sandpaper
Step 1: Building the Armature
-
Wire frame:
Begin by twisting a length of armature wire to create a simple skeleton. Form a loop for the base where the body sits, and extend a single wire upwards, curving it gently to defining the long neck and head angle. -
Foil bulk:
Crumple aluminum foil tightly around the wire to build up the bulk of the body. Shape an oval for the main body and a thinner cylinder up the neck wire. Keep the foil slightly smaller than your desired final size to leave room for the clay layer. -
Secure the form:
Wrap the foil tightly with masking tape. This smooths out sharp crinkles and gives the clay a better surface to adhere to than slick foil.
Fixing Cracks
If cracks appear while air-dry clay dries (common at the neck joint), fill them with a ‘slip’ mixture of clay and water, then smooth over.
Step 2: Sculpting the Form
-
Clay application:
Roll out sheets of clay about 1/4 inch thick. Wrap these sheets around your foil armature, pressing them firmly to remove air bubbles. -
Smoothing seams:
Blend all the seams where clay sheets meet. Use a wet finger or a damp sponge to smooth the surface until it is seamless and the transition from body to neck is fluid and graceful. -
Shaping the head:
Refine the head shape at the top of the neck. Pinch gently to pull out the beak, keeping it straight and aligned with the neck’s curve. The transition from forehead to beak should be subtle, not abrupt. -
Defining the tail:
At the rear of the body, pinch and flatten the clay slightly to form an upward-swept tail. I usually ensure the bottom is flattened enough so the bird sits stably on a table.
Step 3: Adding Details
-
Carving the wing:
Using a needle tool, lightly sketch the outline of a tear-drop shaped wing on the side of the body. Once satisfied with the placement, use a small loop tool to carve deeper grooves to define the wing’s edge. -
Feather texture:
Within the wing outline, carve U-shaped scallops to represent feathers. Layer them like shingles, starting from the back and moving forward. Make the grooves deep enough to catch the antiquing wash later. -
Tail feathers:
Carve horizontal lines across the tail section to suggest tail feathers. -
Facial features:
Press a small hollow circle into the head for the eye using a small round tool or the end of a paintbrush. Carve a line to separate the upper and lower beak. -
Body texture:
Use a needle tool to poke small, random stippling dots on the lower belly area for added textural interest.
Stone Effect
Mix sand or fine grit into your acrylic base coat to give the goose a rough, realistic stone texture before applying the brown wash.
Step 4: Finishing and Painting
-
Drying:
Let the sculpture dry completely according to your clay’s instructions. This may take 24-48 hours for air-dry clay. -
Sanding:
Once dry, use fine-grit sandpaper to smooth any rough fingerprints or bumps, particularly on the neck and beak. -
Base coat:
Paint the entire sculpture with a creamy off-white acrylic paint. You may need two coats for opaque coverage. -
Antiquing wash:
Mix a small amount of raw umber paint with water to create a thin wash. Brush this over the entire piece, making sure it gets into the carved feather crevices. -
Wiping back:
Before the wash dries, use a damp cloth or paper towel to wipe the brown paint off the raised surfaces. The dark paint will remain in the carved lines and textures, highlighting the details. -
Sealing:
Finish with a coat of matte spray varnish to protect the paint and give it a unified, non-glossy sheen.
Place your finished sculpture near a window to let the natural light highlight your beautiful carving work

Classic Mini Bust Study (Simplified Planes)
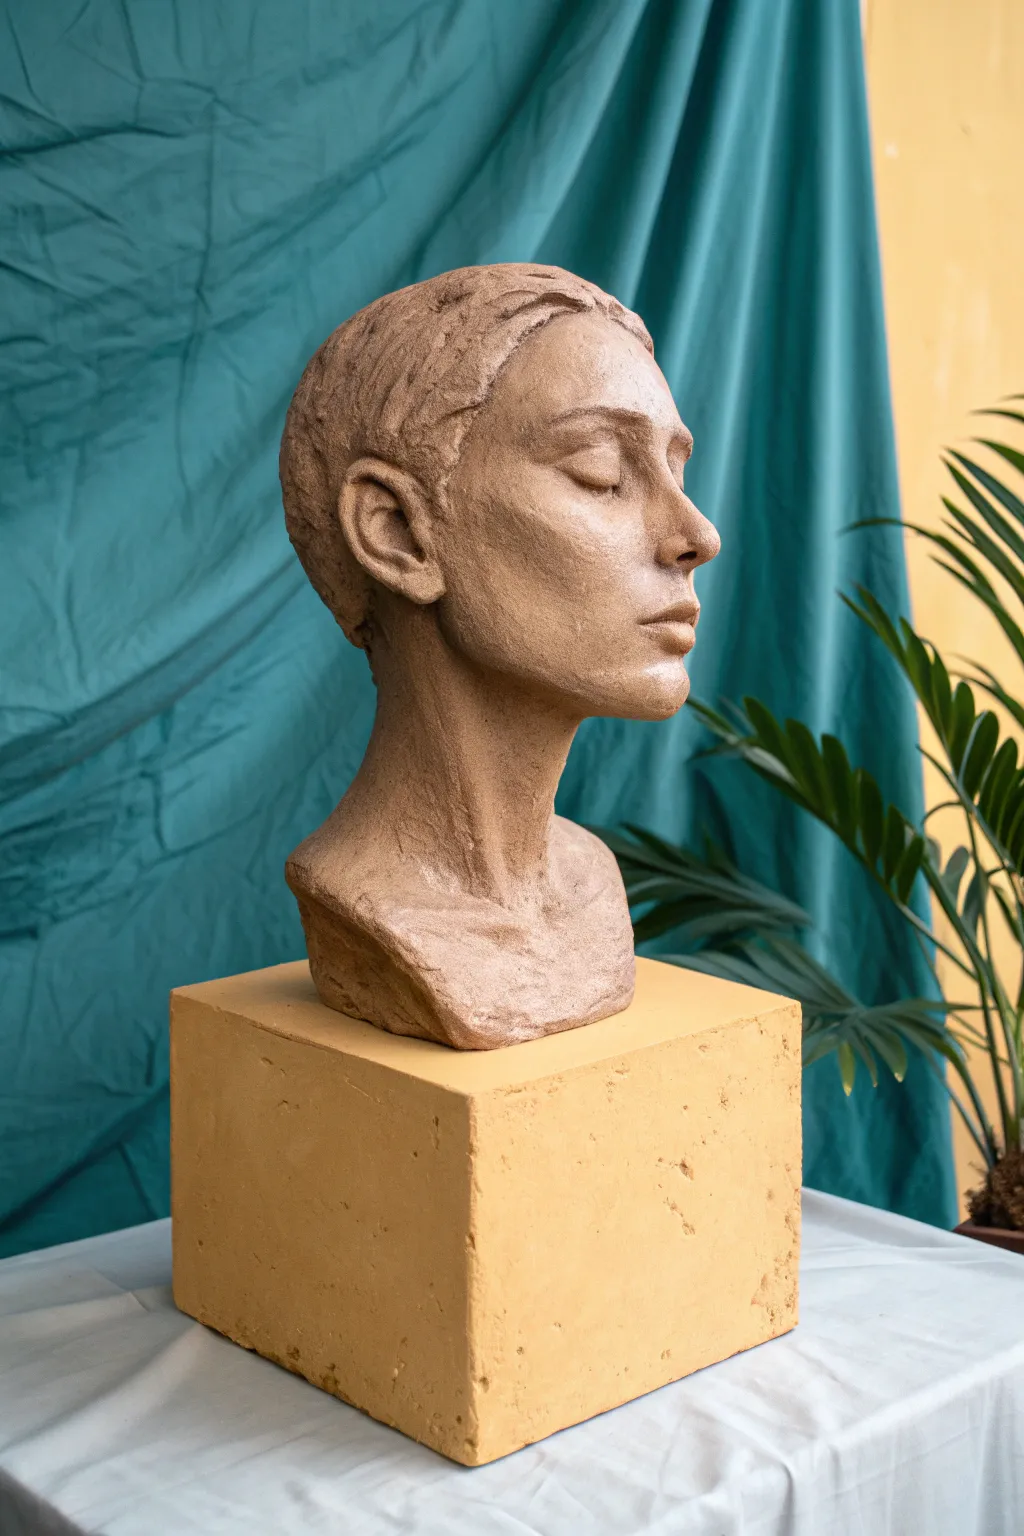
Capture the peaceful essence of a sleeping visage with this classical bust study, focusing on simplified planes and textural warmth. This project creates a timeless, artisanal piece that celebrates the raw beauty of unrefined clay.
Detailed Instructions
Materials
- Water-based sculpting clay (brown/terracotta)
- Armature wire (thick gauge)
- Wooden base or armature stand
- Aluminum foil
- loop tools (various sizes)
- Modeling tools (wooden and metal)
- Sponge
- Spray bottle with water
- Yellow ochre or sandstone block for mounting
Step 1: Armature and Base Structure
-
Prepare the armature:
Begin by securing a sturdy loop of thick wire into a wooden base. Twist the wire to form a rough neck and head shape, ensuring it stands approximately 10-12 inches tall. -
Bulking out the form:
Crumple aluminum foil tightly around the wire loop to create the core volume of the skull. This saves clay and reduces weight. -
Initial clay application:
Cut slabs of your clay and press them firmly onto the foil core. Ensure there are no air pockets between the foil and the clay. -
Establish the neck:
Build a strong cylinder of clay for the neck, connecting the head mass to the base. Angle it slightly forward to give the pose a natural, relaxed feeling.
Step 2: Blocking the Features
-
Map the proportions:
Using a needle tool or wooden skewer, lightly score a guideline for the center of the face, the eye line (halfway down the head), the bottom of the nose, and the mouth. -
Add volume for features:
Add small clay pellets to build up the brow ridge, the nose triangle, the muzzle (mouth area), and the chin. Keep these shapes geometric and blocky at first. -
Define the jawline:
Carve away excess clay to sharpen the jawline, sweeping up towards the ear location. The jaw should feel strong but elegant. -
Sculpt the closed eyes:
Roll two small spheres of clay and press them into the eye sockets. Flatten them slightly and add thin coils for the eyelids, smoothing them down to create the ‘sleeping’ look. -
Refine the nose and mouth:
Shape the nose bridge and nostrils using a small wooden modeling tool. For the lips, focus on the volume of the fleshy parts rather than drawing a line; the top lip should overhang the bottom slightly.
Anatomy Pro-Tip
Keep the eyes exactly halfway down the head. Beginners often place them too high, forgetting the volume of the forehead and cranium needed above the brow line.
Step 3: Refining and Texturing
-
Adding the ears:
Form two ‘C’ shapes from clay tabs and attach them at the jawline height, aligned with the eyes and nose. roughly carve the helix and lobe details. -
Suggesting hair:
Add thin slabs of clay over the skull to represent hair. Instead of carving individual strands, use a rake tool or your fingers to create sweeping, directional texture that pulls back from the face. -
Defining the neck muscles:
Roll distinct coils to represent the sternocleidomastoid muscles (the V-shape on the neck) and blend them into the collarbone area. -
Surface treatment:
I like to use a slightly damp sponge to soften the sharpest tool marks, but don’t over-smooth. Leave some of the rawness to mimic the sandstone-like texture shown in the image. -
Drying process:
Cover the piece loosely with plastic for the first day to slow drying, then uncover to let it dry completely leather-hard before firing or final finishing.
Texture Level Up
After sculpting, gently dab the skin areas with a stiff bristle brush or a piece of burlap fabric. This adds faint pores and grain, making the clay look more like organic stone.
Step 4: Mounting the Bust
-
Prepare the block:
Source a rectangular block of yellow sandstone or cast a plaster block mixed with yellow ochre pigment to match the warm base seen in the reference. -
Final assembly:
Once your sculpture is finished (fired or dried), secure it to the block using a strong epoxy adhesive or a mounting pin if you incorporated a hole in the base.
Step back and admire the quiet dignity your hands have shaped from the earth
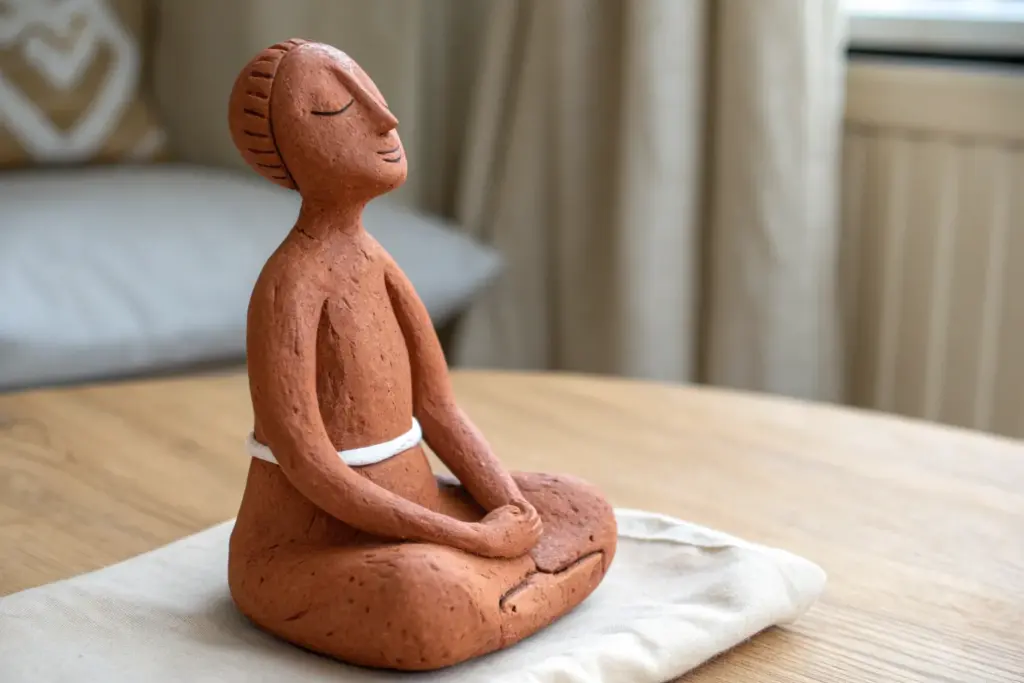
Handbuilt Figure in a Seated Pose
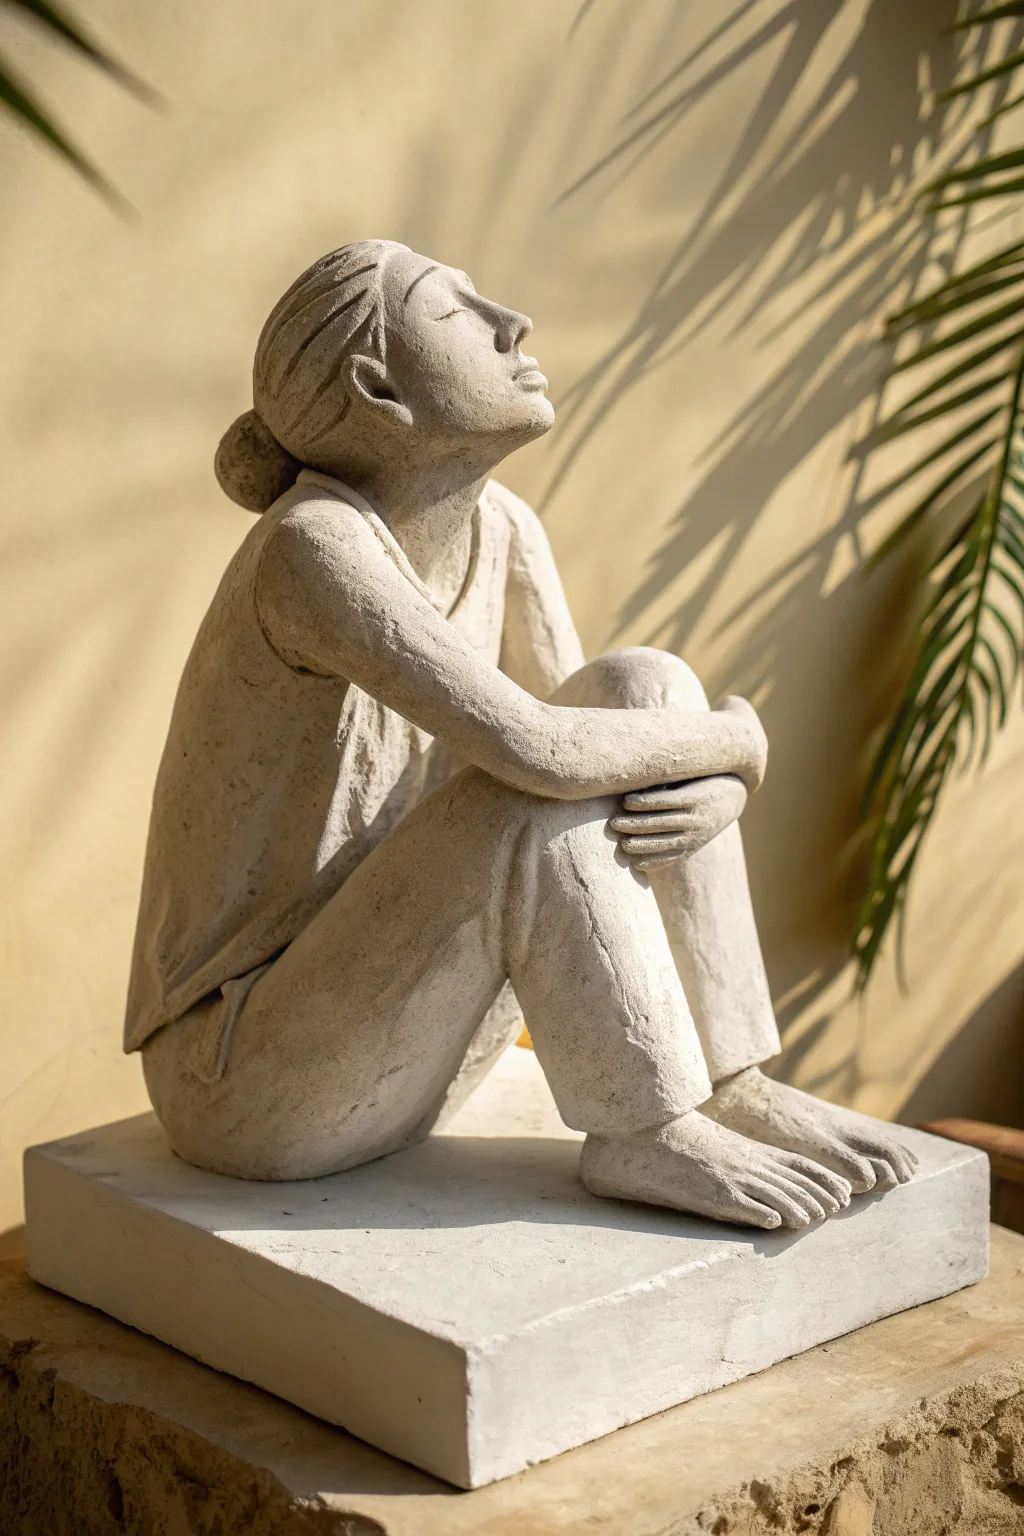
This serene sculpture captures a moment of quiet contemplation, featuring a figure seated with knees drawn up and face lifted to the sky. The rough, textured finish gives it a timeless, weathered stone appearance that beautifully catches the light.
Step-by-Step Tutorial
Materials
- Stoneware clay with grog (for strength and texture)
- Sculpting tools (wire loop, wood modeling tools)
- Needle tool
- Serrated rib or scoring tool
- Slip (clay mixed with water)
- Wooden board or bat for working base
- Plastic bag (for slow drying)
- Sponge
Step 1: Building the Base Structure
-
Create the base slab:
Start by rolling out or flattening a thick rectangular slab of clay about 1 inch thick. This will serve as the plinth or seat for your figure to rest on. -
Form the torso block:
Shape a solid block of clay into an upright oval or rounded rectangle for the torso. It should be slightly leaned forward to accommodate the seated posture. -
Attach the legs:
Roll two thick coils for the legs. Bend them into an inverted ‘V’ shape to mimic knees drawn up to the chest. Score and slip the contact points heavily, then attach them to the base and the lower front of the torso. -
Refine the leg shape:
Use a wooden tool to flatten the shins slightly, suggesting trousers. Define the separation between the thighs and the calves, ensuring the knees look like the highest point.
Head Keep Falling?
If the heavy head droops while the clay is wet, prop it up with a small sponge or crumpled newspaper under the chin until the clay stiffens enough to support the weight.
Step 2: Adding Shoulders and Arms
-
Add the head and neck:
Form a smaller oval for the head and a thick cylinder for the neck. Attach the neck to the torso, tilting it back significantly so the face gazes upward. Secure the head to the neck, blending the clay seamlessly. -
Construct the arms:
Roll two long coils for arms. Position them so they wrap around the drawn-up knees. The elbows should rest on the thighs or slightly to the side, with hands clasping the opposite shins or meeting in front. -
Blend the shoulders:
Add small pads of clay to build up the deltoids where the arms meet the torso. Smooth the clay downward to integrate the arms into the body, erasing any seams. -
Sculpt the clothing folds:
Carve gentle lines near the armpits and waist to suggest a sleeveless shirt. I like to keep these folds soft rather than sharp to maintain the stone-like aesthetic.
Make It Look Antique
After firing, apply a diluted watery acrylic wash in dark grey or mossy green into the crevices, then wipe the high points clean for an aged garden statue vibes.
Step 3: Detailing and Refining
-
Shape the face:
Since the head is tilted back, focus on the profile. Build up the nose bridge and chin. Keep the eyes closed or softly suggested, and refine the jawline. -
Add the hair bun:
Form a small sphere of clay and attach it to the back of the head. Use a tool to draw lines flowing from the forehead back to this bun, simulating pulled-back hair. -
Refine hands and feet:
For the feet, shape simple blocky forms at the end of the legs. Use a needle tool to imply toes rather than sculpting them individually. Do the same for the fingers wrapping around the legs. -
Apply texture:
Take a serrated rib or a rough sponge and gently drag it across the entire surface of the sculpture. This cross-hatching creates that weathered, sandstone texture. -
Review angles:
Turn your sculpture around. Check that the spine curves naturally and the tilt of the head feels balanced, not forced. -
Hollow out (optional but recommended):
If your piece is solid and thick (over 1 inch), slice it carefully off the base, hollow out the torso from underneath to prevent cracking, and reattach it with slip.
Step 4: Finishing and Drying
-
Final smoothing:
Soften any overly sharp edges with a damp sponge, but be careful not to wash away your texturing work. -
Slow drying:
Cover the sculpture loosely with a plastic bag. Let it dry slowly over several days to ensure the thick areas and thin extremities shrink at the same rate. -
Bisque firing:
Once bone dry, fire the piece in a kiln to bisque temperature. -
Surface treatment:
Leave the piece as raw bisque for a natural look, or apply a light oxide wash (like iron oxide) and wipe it back to highlight the textures before a final firing.
Place your finished sculpture near a window where natural light can highlight the contemplative expression and rough texture

The Complete Guide to Pottery Troubleshooting
Uncover the most common ceramic mistakes—from cracking clay to failed glazes—and learn how to fix them fast.
Coil-Built Sculpture Vase With Intentional Negative Space
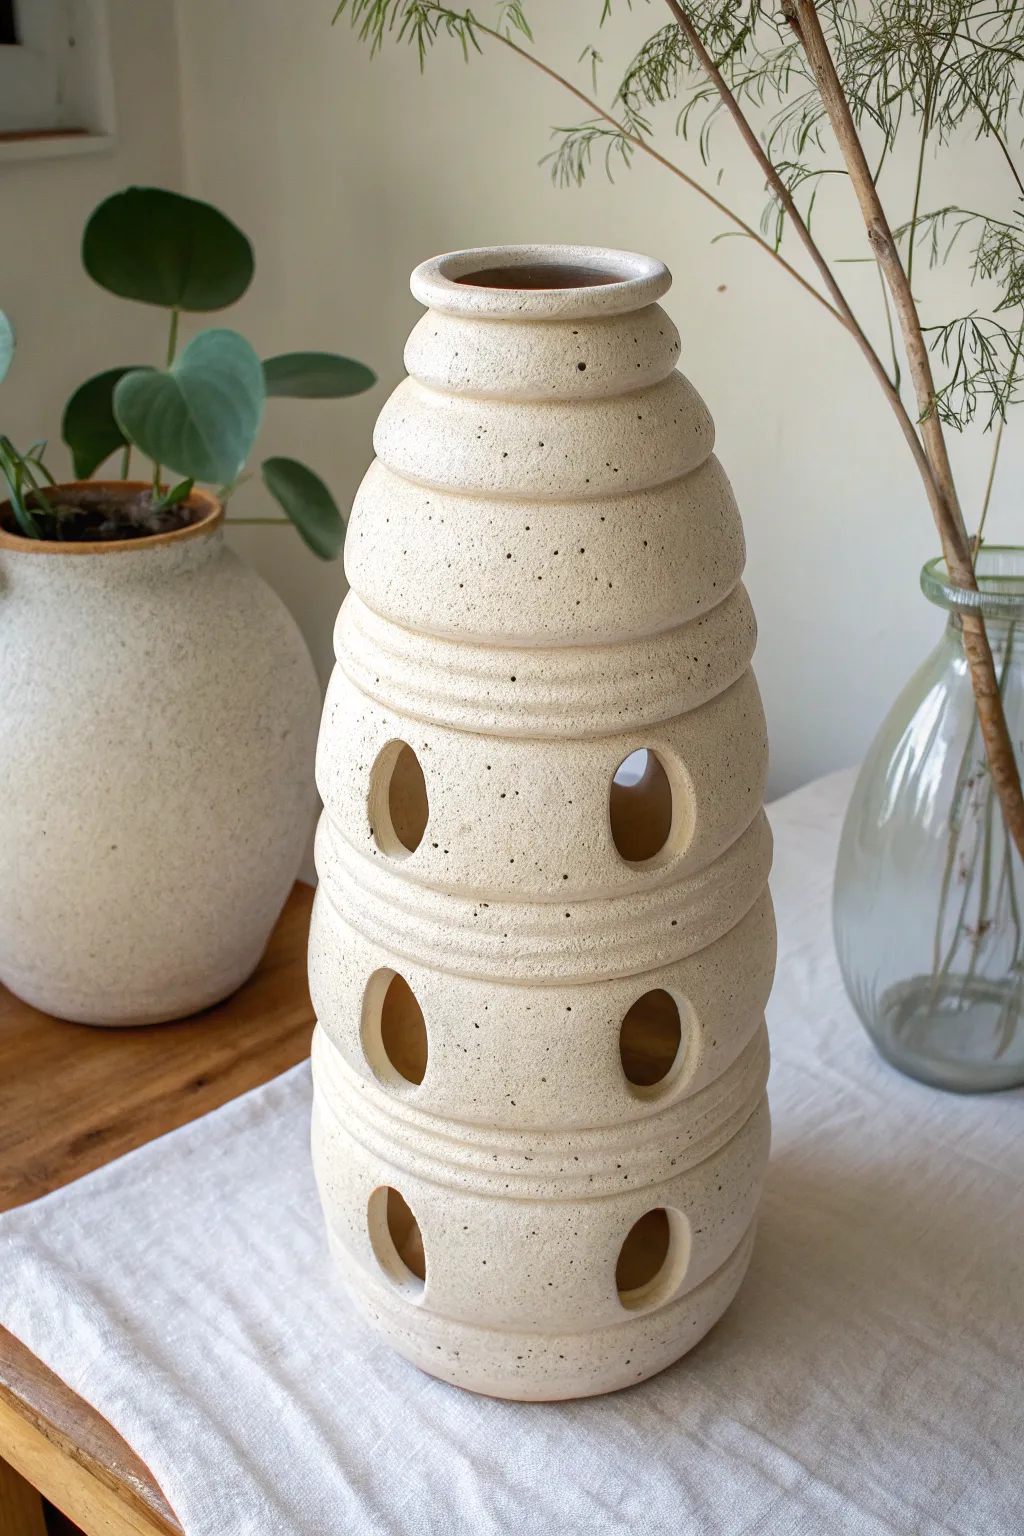
This striking ceramic vessel combines the ancient technique of coil building with a modern, architectural silhouette. Featuring a beehive-like upper section and a perforated base, the speckled clay body and negative space create a dynamic interplay of light and shadow perfect for any contemporary shelf.
Detailed Instructions
Materials
- Stoneware clay with heavy grog or speckles (buff or cream)
- Scoring tool or serrated rib
- Slip (clay slurry)
- Wooden modeling tool
- Circular cookie cutters (approx. 1.5 – 2 inches)
- Sponge
- Wire clay cutter
- Turntable or banding wheel
- Rolling pin (optional for base)
Step 1: Building the Perforated Base
-
Prepare the base slab:
Start by rolling out a thick slab of clay, roughly 1/2 inch thick. Cut a circle about 5-6 inches in diameter to serve as the sturdy footprint of your sculpture. Place this on your banding wheel. -
Roll your coils:
Roll out several long, even coils of clay. Aim for a thickness of about 3/4 inch—thicker coils will help support the height of this structure without buckling. -
Form the first tier:
Score and slip the outer edge of your base slab. Attach your first coil, blending it downwards onto the base on the inside and outside. Continue stacking coils to build a wall about 3 inches high, bulging slightly outward to create a rounded belly shape. -
Constrict the tier:
After the outward bulge, add the next coil slightly inward to begin closing the shape back up. This creates the ‘waist’ of the first tier. Smooth the walls thoroughly to ensure strong adhesion. -
Cut the negative space:
While the clay is leather-hard but still workable, use your circular cutter to punch three to four evenly spaced holes around the belly of this first tier. Smooth the raw edges of the holes with a damp sponge. -
Add a decorative ridge:
Place a coil directly into the ‘waist’ indentation you created. Instead of smoothing this one completely flat, leave it slightly rounded on the outside to form a distinct horizontal ring that separates the tiers visually.
Structural Integrity
Let the bottom tiers stiffen to a firm leather-hard state before adding the heavy solid top section. This prevents the perforated lower walls from slumping under the weight.
Step 2: Constructing the Middle Tiers
-
Build the second tier:
Repeat the process of building upward, bulging out again to form a second rounded tier similar in size to the first. Ensure you are scoring and slipping well, as the weight is increasing. -
Puncturing the second level:
Once the second tier is built and smoothed, punch another set of circular holes. I like to offset these slightly from the holes below for visual variety, but aligning them works too. -
Define the second waist:
Narrow the form again at the top of this tier and apply another decorative ridge coil. This repetitive rhythm of bulge-waist-ridge is key to the sculpture’s architectural look. -
Construct the third perforated tier:
Build a third rounded section. This should be slightly narrower than the base tiers to start tapering the overall form. Punch your final set of holes in this section.
Step 3: Forming the Beehive Top
-
Transition to solid form:
Above the third perforated tier, add your ridge coil. From this point upward, the vessel will be solid without holes. Begin building a taller, conical section that tapers more dramatically. -
Creating the ribbed texture:
Instead of smoothing the exterior of these upper coils completely flat, leave the individual coil shapes visible or accentuate them with a modeling tool to create a ‘beehive’ ribbed effect. -
Tapering the neck:
Gradually reduce the diameter of your coils as you move up. You want a smooth, cone-like slope that leads to a narrow opening at the top. -
Finishing the rim:
Top the vessel with a final, thick coil to create a defined lip. Smooth this rim carefully with a sponge or chamois to ensure it is soft to the touch.
Light It Up
Turn this into a functional luminary by leaving the bottom open (no floor slab) so you can easily place it over an LED candle or puck light.
Step 4: Surface Refinement
-
Smooth and sponge:
Go over the entire piece with a slightly damp sponge. Pay special attention to the cutouts—sharp edges can become brittle after firing. -
Reveal the speckles:
If using a grogged or speckled clay, wiping firmly with a sponge can help reveal the texture by washing away a thin layer of fine surface clay. -
Dry slowly:
Because of the height and the holes, uneven drying can cause cracks. Cover the piece loosely with plastic and let it dry very slowly over several days before bisque firing.
Once fired, the natural speckle of the clay gives this architectural piece a timeless, organic warmth perfect for display.
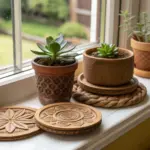
Textured Relief Tile Sculpture (Mountable Art)
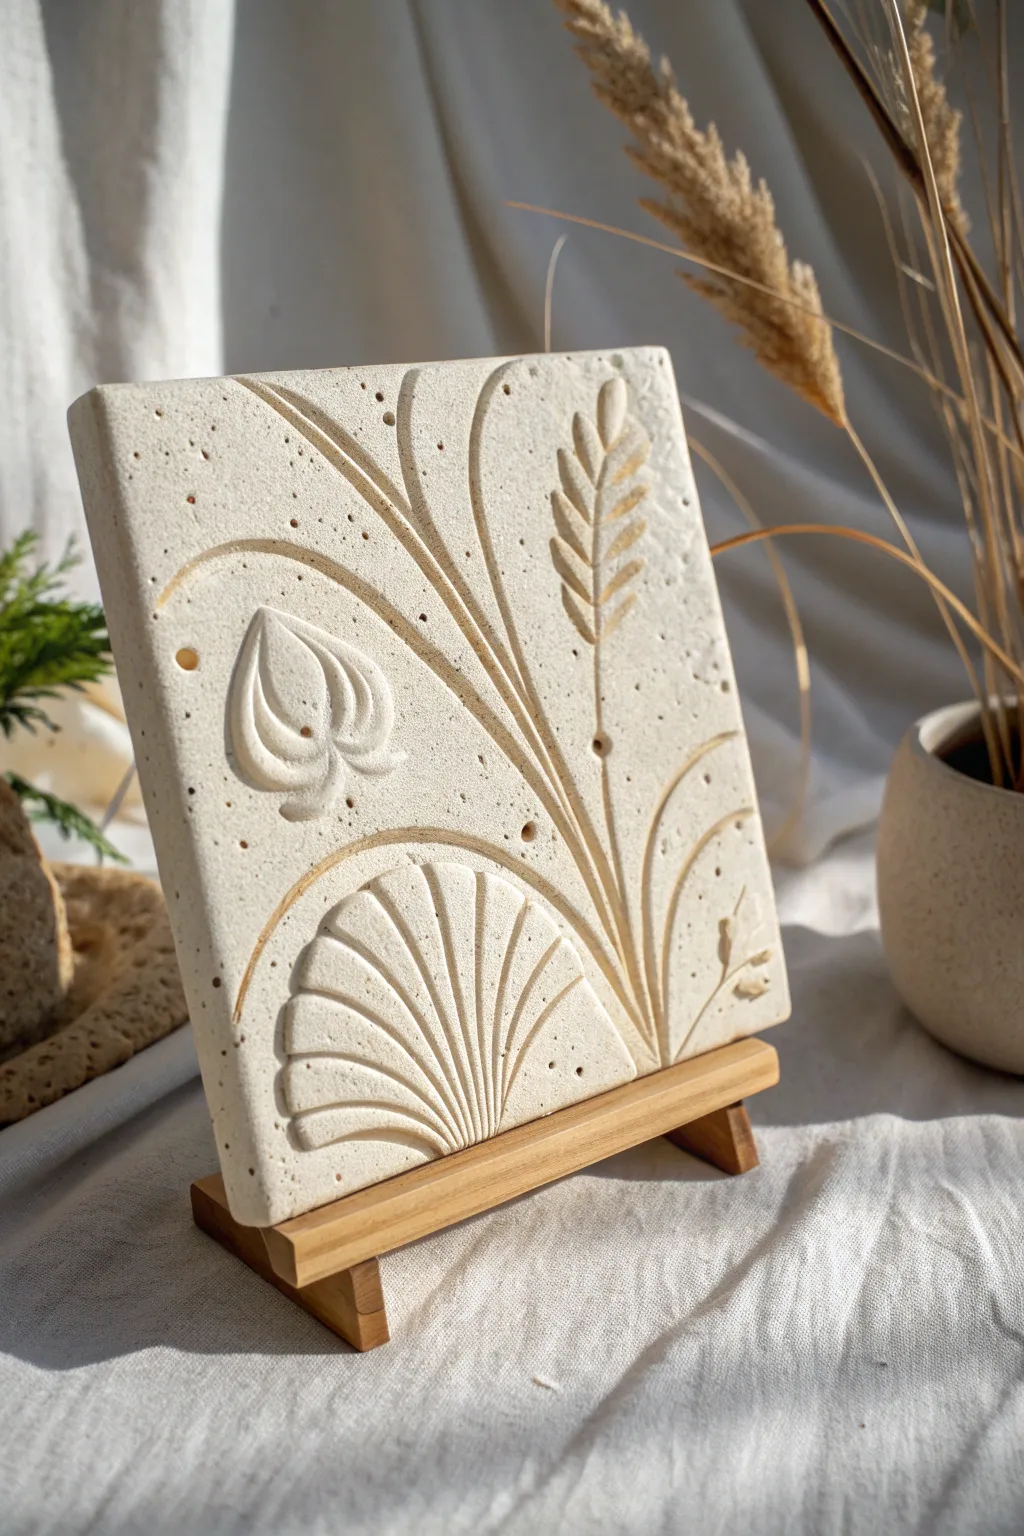
This project captures the elegance of natural forms in a minimalist clay relief tile. The finished piece features a beautiful contrast between smooth carved lines and organic speckles, perfect for display on a simple wooden easel.
How-To Guide
Materials
- White air-dry clay or stone-effect polymer clay
- Rolling pin
- Square cookie cutter or knife and ruler
- Carving tools (loop tool, needle tool)
- Small sponge
- Dried sand or coffee grounds (for speckling, optional)
- Flat wooden board (for working surface)
- Sandpaper (fine grit)
- Small wooden display easel
Step 1: Preparation and Shaping
-
Prepare the Clay:
Start by conditioning your clay. If you are using plain white clay and want that stone-like speckled effect, knead in a small pinch of dried sand or used coffee grounds until evenly distributed. -
Roll the Slab:
Roll out the clay on a flat surface to a uniform thickness of about 1/2 inch (1.2 cm). You want a substantial slab that won’t warp easily. -
Cut the Square:
Using a square cutter or a ruler and knife, cut out a perfect square. Use your finger to gently soften the sharp edges just a touch for a more organic feel. -
Smooth the Surface:
Take a slightly damp sponge and wipe the surface to ensure it is perfectly smooth and free of fingerprints before you begin carving.
Warping Woes?
If the corners curl up while drying, gently weigh them down with light books or place a piece of drywall on top to slow evaporation.
Step 2: Carving the Design
-
Outline the Composition:
Lightly sketch your design onto the damp clay using a needle tool. Draw three main sweeping curves radiating from the bottom right corner towards the top left. -
Carve the Main Stems:
Using a small loop tool or v-gouge, carv along your sketched lines to create the deep channels for the plant stems. Vary the pressure slightly to change the line width. -
Sculpt the Fan Shape:
In the bottom left, carve a semi-circle ‘fan’ shape. Remove the clay around the fan segments so the ribbed sections appear raised. -
Detail the Fan:
Use a needle tool or knife to refine the grooves between the fan segments, ensuring they radiate cleanly from the center point. -
Carve the Tulip Bud:
On the left stem, carve the outline of a tulip bud. Gently scoop out just a little clay inside the petals to give them a concave, cup-like depth. -
Create the Wheat Stalk:
For the wheat on the right stem, press a small, oval modeling tool or the side of a loop tool into the clay on alternating sides of the stem to create the grain kernels. -
Refine the Edges:
Go back over your carved lines. If the clay has dragged or created ‘burrs’ on the edges, smooth them down with a damp brush or your finger. -
Add Texture Details:
Using the tip of a needle tool, poke a few random, shallow holes around the background and near the design elements to enhance the porous, stone-like texture.
Step 3: Finishing
-
Dry the Piece:
Allow the tile to dry slowly on a flat board. Flip it over occasionally to ensure even drying and prevent curling. This usually takes 24-48 hours depending on clay thickness. -
Sand the Edges:
Once fully dry (bone hard), take a piece of fine-grit sandpaper and gently rub the outer edges of the square to make them crisp and clean. -
Surface Sanding:
Very lightly sand the flat surface of the tile to remove any tiny imperfections, being careful not to sand away the texture of your carvings. -
Dust Off:
Wipe the piece with a dry, soft brush or cloth to remove all sanding dust from the crevices. -
Wait for Full Cure:
Ensure the clay is 100% cured before displaying. If it feels cool to the touch, it likely still holds moisture. -
Display:
Place your finished relief tile on the small wooden easel for a museum-quality presentation.
Tint the Texture
After drying, apply a diluted wash of brown acrylic paint and wipe it back immediately. The dark pigment stays in the grooves, making the design pop.
Now you have a serene piece of botanical sculpture to bring a touch of nature indoors

What Really Happens Inside the Kiln
Learn how time and temperature work together inside the kiln to transform clay into durable ceramic.
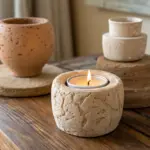
Sculptural Candle Holder With Floral Details
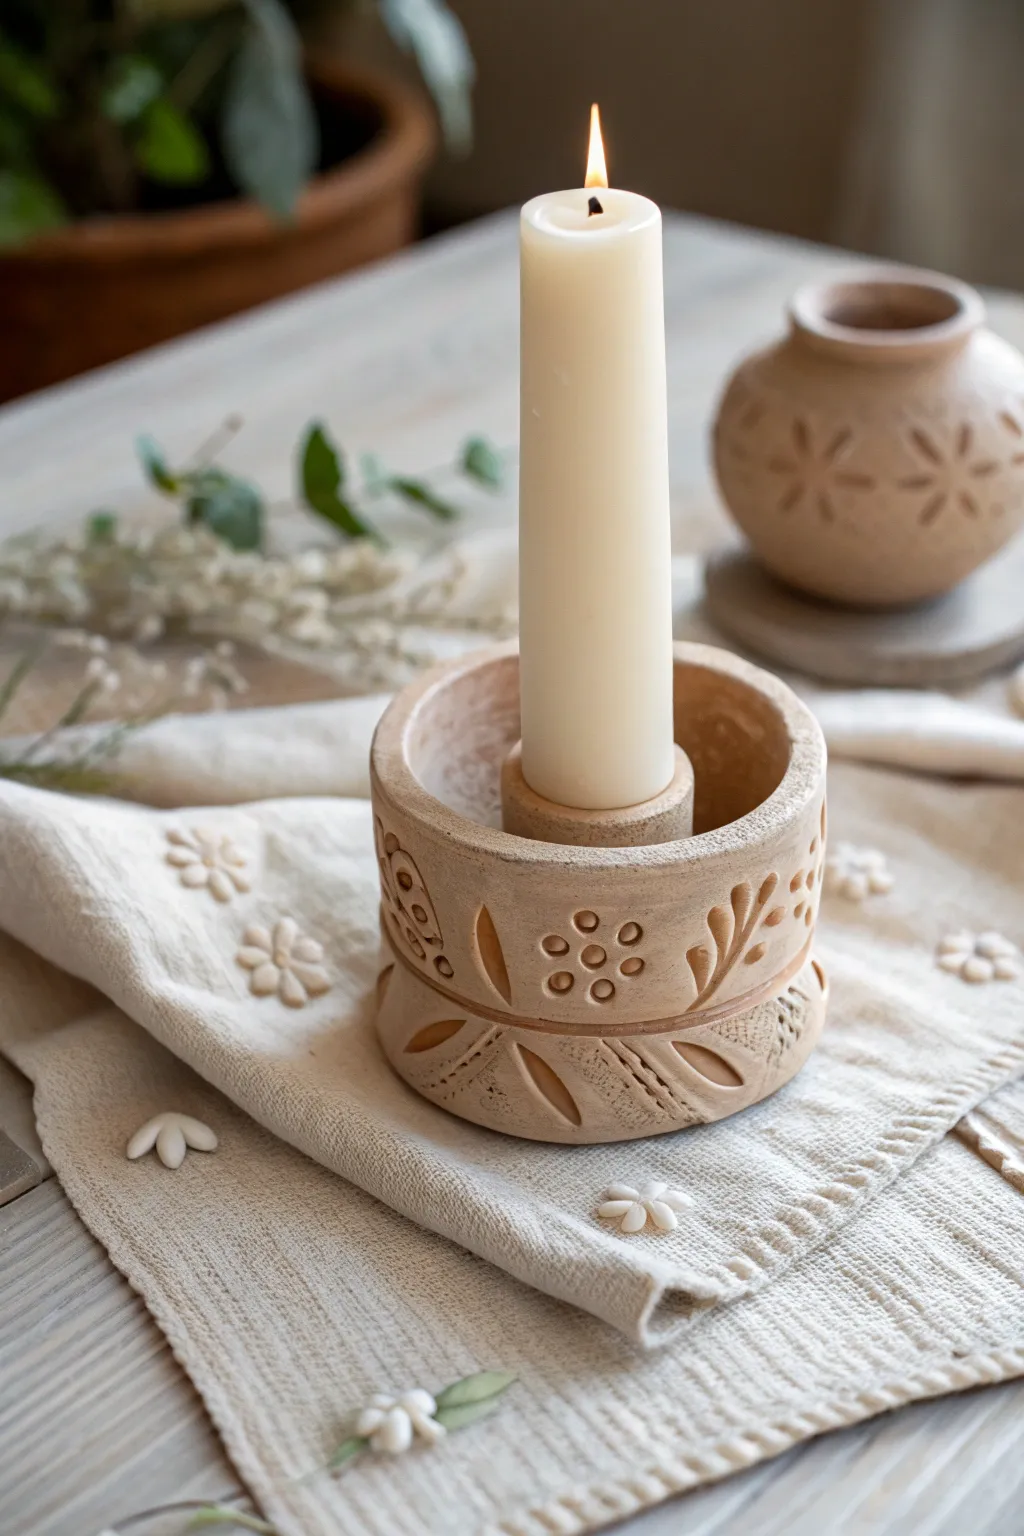
This rustic, nature-inspired candle holder features deep relief carving and a warm, natural finish that brings a cozy touch to any table setting. The two-tier design provides ample space for detailed leaf and berry patterns sculpted directly into the clay body.
Step-by-Step Guide
Materials
- Air-dry clay or polymer clay (natural beige/sand color)
- Standard rolling pin
- Circle cutters (various sizes, or a jar lid)
- Needle tool or toothpick
- Loop carving tool
- Small sponge
- Water bowl
- Sandpaper (fine grit)
- Clear matte varnish or sealant
- Taper candle (to size the opening)
Step 1: Forming the Base Structure
-
Roll the base slab:
Begin by conditioning your clay and rolling out a smooth, thick slab about 3/4 inch thick. This needs sturdiness, so avoid going too thin. -
Cut the primary shape:
Using a large circle cutter or a jar lid as a template, cut out a circle roughly 4 to 5 inches in diameter for the main base. -
Create the walls:
Roll a long, thick coil or a rectangular strip of clay. Attach this to the perimeter of your base circle using the score-and-slip method (if using air-dry clay) or by blending seams firmly (if using polymer). -
Form the inner column:
Create a smaller cylinder of clay to sit in the exact center. This is where the candle will stand. Press your actual taper candle gently into the center of this cylinder to create the perfect-sized socket, wiggling it slightly to allow for shrinkage. -
Refine the height:
Smoothen the connection between the inner column and the outer wall. The outer wall should be slightly taller than the base but can be lower than the central column depending on your preference.
Cracking Woes?
If you see hairline cracks while drying, mix a tiny bit of clay with water to make a paste (slip) and fill them in immediately, then smooth over.
Step 2: Sculpting the Details
-
Smooth the surfaces:
Use a damp sponge to smooth out any fingerprints or rough seams on the walls and rim. I find this stage crucial for a professional look before starting any carving. -
Mark the halfway line:
Use a needle tool to gently scribe a horizontal line around the circumference of the outer wall, effectively dividing the design surface into an upper and lower band. -
Carve the leaf motifs:
On the lower band, use your loop tool or needle tool to carve elongated, diagonal leaf shapes. Press deeply to create shadows, removing slivers of clay to define the veins. -
Add floral circles:
On the upper band, use the end of a paintbrush or a small straw to stamp clusters of small circles. Arrange them in floral patterns, perhaps a central circle surrounded by five or six petals. -
Create dividing texture:
Deepen the horizontal line separating the sections. You can add small diagonal hatch marks along this border to simulate a rope or stitched texture. -
Sculpt accessory pieces:
With leftover scraps of clay, hand-shape 5-6 small, separate flower shapes or simple petals to scatter around the finished piece as décor.
Pro Tip: Clean Cuts
When carving the leaf details, wipe your loop tool on a damp cloth after every few strokes. This keeps the edges of your design sharp and prevents clay drag.
Step 3: Finishing Touches
-
Initial drying phase:
Allow the clay to dry until it is leather-hard. This usually takes a few hours for air-dry clay. It should be firm but still cold to the touch. -
Refine carvings:
Once leather-hard, go back over your carvings with a clean tool to remove any burrs or crumbly bits that occurred during the initial sculpt. -
Full dry:
Let the piece dry completely (24-48 hours usually). Rotate it occasionally so the bottom dries evenly. -
Sanding:
Gently sand the rim and the outside curves with fine-grit sandpaper to achieve that soft, matte stone look visible in the photo. -
Seal the piece:
Apply a clear matte varnish. This protects the clay from candle wax drips while maintaining the natural, unglazed aesthetic.
Place your finished holder on a linen napkin to enjoy the warm atmosphere created by your handiwork
Whistle Sculpture Disguised as a Creature
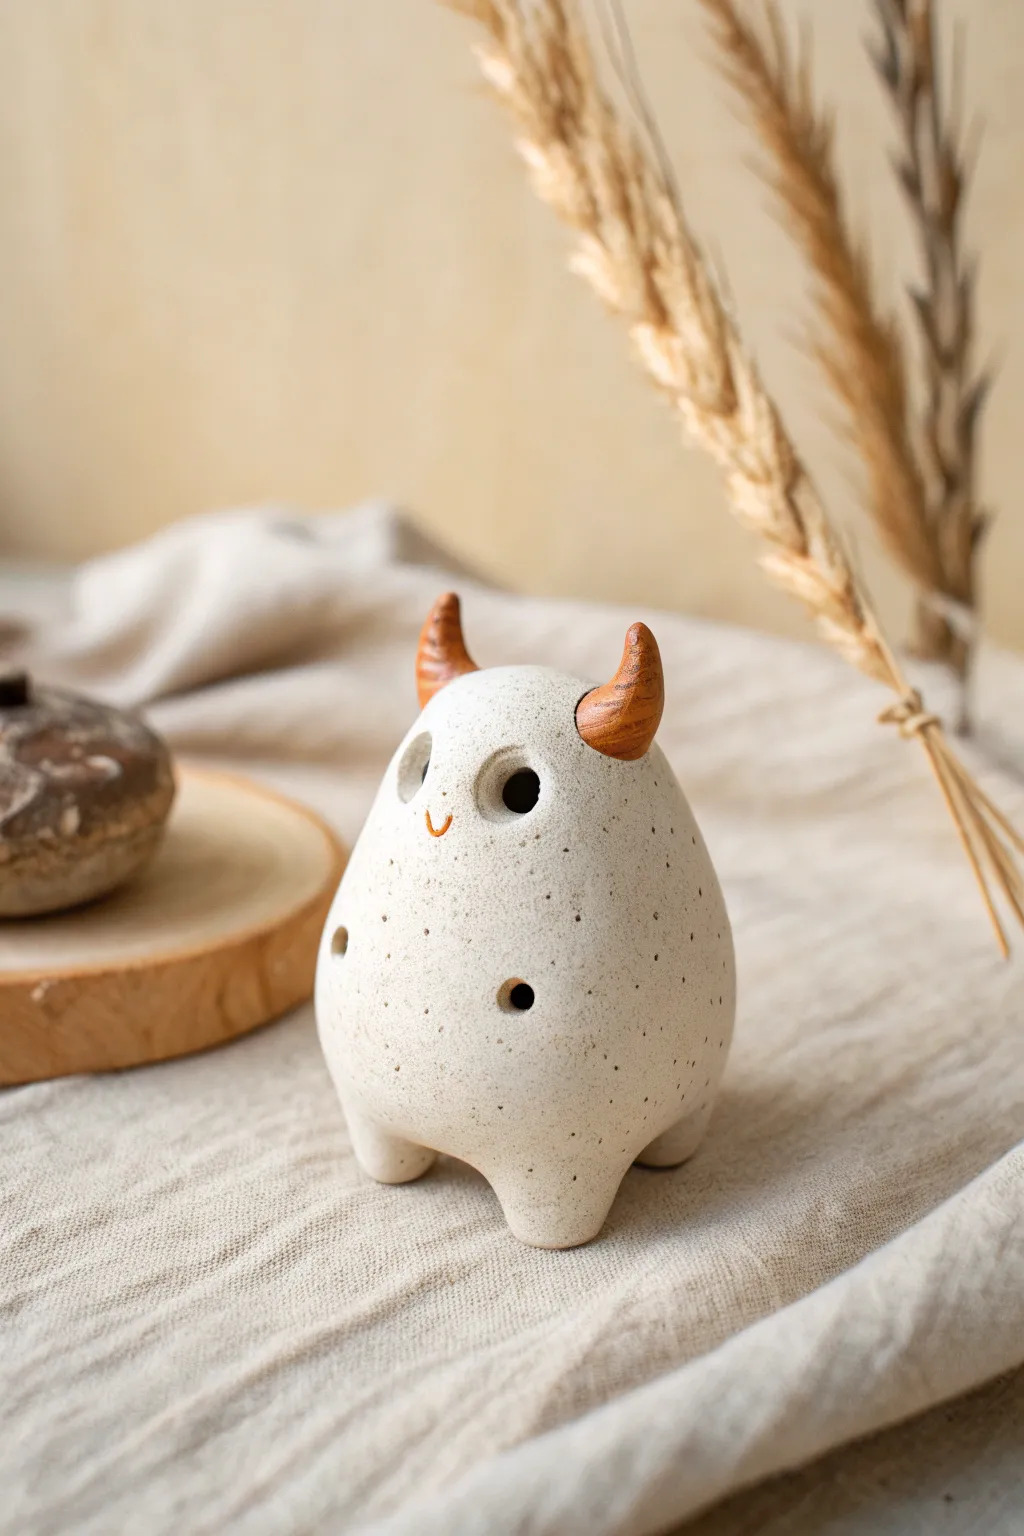
This charming little ceramic monster isn’t just a sculpture; it’s a functional whistle disguised as a cute creature. With its speckled white body, playful grin, and tiny wooden-style horns, it makes for a perfect beginner-friendly project that sings as well as it sits.
Step-by-Step Tutorial
Materials
- White speckle stoneware clay body (cone 5/6 recommended)
- Small wooden sculpting tool (rib or spatula)
- Needle tool
- Popsicle stick or fettling knife (for making the airway)
- Underglaze (warm ochre or amber brown)
- Clear matte glaze
- Small round paintbrush
- Sponge
- Water slip
Step 1: Forming the Body
-
Prepare the pinch pot:
Start with a ball of well-wedged speckled clay about the size of a tangerine. Stick your thumb into the center and gently pinch the walls while rotating the ball to create a hollow sphere with even thickness. -
Shape the creature:
Gently gently taper the top of the sphere to create an egg-like shape, keeping the bottom rounded. Tap the bottom lightly on your work surface to flatten it just enough so it doesn’t roll away. -
Close the form:
If you made an open pinch pot, carefully pinch the opening closed to trap the air inside. This trapped air provides resistance, making it easier to smooth the outside without denting it. -
Add the feet:
Form three small, equal-sized balls of clay. Score and slip the bottom of your egg shape and attach the balls in a tripod formation. Smooth the seams upward into the body so the legs look like they grew organically from the form.
Step 2: Creating the Whistle Mechanism
-
Construct the mouthpiece:
On the back of the creature (opposite where the face will be), create a small, rectangular mouthpiece extension or simply flatten a small area if you prefer an integrated look. -
Insert the airway stick:
Insert your popsicle stick or fettling knife into the mouthpiece area. Push it straight in until you feel it entering the hollow cavity. This establishes the angle of the air channel. -
Cut the fipple window:
With the stick still inserted to support the clay, use your needle tool to cut a small square hole (the window) on the underside of the creature, about an inch away from the mouthpiece opening. -
Create the bevel:
This is the crucial part: carefully carve the edge of the window farthest from the mouthpiece into a sharp 45-degree ramp (the bevel). The air from the channel needs to hit this sharp edge to split and create sound. -
Test the sound:
Remove the stick and blow gently. If it doesn’t whistle, adjust the angle of the bevel or clear any clay debris from the airway. Keep tweaking until you get a clear tone.
Silent Whistle?
If no sound comes out, the airway is likely misaligned. Re-insert your stick and ensure the air stream hits exactly against the sharp bevel edge of the window.
Step 3: Sculpting Details
-
Shape the horns:
Roll two small cones of clay. Gently curve them to give them character. I like to score tight little lines around them with a needle tool to mimic the texture of wood or ram’s horns. -
Attach the horns:
Score and slip the top of the creature’s head and attach the horns firmly. Blend the seams at the base carefully so they don’t pop off during firing. -
Create the eyes:
Use a medium-sized hole cutter or the back of a paintbrush to press deep indentations for the eye sockets. They should be relatively large to match the reference look. -
Add the tuning holes:
If you want to change pitch, carefully drill 2-3 small holes on the front belly. Start with small holes; you can widen them to tune the notes as you test the sound. -
Carve the smile:
Using a needle tool, carve a tiny, simple ‘U’ shape between the eyes for the mouth. Keep it small and minimalist.
Tune It Up
Use a tuner app while drilling the finger holes. Start small—enlarging a hole raises the pitch. You can actually tune it to a specific scale.
Step 4: Surface Finishing
-
Smoothing:
Once the clay is leather hard, use a slightly damp sponge to wipe down the body, removing any fingerprints or rough crumbs created during the hole-cutting process. -
Paint the horns:
Apply an amber or ochre underglaze specifically to the horns. Wipe away a little bit of the underglaze with a sponge—this leaves the color in the recessed texture lines for an antique wood look. -
Glaze application:
After bisque firing, apply a clear matte glaze over the entire piece. Be very careful not to let glaze clog the whistle airway; you might want to use wax resist on the bevel blade before dipping. -
Final firing:
Fire the piece to the temperature required by your clay body (likely cone 5 or 6). Once cool, test your little monster’s voice one last time.
Enjoy the simple magic of playing a tune on a creature you sculpted yourself

TRACK YOUR CERAMIC JOURNEY
Capture glaze tests, firing details, and creative progress—all in one simple printable. Make your projects easier to repeat and improve.
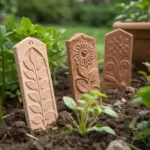
Hanging Bell Sculpture With Carved Patterns

Bring a touch of rustic charm to your home with this handcrafted terracotta bell, featuring bold geometric motifs painted in deep indigo. The warm, unglazed clay surface provides a perfect earthy canvas for the striking blue patterns, creating a piece that feels both ancient and modern.
How-To Guide
Materials
- Earthenware clay (terracotta)
- Rolling pin
- Canvas or cloth mat (for rolling)
- Paper template (fan shape for the cone)
- Slip (clay mixed with water)
- Scoring tool or fork
- Fettling knife
- Small sponge
- Underglaze (Dark Blue or Indigo)
- Fine detail paintbrush
- Brass or gold metal ring (approx. 2-3 inches dia.)
- Jute or heavy hemp rope
- Metal wire (for the clapper attachment)
Step 1: Forming the Bell Shape
-
Prepare the template:
Create a paper template for your bell. Draw a large arc (like a fan shape) that will fold into a cone. The bottom curve should be wider than the top curve. Cut this out to use as your guide. -
Roll the slab:
Roll out a slab of terracotta clay on your canvas mat to a consistent thickness of about 1/4 inch. Ensure it’s smooth and free of air bubbles. -
Cut the clay:
Place your paper template onto the clay slab. Using a fettling knife, carefully trace around the template and cut out the fan shape. Save the excess clay for the handle. -
Join the seam:
Score the two straight edges of the fan shape with a fork or scoring tool. Apply a generous amount of slip to these rough edges. -
Shape the cone:
Gently curve the clay until the scored edges meet, forming a cone. Press the seam together firmly from the inside and outside to ensure a strong bond. -
Smooth the surface:
Use a damp sponge or your fingers to smooth over the seam so it becomes invisible. Gently refine the overall shape, ensuring the bottom rim is circular and level.
Uneven Seam?
If your seam looks lumpy or threatens to crack, use a wooden rib tool to compress the clay across the join line. Reinforce the inside of the seam with a tiny coil of clay blended smooth.
Step 2: Adding Details and Handle
-
Create the handle:
Roll a small coil or cylinder of clay for the top handle. Form it into a loop or a solid knob with a hole through it, large enough to thread your metal ring later. -
Attach the handle:
Score the top of your bell cone and the bottom of your handle piece. Apply slip and press them firmly together. Blend the clay downwards onto the bell body for a seamless transition. -
Pierce the hole:
While the clay is still leather hard, ensure the hole in the handle is clean and open. If you want a clapper inside, make a small hole at the very top of the bell’s interior now as well. -
Leather hard drying:
Allow the bell to dry to a ‘leather hard’ stage. It should be firm to the touch but still cool and slightly carveable. This creates the best surface for painting crisp lines.
Step 3: Painting and Finishing
-
Draft the design:
Lightly sketch your geometric pattern onto the clay using a pencil. Following the image, plan for a zigzag band near the top, a central band of diamonds with vertical lines, and solid stripes at the bottom. -
Paint the zig-zags:
Using a fine detail brush and dark blue underglaze, carefully paint the continuous zigzag line around the upper section. -
Create the diamonds:
Paint the outlining diamond shapes in the middle section. Inside each diamond, paint alternating vertical stripes—I find that steadying my hand against the table helps keep these lines straight. -
Add horizontal bands:
Paint the horizontal stripes that frame the design sections. Add a thicker solid band of blue around the very bottom rim to key the design together. -
Bisque fire:
Once the underglaze is dry, let the piece bone dry completely before bisque firing it in a kiln according to your clay body’s instructions. -
Assembly:
After firing, attach a brass ring through the top handle. Knot a length of jute rope securely to the ring for hanging, perhaps adding decorative knots or tassels as shown in the reference.
Level Up Your Bell
Make a clay ‘clapper’ (the bead inside) and attach it with wire before hanging. This makes the bell functional, producing a lovely, dull earthy clink when moved.
Hang your finished bell near a window or in a garden nook where the sunlight can highlight the contrast between the warm clay and the cool blue patterns
Mushroom Cluster Sculpture With Woodland Vibes
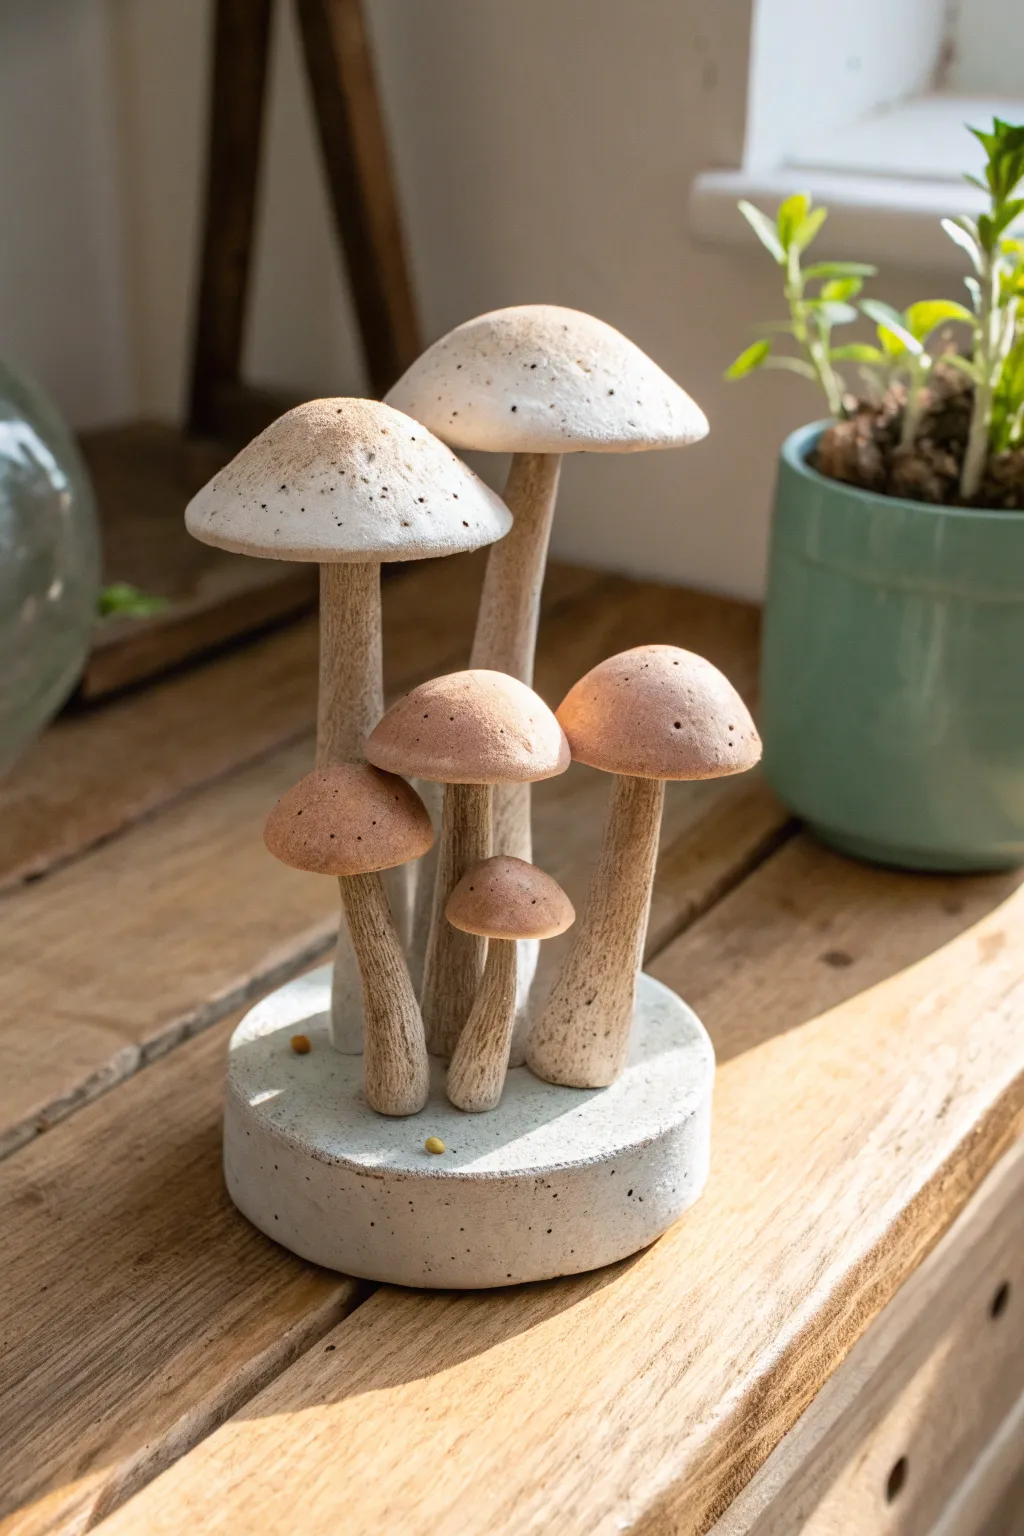
Bring the quiet magic of the forest floor into your home with this textured clay mushroom sculpture. Featuring a cluster of caps in varied sizes and warm earthen tones mounted on a sturdy base, this piece radiates natural woodland charm.
Step-by-Step Guide
Materials
- Air-dry clay (stone or white)
- White Gesso or acrylic primer
- Acrylic paints (Titanium White, Burnt Umber, Raw Sienna, Terra Cotta)
- Round wooden base or thick cardboard tube (for the mold)
- Aluminum foil
- Strong craft glue (E6000) or heavy body gel medium
- Sculpting tools (needle tool, texturing brush)
- Sandpaper (medium and fine grit)
- Old toothbrush or stippling brush
- Sealant (matte varnish)
Step 1: Sculpting the Stems and Caps
-
Form the armatures:
Begin by crumpling aluminum foil into vague mushroom shapes to serve as the core. Make two tall, slender cores for the large back mushrooms, two medium ones, and two tiny ones. This saves on clay and reduces weight. -
Shape the stems:
Roll out ropes of clay and wrap them around your foil stem armatures. Roll them gently on your work surface to smooth them, tapering slightly as you go up so the top is thinner than the base. -
Add texture to stems:
Before the clay dries, take a wire brush or a needle tool and gently drag vertical lines up the stems. This mimics the fibrous texture of real mushroom stalks. -
Create the caps:
Roll balls of clay and flatten them into domes. For the larger mushrooms, press your thumb into the center to create a slight indentation underneath where the stem will connect. -
Refine the cap texture:
Use an old toothbrush or a ball of crumpled foil to tap texture onto the top surface of the caps. You want a porous, organic look rather than perfect smoothness. -
Attach and dry:
Score and slip the top of the stems and the underside of the caps to join them securely. Propping the caps up with extra bits of foam or folded paper towels can help them keep their shape while drying. Let all pieces dry for at least 24 hours.
Cracked Clay?
If hairline cracks appear while drying, don’t panic. Mix a small amount of fresh clay with water to make a paste (slip) and fill the cracks. Sand smooth once dry.
Step 2: Creating the Base
-
Prepare the mold:
To mimic the concrete look in the photo, create a round mold using a strip of cardboard taped into a circle, or a cut section of a large mailing tube. Place this on a non-stick surface. -
Fill the base:
Pack your clay firmly into the mold to create a thick, puck-shaped disc. Smooth the top surface with a little water on your finger, keeping the edges crisp. -
Create mounting holes:
While the base is still wet, take your dried mushroom stems and gently press them into the base to create indentations. This ensures a perfect fit later. Remove the stems and let the base dry completely.
Make it Magical
Add tiny preserved moss bits around the base of the stems or paint the gills underneath with gold leaf for a hidden, enchanting detail.
Step 3: Painting and Assembly
-
Prime the surface:
Once everything is bone dry, coat the mushrooms and the base with a layer of white gesso. This seals the clay and provides a uniform starting point. -
Base coat the stems:
Mix a wash of Burnt Umber and plenty of water. Paint this over the textured stems, letting the dark paint settle into the vertical grooves. -
Dry brush the stems:
Wipe most of the paint off your brush and lightly drag a creamy beige color (White mixed with a touch of Raw Sienna) over the raised surfaces of the stems to highlight the texture. -
Color the caps:
Paint the large caps with a very pale, warm cream color. For the smaller caps, mix a soft Terra Cotta or peach tone. I like to apply this with a sponge to keep the finish mottled and natural. -
Add speckling:
Dilute some dark brown paint on an old toothbrush. Run your thumb over the bristles to flick tiny specks of paint onto the caps and the base, giving them an earthy, realistic appearance. -
Paint the base:
Paint the round base a light, cool grey to resemble concrete. Use the same speckling technique with black and white paint to simulate the aggregate in stone. -
Final assembly:
Apply a strong adhesive or heavy body gel into the indentations on the base. Insert the corresponding mushrooms and hold them in place until the glue grabs. -
Seal:
Finish the piece with a coat of matte spray varnish to protect the paint and eliminate any unnatural shine.
Place your sculpture near a houseplant to fully embrace the woodland aesthetic in your space
Surreal “Thought Bowl” Head Sculpture
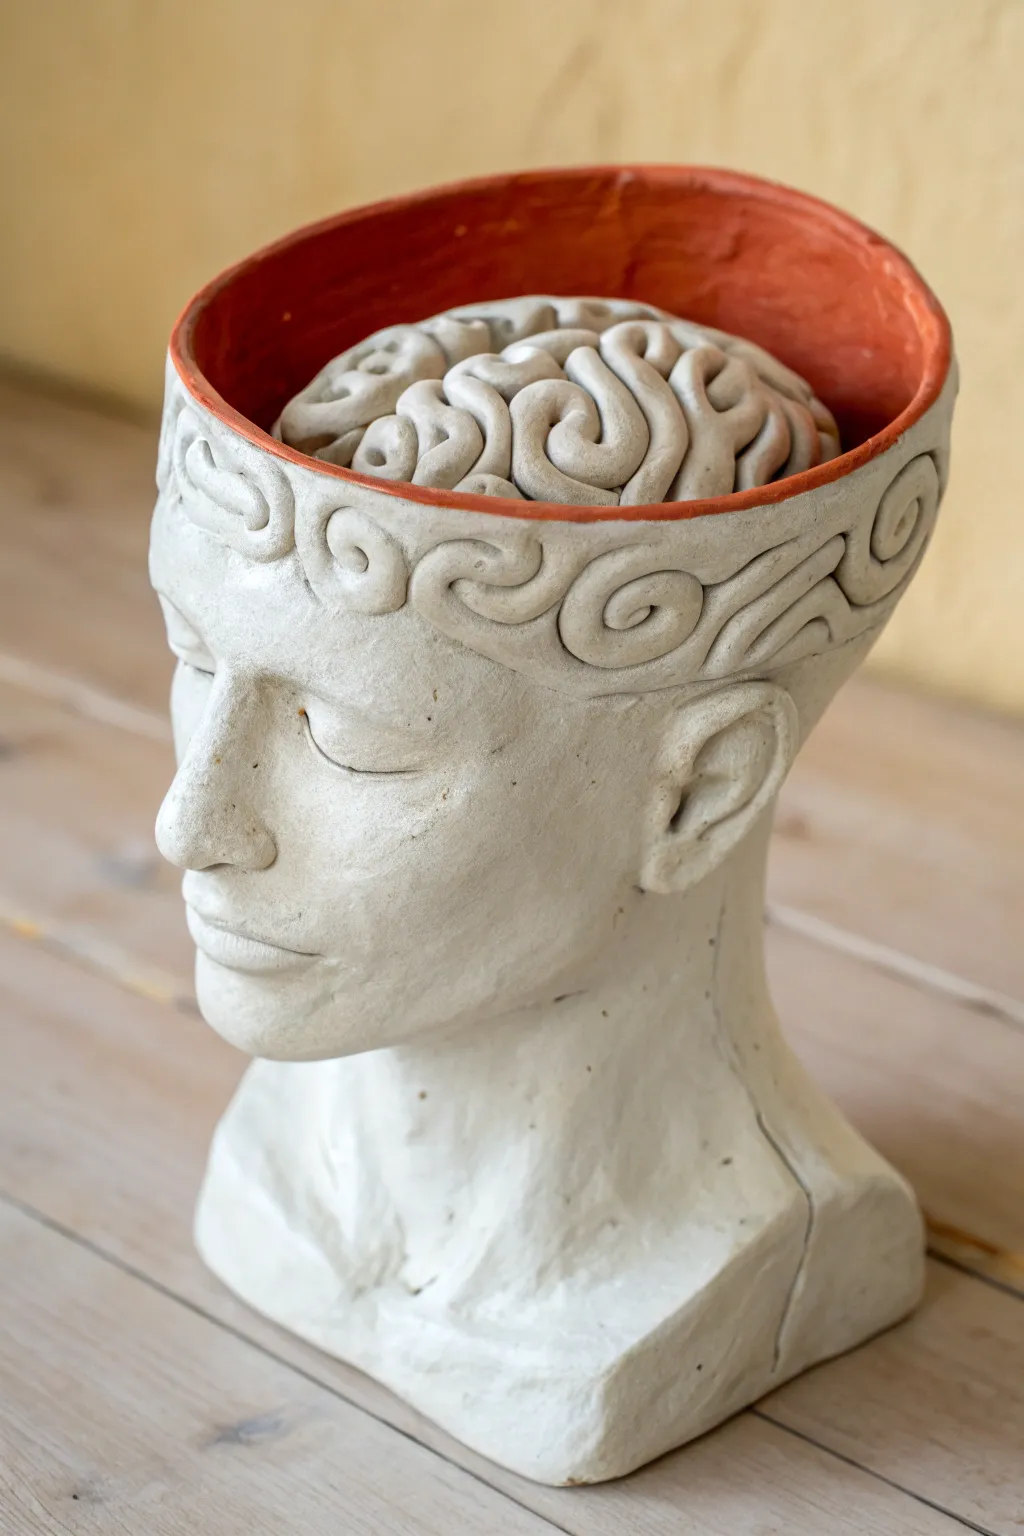
This intriguing sculpture combines a serene human bust with a literal interpretation of the mind at work. By hollowing out the cranium to reveal a sculpted brain, you create a striking conversation piece that blends anatomical interest with surreal artistic expression.
How-To Guide
Materials
- White earthenware or stoneware clay (approx. 5-7 lbs)
- Red decorative slip or underglaze (terracotta color)
- Sculpting tools (wire loop, needle tool, wooden knife)
- Coil rolling surface or table
- Sponge and water
- Calipers or ruler
- Plastic bags for wrapping
- Kiln for firing (or instructions for air-dry clay alternatives)
Step 1: Forming the Bust Base
-
Build the neck and shoulders:
Start by forming a solid, sturdy base for the shoulders and neck. You can use a coil-building method or pinch from a large lump of clay. Ensure the neck is thick enough to support the weight of the head. -
Shape the cranium mass:
Add a large egg-shaped mass of clay on top of the neck to form the head. Score and slip generously to join the pieces securely. Smooth the transition between the neck and jawline. -
Establish facial proportions:
Mark the halfway point of the face for the eyes. Use your thumbs to press into the eye sockets and build up the bridge of the nose. Keep the features relaxed and sleeping; define the closed eyelids and a calm mouth. -
Hollow the form:
Once the basic exterior shape is established and slightly firm (leather hard), slice off the top of the skull horizontally. Carefully hollow out the inside of the head and the neck using loop tools to ensure even wall thickness, leaving the walls about 1/2 inch thick.
Crack Prevention
The brain coils dry faster than the thick head. Cover the brain with a damp paper towel under the plastic to equalize humidity.
Step 2: Sculpting the Brain and Rim
-
Create the bowl rim:
Refine the cut edge of the open skull. It should flare slightly outward like a bowl. Smooth this rim perfectly with a damp sponge, as it will be a focal point. -
Establish the interior shelf:
Inside the hollow head, create a false bottom or a shelf of clay a few inches down from the rim. This will support the brain sculpture so it doesn’t fall into the neck cavity. -
Roll brain coils:
Roll out several long, even snakes of clay, roughly the thickness of a large marker. These will become the gyrification (folds) of the brain. -
Arrange the brain matter:
Begin placing the coils onto the interior shelf. Twist and meander them in a tight, organic pattern to mimic brain tissue. I prefer to work from the center outward to ensure it looks dense. -
Refine the folds:
Use a smooth wooden tool to gently press the coils together so they adhere to one another and the shelf, but maintain their rounded definition. Ensure the brain mass sits slightly lower than the rim.
Gold Mind
Apply gold leaf to the brain coils after the final firing. The metallic shine against the matte stone face creates stunning contrast.
Step 3: Detailing and Surface Treatment
-
Add the decorative headband:
Roll a flat strip of clay and attach it around the forehead area, just below the bowl rim. Use a loop tool or modeling tool to carve repeating spiral or scroll patterns into this strip for a classical relief look. -
Refine facial features:
Go back to the face. Sharpen the eyelids, define the nostrils, and smooth the cheeks. The expression should remain peaceful and neutral. -
Apply texture:
Use a sponge or a slightly rough tool to give the skin area a natural, stone-like texture rather than leaving it perfectly smooth. -
Dry slowly:
Cover the piece loosely with plastic. Let it dry very slowly over several days to prevent the rim or the brain coils from cracking away from the walls. -
Apply color to the rim:
Once bone dry (or bisque fired, depending on your material), paint the interior wall of the bowl and the top rim with the red terracotta slip or underglaze. Leave the exterior and the brain natural white. -
Final wipe:
Use a clean, damp sponge to wipe away any stray red slip that may have gotten onto the brain coils or the exterior forehead, keeping the lines crisp. -
Fire the piece:
Fire the sculpture in a kiln according to the clay manufacturer’s instructions. A matte finish is recommended to maintain the stone appearance.
Place your finished thought bowl on a sturdy surface where light can catch the intricate folds of the mind you have created
Pierced Abstract Form Sculpture With Clean Cutouts
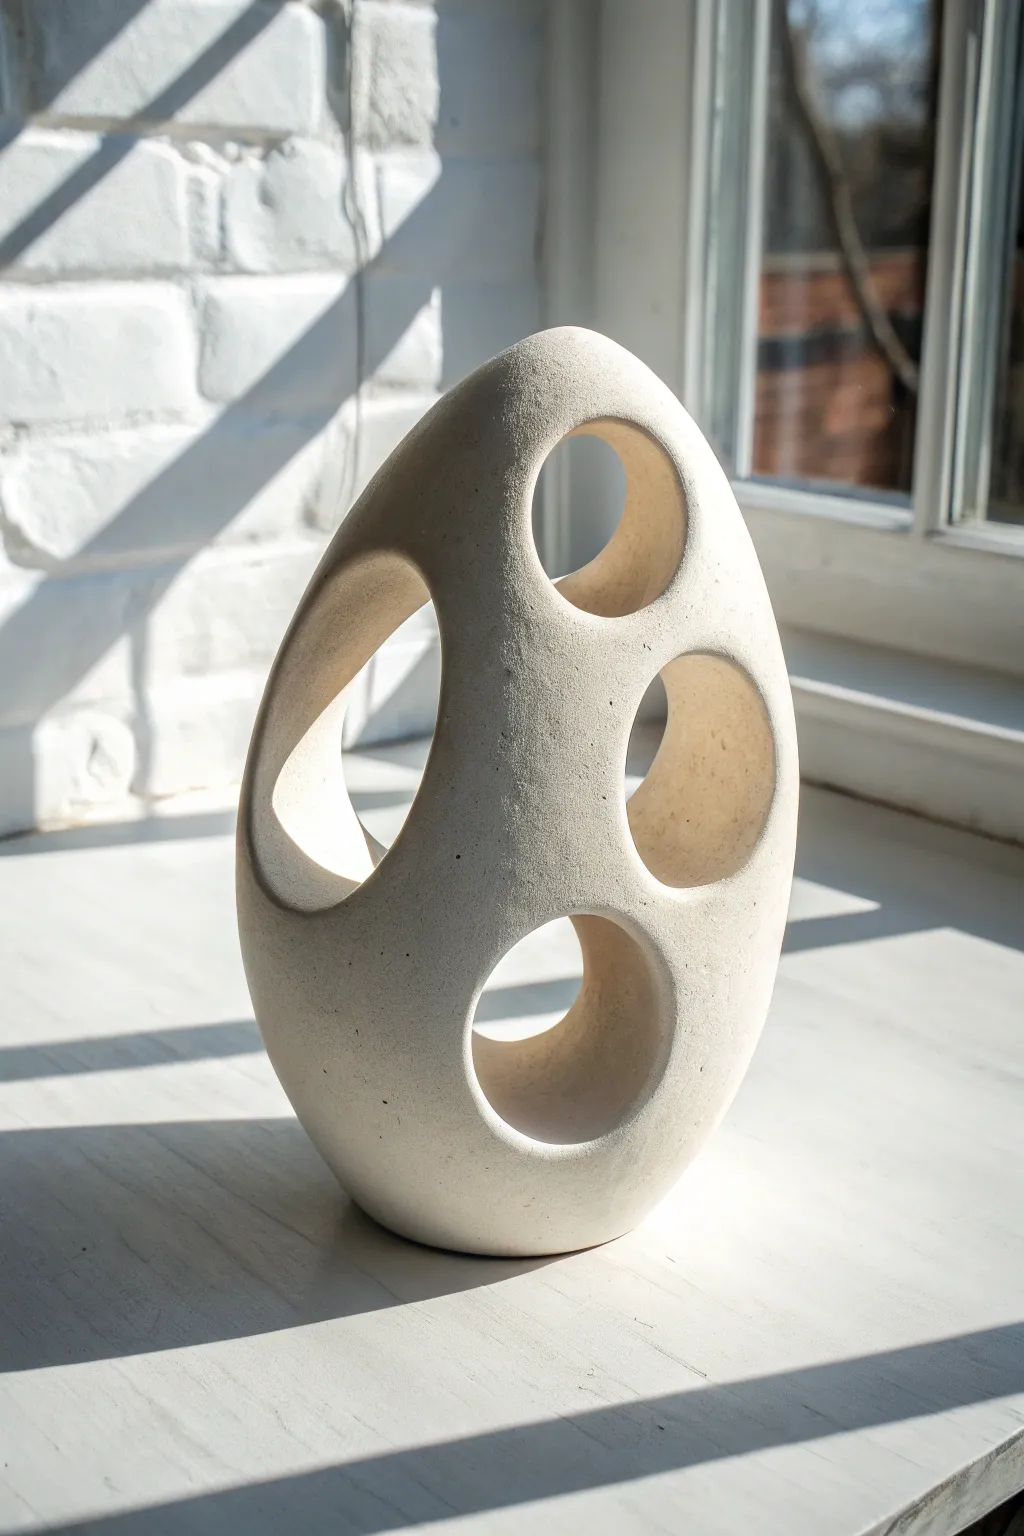
This minimalist sculpture captures the essence of modern organic design with its smooth, egg-like silhouette and daring negative space cutouts. The interplay of light and shadow through the circular piercings creates a dynamic piece that feels both grounded and airy.
Detailed Instructions
Materials
- White stoneware or porcelain clay body (grogged for strength is best)
- Potter’s wheel (optional) or large rolling pin/slab roller
- Large oval rib tool (metal and rubber)
- Needle tool
- Hole cutters or varying sizes of circular cookie cutters
- Fettling knife
- Sponge
- Paddle tool
- Surform tool (cheese grater style)
- Fine-grit sandpaper (for post-firing or dry greenware)
Step 1: Forming the Base Shape
-
Choose your method:
You can create the base ovoid shape either by throwing a closed form on the wheel or by hand-building with coils. For this tutorial, we will focus on large-scale coil building to achieve that organic asymmetry. -
Create the base:
Start by rolling out a thick slab of clay for the foot. Cut a circle roughly 4 inches in diameter to serve as the stable bottom of your egg shape. -
Build up the walls:
Roll out thick coils, about the thickness of your thumb. Attach the first coil to the base, scoring and slipping thoroughly to ensure a strong bond. -
Shape the belly:
As you add subsequent coils, gradually angle them outward to widen the form. Smooth the interior and exterior walls together as you go, ensuring no seams remain visible. Support the wall from the inside with one hand while smoothing the outside. -
Close the form:
Once you’ve reached the widest point (the belly of the egg), begin angling your coils inward. Continue building until you close the top completely, creating a hollow, sealed egg shape. Trap some air inside; the air pressure helps the clay hold its shape while you refine it.
Smooth Operator
Wrap a piece of thin plastic wrap around your finger while smoothing cut edges. It acts as a buffer and creates an incredibly polished, rounded rim instantly.
Step 2: Refining and Sculpting
-
Paddle into shape:
While the air is trapped inside, use a wooden paddle to gently tap the exterior. This compresses the clay particles and helps you refine the curve into a perfect, smooth ovoid. I find this rhythm really meditative as the shape starts to emerge. -
Smooth the surface:
Use a metal rib to scrape away any coil ridges on the exterior. Follow with a soft rubber rib to compress and burnish the surface until it is impeccably smooth. -
Let it stiffen:
Allow the form to dry to a firm leather-hard stage. This is crucial; if the clay is too soft, the walls will collapse when you cut the holes. If it’s too dry, it will crack.
Glow Up
Place a small battery-operated LED puck light inside the base of the sculpture. The light will spill out of the piercings, casting dramatic shadows on your walls.
Step 3: Carving the Negative Space
-
Plan your apertures:
Lightly sketch varying sizes of circles and ovals onto the surface with a needle tool. Aim for an asymmetrical arrangement—perhaps one large hole near the top and two or three smaller ones lower down. -
Initial cuts:
Using a sharp fettling knife or hole cutter, carefully cut out your planned shapes. Remove the clay plugs. The form will lose its internal air pressure now, so handle it gently. -
Refine the edges:
The cut edges will be sharp and square. Use a damp sponge or your fingers to round over these edges, blending the interior wall to the exterior wall for a seamless, continuous look. -
Check the view:
Look through the holes. You are now exposing the interior surface of the sculpture, so you must ensure the inside is just as smooth as the outside. Use a small sponge on a stick or your fingers to smooth any visible interior seams. -
Dry slowly:
Cover the piece loosely with plastic to ensure slow, even drying. Because of the large holes, the edges will dry faster than the body, which can cause tension cracks.
Step 4: Finishing Touches
-
Sand and perfect:
Once bone dry, use fine sandpaper (wear a mask!) to gently sand away any remaining tool marks or roughness. The goal is a surface that looks like tumbled stone. -
Bisque fire:
Fire the piece in a kiln to bisque temperature (usually cone 04). -
Glazing choice:
For the look in the image, apply a matte white glaze or leave the raw stoneware unglazed if the clay body is white enough. If glazing, you can pour glaze inside and swirl it to coat the interior, then spray or dip the exterior. -
Final firing:
Fire to the maturation temperature of your clay body (likely cone 6 or 10).
Place your finished sculpture near a window to watch the shifting sun create new patterns through the day
Dynamic Dancer Sculpture on a Simple Armature
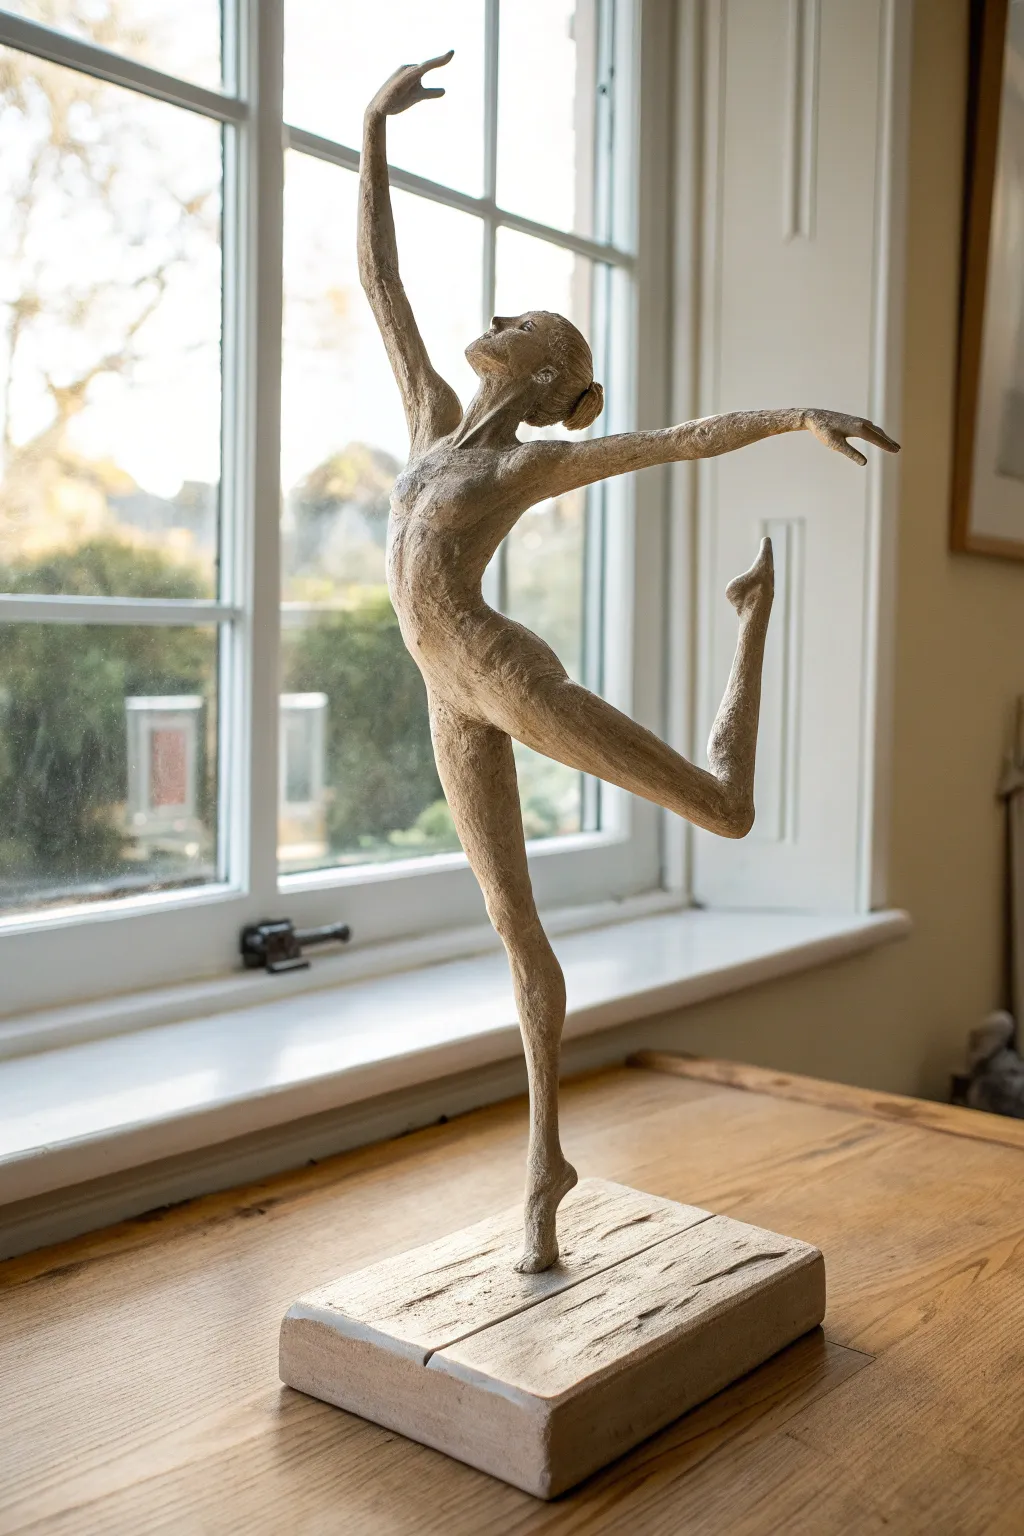
Capture the elegance and movement of a ballerina in mid-motion with this stunning textured clay sculpture. By building over a simple wire armature, you can achieve a dynamic, gravity-defying pose that looks like it belongs in a gallery.
How-To Guide
Materials
- Strong armature wire (12-gauge or similar)
- Thinner binding wire (20-gauge)
- Aluminum foil
- Masking tape
- Paper clay or self-hardening clay (stone texture preferred)
- Wooden block base
- Drill with bit matching main wire gauge
- Wire cutters and pliers
- Sculpting tools (spatula, smoothing tool)
- Sponge and water
- Acrylic paint (warm beige, white, raw umber)
Step 1: Building the Skeleton
-
Prepare the Base:
Begin by selecting a sturdy wooden block for your base. Drill a hole in the center that is deep enough to hold your main support wire securely, but don’t glue it in just yet so you can work on the figure freely. -
Form the Main Armature:
Cut two long lengths of your heavy 12-gauge wire. Twist them together at the ‘torso’ section to create a sturdy core. One end will extend down to become the standing leg and anchor into the base; the other end will split to become the upper body and arms. -
Add Limbs:
Use thinner binding wire to attach additional lengths of wire for the raised leg and the arms. Ensure the arm wires are long enough to form the graceful curve of the hands later. Bend the wire into the specific pose seen in the photo: leg kicked back, one arm high, one arm extended back. -
Bulk Out with Foil:
Crumple aluminum foil firmly around the wire skeleton to create the muscles and body mass. Focus on building volume in the torso, hips, and thighs, tapering down towards the delicate wrists and ankles. Compress the foil tightly so the clay layer won’t need to be too thick. -
Secure with Tape:
Wrap the entire foil form tightly with masking tape. This step is crucial because it smooths out the sharp foil edges and provides a surface the clay can actually stick to.
Leg Wobble Fix
If the sculpture leans or wobbles, the standing leg wire is too weak. Reinforce it by wrapping a second wire around the ankle and embedding it into the base during the glue-up.
Step 2: Sculpting the Figure
-
Apply the Base Layer:
Roll out thin sheets of your paper clay or self-hardening clay. Begin wrapping these sheets around the taped form, smoothing the seams together with a little water. Aim for a layer about 1/4 inch thick. -
Refine the Anatomy:
Add small bits of clay to build up specific muscle groups, particularly the calves, thighs, and shoulders. Use your thumbs to blend the new clay into the base layer seamlessly. -
Sculpt Hands and Feet:
For the delicate extremities, use very small sausages of clay. Suggest the shape of the pointed foot and the graceful curve of the fingers rather than trying to sculpt every individual digit perfectly. -
Create the Hair Layout:
Add a small bun shape to the back of the head and blend it into the skull. Use a sculpting tool to lightly scratch lines indicating hair pulled back tightly. -
Add Surface Texture:
Before the clay dries, take a rough sponge or a stiff bristle brush and stipple the surface of the entire sculpture. This gives it that organic, stone-carved look rather than a smooth, plastic finish. -
Mounting:
Once the sculpture is mostly firm but not fully cured, insert the wire of the standing leg into your wooden base. Apply a strong epoxy glue to the wire before inserting it for a permanent bond. Check the balance immediately.
Bronze Metal Look
Swap the stone paint for a metallic finish. Paint the figure black first, then dry-brush with bronze or gold metallic wax for a classic cast-metal statue appearance.
Step 3: Finishing Touches
-
Drying Time:
Allow the sculpture to dry completely. For a piece this thickness, I usually let it sit for at least 24 to 48 hours to prevent cracking. -
Refining Edges:
If any sharp or unwanted ridges formed during drying, use a fine-grit sandpaper to gently knock them back, though you want to keep that overall rough texture. -
Base Painting:
Paint the entire figure with a warm beige or stone-colored acrylic paint. Ensure you get the paint into all the textured crevices. -
Dry Brushing:
Dip a dry brush into a lighter cream or white paint. Remove almost all the paint on a paper towel, then lightly brush over the raised textures of the sculpture to highlight the stone effect. -
Finish the Base:
Paint the wooden base with a whitewash or a distressed wood finish to complement the rustic elegance of the dancer.
Place your finished sculpture near a window where natural light can play across the beautiful textures you created