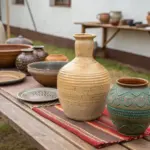
There’s something extra satisfying about making a clay piggy bank—it’s cute, functional, and it quietly cheers you on every time you drop in a coin. Here are my favorite ideas to help you shape a piggy bank that feels totally you, whether you’re working with air-dry clay, polymer clay, or kiln-fired clay.
Classic Round-Belly Piggy Bank
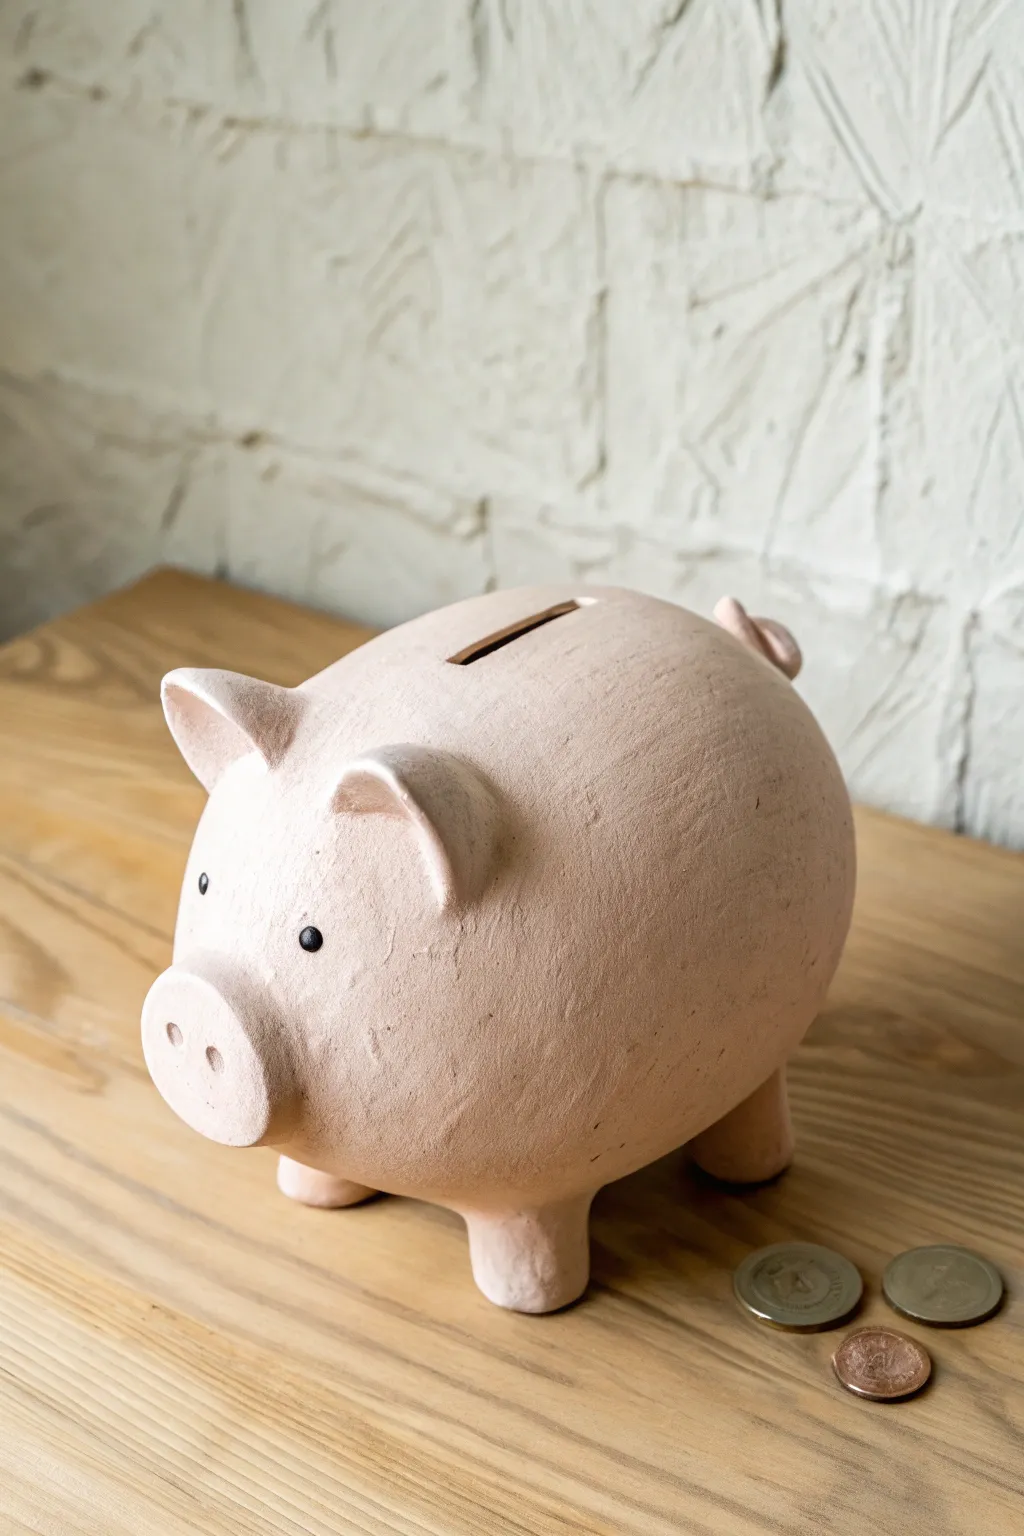
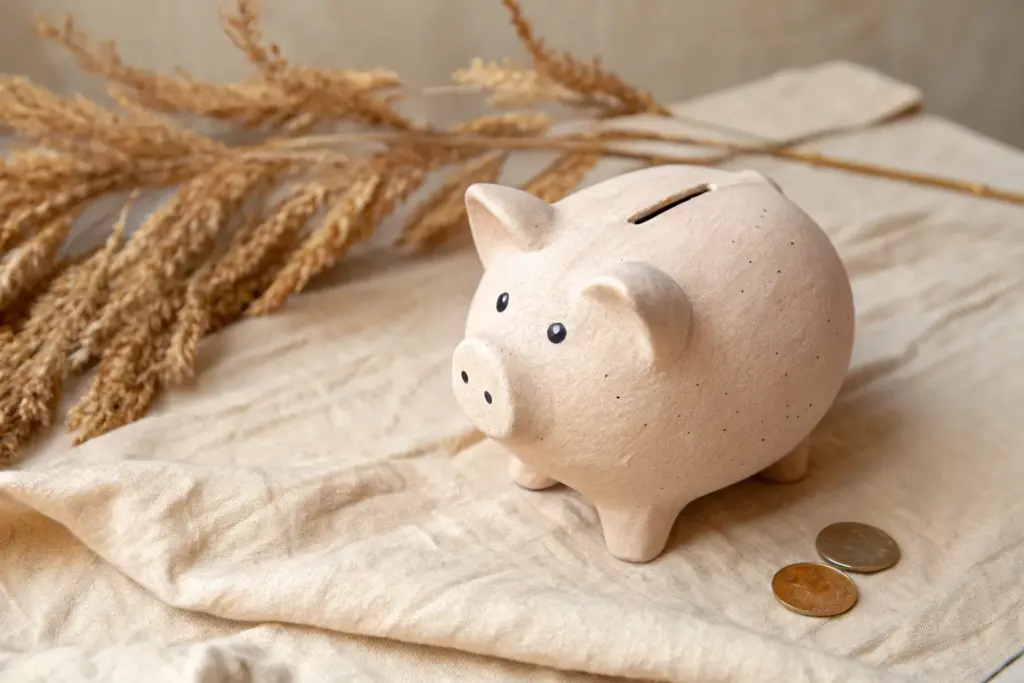
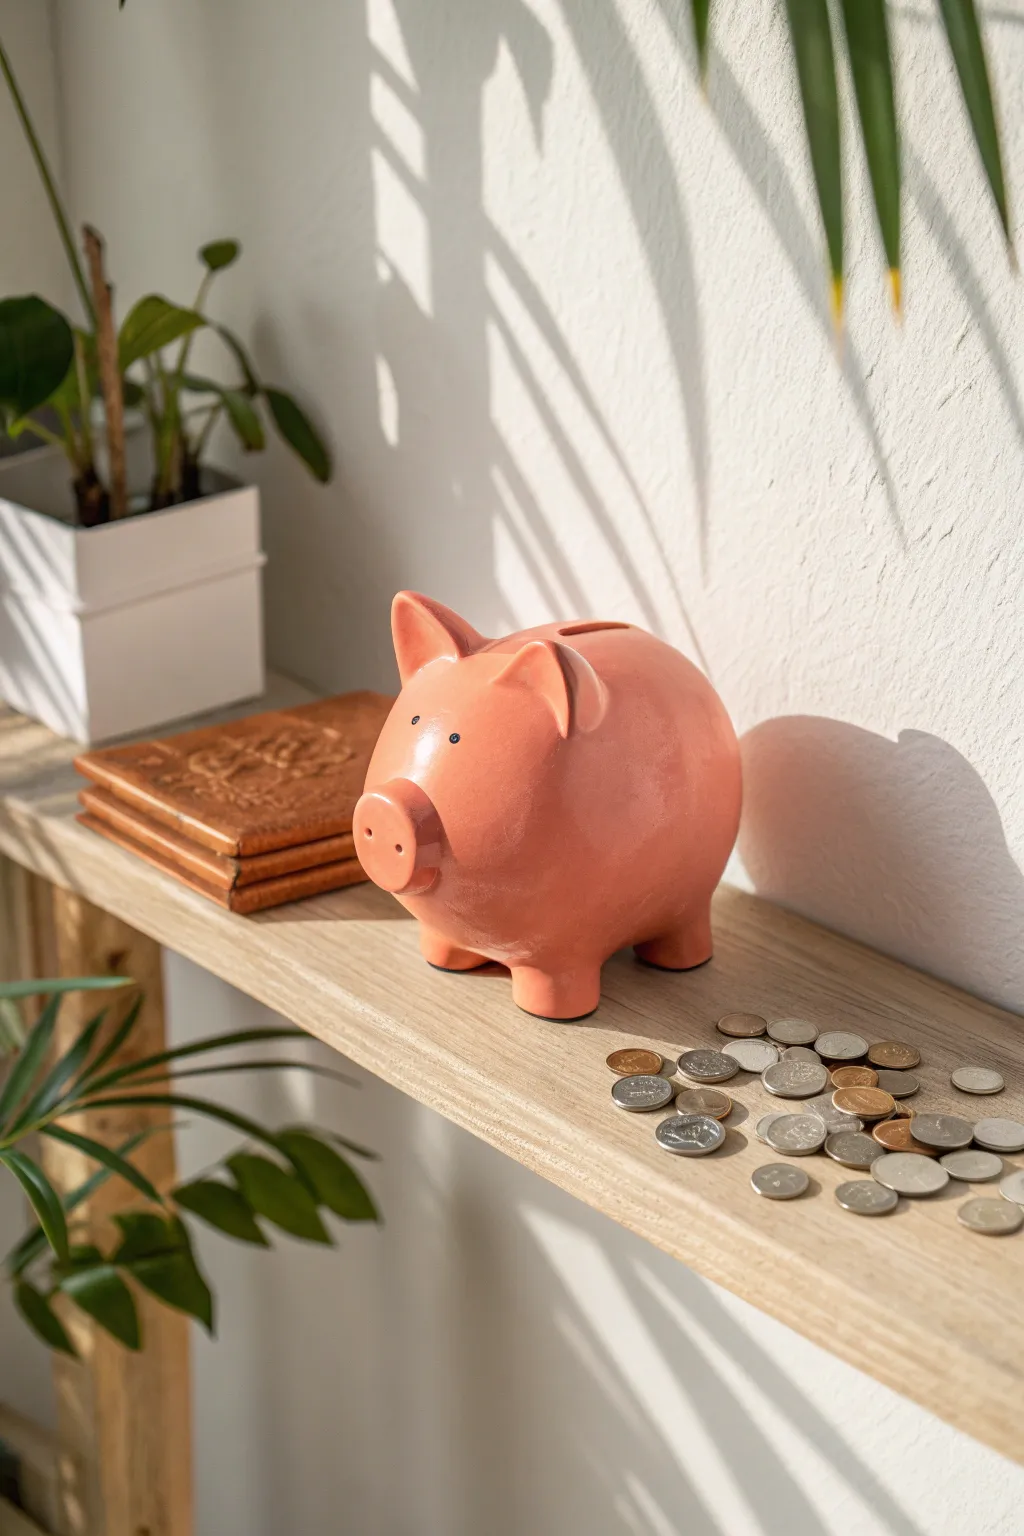
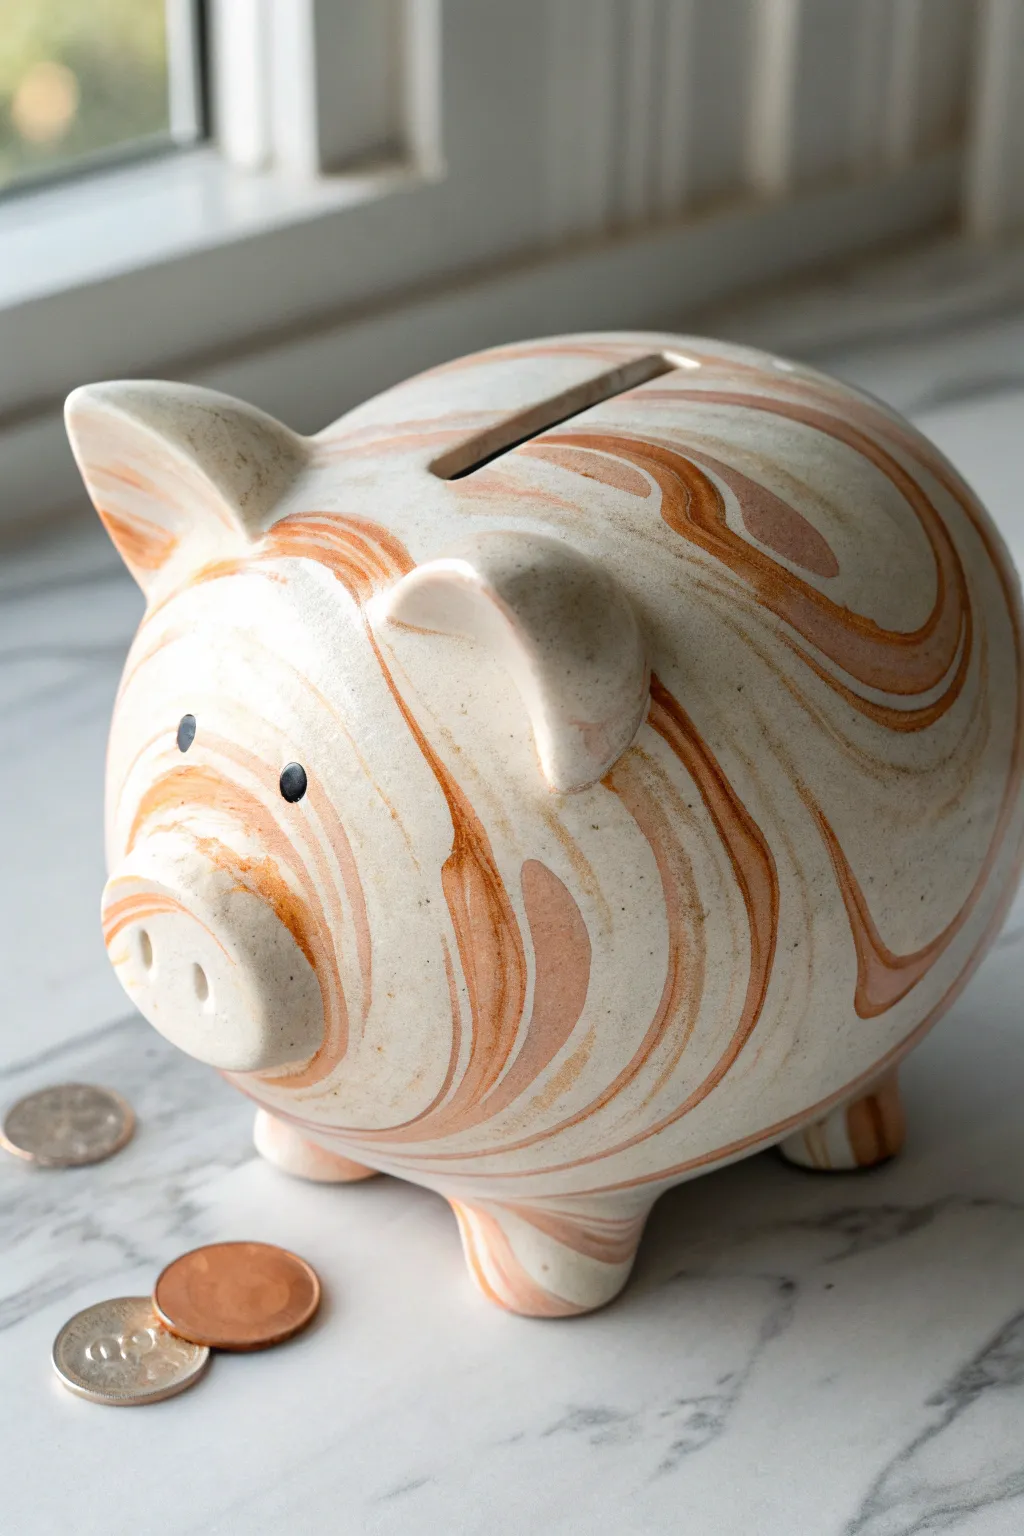
This project brings back the nostalgic charm of a traditional savings jar with a beautifully minimalist, matte finish. With its soft, earthy pink tones and classic round belly, this handcrafted piggy bank makes saving coins a delightful tactile experience.
Detailed Instructions
Materials
- Air-dry clay (terracotta or white)
- Acrylic paint (flesh pink/terracotta mix)
- Black acrylic paint
- Rolling pin
- Clay sculpting tools (knife, smoothing tool)
- Small bowl (for support)
- Water and sponge
- Fine-grit sandpaper
- Small round paintbrush
- Newspaper or armature wire (optional for core)
Step 1: Forming the Body
-
Create the core shape:
Start by balling up a large amount of newspaper into a tight oval shape to act as an armature, or if you prefer a solid heavy bank, simply begin with a large ball of clay. The newspaper method helps reduce weight and drying time. -
Roll the main slab:
Roll out a large, even slab of clay about 1/4 inch thick. It needs to be large enough to completely drape over your core form. -
Wrap the form:
Gently drape the clay slab over your newspaper ball or shape your solid clay into a smooth, symetrical oval. This will be the pig’s main body. -
Seal and smooth:
Where the clay edges meet, score and slip the joints to seal them tight. Use a damp sponge to smooth away any seams or fingerprints until the surface is uniform. -
Create the support legs:
Roll four equal-sized cylinders of clay for the legs. They should be stout and sturdy to support the body’s weight. -
Attach the legs:
Score the bottom of the body and the tops of the legs. Apply a little water or slip, press them firmly together, and smooth the clay from the leg onto the body so they become one piece. -
Level check:
Stand the pig up on a flat surface and gently press down to ensure all four legs touch the ground evenly and the body is level.
Step 2: Adding Character & Details
-
Sculpt the snout:
Form a small, flattened cylinder of clay for the nose. Attach it to the front center of the face using the score-and-slip method. -
Detail the nostrils:
Using the back of a small paintbrush or a round tool, press two distinct indentations into the flat front of the snout to create nostrils. -
Form the ears:
Cut two triangle shapes from a flattened piece of clay. Gently curve them forward slightly to give them a perky, alert look. -
Attach the ears:
Score and attach the ears near the top front of the head. Smooth the join at the base so they look like they grow naturally from the head. -
Add the tail:
Roll a thin growing snake of clay. Coil it into a tight pigtail curl and attach it securely to the rear of the body. -
Cut the coin slot:
I usually wait until the clay has stiffened slightly—about an hour—before doing this. Use a sharp knife to carefully cut a rectangular slot in the top center of the back, wide enough for your largest coins.
Hollow or Solid?
If you used a newspaper core, you can’t retrieve money without breaking the bank later! For a reusable bank, cut a hole in the belly before drying and fit a rubber stopper.
Step 3: Finishing Touches
-
Slow drying:
Allow the pig to dry slowly over 24-48 hours. Keep it loosely covered with plastic for the first day to prevent cracking, then uncover to finish drying. -
Sand for texture:
Once fully dry, use fine-grit sandpaper to gently buff the surface. You want to remove rough bumps while keeping a natural, handmade texture. -
Paint the base:
Mix a pale, dusty pink acrylic paint that mimics natural terracotta. Apply two opaque coats to the entire pig, letting it dry completely between layers. -
Paint the eyes:
Using a very small round brush and black acrylic paint, add two small, simple dots for eyes just above the snout. -
Final matte coat:
To preserve that dry clay look shown in the photo, finish with a matte spray sealant rather than a glossy one.
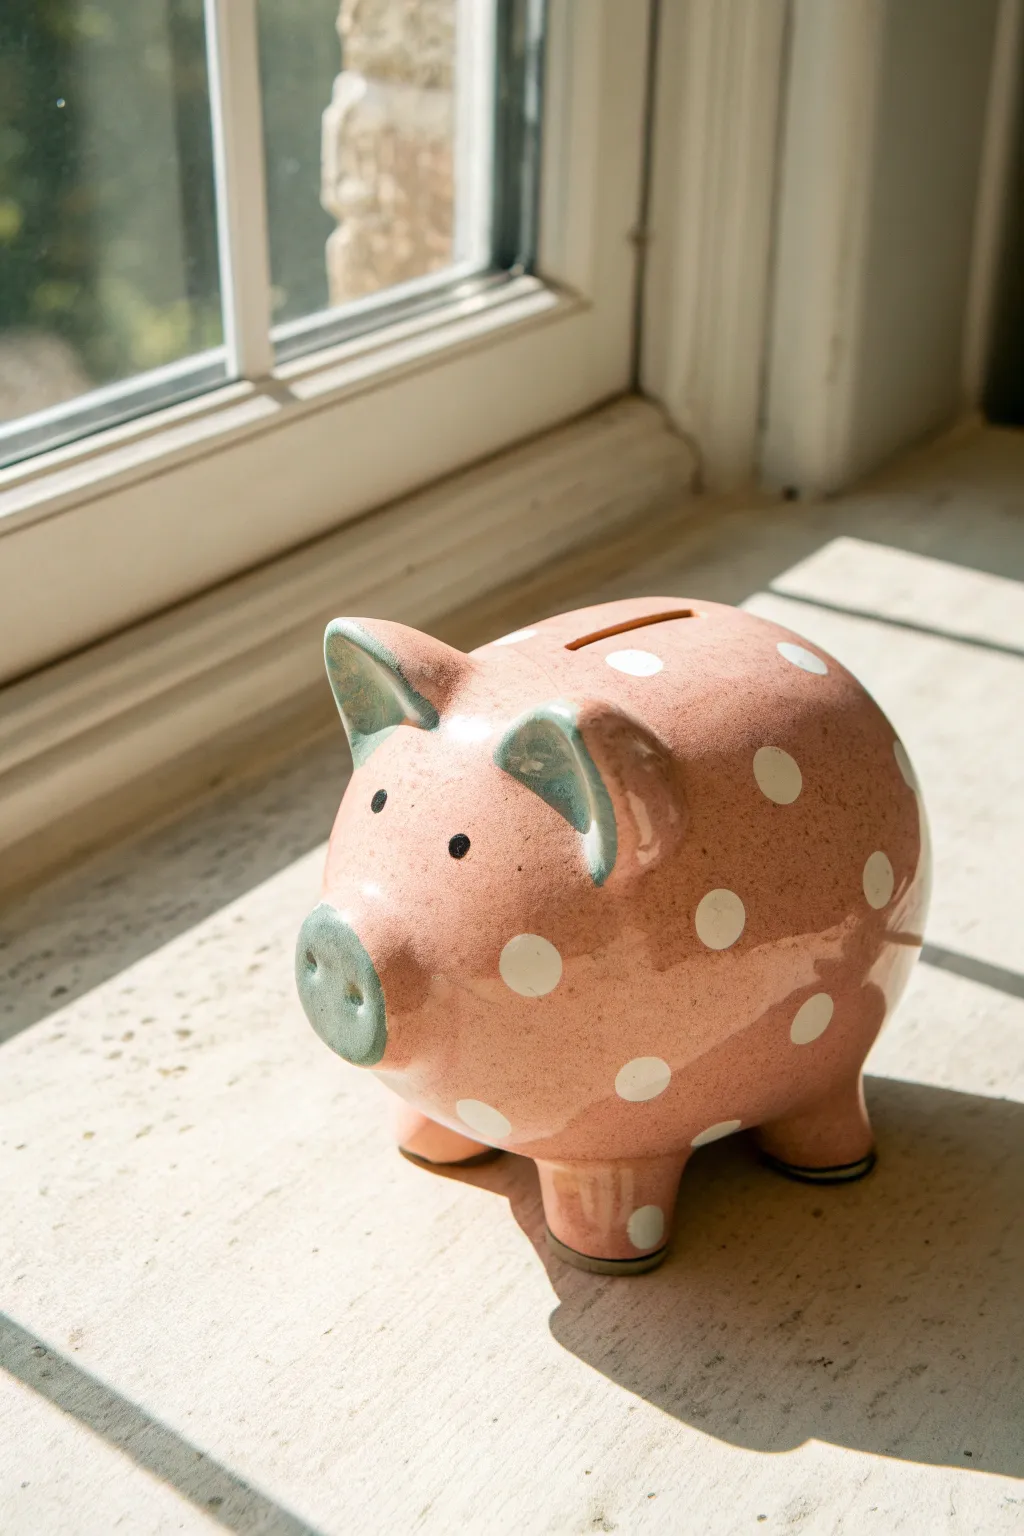
Rustic Wash
Mix a tiny drop of brown paint into water and brush it quickly over the dried pink paint, wiping it off immediately. The dark color stays in the crevices for an aged look.
Now you have a charming spot to stash your spare change for a rainy day


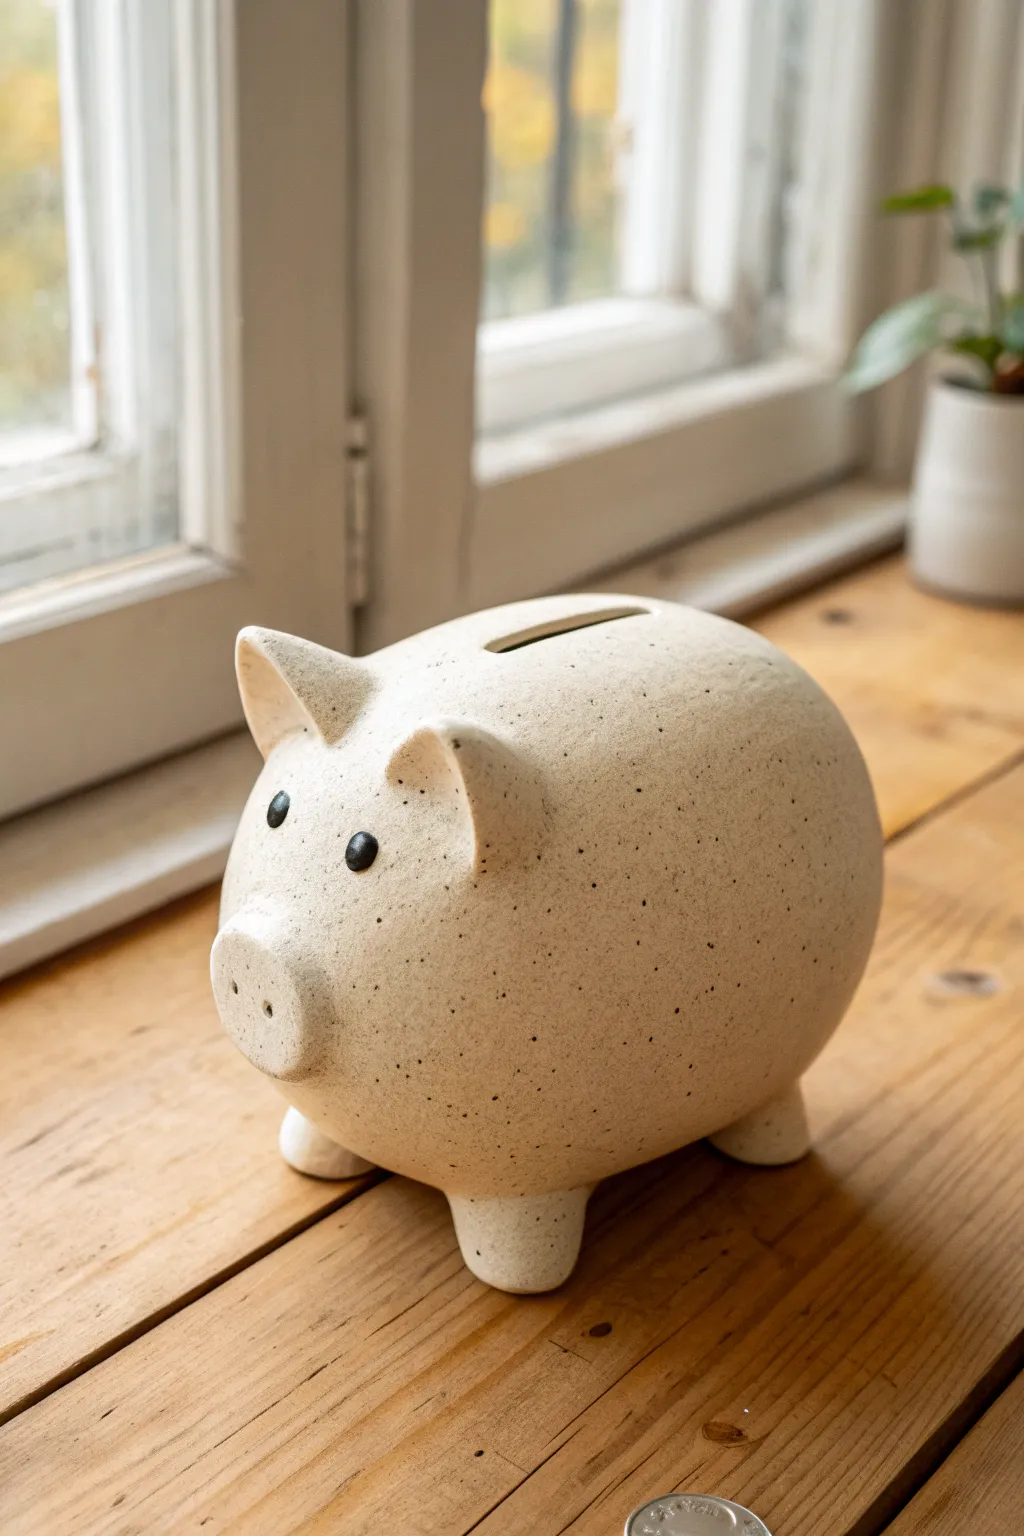
Pinch-Pot Piggy Bank With a Sweet Face

This charming, minimalist piggy bank features a natural speckled clay body and a sweet, simple expression that fits perfectly in modern decor. By joining two pinch pots, you can create the hollow round body that forms the base of this timeless keepsake.
Step-by-Step
Materials
- Speckled stoneware clay (white or cream)
- Scoring tool or fork
- Slip (clay mixed with water)
- Wooden modeling tool
- Fettling knife
- Rubber kidney rib
- Sponge
- Black underglaze
- Small round paintbrush
- Clear matte or satin glaze
Step 1: Forming the Body
-
Create two pinch pots:
Start with two equal balls of speckled clay, roughly the size of large oranges. Press your thumb into the center of each and pinch the walls evenly as you rotate the ball, aiming for a consistent 1/4-inch thickness. -
Score and slip edges:
Once you have two matching cup shapes, rough up the rims of both pots using a scoring tool or a fork. Apply a generous amount of slip to the scored areas. -
Join the pots:
Press the two rims together firmly to trap air inside; this trapped air will support the walls as you work. Smooth the seam on the outside using a wooden tool or your thumb, dragging clay across the line until it disappears. -
Refine the shape:
Gently paddle the hollow sphere with a wooden paddle or your hands to shape it into a slightly elongated oval, resembling a pig’s body. Use a rubber kidney rib to smooth the entire surface.
Step 2: Adding Features
-
Make the snout:
Roll a small ball of clay and flatten it slightly into a thick disk. Score both the back of the disk and the location on the body where the nose will go. -
Attach the snout:
Apply slip and press the snout firmly onto the face. Smooth the edges onto the body to create a seamless transition, but leave the front face distinct. -
Add nostrils:
Using the back of a paintbrush or a small round tool, press two indentations into the snout for nostrils. I like to wiggle the tool slightly to make them distinct. -
Create the ears:
Shape two small triangles from leftover clay. Pinch them slightly to give them a curved, natural look. Score, slip, and attach them just behind the forehead area. -
Form the legs:
Roll four small, equal-sized cones of clay. Attach them to the bottom of the body, blending the clay upwards. Gently tap the pig on the table to flatten the feet so it stands stable. -
Cut the coin slot:
Use a fettling knife to carefully cut a rectangular slot in the top center of the back. Make sure it is wide enough for your thickest coin.
Air Trap Issues
If the body dents while you’re attaching legs, the trapped air might have escaped. Blow gently into the coin slot to re-inflate the form before smoothing.
Step 3: Finishing and Glazing
-
Smooth and dry:
Run a damp sponge over the entire piece to remove harsh fingerprints or rough textures. Let the pig dry slowly under plastic to the leather-hard stage. -
Paint the eyes:
Using a small detail brush and black underglaze, paint two small, solid circles for eyes just above the snout. -
Clean the eyes:
If the black underglaze created a bump, gently smooth it with your finger once dry so it sits flush with the clay surface. -
Bisque fire:
Fire the piece in a kiln to cone 04 (or according to your clay’s instructions). This initial firing hardens the clay. -
Apply clear glaze:
Dip or brush a clear matte or satin glaze over the entire pig. This will seal the clay and allow the natural speckles to show through. -
Glaze fire:
Fire the pig again to the maturity temperature of your clay (usually cone 5 or 6 for stoneware). Let it cool completely before using.
Cork Stopper
Cut a large hole in the belly before firing and find a cork that fits it. This lets you retrieve savings without needing to break your artwork.
Start filling your new friend with coins and watch your savings grow


Coil-Built Piggy Bank With Chunky Legs
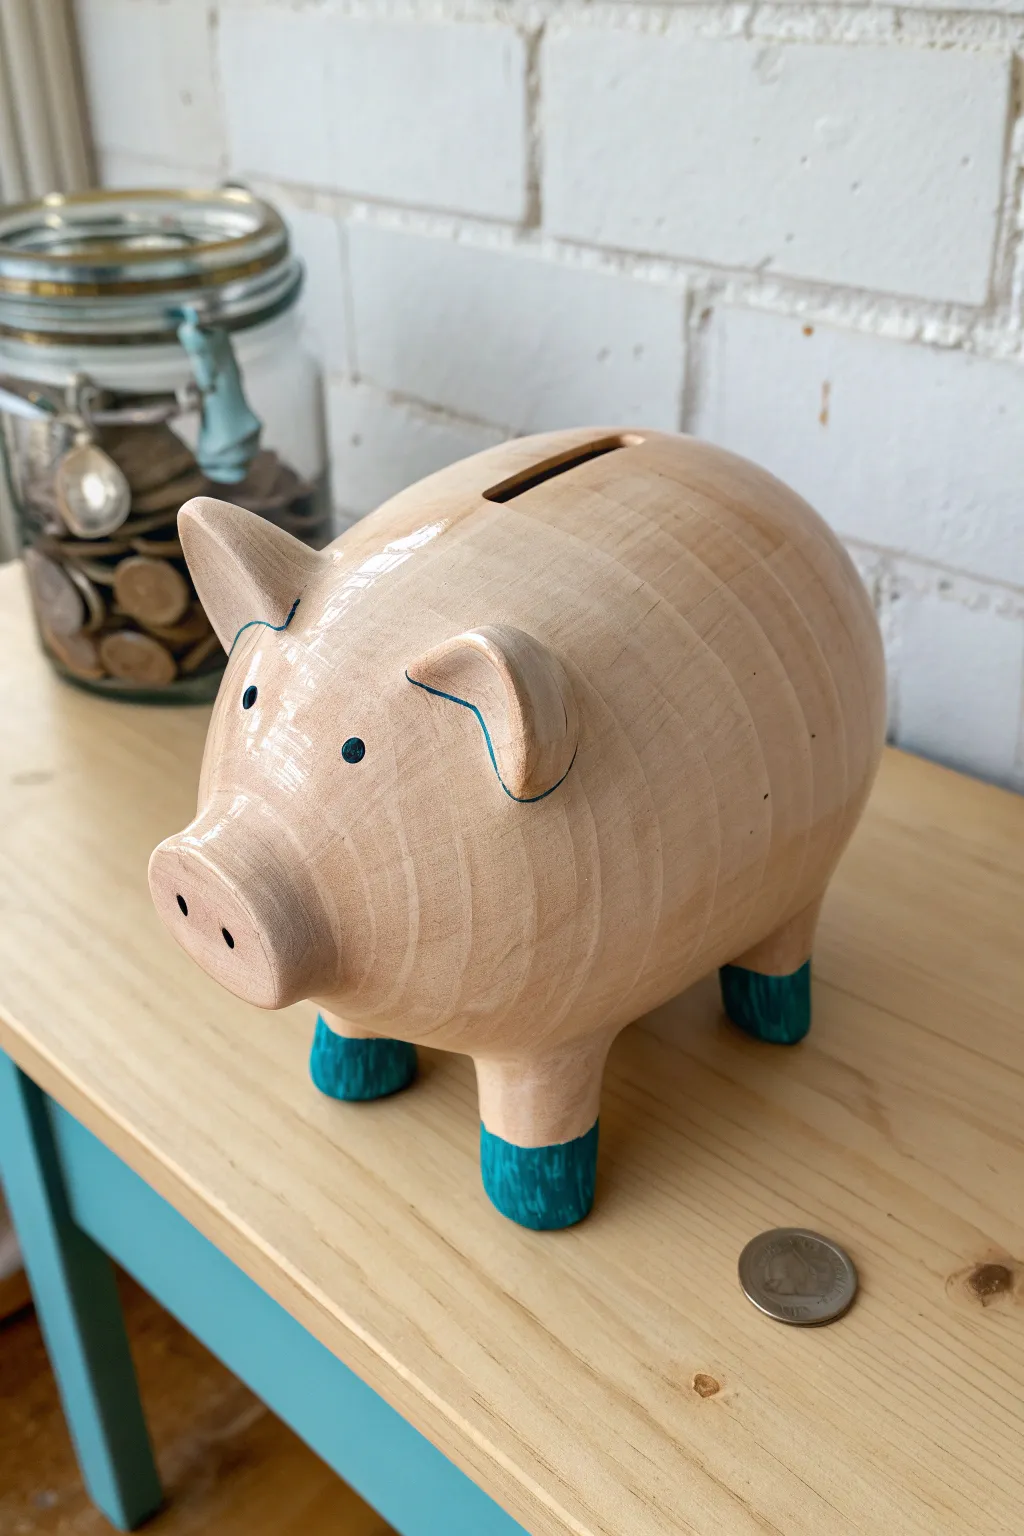
Create a charming, rustic piggy bank that mimics the look of turned wood using clay coil techniques. This sturdy little friend features a smooth, glossy finish and delightful teal-dipped hooves for a pop of modern color.
Step-by-Step Guide
Materials
- Stoneware or earthenware clay (tan or light brown body)
- Clay scoring tool or serrated rib
- Slip (clay mixed with water)
- Wooden modeling tools
- Fettling knife
- Sponge
- Clear gloss glaze
- Underglaze (teal/turquoise)
- Underglaze pencil or thin brush (black)
- Sandpaper (various grits from fine to extra fine)
- Kiln (or access to firing services)
Step 1: Building the Body
-
Form the base:
Start by rolling a slab of clay about 1/4 inch thick. Cut a rounded rectangle shape to serve as the sturdy belly base of your pig. -
Roll your coils:
Roll out several long, even coils of clay, aiming for the thickness of a large marker or your index finger. Keep them consistent for a uniform wall. -
Begin the walls:
Score the edge of your base and apply slip. Lay the first coil around the perimeter, pressing it firmly onto the base. Smooth the interior seam completely to ensure structural integrity. -
Build upward:
Continue stacking coils, scoring and slipping between each layer. As you build up, angle the coils slightly outward to create the wider belly shape, then gradually angle inward to close the form at the top. -
Create the faux wood texture:
Here is the trick: Instead of smoothing the outside perfectly flat, use a rib tool to gently blend the coils while leaving slight horizontal ridges. This mimics the look of wood grain or lathe-turned marks seen in the photo. -
Close the form:
Once the body is an oval shape, close the top hole with a small slab or by spiraling the final coil inward. Smooth the join well.
Wood Grain Magic
To enhance the turned-wood look, gently wipe a darker iron oxide wash over the body before glazing, then sponge it back so it stays only in the coil crevices.
Step 2: Adding Features and Details
-
Attach the snout:
Form a flattened cylinder of clay for the snout. Score and slip the front of the body, then attach the snout securely. Drill two nostrils with a small circular tool. -
Add chunky legs:
Roll four thick, sturdy cylinders for legs. They should be substantial to support the weight. Attach them to the belly using the score-and-slip method, blending the seams thoroughly so they look seamless. -
Sculpt the ears:
Cut two triangular shapes from a slab. Gently curve them to give them dimension and attach them near the top front of the head. I find adding a tiny coil behind the ear helps reinforce the join. -
Cut the slot:
Using your fettling knife, carefully cut a clean, rectangular coin slot into the very top of the pig’s back. Smooth the rough edges with a damp sponge. -
Refine the surface:
Once the clay is leather hard, use a damp sponge to smooth out any sharp edges, but be careful not to erase your horizontal ‘wood grain’ texture.
Step 3: Glazing and Finishing
-
Bisque fire:
Allow the pig to dry completely (this may take a week) before bisque firing it in the kiln according to your clay body’s specifications. -
Apply the ‘dipped’ color:
Paint the bottom inch of each leg with three coats of teal underglaze to create the appearance of dipped paint. -
Add facial details:
Use a black underglaze pencil or a very fine brush with black underglaze to draw the eyes and add a thin outline detail near the ears if desired. -
High gloss finish:
Dip or brush the entire pig (except the bottom of the feet which touch the kiln shelf) in a clear gloss glaze. This will deepen the clay color to look like varnished wood. -
Final firing:
Fire the piece again for the glaze firing. The clear coat will make the clay body shine and seal the underglaze details permanently.
Curly Tail Twist
Don’t forget the tail! Extrude a thin coil of clay and wrap it around a pencil to create a perfect corkscrew tail, then attach it to the rear.
Once cooled, your sturdy ceramic pig is ready to keep your savings safe in style
Air-Dry Clay Piggy Bank You Can Paint Any Color
Create a classic symbol of savings with a modern twist using this warm, coral-toned air-dry clay project. The smooth, minimalist finish and sweet, upturned ears give it a timeless charm that looks lovely on any shelf.
Step-by-Step Tutorial
Materials
- Air-dry clay (white or terracotta)
- Acrylic paint (coral pink, white, black)
- Rolling pin
- Aluminum foil
- Clay sculpting tools (knife tool, sponge)
- Small bowl of water
- Fine grit sandpaper (220 grit)
- Paintbrushes (flat shader and fine detail)
- Gloss varnish or sealant
Step 1: Forming the Body
-
Build the armature:
Begin by crumpling aluminum foil into a large, dense oval shape. This acts as the core, saving clay and reducing drying time while giving you a sturdy base to build upon. -
Roll out the clay:
Roll your air-dry clay into a sheet about 1/4 inch thick. I find this thickness is perfect for coverage without being too heavy. -
Cover the core:
Wrap the clay sheet around your foil oval. Press seams together firmly and smooth them out with wet fingers until the foil is entirely covered. -
Smooth the surface:
Dip a damp sponge into water and gently wipe the entire surface of the body to remove fingerprints and create a seamless, rounded look.
Slip & Score Secret
Always scratch (score) both surfaces and add water (slip) before attaching parts like ears or legs. This acts like glue so pieces don’t fall off later.
Step 2: Adding Features
-
Shape the nose:
Roll a small ball of clay and flatten it slightly into a disc. Attach this to the front of the body for the snout. -
Blend the snout:
Use a modeling tool to smooth the edges of the snout onto the body so it looks like one continuous piece rather than an add-on. -
Create the nostrils:
Press the rounded end of a paintbrush handle into the snout twice to create two clear nostril indentations. -
Make the legs:
Form four equal-sized, stout cylinders of clay. These will be the feet. -
Attach the feet:
Score the bottom of the body and the tops of the feet with a needle tool. Apply a little water slip and press the feet firmly onto the underside. -
Balance check:
Set the pig upright on a flat surface to ensure it stands evenly. Adjust the legs now while the clay is still pliable. -
Form the ears:
Cut two triangle shapes from your rolled clay. Gently curve them to give them a natural, perked-up appearance. -
Secure the ears:
Attach the ears to the top of the head, blending the clay at the base downward onto the body for a strong hold. -
Carve the coin slot:
Using a sharp clay knife, carefully cut a rectangular slot in the center of the pig’s back. Ensure it is wide enough for your thickest coins.
Cracking Issues?
If small cracks appear while drying, don’t panic. Mix a tiny bit of fresh clay with water to make a paste and fill the crack, then sand smooth once dry.
Step 3: Finishing and Painting
-
Let it dry completely:
Place your pig in a safe spot away from direct heat. Let it dry for at least 48 to 72 hours until it is hard and room temperature to the touch. -
Sand for smoothness:
Once fully dry, lightly sand the surface with fine-grit sandpaper to remove any rough bumps or tool marks. -
Mix your color:
Mix a dollop of coral pink acrylic paint with a tiny touch of white to achieve that soft, sun-washed hue shown in the photo. -
Apply the base coat:
Paint the entire pig with your coral mix. Let the first coat dry, then apply a second layer for solid, opaque coverage. -
Paint the eyes:
Using a very fine detail brush or a toothpick, dot two small black eyes just above the snout. -
Seal the project:
Finish by applying a coat of gloss varnish. This protects the paint and gives it a finished ceramic look.
Now you have a charming spot to stow away your spare change

The Complete Guide to Pottery Troubleshooting
Uncover the most common ceramic mistakes—from cracking clay to failed glazes—and learn how to fix them fast.
Minimalist Modern Piggy Bank With Clean Lines
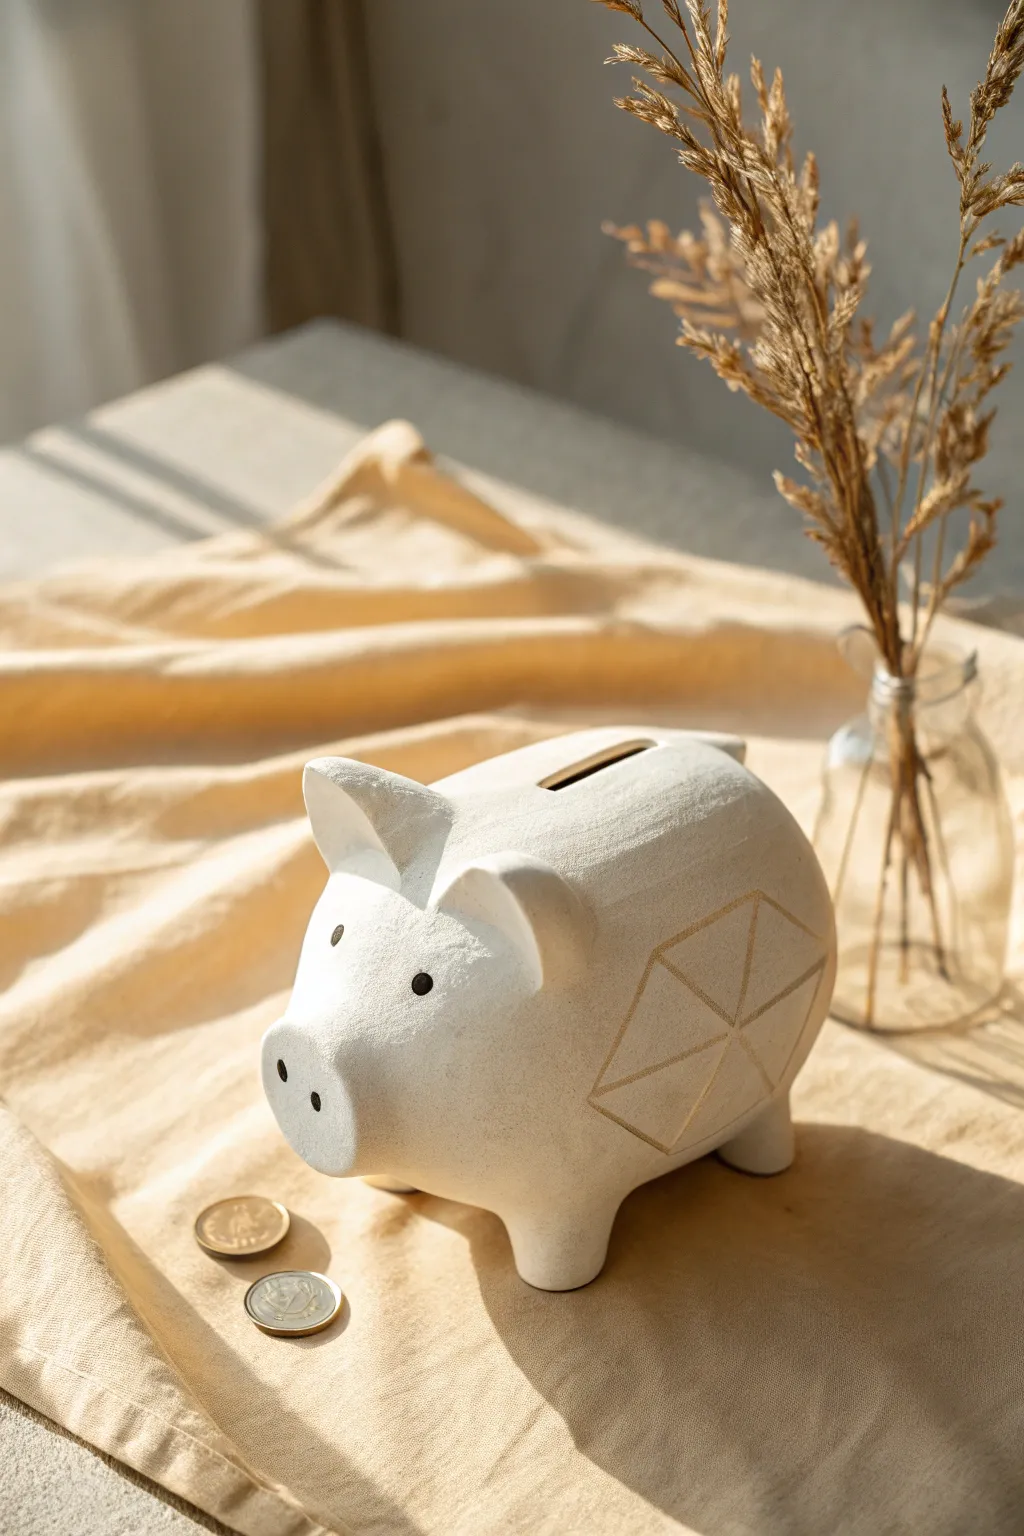
Embrace the beauty of simplicity with this handmade clay piggy bank, featuring crisp white textural finishes and delicate gold geometric accents. It is a modern take on a classic childhood staple that fits perfectly on any grown-up desk or shelf.
Detailed Instructions
Materials
- White air-dry clay (approx. 1kg)
- Small bowl with water
- Rolling pin
- Sculpting tools (needle tool, sponge, wooden knife)
- Sandpaper (fine grit)
- White acrylic paint (matte finish)
- Gold paint pen or liquid gold leaf
- Ruler
- Pencil
- Matte sealant or varnish
Step 1: Forming the Body
-
Prepare the Clay:
Begin by kneading your air-dry clay to warm it up and remove any air bubbles. Form a large, solid oval shape that fits comfortably in two hands; this will be the main body of your pig. -
Hollow the Form:
Carefully slice the oval in half lengthwise. Use a loop tool or spoon to hollow out the insides of both halves, leaving the walls about 1/2 inch thick to ensure structural integrity. -
Rejoin the Halves:
Score the edges of both halves with a needle tool and apply a bit of water or slip (clay mixed with water). Press the halves back together firmly to reform the oval. -
Smooth the Seam:
With wet fingers or a damp sponge, smooth over the seam where the two halves meet until it is completely invisible. -
Shape the Feet:
Roll four small, equal-sized cylinders of clay. Score and slip the bottom of the body, then attach the cylinders to form the legs. Gently blend the clay from the legs onto the body for a seamless transition.
Step 2: Adding Details
-
Create the Snout:
Flatten the front end of your oval slightly to create a nose area. You can add a small disk of clay here for extra dimension if desired, blending the edges smooth. -
Add Nostrils and Eyes:
Using the back of a paintbrush or a large dotting tool, press two indentations into the snout for nostrils. For the eyes, make two smaller, shallow indentations higher up on the face. -
Sculpt the Ears:
Shape two small triangles of clay. Curve them slightly to look like pig ears. Score the top of the head and attach them securely, blending the clay at the base. -
Cut the Coin Slot:
While the clay is still leather-hard (firm but not dry), use a sharp knife or fettling tool to cut a clean, rectangular slot along the top for coins. -
Refine the Surface:
Take a damp sponge and gently wipe the entire surface to remove fingerprints and crate a slightly textured, stone-like finish. I find this steps helps hide minor imperfections. -
Drying Time:
Allow the pig to dry completely. This usually takes 24-48 hours depending on humidity. Rotate it occasionally so the bottom dries evenly.
Keep it Clean
Keep a bowl of water and a towel nearby. Cleaning your hands before switching to the white paint or gold detailing prevents smudging the pristine finish.
Step 3: Finishing Touches
-
Sand and Prep:
Once fully dry, lightly sand any rough patches. Wipe away dust with a slightly damp cloth. -
Base Coat:
Paint the entire pig with matte white acrylic paint. You may need two coats to get that solid, plaster-like appearance. -
Draft the Design:
Using a ruler and a very light pencil touch, sketch a geometric hexagon or diamond pattern on the flank of the pig. Keep the lines thin. -
Fill in the Eyes:
Use a tiny drop of black paint to fill in the eye indentations you made earlier, giving the pig a focused, minimalist expression. -
Apply Gold Accents:
Carefully trace over your pencil lines with a gold paint pen. If you are feeling steady, you can paint a thin gold line around the rim of the coin slot as well. -
Seal:
Finish by applying a matte spray varnish or sealant to protect the paint and clay from moisture and wear.
Stopper Hack
Before the belly dries, cut a circular hole in the bottom. After drying, fit it with a rubber cork so you can retrieve coins without breaking your art.
Now you have a stylish spot to stash your spare change that doubles as modern decor
Terrazzo-Style Speckled Piggy Bank
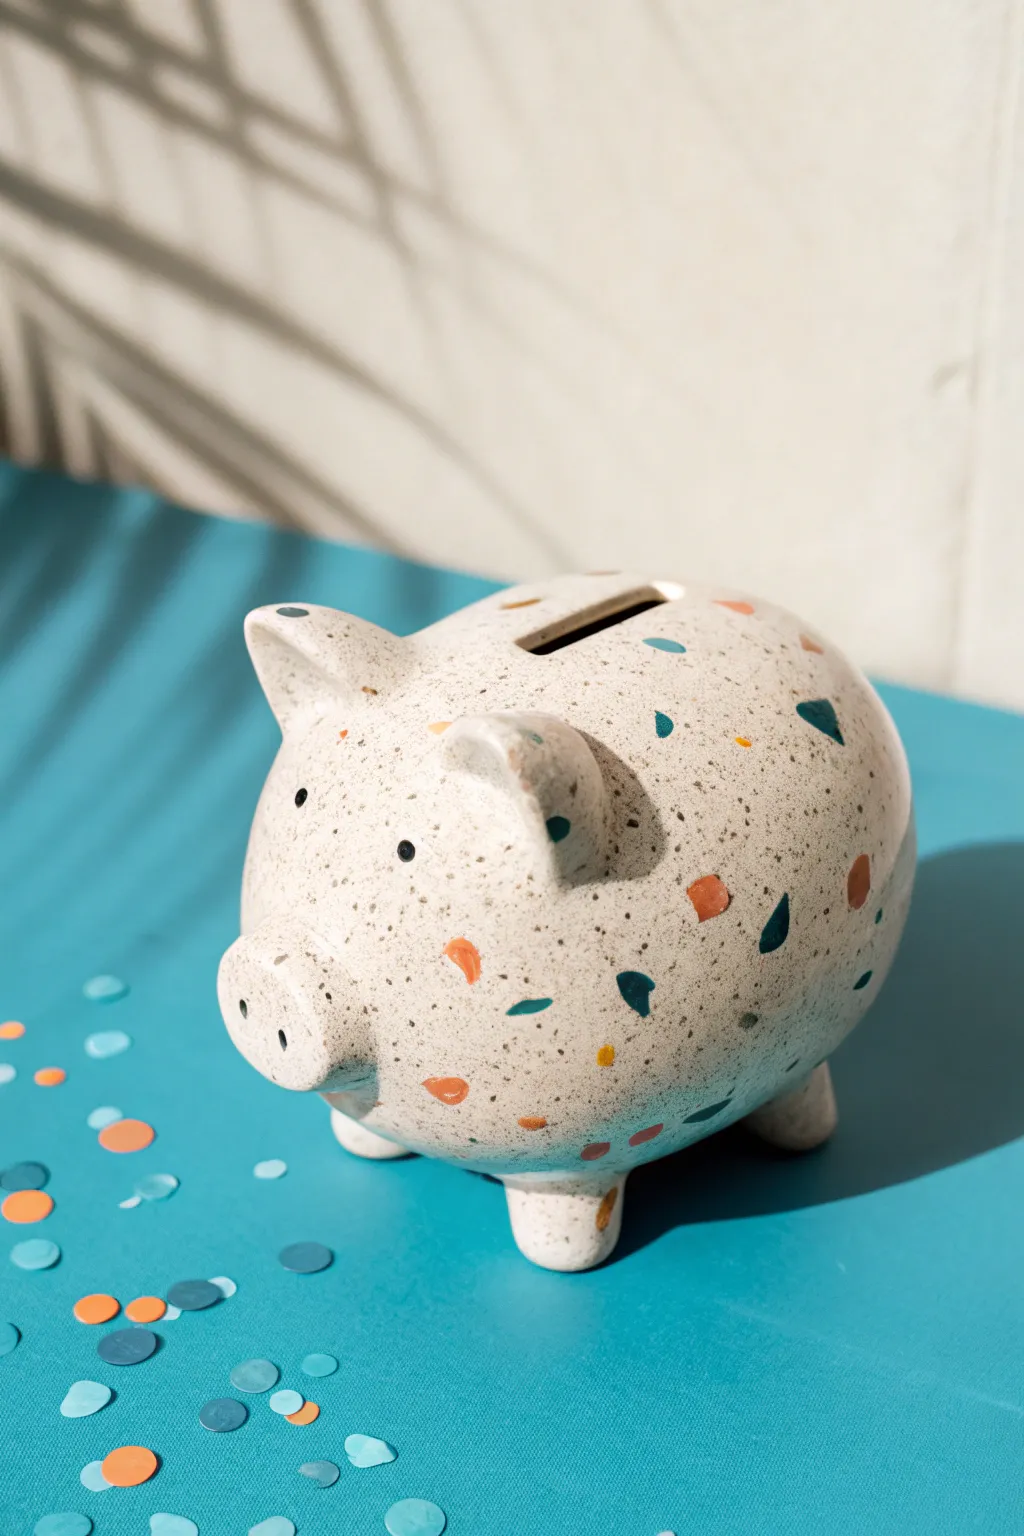
Transform a plain ceramic piggy bank into a modern home decor piece with this faux terrazzo technique. The combination of a granite-like base and colorful, scattered shards creates a sophisticated look that feels much more expensive than a simple DIY project.
Step-by-Step Guide
Materials
- Bisque color or plain white ceramic piggy bank
- Acrylic paints: cream/off-white, black water-based paint or ink, burnt orange, teal blue, dark navy, mustard yellow
- Old toothbrush (for speckling)
- Small flat shader brush
- Round detail brush (size 2 or 4)
- Water cup and paper towels
- Matte or satin clear sealant spray
- Palette or small plate
- Protective sheet or newspaper
Step 1: Base Preparation
-
Clean surface:
Before you begin painting, wipe down your ceramic piggy bank with a slightly damp cloth to remove any dust or oils, ensuring the paint adheres perfectly. -
Apply base coat:
Using a larger soft brush, cover the entire piggy bank with a creamy off-white or light beige acrylic paint. You may need two coats for full opacity. -
Dry thoroughly:
Allow the base coat to dry completely. Since we will be splattering paint next, a dry surface prevents the colors from muddying together.
Step 2: Creating the Granite Speckle
-
Prepare the splatter mix:
Dilute a small amount of black acrylic paint with water (about 50/50 ratio) on your palette until it has an inky consistency. -
Load the toothbrush:
Dip the bristles of an old toothbrush into your watery black paint mixture, tapping off any heavy drips. -
Test spray:
Hold the brush over a piece of scrap paper and run your thumb across the bristles to flick paint. Test the distance to get a fine mist rather than big blobs. -
Splatter the pig:
Moving around the piggy bank, flick the bristles to create a fine, peppery mist of black speckles over the entire surface. I find rotating the pig frequently helps get an even distribution. -
Wait for speckles to set:
Let these fine black dots dry completely. If they are wet when you paint the larger shapes, they might smear.
Natural Texture
Don’t aim for perfect shapes. Real terrazzo is made of broken stone chips, so jagged, uneven edges on your painted shapes look more authentic.
Step 3: Painting the Terrazzo Chips
-
Mix the orange:
Prepare your burnt orange color on the palette. It should be opaque but flowing smoothly. -
Paint orange shapes:
Using a small flat brush, paint random geometric shapes—triangles, trapazoids, and jagged squares—scattered across the body. Keep them spaced out generously. -
Add teal fragments:
Switch to your teal blue paint. Fill in some of the empty spaces with similar irregular shard shapes, varying the size slightly for interest. -
Insert dark navy pieces:
Using the dark navy blue, add a few more shapes. These act as high-contrast anchors in the pattern, so place them thoughtfully. -
Pop in yellow accents:
Finally, add smaller flecks of mustard yellow in the remaining gaps. These should be sparse to act as subtle highlights. -
Refine edges:
Go back over any shapes that look too sheer with a second coat of paint to ensure the colors pop against the speckled background.
Metallic Upgrade
For a glamorous twist, add a fifth color using liquid gold leaf or metallic copper paint to create shimmering ‘stone’ fragments in the mix.
Step 4: Finishing Touches
-
Paint the eyes:
Use the handle end of a paintbrush dipped in black paint to dot the eyes solid black for a clean, modern look. -
Detail the snout:
Paint the nostril indentations black using your smallest detail brush. -
Final dry time:
Allow the entire project to dry for at least 24 hours to ensure all layers are cured. -
Seal the work:
Spray the entire bank with a matte or satin clear coat. This protects the paint from chipping and unifies the finish.
Now you have a trendy, speckled masterpiece ready to start collecting your coins

What Really Happens Inside the Kiln
Learn how time and temperature work together inside the kiln to transform clay into durable ceramic.
Marbled Clay Piggy Bank for a Swirly Look
Give your savings a sophisticated home with this beautifully marbled clay piggy bank. The technique creates organic, flowing ribbons of terracotta and cream that look like they were carved from natural stone.
Detailed Instructions
Materials
- White or cream polymer clay (primary color)
- Terracotta or rust-colored polymer clay (secondary color)
- Aluminum foil
- Rolling pin or pasta machine
- Modeling tools (or a butter knife)
- Clay blade
- Small round cutter or straw (for eyes)
- Black acrylic paint
- Small detail paintbrush
- Glossy polymer clay varnish or glaze
- Oven (for baking)
- Sandpaper (fine grit)
Step 1: Creating the Core Form
-
Form the foil armature:
Start by crumpling aluminum foil into a large, dense oval shape. This will be the body of your pig and helps save clay while keeping the bank lightweight. Press it firmly against a table to create a slightly flattened bottom so it sits stably. -
Smooth the surface:
Roll the foil ball against a hard surface to smooth out sharp ridges. The smoother your foil base, the easier it will be to cover with clay later.
Step 2: Marbling the Clay
-
Prepare your colors:
Condition a large block of white clay and a smaller amount of terracotta clay until they are soft and pliable. You want a ratio of roughly 4 parts white to 1 part terracotta. -
Create snakes:
Roll the white clay into a thick log. Then, roll the terracotta clay into several thinner snakes. -
Combine the clays:
Lay the thin terracotta snakes lengthwise along the white log. Twist the entire bundle together like a candy cane. -
Fold and roll:
Fold the twisted log in half, roll it out again, and twist once more. Be careful not to over-mix; stop when you see distinct, flowing ribbons of color rather than a blended solid orange. -
Flatten the sheet:
Use your rolling pin to flatten the marbled log into a sheet about 1/4 inch thick. Check both sides of the sheet and choose the one with the most pleasing swirl pattern to face outward.
Muddy marble fix
If you over-mixed the clay and the distinct lines disappeared, don’t worry. Simply add more fresh white clay, twist it in once, and roll again to re-introduce contrast.
Step 3: Sculpting the Pig
-
Cover the armature:
Drape the marbled clay sheet over your foil oval. Gently press and smooth the clay down the sides, trimming away excess from the bottom. Smooth the seams with your fingers or a modeling tool until they disappear into the marble pattern. -
Shape the snout:
Take a leftover piece of marbled clay and roll it into a short cylinder. Press this onto the front of the face, blending the edges into the head. Use a large ball tool or your pinky finger to indent two nostrils. -
Add the ears:
Form two triangles from the clay. Pinch them slightly to give them a curved, cupped shape. Attach these to the top of the head, blending the base of the clay downward for a secure bond. -
Form the legs:
Roll four short, stout cylinders of clay. Turn the pig over gently and attach these to the four corners of the belly. Press firmly to ensure they adhere well, then stand the pig up to check that it is level. -
Detail the eyes:
Use a small ball tool to make shallow indentations where the eyes will go. We will paint these after baking. -
Cut the coin slot:
Using your clay blade or a sharp knife, carefully cut a rectangular slot in the center of the pig’s back. Widen it slightly by wiggling the blade to ensure coins will fit after baking. -
Final smoothing:
Dip your finger in a little bit of baby oil or water and run it over the entire surface to remove fingerprints and smooth out any small bumps.
Pro tip: Seamless finish
Before baking, use a scrap piece of white clay to ‘suss’ or rub over any fingerprints. The clay acts like an eraser for textures, leaving a perfectly smooth ceramic-like surface.
Step 4: Baking and Finishing
-
Bake the project:
Place your piggy bank on a baking sheet or ceramic tile. Bake according to the manufacturer’s instructions for your specific brand of polymer clay—usually around 275°F (135°C) for 30 minutes per 1/4 inch of thickness. -
Cool down:
Turn the oven off and crack the door, letting the pig cool down slowly inside. This helps prevent thermal shock cracks. -
Remove the foil (optional):
If you want a functional hollow bank, you’ll need to carefully dig out the foil through the coin slot or a hole in the bottom using a hooked tool. I usually prefer to leave the foil inside for decor pieces, but removing it makes it functional. -
Paint the eyes:
Dip the handle end of your paintbrush into black acrylic paint and dot it into the eye indentations for perfectly round eyes. -
Apply varnish:
Once the paint is dry, coat the entire pig with a glossy polymer clay glaze. This mimics the ceramic look in the photo and protects the surface.
Now you have a chic, handmade vessel ready to hold your coins
Polka Dot Piggy Bank With Playful Color Blocking
This charming piggy bank combines a soft, dusty rose base with fresh mint green accents for a delightful color-blocked effect. The scattered white polka dots add a whimsical, classic touch that transforms a simple ceramic shape into a treasured keepsake.
Step-by-Step
Materials
- Bisque ceramic piggy bank (ready to paint)
- Acrylic paints: Dusty Rose/Salmon Pink, Mint Green/Light Teal, White, Black
- Gloss glaze or spray varnish
- Medium flat paintbrush
- Small round detail brush
- Round foam pouncer (approx 1/2 inch) or large dotting tool
- Masking tape (optional)
- Paper plate or palette
- Water cup and paper towels
- Fine-grit sandpaper (optional)
Step 1: Base Coat & Color Blocking
-
Prep the surface:
Before you begin painting, wipe down your ceramic pig with a slightly damp cloth to remove any dust or oils. If there are any rough seams from the casting process, gently smooth them out with fine-grit sandpaper. -
Map out the accents:
Decide which areas will be your accent color. For this look, we are focusing on the snout and the inner ears. You can lightly mark the boundaries with a pencil if you’re worried about painting outside the lines. -
Paint the main body:
Load your medium flat brush with the Dusty Rose paint. Apply an even coat over the entire body of the pig, carefully avoiding the snout and inner ear areas. Don’t worry about full opacity yet; thin, even layers are best. -
Fill in the mint accents:
Using a smaller brush, carefully paint the snout and the inside of the ears with your Mint Green paint. I like to use the edge of the brush to create a clean line where the pink and green meet. -
Apply second coats:
Once the first layer is dry to the touch (usually 15-20 minutes for acrylics), apply a second coat of pink to the body and mint to the accents. This ensures a rich, solid color without streaky brushstrokes. -
Touch up the transitions:
Inspect the lines where the pink meets the mint green. If they look messy, use your small round brush to carefully tidy up the edges with the appropriate color.
Perfect Polka Circles
If you don’t have a foam pouncer, stick round circle stickers or reinforcement labels onto the pig, paint white inside them, and peel them off while wet.
Step 2: Polka Dots & Details
-
Prepare for dots:
Pour a small amount of white paint onto your palette. Consistency is key here—the paint should be creamy but not too runny to prevent drips. -
Create the polka dots:
Dip your round foam pouncer or large dotting tool into the white paint. Press straight down onto the pink body of the pig to create a perfect circle. Lift straight up to avoid smearing. -
Create a pattern:
Continue placing dots around the body. Aim for a random but balanced spacing, leaving about an inch or two between dots depending on the size of your pig. Don’t forget the legs and underbelly. -
Handle curved surfaces:
When stamping dots on the rounded belly or back, gently rock the pouncer in a tiny circular motion appearing to follow the curve, ensuring the edges of the circle make contact with the clay. -
Paint the eyes:
Using the handle end of a small paintbrush or a tiny dotting tool, dip into black paint and place two small dots above the snout for eyes. Keep them simple for that classic look. -
Add snout details:
If your pig has sculpted nostrils, use a very small brush to darken them slightly with a mix of mint and a tiny drop of black, or simply highlight the sculpted indentation.
Metallic Upgrade
Swap the white paint for a metallic gold or copper for the polka dots. The shimmer adds a sophisticated, modern twist to the pastel palette.
Step 3: Finishing Touches
-
Dry completely:
Allow the entire piggy bank to dry for at least 24 hours. Acrylic paint might feel dry sooner, but it needs time to cure slightly before sealing. -
Apply varnish:
To get that glossy, ceramic-fired look without a kiln, apply a coat of gloss varnish. You can use a spray for an even finish or brush it on carefully with a soft brush. -
Protect the feet:
Once the varnish is dry, consider sticking small felt pads to the bottom of the feet. This protects both your furniture and the paint job on the pig’s feet.
Place your new creation on a sunny shelf and start saving your coins in style

TRACK YOUR CERAMIC JOURNEY
Capture glaze tests, firing details, and creative progress—all in one simple printable. Make your projects easier to repeat and improve.
Sleepy Piggy Bank With Closed Eyes and Blush Cheeks
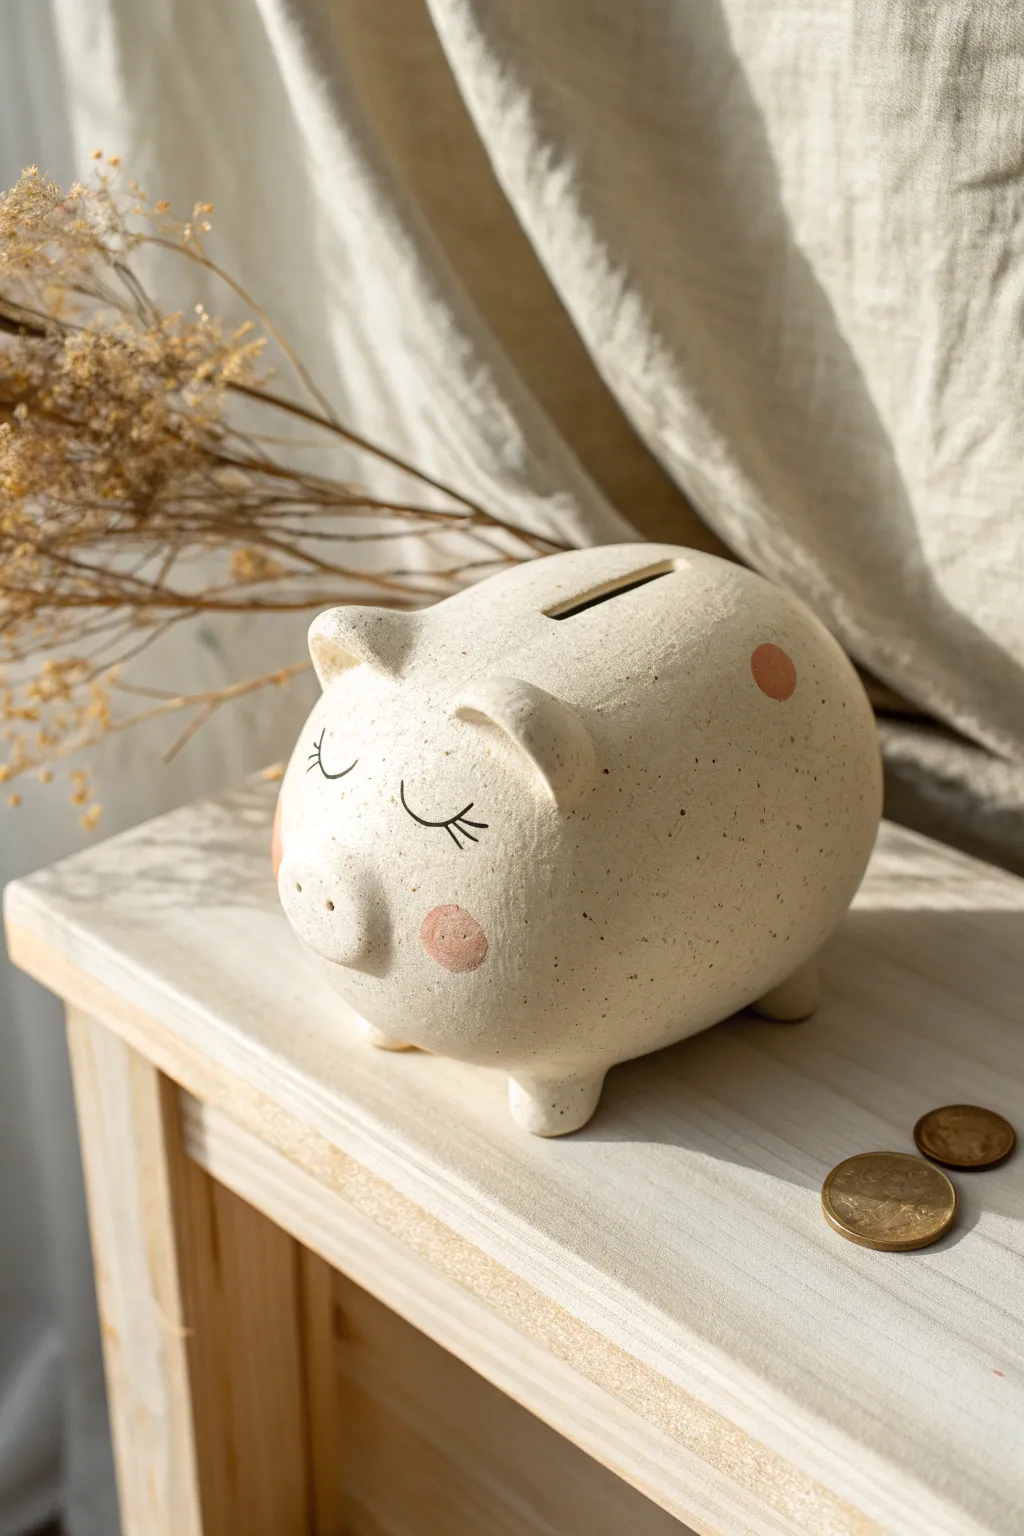
This adorable project transforms simple clay into a charming, speckled piggy bank that looks like boutique ceramic ware. With its peaceful sleeping expression and soft rosy cheeks, it brings a sense of calm to any shelf while helping you save up for your own dreams.
Step-by-Step Tutorial
Materials
- Air-dry clay (white or light cream)
- Clay sculpting tools (or a butter knife and toothpick)
- Small bowl of water
- Acrylic paints (black, soft dusty pink, creamy beige)
- Old toothbrush
- Fine-grit sandpaper
- Fine detail paintbrush
- Rolling pin
- Matte finish sealant spray
Step 1: Shaping the Base
-
Prepare the Body:
Start by taking a large handful of air-dry clay and kneading it until it is smooth and pliable. Form it into a thick, elongated oval shape, similar to a potato, which will serve as the main body of the pig. -
Smooth the Surface:
Dip your fingers lightly in water and run them over the clay body to remove any cracks or fingerprints. You want a very smooth, organic stone-like finish. -
Create the Legs:
Roll four small, equal-sized balls of clay. Gently press these onto the bottom of the body to form stubby legs, blending the clay seams upward into the body so they attached securely. -
Check Stability:
Set the pig down on a flat surface to ensure it stands evenly without wobbling. Gently press down on the back to flatten the bottom of the feet slightly.
Cracking Clay?
If small cracks appear as the clay dries, don’t panic. Mix a small amount of fresh clay with water to create a paste (slip) and fill the cracks, then sand smooth once dry.
Step 2: Adding Features
-
Form the Snout:
Roll a medium-sized ball of clay and flatten it slightly into a disc. Score the back of the disc and the front of the pig’s face with a toothpick to create texture, add a drop of water, and press the snout firmly onto the face. -
Detail the Snout:
Use a rounded tool or the back of a paintbrush to press two small indentations into the snout for nostrils. Blend the edges of the snout into the face slightly for a seamless look. -
Sculpt the Ears:
Shape two small triangles of clay. pinch them slightly to curve them, mimicking a pig’s ear shape. Attach these to the top of the head, blending the clay at the base. -
Cut the Coin Slot:
Using a knife or a flat sculpting tool, careful carve a rectangular slot into the top center of the pig’s back. Wiggle the tool slightly to ensure the opening is wide enough for a thick coin. -
Dry Completely:
Let the sculpture dry for at least 24 to 48 hours. I find it helpful to turn the pig on its side halfway through the drying process to let air reach the bottom. -
Sand for Finish:
Once fully dry and hard, use fine-grit sandpaper to gently buff away any rough bumps or fingerprints, focusing on rounding out the curves.
Step 3: Painting and Decoration
-
Base Coat:
Mix a creamy beige acrylic paint to mimic raw stoneware. Paint the entire pig with two coats, allowing it to dry fully between layers. -
Create the Speckles:
Dilute a tiny amount of black or dark brown paint with water. Dip an old toothbrush into this mixture and run your thumb across the bristles to flick tiny speckles over the entire pig. -
Draw the Eyes:
Using your finest detail brush and black paint, carefully paint two downward-curving semi-circles for closed eyes. Add three small lashes to the outer corner of each eye. -
Paint the Cheeks:
Dip a round sponge or brush into soft dusty pink paint. Dab off most of the excess paint on a paper towel, then gently press a round circle onto the cheek area below the eyes. -
Add Decorative Spots:
Using the same dusty pink color, paint a random organic circle or two on the pig’s rear or back to add visual interest. -
Seal the Project:
Finish by spraying the entire piggy bank with a matte sealant. This protects the paint and gives it that authentic, non-glossy ceramic texture.
Natural Texture
For an even more realistic stone look, mix a pinch of used coffee grounds or fine sand directly into your white clay before sculpting.
Now you have a serene little friend ready to guard your coins and add a touch of handcrafted warmth to your decor
Flower-Decorated Piggy Bank With Hand-Painted Details

Transform a plain ceramic bank into a charming keepsake featuring delicate wildflowers and rustic textures. This project combines simple painting techniques with fine-line details to create a piece that feels both handcrafted and elegant.
Step-by-Step Guide
Materials
- Unfinished ceramic or bisque piggy bank
- Acrylic craft paints (creamy white, sage green, forest green, muted pink, ochre yellow)
- Medium flat paintbrush
- Fine liner brush (size 0 or 00)
- Black fine-tip acrylic paint pen or permanent marker
- Matte finish sealant spray or varnish
- Water cup and paper towels
- HB pencil with eraser
Step 1: Preparation & Base Coat
-
Clean the surface:
Wipe down your piggy bank with a slightly damp cloth to remove any dust or oils from the surface. Let it dry completely. -
Mix the base color:
Mix a small amount of warm white acrylic paint with just a drop of beige or gray to get an ‘antique white’ shade. Pure white can look too stark for this rustic style. -
Apply the first coat:
Using your medium flat brush, apply the base color all over the pig. Don’t worry about making it perfectly smooth; visible brushstrokes add to the textured, handmade look visible in the photo. -
Add texture:
While the first coat is still slightly tacky, dab your brush gently to create subtle ridges, mimicking a rough clay texture. -
Second coat:
Once dry, apply a second coat if the original ceramic color is showing through. Let this layer dry fully for at least an hour.
Oops, Smudged Line!
If your pen smudges on the paint, dip a Q-tip in a tiny bit of water (or rubbing alcohol for stubborn ink) and gently lift it off. Repaint the base white patch if needed.
Step 2: Sketching the Design
-
Plan placement:
Identify the side of the pig where you’l position the main bouquet. The design should curve slightly with the pig’s rounded belly. -
Lightly sketch stems:
Use your pencil to draw very faint guiding lines for three to four main stems rising from the bottom edge near the leg. -
Mark geometric shapes:
Sketch small circles where flower heads will go and simple leaf shapes along the stems. Keep pencil lines light so they don’t show through the paint.
Make It Personal
Add a name or a saving goal (like “Adventure Fund”) in cursive script on the opposite side using the fine liner brush and black paint.
Step 3: Painting the Florals
-
Paint main leaves:
Load your fine liner brush with sage green. Paint the larger leaves first, using a single stroke starting from the stem and lifting pressure as you reach the leaf tip. -
Layer darker stems:
Mix a tiny bit of forest green into your sage. Use this darker shade to paint the thin, connecting stems for contrast against the pale background. -
Create pink blooms:
For the pink flowers, dilute your muted pink paint slightly. Paint simple petal shapes, leaving some transparency so they look like watercolor. -
Add yellow accents:
Using ochre yellow, dap small clusters of dots or tiny strokes to create the yellow wildflower heads. These don’t need to be precise; organic shapes work best. -
Ghost leaves:
I like to mix a very pale, watery brown-grey and paint a few ‘background’ leaves or fern fronds behind the main flowers for depth.
Step 4: Inking & Finishing Details
-
Outline with pen:
Once the paint is 100% dry, use your black fine-tip pen to draw thin outlines around the major leaves and stems. Keep the line shaky and organic rather than rigid. -
Add stem veins:
Draw delicate central veins down the middle of the green leaves and fine lines inside the flower petals to define them. -
Paint the face:
Using black paint or your pen, add two small solid dots for eyes and two tiny dots on the snout for nostrils. Keep them small for a cute, minimalist expression. -
Add blush:
Dry brush a minuscule amount of pink paint on the cheeks, right below the eyes, for a faint rosy glow. -
Clear any marks:
Check for any visible pencil lines that weren’t covered by paint and gently erase them. -
Seal the project:
Spray the entire bank with a matte sealant. This protects your artwork from chipping when coins are dropped in later.
Now you have a piece of functional decor that makes saving money look beautiful
Farmhouse Rustic Piggy Bank With Natural Clay Texture
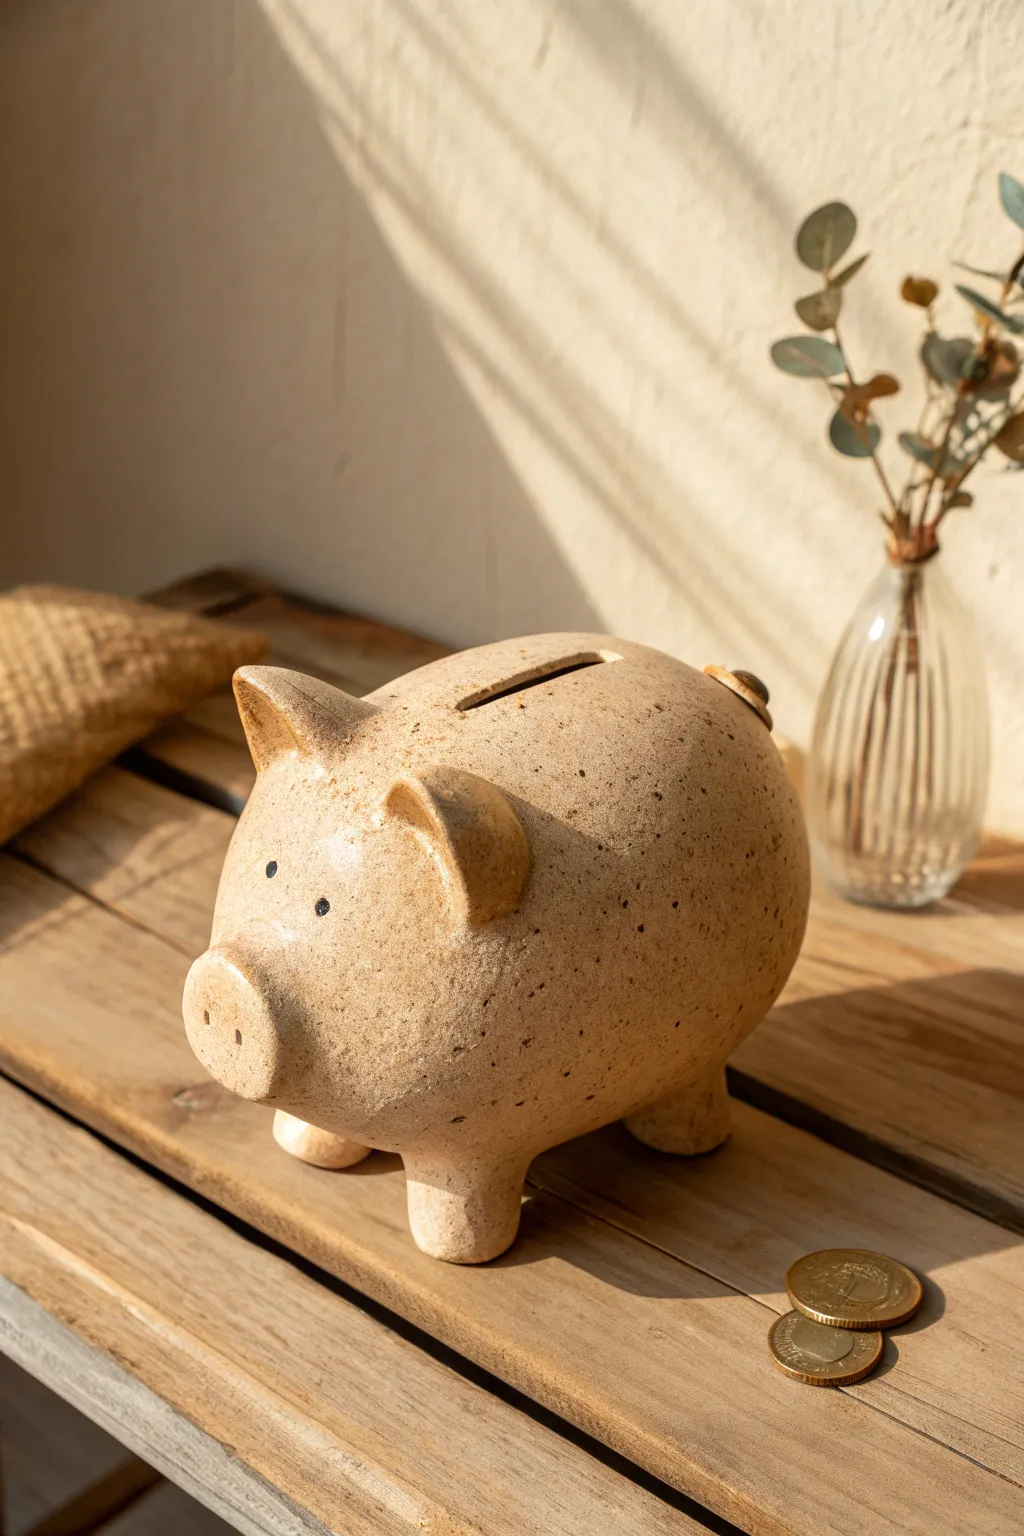
Capture the charm of farmhouse decor with this rustic piggy bank project, featuring a natural, speckled clay finish that feels both timeless and grounded. This piece skips the glossy glazes for a raw, earthy texture that looks perfect on any wooden shelf.
Detailed Instructions
Materials
- Speckled buff stoneware clay (or similar mid-fire clay)
- Pottery wheel (optional) or rolling pin and flat surface
- Score and slip tool (needle tool or serrated kidney)
- Slip (clay mixed with water)
- Wooden modeling tool
- Sponge
- Fettling knife
- Black underglaze
- Small detail brush
- Clear matte glaze (optional, for interior only)
Step 1: Forming the Body
-
Create the main vessel:
Start by forming the main body of the pig. You can either throw a closed form on the wheel that resembles a large egg, or use hand-building techniques. If hand-building, create two pinch pots of equal size. -
Join the halves:
If using the pinch pot method, score the rims of both pots aggressively and apply a generous amount of slip. Press the two halves together firmly to create a hollow sphere or oval. -
Smooth the seam:
With a wooden tool or your thumb, drag clay across the seam to seal it completely. Smooth the area with a damp sponge until the join is invisible and the shape is a continuous oval. -
Shape the snout:
Gently tap one end of the oval against your work surface to flatten it slightly for the snout area. Roll a small coil of clay, form it into a ring, and attach it to this flattened area using the score and slip method. -
Add nostrils:
Use the back end of a small paintbrush or a wooden tool to press two indentations into the snout ring to create nostrils.
Air Trap Warning
Since you are making a closed hollow form, you MUST punch a tiny hole (needle sized) somewhere inconspicuous if you aren’t cutting the coin slot immediately, or the air pressure will cause it to explode.
Step 2: Adding Features
-
Make the legs:
Roll out four short, thick coils of clay for the legs. They should be stout enough to support the weight of the body. Tap the bottoms flat so the pig will stand stably. -
Attach the legs:
Position the legs on the underside of the body. Mark the spots, score both the body and the leg tops, apply slip, and press them on. Smooth the clay from the legs onto the body for a seamless transition. -
Form the ears:
Cut two small triangles from a slab of clay or shape them by hand. Gently curve them to give them a natural, perky look. -
Attach the ears:
Score and slip the ears onto the upper front section of the head, just behind where the eyes will go. I like to blend the back of the ear into the body while leaving the front distinct. -
Create the tail:
Roll a very thin ‘snake’ of clay. Curl it into a pigtail spiral and attach it to the rear of the pig. -
Cut the coin slot:
Allow the clay to stiffen slightly to a leather-hard state. Use a fettling knife to carefully cut a rectangular slot in the top. Smooth the raw edges with a damp sponge or finger. -
Add a cork hole (optional):
If you want the bank to be reusable without breaking, cut a circular hole in the belly sized to fit a standard rubber or cork stopper.
Step 3: Finishing Touches
-
Refine the surface:
Once the piece is leather hard, use a slightly damp sponge to wipe down the entire surface. This exposes the natural grog or sand in the clay, enhancing that speckled texture seen in the photo. -
Paint the eyes:
Dip a small detail brush into black underglaze. Dot two small, simple eyes onto the face. Keep them minimalistic to match the rustic style. -
Bisque fire:
Let the pig dry slowly and completely (cover loosely with plastic for a day or two first) to prevent cracking. Fire it in a kiln to bisque temperature (usually cone 04). -
Glaze (or don’t):
To achieve the look in the photo, leave the exterior unglazed to show off the raw clay body. If you want it functional for holding coins, pour a clear glaze inside the coin slot and swirl it around to seal the interior. -
Final smooth:
If the exterior feels too rough after firing, you can lightly sand it with high-grit sandpaper to soften the texture without removing the character. -
Final firing:
Fire the piece again to the maturation temperature of your specific clay body (likely cone 5 or 6 for speckled stoneware).
Tail Variation
Make the tail functional! Instead of a separate piece of clay, pull a strip directly from the body clay while it’s wet and curl it for a stronger, more organic connection that won’t snap off.
Enjoy saving your pennies in this charming piece of handmade pottery
Piggy Bank With a Removable Belly Plug for Easy Access
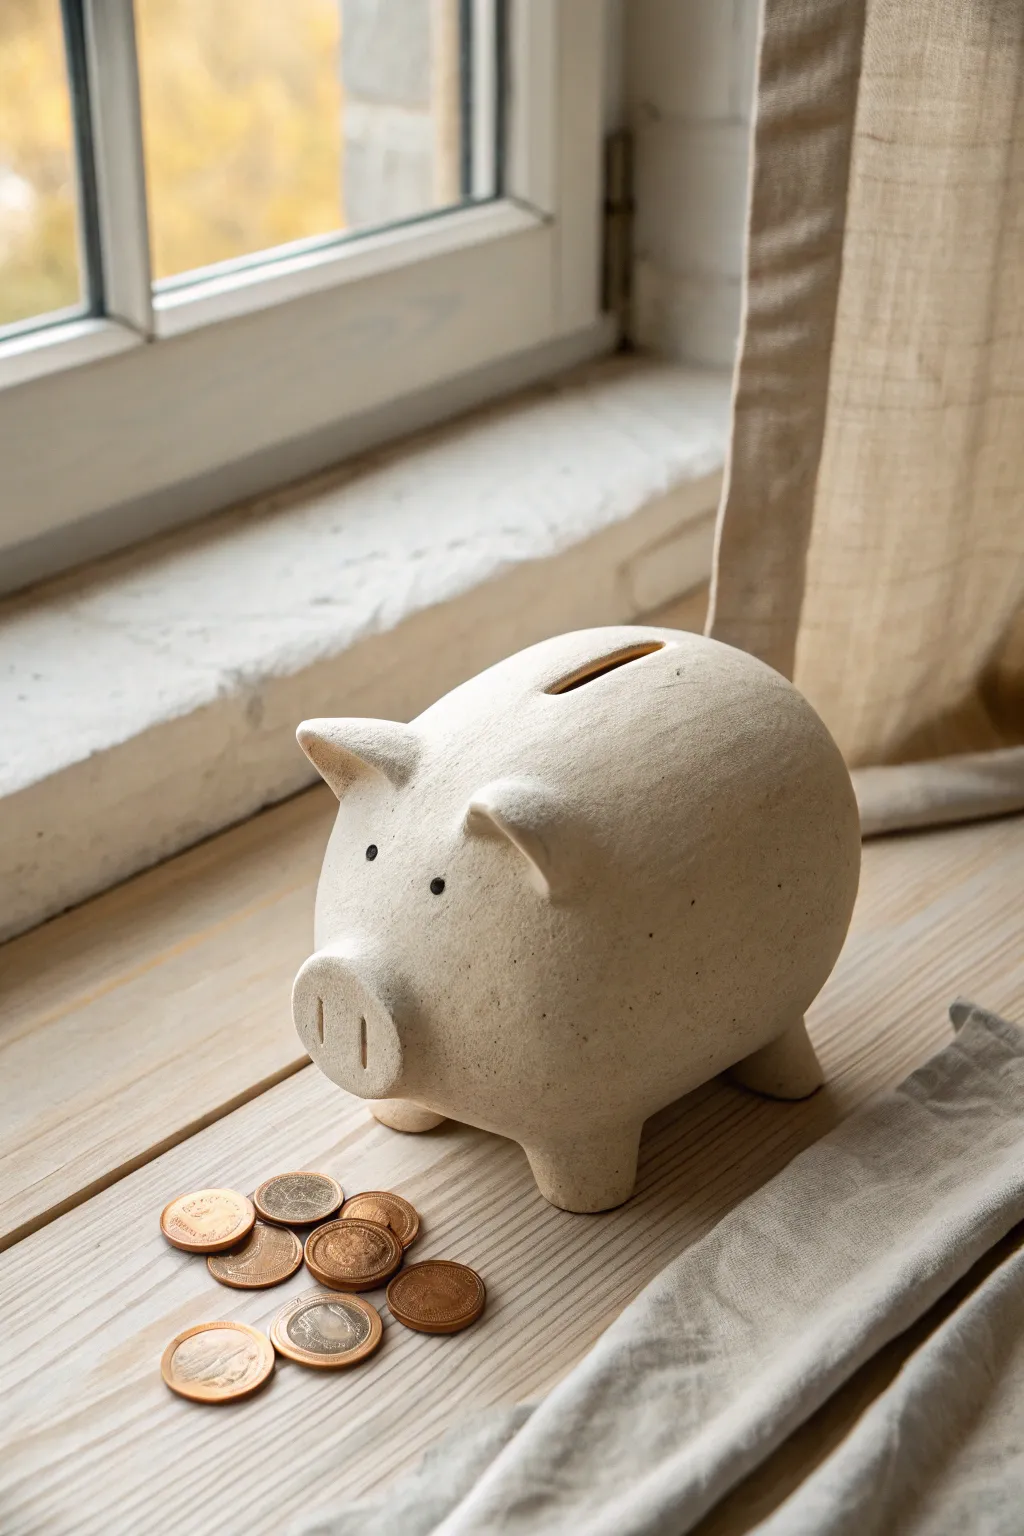
Move away from glossy, brightly colored ceramics with this sophisticated, stone-textured clay bank. Its understated speckled finish and simple silhouette make it a perfect modern accent piece that discreetly holds your loose change.
Step-by-Step Tutorial
Materials
- White stoneware or polymer clay (oven-bake)
- Rubber stopper or cork plug (approx. 1.5 inch diameter)
- Speckled clay additive or black pepper/sand (for texture)
- Pottery tools (needle tool, rib tool, loop tool)
- Rolling pin
- Sponge
- Small paintbrush
- Black acrylic paint
- Matte spray varnish or sealant
- Balloon (optional armature)
Step 1: Forming the Body
-
Prepare the Clay:
Begin by conditioning your white clay until it is pliable and smooth. If you want that natural speckled look shown in the photo, kneading in a tiny pinch of coarse black pepper or specialty clay speckles now will create the faux-stone effect. -
Create the Base Shape:
Form the main body by rolling a large ball of clay. For a hollow bank, I prefer molding the clay around a partially inflated balloon to maintain a perfect oval shape without using too much material. -
Smooth the Surface:
Use a rib tool or your fingers dipped in water to smooth the surface completely. The goal is a uniform, egg-like oval free of fingerprints or lumps. -
Add Legs:
Roll four small, equal-sized cylinders of clay for the legs. Flatten the tops slightly and score the attachment points on both the legs and the body before pressing them firmly onto the underside to ensure the pig stands level.
Sagging Belly?
If the clay sinks while drying, stuff the hollow cavity with crumpled parchment paper or dry tissue through the bottom hole to support the dome shape.
Step 2: Detailing the Features
-
Craft the Snout:
Roll a small disk of clay and attach it to the front of the body. Blend the edges into the face using a modeling tool so it looks seamless, rather than just stuck on. -
Add Nostrils:
Use a small loop tool or the back of a paintbrush to press two vertical indents into the flat front of the snout. They should be simple, clean lines rather than round holes. -
Shape the Ear Triangles:
Cut two small triangles from a flattened sheet of clay. Gently curve them forward to give them a perky, attentive look. -
Attach Ears:
Score and slip the base of the ears, then attach them to the top of the head. Smooth the join line completely with a small tool. -
Cut the Coin Slot:
Use a sharp knife or needle tool to carefully cut a rectangular slot along the spine. Make it slightly wider than your thickest coin to account for any shrinkage during drying or firing. -
Create the Access Hole:
Turn the pig over carefully. Using your rubber stopper as a guide, trace and cut a circular hole in the belly. Test the fit of the stopper—it should be snug but removable.
Step 3: Finishing Touches
-
Refine the Eyes:
For the eyes, simply poke two tiny, shallow holes with a needle tool. You can leave them as indentations or dab a tiny dot of black paint into them later for contrast. -
Final Surface Texture:
Take a barely damp sponge and gently pat the entire surface of the pig. This removes any final tool marks and brings the speckles to the surface, enhancing that stone-like quality. -
Drying or Baking:
If using polymer clay, bake according to package instructions (adding a foil support under the belly helps prevent sagging). If using ceramic clay, allow it to dry slowly under plastic for several days before firing. -
Paint Details:
Once hardened and cooled, use a fine detail brush to paint the tiny eyes black if you didn’t create deep indentations. Keep it minimal. -
Seal the Piece:
Finish with a coat of matte spray varnish. Avoid glossy finishes; the matte look is essential to mimic the raw, organic aesthetic of the original image. -
Insert Stopper:
Pop the rubber stopper or cork into the bottom hole, and your bank is ready to start collecting treasure.
Faux Stone Hack
Don’t have speckled clay? Mix dried tea leaves or coffee grounds into plain white clay. It mimics the mineral texture remarkably well after baking.
Place your new creation on a sunny windowsill and enjoy saving in style
Piggy Bank With a Tiny Crown or Fancy Bow
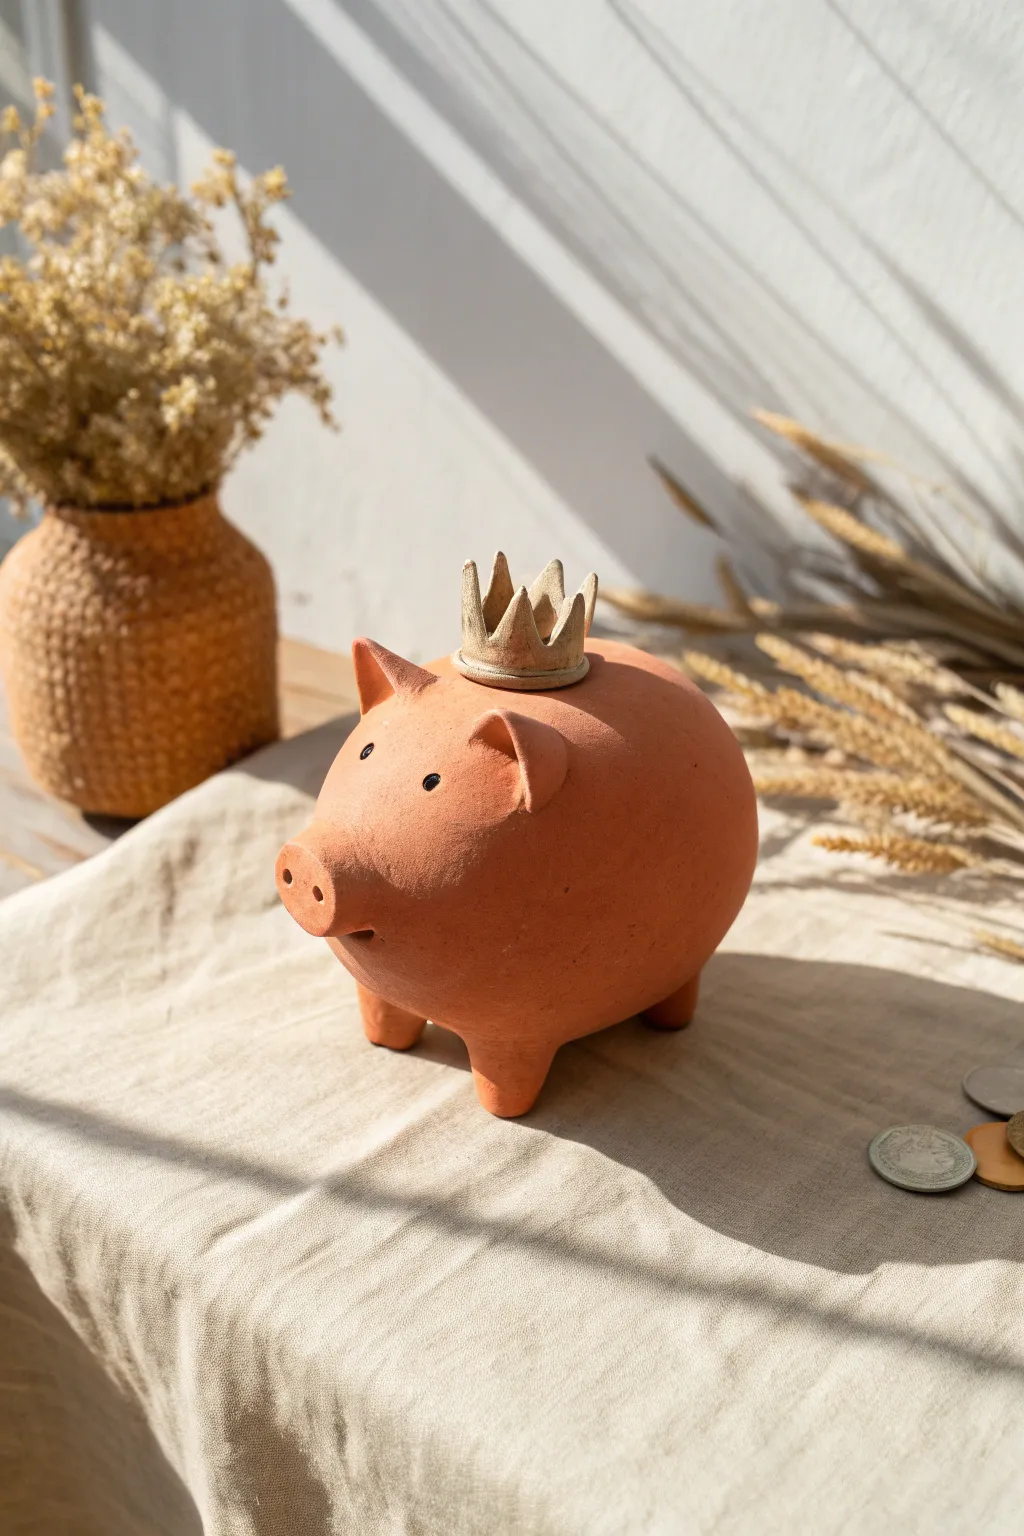
Elevate the humble piggy bank with a touch of royalty by crafting this charming, rustic saver topped with a delicate clay crown. The natural terracotta finish gives it a warm, earthy feel that looks timeless on any shelf.
Detailed Instructions
Materials
- Terracotta air-dry clay or polymer oven-bake clay
- Basic sculpting tools (needle tool, loop tool)
- Small rolling pin
- Water and a small sponge (for smoothing)
- Circular cookie cutter (optional)
- Slip (water mixed with clay bits)
- Matte sealant or varnish
- Coin slot template (cardboard)
Step 1: Forming the Body
-
Prepare the Clay:
Start by kneading a large block of terracotta clay until it is soft and pliable. You want to remove any air bubbles to prevent cracks later. -
Shape the Sphere:
Roll the clay into a large, smooth ball. Gently pat it into an oval shape to mimic the body of a pig, ensuring the surface remains smooth. -
Create the Head Profile:
Using your thumb, press gently into the front section of the oval to distinguish the snout area from the main body, pulling the clay forward slightly. -
Hollow the Interior:
Assuming you are using the pinch pot method for a lighter bank, cut the oval in half, hollow out the insides leaving 1/2 inch walls, score and slip the edges, and rejoin them securely. Smoothing the seam is crucial here. -
Add Legs:
Roll four small, equal-sized cylinders of clay. Attach these to the bottom of the body using the score-and-slip technique (scratching both surfaces and adding water/clay mix). -
Level Step:
Place the pig on a flat surface and press down gently to flatten the bottom of the feet, ensuring it stands level and doesn’t wobble.
Step 2: Sculpting the Features
-
Define the Snout:
Flatten the front of the face slightly. Use a small ball tool or the end of a paintbrush to create two distinct nostril indentations. -
Shape the Ears:
Form two small triangles of clay. Gently curve them forward and attach them to the top of the head using slip. Blend the seams downward into the head so they look like one continuous piece. -
Create the Eyes:
Use a small needle tool to poke two small holes for eyes. You can leave them as indentations or insert tiny black beads if using polymer clay; for air dry, we will paint them later. -
Cut the Coin Slot:
While the clay is still leather-hard (firm but workable), use your cardboard template to mark a rectangular slot on the pig’s back. Carefully cut it out with a fettling knife.
Crack Fixer
If hairline cracks appear while drying, mix a small amount of clay with vinegar to create a paste. Fill the cracks, smooth over, and let dry again.
Step 3: The Crown Jewel
-
Roll the Crown Band:
Roll out a small, thin strip of clay. I find it easiest to trim this into a neat rectangle about 3 inches long and 0.5 inches tall. -
Cut the Points:
Use a sharp craft knife to cut a zigzag pattern along the top edge of your strip to create the crown’s points. -
Form the Circle:
Curl the strip into a circle, overlapping the ends slightly. Score and slip the connection point to seal the ring. -
Attach to Head:
Place the crown centered on the pig’s head behind the ears. Score the contact area deeply and attach firmly with slip, using a tool to blend the bottom edge of the crown onto the head. -
Final Smoothing:
Dip a sponge in water and gently wipe down the entire piece to remove fingerprints and harsh tool marks.
Royal Glamour
Paint the crown with liquid gold leaf or metallic gold paint after the sealing step for a flashy contrast against the matte terracotta.
Step 4: Finishing Touches
-
Drying Time:
Let the pig dry slowly away from direct sunlight for 24-48 hours. If creating a hole in the belly for coin retrieval, crave this out carefully once the clay is firm enough to hold its shape upside down. -
Detailing the Eyes:
Once fully dry (and fired/baked if necessary), use a tiny drop of black acrylic paint inside the eye indentations to bring the face to life. -
Protective Coat:
Apply a clear matte varnish over the entire piggy bank to seal the porous clay and protect the surface from dust.
Your little royal pig is now ready to guard your savings with noble pride
Surprise-Shape Piggy Bank That Still Reads as a Pig
This charming project reimagines the classic piggy bank with a sleek, minimalist silhouette and a natural speckled stoneware finish. By focusing on simple geometric forms—a round, uninterrupted body and tiny button nose—you create a modern piece that still captures the playful essence of a pig.
How-To Guide
Materials
- Speckled stoneware clay (mid-fire)
- Polymer rib tool (flexible)
- Pin tool or needle tool
- Fettling knife
- Scoring tool (or serrated kidney)
- Slip (clay mixed with water)
- Small sponge
- Black underglaze
- Small detail paintbrush
- Clear transparent glaze (cone 5-6)
- Balloon (standard party size)
- Cardboard or wooden paddle
Step 1: Forming the Body
-
Prepare the core:
Inflate a standard balloon to your desired size (around 6-8 inches diameter) and knot it tightly. This will act as the temporary support for your hollow form. -
Roll out slabs:
Roll your speckled clay into a large slab, aiming for a consistent thickness of about 1/4 inch. If the slab is too thin, the pot might collapse; too thick, and it will be heavy. -
Wrap the balloon:
Gently drape the clay slab over the balloon. You may need to cut darts (triangular wedges) out of the clay to get it to conform to the round shape without overlapping too much. -
Seal the seams:
Where the clay edges meet, score and slip the joints thoroughly. Use your fingers or a wooden tool to blend the clay together until the seam is invisible. -
Smooth the surface:
Compress the clay using a flexible polymer rib. This is crucial for strengthening the wall and removing any texture from the rolling pin. I find paddling it gently with a wooden spatula helps round out any flat spots from the draping process. -
Let it firm up:
Allow the clay-covered balloon to rest until it reaches a leather-hard state. The clay needs to be stiff enough to hold its shape without internal support. -
Remove the balloon:
Once leather-hard, pop the balloon with a needle tool and pull the deflated rubber out through a small hole (which we will close up or use for the snout).
Air Trap Warning
Make sure your pig is fully hollow and has an air escape hole (the coin slot works!) before firing. Trapped air pockets will cause the piece to explode in the kiln.
Step 2: Adding Features & Details
-
Create the feet:
Roll four small, identical balls of clay. Flatten the tops slightly to create a wider attachment surface and taper the bottoms just a bit to mimic hooves. -
Attach the legs:
Score and slip the bottom of the body and the tops of your four feet. Press them firmly onto the body, ensuring the pig stands level on a flat surface. -
Form the snout:
Roll a small cylinder of clay for the snout. Attach it to the front face (about mid-height), blend the seams completely for a seamless look, and flatten the front face. -
Indent the nostrils:
Use the back of a small paintbrush or a rounded tool to press two small, cute circular indentations into the snout. -
Sculpt the ears:
Cut two small triangles from a leftover slab. Curve them slightly to give them a natural cup shape and attach them high on the head, pointing slightly forward. -
Carve the coin slot:
Using a fettling knife, carefully cut a rectangular slot in the very top of the back. Use a wet finger or sponge to smooth the sharp edges of the cut so coins slide in easily. -
Create the cork hole:
Flip the pig over and cut a perfect circle in the belly for retrieving money later. Make sure this hole fits the standard rubber or cork stopper you intend to use.
Step 3: Finishing
-
Bisque fire:
Allow the pig to dry completely (bone dry) before firing it in the kiln to cone 04 for the bisque stage. -
Paint the eyes:
Using black underglaze and a fine detail brush, paint two solid black circles for the eyes. Position them fairly wide apart to achieve that distinct cute expression. -
Glaze application:
Dip the entire piece in a clear transparent glaze. This will seal the clay and make the natural speckles pop without obscuring the minimal design. -
Final firing:
Fire the piece again to the maturity temperature of your clay body (usually cone 5 or 6 for stoneware). Ensure the feet are wiped clean of glaze so they don’t stick to the kiln shelf.
Curly Tail Twist
For a bit more character, roll a very thin coil of clay and attach a tiny, tight spiral to the backside before drying. It adds a classic piggy detail.
Once cooled, insert your stopper and find a sunny spot for your new friend to start collecting coins