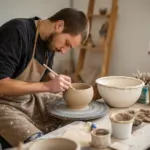
If you’re craving kawaii clay ideas, you’re in the right headspace: small, squishy shapes, sweet little faces, and colors that feel like a dessert menu. These projects are all about keeping it simple and adorable, so you can actually finish a cute batch in an afternoon.
Chibi Cat Heads for Earrings or Keychains
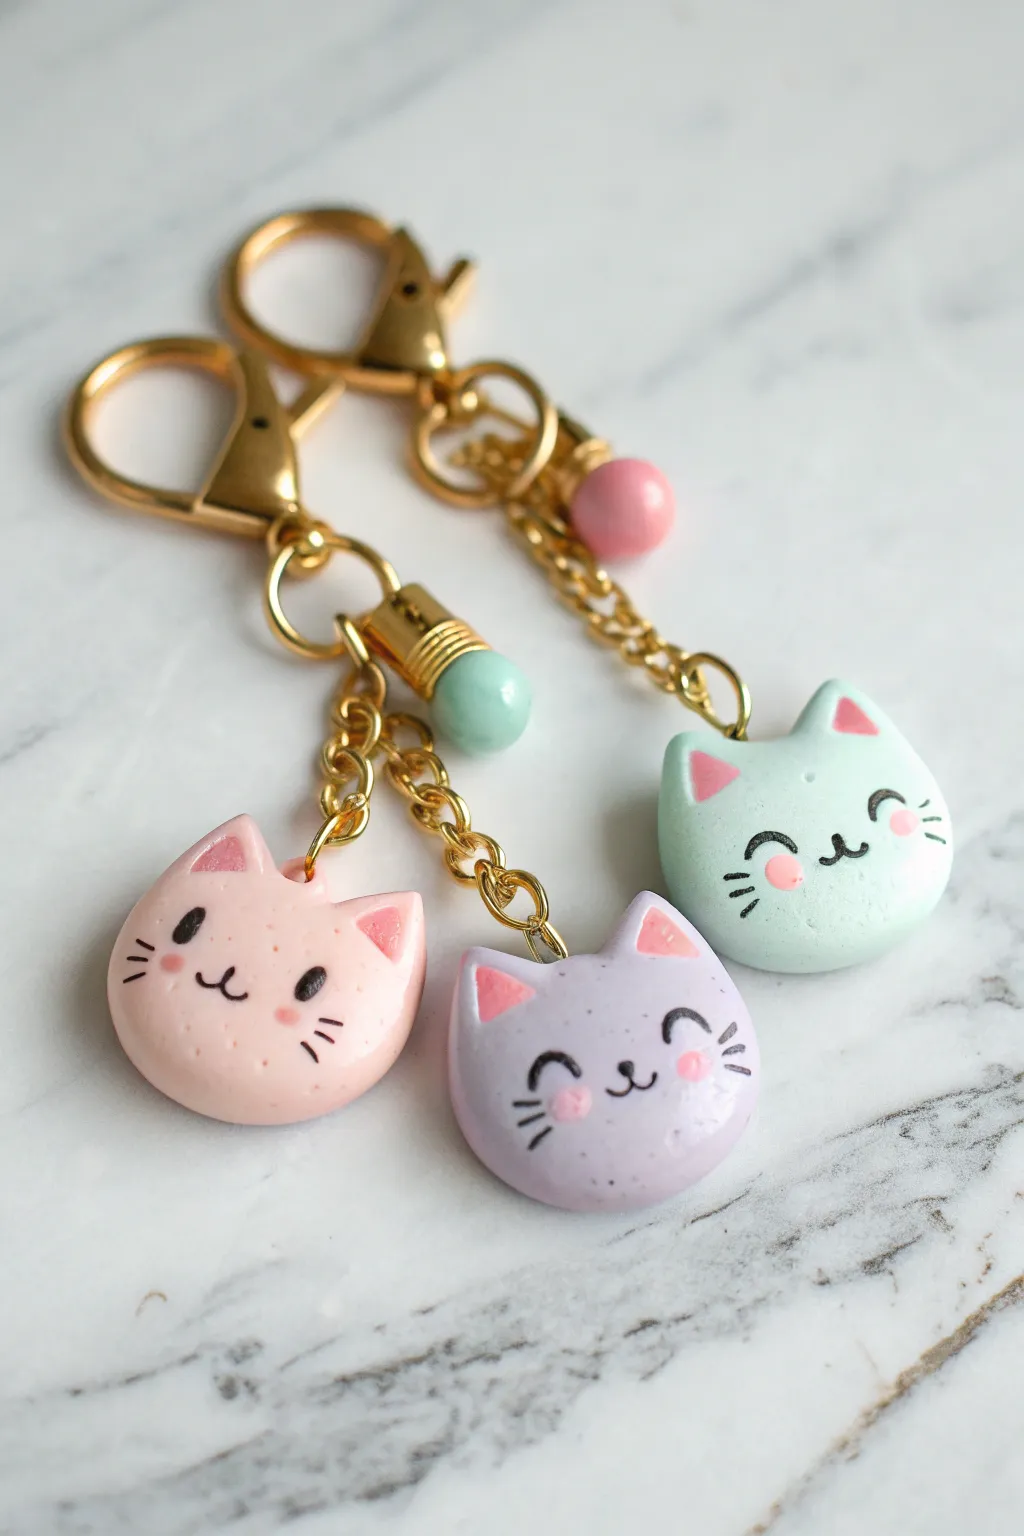
These adorable pastel kitty faces make perfect petite charms for keychains or stitch markers. With their smooth, glossy finish and minimalist kawaii expressions, they add a sweet pop of color to any accessory collection.
Step-by-Step Tutorial
Materials
- Polymer clay (pale pink, lavender, mint green)
- Small amount of darker pink polymer clay
- Gold screw eye pins
- Black acrylic paint
- Fine detail paintbrush or toothpick
- Dotting tool or ball stylus
- UV resin or high-gloss polymer clay glaze
- UV lamp (if using resin)
- Gold keychain hardware (lobster clasps, jump rings, chain)
- Small accent beads or bells (optional)
- Needle nose pliers
- Wet wipes
- Oven for baking
Step 1: Shaping the Base
-
Condition the clay:
Start by kneading your chosen pastel clay colors (pink, lavender, or mint) until they are soft and pliable. This prevents cracks during baking. -
Roll the main sphere:
Pinch off a piece of clay about the size of a large marble (approx 1 inch diameter) and roll it into a very smooth ball between your palms. -
Flatten slightly:
Gently press the ball down against your work surface to flatten it into a thick disc. You want it to look like a slightly squashed macaron shape, rounded on the edges but flat enough to paint on. -
Form the ears:
Take two tiny pinch-sized pieces of the same base color clay. Roll them into balls, then pinch one side to form a triangle shape. -
Attach the ears:
Press the triangles onto the top of your head shape. Use a blending tool or your finger to smooth the seam where the ear meets the head so they become one solid piece. -
Refine the shape:
Check the symmetry of the ears and smooth out any fingerprints. The surface needs to be flawless for that glossy finish later.
Uneven Glaze?
If your resin pulls away from the edges (fisheye effect), the clay might cover by oils. Wipe the baked clay with alcohol before glazing to ensure the resin sticks perfectly flat.
Step 2: Adding Details
-
Add inner ear color:
Take extremely tiny amounts of the darker pink clay. Flatten them into small triangles and press them into the center of each ear. -
Insert hardware:
Screw a small gold eye pin into the top center of the head, between the ears. Twist it gently to secure it deep into the clay. -
Clean and bake:
Wipe the clay gently with a baby wipe or a bit of rubbing alcohol to remove dust. Bake according to your clay package instructions (usually 275°F/130°C for 15-30 minutes). -
Cool down:
Let the charms cool completely before moving to the next step. Painting on warm clay can ruin the acrylics.
Step 3: Painting & Finishing
-
Paint the eyes:
Using a very fine brush and black acrylic paint, add the eyes. You can do two solid ovals for open eyes, or two small upward arches for a happy squint. -
Add mouth and whiskers:
Paint a tiny ‘w’ shape for the mouth in the center. Add two or three short, horizontal whiskers on each cheek. -
Blush the cheeks:
Using a dotting tool, apply two small circles of pink paint (or mix red and white) right under the eyes for rosy cheeks. Let the paint dry completely. -
Apply glaze:
Coat the front and sides of the charm with UV resin. I like to use a toothpick to drag the resin to the very edges without overflowing. -
Cure the finish:
Place under a UV lamp for 2-3 minutes until hard and glassy. If using regular glaze, apply a thick coat and let it air dry for 24 hours. -
Assemble the keychain:
Use pliers to open a jump ring. Attach your cat charm to a gold chain and lobster clasp. Add a small matching accent bead for extra cuteness before closing the ring.
Whisker Wisdom
Drawing whiskers is tricky! Instead of paint, try using a fine-tip permanent archival ink pen. It gives you way more control than a brush on such a tiny curved surface.
Now you have a set of sweet, shiny cat charms ready to gift or keep


Squishy Dumpling Animals (The Ultimate Kawaii Shape)
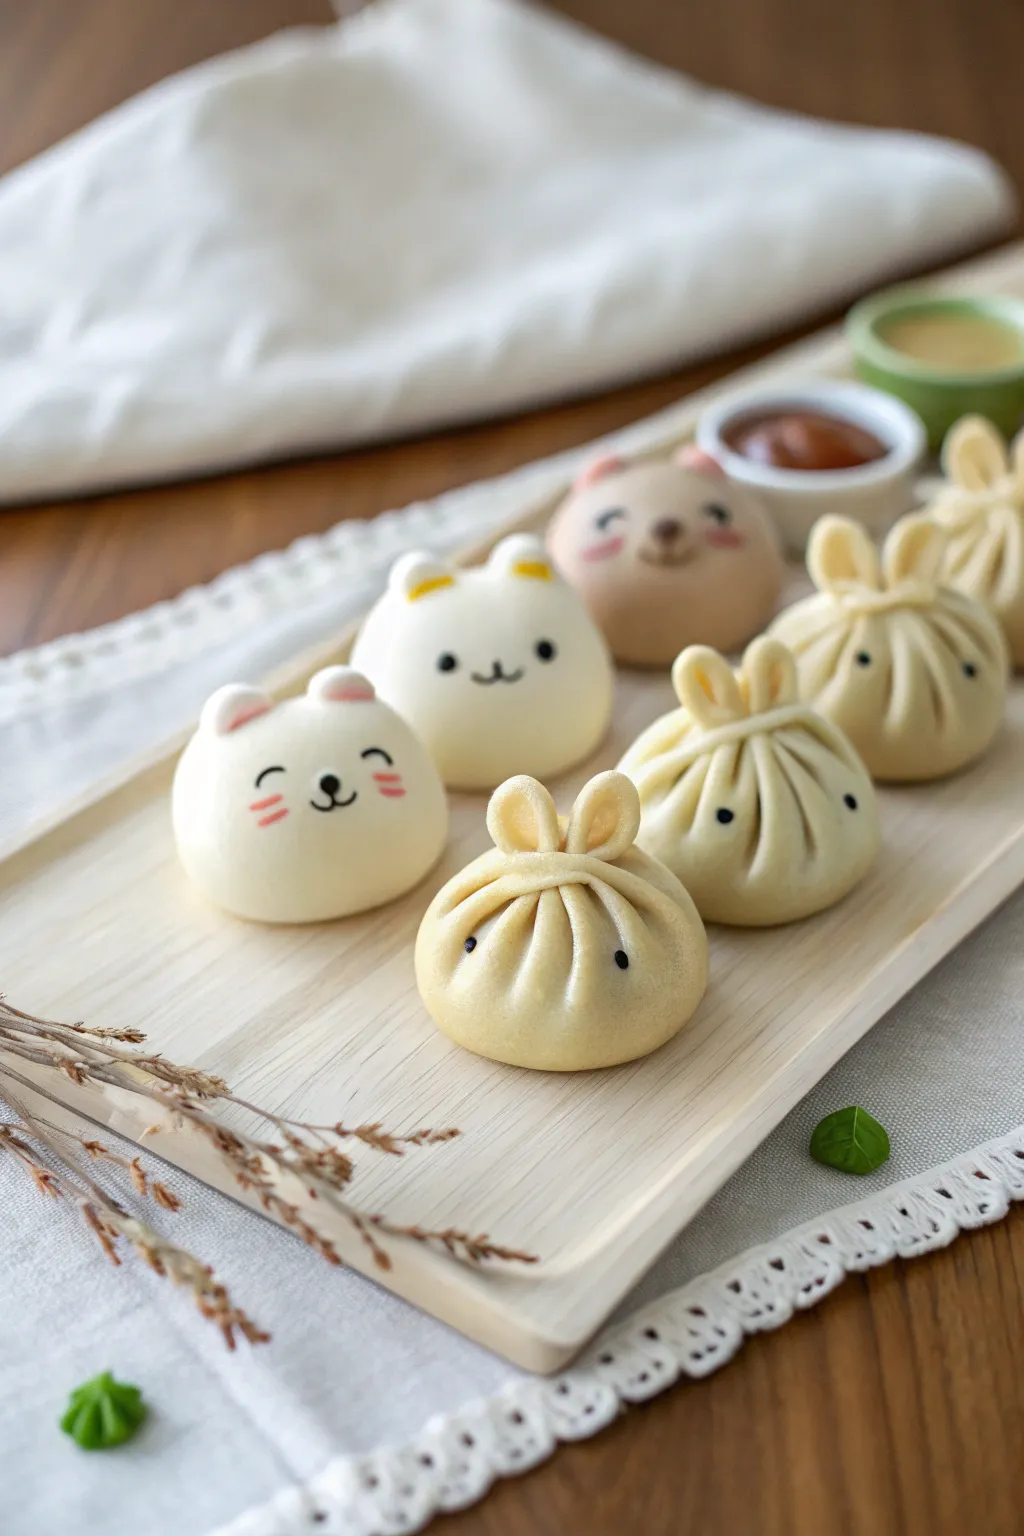
Transform simple clay balls into an adorable spread of steamed buns and dumplings that look good enough to eat. This project focuses on mastering smooth textures and sweet minimalist faces to create a set of kawaii characters.
How-To Guide
Materials
- Air-dry clay (white, beige, translucent)
- Acrylic paints (black, pink, brown, yellow)
- Fine detail paintbrush (00 or 000 size)
- Ball stylus tool
- Clay knife or plastic blade
- Soft pastel chalks (pink, light brown)
- Matte varnish or sealant
- Small rolling pin
Step 1: Shaping the Animal Buns
-
Prepare the Base Clay:
Start by conditioning your white air-dry clay. Knead it until it is completely smooth and free of cracks. For the tan bear bun, mix a tiny dot of brown acrylic paint into a portion of white clay. -
Form the Bun Sphere:
Roll the clay into perfect spheres about 1.5 inches in diameter. Gently press the bottom against your work surface to flatten it slightly so the bun sits stable. -
Add Ears:
Pinch off two tiny balls of clay for ears. For the white cat/bear, flatten them slightly into rounded triangles. Attach them near the top of the head using a touch of water to bond the clay. -
Smooth the Seams:
Use a silicone tool or your finger dipped in water to smooth the connection point of the ears so they look like a single molded piece. -
Create Inner Ear Details:
For the yellow-eared bun, roll tiny crescents of yellow clay (or paint later) and press them onto the front of the ears. For the pink ears, use a small dab of pink clay or shade with pastel chalk.
Step 2: Crafting the Pleated Bunny Dumplings
-
Mix the Dough Color:
To achieve that realistic dumpling dough look, mix white clay with a small amount of translucent clay and a tiny speck of yellow ochre paint. It should look off-white and slightly creamy. -
Shape the Base:
Roll a sphere similar in size to your animal buns. This will be the filling area. -
Create the Pleats:
Using your clay knife or a thin modeling tool, gently press indentations starting from the bottom third and curving up toward the top center. I find it easiest to rotate the dumpling while making these marks to keep them even. -
Pinch the Top Knot:
Gently pinch the clay at the very top where your pleat lines meet to create the sealed knot of the dumpling. -
Form Long Bunny Ears:
Roll two elongated teardrop shapes from the same off-white clay. These should be longer than the bear ears. -
Attach and Pose:
Attach the ears to the sides of the top knot. Bend them slightly so they look relaxed and organic, rather than stiffly upright.
Cracks Appearing?
If you see hairline cracks while drying, apply a ‘slurry’ made of clay mixed with water into the crack. Smooth over with a damp finger and let dry again.
Step 3: Bringing Them to Life
-
Dry Completely:
Let all your creations dry for at least 24 hours. They must be completely hard before painting to prevent the ink from bleeding. -
Add Blushed Cheeks:
Before painting eyes, use a soft brush to apply pink pastel chalk powder to the cheek areas. This creates a soft, airbrushed look that paint can’t replicate. -
Paint the Faces:
Using your finest brush and black acrylic paint, add the faces. Keep the eyes wide-set and level with the nose for maximum cuteness. -
Detailing:
Paint tiny pink whisker lines on the white bunny, or a brown nose on the tan bear. Keep strokes light and confident. -
Seal the Finish:
Coat the figures with a matte varnish. Avoid glossy finishes, as you want these to look like soft, steamed dough.
Steamer Basket Display
Make a miniature bamboo steamer using thin strips of cardboard painted light brown. Line it with a circle of white textured paper to mimic cheesecloth.
Arrange your completed menagerie on a wooden tray for a delightful display that never goes stale


Kawaii Frogs With Blush Cheeks
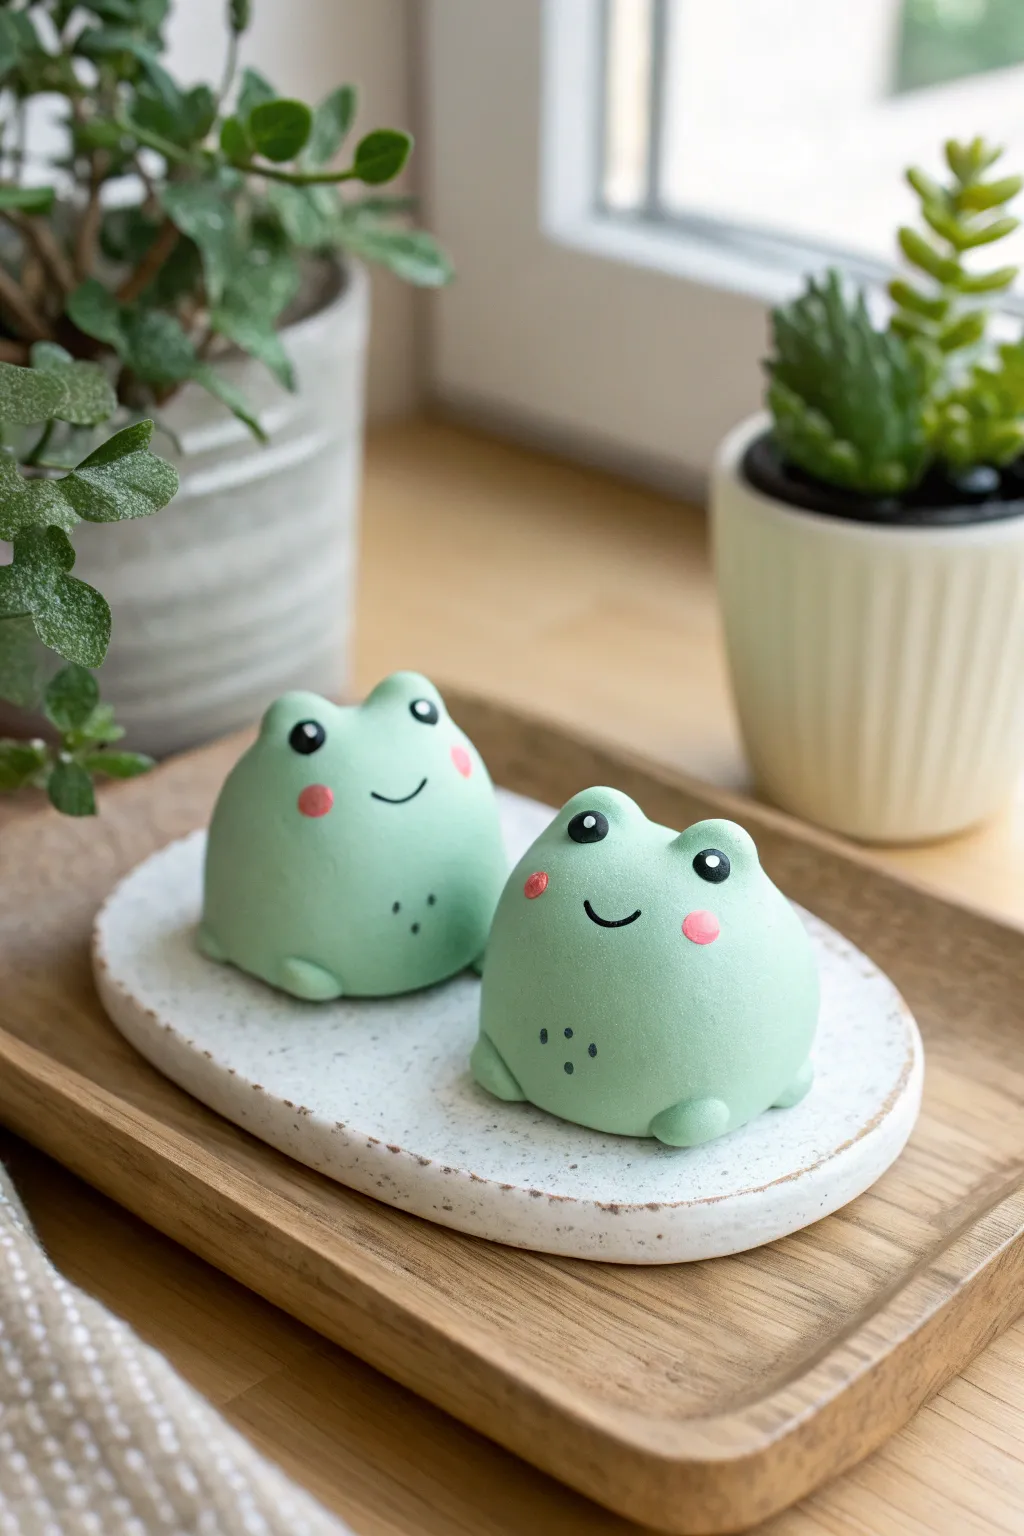
These delightfully chubby frogs are the epitome of kawaii with their simple, rounded shapes and sweet expressions. Sitting perfectly on a desk or shelf, their smooth mint-green finish and rosy cheeks give them a friendly, approachable character that brightens any corner.
Step-by-Step
Materials
- Light mint green polymer clay (or white clay mixed with a touch of green and yellow)
- Black polymer clay
- Pink polymer clay (or pink acrylic paint)
- Clay sculpting tools (specifically a dotting tool or ball stylus)
- Clean work surface (ceramic tile or glass mat)
- Oven for baking
- Aluminum foil
- Optional: Matte varnish for sealing
- Needle tool
Step 1: Shaping the Body
-
Prepare the clay:
Start by conditioning your mint green clay until it is soft and pliable. If you are mixing your own color, aim for a soft pastel shade by using plenty of white with just a hint of green. -
Form the base sphere:
Roll a portion of the conditioned clay into a smooth ball about the size of a golf ball or slightly smaller. Ensure there are no cracks or air bubbles. -
Create the dome shape:
Gently press the ball onto your work surface to flatten the bottom. Use the palm of your hand to smooth the top into a rounded, dome-like mound. It should look like a soft gumdrop. -
Add the feet:
Take two tiny pinch-sized pieces of mint green clay and roll them into balls. Slightly flatten them and press them firmly against the bottom front edge of the body to form chubby little feet. -
Smooth the seams:
Use a silicone tool or your finger to gently blend the top of the feet into the body just a little, so they look attached rather than just stuck on.
Uneven Eyes?
If the eyes look lopsided, don’t peel them off, which distorts the head. Instead, gently nudge them into alignment with a silicone tool before pressing them down firmly.
Step 2: Sculpting the Head & Eyes
-
Form the eye ridges:
Pinch off two small, identical balls of mint green clay. Place them on top of the head, spaced slightly apart, to create the raised area where the eyes will sit. -
Blend the ridges:
Carefully smooth the bottom edges of these eye mounds into the main body so there are no visible seams, keeping the top rounded and distinct. -
Indent the eye sockets:
Using a large ball stylus or the rounded end of a tool, press gently into the center of each raised eye mound to create a shallow socket. -
Place the eyes:
Roll two very small balls of black clay. Press them gently into the sockets you just created. Flatten them slightly so they look like buttons. -
Add the highlight:
Take the tiniest speck of white clay (or wait to paint this later) and place it on the upper right side of each black eye for that classic kawaii twinkle.
Make it a Duo
Create a second, slightly smaller frog to sit beside the first. Vary the smile or eye placement slightly to give them distinct personalities.
Step 3: Adding the Details
-
Create the smile:
Use a needle tool or a small clay knife to gently impress a wide, U-shaped smile between the eyes. Press lightly to avoid distorting the face shape. -
Option A: Clay blush:
If using clay for blush, flatten two tiny disks of pink clay until they are paper-thin. Press them onto the cheeks just below the eyes. -
Add chest details:
With a needle tool or a very fine-tipped marker (post-baking), add three tiny dots in a triangle formation on the frog’s belly area for texture. -
Final smoothing:
Check the entire figure for fingerprints. I find that lightly brushing the surface with a tiny bit of baby oil can smooth these out perfectly before baking. -
Bake the frogs:
Place your frogs on a ceramic tile or foil-lined tray. Bake according to your clay package instructions (usually 275°F/135°C for 15-30 minutes depending on thickness). -
Cool down:
Let the frogs cool completely inside the oven with the door slightly ajar to prevent cracking from thermal shock.
Step 4: Finishing Touches
-
Paint details (Optional):
If you didn’t use clay for the blush or highlights, use a small dotting tool and acrylic paint to add the pink cheeks and white eye sparkles now. -
Seal the piece:
Once any paint is dry, apply a thin coat of matte varnish to protect your work and give it a professional, finished look.
Place your new green friends on a coaster or near a plant for immediate cheer


Pastel Rainbow Snails With Swirly Shells
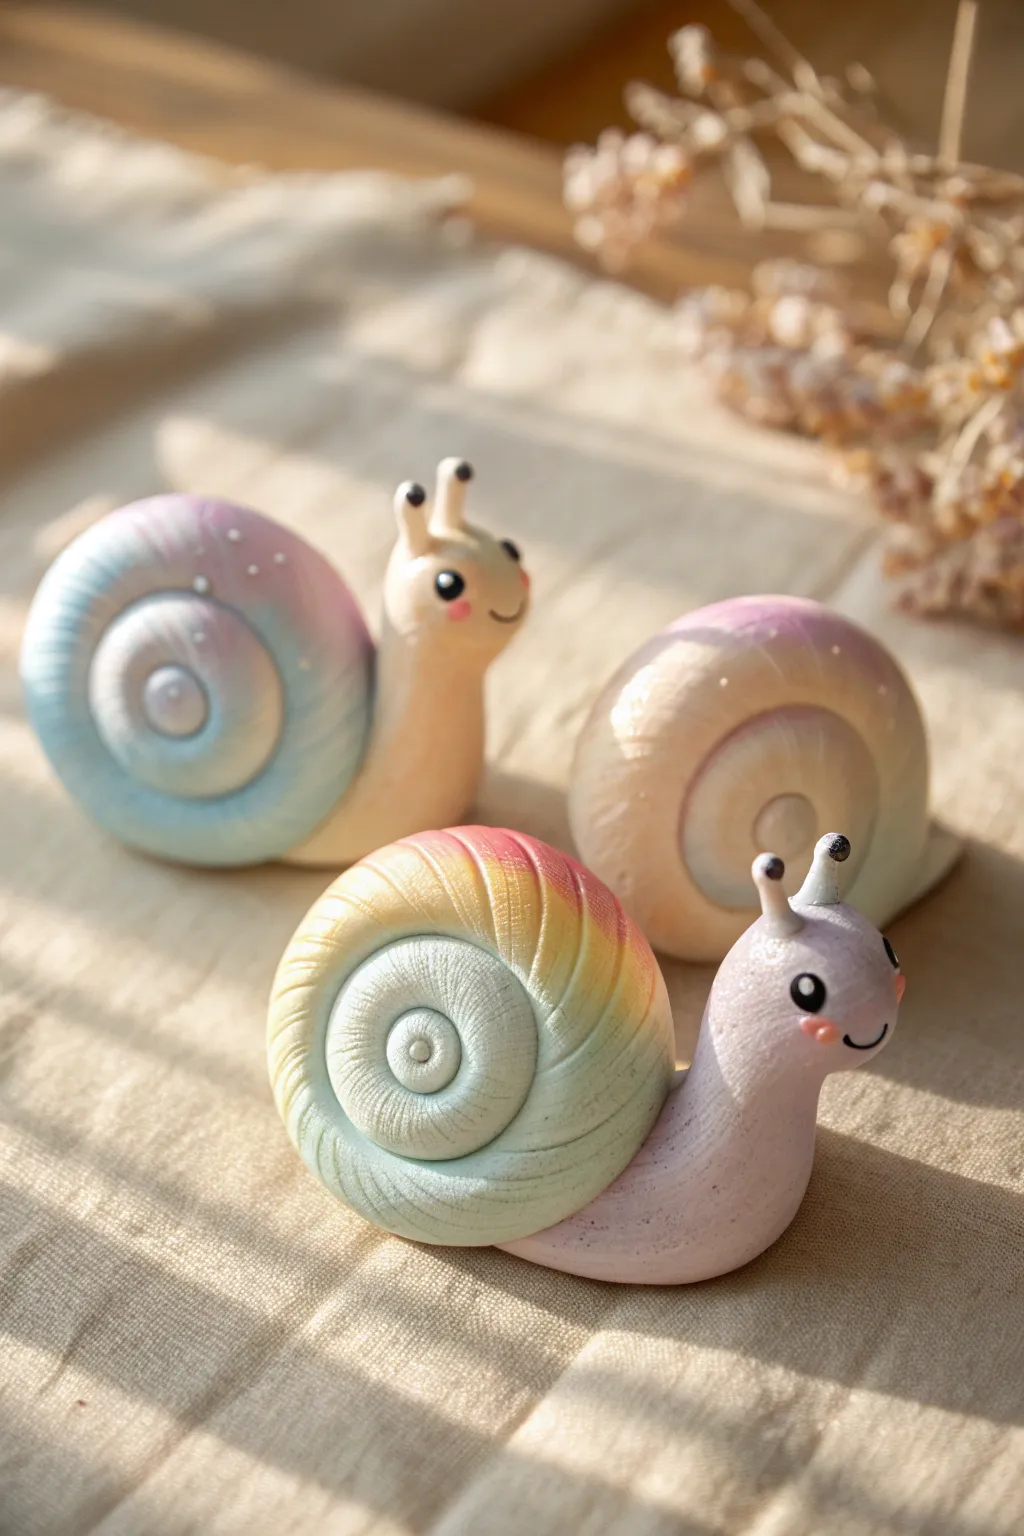
Create a trio of delightful garden companions with these pastel rainbow snails. Featuring soft, blended gradients on their spiral shells and sweet, smiling faces, they are the perfect beginner-friendly project for adding a touch of kawaii magic to your desk.
Step-by-Step Guide
Materials
- Polymer clay (white, pastel pink, baby blue, light yellow, mint green)
- Dotting tools or ball stylus (small and medium sizes)
- Needle tool or toothpick
- Soft pastel chalks (optional, for shading)
- Black acrylic paint or fine-tip marker
- Gloss or matte varnish (optional)
- Clean work surface (ceramic tile or glass)
- Baby wipes (for cleaning hands between colors)
Step 1: Shaping the Rainbow Shells
-
Prepare the Colors:
Start by conditioning your white clay and dividing it into even portions. Mix tiny amounts of your colored clays into the white to create very soft, pale pastel shades of pink, yellow, blue, and mint. -
Create the Gradient Log:
Take three different pastel colors (like yellow, pink, and blue) and roll them into small snakes of equal length. Press them side-by-side. -
Twist and Blend:
Gently twist the three snakes together like a candy cane. Roll this twisted log on your surface to smooth it out, blending the seams while keeping the distinct color separation visible. -
Taper the Coil:
Continue rolling the rainbow log until it is long and thin, about 4-5 inches. Gently apply more pressure to one end to taper it into a point—this will be the center of the shell. -
Roll the Spiral:
Starting from the thin tapered end, tightly roll the clay inward to form a classic snail shell spiral. Keep the rolls snug against each other so there are no gaps. -
Add Texture:
Using a needle tool or a dull knife, gently score shallow lines radiating from the center of the spiral outward to mimic natural shell ridges. I find that subtle scoring adds a lovely organic touch. -
Shape the Outer Edge:
Smooth the thicker, outer end of the roll slightly underneath the shell so it sits flat and looks finished.
Dirty Clay Fix
Pastel clay picks up dust easily. Keep a scrap piece of white clay nearby and roll it in your hands periodically to pull off lint before touching your focal beads.
Step 2: Sculpting the Body and Face
-
Form the Body Base:
Condition a ball of pale beige or light pink clay for the snail’s body. Roll it into a teardrop shape that is thicker at the front (for the head) and tapers to a tail. -
Create the Neck curve:
Gently bend the thicker part of the teardrop upward to create an upright neck and head area. Flatten the bottom slightly so the snail stands stable. -
Attach the Shell:
Press the shell firmly onto the back of the body. You can use a tiny bit of liquid clay or translucent sculpey as ‘glue’ to ensure a strong bond before baking. -
Make Eye Sockets:
Using a small ball tool, press two shallow indentations into the face where the eyes will go. This helps the painted eyes sit better later. -
Sculpt the Stalks:
Roll two very tiny logs of body-colored clay for the eye stalks. Attach them to the top of the head using a dotting tool to blend the seams downward. -
Add the Eyes:
Roll two tiny balls of white clay and place them into the eye sockets you made. Top these with even tinier balls of black clay, or wait to paint them after baking. -
Tiny Details:
Use a needle tool to gently impress a small, curved smile below the eyes. If you like, adhere tiny balls of black clay to the tips of the stalks for extra character.
Step 3: Finishing Touches
-
Soft Blushing:
Scrape a little pink pastel chalk into a powder. Use a soft brush to gently dust rosy cheeks onto the unbaked clay near the smile. -
Bake the Project:
Bake your snails according to your clay package instructions (usually 275°F/135°C for 15-30 minutes). Let them cool completely before handling. -
Paint Highlights:
Using a toothpick and white acrylic paint, add tiny reflection dots to the black part of the eyes to make them look alive and shiny. -
Seal (Optional):
To give the shell a slimy but cute sheen, apply a coat of gloss varnish just to the spiral shell, leaving the body matte for contrast.
Glitter Upgrade
Mix a pinch of fine iridescent mica powder or glitter into the shell clay before rolling. It gives a hidden shimmer that sparkles in sunlight!
Arranging your trio together creates the sweetest little corner of charm

The Complete Guide to Pottery Troubleshooting
Uncover the most common ceramic mistakes—from cracking clay to failed glazes—and learn how to fix them fast.
Mini Toadstool Friends With Little Feet
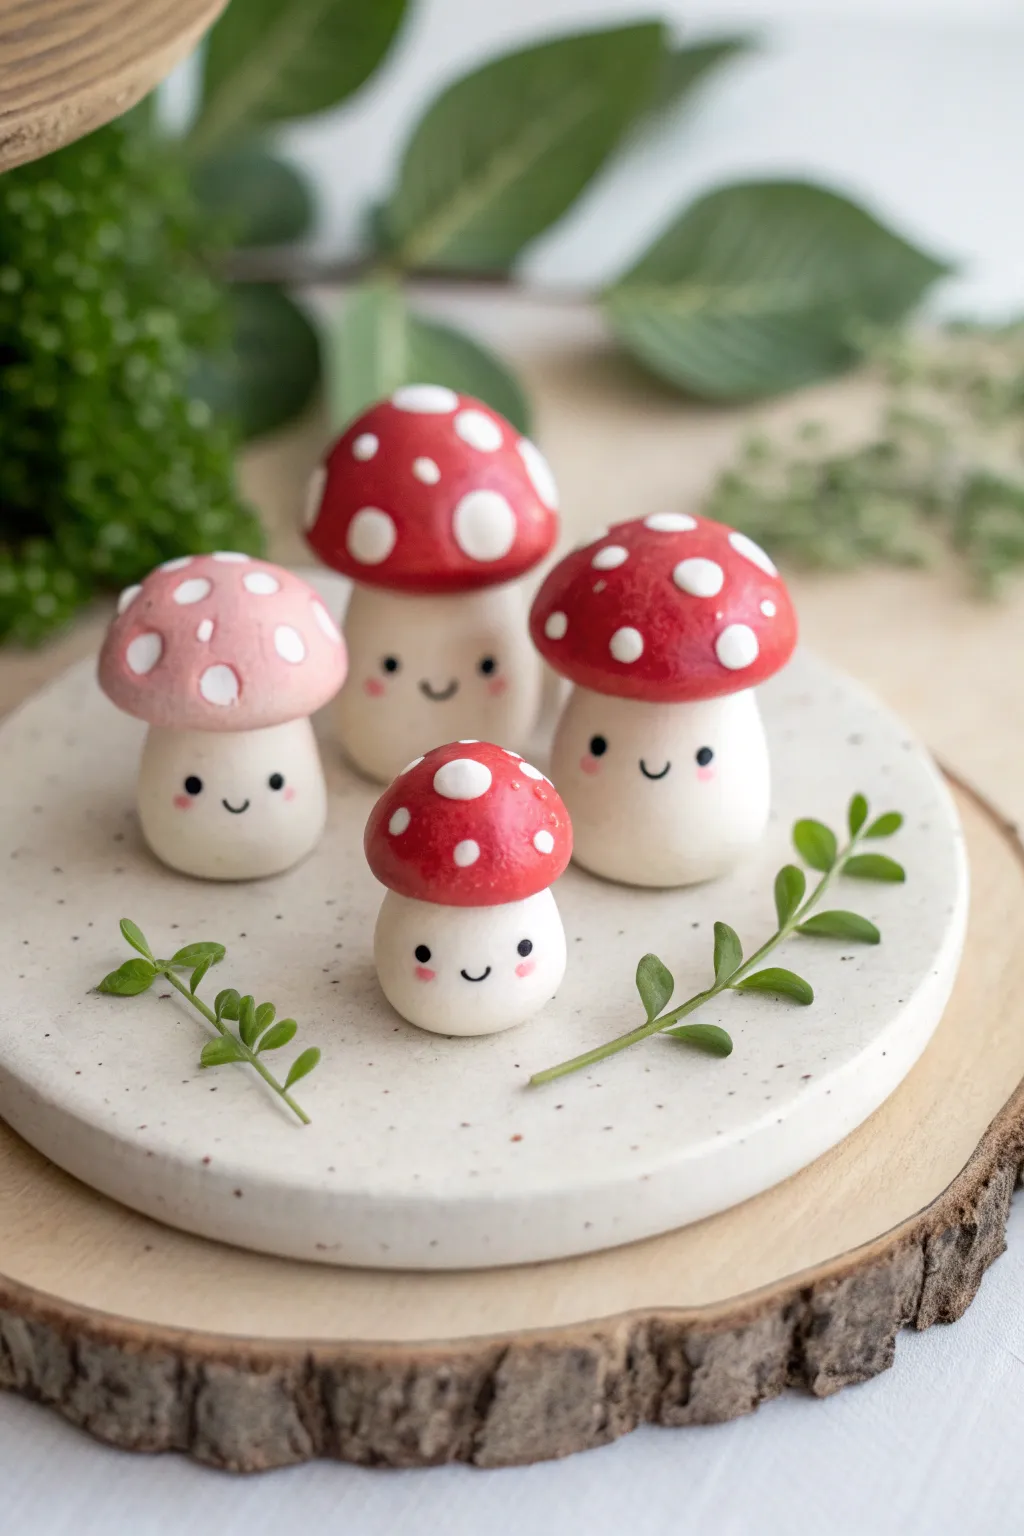
Bring a touch of forest whimsy to your desk with these adorable clay mushroom figurines. Each one features a classic toadstool cap, a sweet smiling face, and a chubby, satisfyingly round little stem.
Step-by-Step
Materials
- Polymer clay (White, Red, Light Pink)
- Acrylic rolling pin
- Pointed sculpting tool or toothpick
- Ball stylus tool (small)
- Black acrylic paint
- Pink chalk pastel or blush
- Small paintbrush (detail size)
- Baking sheet and parchment paper
- Gloss glaze (optional)
Step 1: Shaping the Stems
-
Prepare the Body Clay:
Start by conditioning a chunk of white polymer clay in your hands until it becomes soft and pliable. Roll it into a smooth ball about the size of a large grape for the larger mushrooms, and a smaller pea-sized ball for the baby one. -
Create the Stem Shape:
Gently roll the ball on your work surface, applying slightly more pressure to the top half to create a pear or teardrop shape. You want a wide, stable base that tapers slightly toward the top. -
Flatten the Base:
Tap the bottom of your pear shape onto your table to create a flat surface so the mushroom can stand upright without wobbling. -
Round the Top:
Use your finger to gently flatten the very top point of the stem slightly. This provides a better surface area for the mushroom cap to attach to later. -
Smooth Imperfections:
Check the white clay for any fingerprints or lint. I suggest rubbing the surface very lightly with a drop of baby oil or clay softener to get a porcelain-smooth finish.
Step 2: Crafting the Caps
-
Form the Cap Base:
Take a piece of red clay (or light pink for the variant) and roll it into a ball. Flatten it between your palms or with an acrylic roller until it is a thick disc. -
Dome the Cap:
Place the disc in your cupped palm and gently press the center with your thumb to curve it creating a dome shape. The edges should curl downward slightly. -
Attach Cap to Stem:
Gently press the red dome onto the top of your white stem. Wiggle it slightly to ensure the clay bonds together securely. -
Make the Polka Dots:
Roll tiny, flattened flecks of white clay into very small balls. Varry the sizes slightly for a more organic, natural look. -
Apply the Dots:
Press the tiny white balls onto the red caps randomly. Flatten them flush against the curve of the cap so they don’t look like bumps, but rather like patterns on the mushroom skin.
Uneven Dots?
If your white dots distort when you press them onto the curved cap, try pre-baking the red cap for 5 minutes first, then add raw white clay dots and bake again.
Step 3: Adding Kawaii Details
-
Bake the Figures:
Preheat your oven according to your clay package instructions (usually around 275°F/135°C). Place your mushrooms on parchment paper and bake for about 15-20 minutes. Let them cool completely before painting. -
Paint the Eyes:
Dip a small ball stylus or the handle end of a paintbrush into black acrylic paint. Dot two wide-set eyes onto the white stem. Keep them low on the face for maximum cuteness. -
Draw the Mouth:
Using your finest detail brush or a toothpick, paint a tiny, thin ‘U’ shape between the eyes to create a smile. -
Add Rosy Cheeks:
Scrape a little pink chalk pastel into a powder (or use real blush). Use a dry, soft brush to gently dust pink circles right under the eyes. -
Finish with Glaze:
Once the paint is fully dry, cover the red cap and the painted facial features with a coat of gloss glaze to protect them and give that shiny, ceramic look.
Make it a Charm
Before baking, screw a small eye pin into the center of the mushroom cap. Once baked and cooled, you can attach jump rings to turn these into keychains or earrings.
Arrange your little fungal family on a shelf or glue them to a wooden slice for a complete woodland scene
Bubble Tea Cups With Tiny Straw Details
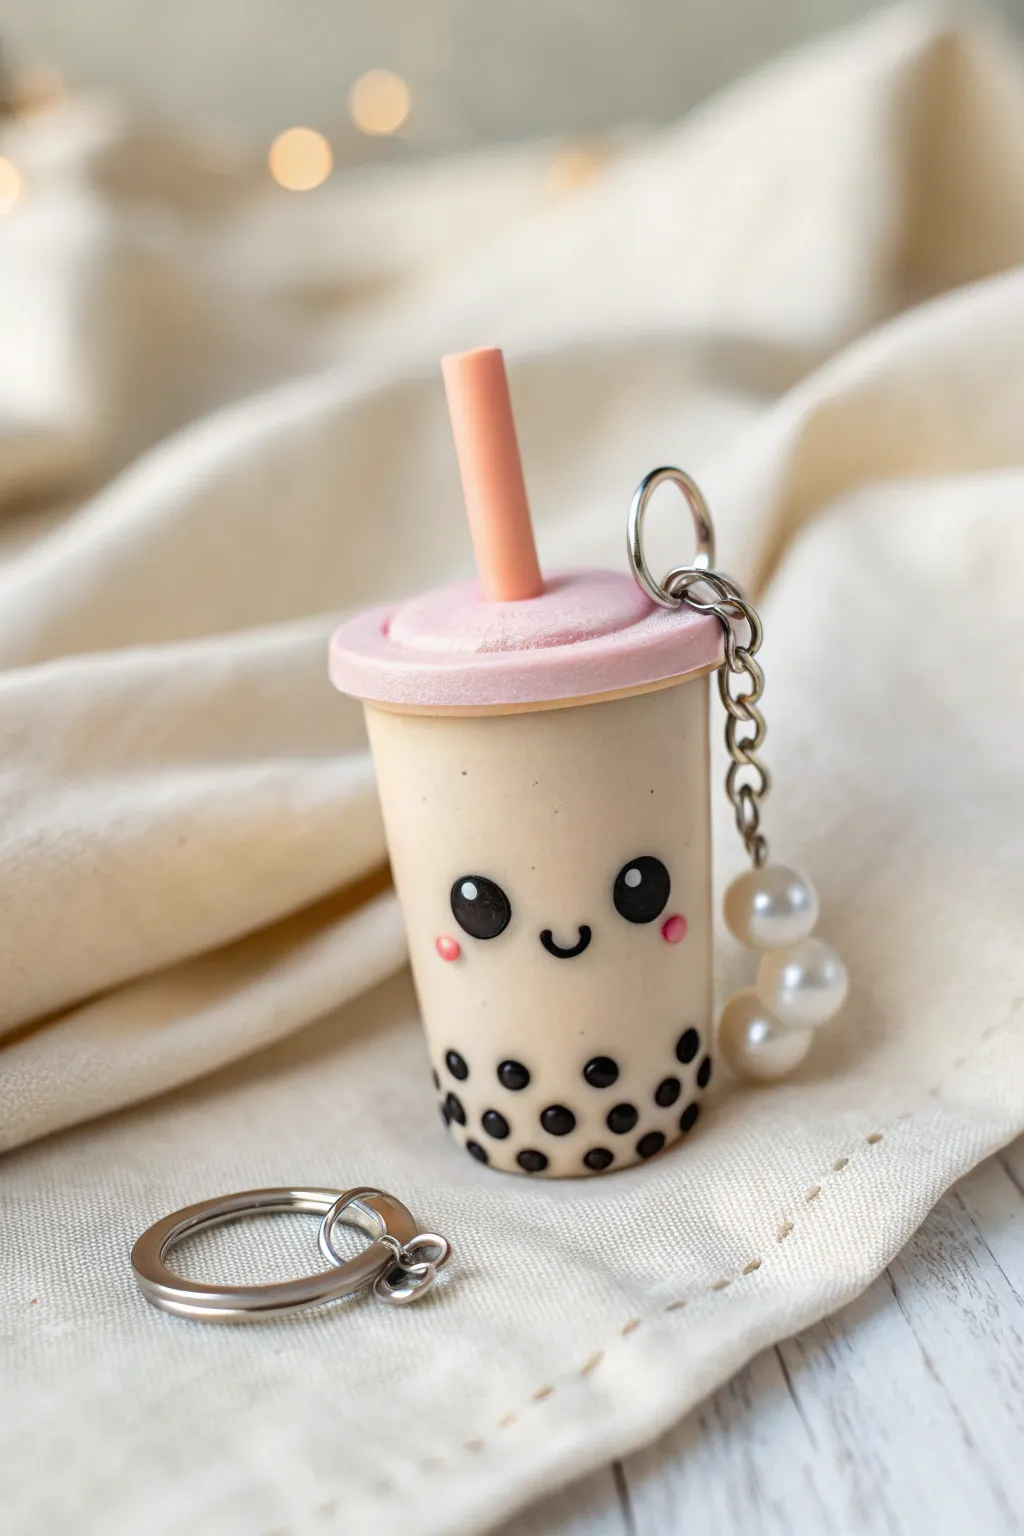
Capture the sweetness of your favorite drink with this adorable polymer clay bubble tea charm. Featuring a milky beige cup, tiny tapioca pearls, and a friendly face, it makes for the perfect keychain or bag accessory.
How-To Guide
Materials
- Polymer clay (beige/tan, pink, black)
- Black acrylic paint or clay for face details
- Pink chalk pastel or blush (for cheeks)
- Gloss glaze or UV resin
- Eye pin or screw eye
- Jump rings and keychain hardware
- Faux pearl beads (optional)
- Clay roller or pasta machine
- X-Acto knife or clay blade
- Dotting tool or small paintbrush
- Round cutter (small circle)
Step 1: Creating the Cup Base
-
Mix the perfect shade:
Start by mixing white clay with a tiny amount of translucent and tan/brown to create a realistic ‘milky tea’ color. Knead it until soft and fully conditioned. -
Shape the cylinder:
Roll your tea-colored clay into a smooth cylinder. It should be slightly wider at the top and taper very gently toward the bottom to mimic a plastic cup shape. -
Flatten the ends:
Gently tap the top and bottom against your work surface to ensure they are flat. The cup should stand up on its own without wobbling. -
Make the boba pearls:
Roll a very thin snake of black clay. Cut tiny, equal-sized pieces and roll them into small balls between your fingers to create the tapioca pearls. -
Attach the pearls:
Press the black spheres onto the lower third of the cup. I like to arrange them somewhat randomly but densely to look like they’ve settled at the bottom. Gently press them flat so they are flush with the cup’s surface.
Uneven Boba?
If your pearls keep falling off before baking, apply a tiny drop of bake-and-bond or liquid polymer clay to the back of each black dot to act as a glue.
Step 2: Lid, Straw and Face Details
-
Form the lid:
Roll out a sheet of pink clay to about 2mm thickness. Use a small round cutter slightly larger than your cup’s top diameter to cut a circle. -
Refine the lid edge:
Place the pink circle on top of the cup. Gently press down the edges to create a slight overhang, mimicking the rim of a plastic lid. -
Create the straw:
Take a darker shade of pink or peach clay and roll a small, smooth log. Cut it to your desired length and press it firmly into the center of the lid. -
Secure the hardare:
Insert an eye pin or screw eye directly into the lid near the straw, pushing it deep into the cup body for security. If using unbaked clay, you’ll bake the hardware right into the piece. -
Add the face:
Using a dotting tool, dab two small spots of black paint (or tiny flat circles of black clay) for the eyes. Use a fine needle tool or brush to paint a small smile between them. -
Add the sparkle:
Add tiny white dots to the upper corners of the black eyes to give them that signature kawaii sparkle. -
Dust some cheeks:
Scrape a little bit of pink chalk pastel into a powder. Use a soft brush or Q-tip to gently dust pink cheeks under the eyes.
Step 3: Baking and Assembly
-
Bake the charm:
Bake your creation according to your clay manufacturer’s instructions (usually around 275°F/130°C for 15-30 minutes). Let it cool completely before handling. -
Seal the piece:
Apply a coat of gloss glaze or UV resin over the entire charm. This not only protects the paint but gives the cup a shiny, plastic-like finish. -
Prepare the extras:
While the glaze dries, thread two pearlescent beads onto a headpin. Create a loop at the top to make a dangling side charm. -
Assemble the keychain:
Using jump rings and pliers, attach your main boba charm and the side pearl charm to the keychain ring.
Flavor Variations
Change the ‘tea’ clay color to customize flavors! Use light purple for taro, green for matcha, or bright pink for strawberry milk.
Now you have a refreshing little charm to keep your keys company


What Really Happens Inside the Kiln
Learn how time and temperature work together inside the kiln to transform clay into durable ceramic.
Chubby Kawaii Whales in Baby Blue
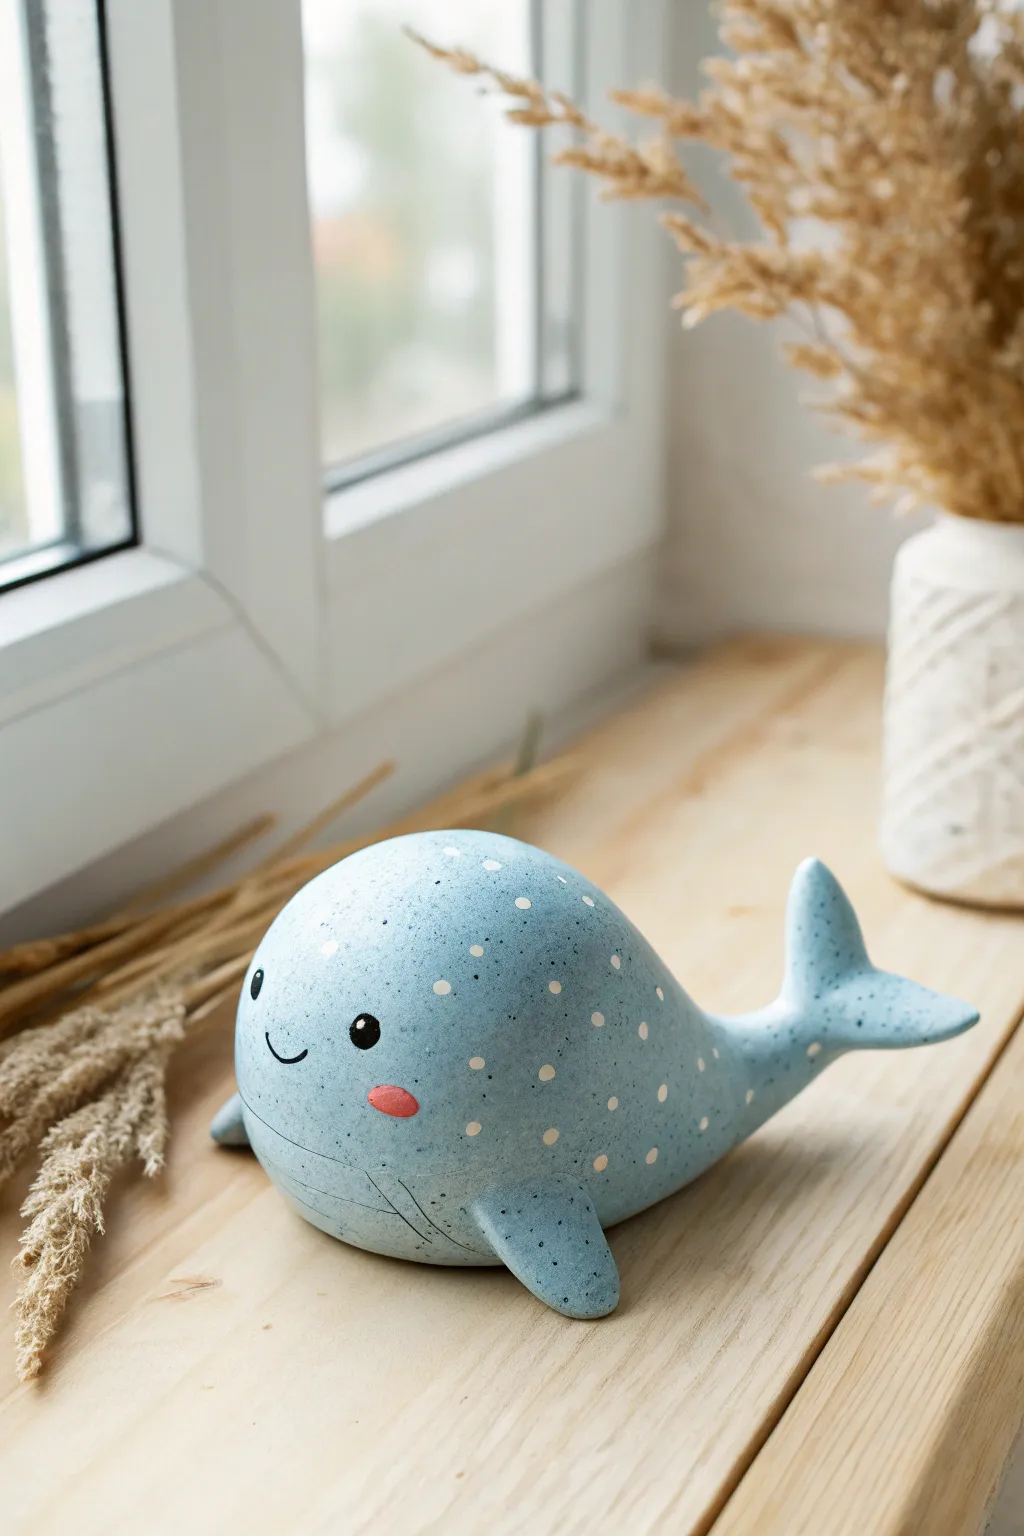
This adorable whale figurine features a soothing cornflower blue body speckled with tiny white dots, making it look like a piece of the sky brought down to earth. With its chubby form, sweet pink cheeks, and upturned grin, this little clay sea creature adds a perfect touch of kawaii charm to any windowsill or desk.
Step-by-Step Tutorial
Materials
- Polymer clay (light blue)
- Acrylic paint (white, black, pink)
- Fine-tipped paintbrush or dotting tool
- Black fine-liner pen (optional, for mouth)
- Clay sculpting tools (needle tool, smoothing tool)
- Soft toothbrush or texture sponge
- Matte varnish
- Wire armature (optional for tail strength)
Step 1: Shaping the Base Body
-
Condition the clay:
Begin by kneading your light blue polymer clay until it is soft and pliable. If you want that speckled stone look shown in the image, you can mix in a tiny amount of very finely ground black pepper or glitter, though painting speckles later works too. -
Form the main shape:
Roll the clay into a large, smooth ball. Gradually taper one end to create a teardrop shape that is still quite bulbous and rounded at the front. -
Refine the curve:
Gently press the wider end of the teardrop against your work surface to flatten the belly slightly so the whale sits stably. Curve the tapered tail end upwards to give the whale a swimming motion.
Step 2: Adding Fins and Tail
-
Create the tail flukes:
Roll a smaller piece of blue clay into a log and flatten it slightly. Cut a ‘V’ shape into the center and round off the edges to form the two lobes of the tail. -
Attach the tail:
Score the end of the body’s tapered tail and the base of the flukes. Press them together, blending the clay seams with a sculpting tool until the transition is seamless and smooth. -
Shape the side fins:
Make two small triangles out of blue clay. Soften the points so they look like rounded flippers. -
Position the fins:
Attach the fins low on the sides of the body, angled slightly backward. Blend the seams thoroughly into the body so they look integral to the shape, not just stuck on.
Stone Effect Secret
For a natural stone look without painting, mix “Granite” colored Sculpey directly with your blue clay. It has built-in speckles that look amazing.
Step 3: Adding Details and Baking
-
Detail the belly:
Using a needle tool or a dull blade, gently carve a few curved horizontal lines across the lower belly area to mimic the whale’s throat grooves. -
Smooth everything out:
Check the entire figure for fingerprints. I like to lightly buff the surface with a tiny bit of baby oil on my finger to get it perfectly smooth before baking. -
Bake the clay:
Place your whale on a baking sheet lined with parchment paper. Bake according to your polymer clay package instructions (usually around 275°F or 130°C for 15-30 minutes depending on thickness). -
Cool down:
Allow the figurine to cool completely before moving on to painting. The clay hardens fully as it cools.
Drooping Tail?
If the tail droops while baking, prop it up with a small folded piece of scrap paper or cardboard to hold the curve in place until it hardens.
Step 4: painting the Personality
-
Create the speckled texture:
Dip an old toothbrush into slightly watered-down dark grey or black paint. Run your thumb over the bristles to flick tiny specks onto the whale’s body. Practice on paper first to control the spray. -
Paint the polka dots:
Using a dotting tool or the back end of a paintbrush, dip into white acrylic paint. Gently stamp random white dots all over the upper body and tail, spacing them out for a whimsical look. -
Add the face:
With black acrylic paint and a fine detail brush, paint two small round eyes wide apart on the face. Paint a small, curved ‘U’ shape for the smiling mouth between them. -
Highlight the eyes:
Once the black eye paint is dry, add a tiny white dot to the upper corner of each eye to bring them to life. -
Rosy cheeks:
Mix a soft pink paint and paint oval blush marks just below the eyes. This gives the whale its signature kawaii appearance. -
Seal the project:
Finish by applying a coat of matte varnish over the entire piece to protect the paint and give the clay a nice, finished texture.
Now you have a serene little ocean companion to brighten up your shelf
Narwhal Charms With a Sparkly Fantasy Twist
These adorable, chubby narwhal charms bring a splash of magic to your keychain collection with their pastel hues and golden accents. Featuring blushing cheeks and delicate polka-dot details, these polymer clay creations are surprisingly simple to sculpt and fun to customize.
Detailed Instructions
Materials
- Polymer clay (baby blue, pastel pink, white, black)
- Acrylic paint (gold, white, pink, mint green)
- Gold screw-eye pins
- Gold lobster clasp keychain hardware
- Sculpting tools (ball styluses, needle tool, flexible blade)
- Gloss glaze or UV resin
- Soft paintbrushes
- Wet wipes (for cleaning hands between colors)
Step 1: Sculpting the Body
-
Condition the Clay:
Start by thoroughly conditioning your chosen base color—either the baby blue or pastel pink—until it is soft and pliable. -
Form the Base Shape:
Roll a medium-sized ball of clay and then gently taper one end to create a smooth, teardrop shape. This will be the narwhal’s body. -
Refine the Tail:
Flatten the tapered end slightly and use a needle tool or blade to split the tip center, gently separating and curving the ends outward to form the tail flukes. -
Smooth the Connection:
Use your finger or a silicone tool to smooth the transition where the tail meets the body so it looks seamless. -
Add Flippers:
Create two tiny teardrops from the same base color, flatten them slightly, and press them onto the sides of the body for flippers. Blend the top edge of the flipper into the body so they don’t fall off.
Fingerprint Fixer
If you notice fingerprints on your raw clay, brush a tiny amount of baby oil or cornstarch over the surface and smooth it gently before baking.
Step 2: Adding Details & Horn
-
Create the Horn:
For the horn, roll a small snake of clay that tapers to a point at both ends. Twist it gently to create a spiral texture, cut it in half, and attach the thicker end to the forehead. -
Secure the Horn:
I usually make a tiny indentation on the head first with a small ball tool to ensure the horn seats securely. -
Insert Hardware:
Insert a gold screw-eye pin directly into the top of the head, behind the horn. You can add a drop of liquid clay or bake-and-bond for extra security. -
Add the Eyes:
Use a small ball tool to make two divots for the eyes. Roll tiny balls of black clay and press them into the sockets, ensuring they sit flush. -
Create the Mouth:
Use a needle tool or a very small U-shaped cutter to impress a tiny, happy smile between the eyes. -
Bake the Clay:
Preheat your oven according to the manufacturer’s instructions for your specific brand of clay. Place your narwhals on a ceramic tile or baking sheet. -
Tent with Foil:
Cover the pieces loosely with aluminum foil to prevent scorching, especially on light colors like pink and blue. -
Cool Down:
Once baked, let the charms cool completely inside the oven to prevent cracking from thermal shock.
Make it Magical
Before baking, dust the tail fins with pearlescent mica powder or fine glitter to give your narwhal an extra shimmering, underwater fantasy effect.
Step 3: Painting & Finishing
-
Paint the Horn:
Using a fine detail brush, carefully paint the spiral horn with metallic gold acrylic paint. -
Add Sparkle to Eyes:
Dip a toothpick in white acrylic paint and add two tiny dots to each black eye to bring them to life. -
Apply Blush:
Dilute a tiny amount of pink paint or use chalk pastel shavings to dust rosy cheeks under the eyes. -
Dot Details:
Using a dotting tool or toothpick, add decorative dots to the body. Use darker pink and teal for the pink narwhal, and gold or white for the blue one. -
Glaze:
Once the paint is fully dry, coat the entire charm in a gloss glaze or UV resin for a durable, shiny finish. -
Attach Hardware:
Open the jump ring on your lobster clasp keychain and loop it through the screw-eye pin, closing it securely with pliers.
Now you have a charming sea creature ready to accompany you on all your daily adventures

TRACK YOUR CERAMIC JOURNEY
Capture glaze tests, firing details, and creative progress—all in one simple printable. Make your projects easier to repeat and improve.
Sleepy Cloud Friends and Tiny Star Sprinkles
Drift into a creative dreamscape with these adorable sleepy cloud figurines, perfect for adding a touch of calm to any desk or shelf. Their soft matte finish and delicate painted expressions give them a cozy, handmade charm accompanied by a scattering of pastel stars.
Step-by-Step
Materials
- White polymer clay (or air-dry clay)
- Pastel yellow, pink, and purple polymer clay (for stars)
- Acrylic rolling pin
- Cloud-shaped cookie cutter (optional, or freehand)
- X-acto knife or clay blade
- Ball stylus tool
- Fine grit sandpaper (400-600 grit)
- Black fine-tip acrylic paint pen or liner brush with black acrylic paint
- Pink acrylic paint or soft pastel shavings
- Small round paintbrush or cotton swab
- Matte varnish (optional)
Step 1: Shaping the Clouds
-
Condition the Clay:
Begin by kneading your white polymer clay until it is soft and pliable. Warm clay prevents cracks and ensures a smoother final surface. -
Form the Base:
Roll the clay into a smooth ball, ensuring there are no visible seams or air bubbles trapped inside. -
Flatten Slightly:
Gently press the ball down onto your work surface with your palm to create a thick disc, about 3/4 inch thick. You want it to be sturdy enough to stand on its own. -
Create the Curves:
Using your fingers, gently pinch and mold the top edge of the disc to form three rounded humps. The middle hump should generally be the tallest to create that classic cloud silhouette. -
Flatten the Bottom:
Tap the bottom edge of your cloud firmly against the table. This creates a flat base so your figurine will stand upright without tipping over. -
Smooth the Surface:
Dip your finger in a tiny bit of water (if using air-dry clay) or baby oil (for polymer clay) and gently smooth out any fingerprints or tool marks. Take your time here for a professional finish. -
Repeat for Friend:
Repeat the process to create a second cloud. It’s nice to make them slightly different sizes or shapes so they look like unique individuals.
Lint Trouble?
White clay loves to attract dust. Keep a stash of baby wipes nearby or use a piece of scotch tape to lift lint off raw clay before baking.
Step 2: Making the Star Sprinkles
-
Roll Colored Clay:
Clean your hands and workspace thoroughly to avoid color transfer. Roll out small amounts of your pastel yellow, pink, and purple clay into thin sheets, about 2-3mm thick. -
Cut the Stars:
Use a tiny star-shaped cutter if you have one. If not, use your X-acto knife to carefully cut small five-point star shapes. They don’t have to be perfect; irregular shapes add character. -
Smooth Edges:
Gently tap the edges of the stars with your finger to soften any sharp cut lines.
Starry Night Mobile
Before baking, poke a small vertical hole through the center of the cloud. Thread fishing line through it later to turn these into a hanging mobile.
Step 3: Baking and Decorating
-
Bake or Dry:
Follow the manufacturer’s instructions for your specific clay. If baking polymer clay, I prefer to tent foil over the tray to prevent any browning or scorching of the white clay. -
Cool and Sand:
Once fully cured and cooled, lightly sand any rough spots or fingerprints with fine-grit sandpaper until the surface feels akin to porcelain. -
Paint the Face Details:
Using a fine-tip black paint pen or a very thin liner brush, carefully draw two curved lines for closed eyes. Add three tiny lashes to the outer corner of each eye. -
Add a Smile:
Draw a small, simple U-shape between the eyes for a content little mouth. -
Rosy Cheeks:
Dip a cotton swab or a small dry brush into a tiny amount of pink paint (or use pink pastel dust). Gently dab circular cheeks onto the face, keeping the color soft and diffused. -
Seal (Optional):
If you want to protect the paint, apply a thin coat of matte varnish. Avoid glossy finishes to keep that soft, dreamy texture.
Enjoy your peaceful new desk companions and their starry surroundings
Kawaii Mini Planters With Faces (For Tiny Succulents)
Give your tiny succulents a sweet place to nap with this adorable two-toned purple planter. Featuring a peaceful sleeping face and delicate details, this handmade pot brings a calm, kawaii vibe to any windowsill.
How-To Guide
Materials
- Air-dry clay or polymer clay (white)
- Acrylic paint (lavender, dark purple, black, soft pink, white)
- Clay rolling pin
- Circle layout tool or cookie cutter (approx. 3-4 inches diameter)
- Clay knife or craft blade
- Small sponge or foam brush
- Fine detail paintbrush (size 00 or 000)
- Dotting tool or toothpick
- High-gloss varnish or sealant
- Water bonding slip (if using air-dry clay)
- Sandpaper (fine grit)
Step 1: Shaping the Planter Base
-
Prepare the base:
Start by rolling out a slab of clay to about 1/4 inch thickness. Cut out a perfect circle for the bottom of your pot using a cutter or by tracing a round object. -
Create the walls:
Roll a long, rectangular strip of clay for the walls. The height should be deep enough for your succulent’s roots, roughly 2.5 to 3 inches tall. -
Assemble the cylinder:
Attach the rectangular strip around the circumference of the base circle. If you are using air-dry clay, score the edges and apply a little water or slip to create a strong bond. -
Smooth the seams:
Use your fingers or a smoothing tool to blend the vertical seam where the wall ends meet, and the bottom seam where the wall meets the base. The outside needs to be perfectly smooth for the face to look right. -
Round the rim:
Gently gently round off the top rim with a wet finger so it isn’t sharp or jagged. I like to check the symmetry here to ensure it’s not looking too lopsided. -
Initial drying:
Allow the pot to dry completely. For air-dry clay, this usually takes 24-48 hours. Once dry, lightly sand any bumps or fingerprints with fine-grit sandpaper until the surface is silky smooth.
Uneven Seams?
If the seam where the wall joins keeps cracking, add a thin ‘snake’ of clay over the joint on the inside of the pot and blend it outwards to reinforce the structure.
Step 2: Painting the Design
-
Base coat:
Paint the entire outside of the pot with a coat of white acrylic paint. This acts as a primer and ensures your purple shades will look bright and pastel. -
Apply the main color:
Mix a soft, pastel lavender shade. Using a sponge or soft brush, apply this color to the top two-thirds of the planter. Dab gently to create a slight texture that mimics stone or ceramic. -
The ombre dip:
Mix a slightly darker, deeper purple tone. Paint the bottom third of the pot with this color. Use a damp sponge to slightly blend the transition line where the two purples meet for a soft gradient effect. -
Adding texture:
Once the purple layers are dry, load an old toothbrush or stiff brush with white paint and flick very fine speckles over the entire surface to give it a speckled ceramic look. -
Polka dots:
Using a dotting tool or the non-brush end of your paintbrush, add larger white polka dots randomly around the upper lavender section.
Add Drainage
Before the clay dries, use a straw to punch a hole in the center bottom. This is vital for succulent health so roots don’t rot in standing water.
Step 3: The Kawaii Face
-
Drafting the face:
Very lightly sketch the sleeping eye arches and small mouth with a pencil. aim for the center of the pot, slightly lower than the middle line. -
Painting the features:
Use your finest detail brush and black paint to trace over your pencil lines. Create two downward curves for sleepy eyes and add three tiny lashes to each. -
The smile:
Paint a tiny ‘U’ shape between and slightly below the eyes for a content little smile. -
Rosy cheeks:
Dip a Q-tip or a round brush into soft pink paint. Dab two circle cheeks right next to the outer edges of the smile. Keep the paint somewhat transparent for a blushing look. -
Sealing:
Once all paint is perfectly dry, coat the entire pot (inside and out) with a waterproof varnish. This is crucial to protect the clay from moisture when you water your plant.
Pop your favorite succulent inside and enjoy the serenity of your new desk companion
Little Onigiri-Style Rice Triangles With Expressions
These adorable onigiri-inspired clay figures feature a smooth, matte white finish and cheerful, blushing expressions painted directly onto their faces. Their simple triangular shape makes them a perfect beginner project, creating a sweet trio that looks good enough to eat—but please don’t.
Step-by-Step
Materials
- White polymer clay or air-dry clay (smooth finish)
- Black fine-tip acrylic paint marker or fine detail brush
- Pink soft pastel chalk (for blush)
- Small soft brush or Q-tip
- Pink acrylic paint (for the mouth)
- Black acrylic paint (if using a brush)
- Clay sculpting tools or a flat blade
- Sandpaper (fine grit, 400-600)
- Clear matte varnish (optional)
Step 1: Shaping the Bodies
-
Condition the clay:
Start by taking a chunk of white clay and kneading it thoroughly until it is soft, pliable, and free of cracks. Warm hands help this process go faster. -
Form a ball:
Roll the conditioned clay into a smooth, seamless sphere between your palms. Make three of these balls, ensuring they are roughly the same size if you want a matching set. -
Create the triangle shape:
Gently flatten the bottom of the ball against your work surface. Using your palms, press the sides in simultaneously to form a soft peak, creating a rounded triangle shape. -
Refine the edges:
Rice balls should look soft, not sharp. Use your thumb to gently round off the three corners and the top peak so the silhouette is chubby and organic. -
Smooth the surface:
Check for any fingerprints. Dip your finger in a tiny bit of water (for air-dry clay) or baby oil (for polymer clay) and lightly buff the surface until it is perfectly smooth. -
Adding texture (optional):
If you want a slight ‘rice’ texture like the image, gently tap the surface with an old toothbrush or a stiff bristle brush. Don’t press too hard; just create subtle pores. -
Cure or dry:
Bake your polymer clay according to the package instructions, or let your air-dry clay sit for 24-48 hours until fully hardened.
Keep it Clean
White clay picks up lint instantly. Keep baby wipes nearby and clean your hands and work surface thoroughly before starting to ensure a pristine finish.
Step 2: Painting the Faces
-
Prepare the surface:
Once the triangles are fully cured and cool, inspect them. If there are any rough spots, lightly sand them with fine-grit sandpaper. -
Draft the face:
Lightly sketch the position of the eyes and mouth with a pencil. Place them lower on the triangle to enhance the ‘cute’ factor. -
Paint the eyes:
Using a black fine-tip paint marker or a detail brush, draw two small ‘U’ shapes for sleeping eyes or curved arches for happy squinting eyes. Keep the lines crisp. -
Draw the mouth outline:
Between and slightly below the eyes, draw the outline of an open, smiling mouth. It should look like a rounded ‘D’ shape on its side or a deep ‘U’. -
Fill the mouth:
Mix a tiny bit of pink paint. Carefully fill in the tongue area at the bottom of the mouth, leaving the upper part black or dark to show depth. -
Prepare the blush:
Scrape a small amount of pink soft pastel chalk onto a piece of paper to create a fine powder. -
Apply the cheeks:
Dip a soft brush or Q-tip into the pink powder. Dab off the excess, then gently apply it in circular motions to the cheeks. Build the color up slowly for a soft, airbrushed look. -
Add cheek details:
I like to add extra personality here by drawing little hatch marks over the pink blush spots using the pink or red paint, mimicking the style in the photo. -
Seal the work:
To protect the pastel blush from smudging, apply a thin coat of matte varnish over the entire piece. Avoid glossy finishes to keep the natural clay look.
Uneven Blush?
If the pastel blush looks blotchy, use a clean piece of polymer clay (before baking) or a kneadable eraser to gently lift off the excess pigment and try again.
Now you have a trio of cheerful onigiri to brighten up your desk or shelf
Tiny Kawaii Backpack or Phone-Grip Figures
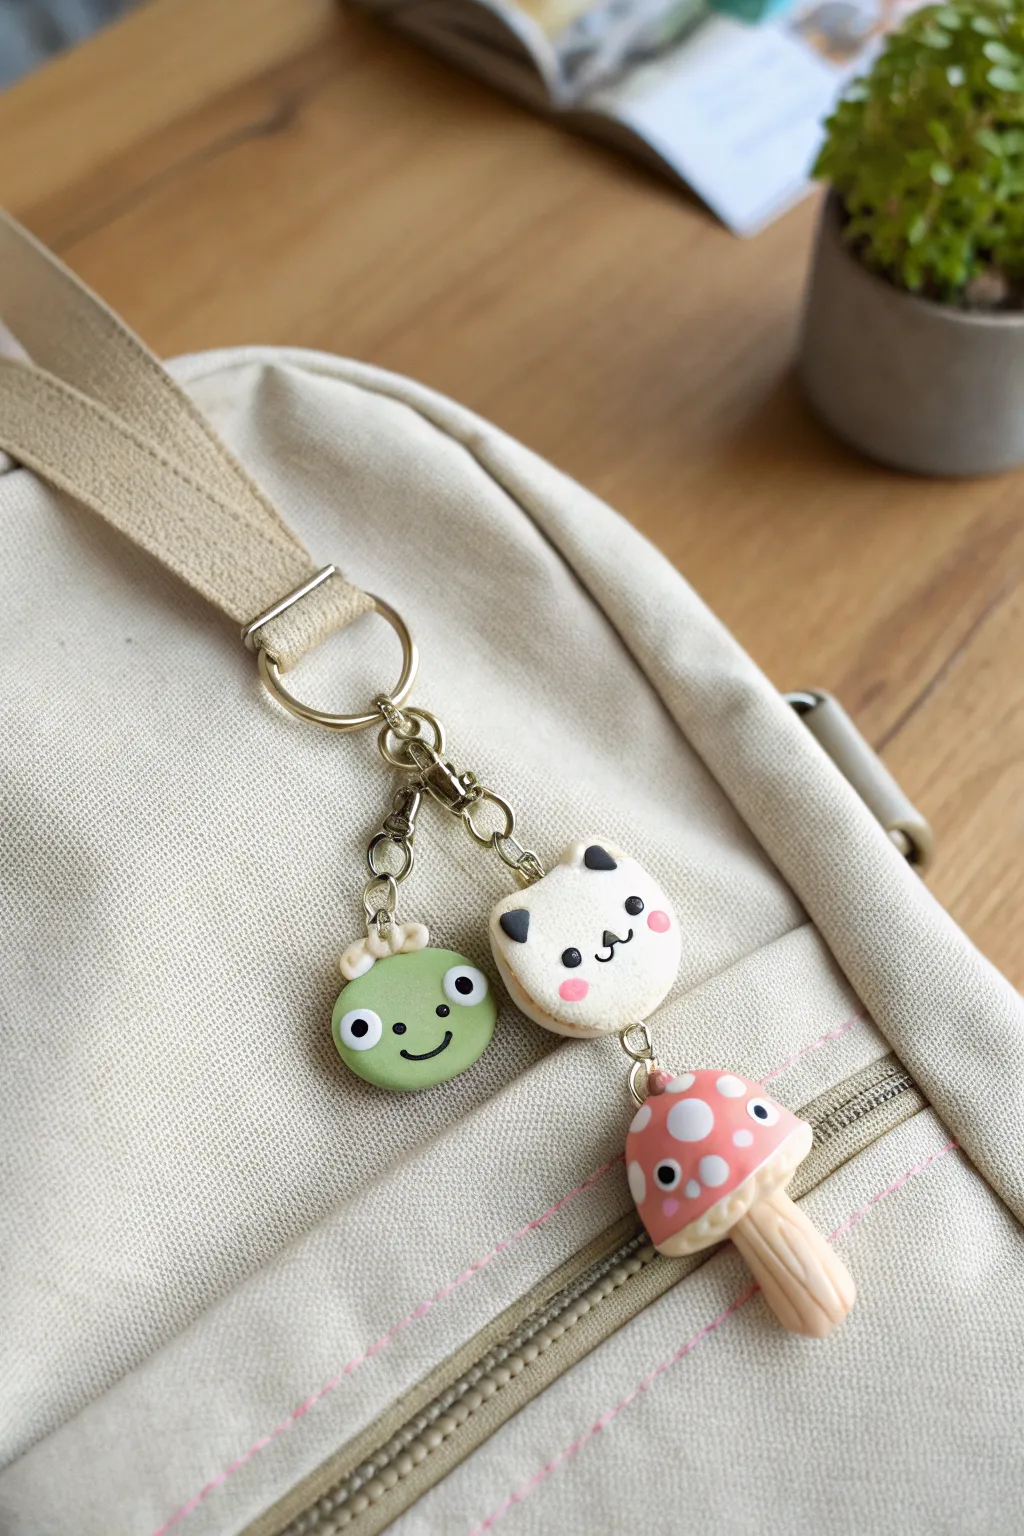
Brighten up your bag with this adorable set featuring a cheerful frog macaron, a sweet cat macaron, and a classic red mushroom. These polymer clay charms are surprisingly simple to sculpt and make the perfect handmade accessory or gift.
How-To Guide
Materials
- Polymer clay (green, white, red, beige/tan, black, pink)
- Eye pins (silver or gold tone)
- Jump rings and keyring hardware
- Dotting tools or ball stylus
- Texture tool (needle tool or toothpick)
- Clay roller
- Translucent liquid clay or bake and bond (optional)
- Gloss glaze (optional for finish)
- Circle cutters (small)
- Jewelry pliers
Step 1: Sculpting the Frog Macaron
-
Form the shells:
Knead your green clay until soft and roll it into a thick sheet. Cut two identical circles using a small cutter. Smooth the top edges slightly with your finger to create a domed macaron shape. -
Texture the feet:
Use a needle tool or toothpick to gently tease and rough up the bottom edge of both green circles. This creates the classic ‘feet’ texture seen on real macarons. -
Add the filling:
Roll a small ball of white or cream clay and flatten it into a disc slightly smaller than your green shells. Sandwich it between the two green halves, pressing gently so they adhere without squishing the texture. -
Create the face:
Roll two tiny balls of white clay for eyes and press them onto the top shell. Add minuscule black clay pupils. For the mouth, roll a hair-thin snake of black clay and curve it into a smile, pressing it gently into place. -
Add the crown:
Make a tiny flattened teardrop shape from beige clay. Use your needle tool to indent three lines at the top to mimic a small dollop of cream or a crown, and attach it to the top of the frog’s head. -
Insert hardware:
Trim an eye pin to size and push it vertically into the center of the macaron. I like to add a tiny dab of liquid clay on the pin first for extra security.
Loose Eye Pins?
If a pin pulls out after baking, remove it, put a drop of superglue on the shaft, and reinsert it into the existing hole. Hold for 10 seconds to bond.
Step 2: Crafting the Cat Macaron
-
Create the cat shape:
Similar to the frog, cut two circles from white clay. Before texturing, gently pinch two small points on the top edge of each circle to form ears. Soften the points so they aren’t too sharp. -
Texture and fill:
Texture the bottom edges of your white cat shells just like you did for the frog. Sandwich a flattened disc of white or creamy filling between them. -
Add facial details:
Use small bits of black clay to make triangular ear tips. Add two black dot eyes and a tiny ‘w’ mouth shape using thin black snakes. Don’t forget pink clay circles for blushing cheeks. -
Secure the top loop:
Insert an eye pin into the top of the cat’s head, ensuring it goes deep enough into the filling layer for stability.
Make it Sparkle
Dust the white filling of the macarons with pearlescent mica powder before baking for a sugary, glittery effect that catches the light.
Step 3: Making the Mushroom
-
Form the stem:
Roll a cylinder of beige or light tan clay. Slightly flare the bottom to create a stable base. Use a dull knife or needle tool to score vertical lines around the stem for a realistic stalk texture. -
Shape the cap:
Roll a ball of red clay and flatten the bottom against your work surface to create a dome. Gently hollow out the underside slightly so it fits snugly over the stem. -
Apply the spots:
Roll several tiny balls of white or light pink clay. Flatten them onto the red cap, varying the sizes for a natural look. Press them flush with the surface. -
Attach the face:
Add two black eyes to the front of the red cap. Place them low on the brim for maximum cuteness. -
Final assembly:
Press the cap firmly onto the textured stem. Insert an eye pin through the top center of the mushroom cap.
Step 4: Baking and Hardware
-
Bake:
Bake all three pieces according to your clay manufacturer’s instructions (usually 275°F/135°C for 15-30 minutes). Let them cool completely before handling. -
Glaze (Optional):
Brush a coat of gloss glaze over the eyes and the mushroom cap if you want them to shine. -
Assemble keychain:
Use jewelry pliers to open jump rings. Attach the frog and mushroom to the bottom of the cat charm, or link them all onto a main keychain ring in a cascading style as shown.
Now you have a charming custom accessory ready to accompany you on all your daily adventures
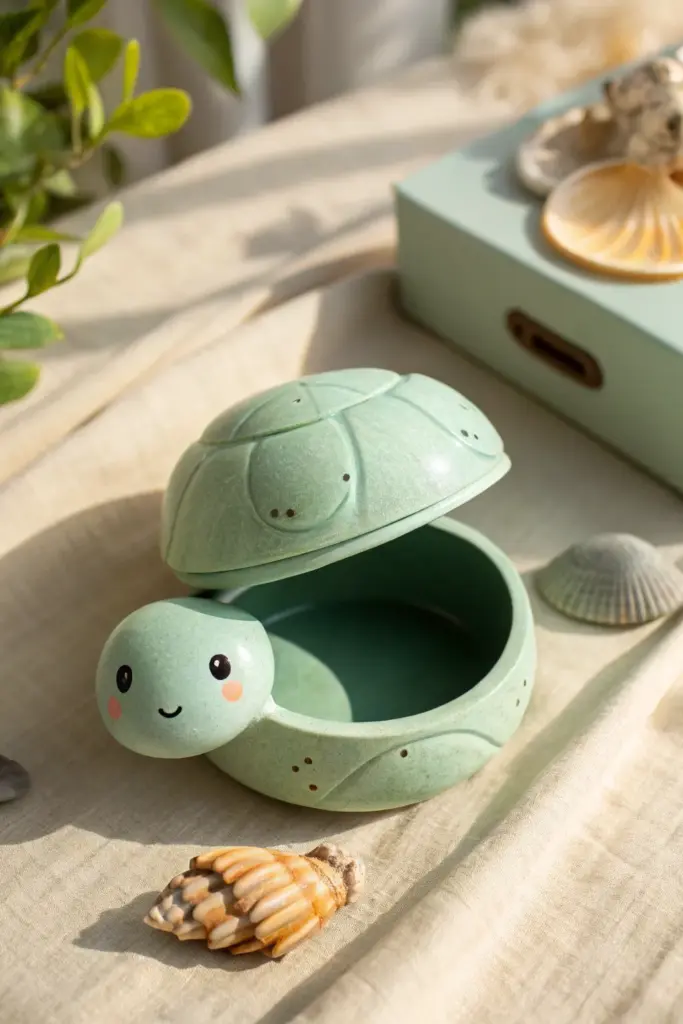
Surprise Kawaii Trinket Box Hidden Inside a Turtle Shell

This adorable turtle project doubles as a secret hiding spot for your tiniest treasures. With its soft minty green color and sweet blushing face, it creates a charming addition to any desk or vanity while keeping jewelry safe inside its shell.
Step-by-Step Tutorial
Materials
- Polymer clay (mint green, white, black, pink)
- Foil or waste clay for armature
- Rolling pin or acrylic roller
- Round cutters (large and slightly smaller)
- Needle tool or toothpick
- Ball stylus tool
- Cornstarch (release agent)
- Craft knife
- Oven for baking
- Gloss varnish or resin (optional)
Step 1: Creating the Base Bowl
-
Prepare the core:
Ball up a piece of aluminum foil into a flattened sphere shape to act as a placeholder for the hollow space, or use a heat-safe glass bowl as a mold. -
Roll the clay:
Condition your mint green clay until soft, then roll it out into a slab about 1/4 inch thick to ensure the wall structure is sturdy. -
Form the bowl:
Drape the clay slab over your chosen mold or form the bottom bowl shape by hand, smoothing the clay upwards to create the walls. Trim the top edge evenly with a craft knife. -
Refine the rim:
Smooth the cut rim with your finger and a bit of cornstarch so the lid will sit flush later. I find tapping it gently against a flat surface helps level it. -
Add the feet:
Roll four small balls of green clay, flatten them slightly, and attach them to the bottom of the bowl for little turtle feet. -
Create the tail:
Shape a tiny cone of green clay and blend it onto the back of the bowl base for a pointed tail.
Lid Won’t Fit?
To ensure a perfect fit, bake the bottom bowl first. Then, form the raw clay lid directly onto the baked base (use cornstarch so it doesn’t stick) and bake again.
Step 2: Sculpting the Head
-
Shape the head:
Roll a smooth, medium-sized ball of green clay for the head. It should be proportional to the body but definitely on the chubby, cute side. -
Attach to base:
Score the clay where the head meets the bowl, apply a drop of liquid clay if available, and press the head firmly onto the front rim of the base. -
Add facial features:
Use a ball tool to make shallow indents for eyes. Press tiny flat discs of black clay into these spots, adding microscopic white dots for highlights. -
Rosy cheeks and smile:
Press small pink clay circles onto the cheeks and use a needle tool to gently carve a simple, curved smile.
Texturing Tip
Use a toothbrush or a crumpled ball of aluminum foil to gently texture the green ‘skin’ parts of the clay before baking for a realistic stone-like finish.
Step 3: Crafting the Shell Lid
-
Form the dome:
Create a second clay slab similar to the first. Drape it over a convex form (like the back of a spoon or a foil dome) to create the lid shape. -
Check the fit:
Constantly check the lid against the base bowl to ensure the circumferences match perfectly before adding details. -
Detail the shell pattern:
Using a needle tool, lightly draw the classic hexagonal turtle shell pattern on the dome surface. Don’t press too deep, just enough to see the lines. -
Add dimension:
Roll thin snakes of green clay or flatten small discs and layer them over the drawn pattern segments to give the shell a slightly raised, 3D texture. -
Add freckles:
Press tiny dark brown or black clay dots sporadically onto the shell and body for extra texture and character.
Step 4: Finishing Touches
-
Final smoothing:
Brush the entire piece lightly with baby oil or cornstarch to remove any fingerprints before baking. -
Bake:
Bake according to your polymer clay package instructions. Using an oven thermometer is highly recommended to prevent scorching the light green color. -
Cool and gloss:
Let the turtle cool completely inside the oven. Once cold, apply a gloss varnish to the eyes and shell to make them shine.
Place this little guardian on your shelf to hide your favorite rings or simply to bring a smile to your face