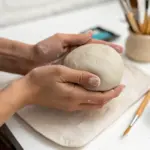
Clay bead necklaces are one of my favorite “instant gratification” jewelry projects—fast, colorful, and totally customizable to your vibe. Below are my go-to clay bead necklace ideas, starting with the classics and sliding into the fun, quirky stuff once you’re warmed up.
Classic Rainbow Heishi Bead Choker
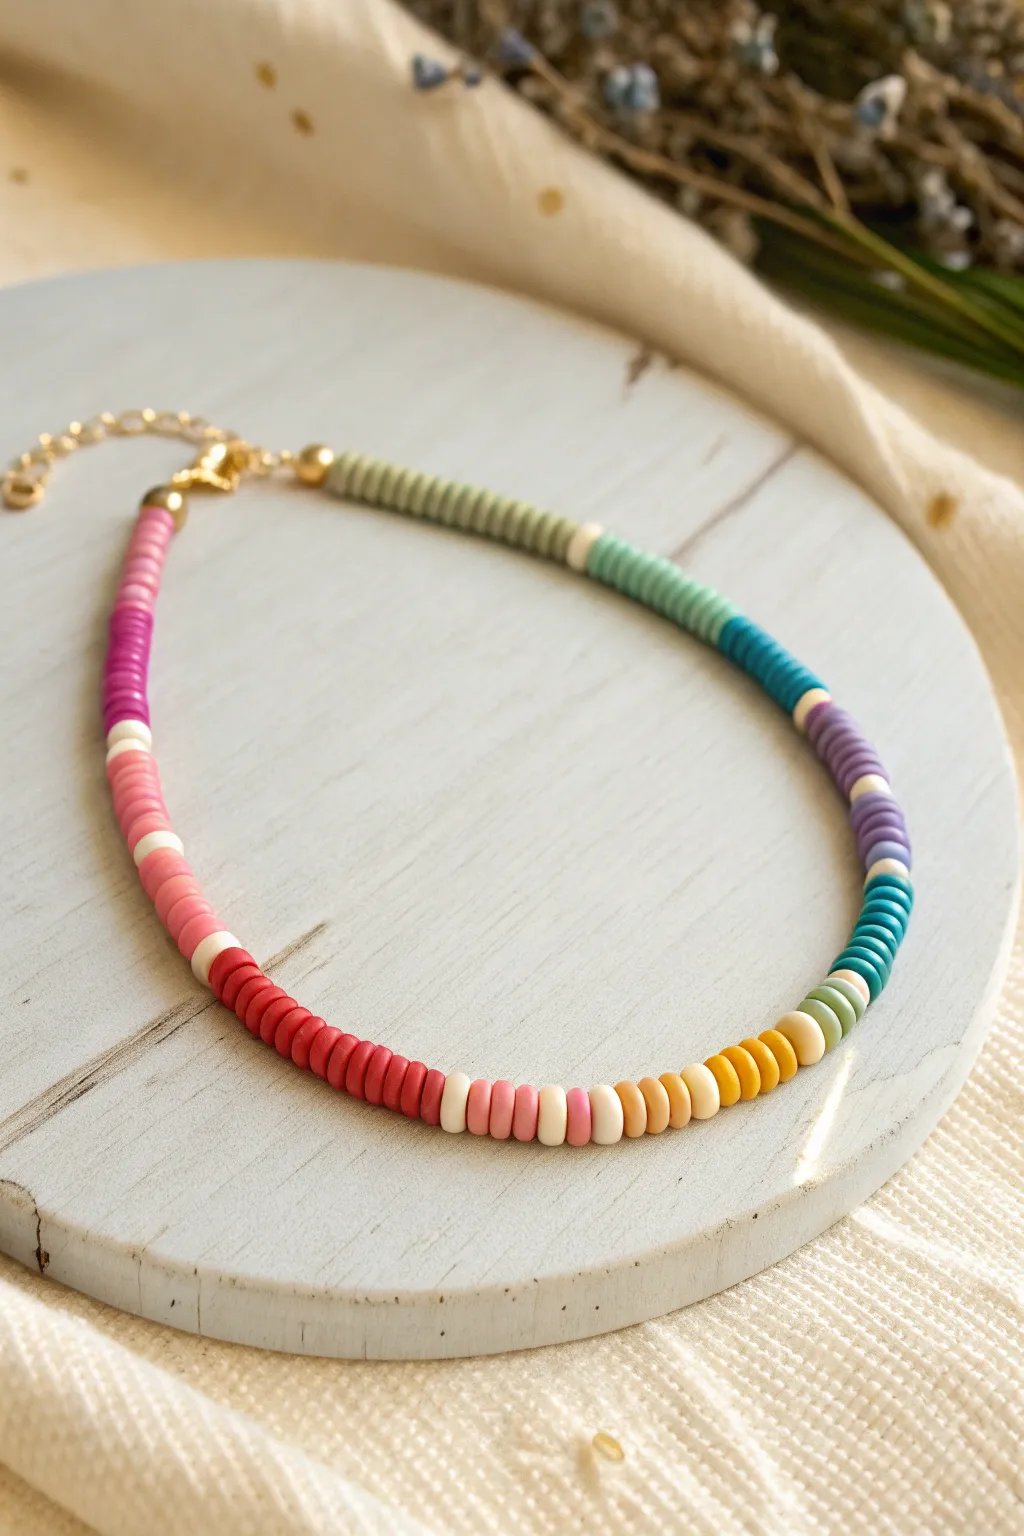
This vibrant choker combines earthy greens and bright pops of color in a sophisticated, blocked pattern that feels modern rather than messy. Using polymer clay heishi beads, you’ll create a smooth, comfortable accessory perfect for layering or wearing solo.
How-To Guide
Materials
- 6mm Polymer clay heishi beads (olive green, mint green, teal, purple, lavender, dark pink, light pink, red, coral, yellow, cream/white)
- Small gold spacer beads (approx. 3-4mm)
- Beading wire (flexible, 7-strand or 19-strand)
- 2 Gold crimp beads
- 2 Gold crimp covers (optional but recommended)
- 2 Gold wire guards (optional)
- Gold lobster clasp
- Gold extender chain
- Flat nose pliers
- Wire cutters
- Crimping pliers
Step 1: Planning and Preparation
-
Measure your wire:
Cut a piece of beading wire approximately 16-18 inches long. This gives you plenty of slack for a standard 14-16 inch choker plus room to work on the clasp ends. -
Secure the first end:
Thread a crimp bead onto one end of the wire, followed by a wire guard if you’re using one. Loop the wire through the last link of your extender chain and back through the crimp bead. -
Crimp it tight:
Use your crimping pliers to flatten the crimp bead securely, locking the wire in place. Cover the crimp with a gold crimp cover for a polished spherical look. -
Add a gold accent:
String on one small gold spacer bead to start the strand. This creates a nice metallic transition before the clay colors begin.
Stiff Necklace?
If your necklace loops stiffly rather than draping, you crimped too tight. Before the final crimp, curl the necklace into a circle to ensure the beads have enough space to sit properly.
Step 2: Creating the Color Blocks
-
Begin with the greens:
Start stringing your heishi beads. This design opens with a long section of muted olive green beads—aim for about 2.5 to 3 inches of length here. -
Break it up:
Add a single cream or white bead to act as a separator between your color blocks. -
Mint transition:
String approximately 1.5 inches of mint green beads, followed by another single cream separator bead. -
Teal section:
Add a shorter block of teal or dark turquoise beads, roughly 1 inch long. Keep an eye on your pattern; the blocks generally get shorter as you approach the center. -
Purple hues:
After a cream separator, string about 0.75 inches of dark purple, another separator, and then 0.5 inches of lavender. -
Center point variation:
For the bottom curve of the necklace, switch to a multi-color striped pattern. Thread a small repeating pattern: two dark teal, two light teal, two light green, two cream. -
Warm tone transition:
Continue the central curve by shifting to warm tones. String small groups (2-3 beads each) of yellow, peach, and coral to transition out of the cool colors. -
Moving to reds:
Create a solid block of red beads, about 1.5 inches long. Following the established pattern, cap this block with a single cream separator bead. -
Pink gradient:
String a 1-inch section of bright pink beads, add a separator, and then finish the clay beading with a 1.5-inch section of dark magenta or fuchsia beads.
Step 3: Finishing Touches
-
Final gold accent:
Once you are happy with the length and color arrangement, slide on one final gold spacer bead to match the beginning. -
Prepare the clasp:
Thread on a crimp bead and your wire guard (if using). Loop the wire through the loop of your lobster clasp. -
Secure the end:
Pass the wire back tail through the crimp bead and tighten the loop close to the clasp, but leave just enough wiggle room for the clasp to move freely. -
Final crimp:
Use your crimping pliers to secure the bead. I usually verify the tension of the necklace here—it shouldn’t be too stiff. -
Trim and conceal:
Trim the excess wire tail close to the crimp. Apply your final crimp cover over the crimp bead and gently close it with pliers.
Mix Up The Finish
For a more luxe look, replace the single cream separator beads with tiny gold wafer beads or freshwater pearls. This adds texture and transforms the piece from casual to dressy.
Now you have a stunning, trendy choker ready to brighten up any outfit


Neutral Minimalist Clay Disc Bead Necklace
Embrace natural tones with this understated necklace featuring smooth clay disc beads in soothing gradients of cream, sand, terracotta, and soft grey. The minimalist design relies on rhythmic color blocking and mixed textures for a sophisticated, bohemian look.
Detailed Instructions
Materials
- Polymer clay in White, Beige/Ecru, Terracotta/Rust, and Grey
- Acrylic paint in dark grey or black (optional, for marbling)
- Beading wire or thread (approx. 24 inches)
- Crimp beads (2)
- Clasp (lobster claw or toggle)
- Jump rings and extender chain
- Rolling pin or clay machine
- Small round cutter (approx. 6-8mm)
- Needle tool or toothpick
- Oven for baking
- Baking sheet and parchment paper
- Jewelry pliers (flat nose and cutting)
Step 1: Creating the Clay Clay Discs
-
Condition the Clay:
Begin by thoroughly kneading each color of polymer clay—white, beige, terracotta, and grey—until they are soft and pliable. -
Mix Custom Shades:
To achieve the subtle gradients seen in the photo, mix a small amount of white into your terracotta clay to create a softer, lighter rust shade. Keep some of the original terracotta separate for deeper accents. -
Create Marbled Effect:
For the patterned beads, take a small ball of white clay and add tiny flecks of black or dark grey paint or clay. Twist and fold the clay, but stop before it’s fully blended to maintain distinct striations. -
Roll the Sheets:
Roll out each clay color into a flat, even sheet. Aim for a thickness of about 3-4mm for a chunky, substantial feel. -
Cut the Discs:
Use your small round cutter to punch out numerous discs from each color sheet. You will need roughly 30-40 terracotta, 20-30 beige, 20 marbled white, 10 grey, and 10 white discs. -
Smooth the Edges:
Gently tap the edges of each cut circle with your finger to remove any jagged bits and create a ‘heishi’ style rounded edge. I find this step crucial for a professional finish. -
Pierce the Holes:
Using a needle tool or toothpick, carefully poke a hole through the exact center of each disc. Ensure the hole is large enough for your beading wire. -
Bake the Beads:
Arrange the beads on a parchment-lined baking sheet and bake according to your clay package instructions (usually around 275°F or 135°C for 15-30 minutes). -
Cool Down:
Allow the beads to cool completely on the tray before handling them to prevent warping.
Step 2: Stringing and Assembly
-
Prepare the Wire:
Cut a length of beading wire approximately 20-22 inches long, allowing extra room for securing the ends. -
Secure the Start:
Thread a crimp bead onto one end of the wire, loop it through a jump ring or the clasp, and thread it back through the crimp bead. Flatten the crimp bead securely with pliers. -
Begin the Pattern:
Start stringing from the back near the clasp. Begin with a sequence of white and grey accent beads interspersed with beige to create the lighter back section. -
Transition Colors:
As you move down the wire, introduce the terracotta beads. Group them in sets of 4-6 to create blocks of solid color. -
Add Texture Sections:
Insert sections of the marbled white beads between the terracotta blocks. These break up the warmth and add visual interest. -
Create the Focal Point:
For the bottom center of the necklace, use a long run of the light wood-tone or beige beads. Frame this section with single grey beads on either side to act as visual ‘stops’. -
Mirror the Pattern:
Continue stringing up the other side, mirroring the color blocks you created on the first side—terracotta blocks, marbled sections, fading into the lighter mix near the clasp. -
Check the Length:
Hold the necklace up to your neck to verify the length and drape. Add or remove beads near the clasp ends if adjustments are needed. -
Finish the End:
Thread a crimp bead onto the remaining wire, loop through the other half of your clasp or extender chain, and pass back through the crimp bead. -
Crimp and Trim:
Pull the wire tight (but leave a tiny bit of slack so the necklace isn’t stiff), flatten the crimp bead with pliers, and trim the excess wire close to the bead.
Sticky Situation?
If clay gets stuck in your small circular cutter, dip the cutter into a bit of cornstarch or water before pressing it into the clay. This acts as a release agent for clean cuts.
Pro Tip: Texture Trick
To mimic the slight wood-grain texture seen on some beige beads, lightly drag a coarse sandpaper or a toothbrush across the unbaked clay surface before cutting your circles.
Now you have a stunning, earth-toned accessory ready to pair with your favorite linen blouse or cozy sweater


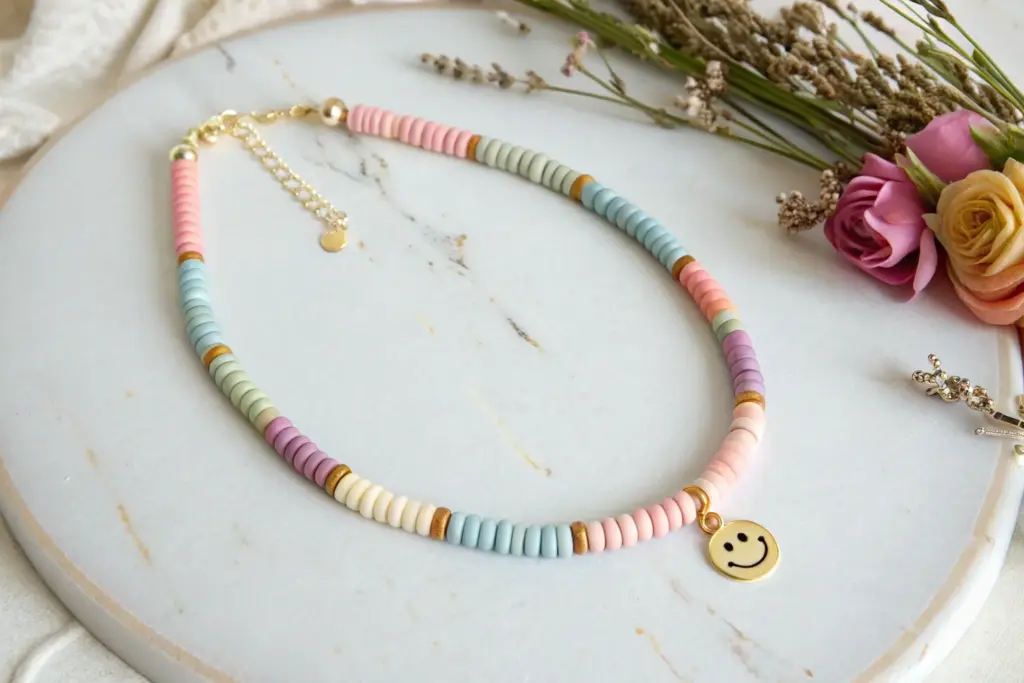
Pastel Clay Bead Necklace With a Tiny Center Charm
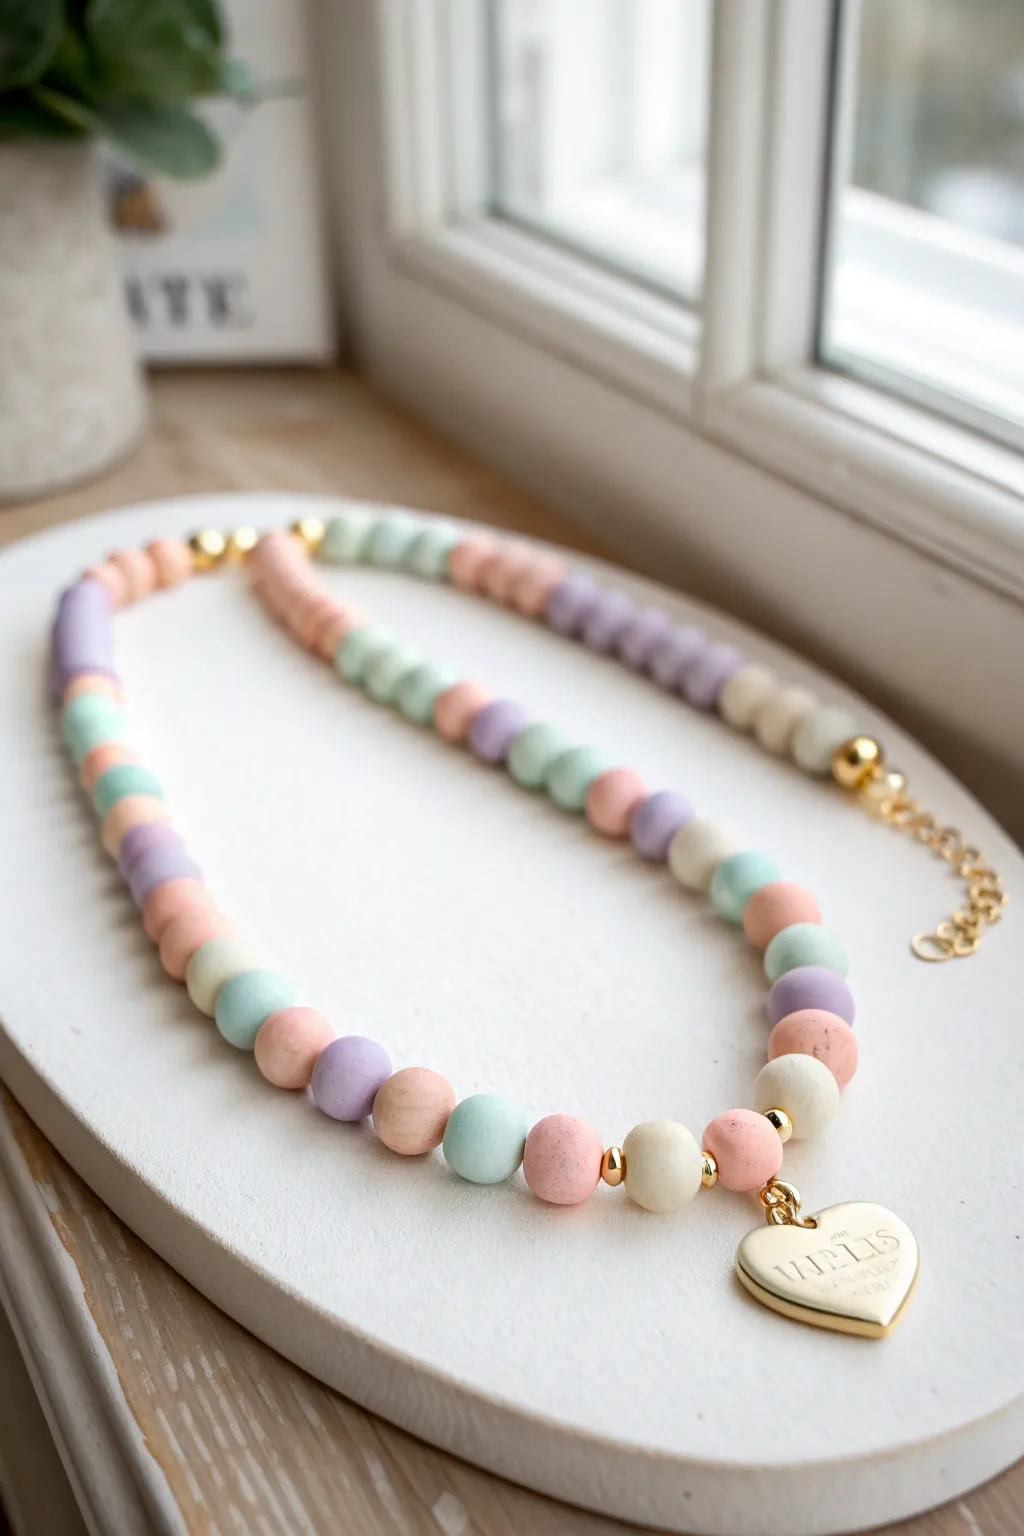
This sweet and simple necklace combines soft, speckled clay beads with elegant gold accents for a perfect everyday accessory. The matte finish of the polymer clay contrasts beautifully with the shine of the heart charm, creating a piece that feels both handcrafted and high-end.
Step-by-Step
Materials
- Polymer clay (mint green, peach/light coral, lavender, cream)
- Speckled clay or black acrylic paint (optional for speckling)
- Beading wire (gold color preferred)
- Gold crimp beads
- Gold heart charm
- Small gold spacer beads (approx. 3-4mm)
- Gold jump rings (4mm and 6mm)
- Gold lobster clasp
- Gold extender chain
- Jewelry pliers (flat nose and cutting)
- Bead reamer or toothpick
- Baking sheet and parchment paper
- Cornstarch (optional for rolling)
Step 1: Prepping and Rolling the Beads
-
Condition the Clay:
Start by warming up your clay colors (mint, peach, lavender, and cream) in your hands. Knead each color separately until it is soft, pliable, and free of cracks. -
Create the Speckle Effect:
If your clay isn’t pre-speckled, take a very tiny pinch of black clay or dried black acrylic paint scrapings and mix it thoroughly into each pastel color. You want the specks to be extremely subtle, like vanilla bean ice cream. -
Portion the Clay:
To ensure uniform bead sizes, roll each color into a long, even snake about 1cm thick. Slice the snakes into equal segments using a tissue blade or craft knife. -
Roll the Spheres:
Take each segment and roll it between your palms to create a smooth, perfect sphere. I like to lightly dust my hands with cornstarch here; it prevents fingerprints and helps get a smoother finish. -
Pierce the Holes:
Using a toothpick or a bead piercing pin, gently poke a hole through the center of each bead. To avoid squishing the shape, pierce halfway through, then flip the bead and pierce from the other side until the holes meet. -
Bake the Clay:
Arrange your beads on a baking sheet lined with parchment paper. Bake according to your clay package instructions (usually 275°F/135°C for 15-30 minutes). Let them cool completely before handling.
Pro Tip: Smooth Finish
Before baking, gently rub each bead with a drop of baby oil on your finger. This smooths out microscopic fingerprints and gives the clay a polished satin sheen.
Step 2: Assembling the Necklace
-
Cut the Wire:
Measure a length of beading wire. For a choker style like the photo, cut about 18 inches to allow slack for crimping. -
Start the Strand:
Secure one end of the wire first. Thread a crimp bead onto the wire, loop it through a jump ring attached to your clasp, and thread it back through the crimp bead. Use flat nose pliers to squash the crimp bead tight. -
Plan the Pattern:
Lay out your cooled beads on a surface to finalize your pattern. The image uses a repeating sequence: Lavender, Cream, Peach, Mint. Keep the color flow consistent. -
Add Spacer Accents:
Notice the gold details near the center. String your clay beads until you reach the middle point, adding small gold spacer beads between the clay beads specifically where the charm will hang. -
Attach the Charm:
Thread a gold spacer bead, then your heart charm (attached via a jump ring), and another gold spacer bead. This frames the focal point perfectly. -
Finish Stringing:
Continue the pattern on the other side of the charm, mirroring the sequence you created on the first half. -
Close the Loop:
Once all beads are strung, add a crimp bead to the open end. Thread the wire through the link of your extender chain, then back through the crimp bead and into the last few clay beads. -
Secure the End:
Pull the wire taut (but not stiff—leave a tiny bit of wiggle room for the beads to drape). Flatten the final crimp bead with your pliers and trim the excess wire close to the bead.
Troubleshooting: Uneven Holes
If your holes closed up during baking, use a bead reamer or a small hand drill to carefully widen them. Do this slowly to avoid cracking the hardened clay.
Now you have a charming, personalized necklace ready to layer or wear on its own


Pearl and Clay Bead Alternating Pattern Necklace
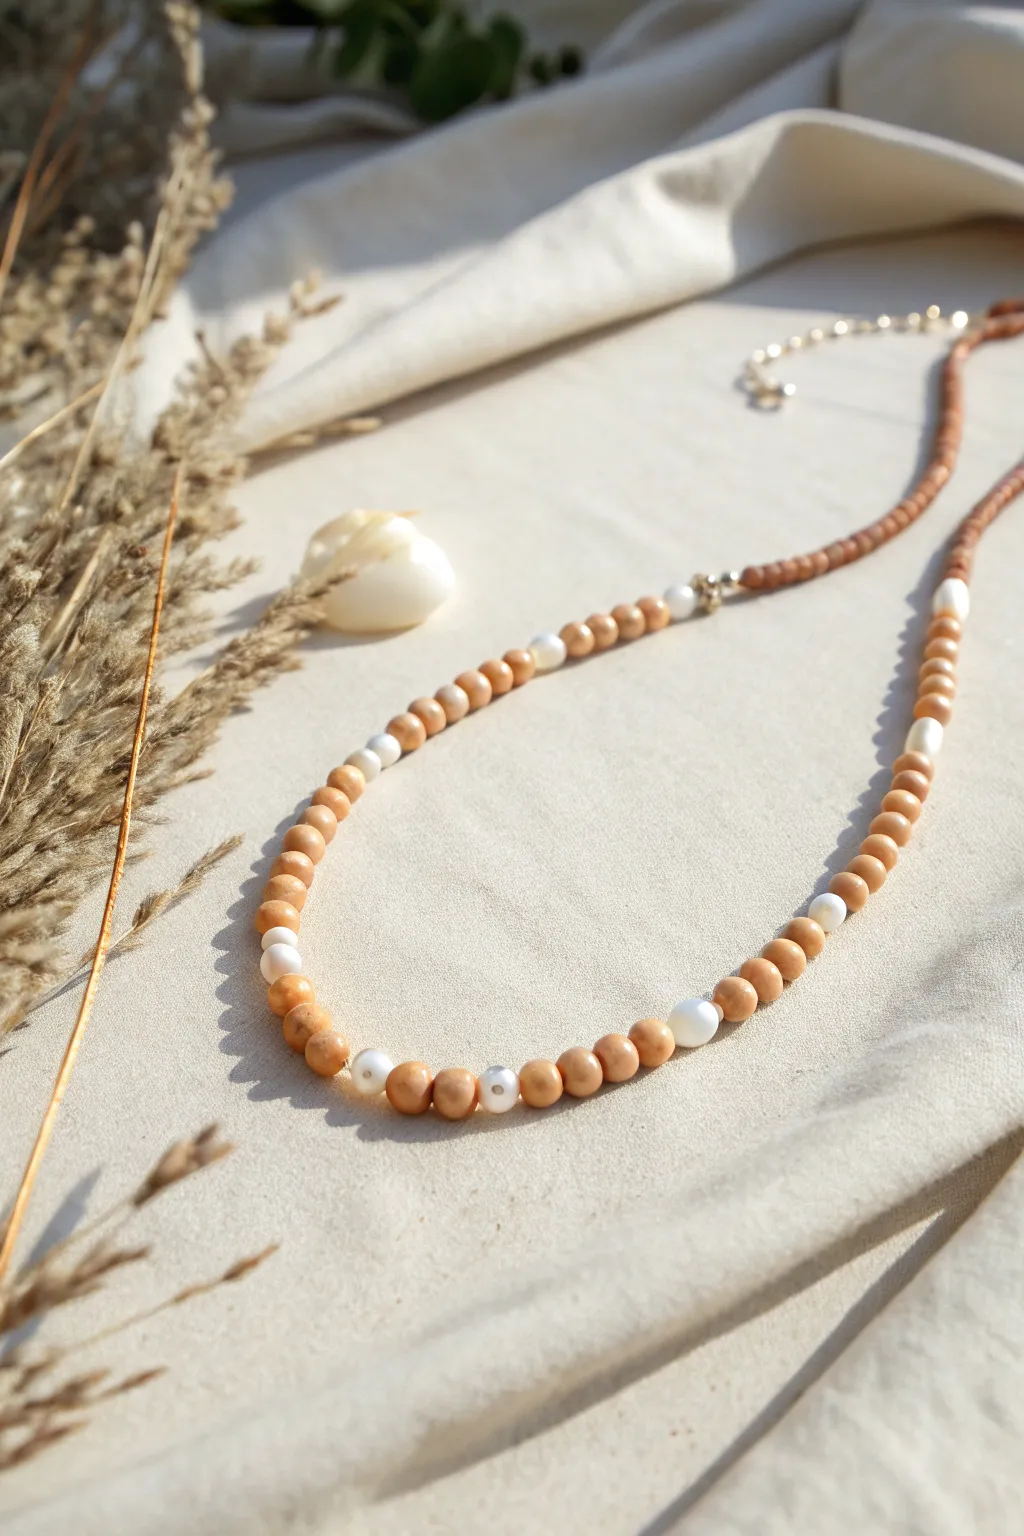
This elegant yet earthy necklace combines the warmth of terracotta-toned clay beads with the luster of small freshwater pearls. The alternating pattern creates a sophisticated rhythm perfect for layering or wearing solo as a subtle statement piece.
Step-by-Step Guide
Materials
- 4mm round polymer clay or jasper gemstone beads (terracotta/tan color)
- 3-4mm small freshwater pearls (irregular/baroque shape preferred)
- Beading wire (flexible, coated)
- 2 small crimp beads (silver or gold)
- 2 wire guards (optional but recommended)
- Lobster clasp and jump ring (or extension chain)
- 2mm crimp covers (optional)
- Flush cutters
- Crimping pliers
Step 1: Planning and Preparation
-
Measure your wire:
Cut a piece of beading wire approximately 20-22 inches long. This gives you plenty of slack for a standard 16-18 inch necklace plus room to finish the ends comfortably. -
Sort your beads:
Pour out your clay beads and pearls onto a bead mat or soft cloth. This prevents them from rolling away and lets you visualize the color variations in the clay beads before stringing. -
Plan the pattern:
Notice the distinct rhythm in the image. The pattern isn’t just one-for-one. It consists of longer sections of clay beads separated by single pearls, transitioning into a specific repeating sequence for the center focal area.
Uneven Tension?
If the necklace kinks or feels stiff, you crimped it too tightly. beads need a tiny bit of wiggle room to drape naturally. Leave a 1mm gap of wire before the final crimp.
Step 2: Starting the Necklace
-
Secure the first end:
Thread a crimp bead onto one end of your wire, followed by a wire guard. Loop the wire through the wire guard and back down through the crimp bead. -
Attach the clasp:
Slide your lobster clasp onto the loop created by the wire guard before tightening. If you aren’t using a wire guard, just loop the wire through the clasp ring and back through the crimp bead. -
Crimp firmly:
Use your crimping pliers to flatten or fold the crimp bead securely. Give the wire a gentle tug to ensure it holds tight. -
String the back section:
Begin stringing only the clay beads. To match the image, string a solid section of about 2-3 inches of just the terracotta clay beads. This will sit at the back of the neck.
Pearl Sizing Tip
Freshwater pearls vary in hole size. Keep a bead reamer handy to gently enlarge any pearl holes that are too small for your beading wire to pass through easily.
Step 3: Creating the Pattern
-
Begin the transition:
After the solid back section, add your first pearl. Then add a shorter section of clay beads (about 8-10 beads). -
Establish the main rhythm:
The core pattern visible in the reference relies on small groups of clay beads separated by single pearls. String 5 clay beads, followed by 1 pearl. -
Repeat the sequence:
Repeat the ‘5 clay beads, 1 pearl’ sequence. I find doing this about 3 or 4 times creates a nice transition toward the center. -
Build the focal section:
toward the center, the spacing tightens. Switch your pattern to: 3 clay beads, 1 pearl. -
Continue the focal pattern:
Repeat the ‘3 clay beads, 1 pearl’ sequence for the main front section of the necklace. This ensures the pearls are more visible where the necklace hangs lowest. -
Mirror the design:
Once you reach the center point, you need to mirror what you’ve just done. Continue with ‘3 clay beads, 1 pearl’ until the focal section is symmetrical. -
Return to wider spacing:
Transition back to the ‘5 clay beads, 1 pearl’ pattern for the next few inches as you move up the side. -
Finish the beadwork:
End the stringing with a solid section of 8-10 clay beads, followed by a single pearl, and finally the solid 2-3 inch section of clay beads to match the beginning.
Step 4: Finishing Touches
-
Check the length:
Hold the necklace up to your neck to check the length. Add or remove clay beads from the ends if adjustments are needed. -
Prepare the final crimp:
Thread a crimp bead onto the open end of the wire, followed by a wire guard (and your extension chain or jump ring). -
Secure the wire:
Pass the wire back down through the crimp bead and through the first few beads on the strand. Pull everything taut, but not so tight that the necklace becomes stiff. -
Final crimp:
Use your pliers to close the crimp bead securely. Trim the excess wire flush against the beads with your cutters. -
Add crimp covers:
If desired, place a crimp cover over each flattened crimp bead and gently squeeze it closed with pliers to make it look like a seamless metal bead.
You now have a beautifully handcrafted necklace that balances rustic textures with delicate shine

The Complete Guide to Pottery Troubleshooting
Uncover the most common ceramic mistakes—from cracking clay to failed glazes—and learn how to fix them fast.
Simple Spacer Style: Clay Beads With Metal-Look Discs
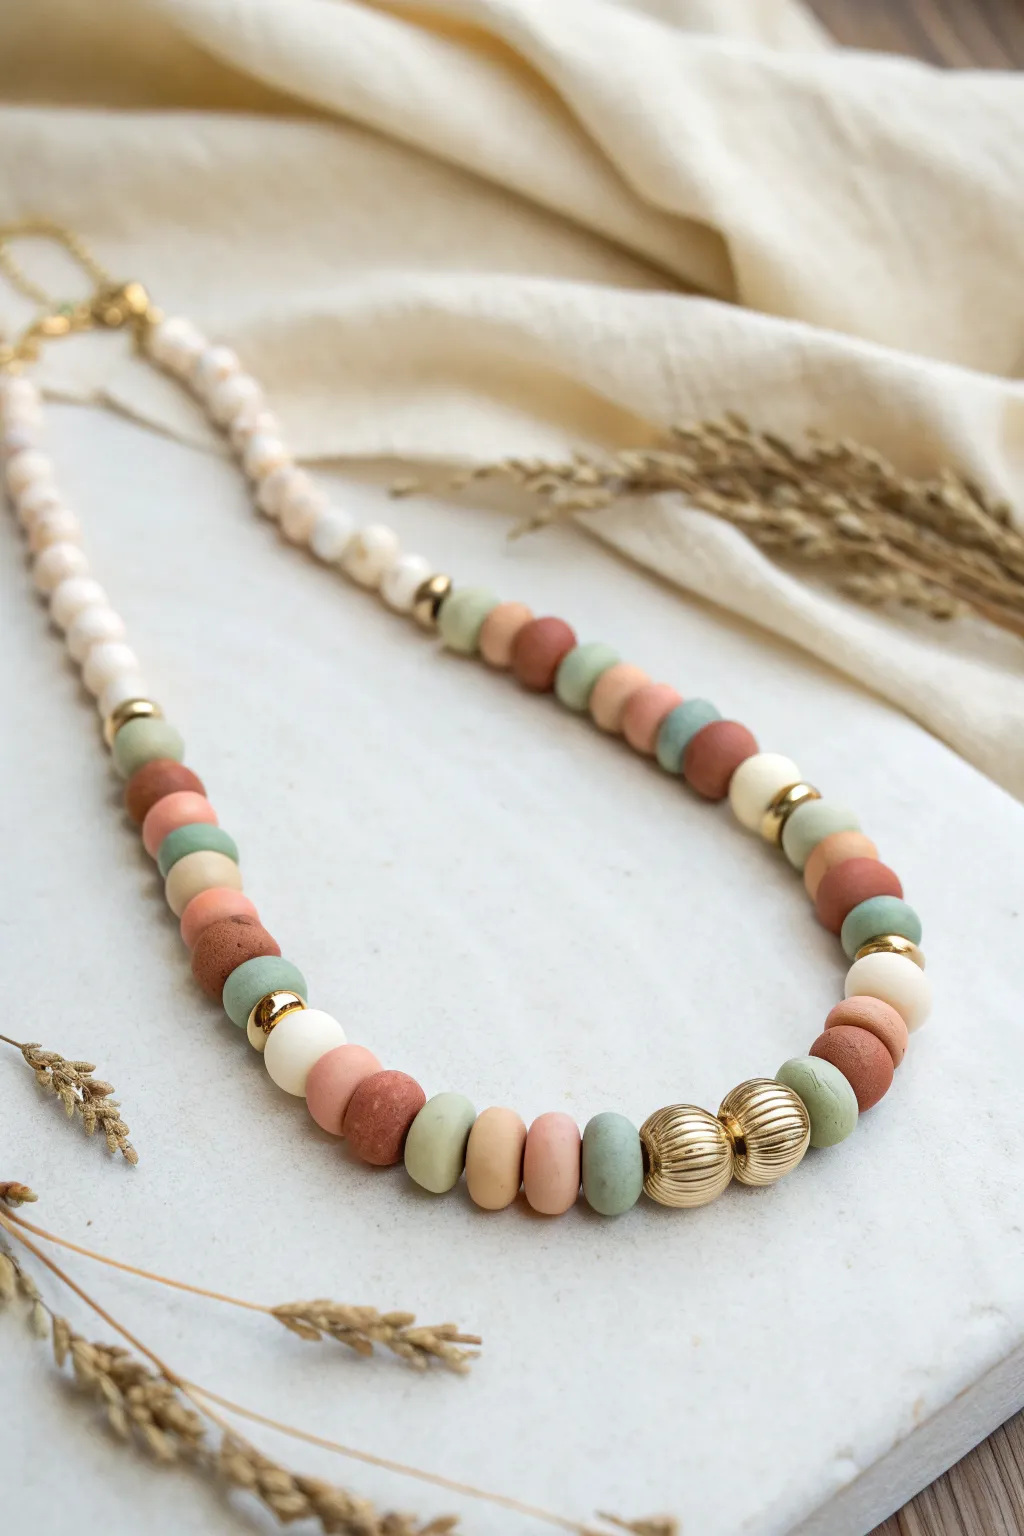
Embrace organic textures and warm, muted tones with this sophisticated polymer clay necklace project. By combining handmade clay discs with striking gold accents, you’ll create a piece that feels both artisanal and polished.
How-To Guide
Materials
- Polymer clay in muted colors: terracotta, sage green, peach, cream
- Gold tone metal spacer beads (small discs)
- Two large ribbed gold accent beads
- Beading wire or strong nylon cord
- Crimp beads and crimp covers
- Gold finish jewelry clasp (lobster claw or toggle)
- Gold finish jump rings
- Clay roller or pasta machine
- Small round clay cutter (approx. 1cm or 0.5 inch)
- Toothpick or bead piercing tool
- Baking sheet and parchment paper
- Jewelry pliers (flat nose and cutting)
- Gloss varnish (optional)
Step 1: Creating the Clay Beads
-
Condition the clay:
Start by warming the polymer clay in your hands. Knead each color block—terracotta, sage, peach, and cream—separately until they are soft and pliable to prevent cracking later. -
Roll out sheets:
Using a clay roller or a pasta machine on a medium setting, roll each color into a flat, even sheet. Aim for a thickness of about 4-5mm to give the beads a nice, chunky profile. -
Cut the shapes:
Take your small round cutter and punch out numerous circles from each color sheet. You will need approximately 15-20 beads of each color, depending on your desired necklace length. -
Soften the edges:
Pick up each cut circle and gently rub the edges with your fingertip. This removes the sharp cut line and gives the bead a more organic, stone-like appearance. -
Pierce the holes:
Using a toothpick or a piercing pin, carefully poke a hole through the center of each circle. I find twisting the tool gently while pushing helps avoid distorting the circle’s shape. -
Bake the beads:
Arrangement the beads on a parchment-lined baking sheet. Bake them according to the manufacturer’s instructions on your specific brand of clay—usually around 275°F (130°C) for 15-30 minutes. -
Cool down:
Allow the beads to cool completely on the tray before handling them. They harden fully as they return to room temperature.
Step 2: Assembling the Necklace
-
Prepare the wire:
Cut a length of beading wire about 24 inches long. This gives you plenty of slack to work with for an average 18-20 inch necklace. -
Secure the first end:
String a crimp bead onto one end, loop the wire through a jump ring attached to your clasp, and thread it back through the crimp bead. Flatten the crimp bead securely with your pliers. -
Start with neutrals:
Begin threading beads from the back neck area. Start with a sequence of smaller cream or white beads to sit comfortably against the neck. -
Establish the pattern:
Transition into your color mix. Thread the clay beads in a random but balanced pattern (e.g., green, peach, terracotta), inserting a small gold spacer disc between every 3 to 5 clay beads for a touch of shine. -
Add the focal point:
Once you reach the center of the wire, add the two large ribbed gold beads. Place a sage green clay bead between them to separate the metals, just like in the reference image. -
Mirror the pattern:
Continue beading up the other side to match the first half. You don’t need to make the color order identical, but try to keep the density of colors and spacers similar for balance. -
Finish the strand:
End the strand with the neutral cream beads to match the beginning section. -
Secure the second end:
Add a crimp bead and the second half of your clasp. Loop the wire back through the crimp bead and pull tight, leaving a tiny bit of wiggle room so the necklace drapes naturally. -
Final touches:
Crush the final crimp bead with your pliers and trim any excess wire closer to the bead.
Uneven Bead Holes?
If your holes look messy after baking, use a small hand drill or a round needle file to gently clean out the centers. This ensures your beads hang straight on the wire.
Textured Finishes
Before baking, gently press a piece of coarse sandpaper or a rough sponge onto the surface of the raw clay beads. This creates a realistic stone-like matte texture.
Enjoy styling your new handcrafted necklace with a linen top or a warm knit sweater
Linked Segment Clay Bead Necklace With Jump-Ring Connectors
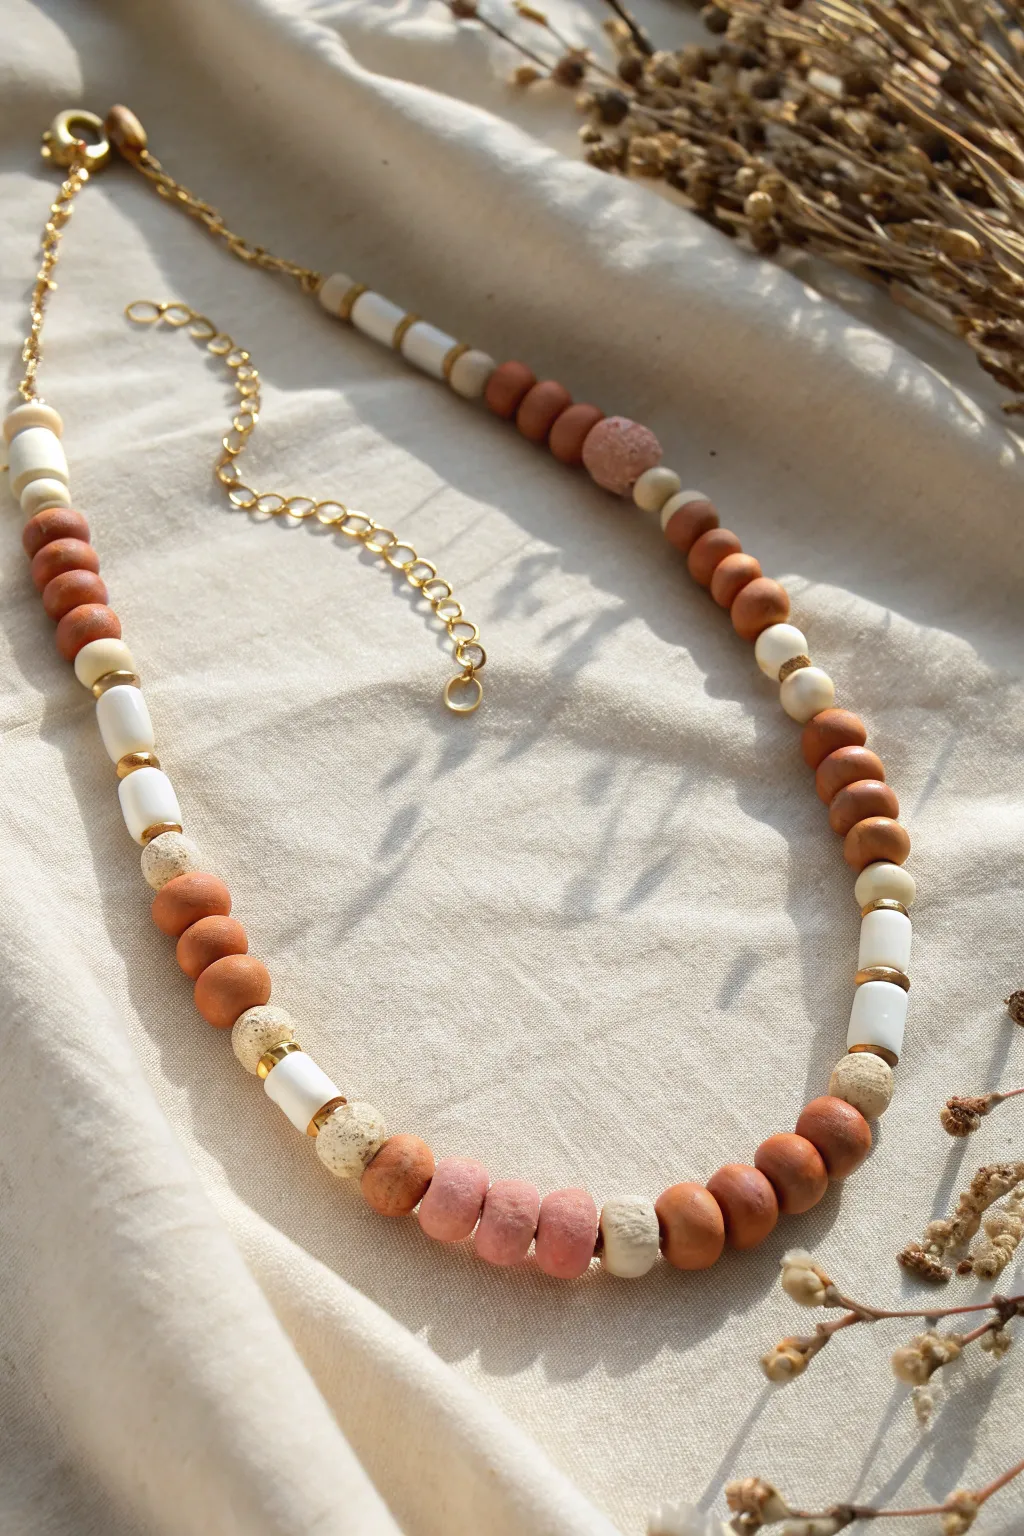
Embrace earthy elegance with this beautiful mixed-texture necklace, featuring warm terracotta tones paired with classic white and gold accents. This design relies on simple stringing techniques but achieves a sophisticated look by rhythmically alternating between round clay beads, cylindrical spacers, and metallic touches.
How-To Guide
Materials
- Polymer clay (Terracotta/Burnt Orange, White, Soft Pink, Textured Beige)
- Gold tube beads (small spacer size)
- Gold finish lobster clasp
- Gold finish extension chain
- Gold crimp beads (2)
- Beading wire (gold or clear, flexible)
- Round nose pliers
- Wire cutters
- Toothpick or bead reamer
- Gloss glaze (optional for select beads)
Step 1: Prepping the Clay Beads
-
Roll Your Rounds:
Begin by conditioning your terracotta, soft pink, and beige clay. Roll small pieces into consistent spheres, aiming for roughly 8-10mm in diameter. -
Create Texture:
For the beige beads, I like to roll the raw clay balls gently over sandpaper or salt to create that speckled, organic stone texture before baking. -
Form the Cylinders:
Using the white clay, roll a snake or log shape and slice it into equal segments about 10-12mm long. Smooth the cut ends so they look like clean cylinders. -
Pierce the Holes:
Carefully use a toothpick or piercing tool to create a hole through the center of every bead. Ensure the hole is wide enough for your beading wire to pass through comfortably. -
Bake and Cool:
Arrange all your beads on a baking sheet or tile. Bake according to your brand of polymer clay instructions (usually around 275°F/135°C for 15-30 minutes). Let them cool completely.
Uneven Rollers?
If your beads aren’t perfectly round after hand-rolling, use an acrylic block. Place the ball on a smooth surface, put the block on top, and move it in small circles to perfect the sphere.
Step 2: Designing the Pattern
-
Central Focus:
Lay out your design on a bead board or towel. Start the center with three soft pink round beads for a gentle focal point. -
Transitioning Texture:
Flank the pink center with one textured beige bead on each side, followed by a terracotta round bead. -
Adding Contrast:
Next, place a white cylinder bead on either side. To give it that refined finish, sandwich the white cylinders between tiny gold tube spacers. -
Building the Length:
Continue the pattern outward: add a textured beige bead, then a group of 3-4 terracotta rounds, then another white cylinder segment with gold spacers. -
Finalizing the Strand:
Finish the ends of the pattern with a longer run of terracotta rounds or white cylinders until you reach your desired necklace length.
Step 3: Assembly
-
Start Stringing:
Cut a length of beading wire about 24 inches long. Attach a crimp bead and one half of your clasp to one end, securing it tightly with pliers. -
Thread the Beads:
Transfer your laid-out pattern onto the wire one bead at a time. Watch the gold spacers carefully; they can be slippery. -
Check the Tension:
Once all beads are strung, hold the necklace up in a U-shape. Ensure there are no gaps where the wire shows, but don’t pull so tight that the necklace becomes stiff. -
Secure the End:
String a crimp bead onto the open end, followed by the extension chain ring. -
Loop Back:
Pass the wire back through the crimp bead and into the first bead or two of your design. -
Crimp and Trim:
Use your pliers to flatten the crimp bead securely. Snip off the excess wire tail as close to the beads as possible without nicking the main wire.
Make It Glossy
Brush a coat of gloss water-based polyurethane varnish onto just the white cylinder beads after baking. This creates a ceramic look that contrasts beautifully with the matte terracotta.
Now you have a stunning, artisan-style piece ready to wear with your favorite linen top


What Really Happens Inside the Kiln
Learn how time and temperature work together inside the kiln to transform clay into durable ceramic.
Double-Strand Clay Bead Necklace for Easy Layering
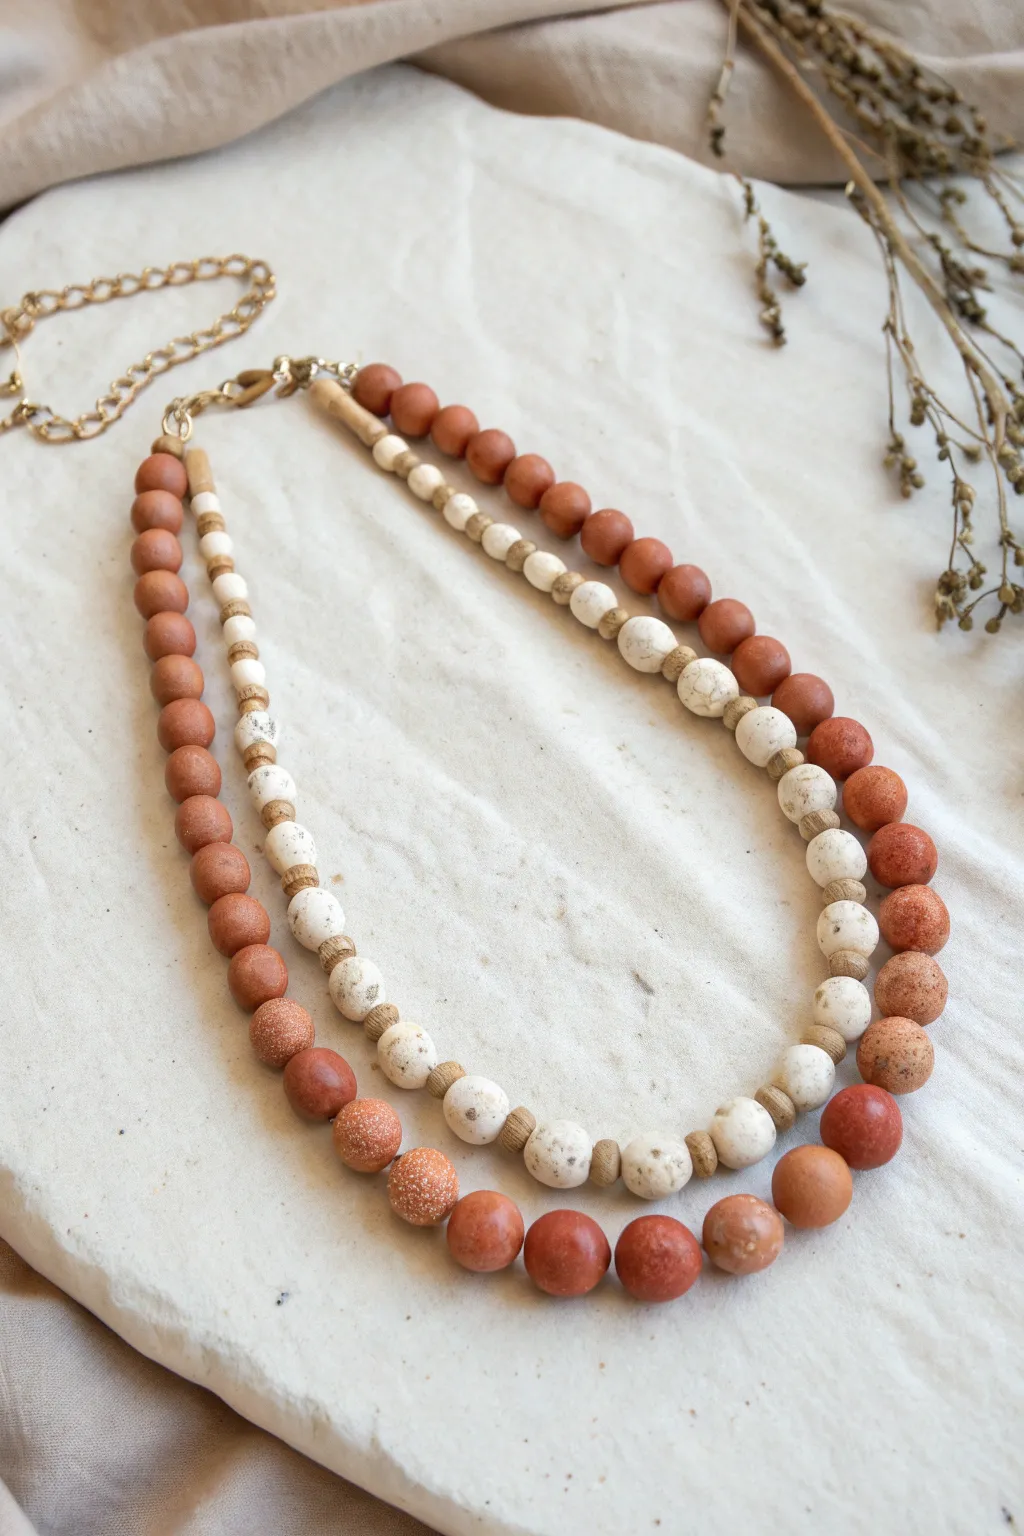
Embrace earthy elegance with this beautiful double-strand necklace that combines the rustic warmth of terracotta with the fresh brightness of speckled white clay. This project simplifies layering by connecting two complementary strands onto a single clasp, creating an effortless, pre-styled look.
Step-by-Step Tutorial
Materials
- Polymer clay (terracotta or reddish-brown color)
- Polymer clay (white or cream with speckles)
- Small wooden spacer beads (approx. 3-4mm)
- Gold-tone jewelry chain (cable chain)
- 2 Gold-tone crimp tubes
- 2 Gold-tone wire guardians (optional but recommended)
- Gold-tone lobster clasp
- 2 Gold-tone jump rings
- Beading wire (nylon-coated stainless steel, gold or neutral color)
- Bead rolling tool or acrylic sheet
- Toothpick or bead piercing pin
- Wire cutters
- Crimping pliers
- Flat nose pliers
- Baking sheet and parchment paper
- Oven
Step 1: Creating the Clay Beads
-
Condition the Clay:
Begin by kneading your terracotta and speckled white polymer clays separately until they are soft and pliable. This conditioning step prevents cracking later. -
Roll the Terracotta Spheres:
Pinch off small pieces of the terracotta clay and roll them between your palms to create smooth spheres. You will need roughly 40-50 beads ranging from 8mm to 10mm in diameter. -
Form the White Spheres:
Repeat the process with the speckled white clay. Aim for slightly smaller beads, roughly 6mm to 8mm, creating about 30-40 of these for the inner strand. -
Pierce Variable Hole Sizes:
Using your toothpick or piercing pin, carefully bore holes through the center of each bead. Twist the pin gently into the bead rather than pushing straight through to avoid flattening the sphere. -
Bake the Components:
Arrange all your pierced beads on a parchment-lined baking sheet. Bake according to your specific clay package instructions, typically around 275°F (135°C) for 15-30 minutes. -
Cool and Finish:
Let the beads cool completely before handling. If any fingerprints are visible, I like to gently sand them away with fine-grit sandpaper at this stage.
Step 2: Designing the Strands
-
Layout the Inner Strand:
On your work surface, plan the shorter inner strand. Use the white speckled beads as the main feature, placing a small wooden spacer bead between every single clay bead to add texture and separate the stones. -
Layout the Outer Strand:
Arrange the longer outer strand using the terracotta beads. For a cohesive look, mimic the pattern by placing a wooden spacer between beads, or keep it solid terracotta for a bolder contrast as seen in the inspiration image. -
Cut the Beading Wire:
Cut two lengths of beading wire. The inner strand wire should be approximately 18 inches, and the outer strand wire about 22 inches, giving you plenty of extra room for crimping.
Sticky Texture?
If your raw clay feels too sticky and is leaving fingerprints, pop it in the fridge for 10 minutes or dust your hands lightly with cornstarch before rolling beads.
Step 3: Assembly & Finishing
-
One Side Connection:
Here is the key to the double-strand design: Holds the ends of BOTH wire strands together. Feed them both through a single crimp tube, then loop them through a wire guardian (attached to a jump ring). -
Secure the First Crimp:
Pass the wires back down through the crimp tube. Use your crimping pliers to flatten the tube securely, locking both strands into place on one jump ring. -
String the Beads:
Thread your laid-out beads onto their respective wires within the design. Be sure to double-check your pattern against your layout before you get too far. -
Check the Drape:
Before closing the necklace, hold the open ends up to your neck or a form to ensure the outer terracotta strand hangs distinctly lower than the inner white strand without tangling. -
Final Connection:
Feed the remaining loose ends of both wires through a second crimp tube, loop through a second wire guardian attached to the lobster clasp, and go back down through the crimp tube. -
Crimp and Trim:
Pull the wires tight enough to remove slack but loose enough that the beads can move slightly. Crimp the tube firmly and use wire cutters to trim the excess wire flush against the bead. -
Add the Extension Chain:
Attach the gold cable chain to one of the jump rings using your flat nose pliers. This adjustable extender adds a professional touch and allows you to customize the length.
Natural Speckles
Don’t have speckled clay? Mix plain white clay with a tiny pinch of ground black pepper or dried coffee grounds before rolling to get an organic granite look.
Now you have a stunning, layered statement piece ready to wear with your favorite linen top
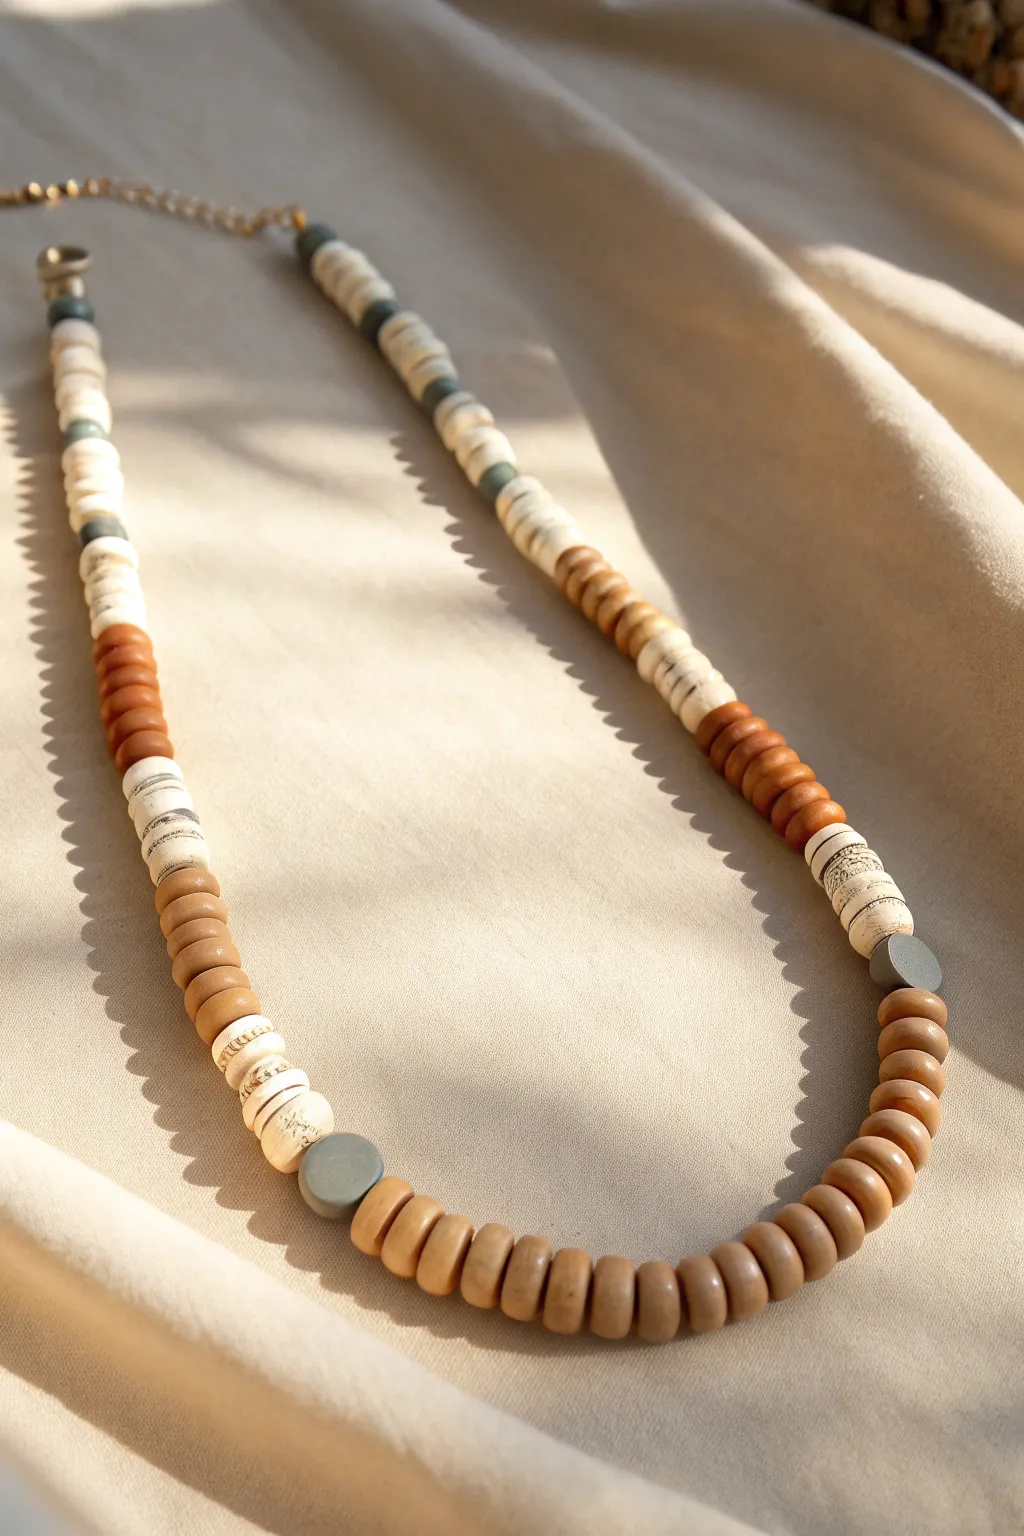
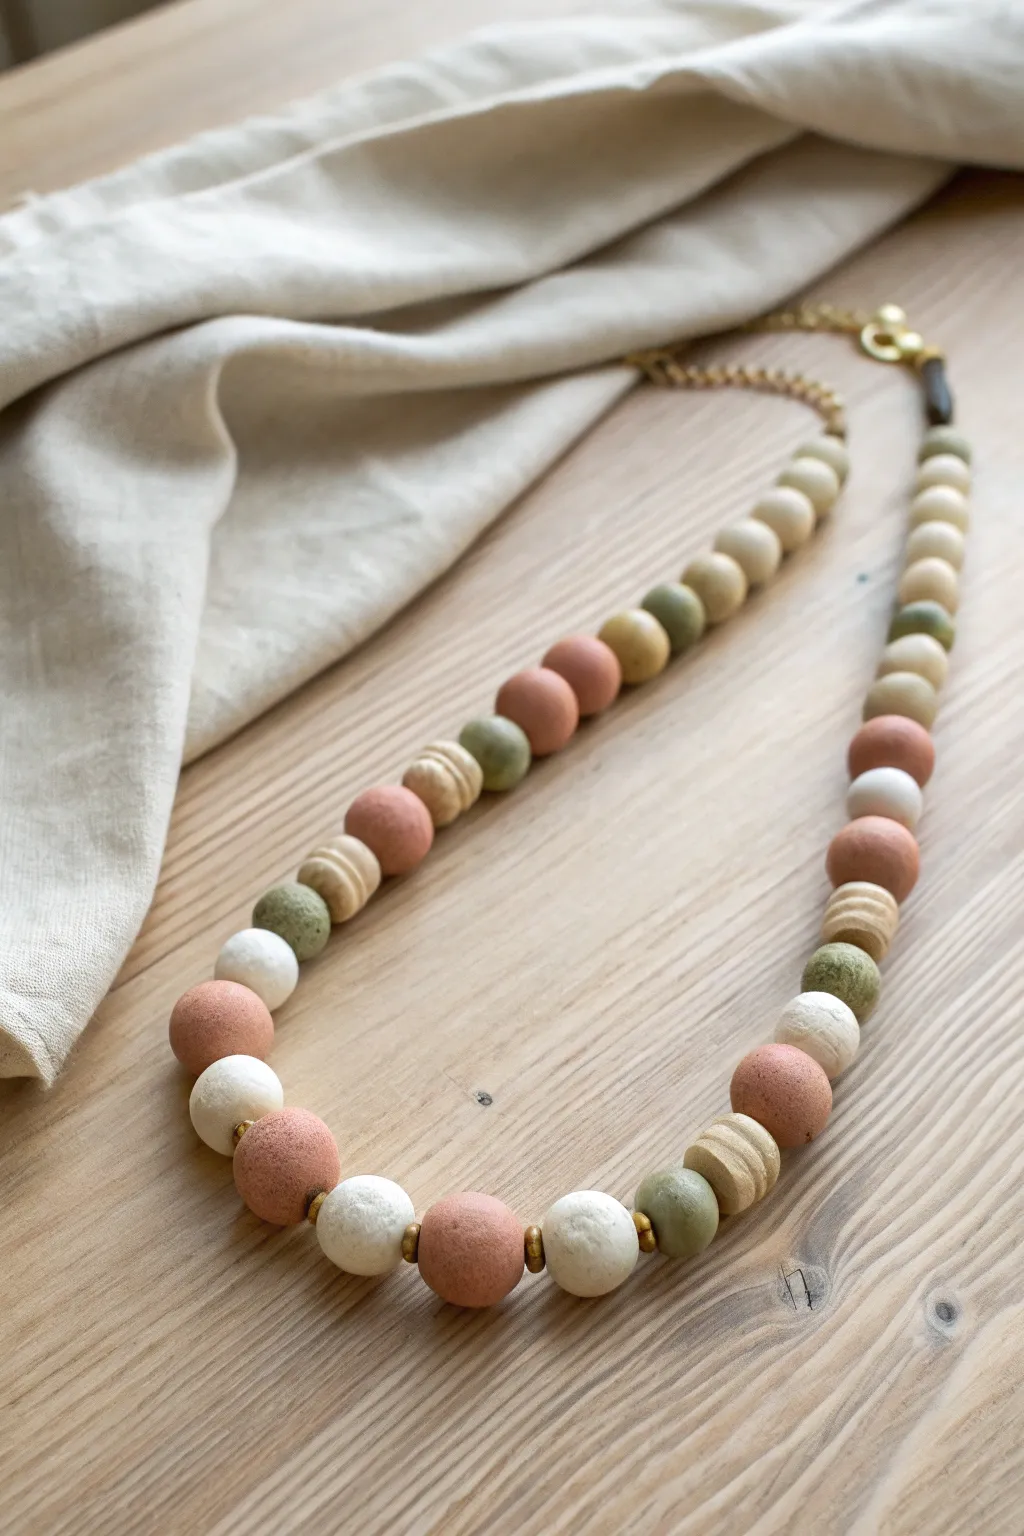
Neck Stack Set: Three Coordinated Clay Bead Necklaces
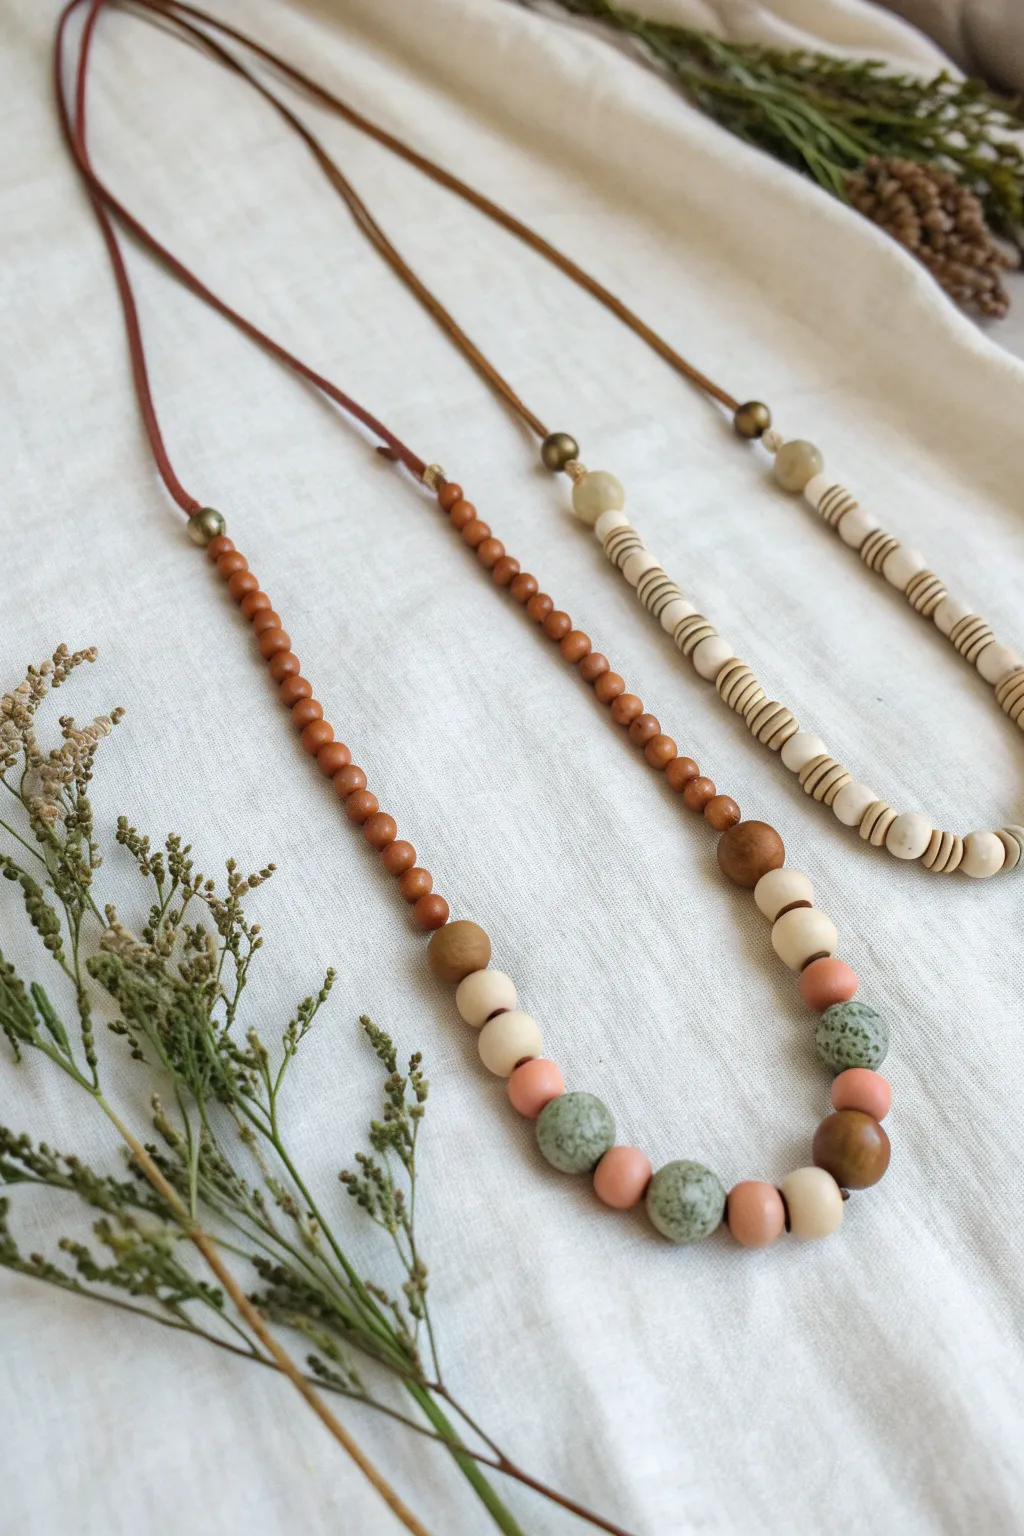
Create a serene, nature-inspired jewelry set with this trio of coordinated necklaces featuring wood, stone, and polymer clay textures. The warm terracotta, cream, and sage green palette brings an organic, grounded feel to any outfit.
Detailed Instructions
Materials
- Red-brown round leather cord (1.5mm or 2mm)
- Small round wooden beads (approx. 4-6mm, reddish-brown)
- Medium round wooden beads (approx. 8-10mm, varying shades of brown)
- Carved bone or wood beads (cream with brown spiral/stripe details)
- Sage green speckled stone or polymer clay beads (10-12mm)
- Terracotta/pinkish-clay smooth round beads (10mm)
- Cream wooden or polymer clay round beads (10mm)
- Antique brass crimp ends or cord ends
- Antique brass spacer beads (small round metal beads)
- Jewelry pliers (flat nose and round nose)
- Scissors
- Clasps (lobster claw or toggle)
Step 1: Preparation & Layout
-
Cut the Cords:
Measure and cut three lengths of leather cord. For a layered look, cut them at staggering lengths—for example, 24 inches, 28 inches, and 32 inches—to allow the strands to drape nicely without tangling. -
Sort Your Palette:
Separate your beads by changing material groups: the small reddish fillers, the striped cream ‘bone’ style beads, and the larger focal beads in sage, clay-pink, and natural wood.
Step 2: Strand 1: The Spiral Cream Layer
-
Anchor the End:
Attach a bead stopper or a piece of tape to one end of your longest cord to prevent beads from sliding off while you work. -
Start the Pattern:
Begin threading the cream-colored beads with brown spiral carvings. Notice how the pattern on these beads creates a continuous texture. I like to alternate the direction of the stripes occasionally for a more organic feel. -
Create a Focal Break:
After about 4-5 inches of the spiral beads, thread a larger, smooth cream stone or resin bead, bracketed by two small antique brass spacer beads. -
Finish the Strand:
Continue the spiral bead pattern for another 4-5 inches until the beaded section is symmetrical. The rest of the cord will remain bare leather. -
Secure the Beads:
Slide an antique brass crimp bead or knot the cord tightly against the last bead on both sides to keep the beaded section centered on the leather.
Stiff Leather Syndrome
If your new leather cord is kinked or stiff from the spool, run it firmly through your fingers several times or hang it with a light weight overnight to relax the shape.
Step 3: Strand 2: The Earthy Focal Layer
-
Begin the Sides:
On the second medium-length cord, start by stringing about 20-25 small reddish-brown wooden beads on each side. These act as the visual ‘chain’ leading to the main attraction. -
Transition Sequence:
Add a medium brown wooden bead, followed by a smooth cream bead, then a clay-pink bead. This establishes a gradient of size and color before the center. -
Build the Centerpiece:
Thread your largest beads now. Alternate between the sage green speckled beads and the terracotta-pink beads. Use a medium wooden bead as a separator between these larger feature beads. -
Add Texture:
Include one or two of the textured green stone beads in the very center to draw the eye. The speckled finish contrasts beautifully with the smooth clay beads. -
Mirror the Design:
Reverse your transition sequence on the other side of the center section: clay-pink bead, cream bead, medium wood bead, and finally back to the small reddish wooden beads. -
Final Adjustments:
Hold the necklace up to check the drape. Ensure the weight is balanced and the focal section sits right in the middle before securing the ends.
Level Up: Scent Diffuser
Leave the natural wooden beads untreated. You can apply a drop of essential oil to them, and the porous wood will act as a gentle personal diffuser throughout the day.
Step 4: Finishing the Set
-
Check Lengths:
Lay both finished beaded cords on a flat surface next to each other. Verify that the ‘Neck Stack’ hangs at different levels so one doesn’t obscure the other. -
Add Cord Ends:
Place a crimp style cord end over the raw tip of the leather. Use your flat nose pliers to fold the metal wings down tightly over the leather, crushing it slightly for a firm grip. -
Attach Clasps:
Open a jump ring using two pliers (twist, don’t pull apart) and attach your chosen clasp to the loop on the cord end. Repeat for all cord ends. -
Optional Knots:
If you prefer a more rustic look and want to skip the metal hardware, you can use sliding knots on the leather cord to make the necklaces adjustable.
Now you have a stunning, layered set of natural necklaces ready to add a touch of bohemian elegance to your daily wardrobe

TRACK YOUR CERAMIC JOURNEY
Capture glaze tests, firing details, and creative progress—all in one simple printable. Make your projects easier to repeat and improve.
Ombre Fade Clay Bead Necklace
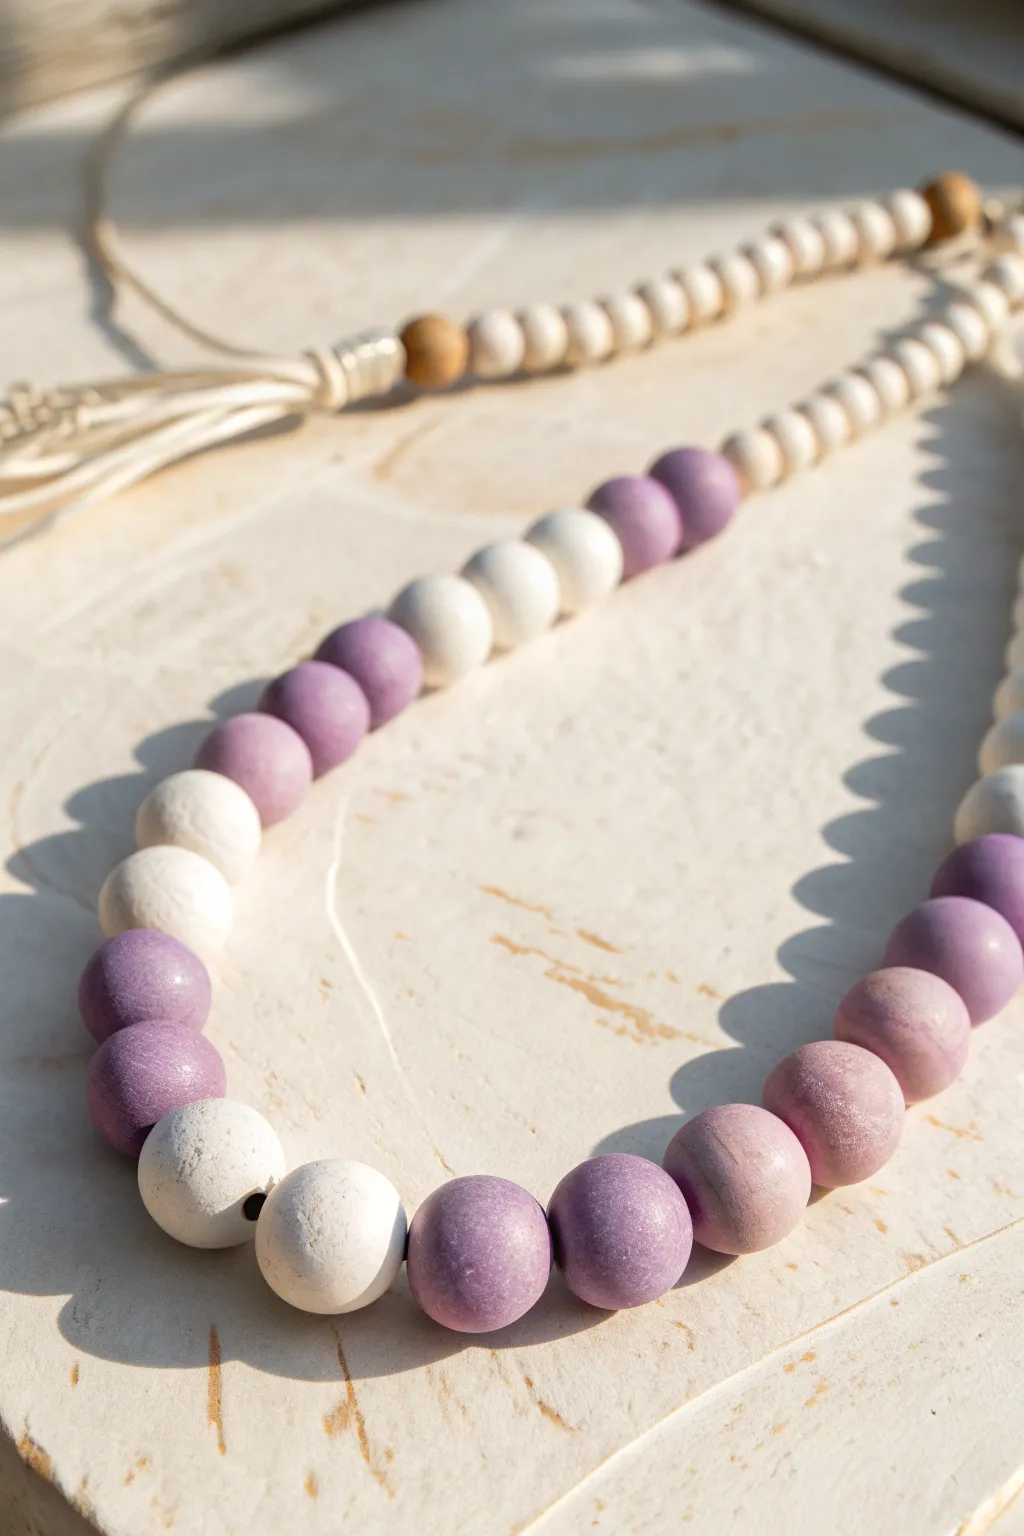
Create a soothing visual rhythm with this hand-rolled clay bead necklace featuring a gentle ombre transition. By mixing simple white and purple clays, you will achieve a sophisticated gradient that mimics the soft hues of a lavender field.
Step-by-Step Guide
Materials
- White polymer clay
- Purple polymer clay
- Waxed cotton cord or hemp string (cream color)
- Bead reamer, toothpick, or skewer
- Acrylic rolling pin or glass jar
- Baking sheet
- Parchment paper
- Fine-grit sandpaper (optional)
- Small beige wooden accent beads (optional)
Step 1: Mixing the Gradient
-
Condition the clay:
Begin by kneading your white and purple polymer clay blocks separately until they are soft, pliable, and easy to work with. -
Portion the base colors:
Cut off a chunk of pure white clay and a chunk of pure purple clay. These will serve as your lightest and darkest spectrum ends. -
Create the mid-tones:
To achieve the ombre effect, you need intermediate shades. Mix equal parts white and purple to get a medium lavender. Then, mix a lot of white with a tiny dot of purple for a very pale lilac. -
Refine the shades:
Adjust your mixtures until you have four distinct piles: pure white, pale lilac, medium lavender, and pure purple. I find aiming for roughly 5-6 beads worth of each color creates a balanced length.
Step 2: Rolling and Piercing
-
Form the spheres:
Pinch off equal-sized pieces of clay from your color piles. Roll them between your palms to create smooth, round spheres approximately 12-15mm in diameter. -
Check for consistency:
Line your beads up side-by-side on your work surface to ensure they are relatively uniform in size, making adjustments where necessary. -
Pierce the holes:
Hold a bead gently between your thumb and forefinger. Using a skewer or needle tool, carefully twist a hole through the center. Wiggle the tool slightly to ensure the hole is wide enough for your cord. -
Refine the shape:
Piercing often distorts the sphere slightly, so gently re-roll the bead between your fingers with the tool still inserted to restore its roundness. -
Bake the beads:
Arrange the beads on a parchment-lined baking sheet. Bake according to your specific clay package instructions, usually around 275°F (135°C) for 15-30 minutes. -
Cool and finish:
Let the beads cool completely. If there are any fingerprints, lightly buff them away with fine-grit sandpaper for that matte, stone-like finish visible in the photo.
Uneven Holes?
If your holes deform while baking, bake beads directly on the skewer or a dedicated bead rack. This keeps the channels perfectly round and straight.
Step 3: Assembly
-
Cut the cord:
Cut a length of cord approximately 35-40 inches long, depending on how low you want the necklace to hang. -
Plan the layout:
Lay out your beads on the table in the ombre pattern shown: White, Pale Lilac, Medium Lavender, Purple, Medium Lavender, Pale Lilac, White. Repeat this sequence. -
String the beads:
Thread the cord through your arranged beads. The matte texture of the clay grips the cord nicely, so they shouldn’t slide too wildly. -
Add the tassel:
At the bottom center of the necklace, tie a simple loop knot. Create a tassel by wrapping extra cord around your hand 20 times, cutting one end, and tying the top. -
Secure the tassel:
Attach the tassel to the bottom loop of your necklace. You can slide a small beige wooden bead over the gathered top of the tassel to hide the knot for a professional finish. -
Final knots:
Tie the two main ends of the necklace cord together at your desired length, trimming any excess string.
Scented Beads
Use terracotta air-dry clay instead of polymer. After drying, add a drop of essential oil to each bead to turn your necklace into a diffuser.
Now you have a stunning, trendy accessory that adds a pop of soft color to any outfit
Focal Pendant Moment: Clay Bead Necklace With a Beaded Bail
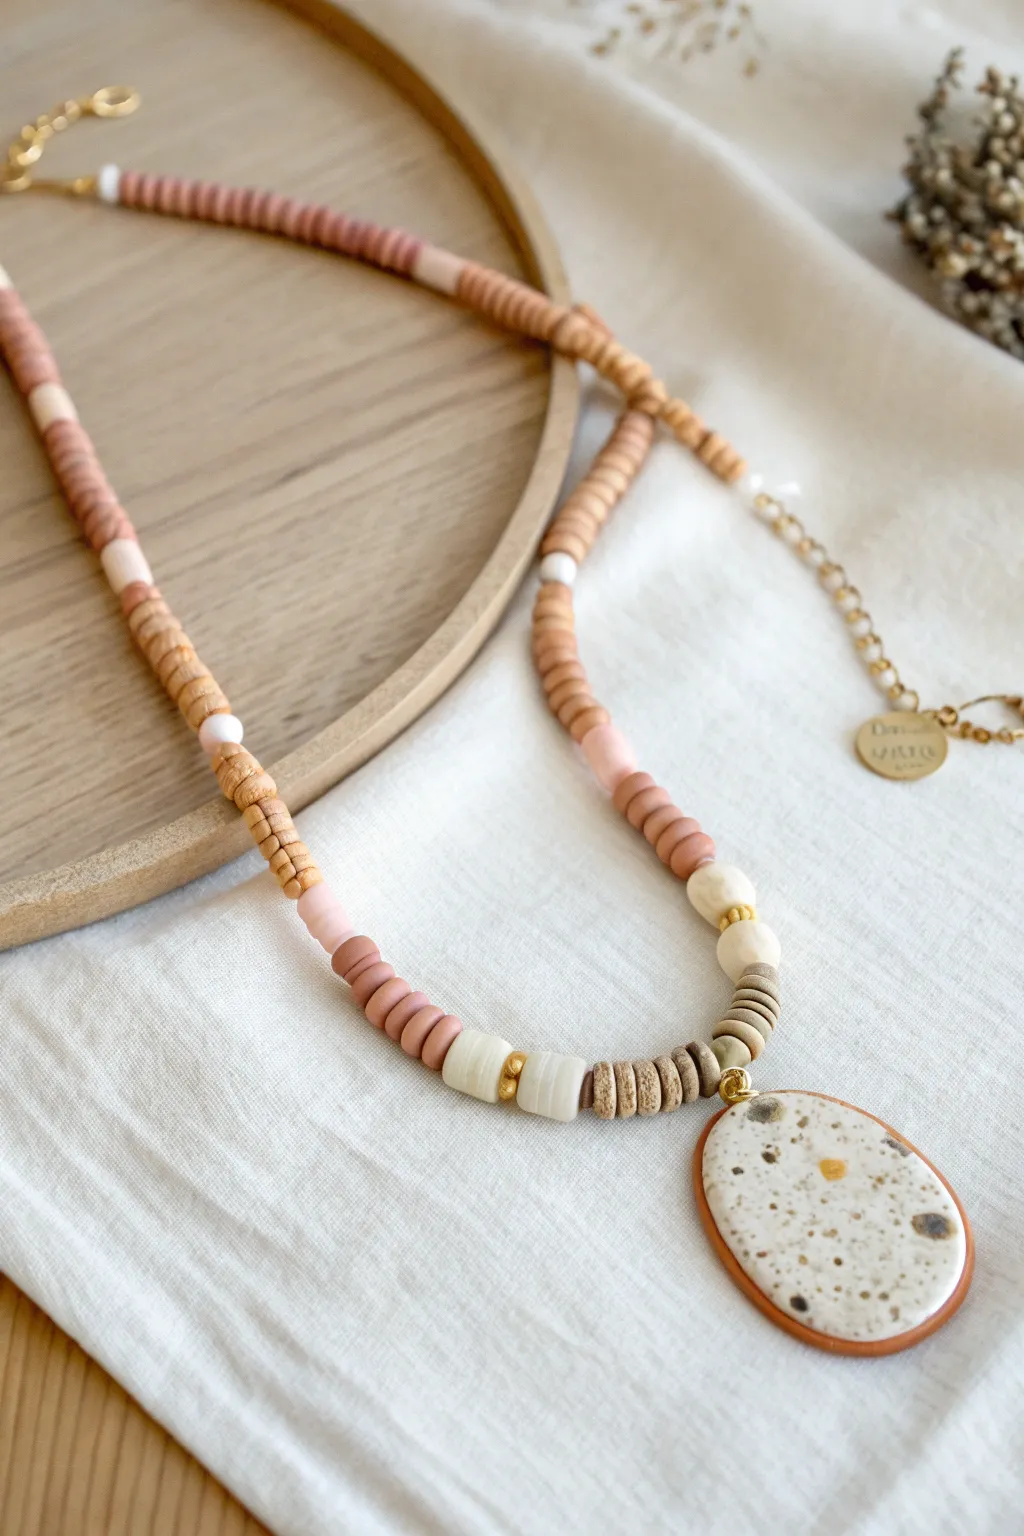
Embrace organic texture and warm, earthy tones with this sophisticated polymer clay necklace. Featuring a striking terrazzo focal pendant and handmade heishi beads, this piece creates a modern boho look that feels effortlessly chic.
Detailed Instructions
Materials
- Polymer clay in terracotta, white, beige, light pink, and brown
- Acrylic rolling pin
- Clay cutting blade
- Oval clay cutter (approx. 2 inches)
- Small round piping tip or straw (for piercing beads)
- Sandpaper (various grits from 400 to 1000)
- Hand drill or dremel with small bit
- Beading wire
- Gold crimp beads and covers
- Gold jump rings (6mm)
- Gold bead spacers (small)
- Lobster clasp and extension chain
- Jewelry pliers (flat nose and cutting)
- Oven for baking
Step 1: Creating the Terrazzo Focal Pendant
-
Prepare the terrazzo chips:
Roll out very thin sheets of brown, beige, and mustard yellow clay. Bake them briefly (about 10 minutes) until set, then let them cool. -
Chop the chips:
Using your clay blade, chop these baked clay sheets into tiny, irregular angular fragments. Keep them varied in size for a natural terrazzo look. -
Mix the base:
Condition a block of white or granite-effect clay. Mix the chopped fragments into this raw clay, kneading gently to distribute them without blending the colors together. -
Roll and cut:
Roll the terrazzo mixture into a slab about 4mm thick. Use your oval cutter to punch out the main pendant shape. -
Add the border frame:
Roll a snake of terracotta clay and flatten it slightly into a long strip. Carefully wrap this strip around the outer edge of your oval pendant, smoothing the seam where the ends meet so it looks continuous. -
Attach the bail loop:
Before baking, insert a gold jump ring into the top center of the clay frame, or create a small clay loop. Alternatively, you can drill a hole after baking. -
Bake the pendant:
Bake the pendant according to your clay manufacturer’s instructions (usually 275°F for 30-45 minutes). I like to bake it on a ceramic tile to keep the back perfectly flat.
Step 2: Crafting the Heishi & Spacer Beads
-
Roll clay sheets:
Condition clay in your chosen palette: terracotta, blush pink, beige, and white. Roll each color into a slab approximately 2-3mm thick. -
Cut small discs:
Use a very small circle cutter or a straw to punch out many small discs from each color. You’ll need roughly 30-40 beads of each color depending on your desired length. -
Make accent beads:
Create a few specialized shapes for variety: roll thicker cylinders in white and beige to serve as ‘statement’ spacers near the pendant. -
Pierce the beads:
Use a toothpick or bead pin to poke a hole through the center of every bead. Ensure the hole is wide enough for your beading wire. -
Bake the beads:
Arrange your beads on a baking sheet and bake them. Since they are small, 20-25 minutes should suffice. -
Sand and finish:
Once cool, wet-sand the terrazzo pendant to reveal the inner chips clearly. You can lightly sand the edges of the heishi beads if they look rough.
Sticky Situation?
If clay sticks to your cutter, dip the cutter in cornstarch or water before pressing down. This acts as a release agent and helps keep your edges sharp and clean.
Step 3: Assembly
-
Stringing the center:
Cut a length of beading wire (approx. 24 inches). Start by threading the wire through the bail of your finished pendant so it hangs in the exact center. -
Adding texture near the pendant:
On both sides of the pendant, string your most textured beads first—use the rustic beige discs and the larger white cylinder beads mixed with gold spacers. -
Create the pattern:
Continue stringing beads up both sides, alternating colors in sections. For example, do an inch of terracotta, then a single white bead, then an inch of beige. -
Finish the ends:
Once you reach your desired length, slide a gold crimp bead onto one end, followed by a wire guardian or jump ring and one half of the clasp. -
Secure the clasp:
Loop the wire back through the crimp bead and use your pliers to flatten it securely. Cover the crimp with a crimp cover if desired for a polished look. -
Repeat on the other side:
Repeat the crimping process on the other end with the extension chain. Trim any excess wire.
Smoother Heishi Beads
To shape heishi beads quickly, string baked beads onto a mandrel or skewer and roll them against sandpaper as a group. This unifies their size and smooths their outer edges evenly.
Now you have a stunning, artisan-style necklace ready to wear with your favorite outfit
Unexpected Texture: Matte Clay Beads With Glossy Accent Beads
Embrace the serene beauty of natural textures with this simple yet striking necklace. Combining matte polymer clay beads in soft terra cotta and sage hues with grooved wooden accents creates a sophisticated, bohemian-inspired accessory perfect for everyday wear.
Detailed Instructions
Materials
- Polymer clay in ‘Terra Cotta’, ‘Sage Green’, and ‘White’ (or ‘Ecru’)
- Wooden beads with horizontal grooves (approx. 15mm)
- Small gold disc spacer beads (heishi style)
- Gold jewelry chain (approx. 24-30 inches)
- Gold lobster clasp and jump rings
- Beading wire (nylon-coated stainless steel)
- Crimp beads
- Medium jewelry pliers (flat nose)
- Wire cutters
- Bead reamer or toothpick
- Baking sheet and parchment paper
- Fine-grit sandpaper (optional)
- Matte varnish (optional)
Step 1: Crafting the Clay Beads
-
Condition the Clay:
Begin by warming up your polymer clay portions in your hands. Knead the terra cotta, sage green, and white clays separately until they are soft and pliable, ensuring no air bubbles remain trapped inside. -
Mix Custom Shades:
To achieve the organic look seen in the photo, you might want slightly varied tones. Try mixing a tiny pinch of white into some of the terra cotta clay to create a softer, lighter pink variation. -
Shape the Spheres:
Roll the clay into balls approximately 15mm in diameter. I find that using a ruler or a specific clay cutter to portion the block first helps keep the sizes consistent. -
Refine the Surface:
Gently roll each ball between your palms to smooth out any fingerprints. The goal is a perfect sphere, but a slight organic irregularity adds to the handmade charm. -
Texture the White Beads:
For the cream-colored beads, gently tap the surface with a tool like a clean toothbrush or crumpled foil before baking if you want to mimic the stone-like texture seen in the inspiration piece. -
Create the Bead Holes:
Using a bead reamer or a toothpick, carefully pierce the center of each clay sphere. Rotate the tool as you push through to prevent the clay from flattening. -
Bake the Beads:
Arrange your beads on a baking sheet lined with parchment paper. Bake according to the manufacturer’s instructions for your specific brand of clay—usually 275°F (135°C) for about 15-30 minutes. -
Cool and Finish:
Allow the beads to cool completely. Once cool, if you prefer an ultra-matte, stone-like feel, you can lightly sand them with fine-grit sandpaper, or leave them as-is for a natural finish.
Stone-Effect Trick
Mix coarse black pepper or dried used coffee grounds into your white clay before rolling. This creates a speckled, faux-stone ceramic look instantly.
Step 2: Assembling the Necklace
-
Prepare the Wire:
Cut a length of beading wire approximately 30 inches long, or longer if you prefer a matron-length necklace. Secure one end with a piece of tape to stop beads from sliding off while you work. -
Plan the Pattern:
Lay out your bead design on a flat surface. Alternating colors is key: try a pattern like terra cotta, white, sage, then a wooden grooved bead. -
Incorporate Gold Accents:
Place a small gold spacer bead between every two or three large beads. This adds that crucial touch of refinement and separates the colors. -
String the Beads:
Transfer your laid-out pattern onto the beading wire. Start from the center focal point and work your way outwards to ensure symmetry. -
Attach the Chain:
Once all beads are strung, string a crimp bead onto the wire, followed by one end of your gold chain. Loop the wire back through the crimp bead and pull tight. -
Secure the Ends:
Use your flat nose pliers to flatten the crimp bead securely, locking the wire in place. Trim the excess wire tail close to the bead. -
Repeat on the Other Side:
Repeat the crimping process on the other end of the beaded section, attaching it to the other end of the chain. -
Add the Clasp:
Find the center point of the chain at the back of the neck. Cut the chain here using wire cutters. -
Final Hardware Installation:
Attach a jump ring to one side of the cut chain and a jump ring with a lobster clasp to the other. Use your pliers to twist the jump rings open and closed securely.
Level Up: Scent Diffuser
Leave the wooden beads unfinished (no varnish). You can then apply a drop of essential oil to the wood, turning your necklace into a personal aromatherapy diffuser.
Now you have a stunning, handcrafted piece that balances modern geometry with organic warmth.