If you’ve got a plain ceramic bunny sitting on your table, you’re basically holding a tiny blank canvas with ears. Here are my favorite ceramic bunny painting ideas—from classic spring looks to playful, unexpected styles you can totally make your own.
Soft Pastel Solid-Color Bunny
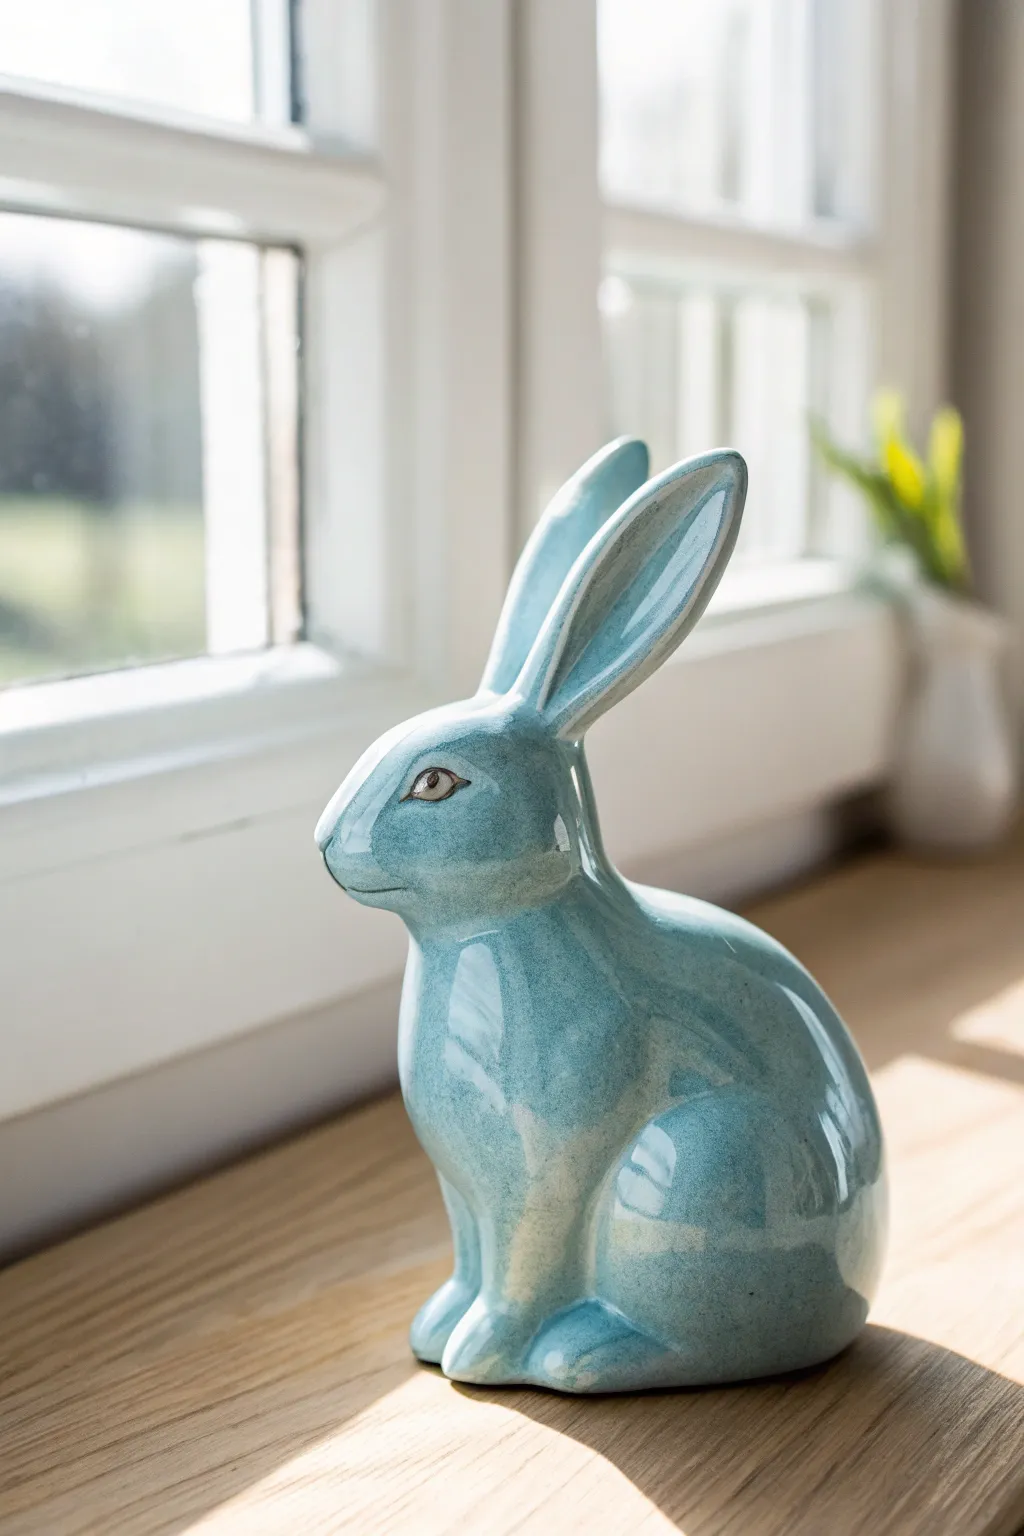
Achieve a sophisticated, high-end look with this monochromatic ceramic project. Resembling a dipped porcelain glaze, this soft blue finish has a beautiful, glass-like sheen that catches natural light perfectly.
How-To Guide
Materials
- Bisque ceramic bunny figurine
- High-gloss acrylic paint or specialty ceramic glaze (Robin’s Egg Blue or Soft Teal)
- White gloss acrylic paint (for mixing highlights)
- Black acrylic paint (for eye details)
- Fine detail brush (size 0 or 00)
- Medium soft shader brush
- Large flat brush or foam brush
- High-gloss clear varnish or spray sealer
- Palette for mixing
- Water and paper towels
Step 1: Preparation & Base Coat
-
Clean the surface:
Before dipping your brush, wipe the ceramic bunny down thoroughly with a slightly damp cloth. Ceramic bisque can be dusty, and you want a perfectly smooth surface for that glossy finish. -
Mix your base color:
On your palette, prepare your main Robin’s Egg Blue color. If your paint is too thick, thin it slightly with a medium or a tiny drop of water to help it level out and reduce brushstrokes. -
Apply the first coat:
Using the large flat brush or foam brush, apply a smooth, even layer of blue over the entire bunny. Don’t worry about full opacity yet; just get the color on. -
Let it dry:
Allow the first coat to dry completely. This usually takes about 20-30 minutes depending on your paint brand. -
Apply second coat:
Apply a second layer of the blue. This is where you should see the solid, rich color develop. Watch out for drips pooling at the bottom of the paws.
Visible Brushstrokes?
If brush lines are ruining the smooth look, use a high-quality soft synthetic brush and mix a flow improver medium into your acrylics to help the paint self-level.
Step 2: Creating Dimension
-
Mix a highlight shade:
Combine your base blue with a small amount of white gloss paint. You want a color just a two shades lighter than your base. -
Highlight the curves:
With your medium shader brush, gently paint this lighter mix onto the highest points: the tops of the ears, the curve of the shoulder, and the thigh. -
Blend the transitions:
While the paint is still slightly wet, use a clean, damp brush to feather the edges of the lighter paint into the base coat for a soft, natural gradient. -
Deepen the shadows:
I like to take a tiny bit of the original blue and go back into the deep creases, like where the legs meet the body, to re-establish depth if the second coat got too thick. -
Inner ear detail:
Use the lighter mix inside the ears. It should be subtle, not a stark contrast, mimicking how light naturally hits the concave shape.
Step 3: The Eye Detail
-
Outline the eye:
Switch to your finest detail brush. Carefully paint the almond shape of the eye using a very thin line of black or dark grey paint. -
Fill the pupil:
Fill in the center of the eye shape with black. -
Add the iris:
Paint a very thin ring of white or pale grey around the pupil if you want extra realism, though a simple solid dark eye works well for this stylized look too. -
The catchlight:
This is the most crucial step for life: add a tiny white dot in the upper corner of the pupil. It instantly wakes up the bunny’s expression.
Level Up: Crackle Effect
For a vintage antique pottery look, apply a crackle glaze medium between your paint layers. Top it with an antiquing wax to highlight the tiny fissures.
Step 4: Sealing
-
Dry completely:
Wait at least 24 hours for all paint layers to cure fully. -
First varnish coat:
Apply a high-gloss clear varnish. Use long, single strokes to avoid bubbles. -
Final gloss layer:
Once the first coat is tacky or dry, apply a second coat of high-gloss varnish. This creates that ‘wet’ ceramic look that makes the piece shine beautifully in the window.
Place your shiny new creation on a sunny ledge and enjoy the cheerful pop of color


Classic White Bunny With Pink Ear Details
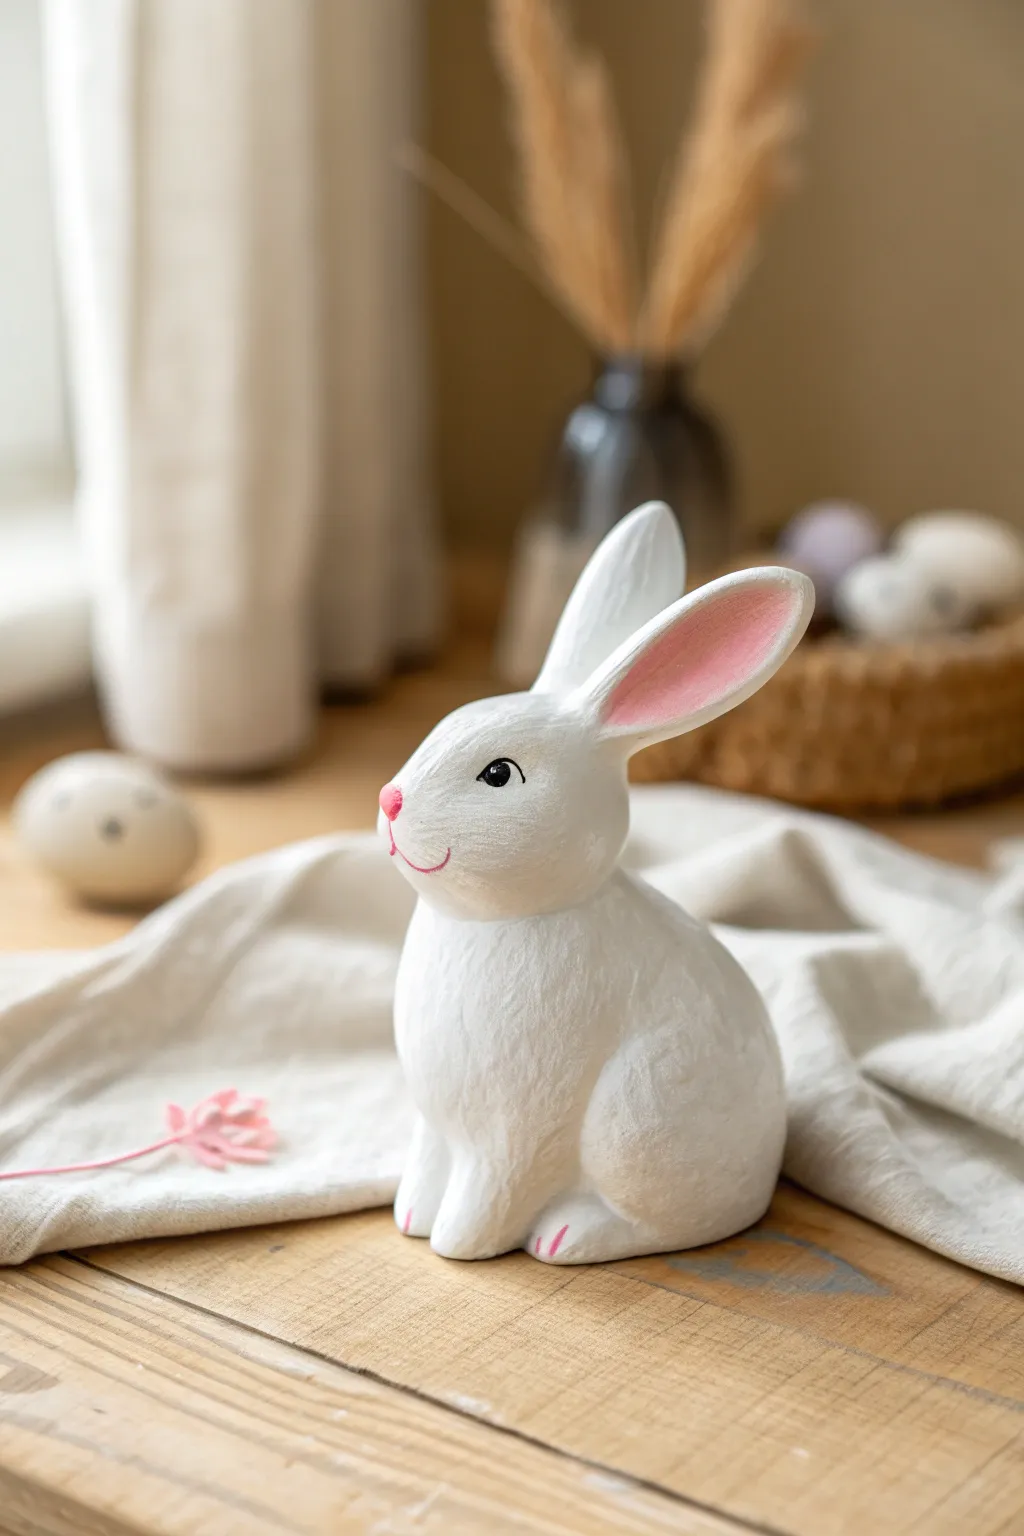
Embrace minimalist charm with this timeless ceramic bunny project, featuring a textured white coat and soft pink accents. The realistic yet understated finish makes this piece perfect for sophisticated spring decor or nursery shelving.
Step-by-Step Tutorial
Materials
- Unpainted ceramic bunny bisque (with fur texture molded in)
- White acrylic paint (matte or satin)
- Soft pink acrylic paint (pastel shade)
- Black acrylic paint
- Medium flat brush (for base coating)
- Fine liner brush (size 0 or 00)
- Small round brush (size 2-4)
- Paper towels
- Water cup
- Palette or paper plate
- Matte spray sealer (optional)
Step 1: Creating the Base Coat
-
Clean the ceramic:
Begin by wiping down your ceramic bunny with a slightly damp paper towel to remove any dust or manufacturing debris. Let it dry completely for a few minutes before starting. -
Apply the first white layer:
Load your medium flat brush with white acrylic paint. Apply an even coat over the entire bunny, working the paint into the recessed fur grooves. Don’t worry if it looks a bit streaky initially. -
Let it dry:
Allow the first coat to dry fully. Acrylics usually take about 15-20 minutes to become touch-dry. -
Add a second coat:
Apply a second layer of white paint to ensure solid, opaque coverage. This bright, clean base is essential for the classic look we are aiming for. -
Check for gaps:
Inspect the bunny from underneath and all angles to ensure you haven’t missed any spots in the texture. Touch up any bare ceramic patches.
Uneven Coverage?
If the white paint looks streaky or gray after two coats, let it dry fully and sponge on a third layer rather than brushing. This builds opacity without brushstrokes.
Step 2: Painting the Details
-
Mix the pink shade:
On your palette, prepare your soft pink paint. If your pink is too vibrant, mix in a tiny drop of white to soften it into a pastel tone. -
Fill the ears:
Using a small round brush, carefully paint the inner recess of the ears with the pink mixture. Keep the edges clean, leaving a rim of white fur visible around the pink center. -
Paint the nose:
Switch to your fine liner brush. Dip just the tip into the pink paint and dab a small, rounded oval onto the tip of the nose. -
Draw the mouth:
With the same liner brush and very little paint, draw a thin, delicate curved line extending downward from the nose to create the mouth smile. -
Paint the eyes:
Clean your brush thoroughly. Using black paint and a small round brush, carefully fill in the eyes. I find steadying my hand against the table helps keep the edges smooth. -
Add the eye highlight:
Once the black paint is completely dry, use the tip of a clean liner brush or a toothpick to place a tiny white dot in the upper corner of each eye. This brings the bunny to life. -
Detail the paws:
Using a very faint amount of pink on your liner brush, add tiny vertical lines to the paws to suggest toes, just like in the reference image.
Step 3: Finishing Up
-
dry brushing for texture (Optional):
If you want to enhance the fur texture, wipe almost all the white paint off a dry brush and lightly sweep it over the dry body to catch the raised areas. -
Final inspection:
Look over your work for any accidental smudges. Use white paint to cover any stray pink or black marks. -
Seal the project:
To protect your artwork, take the bunny to a well-ventilated area and apply a light coat of matte spray sealer. This prevents the paint from chipping over time.
Add Some Sparkle
For a whimsical twist, mix fine iridescent glitter into your final white texturing layer, giving the bunny a magical, frosty shimmer perfect for Easter.
Now you have a charming, handcrafted bunny ready to settle into your home decor


Sweet Polka Dot Bunny
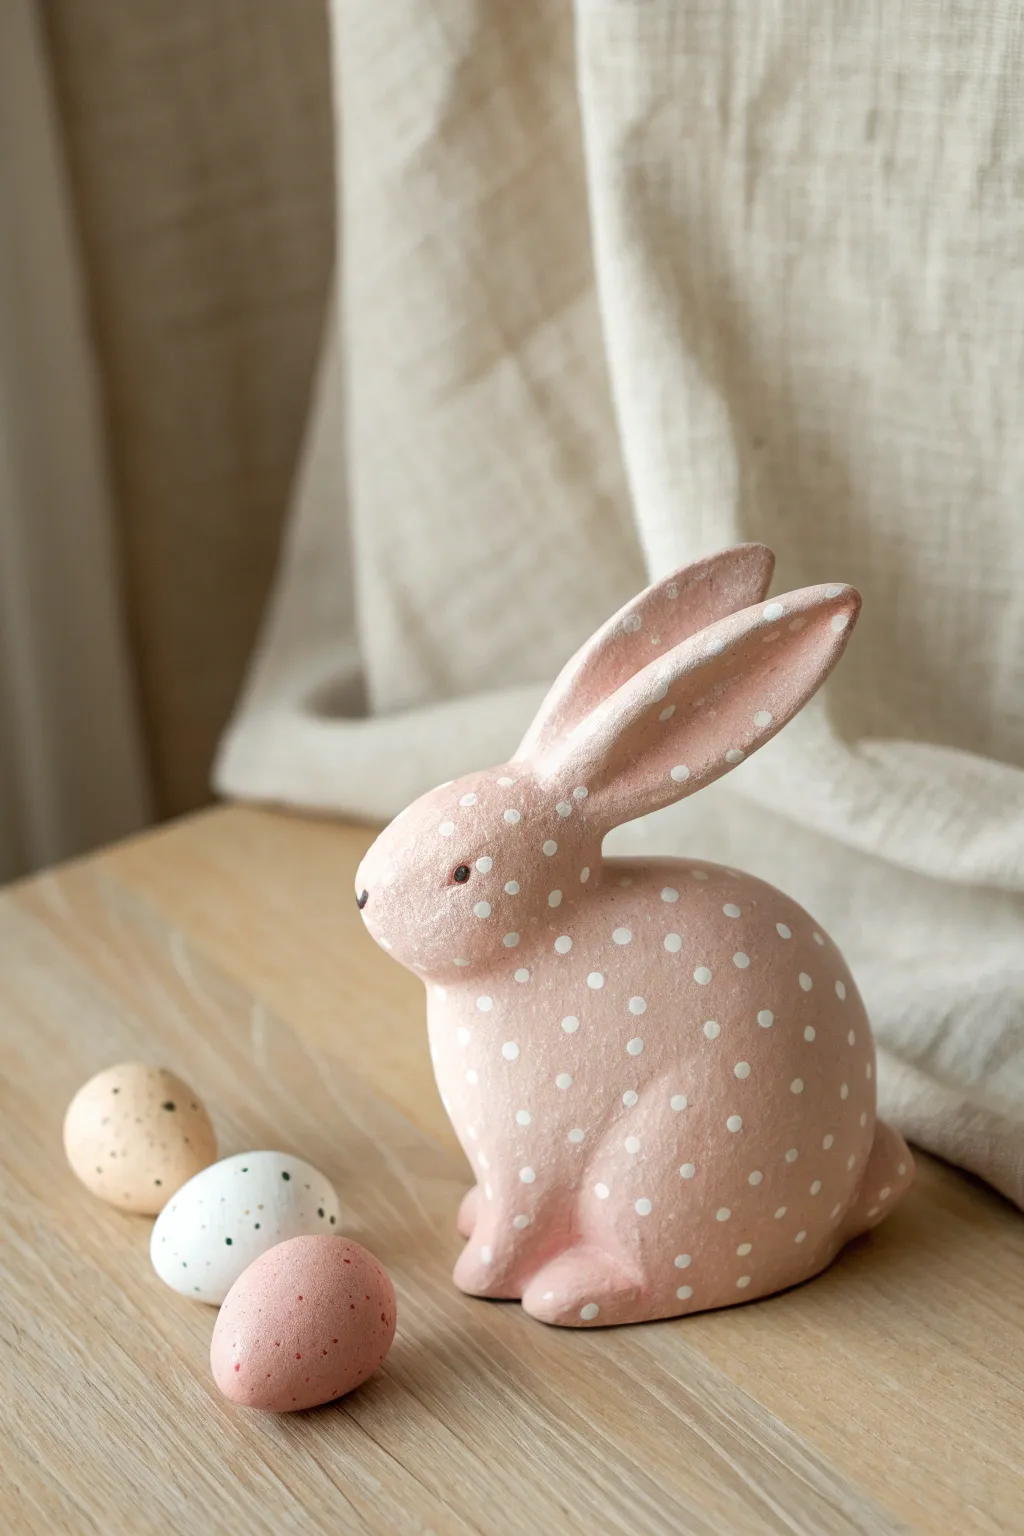
Embrace the softness of spring with this charming polka dot bunny project. By combining a muted, dusty pink base with delicately hand-painted white spots, you can transform a plain ceramic figure into a piece of timeless, vintage-inspired decor.
Step-by-Step Guide
Materials
- Unfinished ceramic bunny figurine
- Acrylic paint (Dusty Pink or cameo pink)
- Acrylic paint (Titanium White)
- Small round paintbrush (size 4 or 6)
- Detail paintbrush (size 0 or 1)
- Cotton swabs or a dedicated dotting tool (optional)
- Palette for mixing
- Paper towels
- Cup of water
- Matte spray sealant
Step 1: Preparation and Base Coat
-
Clean the surface:
Before you begin painting, take a dry paper towel or a soft cloth and wipe down the ceramic bunny to remove any dust or oils from fingerprints, ensuring the paint adheres smoothly. -
Prepare the pink shade:
Squeeze a generous amount of dusty pink acrylic paint onto your palette. If your pink is too bright, mix in a tiny drop of brown or grey to mute it down for that earthy, clay-like appearance seen in the photo. -
Apply the first coat:
Using your medium round brush, apply an even layer of pink paint over the entire bunny. Don’t worry if it looks slightly streaky at this stage; coverage is key. -
Let it dry completely:
Wait about 15 to 20 minutes for the first coat to dry. A matte paint dries relatively quickly, but ensure it’s dry to the touch before proceeding. -
Apply the second coat:
To get that solid, opaque finish, apply a second coat of pink. Smooth out your brushstrokes by painting in the direction of the bunny’s fur or curves. -
Touch up hidden spots:
Turn the bunny upside down or inspect the ears and paws closely to make sure you haven’t missed any white ceramic spots. Fill these in now.
Step 2: Adding the Details
-
Prepare white paint:
Clean your brush thoroughly or switch to your smaller detail brush. Squeeze a small amount of Titanium White paint onto your palette. It shouldn’t be too watery, so use it straight from the tube if possible. -
Paint the eye:
Using your smallest detail brush or a toothpick, carefully paint a tiny black dot for the eye. Add a speck of white highlight once the black is dry to bring it to life. -
Accent the inner ear:
Lightly dry-brush a very faint amount of white inside the long ears to give them depth and texture, blending it softly so there are no harsh lines.
Chalk Paint Trick
For an ultra-matte, vintage texture like the photo, mix a teaspoon of baking soda into your acrylic paint before applying the base coat.
Step 3: The Polka Dot Pattern
-
Test your dotting tool:
You can use the back end of a paintbrush handle, a cotton swab with the cotton removed, or a small round brush. Dip your chosen tool into the white paint and make a few practice dots on a scrap piece of paper to gauge the size. -
Start on the back:
Begin painting dots on the bunny’s back. This lets you get into a rhythm before moving to the more visible face area. -
Stagger the placement:
Place your dots in a random but balanced pattern. Avoid creating perfect grid lines; instead, place a dot in the gap between two dots on the row above to create a natural flow. -
Vary the pressure:
For a hand-painted look, allow some dots to be slightly larger or more opaque than others. I find this slight irregularity adds to the rustic charm of the piece. -
Navigate the curves:
As you move around the legs and neck, space the dots slightly closer together to accommodate the curves of the ceramic form. -
Finish with the ears:
Add a few smaller dots climbing up the ears. Use a lighter touch here so the dots don’t overwhelm the slender shape of the ears.
Natural Speckles
Flick the bristles of an old toothbrush dipped in diluted brown paint over the finished bunny to add tiny, egg-like speckles for extra realism.
Step 4: Finishing Touches
-
Allow final drying time:
Let the white dots dry completely, which should take about 30 minutes to ensure they don’t smear during sealing. -
Seal the artwork:
Take the bunny to a well-ventilated area and apply a light coat of matte spray sealant. This protects the paint from chipping and preserves that flat, chalky finish.
Now your adorable speckled bunny is ready to hop onto your mantle or serve as a centerpiece for your next gathering


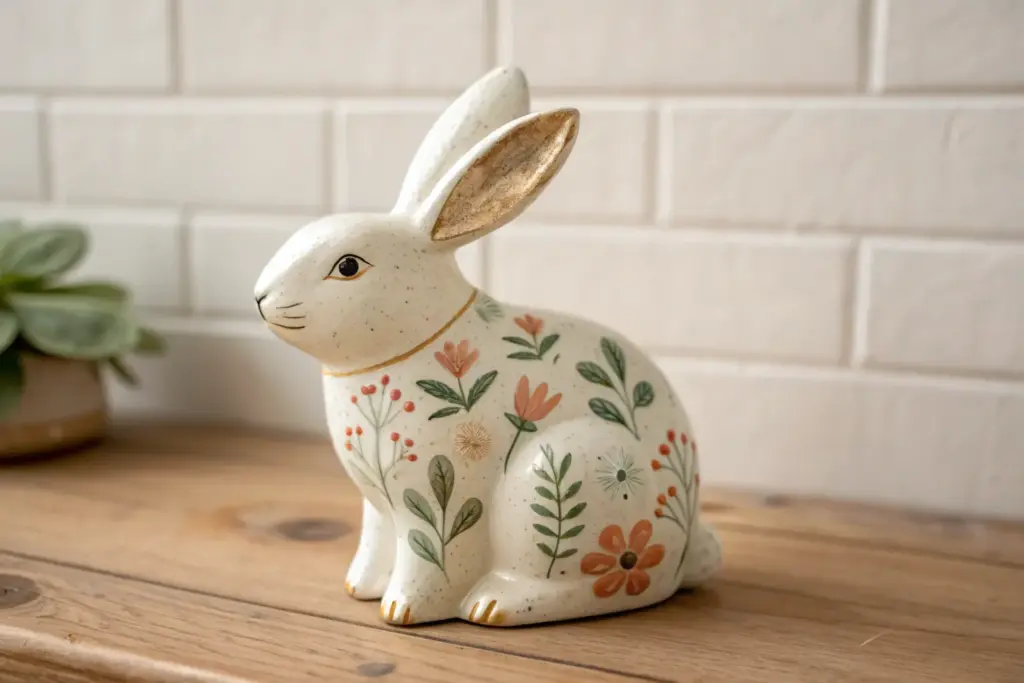
Simple Floral Bunny Pattern
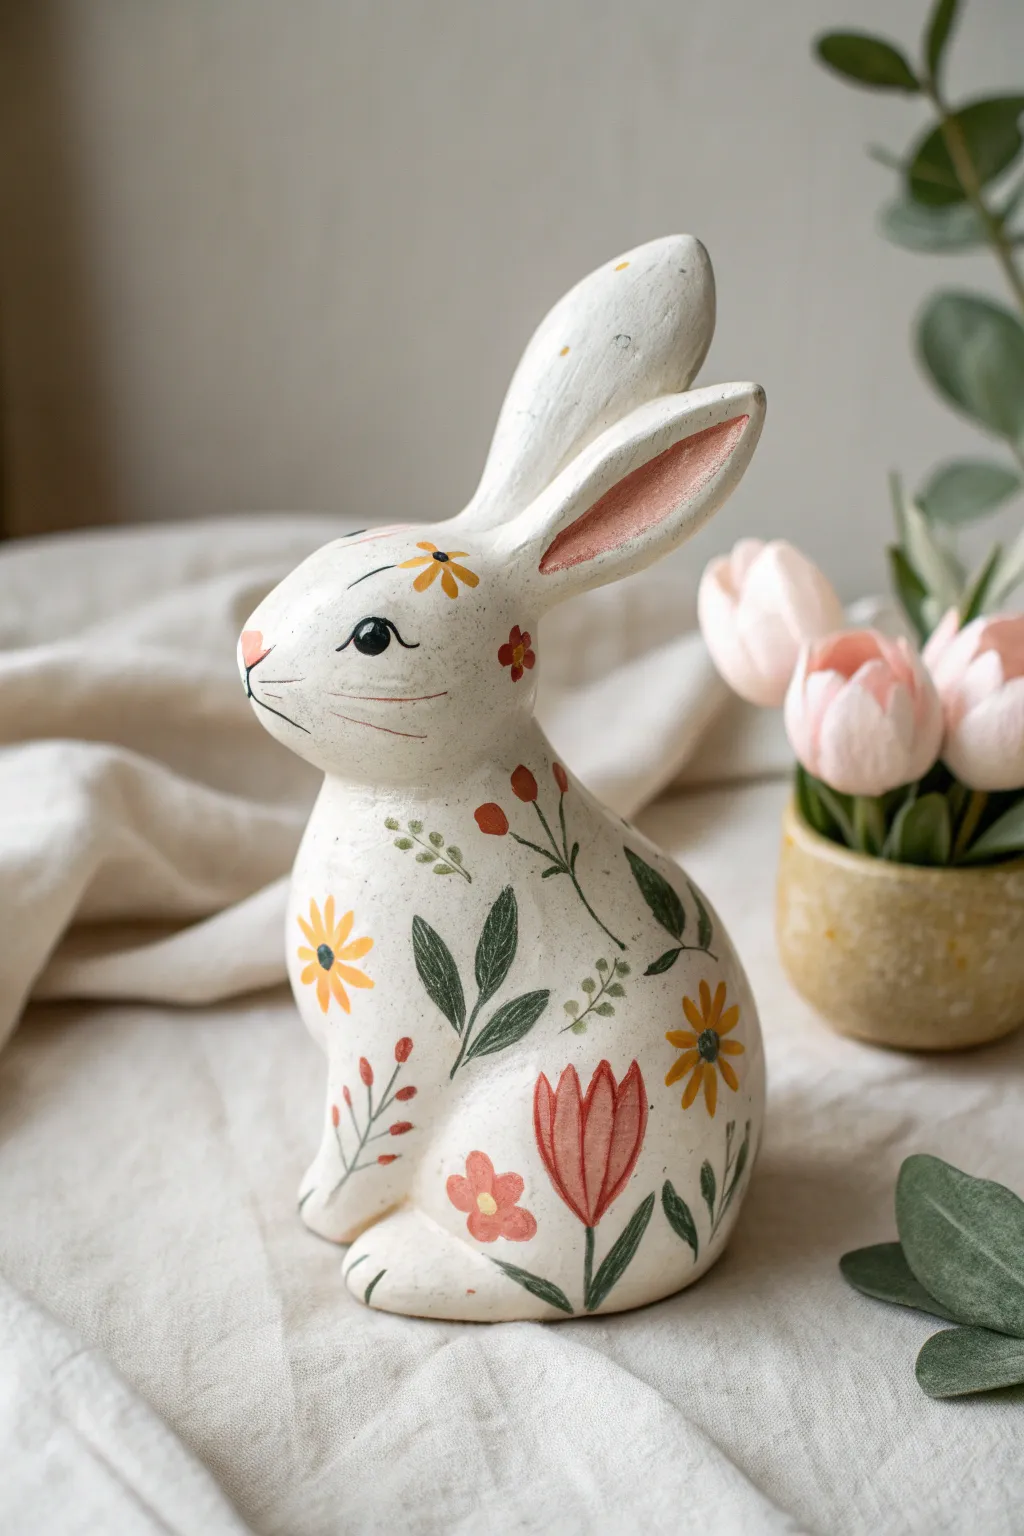
Transform a plain ceramic bunny into a charming piece of folk art with this simple floral pattern. Using a soft, creamy base and delicate botanical motifs, you’ll create a timeless spring decoration that looks lovely on any shelf.
Step-by-Step
Materials
- Bisque ceramic bunny figurine (smooth finish preferred)
- Acrylic paints: Cream/Off-White, Sage Green, Deep Forest Green, Mustard Yellow, Coral Pink, Terracotta, Black
- Synthetic paintbrushes: Medium flat brush (size 6-8), small round brush (size 2), fine liner brush (size 00 or 0)
- Clear matte or satin varnish spray
- Water cup and paper towels
- Palette or wax paper
- Pencil (optional for sketching)
Step 1: Base Preparation
-
Clean surface:
Before painting, wipe the ceramic bunny down with a slightly damp cloth to remove any dust or oils from manufacturing. -
Base coat application:
Using the medium flat brush, apply a smooth coat of Cream or Off-White acrylic paint over the entire bunny. Don’t forget the underside and inside the ears. -
Build opacity:
Let the first coat dry completely for about 15-20 minutes. Apply a second or third coat until you have a solid, opaque finish with no ceramic showing through. -
Ear detailing:
Mix a small amount of Terracotta with the Coral Pink to create a soft, muted pink. Paint the inner recess of the ears with this shade using the small round brush, blending edges slightly for a natural look.
Clean Lines Tip
To get those crisp, thin stems and whiskers, thin your acrylic paint slightly with a drop of water until it has an ink-like consistency.
Step 2: Facial Features
-
Paint the eye:
With the fine liner brush and black paint, carefully paint a solid black almond shape for the eye. Add a tiny curved line above it for the eyelid. -
Eye highlight:
Once the black paint is bone dry, add a tiny dot of white paint near the top of the pupil to bring the expression to life. -
Nose and mouth:
Using the Coral/Terracotta mix from the ears, paint a small, rounded triangle for the nose tip. Use diluted black or dark grey paint on your liner brush to draw the thin mouth lines and three whiskers on the cheek.
Step 3: Floral Patterning
-
Plan the placement:
Visualize where your main flowers will go. The largest motifs work best on the flattest areas, like the haunches and chest. I like to start with the biggest flower to anchor the design. -
Main tulip motif:
On the hip area, paint a stylized tulip shape using Terracotta paint. Paint three distinct petals—one central oval and two curved side petals. -
Add yellow daisies:
Scatter 2-3 daisy motifs around the body using Mustard Yellow. Paint a small circle for the center, then pull small brushstrokes outward for petals. -
Small filler flowers:
Using Coral Pink, add smaller five-petal flowers in the empty spaces. Keep these simple and round to contrast with the sharper tulip shape.
Make it Antique
For a vintage look, lightly brush a diluted brown wash (glaze) over the dried bunny, then immediately wipe it off with a paper towel.
Step 4: Greenery & Details
-
Large leaves:
Load your round brush with Deep Forest Green. Paint bold, single-stroke leaves attached to the main flowers, pressing down at the base and lifting as you pull up to create a point. -
Vine stems:
Using the liner brush and Deep Forest Green, connect your floating flowers with thin, curving stems. -
Sage accents:
Switch to Sage Green. Paint delicate sprigs with tiny leaves to fill negative space, particularly around the neck and back. -
Floral centers:
Add centers to your flowers. Use dark green or black dots in the yellow daisies, and a yellow dot in the center of the pink flowers. -
Final leaf detailing:
Take your fine liner brush with the lighter Cream base color and add tiny veins or highlights to the dark green leaves for dimension.
Step 5: Finishing Touches
-
Protective seal:
Allow the painted pattern to cure for at least 24 hours. Take the bunny outside and spray it with a clear matte or satin varnish to protect your handiwork.
Place your finished bunny near a window or with a vase of fresh tulips to complete the spring vignette

The Complete Guide to Pottery Troubleshooting
Uncover the most common ceramic mistakes—from cracking clay to failed glazes—and learn how to fix them fast.
Dry-Brushed Realistic Fur Bunny
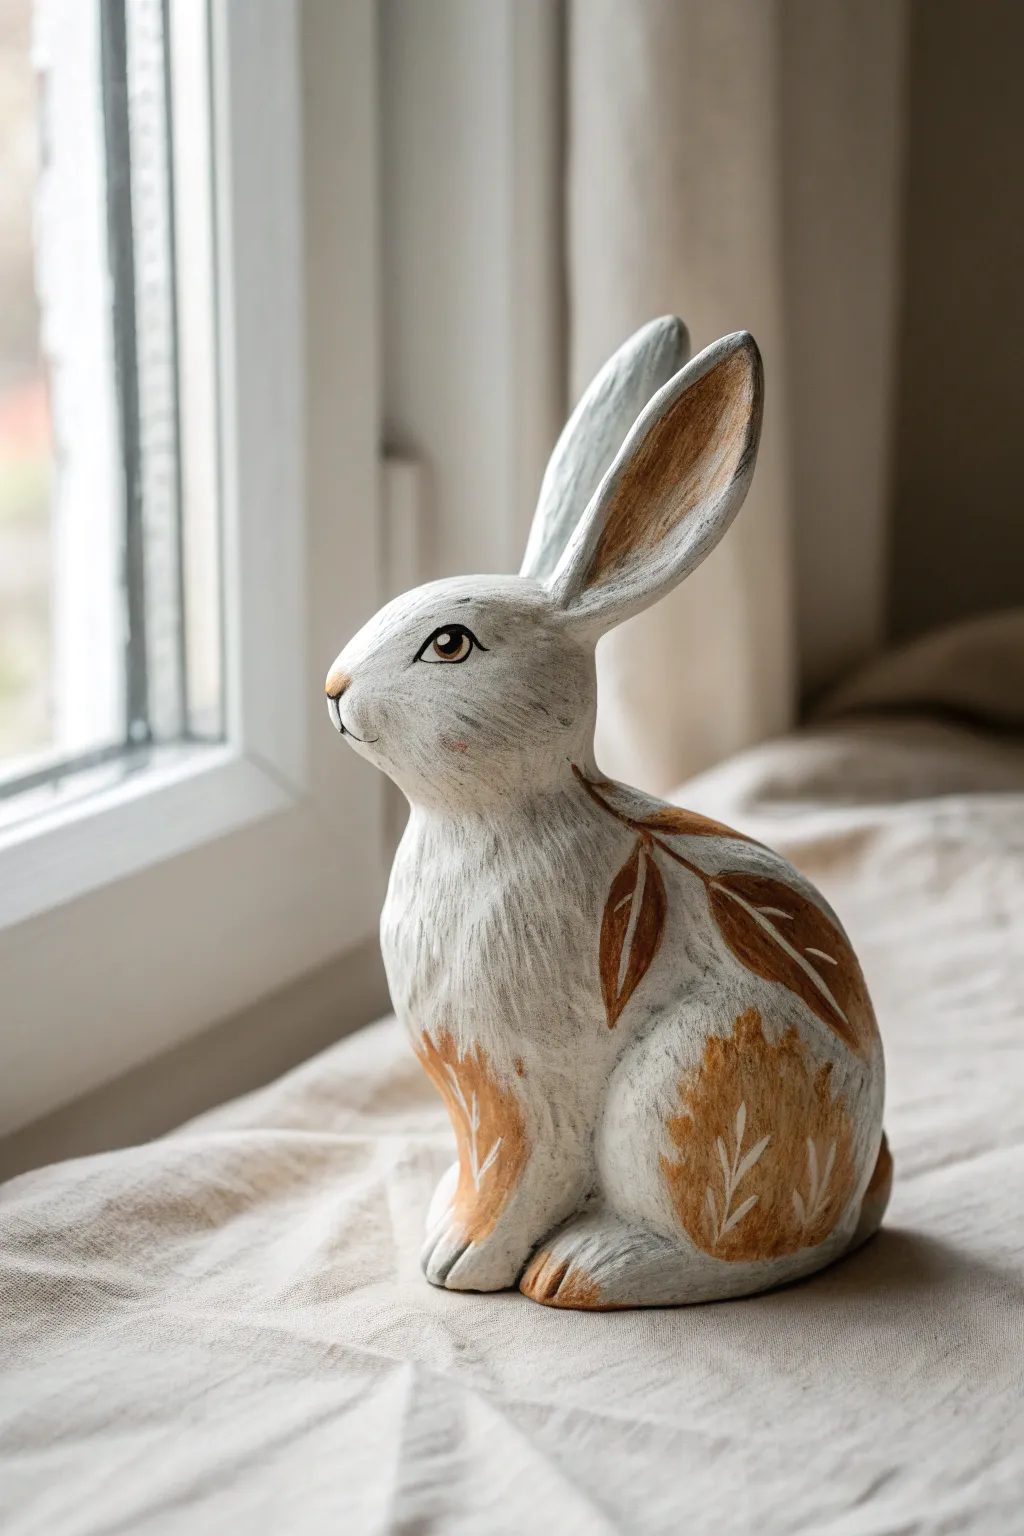
Transform a plain ceramic bunny into a charming piece of woodland decor using dry-brushing techniques to create realistic fur texture. This project combines naturalistic shading with stylized golden leaf accents for a unique, folk-art inspired finish.
Step-by-Step Guide
Materials
- Bisque ceramic bunny figurine
- Acrylic paints: Titanium White, Warm Grey, Charcoal Grey, Burnt Sienna, Yellow Ochre, Black
- Wide flat paintbrush (synthetic)
- Small round detail brush (size 1 or 0)
- Medium round brush
- Paper towels
- Water cup
- Palette or paper plate
- Matte spray varnish
Step 1: Base and Texture
-
Clean surface:
Begin by wiping down your ceramic bunny with a slightly damp cloth to remove any dust or oils that might prevent the paint from adhering properly. -
Base coat:
Mix a small amount of warm grey with white to create a very pale, off-white base color. Apply this evenly over the entire bunny. You may need two thin coats for full opacity. -
Mix dry brush color:
Prepare a deeper grey shade on your palette. For dry brushing, you want the paint to be sticky, not watery, so don’t dilute it. -
Load the brush:
Dip just the tip of your wide flat brush into the grey paint. Vigorously wipe almost all the paint off onto a paper towel until barely any pigment remains. -
Apply fur texture:
Lightly sweep the brush over the bunny’s body, following the direction real fur would grow—generally down the back and legs. The paint should only catch the raised texture of the ceramic. -
Build intensity:
Repeat the dry brushing process, focusing on shadowed areas like the neck creases, under the ears, and around the legs to create depth without covering the white base. -
Highlighting:
Clean your brush completely and load it with pure Titanium White. Dry brush the high points—the nose, top of the head, and tops of the paws—to make them pop against the grey texture.
Brush Control Pro Tip
If your dry brushing looks streaky, your paint is too wet. Let the paint sit on the palette for 5 minutes to thicken before loading your brush.
Step 2: Facial Details
-
Paint the eye:
Using your smallest round brush, paint an almond shape for the eye with Burnt Sienna. Once dry, add a smaller black circle for the pupil. -
Eye highlights:
Dip the very tip of a toothpick or detail brush into white paint and add a tiny dot to the upper corner of the pupil to bring the eye to life. -
Outline the eye:
Carefully outline the eye with a thin line of black or dark grey to define the shape and give it that alert bunny expression. -
Nose and mouth:
Mix a tiny bit of pink or brown into your white paint for the nose tip. Use a thinned dark grey paint to draw the subtle mouth line and whisker hints.
Step 3: Golden Leaf Accents
-
Mix leaf color:
Combine Burnt Sienna with a touch of Yellow Ochre to create a warm, golden-brown hue for the decorative elements. -
Paint the leaves:
On the bunny’s flank, paint large, sweeping leaf shapes. I like to start with the stem and press down to widen the brush for the leaf body. -
Ear detailing:
Use the same golden-brown mixture to paint the inside of the bunny’s ears, leaving a small border of white fur around the edges. -
Add patch details:
Paint a patch of the golden color on the front chest/leg area to simulate a stylized patch of fur or foliage. -
Leaf veins:
Once the brown paint is fully dry, stick to your smallest brush and use white paint to carefully draw fine veins inside the brown leaves. -
Chest detailing:
Add small, white, fern-like strokes inside the golden chest patch to mimic the texture found on the flank leaves. -
Final check:
Review your work for any harsh lines. You can use a damp brush to soften edges or add a final dry brush of white to integrate the brown patches if they look too stuck-on. -
Seal:
Finish by spraying the figurine with a matte clear coat to protect the paint and eliminate any unwanted glossiness.
Metallic Level Up
Mix a tiny drop of gold metallic paint into your brown leaf color. It won’t sparkle loudly, but it gives the decorative leaves a lovely warm glow in sunlight.
Place your finished bunny near a window or potted plant to enjoy its rustic charm
Two-Tone Dipped Paint Bunny
This charming project embraces the beauty of minimalism by combining raw terracotta warmth with a creamy, speckled glaze finish. The result is an earthy, modern piece that looks effortlessly sophisticated on any spring mantle.
How-To Guide
Materials
- Unfinished ceramic or bisque bunny figurine
- Terra cotta colored acrylic paint (matte finish)
- Cream or off-white acrylic paint (matte or satin finish)
- Medium flat paintbrush
- Fine detail paintbrush (size 0 or 00)
- Black acrylic paint
- Brown acrylic paint (for speckles)
- Clean toothbrush or stiff bristle brush
- Painter’s tape (optional)
- Matte clear sealant spray
Step 1: Base Coat Application
-
Prepare the surface:
Begin by wiping down your ceramic bunny with a slightly damp cloth to remove any dust or debris from manufacture. Let it dry completely before starting. -
Apply the terra cotta base:
Using your medium flat brush, paint the entire bottom third of the bunny with terra cotta acrylic paint. This creates the ‘dipped’ look foundation. -
Extend the color upwards:
Don’t worry about a perfect line yet; just ensure the paint covers the bottom area solidly. Extend the paint slightly higher than where you want your final line to be to ensure full coverage. -
Paint the feet:
Make sure to get the paint into the crevices of the paws and underneath the base so no white ceramic shows through when the figurine is lifted. -
Let it dry:
Allow this base layer to dry fully, which usually takes about 20 minutes depending on your paint thickness.
Uneven Dipped Line?
If your hand shakes while painting the transition line, gently wipe the mistake immediately with a damp Q-tip, or wait for it to dry and re-touch the base color.
Step 2: Creating the Dipped Effect
-
Establish the transition line:
Load your brush with cream or off-white paint. Carefully paint the upper two-thirds of the bunny, starting from the ears and working down towards the terra cotta section. -
Refine the meeting point:
When you reach the terra cotta section, carefully drag your brush horizontally to create a relatively straight line. I prefer freehanding this for an organic organic look, but you can use painter’s tape if you want a razor-sharp edge. -
Add a second coat:
Cream paint often requires two coats to be fully opaque. Apply a second layer to the upper section once the first feels dry to the touch. -
Leave the paws exposed:
Pay close attention to the feet sitting at the bottom; if the bunny design has paws resting on the ground, you can choose to leave them terra cotta or carefully paint the tops cream while leaving the ‘trousers’ terracotta.
Step 3: Detailing and Texture
-
Create the speckle mixture:
Dilute a small amount of brown acrylic paint with water until it reaches an inky consistency. It should be runny enough to flick easily. -
Flick the specks:
Dip an old toothbrush or stiff bristle brush into the watered-down brown paint. Hold it near the bunny (about 6-8 inches away) and run your thumb across the bristles to spray fine droplets onto the cream section. -
Control the spray:
Focus the speckling mostly on the cream upper body, but don’t worry if a few land on the terra cotta base; it adds to the natural ceramic feel. -
Paint the eyes:
Using your finest detail brush and black paint, add two small, vertical oval shapes for eyes on either side of the head. -
Define the nose:
With a very light touch, paint a tiny ‘Y’ shape or small triangle for the nose using a mix of brown and terra cotta paint. -
Add whiskers:
Paint three very thin, short lines on each cheek using a diluted grey or light brown paint for subtle whisker details. -
Highlight the eyes:
Once the black eye paint is dry, add a microscopic dot of white to the top corner of each eye to bring the expression to life.
Speckle Practice
Before flicking paint onto your bunny, always test your spray pattern on a piece of scrap paper first to avoid large, unintentional blobs.
Step 4: Finishing Touches
-
Dry completely:
Let the entire piece sit for at least an hour to ensure the speckled paint droplets are completely hardened. -
Seal the artwork:
Ideally, take the bunny outside or to a well-ventilated area. Apply a light coat of matte clear sealant spray. -
Final cure:
Let the sealant cure according to the can’s instructions before placing your new décor item on display.
Now you have a beautifully textured piece that captures the essence of handcrafted pottery without needing a kiln


What Really Happens Inside the Kiln
Learn how time and temperature work together inside the kiln to transform clay into durable ceramic.
Ombré Gradient Bunny
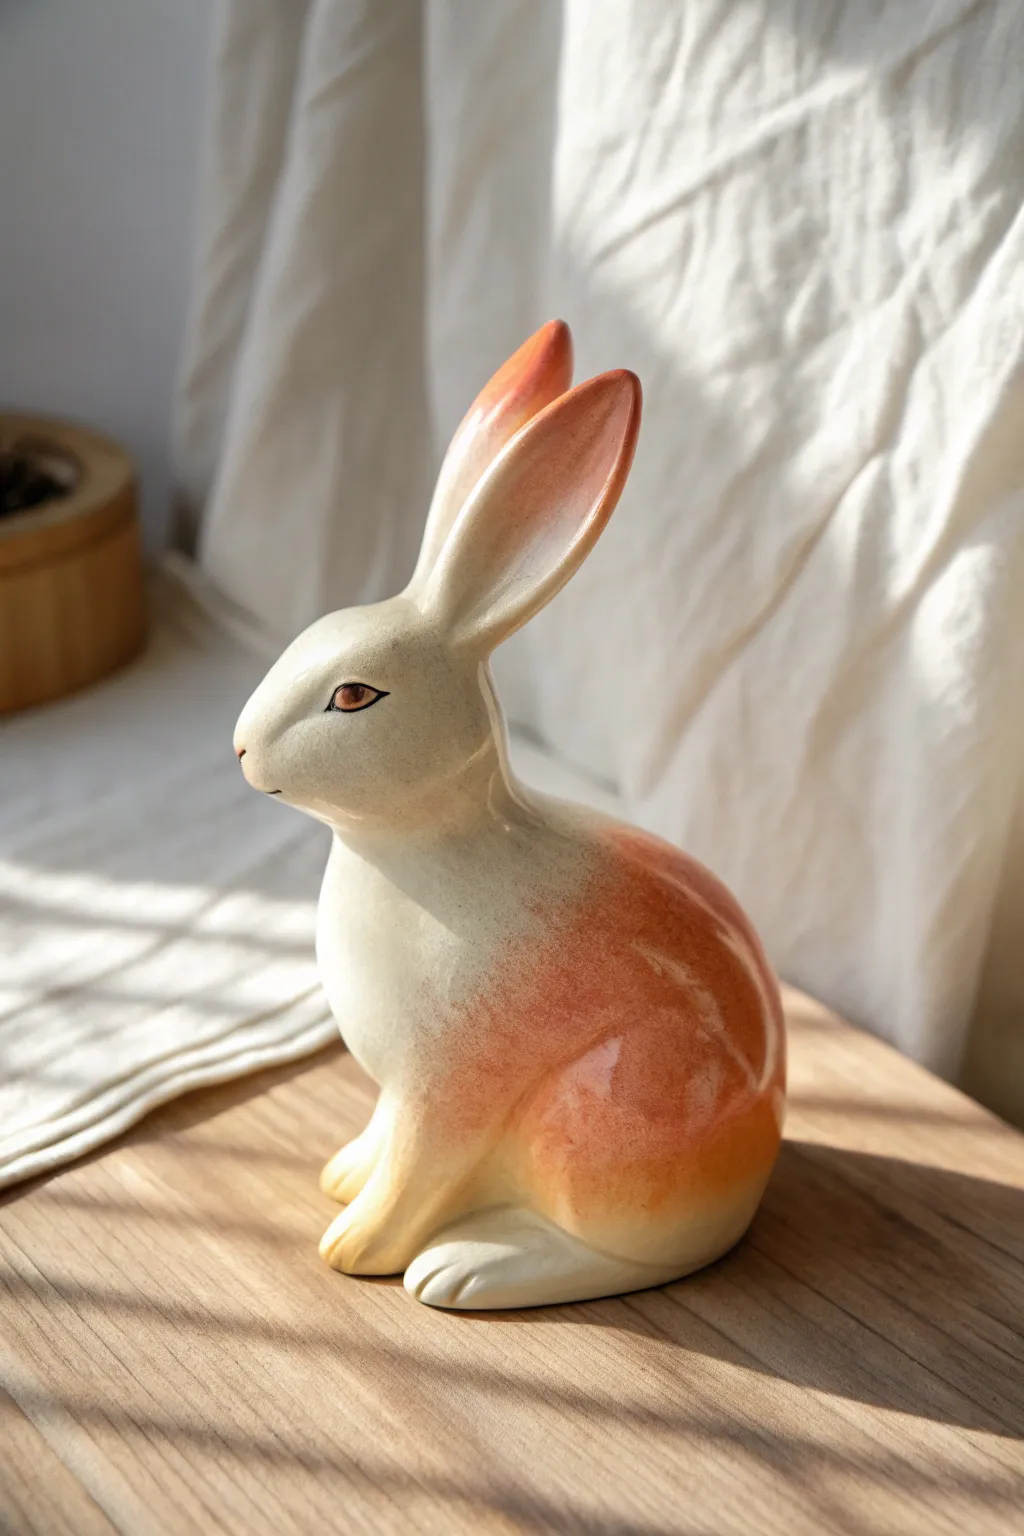
Capture the warmth of a setting sun with this stunning gradient bunny project. By blending creamy whites into rich, earthy terracottas, you’ll achieve a sophisticated, high-end finish that looks professionally glazed.
Step-by-Step Tutorial
Materials
- Bisque ceramic bunny figurine (smooth texture preferred)
- Acrylic paints: Cream/Off-white, Burnt Sienna, Orange Ochre, Dark Brown
- Glazing medium or slow-drying medium
- Soft synthetic flat brushes (large and medium)
- Small round detail brush (size 0 or 1)
- Makeup sponge or foam pouncer
- Palette paper or ceramic tile
- High-gloss spray varnish or brush-on gloss sealer
- Cup of water and paper towels
Step 1: Base Preparation
-
Clean the surface:
Before painting, wipe your ceramic bunny down with a slightly damp cloth. This removes any dust or oils from your hands that might repel the paint. -
Mix the base color:
Create a warm, creamy off-white shade. If you only have pure titanium white, add the tiniest drop of yellow ochre or brown to warm it up so it looks natural, not stark. -
Apply the base coat:
Using your largest flat brush, coat the entire bunny in the cream color. Work in smooth, long strokes to minimize texture. -
Second coat:
Let the first layer dry completely (about 15-20 minutes). Apply a second coat to ensure fully opaque coverage, paying attention to crevices around the legs and ears.
Smooth Blending Pro-Tip
If your paint dries too fast while blending, mist the bunny very lightly with water from a spray bottle. This reactivates the acrylics just enough to smooth out brushstrokes.
Step 2: Creating the Ombré Gradient
-
Prepare the gradient colors:
On your palette, lay out your Cream, Orange Ochre, and Burnt Sienna. Mix a transition shade by combining the Cream with a little Orange Ochre. -
Add glazing medium:
Mix a few drops of glazing medium into your colored paints. This is the secret ingredient that keeps the acrylic wet longer, allowing for smoother blending without harsh lines. -
Start the transition:
Load a clean, soft brush or a foam sponge with your transition shade (light orange-cream). Lightly dab or brush this onto the lower haunches and the middle of the ears. -
Deepen the color:
While the previous layer is still tacky, pick up the Burnt Sienna mixed with Orange Ochre. Apply this to the roundest part of the back thighs and the tips of the ears. -
Blend the boundaries:
I find using a slightly damp makeup sponge works best here. Gently tap where the orange meets the cream body color to blur the line, creating a soft, misty fade. -
Intensify the rear:
Add a final touch of pure Burnt Sienna to the very bottom curves of the bunny’s back legs and the very tips of the ears to anchor the gradient. -
Smooth the ears:
Ensure the gradient on the ears mirrors the body—darkest at the tips, fading to cream at the base where they attach to the head.
Level Up: Texture
Before the final gloss coat, lightly splatter diluted brown paint onto the bunny using an old toothbrush. This creates a speckled ‘pottery’ effect found on vintage ceramics.
Step 3: Details and Finishing
-
Paint the eye silhouette:
Switch to your smallest detail brush. Using dark brown (diluted slightly with water for flow), carefully outline the almond shape of the eye. -
Fill the iris:
Fill the iris with a reddish-brown tone. Once dry, add a tiny black pupil in the center. -
Add the spark:
Dip the tip of a toothpick or the handle end of a brush into pure white paint and dot a tiny highlight in the upper corner of the eye. This brings the bunny to life. -
Nose details:
With an extremely light touch and watered-down brown paint, add a faint line for the mouth and a small touch of pink-brown for the nose tip. -
Final cure:
Allow the paint to cure fully for at least 24 hours. The thick layers of the gradient need time to settle. -
Glosswerk:
Apply two coats of high-gloss varnish. The gloss is essential—it mimics the look of fired ceramic glaze and unifies the gradient textures into a single, smooth surface.
Place your finished bunny near a window where the natural light can catch that beautiful glossy gradient
Blue-and-White Porcelain-Inspired Bunny
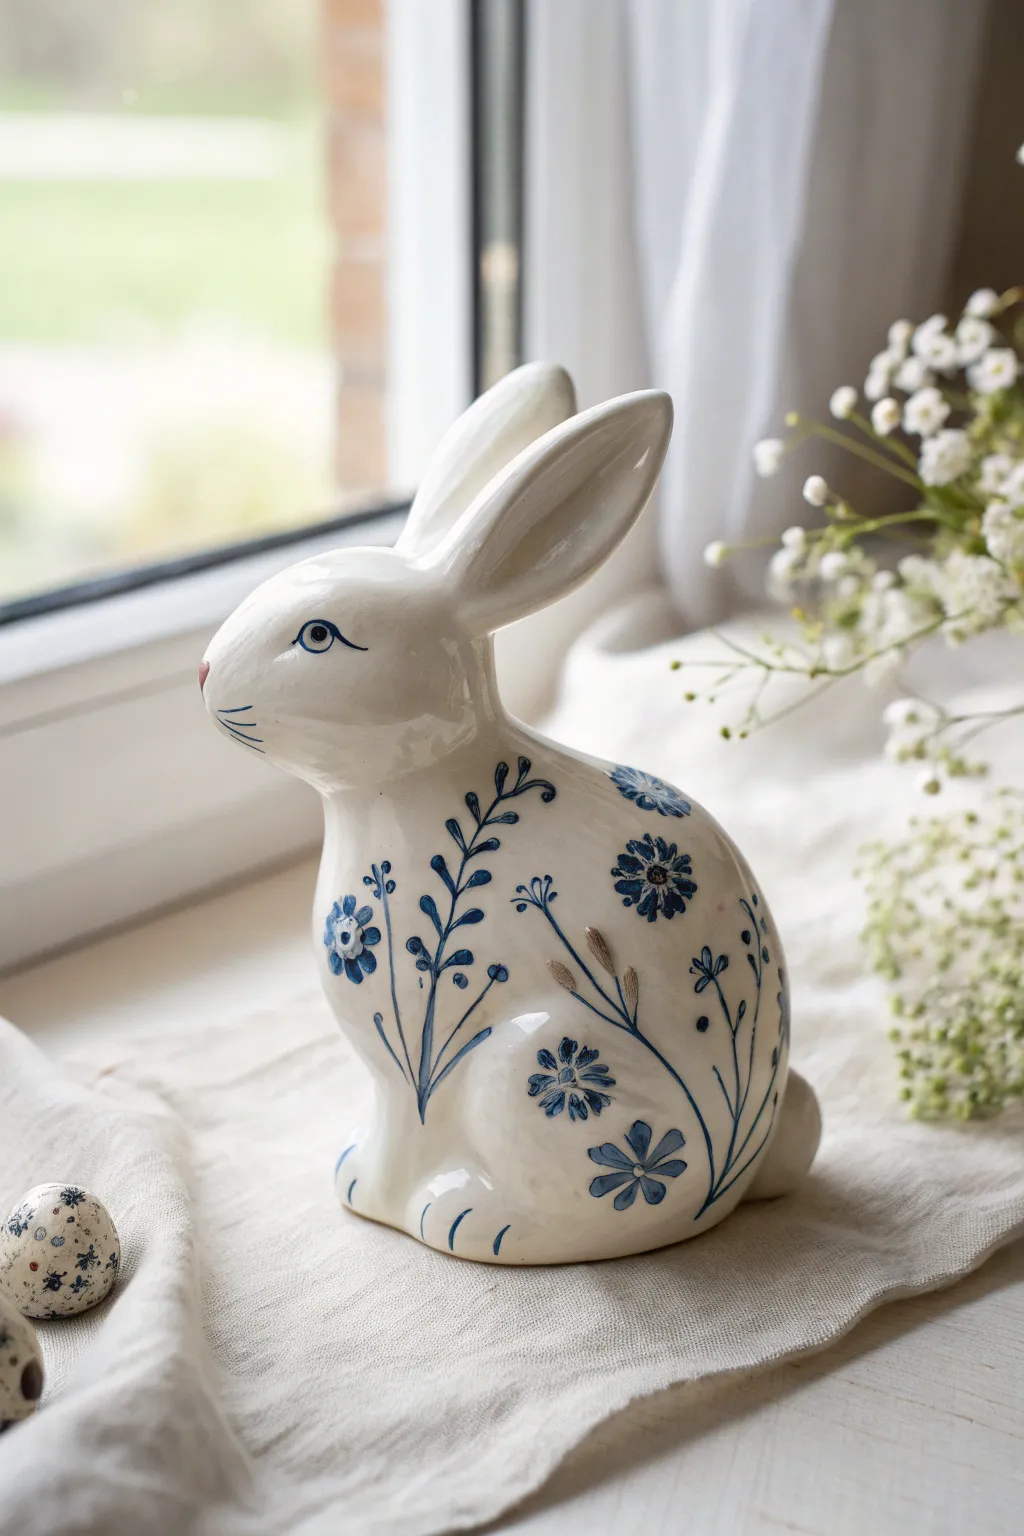
Transform a plain ceramic bunny into a timeless piece of decor with this blue-and-white porcelain design. Using simple brushstrokes, you will create an elegant meadow of wildflowers that climbs up the figurine, giving it a classic heirloom feel.
Step-by-Step Guide
Materials
- Bisque or glazed white ceramic bunny figurine
- Porcelain paint or high-quality acrylics (specifically Indigo Blue or Cobalt Blue)
- Fine detail brush (size 0 or 00)
- Small round brush (size 1 or 2)
- Pale pink porcelain paint (for the nose)
- Rubbing alcohol and cotton pads
- Paper palette or small porcelain dish
- Water cup
Step 1: Preparation and Planning
-
Clean surface:
Before putting brush to ceramic, wipe the entire bunny down with rubbing alcohol on a cotton pad. This removes invisible oils or dust that could prevent the paint from adhering properly. -
Study the form:
Look at the curvature of your bunny’s flank and legs. Visualize where the stems will flow; they should follow the natural rounded shapes of the rabbit’s body, like vines growing up a trellis.
Oops, smudged it?
If you smudge wet paint, don’t wipe it immediately as this spreads the stain. Let it dry completely, then gently scratch the mistake off with a craft knife or toothpick.
Step 2: Painting the Features
-
Paint the eye:
Using your finest detail brush (00) and the blue paint, carefully outline an almond shape for the eye. Add a small pupil inside, leaving a tiny dot of white negative space for a highlight. -
Add the lash line:
Extend a single, thin line from the outer corner of the eye to give the bunny a gentle expression. -
Whiskers and mouth:
Paint three very fine, short strokes on the muzzle for whiskers. Don’t press hard; let the tip of the brush do the work. If your bunny has a sculpted mouth line, trace it lightly with blue. -
Pink nose accent:
Clean your brush thoroughly or switch to a fresh one. Dip just the tip into pale pink paint and dab it onto the nose area. This is the only warm color on the piece, so keep it subtle.
Add a gold accent
For a luxe twist, apply liquid gold leaf to the centers of the dried flowers or the tip of the ears after the blue paint has been baked and fully cooled.
Step 3: Creating the Floral Pattern
-
Start the main stems:
Switch to your size 0 or 1 round brush. Mix your blue with a tiny drop of water to improve flow. Paint long, sweeping stems starting from the base (paws/belly) and curving upward along the flank. -
Vary the line weight:
When painting stems, press down slightly at the start and lift up as you reach the end of the stroke to create a tapered, natural look. -
Add leaves:
Along the main stems, add small, alternating leaves. Use a ‘press and lift’ motion: touch the brush down to create the wide part of the leaf, then pull away quickly to make a sharp point. -
Paint the cornflowers:
For the spiky flowers (resembling cornflowers or bachelor’s buttons), use the fine tip to paint radial lines exploding outward from a center point. Keep the center open or add a small dot. -
Paint the round blossoms:
Create the softer, five-petal flowers by pressing the belly of the round brush down five times in a circle. I find it helpful to turn the ceramic piece as I go, rather than twisting my wrist. -
Add interior details:
Once the flower petals are slightly tacky or dry, use the detail brush to add darker blue centers or tiny stamens to give them depth. -
Fill the gaps:
Look for empty white spaces on the body. Add tiny sprigs, single leaves, or small dots of blue to balance the composition without overcrowding it. -
Back and tail:
Don’t forget the back of the bunny. Add a small floral motif near the tail or base of the ears to ensure the piece looks beautiful from all angles.
Step 4: Finishing Touches
-
Check opacity:
Review your blue strokes. If any look streaky or too transparent, carefully go over them with a second coat of paint, but try to maintain the hand-painted, watercolor-like variation. -
Clean up errors:
If you made a mistake or a line is too thick, use a slightly damp cotton swab or a clean, wet brush to wipe away the error before it cures. -
Curing:
Follow the specific instructions for your paint type. Some porcelain paints require baking in a home oven (usually 300°F/150°C for 30 minutes) to become permanent and dishwasher safe.
Place your finished bunny near a window or with fresh white flowers to highlight the crisp blue tones

TRACK YOUR CERAMIC JOURNEY
Capture glaze tests, firing details, and creative progress—all in one simple printable. Make your projects easier to repeat and improve.
Gingham or Plaid Pattern Bunny
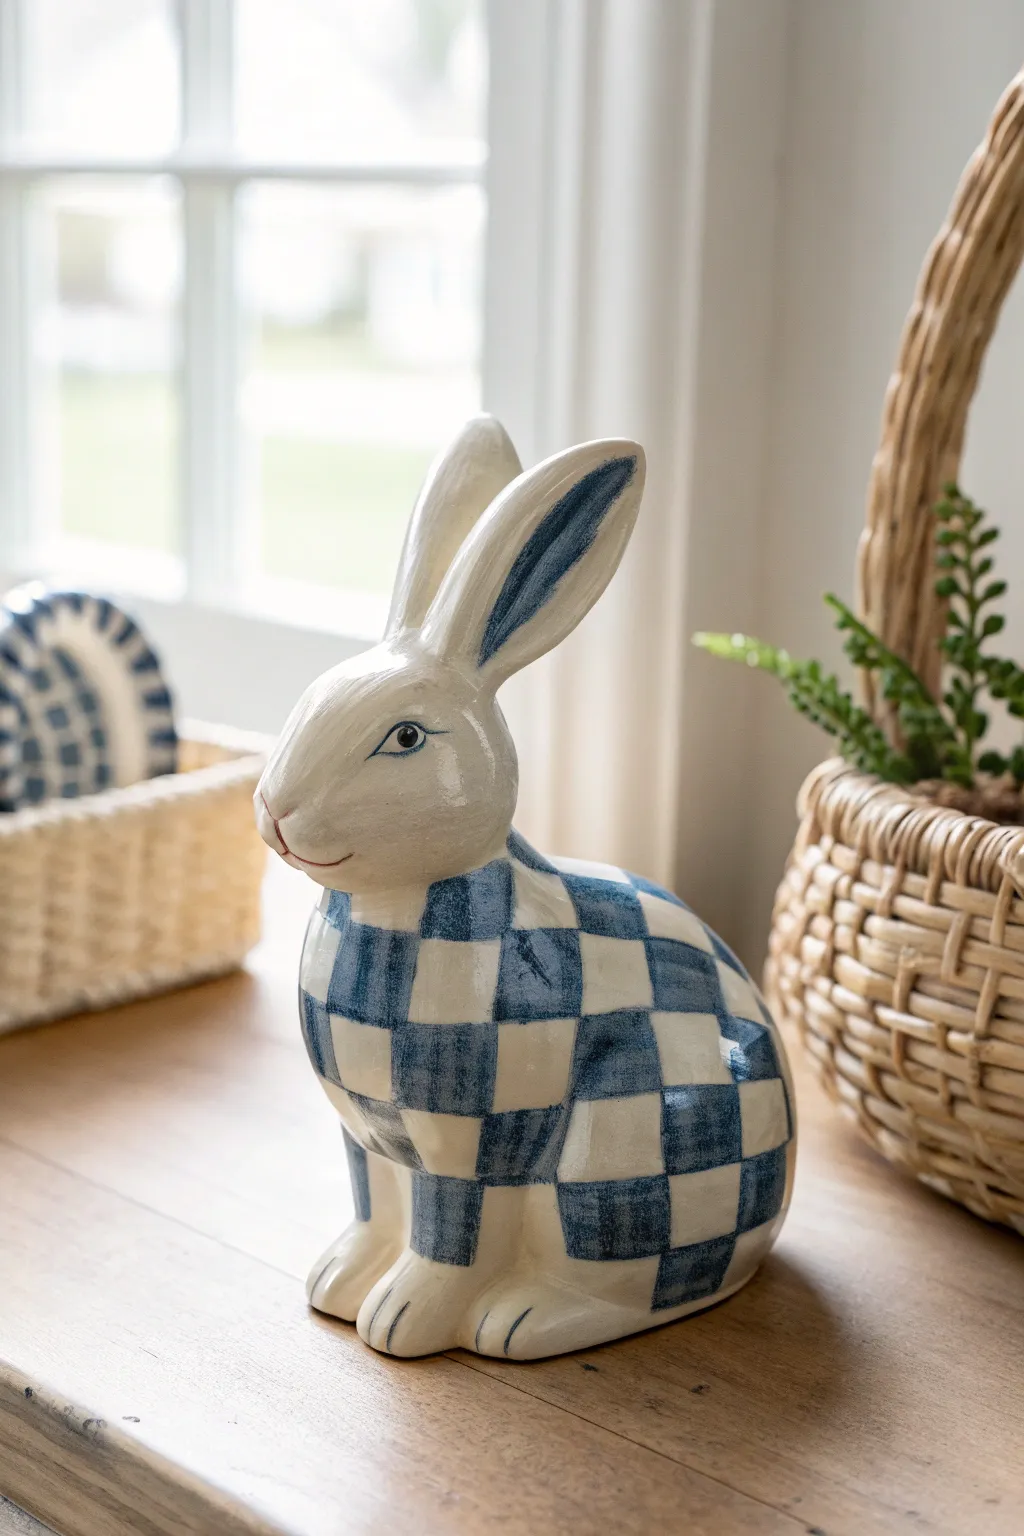
Transform a plain ceramic bunny into a charming farmhouse accent with this classic blue gingham pattern. The crisp geometric checks contrast beautifully with the organic curves of the figurine, creating a timeless piece perfect for spring decor.
Step-by-Step
Materials
- Unfinished ceramic bunny figurine (smooth bisque)
- Acrylic craft paint: Warm Cream or Antique White
- Acrylic craft paint: Navy or Delft Blue
- Acrylic glazing medium or textile medium (to create translucency)
- Flat shader brushes (medium width for checks, approx. 1/2 inch)
- Small round detail brush (size 1 or 2)
- Pencil (light graphite)
- Flexible measuring tape
- Palette or paper plate
- Damp paper towels
- Spray gloss sealer
Step 1: Base Coating
-
Clean surface:
Begin by wiping down your ceramic bunny with a slightly damp paper towel to remove any dust or oils from the bisque surface. Let it dry completely. -
Apply base color:
Load a larger soft brush with your Warm Cream paint. Apply an even coat over the entire figurine, ensuring you get into the crevices of the paws and ears. -
Apply second coat:
Allow the first layer to dry to the touch (about 15-20 minutes). Adding a second coat ensures a solid, opaque background which is crucial for the pattern to pop later.
Tape Trick
For sharper lines on smoother ceramics, use thin automotive detailing tape (1/8 inch) to mask off your grid before painting, peeling it off while paint is still slightly tacky.
Step 2: Mapping the Grid
-
Plan the pattern area:
Decide where the gingham ‘shirt’ will start. In the photo, it begins at the base of the neck and covers the main body up to the tail. Leave the head, chest, and paws cream. -
Mark vertical lines:
Using a flexible tape measure and a very light pencil touch, mark vertical lines down the body and hind legs. Space them about 3/4 inch apart, following the curve of the bunny’s hip. -
Mark horizontal lines:
Draw horizontal lines intersecting the vertical ones to create a grid of squares. Don’t worry if the squares warp slightly around the curves; this adds to the hand-painted charm.
Wobbly Lines?
Don’t panic if your grid curves. These organic shapes are tricky! Step back and look at the whole piece; once the pattern is filled, minor wobbles usually disappear visually.
Step 3: Painting the Gingham
-
Mix the mid-tone blue:
To create the lighter blue intersections for the gingham effect, mix your Navy Blue paint with a drop of water or glazing medium. You want a semi-transparent wash, about 50% opacity. -
Paint vertical stripes:
Using a flat shader brush the same width as your squares, paint the vertical columns with your diluted blue wash. Skip every other column to create stripes. -
Paint horizontal stripes:
Reload your brush with the same wash and paint the horizontal rows, again skipping every other row. Where these stripes cross the vertical ones, the color will naturally darken. -
Add the darkest squares:
Now, use the undiluted Navy Blue paint. Identify the specific squares where the vertical and horizontal blue stripes overlap. Paint these squares solid dark blue to complete the plaid illusion. -
Dry check:
Let the pattern dry thoroughly. If pencil lines are still visible on the white squares, verify the paint is bone dry before gently erasing them.
Step 4: Details & Finishing
-
Ear accents:
Using your small round brush and a slightly watered-down blue paint, add a stroke of color to the inner depression of the ears, feathering the edges so it isn’t too harsh. -
Eye details:
With the finest point of your detail brush and black or dark blue paint, carefully outline the eye. Add a tiny white dot for a catchlight to bring the bunny to life. -
Add the nose:
Mix a tiny bit of red or pink into your cream paint for a subtle nose color. Paint a small ‘Y’ shape for the nose and mouth area. -
Refine edges:
If your grid edges look a bit messy, use the small brush and some original cream paint to touch up the borders of the check pattern. -
Clear coat:
Take the finished bunny to a well-ventilated area. Apply a light, even coat of spray gloss sealer to protect the paint and give it that fired ceramic shine.
Place your newly painted bunny near a window or in a basket to show off its stylish new coat
Minimal Line-Art Face Bunny
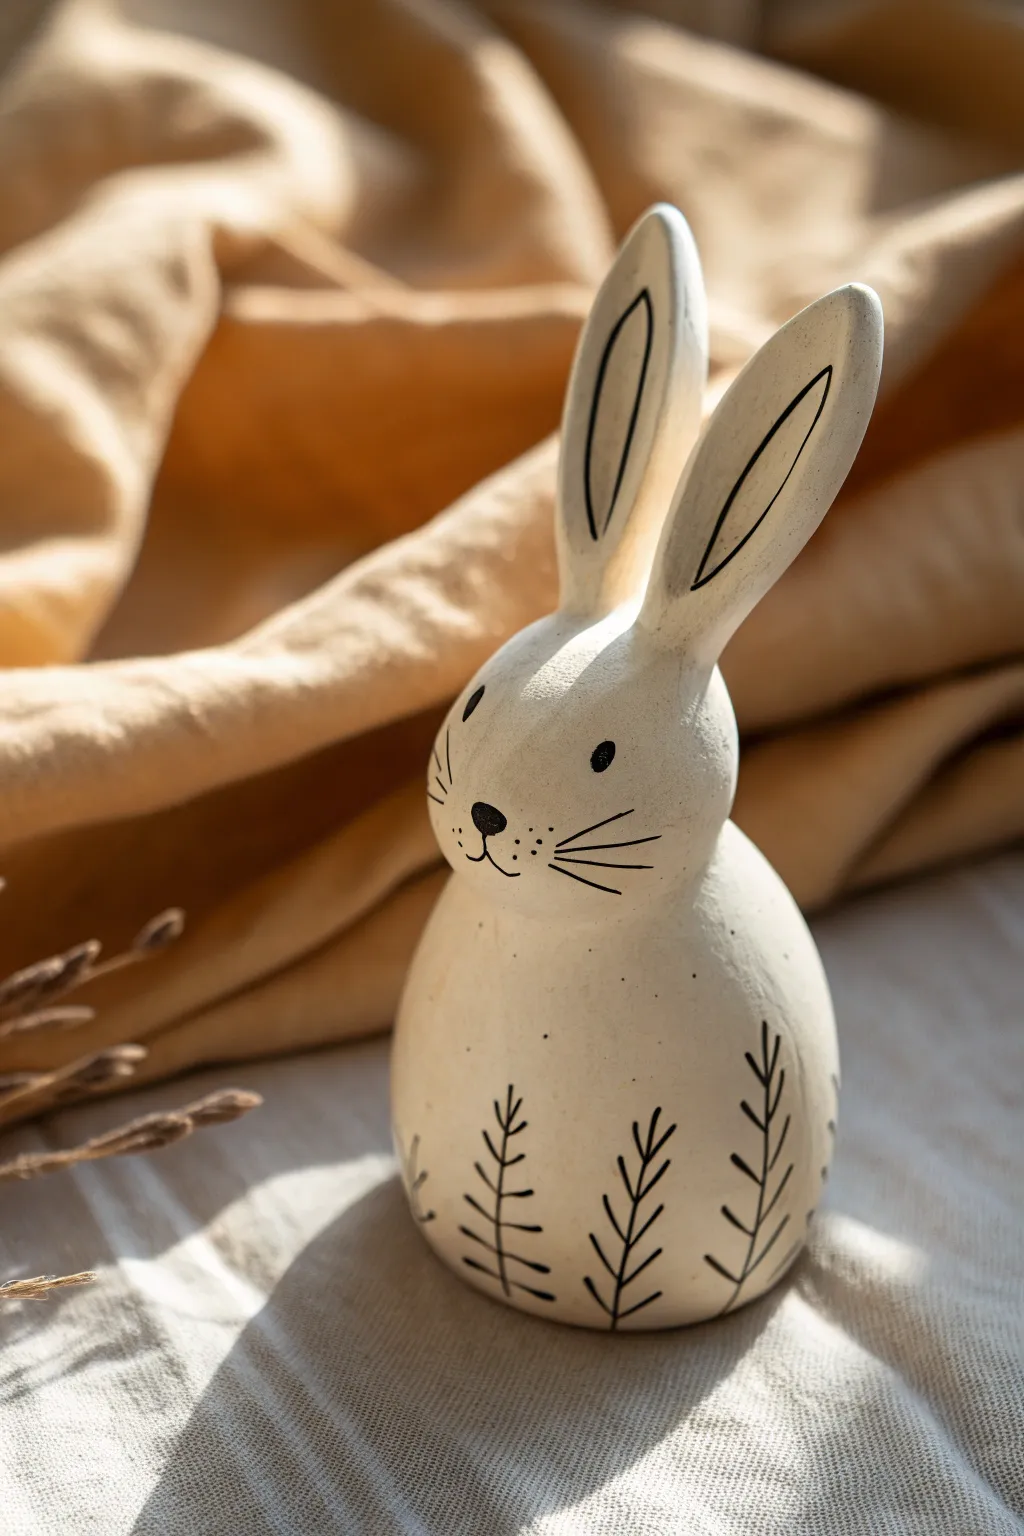
Capture the essence of modern minimalist decor with this understated yet charming ceramic project. The interplay between the raw cream base and crisp black fine-line details creates a sophisticated look perfect for spring mantles or year-round shelving.
Step-by-Step Tutorial
Materials
- Unpainted ceramic bunny bisque or figurine
- Cream or off-white matte acrylic paint (e.g., Antique White)
- Black fine-point paint marker (extra fine tip)
- Black acrylic paint (optional, for brushwork)
- Small round synthetic brush (size 2 or 4)
- Fine liner brush (size 00 or 000)
- Spray matte sealer or varnish
- Pencil and eraser
- Paper towels and water cup
Step 1: Base Coat Preparation
-
Clean the surface:
Before laying down any color, wipe your ceramic bunny with a slightly damp cloth to remove any dust or oils from the surface. Let it dry completely. -
Apply the first coat:
Using your size 4 round brush, apply an even layer of cream or off-white acrylic paint over the entire figurine. Use long smooth strokes to minimize texture. -
Let it dry:
Allow the first coat to dry for about 15-20 minutes. The paint should feel dry to the touch and not tacky before proceeding. -
Check for coverage:
Inspect the bunny for any translucent spots where the raw ceramic shows through. If needed, apply a second coat of cream paint to ensure a solid, opaque finish. -
Smooth the finish:
Once the final base coat is fully dry, if you notice any rough brushstrokes, you can very lightly buff them with a dry paper towel for a matte, eggshell-like texture.
Marker Snagging?
If your paint marker felt tip gets clogged with acrylic paint dust, scribble vigorously on a scrap piece of paper or cardboard to clear the nib and get the ink flowing smoothly again.
Step 2: Designing the Face
-
Sketch the placement:
Using a pencil very lightly, mark the positions for the eyes, nose, and inner ears. Keep the features centered and symmetrical. -
Draw the inner ears:
Take your black fine-point paint marker. Draw a long, thin oval loop inside each ear. The line should be clean and continuous, floating in the center of the ear space. -
Create the eyes:
Using the marker or a fine liner brush with black paint, create two small, solid ovals for eyes. Position them slightly wide-set for a cute, innocent expression. -
Paint the nose:
Draw an inverted rounded triangle for the nose. Fill it in solid black. -
Add muzzle details:
Draw a small vertical line down from the nose, curving outward into a small smile on either side. -
Draw the whiskers:
Flick three straight lines outward from each cheek area. Quick, confident strokes work best here to keep the lines sharp and tapered. -
Add texture dots:
Place three tiny dots on each side of the muzzle, just between the nose and the whiskers, to simulate whisker pads.
Step 3: Botanical Details & Finishing
-
Plan the foliage:
Visualize where the fern-like plants will grow from the base. Imagine them wrapping around the bottom curve of the bunny. -
Draw the stems:
Using the paint marker, draw vertical lines starting from the very bottom edge, curving slightly upward. Vary their heights—some short, some reaching the mid-body. -
Add the leaves:
Draw short, angled dashes coming off both sides of each stem line. Keep these ‘leaves’ simple and somewhat sparse to maintain the minimal aesthetic. -
Vary the density:
I like to leave a little negative space between some plants, rather than crowding them, to keep the design airy. -
Erase pencil marks:
Once you are absolutely certain the ink is dry (give it a good 20 minutes), gently erase any visible pencil guidelines. -
Seal the project:
Take the project outside or to a ventilated area. Apply a light mist of matte spray sealer. This protects the finish without making it shiny, preserving that raw pottery look.
Add a Speckled Effect
For a pottery-glaze look, dilute a tiny drop of brown paint with water and flick it off a stiff brush onto the dried bunny before sealing creates a lovely speckled stone texture.
Place your finished minimalist bunny near a window where natural light can highlight its simple, elegant lines
Metallic Accents on Ears and Tail
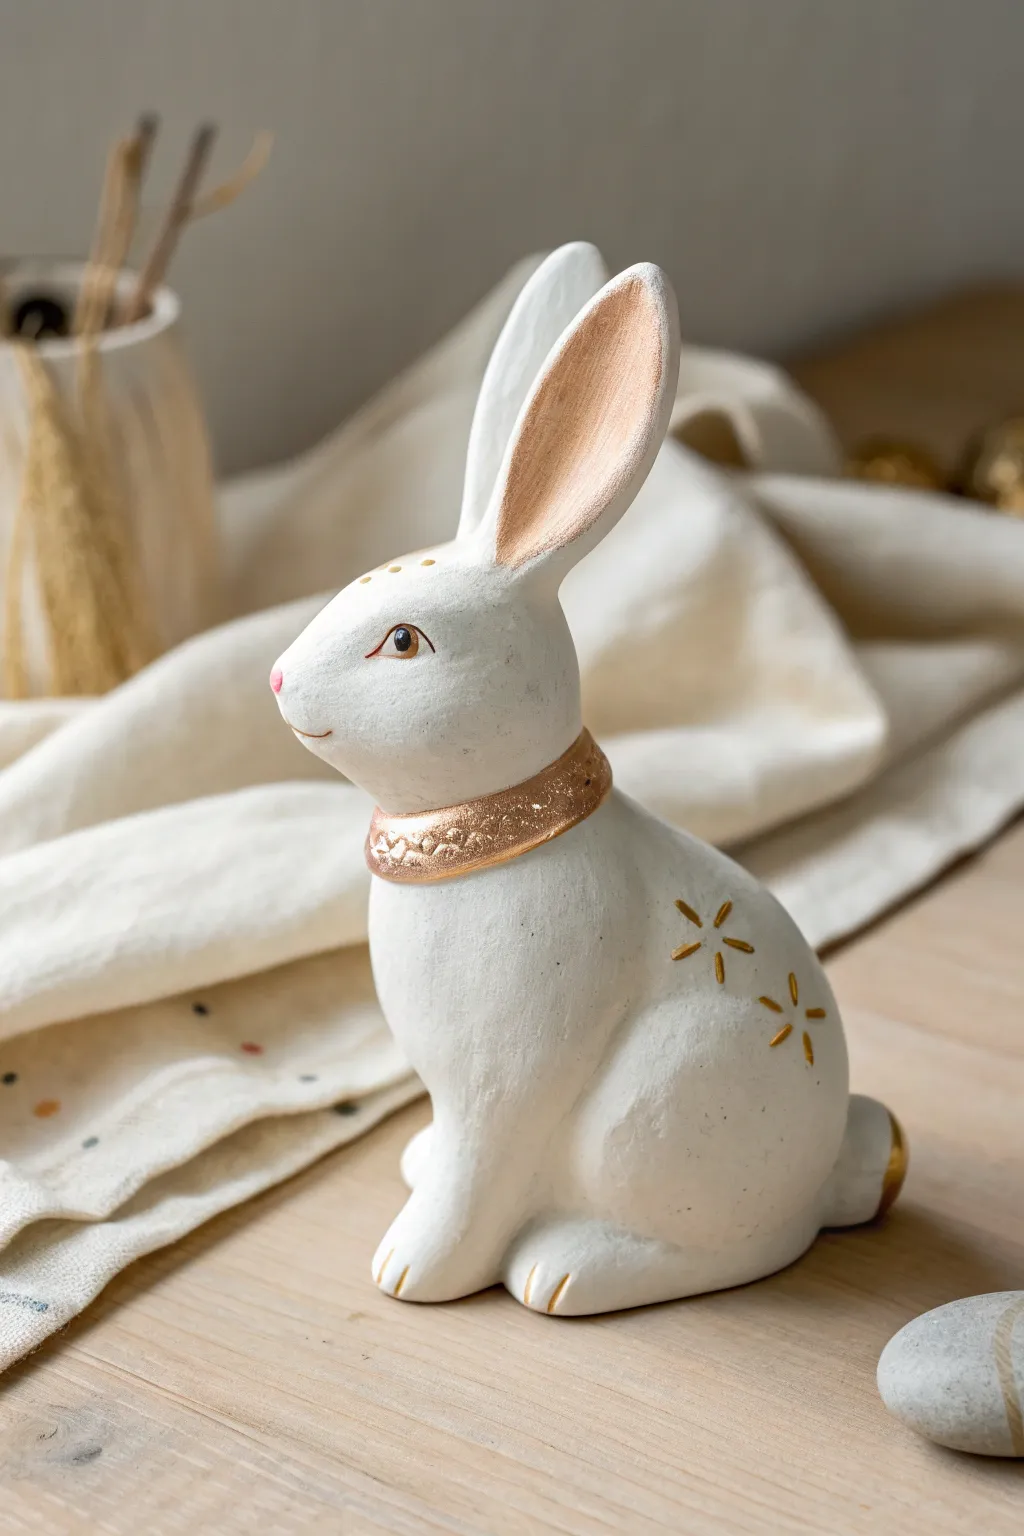
Elevate a simple white ceramic bunny into a sophisticated decor piece using strategic metallic accents. This project combines a clean, matte base with touches of shimmering rose gold for a modern and elegant finish that catches the light beautifully.
Detailed Instructions
Materials
- Unfinished ceramic bunny figurine (bisque)
- White acrylic paint (matte or satin finish)
- Rose gold or copper metallic acrylic paint
- Soft synthetic flat brush (size 6 or 8)
- Small round detail brush (size 0 or 1)
- Clear matte sealant spray
- Palette or small dish
- Water cup and paper towels
- Fine grit sandpaper (optional)
Step 1: Preparation and Base Coat
-
Clean the Ceramic:
Begin by wiping down your ceramic bunny with a damp cloth to remove any dust or manufacturing residue. If there are any rough seams from the mold, gently smooth them out with fine-grit sandpaper before wiping clean again. -
Apply First White Coat:
Squeeze a generous amount of white matte acrylic paint onto your palette. Using your flat brush, apply a smooth, even coat over the entire figurine. Don’t worry if it looks a bit streaky initially; coverage will improve with layers. -
Dry and Repeat:
Allow the first coat to dry completely, which should take about 15-20 minutes. Apply a second coat of white paint, brushing in a cross-hatch pattern to minimize brush strokes and ensure opaque coverage. A third coat might be necessary depending on your paint’s thickness. -
Paint the Base:
Don’t forget to flip the bunny over and paint the underside or any hard-to-reach areas between the paws. -
Let Base Cure:
Once you are happy with the white coverage, let the figurine dry for at least an hour to ensure the base is hard enough to handle without leaving fingerprints.
Clean Lines Hack
Struggling with the collar edge? Use narrow washi tape or painter’s tape to mask off the neck area before painting the metallic strip. Peel it off while paint is slightly wet.
Step 2: Painting the Accents
-
Mix the Metallic Shade:
Shake your rose gold or copper metallic paint well. Place a small amount on your palette. If the metallic paint seems too thick, I find adding a tiny drop of water helps it flow smoother for detailed lines. -
Detail the Ears:
Switch to your smaller detail brush. Carefully paint the inner recessed tonal area of the ears with the metallic paint. Start from the deep center and pull the brush gently outward to create a clean edge where the ear curves. -
Create the Collar:
Visualize a band around the bunny’s neck where a collar would sit. Using the metallic paint, draw two parallel lines around the neck to define the width of the collar, then fill in the space between them. Take your time to keep the width consistent. -
Add Collar Texture:
While the collar paint is wet, you can tap the tip of your brush into it to create a stippled texture, or wait for it to dry and paint small ‘V’ shapes or dots in a slightly lighter metallic shade to mimic embossing. -
Paint the Nose:
Clean your detail brush thoroughly. Mix a tiny speck of red into your white paint to create a soft pink. gently dab a small triangle or oval onto the very tip of the bunny’s nose. -
Define the Eyes:
Using a very fine point brush and brown or black paint, carefully outline the eye shape. Add a small black pupil and a tiny white reflection dot to bring the expression to life.
Antiquing Effect
After the metallic paint dries, dilute some brown paint with water to make a wash. Brush it over the metallic areas and wipe off immediately to let it settle into grooves.
Step 3: Decorative Flourishes
-
Add Floral Motifs:
On the hindquarter or flank of the bunny, use your finest brush and the metallic paint to create simple star-flower shapes. Paint a central cross, then add smaller diagonal lines between the main arms. -
Detail the Forehead:
Add three small metallic dots between the ears on the forehead for a whimsical touch that mimics a headpiece or markings. -
Paint the Tail:
Paint just the very tip of the tail with the metallic rose gold, blending it slightly into the white so it doesn’t look like a hard line. -
Final Inspection:
Check all your metallic edges. If any strayed onto the white, use a clean damp brush to wipe it away immediately, or touch it up with white paint after it dries. -
Seal the Work:
Once all paint is completely dry (give it a few hours), take the bunny to a well-ventilated area and spray it lightly with a clear matte sealant. This protects the finish and prevents the metallic paint from tarnishing over time.
Place your shimmering creation on a mantle or shelf to enjoy its subtle, festive charm all year round
Galaxy Night-Sky Bunny
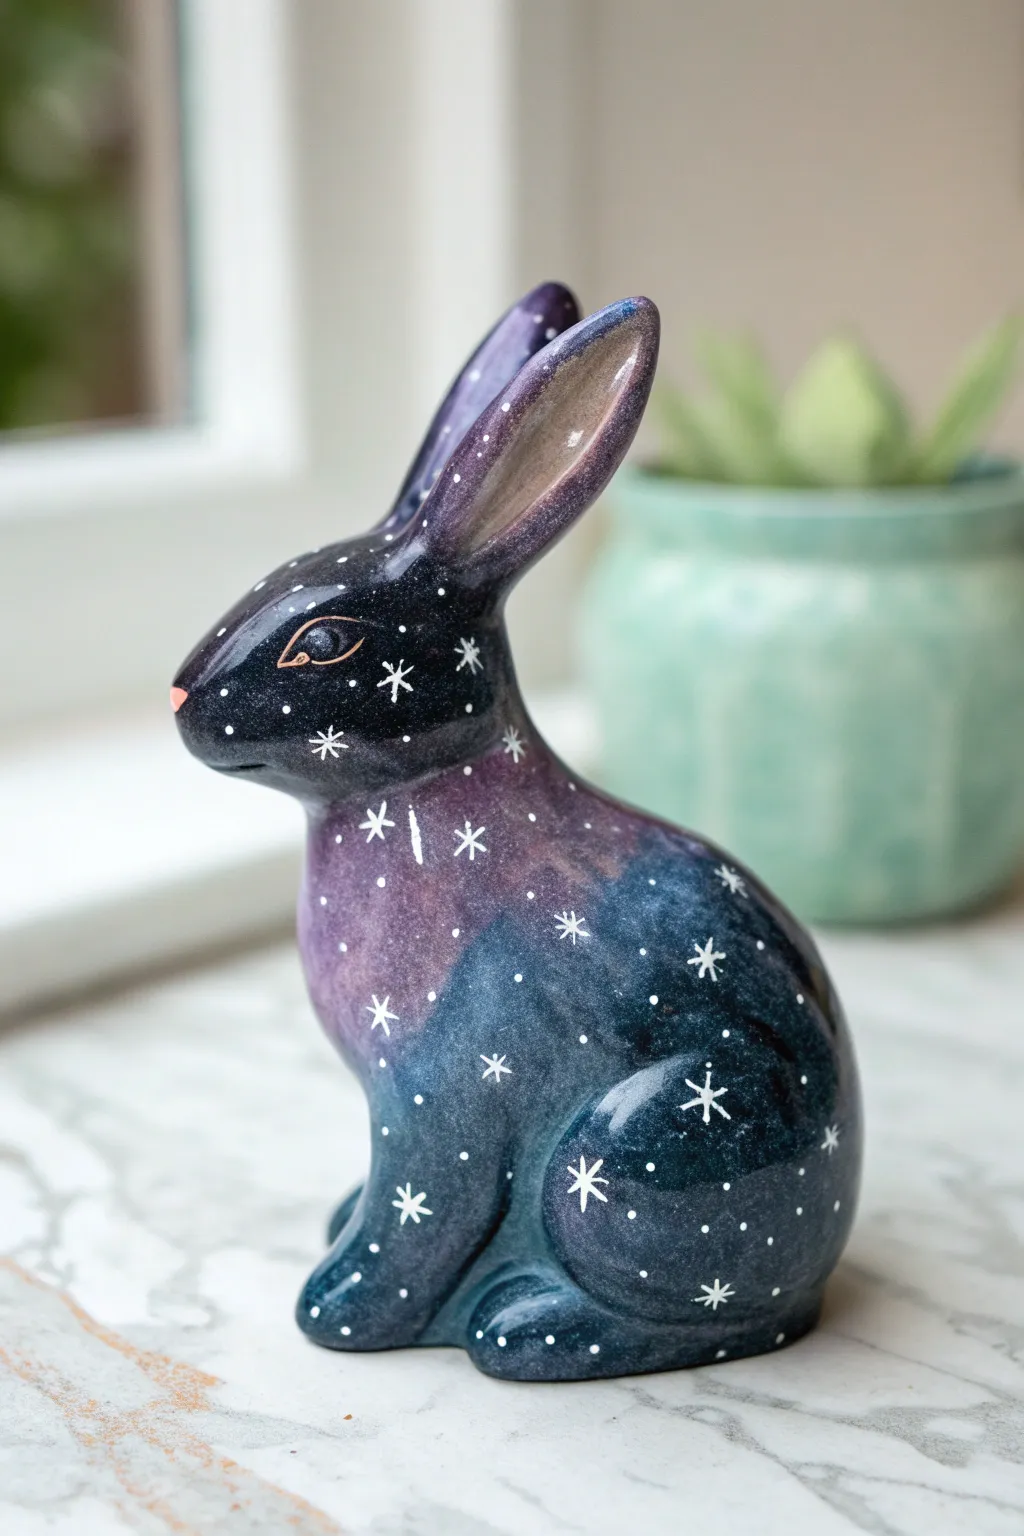
Transform a simple ceramic bunny into a celestial masterpiece featuring deep nebulous colors and twinkling stars. This project uses sponging techniques to create a seamless, dreamy galaxy gradient that looks far more complex than it actually is.
Detailed Instructions
Materials
- Bisque ceramic bunny figurine
- Acrylic paints (black, dark navy blue, deep purple, violet, teal, white)
- Small makeup sponges or sea sponge
- Fine detail paintbrush (liner brush)
- Small flat paintbrush
- Palette or paper plate
- Gloss varnish or sealer
- Water cup and paper towels
Step 1: Base Coat & Gradient
-
Prepare the surface:
Begin by wiping down your ceramic bunny with a slightly damp cloth to remove any dust or ceramic powder. Let it dry completely before starting. -
Apply the dark base:
Squeeze out some black and dark navy blue paint. Using a slightly damp sponge, dab the black paint generously onto the head, the tips of the ears, and the lower back area. -
Create the transition:
While the black is still tacky, sponge the dark navy blue right next to it, blending the edges where the two colors meet. The goal is a soft, mottled transition rather than a hard line. -
Add the nebulous purple:
Mix a deep purple. Sponge this color into the middle of the body and the base of the ears, blending it into the surrounding navy and black areas. -
Highlight with violet:
Take a brighter violet or lighter purple shade. Lightly sponge this onto the chest and the center of the side, creating a glowing ‘nebula’ effect. I like to keep my sponge fairly dry here for better control. -
Introduce teal accents:
For depth, dab a tiny amount of teal or dark turquoise near the bottom legs and paws, blending it into the navy sections. This adds that deep-space complexity. -
Smooth the ear interiors:
Paint the inner ears with a solid color. A dusty mauve or a lighter mix of your purple and white works beautifully here to distinguish the inner ear from the galaxy coat.
Step 2: Stars & Details
-
Splatter the distant stars:
Dilute a small drop of white paint with water until it’s inky. Load an old brush or toothbrush, and gently flick the bristles to spray tiny white specks across the bunny. Test on a paper towel first to avoid large blobs. -
Paint the major stars:
Using your finest detail brush and pure white paint, create larger stars. Paint a small dot, then gently pull four thin lines outward from the center to create a four-point starburst shape. -
Add variance:
Scatter different sizes of stars around. Some can be simple dots, while others are full starbursts. Place a few specifically on the dark black areas for high contrast. -
Define the eye:
Use a metallic gold or copper paint (or a mix of orange and brown) to outline the eye shape. Add a tiny white reflection dot in the pupil to bring the bunny to life. -
Detail the nose:
Paint a small, soft pink triangle for the nose tip. Let this dry completely. -
Dry thoroughly:
Allow the entire piece to dry for at least 24 hours to ensure all layers, especially the sponged gradients, are completely set. -
Seal the galaxy:
Finish with a high-gloss varnish. The gloss is essential here—it deepens the dark colors and makes the galaxy effect look wet and vibrant like real space.
Nebula Nuance
Don’t over-blend! When sponging colors together, stop as soon as they merge slightly. Too much dabbling turns the colors into a muddy gray instead of a vibrant galaxy.
Cosmic Glitter
Before the final varnish, mix a tiny pinch of very fine holographic glitter into a clear glaze and brush it over the darkest areas for extra sparkle.
Now you have a stunning, modernized ceramic piece that mimics the infinite beauty of the night sky
Whimsical Character Bunny With Painted Outfit Details
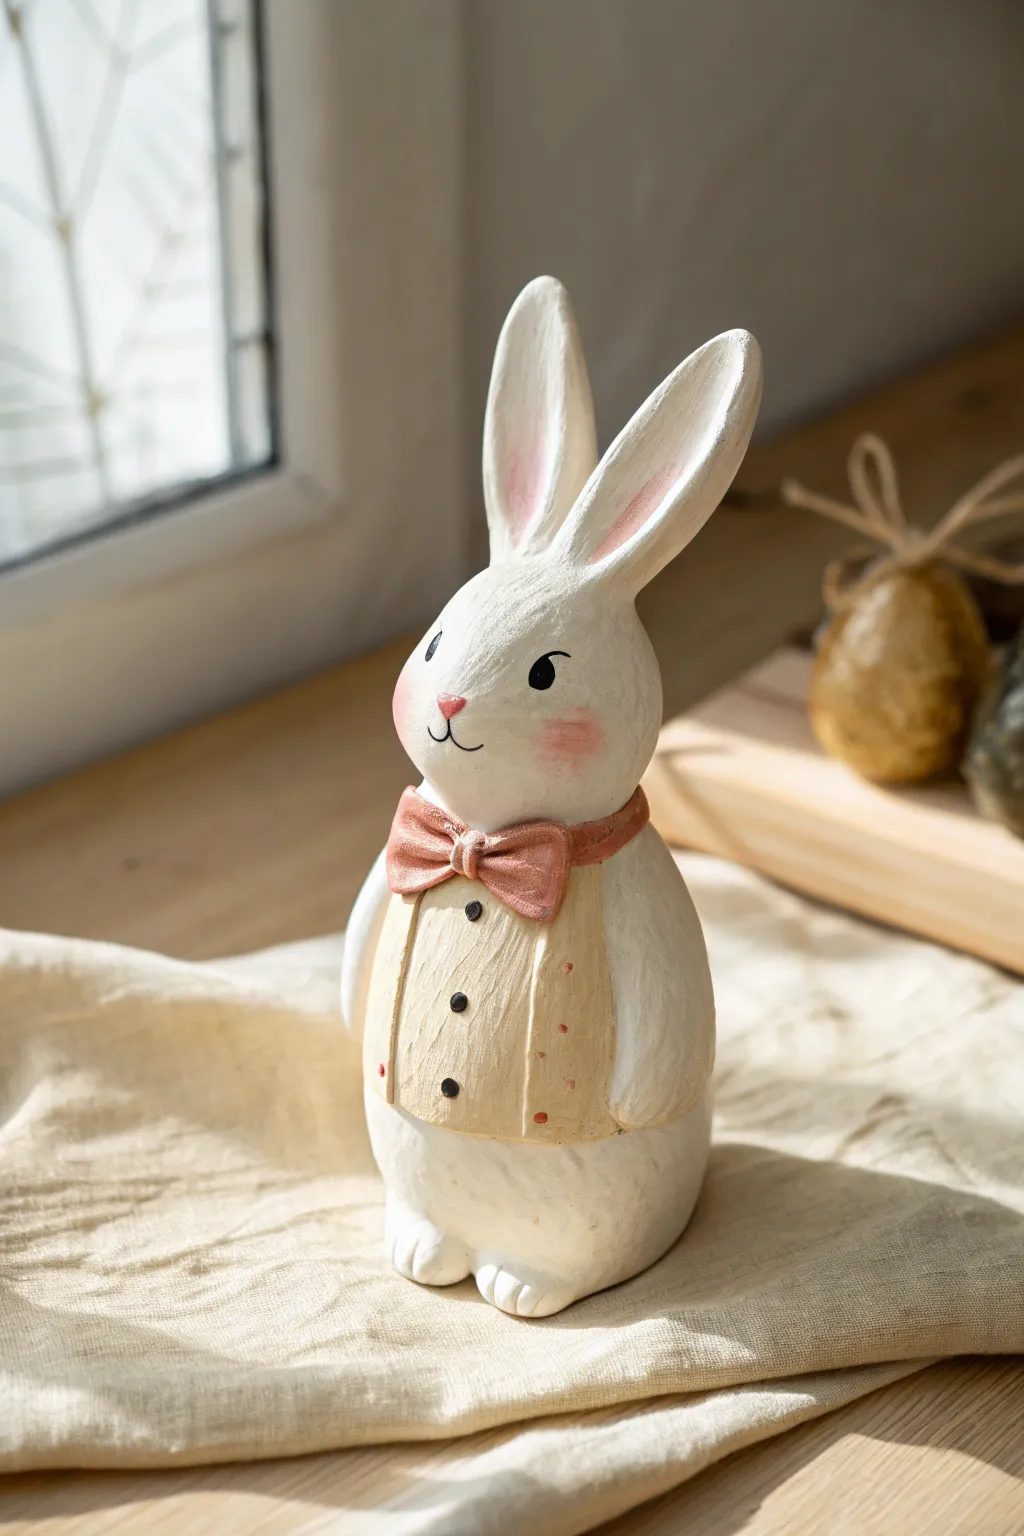
Transform a plain white ceramic rabbit figurine into a dapper gentleman with simple painting techniques that highlight character and charm. The finished look features a soft, matte finish with charming details like rosy cheeks and a spick-and-span vest.
Step-by-Step Guide
Materials
- White or unglazed ceramic bunny figurine (standing)
- Acrylic craft paints: Creamy white (base), pastel pink, warm beige/sand, black
- Matte acrylic sealer (brush-on or spray)
- Assorted paintbrushes: medium flat brush, small round brush, fine liner brush
- Fine-grit sandpaper (optional, for prep)
- Palette or paper plate
- Cup of water and paper towels
- Stylus or toothpick (for dots)
Step 1: Preparation & Base Coat
-
Clean surface:
Begin by wiping down your ceramic bunny with a slightly damp cloth to remove any dust or oils. If the surface feels too rough, you can lightly sand it with fine-grit sandpaper, but be gentle. -
Mix base color:
Create a warm off-white shade by mixing a tiny drop of beige into your white acrylic paint. This gives a softer, more vintage look than stark white. -
Initial coat:
Using a medium flat brush, apply an even coat of the off-white mixture over the entire bunny. Don’t worry about complete opacity yet; thin layers are better than thick ones. -
Build coverage:
Let the first coat dry completely (about 15-20 minutes). Apply a second or third coat until you have solid, opaque coverage without visible brushstrokes.
Step 2: Painting the Outfit
-
Outline the vest:
Before painting, visualize where the vest sits. Using a pencil very lightly, sketch the curved lines of the vest on the bunny’s chest and back. -
Base coat the vest:
Load a small round brush with your warm beige or sand-colored paint. Carefully fill in the vest area, staying within your penciled guidelines. You may need two coats for a smooth finish. -
The charming bowtie:
Mix a soft, dusky pink shade. Paint the bowtie directly above the vest, ensuring the loops are nicely rounded. Get into the crevices of the bow sculpture if your figurine has textured details there. -
Adding vest details:
Once the vest is dry to the touch, use a dipping tool (like the handle end of a brush) dipped in the vest color to add tiny texture bumps if desired, or keep it smooth. -
Vest closure:
Paint a very thin, darker beige vertical line down the center of the vest to represent the opening. This adds crucial dimension. -
Buttons:
Dip the tip of a toothpick or a fine styling tool into black paint. Carefully place 2-3 small black dots down the center line of the vest for buttons. -
Vest side dots:
To mimic stitching or pattern, use a toothpick with rust or dark pink paint to add tiny, vertical rows of dots strictly on the sides of the vest.
Uneven Vest Lines?
If your hand shakes while painting vest edges, let the paint dry fully, then use the original white base color to ‘erase’ and tidy up any messy borders.
Step 3: Face & Finishing Touches
-
Ears and nose:
Dilute your pink paint slightly with water to make a wash. Gently paint the inside of the ears and the little triangle nose. I prefer a wash here because it lets the texture show through. -
Blushing cheeks:
Using a nearly dry brush with a tiny amount of pink paint on it (blot it on a paper towel first), gently rub circular rosy spots onto the cheek area. This is dry-brushing and creates a soft, fuzzy look. -
Eyes:
Use your finest liner brush or a black paint pen to draw the eyes. Keep it simple: a small curved arch for the lid, a black pupil shape, and small eyelashes flicking outward. -
Mouth details:
Paint a very fine black ‘J’ shape and a backward ‘J’ coming from the bottom of the pink nose to form the mouth smile. -
Sealing:
Allow the entire piece to dry for at least an hour. Apply a coat of matte acrylic sealer to protect the paint and un-glaze the finish, giving it that high-end bisque look.
Matte Texture Trick
For a chalky, vintage texture like the photo, mix a teaspoon of baking soda into your white base paint before applying it. It creates a lovely stone effect.
Place your dapper bunny near a window or on a mantle to show off his handsome new attire