If your mugs are starting to look like the same old cylinder, it’s time to have a little more fun with form, texture, and details. These unique clay mug ideas are the kind of projects that feel extra personal every time you wrap your hands around them.
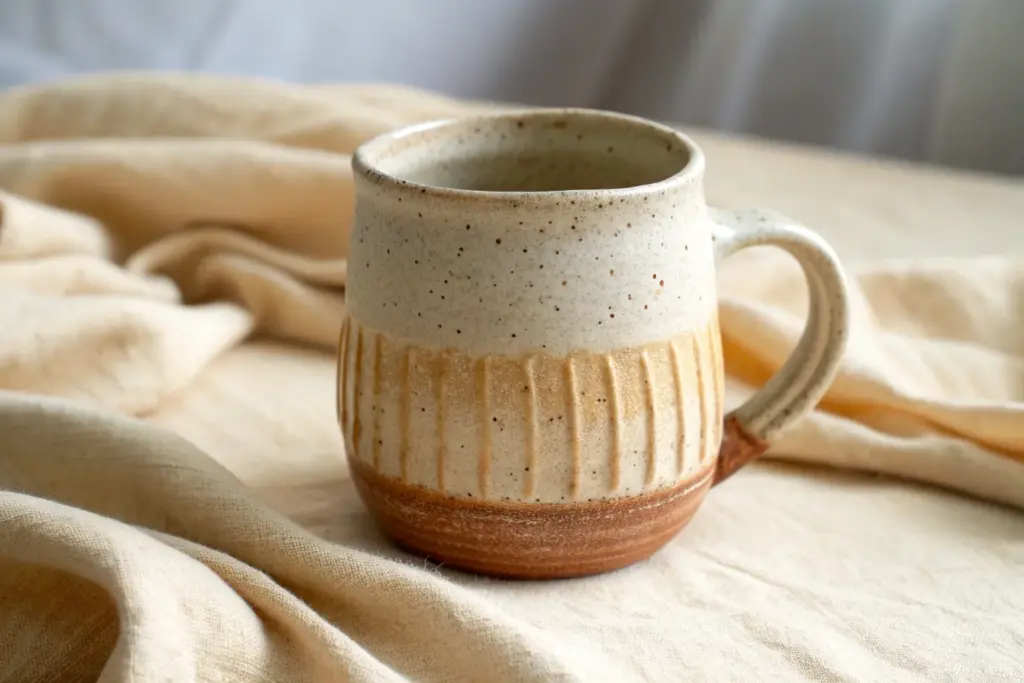
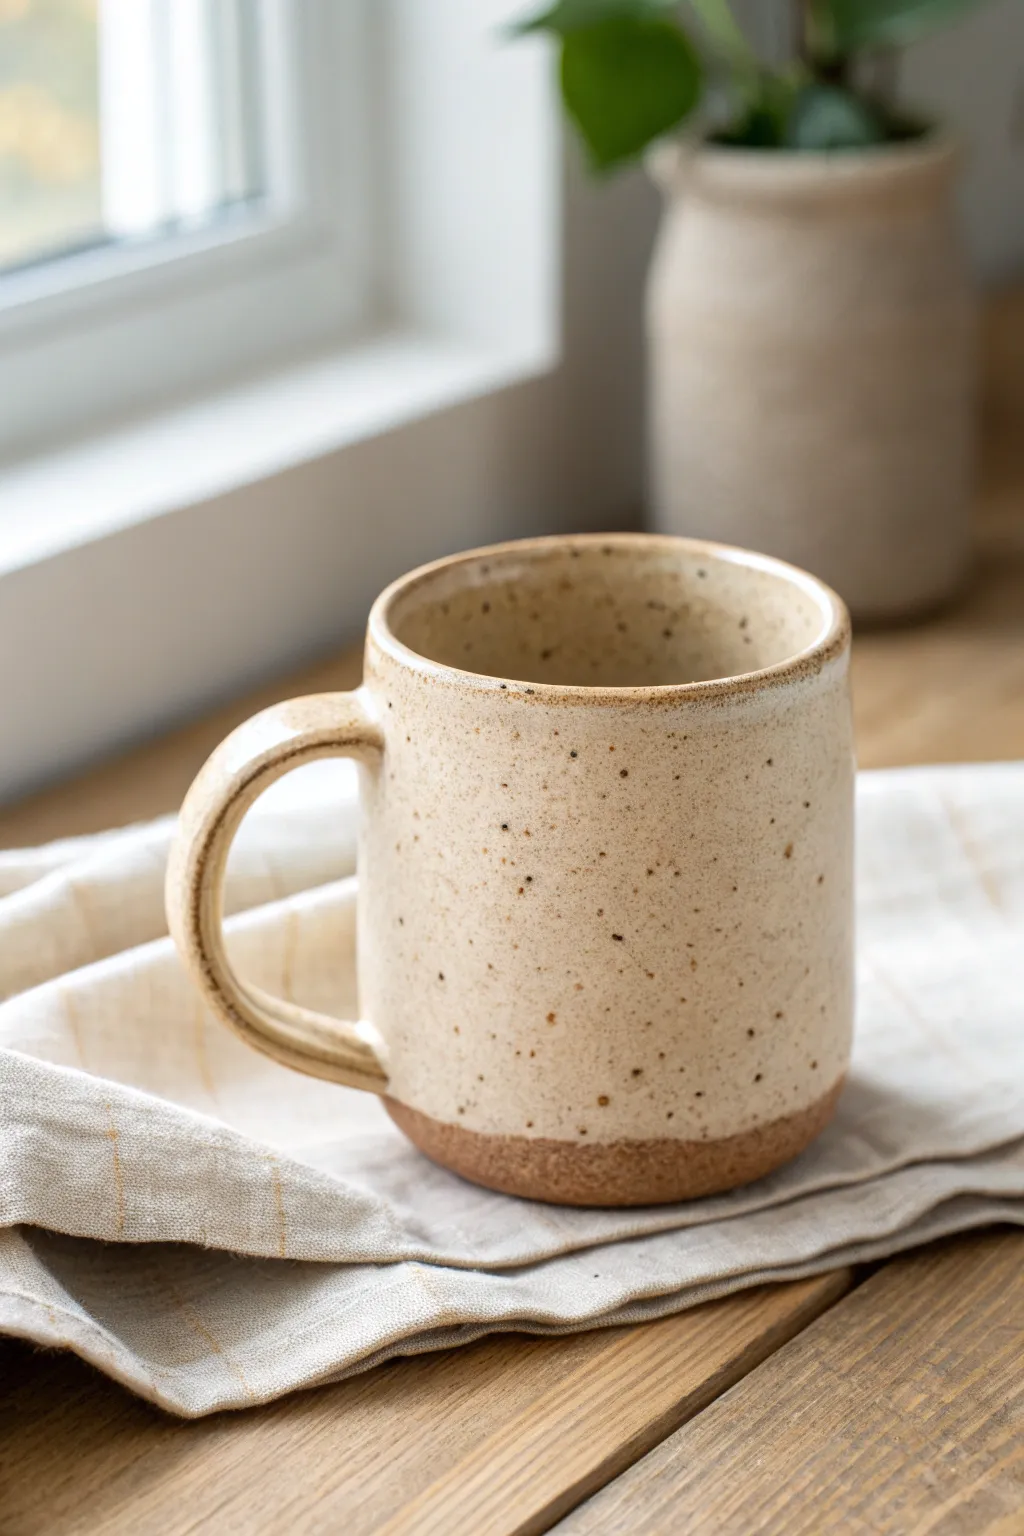
Classic Handmade Mug With a Bold, Oversized Handle
This cozy, handmade mug features a warm, speckled cream glaze that contrasts beautifully with a raw, exposed clay base. Its slightly tapered, rounded form and generously sized handle make it the perfect vessel for wrapping your hands around a hot morning coffee.
Detailed Instructions
Materials
- Stoneware clay body (buff or light brown recommended)
- Pottery wheel
- Throwing tools (sponge, wire cutter, ribs)
- Trimming tools
- Needle tool
- Serrated rib or scoring tool
- Slip
- Speckled cream or ‘oatmeal’ cone 6 glaze
- Wax resist
- Kiln
Step 1: Throwing the Body
-
Prepare the clay:
Start by wedging about 1 to 1.5 pounds of stoneware clay thoroughly to remove air pockets. A slightly larger amount helps create that comforting, weighty feel. -
Center on the wheel:
Secure the clay to the wheel head and center it using steady pressure and water. Ensure you have a wide, stable base. -
Open the form:
Open the hole in the center, leaving about a half-inch of thickness at the bottom for later trimming. -
Pull the walls:
Pull the walls up to form a cylinder. Aim for a slightly rounded, belly-like shape rather than perfectly straight sides. I like to gently push from the inside out as I pull to create that soft curve. -
Refine the shape:
Using a rib on the outside, smooth the walls and slightly taper the rim inward to hold heat better. The final height should be around 4 inches. -
Compress the lip:
Use a chamois or your sponge to smooth and round the rim. A comfortable lip is crucial for a drinking vessel. -
Remove from wheel:
Cut the mug from the bat with a wire tool and set it aside until it reaches leather-hard consistency.
Step 2: Trimming and Handle Attachment
-
Trim the foot:
Once leather hard, flip the mug onto a chuck or the wheel head. Trim away excess clay from the bottom, creating a distinct foot ring about half an inch high. -
Smooth the lower body:
Use a smooth rib to burnish the bottom inch of the exterior wall where the raw clay will remain unglazed. -
Pull the handle blank:
Pull a thick strap of clay for the handle. For this ‘bold’ look, keep it slightly wider and thicker than a standard handle. -
Shape the curve:
Gently curve the pulled strap into a ‘C’ shape and let it stiffen slightly so it holds its arch without sagging. -
Score and slip:
Score the attachment points on both the mug body and the handle ends. Apply a generous amount of slip to both surfaces. -
Attach firmly:
Press the handle firmly onto the mug body. Use a damp sponge to smooth the connection points, blending the clay so it looks seamless. -
Adjust the ergonomics:
Check the balance. The handle should have a large enough loop that three fingers can fit comfortably. -
Bisque fire:
Allow the mug to dry completely, covered loosely with plastic for a slow dry. Fire it in a bisque kiln to standard cone 04.
Crack Prevention
Handle cracks usually happen because the handle dries faster than the body. Wrap the handle tightly in plastic while leaving the body exposed for a few hours to equalize moisture.
Step 3: Glazing and Finishing
-
Wax the foot:
Apply wax resist to the bottom of the mug and up the side wall about 3/4 of an inch. This creates the signature exposed clay line. -
Prepare the glaze:
Stir your speckled cream glaze thoroughly. If using a commercial glaze, ensure the speckles are suspended well in the mixture. -
Dip the mug:
Hold the mug by the foot (or use dipping tongs) and submerge it fully into the glaze for 3 seconds. Pull it out and shake gently to remove drips. -
Clean the edges:
Use a damp sponge to wipe away any stray glaze beads that may have settled on the waxed lower section. -
Glaze fire:
Place the mug in the kiln and fire to cone 6 (or whatever temperature your specific clay and glaze require).
Thumb Rest Trick
While attaching the handle, press a small divot into the top of the handle curve with your thumb. This adds a subtle ergonomic feature that makes holding a heavy mug much easier.
Once cooled, fill your new mug with your favorite warm beverage and enjoy the tactile comfort of handmade pottery


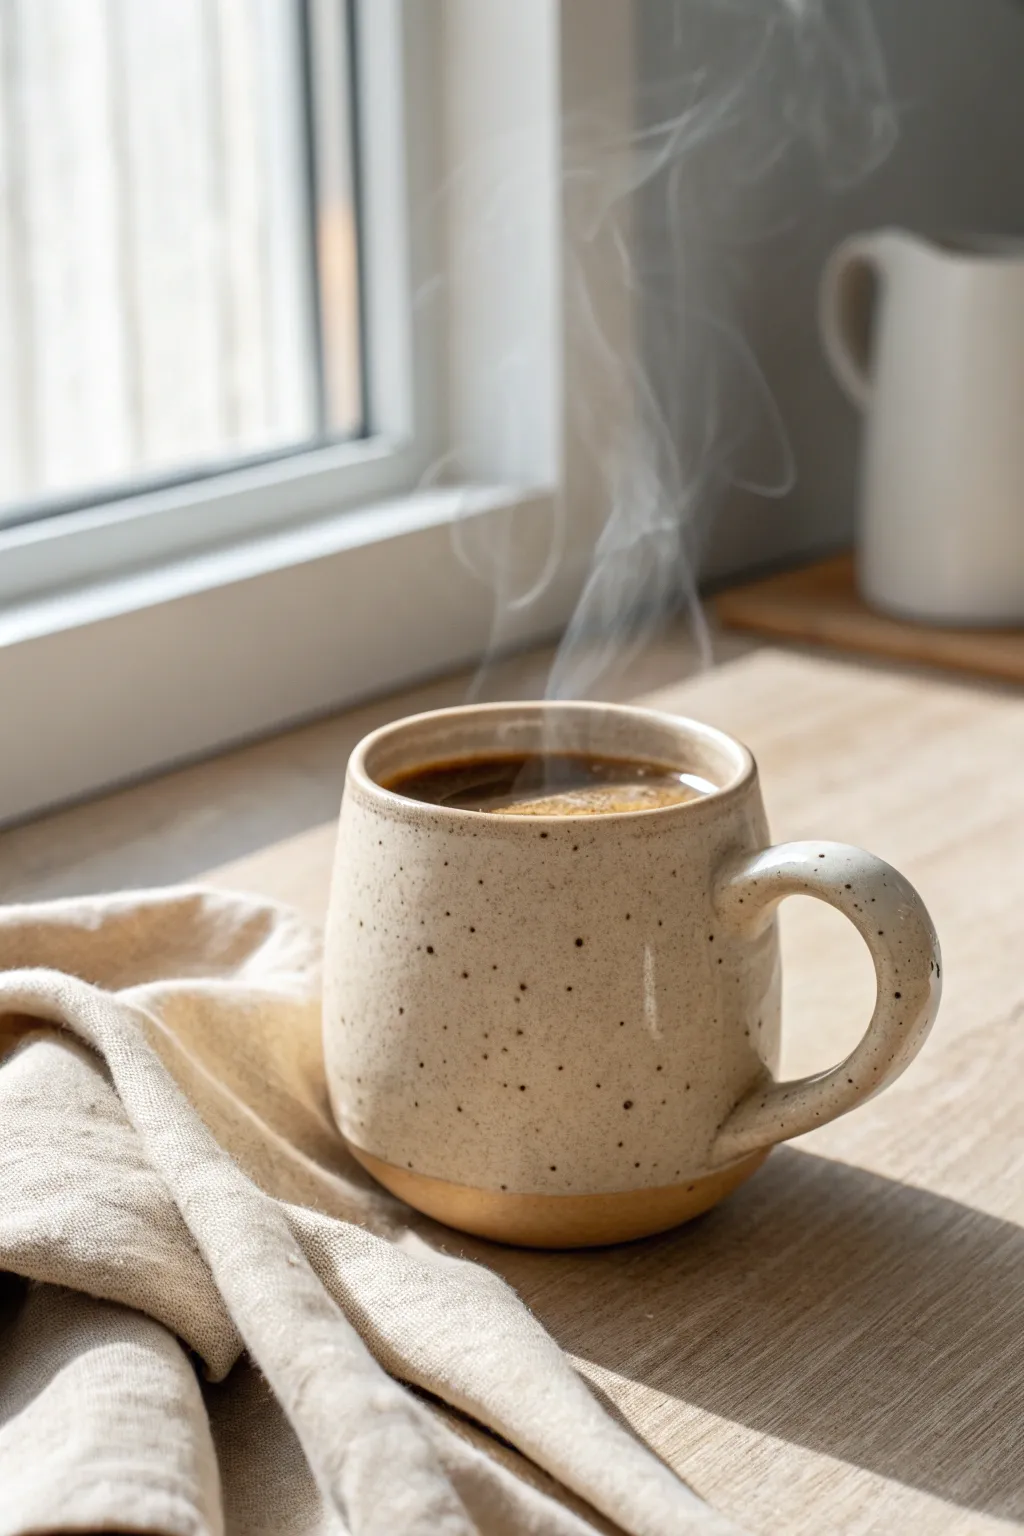
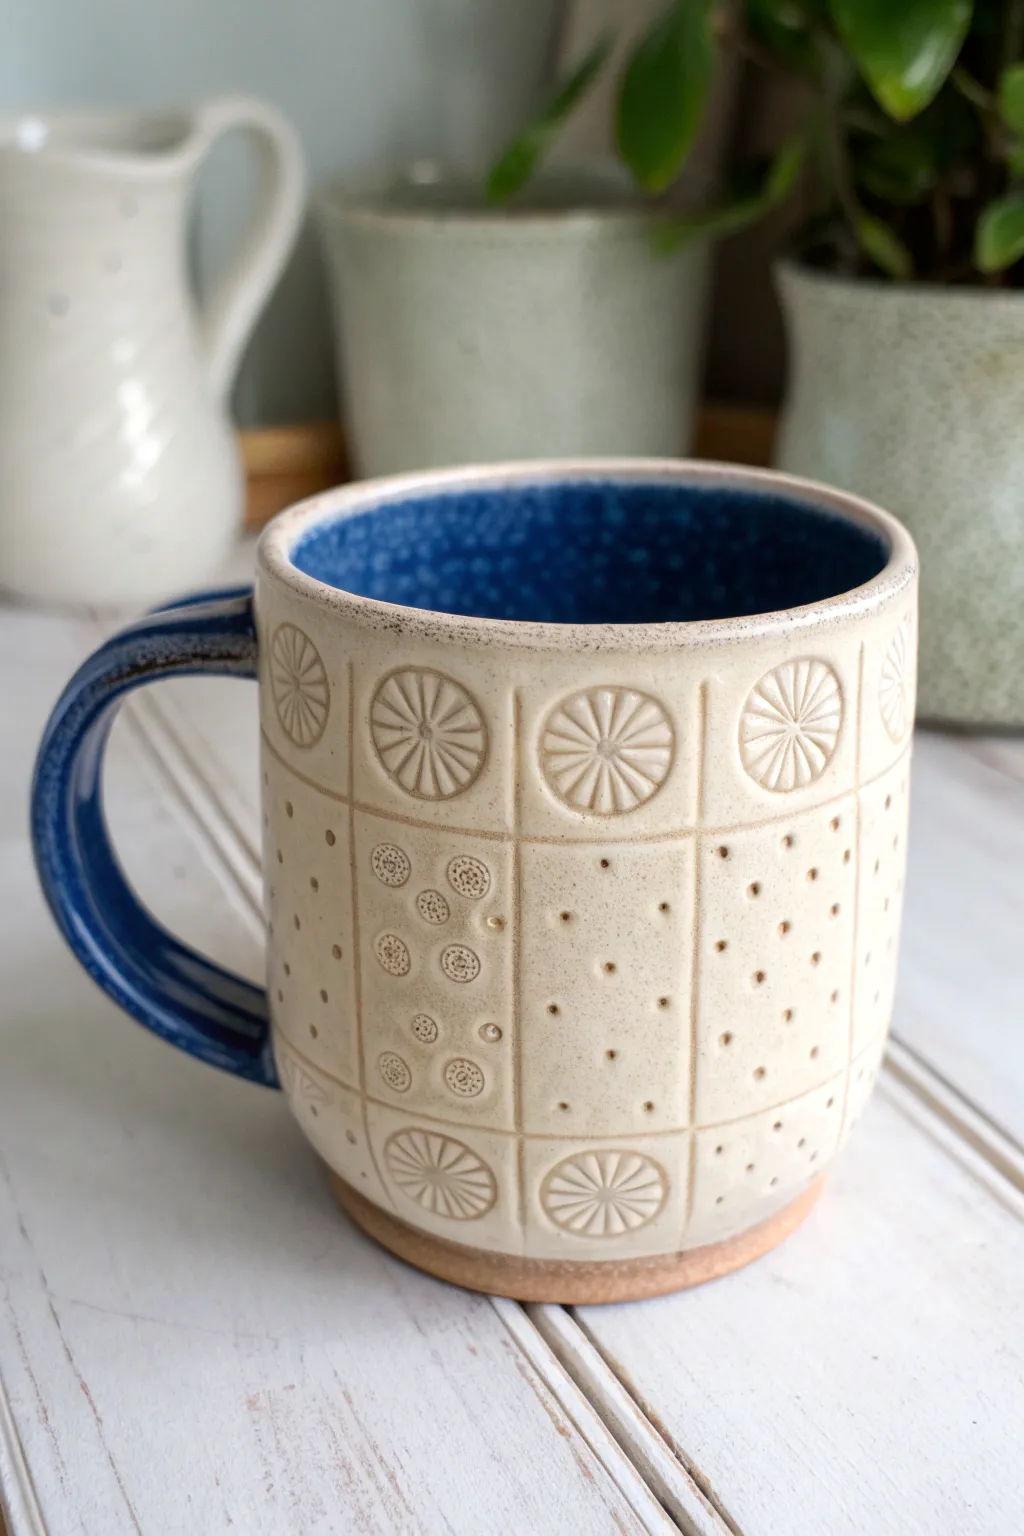
Speckled Glaze Mug With a Soft, Rounded Belly
Embrace the warmth of handmade pottery with this charming, bellied mug that highlights the beauty of raw clay against a smooth glaze. The soft, rounded form fits perfectly in cupped hands, while the speckled cream finish adds a timeless, rustic elegance.
Step-by-Step Tutorial
Materials
- Stoneware clay (speckled or buff)
- Pottery wheel
- Throwing sponge
- Wire cutter
- Rib tool (wooden or metal)
- Needle tool
- Loop tool for trimming
- Small bowl of water
- Serrated rib or scoring tool
- Cream or oatmeal speckled glaze (cone 5/6)
- Glaze brush or tongs for dipping
- Kiln
Step 1: Throwing the Form
-
Center the clay:
Begin with about 1.5 lbs of wedged stoneware clay. Slam it onto the center of your wheel head and use firm pressure with wet hands to cone the clay up and down until perfectly centered. -
Open the vessel:
Creating a wide floor is key for this shape. Press your thumbs into the center, leaving about 3/8 inch for the base, and pull outward to establish a flat interior bottom about 3 inches wide. -
Pull the walls:
Pull the walls up into a basic cylinder first. Maintain an even thickness of about 1/4 inch from bottom to top, keeping the rim slightly compressed to prevent wobbling. -
Shape the belly:
Now for the fun part: shaping the curve. With your inside hand pushing gently outward and your outside hand supporting, slowly swell the mid-section of the cylinder to create that signature rounded belly. -
Collar the rim:
As you belly out the middle, the rim might flare. Gently collar the rim inward with both hands to narrow the opening slightly, ensuring it’s narrower than the widest part of the belly. -
Refine the curve:
Use a flexible metal or wooden rib on the exterior while pushing from the inside to smooth the curve and remove throwing lines if you prefer a cleaner look. -
Finish the lip:
Use a chamois or your sponge to round off the drinking rim, making it smooth and comfortable for the lips.
Glaze Crawling?
If the glaze pulls away leaving bare spots, your bisque ware might have been dusty or oily (lotion). Always wipe bisque with a damp sponge before glazing.
Step 2: Trimming & Handle Making
-
Leather hard stage:
Let the piece dry to leather hard. It should be firm enough to handle without deforming but still cool to the touch. Invert it onto the wheel head and secure it with lugs of clay. -
Define the foot:
Using a loop tool, trim away excess weight from the bottom. Carve a distinct foot ring that separates the rounded body from the table, creating a shadow line that lifts the form. -
Pull a handle:
Takes a nugget of fresh clay and pull a tapered strap using plenty of water. Aim for a shape that is wide enough to be comfortable but not visually heavy. -
Shape the lug:
Cut the clay strip to size. Curve it into an ear shape and let it stiffen slightly on a board until it holds its curve without flopping. -
Attach the handle:
Score the mug body and the handle attachment points vigorously. Apply slip (clay slurry) and press the handle firmly onto the mug. -
Blend the seams:
Use a small wooden tool or your thumb to blend the clay of the handle into the body of the mug, ensuring a seamless transition. I like to smooth a wet finger over the join to erase tool marks. -
Dry slowly:
Cover the mug loosely with plastic to ensure the handle and body dry at the same rate, preventing cracks. Once bone dry, bisque fire it in the kiln.
Step 3: Glazing & Firing
-
Wax the foot:
Apply wax resist to the bottom foot ring and slightly up the side of the raw clay base (about 1/2 inch) to create the exposed clay detail shown in the image. -
Apply glaze:
Dip the bisque-fired mug into your cream speckled glaze. Hold it upside down for 3 seconds, then lift and shake gently to remove drips. -
Clean the line:
Even with wax, I wipe the unglazed bottom section with a damp sponge to ensure a crisp, clean line where the glaze meets the raw clay. -
Final Fire:
Load the mug into the kiln for the glaze firing (typically cone 5 or 6 depending on your clay body) to melt the glaze and mature the clay.
Refined Rim
For a truly professional finish, slightly taper the clay thickness at the very rim. A thinner lip feels more delicate to drink from than a thick, chunky edge.
Once cooled, fill your new favorite mug with coffee and enjoy the tactile comfort of that handcrafted curve


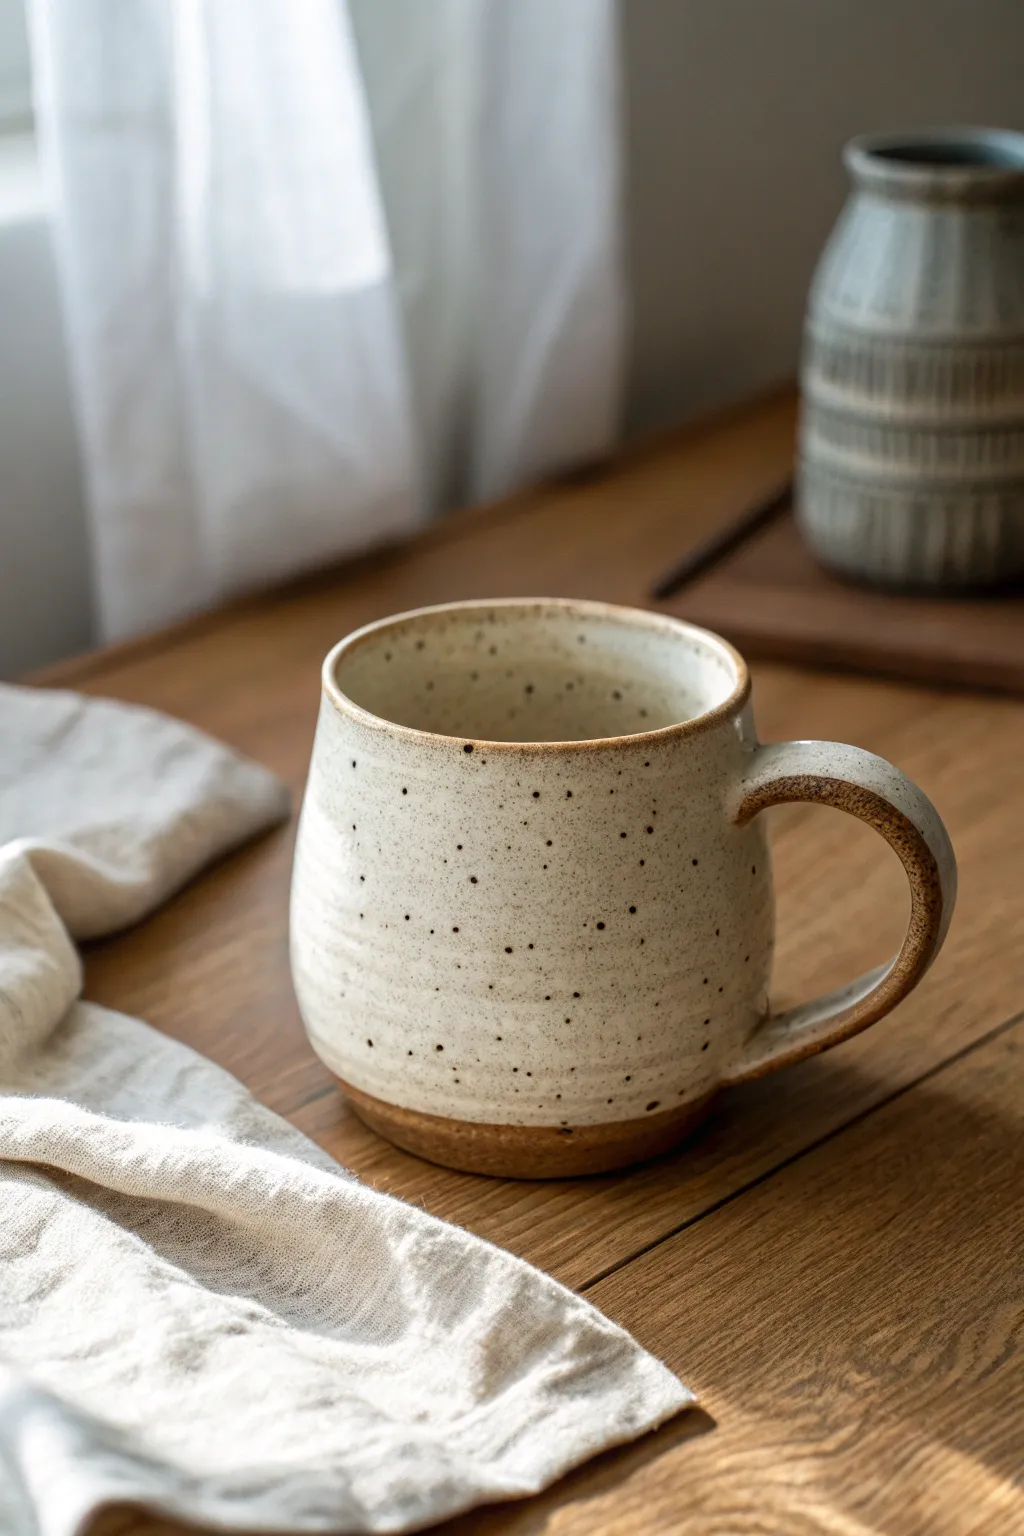
Wavy Rim Mug for a Subtle “Not-Perfect” Charm

This handmade mug strikes the perfect balance between rustic charm and modern simplicity, featuring a speckled oatmeal glaze that drips organically into the raw clay body. The distinct wavy glaze line near the bottom creates a beautiful contrast, celebrating the natural texture of the speckled stoneware beneath.
Step-by-Step Guide
Materials
- Speckled stoneware clay (mid-fire)
- Pottery wheel
- Throwing tools (sponge, wire cutter, rib)
- Trimming tools
- Bucket of water
- Serrated rib or scoring tool
- Slip
- Speckled cream or oatmeal matte glaze
- Wax resist (optional)
- Small brush (for wax)
Step 1: Throwing and Shaping
-
Center the Clay:
Begin with about 1 to 1.5 lbs of wedged speckled stoneware clay. Center it firmly on the wheel head, ensuring it does not wobble before you proceed. -
Open and Pull:
Open the clay and pull up the walls to form a cylinder. Aim for a height of about 4-5 inches, keeping the walls even in thickness from bottom to top. -
Refine the Shape:
Use a metal or wooden rib to smooth the outside walls. Create a very subtle inward taper near the rim to help keep liquids inside while drinking. -
Define the Rim:
Compress the rim with a piece of chamois or your sponge to ensure it is smooth and pleasant for drinking. -
Cut and Dry:
Wire cut the mug from the wheel but leave it on the bat or transfer carefully to a ware board. Let it dry to a leather-hard state.
Drip Control
If your test tile shows the glaze runs too much, hold the dip for less time. A thinner application reduces movement, keeping the wavy line from dripping onto the kiln shelf.
Step 2: Trimming and Handling
-
Trim the Foot:
Once leather-hard, center the mug upside down on the wheel. Trim away excess weight from the bottom and carve a neat foot ring, which gives the mug a professional lift. -
Pull a Handle:
Technique matters here: pull a strap of clay from a carrot-shaped lump, using plenty of water to keep it smooth. Looking at the image, this handle is a simple C-shape loop. -
Attach the Handle:
Score the mug body and the attachment points of the handle. Apply slip and press the handle firmly onto the mug. -
Smoothing Connections:
Wipe away excess slip with a damp sponge or your finger, blending the seams so the handle looks like it grew out of the mug. -
Bisque Fire:
Allow the mug to dry completely (bone dry) before loading it into the kiln for a bisque firing (usually cone 04 or 06).
Step 3: Glazing the Wavy Line
-
Prep for Glazing:
Wipe the bisque-fired mug with a damp sponge to remove any dust. If you want a sharp line, you can use wax resist, but for this organic look, dip-glazing works best. -
Mix the Glaze:
Stir your speckled oatmeal or cream matte glaze thoroughly. I find that a well-mixed glaze ensures those lovely specks show up evenly. -
The Dip Technique:
Hold the mug by the foot (or use glazing tongs). Dip the mug upside down into the bucket, submerging it until the glaze reaches about one inch from the bottom. -
Create the Wave:
Instead of pulling it straight out immediately, hold it in the glaze for just a second longer to allow thickness to build, then pull it out. The thickness encourages the glaze to drip slightly during firing, creating that ‘wavy’ uneven hemline. -
Clean the Rim:
Check the rim area. Since the glaze is fluid, ensure it isn’t too thick on the very lip, or it might run too much. -
Touch Up the Base:
Ensure the bottom inch and the foot are completely free of glaze. Sponge off any accidental drips below the main glaze line so the raw clay remains visible.
Texture Play
Before bisque firing, try carving vertical flutes or small dimples into the clay body. The glaze will break over the high points and pool in the recesses for extra depth.
Step 4: Final Firing
-
Load the Kiln:
Place the mug in the kiln. Since this glaze is intended to be drippy or wavy at the edge, make sure to use a cookie (a small clay disk) under the mug just in case it runs too far. -
Glaze Fire:
Fire to the maturity temperature of your clay and glaze (likely Cone 5 or 6). This melts the glaze into that creamy finish and toasts the exposed clay to a warm golden-brown.
Now you have a cozy, custom piece perfect for your morning coffee rituals


Faceted Mug With Crisp Planes and Modern Lines
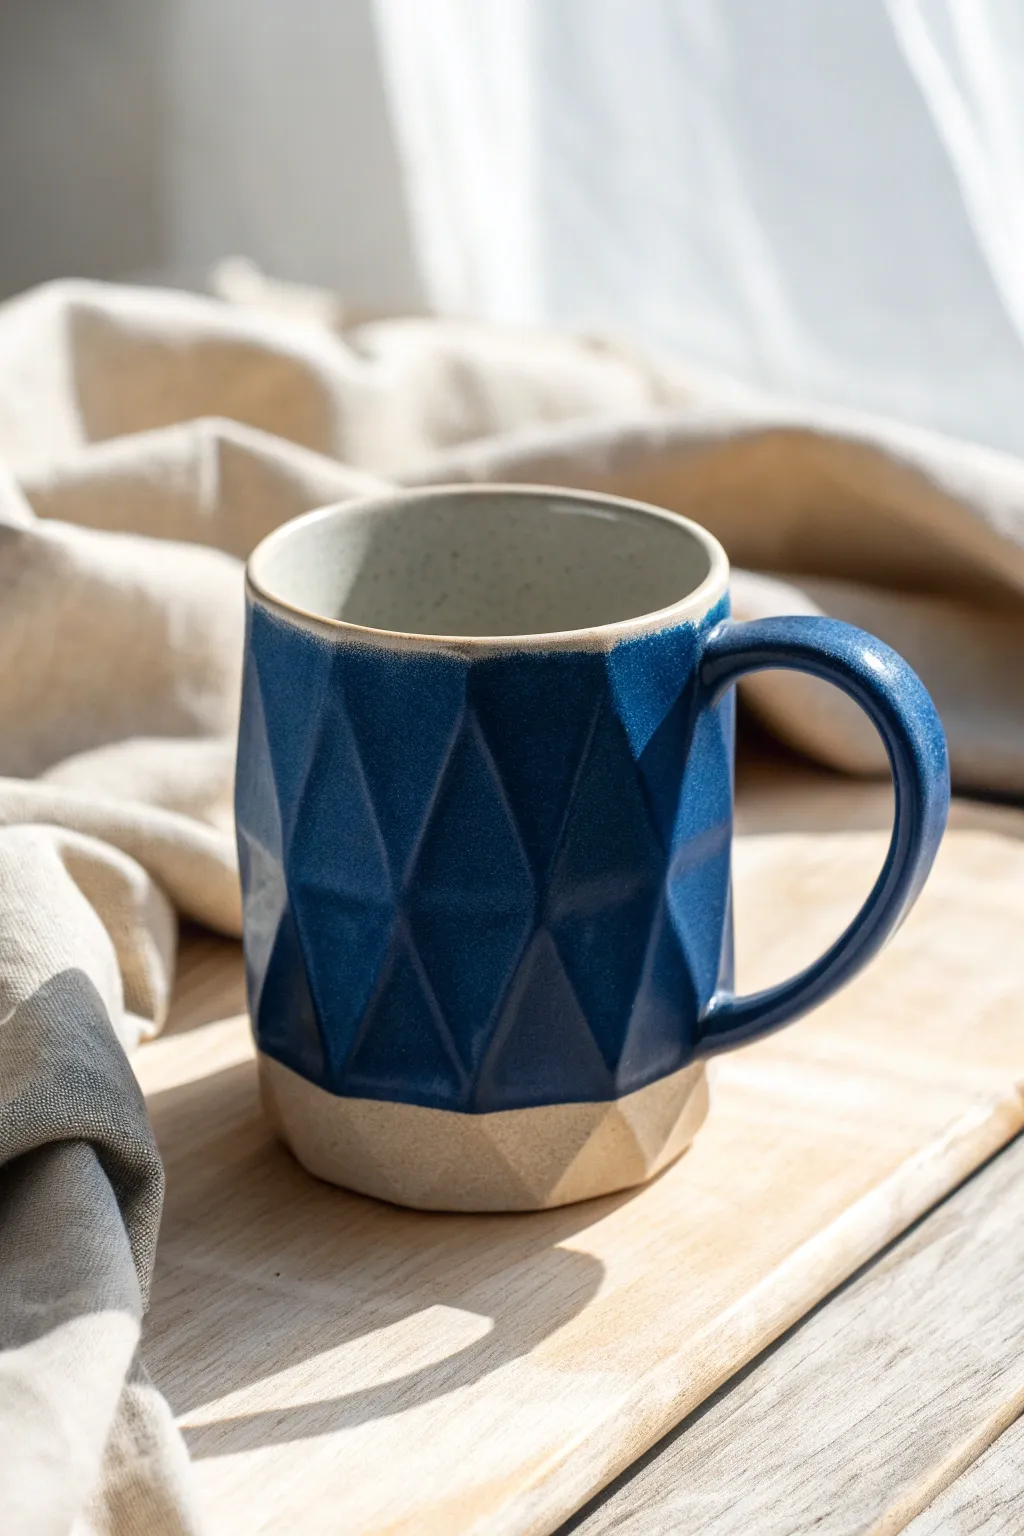
This mug combines modern, sharp geometry with the organic warmth of hand-thrown pottery. By carving crisp diamond-shaped facets into a thick clay cylinder, you reveal striking angles that feel satisfying to hold and catch the light beautifully.
How-To Guide
Materials
- Stoneware clay (speckled or buff)
- Pottery wheel
- Wire cutter
- Standard throwing tools (sponge, ribs, needle tool)
- Cheese cutter tool or sharp fettling knife for faceting
- Loop tool for trimming
- Deep sapphire blue dipping glaze (semi-matte or satin)
- Wax resist
- Sponge for smoothing
Step 1: Throwing the Cylinder
-
Center and Weigh:
Start with about 1.5 lbs of clay. I find this amount gives you enough wall thickness to carve deep facets later without cutting through. Center it firmly on your wheel head. -
Open the Floor:
Open up the clay to establish the interior width. Keep the floor flat and compress it well to prevent S-cracks during drying. -
Pull Thick Walls:
Pull the walls up into a tall, straight cylinder. Crucially, leave the walls significantly thicker than you would for a standard mug—aim for about 1/2 inch thickness to accommodate the carving. -
Clean the Rim:
Use a chamois or sponge to compress and round the rim. A smooth rim is essential since the rest of the form will be angular. -
Leather Hard Drying:
Wire the cylinder off the bat and let it dry slowly to a firm leather-hard stage. The clay needs to be stiff enough to slice crisply without deforming, but soft enough to cut easily.
Uneven Cuts?
If your wire tool drags or creates jagged tears, the clay is too dry. Spray it lightly with water, wrap it in plastic, and let it rehydrate for half a day before trying again.
Step 2: Carving the Facets
-
Mark the Grid:
Lightly scratch or mark vertical guide lines around the cylinder if you want perfect symmetry. Dividing the rim into 6 or 8 equal sections works well for this diamond pattern. -
First Row of Cuts:
Using a cheese cutter wire or a very sharp fettling knife, make your first series of diagonal slices. Start near the top rim (leaving a smooth band) and slice downward and outward. -
Create the Diamond:
For the second row, start your cut from the middle of the previous slice, cutting downwards in the opposite diagonal direction. This intersection creates the diamond midpoint. -
Complete the Pattern:
Continue faceting around the mug, interlocking the cuts. Vary the depth slightly if you want a more organic feel, or keep them uniform for strict geometry. -
Refine the Base:
Let the facets terminate naturally near the bottom, leaving a solid, uncarved band at the very foot. This “skirt” grounds the design visually. -
Edge Cleanup:
Once carved, run a barely damp sponge over the sharpest ridges. You want to soften them just enough so they aren’t razor-sharp to hold, but keep the visual crispness.
Step 3: Handle and Finishing
-
Pull a Handle:
Pull a strap handle from a lug of clay. Keep it simple and curved to contrast with the angular body. -
Attach the Handle:
Score and slip the attachment points. Attach the handle so it clears the faceted texture comfortably, ensuring a good ergonomic loop for fingers. -
Bisque Fire:
Allow the mug to dry completely to bone dry, then bisque fire it to cone 04.
Level Up: Texture Pop
Use a darker clay body or a clay with heavy iron speckles. The dark clay will show through the thinned glaze on the sharp edges, creating an even more dramatic outline.
Step 4: Glazing
-
Wax the Bottom:
Apply wax resist to the foot ring and the bottom inch of the exterior wall. This unglazed band highlights the raw clay texture against the smoothness of the glaze. -
Wax the Rim (Optional):
If you want the exposed rim look shown in the photo, carefuly paint a thin line of wax resist along the top lip. -
Pour the Liner:
Pour a glossy liner glaze inside the mug, swill it around to coat, and pour it out. Wipe any drips off the rim immediately. -
Dip the Exterior:
Holding the mug by the foot (or using tongs), dip the exterior into your deep blue glaze for 3-4 seconds. The glaze will naturally thin out over the sharp facet edges, creating that lighter blue highlight. -
Glaze Firing:
Fire to cone 6 (or your clay body’s maturity temperature) in an oxidation atmosphere to achieve the rich blue color.
Enjoy your morning coffee in a mug that feels as unique as a cut gemstone in your hand

The Complete Guide to Pottery Troubleshooting
Uncover the most common ceramic mistakes—from cracking clay to failed glazes—and learn how to fix them fast.
Two-Tone Dipped Glaze Mug With a Clean Divide
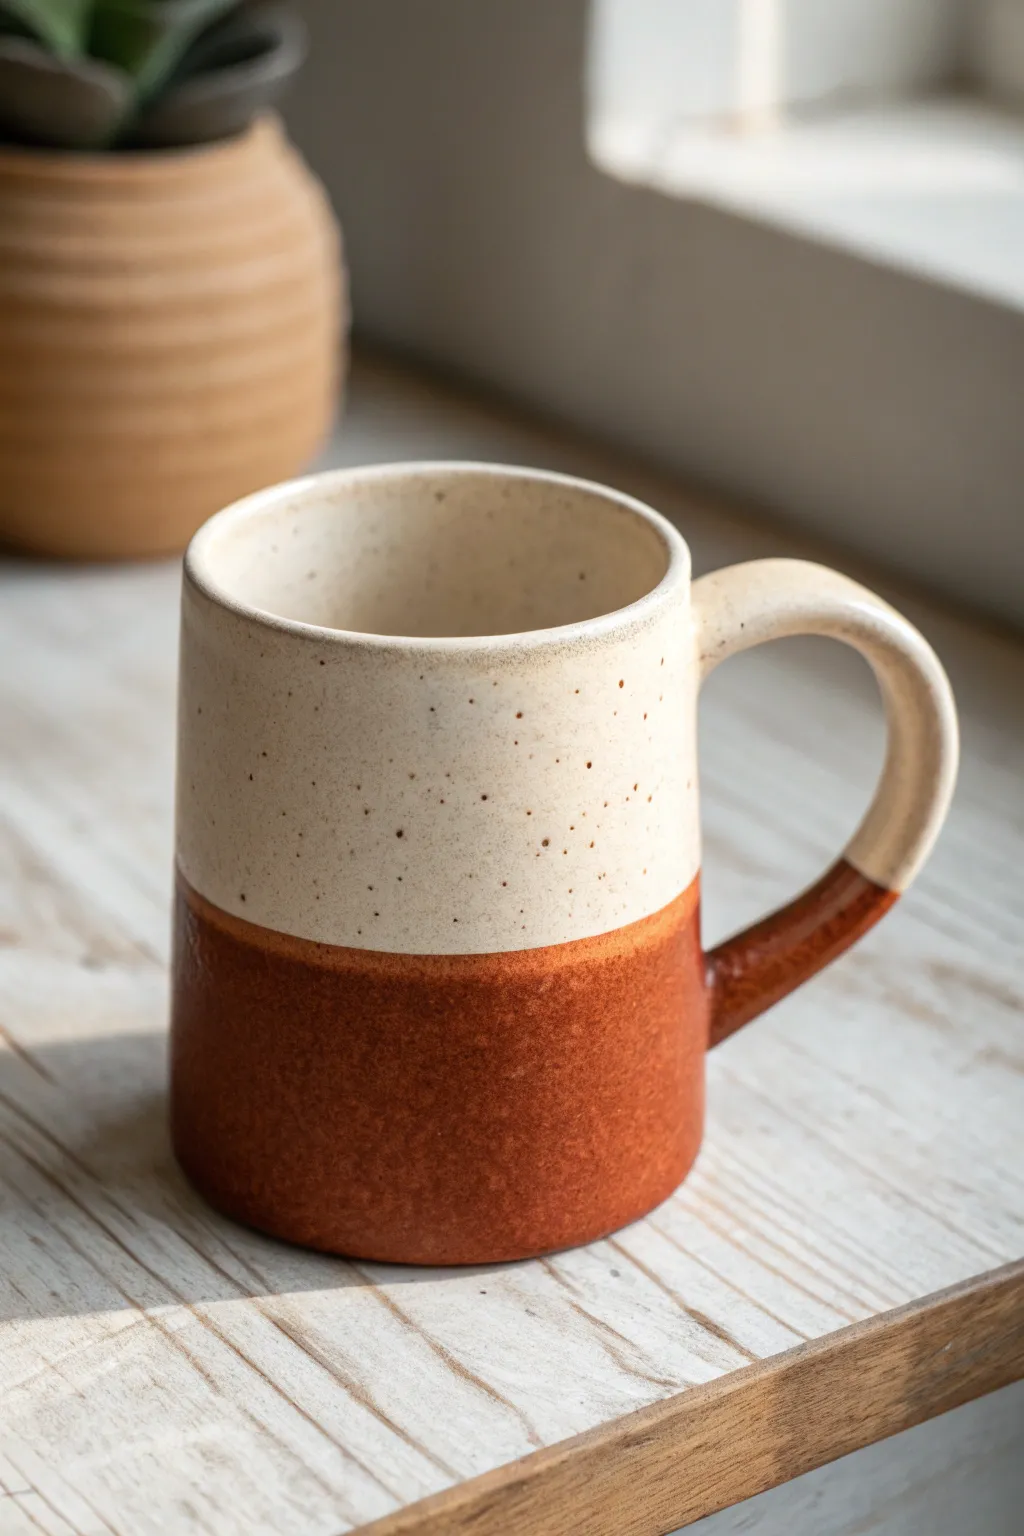
This project features a stunning two-tone design achieved by dipping the bottom half of a speckled beige mug into a rich, rust-colored glaze. The result is a modern farmhouse aesthetic with a crisp, clean divide that highlights the contrast between the smooth upper surface and the deeper tones below.
Step-by-Step
Materials
- Stoneware clay (speckled or buff)
- Pottery wheel
- Throwing tools (sponge, needle tool, rib, wire cutter)
- Trimming tools
- Bucket of water
- Serrated rib or scoring tool
- Clay slip
- Cream/speckled white glaze (food safe)
- Rust/terracotta orange dipping glaze
- Wax resist (brush-on)
- Painter’s tape (optional for ultra-crisp lines)
- Kiln
Step 1: Forming the Mug Body
-
Wedge the clay:
Begin by thoroughly wedging about 1 to 1.5 pounds of stoneware clay to remove air bubbles and ensure consistency. -
Center on the wheel:
Throw the clay onto the wheel head and center it using firm pressure and water for lubrication. -
Open and pull:
Open the centered clay and pull up cylinder walls. Aim for a straight-sided form, but allow for a slight organic softness rather than mechanical perfection. -
Smooth the walls:
Use a rib tool on the exterior while supporting the interior to smooth out throwing lines and compress the clay particles. -
Finish the lip:
Ideally, compress the rim with a chamois or sponge to create a smooth, rounded drinking edge. -
Wire off and dry:
Run a wire tool under the base to separate it from the wheel, then set the cylinder aside until it reaches a leather-hard state.
Uneven Glaze Line?
If dipping by hand is too shaky, use painter’s tape to mask off the top section. Dip quickly and remove the tape immediately while the glaze is still wet to avoid jagged edges.
Step 2: Adding the Handle and Trimming
-
Trim the base:
Once leather-hard, center the mug upside down on the wheel and trim the foot to create a clean, defined bottom edge. -
Pull a handle:
Pull a strap of clay for the handle. For this specific look, aim for a medium thickness that feels substantial but not chunky. -
Shape the ear:
Curve the pulled strap into a classic ‘C’ or ear shape and let it stiffen slightly on a board until it holds its form. -
Score and slip:
Score the attachment points on both the mug body and the handle ends. Apply a dab of slip to these rough areas. -
Attach firmly:
Press the handle onto the mug, smoothing the joints with a wooden tool or your finger to ensure a seamless connection. -
Bisque fire:
Allow the mug to dry completely (bone dry) before loading it into the kiln for a bisque firing.
Speckle Magic
If you don’t have speckled clay, mix a small amount of granular ilmenite or manganese into your white base glaze to fake that beautiful iron-speckled clay body look.
Step 3: Glazing the Two-Tone Design
-
Prepare for glazing:
Wipe the bisque-fired mug with a damp sponge to remove any dust that might interfere with glaze adhesion. -
Glaze the interior:
Pour the cream/speckled white glaze inside the mug, roll it around to coat the entire interior, and pour out the excess. -
Dip the top half:
Holding the mug by the foot, dip the entire exterior into the cream glaze. I find shaking it gently as I pull it out helps remove drips. -
Clean the foot:
Wipe off any glaze from the very bottom of the foot ring to prevent it from sticking to the kiln shelf later. -
Mark the divide:
Once the base coat is dry to the touch, decide where you want your horizon line. You can lightly sketch this with a pencil (the graphite will burn off). -
Dip the bottom:
Hold the mug upside down by the rim (or use glazing tongs). Carefully dip the bottom third into the rust-colored glaze. Hold it steady for 3-5 seconds to get a good layer. -
Refine the line:
If the dip wasn’t perfectly straight, you can technically clean up the edge with a damp sponge, though a dipped edge usually looks best left natural. -
Final wipe:
Double-check the foot ring again. Ensure absolutely no glaze is on the bottom contact surface. -
Glaze fire:
Load the mug into the kiln for the final glaze firing according to your clay and glaze cone rating (typically Cone 5 or 6).
Enjoy your morning coffee in a vessel that feels both timeless and handcrafted
Carved Sgraffito Mug With a Simple Botanical Sketch

This project combines the rustic charm of speckled stoneware with the elegant precision of sgraffito carving. You’ll create a striking contrast by carving through a dark underglaze to reveal the warm, raw clay body beneath in a simple leafy motif.
How-To Guide
Materials
- Speckled buff stoneware clay
- Pottery wheel (or slab roller/rolling pin for hand building)
- Black underglaze (velvet finish recommended)
- Sgraffito tool (small wire loop or sharp needle tool)
- Ribs (metal and wood)
- Sponge
- Wire cutter
- Clear matte glaze
- Soft fan brush
- Kiln
Step 1: Throwing and Shaping
-
Center the clay:
Begin with about 1-1.5 lbs of speckled buff stoneware. Wedge it thoroughly to remove air bubbles, then center it securely on your wheel head. -
Open and pull:
Open the clay and begin pulling your walls. Aim for a cylinder shape with a slightly wider base for stability, tapering just slightly at the rim. -
Refine the form:
Use a metal rib to smooth the outside walls, removing throwing rings to create a perfect canvas for your carving later. Ensure the wall thickness is even. -
Create the rim:
Compress the rim with a chamois or your sponge to make it comfortable for drinking. Create a slight inward curve at the very top. -
Trim and dry:
Wire the mug off the wheel and let it dry to a firm leather-hard stage. This is crucial—too wet and it will warp; too dry and you can’t carve. -
Add the handle:
Pull a simple, comfortable strap handle. Attach it securely using the score and slip method, ensuring the top attachment flows seamlessly from the rim.
Smudged Lines?
If you accidentally smear black dust into the carved lines, wait until the piece is bone dry. Then, gently lightly scrape the white line again with a clean tool to brighten it up.
Step 2: Application and Carving
-
Define the glaze line:
Decide where you want the dark section to end. I usually like to leave the bottom inch or so raw to show off that speckled clay body. -
Apply underglaze:
Using a soft fan brush, apply 2-3 even coats of black underglaze to the exterior, stopping at your defined line. Let each coat dry until it’s no longer shiny before applying the next. -
Sketch the design:
Once the underglaze is dry to the touch but the clay is still leather hard, use a dull pencil to very lightly sketch your main branch line. Don’t press hard; just make a faint guide. -
Carve the main stem:
Using your sgraffito tool, crave the main stem first. Apply steady pressure to cut through the black layer and reveal the tan clay. Vary the line width slightly for an organic look. -
Outline the leaves:
Carve the outlines of the leaves attached to your stem. Keep the shapes simple and almond-like. -
Add leaf veins:
Gently carve the central vein in each leaf, followed by delicate angled lines for the side veins. These lines should be thinner than the outline. -
Add smaller details:
If you have empty space, add a second smaller branch or some tiny berries for visual balance. -
Clean up crumbs:
Use a large, dry, soft brush to gently sweep away the clay burrs and crumbs. Do not use a wet sponge or you will smear the black underglaze.
Step 3: Firing and Finishing
-
Bisque fire:
Allow the mug to dry completely to bone dry. Fire it in a bisque load (usually Cone 06 or 04). -
Clear glaze interior:
Pour clear glaze inside the mug, swirl to coat, and pour out the excess. Wipe any drips off the rim immediately. -
Glaze exterior (optional):
You can dip the exterior in a clear matte glaze to seal it, or leave the outside unglazed if the clay is fully vitrified at your firing temp. A clear matte glaze is best to protect the carving without adding shine. -
Final fire:
Fire the piece to the maturity of your clay (likely Cone 5 or 6 for stoneware). Ensure the bottom is wiped clean of any glaze. -
Sand the bottom:
After firing, hold the mug and lightly sand the unglazed bottom foot with 400-grit sandpaper to ensure it won’t scratch your table.
Level Up: Depth
Try painting a layer of dark blue underglaze, letting it dry, and then painting black over it. When you carve, vary your depth to reveal hints of blue along the edges of the tan clay.
Enjoy your morning coffee knowing you’re holding a piece of handcrafted art you made yourself


What Really Happens Inside the Kiln
Learn how time and temperature work together inside the kiln to transform clay into durable ceramic.
Mishima-Inlay Mug With Clean Pattern Lines
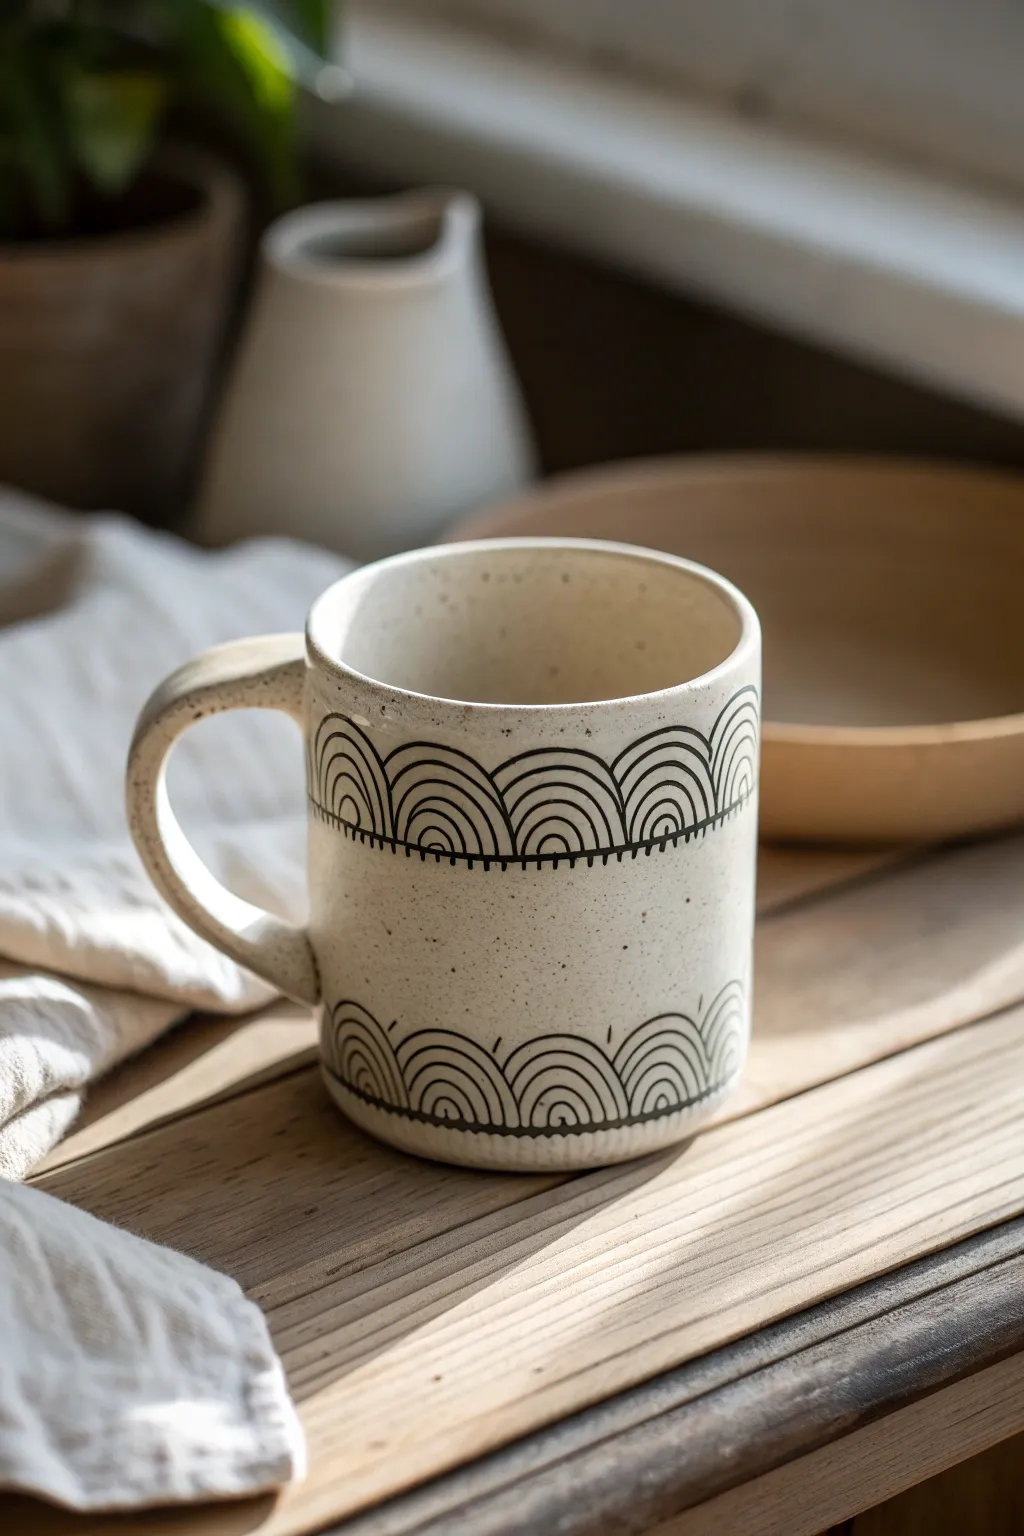
This project combines the clean elegance of black-on-cream line work with the satisfying technique of Mishima inlay. The result is a cozy, speckled mug featuring repeating concentric rainbow arcs that feel both modern and hand-drawn.
Step-by-Step
Materials
- Speckled cream stoneware clay (e.g., Laguna Speckled Buff)
- Black underglaze or black slip
- Pottery wheel (or slab roller for hand-building)
- Needle tool or sharp carving tool
- Small wax carving loop tool
- Metal kidney rib
- Small sponge
- Clear matte or satin glaze
- Paintbrush for underglaze application
- Flexible ruler or measuring tape
Step 1: Forming the Mug Body
-
Throw the cylinder:
Begin by throwing a cylinder on the wheel with about 1 pound of speckled clay. Aim for straight, vertical walls with a flat bottom, keeping the rim slightly rounded for drinking comfort. -
Refine the shape:
Use a metal rib to compress the walls and remove throwing rings, creating a smooth canvas for your carving later. I find that taking extra time here saves a lot of cleanup work after the handle is attached. -
Pull the handle:
Pull a strap handle from a separate lug of clay. Let it curve naturally into a spacious ‘C’ shape or ‘ear’ shape that allows for a comfortable three-finger grip. -
Attach and dry to leather hard:
Score and slip the handle onto the mug body. Clean up the attachment points with a damp sponge. Allow the entire mug to dry slowly until it reaches a sturdy leather-hard stage—this is crucial for clean carving.
Smudged Lines?
If your lines are smearing during the scrape-back, the underglaze is still too wet. Let it dry longer until bone dry, or use a slightly sharper metal rib to cut rather than drag.
Step 2: Carving the Mishima Pattern
-
Mark horizontal guides:
Place the mug on a banding wheel. Using a needle tool, lightly scribe two horizontal lines around the circumference near the top third, and one horizontal line near the bottom third. These will serve as the baselines for your arches. -
Sketch the arches:
Lightly scratch in your repeating rainbow arch designs. You want concentric semi-circles rising from your horizontal baselines. Don’t worry about perfection; the hand-drawn look adds character. -
Carve the lines:
Using a sharp needle tool or a very fine carving tool, incise the lines you just sketched. You want the grooves to be deep enough to hold slip (about 1-2mm) but not so deep they weaken the wall. -
Add detail ticks:
Carve small vertical ‘tick’ marks along the horizontal baselines between the arches to add texture and visual interest. -
Clean the burrs:
Once carved, run a finger lightly over the surface to brush away large clay crumbs, but don’t smooth it out completely yet.
Color Pop
Swap the black underglaze for a deep cobalt blue or a terracotta orange slip. You can also alternate colors for each concentric arch for a true rainbow effect.
Step 3: Inlaying and Finishing
-
Apply black underglaze:
Generously paint black underglaze or slip over all the carved areas. Don’t be shy—messily cover the lines completely, ensuring the liquid gets all the way into the grooves. -
Let it firm up:
Allow the underglaze to dry until it is no longer shiny and feels chalky to the touch. This usually takes 15-20 minutes depending on humidity. -
Scrape the surface:
Using a sharp metal kidney rib, gently scrape the surface of the mug. You are shaving off the excess black surface layer, revealing the cream clay underneath while leaving the black material trapped inside the carved lines. This is the magic Mishima moment. -
Make final wipes:
If a slight haze remains, wipe the surface very gently with a slightly damp sponge. Be careful not to wash the black out of the grooves. -
Bisque fire:
Once the mug is bone dry, bisque fire it to Cone 04 (or your clay’s specific bisque temperature). -
Clear glaze application:
Dip the bisqued mug into a clear matte or satin glaze. A glossy glaze works too, but a satin finish highlights the texture of the speckled clay content beautifully. -
Final firing:
Fire the mug to maturity (likely Cone 5 or 6 for stoneware). The speckles in the clay will pop through the glaze, complementing your sharp black lines.
Now you have a stunning, minimalist mug that invites you to slow down and enjoy your morning coffee
Stamped Texture Mug Using Found Objects for Pattern
Embrace the beauty of everyday textures with this hand-built mug that features a patchwork of stamped patterns. The creamy white exterior highlights delicate indentations, while the vibrant blue interior adds a delightful pop of hidden color.
How-To Guide
Materials
- Stoneware clay body (white)
- Rolling pin
- Fettling knife
- Clay scoring tool or fork
- Slip (clay and water mixture)
- Found objects for stamping (e.g., pen caps, screw heads, vintage buttons, wheel gears)
- Ruler
- Sponge
- Cobalt blue satin glaze
- Clear or translucent white glossy glaze
- Kiln
Step 1: Preparing the Slab
-
Roll the slab:
Begin by rolling out a medium-sized ball of stoneware clay into a rectangular slab. Aim for a consistent thickness of about 3/8 of an inch to ensure the walls are sturdy but not too heavy. -
Smooth the surface:
Use a damp sponge or a rubber rib to compress the clay on both sides. This removes any canvas texture from your work surface and creates a clean canvas for your stamping. -
Cut to size:
Using a ruler and fettling knife, cut a clean rectangle. A standard size for a mug body is roughly 4-5 inches tall and 10-11 inches wide, but adjust based on your desired shrinkage rate.
Sticky Stamps?
If your found objects are sticking to the clay, dust them lightly with cornstarch or baking soda before pressing. This acts as a release agent and burns off in the kiln.
Step 2: Creating the Pattern
-
Grid layout:
With a ruler, lightly score a grid onto your slab. You don’t want to cut through; just create visible guidelines for where your pattern blocks will go. -
Select found objects:
Gather your stamping tools. For this specific look, you need a radial object (like a wheel gear or daisy button), a small hollow circle (like a pen cap), and a solid dot (like a blunt nail head). -
Stamp the focal points:
Press your radial/daisy object firmly into the center of alternating grid squares. Support the clay from underneath so you don’t warp the slab while pressing. -
Add detail texture:
In the remaining empty squares, use your smaller tools. Press the pen cap repeatedly to make small rings, or use the blunt nail to create a stippled, polka-dot effect. Vary the density for visual interest.
Step 3: Assembling the Mug
-
Form the cylinder:
Wait for the slab to become stiff-leather hard so the texture doesn’t smash during handling. Carefully bend the slab into a cylinder, overlapping the ends slightly. -
Join the seam:
Score the overlapping edges and apply slip. Press them together firmly. I prefer to smooth the seam on the inside but leave the outside seam visible if it aligns with the grid pattern, or smooth it entirely if preferred. -
Attach the base:
Roll a small slab for the floor. Place your cylinder on top, trace around it, and cut out the circle. Score, slip, and attach the floor to the cylinder walls. -
Refine the rim:
Run a damp sponge or chamois strip over the rim of the mug to ensure it is rounded and comfortable for drinking. -
Make the handle:
Pull a strap of clay or roll a coil for the handle. Flatten it slightly to match the aesthetic of the mug body. -
Attach the handle:
Score and slip the attachment points on both the mug body and handle ends. Press firmly to join, wiping away excess slip with a wet brush.
Pro Tip: Oxide Wash
To make the texture pop even more, apply an iron oxide wash to the stamped areas and wipe it back with a damp sponge before applying the clear glaze.
Step 4: Glazing and Finishing
-
Bisque fire:
Once bone dry, fire the mug to bisque temperature (usually Cone 04) to prepare it for glazing. -
Glaze the interior:
Pour a deep cobalt blue satin glaze into the inside of the mug. Swirl it quickly to coat the entire interior and handle connection points, then pour out the excess. -
Dip the handle:
Dip just the handle into the same blue glaze, or carefully brush it on to ensure a clean line where the handle meets the body. -
Glaze the exterior:
Dip the exterior of the mug into a clear or translucent white glaze. This will pool slightly in your stamped textures, highlighting the pattern darks and lights. -
Wipe the foot:
Use a sponge to wipe any glaze off the bottom of the mug and about 1/4 inch up the side to prevent it from sticking to the kiln shelf. -
Final Fire:
Fire the mug to your clay body’s maturity temperature (e.g., Cone 6). Let the kiln cool completely before retrieving your finished piece.
Now fill your beautifully textured mug with your favorite warm beverage and enjoy the tactile experience

TRACK YOUR CERAMIC JOURNEY
Capture glaze tests, firing details, and creative progress—all in one simple printable. Make your projects easier to repeat and improve.
Raised Floral Appliqué Mug With Tiny Petals and Leaves
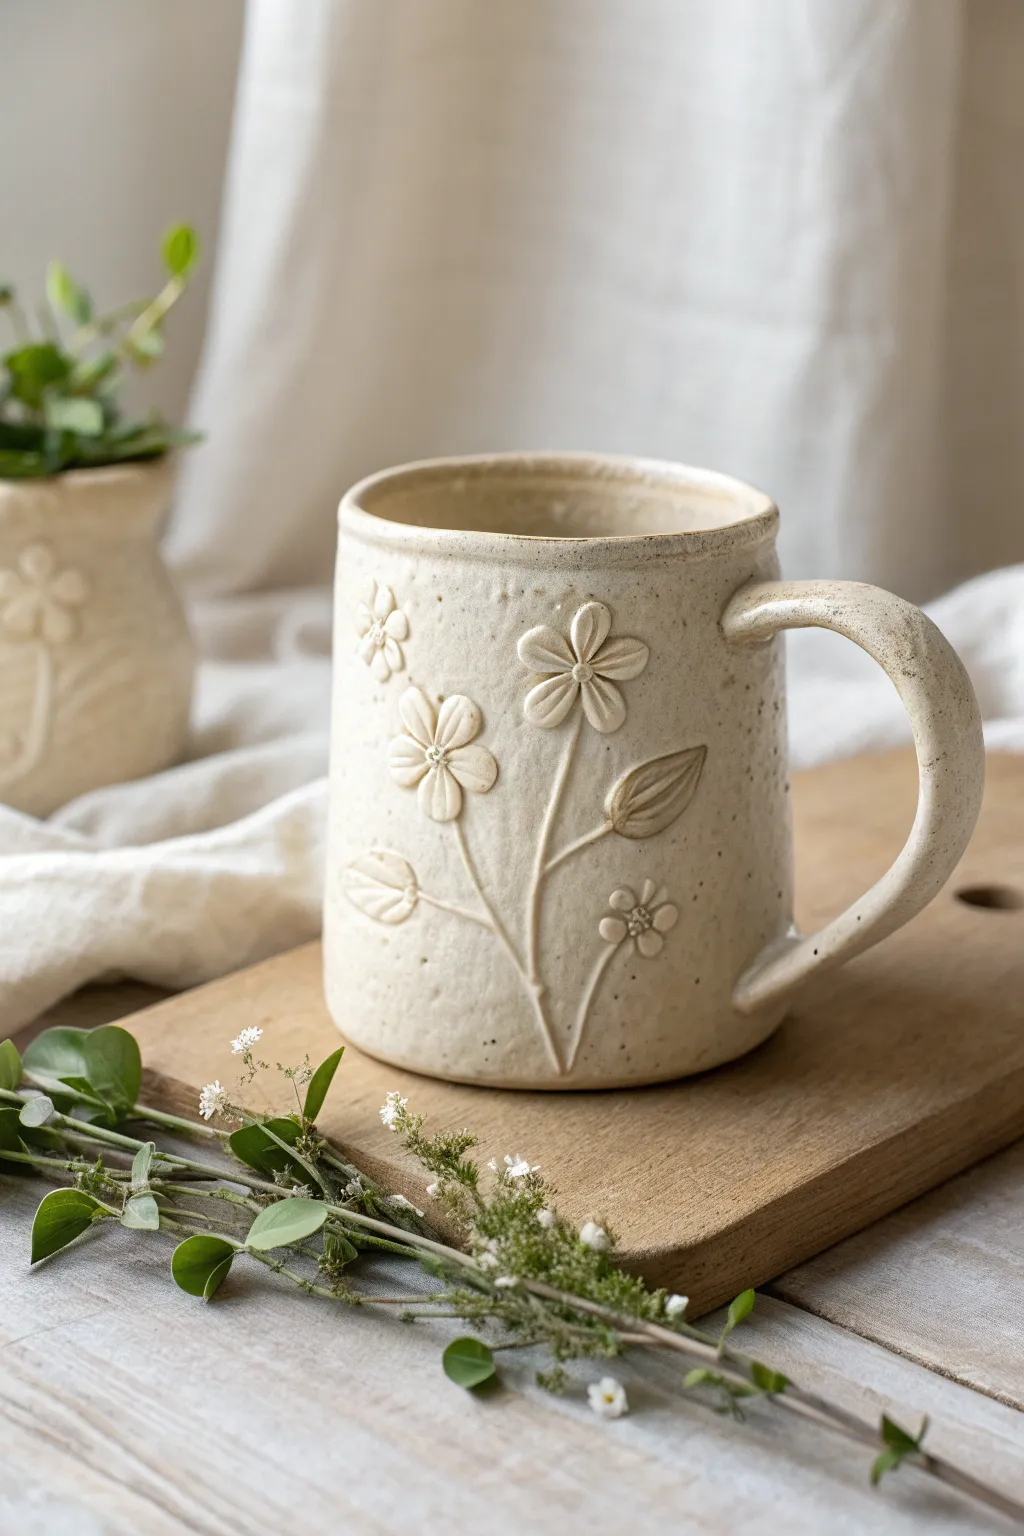
This charming handmade mug features delicate raised floral appliqués on a warm, speckled beige clay body. The tactile design brings a touch of nature to your morning coffee with its gentle relief and organic, earthy finish.
Step-by-Step
Materials
- Speckled stoneware clay (mid-fire)
- Pottery wheel or slab roller (and rolling pin)
- Needle tool
- Scoring tool (serrated rib or needle)
- Slip (clay mixed with water)
- Small wooden modeling tool
- Sponge
- Clear or semi-matte white glaze
- Kiln
Step 1: Forming the Base Mug
-
Prepare the clay:
Begin by wedging about 1 to 1.5 lbs of speckled stoneware clay to remove any air pockets. This ensures a uniform consistency for forming the mug body. -
Construct the cylinder:
You can either throw a simple cylinder on the pottery wheel or roll out a slab to create a hand-built body. Aim for a wall thickness of about 1/4 inch so it’s sturdy enough to hold the appliqués without warping. -
Trim and refine:
Once the cylinder is leather hard, trim away excess clay from the bottom if you threw it on the wheel. Smooth out the surface with a damp sponge or a flexible rib to erase finger marks, creating a clean canvas for your flowers. -
Pull and attach the handle:
Pull a strap of clay for the handle, shaping it into a gentle curve. Score and slip the attachment points on the mug body, press the handle firmly into place, and smooth the seams with a modeling tool or your thumb.
Slip Consistency Tip
Make your slip extra thick, like greek yogurt, for attaching small appliques. Watery slip can cause the tiny petals to slide down the wall of the mug before they dry.
Step 2: Creating Floral Appliqués
-
Roll tiny coils:
Take a very small piece of fresh clay and roll it into a thin coil for the main flower stem. Keep it delicate; thick stems can look clunky on a mug this size. -
Attach the stem:
Score a path on the mug where the stem will go using your needle tool. Apply a tiny amount of slip, then gently press your clay coil onto the scored line. Use a wooden tool to blend the edges of the stem slightly into the mug body so it doesn’t pop off later. -
Form the petals:
Roll five or six tiny balls of clay for the flower petals. Flatten each ball slightly into a teardrop shape. -
Texture the petals:
Before attaching, use the needle tool or a small knife to gently press a central indentation or line down the middle of each petal, giving it that distinct botanical look. -
Attach the flower head:
Score and slip the area at the top of your stem. Arrange the teardrop petals in a circle, pressing them firmly onto the mug surface. Ensure each petal connects well to the clay beneath it. -
Add the center:
Roll a tiny ball of clay for the flower center. Score the middle of your petal arrangement, add slip, and press the ball into place. Use the needle tool to poke a few small dots into the center for texture. -
Create leaves and buds:
Fashion additional teardrop shapes for leaves and smaller rounded shapes for buds. Attach these along the stem or floating nearby using the same score-and-slip method. -
Detail the leaves:
Once attached, use your needle tool to carefully carve vein lines into the leaves and segment lines onto the unopened buds.
Custom Stamp Idea
Create a bisque stamp of a single petal or leaf shape. You can then press this into balls of clay for uniform appliqués, speeding up the process for a full set of mugs.
Step 3: Drying and Glazing
-
Slow drying:
Cover the mug loosely with plastic to let it dry slowly. Because the appliqués are wetter than the mug body, slow drying prevents them from cracking or popping off as the clay shrinks. -
Bisque fire:
Once bone dry, fire the piece to bisque temperature (usually cone 04 or 06) according to your clay’s specifications. -
Clean the bisque:
Wipe the bisqued mug with a damp sponge to remove any dust. This step is crucial for preventing pinholes in your final glaze. -
Glaze application:
Dip the mug into a clear or semi-opaque white glaze that breaks over texture. I find that a glaze that thins out on high points highlights the raised floral details beautifully while showing off the speckles. -
Wipe the foot:
Clean off any glaze from the bottom of the mug with a sponge so it doesn’t stick to the kiln shelf. -
Final firing:
Glaze fire the mug to maturity (typically cone 5 or 6 for mid-fire stoneware). Allow the kiln to cool completely before unloading.
Now you have a beautifully textured mug ready for cozy sips of your favorite warm beverage
Wrapped Vine Handle Mug That Feels Like a Garden Find
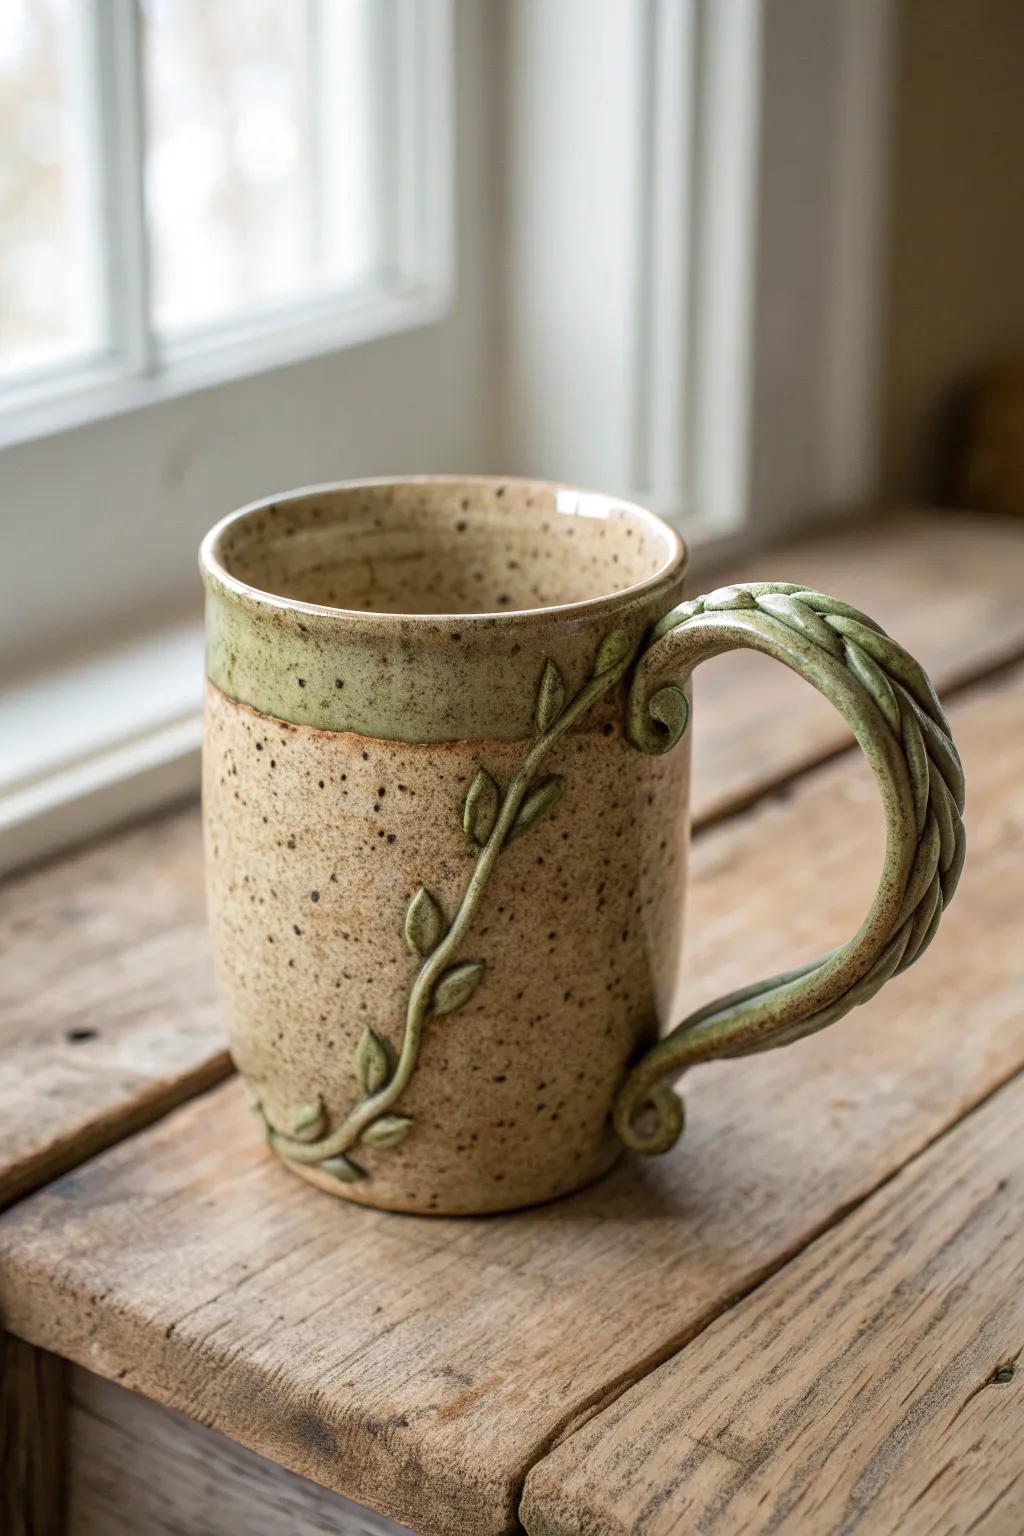
Embrace the cottagecore aesthetic with this nature-inspired mug featuring a twisted vine handle and delicate leaf details. The speckled clay body and soft green accents create the feeling of a treasured garden find that’s perfect for your morning tea.
Detailed Instructions
Materials
- Speckled stoneware clay (e.g., Laguna Speckled Buff)
- Pottery wheel (or slab roller for hand-building)
- Needle tool
- Score and slip tool (serrated rib)
- Clay slip
- Wooden modeling tool
- Sponge
- Rolling pin
- Green celadon or transparent green glaze
- Clear glaze (optional)
Step 1: Throwing the Form
-
Center and open:
Begin with about 1-1.5 lbs of speckled stoneware clay. Center it firmly on the wheel and open the well, establishing a flat interior floor. -
Pull the walls:
Pull the walls into a simple, tall cylinder shape. Aim for a straight profile with a very subtle curve inward near the rim to keep the liquid warm. -
Define the rim:
Compress the rim well with a chamois or your sponge to ensure it’s smooth for drinking. A slight outward flair at the very top can be nice, but keep it mostly vertical. -
Underact the base:
Use a wooden modeling tool to undercut the base of the cylinder, creating a nice shadow line and making it easier to wire off later. -
Dry to leather hard:
Wire the mug off the wheel and set it aside until it reaches a sturdy leather-hard stage. It needs to be firm enough to handle the weight of the attached vine.
Step 2: Sculpting the Vine Handle
-
Roll coils:
Roll out two long, even coils of clay. They should be slightly thicker than a pencil, tapering slightly at the ends. -
Twist the handle:
Gently twist the two coils together to create a braided rope effect. Wet your fingers slightly if the clay starts to crack, smoothing the seams where the coils touch. -
Shape the arch:
Bend the twisted rope into a traditional ear-shaped handle curve. Gently flatten the top and bottom attachment points to create a broader surface for scoring. -
Attach the handle:
Score and slip the attachment points on the mug body and the handle deeply. Press the handle firmly onto the mug, smoothing the clay at the join to ensure a rock-solid bond. -
Add curly cues:
At the top and bottom handle attachments, roll small, thin tapered coils and curl them into spirals (volutes), blending them seamlessly into the main handle to hide the join.
Crack Prevention
Vine handles are prone to cracking. After attaching, wrap the handle tightly in a strip of wet paper towel, then cover the whole mug in plastic for 2 days to equalize moisture.
Step 3: Adding Leaf Details
-
Create the vine extension:
Roll a very thin coil to act as the vine creeping across the mug’s body. Attach it starting from the top handle join, meandering diagonally down toward the bottom center. -
Form small leaves:
Hand-shape tiny teardrops of clay. Flatten them slightly between your thumb and forefinger to create organic leaf shapes. -
Attach leaves:
Score and slip the back of each leaf. Press them along the vine extension on the mug body, alternating sides for a natural growth pattern. -
Define leaf veins:
Using a needle tool or a small knife, gently impress a center vein into each leaf. I like to lift the tips of a few leaves slightly for a 3D effect. -
Slow drying:
Cover the mug loosely with plastic to let it dry very slowly. This is crucial because the handle and body are different thicknesses and could crack if rushed.
Dynamic Glazing
Use a breaking glaze for the leaves. A glaze that thins out over high points will highlight the veins and edges of your sculpted leaves beautifully.
Step 4: Glazing
-
Bisque fire:
Once bone dry, fire the piece to bisque temperature (usually cone 04 or 06). -
Wax resist (optional):
If you want the main body to remain raw speckled clay, apply wax resist to the main cylinder, carefully avoiding the vine, leaves, and handle. -
Apply green glaze:
Brush a celadon or translucent green glaze onto the handle, the trailing vine, the leaves, and the upper rim band. The translucency will let the clay speckles show through. -
Clean up:
Wipe away any stray glaze drips from the unglazed body with a damp sponge. -
Final fire:
Glaze fire to maturity (likely cone 5/6 or 10 depending on your clay body).
Enjoy using your new woodland mug, knowing the handle fits your hand perfectly.
Lidded Clay Mug for Tea-Steeping and Heat-Keeping
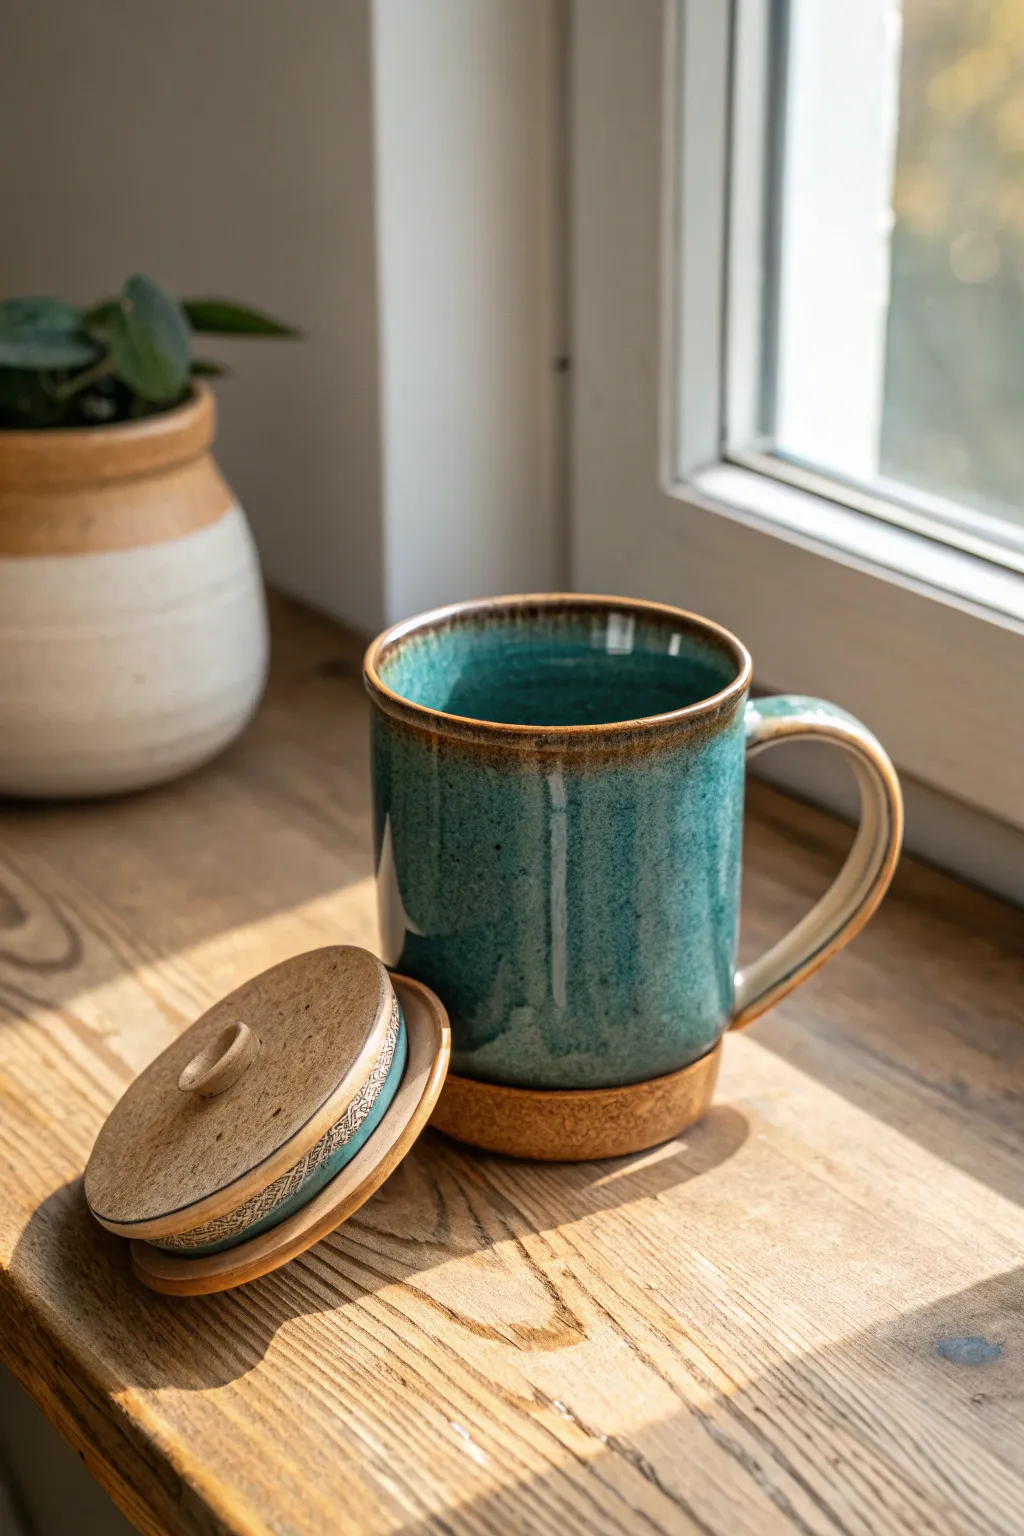
This project guides you through throwing a tall, elegant mug tailored specifically for tea lovers, complete with a fitted lid to keep steam in. The finish features a stunning teal glaze with reactive variations, contrasting beautifully with the raw, earthy tones of the unglazed clay base and rim.
Step-by-Step
Materials
- Stoneware clay (approx. 1.5 lbs)
- Pottery wheel
- Throwing tools (sponge, needle tool, rib, cut-off wire)
- Trimming tools
- Calipers
- Teal reactive glaze
- Wax resist
- Kiln
Step 1: Throwing the Body
-
Center the Clay:
Begin with about 1 pound of wedged stoneware clay. Secure it firmly to the wheel head and center it using steady pressure and water for lubrication. -
Open and Pull:
Open the clay to create a flat floor, leaving about 1/4 inch thickness at the bottom. Pull the walls up into a tall cylinder, aiming for a consistent vertical profile without much taper. -
Refine the Rim:
Use a chamois or your sponge to compress the rim, ensuring it is smooth and slightly rounded. This is crucial for comfortable drinking. -
Create the Gallery (Optional):
If you want the lid to sit inside the rim, use a tool to gently press a small ledge (gallery) just inside the top rim. Alternatively, for a lid that sits on top like the photo, ensure the rim is perfectly flat. -
Measure for the Lid:
Before removing the mug from the wheel, use your calipers to measure the exact diameter of the rim. Lock the calipers in place. -
Cut and Dry:
Wire the mug off the wheel head and set it aside on a ware board to stiffen to a leather-hard state.
Step 2: Creating the Lid and Handle
-
Throw the Lid:
Using a smaller ball of clay (approx. 0.5 lbs), throw a flat disk. Use your caliper measurement to ensure the diameter matches your mug’s rim perfectly. -
Shape the Lid Knob:
While throwing the lid, pull a small amount of clay from the center upwards to form a small, looped knob. Alternatively, you can trim this feature later. -
Pull a Handle:
Pull a strap of clay for the handle. For this design, aim for a medium width—sturdy but elegant. Let it curve naturally into a ‘C’ or ear shape and allow it to stiffen slightly. -
Trimming the Mug:
Once the mug is leather-hard, center it upside down on the wheel. Trim the bottom to create a distinct foot ring. I like to leave a slightly taller unglazed foot area to act as a heat buffer. -
Attach the Handle:
Score and slip the contact points on both the mug and the handle. Attach the handle firmly, blending the clay seams smooth with a modeling tool or your fingers.
Glaze Fit Check
Make sure your glaze and clay body have the same expansion rate (COE). A bad fit causes crazing—fine cracks that can harbor tea tannins and stain over time.
Step 3: Glazing and Firing
-
Bisque Fire:
Load your thoroughly dried mug and lid into the kiln for a bisque firing (usually Cone 04-06). -
Wax Application:
Apply wax resist to the bottom foot of the mug and the underside rim of the lid where it will touch the mug. This prevents the lid from fusing to the mug during firing. -
Glaze Interior:
Pour your teal glaze into the mug, swirl it to coat the entire interior, and pour out the excess. Wipe any drips from the rim immediately. -
Dip the Exterior:
Hold the mug by the foot and dip it into the glaze bucket, stopping just short of the bottom foot ring to leave that lovely band of exposed clay. -
Rim Detail:
If your glaze breaks brown naturally, a single coat is fine. If not, carefully brush a thin line of iron oxide or a darker brown glaze along the very rim to achieve that toasted edge look. -
Glaze the Lid:
Dip or brush the top of the lid with the same teal glaze, avoiding the knob if you want it rough, or glazing it fully. Ensure the contact points remain wax-resisted. -
Final Fire:
Fire the pieces to the maturity temperature of your clay and glaze (typically Cone 5, 6, or 10). Allow the kiln to cool completely before opening.
Cork Base Hack
Skip the foot trimming and instead glue a custom-cut cork disk to the flat bottom after firing. It protects surfaces and looks ultra-modern.
Enjoy the ritual of brewing your favorite loose-leaf blends in your new handmade vessel
Double-Walled Mug With a Chunky, Cozy Profile
Embrace the warmth of handmade ceramics with this chunky, speckled stoneware mug. Its comforting weight, raw clay bottom, and creamy white glaze create a timeless piece perfect for slow mornings and hot coffee.
How-To Guide
Materials
- Speckled stoneware clay (mid-fire or high-fire)
- Pottery wheel
- Throwing tools (sponge, needle tool, wooden rib, wire cutter)
- Trimming tools (loop tool)
- Water bucket
- Cream or Oatmeal active matte glaze
- Wax resist (liquid wax)
- Kiln
- Chamois or plastic bag for smoothing
Step 1: Throwing the Cylinder
-
Prepare the Clay:
Start with a generous ball of speckled stoneware clay, roughly 1 to 1.5 lbs, depending on how large you want your finished mug. Wedge it thoroughly to remove air bubbles. -
Center on the Wheel:
Slam the clay onto the center of the wheel head. Using wet hands and steady pressure, cone the clay up and down until it is perfectly centered and spinning without wobble. -
Open the Form:
Press your thumbs into the center to create the opening, leaving about 1/4 inch of clay at the bottom for the floor. Compress the floor with a flat tool or your fingers to prevent S-cracks later. -
Pull the Walls:
Begin pulling up the walls. For this profile, you want a straight cylinder that doesn’t flare out too much. Keep the walls slightly thicker than a standard teacup to achieve that ‘chunky’ aesthetic. -
Define the Rim:
Once you have the desired height, use a chamois or a damp sponge to round off the rim. A rounded, slightly thick rim is key for the cozy mouthfeel shown in the photo. -
Undercut and Wire Off:
Use a wooden knife tool to trim away excess clay at the base, creating a slight undercut. Run your wire cutter underneath and carefully slide the cylinder onto a ware board to dry slightly.
Cracked Handle?
If hairline cracks appear where the handle joins the mug during drying, compress the joint with a wooden tool and wrap the handle tightly in plastic to re-moisturize it.
Step 2: Trimming and Handle Attachment
-
Dry to Leather Hard:
Wait until the clay is leather hard—stiff enough to hold its shape but soft enough to carve. This usually takes a day. -
Trim the Foot:
Center the mug upside down on the wheel. Use a loop tool to trim the base. For this style, create a flat bottom with just a slight curve up the side, leaving the bottom unglazed later visually separates the form. -
Pull a Handle:
Take a separate small lump of clay and pull a handle using water and friction. Aim for a simple ‘C’ shapestrap handle—not too wide, rounded edges for comfort. -
Attach the Handle:
Score the side of the mug and the attachment points of the handle. Apply slip (clay slurry) and press the handle firmly onto the mug body. The top attachment should align slightly below the rim. -
clean Up the Join:
Use a damp brush or your finger to smooth the seam where the handle meets the mug. I like to make sure there are no sharp ridges here so it feels smooth in the hand. -
Slow Dry:
Cover the mug loosely with plastic to let it dry very slowly. This ensures the handle and body dry at the same rate, preventing cracks.
Make it Yours
Swap the cream glaze for a semi-transparent white. This will interact differently with the iron speckles in the clay, often making them ‘bleed’ through more dramatically.
Step 3: Glazing and Firing
-
Bisque Fire:
Load the bone-dry mug into the kiln for a bisque fire (usually Cone 04). This hardens the clay making it ready for glaze. -
Wax the Bottom:
After cooling, sponge off any dust. Apply wax resist to the bottom inch of the mug’s exterior and the entire underside. This creates the raw clay band seen in the image. -
Dip in Glaze:
Stir your cream or oatmeal glaze well. Using tongs or your hand (if you glaze the inside then outside), dip the mug into the bucket. Hold it for 3-5 seconds for good coverage. -
Clean the Line:
As the glaze dries, use a damp sponge to wipe any inevitable drips off the waxed bottom area. You want a crisp line where the glaze ends and the raw clay begins. -
Glaze Fire:
Load the mug into the kiln again for the final glaze firing (temperature depends on your specific clay/glaze combo, likely Cone 5 or 6). This melts the glaze and vitrifies the clay. -
Sand the Base:
Once unloaded and cool, the raw clay bottom might be slightly rough. Use a fine-grit sandpaper or a diamond sanding pad to smooth the unglazed foot so it won’t scratch your table.
Now brew your favorite beverage and enjoy the tactile comfort of your new creation.
Mug With a Sculpted Face for a Quirky Personality Piece
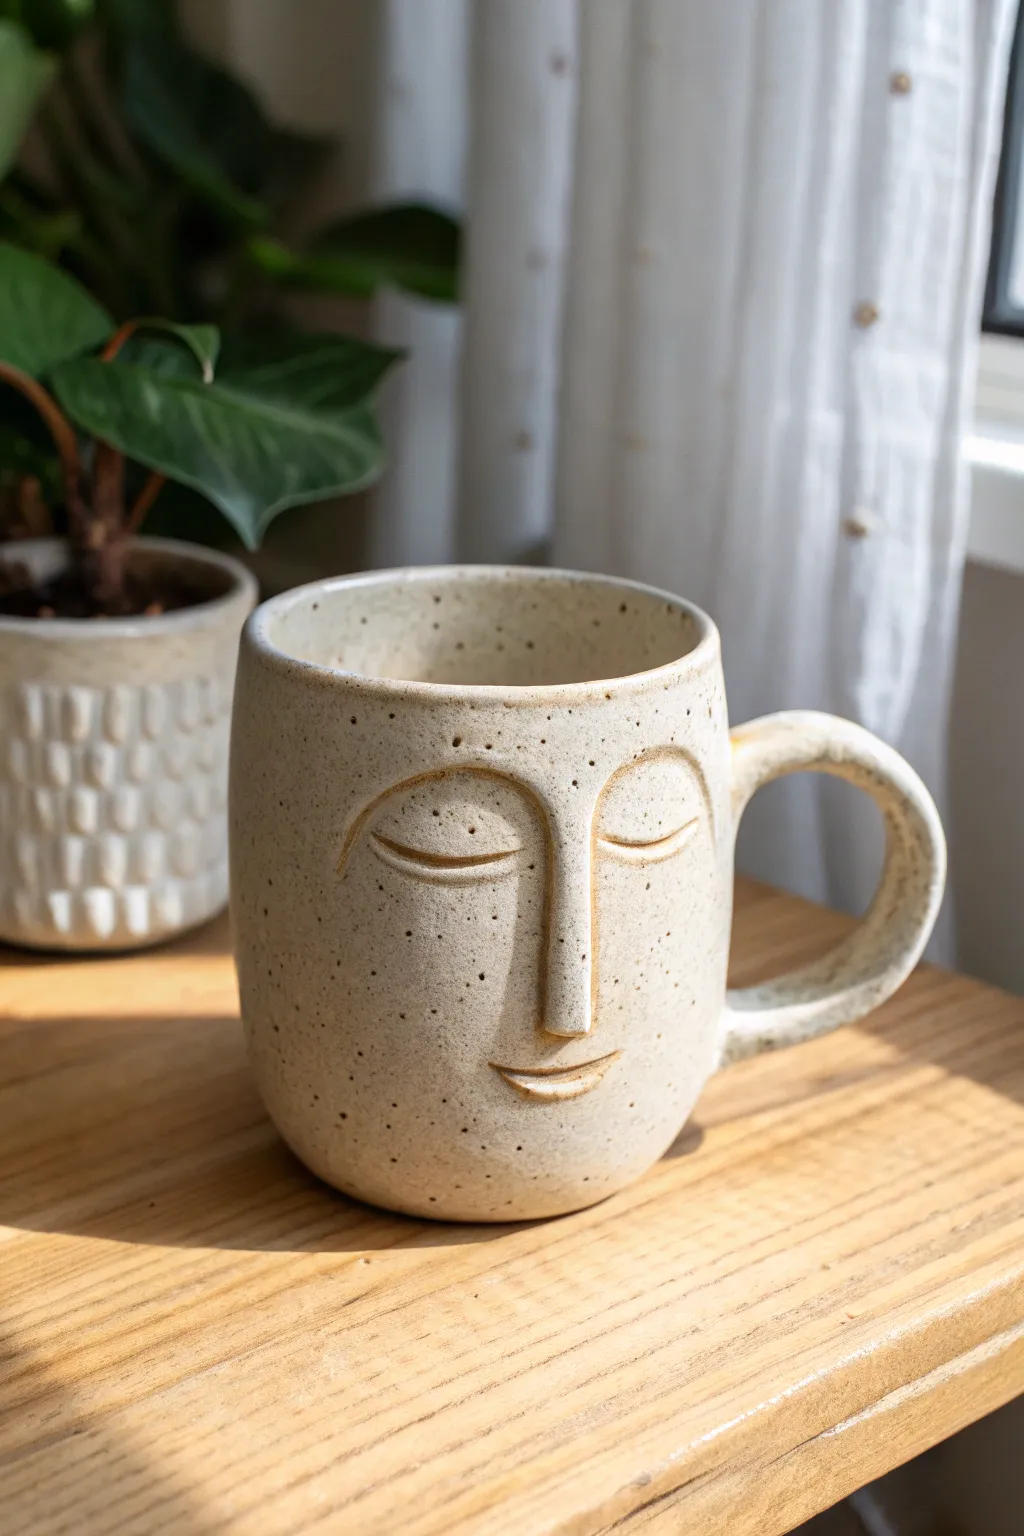
This project transforms a simple ceramic vessel into a piece of functional art with a minimalist, serene personality. Using a speckled clay body and carefully sculpted facial features, you’ll create a comforting mug that feels like holding a calm friend in your hands.
Step-by-Step Tutorial
Materials
- Speckled stoneware clay (mid-range cone 5-6)
- Pottery wheel (or slab roller for hand-building)
- Needle tool
- Wooden modeling tool with a curved edge
- Small loop tool
- Sponge
- Metal rib
- Scoring tool (or serrated kidney)
- Slip (clay mixed with water)
- Clear matte or satin glaze
- Kiln
Step 1: Forming the Base Vessel
-
Prepare the Clay:
Begin by thoroughly wedging about 1 to 1.5 pounds of speckled stoneware clay to remove any air bubbles and ensure particle alignment. -
Throw the Cylinder:
Center the clay on the wheel and open it up. Pull the walls to create a straight-sided cylinder with a slightly rounded bottom edge. Aim for walls that are perhaps a touch thicker than usual—about 1/4 inch—to allow room for carving and pressing without piercing through. -
Refine the Shape:
Use a metal rib to smooth the outside and compress the clay, removing the throwing lines. You want a blank canvas for the face. Slightly taper the rim inward for a cozy feel. -
Dry to Leather Hard:
Wire cut the mug off the bat and let it dry slowly until it reaches a sturdy leather-hard stage. It needs to be firm enough to handle without warping but soft enough to carve and attach additions.
Step 2: Sculpting the Features
-
Map the Face:
I like to lightly sketch the facial placement with a needle tool first. Mark a vertical line for the nose and horizontal arches for the eyes to ensure symmetry before committing. -
Form the Nose Coil:
Roll a small, tapered coil of fresh clay for the nose bridge. It should be thicker at the bottom and fade into nothing at the top. -
Attach the Nose:
Score the center of the mug face and the back of your nose coil. Apply slip, press the coil firmly onto the mug, and smooth the edges down with a wooden tool until the seam disappears completely. -
Define the Brow Bone:
Using a small loop tool or a modeling tool, gently carve away a shallow recessed area on either side of the upper nose bridge. This subtractive method creates the illusion of a brow bone without adding more clay. -
Create the Eyelids:
Roll two very thin, small coils for the eyelids. Score and slip them into place within the ocular arches you sketched earlier. -
Refine the Eyes:
Blend the upper edge of the eyelid coil into the mug face, leaving the bottom edge sharp and defined to mimic a closed eye. Use a damp sponge to soften the transition. -
Sculpt the Mouth:
Add a tiny, slightly curved coil for the mouth. Blend the surrounding clay so the lips appear to rise naturally from the surface rather than sitting on top. -
Detail the Expression:
Use a needle tool or sharp wooden edge to gently incise the line between the lips and define the curve of the closed eyelids. Keep lines clean and deliberate.
Cracks Around Features?
If facial additions crack away during drying, your clay was likely too dry when attaching. Score deeper and use more slip next time, or wrap tightly in plastic to equalize moisture.
Step 3: Handle and Finishing
-
Pull the Handle:
Pull a strap handle from a lug of clay. Aim for a comfortable C-shape that balances the visual weight of the face. Let it stiffen slightly. -
Attach the Handle:
Score and slip the attachment points on the side of the mug (opposite or perpendicular to the face, depending on preference). Press the handle on firmly and smooth the joints. -
Smoothing Check:
Go over the entire piece with a barely damp sponge to remove any sharp burrs or crumbs from the carving process, paying special attention to the lip rim. -
Bisque Fire:
Let the mug dry completely (bone dry) before loading it into the kiln for a bisque firing to cone 04. -
Glazing:
Dip or brush the entire mug in a clear matte or satin glaze. This allows the natural speckles of the clay to show through, appearing like freckles on the face. -
Glaze Firing:
Fire the glazed piece to the maturity temperature of your clay (likely cone 5 or 6). Allow the kiln to cool naturally.
Pro Tip: Make the Nose Pop
When glazing, wipe the glaze back slightly thinner on the high points of the nose and brows. This creates a subtle highlight effect that emphasizes the sculpture’s dimension.
Once the kiln cools, fill your new mug with a warm drink and enjoy the serene company.