I’m obsessed with how translucent polymer clay turns even simple shapes into little light-catchers, especially when you keep things thin and let light transmission do the magic. These ideas are all about that glow—building dreamy depth, faking natural materials, and making details look like they’re floating inside the clay.
Frosted Faux Sea Glass Drop Earrings
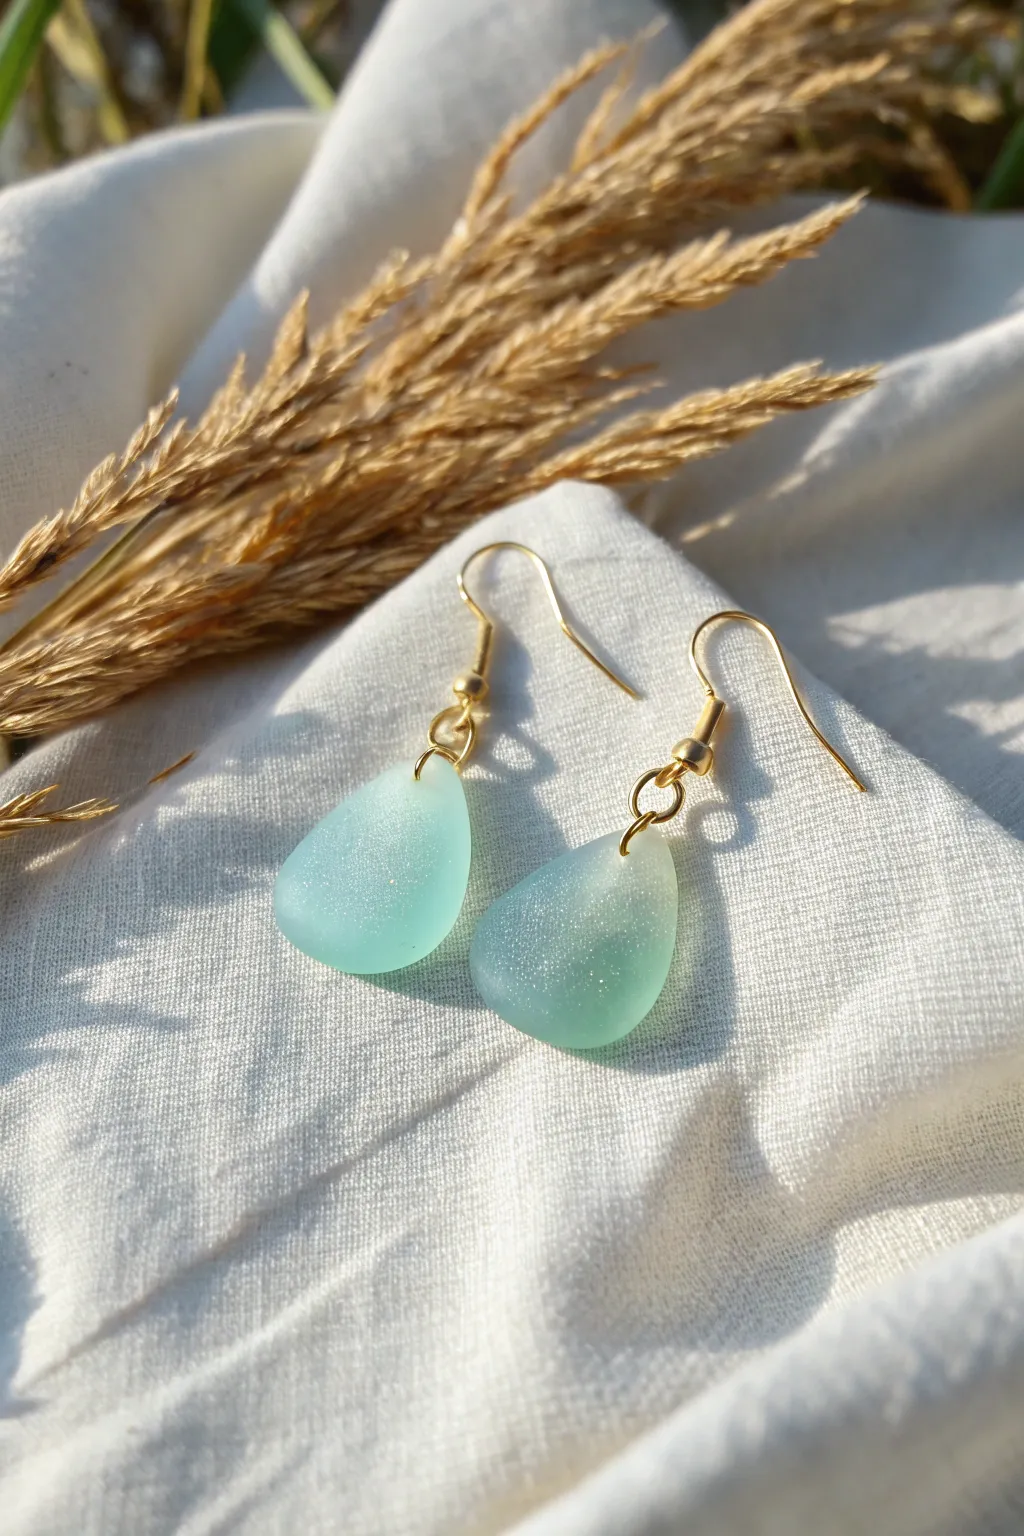
Capture the ethereal beauty of beach-combed treasures with these delicate translucent earrings. By combining translucent polymer clay with a special finishing technique, you’ll achieve a soft, frosted matte texture that mimics real sea glass perfectly.
Step-by-Step Guide
Materials
- Translucent polymer clay (white or transparent)
- Alcohol inks (teal, turquoise, blue)
- Fine iridescent white glitter
- Gold fishhook ear wires (2)
- Gold jump rings (2, approx 4-6mm)
- Teardrop clay cutter (approx 1 inch)
- Acrylic roller or pasta machine
- Ceramic tile or glass work surface
- Jewelry pliers (flat nose and round nose)
- Hand drill or pin drill with small bit
- Fine grit sandpaper (400, 600, 800 grit)
- Bowl of water with a drop of dish soap
- Optional: Sea salt or coarse salt for texture
- Denim fabric scrap
Step 1: Mixing the Clay
-
Condition the base:
Begin by thoroughly conditioning a block of translucent polymer clay. Knead it in your hands until it is warm, soft, and pliable. This prevents air bubbles which can ruin the translucent effect. -
Add color:
Flatten the clay into a pancake. Add a very small drop of teal alcohol ink. Remember that translucent clay darkens when baked, so aim for a shade lighter than your desired final result. -
Incorporate shimmer:
Sprinkle a generous pinch of fine iridescent glitter over the inked clay. I find that white or clear iridescent glitter works best to maintain that authentic oceanic glow without looking too artificial. -
Blend thoroughly:
Fold the clay over to trap the ink and glitter, then knead continuously until the color is completely uniform. Using gloves here can help keep your hands stain-free.
Ice Water Quench
Plunge pieces into ice water immediately after baking. This ‘shocks’ translucent clay, increasing clarity before you sand it matte.
Step 2: Shaping and Baking
-
Roll out the sheet:
Using an acrylic roller or pasta machine, roll the clay out to a medium thickness, approximately 3mm to 4mm. You want it thick enough to resemble a substantial piece of glass. -
Cut the shapes:
Press your teardrop cutter firmly into the clay. Give it a tiny wiggle before lifting to ensure a clean cut. -
Soften the edges:
Real sea glass doesn’t have sharp, machine-cut edges. Gently tap the edges of your cut shapes with your finger to round them off slightly, making them look more organic and tumbled. -
Drill holes:
Uses a pin drill, needle tool, or toothpick to create a hole at the narrow top of each teardrop. Ensure the hole is large enough for your jump rings. -
Bake:
Place the teardrops on a ceramic tile or baking sheet lined with parchment paper. Bake according to your clay manufacturer’s instructions, usually around 275°F (130°C) for 30 minutes. Let them cool completely.
Step 3: Finishing the Frost
-
Prepare for standing:
Once cool, the clay will look somewhat shiny and plastic-like. To get the frosted glass look, we need to sand. Set up a bowl of water with a drop of dish soap. -
Wet sanding:
Dip the first teardrop and a piece of 400-grit sandpaper into the water. Sand the entire surface—front, back, and sides—in a circular motion. The water keeps dust down and prevents scratching. -
Refining the surface:
Move up to 600-grit sandpaper, repeating the process. Finally, give it a quick pass with 800-grit. The goal isn’t to polish it to a shine, but to create an even, velvety matte haze. -
Matte buffing:
Dry the pieces off. Rub them vigorously against a piece of denim fabric (like old jeans). This removes sanding scratches while maintaining that crucial frosted texture.
Salted Texture
Before baking, roll your raw clay shapes in coarse sea salt. After baking, wash the salt away for a pitted, heavily weathered texture.
Step 4: Assembly
-
Open jump rings:
Use your flat nose and round nose pliers to twist a gold jump ring open. Always twist the ends away from each other (side-to-side), never pull them apart, to maintain the circle shape. -
Attach components:
Slide the open jump ring through the hole in your clay teardrop, then slip the loop of the fishhook ear wire onto the ring. -
Close and secure:
Use the pliers to twist the jump ring closed again, ensuring the ends meet flush so the earring doesn’t slip off. -
Final check:
Repeat for the second earring and hold them up to the light to admire that beautiful, frosty translucency.
Enjoy wearing your frosty creations that look freshly plucked from the tide line


Cloudy Quartz Points With Milky Inclusions
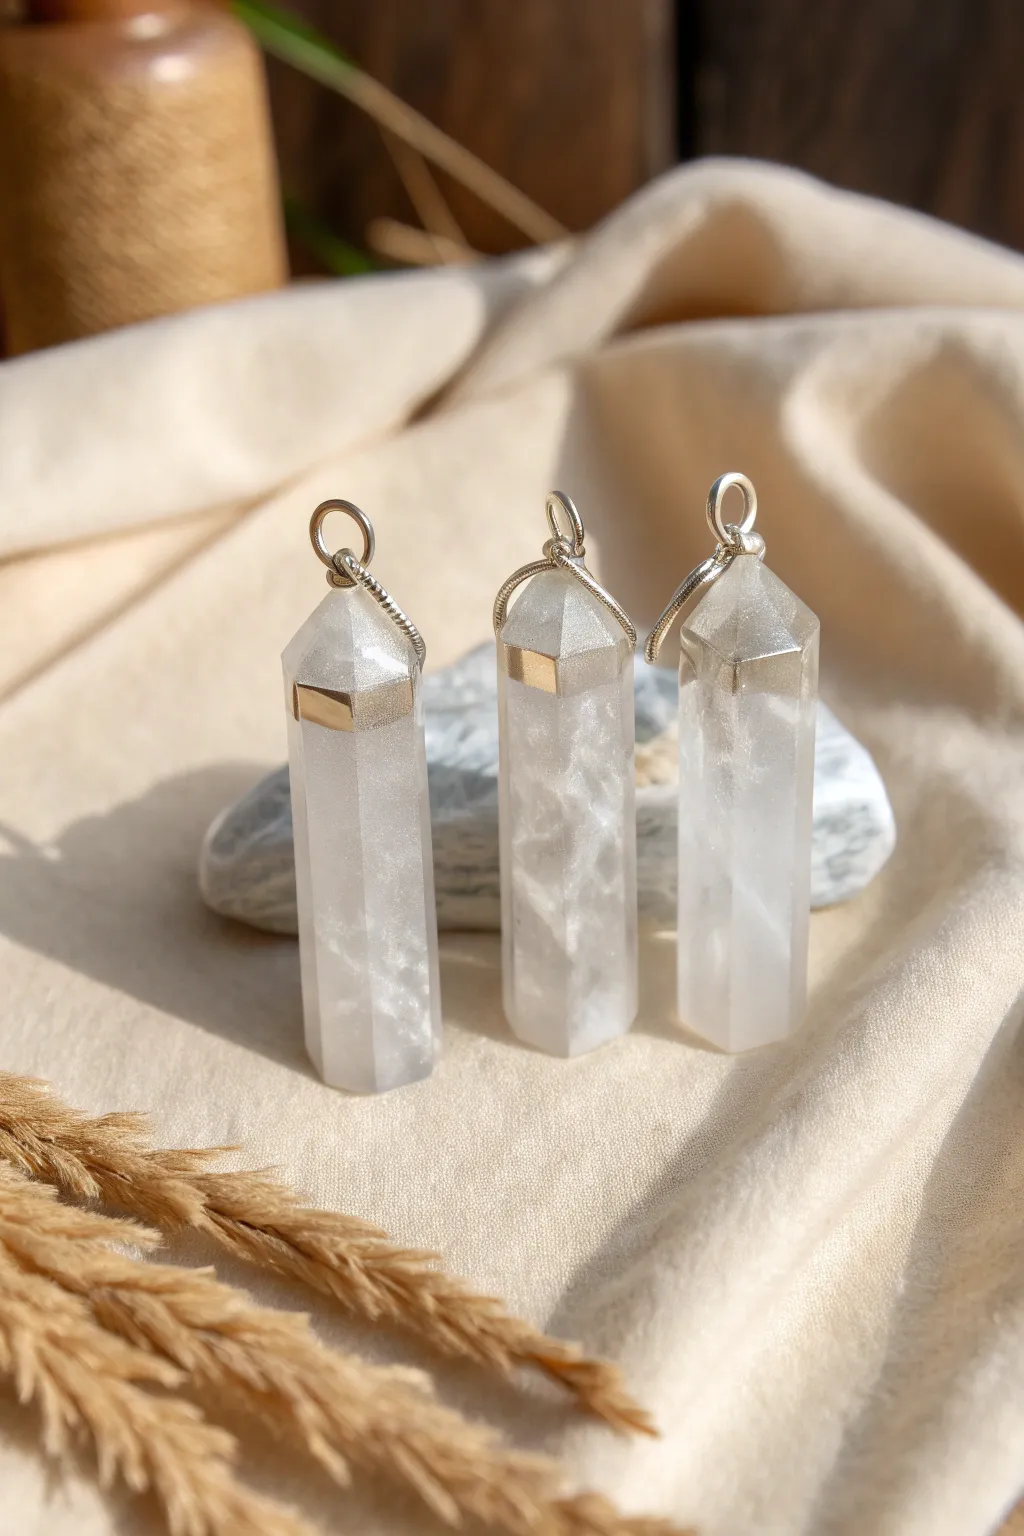
Capture the ethereal beauty of natural crystals by creating these faux cloudy quartz points. Using translucent polymer clay and simple texturing techniques, you can achieve realistic milky inclusions that look stunning when suspended from a delicate bail.
Step-by-Step
Materials
- Translucent polymer clay (high quality like Cernit or Pardo)
- White alcohol ink or liquid polymer clay (white)
- White or pearl mica powder
- Silver or gold leaf flakes (optional)
- Sharp craft blade or tissue blade
- Acrylic rolling pin
- Small eye pins or screw eyes
- Wire (silver or gold plated) for wrapping
- Jewelry pliers (round nose and flat nose)
- Wet/dry sandpaper (grit 400 to 2000)
- Buffing wheel or denim cloth
- Gloss varnish or UV resin (optional for extra shine)
- Oven for baking
Step 1: Preparing the Clay Base
-
Condition the clay:
Begin by thoroughly conditioning your translucent polymer clay until it is soft and pliable. Avoid trapping air bubbles, as clarity is key for this faux stone effect. -
Create the inclusions:
Flatten the clay into a thin sheet. To create the ‘milky’ look, smear a very small amount of white liquid clay or alcohol ink randomly across the surface. You don’t want it opaque, just streaky. -
Add shimmer:
Dust a tiny pinch of white or pearl mica powder over the sheet. If you want a bit of extra dimension, press a few small flakes of silver or gold leaf onto the clay now. -
Stack and distort:
Tear the sheet into irregular pieces and stack them on top of one another. Twist the stack gently and compress it into a log to distort the layers, mimicking natural crystal growth patterns.
Cloudy crystals?
If your crystals look yellow after baking, the oven temp was likely too high. Use an oven thermometer to ensure accuracy, as translucent clay burns easily.
Step 2: Shaping the Crystal Point
-
Form the basic log:
Roll your distorted clay log until it is smooth and roughly the thickness you want for your final crystal, usually about 1/2 inch in diameter. -
Cut to length:
Use your sharp blade to cut the log into segments of your desired pendant length, ensuring the bottom is flat. -
Shape the hexagon:
Stand a cylinder segment upright. Carefully slice vertically down the sides to create six facets. I find it easiest to cut opposite sides first to keep the hexagon symmetrical. -
Carve the termination:
At the top of the cylinder, slice angled cuts from each of the six flat sides inward toward the center to form the pointed tip (termination) of the crystal. -
Smooth the edges:
Gently run your finger over the sharp edges to soften them slightly, or leave them crisp if you prefer a raw cut look. -
Insert the hardware:
If you are using a screw eye or eye pin, insert it into the center of the top point now. Alternatively, create a pilot hole to glue one in after baking.
Step 3: Finishing Touches
-
Bake the pieces:
Bake the crystals according to the manufacturer’s instructions for your specific brand of translucent clay. Translucent clays often benefit from plunging into ice water immediately after baking to improve clarity. -
Sand for clarity:
Once cool, wet sand the facets starting with 400 grit and working up to 2000 grit. This step is crucial for revealing the internal milky swirls. -
Buff to a shine:
Vigorously buff the crystals with a piece of denim or a buffing wheel on a rotary tool to achieve a glass-like sheen. -
Add the bail:
Secure your eye pin with a dab of super glue if needed. Using your pliers, create a small wire wrap around the top of the crystal or attach a jump ring to the eye pin. -
Optional metallic accent:
For the look in the photo, stick a small band of metallic foil tape or paint a metallic strip around the upper portion of the crystal facet before sealing.
Ice Water Shock
Plunge pieces into a bowl of ice water immediately after removing them from the oven. This ‘shocks’ the clay and significantly increases translucency.
String your new faux quartz point on a simple cord or chain to complete this elegant, earthy accessory


Ombre “Jelly” Bangles Using Tinted Translucent Clay
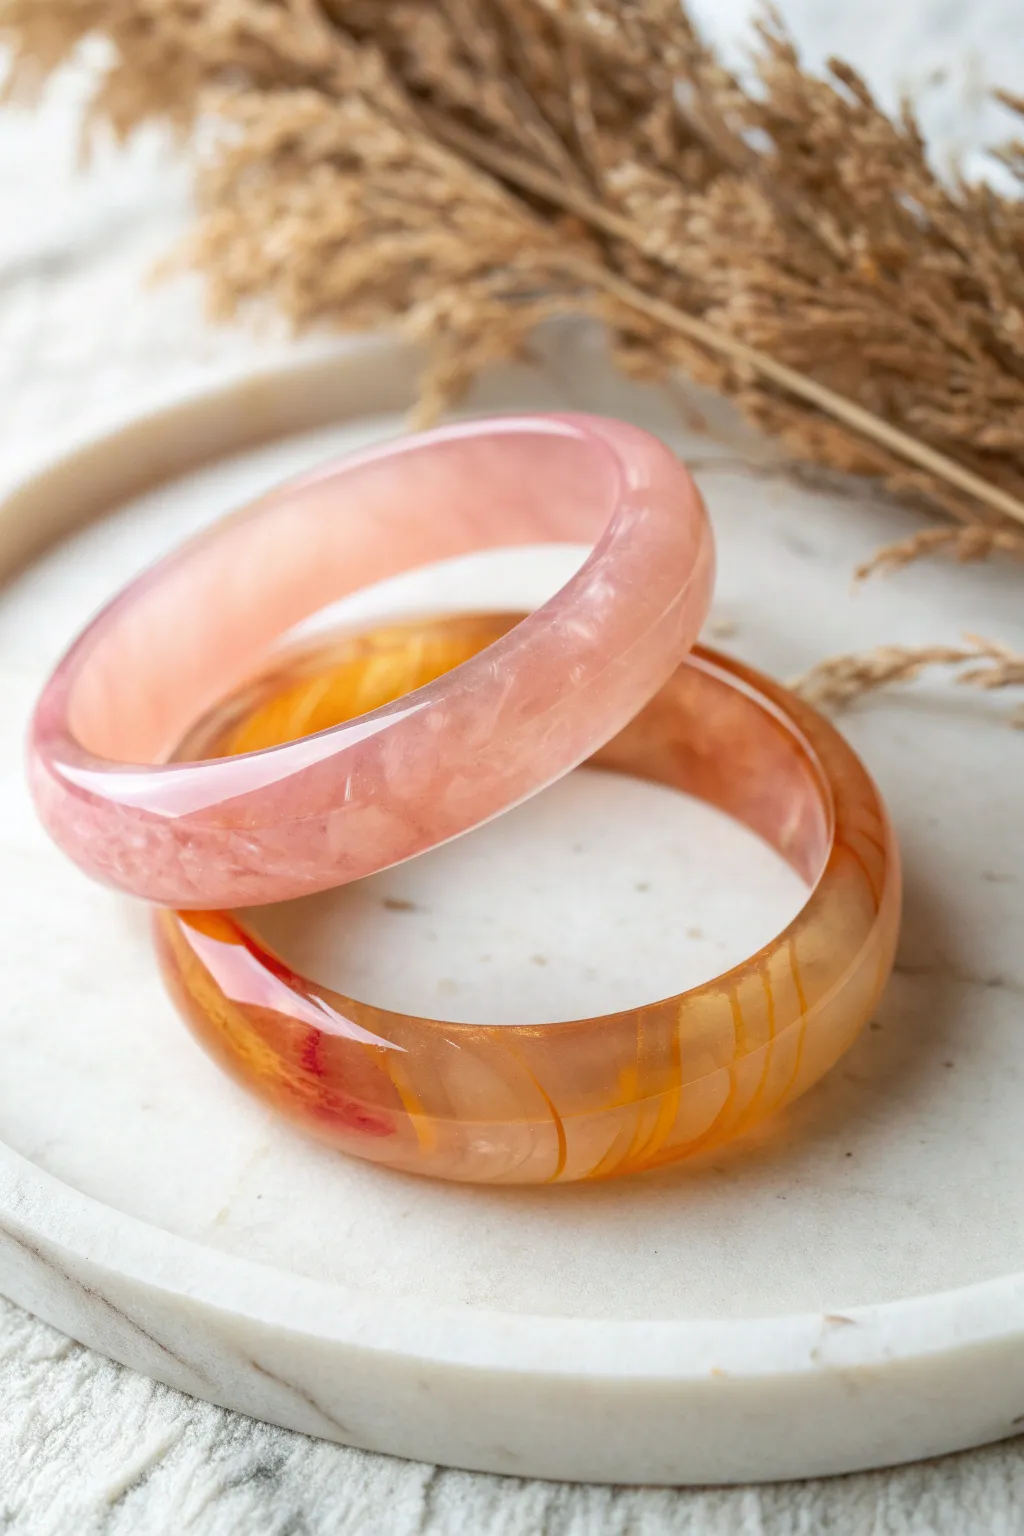
These stunning bangles mimic the look of expensive resin jewelry or carved jadeite but are crafted entirely from tinted translucent polymer clay. The result is a lightweight, durable accessory with a gorgeous inner glow and subtle color swirling.
Step-by-Step Guide
Materials
- Translucent polymer clay (Cernit or Pardo highly recommended)
- Alcohol inks (amber, pink, red)
- Metal bangle core or empty soda can (for shaping)
- Acrylic roller or pasta machine
- Tissue blade
- Wet/dry sandpaper (grits 400 to 2000)
- Polishing compound (optional)
- Denim or buffing wheel
- Liquid polymer clay (optional, for joining)
- Oven thermometer
Step 1: Coloring the Clay
-
Condition the base:
Begin by thoroughly conditioning your translucent clay. It needs to be very soft and pliable to minimize air pockets, which appear as white opaque spots later. -
Divide and tint:
Separate your clay into three equal portions. Leave one portion natural translucent. -
Apply first ink color:
Flatten the second portion and add a tiny drop of your lighter alcohol ink (like a soft amber or pale pink). Fold the clay over the ink to trap it and knead until the color is fully uniform. -
Apply second ink color:
Repeat the process with the third portion using a slightly more saturated color or a deeper shade to create your gradient contrast. -
Let the alcohol evaporate:
Let the tinted clay sit for about 10-15 minutes. This allows the alcohol solvent to evaporate, preventing bubbles during baking.
Ice Water Secret
Plunging hot translucent clay directly into ice water really does boost clarity. The rapid cooling stops the cooking process instantly, preventing internal clouding.
Step 2: Creating the Marble Effect
-
Make snakes:
Roll each of your three colors (clear, light tint, dark tint) into long, thin snakes. -
Twist together:
Gather the snakes and twist them together into one large rope. Fold this rope in half and twist it again. -
Marble the blend:
Smash the rope into a ball, then roll it into a snake again. Repeat this twist-and-fold process 2-3 times, but stop *before* the colors fully blend. You want distinct streaks of clear and color. -
Form the shape:
Roll your marbled clay into a thick, even log that determines the thickness of your bangle ensuring it’s long enough to wrap around your wrist.
Plaquing Problems?
If you see white moon-shapes (plaquing) inside the baked clay, it’s trapped moisture or air. Condition clay thoroughly and avoid trapping air while folding to minimize this.
Step 3: Shaping and Baking
-
Wrap the form:
Wrap your clay log around your chosen metal form (a cleaned soda can works perfectly for a standard size). -
Join the ends:
Where the ends meet, slice through both layers simultaneously with your tissue blade for a perfect flush cut. -
Smooth the seam:
Apply a tiny amount of liquid clay to the join if needed, then gently smooth the seam with your finger or a clay tool until it disappears. -
Final shaping:
Check the bangle for fingerprints. Lightly brush with a little baby oil to smooth the surface if necessary. -
Bake:
Bake according to the manufacturer’s directions for translucent clay. I often bake translucent clay slightly longer than opaque clay to maximize clarity, but watch your temperature closely to prevent scorching. -
Quench immediately:
Remove from the oven and immediately plunge the bangle (still on the form) into a bowl of ice water. This ‘shocking’ process improves the transparency.
Step 4: Finishing and Polishing
-
Initial sanding:
Once cool, remove from the form. Begin sanding under running water with 400 grit paper to remove any bumps or texture. -
Refining the surface:
Continue wet sanding, moving progressively through 600, 800, 1000, and up to 2000 grit. The clay should start looking hazy but extremely smooth. -
Buffing:
Vigorously rub the bangle with a heavy denim cloth or use a buffing wheel on a rotary tool. -
Final shine:
The friction from buffing will heat the clay slightly and bring out that glass-like, high-gloss shine.
Wear your new creations in the sunlight to really show off that mesmerizing depth and color


Suspended Terrazzo Confetti in Crystal-Clear Clay
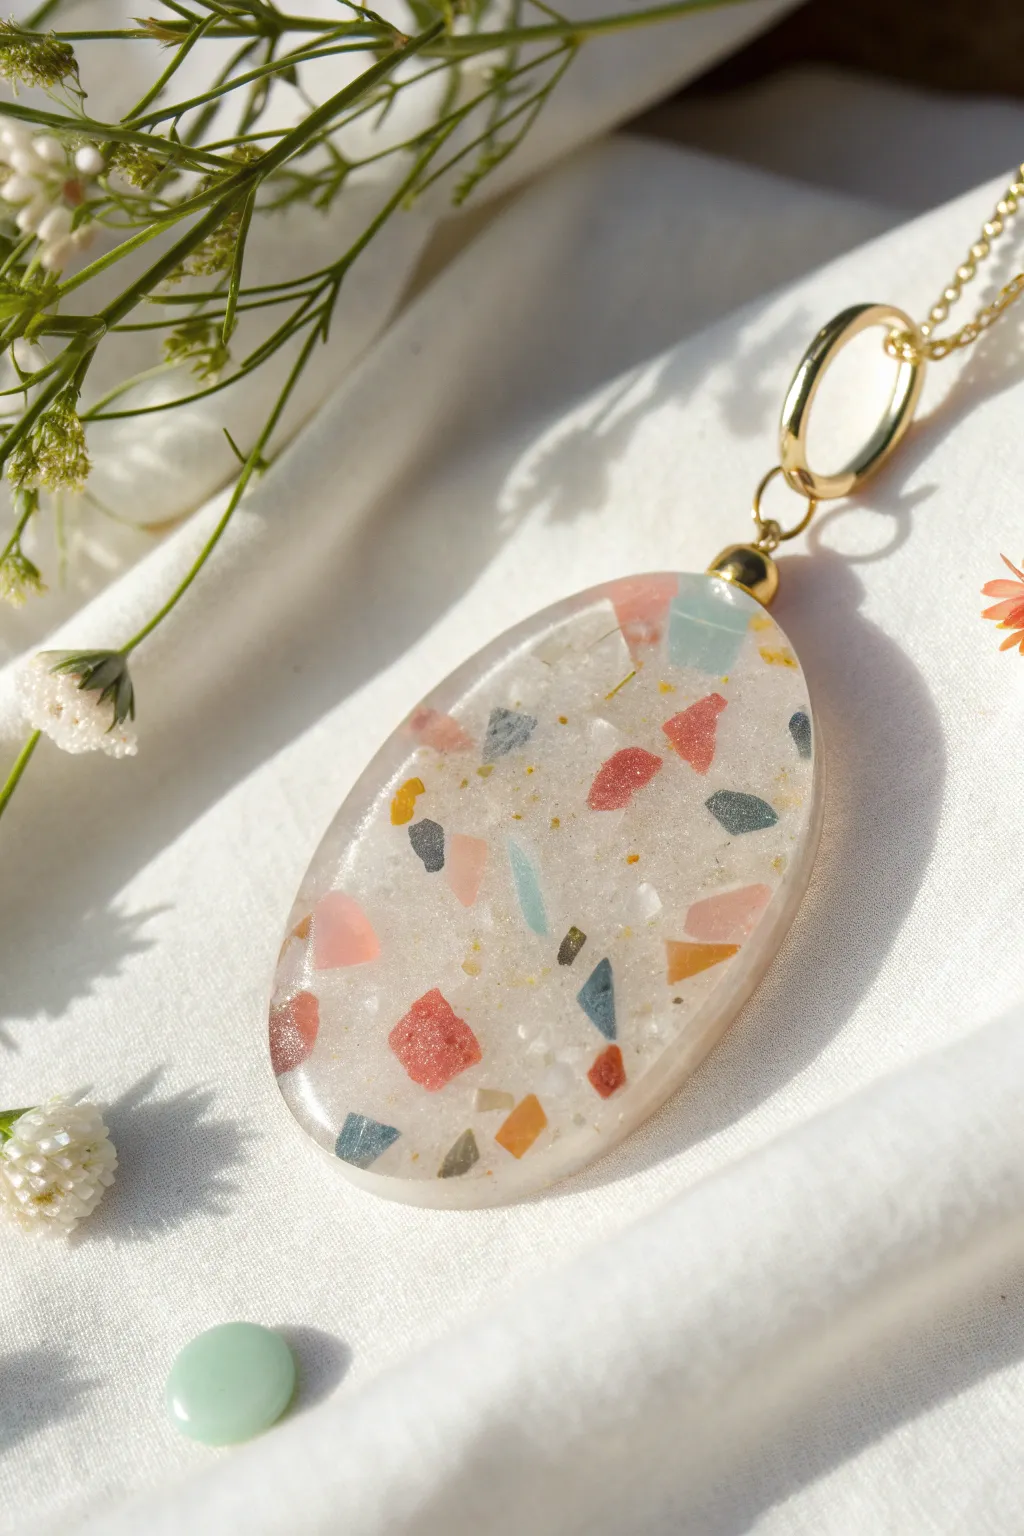
Capture the playful elegance of terrazzo flooring in a delicate, wearable piece of art. Suspended in high-quality translucent clay, these vibrant confetti chips create a mesmerizing floating effect that looks like polished stone.
How-To Guide
Materials
- High-clarity translucent polymer clay (like Cernit Translucent or Pardo)
- Small scraps of colored polymer clay (pinks, blues, greys, mustard yellow)
- Oval clay cutter
- Acrylic rolling pin or pasta machine
- Sharp tissue blade
- Wet/dry sandpaper (grits 400 to 1000)
- Buffing wheel or denim cloth
- Hand drill or Dremel with small bit
- Gold jewelry bail and jump ring
- Gold necklace chain
- UV resin (optional, for extra gloss)
- Oven thermometer
Step 1: Preparing the Confetti
-
Roll Colored Sheets:
Condition your colored clay scraps thoroughly. Roll each color into a very thin sheet, roughly the thickness of cardstock (setting 6 or 7 on a pasta machine). -
Bake the Sheets:
Place these thin colored sheets on a tile or baking tray. Bake them for about 15-20 minutes at the manufacturer’s recommended temperature. Let them cool completely. -
Create the Chips:
Once cool and hard, use your tissue blade or heavy-duty scissors to chop these sheets into tiny, jagged fragments. I like to aim for a mix of sizes, from grains of sand to small triangles, for a natural look.
Cloudy Clay Blues?
If your translucent clay looks milky after baking, confirm your oven temp with an external thermometer. Even slightly low temps prevent full clarity
Step 2: Mixing and Forming
-
Condition Translucent Clay:
Take your translucent clay and condition it well. It needs to be soft and pliable, but avoid trapping air bubbles, which will show as white specks later. -
Incorporate the Chips:
Flatten the translucent clay slightly and sprinkle a generous amount of your baked colored chips onto it. Fold the clay over to trap them. -
Distribute Evenly:
Gently knead the clay to distribute the chips. Be careful not to over-knead, or the sharp edges of the baked chips might begin to crumble or smear. -
Form the Slab:
Roll the mixed clay into a slab about 4mm to 5mm thick. This thickness gives depth to the translucent effect. -
Cut the Shape:
Inspect your slab to ensure you have a nice distribution of color. Press your oval cutter firmly into the clay to cut out your pendant shape.
Add Some Sparkle
Mix in a pinch of fine gold leaf flakes or iridescent glitter along with the colored chips for a glamorous, gem-like shimmer
Step 3: Baking and Finishing
-
Final Bake:
Place your oval cutout on a smooth ceramic tile. Bake for 30–45 minutes at the recommended temperature. Translucent clay often benefits from a longer bake to achieve maximum clarity, but watch for scorching. -
Instant Ice Bath:
Immediately upon removing from the oven, plunge the hot piece into a bowl of ice water. This thermal shock helps improve the transparency of many translucent clay brands. -
Sanding the Surface:
Once cool, wet sand the piece under running water. Start with 400 grit to remove any surface texture and reveal the ‘floating’ chips, then progress through 600, 800, and 1000 grits. -
Buff to a Shine:
Vigourously buff the pendant using a buffing wheel on a rotary tool or a piece of heavy denim. The friction heats the clay and brings out a glass-like shine. -
Optional Glaze:
If hand-buffing isn’t giving you enough gloss, apply a thin layer of UV resin and cure it under a UV lamp for a wet-look finish. -
Assembly:
Drill a small hole at the top of the oval. Thread a gold jump ring through the hole, attach the bail, and string it onto your gold chain.
Wear your new necklace against a dark shirt to really make those suspended colors pop

What Really Happens Inside the Kiln
Learn how time and temperature work together inside the kiln to transform clay into durable ceramic.
“Amber” Pendants With Floating Metal Flakes
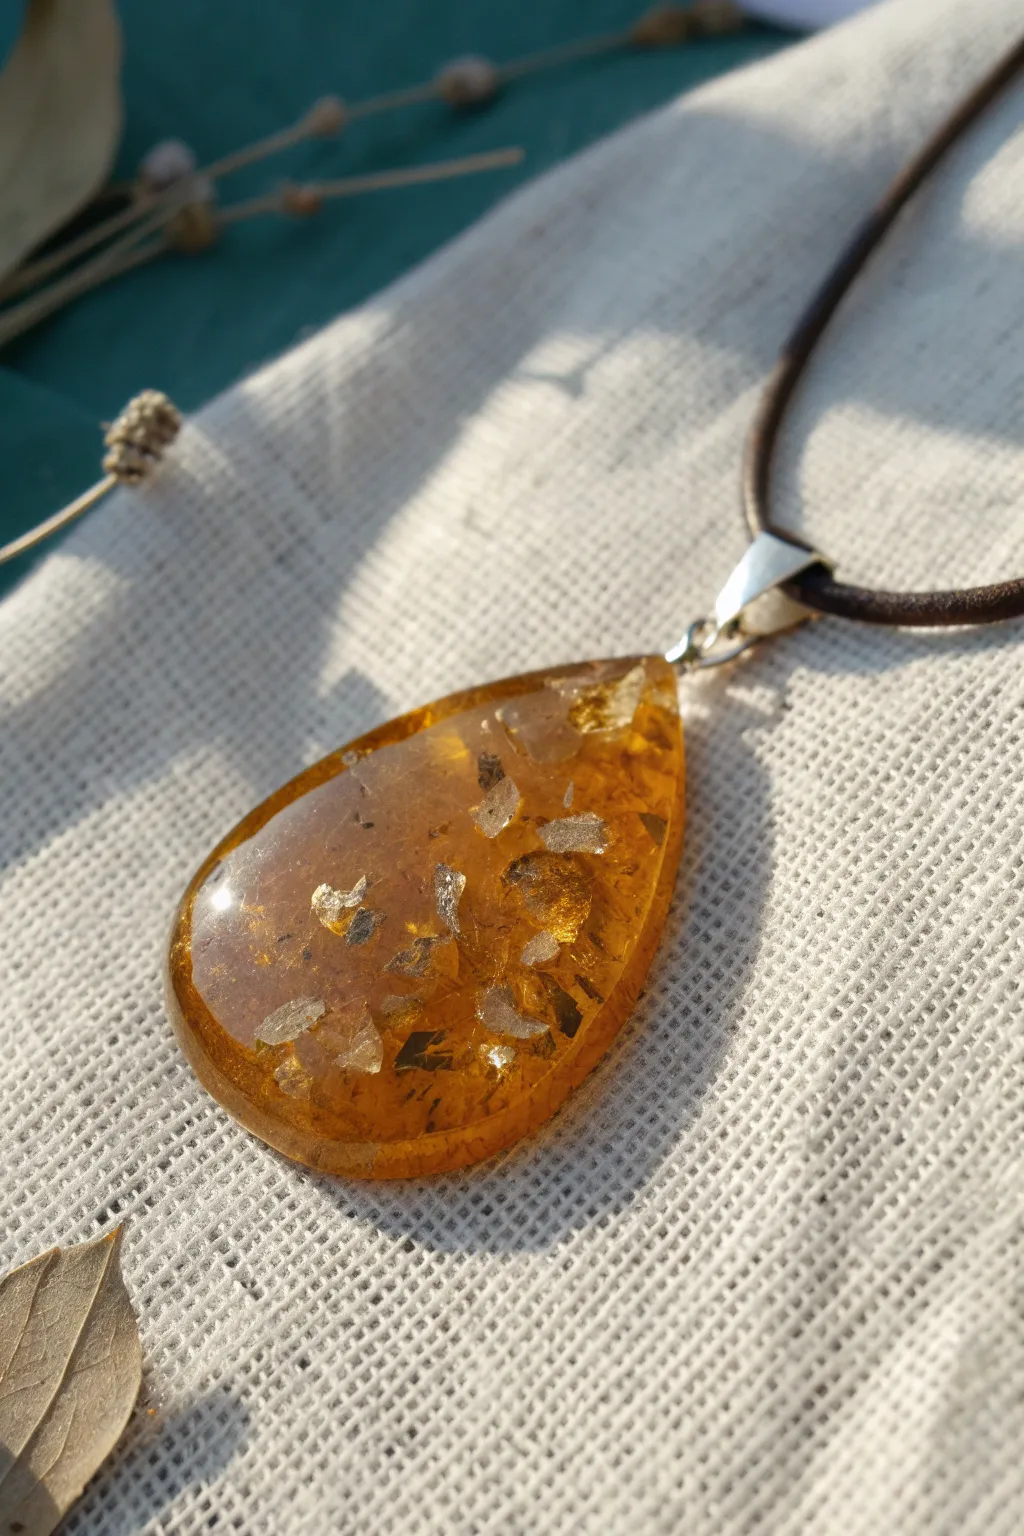
Capture the ancient allure of fossilized resin with this stunning faux amber pendant. Using translucent polymer clay and metallic flakes, you’ll create a glowing, light-catching piece that looks like a treasure from the past.
Step-by-Step Tutorial
Materials
- Translucent polymer clay (white or uncolored)
- Alcohol inks (Yellow, Orange, Brown/Ginger)
- Gold and silver leaf flakes (or composition leaf)
- Glossy polyurethane varnish or UV resin
- Teardrop shape cutter (approx. 2 inches)
- Rolling pin or pasta machine
- Ceramic tile or glass work surface
- Silver pendant bail
- Hand drill or pin vibe
- Two-part epoxy glue
- Fine grit sandpaper (400 to 1000 grit)
- Leather or wax cord for hanging
Step 1: Coloring the Translucent Base
-
Condition the clay:
Start by thoroughly conditioning your translucent polymer clay until it is soft and pliable. Translucent clay can be brittle, so take your time warming it up with your hands. -
Add base color:
Flatten the clay into a pancake. Add 2 drops of yellow alcohol ink and 1 drop of orange ink to the center. Fold the clay over the ink and begin mixing. -
Marbling effect:
Don’t mix the color completely uniform. Stop when the clay is a streaky, rich honey color. For that realistic amber look, I sometimes add a tiny drop of brown ink at the very end and barely mix it in.
Step 2: Adding Inclusions & Shaping
-
Prepare metal flakes:
Take a small pinch of gold and silver leaf flakes. Using tweezers or your fingers, tear them into varying sizes, aiming for mostly small, jagged bits rather than large sheets. -
Incorporate flakes:
Flatten your colored clay again and sprinkle the metal flakes across the surface. Fold the clay over to trap them inside. -
Distribute unevenly:
Twist and fold the clay a few times to disperse the flakes at different depths, but be careful not to over-blend, or the metal will break down into dust. You want visible chunks. -
Roll out the slab:
Roll the clay into a thick sheet, approximately 1/4 inch (6mm) thick. A thicker slab gives the pendant better depth and makes the faux amber effect more convincing. -
Cut the shape:
Place your teardrop cutter over an area of the slab that has a nice distribution of flakes. Press down firmly to cut your shape. -
Smooth the edges:
Gently rub the cut edges with your finger to remove any sharp lines left by the cutter, pivoting the teardrop to soften the rim slightly.
Clearer Clay Project
To increase translucency, bake the piece at the high end of the manufacturer’s temp range and quench immediately in ice water while hot.
Step 3: Baking & Finishing
-
Bake the pendant:
Place the pendant on a ceramic tile. Bake according to your clay manufacturer’s instructions, typically at 275°F (135°C) for 45-60 minutes. Longer baking times often increase translucency. -
Cool via quenching:
Immediately after removing the pendant from the oven, plunge it into a bowl of ice water. This ‘quenching’ technique helps shock the translucent clay into varying degrees of clarity. -
Sand for clarity:
Once cool, wet sand the pendant starting with 400 grit and moving up to 1000 grit. This removes fingerprints and surface texture, revealing the flakes inside. -
Clean surface:
Wash the pendant with soap and water to remove all sanding dust. Let it dry completely. -
Apply gloss finish:
Apply a thin, even coat of UV resin or glossy polyurethane varnish. This is the magic step that turns the matte sanded surface into glass-like amber. -
Cure the finish:
If using UV resin, cure under a UV lamp for 2-3 minutes. If using varnish, let it air dry in a dust-free area for 24 hours.
Ancient Inclusions
For realism, trap a tiny dried insect or small bits of dried moss inside the clay layers alongside the metal flakes before baking.
Step 4: Assembly
-
Drill the hole:
Using a small hand drill or pin vise, carefully drill a hole into the top tip of the teardrop. Insert a screw eye pin or drill straight through for a pinch bail. -
Secure the bail:
Add a tiny dab of two-part epoxy glue to the pin of your bail and insert it into the drilled hole for a permanent hold. -
Add the cord:
String your finished pendant onto a simple leather cord to complete the rustic, natural aesthetic.
Wear your warm, glowing pendant and enjoy the compliments on your fossilized masterpiece
Ocean-Foam Studs With Soft White Swirls in Translucent Layers
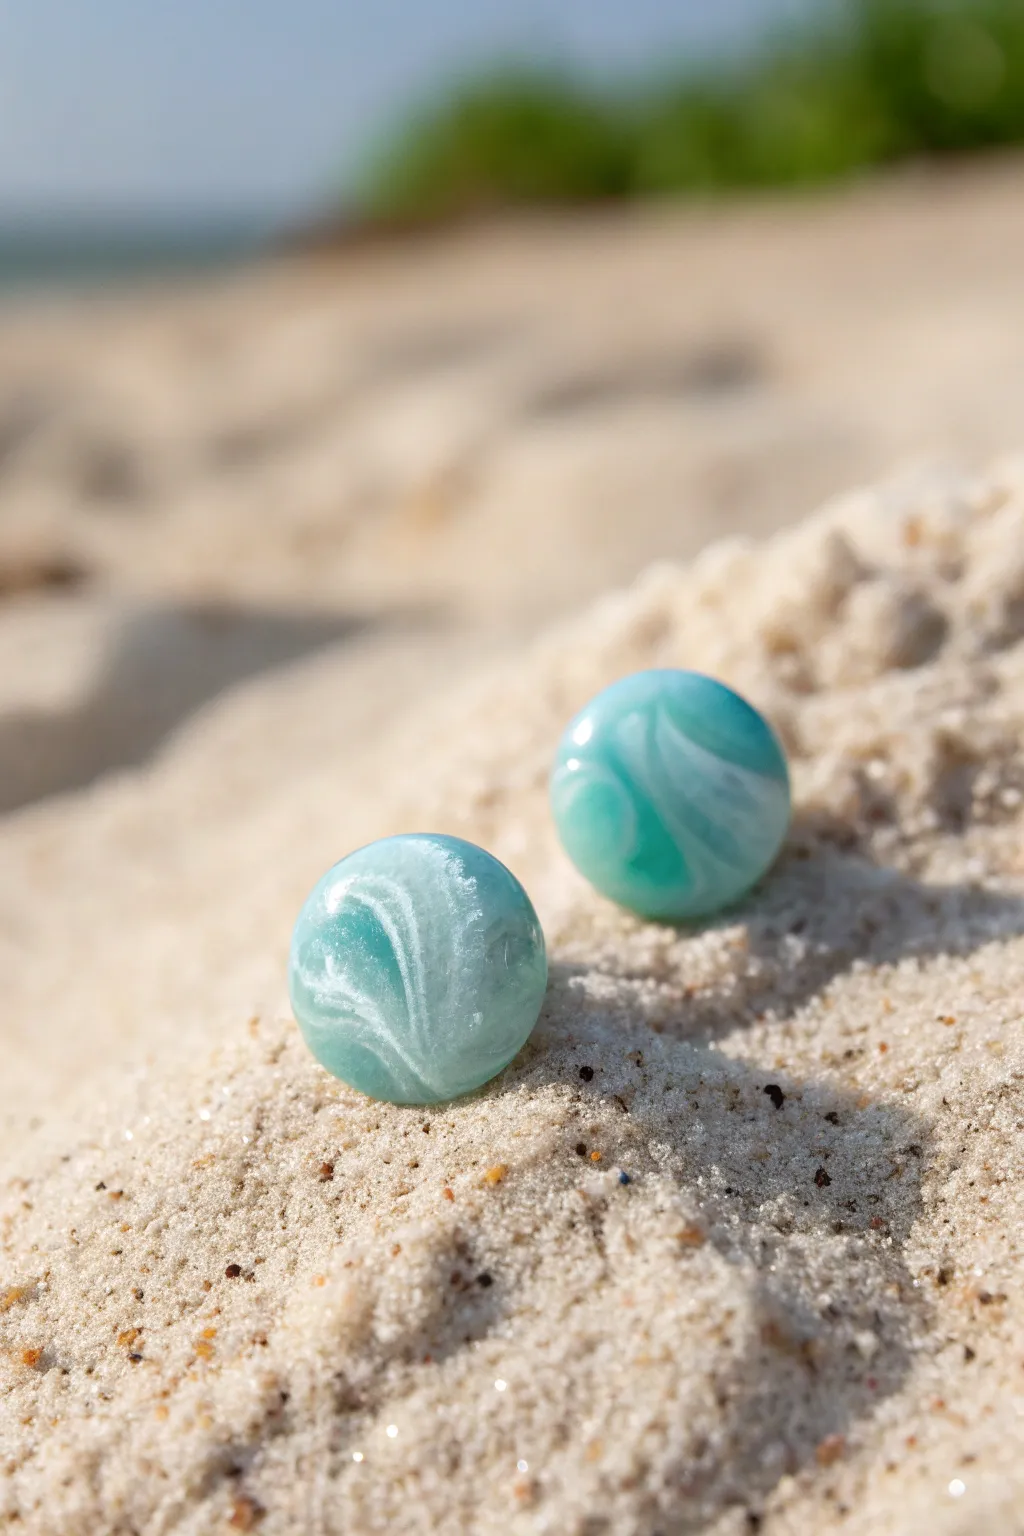
Capture the essence of a tranquil beach with these translucent polymer clay studs that mimic sea foam swirling in ocean water. The depth created by layering translucent teal and white clay gives these gems a stunning, realistic aquatic look.
Detailed Instructions
Materials
- Translucent polymer clay (high quality like Cernit or Pardo)
- Alcohol ink (teal, turquoise, blue)
- Opaque white polymer clay
- Liquid translucent polymer clay (optional but helpful)
- Acrylic roller
- Pasta machine (optional)
- Small round cutter (approx. 10mm)
- Tissue blade
- Circle template or small domed mold (optional)
- Sandpaper (grits 400 through 1200)
- Buffing wheel or denim cloth
- Earring posts and glue (E6000 or similar)
- UV resin or polyurethane varnish for sealing
Step 1: Color Mixing and Prep
-
Condition the Clay:
Start by thoroughly conditioning your translucent clay until it is soft and pliable. It’s crucial that no air bubbles remain, so take your time working it. Condition a small amount of opaque white clay separately. -
Tint the Translucent Base:
Divide your translucent clay into two or three small balls. Add a drop of teal alcohol ink to one and turquoise to another. I like to keep the colors slightly different to create depth. -
Knead the Color:
Wear gloves to avoid staining your hands and knead the ink into the clay until the color is uniform. The clay should look vibrant but still translucent when held up to the light. -
Prepare the White:
Roll your opaque white clay into a very thin sheet. If you have a pasta machine, use the second thinnest setting. If rolling by hand, aim for paper-thickness.
Clearer Waters
To avoid ‘plaquing’ (moon-shaped opaque spots), avoid trapping air while folding and bake at the correct temp. Use an oven thermometer to ensure steady heat.
Step 2: Creating the Swirls
-
Layering the Slab:
Flatten your colored translucent balls into irregular shapes. Tear off small, jagged pieces of the thin white sheet and place them randomly on top of the translucent pieces. -
The Chopping Technique:
Stack the different colored translucent pieces (with their white toppers) into a rough pile. Use your tissue blade to chop the pile into small bits. -
Reforming the Block:
Gather the chopped bits back together and squeeze them into a solid block. Compressing tightly helps eliminate trapped air. -
Slight Twist:
Gently twist the block once or twice. This elongates the white flecks into the swirl patterns seen in the photo, resembling moving water. -
Roll Smooth:
Roll the twisted block into a rod or log shape. The diameter should be slightly larger than your intended earring size.
Sandy Shores
Before baking, press the bottom third of your unbaked dome into real fine sand or gold mica powder to create a ‘shoreline’ effect on the earring itself.
Step 3: Shaping and Curing
-
Slicing:
Using a sharp tissue blade, slice thin discs from your log. Look for the slices that have the most pleasing white swirling patterns. -
Forming the Cabochon:
Take a slice and gently place it over a small ball of scrap translucent clay to create a dome shape, or press it into a silicone cabochon mold. Smooth out any fingerprints. -
Cutting the Base:
Use your round cutter to cut the final clean circle shape from your formed dome. This ensures the edges are neat and uniform. -
Baking:
Place the pieces on a tile or baking sheet. Bake according to the manufacturer’s instructions for translucent clay. Often, translucent clay benefits from a quick plunge into ice water immediately after baking to heighten clarity.
Step 4: Finishing Touches
-
Sanding:
Once cooled, wet sand the pieces starting with 400 grit and moving up to 1200 grit or higher. This removes any surface texture and is vital for glass-like transparency. -
Buffing:
Buff the studs vigorously with a denim cloth or a buffing wheel on a rotary tool. The friction heat brings out the ultimate shine. -
Glazing (Optional):
For extra depth and a ‘wet’ look, apply a thin layer of UV resin or gloss varnish. Cure or dry completely. -
Attaching Posts:
Use strong jewelry glue to attach the earring posts to the back of the clay. Allow the glue to cure fully (usually 24 hours) before wearing.
Enjoy wearing your refreshing little piece of the ocean that captures the sunlight beautifully


The Complete Guide to Pottery Troubleshooting
Uncover the most common ceramic mistakes—from cracking clay to failed glazes—and learn how to fix them fast.
Translucent Cane Slices That Look Like Floating Pattern Windows
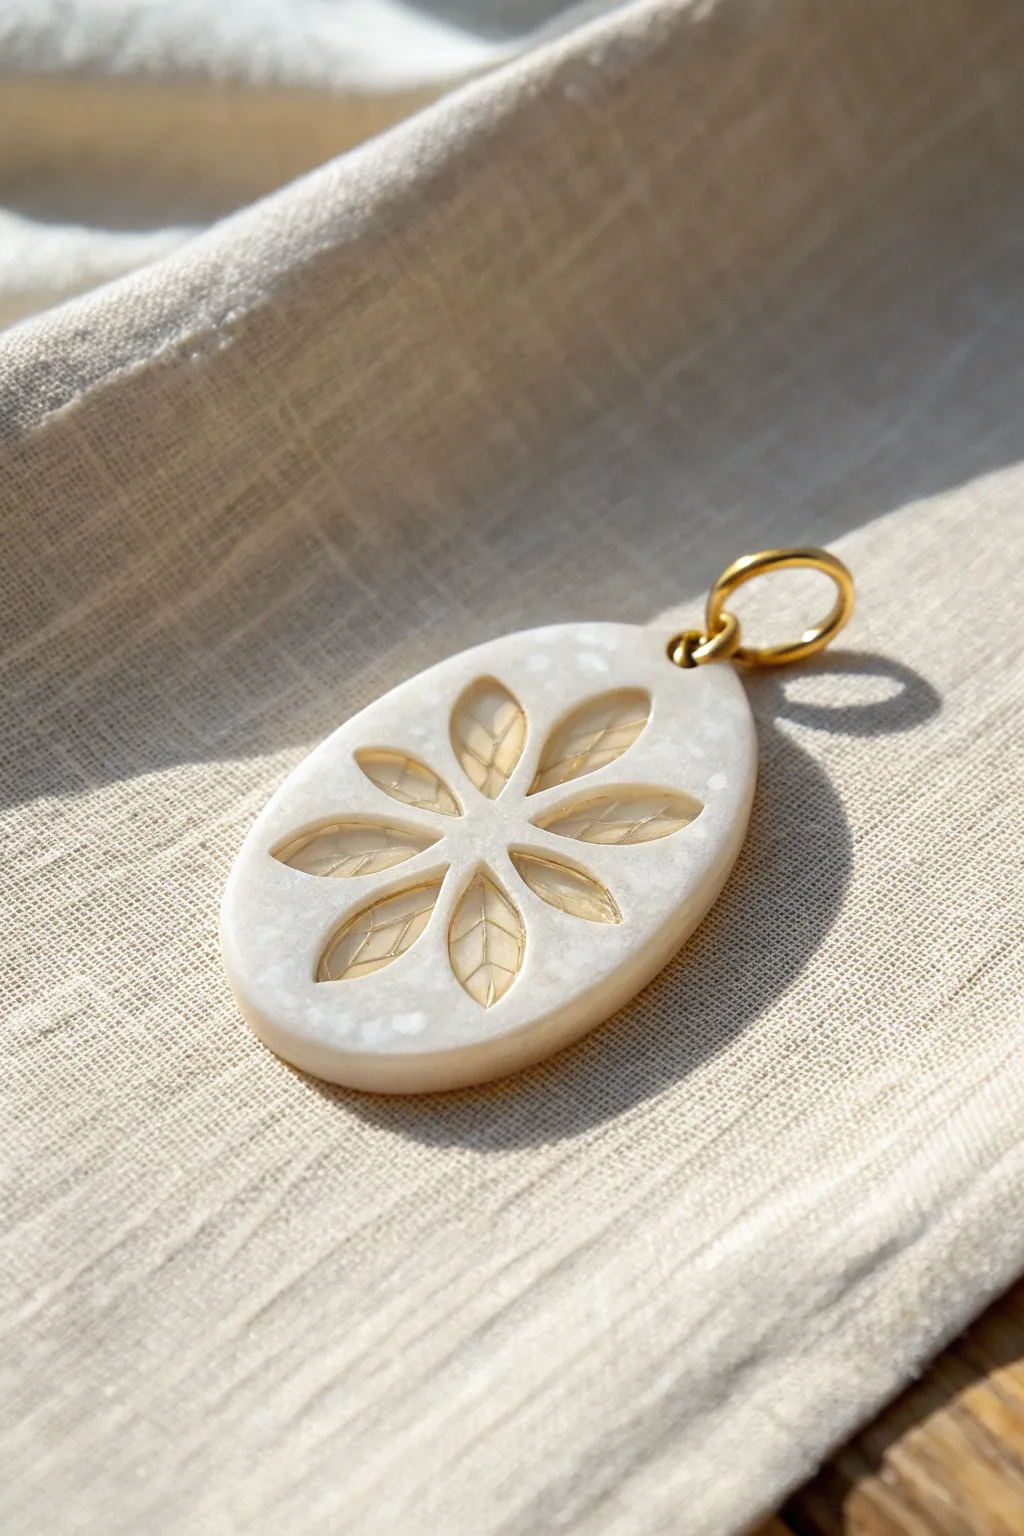
This elegant pendant captures the ethereal beauty of translucent clay by suspending delicate, gold-veined leaves within a milky, light-diffusing base. The result is a sophisticated piece that looks like captured sunlight, perfect for a refined necklace or charm.
How-To Guide
Materials
- Translucent polymer clay (high quality)
- White polymer clay (small amount)
- Gold acrylic paint or gold leaf pen
- Liquid polymer clay (translucent)
- Oval clay cutter
- Small leaf-shaped cutters or scalpel
- Gold jump ring
- Hand drill or pin vibe
- Pasta machine or acrylic roller
- Gloss varnish or resin (optional)
Step 1: Creating the Leaf Cane
-
Prepare the translucent mix:
Begin by conditioning your translucent clay thoroughly. To achieve that milky, semi-opaque look seen in the photo, mix a tiny pinch of white clay into a larger block of translucent clay. Aim for a ratio of about 1 part white to 20 parts translucent. -
Sheet the clay:
Run your milky translucent mix through the pasta machine on a medium-thick setting to create a uniform sheet. -
Cut the leaf shapes:
Use small leaf-shaped cutters to punch out eight distinct petals. If you don’t have a cutter small enough, carefully freehand cut tear-drop shapes with a scalpel. -
Apply gold detailing:
Paint the top surface of each cut leaf shape with gold acrylic paint. For the veining effect, you can gently score a line down the center of each leaf and paint into the groove. Let this paint dry completely. -
Encapsulate the gold:
Once the gold is dry, place a thin layer of plain translucent clay over the painted side. This sandwiches the gold design inside the clay so it floats within the piece.
Preventing Plaques
Translucent clay often gets ‘plaques’ or moon-shaped bubbles. Condition the clay thoroughly but slowly to avoid trapping air, and let the rolled sheets rest before cutting.
Step 2: Assembling the Pendant
-
Form the base slab:
Take the remaining milky translucent mixture and roll it into a slab regarding 3-4mm thick. This needs to be thick enough to embed your leaves without them poking through the back. -
Arrange the pattern:
Arrange your prepared leaf shapes in a radial flower pattern on top of the thick base slab. The gold side should be facing up, although covered by the thin translucent layer. -
Embedding the design:
Gently roll over the arrangement with an acrylic roller. You want to press the leaves down until they are flush with the surrounding background clay. Roll in multiple directions to avoid distorting the circular pattern into an oval just yet. -
Cut the pendant shape:
Position your large oval cutter over the flower pattern. Center it carefully so the floral design sits perfectly in the middle, then press down firmly to cut the final pendant shape. -
Refine the edges:
Gently smooth the cut edges with your finger to remove any sharp lines or drag marks from the cutter.
Depth Perception
For a deeper 3D effect, embed the leaves at slightly different depths by adding very thin layers of translucent clay between some of the petals.
Step 3: Baking and Finishing
-
Bake the piece:
Bake the clay according to the manufacturer’s instructions for translucent clay. It is crucial to watch the temperature, as translucent clay can yellow easily if overheated. I often tent foil over the tray to protect it. -
Quench the clay:
Immediately after removing the piece from the oven, plunge it into a bowl of ice water. This thermal shock helps increase the clarity of translucent clay. -
Sand and buff:
Once cool, sand the piece using wet/dry sandpaper, starting at 400 grit and working up to 2000 grit. This removes surface texture and reveals the depth of the embedded gold leaves. -
Drill the hole:
Use a small hand drill or pin vise to carefully drill a hole at the top narrow end of the oval for your hardware. -
Add shine (optional):
If you want a glass-like finish, apply a thin coat of UV resin or gloss varnish. However, buffing alone provides a lovely organic sheen. -
Attach hardware:
Twist open a gold jump ring using two pairs of pliers. Thread it through the drilled hole and close it securely to finish your pendant.
Wear your new pendant against a dark top to really let that translucent effect shine through
Botanical Lockets With Embedded Dried Flowers
Capture the delicate beauty of spring forever with this ethereal botanical pendant. By combining white clay with crystal-clear resin, you can preserve tiny blue forget-me-nots in a timeless, heirloom-quality piece of jewelry.
Detailed Instructions
Materials
- White or pearl polymer clay (e.g., Fimo or Sculpey)
- Translucent liquid polymer clay or UV resin
- Oval open-backed bezel pendant (gold or brass finish)
- Pressed and dried forget-me-not flowers
- UV lamp (if using UV resin)
- Tweezers
- Pasta machine or acrylic roller
- Craft knife
- High-gloss varnish (optional)
- Jewelry pliers and jump rings
- Ceramic tile or baking surface
Step 1: Base Preparation
-
Condition the Clay:
Begin by thoroughly conditioning your white polymer clay until it is soft and pliable. While plain white works beautifully, a pearl finish adds a subtle, luminous shimmer that catches the light. -
Roll a Thin Sheet:
Use an acrylic roller or a pasta machine on a thick setting to create a smooth, even sheet of clay. It needs to be slightly thicker than the depth of your metal bezel frame. -
Cut the Shape:
Place your oval bezel directly onto the clay sheet and use it like a cookie cutter to press down firmly. Alternatively, trace around the inside of the bezel with a craft needle and cut the shape out carefully. -
Fit the Bezel:
If you are using an open bezel, gently press the clay oval into the frame so it creates a flat background. Ensure the clay is flush with the back edges and creates a smooth surface inside the frame. Smooth out any fingerprints. -
Initial Bake:
Bake the clay-filled bezel according to the manufacturer’s temperature instructions for about 15-20 minutes. This creates a hard surface for your floral arrangement.
Step 2: Floral Arrangement
-
Select Your Blooms:
While the base cools completely, sort through your dried forget-me-nots. Look for a mix of open blooms and tiny buds to create a natural, growing composition. -
Apply Adhesive Layer:
Spread a very thin layer of liquid translucent clay or a drop of UV resin onto the cooled white clay base. This will act as the glue for your delicate flowers. -
Place the Stem:
Using fine-tip tweezers, gently pick up your main floral stem. Place it centrally on the oval, slightly angled to mimic a natural sway. -
Secure the Petals:
Gently tap the flowers down into the liquid layer to ensure they are fully in contact with the base. This prevents air bubbles from getting trapped underneath later. -
Cure the Adhesive:
If using UV resin, cure under the lamp for 60 seconds to lock the flowers in place. If using liquid clay, you’ll bake it during the final encapsulation step.
Pro Tip: Moisture Check
Ensure flowers are 100% dry before embedding. Even slight moisture will cause the resin to turn cloudy or the petals to brown and rot over time inside the casing.
Step 3: Encapsulation & Finish
-
Doming the Pendant:
Carefully pour UV resin over the flowers, starting from the center and spiraling out. The resin should form a dome due to surface tension, stopping right at the metal variation rim. -
Pop Bubbles:
Inspect the piece closely for tiny bubbles, especially around the flower stamens. Use a lighter or a heat gun briefly to pop them, or fish them out with a needle tool. -
Final Cure:
Place the pendant under a UV lamp for 2-4 minutes until the resin is hard, glossy, and tack-free. I prefer to rotate the piece halfway through to ensure even light exposure. -
Add Hardware:
Open a large jump ring using two pairs of jewelry pliers. Thread it through the top loop of the bezel. -
Attach the Bale:
Add a decorative bale or a simple loop connector to the jump ring before closing it securely. Your botanically preserved pendant is now ready to wear.
Level Up: Glowing Blooms
Mix a tiny pinch of phosphorescent (glow-in-the-dark) powder into your white clay base. The flowers will look normal by day, but silhouetted against a glow at night.
Enjoy wearing this little piece of eternal spring close to your heart

TRACK YOUR CERAMIC JOURNEY
Capture glaze tests, firing details, and creative progress—all in one simple printable. Make your projects easier to repeat and improve.
Luminous Mini Sculptures That Glow When Held to the Light
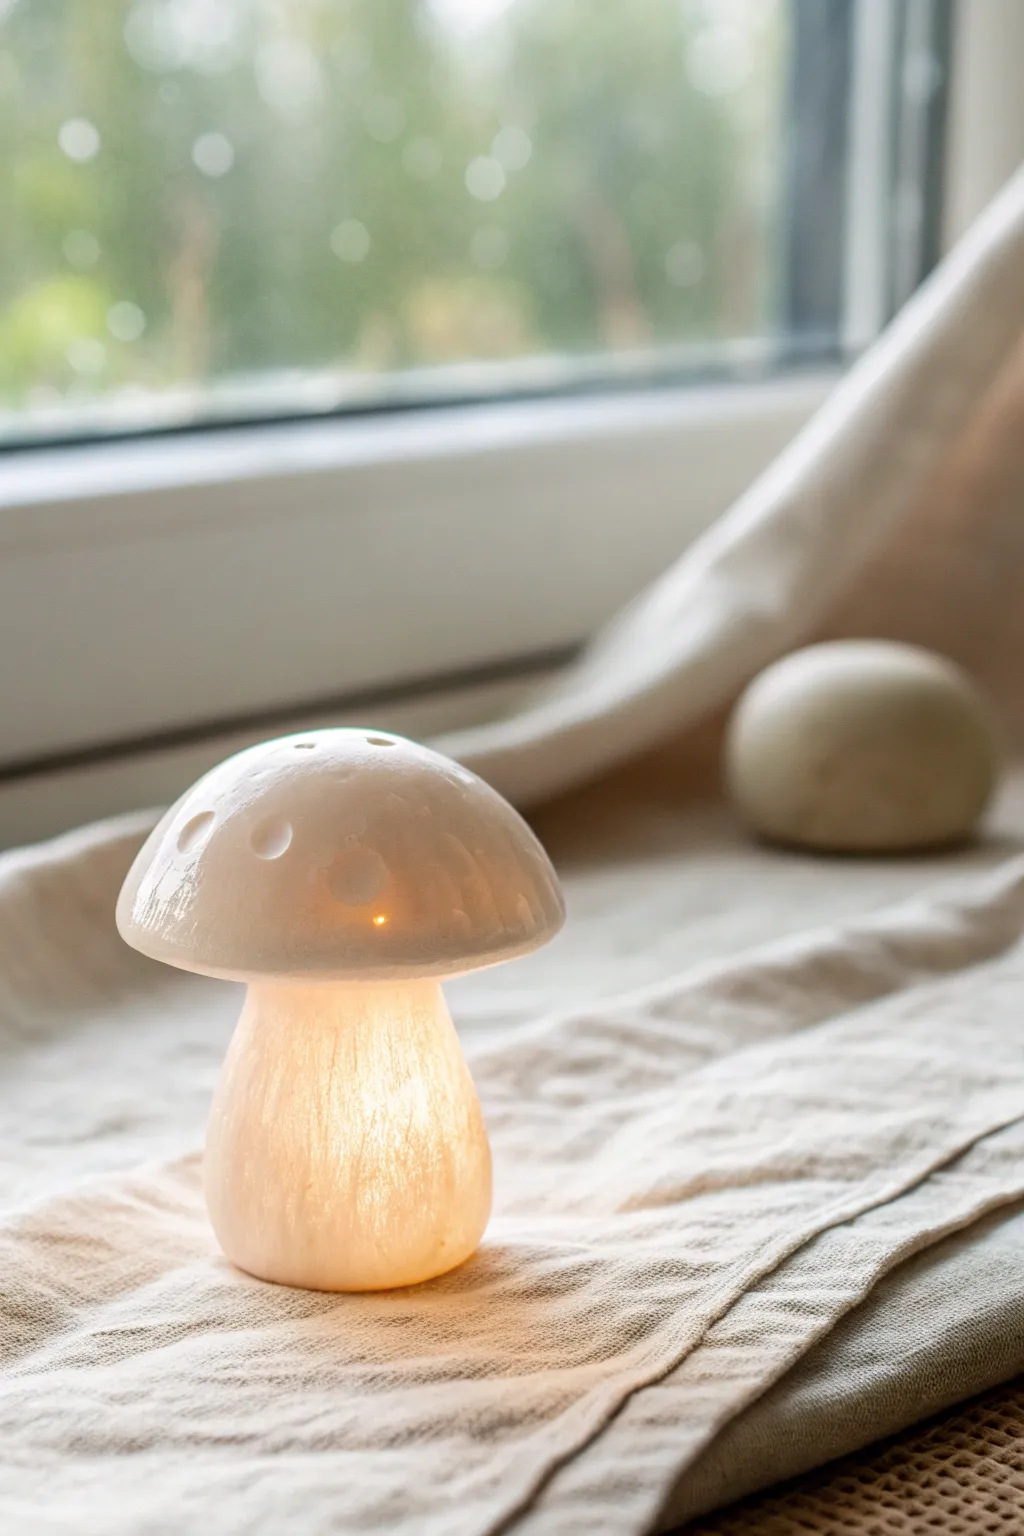
Capture the enchanting glow of a forest floor with this delicate mushroom lamp made from translucent polymer clay. The light shines beautifully through the textured stem and cap, creating a warm, magical ambiance for any cozy nook.
Step-by-Step Guide
Materials
- Translucent polymer clay (white or frosting)
- Small battery-operated LED tea light
- Aluminum foil
- Ball stylus tool (various sizes)
- Needle tool or toothpick
- Acrylic roller or pasta machine
- Liquid polymer clay (translucent)
- Ceramic tile or glass work surface
- Oven for baking
Step 1: Forming the Base
-
Create the core structure:
Begin by shaping a piece of aluminum foil into a cylinder that roughly matches the diameter of your LED tea light. Ensure the foil is tightly packed to provide a sturdy base for the clay. -
Check the fit:
Test the foil core against your tea light. It needs to rest comfortably on top or slide slightly over it, leaving the bottom open so light can enter the stem. -
Condition the clay:
Thoroughly condition your translucent polymer clay until it is warm and pliable. This prevents air bubbles, known as ‘plaquing,’ which can mar the final glowing effect. -
Sheet the clay:
Roll out a sheet of clay to about 3mm thickness. It needs to be thick enough to hold its shape but thin enough to let light pass through. -
Wrap the stem:
Wrap the clay sheet around your foil core, trimmed to fit. Smooth the seam with your finger or a clay shaper until it disappears completely. -
Add texture:
Using a needle tool, gently drag vertical lines down the length of the stem. I like to vary the pressure slightly to create organic, fibrous grooves that mimic a real mushroom stalk.
Moon Crater Fix
If you press too hard and poke through the cap, don’t restart! Place a tiny patch of raw clay on the inside and smooth it. It adds character to the glow.
Step 2: Sculpting the Cap
-
Shape the foil cap:
Create a second ball of aluminum foil and flatten it into a dome shape for the mushroom cap. This acts as your armature. -
Cover with clay:
Roll a slightly thicker sheet of translucent clay and drape it over the foil dome. Smoothing it down gently to avoid trapping air pockets between the foil and clay. -
Refine the edges:
Curve the bottom edges of the cap inward slightly to give it a classic rounded mushroom silhouette. Trim away any excess clay underneath. -
Create the craters:
Use a ball stylus tool to press random indentations into the surface of the cap. These thinner spots will glow brighter when the lamp is lit. -
Smooth the surface:
Lightly brush the cap with a little baby oil or clay softener on your finger to remove fingerprints and achieve a porcelain-like finish.
Color Tinting
Mix a tiny amount of alcohol ink into your translucent clay before sculpting to create soft pink, blue, or green mushrooms.
Step 3: Baking and Assembly
-
First bake:
Bake both the stem and the cap separately according to the clay manufacturer’s temperature instructions for about 20 minutes. This ‘par-bake’ sets the shape. -
Remove the foil:
Once cool enough to handle, carefully remove the aluminum foil from inside the stem and the cap. If the foil sticks, you can use pliers to pull it out in pieces. -
Join the pieces:
Apply a ring of liquid polymer clay (translucent) to the top of the stem and center the cap on top of it. -
Secure the bond:
Press gently to ensure contact. Use a small snake of fresh clay to reinforce the joint underneath the cap if it feels wobbly, blending it smoothly with a tool. -
Final bake:
Bake the assembled mushroom for another 15-20 minutes to cure the liquid clay bond and ensure maximum translucency. -
Cool and light:
Allow the sculpture to cool completely inside the oven to prevent thermal shock cracks. Once cold, place it over your LED tea light to reveal the hidden glow.
Turn down the lights and enjoy the soothing atmosphere created by your new illuminated sculpture
Icy “Glass” Mosaic Wall Art Using Layered Translucent Tiles
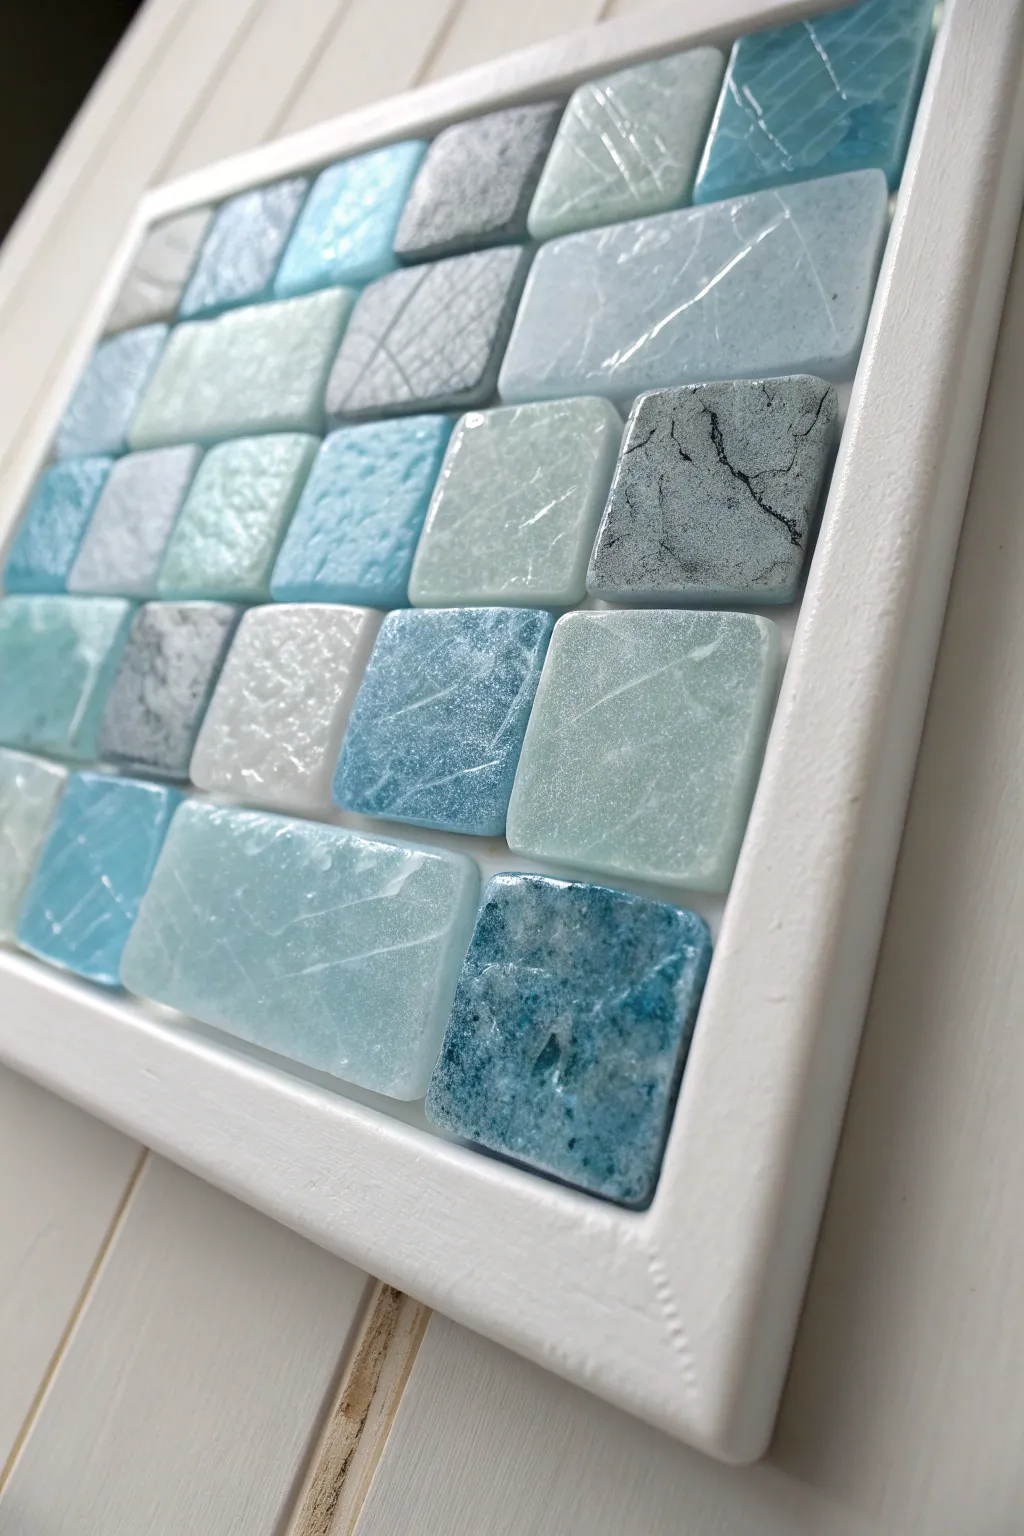
Transform translucent polymer clay into stunning, glass-like tiles that capture the serene beauty of a frozen lake. This mosaic project combines cool blues and whites with crackled textures to create a sophisticated piece of wall art that looks surprisingly high-end.
Step-by-Step Tutorial
Materials
- Translucent polymer clay (high quality, e.g., Cernit or Pardo)
- Alcohol inks (blue, teal, grey, white/pearl)
- Silver leaf or metal foil flakes
- Liquid polymer clay (translucent)
- Square clay cutters (various sizes, primarily uniform)
- ceramic tile or glass sheet for baking
- Heat gun (optional)
- UV resin or gloss glaze
- White acrylic paint (for antiquing)
- Wooden frame with backing board
- Strong craft adhesive (e.g., E6000)
- Mosaic grout (white or light grey)
- Pasta machine or acrylic roller
Step 1: Creating the Faux-Glass Patterns
-
Condition the Clay:
Begin by thoroughly conditioning your translucent polymer clay until it is soft and pliable. You want it as clear as possible, so ensure your hands and work surface are free of lint or dust. -
Tinting Basics:
Divide the clay into four or five batches. Leave one batch pure translucent. For the others, add literally a pinhead amount of alcohol ink—one batch light blue, one teal, one grey. Mix thoroughly. -
Adding Inclusions:
To create the icy, fractured look, chop up some of your translucent clay into tiny, jagged bits. Mix these bits into your tinted batches gently; don’t blend fully, as you want the chunks to remain visible like crushed ice. -
Layering for Depth:
Roll out thin sheets of your various tinted clays. Stack them in random orders, placing bits of silver leaf or foil between layers to mimic mineral veins found in natural stone. -
Creating the Crackle Effect:
Roll a sheet of tinted clay very thin on your pasta machine. Let it sit out to ‘leech’ or dry slightly until it’s brittle. Place this over a thicker sheet of contrasting clay and run it through the machine once; the top dry layer will crack apart, revealing the color underneath. -
Consolidating the Slab:
Gather your various textured and layered stacks. Combine them into a single, cohesive slab about 4-5mm thick. Use an acrylic roller to ensure the surface is smooth and the layers are well-bonded.
Ice Water Shock
Plunging hot baked translucent clay directly into ice water creates a thermal shock that increases transparency and naturally creates tiny internal fissures.
Step 2: Cutting and Baking
-
Cutting the Tiles:
Use your square cutter to punch out tiles from the most interesting parts of your slab. If you want a varied look, cut some rectangles or larger squares to fit your frame size. -
Softening Edges:
Gently tap the sharp edges of each raw tile with your finger. Real tumbled glass usually has softer, rounded corners, and this small step adds significant realism. -
Baking:
Place the tiles on a ceramic tile or glass sheet. Bake according to the manufacturer’s instructions for translucent clay. I often quench them in ice water immediately after baking to increase clarity.
Cloudy Clay?
If your tiles look white instead of clear, you likely didn’t condition the clay enough or baked at too low a temperature. Use an oven thermometer to verify heat.
Step 3: Finishing and Assembly
-
Antiquing (Optional):
If you want more definition in the crackles, rub white acrylic paint over the cooled tiles and quickly wipe the surface clean with a damp paper towel, leaving paint only in the crevices. -
Resining:
Coat the top of each tile with UV resin or a high-gloss glaze. This is the secret to the ‘wet’ glass look. Cure under a UV lamp or let dry completely. -
Layout Design:
Arrange your finished tiles inside your wooden frame without glue first. Play with the color gradient—placing darker blues in corners or mixing them randomly for a natural mosaic feel. -
Adhering Tiles:
Apply a dab of strong adhesive to the back of each tile and press them firmly onto the frame’s backing board. Leave consistent gaps between them for the grout. -
Grouting:
Mix a small amount of white grout. Spread it over the tiles, pressing it into the gaps. Use a damp sponge to wipe the excess grout off the tile surfaces before it hardens. -
Final Polish:
Once the grout is fully dry, give the tiles a final buff with a soft cloth to remove any haze and make your icy creation shine.
Hang your new mosaic near a window to let the light play beautifully off the translucent textures of your tiles