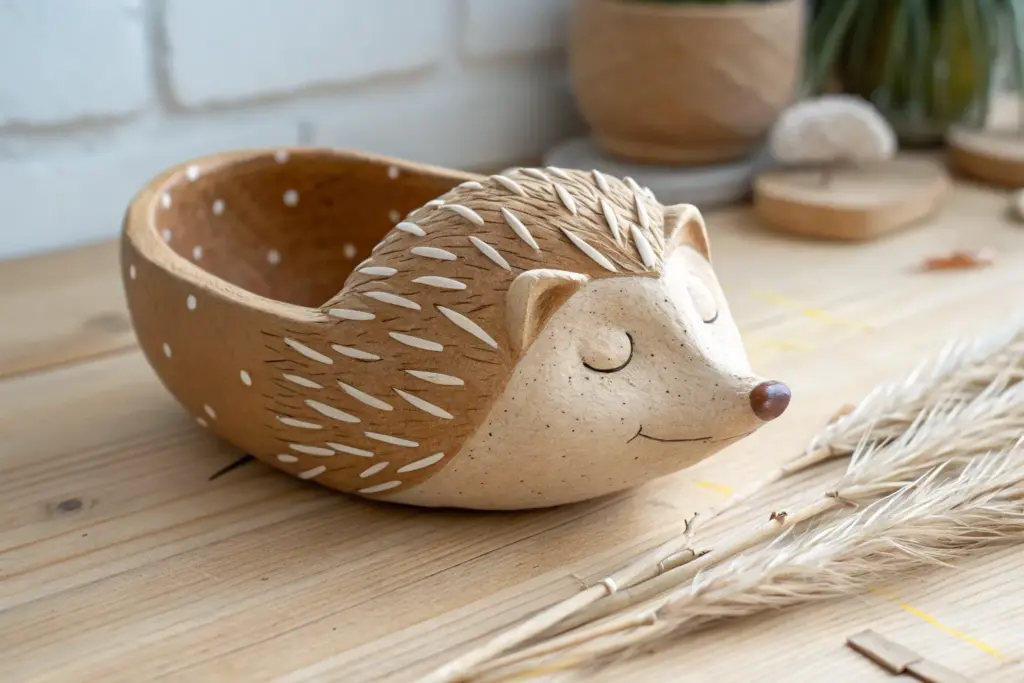
When I’m teaching kids pottery, I always start with projects that feel like play but still sneak in real handbuilding skills. These ideas are all about simple shapes, big imagination, and that proud “I made this!” moment at the end.
Pinch Pot Animal Bowls With Big Personalities
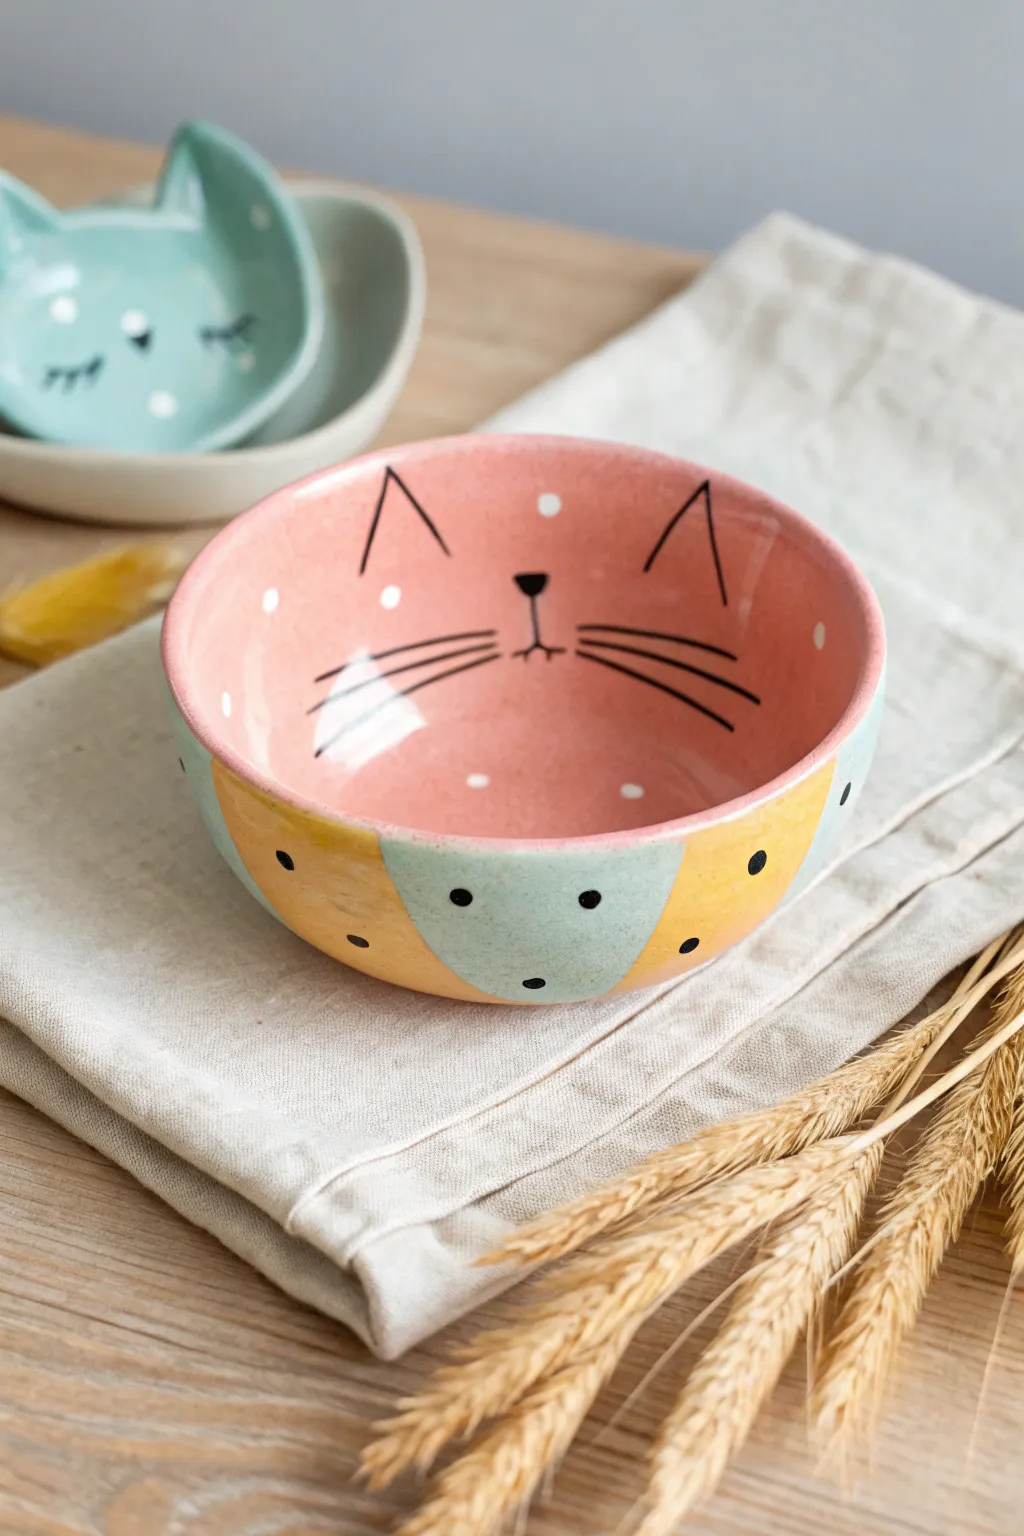
Transform a simple lump of clay into a charming feline friend with this colorful bowl project. Featuring a sweet hand-painted face inside and a playful patchwork design on the exterior, this pinch pot is perfect for holding trinkets or serving snacks.
Step-by-Step
Materials
- Earthenware or stoneware clay (white or light-colored body)
- Pottery tools (needle tool, rib tool, sponge)
- Underglazes (pastel pink, teal/mint, mustard yellow, sleek black, white)
- Clear transparent glaze (food safe if using for food)
- Paintbrushes (medium flat brush for blocking color, fine liner brush for details)
- Water cup
- Rolling pin (optional)
- Kiln access
Step 1: Forming the Bowl
-
Prepare the clay ball:
Start with a ball of clay roughly the size of a large orange. Pat it between your hands to ensure it is round and smooth, removing any major cracks before you begin. -
Open the pot:
Hold the ball in one hand and press your thumb into the center, stopping about a half-inch from the bottom. This forms the initial well of your bowl. -
Pinch the walls:
Gently pinch the clay between your thumb and fingers, rotating the ball as you work. Ideally, you want to pull the clay upwards and outwards to thin the walls evenly. -
Shape the curve:
Continue pinching until the walls are about 1/4 inch thick. Aim for a nice, wide curve rather than a tall cylinder, as this gives you more surface area for the face inside. -
Smooth the surface:
Use a damp sponge or a soft rib tool to smooth out your fingerprint marks on both the inside and outside. A smooth canvas is crucial for the detailed painting later. -
Refine the rim:
Run a damp sponge along the rim to round it off softly. Sharp edges can become brittle after firing, so keeping them rounded is both safer and more aesthetic. -
Dry to leather hard:
Let the bowl dry slowly until it reaches the leather-hard stage. It should be firm to the touch but not dusty or bone dry.
Step 2: Painting the Design
-
Base coat interior:
Using a soft, wide brush, apply 2-3 coats of pastel pink underglaze to the entire interior of the bowl. Allow each coat to dry slightly before applying the next to ensure solid coverage. -
Sketch the face:
Once the pink is dry to the touch, lightly sketch the cat’s features with a pencil. The graphite will burn off in the kiln, so don’t worry about mistakes. -
Paint the exterior pattern:
On the outside, lightly sketch a patchwork pattern of curved shapes. Paint alternating sections with mint teal and mustard yellow underglaze. I like to leave small gaps or overlap them slightly for an organic look. -
Add exterior dots:
Use a the back end of a paintbrush handle dipped in black underglaze to stamp perfect polka dots onto the yellow and teal sections. -
Detail the interior face:
Switch to your finest liner brush and black underglaze. Carefully paint the triangular ears near the rim, the small nose, the mouth, and the long, sweeping whiskers. -
Add highlights:
Dip a small dotting tool or brush tip into white underglaze and add tiny white dots to the pink background for a ‘sparkle’ effect, as well as small highlights on the nose if desired. -
Bisque fire:
Allow the piece to dry completely (bone dry) before loading it into the kiln for the first bisque firing. This hardens the clay and sets the underglaze. -
Apply clear glaze:
Once fired, dip the entire bowl into a clear transparent glaze or brush it on evenly. This will make the colors pop and seal the clay. -
Final firing:
Fire the bowl a second time according to the temperature guidelines of your specific clay and glaze.
Clean Lines Pro Tip
For super crisp whiskers, steady your painting hand by resting your pinky finger on the dry rim of the bowl while you drag the liner brush across the curve.
Troubleshooting Cracks
If you see tiny cracks forming on the rim while shaping, your clay is too dry. Dip your fingers in water and smooth them out instantly before continuing to pinch.
Now you have a purr-fectly adorable bowl ready to brighten up any table setting


Leaf-Imprint Nature Bowls With Real Texture
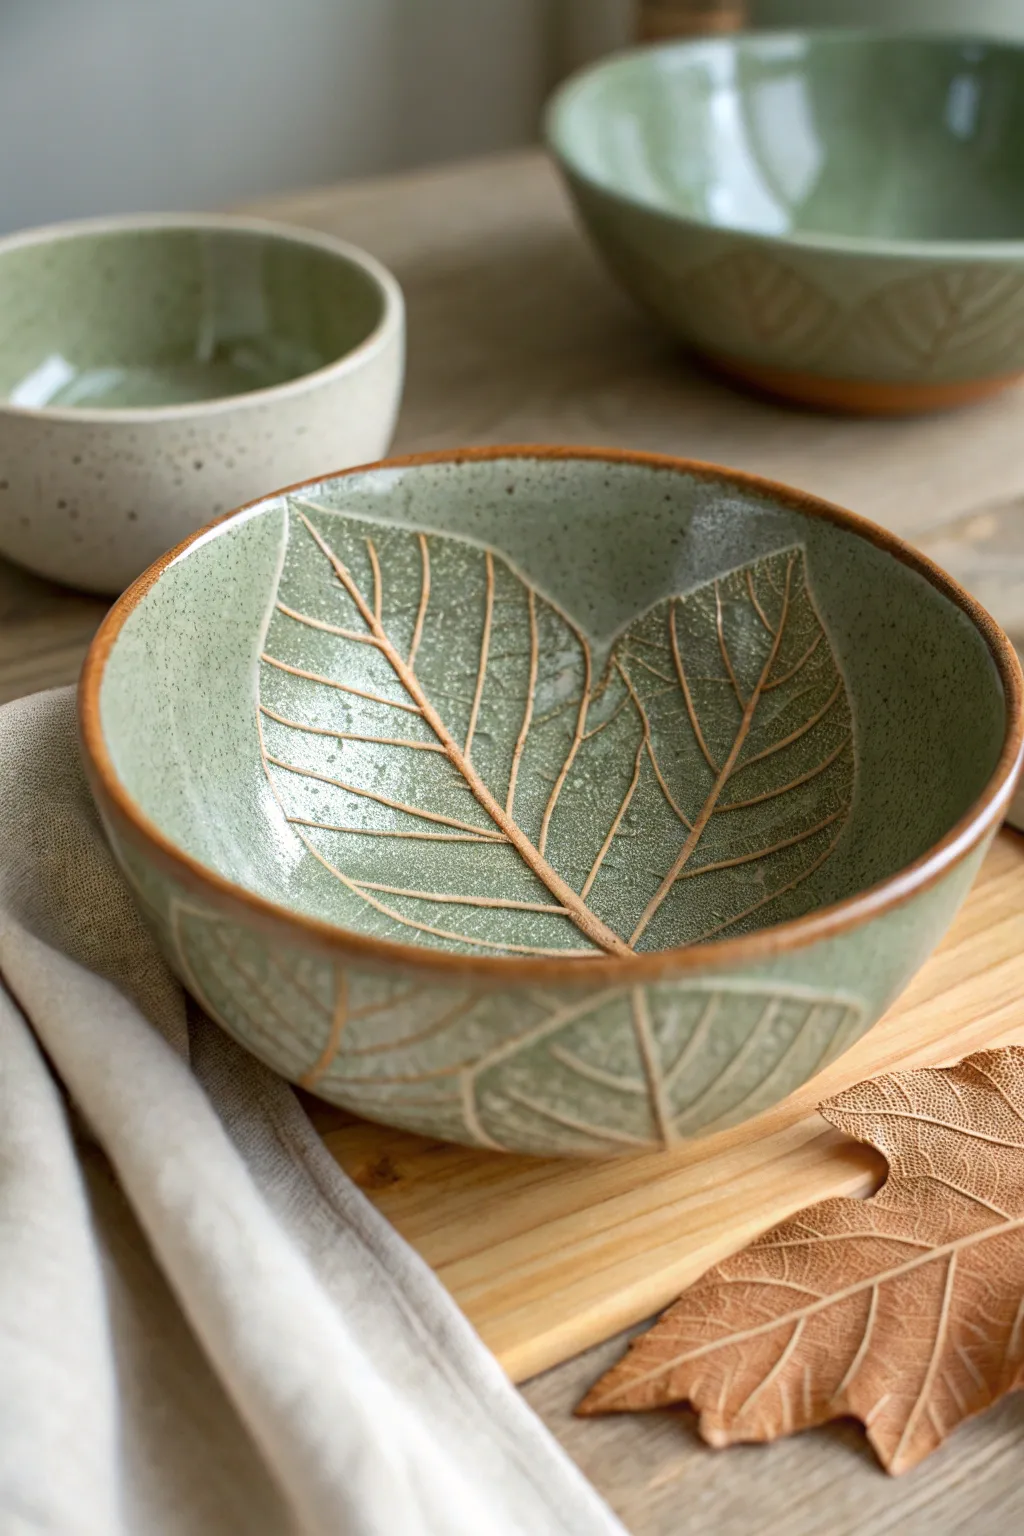
These stunning bowls capture the intricate beauty of nature by using real or sculpted leaves to press deep, realistic vein textures directly into the clay. The result is a functional piece of art with a rustic, speckled moss-green glaze that highlights the warm, exposed clay veins.
Detailed Instructions
Materials
- Stoneware clay (speckled or buff)
- Small to medium mixing bowl (for use as a mold)
- Large, fresh leaves with prominent veins (e.g., hydrangea, maple, tobacco)
- Rolling pin
- Canvas mat or slab roller
- Fettling knife or needle tool
- Banding wheel (optional)
- Sponge
- Glossy speckled green glaze (stoneware compatible)
- Wax resist
- Small paintbrush
Step 1: Preparing the Slab
-
Wedge the clay:
Begin by thoroughly wedging your stoneware clay to remove any air bubbles. This is crucial for a smooth slab. -
Roll out a slab:
Roll your clay out onto a canvas mat until it is an even thickness, approximately 1/4 inch thick. Try to keep the shape roughly circular. -
Smooth the surface:
Use a damp sponge or a soft rib tool to smooth the surface of the clay slab, removing any texture from the canvas.
Step 2: Creating the Leaf Impression
-
Select and place leaves:
Choose a leaf with very strong, raised veins on the back. Place the leaf vein-side down onto the center of your clay slab. -
Roll the impression:
Using your rolling pin, roll firmly over the leaf one or two times. You want to press the veins deep into the clay without thinning the slab too much. -
Remove the leaf:
Carefully peel the leaf away to reveal the detailed impression. If bits of leaf get stuck, use a needle tool to gently lift them out. -
Cut the shape:
Place your bowl mold upside down over the leaf design to create your circle size, or freehand a rough circle around the design allowing for some rim height.
Glaze Beading Up?
If glaze beads up on non-waxed areas, your bisque might be dusty or greasy. Wash the piece and let it dry fully before trying to glaze again.
Step 3: Forming the Bowl
-
Drape the clay:
Gently lift the clay slab and drape it *inside* your mixing bowl mold. Gravity will help it settle into the curve. -
Press into shape:
Use a damp sponge to gently press the clay against the walls of the mold, ensuring the leaf design stays centered at the bottom. -
Refine the rim:
You can leave the rim organic, or trim it flush with the mold’s edge using a fettling knife for a cleaner look seen in the photo. -
Dry to leather hard:
Let the clay dry inside the mold until it is leather hard and holds its shape on its own.
Layering Colors
Try painting the leaf veins with an iron oxide wash before waxing. This creates a darker, more dramatic contrast against the green glaze.
Step 4: Detailed Glazing
-
Bisque fire:
Once bone dry, fire the piece in the kiln to bisque temperature according to your clay body’s specifications. -
Apply wax resist:
This is the secret to the look: carefully paint liquid wax resist *only* over the raised vein lines of the leaf imprint. I prefer using a very fine brush for this precision work. -
Wipe the rim:
Also apply a line of wax resist, or plan to wipe back glaze later, along the very top rim of the bowl to expose that warm clay color. -
Dip or brush glaze:
Apply your speckled green glaze to the entire bowl. The wax will repel the glaze from the veins. -
Clean the texture:
After the glaze dries slightly, use a clean, damp sponge to gently wipe any stray glaze droplets off the waxed veins, ensuring the clay color will show through clearly. -
Final wipe:
Wipe the very bottom foot of the bowl clean so it doesn’t stick to the kiln shelf. -
Glaze fire:
Fire the bowl a final time to the temperature required by your glaze.
Enjoy using your new nature-inspired bowl for salads or simply as a beautiful display piece


Flower and Herb Press Plates That Look Like Garden Prints
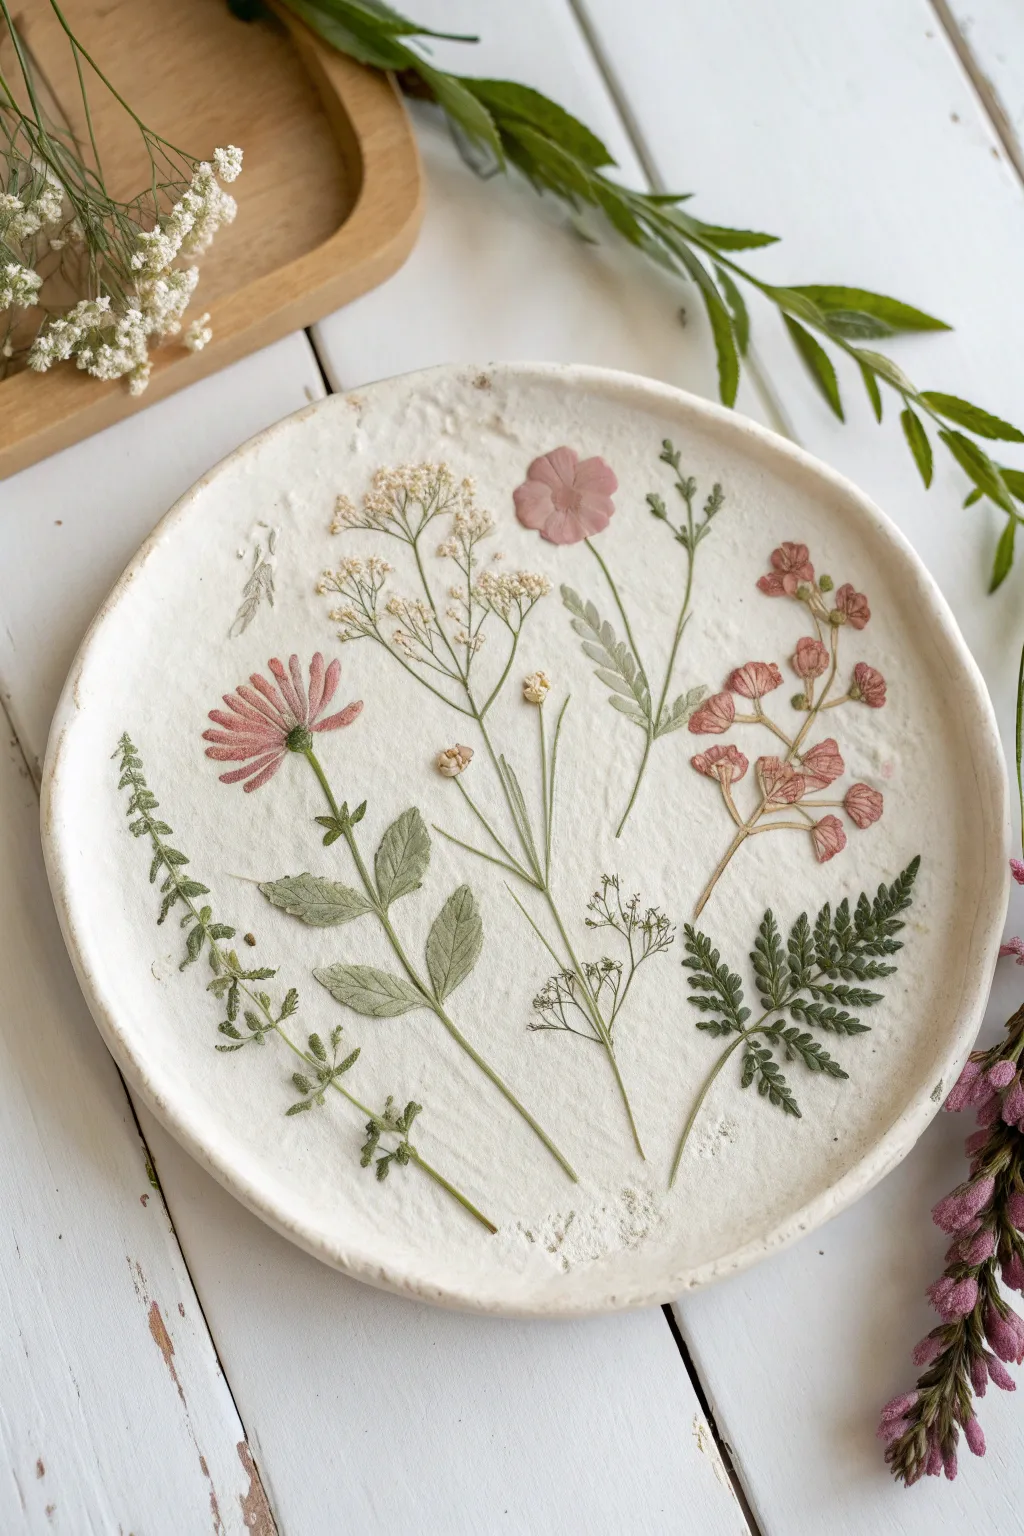
Capture the delicate beauty of a summer garden forever with these simple yet stunning clay plates. By pressing real flowers and herbs directly into white clay, you create a botanical fossil effect that looks like a professional ceramic piece.
How-To Guide
Materials
- White air-dry clay (or polymer clay)
- Rolling pin
- Round cookie cutter or a bowl (approx. 6-8 inches)
- Fresh or dried pressed flowers and herbs (ferns, baby’s breath, cosmos)
- Parchment paper or a silicone mat
- Sponge and water
- Clear matte varnish or Mod Podge (optional)
- Tweezers
- Small craft knife or plastic clay tool
Step 1: Preparing the Clay Canvas
-
Knead the clay:
Begin by taking a handful of white air-dry clay and kneading it in your hands until it feels soft, warm, and pliable. This removes air bubbles and prevents cracking later. -
Roll it out:
Place the clay on a sheet of parchment paper. Use your rolling pin to flatten it into an even circle, aiming for a thickness of about 1/4 inch. If the clay sticks to the roller, you can lay another sheet of parchment on top. -
Cut the shape:
Place your bowl or circle cutter over the rolled clay and press down firmly to cut a perfect circle. Peel away the excess clay from the outside edges and set it aside for another project. -
Smooth the edges:
Dip your finger or a small sponge in a little water and gently run it around the cut edge of the circle. This smooths out any sharp cuts or roughness for a polished look.
Sticky Situation?
If plants stick in the clay and won’t lift out cleanly, let the clay dry for about 15-20 minutes with the plants still in it. As the clay shrinks slightly, the plants often pop out easier.
Step 2: Arranging the Botanical Scene
-
Plan your design:
Before pressing anything into the clay, lay your flowers and herbs lightly on top to experiment with the composition. I like to start with the largest fern or flower in the center and work my way out. -
Use tweezers for details:
For tiny stems like the baby’s breath or delicate petals, use a pair of tweezers to position them exactly where you want them without accidentally denting the clay with your fingers. -
Create variety:
Mix different textures by using fern fronds, small leafy stems, and flat-faced flowers like cosmos or daisies. Leave some white space between them so the design doesn’t look cluttered. -
The initial press:
Once you are happy with the arrangement, place a clean sheet of parchment paper gently over the entire clay circle, covering the plants. -
Roll over the plants:
Take your rolling pin and roll firmly over the parchment paper one or two times. You need enough pressure to push the plants flush with the clay surface, but not so much that you distort the circle shape.
Level Up: Color Wash
Mix a tiny drop of brown paint with water and brush it over the dried plate, then wipe it off immediately with a rag. The dark color stays in the deep crevices, making the fossils pop.
Step 3: Shaping and Drying
-
Remove the paper:
Very slowly peel back the parchment paper to reveal your embedded garden design. -
Extract the plants:
Carefully use your tweezers to lift the plant material out of the clay. Pull slowly to ensure you leave a clean, deep impression behind without tearing the clay walls. -
Form the rim:
To turn this flat circle into a plate, gently curl the edges upward. Pinch and mold the outer rim slightly with your fingertips to create a shallow dish shape. -
Add texture (optional):
If you want the edges to look rustic like the photo, you can lightly tap the rim with a textured stone or a crumpled piece of aluminum foil. -
Let it dry:
Place the plate in a safe, dry spot. Air-dry clay usually takes 24 to 48 hours to fully harden. Turning it over halfway through can help the bottom dry evenly.
Step 4: Finishing Touches
-
Check for rough spots:
Once completely dry, run your hand over the plate. If there are any sharp bits of dried clay, you can gently sand them away with a fine-grit sandpaper. -
Enhance the colors (optional):
If you want the impressions to have color, you can water down some acrylic paint or watercolor and carefully paint inside the indented flower shapes. -
Seal the piece:
To protect your plate from moisture and dust, apply a thin coat of matte varnish or Mod Podge over the entire surface. This also helps the white clay look more like finished ceramic.
Display your beautiful botanical plate on a stand or use it to hold small treasures like rings and keys


Easy Texture Stamp Tiles Using Forks, Lace, or Leaves
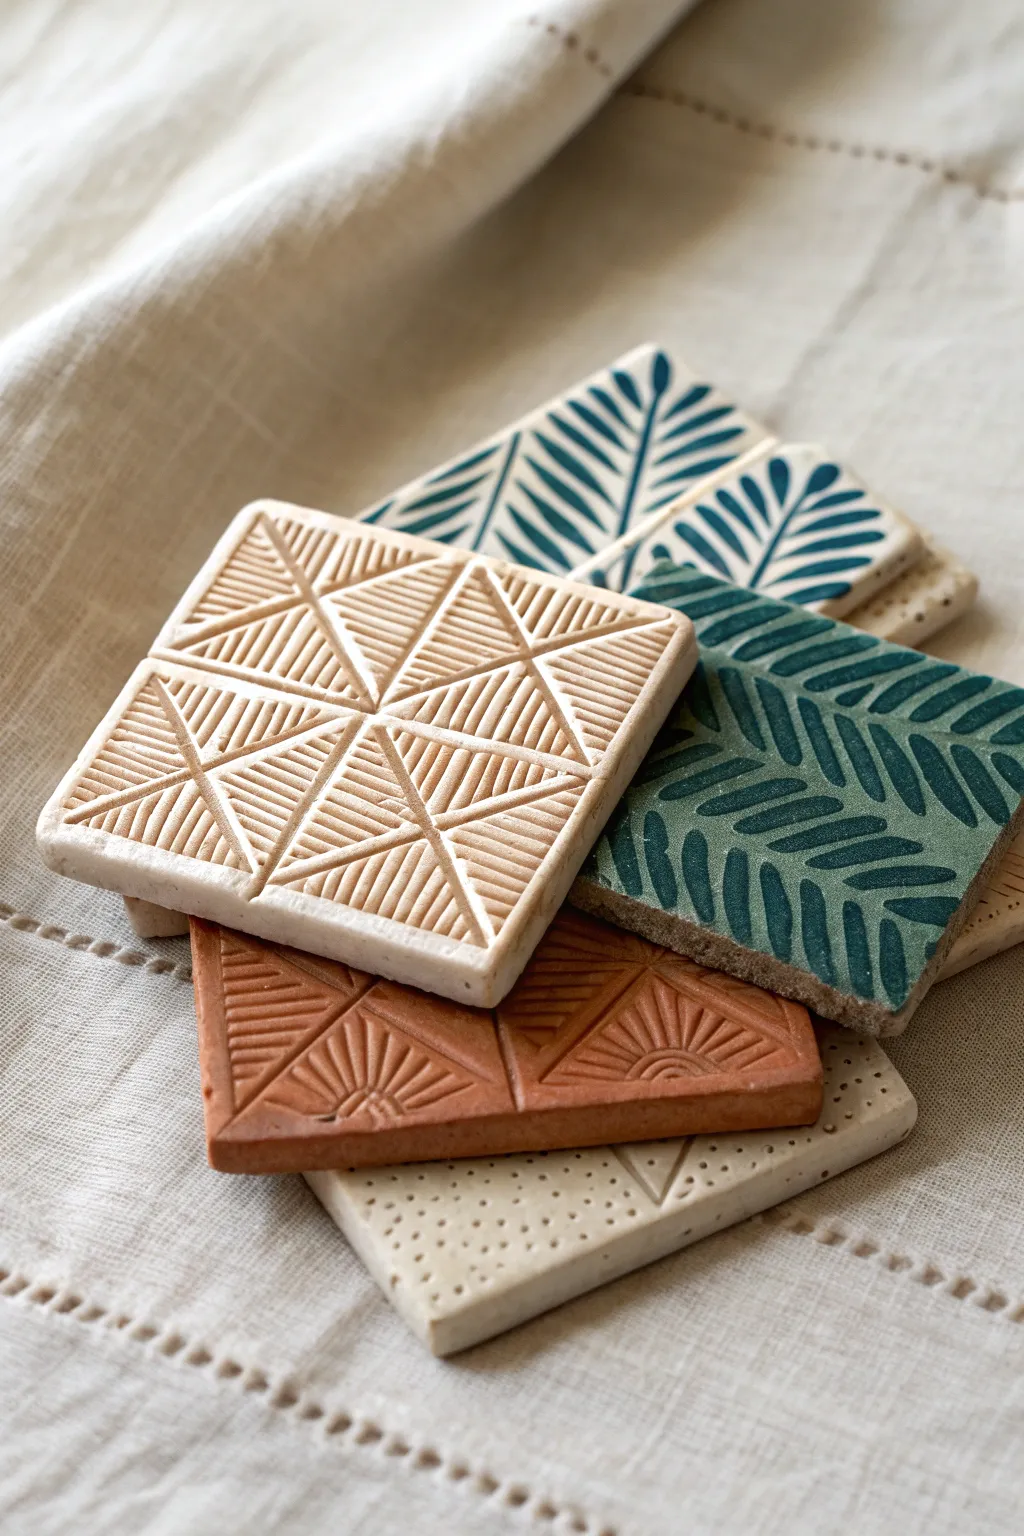
These charming clay tiles introduce children to the joy of surface design using simple, everyday objects. The result is a collection of stackable coasters or decorative pieces featuring geometric lines, leaf impressions, and tactile dots.
Step-by-Step Guide
Materials
- Air-dry clay (white and terracotta colors)
- Rolling pin
- Two wooden rulers or slat guides (approx. 1/4 inch thick)
- Square cookie cutter (approx. 3-4 inches) or a knife and template
- Modelling tools / Plastic forks
- Fresh leaves with prominent veins (fern or similar)
- Small round piping tip or stylus tool (for dots)
- Acrylic paints (teal, deep green, dark blue)
- Small flat paintbrush
- Sponge or damp cloth
- Clear sealant or varnish (optional)
Step 1: Preparing the Base
-
Set up your workspace:
Lay down a piece of canvas or a non-stick baking mat to work on. Place your two wooden rulers parallel to each other, about 5 inches apart. These will act as depth guides to ensure your tiles are perfectly even. -
Roll the slab:
Take a ball of clay—I usually start with a handful size—and flatten it slightly between the guides. Use the rolling pin, resting it on the wooden slats, to roll the clay into a smooth, uniform slab. -
Cut the shape:
Press your square cookie cutter firmly into the slab to cut out the tile shape. If you don’t have a cutter, place a square paper template on the clay and carefully trace around it with a knife or needle tool. -
Smooth the edges:
Dip your finger in a tiny bit of water and gently run it along the cut edges of the square to soften any sharpness or crumbs left by the cutter.
Clean Impressions
If your stamp or leaf is sticking to the clay, lightly dust the clay surface with cornstarch before pressing. It acts as a release agent and burns off later.
Step 2: Creating Patterns
-
Geometric lines design:
For the geometric design with triangles, use a straight edge to lightly press an ‘X’ across the tile, dividing it into four triangles. Then, use a plastic fork or a needle tool to scratch parallel hatched lines inside each section, alternating directions for contrast. -
Leaf impression design:
To make the botanical tiles, select a leaf with strong veins. Place the leaf vein-side down onto the clay surface. Gently roll over it with your rolling pin once to press it in without distorting the tile shape. -
Reveal the leaf texture:
Carefully peel the leaf away by the stem to reveal the impression. If the edges of the imprint look rough, smooth them very gently with a soft, dry brush. -
Sunburst pattern:
Divide a terracotta tile into sections using a light score line. Press a flat tool or the tines of a fork into the corners to create radiating lines that look like sun rays extending from the center point. -
Dotted border texture:
For a simpler look, use a small stylus or the open end of a small piping tip to press rows of tiny dots. Try creating a border or filling specific geometric sections with this stippled texture.
Make It a Set
Create a matching set by using the same color palette across all different textures, or make a puzzle by drawing one large image across four tiles before separating them.
Step 3: Finishing and Color
-
Let them dry:
Place your finished tiles on a wire rack or a piece of drywall to dry. Flip them over every few hours to prevent curling. Depending on humidity, this can take 24 to 48 hours. -
Sand the edges:
Once bone dry, take a piece of fine-grit sandpaper and lightly sand the edges to make them perfectly smooth. -
Apply a wash:
To replicate the two-tone look on the leaf tile, dilute your acrylic paint with a little water. Brush the color over the entire surface, ensuring it gets into the deep grooves of the texture. -
Wipe back:
Immediately use a damp sponge or cloth to wipe the paint off the raised surface. The color will remain trapped in the imprinted veins, highlighting the design beautifully. -
Painting details:
For geometric tiles, you can paint solid blocks of color or leave them natural for an earthy aesthetic. If painting solid areas, use two thin coats rather than one thick one. -
Seal the work:
If these will be used as coasters, apply a coat of waterproof varnish or sealer to protect them from moisture.
Now you have a stunning set of textured tiles ready to gift or display on your coffee table

The Complete Guide to Pottery Troubleshooting
Uncover the most common ceramic mistakes—from cracking clay to failed glazes—and learn how to fix them fast.
Slab Fish Wall Art With Patterned Scales
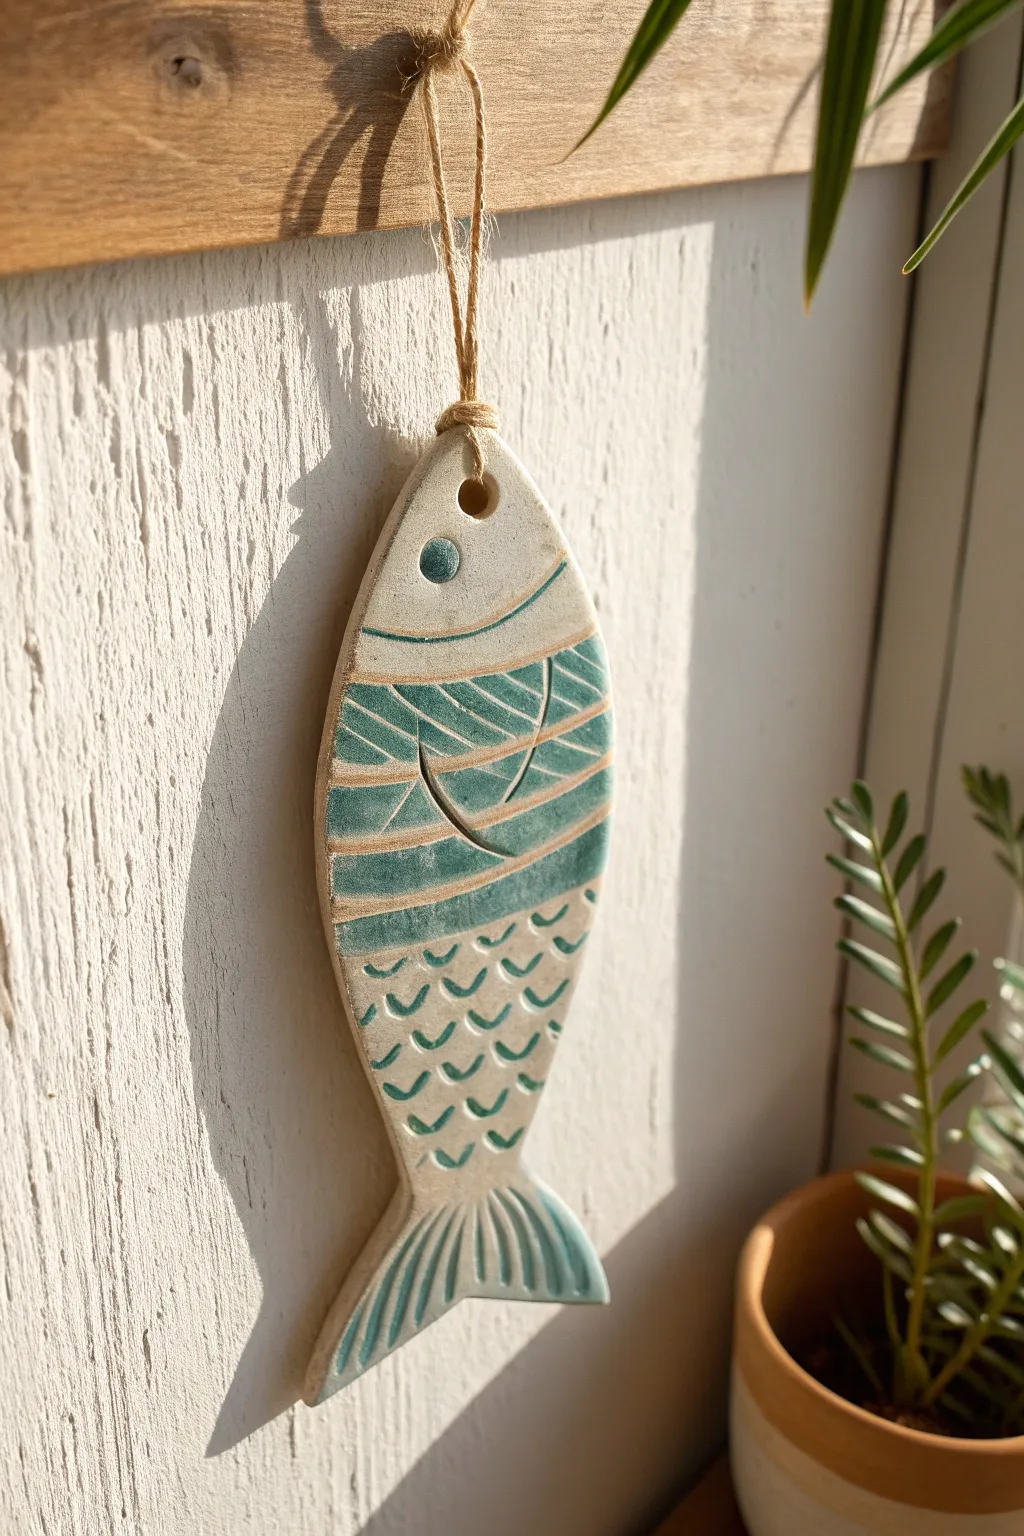
This charming ceramic fish brings a splash of coastal style to any wall with its distinct teal and raw clay textures. By combining slab techniques with simple carving and selective glazing, kids can create a sophisticated yet playful piece of wall art.
How-To Guide
Materials
- White or speckled stoneware clay
- Rolling pin
- Canvas mat or cloth
- Fish template (paper cardstock)
- Needle tool or fettling knife
- Small hole punch or straw
- Carving tools (loop tool or stylus)
- Teal or seafoam green ceramic glaze/underglaze
- Sponge
- Jute twine or hemp cord for hanging
Step 1: Shaping the Slab
-
Roll the clay:
Start by wedging a softball-sized piece of clay to remove air bubbles. Place it on your canvas mat and roll it out into an even slab, aiming for about 1/4 inch thickness. -
Compress the slab:
Use a rib tool or a smooth damp sponge to gently compress both sides of the slab. This aligns the clay particles and prevents warping later in the kiln. -
Cut the shape:
Place your paper fish template onto the clay. Trace around it carefully with a needle tool, keeping the tool vertical to ensure clean, straight edges. -
Smooth the edges:
Dip your finger in a little water and run it along the cut edges of the fish to smooth out any sharp angles or burrs left by the cutting tool. -
Add a hanging hole:
Using a straw or a small hole punch tool, create a hole at the very top of the fish’s head (the mouth area). Make sure it isn’t too close to the edge so the clay remains strong.
Step 2: Adding Textures and Details
-
Define the head:
Use a needle tool or stylus to draw a curved line separating the head from the body. Press gently—you want an indentation, not a cut. -
Create the eye:
Press a small circular cap or smooth tool into the head area to imprint the eye. You can press a smaller dot inside to create a pupil. -
Carve the fin:
Draw a large, tear-drop shaped fin in the center of the body. I like to double emphasize this line to make it pop. -
Map out the stripes:
Lightly sketch wavy horizontal lines across the body section. These will guide where you apply your patterns. -
Engrave the patterns:
Between your sketched lines, alternate your textures. Use a loop tool to carve diagonal hatch marks in some sections and leave others smooth. -
detail the tail:
Use long, sweeping strokes with your tool to carve vertical lines into the tail fin, mimicking the natural ridges of a fish tail. -
Add scale details:
On the lower belly section, use a u-shaped tool or a small loop tool to press repeating ‘U’ shapes into the clay to look like scales.
Clean Lines
When carving lines for the fins or stripes, wait until the clay is ‘leather hard.’ The tools will cut cleaner ribbons of clay without creating messy, crumbly edges.
Step 3: Glazing and Finishing
-
Bisque fire:
Allow the fish to dry slowly under plastic to prevent curling. Once bone dry, fire the piece in the kiln to bisque temperature. -
Apply the glaze:
Brush a coat of teal or seafoam glaze over the patterned areas (the body stripes and tail). Leave the head and the dividing lines unglazed if you want the raw clay contrast. -
Wipe back (Mishima effect):
For the scales, you can paint glaze over the texture and then immediately wipe the surface with a damp sponge. The glaze stays in the deep ‘U’ marks but reveals the clay on top. -
clean up:
Ensure the back of the fish and the hanging hole are completely free of glaze before the final firing. -
Final fire:
Fire the piece again according to your clay and glaze specifications (usually Cone 5 or 6 for stoneware). -
String it up:
Once cool, cut a length of jute twine. Thread it through the mouth hole and tie a secure knot to create a rustic loop for hanging.
Curling Issues?
If the tail or head starts curling up while drying, place a small weighted bag (like a sandbag) gently on the center, or dry it slowly between two pieces of drywall board.
Hang your fish in a sunny spot to let the natural shadows highlight those lovely carved textures
Painted Dot “Mosaic” Pinch Pots for Little Collections
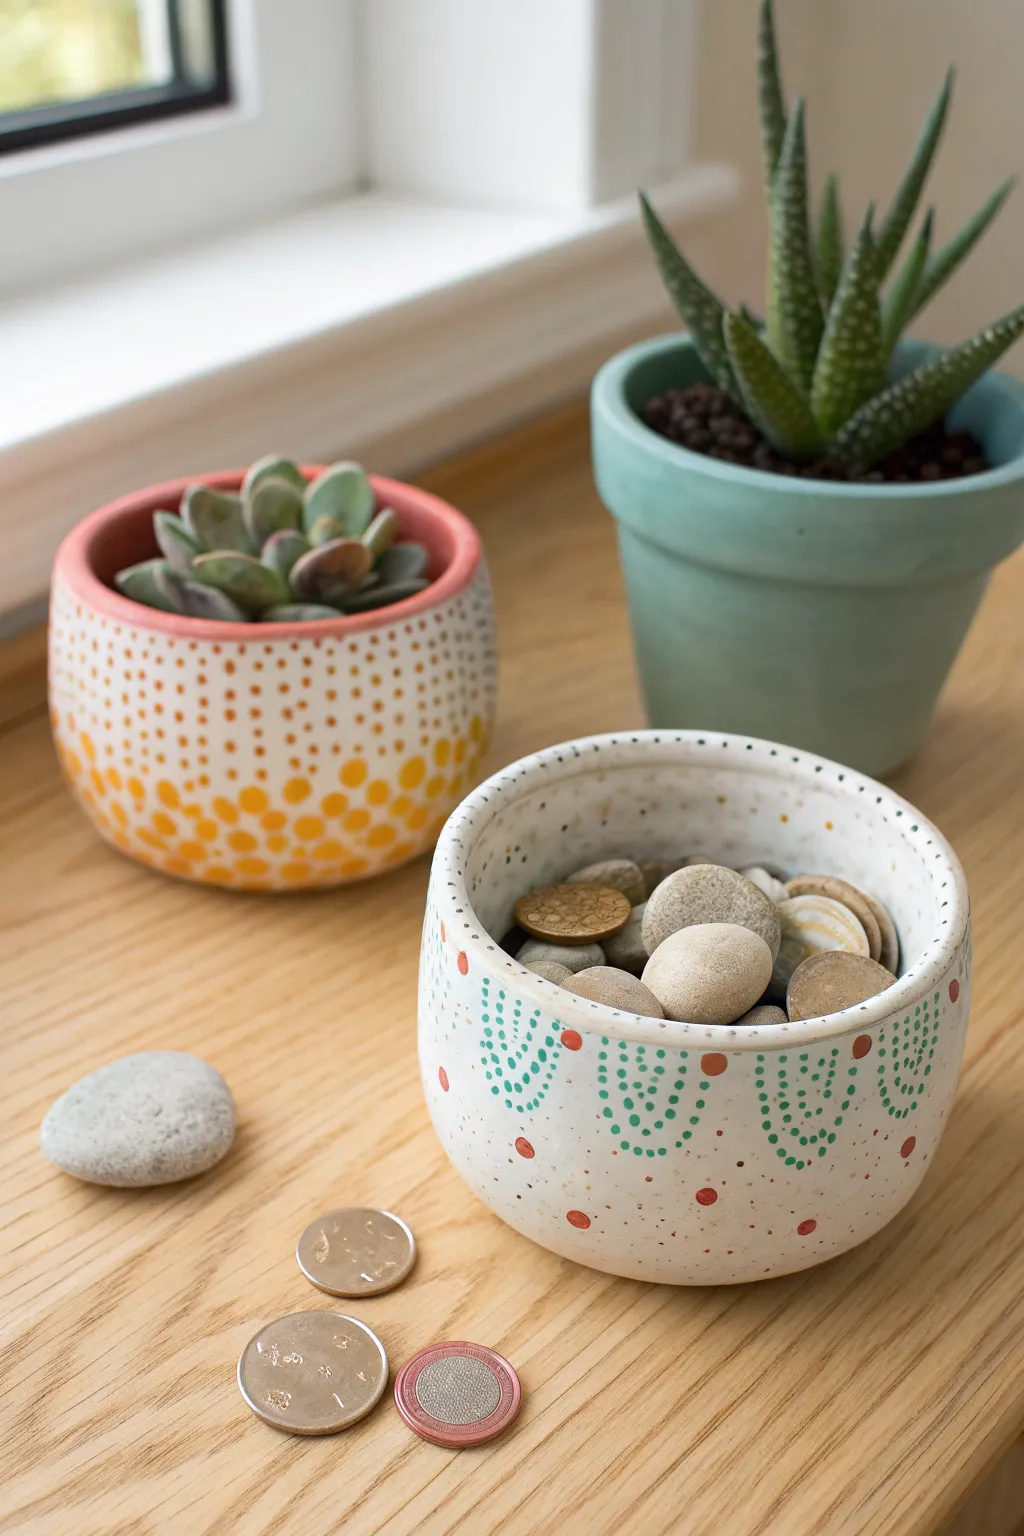
These charming, hand-formed bowls get their character from a classic pinch construction and a playful, repetitive dot design. The finish mimics a mosaic effect using simple paint techniques, making it a perfect project for little hands to hold treasures like pebbles or coins.
Step-by-Step Guide
Materials
- Air-dry clay (white or light gray)
- Small bowl or water for smoothing
- Sponge or damp cloth
- Acrylic paints (teal, orange, red, yellow)
- Fine-point detail paintbrush
- Small dotting tools (optional: toothpick, cotton bud, or back of paintbrush)
- Matte or satin varnish/sealant
- Sandpaper (fine grit)
Step 1: Shaping the Clay
-
Prepare your clay:
Start by grabbing a handful of air-dry clay, roughly the size of a tennis ball or slightly smaller. Knead it in your hands for a minute to warm it up and remove air bubbles. -
Form a sphere:
Roll the clay between your palms until you have a smooth, round ball. -
Start the pinch:
Hold the ball in your non-dominant hand. With your other thumb, press gently into the center of the ball, stopping about half an inch from the bottom. -
Open the pot:
With your thumb still inside, gently pinch the clay between your thumb and fingers. Rotate the ball slightly after each pinch. -
Even out walls:
Continue pinching and turning until the walls are an even thickness—aim for about a quarter-inch thick. Try to keep the bottom flat so it sits sturdily. -
Smooth the rim:
Dip your finger in a little water and run it along the rim to smooth out any cracks. I like to gently tap the rim upside down on the table to level it. -
Refine the surface:
Use a barely damp sponge to wipe the exterior and interior, removing prominent fingerprints or bumps. -
Dry completely:
Set the pot aside in a dry, room-temperature spot. Let it dry for at least 24-48 hours until it turns chalky white and feels hard.
Step 2: Decorating the Surface
-
Sand for smoothness:
Once fully dry, lightly sand any rough spots or sharp edges on the rim with fine-grit sandpaper. Wipe away the dust with a dry cloth. -
Apply base color (optional):
If you want the clean white look shown in the main pot, leave the clay natural or paint a coat of white acrylic. For the rim, you might want to add a thin line of color like the pink rim on the background pot. -
Plan your pattern:
Decide on your motif. The main pot features scalloped ‘U’ shapes made of teal dots, accented with red dots. The background pot uses a gradient of yellow-to-orange dots. -
Paint main dots:
Dip the back of a paintbrush or a dedicated dotting tool into teal paint. Press gently to create the first arc of dots. Re-dip frequently to keep the dots round and consistent. -
Create the scalloped shape:
Make three nested ‘U’ shapes with your teal dots to create the scalloped design visible on the front pot. -
Add accent colors:
Using a smaller tool, like a toothpick, add tiny red or orange dots between the scallops or scattered randomly near the bottom for variety. -
Detail the rim:
Consider adding a row of tiny dots along the very top edge of the rim for a finished look. -
Seal the work:
Once the paint is completely dry, apply a coat of matte or satin varnish to protect the clay and make the colors pop.
Practice Makes Perfect
Before dotting your pot, practice your pressure on a scrap piece of paper. Light touches make small dots; harder presses make larger ones.
Use Nature’s Tools
Instead of brushes, try using items from nature like acorn caps or small twigs to stamp unique textural patterns into the wet clay.
Now your little pot is ready to hold seashells, coins, or tiny succulents


What Really Happens Inside the Kiln
Learn how time and temperature work together inside the kiln to transform clay into durable ceramic.
Clay Bead Necklaces and Keychains Kids Can Customize
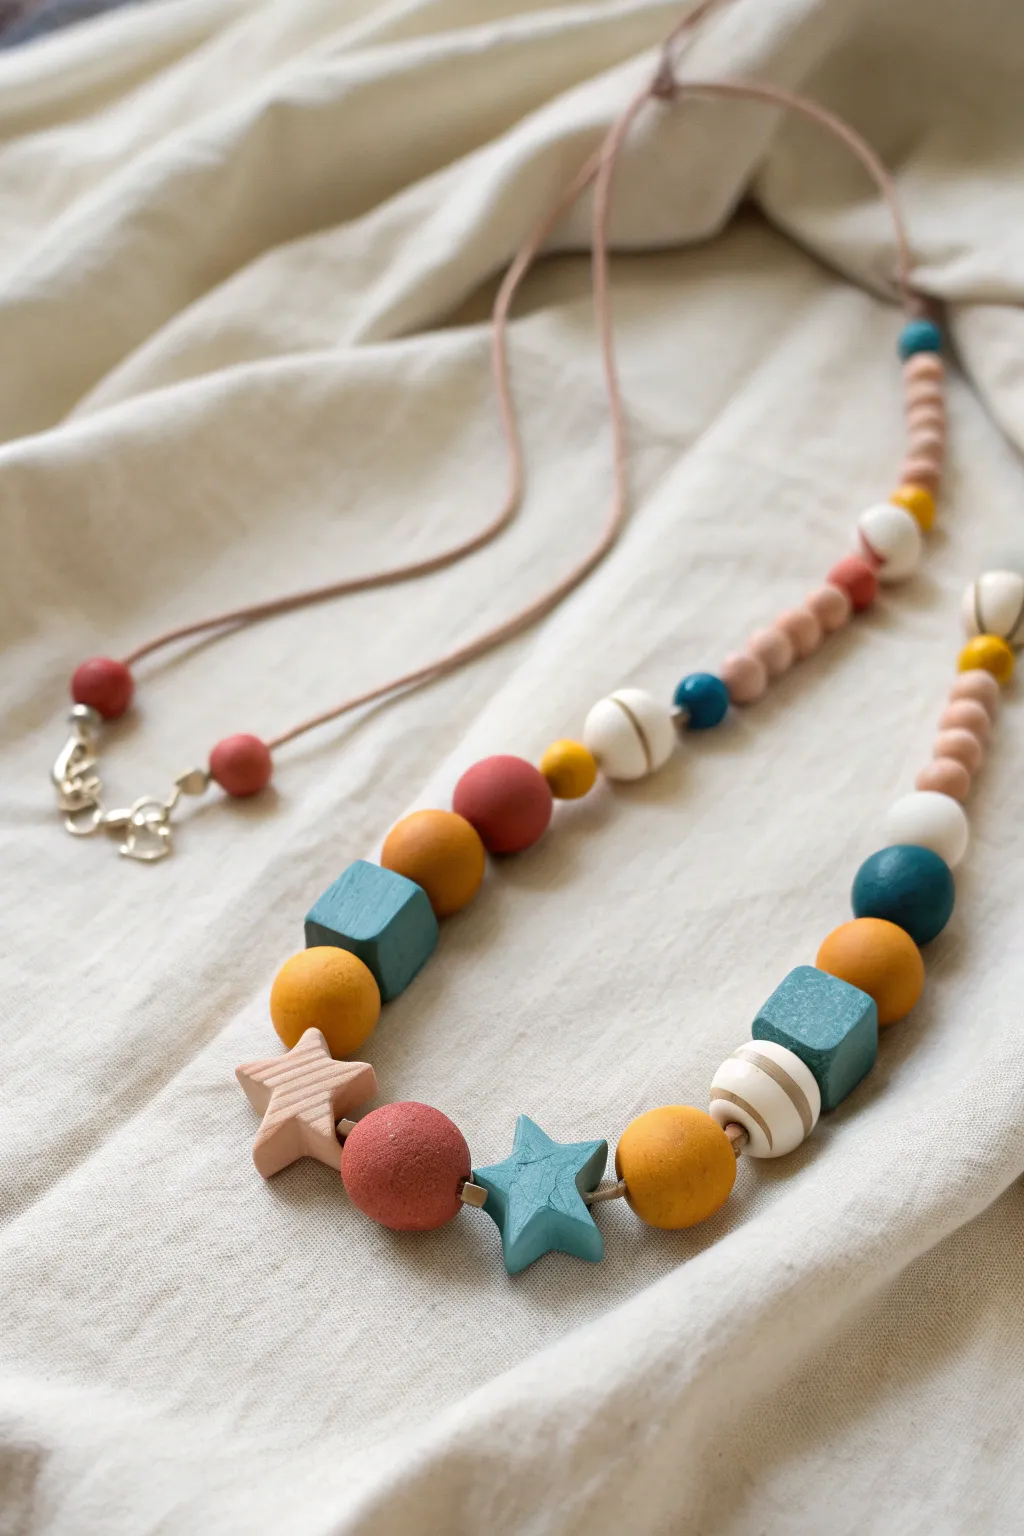
Create a charming, customizable accessory using simple hand-rolled clay beads in earthy tones like terracotta, mustard, and teal. This project combines geometric shapes like cubes and spheres with whimsical stars for a playful yet stylish necklace perfect for kids to wear or gift.
Step-by-Step
Materials
- Air-dry clay or polymer clay (white base recommended)
- Acrylic paints (terracotta, mustard yellow, teal, white, cream)
- Small paintbrushes
- Bamboo skewers or a large needle tool (for piercing)
- Brown waxed cotton cord or leather cord
- Jewelry clasps (lobster claw and jump rings)
- Crimp beads or knots for securing
- Sandpaper (fine grit)
- Gloss or matte varnish (optional)
Step 1: Shaping the Clay Beads
-
Prepare your clay:
Start by conditioning your clay until it is soft and pliable. If you are using white clay, you will paint it later; if using pre-colored polymer clay, mix your custom shades now. -
Roll the spheres:
Pinch off small pieces of clay to form the round beads. You will need larger spheres (about 2cm) for the focal points and much smaller spheres (about 0.5cm) for the back of the necklace. -
Create the geometric shapes:
Form two cube shapes by rolling a ball and then gently pressing it against your work surface on six sides to flatten them. Aim for cubes roughly the same size as your large focal spheres. -
Cut out the stars:
Flatten a small slab of clay to about 1cm thickness. Use a small star-shaped cutter or a craft knife to cut out two stars. Soften the sharp edges slightly with your finger. -
Pierce the holes:
While the clay is still soft, use a bamboo skewer to pierce a hole through the center of every bead. Ensure the hole is wide enough for your cord to pass through easily. -
Dry or bake:
If using air-dry clay, let the beads sit for 24-48 hours until completely hard. For polymer clay, bake according to the manufacturer’s package instructions.
Hole Distortion?
If piecing the hole squashes your bead shape, let the clay dry/harden slightly for 15-20 mins before piercing. Use a twisting motion rather than pushing straight through.
Step 2: Painting and Decoration
-
Sand imperfections:
Once the beads are fully cured or dry, use fine-grit sandpaper to smooth out any fingerprints or rough edges, especially around the bead holes. -
Base coat colors:
Paint your beads in a specific color palette to match the image. Paint the stars a soft pink and a teal. Paint the cubes teal. Paint the large spheres in mustard yellow, terracotta, and cream. -
Paint the spacer beads:
Paint the collection of smaller rear beads in a gradient pattern using light peach, terracotta, and soft brown tones. -
Add stripe details:
Select the two large cream-colored spherical beads. Using a fine detail brush and light tan paint, carefully add horizontal stripes around the circumference of these beads. -
Seal the beads:
Apply a coat of matte or satin varnish to protect the paint and give the beads a finished, professional look. Let them dry completely before handling.
Step 3: Assembly
-
Prepare the cord:
Cut a length of brown waxed cord to your desired necklace length, adding a few extra inches for knots and clasps. -
String the focal section:
Thread the beads starting from the center outward. Place the largest shapes in the middle—alternating between the stars, large spheres, and cubes as seen in the photo. -
Add the smaller beads:
After the main focal section is strung, thread the smaller spacer beads up both sides of the cord to create the back portion of the necklace. -
Attach the clasp:
Thread one end of the cord through a crimp bead and a jump ring (or part of the clasp). Loop the cord back through the crimp bead and flatten it with pliers to secure. -
Finish the other side:
Repeat the attachment process on the other end of the cord with the lobster clasp. Trim any excess cord tail close to the crimp bead.
Pro Tip: Smooth Holes
I always slide the beads back and forth on the skewer gently while they are drying. This keeps the clay from shrinking onto the wood and ensures a clean, open channel.
Now you have a fully personalized piece of wearable art that adds a pop of color to any outfit
Critter Planters for Small Succulents (No Wheel Needed)
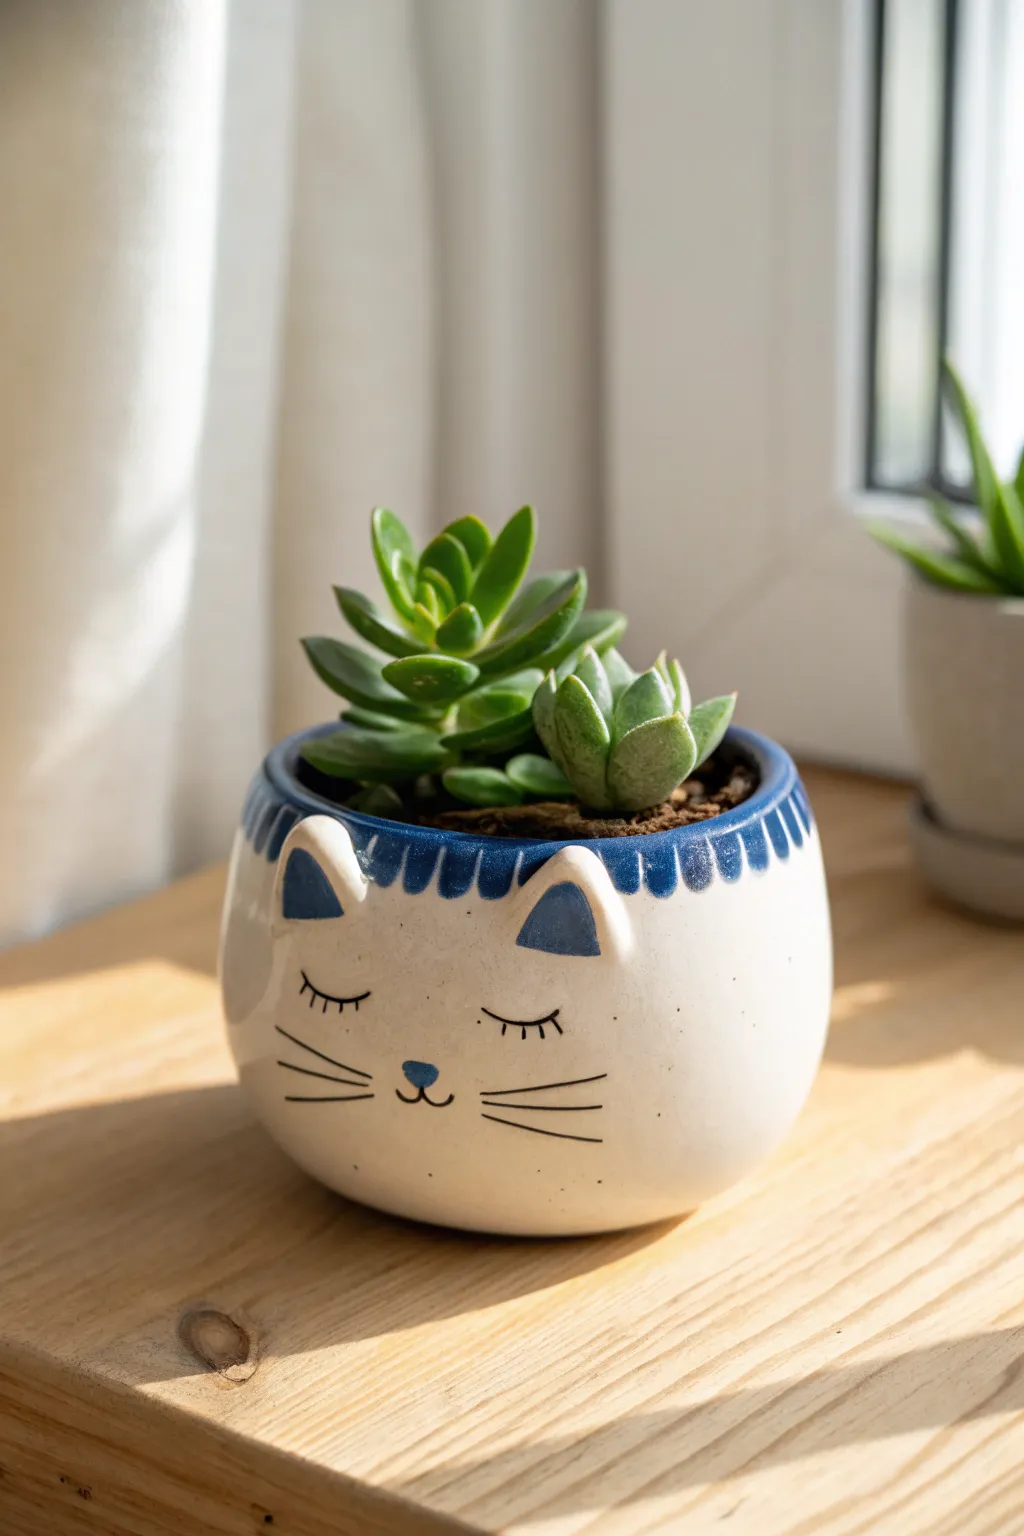
This adorable sleeping cat planter is the perfect hand-building project for beginners, combining a simple pinch pot base with charming sculptural details. The finished piece features a creamy white glaze with sweet blue accents, making it a cozy home for your favorite small succulents.
Step-by-Step Tutorial
Materials
- White earthenware or stoneware clay
- Basic clay tools (needle tool, rib tool, modeling tool)
- Slip (clay mixed with water)
- Small sponge
- Ceramic underglaze pen or fine brush (black)
- Cobalt blue underglaze
- Clear or white dipping glaze (food safe)
- Small paintbrush
- Rolling pin (optional)
Step 1: Shaping the Base
-
Prepare the Clay:
Start with a ball of clay roughly the size of a large orange. Wedge it well to remove air bubbles, then pat it into a smooth, round sphere in your hands. -
Start the Pinch Pot:
Insert your thumb into the center of the ball, stopping about a half-inch from the bottom. This thickness is crucial for a stable base. -
Pinch the Walls:
Using your thumb on the inside and fingers on the outside, gently pinch and rotate the clay. Work your way from the bottom up to thin the walls evenly. -
Create a Rounded Form:
Aim for a bowl shape that curves slightly inward at the rim, rather than flaring out. This gives the kitty a chubby, cute appearance. -
Smooth the Surface:
Use a slightly damp sponge or a flexible rib tool to smooth out any fingerprints or cracks on the exterior. The smoother the surface now, the cleaner the final glaze will look. -
Flatten the Bottom:
Gently tap the pot on your table to create a small, flat sitting area so the planter won’t wobble.
Step 2: Adding Cat Features
-
Form the Ears:
Take two small pinch-sized pieces of leftover clay and shape them into triangles. They should be relatively thick to match the rim. -
Score and Slip:
Score (scratch) the bottom of the ears and the rim of the pot where they will attach. Apply a dab of slip to the scored areas. -
Attach the Ears:
Press the ears firmly onto the rim. Use a modeling tool or your finger to smooth the clay from the ear down onto the pot, blending the seam completely so it disappears. -
Shape the Inner Ear:
Using a small loop tool or your thumb, gently press an indentation into the front of each ear triangle to create depth. -
Refine the Rim:
Go over the rim one last time with a damp sponge to ensure the transition between the ears and the pot is soft and rounded. -
Dry and Bisque Fire:
Let the piece dry slowly to the bone-dry stage. Once dry, fire it in the kiln to bisque temperature according to your clay body instructions.
Drainage Hole Tip
Don’t forget to poke a hole in the bottom center with a straw or needle tool while the clay is still wet! Succulents hate sitting in water.
Step 3: Painting and Glazing
-
Paint the Blue Accents:
Using a small brush and cobalt blue underglaze, fill in the triangle indentations of the ears. Also paint a small, rounded triangle in the center for the nose. -
Add the Decorative Rim:
Make short, vertical brushstrokes with the blue underglaze all along the top rim, stopping just before the ears. I find a flat, square-tipped brush makes these uniform marks easiest. -
Draw the Face Details:
Use a black underglaze pencil or a very fine liner brush with black underglaze to draw the sleeping eyes (two curved U-shapes) with eyelashes. -
Add Whiskers and Mouth:
Draw three straight whiskers extending from each cheek and a small anchor shape below the nose for the mouth. -
Apply Clear Glaze:
Once the underglaze touches are dry, dip the entire pot into a clear or semi-opaque white glaze. This will seal the clay and make the colors pop. -
Final Firing:
Wipe the bottom of the pot clean with a sponge so it doesn’t stick to the kiln shelf, then fire for a final glaze cycle.
Make it a Set
Try making a dog version next by making the ears floppy (folded over) and painting spots on the body instead of a rim pattern.
Once cooled, fill your new feline friend with potting soil and tuck in small succulents for a sweet windowsill display

TRACK YOUR CERAMIC JOURNEY
Capture glaze tests, firing details, and creative progress—all in one simple printable. Make your projects easier to repeat and improve.
Monster Mouth Pencil Holders That Make Cleanup Fun
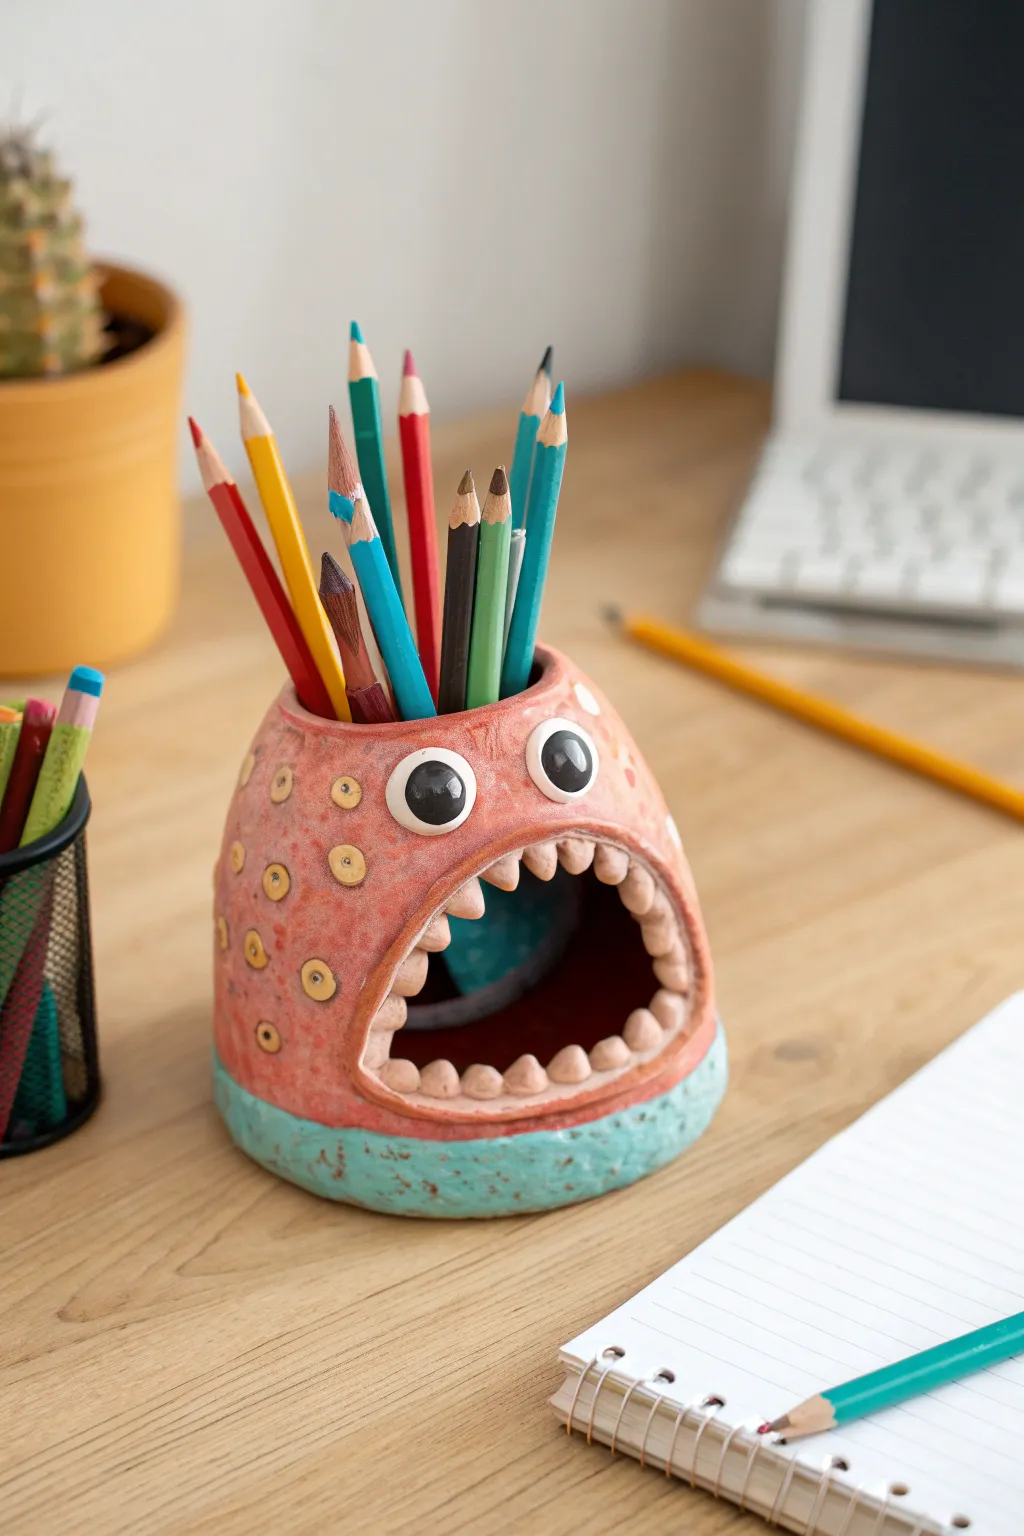
This whimsical pencil holder combines functionality with personality, featuring a wide, toothy grin that doubles as a storage space for small items like an eraser. The textured pink body, googly eyes, and bright turquoise base make this a standout piece for any desk.
Detailed Instructions
Materials
- Earthenware or stoneware clay (approx. 1 lb)
- Pin tool or needle tool
- Rolling pin
- Sponge
- Slip (clay and water mixture)
- Scoring tool or old fork
- Modeling tools (wooden or plastic)
- Small circle cutter (optional)
- Underglazes: Salmon pink/coral, bright turquoise, white, black
- Clear glaze
- Paintbrushes (various sizes)
- Kiln
Step 1: Farming the Base Shape
-
Prepare the clay:
Begin by wedging your clay thoroughly to remove any air bubbles. This ensures your monster won’t crack during firing. -
Pinch pot method:
Start with a ball of clay about the size of a large orange. Push your thumb into the center and gently pinch the walls while rotating the ball to create a deep, even cup shape. -
Refine the walls:
Continue pinching and smoothing until the walls are about 1/4 inch thick. Aim for a slightly tapered shape that is narrower at the top than the bottom. -
Flatten the bottom:
Gently tap the pot on your work surface to create a flat, stable base so your monster stands upright without wobbling.
Step 2: Modeling the Monster Features
-
Cut the mouth:
Use a pin tool or knife to slice a large, open D-shape into the side of the pot. Save the cutout piece of clay. -
Form the inner mouth:
Take the cutout piece, flatten it slightly, and attach it to the inside of the pot behind the opening to create a recessed ‘throat’ or pocket. Score and slip the edges well to join them seamlessly. -
Create the lips:
Roll a thin coil of clay and attach it around the perimeter of the mouth opening. Smooth it down with a modeling tool to create a distinct, raised lip edge. -
Add teeth:
Roll very small balls of clay and shape them into tiny cones. Score and slip each one, attaching them along the top and bottom inside edge of the lips. I find spacing them irregularly makes the monster look friendlier. -
Make the eyes:
Roll two medium-sized balls of clay and flatten them slightly into discs. Score the back of each and attach them firmly above the mouth. -
Add pupils:
Create slightly smaller, raised circles of clay and attach them to the center of the white eye discs to add dimension.
Smooth Seams for Strength
When attaching the inner mouth pocket, use a small coil to reinforce the seam on the inside. This prevents the mouth from cracking open as the clay shrinks.
Step 3: Adding Texture and Glazing
-
Texture the base:
Using a rough sponge or a stiff brush, dab the bottom inch of the pot to create a pockmarked, rocky texture. -
Add body spots:
Roll tiny balls of clay, flatten them into small discs, and press them randomly all over the upper body of the monster. Use a tool to poke a small indentation in the center of each spot. -
Smooth and dry:
Go over the entire piece with a slightly damp sponge to remove any sharp edges or burrs. Allow the piece to dry slowly until it is bone dry, then bisque fire it. -
Base coat colors:
Once bisque fired, apply three coats of salmon pink underglaze to the upper body and spots. Paint the textured bottom section with a bright turquoise underglaze. -
Details:
Paint the teeth and the whites of the eyes with white underglaze. Careful brushwork is key here. Paint the pupils black, adding a tiny white dot for a highlight if desired. -
Spot accents:
Paint the raised spots on the body with a yellow or light orange underglaze to make them pop against the pink skin. -
Seal and fire:
Apply a clear glaze over the entire piece (except the very bottom touching the kiln shelf). Fire again to the temperature required by your specific clay and glaze.
Make it a Pair
Try making a second, shorter monster with a wider mouth to hold paperclips or erasers, creating a matching desk set with different facial expressions.
Once fired, fill your grinning monster with colorful pencils and let it brighten up your workspace
Fairy House Pinch Pots for Imaginative Play
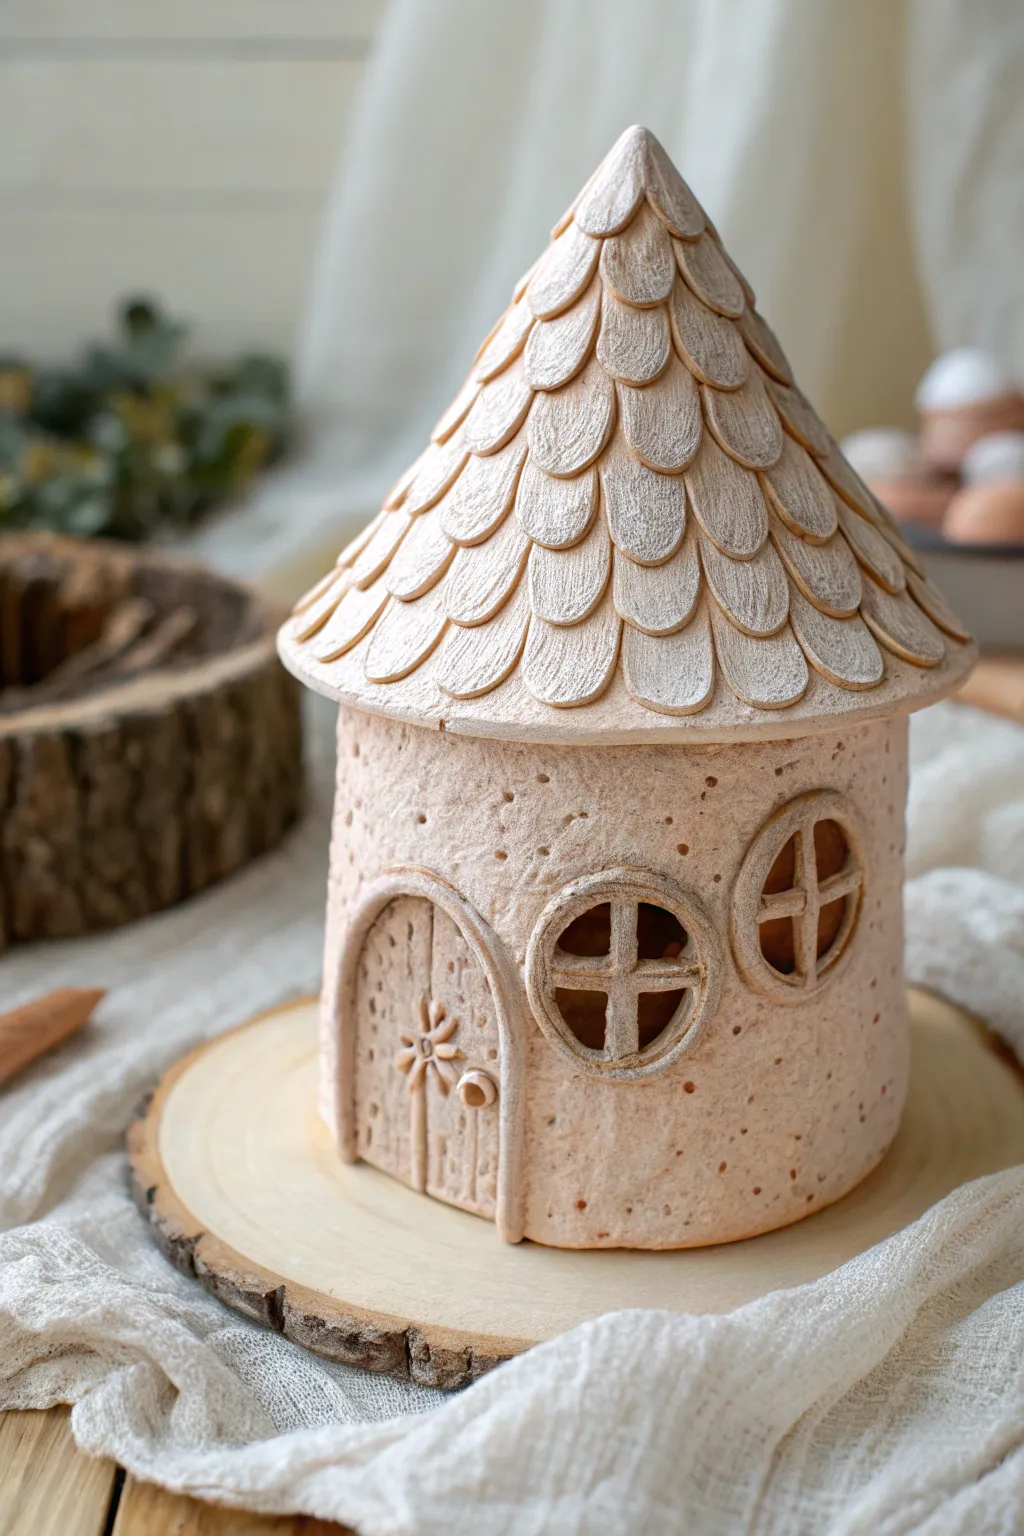
Bring a touch of magic to your garden or shelf with this enchanting ceramic fairy house, featuring a textured cylindrical base and a distinctive shingled roof. The natural, earthy finish gives it a timeless, hand-carved look perfect for imaginative play.
Step-by-Step
Materials
- Light-colored stoneware or earthenware clay (groggy for texture)
- Rolling pin
- Canvas mat or cloth (to prevent sticking)
- Fettling knife or clay needle tool
- Scoring tool (or an old fork)
- Slip (clay mixed with water)
- Small circle cutter (approximately 1-inch)
- Wooden sculpting tools
- Sponge
- Small wooden base or bat
Step 1: Constructing the Base
-
Prepare the base slab:
Begin by rolling out a slab of clay to about 1/4-inch thickness. Cut a circle roughly 4 inches in diameter to serve as the floor of your house. -
Form the walls:
Roll out a second, long rectangular slab of the same thickness. The length should be equal to the circumference of your base circle plus a little overlap. -
Create texture:
Before assembling, I like to gently roll a textured object (like a rough stone or crumpled foil) over the wall slab to create the subtle, pitted surface seen in the photo. Avoid texturing the edges where you will join the clay. -
Attach walls to base:
Score the outer edge of your base circle and the bottom edge of your rectangular wall slab. Apply slip to both scored areas. -
Seal the cylinder:
Stand the wall slab up around the base circle. Score and slip the vertical seam where the ends overlap, blending the clay together smoothly on the inside and outside so the join invisible.
Collapsing Walls?
If the cylinder walls are slumping, stuff the inside with crumpled newspaper or paper towels to support the structure while it stiffens up.
Step 2: Adding Windows and Doors
-
Cut the openings:
Use your needle tool to cut an arched doorway. Use the small circle cutter to remove two round windows on the side of the house. -
Frame the windows:
Roll thin coils of clay and flatten them slightly. Score around the window openings and attach these frames. Use a tool to refine the edges creates a clean, raised border. -
Add window panes:
Roll very thin little ‘snakes’ of clay. Place them inside the window frames in a cross shape to form the muntins, securing them with a dab of water or slip. -
Sculpt the door:
Take the clay piece you cut out for the door (or roll a new slab shape) and add texture to mimic wood grain using a needle tool. Add a tiny ball of clay for a doorknob and a small flower detail if desired. -
Attach the door:
Score and slip the door frame area and press the decorated door partly ajar or fully closed, adding a thin coil frame around it to match the windows.
Step 3: Crafting the Shingled Roof
-
Form the roof cone:
Roll a slab into a semi-circle shape and form it into a cone that is slightly wider than your house base. Join the seam securely. -
Create the shingles:
Roll out a thin sheet of clay and use a small oval or teardrop cutter to make many individual shingles. You can also hand-shape these for a more organic look. -
Check the fit:
Place the plain cone on top of your house base to ensure it sits correctly. It should have a slight overhang representing the eaves. -
Apply the shingles:
Starting at the bottom rim of the cone, attach a row of shingles using slip. Overlap the next row slightly over the first, working your way upward to the peak. -
Refine the texture:
Once all shingles are placed, gently scratch vertical lines into each one with a needle tool to mimic wood grain texture.
Luminary Upgrade
Cut a hole in the bottom of the base or leave the roof detachable. This allows you to place a battery-operated tea light inside for a glowing nightlight window effect.
Step 4: Final Touches
-
Construct the peak:
At the very top, pinch the final shingles together to form a neat point, ensuring no hole is left open unless you want it to act as a chimney vent. -
Dry run assembly:
Place your finished roof onto the base. You can leave them as separate pieces (like a cookie jar lid) or score and slip them together permanently. -
Drying and firing:
Allow the piece to dry slowly under plastic for a few days to prevent warping. Fire according to your specific clay’s instructions. A light oxide wash after bisque firing can highlight the textures without needing a full glaze.
This charming little structure is now ready to welcome its tiny inhabitants
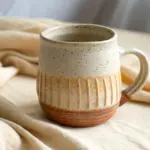
Silly Face Cups and Bowls With Add-On Features
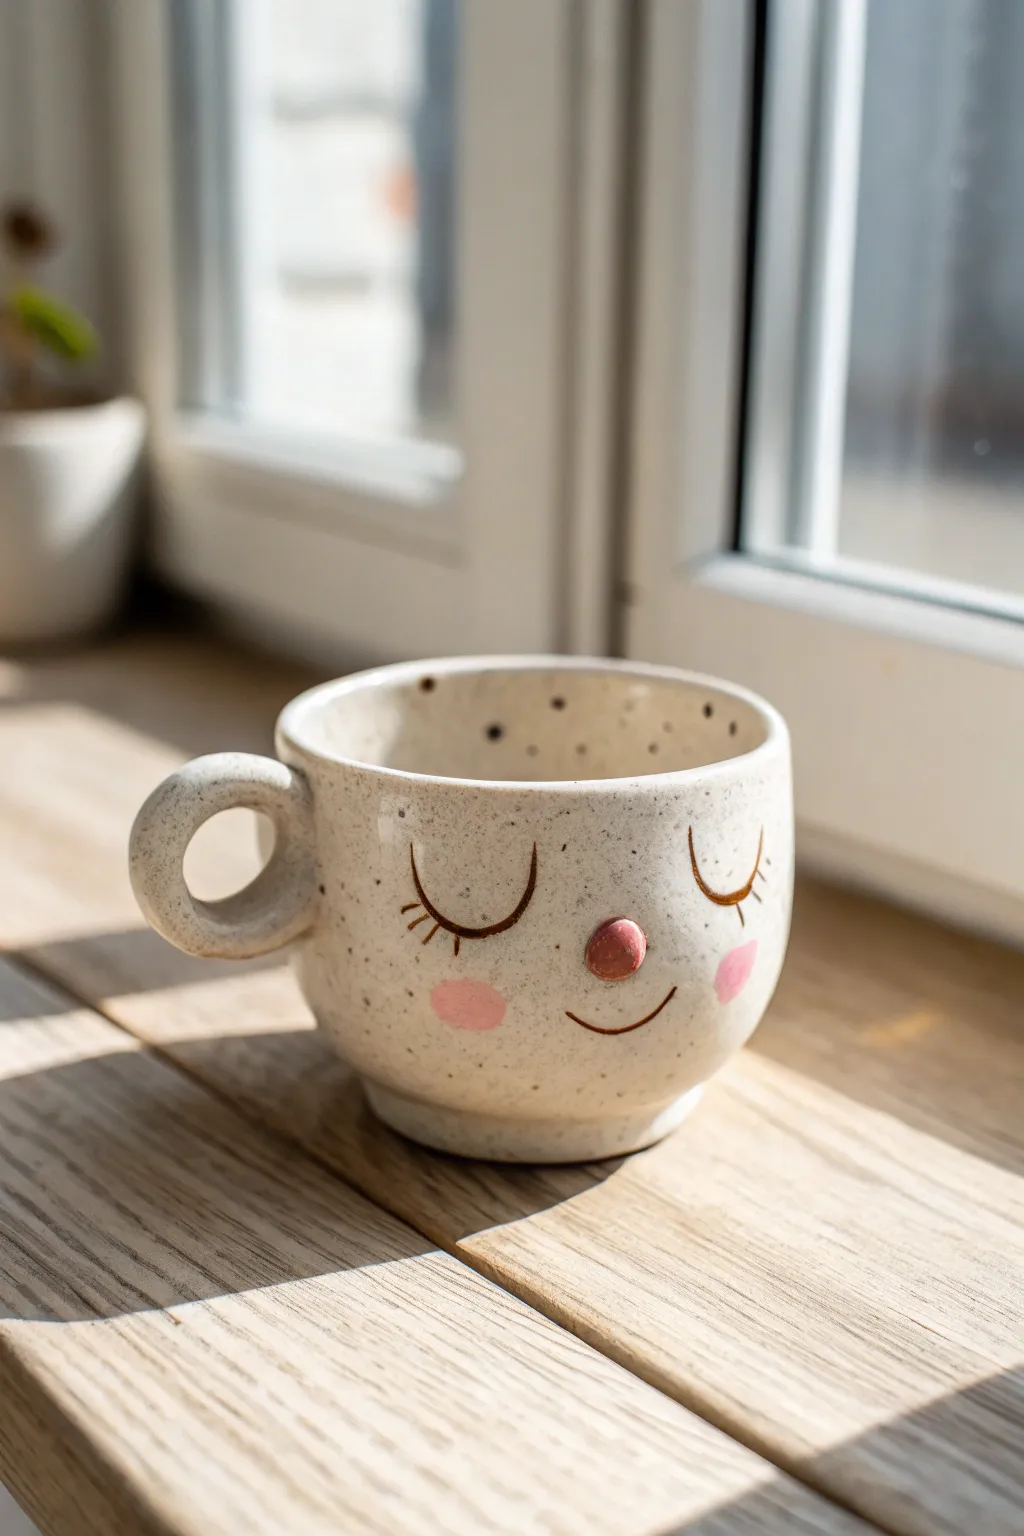
This charming mug features a sweet, sleeping face complete with rosy cheeks and a tiny button nose protruding from the side. Using speckled clay gives it natural character, while the simple pinch pot technique makes it accessible for young potters.
Detailed Instructions
Materials
- Speckled clay body (stoneware or earthenware)
- Small bowl of water
- Scoring tool or needle tool
- Sponge
- Rolling pin
- Wooden modeling tool
- Underglaze (Black and Pink)
- Fine detail brush
- Medium brush
- Clear glaze
Step 1: Forming the Base
-
Prepare the clay:
Start with a ball of well-wedged speckled clay about the size of an orange. Pat it into a smooth sphere in your hands. -
Open the hole:
Press your thumb into the center of the ball, pushing down until you’re about half an inch from the bottom. -
Pinch the walls:
Gently pinch the clay between your thumb and fingers, rotating the ball as you go. Work from the bottom up to thin the walls evenly. -
Shape the cylinder:
Continue pinching and pulling the clay slightly upward to create a cup shape rather than a wide bowl. Aim for a wall thickness of about 1/4 inch. -
Flatten the rim:
Once you have your desired height, tap the rim gently with a flat wooden tool or just smooth it with a damp sponge to make sure it’s level. -
Create the foot:
Using a wooden tool or your thumb, press a slight indentation around the very bottom edge of the mug to define a small foot ring.
Pro Tip: Better Handles
Let the handle stiffen slightly for 15 minutes before attaching it. This prevents it from sagging out of its ‘C’ shape while you smooth the joints.
Step 2: Adding the Features
-
Roll the handle coil:
Roll a thick coil of clay for the handle. It should be roughly the thickness of your finger and about 3 inches long. -
Attach the handle:
Score the side of the mug and the ends of your coil. Add a dab of slip or water, then press the coil onto the mug in a ‘C’ shape. Smooth the connection points well. -
Make the nose:
Roll a small, pea-sized ball of clay for the nose. Flatten the back of it slightly so it sits flush. -
Attach the nose:
Score the spot on the face where the nose will go and score the back of the nose ball. Press it firmly into place right in the center. -
Smooth the nose:
Use a modeling tool to gently blend just the very edge of the nose onto the mug surface so it doesn’t pop off during firing.
Step 3: Decorating and Glazing
-
Bisque fire:
Allow the mug to dry completely (bone dry) and then bisque fire it according to your clay’s instructions. -
Paint the nose:
Once bisqued, paint the 3D nose with pink underglaze. I find two coats usually gives a nice solid color. -
Add rosy cheeks:
Paint two soft pink circles on either side of the nose for cheeks. You can make these slightly oval-shaped for a cuter look. -
Draw the eyes:
Using a fine detail brush and black underglaze, paint two downward curving lines for closed eyelids above the cheeks. -
Add the lashes:
Carefully paint three or four small vertical lashes coming off the eyelids. -
Paint the mouth:
Paint a small, simple smile curve centered under the nose. -
Clear glaze:
Once the underglaze is dry, dip the entire mug into a clear glaze to seal it and make the speckles pop. -
Final firing:
Fire the mug a second time to the temperature required for your clear glaze.
Troubleshooting: Cracking
If small cracks appear near the nose attachment as it dries, smooth them immediately with a damp sponge. These stress cracks mean the nose wasn’t blended enough.
Now you have a cozy little friend to keep your hot cocoa warm
Animal Spoon Rests Kids Can Gift to Family
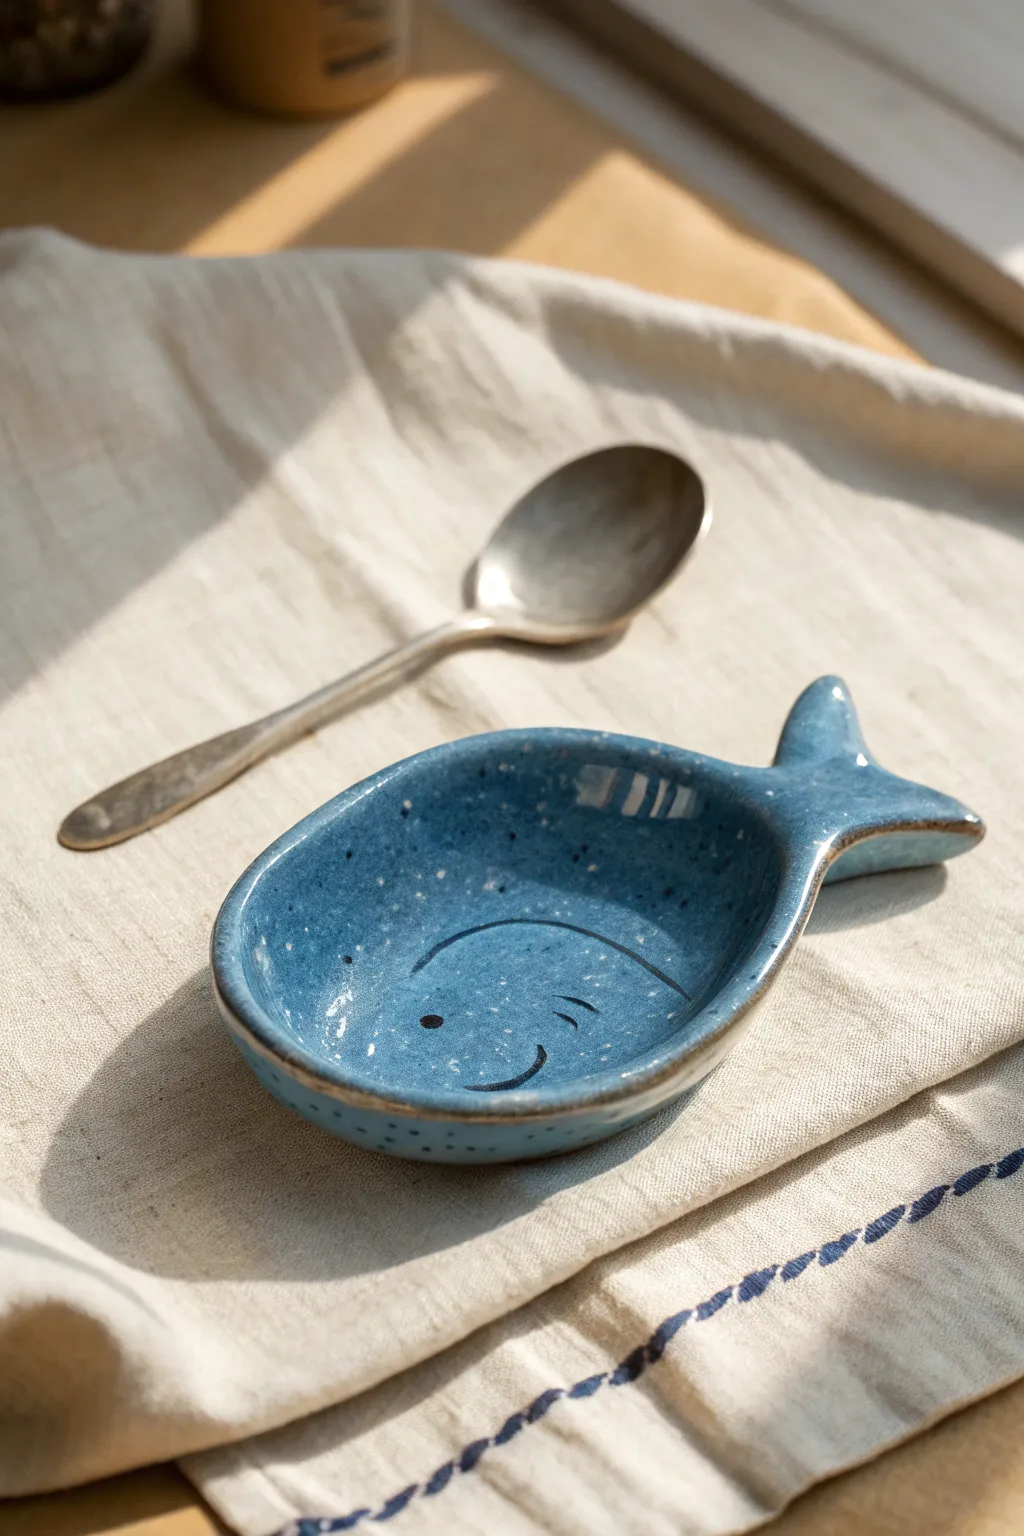
This darling spoon rest combines functionality with a splash of oceanic charm, perfect for keeping countertops tidy. Shaped like a friendly little blue whale (or fish!), its gentle curve and cheerful speckled glaze make it a heartwarming handmade gift for any home cook.
Step-by-Step Tutorial
Materials
- White or light-colored stoneware clay
- Rolling pin
- Canvas mat or cloth (to prevent sticking)
- Needle tool or fettling knife
- Paper template (simple fish/whale shape)
- Small sponge
- Rib tool (rubber or wooden)
- Modeling tool or old credit card
- Underglaze pencil or fine brush (black/dark blue)
- Speckled blue glaze (food safe)
- Clear glaze (optional, depending on blue glaze type)
- Kiln access
Step 1: Shaping the Clay Base
-
Prepare the slab:
Begin by wedging your clay to remove air bubbles, then roll it out on your canvas mat to an even thickness of about 1/4 inch. Smooth both sides with a rib tool to compress the clay particles. -
Cut the shape:
Place your paper template gently onto the clay slab. Using a needle tool or fettling knife, trace around the perimeter to cut out the fish silhouette, being careful to keep the edges clean. -
Smooth the edges:
Dip your finger or a small sponge in a tiny bit of water and run it along the cut edges to soften them. You want to remove any sharp corners or clay burrs left from cutting. -
Create the curve:
To make the dish functional, gently lift the edges of the fish body. Using your thumbs, press the center down slightly while curling the rim upwards to create a shallow bowl shape. -
Refine the tail:
Give the tail section a little extra attention by slightly pinching the edges to define the fins, ensuring they curve upward just enough to match the body’s rim.
Slump Mold Hack
Don’t trust your hand-shaping? Gently press your wet clay slab into a shallow paper bowl or over a large smooth rock to get a consistent curve while it dries
Step 2: Adding Character & Drying
-
Dry to leather hard:
Set the piece aside to dry until it reaches the leather-hard stage. I find loosely draping a piece of plastic over it for the first few hours helps it dry evenly without warping. -
Draw the face:
Once firm but still carveable, use a dull pencil or a needle tool to faintly sketch the placement of the eye and the large, curved mouth. Keep the design simple and offset to the lower half. -
Incise the details:
Go over your sketch lines with a carving tool to deepen them slightly. This creates a physical groove that will hold glaze differently, emphasizing the expression. -
Highlighting features:
Carefully paint the inside of the incised smile and eye with a dark underglaze (like black or dark navy) to make the face pop against the future blue background. -
Smooth final imperfections:
Do one last check for rough spots. Use a slightly damp sponge to wipe away any clay crumbs created during the carving process. -
Bisque fire:
Allow the piece to dry completely to the bone-dry stage. Fire it in the kiln to cone 04 (or your clay’s specific bisque temperature).
Textured Scales
Before glazing, press the curved end of a paperclip or a small loop tool into the clay body to create a pattern of ‘scales’ for extra tactile interest
Step 3: Glazing & Finishing
-
Clean the bisque:
Wipe the fired bisque ware with a clean, damp sponge to remove any dust that might prevent the glaze from adhering properly. -
Apply the base glaze:
Apply 2-3 coats of a speckled blue glaze. Ensure you let each coat dry to the touch before applying the next layer to avoid dragging the brush. -
Check the rim:
If you want the rim to have that slightly exposed, rustic look shown in the image, carefully wipe a tiny bit of glaze off the very edge with a damp sponge. -
Enhance the speckles:
If your glaze isn’t pre-speckled, you can flick a stiff toothbrush dipped in a contrasting dark glaze (or iron oxide) over the surface to create random spots. -
Clear glaze option:
If your blue glaze is matte, you may want to add a thin coat of clear glaze over the top to make the spoon rest easy to clean and glossy. -
Final firing:
Fire the piece again, this time to the maturity temperature of your glaze (usually cone 05/06 or cone 5/6 depending on your materials).
Once cooled, your cheerful ceramic friend is ready to hold spoons and brighten up the kitchen counter
Tic-Tac-Toe Tile Sets for Playable Pottery
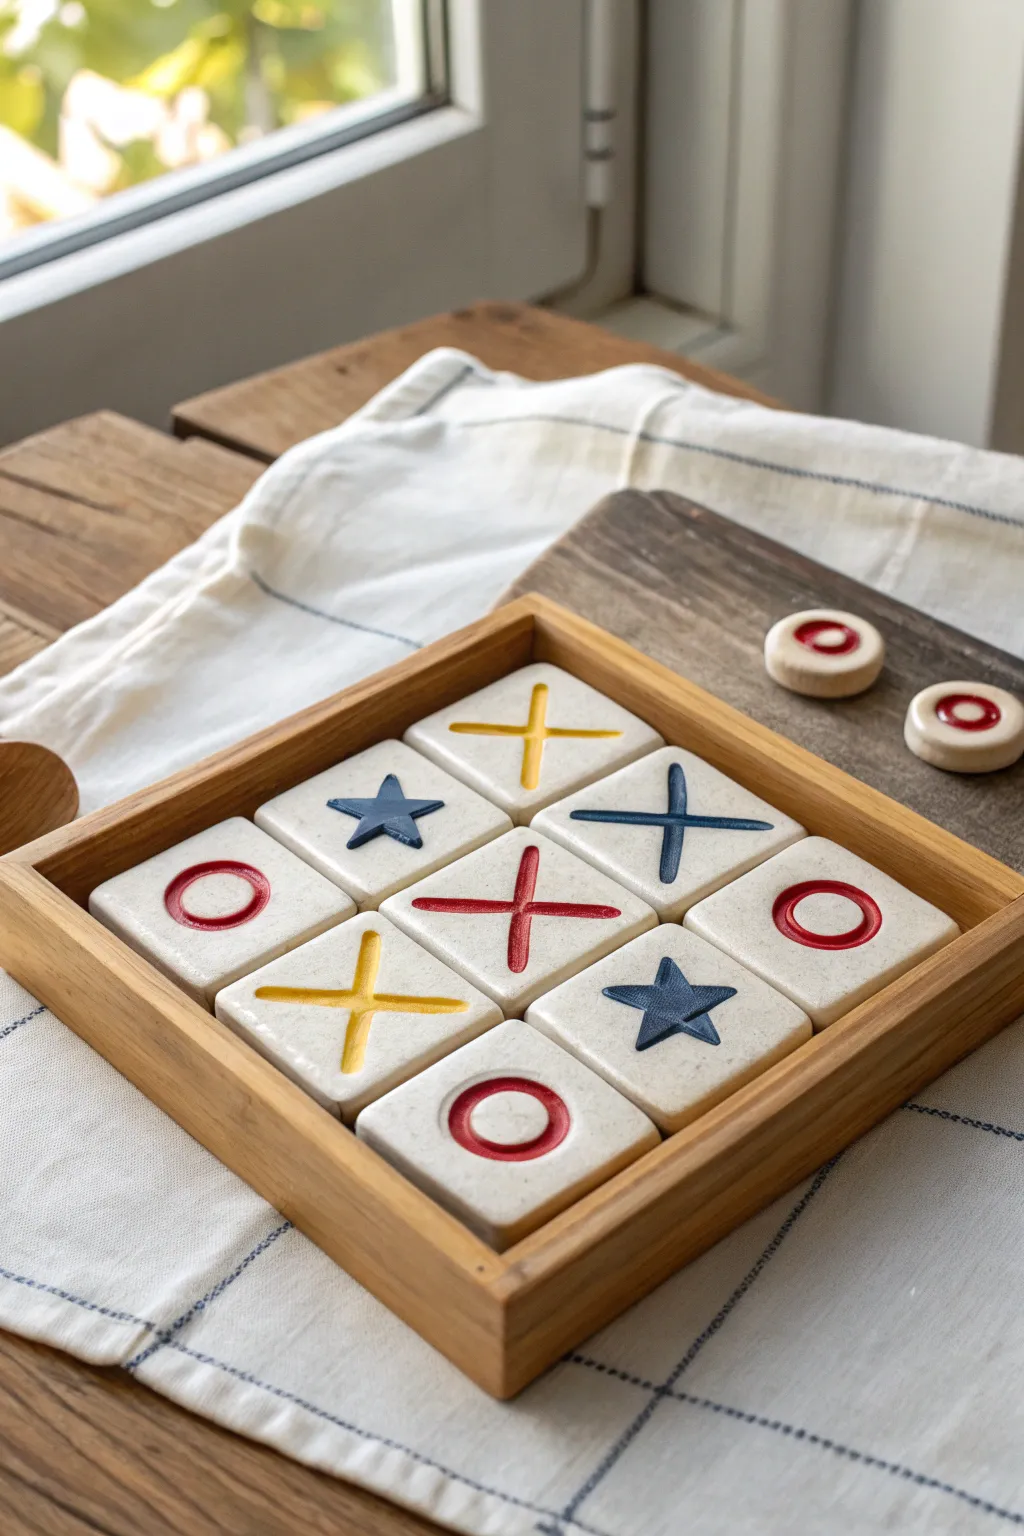
Transform a classic game into a functional piece of art with this charming handmade tile set. Featuring custom-stamped symbols and a creamy speckled glaze, this project is durable enough for endless rounds of play and stylish enough to display.
How-To Guide
Materials
- Light-colored speckled stoneware clay
- Rolling pin
- Canvas mat or cloth
- Square cookie cutter (approx. 2 inches)
- Small carving tools or loop tool
- Wooden guide strips (1/4 inch thick)
- Sponge
- Small shallow bowl of water
- Underglazes (red, yellow, dark blue)
- Clear or matte white glaze
- Small paintbrushes
- Wooden tray (store-bought or handmade)
Step 1: Forming the Tiles
-
Preparation:
Begin by wedging your speckled stoneware clay thoroughly to remove any air bubbles. This ensures your tiles won’t crack during firing. -
Rolling the slab:
Set up your canvas mat and place the 1/4-inch wooden guide strips on either side of your clay. Roll the clay out into a smooth, even slab, using the strips to maintain a uniform thickness. -
Cutting shapes:
Using your square cookie cutter, cut out at least nine tiles. I always recommend cutting two or three extra squares just in case one breaks or warps during the process. -
Smoothing edges:
Once cut, gently run a damp finger or a slightly moist sponge along the sharp edges of each square to round them off. This prevents sharp corners on the finished game pieces.
Step 2: Adding Designs
-
Carving outlines:
Decide on your symbols. The image shows X’s, O’s, and stars, but you can choose any three symbols. Use a needle tool to lightly sketch the design onto the leather-hard clay surface. -
Deepening the relief:
Use a small loop tool or carving tool to carefully gouge out the sketched lines. You want a distinct groove that will hold the glaze color later, but don’t carve so deep that you weaken the tile. -
Optional texture:
If you want the extra rustic look seen in the photo, gently press a textured fabric or a piece of sandpaper onto the surface of the clay around the carved symbols before it dries completely. -
Drying:
Place the tiles between two boards or pieces of drywall to let them dry slowly. This sandwiching technique helps prevent the flat tiles from curling up at the edges. -
Bisque fire:
Once bone dry, fire the tiles to cone 04 (or your clay body’s specifications) for the bisque firing.
Warping Worries?
Tiles curling up? Dry them slower! Flip them daily and keep them weighed down lightly with a board during the leather-hard stage.
Step 3: Glazing and Finishing
-
Cleaning:
Wipe the bisque-fired tiles with a clean, damp sponge to remove any dust that might interfere with glaze adhesion. -
Applying underglaze:
Using a fine-tip brush, fill the carved grooves with underglaze. Use red for O’s, dark blue or black for X’s, and yellow or blue for stars. You may need 2-3 coats for solid color. -
Cleaning up mistakes:
If any underglaze spills onto the flat surface, wait for it to dry slightly and strictly scrape it off with a clean tool or wipe carefully with a very slightly damp sponge. -
Main glaze application:
Dip the tiles into a clear or semi-opaque white matte glaze. Alternatively, brush on the glaze, avoiding the colored grooves if you want them to remain raw and matte. -
Wiping the bottom:
Thoroughly wipe the glaze off the bottom of each tile so it doesn’t stick to the kiln shelf. -
Glaze fire:
Fire the pieces again to the final temperature required for your specific stoneware clay and glaze combination. -
Assembly:
While the firing happens, source a simple square wooden tray that fits nine tiles comfortably. You can also build a simple frame using wood glue and craft wood if you prefer a custom fit.
Make It 3D
Instead of carving into the tile, roll small coils of clay and slip-and-score them onto the surface for raised tactile X’s and O’s.
Arrange your distinct new tiles in the tray and challenge a friend to a game.
Build-a-Buddy Totem Stacks With Funny Faces
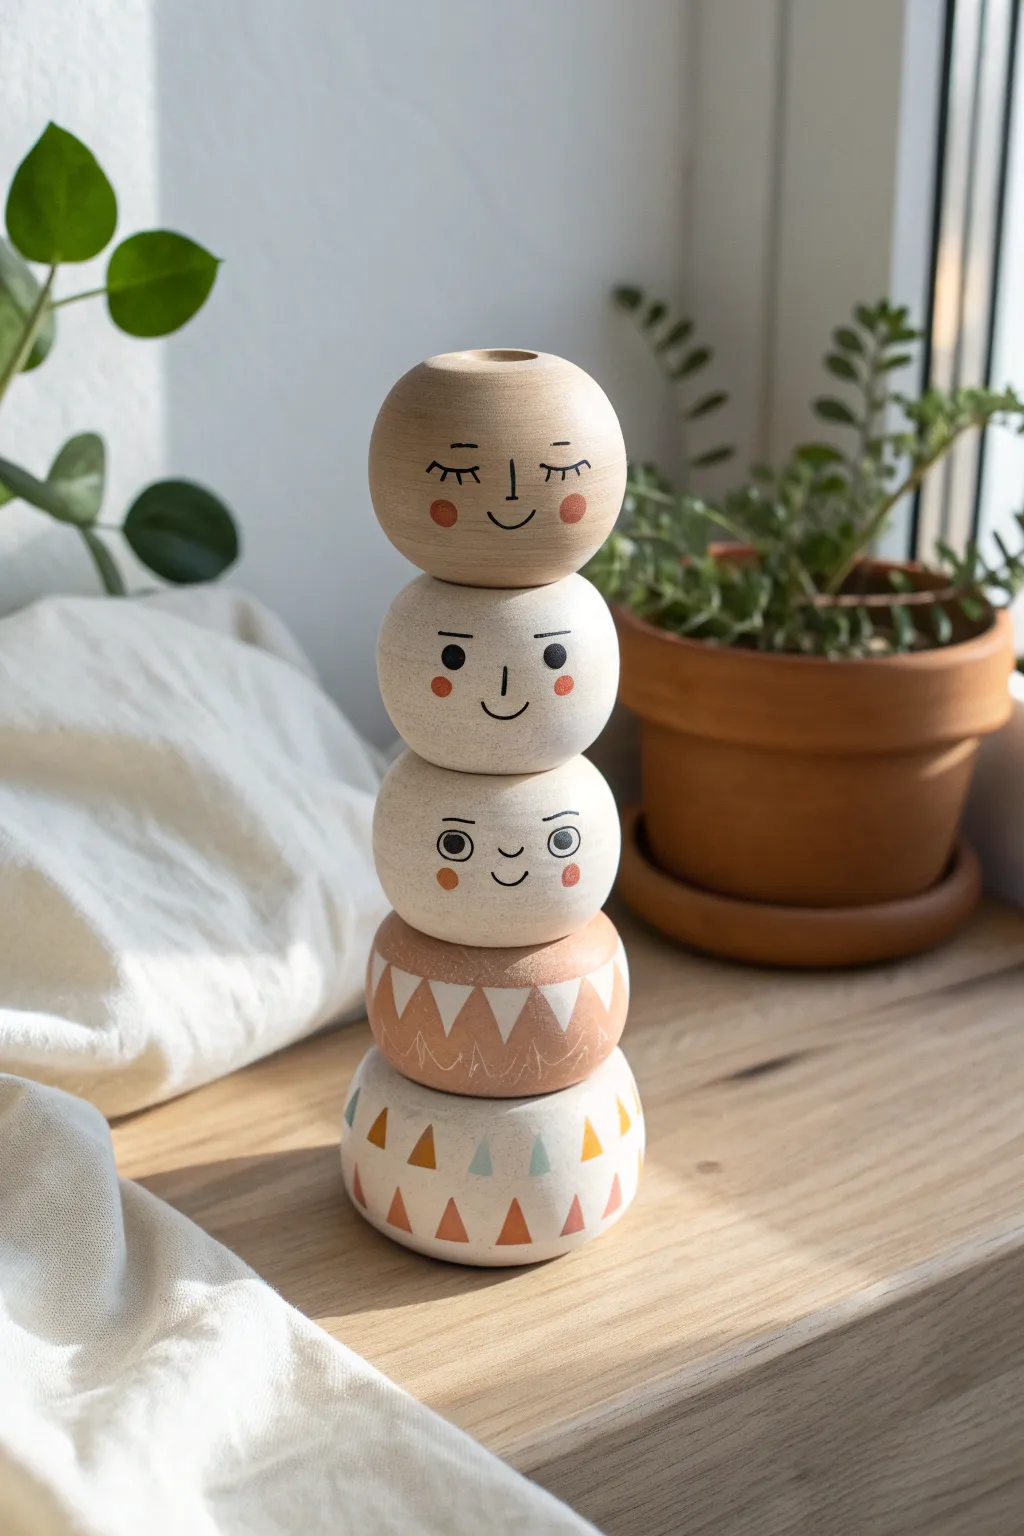
Create a charming stackable sculpture using simple wooden shapes featuring sweet minimalist faces and geometric patterns. This modular project allows kids to mix and match different expressions and outfits for endless playful combinations.
Detailed Instructions
Materials
- 5 wooden craft balls or beads (approx 2-3 inches diameter, some slightly flattened)
- Fine-grit sandpaper (220 grit)
- Acrylic craft paints (cream/off-white, terra cotta, pastel blue, mustard yellow, black)
- Small flat paintbrush
- Fine detail paintbrush or black paint pen
- Small circular sponge dabber (optional)
- Matte spray varnish or Mod Podge
- Pencil and eraser
- Wooden dowel rod (optional, for permanent stacking)
Step 1: Preparing the Shapes
-
Select your forms:
Choose three round wooden balls for the heads and two slightly flatter, wheel-shaped beads for the patterned bases. If you are working with raw clay instead of wood, shape these spheres now and ensure they have a vertical hole through the center before firing or drying. -
Smooth the surface:
Lightly sand each wooden piece with fine-grit sandpaper. You want the surface to be buttery smooth so the painted faces look clean and crisp. -
Prime the wood:
Mix a tiny drop of white paint with water to create a whitewash, or use a plain cream acrylic. Paint a thin base coat over all five pieces to lighten the wood grain without hiding it completely. Let this dry for about 20 minutes.
Step 2: Designing the Faces
-
Sketch the features:
Take the top three spherical pieces. Using a pencil very lightly, sketch simple facial features on the center of each. Try one sleeping face with curved lashes, one happy face with wide eyes, and one curious face. -
Paint the cheeks:
Dip a circular sponge dabber or your fingertip into terra cotta paint. Wipe off most of the paint on a paper towel until it’s almost dry, then gently dab rosy cheeks onto the distinctive face pieces. -
Add main features:
Using your finest detail brush or a black paint pen, carefully trace over your pencil lines. I find that pulling the brush toward me helps keep the lines steady for the smiles and noses. -
Refine the eyes:
For the open eyes, paint small solid black circles. Add tiny eyebrows or eyelashes with a feather-light touch. -
Let faces cure:
Set these three heads aside to dry completely while you work on the body segments.
Wobbly Face Lines?
If your fine lines look shaky, switch to an ultra-fine tip black permanent marker instead of paint. It gives much more control on curved surfaces.
Step 3: Patterning the Base
-
Sketch the base tier:
On the bottom-most flattened sphere, lightly pencil a pattern of small triangles around the circumference. -
Paint geometric shapes:
Fill in your triangles using alternating colors like mustard yellow, pastel blue, and terra cotta. Keep the paint relatively flat and opaque. -
Create the middle tier:
For the second flattened piece (the ‘collar’), sketch a sawtooth or zig-zag line around the middle. -
Fill the collar color:
Paint the bottom half of this shape with your terra cotta or soft brown shade, leaving white triangles pointing down from the top edge. -
Add white details:
Once the collar color is dry, use a small brush to add thin white lines or inverted triangles inside the colored section for extra texture.
Mix & Match Outfits
Make extra ‘body’ segments with different patterns like stripes, polka dots, or solid colors so kids can swap out the totem’s wardrobe daily.
Step 4: Assembly and Finish
-
Seal to protect:
Apply a coat of clear matte varnish or Mod Podge over all pieces. This prevents the paint from scratching off when the pieces are stacked and re-stacked. -
Check fit:
Ensure the holes aligned seamlessly. If you painted inside the holes at all, you might need to use a small file to clear excess paint so they stack straight. -
Stack them up:
Arrange the pieces with the geometric base at the bottom, the collar next, and the three heads stacked on top in your favorite order. -
Secure center (optional):
If you want this to be a permanent statue rather than a toy, insert a wooden dowel rod through the center holes to keep everything perfectly aligned.
Now you have an adorable, custom totem stack that adds a touch of playful personality to any shelf
Star-Punched Luminary Jars for Cozy Night Lights
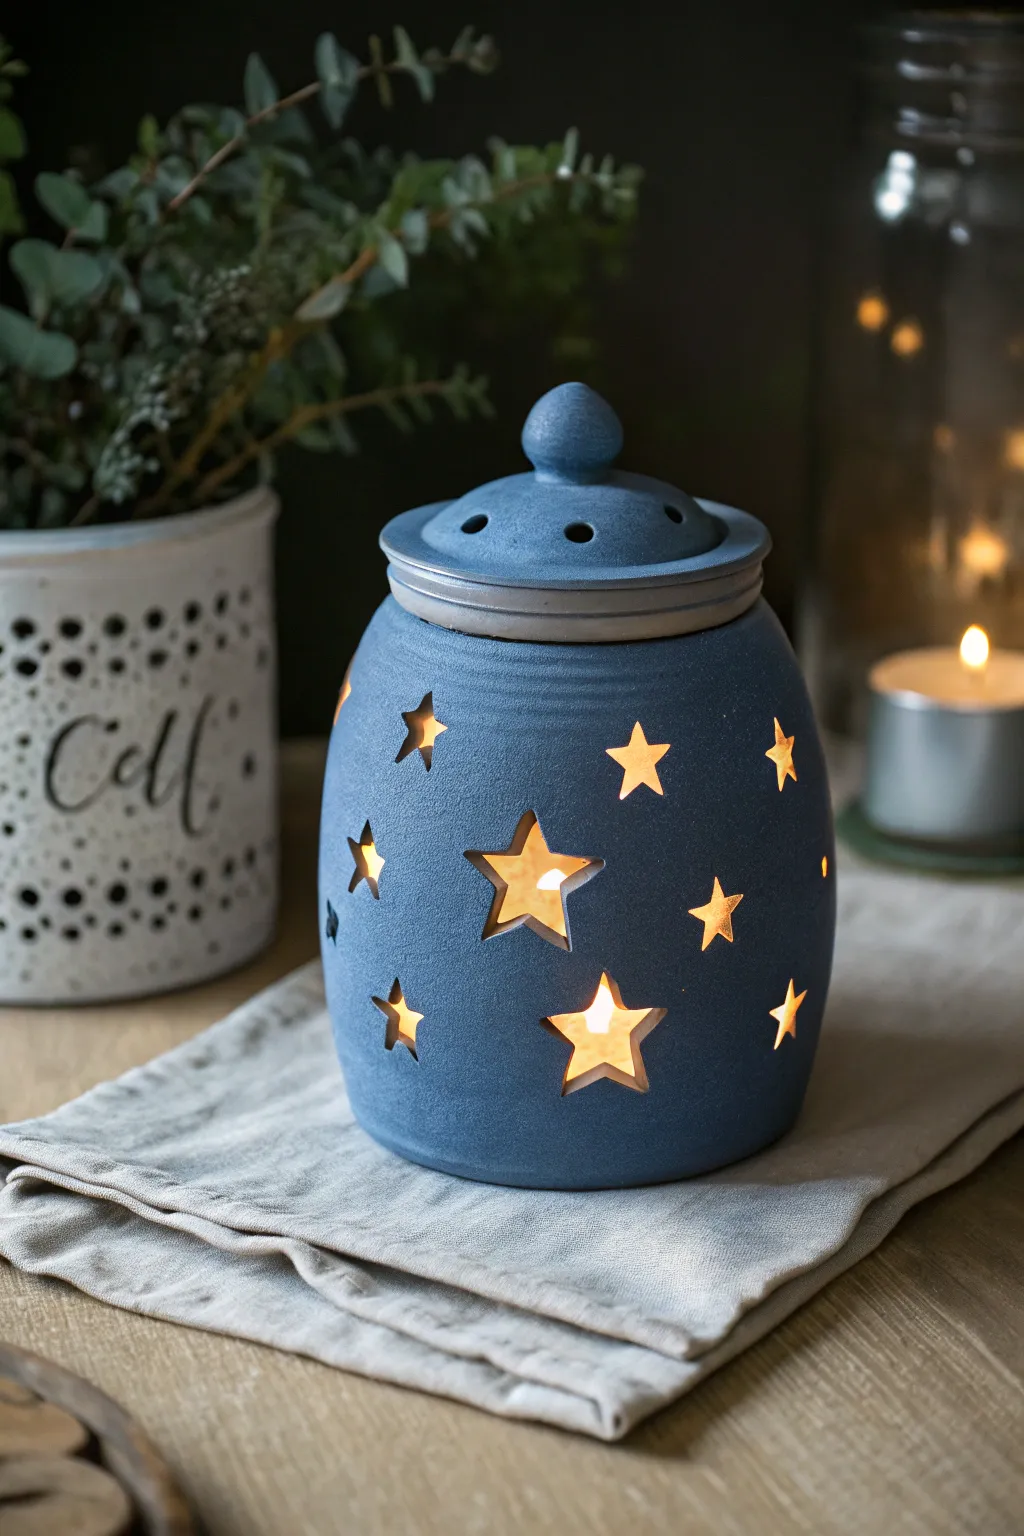
Create a magical night light with this delightful ceramic project that features cut-out stars glowing warmly from within. Using simple pottery techniques, you will build a lidded jar and transform it into a cozy luminary perfect for a bedside table.
Step-by-Step Guide
Materials
- Low-fire white earthenware clay
- Rolling pin
- Canvas mat or cloth
- Star-shaped cookie cutters (various sizes)
- Fettling knife or clay tool
- Small sponge
- Slip (clay mixed with water)
- Scoring tool or old fork
- Matte denim blue glaze
- Paintbrush
- Small tealight candle (battery-operated recommended)
Step 1: Forming the Jar Base
-
Roll the slab:
Begin by wedging your clay to remove air bubbles. Roll it out on your canvas mat into a smooth, even slab about 1/4 inch thick. Aim for a long rectangle shape that is high enough for your desired jar height. -
Cut the rectangle:
Measure and cut a clean rectangle from your slab. The length of the rectangle will determine the circumference of your jar. Keep the excess clay aside for the base and lid. -
Bevel the edges:
To create a seamless join, cut the short ends of your rectangle at a 45-degree angle (beveling). This helps the two ends overlap neatly without creating a thick lump. -
Form the cylinder:
Stand the rectangle up and curve it gently into a cylinder. Score the beveled edges with your tool, apply a generous amount of slip, and press the ends firmly together. -
Secure the seam:
Smooth the seam on both the inside and outside using your finger or a wooden tool. I like to blend the clay until the join is completely invisible to ensure it doesn’t crack during firing. -
Attach the base:
Roll a small piece of excess slab and place your cylinder on top of it. Trace around the bottom, cut out the circle, score and slip both contact surfaces, and attach the floor to the cylinder. Smooth the edges upwards. -
Shape the vessel:
With the cylinder formed, gently push the walls outward from the inside while cupping the outside to give it a slightly rounded, pot-bellied shape. Smooth the rim with a damp sponge.
Clean Cuts Every Time
Wait until the clay is truly leather-hard before cutting stars. If the clay is too soft, the walls will deform; too dry, and it might crack.
Step 2: Creating the Lid
-
Cut the lid slab:
Roll out another small slab. Cut a circle that is slightly larger than the opening of your jar so it can sit comfortably on top. -
Add a flange:
Roll a small coil of clay and attach it to the underside of the lid circle. This flange should fit just inside the jar’s opening to keep the lid from sliding off. -
Form the knob:
Shape a small ball of clay into a knob or handle. Score and slip the center of the lid’s top surface and attach the knob securely. -
Add ventilation holes:
Using a small hole punch or straw, poke several small holes in the lid around the knob. This is crucial for heat to escape if you use a real candle, but looks decorative even with LEDs.
Lid Won’t Fit?
Always dry the lid ON the jar. Place a piece of paper towel between them to prevent sticking. They will shrink together and fit perfectly.
Step 3: Adding the Stars & Glazing
-
Punch the stars:
Once the clay is leather-hard (firm but still cool to the touch), use your star-shaped cutters to punch holes through the jar walls. Support the wall from the inside with your hand as you press. -
Vary the sizes:
Use different sized star cutters to create visual interest. Scatter them randomly around the jar, leaving enough solid clay between cutouts to maintain structural integrity. -
Clean the edges:
After cutting, tiny crumbs of clay often cling to the edges of the stars. Use a damp sponge or soft brush to smooth away these burrs carefully. -
Bisque fire:
Allow your piece to dry completely until bone dry. Fire it in the kiln to a bisque temperature (usually cone 04) to prepare it for glazing. -
Apply the glaze:
Brush 2-3 coats of a matte denim blue glaze onto the exterior. You can leave the inside unglazed or use a clear glaze to reflect more light. -
Wipe the footing:
Ensure the bottom of the jar and the rim where the lid sits are wiped clean of glaze so they don’t fuse shut during firing. -
Final firing:
Fire the piece again to the temperature specified by your glaze manufacturer. Once cool, place a tealight inside and watch your stars twinkle.
Now you have a charming, starry vessel ready to add a warm glow to any dark corner.