If you’ve ever rolled a little ball of clay and thought, “Okay… now how do I make this look like a flower?” you’re in the right place. These clay flower ideas are meant to feel doable and fun, whether you’re using air dry clay, polymer clay, or good old ceramic clay.
Classic Spiral Clay Rose
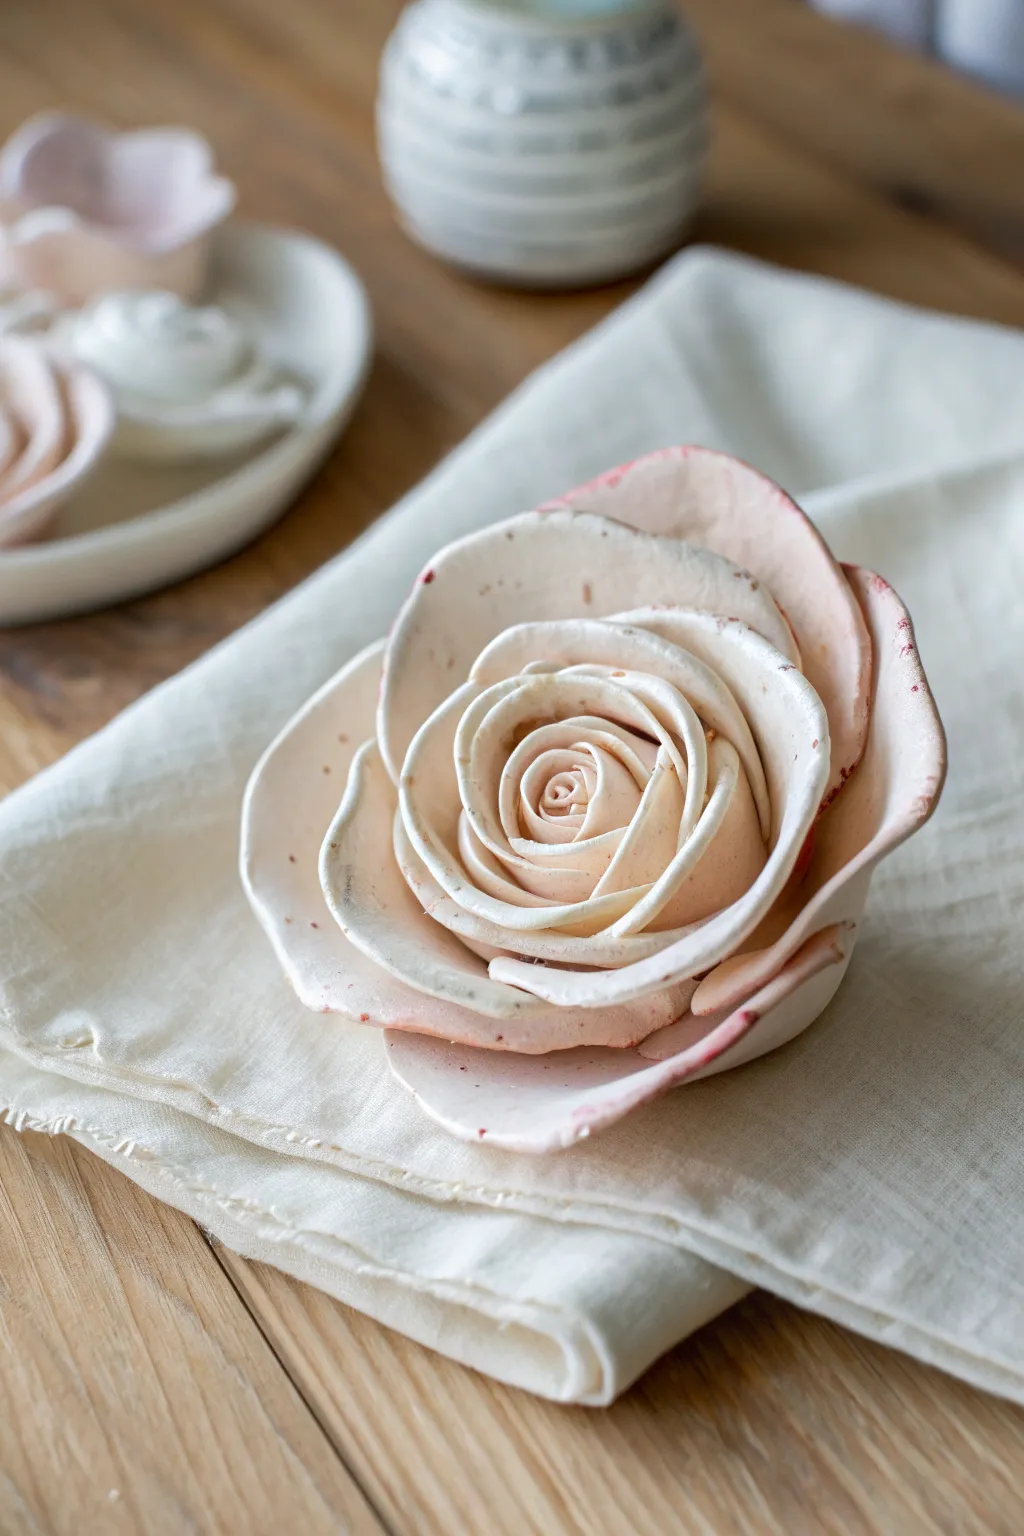
Capture the delicate beauty of a garden bloom with this handcrafted clay rose, featuring soft, blush-edged petals and a unique speckled finish. This project creates a stunning, organic-looking flower perfect for tabletop decor or a personalized gift.
Step-by-Step Tutorial
Materials
- White polymer clay or air-dry clay (approx. 200g)
- Acrylic paints (Soft pink, Cream, Burnt Umber)
- Small paintbrush or toothbrush for speckling
- Rolling pin or clay machine
- Ball tool (large and medium)
- Creating mat or parchment paper
- Clay cutting blade or craft knife
- Soft sponge or foam pad
- Gloss or matte varnish (optional)
Step 1: Preparing the Clay Base
-
Condition the Clay:
Begin by kneading your white clay thoroughly until it becomes soft, warm, and pliable. This prevents cracking later on. -
Mix the Base Color:
Knead in a tiny amount of cream and soft pink acrylic paint or pigment into the white clay. Aim for a very pale, barely-there blush tone rather than a solid pink. -
Add Speckled Texture:
Before sculpting, create the speckles by flicking a toothbrush loaded with watered-down Burnt Umber paint over the raw clay. Alternatively, mix in small shavings of dried brown clay or coarse black pepper for an organic texture. -
Roll Out the Clay:
Flatten the clay using a rolling pin to a uniform thickness of about 2-3mm. It should be thin enough to look delicate but sturdy enough to hold its shape.
Floppy Petals?
If petals droop too much, tuck small pieces of tissue paper or cotton balls between layers. Remove them once the clay has hardened completely.
Step 2: Sculpting the Center
-
Create the Bud Core:
Pinch off a small piece of clay and roll it into a teardrop shape. This will serve as the support for your central spiral. -
Cut the First Petals:
Cut out 3-4 small teardrop or oval shapes from your rolled sheet for the innermost petals. -
Thin the Edges:
Place the petals on a foam pad and gently run a ball tool around the edges. This thins them out and gives them a slight curl, mimicking real flower petals. -
Wrap the First Petal:
Take one thinned petal and wrap it tightly around the teardrop core, curling it inward so it completely conceals the center point. -
Form the Spiral:
Wrap the remaining small petals around the core, overlapping them slightly. Each new petal should start at the midpoint of the previous one to create a tight spiral effect.
Step 3: Building the Bloom
-
Cut Larger Petals:
Cut 5-6 medium-sized petals and 5-6 large petals. They should be roughly oval but creating slight irregularities makes them look more natural. -
Shape and Texture:
Use your fingers to gently pull and stretch the edges of these larger petals. I find that pinching the very edge creates a lovely, ruffled look. -
Add Medium Layer:
Attach the medium petals around the bud, pressing the base of each petal firmly to the bottom of the flower. Allow the tops to flare slightly outward. -
Create the Open Look:
Attach the largest petals for the final layer. Position them lower on the stem base and curve them significantly outward, almost laying flat, to simulate a fully bloomed rose.
Rustic Edge Trick
To get that slightly worn, vintage look on the petal rims, lightly tear the edges of the clay before you roll them smooth. It adds instant character.
Step 4: Finishing Details
-
Enhance the Edges:
Dip a dry brush into a small amount of soft pink paint or pastel dust. Gently brush the very edges of the outer petals to accentuate the blushing effect shown in the image. -
Refine the Speckles:
If the sculpting process faded your speckles, gently flick a tiny bit more watered-down brown paint over the finished flower. Focus on the outer petals. -
Trim the Base:
If the bottom of the rose has become too bulky from all the petal layers, carefully slice off the excess clay with a blade to create a flat base for sitting. -
Final Shape Check:
Before drying, use your fingers to gently curl a few petal edges backward or inward to break up symmetry.
Allow your creation to dry fully according to your clay’s instructions and enjoy your everlasting bloom


Simple Daisy With Textured Center
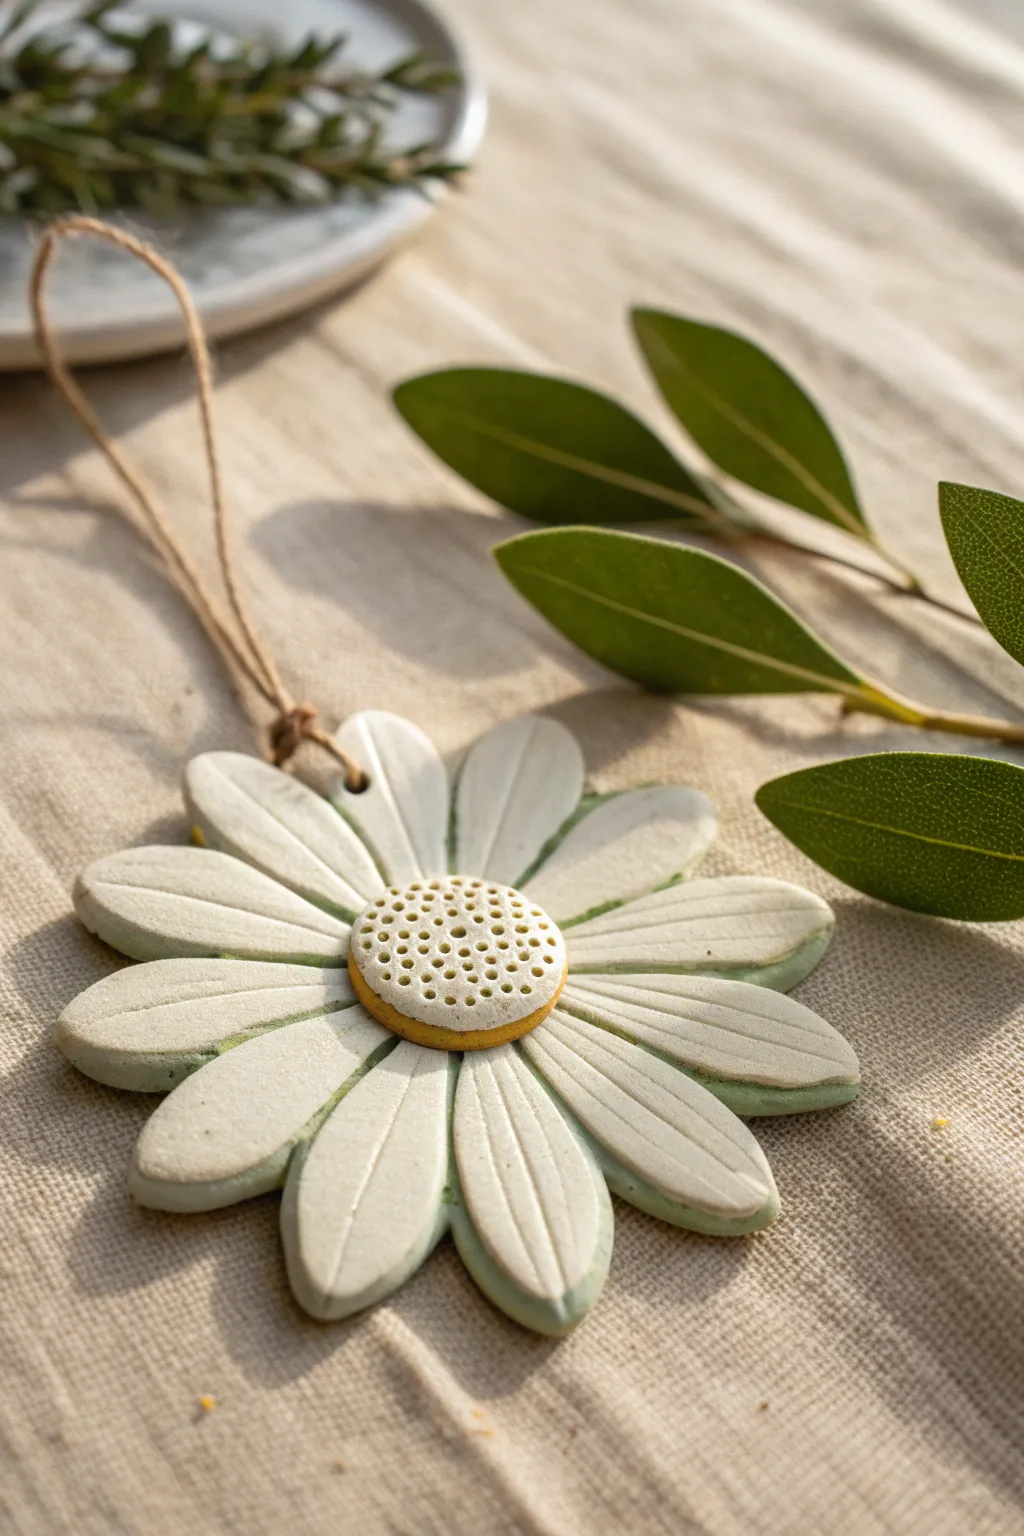
This charming clay daisy brings a touch of nature indoors with its soft white petals and a tactile, golden-yellow center. The simple twine hanger adds a rustic feel, making it perfect for year-round decor or as a sweet handmade gift.
Step-by-Step
Materials
- White styling clay (air-dry or polymer based on preference)
- Acrylic rolling pin
- Leaf-shaped or petal cutter (teardrop shape)
- Modeling tool or butter knife for detailing
- Yellow acrylic paint or yellow clay
- Needle tool or toothpick
- Jute twine
- Small paintbrush
- Soft pastel chalks in sage green (optional)
- Sandpaper (fine grit)
- Clear matte varnish
Step 1: Forming the Flower Base
-
Roll the clay:
Begin by conditioning your white clay until it is soft and pliable. Roll it out on a smooth surface to an even thickness of about 1/4 inch. -
Cut the petals:
Using a teardrop or petal-shaped cutter, punch out roughly 12 to 14 individual petals. If you don’t have a cutter, you can hand-cut teardrop shapes using a craft knife. -
Smooth the edges:
Gently run your finger along the cut edge of each petal to soften any sharp ridges left by the cutter. This gives the flower a more organic, natural look. -
Create the center vein:
Place a petal flat on your workspace. Using the back of a knife or a wide modeling tool, press a distinct line down the center of each petal, stopping just short of the tip. Repeat for all petals. -
Arrange the first layer:
Take a small ball of flattened clay to use as a base. Press five or six petals onto this base in a circle, ensuring the pointed ends meet in the middle. -
Add the second layer:
Layer the remaining petals on top of the first set, placing them in the gaps between the bottom petals. This creates fullness and dimension.
Petals falling off?
If petals won’t stick, score the clay (scratch cross-hatches) where pieces join and add a drop of water or liquid clay to create a ‘slip’ before pressing together.
Step 2: Adding the Textured Center
-
Prepare the center:
Roll a ball of clay roughly the size of a large marble. Flatten it slightly into a thick disc shape that fits proportionately in the middle of your petal arrangement. -
Texture the disc:
Using a needle tool or toothpick, prick the surface of the disc repeatedly. Create a dense pattern of small holes to mimic the pollen texture of a real flower center. -
Attach the center:
Press the textured disc firmly into the center of your petals. You can use a tiny dab of water (for air-dry clay) or liquid clay (for polymer) to ensure a strong bond.
Scented Decor
If using air-dry clay or terracotta, put a few drops of essential oil on the textured center after it dries. The porous clay acts as a natural diffuser.
Step 3: Finishing Touches
-
Make the hanging hole:
Decide which petal will be at the ‘top.’ Use a straw or a tool to poke a clean hole through the tip of that petal for the string. Make sure it’s not too close to the edge to prevent tearing. -
Add subtle color:
Before drying, I like to shave a little sage green pastel chalk into a dust. Brush this gently onto the edges and undersides of the petals for that realistic, greenish shadow seen in the photo. -
Dry or bake:
Follow the manufacturer instructions for your specific clay. If baking polymer clay, support the petals with foil to keep them 3D. If air-drying, let it sit undisturbed for 24-48 hours. -
Paint the center:
Once fully dry or cured, paint the textured center disc with a warm yellow acrylic paint. Use a dry-brush technique to keep the paint out of the deepest holes, highlighting the texture. -
Seal the piece:
Coat the entire flower with a clear matte varnish. This protects the clay and seals in the chalk shading. -
Attach the twine:
Cut a length of jute twine. Thread it through the hole in the top petal and tie a secure knot to create a hanging loop.
Hang your finished daisy in a bright window or on a wall to enjoy a bloom that never fades


Mini Five-Petal Blossoms (Super Beginner-Friendly)
These delicate, matte-finish blossoms are the perfect introduction to floral clay sculpting. With their soft pastel hues and simple five-petal shape, they make charming beads, table scatter, or sweet embellishments for larger projects.
Step-by-Step Tutorial
Materials
- Polymer clay (in pastel pink, peach, yellow, mint, and blue)
- Parchment paper or ceramic tile (work surface)
- Needle tool or toothpick
- Ball stylus tool (small)
- Blade or craft knife
- Cornstarch or baby powder (optional, to prevent sticking)
- Oven (for baking polymer clay)
Step 1: Preparing the Clay
-
Condition the clay:
Begin by warming up your clay colors in your hands. Knead each pastel shade separately until it is soft, pliable, and free of cracks. -
Portioning:
Roll your conditioned clay into a thin log or ‘snake’, roughly 1/4 inch thick. Use your blade to slice off five equal-sized segments for a single flower. I find keeping these pieces consistent is key to a symmetrical bloom. -
Rolling spheres:
Take each of the five small segments and roll them between your fingers into smooth, tiny balls. Repeat this for all your desired color variations.
Fingerprint Fix
If you see fingerprints on your petals, lightly brush them with a tiny amount of baby oil or cornstarch before baking to smooth the surface.
Step 2: Shaping the Flower
-
Form the circle:
Arrange five balls of the same color into a tight circle on your work surface. They should be touching each other in the center. -
Pressing the petals:
Gently press down on the center of the ring with your thumb or finger to flatten the balls slightly. You want them to stick together but retain a puffy, rounded appearance. -
Smoothing the center:
If the center join looks messy, use your finger to gently smudge the clay inward, ensuring a strong bond between the five petals. -
Defining the petals:
Use the side of your needle tool or toothpick to press indentations between each petal. Press from the outer edge toward the center, but don’t cut all the way through. -
Rounding the edges:
Tap the outer edge of each petal gently with your finger to remove any sharpness and give it that soft, organic look visible in the photo.
Petal Proportions
Use a mini circle cutter to punch out your initial clay pieces. This guarantees every single petal starts with the exact same amount of clay.
Step 3: Adding Detail & Finishing
-
Creating the center hole:
Take your needle tool or a small stylus. Press directly into the center of the flower to create a small hole. This can be decorative or functional if you plan to thread them later. -
Adding texture (optional):
For a two-tone look like some in the example, press a tiny ball of contrasting yellow clay into the center hole you just made. -
Texturing the center:
Poke the center (either the hole or the yellow clay) gently with a needle tool to create a stippled texture. -
Final shaping check:
Look closely at your flower. If the petals have flattened too much, gentle nudge them upward from underneath to give the flower a slightly cupped dimension. -
Baking:
Transfer your flowers to a baking sheet lined with parchment paper. Bake according to your specific brand of clay’s instructions (usually around 275°F or 135°C for 15-30 minutes). -
Cooling:
Allow the flowers to cool completely in the oven with the door slightly ajar to prevent thermal shock cracks.
Once cooled, scatter these lovely matte blooms on a decorative tray or string them together for a springtime garland


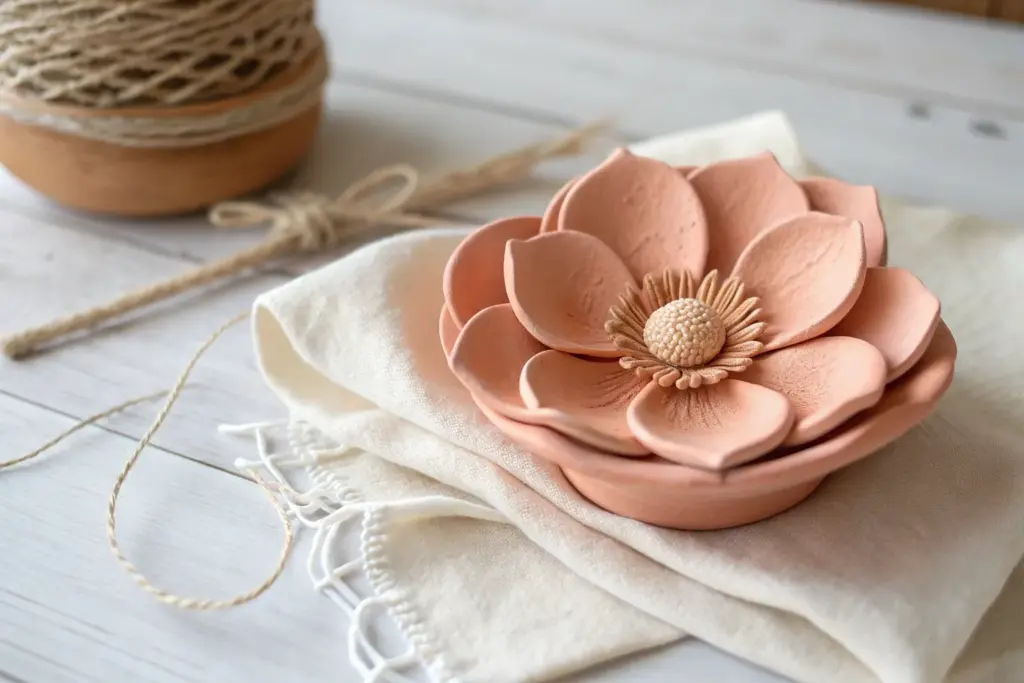
Plumeria-Inspired Pinwheel Bloom
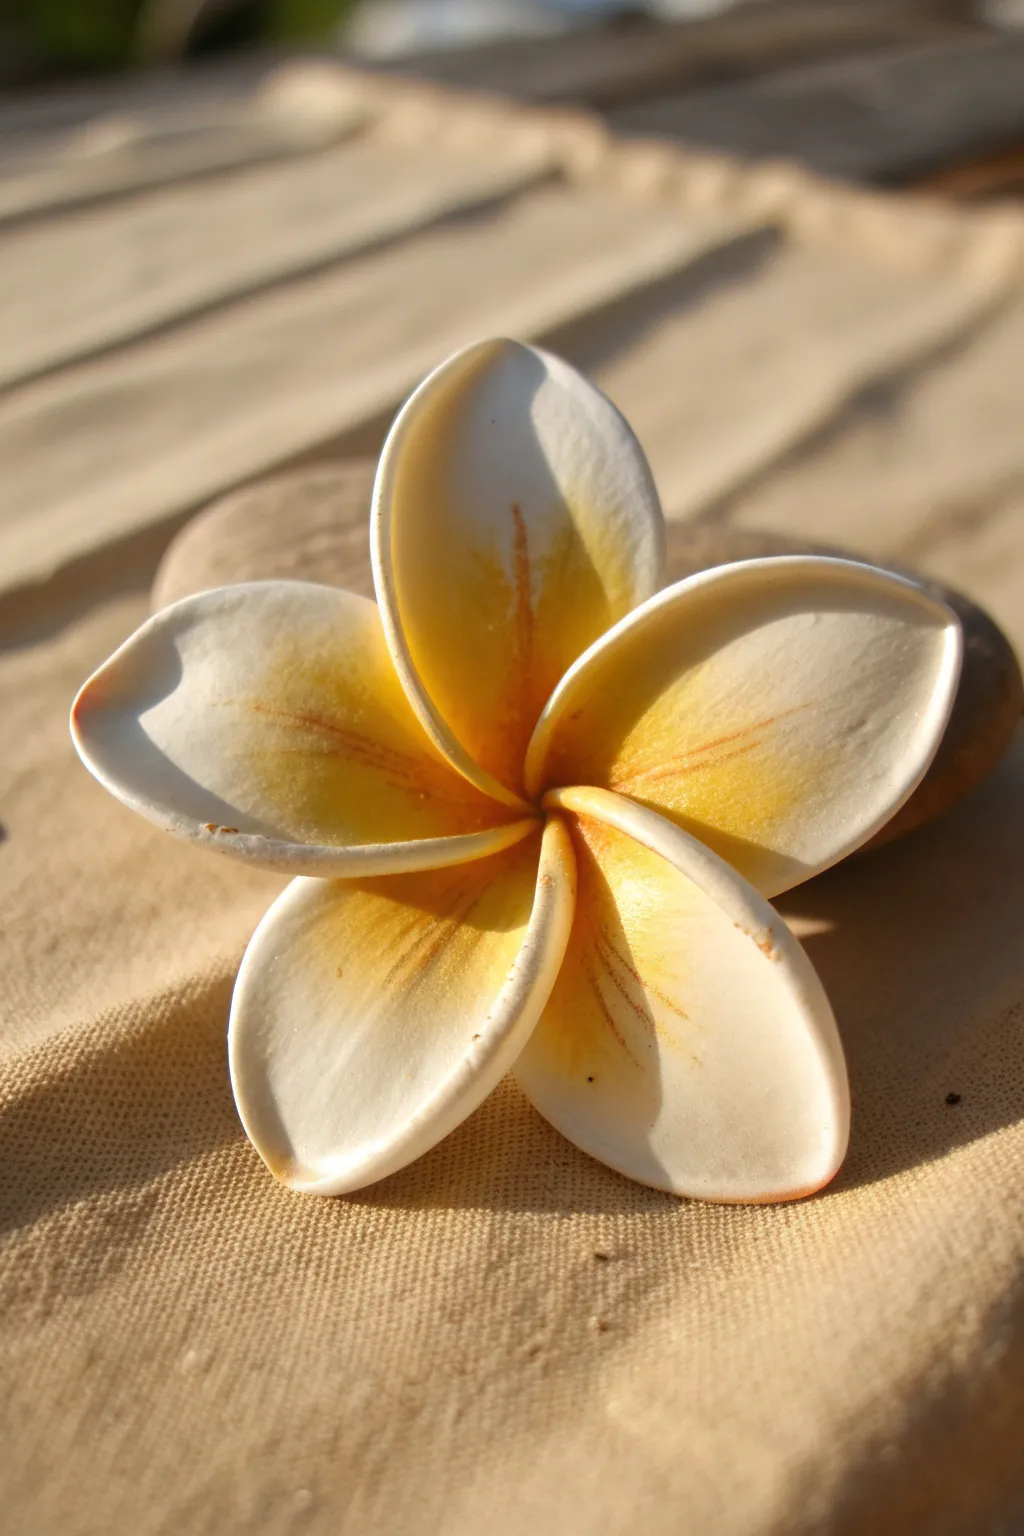
Capture the essence of tropical relaxation with this delicate, sun-kissed clay plumeria. The soft white petals feature a warm, radiant yellow center, sculpted to mimic the flower’s iconic pinwheel spiral.
Step-by-Step Tutorial
Materials
- White polymer clay or air-dry flower clay (approx. 20g)
- Yellow soft pastel chalk or yellow acrylic paint
- Small paintbrush (soft shader)
- Ball tool (medium size)
- Needle tool or toothpick
- Rolling pin or pasta machine
- Clay cutter (teardrop shape, approx. 1 inch) or craft knife
- Work surface (ceramic tile or glass mat)
Step 1: Shaping the Petals
-
Condition the Clay:
Start by thoroughly conditioning your white clay until it is soft, pliable, and free of cracks. A warm, consistent texture is key for smooth petals. -
Form Teardrops:
Divide your clay into five equal portions. Roll each portion into a smooth ball about the size of a large pea, then taper one end to form a teardrop shape. -
Flatten the Shapes:
Gently press each teardrop flat between your thumb and forefinger. You want the wider end to remain slightly rounded and the tapered end to be thicker for attaching later. -
Thin the Edges:
Place a petal on your palm. Using your thumb or a ball tool, gently roll over the edges of the wider part to thin them out. This makes the flower look delicate and realistic rather than chunky. -
Create Texture:
While the petal is in your palm, use your thumb to press a slight concave curve into the center. This slight cupping helps the petals catch the light naturally.
Smooth Operator
Work on a piece of plastic wrap or a glossy tile. This allows you to lift the thin petals without distorting their shape or leaving fingerprints.
Step 2: Adding Color
-
Prepare Yellow Pigment:
If using chalk pastels, scrape a small amount of bright yellow chalk into a powder. If using paint, squeeze a tiny dot onto a palette. -
Shade the Base:
Take a dry soft brush and pick up the yellow pigment. Apply it heavily to the narrow, pointed end of each petal, fading it out as you move toward the middle. I find less is more here—you can always add layers. -
Create a Gradient:
Blend the yellow upward so it stops about halfway up the petal. The transition should be soft, not a hard line. -
Add Depth lines:
For extra realism, use a needle tool to very lightly etch faint, tiny lines radiating from the yellow base into the white area, mimicking natural veins.
Step 3: Assembly and Finishing
-
Start the Spiral:
Take your first petal and curl the right edge slightly upward. This ‘lift’ is crucial for the classic pinwheel overlap. -
Attach Second Petal:
Place the pointed base of the second petal next to the first. Layer the left edge of the second petal *under* the lifted right edge of the first petal. -
Continue the Circle:
Repeat this pattern with the third and fourth petals, always tucking the new petal’s left side under the previous petal’s right side. -
Close the Loop:
Insert the fifth and final petal. Tuck its left side under the fourth petal, and carefully lift the first petal’s right edge to tuck the fifth petal’s right side underneath it. -
Secure the Center:
Gently pinch all five pointed bases together at the bottom center to bond the clay. Use a smoothing tool to merge the clay at the back so it holds together firmly. -
Refine the Shape:
Adjust the curve of each petal tip. Plumeria petals often have a slight backward curl at the very edge, so gently roll the tips back with your finger. -
Final Coloring Touch:
Once assembled, dab a tiny bit more intensified yellow or even a hint of orange right into the deep center cavity to create a focal point. -
Bake or Dry:
Follow part-specific instructions for your clay type (bake at manufacturer’s temp or air dry for 24 hours). Support the petals with small pieces of tissue if they droop.
Scented Secret
After baking or drying, add a drop of plumeria essential oil to the unsealed underside of the clay to turn your sculpture into a fragrant aromatherapy piece.
Now you have a perpetual bloom that brings a touch of island warmth to any room.

The Complete Guide to Pottery Troubleshooting
Uncover the most common ceramic mistakes—from cracking clay to failed glazes—and learn how to fix them fast.
Sunflower With Layered Petals and Seed Disk
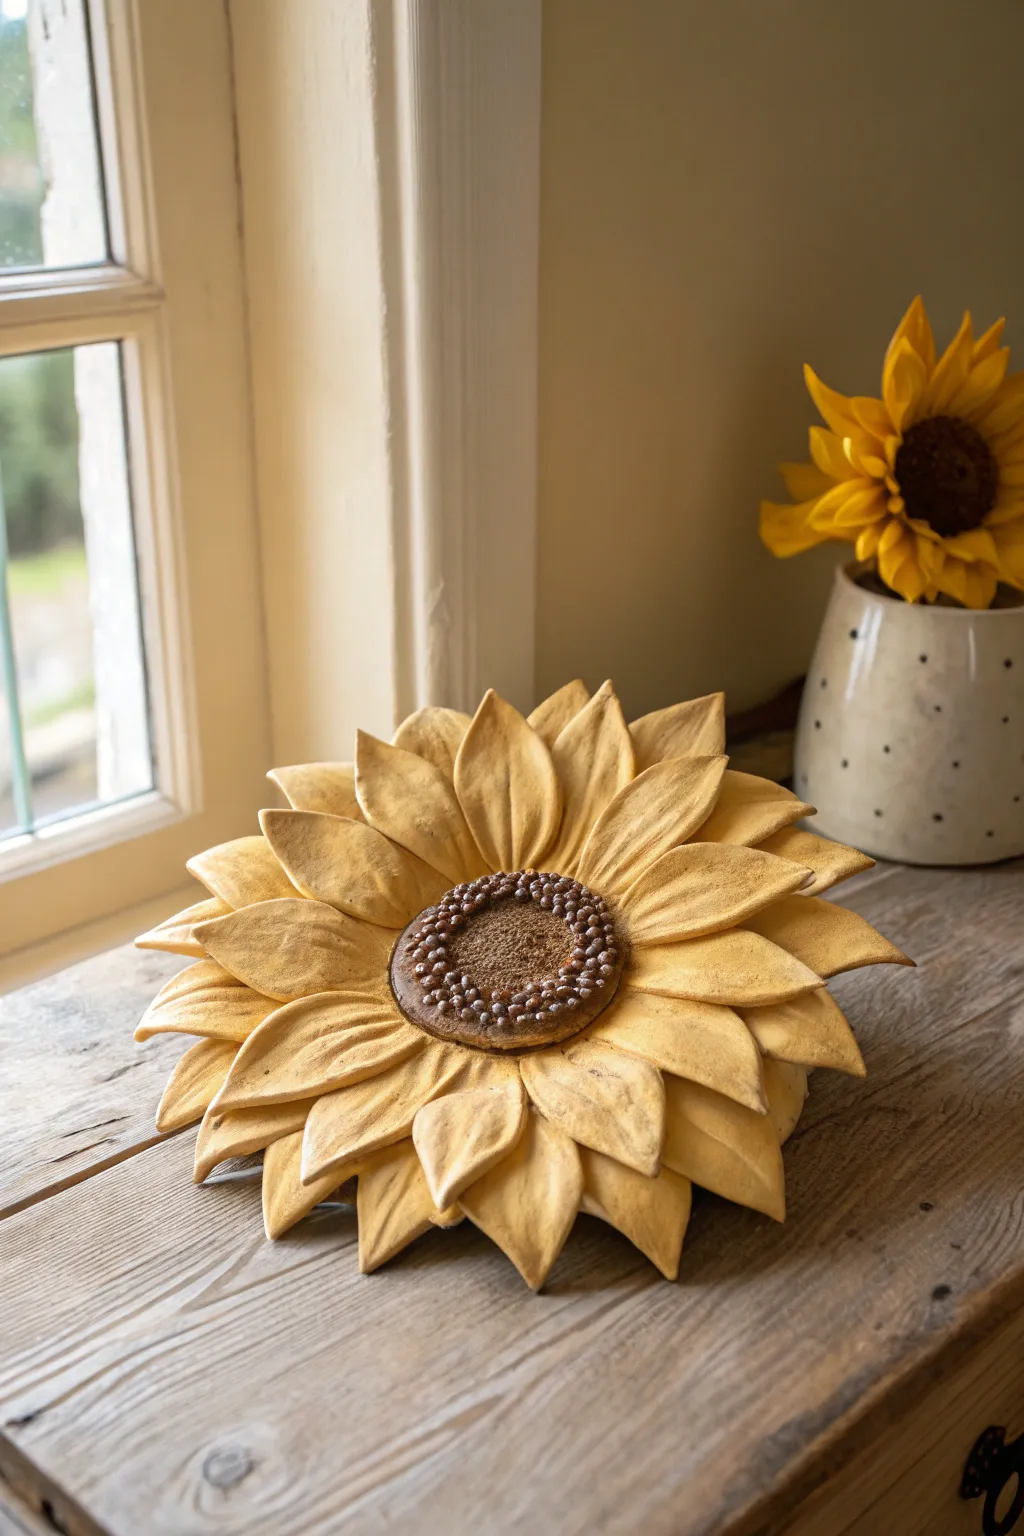
Bring the warmth of late summer indoors with this robust, textured clay sunflower. Its charm lies in the organic layering of petals and the realistic, seeded center, making it a perfect centerpiece or wall hanging.
Step-by-Step Guide
Materials
- Air-dry clay or polymer clay (yellow and brown, or white to be painted)
- Rolling pin
- Leaf-shaped cookie cutter (large teardrop shape) or craft knife
- Veining tool or toothpick
- Ball tool (small)
- Small bowl or curved form (for drying shape)
- Texture sponge or stiff brush
- Acrylic paints (Yellow ochre, burnt umber, lighter yellow)
- Matte varnish
Step 1: Forming the Base and Petals
-
Create the base:
Start by rolling out a thick, flat disc of clay about 3 inches in diameter. This will serve as the anchor for your petals, so it doesn’t need to be pretty, just sturdy. -
Roll out clay for petals:
Roll out a large sheet of clay to about 1/4 inch thickness. Consistency is key here, but slight variations add to the natural look. -
Cut the first layer:
Using a teardrop cutter or a craft knife, cut out 10-12 large petal shapes. These should be the largest petals for the outermost ring. -
Add vein texture:
Take each petal and gently score a central vein line down the middle using a veining tool or the back of a knife. Add fainter, branching veins for realism. -
Attach the outer ring:
Score and slip the edge of your base disc (if using water-based clay) and attach the petals in a circle, slightly overlapping their edges. -
Create movement:
Before the clay sets, gently pinch the tips of the petals and curl some edges upward or downward. I find this irregularity makes the flower look much more alive. -
Cut inner petals:
Cut a second set of slightly smaller petals for the inner layer. You’ll likely need another 10-12 pieces. -
Layer the second ring:
Attach this inner ring of petals on top of the first, offsetting them so the points of the new petals sit between the gaps of the layer below.
Drooping Petals?
If gravity is pulling your petals too flat while working, tuck small balls of aluminum foil or plastic wrap under the petals to support their shape until the clay hardens.
Step 2: Sculpting the Seed Disk
-
Form the center mound:
Roll a ball of brown clay (or white clay to be painted later) into a flattened dome shape that fits snugly in the open center of your petals. -
Texture the disk edge:
Before attaching, press a texture sponge or stiff brush around the very outer rim of this brown dome to create a ‘fuzzy’ pollen texture. -
Attach the center:
Firmly press the dome into the center of the flower. Use a modeling tool to blend the bottom edge of the dome into the base of the petals so it doesn’t fall out. -
create the rim seeds:
Roll very tiny, peppercorn-sized balls of clay. Press these into a ring around the outer edge of the center disk to mimic the larger, mature seeds. -
Details the center:
For the very middle of the seed disk, use a small ball tool or a toothpick to stipple thousands of tiny dots, creating a dense, sponge-like texture. -
Dry with support:
Place the entire flower into a shallow, curved bowl lined with parchment paper. This ensures the petals dry in a slightly cupped, natural shape rather than lying flat.
Make it a Wall Piece
Embed a wire loop or a hook into the back of the base disc while the clay is still wet. Reinforce it with a small patch of extra clay for a secure hanger.
Step 3: Painting and Finishing
-
Base coat:
Once fully cured, apply a base coat of yellow ochre to the petals. Don’t worry about perfect coverage; a little transparency can look nice. -
Dry brush highlights:
Dip a dry brush into a lighter, creamy yellow paint. Lightly sweep it over the raised veins and petal tips to accentuate the texture. -
Define the center:
Paint the seed disk dark brown. While wet, wipe a little off the raised ‘seeds’ on the rim to reveal the clay color, or highlight them later with a touch of tan paint. -
Seal the work:
Finish with a coat of matte varnish to protect the clay and give it a finished, professional sheen without making it look plastic.
Display your durable bloom on a sunny windowsill to enjoy the feeling of autumn all year round
Monochrome White Flowers for a Clean, Sculptural Look
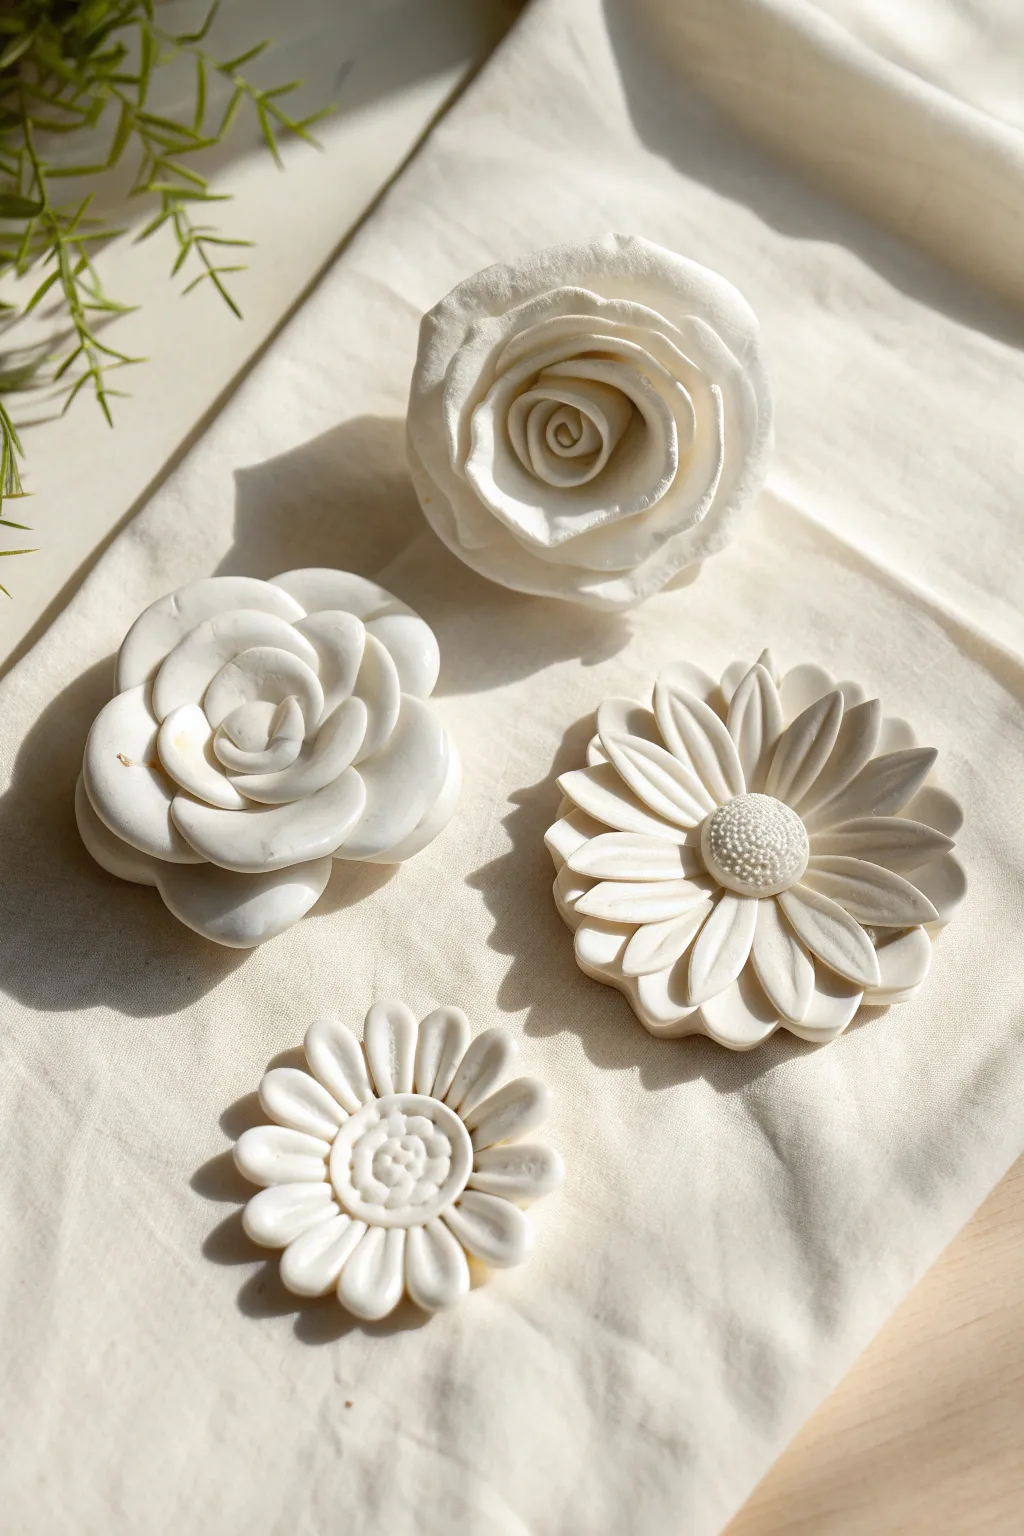
Achieve a stunningly minimalist aesthetic with these monochromatic white clay flowers, ranging from romantic roses to structured daisies. Their matte, clean finish mimics the look of porcelain, making them perfect for elegant home decor or shadow box displays.
How-To Guide
Materials
- White air-dry clay (or polymer clay for baking)
- Clay roller or pasta machine
- Ball stylus tools (various sizes)
- Small circle cutter
- Leaf shaping mold or texture mat (optional)
- Small paintbrush (for water bonding)
- Craft knife or scalpel
- Texture sponge or stiff brush
- Smooth work surface or silicone mat
Step 1: The Classic Rose
-
Prepare the Base:
Roll a small ball of clay into a cone shape to serve as the rose’s center bud. This provides a sturdy structure for the petals to cling to. -
Create Petals:
Roll out a thin sheet of clay and cut several circles. Flatten the edges of each circle with your thumb or a ball tool to thin them out and give a delicate, organic feel. -
Wrap the Inner Bud:
Take the first petal and wrap it tightly around the cone tip so it curls over itself. Add a second petal directly opposite, wrapping it slightly looser than the first. -
Build the Bloom:
Continue adding petals in an overlapping spiral pattern. Gently roll the upper edges of the outer petals backward with your fingertip to open up the bloom. -
Finish the Rose:
Once you reach the desired fullness, slice off the excess clay at the bottom of the cone to create a flat base for the flower to sit on.
Cracking Clay?
If using air-dry clay, cracks can appear as it shrinks. Smooth cracks with a slightly damp finger or slip (clay mixed with water) immediately.
Step 2: The Sculpted Camellia
-
Base Construction:
Start with a flat disc of clay as your foundation. This flower is built from the outside in. -
Thick Outer Petals:
Mold five to six thick, rounded teardrop shapes. Arrange them in a circle on the base, flattening them slightly but keeping the edges soft and rounded like a camellia. -
Inner Layers:
Create a second layer of slightly smaller rounded petals, placing them in the gaps between the first layer’s petals. -
The Center Bud:
For the center, roll a small strip of clay into a loose spiral and place it deeply into the middle of the flower, blending the bottom edges with a dab of water.
Go High-Gloss
While these look great matte, applying a high-gloss varnish after drying mimics glazed ceramic for a true porcelain effect.
Step 3: The Textured Daisy
-
Petal Formation:
Roll out a sheet of clay to medium thickness. Cut approximately 15-20 long, narrow teardrop shapes for the petals. -
Detailing Petals:
Use a modeling tool or knife to press a central vein line down the length of each petal. I find this adds necessary dimension to preventing the flower from looking too flat. -
Layering:
Arrange a bottom layer of larger petals in a circle. Add a second layer of petals on top, positioned in the spaces between the bottom petals. -
Textured Center:
Roll a ball of clay and flatten it slightly into a dome. Place it in the center of the petals. -
creating the Stamen:
Use a small needle tool or a stiff toothbrush to stipple the surface of the center dome, creating a dense, pollen-like texture.
Step 4: The Small Wildflower
-
Simplified Petals:
Create 10-12 small, oval-shaped petals. These should be shorter and thicker than the daisy petals. -
Radial Assembly:
Press the petals together in a tight radial circle. The petals should touch side-by-side rather than overlapping significantly. -
Detailed Core:
Place a small flat disc in the center. Use a tiny ball tool to emboss a circle of dots around the perimeter of this center disc. -
Final Drying:
Let all flowers dry completely on a flat surface. For the curved petals, you can rest them in a curved paint palette or egg carton to hold their shape while drying.
Arrange your trio of blooms together to admire the clean, bright sculptural effect you have created


What Really Happens Inside the Kiln
Learn how time and temperature work together inside the kiln to transform clay into durable ceramic.
Pressed-Flower Look Using Flat Petal Layers
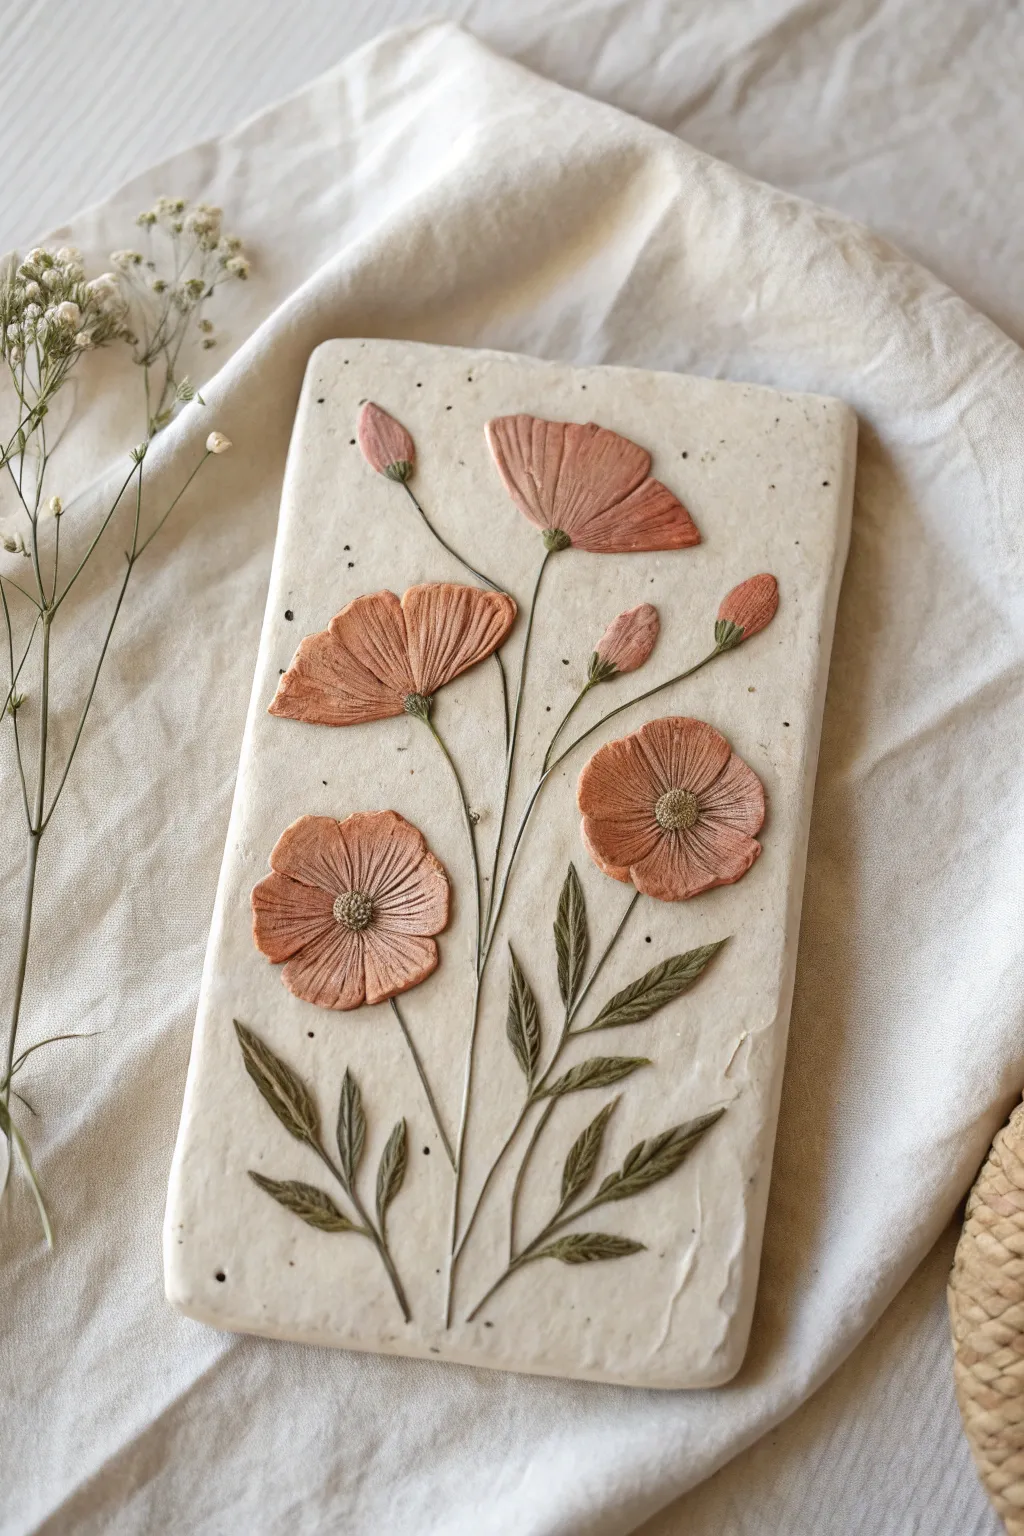
Capture the delicate beauty of a pressed flower specimen without flattening natural blooms by sculpting this dimensional relief slab. Using lay-flat techniques and subtle texturing, you’ll create a vintage-inspired botanical art piece that feels both organic and refined.
Step-by-Step Tutorial
Materials
- Polymer clay (cream/white speckle, terracotta, olive green, brown)
- Rectangular clay cutter or long blade
- Rolling pin or pasta machine
- Needle tool or detailing pick
- Small ball stylus
- Parchment paper or ceramic tile (surface)
- Soft paintbrush
- Acrylic roller
- Oven (if using polymer clay)
Step 1: Preparing the Base
-
Condition the clay:
Begin by thoroughly conditioning your cream or white speckled clay until it is pliable. If you don’t have pre-speckled clay, mix in a tiny pinch of black pepper or dried vanilla bean specks for that organic look. -
Roll the slab:
Roll the clay out into a thick, even sheet, approximately 1/4 inch thick. It needs to be substantial enough to support the added floral layers without warping. -
Cut the shape:
Use a rectangular cutter or a long, sharp blade to cut a clean rectangle. Soften the sharp cut edges slightly with your finger for a more handmade, stone-like appearance. -
Sketch the composition:
I like to take a needle tool and very lightly scratch a guide line for your main stems directly onto the raw clay slab to ensure your spacing is balanced before committing to the sculpting.
Clean Texture Trick
If your needle tool sticky and pulling up the clay while texturing petals, dip the tip in a tiny bit of cornstarch or baby powder before pressing it into the clay.
Step 2: Sculpting the Stems and Leaves
-
Create thin stems:
Roll exceptionally thin snakes of olive green clay. Gently press them onto the slab following your guide lines, using a tool to nudge curves into place so they look natural rather than stiff. -
Form the leaves:
Shape small teardrops of olive green clay. Flatten them between your fingers before placing them attached to the stems. -
Texture the foliage:
Use a needle tool or craft knife to press vein lines into each leaf. The key here is not just drawing a line, but pressing a groove to create relief texture.
Step 3: Building the Flowers
-
Mix petal colors:
Create a soft terracotta shade. You might want to marble it slightly with a touch of white or a darker orange to give the petals depth rather than a flat, solid color. -
Shape the petals:
Form small balls of your petal color and flatten them into thin pancakes. Pinch one end slightly to create the attachment point for the flower center. -
Attach the base petals:
Place the flattened petals onto the slab at the top of your stems. For the open flowers, arrange them in a fan shape or a full circle, overlapping slightly. -
Add line texture:
This step defines the style: use your needle tool to press deep, radiating lines from the center of the flower outward to the petal tips. This mimics the striations of a poppy or cosmos. -
Create buds:
For the buds, place a single teardrop shape of petal clay at the tip of a stem. Add a tiny green cup (sepal) at the bottom where it meets the stem and texture vertically. -
Sculpt the centers:
Roll a small ball of olive or brownish-green clay. Press it into the center of the open blooms. Use a needle tool to stipple it forcefully, creating a fuzzy, pollen-like texture.
Wall Hanging Upgrade
Before baking, use a straw to punch a hole in the top center. After curing, loop a leather cord or velvet ribbon through it to turn this slab into a hanging ornament.
Step 4: Final Details and Curing
-
Check connections:
Gently press down on all added elements to ensure they are fused to the background slab. You don’t want delicate petals popping off after baking. -
Add surface pits:
Using a tool with a blunt point, add a few random indentations around the background slab to enhance the rustic, weathered stone aesthetic. -
Bake the piece:
Bake according to your clay manufacturer’s specific time and temperature instructions. Since the slab is thick, ensure you don’t underbake. -
Cooling:
Let the piece cool completely in the oven or under a heavy book (protected by parchment) to prevent the large flat shape from curling up at the corners.
Display your finished botanical slab on a small easel or mounted in a shadow box to bring a permanent touch of nature indoors
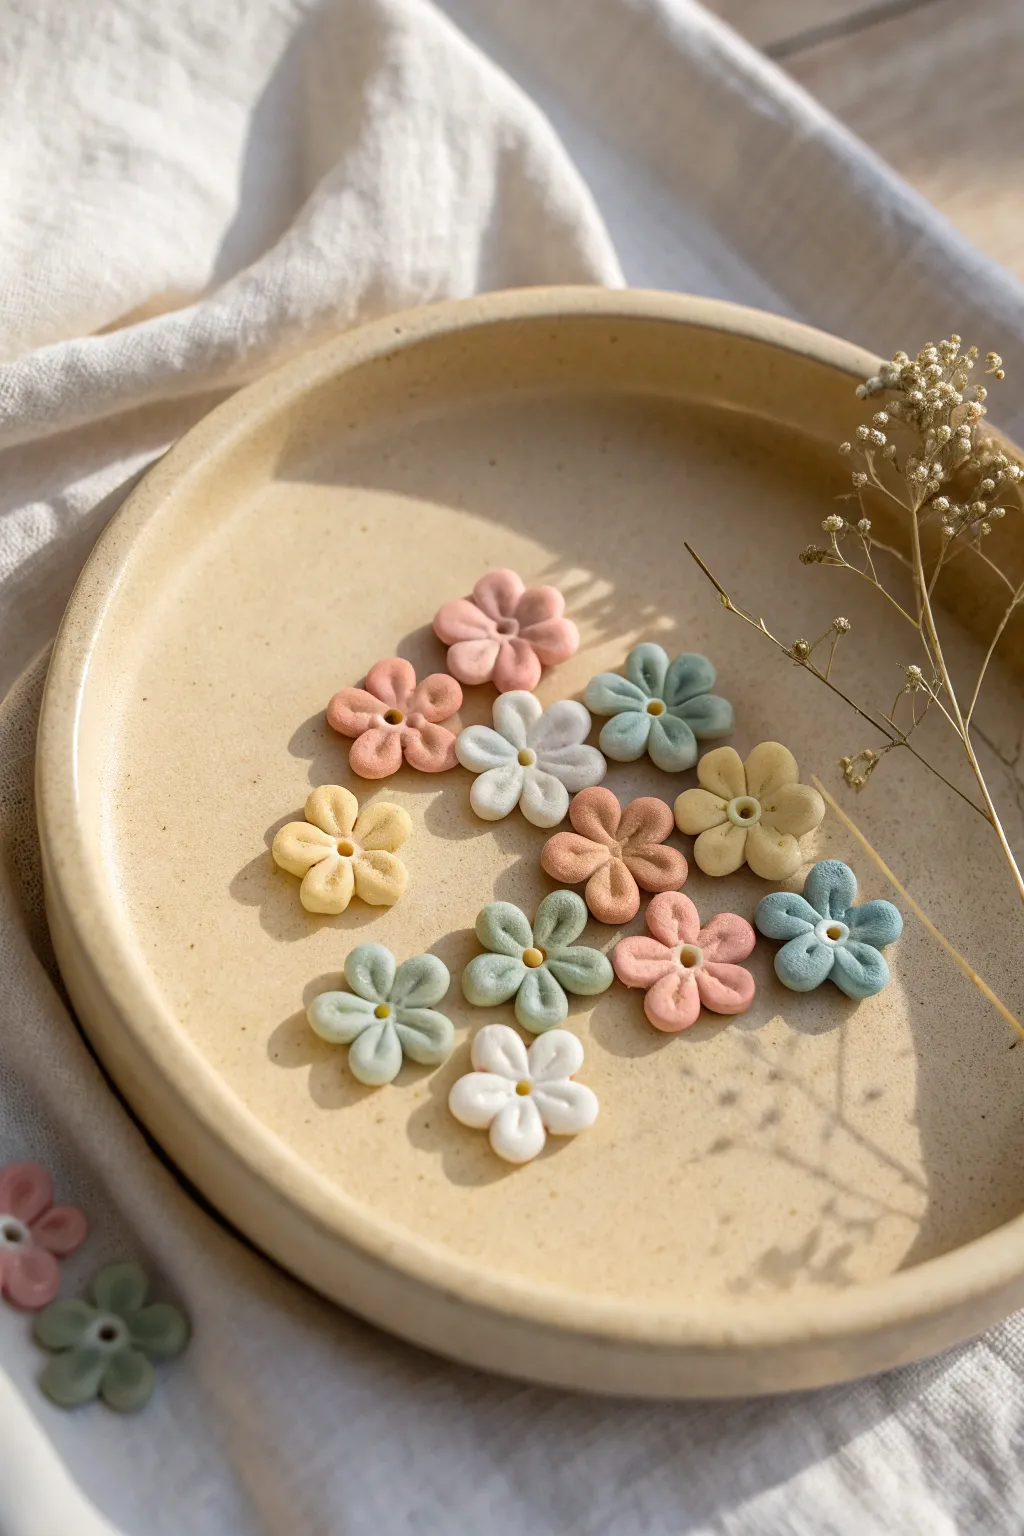
Clay Flowers as Bowl Fillers or Table Scatter
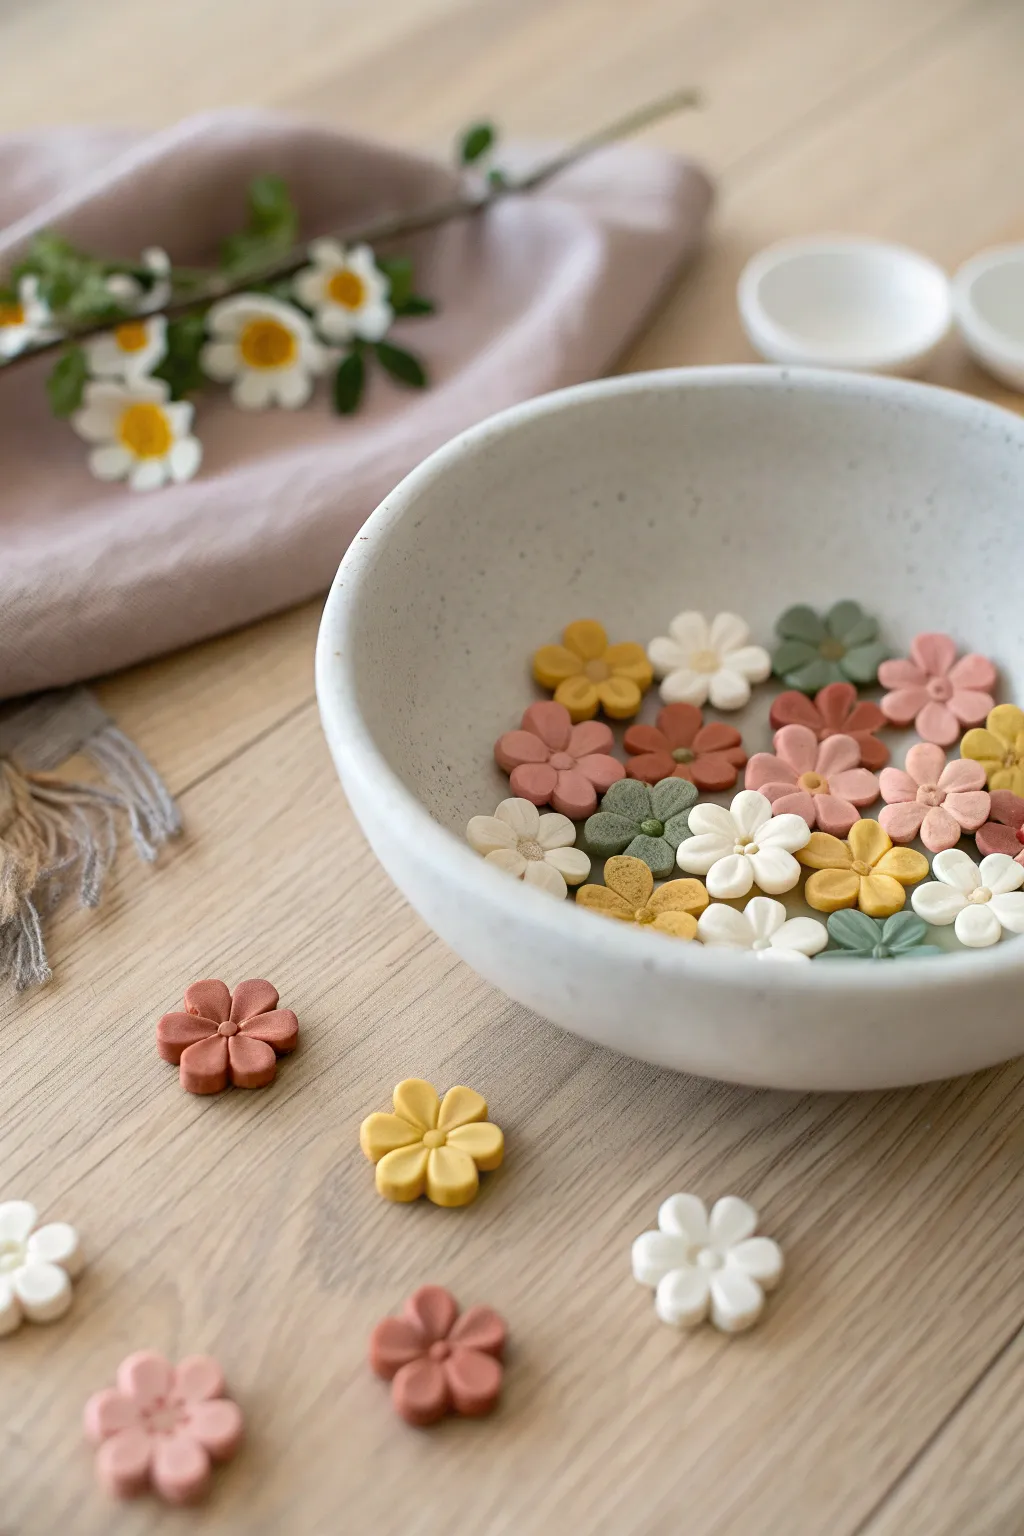
These charming, understated clay flowers bring a soft touch of whimsy to any bowl or tabletop. With their matte finish and earthy pastel palette, they mimic the simple beauty of wildflowers in everlasting form.
Step-by-Step
Materials
- Polymer clay or air-dry clay (colors: white, mustard yellow, sage green, terracotta, blush pink)
- Acrylic rolling pin or clay machine
- Small 5-petal flower cookie cutter (approx. 1 inch)
- Ball stylus tool (medium size)
- Parchment paper or silicone work mat
- Cornstarch or baby powder (for release)
- Needle tool or toothpick
- Soft brush (for dusting)
- Baking sheet (if using polymer clay)
Step 1: Color & Clay Preparation
-
Condition the clay:
Begin by kneading your chosen clay colors individually until they are soft, pliable, and free of cracks. Warm hands help this process significantly. -
Mix custom shades:
To achieve the muted, earthy look from the photo, you may need to mix colors. Try adding a tiny bit of brown or grey to bright yellows and pinks to tone them down into mustard and blush. -
Roll out sheets:
Using your acrylic roller, flatten a portion of each color into an even sheet. Aim for a thickness of about 3-4mm—thick enough to be sturdy but delicate enough to look like a petal.
Sticky Clay Fix
If clay gets stuck inside the cutter, use a stiff bristle paintbrush to push it out from the back, or dip the cutter in water/cornstarch before every press.
Step 2: Cutting & Shaping
-
Dust your surface:
Lightly dust your work surface and the cutter with a little cornstarch to prevent sticky situations. -
Cut the shapes:
Press your small 5-petal flower cutter firmly into the clay sheet. Wiggle it slightly to ensure a clean cut, then release the clay flower. -
Clean the edges:
Inspect the edges of your cutout. If there are any ragged bits of clay, gently smooth them down with your fingertip. -
Soften the petals:
Place the clay flower on your palm or a foam mat. Using the larger end of a ball stylus or your thumb, press gently into the center of each petal to give it a slight concave curve. -
Create the center indent:
Press the ball stylus directly into the very center of the flower. This creates a neat depression that helps lift the petals upward slightly. -
Add center detail:
I like to take a tiny pinch of clay in a contrasting color (like yellow for a white flower) and roll it into a minuscule ball. Place this into the center depression you just made. -
Texture the center (optional):
For extra realism, gently poke the tiny center ball with a needle tool to give it a pollen-like texture. -
Create the line details:
Using a dull knife or the side of a needle tool, gently impress a straight line down the center of each petal, radiating from the center outward. Don’t cut all the way through. -
Vary the shapes:
Repeat the cutting process for all your colors. Leave some flowers flat and curl the petals of others upward more dramatically to create variety in your final pile.
Pro Tip: Natural Curve
Dry or bake a few flowers inside the curved wells of an empty egg carton or a paint palette. This freezes them in a cupped shape for a more natural look.
Step 3: Finishing the Blooms
-
Arrange for drying:
Transfer your creations to a parchment-lined baking sheet (for polymer) or a flat drying surface (for air-dry). Make sure they aren’t touching. -
Bake or dry:
Follow the specific instructions on your clay package. For polymer clay, bake at the recommended temperature (usually 275°F/135°C) for 15-30 minutes. -
Cool completely:
Let the flowers cool completely on the baking sheet before handling them. They are fragile while warm. -
Sand rough spots:
If you notice any sharp edges or fingerprints after curing, use a fine-grit sanding sponge to buff them away gently. -
Matte finish:
The look in the photo is very matte. If your clay is shiny, you can apply a layer of matte varnish to dull the sheen and protect the surface.
Fill a favorite ceramic bowl with your handful of blooms and enjoy the everlasting garden you’ve created