
If you’ve ever been obsessed with opening tiny containers (same), you’re going to love these ceramic box with lid ideas. I lean on simple slab-built shapes that stay beginner-friendly, then dress them up with texture, color, and fun lid details.
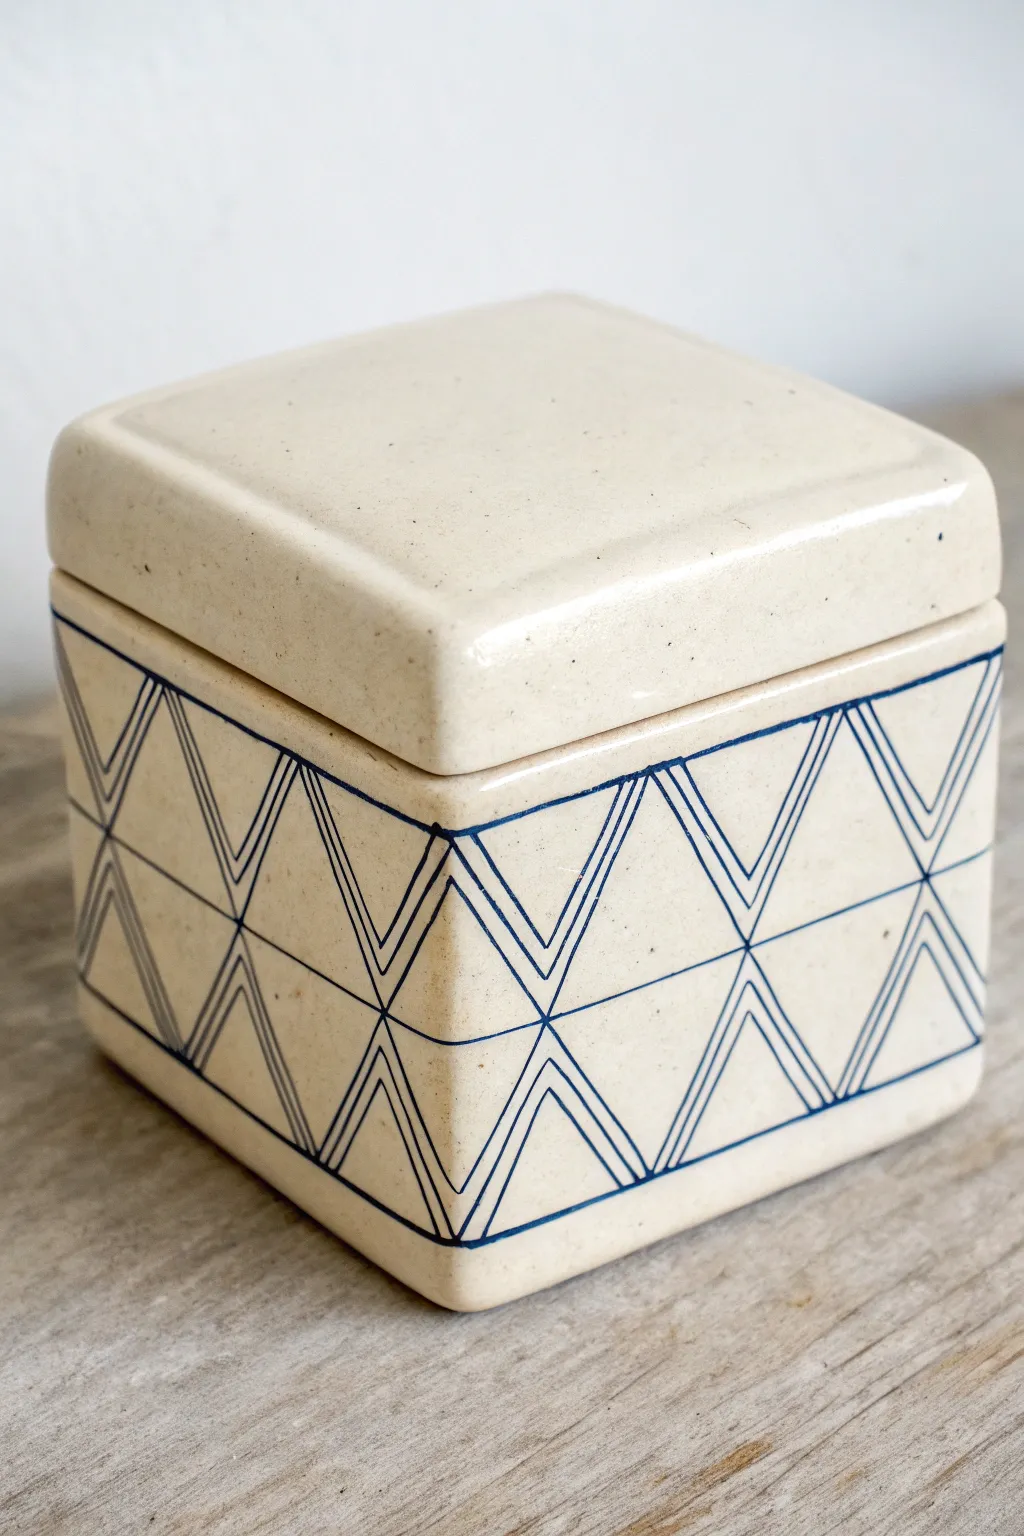
Classic Square Slab-Built Trinket Box With Fitted Lid
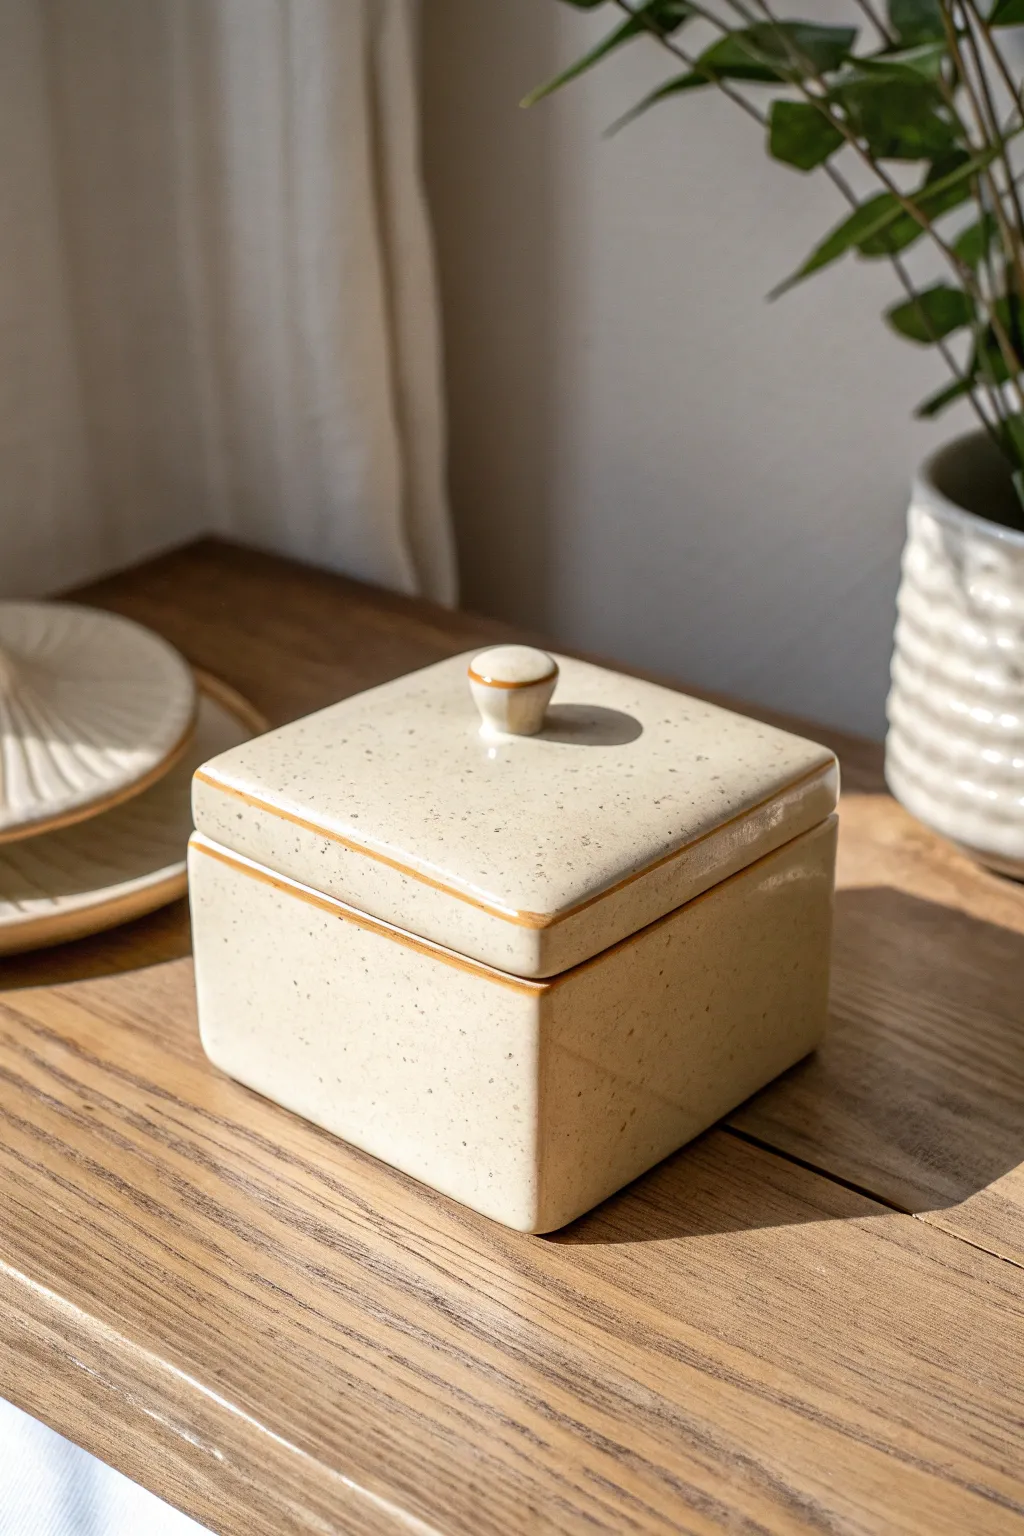
This elegant square box combines clean slab-built geometry with soft, natural glazing technique. The speckled cream finish and delicate brown rim detailing give it a warm, contemporary feel perfect for storing jewelry or tea bags.
Step-by-Step Tutorial
Materials
- Speckled Stoneware Clay
- Rolling Pin and 1/4″ thickness strips/slats
- Fettling Knife or X-Acto blade
- Needle Tool
- Serrated Rib or Scoring Tool
- Slip (clay and water slurry)
- Square Template (paper or cardboard, approx. 4×4 inches)
- Small sponge
- Cream/Oatmeal Glaze (matte or satin)
- Iron Oxide Stain or Dark Brown Underglaze
Step 1: Creating the Box Body
-
Roll the Slabs:
Begin by rolling out your speckled stoneware clay. Use 1/4-inch slats or guide rails on either side of the clay to ensure an even thickness throughout the entire slab, which is crucial for structural integrity. -
Cut the Components:
Using your square template, cut out five identical squares from the leather-hard slab. These will become the base and the four walls. Let them stiffen slightly until they can hold their shape without bending. -
Bevel the Edges:
For the cleanest corners, miter the edges of your wall pieces and the base at a 45-degree angle. This ensures a sharp 90-degree join and creates a stronger bond than a simple butt joint. -
Score and Slip:
Aggressively score the beveled edges using a serrated rib or needle tool. Apply a generous amount of slip to the scored areas. -
Assemble the Walls:
Attach the walls to the base and to each other. Press the joints firmly together to ensure they lock. I find using a small wooden paddle to tap the walls gently helps square everything up perfectly. -
Reinforce the Seams:
Roll a very thin coil of soft clay and press it into the interior corners of the box. Smooth this coil out with a modeling tool or your finger to reinforce the seams. -
Refine the Exterior:
Smooth the exterior corners with a rib tool to remove any excess slip and sharpen the edges. The box should look crisp and geometric.
Clean Corners Pro Tip
After joining your walls, cover the box with plastic and let the moisture equilibrate overnight. Then, use a distinct Surform tool to rasp the corners sharp.
Step 2: Constructing the Lid and Knob
-
Cut the Lid Slab:
Cut another square from your slab that matches the outer dimensions of your assembled box exactly. This will sit flush on top. -
Add the Flange:
To keep the lid from sliding off, attach a smaller square of clay (or four strips) to the underside of the lid slab. This inner flange should fit loosely inside the box opening, allowing for shrinkage. -
Shape the Knob:
Roll a small ball of clay and shape it into a tapered cylinder or mushroom shape. Score and slip the center of the lid, then attach the knob securely. -
Refine the Knob:
Smooth the transition between the knob and the lid so it looks seamless. Using a wet sponge, round off the top edge of the knob slightly for a comfortable grip. -
Dry Slowly:
Place the lid on the box during the drying process. This helps prevent warping and ensures the fit remains true as the clay shrinks. Cover loosely with plastic for the first 24 hours.
Step 3: Glazing and Finishing
-
Bisque Fire:
Fire the completely dry piece to cone 04 (or your clay body’s bisque temperature) to prepare it for glazing. -
Apply Base Glaze:
Dip the entire box and lid into a satin cream or oatmeal glaze. If brushing, apply 3 even coats, letting each dry in between. Ensure the glaze isn’t too thick on the flange area. -
Clean the Contact Points:
Wipe away all glaze from the underside flange of the lid and the top rim of the box where the lid sits. If these fuse during firing, the box will be ruined. -
Add the Rim Detail:
Dip a fine detail brush into iron oxide wash or dark brown underglaze. carefully paint a thin line along the rim of the lid and a circle around the top edge of the knob. -
Enhance the Definition:
Paint a similar thin line under the ‘shelf’ of the lid where it meets the box body. This creates that lovely bordered effect seen in the photo. -
Final Fire:
Glaze fire the piece to cone 5/6 (or your clay’s specific maturity temperature). Make sure to fire the lid separately on the kiln shelf or use alumina wax on the potential contact points.
Level Up: Surface Texture
Before constructing the box, gently press a piece of large-weave linen or canvas onto your fresh slab to give the clay a subtle fabric texture under the glaze.
Once cooled, fill your new ceramic box with treasures or place it on a shelf to admire the clean lines


Rectangular Keepsake Box With Beveled Corners
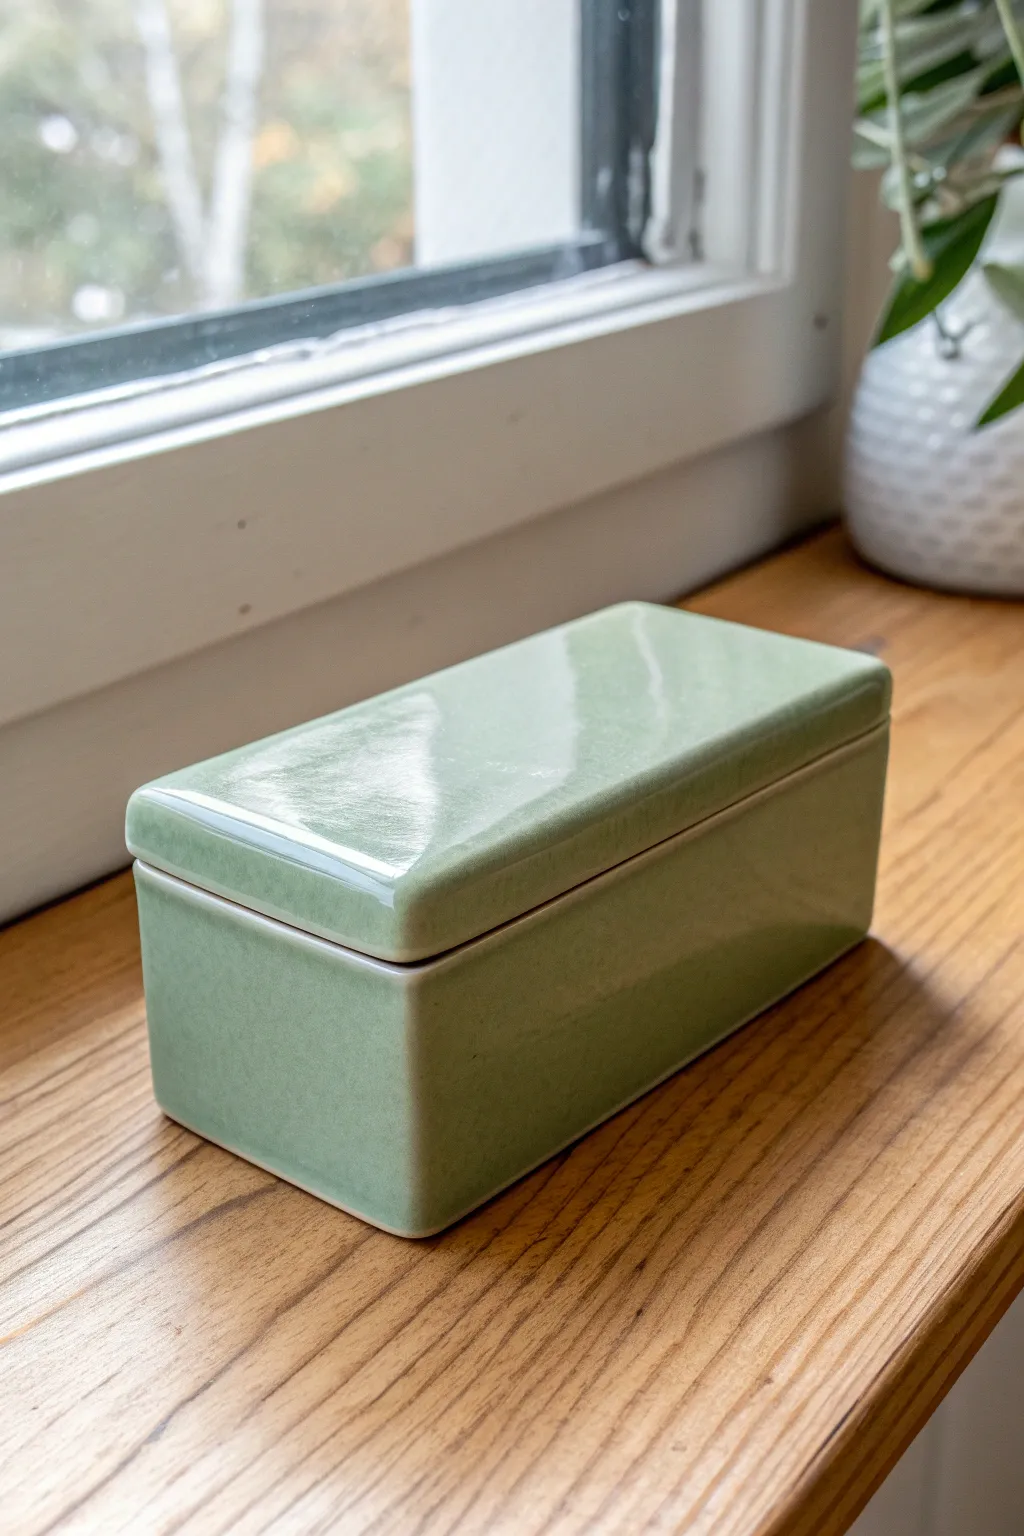
This project teaches you to construct a clean, modern rectangular keepsake box with subtle, softened corners that feel great in the hand. The result is an elegant container finished with a translucent green celadon glaze that highlights the craftsmanship of your build.
Step-by-Step
Materials
- White stoneware or porcelain clay body
- Rolling pin
- Fabric canvas or slab roller
- Fettling knife
- Ruler
- Paper template (rectangle)
- Scoring tool or serrated rib
- Slip
- Soft rib (rubber or silicone)
- Sponge
- Celadon glaze (Geil green or similar)
- Soft fan brush
Step 1: Slab Preparation
-
Roll the Slabs:
Begin by rolling out your clay on a piece of canvas to a consistent thickness of about 1/4 inch. If you are using porcelain, handle it gently to avoid warping. -
Compress the Clay:
Using a soft rubber rib, smooth the surface of the slab firmly in multiple directions. This compression is crucial for preventing warping during the firing process. -
Leather Hard Stage:
Leave the slab uncovered for a few hours until it reaches a stiff leather-hard state. It needs to be sturdy enough to stand up without slumping but soft enough to join.
Step 2: Construction
-
Cut the Wall Panels:
Using your ruler and fettling knife, cut four rectangular wall pieces and one base piece. I find it helpful to miter the vertical edges at a 45-degree angle for a cleaner seamless corner. -
Score and Slip:
Rough up the edges of the base and the contact points of your wall pieces with a scoring tool. Apply a generous amount of slip to these areas. -
Assemble the Walls:
Press the walls onto the base and join the corners together. Use a small wooden tool to blend the seams on the inside of the box for reinforcement. -
Refine the Seams:
Paddle the outside corners gently with a flat wooden paddle to ensure the mitered joints are tight and square. -
Create the Lid:
Cut another rectangle slightly larger than your box opening for the lid top. Attach a smaller rectangle (a flange) to the underside of the lid that fits snugly inside the box rim to keep it in place.
Smart Templates
Make your paper templates out of tar paper or craft foam. They won’t get soggy from the wet clay, ensuring your cuts stay perfectly straight for every wall.
Step 3: Refrooming and Finishing
-
Softening Corners:
Once assembled and stable, use a damp sponge or a soft rib to gently round over the sharp 90-degree corners of the box exterior. This gives the piece that ‘beveled’ soft look shown in the photo. -
Smooth the Rim:
Run a damp chamois or sponge over the rim of the box and the edge of the lid to ensure there are no sharp burrs. -
Dry Slowly:
Place the lid on the box with a thin piece of paper between them to prevent sticking. Wrap the entire piece loosely in plastic to dry slowly and evenly, which prevents warping. -
Bisque Fire:
Fire the bone-dry piece in the kiln to bisque temperature (usually cone 04 or 06).
Surface Texture
Before assembling, lightly press lace or leaves into the slab. Celadon glazes pool beautifully in textures, revealing the pattern in a darker shade of green.
Step 4: Glazing
-
Clean the Bisque:
Wipe the fired box with a damp sponge to remove any kiln dust, which can cause pinholes in the glaze. -
Apply Wax Resist:
Paint liquid wax resist carefully on the foot of the box and the contact points where the lid meets the box rim. -
Dip or Brush Glaze:
Dip the box into a translucent green celadon glaze. If brushing, apply 3 smooth, even coats, letting each dry slightly in between. Celadon relies on thickness for depth, so ensure consistent application. -
Clean Edges:
Double-check that no glaze has dripped onto the waxed friction points. Wipe away any excess with a clean sponge. -
Glaze Fire:
Fire the piece to the maturity temperature of your clay and glaze (typically cone 5/6 or cone 10).
Now you have a timeless ceramic box perfect for hiding away little treasures on your windowsill


Soft-Edge Pillow Box With Curved Slab Walls
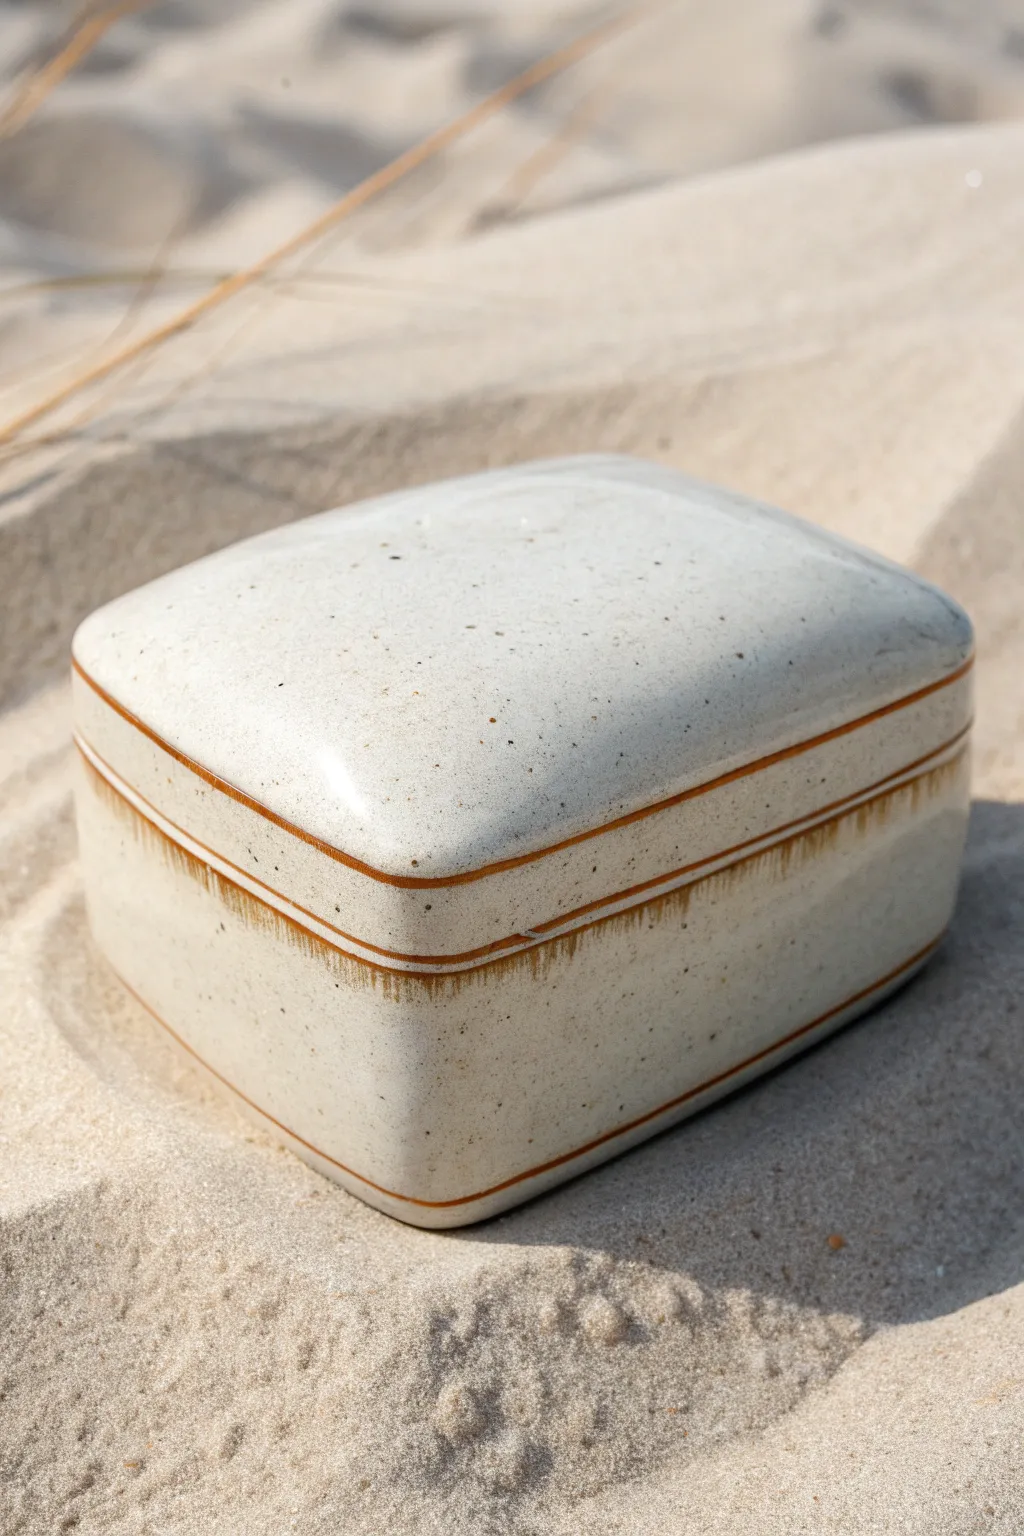
This charming ceramic box features a distinctively soft, cushioned silhouette created by gently curving the slab walls before assembly. The speckled clay body and delicate oxide stripes give it a beachy, organic feel that perfectly complements its relaxed shape.
How-To Guide
Materials
- Speckled stoneware clay (white or light buff)
- Rolling pin and guide strips (slaat sticks)
- Fettling knife
- Ribs (metal and soft rubber)
- Slip and scoring tool
- Paddle tool
- Pony roller or small brayer
- Red iron oxide wash or brown underglaze
- Fine liner brush
- Clear glossy glaze
- Banding wheel
Step 1: Forming the Soft Walls
-
Roll the Slabs:
Begin by rolling out a consistent slab of speckled stoneware clay to about 1/4 inch thickness. Compress the clay on both sides with a rib to align the particles and prevent warping later. -
Cut the Base and Lid:
Cut two identical squares or rectangles for the floor and the lid top. Set these aside on a ware board covered with canvas or paper to firm up slightly over an hour. -
Cut the Wall Stratrips:
Cut long strips for the walls. The height is up to you, but 2-3 inches works well for this scale. Ensure the length is enough to wrap around the perimeter of your base with a little overlap. -
Create the Pillow Curve:
This is the crucial step for the ‘pillow’ look. While the wall strips are still pliable, gently bow them outward. You can do this by laying them over a rolling pin or simply manipulating them with your hands so they have a convex curve. -
Stiffen the Slabs:
Let all your components dry to a sturdy leather-hard state. The walls need to be stiff enough to hold that outward curve without collapsing when standing vertically.
Warped Lid Woes?
If your lid rocks after firing, use a flat lap or a sheet of wet-dry sandpaper glued to a flat surface. Grind the box rim in figure-8 motions until level.
Step 2: Assembly and Refining
-
Bevel the Edges:
Cut 45-degree angles on the edges where the walls will meet the floor and where the wall ends meet each other. This increases surface area for a stronger join. -
Score and Slip:
Aggressively score and apply slip to the base perimeter and the bottom edge of your curved walls. Attach the walls, pressing firmly to ensure a bond. -
Close the Seam:
Join the vertical wall seam. I like to use a small pony roller on the inside of the seam to seal it tight without flattening the beautiful outward curve you created. -
Round the Corners:
Instead of sharp 90-degree corners, use a paddle or your hands to gently round the four corners of the box, enhancing the soft, fabric-like aesthetic. -
Form the Lid:
Take your lid slab (which should be leather hard) and gently press it over a hump mold or a small bowl to give it a slight dome shape. This mirrors the puffed walls. -
Add the Flange:
Create a gallery or flange system. You can either add an inner coil to the lid that fits inside the box, or add a small strip inside the box rim that sits slightly higher than the wall. -
Clean Up:
Use a damp sponge to smooth all join lines and soften the rim. Run a soft rubber rib over the surfaces to bring the grog and speckles slightly to the surface.
Step 3: Decoration and Glazing
-
Bisque Fire:
Dry the piece slowly under plastic to prevent warping, then bisque fire to Cone 04 (or your clay body’s specifications). -
Apply Oxide Lines:
Mix red iron oxide with water to a watercolor consistency. Place the box on a banding wheel. Hold a fine liner brush steady against the box while spinning the wheel to create the thin horizontal bands. -
Create the Brushed Effect:
For the thicker band near the rim, apply the oxide heavily, then use a slightly damp, clean brush to drag the color downward vertically, creating the ‘bleeding’ or comb-tooth vertical texture seen in the photo. -
Wax Resist:
Apply wax resist to the bottom of the box and the contact points where the lid touches the box to prevent them from fusing during firing. -
Clear Glaze:
Dip the entire piece (lid separately) into a clear glossy glaze. The clear coat will make the speckles in the clay body pop and seal the oxide decoration. -
Final Firing:
Glaze fire to maturity (likely Cone 5 or 6). Ensure the lid is fired on the box if possible (with alumina hydrate or wadding) to ensure the fit remains perfect, or fire side-by-side if you are confident.
Clean Lines Pro Tip
For steadier stripes, rest your pinky finger on the table or a steady prop while holding the brush. Let the spinning banding wheel do the work, not your hand.
Now you have a serene little container perfect for keeping small treasures or sea glass.


Gallery-Fit Lid Box With Clean Hidden Flange
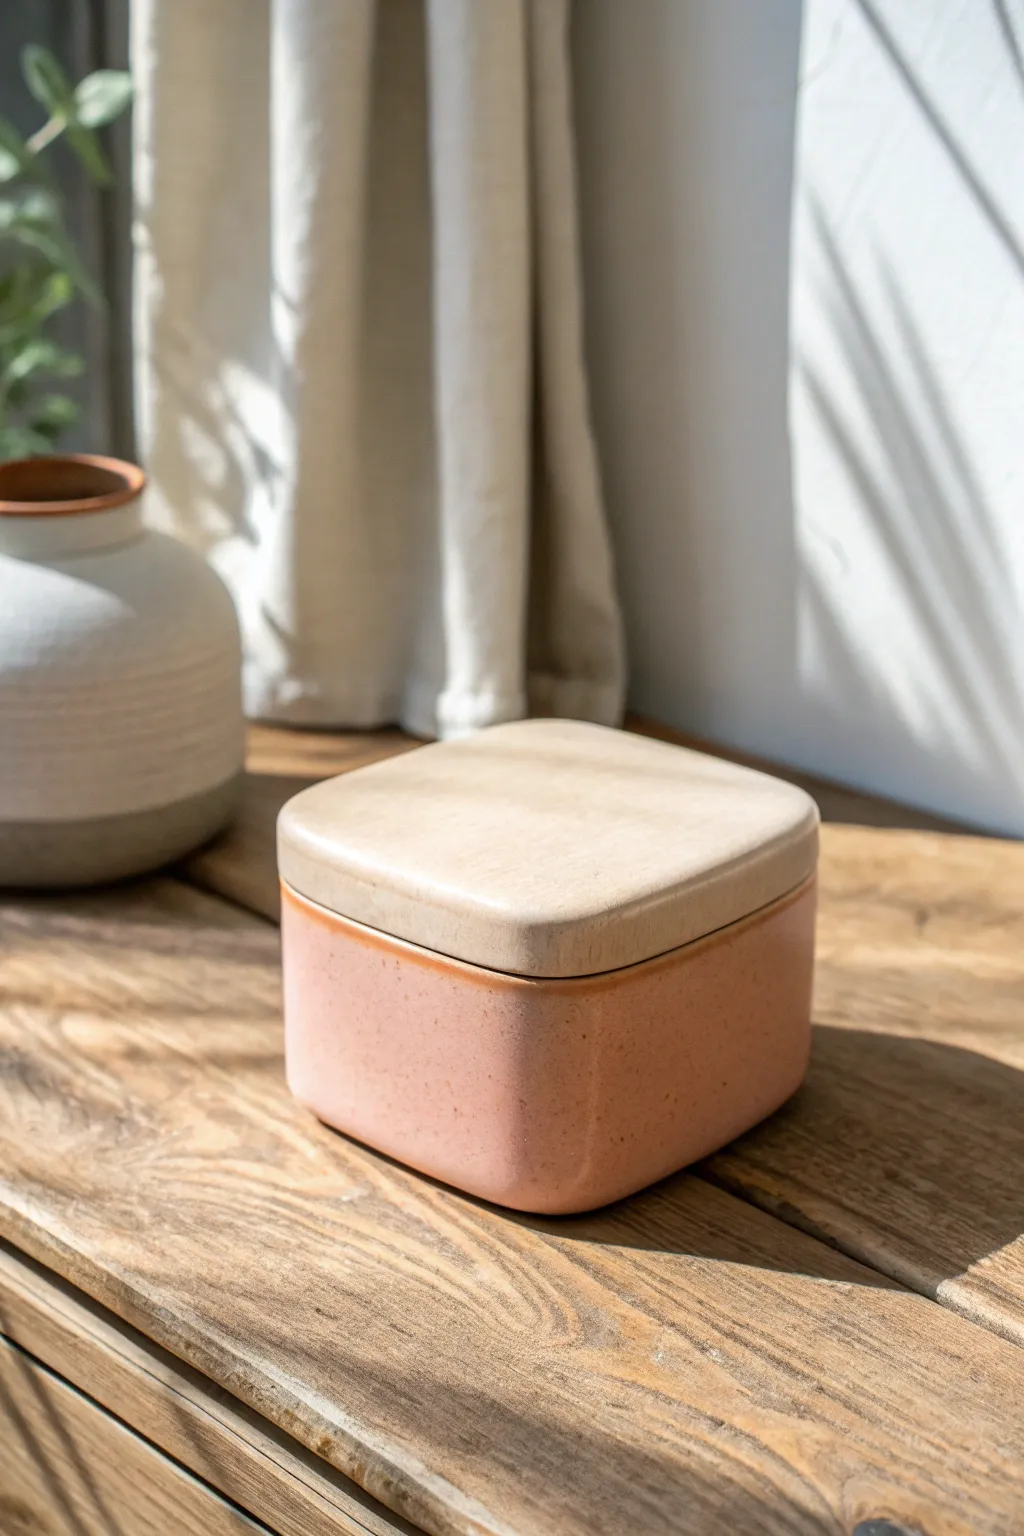
Achieve a sleek, contemporary look with this square ceramic box featuring soft, rounded corners and a gallery-style lid fit. The contrast between the warm, speckled peach base and the creamy, matte lid creates a gentle, earthy aesthetic perfect for storing small treasures.
Step-by-Step Tutorial
Materials
- White stoneware clay body
- Rolling pin
- Canvas work surface
- Wooden guide strips (1/4 inch thickness)
- Needle tool
- Fettling knife
- Square template (paper or cardstock, approx. 4×4 inches)
- Score and slip tool (or serrated rib)
- Soft rib (red or yellow)
- Sponge
- Peach/terracotta speckled glaze (satin finish)
- Cream/beige glaze (matte finish)
- Wax resist
Step 1: Slab Construction
-
Roll the Slabs:
Begin by rolling out your white stoneware clay on a canvas surface. Use 1/4 inch wooden guide strips on either side of the clay to ensure a perfectly even thickness. -
Smooth the Texture:
Before cutting, compress the clay slab on both sides using a soft rib. This removes canvas texture and aligns the clay particles to prevent warping later. -
Cut the Base and Walls:
Using your square template, cut out one square for the base. Then, measure and cut a long rectangular strip that is long enough to wrap around the perimeter of the base, plus a little extra for the seam. -
Bevel the Edges:
For a clean join, cut the short ends of your wall strip at a 45-degree angle where they will meet. This creates a stronger seam than a butt joint. -
Firm Up:
Let the pieces sit until they are ‘leather hard’—firm enough to hold their shape without slumping, but soft enough to bend slightly without cracking.
Clean Fit Tip
Dry the lid while it’s sitting on the box (with a paper towel between them). This ensures the lid warps in sync with the box, keeping a perfect fit.
Step 2: Assembling the Box
-
Attach Walls to Base:
Score (scratch) and apply slip to the bottom edge of the wall strip and the outer perimeter of the base square. -
Form the Square:
Place the wall strip onto the base. Wrap it around, ensuring the beveled ends meet perfectly to form the fourth corner. Press firmly to seal the bottom and vertical seams. -
Reinforce Seams:
Take a very thin coil of wet clay and press it into the inside bottom seam. Smooth it out with a rounded tool or your finger to ensure a watertight bond. -
Shape the Form:
To achieve the look in the photo, gently paddle the outside corners with a wooden paddle or your hand. You want to soften the sharp 90-degree angles into rounded, organic curves. -
Level the Top:
Turn the box upside down onto a flat board and tap it gently to level the rim. Alternatively, use a surform tool to shave the top rim completely flat once it’s stiffer.
Warping Walls?
If your box walls start bowing inward or outward while working, stuff the interior with crumpled newspaper to support the shape while it stiffens.
Step 3: Creating the Gallery Lid
-
Cut the Lid Component:
Cut another square from your slab matching the dimensions of your finished box opening. This will be the top visual surface of the lid. -
Create the Flange:
Cut a smaller square that fits exactly *inside* the opening of your box. This inner slab creates the ‘gallery fit’ or flange preventing the lid from sliding off. -
Attach Lid Parts:
Score and slip the center of the large lid square and the smaller flange square. Press them together, ensuring the smaller square is perfectly centered. -
Round the Lid Edges:
Once assembled, use a damp sponge to round the top outer edges of the lid to match the soft, pillowed look of the box body. -
Dry and Bisque:
Dry the box with the lid places on it (separated by a piece of paper) to ensure they shrink together. Bisque fire according to your clay body’s specifications.
Step 4: Glazing
-
Wax the Contact Points:
Apply wax resist carefully to the gallery flange on the lid and the interior rim of the box where the lid sits. This prevents the lid from fusing shut during firing. -
Glaze the Interior:
Pour the peach glaze inside the box, swirl to coat, and pour out the excess. I typically wipe the rim immediately to keep it clean. -
Glaze the Exterior:
Dip or brush the exterior of the box in the satin peach speckled glaze. Aim for an even coat but allow the speckles to show through. -
Glaze the Lid:
Dip the top of the lid into the cream matte glaze. Keep the application smooth to highlight the simple form. -
Final Fire:
Fire the piece to cone 5 or 6 (or your clay’s maturity temperature). Ensure the lid is not on the box during glaze firing unless you have thoroughly waxed and tested the fit.
Now you have a serene, functional vessel ready to display on your shelf or gift to a friend

The Complete Guide to Pottery Troubleshooting
Uncover the most common ceramic mistakes—from cracking clay to failed glazes—and learn how to fix them fast.
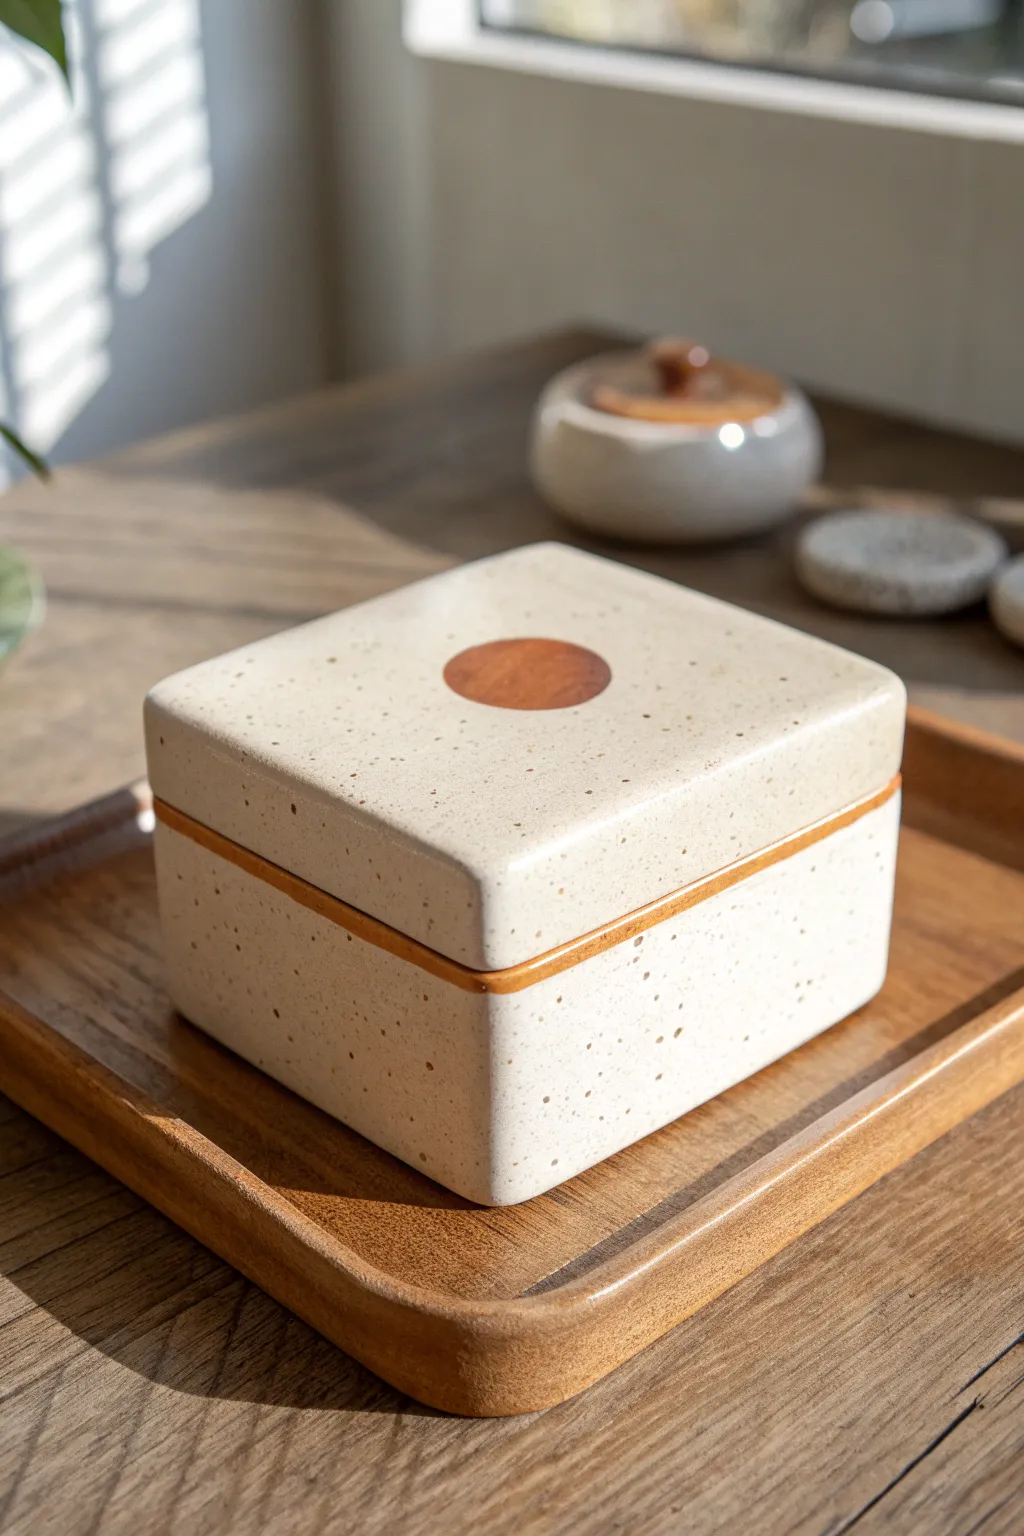
Footed Ceramic Box With Simple Slab Feet
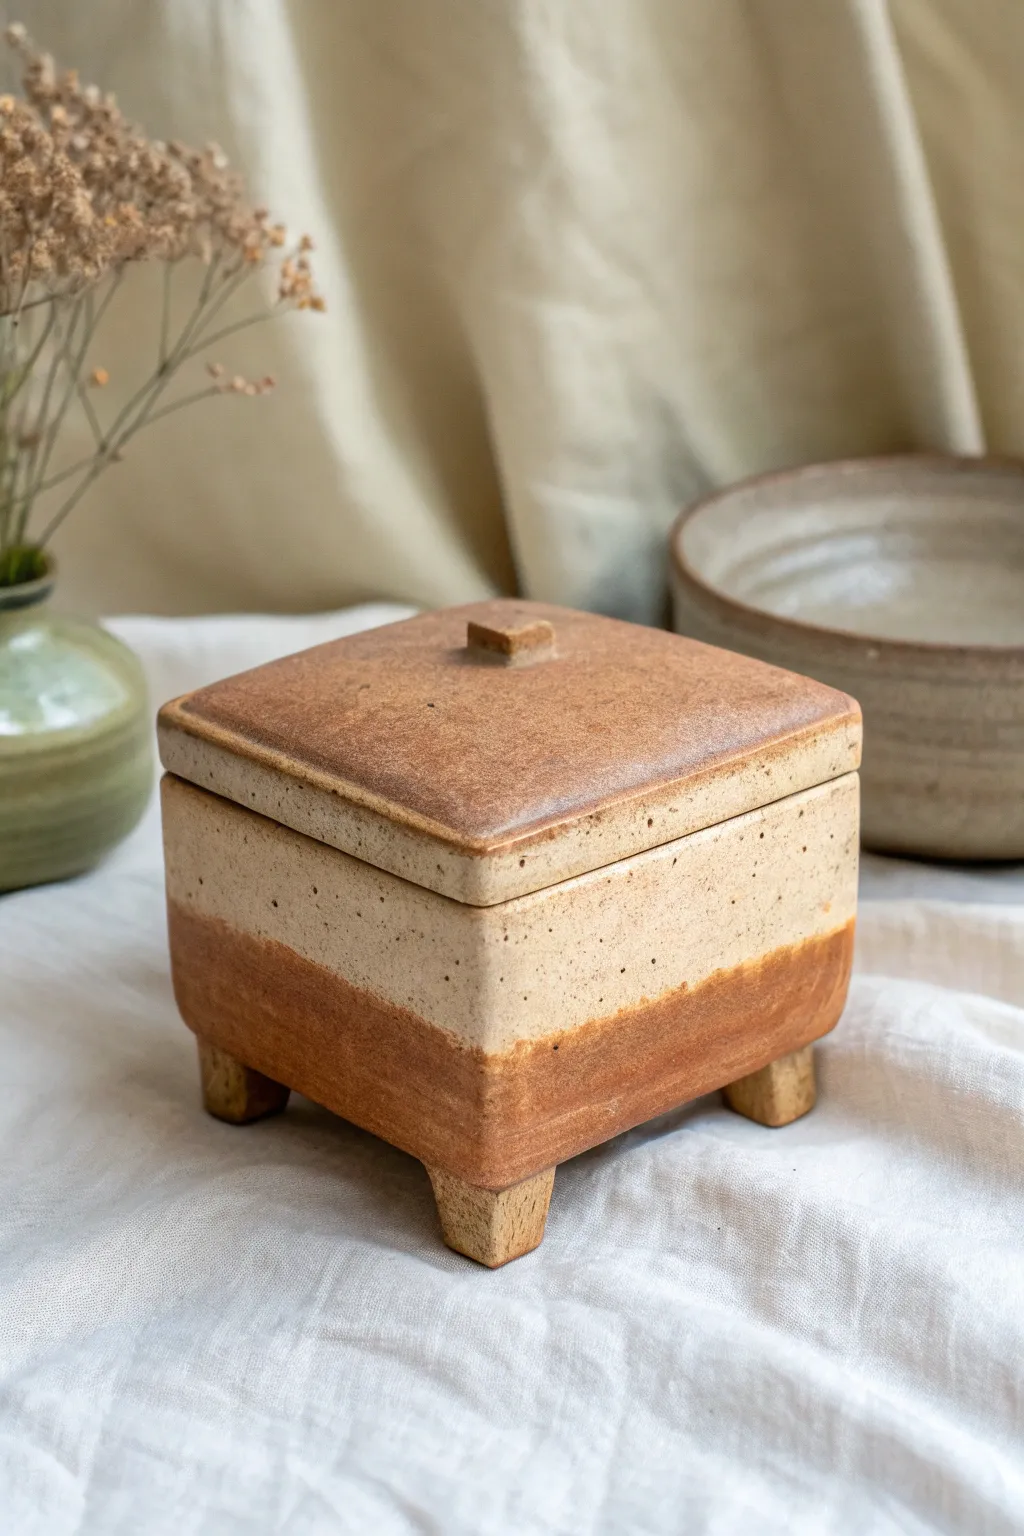
This charming lidded box features a sturdy square form elevated by simple slab feet, offering a perfect blend of modern geometry and organic texture. Its earthy warmth comes from a dual-glaze application that sandwiches a speckled cream band between rich, iron-red tones.
How-To Guide
Materials
- Stoneware clay (speckled or iron-rich)
- Rolling pin and guide strips (approx. 1/4 inch thick)
- Fettling knife or needle tool
- Serrated rib tool
- Slip (clay and water slurry)
- Square template (cardboard or paper)
- Wooden paddle
- Sponge
- Iron-rich glaze (Tenmoku or Shino type)
- Matte cream or white speckled glaze
- Wax resist
Step 1: Slab Construction
-
Roll and cut slabs:
Begin by rolling out a consistent slab of clay, roughly 1/4 inch thick. Using your paper template, cut out five squares of equal size: one for the base and four for the walls. Cut a slightly larger square for the lid to account for overhang. -
Bevel the edges:
To create seamless 90-degree corners, cut the vertical edges of your four wall pieces at a 45-degree angle. Leave the bottom edges flat to sit on the base. -
Texture the surfaces:
Before assembly, smooth the clay with a rib. If you want a more organic feel like the photo, lightly paddle the surface or press a canvas texture into the clay while it’s still flat. -
Score and slip:
Score the beveled edges of the walls and the perimeter of the base thoroughly. Apply a generous amount of slip to these scored areas. -
Assemble the box:
Stand the walls up on the base, pressing the beveled corners together firmly. I like to use a small coil of soft clay on the inside corners to reinforce the joint, blending it smooth with a modeling tool. -
Refine the shape:
Use a wooden paddle to gently tap the walls into a perfect square, straightening any warping that happened during handling. Smooth the outside seams so they disappear completely.
Step 2: Lid and Feet
-
Create the lid gallery:
Roll a small coil or cut thin strips of slab to create a flange on the underside of your lid piece. This flange should fit snugly inside the box opening to keep the lid from sliding off. -
Shape the lid profile:
Gently curve the top surface of the lid by pressing it over a puki or a small foam cushion. The lid in the example has a subtle dome shape, softening the hard angles. -
Add the knob:
Cut a very small clay cube for the handle. Score the center of the lid and the bottom of the cube, attach with slip, and clean up any excess slip with a brush. -
Cut the feet:
From your remaining slab scraps, cut four small rectangles for the feet. They should be sturdy and slightly tapered if you prefer that aesthetic. -
Attach the feet:
Flip the box over (once it’s leather hard to avoid squashing the rim). Score and slip the four corners of the base and attach the feet. Verify the box sits level by flipping it back upright on a straight board. -
Slow drying:
Loosely cover the entire piece with plastic to let it dry slowly. Uneven drying is the enemy of square boxes and can lead to warped lids.
Warped Lids?
Make sure to dry your box with the lid ON. Place a small piece of paper towel between the lid and rim to prevent sticking, but keep them together so they shrink at the same rate.
Step 3: Glazing Process
-
Bisque fire:
Once bone dry, fire the piece to bisque temperature (usually Cone 04 or 06). Wipe the fired piece with a damp sponge to remove dust. -
Wax resist application:
Apply wax resist to the bottom of the feet and the gallery where the lid meets the box. This prevents the lid from fusing shut during the glaze firing. -
Dip the top and bottom:
First, dip the bottom third of the box (including the feet) and the lid into your iron-rich, reddish-brown glaze. Let this dry completely. -
Apply the center band:
Carefully brush or pour the matte cream glaze onto the middle section of the box walls. Be precise to leave the red-brown band at the bottom exposed, creating that distinct horizon line. -
Clean up edges:
Use a damp sponge to neaten the line where the two glazes meet if needed, though a slightly organic overlap adds character. Ensure no glaze is on the contact points of the lid. -
Final firing:
Fire the piece to maturity (likely Cone 5/6 or Cone 10 depending on your clay body). Allow the kiln to cool naturally.
Make it a Set
Create a nesting set by making two smaller boxes that fit inside a larger tray made with the same technique. Use a dark clay body for deeper contrast.
This simple slab technique opens the door to endless variations in size and surface decoration
Leaf-Impressed Botanical Box With Matching Lid Print
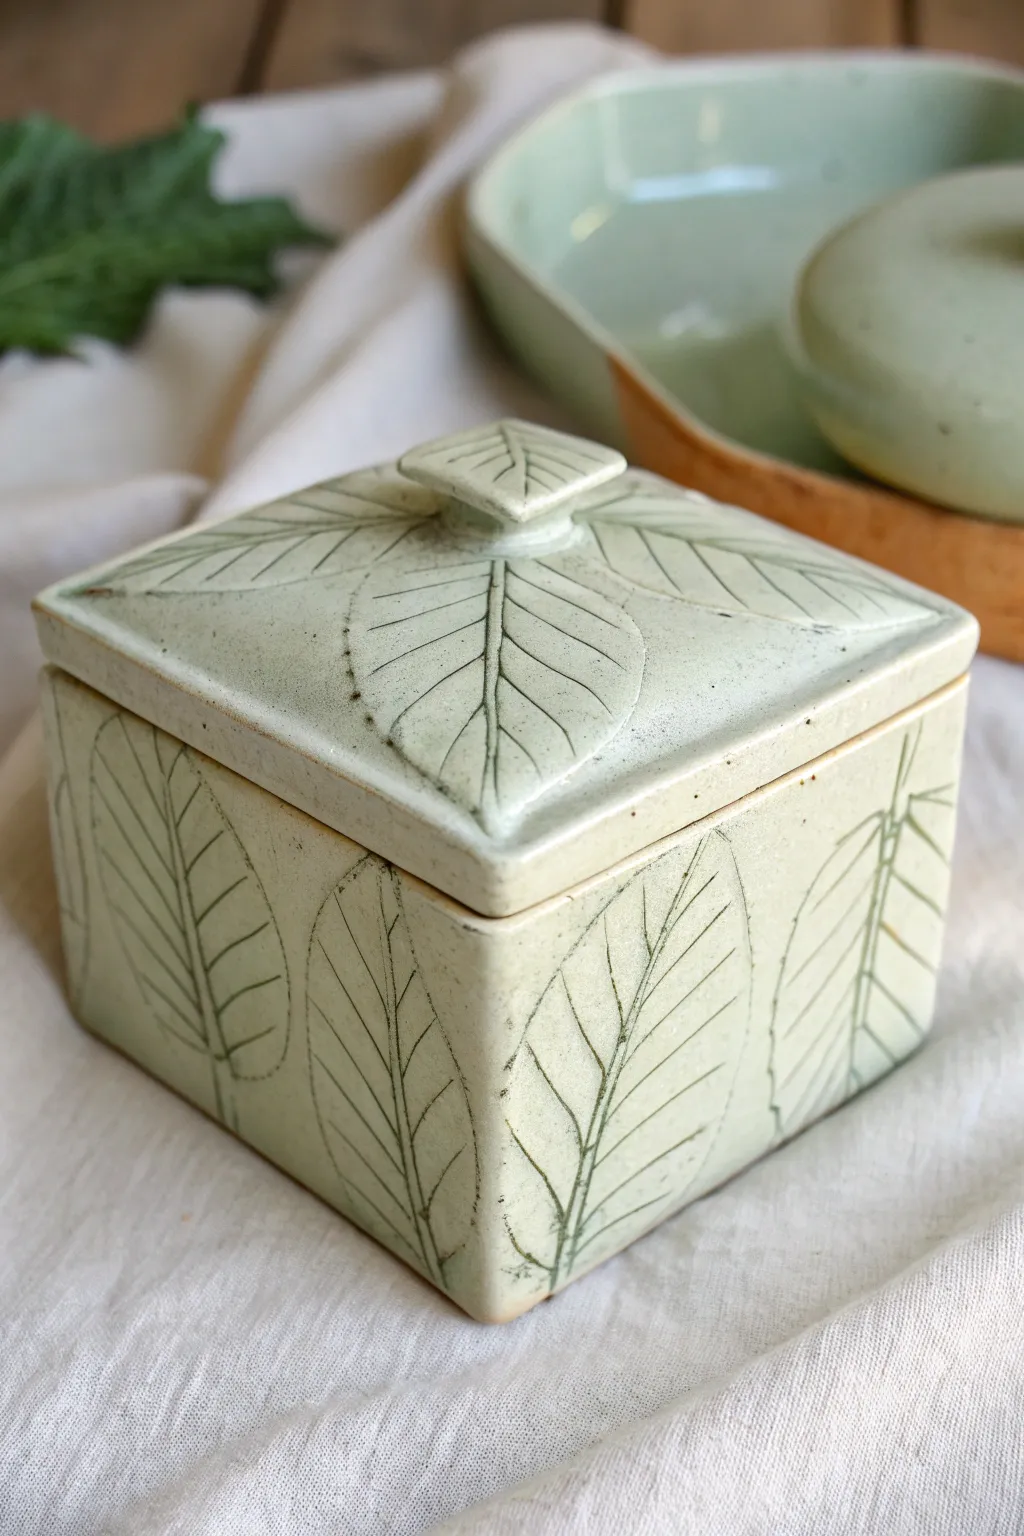
Capture the delicate beauty of nature with this slab-built ceramic box featuring intricate leaf impressions. The soft green celadon glaze pools beautifully in the textured veins, creating a timeless, organic container perfect for keepsakes.
Step-by-Step Guide
Materials
- White stoneware or porcelain clay body
- Rolling pin
- Two 1/4-inch wooden thickness strips (slats)
- Fresh, deeply veined leaves (fern, laurel, or similar)
- Fettling knife or needle tool
- Scoring tool (serrated rib or fork)
- Slip (clay and water slurry)
- Square template (approx. 4×4 inches)
- Ruler
- Sponge
- Underglaze (dark green or black) for inlay
- Celadon glaze (pale green)
- Wax resist
Step 1: Slab Preparation
-
Roll the Slabs:
Begin by wedging your clay thoroughly to remove air bubbles. Place the clay between your two wooden thickness strips and roll it out into a smooth, even slab. You will need enough area for five square sides and a lid. -
Smooth the Surface:
Use a flexible rib (metal or rubber) to compress the clay on both sides. This aligns the clay particles, preventing warping later, and creates a pristine canvas for your botanical textures. -
Leaf Selection:
Choose flexible leaves with prominent veining on the backside. Stiff, dried leaves will crack the clay, so fresh cuttings work best. -
Impressing the Texture:
Arrange your leaves vein-side down onto the clay slab. Space them out considering where your cuts will be. Gently roll over the leaves with your rolling pin, applying firm pressure to imbed the veins deep into the clay surface. -
Remove the Botanicals:
carefully peel the leaves away to reveal the impressed design. If a leaf tears, use a needle tool to gently lift the remnants without marring the clay.
Keep it Square
Use a clear quilting ruler to check your angles. While the clay is leather hard, you can gently paddle the sides with a wooden spoon to correct any warping.
Step 2: Construction
-
Cut the Components:
Using your square template and fettling knife, cut out five equal squares for the box (bottom and four walls) and one slightly larger square for the lid. Be mindful to center beautiful leaf sections on each piece. -
Miter the Edges:
For a seamless look, cut the vertical edges of your wall pieces and the perimeter of the base at a 45-degree angle. This creates stronger corners and hides the seams better than butt joints. -
Score and Slip:
Rough up the mitered edges with a serrated rib or scoring tool. Apply a generous amount of slip to these scored areas. I like to let it sit for a few seconds to get tacky before joining. -
Assemble the Box:
Press the walls onto the base and against each other, ensuring the corners are square. Use a small wooden tool to reinforce the seams on the inside of the box. -
Shape the Lid:
Take your lid slab and gently press the center upwards from the bottom (concave) side to create a slightly domed shape. This prevents sagging during firing. -
Create the Handle:
Cut a small diamond or leaf shape from a scrap of textured clay. Fold it slightly to give it dimension and attach it to the center of the lid using the score and slip method. -
Add a Flange:
Roll a small coil or cut thin strips of clay. Attach these to the underside of the lid, inset about 1/4 inch from the edge, to create a flange that keeps the lid from sliding off the box.
Dual-Tone Magic
Try using a dark clay body and painting the leaves with white slip before impressing them. Glaze with clear for a stunning high-contrast reverse effect.
Step 3: Finishing and Glazing
-
Bisque Fire:
Allow the box to dry slowly under plastic to prevent warping. Once bone dry, bisque fire the piece to cone 04 (or according to your clay’s specifications). -
Mishima Inlay (Optional):
To get the dark lines seen in the photo, brush a dark underglaze over the textured areas. Wipe the high points clean with a damp sponge, leaving the color only in the deep recesses of the leaf veins. -
Apply Wax Resist:
Brush wax resist carefully onto the flange of the lid and the top rim of the box where the lid sits. This prevents the pieces from fusing together in the kiln. -
Glazing:
Dip or pour a translucent pale green celadon glaze over the entire piece. Do not overapply, as you want the texture and inlay to show through clearly. -
Clean the Foot:
Wipe any glaze off the very bottom of the box so it doesn’t stick to your kiln shelf. -
Final Firing:
Glaze fire the piece to the maturity temperature of your clay and glaze (typically cone 5 or 6). Allow the kiln to cool completely before opening.
Once fired, fill your beautiful new box with tea, jewelry, or simply display it to enjoy the permanent impression of nature


What Really Happens Inside the Kiln
Learn how time and temperature work together inside the kiln to transform clay into durable ceramic.
Stamped Pattern Box With Repeating Texture Bands

This elegant ceramic box combines simple geometry with subtle texture, making it a perfect storage solution for keepsakes or jewelry. The natural speckling of the clay body shines through a clear glaze, highlighted by clean, grooved bands that wrap seamlessly around the form.
How-To Guide
Materials
- Speckled stoneware clay (approx. 3-4 lbs)
- Rolling pin and guide sticks (1/4 inch thick)
- Fettling knife
- Ruler and square
- Slip and scoring tool
- Wooden modeling tool (flat edge)
- Loop tool or ribbons tool (small)
- Paddle
- Clear matte or glossy glaze
- Sponge
- Kiln
Step 1: Slab Building the Base
-
Roll the Slabs:
Begin by rolling out your speckled stoneware clay to a uniform 1/4-inch thickness using guide sticks. You will need enough surface area for the four walls, the base, and the lid. -
Cut Wall Components:
Using a ruler and fettling knife, measure and cut two long rectangular strips for the walls. Or, cut four separate rectangles if you prefer corner joints. For this size, aim for walls about 4 inches high. -
Bevel the Edges:
For clean, sharp corners, cut the vertical edges of your wall pieces at a 45-degree angle. This miter joint creates a stronger bond and hides the seam better than a butt joint. -
Assemble the Walls:
Score the beveled edges thoroughly and apply slip. Stand the walls up to form a rectangle, pressing the joints firmly together. Use a small coil of clay on the interior seams to reinforce the connection, smoothing it out completely. -
Attach the Floor:
Place your rectangular wall frame onto the remaining slab. Trace around the outside, then cut the floor piece just slightly larger. Score and slip the bottom edges of the walls and the floor slab, then press the walls down firmly. -
Paddle into Shape:
Once assembled, gently paddle the exterior walls with a wooden paddle. I like to do this to compress the clay and ensure the box is perfectly straight and the corners are tight.
Warping Woes?
If your lid rocks or doesn’t sit flat, dry it ON the box with a piece of newsprint in between. This helps them shrink together and maintain a matching shape.
Step 2: Creating the Lid and Details
-
Cut the Lid Slab:
Measure the outer dimensions of your box rim. Cut a slab rectangle that matches these dimensions exactly for a flush fit. -
Add a Flange:
To keep the lid from sliding off, you need a flange. Roll a small coil or cut a narrow strip of clay and attach it to the underside of the lid, inset about 1/4 inch from the edge. Test fit it gently on the box to ensure it sits inside the walls. -
Refine the Lid Edge:
Once the lid is leather hard, use a sponge or a rib to round over the top edges slightly, softening the hard sharpness into a gentle curve as seen in the photo. -
Mark Groove Guides:
With the box at a firm leather-hard stage, use a ruler to lightly mark horizontal parallel lines around the mid-section of the box where the texture bands will go. -
Carve Texture Bands:
Using a small loop tool or the rounded end of a modeling tool, carefully carve out the horizontal grooves. Apply steady pressure to keep the depth consistent as you travel around the corners. -
Smooth the Grooves:
Dip your finger or a soft brush in a little water and run it through the carved grooves to remove any sharp burrs or crumbs of clay.
Step 3: Finishing and Firing
-
Bisque Fire:
Allow the box and lid to dry slowly and evenly, preferably under plastic for the first day to prevent warping. Fire to cone 04 (or your clay’s bisque temperature). -
Apply Clear Glaze:
Dip or brush a clear glaze over the entire piece. A clear glaze is crucial here to let the natural speckles of the clay body serve as the primary visual texture. -
Wipe the Foot:
Ensure the bottom of the box and the contact points of the lid (if firing together) are free of glaze. You can use wax resist on the flange and the box rim to prevent them from fusing shut. -
Glaze Fire:
Fire the piece to the maturity temperature of your stoneware clay (typically cone 5 or 6). Don’t fire the lid ‘on’ the box unless you have thoroughly waxed the contact areas and trust your glaze not to run.
Color Pop
Before clear glazing, rub a dark underglaze (like black or dark blue) into the carved grooves and sponge off the excess to make the lines really stand out.
Now you have a timeless, functional vessel that showcases the raw beauty of the earth materials
Carved Inlay Box Using Underglaze in the Lines
This elegant square box showcases the beauty of the Mishima technique, where crisp geometric lines are carved into the clay and inlaid with a deep blue underglaze. The result is a clean, modern design that contrasts beautifully with a warm, speckled creamy white finish.
Detailed Instructions
Materials
- Box-grade stoneware clay (smooth, light-colored)
- Square slump mold or slab-building templates
- Rolling pin and guide sticks (approx. 1/4 inch)
- Small square biscuit cutter (optional)
- Fettling knife
- Serrated metal rib and smooth rubber rib
- Needle tool or sgraffito carving tool (fine point)
- Ruler or straight edge
- Dark blue underglaze
- Small paintbrush
- Metal rib or green scouring pad
- Clear or translucent white glossy glaze (cone compatible with your clay)
Step 1: Constructing the Box
-
Roll the slabs:
Begin by wedging your clay thoroughly to remove air bubbles. Roll out a large, even slab approximately 1/4 inch thick using guide sticks to ensure uniform thickness. -
Cut the components:
Using paper templates or a ruler, cut out five square panels for the box base and one slightly larger square for the lid. To create the lid’s lip, cut four narrow strips of clay. -
Assemble leather-hard slabs:
Let the slabs stiffen to a leather-hard state. This is crucial for maintaining the geometric shape. Score and slip the edges of your base squares and assemble them into a cube, reinforcing the internal corners with thin coils. -
Construct the lid:
Attach the four narrow strips to the underside of your lid slab, inset slightly so they will fit snugly inside the box opening. Smooth all joins. -
Refine the surface:
Once assembled, use a damp sponge and a smooth rubber rib to ensure all faces are perfectly flat and the corners are softened but distinct.
Smudgy Lines?
If wiping back the underglaze smears blue across the white clay, your sponge is too wet. Use a firmly squeezed sponge or a metal rib to scrape the semi-dry underglaze off cleanly.
Step 2: Carving the Inlay Design
-
Map the grid:
Once the box is a firm leather-hard, lightly mark a horizontal centerline around the entire perimeter with a ruler. Then, mark vertical dividers to create even quadrants on each face. -
Draw the triangles:
Connect your guide marks to form the base ‘X’ shapes and diamonds. Drawing lightly with a pencil first can be helpful; the graphite burns out in the kiln. -
Carve the parallel lines:
Using a needle tool or a fine sgraffito tool, carve the primary geometric lines. Then, carefully carve duplicate lines inside the first set to create the nested triangle effect seen in the reference. -
Clean the burrs:
After carving, do not brush away the clay crumbs yet, as this can smudge the lines. Let the piece dry slightly, then gently brush or pick off the sharp burrs of clay.
Step 3: Inlay and Finishing
-
Apply underglaze:
Paint the dark blue underglaze generously over the carved lines. Don’t worry about staying inside the lines; you want the glaze to fill the crevices completely. -
Let it set:
Allow the underglaze to dry until it is no longer shiny. -
Scrape back excess:
Using a clean metal rib or a slightly damp green scouring pad, gently scrape or wipe away the surface underglaze. The goal is to remove all color from the flat surface while leaving the carved lines filled. -
Bisque fire:
Once bone dry, fire the piece to bisque temperature (usually Cone 04 or 06). -
Glaze application:
Dip or brush the entire box in a clear or translucent white glaze. If your clay body isn’t naturally speckled, choose a glaze with subtle speckles to match the look. -
Final firing:
Fire the piece to the final maturity temperature for your clay and glaze combination.
Pro Tip: Clean Corners
When carving lines that wrap around the corners of the box, wait until the clay is quite firm. Soft corners will deform under the tool pressure, ruining the sharp geometric silhouette.
Now you have a stunning, architecturally inspired box perfect for storing small treasures

TRACK YOUR CERAMIC JOURNEY
Capture glaze tests, firing details, and creative progress—all in one simple printable. Make your projects easier to repeat and improve.
Tape-Resist Color-Block Box With Crisp Sections
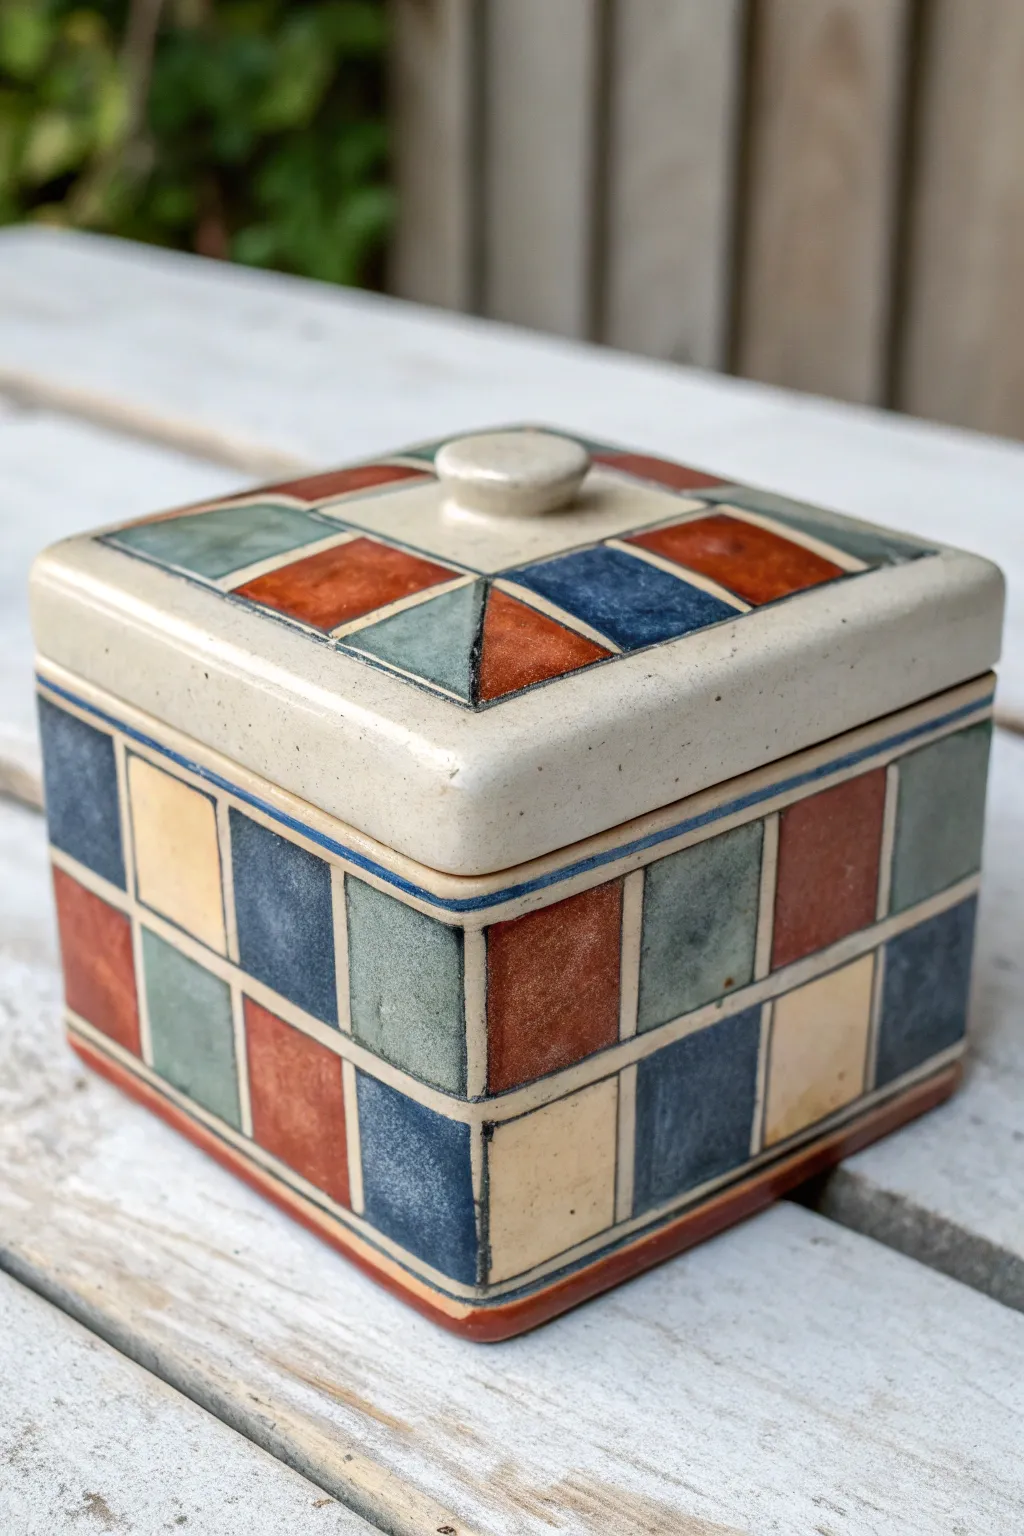
This charming ceramic box features a classic tape-resist technique to create a bold, stained-glass-style geometric pattern. The result is a satisfyingly symmetrical container with crisp separation between earthy red, deep blue, green, and cream blocks.
Step-by-Step
Materials
- Cone 04 white earthenware clay (or similar smooth clay body)
- Ceramic rolling pin
- Rolling slats or guide strips (approx. 1/4 inch thick)
- Pottery knife or fettling knife
- Score and slip tool
- Ruler and square
- Small round clay cutter or cookie cutter (for the handle)
- Narrow painter’s tape or graphic art tape (1/8 inch width)
- Underglazes in: Rust Red, Navy Blue, Sage Green, and Cream/Pale Yellow
- Flat shader brushes and detail brushes
- Clear glaze
- Sponge and water
- Kiln access
Step 1: Slab Construction
-
Roll your slabs:
Begin by rolling out your white earthenware clay on a canvas surface. Use your guide strips to ensure an even 1/4 inch thickness throughout, which is crucial for a box that fits together perfectly without warping. -
Cut the components:
Using your ruler and square, measure and cut five equal squares for the box base (bottom plus four sides). Cut a slightly larger square for the lid that will overhang the base by about 1/8 inch around the perimeter. Don’t forget to cut a smaller square or inset flange that will fit inside the box opening to keep the lid secure. -
Let the clay firm up:
Allow your cut slabs to dry to a ‘leather hard’ state. This is vital; if the clay is too soft, the walls will slump during assembly. They should be firm enough to hold their shape but still cool to the touch and able to be scored. -
Assemble the box:
Score the edges of your base and side panels deeply, apply slip, and press the walls onto the base. Reinforce the inside seams with a thin coil of soft clay, smoothing it out with your finger or a modeling tool to ensure a watertight seal. -
Create the lid:
Attach the flange square to the underside of your main lid slab using the score-and-slip method. Flip it over and attach a small round knob in the center. I like to smooth the connection point of the knob carefully so it feels comfortable to grip. -
Refine the edges:
Once assembled, use a damp sponge to smooth all sharp corners and edges. The box needs to look polished before any color is applied. Let the piece dry completely. -
Bisque fire:
Load the bone-dry box and lid into the kiln and bisque fire to Cone 04 (or according to your clay’s specifications). This prepares the surface for glazing.
Step 2: Tape Resist & Glazing
-
Clean the bisque:
Wipe the bisque-fired ware with a damp sponge to remove any kiln dust. This ensures the tape sticks properly and the glaze adheres well. -
Apply the tape grid:
Using the 1/8 inch graphic tape, mask off the grid pattern. Start with horizontal lines around the perimeter of the box, then add the vertical dividers to create squares. Press the tape down firmly to prevent underglaze from bleeding underneath. -
Tape the lid design:
For the lid, create a diagonal pattern radiating from the center knob. Create triangles and trapezoids that echo the geometry of the box sides. -
Plan your colors:
Look at your grid and mentally assign colors to avoid two of the same color touching. The pattern relies on the alternating rhythm of the Rust Red, Navy Blue, Sage Green, and Cream. -
Apply underglaze:
Using a flat shader brush, fill in the squares with your chosen underglaze colors. Apply 3 coats of each color, letting each coat dry before adding the next, to get that solid, opaque look. -
Remove the tape:
Once the underglaze is dry to the touch (but before firing), carefully peel away the tape. You should see crisp white lines of raw bisque clay revealed between your color blocks. -
Touch up the lines:
If any underglaze bled under the tape, gently scrape it away with a sharp needle tool or clean it up with a stiff, damp brush. The white lines act as ‘grout’ and need to be clean. -
Apply clear glaze:
Dip the entire box and lid into a clear glaze, or brush on three smooth coats. This will seal the underglaze and the raw clay lines, making the final piece food-safe and glossy. -
Final firing:
Stilt the box and lid carefully in the kiln and glaze fire to the appropriate temperature for your clear glaze (likely Cone 05 or 06).
Sticky Situation
Burnish the tape edges with the back of a fingernail or a spoon handle. A tight seal prevents ‘bleeding’ and makes your lines perfectly crisp.
Glaze Crawling?
If the clear glaze pulls away from the colored sections, dusty underglaze might be the cause. Sponge the painted areas lightly before applying clear glaze.
Now you have a stunning, functional storage box that showcases your precision and design skills
Faux Woodgrain Treasure Box With A Dark Wash
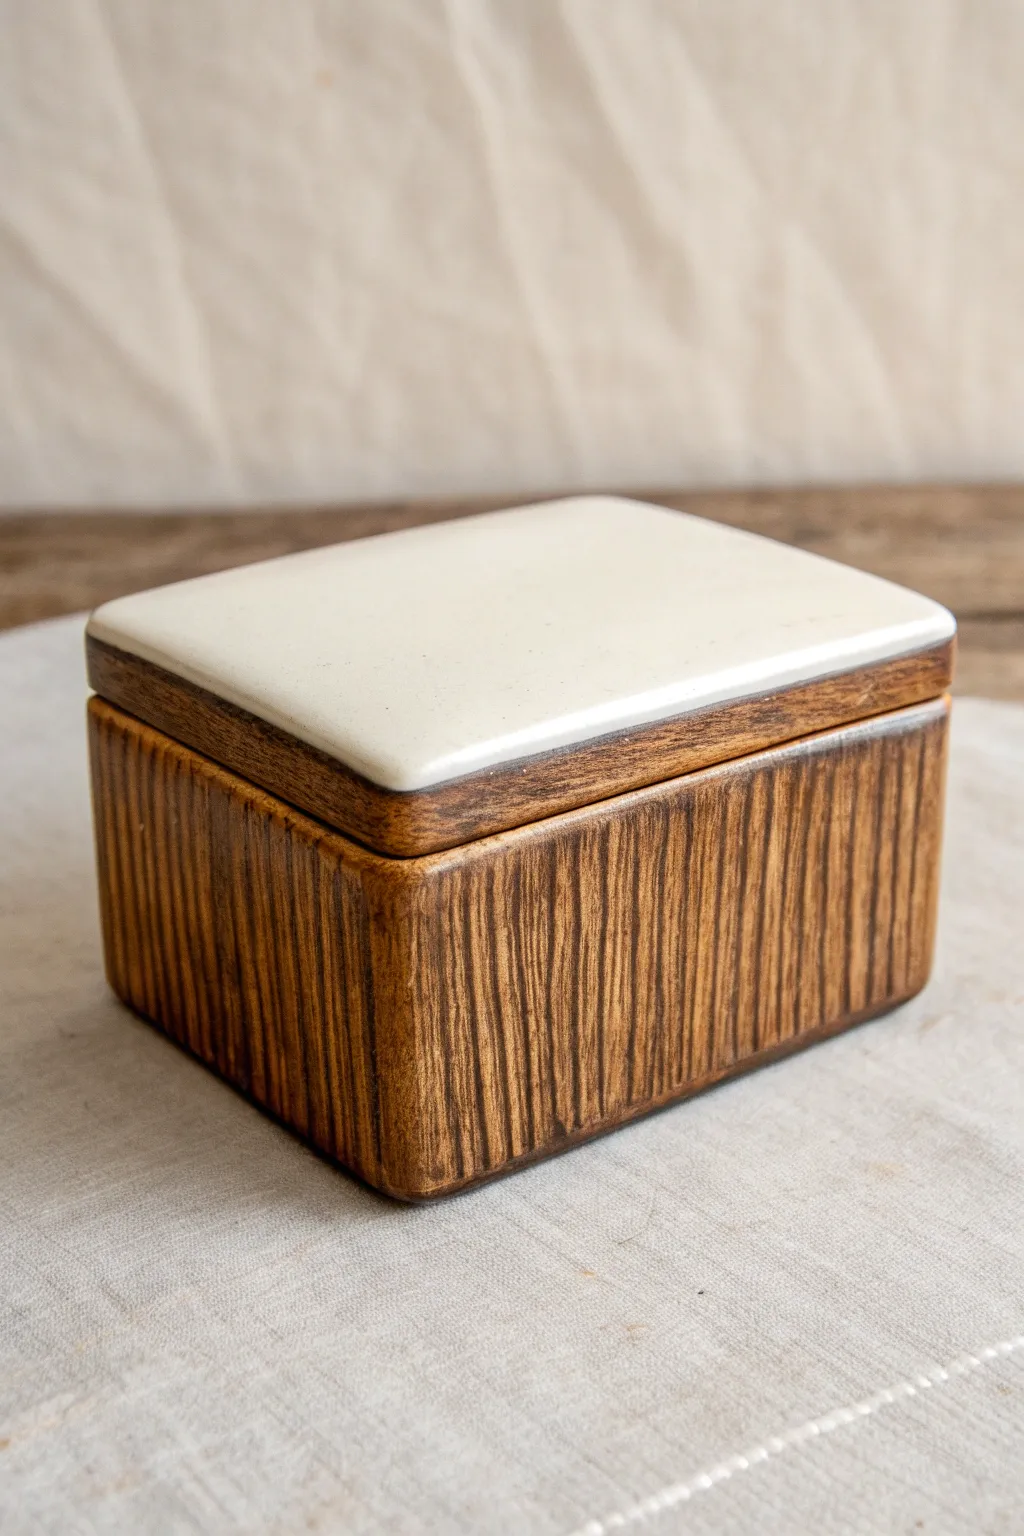
Turn a simple ceramic bisque box into a sophisticated treasure chest that mimics the look of rich, dark walnut wood contrasted with a creamy lid. The secret lies in a clever carving technique paired with an antiquing wash to bring out incredible texture.
Step-by-Step Guide
Materials
- Rectangular ceramic bisque box with lid
- Carving tool (V-gouge or needle tool)
- Medium grit sandpaper
- Damp sponge
- Dark brown underglaze (e.g., Walnut or Mocha)
- Cream or Off-White glaze (gloss or satin)
- Wide shader brush
- Small detail brush
- Clean rag or paper towels
- Clear transparent glaze (optional, for the wood part)
Step 1: Sculpting the Wood Texture
-
Prepare the surface:
Begin with your leather-hard or bisque ceramic box. If it’s greenware, be gentle; if it’s bisque, you’ll need slightly more pressure. Wipe the entire surface with a damp sponge to remove any dust. -
Map the grain direction:
Decide on the direction of your wood grain. For this look, the grain runs vertically on the sides of the box base, creating a tall, sturdy appearance. -
Carve the initial grooves:
Using a V-gouge tool or a needle tool, carve vertical lines down the sides of the box base. Vary the pressure: press harder for deep grooves and lighter for shallow scratches. -
Add organic variation:
Wood isn’t perfectly straight. Wiggle your tool slightly as you pull down to create natural imperfections. Don’t worry about spacing them evenly; random grouping looks more authentic. -
Texture the lid rim:
Don’t forget the rim of the lid. Carve horizontal lines along the thick edge of the lid to mimic end-grain or a darker wood trim, distinct from the smooth top. -
Smooth the burrs:
Once carved, lightly sand the surface with medium grit sandpaper to knock down any sharp clay burrs. You want texture, but not sharp edges. -
Final clean:
Wipe the box thoroughly with a damp sponge again to remove all sanding dust from the crevices. This is crucial for the glaze to adhere properly.
Grain Variety
Vary your carving speed. Fast strokes create smoother lines, while slow, hesitant strokes create jagged, bark-like texture.
Step 2: Glazing and Finishing
-
Apply the dark wash:
Load a wide shader brush with dark brown underglaze. Apply a heavy coat over the entire textured base and the textured rim of the lid, working the pigment deep into the carved lines. -
Wipe back the color:
While the underglaze is still damp, take a wet sponge or rag and firmly wipe the surface. You want to remove most of the color from the ‘high points’ while leaving the dark brown stuck in the carved recesses. -
Evaluate the contrast:
If the wood look is too light, add another localized wash of dark brown to specific areas and wipe gently. I like to keep the corners slightly darker for an aged effect. -
Glaze the lid top:
Switch to a clean brush. Apply 2-3 coats of Cream or Off-White glaze to the smooth top surface of the lid. extend this just to the edge where the wood texture begins. -
Clean the edges:
Use a steady hand and a small detail brush to neaten the line where the cream glaze meets the dark wood rim. A crisp line here makes the materials look distinct. -
Seal the wood (Optional):
For a glossy finish on the wood section, apply a clear transparent glaze over the dark washed areas. If you prefer a matte, natural wood look, you can leave the underglaze raw (if the clay body is vitrified) or use a matte clear glaze. -
Dry completely:
Allow the glazes to dry completely before handling. -
Stilt and fire:
Place the lid and box separately in the kiln. If you glazed the bottom, make sure to stilt the box. Fire according to your glaze and clay specifications (usually cone 06 or cone 6).
Knotty Addition
Add ‘knots’ to your woodgrain by pressing a small circle into the clay and curving your vertical grain lines around it to flow naturally.
Once fired, you will have a durable ceramic vessel that warms up any room with its earthy, organic charm
Slide-Lid Matchbox-Style Ceramic Box With A Hidden Surprise
This project guides you through creating a charming square ceramic box that mimics the clean lines of a matchbox, complete with a snug-fitting lid. The finish features a warm, creamy glaze speckled with iron spots and natural clay accents, perfect for storing trinkets or serving dry snacks.
Step-by-Step
Materials
- Stoneware clay (smooth or speckled body)
- Rolling pin and guide strips (approx. 1/4 inch thickness)
- Fettling knife or X-Acto blade
- Paper template (square, approx. 4×4 inches)
- Scoring tool and slip
- Sure-form tool or rasp
- Sponge
- Wax resist
- Creamy matte white glaze (with iron speckles or use a speckled clay body)
- Red iron oxide wash or brown underglaze (for rim accent)
- Flat shader brush
- Pottery wheel or slab mat
Step 1: Forming the Base and Lid
-
Roll the Slabs:
Begin by rolling out your clay into a consistent slab. Use guide strips to ensure an even thickness of about 1/4 inch. If you want natural speckles from the clay itself, choose a speckled buff stoneware body. -
Cut the Components:
Using your square paper template, cut out two identical squares for the top and bottom. Then, cut four rectangular strips for the box walls and four slightly shorter strips for the lid’s interior flange. -
Dry to Leather Hard:
Let all your cut pieces sit until they reach a firm leather-hard stage. This is crucial for maintaining square corners and crisp lines during assembly. -
Miter the Edges:
For the cleanest corners, use your fettling knife to cut 45-degree angles on the ends of your wall strips. This miter joint creates a sharp, professional box shape. -
Assemble the Box:
Score and slip the edges of the base square and the mitered wall strips. Assemble the four walls onto the base, pressing the corners firmly together. -
Reinforce Corners:
Roll tiny thin coils of clay and press them into the interior seams of the box. Smooth these out completely with a modeling tool or your finger to ensure structural integrity.
Warping Worries
Box walls bowing? Dry your piece slowly under loose plastic. Uneven drying causes warping. Weighing down the rim with a flat board while drying helps keep it square.
Step 2: Creating the Lid Mechanism
-
Construct the Lid:
Take the second square slab (the top). To create a ‘slide-lid’ feel or a secure drop-in lid, attach the four smaller strips to the underside of this square, inset by the thickness of your box walls. -
Test the Fit:
Gently test the fit of the lid on the box. It should be snug but not tight—remember that glaze will add thickness later. Shave off excess clay from the flange if necessary. -
Refine the Shape:
Once assembled and stiffened, use a rasp or sure-form tool to sharpen the exterior corners and ensure the walls are perfectly vertical. I like to do this when the clay is quite firm to get really crisp edges. -
Smooth the Surface:
Use a slightly damp sponge to wipe away grog or harsh marks left by the rasp, smoothing the entire surface to prepare it for glazing.
Make it a Set
Make 3 boxes of varying heights but identical footprints. Stack them for a tiered bento-style tower, applying the oxide rim to each junction for a unified look.
Step 3: Glazing and Finishing
-
Bisque Fire:
Fire the fully dried piece to cone 04 (or your clay’s specific bisque temperature). -
Wax Resist Application:
Apply a perfect circle of wax or a round sticker to the exact center of the lid. This will keep that area free of the main glaze, revealing the raw clay underneath. -
Apply the Main Glaze:
Dip or brush the entire box and lid (except the flange area) with a creamy white matte glaze. If your clay isn’t speckled, choose a glaze that includes iron flecks. -
Clean the Contact Points:
Thoroughly wipe glaze off the rim of the box where the lid sits, and the flange of the lid. These surfaces must be bare clay to prevent fusing during firing. -
Accent the Rim:
Using a small brush and iron oxide wash or brown underglaze, carefully paint the exposed clay strip between the lid and the box. This creates the dark band visible in the reference. -
Peel and Clean:
Remove the wax/sticker from the lid’s center. If desired, stain this circle with a light wash of iron oxide to darken the raw clay slightly, matching the rim. -
Glaze Fire:
Fire the piece to maturity (typically Cone 5 or 6). Ideally, fire the lid ON the box. NOTE: You must apply alumina hydrate or wadding between the lid and box to prevent sticking, or fire them side-by-side if you are worried about fusing.
Enjoy using your sleek new ceramic box for tea, jewelry, or simply as a minimalist display piece