When you’re craving a quick win in the studio, small clay figures are my favorite kind of project—fast, cute, and totally doable even on a busy day. Here are a bunch of beginner-friendly ideas you can sculpt with simple shapes, then personalize with tiny details that make them feel alive.
Chibi Cat Minis With Big Heads
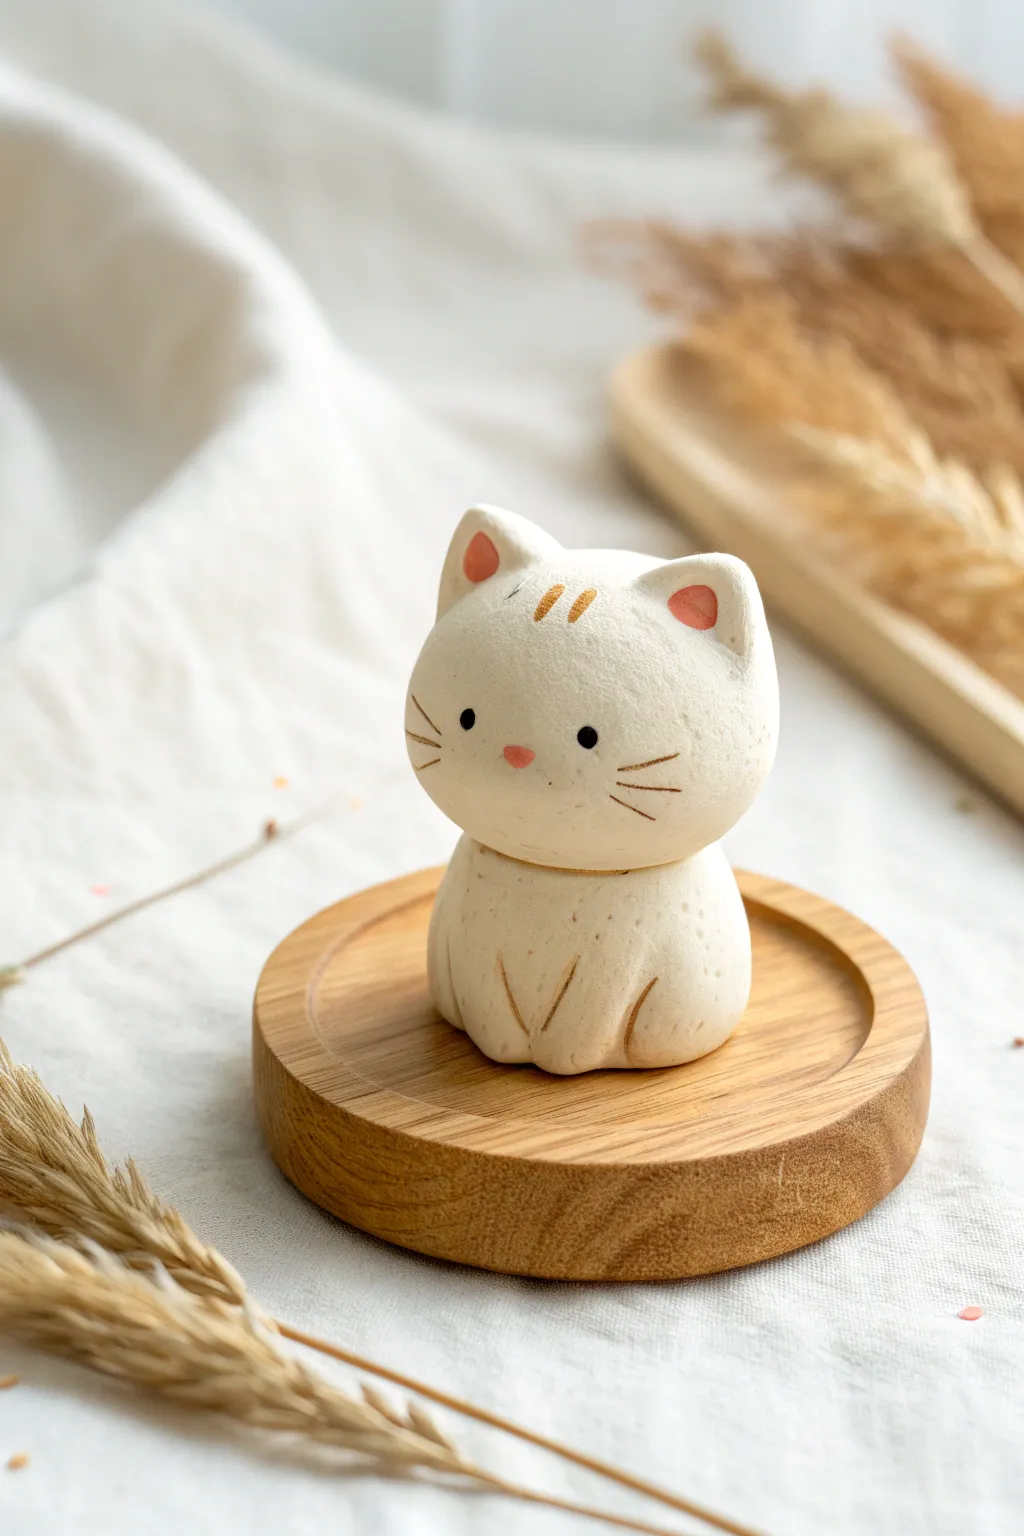
Create this charming little feline friend with its signature oversized head and minimalist features. This clay project captures the adorable chibi aesthetic through clean lines, soft textures, and a simple two-piece stacked construction.
Detailed Instructions
Materials
- White polymer clay or air-dry clay (smooth texture)
- Small wooden coaster or round display base
- Modeling tools (or a toothpick)
- Small ball stylus tool
- Fine grit sandpaper (400-600 grit)
- Acrylic paints (Soft pink, Black, Burnt orange/Gold)
- Fine detail paintbrush (Size 0 or 00)
- Matte spray varnish
Step 1: Shaping the Head
-
Roll the main form:
Begin by conditioning your clay until it is pliable. Roll a smooth ball approximately 1.5 inches in diameter for the head. It needs to be significantly larger than the body to achieve that cute chibi look. -
Flatten the shape:
Gently press the ball between your palms to flatten it slightly into a thick disc or bun shape. The goal is a rounded oval, not a flat pancake, so keep the edges soft and curved. -
Form the ears:
Pinch two small triangles of clay from your main supply. Shape them into soft, rounded points rather than sharp spikes. Attach these firmly to the top left and right of the head. -
Blend the seams:
Use a modeling tool or your finger to smooth the seam where the ears join the head. The transition should be invisible, making the ears look like they grew organically from the skull. -
Create ear depth:
Take a small ball tool and press gently into the front center of each ear triangle to create a concave inner ear area.
Step 2: Creating the Body
-
Form the base:
Roll a second ball of clay, roughly two-thirds the size of the head. Shape this into a rounded gumdrop or broad teardrop shape with a flat bottom so it sits securely. -
Flatten the top:
Press the top of the body piece gently to create a steady platform where the head will eventually rest. It doesn’t need to be perfectly flat, just stable. -
Carve the paws:
Using a needle tool or toothpick, gently carve two vertical, slightly curved lines into the front of the body. These indentations suggest the separation of the front paws. -
Add detail lines:
Add a few smaller, faint tick marks near the bottom of the paw sections to hint at toes. Keep these subtle; the charm is in the simplicity.
Cracks happen
If using air-dry clay, small cracks might appear as it shrinks. Make a ‘slip’ paste of water and clay to fill them, let dry, and sand smooth.
Step 3: Refining and Finishing
-
Texture the surface:
Before drying, check the surface texture. If you want that slightly pitted, natural look seen in the photo, gently tap the surface with a stiff-bristled brush or a balled-up piece of aluminum foil. -
Dry or Bake:
If using polymer clay, bake according to the package instructions. If using air-dry clay, let the pieces sit undisturbed for 24-48 hours until fully hardened. -
Sand for smoothness:
Once hard, use fine-grit sandpaper to buff away any fingerprints or sharp edges. The finish should look matte and stony. -
Assemble the stack:
Test the fit of the head on the body. If you want them permanently attached, use a dab of strong craft glue or superglue between the pieces. I prefer securing them offset slightly for a curious expression. -
Paint the face details:
Using your finest brush and black paint, dot two small, wide-set eyes on the lower half of the face. Add three thin whisker lines on each cheek. -
Add color accents:
Paint the inner ears and a tiny triangular nose with soft pink. Lastly, add three small dashed lines on the forehead using the burnt orange or gold paint for tabby markings. -
Seal the piece:
Finish by spraying the entire figure with a matte varnish to protect the paint without adding unnatural shine.
Make it a shaker
Hollow out the head before joining it to create a cavity. Place a small bell inside before gluing the head to the body for a gentle rattle sound.
Place your tiny cat on its wooden coaster for a serene desk companion


Tiny Frogs With Chunky Cheeks
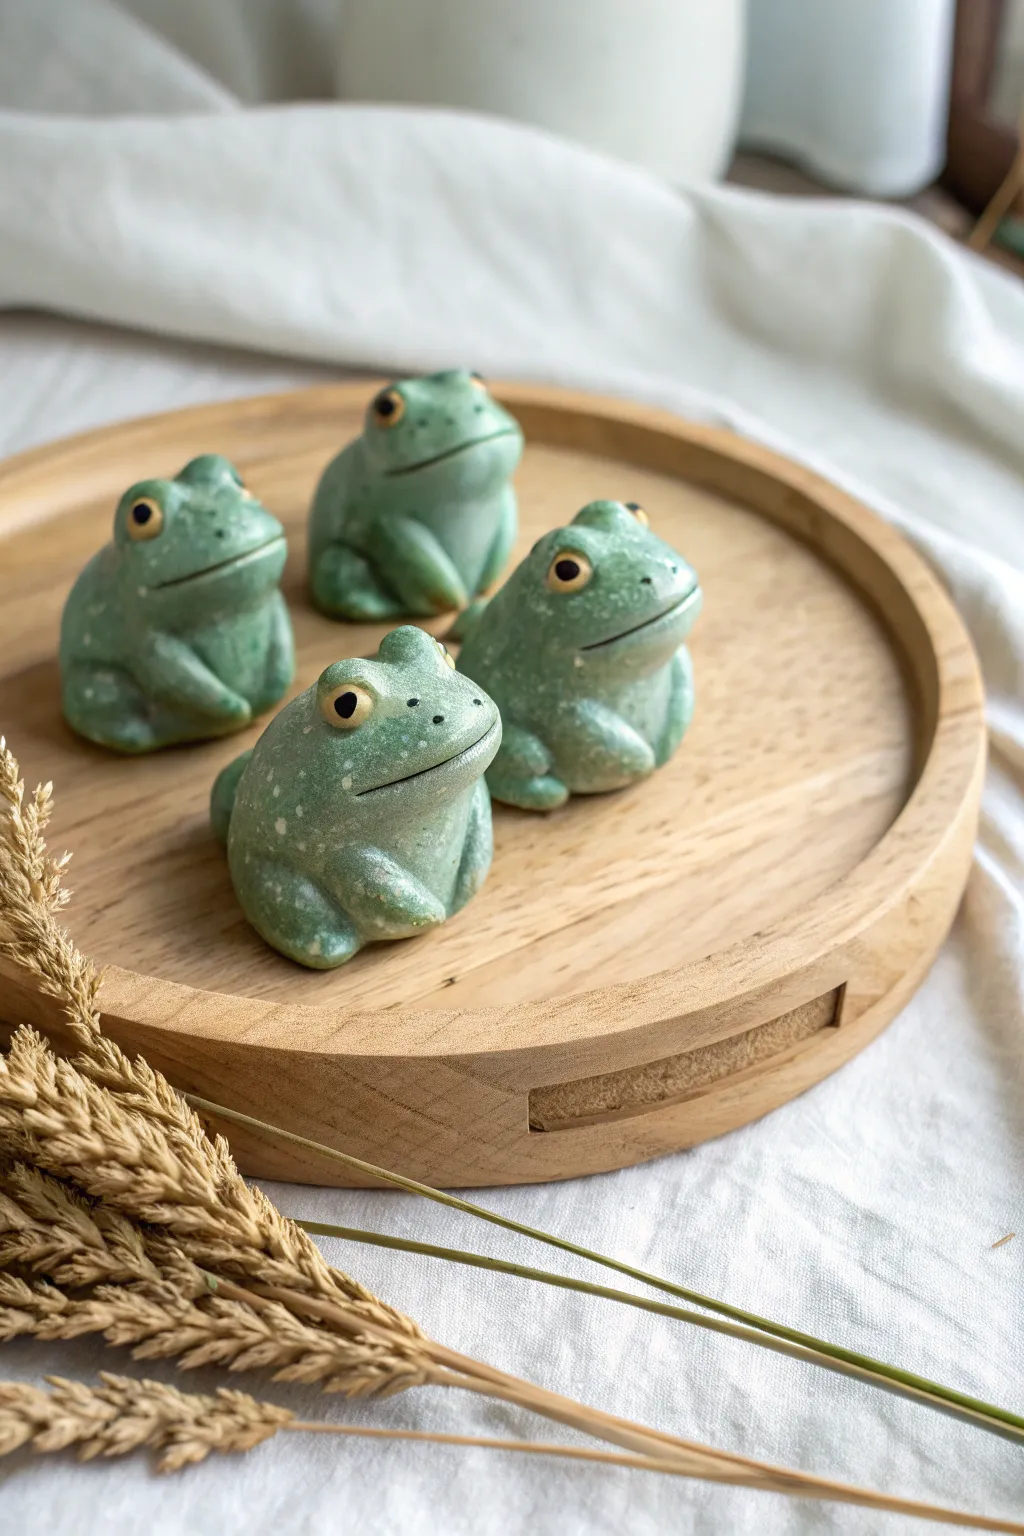
These adorable little amphibians bring a touch of pond life to your desk or shelf with their chunky cheeks and inquisitive expressions. Crafted with simple shapes and a speckled finish, they capture a perfect balance between realistic texture and charming caricature.
How-To Guide
Materials
- Green polymer clay (or white clay + green acrylic paint)
- Black polymer clay or small black beads (for eyes)
- Gold or yellow acrylic paint (for eye rims)
- White or light grey acrylic paint (for speckling)
- Gloss varnish or clear sealant
- Sculpting tools (ball styluses, needle tool, rubber shapers)
- Old toothbrush (for spatter texture)
- Aluminum foil (optional core)
Step 1: Shaping the Bodies
-
Form the base:
Start by conditioning your green clay until it is soft and pliable. Roll a ball about the size of a walnut for the main body. If you want to save clay, you can use a small ball of tightly scrunched aluminum foil as a core. -
Create the frog shape:
Gently gently press the ball onto your work surface to flatten the bottom. Use your thumbs to push the mass slightly forward, creating a hump-backed posture distinct to a sitting frog. -
Define the head:
Instead of adding a separate head, pinch the front upper third of your clay mound. Smooth this area upwards to suggest a head that merges seamlessly into the body, keeping those cheeks nice and chubby.
Fixing Cracks
If cracks appear while smoothing seams, dip your finger or tool in a tiny bit of clay softener (or baby oil) and massage the area gently to blend it back together.
Step 2: Adding Limbs
-
Make the rear legs:
Roll two small sausage shapes of green clay, roughly half the length of the body. Flatten them slightly. -
Attach the thighs:
Press these sausage shapes against the sides of the body, starting low near the back and curving upward toward the hip. Blend the seams smoothly with a rubber shaper so the legs look like part of the main mass. -
Form the front legs:
Roll two smaller, thinner cylinders for the front arms. Position them vertically right under expected chin area. -
Sculpt the feet:
Press the bottom of the front legs slightly outward. Use a needle tool or small knife to make tiny indentations for toes, keeping them subtle rather than distinct digits.
Pond Scenery
Create a lily pad base for your frog by rolling out a flat disc of green clay, cutting a small ‘V’ wedge out of one side, and texturing veins with a needle tool.
Step 3: Facial Features
-
Carve the mouth:
Use a thin blade or needle tool to slice a wide, gentle smile across the front of the face. Curve the ends slightly upward into the cheeks to give that happy, satisfied expression. -
Prepare eye sockets:
Using a medium-sized ball tool, press two indentations on the top of the head where the eyes will go. Space them wide apart for a cuter look. -
Sculpt the eyes:
Roll two tiny balls of the same green clay to form the eyelids/eye mounds and place them into the sockets. Press a smaller indentation into the center of each mound. -
Insert the pupils:
Place tiny balls of black clay (or small black beads) into the indentations you just made. Bake the clay according to the manufacturer’s instructions at this stage.
Step 4: Painting & Finishing
-
Paint the eye rims:
Once cool, use a fine detail brush and gold or yellow acrylic paint to carefully outline the black pupil, creating a bright iris ring. -
Create the mottled skin:
Dilute some white or light grey acrylic paint with water. Dip an old toothbrush into this mixture. -
Apply the speckles:
Hold the toothbrush near the frog and run your thumb across the bristles to flick tiny specks of paint onto the green skin. I prefer to practice on a paper towel first to control the spray density. -
Highlight the cheeks:
Dry brush a tiny amount of lighter green or yellow-green on the tops of the knees and the chubby cheek areas to accentuate the roundness. -
Seal the work:
Finish by applying a coat of satin or gloss varnish. This protects the paint and gives the frogs a perpetually moist, amphibious look.
Group your finished frogs together on a tray to create your own quiet little council of amphibians


Mini Penguin Pals With Teardrop Bodies
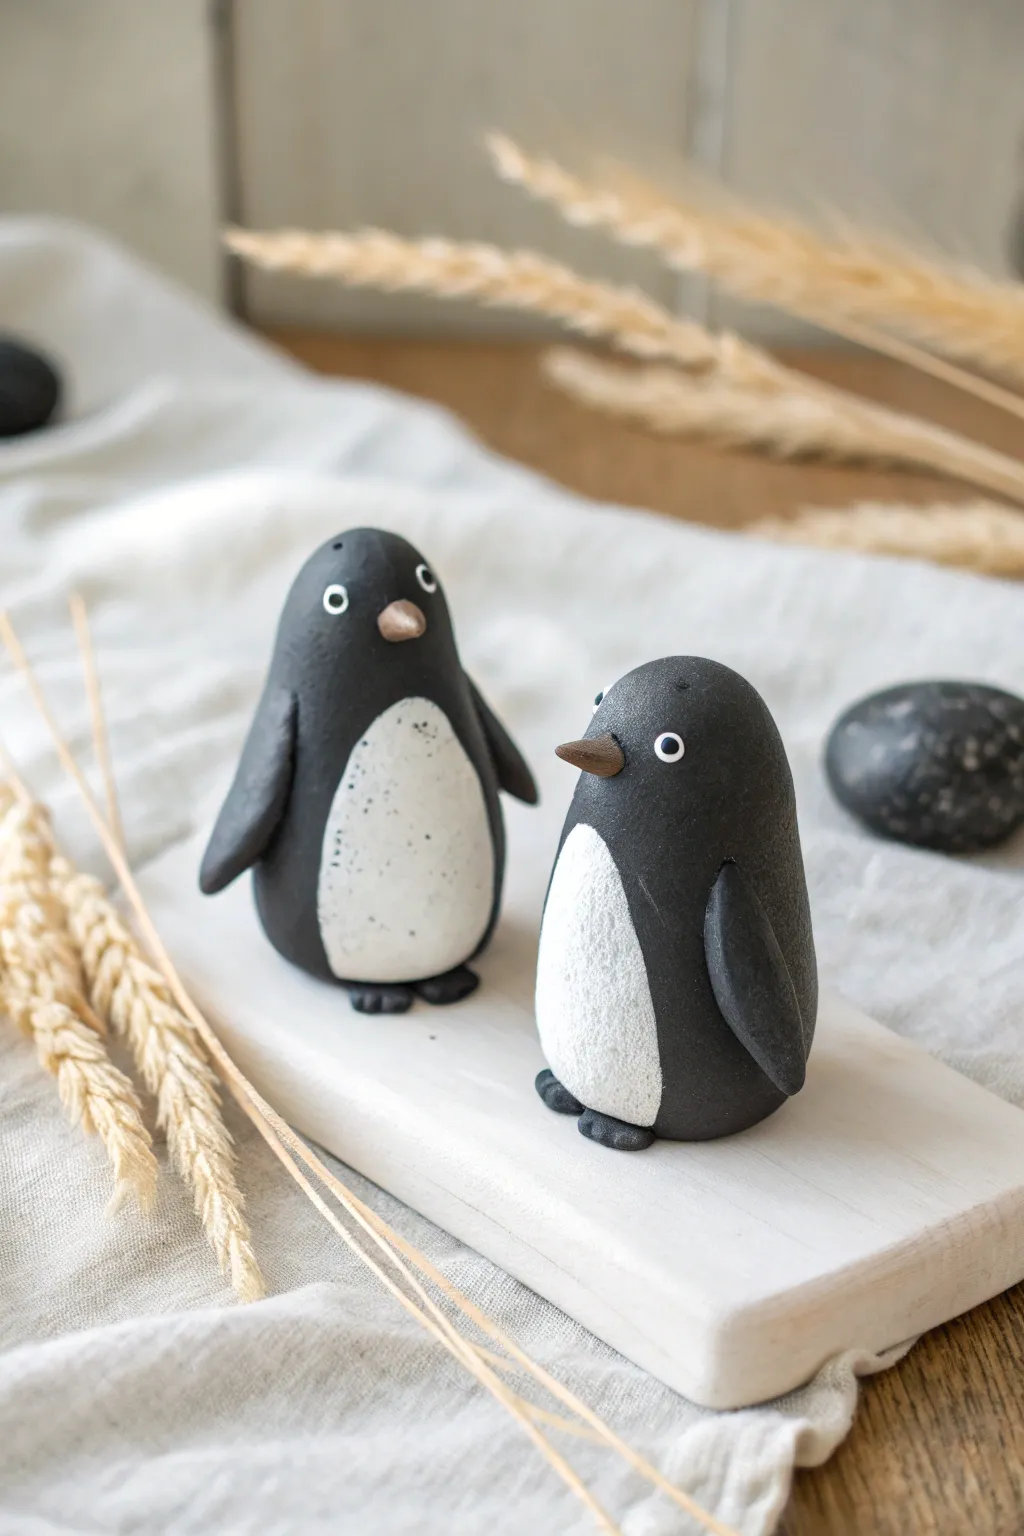
These charming little penguins are sculpted from simple teardrop and oval shapes, giving them a sleek, modern look perfect for winter decor. Their matte finish and sweet, minimalist expressions make them an adorable addition to any shelf or holiday display.
Step-by-Step
Materials
- Black polymer clay
- White or speckled granite polymer clay
- Tan or light brown polymer clay
- Basic sculpting tools (needle tool, small ball tool)
- Acrylic rolling pin
- Craft knife
- White acrylic paint (for eyes)
- Small dotting tool or toothpick
- Black fine-tip marker/paint (for pupils)
- Oven and baking sheet (if using polymer clay)
Step 1: Creating the Body
-
Form the base shape:
Start with a golf-ball-sized chunk of black clay. Condition it well until soft, then roll it into a smooth ball. -
Shape the teardrop:
Gently roll one side of the ball against your work surface to taper it upward, creating a fat teardrop or pear shape. The bottom should remain wide and rounded so it sits flat. -
Flatten the base:
Press the bottom of the teardrop firmly onto your work surface. Tap the top gently to round off any sharp points; you want a smooth, domed head.
Step 2: Adding Details
-
Prepare the belly:
Roll a smaller piece of white or speckled clay into a ball, then flatten it into a thin oval using your rolling pin. -
Attach the tummy:
Press this white oval onto the front of the black body. It should stretch from near the bottom almost to where the ‘chin’ would be. -
Blend the seams:
Use your thumb or a smoothing tool to gently press the edges of the white clay so it sits flush against the black body, ensuring it doesn’t look like a thick sticker. -
Refine the texture:
If you want that slight speckled look seen in the photo, you can lightly tap the white clay with a toothbrush or stiff brush to add texture.
Clean Clay Tip
Black clay loves to pick up dust. Keep a pack of baby wipes nearby and clean your hands thoroughly before touching the white belly clay to keep it pristine.
Step 3: Wings and Feet
-
Make the wings:
Create two small teardrops of black clay. Flatten them between your fingers until they look like long petals. -
Attach the flippers:
Press the wider end of the wing onto the side of the body, just below the neck area. Smooth the seam at the shoulder into the body so it blends seamlessly. -
Curve the flippers:
Gently flare the tips of the wings outward slightly to give the penguin a bit of movement and life. -
Sculpt the feet:
Roll two tiny balls of black clay and flatten them into discs. Use a knife tool to make two small indents in the front of each disc for toes. -
Position the feet:
Place the feet underneath the front edge of the white belly so they are just peeking out.
Winter Texture
Before baking, lightly dust the black body with cornstarch or baby powder to create a softer, matte ‘slate’ finish instead of a shiny plastic look.
Step 4: Face and Finishing
-
Shape the beak:
Take a tiny amount of tan or brown clay and roll it into a small cone. Flatten the underside slightly so it isn’t perfectly round. -
Attach the beak:
Press the beak onto the center of the face area, just above the white belly. Angle it slightly downward. -
Bake the figures:
Bake your penguins according to the clay manufacturer’s instructions (usually around 275°F or 130°C for 15-30 minutes). -
Paint the eyes:
once cooled, dip a dotting tool into white acrylic paint and place two dots on either side of the beak. -
Add pupils:
When the white paint is dry, use a fine-tip black marker or a needle with black paint to add tiny dots in the center for the pupils.
Group these little guys in pairs or trios on a mantelpiece for an instant wintry mood


Little Bunny Buddies With Stubby Ears
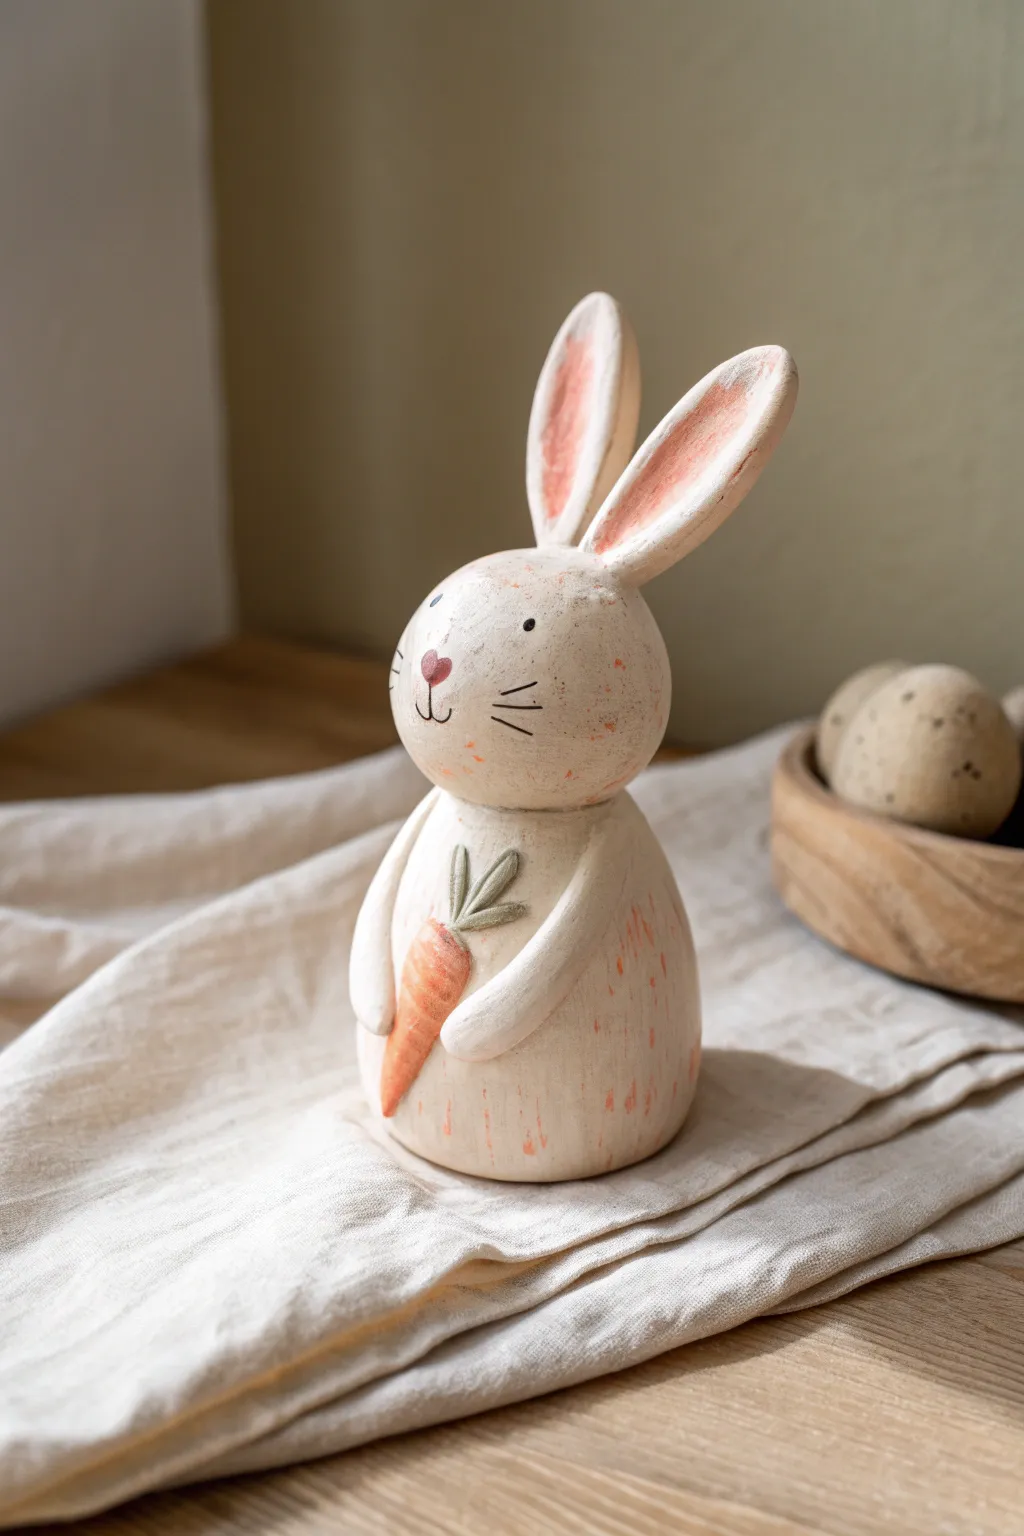
Sculpt a heartwarming touch of country charm with this adorable standing rabbit figure holding a tiny carrot. The textured finish and soft pastel accents give it a lovely, handcrafted wooden look without requiring any carving tools.
Detailed Instructions
Materials
- Air-dry clay (white or natural stone color)
- Aluminum foil
- Sculpting tools (needle tool, modeling tool)
- Acrylic paints (antique white/cream, soft pink, orange, sage green, black)
- Small paintbrushes (detail brush and flat brush)
- Water and sponge
- Fine-grit sandpaper
- Matte varnish or sealant
Step 1: Forming the Base Structure
-
Create the core:
Start by crumpling a piece of aluminum foil into a tight egg shape. This will be the core of the bunny’s body, saving clay and reducing drying time. -
Cover with clay:
Roll out a slab of clay about ¼ inch thick. Wrap it completely around the foil egg, smoothing the seams together with a little water until you have a solid, seamless oval shape. -
Construct the head:
Roll a smaller ball of solid clay for the head. Flatten the bottom slightly and score both the underside of the head and total top of the body. -
Attach the head:
Use a dab of water or clay slip (clay mixed with water) to join the head to the body. Blend the clay downwards at the neck seam to ensure a strong bond, then smooth it out so there is a slight indentation but no crack.
Make It Look Wooden
Apply the creamy base coat unevenly or lightly sand it back in spots after drying to reveal the raw clay underneath. This mimics distressed painted wood.
Step 2: Adding Features and Limbs
-
Shape the ears:
Roll two equal sausage shapes of clay and flatten them gently. Pinch one end of each to form a point and taper the other end for attachment. -
Attach the ears:
Score the top of the head and the base of the ears. Attach them upright, smoothing the clay connection points. You can angle them slightly for expression. -
Make the arms:
Roll two small logs of clay for the arms. They need to be long enough to reach from the shoulder area to just below the belly center. -
Position the arms:
Attach the arms to the sides of the body, blending the clay at the shoulders. Curve them forward as if the bunny is holding something against its stomach. -
Sculpt the carrot:
Roll a tiny cone of clay for the carrot. Use a needle tool to scratch horizontal lines across it for texture. -
Place the carrot:
Tuck the carrot between the paws. Gently press the paws into the carrot to secure it, using a touch of slip if necessary. -
Add carrot greens:
Roll three tiny teardrops of clay. Attach them to the top of the carrot to create the leafy greens.
Seasonal Switch
Instead of a carrot, sculpt the bunny holding a small Easter egg, a heart for Valentine’s Day, or a tiny pumpkin for an autumnal version.
Step 3: Finishing Touches and Painting
-
Refine the texture:
Before the clay dries, take a stiff bristle brush or a crumpled ball of foil and lightly tap it all over the surface. This creates a stone-like or wood-grain texture rather than a perfectly smooth plastic look. -
Let it dry:
Allow the figure to dry completely. Depending on the thickness and humidity, this can take 24 to 48 hours. I usually rotate it simply once halfway through so the bottom dries evenly. -
Base coat:
Paint the entire bunny with a coat of antique white or cream acrylic paint. Let this dry fully. -
Paint the details:
Paint the inner ears and a small heart-shaped nose with soft pink. Paint the carrot orange and the leaves sage green. -
Add facial features:
Use a very fine detail brush or a black paint pen to draw small dots for eyes, a vertical line from the nose, and whiskers. -
Create a rustic finish:
Dilute a tiny drop of pink or light brown paint with lots of water. Lightly brush this ‘wash’ over the body, wiping most of it off immediately with a paper towel to leave subtle traces in the texture. -
Seal the work:
Protect your creation with a coat of matte varnish to preserve the natural, earthy aesthetic.
Place your finished bunny on a shelf or mantle for a sweet decorative accent that lasts all spring

The Complete Guide to Pottery Troubleshooting
Uncover the most common ceramic mistakes—from cracking clay to failed glazes—and learn how to fix them fast.
Smiley Toast Characters With Simple Faces
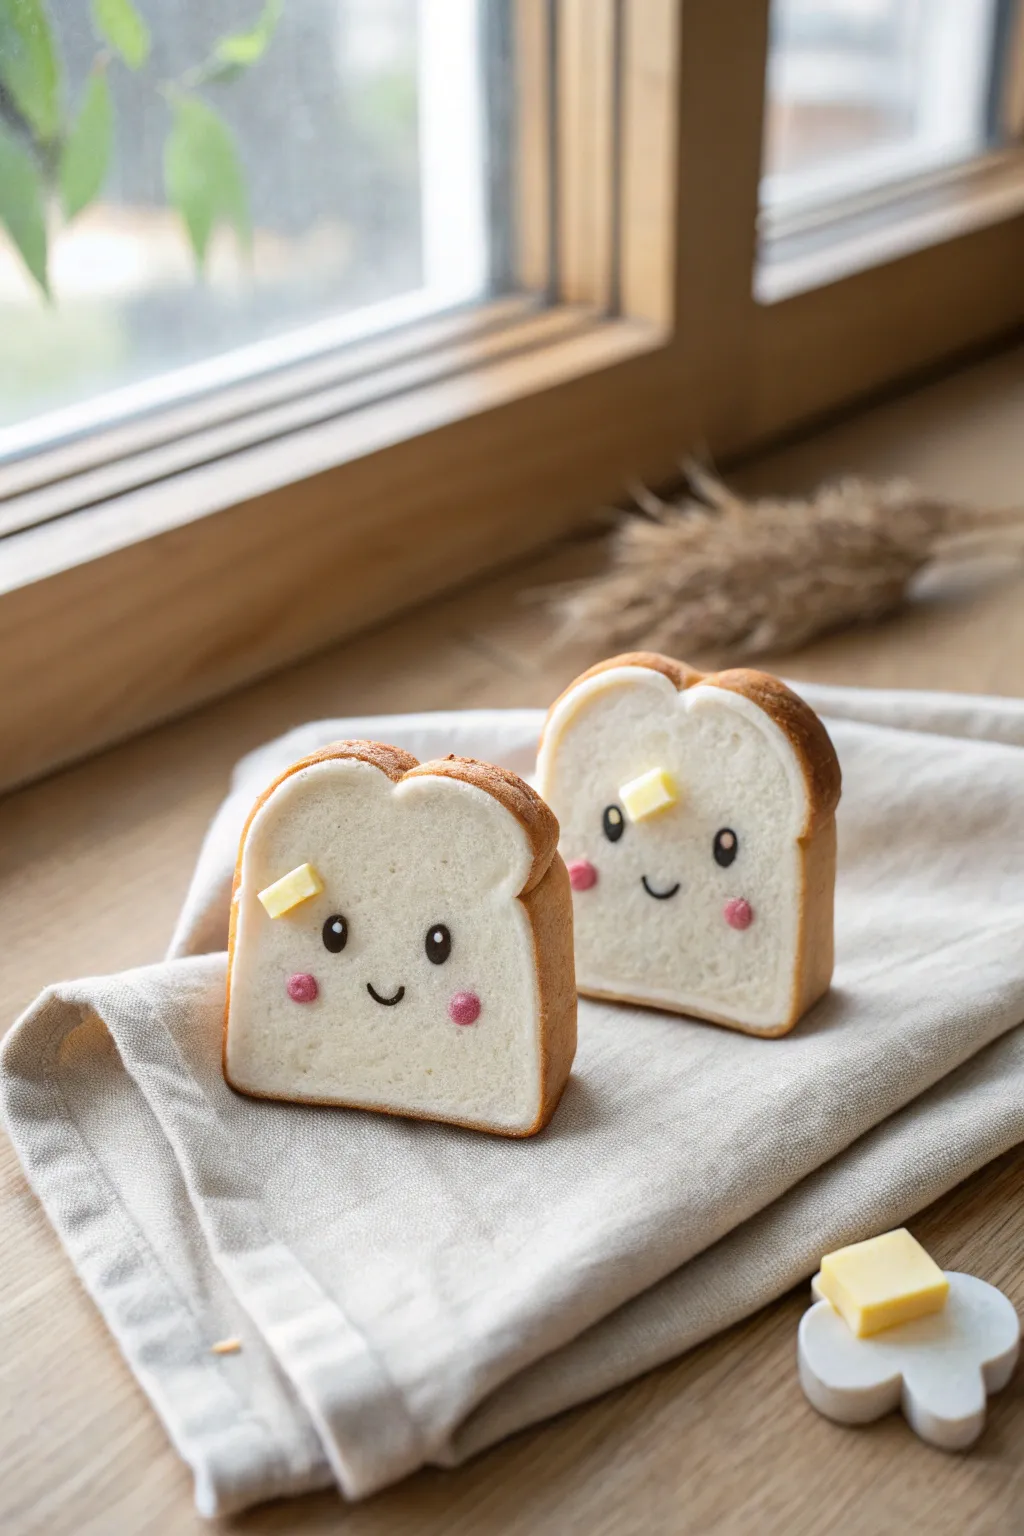
These adorable polymer clay toast figures bring a delightful morning cheer to any desk or shelf. With their warm, toasted crusts, tiny melting butter pats, and blushing cheeks, they are a simple yet incredibly satisfying project to sculpt.
Step-by-Step Tutorial
Materials
- White polymer clay
- Light brown polymer clay (or translucent liquid clay mixed with brown pastel)
- Yellow polymer clay
- Pink polymer clay
- Black polymer clay (very small amount)
- Dry soft pastels (orange, brown, yellow orchre)
- Soft paintbrush for shading
- Texture tool (toothbrush or stiff bristle brush)
- Needle tool or toothpick
- Clay blade or craft knife
- Dotting tools
- Oven for baking
Step 1: Shaping the Loaf
-
Condition the Clay:
Begin by conditioning your white polymer clay until it is soft and malleable. This prevents cracks during shaping. -
Form the Base Shape:
Roll the white clay into a smooth ball, then gently flatten it into a thick, uniform square slab about 3/4 inch thick. -
Create the Bread Curve:
Use your fingers to round the top two corners more significantly than the bottom ones. Press an indentation in the very center of the top edge to create the classic ‘M’ shape of a bread loaf slice. -
Refine the Sides:
Gently tap the artwork on your work surface to flatten the bottom so it stands independently. Smooth the sides to ensure they are straight and even. -
Add Texture:
Take a clean toothbrush or stiff bristle brush and gently tap it all over the front and back flat surfaces of the white clay. This mimics the airy texture of bread.
Realistic Texture Pro-Tip
For ultra-realistic bread texture, gently poke the white surface with a needle tool in random spots *after* using the toothbrush. This simulates larger air bubbles distinct from the general crumb.
Step 2: Toasting the Crust
-
Prepare the Pastels:
Scrape some yellow ochre, orange, and light brown soft pastels into fine powder using your craft knife. -
Apply Initial Color:
Using a soft dry brush, pick up the yellow ochre powder and gently brush it around the outer perimeter of the bread slice. Don’t worry about being too neat; bread toasts unevenly. -
Deepen the Crust:
Layer the light brown powder over the yellow ochre, concentrating heavily on the very edges/sides (the crust area). Leave the center of the bread face mostly white. -
Create the Crust Layer:
Roll a very thin sheet of light brown clay. Cut a long strip that matches the width of your bread slice. -
Wrap the Loaf:
Wrap this brown strip around the perimeter of the white shape to act as the actual crust skin, blending the seams underneath the bottom where it won’t be seen. -
Texture the Crust:
Lightly texture this new brown layer with your toothbrush so it doesn’t look too smooth compared to the bread face.
Level Up: Accessories
Make a tiny clay plate or checkered napkin to sit underneath your finished toast, or coat the butter pat with a thin layer of UV resin after baking for a wet, melting shine.
Step 3: Adding the Personality
-
Make the Face Indentations:
Use a medium-sized ball tool to press two shallow indentations where you want the eyes to go. This helps the black clay sit flush. -
Form the Eyes:
Roll two tiny specks of black clay into balls, flatten them slightly, and press them into the sockets. Add microscopic dots of white clay for the ‘catch light’ reflections. -
Add the Smile:
Roll an incredibly thin snake of black clay. Cut a tiny U-shape and gently press it into the clay between the eyes using a needle tool. -
Blushing Cheeks:
Roll two small balls of pink clay. Flatten them onto the bread face below the eyes and texture them slightly with your toothbrush to blend them in.
Step 4: The Butter Topping
-
Cut the Butter:
Condition a small amount of yellow clay. Shape it into a small rectangular block to resemble a pat of butter. -
Place the Butter:
Position the butter pat on the upper left forehead area of the toast. Press it down firmly so it adheres. -
Melting Effect:
I like to use a silicone tool to smear just the bottom edge of the yellow square slightly downward, making it look like it’s beginning to melt from the warmth. -
Final Bake:
Bake your creations according to the manufacturer’s instructions for your specific brand of polymer clay. Let them cool completely before handling.
Once cooled, these cheerful breakfast buddies are ready to bring a smile to your kitchen counter
Happy Egg Duos With Yolk Faces
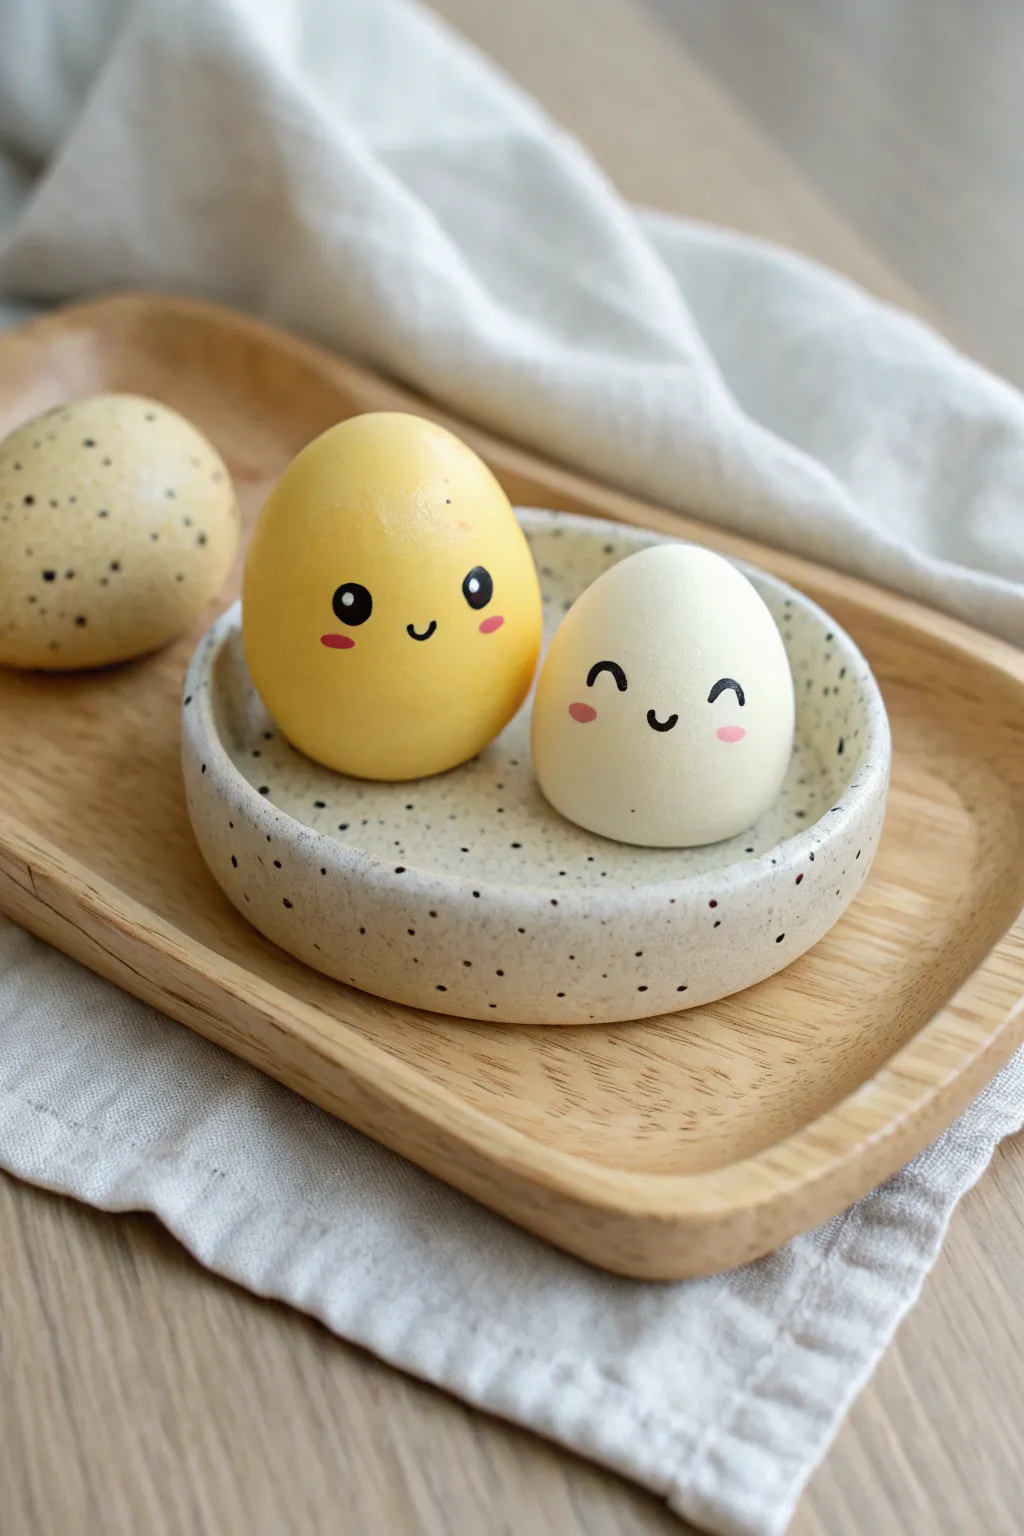
Create this adorable pair of smiling egg characters, featuring a cheerful yellow yolk friend and a sweet white shell companion cozied up in a custom handmade dish. This project combines simple shaping techniques with charming facial details for a heartwarming desk decoration.
Step-by-Step Guide
Materials
- Polymer clay (yellow, white, and a beige/tan color)
- Black acrylic paint
- Pink acrylic paint
- Small dotting tool or toothpick
- Fine detail paintbrush (size 0 or 00)
- Old toothbrush (for speckling)
- Rolling pin
- Circle cutter or bowl (approx. 3-4 inches)
- Oven for baking
- Parchment paper
Step 1: Shaping the Characters
-
Condition the yellow clay:
Start by kneading a chunk of yellow polymer clay until it is soft and pliable. Roll it into a smooth ball about the size of a large walnut. -
Form the yellow egg:
Gently taper the top of the yellow ball to create a classic egg shape. Keep the bottom slightly flattened so it can stand upright on its own without rolling away. -
Make the white companion:
Repeat the previous steps using white polymer clay. Make this egg strictly white and slightly smaller than the yellow one to create a cute size contrast between the ‘yolk’ and the ‘shell’. -
Create the speckled brown egg:
Take your beige or tan clay and form a third egg shape. This one will sit outside the dish as a decorative accent. -
Add texture to the brown egg:
Before baking, use a stiff brush or a crumpled ball of foil to gently texture the surface of the beige egg if you want a natural shell look, though smooth is fine too.
Smoother Surfaces
Before baking, wipe your raw clay eggs with a tiny bit of baby oil or rubbing alcohol on your finger. This removes fingerprints and dust for a flawless finish.
Step 2: Crafting the Speckled Dish
-
Roll out the base:
Roll out a portion of white or very light grey clay into a slab approximately 1/4 inch thick. -
Cut the dish shape:
Use a circle cutter or trace around a small bowl to cut a perfect circle from your clay slab. -
Form the raised rim:
Gently curve the edges of the circle upward to create a shallow bowl shape. Use your fingertips to smooth the rim so it’s rounded and organic rather than sharp. -
Apply the speckles:
Dip an old toothbrush into slightly watered-down black acrylic paint. Run your thumb across the bristles to flick tiny specks of paint onto the raw clay dish. Do the same for the beige egg you made earlier. -
Bake the clay:
Arrange the two white/yellow eggs, the beige egg, and the dish on a parchment-lined baking sheet. Bake according to your brand of polymer clay’s instructions (usually 275°F/135°C for 15-30 minutes).
Step 3: Bringing Them to Life
-
Cool completely:
Allow all pieces to cool down fully after baking. Painting on warm clay can make the paint dry too fast and get clumpy. -
Paint the eyes:
Using your fine detail brush and black acrylic paint, add eyes to the yellow egg. Paint two small circles, then add tiny white highlights once the black is dry for a ‘sparkle’ effect. -
Paint the cheerful mouths:
For the yellow egg, paint a small ‘u’ shape between the eyes. For the white egg, paint a wider smile and two upside-down ‘u’ shapes for happy, squinting eyes. -
I prefer using a toothpick here:
When doing the tiny mouths, I sometimes find a brush too flimsy, so dipping a toothpick in paint gives me more control over the line width. -
Add rosy cheeks:
Dip a dotting tool or the flat end of a brush into pink paint. Gently stamp oval blush marks (for the yellow egg) and round circular blush marks (for the white egg) just below their eyes. -
Final assembly:
Place the two smiling eggs inside the speckled dish and set the beige speckled egg alongside it to complete the scene.
Wobbly Eggs?
If your eggs won’t stand up straight after baking, use a piece of fine-grit sandpaper to gently sand the bases until they are completely flat and stable.
Place your happy egg duo on a shelf or desk to bring a smile to your face every time you see them


What Really Happens Inside the Kiln
Learn how time and temperature work together inside the kiln to transform clay into durable ceramic.
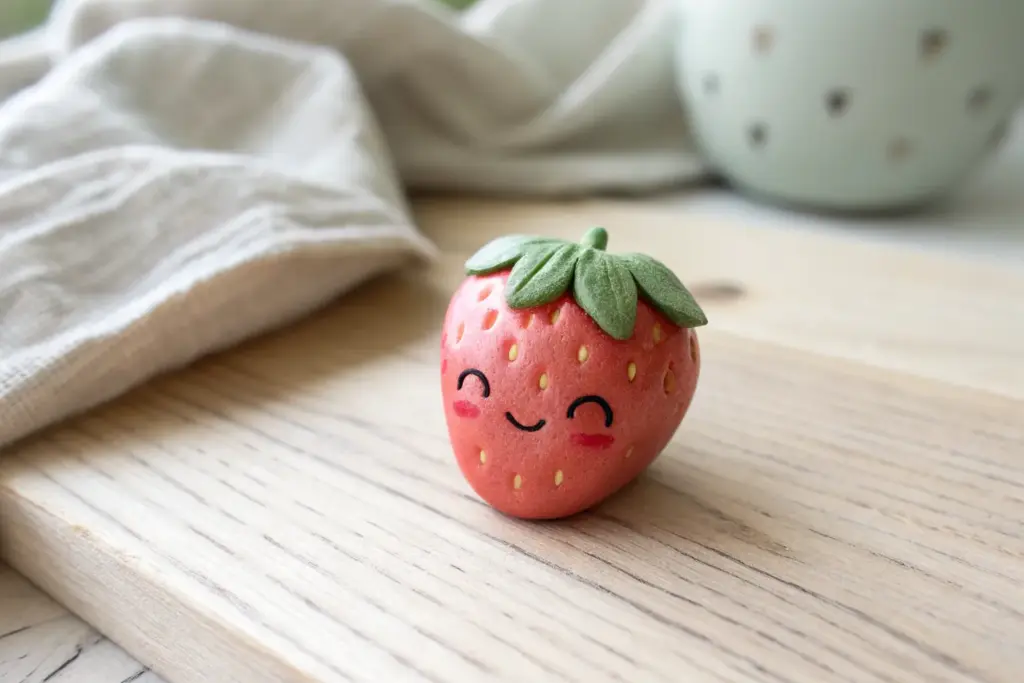
Mini Fruit Friends (Strawberry, Orange, Lemon)
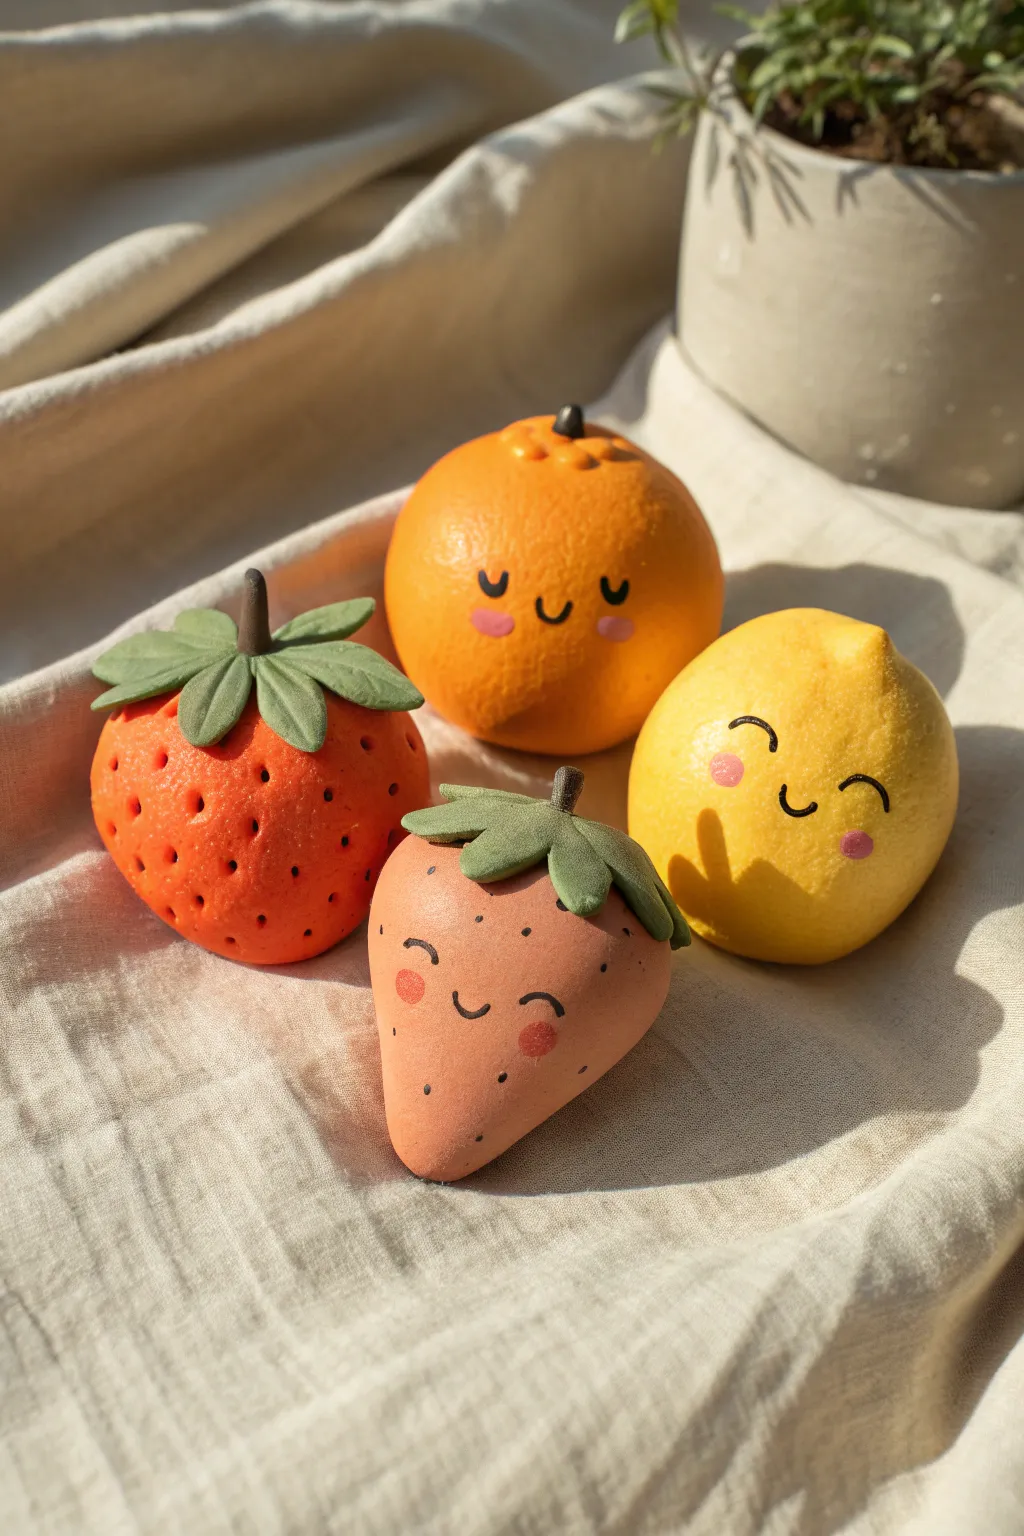
Brighten up your desk or shelf with this adorable quartet of happy fruit friends. You’ll learn to sculpt simple spherical and tapered shapes into a cheerful orange, a sunny lemon, and two sweet strawberries, each finished with a charming hand-painted face.
Detailed Instructions
Materials
- Air-dry clay or polymer clay (white is versatile, or pre-colored)
- Acrylic paints (bright orange, yellow, pale pink, coral red, dark green, light green, black)
- Small detail paintbrushes
- Ball stylus tool or a toothpick
- Basic sculpting tools
- Matte varnish or sealant (optional)
Step 1: Sculpting the Base Shapes
-
Portion the clay:
Start by dividing your clay into four equal-sized balls, each about the size of a golf ball or slightly smaller. Roll them in your palms until they are smooth and free of major cracks. -
Form the orange:
Take one ball and perfect its round shape to create the orange. Gently press the top and bottom just a tiny bit so it sits flat without rolling away. -
Texture the orange peel:
Using a stiff toothbrush or a textured sponge, lightly tap the entire surface of the orange sphere to mimic the pitted texture of citrus peel. Don’t press too hard; just enough to break the smoothness. -
Shape the lemon:
Roll another ball, but this time, gently pinch and pull opposite ends to create the distinct lemon tips. It should look like a slightly elongated football shape. -
Sculpt the strawberries:
For the remaining two balls, roll each into a smooth teardrop or cone shape. Flatten the wider end slightly so they can stand upright. I usually make one a bit plumper than the other for variety. -
Add strawberry seeds:
Use a small ball stylus or the tip of a toothpick to press tiny indentations all over the surface of the strawberry shapes. These will be the seed pockets.
Pro Tip: Seamless Joining
When attaching the stems and leaves, use a tiny bit of water (for air-dry clay) or liquid clay (for polymer) to act as glue. This ensures pieces won’t pop off later.
Step 2: Adding Greenery & Details
-
Create the leafy caps:
Flatten a small piece of clay into a thin pancake. Use a craft knife to cut out star-shaped patterns or individual leaf shapes. You’ll need two sets of leaves for the strawberries. -
Attach strawberry leaves:
Gently press the leaf shapes onto the top (broad end) of each strawberry. Drape the tips of the leaves down slightly so they hug the fruit. -
Add stems:
Roll three tiny snakes of clay. Attach a short, stubby one to the center of the orange, and slightly longer ones to the tops of the strawberry leaves. Smooth the seams where they connect. -
Dry or Bake:
If using air-dry clay, let the figures sit in a dry spot for 24-48 hours. If using polymer clay, bake according to the manufacturer’s instructions on the package.
Step 3: Painting and Expressions
-
Base coat the orange:
Paint the round textured fruit with a vibrant orange acrylic paint. Depending on your paint’s opacity, you might need two coats for full coverage. -
Base coat the lemon:
Paint the lemon shape with a sunny, bright yellow. Ensure you get into any small crevices near the tips. -
Paint the strawberries:
Paint the plumper strawberry a bright red-orange. For the second strawberry, mix white into your red paint to create a soft, pastel coral-pink shade. -
Color the leaves:
Paint the strawberry leaves a muted sage green or olive tone. Paint the stems a darker brown-green to make them stand out. -
Add strawberry seeds:
Once the red/pink base is dry, use a fine tip brush or toothpick to dab tiny dots of dark contrasting paint (like black or dark brown) into the seed indentations you made earlier. -
Paint the faces:
Using your finest brush and black paint, draw simple faces. Use curved ‘U’ shapes for happy closed eyes and small smiles. Vary the expressions—try a wink on the lemon or a side-smile on the pink berry. -
Add rosy cheeks:
Dip the back end of a paintbrush handle into pink paint and stamp two small circles directly under the eyes of each fruit for instant cuteness. -
Seal (Optional):
To protect your paint job, brush on a layer of matte varnish once everything is completely dry.
Level Up: Fruity Scene
Create a tiny wooden crate out of popsicle sticks to display your fruit friends, or glue magnets to the back of them to turn them into adorable fridge decor.
Now you have a refreshing set of pocket-sized pals ready to bring a smile to anyone’s face.
Mushroom People With Tiny Boots
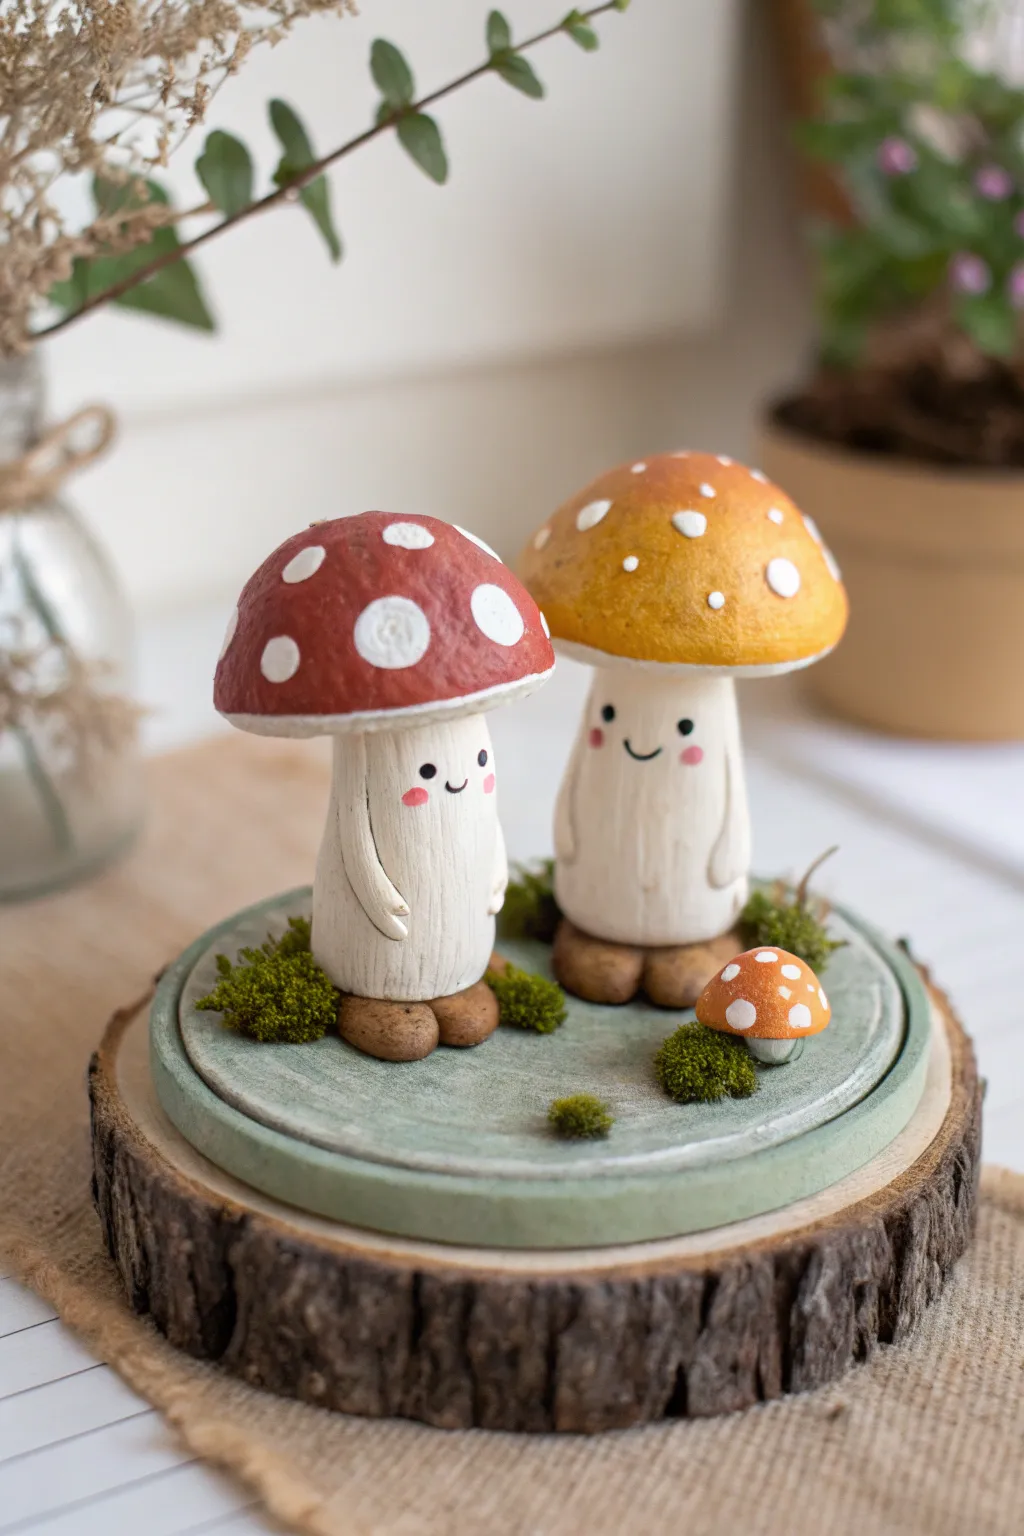
Bring the forest floor to life with these adorable clay mushroom figures, complete with tiny boots and sweet smiling faces. Mounted on a rustic wood slice, this charming trio makes a perfect desk companion or bookshelf accent.
Step-by-Step Tutorial
Materials
- Polymer clay (white, brown, red, yellow/ochre)
- Foil or wire for armature (optional but recommended for stability)
- Sculpting tools (needle tool, ball stylus)
- Acrylic paints (black, pink, white)
- Small rustic wood slice
- Preserved craft moss
- Strong craft glue (E6000 or super glue)
- Matte varnish
- Fine detail paintbrush
- Mod Podge or green acrylic paint (for the base)
Step 1: Sculpting the Stems
-
Prepare the clay:
Begin by conditioning your white polymer clay until it is soft and pliable. Divide it into two larger portions for the main figures and a tiny speck for the baby mushroom. -
Form the bodies:
Roll the larger portions into thick cylinders that are slightly wider at the bottom than the top. Smooth out any fingerprints. -
Add texture:
Using a needle tool or a dull knife, gently score vertical lines up and down the stems to mimic the natural texture of a mushroom stalk. Keep the pressure light so the lines aren’t too deep. -
Shape the arms:
Roll two very thin snakes of white clay for each figure. attach them to the sides of the bodies, blending the top seam so they look seamless, while leaving the little hands resting on their bellies.
Step 2: Creating the Caps & Boots
-
Shape the caps:
Take your red and ochre clay. Roll them into balls, then flatten the bottom and round the top to create a classic dome shape. Make a tiny orange cap for the baby mushroom. -
Add spots:
Roll tiny balls of white clay and press them flat onto the colored caps. Vary the sizes for a natural look—some large, some small. -
Texture the caps:
Gently press a piece of sandpaper or a toothbrush against the caps to give them an earthy, non-shiny texture before baking. -
Model the boots:
Using brown clay, create four small oval shapes. Press an indentation into the top of each where the stem will sit. I find it helpful to test the fit before baking to ensure the mushrooms stand straight. -
Assembly and baking:
Press the caps firmly onto their respective stems. Place the stems into the boots. Bake everything according to your clay package instructions (usually 275°F/130°C for 15-30 minutes).
Boot Stability
Insert a short piece of toothpick or wire between the boots and the leg *before* baking. This acts as an internal dowel, ensuring your mushroom people won’t topple over later.
Step 3: Painting & Finishing
-
Applying the face:
Once the figures are completely cool, use a fine detail brush or a toothpick to paint two tiny black dots for eyes and a small curved line for a smile. -
Adding blush:
Dip a dry brush into a tiny amount of pink paint (or use chalk pastel dust) and gently dab rosy cheeks underneath the eyes. -
Protecting the work:
If desired, coat the clay figures with a matte varnish to protect the paint and remove any remaining polymer shine.
Glow Up
Use glow-in-the-dark polymer clay for the white spots on the caps. When you turn off the lights, your little forest friends will magically illuminate the shelf.
Step 4: The Mossy Base
-
Prep the base:
Take your wood slice. If the wood is very raw, you might want to sand the top surface. Paint a circle of sage green inside the unfinished wood rim to simulate the ground. -
Create a riser:
To give the display height like in the photo, create a flat disc from green clay or painted cardboard that fits inside the wood rim, and glue it down. -
Secure the figures:
Apply strong glue to the bottom of the tiny boots and press the two main mushrooms firmly onto the center of the green base. -
Add the baby mushroom:
Glue the tiny orange mushroom slightly in front of the pair. -
Plant the moss:
Apply dots of glue around the figures’ feet and randomly on the base. Press small clumps of preserved moss into the glue to create a lush, forest-floor environment.
Place your finished woodland scene near a houseplant to make them feel right at home

TRACK YOUR CERAMIC JOURNEY
Capture glaze tests, firing details, and creative progress—all in one simple printable. Make your projects easier to repeat and improve.
Mini Ghost Figures With Spooky-Cute Vibes
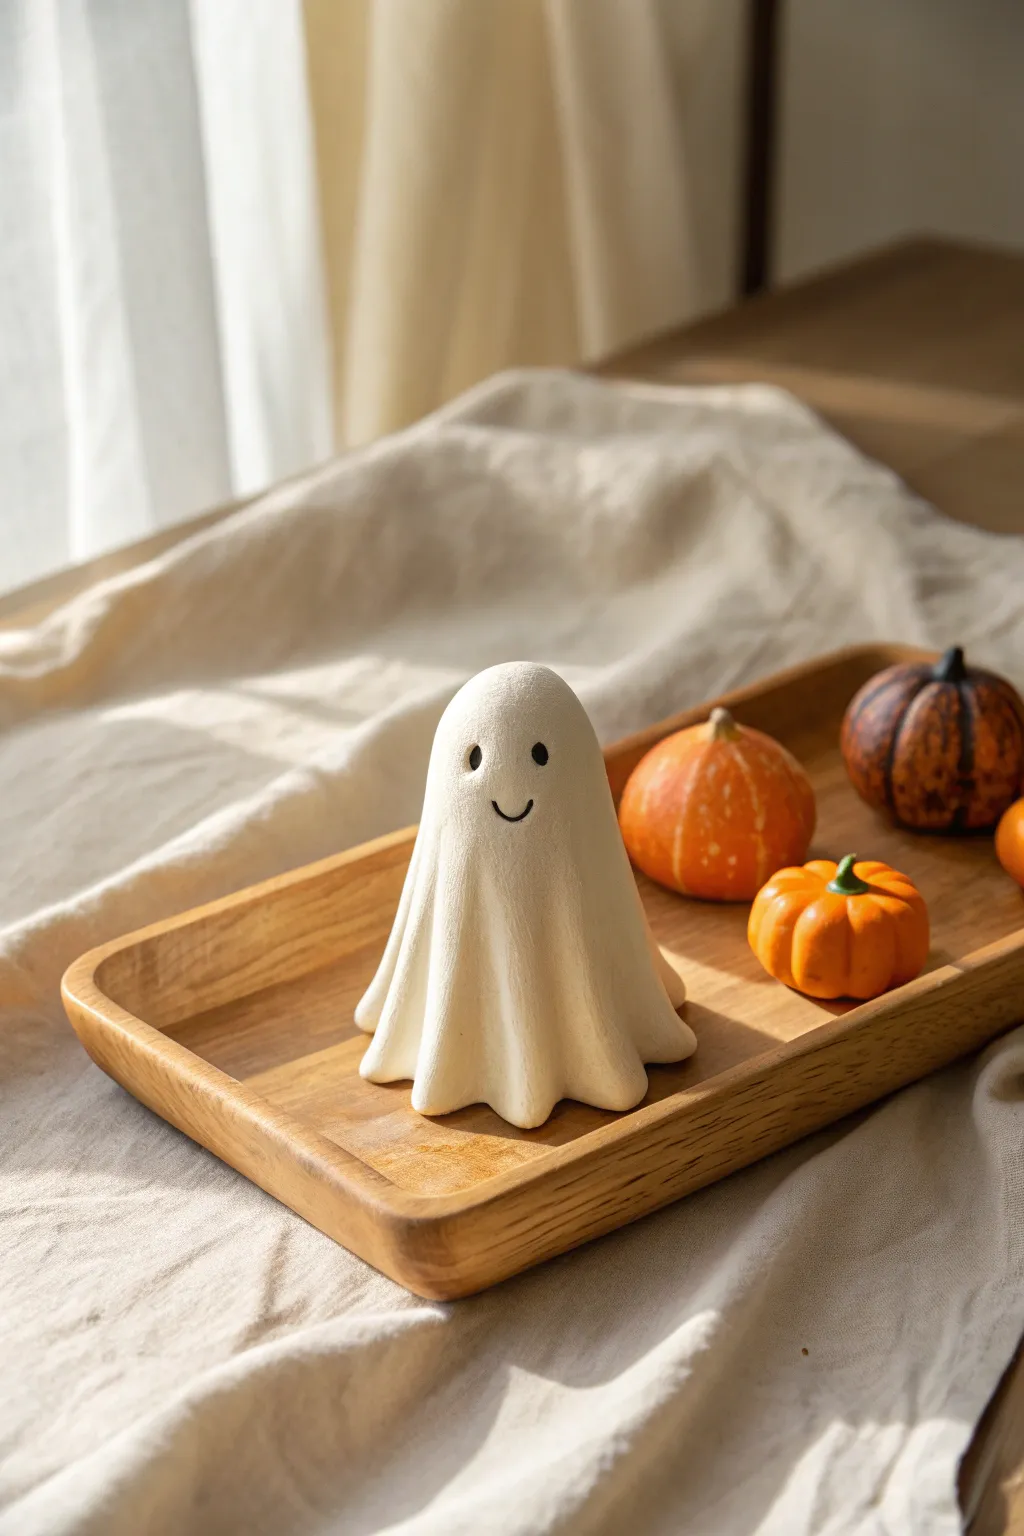
These charming little specters bring a touch of whimsy to your autumn decor with their softly draped folds and sweet, simple expressions. The matte finish and flowing lines make this ghost look like a captured moment of motion rather than a stiff statue.
How-To Guide
Materials
- White polymer clay (or air-dry clay)
- Black acrylic paint
- Small detail paintbrush or dotting tool
- Rolling pin (acrylic or wooden)
- Ball of aluminum foil (approx. 1 inch diameter)
- Clay sculpting tools (specifically a blending tool)
- Oven (if using polymer clay)
- Matte varnish (optional)
Step 1: Forming the Base
-
Condition the clay:
Begin by taking a chunk of white clay and kneading it thoroughly in your hands until it becomes soft, pliable, and free of cracks. -
Create the armature:
Crumple a piece of aluminum foil into a tight ball, slightly elongated vertically to form an egg shape. This will be the core structure of your ghost. -
Cover the core:
Flatten a portion of your conditioned clay and wrap it smoothly over the foil egg. Roll it gently between your palms to smooth out any seams so you have a seamless, ghost-shaped mound.
Cracks Appearing?
If you see tiny cracks forming while bending the clay ‘folds,’ your clay is too dry. Mix in a drop of clay softener or baby oil and knead again.
Step 2: Sculpting the Drape
-
Prepare the sheet layer:
Roll out a separate piece of white clay into a medium-thickness circle. It doesn’t need to be paper-thin; keeping it slightly thick helps hold the fold shapes later. -
Drape the clay:
Center the rolled circle over your ghost base and gently let it flop down the sides. It should cover the base completely and pool slightly at the bottom. -
Form the folds:
Using your fingers, gently pinch and guide the clay at the bottom edge to create vertical ripples. I like to push the clay slightly inward between the folds to exaggerate the ‘fabric’ look. -
Refine the edges:
Smooth the very bottom edge where it touches the table so it sits flat, but keep the wavy perimeter intact to simulate a flowing hemline. -
Smoothing the surface:
Check the entire surface for fingerprints. Use a tiny bit of water (for air-dry clay) or baby oil (for polymer clay) on your finger to buff out any imperfections.
Step 3: Adding Personality
-
Baking or Drying:
If using polymer clay, bake according to the package instructions (usually around 275°F/135°C for 15-30 minutes). If using air-dry clay, let it sit undisturbed for 24-48 hours until fully white and hard. -
Painting the eyes:
Dip a small dotting tool or the back end of a paintbrush into black acrylic paint. Press firmly twice on the upper third of the ghost’s face to create two solid, widely spaced oval eyes. -
Painting the smile:
Using your finest detail brush, paint a small, thin ‘U’ shape right between the eyes. Keep the line weight delicate for that friendly expression. -
Sealing the work:
Once the paint is completely dry, you can apply a coat of matte varnish. This protects the clay from dust and gives it a professional, finished porcelain texture.
Glow Up Idea
Use glow-in-the-dark polymer clay instead of plain white. During the day it looks classic, but at night it becomes a spooky green beacon.
Place your little ghost on a wooden tray or shelf to add a subtle, spirited charm to your room
Tiny Blob Monsters With One Big Eye
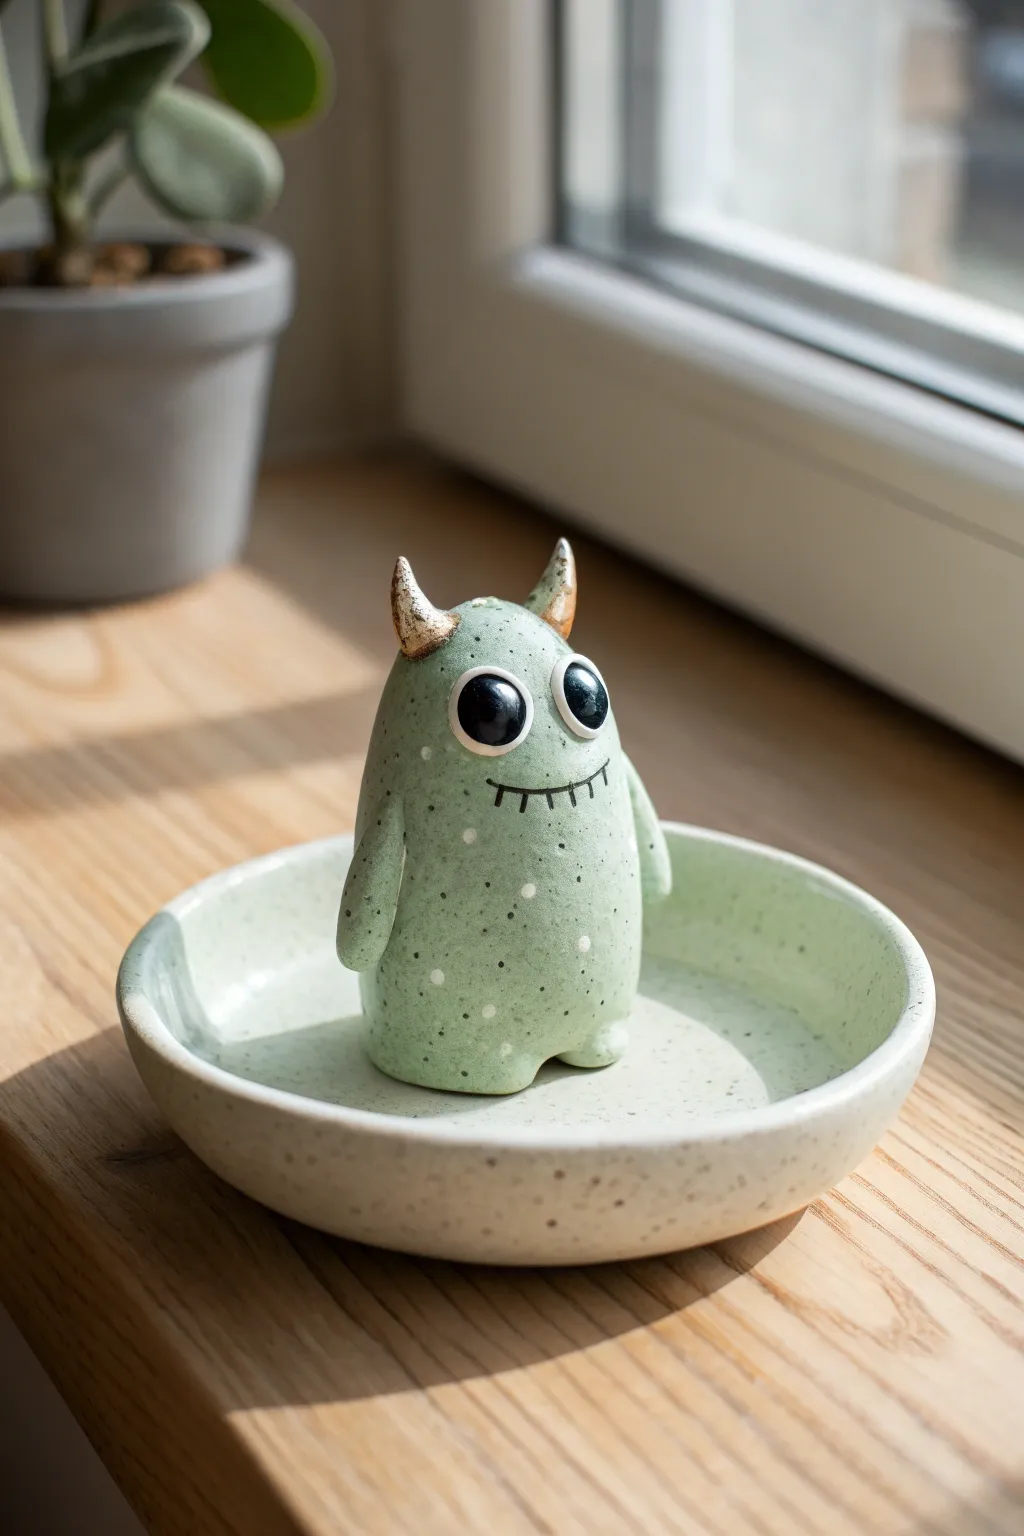
This charming little desktop companion features a soft green, speckled finish and sits perfectly in its own custom saucer. With his tiny gold horns and stitched smile, this whimsical clay figurine adds a touch of playful personality to any sunny windowsill.
Step-by-Step Tutorial
Materials
- Polymer clay (light sage green, white)
- Acrylic paints (black, white, metallic gold)
- Coarse black pepper or dried used coffee grounds (for speckling effect)
- Clear gloss varnish or UV resin
- Sculpting tools (ball styluses, needle tool)
- Rolling pin or pasta machine
- Circle cutter (approx 4-5 inches)
- Fine-point paintbrush
- Oven and baking sheet
Step 1: Prepping the Clay Body
-
Mix the Speckled Clay:
Start by conditioning a block of light sage green polymer clay. To achieve that organic, stone-like speckled look, knead in a pinch of coarse black pepper or very dry used coffee grounds until evenly distributed. -
Form the Base Shape:
Roll a golf-ball-sized amount of your speckled green clay into a smooth sphere, then gently elongate it into a rounded gumdrop or ghost shape. Flatten the bottom slightly so it stands upright securely. -
Add Little Feet:
Pinch off two very small balls of the same green clay. Press them gently onto the bottom front of the body to create subtle, stubby feet, blending the seams upward with a sculpting tool so they look integrated. -
Sculpt the Arms:
Create two small elongated teardrop shapes for the arms. Attach them to the sides of the body, pressing the wider top part into the shoulder area and letting the little nubby hands hang down naturally.
Clean Clay Tip
Keep baby wipes handy! White clay picks up dust instantly. Wipe your hands and tools thoroughly before handling the white eye or horn clay to avoid grey smudges.
Step 2: Adding Character Details
-
Create Eye Sockets:
Use a medium-sized ball tool to press two indentations into the upper half of the face where the eyes will go. Spacing them slightly apart gives a cute, wide-eyed look. -
Form the Eyeballs:
Roll two balls of white clay that fit snugly into your indentations. Press them in gently; they should protrude slightly but look anchored in the face. -
Sculpt the Horns:
Roll two clear or translucent white clay cones (or use regular white) for the horns. Attach these to the very top of the head, gently curving them outward or inward depending on the personality you want. -
Texture the Surface:
Before baking, give the entire green surface a gentle rub with a soft toothbrush or texture sponge to remove fingerprints and enhance the matte, stone-like quality.
Step 3: Creating the Saucer
-
Roll the Dish Base:
Take the remaining speckled green clay and roll it out into a flat sheet, about 1/4 inch thick. -
Cut and Shape:
Use a circle cutter (or a bowl as a template) to cut a perfect circle. Gently curve the edges upward to create a shallow dish shape. -
Smooth the Rim:
Dip your finger in a little bit of clay softener or baby oil and run it along the rim of the dish to ensure it is perfectly round and smooth. -
Test the Fit:
Briefly place your unbaked monster into the center of the unbaked dish to ensure the proportions look right, then separate them for baking. -
Bake:
Bake both pieces according to your clay manufacturer’s instructions. Usually, this means 275°F (130°C) for about 30 minutes per quarter-inch of thickness.
Make it a planter
Before baking, use a small melon baller to hollow out the top of the monster’s head. After baking, you can pop a tiny air plant or succulent inside!
Step 4: Painting and Finishing
-
Paint the Pupils:
Once cool, use a dotting tool or the back of a paintbrush dipped in black acrylic paint to create large, dilatated pupils on the white eyeballs. -
Add Reflections:
While the black paint is still wet—or after it sets, depending on your confidence—add a tiny white dot in the upper right corner of each pupil for a spark of life. -
Draw the Smile:
Using a very fine liner brush or an extra-fine black paint pen, carefully draw a horizontal curved line for the mouth. Add small vertical hatch marks across it to create the ‘stitched’ effect. -
Gild the Horns:
Paint the horns with metallic gold acrylic paint. I like to dab the paint on slightly unevenly to give it an antique, weathered texture. -
Add Extra Speckles:
If your clay doesn’t look speckled enough, dilute some white and light grey acrylic paint and flick it onto the monster using an old toothbrush for added texture. -
Varnish:
Finish by applying a glossy varnish or UV resin specifically to the eyes to make them look wet and glass-like, keeping the body matte for contrast.
Place your little monster in its dish and enjoy the quirky charm it brings to your space
Pocket-Sized Dino Minis With Rounded Spikes
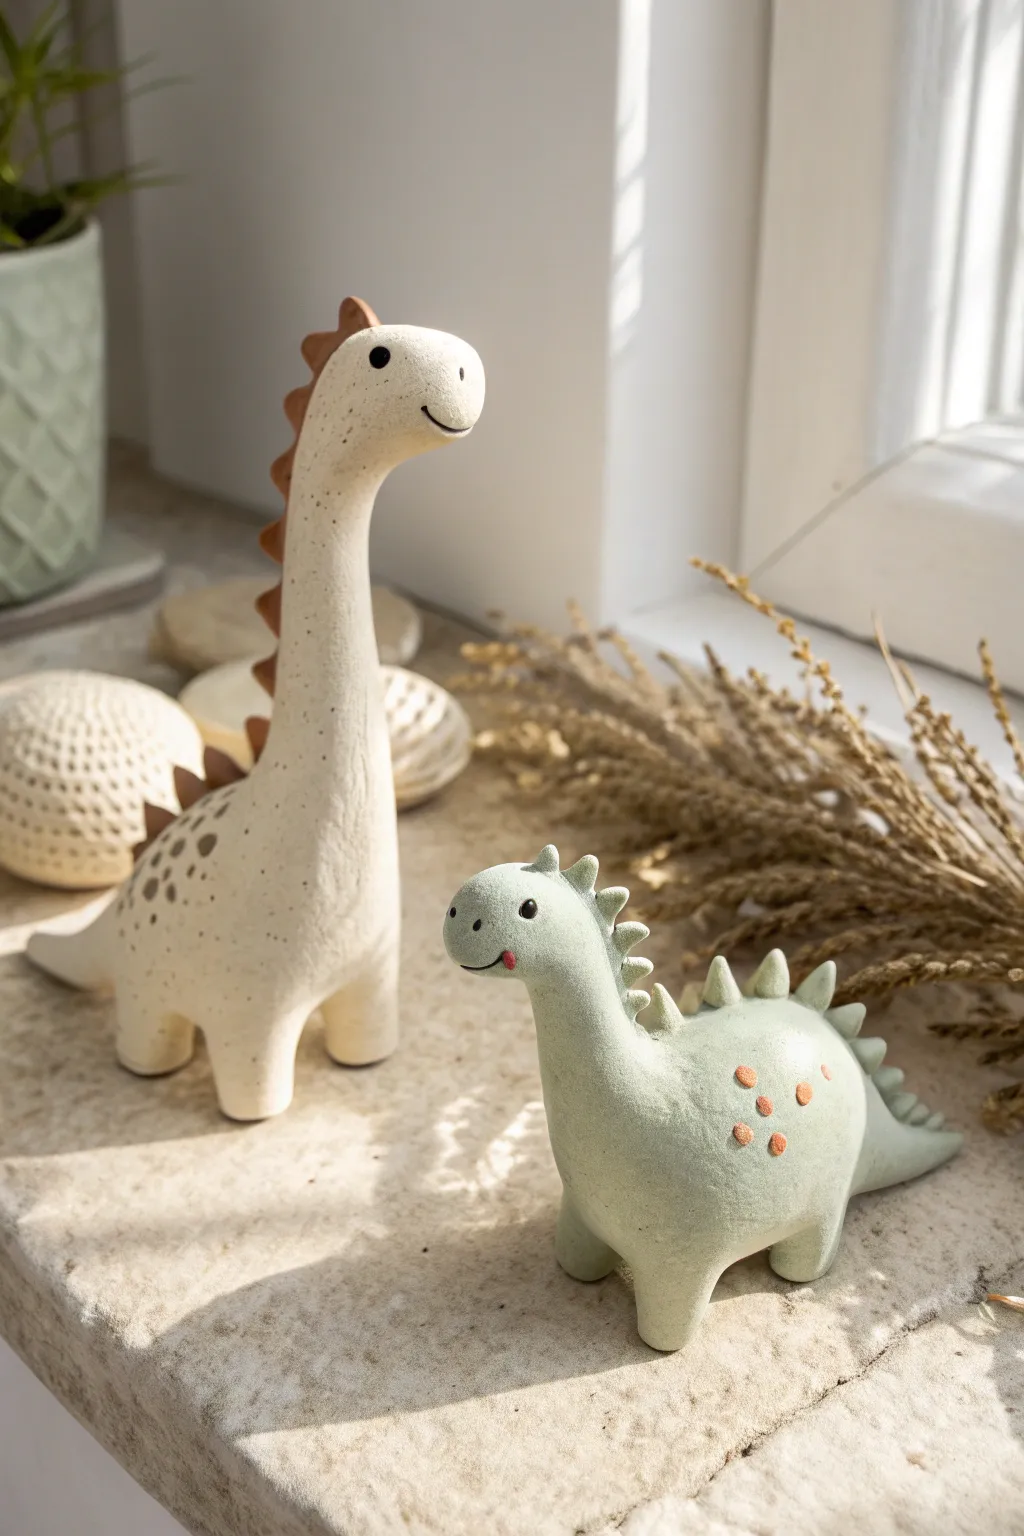
Bring a prehistoric touch to your shelves with these charming, minimalist clay dinosaurs. Their smooth, matte finishes and rounded details give them a gentle, modern look perfect for desk buddies or nursery decor.
Step-by-Step
Materials
- Air-dry clay (stone or white color)
- Acrylic paints (cream, sage green, terracotta brown, burnt orange)
- Fine grit sandpaper
- Small bowl of water
- Sculpting tools (needle tool, smooth wooden rib)
- Fine detail paintbrush
- Matte varnish or sealant
Step 1: Sculpting the Tall Brontosaurus
-
Form the Base Body:
Start with a handful of clay and roll it into a thick cylinder. Gently pull one end upwards to elongate the neck, tapering it slightly as you go, while keeping the base wide for stability. -
Shape the Head:
At the top of the neck, gently bend the clay forward to create the head. Use your thumb to smooth the transition so the head looks like a natural extension of the neck rather than a separate ball. -
Define the Legs:
At the base, use your fingers to pinch out four stout legs. Instead of attaching separate pieces, I find it stronger to pull them directly from the main body mass. Tap the feet on a flat surface to ensure the figure stands level. -
Add the Tail:
Pinch the rear of the body to form a short, pointed tail that curves slightly downward to balance the figure. -
Attach the Spikes:
Roll tiny triangles of clay for the dorsal plates. Score the back of the neck and the base of each spike, dampen with a touch of water, and press them in a row from the top of the head down to the middle of the back.
Step 2: Sculpting the Stubby Stegosaurus
-
Create the Oval Body:
Roll a new ball of clay into a smooth egg shape. This will be the main body for your smaller dinosaur. -
Form Neck and Head:
Gently pull a shorter, thicker section upwards from the front of the ‘egg’ to act as the neck and head. Keep the snout rounded and somewhat blunt. -
Pull the Legs:
Just like the first dino, turn the figure over and pull four short, chubby legs out from the belly area. Flatten the bottoms so they support the weight evenly. -
Add the Ridge Spikes:
Create slightly larger, more jagged triangular spikes for this one. Attach them in a double row or a single central ridge running from the head all the way down to the tail tip using the score-and-slip method.
Smoother Joins
Use a damp paintbrush instead of your finger to smooth hard-to-reach crevices, especially between the spikes and the main body.
Step 3: Refining and Painting
-
Smooth and Dry:
Dip your finger in water and run it over both figures to erase fingerprints and smooth any joins. Set them aside to dry completely (usually 24-48 hours depending on humidity). -
Sand Imperfections:
Once bone dry, use fine-grit sandpaper to gently buff away any rough spots or sharp edges, particularly around the feet and spike tips. -
Base Coat Painting:
Paint the tall dinosaur with a creamy off-white acrylic. For the smaller dino, mix a soft sage green. Apply two thin coats for opaque coverage, letting the first coat dry before adding the second. -
Paint the Spikes:
Using a terracotta brown, carefully paint the spikes of the tall cream dinosaur. For the green dinosaur, painting the spikes is optional; you can leave them the body color or tint them slightly lighter. -
Add Details and Spots:
Dip the handle end of a paintbrush into burnt orange paint and dot three distinct spots onto the side of the green dinosaur. Add smaller speckling to the cream dinosaur’s back if desired. -
Face the Music:
With your finest brush and black paint, add tiny dot eyes and a simple curved smile to both faces. A tiny touch of pink can be added for a cheek blush or tongue. -
Seal the Deal:
Finish both figures with a coat of matte varnish to protect the paint and give them that finished ceramic look.
Texture Twist
Before the clay dries, gently press a piece of coarse fabric or a clean stone against the akin to create a subtle, realistic dinosaur skin texture.
Now you have a pair of prehistoric pals ready to guard your succulents or books
Mini Sea Creature Figures (Octopus, Whale, Turtle)
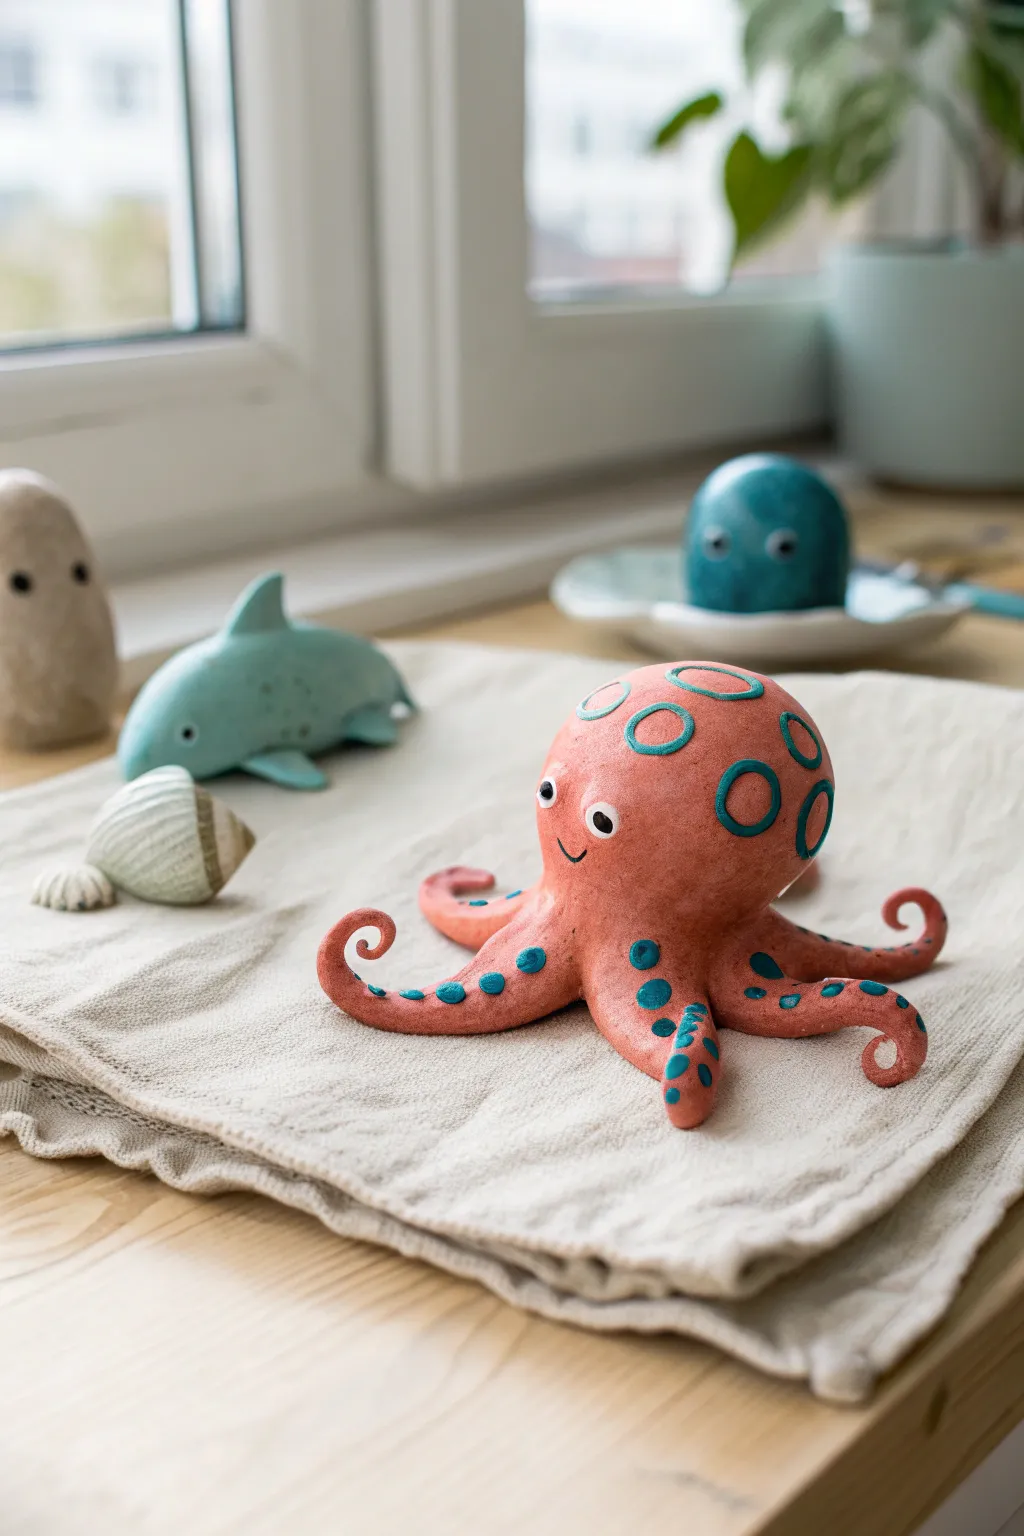
Bring the ocean to your windowsill with this adorable, coral-pink octopus figure featuring teal ring accents. This charming clay project is perfect for beginners, combining simple round shapes with playful textures for a whimsical finish.
How-To Guide
Materials
- Polymer clay or air-dry clay (coral/salmon pink color)
- Polymer clay (teal/turquoise blue color)
- White clay
- Black clay
- Clay sculpting tools (ball stylus tool, needle tool)
- Smooth work surface or mat
- Acrylic rolling pin
- Clear matte varnish (optional)
- Gloss varnish for eyes (optional)
Step 1: Forming the Body
-
Prepare the Base Clay:
Start by conditioning your coral-pink clay. Knead it in your hands until it is soft, pliable, and free of cracks. If you are mixing colors to achieve this specific salmon shade, blend a small amount of orange into pink clay. -
Create the Head:
Roll a large portion of the pink clay into a smooth ball about the size of a golf ball or slightly larger. This will be the main head/body of the octopus. Gently flatten the bottom just a little so it can sit flat later. -
Shape the Tentacles:
Roll out eight smaller logs of pink clay. Each one should be thinner at one end and slightly thicker at the other where it will attach to the body. -
Curl the Tips:
Take the thin end of each tentacle and curl it into a cute little spiral. Vary the tightness of the curls to give your octopus a relaxed, natural movement. -
Attach Tentacles:
Press the thicker ends of the tentacles onto the underside of the main body ball. Use a silicone smoother or your finger to blend the seams upward so the legs look like they are growing seamlessly out of the body. -
Pose the Figure:
Arrange the tentacles so they spread out on your work surface. Some can lay flat, while you might lift one or two slightly in the air for a dynamic look.
Smooth Seams Tip
Use a tiny drop of liquid polymer clay (or water for air-dry clay) on your finger to blend the tentacle seams invisible.
Step 2: Adding Details
-
Create the Eyes:
Roll two small balls of white clay and flatten them slightly onto the face area. Add tiny pupils using very small bits of black clay placed in the center of the white circles. -
Sculpt the Smile:
Using a needle tool or a small curved clay tool, gently press a simple, u-shaped smile into the clay just below the eyes. Keep the indentation fairly shallow. -
Make the Rings:
Condition your teal clay. Roll it very thin, almost like a sheet of paper. You can use a tiny round cutter or a straw to punch out small circles, then remove the centers to make rings. -
Apply Head Markings:
Gently press these teal rings onto the top of the octopus’s head. Place them randomly, overlapping sizes slightly if you wish, but keep them generally spaced out. -
Make Tentacle Dots:
Roll tiny balls of the same teal clay. Press them flat onto the tentacles to create suction cup details or decorative spots. -
Texture the Surface:
I like to take a dry sea sponge or a crumpled piece of foil and very lightly tap it over the pink skin areas. This gives it a matte, slightly organic texture rather than being perfectly smooth plastic-looking. -
Clean Up:
Check your sculpture for fingerprints. You can smooth these away with a drop of baby oil on your finger or by lightly brushing with a soft paintbrush.
Step 3: Finishing Touches
-
Bake or Dry:
If using polymer clay, bake according to the package directions (usually 275°F/135°C for 15-30 minutes per 1/4 inch thickness). If using air-dry clay, leave it in a dry spot for 24-48 hours. -
Cool Down:
Let the figure cool completely before handling. Polymer clay is still slightly soft when hot and hardens as it cools. -
Varnish:
For a professional finish, apply a clear matte varnish over the body to protect the clay. Use a small dot of gloss varnish specifically on the eyes to make them look wet and alive.
Level Up: Sea Friends
Use leftover blue clay to make a simple whale shark companion like the one in the background by shaping a teardrop log.
Place your new friendly cephalopod on a linen cloth or shelf to enjoy a bit of handcrafted seaside charm
Tiny Duck Figures With Silly Little Props
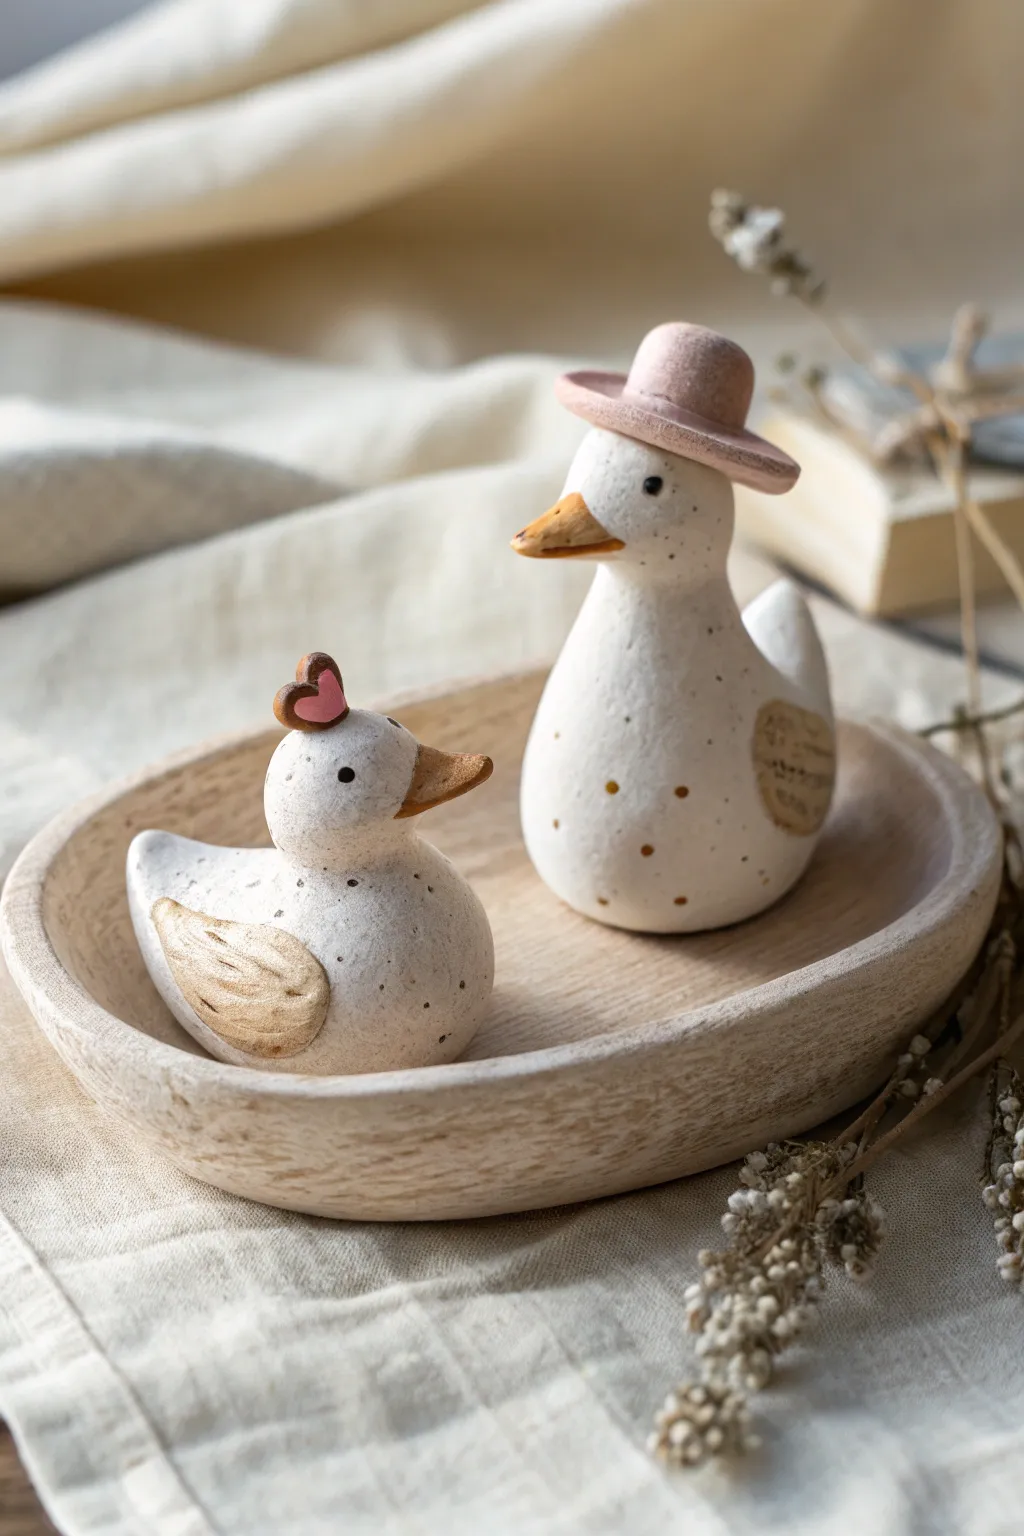
These charming little duck figurines, crafted with a speckled stoneware look, bring a touch of playful cottagecore to any shelf. One wears a dapper pink hat while its companion sports a sweet heart crest, making them a perfect duo for a beginner sculpting project.
Detailed Instructions
Materials
- White polymer clay or air-dry clay (approx. 100g)
- Acrylic paints (brown/ochre, pastel pink, black, white)
- Small stiff-bristled brush or old toothbrush
- Fine detail paintbrush (size 0 or 00)
- Modeling tools (or a toothpick)
- Matte spray varnish or sealant
- Small amount of water (if using air-dry clay)
Step 1: Sculpting the Bodies
-
Form the base shapes:
Start by dividing your clay into two unequal portions—one slightly larger for the standing duck and a smaller one for the sitting duck. Roll the larger piece into a smooth pear shape, tapering the top for the neck and head. Roll the smaller piece into a rounded, squat oval shape. -
Create the duck heads:
For both figures, gently pinch and pull clay from the top of your shapes to define the head, keeping it seamless with the body. For the sitting duck, curve the neck slightly forward so it looks attentive. -
Pull out the tails:
At the rear of each body, pinch a small amount of clay and pull it outward and slightly up to create a jaunty little tail point. Smooth the transition with your thumb so it isn’t too sharp. -
Add the beaks:
Roll two very tiny cones of clay. Press one onto the front of each face. Use a modeling tool or your finger to blend the back edge of the beak into the head so it doesn’t just look stuck on. -
Sculpt the wings:
Create four small, flat teardrop shapes from fresh clay. Press one onto each side of the ducks’ bodies. Use a toothpick or knife tool to impress faint lines into these teardrops to mimic feathers.
Step 2: Adding the Accessories
-
Make the hat brim:
For the taller duck, roll a small ball of clay and flatten it into a thin disc. Place this disc directly on top of the duck’s head. -
Finish the hat:
Roll a smaller cylinder of clay and place it centrally on top of the brim. Smooth the seam between the cylinder and the brim gently with a tool to secure the hat structure. -
Create the heart crest:
For the smaller duck, flatten a tiny piece of clay and cut or mold it into a heart shape. Attach this upright on the top of its head, slightly behind the eyes. -
Dry or Bake:
If using polymer clay, bake according to the package instructions (usually 275°F/135°C for 15-30 minutes). If using air-dry clay, let the figures sit in a dry, warm spot for at least 24-48 hours until completely hard.
Smooth Operator
Before baking or drying, brush a tiny amount of baby oil (polymer) or water (air-dry) over the clay to remove fingerprints for a professional finish.
Step 3: Painting & Detailing
-
Base coat the features:
Once cured and cool, paint the beaks and the wing feathers with a diluted wash of ochre or light brown paint. The wash allows the texture to show through. I prefer keeping the paint thin here to maintain that ceramic look. -
Paint the accessories:
Using a pastel pink, carefully paint the hat on the tall duck and the heart crest on the small duck. You may need two thin coats for opaque coverage. -
Add the speckled texture:
Dilute some light brown paint with water. Load a stiff brush or toothbrush, and run your thumb across the bristles to flick tiny speckles over the white bodies of the ducks. Avoid the pink accessories if possible. -
Paint the eyes:
Dip the back end of a paintbrush or a toothpick into black paint. Dot two small eyes onto each face. Keep them symmetrical for a cute expression. -
Add gold spots:
Using a very fine brush, add a few deliberate dots of ochre or gold paint on the chest areas to simulate a stylized pattern. -
Seal the work:
Finish by spraying the figures with a matte varnish. This protects the paint and unifies the sheen, making them look like finished pottery.
Cracked Clay?
If air-dry clay develops hairline cracks while drying, mix a slurry of fresh clay and water to fill them in, then sand smooth once dry.
Arrange your new feathered friends in a small wooden bowl or nestled among books for a cozy display
Mini Succulent Critters That Sit by Your Plants
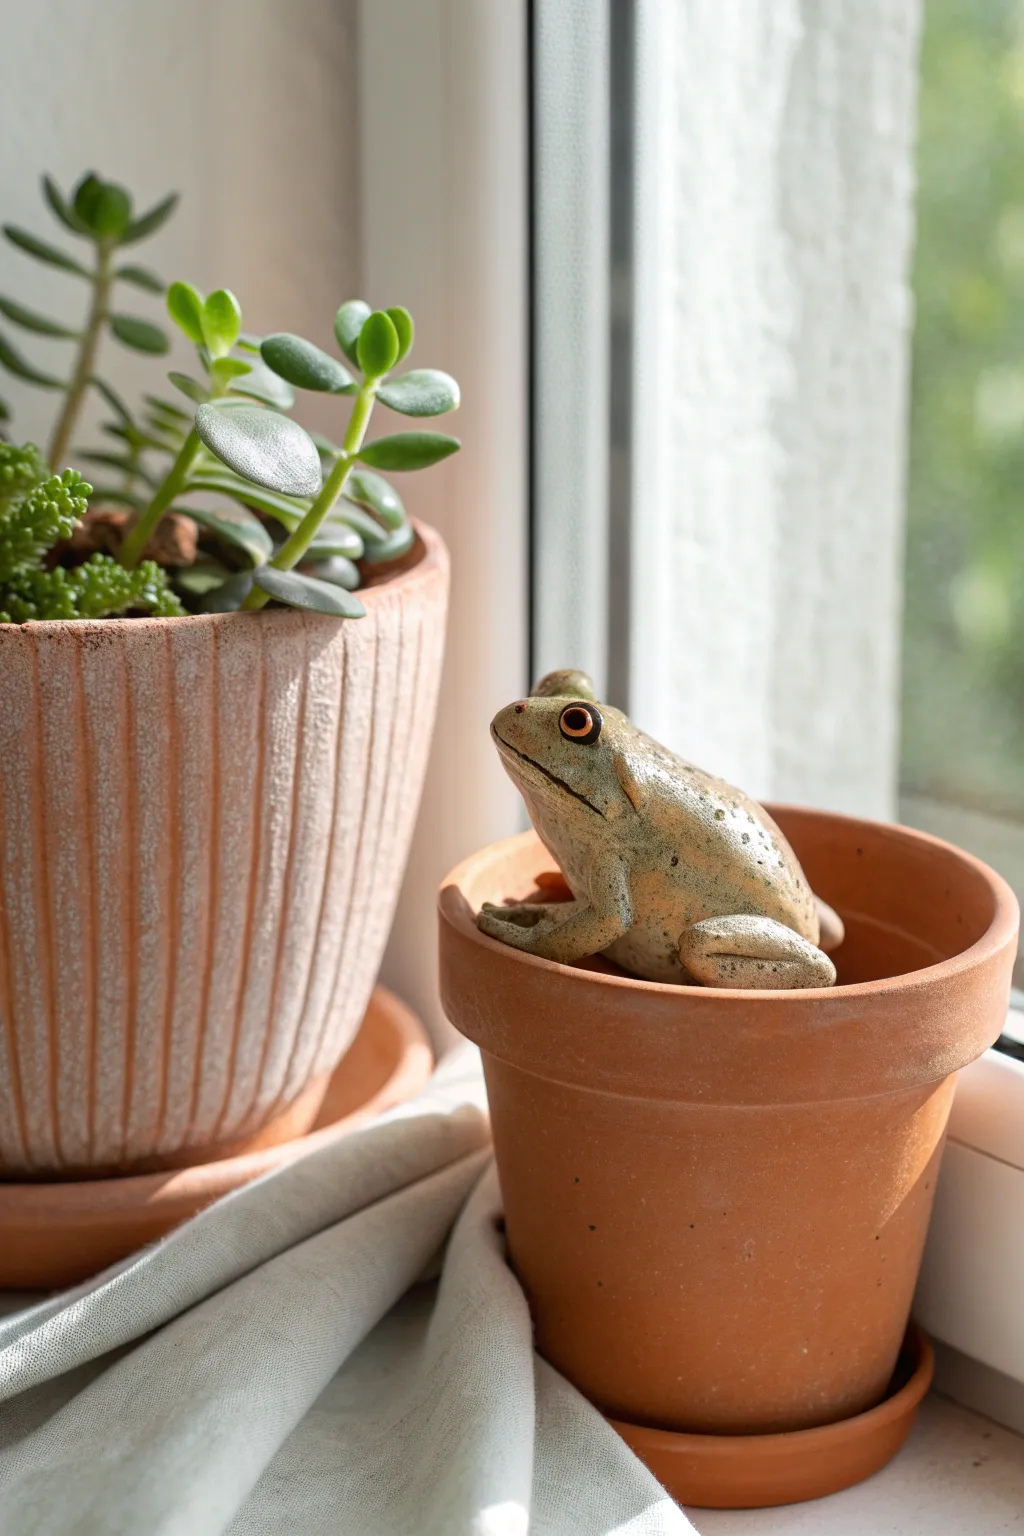
Sculpt a charming, realistic frog companion designed specifically to perch inside a standard small terracotta pot. With its textured skin and glossy eyes, this little amphibian brings a watchful, lifelike presence to your indoor garden.
Step-by-Step Guide
Materials
- Polymer clay (beige or light grey base)
- Small terracotta pot (project fit checker)
- Sculpting tools (needle tool, ball stylus)
- Acrylic paints (sand, olive green, brown, black, orange)
- Paintbrushes (detail round, small flat shader)
- High-gloss varnish
- Matte varnish
- Aluminum foil
- Old toothbrush or stiff bristle brush
Step 1: Shaping the Armature
-
Create a foil core:
Crumple a small piece of aluminum foil into a rough egg shape. This saves clay and ensures the frog isn’t too heavy. -
Cover the core:
Condition your beige polymer clay until pliable, then roll it into a sheet. Wrap this sheet completely around your foil core, smoothing the seams until you have a solid clay egg. -
Define the head:
Gently pinch one end of the egg shape to distinguish the head from the body. You want a subtle slope, not a distinct neck, as frogs have streamlined bodies.
Step 2: Sculpting the Anatomy
-
Form the hind legs:
Roll two thick sausages of clay for the back legs. Bend them into a ‘V’ shape to create the thigh and calf, then press them firmly onto the sides of the body towards the back. -
Blend the seams:
Use a clay shaper or your thumb to smooth the clay where the legs meet the body. The connection should look seamless and muscular. -
Check the fit:
Place your unfinished sculpture into the specific terracotta pot you intend to use. Adjust the pose now so the frog looks like it is resting its weight against the rim or sitting comfortably inside. -
Add front legs:
Create two smaller, thinner logs for the front arms. Attach them so they extend downward, adding small flat pads for feet that will rest on the pot’s edge or soil. -
Sculpt the face:
Use a ball tool to make shallow indentations for the eyes. Add a thin strip of clay above each eye socket to create the prominent ridges frogs are known for. -
Add the mouth:
Take a needle tool or a thin blade and cut a long, wide slit for the mouth. Curve it slightly upwards at the corners for a neutral expression.
Problem Solver: Clay Slumping?
If the clay gets too soft and the legs sag while sculpting, pop the frog in the fridge for 10 minutes to firm up the material before continuing detail work.
Step 3: Detailing and Baking
-
Texture the skin:
Gently tap an old toothbrush or a stiff bristle brush over the back and legs. This breaks up the smooth surface and mimics realistic amphibian skin texture. -
Insert eye details:
Roll two tiny balls of clay and place them into the sockets. Smooth them in, ensuring they bulge slightly. -
Refine the pose:
Do one final check in the pot. I always make sure the front feet are gripping or resting naturally before committing to the cure. -
Bake the clay:
Bake according to your polymer clay manufacturer’s instructions. Usually, this means 275°F (130°C) for about 15-30 minutes per 1/4 inch of thickness. Let it cool completely.
Level Up: Wet Look
Want a frog that just hopped out of a pond? Instead of matte varnish, use a satin glaze over the whole body to give the skin a permanently moist appearance.
Step 4: Painting and Finishing
-
Apply base coat:
Paint the entire frog with a wash of watery beige or sand-colored acrylic paint. This acts as a primer and fills the texture. -
Add color variation:
Using a dry-brush technique, lightly apply olive green paint to the back and head ridges, leaving the belly and throat lighter. -
Create speckles:
Dilute some dark brown paint and flick it onto the frog using a stiff brush or use a fine detail brush to dot random spots for a natural pattern. -
Paint the eyes:
Paint the eyeballs a coppery orange. Once dry, add a vertical slit pupil in black and a tiny white dot for a reflection highlight. -
Seal the piece:
Coat the skin with a matte varnish to protect the paint without looking wet. Finally, apply a drop of high-gloss varnish only to the eyes for a life-like shine.
Now your charming little amphibian is ready to nestle among your succulents and keep watch over the garden
Tiny Terrarium Gnomes With Cone Hats
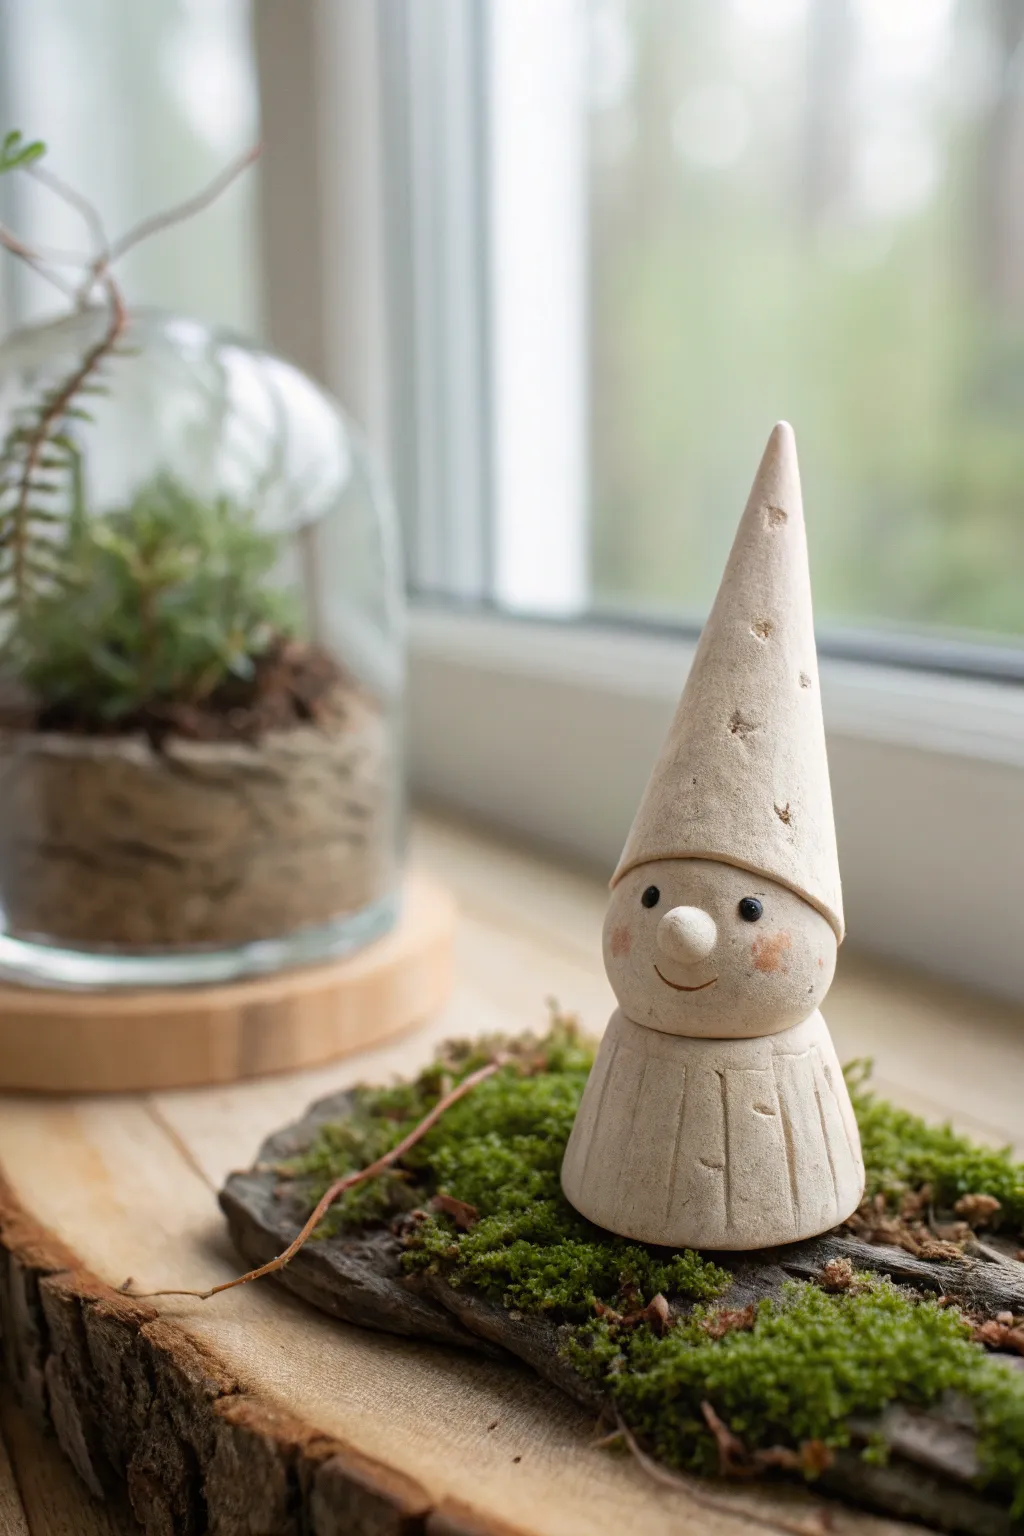
Bring a touch of enchantment to your indoor garden with this charming handcrafted clay gnome. Featuring a rustic texture, a simple expressive face, and an exaggerated conical hat, this little guardian fits perfectly atop a bed of moss.
Detailed Instructions
Materials
- Polymer clay (stone or beige color)
- Acrylic paints (black, pink/blush)
- Small dotting tool or toothpick
- Fine-grit sandpaper
- Aluminum foil (optional for core)
- Needle tool or craft knife
- Clear matte varnish (waterproof)
- Soft paintbrush
Step 1: Forming the Body Base
-
Condition the clay:
Begin by warming a thumb-sized amount of polymer clay in your hands, kneading it until it is soft and pliable to prevent cracking later. -
Shape the tunic:
Roll the clay into a smooth ball, then gently flatten the bottom against your work surface. Taper the top slightly so it resembles a short, stout gumdrop shape. -
Create the pleats:
Using a needle tool or the back of a craft knife, press vertical lines around the lower half of the body. -
Add texture:
Don’t make these lines perfectly uniform; varying the depth and spacing gives the tunic a carved, rustic fabric look.
Step 2: Sculpting the Head and Face
-
Roll the head:
Take a smaller piece of clay, about half the size of the body, and roll it into a perfect sphere. -
Attach to the body:
Press the head gently onto the tapered top of the tunic. I like to twist it slightly back and forth to ensure a good bond without squishing the shapes. -
Make the nose:
Roll a tiny pea-sized ball of clay and press it into the center of the face. Smooth the edges very slightly so it sticks but remains prominent. -
Carve the smile:
Use the edge of your needle tool or a small curved tool to indent a simple, happy smile slightly off-center below the nose.
Natural Texture Hack
Before baking, gently roll a textured rock or a piece of rough sandpaper over the hat surface to give it an authentic, stone-like pitted appearance.
Step 3: Crafting the Signature Hat
-
Roll a cone:
Take a piece of clay roughly equal in volume to the body and roll it into a long, tapered cone or carrot shape. -
Hollow the base:
Use your thumb or a rounded tool to gently indent the wider bottom of the cone, creating a concave space that will fit over the head. -
Attach the hat:
Place the cone onto the head, pulling it down slightly over the forehead area so it looks cozy. -
Detail the texture:
Poke random, small indentations into the hat using your needle tool to mimic the look of worn stone or rough felt. -
Check balance:
Set the figure down to ensure it stands completely straight before baking; adjust the bottom if it wobbles.
Head Keep Falling?
If the head feels unstable on the body, insert a short piece of toothpick or wire into the neck area to act as an internal armature before joining.
Step 4: Finishing Touches
-
Bake the figure:
Bake your gnome according to the polymer clay package instructions (usually 275°F/135°C for 15-30 minutes depending on thickness). -
Cool and sand:
Once fully cooled, lightly sand any fingerprints or sharp edges to give the surface a weathered, matte finish. -
Paint the eyes:
Dip a fine dotting tool or toothpick into black acrylic paint and place two small, wide-set dots for the eyes. -
Apply blush:
Dilute a tiny amount of pink paint with water (or use pastel chalk dust) and dry-brush soft rosy cheeks on either side of the nose. -
Seal for protection:
Because this gnome might live near moisture in a terrarium, coat the entire figure with a waterproof matte varnish.
Place your finished gnome on a patch of moss and enjoy the quiet magic it brings to your display
Mini Zodiac-Inspired Animal Figures
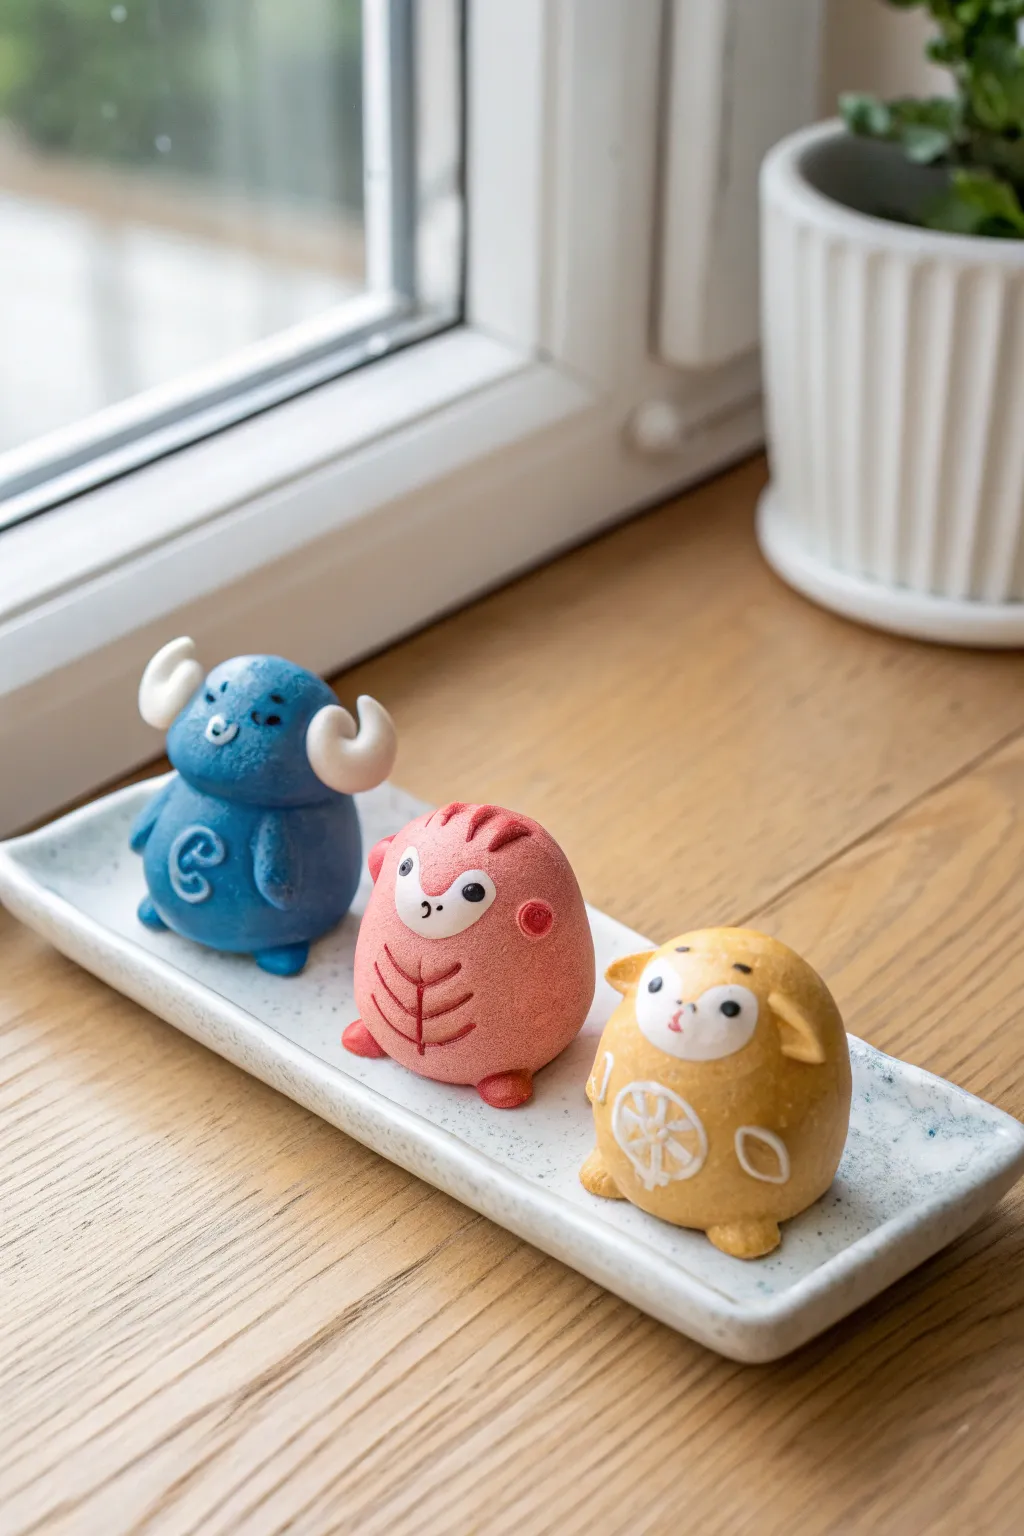
Create a delightful set of round, palm-sized zodiac charms featuring an ox, a tiger, and a sheep, each bursting with personality and soft, matte colors. These stylized figurines rely on simple spherical shapes and delicate painted details to achieve a modern, kawaii aesthetic perfect for desk decor.
Step-by-Step Tutorial
Materials
- Polymer clay (white base)
- Acrylic paints (Royal Blue, Coral Red, Mustard Yellow, White, Black)
- Pottery sponge or textured foam
- Detail brushes (fine liner and small round)
- Dotting tool or ball stylus
- Sculpting tools (silicone shapers/needle tool)
- UV resin or gloss glaze (optional for eyes only)
- Baking tray and parchment paper
Step 1: Basic Forms
-
Mix colors:
Before sculpting, mix your white polymer clay with small amounts of acrylic paint or pigment powder to create three pastel base tones: a deep sky blue, a soft coral pink, and a warm mustard yellow. Knead thoroughly until the color is uniform. -
Create the bodies:
Roll three equal-sized spheres of clay, approximately 4-5cm in diameter. Gently tap the bottom of each sphere against your work surface to create a flat base so they sit securely. -
Add tiny feet:
For each figure, roll two tiny balls of the corresponding body color. Press these under the front of the body shape and blend the seams slightly with a silicone tool so they look like nubby little feet poking out.
Seamless Blending
Use a rubber-tipped clay shaper instead of your fingers to smooth connections (like ears or horns). It eliminates prints and creates a seamless, professional bond.
Step 2: Sculpting the Blue Ox
-
Create the muzzle:
Mix a slightly lighter shade of blue and press a small oval onto the front of the blue sphere for the muzzle area. -
Form the horns:
Take plain white clay and roll two small tapered cones. Curl them slightly into crescent shapes and attach them firmly to the top of the head, blending the clay at the attachment point. -
Add ears:
Shape two small teardrops of blue clay. Attached them just below the horns, pressing the center with a ball stylus to create depth. -
Texture:
Gently pat the entire surface with a piece of textured foam or a coarse sponge to remove fingerprints and give the clay a matte, stone-like texture.
Clay Too Soft?
If your clay gets too warm and sticky to hold its shape, pop it in the fridge for 10 minutes. This firms it up, making tiny details like ears much easier to handle.
Step 3: Sculpting the Pink Tiger
-
Add the face plate:
Form a heart-shaped piece of white clay and flatten it extremely thin. Press this onto the upper front of the pink sphere for the face. -
Ears and details:
Attach two tiny triangles on top of the head for ears. I find using a needle tool to scratch three shallow lines on top of the head adds a nice ‘fur’ texture. -
Cheek accents:
Press two tiny circles of clay on the sides of the body where ‘arms’ might be, making a slight indentation in the center of each.
Step 4: Sculpting the Yellow Sheep
-
Face and fleece:
Similar to the tiger, add a thin white oval of clay for the face. For the ears, shape two drooping teardrops of yellow clay and attach them to the sides of the head. -
Bake:
Place all figures on a parchment-lined tray. Bake according to your clay manufacturer’s instructions (usually 110°C-130°C for 30 minutes). Let them cool completely before painting.
Step 5: Painting Details
-
Face details:
Using a very fine liner brush and black acrylic, paint tiny wide-set eyes and small noses on all figures. Add a tiny white reflection dot in the eyes for life. -
Ox symbols:
Paint a white spiral symbol on the belly of the blue ox. Add dots or small lines to the horns for extra detail. -
Tiger stripes:
On the pink figure, paint thin red or dark pink lines: three vertical stripes on the forehead and a stylized ‘branch’ pattern on the belly. -
Sheep wheel:
On the yellow sheep’s belly, use white paint to draw a circle with intersecting lines, resembling a wagon wheel or flower. Add small white loops near the feet. -
Finish:
If desired, add a drop of UV resin or localized gloss varnish just to the eyes to make them shine, keeping the rest of the body matte.
Arrange your trio on a small ceramic tray or window sill to enjoy their cheerful company
Tiny Stackable Figures (Totem-Style Animals)
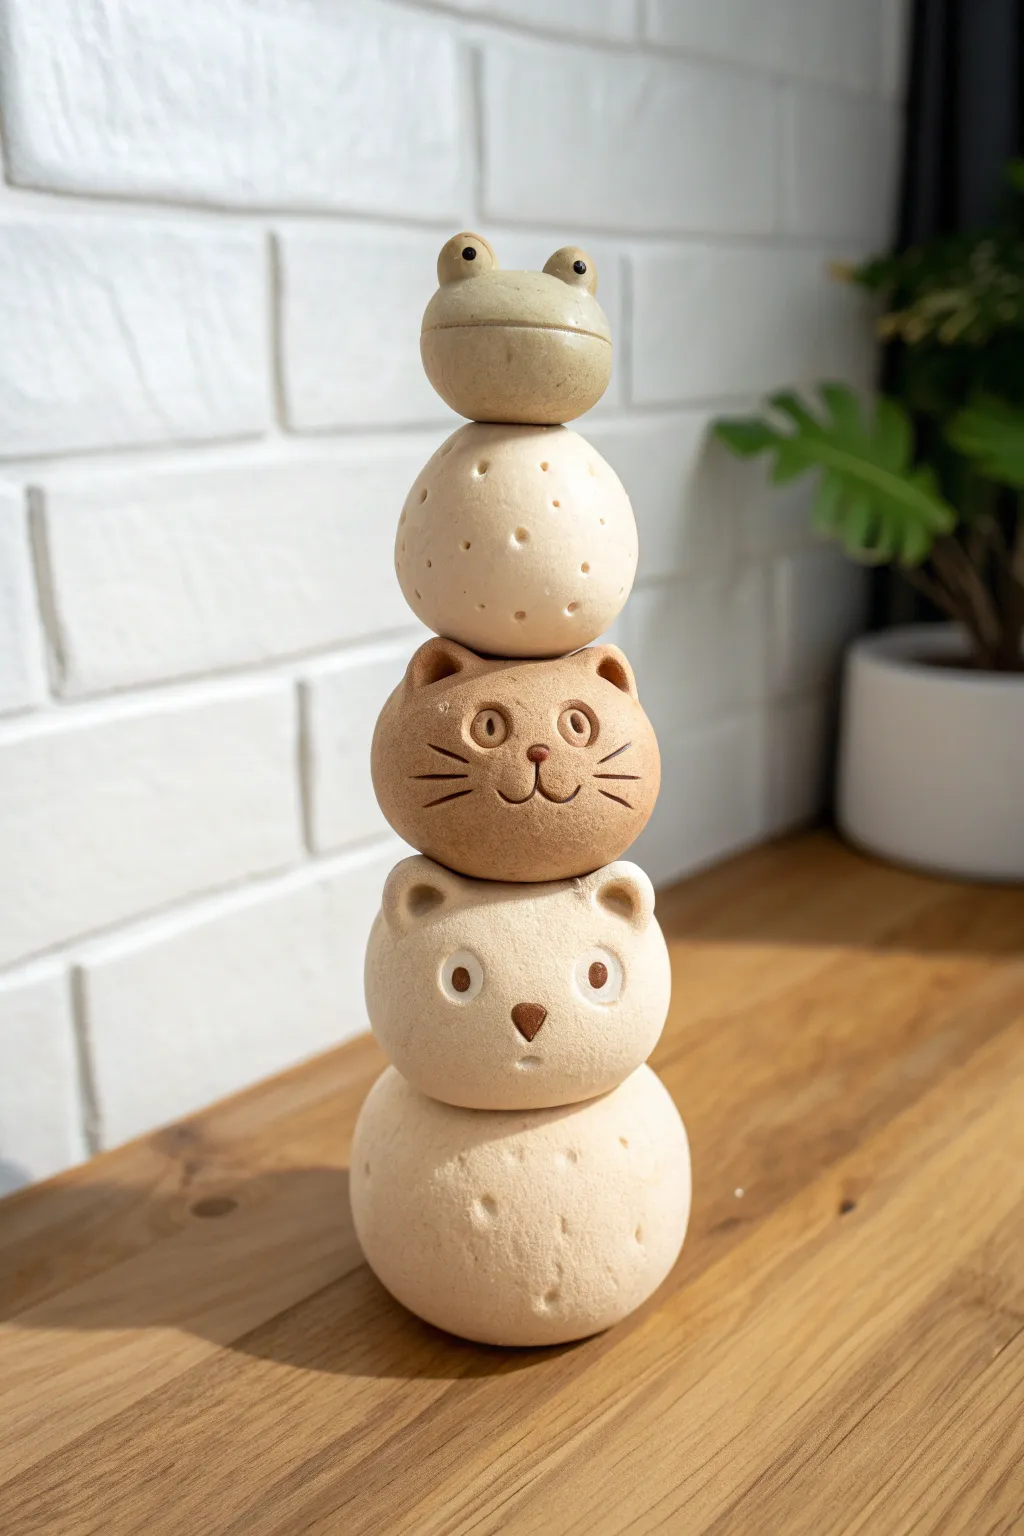
Create a charming stack of woodland friends with this modular clay totem project. The design features a frog, cat, and bear perched atop textured base spheres, all finished with a natural, unglazed aesthetic that highlights the raw beauty of the clay.
Step-by-Step
Materials
- Polymer clay or air-dry clay (in beige, light ochre, and warm terracotta)
- Small rolling pin
- Modeling tools (needle tool, ball stylus)
- Hobby knife
- Toothbrush or coarse sponge (for texturing)
- Small paintbrush
- Brown acrylic paint (for details)
- Water (if using air-dry clay)
- Aluminum foil (for core structure)
- Oven (if using polymer clay)
Step 1: Planning and Base Construction
-
Prepare the foil cores:
To keep the figures light and save clay, scrunch clean aluminum foil into five increasingly smaller balls. The largest should be for the base, tapering up to the tiniest one for the frog. -
Condition the base clay:
Take your lightest beige or off-white clay and knead it until soft and pliable. Use a rolling pin to create a sheet about 3-4mm thick. -
Form the bottom sphere:
Wrap the clay sheet around the largest foil ball, smoothing the seams completely with your thumb until you have a perfect sphere. Gently press the bottom against your work surface so it stands stable. -
Add surface texture:
Gently tap the surface of the base sphere with a clean toothbrush or a piece of crumpled foil to give it that organic, stone-like texture visible in the photo. -
Indent the details:
Using a small ball stylus or the end of a paintbrush, press random, shallow indentations around the sphere to mimic porous rock or dough.
Step 2: Sculpting the Animal Tiers
-
Sculpt the bear head:
Cover the second-largest foil ball with light beige clay. Shape it slightly oval, wider at the cheeks. -
Create bear features:
Pinch two small, rounded triangles of clay and blend them onto the top for ears, pressing the centers with a round tool. Use a small dab of brown clay for the nose. -
Make the cat head:
For the middle tier, I like to use a slightly warmer, ochre-tinted clay to distinguish it from the bear. Cover the medium foil ball and shape slightly pointed ears directly from the mass of the head. -
Detail the cat face:
Use a needle tool or small knife to carefully incise the whiskers. Press a small ball of darker clay for the nose and carve the mouth curves beneath it. Make larger, rounded indentations for the eyes. -
Sculpt the spacer sphere:
Create the second-to-last sphere using the beige clay again. Like the base, texture this thoroughly with your toothbrush and create small crater-like divots with a stylus. -
Form the frog topper:
For the smallest tier, use a greenish-beige clay mix. Shape a wide, flattened oval. Add two prominent bumps on top for the eye sockets. -
Flatten the connection points:
Before baking or drying, gently press each piece on top of the one below it to create a subtle flat spot. This ensures they stack securely later without wobbling.
Uneven Stacking?
If the dried pieces wobble when stacked, use a small piece of sandpaper to gently flatten the contact points on the bottom of each figure until flush.
Step 3: Finishing and Assembly
-
Cure the clay:
Bake your pieces according to the polymer clay package instructions, or let them air dry for 24-48 hours until rock hard. -
Paint the eye details:
Once cool, use a fine-tip brush and brown acrylic paint to fill in the eyes of the bear and cat. A tiny white dot can be added for a ‘catchlight’ to bring them to life. -
Accentuate the carvings:
Dilute a little brown paint with water to make a wash. Determine if the cat’s whiskers or frog mouth need more definition; if so, paint the wash into the grooves and wipe the surface clean immediately. -
Stack the totem:
Arrange your finished pieces: large textured base, bear, cat, textured spacer, and finally the frog on top. -
Secure the stack:
You can leave them loose as a balancing toy, or permanently adhere them with a dab of superglue or strong epoxy between each layer for a solid sculpture.
Make It Interactive
Embed small, strong magnets inside the top and bottom of each figure during the sculpting phase so the animals snap together magically.
Display your totem on a sunny shelf where the light can catch the subtle textures of your handiwork
Mini Story Scene Figures (Two Characters, One Tiny Moment)
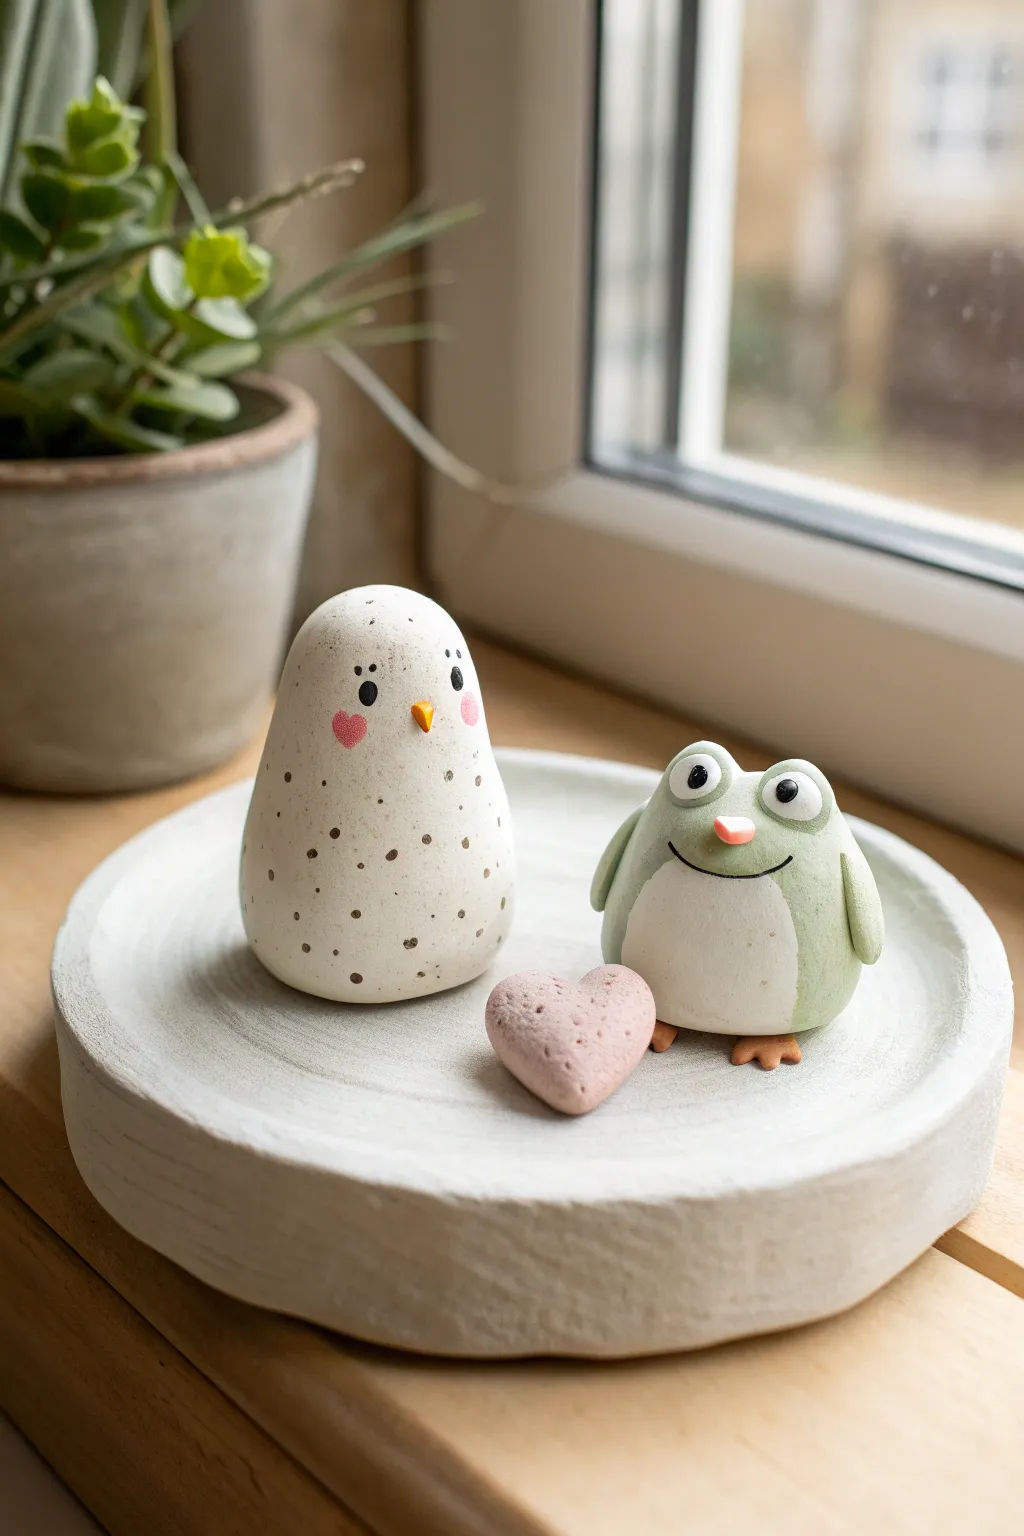
Create this heartwarming vignette featuring a speckled white bird and a cheery green frog sharing a quiet moment. This project combines simple organic shapes with minimalist features to tell a sweet visual story on a handmade display tray.
Step-by-Step Tutorial
Materials
- Polymer clay (white, light green, pink, orange, black, tan/grey)
- Small round display dish or extra white clay to make one
- Pointed detailing tool or toothpick
- Ball stylus tool
- Soft paintbrush for smoothing
- Acrylic paint (black, brown – optional for speckles)
- Matte varnish or sealant
- Oven for baking
Step 1: Shaping the Bird
-
Form the Body:
Start with a golf-ball-sized piece of white clay. Roll it into a smooth ball, then gently elongate it upward to create a tall, rounded pear shape. The bottom should be wide and flat for stability. -
Add Facial Features:
For the beak, shape a tiny cone from orange clay and press it into the center of the face. Use your ball stylus to create two small indents for eyes, then insert tiny balls of black clay. -
Create Cheeks:
Take extremely small amounts of pink clay and flatten them into ovals. Press these gently onto the bird’s cheeks, just below the eye line. -
Add Speckled Texture:
To achieve the speckled look, you can either mix tiny crumbs of brown clay into your white base before shaping, or paint small dots on after baking. I prefer adding tiny distinct dots of brown paint later for more control.
Uneven Surfaces?
If fingerprints are visible, lightly brush the raw clay with a little baby oil or cornstarch before baking to smooth them out completely.
Step 2: Crafting the Frog Friend
-
Shape the Green Base:
Roll light green clay into a slightly shorter, stout oval shape. Flatten the bottom so it sits securely. -
Insert the Belly:
Roll a smaller ball of white clay and flatten it into a thin disc. Press this onto the front of the green body to create the tummy. -
Form the Arms:
Roll two small teardrop shapes from green clay. Attach these to the sides of the body, blending the upper seam so they look like natural extensions of the form. -
Sculpt the Face:
Create large eyes by pressing two balls of white clay onto the top of the head. Add tiny black pupils to the center. Add a small pink triangle for the nose. -
Carve the Smile:
Using a needle tool or toothpick, carefully carve a wide, curved smile into the face just below the nose to give him a happy expression. -
Add Feet:
Shape two small, three-toed feet using orange or tan clay. Place the frog on top of them so they peek out from underneath.
Pro Tip: Eye Sparkle
Add a tiny dot of white paint to the black pupils after baking. This ‘catchlight’ brings the characters to life instantly.
Step 3: The Tiny Heart & Base
-
Make the Heart:
Form a small amount of pink clay into a heart shape. Use a needle tool to add texture by poking small dots all over the surface, giving it a stone-like appearance. -
Prepare the Dish:
If making the display dish shown, roll out a slab of grey or white clay. Cut a circle, raise the edges slightly to form a rim, and smooth the surface. -
Bake:
Arrange your pieces on a baking tile—keep them separate so they don’t fuse. Bake according to your clay manufacturer’s instructions (usually 275°F/135°C for 15-30 minutes). -
Assemble and Finish:
Once cool, arrange the figures and the heart on the dish. If desired, use a dab of strong glue to secure them in place. -
Varnish:
Apply a coat of matte varnish to protect the clay and give it a finished, ceramic-like feel.
Now you have a charming little scene ready to brighten up a windowsill or desk