I love how air dry clay turns a simple afternoon at the table into sweet little Valentine’s keepsakes you can actually use or gift. If you’re craving easy, heart-forward projects that still feel special, these ideas are the ones I keep coming back to.
Candy-Style Message Hearts With Stamped Words
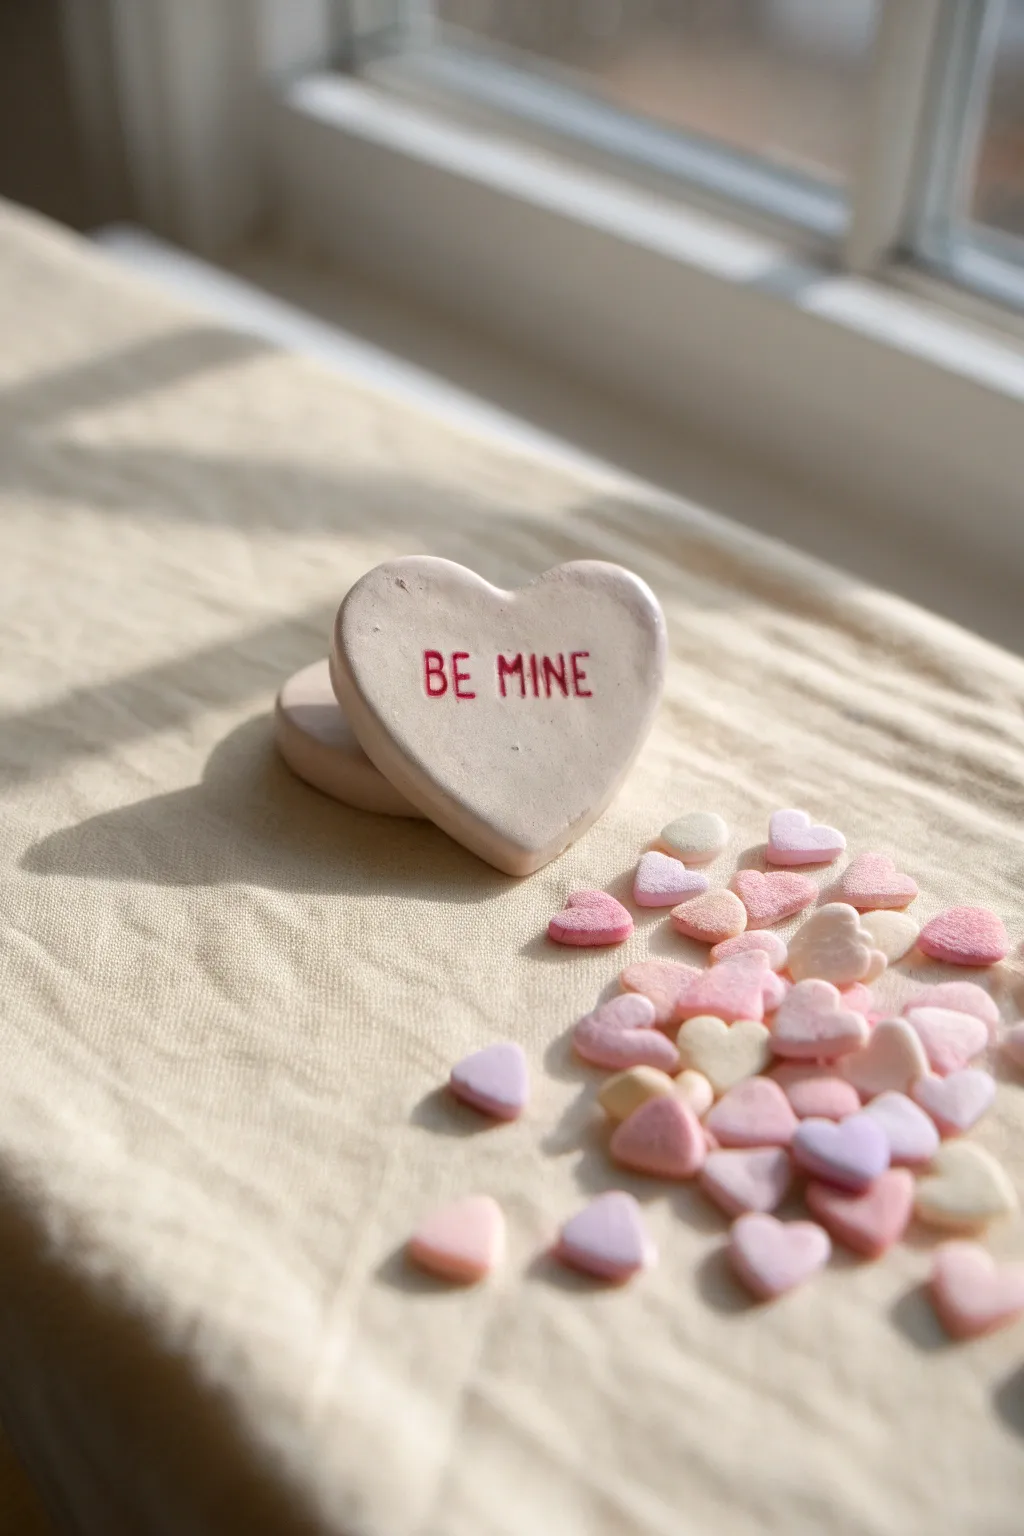
Recreate the nostalgia of conversation hearts with these hand-sculpted clay valentines. They feature a smooth, matte finish and classic red stamped lettering that makes a sweet, lasting keepsake.
Step-by-Step Guide
Materials
- White or cream air dry clay
- Rolling pin
- Heart-shaped cookie cutter (medium size)
- Small alphabet stamps
- Red acrylic paint
- Fine-grit sandpaper (optional)
- Clear matte sealant spray
- Small detail paintbrush
- Wax paper or craft mat
- Cup of water
Step 1: Shaping the Hearts
-
Prepare your workspace:
Lay down a piece of wax paper or a dedicated craft mat to prevent the clay from sticking to your table. -
Condition the clay:
Take a handful of air dry clay and knead it in your hands until it feels soft, warm, and pliable. This reduces the chance of cracks forming later. -
Roll it out:
Using your rolling pin, flatten the clay to an even thickness. Aim for about 1/4 to 1/2 inch thick—you want them slightly chunky like real candy hearts. -
Cut the shapes:
Press the heart-shaped cookie cutter firmly into the rolled clay. Wiggle it slightly to ensure a clean cut, then lift the cutter. -
Smooth the edges:
Dip your finger in a little bit of water and run it gently along the cut edges of the heart to smooth out any roughness or jagged bits.
Step 2: Stamping and Finishing
-
Prepare your message:
Select the letters for your message (like BE MINE) from your alphabet stamp set. Arrange them on the table first to check spacing. -
Stamp the clay:
Press the stamps gently but firmly into the center of the damp clay heart. Don’t push all the way through; you just want a clear indentation. -
Initial drying:
Set the hearts aside in a safe, dry place. I usually let them sit for at least 24 hours, flipping them once halfway through to ensure even drying. -
Sand imperfections:
Once fully dry and hard, inspect the hearts. If there are any rough spots, lightly buff them with fine-grit sandpaper until smooth. -
Paint the letters:
Dip a very fine detail brush into red acrylic paint. Carefully fill in the indented letters. Don’t worry if you go outside the lines slightly. -
Clean up paint edges:
If you did get paint on the surface, wait for it to dry slightly, then very gently scrape the excess off the surface with a craft knife or sand it away lightly. -
Seal the project:
Take the hearts to a well-ventilated area and apply a light coat of clear matte sealant spray. This protects the clay without making it look glossy or plastic. -
Allow to cure:
Let the sealant dry completely according to the bottle instructions before handling or gifting your new conversation hearts.
Fixing Cracks
If small cracks appear while drying, mix a tiny bit of fresh clay with water to make a paste. Fill the crack, smooth it over, and let dry again.
Make Them Pastel
Knead a drop of acrylic paint into the white clay before rolling it out to create pastel pink, yellow, or purple hearts just like the real candy.
These charming clay hearts are now ready to be gifted to someone special or displayed as lovely seasonal decor


Simple Heart Gift Tags With Ribbon Holes
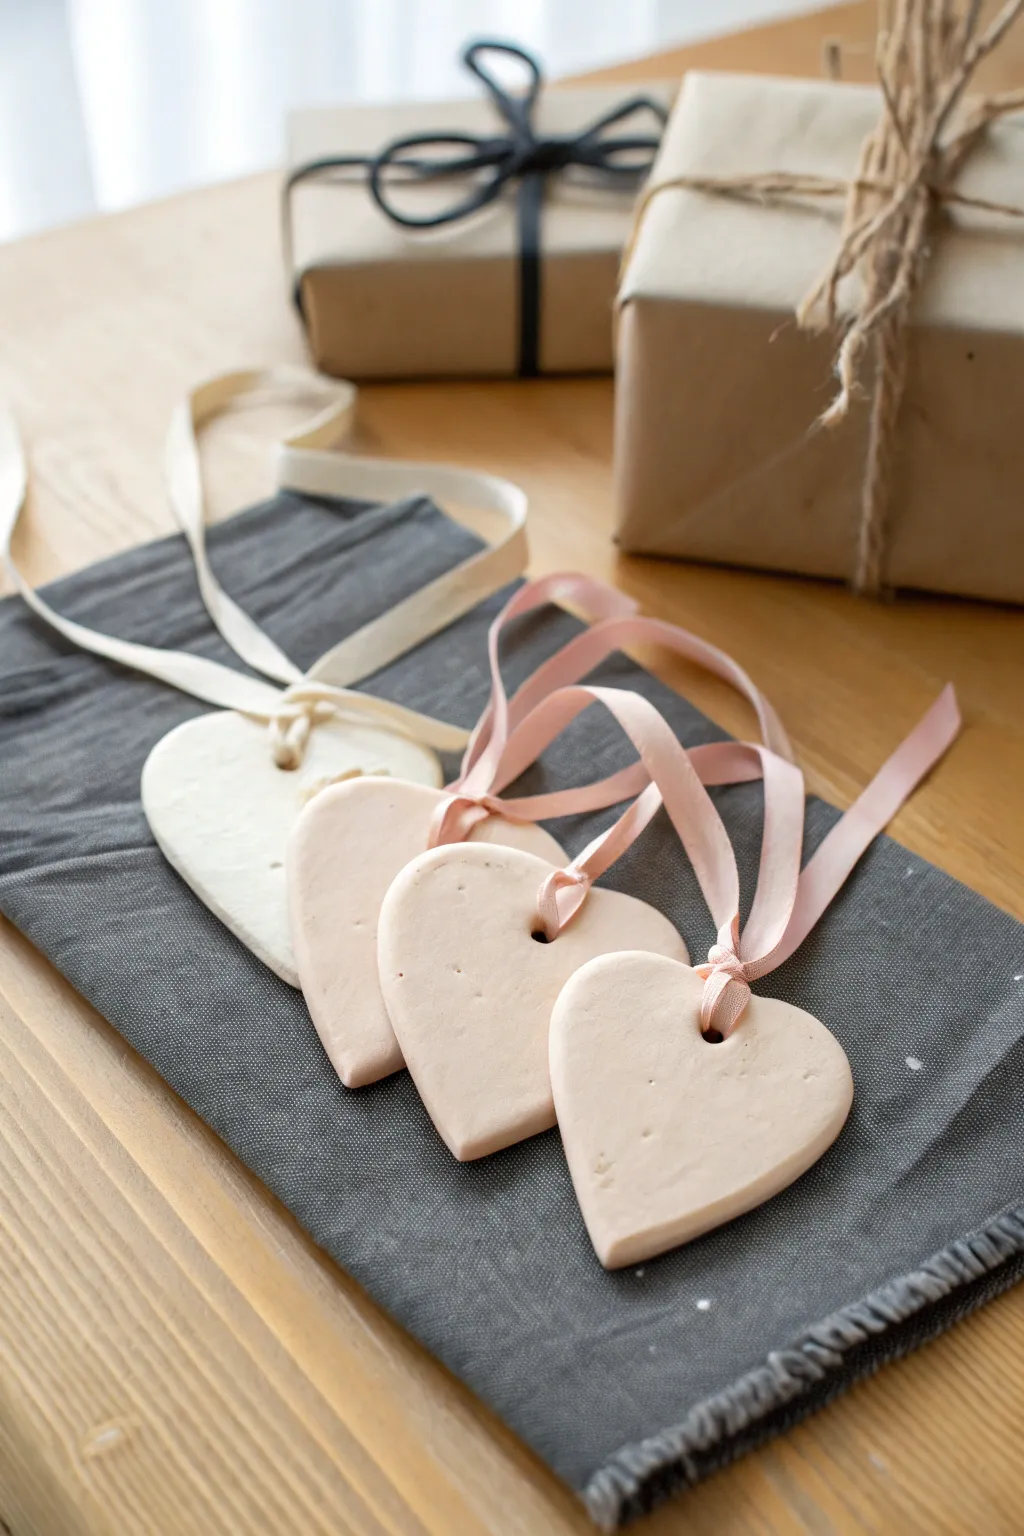
These sweetly simple heart tags add a personalized, handmade touch to any gift wrapping or can serve as darling minimalist ornaments. Crafted from smooth air dry clay in soft blush and cream tones, they feature a classic heart silhouette finished with delicate ribbon ties.
How-To Guide
Materials
- White air dry clay
- Light pink or peach acrylic paint
- Rolling pin
- Heart-shaped cookie cutter (medium size)
- Parchment paper or non-stick craft mat
- Straw or wooden skewer (for making holes)
- Fine-grit sandpaper (400 or 600 grit)
- Light pink satin ribbon (1/4 inch width)
- Cream or ivory satin ribbon (1/4 inch width)
- Scissors
- Small bowl of water
- Sponge or soft cloth
Step 1: Preparing the Clay
-
Tint the clay:
Start by taking a handful of white clay. To achieve the soft blush tone seen in the pink hearts, add a very small drop of light pink or peach acrylic paint directly into the clay. Knead the clay thoroughly until the color is completely uniform and streak-free. Leave a portion of clay plain white for the contrast tag. -
Check consistency:
If the clay feels sticky after adding paint, let it sit for a few minutes or dust your hands lightly with cornstarch. It should be pliable but firm enough to hold its shape. -
Roll it out:
Place your clay on parchment paper or a non-stick mat. Roll it out evenly to a thickness of approximately 1/4 inch (about 5-6mm). You want them thick enough to be sturdy but not chunky.
Water Smoothing Tip
Keep a small sponge handy while working. A quick swipe over the clay surface before drying removes fingerprints better than just using your fingers.
Step 2: Shaping and Refining
-
Cut the shapes:
Press your heart-shaped cookie cutter firmly into the clay. Give it a tiny wiggle to ensure a clean cut, then lift the cutter. Gently peel away the excess clay from around your heart shapes. -
Smooth the edges:
Dip your finger into a small bowl of water and gently run it along the cut edges of the hearts. This softens the sharp angle left by the cutter and fixes any small tears, giving the hearts that pillowy, finished look. -
Create the hole:
Using a plastic drinking straw or a wooden skewer, punch a hole in the top center of each heart, right where the two curves meet. Ensure the hole is centered and at least 1/4 inch down from the edge to prevent breakage. -
Clean the hole:
Twist the straw gently as you pull it out to get a clean circle. If using a skewer, you might need to insert it from both front and back to ensure the opening is smooth on both sides.
Preventing Curling
If your hearts curl up at the edges while drying, place a lightweight book or flat board on top of them once they are leather-hard (semi-dry) to press them flat.
Step 3: Drying and Finishing
-
Let them dry:
Lay the hearts flat on a clean sheet of parchment paper in a cool, dry place. Let them air dry for at least 24-48 hours. I often flip them over halfway through the drying process to ensure the bottoms dry evenly and to prevent curling. -
Sand for smoothness:
Once fully cured and hard, take a piece of fine-grit sandpaper and very gently buff the surface and edges. This removes any fingerprints or uneven textures left during handling. -
Dust off debris:
Wipe the hearts with a barely damp cloth or a dry soft brush to remove the sanding dust.
Step 4: Adding the Ribbon
-
Cut the ribbon:
Cut lengths of satin ribbon, approximately 10-12 inches long for each tag. Use pink ribbon for the blush hearts and cream ribbon for the white heart to match the image style. -
Thread the loop:
Take a piece of ribbon and fold it in half. Pinch the folded end and push it through the hole in the heart from the front to the back. -
Secure the knot:
Open the loop you just pushed through, grab the two loose tail ends of the ribbon, and pull them through the loop. This creates a secure ‘larks head’ knot which sits neatly at the base of the hole. -
Tighten gently:
Pull the tails gently to tighten the knot against the clay, ensuring the ribbon lies flat and the satin sheen is visible.
Now your charming clay hearts are ready to be tied onto gift boxes or hung as elegant seasonal decor


Valentine’s Heart Ornaments for Branches or a Mini Tree
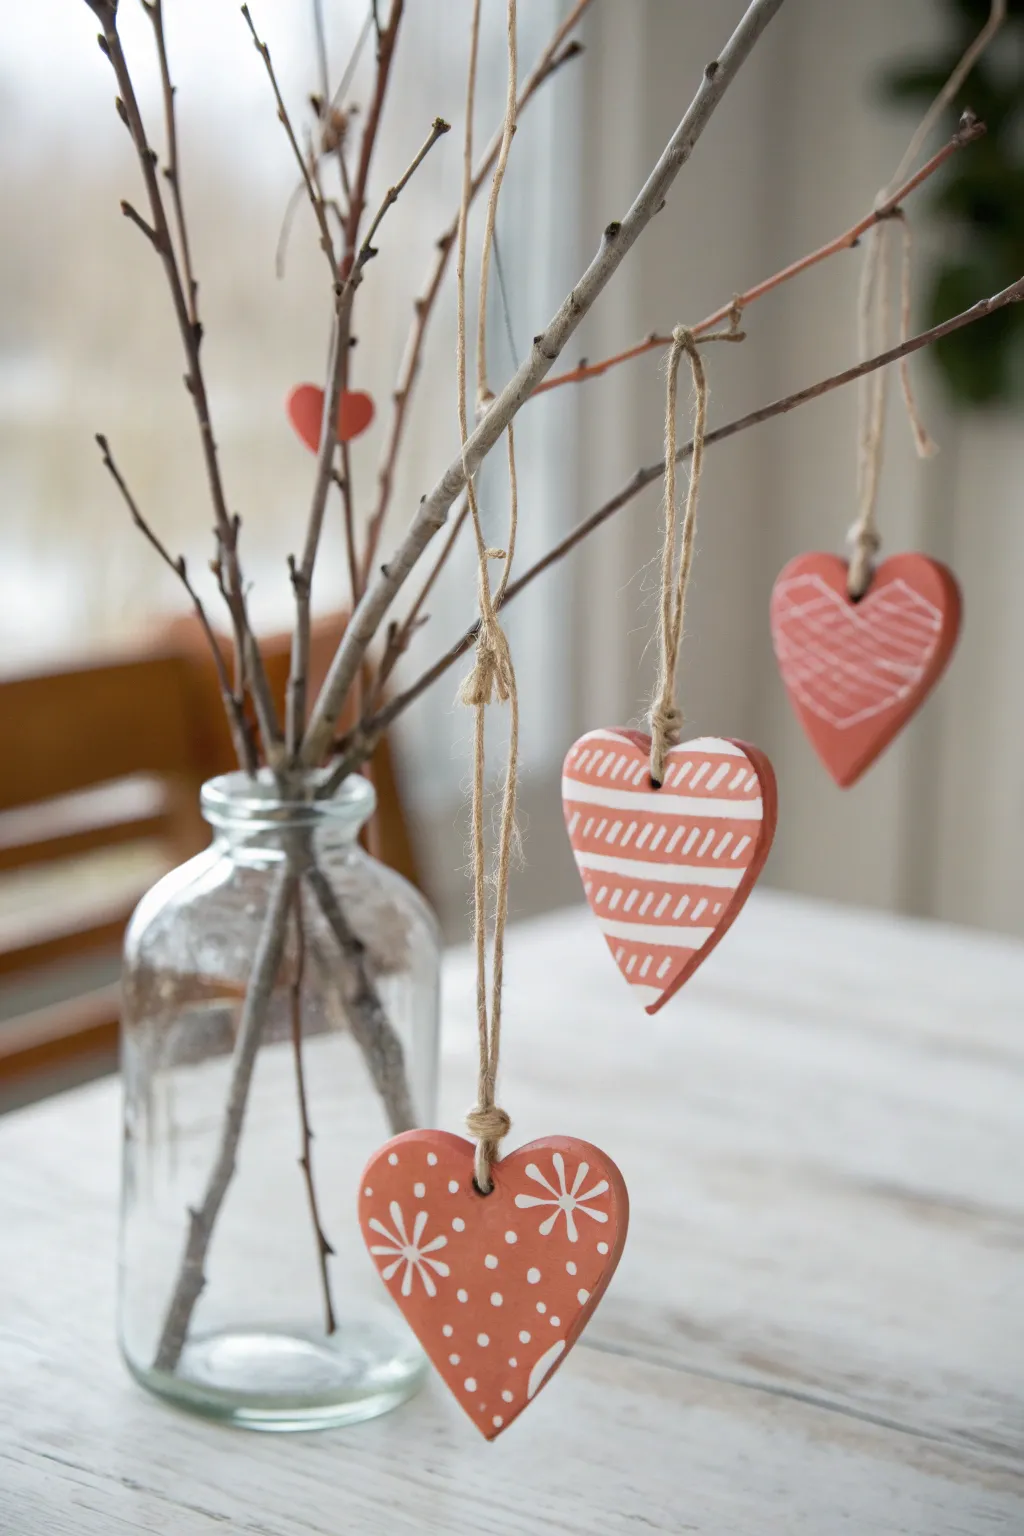
These charming ornaments bring a rustic, Scandinavian-inspired touch to your Valentine’s Day decor, combining the warm look of terracotta with delicate white painted patterns. Perfect for hanging on a ‘love tree’ of gathered branches, they are a simple yet striking project suitable for beginners.
Step-by-Step Guide
Materials
- Air dry clay (white or terracotta colored)
- Small heart-shaped cookie cutter (approx. 2-3 inches)
- Acrylic paint (Terracotta/Red-Orange color if using white clay)
- White paint marker (fine tip) or white acrylic paint with a tiny detail brush
- Rolling pin
- Parchment paper or craft mat
- Drinking straw or skewer (for making holes)
- Jute twine or rustic string
- Sandpaper (fine grit)
- Matte sealant (optional)
Step 1: Shaping the Hearts
-
Prepare your clay:
Begin by kneading a handful of your air dry clay until it is soft, pliable, and free of cracks. This helps condition it for rolling. -
Roll it out:
Place the clay on a sheet of parchment paper to prevent sticking. Use your rolling pin to flatten the clay to an even thickness, roughly 1/4 to 1/8 of an inch thick. You want them sturdy but not too heavy. -
Cut the shapes:
Press your heart-shaped cookie cutter firmly into the clay. Lift the cutter and gently pop the shape out. Repeat to make as many ornaments as you desire. -
Smooth the edges:
Dip your finger in a little bit of water and run it gently around the cut edges of each heart to smooth out any roughness or jagged bits left by the cutter. -
Create the hanging hole:
Take a drinking straw or a thick skewer and poke a hole near the top center (the ‘dip’) of each heart. Ensure the hole goes all the way through and is large enough for your twine. -
Drying time:
Lay the hearts flat on clean parchment paper. Let them dry completely according to package directions, usually 24-48 hours. I like to flip them over halfway through so both sides dry evenly.
Clay Cracking?
If edges curl while drying, place a light book on top (with parchment in between) once the surface is dry to the touch to keep them flat.
Step 2: Painting and Decoration
-
Sand imperfections:
Once fully cured and hard, check the edges. If there are any sharp spots, lightly sand them away with fine-grit sandpaper. -
Apply base color:
If you used terracotta clay, skip this step. If you used white clay, paint the entire surface (front, back, and sides) with a terracotta or warm reddish-orange acrylic paint. Let it dry completely. -
Plan your patterns:
Decide on three distinct doodle patterns to replicate the look: horizontal stripes with dashes, snowflakes with dots, and a messy cross-hatch style. -
Draw the stripes:
Using a white paint pen, draw horizontal bands across one heart. Fill the spaces between the bands with short, diagonal hash marks. -
Draw the snowflakes:
On another heart, draw simple asterisks (*) to represent snowflakes. Fill the empty space around them with random small polka dots. -
Draw the cross-hatch:
For the third style, draw loose diagonal lines in one direction, then cross over them in the opposite direction to create a textured, woven look. -
Seal (optional):
To protect your paintwork, you can apply a light coat of matte varnish or mod podge, though leaving them raw keeps that nice matte pottery texture.
Pro Tip: Better Lines
Shake your white paint pen vigorously before starting and test the flow on a scrap piece of paper first to prevent blobs on your finished hearts.
Step 3: Assembly
-
Cut the twine:
Cut lengths of jute twine, approximately 8-10 inches long for each ornament. -
Thread the loops:
Fold a piece of twine in half. Push the folded loop end through the hole in the heart from front to back. -
Secure the hanger:
Pass the loose ends of the twine through the loop you just pushed through, pulling tight to create a lark’s head knot at the top of the heart. -
Tie it off:
Knot the two loose ends of the twine together at the top to create the hanging loop. -
Display:
Collect some bare branches from outside, arrange them in a glass bottle or vase, and hang your new handmade valentines.
Enjoy the cozy warmth these handmade accents add to your home this season


Heart Keychains With Tassel-Friendly Holes
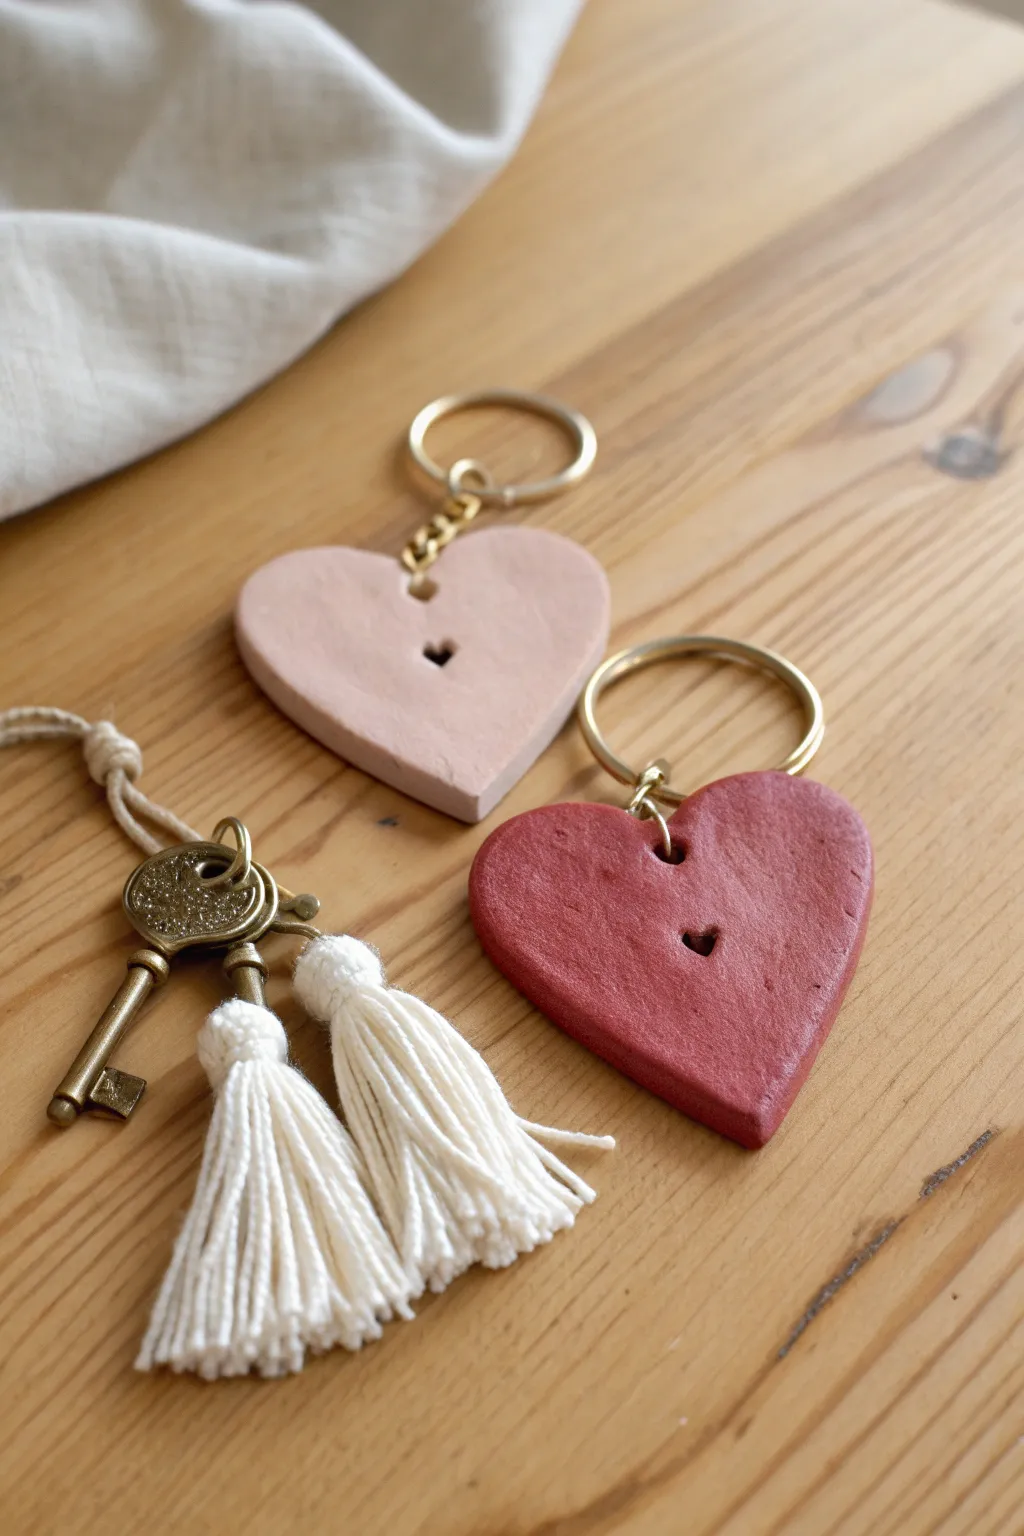
These charming, rustic heart keychains feature a sweet central cutout and pair perfectly with handmade tassels for a complete gift. The matte finish and muted pink and terracotta tones give them a modern, sophisticated look that elevates simple air dry clay.
Step-by-Step Tutorial
Materials
- White air dry clay
- Rolling pin
- Heart-shaped cookie cutter (medium size)
- Tiny heart-shaped cutter (or a sharp knife)
- Parchment paper or baking paper
- Sandpaper (fine grit)
- Acrylic paint (muted pink and terracotta red)
- Paintbrush
- Key rings (gold finish)
- Jump rings (gold finish)
- Needle nose pliers
- Straw or toothpick (for making holes)
- White cotton yarn (for tassels)
- Scissors
Step 1: Shaping the Hearts
-
Prepare the workspace:
Lay down a sheet of parchment paper on a flat surface to prevent sticking. Take a handful of air dry clay and knead it until it’s smooth and warm. -
Roll the slab:
Place the clay on the paper and roll it out evenly. You want a thickness of about 1/4 inch (approx. 5-6mm)—thick enough to be sturdy but not too heavy. -
Cut the main shape:
Use your medium-sized heart cutter to press firmly into the clay. Wiggle it slightly to ensure a clean cut before lifting. -
Create the mini heart:
Position your tiny heart cutter exactly in the center of the main heart. Press down to remove the middle section, creating that signature window. -
Punch the hardware hole:
Using a straw or a thick skewer, create a hole at the top dip of the heart for the jump ring. Ensure it isn’t too close to the edge to prevent cracking. -
Smooth the edges:
Dip your finger in a little water and gently run it along all the cut edges to smooth out any roughness or stray clay bits. -
Dry completely:
Leave the hearts on the parchment paper to air dry. This usually takes 24-48 hours depending on humidity; turn them over halfway through so both sides dry evenly.
Smooth Surface Secret
Before cutting your shapes, gently roll a damp sponge over the clay slab. This removes canvas textures or fingerprints for a porcelain-like finish.
Step 2: Finishing and Assembly
-
Sand for perfection:
Once fully dry, gently sand the edges and the surface with fine-grit sandpaper to remove any remaining bumps or sharp corners. -
Apply the base coat:
Paint the entire heart in your chosen color (muted pink or terracotta). I like to do the edges first, then lay it flat to do the face. -
Second coat:
Let the first layer dry completely before adding a second coat for opaque, streak-free coverage. -
Make the tassels:
Wrap white cotton yarn around four fingers about 15-20 times. Slide the loops off your hand carefully. -
Tie the tassels:
Slide a short piece of yarn through the top loop and tie it tight. Take another piece and wrap it around the ‘neck’ of the tassel (about 1cm down from the top) to secure the bundle. -
Trim the fringe:
Cut the bottom loops of the tassel and trim straight across so the ends are even and fluffy. -
Attach the jump ring:
Use pliers to open a gold jump ring sideways. Slide it through the hole at the top of the clay heart. -
Connect the key ring:
Before closing the jump ring, slide on the large gold keyring. If you are attaching the tassel to the key ring directly (like the image on the left), add it now. -
Secure everything:
Use the pliers to close the jump ring securely, ensuring the ends meet perfectly so nothing slips off.
Cracking Around Holes?
If the clay cracks near the hole while drying, you likely punched it too close to the edge. Leave at least 3-4mm of clay border for strength.
Give your keys a lovely upgrade or gift these durable, heartfelt accessories to your favorite people

The Complete Guide to Pottery Troubleshooting
Uncover the most common ceramic mistakes—from cracking clay to failed glazes—and learn how to fix them fast.
Tiny Heart Ring Dish With a Thumbprint Dip
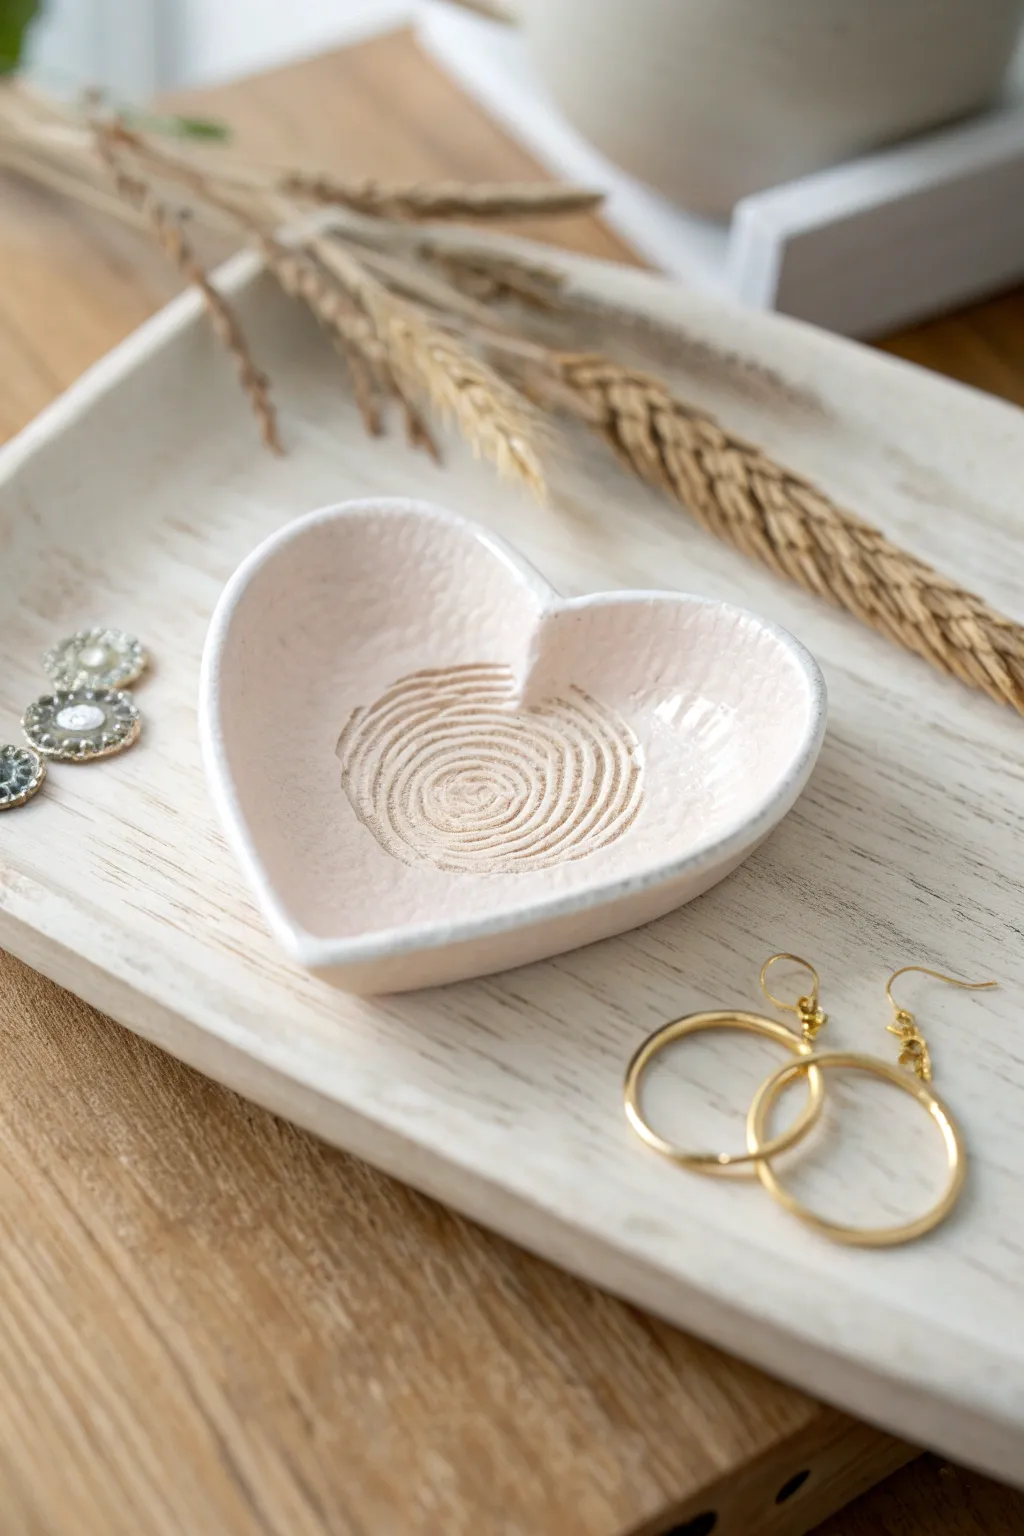
This delicate blush-pink ring dish features a classic heart shape with a unique twist—a mesmerizing spiral texture impressed right into the center. It’s the perfect minimalist holder for your favorite earrings or rings giving them a heartfelt resting spot.
Detailed Instructions
Materials
- White air-dry clay
- Rolling pin
- Heart-shaped cookie cutter (medium size)
- Small bowl of water
- Sandpaper (fine grit)
- Acrylic paint (pale blush pink or white mixed with a drop of red)
- High-gloss varnish or sealant
- Paintbrush (soft bristle)
- Texturing tool (thick twine, clay wire tool, or even a paperclip)
Step 1: Shaping the Clay
-
Condition the Clay:
Begin by taking a handful of air-dry clay and kneading it in your hands until it becomes warm, soft, and pliable. This prevents cracks later on. -
Roll it Out:
Place the clay on a smooth surface or craft mat. Roll it out to an even thickness, aiming for about 1/4 inch thick so it’s sturdy but not chunky. -
Cut the Shape:
Press your heart-shaped cookie cutter firmly into the rolled clay. Wiggle it slightly to ensure a clean cut, then lift the cutter and peel away the excess clay from the outside edges. -
Smooth the Edges:
Dip your finger into a small bowl of water and gently run it along the cut edges of the heart to soften any sharp angles or burrs left by the cutter.
Step 2: Creating the Texture
-
Prepare the Center:
With the heart flat on your work surface, focus on the very center where the dish will dip primarily. -
Form the Dip:
Gently press your thumb into the center of the heart to create a shallow concave shape. I like to slowly work my way outward to curve the edges of the heart upward slightly, creating a bowl effect. -
Imprint the Spiral:
Using a piece of thick twine coiled into a circle, or the loop of a wire clay tool, press gently into the center depression. If using a tool, press firmly and drag it in a tight spiral motion starting from the center outward to creating the ripple effect seen in the photo. -
Refine the Rim:
Double-check the outer rim of the heart. If the texturing distorted the shape, gently press the sides back into a symmetrical heart form.
Smooth Moves
To get a glassy smooth finish before painting, use a barely damp sponge to wipe the clay down right before it dries completely.
Step 3: Finishing Touches
-
Allow to Dry:
Set the dish aside in a safe, dry place. Let it cure for at least 24-48 hours. Turn it over halfway through the process to ensure the bottom dries evenly. -
Sand for Smoothness:
Once fully rigid and dry, take your fine-grit sandpaper and lightly buff the edges and the underside. Be careful not to sand away your spiral texture inside. -
Mix the Color:
Mix a very small amount of pink acrylic paint with white to achieve that barely-there blush tone. You want a pastel color that mimics colored porcelain. -
Apply Base Coat:
Paint the entire dish, ensuring you get paint into the grooves of the spiral texture. Let this coat dry completely. -
Seal the Dish:
Finish by applying one or two thin coats of high-gloss varnish. This gives it that ceramic-like shine and protects the clay from moisture or scratches. -
Final Cure:
Let the varnish cure according to the bottle instructions (usually overnight) before placing any jewelry inside.
Make it Luxe
After the pink paint dries, use a fine detail brush to paint just the very rim of the heart with metallic gold paint for an elegant border.
Your lovely little catch-all is now ready to hold your treasures
Personalized Initial Hearts as Pocket Tokens
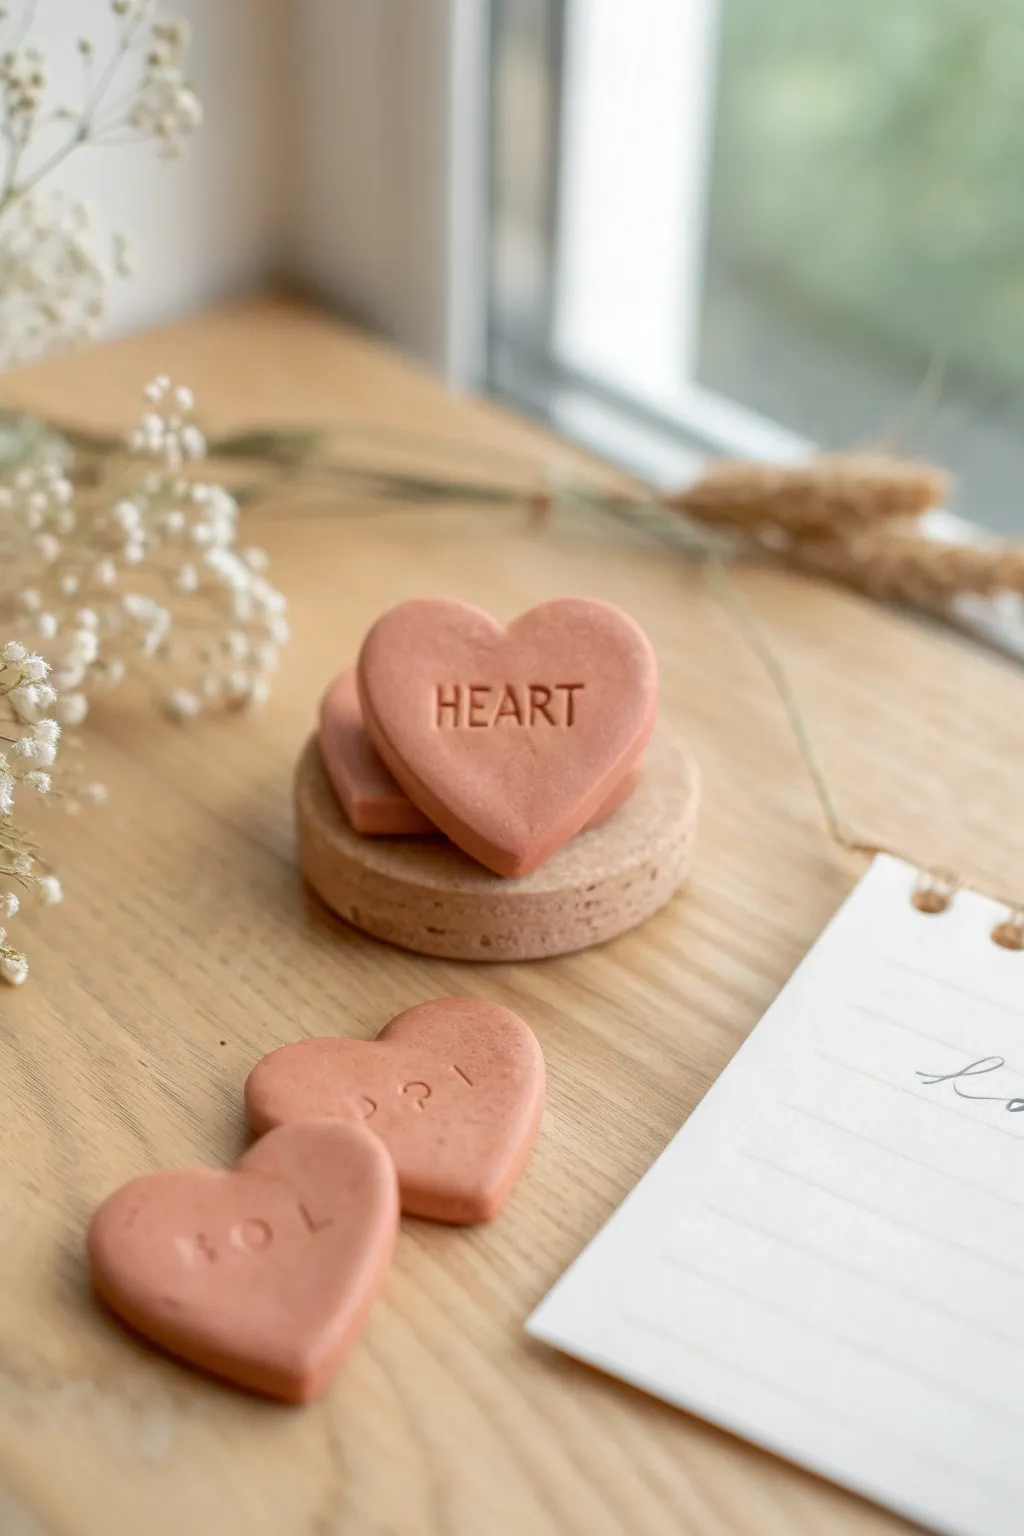
These charming pocket tokens combine the rustic warmth of terracotta with a smooth, modern finish. Perfect for Valentine’s Day or as simple keepsakes, these heart-shaped tokens feature personalized stamped messages that make them truly one-of-a-kind.
Step-by-Step Guide
Materials
- Terracotta-colored air dry clay
- Rolling pin
- Heart-shaped cookie cutter (approx. 2 inches wide)
- Small alphabet stamp set
- Parchment paper or non-stick craft mat
- Fine-grit sandpaper (400 grit)
- Small bowl of water
- Sponge or smooth cloth
- Matte varnish or sealant (optional)
Step 1: Shaping the Base
-
Prepare your workspace:
Lay down a sheet of parchment paper or a non-stick craft mat to protect your work surface and prevent the clay from sticking. -
Condition the clay:
Take a handful of terracotta air dry clay and knead it gently in your hands. This warms up the material and ensures it’s pliable and free of air bubbles. -
Roll it out:
Place the clay on your mat and use a rolling pin to flatten it. Aim for an even thickness of about 1/4 inch (6mm) to ensure the tokens feel substantial. -
Smooth the surface:
If you notice any texture from the rolling pin or small cracks, dip your finger in water and gently glide it over the surface to create a perfectly smooth canvas. -
Cut the shapes:
Press your heart-shaped cookie cutter firmly into the clay. Give it a tiny wiggle to ensure a clean cut, then lift it away. Repeat to make as many hearts as you need.
Stamp Cleaning
Clean your rubber stamps immediately after use with a damp cloth or scrolling baby wipe. Dried clay can get stuck in the fine crevices of the letters and ruin future impressions.
Step 2: Stamping and Refining
-
Plan your text:
Before stamping, arrange your alphabet stamps on the table to check spelling and spacing. I find it helpful to test the press on a scrap piece of clay first. -
Stamp the message:
Gently press the letters into the center of each heart. Apply even pressure so the impression is clear but not so deep that it distorts the heart shape. -
Remove excess clay:
Carefully peel away the scrap clay from around your heart shapes. You can ball this up and store it in an airtight container for future projects. -
Refine the edges:
Dip your finger in a little water and run it along the cut edges of the hearts. This softens the sharp angle left by the cutter, giving it that professional, rounded look. -
Initial drying phase:
Let the hearts sit undisturbed on the parchment paper for about hour. This allows the surface to firm up just enough to be handled carefully.
Gold Rush
For a luxe touch, highlight the stamped letters with a tiny detail brush and liquid gold leaf paint after the clay has fully dried. The metallic shine pops against the terracotta.
Step 3: Finishing Touches
-
Flip for even drying:
Carefully turn the hearts over to let the bottom side dry. This prevents curling. Let them air dry completely for 24-48 hours, depending on humidity. -
Sanding imperfections:
Once fully dry and hard, take your fine-grit sandpaper and very gently buff away any remaining rough spots on the edges or back. -
Clean the dust:
Wipe the hearts with a slightly damp sponge or cloth to remove the fine clay dust generated by sanding. -
Optional sealing:
To protect them from moisture and handling, apply a thin coat of matte varnish. This preserves the natural clay look while adding durability. -
Final cure:
Allow the sealant to dry completely according to the bottle’s instructions before gifting or carrying your new tokens.
Enjoy sharing these tactile little reminders of affection with your favorite people


What Really Happens Inside the Kiln
Learn how time and temperature work together inside the kiln to transform clay into durable ceramic.
Doily-Pressed Lace Texture Hearts
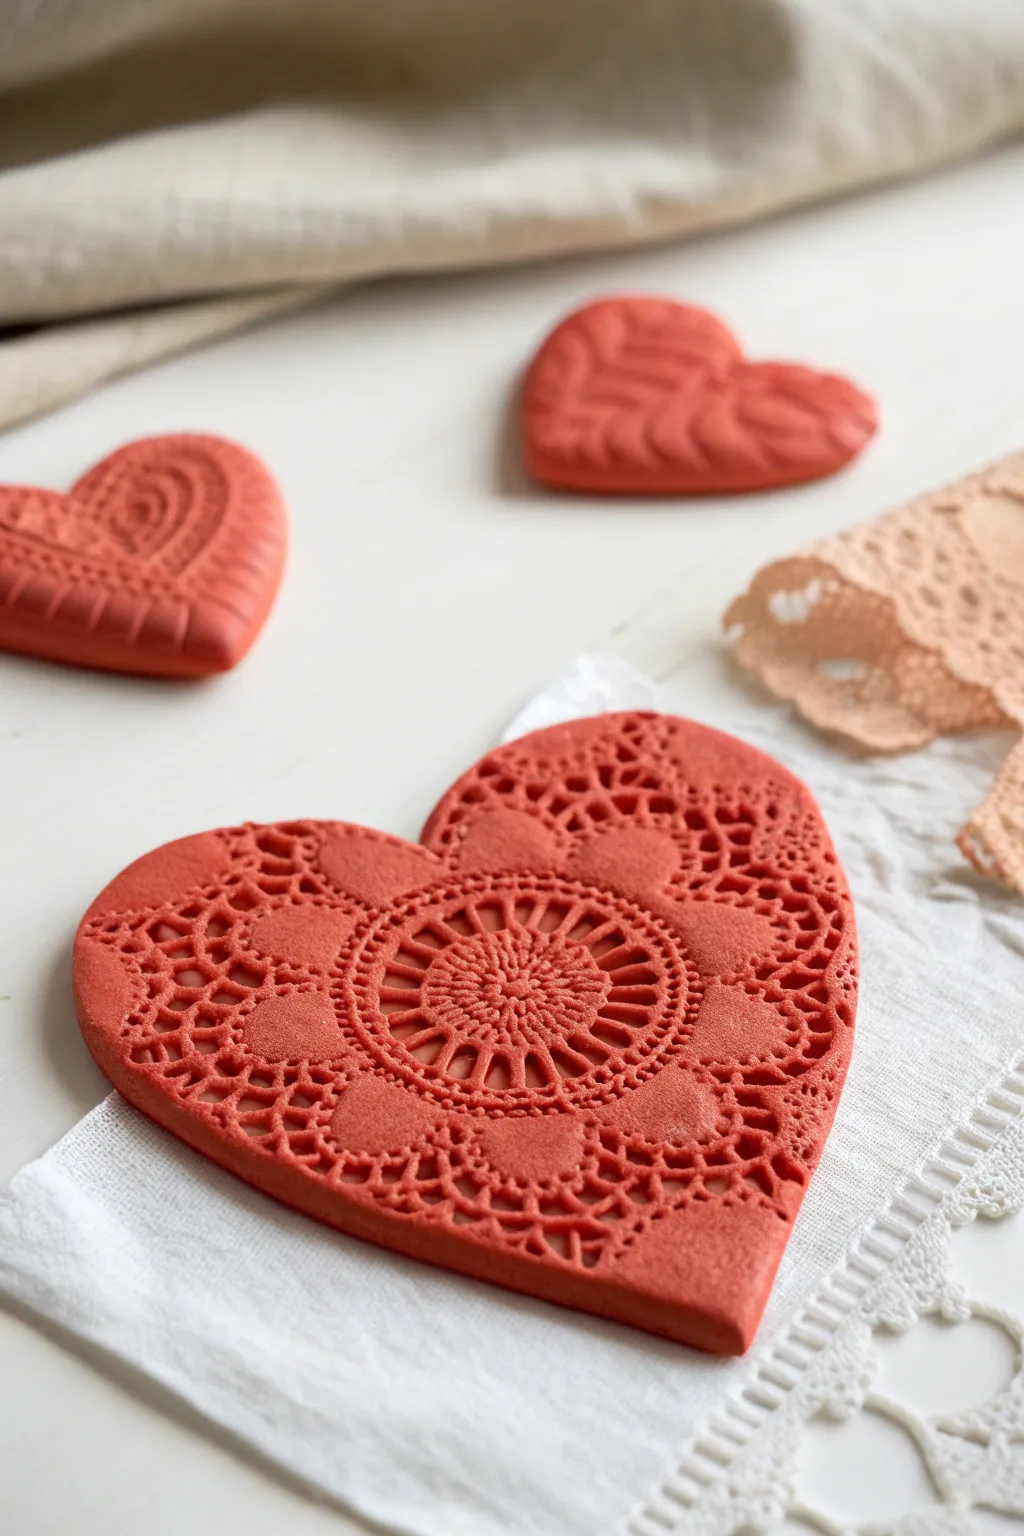
Transform plain air-dry clay into vintage-inspired keepsakes with nothing more than a scrap of lace or a paper doily. These terracotta-hued hearts feature intricate embossed patterns that catch the light beautifully, making them perfect for Valentine’s Day decor or unique gift tags.
Step-by-Step Tutorial
Materials
- Terracotta colored air-dry clay (or white clay + terracotta acrylic paint)
- Vintage lace doilies (crocheted cotton works best)
- Rolling pin (acrylic or wooden)
- Parchment paper or silicone mat
- Heart-shaped cookie cutters (various sizes)
- Sharp crafting knife or needle tool
- Fine-grit sandpaper (optional)
- Matte spray varnish (optional)
Step 1: Preparing the Clay
-
Condition the clay:
Begin by taking a handful of terracotta air-dry clay and kneading it thoroughly in your hands. You want it to be warm and pliable without any cracks. -
Prepare your surface:
Lay down a sheet of parchment paper or a silicone mat. This prevents the clay from sticking to your table and makes it easier to lift the delicate shapes later. -
Initial rolling:
Place the clay ball in the center of your work surface and flatten it slightly with your palm. Use your rolling pin to roll it out to an even thickness of about 1/4 inch (6mm).
Step 2: Texturing and Cutting
-
Position the lace:
Select a section of your crochet doily that has a strong, defined pattern. Lay the lace gently over the rolled-out clay slab, ensuring it covers the area where you plan to cut your heart. -
Imprint the pattern:
With the lace in place, roll over the clay one more time with firm, consistent pressure. I prefer to roll only once in a single direction to keep the pattern crisp and prevent ‘ghost’ double images. -
Reveal the texture:
Carefully peel back the lace from one corner to reveal the embossed design underneath. If the impression looks too faint, you can re-lay it exactly and press harder, but it’s tricky to align perfectly. -
Cut the shape:
Position your heart-shaped cookie cutter over the most interesting part of the textured clay. Press straight down firmly, give it a tiny wiggle to separate the edges, and lift the cutter. -
Remove excess clay:
Peel away the excess scrap clay from around the heart shape. Save these scraps in an airtight bag or container to use for smaller hearts later.
Sticky Lace?
If your lace is sticking to the clay, lightly dust the clay surface with cornstarch before laying the doily down. Brush the excess off after peeling.
Step 3: Refining and Drying
-
Smooth the edges:
Dip your finger in a small amount of water and very gently run it along the cut edges of the heart to smooth out any roughness or loose bits of clay. -
The drying phase:
Leave the hearts on the parchment paper to dry. Flip them over carefully after about 12 hours to ensure the bottom dries evenly. Total drying time will take 24-48 hours depending on humidity. -
Sanding (optional):
Once fully cured and hard, check the edges again. If they feel sharp, lightly buff them with fine-grit sandpaper for a professional finish. -
Seal the surface:
To protect the texture and deepen the terracotta color, give the hearts a light coat of matte spray varnish. This prevents the clay from absorbing moisture over time.
Create a Hanging Ornament
Before the clay dries, use a straw or skewer to poke a neat hole near the top curve of the heart. Once dry, thread velvet ribbon or jute twine through.
Arranged together on a table or hung individually, these textured hearts carry a timeless charm that feels both handmade and elegant
Stencil-Imprinted Valentine Hearts With All-Over Pattern
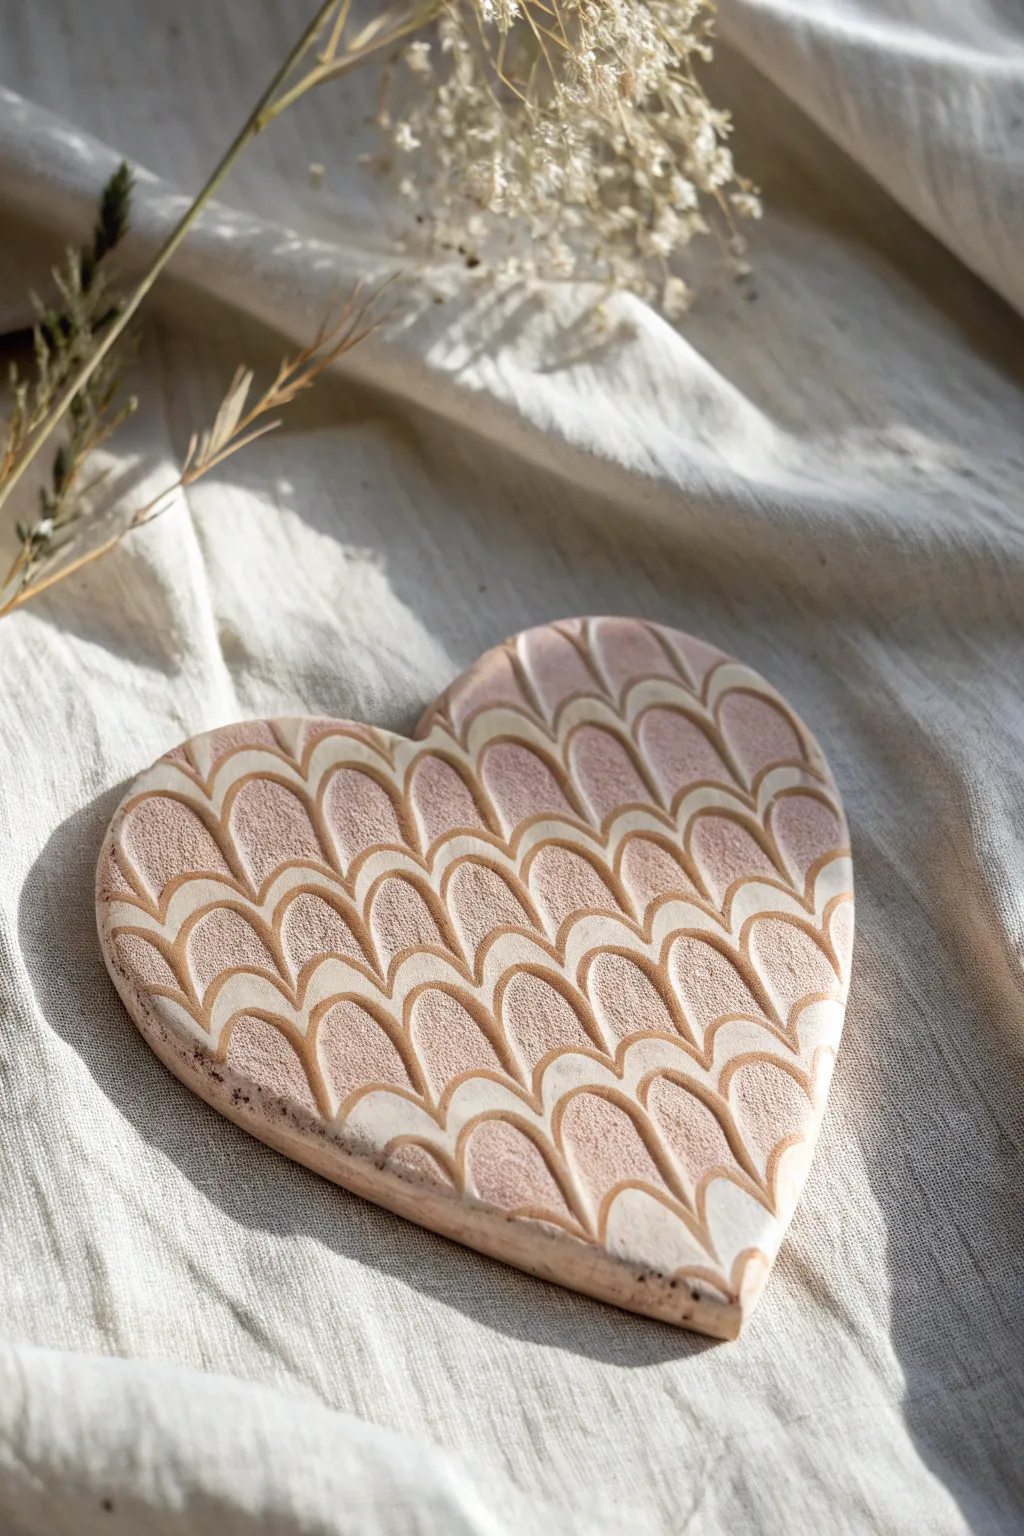
Create a stunningly intricate Valentine’s decoration without needing advanced sculpting skills. This project uses a clever stencil technique to imprint a repeating scallop pattern directly into air dry clay, revealing beautiful contrasting textures.
Step-by-Step Guide
Materials
- White or cream air dry clay
- Rolling pin
- Heart-shaped cookie cutter (large)
- Scallop or ‘fish scale’ pattern stencil (thick mylar works best)
- Rolling pin with guides (optional, but helpful for even thickness)
- Small sponge or stipple brush
- Soft pink or terracotta acrylic paint (watered down) or pigment powder
- Fine grit sandpaper
- Clear matte varnish
- Clean work surface or silicone mat
Step 1: Preparing the Base
-
Condition the Clay:
Begin by taking a handful of air dry clay and kneading it in your hands. You want it to be warm, pliable, and free of any air bubbles before you start rolling. -
Roll out a Slab:
Place the clay on a clean, smooth surface. Using a rolling pin, roll the clay out into an even slab. Aim for a thickness of about 1/4 inch (6mm) to ensure the final heart is sturdy. -
Smooth the Surface:
I like to run a slightly damp finger or a rib tool over the top surface to remove any canvas marks or rolling pin lines, ensuring a pristine base for the pattern.
Clay sticking to stencil?
If the stencil lifts clay when you remove it, lightly dust the clay surface with cornstarch or baby powder before laying the stencil down. This acts as a release agent.
Step 2: Imprinting the Pattern
-
Position the Stencil:
Lay your scallop-patterned stencil gently onto the rolled-out clay. Ensure the pattern is aligned straight if you want a symmetrical look. -
Roll the Impression:
Use your rolling pin to roll firmly directly over the stencil. This pushes the stencil into the clay, raising the clay inside the open areas of the design. -
Check the Depth:
Carefully lift one corner of the stencil to peek. If the impression isn’t deep enough to define the scallops clearly, lay it back down and roll again with slightly more pressure. -
Add Texture (Optional):
For the textured effect seen in the photo, take a small sponge or stiff brush and dab it firmly into the exposed clay areas while the stencil is still in place. This creates that pitting contrast against the smooth lines. -
Remove the Stencil:
Slowly peel the stencil away from the clay. Do this vertically to avoid distorting the raised pattern borders.
Step 3: Cutting and Refining
-
Cut the Heart Shape:
Position your large heart cutter over the most pleasing part of the pattern. Press down firmly to cut the shape. -
Release the shape:
Remove the excess clay from around the cutter first, then gently push the heart out of the cutter. -
Soften the Edges:
Dip your finger in a little water and very gently smooth the outer rim of the heart to remove any sharp drag marks from the cutter. -
Let it Dry:
Place the heart on a wire rack or a piece of parchment paper. Allow it to air dry completely for 24-48 hours, flipping it occasionally to prevent warping.
Make it an ornament
Before drying, use a straw to punch a neat hole at the top center of the heart. Once finished, thread a velvet ribbon or twine through to hang it.
Step 4: Finishing Touches
-
Sand the Relief:
Once fully dry, take a piece of fine sandpaper and very lightly sand the top surface. This highlights the raised ‘grid’ lines of the scallop pattern, making them smooth and white against the textured inner areas. -
Enhance with Color:
Mix a very watery wash of pink or terracotta acrylic paint. Brush this over the entire piece, letting it sink into the textured recesses. -
Wipe Back:
Immediately wipe the surface with a damp cloth or sponge. The paint will stay in the textured ‘scales’ but wipe off the smooth, raised ridges, recreating the two-tone look. -
Seal:
Finish by applying a thin coat of clear matte varnish to protect the clay and set the color without adding unwanted shine.
This elegant texture technique opens up endless possibilities for creating sophisticated clay patterns

TRACK YOUR CERAMIC JOURNEY
Capture glaze tests, firing details, and creative progress—all in one simple printable. Make your projects easier to repeat and improve.
Pressed Petal Heart Plaques
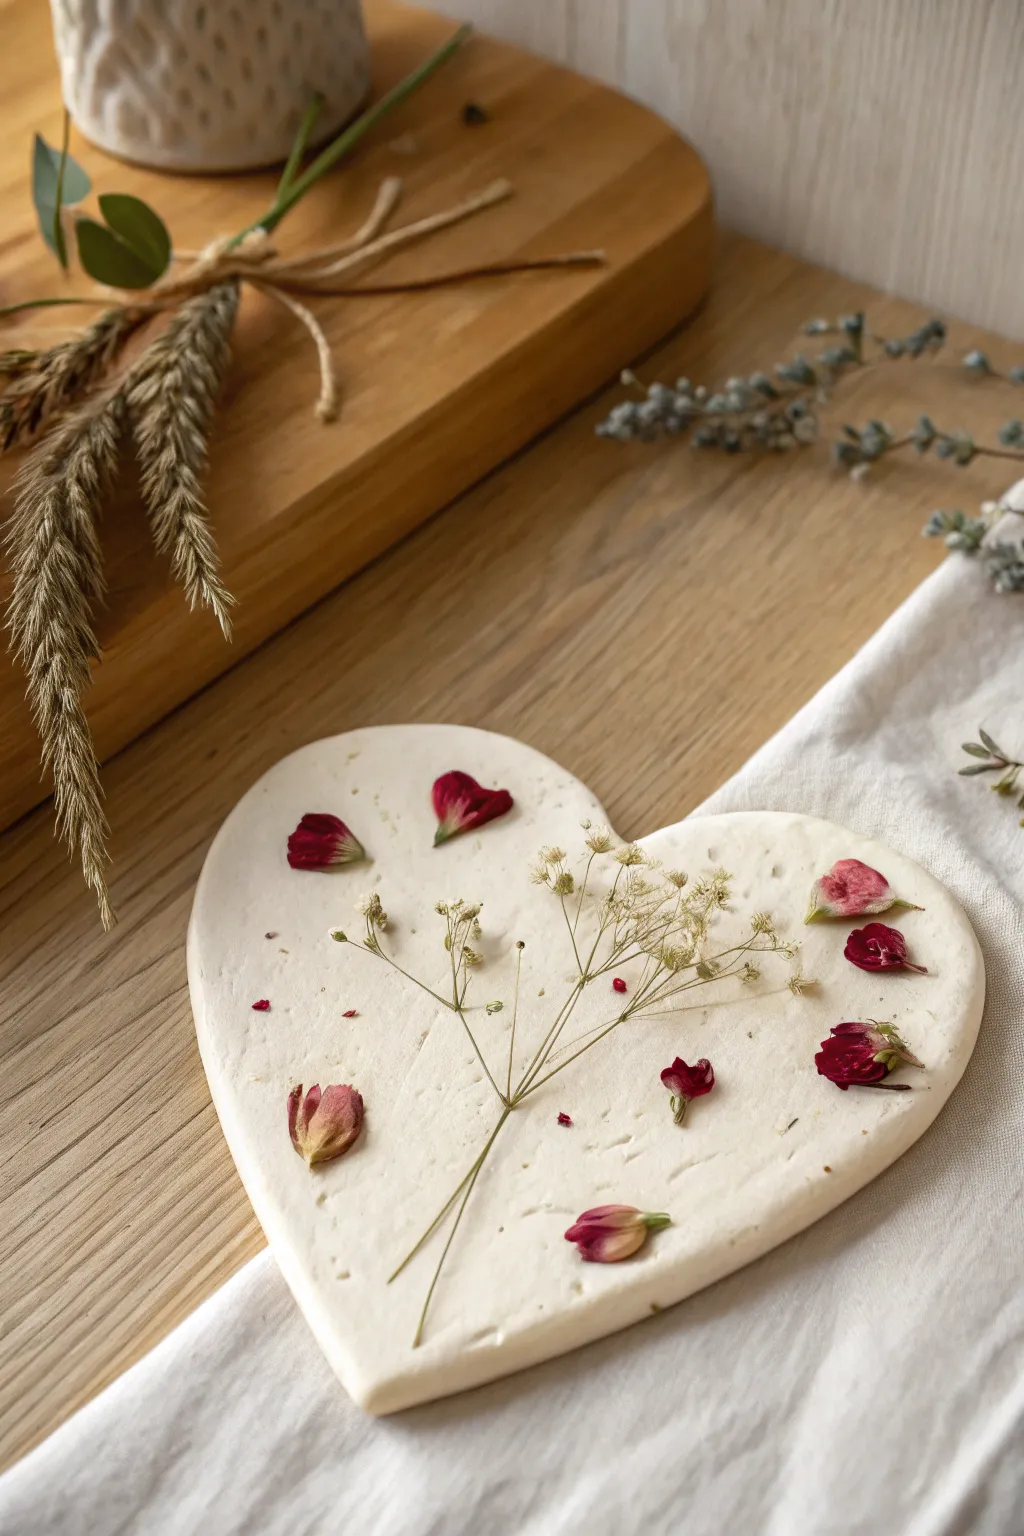
Capture the delicate beauty of nature with these romantic heart-shaped plaques featuring real pressed botanicals. The stark white clay provides the perfect minimalist canvas for vibrant petals and wispy dried stems, creating a timeless Valentine’s keepsake.
How-To Guide
Materials
- White air dry clay
- Rolling pin
- Heart-shaped cookie cutter (large)
- Parchment paper or non-stick craft mat
- Dried red rose petals or similar small flowers
- Dried baby’s breath (gypsophila) sprigs
- Tweezers
- Fine-grit sandpaper (optional)
- Matte varnish or sealant (optional)
Step 1: Shaping the Clay Base
-
Prepare your workspace:
Lay down a sheet of parchment paper or a non-stick silicone mat on a flat, stable surface to prevent the clay from sticking. -
Condition the clay:
Take a handful of white air dry clay and knead it in your hands for a minute or two until it is soft, pliable, and free of cracks. -
Roll it out:
Using a rolling pin, flatten the clay ball into a smooth slab. Aim for a thickness of about 1/4 inch (approx. 5-6mm) to ensure the final plaque is sturdy but elegant. -
Create the heart shape:
Press your large heart-shaped cookie cutter firmly into the clay slab. Wiggle it slightly to ensure a clean cut all the way through. -
Isolate the heart:
Carefully peel away the excess clay from around the outside of the cutter before lifting the cutter itself. This keeps the edges neat. -
Smooth the edges:
Dip your finger in a tiny bit of water and gently run it along the cut edges of the heart to smooth out any roughness or burrs.
Fresh vs. Dried
Use fully dried flowers rather than fresh ones. Fresh flowers contain moisture that will shrink as they dry, potentially pulling away from the clay or molding.
Step 2: Arranging the Botanicals
-
Plan your design:
Before pressing anything into the clay, lay out your dried flowers on the table next to your heart to visualize the composition. A central sprig with scattered petals works beautifully. -
Place the main sprig:
Take a delicate sprig of dried baby’s breath. Gently position it diagonally across the center of the clay heart. I like to let the stems cross slightly at the bottom for a natural look. -
Press stems lightly:
Using your finger or the back of a spoon, press the stems very gently into the clay so they sit flush with the surface. -
Add petal accents:
Using tweezers for precision, pick up your small dried red petals. Place them randomly around the central sprig, or nestle them near the stems to look like buds. -
Embed the flowers:
Once you are happy with the placement, gently roll your rolling pin over the entire heart one time with very light pressure. This embeds the botanicals into the clay without crushing them completely. -
Secure edges:
If any petal edges are lifting, tap them down gently with your finger to ensure they adhere to the moist clay.
Scented Surprise
Before the clay dries, add a few drops of rose or lavender essential oil to the back of the plaque. It will act as a subtle passive diffuser for the room.
Step 3: Drying and Finishing
-
Begin drying:
Leave the heart on the parchment paper in a cool, dry place away from direct sunlight, which can cause cracking. -
Flip for even drying:
After about 12-24 hours, carefully flip the heart over so the bottom side can dry. This prevents warping. Be very gentle with the flower side. -
Check for dryness:
Allow another 24 hours or until the clay is completely hard and turns a chalky white color throughout. -
Sand imperfections:
If the edges feel sharp after drying, very lightly run a piece of fine-grit sandpaper along the rim to soften it. -
Seal the piece (optional):
To protect the dried flowers from humidity, you can apply a thin coat of matte varnish or Mod Podge over the top, though leaving it raw gives a lovely rustic texture.
Now you have a charming piece of botanical art ready to display or gift.
Laced Woven Heart Hang-Ups With Yarn Threading
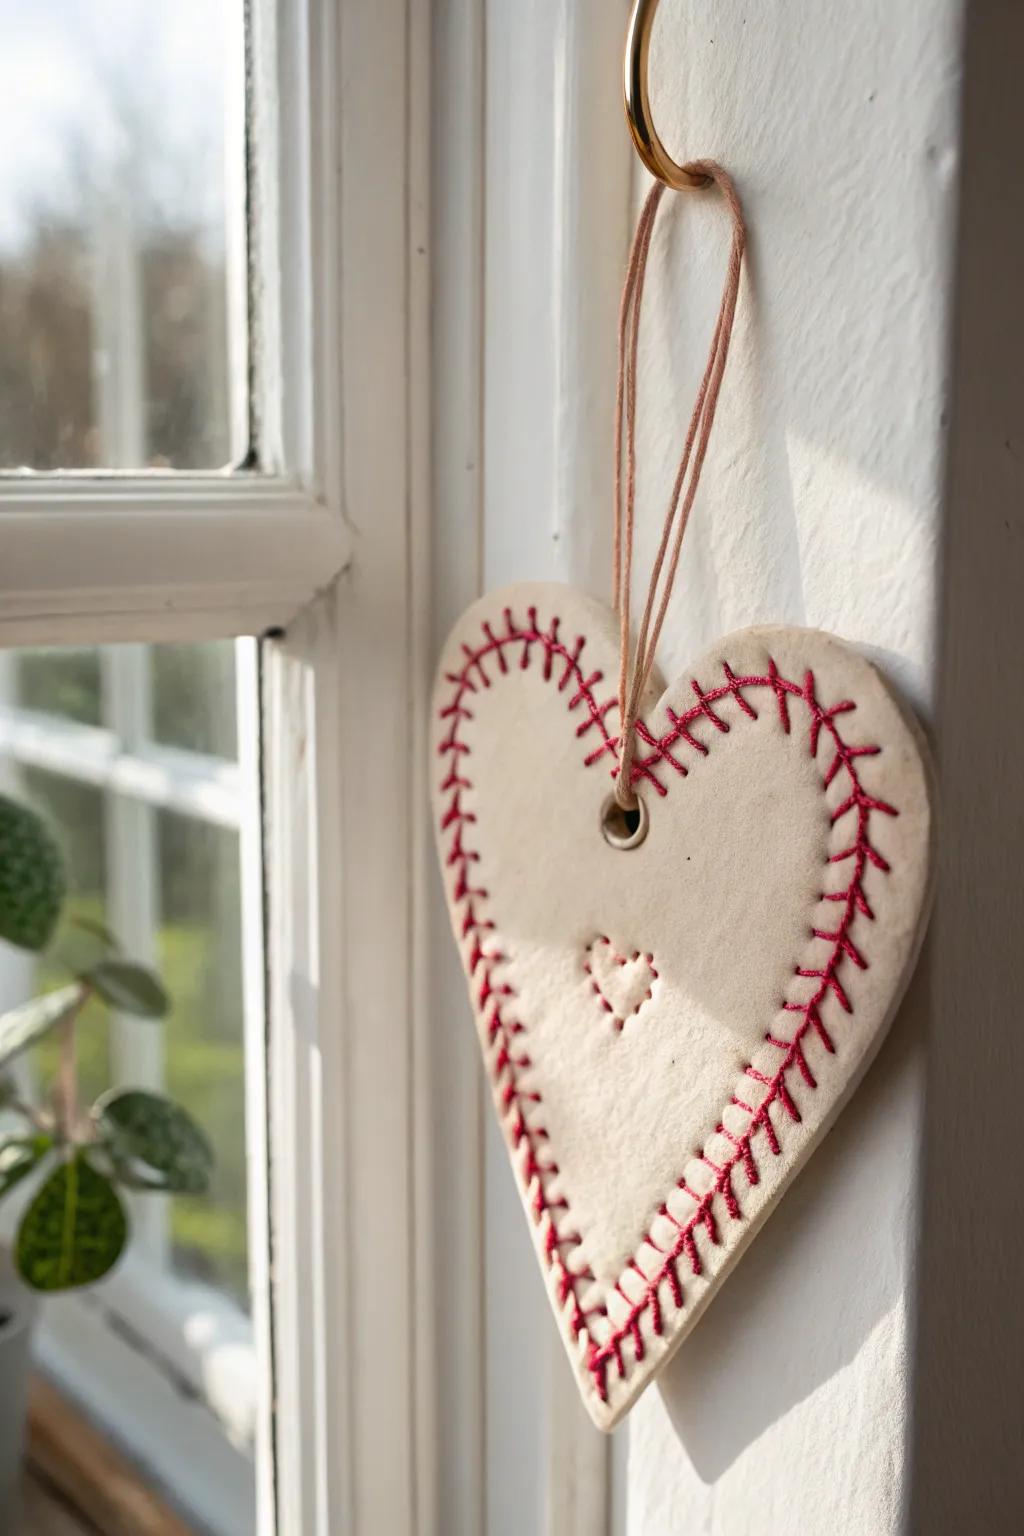
These charming ornaments combine the smooth, rustic finish of air-dry clay with the vibrant texture of red yarn stitching. They evoke the look of a classic baseball or hand-sewn leather craft, making them a unique and heartfelt Valentine’s decoration.
Detailed Instructions
Materials
- White air-dry clay
- Rolling pin
- Large heart-shaped cookie cutter
- Small heart stamp or smaller cutter (for impression)
- Clean toothpick or needle tool
- Red embroidery floss or thin yarn
- Blunt tapestry needle
- Sandpaper (fine grit)
- Hemp cord or twine for hanging
- Clear acrylic sealant (optional)
Step 1: Shaping the Clay
-
Prepare your workspace:
Lay down a sheet of parchment paper or a silicone mat to prevent the clay from sticking to your table. -
Roll out the clay:
Take a handful of air-dry clay and knead it briefly until pliable. Roll it out to a uniform thickness of about 1/4 inch; you want it sturdy enough to hold stitches but not too heavy. -
Cut the shape:
Press your large heart-shaped cookie cutter firmly into the clay. wiggle it slightly to ensure a clean cut, then carefully remove the excess clay from around the shape. -
Smooth the edges:
Dip your finger in a little water and gently run it along the cut edges of the heart to smooth out any roughness or loose bits of clay.
Step 2: Adding Details & Holes
-
Create the center motif:
Take your small heart stamp (or use a toothpick to draw freehand) and press a small heart shape gently into the center of the ornament. Do not cut all the way through. -
Mark the stitch spacing:
Using a ruler lightly as a guide, lightly mark dots around the perimeter of the heart, setting them about 1/4 inch apart and 1/4 inch away from the edge. -
Pierce the stitch holes:
Using a toothpick or a needle tool, poke holes through the clay at every mark you made. Wiggle the tool slightly to ensure the holes are wide enough for your yarn. -
Add detail to the center:
If you want the center heart to match the border, poke tiny faux-stitch holes around the outline of the inner heart impression as well. -
Create the hanging hole:
Use a straw or a slightly larger tool to punch a clean hole near the top center of the heart for the hanging loop later. -
Let it dry:
Place the heart on a flat surface away from direct heat. Let it dry for 24-48 hours, flipping it over halfway through to ensure even drying and prevent warping.
Clean Hole Trick
If your holes shrink during drying, simply use a small drill bit or your needle tool to gently re-open them carefully by hand before you start stitching.
Step 3: Stitching and Finishing
-
Sand for perfection:
Once fully dry and hard, use fine-grit sandpaper to gently smooth any rough spots on the edges or surface. -
Thread the needle:
Cut a long length of red embroidery floss or thin yarn. Thread it onto a blunt tapestry needle. -
Begin stitching:
Start from the back of the heart at the bottom point. Pull the thread through, leaving a small tail representing the first stitch. -
Create the loop stitch:
Bring the needle over the edge of the heart and go back down through the *next* hole from the front side. Before pulling tight, ensure the thread loops cleanly over the edge. -
Continue the pattern:
Repeat this whip-stitch motion around the entire perimeter. I find it helpful to keep consistent tension so the yarn lays flat against the clay edge. -
Secure the thread:
When you reach the start, tie the two ends together securely on the back side of the ornament and trim the excess yarn closely. -
Add the hanger:
Thread a piece of hemp cord or twin through the top hole. Tie a knot to create a loop for hanging. -
Seal (Optional):
For longevity, you can brush a light coat of matte acrylic varnish over the clay parts, being careful to avoid the yarn.
Texture Twist
Before cutting the heart shape, roll a lace doily or textured fabric over your clay slab to give the entire surface a beautiful embossed pattern.
Now hang your handcrafted heart in a sunny window or gift it to someone special to admire
Mini Heart Magnets for Sweet Everyday Notes
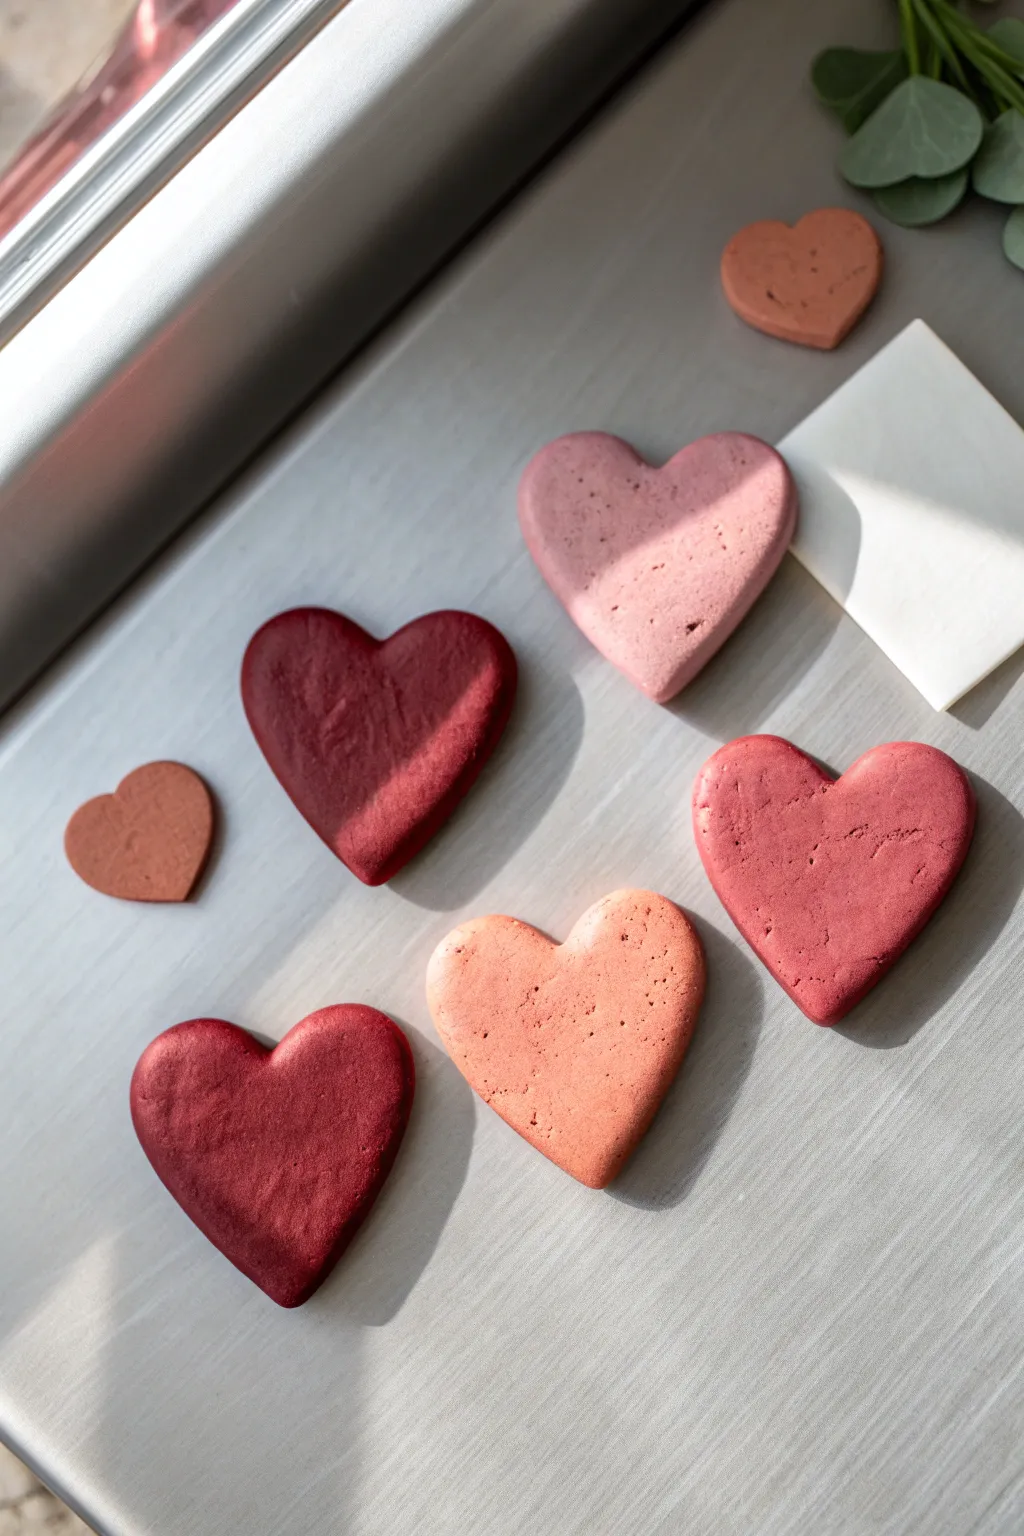
These charming, miniature heart magnets bring a touch of rustic romance to your fridge or magnetic board. With their matte, stone-like finish in warm shades of terracotta, blush, and burgundy, they offer a sophisticated twist on classic Valentine’s decor.
Step-by-Step Guide
Materials
- White air-dry clay (stone effect or smooth)
- Acrylic paints (burgundy, red, terracotta, white)
- Small heart-shaped cookie cutters (various sizes)
- Rolling pin
- Parchment paper or non-stick craft mat
- Fine-grit sandpaper
- Strong round craft magnets
- Super glue or E6000 adhesive
- Old toothbrush or stiff bristle brush
- Matte varnish (optional)
Step 1: Coloring the Clay Base
-
Divide clay:
Start by pinching off four or five golf-ball-sized chunks of white air-dry clay. We want a gradient of colors, so keep them separated. -
Mix the darkest shade:
Take the first ball and add a drop of burgundy acrylic paint into the center. Fold the clay over the paint and knead thoroughly until the color is uniform. -
Create mid-tones:
For the next ball, mix red paint with a tiny dot of brown or terracotta to create a warm, deep red. -
Mix lighter shades:
Mix the remaining balls with varying amounts of pink, terracotta, and white paint. Aim for a dusty rose and a pale peach tone. I find mixing the paint directly into the clay creates a much more natural, stone-like look than painting on top later. -
Prevent drying:
Wrap any clay balls you aren’t currently using in plastic wrap or a damp cloth to keep them from drying out while you work.
Cracked Clay?
If you see tiny cracks forming as the clay dries, smooth a slurry of clay and water over the crack with your finger, then let dry again.
Step 2: Shaping and Texturing
-
Roll it out:
Place a colored clay ball on your parchment paper. Roll it out to an even thickness, roughly 1/4 inch (about 6mm). Avoid going too thin, or the magnet might show through later. -
Add texture:
Before cutting, take an old toothbrush or a stiff brush and gently tap the surface of the clay. This creates the subtle, pitted texture seen in the photo. -
Cut the shapes:
Press your heart-shaped cutters firmly into the textured clay. Use different sizes for variety. -
Release the shapes:
Gently peel away the excess clay. If the heart sticks to the cutter, push it out very gently from the back to maintain the flat shape. -
Smooth the edges:
Dip your finger in a little water and lightly run it along the cut edges of the hearts. This softens the sharp cut lines, giving them a more organic, tumbled look. -
Embed the magnet (Method A):
If your clay is thick enough, you can press a magnet gently into the back now to create an indentation, then remove it. This ensures it sits flush later. -
Repeat process:
Repeat the rolling and cutting steps with all your different clay colors until you have a beautiful collection of hearts.
Marbled Magic
Stop kneading the paint into the clay before it’s fully blended. This leaves swirls of white and color for a stunning faux-marble effect.
Step 3: Finishing Touches
-
Drying time:
Lay the hearts flat on clean parchment paper. Let them air dry for at least 24-48 hours. Turn them over halfway through to ensure the backs dry evenly. -
Sand for imperfections:
Once fully distinct and hard, check the edges. If there are any jagged bits, gently buff them away with fine-grit sandpaper. -
Dusting off:
Wipe the hearts with a dry cloth to remove any sanding dust. -
Attach magnets:
Apply a dot of strong super glue or E6000 to the back of each heart (or into the indentation you made earlier). Press the magnet firmly into place. -
Final cure:
Allow the glue to cure completely according to the package instructions before sticking them to your fridge. -
Optional seal:
If you want extra protection, brush on a coat of ultra-matte varnish. Avoid glossy finishes if you want to keep that raw stone aesthetic.
Now you have a set of earthy, heartfelt magnets ready to hold your sweetest notes
Heart Place Card Holders With a Simple Slot
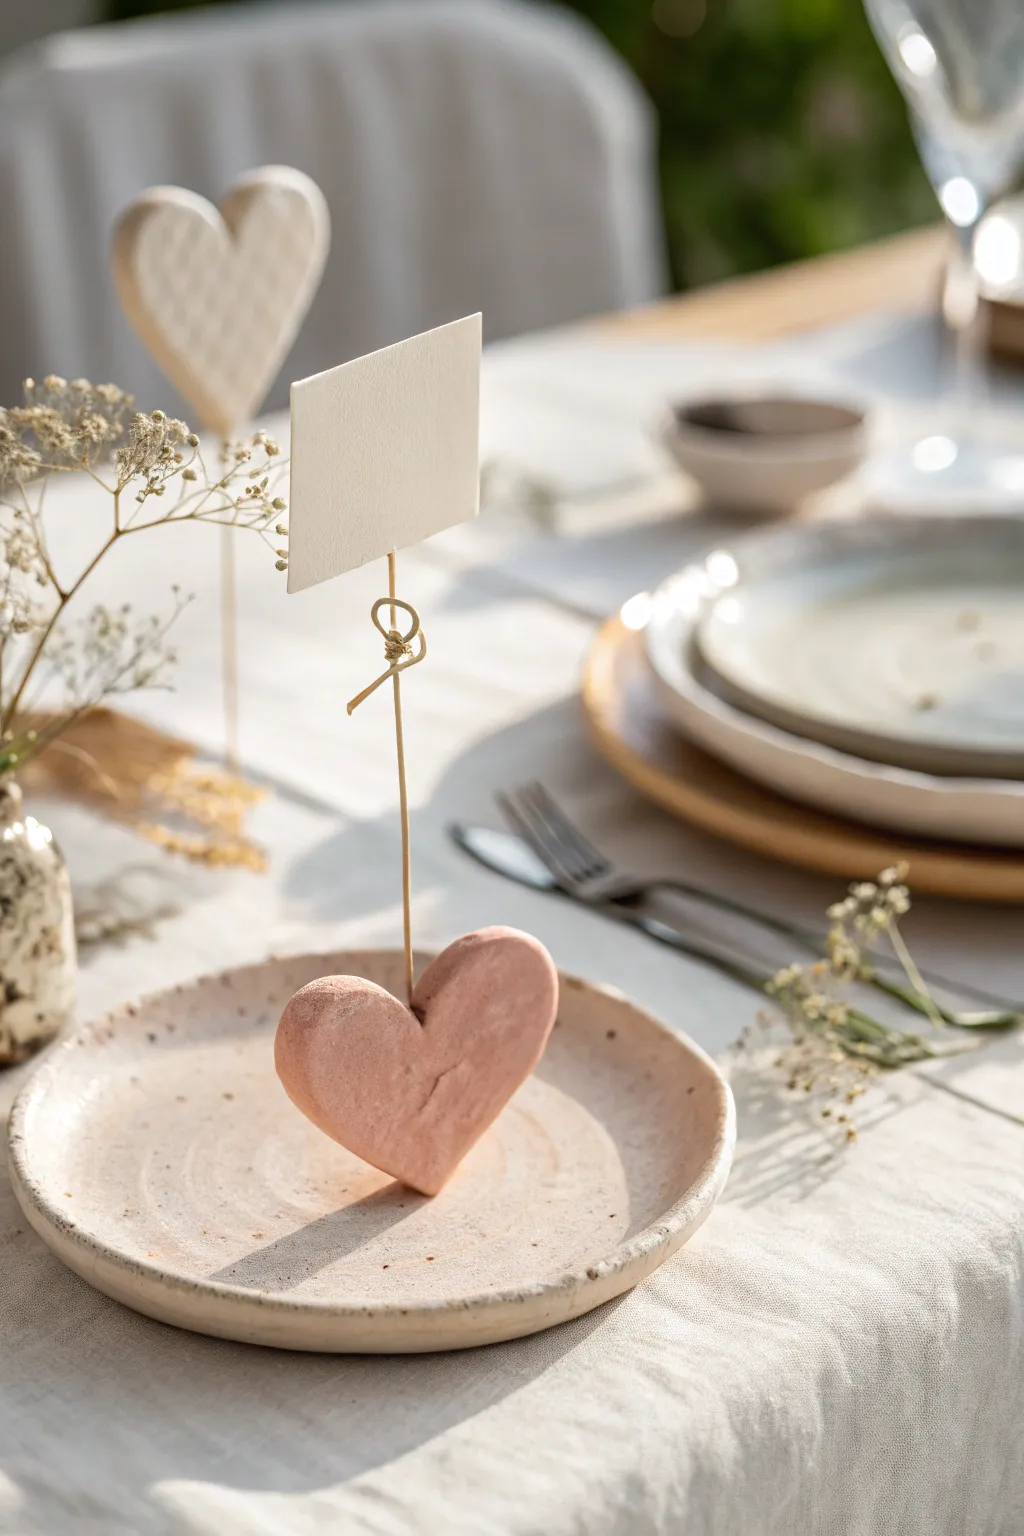
These charming, rustic heart place card holders add a sweet, handmade touch to any Valentine’s tablescape. With their soft terracotta pink hue and simple wire spiral, they offer a perfect blend of organic warmth and minimal elegance.
How-To Guide
Materials
- Air dry clay (white or pre-colored terracotta)
- Pink or terracotta acrylic paint (if using white clay)
- Small paintbrush or sponge
- Gold or brass craft wire (20 or 22 gauge)
- Wire cutters
- Needle-nose pliers
- Rolling pin
- Heart-shaped cookie cutter (medium size)
- Fine-grit sandpaper (optional)
- Cardstock for place cards
Step 1: Shape and Sculpt the Hearts
-
Prepare the clay:
Begin by conditioning your air dry clay. Knead a handful until it is soft, pliable, and free of cracks. If you are mixing paint directly into white clay for a solid color, add a small dollop of pink or terracotta paint now and knead until the color is uniform. -
Roll out the slab:
Roll the clay out on a smooth surface to a thickness of about 3/4 inch to 1 inch. You want these strictly thick enough to stand on their own and support the wire, so err on the side of chunky rather than thin. -
Cut the shapes:
Press your heart-shaped cookie cutter firmly into the clay. create as many hearts as you need place settings. -
Soften the edges:
Once cut, remove the excess clay. Use a bit of water on your finger to gently rub the harsh edges created by the cutter. The goal is a soft, stone-like pillowy look rather than sharp, bakery-cookie edges. -
Refine the surface:
If you want that slightly rustic, textured look seen in the photo, don’t smooth the surface perfectly. Dab it lightly with a textured sponge or crumpled aluminum foil to give it an organic feel.
Wobbly Wire Fixed
If the wire feels loose after the clay dries, pull it out gently, add a drop of superglue or clear epoxy to the wire end, and push it back into the hole.
Step 2: Create the Wire Holder
-
Cut the wire:
Using your wire cutters, snip a length of gold or brass wire approximately 6 to 8 inches long for each holder. This gives you enough length for the stand and the decorative loop. -
Form the card clip:
At one end of the wire, use your needle-nose pliers to create a spiral or a double loop. This is where the card will sit. Twist the wire around the pliers’ nose twice to create a tight gap that can grip a piece of paper. -
Add a decorative twist:
Just below the clip, I like to add a loose, small knot or twist in the wire stem for visual interest, exactly like the one in the example image. -
Straighten the stem:
ensure the rest of the wire extending downward is relatively straight so it will stand upright without tipping the heart over.
Textured Terrazzo
Knead tiny chips of dried colored clay or sand into your wet clay before rolling. When dried and lightly sanded, it creates a chic terrazzo stone effect.
Step 3: Assembly and Finish
-
Insert the wire:
While the clay hearts are still wet, carefully insert the straight end of your wire heavily into the geometric center of the heart’s top (the dip between the lobes). Push it in deep enough to be stable, at least halfway through the heart’s height. -
Secure the base:
Gently pinch the clay around the entry point of the wire to seal it and ensure the wire doesn’t wobble as the clay shrinks during drying. -
Check balance:
Stand the heart up on a flat surface. Adjust the wire angle now if it’s leaning. The bottom of the heart needs to be flat enough to sit securely. -
Allow to dry:
Let the hearts dry completely in a safe, dry area. Depending on the thickness and your climate, this usually takes 24 to 48 hours. Turn them occasionally to ensure even drying. -
Sand (optional):
Once fully cured, if there are any distracting sharp bits on the bottom, gently sand them away with fine-grit sandpaper. -
Paint (if needed):
If you used plain white clay and didn’t tint it earlier, now is the time to paint. Mix a muted, dusty pink using acrylics. Apply a wash (paint mixed with a little water) to keep the texture visible. -
Final touch:
Cut small rectangles of cardstock for your name cards, write your guests’ names, and slide them into the wire loops.
Now you have a set of personalized, artisan-style card holders ready for your celebration
Heart Tea Light Holders With a Soft Glow
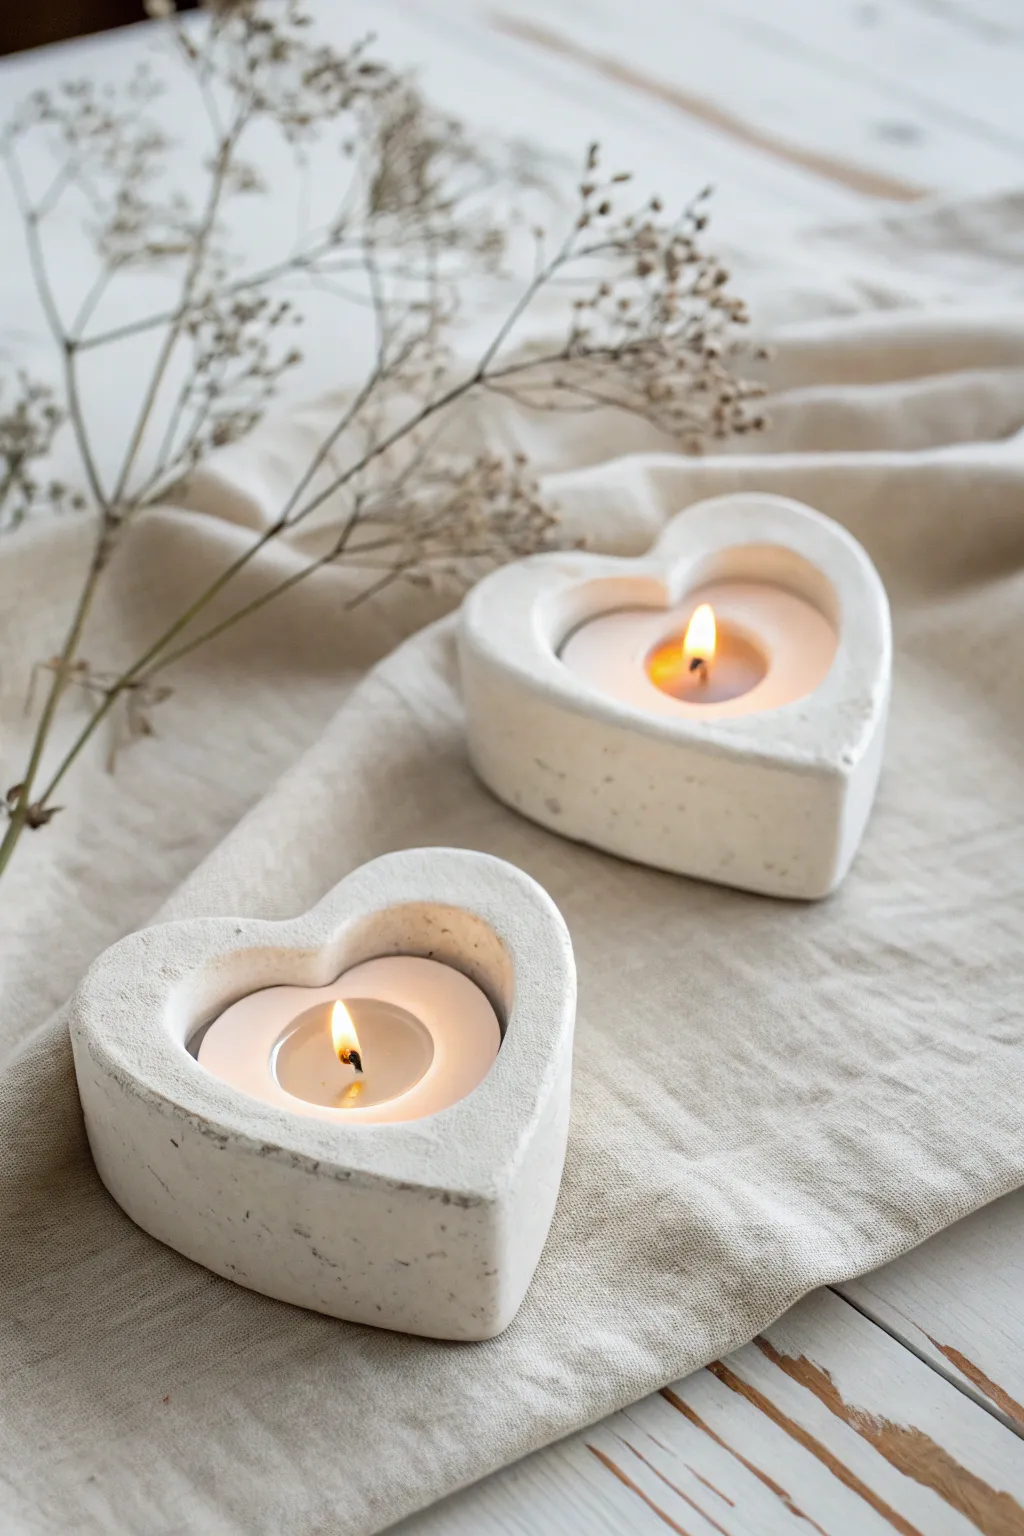
Achieve the trendy, industrial-chic look of cast concrete without the heavy lifting using standard air dry clay. These chunky heart votives have a beautiful matte finish and a substantial feel, perfect for setting a romantic mood.
Detailed Instructions
Materials
- White or light grey air dry clay (approx. 500g)
- Small heart-shaped cookie cutter (slightly larger than a tea light)
- Larger heart-shaped cookie cutter (about 1 inch wider than the small one)
- Rolling pin
- Tea light candle (for sizing)
- Parchment paper or non-stick mat
- Cup of water
- Sponge or craft knife
- Sandpaper (fine grit)
- Optional: Speckled clay or black pepper/sand for texture
Step 1: Shaping the Base
-
Prepare the Clay:
Begin by conditioning a large ball of air dry clay in your hands until it is pliable and warm. If you want that faux-concrete speckled look shown in the photo, knead in a tiny pinch of black pepper or black sand at this stage. -
Roll it Out:
Roll the clay out onto parchment paper. You want this creating to be quite thick—aim for at least 1.5 to 2 inches (3-5 cm) in height to give it that chunky, modern aesthetic. -
Cut the Shape:
Press your larger heart-shaped cutter firmly into the thick slab of clay. Wiggle it slightly to ensure it cuts all the way through to the mat, then remove the excess clay from around the outside. -
Create the Well:
Take the smaller heart cutter and center it carefully inside the clay heart. Press down, but do not go all the way through; stop about halfway down to create the nest for the candle. -
Excavate the Center:
Use a craft knife or a spoon to carefully scoop out the clay from inside the smaller heart cut. Smooth the bottom of this well with your finger so the candle sits flat.
Shrinkage Tip
Clay shrinks about 10-15% when drying. Make the candle hole slightly larger than the tea light metal cup to ensure it fits later.
Step 2: Refining and Drying
-
Check the Fit:
Before the clay hardens, test the fit by placing a real tea light inside the well. It should slide in easily with a little wiggle room, as clay shrinks slightly when drying. -
Smooth the Edges:
Dip your finger or a slightly damp sponge into water and run it along the top rim and outer sides. I find this steps crucial for erasing any sharp lines left by the cookie cutter. -
Soften the Walls:
Gently round over the top edges of the heart to give it that soft, molded look rather than a sharp, cut edge. -
Texture the Surface:
To mimic the stone-like texture in the photo, gently tap the exterior with a bristle brush or a crumpled ball of aluminum foil. This removes the ‘perfect’ synthetic smoothness of the clay. -
Initial Drying:
Move the hearts to a safe place to dry. Because they are thick, this creates a longer drying time. Let them sit undisturbed for 24 hours. -
Flip and Continue:
After the first day, carefully flip the hearts over so the bottom can breathe. Let them dry for another 24-48 hours until they are completely hard and room temperature to the touch (cold clay is still wet!).
Step 3: Finishing Touches
-
Sand for Perfection:
Once fully cured, take fine-grit sandpaper and gently buff the sides and top. Focus on any uneven spots, but keep some of the natural variation. -
Dust Off:
Wipe the entire piece down with a dry cloth to remove any clay dust from sanding. -
Optional Painting:
If your clay dried too white or unevenly, you can apply a light wash of watered-down grey acrylic paint, then wipe it off immediately with a rag to stain the texture. -
Seal for Safety:
Apply a matte varnish or sealant, especially inside the candle well. Since this is for a candle, ensure your sealant is non-flammable once dry. -
Final Test:
Place your fresh tea light inside, invite someone over, and enjoy the cozy glow.
Cracking Issues?
If small cracks appear during drying, create a ‘slip’ paste (clay + water) and fill the cracks, then smooth over with a finger.
These sturdy little hearts add a touch of romance to any table setting
Marbled-Paint Heart Coasters
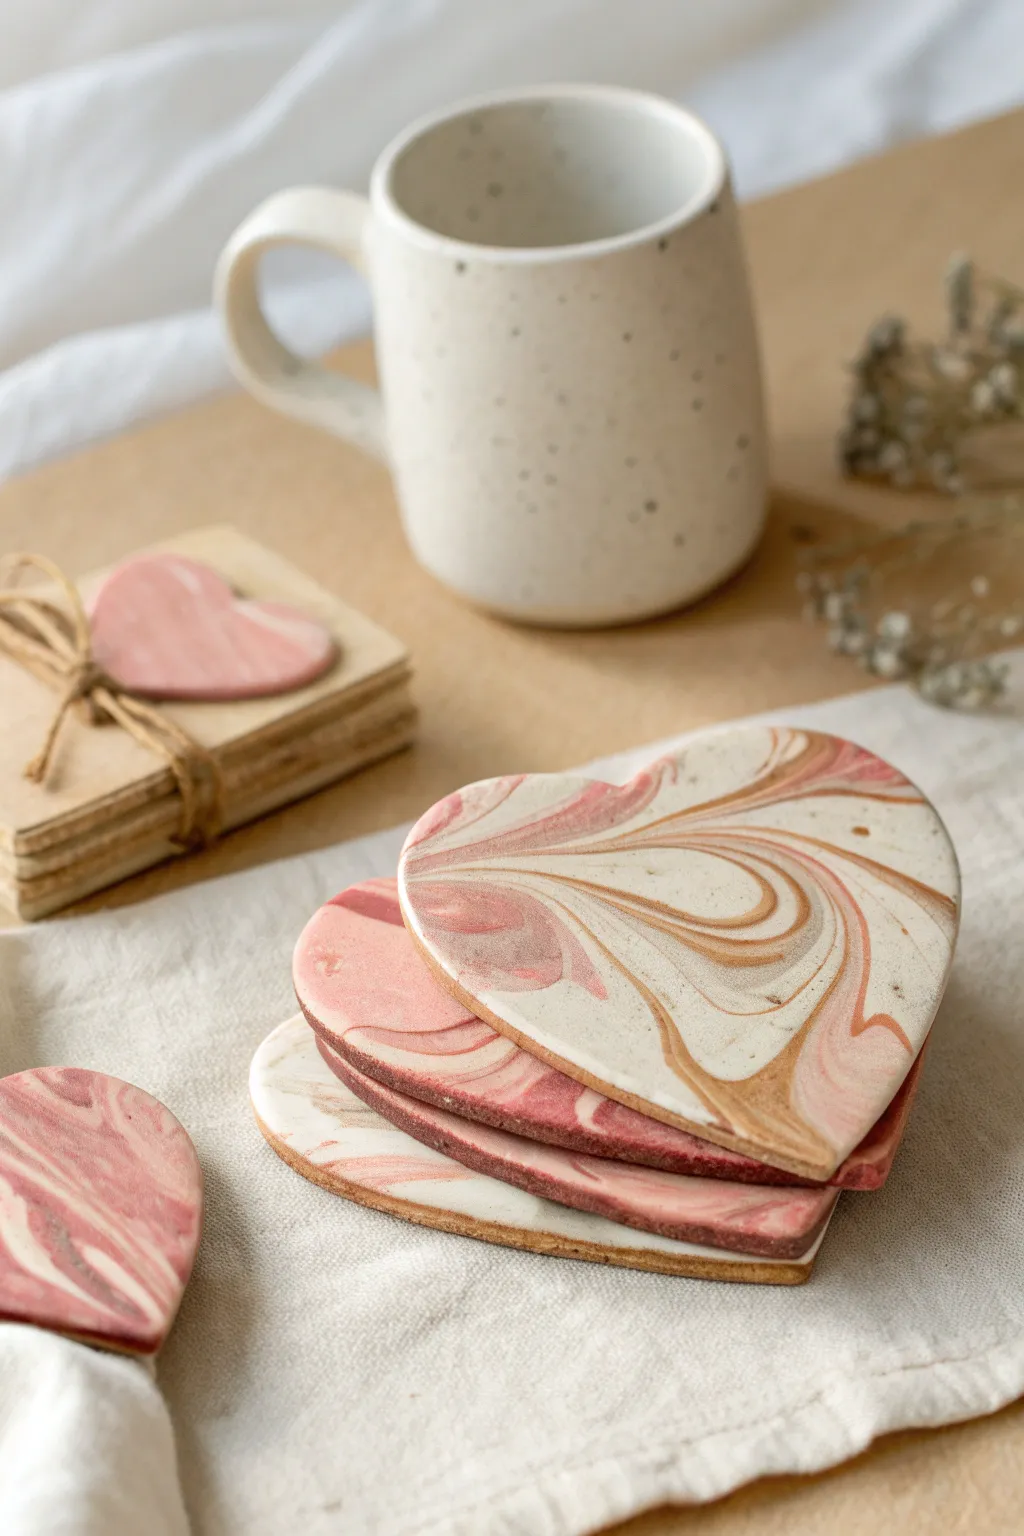
These elegant heart-shaped coasters combine soft white, blush pink, and subtle gold tones in a mesmerizing marbled swirl pattern. They make sophisticated Valentine’s gifts that look professionally crafted but are surprisingly simple to shape and style right at home.
Step-by-Step
Materials
- White air-dry clay (smooth textured)
- Acrylic paints (White, Dusty Rose/Pink, Metallic Gold/Beige)
- Rolling pin
- Heart-shaped cookie cutter (large enough for a mug base)
- Parchment paper or non-stick craft mat
- Sandpaper (fine grit)
- Gloss or matte varnish/sealant (waterproof recommended)
- Simple craft knife or needle tool (optional)
- Gloves (optional to keep hands clean)
Step 1: Preparing the Clay
-
Portion the clay:
Start by cutting your block of white air-dry clay into three separate balls. One ball should be significantly larger (about 70% of the total clay), as this will be your base white color. -
Color the smaller portions:
Take the second ball of clay and flatten it slightly. Add a small drop of pink acrylic paint into the center. Fold the clay over the paint and knead it until the color is fully incorporated and uniform. Wear gloves if you want to avoid stained fingers. -
Adding the accent tone:
Repeat the coloring process with the third small ball, kneading in a touch of beige or metallic gold paint to create a warm accent tone to complement the pink. -
Create elongated ropes:
Roll each colored ball (white, pink, and beige) into long, snake-like ropes. The white rope should be thicker than the colored ones since it’s the primary background.
Fixing Muddy Colors
If your colors are blending into one solid muddy shade, stop kneading immediately. Next time, twist the ropes fewer times before rolling to keep the color veins distinct and bold.
Step 2: Marbling and Shaping
-
Twist the colors together:
Lay the ropes next to each other and twist them together into one large spiral. Then, fold this twisted rope in half and twist it again. Don’t over-knead at this stage, or the colors will turn muddy instead of distinct marble veins. -
Form a ball:
Gently squish your twisted rope into a single, compact ball. You should see distinct stripes of color on the surface. -
Roll out the slab:
Place the ball on parchment paper. Using a rolling pin, roll the clay out to an even thickness of about 1/4 inch (6mm). Rotate your rolling direction frequently to keep the shape even. -
Check the pattern:
If I find the marble pattern isn’t swirly enough for my taste, I sometimes fold the slab in half once and roll it out again gently to create more complex veins. -
Cut the shapes:
Press your heart-shaped cutter firmly into the most attractive parts of the marbled slab. Lift the cutter straight up to get clean edges. -
Clean the edges:
Remove the excess clay from around your hearts. Dip your finger in a little water and gently smooth the cut edges of the hearts to remove any roughness or loose crumbs.
Step 3: Finishing Touches
-
Drying phase:
Place the hearts on a clean sheet of parchment paper in a cool, dry area. Let them air dry for 24 to 48 hours. Carefully flip them over halfway through the drying time to ensure the bottom dries evenly and to prevent warping. -
Optional sanding:
Once fully cured and hard, use fine-grit sandpaper to briefly gently buff the edges or surface if there are any sharp points or fingerprints left behind. -
Sealing the coaster:
This step is crucial for coasters. Apply a coat of waterproof varnish or sealant to the top and sides. This protects the clay from moisture condensation from mugs. -
Apply second coat:
Let the first coat dry completely according to the bottle instructions, then apply a second layer for durability. -
Final cure:
Allow the sealant to cure fully before placing any hot mugs on your beautiful new creations.
Gilded Edges
For an extra touch of glamour, use a small paintbrush to apply liquid gold leaf or gold paint to just the vertical edges of the finished, dry coaster before sealing.
Stack these beautiful hearts together and tie them with a piece of twine for a heartfelt handmade gift
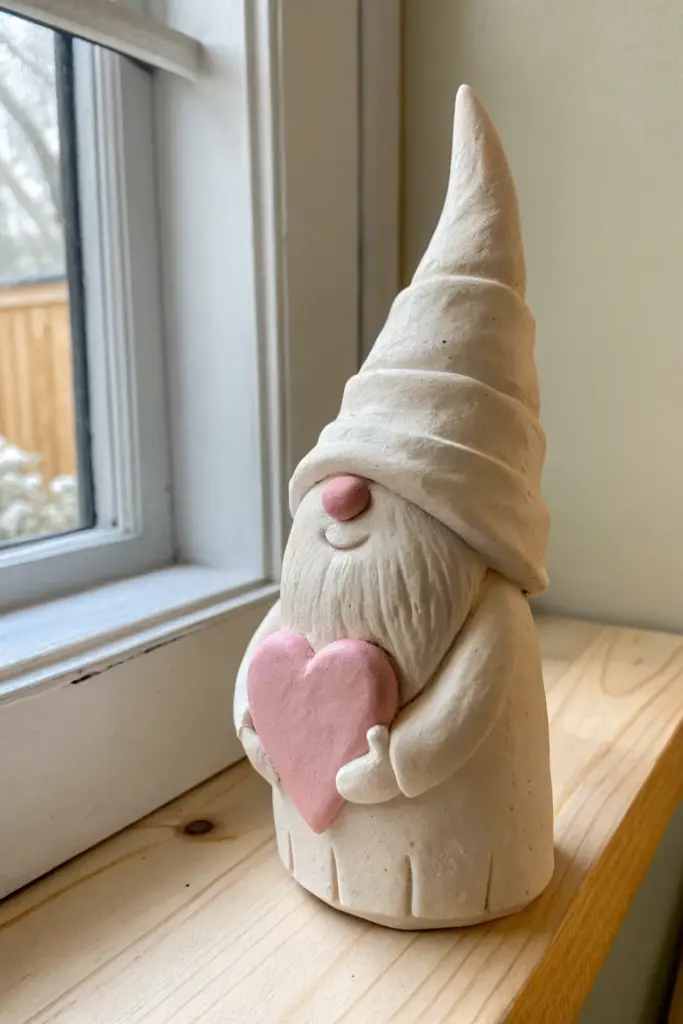
Cute Valentine Gnome Holding a Clay Heart
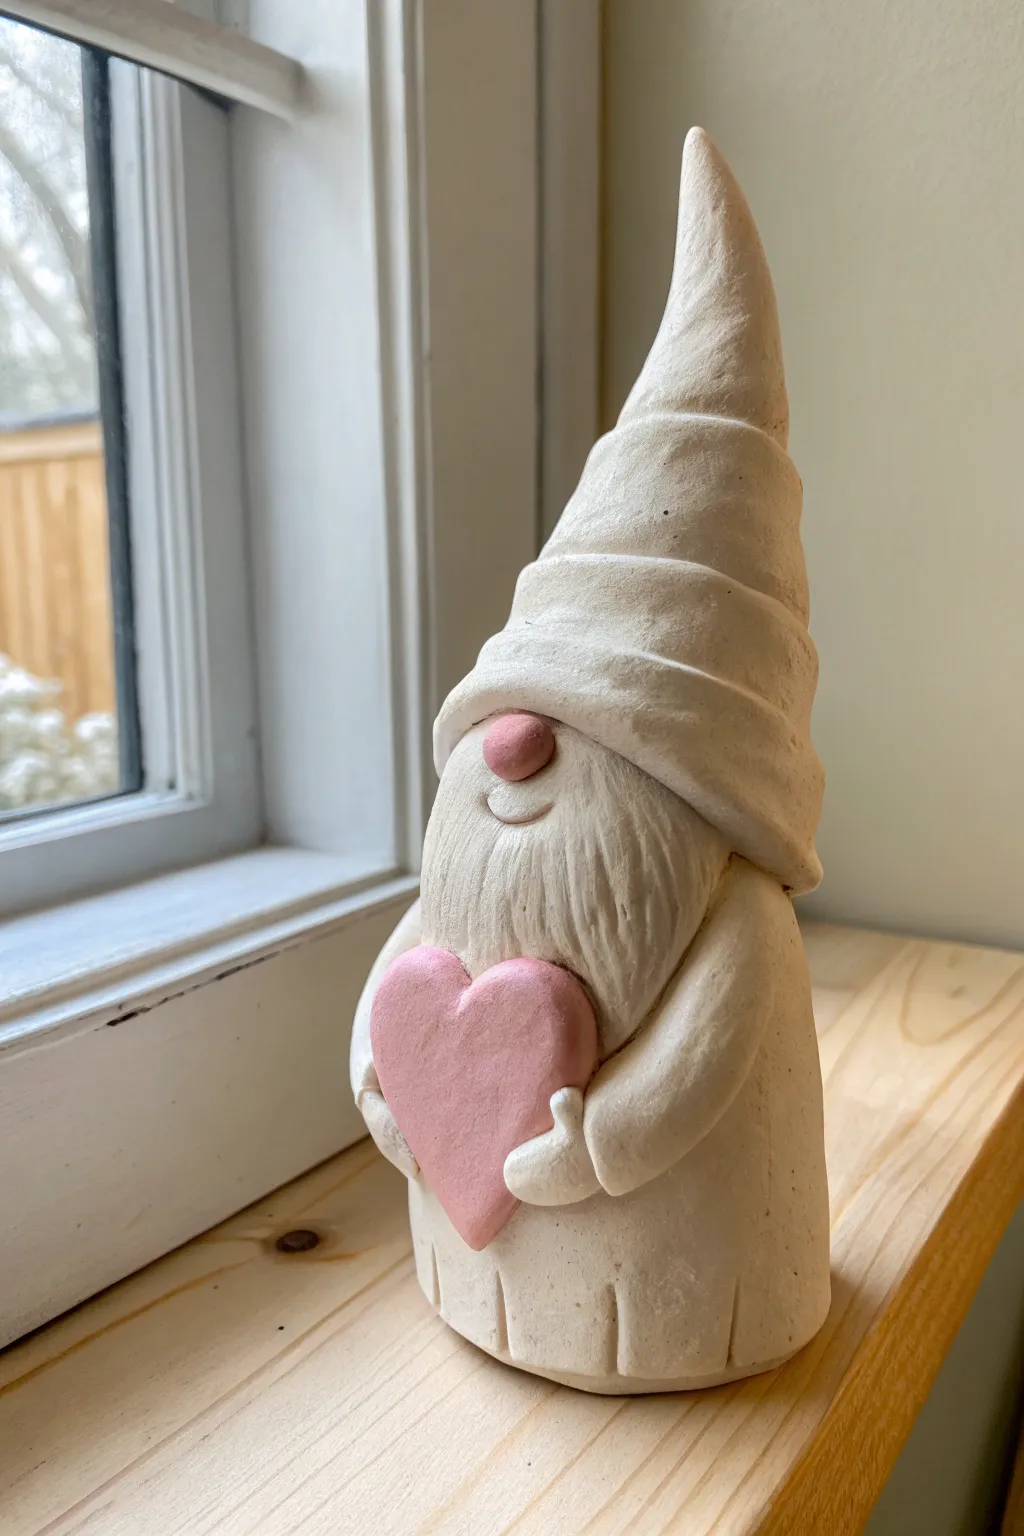
This adorable clay gnome is the perfect handmade Valentine’s keepsake, featuring a textured beard, a slouchy hat, and a sweet pink heart clutched in its hands. The rustic, unglazed finish gives it a charming, organic look that sits beautifully on any windowsill or mantle.
Detailed Instructions
Materials
- White or natural air dry clay
- Pink acrylic paint (or pre-tinted pink clay)
- Small cup of water
- Pointed sculpting tool or toothpick
- Needle tool
- Acrylic rolling pin
- Parchment paper (to work on)
- Fine grit sandpaper
Step 1: Forming the Body and Head
-
Roll the base:
Start with a ball of white clay about the size of a tangerine. Roll it on your surface into a thick cylinder shape, slightly tapering it toward the top to create the gnome’s body. -
Flatten the bottom:
Tap the bottom of the cylinder firmly against your work surface so the gnome stands up straight and stable. -
Create the nose:
Take a very small ball of clay and mix in a tiny drop of pink acrylic paint until fully blended (or use pre-tinted clay). Roll it into a smooth sphere for the nose. -
Attach the nose:
Score the back of the nose and the spot on the face where it will sit. Add a dab of water (slip) and press the nose firmly onto the upper middle part of the body cylinder.
Step 2: Crafting the Beard and Hat
-
Mark the beard area:
Using your needle tool, lightly sketch a triangular beard shape starting from under the nose and flowing down the front of the body. -
Texturize the whiskers:
Use your pointed tool or needle to scratch long, vertical lines into the clay within that beard area. Vary the depth of the lines to make the facial hair look realistic and full. -
Make the hat cone:
Roll a larger piece of white clay into a long, tall cone. The base should be wide enough to fit over the top of the body. -
Hollow the hat base:
Use your thumb to press into the wide end of the cone, creating a hollow indentation so it can sit securely on the head. -
Add the hat folds:
Before attaching, gently squish and twist the cone slightly to create horizontal ripples and folds, giving it that classic slouchy gnome look. -
Attach the hat:
Score and slip the top of the body and the inside of the hat. Press the hat down so the brim rests just above the nose, slightly overlapping the top of the beard.
Cracks in the Clay?
If small cracks appear while drying, mix a tiny bit of fresh clay with water to make a paste. Fill the cracks, smooth with a finger, and let dry again.
Step 3: Adding the Heart and Details
-
Shape the heart:
Using the same pink clay mix you used for the nose, flatten a small piece and cut or shape it into a heart. Smooth the edges with a wet finger. -
Place the heart:
Score the back of the heart and the belly of the gnome. Press the heart onto the beard area, centered below the nose. -
Create the arms:
Roll two small snakes of white clay for the arms. They should be long enough to reach from the side of the body to the edge of the heart. -
Secure the arms:
Attach the arms to the sides of the body, curving them forward so they appear to be reaching around the heart. -
Form the hands:
Flatten the ends of the arms into small mittens. Use your tool to make a small indentation for a thumb, shaping the hands to cup the sides of the pink heart. -
Refine the base:
Use a knife or modeling tool to press small vertical indentations around the very bottom edge of the gnome, creating the suggestion of a tunic hem.
Make it Sparkle
Before the pink clay heart dries, gently press loose glitter into the surface or paint it with pearl-finish acrylics after drying for extra Valentine’s magic.
Step 4: Final Touches
-
Smooth imperfections:
Dip your finger in water and gently run it over any rough areas on the hat or body, being careful not to erase your beard texture. -
Dry completely:
Let the gnome sit in a cool, dry place for 24-48 hours. I recommend flipping it gently once the outside feels firm to ensure the bottom dries thoroughly. -
Sand and finish:
Once fully cured, use fine-grit sandpaper to buff away any fingerprints or sharp edges for a professional matte finish.
Now you have a charming little guardian for your Valentine’s decor