If you’ve got a little polymer clay and a few minutes, you can make something seriously cute without fancy tools or advanced sculpting. I’m sharing my favorite simple polymer clay ideas that start with basic shapes and still feel like a finished, giftable project.
Simple Polymer Clay Bead Bracelets (Round And Tube Beads)
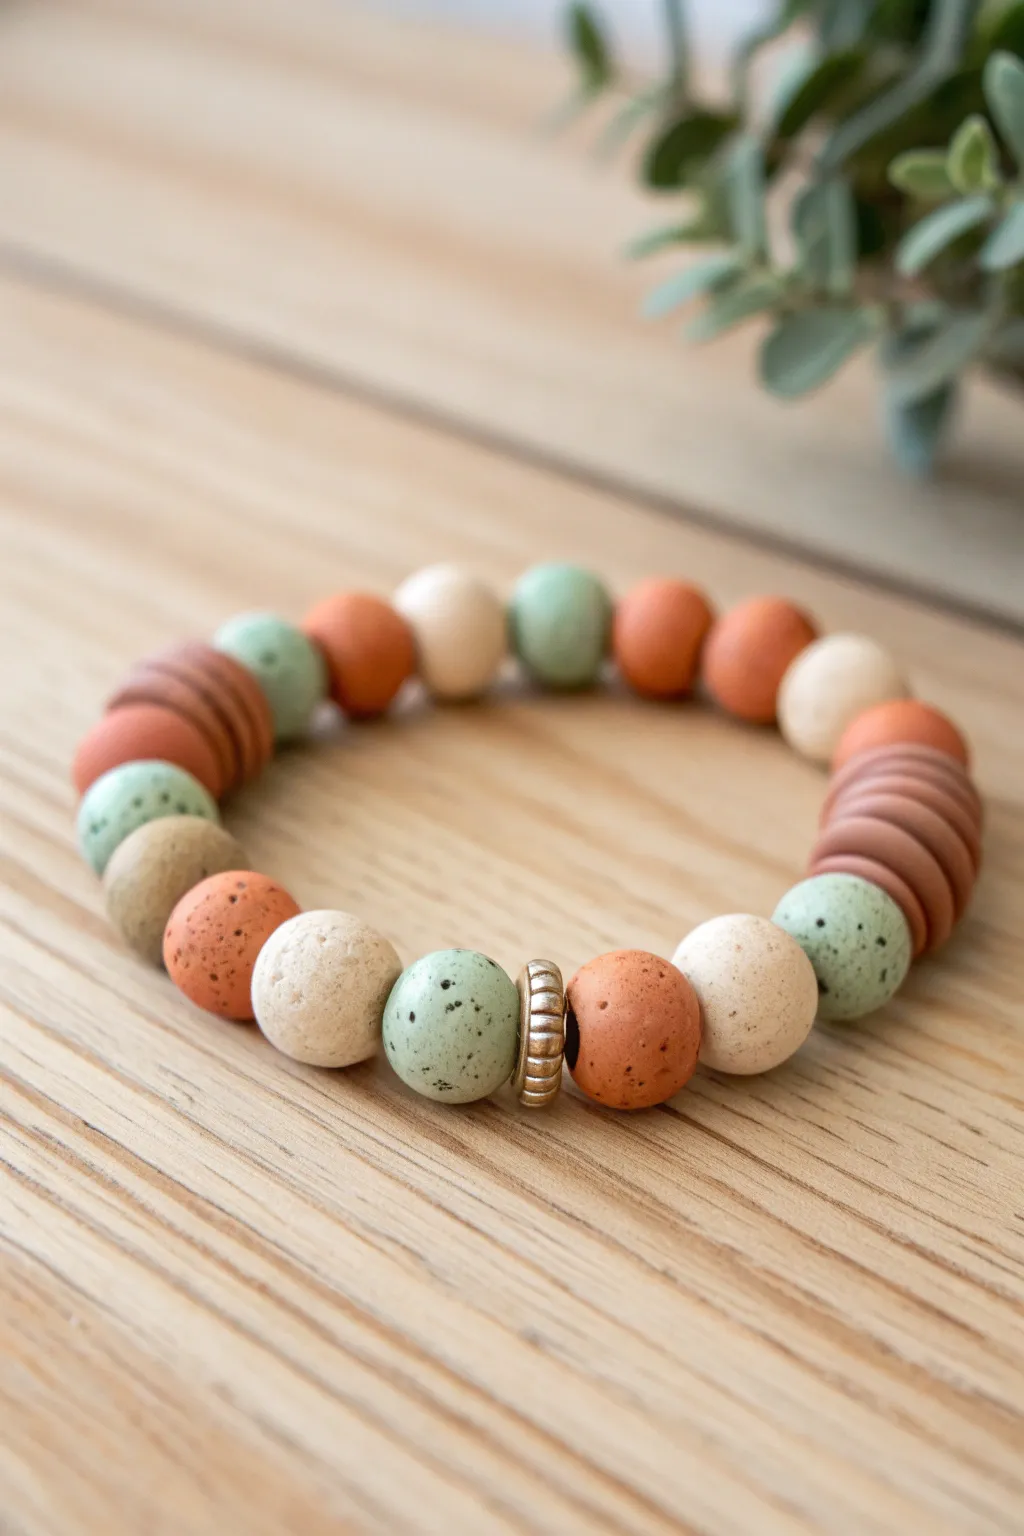
This rustic, nature-inspired bracelet combines organic textures with a calming palette of sage, terracotta, and cream. The speckled finish gives the polymer clay beads a convincing stone-like effect that looks effortlessly chic on any wrist.
Step-by-Step Guide
Materials
- Polymer clay (Terracotta, Sage Green, Beige, Chocolate Brown)
- Black acrylic paint or black polymer clay (very small amount)
- Toothbrush or stiff bristle brush
- Bead piercing pins or toothpicks
- Elastic jewelry cord (0.7mm or 0.8mm)
- Acrylic roller or pasta machine
- Small round cutter or measuring spoon
- A baking sheet and parchment paper
- Small gold metal accent bead or spacer
- Super glue (optional)
Step 1: Preparing the Clay
-
Condition the base colors:
Start by warming up your terracotta, sage green, beige, and chocolate brown clay in your hands. Knead each color separately until it is soft, pliable, and free of cracks. -
Create the speckle mix:
To achieve the faux-stone look, you have two options. You can either mix a very tiny amount of black clay into your base colors (don’t blend fully, leave it streaky for a marble effect) or, for true speckles, mix in black pepper or pre-baked black clay crumbs. -
Alternative speckle method:
I personally prefer using ground black pepper mixed directly into the beige and green clay. It adds that perfect organic texture without darkening the main color too much.
Step 2: Shaping the Round Beads
-
Measure the clay:
To ensure your round beads are consistent in size, roll the clay into a thick log. Slice even segments, or use a small circle cutter on a flattened sheet to punch out equal amounts of clay for each bead. -
Roll the spheres:
Take each measured segment and roll it briskly between your palms. Use a light circular motion to create smooth, even spheres. Aim for beads that are roughly 10-12mm in diameter. -
Pierce the holes:
Gently insert a bead pin or toothpick into the center of a sphere. Rotate the pin while pushing to avoid squishing the bead shape. Push the pin through until it pokes out the other side. -
Texturize the surface:
Before baking, gently tap the surface of the round beads with a toothbrush or a crumpled ball of aluminum foil. This removes fingerprints and adds a matte, porous stone texture.
Hole Distortion?
If your bead holes deform when piercing, try refrigerating the raw beads for 10 minutes before poking. Cold clay holds its shape much better against pressure.
Step 3: Creating the Disc Beads
-
Design the disc stack:
For the contrasting sections (the reddish-brown stacks shown in the image), roll a snake of clay that is slightly thicker than your round beads. -
Slice the discs:
Use a sharp tissue blade to slice thin, even wafers from the log. These don’t need to be perfectly identical, as a little variation adds to the handmade charm. -
Pierce firmly:
Pierce these flat discs through the center. Wiggle the pin slightly to ensure the hole is large enough for your elastic cord later.
Scent Diffuser
Make this an aromatherapy bracelet by using unvarnished terracotta or lava stone clay. The porous surface will absorb and slowly release essential oils.
Step 4: Baking and Finishing
-
Arrange on baking sheet:
Place all your pierced beads on a parchment-lined baking sheet. You can leave them on the pins if you have a bead rack, or gently slide them off and rest them on a bed of cornstarch to prevent flat spots. -
Bake the clay:
Bake the beads according to your polymer clay manufacturer’s instructions (usually around 275°F or 130°C for 15-30 minutes). Let them cool completely before handling. -
Add paint speckles (optional):
If your baked beads need more texture, dilute a drop of black acrylic paint with water. Dip a toothbrush in it and flick the bristles with your thumb to spray tiny dots onto the beads. Let dry. -
Stringing the design:
Cut a piece of elastic cord about 10 inches long. Begin threading your beads. Alternating colors creates a nice rhythm—try one terracotta, one beige, one green. -
Incorporating accents:
Insert the stack of flat disc beads on two opposite sides of the bracelet for visual interest. Add your metallic gold spacer bead as a focal point between two larger round beads. -
Check the fit:
Wrap the strand around your wrist to check the sizing. Add or remove beads as necessary until it fits comfortably but isn’t too loose. -
Secure the knot:
Tie a surgical knot (left over right, right over left, then repeat). Pull the elastic tight to secure the tension. -
Final touches:
Add a tiny drop of super glue to the knot for extra security. Once dry, snip the excess cord ends and tuck the knot inside the hole of a neighboring bead.
Wear your new bracelet alone for a minimalist look or stack it with gold bangles for a boho statement


Mini Squishy-Style Animals Made From One Ball Shape
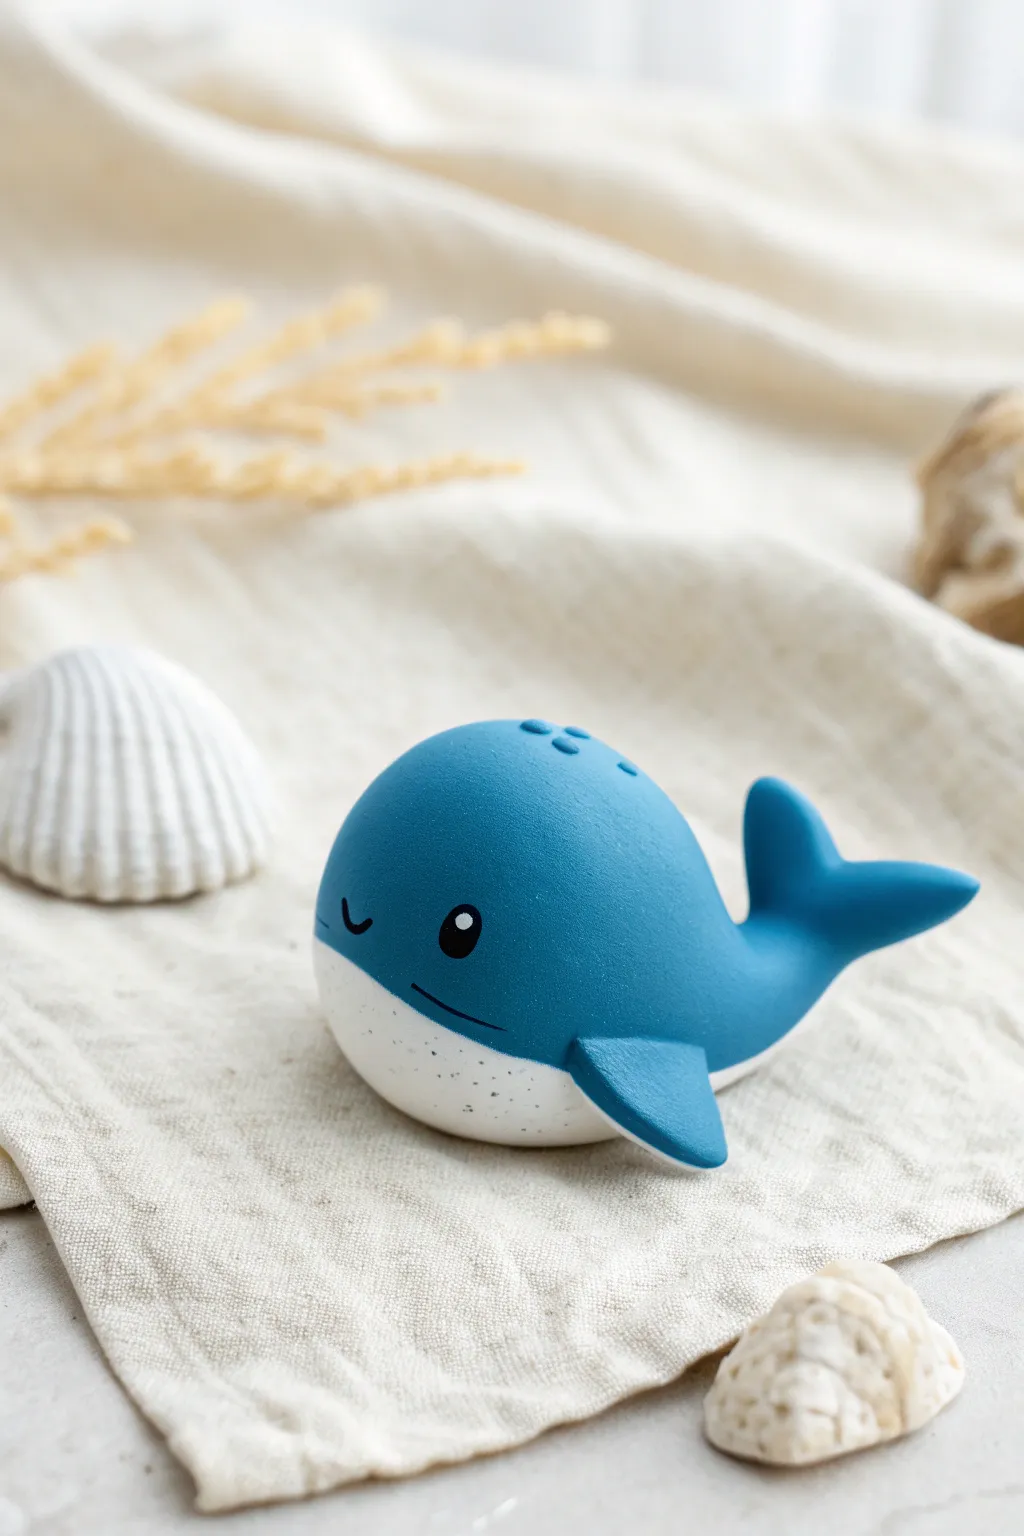
This adorable little whale figurine proves that you don’t need complex armatures to create something full of personality. With its smooth, rounded belly and perky tail fins, this project is the perfect introduction to creating “squishy-style” creatures from a single basic shape.
Step-by-Step Tutorial
Materials
- Polymer clay (Deep Ocean Blue)
- Polymer clay (White or very pale cream)
- Black acrylic paint or black clay for eyes
- Dotting tools or ball stylus (various sizes)
- Needle tool or toothpick
- Rolling pin or pasta machine
- Clay slicer or craft knife
- Wet wipes (for cleaning hands between colors)
- Baking sheet and parchment paper
- Glaze (optional, matte or gloss)
Step 1: Shaping the Body Base
-
Create the main sphere:
Start by conditioning your blue clay until it is soft and pliable. Roll a generous amount into a smooth, seamless ball about the size of a golf ball. This will become the entire body of your whale. -
Form the teardrop:
Gently roll one side of the ball between your palms to taper it slightly, creating a very subtle teardrop shape. The rounded end will be the face, and the tapered end will connect to the tail. -
Flatten the bottom:
Press the shape gently onto your work surface to flatten the bottom. You want a clear distinction between the rounded back and the flat belly, which helps the figurine sit stably. -
Prepare the white belly:
Clean your hands thoroughly with wet wipes. Condition a smaller piece of white clay and roll it into a ball, then flatten it into a thin, oval disk using your rolling pin. -
Attach the belly:
Place the blue body onto the white disk. Gently press the edges of the white clay up the sides of the blue body, smoothing the seam with your finger or a Silicone tool so the two colors merge seamlessly without a bump.
Smudging Colors?
Blue pigment loves to stain white clay! Keep a pack of baby wipes handy and clean your hands and tools obsessively before touching the white belly clay.
Step 2: Adding Fins and Tail
-
Shape the tail flukes:
Take two small balls of blue clay and shape them into flattened teardrops. Curve the pointed ends slightly upward. -
Attach the tail:
Press the wider, rounded ends of these teardrops together to form a V-shape. Attach this assembly to the tapered back end of your whale body, blending the clay seams underneath so it looks like one continuous piece. -
Create side fins:
Roll two equal pea-sized balls of blue clay. Flatten them into triangles with rounded corners. -
Position the fins:
Attach one fin to each side of the body, fairly low down near the white belly line. Angle them slightly backwards to give the impression of swimming. -
Create the blowhole:
Using a small ball stylus or dotting tool, press three small indentations in a triangular formation on the very top of the head.
Step 3: Bringing it to Life
-
Mark the eyes:
Determine the placement for the eyes on the blue section, keeping them wide-set for a cuter look. -
Paint or sculpt eyes:
You can either press tiny balls of black clay into the face or, for a smoother finish like the photo, wait until after baking to paint them. If painting, use a medium dotting tool dipped in black paint. -
Add eye highlights:
To get that sparkling look, create a tiny white reflection dot in the upper corner of the black eye pupil using a needle tool or the smallest dotting tool you have. -
Carve the smile:
Use a needle tool to gently carve a small, curved smile just to the side of the eye. I find a small, J-shaped curve adds a cheeky expression. -
Add the mouth line:
Use the needle tool or a clay knife to softly indent a horizontal line separating the general mouth area, adding depth to the face just above the white belly line. -
Texture the belly (Optional):
If you want the speckled look seen in the reference, you can use an old toothbrush to gently flick diluted grey paint onto the white belly area after baking, or mix fine black pepper into the white clay before shaping. -
Final smooth:
Do a final check for fingerprints. Use a drop of baby oil on your finger to lightly buff them away before baking. -
Bake:
Bake in your home oven according to the manufacturer’s instructions for your specific brand of clay. Let it cool completely before handling.
Spout It Out
Make a “water spout” using a small piece of translucent wire or stiff fishing line, glued into the blowhole, with tiny blue beads or white clay bits at the top.
Give your new little ocean friend a spot on your desk to bring a smile to your workday


Polka Dot And Speckle Texture Charms
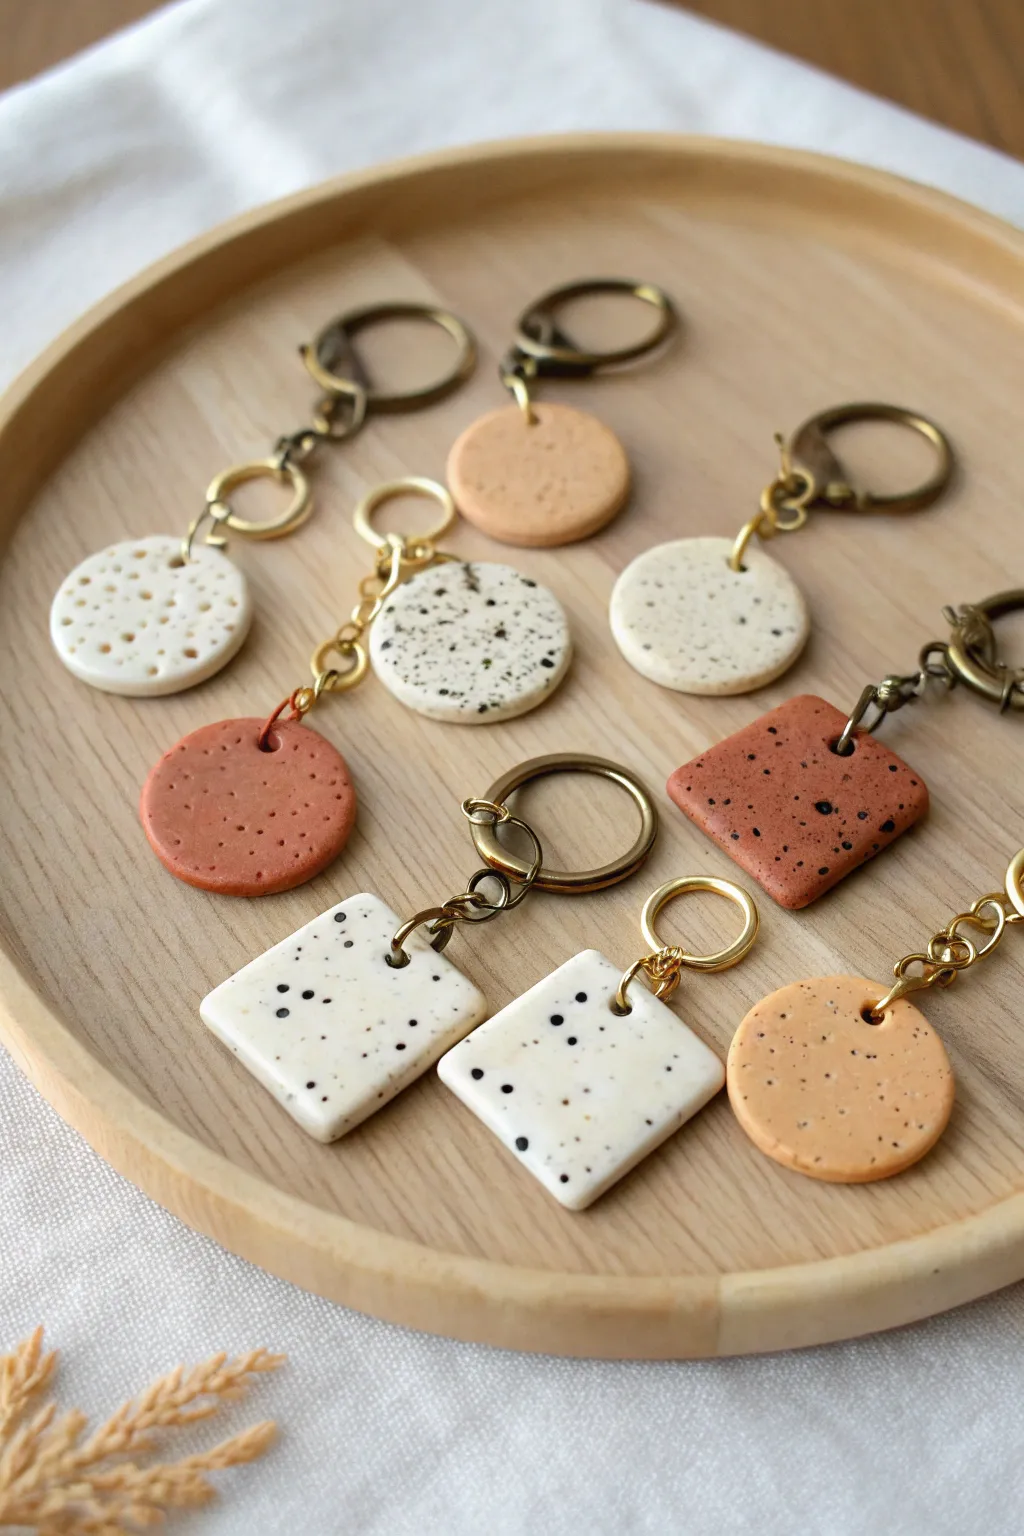
These charming polymer clay keychains feature earthy tones and playful speckled textures that mimic ceramic stoneware. With a mix of circular and square shapes, they make perfect minimalist accessories for your keys or bags.
Step-by-Step
Materials
- Polymer clay (white, terracotta, beige/tan)
- Black acrylic paint or black polymer clay for speckles
- Rolling pin or pasta machine
- Shape cutters (small circle and square)
- Toothpick or needle tool
- Old toothbrush (optional for speckling)
- Jump rings (gold or brass finish)
- Keyring hardware (lobster clasps and split rings)
- Jewelry pliers
- Baking sheet and parchment paper
- Oven
Step 1: Preparing the Clay
-
Condition the clay:
Start by warming the polymer clay in your hands, kneading it until it becomes soft and pliable. Do this separately for each color—white, terracotta, and beige—to avoid accidental color mixing. -
Create the speckled effect (Method 1: Paint):
For a surface speckle like the white square charms, roll out your white clay first. Dip an old toothbrush into slightly watered-down black acrylic paint. -
Splatter the clay:
Run your thumb over the bristles to flick tiny droplets of black paint onto the flattened clay sheet. Let the paint dry completely before cutting any shapes. -
Create the speckled effect (Method 2: Clay inclusions):
For an embedded look like the round charms, take a tiny pinch of black clay and chop it into microscopic crumbs. Mix these crumbs into your base color (white or beige) and roll it out; the black bits will stretch into organic speckles. -
Patterning with texture:
For the indented polka dot texture seen on the white circle charm, take a toothpick or a small ball tool and gently press random dots into the surface of the rolled clay sheet.
Clean those edges
Before baking, use a baby wipe or a cotton swab dipped in rubbing alcohol to gently smooth away fingerprints and refine the edges for a professional finish.
Step 2: Cutting and Baking
-
Roll to thickness:
Identify the thickness you want for your charms; about 3mm to 4mm is sturdy enough for a keychain without being too heavy. Ensure the slab is even. -
Cut the shapes:
Using your cookie cutters, press firmly into the clay to cut out circles and squares. If the clay sticks to the cutter, you can dip the cutter in a little cornstarch first. -
Smooth the edges:
Gently run your finger around the cut edges to smooth out any harsh lines or jagged bits left by the cutter. -
Pierce the holes:
Use a toothpick or a small straw to create a hole near the top edge of each shape. I recommend making the hole slightly larger than you think you need, as it can shrink slightly during baking. -
Bake the charms:
Place your clay pieces on a parchment-lined baking sheet. Bake according to the manufacturer’s instructions for your specific brand of clay (usually around 275°F or 130°C for 15-30 minutes). -
Cool down:
Allow the pieces to cool completely on the baking sheet. They will be slightly soft when hot but will harden as they cool.
Dull looking clay?
If your baked clay looks chalky or dull, buff it vigorously with a piece of denim or apply a very thin coat of matte varnish to bring out the colors.
Step 3: Assembly
-
Prepare the hardware:
Gather your large split keyrings, lobster clasps, and jump rings. You’ll likely need two jump rings per charm—one to attach to the clay and one to connect to the keychain finding. -
Open the jump ring:
Using two pairs of pliers, twist a jump ring open sideways (never pull it apart). Slide it through the hole in your baked clay charm. -
Attach the chain:
Before closing that first ring, loop on a short length of chain or a second jump ring, depending on how long you want the dangle to be. -
Connect the clasp:
Attach the other end of the chain or the second jump ring to the main keyring hardware. Twist the jump rings closed securely so there is no gap. -
Final check:
Give the keychain a gentle tug to ensure all connections are tight and the charm hangs freely.
Now you have a set of modern, handcrafted keychains ready to organize your keys or gift to a friend


Tiny Fruit Slices (Citrus, Kiwi, Watermelon)
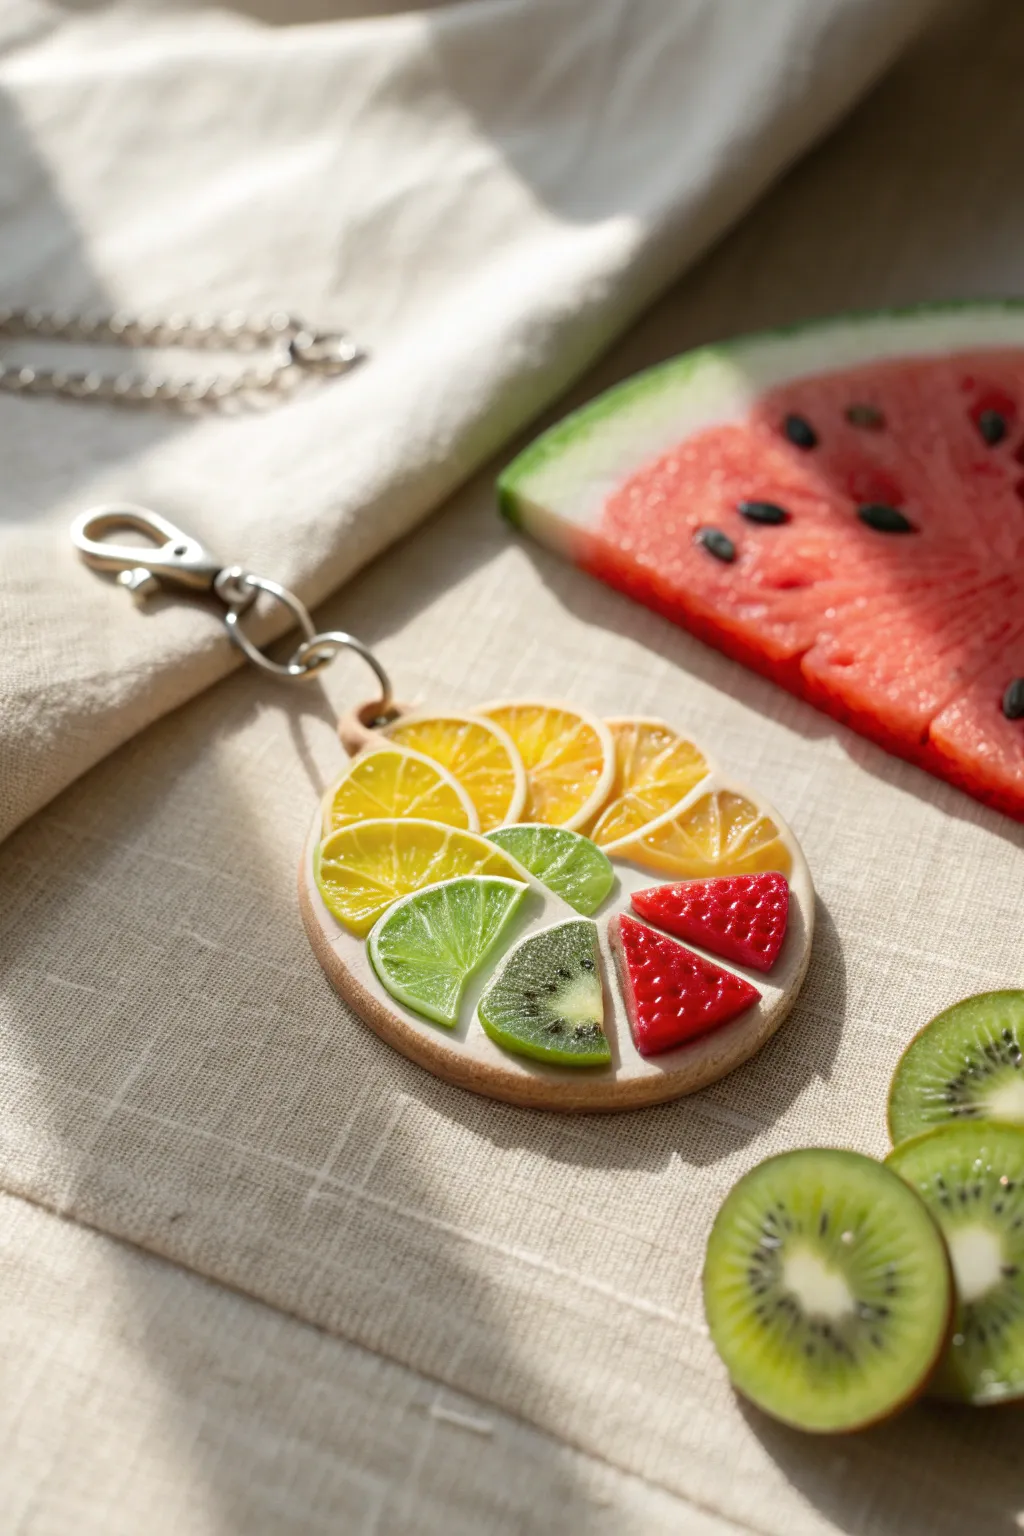
This delightful keychain captures the essence of summer with a vibrant arrangement of miniature citrus, kiwi, and berry slices. Encased on a smooth circular base, it makes for a cheerful accessory that looks almost good enough to eat.
Step-by-Step Tutorial
Materials
- Polymer clay (white, translucent white, lemon yellow, orange, bright green, red, beige/light brown)
- Polymer clay canes (citrus and kiwi) or DIY cane supplies
- Liquid polymer clay (Fimo Liquid or similar)
- Circular clay cutter (approx. 2 inches)
- X-Acto knife or tissue blade
- Needle tool
- Small jump ring and lobster clasp keychain
- Rolling pin or pasta machine
- Gloss glaze (optional)
Step 1: Creating the Base
-
Condition the base clay:
Start by conditioning the beige or light brown clay until it is soft and pliable. This needs to be sturdy, as it forms the backing of your keychain. -
Roll out the base:
Roll the beige clay into a sheet approximately 3-4mm thick. You want it substantial enough to hold the weight of the hardware but not too bulky. -
Cut the circle:
Use your circular cutter to punch out a perfect circle. Smoothing the edges with your finger gently removes any stray bits of clay. -
Add the hardware loop:
Before baking, fashion a small loop of polymer clay or embed a small metal eye pin into the top of the circle. This will be the connection point for your keychain later.
Freshness Factor
Make citrus segments look juicier by dotting a tiny bit of clear liquid clay onto the ‘pulp’ areas before baking. It adds depth and realism.
Step 2: Preparing the Fruit Slices
-
Slice the canes:
This project shines when you use pre-made fruit canes for precision, though you can make your own. Slice your lemon, orange, lime, and kiwi canes as thinly and evenly as possible with a sharp blade. -
Quarter the slices:
Take your round citrus and kiwi slices and cut them into halves, and then quarters or smaller wedges. You want a variety of shapes to fit the puzzle. -
Hand-sculpt strawberries:
Since strawberry canes can be tricky, sculpt small triangular wedges from red clay to match the size of your other fruit pieces. -
Detail the berries:
Use a needle tool or small dotting tool to gently press tiny indents into the red wedges to simulate seeds. This adds wonderful texture.
Step 3: Assembly and Finishing
-
Arrange the composition:
Apply a thin layer of liquid polymer clay over the beige base; this acts as the glue. Start placing your fruit slices, beginning with the larger citrus pieces at the top. -
Fill the gaps:
Continue arranging the pieces in a mosaic style, fitting the green lime, kiwi, and red berry wedges into place until the circle is completely covered. -
Texture the surface:
Use your needle tool to add tiny radial lines on the citrus slices to mimic the pulp texture if your canes are smooth. I find this extra step really brings the fruit to life. -
Bake carefully:
Bake the piece according to your clay manufacturer’s instructions, usually around 275°F (130°C) for 15-30 minutes. Let it cool completely. -
Glaze for shine:
Brush a coat of gloss glaze over the fruit surface to give it that fresh, juicy look. Let this dry fully before handling. -
Attach the hardware:
Use pliers to open a jump ring, thread it through your clay loop, and attach the lobster clasp mechanism. close the jump ring securely.
Make it a Set
Create smaller versions of this medallion using just one or two fruit slices to make matching earrings for a complete summer accessory set.
Now you have a refreshing, colorful accessory ready to brighten up your keys or bag

The Complete Guide to Pottery Troubleshooting
Uncover the most common ceramic mistakes—from cracking clay to failed glazes—and learn how to fix them fast.
Mini Donut Or Cookie Charms With Faux Sprinkles
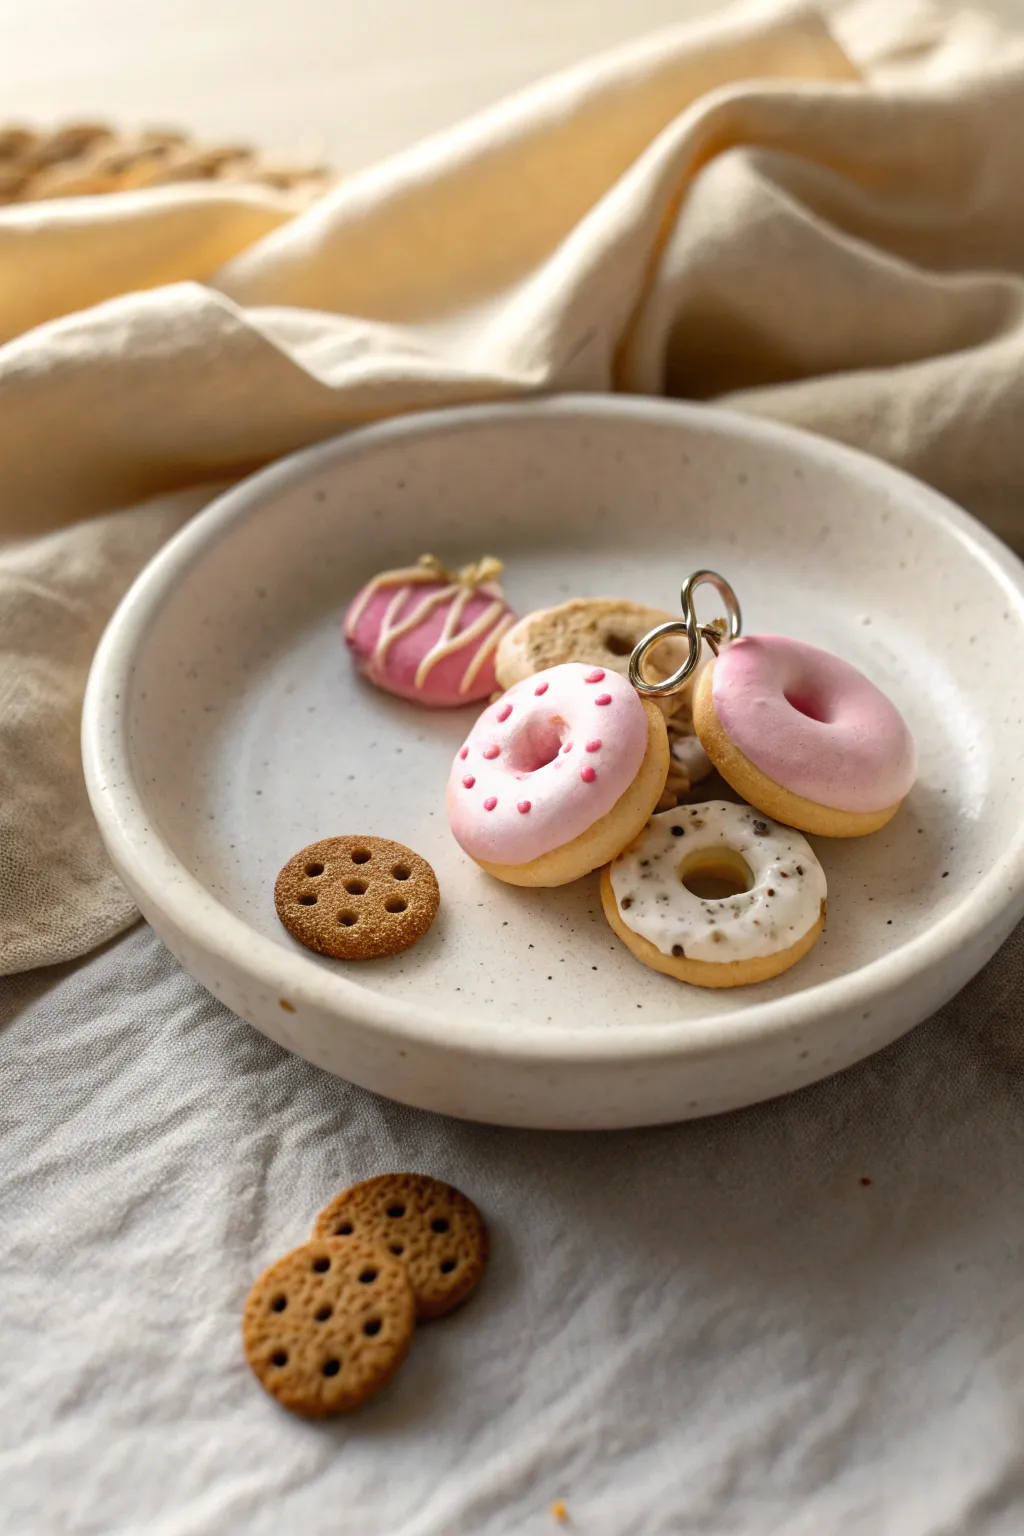
These adorable miniature donuts and cookies are perfect for jewelry making or simply as cute collectibles. The soft pastel frosting and tiny realistic details make them look good enough to eat, but they are surprisingly easy to sculpt from clay.
Detailed Instructions
Materials
- Polymer clay (beige, pink, white, dark brown)
- Liquid polymer clay (translucent or white)
- Chalk pastels (orange, yellow ochre, brown)
- Soft paint brush for shading
- Ball stylus tool or toothpick
- Needle tool
- Small round cutter (approx. 1-2cm diameter)
- Very small circle cutter or cocktail straw (for donut holes)
- Eye pins or jump rings
- Gloss glaze (optional)
- Oven and baking sheet
Step 1: Shaping the Dough Base
-
Mix the perfect dough color:
Start by conditioning your beige polymer clay. If it’s too pale, mix in a tiny pinhead-sized amount of ochre or yellow to get a warm, baked-good tone. -
Roll and cut:
Roll out the clay to a thickness of about 4-5mm. Use your small round cutter to punch out several circles. These will be the bases for both the donuts and the cookies. -
Form the donuts:
For the donuts, take a circle and gently press the edges to round them off so they aren’t sharp. Use a smaller cutter or straw to punch a hole slightly off-center or right in the middle, depending on the look you want. -
Make the cookies:
For the cookies shown in the foreground, keep the circles solid. Gently pat the top with a textured sponge or toothbrush to give it a crumbly, baked texture. -
Add cookie details:
Use a small ball tool or needle to poke random holes or a pattern into the surface of the cookies, mimicking the look of docked dough or traditional butter cookies.
Sticky Situation?
If your clay is sticking to the table or cutters, lightly dust the surface with cornstarch or baby powder before rolling it out.
Step 2: Baking Realism
-
Prepare the shading dust:
Scrape a little bit of orange, yellow ochre, and brown chalk pastel into fine powders using a craft knife. -
Apply the ‘baked’ effect:
Dip a soft, dry brush into the ochre and orange dust. Gently brush this onto the edges and tops of your raw clay donuts and cookies. Focus on the areas that would naturally brown in an oven. -
Add definition:
Use a tiny amount of the brown dust for deeper shading, particularly inside the donut holes and around the bottom edges.
Make it Sparkle
Mix micro-glitter or pearlescent powder into your liquid clay frosting for a magical, sugared effect on your donuts.
Step 3: Frosting and Finishing
-
Create the frosting:
Mix a small amount of liquid polymer clay with solid pink or white clay until you have a thick, paste-like consistency. It should be viscous enough to hold its shape but fluid enough to spread. -
Apply the glaze:
Carefully apply the liquid clay mixture to the top of the donuts. Use a needle tool to gently guide the ‘icing’ down the sides slightly to simulate gravity. I find it helps to let it pool just a bit for a realistic look. -
Add texture or drizzle:
For the white-frosted donut, mix in tiny specks of black pepper or cured black clay crumbs to simulate vanilla bean or poppy seeds. For the pink striped donut, roll a very thin snake of pale clay and drape it across the top. -
Add sprinkles:
For the dotted pink donut, use a needle tool to pick up tiny dots of darker pink liquid clay or small flattened balls of raw clay and place them onto the wet frosting. -
Secure the hardware:
If you are making these into charms, insert an eye pin into the top of the donut or cookie now. Ensure the loop is facing the direction you need for hanging. -
Bake carefully:
Place your creations on a baking sheet lined with clean paper. Bake according to your polymer clay package instructions, usually around 275°F (130°C) for 15-20 minutes. -
Final touches:
Once cool, you can attach jump rings to your charms. You can leave the finish matte as seen in the photo for a modern look, or add a touch of glaze to the icing for extra shine.
Enjoy creating a whole batch of these zero-calorie treats for your next crafting session
Mini Succulent Pots Using Simple Cones And Teardrops
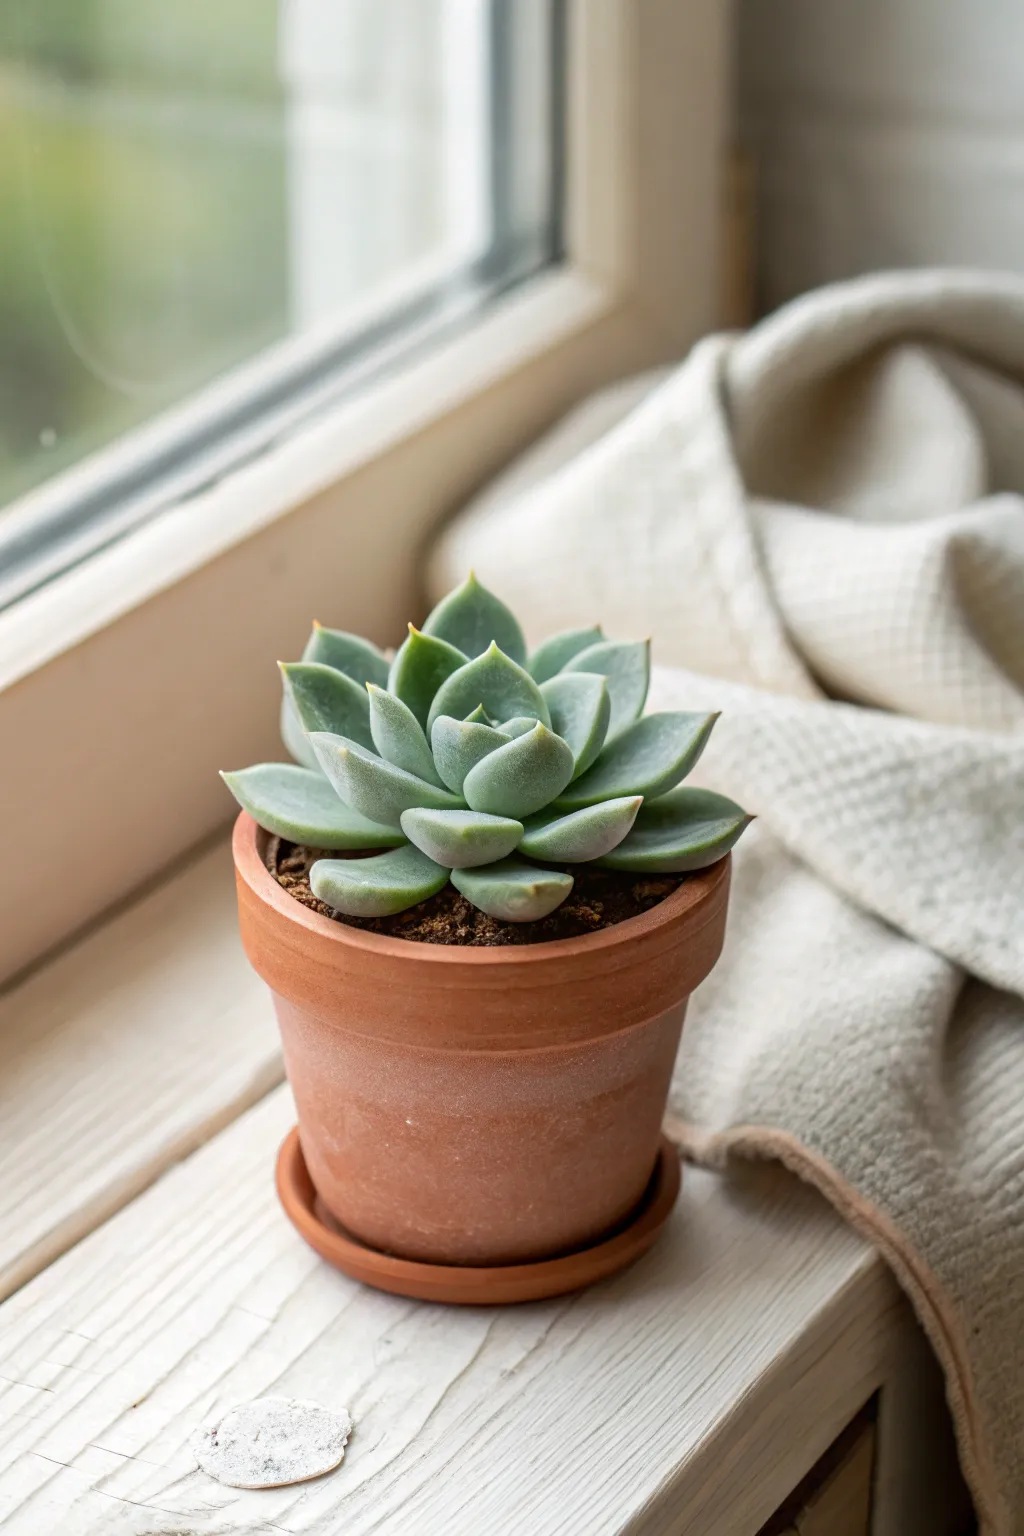
Capture the serenity of nature with this hyper-realistic polymer clay succulent that never needs watering. By layering simple teardrop shapes in soft sage greens, you’ll build an Echeveria rosette that looks right at home on any sunny windowsill.
Step-by-Step Guide
Materials
- Polymer clay (translucent white, sap green, and a touch of teal or blue)
- Chalk pastels (dark green, burgundy/red, and brown)
- Small terracotta pot (approx. 2-3 inches)
- Aluminum foil
- Liquid polymer clay or Bake & Bond
- Needle tool or toothpick
- Soft paintbrush
- Ball stylus tool
- Dried coffee grounds or brown decorative sand
Step 1: Preparing the Base and Color
-
Mix your custom green:
Start by mixing a large batch of sage green clay. Combine translucent white with a small amount of sap green and a tiny dot of teal to get that dusty, cool succulent color. The translucent clay is key for a waxy, realistic finish. -
Create the pot filler:
Crumple a ball of aluminum foil that fills about three-quarters of your terracotta pot. This saves clay and keeps the pot lightweight. -
Cover the base:
Roll out a sheet of brown scrap clay or your green mix and drape it over the foil ball, pressing it firmly into the pot so it sits just below the rim. This forms the ‘dirt’ mound. -
Add texture:
Apply a layer of liquid clay over the top of the mound. Sprinkle dried coffee grounds or brown sand over the liquid clay to simulate realistic potting soil.
Leaves Too Floppy?
If your thin leaves droop while working, rest them on small tufts of polyester fiberfill or cotton balls to support their shape until you bake the piece.
Step 2: Forming the Leaves
-
Roll the teardrops:
Divide your sage green clay into many small balls. You will need three sizes: small (pea-sized) for the center, medium for the middle layers, and large for the outer ring. -
Shape the leaves:
Take a clay ball and roll it into a teardrop shape. Flatten it gently between your thumb and finger, keeping the pointed end slightly thicker than the wide end. -
Curve the edges:
Place the flattened teardrop in your palm. Use a ball stylus or your thumb to gently press the center, creating a slight spoon-like curve. Pinch the pointed tip just barely to sharpen it. -
Dust the tips:
Shave a little red or burgundy chalk pastel into a powder. Use a soft brush to lightly dust just the very pointed tips and edges of your leaves to mimic sun-stress coloration.
Step 3: Assembling the Rosette
-
Start the outer ring:
Apply a dab of liquid clay to the center of your soil mound. Place 5-6 large leaves in a circle, with their pointed tips facing outward and slightly upward. -
Build the second layer:
Place the medium-sized leaves in a second ring inside the first one. Position each new leaf in the gap between two leaves from the previous row. -
Create the core:
Continue adding smaller and smaller leaves as you move inward, angling them more vertically as you reach the center to imitate new growth unfurling. -
The final bud:
For the very center, take three tiny teardrops and press them together into a tight cluster, then place this bud into the middle of the rosette. -
Inspect the form:
Look at the succulent from all angles. Gently nudge leaves with a needle tool if they need to be lifted or spaced out more evenly. -
Add the ‘farina’:
To recreate that dusty white coating succulents have, lightly brush cornstarch or white pastel powder over the inner leaves.
Level Up: Propagation Station
Make a few loose, single leaves with tiny pink clay ‘roots’ coming out of the bottom end and scatter them on the soil to look like a propagation project.
Step 4: Baking and Finishing
-
Bake the project:
Place the entire pot with the clay on a baking sheet. Bake according to your polymer clay package instructions (usually 275°F/130°C for 15-30 minutes). -
Cool down:
Let the pot cool completely in the oven with the door slightly ajar. Sudden temperature changes can sometimes crack the clay or the pot. -
Secure loose pieces:
If the clay rosette feels loose in the pot after baking, carefully lift it out and glue it back in with super glue or strong craft adhesive. -
Final touches:
If you want a dewy look, add tiny droplets of UV resin or gloss varnish to one or two leaves, but keep it minimal for realism.
Place your everlasting succulent on a sunny ledge and enjoy the greenery without the maintenance


What Really Happens Inside the Kiln
Learn how time and temperature work together inside the kiln to transform clay into durable ceramic.
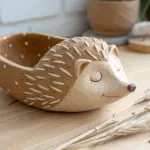
Cute Ghost And Pumpkin Minis For Quick Seasonal Wins
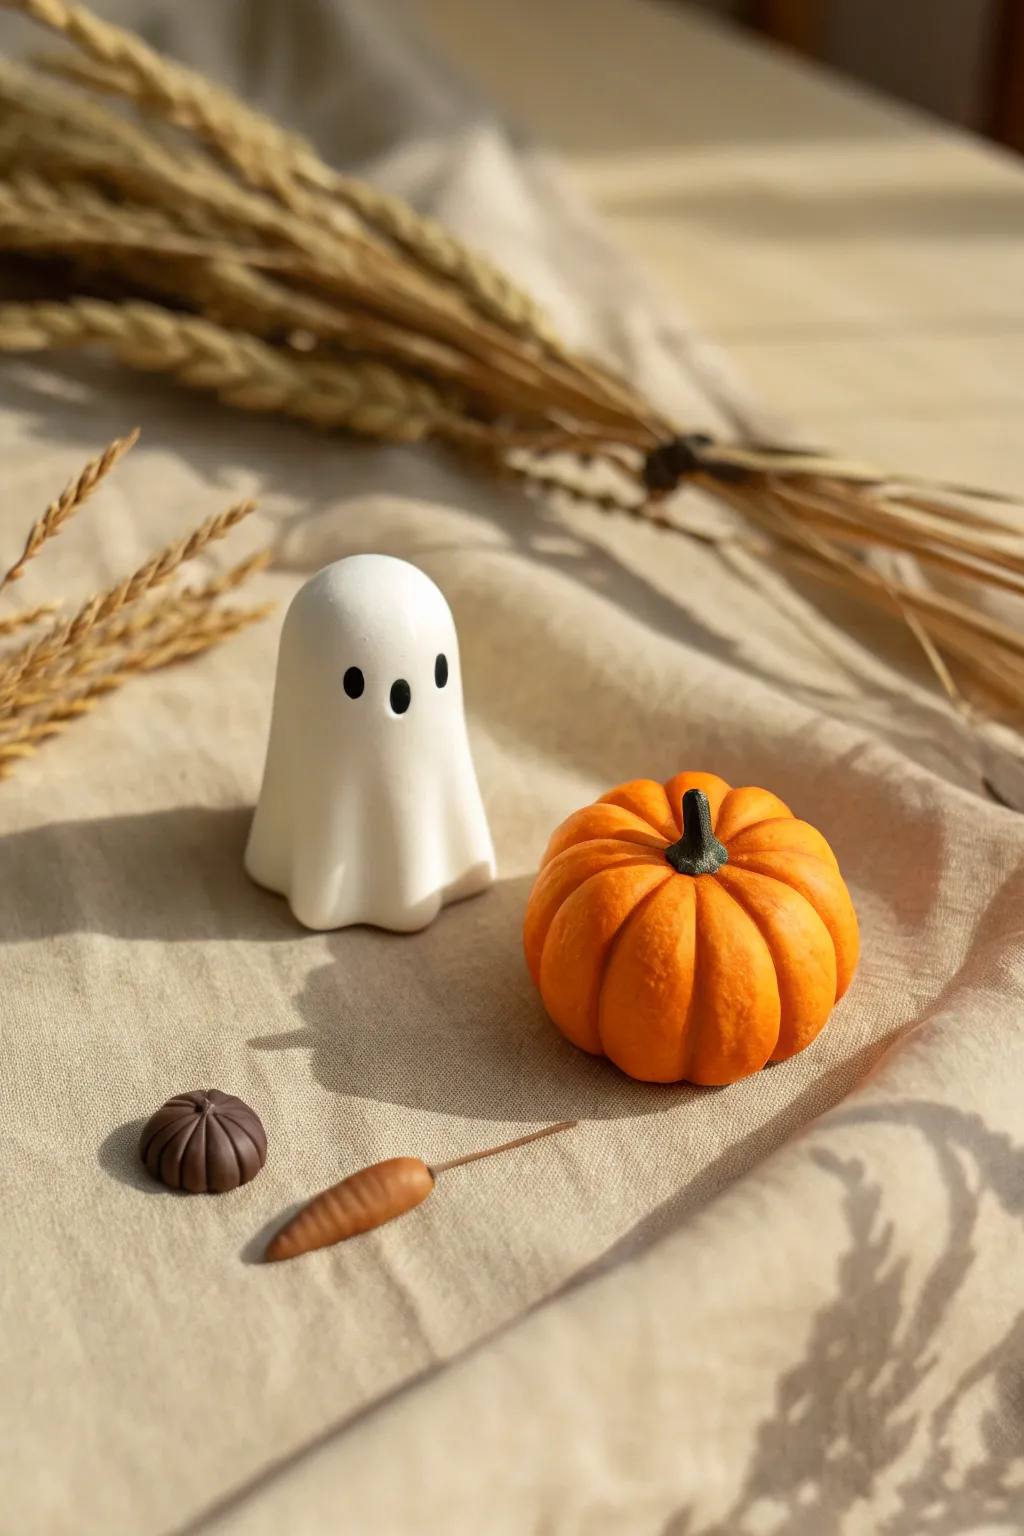
These miniature ceramic-style figures capture the cozy essence of autumn with a classic sheet ghost and a textured pumpkin. Their matte finish and soft rounded edges give them a modern, minimalist charm perfect for seasonal decor.
Step-by-Step
Materials
- White polymer clay
- Orange polymer clay
- Dark brown polymer clay
- Green polymer clay
- Black acrylic paint
- Small dotting tool or toothpick
- Modeling tools (needle tool, ball tool)
- Blade or craft knife
- Baking sheet/tile
- Oven (per clay instructions)
Step 1: Sculpting the Ghost
-
Base Shape:
Condition a medium-sized ball of white clay until strictly smooth and pliable. Roll it into a thick cylinder with a widely rounded top, resembling a dome or a large thimble. -
Creating the Drapes:
Gently pinch and pull the bottom edge of the cylinder outwards to create a flared skirt. -
Adding Folds:
Use a rounded modeling tool or your finger to push gentle indents vertically up the sides of the ‘skirt’ to mimic heavy fabric folds. -
Softening Edges:
Press the bottom edge against your work surface to flatten it so the ghost stands securely. Smooth any sharp angles with a fingertip to maintain that soft, ceramic look. -
Adding the Face:
Take three very tiny bits of black clay (or paint later if preferred). Roll them into small ovals. -
Placement:
Press two ovals onto the upper part of the dome for eyes, slanting them slightly. Place the third oval below them in a vertical orientation for the classic ‘O’ mouth.
Clean Clay Pro-Tip
White clay picks up dust instantly. I always wipe my hands and work surface with a baby wipe or alcohol swab right before touching the white clay to keep the ghost pristine.
Step 2: Crafting the Classic Pumpkin
-
Forming the Orb:
Roll a ball of orange clay, slightly smaller or equal in volume to the ghost figure. Flatten the top and bottom poles very slightly. -
Marking Segments:
Using a needle tool or the back of a craft knife, press vertical lines from the top center to the bottom center all around the ball. -
Deepening Grooves:
Go back over these lines with a slightly thicker tool to widen the grooves, creating distinctive pumpkin lobes. Smooth the ridges with your finger to remove tool marks. -
Stem Socket:
Press a small indentation into the center of the top where all the lines converge. -
Adding the Stem:
Roll a tiny snag of green or dark brown clay into a tapered cone. Press it firmly into the indentation you just made. -
Texturing the Pumpkin:
For that realistic matte look, gently tap the entire surface of the orange clay with a clean toothbrush or stiff brush to add subtle skin texture.
Level Up: Matte Finish
To get the ceramic look seen in the photo, skip the glossy varnish. Instead, lightly buff the cured pieces with a bit of cornstarch before baking to eliminate shine.
Step 3: Miniature Accents & Finishing
-
Mini Gourd:
Take a marble-sized piece of dark brown clay and flatten it into a disc shape. -
Ribbing:
Like the pumpkin, press deep grooves all around the edge, meeting in the center, resembling a star anise or a tiny decorative gourd. -
Tiny Carrot:
Roll a small snake of orange clay, tapering one end to a sharp point. Use a knife to create tiny horizontal texture lines across the surface. -
Baking:
Arrange all your pieces on a ceramic tile or parchment-lined baking sheet. -
Curing:
Bake according to your specific polymer clay package directions (usually 275°F/135°C for 15-30 minutes). -
Cooling:
Let the pieces cool completely in the oven with the door cracked to prevent thermal shock cracks.
Arrange your new little friends on a mantle or desk for an instant touch of autumn warmth
Mini Ocean Creatures: Whale, Narwhal, And Jellyfish
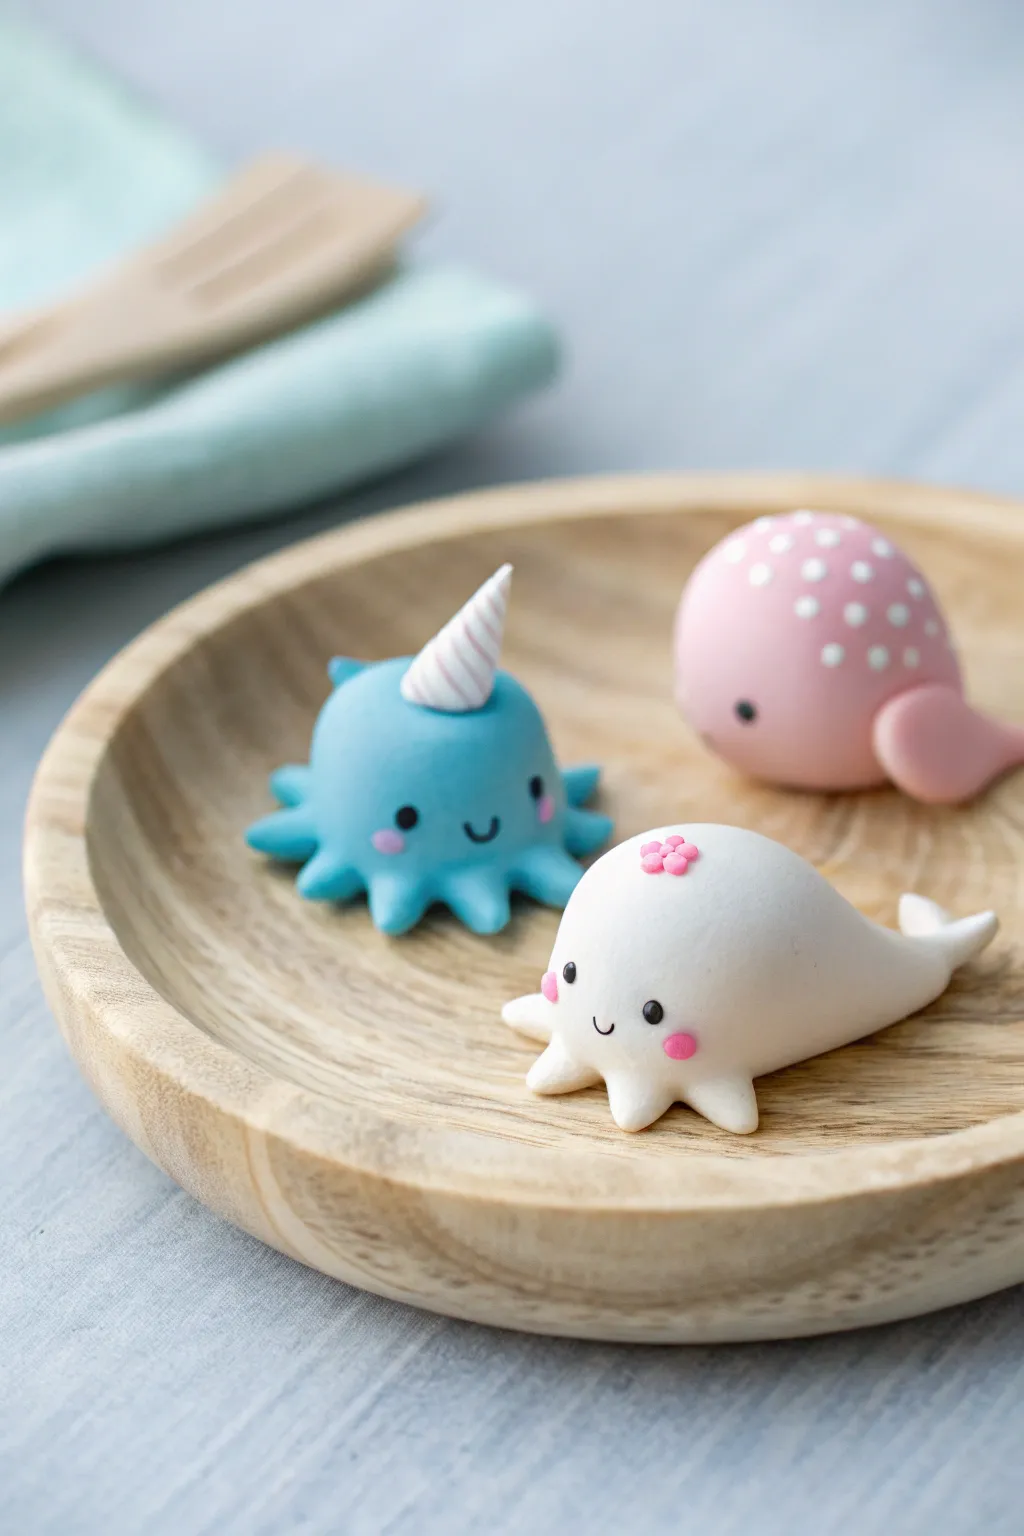
Create a delightful set of kawaii ocean friends that fit perfectly in the palm of your hand. This tutorial guides you through shaping a spunky blue jellyfish-narwhal hybrid, a gentle white whale, and a spotted pink companion, all resting on a simple wooden dish.
Step-by-Step Guide
Materials
- Polymer clay (Baby Blue, White, Soft Pink, Black)
- Clay sculpting tools (ball stylus, needle tool)
- Acrylic rolling pin (optional)
- Clean work surface (tile or glass mat)
- Wet wipes (for cleaning hands between colors)
- Oven for baking
Step 1: The Blue Narwhal-Jellyfish
-
Base shape:
Start by conditioning a ball of baby blue clay about the size of a walnut. Roll it into a smooth sphere, then gently flatten the bottom against your work surface to create a dome shape. -
Creating the tentacles:
Around the bottom edge of the dome, pinch out small sections of clay to form the tentacles. You want about 6-8 small, rounded nubs radiating outward. -
Smoothing the form:
Use your finger or a smoothing tool to round off the tips of the tentacles so they look soft and organic, not sharp. The connection point between the head and tentacles should be seamless. -
The horn:
Take a tiny amount of white clay and roll it into a thin cone. Twist a very thin snake of pink clay around it to create the spiral effect, then attach this horn to the center of the head. -
Facial features:
Roll two miniscule balls of black clay for eyes and press them onto the face. Use a needle tool to scratch a tiny ‘U’ shape for the smile between the eyes. -
Blush details:
Add tiny flattened ovals of pink clay just below the eyes for rosy cheeks.
Step 2: The Floral White Whale
-
Body formation:
Condition a piece of white clay into a teardrop shape. The rounded end will be the head, and the tapered end will become the tail. -
Defining the tail:
Gently curve the tapered tail upward. Flatten the very tip slightly and use a tool to split it in the middle, creating flukes. -
Front flippers:
I like to form two small triangles of white clay and attach them to the front underside of the body, smoothing the seams so they look integrated. -
Making the face:
Like the blue creature, add two tiny black clay balls for eyes wide apart. Press them in slightly to secure them. -
Rosy cheeks:
Apply small pink circles under the eyes for blush. These should be quite prominent on the white background. -
Flower accessory:
Create five microscopic balls of pink clay. Arrange them in a circle on top of the whale’s head and flatten them gently with a small dotting tool to create a flower shape.
Clean Clay Tip
White clay picks up dust easily! Always wash your hands or clean them with a baby wipe before handling the white clay, especially after using dark colors like the black eye details.
Step 3: The Spotted Pink Friend
-
Main shape:
Roll soft pink clay into a smooth, slightly elongated egg shape. This one is rounder than the white whale. -
Adding flippers:
Form two flat teardrops from the same pink clay and attach them to the sides of the body as fins. -
Face details:
Add the standard kawaii face: two small black eyes placed low on the body. -
Polka dots:
Roll very tiny balls of white clay. Press these randomly over the top half of the pink body, flattening them so they become flush with the surface. -
Final baking:
Preheat your oven according to the clay manufacturer’s instructions. Place all three figures on a baking sheet and bake for the recommended time (usually 15-30 minutes).
Baking Troubleshooting
To prevent flat shiny spots on the bottom of your figures, bake them on a bed of cornstarch or on a piece of printer paper instead of directly on a metal baking sheet.
Once cooled, arrange your adorable trio on a small wooden dish for a charming ocean-themed display

TRACK YOUR CERAMIC JOURNEY
Capture glaze tests, firing details, and creative progress—all in one simple printable. Make your projects easier to repeat and improve.
Simple Polymer Clay Ring Dish With A Wavy Rim
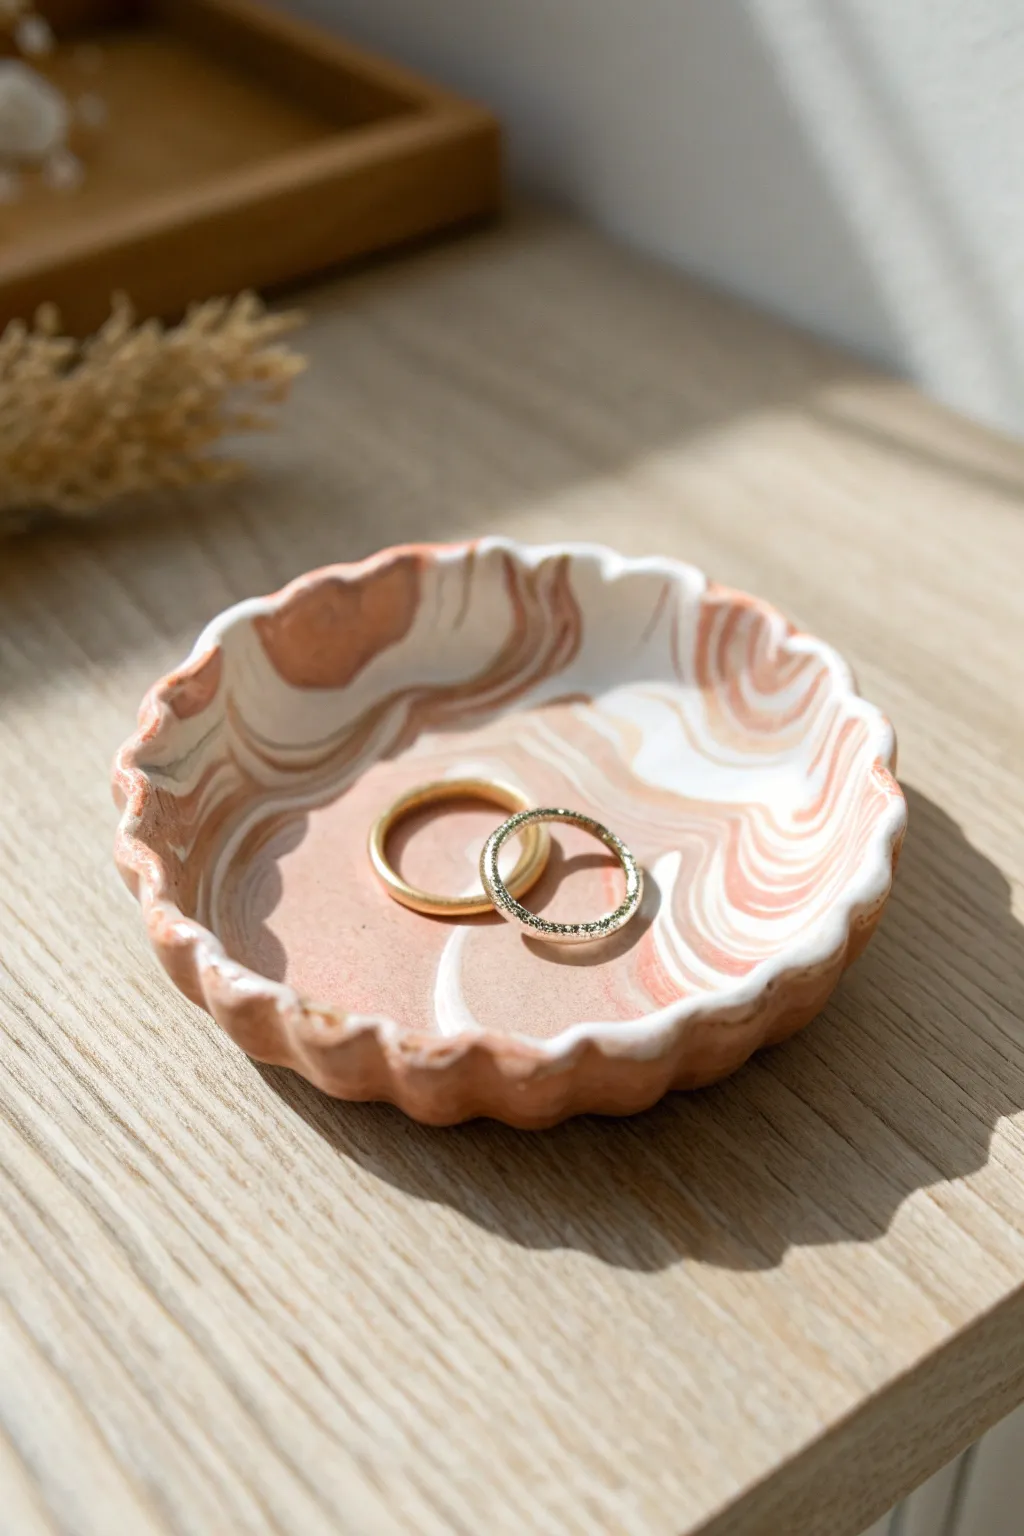
This elegant trinket dish features swirling ribbons of white and terracotta clay, reminiscent of a sandy desert landscape. Its unique, organically wavy rim adds a handcrafted touch that looks beautiful on any nightstand.
Step-by-Step Tutorial
Materials
- White polymer clay
- Terracotta or peach polymer clay
- Acrylic rolling pin or pasta machine
- Circle cookie cutter (approx. 4 inches) or a bowl to trace
- Craft knife
- Small oven-safe bowl (for shaping)
- Sandpaper inside a bowl of water (wet sanding)
- Gloss glaze or polyurethane varnish (optional)
- Soft brush
Step 1: Marbling the Clay
-
Condition the clay:
Start by kneading both the white and terracotta polymer clay separately until they are soft, pliable, and warm to the touch. -
Create logs:
Roll each color into a long, snake-like log. Aim for the white log to be slightly thicker if you want that to be the dominant background color. -
Twist together:
Hold the two logs together and twist them around each other to create a candy-cane effect. The tighter the twist, the finer your marble lines will be. -
Fold and roll:
Fold the twisted log in half and roll it into a ball. Then, roll it back out into a log. Repeat this process of twisting, folding, and rolling a few times. -
Check the pattern:
Stop twisting when you see striations that you like; over-mixing will result in a solid orange color rather than a defined marble. -
Form a ball:
Roll your marbled log into a smooth, tight sphere, ensuring there are no air bubbles trapped inside.
Clean Clay Tip
Keep baby wipes or rubbing alcohol nearby. Clean your hands and rolling pin before switching to white clay to prevent lint or color transfer.
Step 2: Shaping the Dish
-
Roll out the slab:
Using your acrylic roller, flatten the ball into a smooth slab about 1/4 inch thick. Rotate the clay frequently as you roll to keep the shape even. -
Cut the circle:
Place your circle cutter or a small bowl onto the clay slab to determine the size of your dish. Press down firmly or trace around the bowl with a craft knife to cut out a perfect circle. -
Smooth the edges:
Gently run your finger along the cut edge of the clay circle to soften any sharpness left by the cutter. -
Create the waves:
To achieve the signature ruffled rim, gently pinch the edge of the clay circle between your thumb and forefinger at regular intervals. I like to push slightly upward to give it more dimension. -
Refine the fluting:
Work your way around the entire circumference, adjusting the waves so they look organic but somewhat symmetrical. -
Form the curve:
Carefully lift your clay circle and place it inside your small oven-safe bowl. Gently press the center down so it takes the concave shape of the bowl.
Gold Rim Upgrade
After baking, paint the wavy edge with liquid gold leaf or metallic acrylic paint to make the rim pop and look luxurious.
Step 3: Baking and Finishing
-
Bake:
Place the bowl with the clay inside into your oven. Bake according to the manufacturer’s instructions on your clay package (usually around 275°F or 135°C for 15-30 minutes). -
Cool down:
Remove the bowl from the oven and let the clay cool completely before trying to pop it out. The clay hardens fully as it cools. -
Wet sand edges:
Once cool, dip your sandpaper in water and gently sand the rim of the dish to make it perfectly smooth and professional-looking. -
Rinse and dry:
Rinse off any milky sanding residue and pat the dish completely dry with a paper towel. -
Seal (Optional):
For a glossy ceramic look, apply a thin coat of gloss glaze using a soft brush. Let it dry completely before using.
Enjoy displaying your rings in this lovely handmade piece
Terrazzo-Style Coasters Using Leftover Clay Bits
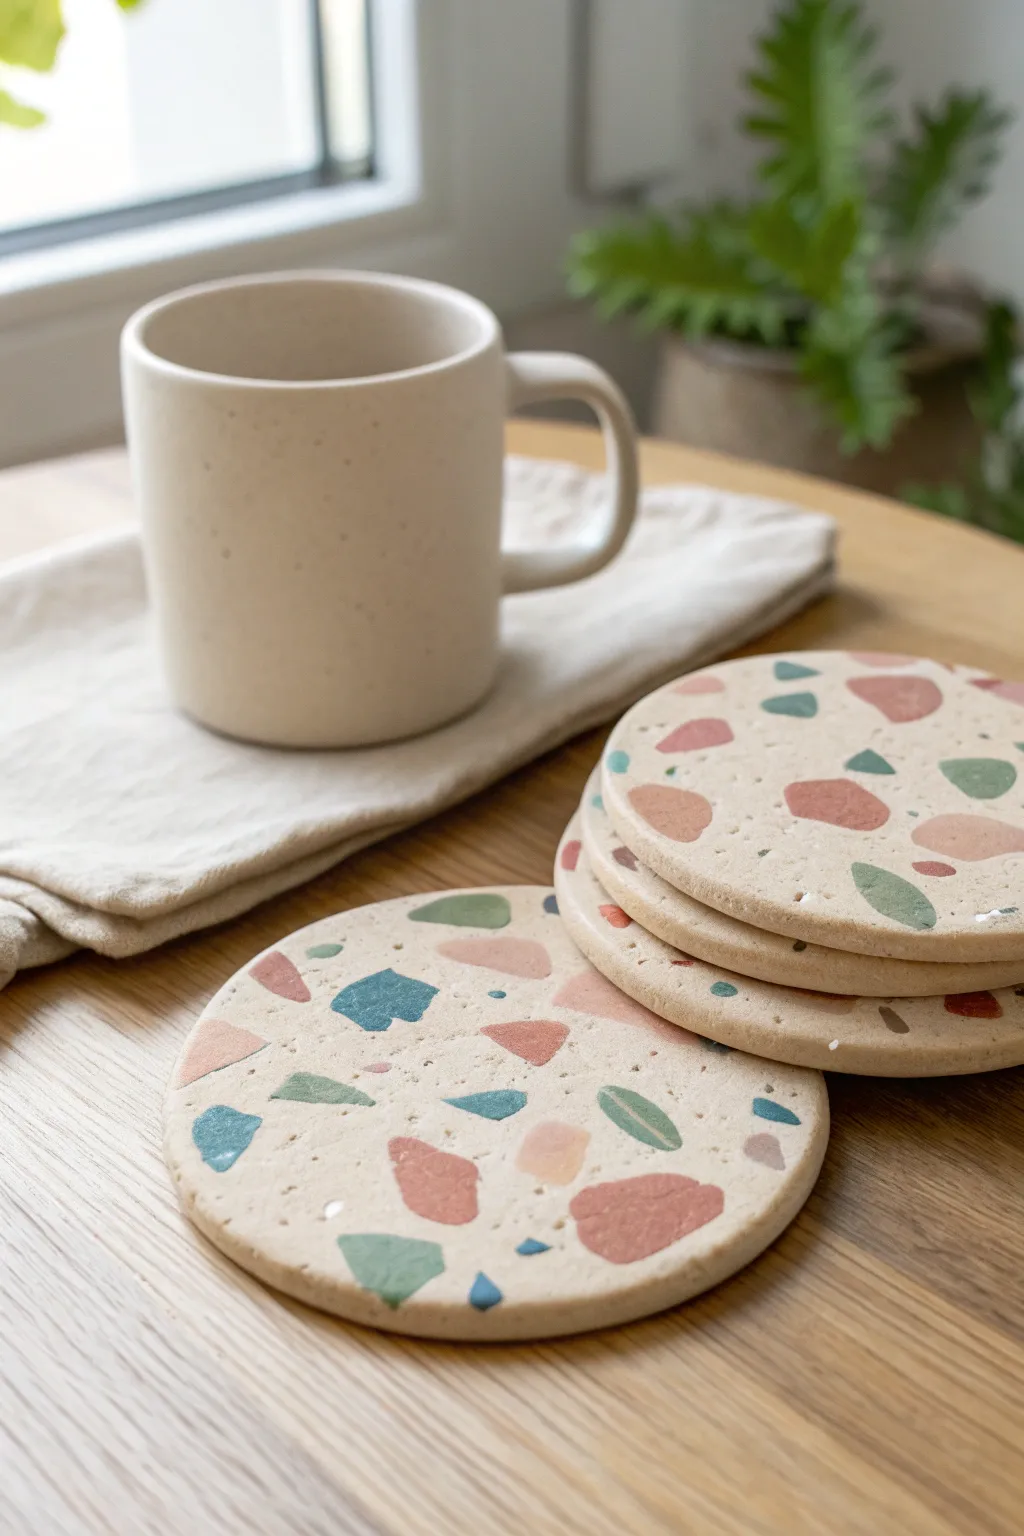
Transform your leftover clay scraps into sophisticated home decor with these terrazzo-style coasters. This project captures the trendy look of polished stone by embedding colorful clay fragments into a creamy, neutral base.
How-To Guide
Materials
- Polymer clay (white or beige for the base)
- Small scraps of colored polymer clay (terracotta, turquoise, sage green, mauve)
- Acrylic rolling pin or pasta machine
- Round cookie cutter (approx. 4 inches / 10 cm)
- Parchment paper or baking mat
- Craft knife or tissue blade
- Sandpaper (various grits: 200, 400, 600, 800)
- Small bowl of water
- Oven safe for baking clay
- Matte or satin polymer clay varnish (optional)
Step 1: Preparing the Clay Chips
-
Gather your scraps:
Collect small amounts of your chosen accent colors. For the look in the photo, aim for an earthy palette including terracotta orange, muted teal, sage green, and soft pink. -
Flatten the colors:
Roll each colored piece of clay into a thin sheet, roughly 1-2mm thick. It doesn’t need to be perfect since you’ll be cutting it up anyway. -
Create the terrazzo chips:
Using your craft knife or tissue blade, chop the colored sheets into irregular, angular fragments. Vary the sizes, keeping most between the size of a grain of rice and a small pea. -
Refrigerate the chips:
If your clay is soft or sticky, place the chopped bits in the fridge for 10 minutes. This helps them hold their sharp, angular shapes when you mix them later.
Smudged Colors?
If your colored chips are smearing into the white base while rolling, the clay is too warm. Pop the whole slab in the fridge for 15 minutes before your final roll.
Step 2: Forming the Base
-
Condition the base clay:
Take a large block of your white or beige clay and condition it by kneading until it’s soft and pliable. I find warm hands make this step much faster. -
Roll the base sheet:
Roll the conditioned base clay into a thick sheet, approximately 5-6mm thick. This will ensure your coasters are sturdy enough for daily use. -
Apply the chips:
Scatter your prepared colored chips randomly over the surface of the base sheet. Don’t overthink the placement—terrazzo looks best when it feels spontaneous. -
Press them in:
Gently press the chips down with your fingers so they stick to the base layer. -
Roll flat again:
Cover the clay with parchment paper and roll over it again with your acrylic roller. Apply firm pressure to force the chips into the base until the surface is completely smooth and level.
Step 3: Cutting and Baking
-
Check the pattern:
Peel back the parchment. If you see large gaps without color, simply press a few more chips into those spots and roll again until smooth. -
Cut the shapes:
Place your round cutter on the slab and press down firmly to cut out your coasters. Wiggle the cutter slightly before lifting to ensure a clean separation. -
Smooth the edges:
Before baking, run your finger lightly around the rim of each coaster to soften any sharp cutting marks. This saves sanding time later. -
Bake:
Transfer the rounds to a baking sheet lined with parchment paper. Bake according to your specific clay brand’s instructions (usually 275°F/135°C for 30 minutes). -
Cool down:
Allow the coasters to cool completely on a flat surface. Don’t rush this, as warm clay is still slightly flexible.
Level Up: Stone Texture
Mix a tiny pinch of black pepper or used dried coffee grounds into your white base clay before rolling. This creates a realistic speckled stone or ceramic effect.
Step 4: Finishing Touches
-
Wet sanding:
Place a sheet of 200-grit sandpaper flat on your work surface and add a little water. Place the coaster face down and sand in a circular motion to expose the crisp edges of the colored chips. -
Refine the finish:
Repeat the wet sanding process, moving progressively through higher grits (400, 600, then 800) until the surface feels incredibly smooth to the touch. -
Wash and dry:
Rinse off the milky sanding residue carefully and pat the coasters dry with a lint-free cloth or paper towel. -
Optional sealing:
If you want extra protection against coffee stains, apply a thin layer of matte varnish, though usually, well-sanded polymer clay is naturally water-resistant enough on its own.
Stack your finished set on the coffee table and enjoy that modern, artisanal vibe you created yourself
Mini Plant Markers With Simple Icon Shapes
Add a charming, handcrafted touch to your indoor garden with these minimalist plant markers. Using white polymer clay and simple iconography, these stakes perfectly complement the natural beauty of tiny succulents without overpowering them.
Step-by-Step Guide
Materials
- White or translucent white polymer clay
- Rolling pin or acrylic roller
- Small round circle cutter (approx. 1.5 inches)
- Wooden skewers or toothpicks
- Green fine-tip paint marker or acrylic paint with a detail brush
- Parchment paper or baking tile
- Oven
- Fine-grit sandpaper (optional)
- Gloss or matte varnish (optional)
Step 1: Shaping the Clay Base
-
Condition the clay:
Begin by warming a small block of white polymer clay in your hands. Knead and roll it until it becomes soft, pliable, and free of any cracks. -
Roll it out:
Place the clay on a clean, flat surface or parchment paper. Use your acrylic roller to flatten the clay to an even thickness of about 1/4 inch (6mm). You want it sturdy enough to hold the stick but not too heavy. -
Cut the circles:
Press your round circle cutter firmly into the rolled clay to punch out your shapes. Lift the excess clay away from the circles before lifting the circles themselves to prevent distortion. -
Smooth the edges:
Gently run your finger around the perimeter of each clay circle to soften any sharp edges left by the cutter. This professional finish makes a big difference.
Loose skewer fix
If the stick wobbles after baking, simply pull it out, add a drop of superglue to the tip, and slide it back into the existing hole.
Step 2: Assembly and Baking
-
Insert the stake:
Take a wooden skewer and carefully insert the pointed end into the bottom edge of the clay circle. Push it in about half an inch to ensure it’s secure. -
Secure the bond:
I like to gently pinch the clay around the entry point of the skewer to seal it tight. If the skewer feels loose, you can remove it, add a tiny dab of bake-and-bond or liquid clay, and reinsert. -
Pre-bake check:
Lay the markers flat on a parchment-lined baking sheet. Double-check that the circles are still round and haven’t deformed during the skewer insertion. -
Bake:
Bake the clay pieces according to the manufacturer’s instructions on the packet. Generally, this is around 230°F to 275°F (110°C – 135°C) for 15-30 minutes. -
Cool down:
Remove the tray from the oven and let the markers cool completely. Do not attempt to paint them while they are warm, or the paint may not adhere properly.
Stamp it instead
For a textured look, press a small botanical rubber stamp into the raw clay before baking, then trace the indented lines with paint later.
Step 3: Adding the Design
-
Draft the icon:
Before committing to the clay, practice drawing a simple succulent shape on a scrap piece of paper. Think of overlapping teardrop shapes for the leaves and a simple trapezoid for the pot. -
Draw the pot base:
Using your green fine-tip paint marker, draw a small horizontal trapezoid near the bottom of the white circle. Add two horizontal lines across it for texture. -
Outline the center leaf:
Draw an upright teardrop shape directly in the center above the pot base. This will guide the rest of your symmetry. -
Add side leaves:
Draw two slightly smaller teardrop shapes on either side of the center leaf, angling them outward slightly. -
Fill the gaps:
Add smaller triangle tips peeking out from behind the main leaves to create depth and fullness to your succulent illustration. -
Let it dry:
Allow the marker or paint to dry completely. If you used acrylic paint, ensure no thick globs remain that could smear. -
Seal the deal:
To protect your drawing from watering splashes, apply a thin coat of matte or gloss varnish over the clay surface.
Place your new marker in a potted plant and enjoy the organized aesthetic
Polymer Clay Hair Clip Toppers In Easy Abstract Shapes
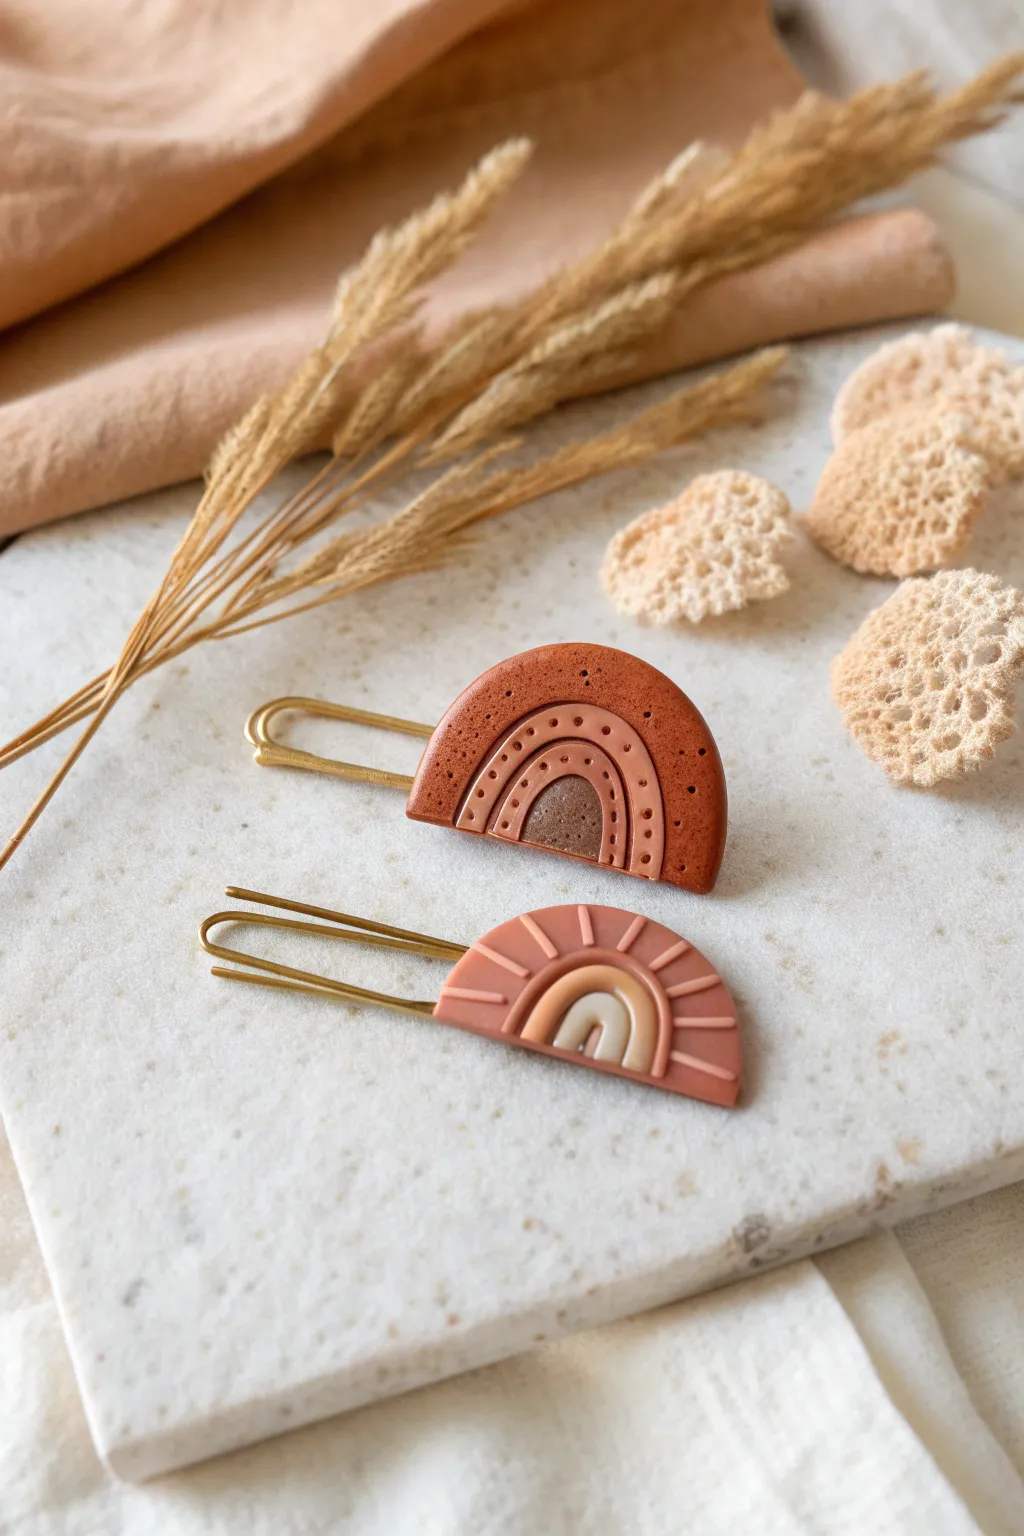
These stylish semi-circle hair clips feature warm, earthy tones and simple abstract line work that evokes rainbows and sunbursts. They are perfect beginner projects because they rely on basic shapes and additive texture rather than complex sculpting.
Detailed Instructions
Materials
- Polymer clay in terracotta, peach, tan, and brown shades
- Gold-tone slide-on bobby pin bases or alligator clips
- Liquid polymer clay (bakeable adhesive) or strong superglue
- Clay roller or pasta machine
- Round cutter (approximately 1.5 – 2 inches diameter)
- X-Acto knife or sharp rigid blade
- Needle tool or toothpick
- Clean ceramic tile or baking sheet covered with parchment paper
- Oven
Step 1: Preparing the Base
-
Condition the Clay:
Begin by conditioning your main base color—the terracotta or dusty rose shade—by kneading it in your hands until it is soft and pliable. This prevents cracks during baking. -
Roll out the Sheet:
Roll the conditioned clay into an even sheet approximately 3mm to 4mm thick. You want it sturdy enough to hold the clip but not too heavy. -
Cut the Circles:
Use your round cutter to stamp out circles. If you don’t have a cutter, you can trace a small jar lid and cut around it with your knife. -
Create Semi-Circles:
Use your rigid blade to cut each circle exactly in half. These semi-circles will form the main body of your clips. -
Smooth the Edges:
Gently run your finger along the cut edge and the curved edge to soften any sharpness or harsh angles left by the blade.
Clean Edges Protocol
Before baking, use a cotton swab dipped in a tiny bit of acetone or rubbing alcohol to lightly brush away any stray fingerprints or lint for a professional finish.
Step 2: Designing the Rainbow Clip
-
Roll Thin Snakes:
Take a lighter shade of clay (like peach or tan) and roll it into a very thin, even snake on your work surface. -
Create the Arches:
Place the thin clay snake onto the terracotta semi-circle, forming an arch shape. Repeat with a second snake inside the first one to create a rainbow effect. -
Add the Center:
For the innermost semi-circle, take a small ball of darker brown clay, flatten it slightly into a half-moon shape, and press it into the center bottom of your rainbow. -
Texturing:
I find using a needle tool works best here to add details. Poke small, evenly spaced dots into the clay snakes and the base to create depth and visual interest.
Level Up: Speckled Effect
Mix some ground black pepper or dried used coffee grounds into your clay before rolling it out to create a trendy, organic faux-stone granite look.
Step 3: Designing the Sunburst Clip
-
Form the Center Arches:
Similar to the rainbow clip, take a small semi-circle of tan clay and press it into the bottom center of the pink base. Add a contrasting arched snake of clay over it. -
Cut the Rays:
Roll out a small sheet of the base pink color. Cut very small, thin strips to act as the sun’s rays. -
Arrange the Rays:
Place these small strips radiating outward from the center arch, pressing them gently so they bond with the base layer.
Step 4: Finishing Up
-
Final Inspection:
Check for any lint or fingerprints. You can gently wipe the surface with a tiny amount of rubbing alcohol on your finger to smooth imperfections. -
Bake:
Bake the clay pieces according to your specific brand’s package instructions (usually 275°F for 15-30 minutes). -
Cool Down:
Let the clay pieces cool completely on the baking sheet to regain their full strength. -
Attach the Hardware:
Apply strong superglue or two-part epoxy to the flat pad of the gold hair pin. Press the cooled clay piece firmly onto the clip. -
Secure the Bond:
Allow the adhesive to cure fully (usually 24 hours for maximum strength) before wearing your new accessories.
Clip these into a messy bun or side-part to add a touch of handmade warmth to your outfit
Mini Desk Buddy Figurines With Big Eyes (No Arms Needed)
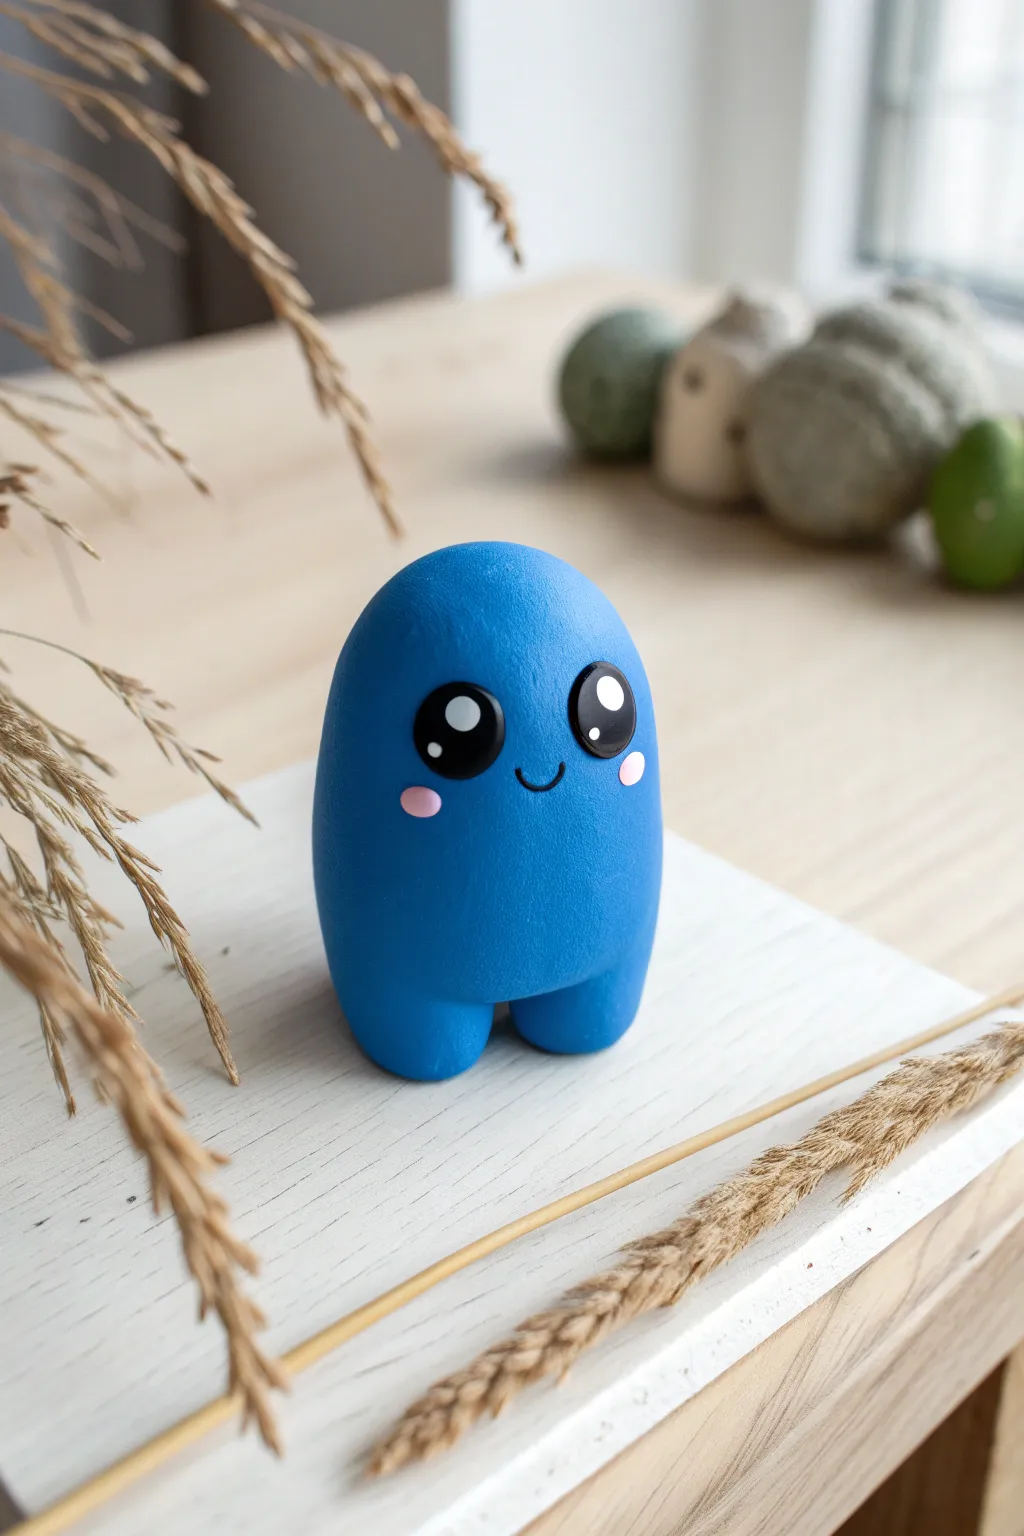
This ridiculously cute desk companion brings instant cheer with its minimalist shape and oversized eyes. Sculpted from a single vibrant color, this armless friend proves that sometimes the simplest designs have the most personality.
Step-by-Step
Materials
- Blue polymer clay (e.g., Fimo Soft or Sculpey)
- Black polymer clay
- White or pale pink polymer clay for cheeks
- White acrylic paint
- Small dotting tool or toothpick
- Fine detail brush
- Gloss glaze or UV resin
- Smooth work surface
- Oven for baking
Step 1: Shaping the Base Body
-
Condition the Clay:
Start by taking a chunk of your blue polymer clay about the size of a golf ball. Knead and warm it in your hands until it becomes soft and pliable, which prevents cracks during baking. -
Form a Smooth Ball:
Roll the blue clay between your palms to create a perfectly seamless sphere. Inspect it closely to ensure there are no air bubbles or fingerprints marring the surface. -
Elongate into an Egg:
Gently roll the sphere back and forth on your work surface, applying slightly more pressure near the top to create an egg-like or rounded oblong shape. The top should be slightly narrower than the bottom. -
Flatten the Base:
Tap the bottom of your egg shape gently against the table to create a flat surface so your figurine can stand upright without wobbling. -
Refine the Silhouette:
Use your fingers to smooth out the sides, ensuring the transition from the rounded top to the wider base is seamless and organic.
Step 2: Adding Legs and Features
-
Divide the Feet:
At the bottom center of your standing shape, use a sculpting tool or your pinky finger to gently press an indentation upwards. This creates the illusion of two separate, stubby legs. -
Shape the Stubs:
Refine each leg stub by rounding off the edges with your fingertips. They should look like little nubs supporting the main body mass. -
Check Stability:
Stand the figure up again to ensure the legs are even. If one side is higher, gently tap the feet on the table again to level them. -
Prepare the Eye Sockets:
Using a large ball tool or the rounded end of a paintbrush, press two indentations into the upper third of the face where the eyes will go. Spacing them slightly apart adds to the cute factor. -
Insert the Eyes:
Roll two small balls of black clay that fit snugly into your indentations. Press them in gently so they are slightly flattened but still retain a convex curve.
Smooth Operator
Before baking, use a drop of baby oil on your finger to gently buff away any fingerprints on the blue clay for a flawless finish.
Step 3: Final Details and Finishing
-
Add Cheeks:
Take two tiny specks of pale pink clay and roll them into balls. Press these flat onto the face, just below and slightly to the outside of each eye. -
Create the Smile:
Use a needle tool or a small curved blade to gently impress a tiny ‘u’ shape between the eyes for a mouth. Keep it small and centered. -
Bake the Figurine:
Place your creation on a baking sheet lined with parchment paper. Bake according to your clay manufacturer’s instructions (usually around 230°F-275°F for 15-30 minutes). -
Cool Down:
Let the figurine cool completely inside the oven or on a wire rack. Avoid touching it while hot, as the clay is still fragile. -
Paint Eye Highlights:
Once cool, dip a dotting tool or toothpick into white acrylic paint. Add one large white dot in the upper corner of the black eye and a smaller dot below it for a sparkling look. -
Glaze the Eyes:
For that glassy, professional finish, I like to apply a drop of UV resin or high-gloss glaze just to the black part of the eyes. Cure or let dry completely.
Accessories Galore
Give your buddy a personality by sculpting a tiny hat, a pair of headphones, or a miniature bowtie to stick on before baking.
Now you have an adorable little listener ready to keep you company during your workday
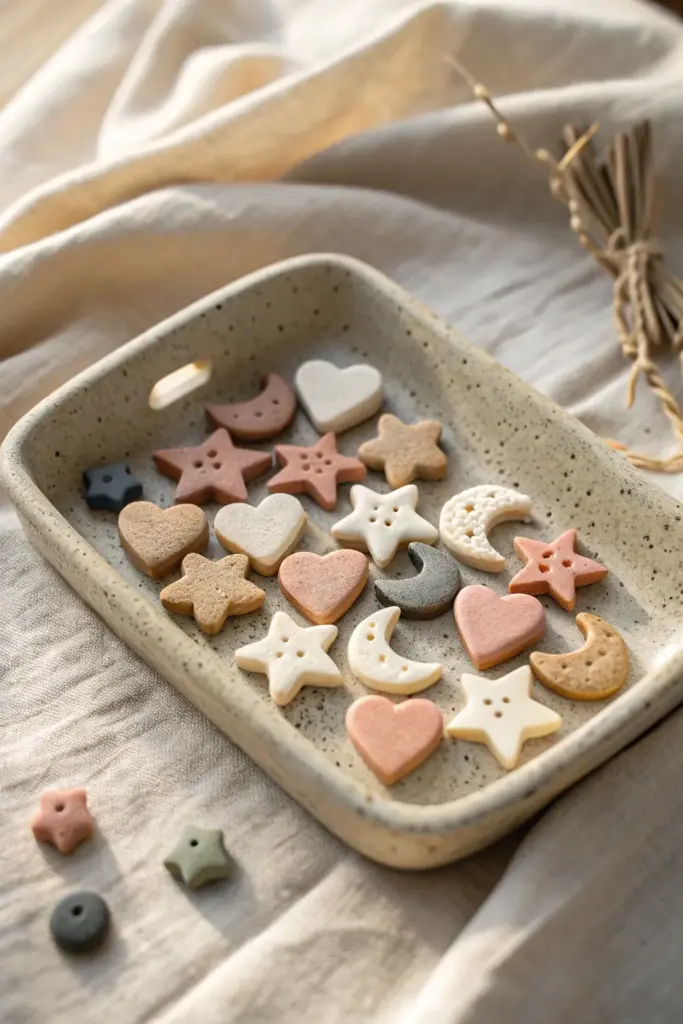
Tiny Polymer Clay “Lucky Charms” Set You Can Batch-Make
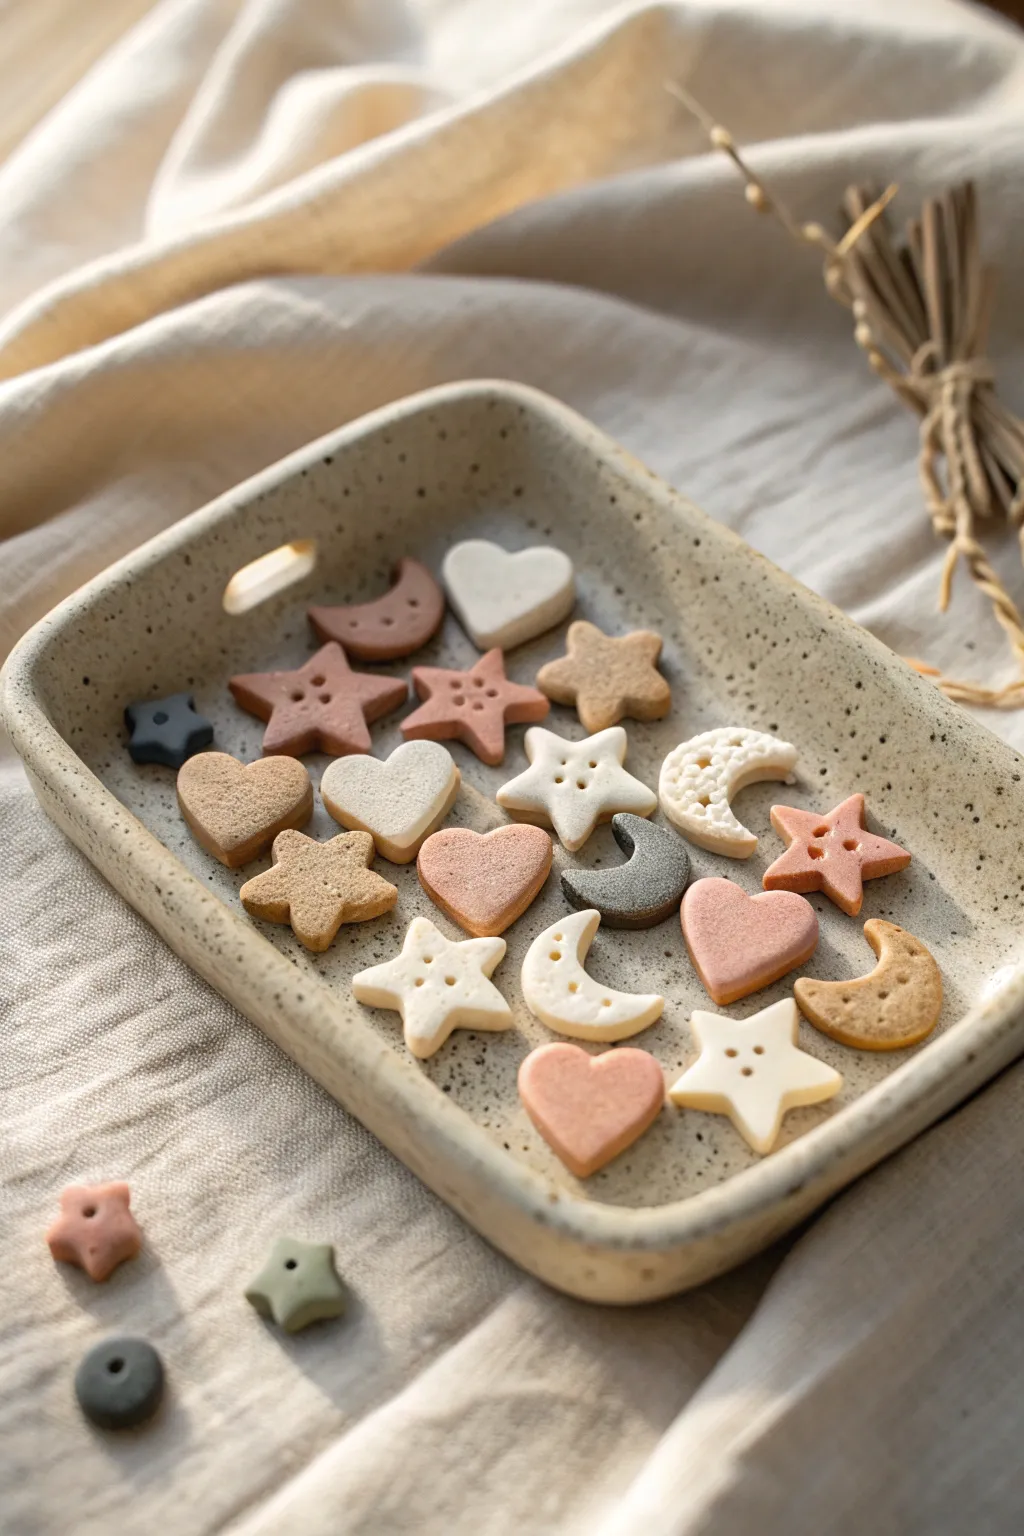
These delightful, miniature shapes look good enough to eat but are designed to be sweet little embellishments or game counters. With a soft, muted color palette of terracotta, cream, and sage, this batch-making project is perfect for using up scrap clay.
Detailed Instructions
Materials
- Polymer clay (white, beige, terracotta, sage green, grey)
- Small geometric cutters (stars, hearts, moons – approx. 0.5 to 1 inch)
- Acrylic rolling pin or pasta machine
- Needle tool or toothpick
- Ball stylus tool (small)
- Textured blending sponge or toothbrush (optional)
- Parchment paper
- Baking sheet
- Oven
Step 1: Preparation & Color Mixing
-
Condition the clay:
Start by kneading your white polymer clay until it is soft and pliable. Do the same for your colored clays. -
Create custom shades:
Mix small amounts of terracotta into white to create a soft blush pink. Mix a tiny dot of brown into white for a creamy beige. Keep some colors pure for contrast. -
Add texture (optional):
If you want that speckled pottery look seen in the tray, mix in a tiny pinch of ground black pepper or dried vanilla bean specks into your cream or beige clay during the conditioning phase. -
Roll out sheets:
Roll your conditioned clay into even sheets. Aim for a thickness of about 3-4mm (roughly 1/8 inch) so the charms feel substantial but not chunky.
Clean Cuts Tip
Place a piece of plastic wrap over the clay before using your cutters. This creates a beautifully rounded, pillow-like edge instantly without needing to sand later.
Step 2: Cutting & Shaping
-
Punch out shapes:
Using your mini cutters, press firmly into the clay sheets to cut out your stars, hearts, and crescent moons. Try to cut them close together to minimize waste. -
Release the shapes:
Gently push the clay shapes out of the cutters. If they stick, I find dipping the cutter in cornstarch beforehand helps release them cleanly. -
Smooth the edges:
Run your finger lightly around the cut edge of each shape to soften the sharp ridge left by the cutter, giving it a more finished, ceramic look. -
Texture the surface:
For the textured moons and hearts, gently tap the surface with a clean toothbrush or a texture sponge to give it a rough, stony appearance.
Make Them Wearable
Before baking, insert a small metal eye pin into the top of a few charms. Once baked, you can easily attach them to a chain for a matching necklace.
Step 3: Detailing & Finishing
-
Create button holes:
Take your needle tool or a small ball stylus. Press two or four symmetrical holes into the center of the stars and stars to mimic buttons. -
Add moon craters:
For the smooth crescent moons, use the ball stylus to press random indentations into the surface, creating stylized crater effects. -
Make the ‘lace’ moon:
For the decorative white moon, use a needle tool to poke many tiny holes close together, creating a porous, coral-like texture. -
Arrange for baking:
Place all your finished pieces on a baking sheet lined with parchment paper. Ensure they aren’t touching. -
Bake:
Bake according to your clay manufacturer’s instructions (usually 275°F/135°C for 15-30 minutes). Watch lighter colors to ensure they don’t brown. -
Cool down:
Let the pieces cool completely on the tray before handling them to ensure they harden fully.
Once cooled, these tiny treasures are ready to be used as buttons, glued onto magnets, or simply displayed in a pretty dish