If you love making pieces that are both pretty and genuinely useful, ceramic tray ideas are the sweet spot. I’m sharing a mix of classic trinket tray favorites and more artsy twists you can totally make your own.
Classic Round Ring Dish Tray
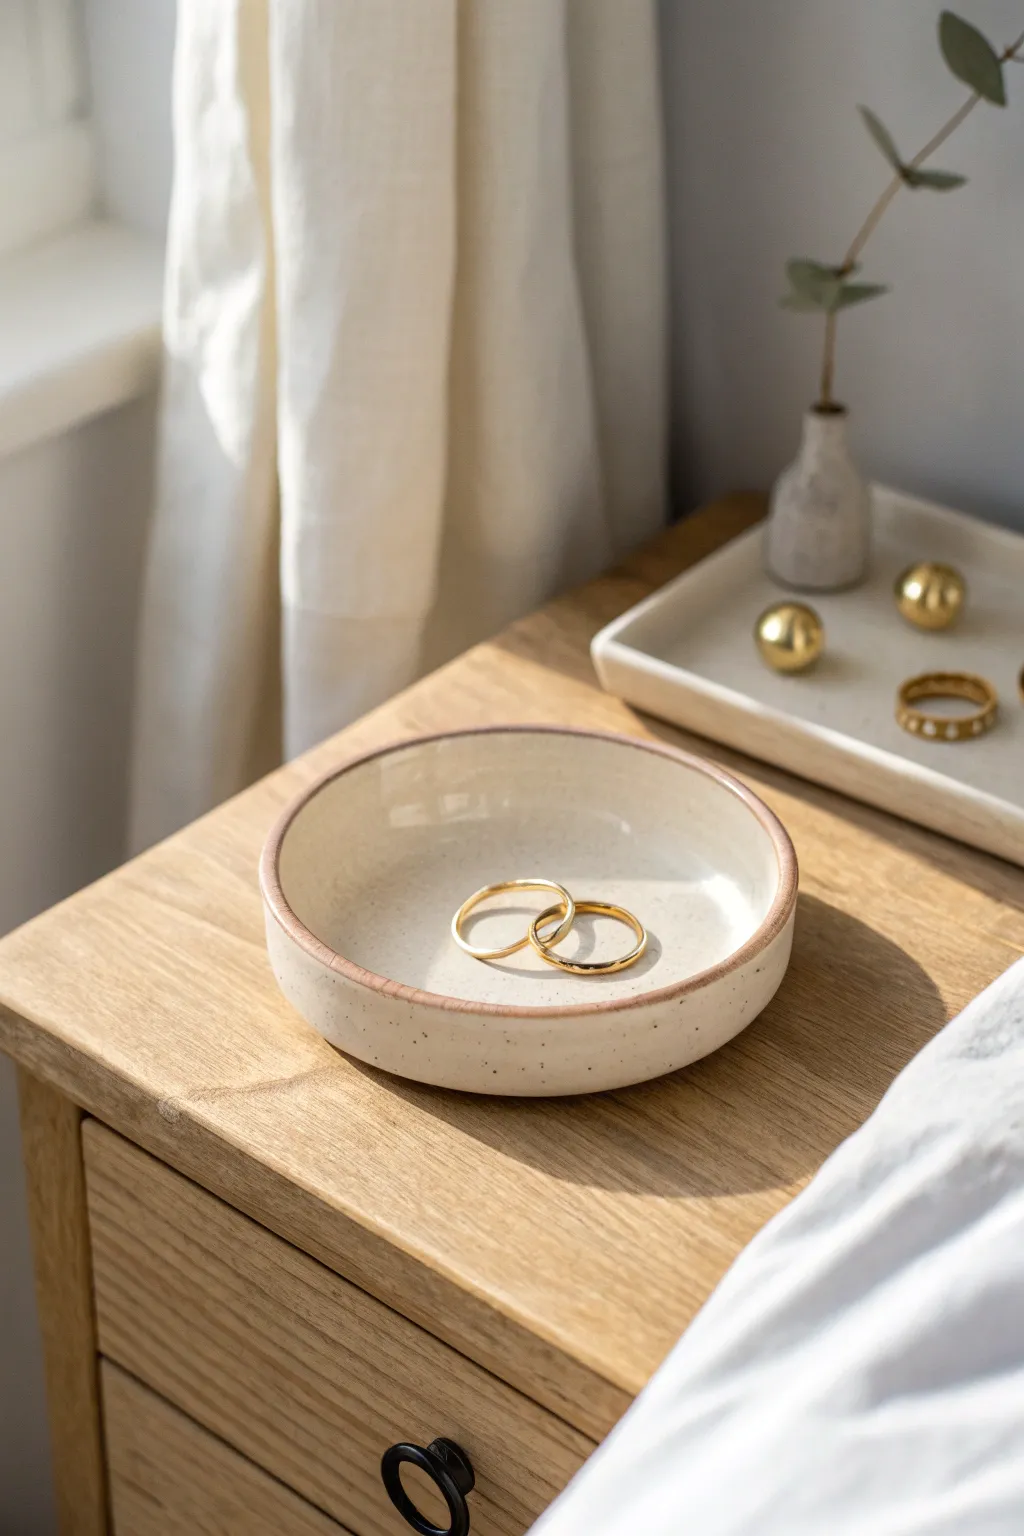
This elegant little catch-all brings a touch of organic warmth to your bedside table with its creamy speckled glaze and subtle terracotta rim. Perfect for holding your everyday jewelry, its simple, hand-built form celebrates the beauty of imperfection.
Detailed Instructions
Materials
- Speckled buff stoneware clay (provides the natural flecks)
- Canvas mat or cloth (to work on)
- Rolling pin
- Two wooden guide strips (approx. 1/4 inch thick)
- Circular template (paper or lid, approx. 4-5 inches)
- Needle tool or fettling knife
- Yellow rib tool (soft polymer)
- Small sponge
- Creamy white gloss glaze
- Iron oxide wash or terracotta under glaze
- Fine grit sanding pad
- Small paintbrush
Step 1: Forming the Base
-
Prep the clay:
Cut a manageable 1lb chunk of speckled buff stoneware clay. Wedge it thoroughly on your canvas surface to remove air bubbles and ensure an even consistency. -
Set up guides:
Place your wooden guide strips on either side of the clay. This ensures your slab will be a uniform thickness. I like to space them wide enough to accommodate the full rolling motion. -
Roll the slab:
Using your rolling pin, flatten the clay until the pin rests on the guide strips. Roll in multiple directions to compress the clay platelets, which helps prevent warping later. -
Smooth the surface:
Take your soft yellow rib tool and gently drag it across the surface of the slab. This compresses the clay further and removes the canvas texture, leaving a smooth finish for the interior of your dish. -
Cut the shape:
Place your circular template onto the smooth clay slab. Holding your needle tool vertically, trace around the template to cut out your perfect circle.
Step 2: Building the Walls
-
Lift the edges:
Gently lift the clay circle from the canvas. Place it on a small foam pad or simply cup it in your hand. Using your thumb and forefinger, slowly pinch the outer edge upward to create a low wall. -
Refine the rim:
Ensure the wall is roughly uniform in height, about 0.5 to 0.75 inches tall. Don’t worry about machine perfection; the slight undulation adds to the organic charm. -
Smooth the transition:
Use a barely damp sponge to smooth the transition between the flat base and the rising wall on the inside. Run the sponge around the rim to soften any sharp edges created during pinching. -
Dry slowly:
Place the dish on a board, loosely covered with plastic for the first day to equalize moisture. Then, uncover and let it dry completely to the ‘bone dry’ stage.
Warping Woes?
If your dish dries unevenly, the bottom may not sit flat. Dry it slowly under plastic, or weigh the center down with a small sandbag during the leather-hard stage.
Step 3: Firing and Glazing
-
Bisque fire:
Fire the bone-dry piece in a kiln to cone 04. This initial firing transforms the fragile clay into durable ceramic ready for glazing. -
Clean the bisque:
Once cool, wipe the entire piece with a damp sponge to remove any kiln dust. This prevents glaze crawling. -
Apply the rim detail:
Using a small brush, carefully paint a thin line of iron oxide wash or terracotta underglaze along the very top edge of the rim. Let this dry for a few minutes. -
Glaze the interior:
Pour a small amount of creamy white gloss glaze into the dish. Swirl it around ensuring the bottom and inside walls are coated, then pour the excess back into your container. -
Coat the exterior:
Dip the exterior of the dish into the white glaze, or brush it on if you prefer. Be careful not to smudge the rim detail you added earlier. -
Reveal the rim:
With a damp sponge, very gently wipe the glaze off just the very top edge of the rim. This allows that iron oxide line to peek through, creating the contrast seen in the photo. -
Clean the foot:
Wipe all glaze off the very bottom of the dish where it will sit on the kiln shelf. Any glaze left here will fuse your beautiful tray to the kiln. -
Glaze fire:
Fire the piece again, this time to cone 6 (or the temperature specific to your clay and glaze). This melts the glass and brings out the speckles in the clay body.
Pro Tip: Smoother Surface
After the first bisque firing, lightly sand the surface with 400-grit sandpaper before glazing. This ensures a buttery smooth finish that feels professional to the touch.
Now you have a timeless, handcrafted piece ready to organize your treasures


Oval Slab-Built Serving Tray With Soft Handles
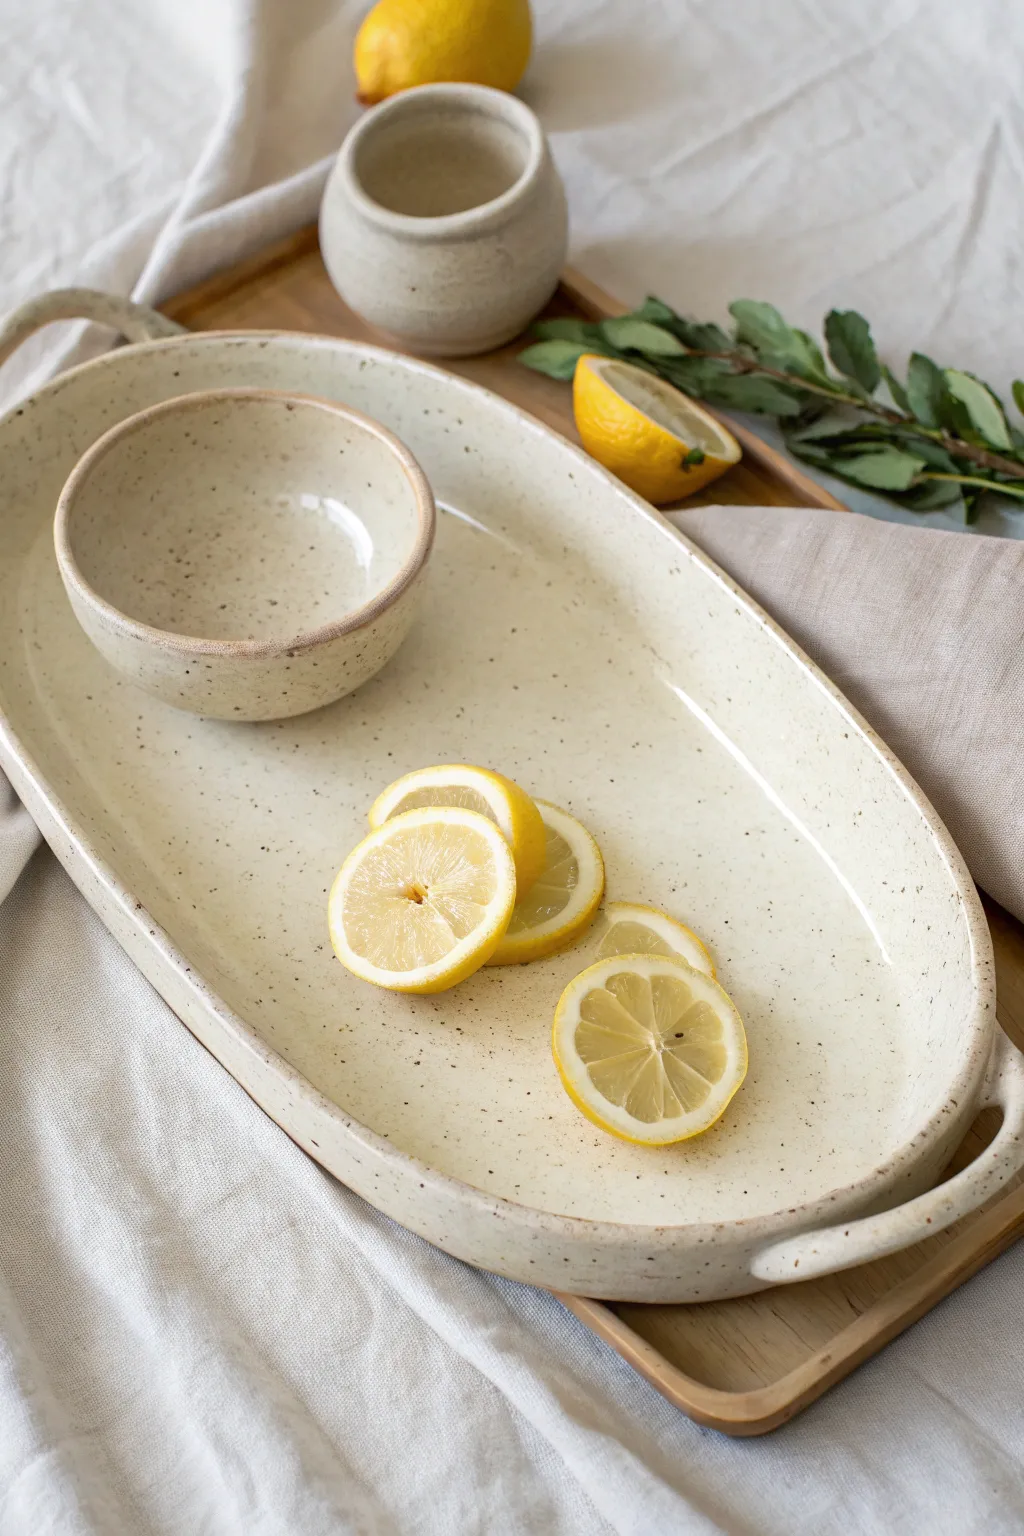
This elegant, slab-built ceramic tray features a timeless oval silhouette and soft, integrated loop handles that make serving a breeze. The creamy, speckled glaze gives it a warm, organic feel perfect for holding fresh fruit or acting as a centerpiece catch-all.
Step-by-Step Tutorial
Materials
- Speckled stoneware clay (approx. 3-4 lbs)
- Rolling pin
- Canvas work surface or slab mat
- Oval paper template (approx. 14″ x 8″)
- Needle tool or fettling knife
- Flexible metal rib and soft rubber rib
- Sponge
- Scoring tool (serrated kidney or fork)
- Slip (clay mixed with water)
- Wooden modeling tool
- Creamy matte or satin white glaze (food safe)
- Kiln
Step 1: Creating the Slab Base
-
Roll the clay:
Begin by wedging your speckled stoneware clay to remove air bubbles. Roll it out into a large, even slab approximately 1/4 to 3/8 inch thick. Turn the slab occasionally as you roll to ensure even compression. -
Compress the surface:
Using a flexible metal rib, compress the clay surface on both sides. dragging the rib across the clay aligns the particles, preventing warping during firing and creating a smooth finish. -
Cut the shape:
Place your oval paper template onto the slab. Using a needle tool or fettling knife, cut vertically around the template. Remove the excess clay but keep it nearby for the handles. -
Soften the rim:
Take a damp sponge or your finger and run it along the cut edge of the oval base to smooth any sharp corners or drag marks left by the knife.
Step 2: Forming the Walls
-
Lift the edges:
Place the oval slab on a piece of foam or a thick towel. Gently lift the edges of the slab upwards to create a slight curve. You can tuck small pieces of foam under the rim to support it while it stiffens. -
Create a coil:
While the base stiffens slightly, roll a long, even coil of clay, about the thickness of your finger. This will become the reinforced rim/wall depending on your preferred height. -
Score and slip:
Score the top edge of your oval base and the underside of the coil thoroughly. Apply a generous amount of slip to the scored areas. -
Attach the wall:
Press the coil firmly onto the base. Using your thumb or a wooden tool, blend the clay downwards on the inside and outside to merge the coil seamlessly with the slab base. -
Refine the curve:
Use a soft rubber rib to smooth the join marks completely. Shape the wall so it flares outward slightly, mimicking the gentle slope seen in the photo.
Prevent Warping
To keep the bottom perfectly flat, dry the tray on a slat board or drywall. You can also place a weighted bag of sand in the center while it dries to ‘leather hard’.
Step 3: Adding Handles & Finishing
-
Make the loops:
Roll a smaller, thinner coil for the handles. Cut two segments, roughly 3 inches long each. Tap them gently on the table to slightly flatten the profile, then curve them into a ‘U’ shape. -
Attach handles:
Score and slip the ends of the ‘U’ shapes and the corresponding spots on the short ends of the tray’s exterior rim. Press them firmly into place. -
Blend the joints:
Use a modeling tool to smear the clay from the handle ends onto the tray body. I find that adding a tiny decorative coil around the join can help reinforce it if the connection looks thin. -
Let it dry slowly:
Loosely cover the tray with plastic. Slow drying is crucial for flat pieces like trays to prevent warping. Let it dry to bone dry over several days. -
Bisque fire:
Load the bone-dry tray into the kiln for a bisque firing (usually Cone 04 or 06, depending on your clay body). -
Glazing:
Once bisque fired, wipe the tray with a damp sponge to remove dust. Pour or dip the tray in a creamy white glaze. The glaze should be translucent enough to let the clay’s natural speckles show through. -
Wipe the foot:
Ensure the bottom of the tray is completely free of glaze. You can use a wax resist before glazing or wipe it clean with a sponge afterwards. -
Glaze fire:
Fire the tray again to your clay’s maturity temperature (e.g., Cone 5, 6, or 10). Allow the kiln to cool completely before removing your finished serving tray.
Glaze Crawling?
If the glaze pulls away leaving bare spots, it might be due to dust or oil on the bisque. Always wash your hands and wipe the piece with a damp sponge before glazing.
Now you have a stunning, handmade vessel ready to serve guests or display your favorite items


Long Rectangular Vanity Tray
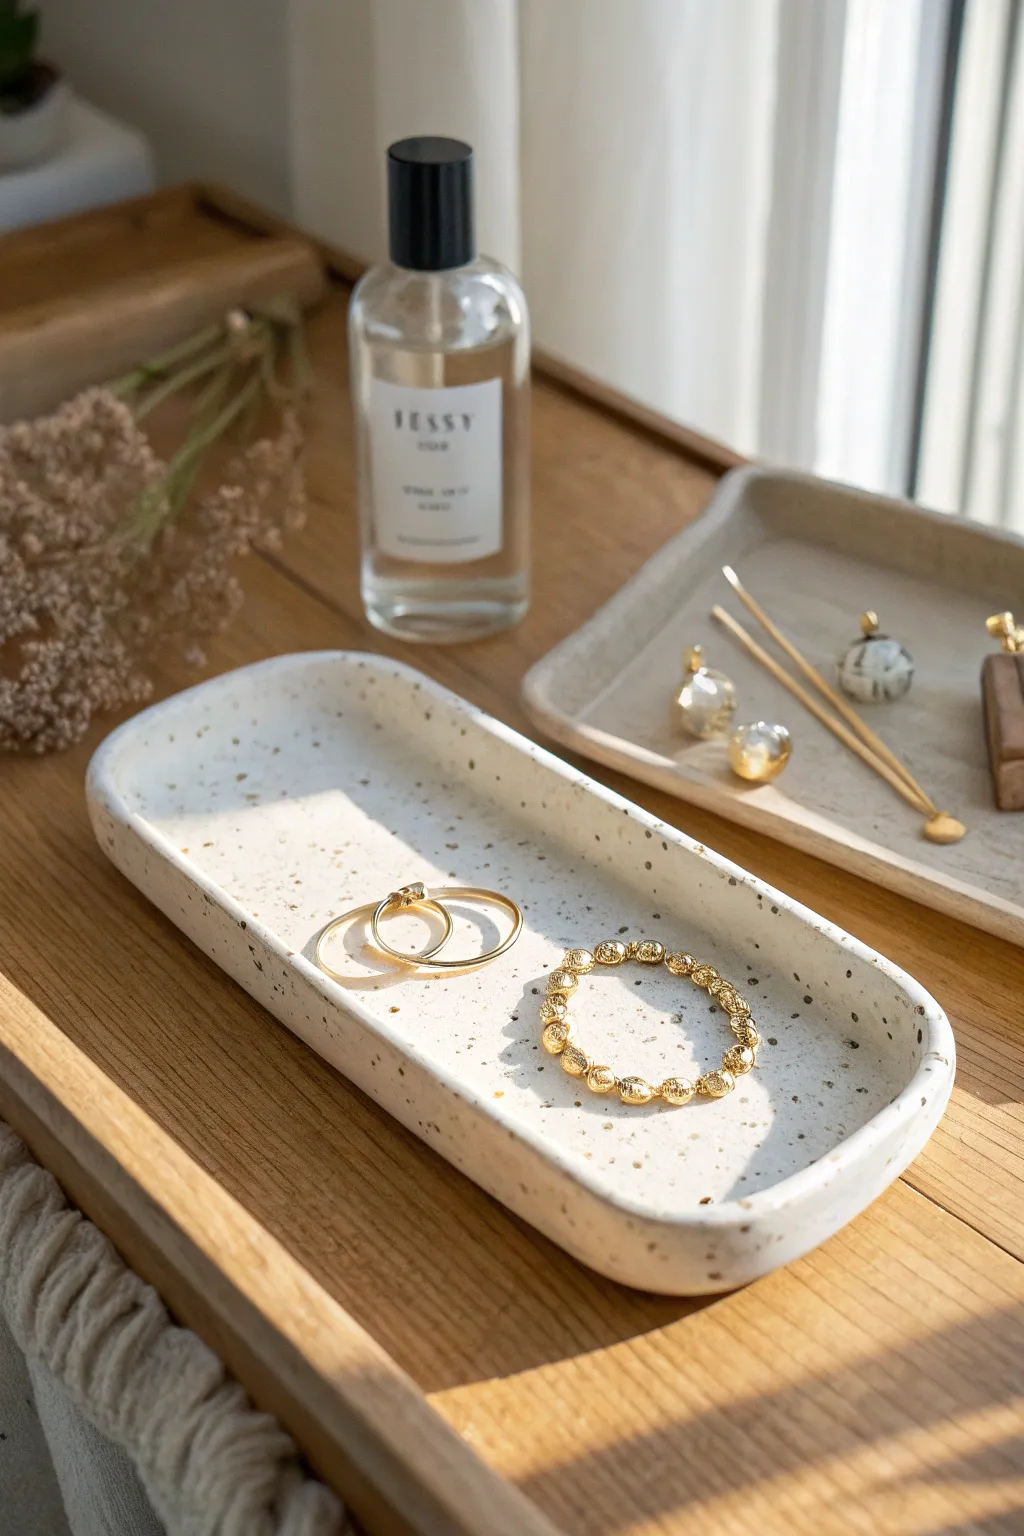
Create a sophisticated long vanity tray that looks like expensive speckled ceramic but can be made right at home with air-dry clay or polymer clay. Its elongated shape and subtle texture make it perfect for organizing your gold accessories, daily scents, or small keepsakes.
Detailed Instructions
Materials
- White air-dry clay or polymer clay
- Rolling pin
- Craft knife or clay cutter
- Ruler
- Fine-grit sandpaper (400 and 600 grit)
- Acrylic paints (black, brown, burnt sienna)
- Old toothbrush or stiff bristle brush
- Gloss or satin varnish/sealant
- Small bowl or cup of water
- Guide rails or magazines (for even thickness)
- Soft sponge
Step 1: Shaping the Clay
-
Condition the clay:
Start by taking a generous amount of white clay and kneading it in your hands. This warms up the material, making it pliable and preventing cracks later on. -
Roll out the slab:
Place your clay on a smooth surface. Using guide rails or two magazines of equal thickness on either side, roll the clay out until you have a uniform slab about 1/4 inch thick. -
Cut the rectangle:
Use your ruler and craft knife to cut a long rectangle. Aim for dimensions around 10 inches by 4 inches, or whatever size fits your vanity space best. -
Create the walls:
Gather the excess clay scraps and roll them into a long, even coil or ‘snake’ about the thickness of your pinky finger. This will form the rim of the tray. -
Attach the coil:
Score the edges of your rectangular base and the underside of the coil with a needle tool or toothpick. If using air-dry clay, dab a little water (slip) on the scored areas; for polymer clay, use a touch of liquid clay or just firm pressure. -
Secure the rim:
Place the coil along the perimeter of the base rectangle. Gently press it down to ensure good contact all the way around. -
Blend the seams:
Using your thumb or a modeling tool, drag the clay from the coil down onto the base, both on the inside and outside. Smooth this seam until the wall and base look like one solid piece. -
Shape the corners:
The tray in the photo has soft, rounded corners rather than sharp angles. Use your fingers to gently curve the inside and outside of each corner, smoothing away any sharp edges.
Pro Tip: Clean edges
Keep a small bowl of water nearby while blending the coil walls. A wet finger acts like a mini-smoothing tool to erase seam lines effortlessly.
Step 2: Refining and Finishing
-
Smooth the surface:
Dip a sponge lightly in water and run it over the entire surface to remove fingerprints and minor bumps. I like to be extra gentle here to keep the walls vertical. -
Dry or bake:
If using air-dry clay, let the piece dry for 24-48 hours, flipping it occasionally for even airflow. If using polymer clay, bake according to the package instructions. -
Sand for perfection:
Once fully cured and cool, use fine-grit sandpaper to smooth out any remaining imperfections, focusing on the top rim and the rounded corners. -
Prepare the speckle paint:
Mix a small amount of water with black, brown, and burnt sienna acrylic paint in separate dishes. You want an inky, fluid consistency. -
Apply the first speckles:
Dip an old toothbrush into the watered-down black paint. Hold it over the tray and flick the bristles with your thumb to spray tiny droplets across the surface. -
Add dimension:
Repeat the flicking process with the brown and burnt sienna mixtures. Using multiple colors adds depth and mimics the look of natural fired ceramic or stone. -
Let the paint dry:
Allow the paint speckles to dry completely. This usually only takes about 15-20 minutes since the layers are so thin. -
Seal the tray:
Apply a coat of satin or gloss varnish over the entire piece. This protects the paint and gives the tray a finished, high-end ceramic look.
Level Up: Gold Rim
After the speckles are dry, paint just the very top edge of the rim with liquid gold leaf or metallic acrylic paint for a luxe, gilded finish.
Place your new tray on your dresser and enjoy the elegant, minimalist home for your favorite jewelry pieces


Soap Tray With Drainage Ridges
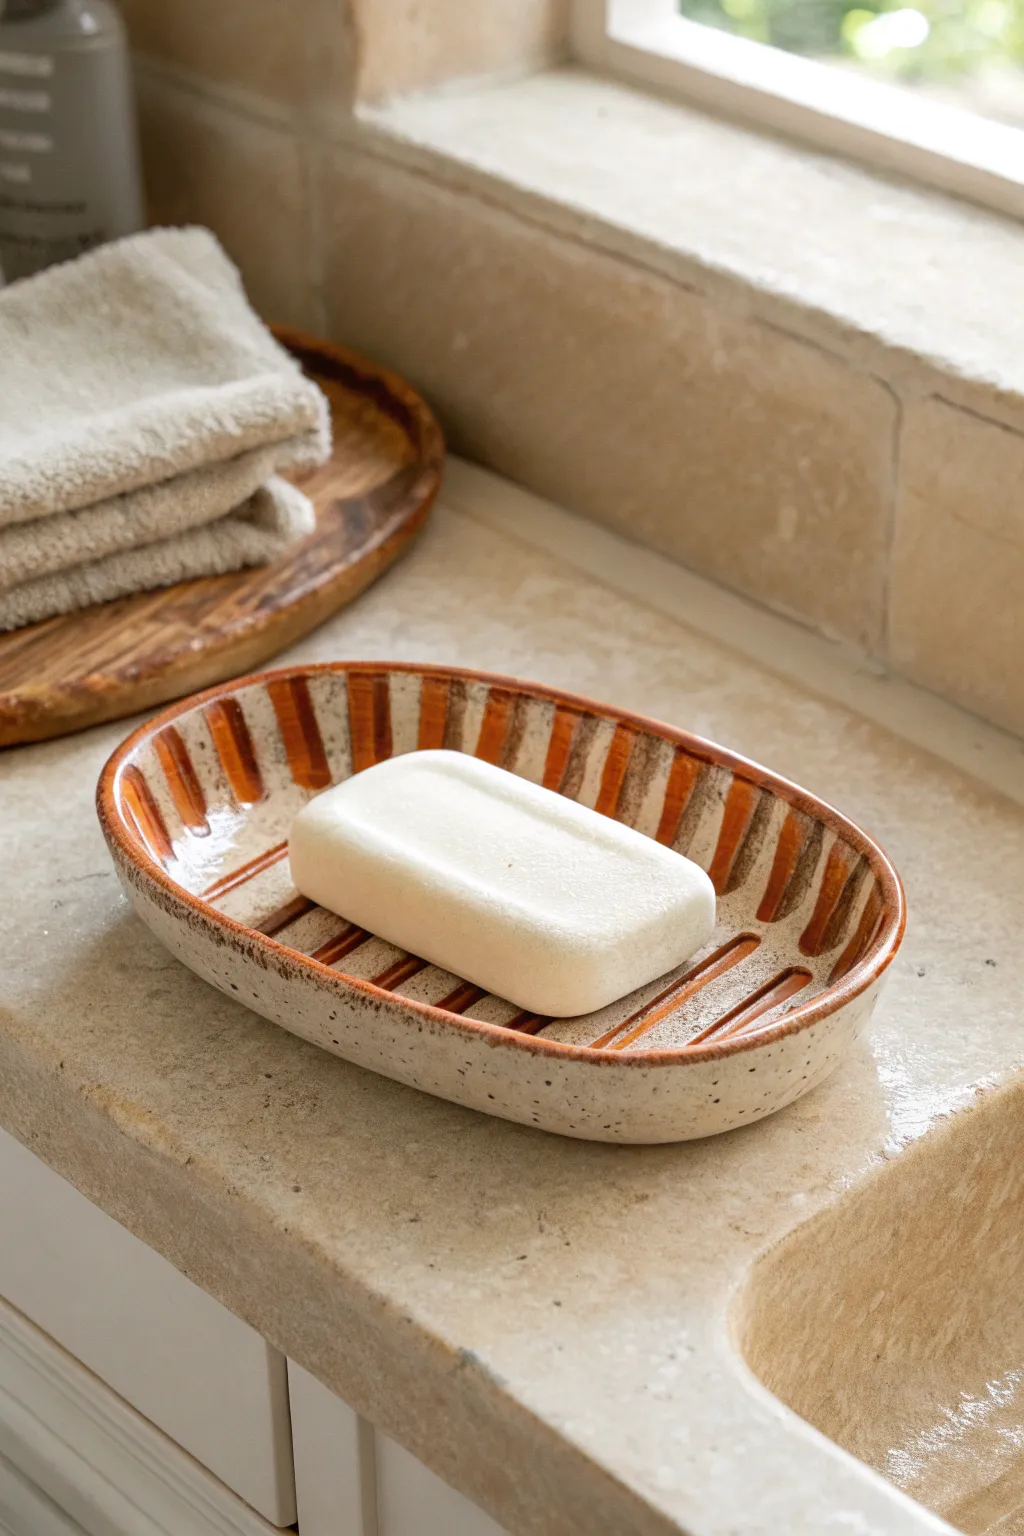
Bring earthy charm to your bathroom counter with this speckled ceramic soap dish featuring hand-carved drainage ridges. The warm terracotta stripes and natural glaze create a spa-like aesthetic while keeping your soap dry and extending its life.
Step-by-Step Guide
Materials
- Speckled stoneware clay (approx. 1 lb)
- Rib tool (kidney shaped, soft)
- Needle tool
- Loop tool (medium size)
- Small carving tool
- Sponge
- Rolling pin and guide sticks (1/4 inch)
- Canvas or slab mat
- Iron oxide wash or terracotta underglaze
- Clear matte glaze
- Small paintbrush
Step 1: Forming the Base
-
Prep the clay:
Begin by wedging your speckled stoneware clay thoroughly to remove any air bubbles. This ensures a strong, crack-free finish during firing. -
Roll the slab:
Set up your guide sticks on either side of the clay. Roll the clay out into a smooth, even slab about 1/4 inch thick. -
Smooth the surface:
Take your soft rib tool and gently compress the slab surface in all directions. This aligns the clay particles and creates a pristine canvas for your design. -
Cut the shape:
Using a needle tool, cut out a distinct oval shape. I find measuring about 6 inches long by 4 inches wide is perfect for standard soap bars. -
Soften the edges:
Run a damp sponge or your fingertip along the cut edge to round it off slightly, removing any sharp burrs left by the needle tool.
Even Drying is Key
To prevent warping, dry the dish slowly. Loosely cover it with plastic for the first day so the rim and base dry at the same rate.
Step 2: Building the Rim
-
Create a coil:
Roll a separate piece of clay into a long, thin coil, roughly the thickness of a pencil. -
Score and slip:
Score the outer perimeter of your oval base and one side of the coil. Apply a small amount of slip (liquid clay) to the scored areas. -
Attach the rim:
Press the coil firmly onto the edge of the base. Gently pinch it to adhere it securely. -
Blend the seams:
Using a modeling tool or your thumb, blend the inside of the coil down into the base so the transition is seamless. Repeat for the outside edge. -
Refine the wall:
Use your fingers to pull the wall up slightly, creating a gentle curve. The dish should be about 1 inch deep.
Step 3: Carving and Decorating
-
Carve the ridges:
Wait until the clay is leather-hard. Use a loop tool to carve parallel grooves along the bottom of the dish interior. These ridges allow water to drain away from the soap. -
Add stripe details:
Using a smaller carving tool, gently etch vertical lines along the inner walls of the dish, aligning them roughly with the floor ridges. -
Clean up crumbs:
Brush away any clay crumbs with a soft, dry brush. Avoid using water at this stage, as it can weaken the details. -
Bisque fire:
Allow the piece to dry completely (bone dry) before loading it into the kiln for the first firing (bisque fire), typically to cone 04. -
Apply oxide wash:
Once bisqued, paint the interior stripes and ridges with an iron oxide wash or terracotta underglaze. Wipe back excess with a sponge so the color remains mostly in the recesses. -
Glaze the piece:
Dip the entire dish into a clear matte glaze, or brush it on evenly. Ensure the foot of the dish is wiped clean of glaze. -
Final fire:
Load the kiln again for the glaze firing, typically to cone 5 or 6 depending on your clay body instructions.
Glaze Pooling?
If glaze fills your carved ridges too thickly, the definition will be lost. Blow gently on the wet glaze or brush excess out of the grooves before firing.
Place your finished dish by the sink and enjoy the functional beauty of your handmade ceramic art

The Complete Guide to Pottery Troubleshooting
Uncover the most common ceramic mistakes—from cracking clay to failed glazes—and learn how to fix them fast.
Entryway Key-and-Coin Catchall Tray
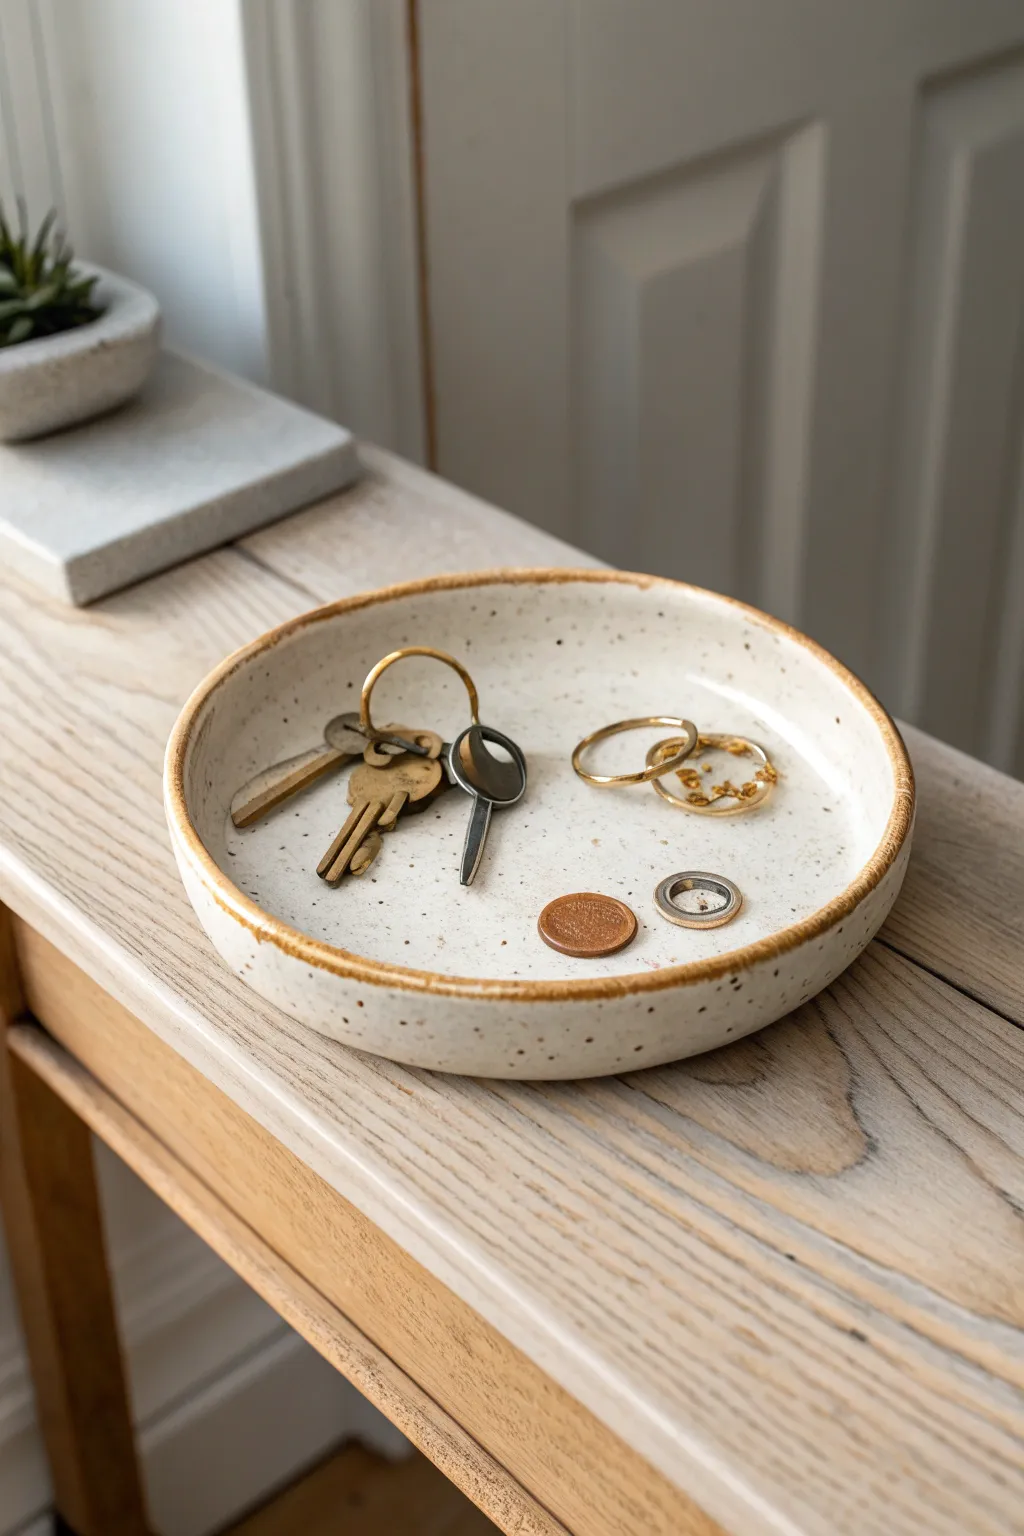
Create a rustic yet refined entryway dish perfect for corralling keys and loose change. This project uses speckled stoneware clay and a simple slab-building technique to achieve a charming, organic form with a distinctive exposed clay rim.
Detailed Instructions
Materials
- Speckled stoneware clay (white body with manganese speckles)
- Rolling pin
- Canvas work surface or slab mat
- Circular template (paper or flexible plastic, approx. 6-7 inches diameter)
- Fettling knife or pin tool
- Scoring tool (or serrated rib)
- Slip (clay scraps mixed with water)
- Small sponge
- Banding wheel (optional but helpful)
- Wooden modeling tool
- Glossy clear or transparent white glaze
- Wax resist (optional)
Step 1: Preparing the Slab
-
Wedge the clay:
Start with a ball of speckled stoneware clay roughly the size of a large grapefruit. Wedge it thoroughly on your canvas surface to remove air bubbles and ensure the consistency is even throughout. -
Flatten the base:
Press the ball of clay flat with your palm to create a thick puck. This initial flattening helps guide the shape before you begin rolling. -
Roll the slab:
Using your rolling pin, roll the clay out into an even slab. Aim for a consistent thickness of about 1/4 inch. I find rotating the slab frequently prevents it from sticking to the canvas. -
Compress the surface:
Take a rubber rib or a damp sponge and gently drag it across the surface of the slab on both sides. This aligns the clay particles, preventing warping during firing, and smooths out canvas textures.
Rustic Rim Aesthetic
Instead of wax resist, try simply wiping the glaze off the rim with a damp sponge after dipping. This creates a softer, more organic transition line than wax.
Step 2: Constructing the Tray
-
Cut the base:
Place your circular template onto the slab. Using your fettling knife, cut vertically around the template to create a clean circle for the base of your tray. -
Create the side strip:
From the remaining slab, cut a long rectangular strip about 1 inch tall. Ensure it is long enough to wrap around the entire circumference of your circular base. -
Score the connection points:
Take your scoring tool and roughen the top edge of your circular base. Do the same to one long edge of your rectangular strip. Apply a generous amount of slip to these scored areas. -
Attach the wall:
Gently lift the strip and place it onto the scored edge of the base. Wrap it fully around, overlapping the ends slightly where they meet. -
Cut and join the seam:
Where the strip ends overlap, slice through both layers at a diagonal angle. Remove the excess clay pieces, score the fresh edges, apply slip, and press them firmly together to create a seamless wall.
Warping Walls?
If your tray walls slump or warp while drying, they might be too wet. Use a heat gun briefly to stiffen the clay before building, or dry it upside down initially.
Step 3: Refining and Shaping
-
Blend the interior seam:
Use a wooden modeling tool to drag clay from the wall down onto the base on the inside of the tray. Smooth this area thoroughly so the transition from floor to wall is a gentle curve rather than a sharp angle. -
Secure the exterior:
Flip the tray over gently or support the wall with one hand while using your tool to blend the exterior seam where the wall meets the base. Smooth away any tooling marks with your sponge. -
Shape the rim:
Run a damp sponge or your fingers wrapped in a piece of chamois leather over the top rim. Round it off nicely to ensure it feels soft to the touch after firing. -
Enhance the form:
If you want the slightly flared look seen in the photo, gently press the walls outward from the inside using a soft rib while supporting the exterior with your other hand. -
Dry slowly:
Cover the completed tray loosely with plastic. Allow it to dry slowly to the bone-dry stage to prevent the base from cracking or the rim from warping.
Step 4: Glazing and Firing
-
Bisque fire:
Fire the bone-dry piece in a kiln to cone 04 (or your clay’s specific bisque temperature). This prepares the clay to accept glaze. -
Wax the rim:
To achieve the contrast seen in the inspiration image, carefully apply wax resist to the very top edge of the rim. This prevents the glaze from sticking there, leaving the raw speckled clay exposed. -
Apply the glaze:
Dip the tray into a glossy white or transparent glaze. Alternatively, pour the glaze inside, swirl to coat, and pour out the excess. -
Clean the foot:
Wipe the bottom of the tray completely clean of any glaze with a damp sponge to prevent it from fusing to your kiln shelf. -
Glaze fire:
Fire the piece a final time to the maturity temperature of your clay and glaze (typically cone 5 or 6 for stoneware). The heat will interact with the clay’s manganese, bringing out those beautiful dark speckles through the glaze.
Once fired, place this functional beauty on your console table and enjoy the satisfaction of using your own handmade pottery every day
Thumbprint Rim Trinket Tray

This charming, shallow ceramic dish features earthy tones and intricate sgraffito-style spiral patterns that give it a warm, handmade feel. The interior hosts a mesmerizing concentric ripple design, while the exterior boasts a sturdy, carved motif perfect for holding trinkets or serving snacks.
Step-by-Step Guide
Materials
- Stoneware clay (buff or speckled)
- Pottery wheel (or slab roller for hand-building)
- Rib tool (wooden and metal)
- Loop carving tool (small rounded edge)
- Needle tool
- Sponge
- Creamy white glaze (food safe)
- Clear glaze (optional)
- Iron oxide wash or dark tan stain
- Kiln
- Wire cutter
Step 1: Forming the Base
-
Center and throw:
Begin with about 1-1.5 lbs of stoneware clay. Center it firmly on your pottery wheel bat, ensuring no wobble exists before opening. -
Open the clay:
Open the clay wide and shallow. Instead of pulling tall walls, focus on creating a floor that transitions gently into a low, vertical rim about 1.5 inches high. -
Compress the floor:
Use a wooden rib or a damp sponge to compress the floor thoroughly. This prevents future cracking and creates a smooth canvas for your interior texture. -
Add interior texture:
While the wheel is spinning slowly, take a small loop tool or even a rounded wooden stick. Starting from the exact center, press gently and move slowly outward to the edge of the floor to create the continuous spiral ridge pattern. -
Clean the rim:
Use a chamois or a small strip of plastic to smooth the lip of the bowl, ensuring it is rounded and comfortable to touch. -
Wire off:
Run your wire cutter under the base of the pot and set the bat aside until the clay reaches leather-hard consistency.
Clean Lines
Wait until the clay is a firm leather-hard before carving. If the clay is too wet, the tool will drag and create messy, jagged edges.
Step 2: Trimming and Carving
-
Trim the foot:
Once leather hard, center the bowl upside down on the wheel. Trim away excess weight from the bottom and define a clean, low foot ring. -
Sketch exterior guides:
Using a needle tool, lightly scratch a horizontal line around the midpoint of the exterior wall to act as a guide for your carving. -
Carve the bottom spirals:
Using a small loop tool, carve repetitive circular swirls along the bottom half of the exterior wall. Vary the pressure slightly to give the lines an organic, hand-drawn look. -
Carve the top vertical lines:
On the upper half of the exterior rim, carve vertical, slightly angled lines. These don’t need to be perfectly parallel; irregular spacing adds character. -
Smooth the burrs:
Once the carving is done, gently rub the surface with a barely damp sponge or your finger to knock off any sharp clay crumbs or burrs without erasing the texture. -
Bisque fire:
Let the piece dry completely (bone dry) and fire it to bisque temperature (usually Cone 04 or 06).
Glaze Too Thick?
If your interior spiral texture disappears after glazing, your glaze application was likely too thick. Add a little water to thin it or wipe more off the high points.
Step 3: Glazing and Finishing
-
Apply oxide wash:
Brush an iron oxide wash or dark tan stain into the carved lines on the exterior and the spiral grooves on the interior. -
Wipe back:
Using a damp sponge, wipe away the excess oxide from the raised surfaces, leaving the dark color trapped only in the recessed textures. -
Glaze interior:
Pour a creamy white glaze into the interior. Swirl it quickly to coat, then pour out the excess. The glaze should break over the spiral ridges, revealing the clay body underneath. -
Glaze exterior rim:
Dip the exterior quickly or brush the white glaze lightly near the rim, letting the raw clay and oxide show through on the lower carved sections for contrast. -
Clean the foot:
Wipe the foot ring completely clean of glaze to prevent it from sticking to the kiln shelf. -
Final firing:
Fire the piece to maturity (Cone 6 or 10, depending on your clay and glaze).
Now you have a beautifully textured dish ready to display your favorite small treasures


What Really Happens Inside the Kiln
Learn how time and temperature work together inside the kiln to transform clay into durable ceramic.
Scalloped Edge Dessert Tray
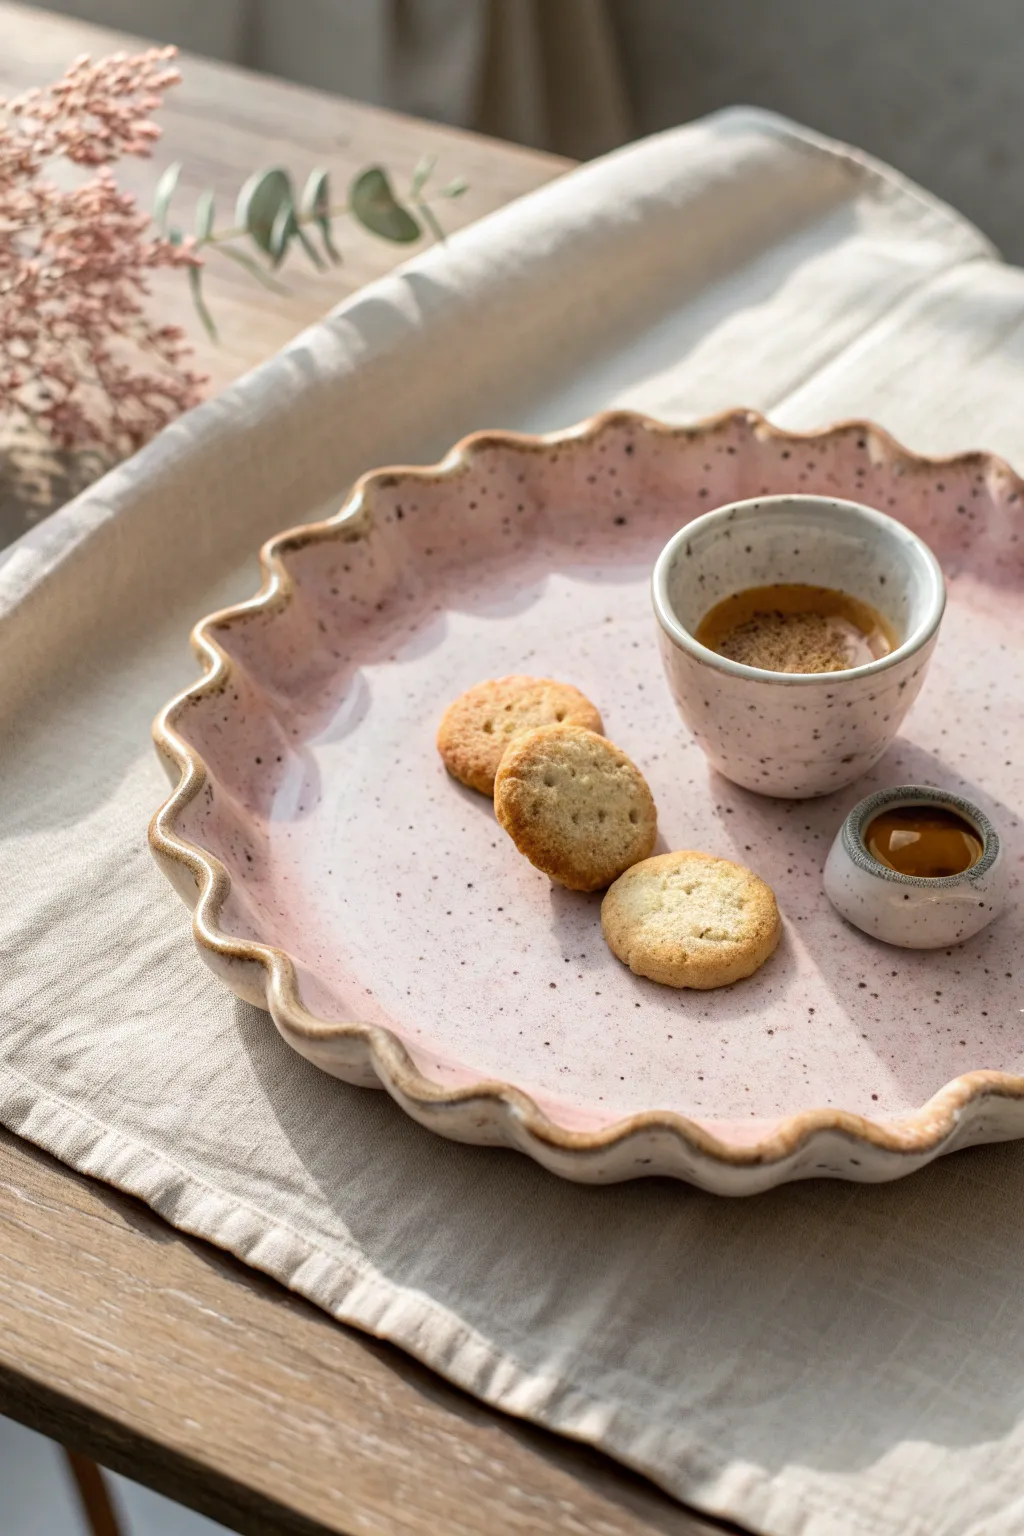
Embrace the charm of handmade imperfections with this softly scalloped dessert tray and matching dip cup. The finished piece features a delicate pink glaze with natural speckling, perfect for a cozy afternoon tea or displaying your favorite jewelry.
Detailed Instructions
Materials
- Speckled clay body (buff or white stoneware)
- Rolling pin
- Canvas work surface
- Circle template or plate (approx. 9-10 inches)
- Needle tool
- Pottery sponge
- Rib tool (wooden or silicone)
- Soft pink glossy glaze
- Clear glaze (optional)
- Kiln access
- Modeling tool or finger for fluting
Step 1: Forming the Tray Base
-
Wedge the clay:
Begin by thoroughly wedging about 2-3 pounds of speckled clay. This ensures all air bubbles are removed and the clay particles are aligned, which is crucial for preventing cracks during firing. -
Roll out a slab:
Roll your clay out onto a canvas surface until it is a consistent 1/4 inch thickness. Rotate the slab frequently as you roll to ensure it stretches evenly and doesn’t stick to the fabric. -
Compress the slab:
Using a rib tool, gently drag it across the surface of the clay in multiple directions. This compression step strengthens the bonds in the clay and creates a pristine, smooth canvas for your glaze later. -
Cut the circle:
Place your circular template or an upside-down dinner plate onto the slab. Trace around it essentially using a needle tool held vertically, then remove the excess clay.
Step 2: Creating the Scalloped Edge
-
Lift the rim:
Place the clay circle on a banding wheel or a movable board. Gently lift the outer 1 inch of the rim upward with your fingers to create a shallow dish profile, rather than a flat plate. -
Mark the intervals:
Lightly mark even intervals around the rim where you want your scallops to be. You don’t need to measure perfectly; eyeing it keeps the organic, handmade feel. -
Form the scallops:
Use your thumb and forefinger to gently push the rim inward at your marked points, while using a finger from your other hand to push outward in the spaces between. This push-pull motion creates the wave pattern. -
Refine the curve:
Once the basic wave is established, smooth the curves with a damp sponge. Make sure the peaks of the scallops aren’t too sharp, as glaze tends to run off sharp edges. -
Smooth the lip:
Run a piece of chamois or a very smooth, damp sponge along the very edge of the rim to compress it one last time and ensure it will be comfortable to handle.
Warping Woes?
If your tray doesn’t sit flat after drying, try weighing down the center with a sandbag or small bag of rice during the leather-hard drying stage.
Step 3: The Matching Cup (Optional)
-
Pinch pot method:
Roll a small ball of leftover clay, about the size of a golf ball. Press your thumb into the center and gently pinch the walls upward and outward while rotating the ball. -
Shape the vessel:
Keep pinching until the walls are an even thickness. Since the tray is organic, I like to keep the cup slightly irregular too, just smoothing the rim so it’s pleasant to drink from.
Glaze Tip Effect
To get the burnt-orange edge effect seen in the image, look for a glaze labeled ‘breaking.’ These thin out over textures, revealing the raw clay color beneath.
Step 4: Drying and Bisque Firing
-
Slow drying:
Loosely cover your tray and cup with plastic. Allow them to dry very slowly over several days to prevent the large flat bottom of the tray from warping. -
Bisque fire:
Once bone dry, fire the pieces to bisque temperature (usually cone 04 or 06, depending on your clay body instructions).
Step 5: Glazing
-
Wax the bottom:
Apply wax resist to the foot or bottom surface of both the tray and cup to prevent them from sticking to the kiln shelf. -
Apply the pink glaze:
Dip or brush your soft pink glaze onto the tray. If your clay body is heavily speckled, a semi-transparent glaze works best to let those iron spots show through. -
Rim accent:
For the darker rim effect seen in the photo, wipe the glaze thinly on the very edge, or layer a slightly darker, reactive glaze just on the scallop peaks. -
Final fire:
Fire the pieces to the maturity temperature of your clay and glaze (typically cone 5 or 6 for stoneware). Let the kiln cool completely before opening.
Once fired, layout your sweets and enjoy the beautiful contrast between the soft pink glaze and the earthy speckles of the clay.
Wavy Organic Freeform Tray
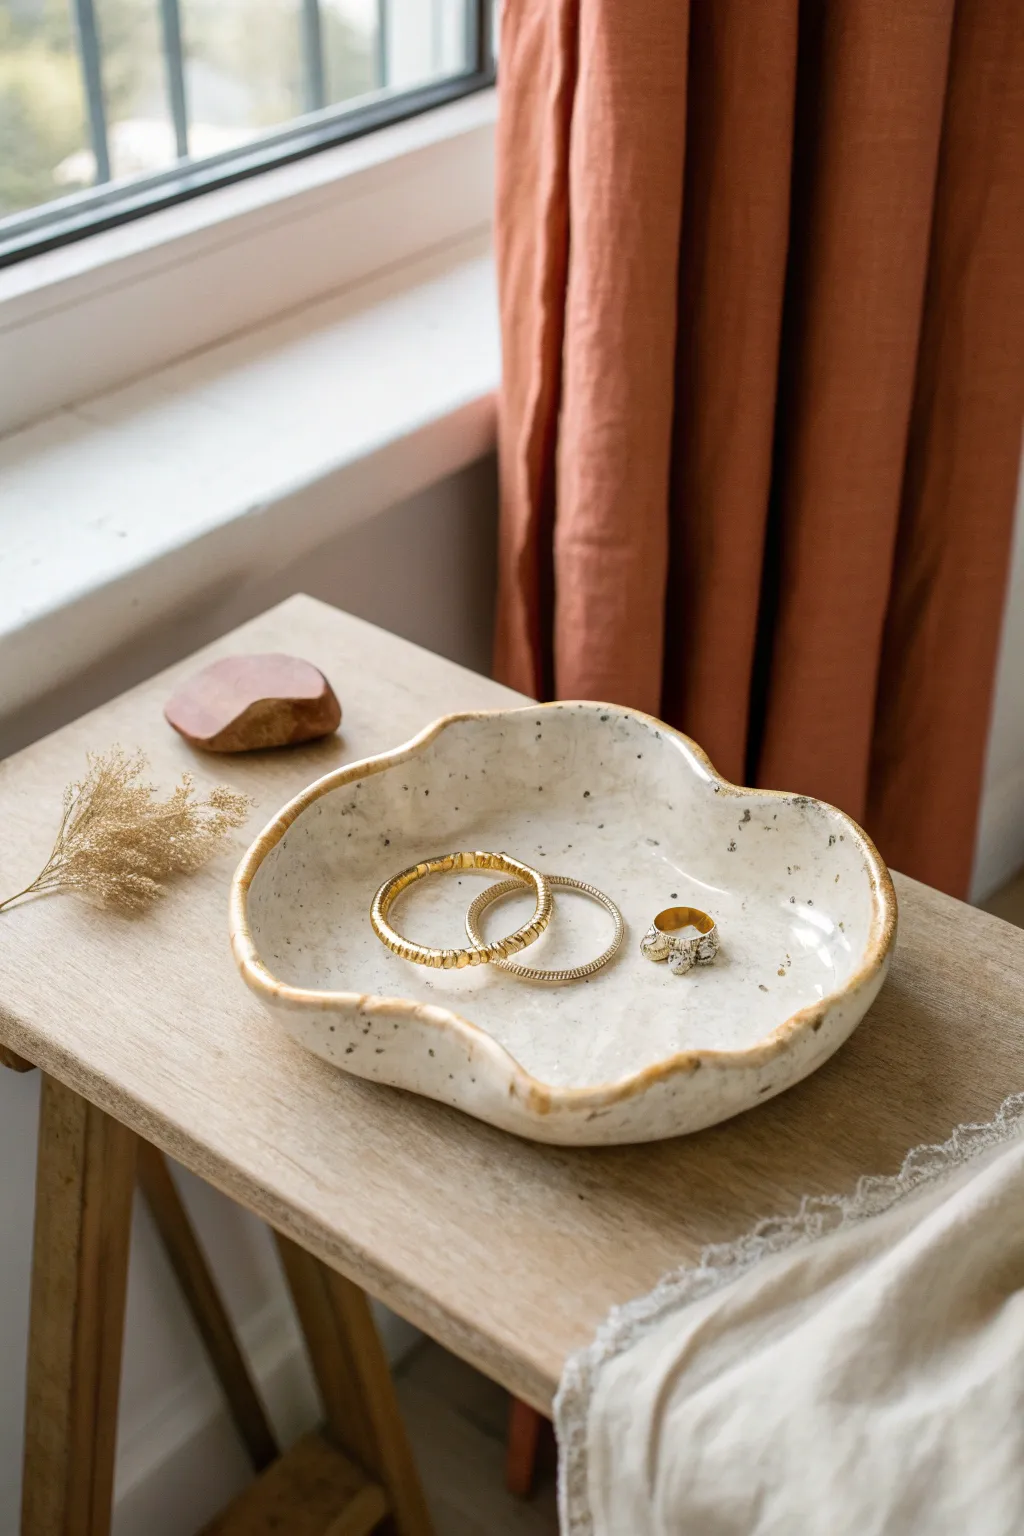
Embrace the beauty of imperfection with this lovely freeform ceramic tray, perfect for holding your daily jewelry. Its gentle, wavy rim and speckled glaze give it a natural, earthy feel that looks effortlessly chic on any bedside table.
Step-by-Step Tutorial
Materials
- White stoneware clay (speckled variety recommended)
- Rolling pin
- Canvas mat or slab roller
- Needle tool or fettling knife
- Soft rib tool (rubber or silicone)
- Sponge
- Bowl or slump mold (optional)
- Speckled white glaze (if clay isn’t speckled)
- Iron oxide wash or brown underglaze
- Clear glaze
- Paintbrushes
- Kiln access
Step 1: Shaping the Clay Body
-
Prep the clay:
Begin by wedging your clay thoroughly to remove air bubbles. If you are using a standard white clay but want the look shown, you can wedge in granular manganese or ilmenite, but buying pre-mixed speckled clay is much easier. -
Roll out a slab:
Place your clay on a canvas mat to prevent sticking. Roll it out into an even slab, approximately 1/4 inch thick. I like to rotate the clay periodically to ensure an even thickness throughout. -
Compress the slab:
Take your soft rib tool and gently run it over the surface of the slab in multiple directions. This compresses the clay particles, preventing future cracking, and smooths out the canvas texture. -
Cut the organic shape:
Using a needle tool, sketch a loose, abstract flower or cloud shape directly onto the clay. Don’t aim for perfect symmetry; the charm lies in the freeform curves. Cut along your sketched line. -
Smooth the edges:
Dip your fingers or a small sponge in a little water and run them along the cut edge to round it off. Sharp edges can become very brittle after firing, so aim for a soft, rounded rim.
Use a Slump Mold
For more consistent curves, drape your clay sland over a melon or a rounded rock covered in plastic wrap while shaping the waves.
Step 2: Forming the Waves
-
Lift the edges:
Gently lift the edges of your clay slab. You can do this by placing the slab into a shallow bowl lined with plastic wrap to serve as a slump mold, or by hand-forming it on a flat surface. -
Create the undulation:
If hand-forming, pinch and lift sections of the rim to create the wavy, undulating effect. Support the raised areas with small pieces of foam or balled-up newspaper underneath so they don’t collapse while drying. -
Refine the curve:
Use your thumb to gently press the center of the tray down slightly, ensuring there is a nice dip to hold items securely. Smooth out any finger marks with a damp sponge. -
Slow drying:
Cover the piece loosely with plastic to let it dry slowly to the leather-hard stage. This prevents warping. Once leather-hard, uncover and let it dry completely to bone dry before the bisque fire.
Step 3: Glazing and Firing
-
Bisque fire:
Fire the bone-dry piece in the kiln to cone 04 (or your clay’s specific bisque temperature). This prepares the ceramic for glazing. -
Clean the bisque:
Wipe the fired piece with a damp sponge to remove any kiln dust. This ensures the glaze adheres properly to the surface. -
Apply base glaze:
If your clay body is speckled, dip or brush on a clear or semi-opaque white glaze. If your clay is plain white, use a ‘speckled white’ commercial glaze to achieve the spotted effect shown in the image. -
Create the oxide rim:
Dip a small, fine brush into iron oxide wash or a dark brown underglaze. Very carefully paint the very top edge of the wavy rim. The unsteady, hand-painted line adds to the organic aesthetic. -
Glaze fire:
Load the kiln for the final glaze firing. Make sure to wipe the bottom of the tray clean of any glaze so it doesn’t fuse to the kiln shelf. Fire to the maturity temperature of your clay and glaze (often Cone 5 or 6). -
Cool and finish:
Allow the kiln to cool completely before opening. I find that rushing the cooling process can sometimes craze the glaze. Remove your finished tray and check the bottom for any rough spots, sanding them down if necessary.
Add Gold Luster
For extra luxury, apply a real gold overglaze to the rim after the glaze firing and refire at a lower temperature (Cone 018).
Now you have a stunning, boutique-style catchall ready to display your favorite rings.

TRACK YOUR CERAMIC JOURNEY
Capture glaze tests, firing details, and creative progress—all in one simple printable. Make your projects easier to repeat and improve.
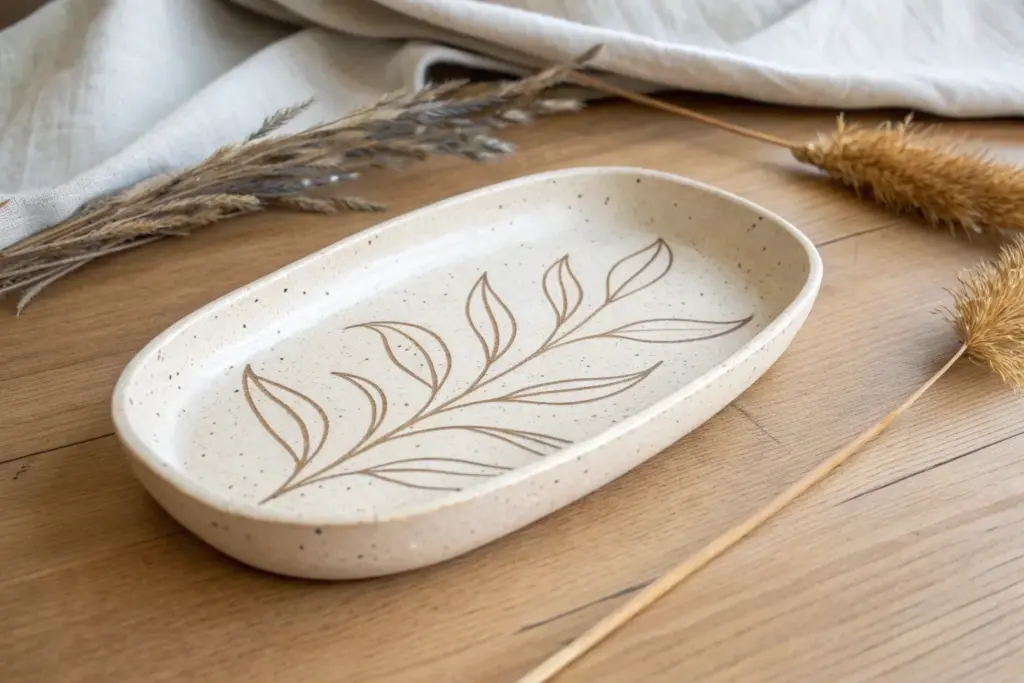
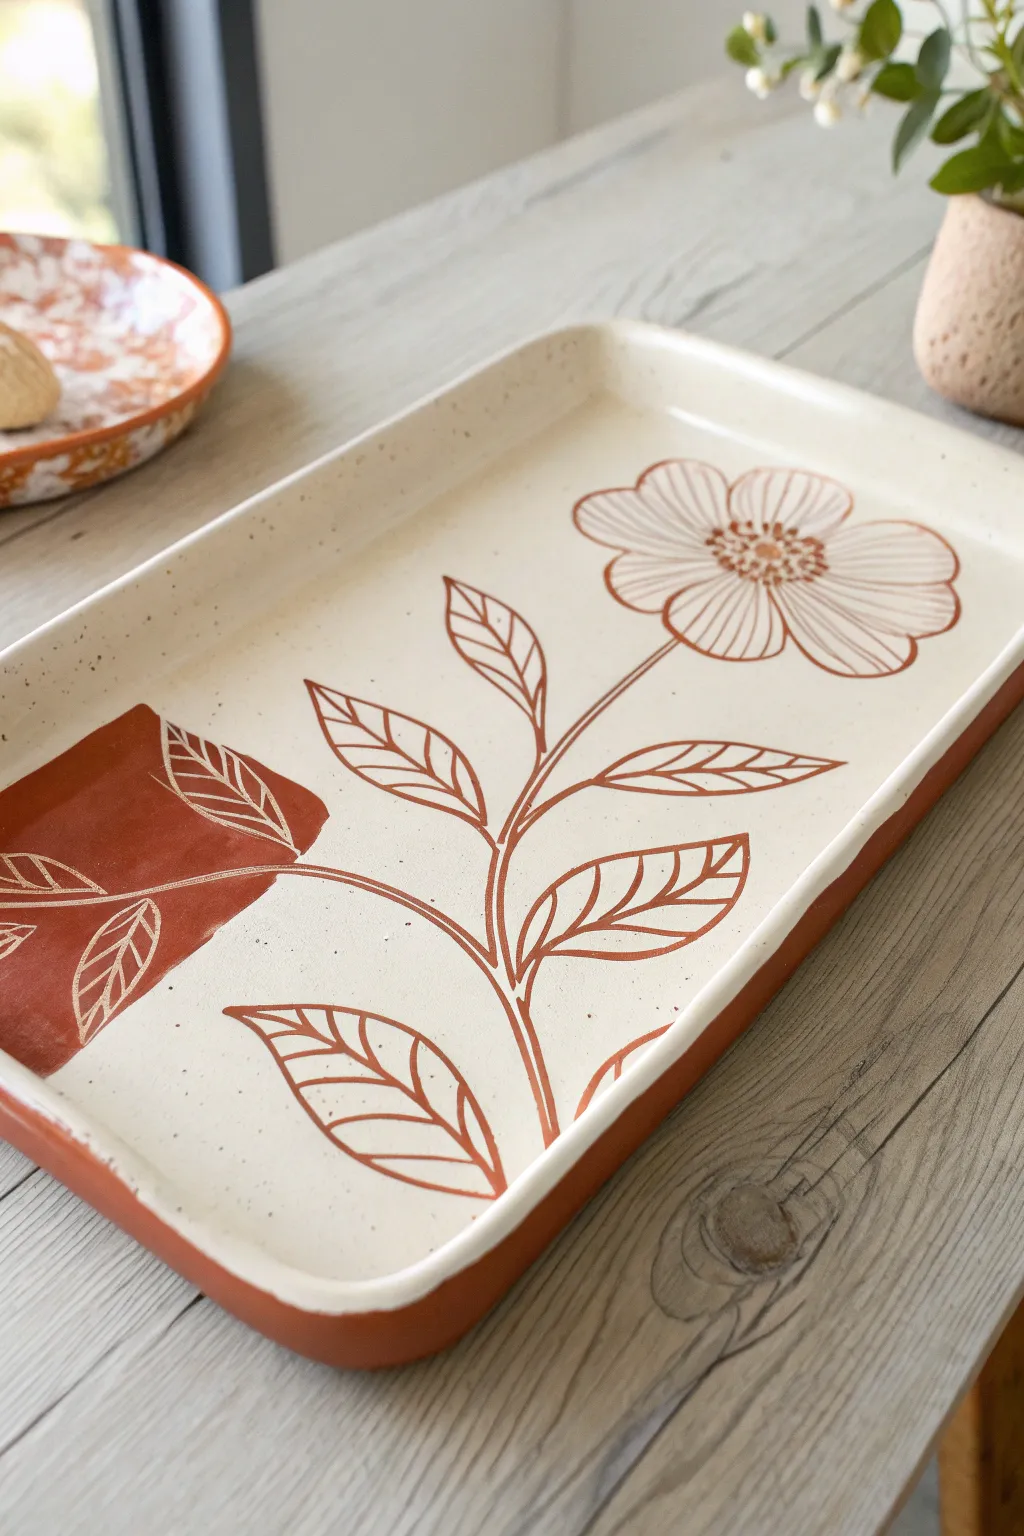
Minimal Botanical Line Art Tray

This elegant ceramic project features a stark, simple botanical illustration on a long, cream-colored tray. The fine black lines create a sophisticated contrast against the glossy, speckled glaze, making it a perfect accent piece for a modern dining table or vanity.
Step-by-Step Guide
Materials
- Bisque-fired rectangular ceramic tray (approximately 10×5 inches)
- Black underglaze pencil or fine-tip underglaze applicator bottle
- Clear transparent glaze (cone 06 or 6, depending on your clay body)
- Wide soft fan brush
- Pencil and paper for sketching
- Tracing paper (optional)
- Damp sponge
- Kiln access
Step 1: Planning and Preparation
-
Surface Prep:
Begin by wiping down your bisque-fired tray with a damp sponge. This removes any kiln dust or oils from your hands that might interfere with glaze adhesion. -
Sketch Your design:
On a piece of paper, practice drawing a simple, curving stem with alternating leaves. Aim for a loose, organic look rather than perfect symmetry. The design shown uses a single central stem that curves slightly, with paired leaves extending outward. -
Transfer or Freehand:
If you are confident, you can draw directly on the bisque. If you prefer a guide, lightly sketch the main spine of the branch onto the tray using a standard graphite pencil. The graphite will burn off completely in the kiln, leaving only your underglaze design.
Step 2: Applying the Design
-
Draw the Stem:
Using a black underglaze pencil or a fine-tip applicator, draw the central stem first. Start from one corner and extend it diagonally towards the opposite side, stopping before you hit the rim. -
Define the Line Quality:
For the specific look in the photo, allow your lines to be slightly sketchy. Don’t worry about trying to draw one continuous, perfect line. Small breaks or overlapping strokes add to the hand-drawn charm. -
Add Leaf Outlines:
Draw the basic almond shapes of the leaves attaching to the stem. Space them out generously so the design feels airy and uncluttered. -
Detail the Leaves:
Inside each leaf outline, draw a central vein. Then, add the texture. Instead of solid lines, use tiny, rapid dashes or stippling to create the shading on the leaves. This mimics the look of a printed illustration or embroidery. -
Clean Up:
If you make a smudge with the underglaze pencil, you can gently sand it away with a small piece of sandpaper or a stiff brush, but be careful not to damage the bisque surface. -
Set the Design:
Briefly dampen the design by lightly misting it with water or dabbing very gently with a barely damp sponge. This helps the underglaze settle into the pores of the clay before glazing.
Choosing Your Tool
Tips vary! An underglaze pencil gives a charcoal-sketch texture, while a fine liner brush with liquid underglaze creates sharper ink-like lines.
Step 3: Glazing and Firing
-
Prepare the Clear Glaze:
Stir your clear transparent glaze thoroughly. Ensure there are no clumps, as you want a crystal-clear finish to show off the line work. -
First Coat:
Using a wide soft fan brush, apply a flowing coat of clear glaze over the entire interior of the tray. Be careful not to drag the brush hard over the drawing, or you risk smearing the black lines. -
Drying Time:
Let this first coat dry until it is no longer cool to the touch. I usually give it about 15 minutes to be safe. -
Second and Third Coats:
Apply two more coats of clear glaze, allowing each to dry in between. Cross-hatch your brush strokes (brush horizontally for one coat, vertically for the next) to ensure even coverage without streaks. -
Rim Check:
Wipe away any drips from the underside or the foot of the tray using a clean sponge. -
Fire the Tray:
Load the tray into the kiln. Fire it to the temperature required by your specific clay and glaze combination (commonly cone 06 for low fire or cone 6 for mid-fire). The clear glaze will melt and seal your drawing beneath a glossy, food-safe surface.
Smudging The Drawing?
If your clear glaze brush drags the black lines, try dabbing the first coat of glaze on gently rather than brushing it across the surface.
Once cooled, your custom tray is ready to serve snacks or hold jewelry with effortless boutique style
Celestial Sun-and-Moon Tray Set
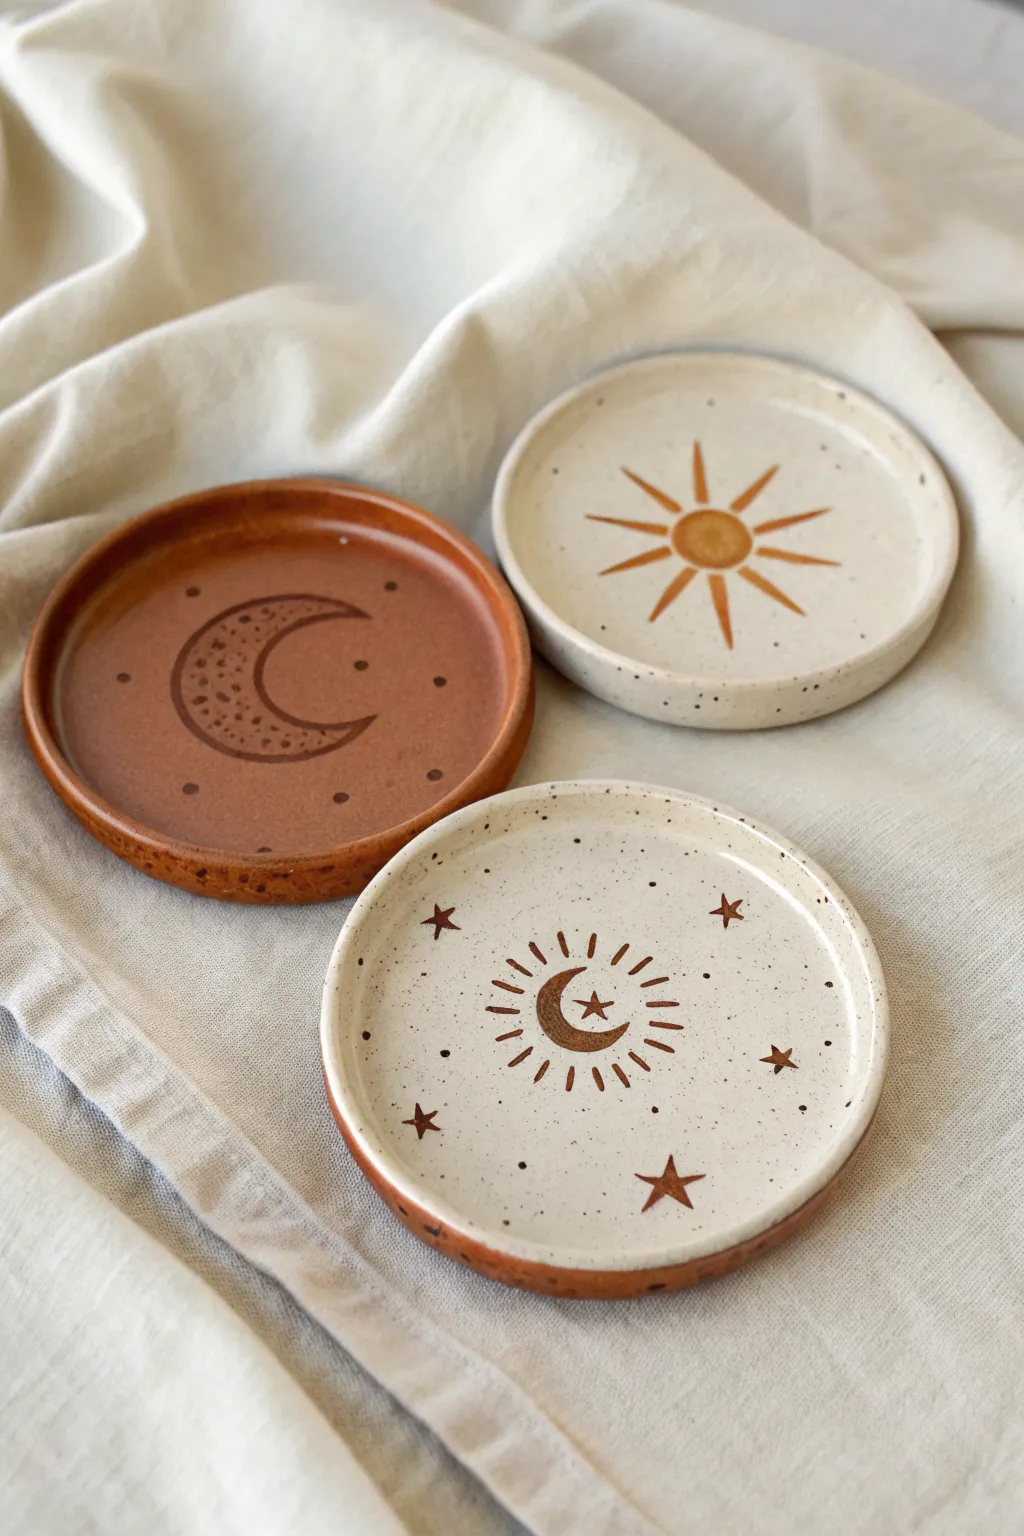
Bring the magic of the cosmos down to earth with this set of three handcrafted ceramic trays featuring warm terracotta tones and speckled cream glazes. These small dishes are perfect for holding rings or crystals, showcasing a charmingly rustic sun, moon, and star motif.
Step-by-Step
Materials
- Red earthenware or terracotta clay
- Rolling pin
- Circular cookie cutters or templates (approx. 4 inches)
- Small sponge
- Creamy white speckled glaze (opaque)
- Clear glaze
- Underglaze pencil or fine brush
- Terracotta or rust-colored underglaze
- Needle tool or toothpick
- Kiln (or air-dry clay alternatives with acrylics/sealant)
Step 1: Shaping the Base
-
Roll out the slab:
Begin by wedging your red clay to remove air bubbles, then roll it out into an even slab about 1/4 inch thick. -
Cut the circles:
Use your circular cutter or a template to cut out three identical circles. Smooth the raw edges with a slightly damp sponge to remove any burrs. -
Create the rims:
Gently pinch up the edges of each circle to create a small, raised rim. You want a shallow dish shape rather than a flat coaster. Smooth the transition between the floor and the wall with your thumb. -
Initial drying:
Allow the pieces to dry to a ‘leather hard’ state. They should be firm enough to handle without warping but still hold moisture.
Smudged Lines?
If your underglaze lines blur on the raw glaze, wait for the base glaze to be bone dry before painting. Use a very fine liner brush and minimal water.
Step 2: Applying the Design
-
Wax resist application (Optional):
For the full moon design on the terracotta dish, apply a circle of wax resist in the center if you plan to glaze around it, or simply leave the clay bare for the next steps. -
Glazing the light trays:
Take two of the trays and apply 2-3 coats of the creamy speckled white glaze to the entire interior surface. Leave the exterior raw clay for contrast if desired, or glaze fully. Let this dry completely. -
Painting the Sun:
On one of the white-glazed trays, use a fine brush and rust-colored underglaze to paint a central solid circle. Extend thin, triangular rays outward to create the sunburst. -
Starry Moon Design:
On the second white tray, paint a small crescent moon in the center using the rust underglaze. Surround it with radiating dashes and tiny five-point stars scattered across the surface. -
The Dark Moon Tray:
For the third tray (the unglazed red clay one), paint a large crescent moon outline using a darker brown underglaze or slip. Fill the crescent with a speckled texture or lighter wash, and dot the surrounding negative space with small painted circles.
Go Gold
For a luxe touch, apply a gold luster overglaze to the sun rays or stars after the final firing, then refire at a very low temperature (Cone 018).
Step 3: Firing and Finishing
-
Bisque fire:
Once fully bone dry, load the trays into the kiln for a bisque firing according to your clay body’s specifications (usually Cone 04-06). -
Clear glaze application:
Dip the red clay tray (and the painted areas of the white trays if the underglaze requires it) into a clear glaze to seal the design and make it food safe. -
Wipe the feet:
Carefully wipe any glaze off the very bottom of the trays with a damp sponge to prevent them from sticking to the kiln shelf. -
Glaze fire:
Fire the pieces a second time to the temperature required by your glaze (often Cone 5 or 6 for stoneware durability). -
Cooling:
Allow the kiln to cool completely before opening. This patience prevents thermal shock and crazing on your beautiful glazes. -
Final inspection:
Check the rims for any sharp spots. If you find any rough patches on the bottom, sand them lightly with wet sandpaper.
Now you have a stunning set of celestial trays ready to organize your trinkets or simply admire
Fruit Pattern Snack Tray
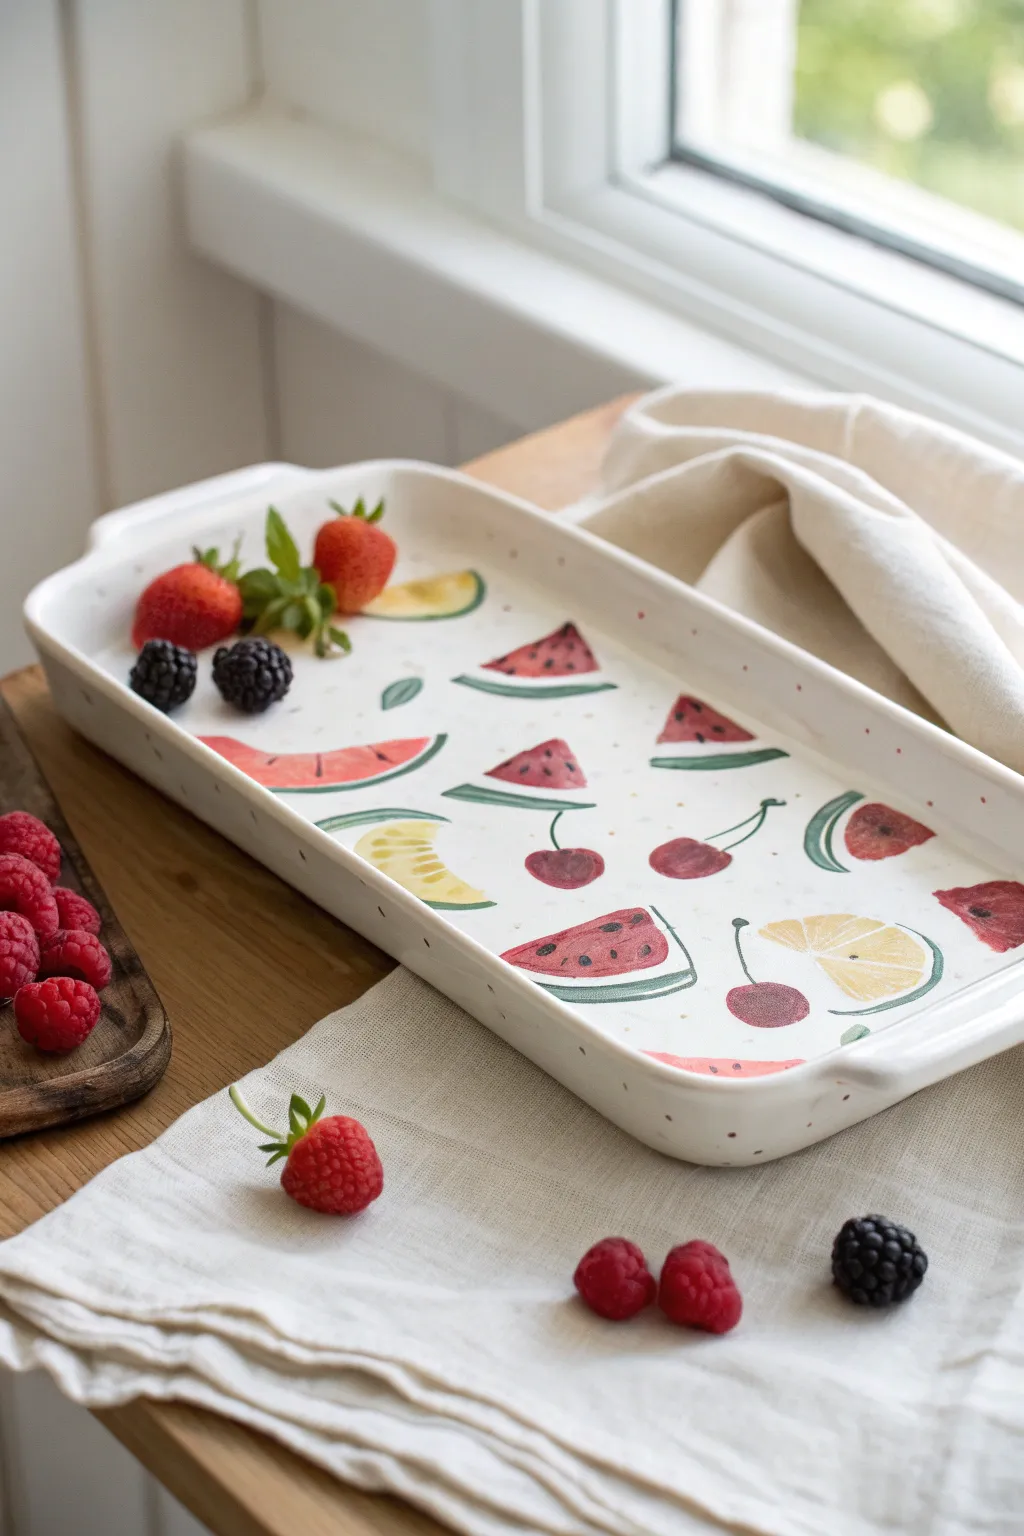
Bring the freshness of a summer picnic to your table with this delightful hand-painted ceramic tray. Featuring whimsical illustrations of watermelon slices, lemons, and cherries, this project transforms a plain white serving dish into a conversation piece that perfectly captures the joy of ripe fruit.
How-To Guide
Materials
- Rectangular white ceramic baking dish or tray
- Ceramic paints or high-quality porcelain markers (red, green, yellow, deep purple, black/dark brown)
- Rubbing alcohol and cotton pads
- Fine-point paintbrush (size 0 or 1)
- Medium round paintbrush (size 4)
- Pencil (optional for sketching)
- Palette for mixing paints
- Oven (for curing the paint)
- Paper towels
Step 1: Preparation and Planning
-
Clean the surface:
Begin by thoroughly washing your ceramic tray with soap and water to remove any factory residue. Dry it completely with a clean towel. -
Degrease for adhesion:
Take a cotton pad soaked in rubbing alcohol and wipe down the entire interior surface of the tray. This step removes oils from your fingers and ensures the paint bonds permanently to the glaze. -
Plan your layout:
Visualize where you want your fruit to go. The charm of this design lies in its loose, scattered pattern. Aim for a mix of watermelon wedges, lemon slices, and cherries evenly distributed across the whitespace. -
Light sketching (optional):
If you are nervous about freehand painting, use a pencil to very lightly sketch the basic triangular and circular shapes used for the fruit. Don’t press hard, as graphite can sometimes smear into light paint colors.
Watercolor Effect
To get that soft, illustrative look seen in the photo, dilute your ceramic paint slightly with a specifically designed thinner (not water) to create varying opacity in your fruit slices.
Step 2: Painting the Fruit Icons
-
Start with watermelon rinds:
Using a fine brush and green ceramic paint, create the curved base for your watermelon slices. These should look like smiles or crescents scattered in different orientations. -
Add the lemon rinds:
With yellow paint, draw similar crescent shapes for the lemon slices, perhaps making them slightly thicker than the watermelon rinds to represent the zest. -
Fill the watermelon flesh:
Switch to your medium brush and red paint. Fill in the triangular shape above the green rinds, leaving a tiny sliver of white space between the red flesh and the green skin to mimic the rind’s pith. -
Paint the lemon segments:
For the lemons, paint a semi-circle of yellow above the rind. While the paint is wet, you can lift out small lines with a dry brush or toothpick to create the look of citrus segments, or simply paint triangular wedges leaving white gaps between them. -
Create the cherries:
Dip your medium brush into a deep purple or maroon paint. Dab two small, connected circles for each pair of cherries. Keep these simple and slightly imperfect for an organic feel. -
Add cherry stems:
Using your finest brush and green paint (or a dark brown if you prefer), draw thin, curved lines connecting the cherry pairs. Add a tiny leaf to the top of the stem connection for extra detail.
Seasonal Switch
Adapt this technique for autumn by swapping the summer fruits for painted illustrations of pumpkins, acorns, and maple leaves in warm oranges and browns.
Step 3: Details and Finishing Touches
-
Add watermelon seeds:
Once the red paint is dry to the touch, use a very fine brush or a black porcelain marker to add small teardrop seeds to the watermelon slices. -
Detail the lemons:
If your lemons need more definition, add very faint white or lighter yellow lines to separate the juicy segments. -
Incorporate playful dots:
To fill the empty white space and tie the design together, add tiny dots of red or pink scattered randomly between the fruit illustrations. This creates a cohesive pattern. -
Border accents:
I like to add a subtle detail to the rim as well; paint small dots along the inner vertical walls of the tray to frame your artwork. -
Clean up mistakes:
Before curing, inspect your work. If you made a mistake, use a damp cotton swab or toothpick to scrape away stray paint while it’s still uncured.
Step 4: Curing the Artwork
-
Allow to dry:
Let the tray sit undisturbed for at least 24 hours. This ensures the moisture evaporates from the paint before heat is applied. -
Bake to set:
Place the tray in a cold oven. Set the temperature according to your paint manufacturer’s instructions (usually around 300°F/150°C) and bake for 30-40 minutes. Putting it in cold prevents the ceramic from cracking due to thermal shock. -
Cool down:
Turn the oven off and leave the tray inside until it is completely cool. Removing it while hot can compromise the durability of the paint.
Now your custom serving tray is ready to add a splash of color to your next brunch or afternoon snack spread
Terrazzo Speckle Ceramic Tray
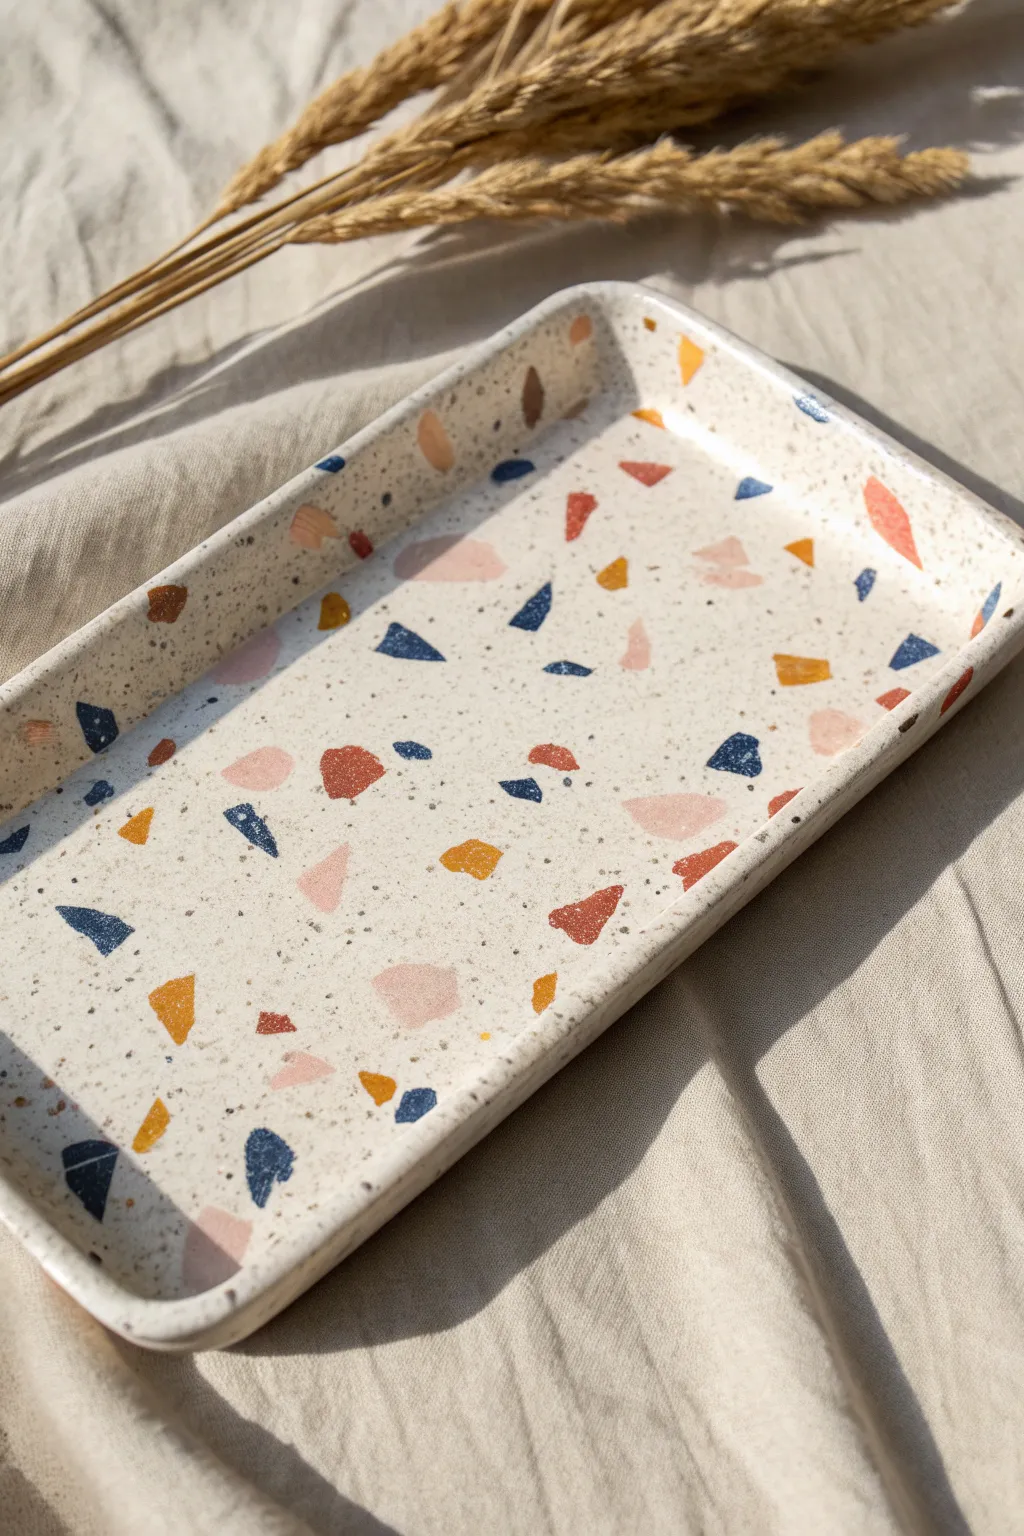
Create a modern catch-all dish featuring a playful yet sophisticated terrazzo pattern. This project mimics the look of fired ceramic using air-dry clay and clever painting techniques, resulting in a creamy, speckled finish dotted with vibrant geometric shards.
Step-by-Step Guide
Materials
- White air-dry clay
- Rolling pin
- Rectangle template (cardboard or paper)
- Craft knife or clay cutter
- Sponge and water
- Sandpaper (fine grit)
- Acrylic paints (Cream/Off-White, Navy Blue, Burnt Orange, Mustard Yellow, Soft Pink)
- Black or brown paint for speckles
- Small flat paintbrush
- Old toothbrush
- Gloss varnish or sealant
Step 1: Shaping the Clay Base
-
Condition the clay:
Begin by kneading a large handful of white air-dry clay until it is soft, pliable, and free of air bubbles. -
Roll out the slab:
Roll the clay out onto a smooth surface to an even thickness of about 1/4 inch. If you want a uniform look, use depth guides on either side of your rolling pin. -
Cut the rectangle:
Place your rectangular template onto the clay slab and use a craft knife to cut around it cleanly. Remove the excess clay. -
Form the edges:
Gently lift the edges of the rectangle upward to create a rim. I like to pinch the corners slightly to give them a rounded, organic curve rather than a sharp 90-degree angle. -
Smooth the surfaces:
Dip a sponge in a little water and run it over the entire surface of the tray to smooth out fingerprints, cracks, or rough edges. -
Let it dry:
Allow the tray to dry completely for 24-48 hours. Turn it over halfway through the drying process to ensure the bottom dries evenly.
Paint Consistency Pro-Tip
For the splatter step, test the consistency on a scrape piece of paper first. Too thick and you get blobs; too thin and it creates a wash.
Step 2: Sanding and Base Coat
-
Sand imperfections:
Once fully dry, lightly sand any rough spots or uneven edges with fine-grit sandpaper until the tray feels smooth to the touch. -
Clean dust:
Wipe the tray down with a slightly damp cloth to remove all sanding dust before painting. -
Mix the base color:
Mix white acrylic paint with a tiny drop of yellow or brown to create a warm, creamy off-white shade. -
Apply base coat:
Paint the entire tray, top and bottom, with your cream mixture. You may need two coats for full opacity, letting it dry between layers.
Step 3: Creating the Terrazzo Effect
-
Paint the geometric ‘chips’:
Using a small flat brush, paint small, random geometric shapes scattered across the tray. Think triangles, trapezoids, and irregular shards. -
Distribute colors:
Alternate between your colors—Navy Blue, Burnt Orange, Mustard Yellow, and Soft Pink. Try to space out identical colors so they aren’t clustered together. -
Refine the shapes:
Go back over any shapes that look too transparent with a second coat of paint to make the color pop against the cream background. -
Extend to the rim:
Don’t forget to paint a few shapes going up the sides and over the rim of the tray for a continuous, realistic stone look. -
Create the fine speckles:
Dilute a small amount of dark brown or black paint with water until it is engagingly runny. -
Splatter paint:
Dip an old toothbrush into the diluted paint, hold it over the tray, and run your thumb across the bristles to mist fine speckles over the entire surface. -
Seal the tray:
Once all paint is bone dry, apply a coat of gloss varnish. This mimics the shine of glazed ceramic and protects your design.
Uneven Drying Trouble?
If the clay starts warping as it dries, gently weigh down the center with a small beanbag or light book (protected by parchment paper) to keep it flat.
Place your new jewelry or keys in the tray and enjoy the handmade charm on your dresser
Stamped Texture Pattern Tray With Glossy Pooling Glaze
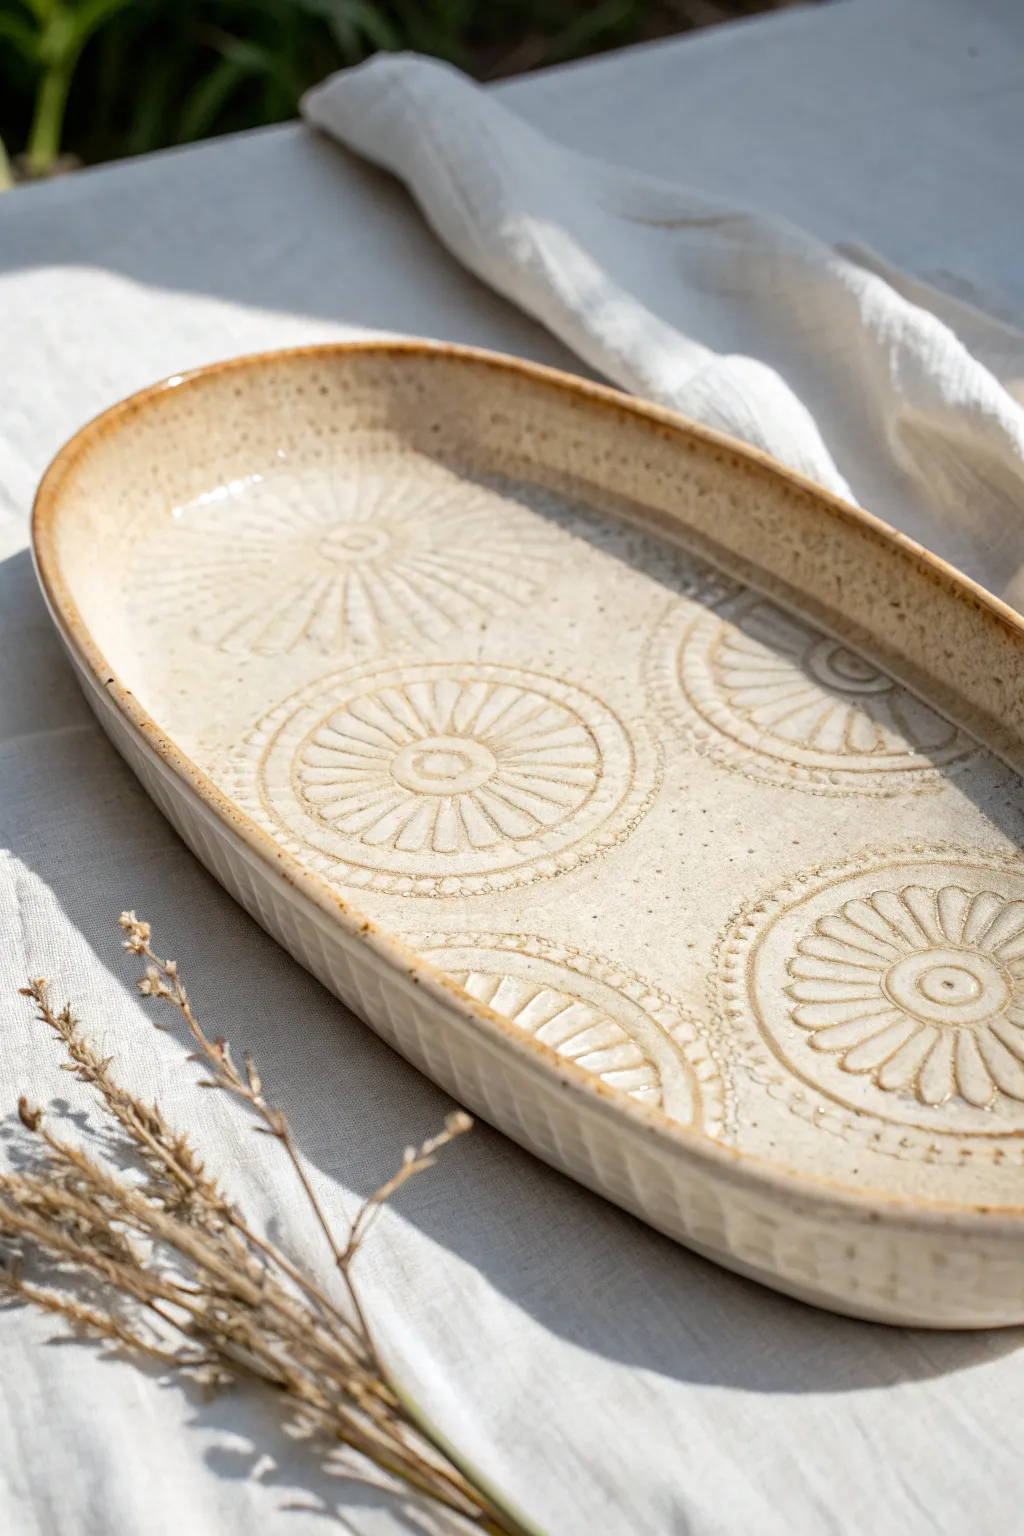
Capture the warmth of handmade ceramics with this textural oval tray, featuring a repeating sunburst pattern that catches the glaze beautifully. The creamy, speckled finish and organic edges give it a timeless, artisanal quality perfect for serving or display.
Step-by-Step
Materials
- Speckled buff stoneware clay
- Rolling pin
- Canvas or slab mat
- Oval slump mold or large oval plaster form
- Large floral or sunburst stamp (bisque, wood, or 3D printed)
- Small round or dot stamp (optional detailing)
- Fettling knife
- Rib tool (rubber or kidney)
- Sponge
- Cream or glossy clear glaze (cone 5/6 recommended)
Step 1: Slab Preparation
-
Wedge the clay:
Begin by thoroughly wedging about 3-4 pounds of speckled buff clay to remove air bubbles and ensure particle alignment, which prevents warping later. -
Roll the slab:
On your canvas or slab mat, roll out a large, even slab of clay approximately 1/4 to 3/8 inch thick. Rotate the clay frequently to maintain an even oval shape. -
Compress the surface:
Take a rubber rib tool and glide it firmly over both sides of the slab. This compression step is crucial for preventing cracks and creating a smooth canvas for your texture.
Stamp Release
Dust your stamps lightly with cornstarch before pressing them into moist clay. This prevents sticking and ensures a crisp, clean impression every time.
Step 2: Texturing and Shaping
-
Establish the center:
Identify the center of your slab visually. Press your large sunburst stamp firmly into the clay to create the central focal point. -
Continue the pattern:
Working outward from the center, stamp the sunburst pattern in a repeating grid or alternating arrangement. If your stamp has a border, you can overlap slightly or leave small gaps for added visual interest. -
Add detail:
If you have smaller dot stamps or tools, press them into the negative spaces between the large medallions to create a cohesive, intricate surface. -
Cut the shape:
Place your oval template or mold upside down on the textured slab (hovering, not touching) to gauge size, then use a fettling knife to cut a clean oval shape, leaving about an inch of excess border. -
Form the tray:
Carefully lift your slab and drape it *inside* a slump mold (or over a hump mold depending on your preference). I prefer a slump mold here to keep the texture pristine. -
Define the rim:
Gently press the slab into the curve of the mold. Use your fingers to slightly curl the edge upwards, ensuring the rim has a defined, consistent lip. -
Add rim texture:
Using a serrated rib or a small carving tool, create vertical hash marks along the exterior wall of the tray to mimic the fluted look seen in the photo.
Step 3: Drying and Glazing
-
Slow drying:
Cover the piece loosely with plastic and let it dry slowly to leather hard. Once sturdy, remove it from the mold to allow the bottom to dry completely to bone dry state. -
Bisque fire:
Load the bone-dry greenware into the kiln and bisque fire to Cone 04 (or your clay body’s specific recommendation). -
Clean the bisque:
Wipe the fired piece with a damp sponge to remove any kiln dust, which helps the glaze adhere properly. -
Apply glaze:
Pour or dip the tray in a high-gloss cream or transparent glaze. Ensure the glaze fills the stamped recesses. -
Wipe back (optional):
For higher contrast, you can gently wipe the high points of the texture with a damp sponge, leaving more glaze in the deep impressions to darken them. -
Rim detailing:
The rim in the photo has a lovely toasted look. The clay body itself may provide this, or you can brush a very thin layer of iron oxide wash just on the rim edge. -
Glaze fire:
Fire the piece to maturity (likely Cone 5 or 6). The glaze will pool in the stamped depressions, creating that beautiful depth and color variation.
Warping Woes?
If your oval trays tend to warp, weigh down the center with a sandbag during the leather-hard drying stage to keep the bottom perfectly flat.
Once cooled, your tray is ready to bring a touch of handcrafted elegance to your table setting
Sgraffito Illustration Tray
Embrace the earthy warmth of terracotta with this stunning sgraffito tray, featuring delicate botanical line work carved through creamy slip. The contrast between raw red clay and smooth matte white glaze creates a modern yet rustic piece perfect for display or light use.
How-To Guide
Materials
- Rectangular slab of terracotta clay (smooth body)
- Cream or off-white underglaze
- Rolling pin and guide strips (1/4 inch)
- Small sponge
- Wire cutter
- Needle tool
- Sgraffito loop tool (small)
- Rib tool (soft silicone)
- Paper template (tray shape)
- Soft detail brush
- Clear matte glaze
Step 1: Forming the Slab Tray
-
Roll the slab:
Begin by rolling out your terracotta clay to a uniform thickness of about 1/4 inch using guide strips. Compress the clay on both sides with a soft rib to align clay particles and prevent warping later. -
Cut the shape:
Place your rectangular paper template onto the slab. Using a needle tool held vertically, cut around the perimeter. Remove the excess clay and smooth the rough cut edges with a damp sponge. -
Turn up the rim:
Gently lift the edges of the rectangle to create a rim roughly 1/2 to 3/4 inch high. Pinch the corners softly to create rounded, smooth transitions rather than sharp angles. -
Refine the form:
Smooth the interior curve where the floor meets the wall using your finger or a sponge to ensure a seamless transition. The rim should have a soft, organic feel. -
Dry to leather hard:
Allow the tray to dry slowly until it reaches a sturdy leather-hard state. It should be firm enough to handle without bending but still contain moisture.
Clean Lines
Keep your sgraffito tool sharp! A dull loop drags the clay rather than slicing it, causing jagged edges. Wipe the tool tip often on a sponge to keep cuts crisp.
Step 2: Applying Slip & Speckles
-
Mask the block area:
Using a piece of paper or specialized pottery tape, mask off a rectangular block on the left side of the tray where you want the raw clay to remain visible. -
Apply underglaze:
Brush 2-3 even coats of cream underglaze over the entire interior surface, painting right over your masking material. Let each coat dry until matte before adding the next. -
Add speckles:
Dilute a tiny amount of black or dark brown underglaze with water on a toothbrush. Run your thumb over the bristles to flick a fine mist of speckles across the wet cream surface. -
Remove the mask:
Carefully peel away the paper or tape while the underglaze is still slightly damp to reveal the clean, sharp edge of the naked terracotta block. -
Clean the rim:
Use a damp sponge to wipe any excess white underglaze off the very top edge of the rim, leaving a clean terracotta border that frames the illustration.
Underglaze Flaking?
If the white layer chips off while carving, the underglaze was applied too thick or the clay is too dry. Mist the clay slightly or apply thinner coats next time.
Step 3: Carving the Botanical Design
-
Sketch lightly:
Once the underglaze is dry to the touch, very lightly sketch your flower stem and leaves using a soft pencil. The graphite will burn off in the kiln, so don’t worry about mistakes. -
Start the stem:
Using a small sgraffito loop tool, carve the main stem line first. Apply consistent pressure to cut through the white layer and reveal the red clay beneath. -
Carve the leaves:
Outline the leaf shapes attached to the stem. Notice how the design crosses over the terracotta block section—here, you will carve into the clay just for texture, or paint the white lines back in if you prefer high contrast. -
Detail the veins:
Carve the internal veins of the leaves. I like to start from the center vein and gently flick the tool outward to taper the lines toward the leaf edges. -
Outline the flower:
Carve the large flower head on the right side. Start with the center circle, stippling it with small dots for pollen texture. -
Carve petals:
Carve the large, open petals radiating from the center. Add fine internal lines within the petals for shading and depth. -
Detail the block section:
Where the leaves overlap the red block, use a fine liner brush with cream underglaze to paint the leaf details (reverse sgraffito), or simply carve into the red clay for a subtle textural difference. -
Clean up crumbs:
Use a large, fluffy soft brush to gently sweep away all the clay burrs and crumbs created by carving. Do not use your hand, as oils can smear the underglaze.
Step 4: Finishing
-
Bisque fire:
Fire the tray to cone 04 (or your clay’s bisque temperature). This sets the shape and makes the underglaze permanent. -
Clear glaze:
Dip or brush a thin layer of clear matte glaze over the entire piece to seal the clay while maintaining that soft, earthy aesthetic. -
Final fire:
Glaze fire the piece to the maturity temperature of your specific clay body (likely cone 04 or cone 6).
Once fired, fill your tray with trinkets or serve snacks on your new collaborative art piece made with the earth.
Inlaid Linework Mishima-Style Tray

This elegant oval tray features delicate, inlaid geometric lines contrasting beautifully against speckled clay, created using the Japanese Mishima technique. The understated chevron patterns on the interior floor and exterior walls provide tactile interest and a modern, handcrafted aesthetic.
Step-by-Step Tutorial
Materials
- Speckled Stoneware Clay (cone 5/6)
- Oval Plaster Mold or Drape Mold
- Rolling Pin
- Canvas Work Surface
- Rib Tool (Rubber or Metal)
- Fettling Knife or Needle Tool
- Loop Tool or Carving Set
- Underglaze (Black or Dark Grey)
- Clear or Semi-Matte White Glaze
- Sponge
- Wax Resist (optional)
Step 1: Forming the Tray
-
Roll out the slab:
Begin by wedging your speckled stoneware clay thoroughly to remove air bubbles. Roll it out into an even slab, approximately 1/4 to 3/8 inch thick. Compress the slab on both sides with a rib tool to align the clay particles and prevent warping. -
Use the mold:
If using a slump mold, gently drape your slab inside it, pressing carefully to conform the clay to the shape without stretching it too thin. If using a drape mold, place the slab over the form. Ensure the base is flat and the walls rise gently. -
Trim the edges:
Once the clay is in place, use your fettling knife or needle tool to trim the excess clay from the rim. Smooth the rim with a damp sponge or piece of chamois for a professional, rounded finish. -
Leather hard stage:
Allow the tray to dry slowly to the leather-hard stage. This is crucial—the clay must be firm enough to handle and carve without deforming, but soft enough to cut cleanly.
Clean Lines Pro Tip
When wiping back underglaze, wipe perpendicular to your carved lines rather than parallel. This prevents the sponge from scooping the color out of the grooves.
Step 2: Carving the Mishima Design
-
Plan your geometry:
Lightly sketch your design onto the leather-hard clay using a dull pencil or a light touch with a needle tool. Aim for the chevron pattern seen in the image: distinct triangles facing inward along the length of the tray. -
Carve the interior:
Using a fine-point loop tool or carving tool, carefully incise the lines on the interior floor. You want a shallow, clean channel. Keep your hand steady to maintain straight, geometric lines. -
Carve the exterior:
Repeat the geometric pattern on the exterior walls. The image shows a satisfying repetition of triangles around the base. I find holding the tray in my lap for this part gives better control over the angles. -
Clean up the burrs:
Once carved, run a finger or dry brush gently over the lines to remove the little crumbles of clay (burrs). Do not sponge it yet, as you want crisp edges.
Add Color Depth
Mix a tiny amount of cobalt blue into your black underglaze for the inlay. It creates a richer, cooler dark tone that contrasts beautifully with warm white clay.
Step 3: Inlay and Finishing
-
Apply the underglaze:
Brush a thick layer of black or dark grey underglaze directly over your carved lines. Don’t worry about being messy; the goal is to fill the carved channels completely. -
Let it set:
Allow the underglaze to dry until it is no longer shiny. This ensures it stays in the grooves during the wiping phase. -
Wipe back:
Using a clean, slightly damp sponge (not soaking wet), wipe across the surface of the clay. Rinse your sponge frequently. You want to remove the underglaze from the high points of the clay while leaving it trapped inside the carved lines. -
Bisque fire:
Once the tray is fully bone dry, load it into the kiln for a bisque firing. -
Glazing:
For the finish shown, apply a thin layer of clear or semi-matte white glaze. A satin matte glaze works best to highlight the texture without creating distracting reflections. -
Final wipe:
Wipe the foot of the tray clean before the final firing. -
Glaze fire:
Fire the tray to the maturity temperature of your clay and glaze (likely cone 5 or 6). This final firing will vitrify the clay and fuse the inlaid lines with the body.
Once cooled, your tray is ready to serve as a stunning centerpiece or functional organizer.
Layered Slip-Stripe Agate-Style Tray
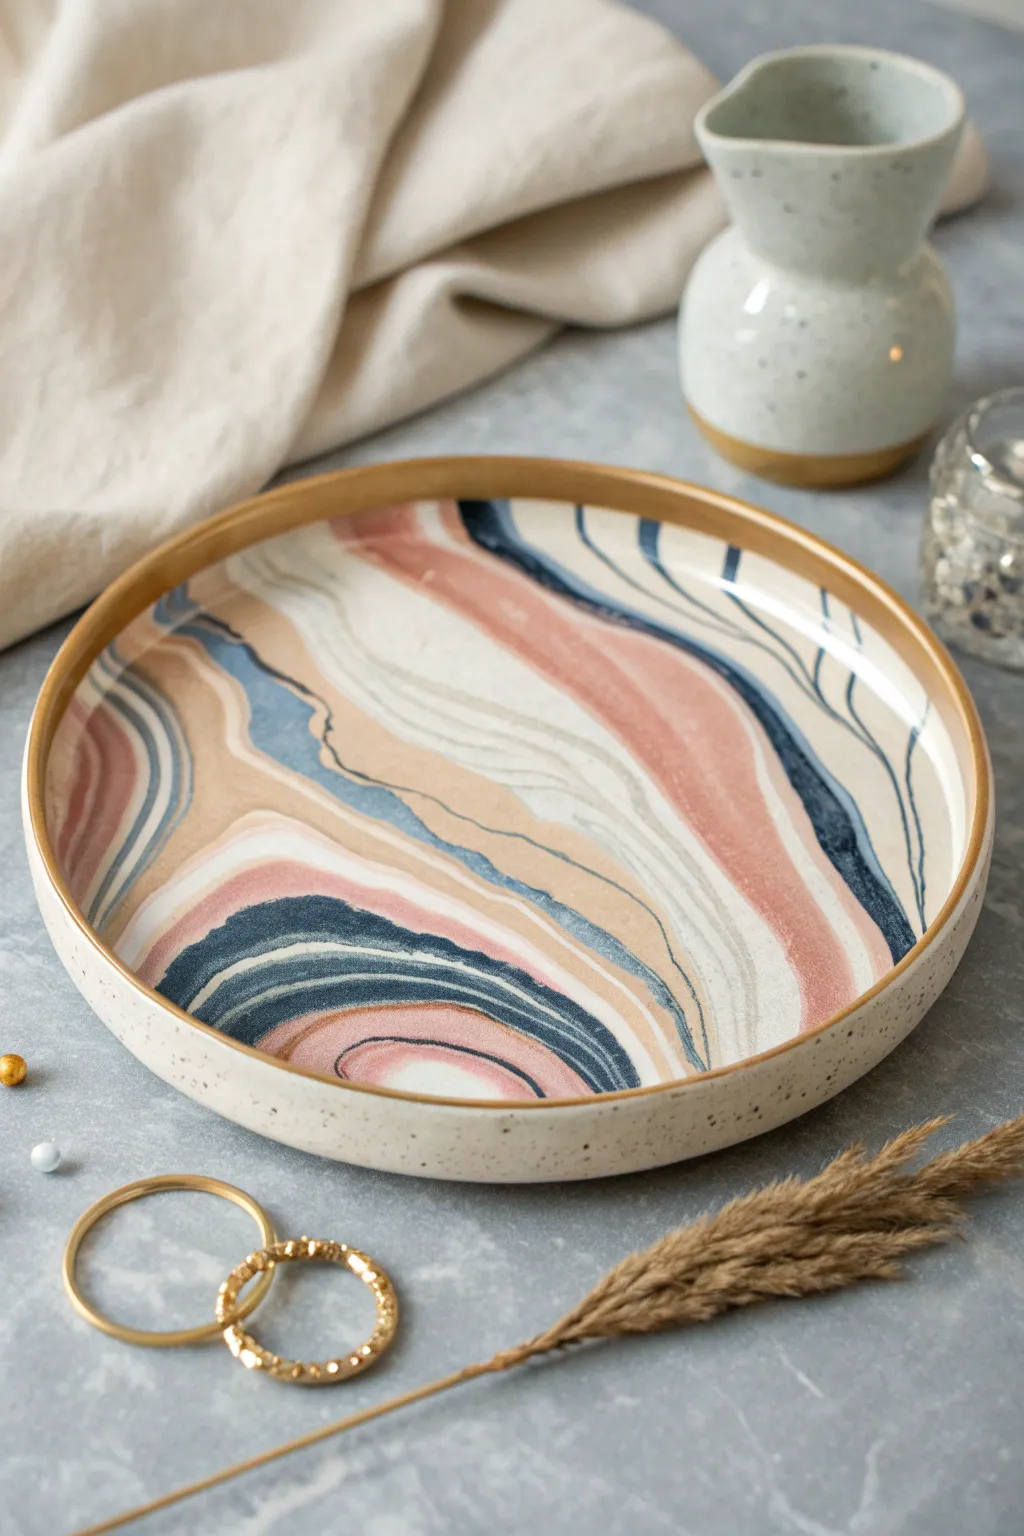
Bring the calming beauty of natural agate stone into your home with this ceramic tray project that mimics organic sediment layers. Using colored clay slips and a simple slab-building technique, you will achieve a stunning, painterly effect with fluid ribbons of navy, blush, and cream.
Step-by-Step
Materials
- White or speckled stoneware clay body
- Underglaze or colored slips (Navy Blue, Blush Pink, Beige/Tan, Cream)
- Round slump mold or large plaster bowl
- Rolling pin and guide sticks (approx. 1/4 inch)
- Small synthetic paintbrushes
- Soft rubber rib
- Fettling knife or needle tool
- Sponge
- Gold luster (overglaze) and dedicated brush
- Clear transparent glaze (optional, depending on finish desired)
- Canvas work surface
Step 1: Preparing the Slab Canvas
-
Roll the base slab:
Begin by wedging your stoneware clay thoroughly to remove air bubbles. Roll it out on a canvas surface into a large, even slab approximately 1/4 inch thick. Use guide sticks to ensure uniform thickness. -
Smooth the surface:
Take a soft rubber rib and compress the clay surface gently. This removes canvas texture and creates a smooth ‘canvas’ for your slip application. -
Mix your palette:
Prepare your colored slips or underglazes. You want a consistency similar to heavy cream. If they are too thick, create ridges; too thin, and the colors won’t pop. I like to test a small dab on scrap clay first.
Clean Lines Pro-Tip
When painting slips, wait a few seconds between colors so they don’t muddy together immediately. The final roll-over will blend them naturally without creating brown gaps.
Step 2: Creating the Agate Pattern
-
Apply the first sweeping curve:
Load a medium brush with cream slip. Start from one edge and paint a broad, organic curve across the slab. Don’t worry about perfect lines; natural wiggles mimic stone layers. -
Layer in the blush tones:
Next to the cream, paint a thick band of blush pink. Allow the wet slip to slightly pool at the edges of the stroke for textured depth. -
Add deep contrast:
Introduce the navy blue slip. Paint thinner, more erratic lines that follow the general curve of the previous layers but occasionally branch off or taper. This high-contrast color defines the ‘agate’ look. -
Fill with neutrals:
Fill the remaining spaces with beige and tan slips. Alternate the width of these bands to keep the composition dynamic and less like a straightforward rainbow. -
Let the sheen fade:
Allow the painted slab to sit until the wet sheen of the slip has disappeared and the surface feels leather-hard but still pliable. -
Stretch the design:
This is the crucial step: gently roll over the painted slab *once more* with your rolling pin. This embeds the slip into the clay body and slightly distorts the lines, creating that authentic, fluid fluid agate appearance.
Level Up: Texture
Instead of a smooth clear glaze, try a matte clear glaze. It gives the tray a soft, stone-like feel that mimics the texture of unpolished river rocks.
Step 3: Forming and Refining
-
Cut the circle:
Place a circular template or plate over your patterned area. Use a needle tool to cut out your tray shape, ensuring you capture the most interesting part of the pattern. -
Transfer to the mold:
Carefully lift the slab and place it into your slump mold or plaster bowl. Gently press the clay down to conform to the curve, being careful not to smudge the design. -
Refine the rim:
While the clay is in the mold, use a chamois or damp sponge to smooth the cut edge of the rim. It should be rounded and comfortable to the touch. -
Slow drying:
Cover the mold loosely with plastic to allow for slow, even drying. This prevents warping, which is common in flat pieces.
Step 4: Firing and Finishing
-
Bisque fire:
Once bone dry, fire the tray to your clay body’s bisque temperature (usually Cone 04/06). -
Glaze application:
Apply a clear transparent glaze over the entire piece to seal it and make the colors vibrant. Fire again to the glaze maturity temperature (e.g., Cone 5/6). -
Apply gold luster:
For the metallic rim shown in the reference, apply a thin, steady line of gold luster (overglaze) to the very edge of the fired piece using a dedicated brush. Work in a well-ventilated area. -
Final Lustre Fire:
Fire the piece a third time to the low temperature required for the luster (usually around Cone 018) to set the gold.
Place your finished tray on a coffee table or vanity to add a sophisticated, artistic touch to your daily routine
Carved Fluted Tray With Shadow Lines
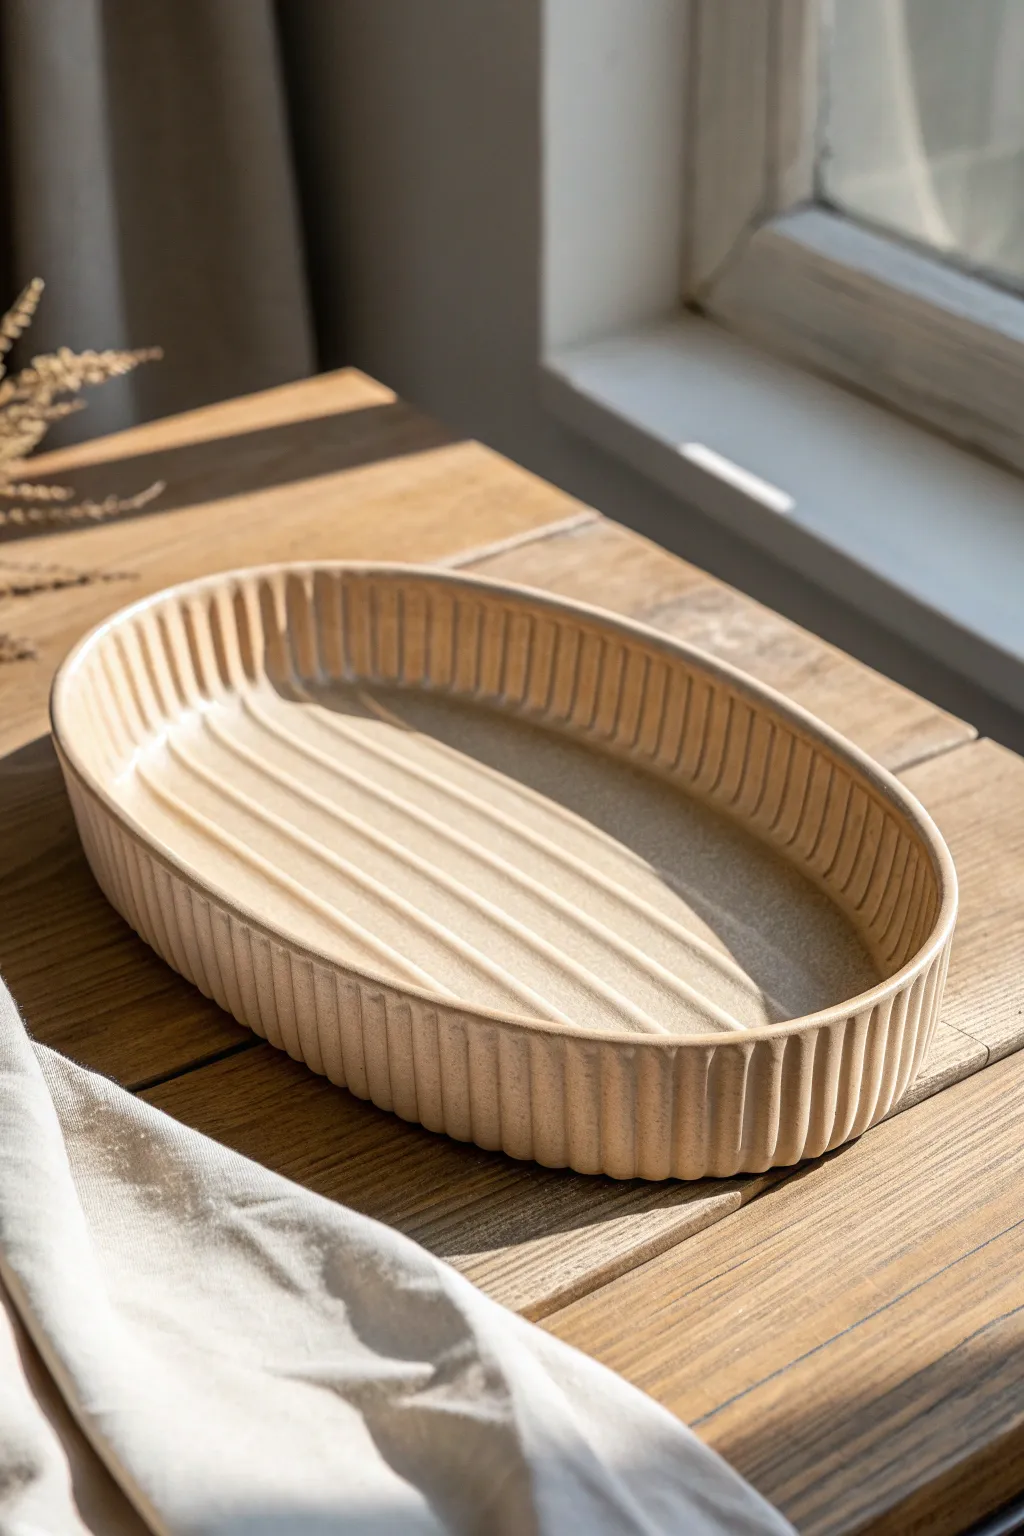
Capture the elegance of shadow and light with this fluted oval ceramic tray, featuring textural ridges both inside and out. Its neutral sand-colored glaze and rhythmic carving make it a timeless centerpiece for any table.
How-To Guide
Materials
- Stoneware clay (buff or speckled)
- Oval slumping mold or drape mold
- Rolling pin with thickness guides (approx. 1/4 inch)
- Rib tool (flexible metal and soft rubber)
- Fettling knife
- Carving tool (U-gouge or fluting tool)
- Loop tool
- Sponge
- Score and slip tool
- Matte beige or sand-colored glaze
- Kiln
Step 1: Forming the Base
-
Roll the slab:
Begin by wedging your stoneware clay thoroughly to remove air bubbles. Roll out a large slab that is approximately 1/4 inch thick, ensuring it is large enough to cover your mold with excess. -
Compress the clay:
Use a flexible rubber rib to compress the clay on both sides. This aligns the clay particles, preventing future warping, and creates a smooth canvas for your carving. -
Mold the shape:
Carefully drape your clay slab over or into your oval mold. For this specific shape with vertical walls, a slump mold (where clay goes inside) often works best to keep the walls upright, but a drape mold works if you handle it gently. -
Define the base:
Press the clay firmly against the bottom of the mold to establish the flat base. Use a damp sponge to smooth the internal transition from the floor to the walls. -
Trim the rim:
Once the clay has stiffened slightly (leather hard), use your fettling knife or needle tool to trim the excess clay flush with the top of the mold for an even rim.
Consistent Carving
Keep your carving tool at a consistent angle for every stroke. This uniformity creates the professional, machine-like rhythm.
Step 2: Carving the Texture
-
Create the interior ridges:
While the clay is still in the mold but firm enough to hold detail, use a loop tool or a U-gouge to carve long, parallel lines across the interior floor of the tray. I find that pulling the tool towards me in a steady motion creates the cleanest lines. -
Soften the interior texture:
If the carved edges are too sharp, gently run a damp soft brush or your finger over the ridges to round them slightly without erasing the valley. -
Release from mold:
Let the clay dry to a sturdy leather-hard stage. Carefully remove it from the mold. The walls should now stand on their own without slumping. -
Mark vertical guides:
Lightly sketch vertical lines on the exterior walls to guide your fluting. These should be evenly spaced to create that repetitive rhythm seen in the photo. -
Carve the exterior fluting:
Using your fluting tool or U-gouge, carve vertical channels from the rim down to the base. Vary the pressure slightly; start lighter near the rim, press deeper in the middle, and taper off near the bottom. -
Clean up the rim:
The carving might have displaced some clay at the rim. Use a damp sponge or chamois cloth to smooth the top edge, ensuring it feels nice to the touch.
Step 3: Finishing and Firing
-
Slow drying:
Loosely cover the tray with plastic to let it dry very slowly. Uneven drying in an oval shape can often lead to warping, so patience is key here. -
Bisque fire:
Once bone dry, load the tray into the kiln for a bisque firing (typically Cone 04). Ensure it is supported evenly on the shelf. -
Apply the glaze:
Choose a satin or matte glaze in a sandy, neutral tone. Pour the glaze into the interior, swirl it to coat, and pour out the excess. Dip or spray the exterior. -
Check the thickness:
If the glaze is too thick, it will fill your beautiful carving. A thinner application is better here to allow the glaze to ‘break’ over the high points and pool slightly in the recesses. -
Glaze fire:
Fire the piece to the maturity temperature of your clay and glaze (often Cone 5 or 6 for stoneware). Allow the kiln to cool completely before opening.
Fixing Warp
If the oval starts to twist while drying, gently weight the rim down with small bean bags or sandbags to keep it flat on the board.
Place your finished tray in a sunny spot to watch the shadows play across your hand-carved ridges
Metallic-Edged Accent Tray
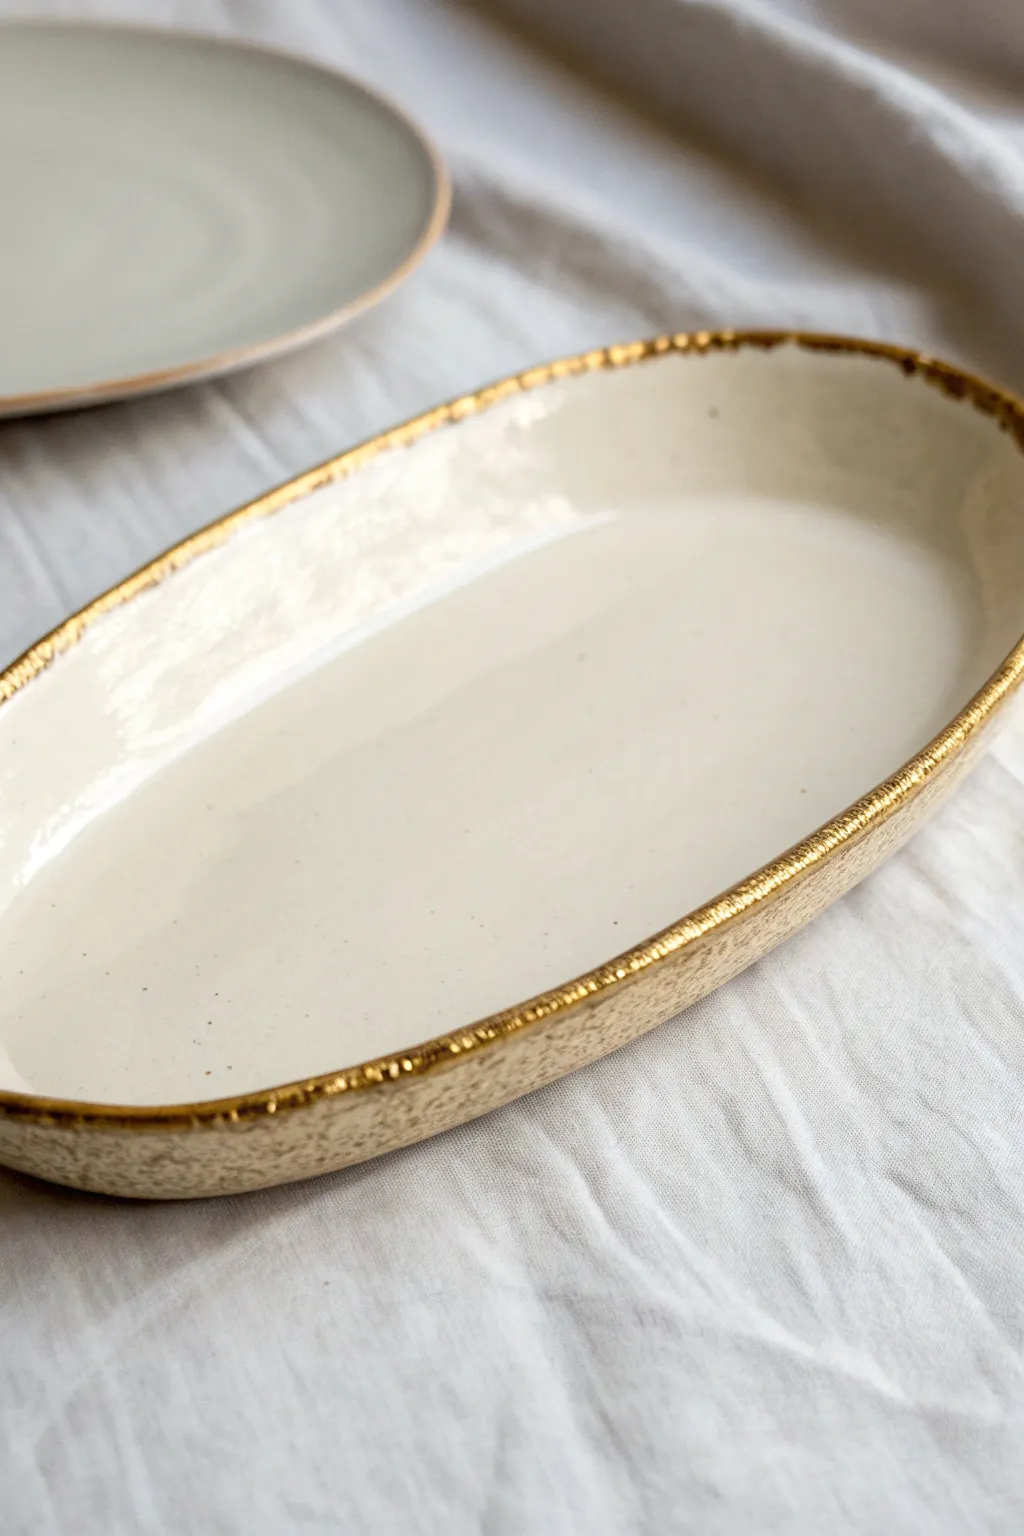
Elevate a simple handmade ceramic form into a luxurious accent piece with this gold-rimmed tray tutorial. The contrast between the smooth, creamy interior glaze and the textured, metallic-kissed edge creates a stunning balance of rustic and refined aesthetics.
Step-by-Step Tutorial
Materials
- Light-colored stoneware clay (smooth)
- Rolling pin and guide sticks (approx. 1/4 inch)
- Oval paper template or slump mold
- Pottery rib (metal or rubber)
- Sponge
- Fettling knife or needle tool
- Glossy cream or white dipping glaze
- Speckled tan or sandstone underglaze (optional for exterior)
- Gold luster (overglaze)
- Luster brush (small, dedicating to gold)
- Kiln (or access to firing services)
- Clean rags
- Respirator/mask (for luster application)
Step 1: Forming the Tray
-
Roll the Slab:
Begin by wedging your stoneware clay thoroughly to remove air bubbles. Roll it out into a consistent slab using guide sticks to ensure an even thickness of about 1/4 inch. -
Smooth the Surface:
Take a soft rib tool and compress the clay slab on both sides. This aligns the clay particles to prevent warping later and creates that super-smooth canvas for your interior glaze. -
Cut the Shape:
Using your oval template or simply placing the slab over a plaster slump mold, cut the excess clay away with a fettling knife. If using a slump mold, gently press the clay down to conform to the curve. -
Refine the Rim:
This step is crucial for the final look. Run a damp sponge or your finger along the cut edge to round it off. You want a slightly organic, uneven lip rather than a sharp, mechanical edge. -
Add Texture (Optional):
To mimic the speckled exterior texture if your clay is smooth, you can gently sponge a darker slip or underglaze onto the outside/underside of the form now, while it’s still leather hard. -
Slow Dry:
Loosely cover the tray with plastic and let it dry very slowly to the leather-hard stage, then uncover to let it become bone dry. This prevents the long oval shape from curling up at the ends. -
Bisque Fire:
Load the bone-dry greenware into the kiln and bisque fire it to the appropriate cone (usually Cone 04) to prepare it for glazing.
Luster Purple Haze?
If your gold comes out purple or cloudy, it was applied too thin or fired too hot. Apply a second coat and refire at a slightly lower cone.
Step 2: Glazing and Decoration
-
Clean the Bisque:
Wipe down the fired piece with a damp sponge to remove any kiln dust, which can cause glaze crawling. -
Interior Glazing:
Pour your glossy cream glaze into the interior of the tray, swirl it to coat evenly, and pour out the excess. Alternatively, you can dip the whole piece if you want the cream color everywhere. -
Exterior Detail:
If you want the exterior to have that raw, sandy look shown in the image, wipe back any glaze from the outside using a sponge, leaving the raw clay or your previous texture exposed. -
Glaze Fire:
Fire the piece again to the maturation temperature of your clay and glaze (typically Cone 5 or 6 for stoneware). Let the kiln cool completely before opening.
Step 3: Applying the Gold Luster
-
Prep the Surface:
Once the piece is cool and clean, wipe the rim with alcohol to remove any oils from your fingerprints. Luster is very sensitive to grease. -
Apply Luster:
Dip your dedicated brush into the gold luster. Paint a defined line along the very edge of the rim. I like to let the brush skip slightly or vary the pressure to create that organic, ‘dipped’ appearance. -
Extend the Edge:
Bring the gold slightly down the exterior wall (about 2-3mm) and just barely onto the interior lip. This makes the gold visible from all angles. -
Check Coverage:
Ensure the gold application is solid but not dripping. A single, confident coat is usually better than trying to rework drying luster. -
Third Firing:
Place the tray back in the kiln for a third firing. Luster fires at a much lower temperature (usually between Cone 018 and 022). Check your specific bottle for the exact target cone. -
Ventilation Safety:
Ensure your kiln room is exceptionally well-ventilated during this firing, as burning off the mediums in gold luster produces strong fumes.
Level Up: Texture Play
Use a clay body with heavy grog or sand. When you wipe back the exterior glaze, the rough texture will contrast beautifully with the smooth gold rim.
Now you have a stunning, food-safe tray perfect for holding jewelry or serving delicate appetizers
Mosaic-Inset Ceramic Tray
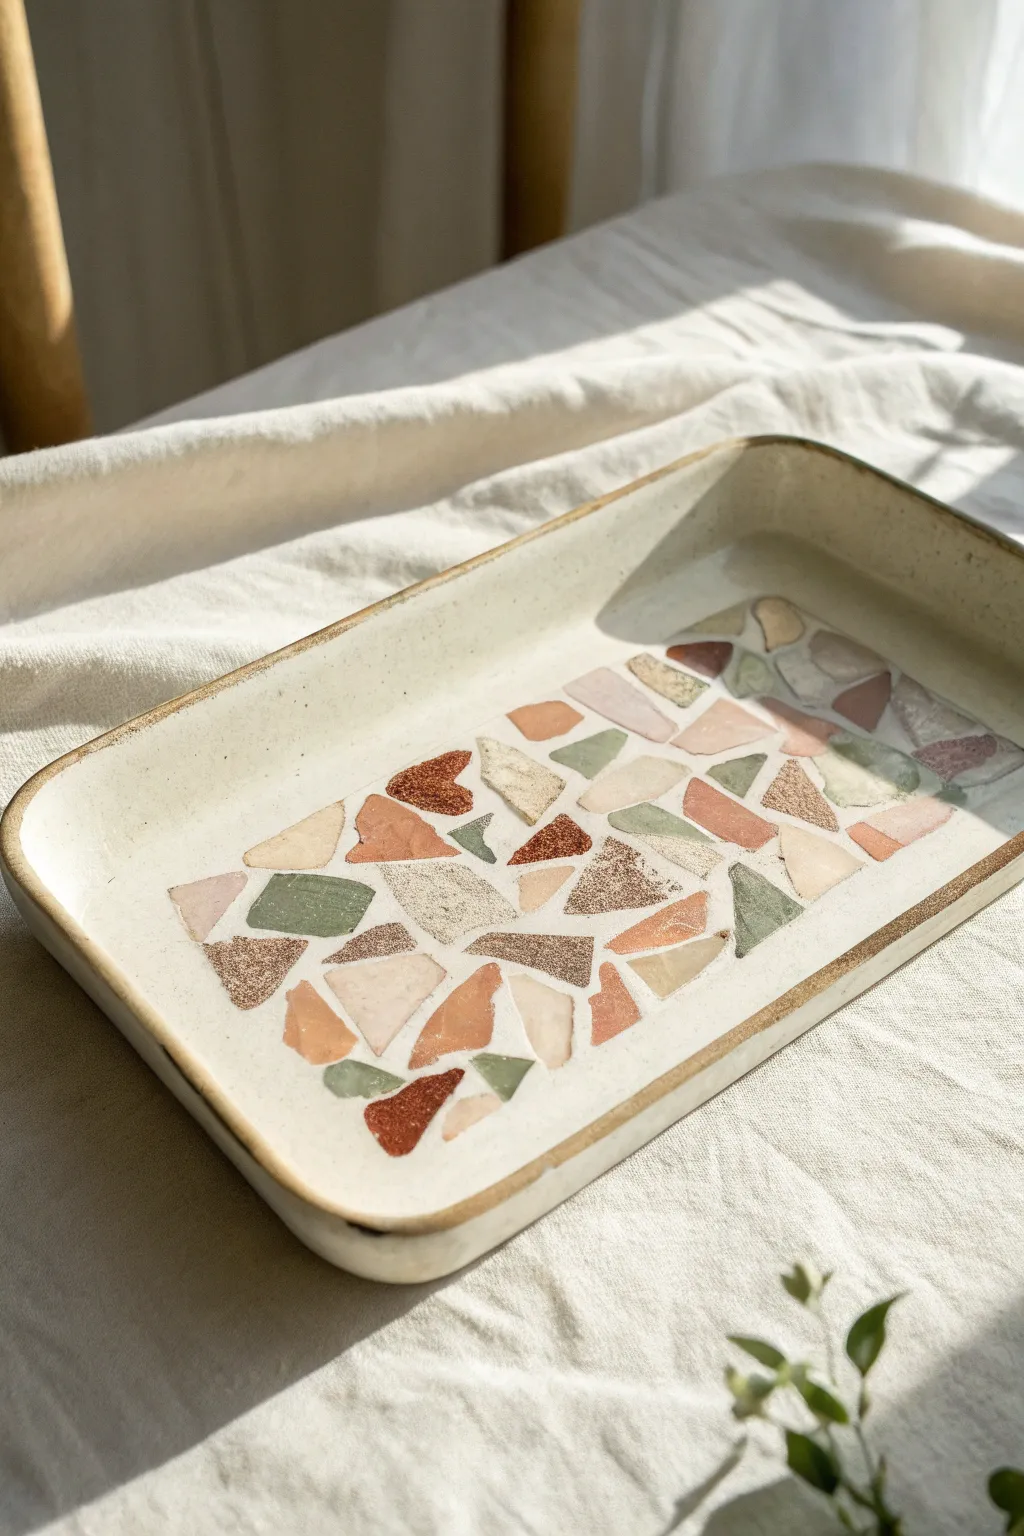
Transform a plain ceramic dish into a stunning statement piece using a broken-shard mosaic technique. This project combines the organic charm of terrazzo with the sleek finish of ceramics, featuring a palette of earthy rusts, sage greens, and soft pinks.
Step-by-Step
Materials
- Rectangular ceramic tray (unglazed bisqueware or matte glazed)
- Ceramic tiles or shards in various colors (rust, sage, pink, cream, speckled brown)
- Tile nippers or hammer
- Safety glasses
- Tile adhesive (mastic) or clear drying craft glue suitable for ceramics
- Sanded grout (white or off-white)
- Rubber grout float or spatula
- Sponge
- Soft cloth
- Grout sealer (optional)
- Sandpaper (medium grit)
Step 1: Preparing the Mosaic Pieces
-
Gather your palette:
Collect ceramic tiles in your chosen color scheme. If you can’t find specific tile colors, you can use broken plates or thrifted ceramic dishes that have the right glaze colors. -
Break the tiles:
Put on your safety glasses. Wrap a tile in an old towel or heavy cloth to contain flying shards. Use a hammer to gently break the tile into manageable medium-sized chunks. -
Refine the shapes:
inspect your broken pieces. Use tile nippers to shape them further into irregular polygons. Aim for pieces that are roughly smaller than a coin, with interesting angles rather than perfect squares. -
Rough layout:
Before gluing anything, place your tray on a flat surface. Lay out your shards inside the tray to test the arrangement. I like to dry-fit the entire design first to ensure the colors are balanced evenly across the surface. -
Check spacing:
Leave gaps between the pieces—this is where your grout will go. Aim for consistent spacing of about 1/8 to 1/4 inch so the white background can show through clearly, creating that terrazzo look.
Uneven Surface?
If your shards have different thicknesses, apply extra adhesive under thinner pieces to raise them up. The tops should be flush for a smooth tray surface.
Step 2: Adhering the Mosaic
-
Prepare the adhesive:
If using mastic, open your container and have a small spatula ready. If using a specific ceramic glue, ensure the nozzle is clear. -
Apply glue to shards:
Pick up one shard at a time from your dry layout. Apply a dab of adhesive to the back of the piece. You don’t need a thick layer, just enough to bond it flat against the tray. -
Set the pieces:
Press the shard firmly onto the tray’s surface. Repeat this process, working from the center outwards or from one corner across, maintaining your planned spacing. -
Let it cure:
Once all pieces are glued down, let the tray sit undisturbed. Follow the drying time on your adhesive package—usually, letting it cure overnight is best to ensure pieces don’t shift during grouting.
Step 3: Grouting and Finishing
-
Mix the grout:
Mix your sanded grout with water in a small container until it reaches the consistency of peanut butter. Sanded grout is crucial here as it fills wider gaps more effectively without cracking. -
Apply the grout:
Scoop a generous amount of grout onto the mosaic surface. Use a rubber float or a spatula to spread it across the entire inlaid area, pressing firmly to force it into all the gaps. -
Scrape off excess:
Drag the edge of your float diagonally across the tiles to remove the bulk of the excess grout from the tops of the shards. -
First wipe:
Wait about 10-15 minutes for the grout to set slightly. Dampen a sponge (wring it out well so it’s just moist, not dripping) and gently wipe the surface in a circular motion to clean the tiles and smooth the grout lines. -
Remove the haze:
Allow the grout to dry for another hour or two until a hazy film appears. Polish the tiles vigorously with a dry, soft cloth to remove this haze and make the colors pop. -
Optional sealing:
If you plan to use this tray for serving food or in a bathroom, apply a grout sealer once the grout is fully cured (usually after 24-48 hours) to protect against staining. -
Rim finish:
If your tray’s rim got messy during the process, use fine-grit sandpaper to gently clean off any dried grout specks, leaving a clean earthy edge to match the mosaic.
Level Up: Gold Accents
Mix a tiny pinch of gold mica powder into your clear grout sealer for a subtle sparkle, or use the Kintsugi method by painting grout lines gold.
Now you have a beautifully textured tray that brings an artisanal touch to any table setting
Faux Ceramic Air-Dry Clay Tray With High-Gloss Finish
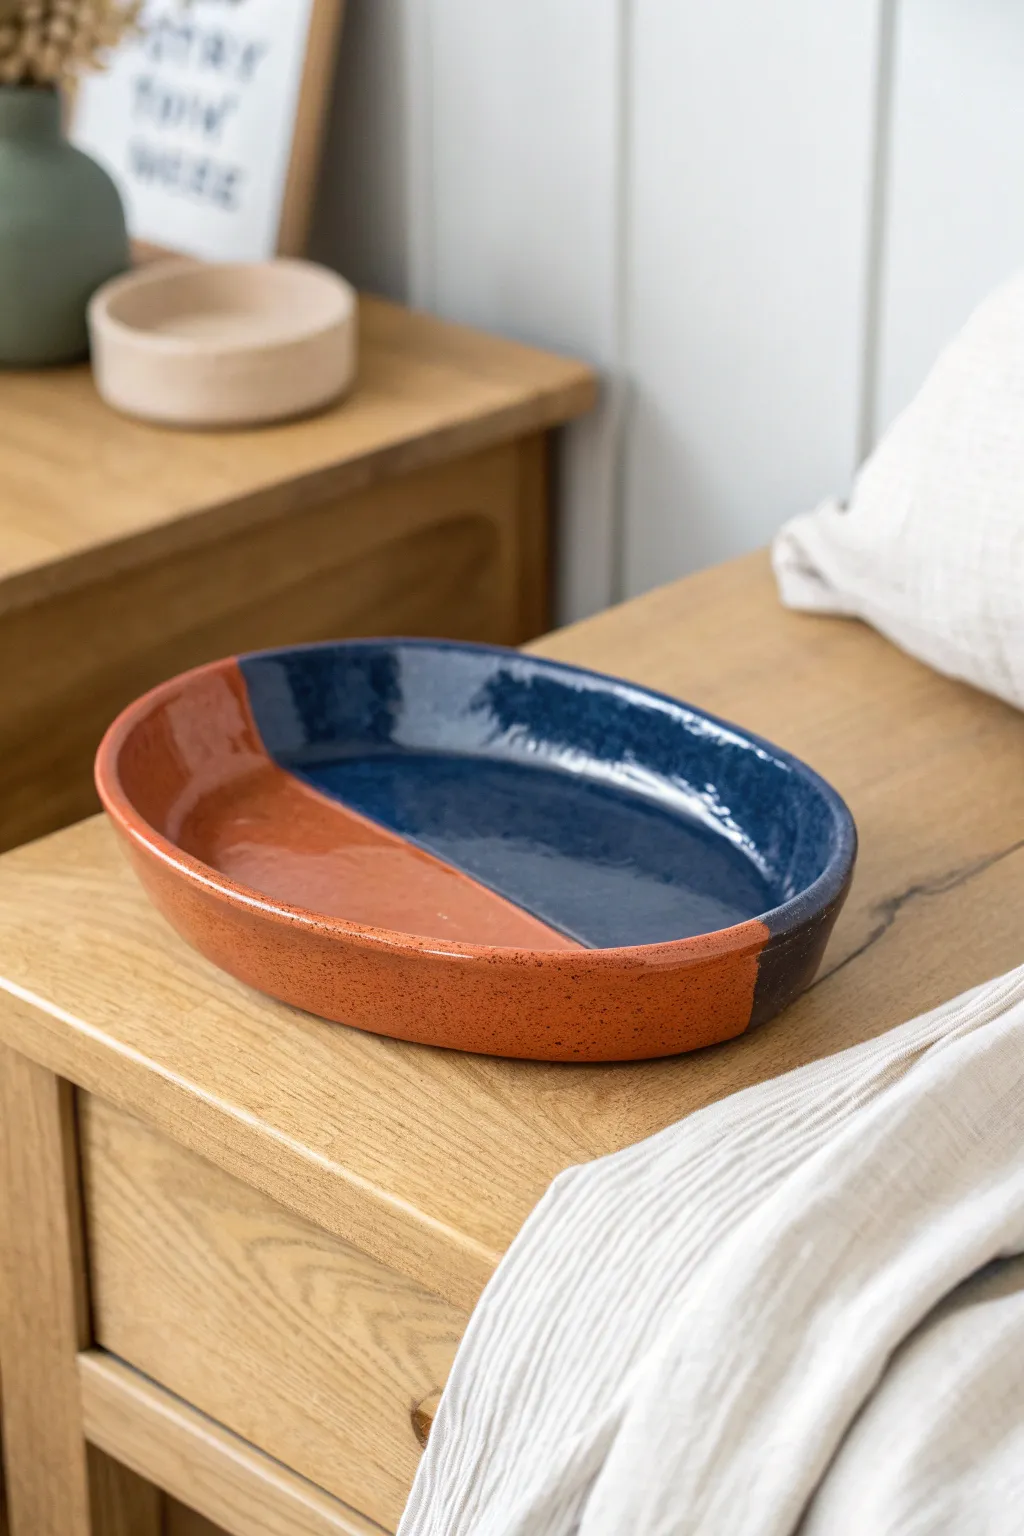
Master the expensive look of glazed stoneware using nothing but affordable air-dry clay and high-gloss varnish. This oval tray features a striking color block design, pairing warm terracotta with deep navy blue for a modern, artisanal aesthetic.
Detailed Instructions
Materials
- Air-dry clay (white or terracotta)
- Rolling pin
- Rolling guides or wooden slats (approx. 1/4 inch thick)
- Smooth work surface (canvas mat or silicone sheet)
- Craft knife or clay cutter
- Small bowl with water
- Sponge or soft paintbrush
- Oval paper template (approx. 8×5 inches)
- Sandpaper (fine grit, 220-400)
- Acrylic paints: Burnt Orange/Terracotta and Navy Blue
- High-gloss polyurethane varnish or resin (food safe if desired)
- Soft synthetic brushes
- Washi tape or painter’s tape
Step 1: Shaping the Base
-
Prepare the Clay:
Begin with a large handful of air-dry clay. Knead it thoroughly in your hands to warm it up and remove any air pockets, which prevents cracking later. -
Roll the Slab:
Place your clay on a smooth surface. Using rolling guides to ensure even thickness, roll the clay out into a large oval shape about 1/4 inch thick. -
Cut the Shape:
Lay your oval paper template onto the rolled clay. Use a craft knife to trace around the edge, cutting vertically to create a clean, sharp oval base. -
Smooth the Edges:
Dip your finger in a little water and run it along the cut edge of the base to smooth out any roughness or sharp corners left by the knife.
Pro Tip: Liquid Glass
For a surface that looks exactly like fired glaze, skip standard varnish and use a clear casting resin or ‘Triple Thick’ glaze. The depth it adds makes the clay indistinguishable from ceramic.
Step 2: Building the Walls
-
Create a Coil:
Roll a long snake or coil of clay that is consistent in thickness (about the width of a pinky finger) and long enough to circle the entire perimeter of your oval base. -
Score and Slip:
Using a needle tool or knife, make small scratch marks (scoring) all along the top edge of your base and on one side of your coil. Dab a little water (slip) onto the scratched areas. -
Attach the Coil:
Press the coil firmly onto the edge of the base. Ensure the ends meet neatly; slice through both overlapping ends at an angle and press them together for a seamless join. -
Blend the Seams:
This is crucial for the faux-ceramic look. Use your thumb or a modeling tool to drag the clay from the coil down onto the base on the inside, and from the base up onto the coil on the outside.
Level Up: Speckled Effect
Before sealing, use an old toothbrush to flick tiny specks of watered-down brown paint onto the terracotta section. This mimics the natural impurities found in real stoneware clay.
Step 3: Refining and Finish
-
Smooth the Form:
Once the coil is blended, use a damp sponge to smooth the entire surface. Gently pinch and pull the walls upwards to create a slight curve, ensuring the rim is level. -
Dry Completely:
Let the tray dry slowly away from direct heat or sunlight. This usually takes 24-48 hours. I like to flip it over gently halfway through so the bottom dries evenly. -
Sand to Perfection:
Once bone dry, use fine-grit sandpaper to buff away any fingerprints or uneven bumps. The smoother the surface now, the more convincing the ‘ceramic’ finish will be later. -
Clean the Dust:
Wipe the entire piece with a slightly damp cloth to remove all sanding dust before painting.
Step 4: Painting and Glazing
-
Mark the Color Line:
Decide on your diagonal split. You can eyeball it for an organic look, or lightly use a pencil to mark where the terracotta color meets the navy. -
First Coat – Terracotta:
Paint the smaller section with your burnt orange or terracotta acrylic paint. Apply 2-3 thin coats for opacity, letting each coat dry fully. -
First Coat – Navy:
Paint the larger section in deep navy blue. Be careful where the two colors meet; use a steady hand or a piece of washi tape to get a crisp line. -
Apply the High Gloss:
Once the paint is fully cured, apply a thick coat of high-gloss varnish. This step mimics the kiln-fired glaze. Ensure you brush in long, even strokes to avoid bubbles. -
Final Coat:
For maximum shine and durability, apply a second coat of varnish after the first has dried according to the manufacturer’s instructions.
Now you have a stunning, high-shine tray perfect for holding trinkets on your bedside table