If you’re craving cute Halloween projects that are more “aww” than “boo,” clay is the sweetest way to make it happen. These ideas are all about tiny, friendly spooky characters you can turn into desk buddies, charms, and little seasonal keepsakes.
Chibi Ghost Desk Buddies
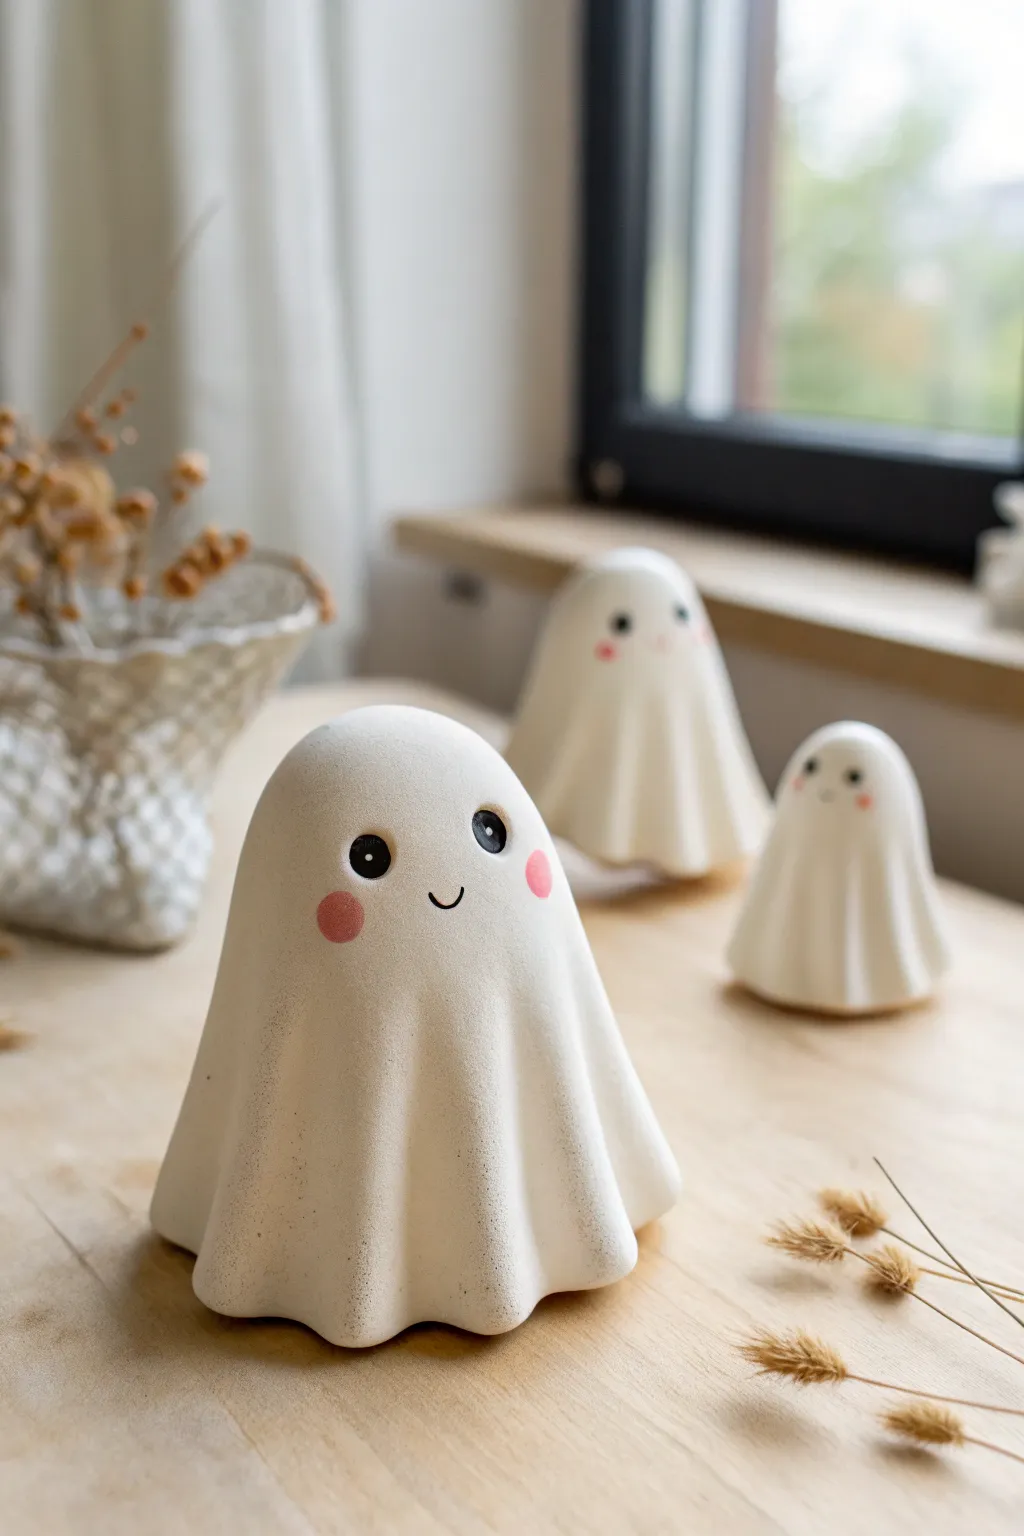
These adorable desk companions capture the classic draped sheet look in a solid, lasting form. With their matte finish, rosy cheeks, and gentle folds, they bring a sweet rather than spooky vibe to your Halloween decor.
Step-by-Step
Materials
- White polymer clay or air-dry clay (approx. 100g per ghost)
- Aluminum foil
- Rolling pin
- Smooth work surface or silicone mat
- Ball stylus tool or toothpick
- Black acrylic paint
- Pink acrylic paint or soft pink pastel chalk
- Fine detail paintbrush
- Matte varnish (spray or brush-on)
- Small sponge or cotton swab
Step 1: Forming the Core
-
Create the armature:
Crumple a piece of aluminum foil into a tapered cone shape. The base should be roughly 1.5 inches wide and the height about 2.5 inches. Compact it tightly so it creates a solid support structure. -
Smooth the foil:
Check your foil cone for any sharp points that might poke through the clay later. Roll the cone on your table a few times to smooth out the exterior as much as possible. -
Condition the clay:
Take a portion of white clay and knead it in your hands until it becomes soft and pliable. If using polymer clay, this warm-up step is crucial to prevent cracking. -
Roll the sheet:
Flatten the conditioned clay into a pancake shape, then use your rolling pin to roll it out into a circle roughly 1/8 inch thick. Aim for a diameter about twice the height of your foil cone.
Fixing Cracks
If small cracks appear while air-dry clay is drying, mix a tiny bit of fresh clay with water to make a paste and fill the gaps. Smooth with a wet finger.
Step 2: Draping the Ghost
-
Initial placement:
Place your foil cone in the center of your work surface. Gently lift the clay circle and center it over the point of the cone. -
Creating the drape:
Slowly lower the clay circle over the cone. Let gravity do some of the work, but guide the clay to create natural-looking vertical folds. You want the clay to ripple like fabric. -
Refining the folds:
Use your fingers to gently pinch and shape the bottom edges of the ‘sheet’ so they curve outward slightly, creating that fluttering fabric effect. Ensure the bottom edge is even enough for the ghost to stand stable. -
Smoothing the dome:
With the pad of your thumb, very gently smooth the top of the ghost’s head to ensure it’s round and the foil point isn’t creating a sharp peak. I like to keep a light touch here to avoid flattening the clay. -
Texturing (Optional):
If you want a slightly rustic stoneware look like the photo, you can lightly dab the surface with a piece of stiff sponge or a textured cloth before the clay hardens.
Spooky Glow
Use glow-in-the-dark polymer clay instead of white to make your ghosts illuminate when the lights go out for a fun nighttime surprise.
Step 3: Finishing Details
-
Hardening the clay:
If using polymer clay, bake according to the package instructions (usually 275°F/135°C for 15-30 minutes). If using air-dry clay, let it sit undisturbed in a dry area for 24-48 hours until fully white and hard. -
Painting the eyes:
Once fully cured and cool, dip a ball stylus or the back end of a paintbrush into black acrylic paint. Dot two wide-set eyes onto the upper third of the ghost’s face. -
Adding the smile:
Using your finest detail brush and black paint, draw a tiny, shallow U-shape between the eyes. Keep the line extremely thin for that cute ‘chibi’ aesthetic. -
Applying blush:
Mix a tiny amount of pink paint with water to make a glaze, or scrape some pink pastel chalk into dust. Use a dry brush or cotton swab to gently dab round pink circles on the cheeks just below the eyes. -
Wait for paint to dry:
Allow the painted face details to dry completely. This usually takes about 10-15 minutes for thin acrylics. -
Adding highlights:
For extra life, add a tiny white dot reflecting light in the upper corner of each black eye using a toothpick. -
Sealing the piece:
Apply a coat of matte varnish over the entire ghost. This protects the paint and gives the clay that smooth, finished ceramic appearance shown in the image.
Place your trio of ghosts on a shelf or windowsill to add a touch of friendly haunting to your home


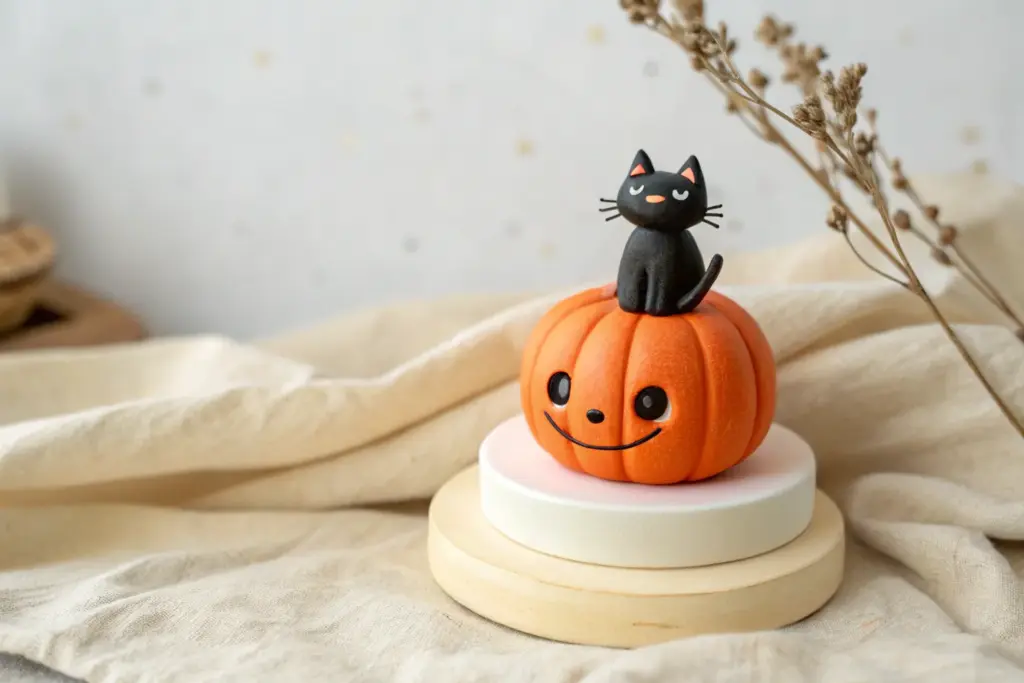
Tiny Black Cat With Pumpkin Pal
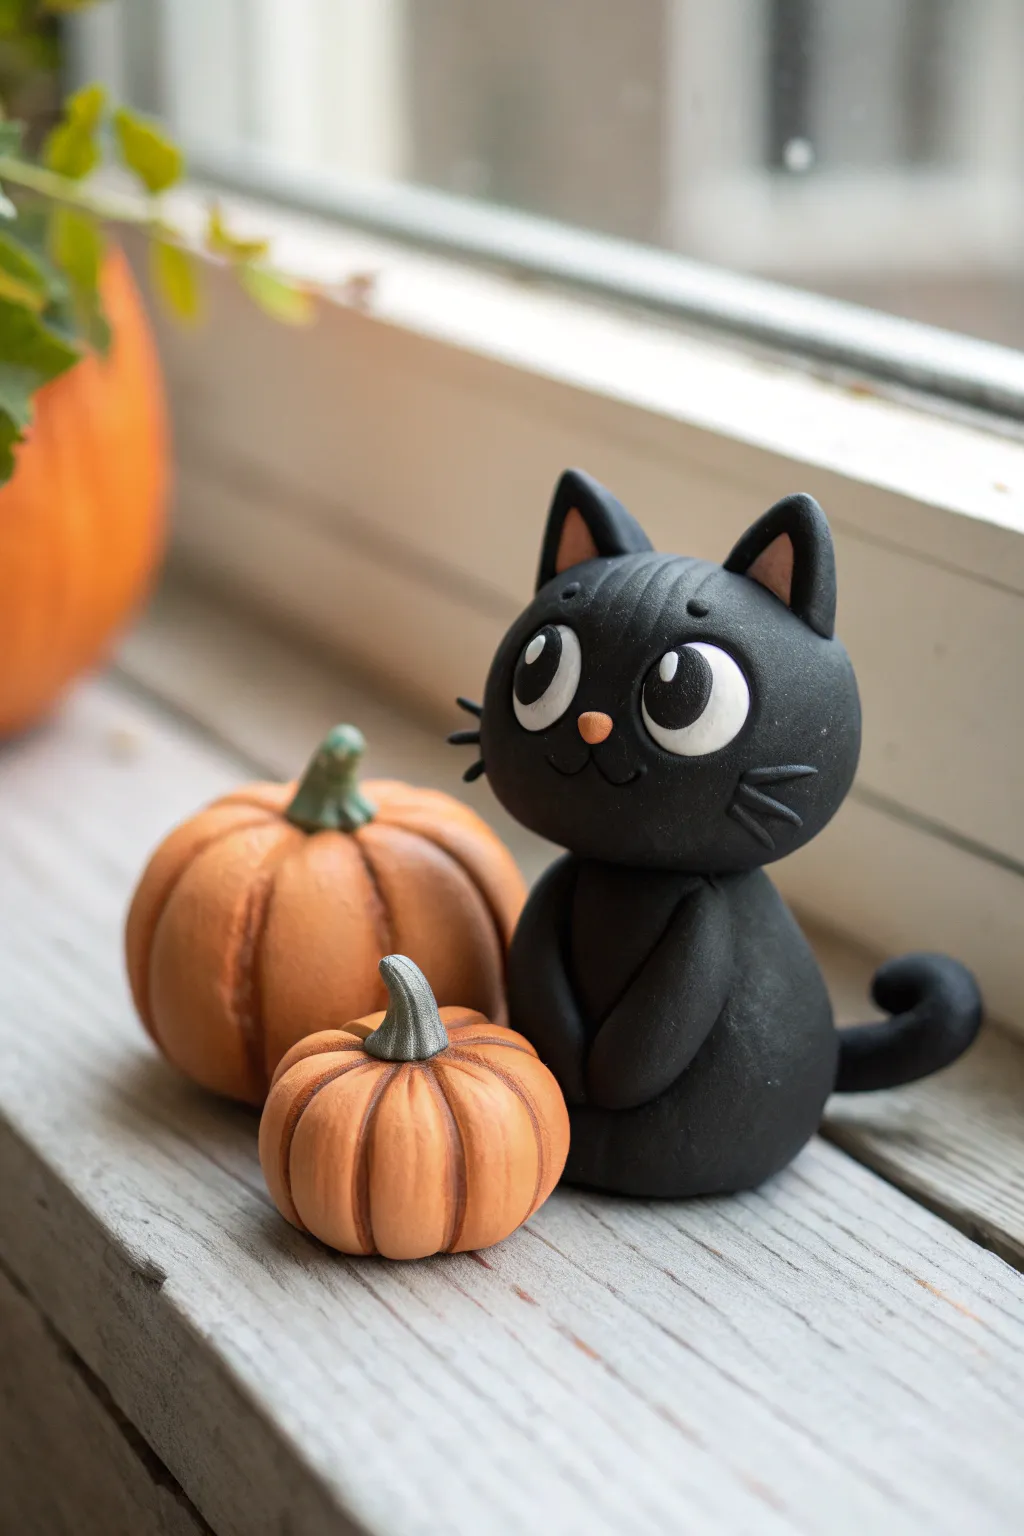
This adorable polymer clay project brings a touch of Halloween magic to any windowsill or shelf. Featuring a sweet, wide-eyed black cat and its miniature pumpkin companions, the finished piece has a smooth, matte look that is simply charming.
Detailed Instructions
Materials
- Black polymer clay
- Orange polymer clay (terracotta or pumpkin shade)
- White, dark green, and grey polymer clay
- Translucent liquid clay (optional)
- Small ball stylus tool
- Needle tool or toothpick
- Clay sculpting tools (silicone shapers)
- Soft pastels (brown, orange) for shading
- Small brush
- Oven for baking
Step 1: Sculpting the Cat Body
-
Form the base:
Start by conditioning a chunk of black clay until it’s soft and pliable. Roll a smooth ball about the size of a walnut for the body and slightly shape it into a rounded teardrop, flattening the bottom so it sits stably. -
Shape the head:
Roll a second, slightly larger ball of black clay for the head. It should be a bit of a squircle shape—round but slightly flattened at the chin. -
Attach head to body:
Press the head firmly onto the narrow top of the body piece. You can insert a small piece of toothpick or wire between them for internal support if you like. -
Create the ears:
Shape two small triangles of black clay. Indent the centers slightly with a ball tool and press a tiny triangle of light pink or nude clay inside for the inner ear. Attach these to the top of the head. -
Add texture details:
Using a needle tool, gently press three small lines on each cheek to create whisker indentations. Add a few very light textural lines on the forehead to suggest fur.
Step 2: Adding the Face and Limbs
-
Make the eyes:
Roll two small circles of white clay and flatten them onto the face. They should be quite large to achieve that cute, cartoonish look. -
Add pupils:
Place smaller black circles onto the white eyes, positioning them slightly to the side or crossing them for a silly expression. Add a tiny white dot on each black pupil for a life-like glint. -
Nose and mouth:
Place a tiny oval of pink clay between the eyes for the nose. Use your needle tool to scribe a small anchor shape (‘w’) underneath for the smiling mouth. -
Sculpt the paws:
Roll two small logs of black clay for the front legs. Attach them vertically to the front of the body, curving them slightly inward so the paws meet at the chest. Smooth the seams at the shoulders. -
Add the tail:
Roll a tapered snake of black clay. Attach the thicker end to the back of the body and curl the tip upward in a playful curve.
Clean Clay Tip
Keep baby wipes or hand sanitizer nearby. Clean your hands thoroughly when switching from the black clay to white or orange to avoid dirty smudges on the lighter colors.
Step 3: Crafting the Pumpkins
-
Form pumpkin bases:
Create two balls of orange clay—one slightly larger than the other. Slightly flatten them so they aren’t perfect spheres. -
Create ribs:
Use a needle tool or the side of a toothpick to press vertical grooves all around the pumpkin, running from top to bottom to create the segments. -
Shade the pumpkins:
I find this step crucial for realism: shave a little brown or dark orange soft pastel into dust. Use a dry brush to sweep this dust into the grooves you just created to add depth. -
Make the stems:
Mix a tiny bit of green and grey clay for a muted stem color. Roll small, twisted cone shapes and press them firmly onto the top center of each pumpkin.
Make it Shine
Mix a tiny amount of mica powder into the clay for the cat’s eyes before baking. It gives them a magical, subtle shimmer perfect for a spooky Halloween feline.
Step 4: Baking and Finishing
-
Final check:
Before baking, give everything a once-over for fingerprints. You can smooth them out with a tiny bit of baby oil on your finger. -
Bake the project:
Place your cat and pumpkins on a tile or baking sheet. Bake according to your clay package instructions (usually around 275°F/130°C for 15-30 minutes depending on thickness). -
Cool down:
Let the pieces cool completely in the oven before moving them to prevent cracking.
Arranging these little figures on your windowsill will bring festive cheer all season long


Mini Witch Hat Charms
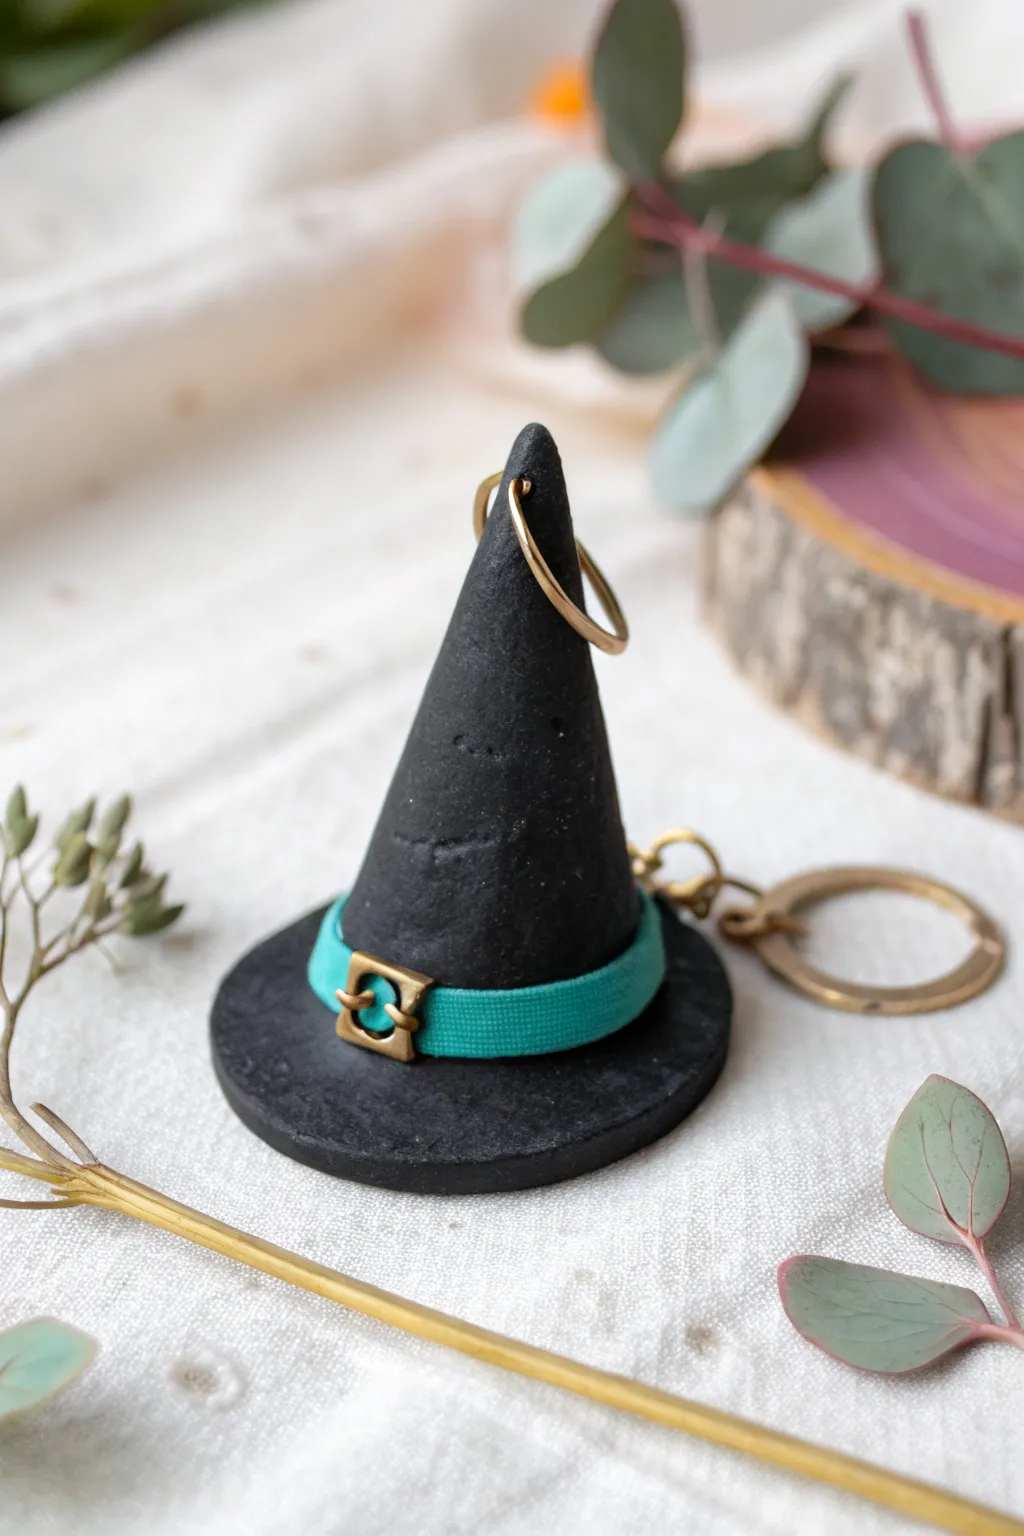
Cast a spell on your keyring with this dainty witch hat charm, crafted from black polymer clay. Its sleek cone shape is punctuated by a pop of teal and a tiny gold buckle, making it the perfect understated accessory for spooky season.
Step-by-Step Guide
Materials
- Black polymer clay
- Teal or turquoise polymer clay (small amount)
- Gold polymer clay or gold acrylic paint
- Clay roller or acrylic rolling pin
- X-acto knife or craft blade
- Needle tool or toothpick
- small gold jump rings
- Gold keychain finding
- Baking sheet and parchment paper
- Gloss varnish (optional)
Step 1: Shaping the Base
-
Condition the clay:
Begin by thoroughly conditioning your black polymer clay until it is soft and pliable. This prevents cracks from forming during shaping. -
Form the cone:
Roll a medium-sized ball of black clay into a smooth cone shape. Roll it gently against your work surface to elongate the tip while keeping the base flat and circular. -
Create the brim:
Roll a second piece of black clay into a flat sheet, about 2-3mm thick. Use a small round cutter or a knife to cut out a perfect circle slightly wider than the base of your cone. -
Attach firmly:
Press the cone firmly onto the center of the flat circle. I find using a blending tool or your fingertip to seamlessy meld the underside of the brim with the cone base ensures it stays attached. -
Texture lightly:
Gently tap the surface with a piece of sandpaper or a toothbrush to give the hat a subtle, stone-like texture instead of a perfect plastic shine.
Clean Hands, Clean Clay
Black clay shows dust easily! Wipe your hands and work surface with a baby wipe before starting, and keep a piece of scrap clay nearby to lift lint off the main piece.
Step 2: Adding the Details
-
Roll the hat band:
Condition a small amount of teal polymer clay. Roll it into a very thin, long snake or strip, then flatten it slightly with your roller. -
Trim the band:
Use your craft knife to slice the flattened teal strip so it has straight, clean edges. It needs to be long enough to wrap around the base of the cone. -
Attach the band:
Wrap the teal strip around the base of the cone, right where it meets the brim. Trim off any excess and smooth the seam at the back. -
Texture the band:
Use a needle tool to press tiny vertical lines into the teal band, mimicking the weave of fabric ribbon. -
Make the buckle:
Roll a tiny rope of gold clay (or use scrap clay you can paint later). Shape it into a small square frame. -
Add the prong:
Add a microscopic line of clay across the center of the square for the buckle’s prong. -
Place the buckle:
Press the gold buckle gently onto the front center of the teal hat band.
Step 3: Hardware and Finishing
-
Insert the top ring:
Take a small gold jump ring. Gently push it into the clay near the peak of the hat cone. You can secure it with a dab of liquid clay for extra hold. -
Add side attachment (optional):
If you want a keychain loop at the brim like the photo, carefully pierce a hole in the brim edge or insert a screw eye pin into the side. -
Bake carefully:
Place your charm on parchment paper. Bake according to your clay package instructions (usually 275°F/135°C for 15-30 minutes). -
Cool down:
Let the piece cool completely before handling so it hardens fully. -
Paint details:
If you didn’t use gold clay, carefully paint the buckle with gold acrylic paint using a fine detail brush. -
Assemble keychain:
Use pliers to attach your larger keychain ring to the embedded jump ring or eye pin.
Bend the Top
Give the cone tip a slight crooked bend before baking. This simple tweak adds instant whimsey and character, making it look like a well-worn witch’s hat.
Now you have a bewitching little accessory ready to haunt your bag or keys


Cute Candy Corn Trio
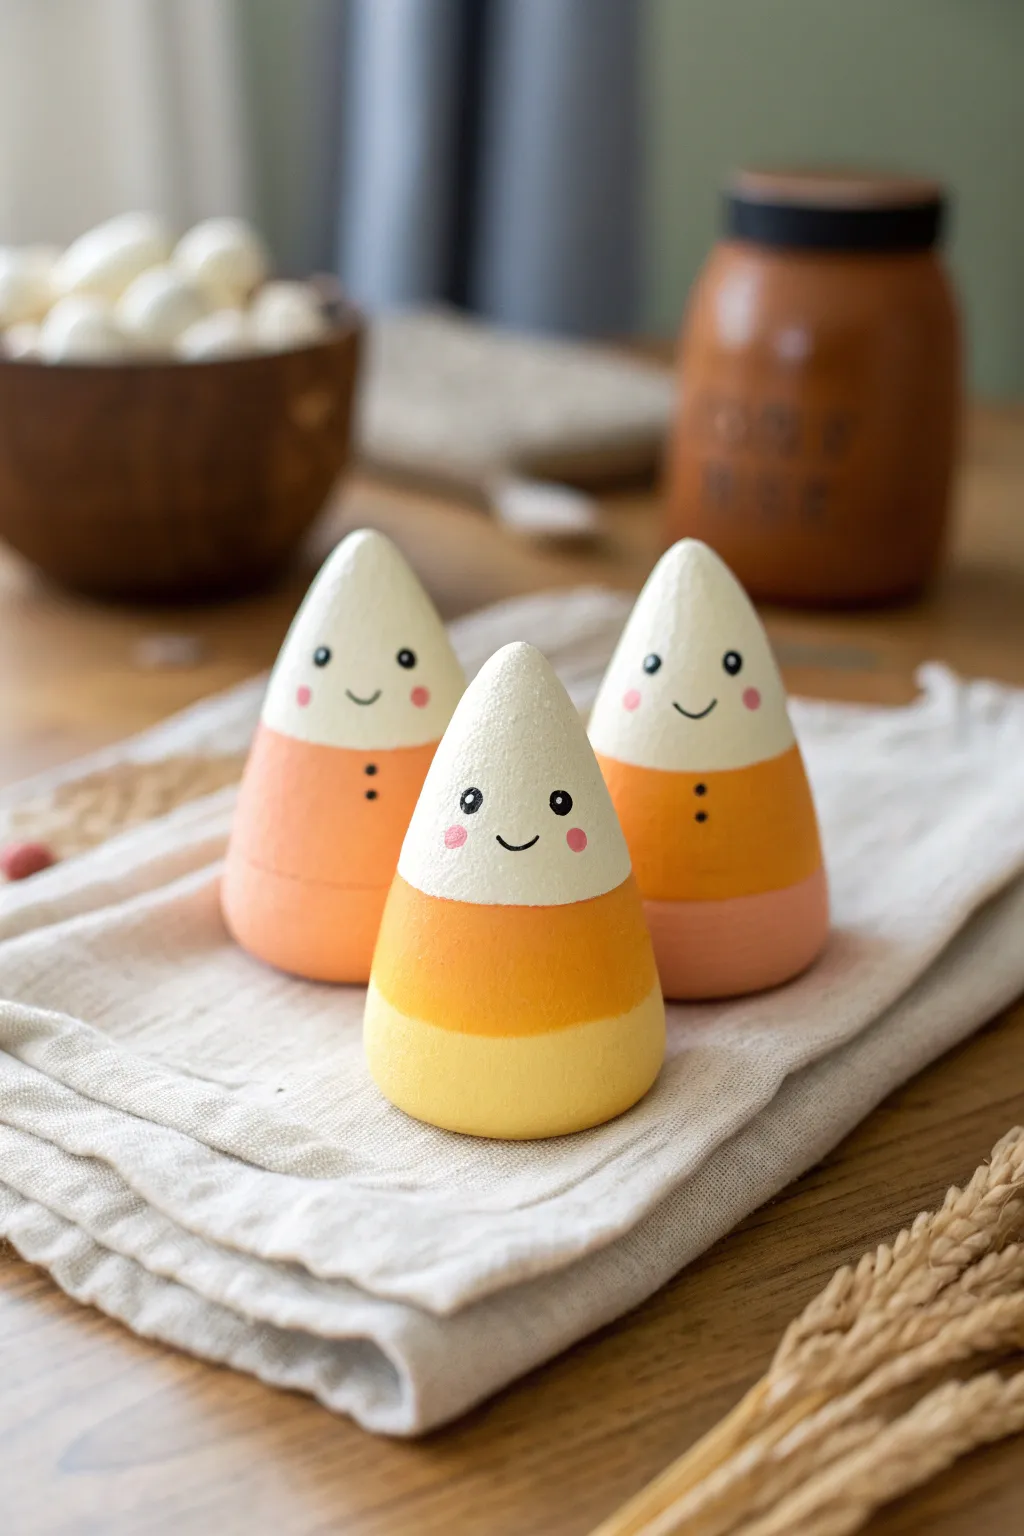
These adorable little candy corn figurines bring a sweet, smiling touch to your Halloween decor without the sugar rush. With their smooth, rounded shapes and cheerful painted faces, they make for a charming display on any table or mantle.
Step-by-Step Tutorial
Materials
- Air-dry clay or polymer clay (white)
- Acrylic paints: White, bright orange, deep yellow, pink, black
- Paintbrushes: Medium flat brush, fine detail brush
- Fine-grit sandpaper (optional)
- Matte sealant or varnish
- Rolling pin or smooth jar
- Dotting tool or toothpick
- Water cup and paper towels
Step 1: Shaping the Clay
-
Portion the clay:
Start by dividing your clay into three equal portions. Roll each portion in your hands until it forms a smooth, crack-free sphere roughly the size of a golf ball or slightly larger. -
Form the cone base:
Take one sphere and gently roll it back and forth on your work surface while applying slightly more pressure to one side. This will begin to form a teardrop or cone shape. -
Flatten the bottom:
Once you have a rough cone, tap the wider bottom end firmly against the table to create a flat base so the figurine stands up on its own without wobbling. -
Refine the shape:
Use your fingers to smooth out the sides, aiming for a rounded, chubby cone rather than a sharp geometric one. Soften the very top point so it looks like a worn candy corn. -
Repeat the process:
Create the other two figurines using the same method. I like to vary the heights slightly—maybe make one a bit shorter and stumpier—to give the trio more personality. -
Smooth imperfections:
Dip your finger in a tiny bit of water (for air-dry clay) or baby oil (for polymer clay) and gently buff out any fingerprints or cracks on the surface. -
Dry or bake:
Let the clay dry completely according to the package instructions. If using polymer clay, bake it in the oven. If using air-dry clay, allow 24-48 hours for full hardening.
Uneven Clay Surface?
If you struggle to smooth out air-dry clay with just water, let it dry completely and then use a damp sanding sponge. It removes lumps without creating dust.
Step 2: Painting the Layers
-
Prepare the surface:
Once hardened, check for any rough spots. A quick pass with fine-grit sandpaper ensures a professional, smooth finish before painting. -
Base coat:
Paint the entire surface of each figurine white. This acts as a primer and ensures your yellow and orange colors will pop. Let this layer dry completely. -
Mark the sections:
Lightly visualize or sketch where your three color bands will go. The top third will remain white, the middle will be orange, and the bottom third will be yellow. -
Paint the bottom yellow:
Using your flat brush, paint the bottom third of the cone with deep yellow. Don’t worry about a perfectly straight line; a slightly organic edge looks softer. -
Paint the middle orange:
Paint the middle section bright orange, carefully meeting the yellow line. Again, hand-painted lines add to the charm, so they don’t need to be taped off. -
Refresh the white:
If needed, add a fresh coat of white to the top tip to ensure it looks crisp and clean against the orange band.
Step 3: Adding the Faces
-
Place the eyes:
Using a dotting tool or the handle end of a paintbrush dipped in black paint, place two small dots widely spaced apart on the white section of the cone. -
Add the smile:
Switch to your finest detail brush. Paint a tiny, thin ‘U’ shape between the eyes for a simple, happy smile. Keep the line delicate for the cutest expression. -
Paint the cheeks:
Dip a toothpick or small tool into pink paint. Gently stamp a small pink dot just below and to the outside of each eye to create rosy cheeks. -
Add body details:
On the orange section, add two or three tiny vertical black dots down the center to mimic buttons, giving them a little outfit appearance. -
Seal the project:
Once all paint is visibly dry, apply a coat of matte varnish or sealant. This protects the paint from chipping and gives the clay a cohesive, finished look.
Getting Sharp Details
For the tiny smiles and buttons, try using a fine-tip permanent crafting marker instead of a paintbrush. It offers way more control than a brush.
Arrange your finished trio on a kitchen towel or shelf to enjoy their happy autumn vibes

The Complete Guide to Pottery Troubleshooting
Uncover the most common ceramic mistakes—from cracking clay to failed glazes—and learn how to fix them fast.
Happy Bat Wing Clips Or Magnets
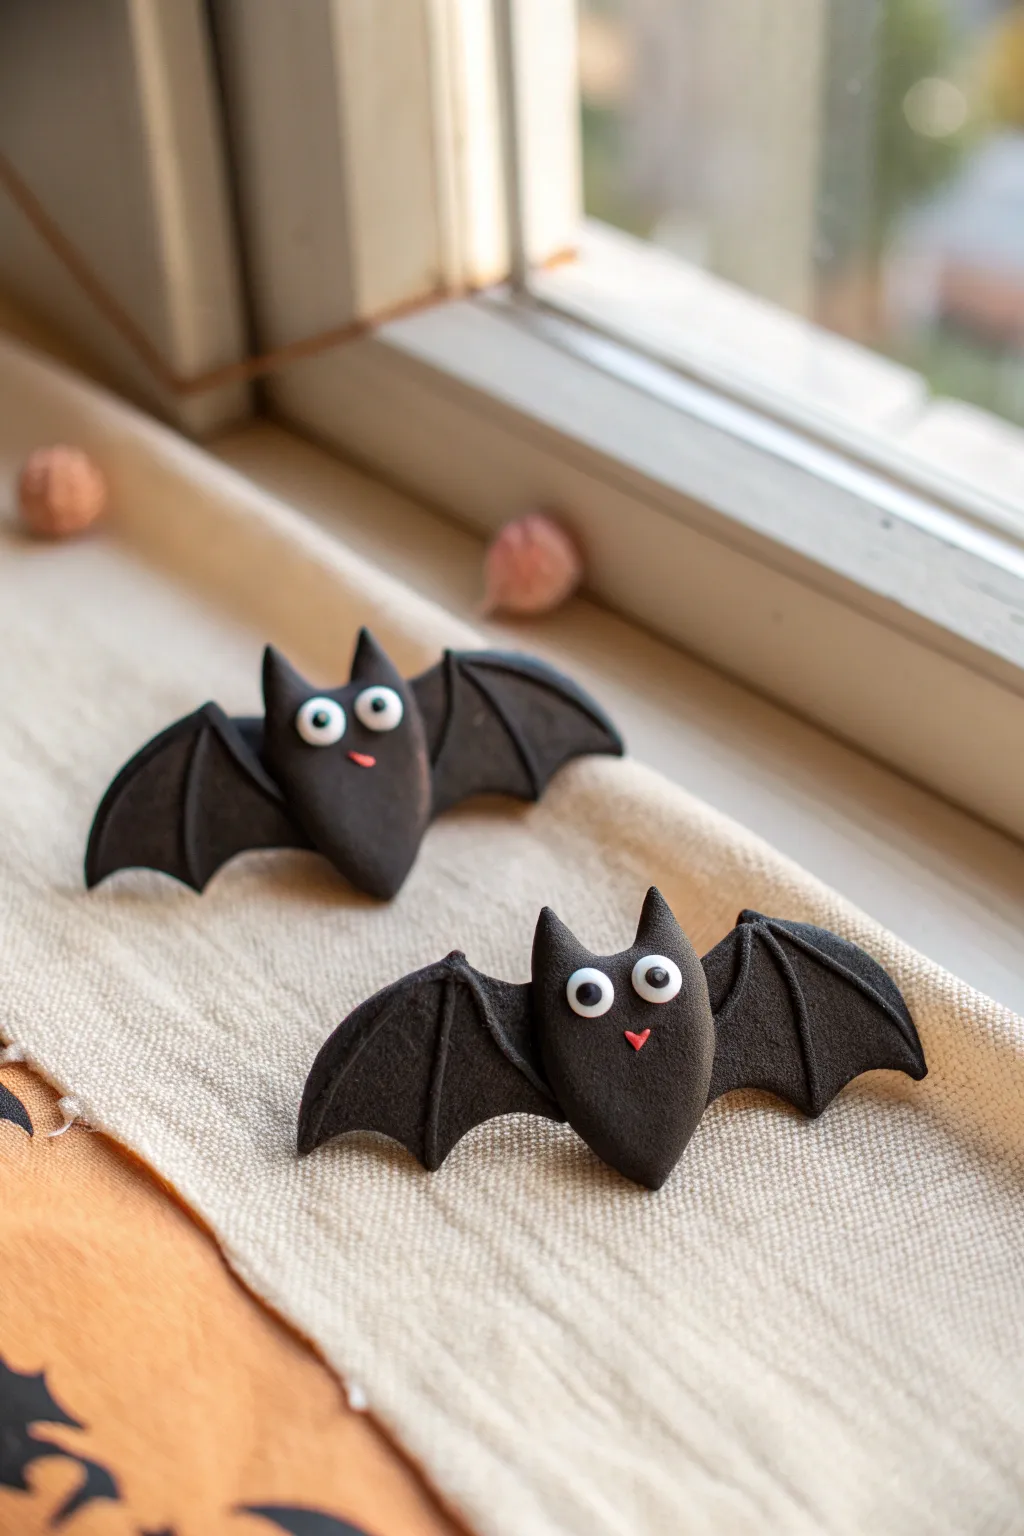
These adorable little bats are the perfect spooky-sweet addition to your Halloween decor. Crafted from sleek black clay with expressive eyes and textured wings, they can easily transform into festive magnets or hair clips.
Detailed Instructions
Materials
- Black polymer clay
- White polymer clay
- Red polymer clay (very small amount)
- Black clay detailing tool or toothpick
- Rolling pin
- Clay knife or cutting blade
- Small ball tool
- Strong craft glue
- Hair clips or circular magnets
- Oven for baking
Step 1: Shaping the Bodies
-
Condition the clay:
Begin by kneading your black polymer clay until it is soft and pliable. This prevents cracking later on. -
For the main body:
Roll a small ball of black clay, roughly the size of a large grape. -
Form the teardrop:
Gently roll one end of the ball between your palms to taper it into a smooth teardrop shape. Flatten it slightly so it isn’t completely round. -
Create the ears:
At the wider, rounded top of the teardrop, use your fingers to pinch two small points upwards. These will become the pointed bat ears. -
Refine the head:
Smooth the area between the ears to create a gentle dip, giving the head a distinct shape separate from the body.
Clean Clay Tip
Work with the white clay for the eyes *before* the black clay, or wash hands thoroughly between colors to keep the whites bright.
Step 2: Crafting the Wings
-
Roll out the clay:
Roll a separate piece of black clay flat, aiming for about 3mm thickness. -
Cut the wing shapes:
Use your knife to cut two wing shapes. Think of a rounded triangle with a scalloped bottom edge to mimic a bat’s wing structure. -
Add bone detail:
Take a very thin snake of black clay and lay it across the wing horizontally. Press it down gently to fuse it. -
Vertical texture:
Roll two shorter, thin snakes of clay. Attach them vertically from the horizontal line down to the points of the scalloped edge. -
Attach wings to body:
Press the wings firmly onto the back of your teardrop body shape. I like to blend the clay slightly at the connection point on the back for extra durability.
Glitter Upgrade
Before baking, brush a tiny amount of purple or silver mica powder onto the wing ridges to make the details pop.
Step 3: Adding Personality
-
Make the eyes:
Roll two tiny balls of white clay and flatten them into discs. Press these onto the upper part of the bat’s face. -
Add pupils:
Roll two minuscule balls of black clay and press them into the center of the white discs. -
Create a smile:
Take a tiny speck of red clay. Roll it into a microscopic triangle or thin line depending on the expression you want. -
Place the mouth:
Gently press the red clay just below the eyes using your small ball tool or toothpick. -
Final check:
Look over your bat for any fingerprints. You can smooth them out lightly with a drop of baby oil on your finger if needed.
Step 4: Baking and Assembly
-
Bake the clay:
Place your bats on a baking sheet lined with parchment paper. Bake according to your specific polymer clay package instructions (usually around 275°F/135°C for 15-30 minutes). -
Cool down:
Let the bats cool completely before handling them. They are fragile while warm. -
Choose your backing:
Decide if you want a magnet or a hair clip. -
Glue the backing:
Apply a dab of strong craft glue to the back of the bat and press your magnet or clip firmly into place. -
Dry completely:
Allow the glue to cure fully following the manufacturer’s time guidelines before using.
Now you have a colony of cute bats ready to hang around your house
Sweet Spider With Heart Marking
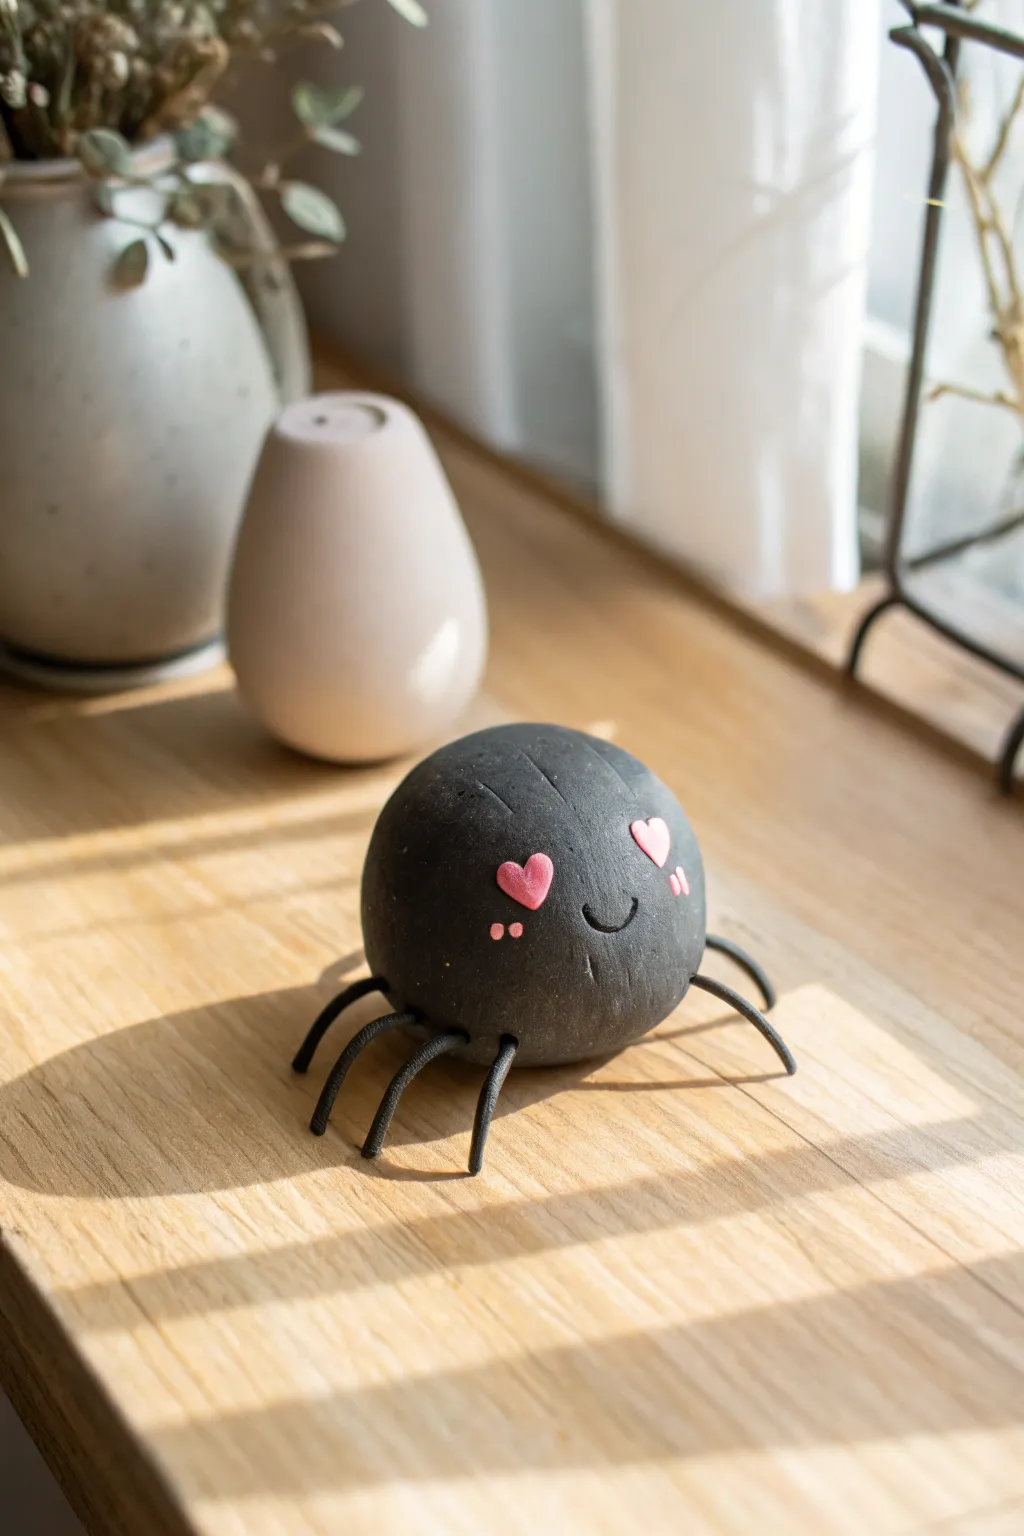
Transform a spooky critter into a sweetheart with this adorable polymer clay project. This round, smiling spider features charming pink heart eyes and delicate wire legs, making it perfect for sitting on a windowsill or desk.
Step-by-Step Guide
Materials
- Black polymer clay
- Pink polymer clay (soft pastel shade)
- Black jewelry wire or silicone cord (1mm – 2mm thick)
- Needle tool or clay sculpting tool
- Small ball stylus
- Wire cutters (if using metal wire)
- Super glue or liquid clay
- Craft knife
- Oven for baking
Step 1: Shaping the Body
-
Prepare the main clay:
Begin by conditioning a block of black polymer clay. Knead it in your hands until it is soft, pliable, and free of any air bubbles. -
Form the sphere:
Roll the black clay into a smooth, even ball about the size of a tangerine or a golf ball, depending on how large you want your spider to be. -
Smooth the surface:
Once rolled, gently pat the surface to remove any fingerprints. If you see lint or dust on the black clay, use a piece of clear tape to lift it off. -
Flatten the base:
Press the ball gently onto your work surface to create a small flat spot on the bottom. This ensures your spider won’t roll away once finished.
Dusty Clay?
Black clay shows every speck of dust. If rubbing alcohol doesn’t clean it, brush on a tiny bit of baby oil before baking to smooth out fingerprints and hide lint.
Step 2: Creating the Face
-
Mark eye placement:
Determine where the face will be. Use your needle tool to lightly mark two spots where the eyes will go, keeping them relatively wide apart for a cute look. -
Shape the heart eyes:
Condition a very small amount of pink clay. Divide it into two equal tiny balls, then flatten them teardrop shapes. Press two teardrops together at the points to form a heart, or cut a heart shape with a tiny cutter. -
Attach the eyes:
Genly press the pink clay hearts onto the black sphere at an angle. I like to tilt them slightly outward to give the spider an affectionate expression. -
Add blush marks:
Roll two impossibly tiny bits of pink clay into cylinders. Cut them into four tiny segments. Place two small vertical dashes under each eye to create blush marks. -
Carve the smile:
Using a curved tool or the tip of a needle tool, press a simple ‘U’ shape smile into the black clay between the eyes. Create small dimples at the ends of the smile for extra character. -
Add forehead details:
Use a needle tool or knife to gently score a few straight vertical lines near the top of the head for texture.
Make it Sparkle
For a magical touch, brush a tiny amount of mica powder or pearl ex over the pink hearts before baking to make the eyes shimmer in the light.
Step 3: Adding Legs and Finishing
-
Pre-drill leg holes:
Before baking, use a tool that matches the diameter of your wire or cord to poke four holes on each side of the body. Angle them slightly downward so the legs will support the body. -
Bake the body:
Place the clay body on a baking sheet or tile. Bake according to your polymer clay package instructions (usually around 275°F/135°C for 15-30 minutes). -
Cool down:
Allow the clay body to cool completely before handling. It will be slightly soft when hot but hardens as it cools. -
Cut the legs:
While the body cools, cut eight pieces of black wire or silicone cord. Each leg should be about 1.5 inches long, though you can vary the length slightly. -
Shape the legs:
Bend each wire piece gently in the middle to create the ‘knee’ joint of the spider leg. The bend should be soft, not a sharp right angle. -
Secure the legs:
Dip the tip of each leg into a tiny drop of super glue. Insert the legs into the pre-drilled holes on the baked body. -
Final adjustment:
Once the glue is dry, adjust the angles of the legs so the feet touch the surface evenly and the spider stands up straight.
Now you have a friendly little arachnid to brighten up your festive decor


What Really Happens Inside the Kiln
Learn how time and temperature work together inside the kiln to transform clay into durable ceramic.
Pastel “Spooky Cute” Skeleton Pieces

This adorable skeleton figurine swaps the scary for the sweet with a soft pastel color palette and a charming, oversized skull. The seated pose and rounded, chubby aesthetic make it a perfect desk buddy or tiered tray decoration for a less frightful Halloween.
Detailed Instructions
Materials
- Polymer clay (white, pastel pink, pastel purple, mint green, pale yellow, peach)
- Black polymer clay (very small amount)
- Clay sculpting tools (dotting tool, needle tool, hobby knife)
- Aluminum foil
- Liquid polymer clay (optional, for bonding)
- Oven for baking
- Soft brush (optional, for smoothing)
Step 1: Sculpting the Head
-
Form the core:
Crumple a small ball of aluminum foil, roughly the size of a walnut, to use as a lightweight armature for the head. This saves clay and helps with baking. -
Cover with clay:
Flatten a sheet of white clay and wrap it completely around the foil ball, smoothing out all seams until you have a uniform white sphere. -
Add the eye sockets:
Use a large ball tool or your thumb to press two deep, oval indentations into the front of the sphere for the eyes. They should be relatively large for that cute look. -
Shape the nose:
Press a small, triangular indentation between and slightly below the eyes to form the nose cavity. -
Create the mouth area:
Add a small, flattened rectangle of white clay below the nose to build up the jaw slightly. Use a needle tool or knife to score vertical lines for teeth, and a horizontal line to separate the top and bottom jaw. -
Fill the eyes:
Take two small balls of black clay, flatten them into ovals, and press them firmly into the back of your eye sockets to create depth. I find texturing the black clay slightly with a toothbrush adds a nice matte effect. -
Add cranial detail:
Flatten a thin piece of pale yellow clay and gently press it onto the back/top of the skull to look like a ‘cap’ or bone plate, smoothing the edges slightly but leaving a visible seam.
Step 2: Building the Body
-
Create the spine:
Roll a small vertical log of white clay to serve as the central spine. Position it upright on your work surface. -
Form the ribs:
Roll small snakes of mint green, lavender, and peach clay. Cut these into short segments and curve them into ‘C’ shapes. -
Stack the ribcage:
Attach the colored ribs to the front of the spine, alternating colors. Since this is a stylized piece, stack them closely together like stripes on a shirt. -
Add the sternum:
Roll tiny balls of pale pink or white clay and flatten them down the center of the chest where the rib ends meet, creating a cute sternum detail.
Clean Slates
White and pastel clays show dust easily. Keep a pack of baby wipes nearby and clean your hands and tools thoroughly between color changes.
Step 3: Limbs and Assembly
-
Sculpt the arms:
Create two teardrop shapes from mint green clay for the upper arm bones. For the forearms/hands, make rounded white shapes and use a knife tool to mark simple finger separations. -
Attach the arms:
Press the arms onto the sides of the ribcage. Angle them slightly downward so the hands rest near where the hips will be. -
Make the legs:
Roll two thick logs of pink clay for the leg bones. Bend them slightly at the ‘knee’ to support a sitting position. -
Form the feet:
Create chubby, rounded foot shapes—one in pink and one in yellow for asymmetry. Flatten the bottoms slightly so they sit flat. -
Connect the lower body:
Attach the legs to the bottom of the spine structure. Position them extended forward in a ‘V’ shape, as if the skeleton is sitting on the floor. -
Join head to body:
Insert a toothpick or piece of wire into the top of the spine and push the head onto it. If the clay isn’t sticky enough, a drop of liquid polymer clay helps here. -
Final texture check:
Gently wipe the surface with a bit of baby oil or clay softener on your finger to remove any fingerprints before baking. -
Bake:
Bake according to your clay manufacturer’s instructions (usually 275°F/135°C for 15-30 minutes). Let it cool completely inside the oven to prevent cracking.
Make it a Keychain
Before baking, screw a small eye hook into the top of the skull. Once baked and cooled, you can attach a chain to take your spooky friend on the go.
Now you have a charmingly eerie companion ready to brighten up your shelf
Kawaii Mummy With Peekaboo Eyes
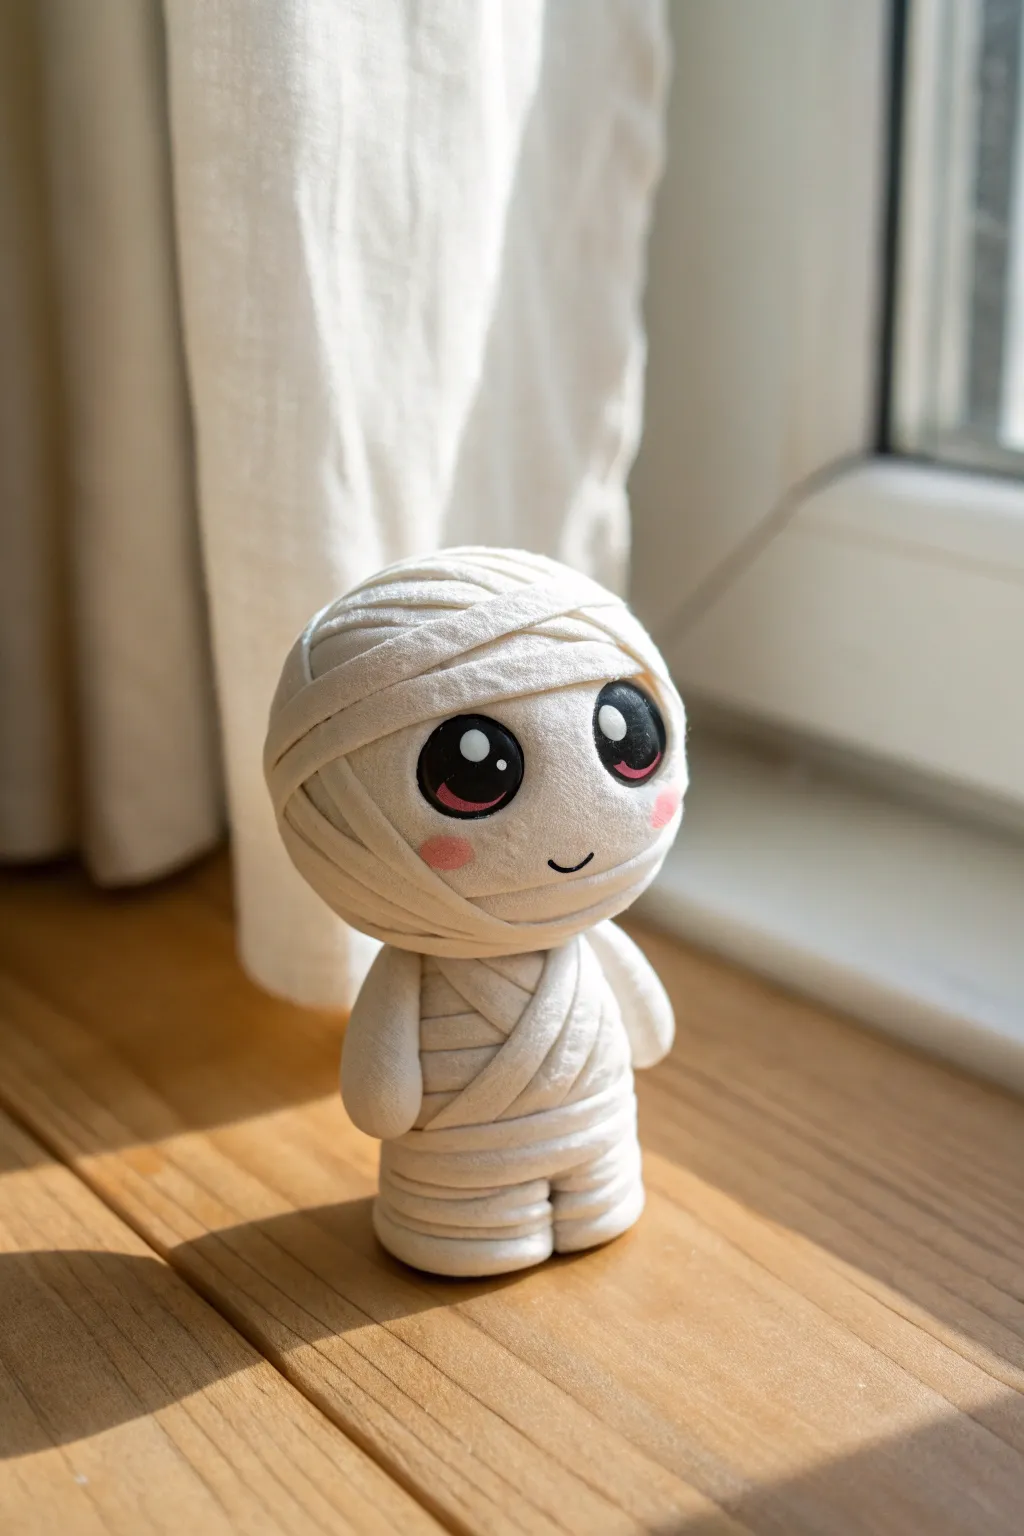
This adorable little mummy figure features oversized eyes and soft, wrapped textures that make it far more sweet than scary. With its blushy cheeks and simple bandage detailing, it is the perfect desk companion or spooky-cute Halloween decoration.
Step-by-Step Guide
Materials
- White modeling clay (air-dry or polymer, like Fimo or Sculpey)
- Black clay (small amount)
- Pink clay or pink pastel chalk
- Rolling pin or smooth round marker
- Clay carving tool or plastic knife
- Smoothing tool or blending silicone tip
- Small dotting tool or toothpick
- White acrylic paint (for highlights)
- Gloss varnish (optional)
Step 1: Forming the Mummy Base
-
Create the head:
Start by rolling a ball of white clay approximately the size of a golf ball. Gently flatten the back slightly if you want the head to retain a round but not perfectly spherical shape. -
Shape the body:
Roll a second piece of white clay into a slightly smaller cylinder or thick oval shape. This will be the torso. -
Join the pieces:
Press the head firmly onto the body cylinder. If you are using polymer clay, blending the seam at the neck isn’t strictly necessary since we will cover it with bandages, but ensuring a tight bond is important so the head doesn’t wobble. -
Add the arms:
Roll two small sausage shapes for arms. Attach them to the sides of the body, pressing them down so they hang comfortably at the sides. -
Make the legs:
Instead of separate legs, I shape the bottom of the body cylinder into two distinct ‘feet’ by making a vertical indentation at the base. This creates a solid, stable base for standing.
Clean Clay Tip
White clay attracts dust like a magnet! Keep a packet of baby wipes nearby and clean your hands and tools thoroughly before handling the white clay strips.
Step 2: Wrapping the Bandages
-
Prepare the strips:
Roll out a thin sheet of white clay. Use your cutting tool to slice long, uneven strips about 5-8mm wide. They don’t need to be perfect; slightly ragged edges add character. -
Wrap the legs and torso:
Begin wrapping strips around the bottom of the figure, overlapping them slightly as you work your way up. Smooth the ends of the strips into the underlayers so they don’t peel off later. -
Wrap the arms:
Take smaller strips and wrap the arms individually. You can create a crisscross pattern to make it look like authentic mummy wrapping. -
Wrap the head:
Start wrapping the head, but be strategic. Leave a clear, oval-shaped open space in the center of the face for the eyes and mouth. The bandages should frame this area. -
Add texture:
Use your smoothing tool to gently press down on the bandages, creating soft creases and folds. This ensures the figure doesn’t look too bulky and the wraps look like tight cloth.
Step 3: The Kawaii Face
-
Create eye sockets:
In the open face area, use your thumbs or a ball tool to press two gentle indentations where the eyes will go. This helps the large eyes sit flush with the face. -
Add the eyes:
Roll two balls of black clay and flatten them into large ovals. Press them into the indentations you just made. They should be quite large to achieve that ‘kawaii’ look. -
Add the blush:
Take extremely tiny amounts of pink clay and flatten them into ovals. Place these directly under the outer edges of the black eyes for rosy cheeks. Alternatively, you can brush on pink pastel dust after baking. -
Sculpt the mouth:
Use a small carving tool or a toothpick to press a tiny, curved smile into the white clay between the cheeks. -
Baking or drying:
If using polymer clay, bake according to the package instructions (usually 230°F-275°F for 15-30 minutes). If using air-dry clay, let it sit in a dry spot for 24-48 hours. -
Paint highlights:
Once hardened and cool, use a dotting tool or toothpick dipped in white acrylic paint to add two reflection dots to each black eye: one larger dot near the top and a smaller one below. -
Add colored iris (optional):
For extra detail like in the reference, you can paint a small crescent of dark pink or red at the bottom of the black eye before adding the white highlights.
Dirty Mummy Mod
Make it look ancient! After baking, dilute brown acrylic paint with water (a ‘wash’) and brush it over the bandages, then wipe most of it off to shadow the crevices.
Now you have a charming little mummy ready to keep watch over your desk

TRACK YOUR CERAMIC JOURNEY
Capture glaze tests, firing details, and creative progress—all in one simple printable. Make your projects easier to repeat and improve.
Friendly “Green Monster” Mini Figurine
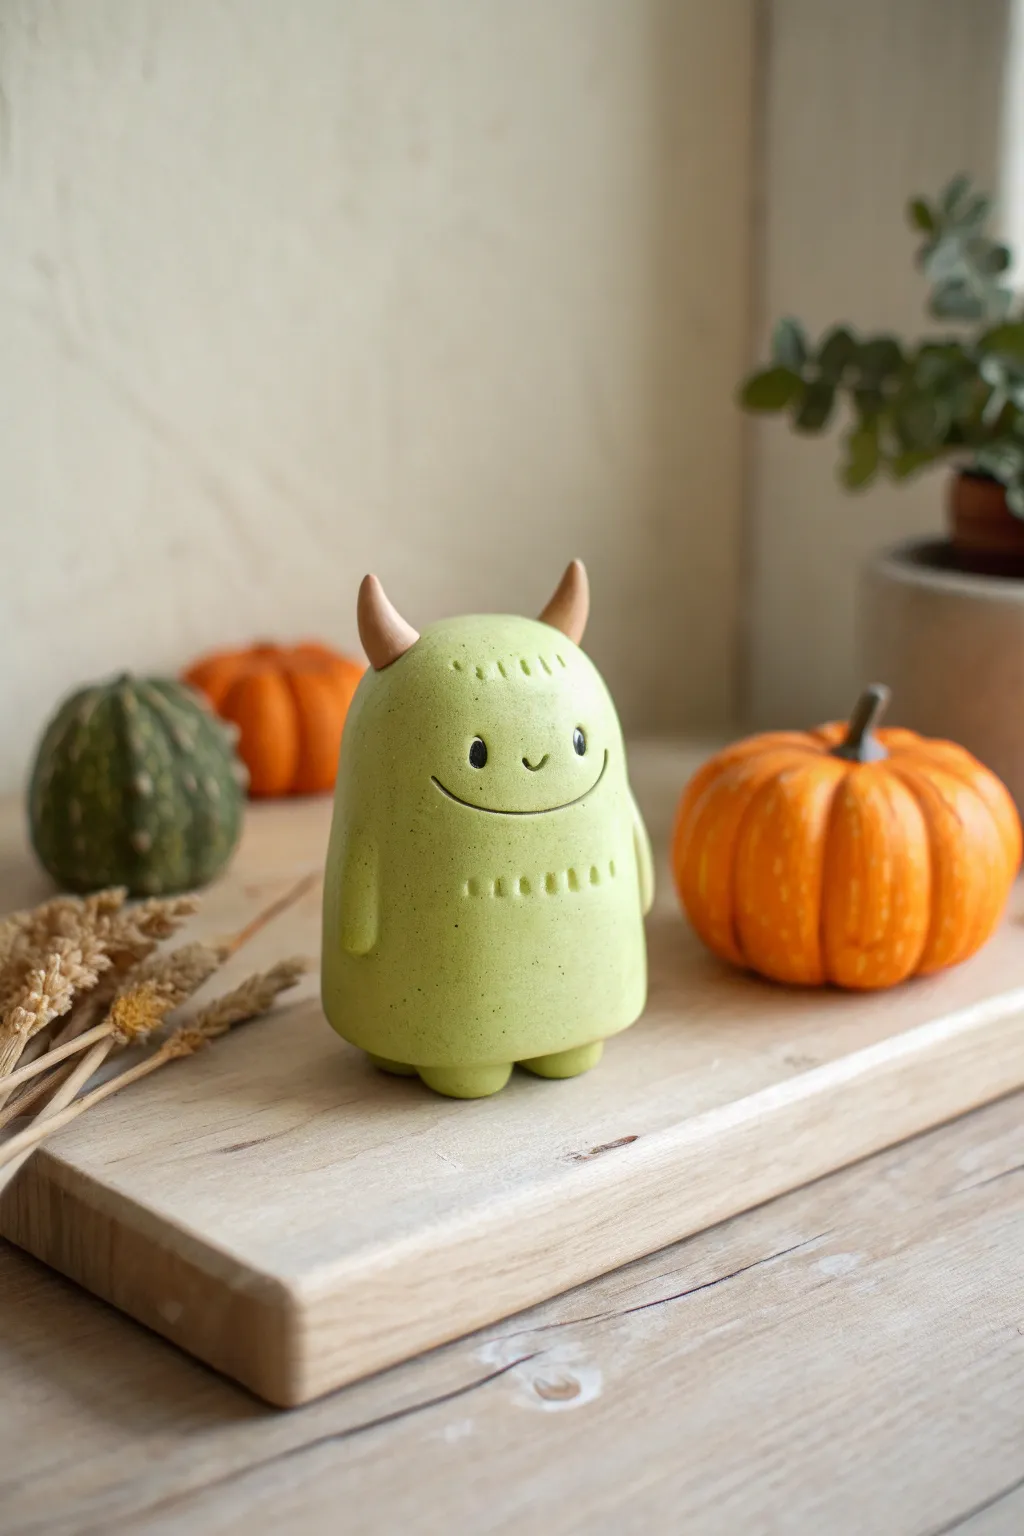
This adorable green monster isn’t scary at all; in fact, he looks ready for a hug. With his smooth, speckled green finish, tiny horns, and sweet stitched smile, this clay figurine makes a perfect friendly addition to your Halloween decor.
Step-by-Step Tutorial
Materials
- Polymer clay (light green, translucent, beige/tan)
- Black acrylic paint
- Fine grit sandpaper
- Speckle additive (black pepper or embossing powder)
- Needle tool or toothpick
- Ball stylus tool
- Oven for baking
- Satin varnish (optional)
Step 1: Shaping the Body Base
-
Mix the clay:
Start by conditioning your light green polymer clay. To achieve that organic, stone-like look, I knead in a tiny pinch of ground black pepper or black embossing powder until it’s evenly distributed. -
Form the main shape:
Roll a large walnut-sized ball of the green clay until it is perfectly smooth with no cracks. -
Create the cylinder:
Gently roll the ball into a thick cylinder shape, tapering it slightly at the top so it looks a bit like a rounded gumdrop. -
Add the feet:
Create two small balls of green clay, roughly the size of peas. Press them onto the bottom of the body, spacing them slightly apart so the figure stands stably. -
Add the arms:
Roll two small, elongated teardrop shapes for the arms. Press these flush against the sides of the body, blending the top seam so they look integrated rather than just stuck on.
Clean Clay Tip
Keep baby wipes nearby to clean your hands between colors. Green clay picks up dust easily, so wipe your tools and work surface before starting the main body shape.
Step 2: Adding Character Details
-
Sculpt the horns:
Take your beige or tan clay and roll two small cones. Curve them slightly to give them a natural horn shape. -
Attach the horns:
Place the horns on the top outer edges of the head. Press firmly to adhere, or use a drop of liquid clay for a stronger bond. -
Mark the eye sockets:
Use a medium ball stylus to press two distinct indentations where the eyes will go. Place them somewhat wide apart for a cuter expression. -
Create the smile:
Use a needle tool to gently carve a shallow, wide U-shape connecting the area below the eyes. Keep the line depth consistent. -
Add stitch details:
Using the very tip of your needle tool, press tiny vertical hash marks along the chest area and across the forehead. These decorative stitches give him a textured, handmade toy vibe.
Make Him Spooky
For a scarier version, make one horn broken or use glow-in-the-dark clay for the eyes. You can also dry-brush a little brown paint near his feet for a ‘dirty’ look.
Step 3: Finishing Touches
-
Bake the figure:
Place your monster on a ceramic tile or baking sheet. Bake according to your clay manufacturer’s specific temperature and time instructions. -
Cool down:
Let the figure cool completely inside the oven or on a wire rack before handling to prevent fingerprints on the warm clay. -
Paint the eyes:
Dip a small dotting tool or the end of a paintbrush handle into black acrylic paint. Carefully fill the eye indentations you made earlier. -
Paint the mouth:
Use a very fine liner brush with thinned black paint to darken the carved smile line, wiping away any excess quickly if it spills over. -
Highlight the eyes:
For that spark of life, add a minuscule dot of white paint to the upper corner of each black eye. -
Seal (Optional):
If you want a slight sheen like the reference photo, brush a thin layer of satin varnish over the green body, avoiding the matte horns.
Place your new green friend alongside some mini pumpkins for a charming seasonal display
Tiny Cauldron With Bubble Details
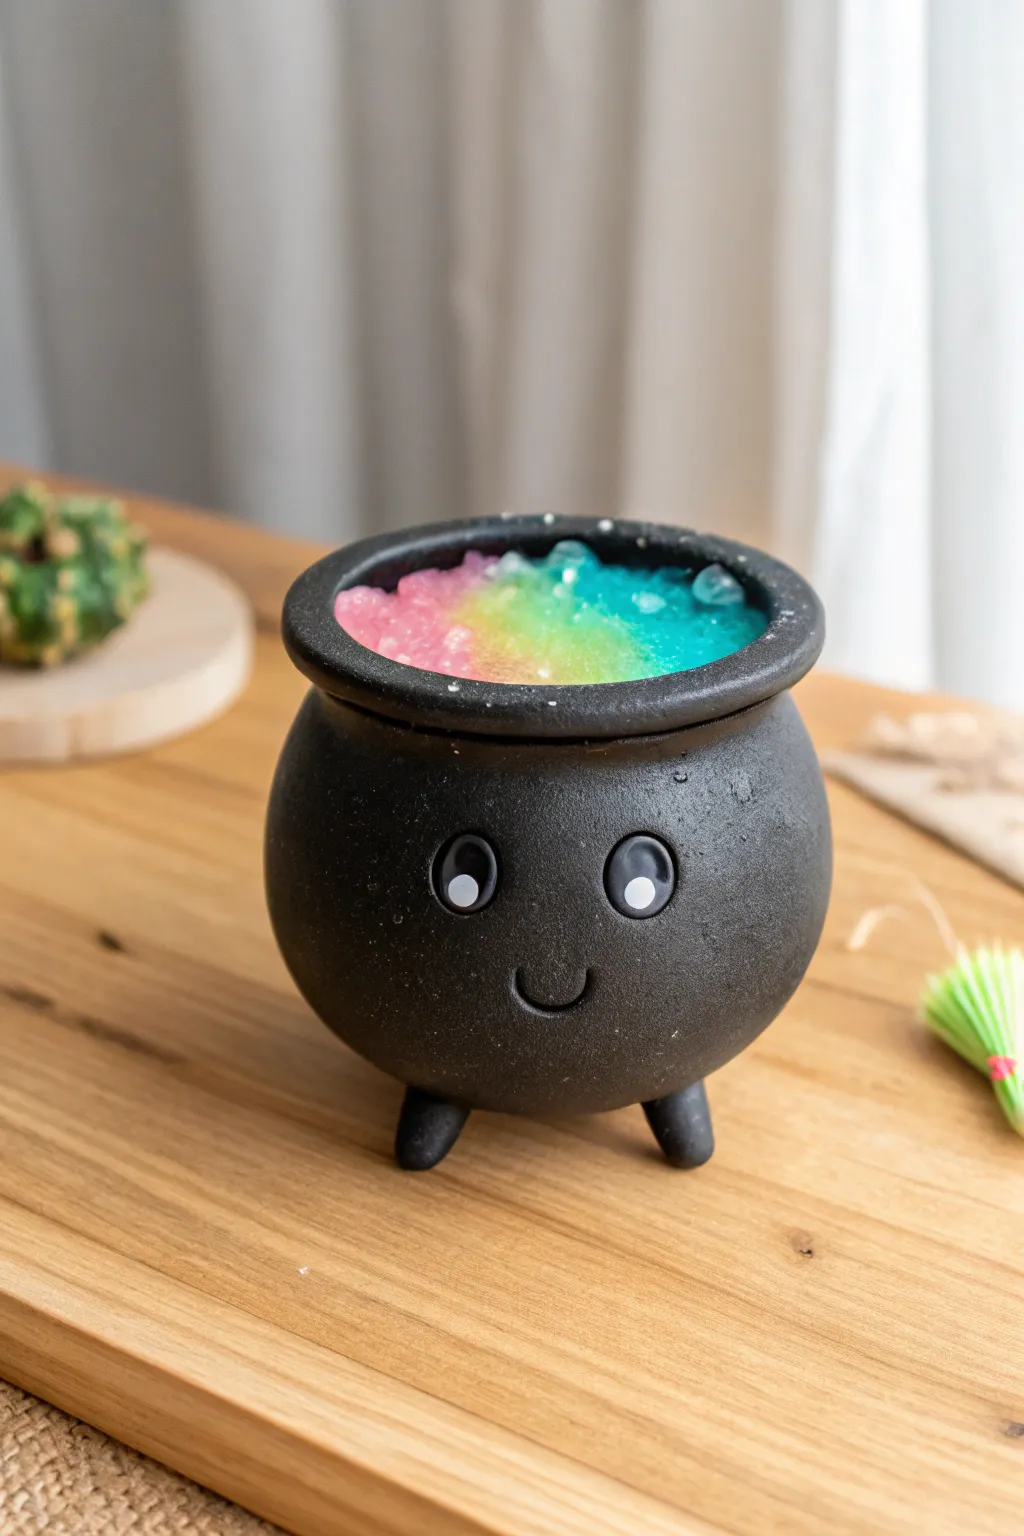
This adorable miniature cauldron is bubbling over with a rainbow potion, making it the perfect spooky yet sweet desktop companion. With its matte black finish and cheerful face, it transforms simple clay into a magical little friend.
Step-by-Step Guide
Materials
- Black polymer clay
- Translucent liquid polymer clay (or UV resin)
- Alcohol inks (Pink, Yellow, Blue)
- Glass microbeads or clear seed beads
- White acrylic paint
- Black acrylic paint
- Small ball stylus tool
- Needle tool
- Toothpick
- Fine detail paintbrush
- Texture sponge or toothbrush
- Oven for baking clay
Step 1: Sculpting the Cauldron Base
-
Form the main body:
Start by rolling a ball of black polymer clay about the size of a golf ball until it is smooth and free of cracks. -
Hollow out the bowl:
Gently press your thumb into the center of the ball to create a hollow opening, pinching and turning the clay to form uniformly thick walls for your pot. -
Add the feet:
Roll three small, equal-sized logs of black clay. Attach them to the bottom of the cauldron in a tripod arrangement so it stands stably on its own. -
Create the rim:
Roll a snake of black clay that is slightly thicker than the cauldron’s edge. Wrap it around the top opening and smooth the seam where it joins the bowl, leaving the top edge somewhat rounded. -
Texture the surface:
To mimic the look of cast iron, gently tap a texture sponge or an old toothbrush over the entire exterior surface of the cauldron, avoiding the face area if you prefer that smoother.
Step 2: Adding the Face Details
-
Carve the eye sockets:
Use a medium-sized ball stylus to press two shallow indentations where the eyes will sit. Space them somewhat wide apart for a cuter look. -
Form the eyes:
Roll two tiny balls of black clay and press them firmly into the indentations you just made. They should bulge out slightly. -
Carve the smile:
Use the edge of a small spoon tool or a curved needle tool to press in a simple U-shaped smile right between and slightly below the eyes. -
Bake the cauldron:
Bake the clay piece according to your package instructions (usually 275°F/135°C for 15-30 minutes). Let it cool completely before proceeding.
Fixing Cloudy Potions
If your liquid clay looks milky after baking, you likely under-baked it or used too thick a layer. Hit it with a heat gun briefly to clarify it.
Step 3: Creating the Bubbling Potion
-
Paint the eye details:
Using a very fine brush and white acrylic paint, add circular highlights to the black eye bumps. Once dry, add a tiny black dot in the center for the pupil. -
Prepare the potion base:
Mix a small amount of translucent liquid polymer clay (or UV resin) with glass microbeads in a small cup. The beads provide the chunky ‘ice’ texture. -
Fill the cauldron:
Pour the bead mixture into the hollow of the baked cauldron until it reaches just below the rim. -
Add color zones:
Place a single drop of pink alcohol ink on the left side of the mixture, yellow in the center, and blue on the right. Let the colors bleed slightly into each other. -
Add top bubbles:
Sprinkle a few extra dry microbeads or larger clear beads on top to look like rising bubbles. -
Final cure:
Bake the piece again for about 15 minutes to set the liquid clay (or cure under a UV lamp if using resin) until the potion is solid and glossy.
Glow Up
Mix glow-in-the-dark powder into your liquid clay potion mixture before pouring. Now your spooky little friend will light up when the lights go out.
Set your happy little cauldron on a shelf to brew up some smiles all season long
Cute Eyeball Friends (Not Gross, Promise)
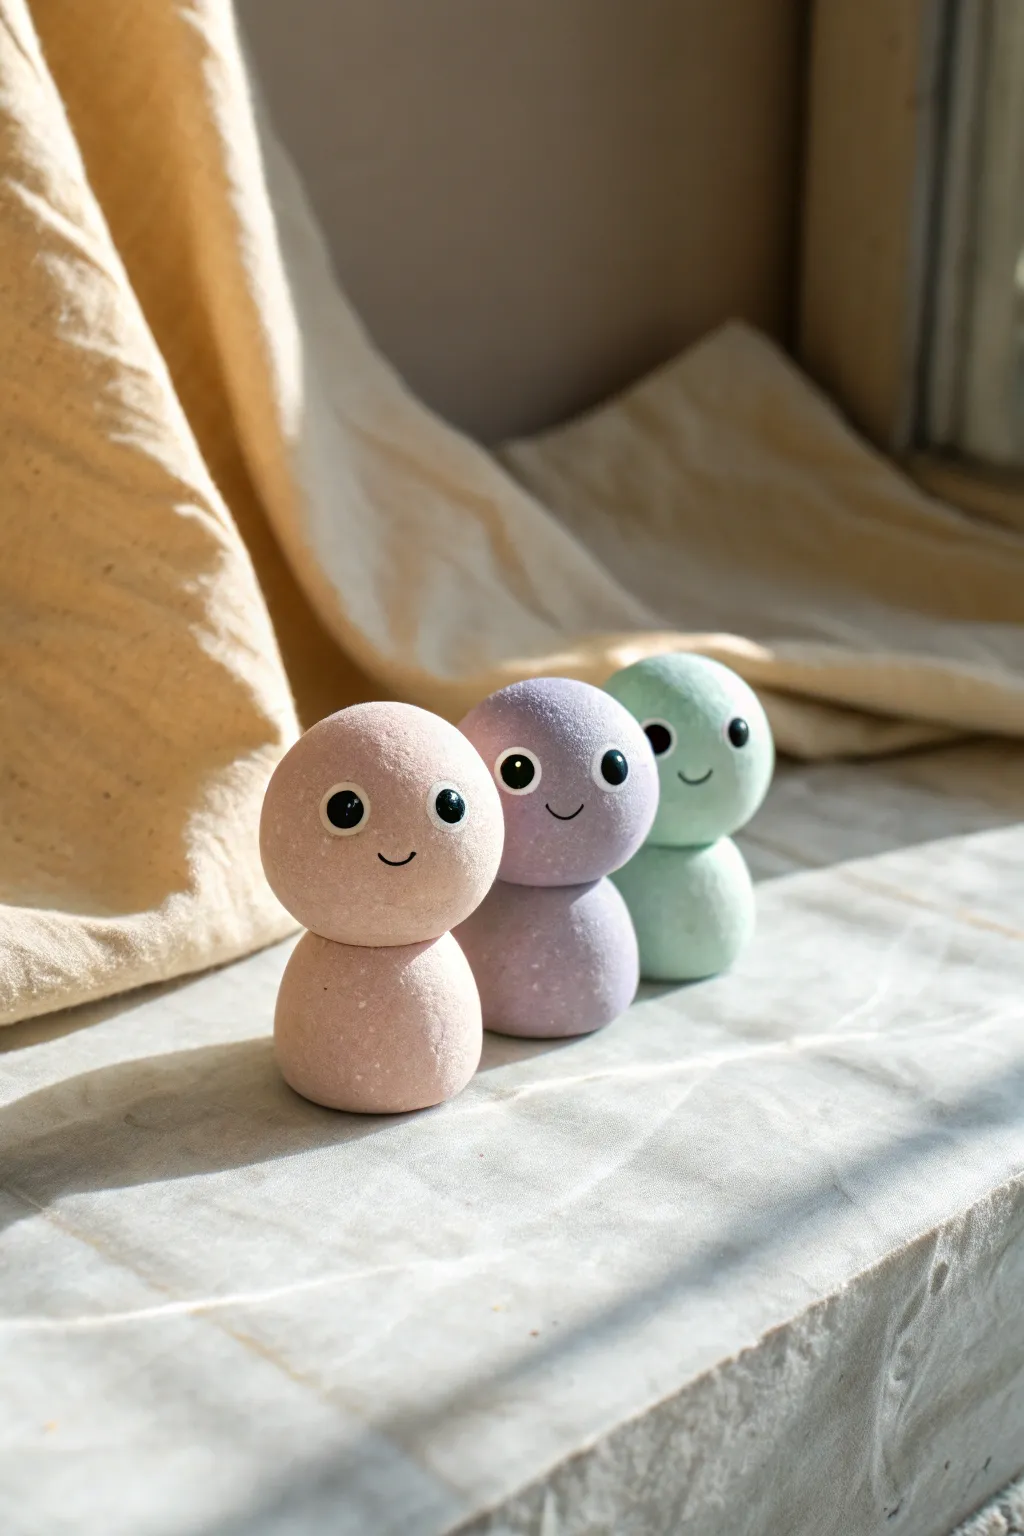
Move over, bloodshot eyes and gory ghouls; these adorable pastel eyeball friends prove Halloween can be sweet instead of scary. With their smooth, matte finish and innocent expressions, these stackable clay figures add a touch of whimsy to any windowsill or shelf.
Step-by-Step
Materials
- Polymer clay (white, pastel pink, pastel purple, pastel green)
- Acrylic rolling pin
- Clean work surface (glass or ceramic tile)
- Modeling tool or toothpick
- Aluminum foil (optional, for armature)
- Black acrylic paint
- White acrylic paint
- Very fine detail paintbrush
- Small dotting tool (or ball-head pin)
- Oven for baking
- Baking sheet with parchment paper
- Matte spray varnish (optional)
Step 1: Shaping the Bodies
-
Condition the clay:
Start by taking your pastel pink polymer clay and kneading it in your hands until it becomes soft, pliable, and warm to the touch. -
Form the base:
Roll a medium-sized ball of clay (about the size of a large walnut) between your palms to create the bottom section of the body. -
Shape the body:
Gently tap the bottom of the ball on your work surface to create a flat base so the figure stands up on its own, then slightly taper the top into a subtle tear-drop shape. -
Create the head:
Roll a second ball of pink clay, making this one just slightly larger than the base piece to give it that cute, bobblehead look. -
Refine the sphere:
Roll this head piece until it is perfectly smooth, checking for any fingerprints or lint; gently buff them out with your thumb if needed. -
Stack the pieces:
Place the head sphere directly onto the tapered top of the base piece. Press down gently but firmly to adhere them without squashing the shapes. -
Secure the bond:
I like to take a blending tool to gently smudge a tiny bit of clay from the base onto the underside of the head at the back—this makes the connection stronger. -
Repeat for friends:
Repeat the entire process with your purple and green clay to create the two companions, ensuring they are roughly the same height.
Step 2: Baking and Painting
-
Bake the figures:
Place your three friends on a baking sheet lined with parchment paper. Bake according to your brand of clay’s specific instructions (usually 275°F/135°C for 15-30 minutes). -
Cool down:
Allow the figures to cool completely inside the oven with the door cracked; this prevents cracking from sudden temperature changes. -
Start the eyes:
Using black acrylic paint and a medium-sized dotting tool (or the back of a paintbrush handle), create two large, solid black circles for the eyes. Space them somewhat wide for a cuter look. -
Paint the mouth:
With your finest detail brush and black paint, carefully draw a tiny, thin ‘U’ shape between the eyes for a smile. -
Add highlights:
Wait for the black paint to be bone dry. Then, dip a smaller dotting tool into white paint and add a ‘reflection’ dot in the upper right corner of each black eye. -
Protect the finish:
If you want them to last longer or sit near a sunny window, apply a light coat of matte spray varnish once the paint is fully cured.
Smooth Operator
Before baking, lightly brush the raw clay with a tiny amount of baby oil or cornstarch. This smooths out fingerprints creating a professional matte finish.
Accessory Upgrade
Give them tiny witch hats or pumpkin stems made of clay to lean harder into the Halloween theme while keeping the cute aesthetic.
Line up your new colorful companions on a windowsill to watch over the season
Ghost Holding A Tiny Pumpkin

This adorable little ghost sculpture captures the cozy spirit of Halloween with its sweet, sleepy expression and tiny pumpkin prize. Made with smooth white clay and simple shapes, it’s a delightful project perfect for decorating a desk or shelf.
How-To Guide
Materials
- White or translucent polymer clay
- Orange polymer clay
- Green polymer clay
- Pink polymer clay (or chalk pastels)
- Black acrylic paint or clay
- Fine detail brush or needle tool
- Smoothing tools or your fingers
- Aluminum foil (for armature)
- Oven for baking
Step 1: Sculpting the Ghost Body
-
Prepare the Core:
Start by crumpling a broad piece of aluminum foil into a pear shape. This will be the armature for your ghost, saving clay and reducing baking weight. -
Cover with White Clay:
Condition your white clay until soft, then roll out a sheet roughly 1/4 inch thick. Wrap this sheet fully around your foil pear, smoothing the seams until invisible. -
Shape the Base:
Gently press the wider, bottom part of the pear onto your work surface to flatten it slightly so the ghost stands upright independently. -
Refine the Head:
Smooth the upper portion into a rounded dome shape for the head, ensuring there’s a seamless transition to the body. -
Create the Bottom Folds:
Using a modeling tool or the side of your finger, press vertical indentations into the very bottom edge of the ghost to mimic the ripples of a flowing sheet.
Step 2: Making the Pumpkin
-
Form the Pumpkin Base:
Roll a ball of orange clay about the size of a large marble, or whatever scale fits comfortably against your ghost’s tummy. -
Add Texture:
Use a needle tool or toothpick to press vertical lines from the top center to the bottom center of the orange ball, creating the classic pumpkin ridges. -
Create the Stem:
Roll a tiny snake of green clay. Attach it to the top center of the pumpkin, blending the adherence point slightly so it doesn’t pop off. -
Shape the Stem:
Pinch the top of the green stem to give it a cut, angular look, just like a real pumpkin stem.
Fixing Fingerprints
If your white clay is picking up fingerprints or dust, lightly brush the unbaked clay with a little baby oil or cornstarch to smooth it out before baking.
Step 3: Assembly and Details
-
Position the Pumpkin:
Press the finished pumpkin gently against the center of the ghost’s body. You want it to look like it’s being held tight. -
Add the Arms:
Roll two small sausage shapes of white clay for the arms. Curved them around the pumpkin, blending the clay at the shoulders so the arms look like they grow naturally from the body. -
Smooth the Connections:
Spend some time smoothing the shoulder joints with a silicone tool or your finger to erase any seams. -
Create Cheeks:
Take two minuscule flattened dots of pink clay and press them onto the face area for rosy cheeks. Alternatively, you can brush on pink pastel dust before baking. -
Paint the Face:
Using a very fine brush and black paint (or tiny snakes of black clay), create two ‘U’ shapes for the sleepy closed eyes and a small ‘u’ shape for the smiling mouth between the cheeks. -
Bake:
Bake the sculpture according to your specific clay brand’s package instructions. Usually, this is around 275°F for 15-30 minutes per 1/4 inch of thickness. -
Cool and Finish:
Let the ghost cool completely before handling. If you used paint for the face, you can now add a matte varnish to protect the details.
Spooky Glow Upgrade
Swap the standard white clay for glow-in-the-dark polymer clay. Your cute ghost will look sweet by day but magically luminescent when the lights go out.
Once baked and cooled, your friendly ghost is ready to haunt your home with pure cuteness
Pumpkin Patch Mini Set (Mix-and-Match Faces)
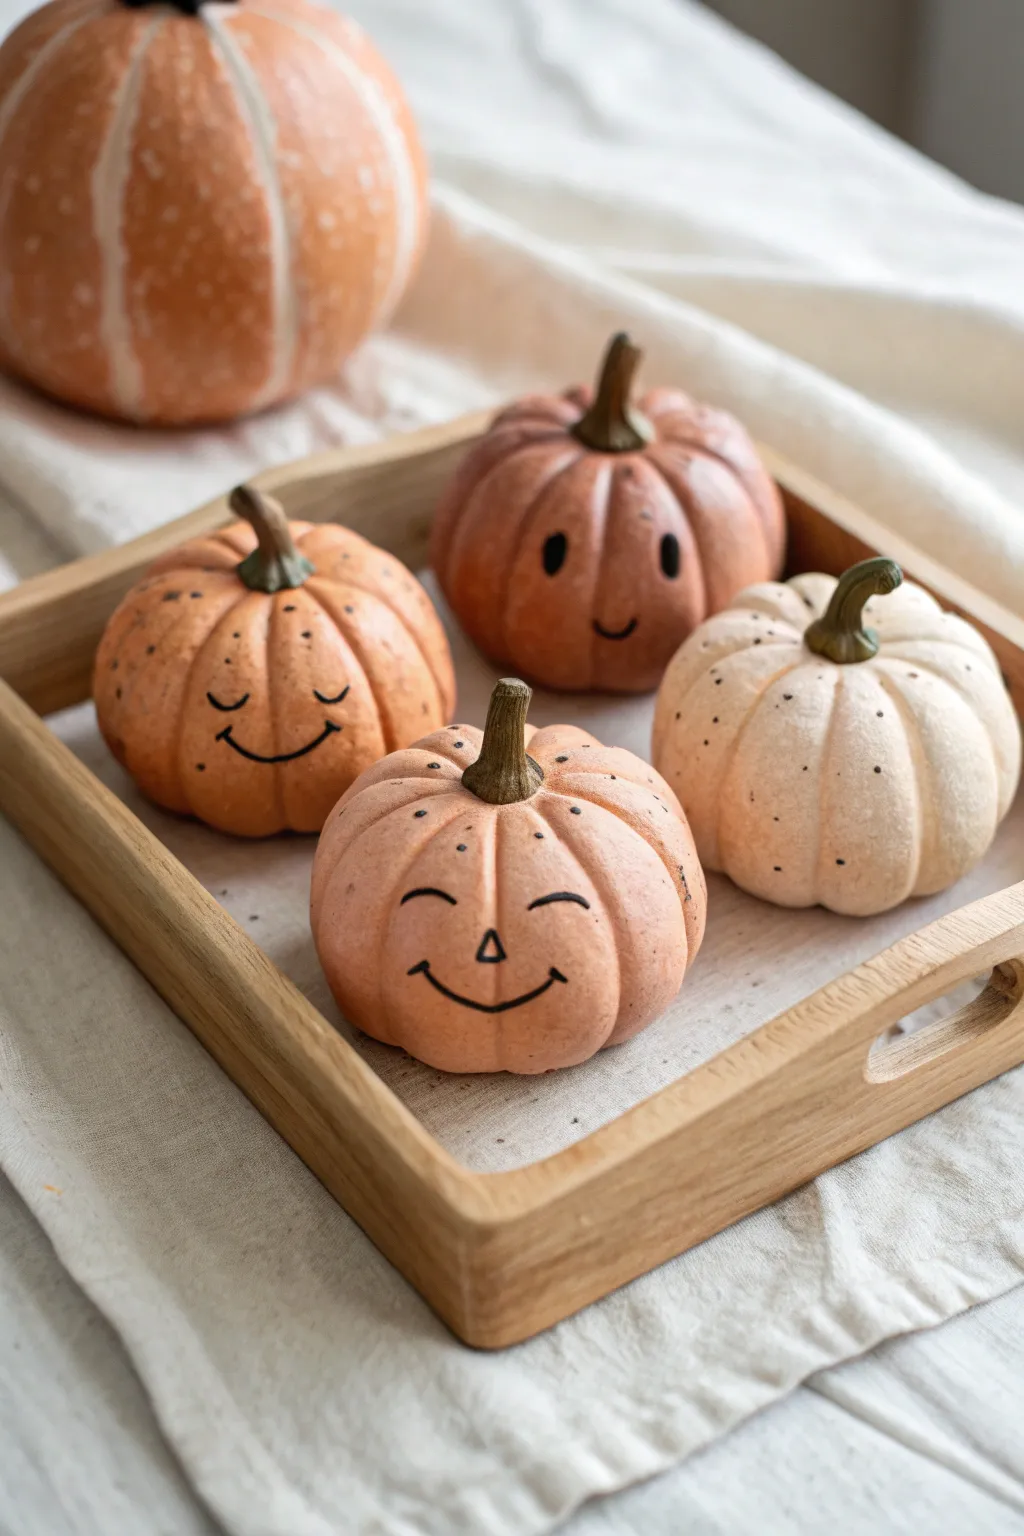
Create a charming collection of miniature pumpkins that brings a soft, rustic touch to your Halloween decor. These hand-sculpted clay pieces feature varied shades of peach and cream, with simple, whimsical ink faces that add distinct personalities to each gourd.
Detailed Instructions
Materials
- Air-dry clay (white or terracotta)
- Acrylic paints (burnt orange, peach, cream, moss green, brown)
- Fine-grit sandpaper
- Sculpting tools (needle tool or toothpick, ball stylus)
- Small flat paintbrush
- Ultra-fine black permanent marker or detail paint pen
- Matte varnish or sealant
- Small wooden tray (optional for display)
Step 1: Sculpting the Base Shapes
-
Portion the clay:
Begin by breaking off four or five golf-ball-sized chunks of air-dry clay. Roll them between your palms until you have smooth, crack-free spheres. It’s okay if they vary slightly in size; natural variation makes the set look more authentic. -
Flatten slightly:
Gently press each sphere down onto your work surface to create a stable base, flattening the shape just enough so it resembles a squat pumpkin rather than a perfect ball. -
Create the ribs:
Use a sculpting tool or the side of a toothpick to press vertical indentations around the circumference of the pumpkin. Start from the center of the top and drag the tool down to the base to create the distinct ribbed sections. -
Soften the edges:
After carving the ribs, use a damp fingertip to gently smooth over the indentations. You want the segments to look puffy and organic, not sharp or geometric. -
Indent the top:
Press your thumb or a ball stylus firmly into the center of the top to create a small well. This depression is where the stem will eventually sit.
Smooth Surface Secret
Keep a small bowl of water nearby while sculpting. Dipping your finger and smoothing the clay before it dries saves tons of sanding time later.
Step 2: Adding Details and Drying
-
Form the stems:
Roll small, thin snakes of clay for the stems. I like to twist them slightly or bend the tips so they look withered and realistic rather than perfectly straight. -
Attach the stems:
Score the bottom of the stem and the depression in the pumpkin using a needle tool. Apply a tiny dab of water (or slip) to join them, pressing firmly to ensure a strong bond. -
Refine the surface:
Look over your pumpkins for any accidental fingerprints or rough textures. A brush dipped in a little water can smooth these out perfectly. -
Allow to cure:
Let the pumpkins dry completely in a cool, dry place. Depending on your brand of clay and humidity, this usually takes 24 to 48 hours. Rotate them occasionally so the bottoms dry evenly. -
Sand imperfections:
Once fully hard, inspect your pumpkins. If there are any sharp ridges or rough spots, gently buff them away with fine-grit sandpaper for a professional finish.
Make It a Magnet
Embed a strong neodymium magnet into the back of the pumpkin while the clay is still wet to create adorable seasonal fridge decor.
Step 3: Painting and Finishing
-
Apply base coats:
Paint each pumpkin in solid, muted tones. Go for a mix of soft peach, warm terracotta, and creamy white. You may need two coats for full opacity, letting the paint dry completely between layers. -
Add texture:
For a rustic look, use a dry brush technique with a slightly darker shade in the crevices of the ribs, or speckle the surface by flicking a toothbrush loaded with watered-down brown paint. -
Paint the stems:
Color the stems with a dark mossy green or brown. Bring a little of this color down onto the very top of the pumpkin shoulder to simulate where the vine connected. -
Draw the faces:
Using an ultra-fine black marker, draw simple expressions on a few of the pumpkins. Try wide U-smiles, closed sleeping eyes (curved lines with tiny lashes), or a tiny triangular nose. Keep the lines thin and delicate. -
Seal the work:
Protect your paint job with a coat of matte varnish. This removes the plastic-like sheen of acrylics and gives the pumpkins a high-end, ceramic feel.
Arrange these little characters on a tray or shelf to add a whimsical spirit to your autumn home
Halloween Animal Hybrids (Pumpkin Turtle, Bat Bunny, Etc.)
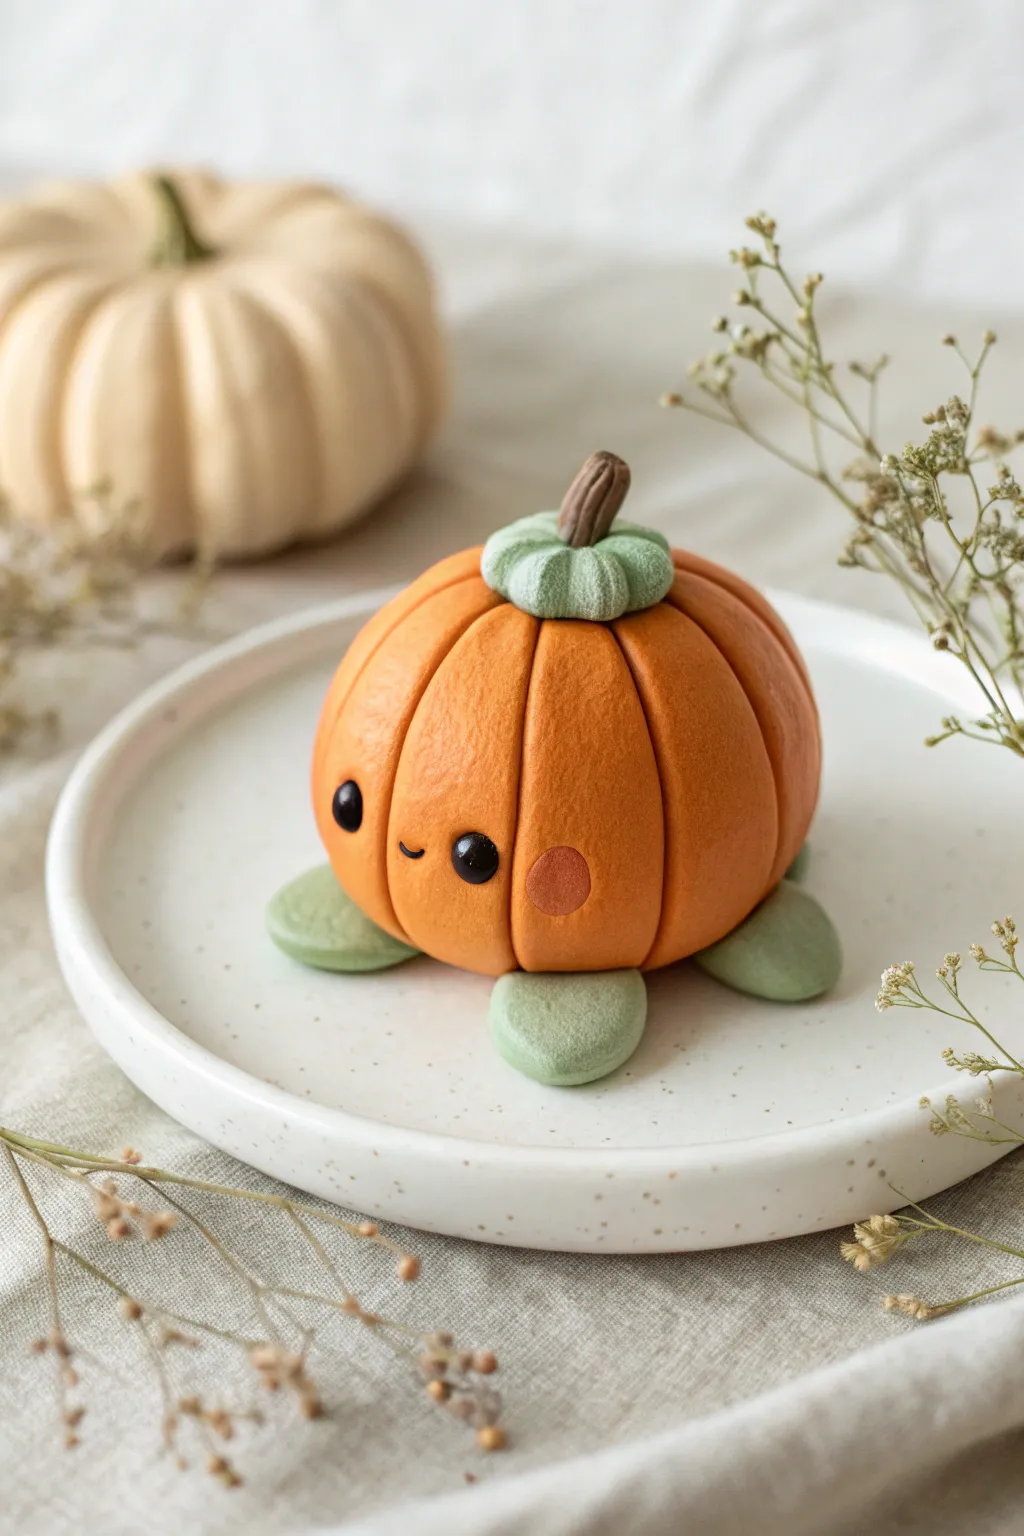
This charming little figurine combines the sturdy shape of a turtle with the festive spirit of a Halloween pumpkin. With its ribbed orange shell, blushing cheeks, and tiny green flippers, it creates a whimsical addition to your autumn decor.
Step-by-Step Guide
Materials
- Polymer clay (Orange, Sage Green, Dark Brown, Black, Pink)
- Clean working surface or clay mat
- Ball stylus tool (medium and large)
- Needle tool or clay knife
- Soft brush for blending (optional)
- Matte varnish (optional)
Step 1: Creating the Pumpkin Shell Body
-
Form the base:
Start by conditioning a generous amount of orange polymer clay until it is soft and pliable. Roll it into a smooth, seamless ball about the size of a golf ball or slightly larger, depending on how big you want your turtle. -
Shape the pumpkin:
Gently press the ball down onto your work surface so the bottom flattens slightly, creating a stable dome shape. This forms the main body and shell of your turtle. -
Add vertical ribs:
Using a needle tool or the back of a non-serrated knife, press vertical lines into the orange dome. Start at the bottom edge and curve up toward the center top, spacing them evenly around the sphere to mimic pumpkin ridges. -
Smooth the ridges:
If the lines look too sharp, gently run your finger or a silicone smoothing tool over the indentations to soften them. You want deep grooves that look pillowy, not jagged cuts. -
Indent the top:
Press a medium-sized ball tool directly into the top center of the pumpkin where all your lines meet. This creates a neat little divot where the stem will sit.
Step 2: Adding Charming Details
-
Create eye sockets:
Choose one side of the pumpkin to be the face. Use a medium ball tool to press two small, shallow indentations where the eyes will go. Spacing them somewhat wide apart adds to the cute factor. -
Insert the eyes:
Roll two very tiny balls of black clay. Place them into the eye sockets you just created and gently press them flat so they are flush with the orange surface. -
Draw the mouth:
Using a needle tool or a very fine clay sculpting tool, carefully etch a tiny, upward-curving smile directly between the eyes. Keep it small and simple. -
Add blushing cheeks:
Take the tiniest pinch of pink or reddish-orange clay and flatten it into two paper-thin circles. Press these onto the ‘cheeks’ just below and to the outside of the eyes.
Clean Start Pro Tip
Wash hands thoroughly between colors! Orange clay stains easily. When switching from dark colors like black to light sage green, use baby wipes to clean your fingers and tools completely.
Step 3: Forming the Turtle Flippers
-
Prepare the limbs:
Condition some sage green clay and divide it into four equal portions. Roll each portion into a small ball. -
Shape the flippers:
Flatten each green ball slightly into a thick oval or teardrop shape. These don’t need to be detailed; a simple, rounded paddle shape looks best. -
Attach the legs:
Lift the orange body slightly and tuck the four green flippers underneath the edge of the pumpkin. Arrange them so they peek out symmetrically—two in front and two in back. -
Secure the bond:
Gently press the orange body down onto the green legs to ensure they stick together firmly. I like to use a blending tool underneath to smudge the clay together where no one will see it.
Sticky Situation?
If your clay is too soft and sticky, making fingerprints hard to avoid, place the clay in the refrigerator for 10 minutes. This firms it up, making it easier to smooth out imperfections.
Step 4: Top Stem and Finishing
-
Make the leafy base:
Use a small amount of the same sage green clay to make a flattened disk. Use a knife to mark lines radiating from the center, creating a segmented, star-like leaf shape. -
Position the leaf:
Place this green disk into the depression you made earlier on top of the pumpkin. Press it down so it conforms to the curve of the shell. -
Create the stem:
Roll a small piece of dark brown clay into a short, slightly twisted log. One end should be slightly thinner than the other. -
Texture the stem:
Use a needle tool to scratch vertical wood-grain texture lines up and down the brown stem. -
Final assembly:
Press the brown stem firmly into the center of the green leaf section. -
Bake and finish:
Bake the figurine according to your specific polymer clay’s package instructions. Once fully cooled, you can apply a tiny dot of white paint to the eyes for a highlight or brush on a matte varnish for protection.
Your little pumpkin turtle is now ready to crawl into your fall display with its sweet, seasonal charm