I’m always amazed at how ceramic wall art can turn a plain wall into something you can almost feel with your eyes—glaze shine, carved lines, and those delicious little shadows. Here are my favorite ideas, starting with the classics and moving into the fun, sculptural “where did you get that?” pieces.
Gallery Wall of Handpainted Ceramic Plates

Transform plain ceramic dishes into a stunning vertical garden of art with this hand-painted plate gallery. Featuring a cohesive palette of terracotta, sage, and oatmeal, these botanical and geometric designs bring an earthy, artisanal warmth to any blank wall.
Step-by-Step
Materials
- Collection of 12-14 white or cream ceramic plates (varying sizes: 5-12 inches)
- Ceramic paints or porcelain markers (Terracotta, Sage Green, Mustard Yellow, Charcoal Grey)
- Rubbing alcohol and cotton pads
- Fine liner brushes (sizes 0 and 1)
- Medium round brushes (sizes 4 and 6)
- Pencil
- Carbon transfer paper (optional)
- Plate hangers (spring-loaded or adhesive discs)
- Baking sheet
- Oven (for curing)
- Kraft paper (large roll for layout planning)
- Painter’s tape
- Hammer and nails
Step 1: Planning the Layout
-
Trace and test:
Before touching a single plate, trace the outline of each plate onto a large roll of kraft paper. Cut these paper circles out. -
Find the flow:
Arrange the paper circles on the floor or tape them to the wall. Aim for an organic cloud shape rather than a perfect grid, placing larger plates near the center or bottom to anchor the design. -
Map the designs:
On your paper templates, sketch rough ideas for each plate. Mix botanical motifs (leaves, branches) with geometric patterns (sunbursts, concentric circles) to keep the visual rhythm interesting.
Clean Lines Hack
For the geometric plates with straight lines, use thin automotive masking tape (fineline tape) to mask off areas. Peel it off while paint is slightly wet.
Step 2: Painting the Ceramics
-
Prep surfaces:
Wipe down every plate thoroughly with rubbing alcohol on a cotton pad. This removes oils and fingerprints that could prevent the paint from adhering properly. -
Draft the sunburst:
For the top sun-themed plate, lightly sketch a central circle and radiating lines using a pencil. The graphite will burn off in the oven later. -
Paint the sun:
Using a mustard yellow ceramic paint and a medium round brush, fill in the central circle. Use quick, confident strokes to add the rays, alternating between thick and thin lines for a dynamic look. -
Create the large fern:
On a large platter, paint a bold central stem in terracotta. Add large, almond-shaped leaves extending outward. I like to mix a tiny bit of white into the terracotta for a slightly sun-faded effect on the tips. -
Detail the green botanical:
For the plate with the large green fronds, use sage green paint and a fine liner brush. Paint a vertical stem and add delicate, needle-like leaves curving gently upwards. -
Execute the geometric patterns:
For the lattice-pattern plate, carefully paint intersecting diagonal lines. Add small dots at the intersections using the back end of your paintbrush handle dipped in terracotta paint. -
Layer concentric circles:
On a medium plate, paint rings of varying thickness and patterns—dots, dashed lines, and solid bands. A pottery wheel helps here, but hand-painting adds that charming wabi-sabi irregularity found in the original image. -
Add abstract textures:
For the smaller filler plates, use a dry-brush technique to create scratchy textures or simple starbursts. These simpler designs prevent the wall from looking too busy. -
Clean up edges:
If you make a mistake, quickly wipe it away with a damp Q-tip or a wet wiping cloth before the paint sets. Check all edges to ensure clean lines.
Step 3: Curing and Mounting
-
Dry completely:
Let all painted plates sit undisturbed for at least 24 hours to allow the paint to chemically bond with the surface. -
Bake to set:
Place the plates in a cool oven. Set the temperature to 300°F (150°C) and bake for 35 minutes. Turn the oven off and let the plates cool completely inside the oven to prevent cracking. -
Attach hangers:
Once cool, attach adhesive disc hangers to the back of smaller plates and sturdy spring-loaded wire hangers for the heavier platters. -
Mark the wall:
Using your paper templates still on the wall, mark exactly where the nail needs to go for each hanger hook. Double-check spacing. -
Hang and adjust:
Hammer in your nails, remove the paper templates, and hang your ceramic art. Step back and gently tilt the plates until they look level and balanced.
Add Dimension
Mix a bit of baking soda into your acrylic ceramic paint for one or two plates. This creates a raised, gritty texture that mimics raw stoneware pottery.
Now you have a gallery wall that brings the warmth of the Mediterranean right into your home.


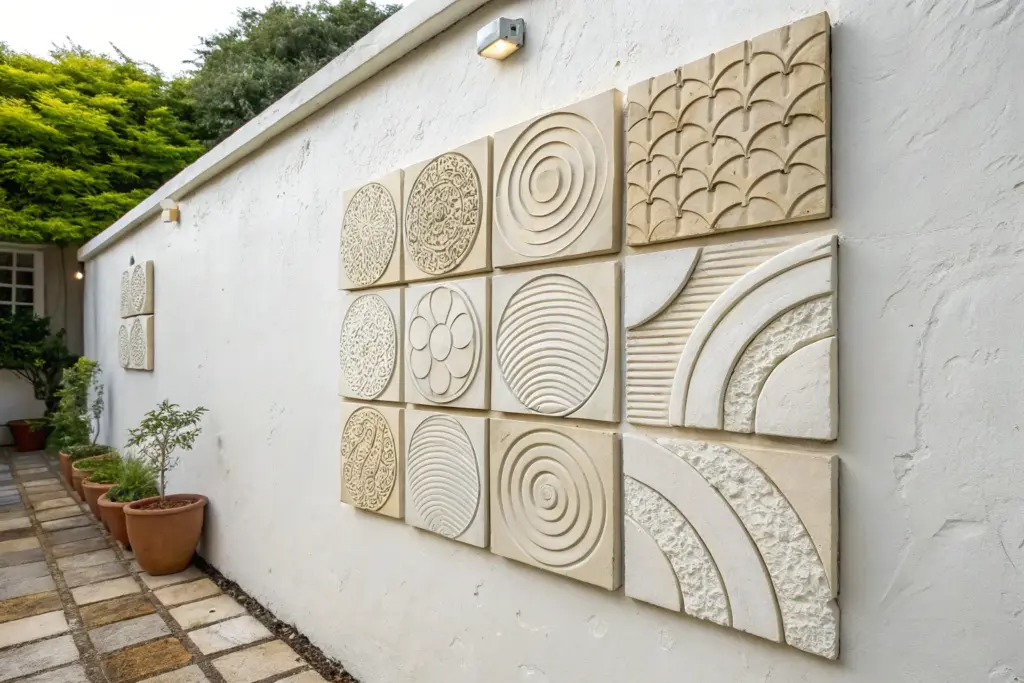
Textured Relief Tile Grid
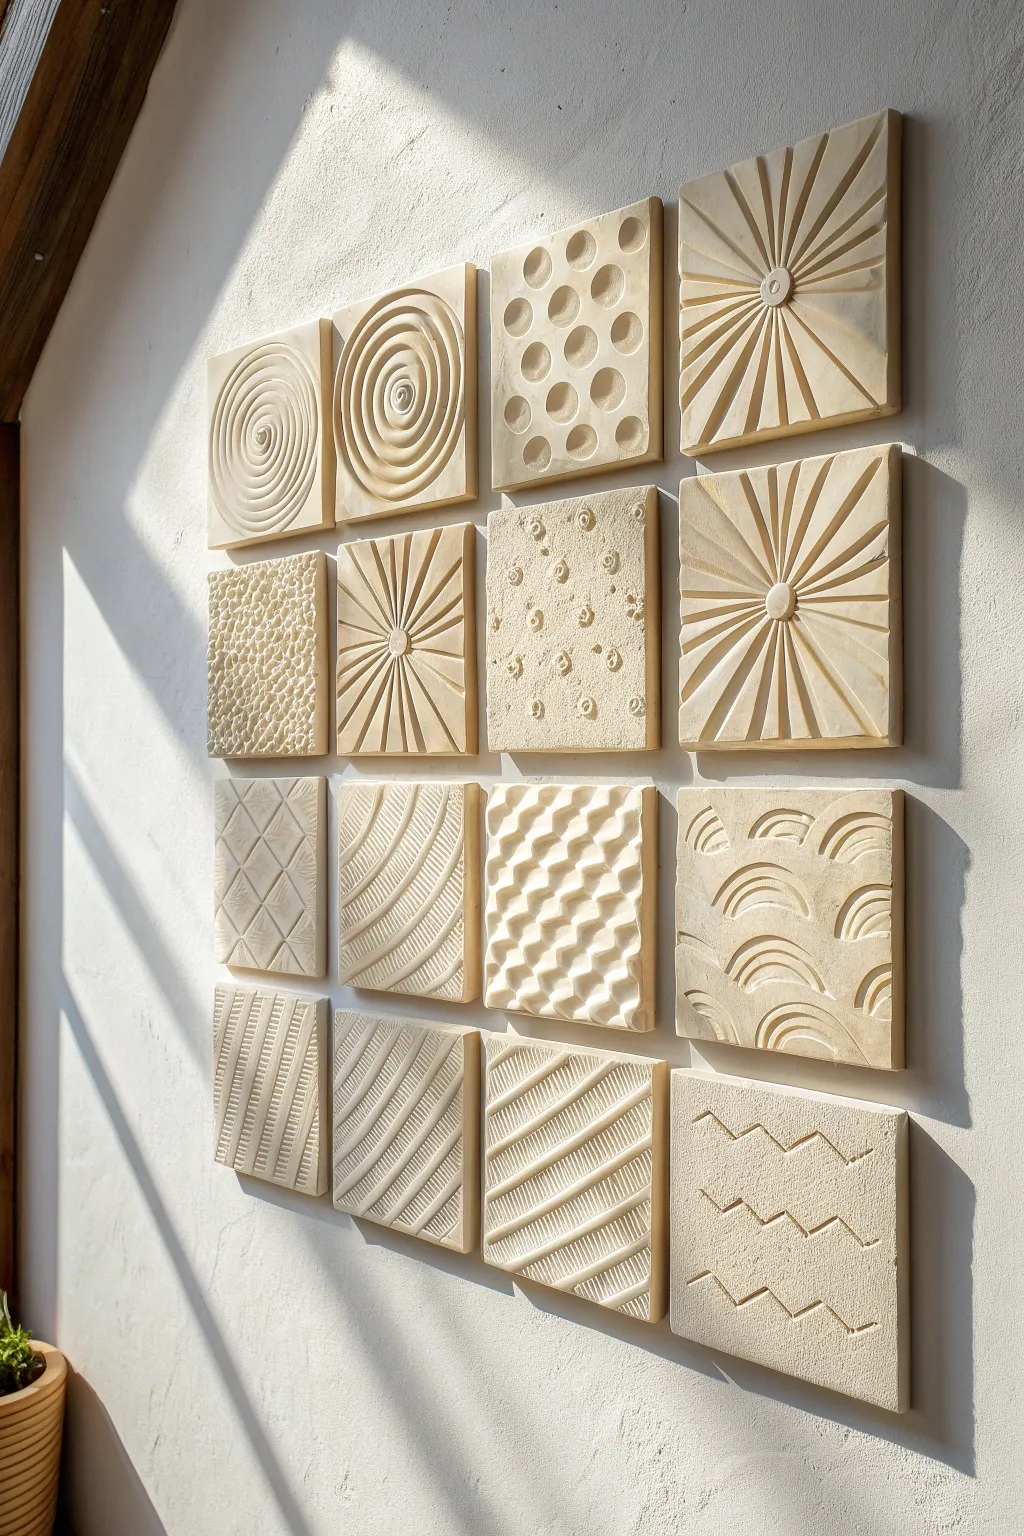
Transform a blank wall with this sophisticated grid of sixteen handcrafted relief tiles, featuring a tactile array of geometric and organic textures. The creamy, monochromatic finish highlights the interplay of light and shadow, creating a dynamic piece of art that shifts throughout the day.
Step-by-Step Tutorial
Materials
- High-quality air-dry clay (white or cream) or polymer clay
- Rolling pin with guide rings (0.5 inch thickness)
- Square cookie cutter or template (4×4 or 5×5 inches)
- Carving tool set (loop tools, needle tools, ribbon tools)
- Smoothing sponge
- Fine-grit sandpaper (220 and 400 grit)
- Matte white acrylic paint or gesso
- Sealant (matte spray varnish)
- Heavy-duty mounting tape or construction adhesive
- Ruler and pencil
- Canvas cloth or large ceramic tile (as a work surface)
Step 1: Preparation & Base Creation
-
Prepare your workspace:
Set up a clean, flat surface covered with a canvas cloth to prevent the clay from sticking. Ensure you have ample lighting to see the textures clearly as you work. -
Condition the clay:
Take a large chunk of your clay and knead it thoroughly until it is soft, pliable, and free of air bubbles. This step is crucial preventing cracks during drying. -
Roll out the slab:
Using a rolling pin with guide rings set to roughly a half-inch thickness, roll the clay out into a large, even slab. If you don’t have guide rings, place two wooden rulers on either side of the clay to support the pin. -
Cut the squares:
Use your square cutter or a template with a sharp knife to cut out sixteen identical squares. Measure carefully to ensure your final grid looks uniform. -
Smooth the edges:
Dip your finger or a small sponge in water and gently run it along the cut edges of each square to soften any sharp corners or burrs.
Step 2: Texturing the Tiles
-
Create the sunbursts:
For the starburst designs, press a small circular object into the center gently. Use a straight edge or a ribbon tool to carve deep lines radiating outward from the center to the edges. -
Carve the spirals:
Using a U-shaped loop tool, start from the center of a tile and carve a continuous spiral line outward. Vary the depth slightly to give it a hand-carved feel. -
Form the polka dots:
Take a ball stylus tool or the rounded end of a paintbrush to press indentations into the clay. For the textured background versions, gently stipple the surface around the dots with a stiff brush. -
Sculpt the waves:
Use a medium-sized loop tool to carve intersecting semi-circles to mimic fish scales or waves. Keep the pressure consistent so the repeating pattern looks cohesive. -
Texture the honeycomb:
Press a hex-shaped tool or carefully carve hexagonal divots into the surface. Leave the ridges between them raised to catch the light. -
Carve linear patterns:
For the striped tiles, use a ruler as a guide and carve diagonal parallel lines. For the zigzag tile, sketch the pattern lightly with a needle tool first, then deepen the lines. -
Refine the details:
Go back over each tile with a small brush to remove any clay crumbs created during carving. Use a damp sponge to smooth out any unintentional rough patches.
Warping Worries
If tiles curl while drying, simply mist the dry side slightly and weigh them down with a heavy board overnight to flatten them back out.
Step 3: Finishing & Mounting
-
Let them dry slowly:
Place the tiles on a wire rack or mesh screen to air dry. Cover them loosely with plastic wrap for the first 24 hours to slow drying and prevent warping, then uncover to finish drying completely. -
Sand the surfaces:
Once bone dry, use 220-grit sandpaper to smooth any sharp peaks or rough edges. Follow up with 400-grit for a polished, professional finish. -
Apply the base coat:
Paint each tile with a layer of white gesso or matte acrylic paint. I find distinct brush strokes interrupt the relief effect, so try to apply the paint smoothly or use a spray primer. -
Add a protective seal:
Spray the tiles with a matte varnish to protect them from dust and moisture without adding an artificial sheen. -
Plan the layout:
Arrange your sixteen tiles on a table first to find the most pleasing distribution of patterns. Measure your wall space and lightly mark a 4×4 grid with a pencil and level. -
Mount the artwork:
Apply heavy-duty mounting tape or construction adhesive to the back of each tile. Press them firmly onto the wall according to your grid markings, holding each for a few seconds to ensure a strong bond.
Color Pop
Mix a small amount of sand into your paint for a limestone effect, or dry-brush a slightly darker tone over the ridges to enhance contrast.
Step back and admire how the changing daylight interacts with the textures of your new wall sculpture


Oversized Statement Platter With Bold Glaze
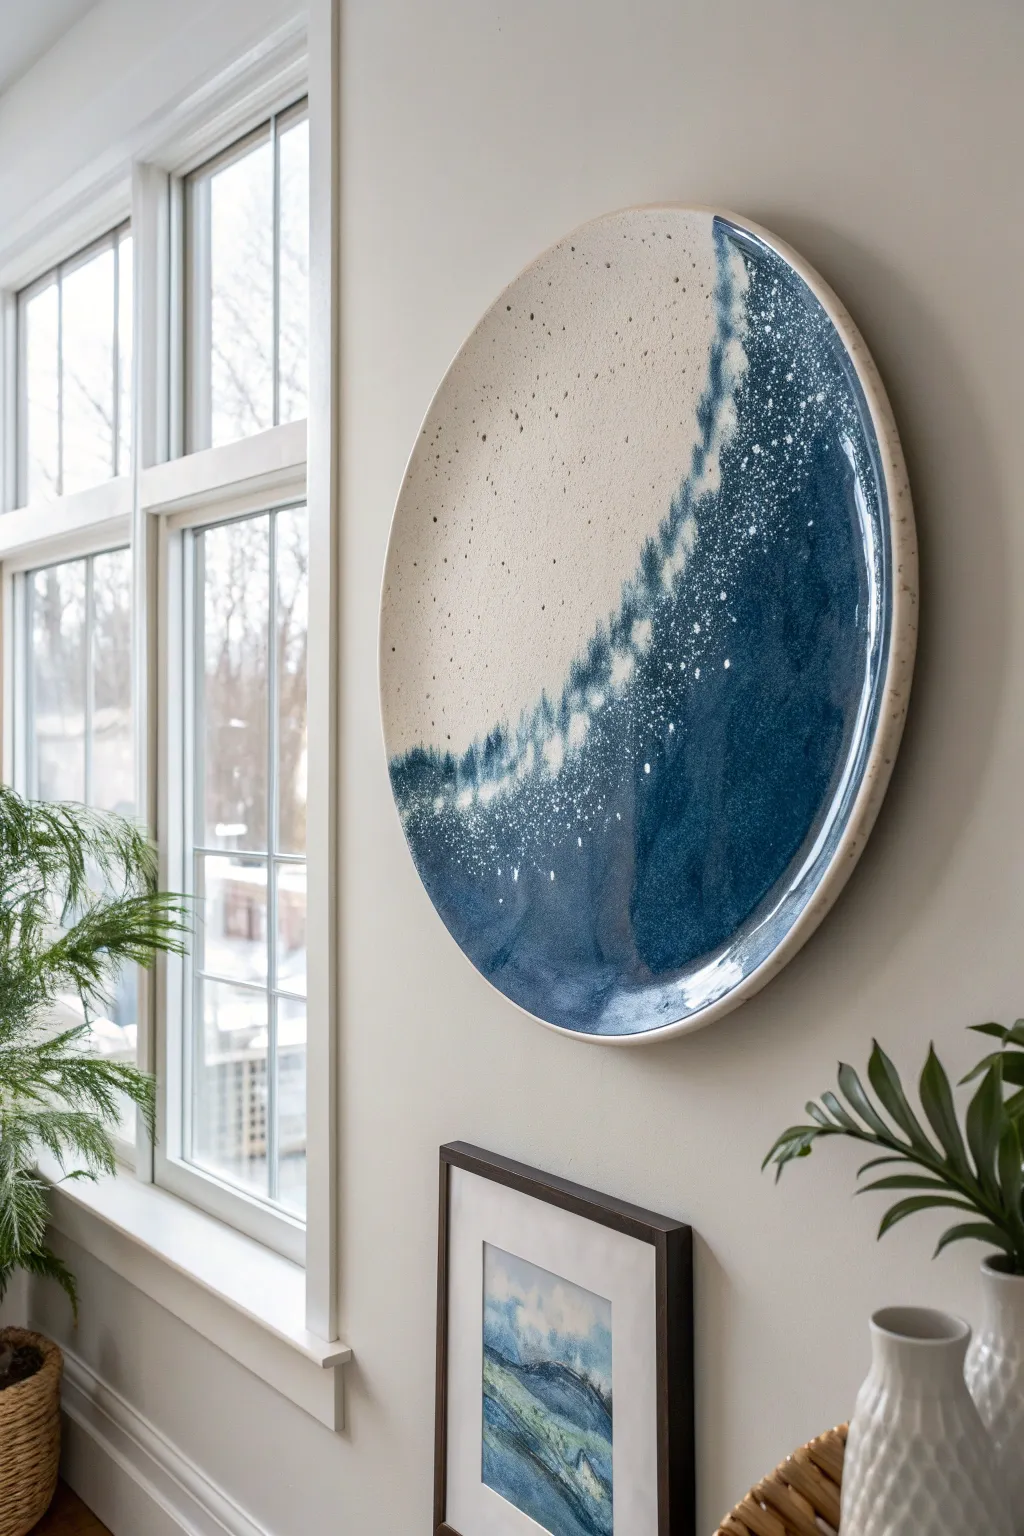
Capture the moody elegance of a breaking wave with this oversized ceramic platter that serves as a stunning wall feature. The contrast between the matte, speckled cream clay and the glossy, deep blue reactive glaze creates a textural landscape that feels both organic and modern.
Detailed Instructions
Materials
- 20-25 lbs stonewares clay (speckled buff recommended)
- Pottery wheel (or large slab roller for hand-building)
- Large throwing bat (at least 20 inches)
- Rib tools (wood and metal)
- Wire cutter
- Loop trimming tools
- Large sponge
- Masking tape or wax resist
- Deep blue reactive glaze (gloss)
- Matte white or clear glaze (optional)
- Large fan brush
- Splatter brush or stiff toothbrush
- Didymium safety glasses (for kiln loading)
- Plate wire hanger or integrated clay lug system
Step 1: Forming the Platter
-
Prepare the clay:
Begin by thoroughly wedging your 20-25 lbs of speckled stoneware clay. For a platter of this magnitude, removing air pockets is critical to prevent warping or explosions in the kiln. -
Center the mass:
SLAM the clay onto a large bat secured to your wheel head. Use your entire body weight to center this large amount of clay, keeping your elbows tucked firmly into your sides. -
Open wide and low:
Open the clay form, focusing on spreading it outward rather than downward. Leave a base thickness of at least half an inch to support the wide span. -
Pull the floor:
Using the heel of your hand or a large rib, compress the floor significantly. Pull the clay outward to your desired diameter (aim for 22-24 inches to account for shrinkage), creating a gentle, continuous curve. -
Define the rim:
Pull up a shallow rim, about 1-2 inches high. Use a chamois cloth to smooth and compress the lip, ensuring it is thick enough to resist chipping. -
Dry slowly:
Cut the platter from the bat with a wire tool but do not remove it yet. Cover the rim with plastic while leaving the center exposed to encourage even drying. This helps prevent the dreaded ‘S-crack’.
Step 2: Trimming and Firing
-
Flip and center:
Once the clay is leather-hard, carefully flip the platter onto a foam trimming bat. Center it perfectly and secure it with large clay lugs. -
Trim the foot:
Using a sharp loop tool, carve away excess weight from the base. Carve a double foot ring for better stability on large platters. -
Add hanging mechanism:
If you aren’t using a wire hanger later, now is the time to attach clay lugs or create holes in the foot ring for hanging wire. -
Bisque fire:
Allow the platter to bone dry completely—this may take a week or more for thick pieces. Bisque fire to Cone 04 (or your clay body’s specifications).
Warp prevention pro-tip
Dry oversized platters on drywall board or a plaster bat. These materials absorb moisture from the bottom, helping the thick base dry at the same rate as the thinner rim.
Step 3: Glazing the Wave
-
Clean surface:
Wipe the bisqued platter with a damp sponge to remove any dust that could repel the glaze. -
Map the curve:
Visualize a crescent shape taking up about 40% of the platter. You can lightly sketch this curve with a pencil (the graphite will burn off). -
Apply the blue base:
Using a large fan brush, apply three generous coats of the deep blue reactive glaze to the crescent area. Brush in different directions for each coat to ensure even coverage. -
Create the transition:
While the blue glaze is still damp, use a wet sponge to dab and blur the inner edge of the blue curve, softening the line where it meets the bare clay. -
Splatter effect:
Dip a stiff toothbrush or splatter brush into the blue glaze. Flick the bristles to spray fine droplets onto the bare cream section, concentrating them near the blue border to mimic sea spray. -
White accents:
I like to take a contrasting white glaze and splatter it lightly over the wet blue section. This reacts in the kiln to create those starry, foam-like spots. -
Clean the foot:
Meticulously wipe any glaze off the foot ring and bottom 1/4 inch of the rim to prevent the platter from fusing to the kiln shelf.
Glaze crawling fix
If your glaze ‘crawls’ leaving bare patches, you likely applied it too thickly or over a dusty surface. Wash it off, let the bisque dry fully, and re-apply thinner coats.
Step 4: Final Fire and Mounting
-
Glaze fire:
Fire the piece to Cone 5/6 (mid-range) or Cone 10 (high-fire) depending on your clay and glaze choice. A slow cooling cycle can help develop micro-crystals in the reactive blue glaze. -
Sand the bottom:
Once cool, use diamond sanding pads or wet-dry sandpaper to smooth the unglazed foot ring so it won’t scratch the wall. -
Mount securely:
Install a heavy-duty plate hanger tailored for oversized platters. Ensure your wall anchor is rated for the weight of this substantial ceramic piece.
This monumental piece brings the calmness of the coast into your home with a timeless artisan touch


Botanical Leaf-Imprint Wall Plaques
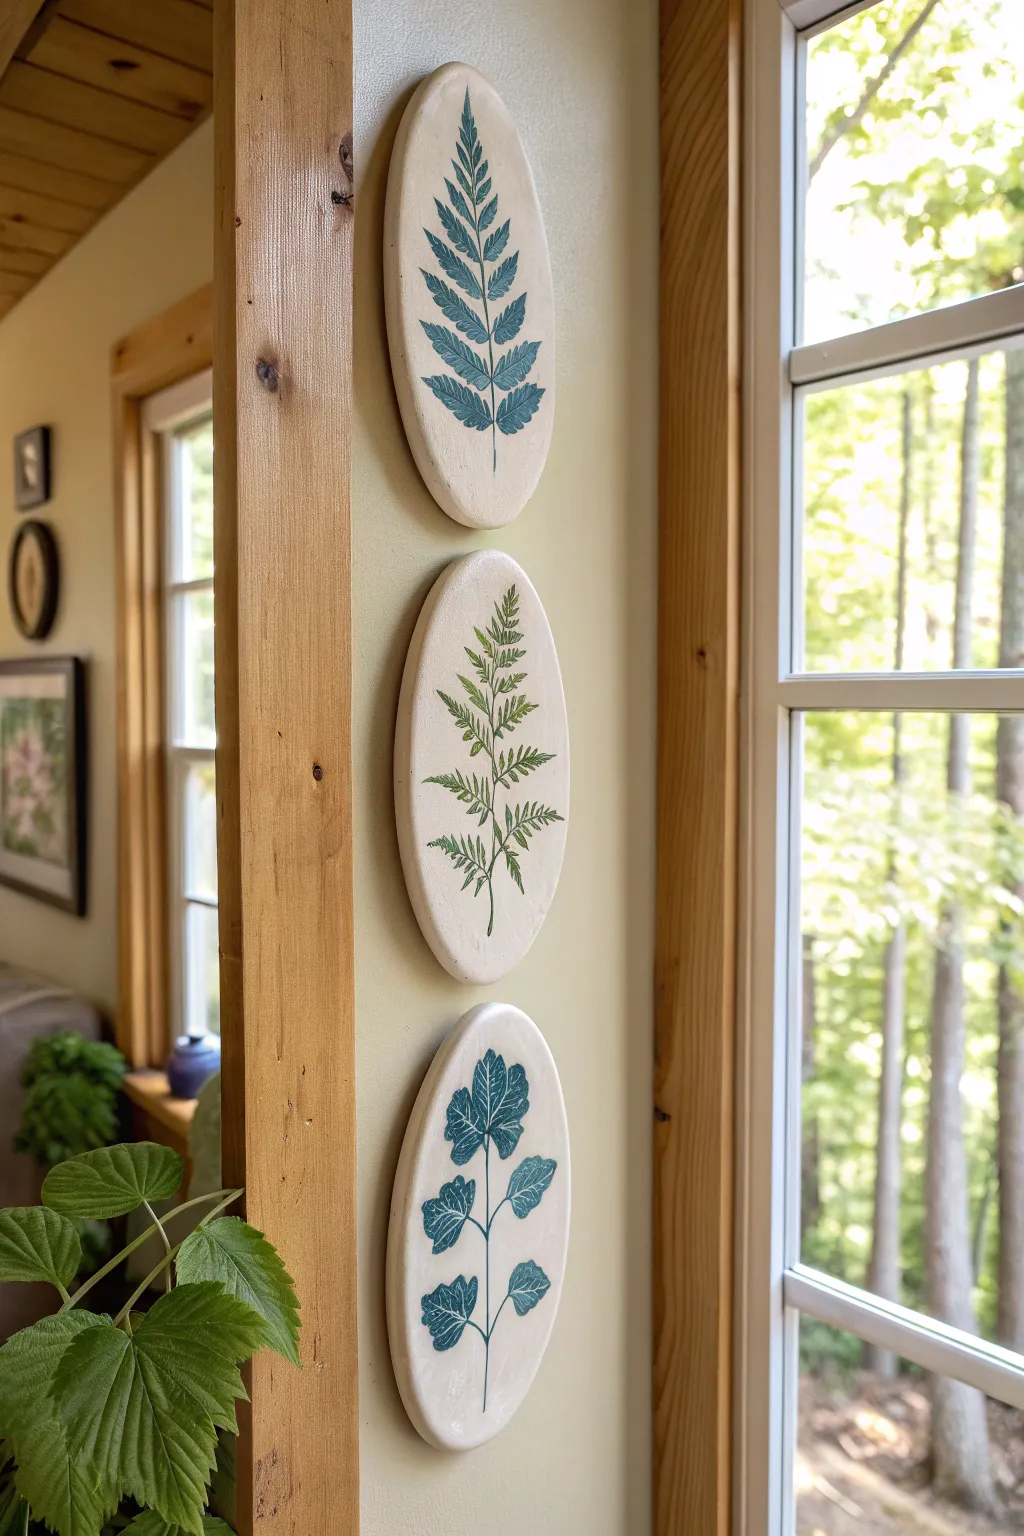
Bring the serenity of the forest indoors with these sophisticated oval wall plaques featuring delicate botanical impressions. The clean white clay contrasts beautifully with deep teal and fern green glazes, creating a modern organic focal point for any narrow wall space.
Step-by-Step Tutorial
Materials
- White air-dry clay (smooth texture) or polymer clay
- Rolling pin
- Oval cookie cutter or oval paper template and craft knife
- Fresh fern leaves and fig/maple leaves (deeply veined)
- Fine-grit sandpaper (220-400 grit)
- Acrylic paints (Teal, Forest Green, Deep Emerald)
- Small fine-point paintbrush
- Clear matte or satin varnish spray
- Small bowl of water
- Rolling surface (canvas or parchment paper)
- Command strips or plate hangers for mounting
Step 1: Shaping the Clay Canvases
-
Condition the clay:
Begin by working a large handful of white air-dry clay in your hands until it is pliable and warm, removing any air bubbles to prevent cracks later. -
Roll out the slab:
On a stick-resistant surface like canvas or parchment paper, roll the clay out to a uniform thickness of about 1/4 to 1/3 inch. Aim for a smooth, even surface. -
Cut the ovals:
Using a large oval cutter or a paper template you’ve traced, cut out three identical oval shapes. Smooth the raw edges gently with a slightly damp finger to round them off. -
Impress the botanicals:
Select your fresh leaves. Place one leaf vein-side down onto the center of a clay oval. Gently roll over the leaf with your rolling pin once with firm, even pressure to embed the veins into the clay. -
Reveal the texture:
Carefully lift the stem of the leaf and peel it away from the clay to reveal the imprinted design. Repeat this process for the other two plaques using different leaf varieties.
Cracked Clay Rescue
If hairline cracks appear during drying, make a paste of clay dust and water (slip). Fill the crack, let dry, and sand smooth before painting.
Step 2: Drying and Refining
-
Initial drying phase:
Place the clay ovals on a wire rack or a mesh screen to allow air to circulate underneath. Let them dry for 24-48 hours away from direct heat sources to prevent warping. -
Check for flatness:
halfway through the drying process, gently flip the ovals over. If you notice slight curling, you can weigh them down lightly with a book placed over a paper towel. -
Sand the surface:
Once the clay is bone dry and hard, take your fine-grit sandpaper and very lightly buff the edges and the flat surface around the imprint to remove any fingerprints or roughness. -
Dust off residue:
Wipe the creative dust away with a dry, soft cloth or a fluffy paintbrush to ensure a clean surface for painting.
Gilded Edges
For a luxe upgrade, paint the outer rim of each oval with liquid gold leaf or metallic wax after sealing to frame the botanical art.
Step 3: Painting and Finishing
-
Prepare the paint wash:
To achieve the look in the photo, you don’t want thick, opaque paint. Dilute your teal and green acrylics slightly with a drop of water to create a fluid consistency. -
Fill the impression:
Using a fine-point brush, carefully paint inside the depressed lines of the leaf imprint. I like to let the paint pool slightly in the deeper veins for added dimension. -
Create distinct color palettes:
Paint the top and bottom fern designs in different shades—perhaps a blue-leaning teal for one and a true forest green for the other—to create visual interest while keeping the set cohesive. -
Clean up edges:
If any paint strays outside the imprinted lines onto the smooth white surface, quickly wipe it away with a damp cotton swab or wait for it to dry and gently scrape it off. -
Seal the artwork:
Take your designs outside or into a well-ventilated area and spray them with two light coats of clear matte or satin varnish to seal the clay and protect the paint. -
Mount the trio:
Once fully cured, attach adhesive hanging strips to the back suitable for the weight of your clay, and arrange them vertically on a narrow wall or doorframe.
Enjoy the calm, natural atmosphere these handcrafted pieces add to your home

The Complete Guide to Pottery Troubleshooting
Uncover the most common ceramic mistakes—from cracking clay to failed glazes—and learn how to fix them fast.
Ceramic Flower Blooms as a Modular Cluster
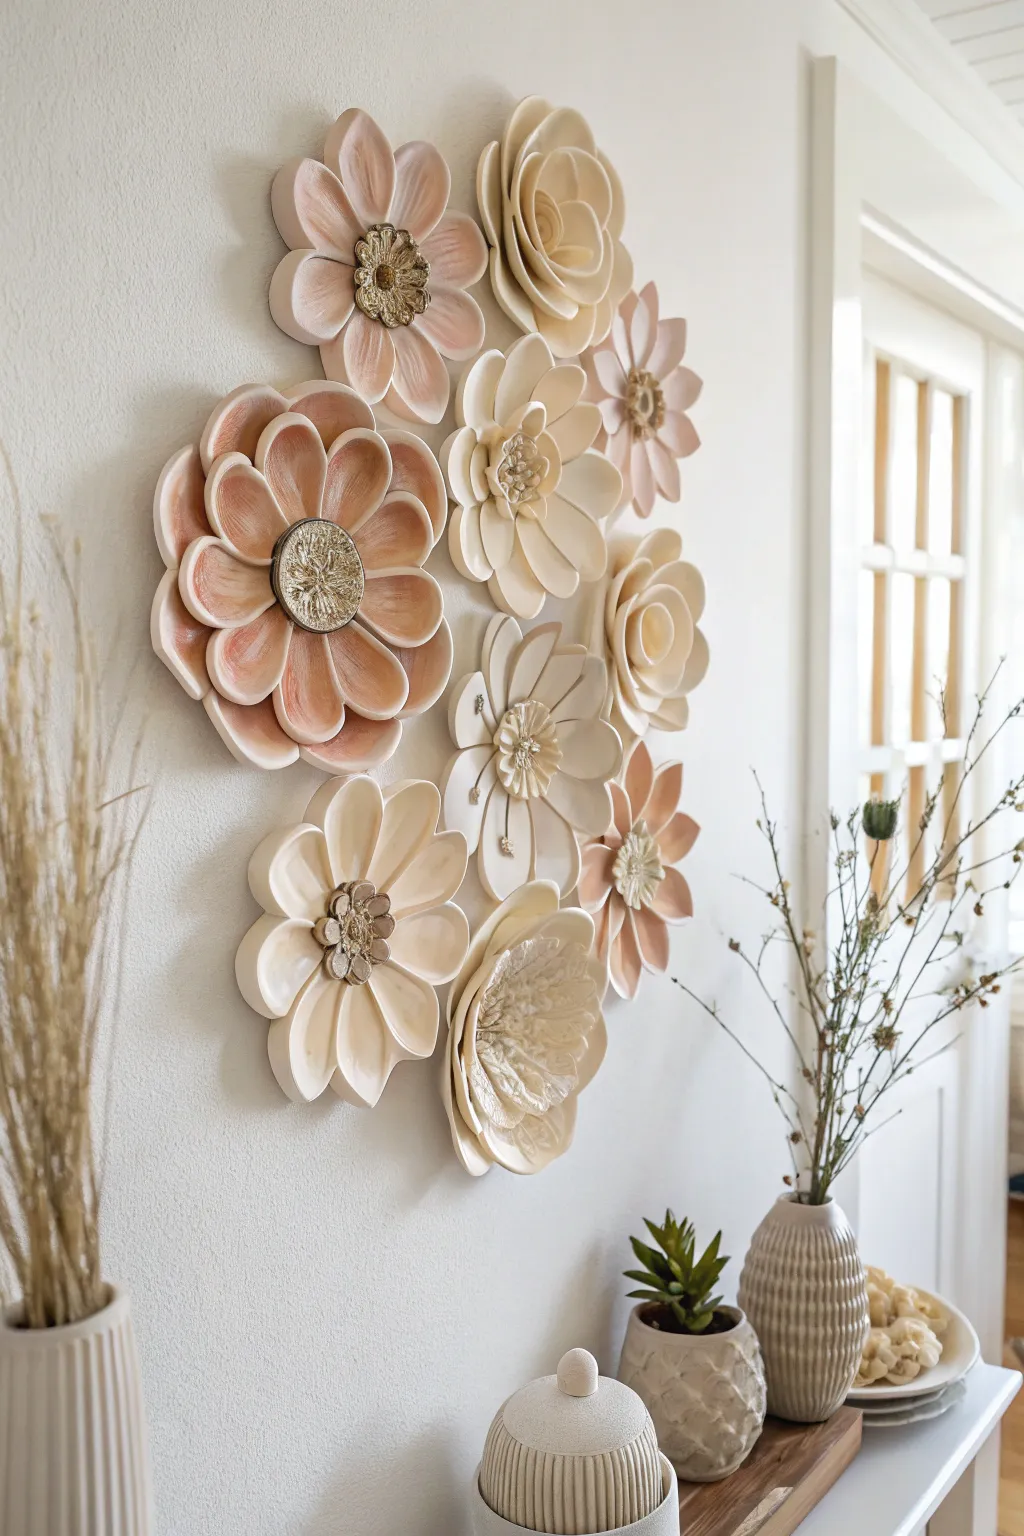
Transform a plain wall into a blooming sanctuary with this cluster of handmade ceramic flowers. Featuring varied shapes ranging from open daisies to tight rosebuds in a soft palette of cream, peach, and blush, this modular arrangement lets you customize your composition to fit any space.
How-To Guide
Materials
- Low-fire white earthenware clay (approx. 5-10 lbs)
- Rolling pin and guide sticks (1/4 inch thickness)
- Canvas work surface
- Flower petal cookie cutters (various sizes: teardrop, round)
- Modelling tools (ball stylus, needle tool)
- Small sponge and bowl of water
- Scoring tool or serrated rib
- Slip (liquid clay)
- Underglazes (Soft Pink, Peach, Cream, Metallic Gold/Bronze)
- Clear transparent glaze
- Kiln (or access to firing services)
- High-strength epoxy adhesive
- Wall hanging hardware (d-rings or plate hangers)
Step 1: Forming the Flower Bases
-
Prepare variable slabs:
Begin by wedging your clay thoroughly to remove air bubbles. Roll out slabs of clay to a uniform 1/4 inch thickness using guide sticks, ensuring enough surface area for several blooms. -
Cut the base shapes:
For each flower, cut a round circle about 2-3 inches in diameter to serve as the sturdy backing plate. This won’t be visible but provides the foundation for building. -
Cut petals in bulk:
Using your cookie cutters or a needle tool, cut out dozens of petals in varying sizes. I find it helpful to group them by size (small, medium, large) to make the assembly process smoother.
Cracked Clay?
If petals crack while drying, create a ‘paper clay’ slurry by dissolving toilet paper into your slip. Fill the crack, smooth it over, and dry very slowly.
Step 2: Sculpting the Blooms
-
Pinch and thin edges:
Take individual petals and gently pinch the edges with your thumb and forefinger to thin them out. This makes the clay look more delicate and organic, mimicking real petals. -
Assemble the outer ring:
Score the outer edge of your base circle and apply a dab of slip. Attach the largest petals first, pressing them firmly onto the base and slightly overlapping each one. -
Add inner layers:
Work inward in concentric circles. As you move toward the center, use slightly smaller petals and angle them upward more aggressively to create depth and a cup shape. -
Create variety:
For the rose-style blooms, roll a long strip of clay into a spiral and attach it to the center. for the daisy shapes, leave the center open for a textured disk later. -
Texture the centers:
For the open flowers, roll a small ball of clay, flatten it, and press it into the center. Use a needle tool to poke hundreds of tiny holes or create a cross-hatch pattern for pollen texture. -
Final shaping:
Before the clay hardens, gently curl some petal tips backward and push others forward. This movement prevents the flowers from looking tailored or stiff.
Step 3: Glazing and Firing
-
Bisque firing:
Allow your flowers to dry slowly under loose plastic for several days to prevent cracking. Once bone dry, fire them to bisque temperature (usually cone 04). -
Apply base color:
Using a soft brush, apply three coats of underglaze. Use cream for the petals of the white flowers, and alternate between soft peach and blush pink for the others. Leave the application slightly uneven to enhance the hand-painted look. -
Accent the centers:
Paint the textured centers with a metallic gold or bronze underglaze, or use a dark brown to create high contrast against the pastel petals. -
Clear glaze:
Apply a coat of clear transparent glaze over the entire piece to seal it and give it a gentle sheen. Be careful not to let glaze pool too thickly in the deep crevices of the petals. -
Glaze fire:
Fire the pieces a second time to the maturation temperature of your glaze and clay body.
Add Organic Flair
Before firing, press real leaves or lace into the wet clay petals. The texture will catch the glaze beautifully and add intricate detail.
Step 4: Mounting
-
Attach hardware:
Once the ceramics are cooled, sand the backs lightly to rough them up. Mix your high-strength epoxy and attach a D-ring or plate hanger secure onto the back of each flower. -
Arrange and hang:
Lay your flowers out on the floor first to find the perfect arrangement. Cluster them tightly so they look like they are growing together, then transfer the layout to your wall.
Enjoy the everlasting beauty of your ceramic garden as it brightens your room year-round
Minimalist Moon Phase Wall Set
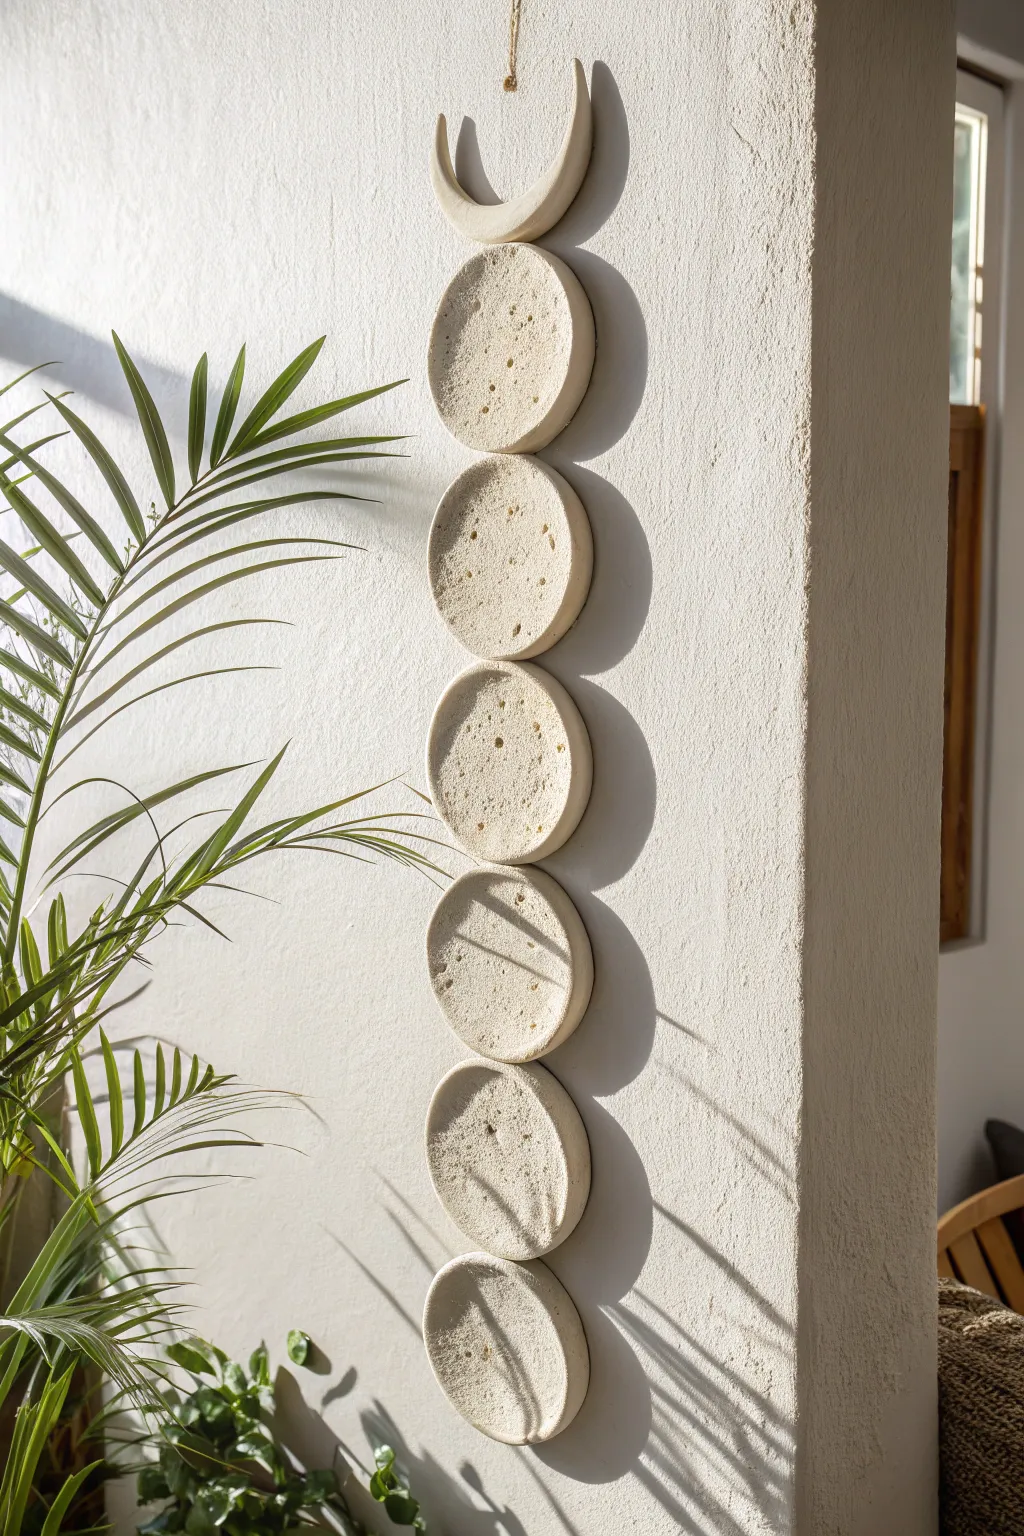
Bring the celestial calm of the moon into your home with this striking, vertically stacked wall hanging. Featuring crude, stone-like textures and a soothing cream palette, these ceramic discs capture the raw beauty of lunar craters in a minimalist format.
Step-by-Step Guide
Materials
- Air-dry clay (white or stone color) or polymer clay
- Rolling pin
- Circle cutters (approx. 4-5 inches diameter) or a bowl to trace
- Moon cutter or template for the crescent shape
- Texturing tools: old toothbrush, crumpled foil, sea sponge, coarse salt
- Sandpaper (medium grit)
- Strong craft glue or epoxy
- Jute twine or strong cording
- Skewer or straw (for piercing holes)
- Acrylic paint (cream, beige, slightly darker wash) – optional
- Matte sealant spray
Step 1: Shaping the celestial bodies
-
Prepare the clay:
Begin by conditioning your clay. Knead it until it is soft and pliable, ensuring there are no air bubbles trapped inside. Divide the clay into seven equal portions—one for the crescent moon and six for the full moon discs. -
Roll out the slabs:
Focusing on one portion at a time, roll the clay out to a consistent thickness of about 1/4 inch. I like to keep them slightly thick to enhance that heavy, stone-like appearance. -
Cut the shapes:
Using your circle cutter or by tracing around a bowl with a knife, cut out six perfect circles. For the top piece, cut a crescent moon shape. You can freehand this or use the same circle cutter twice to create the arc. -
Smooth the edges:
Dip your finger in a little water and run it along the cut edges of each piece to smooth out any sharpness or loose clay bits.
Uneven Clay?
If your clay curls up while drying, it’s drying exclusively on one side. Gently flip your pieces every few hours during the drying process to keep them perfectly flat.
Step 2: Adding texture and detail
-
Create the cratered surface:
This is the fun part where perfection isn’t the goal. Press a sea sponge or a crumpled ball of aluminum foil firmly into the surface of the wet clay to create a pitted, rock-like base texture. -
Deepen the craters:
To mimic specific moon craters, use the end of a paintbrush handle or a small round tool to press deeper indentations into random spots on the discs. Vary the sizes for a natural look. -
Add fine grit:
For extra realism, sprinkle a little coarse salt or sand onto the wet clay and lightly roll over it again to embed the grains. This creates that gritty, ancient stone feel. -
Create connection points:
You need a way to connect the pieces. Use a skewer or straw to poke holes vertically through the pieces. For the crescent moon, poke one hole at the top (for hanging) and one at the bottom center. For the circles, poke one hole at the top and one at the bottom, aligned centrally. -
Dry the pieces:
Lay all pieces flat on a board or drying rack. Allow them to air dry completely according to package instructions (usually 24-48 hours). Turn them over halfway through to ensure even drying and prevent warping.
Step 3: Finishing and assembly
-
Sand the surfaces:
Once fully dry (and hard), gently sand the edges to refine the shape, but leave the surface texture rough. If you used salt for texture, brush away any loose grains. -
Apply a color wash (Optional):
If your clay is too stark white, mix a tiny drop of beige or gray paint with water to create a thin wash. Brush this over the texture and wipe it back immediately with a rag, letting the color settle only in the deep crevices. -
Seal the artwork:
Spray all pieces with a matte clear coat to protect the clay and lock in the texture without adding an unnatural glossy shine. -
Attach the twine:
Cut short lengths of jute twine to connect the pieces. Start by tying the bottom of the crescent moon to the top of the first circle. Keep the knot hidden behind the clay if possible, or use a simple loop knot. -
Connect the strand:
Continue tying the circles together in a vertical chain. Keep the distance between each disc consistent—about half an inch of space works well to let them hang freely. -
Create the hanger:
Thread a longer piece of jute through the top hole of the crescent moon. Create a loop for hanging and tie it off securely.
Gilded Edge
For a touch of elegance, paint just the side edges (the rim) of each disc with liquid gold leaf. The metallic shine contrasts beautifully with the rough, matte surface.
Hang your lunar cycle in a spot that receives natural light to highlight the deep textures you created


What Really Happens Inside the Kiln
Learn how time and temperature work together inside the kiln to transform clay into durable ceramic.
Abstract Ripple Slab Sculpture
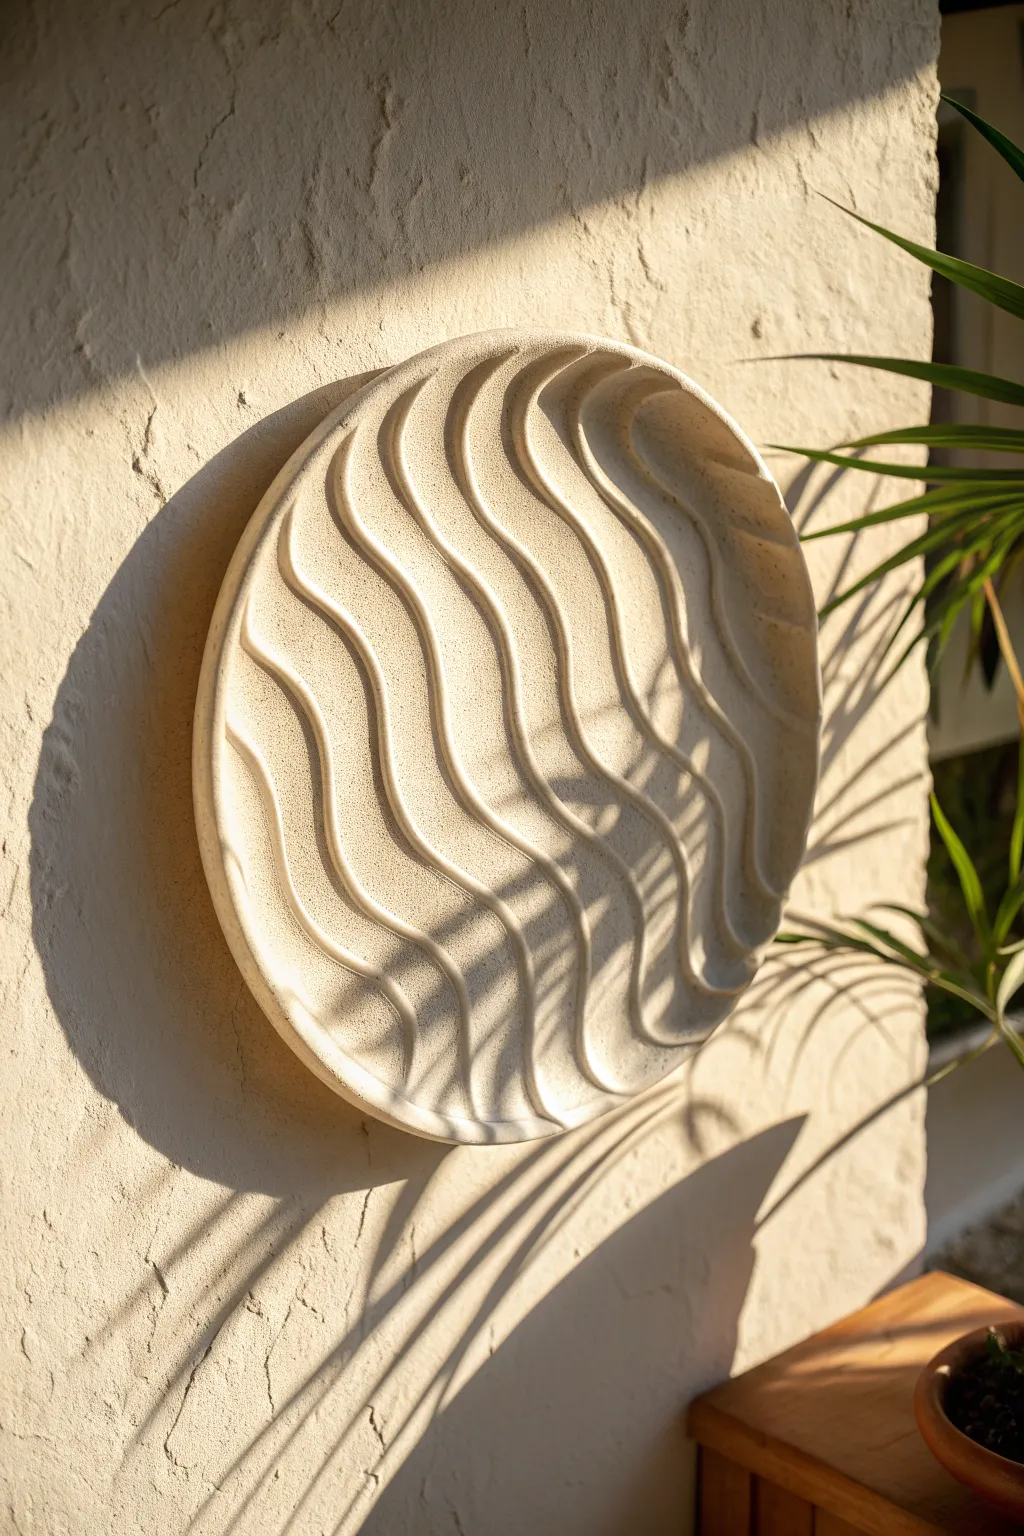
Bring the calming movement of desert dunes or ocean tides into your home with this textured circular relief sculpture. This project focuses on subtle depth and shadow play, using rhythmic carving to transform a simple clay slab into a captivating focal point.
Detailed Instructions
Materials
- High-grog stoneware clay (5 lbs)
- Rolling pin
- Two wooden guide slats (approx. 1/2 inch thick)
- Circular bat or sturdy wooden board
- Pottery needle tool
- Loop tool (large, pear-shaped or U-shaped)
- Rubber kidney rib
- Serrated metal rib
- Large sponge
- Wire clay cutter
- Wall-hanging hardware (d-rings or wire kit)
- High-temp epoxy or heavy-duty mounting adhesive
Step 1: Slab Preparation
-
Wedge the clay:
Begin by thoroughly wedging your stoneware clay to remove any air pockets and ensure an even consistency, which is crucial for preventing warping later. -
Set up guides:
Place your wooden guide slats on either side of your work surface. These will ensure your slab is a uniform thickness, about 1/2 inch to 3/4 inch, giving you enough depth to carve into without cutting through. -
Roll the slab:
Roll out the clay between the slats until the rolling pin rests on the wood guides. Compress the slab on both sides using a rubber kidney rib to align the clay particles. -
Cut the circle:
Place your circular bat or a round template (like a large plate or bucket lid) onto the slab. Using your needle tool held vertically, trace and cut out a perfect circle, roughly 14-16 inches in diameter. -
Smooth the edges:
Once the excess clay is removed, run a damp sponge or your finger along the cut edge to soften the sharp angle and give it a finished look. -
Create the rim:
Using your fingers, gently press down on the outer 1/2 inch of the circle to create a slightly raised bevel or rim, framing the interior canvas where we will carve.
Step 2: Carving the Ripples
-
Sketch the flow:
Lightly drag your needle tool across the surface to map out your wave pattern. Design fluid S-curves that move vertically across the circle, keeping the spacing organic but relatively consistent. -
Start the channels:
Take your large loop tool and begin carving out the ‘valleys’ of your waves. Follow your sketched lines, scooping out clay to create the low points of the design. -
Refine the ridges:
As you carve adjacent valleys, a natural ridge will form between them. Use the loop tool to carefully shape these high points, making sure they curve smoothly rather than peaking sharply. -
Vary the depth:
I like to carve slightly deeper near the center of the piece and taper the depth as the waves approach the rim. This creates a really nice illusion of volume and keeps the edges structural. -
Add texture:
Once the main forms are carved, take a serrated metal rib and gently drag it over the entire surface in the direction of the waves. This creates that lovely sandstone-like texture visible in the photo. -
Soften the marks:
If the serrated marks look too aggressive, gently pat them down with a barely damp sponge. You want the texture to remain but lose any sharp burrs.
Smooth Moves
Work the clay when it is ‘leather hard’—stiff enough to hold its shape but soft enough to carve. If it’s too soft, the ridges will slump; too dry, and it will chip.
Step 3: Finishing and Mounting
-
Slow drying:
Cover the piece loosely with plastic to let it dry very slowly over several days. Rapid uneven drying is the enemy here and will cause your flat circle to warp into a potato chip shape. -
Bisque fire:
Once bone dry, fire the piece to a bisque temperature suitable for your clay body (usually Cone 04-06). -
Glaze or leave raw:
To achieve the look in the image, you can leave the clay raw if it’s a nice sandy color, or apply a very dry, matte white or cream glaze. Avoid glossy glazes, which will reflect light and hide the subtle shadows. -
Final firing:
Fire the piece to maturity (Cone 5, 6, or 10 depending on your clay). Ensure the kiln shelf is perfectly flat. -
Attach the mount:
Since drilling a hole might weaken high-relief areas, mix a two-part high-strength epoxy. Attach a sturdy D-ring hook directly to the center back of the fired ceramic. -
Cure and hang:
Allow the epoxy to unexpected fully for 24 hours before testing the weight. Hang on a wall that receives directional sunlight to maximize the shadow play of your carved ripples.
Go Big or Go Home
Create a triptych by making three identical circles. When mounting, rotate the wave patterns slightly on each one to create a sense of continuous motion across the wall.
Now you have a stunning piece of architectural art that changes mood as the light shifts throughout the day
Coral-Inspired High-Relief Wall Accent
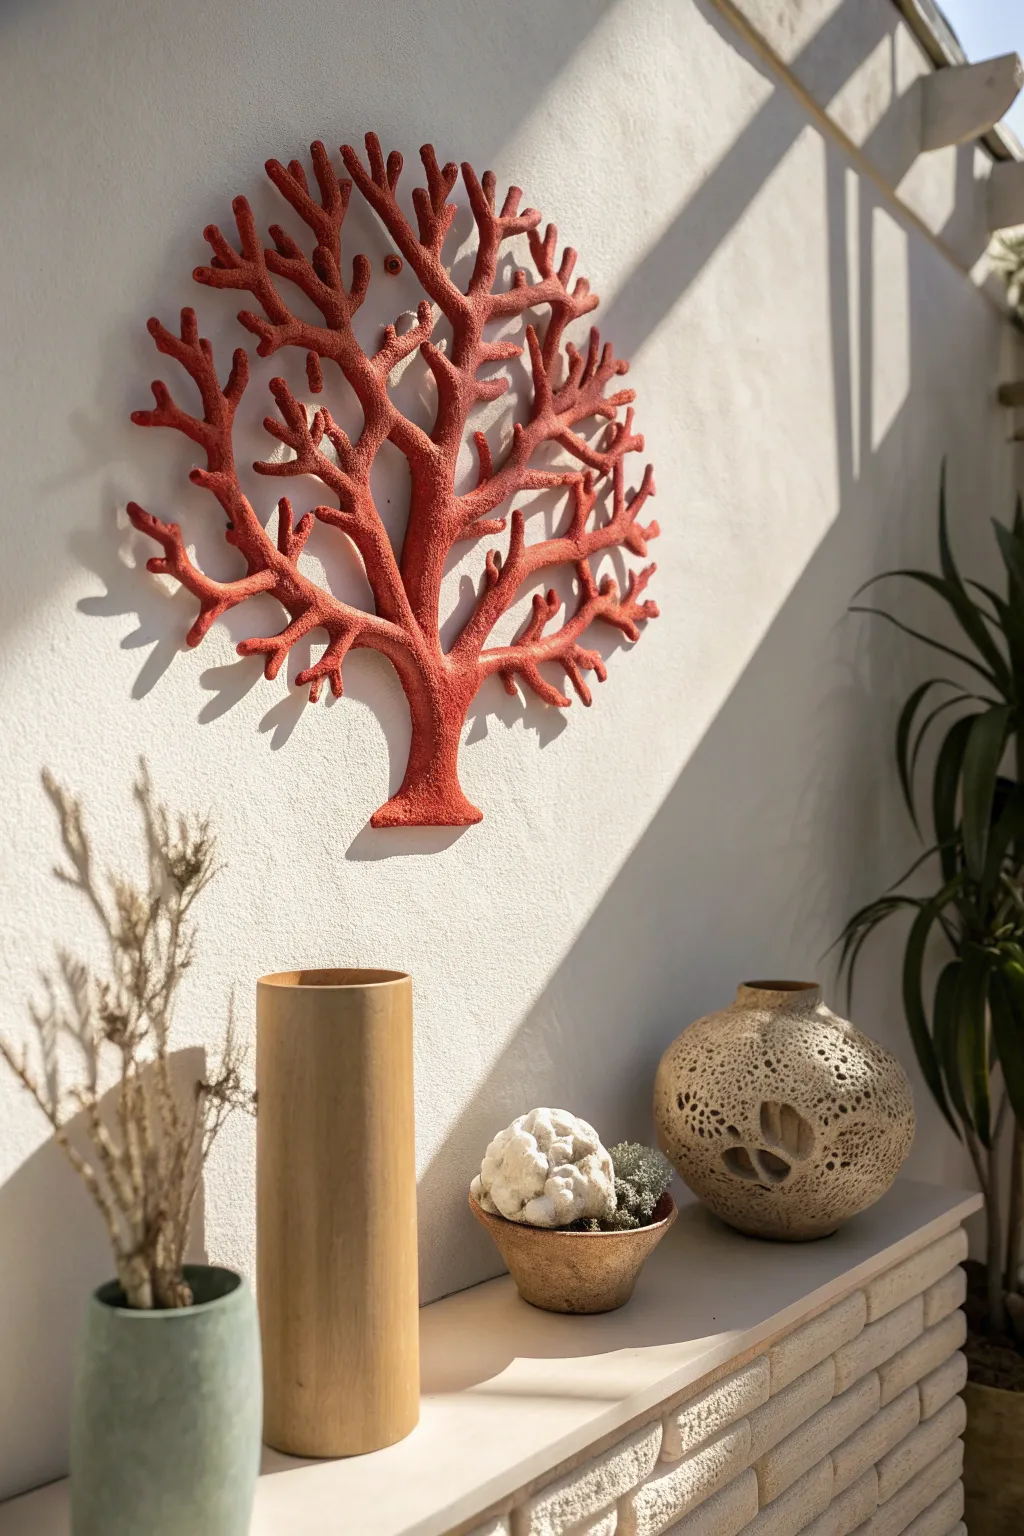
Bring the vibrant texture of the ocean into your home with this striking high-relief wall accent. This project mimics the organic, branching structure of red coral using air-dry clay or ceramic techniques for a bold statement piece that casts dramatic shadows.
Step-by-Step Guide
Materials
- High-quality air-dry clay (or earthenware clay if firing)
- Strong cardboard or plywood sheet (for template)
- Pencil and eraser
- Craft knife or scroll saw
- Aluminum foil
- Masking tape
- Sculpting tools (needle tool, loop tool)
- Texturing tool (stiff bristle brush or sea sponge)
- Texture paste or slip
- Terracotta or coral red acrylic paint
- Matte spray varnish
- Heavy-duty mounting adhesive or Z-clips
Step 1: Preparation and Armature
-
Design the silhouette:
Sketch a large, branching tree or fan coral shape onto a large piece of cardboard or thin plywood. Focus on creating a thick central trunk that splits into smaller, delicate branches. -
Create the base:
Cut out your drawn silhouette carefully. If using cardboard, layer two pieces together for extra rigidity. -
Build volume:
Crumple aluminum foil into sausage shapes of varying thicknesses. Tape these along the branches of your template to build up a 3D rounded form, keeping the trunk thickest. -
Secure the armature:
Wrap masking tape tightly around the entire foil structure. This secures the foil and provides a better surface for the clay to grip onto.
Natural Texture Hack
Press a piece of coarse sandpaper or a real dried sponge into the wet clay before adding the slip layer for deeper, organic pitting patterns.
Step 2: Sculpting the Form
-
Apply the base layer:
Roll out sheets of clay to about 1/4 inch thickness. Drape these over the prominent side of your armature, pressing firmly to adhere to the tape. -
Wrap the branches:
Work around each branch, smoothing the clay so no seams are visible. The back side can remain flat for easier wall mounting, but ensure the edges curl under slightly to hide the armature. -
Add detail branches:
Roll small coils of clay and attach them to the main branches to create the finest tips of the coral structure. Score and slip these joints well so they don’t break off later. -
Refine the shape:
Smooth out lumpy areas with a damp sponge, but don’t aim for perfection—organic irregularities make it look more realistic.
Step 3: Texturing and Finishing
-
Create surface texture:
Mix a small amount of clay with water to create a thick slip (or use texture paste). Dab this heavily over the entire surface using a stiff bristle brush or a natural sea sponge to create a porous, coral-like grit. -
Add pore details:
While the clay is still damp, use a needle tool to poke small, random clusters of holes, mimicking the polyps found on real sea fans. -
Dry thoroughly:
Allow the sculpture to dry completely. For a piece this size, I usually let it sit for at least 48-72 hours in a draft-free area to prevent cracking. -
Base coat painting:
Apply a base coat of deep terracotta paint. Ensure you push the paint into all the textured crevices. -
Dry brushing:
Once dry, lightly dry-brush a brighter coral red over the raised areas. This highlights the beautiful texture you created. -
Seal the work:
Spray the entire piece with a matte varnish. This protects the finish and deepens the color without adding an artificial gloss. -
Install hardware:
Attach heavy-duty D-rings or a French cleat system to the flat back of the sculpture. Ensure the adhesive used is rated for the weight of your finished piece.
Oceanic Ombré
Paint the base in dark maroon, the mid-tones in coral, and dry brush the very tips in pale peach or white to simulate sun-bleached coral.
Hang your sculpture where the sunlight hits it obliquely to maximize the dramatic shadows referenced in the inspiration image

TRACK YOUR CERAMIC JOURNEY
Capture glaze tests, firing details, and creative progress—all in one simple printable. Make your projects easier to repeat and improve.
Bird Flock Wall Installation
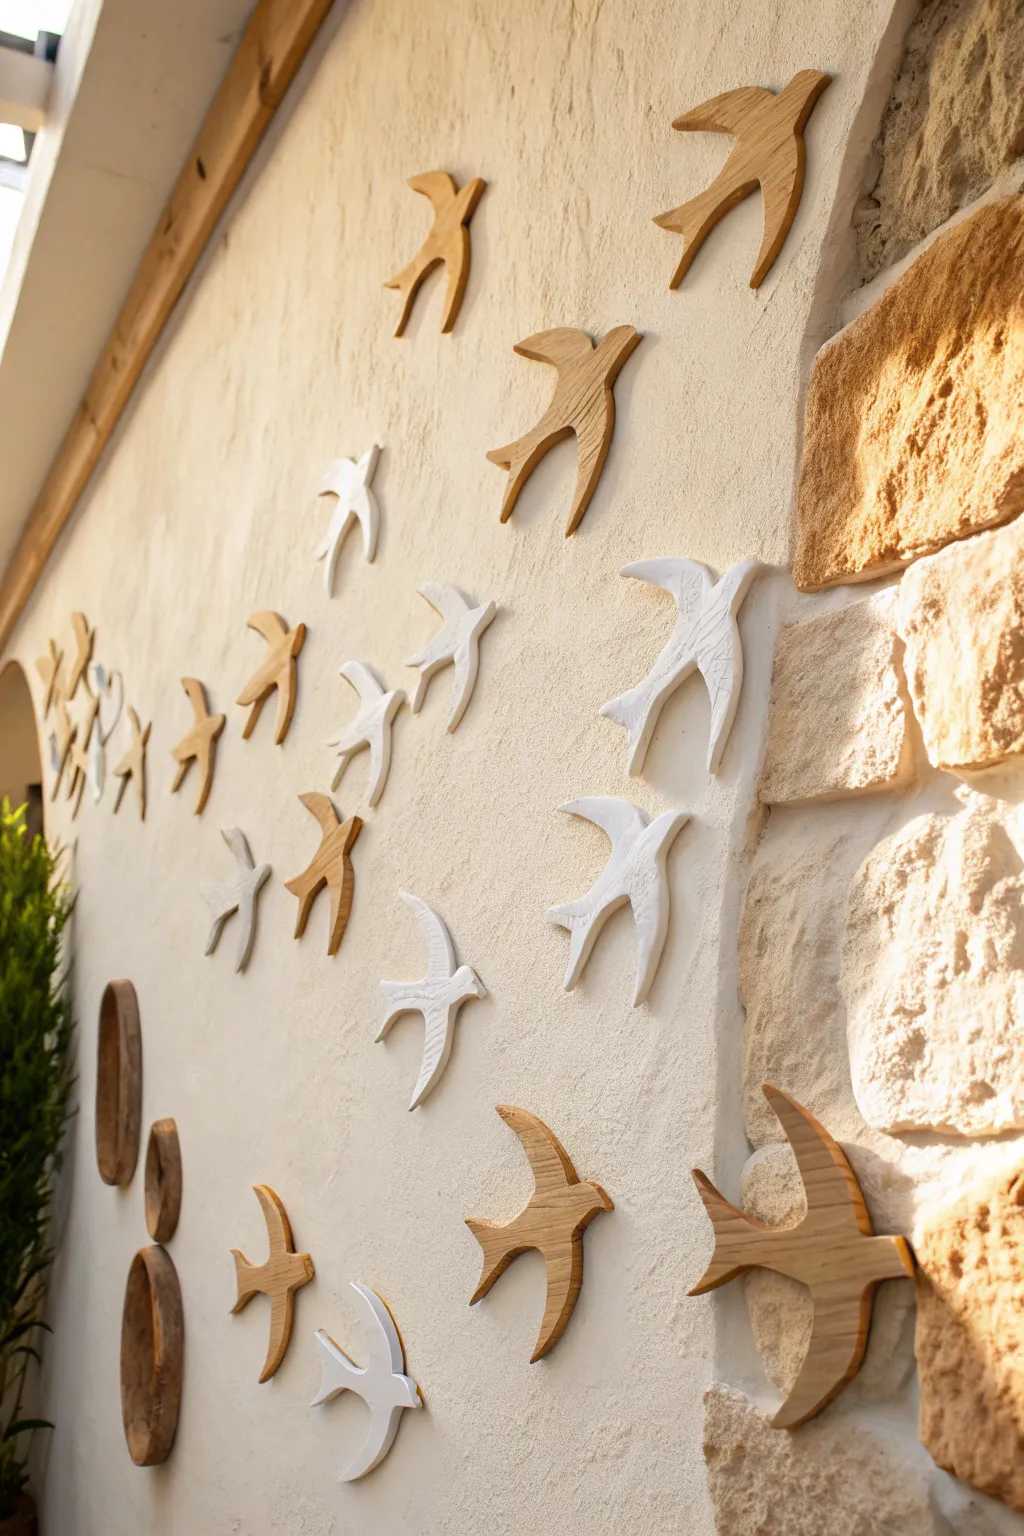
Transform a blank wall into a dynamic sky with this flock of handcrafted ceramic birds. By mixing natural clay tones resembling wood grain with crisp white glazes, you create a sense of movement and depth that feels both modern and rustic.
How-To Guide
Materials
- Earthenware or stoneware clay (a grogged clay body works well for texture)
- Bird template (cardstock or sturdy paper)
- Rolling pin
- Canvas mat or slab roller
- Needle tool or fettling knife
- Modeling tool or rib
- Sponge
- White underglaze or glaze
- Iron oxide wash (for the wood-look birds)
- Clear matte glaze (optional)
- Epoxy adhesive or heavy-duty mounting tape
- Cardboard for drying support
Step 1: Shaping the Flock
-
Create your template:
Sketch a simple swallow silhouette on cardstock with open wings and a forked tail. It’s helpful to make two slightly different sizes or angles to keep the flock looking natural, then cut them out. -
Roll out the slab:
Roll your clay out on a canvas mat to a thickness of about 1/4 inch. Try to keep the thickness consistent so the birds dry evenly without warping. -
Trace and cut sets:
Place your templates on the clay slab. Using a needle tool, cut out your bird shapes. You will need about 20-30 birds for a full-wall effect like the photo. -
Smooth the edges:
Once cut, run a damp sponge or your finger along the cut edges of every bird to soften sharpness and remove any clay burrs.
Sticky Situation?
If birds slide down while the glue sets, use masking tape to strap them against the wall temporarily until the epoxy cures completely.
Step 2: Adding Detail and Movement
-
Sculpt the wings:
Gently lift the wings of each bird slightly upward. I find placing a small piece of crumpled paper or cardboard under the wing tips helps hold this dynamic ‘in-flight’ shape while the clay leather-hardens. -
Impress texture:
For the birds intended to look like wood, use a stiff bristle brush or a texture tool to lightly drag wood-grain-like lines across the surface of the clay wings and body. -
Refine the surface:
For the birds destined to be white, use a rubber rib to make the surface perfectly smooth, erasing any canvas texture. -
Slow drying:
Cover the birds loosely with plastic and let them dry slowly over several days to the bone-dry stage. This prevents the delicate wing tips from curling or cracking.
Pro Tip: Depth Perception
Make 3-4 birds in a darker clay body or glaze. Placing these ‘shadow’ birds deeper in the flock creates an illusion of 3D depth.
Step 3: Firing and Glazing
-
Bisque fire:
Load the bone-dry birds into the kiln carefully and fire to cone 04 (or your clay’s specific bisque temperature). -
Apply iron oxide wash:
For the ‘wood’ birds, mix iron oxide with water and brush it over the textured bisque. Wipe it back with a damp sponge so the dark color stays deep in the grooves but reveals the clay color on the high points. -
Glaze the white birds:
Dip or brush the smooth birds with a bright white glaze. Two to three coats will ensure an opaque, crisp finish that contracts beautifully with the faux wood. -
Final wipe:
Ensure the backs of all birds are clean of glaze so they don’t stick to the kiln shelf. -
Glaze fire:
Fire the birds again to the maturity temperature of your clay and glaze combination.
Step 4: Installation
-
Plan the flow:
Lay your finished ceramic birds out on the floor first. Arrange them in a sweeping upward curve, grouping them denser at the bottom and spreading them out as they ‘fly’ higher. -
Mock up the wall:
Use painter’s tape to mark the general positions on the wall to ensure your spacing works within the architectural features of the room. -
Prepare the adhesive:
Mix a strong two-part epoxy or use heavy-duty mounting tape specifically designed for ceramics or stone surfaces. -
Mount the birds:
Apply the adhesive to the flat back of a bird and press it firmly against the wall. Hold for 30-60 seconds (or as directed by your adhesive) to ensure an initial bond. -
Vary the angles:
As you mount them, slightly rotate individual birds so they aren’t all flying at the exact same angle; this irregularity makes the flock look alive.
Step back and admire how your new ceramic flock adds an airy sense of freedom to the room
Mosaic Medallion With Tile Inlay
This striking circular wall feature combines the rustic charm of textured stone with the precision of cut tile. By layering radiating floral patterns in warm terra cotta and creamy beige tones, you’ll create a sophisticated focal point perfect for a patio or garden wall.
Step-by-Step
Materials
- Circular cement board base (at least 24 inches diameter)
- Terra cotta-colored ceramic tiles (smooth finish)
- Textured sandstone or slate tiles (beige/tan)
- White pebble mosaic sheets or loose white pebbles
- Small red/brown mosaic tiles (for the border)
- Tile adhesive (thin-set mortar)
- Dark grey grout (sanded)
- Tile nippers and tile wet saw
- Compass or string and pencil
- Grout flate
- Sponge and bucket
- Metal or plastic edging strip (optional, for rim)
Step 1: Planning and Cutting
-
Prepare the base:
Start with your circular cement board backing. If you are cutting it yourself from a square sheet, use a jigsaw and seal the edges with a concrete sealer to prevent moisture absorption. -
Mark the rings:
Find the exact center of your circle. Using a compass or a string pinned to the center, lightly draw three concentric circles: a small inner circle for the central star, a larger middle band for the main petals, and an outer ring for the border. -
Cut the central star:
Using thin terra cotta tiles, cut 12 sharp, narrow diamond or petal shapes. Precision is key here, so I recommend using a wet saw for clean, straight edges that meet perfectly in the middle. -
Cut the main petals:
For the larger ring, you need two types of shapes. First, cut broad, curved petal shapes from your textured orange/brown stone tiles. Then, cut matching ‘negative space’ shapes from your beige sandstone tiles to fit between them. -
Prepare the border tiles:
Cut your red/brown border tiles into small, uniform rectangles. You’ll need enough to go around the entire circumference of the piece.
Uneven Surfaces?
If pebbles are thinner than tiles, build up their height by adding extra mortar underneath. All top surfaces should be level for a smooth finish prevents water pooling.
Step 2: Assembling the Mosaic
-
Set the center point:
Apply a small amount of thin-set mortar to the very center. Arrange your 12 narrow terra cotta petals so their points touch in the middle, creating a starburst effect. -
Fill the inner background:
In the spaces between the starburst points, press in small white pebbles or pieces of white textured stone. This creates a high-contrast background that makes the red star pop. -
Lay the main petals:
Butter the back of your large orange/brown stone petals and place them in the middle ring. Ensure the spacing is symmetrical. -
Add the contrast petals:
Place the lighter beige sandstone cuts in the gaps between the orange petals. These should nestle in comfortably, leaving a uniform gap for grout lines. -
Create the pebble field:
The background behind the large petals needs texture. Use your white pebbles to fill all the remaining negative space in this middle ring, packing them tightly but keeping them level with the flat tiles. -
Install the border:
Apply mortar to the outer rim. distinct ring. Place your rectangular red/brown tiles side-by-side, radiating outward to form a clean, definition boundary for the artwork.
Pattern Precision
Draw your full design directly onto the cement board before gluing. Numbering the cut pieces on the back helps you place them exactly where they fit best.
Step 3: Grouting and Finishing
-
Let it cure:
Allow the adhesive to dry completely, usually for 24 hours. Do not disturb the stones during this time. -
Apply the grout:
Mix up a batch of dark grey sanded grout. Spread it generously over the entire surface, using a rubber float to push it deep into the crevices, especially around the irregular pebbles. -
Reveal the texture:
Wait about 15-20 minutes for the grout to set slightly, then wipe the surface with a damp sponge. Rinse the sponge frequently. You want to clean the tile faces but leave the dark grout lines intact. -
Detail cleaning:
For the pebbled areas, you might need to use a soft brush or a gloved finger to gently remove excess grout so the rounded tops of the stones are visible. -
Final polish:
Once the grout is fully dry (usually the next day), buff the smooth tile surfaces with a dry cloth to remove any remaining haze. Apply a stone sealer to protect the porous elements from weather.
Hang your durable masterpiece on a sturdy exterior wall and enjoy how the sunlight plays across the intricate textures
Layered Cutout Shapes for Shadow Depth

Create a striking vertical wall sculpture using layered ceramic arches in alternating earth tones and deep blues. This modular design emphasizes shadow and depth through stacked geometric forms, bringing a sophisticated mid-century modern vibe to any blank wall.
Step-by-Step Guide
Materials
- White or beige stoneware clay (approx. 5 lbs)
- Rolling pin and guide sticks (1/4 inch thickness)
- Compass or circle templates (large, medium, small diameters)
- Needle tool or fettling knife
- Ceramic underglazes (terracotta/rust red and navy blue)
- Clear matte glaze (optional, for sealing)
- High-temperature wire or strong jump rings
- Drill bit for ceramics or needle tool for wet clay holes
- Sponge and bucket of water
- Kiln access
Step 1: Planning and Cutting
-
Design your template:
Before touching clay, sketch out your full vertical design on paper. For this specific look, you need five main modules. Each module consists of three nested semi-circles: a large outer arch, a medium middle arch, and a small solid semi-circle center. -
Prepare the slab:
Wedge your clay thoroughly to remove air bubbles. Roll out a large slab using 1/4 inch guide sticks to ensure uniform thickness across all pieces, which is crucial for even drying. -
Cut the primary circles:
Using your compass or templates, lightly trace five large circles onto the clay slab. Cut them out carefully with a needle tool. -
Create the arches:
Cut each large circle perfectly in half to create two semi-circles. You will arrange these back-to-back later or stack them vertically as needed for the specific ‘totem’ look shown. -
Segment the shapes:
For each semi-circle module, you need to cut the concentric layers. Use your medium and small templates to cut the inner arches out of the main shape. You should end up with separate pieces: an outer arch, a middle arch to be colored later, and a small inner semi-circle.
Straight Edges Pro-Tip
To get perfectly flat bottoms on your semi-circles, I like to press them gently against a wooden board immediately after cutting while the clay is still soft.
Step 2: Refining and Assembly
-
Smooth the edges:
Once the clay is leather hard, use a damp sponge to smooth down every cut edge. Sharp edges can become brittle after firing, so round them off gently. -
Create connection points:
If you plan to wire the finished pieces together after firing, drill small holes at the top and bottom center of each component now. Alternatively, you can score and slip the pieces together into solid blocks if you want rigid segments. -
Score and slip (for rigid assembly):
To mimic the image exactly where the arches look like solid units, score the back of the colored arch and the edges of the beige arches. Apply slip and press them firmly together on a flat surface to bond them into a single semi-circle unit. -
Create the vertical layout:
Arrange your five completed semi-circles in a vertical line to check the spacing. Ensure the flat bottoms of the semi-circles are perfectly horizontal. -
Bore vertical channels:
To hang this as one cohesive column, carefully create a vertical channel or set of holes through the center of each unit that will align when stacked. I prefer creating a channel on the back so the wire is hidden.
Level Up: Texture Play
Before cutting your shapes, roll a piece of textured fabric or canvas into the raw clay slab. The underglaze will settle into the weave pattern for amazing depth.
Step 3: Glazing and Finishing
-
First firing:
Load your bone-dry pieces into the kiln for a bisque fire. This prepares the clay to accept the underglaze without turning to mud. -
Masking off:
Use wax resist or masking tape to cover the areas you want to remain raw beige clay (the outer arch and the center semi-circle). -
Applying color:
Apply 3 coats of terracotta underglaze to the middle arches of the first, third, and fifth units. Apply 3 coats of navy blue underglaze to the middle arches of the second and fourth units. -
Removing resist:
Peel away any tape or wipe off wax resist mistakes with a clean sponge. The contrast between the raw clay texture and the saturated color is key to this aesthetic. -
Glaze firing:
Fire the pieces again to the temperature recommended for your specific clay body and underglaze. Leaving the clay unglazed (matte) enhances the natural stone look. -
Final assembly:
Thread a strong wire or rod through the vertical channels you created. Secure the bottom with a washer and create a loop at the very top for hanging.
Hang your ceramic totem in a bright spot where the relief shadows can change throughout the day
Black-and-White Sgraffito Story Panels
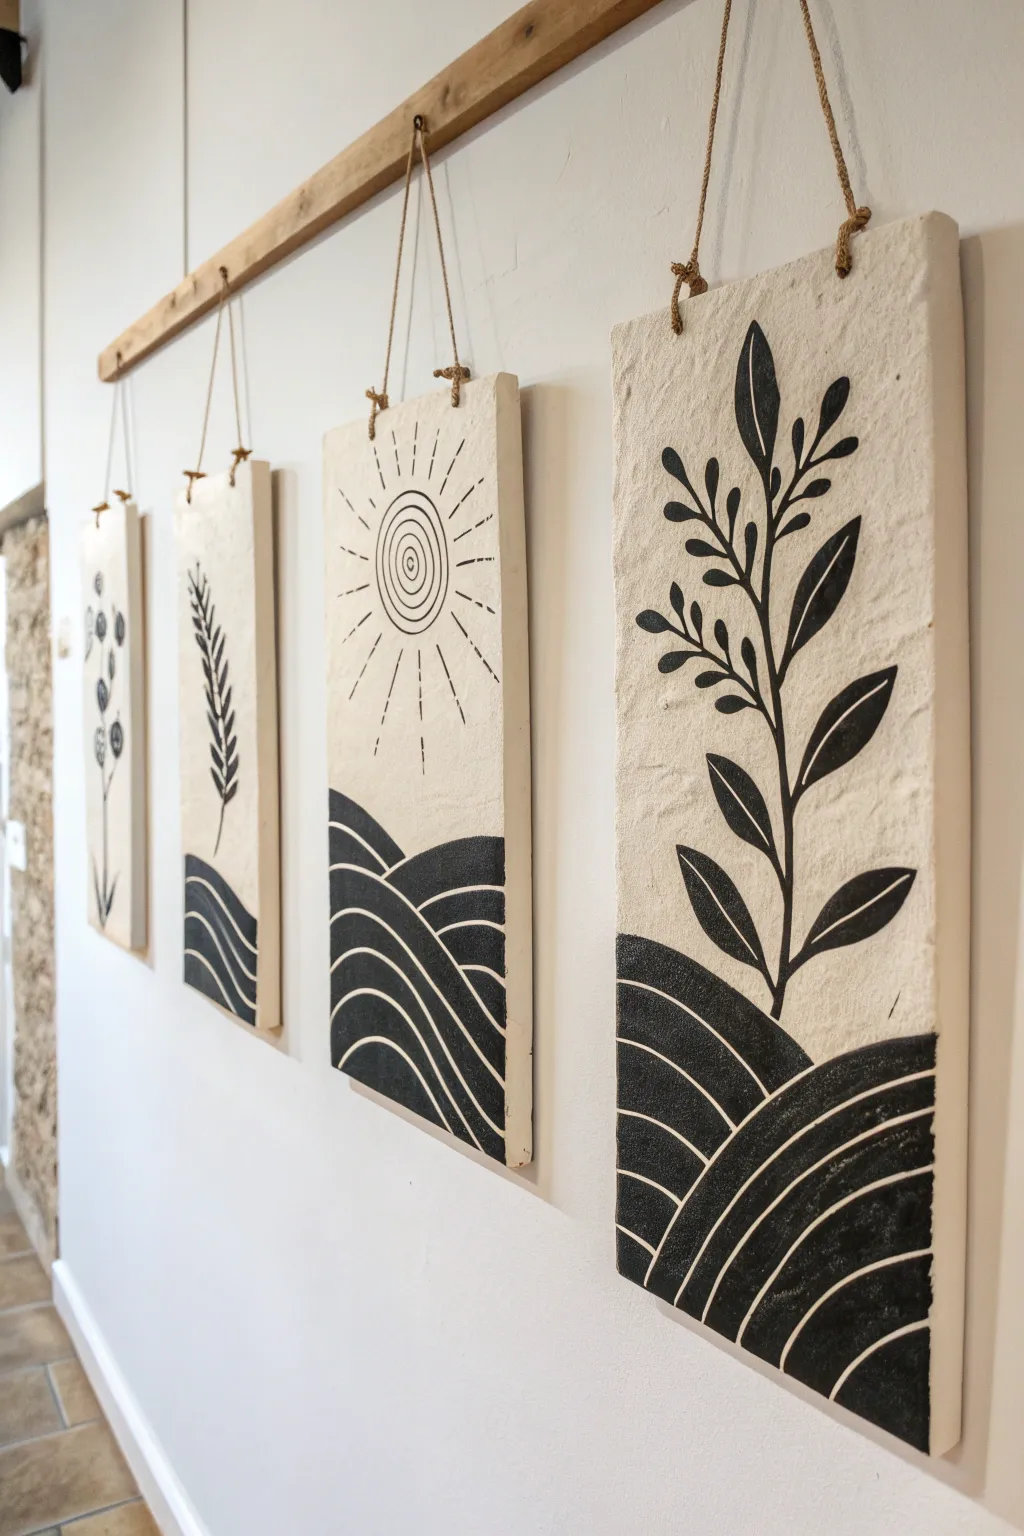
These striking ceramic panels combine the rustic charm of unglazed clay with bold, high-contrast imagery using the sgraffito technique. By layering black slip over white clay and carving back through, you’ll create a cohesive narrative series perfect for a hallway or feature wall.
How-To Guide
Materials
- White stoneware clay body (rolled into slabs)
- Black underglaze or black slip
- Rolling pin and guide strips (canvas or slab roller)
- Rectangular paper template
- Fettling knife or needle tool
- Loop tools or sgraffito carving tools (various sizes)
- Small drill bit or hole punch tool for clay
- Twine or jute cord
- Wooden batten or rail for hanging
- Soft hake brush
- Sponge
Step 1: Slab Preparation
-
Roll out the clay:
Begin by rolling out your white stoneware clay into a consistent slab, approximately 1/4 to 3/8 inch thick. Using guide strips ensures the thickness is uniform, which helps prevent warping later. -
Cut the panels:
Place your rectangular paper template onto the slab and cut out four identical panels using a fettling knife. Smooth the edges with a damp sponge to remove any sharp burrs. -
Add hanging holes:
While the clay is still plastic, create two holes at the top of each panel about an inch from the corners. Ensure the holes are large enough to accommodate your twine, keeping in mind clay shrinks when fired. -
Dry to leather hard:
Allow the slabs to dry slowly between boards or plastic sheets until they reach a leather-hard state. They should be firm enough to handle without bending, but still contain moisture.
Step 2: Applying the Design
-
Apply the black underglaze:
Paint the bottom third of each panel with 2-3 coats of black underglaze or slip to create the ground or hill area. Let each coat lose its sheen before applying the next. -
Paint the motifs:
Using a finer brush, paint the silhouette of your plant or sun designs on the upper section. Don’t worry about the fine internal details yet; just block in the solid black shapes. -
Let it set:
Wait until the underglaze is dry to the touch but the clay underneath is still leather hard. This is the sweet spot for clean carving lines.
Clean Lines
If your carving tool is dragging or tearing the clay, the slab is too wet. Let it dry for another hour. If it chips, it’s too dry—mist lightly with water.
Step 3: Carving (Sgraffito)
-
Carve the hill lines:
Using a loop tool, carve rhythmic, curved lines through the black section at the bottom to reveal the white clay underneath. Varying the pressure creates thick and thin lines that mimic rolling hills or waves. -
Detail the plants:
For the botanical panels, use a finer sgraffito tool to scratch veins into the leaves and stems. This negative space technique adds depth and definition to the black silhouettes. -
Carve the sun:
On the sun panel, use a needle tool or small loop to carve concentric circles inside the sun shape and dashed lines for the rays radiating outward. -
Clean up crumbs:
I prefer to use a soft, dry brush to gently sweep away the clay crumbs as I work. Avoid rubbing them with your finger, which can smear the black pigment onto the white background.
Make it a Calendar
Create 12 total panels, depicting a different seasonal plant or weather pattern for each month, and rotate the display throughout the year.
Step 4: Finishing and Assembly
-
Bisque fire:
Once fully bone dry, load the panels flat into the kiln for a bisque firing. Firing them flat helps ensure they stay straight. -
Glaze (optional) and final fire:
For a matte look like the photo, you can leave the clay unglazed and fire to maturity. If you want protection, apply a clear matte glaze before the final glaze firing. -
Prepare the hanger:
Cut four lengths of jute twine. Tie a knot at one end of a string, thread it through the back of the left hole, up to create a loop, and down through the front of the right hole. -
Secure the knots:
Tie a knot at the end of the twine behind the right hole to secure the loop. Adjust the length so all panels will hang at the same height. -
Hang the rail:
Mount a wooden batten to your wall using appropriate anchors. You can add small hooks or simply drape the twine loops over nails driven into the wood for a rustic display.
Step back and admire how the simple contrast creates a modern yet earthy statement piece for your home
Marbled Clay or Slip-Swirled Wall Tiles
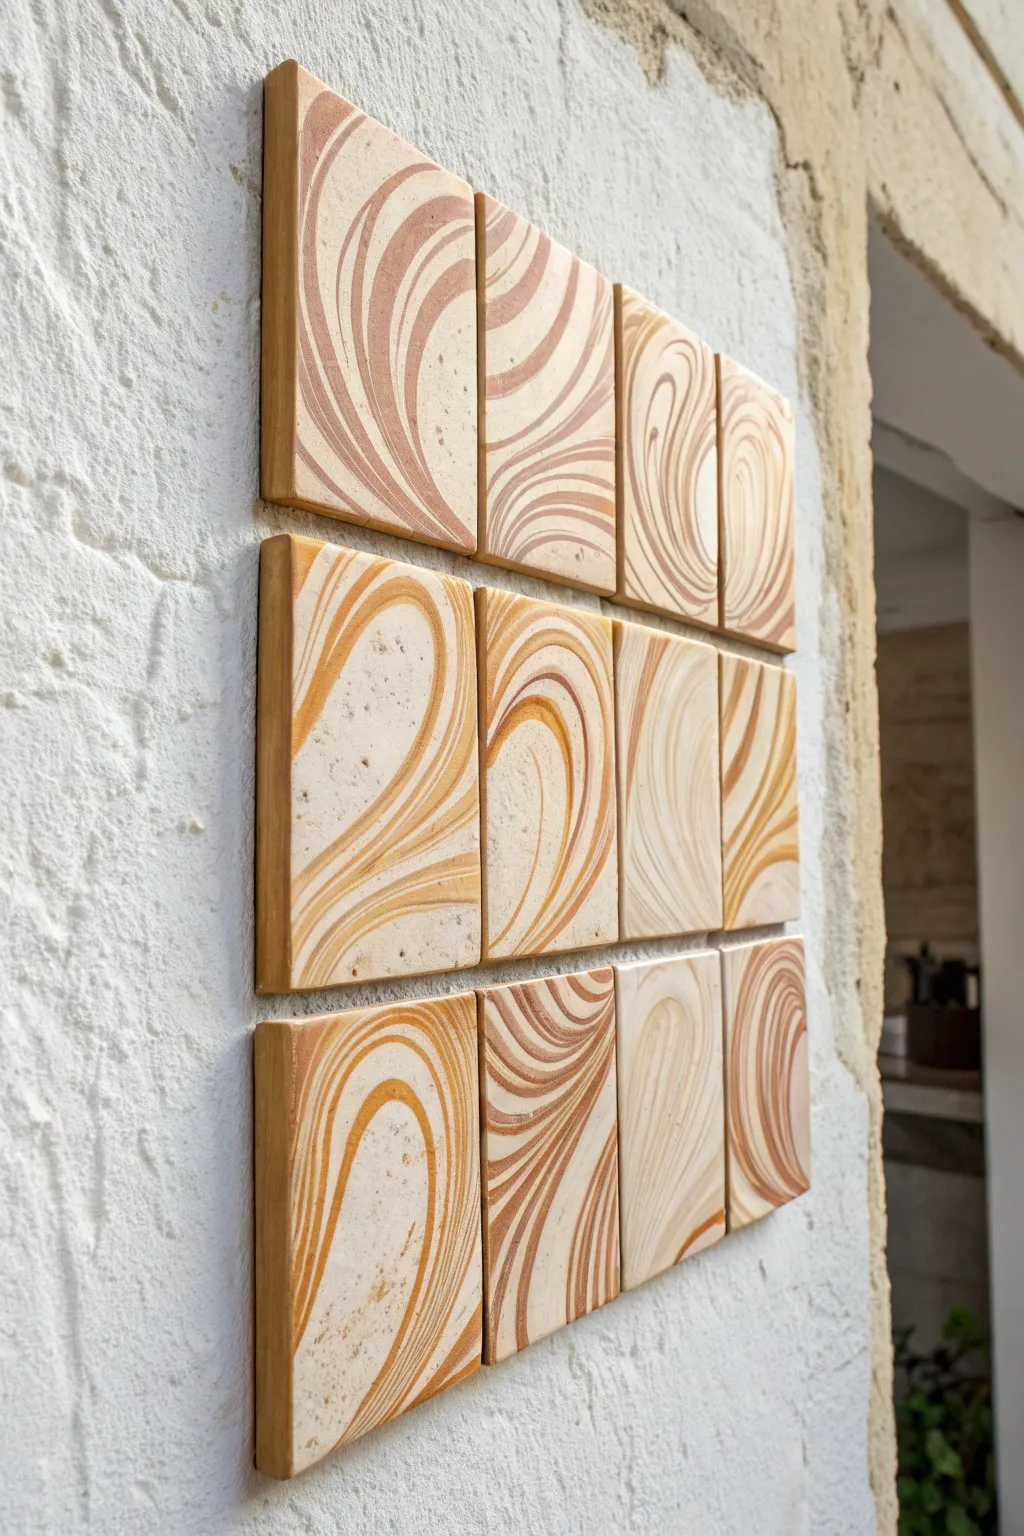
These striking ceramic tiles feature organic, flowing patterns created by marbling different colored clays together, evoking the natural strata of sedimentary rock. The warm ochre and terracotta tones bring an earthy, grounding presence to any wall space.
Step-by-Step Guide
Materials
- White stoneware clay body
- Terracotta or red earthenware clay body
- Yellow or ochre mason stain (optional, for enhancing the yellow tone)
- Ceramic rolling pin
- Two 1/4 inch wooden thickness strips
- Square tile cutter or fettling knife and ruler
- Canvas working mat or slab roller
- Rib tool (rubber or metal)
- Sponge
- Tile adhesive or mounting mastic
- Clear matte glaze (optional)
- Kiln access
Step 1: Preparing the Marbled Slab
-
Prepare Clay Blocks:
Cut substantial blocks of your white clay and your terracotta clay. If you want a third, yellower tone like the example, knead ceramic mason stain into a portion of the white clay until uniform. -
Stacking the Layers:
Cut thick slices off each clay block. Stack them in an alternating pattern—white, terracotta, ochre, white—to create a ‘sandwich’ of clay colors. The thickness of these initial slices determines how bold the lines are. -
Slicing and Slamming:
Cut the stacked sandwich in half vertically using a wire cutter. Slam the two halves back together, but offset them slightly or rotate one half to disrupt the uniform stripes. -
Initial Rolling:
Begin to flatten the stack with your hands or a rolling pin just enough to connect the pieces. You don’t want to thin it out fully yet, just ensure the layers are adhered. -
Creating the Swirls:
To get those dramatic, elongated swirls, pick up the clay slab and gently throw it onto your canvas at a slight angle. This stretches the clay in one direction, pulling the colors into long streaks. -
Rolling to Thickness:
Place your 1/4 inch wooden thickness strips on either side of the clay. Roll the pin over the strips to compress the slab to a perfectly uniform thickness. I find rolling in different directions helps distort the pattern further.
Clean Swirls
If the marbling looks smeared after rolling, gently scrape the top ‘skin’ of the clay off with a metal kidney rib to reveal the crisp lines underneath.
Step 2: Cutting and Refining
-
Smoothing the Canvas Texture:
Once rolled, use a rib tool to firmly compress the surface. This removes the canvas texture and brings the fine clay particles to the top, sharpening the visual contrast between the colors. -
Cutting the Tiles:
Using a square tile cutter or a ruler and fettling knife, cut out twelve identical squares. Try to position your cuts over the most interesting sections of the marbling. -
Cleaning Edges:
Gently smooth the cut edges with a damp sponge or your finger to remove sharp burrs. Avoid over-wetting, as that can smear the surface clay colors together. -
Slow Drying:
Sandwich the tiles between two pieces of drywall or heavy wooden boards to dry. This weight is crucial for tiles, as it prevents the corners from curling up during the drying process.
Make it Pop
Add a thin slice of black clay into your initial stack. Even a tiny amount creates high-contrast veins that make the earth tones look much more dramatic.
Step 3: Firing and Installation
-
Bisque Fire:
Once bone dry, fire the tiles in a kiln to a bisque temperature (usually cone 04). This hardens the clay and prepares it for glazing or final finishing. -
Finishing Options:
For a raw, stone-like look like the original image, you can leave the clay unglazed and fire to maturity. If you prefer protection, brush on a very thin layer of clear matte glaze. -
Glaze Fire:
Fire the tiles a second time to the maturation temperature of your specific clay body (e.g., cone 5 or 6 for stoneware). -
Planning the Layout:
Arrange your fired tiles on the floor first. Rotate them to see how the swirls interact; you can create a continuous flow or a chaotic energy depending on orientation. -
Mounting:
Apply dabs of high-strength construction adhesive or tile mastic to the back of each tile and press firmly onto the wall. Use a small level to ensure your grid remains straight.
Enjoy the organic warmth your new custom tile installation adds to the room
Wall-Mounted Mini Bud Vases
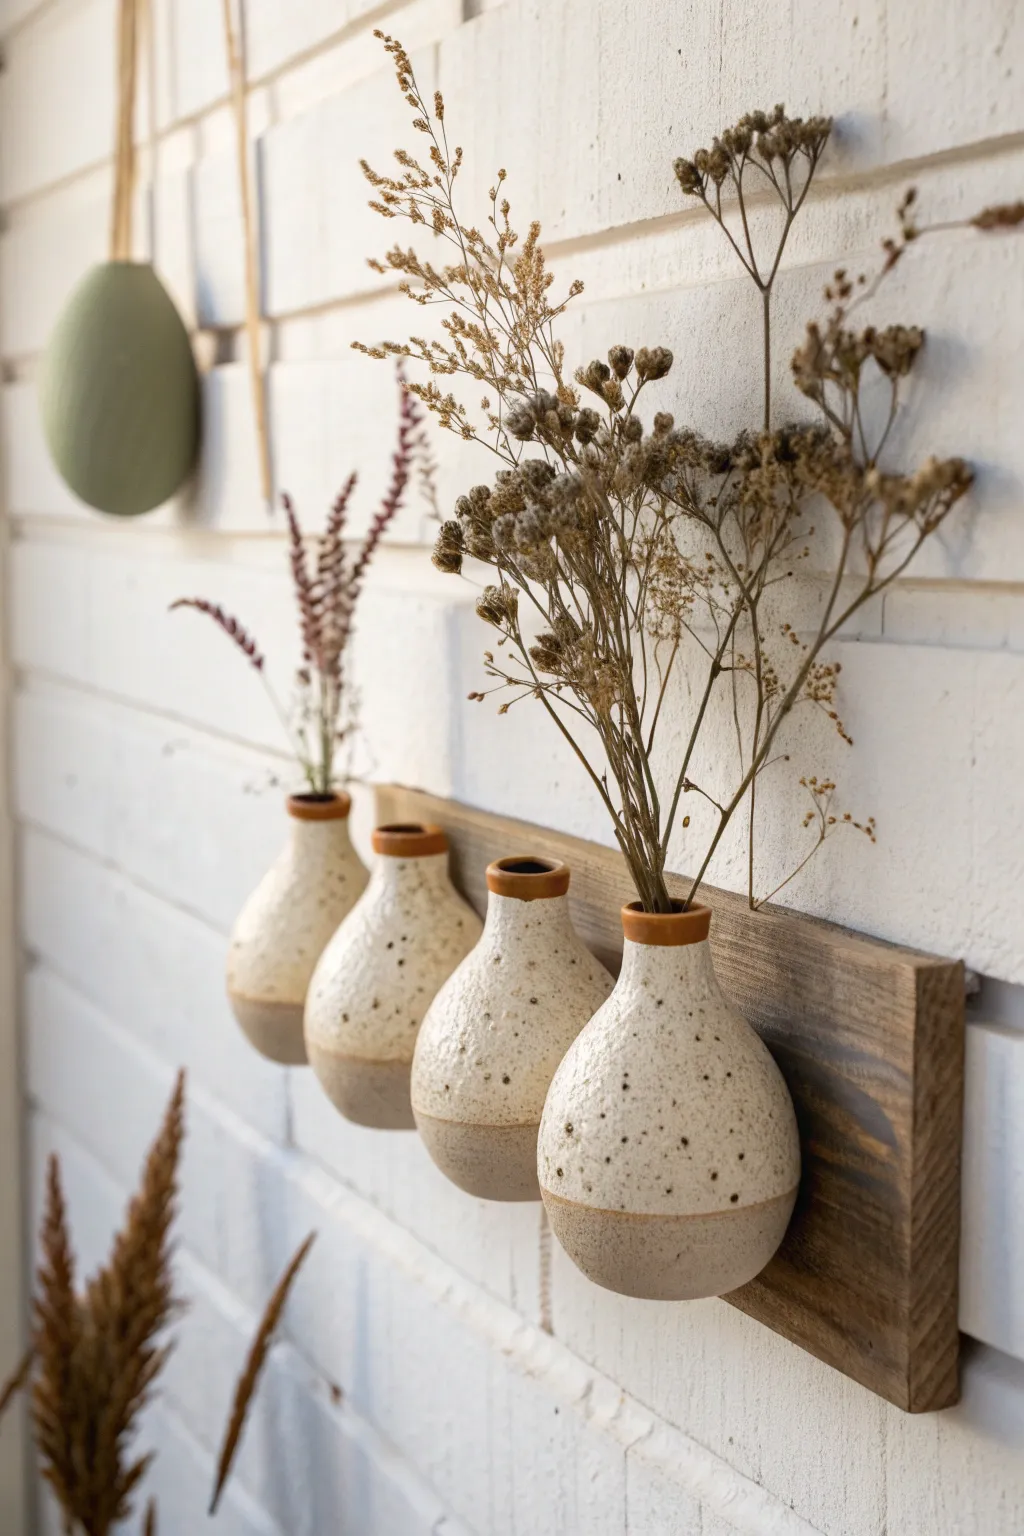
Create a stunning focal point for your dried florals with this set of four tiered bud vases mounted on a rustic wooden plank. The combination of speckled creamy glaze, raw clay bottoms, and warm wood tones brings an organic, modern touch to any empty wall space.
How-To Guide
Materials
- Stoneware clay (speckled or flecked)
- Pottery wheel (or coil building tools)
- Wooden throwing ribs
- Wire cutter
- Needle tool
- Sponge
- Wooden board (approx. 18″ x 4″ x 1″)
- Drill with ceramic bit and wood bit
- Creamy white speckled glaze
- Red iron oxide wash (optional for rim)
- Strong adhesive (E6000) or screws/anchors for mounting vases
- Sawtooth picture hangers
Step 1: Throwing the Vases
-
Prepare your clay:
Begin by wedging four balls of stoneware clay. Weigh them to ensure they are identical—about 1 pound (450g) each is a good starting point for this size. -
Center the clay:
Throw the first ball onto the wheel head. Center it firmly, cone up, and cone down to align the clay particles. -
Open the form:
Open the hole in the center, leaving the floor slightly thicker than usual to support the rounded bottom later. -
Pull the walls:
Pull the walls upward into a cylinder. Keep the top slightly narrower than the base to prepare for collaring. -
Shape the belly:
Use a wooden rib on the outside and your fingers inside to gently push the belly of the vase outward. You want a bulbous, teardrop shape that is widest near the bottom. -
Collar the neck:
Gently collar the top section inward to create a very narrow neck. Do this slowly to avoid buckling the clay walls. -
Create the heavy rim:
Thicken the remaining clay at the very top lip by compressing it downward slightly. Use a chamois to smooth it into a distinct, rounded ring. -
Refine the foot:
Using a wooden knife tool, undercut the base of the vase significantly to give it that floating, rounded-bottom appearance. -
Trim off the wheel:
Wire the vase off the wheel and set it aside. Repeat the process for the remaining three balls of clay, aiming for uniformity.
Consistency Pro-Tip
Use a taller ‘gauge stick’ next to your wheel when throwing. Mark the height of the belly and rim on the stick so you can match all four vases perfectly.
Step 2: Trimming and Firing
-
Leather hard stage:
Wait until the pots are leather hard. Using a chuck or a gryphon lid, trim the bottom of each vase. Aim for a continuous curve so the vase looks like an egg, rather than having a flat foot. -
Flatten the back (Crucial Step):
While the clay is still leather hard, gently tap the back side of each vase against a flat table. We need a flat surface area here so it sits flush against the wooden board later. -
Create mounting holes:
Using a needle tool or small drill bit, create a small hole in the flattened back section if you plan to hang them via nails. Alternatively, skip this if using high-strength epoxy. -
Bisque fire:
Load the kiln and bisque fire to Cone 04 (or your clay’s specific temperature).
Step 3: Glazing and Assembly
-
Apply wax resist:
Paint a line of wax resist around the bottom third of each vase. This preserves the raw, speckled clay texture at the base. -
Dip the glaze:
Hold the vase by the foot and dip the top two-thirds into your creamy white glaze. Shake off excess and clean any drips. -
Detail the rim:
Carefully paint a thin band of red iron oxide wash or a dark brown glaze just on the rounded rim for that contrasting detail. -
Glaze fire:
Fire the vases to maturity (likely Cone 5/6 depending on your stoneware). -
Prepare the wood:
Cut your wooden board to size. Sand the edges smooth and apply a stain of your choice—I find a walnut finish contrasts beautifully with the cream glaze. -
Mount the hangers:
Flip the board over and install two sturdy sawtooth hangers on the back. -
Attach the vases:
Apply a generous amount of E6000 or strong epoxy to the flat spot on the back of each vase. Press them firmly onto the wood board, spacing them evenly. Use painter’s tape to hold them in place while the glue cures for 24 hours.
Uneven Hanging?
If the vases slip while gluing, support the bottom of each vase with a small ball of scrap clay or a folded towel to keep them level until heavy-duty adhesive sets completely.
Once the adhesive has fully cured, mount your new ceramic installation and fill the vases with dried lavender or wheat stalks for a lovely pastoral vibe
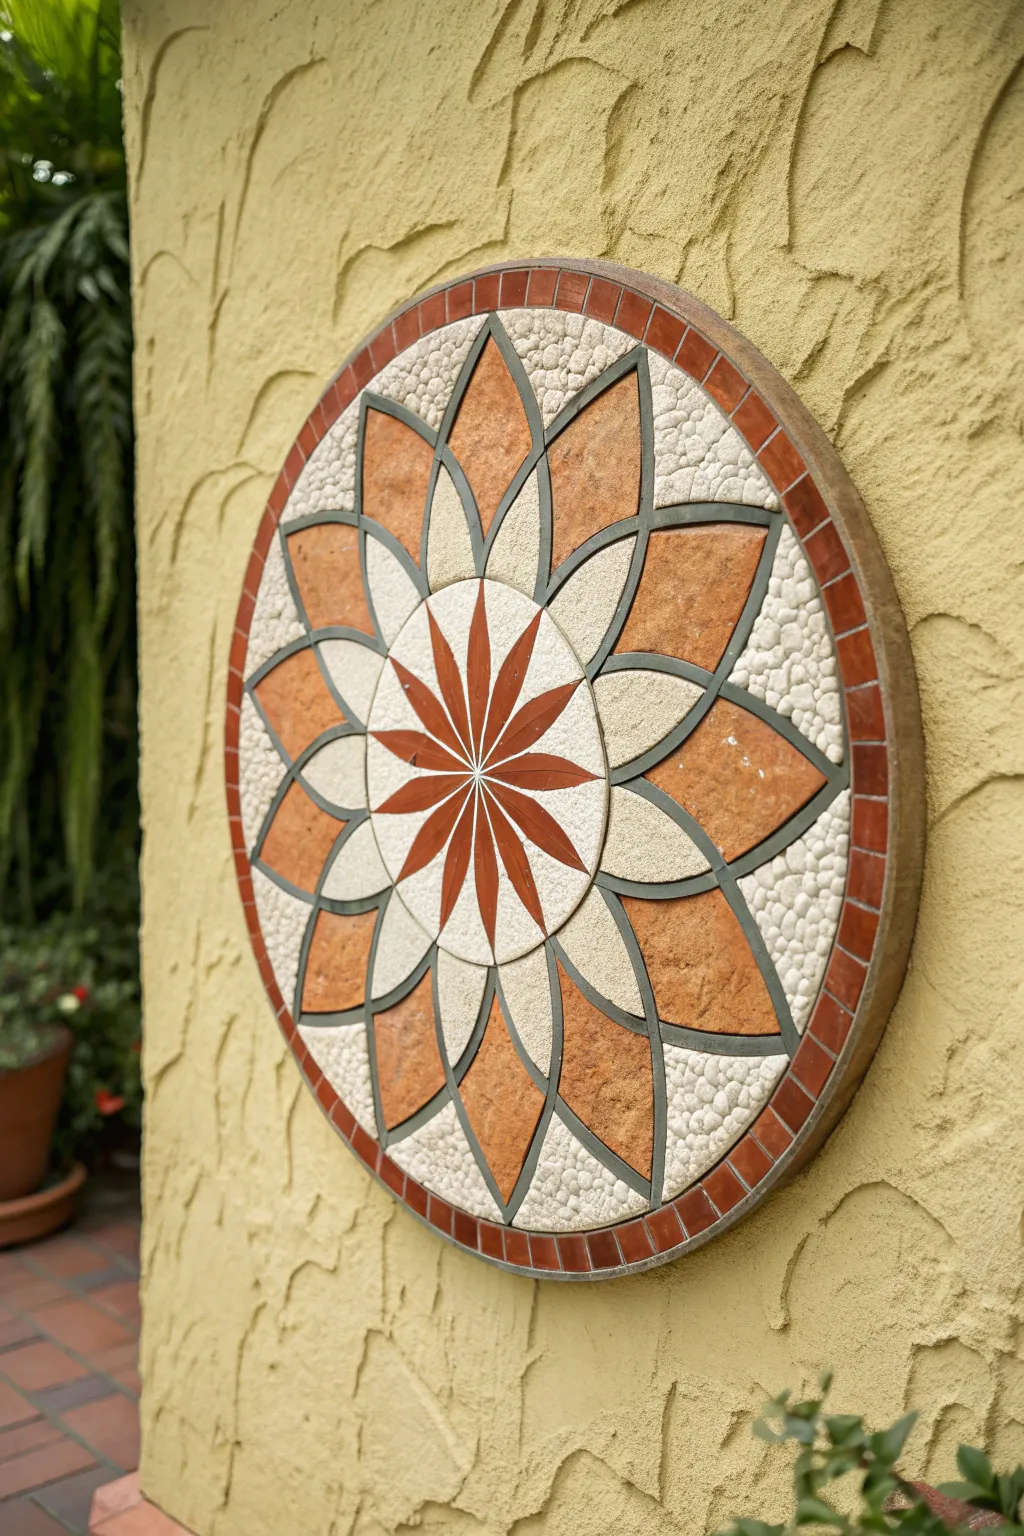
Outdoor Garden Wall Medallions
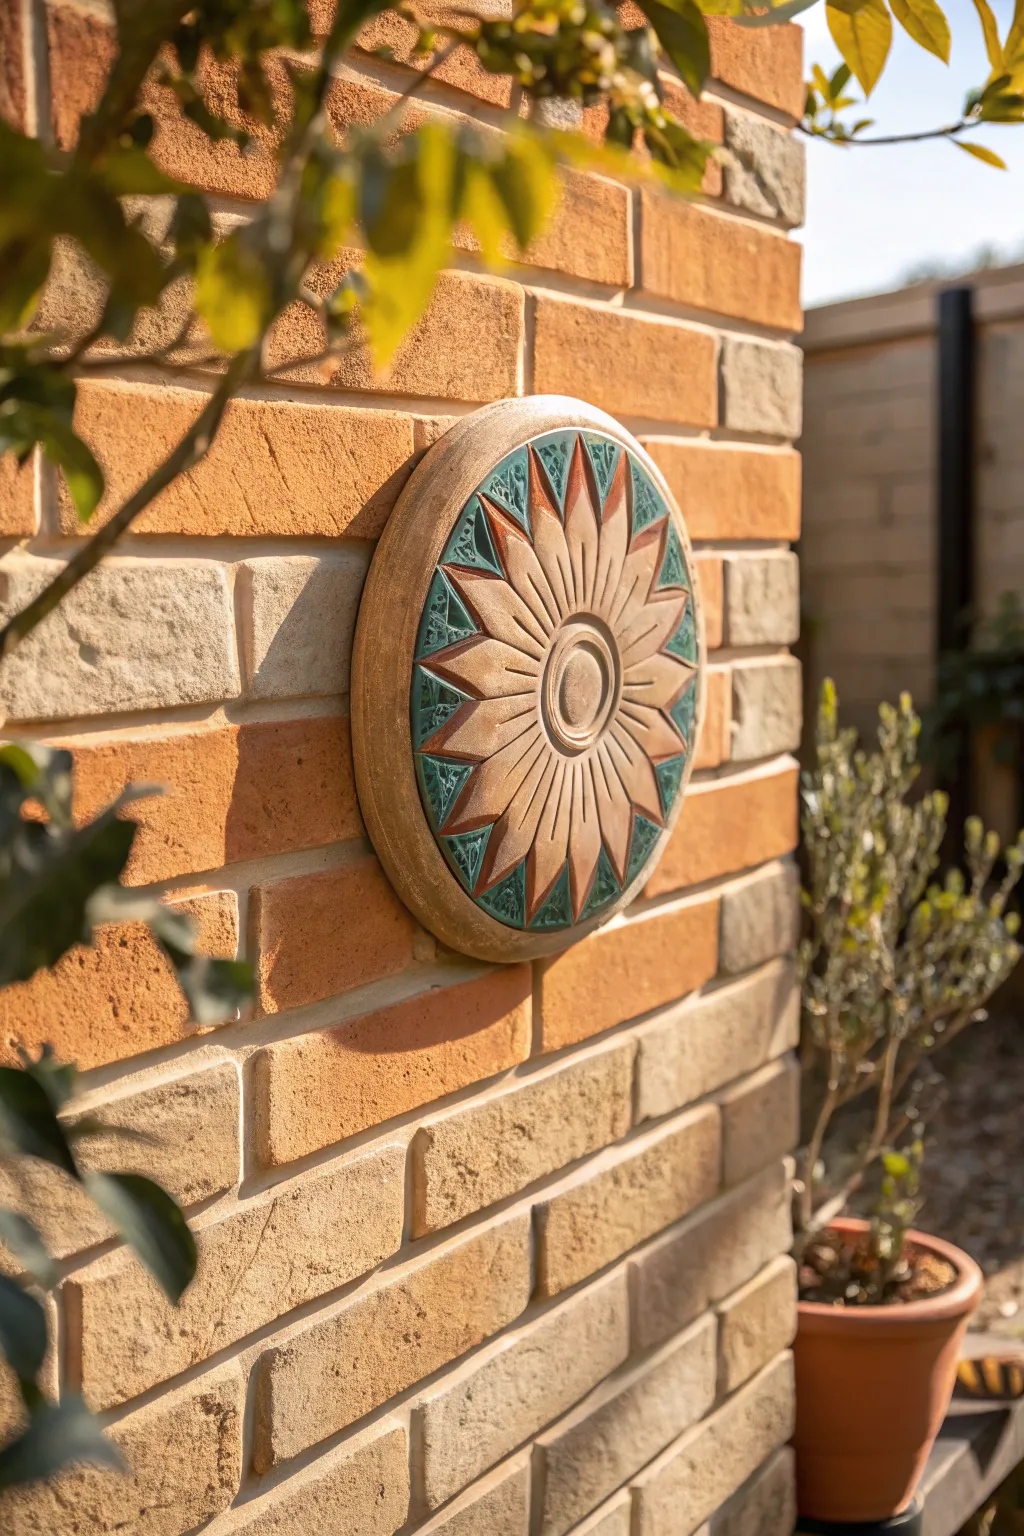
Bring a touch of perpetual sunshine to your garden wall with this rustic, relief-carved ceramic medallion. The interplay between the warm, natural clay tones and the recessed turquoise glaze creates a stunning contrast that weathers beautifully outdoors.
Detailed Instructions
Materials
- Stoneware or terracotta clay (low grog recommended)
- Circular bat or banding wheel
- Rolling pin and guides (approx. 1/2 inch thick)
- Circle cutter or template (10-12 inch diameter)
- Needle tool
- Loop tools (various sizes for carving)
- Wooden modeling tools
- Rubber kidney rib
- Turquoise or teal ceramic glaze (cone appropriate for your clay)
- Small glaze brush
- Sponge
- Wire cutter
- Kiln access
Step 1: Forming the Base
-
Prepare the slab:
Begin by wedging your clay thoroughly to remove any air bubbles. Roll out a slab of clay to a uniform thickness of about 1/2 inch to 3/4 inch using guide sticks to ensure an even surface. -
Cut the circle:
Place your circle template on the slab and cut around it cleanly with a needle tool. If you are working on a banding wheel, center the slab now to make the subsequent design steps easier. -
Smooth the edges:
Using a slightly damp sponge or your fingers, round over the sharp cut edge of the circle. This creates that soft, finished ‘cookie’ look seen in the final piece. -
Define the border:
Lightly scribe a concentric circle about 1 inch in from the edge to mark the rim. Then, mark the center point and scribe a small circle for the central button of the flower.
Warping Worries?
Flat disks warp easily. Dry it slowly on a ventilated rack, or flip it daily. Weighting center with a sandbag while drying also helps.
Step 2: Sculpting the Relief
-
Sketch the petals:
Lightly draw the sunburst petal shapes radiating from the center circle to the inner edge of your rim. Aim for triangular, pointed petals that touch at the base but separate slightly at the tips. -
Carve the negative space:
Using a small loop tool, begin carving away the clay *between* the petals. You want to recess these background areas evenly, going down about 1/4 inch, leaving the petals raised. -
Refine the petal shapes:
Once the background is recessed, use a wooden modeling tool to shape the petals. Create a ridge down the center of each petal by beveling the sides slightly downwards. -
Detail the center:
Sculpt the center button by carving a small moat around it. You can press a small indentation in its middle to mimic the seed head. -
Texture the background:
The recessed areas will eventually hold glaze. I like to leave this area slightly textured or rough so the glaze has something to grip and pool into. -
Smoothing:
Take a rubber kidney rib and very gently smooth the high points—the rim and the tops of the petals. This compresses the clay and removes any burrs from carving.
Step 3: Drying and Bisque Firing
-
Create hanging mechanism:
Carefully flip the medallion over onto a soft foam mat. Score and slip a small clay loop onto the back, or carve a keyhole slot for hanging. -
Slow drying:
Sandwich the medallion between two pieces of drywall ware board or cover loosely with plastic to dry very slowly. This helps prevent warping, which is common with flat disks. -
Bisque fire:
Once bone dry, fire the piece to a bisque temperature (usually Cone 04 or 06) to prepare it for glazing.
Pro Tip: Rustic Wash
Before glazing, apply an iron oxide wash over the whole piece and wipe it back. This enhances the ‘toasted’ look of the bare clay areas.
Step 4: Glazing and Final Fire
-
Wax resist (optional):
If you want really clean lines, paint liquid wax resist carefully over the raised petal surfaces and the outer rim. This prevents glaze from sticking where you want raw clay. -
Apply the glaze:
Using a small brush, dab a turquoise or teal glaze into the recessed background areas between the petals. Apply it thickly enough to get a rich color. -
Wipe back:
If you didn’t use wax resist, use a clean, damp sponge to wipe away any glaze that got onto the high points (the petals and rim). You want the glaze *only* in the deep recesses. -
Glaze fire:
Fire the piece to the maturity temperature of your clay and glaze combination (e.g., Cone 5/6 for stoneware). Ensure the piece is stilted or the back is wiped clean so it doesn’t fuse to the kiln shelf.
Hang your finished sunburst on a brick wall or fence post to catch the afternoon light and add artistic flair to your outdoor space
Ceramic Wall Hanging With Strung Tiles
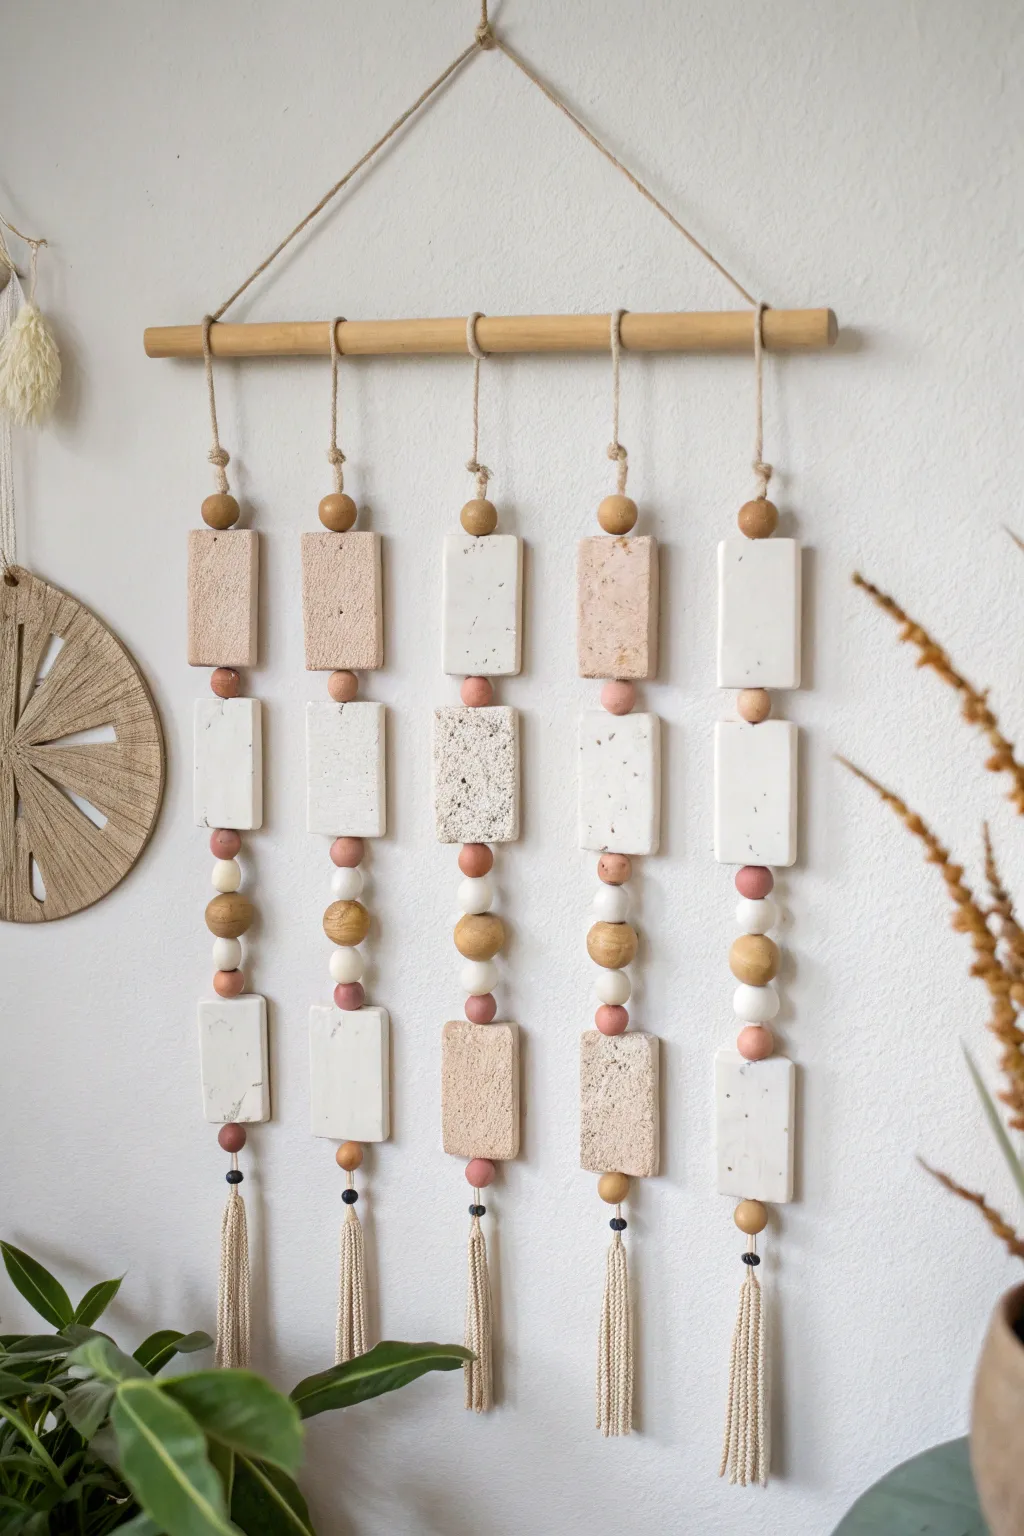
This earthy wall hanging combines the raw texture of unglazed ceramic tiles with the warmth of wooden beads for a sophisticated, textural statement piece. Its linear design and neutral palette of cream, terracotta, and soft pinks make it a versatile accent for any modern bohemian space.
Step-by-Step Tutorial
Materials
- Light-colored polymer clay or air-dry clay (colors: white, speckled beige, terracotta/pink)
- Wooden dowel (approx. 12-14 inches long)
- Natural jute twine or hemp cord
- Wooden beads (natural and white painted, assorted sizes)
- Rolling pin
- sharp craft knife
- Ruler
- Straw or skewer (for poking holes)
- Baking sheet and parchment paper
- Scissors
Step 1: Making the Ceramic Tiles
-
Prepare the clay:
Condition your clay by kneading it until it’s soft and pliable. You’ll need three distinct colors: a solid white, a speckled beige (you can add ground pepper or sand to white clay for a faux-stone look), and a soft terracotta or blush pink. -
Roll it out:
Roll your clay out on a flat surface to an even thickness of about 1/4 inch. If you want that lovely organic texture seen in the photo, lightly press a piece of coarse sandpaper or a stone onto the clay surface before cutting. -
Cut the shapes:
Using your ruler and craft knife, cut out 15 identical rectangles. Each should be roughly 1.5 inches wide by 2.5 inches tall. Make 5 of each color so you can mix and match later. -
Add holes:
Before the clay hardens, carefully poke a hole through the center of every rectangle running lengthwise. Since these are long, a skewer is best. Ensure the hole is wide enough for your twine to pass through easily. -
Baking or drying:
Place your tiles on a parchment-lined baking sheet. If using polymer clay, bake according to the package instructions (usually 275°F for 15-30 minutes). If using air-dry clay, let them sit in a dry spot for 24-48 hours until fully hardened.
Step 2: Assembling the Strands
-
Cut the twine:
Cut five lengths of jute twine, each about 30 inches long. This gives you plenty of slack for knotting and creating the tassels at the bottom. -
Start the first strand:
Take your first piece of twine and tie a sturdy knot about 4 inches from one end. This will eventually become your bottom tassel. -
Thread the bottom section:
Thread a small bead onto the twine so it rests on your knot. This acts as a stopper. Then slide on your bottom-most ceramic rectangle. -
Add the middle decorative beads:
Above the first rectangle, thread a specific pattern of beads. In the photo, the pattern is: small terracotta bead, white round bead, larger natural wood bead, white round bead, small terracotta bead. Feel free to vary this rhythm. -
Add the middle tile:
Slide on your second ceramic rectangle. Mixing textures here looks great—try placing a smooth white tile above a rougher speckled one. -
Add spacer beads:
Thread just one small bead above this second tile to act as a spacer, then slide on your final top ceramic rectangle. -
Top bead finish:
Finish the decorative part of the strand by adding one final round wooden bead at the very top of the last tile. -
Repeat for all strands:
Repeat this threading process for the remaining four strands. I find it helpful to lay them all out on a table side-by-side first to ensure the lengths and patterns look balanced before tying anything off.
Uneven Clay?
If your rectangular tiles warp while drying or baking, place a heavy book on top of them (sandwiching them between parchment paper) while they cool or dry to flatten them back out.
Step 3: Final Construction
-
Attach to dowel:
Tie the top of each strand onto your wooden dowel. Space them evenly apart—about 2 inches between each strand works well. Utilize a simple lark’s head knot or just a double knot. -
Secure the knots:
Once you are happy with the spacing and the vertical alignment (ensuring all bottom tiles hang at the same level), dab a tiny bit of glue on the knots at the dowel to keep them from sliding or unraveling. -
Create the tassels:
Go back to the bottom of each strand. Unravel the 4 inches of twine you left below the bottom knot. Comb out the fibers with a fine-tooth comb to create fluffy tassels. -
Trim the tassels:
Use sharp scissors to trim the tassels so they are neat and uniform in length. -
Add the hanger:
Cut a final piece of twine for the main hanger string. Tie each end securely to the outer edges of the wooden dowel. Adjust the length so it hangs at your desired height.
Fragrance Boost
Use unsealed ceramic or air-dry clay tiles as essential oil diffusers. Put a drop of lavender or eucalyptus oil on the back of the porous tiles for a subtle, lasting scent.
Hang your new textural masterpiece on a clean wall to bring an instant sense of calm and craftsmanship to the room
Deconstructed Abstract Sculpture in Wall Segments
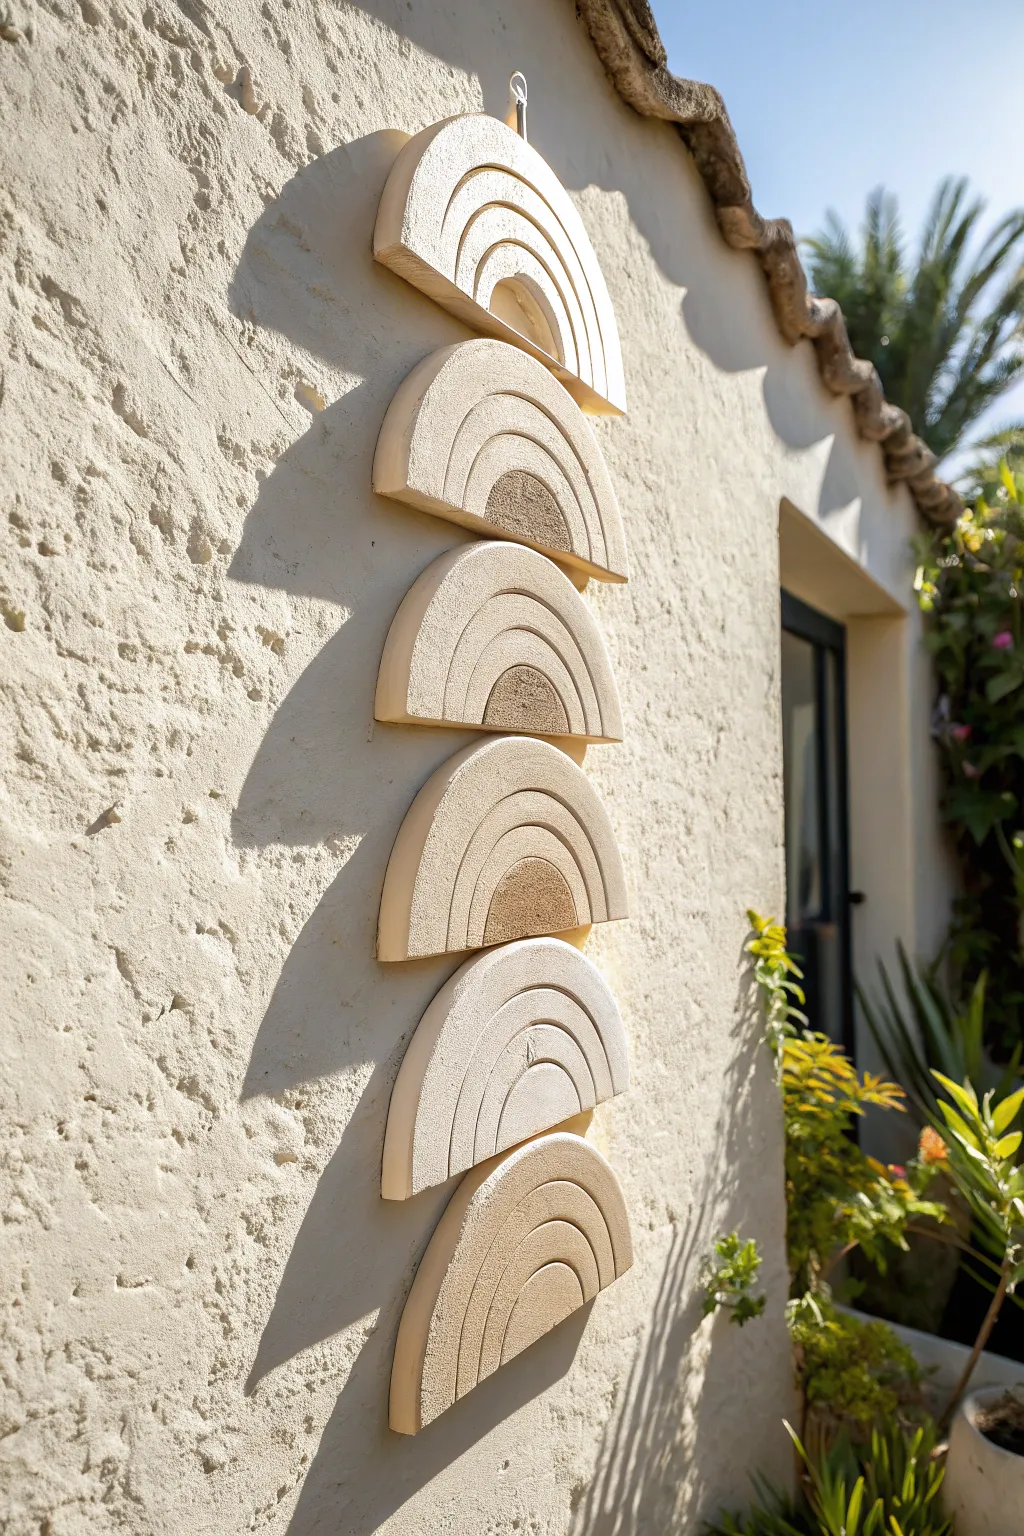
Bring the serene vibes of a desert villa to your home with this stunning vertical wall sculpture. Featuring six textured, semi-circular segments stacked in a totem style, this project mimics the look of high-end ceramic art using accessible air-dry clay or ceramic bisque.
How-To Guide
Materials
- Air-dry clay (white or natural stone color) or pre-made ceramic semi-circles
- Rolling pin and guide strips (approx. 1/2 inch thick)
- Circular cookie cutters or bowls (various sizes for cutting and tracing)
- Needle tool or clay carving tools
- Sanding sponge (medium grit)
- Textured spray paint (stone effect) or acrylic paint mixed with sand
- Strong jewelry wire or heavy-duty fishing line
- Drill with a small masonry bit (if firing) or standard bit (for air-dry)
- Matte spray sealant
- Strong adhesive (E6000 or similar)
Step 1: Shaping the Segments
-
Prepare the Clay:
Begin by conditioning your air-dry clay. Knead it thoroughly until it is warm and pliable, removing any air bubbles that could cause cracks later. -
Roll Out Slabs:
Using a rolling pin and guide strips to ensure even thickness, roll out a large slab of clay. You want these pieces to be substantial, so aim for at least 1/2 inch thickness. -
Cut the Base Circles:
Find a bowl or large circle cutter that matches your desired width (approx. 6–8 inches). Cut out three large full circles from your slab. -
Create Semi-Circles:
Use a long blade or wire cutter to slice each of the three circles exactly in half. You now have six semi-circles. Smooth the cut create edges with a damp sponge. -
Refine the Shape:
Gently tap the curved edges on your work surface to flatten them slightly if you want a blockier look, or smooth them round for a softer finish. Ensure the bottom straight edge is perfectly flat.
Step 2: Carving and Texturing
-
Map the Arches:
Lightly trace concentric arches onto each semi-circle using smaller bowls or compass tools. Don’t press too deep yet; these are just your guides. -
Carve the Grooves:
Using a needle tool or U-shaped ribbon tool, carve out the lines you just traced. Create deep, defined grooves to separate the ‘rainbow’ layers. -
Add Texture:
For that rustic, stony look, texture the clay surface before it dries. Press a crumpled ball of aluminum foil or a coarse sponge into the damp clay. -
Create Connection Holes:
This is crucial: poke a hole vertically through the center of each piece. It needs to go from the top of the curve down through the center of the flat bottom edge. Alternatively, drill two holes near the flat edge and one at the top peak for wire linking. -
Controlled Drying:
Place your pieces on a wire rack to dry. I like to cover them loosely with plastic wrap for the first 24 hours to prevent warping, then let them air dry completely for another 2-3 days.
Weight Distribution Tip
To keep the pieces from sliding down, add a small washer or bead knot hidden inside the bottom arch of each segment to support the weight of the piece above it.
Step 3: Finishing and Assembly
-
Sand the Edges:
Once fully dry (bone dry), use a sanding sponge to smooth out any sharp burrs or rough patches on the back and edges. -
Apply Stone Finish:
If your clay isn’t already the perfect sandy beige, apply a faux-stone effect. Use a textured spray paint in a ‘bleached stone’ or ‘sandstone’ color. Apply light, even coats. -
Highlight the Grooves:
To make the carved arches pop, you can lightly brush a slightly darker beige paint into the recessed grooves, then wipe the surface clean with a rag. -
Seal the Work:
Protect your sculpture with a matte clear coat. This prevents the textured paint from flaking and seals the clay against humidity. -
String the Totem:
Thread your heavy-duty wire or cord through the vertical channel you created. Tie knots or use crimp beads between each segment to maintain spacing so they don’t crush each other. -
Create the Hanger:
Form a sturdy loop at the very top of the wire coming out of the first semi-circle. Ensure it represents the center of gravity so the piece hangs straight.
Fixing Cracks
If hairline cracks appear during drying, make a slip (wet clay paste) and fill them immediately. Smooth over with a damp finger and let dry slowly away from drafts.
Hang your new sculptural totem on an exterior stucco wall or in a sunlit entryway to showcase those beautiful shadows