Handbuilding is my favorite way to get clay from “blob” to “beautiful” without overthinking it. If you’ve got your hands, a flat surface, and a little curiosity, you’re already set up for so many cozy, satisfying projects.
Pinch Pot Bowls With Soft, Organic Curves
Embrace the irregular beauty of handbuilding with these gently curved pinch pots. The charm lies in their soft, uneven rims and the contrast between the smooth, glazed interior and the raw, speckled exterior clay body.
Detailed Instructions
Materials
- Speckled buff or stoneware clay
- Water in a small cup
- Sponge
- Wooden modeling tool or old credit card
- Iron oxide wash or dark underglaze
- Clear or white semi-transparent glaze
- Small paintbrush
- Kiln (or access to a firing service)
Step 1: Forming the Pinch Pot Base
-
Prepare the Clay:
Start with a ball of clay roughly the size of a tangerine. Pat it back and forth between your hands to begin rounding it and to compress the particles. -
Open the Form:
Hold the ball in your non-dominant hand. Press your thumb into the center, pushing down until you are about a quarter-inch from the bottom. Be careful not to push all the way through. -
Begin Pinching:
With your thumb inside and fingers on the outside, gently squeeze the clay wall. Rotate the ball slightly after each pinch. -
Work Upwards:
Start pinching at the bottom of the wall and work your way up to the rim in a spiral motion. Aim for an even thickness throughout the bowl, ideally around 1/4 inch.
Cracking Up?
If you see cracks forming on the rim while pinching, your clay is too dry. Smooth a tiny bit of water or vinegar over the crack immediately to rejoin the clay.
Step 2: Refining and Shaping
-
Smooth the Interior:
Use your thumb or a slightly damp sponge to compress the inside bottom and walls, removing any deep finger marks while leaving subtle undulations. -
Shape the Exterior:
Gently paddle the outside of the bowl with a wooden spoon or flat tool to refine the curve, or simply use your hands to cup and shape the bowl into a pleasing hemisphere. -
Define the Rim:
Instead of cutting the rim straight, gently press down on it with your finger in random spots to create that organic, wavy look. Smooth the sharp edge with a shammy or damp finger so it’s pleasant to touch. -
Refine the Foot:
Tap the bottom of the bowl gently on your table to flatten it slightly so it sits stable. I like to press the center of the interior floor down just a tiny bit to create a subtle foot definition. -
Dry Slowly:
Cover the bowls loosely with plastic and let them dry to the bone-dry stage. Uneven drying can cause warping, so take your time here.
Step 3: Glazing and Surface Treatment
-
Bisque Fire:
Fire the bone-dry bowls in a kiln to bisque temperature (usually cone 04 or 06) to prepare them for glazing. -
Clean the Bisque:
Wipe the fired bowls with a damp sponge to remove any kiln dust, which can prevent glaze from adhering properly. -
Apply Oxide to Rim:
Dip a small brush into iron oxide wash or a dark brown underglaze. Paint a thin, uneven line along the very edge of the rim. -
Wipe Back Oxide:
Using a clean, damp sponge, gently wipe away some of the oxide you just applied. This leaves the color in the texture and clay pores for a subtle, antiqued look. -
Glaze the Interior:
Pour a translucent white or clear glaze inside the bowl. swirl it around to coat the entire interior up to the rim, then pour out the excess. -
Clean the Exterior:
Ensure the exterior remains unglazed raw clay. If any glaze dripped down the outside, sponge it off completely. -
Final Fire:
Place the bowls in the kiln for the glaze firing (temperature depends on your specific clay and glaze, often cone 5 or 6). Ensure the bowls do not touch each other in the kiln.
Make it a Set
Weigh your clay balls before starting. Using exactly 1lb, 0.75lb, and 0.5lb balls helps create perfectly nesting bowls without guessing sizes.
Once cooled, your bowls are ready to hold everything from morning cereal to your favorite trinkets


Coil-Built Mugs With Chunky, Comfort Handles
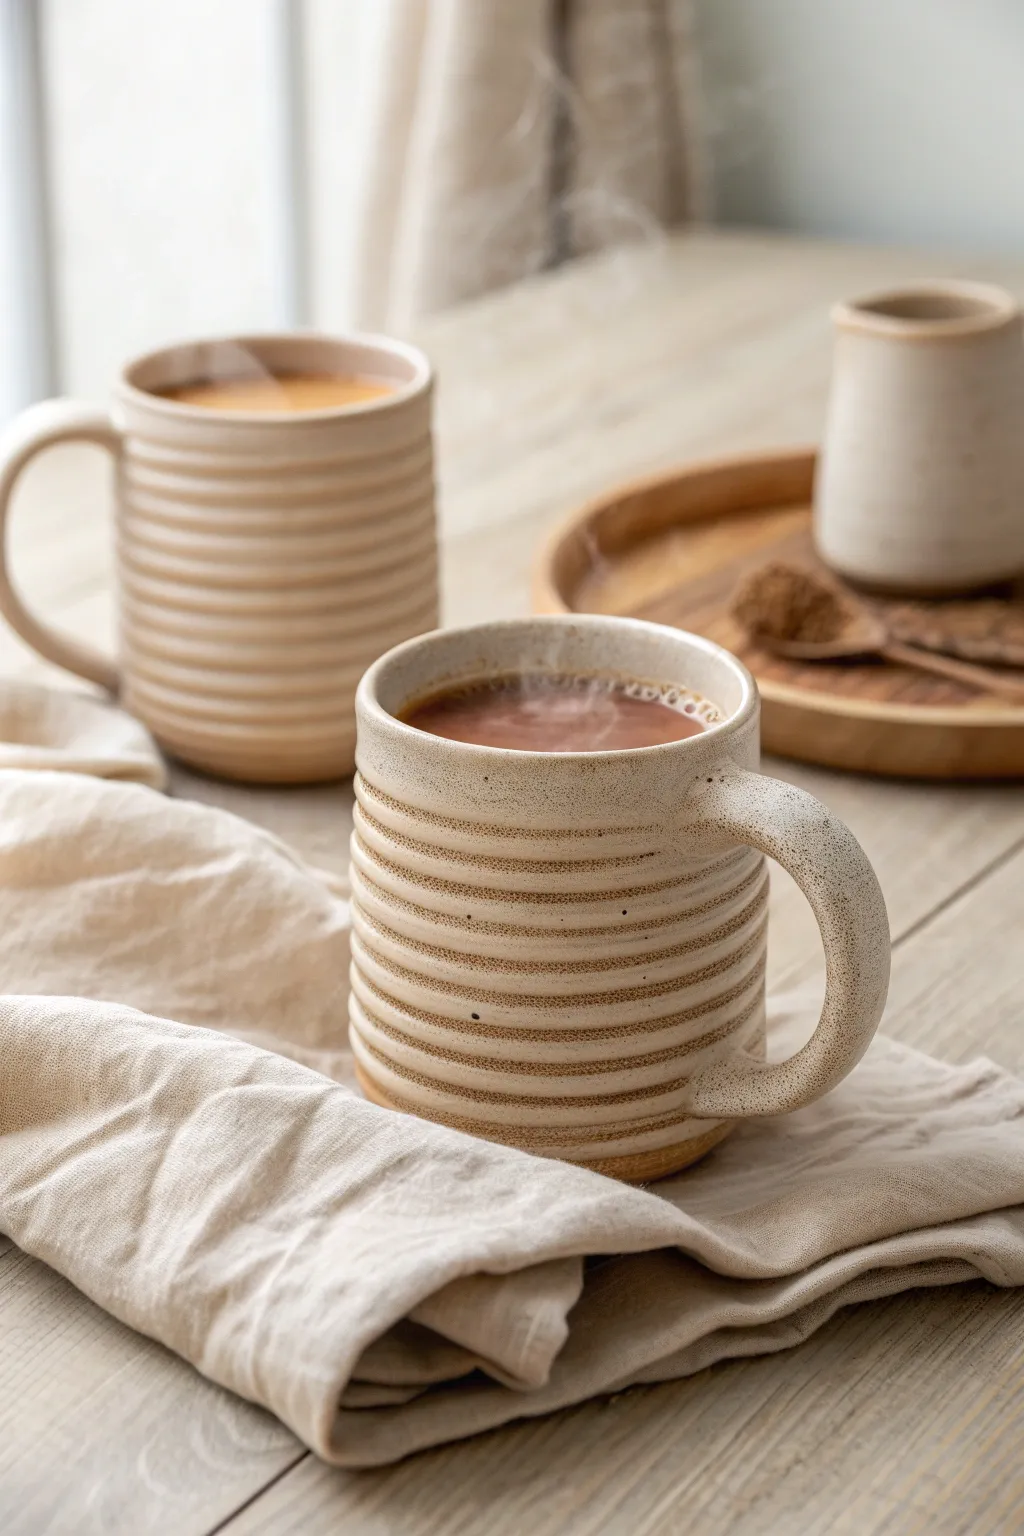
Embrace the tactile charm of handbuilding with these rustic coil mugs, featuring distinctive horizontal ridges that feel wonderful to hold. The chunky, oversized handle adds an extra level of comfort, making this the perfect vessel for your morning coffee or evening tea.
Step-by-Step Guide
Materials
- Stoneware clay (speckled or buff works best)
- Pottery wheel or banding wheel
- Rolling pin
- Canvas work surface
- Scoring tool or serrated kidney
- Slip (clay mixed with water)
- Wooden modeling tool
- Sponge
- Cutting wire
- Fettling knife
- Speckled or matte white glaze
Step 1: Creating the Base and Coils
-
Prepare the base:
Begin by rolling out a slab of clay to about 1/4 inch thickness on your canvas. Use a circular cookie cutter or trace around a jar lid to cut out a circle roughly 3.5 inches in diameter for the floor of your mug. -
Score and slip:
Score the outer perimeter of your circular base thoroughly with your tool, then daub a generous amount of slip onto the roughened area. -
Roll your coils:
Roll out several long, even ropes of clay, aiming for a consistent thickness of about 1/2 inch. Try to use your whole hand from fingertips to palm to avoid creating flat spots. -
Attach the first coil:
Place your first coil around the slipped edge of the base. Cut the ends at an angle where they meet to ensure a seamless join, then gently press it down. -
Blend the inside:
Using your thumb or a wooden modeling tool, smear the inside of the coil down onto the base to bond them together securely. Leave the outside unblended to maintain that signature ridged look. -
Build upward:
Continue stacking coils one on top of the other. Score and slip slightly between each layer if your clay isn’t super moist, but if it is fresh, simple pressure might suffice. -
Shape the profile:
As you stack, ensure the walls go straight up for a cylinder shape. Smooth the interior seams completely with your thumb or a rib tool as you go, since it gets harder to reach the bottom as the mug grows taller.
Keeping It Straight
Rotate your banding wheel constantly while stacking coils. Viewing the profile from different angles ensures your mug doesn’t lean unintentionally to one side.
Step 2: Defining Texture and Rim
-
Refine the ridges:
Once you have reached your desired height (about 4-5 inches), use a damp sponge or your finger to gently round over the exterior coils. You want to soften any sharp edges while keeping the distinct horizontal lines. -
Smooth the exterior:
If you want a cleaner look like the photo, you can lightly drag a serrated rib or finger across the coils to unify them slightly while preserving the grooves. I find a soft sponge works best to create that ‘worn’ stone feel. -
Finish the rim:
Add one final coil or simply smooth the top edge of the wall. Compress the rim with a damp piece of chamois or plastic wrap to make it smooth and pleasant for drinking.
Color Wash Effect
Before glazing, rub a dark oxide wash (like iron oxide) into the grooves and wipe it back with a sponge. This deepens the shadows between coils for higher contrast.
Step 3: Handle and Finishing
-
Pull or roll a handle:
Form a thick, chunky coil for the handle. Flatten it slightly into a strap shape, keeping it robust to match the visual weight of the mug. -
Shape the curve:
Curve the clay into a ‘C’ or ear shape and let it set up for about 15-20 minutes until it holds its form without flopping. -
Attach the handle:
Score and slip the contact points on both the mug body and the handle ends. Press the handle firmly onto the mug, blending the clay at the attachment points with a wooden tool. -
Add thumb rest:
For extra comfort, press your thumb gently into the top curve of the handle to create a subtle indentation. -
Slow dry:
Cover the mug loosely with plastic to let it dry slowly and evenly, which prevents the handle from cracking away from the body. -
Bisque fire:
Once bone dry, fire the piece to bisque temperature (usually Cone 04 or 06). -
Glaze application:
Dip or brush your mug with a satin matte white or oatmeal glaze. The glaze should break over the ridges, highlighting the coil texture. -
Final wipe:
Wipe the bottom of the mug clean with a sponge to prevent it from sticking to the kiln shelf. -
Glaze fire:
Fire again to your clay body’s maturity temperature (e.g., Cone 5/6 for stoneware).
Enjoy the comforting warmth of your new favorite mug during your next coffee break


Slab-Built Trinket Trays With Clean Lines
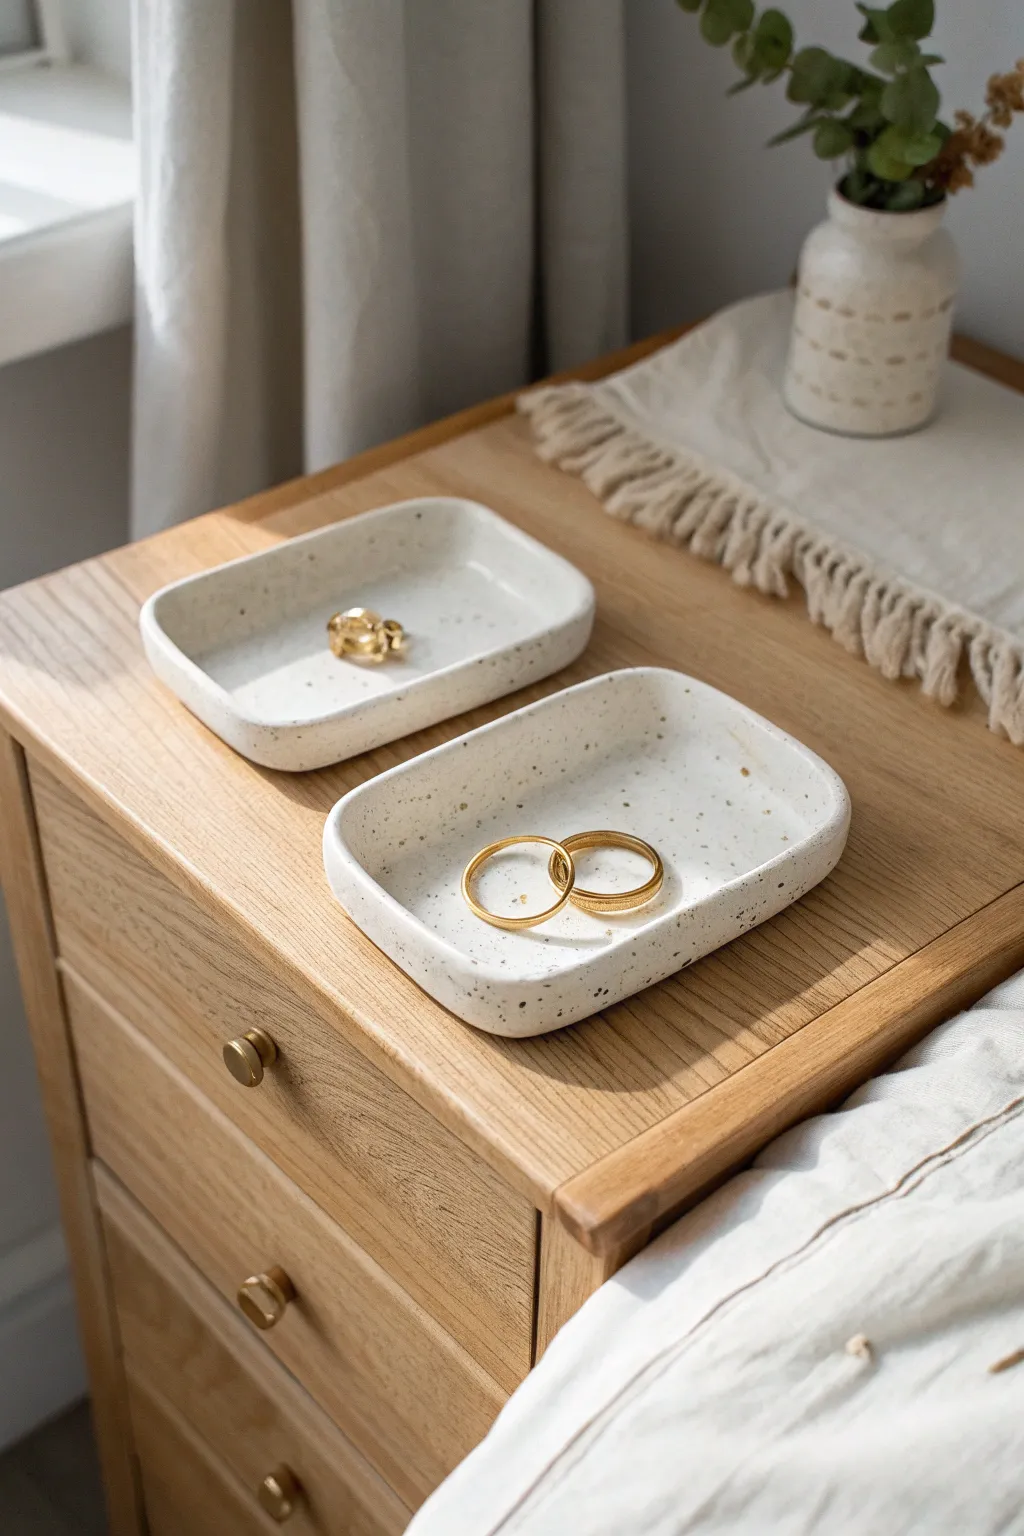
These elegant, understated trays rely on the natural beauty of speckled clay and smooth, curved lines to create a perfect landing spot for your jewelry. The raised edges are subtle but functional, achieved through simple slab-building techniques that look deceptively high-end.
Step-by-Step
Materials
- Speckled stoneware clay (white base)
- Rolling pin
- Two wooden guide slats (approx. 1/4 inch thick)
- Rectangular paper template (approx. 4×6 inches)
- Needle tool or fettling knife
- Soft sponge
- Soft rib tool (rubber or silicone)
- Clear glaze (transparent)
- Canvas or slab mat for working
- Sandpaper (for greenware stage)
Step 1: Preparing the Slab
-
Wedge the clay:
Start by thoroughly wedging a ball of speckled stoneware clay to remove air bubbles and ensure an even consistency. The speckles are key here, so choose a clay body where they are already mixed in. -
Set up guides:
Place your canvas on a flat work surface. Position your two wooden guide slats parallel to each other, slightly wider than your intended slab width. This ensures your clay thickness is perfectly uniform. -
Roll the slab:
Place the clay ball between the slats. Using your rolling pin, roll the clay out until the pin rides on top of the wooden guides. Aim for a thickness of about 1/4 inch for a sturdy yet delicate feel. -
smooth the surface:
Before cutting, take a soft rib tool and gently compress the surface of the clay in all directions. This aligns the clay particles which helps prevent warping later, and creates that super-smooth finish we want.
Use a Foam Support
To get perfectly lifted edges, place your wet slab on a piece of foam and press the center down with a weighted object. The foam naturally pushes the edges up evenly.
Step 2: Shaping the Tray
-
Cut the rectangle:
Place your paper template onto the smooth slab. Using a needle tool or fettling knife, cut straight down around the template to create your rectangle. Remove the excess clay. -
Soften edges:
Use a damp sponge or your fingertip to gently smooth the sharp cut edges. You aren’t rounding them over completely yet, just taking off the burrs and sharpness. -
Create rounded corners:
Instead of sharp 90-degree angles, use a small coin or just your eye to guide your knife and round off the four corners of the rectangle. This gives the tray its modern, organic look. -
Lift the edges:
Gently lift the slab from the canvas. Using your thumb on the inside and fingers on the outside, support the clay and gently curl the edges upward. Work your way around the perimeter slowly. -
Refine the curve:
The goal is a shallow dish, not a deep bowl. Continue to smooth the upturned edge with a damp sponge, ensuring the transition from the flat base to the wall is seamless and curved, not angular. -
Level the rim:
Check the rim from eye level. If there are high spots, gently press them down or use your rib to even them out. The rim should be soft and rounded, mimicking the look of a river stone.
Add a Gold Rim
For a luxe touch, apply a small amount of gold luster to the very rim of the tray after the glaze firing and fire it a third time at a very low temperature (Cone 018).
Step 3: Finishing and Firing
-
Slow drying:
Place your tray on a flat board. Loosely cover it with plastic to let it dry slowly. This is crucial for slab pieces to prevent the corners from curling up as they shrink. -
Bisque fire:
Once the piece is bone dry, fire it to bisque temperature (usually Cone 06 or 04) according to your clay manufacturer’s instructions. -
Sand smooth:
After the bisque firing, use a fine-grit sandpaper to briefly go over the rim and bottom if there are any rough spots. Wipe away all dust with a damp sponge. -
Apply clear glaze:
Dip or brush a coat of transparent clear glaze over the entire piece. I prefer dipping for these small trays to get an impeccably even coat that lets the speckles shine through without brushstrokes. -
Wipe the foot:
Use a clean, damp sponge to wipe all glaze off the very bottom of the tray so it doesn’t fuse to your kiln shelf during firing. -
Glaze fire:
Fire the tray to the maturity temperature of your clay (commonly Cone 5 or 6 for stoneware). Allow the kiln to cool completely before removing your finished trays.
Now you have a chic, minimalist set of trays ready to organize your bedside table


Leaf-Imprint Dishes for Quick, Pretty Texture
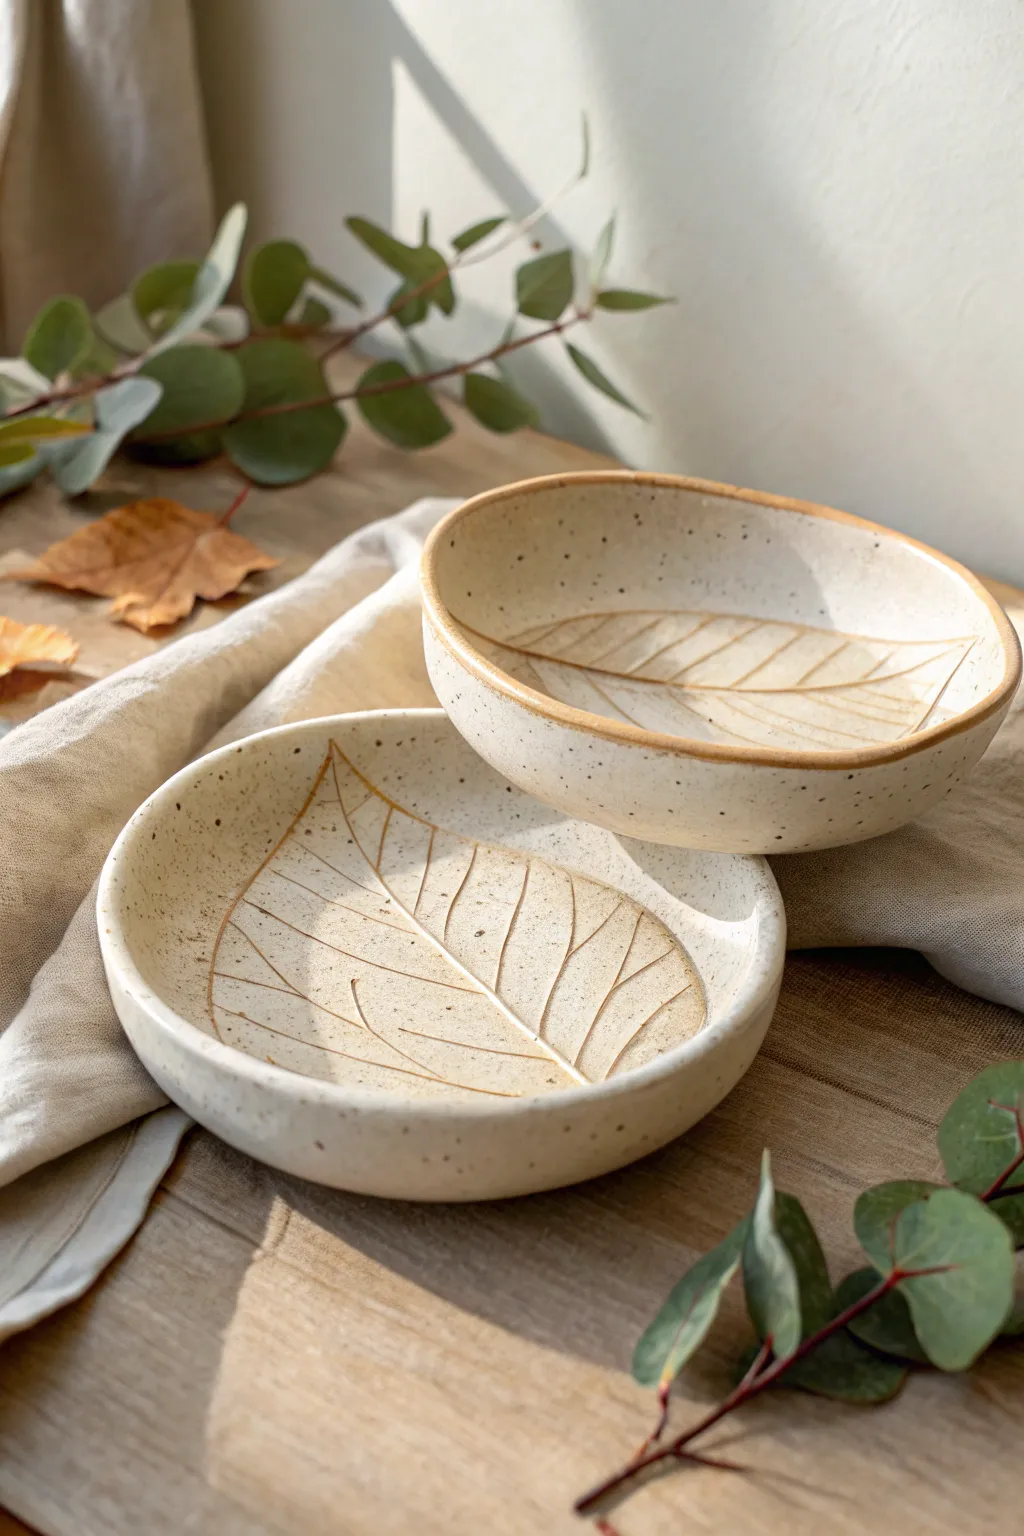
Capture the delicate beauty of autumn foliage forever in clay with these speckled, minimalist dishes. The subtle leaf vein impressions and toasted brown rims give them a cozy, rustic charm perfect for holding jewelry or small trinkets.
Step-by-Step Guide
Materials
- Speckled buff stoneware clay
- Fresh, sturdy leaves (with prominent veins)
- Rolling pin
- Guide sticks or canvas boards
- Needle tool or fettling knife
- Small bowl or foam mold for shaping
- Sponge
- Clear or transparent gloss glaze
- Iron oxide wash (optional)
Step 1: Prepping and Rolling
-
Wedge the clay:
Begin with a ball of speckled stoneware clay about the size of a large orange. Wedge it thoroughly to remove air bubbles and ensure particle alignment. -
Set up your workspace:
Place your clay on a canvas board or cloth. Set up guide sticks on either side to ensure an even thickness, aiming for about 1/4 inch. -
Roll out a slab:
Using your rolling pin, roll the clay out into a smooth, even slab. Check periodically to make sure the clay isn’t sticking to your surface by lifting and flipping it. -
Smooth the surface:
Take a soft rib tool or a slightly damp sponge and compress the surface of the slab. This removes canvas texture and sets a clean stage for your leaf.
Step 2: Creating the Impression
-
Place the leaf:
Select a leaf with thick, protruding veins on the back. Place it vein-side down onto your clay slab. Gently pat it to help it adhere initially. -
Roll in the texture:
Use a small pony roller or your main rolling pin to press the leaf firmly into the clay. I prefer to roll once with firm pressure rather than multiple times to avoid ghost images. -
Cut the shape:
Using a needle tool, cut a circle around the leaf. You can freehand a loose organic oval or use a round template that is slightly larger than the leaf itself. -
Reveal the details:
Carefully find the stem of the leaf and peel it away from the clay. Pull slowly to reveal the clean, sharp impression of the veins underneath.
Sticking Issues?
If the leaf keeps sticking to your roller instead of the clay, place a sheet of newspaper over the leaf before rolling. This creates a barrier while still transferring the pressure.
Step 3: Shaping and Refining
-
Soften the edges:
Before shaping, run a damp sponge or your finger around the cut rim of the clay to smooth any sharp edges left by the needle tool. -
Form the curve:
Lift your clay circle and gently place it into a shallow slump mold or a paper bowl lined with plastic. Press gently in the center to encourage a curve. -
Define the rim:
While it sits in the mold, check the rim again. If you want that slightly irregular, handmade look seen in the photo, gently manipulate the edge with your thumb and forefinger. -
Dry slowly:
Cover the piece loosely with plastic so it dries slowly to the leather-hard stage. This prevents warping, especially with flat shapes.
Fresh is Best
Avoid dried, crunchy leaves—they will crumble into the clay and create a mess. Use fresh, supple leaves for the cleanest impression and easiest removal.
Step 4: Finishing and firing
-
Bisque fire:
Once bone dry, fire the piece to bisque temperature (usually cone 04) to prepare it for glazing. -
Apply oxide wash:
To highlight the veins like the example, brush a diluted iron oxide wash into the leaf impression and wipe away the excess with a damp sponge, leaving color only in the deep grooves. -
Glaze application:
Dip or brush a clear or semi-transparent gloss glaze over the entire interior. This will make the speckles in the clay pop and seal the surface. -
Create the toast rim:
Wipe the glaze off the very edge of the rim with a wet sponge. This exposes the raw clay, creating that warm, toasted brown outline after the final firing. -
Final fire:
Glaze fire the piece to maturity (typically cone 5 or 6 for stoneware). Ensure the foot is wiped clean so it doesn’t stick to the kiln shelf.
Enjoy the simple elegance of bringing nature’s patterns into your home

The Complete Guide to Pottery Troubleshooting
Uncover the most common ceramic mistakes—from cracking clay to failed glazes—and learn how to fix them fast.
Ruffled-Edge Plates That Feel Extra Special
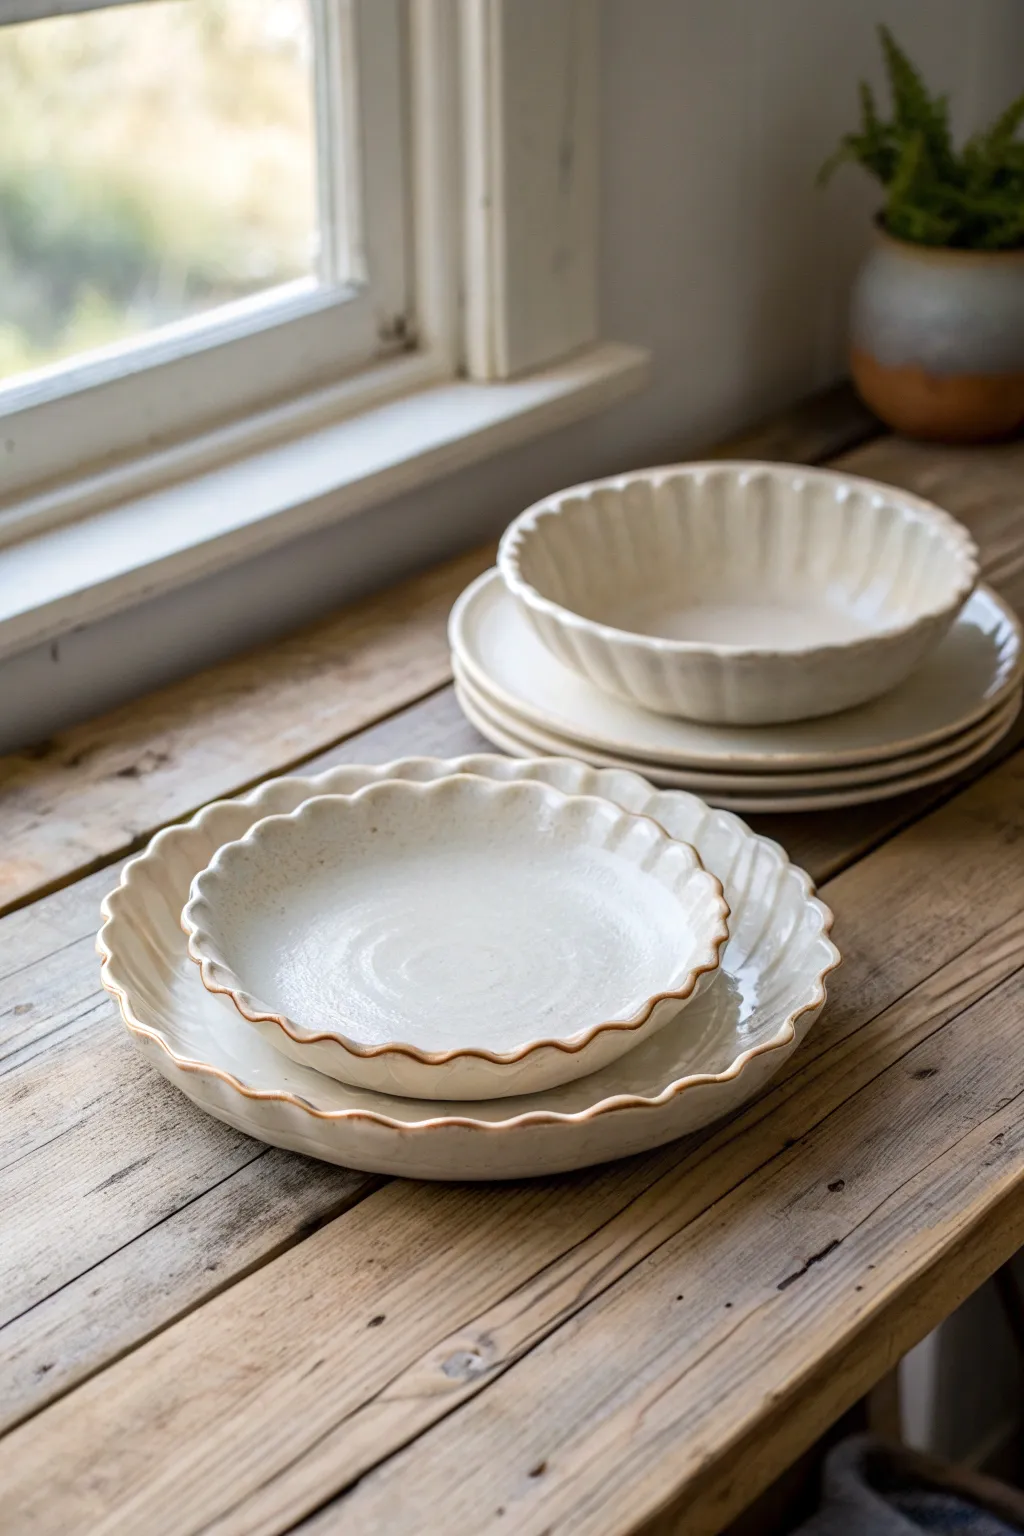
Elevate your dining table with these charming hand-built plates and bowls, featuring soft, undulating rims that catch the light beautifully. The glossy cream glaze pooling in the flutes creates a timeless, artisanal look that feels both rustic and refined.
Step-by-Step Tutorial
Materials
- Stoneware clay (a speckled buff body works well)
- Rolling pin
- Canvas work surface or slab mat
- Guide sticks (1/4 inch thick)
- GR Pottery Forms or plaster hump molds (plate and bowl shapes)
- Rubber kidney rib
- Needle tool or fettling knife
- Sponge
- Soft fan brush
- Cream or white breaking glaze
- Wire clay cutter
Step 1: Preparing the Slabs
-
Wedge the clay:
Begin by thoroughly wedging your stoneware clay to remove any air bubbles and ensure an even consistency, which is crucial for preventing cracks during firing. -
Set up your guides:
Place your canvas on a flat table and position the 1/4 inch guide sticks on either side of your clay ball to ensure your slab rolls out to a perfect, uniform thickness. -
Roll out the slab:
Using the rolling pin, roll the clay out firmly from the center towards the edges. Rotate the slab occasionally to keep the shape relatively circular and prevent the canvas texture from becoming too deep. -
Compress the slab:
Once rolled, take your soft rubber kidney rib and glide it over the surface of the clay in multiple directions. This compression aligns the clay particles, smooths out canvas texture, and strengthens the slab.
Pro Tip: Consistent Waves
Use a dowel rod or the handle of a large paintbrush to press your flutes. This guarantees that every curve is the exact same size and depth for a uniform set.
Step 2: Shaping the Plates and Bowls
-
Position the mold:
Place your chosen hump mold or form onto the slab. For the dinner plates, use a large flat mold; for the bowls, choose a deeper, curved form. -
Cut the shape:
Use a needle tool to trace and cut a circle around the mold, leaving about 1.5 to 2 inches of extra clay extending beyond the mold’s edge to account for the rim. -
Form the base:
Gently press the slab onto the mold to define the bottom and transition area. Use a damp sponge to smooth the clay against the form, ensuring there are no air pockets trapped underneath. -
Define the rim:
With the clay still on the mold, use your fingers to gently lift the overhanging clay slightly so it doesn’t droop straight down, establishing a horizontal rim orientation.
Step 3: Creating the Ruffles
-
Mark spacing:
Lightly mark even intervals around the rim with your needle tool to guide your ruffles. This ensures your pattern stays consistent all the way around the plate. -
Form the flutes:
Use I prefer using the side of my thumb or a thick rounded tool handle to press gently down into the rim at each mark, simultaneously supporting the clay from underneath with your fingers to create a soft wave. -
Refine the edge:
Run a damp sponge or chamois cloth along the very edge of the rim to soften any sharp angles created by the cutting tool. The ruffles should look organic and soft, not sharp. -
Dry slowly:
Allow the pieces to stiffen to leather-hard while still on the molds. Cover them loosely with plastic if your studio is dry, as rims dry faster than centers and can warp.
Troubleshooting: Warping Rims
If your rims warp upward or flop down during firing, you likely removed the mold too soon. Let the clay dry to a firm leather-hard stage on the mold to lock in the shape.
Step 4: Finishing and Glazing
-
Remove and trim:
Once leather-hard, carefully pop the plate off the mold. Turn it over and smooth the bottom with a rib. You can add a foot ring now if desired, or simply smooth the flat bottom. -
Bisque fire:
Let the greenware dry completely before loading it into the kiln for a bisque firing to cone 04 (or your clay’s specific bisque temperature). -
Apply wax resist:
After bisque firing, wipe the pieces down with a damp sponge to remove dust. Apply wax resist to the bottom contact points to prevent the piece from sticking to the kiln shelf. -
Glaze application:
Dip or brush on a cream-colored ‘breaking’ glaze. A breaking glaze will thin out over the high points of the ruffles, revealing the warm clay color underneath, while pooling thicker and whiter in the valleys. -
Wipe the rim:
For the specific look in the photo, take a damp sponge and very gently wipe just the very crest of the ruffled edge to thin the glaze further, encouraging that toasted brown edge effect. -
Glaze fire:
Fire the glazed pieces to the final maturity temperature of your clay and glaze combination (typically Cone 5 or 6 for stoneware).
Now you have a stunning, cohesive set of handmade dinnerware ready for your next gathering
Textured Rolling Pin Platters With Statement Patterns
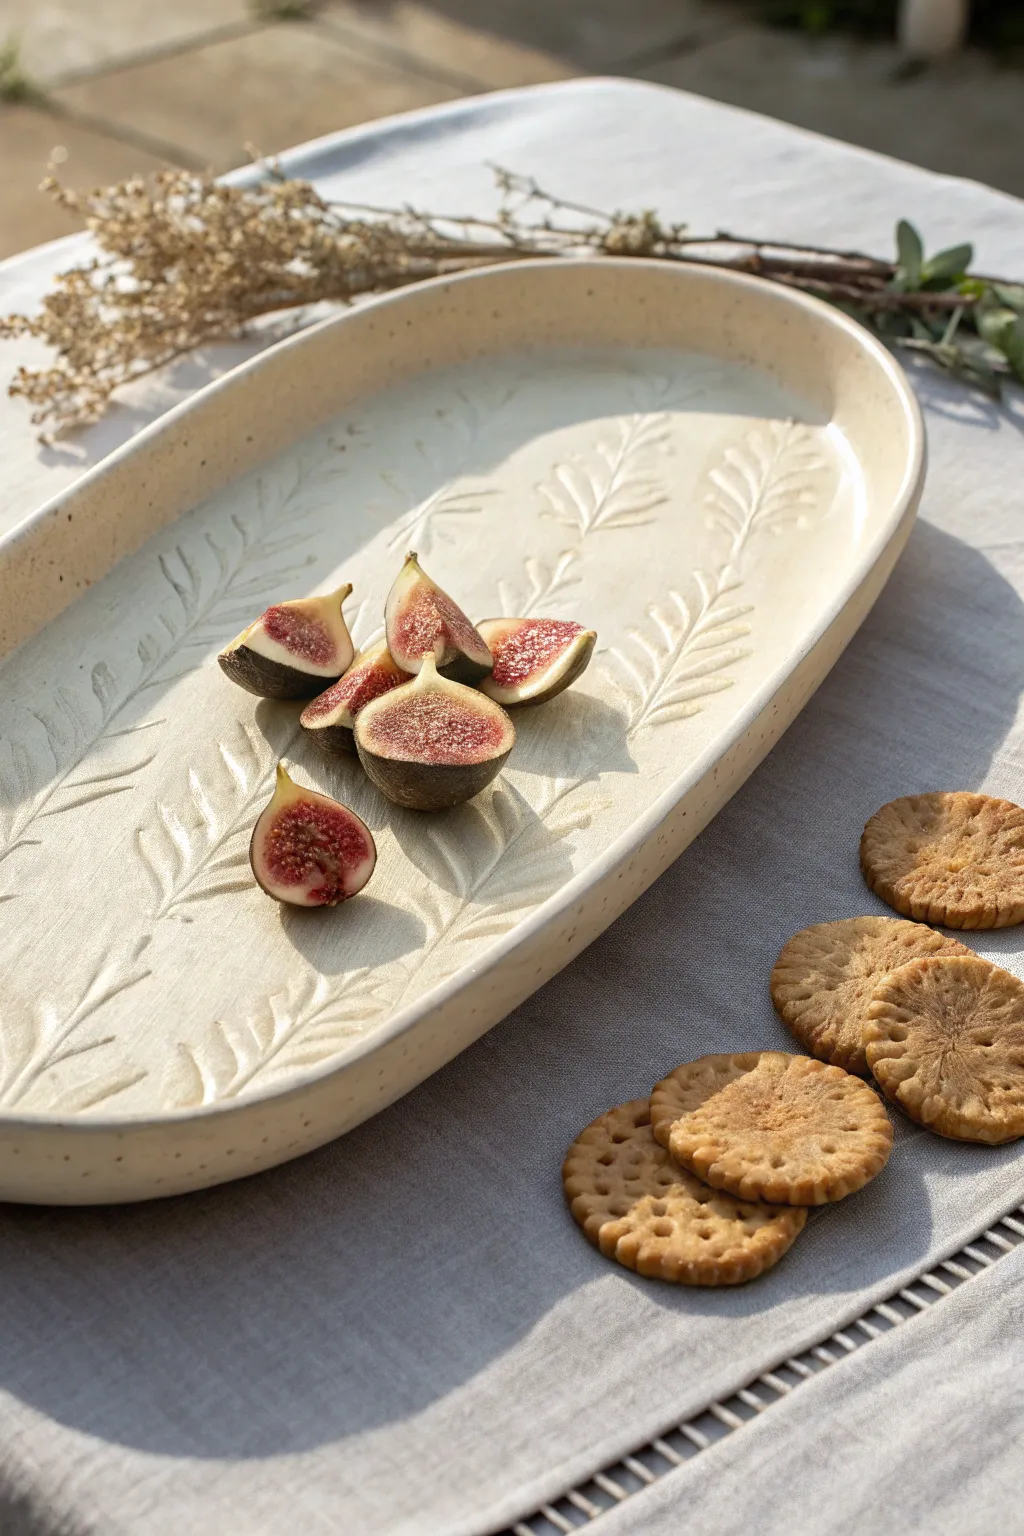
Create a stunning centerpiece for your table with this elongated oval platter featuring delicate botanical impressions. Using a textured rolling pin or real leaves, you’ll capture the subtle elegance of nature in a durable, handcrafted ceramic piece perfect for serving seasonal treats.
Step-by-Step Guide
Materials
- Speckled buff stoneware clay (mid-fire)
- Rolling pin (heavy duty)
- Patterned rolling pin (fern/leaf design) OR real stiff leaves
- Canvas work surface or slab mat
- Needle tool or fettling knife
- Oval paper template (approx. 14 x 6 inches)
- Soft rib (yellow mudtools rib)
- Sponge
- Wooden modeling tool
- Plastic wrap or thin plastic sheet
- Foam sheet or soft cushion for shaping
- Clear or light translucent glaze
Step 1: Preparing the Slab
-
Wedge the clay:
Begin by thoroughly wedging about 3-4 lbs of speckled stoneware clay to remove air bubbles and ensure a uniform consistency. This prevents cracking later. -
Initial rolling:
Place the clay on your canvas or slab mat. Using your smooth rolling pin, roll out a slab that is slightly thicker than your final desired thickness, roughly 3/8 of an inch. Roll in multiple directions to compress the clay platelets. -
Applying texture:
If using a textured rolling pin, roll it firmly and evenly across the slab in one single, continuous pass to impress the fern pattern. If using real leaves, arrange them on the slab, cover with a piece of paper to prevent sticking, and roll over them firmly to press them deep into the clay. -
Remove leaves:
If you used real botanicals, carefully peel them away using a needle tool to lift the edges, revealing the detailed veins and stems left behind. -
Smooth the back:
Carefully flip the slab over onto a clean board. Use a soft rib to compress and smooth the un-textured side, which will become the bottom of your platter. This compression helps prevent warping.
Warp Worries?
Platters warp easily. Dry it VERY slowly under plastic for several days. Weigh down the edges with small sandbags while drying if they start to lift unevenly.
Step 2: Shaping the Form
-
Cut the shape:
Flip the slab back over so the texture faces up. Place your oval paper template over the most pleasing part of the pattern. Holding your fettling knife or needle tool vertically, trace around the template to cut out the oval shape. -
Soften edges:
Wrap a small piece of thin plastic wrap around your finger and gently run it along the cut edge of the clay. This smooths the sharp corner created by the cut without destroying the texture near the rim. -
Lift the rim:
Transfer the slab onto a piece of foam or a soft cushion. Gently press the center of the slab down into the foam while lifting the edges with your hands to create a curved, shallow bowl shape. I find this creates a more organic curve than a slump mold. -
Refine the curve:
Work around the perimeter, using your fingers to pinch and lift the rim slightly to define the height of the platter’s wall. Aim for a height of about 1 inch for the rim. -
Set the form:
Once you are happy with the curve, prop up the edges with small pieces of clay or foam scraps if needed to holding the shape while it firms up.
Go Oxide
Instead of full glaze, wipe a dark oxide (like iron or cobalt wash) into the texture, then wipe away the excess with a sponge. Cover with clear glaze for high contrast.
Step 3: Finishing and Glazing
-
Dry slowly:
Cover the platter loosely with plastic to allow it to dry slowly to leather hard. This is crucial for long, flat pieces to prevent warping. -
Clean the foot:
Once leather hard, flip it over gently and smooth the bottom again with a slightly damp sponge. You can carve a shallow foot ring if desired, but a flat bottom works well for this low profile. -
Bisque fire:
Allow the piece to dry completely to the bone-dry stage before bisque firing it to cone 04 (or your clay body’s specifications). -
Glaze application:
Choose a clear or translucent celadon glaze that breaks over texture. Pour or brush the glaze over the platter. The translucent glaze will pool slightly in the leaf impressions, highlighting the pattern beautifully. -
Wipe the rim:
Use a damp sponge to wipe back a tiny bit of glaze from the very edge of the rim if you want to highlight the raw clay body’s speckles. -
Glaze fire:
Fire the platter to the final maturity temperature of your clay (likely cone 5 or 6 for stoneware).
Now you have a serene, nature-inspired serving vessel ready to showcase your favorite appetizers or fruits.


What Really Happens Inside the Kiln
Learn how time and temperature work together inside the kiln to transform clay into durable ceramic.
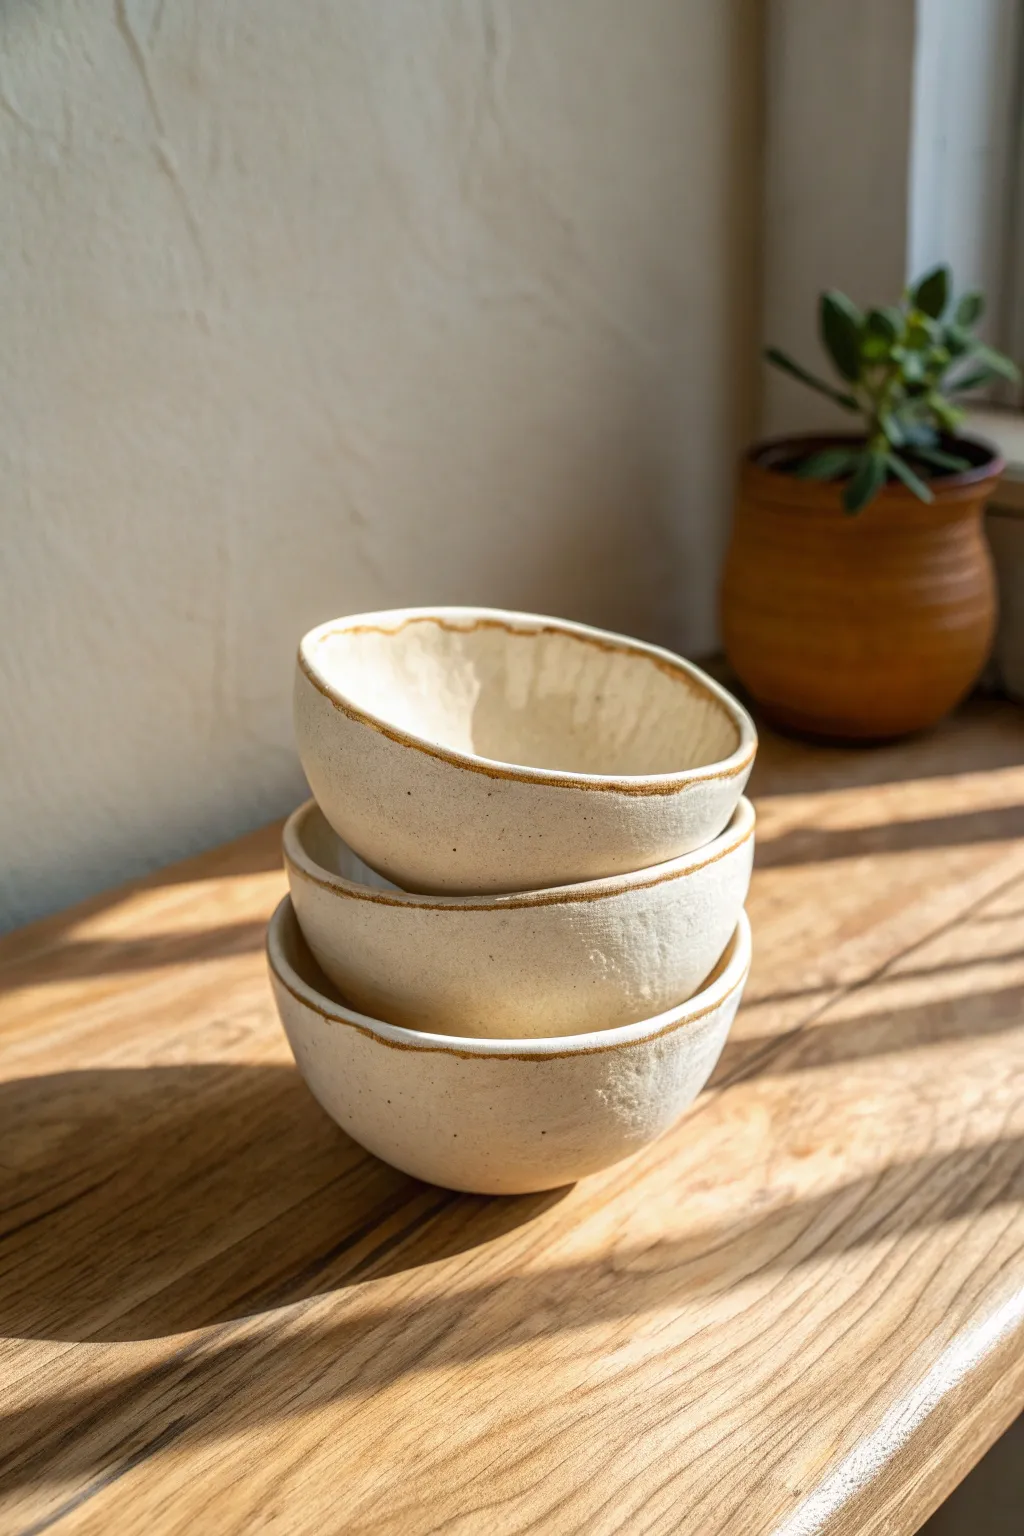
Nesting Bowl Sets Made by Slump Molding
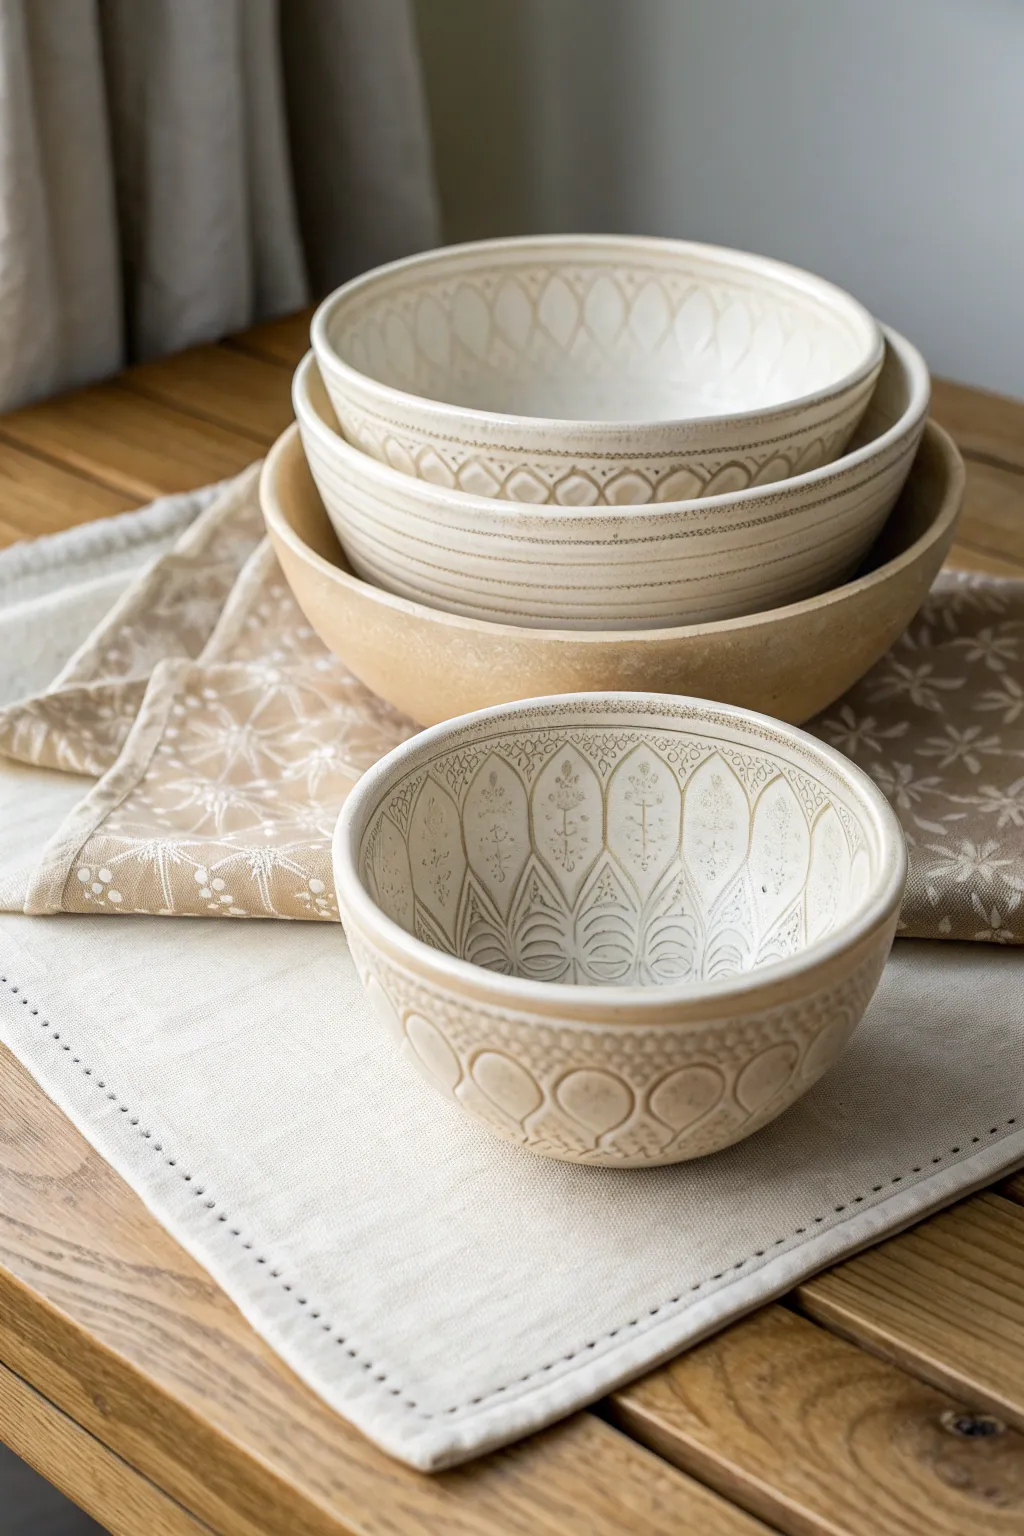
Create a stunning set of functional nesting bowls that feature delicate etched patterns and a rustic, natural aesthetic. Using simple slump molds, you will build these forms by hand and decorate them with a sgraffito-inspired carving technique to reveal the raw clay body beneath a slip or underglaze.
Step-by-Step Tutorial
Materials
- Stoneware clay (buff or light brown speckle recommended)
- Set of 3-4 existing bowls for molds (nesting sizes)
- Rolling pin and guide sticks (approx. 1/4 inch)
- Smooth work surface or canvas mat
- Soft rubber rib
- Fettling knife or needle tool
- Loop tool for trimming
- White or cream-colored creative slip or underglaze
- Carving tools (sgraffito tool or fine needle)
- Sponge and water
- Matte or satin clear glaze
Step 1: Preparing the Slabs
-
Roll your clay:
Begin by wedging your clay to remove air bubbles. Roll out a large slab of clay to a consistent thickness of about 1/4 inch using guide sticks. -
Smooth the surface:
Take a soft rubber rib and compress the clay slab on both sides. This aligns the clay particles to prevent warping and creates a smooth canvas for your future carving. -
Measure your molds:
Place your selected mixing bowls upside down on the slab. These will act as your slump molds. Cut circles around them, leaving about an inch of excess clay beyond the rim of each bowl.
Step 2: Forming the Bowls
-
Mold the clay:
If using rigid bowls as molds, consider covering them with plastic wrap or a thin layer of cornstarch to prevent sticking. Carefully lift your clay circles and drape them *into* the bowls for a slump mold, or over them for a hump mold. For this specific nesting look, slumping inside a bowl often yields a nicer defined rim. -
Refine the shape:
Gently press the clay into the curve of the mold using a damp sponge or your rib tool. Work from the center outward to avoid trapping air pockets. -
Trim the rim:
Once the clay has stiffened slightly to leather-hard (usually after 1-2 hours), use your needle tool or fettling knife to trim the excess clay flush with the rim of the mold, or create a straight level line if your mold is deep. -
Smooth the edge:
Use a slightly damp sponge or a chamois cloth to round over the sharp cut edge of the rim. This looks professional and prevents chipping later.
Uneven Rims?
If your rims warp while drying, place a flat board with a heavy book on top of the rim while the bowl is still leather hard to gently press it back into alignment.
Step 3: Application and Carving
-
Apply slip:
Once the bowls are sturdy leather-hard and removed from the molds, brush 2-3 even coats of white slip or underglaze over the interior and exterior. I like to let the slip dry until it’s no longer tacky to the touch before moving on. -
Map your design:
Lightly sketch your pattern ideas with a pencil directly onto the dry slip. The pencil marks will burn off in the kiln. For the look in the image, aim for repeating botanical motifs like leaves or petals around the interior walls. -
Carve the details:
Using a fine carving tool, scratch through the layer of white slip to reveal the darker clay body underneath. Use varying pressure to create thick and thin lines for the petal outlines. -
Add texture:
Inside the leaves or petals, scratch tiny stippled dots or small hash marks to create shading and texture, mimicking the intricate look of the reference photo. -
Decorate the exterior:
Don’t forget the outside. Flip the bowl over and carve a simple repeating scalloped pattern or geometric band near the rim to tie the design together.
Add a Foot Ring
Make the bowls float visually by adding a coiled foot ring. Score and slip a small coil onto the bottom, then paddle it flat for stability before carving.
Step 4: Finishing and Firing
-
Clean up crumbs:
Carving creates little clay burrs. Wait until the bowl is bone dry, then use a soft, dry brush to gently sweep away the debris. Do not use water here, or you might smudge the design. -
Bisque fire:
Load your bone-dry bowls into the kiln for a bisque firing (usually cone 04 or 06). This hardens the clay and prepares it for glazing. -
Wipe down:
After the bisque fire, wipe the bowls with a damp sponge to remove any kiln dust. -
Glaze application:
Dip or brush a clear matte or satin glaze over the entire piece. Avoid glossy glazes if you want to maintain that earthy, stone-like texture shown in the example. -
Final wipe:
Wipe the foot (bottom) of the bowls completely clean of glaze using a sponge so they don’t stick to the kiln shelf. -
Glaze fire:
Fire the bowls a final time to the temperature required by your clay body (likely Cone 5 or 6 for stoneware).
Stack your finished set on a linen runner to display the beautiful interplay of your hand-carved patterns
Lidded Pinch Pots for Salt, Spices, or Tiny Treasures
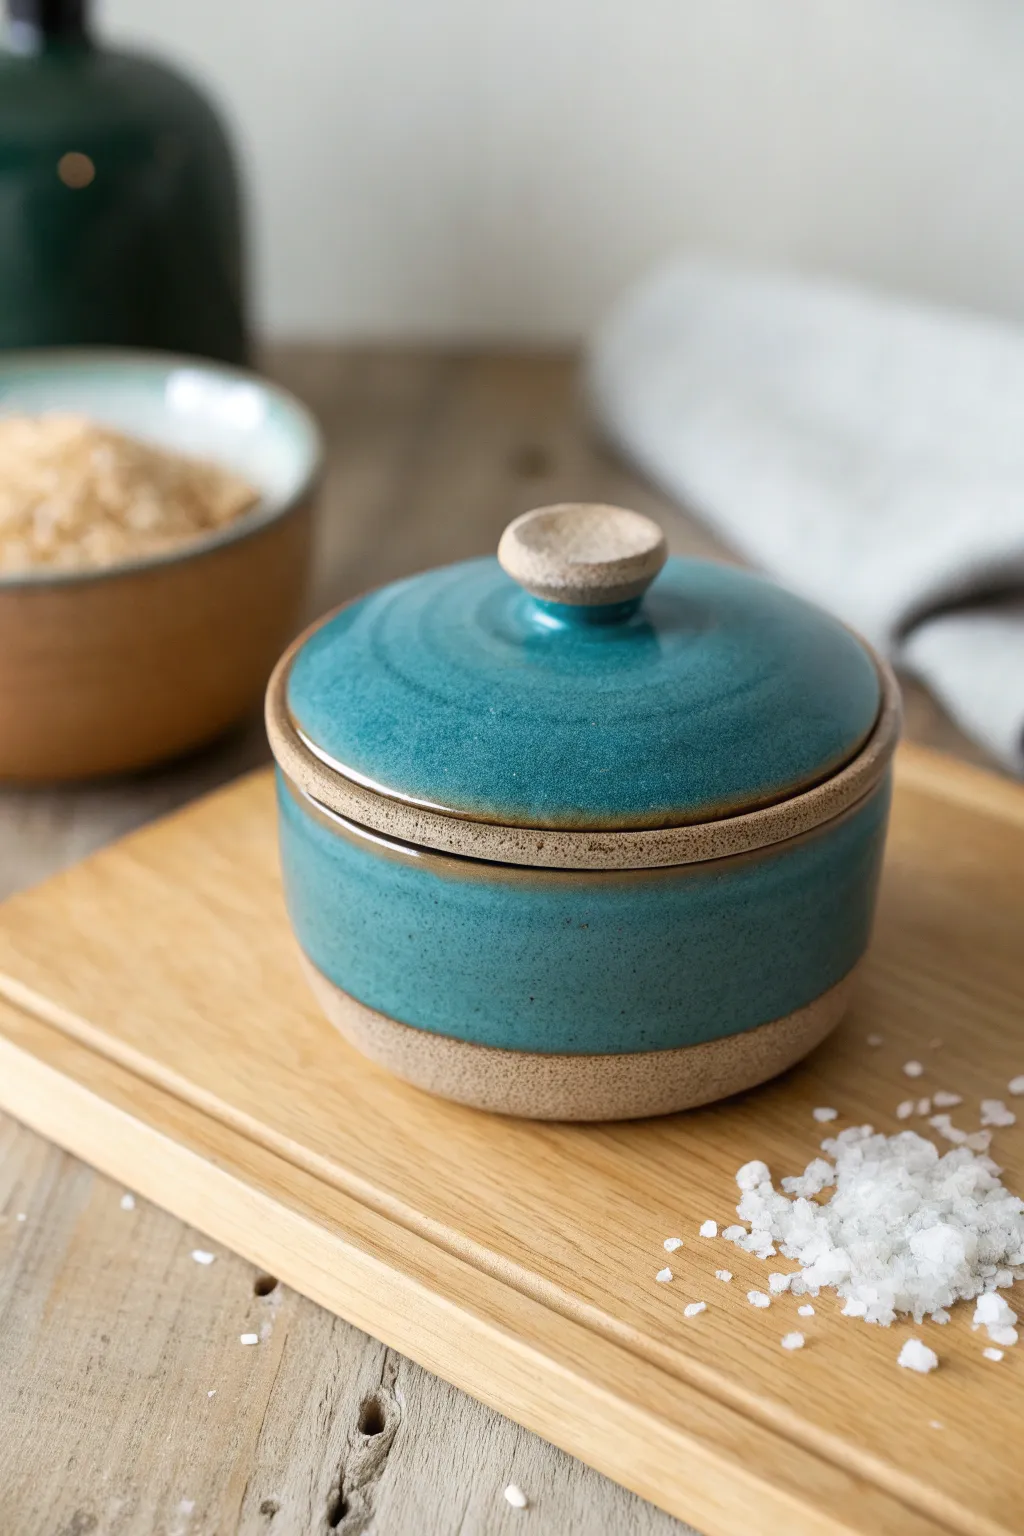
This charming lidded vessel combines the organic feel of raw, speckled stoneware with a rich, glossy teal glaze. It’s perfectly sized for pinching sea salt at the table or keeping precious trinkets safe.
Detailed Instructions
Materials
- Speckled stoneware clay (mid-fire)
- Pottery wheel (optional) or hand-building tools
- Loop tool for trimming
- Needle tool
- Rib tool (metal or rubber)
- Sponge
- Scoring tool or fork
- Slip (liquid clay)
- Teal/Turquoise reactive glaze
- Wax resist
- Kiln
Step 1: Forming the Base
-
Prepare the Clay:
Start with a ball of well-wedged speckled clay about the size of a large orange. Keeping the clay consistent ensures the final pot won’t warp during firing. -
Pinch the Bowl:
Press your thumb into the center of the ball, stopping about half an inch from the bottom. Slowly pinch and rotate the clay to open up a bowl shape, aiming for walls that are roughly 1/4 inch thick. -
Build the Walls:
Whether pinching or throwing on a wheel, pull the walls straight up rather than flaring them out wide. You want a vertical, cylindrical profile for this specific salt cellar look. -
Refine the Rim:
Use a damp sponge or chamois to smooth the top rim. It needs to be flat and even so the lid will seat properly later. -
Create the Gallery:
This step is crucial for a lid. Gently push the inner rim down and out slightly to create a small ledge (gallery) inside the lip, or plan to make a lid with a flange that fits inside the plain rim. The pot in the image uses a simple flanged lid system.
Wobbly Lid Fix
If your fired lid rattles, apply a small dab of water-based grinding paste to the rim, put the lid on, and twist back and forth to sand the contact points perfectly flush.
Step 2: Crafting the Lid
-
Measure the Opening:
Using calipers or a ruler, measure the interior diameter of your pot’s rim. Write this measurement down. -
Form the Lid Slab:
Roll out a small slab of clay or flatten a ball to creating a disc that is slightly wider than the pot’s outer diameter. This will be the top of your lid. -
Add the Flange:
Score and slip a coil of clay onto the underside of your lid disc. The outer diameter of this coil ring should match the interior measurement you took earlier, ensuring a snug fit. -
Shape the Curve:
Gently press the center of the lid from the underside to give it a slight dome shape. Use a rib to smooth the top surface into a gentle curve. -
Attach the Knob:
Roll a small ball of clay for the knob. Flatten the top slightly. Score and slip the center of the lid top and attach the knob securely.
Step 3: Trimming and Finishing
-
Leather Hard Stage:
Let both pieces dry until they are leather hard—firm enough to handle without deforming but soft enough to carve. -
Trimming the Foot:
Turn the pot upside down. Use a loop tool to trim away excess clay at the bottom, creating a distinct foot ring. This adds elegance and visual lift. -
Refining the Lid Fit:
Place the lid on the pot. If it’s too tight, carefully shave down the flange. If it’s too loose, you may need to compress the pot rim slightly inward. -
Opening the Knob:
I like to use a small loop tool to carve a slight indentation into the top of the knob, giving it a tactile, button-like feel. -
Bisque Fire:
Allow the clay to dry completely (bone dry) before loading it into the kiln for the bisque firing (usually cone 04 or 06).
Level Up: Spoon Slot
Before the clay dries, use a circular cutter to remove a semi-circle from the pot’s rim and the lid’s edge. This creates a perfect little notch to leave a serving spoon inside.
Step 4: Glazing
-
Wax Resist Application:
Apply wax resist to the bottom half-inch of the pot’s exterior, the entire bottom foot, the rim of the lid (where it touches the pot), and the top face of the knob. This creates the raw clay contrast. -
Applying Exterior Glaze:
Dip the top portion of the pot into your teal glaze. Hold it upside down for a few seconds to let excess drip off. -
Glazing the Lid:
Dip the lid into the glaze, careful not to get glaze on the flanged area or the waxed rim. Wipe away any stray droplets immediately with a damp sponge. -
Checking the Rim:
Ensure the contact points where the lid meets the pot remain completely bare clay; otherwise, they will fuse together in the kiln. -
Glaze Fire:
Fire the piece to the maturity temperature of your clay and glaze (likely cone 5 or 6). The heat will interact with the speckles in the clay, often burning them through the glaze for texture.
Once cooled, fill your new creation with coarse sea salt or spices and enjoy the handmade touch it brings to your kitchen counter

TRACK YOUR CERAMIC JOURNEY
Capture glaze tests, firing details, and creative progress—all in one simple printable. Make your projects easier to repeat and improve.
Slab-Built Butter Dishes With a Snug-Fit Lid
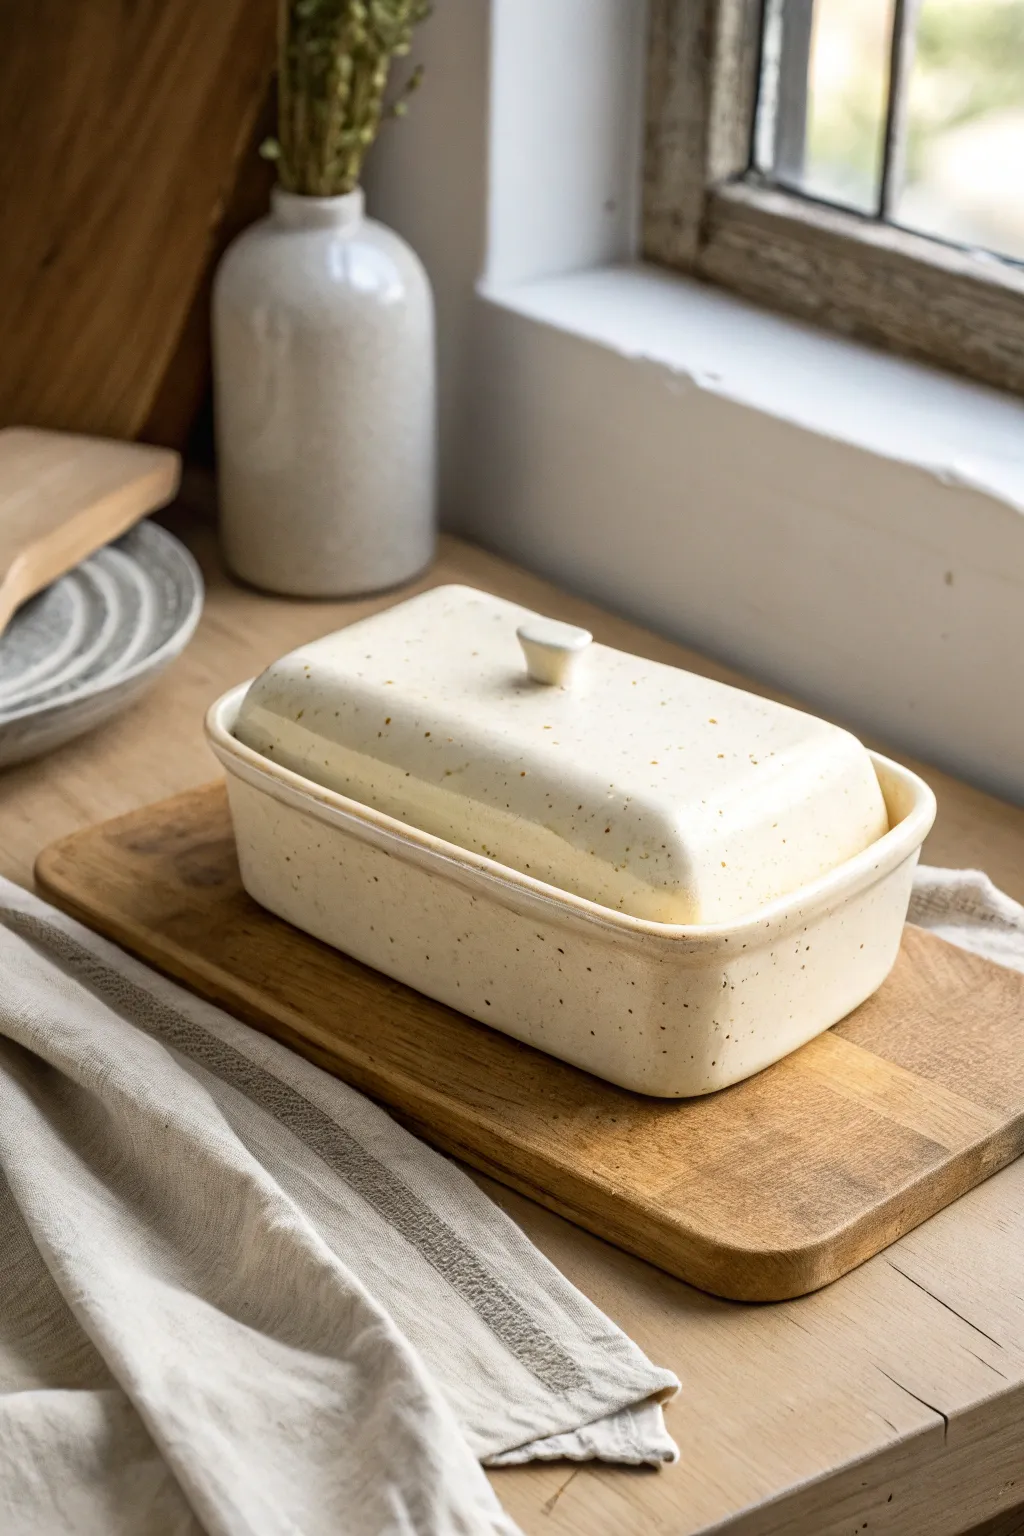
This project creates a beautifully minimalist, deep-basined butter dish that feels both modern and rustic. The key feature is the sunken, snug-fitting lid that keeps your butter secure and fresh while showing off a lovely speckled glaze.
Step-by-Step Tutorial
Materials
- Speckled Stoneware Clay
- Rolling Pin
- Canvas or Ware Board
- Fettling Knife or Needle Tool
- Ruler
- Paper Templates (Base: 6×4″, Walls: 2.5″ tall)
- Scoring Tool or Serrated Kidney
- Slip
- Wood or Rubber Rib
- Cream Satin/Gloss Glaze
- Sponge
Step 1: Preparing the Slabs
-
Roll out the Clay:
Begin by rolling out a generous slab of speckled stoneware clay to a uniform thickness of about 1/4 inch. Consistent thickness is crucial for ensuring the lid and base dry at the same rate. -
Smooth the Surface:
Use a soft rib to compress the clay on both sides. This removes the canvas texture, aligns the clay particles to prevent warping, and creates that smooth, professional finish we’re aiming for. -
Cut the Base Pieces:
Using your paper templates, cut out the bottom rectangle for the dish. Then, cut a long strip (or four separate pieces) for the vertical walls of the base. I prefer cutting a single long strip and mitering the corners for a cleaner look.
Shrinkage Alert
Make the lid while the base is still leather hard. If the base dries too much before you measure for the lid, the shrinkage rates will differ and the lid won’t fit after firing.
Step 2: Assembling the Base
-
Score and Slip:
Thoroughly score the perimeter of the base slab and the bottom edge of your wall strip. Apply a generous amount of slip to the scored areas. -
Attach the Walls:
Place the walls onto the base. If using a single strip, wrap it around the perimeter and join the ends. If using separate pieces, attach them one by one. -
Reinforce the Seams:
Use a thin coil of clay along the interior seams where the wall meets the floor. Smooth this coil down with your finger or a modelling tool to create a strong, curved interior transition. -
Soften the Corners:
For the exterior, gently tap the sharp corners with a wooden paddle or smooth them with your fingers to create the rounded, soft rectangular shape seen in the photo.
Step 3: Creating the Lid
-
Measure the Opening:
Once the base is constructed and stiffened slightly to leather-hard, carefully measure the *inner* dimensions of the opening. This is critical for the snug fit. -
Form the Flange:
Cut a slab slightly smaller than your inner measurements to act as the flange (the part that sits inside the dish). Cut a second, larger slab that will sit on top of the rim. -
Assemble the Lid Body:
Score and slip the smaller flange slab to the center of the larger lid slab. This step creates the ‘step’ that locks the lid in place. -
Shape the Lid Dome:
Currently, the lid is flat. To get the domed look, you can either gently slump the top slab over a small mold before assembly, or build a hollow box structure if you prefer a taller profile like the example. -
Refine the Edges:
Smooth the edges of the top lid slab so they align perfectly with the exterior walls of the bottom dish when placed together.
Wax Resist Trick
Apply wax resist to the flange of the lid and the interior rim of the base before glazing. This ensures these contact points remain bare clay and won’t fuse together in the kiln.
Step 4: Adding the Knob
-
Shape the Knob:
Roll a small ball of clay and taper it slightly to form a simple, ergonomic flared knob. -
Attach to Center:
Score the center of the lid and the bottom of the knob. Press them firmly together, giving a little twist to lock the bond. -
Clean Up:
Use a damp sponge to wipe away any excess slip around the knob and all joints. Smooth the rim of the lid one last time to ensure it feels pleasant to the touch.
Step 5: Finishing
-
Slow Drying:
Place the lid onto the base with a thin piece of paper or plastic in between to prevent sticking. Let them dry slowly together under loose plastic to ensure the fit remains perfect. -
Bisque Fire:
Once bone dry, bisque fire the piece to Cone 04 (or your clay’s specific bisque temperature). -
Glazing:
Apply a cream-colored satin or gloss glaze. The speckles in the clay body will burn through the lighter glaze, creating the texture seen in the image. -
Glaze Firing:
Fire onto stilts or wadded furniture to Cone 5/6. Be careful not to glaze the locking flange area too thickly, or the lid won’t fit.
Now you have a charming, custom piece of kitchenware ready for your next breakfast spread
Citrus Juicers With a Simple Reamer Cone
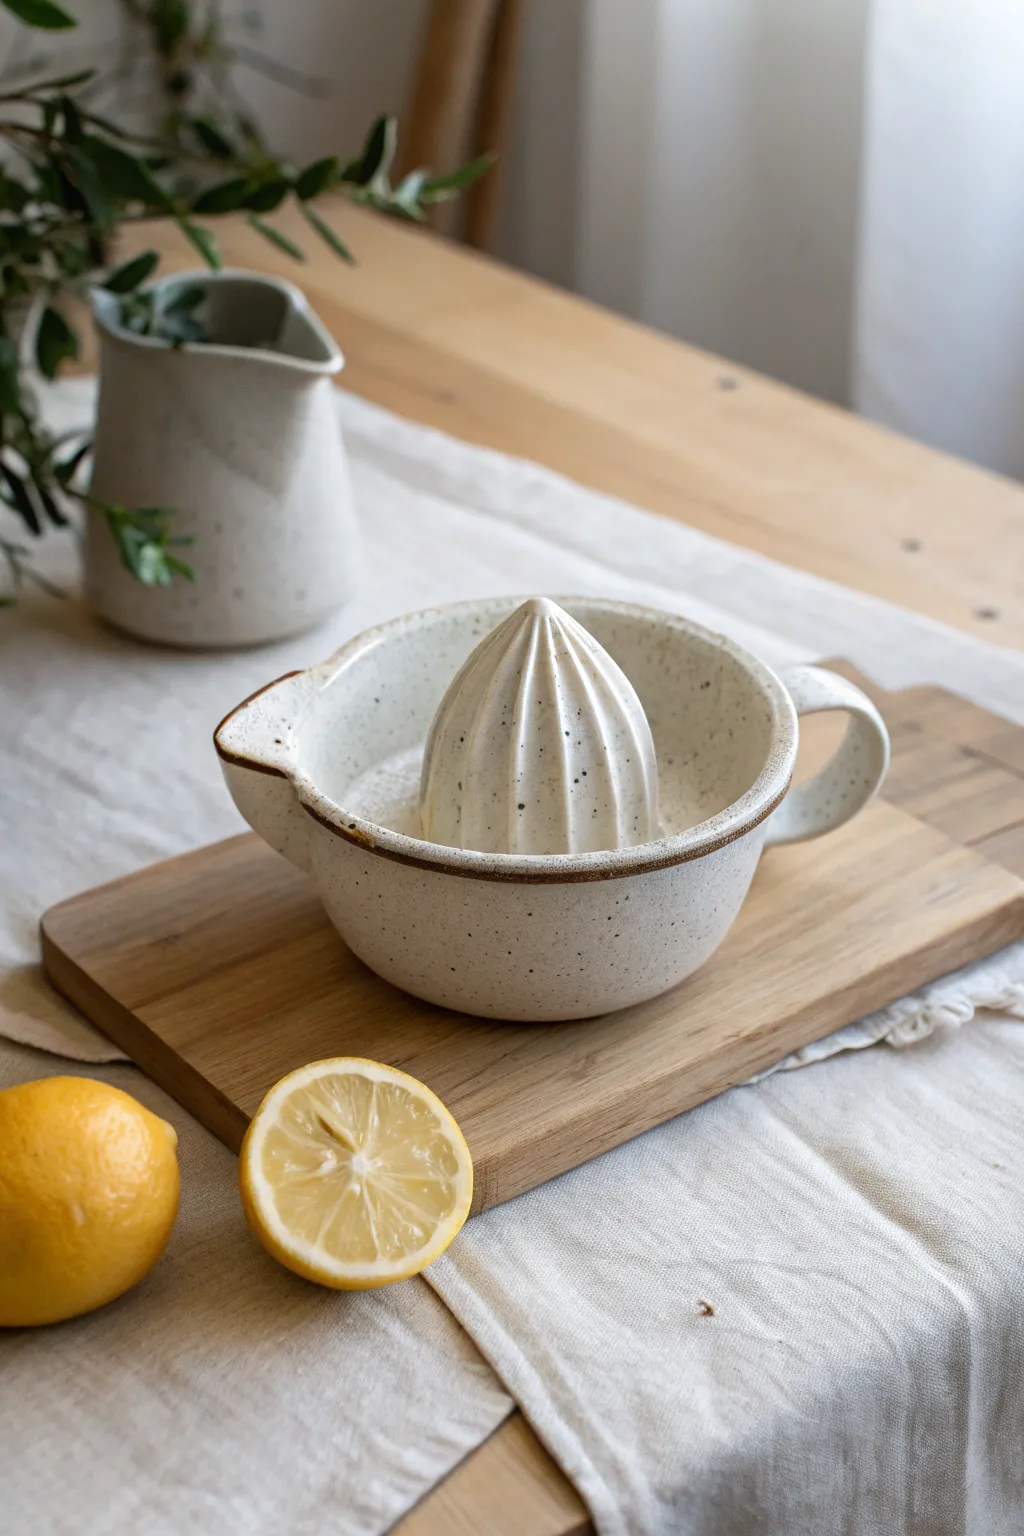
Embrace the rustic charm of hand-built pottery with this beautiful speckled clay juicer. Featuring a deep catch-basin and a sturdy reamer cone, this functional piece combines earthy aesthetics with kitchen utility.
Step-by-Step Guide
Materials
- Speckled stoneware clay (mid-fire)
- Pottery wheel (optional, but hand-building instructions provided below)
- Rib tool (kidney)
- Needle tool
- Sponge
- Loop tool for trimming
- Slip and scoring tool
- White matte glaze
- Wax resist
- Kiln
Step 1: Forming the Bowl Base
-
Roll the slab:
Begin by rolling out a slab of speckled clay to about 1/4 inch thickness. Alternatively, if you prefer wheel-throwing, throw a simple, wide bowl form with a flat bottom. -
Shape the bowl:
Cut a circle from your slab (approx. 6 inches diameter) for the base. Roll a long rectangular coil to build up the walls, attaching it to the base with slip and scoring, or drape your slab over a hump mold to create a uniform bowl shape. -
Refine the walls:
Smooth the connection points inside and out using a rib tool. Ensure the walls curve upward gently, creating a basin deep enough to hold juice but wide enough to discard seeds. -
Create the spout:
While the clay is still plastic, gently pull one side of the rim outward to form a generous pouring spout. Smooth the edge so the liquid will flow cleanly without dripping.
Sharp Ridges Matter
When carving the cone ridges, keeping the edges slightly sharp rather than perfectly round helps grip the fruit better and extracts juice more efficiently.
Step 2: Sculpting the Reamer Cone
-
Form the cone:
Take a separate ball of clay and shape it into a cone. It needs to be roughly 2.5 to 3 inches tall. I like to keep the base wide for stability. -
Hollow it out:
Carefully hollow out the underside of the cone using a loop tool. This ensures the clay thickness matches the bowl, preventing explosions in the kiln and reducing weight. -
Carve the ridges:
Using a modeling tool or the back of a needle tool, carve deep vertical ridges running from the tip of the cone down to the base. These ridges are crucial friction points for juicing the fruit. -
Attach the cone:
Score the center of your bowl and the bottom of your hollowed cone. Apply slip liberally and press the cone firmly into the center of the bowl. Clean up excess slip with a brush.
Seed Catcher Holes
Level up by adding a filter shelf! Create a small perforated clay disk that sits around the base of the cone to catch seeds while letting juice drain through.
Step 3: Adding the Handle and Details
-
Pull the handle:
Pull a short, comfortable handle strap or roll a coil. It should be sturdy enough to provide leverage when you are twisting a lemon against the reamer. -
Attach the handle:
Attach the handle opposite the pouring spout. Score and slip the contact points, blending the clay smoothly into the body of the bowl for a seamless look. -
Define the rim:
Compress the rim of the bowl with a damp chamois or sponge. Create a slight bevel or definition line just below the rim on the exterior to catch the glaze later. -
Slow drying:
Loosely cover the piece with plastic to let it dry slowly. This is critical because the cone and the bowl may dry at different rates, which can cause cracking.
Step 4: Glazing and Finishing
-
Bisque fire:
Once bone dry, fire the piece to bisque temperature (usually cone 04) to prepare it for glazing. -
Wax resist application:
Apply wax resist to the very edge of the rim and the foot ring. This will leave the raw, speckled clay exposed, creating that lovely rustic contrast seen in the photo. -
Glazing:
Dip or pour a matte white glaze over the entire piece. Because the clay is speckled, the iron spots will burn through the white glaze, adding texture. -
Clean up:
Use a damp sponge to wipe any wayward glaze off the waxed rim and foot to ensure clean, sharp lines. -
Final firing:
Fire to the maturity temperature of your clay body (likely cone 5 or 6). Once cool, sand the bottom if necessary to protect your table.
Once fired, you will have a durable, custom kitchen tool perfect for your morning lemonade.
Planters With Drain Trays Built From Matching Slabs
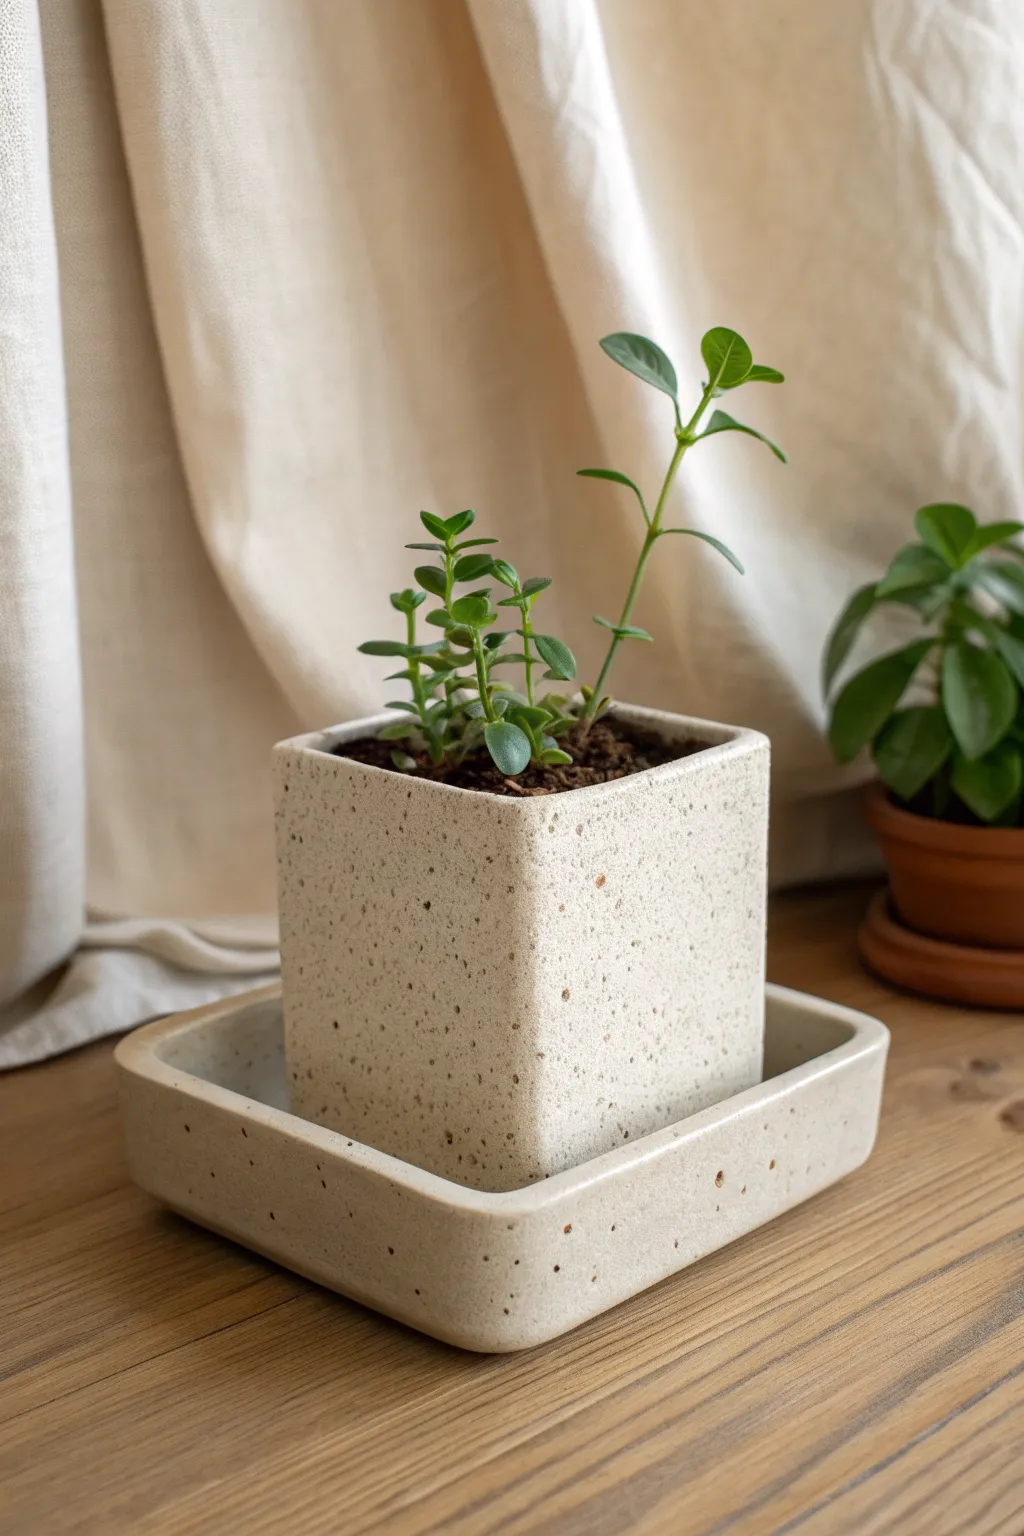
Create a modern, minimalist home for your small succulents with this perfectly matched planter and saucer set. The clean lines and speckled stoneware finish give it a professional, high-end look while remaining a straightforward slab project.
How-To Guide
Materials
- Speckled buff stoneware clay
- Rolling pin
- Two 1/4-inch wooden guide strips
- Needle tool or fettling knife
- Ruler or triangle square
- Serrated rib or scoring tool
- Slip (clay mixed with water)
- Wooden modeling tool
- Damp sponge
- Chamois strip
- Matte clear glaze
Step 1: Preparing the Slabs
-
Roll the clay:
Begin by wedging your speckled clay to remove air bubbles. Place your 1/4-inch wooden guide strips on either side of the clay and use your rolling pin to create a smooth, even slab. -
Compress the surface:
Take a rubber rib and firmly drag it across the surface of the slab in multiple directions. This aligns the clay particles, preventing warping later, and creates that smooth canvas for the speckled texture. -
Cut the planter walls:
Using a ruler and needle tool, measure and cut four identical rectangles for the pot’s walls. For the size shown, try 3.5 inches wide by 3.5 inches tall. -
Cut the planter base:
Cut a square for the base. It should be slightly smaller than the assembled walls if you plan to attach them to the side of the base, or calculate the precise interior dimension if attaching walls on top of the base. -
Cut the tray pieces:
For the saucer, cut a square base that is about 1.5 inches wider than your planter (approx. 5 inches). Cut four long strips for the tray rim, roughly 1 inch tall. -
Let them stiffen:
Allow all your cut pieces to sit out until they reach ‘leather hard.’ They should be stiff enough to hold their shape without bending but still dark with moisture. This is crucial for sharp corners.
Warped Walls?
If your straight walls start bowing inward or outward during drying, place a piece of soft foam block inside the pot to support the shape as it shrinks and dries.
Step 2: Assembling the Planter
-
Bevel the edges:
For the sharpest 90-degree corners, cut a 45-degree angle on the vertical edges of your four wall pieces. This miter joint creates a seamless look. -
Score and slip:
Rough up the beveled edges with your serrated tool and apply a generous amount of slip. -
Join the walls:
Press the walls together to form a box. I like to use a square blocks or a box from the pantry to support the inside walls while I press the joints together. -
Attach the base:
Score the bottom edge of your box and the perimeter of your base piece. Press the box onto the base firmly. -
Reinforce the interior:
Roll a very thin coil of clay and press it into the bottom interior seam. Smooth it out with a wooden tool to ensure it’s watertight. -
Add drainage:
Use a hole cutter or the back of a wide paintbrush to punch a centered drainage hole in the bottom of the pot.
Step 3: Creating the Tray & Finishing
-
Assemble the tray:
Construct the tray using the same scoring and slipping method used for the pot. Attach the low rim strips to the larger base square, ensuring the corners are tight. -
Curve the tray corners:
The tray in the image has soft, rounded corners. Gently paddle the sharp exterior corners of the tray with a wooden spoon or smooth them with your thumb to round them off. -
Smooth the rims:
Use a damp sponge or a strip of chamois leather to compress and round the top rims of both the planter and the tray. This prevents chipping after firing. -
Dry slowly:
Place the pot inside the tray (with a piece of paper between them to prevent sticking) and wrap the whole set loosely in plastic. Let dry very slowly over several days to prevent warping. -
Bisque fire:
Once bone dry, fire the pieces to cone 04 (or your clay’s specific bisque temperature). -
Glaze and final fire:
Dip or brush a matte clear glaze over the entire piece (avoiding the bottom touching the kiln shelf). This highlights the natural speckles while making the surface easy to clean. Fire to maturity (usually cone 5 or 6).
Level Up: Texture
Before assembling, gently roll a textured fabric or canvas heavily into the slab surface. The glaze will break over the texture, adding depth to the speckles.
Enjoy the satisfaction of sliding your finished pot perfectly into its custom-sized tray
Animal Planters That Start as a Pinch Pot Base
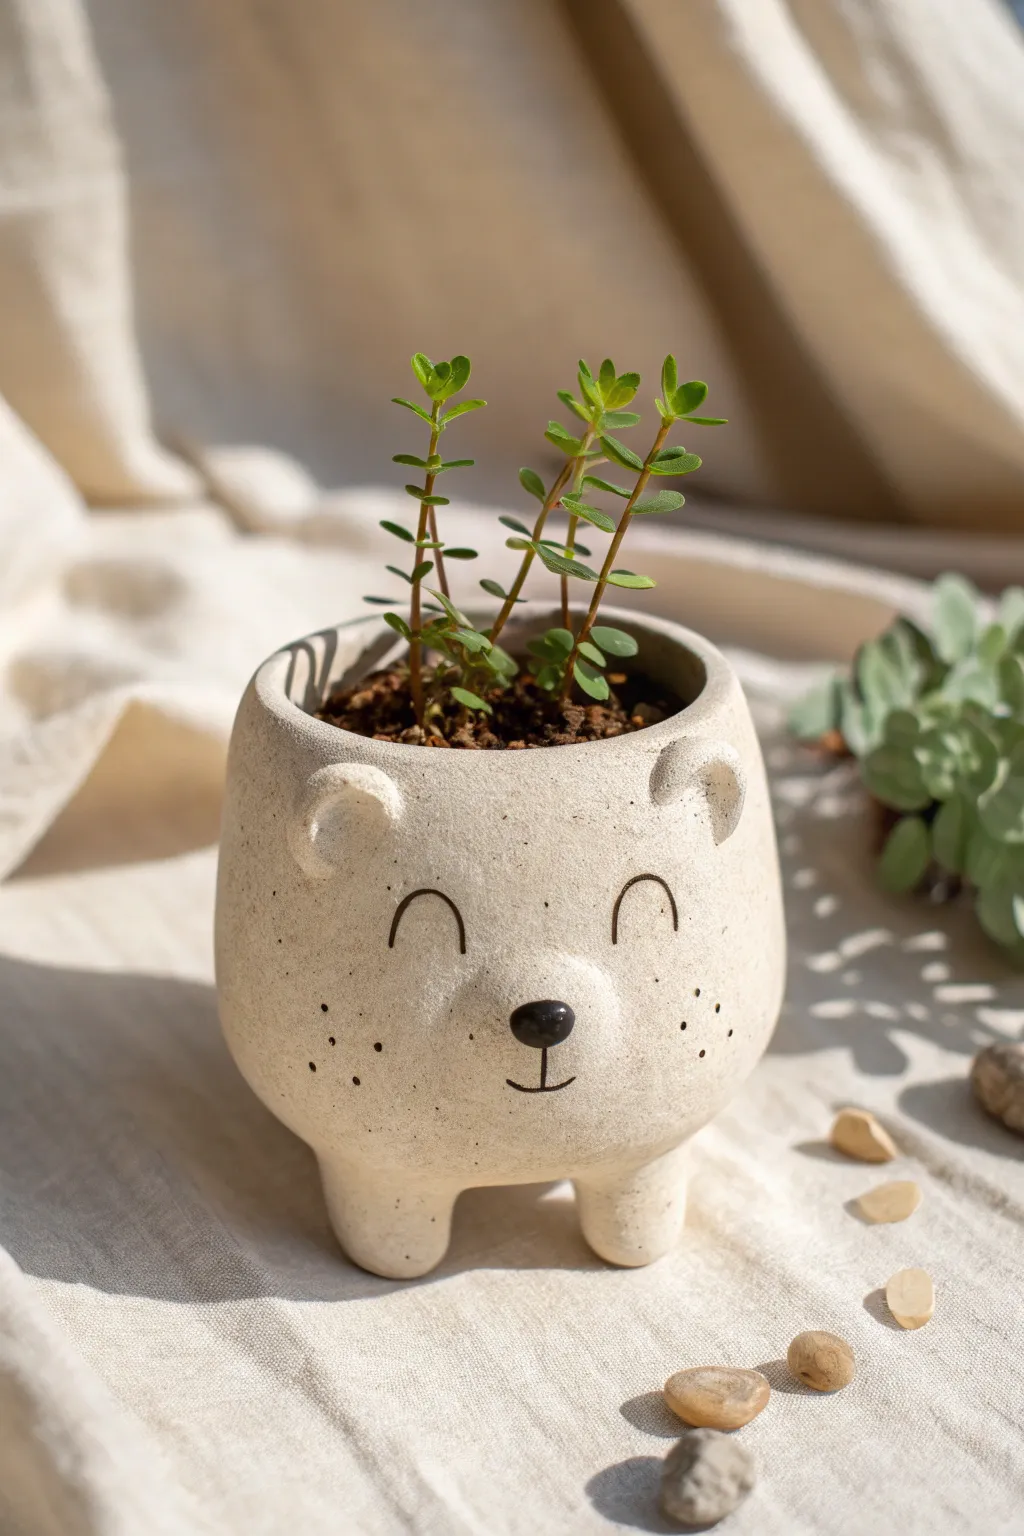
This adorable planter transforms a simple ball of clay into a smiling bear with just a few clever additions. The speckled, matte finish gives it a polished, stoneware look that perfectly complements succulent clippings.
Detailed Instructions
Materials
- Speckled buff stoneware clay (or polymer clay for non-kiln method)
- Small bowl relative to hand size
- Scoring tool or old toothbrush
- Slip (clay mixed with water)
- Wooden modeling tool or popsicle stick
- Sponge
- Needle tool
- Small paintbrush
- Black underglaze or black acrylic paint
- Clear matte glaze (for ceramic version)
Step 1: Forming the Base
-
Prepare your clay:
Start with a ball of clay roughly the size of a large orange. Wedge it well to remove air bubbles, then pat it specifically into a smooth sphere. -
Open the pinch pot:
Hold the sphere in your non-dominant hand. Press your thumb into the center, stopping about a half-inch from the bottom. This thickness is crucial for the stability of the feet added later. -
Pinch the walls:
Using a rhythmic pinching motion with your thumb on the inside and fingers on the outside, rotate the ball while gently thinning the walls. Aim for uniform thickness, roughly 1/4 inch. -
Shape the vessel:
For this bear shape, you want the belly slightly wider than the rim. Gently push the walls outward from the inside to create a rounded, bulbous belly, but keep the rim plain and vertical. -
Smooth the surface:
Take a slightly damp sponge or a flexible rib tool and smooth the exterior. I like to spend extra time here erasing any fingerprints, as the speckled finish looks best on a clean surface.
Feet Falling Off?
If attachments pop off during drying, you likely didn’t score deeply enough. The scored texture should look like Velcro before adding slip.
Step 2: Adding Features
-
Make the feet:
Roll two small balls of clay, about the size of large marbles. Slightly taper them into short, stout cones. -
Attach the feet:
Flip your pot over. Score the bottom of the pot and the top of the feet aggressively with your needle tool. Apply slip, press the feet firmly into place, and smooth the seam so the clay flows together perfectly. -
Level the pot:
Turn the pot right-side up and gently tap it on the table to ensure the feet sit flat and the pot is stable. -
Create the snout:
Form a small, flattened oval of clay. Score and slip the center of the pot’s face, then attach the oval. Smooth the edges down so it looks like a natural protrusion rather than a stuck-on button. -
Form the ears:
Roll two small balls and press your thumb into them to create shallow cups. These will be the ears. -
Attach the ears:
Score and slip the top rim where the ears will go. Press the indented ‘cups’ onto the rim, blending the clay downward onto the body for a strong bond.
Step 3: Refining and Decorating
-
Smooth everything again:
Go over all your join/seam lines with a lightly damp sponge. The transition from ear to head and foot to body should be seamless. -
Draw the expression:
Using a needle tool or a very fine brush with black underglaze, engage a steady hand. Paint two small downward curving arches for eyes and add three tiny dots on each cheek for freckles. -
Paint the nose and mouth:
Paint a small black oval on the snout protrusion. Below it, paint a simple anchor shape (a line down with a curve at the bottom) for the mouth. -
Dry and fire:
Allow the piece to dry slowly under loose plastic to prevent the attachments from cracking. Once bone dry, bisque fire the piece. -
Glaze application:
Dip the piece in a clear matte glaze to seal the clay but keep that natural texture visible. This also makes the black underglaze details pop without smearing. -
Final steps:
Fire again to stoneware temperature. If using a polymer clay, simply bake according to package instructions and seal with a matte varnish.
Pro Tip: Hollow Snout
For a lighter pot, poke a tiny hole from inside the pot through the wall behind the snout attachment to let trapped air escape during firing.
Once fired, fill your new bear friend with sandy soil and your favorite succulents for a charming desk companion
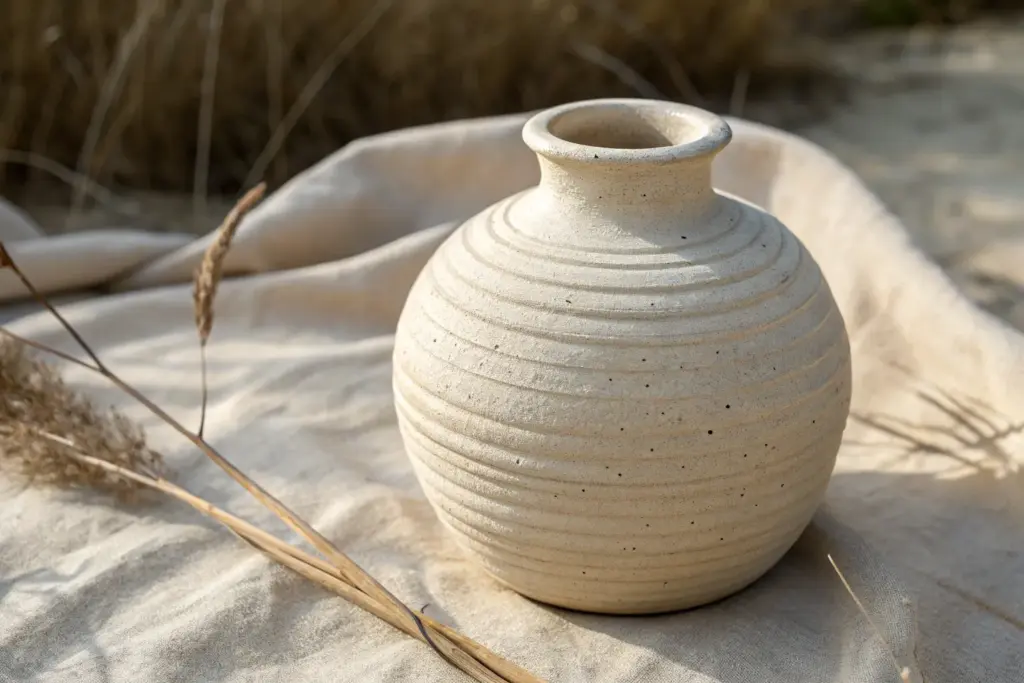
Coil Vases With Intentional Asymmetry
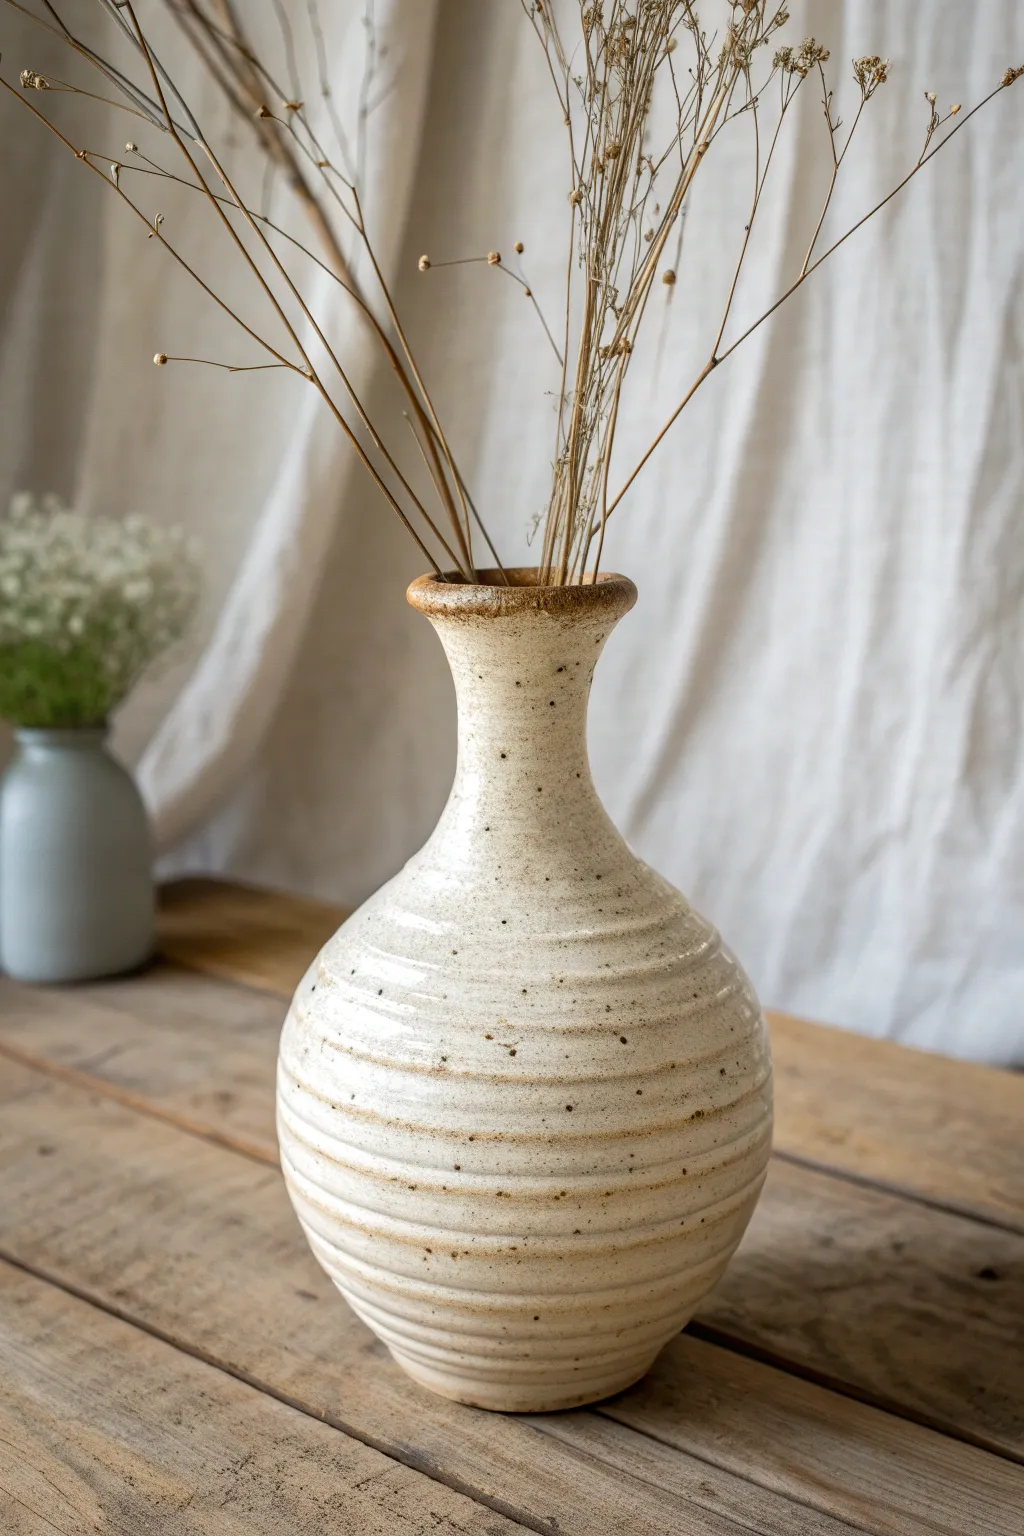
Embrace the tactile nature of clay with this hand-built vase, featuring exposed coil ridges that celebrate the process of its creation. The speckles in the beige clay body add an organic, earthy charm while the gently flaring neck provides an elegant finish.
Step-by-Step Tutorial
Materials
- Speckled buff stoneware clay (mid-fire)
- Scoring tool or serrated rib
- Slip (clay mixed with water)
- Wooden modeling tool
- Metal rib or sponge
- Fettling knife
- Rolling pin (optional)
- Turntable or banding wheel
- Clear or transparent glossy glaze
Step 1: Building the Base and Body
-
Create the slab base:
Start by flattening a ball of clay into a circular slab about 1/4 inch thick. Cut a perfect circle, roughly 4 inches in diameter, to serve as the sturdy foundation for your vase. -
Roll your coils:
Roll out several long, even ropes of clay on a table. Aim for a thickness similar to your pinky finger. Try to keep them consistent, but don’t worry about perfection; slight variations add character. -
Attach the first coil:
Score the outer edge of your base and apply a little slip. Lay your first coil around the perimeter. Use your thumb or a wooden tool to blend the clay downwards on the *inside* only, sealing it to the base while leaving the outside round. -
Build outward:
Continue stacking coils. To create the bulbous belly shape, place each new coil slightly to the outer edge of the one below it. Remember to score and slip between every layer to prevent cracking. -
Smooth the interior:
I find it crucial to stop every few inches to smooth the interior walls completely. Use a wooden tool or your fingers to drag clay from the upper coil down to the lower one, ensuring a strong bond. -
Form ridges:
On the exterior, gently press the coils together with your fingers to secure them, but deliberately leave the rounded ‘hummps’ visible. You can use a damp sponge to soften rough edges without erasing the horizontal lines.
Cracking at the Seems?
If coils separate during drying, you likely didn’t blend the inside enough. Always smear the clay downwards on the interior until the coil lines effectively disappear.
Step 2: Shaping the Neck and Rim
-
Narrow the form:
Once you reach the widest part of the belly, begin placing your coils slightly toward the *inner* edge of the previous row. This will start tapering the shape inward to create the shoulder. -
Control the drying:
If the bottom feels wobbly under the weight, pause here. Cover the top rim with plastic but leave the bottom exposed to air for an hour or so until it stiffens up enough to support the neck. -
Build the vertical neck:
When the opening is about 2-3 inches wide, stop tapering. Stack the next 3-4 coils directly on top of each other vertically to create the elongated neck. -
Flare the rim:
For the final coil, place it slightly outward again. Use your fingers to pinch and flare this top ring gently, creating a welcoming lip for flower stems. -
Refine the surface:
Check the exterior for any unintentional gaps. Run a damp sponge over the entire piece to compress the clay particles and bring out the texture of the grog or speckles.
Step 3: Finishing and Glazing
-
Slow drying:
Loosely cover the vase with plastic and let it dry slowly over several days. This slow process is vital for coil pots to ensure even shrinkage and prevent tension cracks. -
Bisque fire:
Once bone dry, fire the piece to bisque temperature (usually cone 04 or 06) to prepare it for glazing. -
Glaze application:
Dip the vase into a clear or semi-transparent glaze. A transparent glaze is best here because it will reveal the natural speckles in the clay body and pool slightly in the coil grooves to accentuate the texture. -
Wipe the foot:
Use a wet sponge to clean any glaze off the very bottom of the vase and about 1/4 inch up the side to prevent it from sticking to the kiln shelf. -
Final firing:
Fire the vase to the maturity temperature of your clay (likely cone 5 or 6 for stoneware). Allow the kiln to cool completely before removing your finished work.
Level Up: Oxide Wash
Before glazing, brush iron oxide into the exterior grooves and wipe the surface back with a sponge. This darkens the recesses for deeper contrast.
Fill your new vessel with dried botanicals or fresh blooms to highlight the natural beauty of the clay.
Wall Pocket Vases Made From Folded Slabs
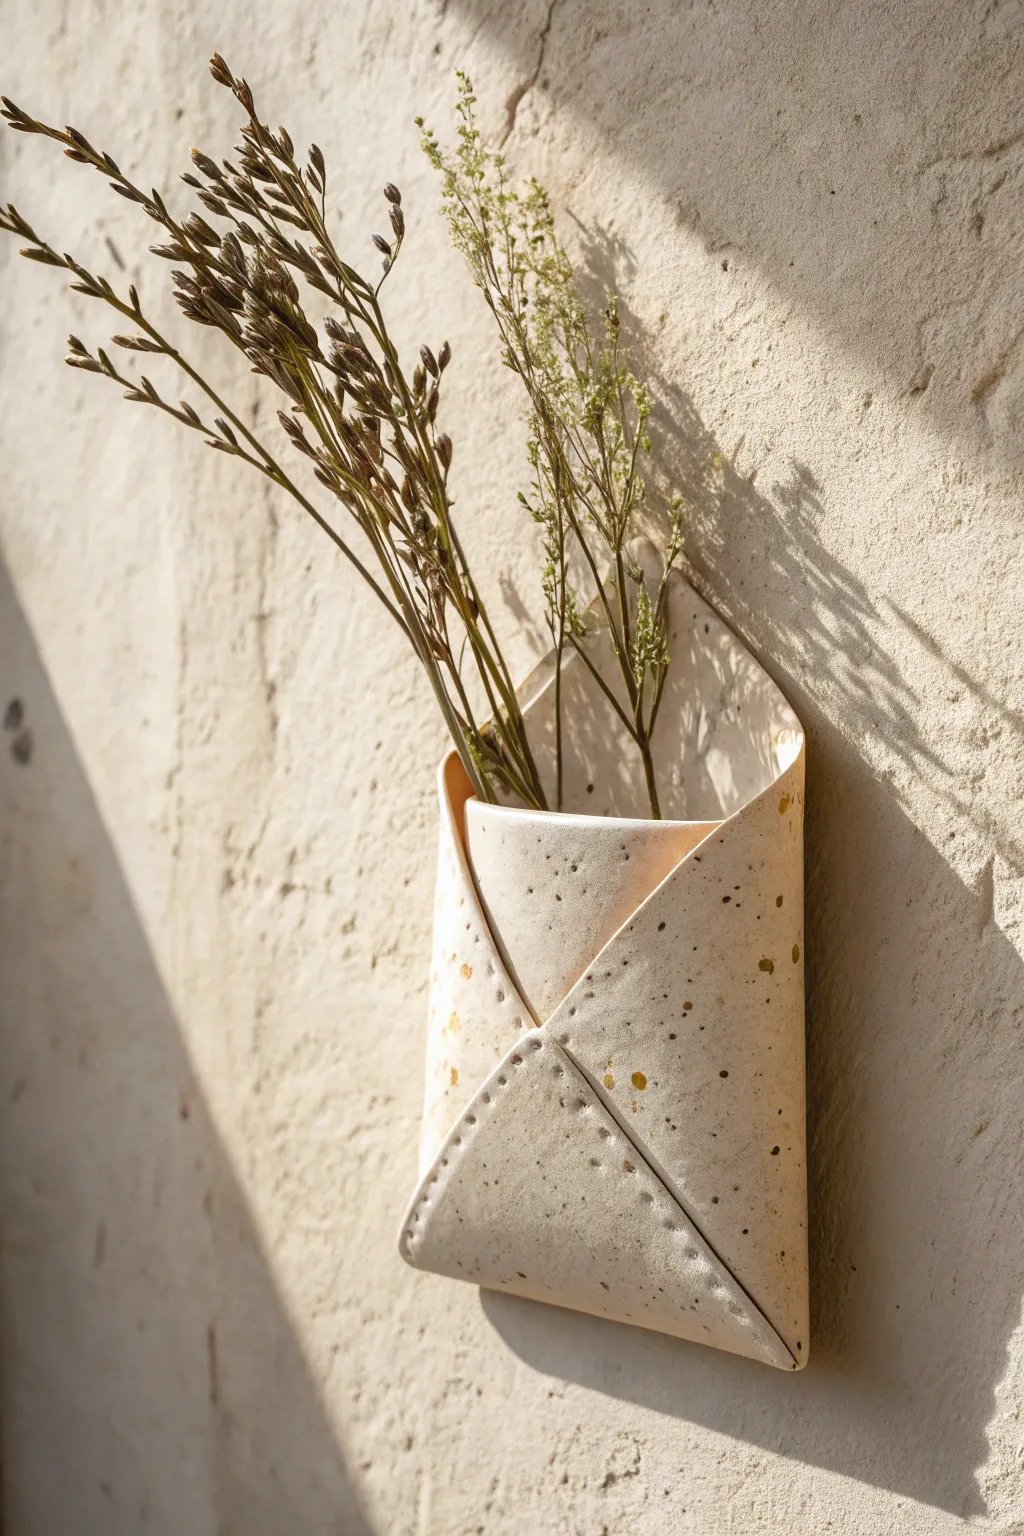
This charming project reimagines the simple elegance of a folded paper envelope into a functional ceramic piece. With its faux stitching details and speckled finish, this wall pocket is perfect for displaying dried wildflowers or grasses.
How-To Guide
Materials
- Light-colored stoneware clay (speckled or plain)
- Rolling pin
- Canvas or slab mat
- Paper template (square)
- Fettling knife or needle tool
- Serrated rib or scoring tool
- Slip (clay mixed with water)
- Tracing wheel or star wheel tool (for stitching effect)
- Wooden dowel or pencil (for the hanging hole)
- Sponge
- Matte clear glaze or white glaze (optional)
Step 1: Preparing the Slab
-
Roll out the clay:
Begin by wedging your clay to remove air bubbles, then roll it out into an even slab. Aim for a thickness of about 1/4 inch—thick enough to hold its shape but thin enough to look delicate. -
Compress the slab:
Use a rubber rib to smooth and compress the clay on both sides. This aligns the clay particles, preventing warping later, and creates a nice canvas for the speckled texture. -
Cut the square:
Lay your paper square template onto the slab. A 6-inch or 8-inch square works well for a medium-sized pocket. Cut around the template using a fettling knife or needle tool. -
Smooth the edges:
Run a damp sponge or your finger along the cut edges to soften them. Sharp edges can chip easily after firing, so rounding them slightly now saves time later.
Stitch Perfect
If you don’t have a tracing wheel, use a needle tool to poke individual holes along the seams. Space them evenly for a neat, hand-stitched leather look.
Step 2: Folding and Assembling
-
Orient the square:
Position the clay square in front of you like a diamond, with one point facing down and one point facing up. -
First side fold:
Gently lift the left point and fold it inward towards the center, but don’t press it down yet. You are visualizing where the envelope flaps will overlap. -
Second side fold:
Bring the right point in to overlap the left point slightly. Adjust the angles until you are happy with the width of the pocket. -
Score the connection points:
Mark lightly where the clay overlaps. Open the flaps back up and score the contact areas thoroughly with a serrated rib or needle tool. -
Apply slip:
Dab a generous amount of slip onto the scored areas. This acts as the glue for your clay. -
Secure the side flaps:
Fold the left and right flaps back into position. Press the overlapping sections together firmly to ensure a strong bond, wiping away excess slip that squishes out. -
Bottom fold:
Lift the bottom point up. It should triangularly cover the bottom opening where the side flaps meet. -
Attach the bottom flap:
Score and slip the back of the bottom flap and the area it will touch on the side flaps. Press it securely into place, creating that classic envelope seal look.
Level Up: Texture
Before folding, roll lace or a patterned fabric onto your clay slab. The texture will appear on the outside of the envelope flaps for added vintage character.
Step 3: Adding Details & Finishing
-
Create the volume:
Gently insert your hand or a soft sponge into the pocket to bell it out slightly. You don’t want it completely flat; it needs space to hold stems. -
Add faux stitching:
Run a tracing wheel or star wheel tool along the hem of the folded flaps. Press firmly enough to leave an impression that mimics sewing stitches. -
Create the hanging hole:
On the back point of the diamond (the part that didn’t get folded), use a hole punch tool or a wooden dowel to create a hole for a nail or hook. Make it slightly larger than needed, as clay shrinks. -
Refine the surface:
Do a final check for rough spots. I like to smooth out any fingerprints with a slightly damp chamois cloth. -
Dry slowly:
Tent the piece loosely with plastic to let it dry slowly. This prevents the folded seams from pulling apart as the clay shrinks. -
Bisque fire:
Once bone dry, fire the piece in a kiln to bisque temperature (usually Cone 04). -
Glaze application:
Apply a thin layer of matte clear glaze if you used speckled clay to let the natural texture shine, or use a satin white glaze for a clean look. Wipe the bottom clean. -
Final firing:
Fire again to the maturity temperature of your clay body (likely Cone 5 or 6). Once cool, hang it up and add your dry florals.
Enjoy the simple beauty of your handmade wall pocket as it adds a touch of nature to your vertical spaces
Sgraffito Sketch Tiles for Low-Pressure Surface Play
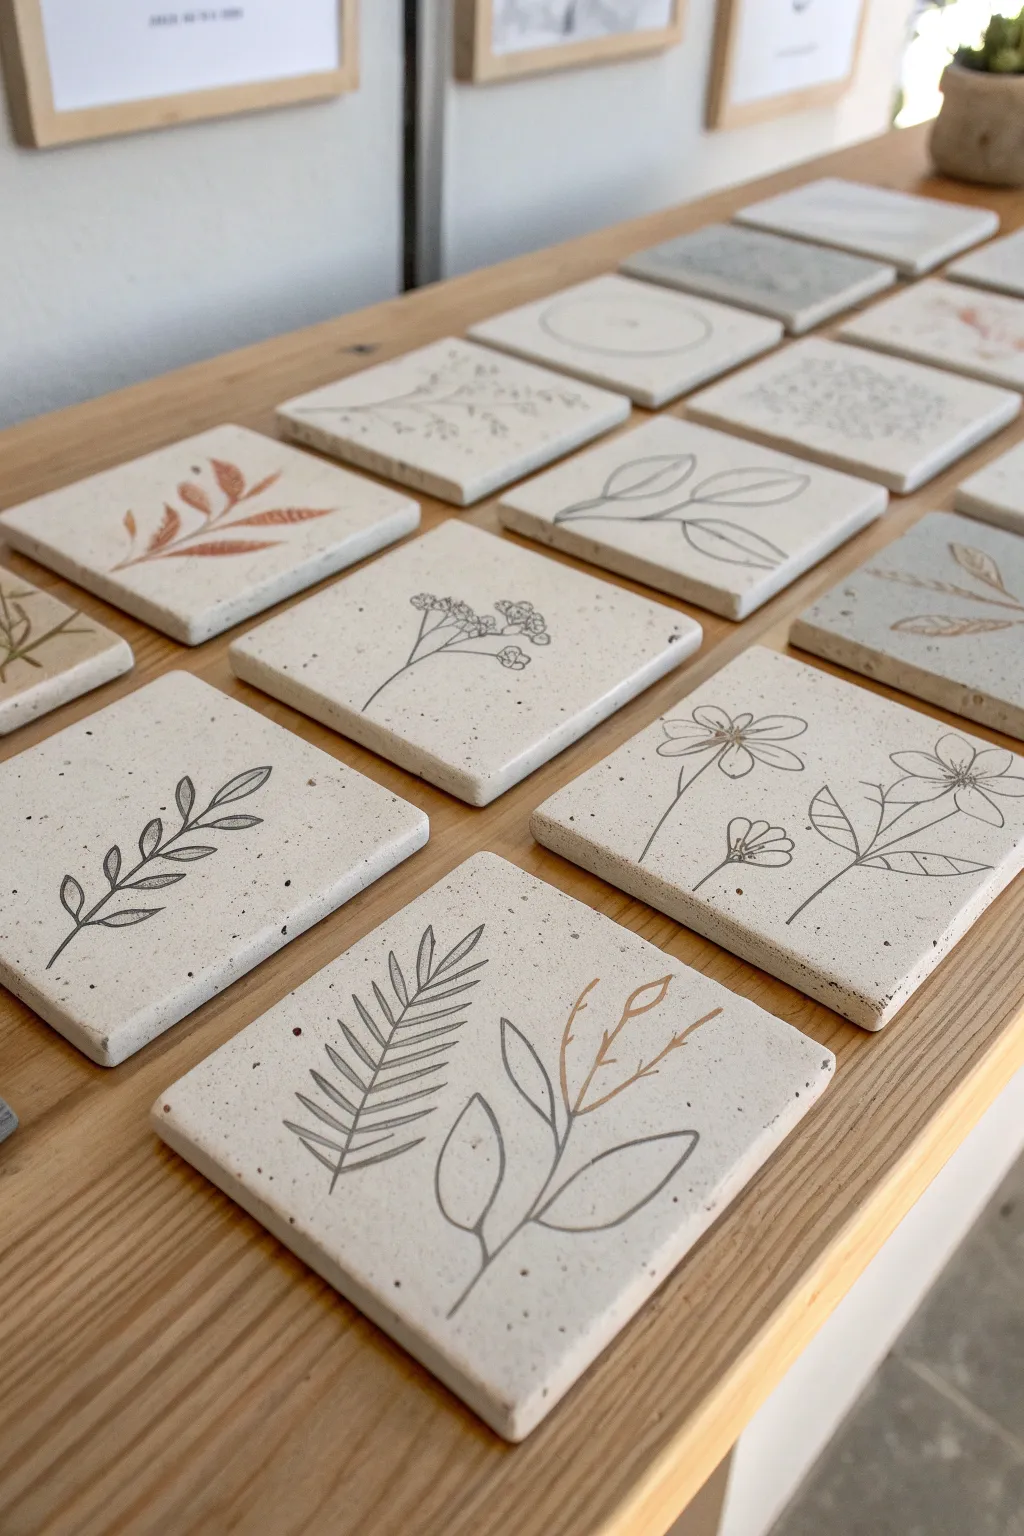
These charming ceramic tiles capture the delicate beauty of botanical sketches using simple line work on a speckled clay canvas. The process combines standard slab building with a relaxed approach to sgraffito-style drawing, perfect for testing new motifs without the pressure of a large vessel.
Detailed Instructions
Materials
- Speckled clay body (e.g., Stoneware with manganese speckles)
- Rolling pin
- Two 1/4 inch wooden guide strips
- Square tile cutter or ruler and needle tool
- Canvas or slab mat
- Underglaze pencil (black or dark grey)
- Fine-point carving tool or sgraffito tool
- Small paintbrush
- Clear matte glaze
- Sponge
Step 1: Preparing the Canvas
-
Wedging the Clay:
Begin by thoroughly wedging your speckled clay body. This ensures uniform consistency and removes air bubbles, which is crucial for flat tiles that won’t warp during firing. -
Setting Up Guides:
Place your canvas or slab mat on a sturdy work surface. Lay down your two wooden guide strips parallel to each other, spacing them slightly wider than your desired tile size. -
Rolling the Slab:
Place the clay between the guides and roll it out with your rolling pin. The guides facilitate a perfectly even thickness, which is the secret to a uniform set of tiles. -
Compression:
Take a rubber rib or a slightly damp sponge and compress the surface of the slab. Run it smoothly in multiple directions to align the clay particles, reducing the chance of warping later. -
Cutting Squares:
Use a square tile cutter for speed, or measure carefully with a ruler and slice with a needle tool. Aim for 4×4 inch squares, keeping in mind they will shrink during firing. -
Smoothing Edges:
Once cut, gently run your finger or a damp sponge along the sharp edges of each tile to soften them. Sharp corners can become brittle after firing. -
Leather Hard Stage:
Let the tiles dry slowly to a leather-hard state. I like to sandwich them between two pieces of drywall or wooden boards to keep them perfectly flat as moisture evaporates.
Flatness Fix
If tiles start curling while drying, flip them over daily and dry them slowly under a weighted board. Even drying is the only way to prevent warping.
Step 2: Sketching and Carving
-
Planning the Design:
Sketch your botanical ideas on a piece of paper first. Simple line drawings of leaves, wildflowers, and stems work best for this clean aesthetic. -
Applying Underglaze (Optional Variation):
For the two-tone look seen on some tiles, paint a thin wash of reddish-brown underglaze on specific leaves before carving. Let this dry completely. -
Transferring the Image:
You can freehand directly onto the leather-hard clay, or lay your paper sketch on top and trace the lines gently with a dull pencil to leave a faint impression in the clay. -
Carving the Lines:
Using a fine-point sgraffito tool or a specialized needle tool, carve into the lines of your drawing. Since we aren’t carving through a full layer of slip, this is more like dry-point etching. -
Inlaying Color:
Brush a dark underglaze (black or dark grey) into the carved lines. Don’t worry about being messy; you want the pigment to settle deep into the grooves. -
Wiping Back:
Once the underglaze is touch-dry, use a clean, slightly damp sponge to wipe the surface of the tile. This removes the excess surface color while leaving the dark lines distinct. -
Final Drying:
Allow the tiles to dry completely to the bone-dry stage. To prevent last-minute warping, dry them slowly under loose plastic if your studio is dry.
Step 3: Firing and Finishing
-
Bisque Fire:
Load the bone-dry tiles into the kiln for a bisque fire (usually cone 04). Stack them carefully or use a tile setter to save space. -
Glazing:
After the bisque, dip or brush the tiles with a clear matte glaze. This protects the drawing and enhances the natural speckles of the clay without creating a distracting shine. -
Glaze Firing:
Fire the tiles to the maturity temperature of your clay body (typically cone 5 or 6 for speckled stoneware). Ensure no glaze is on the bottom of the tiles to prevent sticking to the kiln shelf.
Make it a Set
Glue cork backing to your finished fired tiles to turn them into functional, high-end coasters for your coffee table.
Once fired, you will have a durable library of sketches that celebrate the natural beauty of the clay
Appliqué Decor on Mugs, Bowls, and Plates
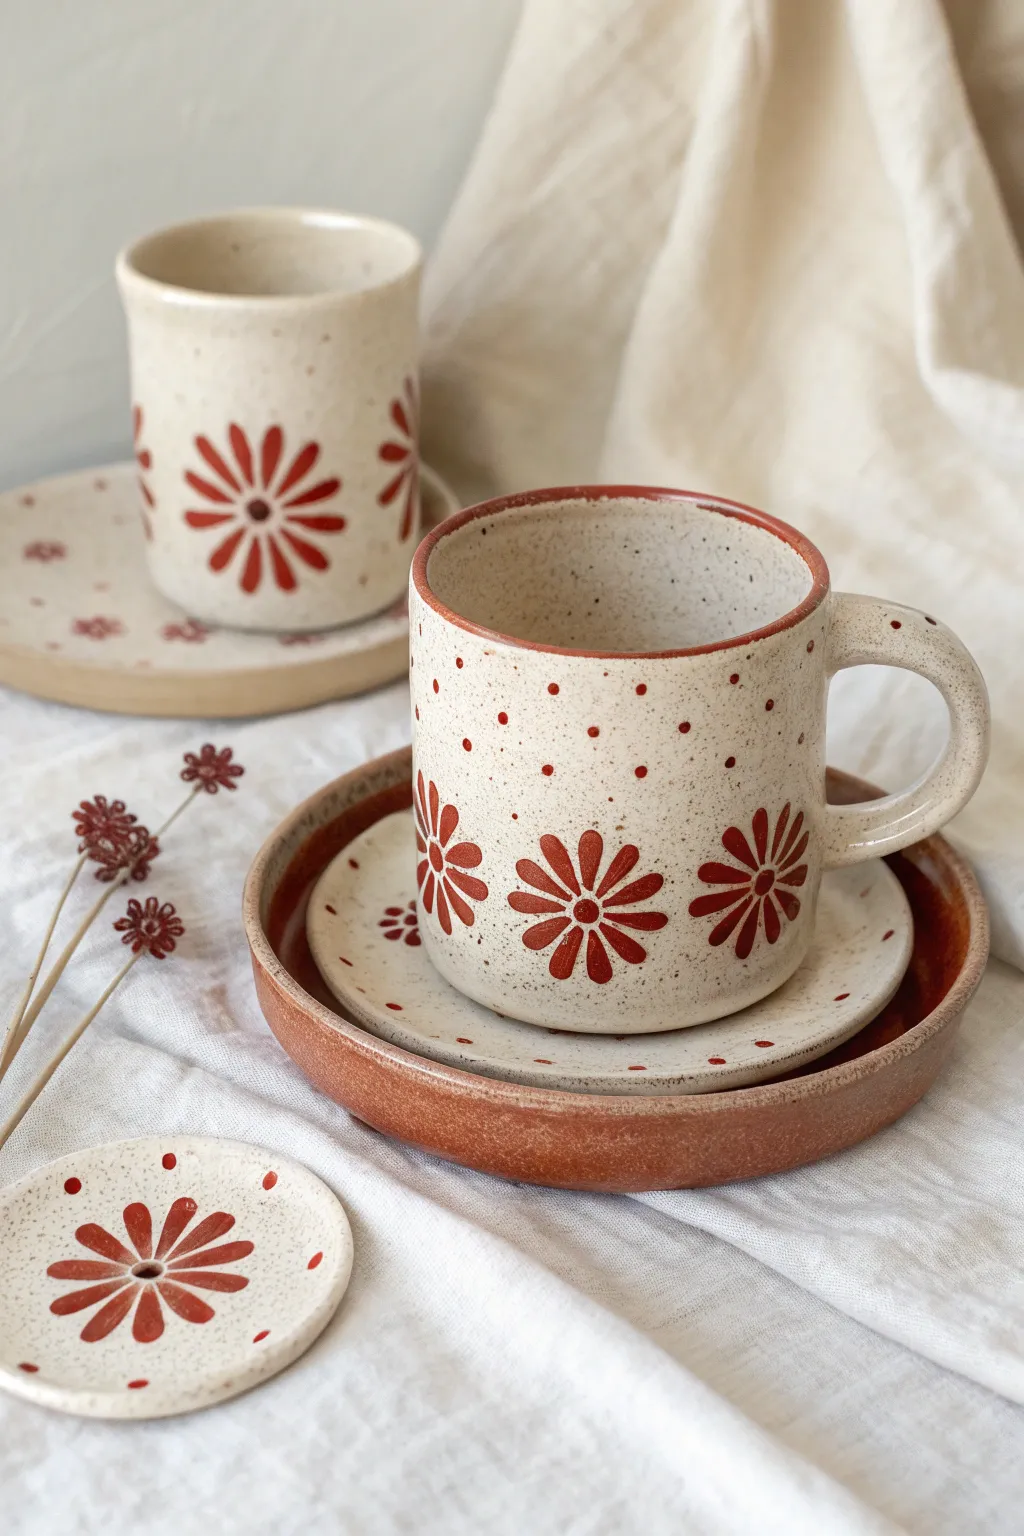
This charming ceramic set features a warm, speckled clay body adorned with simple rust-red floral motifs for a cozy, folk-art aesthetic. The technique relies on contrasting raw clay colors and careful underglaze application to achieve that distinct vintage pottery feel.
Step-by-Step Guide
Materials
- Speckled stoneware clay (e.g., Lagunita or toasted speckle)
- Red decorative slip or underglaze (Terra Cotta color)
- Pottery wheel (or slab roller for handbuilding)
- Rib tool
- Sponge
- Pin tool
- Trimming tools
- Small round paintbrush
- Dull pencil or scoring tool
- Clear matte or satin glaze
- Kiln
Step 1: Forming the Vessels
-
Throw or Build the Mug Body:
Begin by throwing a simple cylinder on the wheel with about 1 lb of speckled clay. Aim for straight walls and a flat bottom. If handbuilding, roll a slab to 1/4 inch thickness and form a cylinder around a template, smoothing the seam thoroughly. -
Shape the Rim:
While the clay is still plastic, compress the rim with a chamois or sponge. Create a slightly rounded lip, which will later catch the decorative red stain beautifully. -
Create the Handle:
Pull a strap handle or roll a coil, flattening it slightly. Shape it into a ‘C’ or ear shape that comfortably fits two fingers. Score and slip the attachment points on both the mug body and handle ends, then press firmly to attach. Wipe away excess slip. -
Form the Saucers and Plates:
For the saucer nestled under the mug, throw a small, flat plate with a subtly upturned rim. I often throw these off the hump to save time. For the larger bottom plate, create a wider diameter with a deeper, vertical rim (about 1 inch high) to create that nesting look. -
Create the Mini Dish:
Use a small ball of leftover clay to pinch or press a tiny, shallow dish, perfect as a spoon rest or tea bag holder. -
Bisque Fire Preparation:
Allow all pieces to dry slowly to the leather-hard stage. Trim the foot rings on the mug and plates to define their bottoms. Let them dry completely to bone dry before firing to bisque temperature (usually Cone 04).
Step 2: Decorating & Glazing
-
Clean the Bisqueware:
Once your pieces are out of the bisque kiln, wipe them down with a damp sponge to remove any dust or debris that might interfere with glazing. -
Apply the Rim Detail:
Using the rust-red underglaze or slip, carefully paint the very edge of the rim on the mug and the outer edge of the saucers. A steady hand is key here, but slight wobbles add to the handmade charm. -
Plan the Flower Spacing:
Lightly mark the center points for your flowers using a pencil. On the mug, space these evenly around the lower third. On the saucers, place them centrally or scatter them depending on your preference. -
Paint the Petals:
Loading a small round brush with red color, paint the petals. Start from the outside and stroke inward toward the center dot to get that tapered petal shape. Aim for 8-10 petals per flower. -
Add Centers and Dots:
Place a solid dot of color in the center of each flower. To fill negative space, add tiny polka dots or speckles using the tip of your brush around the upper section of the mug and scattered on the plates. -
Glaze the Interior:
Pour clear matte glaze inside the mug and swirl to coat, pouring out the excess. For the plates, you can dip them or brush the clear glaze on. -
Glaze the Exterior:
Dip the exterior of the mug and the tops of the plates into the clear glaze. Ensure the coat is even but not too thick, as you want the clay’s natural speckles to show through. -
Wipe the Foot:
Use a damp sponge to meticulously wipe all glaze off the foot rings and bottoms of the plates so they don’t fuse to the kiln shelf. -
Final Firing:
Load the kiln and fire to the maturity temperature of your clay and glaze (typically Cone 5 or 6 for stoneware). Allow the kiln to cool completely before unloading.
Brush Technique Tip
For consistent petal shapes, press down firmly at the start of the stroke and lift up as you drag the brush toward the flower’s center.
Level Up: Wax Resist
Apply wax resist over your red painted flowers before dipping in a white glaze. This creates a bold resistance effect where the raw clay shows around the design.
Now you have a coordinated breakfast set ready for your morning coffee and toast
Gargoyle-Inspired Mini Sculptures That Double as a Vase
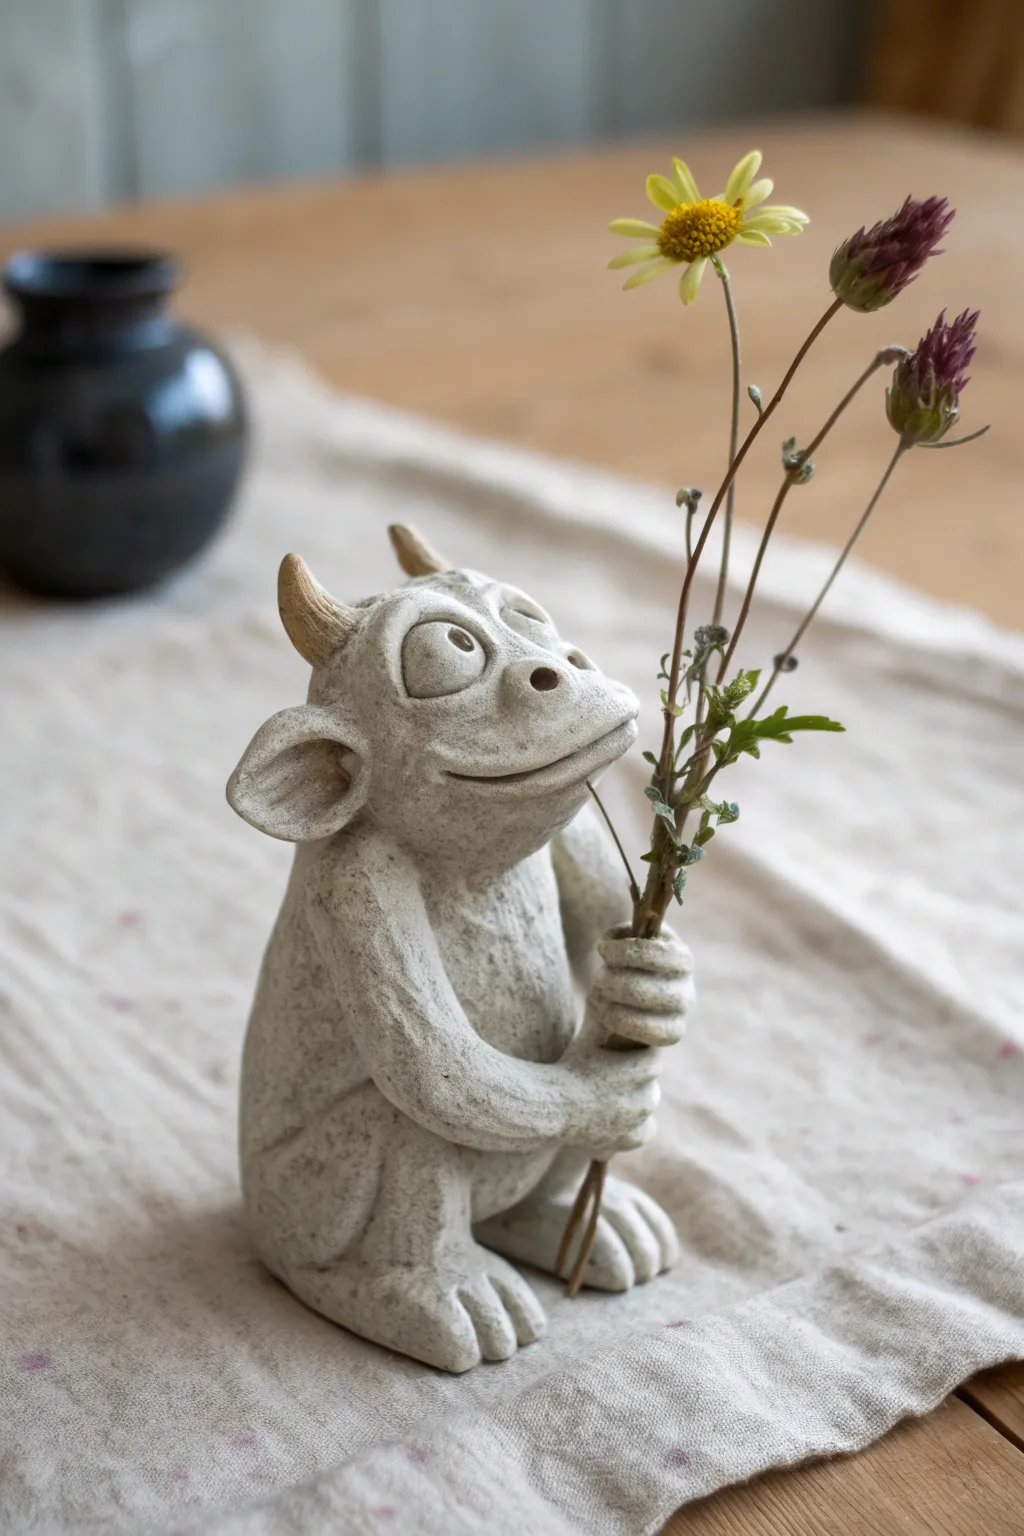
This charming little gargoyle isn’t here to scare anyone away; he’s here to hold your favorite dried blooms. With his goofy grin, uneven horns, and textured stone finish, he brings a touch of fairytale magic to any windowsill.
How-To Guide
Materials
- Stoneware clay (preferably with grog or speckles)
- Small rolling pin
- Pointed sculpting tool or needle tool
- Serrated ribbon tool
- Sponge
- Slip (clay and water slurry)
- Small paintbrush
- Wooden modeling tool
- Dried flowers or thin twigs for display
Step 1: Forming the Body and Head
-
Create the base pinch pots:
Start with two balls of clay, one slightly larger for the body and a smaller one for the head. Press your thumb into the center of the larger ball to create a pinch pot shape. Repeat for the smaller ball. -
Join the pinch pots:
Score the rim of both pinch pots and apply a dab of slip. Press them together to form a hollow egg shape. This will be the main torso of your gargoyle. Smooth the seam completely with your thumb or a wooden tool. -
Shape the torso:
Gently tap the bottom of the egg on your work surface to create a flat base so the figure sits securely. Elongate the top slightly to form a neck area. -
Sculpt the head:
Roll a medium-sized ball of clay for the head. It shouldn’t be perfectly round; flatten the front face area slightly to make room for his wide smile. -
Attach the head:
Score and slip the top of the body and the bottom of the head. Press the head firmly onto the body. Use a sculpting tool to drag clay from the neck up to the head and down to the body to secure the bond, then smooth it out.
Step 2: Adding Limbs and Features
-
Form the legs:
Roll two thick coils of clay for the legs. Bend them into a squatting knee shape. Attach these to the sides of the lower body, blending the clay onto the torso thoroughly so they look integrated, not just stuck on. -
Sculpt the feet:
Flatten the ends of the leg coils against the table. Use a knife or needle tool to cut slits for toes, then round off the edges of each toe to make them look soft and stone-like. -
Create the arms:
Roll two thinner coils for arms. Attach them at the shoulders. Position the arms so they reach forward and meet in the center of the chest or belly, as if he is clasping something small. -
Fashion the hands:
Flatten the ends of the arm coils slightly. Cut fingers similar to the toes. mold the hands specifically so there is a small vertical opening between the fists—this is where your flower stem will eventually sit. -
Add the face details:
Roll two small balls for eyes and press them onto the upper face. Make a smaller ball for the nose snout and attach it below the eyes. Use a tool to poke nostrils and carve a very wide, curved smile that stretches cheek to cheek. -
Attach the ears:
Shape two teardrops of clay. Press your thumb into the center of each to make them concave. Attach these to the sides of the head. I like to position one slightly lower than the other to give him a confused, quirky expression. -
Horn installation:
Roll two small cones for horns. Score and slip them onto the top of the head. Curve them gently backward or slightly askew for character.
Slumping Horns?
If gravity is pulling the horns or ears down while the clay is soft, use small balled-up pieces of paper towel or foam tucked underneath them for support until the clay stiffens.
Step 3: Texturing and Finishing
-
Refine the surface:
Check all your seams. If the clay is too smooth, it looks like plastic. We want stone. Take a toothbrush or a stiff bristle radiance tool and gently tap over the entire surface to create a pitted texture. -
Clean the flower clasp:
Ensure the hole between the hands goes all the way through so a stem can pass cleanly. Use a small stick or tool handle to verify the opening size. -
Drying:
Because the body is hollow and sealed, you must poke a tiny, discreet hole (vent) underneath the figure or hidden in an ear to let expanding air escape during firing. Let the piece dry slowly under loose plastic to prevent cracking. -
Bisque fire:
Fire the piece to bisque temperature (usually cone 04). -
Glazing:
For the stone look, skip the colorful glossy glazes. Apply a matte, speckled beige or light grey glaze. Alternatively, use an oxide wash (like iron oxide) and wipe most of it back with a sponge, leaving dark clay in the textures. -
Final firing:
Fire again to the recommended temperature for your clay and glaze combination.
Mossy Makeover
After the final firing, dab tiny spots of matte green acrylic paint into the deepest crevices or on the top of the head to simulate patches of moss growing on old stone.
Once fired, slip a dried wildflower into his hands and find him a cozy spot to guard your home.
Creature-Vessel Hybrids With Wrapped Coil “Tentacles”
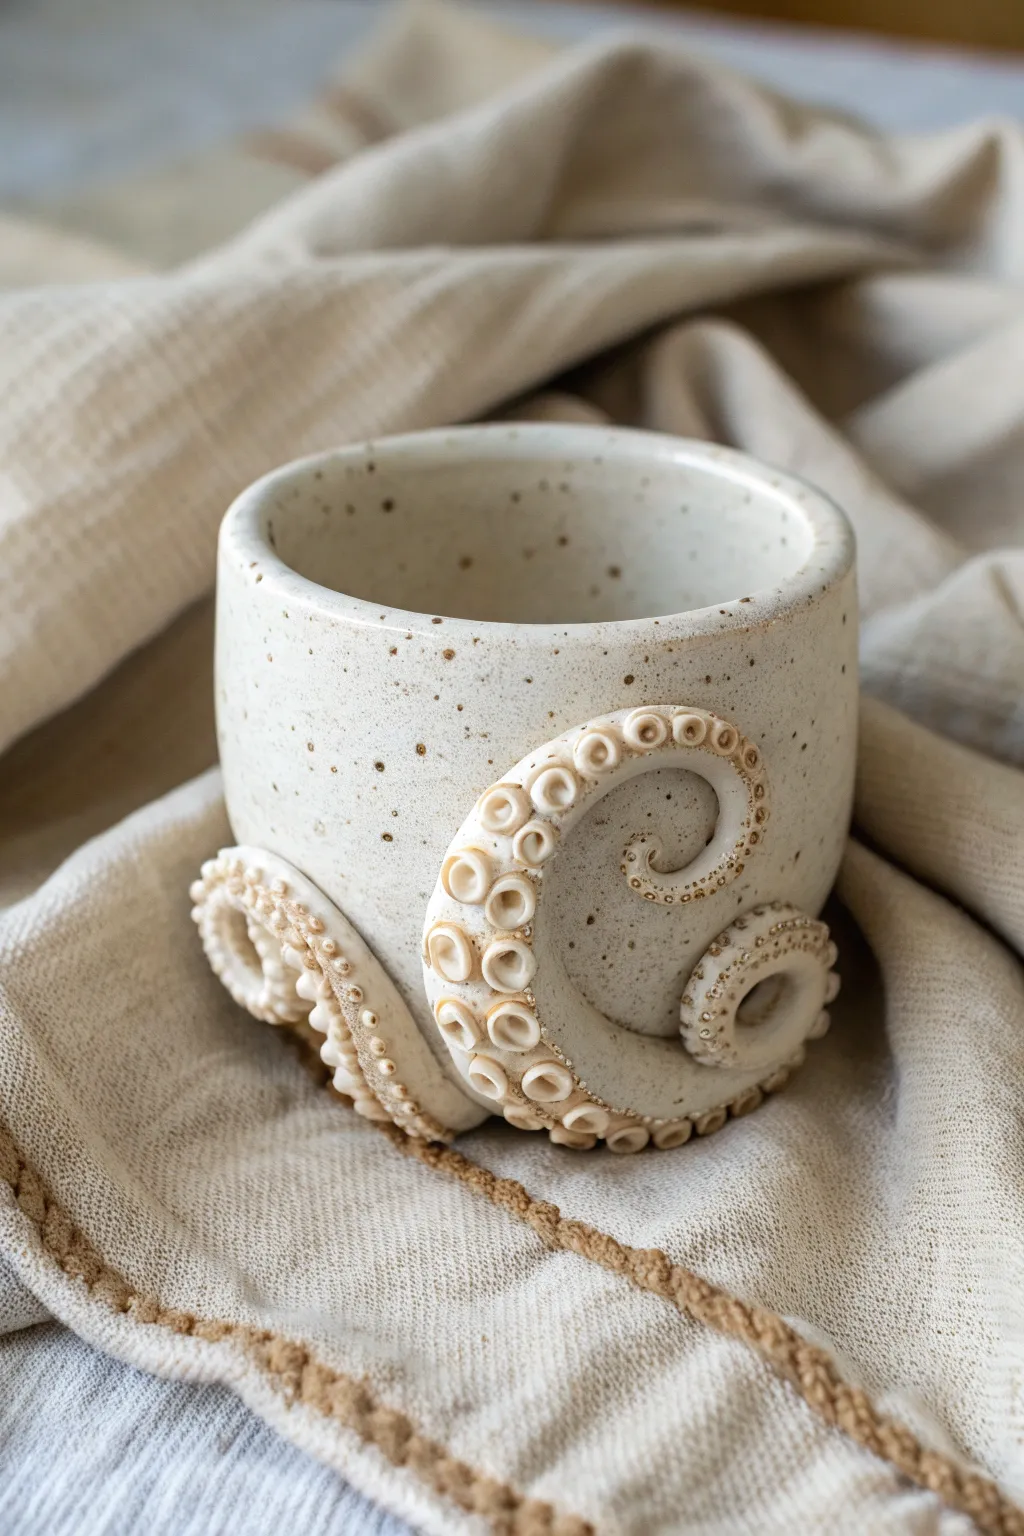
Embrace the fluid beauty of the ocean with this hand-built vessel featuring coiled tentacles wrapping organically around its base. Using a speckled clay body, you’ll learn to sculpt realistic suction cups and integrate sculptural elements seamlessly onto a functional form.
Step-by-Step Tutorial
Materials
- Speckled stoneware clay (e.g., cone 6 buff speckled)
- Canvas working mat or slab roller
- Rolling pin and guide strips (approx. 1/4 inch)
- Circular cookie cutter or template (for the base)
- Scoring tool or serrated rib
- Slip (clay mixed with water)
- Ball stylus tools (various sizes)
- Smoothing tools (ribs, sponges, wooden modeling tools)
- Fettling knife
- Transparent or white satin glaze
Step 1: Forming the Base Vessel
-
Roll the slab:
Begin by rolling out your speckled clay into an even slab, using guide strips to maintain a thickness of about 1/4 inch. Compress the clay on both sides with a rib to align the particles and prevent warping. -
Cut the components:
Cut a rectangle for the vessel walls (roughly 10-12 inches long by 4 inches high for a standard mug size) and a circle for the base using your cutter or template. -
Assemble the cylinder:
Bevel the short edges of your rectangle at a 45-degree angle. Score and slip these edges thoroughly, then curve the slab into a cylinder and press the beveled edges together to create a seamless join. -
Attach the base:
Score and slip the bottom edge of the cylinder and the outer edge of your circular base. Press them firmly together, then use a wooden tool to blend the clay from the outside wall down onto the base to lock it in. -
Refine the form:
Use a damp sponge or a soft rib to smooth the join seam and the rim. I like to let this stiffen to soft leather-hard before adding sculptural elements so the cup keeps its shape under pressure.
Stylus Secrets
Use different sized ball tools for the suction cups. Match the tool size to the clay ball size to prevent cracking the edges of the cup as you press down.
Step 2: Sculpting the Tentacles
-
Create tapered coils:
Roll out several coils of clay. Instead of making them uniform, taper them so they are thicker at one end (the attachment point) and thinner at the tip to mimic an octopus arm. -
Plan the placement:
Without using slip yet, dry-fit the coils against the mug wall. Curl the ends into spirals and let them wrap around the bottom edge. Experiment until the composition feels balanced and fluid. -
Attach the coils:
Once satisfied with the placement, trace the outline of the coil lightly onto the mug. Score and slip both the marked area on the mug and the back of the coil, then press firmly to attach. -
Blend the edges:
Use a small modeling tool to blend the underside of the coil into the mug wall to ensure a strong bond, but leave the top and sides accessible for detailing.
Step 3: Detailing the Suction Cups
-
Make clay spheres:
Roll many tiny balls of clay, ranging in size from small peas to pinheads. These will become the individual suction cups. -
Attach the spheres:
Score the surface of the attached tentacle coil. Brush on a little slip or water, then press the clay balls onto the tentacle in two rows, placing larger balls near the thick base and tiny ones near the curled tip. -
Shape the cups:
Take a ball stylus tool and press it gently into the center of each clay sphere. This creates the hollow ‘cup’ shape and simultaneously adheres the ball securely to the coil. -
Refine the rims:
For the larger suckers, you can gently pinch or flatten the outer rim slightly to make them look more organic and less like perfect donuts. -
Smooth the connections:
Use a tiny, slightly damp brush to clean up any rough edges around the suction cups and ensure there are no sharp burrs of clay.
Oceanic Contrast
Use a reactive glaze on just the tentacles that contrasts with the mug body—like a pale celadon or floating blue—to make the creature elements pop vividly.
Step 4: Finishing and Glazing
-
Final drying:
Cover the piece loosely with plastic to let the moisture equalize between the thick tentacles and thinner walls. Let it dry slowly to the bone-dry stage. -
Bisque fire:
Fire the piece in a kiln to bisque temperature (usually Cone 04) to prepare it for glazing. -
Apply glaze:
Dip or brush the entire mug with a transparent or semi-opaque white satin glaze. This allows the natural speckles of the clay body to show through, enhancing the sandy, organic look. -
Wipe the details:
If your glaze is thick, gently wipe the high points of the suction cups with a damp sponge so the glaze pools in the recesses, highlighting the texture. -
Glaze fire:
Fire the mug to the final maturity temperature for your clay and glaze (typically Cone 6 for speckled stoneware).
Now you have a stunning, tactile mug that brings a touch of deep-sea mystery to your morning coffee routine.