When I’m teaching beginners, I always start with easy clay figures that come together from simple shapes—little balls, ovals, and tiny coils. Here are my go-to ideas you can make with air-dry clay or polymer clay, without stressing about perfect details.
Chubby Penguin With Dot Eyes
This charming, egg-shaped penguin combines rustic simplicity with clean modern design. Its speckled white belly and smooth, matte black back create a delightful contrast that looks perfect on a windowsill or shelf.
How-To Guide
Materials
- Air-dry clay (white or grey based)
- Acrylic paint (black, white, burnt orange)
- Small paintbrush (flat and detail round)
- Sculpting tool or old credit card for smoothing
- Water cup
- Medium-grit sandpaper
- Matte spray varnish (optional)
- Old toothbrush (for splatter effect)
Step 1: Sculpting the Base Form
-
Condition the Clay:
Start by taking a handful of air-dry clay roughly the size of a large orange. Knead it in your hands for a few minutes until it is warm, pliable, and free of any air bubbles. -
Form the Egg Shape:
Roll the clay into a smooth ball between your palms, then gently apply more pressure to the top half to taper it slightly. You want a classic egg silhouette—wider at the bottom and narrower at the head. -
Flatten the Base:
Hold your egg shape upright and gently tap the bottom against your work surface. This creates a small, flat platform so the penguin stands securely without wobbling. -
Smooth the Surface:
Dip your finger in a little water and run it over the entire surface of the clay. Erase any fingerprints or cracks until the ‘egg’ is perfectly smooth. -
Shape the Beak:
Take a tiny, pea-sized bit of extra clay and roll it into a small cone. Flatten the underside slightly and press it firmly onto the center of the ‘face’ area, blending the back edges into the main body. -
Add the Feet:
Form two small, flat ovals from clay. Position them sticking out slightly from under the front of the body. Use a sculpting tool to press two small indentations into each foot for toes. -
Dry Completely:
Set your penguin aside to dry. Depending on the clay brand and humidity, this usually takes 24 to 48 hours. Rotate it occasionally so the bottom dries evenly.
Stone Effect Secret
Mix a pinch of baking soda into your white paint before applying it. This creates a gritty, textured surface that looks and feels just like an actual river stone.
Step 2: Finishing and Painting
-
Sand for Texture:
Once fully bone-dry, lightly sand the surface. Don’t make it perfectly glass-smooth; leaving a tiny bit of texture adds to the stone-like aesthetic. -
Dust Off:
Wipe the entire figure down with a slightly damp cloth or a dry brush to remove all clay dust before painting. -
Paint the Belly Layer 1:
Paint a large oval shape on the front of the penguin using white acrylic paint. This is the belly and face area. It simulates the ‘peeking out’ look of the penguin’s white feathers. -
Outline the Face:
While painting the white area, curve the top border into a heart-shape around where the eyes will go, leaving space for the black ‘widow’s peak’ on the forehead. -
Paint the Black Coat:
I prefer to use a flat brush here to carefully paint the rest of the body black. Cover the back, sides, and top of the head, meeting the white edge cleanly. -
Second Coat:
Apply a second layer of both white and black paint to ensure the colors are opaque and solid, hiding the clay color underneath. -
Paint the Beak:
Use a burnt orange or mustard yellow acrylic to paint the small beak cone. A matte finish looks best here. -
Paint the Feet:
Use the same orange color to carefully paint the two feet peeking out at the bottom. -
Add the Eyes:
Using the back of a paintbrush handle or a dotting tool, dip into black paint and stamp two confident circles on the white face area for eyes. -
Add Eye Highlights:
Once the black eye dots are dry, use a toothpick to add a tiny white reflection dot in the upper corner of each eye. This brings the character to life. -
Create the Speckles:
For the stone effect, dilute a tiny drop of black paint with water. Dip an old toothbrush into it, and gently flicker the bristles with your thumb to spray fine speckles over the white belly area. -
Varnish:
Seal your work with a matte spray varnish to protect the paint without making it shiny.
Make it a Set
Make a whole family by creating three different sized ‘eggs.’ Vary the beak placement (looking up, down, or sideways) to give each one a distinct personality.
Place your little penguin near some dried grass or a sunny window to enjoy its calm presence


Round Kitty With Tiny Paws
This charmingly minimal cat figurine features a satisfyingly round body, tiny nubby feet, and simple carved expressions. The finish mimics speckled stoneware clay, giving it a cozy, rustic look perfect for a windowsill companion.
Step-by-Step Guide
Materials
- White polymer clay (or air-dry clay)
- Speckled tan or grey clay (optional, for mixing)
- Black pepper or dried coffee grounds (if creating faux specks)
- Needle tool or toothpick
- Small ball stylus tool
- Caramel or light brown acrylic paint
- Fine detail paintbrush
- Matte varnish
- Aluminum foil (for core, optional)
Step 1: Preparing the Clay Body
-
Create the speckled effect:
If you don’t have pre-speckled pottery clay, you can simulate the look. Take your block of white polymer clay and mix in a very small pinch of black pepper or dried coffee grounds. Knead thoroughly until the specks are evenly distributed throughout the white base. -
Form the main shape:
Roll a large handful of clay into a smooth ball. Start shaping it into a tall, rounded egg shape. The bottom should be slightly wider than the top to give it that heavy, settled look. -
Flatten the base:
Gently tap the wider bottom of your egg shape against your work surface. You want it to sit completely flat and stable without rocking, while maintaining the rounded curve of the sides. -
Smooth the surface:
Use your thumb to smooth out any fingerprints. The charm of this piece lies in its clean, continuous curve, so take a moment to ensure the silhouette is nice and even.
Crumbly Carvings?
If carving the eyes creates rough clay crumbs, dip your needle tool in a tiny bit of oil (baby oil or water) before slicing. This helps the tool glide cleanly.
Step 2: Adding Ears and Feet
-
Make the ears:
Pinch off two small, equal-sized pieces of clay. Roll them into balls and then shape them into triangular pyramids. -
Attach the ears:
Place the triangles on the top of the head, spacing them moderately apart. Blend the clay at the base of the ears downward into the head using a modeling tool or your finger so there are no seams. -
Refine ear shape:
Once attached, pinch the tips slightly to make them soft rather than sharp. Use a small ball tool to gently indent the front center of each ear to create the inner ear shadow. -
Create the feet:
Roll two small balls of clay, slightly flattened. These should be quite small compared to the body to get that ‘tiny paws’ look. -
Attach the feet:
Turn the cat over and attach the two balls to the front underside of the base. Press them on firmly so they peek out just slightly from under the round belly when the cat is standing.
Step 3: Sculpting the Face
-
Mark the nose:
Find the center of the face, about one-third of the way down from the ears. Press a tiny bit of extra clay into a small triangle for the nose, or simply mark the spot where you will paint it later. -
Carve the eyes:
Using a needle tool, draw two U-shapes (curving downwards) for the sleeping eyes. Make the lines fairly deep but clean, removing any clay crumbs that roll up. -
Carve the mouth:
Starting from the bottom point of the nose, draw a small anchor shape or two curved lines growing outward to create a happy, smiling mouth. -
Add whiskers:
On each cheek, gently carve three straight lines for whiskers. Keep them light and airy. -
Add texture (optional):
If you want the surface to look more like stone, you can gently tap the surface with a stiff toothbrush to remove the ‘plastic’ shine of the clay.
Seamless Blending
For invisible seams on ears, use the back of a spoon to burnish the clay connection points. It smooths the joint better than fingers without leaving prints.
Step 4: Finishing and Painting
-
Bake or dry:
Follow the instructions for your specific clay. If using polymer clay, bake it on a dedicated baking sheet. If using air-dry clay, let it sit for 24-48 hours until fully hard. -
Paint the details:
Using a fine brush and caramel-colored acrylic paint, fill in the inner triangles of the ears and paint the small triangular nose. -
Highlight the carving:
If you want the carved lines (eyes, whiskers) to stand out, you can run a very diluted wash of brown paint into the grooves and wipe the surface clean immediately, leaving paint only in the recesses. -
Seal the piece:
I usually prefer a matte varnish for this project to maintain the stone-like aesthetic. Apply one thin coat to protect your paint and give the clay a unified finish.
Place your little round kitty on a sunny shelf where its peaceful expression can bring a moment of calm to your day


Mini Teddy Bear With Big Head
This charming project creates a minimalist teddy bear that looks like it was carved from soft sandstone or limestone. With its oversized head and subtle, sculpted features, it makes for a timeless decorative piece that brings a calm, natural aesthetic to any shelf.
Step-by-Step Tutorial
Materials
- Air-dry clay (stone, granite, or natural color)
- Small bowl of water
- Pointed clay tool or toothpick
- Small sponge for smoothing
- Old toothbrush or stippling brush for texturing
- Acrylic paint (warm beige, soft brown)
- Matte finishing spray
Step 1: Sculpting the Head and Body
-
Form the head base:
Start with a ball of clay roughly the size of a tangerine. Roll it firmly between your palms until it is perfectly smooth and round. -
Shape the snout area:
Instead of adding a separate nose piece, gently pinch and pull the front of the head ball to extend it slightly, creating a subtle snout shape. -
Create the body:
Take a slightly smaller amount of clay to form the body. Shape it into a rounded pear form, slightly flattened at the top where the head will sit. -
Attach the head:
Score the top of the body and the bottom of the head with a toothpick. Add a drop of water to make a slip, then press the head firmly onto the body. -
Blend the neck seam:
Using your thumb or a modeling tool, smooth out the connection point at the back of the neck so the two pieces feel integrated, but leave a distinct crease at the front to define the chin. -
Shape tiny ears:
Roll two small marble-sized balls. Press your thumb into the center of each to create a cup shape, then attach them to the top corners of the head using the score-and-slip method.
Cracking Up?
If small hairline cracks appear as the clay dries, mix a tiny bit of fresh clay with water to form a paste (slip) and fill the cracks, then smooth over.
Step 2: Adding Limbs and Details
-
Form the legs:
Roll two thick logs of clay for legs. Round off one end for the paw and slightly taper the other end where it will join the hip. -
Attach the legs:
Position the legs at the base of the body so they splay outward. Press them firmly into place and smooth the clay at the hip joint to secure them. -
Create the arms:
Roll two smaller logs for the arms. Adhere them high on the torso so they rest naturally along the sides of the body. -
Define the seams:
To mimic an old-fashioned jointed bear, use your pointed tool to gently scribe a line where the arms and legs meet the body, enhancing the toy-like appearance. -
Carve the face:
Use the back of a small paintbrush to press deep indentations for the eyes. Use a smaller tool to press in a triangle nose and scribe a simple curved smile line. -
Detail the snout:
Add a vertical line connecting the nose to the mouth for that classic teddy bear look.
Natural Texture
Mix clear sand or dried coffee grounds directly into your clay block before sculpting. This creates an authentic, gritty stone texture without needing to paint it later.
Step 3: Texturing and Finishing
-
Texturizing the surface:
Before the clay dries, take an old toothbrush or a stiff stippling brush and gently tap it all over the surface of the bear. This creates a porous, stone-like texture. -
Smoothing specific areas:
I find it helpful to lightly smooth the nose tip and the inside of the ears with a finger to create a textural contrast against the rougher body. -
Allow to dry:
Let the figure dry completely for at least 24-48 hours. Keep it away from direct heat to prevent cracking. -
Painting the base:
Dilute a warm beige acrylic paint with water to make a wash. Apply this all over the bear, letting the paint settle into the texture holes. -
Darkening the features:
Use a darker brown paint for the nose tip and inside the eye indentations to make the features pop. -
Adding speckles:
Load a toothbrush with watered-down brown paint and flick the bristles to spray tiny speckles over the bear, enhancing the natural stone effect.
Once dry, place your stoneware-style bear among some dried botanicals for a cozy, rustic display


Easy Turtle With A Dome Shell
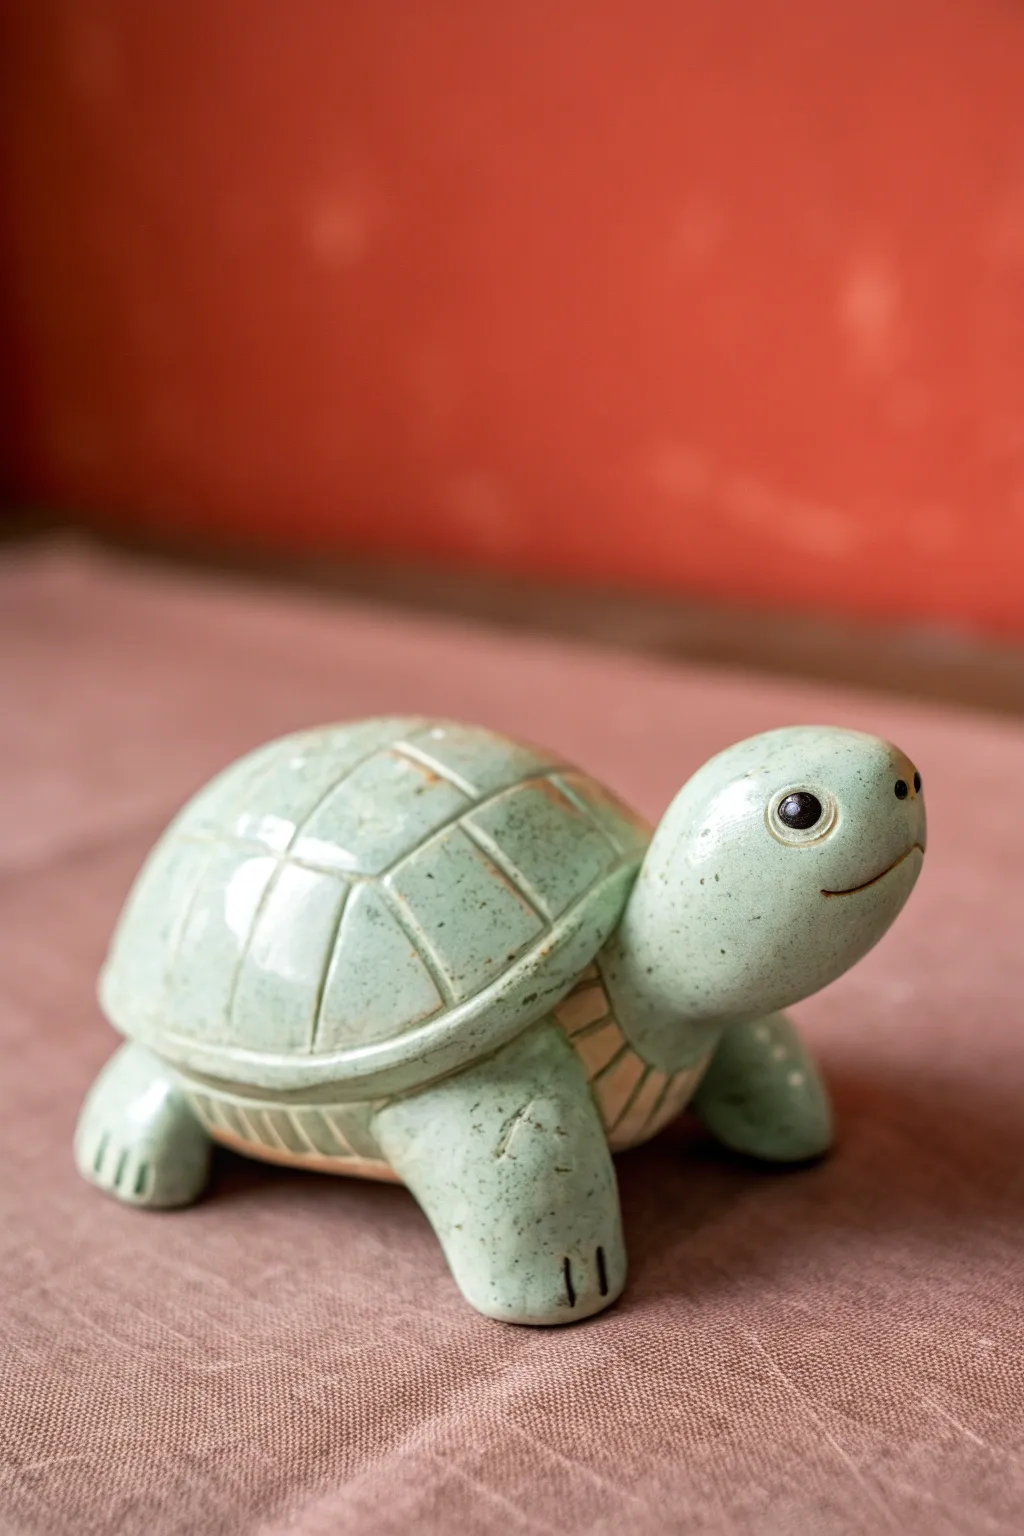
This charming little turtle features a smooth, domed shell and a sweet, upturned expression that brings him to life. With a pale celadon green glaze and simple geometric carving, he makes a perfect desk companion or garden accent.
How-To Guide
Materials
- Light-colored smooth clay (white earthenware or stoneware)
- Celadon or light teal green glossy glaze
- Modelling tools (needle tool, wooden rib)
- Sponge and water cup
- Rolling pin
- Slip (clay mixed with water)
- Small paintbrush for glazing
- Kiln (if using firing clay) or sealant (if using air-dry clay)
Step 1: Forming the Body Mechanics
-
Shape the Shell Base:
Begin by rolling a ball of clay roughly the size of a tangerine until it is completely smooth. Gently flatten the bottom against your work surface to create a distinct dome shape. -
Smooth the Form:
Use a damp sponge or a flexible rib tool to refine the dome, ensuring there are no lumps or fingerprints. The smoother this base is, the better the final glaze will look. -
Create the Head:
Roll a smaller ball of clay about one-third the size of the shell. Gently elongate it into a thick teardrop shape, keeping the wider end rounded for the face. -
Attach the Head:
Score the narrow end of the head and the front of the shell where they will meet. Apply a dab of slip, press the pieces together firmly, and smooth the seam underneath so it looks seamless. -
Form the Limbs:
Create four small, thick cylinders for the legs. I like to slightly flatten the bottom of each to help the turtle stand securely.
Step 2: Adding Details and Texture
-
Mount the Legs:
Score and slip the tops of the four legs and attach them to the underside of the shell. Position the front legs slightly angled outward for a natural stance. -
Define the Shell Rim:
Using a wooden modelling tool or the back of a knife, press a horizontal line around the circumference of the shell, creating a rim that separates the ‘dome’ from the underbelly area. -
Carve the Scutes:
With a needle tool or small carving loop, lightly draw the pattern on top of the shell. Start with a central shape, then add surrounding blocks. Deepen these lines once you are happy with the spacing. -
Sculpt the Underbelly Texture:
Just below the shell’s rim and above the legs, crave short, vertical parallel lines to mimic the soft skin usually seen on a turtle’s neck and sides. -
Detail the Face:
Use a small ball tool to press indentations for the eyes. Use a needle tool to drag a gentle, curving smile line upwards to give him a happy expression. -
Refine the Claws:
Press two or three small indentations into the front of each foot to represent toes or claws.
Glaze Pooling
Choose a translucent glaze rather than an opaque one. Translucent glazes naturally pool in the carved grooves of the shell, making the lines darker without extra painting.
Step 3: Finishing and Glazing
-
Smoothing Check:
Go over the entire piece with a very slightly damp sponge to soften any sharp carving edges or burrs. -
Bisque Fire (or Dry):
If using ceramic clay, allow the piece to dry slowly and then bisque fire it. If using air-dry clay, wait until it is bone dry. -
Initial Glazing:
Apply your celadon or pale green glaze over the entire body. This type of glaze often pools beautifully in carved lines, naturally highlighting your shell details. -
Highlighting the Eyes:
Carefully paint the inside of the eye sockets black. Add a tiny dot of white glaze for a ‘reflection’ highlight to make the eyes look alert. -
Wipe the Feet:
If firing in a kiln, ensure the very bottom of the feet are wiped clean of glaze to prevent the turtle from sticking to the kiln shelf. -
Final Wiring:
Fire the piece according to your glaze instructions to achieve that glossy, glass-like finish shown in the photo.
Shell Variations
Instead of a geometric pattern, try pressing real leaves or lace into the soft clay shell for an organic texture before attaching the head and legs.
Place your finished turtle on a sunny windowsill where the light can catch the glossy curves of the shell

The Complete Guide to Pottery Troubleshooting
Uncover the most common ceramic mistakes—from cracking clay to failed glazes—and learn how to fix them fast.
Tiny Octopus Made From One Ball And Coils
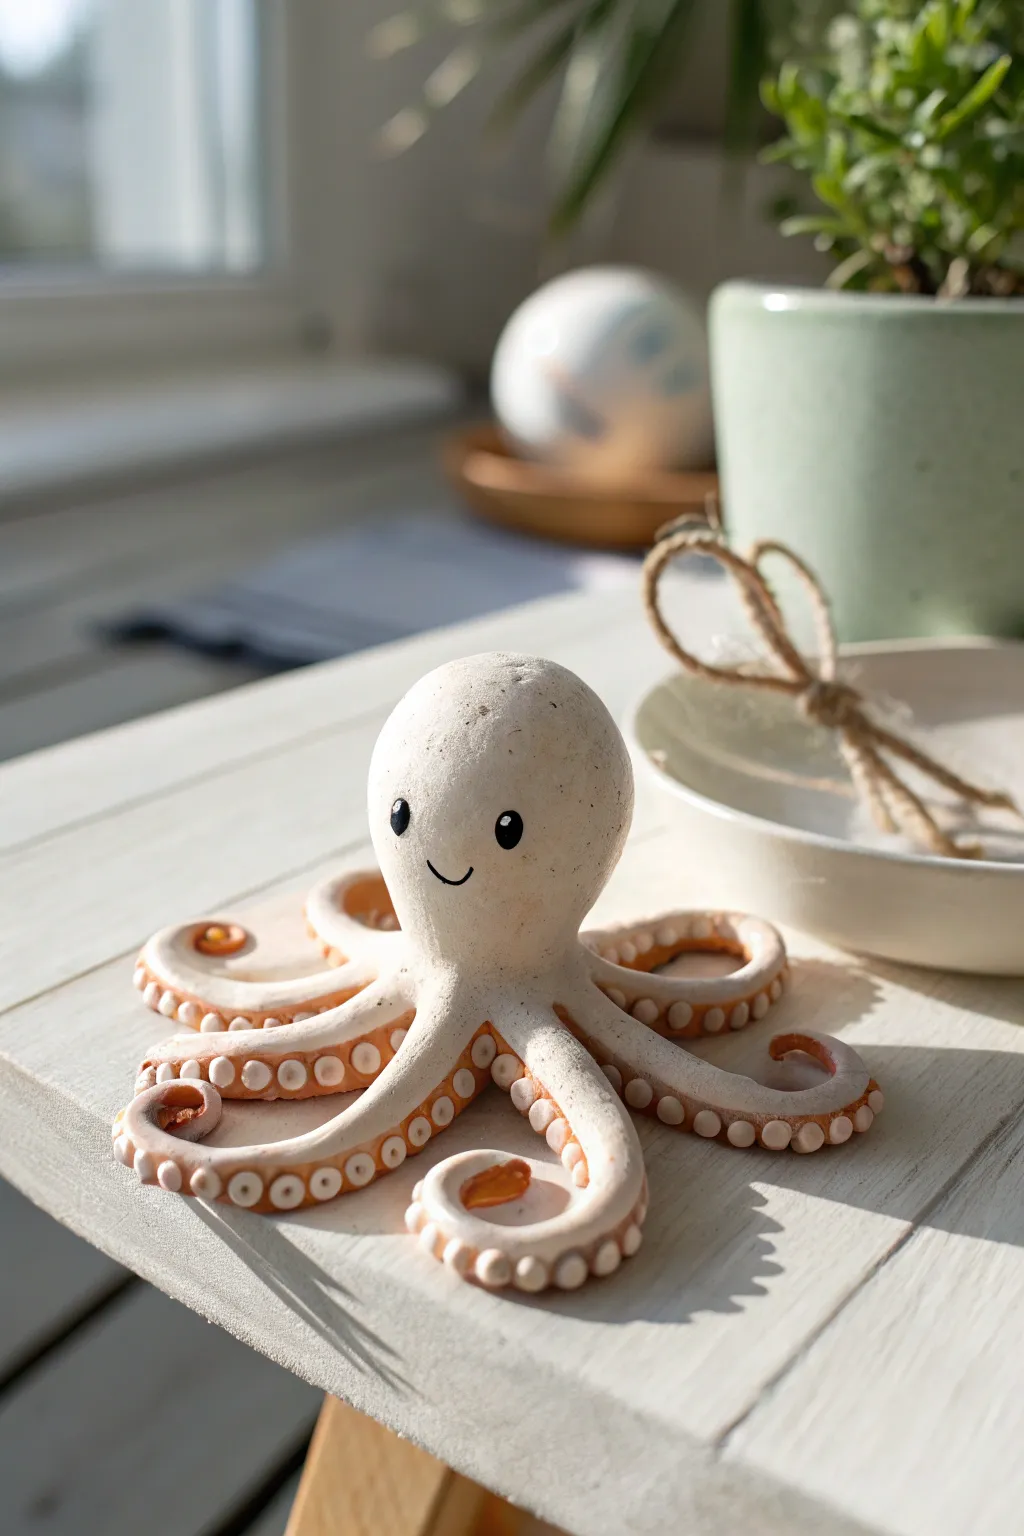
This adorable little sea creature is crafted from simple shapes that come together to form a friendly desk companion. With its matte, stony texture and distinctively detailed orange suckers, this octopus has a polished, artisanal look that’s surprisingly easy to achieve.
Detailed Instructions
Materials
- White polymer clay or air-dry clay (smooth texture)
- Acrylic paint (black for eyes, warm orange/amber for suckers)
- Fine-grit sandpaper (optional)
- Small ball stylus or dotting tool
- Fine detail paintbrush
- Modeling tool or toothpick
- Blade or craft knife
- Matte varnish (optional)
Step 1: Forming the Body
-
Create the head:
Start by rolling a generous ball of white clay about the size of a golf ball. Ensure it is perfectly smooth by rolling it firmly between your palms to eliminate any cracks. -
Shape the dome:
Gently taper the bottom of the ball slightly so it looks like an upside-down egg or a rounded dome, rather than a perfect sphere. This will be the main body/head. -
Prepare the tentacles:
Roll out eight long coils of clay. They should be thicker at one end (where they attach to the body) and taper off to a gentle point at the other end. -
Attach the base legs:
Turn the head upside down. Arrange the eight coils in a radial flower pattern on the underside of the head, pressing the thick ends firmly into the center base of the head. -
Blend the seams:
Use a modeling tool or your thumb to smooth the clay where the legs meet the head. The transition should be seamless, so it looks like one solid piece.
Step 2: Sculpting Details
-
Pose the tentacles:
Turn the octopus right-side up. Gently curl the tips of the tentacles outward and upward in loose spirals or waves to give the figure dynamic movement. -
Create sucker indentations:
Flip the octopus over carefully or work from the side. Use a small ball stylus to press a row of indentations all the way down the underside of each tentacle. -
Add dimension to suckers:
Roll very tiny balls of white clay—dozens of them. Place one tiny ball into each indentation you just made. -
Flatten the suckers:
Take a slightly smaller tool or just your finger and gently press the tiny balls flat so they look like rings or buttons sitting on the tentacle surface. I find this creates that classic suction-cup look. -
Smooth the surface:
Check the head for fingerprints. Lightly buff them away with a drop of baby oil or water, depending on your clay type. -
Cure the clay:
Bake (for polymer) or let dry (for air-dry) according to the package instructions. If using air-dry clay, allow at least 24-48 hours for full hardening.
Legs falling off?
If tentacles droop while sculpting, support them with crumpled bits of aluminum foil or paper towel underneath until the clay stiffens or finishes baking.
Step 3: Painting and Finishing
-
Sand for texture:
Once fully cured, use fine-grit sandpaper to lightly scuff the head. This gives it that weathered, stone-like texture seen in the photo. -
Paint the suckers:
Mix a warm amber or orange acrylic paint with a lot of water to create a wash. Carefully apply this to the suckers, letting the paint pool in the crevices to define the rings. -
Wipe back excess:
Before the wash dries completely, lightly wipe the surface of the suckers with a damp cloth or paper towel so the orange remains mostly in the recesses. -
Draw the face:
Using a fine brush and black paint, add two small oval eyes wide apart on the head. Add a tiny white dot in each for a highlight. -
Add the smile:
Paint a very thin, small ‘u’ shape between the eyes for a minimalist mouth. -
Seal the work:
Finish with a matte varnish to protect the paint while maintaining the natural, unglazed pottery look.
Customize It
Make a tiny sailor hat or a flower out of clay and attach it to the head before baking to give your octopus a unique profession or personality.
Place your new cheerful friend on a windowsill where the light can catch those detailed textures
Simple Snail With A Spiral Shell
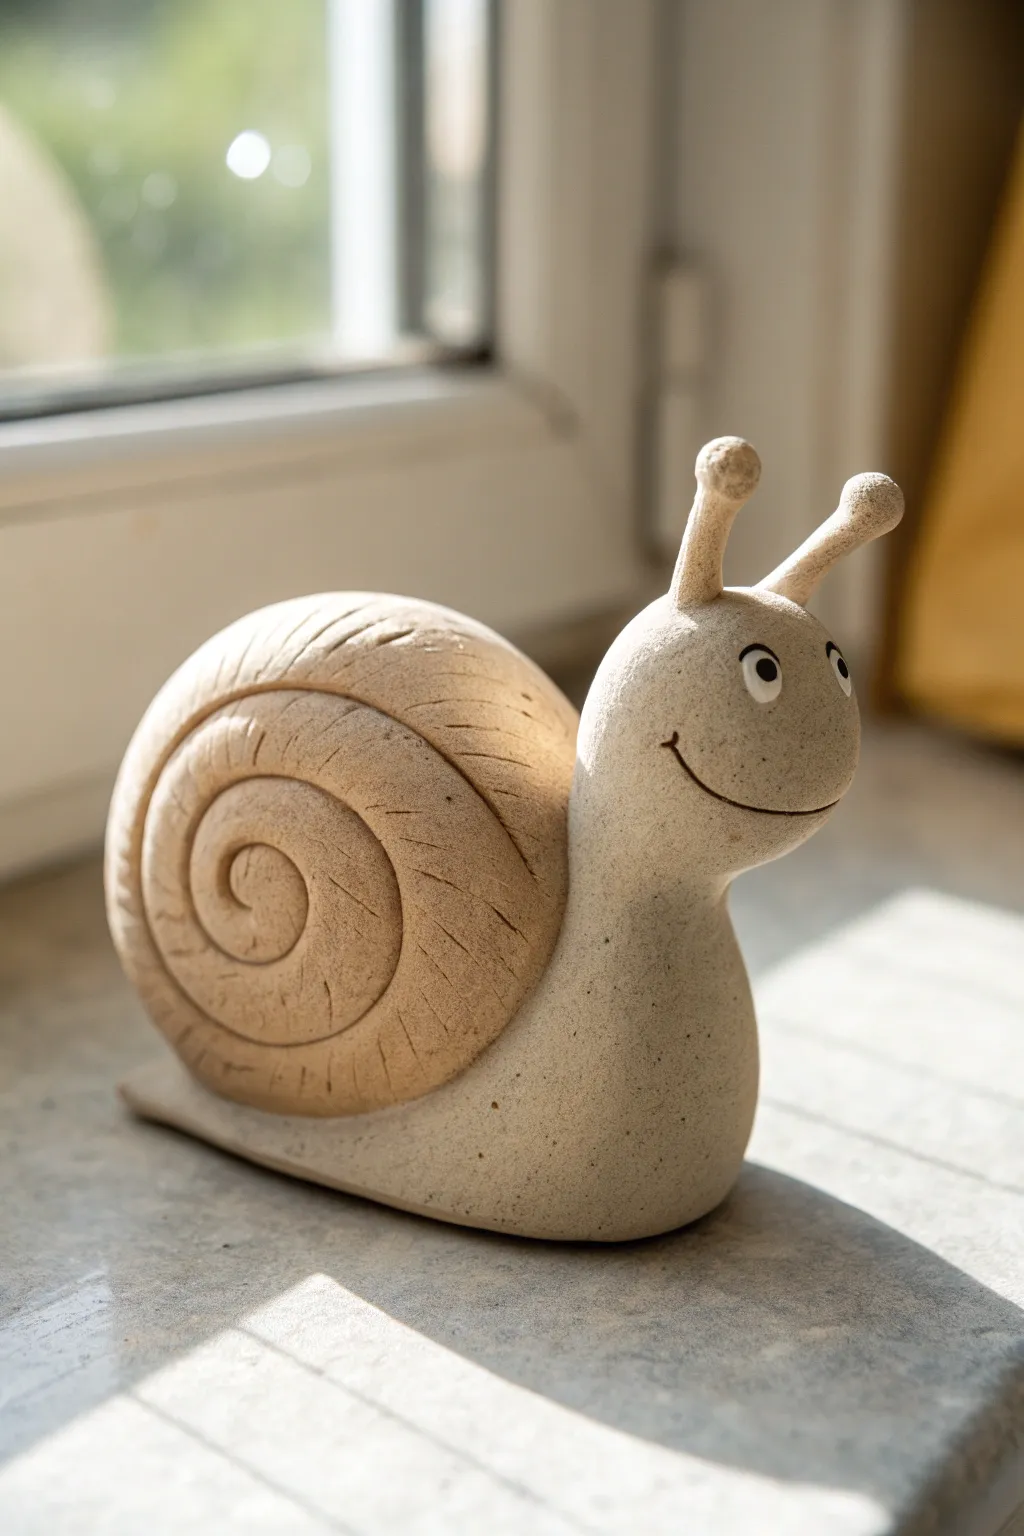
Sculpt a charming little garden companion with this easy clay snail project. Featuring a deeply textured spiral shell and a cheerful, upright face, this figurine has a natural, earthy look that fits perfectly on a windowsill.
Step-by-Step
Materials
- Light-colored speckled clay (stoneware or polymer)
- Contrasting beige or tan clay (for the shell)
- Needle tool or toothpick
- Small ball stylus tool
- Wire clay cutter
- Scoring tool (or an old toothbrush)
- Slip (clay water glue)
- White acrylic paint
- Black acrylic paint
- Fine detail paintbrush
- Clear matte varnish (optional)
Step 1: Forming the Body
-
Prepare the base clay:
Start by conditioning a fist-sized ball of your light speckled clay. Roll it into a smooth, thick log shape, tapering it slightly at one end to form the tail. -
Shape the head and neck:
Gently bend the thicker end of the log upwards at a 90-degree angle to create the neck and head. Smooth out the crease where the clay bends so the transition looks natural and strong. -
Refine the form:
Flatten the bottom of the entire body section by tapping it gently on your work surface. This ensures your snail will sit stably without wobbling. -
Create the eyestalks:
Roll two small, identical snake-like coils of the same clay, about an inch long each. Round off the tops to create the little bulbous ends for the eyes. -
Attach the stalks:
Score the top of the snail’s head and the bottom of the stalks. Apply a dab of slip and press the stalks firmly onto the head, blending the clay downwards with a modeling tool to secure the seam.
Shell Won’t Stay Up?
If the shell is too heavy and keeps tipping the snail over, insert a toothpick deeper into the body acting as a hidden dowel rod to support the shell’s weight until it dries.
Step 2: Creating the Spiral Shell
-
Roll a massive coil:
Switch to your contrasting tan or beige clay. Roll a very long, thick snake that tapers gradually toward one end. The thick end should be roughly the same width as the snail’s body. -
Coil the shell:
Starting with the thinnest end, begin rolling the clay snake into a tight spiral. Keep wrapping until you have a large, snail-shell disc shape. -
Attach the shell:
Score the back of the snail’s body heavily and do the same to the bottom/side of your spiral shell. Use plenty of slip here, as this is a heavy attachment. -
Secure the join:
Press the shell firmly onto the back. I find it helpful to wiggle it slightly to lock the clays together. Use a tool to smooth the clay from the underside of the shell onto the body where they meet. -
Add texture:
Using a needle tool or toothpick, carve deep, curved lines radiating from the center of the spiral outward. These lines mimic the growth ridges of a real shell and add great visual interest.
Step 3: Bringing it to Life
-
Carve the smile:
Use the edge of a spoon or a curved modeling tool to press a wide, U-shaped smile into the face. Deepen the corners slightly for a happier expression. -
Mark the eye sockets:
With a ball stylus, press two shallow indentations just below the eyestalks where the painted eyes will go. -
Smooth and verify:
Check over your sculpture for any unwanted fingerprints. Smooth them away with a barely damp sponge or your finger. -
Dry or Bake:
If using air-dry or polymer clay, follow the package instructions to cure. If using ceramic clay, let it dry slowly under plastic before firing. -
Paint the eyes:
Once hardened and cooled, use a fine brush to paint two white ovals in the indentations you made earlier. -
Add pupils:
When the white paint is fully dry, add a small black dot to the upper right corner of each eye. This creates a cute, glancing look. -
Protect the piece:
Finish by applying a clear matte varnish if desired, especially if this snail will be living near any moisture.
Antique Finish
To make the textures pop, dilute brown acrylic paint with water. Brush it over the shell’s grooves, then immediately wipe the surface with a rag, leaving dark paint only in the cracks.
Enjoy your new slow-moving friend sitting happily on your shelf


What Really Happens Inside the Kiln
Learn how time and temperature work together inside the kiln to transform clay into durable ceramic.
Happy Mushroom With A Chunky Stem
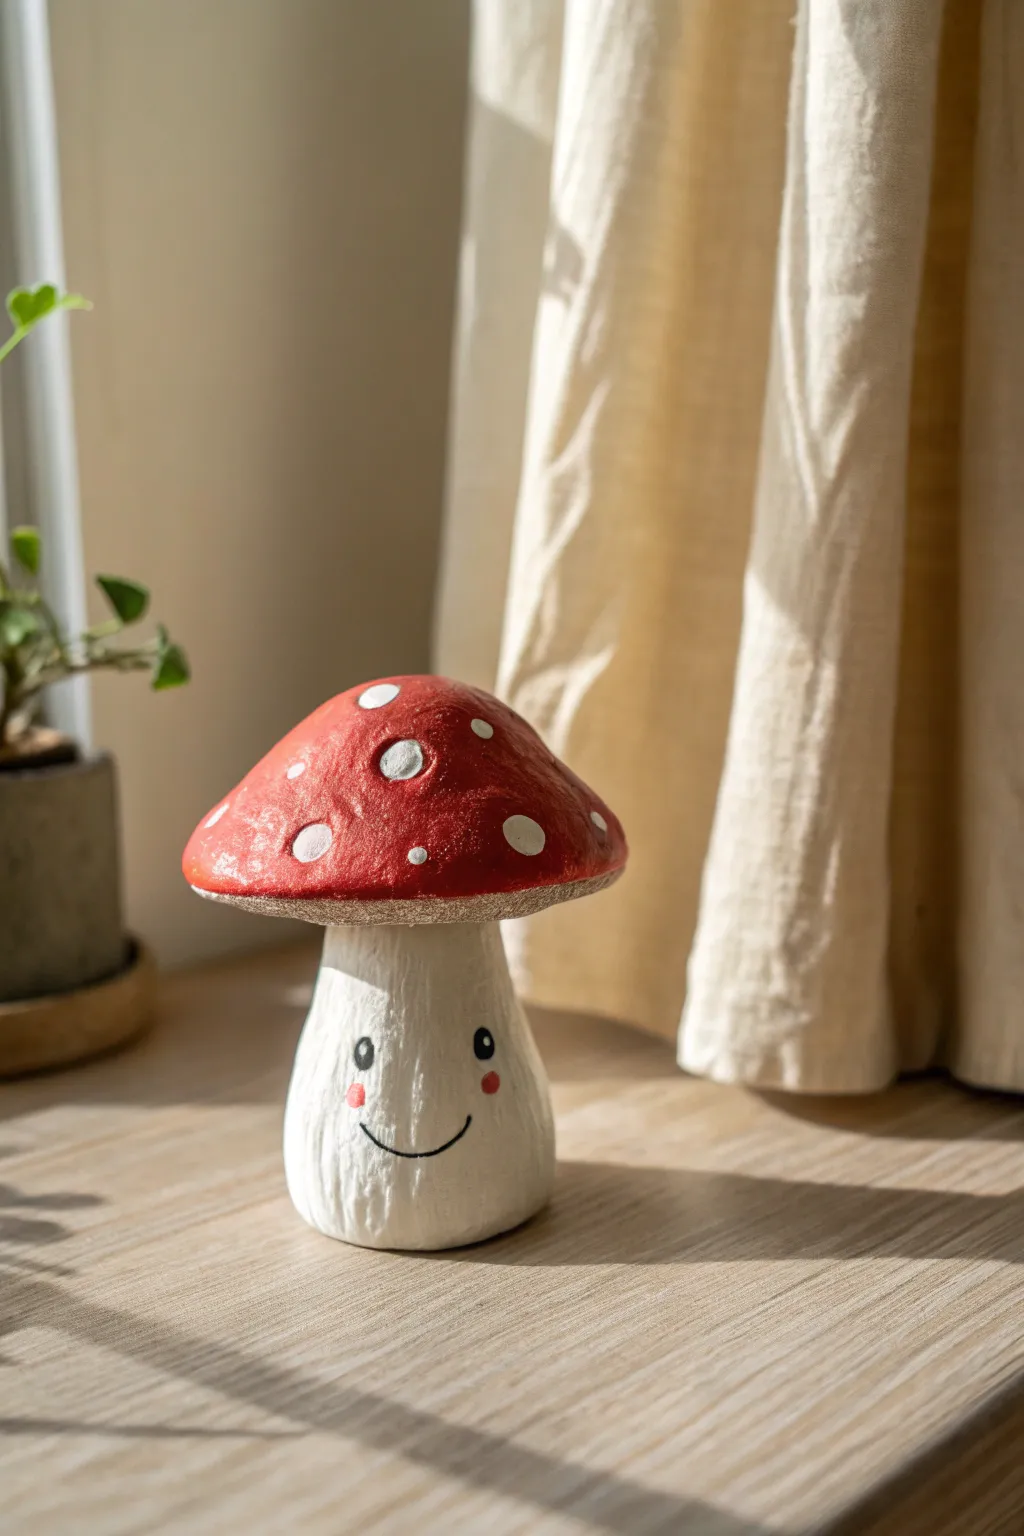
Bring a touch of forest charm to your windowsill with this adorable, bright-eyed mushroom figure. Its chunky white stem features a simple, painted-on smile, while the textured red cap adds a classic fairytale vibe to any corner of your home.
Step-by-Step Guide
Materials
- Air-dry clay (white)
- Acrylic paints (Red, White, Black, Pink)
- Sculpting tools (or a toothpick)
- Rolling pin
- Aluminum foil
- Fine grit sandpaper
- Paintbrushes (medium flat, small detail)
- Matte varnish or sealant
- Water cup
Step 1: Sculpting the Base Form
-
Core construction:
Begin by crumpling a piece of aluminum foil into a thick, slightly tapered cylinder. This will be the core of the stem to save clay and keep the figure lightweight. -
Stem shaping:
Roll out a slab of white air-dry clay to about 1/4 inch thickness. Wrap this around your foil cylinder, smoothing the seam with a little water on your finger until it disappears. -
Creating the base:
Flatten the bottom of the stem against your work surface so the mushroom stands independently. Gently widen the base slightly to give it that ‘chunky’ stable look visible in the photo. -
Top prep:
Flatten the top of the stem slightly to create a platform where the cap will eventually sit. Set this piece aside to firm up while you work on the cap.
Cracks in the Clay?
If small cracks appear during drying, create a ‘slip’ paste by mixing a bit of fresh clay with water. Smear this into constraints, let dry, and sand smooth.
Step 2: Creating the Cap
-
Foil dome:
Shape a second piece of aluminum foil into a dome or bowl shape. It should be wider than your stem. This acts as the armature for the mushroom cap. -
Covering the cap:
Roll out more clay and drape it over the foil dome. Trim the excess around the rim, tucking the edges underneath for a neat finish. -
Adding texture:
Before the clay dries, take a crumpled ball of tin foil or a coarse sponge and gently press it all over the surface of the cap. This creates the organic, pitted texture that gives the mushroom character. -
Assembly:
Score (scratch) the top of the stem and the underside of the cap. Apply a dab of water or liquid clay slip to these scored areas and press them firmly together. -
Refining the connection:
Use a sculpting tool to smooth the clay where the cap meets the stem underneath, ensuring a strong bond. I like to add a tiny coil of clay here to reinforce the neck if it feels wobbly. -
Drying time:
Allow the entire figure to dry completely. This usually takes 24-48 hours depending on humidity. Don’t rush this step or cracks may appear.
Add Some Sparkle
For a magical twist, mix fine iridescent glitter into your white paint for the spots, or use a gloss varnish only on the eyes to make them look wet and shiny.
Step 3: Painting and Details
-
Sanding:
Once bone dry, lightly sand the stem if there are any harsh rough patches, but leave the uneven texture on the stem as it adds to the rustic look. -
Base coat:
Paint the stem with white acrylic paint. You might need two coats for opaque coverage. Let it dry. -
Red cap:
Paint the entire top surface of the cap with a vibrant red acrylic. Use a stippling motion (dabbing straight down) to help the paint get into all those little texture pits you created earlier. -
Adding spots:
Dip a round paintbrush or the end of a chopstick into white paint. Dot various sizes of circles onto the red cap. Don’t make them perfect circles; organic shapes look more natural. -
Drawing the face:
Using a very fine detail brush and black paint, paint two small vertical ovals for eyes about halfway up the stem. -
The smile:
Paint a thin, u-shaped line between the eyes for the smile. Keep the line slightly shaky or imperfect to match the handmade aesthetic. -
Rosy cheeks:
Mix a tiny amount of red with white to make a soft pink. Dab two small dots just below the eyes for blushing cheeks. -
Eye highlights:
Add a tiny speck of white paint inside the black part of the eyes to bring the character to life. -
Sealing:
Finish by coating the entire mushroom in a matte varnish to protect the paint and give it a finished, professional sheen.
Place your happy mushroom near ample light to let those cheerful colors pop against your decor
Cute Pumpkin With Simple Grooves
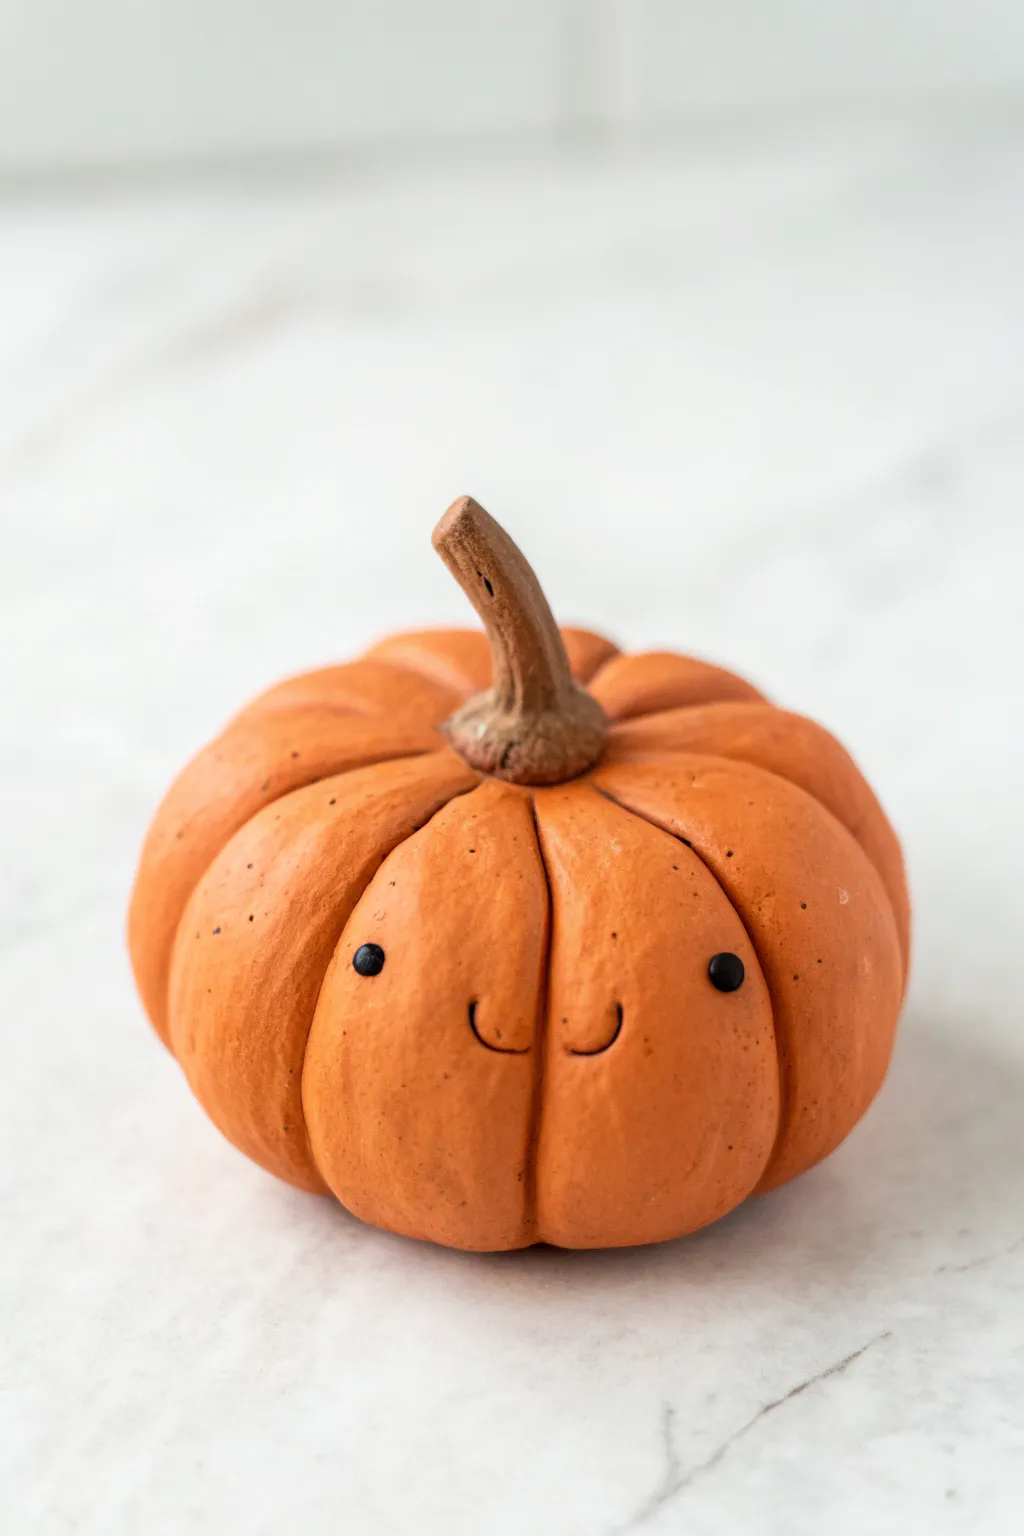
Embrace the autumn spirit with this adorable little clay companion. With its charming, tiny face and classic ribbed texture, this miniature pumpkin is the perfect easy project for beginners looking to create seasonal decor.
How-To Guide
Materials
- Polymer clay (Orange and Brown)
- Black acrylic paint or black clay
- Fimo gloss varnish or matte finish (optional)
- Needle tool or toothpick
- Ball stylus tool (small)
- Soft paintbrush
- Baking sheet
- Oven (if using oven-bake clay)
Step 1: Forming the Base
-
Condition the Clay:
Begin by taking a chunk of orange polymer clay about the size of a golf ball. Knead it thoroughly in your warm hands until it becomes soft and pliable, which prevents cracking later. -
Roll a Sphere:
Roll the conditioned clay between your palms to form a smooth, perfect sphere. Ensure there are no visible seams or large air bubbles on the surface. -
Flatten Slightly:
Gently press the sphere onto your work surface to flatten the bottom slightly so it sits stable. Then, give a very light press on the top to create a slightly squat, pumpkin-like shape.
Step 2: Adding Texture
-
Mark the Center:
Using your needle tool, make a small indentation at the very center of the top of the pumpkin. This guide hole shows where the stem will eventually live. -
Create Vertical Lines:
Starting from the center indentation, gently drag your needle tool down the side of the sphere to the bottom center. Repeat this to divide the pumpkin into quarters. -
Divide Sections:
Now, add additional lines in between your first four marks. Aim for about 8 to 10 sections total, spacing them somewhat evenly around the circumference. -
Deepen the Grooves:
I prefer to use the side of the needle tool or a modeling tool to widen and deepen these grooves now. Smooth the edges of the grooves with your finger so they look like soft ripples rather than sharp cuts. -
Add Speckles (Optional):
To mimic the natural look in the photo, you can take an old toothbrush and very lightly flick tiny specks of brown paint onto the orange clay, or gently texture the surface with sandpaper for a matte look.
Smudging The Face?
If you smudge the tiny black eye clay onto the orange, use a cotton swab dipped in a tiny amount of rubbing alcohol or baby oil to wipe the orange clay clean before baking.
Step 3: Creating the Face
-
Position the Eyes:
Choose a ‘front’ section that is relatively smooth. Take your small ball stylus and press two indentations into the clay where you want the eyes to be. -
Sculpt the Mouth:
Using a very fine needle tool, gently carve a small ‘w’ shape or two connected ‘u’ shapes between and slightly below the eyes. Press lightly to ensure the line is visible but delicate. -
Insert the Eyes:
Roll two impossibly tiny balls of black clay. Place them into the eye indentations you made earlier and press them flat so they are flush with the pumpkin’s surface.
Make it a Charm
Before baking, insert a metal eye-pin into the clay right next to the stem. Once baked, you can attach a jump ring and chain to turn your pumpkin into a necklace or keychain.
Step 4: The Stem and Finish
-
Shape the Stem:
Condition a small piece of brown clay. Roll it into a tapered log shape, keeping one end slightly wider. -
Texture the Stem:
Use your needle tool to scratch vertical lines up and down the brown clay log to simulate a wood-like texture. Twist the top slightly for a realistic curve. -
Attach the Stem:
Place the wider end of the stem into the top center indentation of your pumpkin. Use a tool to blend the bottom edges of the brown clay onto the orange slopes for a secure bond. -
Bake:
Place your pumpkin on a baking sheet lined with parchment paper. Bake according to your specific clay manufacturer’s instructions (usually around 275°F or 135°C for 15-30 minutes). -
Cool Down:
Let the pumpkin cool completely inside the oven or on a wire rack. The clay is fragile when hot, so patience is key here. -
Varnish:
Once fully cool, apply a thin coat of matte or satin varnish if you want to protect the surface and give it a finished sheen.
Now you have a charming eternal pumpkin to brighten up your desk all year long

TRACK YOUR CERAMIC JOURNEY
Capture glaze tests, firing details, and creative progress—all in one simple printable. Make your projects easier to repeat and improve.
Friendly Little Ghost Figure
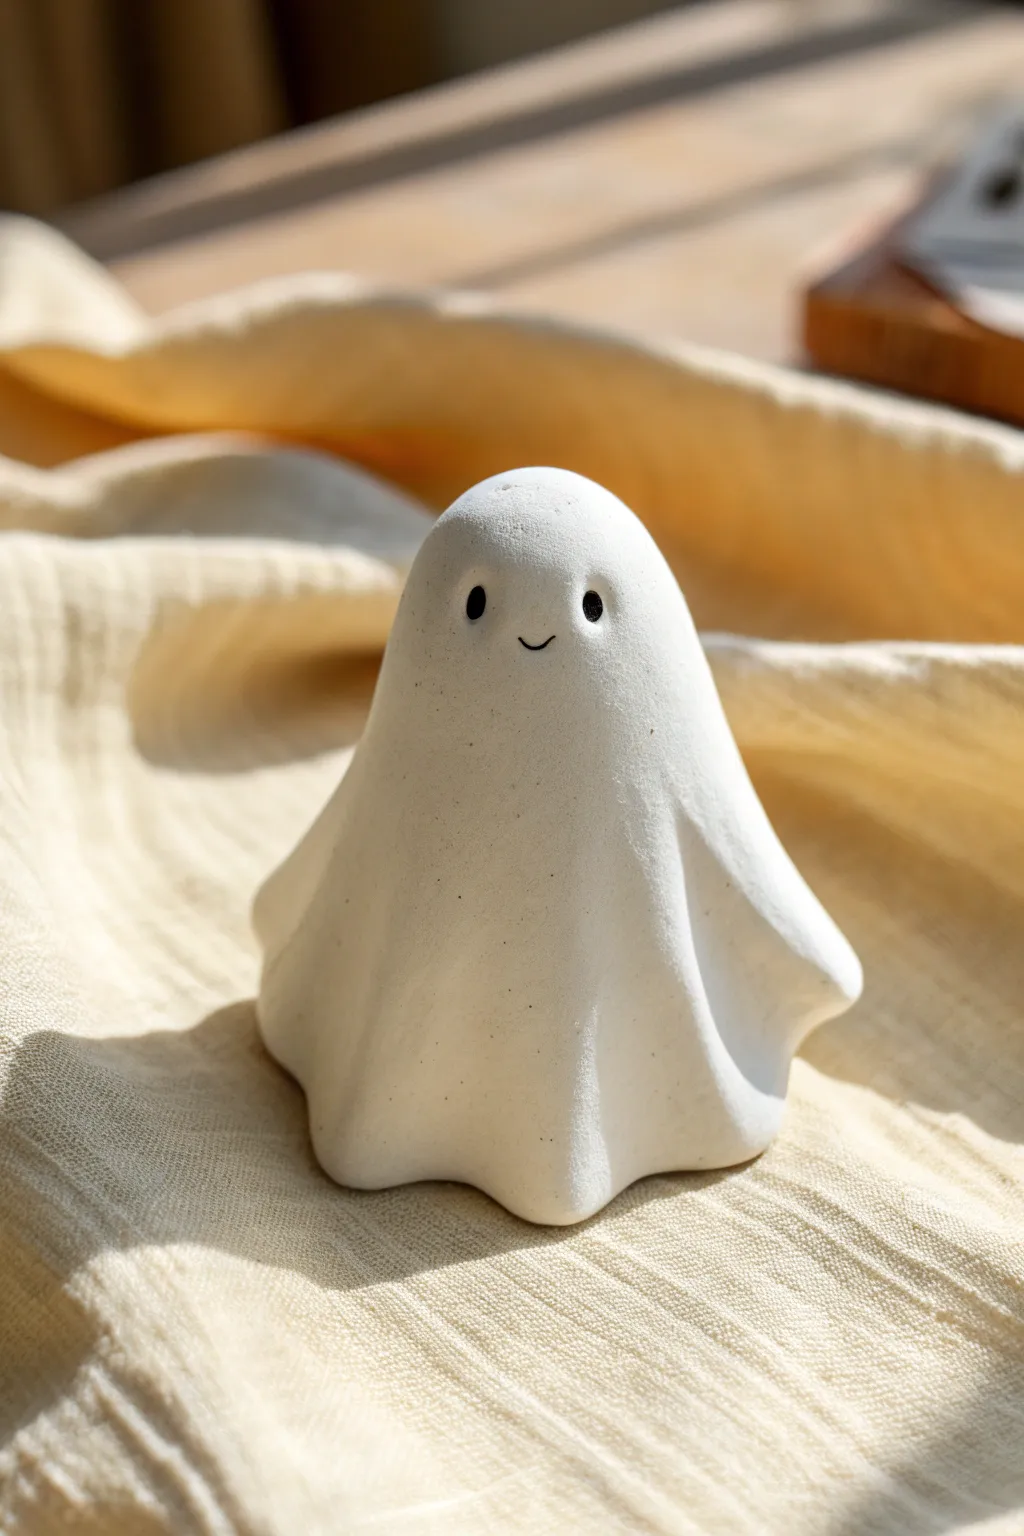
This charming minimalist ghost figure brings a touch of whimsical spookiness to your decor without being scary. Its smooth, matte finish and gentle folds give it a classic sheet-ghost appearance that looks adorable on a desk or shelf.
Step-by-Step Tutorial
Materials
- White smooth air-dry clay (or polymer clay)
- Black acrylic paint
- Fine-point paintbrush or dotting tool
- Aluminum foil (for the core)
- Small rolling pin
- Modeling tools or a smooth butter knife
- Fine-grit sandpaper (optional)
- Matte varnish (optional)
Step 1: Forming the Base
-
Create a foil core:
Start by scrunching a piece of aluminum foil into a cone shape with a rounded top. This saves clay and makes the figure lighter. Aim for a shape about 2 inches tall and 1.5 inches wide at the base. -
Condition the clay:
Take a handful of white air-dry clay and knead it well until it is soft and pliable. If the clay feels dry, I like to dip my fingers in a tiny bit of water to rehydrate it. -
Roll out a sheet:
Roll a portion of the clay into a flat, circular slab about 1/4 inch thick. This will become the draped ‘fabric’ of the ghost. -
Cover the core:
Place your foil cone in the center of the clay circle. Gently lift the edges of the clay and drape them over the foil, smoothing the clay upwards toward the rounded head. -
Smooth the seams:
Once the clay fully covers the foil, use your fingers and a little water to smooth out any seams or cracks so the ghost looks like one solid piece.
Step 2: Sculpting the Details
-
Shape the head:
Gently mold the top of the form into a smooth, dome-like head. Ensure it is symmetrical and round. -
Create the signature folds:
Using your thumb and forefinger, gently pinch and pull the bottom edges of the clay outward to create wavy folds. This mimics the look of a flowing bedsheet. -
Refine the draping:
Use a modeling tool or the handle of a paintbrush to deepen the valleys between the folds. The folds should look soft and organic, not sharp. -
Add gentle arms:
On the sides of the ghost, lightly press and pull two small sections of clay outward to suggest little arms beneath the sheet. Keep them subtle and integrated. -
Check balance:
Set the ghost on a flat surface to make sure it stands straight. Press gently on the top if you need to flatten the base slightly for stability. -
Smoothing the surface:
Dip your finger in water and run it over the entire surface to remove fingerprints and tiny imperfections. The goal is a clean, matte texture.
Clean Clay Tip
Keep a pack of wet wipes nearby while sculpting. Dust and lint love white clay, so wiping your hands frequently ensures your ghost stays pristine white without needing paint later.
Step 3: Finishing Touches
-
Let it dry:
Allow the figure to dry completely. For air-dry clay of this thickness, this usually takes 24 to 48 hours. Keep it away from direct heat to prevent cracking. -
Slight sanding:
Once fully dry, you can use fine-grit sandpaper to buff away any remaining rough spots, giving it a porcelain-like feel. -
Paint the eyes:
Using a fine-point brush or a dotting tool, carefully dab two black ovals for the eyes. Position them wide apart for a cute, innocent expression. -
Paint the smile:
With the very tip of your finest brush, paint a tiny, thin curve between the eyes for the smile. Keep the line delicate to maintain the minimalist style. -
Seal the piece:
If desired, apply a coat of matte varnish to protect the paint and clay. Avoid glossy finishes if you want to keep the soft, fabric-like appearance seen in the original image.
Cracks Appearing?
If small hairline cracks appear as the clay dries, don’t panic. Make a ‘slurry’ by mixing a tiny bit of clay with water until it’s a paste, and fill the cracks, then smooth it over.
Place your completed friendly ghost on a warm windowsill or a cozy corner to bring a smile to anyone who sees it
Blob Frog With A Big Smile
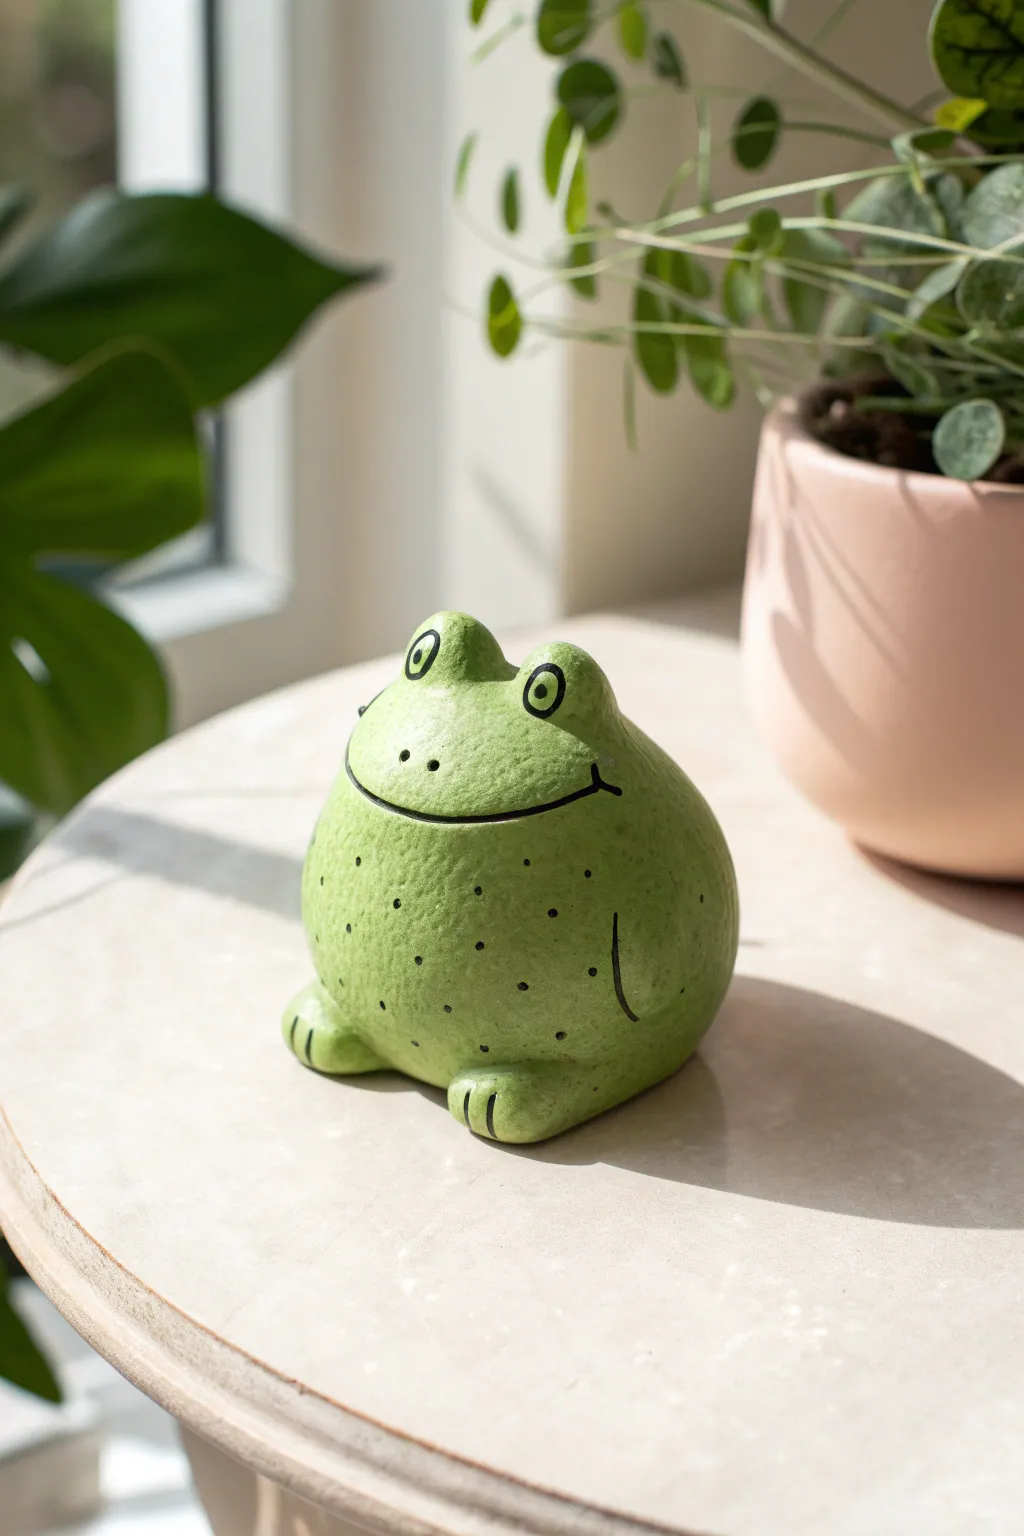
This cheerful little amphibian is the perfect starting point for sculpting, featuring a simple spherical body that is packed with personality. With its wide, painted smile and charming speckled skin, this heavy-bottomed friend adds a touch of whimsy to any desk or windowsill.
Step-by-Step Guide
Materials
- Air-dry clay (or polymer clay)
- Acrylic paints (Light green, black, white)
- Fine-grit sandpaper
- Small paintbrush (detail brush)
- Medium paintbrush
- Needle tool or toothpick
- Ball stylus tool
- Water cup (for smoothing)
- Matte or satin varnish (optional)
Step 1: Shaping the Base
-
Form the main sphere:
Start with a fist-sized ball of clay. Roll it firmly between your palms until it is perfectly round and smooth. -
Create the base:
Gently tap the ball onto your work surface to create a flat bottom. This ensures your frog sits stably without rolling away. -
Shape the body taper:
Using your palms, gently narrow the top third of the sphere just slightly. You don’t want a neck, just a subtle taper so the body feels weighted at the bottom. -
Add the eyes:
Roll two small, marble-sized balls of clay. Place them side-by-side on the very top of the head. -
Blend the eyes:
Using your thumb or a modeling tool, smear the clay from the bottom of the eye balls down into the main body so they become one solid unit. Keep the tops rounded.
Smoother Blending
If you struggle to blend the eyes or feet seamlessly, use the back of a spoon dipped in water. The curve of the spoon matches the frog’s round body perfectly.
Step 2: Adding Details
-
Make the feet:
Roll two smaller flattened ovals for the feet. Place them at the front base of the body, sticking out slightly. -
Blend the feet:
Like the eyes, blend the back edge of the feet into the main body so they are securely attached. -
Detail the toes:
Take a needle tool or toothpick and press two indentations into the front of each foot to imply three simple toes. -
Form the arms:
Roll tiny snakes of clay and press them vertically onto the sides of the body to suggest arms resting against the belly, blending them until they look like slight reliefs on the skin. -
Inscribe the mouth:
Use a needle tool to gently carve a long, wide arc across the face for the smile. I find it helpful to start in the middle and curve upwards toward the cheeks. -
Smooth the surface:
Dip your finger in a little water and gently run it over the entire sculpture to remove fingerprints and harsh tool marks. -
Dry the sculpture:
Let the clay dry completely according to the package instructions (usually 24-48 hours for air-dry clay).
Make it a Bank
Before the clay dries, cut a rectangular slot in the back and hollow out the inside to turn your cheerful frog sculpture into a functional coin bank.
Step 3: Painting & Finishing
-
Sand imperfections:
Once fully dry, lightly sand any rough spots or bumps with fine-grit sandpaper for a ceramic-smooth finish. -
Apply base coat:
Paint the entire frog with a light, warm green acrylic paint. You may need two coats for opaque coverage. -
Define the mouth:
Use a very thin brush and black paint to carefully trace the carved smile line, adding small perpendicular tick marks at the corners. -
Paint the eyes:
Paint a white circle inside the sculpted eye bumps. Once dry, add a black outline and a small black pupil in the center. -
Add the nostrils:
Paint two tiny black dots between the eyes, slightly lower than height of the pupils. -
Create the texture:
Dip a stiff brush or stylus into black paint and gently dab small speckles all over the lower body and belly. -
Seal:
If desired, apply a coat of matte or satin varnish to protect the paint and give it a finished sheen.
Now you have a smiling companion ready to brighten up your shelf
Mini Dino With A Chunky Tail
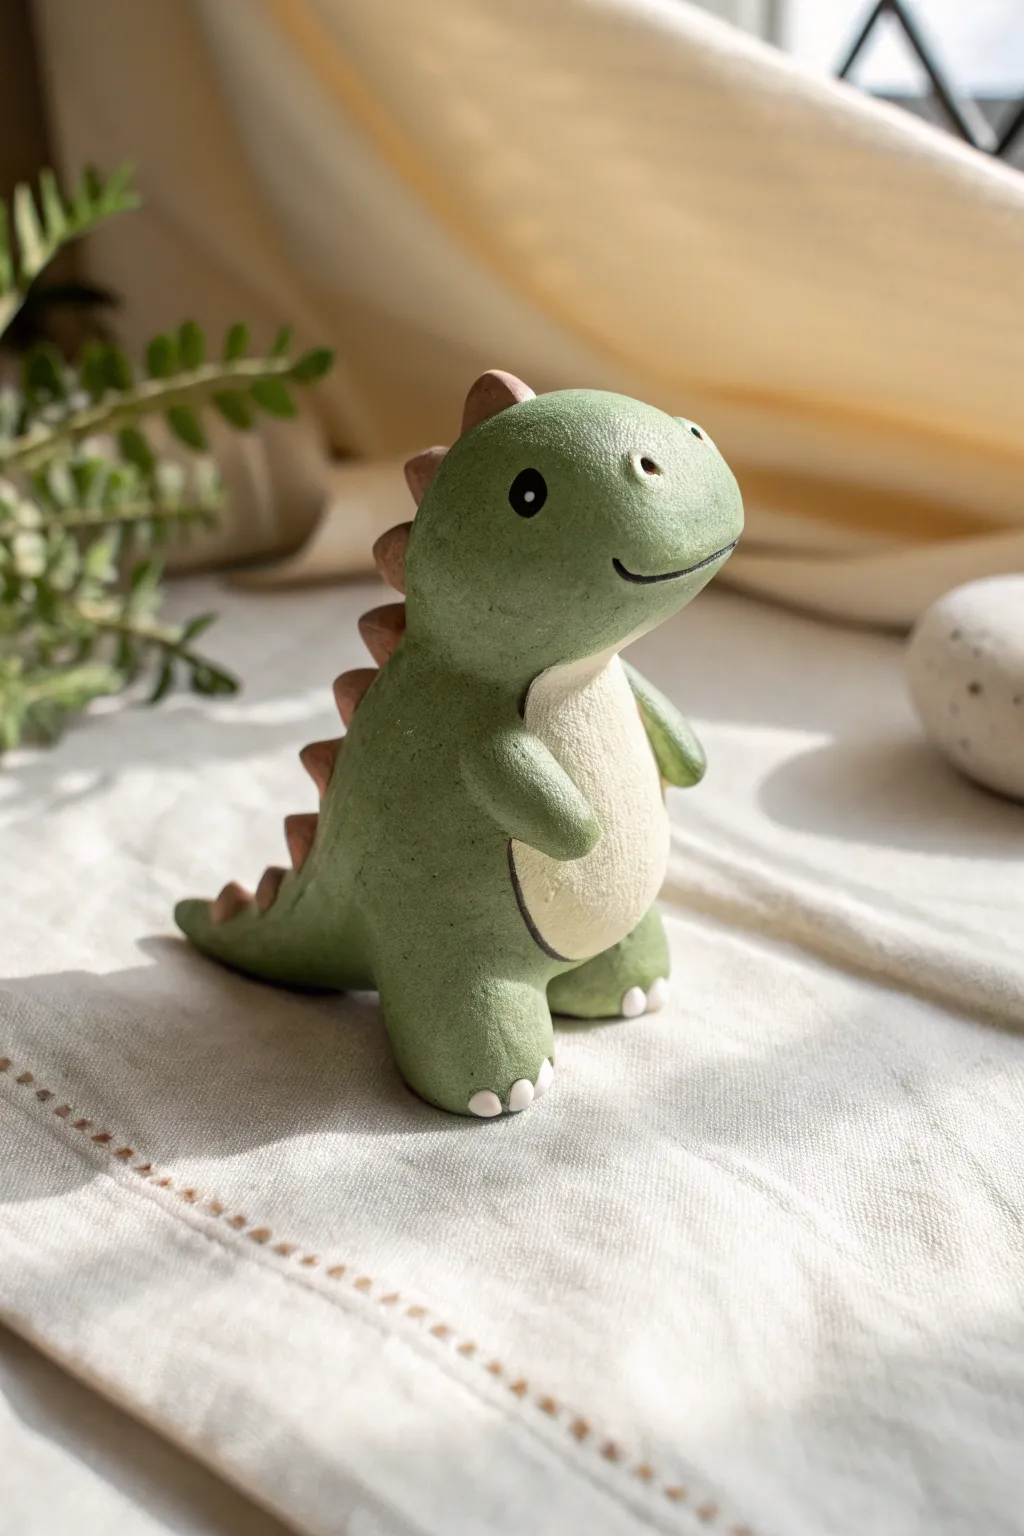
This adorable dinosaur figurine features a wonderfully chunky aesthetic with its round belly and stubby tail that acts as a natural stand. The project uses simple shapes to create a characterful little friend with a smooth, matte finish that looks professional yet handmade.
How-To Guide
Materials
- Green polymer clay (sage or olive tone)
- Cream/off-white polymer clay
- Reddish-brown polymer clay (terra cotta tone)
- Black and white acrylic paint
- Small dotting tool or toothpick
- Modeling tools (smoothing tool, knife)
- Aluminum foil (optional for core)
- Oven for baking (if using polymer clay)
Step 1: Basic Body Construction
-
Form the main shape:
Start with a large ball of green clay. Roll it into a smooth pear shape, keeping the bottom wide and heavy. -
Shape the head:
Gently gently pinch and mold the narrower top part of the pear to define the head area. Keep the transition to the neck subtle and thick. -
Create the tail:
Pull a section of clay from the heavy bottom bae backwards to form a thick, conical tail. This tail, along with the feet, will create a tripod to help the figure stand stably. -
Add the legs:
Roll two thick logs of green clay for the legs. Attach them to the bottom front of the body, blending the seams completely with your smoothing tool until they look like part of the main piece. -
Make the arms:
Create two smaller, teardrop-shaped pieces of green clay. Press them onto the sides of the chest area, angling them slightly forward for a cute posture.
Step 2: Adding Details & Character
-
Create the belly patch:
Roll a thin, flat oval of cream-colored clay. Press this onto the front of the body, starting just under the chin and ending between the legs. -
Texture the belly:
Gently pat the cream clay to ensure it adheres fully without distorting the oval shape too much. -
Prepare the spikes:
Take your reddish-brown clay and create a series of small triangles. I find it easiest to roll a small snake and cut it into even segments first. -
Attach the spikes:
Press the triangles in a single row starting from the top of the head, down the back, and onto the tail. Space them evenly. -
Refine the face:
Use a small ball tool to make slight indentations where the eyes will go. This helps with placement later. -
Add the smile:
Use a curved blade or the side of a toothpick to gently impress a wide, curved smile into the clay. -
Create nostrils:
Poke two tiny holes above the smile for the nostrils using a needle tool. -
Make the toes:
Roll tiny balls of white clay and press three onto the tip of each foot for claws.
Smooth Operator
Before baking, use a drop of baby oil on your finger to gently rub away any fingerprints on the clay. This creates that flawless, professional matte finish.
Step 3: Finishing Touches
-
Bake the figure:
Bake your dinosaur according to the manufacturer’s instructions for your specific brand of clay. Let it cool completely. -
Paint the eyes:
Using a small detail brush or dotting tool, paint filled-in black circles into the eye indentations you made earlier. -
Add eye highlights:
Once the black paint is dry, add a tiny white dot to the upper corner of each eye to bring the character to life. -
Enhance the smile:
If desired, very carefully run a thin line of black paint or a fine-tip marker inside the smile indentation to make it pop.
Go Prehistoric
Try marbleizing two shades of green together for the body to give the ‘skin’ a more organic, textured look without actually adding rough texture.
Your chunky little dinosaur is now ready to guard your desk or bookshelf
Bunny With Long Ears And A Puffy Body
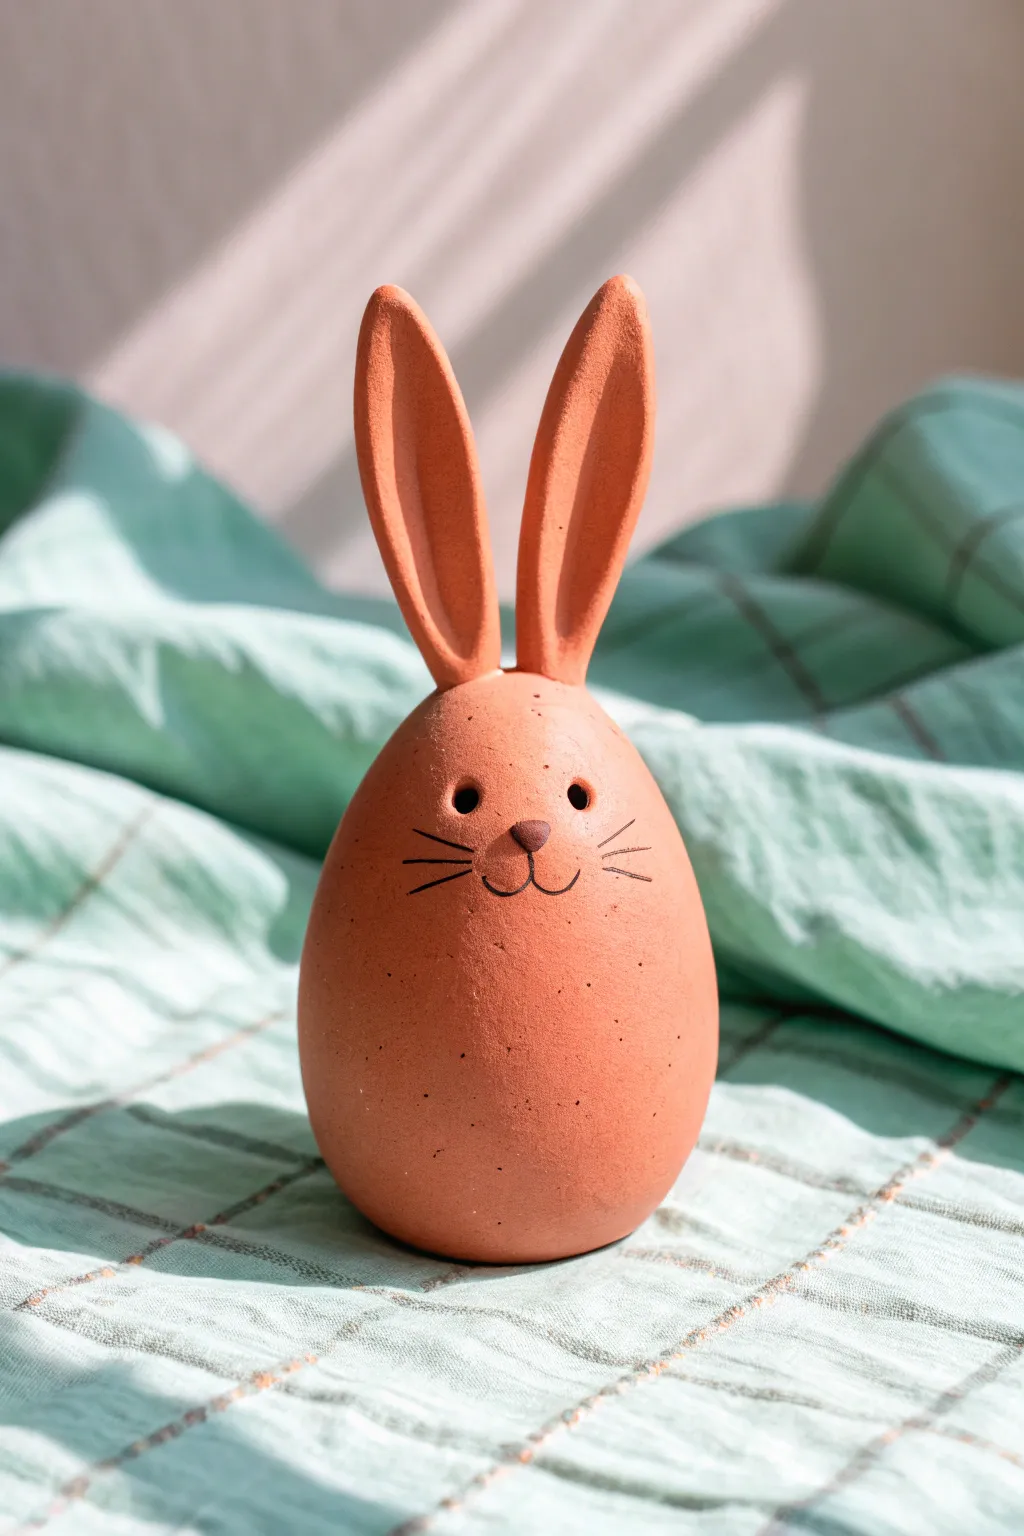
This charming project combines the simplicity of an egg shape with the character of long, expressive ears to create a minimalist bunny figure. The warm, terracotta-colored finish gives it a rustic, handcrafted appeal perfect for spring décor or garden shelves.
Detailed Instructions
Materials
- Terracotta-colored polymer clay or air-dry clay (approx. 200g)
- Black fine-point permanent marker or acrylic paint pen
- Small ball stylus tool or a round-headed pin
- Smooth work surface or silicone mat
- Rolling pin (optional)
- Clay adhesive or ‘slip’ (if using air-dry clay)
- Small paintbrush (for blending)
- Sandpaper (fine grit)
Step 1: Forming the Base
-
Prepare the Clay:
Begin by conditioning your clay thoroughly until it’s soft and pliable. If you are using air-dry clay, knead it with a drop of water to smooth out any potential cracks. -
Shape the Body:
Take a large portion of the clay (about the size of a tennis ball) and roll it into a smooth sphere between your palms. -
Refine the Egg Shape:
Gently taper the top of the sphere to create an egg shape. The bottom should remain wider to ensure the bunny sits stably without tipping over. -
Flatten the Base:
Tap the wider bottom end against your work surface firmly once or twice to create a flat standing area. -
Smoothing:
Run your thumb over the surface to remove any fingerprints. For a speckled, natural pottery look like the original, you don’t need it to be perfectly glass-smooth.
Floppy Ears?
If the ears won’t stand up, insert short lengths of toothpicks or wire into the head as internal armatures, then slide the clay ears over them for support.
Step 2: Sculpting the Ears
-
Portion the Ears:
Pinch off two equal-sized pieces of clay, roughly the size of large grapes. -
Elongate the Shapes:
Roll each piece into a long sausage shape, tapering both ends slightly but leaving the middle thicker. -
Flatten and Groove:
Gently flatten the rolls against your work surface. Use your thumb or a modeling tool to press a shallow indentation down the center of each ear to create the inner ear canal. -
Refining the Tips:
Pinch the top ends slightly to create a rounded point, giving them that classic rabbit silhouette. -
Attach the Ears:
Press the bottom of the ears firmly onto the top of the egg body. If using air-dry clay, score the attachment points and add a dab of water or slip first. -
Blend the Seams:
Use a modeling tool or your finger to smooth the clay from the base of the ears down onto the head so they are seamless and secure.
Seamless Blending
Dip your finger or tool in water (for air-dry clay) or baby oil (for polymer clay) to completely erase seam lines where the ears attach to the head.
Step 3: Face Details & Finishing
-
Create Eye Sockets:
Using a small ball stylus or a chopstick, press two small, deep indentations into the upper half of the egg shape for the eyes. -
Add the Nose:
Take a tiny, lentil-sized piece of clay. Roll it into a small triangle or oval and press it firmly onto the face, just below the center of the eyes. -
Curing or Drying:
If using polymer clay, bake according to package directions (usually 275°F/135°C). If using air-dry clay, allow it to dry completely for 24-48 hours away from direct heat. -
Sanding (Optional):
Once fully cured or dry, inspect your bunny. If there are sharp distinct ridges, I like to gently sand them down with fine-grit sandpaper for a smoother feel. -
Draw the Whiskers:
Using a fine-point black maker, draw three straight whiskers radiating out from each side of the cheeks. -
Draw the Mouth:
Draw a small vertical line down from the nose, connecting to two curved ‘J’ shapes to form the smiling mouth. -
Darken the Eyes:
Carefully color the inside of the eye indentations with the black marker to give them depth and character. -
Faux Speckling (Optional):
To mimic the stone look in the photo, you can flick a toothbrush with diluted brown paint lightly over the surface.
Place your warm-toned bunny in a spot with natural light to highlight its simple, organic shape
Sleepy Sloth Hugging A Tiny Heart
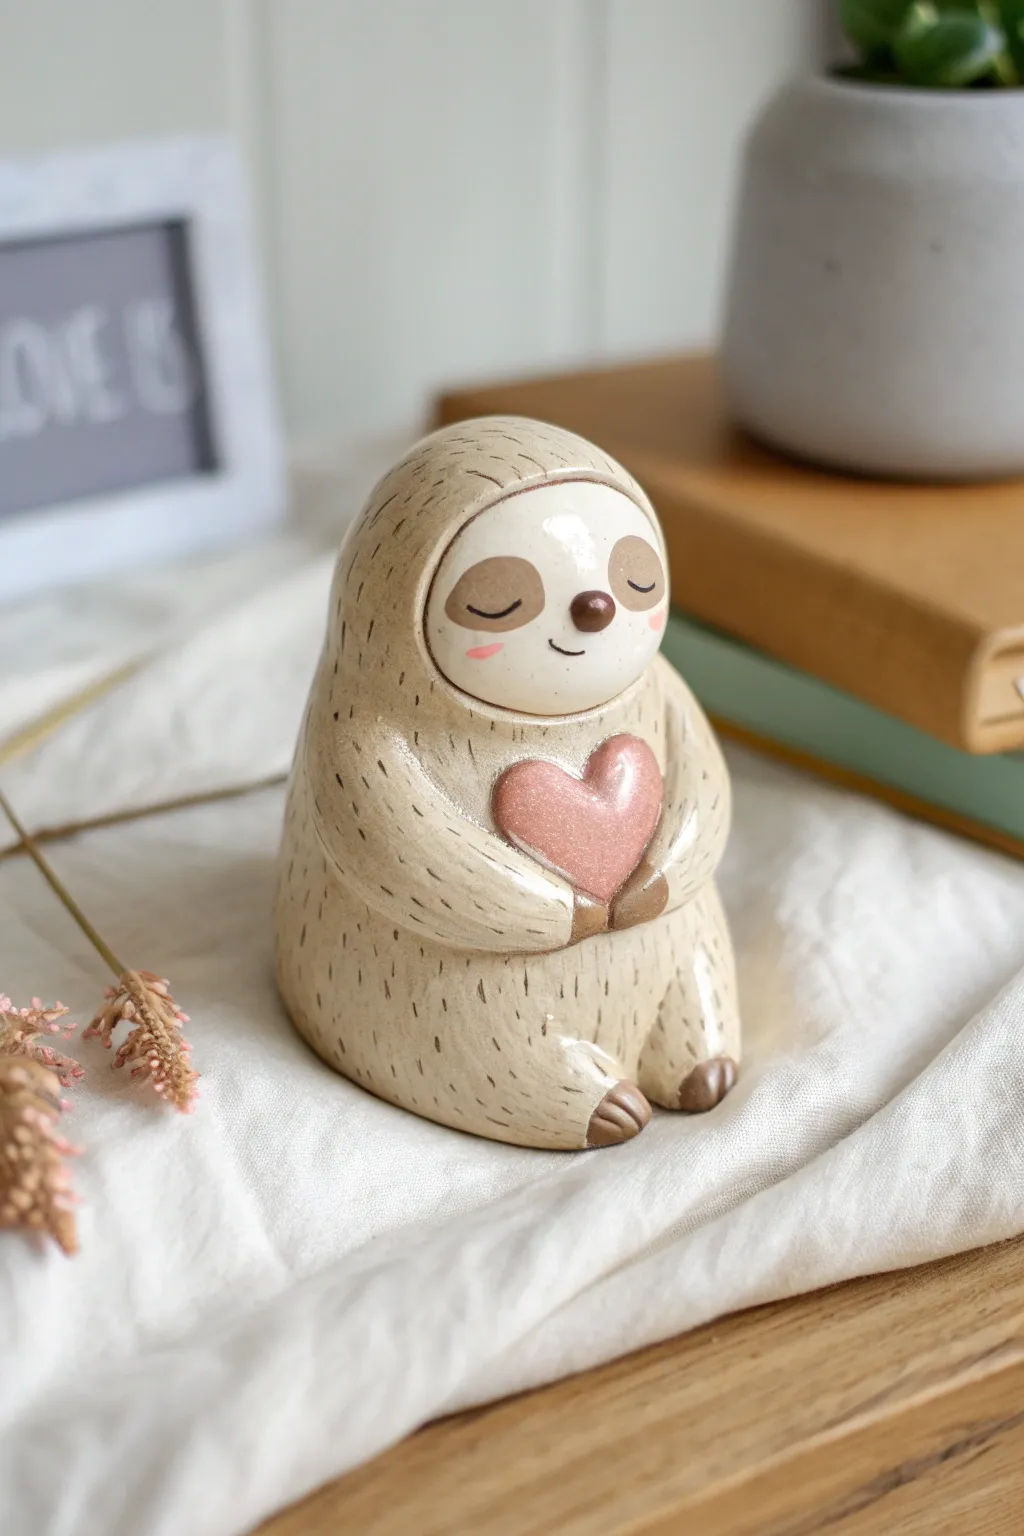
This adorable, sleepy sloth holding a tiny heart makes for a perfect desk companion or a heartfelt handmade gift. With its smooth, rounded body and simple painted details, it is an ideal project for beginners learning to shape character forms.
Step-by-Step Guide
Materials
- Polymer clay (beige/tan, white, light pink)
- Acrylic paints (brown, black, pink)
- Small fine-point paintbrush
- Modeling tools (or a toothpick)
- Gloss glaze (optional)
- Rolling pin or smooth glass jar
- Aluminum foil (for core)
Step 1: Shaping the Base
-
Create a foil core:
Start by scrunching a small piece of aluminum foil into a teardrop shape. This saves clay and helps keep the figure lightweight while baking. -
Condition the clay:
Take your beige or tan clay and knead it well until it is soft and pliable. This prevents cracks later on. -
Cover the core:
Flatten the beige clay into a sheet and wrap it completely around your foil core. -
Smooth the form:
Roll the shape gently between your palms to smooth out any seams. You want a distinct pear shape—narrower at the head and wider at the base so it sits stably.
Fur Texture Tip
Make your fur marks deeper near the bottom and lighter near the face. This adds realistic depth and shading without painting.
Step 2: Adding Features
-
Form the face:
Roll a small ball of white clay, flatten it into a thick disc, and press it onto the upper ‘head’ area of your beige pear base. -
Blend the edges:
Use your thumb or a smoothing tool to gently blend the edges of the white disc into the beige body so it looks like a natural mask pattern. -
Create the arms:
Roll two sausage shapes from beige clay, slightly tapered at one end. These should be long enough to reach from the shoulders to the center of the tummy. -
Attach the arms:
Press the thicker ends of the arms onto the sides of the sloth’s body, blending the clay at the shoulder. Curve them forward as if they are hugging something. -
Make the heart:
Take a small amount of pink clay and shape it into a heart. It should be sized just right to fit between the sloth’s hands. -
Place the heart:
Position the heart on the tummy and gently press the tips of the arm ‘hands’ against the sides of the heart to hold it in place.
Level Up: Accessories
Before baking, add a tiny clay flower on the sloth’s head or swap the heart for a favorite snack like a leaf or strawberry.
Step 3: Details & Legs
-
Add the feet:
Form two small ovals of beige clay for the feet. Press them onto the bottom front of the body, pointing slightly outward. -
Mark the claws:
Using a knife tool or toothpick, gently press three indentations into the ends of the hands and feet to suggest claws. -
Paint the claws:
Once you are happy with the shape, use a tiny amount of brown paint (or dark brown clay) to color just the tips of the hands and feet. -
Texture the fur:
I like to take a needle tool or toothpick and make tiny, random scratch marks all over the beige parts of the body to mimic fur texture.
Step 4: Baking & Painting
-
Bake the figure:
Follow the baking instructions on your specific package of polymer clay. Let the figure cool completely before painting. -
Paint the face:
Using a very fine brush and brown paint, carefully draw two curved lines for the sleepy closed eyes. -
Add the nose:
Paint a small brown oval for the nose right between the eyes, and a tiny curved line underneath for a smile. -
Apply blush:
Dip a dry brush into a tiny bit of pink paint (or use soft pastel powder) and gently dab rosy cheeks under the eyes. -
Glaze the heart:
For a shiny finish, apply a coat of gloss glaze to the pink heart and the nose, leaving the rest of the body matte for contrast.
Enjoy the calm presence of your new little sloth friend on your shelf or desk
Avocado Character With A Pit Belly
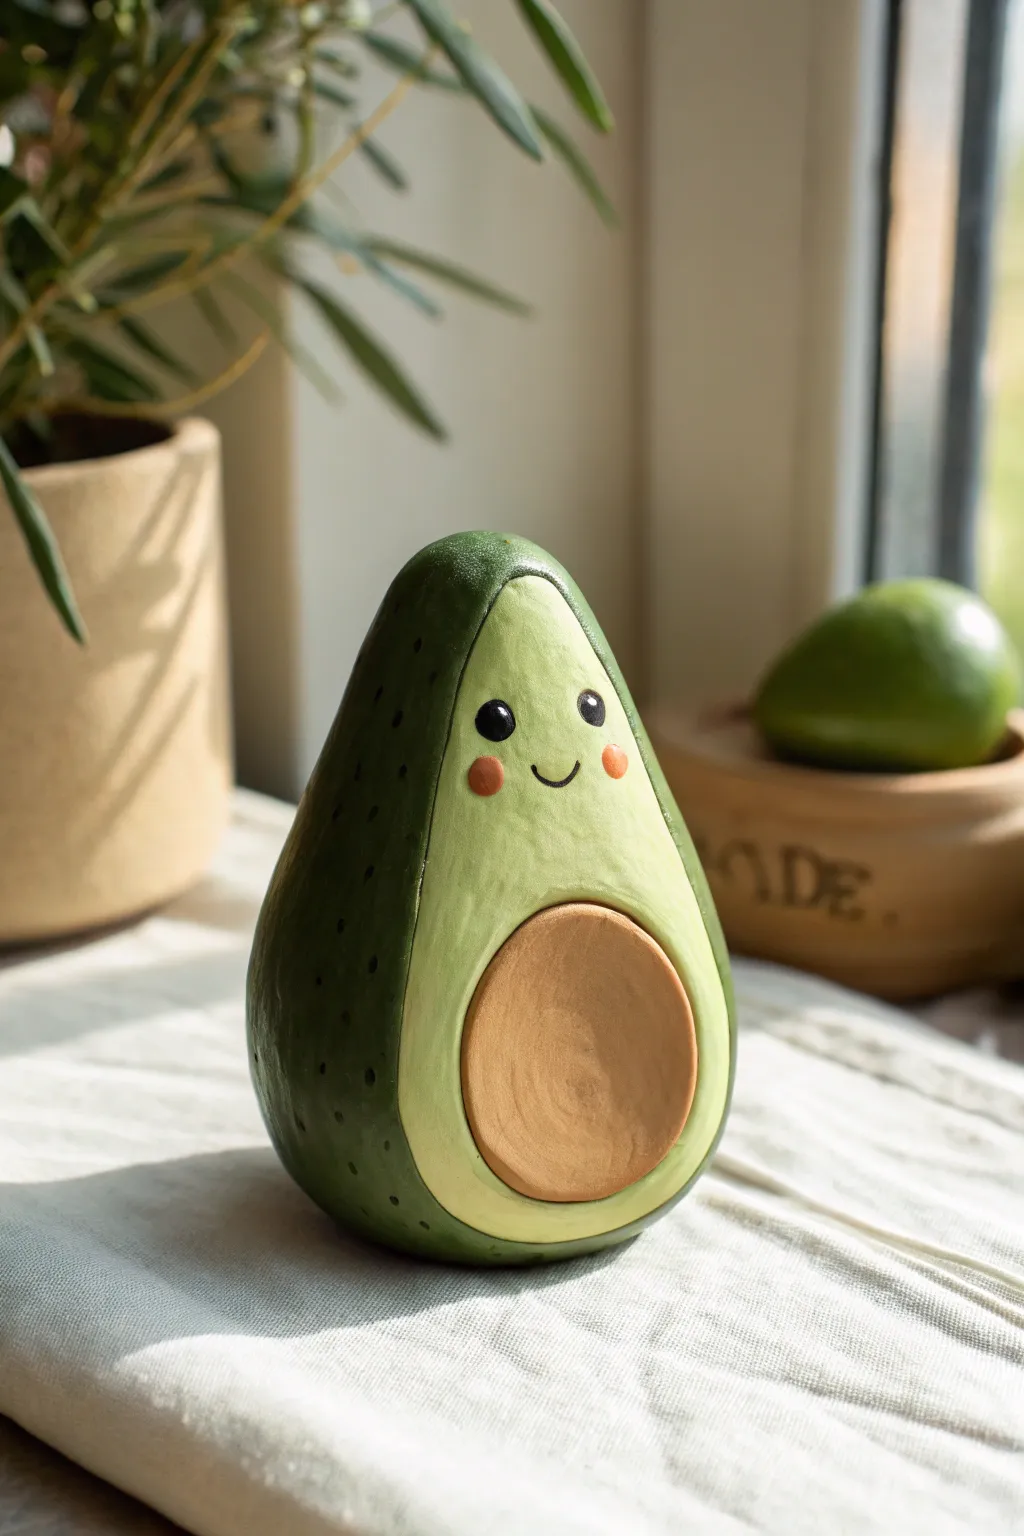
This adorable clay avocado brings a cheerful presence to any shelf with its cute smile and prominent, round belly. The stylized figure features a textured dark green skin, a creamy interior, and a perfectly centered pit that adds delightful dimension.
How-To Guide
Materials
- Polymer clay or air-dry clay (white or beige base)
- Acrylic paints (dark green, light avocado green, warm brown, black, coral/pink)
- Sculpting tools (needle tool, soothing tool)
- Aluminum foil (for the core)
- Fine grit sandpaper
- Paintbrushes (medium flat, small detail)
- Matte varnish or sealant
Step 1: Forming the Body
-
Create the core:
Begin by scrunching a piece of aluminum foil into a pear shape. This saves clay and keeps the figure lightweight. It should be slightly smaller than your desired final size. -
Prepare the clay:
Condition your clay until it is soft and malleable. Roll it out into a flat sheet, roughly 1/4 inch thick, large enough to cover your foil core completely. -
Wrap the form:
Drape the clay sheet over the foil pear shape. Gently press and smooth the seams where the clay meets, ensuring the foil is completely hidden inside. -
Refine the shape:
Roll the clay figure between your palms to smooth out any bumps. Focus on creating a teardrop silhouette—wider at the bottom and tapering gently to a rounded point at the top. -
Flatten the base:
Tap the bottom of the avocado firmly against your work surface. This creates a stable, flat base so your figure stands upright without wobbling.
Uneven Drying?
If your air-dry clay cracks while drying, mix a small amount of fresh clay with water to make a paste (slip) and fill the cracks, then sand smooth once dry.
Step 2: Adding Details & Texture
-
Define the face area:
Using a modeling tool or your thumb, gently press a shallow indentation into the front of the belly area where the lighter green flesh will be painted later. This doesn’t need to be deep, just a subtle surface change. -
Create the pit:
Roll a separate ball of clay, then flatten it slightly into a thick disc. Press this firmly into the lower center of the belly area to represent the avocado seed. -
Smooth the transition:
Use a silicone smoothing tool or your finger with a little water to blend the edges of the pit slightly, so it looks embedded rather than just stuck on. -
Add skin texture:
On the back and sides of the figure (avoiding the front face area), use a needle tool or a stiff toothbrush to stipple tiny dots. This mimics the bumpy texture of real avocado skin. -
Dry or bake:
If using air-dry clay, let it sit for 24-48 hours. If using polymer clay, bake according to the manufacturer’s instructions for the thickness of your piece. -
Sand imperfections:
Once fully cured or dry, use fine-grit sandpaper to gently smooth the front ‘face’ area and the pit surface, ensuring a perfect canvas for painting.
Make It Interactive
Before the clay dries, create a matching concavity in the belly instead of adding the pit. Roll a separate ball for the pit so it can be taken in and out!
Step 3: Painting the Character
-
Base coat the skin:
Paint the back and textured sides with a deep, forest green acrylic paint. I like to dab the brush to get into all those little texture holes we made. -
Paint the flesh:
Mix a very pale, creamy yellow-green. Carefully paint the smooth front section, creating an oval shape that frames the central pit. -
Color the pit:
Paint the protruding round belly disc with a warm shade of brown. You might need two coats here to get a solid, opaque color akin to terra cotta. -
Outline the separation:
Using a very fine brush, add a thin, slightly darker green line where the creamy flesh meets the dark skin to neaten up the transition. -
Paint the eyes:
Using a dotting tool or the back of a paintbrush, place two solid black dots for eyes on the upper part of the light green area. -
Add the smile:
With your finest detail brush or a black paint pen, draw a tiny, U-shaped mouth right between the eyes. -
Apply blush:
Dip a Q-tip or small brush into coral or pink paint. Dab off most of the paint on a paper towel, then gently stamp two rosy cheeks under the eyes. -
Add eye highlights:
Finish the face by placing a tiny white spec in the upper corner of each black eye. This ‘sparkle’ brings the character to life. -
Seal the piece:
Protect your paint job with a coat of matte varnish. This removes any unnatural shine from the acrylics and unifies the texture.
Place your little green friend on a windowsill near some plants for the perfect display
Stacked Totem Of Mini Faces

Create a calming piece of decor with this stacked totem of sleeping faces. Using simple spherical forms and minimalist facial features, this project captures a peaceful, zen-like aesthetic that brings tranquility to any shelf.
Detailed Instructions
Materials
- Terracotta-colored polymer clay or air-dry clay (approx. 500g)
- Acrylic paint (black, dark red, and cobalt blue)
- Fine detail paintbrush (size 0 or 00)
- Wooden skewer or dowel (for structural support)
- Rolling pin (optional)
- Clay cutting tool or knife
- Sandpaper (fine grit)
- Matte varnish or sealant
- Strong craft glue (if not using a central dowel)
Step 1: Shaping the Elements
-
Portion the clay:
Begin by dividing your clay into five main sections. You will need four equal portions for the head spheres and one slightly larger portion for the decorative base. -
Roll the spheres:
Take the four equal portions and roll them in your palms until they form smooth, consistent spheres. Aim for a diameter of about 1.5 to 2 inches each. Spend time smoothing out any cracks or seams for a flawless finish. -
Form the base:
Take the remaining larger portion and form a thick, flattened cylinder or puck shape. It should be wider than your spheres to provide stability. Gently tap the sides on your work surface to create a flat vertical edge. -
Create the stack channel:
If you are using a skewer for support, carefully pierce a hole vertically through the center of the base and each sphere while the clay is still soft. This ensures they align perfectly later without distorting the shape. -
Flatten contact points:
Gently press the top of the base and the top and bottom of each sphere (except the very top of the highest head) against a flat surface. This creates a small flat spot that helps the pieces stack securely without wobbling. -
Dry or bake:
Follow the instructions for your specific clay. If using polymer clay, bake at the recommended temperature. If using air-dry clay, allow the pieces to dry completely for 24-48 hours until hard and light in color.
Step 2: Painting and Assembly
-
Sand imperfections:
Once fully cured or dry, inspect your shapes. Use fine-grit sandpaper to gently smooth away any fingerprints, bumps, or rough textures, wiping away dust with a damp cloth afterward. -
Paint the facial features:
Using a fine detail brush and black acrylic paint, carefully draw the face on each sphere. Start with a vertical line for the nose that curves at the top into an eyebrow. Add a second curved line for the other eyebrow. -
Add the lashes:
Paint two downward-curving crescents for the closed eyelids. Add small, quick vertical strokes along the bottom of the curve to create the eyelashes. -
Paint the lips:
Switch to dark red paint. Below the nose line, paint a small, simple mouth. A tiny, horizontal almond shape works best for this minimalist look. -
decorate the base:
On the cylindrical base piece, paint a thick ring of cobalt blue around the top edge. Below this ring, use the tip of your brush handle or a dotting tool to add rows of small blue dots around the circumference. -
Seal the paint:
Allow the paint to dry completely. Apply a coat of matte varnish to each piece to protect the paint and give the clay a unified finish. I find matte works better than gloss to maintain that natural terracotta look. -
Assemble the totem:
Insert your skewer or dowel into the base, securing it with a dab of glue. Thread the spheres onto the skewer one by one, adding a small amount of strong glue between each layer to permanent bond them. -
Final adjustments:
While the glue is still tacky, rotate the spheres to ensure all the faces are aligned forward perfectly. Let the adhesive cure fully before moving your new artwork.
Wobbly Spheres?
If your dried spheres are too round to stack safely, use a piece of coarse sandpaper on a table and rub the contact points of the clay against it to grind a flat spot.
Clean Lines Pro Tip
Sketch the faces lightly with a pencil before painting. If you make a mistake with the pencil, it erases easily from baked or dried clay, saving you from painting errors.
Place your serene totem near a plant or window to enjoy its calming presence every day