When I want instant summer vibes, I reach for beach clay bead bracelets—they’re quick, colorful, and feel like a mini vacation on your wrist. Below are my favorite design directions, starting with the classic heishi bead looks everyone loves and drifting into a few more unexpected beachy twists.
Cowrie Shell Centerpiece With Sandy Neutrals

Capture the essence of a serene shoreline with this beautiful bracelet, featuring a striking cowrie shell centerpiece flanked by beads in sandy hues. The mix of matte polymer clay textures and soft neutral tones creates an effortless, beach-ready accessory perfect for summer layering.
Step-by-Step Guide
Materials
- One large natural cowrie shell bead (drilled lengthwise)
- Polymer clay heishi beads (6mm or 8mm) in varied neutral tones: light beige, tan, latte, terracotta, and soft grey-mauve
- Small gold spacer beads (brass, approximately 3mm)
- A few small decorative accent beads (optional, like tiny seed beads for clasp finishing)
- Beading wire (flexible 7-strand or similar high-quality stringing wire)
- Two crimp beads
- Two crimp covers (gold finish)
- Two wire guardians (gold finish, optional but recommended)
- Lobster claw clasp and jump ring (antique gold or brass finish)
- Crimping pliers
- Wire cutters
- Flat nose pliers
Step 1: Preparation & Centerpiece
-
Measure your wire:
Cut a length of beading wire approximately 10-12 inches long. This gives you plenty of extra room to work with the clasp ends without struggling. -
Check the shell:
Examine your cowrie shell. Ensure the drilled holes are clear of debris so the wire can pass through smoothly. -
Thread the centerpiece:
Slide the cowrie shell onto the center of your wire. This will be the focal point, so we will build the design outwards from here to ensure symmetry.
Shell Doesn’t Sit Flat?
If the cowrie shell flips over while wearing, try adding tighter/smaller spacer beads directly next to it. This limits its movement on the wire.
Step 2: Creating the Bead Pattern
-
Frame the shell:
On both sides of the cowrie shell, add one polymer clay bead in a light, sandy yellow tone. -
Add metallic accents:
Next, slide three small gold spacer beads onto the wire on each side of those first clay beads. This creates a nice metallic break between the focal point and the rest of the strand. -
Begin the color gradient:
Choose a darker clay bead—perhaps a terracotta or burnt orange shade—and thread one onto each side. -
Layer in neutrals:
Follow the terracotta bead with a soft grey-mauve clay bead on both the left and right strands. -
Introduce texture:
Add a lighter, textured beige bead next. If you have any beads with a speckled or wood-like finish, this is a great place to use them. -
Continue the pattern:
Continue adding beads, mirroring the sequence on both sides. I like to alternate between the lighter ‘sand’ colors and the darker ‘earth’ tones to keep the visual interest high. -
Check the length:
Pause periodically to wrap the bracelet around your wrist or a sizing cone. You want the beaded section to comfortably reach almost all the way around, leaving about half an inch for the clasp hardware.
Step 3: Finishing the Ends
-
Prepare the first crimp:
Slide a crimp bead onto one end of the wire, followed by a wire guardian. -
Attach the clasp:
Thread the wire through the wire guardian loop, hooking the lobster clasp onto the guardian. Then, pass the wire back down through the crimp bead. -
Secure the crimp:
Pull the wire snug (but not too tight, or the bracelet will be stiff) and use your crimping pliers to flatten or fold the crimp bead securely. -
Hide the crimp:
Place a crimp cover over the flatted crimp bead. Use your pliers to gently squeeze the cover closed so it looks like a round gold bead. -
Finish the second side:
Repeat the crimping process on the other end of the bracelet, attaching a jump ring instead of a clasp. -
Trim excess wire:
Once both ends are crimped and covered, thread the excess tail of wire back through the first few beads for extra security, then trim the remaining wire flush with your cutters.
Add a Charm
Attach a tiny starfish or pearl charm to the jump ring near the clasp for an extra hidden detail that makes the closure look high-end.
Now you have a stunning, symmetrical piece of jewelry that brings a touch of the coast to any outfit


Pearl and Shell “Beach Treasure” Mix
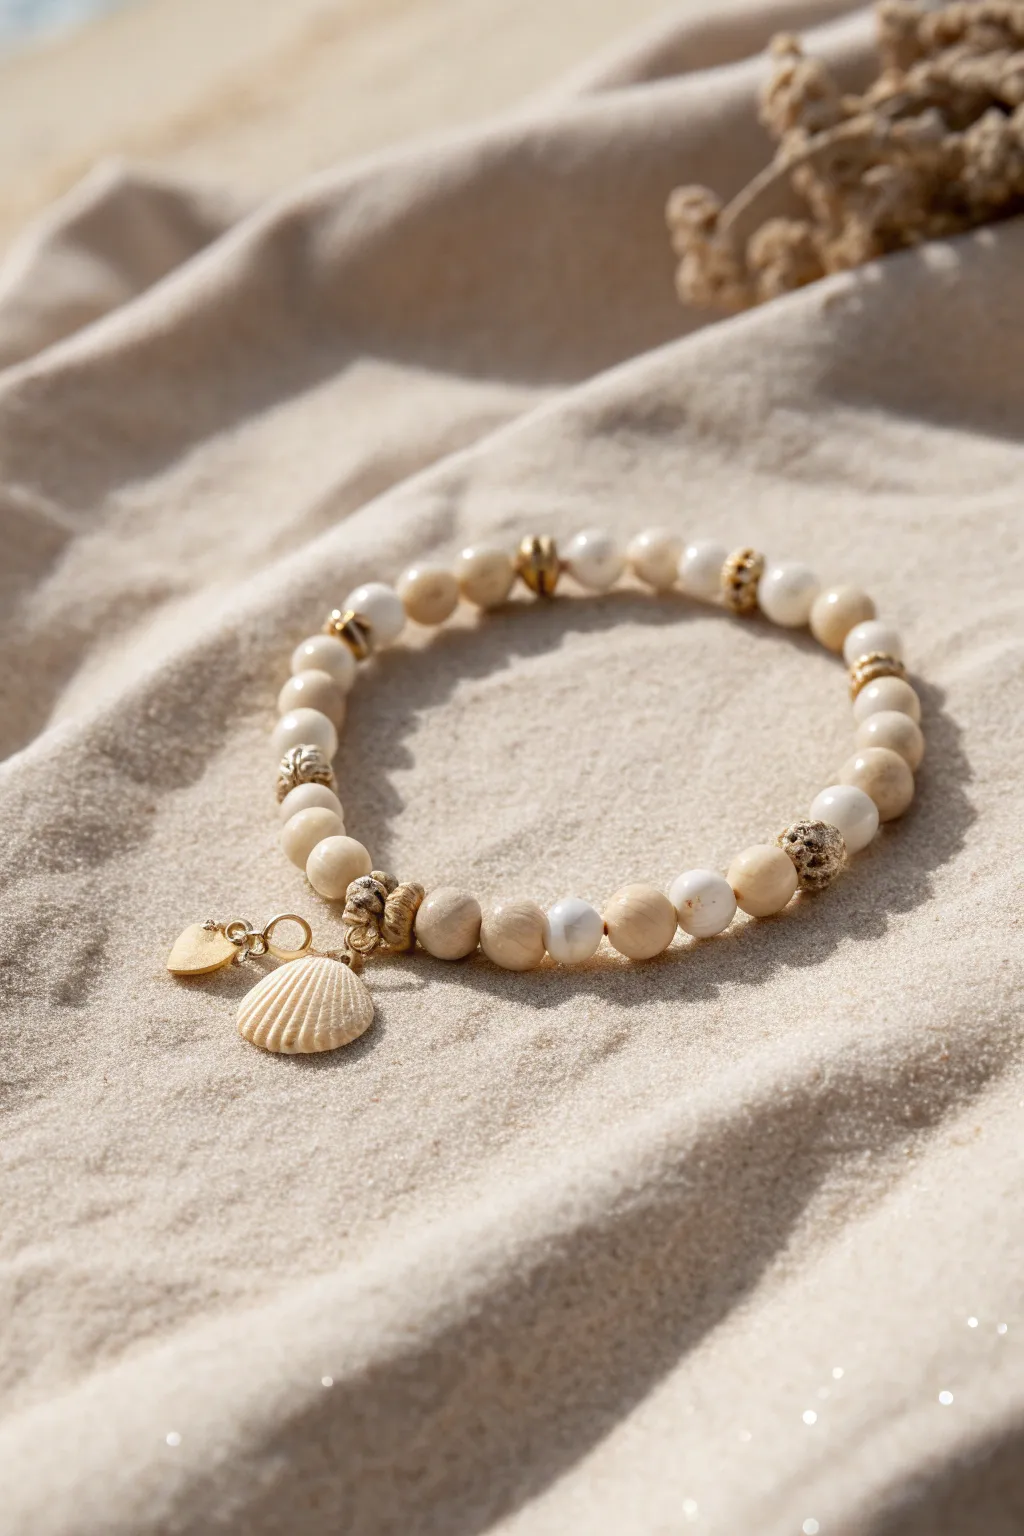
Evoke the feeling of finding washed-up treasures upon the sand with this elegant bracelet design. Combining creamy pearls, earthy stone beads, and delicate shell charms creates a sophisticated yet relaxed beach accessory.
Step-by-Step
Materials
- Elastic beading cord (0.7mm or 0.8mm clear)
- Beige/tan round stone beads (8mm, likely jasper or matte agate)
- White or cream round beads (8mm, shell, pearl, or howlite)
- Gold-tone textured spacer beads
- Gold-tone flat rondelle spacers
- Large scallop shell charm (gold bail)
- Small gold heart charm
- Gold jump rings (open type)
- Jewelry glue or clear nail polish
- Scissors
Step 1: Preparation and Initial Stringing
-
Measure your cord:
Cut a length of elastic cord about 10-12 inches long. This gives you plenty of slack for tying knots later without struggling with tight ends. -
Pre-stretch the elastic:
Pull the cord firmly between your hands a few times. This pre-stretching step prevents the bracelet from loosening up after the first time you wear it. -
Secure one end:
Place a piece of tape or a bead stopper on one end of your cord to stop beads from sliding off while you work. -
Start the pattern:
Begin by threading on one of the larger beige stone beads. This will anchor your design. -
Add texture:
Follow the first bead with a textured gold spacer bead to introduce a metallic accent right away.
Natural Variation
Use beads with slight color variations or matte finishes. Perfectly uniform beads look plastic; organic imperfections mimic real stones and shells.
Step 2: Creating the Bead Sequence
-
Build the first section:
Add a sequence of alternating white and beige beads. For a natural look, you don’t need a strict 1-to-1 pattern; try doing two beige, one white, or mixing them randomly. -
Insert gold accents:
Every 4 to 6 beads, insert a gold spacer. Vary between the textured round spacers and the flatter rondelle spacers to mimic the irregular beauty of found sea treasures. -
Check the length:
Periodically wrap the strand around your wrist. You want it to fit comfortably but not droop too much, keeping in mind the charms will add a focal point. -
Prepare the focal point:
Identify the center of your strand or where you want the charms to hang. This is where we will attach the jump rings later. -
Finish the strand:
Continue threading beads until the bracelet is your desired length, ensuring the last bead creates a seamless pattern with the first one when closed.
Step 3: Adding Charms and Finishing
-
Prepare the charms:
Take an open jump ring and carefully slide on the large scallop shell charm and the small gold heart charm together. -
Attach to the bracelet:
Before tying the knot, slide this loaded jump ring directly onto the elastic cord so it sits between two beads. Alternatively, you can attach the jump ring to a specific gold bail bead if you included one. -
Tie the knot:
Remove the tape/stopper. Bring both ends together and tie a standard square knot (right over left, left over right). Pull tight. -
Secure the knot:
Tie a second surgeon’s knot for extra security. I like to add a tiny drop of jewelry glue or clear nail polish to the knot to bond it permanently. -
Hide the mechanics:
Once the glue is tacky but not fully hard, slide the knot inside the hole of the nearest large bead to hide it. -
Trim the ends:
Carefully snip off the excess elastic cord close to the bead hole, being careful not to cut the main knot.
Ocean Ombre
Create a gradient effect by arranging beads from dark tan to cream to pure white, mimicking the transition from wet sand to sea foam.
Now you have a piece of seaside elegance to wear wherever you go


Nautical Stripes in Navy, White, and Coral
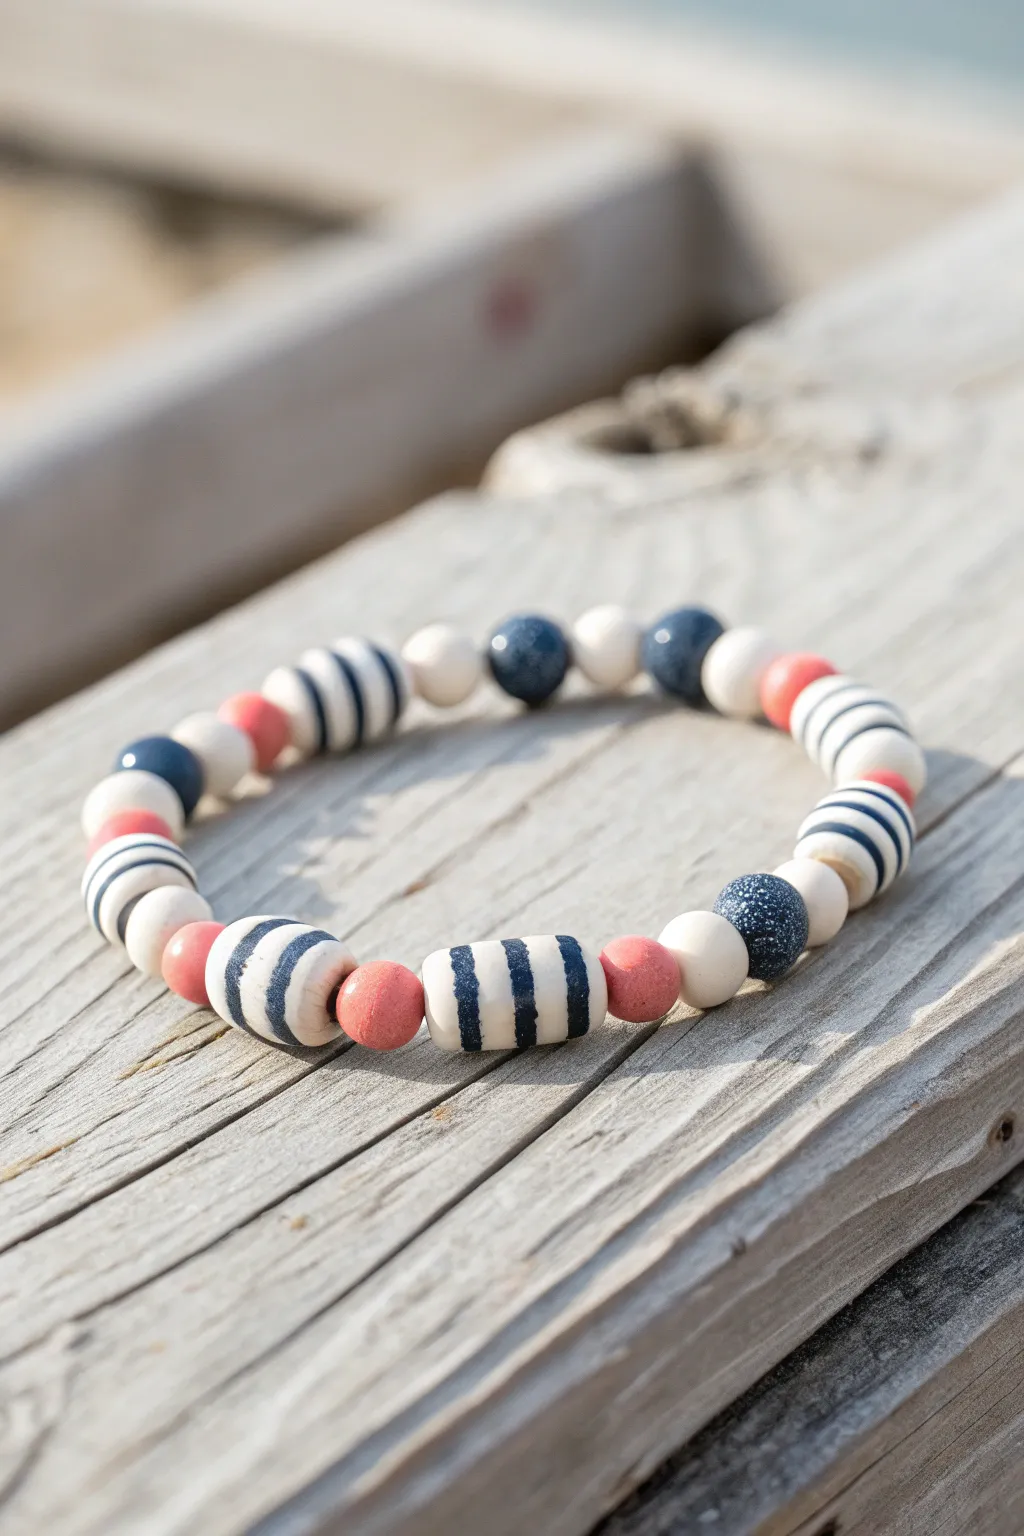
Capture the spirit of the seaside with this charming clay bead bracelet featuring classic navy stripes and pops of coral pink. The mix of hand-painted wooden beads creates a textured, organic look that feels perfectly at home on the boardwalk.
How-To Guide
Materials
- Large wooden tube beads (approx. 10-12mm)
- Medium round wooden beads (approx. 8mm)
- Small round wooden beads (approx. 6mm)
- Navy blue acrylic paint
- Cream or off-white acrylic paint
- Coral pink acrylic paint
- Matte finish sealant or varnish
- Thin paintbrush (liner brush)
- Medium flat paintbrush
- Elastic beading cord (0.8mm or 1mm)
- Superglue or jewelry glue
- Scissors
- Bamboo skewers or toothpicks (for holding beads while painting)
- Styrofoam block or floral foam (optional drying stand)
Step 1: Preparation & Base Painting
-
Sort your beads:
Select your wooden beads. You will need about 6-8 large tube beads, 8-10 medium round beads, and a handful of smaller accent beads to match the pattern in the photo. -
Mount the beads:
Slide the beads onto bamboo skewers. This is my secret weapon for painting all sides without getting messy fingers; if the holes are large, wrap a bit of tape around the skewer first for a snug fit. -
Paint the white base:
Using the cream/off-white paint and a flat brush, coat all the tube beads and about half of the medium round beads. They may need two coats for full opacity. -
Paint the coral accents:
Paint the remaining small and medium round beads with the coral pink shade. Aim for a soft, matte finish rather than a high gloss. -
Paint the navy solids:
Select a few round beads to be solid navy blue. Paint these carefully and set all beads aside on your foam block to dry completely.
Stripes looking shaky?
If painting straight lines is tricky, wrap thin painter’s tape or washi tape around the bead to mask off the areas you want to keep white, then peel it off while the paint is still slightly wet.
Step 2: Detailing the Nautical Patterns
-
Prepare the liner brush:
Load your thin liner brush with navy blue paint. Make sure the paint consistency is fluid but not watery to prevent bleeding on the wood grain. -
Stripe the tube beads:
On the white tube beads, paint three distinct navy rings: one in the center and one near each edge. Keep the lines slightly imperfect to maintain that rustic, hand-crafted charm. -
Stripe the round beads:
Take the white round beads and paint horizontal navy stripes around them. Rotating the skewer slowly with one hand while holding the brush steady with the other helps create cleaner lines. -
Create the speckled texture:
For the solid navy beads, use a stiff brush or an old toothbrush to lightly flick or dab a tiny amount of white paint onto them, creating a starry or sea-salt texture. -
Seal the beads:
Once all paint is thoroughly dry, apply a coat of matte sealant. This protects the wood and ensures the acrylic paint won’t chip during wear.
Step 3: Assembly
-
Cut the cord:
Cut a piece of elastic cord about 10-12 inches long. This gives you plenty of extra room to tie the knot comfortably. -
Pre-stretch the elastic:
Give the elastic cord a few firm tugs. This pre-stretching prevents the bracelet from loosening up significantly after you first wear it. -
Plan your pattern:
Lay out your beads on a table to verify the sequence. The pattern in the image alternates between a striped tube bead, a coral round bead, a striped round bead, and occasionally a solid navy textured bead. -
String the beads:
Thread the beads onto the elastic according to your layout. Keep the tension even but not tight. -
Check the size:
Wrap the strung beads around your wrist to check the fit. Add or remove small spacer beads if necessary to get the perfect size. -
Tie the knot:
Tie a surgeon’s knot (a square knot with an extra loop through) to secure the ends. Pull the elastic tight so the knot is firm. -
glue and trim:
Add a tiny drop of jewelry glue to the knot. Let it dry for a minute, then trim the excess cord ends close to the knot. -
Hide the knot:
Gently gently pull the elastic to slide the knot inside the hole of one of the larger tube beads to hide it from view.
Weathered Wood Look
Before sealing, lightly sand the painted beads with fine-grit sandpaper. This distressing technique reveals bits of the natural wood underneath for an authentic driftwood vibe.
Your new nautical bracelet is ready to pair with a breezy sundress or your favorite jeans for a touch of coastal flair


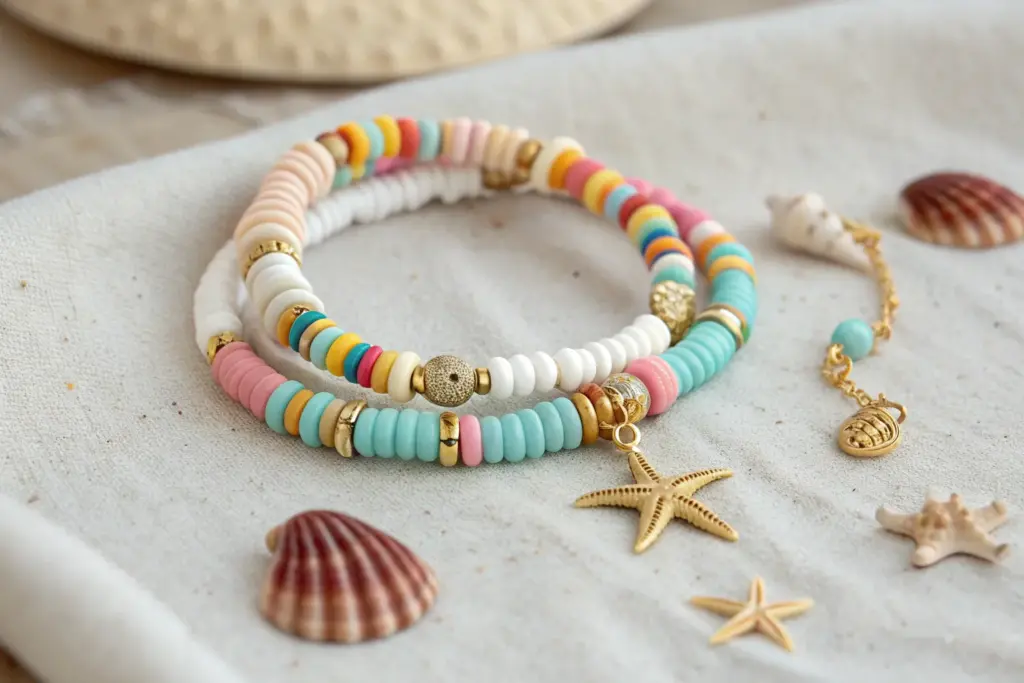
Pastel Coral Reef Palette With a Starfish Charm
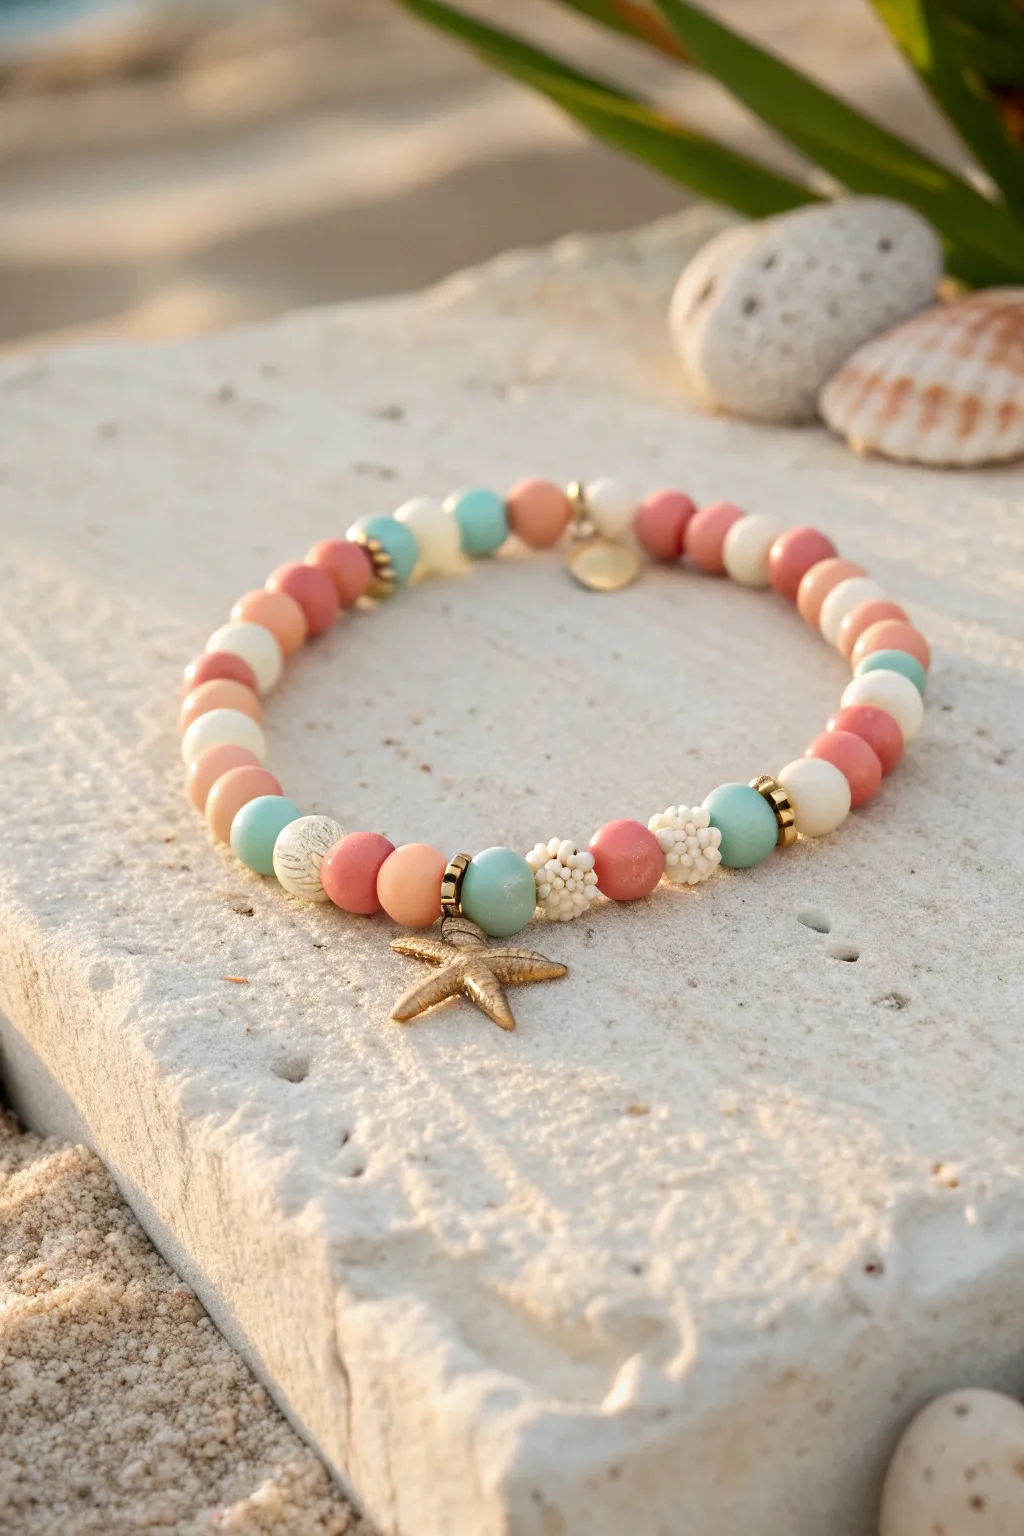
Capture the soft, sun-kissed hues of a coastal sunrise with this charming beaded bracelet. Combining matte clay textures with gold accents and a standout starfish charm, it’s the perfect accessory for beach days or summer layering.
Step-by-Step Tutorial
Materials
- Polymer clay heishi beads (matte finish): Salmon pink/coral
- Polymer clay heishi beads (matte finish): Light peach/apricot
- Polymer clay heishi beads (matte finish): Cream/off-white
- Polymer clay heishi beads (matte finish): Teal/turquoise
- Round textured beads: White with speckled pattern (approx. 6-8mm)
- Round textured beads: White beaded/bumpy texture (approx. 6-8mm)
- Gold tone spacer discs (approx. 4mm)
- Gold tone starfish charm
- Gold tone circular logo tag (optional)
- Elastic stretch cord (0.7mm or 0.8mm)
- Jewelry glue or clear nail polish
- Scissors
Step 1: Planning Your Pattern
-
Measure and cut:
Begin by measuring your wrist to determine the needed length. Cut a piece of elastic cord about 3-4 inches longer than this measurement to ensure you have plenty of room for tying the finishing knot. -
Secure the end:
Tape one end of your elastic cord to your workspace or attach a bead stopper clips. This prevents beads from sliding off while you work on your design. -
Lay out the palette:
Before threading, I like to pour my beads into small piles on a bead board or soft cloth. This helps you visualize the balance of colors—think soft corals, teals, and milky whites.
Sticky Situation
Use a toothpick to apply the glue to the knot. This prevents glue from flooding onto the nearby beads and ruining the elastic’s stretch.
Step 2: Creating the Focal Section
-
Thread the centerpiece:
Start by threading the gold starfish charm onto the center of your cord. This will hang as the main focal point. -
Add flanking accents:
Immediately next to the starfish on both sides, add a gold spacer disc. This highlights the charm and gives it a finished metal-on-metal look. -
Build the texture:
On the left side of the charm, add a teal bead, then a gold spacer, then a textured white ‘bumpy’ bead. -
Mirror the right side:
On the right side of the charm, mirror this mostly, but perhaps swap the bumpy bead for a speckled white bead to add subtle asymmetry.
Sea Treasure
Swap the metal starfish for a genuine small seashell found on your travels. Drill a tiny hole near the hinge carefully to make it wearable.
Step 3: Stringing the Length
-
Begin the color blocking:
Working outwards from your center section, start adding your smooth clay heishi beads. Use a random but balanced pattern. -
Mix your corals:
Alternate between the deeper salmon pink and the lighter peach tones. Group 2-3 of the same color together occasionally to create small blocks of color. -
Interject cream and teal:
Break up the pinks with single cream or teal beads. These cooler tones prevent the design from looking too warm and keep that ‘sea glass’ vibe. -
Insert texture breaks:
About one-third of the way up the bracelet strands, insert another textured white bead (either speckled or bumpy) flanked by gold spacers to add rhythm to the strand. -
Check the symmetry:
Ensure both sides of the beaded strand are roughly even in length. Hold the ends together to see if the charm sits nicely in the bottom center.
Step 4: Finishing Touches
-
Add the branded tag:
If you have a small gold logo tag or a simple gold coin charm, thread this on one end near the halfway point opposite the starfish. -
Final sizing:
Check the fit by wrapping the unfinished strand around your wrist. It should sit comfortably without pinching or leaving deep indentations. -
Pre-stretch the cord:
Gently pull on both ends of the elastic. Pre-stretching helps prevent the bracelet from sagging or loosening permanently after the first wear. -
Tie the knot:
Tie a strong surgeon’s knot (right over left, left over right) to secure the bracelet. Pull it tight. -
Secure and trim:
Apply a tiny dab of jewelry glue to the knot. Let it dry completely, then trim the excess cord ends carefully close to the knot. -
Hide the knot:
If possible, slide the nearest bead (preferably a larger textured one or a bead with a large hole) over the knot to conceal it.
Slip on your new creation and enjoy the calming beach vibes wherever you go

The Complete Guide to Pottery Troubleshooting
Uncover the most common ceramic mistakes—from cracking clay to failed glazes—and learn how to fix them fast.
Tropical Greens With a Sea Turtle Focal
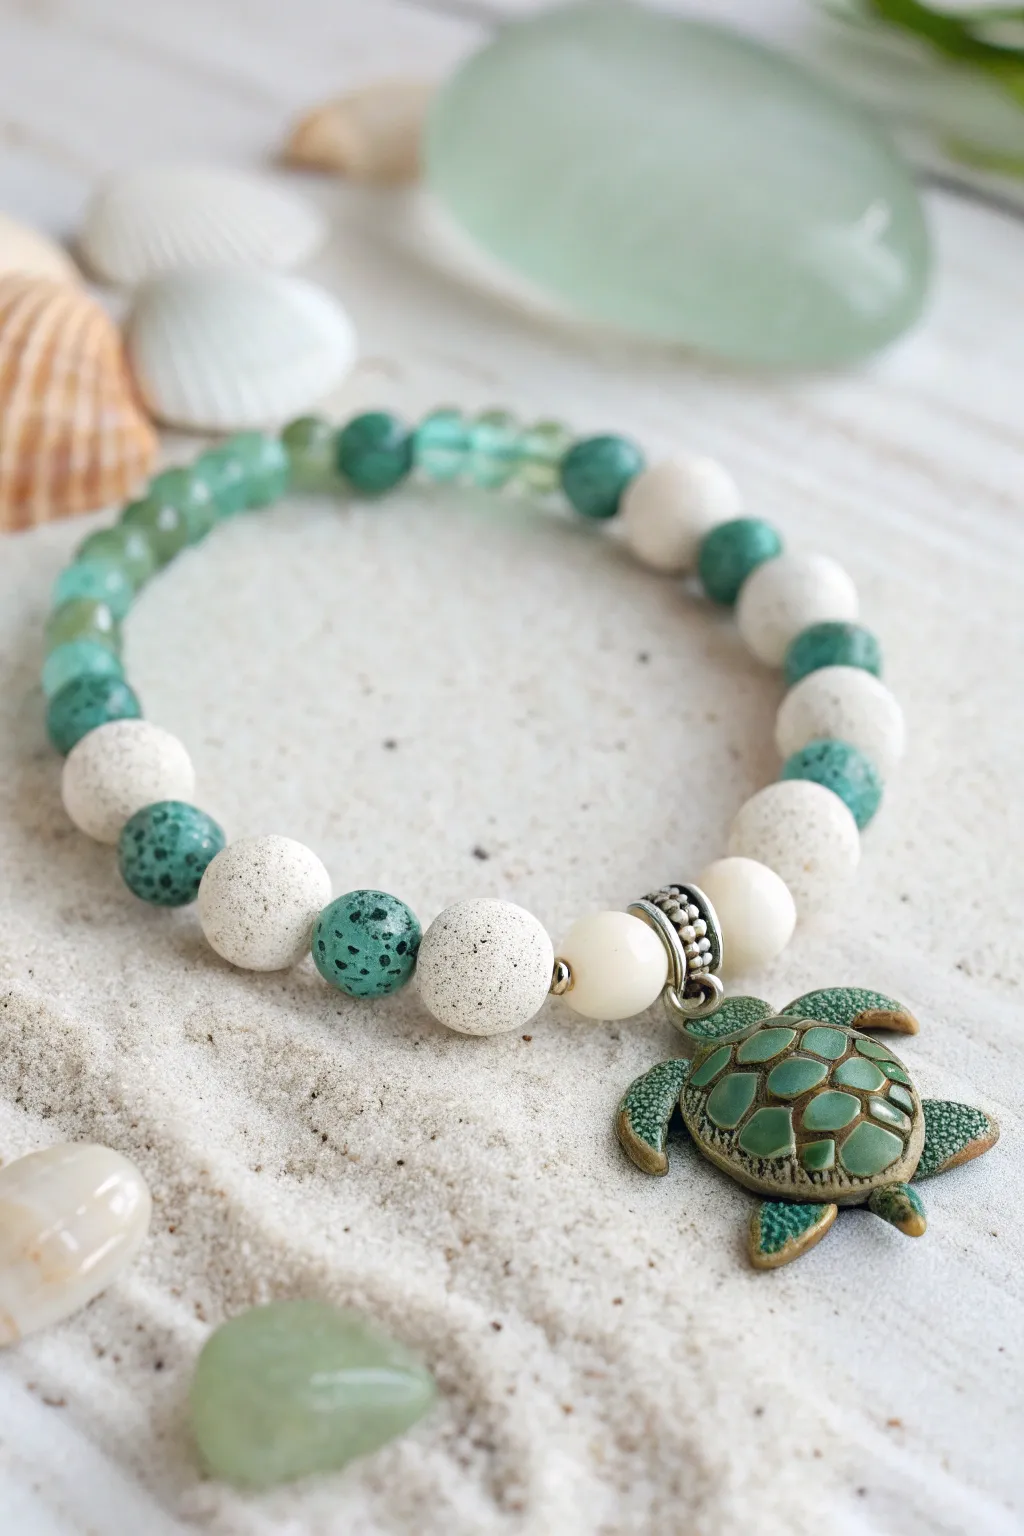
Bring the serene vibes of the shoreline to your wrist with this sea turtle focal bracelet. Featuring a soothing palette of sandy whites, translucent greens, and speckled teal, this piece mimics the colors of a tropical cove.
How-To Guide
Materials
- Elastic stretch cord (0.7mm or 0.8mm)
- Sea turtle enamel charm (bronze tone)
- Jump ring (bronze or antique gold)
- Bead bail (textured silver or antique silver spacer with large hole)
- 10mm White lava stone beads (porous)
- 10mm Speckled teal ceramic or stone round beads
- 8mm Cream smooth round beads (stone or glass)
- 6mm-8mm Translucent green faceted glass beads (fire-polished)
- Jewelry glue (E6000 or G-S Hypo Cement)
- Scissors or bead nippers
- Masking tape or bead stopper
Step 1: Preparation
-
Measure and cut:
Cut a piece of elastic cord about 10-12 inches long. This generous length gives you plenty of room to tie secure knots later without struggling. -
Pre-stretch the cord:
Hold both ends of the cord and give it a firm tug a few times. Pre-stretching prevents the bracelet from sagging or becoming loose after the first few wears. -
Secure the end:
Apply a piece of masking tape to one end of the cord or attach a bead stopper. This simple step saves you from the frustration of beads sliding right off as you work.
Scent Diffuser Tip
Add a drop of ocean-scented essential oil to the white porous lava beads. They act as a natural diffuser and will hold the scent for days.
Step 2: Stringing the Pattern
-
Start the sequence:
Begin by threading on the beads for the back of the bracelet. This section features the translucent green faceted beads. String about 10-12 of these, mixing the lighter and darker shades if your strand has variation. -
Transition beads:
Next, add one speckled teal bead followed by one white lava bead. This begins the transition from the glassy ‘water’ look to the ‘sandy’ texture. -
Build the pattern:
Continue the pattern by alternating the speckled teal beads with the white lava beads. Just follow an A-B-A-B sequence (Teal, White, Teal, White). -
Check the symmetry:
Aim for about four or five repetitions of this alternating pattern on the left side of where the focal will sit, and mirror it on the right side if you want perfect symmetry, though this design looks great slightly asymmetrical too. -
Frame the focal:
To frame the charm, thread on one smooth cream 8mm bead. This smaller, smoother bead acts as a nice buffer before the metal hardware. -
Attach the bail:
Slide on your decorative bead bail. This is the carrier component that the charm will hang from. -
Finish the frame:
Add the second smooth cream 8mm bead immediately after the bail.
Bail Orientation
If your turtle hangs sideways, you may need a second small jump ring between the bail and the charm to rotate it 90 degrees forward.
Step 3: Charm Assembly
-
Open the jump ring:
Using two pairs of pliers (if you have them) or your fingers, twist open the jump ring laterally—don’t pull it apart or you’ll weaken the metal. -
Connect the turtle:
Slip the loop of your sea turtle charm onto the open jump ring, then hook the jump ring onto the loop of the bead bail you just strung. -
Close the ring:
Twist the jump ring back ensuring the ends meet perfectly flush so the heavy charm doesn’t slip off.
Step 4: Closing the Bracelet
-
Size checks:
Wrap the beaded strand around your wrist to check the fit. It should sit comfortably without pinching. Add or remove a few of the translucent green beads at the back if adjustments are needed. -
Tie the knot:
Remove the tape or stopper. Bring the two ends together and tie a surgeon’s knot (loop the cord through twice on the first throw of the knot) and pull it tight. -
Secure with glue:
Apply a tiny dot of jewelry glue directly onto the knot. I find a toothpick helps apply it precisely without making a mess. -
Hide the knot:
While the glue is still tacky, gently pull the knot inside the hole of the nearest large bead (the lava bead or teal bead works best) to hide it. -
Trim excess:
Once the glue has fully dried (wait at least 15 minutes), trim the excess cord tails close to the bead hole carefully.
Enjoy wearing this little piece of the ocean that captures the calm of the sea turtle
Speckled “Sand” Beads Paired With Clean Ocean Blues
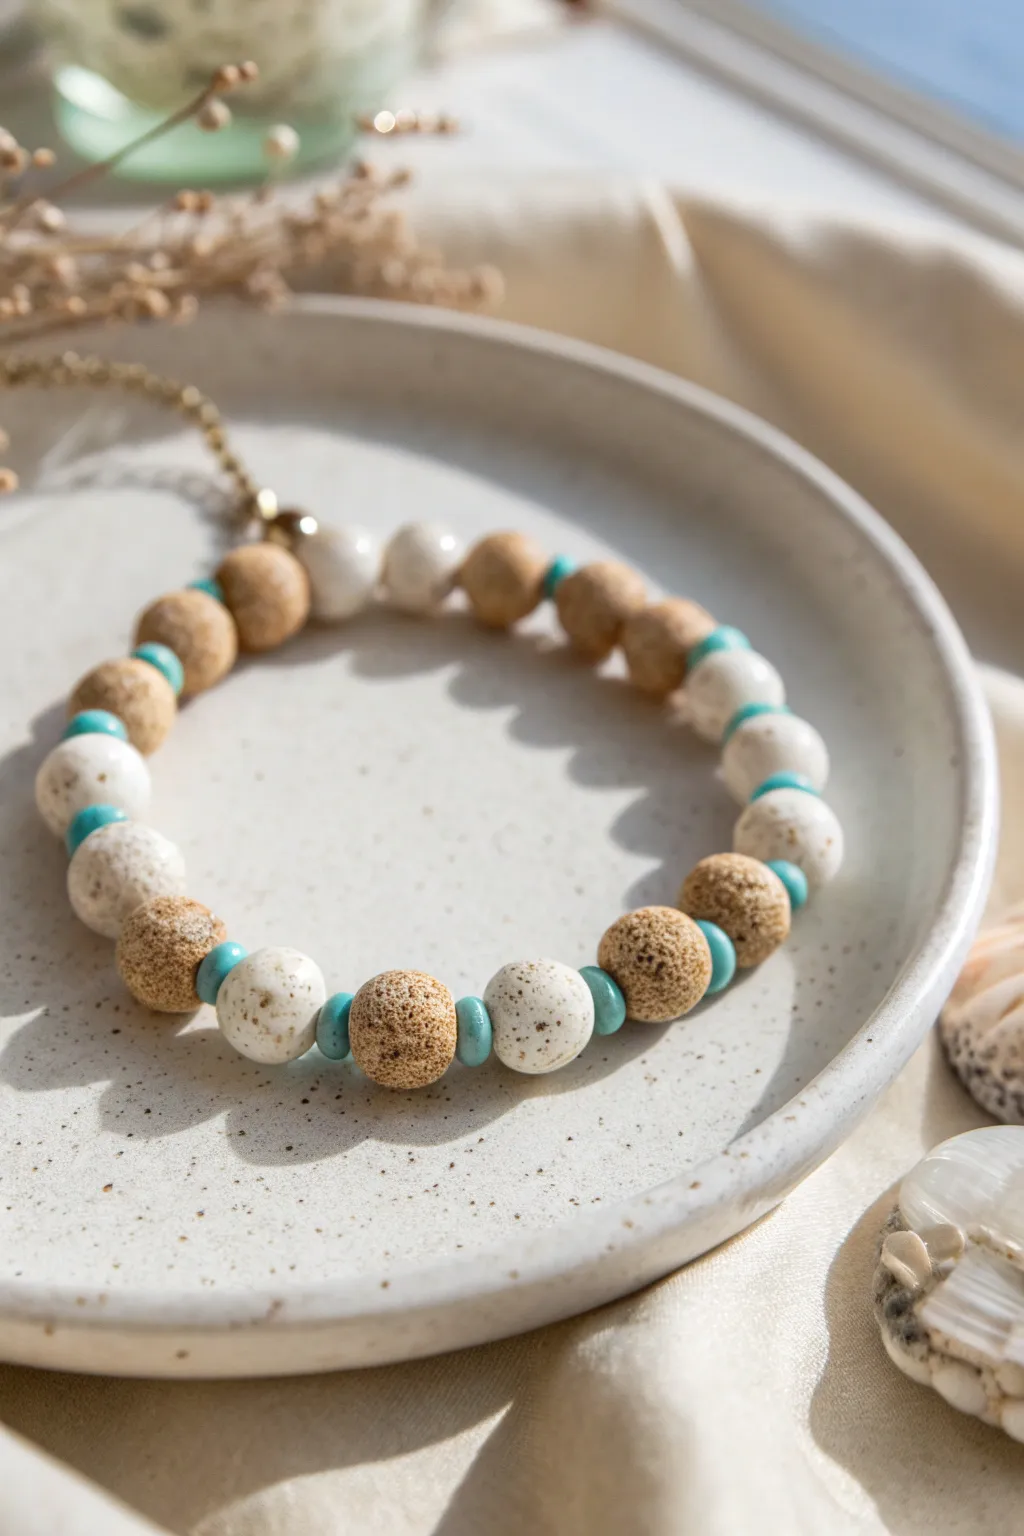
Capture the essence of a serene beach walk with this textured bracelet that mimics the look of sandy pebbles and ocean-tumbled stones. By combining speckled clay beads with vibrant turquoise spacers, you create a piece that feels both organic and refreshing.
Step-by-Step Guide
Materials
- Polymer clay (white, beige/tan, dark brown for speckling)
- Acrylic paint (brown or black) & old toothbrush (alternative to clay speckling)
- Turquoise or teal heishi beads (small spacers)
- Elastic beading cord (0.7mm or 0.8mm)
- Beading needle (optional but helpful)
- Gold crimp beads or knot covers
- Small gold charm or connector (optional)
- Gold finish chain (extender)
- Super glue or jewelry cement
- Parchment paper and baking tray
- Oven
Step 1: Creating the Speckled Clay Beads
-
Mix the base colors:
Start by conditioning your polymer clay. You will need two main base colors: a clean white and a warm, sandy beige. Create balls of clay about 1cm in diameter for each bead. -
Add the speckles (Method A: Clay):
For a natural stone look, grate a tiny amount of dark brown or black bakeable clay into fine dust. Roll your white and beige balls into this dust lightly, then roll them between your palms to embed the specks into the surface. -
Add the speckles (Method B: Paint):
Alternatively, you can bake plain beads first. Once baked and cooled, dip an old toothbrush into diluted brown acrylic paint and flick fine splatter across the beads for that sandy texture. -
Shape the beads:
Roll each speckled piece into a perfect sphere. To get the specific look in the photo, ensure they aren’t too uniform; a slight organic variation adds to the pebble aesthetic. -
Pierce the holes:
Using a bead pin or a thick needle, carefully pierce a hole through the center of each clay sphere. Rotate the bead gently as you push through to avoid deforming the round shape. -
Bake the beads:
Arrange your clay beads on a parchment-lined baking sheet. Bake according to your brand of polymer clay instructions (usually around 275°F/135°C for 15-30 minutes). -
Cool and finish:
Let the beads cool completely. If you used the paint speckle method, apply a matte varnish now to seal the paint and mimic the texture of dry stone.
Stone Texture Trick
Before baking, gently roll your raw clay beads over a piece of coarse sandpaper or a clean rock to imprint a realistic, pitted texture.
Step 2: Assembling the Bracelet
-
Measure your cord:
Cut a length of elastic cord about 10-12 inches long. Is find it easier to work with extra length so the beads don’t slide off while styling. -
Pre-stretch the elastic:
Give the elastic cord a few firm tugs. This pre-stretching step prevents the bracelet from becoming loose and saggy after the first few wears. -
Plan your pattern:
Lay out your beads on a bead board or cloth. The pattern shown alternates between the beige/tan earthy beads and the white sandy beads. -
Insert spacers:
Between every large clay bead, place a small turquoise or teal spacer bead. This pop of color is crucial for that ‘ocean water’ contrast against the sand tones. -
Start stringing:
Thread your beads onto the elastic cord following your layout. Usually, about 18-20 large clay beads fit a standard wrist, but adjust as needed. -
Check the fit:
Wrap the strung beads around your wrist to check the sizing. It should sit comfortably without pinching skin or showing large gaps of elastic. -
Add gold accents:
At the ends of your strand, thread on your gold crimp bead or knot cover. If you wish to replicate the image exactly, add a small loop of gold chain or a charm connector at the closure point. -
Tie the knot:
Tie a surgeon’s knot (right over left, left over right) with the elastic ends. Pull it tight while gently compressing the beads together to minimize slack. -
Secure the knot:
Add a tiny drop of jewelry glue or cement to the knot for extra security. Let it dry for a moment before trimming the excess cord.
Luxe Upgrade
Replace the polymer clay spacers with real tumbled turquoise chips or tiny freshwater pearls for a more high-end, boutique jewelry feel.
Step 3: Final Touches
-
Hide the knot:
If possible, gently tug the knot inside the hole of the nearest large clay bead or hide it inside a crimp cover if used. -
Attach the chain:
If you added a connector loop, use jump rings to attach a short length of gold extender chain for an elegant finish.
Slip on your new creation and enjoy the calming beach vibes it brings to your daily outfit


What Really Happens Inside the Kiln
Learn how time and temperature work together inside the kiln to transform clay into durable ceramic.
Boardwalk Neutrals With Faux Driftwood Tones
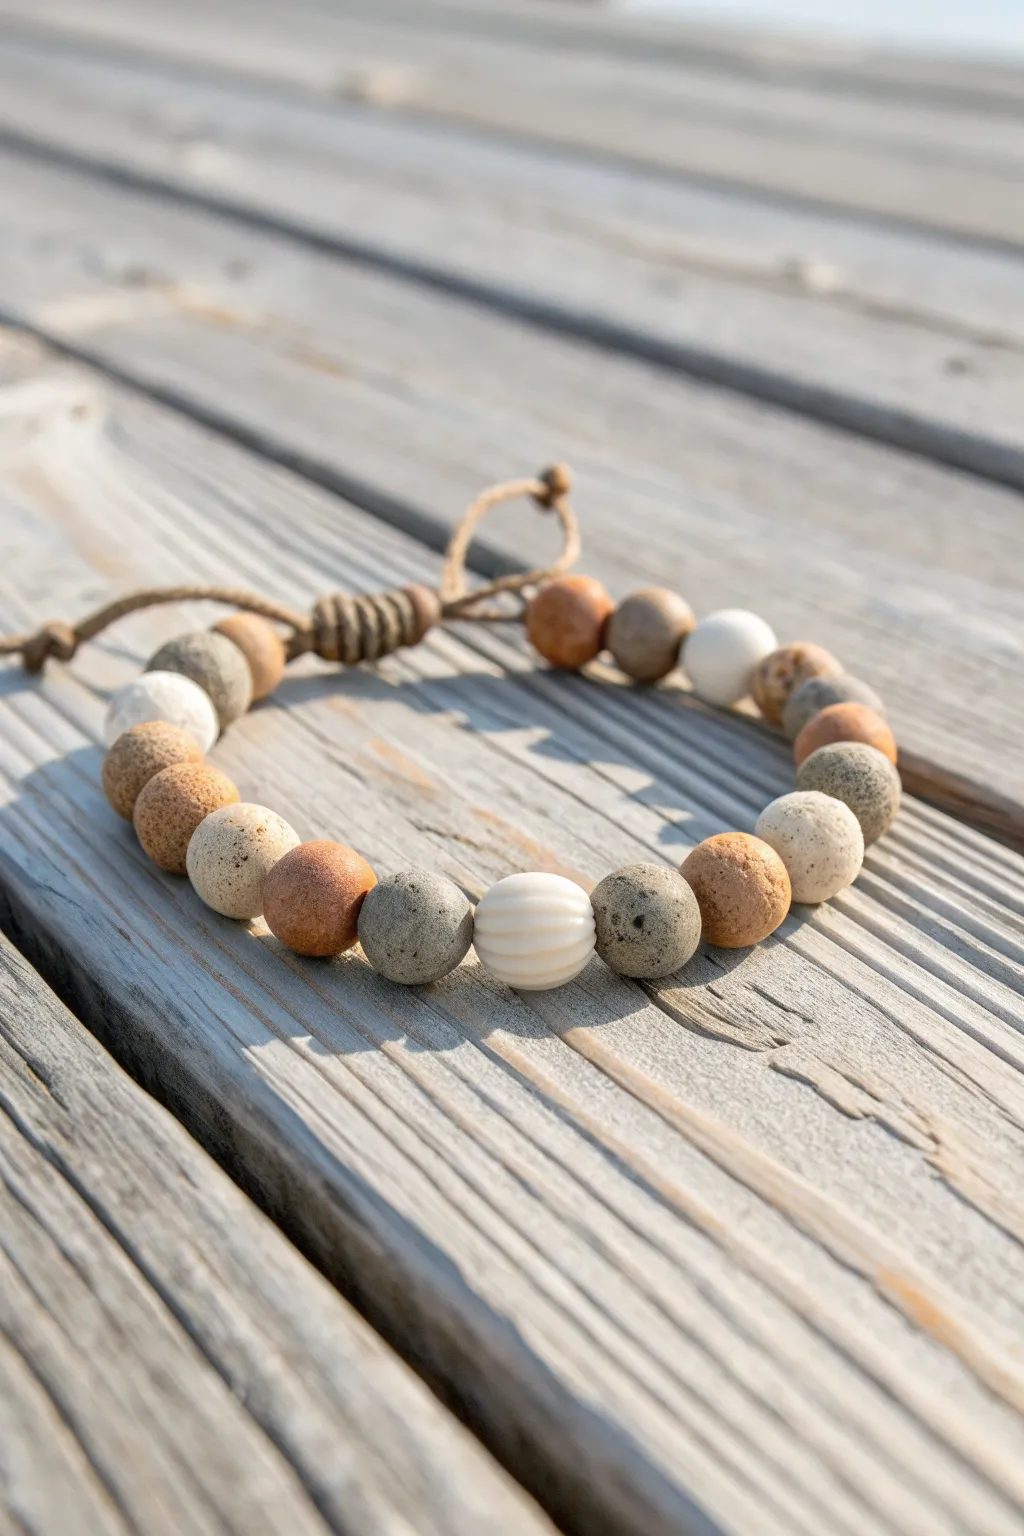
Capture the essence of a quiet morning walk on the pier with this beautifully textured bracelet. Using polymer clay to mimic weathered stone and driftwood tones, this piece combines rustic charm with elegant simplicity.
Step-by-Step Guide
Materials
- Polymer clay (colors: white, ecru, dark brown, granite/stone effect, tan)
- Rough sandpaper or a texture sponge
- Toothpicks or bead piercing pins
- Natural hemp cord or waxed cotton cord (approx. 1mm thick)
- A sharp craft blade
- Parchment paper and baking tray
- Oven (for curing clay)
- Scissors
Step 1: Creating the Clay Palette
-
Mix your base tones:
Begin by conditioning your clay. You want a palette that reflects natural beach findings. Mix specific amounts of white and brown to create varying shades of warm sand and cool driftwood greys. -
Create the granite look:
For the grey speckle beads, I like to take a pre-mixed ‘granite’ effect clay and blend in a tiny pinch of dark brown to warm it up, making it look like real beach pebbles. -
Form the rust tones:
Mix tan clay with a small amount of orange or terracotta to achieve that sun-baked sandstone color.
Step 2: Forming and Texturing Beads
-
Portion the clay:
Roll your mixed clay colors into logs of equal thickness. Slice about 20-22 equal segments to ensure your beads end up roughly the same size. -
Roll into spheres:
Roll each segment between your palms to form smooth, round spheres. They don’t need to be mathematically perfect; slightly organic shapes look more natural. -
Applying the texture:
This is the crucial step for the ‘driftwood’ look. Gently roll each bead over rough sandpaper or press a coarse texture sponge against the surface. You want to create pits and surface imperfections. -
Create the accent bead:
For the central white bead, roll a smooth sphere of ecru or white clay. Use the blunt side of your craft blade to gently press vertical indentations all around the circumference, creating a ribbed, shell-like effect. -
Pierce the holes:
Carefully insert a toothpick or bead pin through the center of each bead. Rotate the pin as you push to avoid squashing the shape. -
Widen the openings:
Since we are using cord, gently wiggle the toothpick to widen the hole slightly more than usual so the hemp can pass through easily later.
Uneven Textures?
If your texturing is flattening the beads too much, chill the clay in the fridge for 10 minutes before rolling over the sandpaper. This keeps them round.
Step 3: Baking and Assembly
-
Bake the beads:
Arrange your pierced beads on a parchment-lined tray. Bake according to your brand of clay’s specific instructions (usually 275°F/135°C for 30 minutes). Let them cool completely. -
Arrange your pattern:
Lay the cooled beads out on a table. Place the ribbed accent bead in the center, then alternate your grey, tan, and rust colors symmetrically outward. -
String the beads:
Cut a length of hemp cord about 12 inches long. Thread your beads onto the cord following your laid-out pattern. -
Measure the fit:
Wrap the beaded section around your wrist to check the spacing. Remove or add a bead if necessary for a comfortable fit. -
Tie the sliding knot:
Bring the two tail ends of the cord together, overlapping them. Cut a separate shorter piece of cord (about 5 inches). -
Form the macramé closure:
Using the short cord, tie a series of square knots (macramé box knots) over the two overlapped tail ends. This creates the sliding mechanism. -
Secure the slider:
Trim the ends of the knotting cord very close to the knot. Apply a tiny dot of glue to the cut ends (being careful not to glue the slider to the main cords). -
Finish the tails:
Tie a simple overhand knot at the very end of each main tail cord so they can’t slip through the slider. Trim any excess.
Salt Scrub Hack
Roll raw beads in coarse sea salt before baking. After baking and cooling, wash the beads; the salt dissolves, leaving perfect porous craters.
Enjoy wearing your new bracelet that carries the peaceful vibe of the boardwalk wherever you go
Charm Cluster Beach Bracelet With Mini Shells and a Star
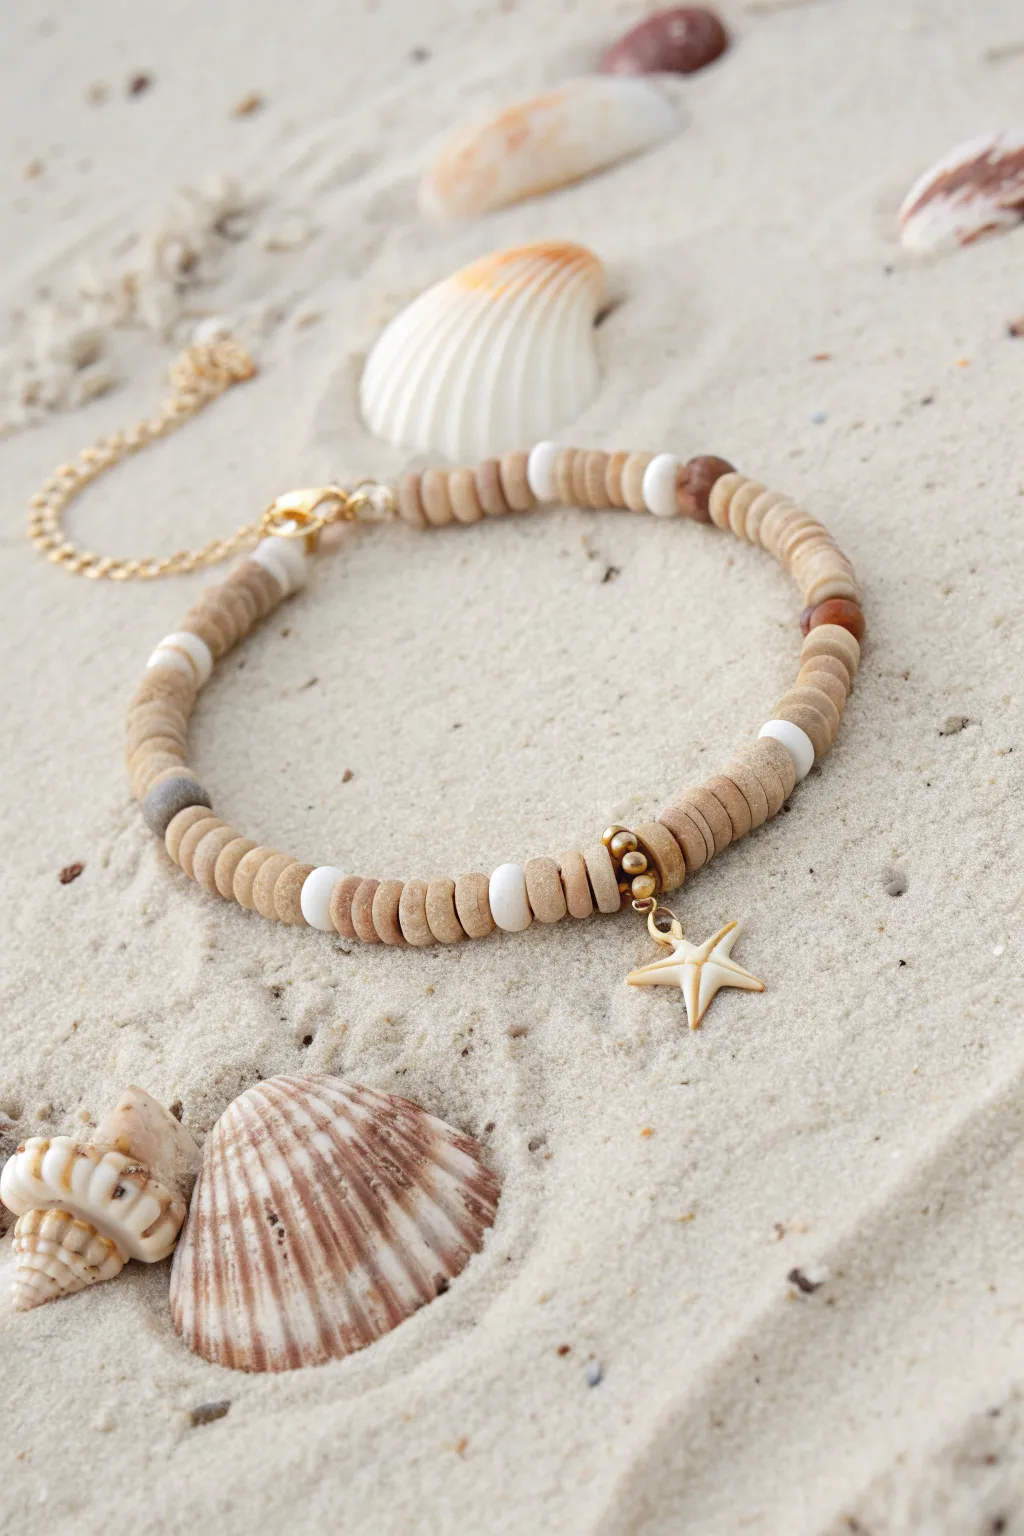
Capture the essence of a serene shoreline with this minimalist polymer clay bead bracelet. Featuring sandy beige tones, crisp white accents, and a delicate gold starfish charm, this piece is a wearable souvenir of sunny days.
Detailed Instructions
Materials
- Beige/tan flat clay disc heishi beads (4mm or 6mm)
- White flat clay disc heishi beads
- Dark brown/wood-tone accent beads (round or disc)
- Gold starfish charm with open jump ring
- Two gold crimp beads
- Two gold wire guardians (optional but recommended)
- Gold lobster clasp
- Gold extension chain
- Flexible beading wire (e.g., 0.38mm)
- Wire cutters
- Flat nose pliers
- Crimping pliers
Step 1: Preparation & Charm Placement
-
Measure your wire:
Cut a length of beading wire approximately 10 inches long. This gives you plenty of extra room to work with the clasp ends without struggling. -
Start the center:
Since the charm is the focal point, I find it easiest to start right in the middle. Thread your gold starfish charm onto the wire so it sits roughly in the center. -
Add gold spacers:
On either side of the starfish charm, thread on a small gold spacer bead or a tiny gold seed bead to frame the metal component.
Step 2: Beading the Pattern
-
Create the main sequence:
Begin threading your beige clay discs. The dominant pattern here is a long run of beige—add about 10 to 12 beige beads on one side of the charm. -
Insert an accent:
Slide on one single white clay disc bead to break up the tan color. -
Repeat the block:
Add another block of 6 to 8 beige beads, followed by a darker brown accent bead. This irregularity mimics the natural look of sand and pebbles. -
Balance the other side:
Repeat the exact same pattern on the other side of the starfish charm so the design is symmetrical radiating outward. -
Continue the pattern:
Continue adding beads in this rhythm: a large block of beige, a white accent, a smaller block of beige, a dark accent. Do this until the beaded section measures about 6 to 6.5 inches (or your desired wrist size). -
Double check the length:
Wrap the unfinished strand around your wrist to check the fit. Remember the clasp will add about half an inch to the final length, so don’t make the beaded portion too long.
Loosey Goosey?
If your bracelet feels stiff, you pulled the wire too tight before crimping. Leave a tiny gap (1mm) of wire slack at the end to allow the beads to rotate freely.
Step 3: Finishing the Ends
-
Thread the first crimp:
On one end of the wire, slide on a gold crimp bead. -
Add the hardware:
Thread the wire through the loop of your lobster clasp. If you are using a wire guardian, thread the wire up through one side, loop the clasp in the U-curve, and go down the other side. -
Back through the crimp:
Take the tail end of the wire and pass it back through the crimp bead you just added, creating a loop that holds the clasp. -
Secure the crimp:
Slide the crimp bead snugly against the clasp (or guardian), but leave a tiny bit of wiggle room so the clasp can move. Use your crimping pliers to flatten or fold the crimp bead securely. -
Trim the excess:
Tuck the short tail of wire into the first few beads of your bracelet to hide it, then trim any remaining wire flush with your cutters. -
Finish the second side:
Repeat the crimping process on the other end of the bracelet. This time, instead of a clasp, attach the gold extension chain. -
Tighten correctly:
Before crushing the final crimp, ensure there are no gaps between your beads, but don’t pull so tight that the bracelet becomes stiff and rigid. It needs to drape naturally.
Beachcomber Style
Swap the manufactured gold charm for a tiny, real drilled seashell or a piece of sea glass for a truly authentic beach-find look.
Slip on your new bracelet and enjoy the subtle seaside vibes wherever you go

TRACK YOUR CERAMIC JOURNEY
Capture glaze tests, firing details, and creative progress—all in one simple printable. Make your projects easier to repeat and improve.
Double-Strand Wrap in Seafoam and Sand
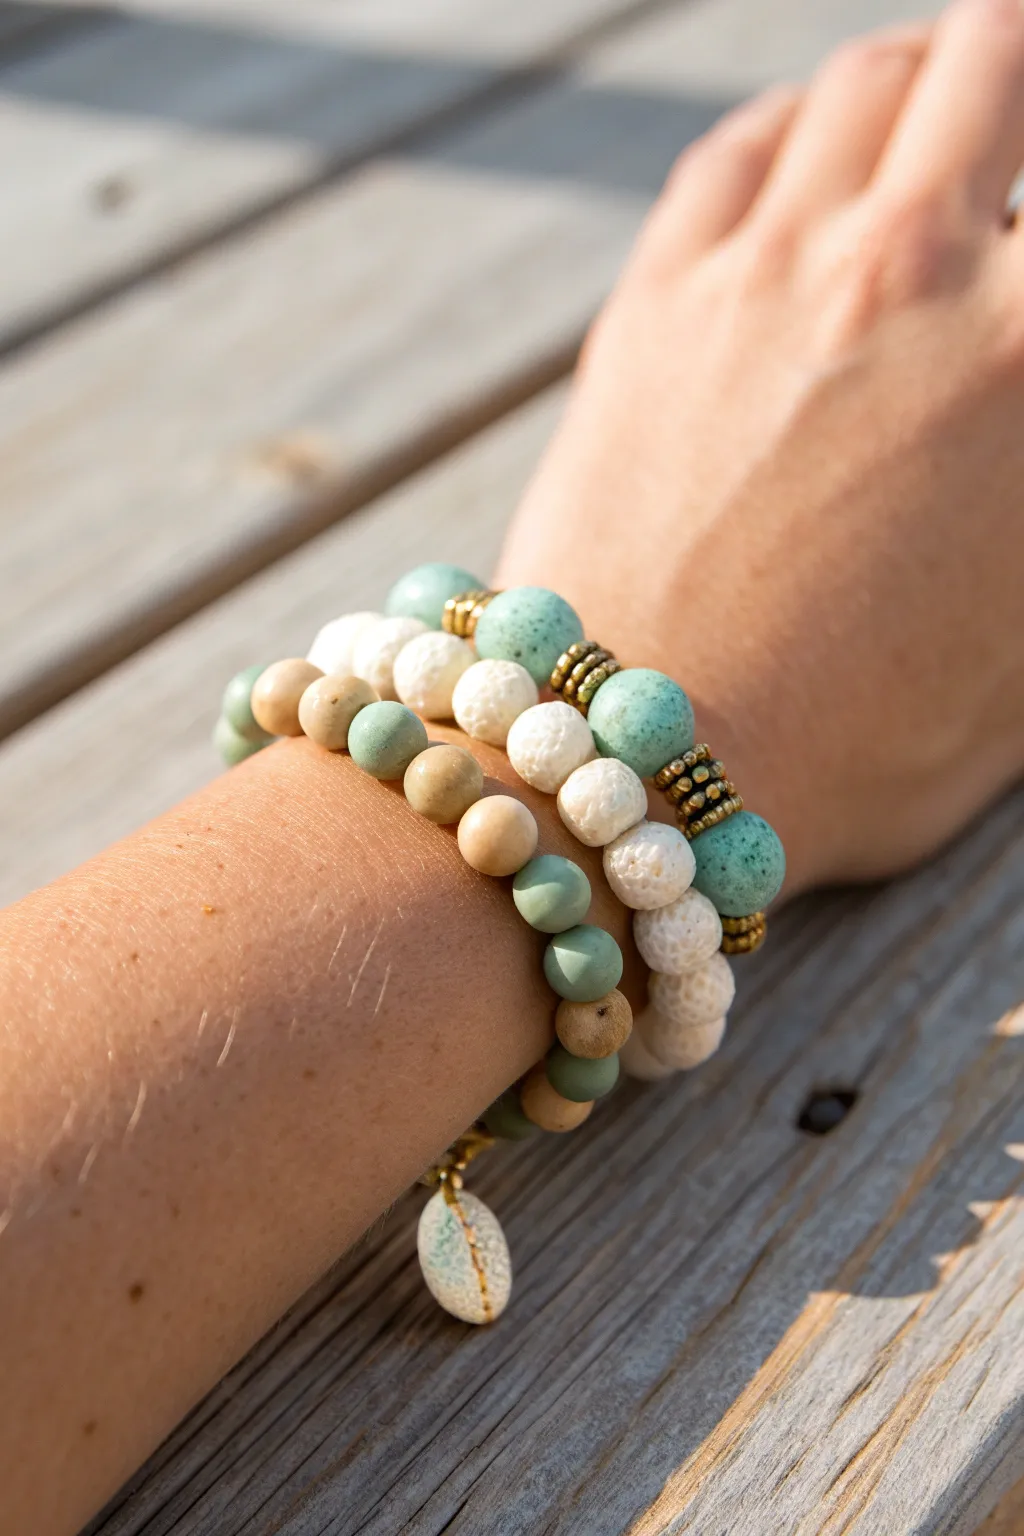
Capture the essence of a tranquil beach day with this beautiful multi-strand look created from just a single wrap bracelet. The soothing combination of porous white lava rock, smooth matte jasper, and speckled seafoam turquoise evokes the natural textures of sand and surf.
How-To Guide
Materials
- Memory wire (bracelet size) or heavy-duty elastic cord (0.8mm)
- White lava rock beads (8mm and 10mm)
- Matte beige jasper or river stone beads (8mm and 10mm)
- Speckled seafoam/turquoise ceramic or gemstone beads (10mm – 12mm)
- Small seafoam green spacer beads (6mm)
- Antique gold tiered spacer beads (heishi style)
- Daisy flower gold spacers
- One large teardrop charm (white turquoise or ceramic)
- Gold jump ring
- Wire cutters
- Round nose pliers
- Jewelry adhesive (optional)
Step 1: Planning the Pattern
-
Measure the wire:
Cut a length of memory wire that encompasses about three full loops around your wrist. If using elastic, cut a piece about 22 inches long to be safe, but remember this tutorial focuses on the structure of a wrap style. -
Define the segments:
Visualize the bracelet in three distinct sections: the ‘sand’ section (beige stones), the ‘surf’ section (white lava), and the ‘sea’ section (turquoise accents). Laying these out on a bead board first is incredibly helpful. -
Prepare the charm:
Attach your teardrop charm to a sturdy gold jump ring. Set this aside, as it will be the finishing touch on the very last loop.
Step 2: Stringing the Texture
-
Start the first loop:
Create a loop at one end of your memory wire using round nose pliers to prevent beads from sliding off. Begin threading your ‘sand’ section using the matte beige jasper beads. -
Create variation:
Alternate between the smaller (8mm) and larger (10mm) beige beads. I usually place a small seafoam spacer bead between every three or four beige stones to tie the color palette together early on. -
Transition to white:
As you complete the first full wrist rotation, switch to the white lava rock beads. These add that wonderful porous texture mimicking coral or sea foam. -
Add metal accents:
Insert an antique gold daisy spacer occasionally between the white lava beads. The metallic sheen warms up the cool white tones nicely.
Essential Oils
Add a drop of ocean-scented essential oil to the white lava beads. Their porous nature acts as a natural diffuser, carrying the scent all day.
Step 3: Adding the Focal Points
-
Introduce the seafoam:
For the second loop—the most visible part on top of the wrist—introduce the large speckled turquoise beads. These are your showstoppers. -
Frame the focal beads:
Flank each large turquoise bead with a stack of antique gold tiered heishi spacers. Use two or three thin spacers on each side to create a textured gold ‘cap’ for the bead. -
Mix the textures:
Between these gold-capped turquoise sections, add a short run of 3-4 white lava beads. This contrast makes the smooth blue stones pop even more. -
Continue the pattern:
Repeat this pattern—turquoise focal, gold stack, lava filler—until you have covered the second full loop of the bracelet.
Wire Too Hard?
Memory wire is tough! Use heavy-duty cutters intended for steel wire, not your delicate jewelry nippers, or you risk damaging your good tools.
Step 4: Finishing Touches
-
Final strand mix:
For the final loop, return to a random mix of the beige jasper and smaller green spacer beads. This creates a cohesive look where the bottom layer matches the start. -
Attach the charm:
Before closing off the wire, slide on your prepared teardrop charm. It should dangle freely at the very end of the wrap. -
Secure the end:
Use your round nose pliers to curl the final end of the memory wire into a tight loop. Make sure the loop is fully closed so the charm doesn’t slip out. -
Check for gaps:
Hold the bracelet up and check for any awkward gaps where wire shows. If needed, you can gently squeeze the loops to distribute the beads more evenly before the final wear.
You now have a wonderfully textured accessory that feels like carrying a piece of the shoreline with you
Stamped Texture Focal Bead With a Tiny Wave Pattern
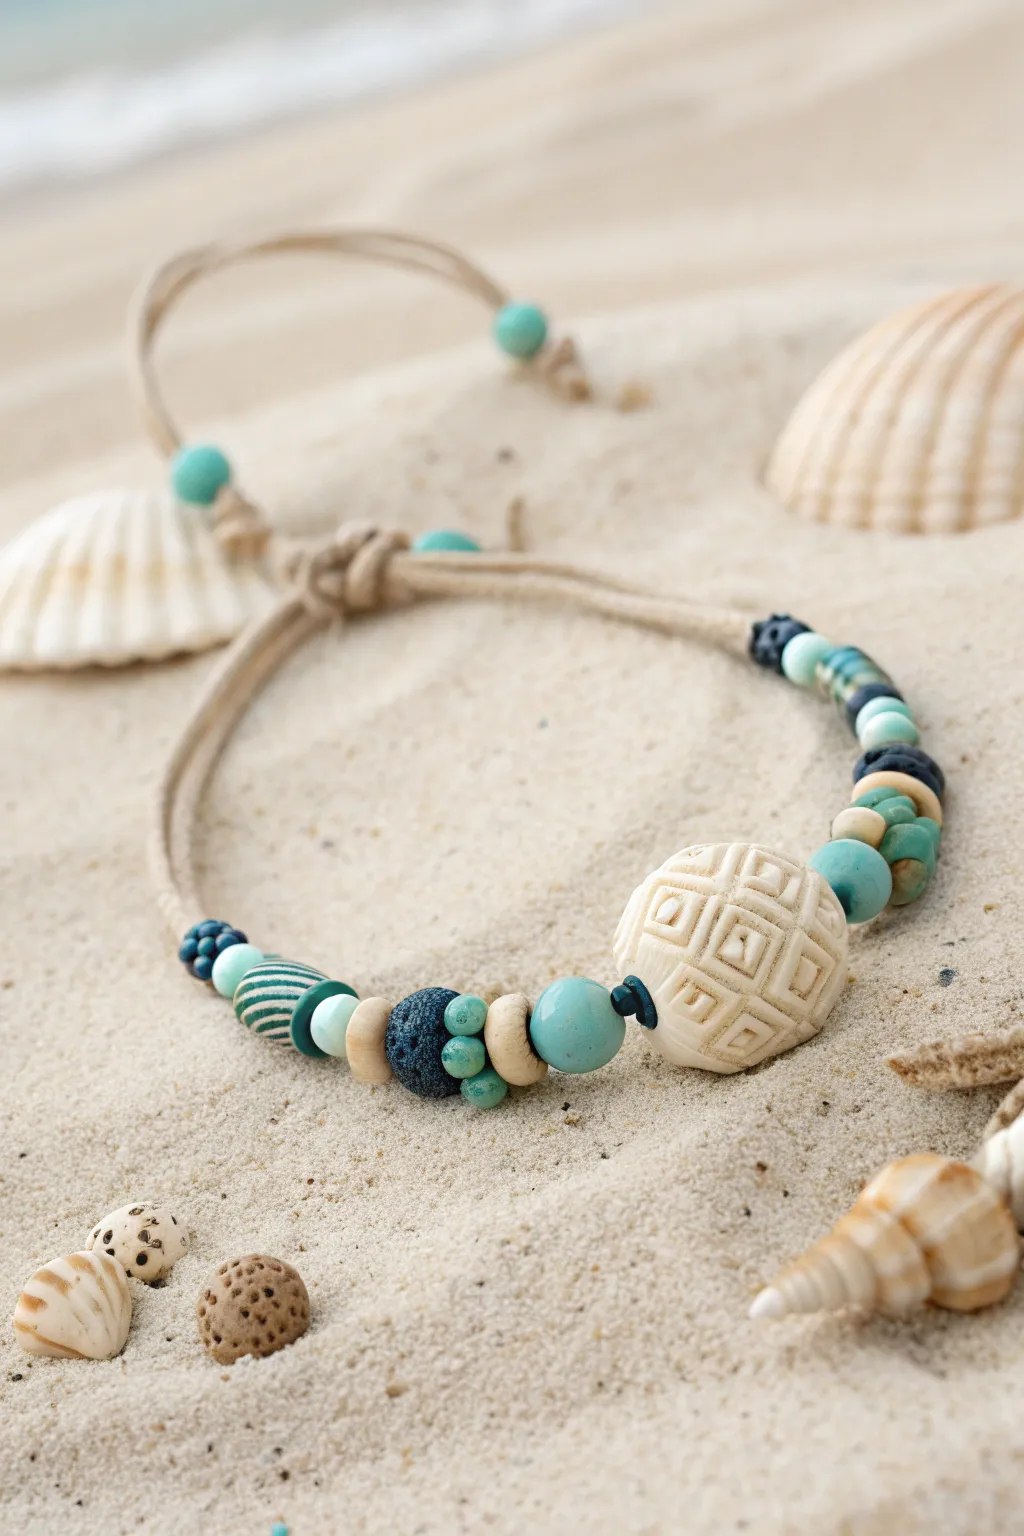
Capture the essence of a tranquil beach day with this textured bracelet, featuring a prominent stamped focal bead flanked by an array of turquoise and sandy-hued accents. The natural hemp cord construction adds a rustic, earthy touch that perfectly complements the intricate clay work.
How-To Guide
Materials
- Polymer clay (white or cream)
- Polymer clay (various shades of turquoise, teal, and navy)
- Acrylic paint (burnt umber or soft brown for antiquing)
- Hemp cord or waxed linen cord (tan/beige, roughly 1mm)
- Geometric texture stamp or small square cutter
- Bead reamer or toothpick
- Wooden beads (natural finish)
- Lava beads (black or dark navy)
- Sandpaper (fine grit)
- Gloss glaze (optional)
Step 1: Crafting the Focal Bead
-
Condition the Clay:
Start by conditioning a chunk of white or cream polymer clay until it is soft and pliable. Roll it into a smooth ball, approximately 3/4 inch to 1 inch in diameter. -
Pierce the Core:
Using a bead reamer or a thick toothpick, gently pierce a hole through the center of the ball. Rotate the bead as you push through to keep the shape spherical. -
Stamp the Texture:
Press a geometric square stamp gently into the surface of the clay ball. If you don’t have a stamp, use the corner of a small square cutter or a sculpting tool to impress concentric square patterns. -
Repeat the Pattern:
Rotate the bead and repeat the stamping process around the circumference, leaving small gaps or overlapping slightly depending on your desired look. -
Cure the Bead:
Bake the focal bead according to the manufacturer’s instructions for your specific brand of clay. Let it cool completely. -
Antique the Surface:
Dilute a small amount of burnt umber acrylic paint with water. Brush this wash over the textured bead, ensuring it settles into the stamped crevices. -
Wipe and Seal:
Immediately wipe the high points of the bead with a damp paper towel or cloth. This leaves the darker paint in the recesses, highlighting the pattern. Seal with a matte or satin varnish if desired.
Stamp Improvisation
No stamp? No problem. Use the end of a square chopstick or the head of a Phillips screwdriver to create interesting geometric indentations.
Step 2: Creating Accent Beads
-
Mix Custom Colors:
Blend your turquoise and teal clays to create a few varying shades of ocean blue. Leave some clay unmixed for solid colored beads. -
Form Small Spheres:
Roll several small beads, roughly 6mm to 8mm in size. Make a mix of solid turquoise, dark navy, and perhaps a marbled one. -
Texturize Heishi Beads:
Create disk-shaped beads (heishi style) by flattening small balls. You can stack contrasting colors to make a striped cylinder, then slice it into disks for a striped effect. -
Bake Accents:
Pierce holes in all your accent beads using a needle tool, ensuring the hole size will fit your cord. Bake these along with any additional clay components.
Scented Lava
Use porous lava rock beads as accents alongside your clay ones. Add a drop of essential oil to them for a diffuser bracelet.
Step 3: Assembling the Bracelet
-
Prepare the Cord:
Cut a length of hemp cord approximately 20 inches long. Fold it in half to create a loop at one end for the closure. -
Knot the Loop:
Tie an overhand knot about half an inch down from the fold to secure the loop. This will serve as part of your toggle clasp mechanism. -
String the First Side:
Thread a sequence of smaller beads onto both cords together. Start with a dark lava bead or navy clay bead, followed by a mix of wooden spacers and your handmade turquoise accents. -
Add the Focal:
Slide your large, textured focal bead onto both cords. It should sit comfortably in the center of your design. -
Mirror the Pattern:
String the remaining accent beads on the other side of the focal bead. Try to mirror the general weight and color balance of the first side, though exact symmetry isn’t necessary. -
Secure the Ends:
Once all beads are strung, tie a sturdy overhand knot tightly against the last bead to keep everything in place. -
Create the Toggle Bead:
Thread one final medium-sized turquoise bead onto the tail ends. Tie a second knot after this bead, leaving enough space for it to slip through the starting loop securely. -
Trim Excess:
Trim the remaining cord tails, leaving a short fringe if you like the rustic look, or cut close to the knot and dab with a little glue for security.
Now you have a stunning piece of wearable art that carries the relaxed spirit of the shore wherever you go