Whenever I’m craving a fresh, earthy color palette at my studio table, I reach for green clay beads first. Here are my favorite green clay bead bracelet ideas—from classic everyday stacks to playful, artsy designs that still feel totally wearable.
Sage Green Heishi Bracelet With Gold Spacers
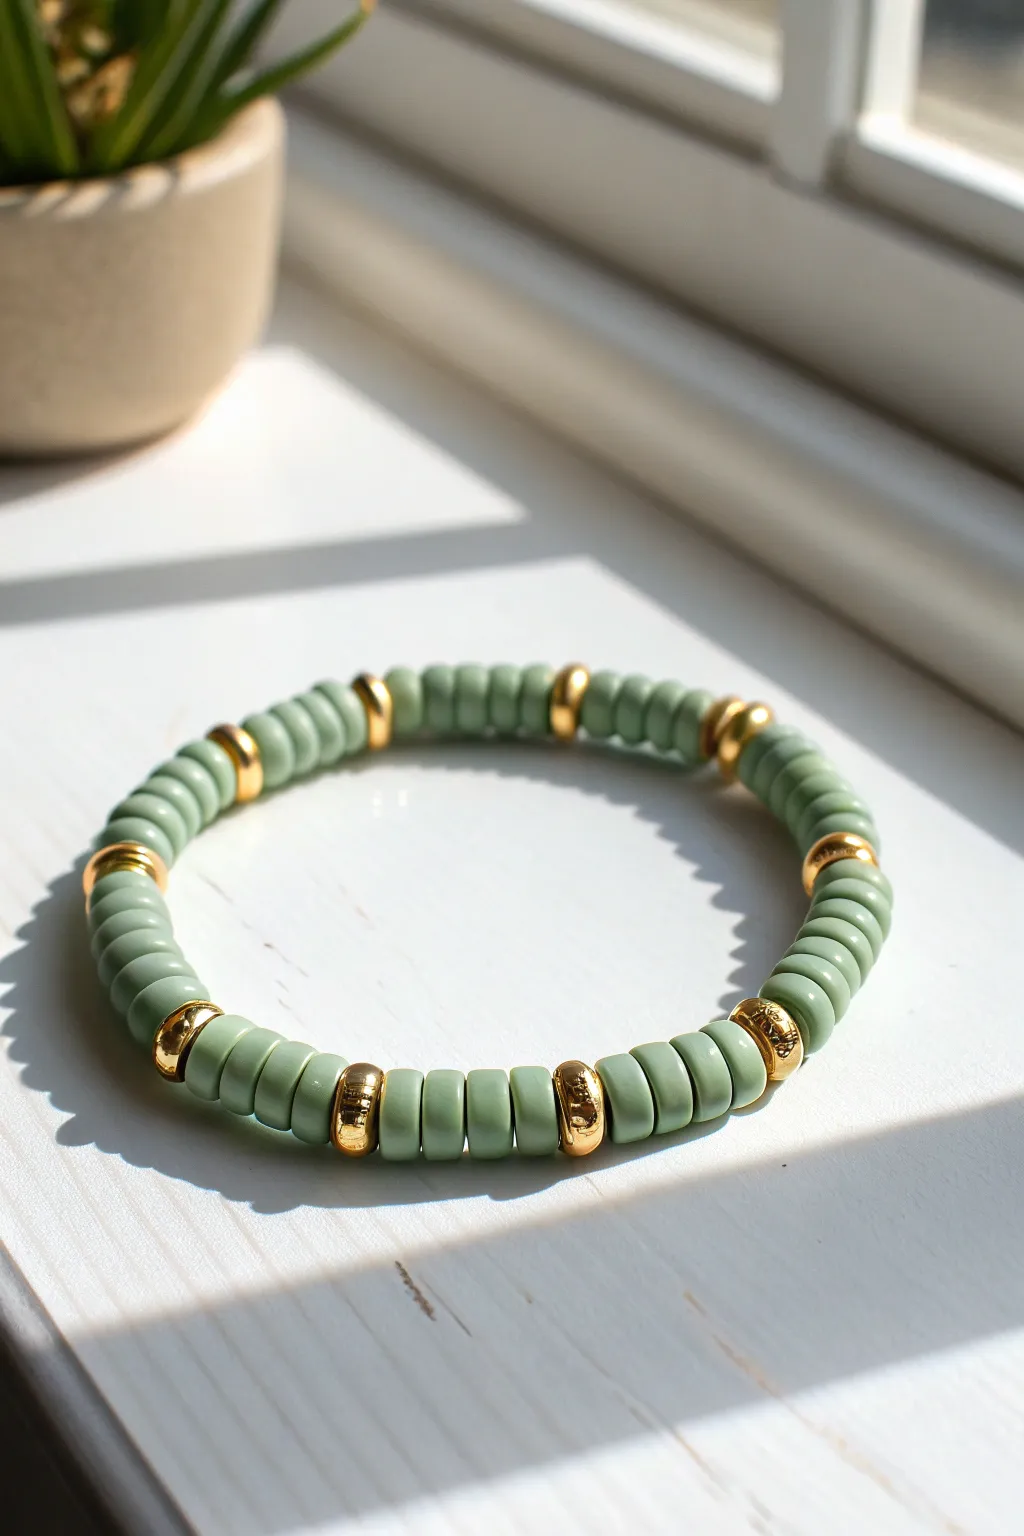
Capture the calm elegance of nature with this simple yet chic accessory. Featuring muted sage green heishi discs punctuated by gleaming gold spacers, this bracelet offers a perfect balance of earthy tones and sophisticated shine.
Step-by-Step Guide
Materials
- Sage green polymer clay heishi beads (6mm or 8mm)
- Gold tone metal spacer beads (rounded or saucers)
- Strong elastic cord (0.7mm or 0.8mm)
- Jewelry glue or clear nail polish
- Scissors or jewelry snips
- Beading needle (optional, for easier threading)
- Tray or cloth to keep beads contained
Step 1: Planning and Preparation
-
Measure your wrist:
Wrap a flexible measuring tape around your wrist to find your exact size. Add about 1/2 inch to this measurement to ensure the bracelet fits comfortably without being too tight. -
Cut the elastic:
Cut a piece of elastic cord roughly 10 inches long. I find it much easier to work with a generous excess of cord rather than struggling with short ends later. -
Pre-stretch the cord:
Hold both ends of the elastic and give it a few firm tugs. Pre-stretching prevents the bracelet from drooping or loosening immediately after you finish making it. -
Secure one end:
Place a piece of tape or a bead stopper clip on one end of the elastic cord so your beads don’t slide right off while you work.
Knot Hiding Trick
If the knot won’t fit inside a clay bead, try hiding it specifically inside one of the gold spacer beads, as metal beads often have slightly larger holes.
Step 2: Creating the Pattern
-
Establish the repeating unit:
Examine the design in the photo. The pattern consists of segments of green clay beads separated by single gold spacers. -
Start with green beads:
Thread on approximately 4 to 5 sage green heishi beads. -
Add a gold accent:
Slide on one gold spacer bead. Ensure the gold bead is just slightly larger or thicker than the clay beads to create that nice definition seen in the image. -
Build the second segment:
Add another set of 4 to 5 green beads. Consistency is key here, so count your beads carefully to keep the segments even. -
Continue the pattern:
Repeat the process: one gold spacer, followed by a block of green beads. Continue until you have reached your desired length. -
Check the fit:
Carefully wrap the unfinished strand around your wrist to check the sizing. Remember that the knot will take up a tiny bit of space. -
Adjust if necessary:
Add or remove a few beads if needed. Ideally, end with a green section so that when you tie it, the gold spacers remain spaced evenly throughout the loop.
Textured Twist
Replace the smooth gold spacers with faceted or corrugated gold beads to add extra sparkle and texture to your sage green stack.
Step 3: Finishing Touches
-
Prepare to tie:
Remove the tape or clip from the end of the cord. Bring both ends together carefully. -
Tie the first knot:
Make a simple overhand knot relative to the beads, pulling it tight enough to remove slack but not so tight that the beads pucker. -
Secure with a surgeon’s knot:
For the second knot, loop the elastic through twice before pulling tight. This creates a secure surgeon’s knot that is less likely to slip. -
Apply adhesive:
Dab a tiny drop of jewelry glue or clear nail polish directly onto the knot. This helps fuse the elastic and prevents unraveling. -
Hide the knot:
While the glue is still slightly tacky, gently pull the elastic so the knot slides inside the hole of the nearest gold spacer or clay bead. -
Trim the excess:
Once the glue is fully dry, use sharp scissors to trim the excess elastic tails as close to the bead as possible without cutting the knot.
Enjoy wearing your new minimalist bracelet individually or stacked with other gold accessories


Ombre Gradient From Mint to Emerald
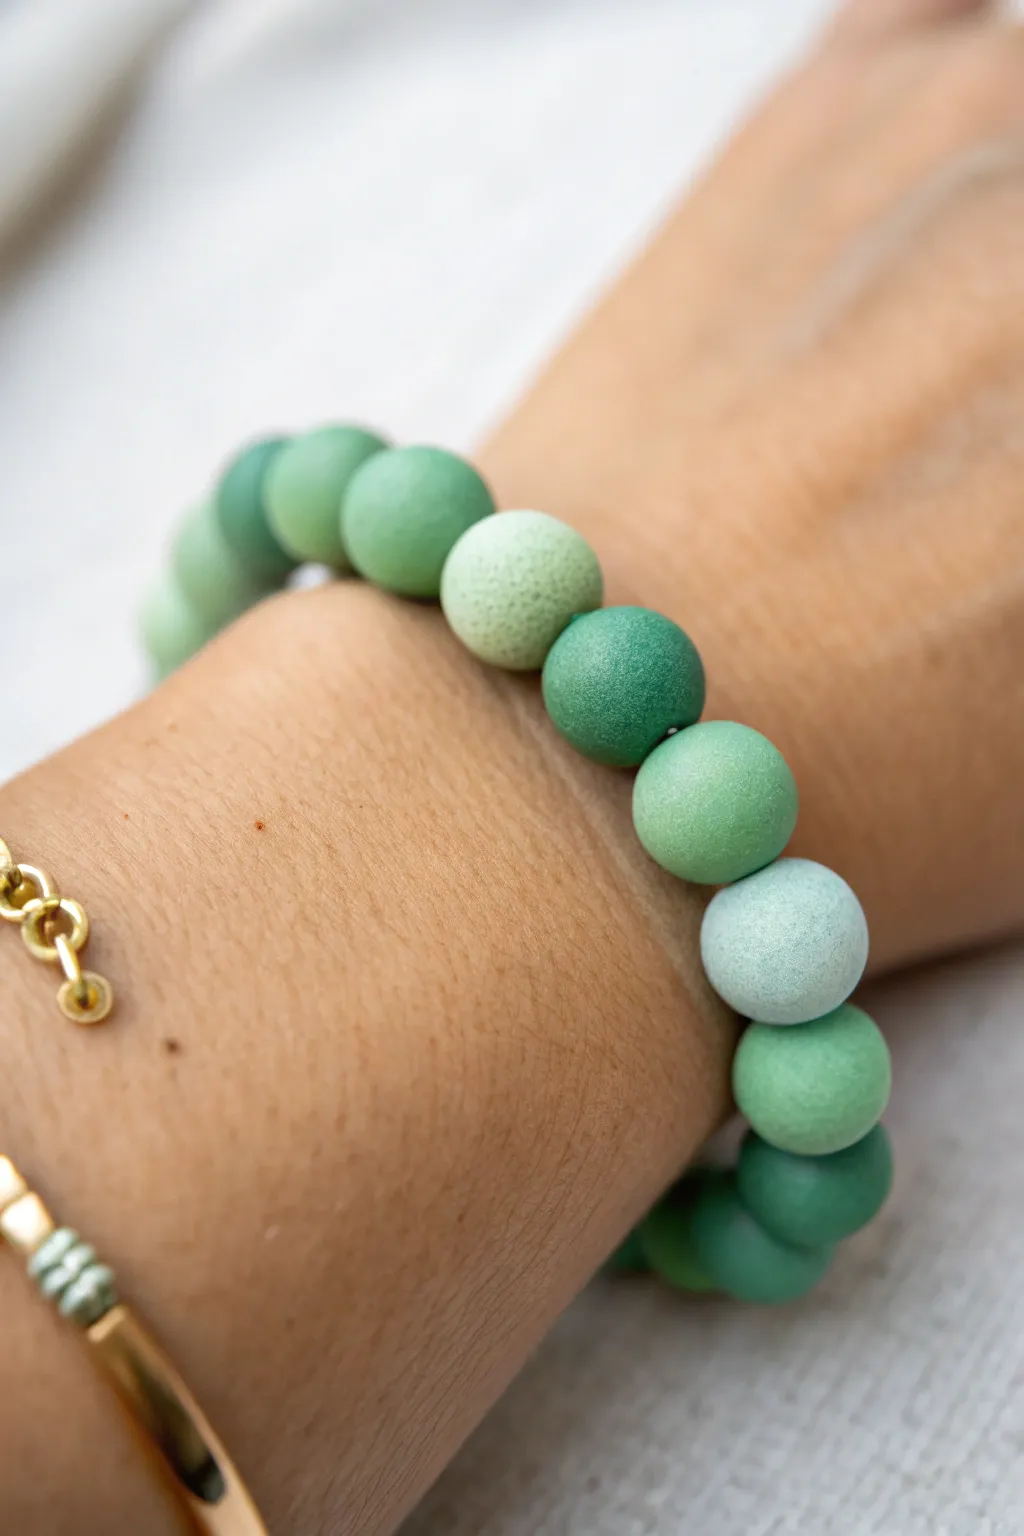
Capture the soothing tones of nature with this ombre bracelet, featuring a seamless transition from pale mint to deep emerald. This simple yet elegant project relies on careful color sorting to create a sophisticated gradient effect that looks stunning on the wrist.
Step-by-Step Tutorial
Materials
- Matte round polymer clay beads (10mm or 12mm)
- Bead colors: Pale mint, light sage, grass green, forest green/emerald
- Strong elastic cord (0.8mm or 1mm thickness)
- Jewelry glue or clear nail polish
- Scissors
- Bead design board or a piece of felt
- Tape or binder clip
Step 1: Preparation and Sorting
-
Assess your palette:
Begin by laying out all your green beads on a white surface. Good lighting is crucial here so you can distinguish the subtle variations in hue. -
Group by shade:
Separate your beads into four distinct piles ranging from lightest (pale mint) to darkest (emerald or deep forest green). This visual organization is the secret to a smooth ombre. -
Check bead quality:
Inspect each bead hole. If you find any clay burrs blocking the way, gently clear them out with a large needle or a bead reamer before stringing. -
Prepare the cord:
Cut a piece of elastic cord about 10-12 inches long. This generous length gives you plenty of room to tie knots without struggling. -
Pre-stretch the elastic:
Hold the ends of the cord and give it a few firm tugs. I almost always do this to prevent the bracelet from stretching out and becoming loose after the first few wears. -
Secure one end:
Place a piece of tape over one end of the cord or attach a binder clip. This acts as a stopper so your beads don’t slide off while you work.
Knot Slipping?
If the elastic feels too slick for a knot to hold, dab it with a little rubbing alcohol before tying. This removes manufacturing lubricants and adds grip.
Step 2: Stringing the Gradients
-
Design the pattern:
On your bead board or felt, arrange the beads in a line to test the gradient. To matching the photo, aim for blocks of color rather than a mixed scatter—group 3-4 beads of the same shade together before transitioning. -
Start with the mid-tones:
Begin stringing with your medium grass green beads. Thread about 3 to 4 of these onto the cord. -
Transition to light:
Next, add 3 to 4 of your light sage or pale mint beads. This creates the ‘light’ side of the bracelet shown prominently in the reference image. -
Add the darkest tones:
Follow the light section with your darkest emerald or forest green beads. Grouping them this way ensures the gradient flows logically around the wrist. -
Complete the circle:
Finish the strand by adding any remaining medium-dark beads to bridge the gap back to your starting color. The goal is a cyclic ombre where the colors blend into one another seamlessly. -
Check the fit:
Wrap the strand around your wrist to check the sizing. For an average wrist, you’ll likely use between 18 to 22 beads depending on their size, but adjust until it sits comfortably without digging in.
Step 3: Finishing Touches
-
Prepare to knot:
Remove the tape or clip. Bring both ends of the elastic together, ensuring there is no slack between the beads. -
Tie the first knot:
Tie a simple overhand knot, pulling it tight enough that the beads touch but not so tight that they buckle or the elastic stretches thin. -
Surgical knot:
Follow up with a surgeon’s knot for extra security. Loop the elastic through twice before pulling tight. This extra loop provides significant friction to hold the knot in place. -
Secure with glue:
Apply a tiny drop of jewelry glue or clear nail polish directly onto the knot. Allow it to become tacky and dry for a few minutes. -
Hide the mechanism:
Once the glue is dry, trim the excess elastic tails close to the knot (leave about 1-2mm). Gently pull the cord so the knot slides inside the hole of an adjacent bead, hiding it from view.
Pro Tip: Matte Finish
To maintain that dusty, matte clay look shown in the photo, avoid verifying or sealing the beads. Natural oils from your skin will slowly polish them over time.
Now you have a serene, nature-inspired accessory ready to stack or wear solo


Clean Color-Block: Green, White, Green
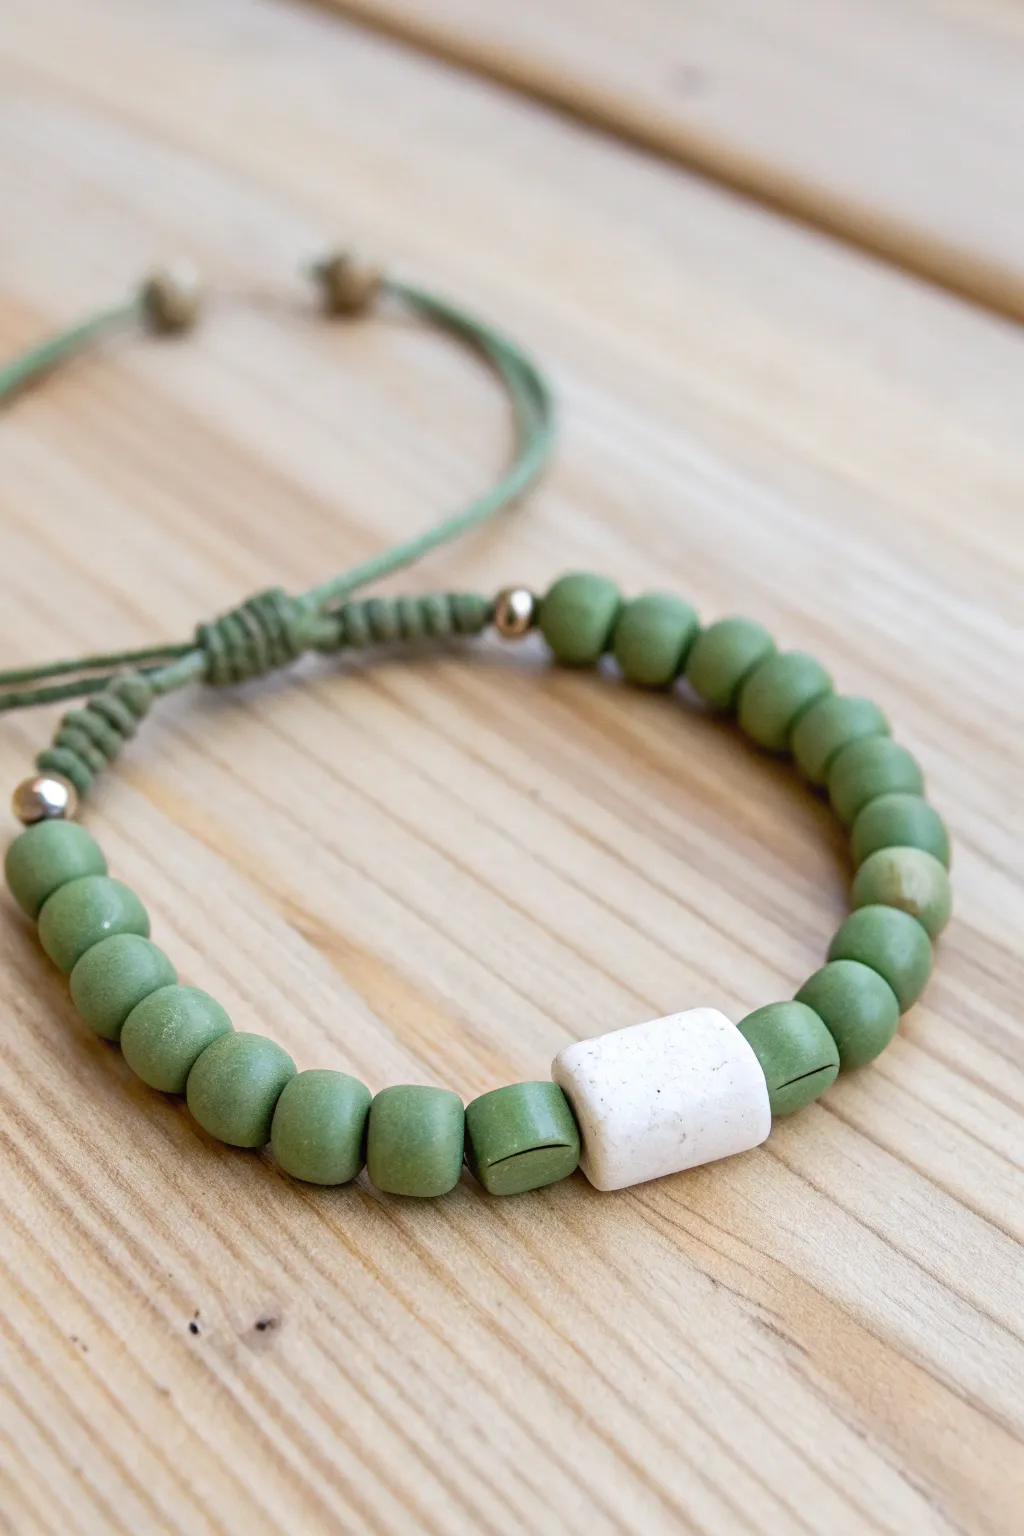
This understated bracelet combines matte olive green beads with a striking white focal point for a look that is both organic and modern. The adjustable sliding knot closure makes it comfortable for any wrist size and adds a professional finish.
How-To Guide
Materials
- Matte olive green polymer clay or ceramic beads (approx. 6mm-8mm)
- One large white rectangular tube bead (ceramic or stone, approx. 12mm)
- Small gold spacer beads (2mm-3mm)
- Olive green nylon macramé cord (0.8mm or 1mm thickness)
- Scissors
- Lighter or thread burner
- Tape or clipboard (to hold work in place)
Step 1: Preparation
-
Measure and cut:
Cut a piece of green nylon cord to approximately 12-14 inches long. This will be your main holding cord. -
Prepare the ends:
Quickly pass the lighter flame over the ends of the cord to melt them slightly. This prevents fraying and makes threading the beads much easier.
Loose closure?
If your sliding knot slips too easily, your macramé knots might be too loose. Tighten them significantly as you work, or use a slightly thicker cord for more friction.
Step 2: Beading
-
Start the pattern:
Thread one small gold spacer bead onto the cord and slide it to the center. -
Add first green section:
String approximately 10 to 12 of the olive green beads onto the cord. The exact number will depend on your wrist size, but aim to cover about a third of the bracelet’s circumference. -
Place the focal bead:
Slide on the large white rectangular tube bead. Ensure it sits right next to your last green bead. -
Complete the green section:
Add the same number of green beads to the other side of the white focal bead to maintain symmetry. -
Finish the strand:
Thread the second gold spacer bead onto the end, sandwiching all the clay beads between the two gold accents. -
Center the beads:
Move the entire group of beads to the exact middle of your cord.
Step 3: Knotted Closure
-
Secure the ends:
Tie a simple overhand knot with the cord immediately next to the gold spacer beads on both fit ends. This keeps the beads tight and centered. -
Form the loop shape:
Cross the two tail ends of your bracelet cord over each other to form a circle. I like to tape these tails down to a table so they stay parallel while I knot. -
Cut the knotting cord:
Cut a fresh piece of green cord, about 8-10 inches long. -
Begin the square knot:
Slide this new cord under the two crossed tail ends. Tie a simple overhand knot to secure it. -
Create the macramé slide:
Start a square knot sequence: take the left string over the center cords, and the right string over that left string, then under the center cords and up through the left loop. -
Tighten and repeat:
Pull the knot tight. Repeat the process starting with the right string. Continue alternating sides until you have a knotted section about 0.5 inches long. -
Trim and seal:
Trim the excess lengths of the knotting cord (not the main bracelet cords!) very close to the knot. Use your lighter to carefully melt the tips to seal the knot permanently.
Level It Up
Swap the single central white bead for three smooth river stones or a personalized letter bead to add a custom touch to your stack.
Step 4: Finishing Touches
-
Check the fit:
Slide the knot open and try the bracelet on to check the maximum width needed for your hand. -
Add end details:
Thread a small gold bead onto each of the dangling tail ends. -
Final knots:
Tie a secure knot at the very end of each cord to trap the gold bead. Make sure the tails are even. -
Final trim:
Trim any excess cord past the final knots and give them a quick pass with the lighter to seal.
Enjoy wearing this natural, minimalist accessory with your favorite casual outfits


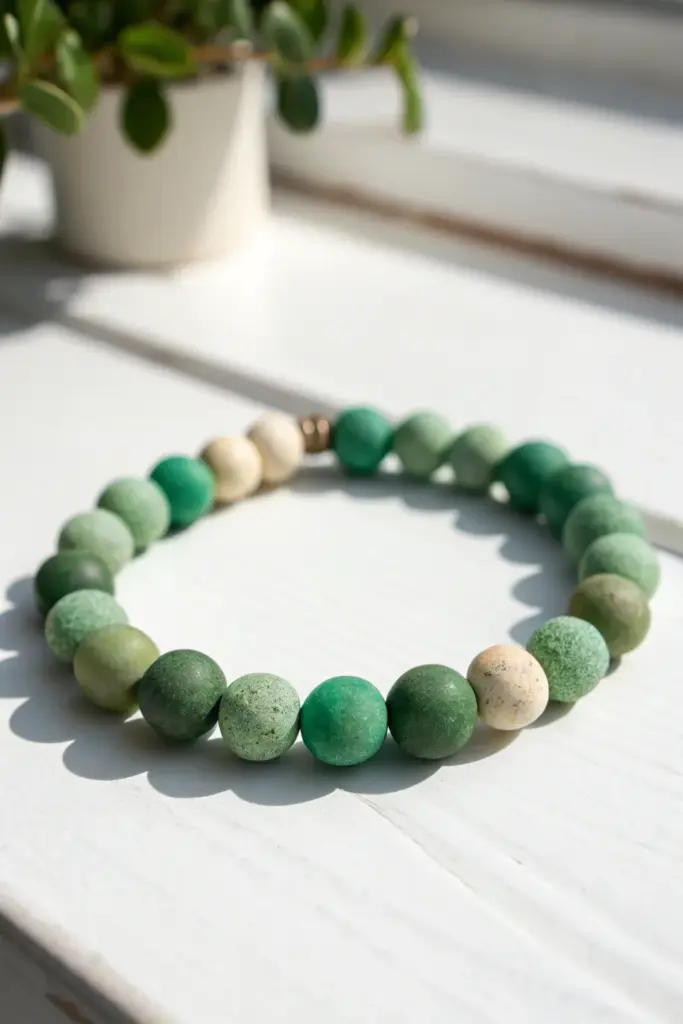
Deep Green and Cream “Cafe Matcha” Palette
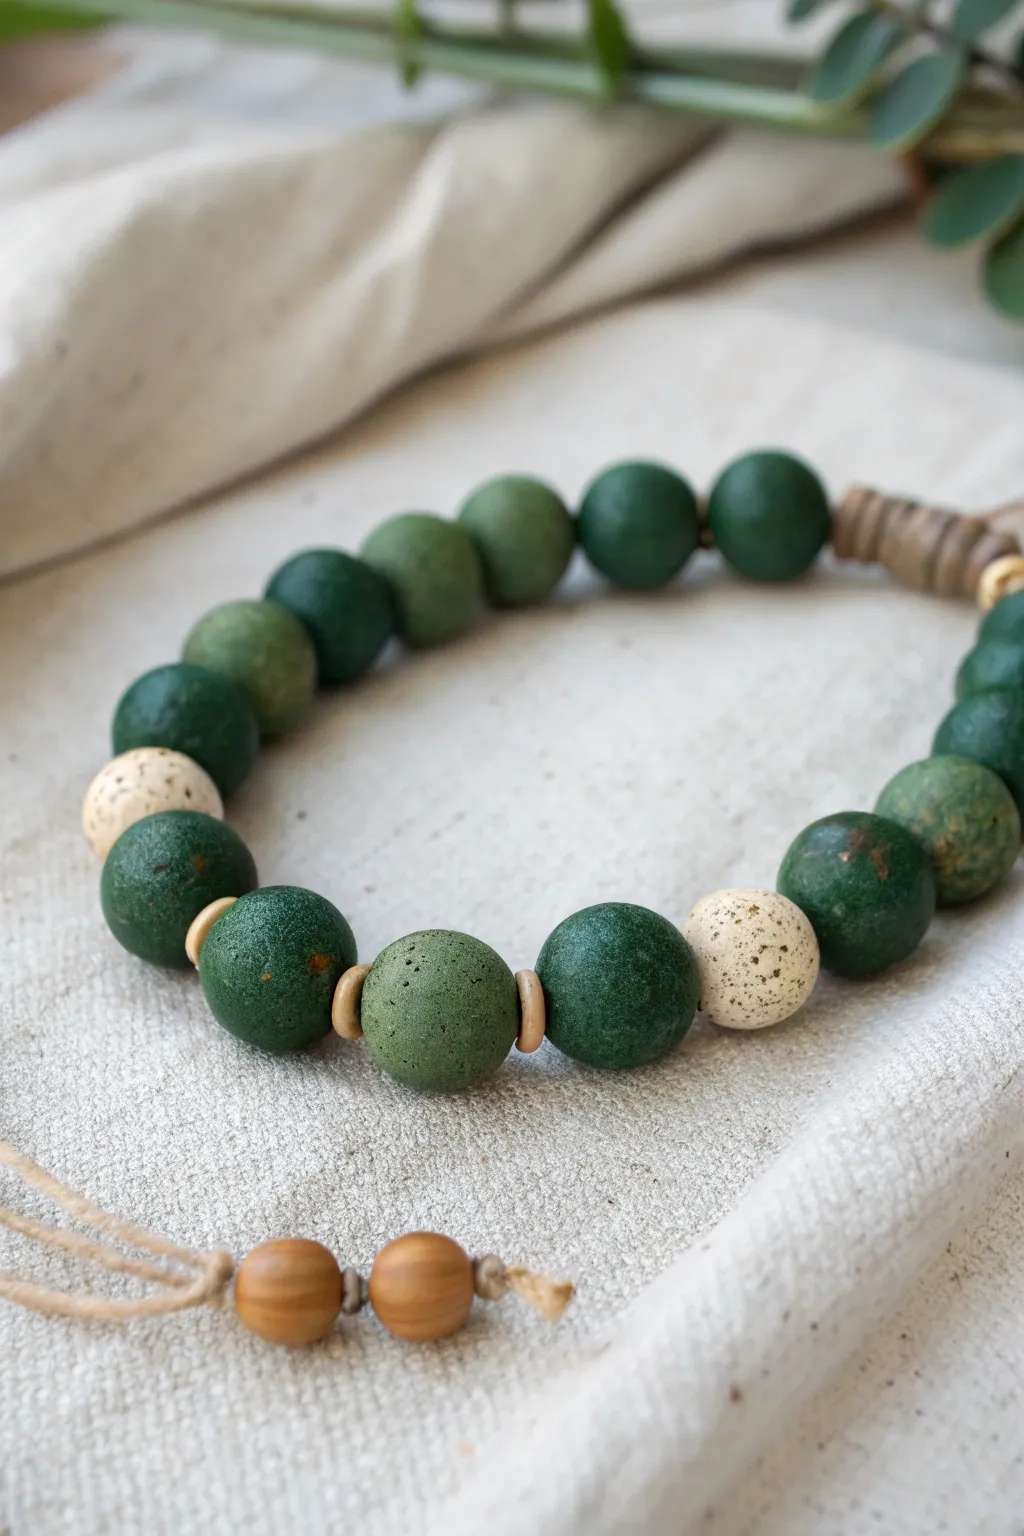
Evoking the soothing tones of a frothy matcha latte, this bracelet combines deep forest greens with creamy, speckled accents for an earthy, grounded accessory. The mix of textures—from smooth to porous clay—finished with natural wood elements creates a tactile piece perfect for everyday wear.
Detailed Instructions
Materials
- Polymer clay (Deep Forest Green, Moss Green, Cream/ecru)
- Black pepper or dried tea leaves (for speckling effect)
- Small round wooden spacer beads (approx. 4-6mm)
- Larger wooden beads for cord ends (approx. 8mm)
- Textured blending sponge or stiff-bristled toothbrush
- Bead reamer or toothpick
- Baking sheet and parchment paper
- Oven (for curing clay)
- Hemp cord or waxed cotton aesthetic cord (1mm thickness)
- Scissors
Step 1: Preparing the Clay Beads
-
Condition the clay:
Start by warming up your deep green and moss green polymer clay blocks in your hands until they are soft and pliable. Do the same for the cream color. -
Create the speckled cream mixture:
Flatten the cream clay and sprinkle a tiny pinch of ground black pepper or crushed dried tea leaves onto it. Fold and knead the clay repeatedly until the speckles are evenly distributed to mimic stone or ceramic. -
Portion the beads:
Roll your clay into logs of equal thickness. Slice the green logs into roughly 14-16 segments and the cream log into 2-4 segments, ensuring they are consistent in size for uniform beads. -
Shape the rounds:
Roll each segment between your palms to form smooth, round spheres. Don’t worry if they aren’t perfectly machine-round; slight organic variations add to the charm. -
Texturizing the green beads:
Take about half of your green beads and gently roll their surface over a textured sponge or tap them stippling-style with a stiff toothbrush. This creates the porous, moss-like texture seen in the reference.
Hole Distortion?
If piercing the bead squishes its round shape, let the clay sit in the fridge for 10 minutes first. Cold clay holds its shape better against the tool pressure.
Step 2: Piercing and Curing
-
Pierce holes:
Using a bead reamer or toothpick, carefully bore a hole through the center of each bead. Rotate the bead as you push through to prevent flattening the shape. -
Check the hole size:
Verify that your hemp cord can pass through the holes you’ve created. I usually test one bead before baking the whole batch just to be safe. -
Bake the clay:
Arrange the beads on a parchment-lined baking sheet. Bake according to your polymer clay manufacturer’s instructions (usually around 275°F or 135°C for 15-30 minutes). -
Cool down:
Allow the beads to cool completely in the oven with the door cracked open. This gradual cooling tempers the clay and makes it more durable.
Step 3: Stringing and Assembly
-
Prepare the cord:
Cut a length of hemp cord approximately 24 inches long. This gives you plenty of slack for knotting and the adjustment mechanism. -
Start the pattern:
Tie a loose temporary knot about 6 inches from one end. Thread on your first green bead. -
Add spacers:
Thread a small wooden spacer bead next. This separates the clay beads and adds a light wood accent that breaks up the green tones. -
Build the rhythm:
Continue stringing, alternating between green beads (mixing smooth and textured ones), wooden spacers, and placing the cream speckled beads as focal points toward the center or sides. -
Finish the main strand:
Once you’ve reached your desired bracelet length (usually about 6.5 to 7 inches of beads), end with a final green bead.
Scent Infusion
Knead a drop of essential oil (like cedar or pine) into the porous wooden spacer beads before stringing. The wood acts as a natural diffuser.
Step 4: The Closer Mechanism
-
Create the loop closure:
Remove the temporary knot. Bring both cord ends together, forming a circle with the bracelet. -
Macramé sliding knot:
Cut a separate 10-inch piece of cord. Lay the bracelet ends parallel to each other and use the new piece to tie a series of square knots (cobra stitch) over both bracelet cords to create a sliding adjuster. -
Add end beads:
Thread one large wooden bead onto each loose end of the main bracelet cord. Tie a sturdy overhand knot right after the wood bead to secure it. -
Trim excess:
Trim any excess cord close to the knots on the slider and the end beads. You can add a tiny dab of glue to the knots for extra security.
Slide your new bracelet on and enjoy the calm, natural vibes of your handmade creation

The Complete Guide to Pottery Troubleshooting
Uncover the most common ceramic mistakes—from cracking clay to failed glazes—and learn how to fix them fast.
Emerald Pop Bracelet With Chunky Accent Beads
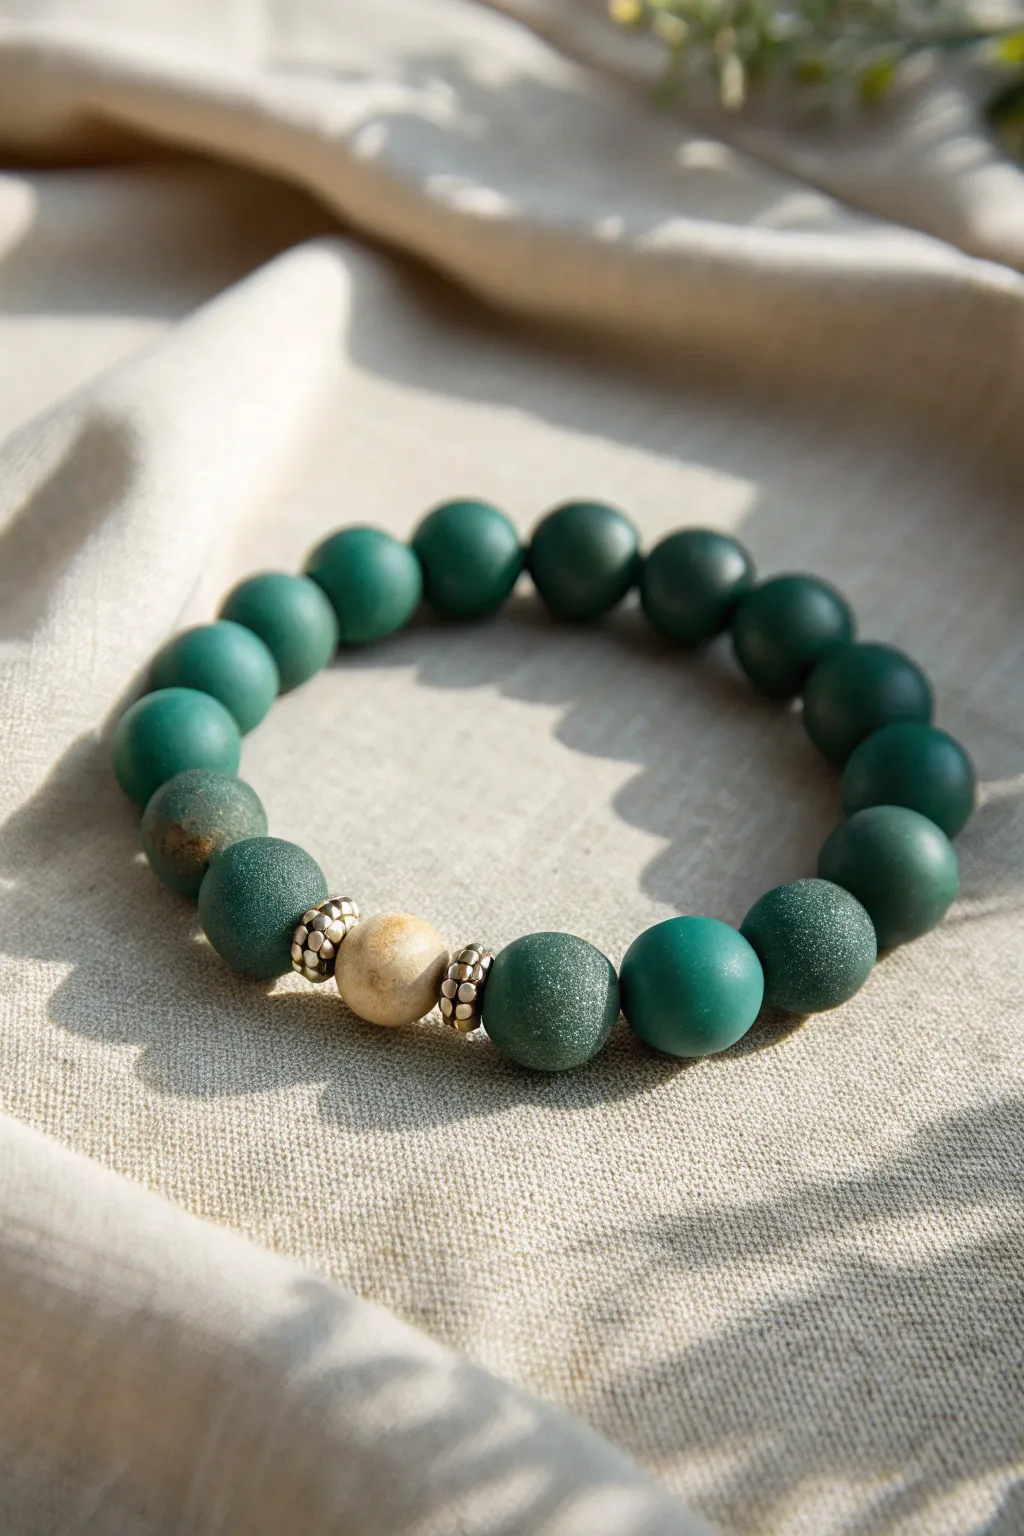
This sophisticated design combines the deep, calming hues of emerald green with earthy, natural textures. By mixing matte finish beads with a striking wood and metallic focal point, you’ll create an accessory that feels both grounded and luxurious.
Step-by-Step
Materials
- Matte emerald green round beads (10mm or 12mm)
- Textured or ‘frosted’ stone/clay green beads (same size as main beads)
- One large natural wood bead (cream or light beige, approx. 12mm)
- Four textured metallic spacer beads (silver or antique brass tones)
- Strong elastic jewerly cord (0.8mm or 1mm)
- Jewelry adhesive (e.g., G-S Hypo Cement)
- Scissors
Step 1: Planning Your Pattern
-
Measure your wrist:
Wrap a piece of string around your wrist to find your size, then add about half an inch for a comfortable fit. -
Lay out the focal point:
On a bead board or a soft towel, place your single large wooden bead in the center. -
Add metallic accents:
Place one metallic spacer bead on either immediate side of the wooden bead to frame it. -
Incorporate texture:
Next to the metallic spacers, place one of your textured or frosted green beads on each side. -
Add secondary spacers:
Finish the focal section by adding a second metallic spacer bead after each of the textured green beads.
Knot Hiding Trick
Plan your design so the knot lands near the wooden bead or a spacer. These often have larger holes, making it much easier to pull the knot inside for a professional finish.
Step 2: Stringing the Beads
-
Prepare the cord:
Cut a length of elastic cord about 10-12 inches long. Having extra length makes tying the final knot much easier. -
Pre-stretch the elastic:
Give the cord a few gentle tugs. I always do this to prevent the bracelet from stretching out permanently after the first wear. -
Fill the length:
Arrange the remaining matte emerald beads in a line to complete the circumference needed for your wrist measurement. -
Begin stringing:
Thread the main run of matte green beads onto the elastic first. This creates the ‘back’ of the bracelet. -
Add the focal section:
Carefully thread your layout from Step 1: spacer, textured green, spacer, wood bead, spacer, textured green, spacer. -
Check the fit:
Wrap the unfinished strand around your wrist. If it feels too tight, add another matte green bead; if it’s too loose, remove one.
Gaping Beads?
If you see cord showing between beads, your elastic is too tight. The beads should touch but not be squeezed. Restring with slightly less tension so the bracelet drapes naturally.
Step 3: Finishing Touches
-
Tie the first knot:
Bring the two ends of the elastic together and tie a single overhand knot, pulling it snug against the beads. -
Secure with a surgeon’s knot:
Tie a second knot, but loop the elastic through twice before pulling tight. This creates a secure surgeon’s knot. -
Apply adhesive:
Dab a tiny drop of jewelry glue directly onto the knot. Be careful not to get glue on the neighboring beads. -
Let it cure:
Allow the glue to dry for at least 15 minutes before moving on. -
Hide the knot:
If one of your beads has a large enough hole, gently tug on the elastic to slide the knot inside that bead. -
Trim the excess:
Using sharp scissors, trim the tails of the elastic cord close to the knot (or flush with the bead hole if you hid the knot).
Slip on your beautiful new creation and enjoy the organic, earthy vibe it adds to your outfit
Green Letter Bead Bracelet With a Lucky Word
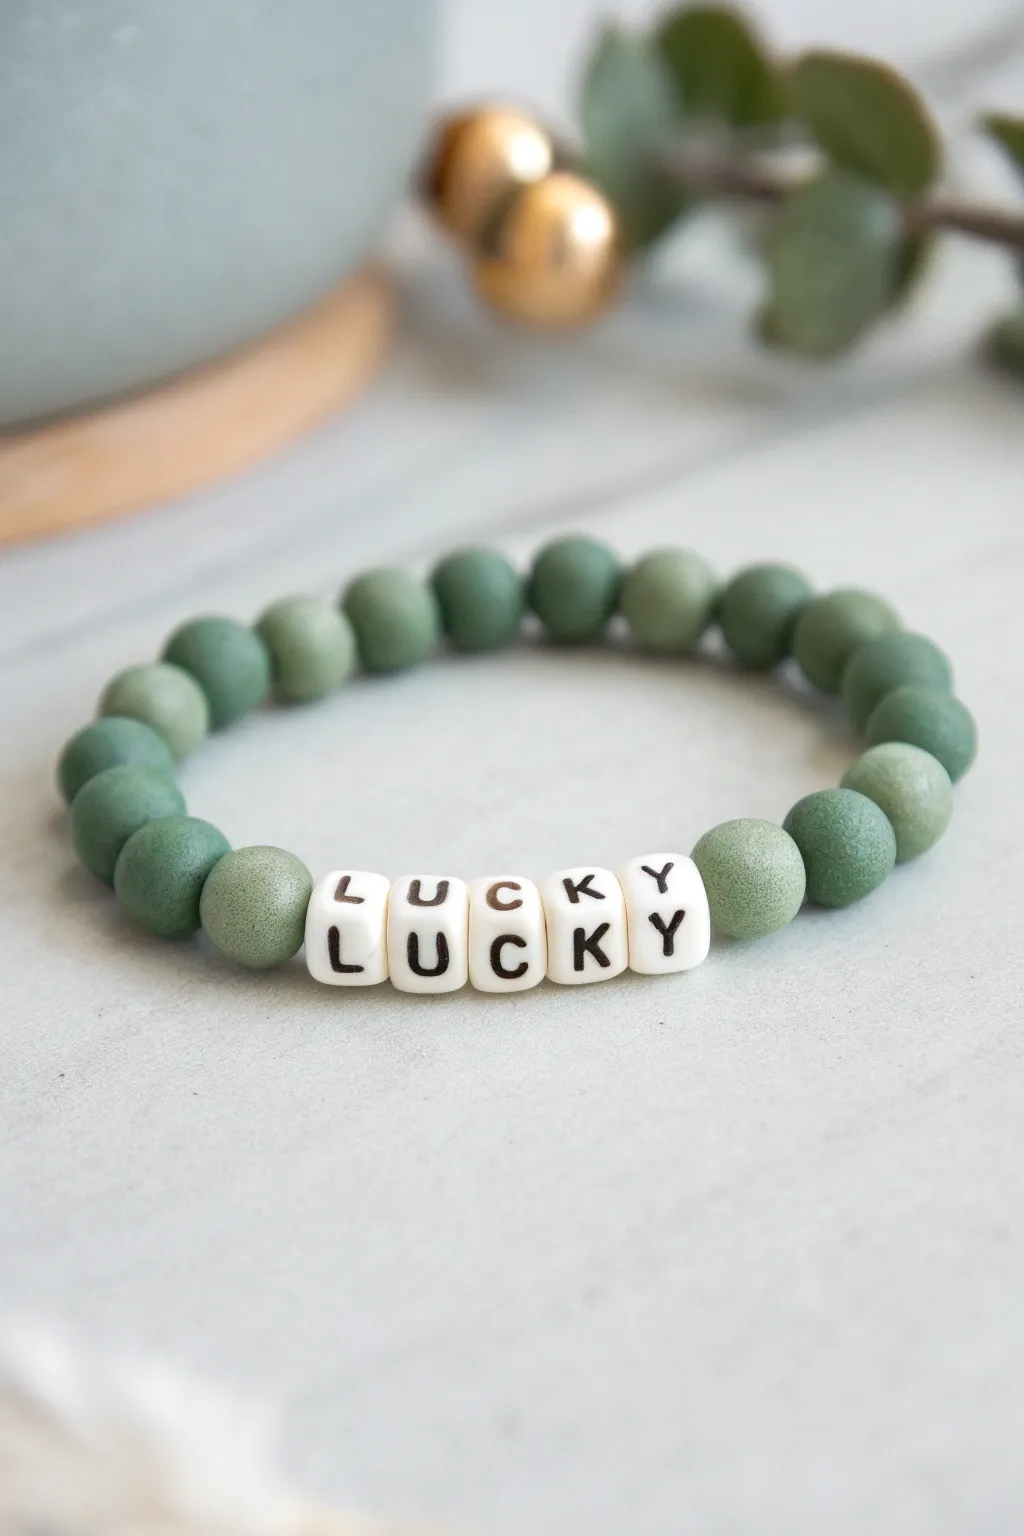
Embrace serenity and good fortune with this muted green bead bracelet featuring stark white letter beads. Its mix of sage and forest tones creates a natural, earthy look perfect for stacking or wearing solo.
Step-by-Step Guide
Materials
- Matte round beads (8mm or 10mm) in mixed sage/dark green shades (approx. 20-24 beads)
- White square alphabet beads with black lettering spelling ‘LUCKY’
- Strong elastic bead cord (0.8mm or 1.0mm recommended)
- Scissors
- Hypo-cement or strong jewelry glue
- Bead stopper or a simple binder clip
- Measuring tape
Step 1: Preparation & Layout
-
Measure your wrist:
Before cutting any cord, wrap a measuring tape comfortably around your wrist. Add about half an inch to this measurement for a standard fit, or a full inch if you prefer a looser drape. -
Cut the elastic cord:
Cut a piece of elastic cord approximately 10-12 inches long. Having this extra length makes the final knot-tying step significantly less frustrating than working with short ends. -
Pre-stretch the cord:
Hold the cord firmly at both ends and give it several gentle tugs. This pre-stretching prevents the bracelet from becoming loose and saggy after the first few times you wear it. -
Secure one end:
Attach a bead stopper or a binder clip to one end of your elastic cord. This simple precaution saves you from the disaster of beads sliding right off the other side as you work. -
Plan your color gradient:
Pour out your green beads onto a soft surface or bead mat. Sift through the shades to find a pleasing mix of light sage and darker forest greens. -
Arrange the pattern:
Lay out your beads in a line before threading. I like to alternate the lighter and darker green beads randomly to give it that organic, natural feel seen in the photo.
Step 2: Assembly
-
Start the first half:
Begin threading the green beads onto the cord. You will need roughly 9 to 11 beads for the first side, depending on your wrist size. -
Thread the word:
Pick up your white letter beads. Double-check they spell ‘LUCKY’ in the correct order before stringing them on, ensuring they are facing the right way up relative to how you want to read them. -
Complete the circle:
Continue threading the remaining green beads on the other side of the word. Try to use the same number of beads as the first side to keep the text centered on your wrist. -
Check the fit:
Carefully wrap the unknotted strand around your wrist to check the size. Ideally, the ends should touch without gaps but not feel tight against your skin. -
Adjust if needed:
If it feels too tight or loose, remove or add one green bead at a time from the ends (not near the letters) to maintain symmetry.
Knot Slipping?
If your elastic knot keeps coming undone before you can glue it, try rubbing the knot area with a little beeswax or chalk. The added texture provides grip.
Step 3: Finishing Touches
-
Prepare the knot:
Remove the bead stopper while gripping the ends tightly. Bring the two ends of the cord together. -
Tie a surgeon’s knot:
Cross the ends like a normal knot, but loop the top string through twice instead of once before pulling tight. This creates extra friction to hold the elastic. -
Secure and tighten:
Pull the cords firmly to tighten the knot without snapping the elastic. Repeat the knotting process once more for extra security. -
Apply adhesive:
Dab a tiny drop of hypo-cement or jewelry glue directly onto the knot. Let this dry for a moment; it seals the knot and prevents it from slipping undone over time. -
Hide the knot:
Once the glue is tacky but mostly dry, gently tug the elastic so the knot slides inside the hole of the nearest green bead. This hides the mechanics for a professional finish. -
Trim the excess:
Using your scissors, carefully trim the remaining tails of the elastic cord close to the bead hole, being extremely careful not to nick the main structural knot.
Golden Glow
Add sophistication by placing small gold spacer beads or heishi discs between the green beads and the letter blocks.
Slip your new lucky charm onto your wrist and enjoy the calming green tones


What Really Happens Inside the Kiln
Learn how time and temperature work together inside the kiln to transform clay into durable ceramic.
Mossy Green “Stone” Palette With Speckles

Capture the essence of a forest floor with this beautiful, earthy bracelet featuring handmade polymer clay beads. The variation of mossy greens mixed with creamy, speckled accents creates a natural, stone-like aesthetic that feels organic and grounding.
Step-by-Step Tutorial
Materials
- Polymer clay in ‘Moss Green’, ‘Leaf Green’, ‘Olive’, and ‘Translucent’
- Polymer clay in ‘Ecru’ or ‘Beige’
- Coarse black pepper or dried used coffee grounds (for speckling)
- Acrylic roller or pasta machine
- Circle cutters (small)
- Bead piercing pins or toothpicks
- Baking tile or cardstock
- Elastic jewelers cord (0.8mm or 1mm)
- Small ribbed metal spacer bead (antique silver or bronze)
- Super glue or jewelry cement
- Fine grit sandpaper (400-600 grit)
- Buffing cloth (denim or cotton)
Step 1: Creating the Faux Stone Clay
-
Condition the Greens:
Begin by conditioning your green clays separately. You want about three distinct shades ranging from a dark forest green to a lighter olive tone. -
Add Translucency:
Mix a small amount of translucent clay (about 1 part translucent to 3 parts color) into each green shade. This adds depth so the beads look like stone rather than flat plastic. -
Prepare the Speckle Mix:
Flatten your green clays into sheets. Sprinkle a generous pinch of coarse black pepper or dried coffee grounds onto the clay sheets. -
Incorporate the Texture:
Fold the clay over the speckles and run it through your pasta machine or roll it out by hand. Repeat this folding and rolling process until the speckles are evenly distributed throughout the clay. -
Create the Cream Clay:
Repeat the speckling process with your Ecru or Beige clay. Be slightly more generous with the pepper here, as the contrast is key for those two accent beads.
Natural Texture Hack
Mix varying ratios of the green clays together partially to create a marbled effect, mimicking the natural mineral veins found in real moss agate stones.
Step 2: Forming the Beads
-
Portion Control:
For consistent sizing, roll your clay into a thick log or sheet and use a small circle cutter to punch out equal amounts of clay for each bead. -
Rolling Spheres:
Roll the punched circles between your palms to create smooth, round spheres. I find washing my hands between colors prevents the greens from staining the pristine cream beads. -
Texturizing (Optional):
If you want a rougher, more porous look like the reference creates, gently tap the surface of the raw beads with a stiff toothbrush or a crumpled ball of aluminum foil. -
Piercing the Holes:
Gently twist a bead piercing pin or toothpick through the center of each sphere. Rotate the bead as you pierce to keep the shape round. -
Baking Prep:
Leave the beads on the piercing pins if possible and suspend them over a baking tray, or place them gently on a bed of cornstarch or accordion-folded cardstock to prevent flat spots. -
Baking:
Bake the beads according to your specific polymer clay manufacturer’s instructions (usually 275°F/130°C for 30-60 minutes).
Step 3: Finishing and Assembly
-
Cooling and Sanding:
Let the beads cool completely. Use wet/dry sandpaper under running water to smooth out any fingerprints or sharp edges around the holes. -
Buffing:
Rub the beads vigorously with a piece of denim or heavy cotton. This burnishing step gives them a lovely natural sheen without needing varnish. -
Layout Design:
Arrange your beads on a bead board or towel. Place the two cream beads side-by-side, then the metal spacer, and fill the rest of the loop with your assorted green tones. -
Stringing:
Cut a piece of elastic cord about 10-12 inches long. Pre-stretch it by pulling on it firmly a few times to prevent it from sagging later. -
Threading Beads:
Thread all your beads onto the elastic. Check the fit around your wrist before tying. -
Securing the Knot:
Tie a surgical knot (like a square knot, but loop the thread through twice on the first pass). Pull it very tight. -
Final Glue:
Add a tiny drop of super glue or jewelry cement to the knot. Let it dry, then trim the excess cord, ideally tucking the knot inside the hole of a neighboring bead.
Scented Jewelry Idea
Use unglazed terracotta clay for the cream beads instead of polymer. They act as a porous diffuser, allowing you to add drops of essential oils to the bracelet.
Now you have a stunning, nature-inspired accessory that perfectly captures organic beauty
Green Stripe Sections Separated by Tiny Bead “Stops”
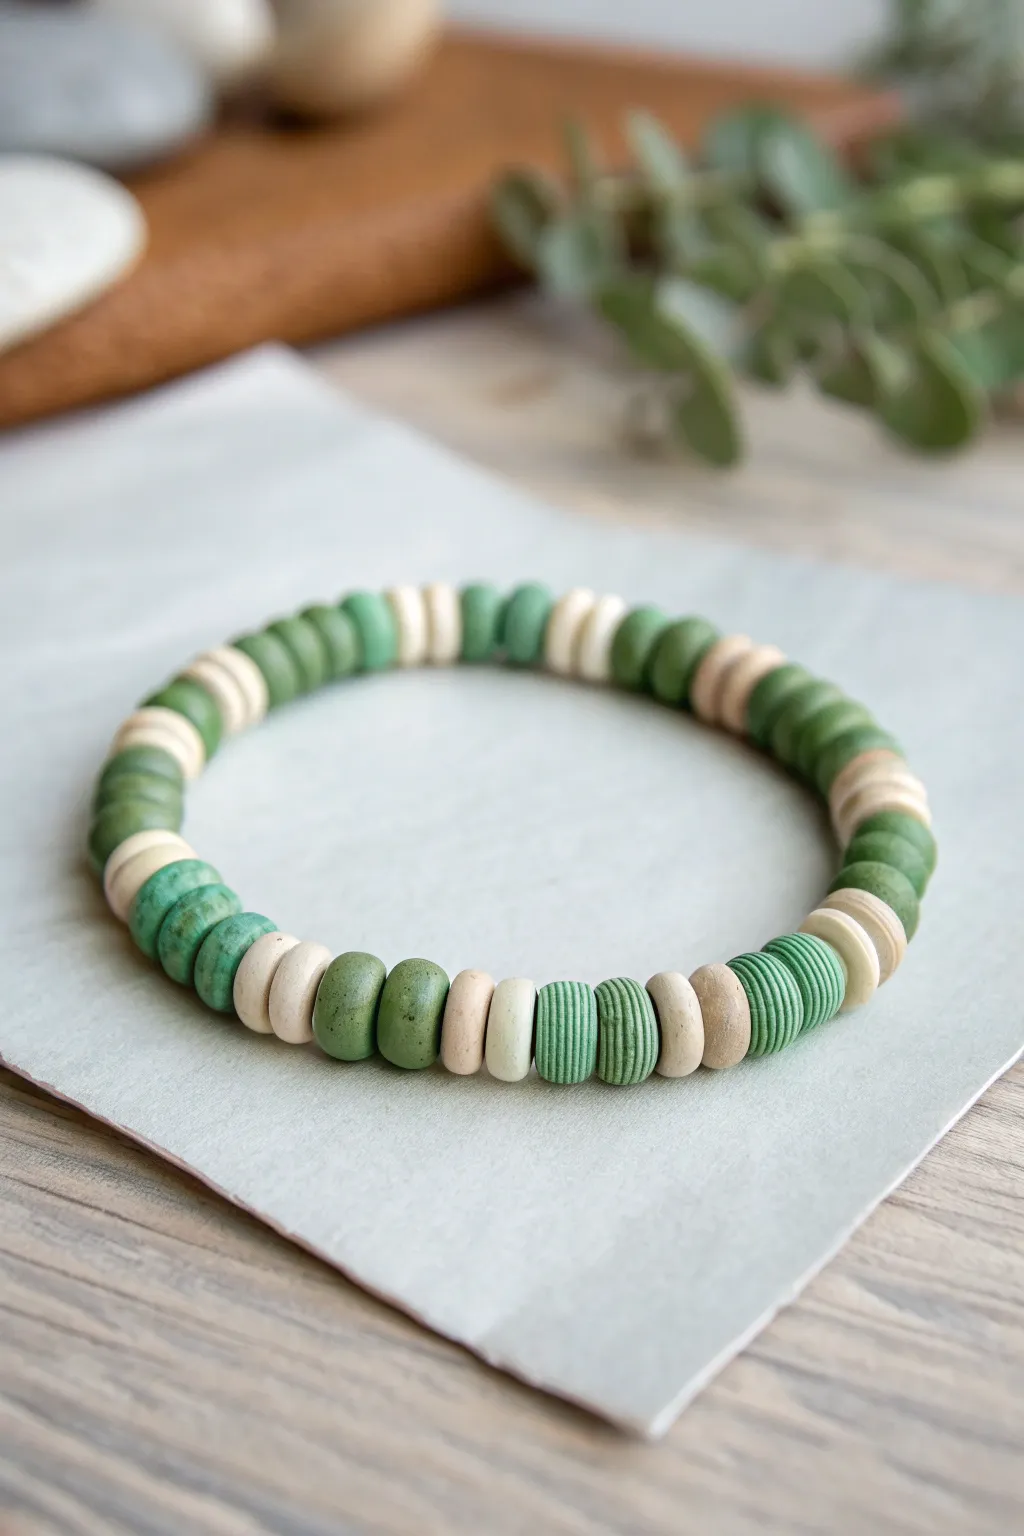
Embrace earthy elegance with this textured polymer clay bracelet, featuring a mix of soothing greens and creamy neutrals. The rhythmic pattern of ridged and smooth disc beads creates a sophisticated yet organic accessory perfect for everyday wear.
Step-by-Step
Materials
- Polymer clay in Forest Green, Sage Green, and Cream/Beige
- Bead rolling tool or flat acrylic sheet
- Round clay cutter (small diameter, approx 6-8mm)
- Toothpick, needle tool, or bead pin
- Fine-grit sandpaper (optional)
- Strong elastic cord (0.7mm or 0.8mm)
- Super glue or jewelry cement
- Oven for baking
- Baking tray and parchment paper
Step 1: Creating the Clay Discs
-
Condition the clay:
Begin by thoroughly conditioning your three colors of polymer clay—forest green, sage green, and cream—until they are soft and pliable. This prevents cracking later. -
Roll out sheets:
Roll each color into a uniform slab approximately 4-5mm thick. I prefer using pasta machine guides to ensure the thickness is perfectly consistent across all colors. -
Cut the shapes:
Use your small round cutter to punch out numerous circles from each color slab. You will need about 40-50 discs total, depending on your wrist size. -
Adding texture:
Select about half of your green tone discs for texturing. Take a needle tool or toothpick and gently press parallel lines around the outer edge of these discs to create a ribbed, coin-edge effect. -
Smooth the others:
Leave the cream beads and the remaining green beads smooth. Gently pat their edges with your finger to round off any sharp cuts from the cutter. -
Pierce holes:
Carefully poke a hole through the center of each disc using a bead pin or toothpick. Twisting the tool as you push through helps prevent distorting the round shape.
Texturing Tip
To get perfectly even ridges on the textured beads, try rolling the edge primarily against the thread of a long bolt or screw instead of hand-marking each line.
Step 2: Baking and Finishing
-
Prepare for baking:
arrange all your beads on a baking tray lined with parchment paper. Ensure they aren’t touching so they bake evenly. -
Bake the clay:
Bake the beads according to the manufacturer’s instructions on your clay package. This is usually around 265°F (130°C) for 15-30 minutes. -
Cool down:
Allow the beads to cool completely on the tray before handling them. They harden as they cool. -
Sand for finish:
For a truly professional matte look like the photo, lightly sand the flat sides of the cream beads on a piece of fine-grit sandpaper to reveal a stony texture. -
Cut the cord:
Cut a piece of elastic cord about 10-12 inches long. This gives you plenty of extra room for tying the knot later. -
Pre-stretch elastic:
Give your elastic cord a few firm tugs to pre-stretch it. This crucial step prevents the bracelet from sagging after you wear it a few times. -
String the pattern:
Begin threading your beads. Follow the pattern in the image: group 2-3 green beads (mixing textured and smooth), followed by 1-2 cream separator beads. -
Check the fit:
Wrap the strung beads around your wrist to check the size. Add or remove beads until it sits comfortably without gaps. -
Secure the knot:
Tie a surgeon’s knot (right over left, left over right) and pull tight. Add a tiny dab of jewelry glue to the knot for extra security. -
Hide the knot:
Once the glue is tacky but not fully hard, trim the excess ends and gently tug the knot inside the hole of one of the larger green beads to hide it.
Speckled Stone Effect
Mix just a pinch of black pepper or dried used coffee grounds into your cream clay before rolling. This creates a realistic faux-stone speckle after baking.
Enjoy the calming natural vibe of your new handmade bracelet.

TRACK YOUR CERAMIC JOURNEY
Capture glaze tests, firing details, and creative progress—all in one simple printable. Make your projects easier to repeat and improve.
Stacked Set of Three: Mint, Sage, and Forest

Embrace the calming spectrum of nature with this trio of stretch bracelets featuring a smooth transition of green hues. From pale mint to deep forest, these bracelets create a cohesive, layered look accented by elegant gold spacers for a touch of warmth.
Detailed Instructions
Materials
- 8mm round beads in Mint Green (Jade or similar stone look)
- 8mm round beads in Sage Green (Aventurine or similar stone look)
- 8mm round beads in Forest Green (Moss Agate or similar stone look)
- Gold tone heishi or disc spacer beads (approx. 4-6mm)
- 0.8mm clear elastic stretch cord
- Jewelry glue or clear nail polish
- Scissors
- Bead stopper or masking tape
- Beading needle (optional, for easier threading)
Step 1: Preparation & Design
-
Measure your wrist:
Wrap a measuring tape comfortably around your wrist where you want the bracelets to sit. Add about half an inch to this measurement to ensure the bracelets aren’t too tight. -
Cut the cord:
Cut three pieces of elastic cord, each about 10-12 inches long. Having extra length makes tying the finishing knots significantly easier than struggling with short ends. -
Pre-stretch the elastic:
Hold each piece of cord between your hands and give it a few firm tugs. This pre-stretching step is crucial because it prevents the bracelet from loosening up and sagging after you wear it a few times. -
Secure the ends:
Place a bead stopper or a piece of masking tape on one end of each cord to prevent your beads from sliding off while you work.
Step 2: Creating the Mint Layer
-
Arrange the pattern:
Lay out your mint green beads. For this lightest layer, simply string the beads continuously without spacers for a clean, minimalist base, or decide where you want the gold accent to sit. -
String the beads:
Thread the mint beads onto the first cord until you reach your desired length. -
Adding the focal point:
If you want to mirror the other bracelets, add a small stack of 3-4 gold heishi spacers near the center, or keep this one solid stone for contrast. -
Check the fit:
Wrap the unfinished strand around your wrist to verify sizing; the ends should touch comfortably without stretching the cord.
Knot Slipping?
If your elastic knot keeps slipping undone before the glue dries, try tying the knot around a straight pin. Pull tight, dab glue, then remove the pin once tacky.
Step 3: Creating the Sage & Forest Layers
-
Start the Sage strand:
Begin threading the medium-toned sage green beads onto the second cord. -
Insert the gold accent:
Once you have strung about half the beads, slide on a stack of 4 gold heishi spacer beads. This creates the metallic ‘bar’ look seen in the image. -
Finish the Sage strand:
Continue threading the rest of the sage beads until it matches the length of the first bracelet. -
Build the Forest strand:
Repeat the process with the darkest forest green beads on the third cord. -
Align the accents:
When adding the gold spacers to this third bracelet, try to position them so they will sit near the spacers on the Sage bracelet when worn, creating a visual connection.
Texture Twist
Swap the glossy round beads for matte or frosted finish stones on just the middle ‘Sage’ strand. The mix of textures adds a sophisticated, tactile element.
Step 4: Finishing Touches
-
Tie the first knot:
Remove the bead stopper. Bring the two ends of the cord together and tie a basic overhand knot, pulling it tight to bring the beads together. -
Secure with a surgeon’s knot:
Tie a second knot, but loop the cord through twice before pulling tight. This extra loop is what makes it a ‘surgeon’s knot’ and it holds much better than a standard square knot. -
glue the knot:
Apply a tiny drop of jewelry glue or clear nail polish to the knot. I like to let this dry briefly, maybe 30 seconds. -
Hide the knot:
If possible, gently tug on the cord to slide the knot inside the hole of an adjacent bead. This hides the mechanics and protects the knot from wear. -
Trim the excess:
Once the glue is fully dry, use sharp scissors to trim the excess cord carefully, getting as close to the bead hole as possible without cutting the knot. -
Repeat for all strands:
Perform the tying and gluing steps for the remaining two bracelets.
Slip your new stack onto your wrist and enjoy the lovely ombre effect of your handmade creation
Scrap-Friendly “All the Greens” Mismatch Bracelet

Embrace the beauty of imperfection by gathering leftover green polymer clay bits to create this earthy, tonal masterpiece. The matte finish and varied hues give it a sophisticated, organic feel that looks far more expensive than its scrap-bin origins.
How-To Guide
Materials
- Polymer clay scraps (various greens: emerald, olive, mint, forest, teal)
- Polymer clay scraps (neutral: beige, cream, or sand)
- Texture sponge or coarse sandpaper
- Bead piercing pin or needle tool
- Elastic clear cord (0.7mm or 0.8mm)
- Super glue or jewelry cement
- Antique bronze spacer bead (small)
- Oven for baking
- Cornstarch or baking soda (for bead rolling)
Step 1: Mixing and Marbling
-
Assess Your Green Palette:
Gather all your green clay scraps. You want a wide range of values from dark forest greens to light mints. If you have too much of one shade, mix a little white or yellow into a portion of it to create a new tone. -
Create Muted Neutrals:
Prepare a small amount of beige or sand-colored clay. I like to mix a tiny speck of brown into white clay to get that natural, stone-like cream shade seen in the photo. -
Partial Mixing:
Take two different green scraps (e.g., a dark and a light) and twist them together. Stop mixing before they are fully blended. This creates subtle veins and color variations within a single bead. -
Grit Effect (Optional):
For the speckled look seen in some beads, mix in a pinch of ground black pepper or dried herbs into a few of the green batches. This simulates real stone inclusions.
Sticky Bead Fix
If your raw clay feels too sticky or soft to roll into perfect spheres, leach it first. Place the raw clay bits between sheets of white printer paper for an hour to absorb excess plasticizer.
Step 2: Forming the Beads
-
Portion Control:
Slice your clay blocks into uniform chunks. Aim for roughly 1/2-inch cubes to result in standard 10mm-12mm round beads. -
Roll the Spheres:
Roll each chunk in your palms to create spheres. Don’t worry about perfect geometric precision; a little organic wobble adds to the handmade charm. -
Initial Texturing:
To achieve the matte, stone-like finish, gently roll the unbaked beads over coarse sandpaper or dab them with a texture sponge. This removes fingerprints and adds surface interest. -
Piercing the Holes:
Hold a bead gently and insert your piercing pin. Twist as you push through to avoid distorting the sphere shape. Pierce directly through the center. -
Refining the Exit:
Once the pin pokes through the other side, remove it and re-insert it from that exit hole. This ensures a clean, open channel for your elastic later. -
Baking Prep:
Arrange the beads on a bed of cornstarch or baking soda on your baking sheet. This creates a soft cushion that prevents flat spots from forming on the bottom of the beads during baking.
Step 3: Baking and Finishing
-
Bake the Beads:
Bake according to your clay manufacturer’s instructions (usually 275°F/135°C for 30–60 minutes). Since these are solid spheres, lean toward a longer bake time to ensure strength. -
Cooling Down:
Allow the beads to cool completely. Do not rinse the cornstarch off until they are cool, or the rapid temperature change could cause cracks. -
Rinse and Dry:
Wash the beads in soapy water to remove the baking powder residue. Use an old toothbrush to scrub the texture if needed, then dry thoroughly.
Pro Tip: Buffing
After baking, vigorously rub the beads with a piece of denim or heavy canvas. This doesn’t make them shiny but deepens the colors and gives them a velvety smooth hand-feel.
Step 4: Assembly
-
Layout Design:
Lay your beads out on a bead board or towel. Start with the beige/cream beads as your focal point, placing the small bronze spacer bead between two of them or next to them. -
Create the Gradient:
Arrange the remaining green beads in a pleasing, randomized pattern. Avoid placing identical shades right next to each other to maintain the ‘scrappy’ look. -
String the Bracelet:
Cut a 10-inch length of elastic cord. Pre-stretch it by pulling it firmly a few times; this prevents the bracelet from stretching out later. String your beads onto the cord. -
Check the Fit:
Wrap the strand around your wrist. It should be snug but not tight. Add or remove a bead if necessary to get the perfect diameter. -
Secure the Knot:
Tie a surgeon’s knot (right over left twice, then left over right). Pull tight. Apply a tiny dot of super glue to the knot. -
Hide the Evidence:
Trim the excess elastic ends. If one of your beads has a slightly larger hole, gently tug the knot inside that bead to conceal it.
Now you have a custom, eco-friendly accessory that turns leftover scraps into a cohesive style statement