If you’ve been craving air dry clay animals that look adorable without needing fancy sculpting skills, you’re in the right place. I love projects that start with simple balls and blobs and still end up with a whole little menagerie on your shelf.
Chubby Cat Figurines With Tiny Paws
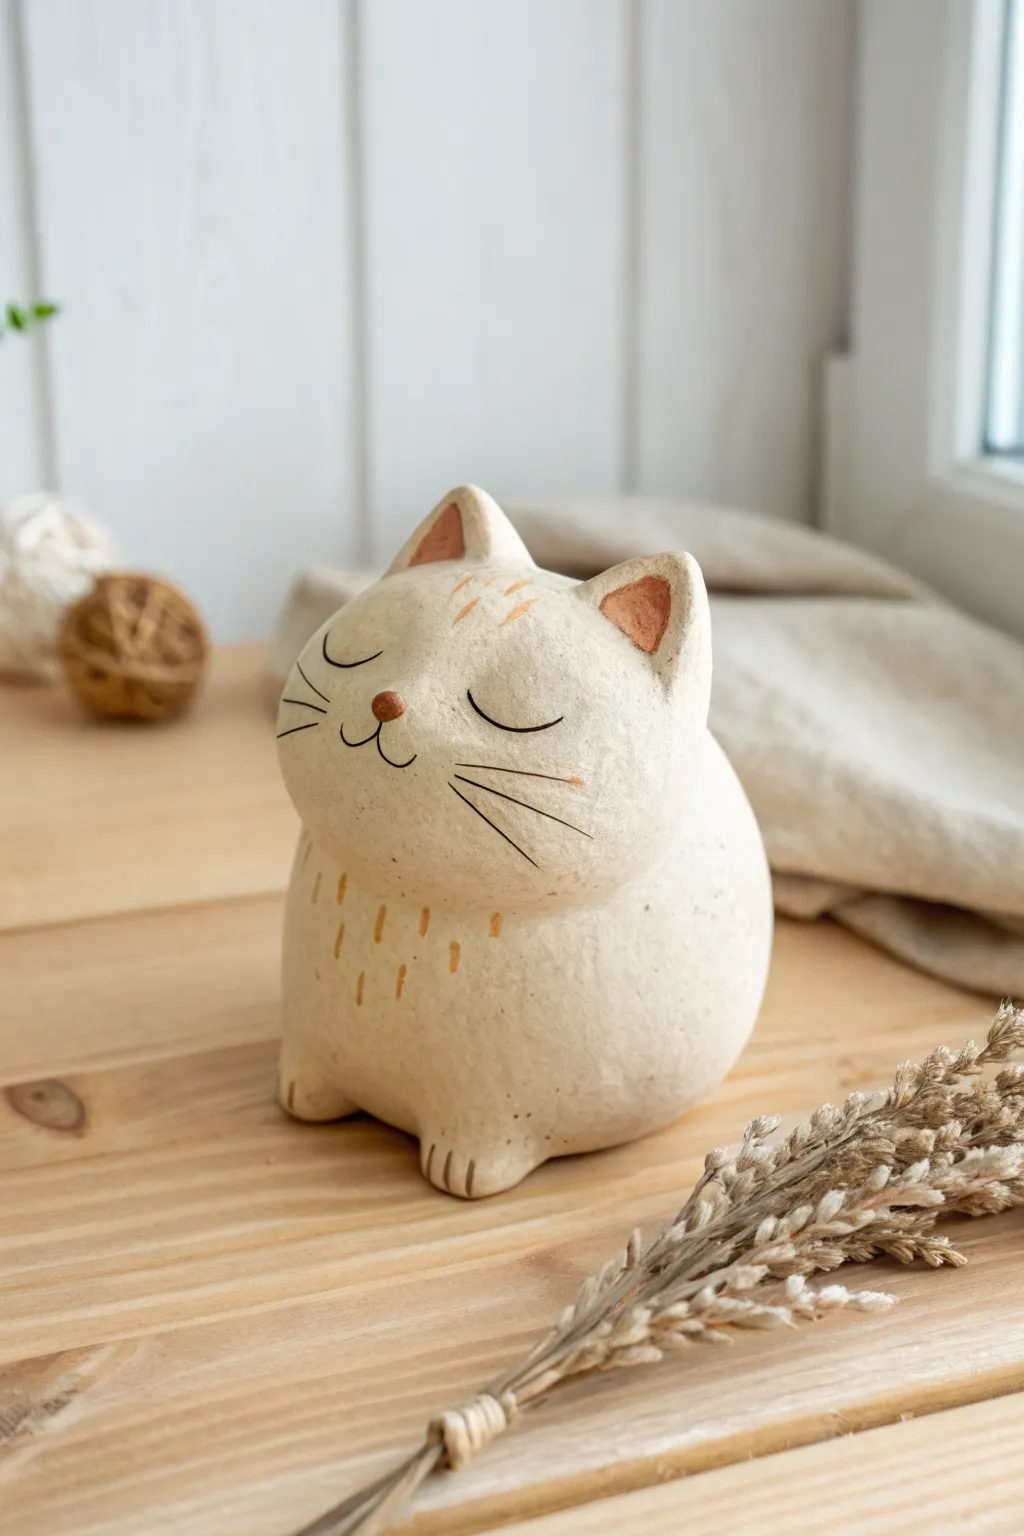
This adorable, chubby cat figurine brings a touch of serenity to any shelf with its closed eyes and contented smile. Using a single cohesive shape as the base, you will sculpt a charming, minimalist kitty that feels handmade and heartwarming.
How-To Guide
Materials
- White air-dry clay (stone texture preferred)
- Small cup of water
- Aluminum foil
- Needle tool or toothpick
- Small rolling pin
- Sponge or fine sandpaper
- Acrylic paints (black, terracotta/orange, soft pink)
- Fine detail paintbrush
- Matte varnish (optional)
Step 1: Forming the Base
-
Create a core:
To save clay and keep the sculpture lightweight, crumple a piece of aluminum foil into a tight ball, slightly larger than a golf ball. This will be the armature for the chubby body. -
Roll your clay:
Condition a chunk of clay by kneading it until it’s pliable. Roll it into a thick slab, about 1/4 inch thick, using your rolling pin. -
Wrap the armature:
Drape the clay slab over your foil ball. Gently press and smooth the clay around the foil, ensuring there are no air pockets caught inside. Trim away excess clay at the bottom and seal the seam. -
Refine the shape:
Roll the clay-covered ball on your work surface to make it exceptionally round and smooth. Gently tap the bottom against the table to create a flat base so the cat sits securely.
Step 2: Sculpting the Features
-
Shape the head:
While the body is still round, use your fingers to gently pinch and pull the upper portion of the ball. You want to create a subtle separation or slope that defines where the head begins, without detaching it from the body. -
Form the ears:
Take two small pea-sized balls of extra clay. Flatten them into triangles. Score the bottom of the triangles and the top of the cat’s head with your needle tool, add a dab of water (slip), and press the ears firmly into place. -
Blend the seams:
Using a wet finger or a clay tool, smooth the clay where the ears meet the head until the seams disappear completely. The ears should look like they grew naturally from the body. -
Add the nose:
Roll a tiny, lentil-sized ball of clay. Attach it to the center of the face area using the score-and-slip method. Press it gently so it creates a small, cute button nose. -
Create the paws:
At the very bottom front of the figurine, pinch out two tiny nubs directly from the body clay to suggest feet. Alternatively, add two small flattened balls of clay. -
Detail the toes:
Use your needle tool or a knife to gently press three vertical lines into each tiny paw nub to represent toes. -
Smooth the surface:
Dip your finger or a sponge in water and go over the entire sculpture. Smooth out any fingerprints or cracks. I find this step crucial for getting that stone-like finish later. -
Let it dry:
Place your kitty in a dry, safe spot. Depending on the humidity and thickness, let it dry for 24 to 48 hours until it is fully hard and white.
Cracks Appearing?
If you see hairline cracks as it dries, fill them immediately with a ‘slurry’ made of clay dissolved in a little water. Smooth it over the crack with your finger.
Step 3: Painting & Finishing
-
Sand for texture:
Once fully dry, you can lightly sand any rough patches. However, leaving a bit of surface texture adds to the rustic charm shown in the photo. -
Draw the face:
Using a fine paintbrush and black acrylic paint, carefully paint two downward-curved arcs for the sleeping eyes. Add a small ‘w’ shape mouth connected to the nose. -
Sketch the whiskers:
Paint three thin, delicate lines radiating from each cheek area for whiskers. Keep your hand steady and use very little pressure. -
Add warmth:
Mix a terracotta or soft orange paint. Paint the inside triangle of the ears and add small dash marks on the forehead and chest to mimic fur texture. -
Paint the nose:
Paint the button nose with a solid coat of the terracotta or a darker brownish-red color to make it pop against the white clay. -
Seal the piece:
To protect your paint without making it glossy, apply a thin layer of matte varnish over the entire figurine once the paint is completely dry.
Pro Tip: Weighted Base
Before sealing up the bottom, push a small flat stone or metal washer into the base clay. This lowers the center of gravity and prevents the round cat from rolling over easily.
Now you have a peaceful little companion to keep you company on your desk


Classic Puppy Dogs With Floppy Ears

These charming, rustic-style puppies bring a touch of playful character to your shelf with their simple shapes and adorable floppy ears. The project features a delightful speckled finish that mimics stoneware pottery, achieved easily with standard air dry clay and a bit of paint.
Detailed Instructions
Materials
- White air dry clay (200g for the pair)
- Acrylic paints: Black, terracotta/muted red, silver
- Fine-tipped paintbrush
- Old toothbrush (for speckling)
- Small cup of water
- Sculpting tool or plastic knife
- Slip (clay mixed with water into a paste)
- Matte varnish (optional)
Step 1: Shaping the Bodies
-
Create the base:
Start by dividing your clay into two unequal portions—one for the parent dog and a smaller amount for the puppy. Roll the larger portion into a smooth, slightly tapered cylinder for the body, flattening the bottom so it sits securely. -
Form the head:
Roll a separate ball of clay for the head, slightly oval-shaped. Gently pinch the front to form a distinct snout area, ensuring it’s not too pointy but rounded and friendly. -
Attach head to body:
Use your sculpting tool to scratch marks onto the top of the body and the bottom of the head (scoring). Apply a dab of slip and press the head firmly onto the body, smoothing the seam at the neck with a wet finger. -
Sculpt the legs:
For the front legs, roll two thick, short coils of clay. Mark where the legs will go on the body, score, slip, and blend the clay upwards into the chest so they look seamless. Shape the paws at the bottom. -
Add haunches:
For the seated rear leg, shape a rounded, flat disc of clay and attach it to the side of the body near the base. Keep this subtle, as if the leg is tucked under the body.
Stone Effect Secret
Mix dried coffee grounds or fine sand into your white clay before sculpting. This creates a natural, textured ‘speckled’ look without needing to paint the dots later.
Step 2: Adding Details
-
Make the ears:
Roll two tear-drop shapes and flatten them to creating the signature floppy ears. They should be relatively thick to match the rustic style. -
Attach the ears:
Score the sides of the head and press the narrow end of the ears into place. Smooth the clay so the ears look like they are growing from the head, not just stuck on. Let them drape naturally. -
Tail time:
Roll a very small, short cone for the tail. Attach it to the lower back of the body, curving it slightly upward or to the side for character. -
Refine the snout:
Use a modeling tool to verify the snout shape is distinct. You can gently press a small indentation where the nose will go later. -
Create the puppy:
Repeat the entire process with your smaller lump of clay to make the puppy companion. For the puppy, I find making the head slightly larger in proportion to the body increases the cuteness factor.
Step 3: Finishing Touches
-
Dry completely:
Allow your dogs to dry for at least 24-48 hours. Turn them occasionally to ensure the bottom dries evenly. -
Paint the collar:
Once dry, paint a band around the neck using the terracotta/muted red acrylic. Make it a distinct, thick line to represent a leather collar. -
Add the tag:
For the larger dog, use a tiny dot of silver paint to create a hanging tag on the front of the collar. -
Facial features:
Using a fine brush or a toothpick, dot on the eyes and paint a rounded triangular nose using black acrylic. Paint a thin, gentle curve for the mouth line. -
The speckled effect:
Dilute a tiny amount of black paint with water. Dip an old toothbrush into this watery mix and run your thumb across the bristles to flick tiny specks onto the dogs. -
Seal the work:
Once the paint is fully dry, apply a coat of matte varnish to protect the surface and unify the sheen.
Cracks Appearing?
If hairline cracks appear while drying, mix a tiny bit of fresh clay with water to make a thin paste. Rub this into the cracks with your finger and let dry again.
Group your finished pair together on a windowsill for a heartwarming display of handcrafted friendship


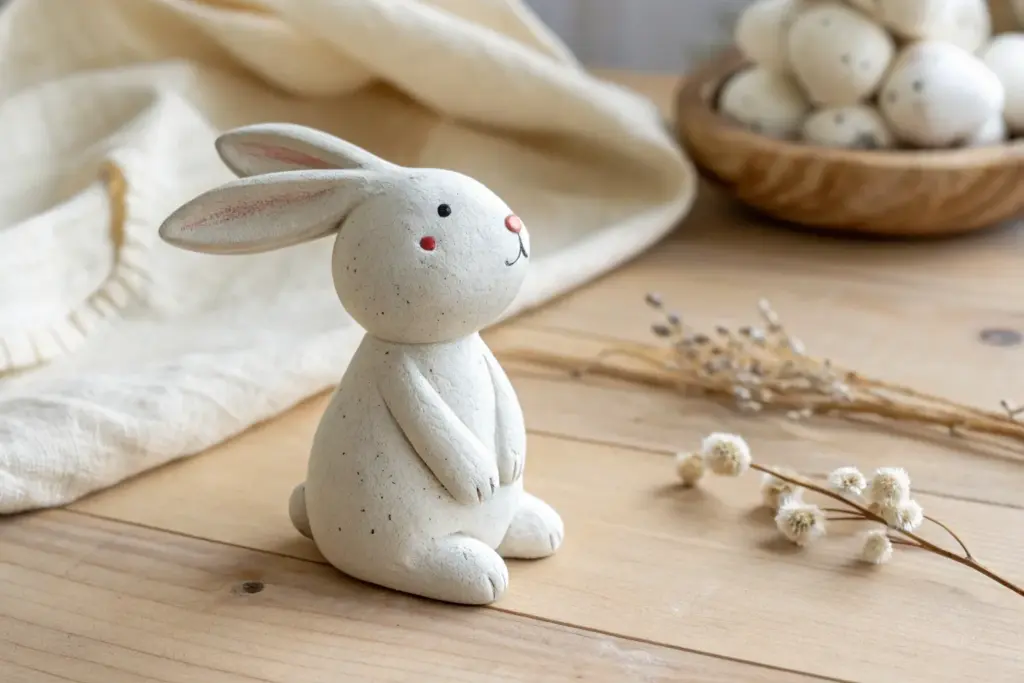
Mini Bunnies With Round Tails

Embrace the beauty of simplicity with this sleek, minimalist clay rabbit figurine. Its smooth, rounded silhouette and soft pastel accents make it a perfect, understated decoration for a modern spring display.
Step-by-Step Tutorial
Materials
- White or pale porcelain-style air dry clay
- Water in a small cup
- Rolling pin (optional)
- Small dab of pink acrylic paint or soft pink pastel chalk
- Black acrylic paint
- Fine detail paintbrush or toothpick
- Smooth work surface (silicone mat recommended)
- Sandpaper (fine grit)
Step 1: Shaping the Body
-
Create the base:
Start by conditioning a golf-ball-sized amount of clay in your hands until it is pliable and warm. Roll it into a smooth, seamless ball. -
Form the pear shape:
Gently gently roll the ball on your work surface, applying slightly more pressure to the top half to taper it. You want a distinct pear shape—a wider bottom for stability and a narrower neck area. -
Flatten the bottom:
Press the wider base of your pear shape firmly onto your work surface so the bunny sits upright without wobbling. Smooth out any fingerprints with a drop of water on your fingertip.
Step 2: Adding the Head
-
Roll the head:
Take a smaller piece of clay, about half the size of the body, and roll it into a slightly oval sphere. -
Attach to body:
Score the top of the body and the bottom of the head piece with a needle tool or toothpick to rough up the surfaces. Adding a tiny bit of water known as ‘slip’ helps create a stronger bond. -
Blend the seams:
I usually prefer to use a rubber clay tool, but your finger works too—gently drag clay from the head down onto the neck to blend the two pieces together seamlessly. The neck should look smooth, not like two balls stacked on top of each other.
Smooth Operator
Keep a wet wipe or damp sponge nearby. Wiping your hands constantly prevents drying clay crumbs from sticking to your fresh, smooth bunny.
Step 3: Ears and Details
-
Shape the ears:
Roll two equal sausage shapes of clay, about the length of the body. Flatten them slightly into long, pointed ovals. -
Create the inner ear:
Before attaching, gently press a smaller tool or your pinky finger into the center of one ear to create a shallow groove. -
Attach the ears:
Attach the ears to the top of the head using the scoring method. Angle them slightly backward for a natural look. Smooth the base of the ears into the skull so they look integrated. -
Add tiny feet:
Roll two very tiny spheres of clay for the feet. Flatten them slightly and attach them to the very bottom front of the body, just peeking out. -
Refine the surface:
Check the entire sculpture for cracks or bumps. Dipping your finger in water and gliding it over the clay creates that porcelain-smooth finish. -
Let it dry:
Allow the bunny to dry completely in a cool, dry place. This usually takes 24-48 hours depending on humidity. Don’t rush this step or cracks may appear.
Creative Texture
Before the clay dries, gently press a clean piece of linen fabric against the body to leave a subtle, woven texture imprinted on the surface.
Step 4: Finishing Touches
-
Sand imperfections:
Once fully dry, use fine-grit sandpaper to gently buff away any fingerprint ridges or uneven spots. -
Pink inner ear:
Mix a very watery wash of pink acrylic paint, or shave some pink pastel chalk. Gently brush this into the groove of the indented ear for a soft, blushing effect. -
Paint the nose and feet:
Use the same soft pink tone to dab a tiny spot for the nose and to color the two little feet at the base. -
Add the eyes:
Dip the very tip of a toothpick or a dotting tool into black acrylic paint. Carefully place two small dots on the sides of the head for the eyes.
Place your finished bunny on a tray with some dried grasses for a serene display


Pandas With Big Heads and Dot Eyes
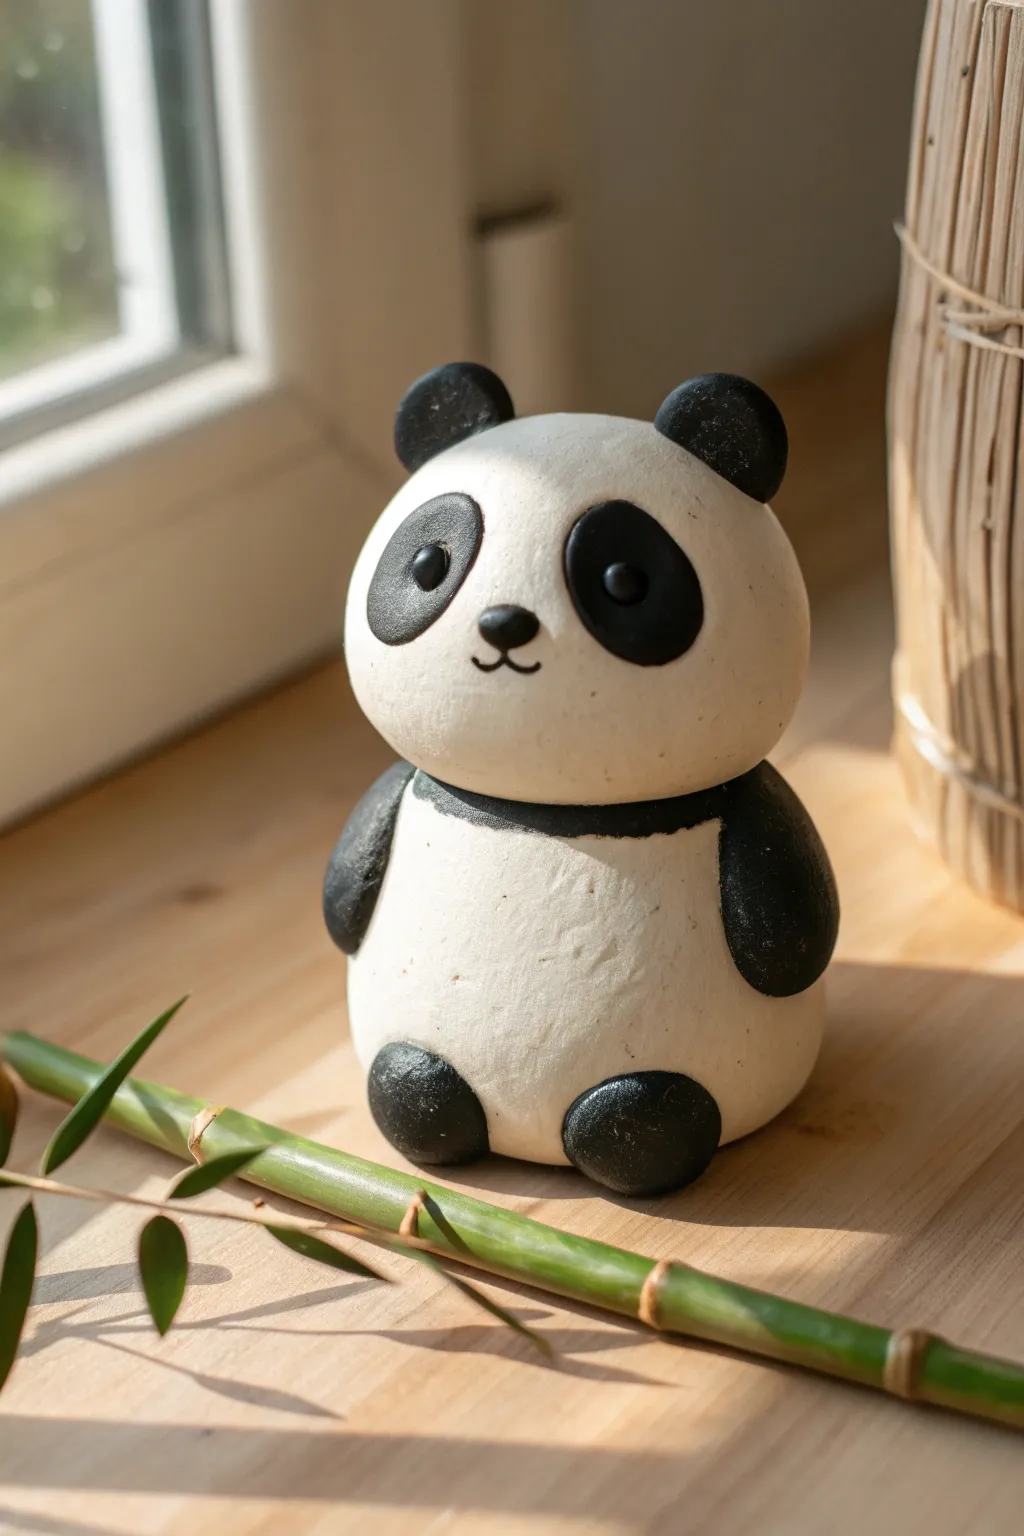
This adorable panda figurine features a delightfully oversized head resting on a round, sturdy body, capturing a minimalist, kawaii aesthetic. Its smooth finish and simple black-and-white color scheme make it a perfect beginner project that brings a touch of calm to any shelf.
Detailed Instructions
Materials
- White air-dry clay (smooth texture preferred)
- Black acrylic paint (matte finish)
- Fine grit sandpaper (e.g., 400 grit)
- Small round paintbrush
- Detail paintbrush (size 0 or 00)
- Small cup of water
- Clay sculpting tools (specifically a smoothing tool and a needle tool)
- Wire or toothpick (for internal structure)
- Rolling pin (optional)
Step 1: Shaping the Base Forms
-
Roll the body:
Start with a chunk of white clay roughly the size of a golf ball. Roll it firmly between your palms until you have a smooth, consistent sphere. -
Flatten the base:
Gently tap the bottom of the sphere onto your work surface to create a flat side so the panda will sit upright without rolling away. -
Shape the head:
Take a slightly larger piece of clay for the head—this panda is all about that cute, big-headed look. Roll it into a smooth sphere, then press it very slightly into an oval shape to widen the cheeks. -
Connect head and body:
Insert a short piece of wire or a toothpick halfway into the center of the body sphere. Apply a tiny dab of water to the contact point, then press the head firmly onto the body, sliding it over the support. -
Blend the seam:
Using your thumb or a smoothing tool, gently blend the clay where the head meets the body just slightly at the back to secure it, but leave the definition of the neck visible.
Smooth Operator
Keep a damp sponge nearby while working. Wiping your tools frequently prevents dried clay crumbs from sticking to your smooth white surfaces.
Step 2: Adding the Extremities
-
Create the ears:
Roll two small, pea-sized balls of clay. Flatten them slightly against your thumb to create thick discs. -
Attach the ears:
Score (scratch) the top of the head and the bottom of the ears with a needle tool. Add a drop of water and press the ears onto the head, smoothing the seam at the back so they integrate seamlessly. -
Form the arms:
Roll two elongated teardrop shapes for the arms. They should be chubby at the bottom and tapered at the top. -
Position the arms:
Attach the arms to the sides of the body using the slip-and-score method. Press them flat against the sides so they contour to the round belly shape. -
Add the feet:
Create two small ovals for the feet. Attach them near the bottom front of the body, positioning them so they stick out slightly to give the panda a seated look. -
Smooth everything out:
Dip your finger in water and run it over the entire sculpture to remove fingerprints and minor imperfections. I find this helps create that polished, ceramic-like look later on.
Bamboo Bonus
Use leftover green-tinted clay to roll a long, thin cylinder. Score lines every inch to create a segmented bamboo stalk prop for your panda.
Step 3: Refining and Painting
-
Let it dry completely:
Allow the sculpture to air dry for 24-48 hours. Turn it occasionally so the bottom dries evenly. -
Sand for smoothness:
Once fully dry, use fine-grit sandpaper to gently buff the surface. Focus on the back of the head and any uneven bumps on the belly. -
Outline the features:
VERY lightly sketch the eye patches, nose, ears, and limb boundaries with a pencil. This ensures your symmetry is correct before you commit to paint. -
Paint the black limbs:
Using the small round brush and black acrylic paint, fill in the ears, arms, and feet. Use confident strokes to get a clean edge against the white body. -
Paint the eye patches:
Carefully paint two large, slanted ovals for the eye patches. They should angle slightly downward toward the nose. -
Add the belt line:
Connect the black arms across the back with a painted line if you want to mimic the panda’s shoulder markings, or leave them as separate shapes as seen in the reference. -
Detail the face:
Using your smallest detail brush, paint a small, rounded triangle for the nose. Extending from the bottom of the nose, paint a tiny anchor shape or ‘w’ for the mouth. -
Add the eyes:
Once the black eye patches are dry, you can add dimension. Either dot a tiny bit of black clay on top for 3D eyes, or just ensure the black paint is opaque. For a spark of life, add a tiny white dot highlight in the black area.
Now you have a charming little desk companion that looks peaceful and ready to display

The Complete Guide to Pottery Troubleshooting
Uncover the most common ceramic mistakes—from cracking clay to failed glazes—and learn how to fix them fast.
Tiny Turtles With Textured Shell Tiles
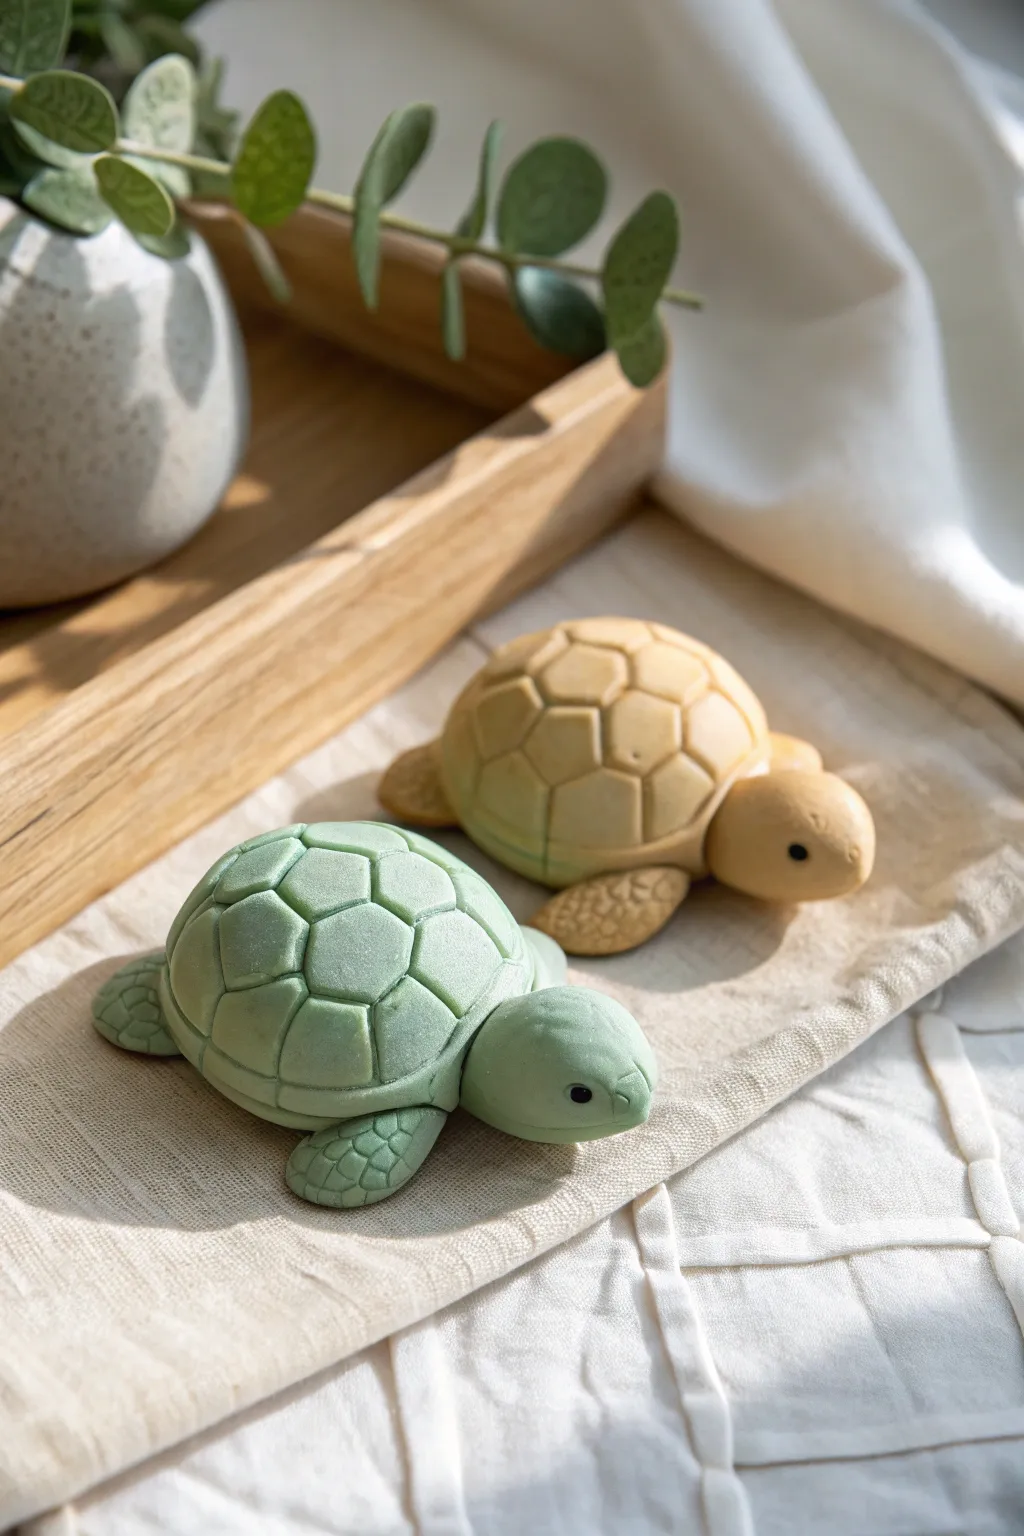
These charming air dry clay turtles feature a unique shell construction that looks like a mosaic of smooth stones. The result is a clean, modern aesthetic with a soft matte finish that feels wonderful to hold.
How-To Guide
Materials
- Air dry clay (green and beige/ochre)
- Small rolling pin
- Clay blending tools (silicone tipped)
- Precision knife or scalpel
- Small ball tool
- Water in a small dish
- Fine-grit sandpaper
- Needle tool
- Black acrylic paint (for eyes)
Step 1: Forming the Base
-
Create the body:
Start by rolling a ball of clay roughly the size of a golf ball or slightly larger. Gently press it onto your work surface to flatten the bottom while keeping the top domed and rounded. -
Shape the head:
Roll a second smaller ball for the head. Shape it into a slightly elongated oval, making one end a bit wider for the muzzle area. -
Attach the head:
Score the attachment points on both the body and the head with a needle tool. Apply a dab of water or clay slip, press the head firmly to the front of the body, and smooth the seam underneath with a blending tool. -
Make the flippers:
Create four small, teardrop-shaped pieces for the flippers. Flatten them gently with your thumb. -
Attach the flippers:
Attach the flippers under the main body dome using the score-and-slip method. Position two near the front and two near the back, angling them slightly outward.
Step 2: Creating the Tiled Shell
-
Prepare the slab:
Roll out a separate sheet of clay to about 3mm thickness. It needs to be uniform, so use guide sticks if you have them. -
Cut the central hexagon:
With your precision knife, cut out a clean hexagon shape. This will be the center tile of the shell. -
Place the center tile:
Dab a tiny bit of water on the top center of the turtle’s back. Place your hexagon tile there and gently press it down so it conforms to the curve without losing its sharp edges. -
Cut surrounding tiles:
Cut several trapezoid or pentagon shapes from your slab. They should feature angled sides that will puzzle-piece around the central hexagon. -
Arrange the first ring:
Attach this first ring of tiles around the central hexagon. Leave a very thin, consistent gap between each tile to create that deep, grooved ‘grout line’ effect visible in the photo. -
Smooth the edges:
After placing each tile, I find it helpful to gently run a finger or soft silicone tool over the sharp upper edges to soften them slightly, creating a pillow-like look. -
Complete the shell:
Continue cutting and placing tiles until you reach the bottom edge of the shell. You may need to custom-cut slightly curved pieces for the bottom rim.
Cracks in the Gaps?
If the base clay shrinks more than the tiles and cracks appear in the grooves, mix a tiny amount of clay with water to make a paste and fill cracks with a fine brush.
Step 3: Details & Finish
-
Texture the flippers:
Using a small ball tool or a dull pencil tip, gently press a scaled texture into the top surface of the flippers. -
Add facial features:
Use a needle tool or knife to mark a simple horizontal line for the mouth. For the nostril, make two tiny pinpricks above the mouth line. -
Initial drying:
Let the turtle sit undisturbed for about 24-48 hours. Turn it over halfway through if possible to let the bottom dry evenly. -
Sanding:
Once bone dry, use fine-grit sandpaper to buff out any fingerprints or rough spots on the head and flippers. Be careful not to sand down your crisp tile edges. -
Paint the eyes:
Dip a ball tool or the handle end of a paintbrush into black acrylic paint. Dot two small, solid black eyes on either side of the head.
Two-Tone Effect
For more depth, use a slightly darker shade of clay for the base body than you use for the shell tiles. This makes the ‘grout lines’ pop visually.
Place your finished turtles near a potted plant for a calm, natural display
Frogs Made From Two Simple Clay Balls
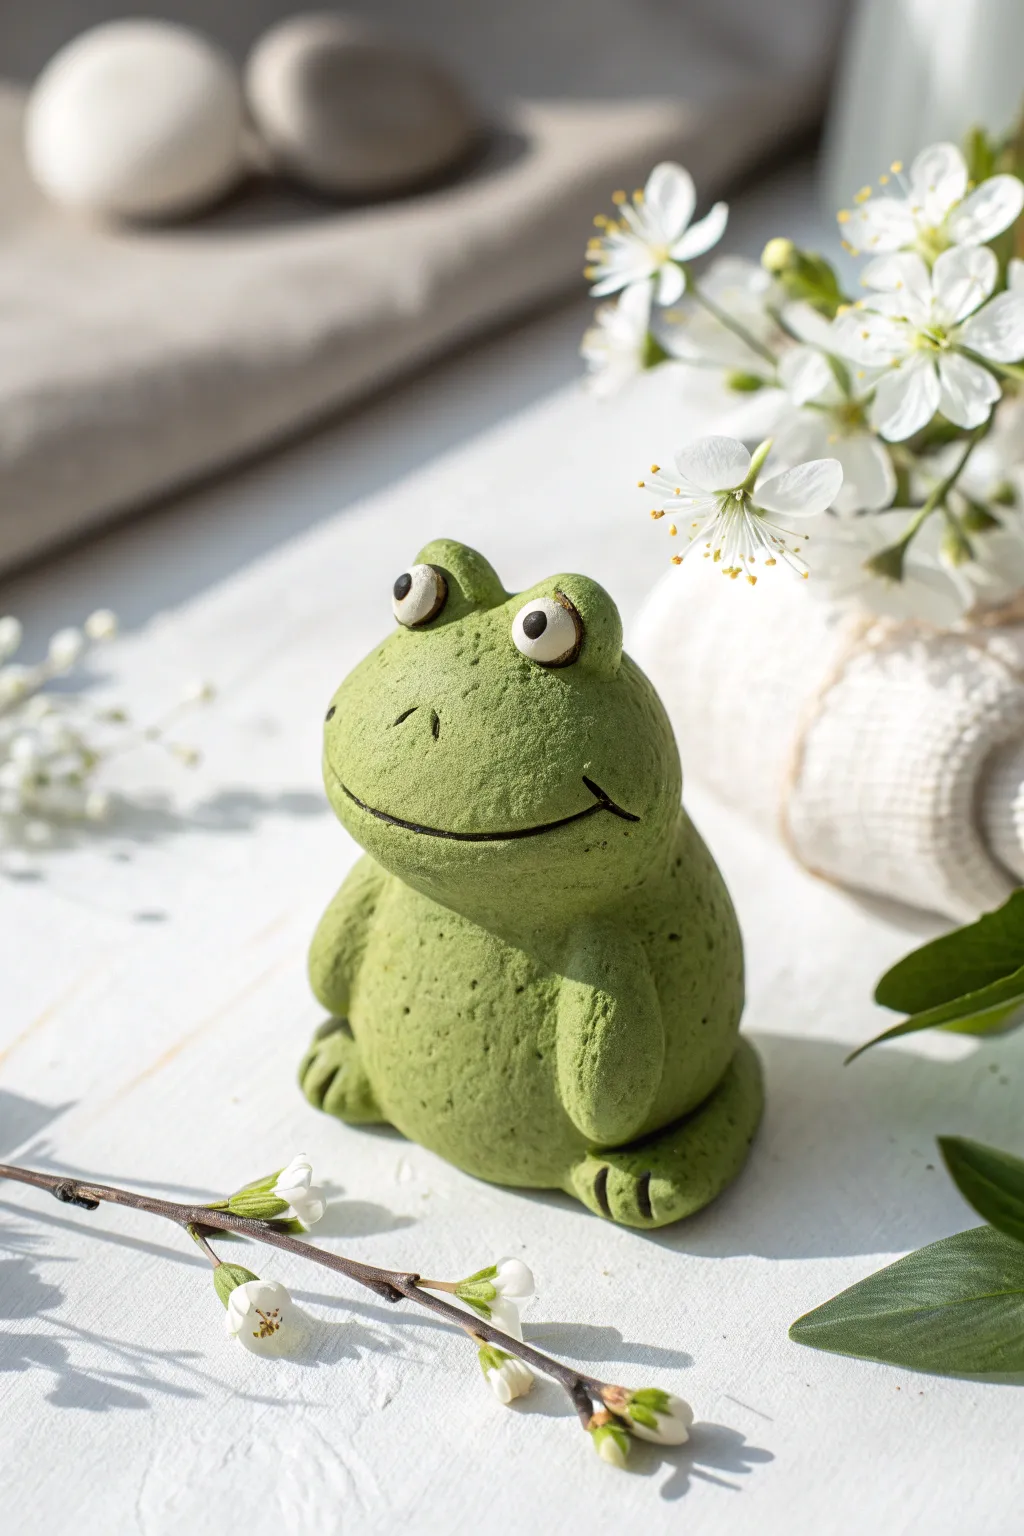
This whimsical frog brings a cheerful, rustic charm to your decor with its exaggerated eyes and textured, mossy-green finish. By starting with two basic spheres, you can quickly sculpt this friendly character that looks like it hopped right out of a garden fairytale.
Step-by-Step
Materials
- Air dry clay (white or terracotta)
- Acrylic paints (moss green, lime green, black, white)
- Texture tool (old toothbrush, stiff paintbrush, or crumpled foil)
- Clay sculpting tools (needle tool, modeling tool)
- Small cup of water
- Fine grit sandpaper
- Matte varnish or sealant
Step 1: Forming the Base Structure
-
Roll the body:
Start by taking a large chunk of clay and rolling it into a smooth, slightly squat sphere for the frog’s body. Tap the bottom gently on your work surface to create a flat base so it stands securely. -
Create the head:
Roll a second sphere, slightly smaller than the body but still substantial. Press it gently onto the top of the body sphere. To ensure a strong bond, you can score both connecting surfaces (scratch them up a bit) and add a dab of water before pressing them together. -
Blend the neck:
Using a modeling tool or your thumb, smooth the clay at the seam where the head meets the body. You don’t want a perfect seamless blend; keep a slight definition, but ensure the head is firmly attached. -
Add the feet:
Roll two small balls for the feet. Flatten them slightly into ovals and attach them to the bottom front of the body. Use a needle tool or knife to press three indentations into each foot to create cute little toes. -
Form the arms:
Roll two small sausages of clay for the arms. Press them vertically against the sides of the body, blending the upper part into the shoulder area while leaving the hands resting on the tummy or thighs.
Step 2: Sculpting the Expression
-
Make the eye sockets:
Roll two medium-sized balls for the eyes. These frogs look funniest with oversized eyes, so don’t be shy with the size. Attach them to the very top of the head, side-by-side. -
Refine the eyes:
Once attached, securely blend the bottom of the eye spheres into the head so they don’t fall off. You can use a small ball tool to make a tiny indentation where the pupil will go later. -
Carve the mouth:
Using a needle tool or a thin blade, carve a long, wide smile across the face. Make the cut fairly deep and curve the ends upward slightly towards the eyes for a happy expression. -
Add nostrils:
Poke two small vertical slits or holes just above the mouth line for the nose. Keep them small and relatively close together. -
Texturize the surface:
To get that stone-like look seen in the photo, gently tap the entire surface of the frog with an old toothbrush or a ball of crumpled foil. Focus on the back and head, leaving the eyes relatively smooth. -
Dry completely:
Let the frog sit undisturbed to dry. Depending on the thickness of your clay, this may take 24 to 48 hours. Turn it occasionally once the outside is hard to let the bottom breathe.
Pro Tip: Weighted Base
Before rolling the body sphere, hide a small, smooth rock or a balled-up piece of foil inside the clay. This saves material and makes the frog heavy enough to use as a paperweight.
Step 3: Painting and Finishing
-
Apply base coat:
Paint the entire frog with a mossy green acrylic paint. Since the surface is textured, make sure to work the brush into all the little stippled areas. -
Dry brush highlights:
Dip a dry brush into a lighter lime green or yellowish-green paint. Wipe most of it off on a paper towel, then lightly flick the brush over the textured areas. This highlights the bumps and gives it a realistic depth. -
Paint the eyes:
Paint the round eyeballs pure white. You may need two coats to cover the green base. Let this dry completely before moving to the next step. -
Add pupils:
Using a fine detail brush or the end of a needle tool dipped in black paint, place a dot in the center of each white eye. I find that making one pupil slightly larger or offset adds extra character. -
Define the mouth:
Mix a small amount of dark green or watery black paint and carefully run a thin line inside the carved mouth groove to make the smile pop. -
Seal the piece:
Once all paint is perfectly dry, apply a coat of matte varnish. This protects the paint and unifies the sheen, giving it that finished ceramic look.
Level Up: Garden Accessorizing
While the clay is wet, form a tiny flower or a clay fly and attach it to the frog’s head or hand. Alternatively, sculpt a small lily pad for your frog to sit on permanently.
Place your finished frog on a sunny windowsill or a bookshelf where his goofy smile can greet you every day


What Really Happens Inside the Kiln
Learn how time and temperature work together inside the kiln to transform clay into durable ceramic.
Foxes With Pointy Ears and Painted Masks
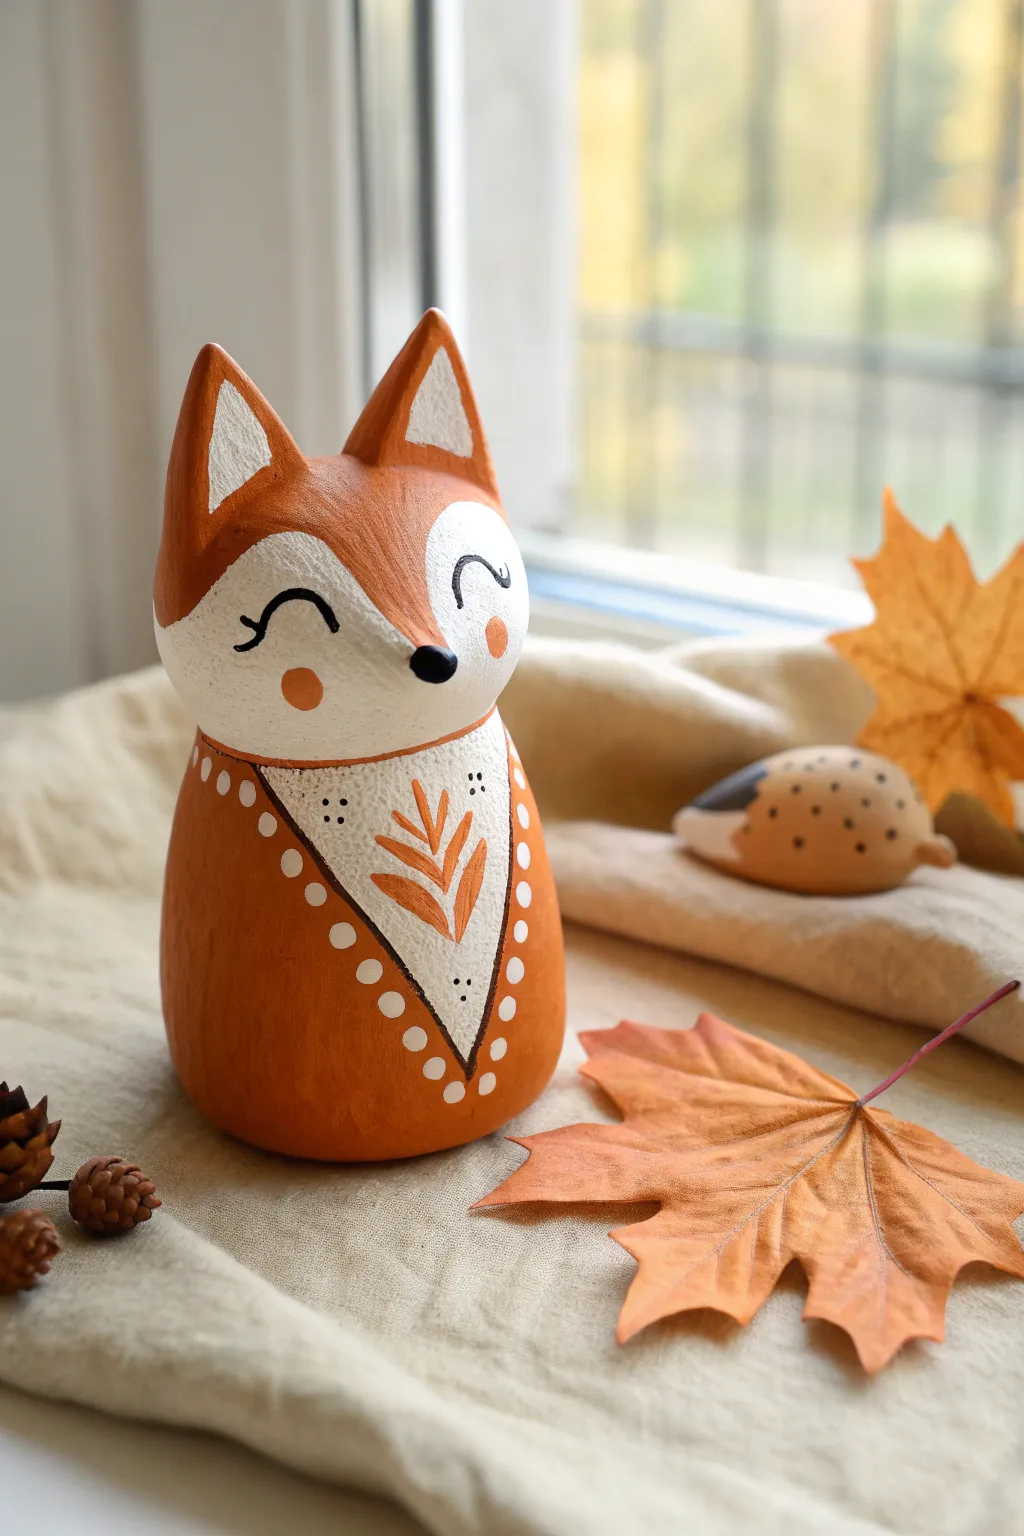
Embrace the cozy vibes of autumn with this adorable, minimalist fox made from air dry clay. Its smooth, rounded form and sweet painted expression make it a perfect beginner project that captures the essence of woodland charm without needing complex sculpting skills.
Detailed Instructions
Materials
- Air dry clay (white or terracotta)
- Water in a small cup
- Rolling pin
- Modeling tools (or a toothpick)
- Acrylic paints (orange/terracotta, white, black)
- Small paintbrushes (flat and fine tip)
- Fine-grit sandpaper
- Varnish or sealant (matte)
Step 1: Sculpting the Base Form
-
Prepare the clay:
Start by conditioning a generous handful of air dry clay. Knead it in your hands until it plays warm and pliable, ensuring there are no hidden air bubbles. -
Roll the body:
Roll the clay into a smooth ball, then gently roll it on your work surface to elongate it slightly into a fat teardrop or egg shape. Flatten the bottom so it stands up straight on its own. -
Smooth the surface:
Dip your finger in a little water and smooth out any cracks or fingerprints on the body. You want a very clean, minimalist surface for the paint later. -
Form the head:
Take a second piece of clay, slightly smaller than the body. Roll it into a ball, then pinch one side to create a soft point for the nose. This shouldn’t be too sharp—think soft and rounded. -
Shape the ears:
Pinch two small triangles from the top of the head piece to form the ears. Refine their shape so they are pointy and symmetrical. Use a tool or your finger to slightly flatten the front face of the ears. -
Attach the head:
Score the top of the body and the bottom of the head with a toothpick (hatch marks). Apply a dab of water or clay slip, then press the head firmly onto the body. Smooth the clay across the seam at the back of the neck to join them seamlessly.
Step 2: Refining and Drying
-
Add the nose:
Roll a very tiny bead of clay and attach it to the very tip of the snout using a drop of water. Gently press it so it adheres well but keeps its round shape. -
Check the silhouette:
Rotate your fox. Ensure the ears are perky and the head is centered. I like to give the chest area a subtle outward curve to make the fox look proud and puffy. -
Dry completely:
Set the fox aside in a dry, room-temperature spot. Let it dry for at least 24-48 hours. Turn it occasionally so the bottom dries evenly. -
Sand for smoothness:
Once fully dry and hard, use fine-grit sandpaper to buff away any rough spots, bumps, or fingerprints. Wipe away the dust with a slightly damp cloth.
Keep it Clean
Keep hand wipes nearby when switching between orange and white paint. Acrylics stain easily, and you want that white chest bib to stay crisp and bright.
Step 3: Painting the Details
-
Base coat the colors:
Using a matte acrylic paint in a warm terracotta orange, paint the entire body and the back of the head. Leave the face area unpainted (or paint it white if your clay isn’t white). -
Paint the mask:
Carefully paint a heart-shaped white mask on the face. The top lobes of the heart should go around the eyes, and the point should end at the nose. Also, paint the inner triangles of the ears white. -
Create the chest bib:
Paint a white ‘V’ shape on the chest. Inside this white area, use your orange paint and a very fine brush to paint a stylized leaf or twig design. -
Add decorative dots:
Using the back end of a paintbrush dipped in white paint, dot a line along the border where the orange body meets the white chest bib. This creates a charming stitched effect. -
Draw the face:
With a fine detail brush and black paint, draw two curved arches for the sleeping eyes. Add small eyelashes if you like. Paint the nose bead solid black. -
Final touches:
Add two soft orange circles for rosy cheeks on the white mask. You can also add tiny black dots around the nose or on the chest bib for texture. -
Seal the piece:
Once the paint is thoroughly dry, apply a coat of matte varnish to protect your work and give it a finished, professional look.
Forest Friends
Create a whole woodland scene by making a tiny clay hedgehog (just a simple oval with a snout) or sculpting some flat clay leaves to scatter around your fox.
Place your finished fox on a windowsill or shelf to bring a touch of woodland magic to your home
Sloths That Look Like Cozy Little Beans
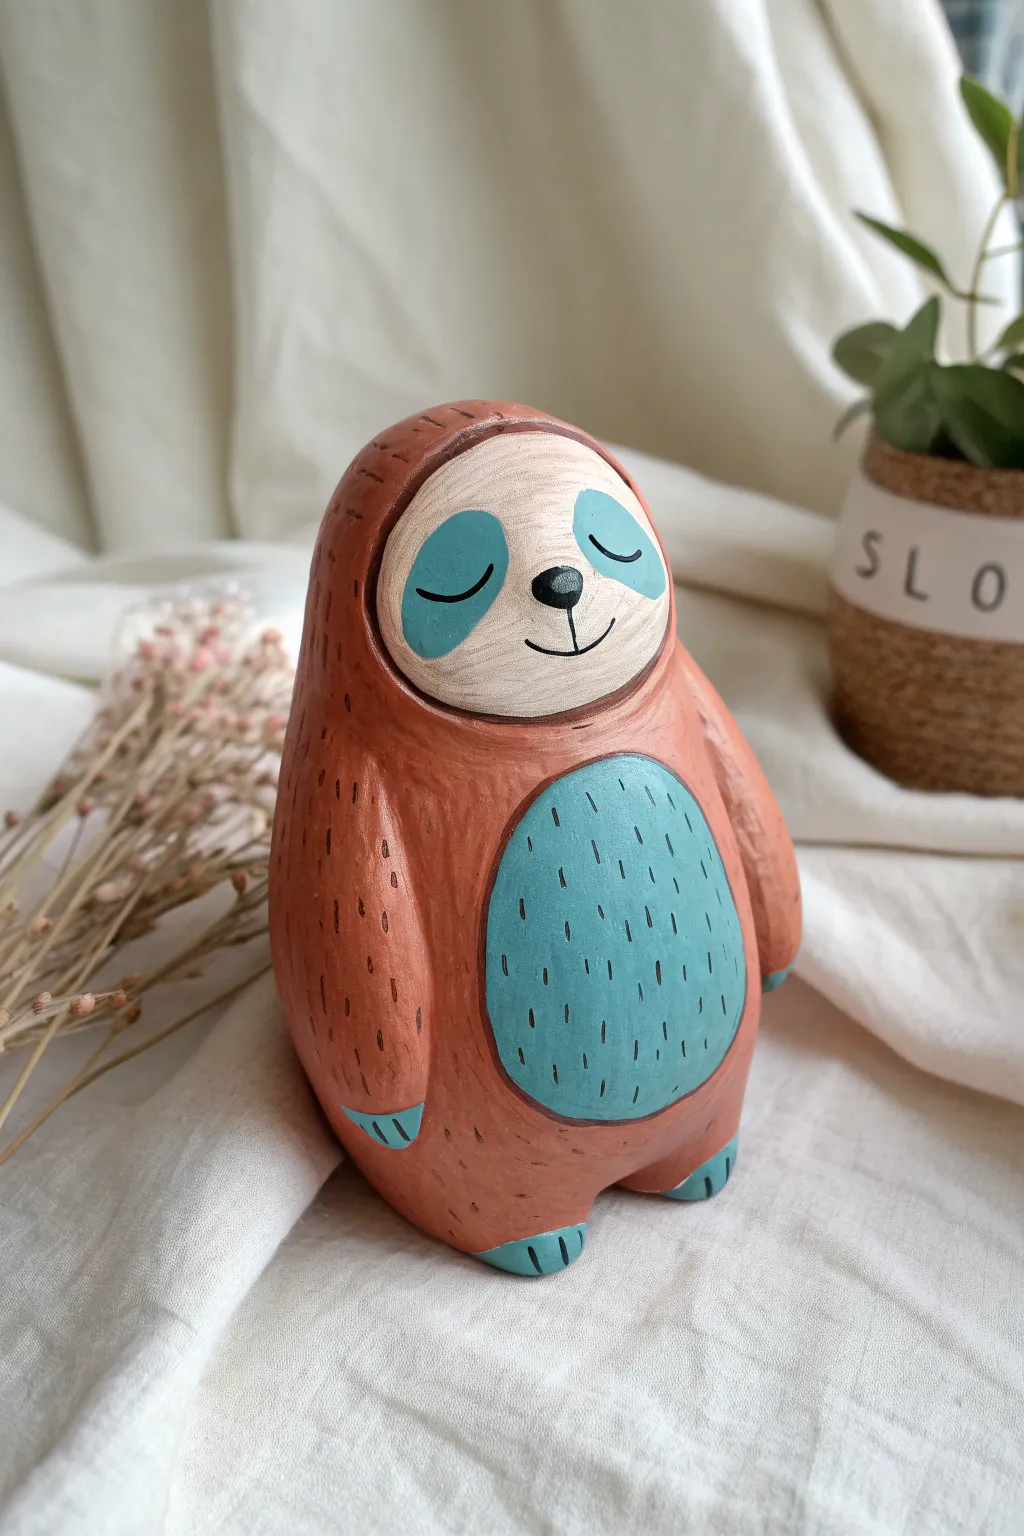
Transform a simple lump of clay into this adorable, bean-shaped sloth that captures the essence of a lazy afternoon. With its smooth, rounded form and sweet painted details, this little friend makes a perfect desk companion or a heartwarming gift.
Step-by-Step Tutorial
Materials
- Air dry clay (white or terracotta)
- Acrylic paints (terracotta brown, teal blue, cream/off-white, black)
- Paintbrushes (medium flat brush, fine detail brush)
- Clay sculpting tools or a smooth butter knife
- Aluminum foil (for armature)
- Small cup of water
- Fine-grit sandpaper
- Matte varnish or sealant
Step 1: Sculpting the Base Form
-
Make a core:
Start by crumpling a piece of aluminum foil into a dense, vertical oval shape, roughly the size of a large potato. This will act as the core to save clay and reduce drying time. -
Wrap the core:
Roll out a slab of air dry clay about 1/4 inch thick. Completely wrap your foil core, pinching the seams together and smoothing them out with a bit of water until you have a seamless, egg-like shape. -
Define the silhouette:
Gently tap the bottom of the egg on your work surface to flatten it so the figurine stands steadily. Then, refine the top to be slightly narrower, creating a gentle slope for the head without making a distinct neck. -
Add feet stubs:
Roll two small balls of clay and two slightly larger ones. Attach the larger ones to the bottom sides for feet and the smaller ones just above them for hands. Blend the edges seamlessly into the main body so they look like little nubs rather than attached balls.
Cracks happen
If small cracks appear as the clay dries, don’t panic. Mix a tiny bit of fresh clay with water to make a paste (slip) and fill the cracks, then smooth over with a damp finger.
Step 2: Refining Features
-
Shape the face:
Use your thumb to gently press a shallow, oval indentation near the top of the body. This flat area will become the sloth’s face. -
Carve the arms:
Using a modeling tool or a dull knife, lightly carve vertical lines down the sides of the body to suggest where the arms rest against the torso. Don’t cut too deep; you just want a subtle relief line. -
Create texture:
If you want a slight fur texture, you can use a stiff bristle brush to tap gently over the body (avoiding the face and tummy area), though smooth works beautifully too. -
Dry completely:
Let your sloth dry for at least 24-48 hours. I usually rotate it every few hours at the start so the bottom dries evenly. Once fully dry, sand away any rough bumps with fine-grit sandpaper.
Weight it down
For a sturdier figurine that won’t tip over easily, press a small, clean stone or a heavy washer into the bottom of your foil core before wrapping it in clay.
Step 3: Painting and Details
-
Base coat:
Paint the entire body with a warm terracotta brown acrylic paint. You may need two coats for opaque coverage. Let this dry completely before moving on. -
Paint the tummy:
Mix a soft teal blue. Paint a large, rounded oval on the sloth’s belly. It should look like a soft egg shape sitting low on the torso. -
Paint the face:
Using a cream or off-white color, paint the indented face area you created earlier. A second coat helps this light color stand out against the darker brown base. -
Add eye patches:
Switch back to your teal paint. Carefully paint two tilted oval shapes inside the cream face area for the distinctive sloth eye patches. -
Define the paws:
Paint the tips of the hand and foot nubs with the same teal color to create little claws or decorative tips. -
Draw the features:
Using a very fine liner brush and black paint, draw two curved lines for closed, sleepy eyes inside the teal patches. Add a small oval nose and a simple smile in the center of the cream face. -
Add fur details:
With the fine brush and black paint (or a dark brown marker), add tiny vertical ticking marks all over the brown fur and the teal tummy. This ‘dash’ pattern gives the stylized look of fur. -
Seal the work:
Once all paint is bone dry, apply a coat of matte varnish to protect your paint job and give the clay a professional finish.
Place your little bean sloth on a shelf surrounded by plants for the ultimate cozy vibe

TRACK YOUR CERAMIC JOURNEY
Capture glaze tests, firing details, and creative progress—all in one simple printable. Make your projects easier to repeat and improve.
Hedgehogs With Easy Pressed-In Spines
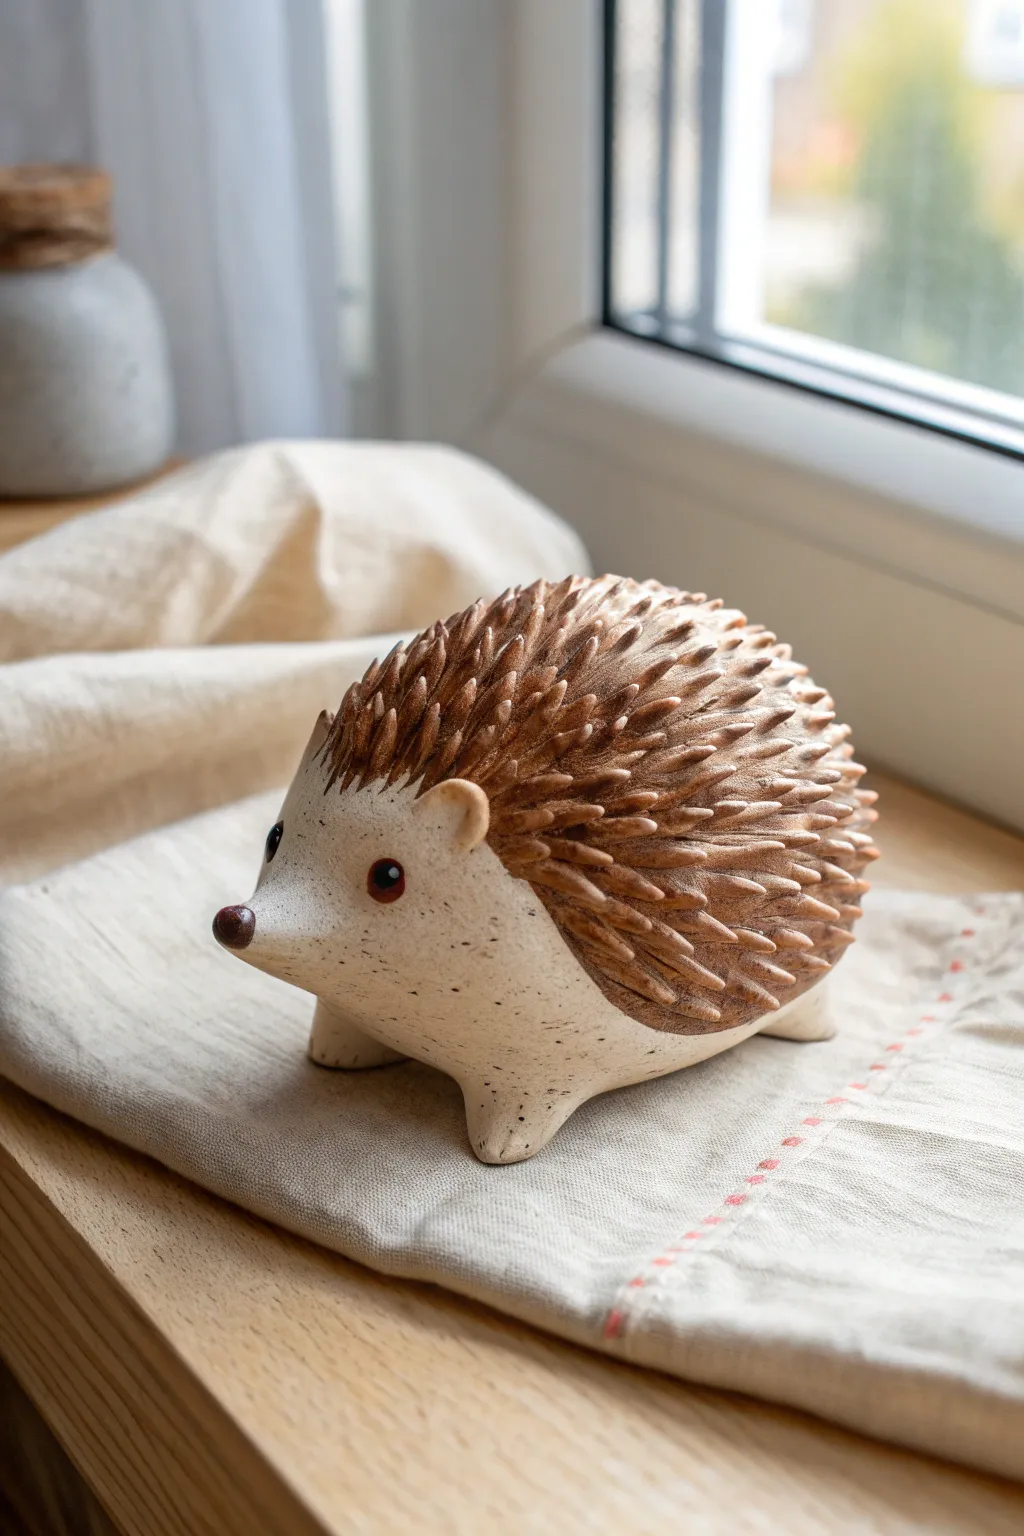
This charming little hedgehog combines smooth clay work with rewarding texture techniques for a piece that looks remarkably like kiln-fired pottery. With its speckled cream belly and meticulously detailed brown spines, it makes a delightful guardian for your window sill or bookshelf.
Step-by-Step
Materials
- White or pale cream air dry clay (250g)
- Small sculpting tools (ball stylus, needle tool)
- Acrylic paints (Dark brown, cream/beige, burnt sienna, black)
- Stiff paintbrush or toothbrush (for speckling)
- Medium flat brush and small detail brush
- Gloss or satin varnish/sealant
- Small cup of water
- Aluminum foil (optional, for armature)
- Parchment paper
Step 1: Shaping the Base
-
Create the core:
Start by rolling a ball of clay roughly the size of a grapefruit. If you want to save weight and clay, you can crunch up a ball of aluminum foil first and wrap your clay evenly around it, ensuring the layer is at least 1/4 inch thick. -
Form the teardrop:
Gently shape the ball into a fat teardrop or egg shape. The narrower end will become the snout, while the wider, rounded end forms the back of the hedgehog. -
Pull the snout:
Pinch the narrow end upward slightly to create a perky, upturned nose. I like to smooth the transition where the nose meets the forehead so there isn’t a sharp angle, keeping the face soft and round. -
Add the feet:
Roll four small marble-sized balls of clay. Flatten slightly and attach them to the underside of the body using a little water or ‘slip’ (clay mixed with water) as glue. Position two near the front and two near the back for stability. -
Blend the seams:
Use your thumb or a modeling tool to blend the edges of the feet seamlessly into the main body. The hedgehog should look like one cohesive piece, rather than parts stuck together. -
Refine the ears:
Roll two tiny, pea-sized balls and flatten them into discs. Press them gently onto the head, just behind where the eyes will go, and curve them slightly forward. Blend the back edge of the ears into the head.
Spine Stability
If your clay spikes are slumping while you work, your clay is too wet. Let the main body sit for 15 minutes to firm up before dragging or attaching the spikes.
Step 2: Creating Texture
-
Mark the spine line:
Before adding texture, lightly trace a faint line with a needle tool separating the face/belly area from the back. This guides where your ‘spines’ will start and stop. -
Forming spines:
This is the most time-consuming but meditative part. Pinch small bits of clay to form tiny cones or spikes. Alternatively, you can use a small tool to drag and lift the wet clay on the back into little peaks, row by row. -
layering the texture:
Start at the rear of the hedgehog and work your way forward toward the forehead. Ensure the spines overlap slightly and point backward. Vary the sizes slightly for a more organic, natural look. -
Smooth the face:
While the back is textured, keep the face and belly area perfectly smooth. Dip your finger in a little water and gently buff out any fingerprints on the un-spined areas. -
Initial drying:
Let the sculpture dry completely. Depending on humidity and thickness, this might take 24-48 hours. Turn it over occasionally so the bottom dries too.
Step 3: Painting and Finishing
-
Base coat:
Paint the entire hedgehog with a cream or pale beige acrylic paint. This unifies the surface and provides a good ground for the darker colors. -
Painting the spines:
Mix a warm dark brown with a touch of burnt sienna. Carefully paint the spined area on the back. Use a ‘dry brush’ technique here—load the brush with paint, wipe most of it off, and lightly drag it over the raised spikes to catch the texture without filling the crevices completely. -
Adding speckles:
For that ceramic pottery look, dilute a tiny drop of dark brown paint with water. Dip an old toothbrush or stiff brush into it, and flick the bristles with your thumb to mist tiny speckles over the smooth cream face and belly. -
Facial features:
Use a small detail brush to paint two solid black circles for the eyes. Add a tiny dot of white in the upper corner of each eye for a reflection. Paint the tip of the snout dark brown for the nose. -
Sealing:
Once the paint is fully dry, coat the entire piece with a satin or gloss varnish. This protects the clay from moisture and gives it that polished, fired-ceramic shine.
Natural Gradient
For realistic depth, paint the deepest crevices between spines with a darker almost-black brown, and highlight just the very tips of the spines with a lighter tan color.
Now your adorable hedgehog is ready to add a touch of woodland whimsy to your home
Snails With Swirly Shells and Cute Antennae
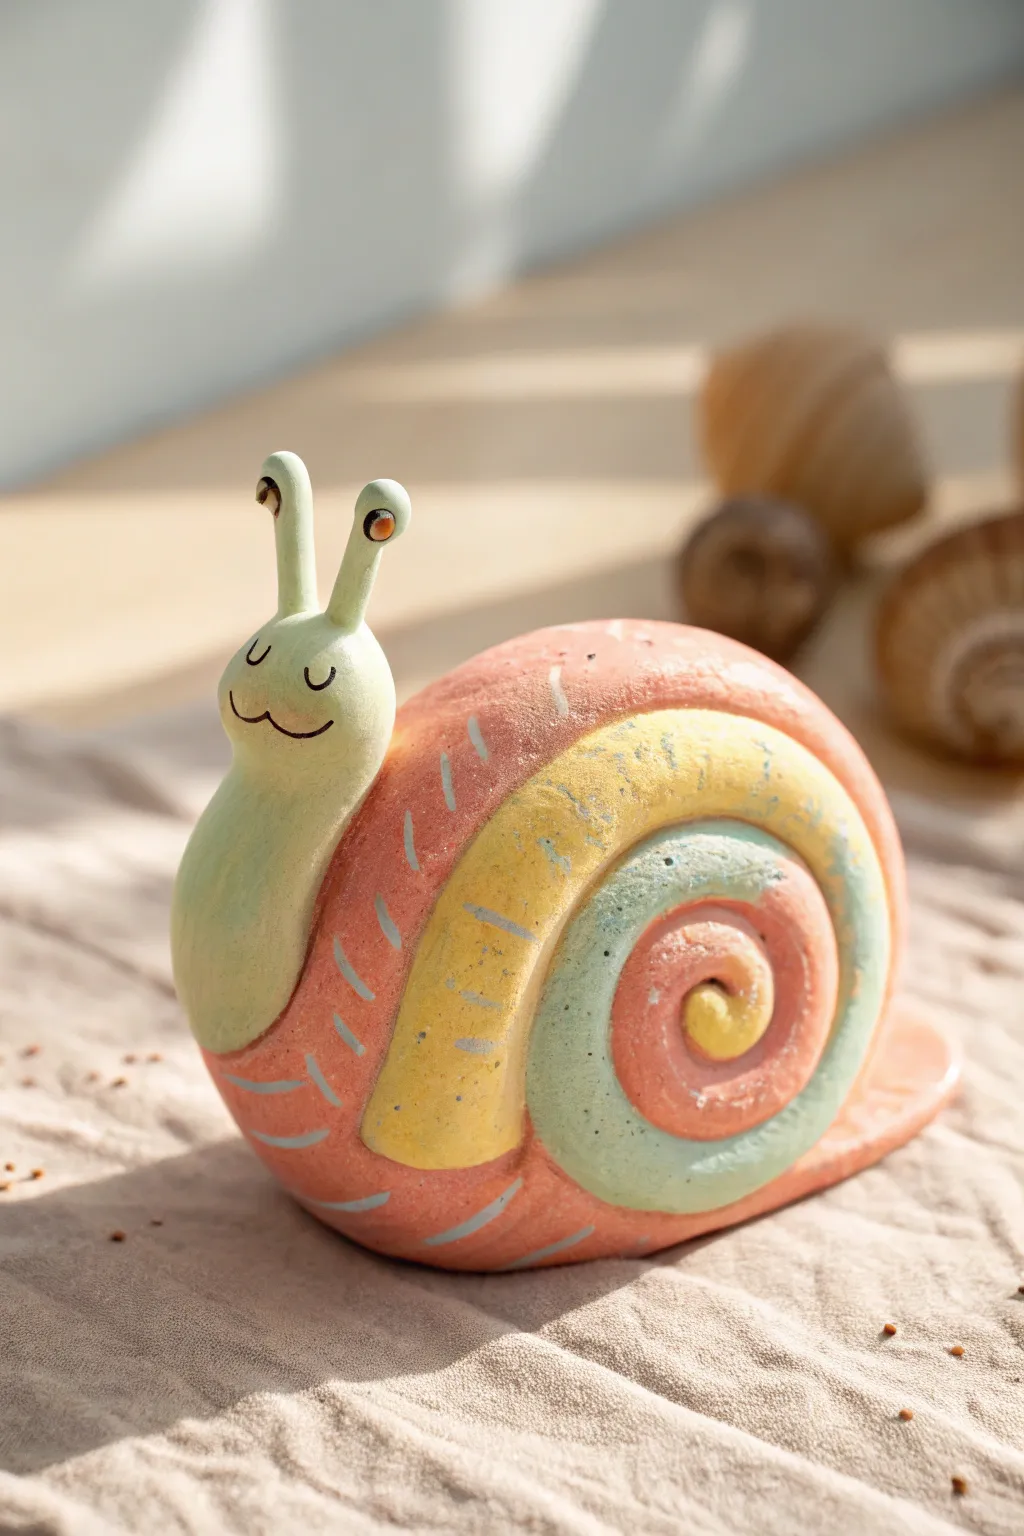
This charming little snail features a soft, matte finish and a whimsical spiraled shell that brings a touch of magic to any shelf. With its friendly smile and gentle pastel colors, it’s a perfect beginner sculpting project that looks deceptively professional.
How-To Guide
Materials
- Air dry clay (white)
- Acrylic paints (pastel pink, mint green, pale yellow, dark brown)
- Basic sculpting tools (needle tool, smoothing tool)
- Water cup and small sponge
- Aluminum foil
- Fine-grit sandpaper
- Matte varnish or sealant
- Fine liner brush
- Flat shader brush
Step 1: Sculpting the Base
-
Create the core:
Start by crumpling a small piece of aluminum foil into a tight ball, slightly flattened on one side. This will act as the lightweight armature for the shell, saving you clay and speeding up drying time. -
Wrap the shell:
Roll out a sheet of white air dry clay to about 1/4 inch thickness. Wrap this completely around your foil ball, smoothing out any seams with a little water on your finger until you have a smooth, slightly flattened sphere. -
Form the body:
Take a separate lump of clay and roll it into a thick, elongated teardrop shape. Bend the wider end upward to create the neck and head, while flattening the bottom of the tapered tail so it sits flush on your workspace. -
Attach the pieces:
Score the back of the body and the front of the shell piece with a needle tool (making scratch marks). Apply a dab of water or clay slip, then press the shell firmly onto the back of the snail’s body. Smooth the clay where they join to create a seamless bond.
Step 2: Adding Details
-
Make the coil texture:
Roll a long, thin snake of clay. Starting from the center of the shell’s side, wind this coil in a spiral, pressing it gently onto the shell’s surface to create that raised 3D swirl effect shown in the photo. -
Smooth the transition:
Use a modeling tool to blend the outer edges of your added coil into the main shell shape, so it looks like one organic piece rather than a snake stuck on top. -
Sculpt the eye stalks:
Roll two small, identical cylinders of clay. Attach them to the top of the head using the scoring method. Gently round off the tips where the eyes will be painted later. -
Refine the shape:
Check the snail’s stability. If it tips over, gently press the bottom against the table again to flatten the base. Dip a sponge in water and wipe the entire surface to remove fingerprints. -
Drying time:
Let the sculpture dry completely. This usually takes 24-48 hours depending on humidity. I like to rotate it occasionally so the bottom gets air exposure too.
Cracking Clay?
If small cracks appear as the clay dries, don’t panic. Mix a tiny bit of fresh clay with water to make a paste and fill the cracks, then sand smooth once dry.
Step 3: Painting & Finishing
-
Base coat the body:
Mix a soft mint green acrylic paint. Apply an even coat to the snail’s head, neck, and tail. You might need two thin coats for full coverage. -
Base coat the shell:
Paint the main underlying color of the shell with a rusty, pastel pink or coral shade. Carry this color down to the very bottom edges of the shell. -
Highlight the spiral:
Paint the raised inner spiral of the shell. As seen in the reference, use alternating bands of pale yellow and mint green that follow the curve of the coil. -
Add texture marks:
Using a very fine liner brush and thinned-down light blue or white paint, add tiny hatch marks along the pink sections of the shell to mimic a rough, natural texture. -
Paint the face:
With a fine brush and dark brown paint, carefully draw a ‘U’ shape for the mouth and two upside-down ‘U’ shapes for sleeping eyes. Add small dots of orange or brown on the tips of the antennae. -
Distress the finish:
Once the paint is fully dry, lightly sand the surface with fine-grit sandpaper. This reveals a tiny bit of white clay and gives it that rustic, stone-like appearance. -
Seal:
Finish with a coat of matte varnish to protect the paint without making it shiny, preserving that soft, earthy look.
Make it Glitter
For a magical twist, mix a pinch of fine iridescent glitter into your matte varnish before the final coat to make the shell shimmer like a real sea snail.
Now you have a peaceful little desk companion ready to keep you company while you work
Farm Animal Set: Pig, Cow, and Sheep
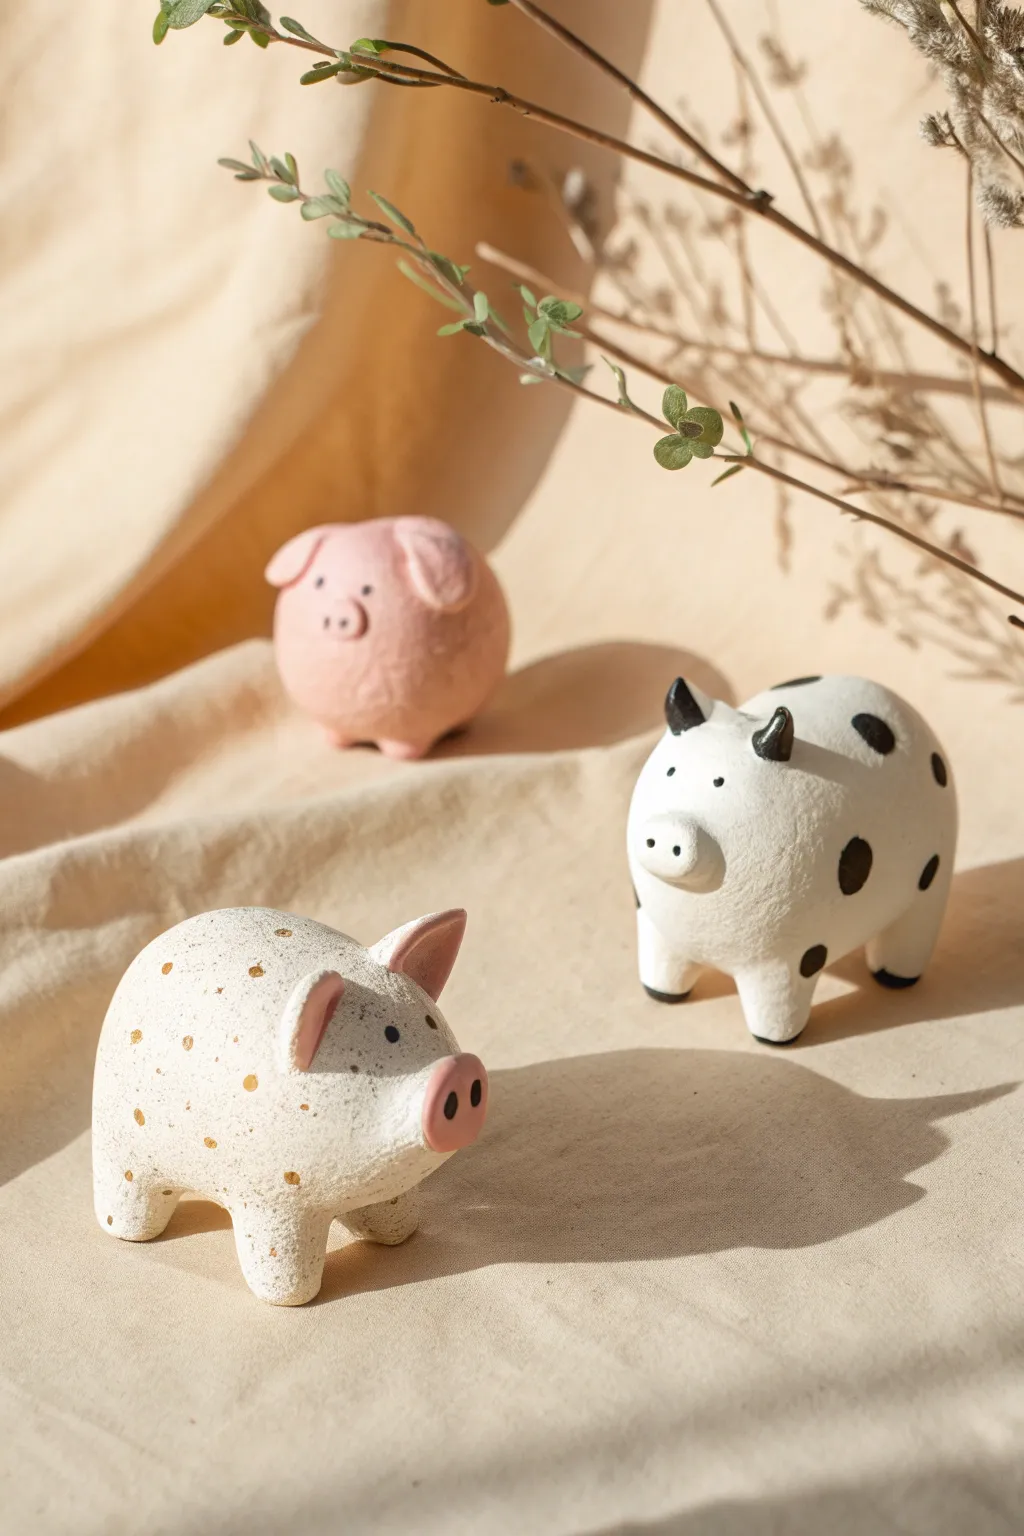
These charming, chunky farm animals look almost like they stepped out of a storybook with their rounded shapes and minimalist features. It’s a delightful air dry clay project that celebrates simple forms, soft colors, and delicate polka dots.
Step-by-Step
Materials
- White air dry clay
- Acrylic paints (pastel pink, cream/white, black, gold)
- Small fine-point paintbrushes
- Ball stylus tool or toothpick
- Water in a small cup
- Smooth work surface or mat
- Fine-grit sandpaper (optional)
Step 1: Shaping the Bodies
-
Prepare the base:
Start by taking three equal-sized portions of white air dry clay. Knead each piece until it is soft, pliable, and free of cracks. -
Roll the main forms:
Roll each portion into a smooth, slightly elongated egg shape. These will be the bodies for the cow and the two pigs. -
Add sturdy legs:
For each animal, roll four small spheres of clay. Press these gently onto the bottom of the body shape to serve as stout legs. Smooth the seams with a little water on your fingertip to join them securely. -
Flatten for stability:
Once the legs are attached, gently press the entire figure down onto your work surface. This creates flat bottoms on the feet so the animals stand up straight without wobbling.
Step 2: Adding Features
-
Create the snouts:
For the pink pig and the spotted piglet, roll small ovals of clay and flatten them slightly. Attach these to the front of their faces. For the cow, make a slightly wider, flatter oval snout. -
Form the ears:
Shape small triangles for the pigs’ ears and attach them near the top of the head, folding one slightly forward for character. For the cow, create teardrop shapes that point outward, plus two tiny cones for the horns. -
Smooth everything out:
Dip your finger or a brush in water and go over all connection points. The goal is a seamless, matte finish where the clay looks like one solid piece. -
Dry thoroughly:
Let your farm animals dry completely for 24-48 hours. I usually rotate them halfway through so the bottoms dry evenly. You can lightly sand any rough spots once they are hard.
Seamless Joints
Use a technique called “scoring and slipping” (scratching the clay surface and adding water) before attaching legs to ensure they don’t pop off when drying.
Step 3: Painting and Details
-
Base coat: classic pink:
Paint one pig entirely with a soft pastel pink acrylic. You may need two thin coats for opaque coverage. -
Base coat: creamy white:
Paint the cow and the second piglet with a warm, creamy white or off-white color. This adds a lovely natural pottery look compared to stark white. -
Paint the piglet’s details:
For the cream-colored piglet, paint the snout and the insides of the ears with the same pastel pink used on the first pig. -
Add the cow’s spots:
Using black paint and a small round brush, dab organic, uneven spots onto the cow’s body. Paint the horns black as well. -
Detail the faces:
Use the very tip of a fine brush or a toothpick dipped in black paint to create tiny dots for the eyes on all animals. Add two tiny vertical dashes or dots on the snouts for nostrils. -
Gold speckles:
For the cream piglet in the foreground, dip a small brush or toothpick into metallic gold paint. Gently dot random speckles across its back and sides for a whimsical touch. -
Final touches:
Let the paint dry completely. If you want a glossy finish, you can add a varnish, but leaving them matte preserves that natural clay texture shown in the photo.
Turn it into a Mobile
Before the clay dries, carefully insert a small metal eye hook into the center of each animal’s back. Once painted, string them up for a nursery mobile.
Now you have a trio of adorable farm friends ready for display
Mini Elephants With Curled Trunks
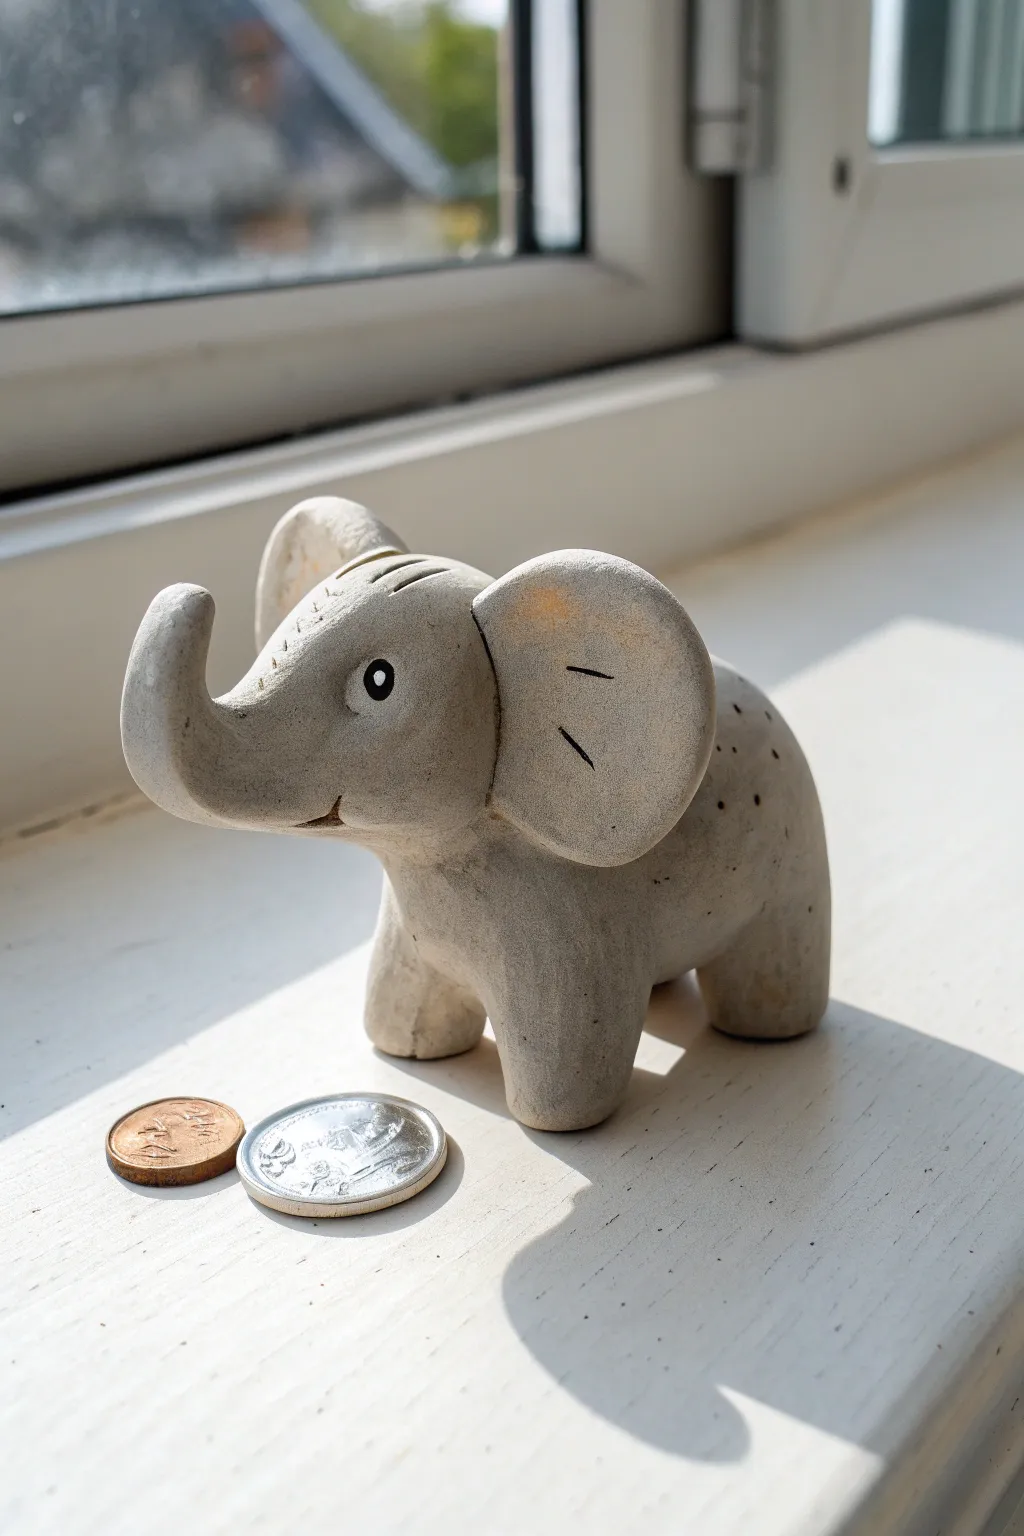
This charming, smooth-style elephant features a gently upward-curling trunk, large round ears, and little polka dot details on its back. The finished piece has a delightfully tactile, stone-like matte finish that sits perfectly on a windowsill or desk.
How-To Guide
Materials
- High-quality air dry clay (white or light grey)
- Small cup of water
- Modeling tools (or a blunt knife and toothpick)
- Acrylic paint (black and very dark grey)
- Fine detail paintbrush
- Optional: 400-grit sandpaper (for smoothing)
- Matte varnish or sealant
Step 1: Basic Shape Structure
-
Form the body:
Begin with a golf-ball-sized chunk of clay. Roll it into a smooth sphere, then gently elongate it into a thick oval shape to form the main torso of the elephant. -
Create the legs:
Pull four small, equal sections of clay from underneath the body. Gently shape these into short, stout stumps for legs. Focus on keeping them wide and flat at the bottom so the figure stands stably. -
Shape the head:
Roll a slightly smaller ball of clay for the head. Attach it firmly to the front of the body using a little water to smooth the seam until the neck joint is invisible. -
Sculpt the trunk:
Pull clay from the front of the face outwards to form the trunk. Taper it as it extends, then curve the tip upwards in a joyous ‘J’ shape.
Cracks Appearing?
If tiny cracks appear while drying, don’t panic! Mix a tiny bit of fresh clay with water to make a paste (slip) and fill the cracks, then smooth over.
Step 2: Ears and Refinements
-
Flatten the ears:
Create two medium-sized balls of clay and flatten them into teardrop or rounded triangle disks. These should be fairly thick, not paper-thin, to match the sturdy style of the figure. -
Attach the ears:
Score the sides of the head lightly, add a dab of water, and press the ears into place. Smooth the clay from behind the ear onto the head to secure the bond. -
Define the mouth:
Use a modeling tool or the side of a toothpick to press a small, curved line under the trunk for a subtle smile. -
Smooth the surface:
Dip your finger in water and gently rub over the entire sculpture. This removes fingerprints and creates that seamless, stone-like appearance. I like to spend extra time here ensuring the transition from trunk to forehead is perfectly smooth.
Make it a Bank
Before drying, use a knife to carefully cut a slot in the top of the back. Hollow out the body more during the initial build to hold coins inside.
Step 3: Fine Details
-
Add texture lines:
Using a needle tool or sharp toothpick, gently press two or three curved lines onto the trunk near the forehead to simulate wrinkles. -
Score the ears:
Press two small, angled lines into the upper part of each ear flap for added dimension. -
Detail the back:
Use the tip of your needle tool to poke small, shallow dimples across the elephant’s back. Space them randomly for a natural, speckled texture. -
Drying time:
Let the elephant air dry for 24 to 48 hours. Keep it away from direct heat sources to prevent cracking. -
Sanding (Optional):
If there are any rough rough spots after drying, lightly buff them with fine-grit sandpaper for a professional finish.
Step 4: Painting the Face
-
Paint the eye whites:
Paint a small, solid white circle on each side of the face for the eyes. -
Add the pupils:
Once the white is dry, use your finest brush or a dotting tool to add a black dot in the center of the eye. -
Add the highlight:
Place a teeny tiny white dot inside the black pupil to bring the expression to life. -
Final wash (Optional):
To enhance the ‘stone’ look, you can mix a very watery grey paint and brush it over the sculpture, then wipe it off immediately with a paper towel. The color will stay in the textured lines and dimples. -
Seal the work:
Finish with a coat of matte varnish to protect your new little friend.
Now you have a wonderful, smooth little elephant sculpture ready to guard your loose change or decorate your shelf
Giraffes With Painted Spots and Tiny Horns
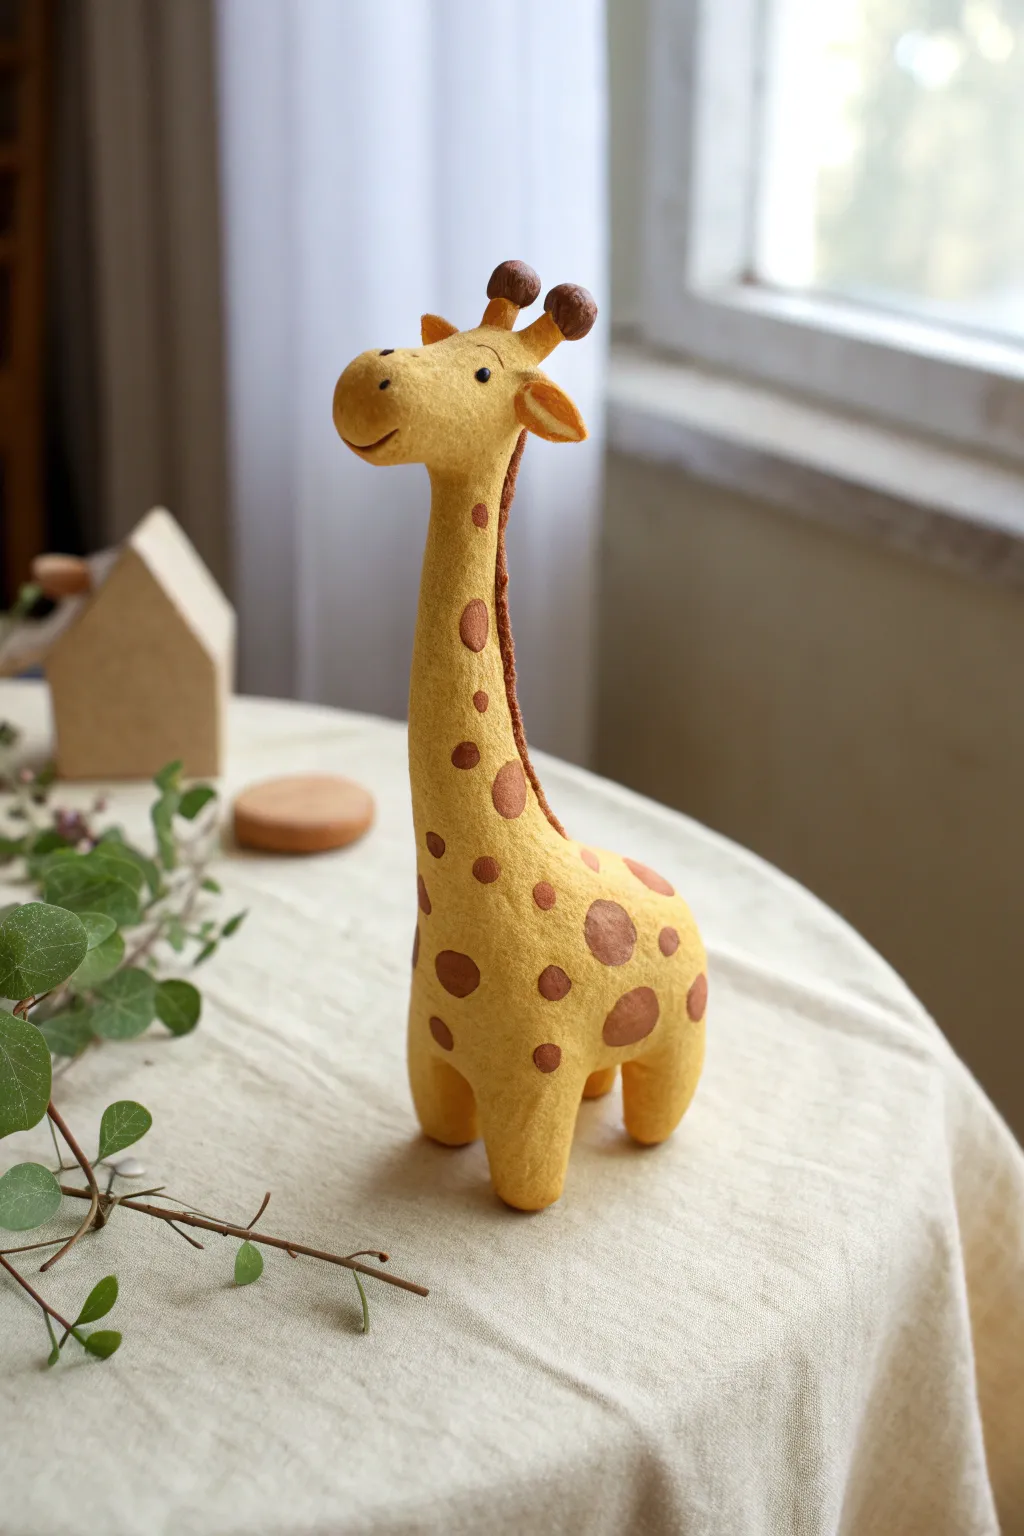
Stand tall with this charming giraffe sculpture, featuring a delightfully elongated neck and hand-painted spots. Its stylized form and warm, ochre tones give it a modern, playful look perfect for shelf decor or a nursery centerpiece.
Step-by-Step Guide
Materials
- High-quality air dry clay (white or terracotta)
- Acrylic paints (Yellow ochre, dark brown, black, white)
- Aluminum foil (for armature)
- Sturdy crafting wire or floral wire
- Sculpting tools (needle tool, smoothing tool)
- Water and a small sponge
- Paintbrushes (medium flat, small round)
- Fine-grit sandpaper
- Matte varnish (optional)
Step 1: Building the Armature
-
Wire Skeleton:
Cut a length of wire about 12 inches long. Bend it in half and twist the top section together to create a strong core for the neck. Bend the bottom ends outwards to form the front legs. -
Body Form:
Cut another shorter piece of wire for the back legs and twist it onto the main wire structure near the base of the ‘neck’. Adjust the stance so the wire frame stands on its own. -
Foil Bulk:
Crumple aluminum foil tightly around the wire core. Create a teardrop shape for the body and a thinner cylinder for the long neck. Don’t worry about the head yet; just focus on a solid base structure.
Neck Drooping?
If the long neck keeps bending while you sculpt, prop it up against a glass or object while the clay firms up. The internal wire is crucial here.
Step 2: Sculpting the Form
-
Clay Layer application:
Roll out a sheet of clay to about 1/4 inch thickness. Wrap this around your foil body, pressing it firmly to ensure it adheres to the armature. -
Neck Construction:
Take a snake of clay and wrap it around the neck foil. Use wet fingers to blend the clay downwards into the shoulder area so there are no visible seams. -
Head Shaping:
Roll a smooth ball of clay for the head. Slightly elongate one side to create the snout. Attach this to the top of the neck using the score-and-slip method (roughing up both surfaces and adding water). -
Leg Definition:
Add small cylinders of clay to the leg wires. The legs on this stylized giraffe are thick and sturdy, almost like little pillars, so keep them simple and rounded at the bottom. -
Smoothing:
Use a damp sponge or your finger to smooth out the entire figure. Special attention is needed where the neck meets the body—I like to spend extra time here to ensure a graceful curve.
Seamless Blending
To erase fingerprints, dip your finger in a tiny bit of water and rub gently in circles. Don’t add too much water or the clay will crack.
Step 3: Adding Details
-
Ears and Ossicones:
Shape two tiny oval leaves for ears and two small cylinders for the horns (ossicones). Attach the ears to the side of the head and the horns to the top, blending the clay at the connection points. -
Facial Features:
Use a needle tool or small ball stylus to gently indent eye sockets. Add a small etched line for the smiling mouth. -
Mane Texture:
Roll a very thin strip of clay and attach it down the back of the neck. You can leave it smooth or use a needle tool to scratch in hair texture. -
Drying:
Let the sculpture dry completely. This usually takes 24-48 hours depending on thickness. Rotate it occasionally so the bottom of the feet dry evenly.
Step 4: Painting and Finishing
-
Base Coat:
Sand away any rough bumps. Paint the entire giraffe with a warm yellow ochre acrylic paint. You may need two coats for opaque coverage. -
Painting the Spots:
Mix a warm brown shade. Using a small round brush, paint irregular oval spots all over the body and neck. Vary the sizes—larger spots on the back, smaller ones towards the head and legs. -
Detailing the Mane:
Paint the mane strip down the back of the neck in a dark brown, perhaps slightly darker than your spots. -
Face Details:
Use the tip of a toothpick or a fine liner brush to paint small black eyes inside the indents you made earlier. Paint the tips of the horns dark brown. -
Sealing:
Once the paint is fully dry, apply a matte varnish to protect your work without making it too shiny.
Place your completed giraffe on a shelf where its cheerful yellow coat can brighten up the room
Penguins With Simple Black-and-White Color Blocking
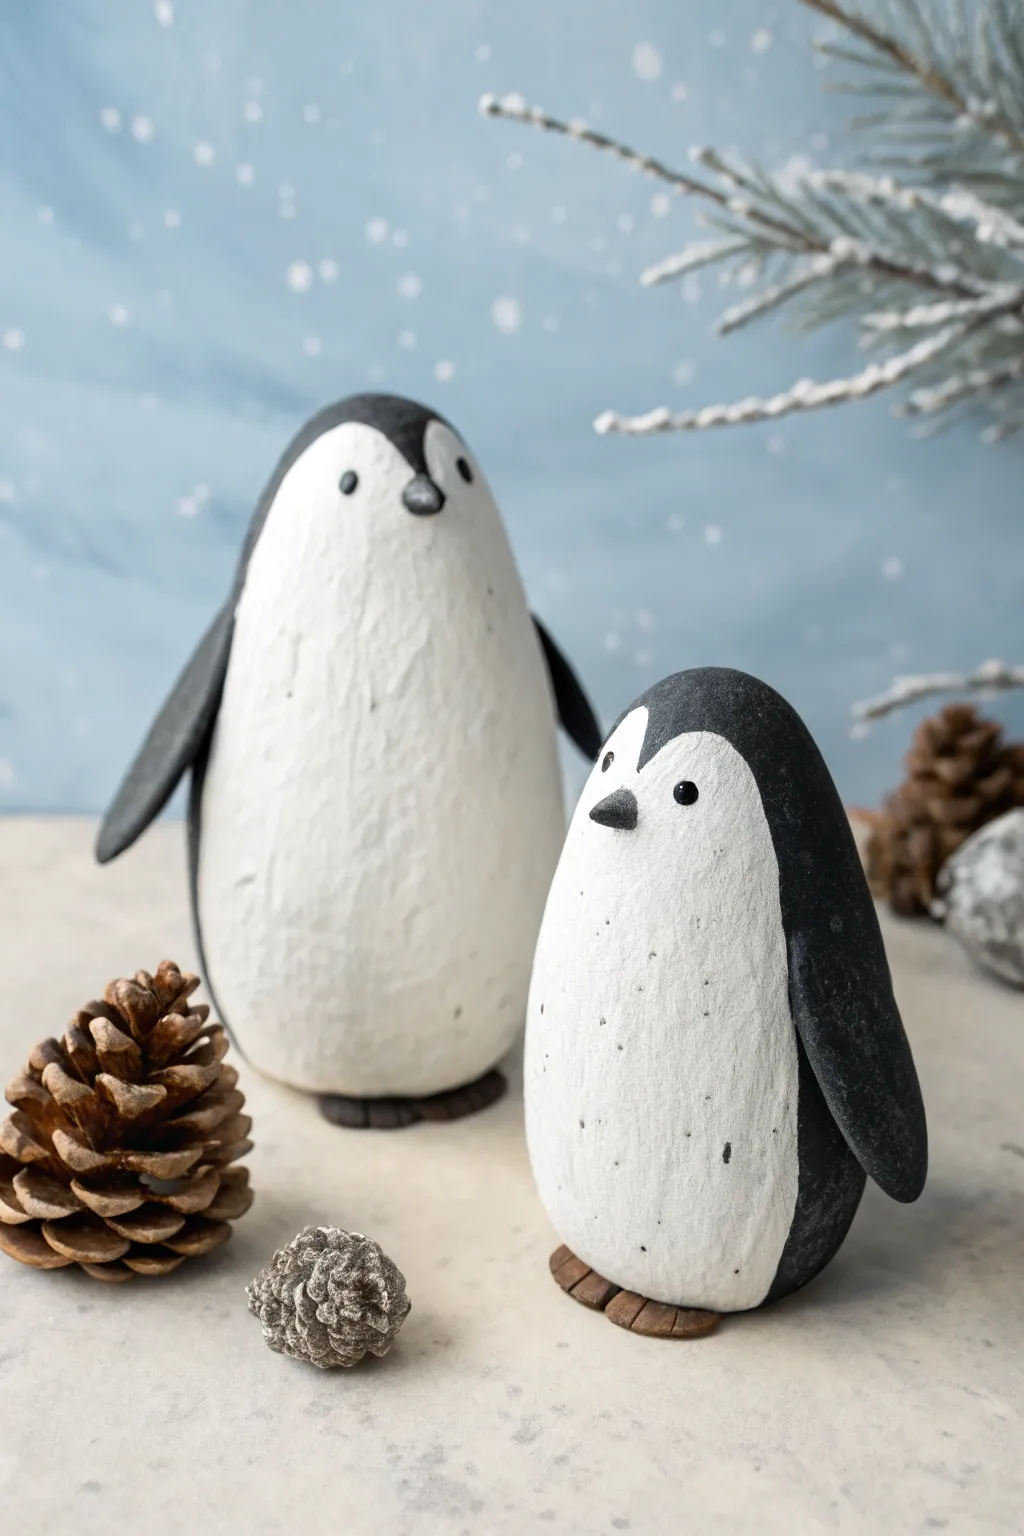
These charming, minimalist penguins embrace the natural, matte texture of air dry clay for a modern winter decoration. Their simple pebble-like shapes and stark black-and-white color blocking make them an approachable project for sculptors of any skill level.
Step-by-Step
Materials
- White or grey air dry clay
- Aluminum foil (for armature)
- Acrylic paint (Matte Black, Titanium White, Raw Umber)
- Wide, flat paintbrush
- Small round detail brush
- Water cup and paper towels
- Sculpting tool or butter knife
- Fine-grit sandpaper (optional)
- Matte varnish or sealant
Step 1: Forming the Body
-
Create a Foil Core:
Begin by crumpling aluminum foil into an elongated egg shape. One should be taller and slightly tapered at the top for the adult penguin, and a smaller, rounder egg shape for the chick. -
Condition the Clay:
Knead a large handful of air dry clay until it feels warm and pliable. If it feels too stiff, dip your fingers in a little water to soften it. -
Wrap the Core:
Flatten the clay into a pancake about 1/4 inch thick. Wrap this sheet fully around your foil armature, smoothing the seams together with a wet finger so the foil is completely hidden. -
Refine the Shape:
Roll the clay figure gently on your work surface to smooth out lumps. The taller penguin should have a slight forward lean, while the smaller one can be rounder and squat. -
Flatten the Base:
Tap the bottom of each figure firmly against the table to create a flat, stable base so they stand upright without wobbling.
Cracked Clay?
Mix a small amount of fresh clay with water to make a paste (slip). Fill any drying cracks with this paste and smooth over with a damp finger.
Step 2: Adding Details
-
Sculpt the Wings:
Form two flat, elongated teardrop shapes for the wings. Attach them to the sides of the body by scoring the clay (scratching crisscross lines) and adding a dab of water (slip) to join them securely. -
Create the Beak:
Pinch a tiny amount of clay into a small cone. Attach this to the face area using the score-and-slip method, blending the edges slightly so it doesn’t pop off later. -
Shape the Feet:
Make two small, flat distinct pads for feet. Slide them slightly under the front of the body so just the toes are peeking out. -
Texture the Surface:
For a rustic look similar to the photo, I deliberately leave faint fingerprints or use a stiff brush to stipple the white areas while the clay is wet. This mimics feathers. -
Dry Completely:
Let the figures dry for at least 24-48 hours. They should feel room temperature and look chalky white when fully cured.
Winter Accessories
Before the clay dries, sculpt miniature scarves or winter hats directly onto the penguins, painting them red or green later for holiday flair.
Step 3: Painting & Finishing
-
Base Coat:
Paint the entire body with white acrylic paint first. Use two coats if necessary to get a solid, opaque coverage. -
Block the Black Areas:
Using a flat brush and black paint, carefully paint the back, the tops of the wings, and the classic ‘widow’s peak’ shape on the forehead. Keep the lines crisp. -
Paint the Details:
Use a small detail brush to paint the beak black or dark grey. Dot two small black eyes on either side of the beak. -
Add Speckling:
To achieve the organic texture seen in the photo, dilute a tiny bit of grey or black paint with water. Flick the bristles of an old toothbrush or stiff brush to create subtle speckles on the white belly. -
Paint the Feet:
Mix a small amount of brown (Raw Umber) to paint the feet pads. You can add faint lines for toes once the base brown is dry. -
Seal the Work:
Once all paint is dry, apply a matte varnish to protect the surface without making it shiny, preserving that stone-like finish.
Place your new penguin family among some pinecones or faux snow to complete your frosty winter scene
Sea Creatures: Whale and Octopus Desk Friends
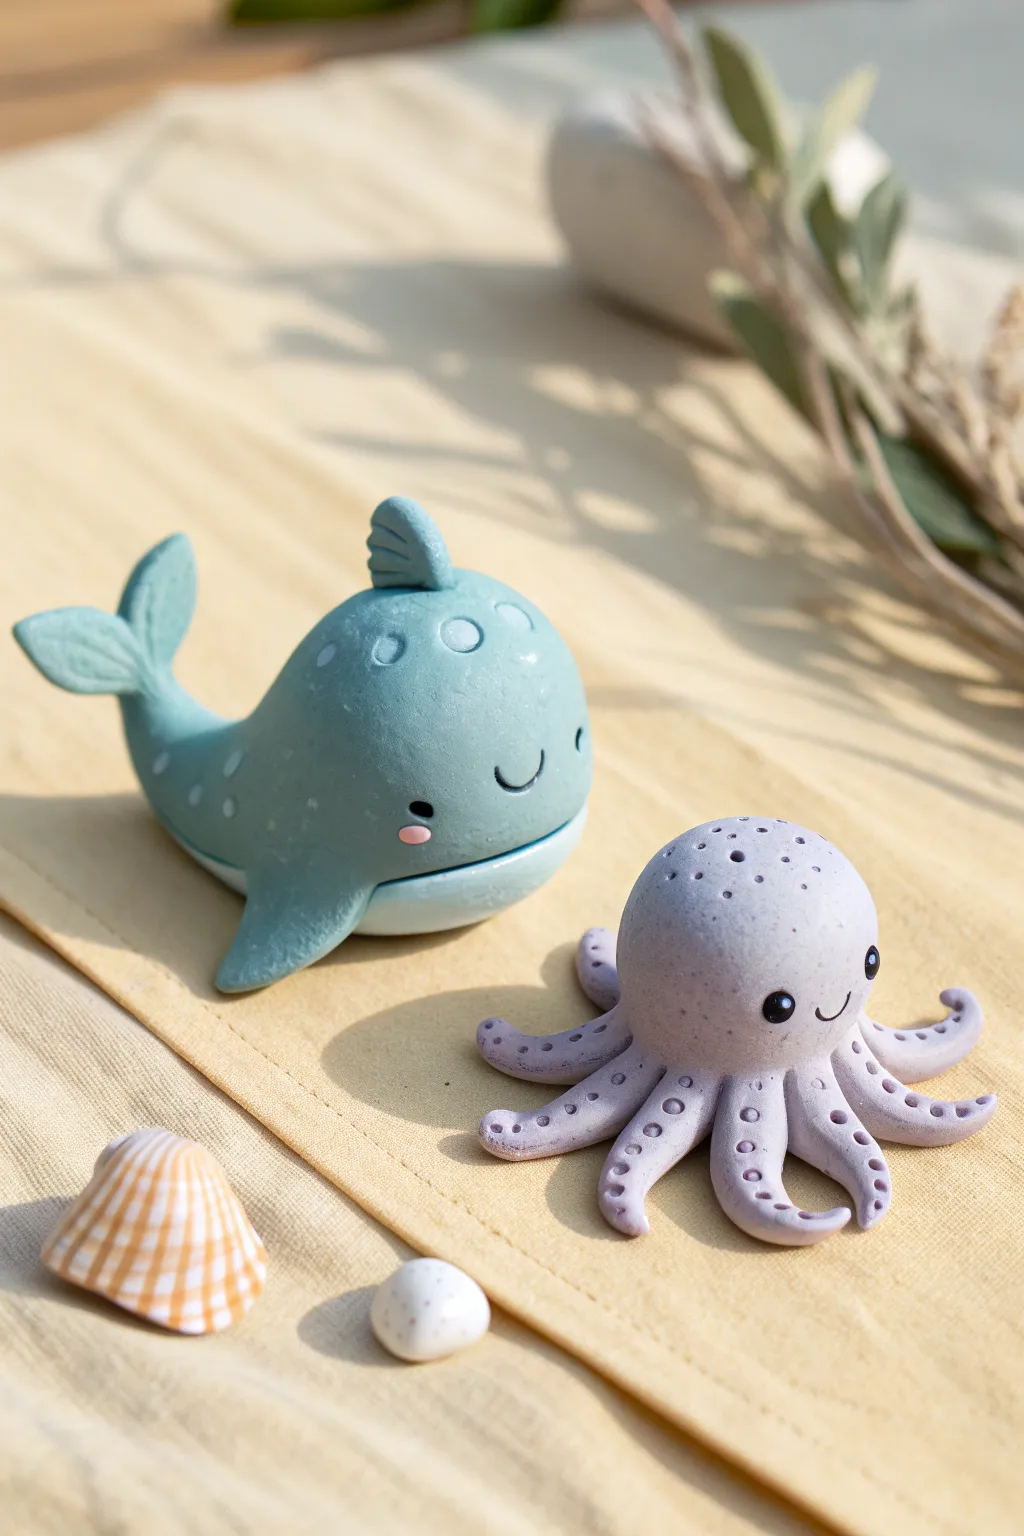
Brighten up your workspace with these charming sea creature figurines, featuring a smooth, matte finish and adorable painted expressions. This dynamic duo—a gentle teal whale and a playful purple octopus—makes for the perfect introduction to modeling cute animals.
Detailed Instructions
Materials
- Air dry clay (white)
- Acrylic paints (teal, lavender/purple, black, pink, white)
- Sculpting tools (ball styluses, needle tool, plastic knife)
- Cup of water and sponge
- Fine grit sandpaper (optional)
- Paintbrushes (small detail brushes)
- Matte varnish or sealant
Step 1: Sculpting the Gentle Whale
-
Form the Body Base:
Start by conditioning a golf-ball-sized piece of clay until it’s pliable. Roll it into a smooth sphere, then gently elongate one end to create a teardrop shape. This tapered end will become the tail. -
Curve the Tail:
Gently curve the tapered tail end upwards. Flatten the very tip slightly with your thumb to prepare it for the flukes. -
Create the Flukes:
Take a small pinch of fresh clay and shape it into a heart or a broad ‘V’. Attach this to the flattened tip of the tail, blending the seams thoroughly with a little water so it looks like one solid piece. Use a tool to impress faint lines for texture if desired. -
Add the Fin:
Shape a small triangle of clay for the dorsal fin. Attach it to the center of the whale’s back, blending the clay downwards to secure it. -
Attach Side Fins:
Create two small, flattened teardrop shapes for the side fins. Press them firmly onto the lower sides of the whale’s body, angling them slightly backward. -
Refine the Shape:
Use a damp sponge or your finger to smooth out any fingerprints or join lines. If you want the underbelly look seen in the photo, you can gently flatten the bottom or carve a shallow line distinguishing the belly area. -
Add Surface Details:
Using a small ball tool or the end of a paintbrush, gently press circular indentations into the top of the head for a textured, barnacle-like effect.
Crack Control
If small cracks appear while drying, don’t panic! Mix a tiny bit of fresh clay with water to make a paste (slip) and fill the cracks, then smooth over.
Step 2: Sculpting the Playful Octopus
-
Shape the Head:
Roll a slightly smaller ball of clay for the octopus’s head. It should be round but slightly flattened at the bottom where the legs will attach. -
Form the Tentacles:
Roll out eight small logs or ‘snakes’ of clay, tapering them at one end. They don’t need to be perfectly identical in length; variety makes it look more natural. -
Assemble the Base:
Arrange the eight tentacles in a starburst pattern on your work surface. Press them together at the center, then place the head ball on top of this junction. -
Blend and Pose:
Blend the clay from the head down into the legs so there are no seams. Curl the tips of the tentacles upwards or sideways to give the octopus a sense of movement. -
Add Suction Cups:
Using a very small ball tool or a dull toothpick, press rows of tiny indents along the visible undersides and sides of the curled tentacles to mimic suction cups. -
Texture the Head:
Similar to the whale, add a few small stylistic pores or dots on top of the head using a needle tool for texture.
Step 3: Painting and Finishing
-
Drying Time:
Allow both figures to dry completely for 24-48 hours. I find flipping them over halfway through helps the bottoms dry evenly. -
Smooth the Surface:
Once bone dry, you can lightly sand any rough spots with fine-grit sandpaper for a professional finish. -
Base Coats:
Paint the whale a soft teal or dusty blue. Paint the octopus a light lavender. You may need two coats for full opacity. -
Painting the Faces:
Using a very fine detail brush, paint small black circles for eyes on both creatures. Add a tiny U-shaped smile between the eyes. -
Adding Highlights:
Dip the tip of a toothpick in white paint and add a tiny dot to the top corner of each black eye. This ‘catchlight’ brings them to life. -
Rosy Cheeks:
Mix a tiny bit of pink paint with water to make a glaze, or use watered-down pink acrylic. Dab small oval cheeks under the eyes. -
Decorative Dots:
Use a lighter shade of teal to highlight the textured ‘barnacle’ circles on the whale’s head, and perhaps a lighter purple for the octopus’s suction cups. -
Seal:
Finish with a coat of matte varnish to protect the paint and give that smooth, ceramic-like look.
Weighted Base
To make them sturdy paperweights, crumple a small ball of aluminum foil around a heavy nut or washer and use that as the core of your main clay ball.
Enjoy arranging your new aquatic friends on your desk for a daily dose of cuteness
Axolotls With Frilly Gills and Pastel Paint
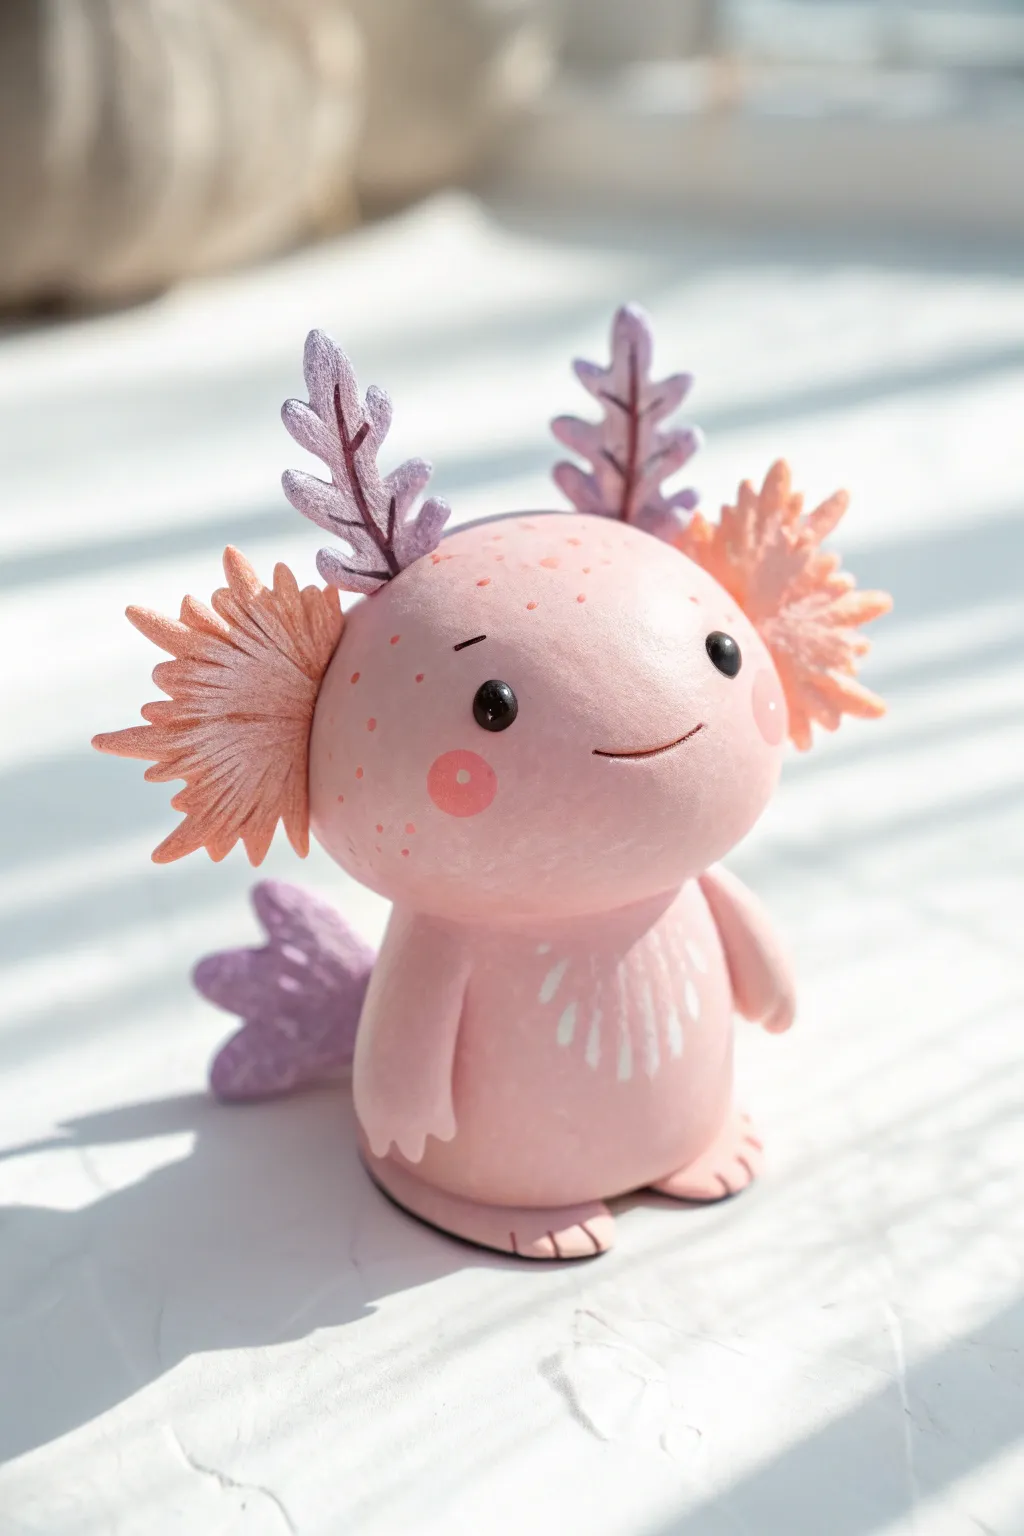
Sculpt your own whimsical water friend with this incredibly sweet axolotl project. Featuring soft pastel hues, delicate frilly gills, and a charming smile, this figurine brings a touch of magic to any shelf.
Step-by-Step
Materials
- White air-dry clay (smooth texture)
- Acrylic paints (pastel pink, apricot/peach, lavender, white, black)
- Small sculpting tools (needle tool, ball stylus)
- Water cup and sponge
- Aluminum foil (for armature core)
- Fine detail paintbrushes
- Sandpaper (fine grit)
- Matte varnish or sealant
Step 1: Forming the Base
-
Create the core:
Crumple a small amount of aluminum foil into a round ball for the head and a slightly elongated oval for the body. This reduces clay drying time and weight. -
Cover the head:
Roll out a sheet of white air-dry clay. Wrap it smoothly around the foil head ball, ensuring no foil is visible. Use a little water on your finger to smooth out any seams until you have a perfect sphere. -
Shape the body:
Cover the body foil armature in the same way. Gently press the body against a flat surface to create a stable base so the figure stands upright. -
Connect head and body:
Score the top of the body and the bottom of the head with a needle tool to create rough texture. Apply a dab of water or clay slip, then press them firmly together. Smooth the clay over the join line to make it seamless.
Step 2: Adding Features
-
Sculpt the arms:
Roll two small sausage shapes for arms. Flatten one end of each slightly and use a needle tool or knife to cut three tiny triangular notches for fingers. -
Attach the limbs:
Attach the arms to the sides of the body, blending the clay at the shoulder joint smoothly into the torso. Add two small, flattened ovals for feet at the base, marking toes on them as well. -
Make the tail:
Flatten a piece of clay into a broad, leaf-like shape for the tail fin. Use your tool to create deep, wavy indentations or notches to simulate a fin texture. -
Attach the tail:
Score and slip the back of the body and attach the tail securely. You may need to prop it up with a small object while it dries.
Smooth Operator
Use a brush dipped in water to smooth the raw clay before drying. It eliminates fingerprints far better than sanding later.
Step 3: Creating the Frills
-
Shape the side gills:
Create two large, fan-like shapes for the side gills. Use a knife tool to cut deep slices into the edges to create a feathery, fringed look. -
Attach side gills:
Press these onto the sides of the head. Use a blending tool to secure the base of the gill to the head so they don’t fall off later. -
Form the top stalks:
Roll two thin stems of clay for the top antennae-like gills. Add small, leaf-shaped bits of clay along the stem to create a fern-like appearance. -
Attach top stalks:
Carefully attach these to the top of the head. I like to let these dry briefly before attaching so they hold their shape better against gravity. -
Drying:
Allow the entire sculpture to dry completely for 24-48 hours. Keep it away from direct heat to prevent cracking.
Glitter Glam
Mix a tiny pinch of iridescent fine glitter into your varnish coat or the lavender paint for a magical, aquatic shimmer on the fins.
Step 4: Painting and Finishing
-
Base coat:
Paint the entire body and head with a smooth coat of pastel pink acrylic paint. You may need two thin coats for even coverage. -
Paint the gills:
Paint the side feathery gills a soft apricot or peach color. Paint the top darker fern-like stalks and the tail fin a gentle lavender color. -
Add face details:
Using a very fine brush or a ball stylus tool, paint two solid black circles for eyes. Add a tiny white highlighting dot to each eye for sparkle. -
Rosy cheeks and smile:
Paint soft pink circles for cheeks and paint a thin, curved line for the smile in a darker pink or brown. Add tiny freckles on the forehead with the tip of a toothpick. -
Belly details:
Paint delicate white strokes on the belly to suggest a lighter underbelly texture. -
Seal:
Once the paint is fully dry, apply a matte varnish to protect your new friend and give the finish a professional look.
Enjoy displaying your adorable pastel creation on your desk or bookshelf
Dinosaur Hatchlings With Oversized Eyes
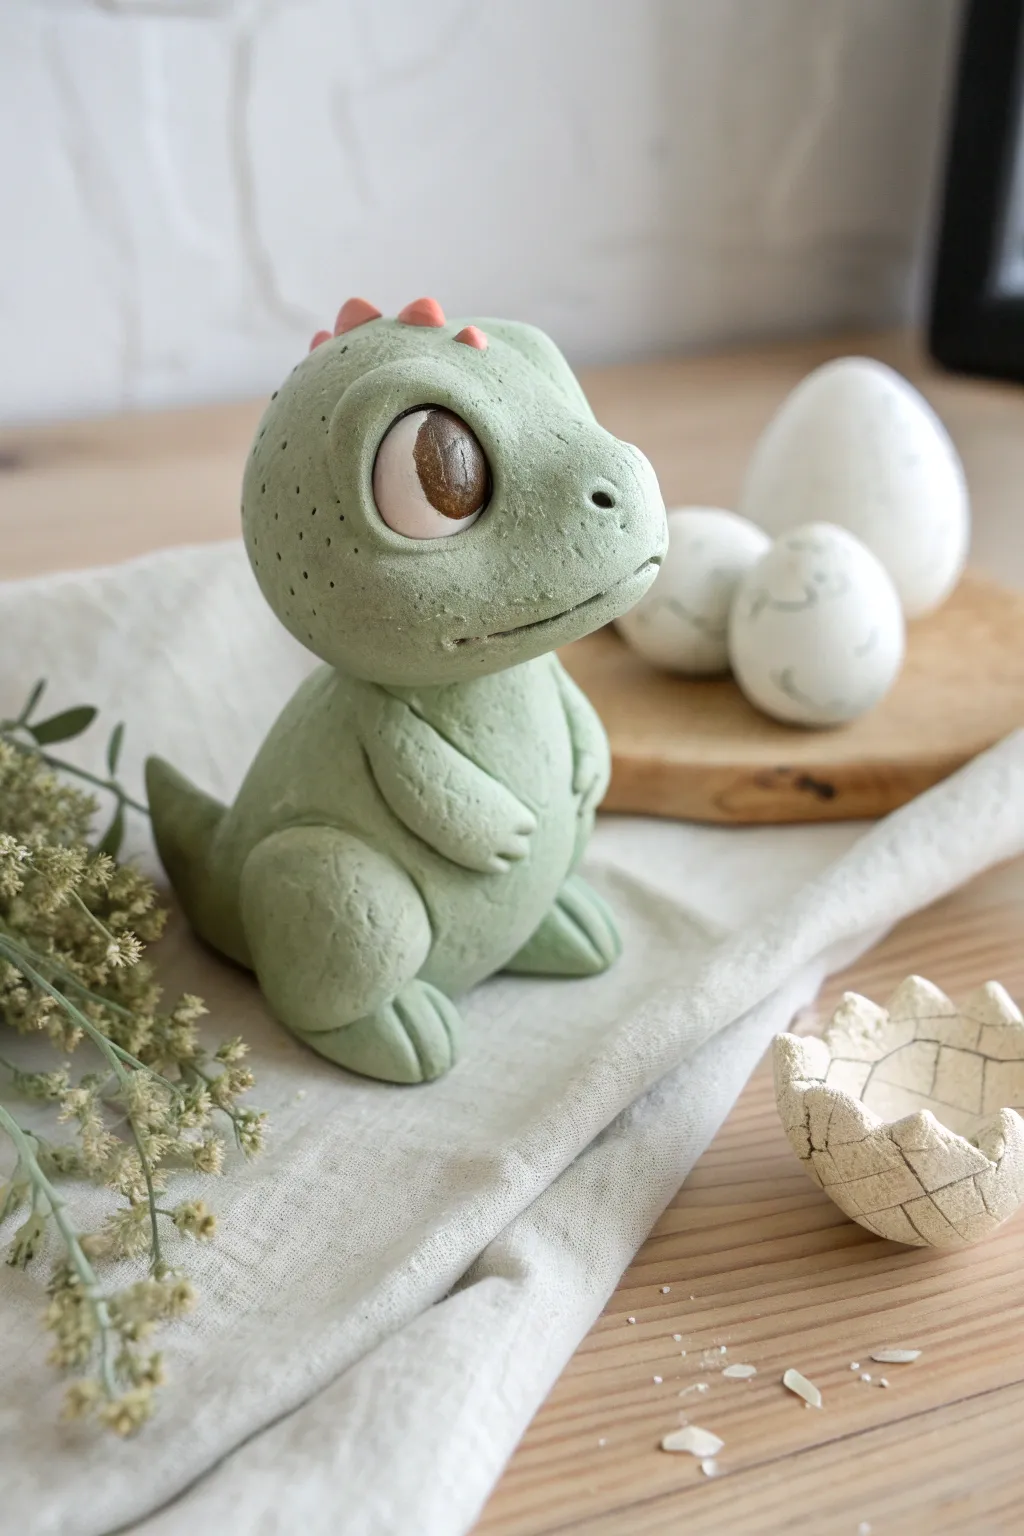
Sculpt your very own prehistoric pal with this adorable baby dinosaur project. Featuring a textured green finish and expressive, oversized eyes, this little hatchling makes for a charming desk companion or gift.
How-To Guide
Materials
- Green air dry clay (or white clay + acrylic paint)
- White, black, brown, and pink air dry clay (small amounts)
- Basic clay sculpting tools (needle tool, modeling tool)
- Aluminum foil (for armature)
- Toothpicks or wire
- Water in a small cup
- Soft paintbrush
- Sponge or stiff brush for texturing
Step 1: Forming the Body and Head
-
Create the core:
Start by crumpling a small piece of aluminum foil into a pear shape for the body and a slightly larger, rounded shape for the head. This saves clay and makes the figure lighter. -
Cover the body:
Roll out a sheet of your green clay. Wrap it around the pear-shaped foil armature, smoothing the seams together with a bit of water until you have a seamless, chubby dinosaur body. -
Shape the head:
Cover the head foil armature with green clay similarly. Refine the shape so it has a definitive snout area and a high forehead. -
Attach the head:
Insert a toothpick or short piece of wire halfway into the neck of the body. Push the head onto the exposed end to secure it. Blend the clay at the neck seam using a modeling tool so the head and body become one solid unit.
Cracks Appearing?
If you see small cracks forming while drying, mix a tiny bit of fresh clay with water to make a paste (slip) and stroke it into the cracks with a brush to seal them up.
Step 2: Sculpting the Features
-
Add the legs:
Roll two thick teardrop shapes of green clay for the chunky hind legs. Press them onto the bottom sides of the body. -
Define the feet:
Use a needle tool or knife to gently press indentations into the ends of the legs to create three toes on each foot. -
Attach the arms:
Create two smaller sausage shapes for the arms. Attach them high on the chest, smoothing the shoulder connection. Add small toe marks on the hands just like you did for the feet. -
Make the tail:
Roll a cone of clay for the tail. Attach it to the lower back of the dinosaur, curving it slightly to one side so it looks visible from the front. Blend the seam thoroughly.
Step 3: Facial Details and Texture
-
Sculpt the mouth:
Use a sharp tool to cut a horizontal slit across the snout for the mouth. Slightly curve the corners up for a gentle smile. -
Create eye sockets:
Press your thumbs or a large ball tool deeply into the sides of the head to create large, round sockets where the eyes will go. -
Construct the eyes:
Roll two balls of white clay and press them into the sockets. Add a smaller flattened circle of brown clay for the iris, and a tiny black pupil in the center. Add a microscopic dot of white for a highlight. -
Add the ridge:
Take tiny pinched triangles of pink or light red clay. Attach them in a row running down the back of the head, blending the bottom edges into the green skin. -
Texture the skin:
Take a rough sponge or a stiff-bristled brush and gently tap it all over the green clay surfaces. This gives the skin a realistic, porous dinosaur texture rather than a perfectly smooth finish. -
Freckle details:
Using a needle tool, poke tiny, shallow dots sporadically around the cheeks and head to simulate freckles or pores. -
Final drying:
Allow your dinosaur to dry completely in a safe, dry place away from direct sunlight to prevent cracking. This usually takes 24-48 hours depending on the clay thickness.
Making It Match
To get that specific muted green color from the photo, try mixing a tiny dot of brown or grey paint into your bright green clay before you start sculpting.
Now you have a prehistoric companion ready to guard your desk
Animal Planter Buddies: Tiny Heads on Mini Pots
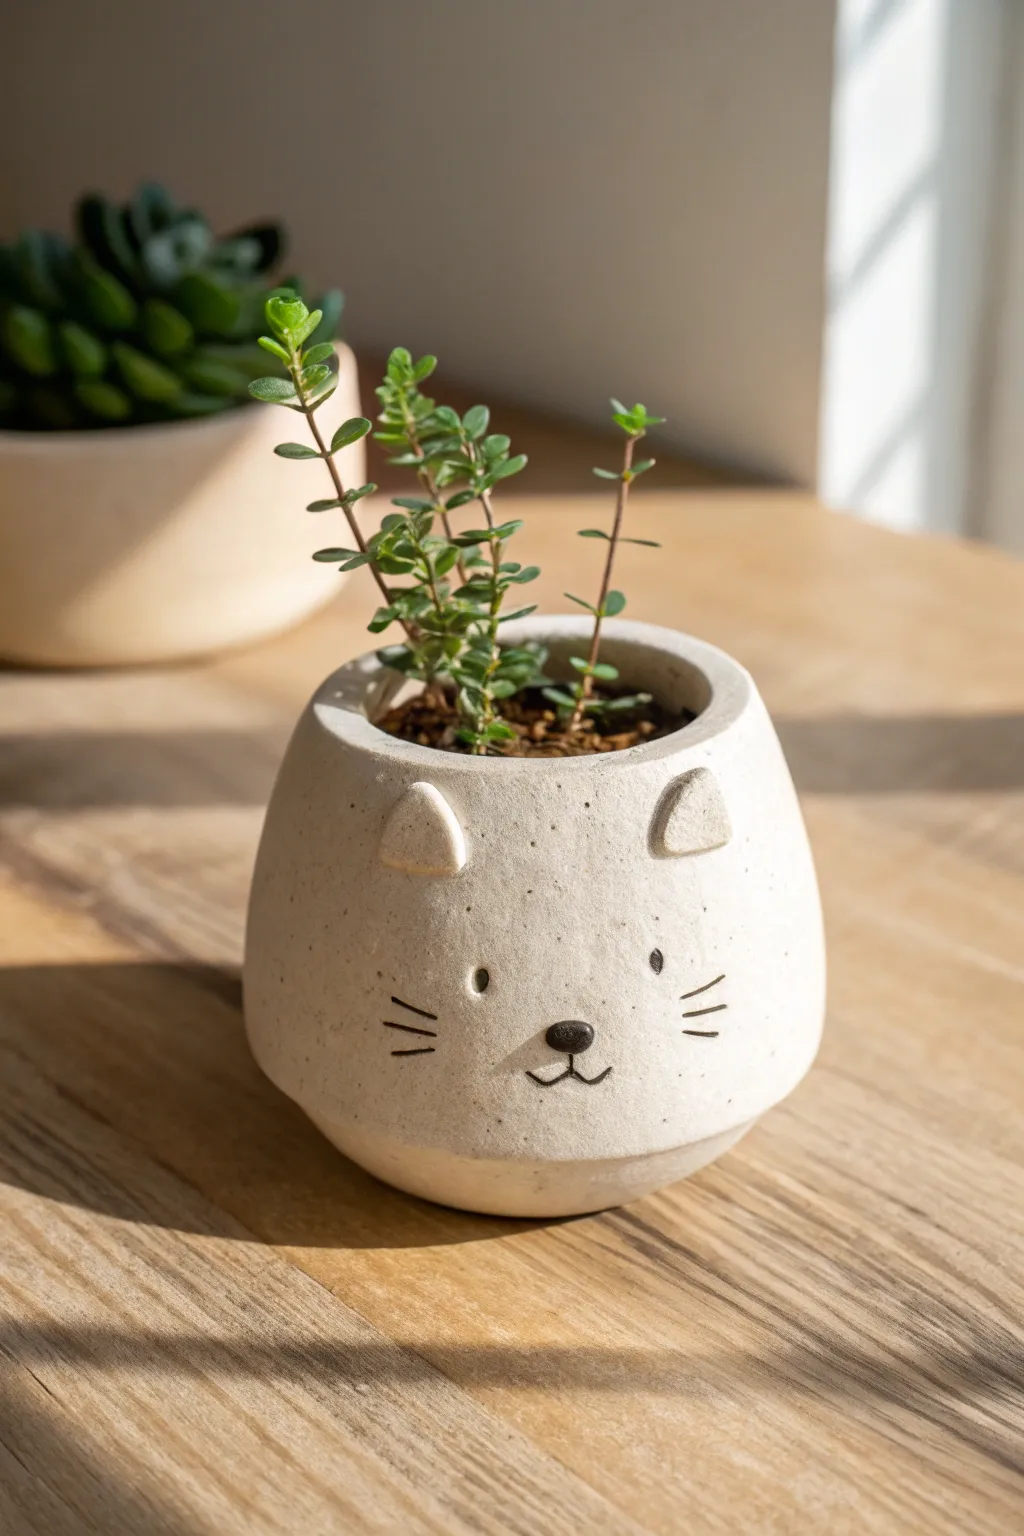
This adorable mini planter features a clean, minimalist cat face that adds whimsical charm to any succulent collection. The textured, speckled finish gives it a trendy ceramic look without the need for a kiln.
Detailed Instructions
Materials
- White air-dry clay (stone or granite effect preferred)
- Small rolling pin
- Circle cutter or bowl (approx. 4-inch diameter)
- Craft knife or clay tool
- Small bowl of water
- Fine-grit sandpaper
- Black acrylic paint
- Fine-point paintbrush
- Matte varnish or sealant
- Small succulent or air plant for finishing
Step 1: Shaping the Base
-
Prepare the clay:
Start with a ball of clay roughly the size of a tennis ball. Knead it until it’s pliable and smooth, removing any large air bubbles. -
Form the pinch pot:
Insert your thumb into the center of the ball and gently pinch the walls while rotating the clay in your hand. Aim for an even thickness of about 1/4 inch all around. -
Flatten the bottom:
Gently tap the bottom of your pinch pot against your work surface to create a flat, stable base so it won’t wobble. -
Shape the walls:
Smooth the walls upward, tapering them slightly inward at the top to create that cozy, rounded shape shown in the photo. Use a little water on your fingers to smooth out any distinct fingerprints. -
Refine the rim:
Run a wet finger along the top rim to ensure it is smooth and even. It doesn’t need to be perfect; a little organic irregularity adds character.
Step 2: Adding Character
-
Form the ears:
Roll two small, pea-sized balls of clay. Flatten them slightly into triangles to serve as the cat’s ears. -
Attach the ears:
Score the bottom of the ears and the spot on the rim where you want them to sit. Apply a drop of water (slip) and press them firmly onto the rim. -
Blend the seams:
Using a clay tool or your finger, blend the clay at the base of the ears downwards into the pot body so they look seamless and integrated. -
Create the nose nub:
Roll a tiny, lentil-sized piece of clay. Attach this to the front center of the pot to create a slightly raised 3D nose. -
Optional texture:
If you aren’t using speckled clay, you can flick a stiff toothbrush with diluted brown paint over the wet clay now to simulate that granite texture. -
Dry partially:
Allow the pot to sit for about 24-48 hours until it is completely dry and hard to the touch throughout.
Smooth Surface Secret
Keep a small sponge damp with water nearby. Lightly sponging the clay before it dries removes fingerprints better than smoothing by hand.
Step 3: Finishing Touches
-
Sand for smoothness:
Once fully dry, gently sand any rough spots or sharp edges on the rim using fine-grit sandpaper. Wipe away the dust with a slightly damp cloth. -
Seal the inside:
To protect the clay from moisture, apply a generous coat of waterproof sealer or varnish to the inside of the pot. I like to do two coats here just to be safe. -
Paint the face features:
Using a fine paintbrush and black acrylic paint, carefully paint two small vertical ovals for eyes and thin whiskers on either side. -
Detail the mouth:
Paint the raised nose nub black, and draw a dainty ‘w’ shape beneath it for the mouth. -
Final seal:
Apply a matte varnish over the entire outside of the pot to protect your paint job and give the piece a finished, professional look. -
Plant:
Once dry, add a small layer of gravel for drainage, then potting soil, and tuck your tiny plant into its new home.
Make It a Fox
Swap the ear shape for taller triangles and paint the clay with burnt orange acrylics to turn this kitty into a woodland fox friend.
Now your little green friend has the perfect companion to sit on your windowsill
Animal Trinket Dishes Shaped Like Faces and Ears
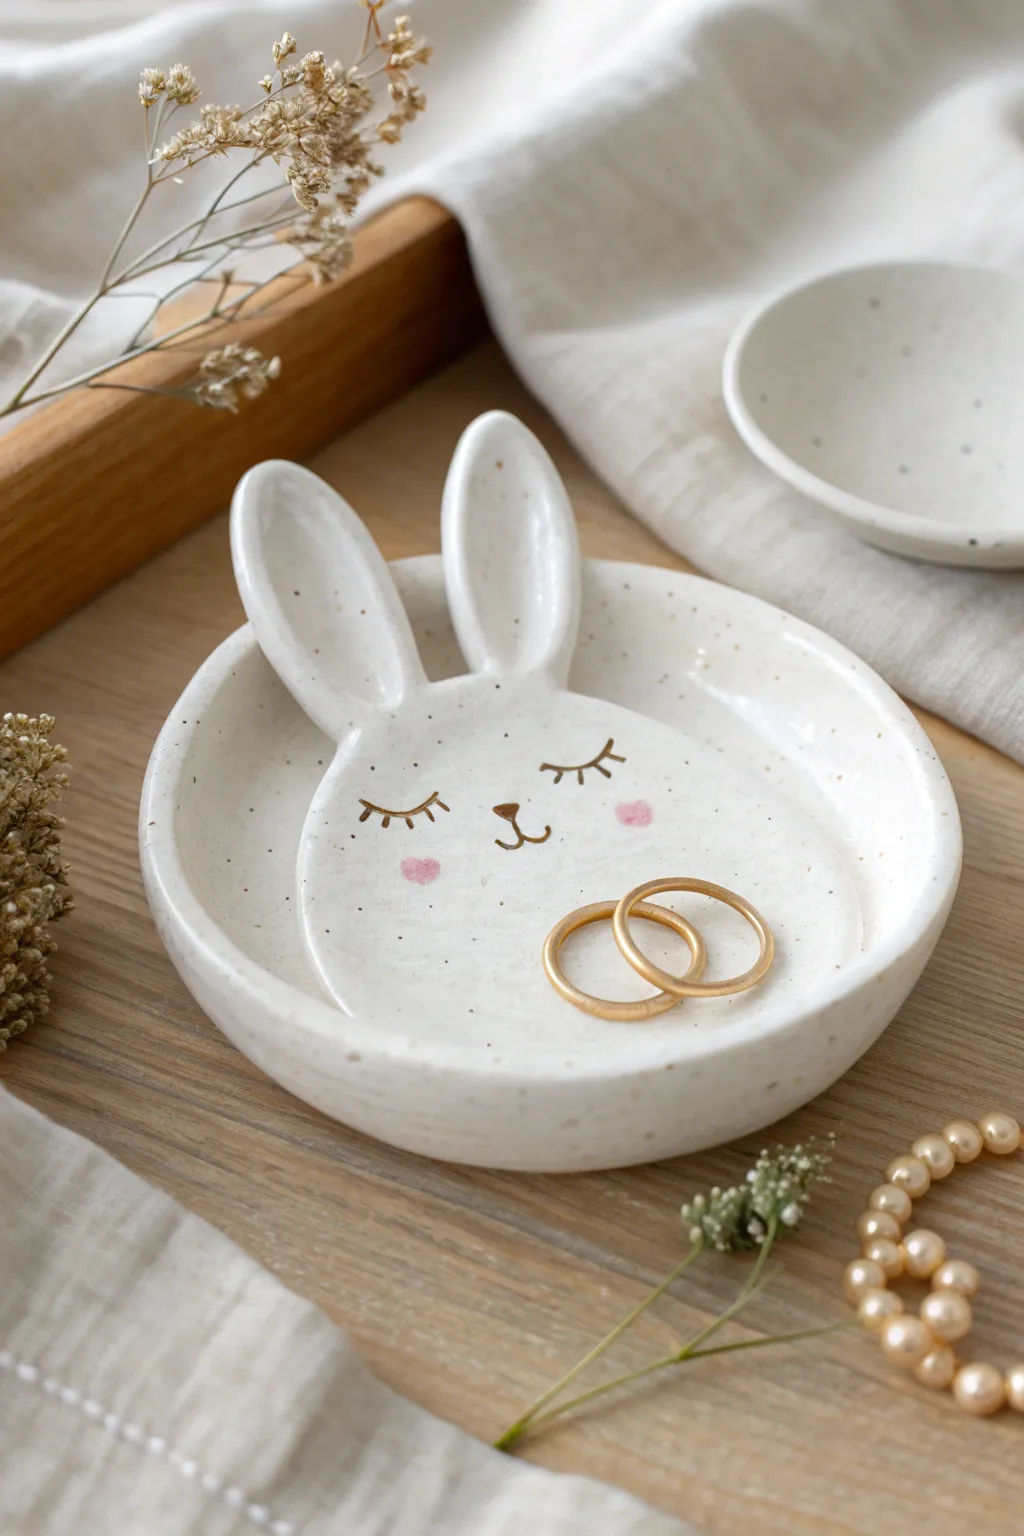
Capture the sweetness of a sleepy bunny in this charming trinket dish project. With its upturned ears and delicate speckled finish, this piece is perfect for holding your favorite rings or simply brightening up a bedside table.
How-To Guide
Materials
- White air dry clay
- Rolling pin
- Needle tool or craft knife
- Bowl of water
- Small sponge
- Acrylic paints (gold, pink, black/dark brown)
- Fine detail paintbrush
- Brown shade acrylic paint or brown ink (for speckling)
- Old toothbrush
- Medium-grit sandpaper
- Gloss varnish or clear sealant
Step 1: Shaping the Base
-
Prepare the clay:
Begin by conditioning a handful of white air dry clay until it is smooth and pliable. If the clay feels too stiff, add a tiny drop of water to help soften it up. -
Roll the slab:
Roll the clay out onto a flat surface to an even thickness of about 1/4 inch. Lift and rotate the clay occasionally so it doesn’t stick to your work surface. -
Cut the circle:
Find a circular template, like a large mug or small bowl (approx. 4 inches diameter), place it on the clay, and trace around it with a needle tool to cut out your base circle. -
Create the rim:
Roll a long, thin snake of clay. Score the outer edge of your circle base and the underside of the snake, apply a little water as slip, and press the coil onto the rim of the base. -
Blend the edges:
Using your thumb or a modeling tool, smooth the coil downwards into the base on both the inside and outside until the seam disappears completely.
Supporting the Ears
While drying, place something behind the ears (like a crumpled paper towel or small paint bottle) to prop them up so they don’t droop backward while the clay is wet.
Step 2: Adding the Bunny Ears
-
Cut ear shapes:
Roll out a small separate piece of clay and freehand cut two long, oval ear shapes. They should be slightly wider at the bottom where they will attach to the dish. -
Shape the ears:
Gently press your thumb into the center of each ear to give them a concave, curved look, exactly like a real rabbit’s ear. -
Attach to the dish:
Score the top rim of your bowl where the ears will go. Score the bottom of the ears. Using plenty of slip (water/clay mix), press the ears onto the inner rim. -
Secure the bond:
This is crucial: smooth the clay from the base of the ear down into the dish extensively so they become one solid unit. I like to add a tiny extra coil of clay behind the ears for support. -
Smooth everything:
Dip your sponge in water and run it over the entire piece—rim, ears, and basin—to remove fingerprints and soften any sharp edges.
Make it Luxe
After the sealant dries, paint the very top rim of the dish and the tips of the ears with metallic gold leaf paint for an elegant, high-end ceramic look.
Step 3: Finishing and Decoration
-
Let it dry:
Allow the dish to dry completely for at least 24-48 hours. Turn it over halfway through the process to ensure the bottom dries evenly. -
Sand for smoothness:
Once bone dry, use medium-grit sandpaper to gently buff away any bumps or rough spots on the rim and edges. Wipe away the dust with a damp cloth. -
Create the speckles:
Dilute a small amount of brown paint or ink with water. Dip an old toothbrush into the mix and flick the bristles with your thumb to spray fine speckles over the entire white dish. -
Paint the face:
Using a very fine detail brush and gold or dark brown paint, carefully draw two curved lines with lashes for sleepy eyes and a small ‘Y’ shape for the nose and mouth. -
Add rosy cheeks:
Dip a fingertip or a round sponge dauber into pink paint. Blot most of it off on a paper towel, then gently dab two soft pink circles onto the bunny’s cheeks. -
Seal the piece:
Protect your hard work by applying two coats of high-gloss varnish. This mimics the look of the ceramic glaze in the photo and makes the dish durable.
Now you have a sweet little guardian for your jewelry collection
Mini Animal Dioramas: A Little Scene With One Star Critter
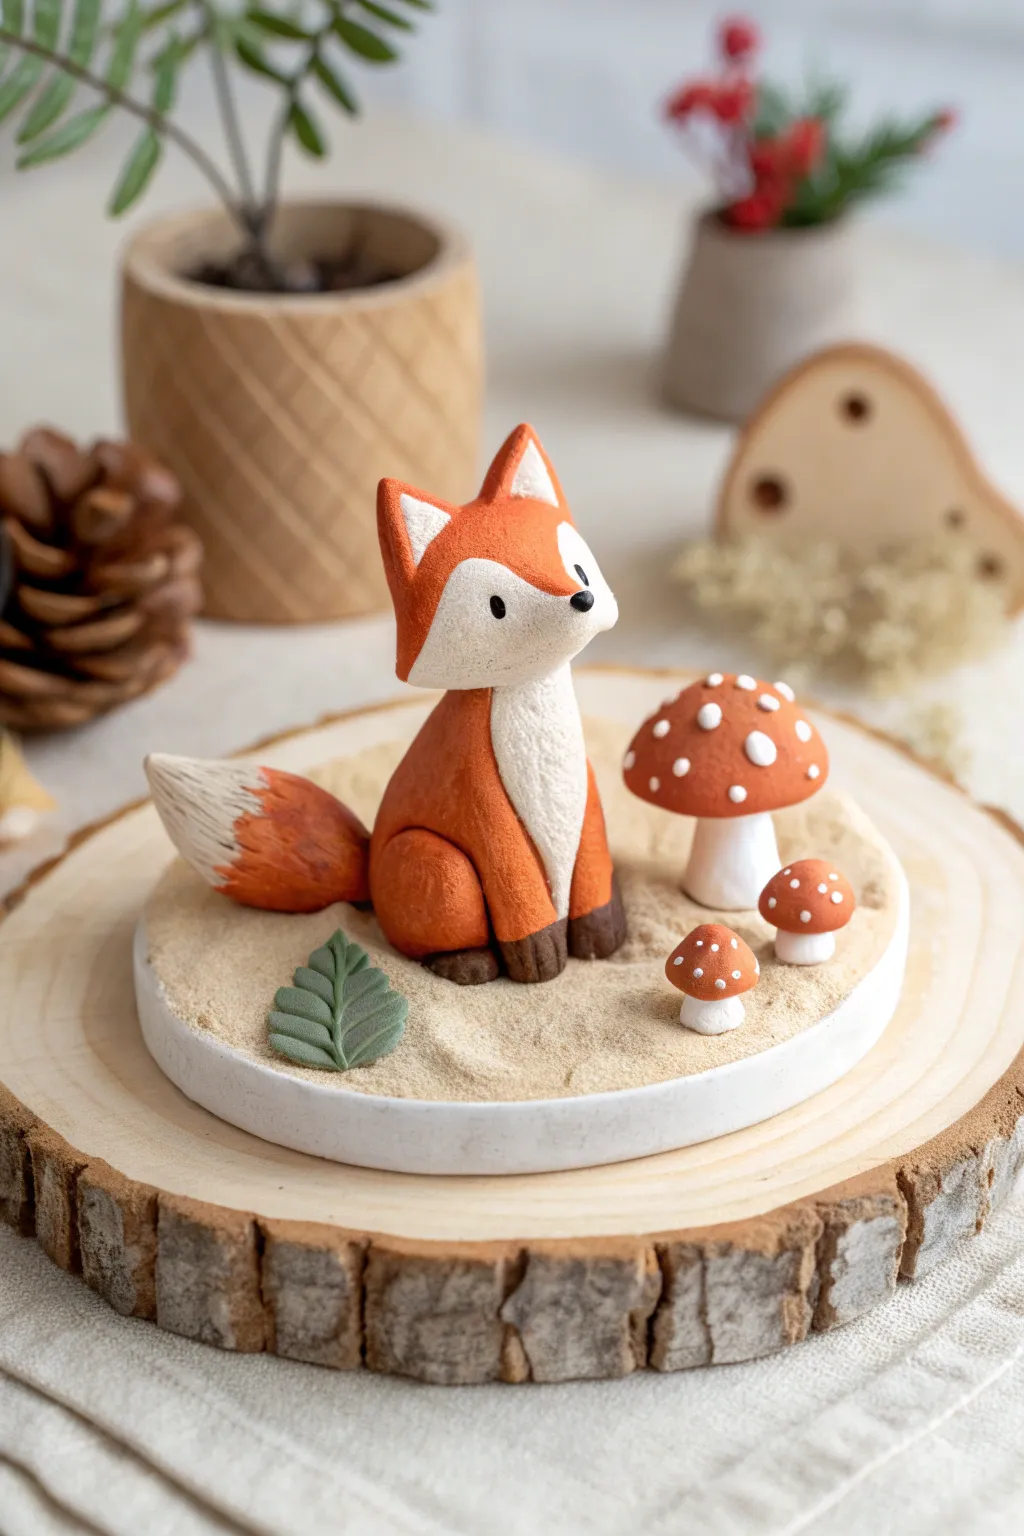
Capture the magic of an autumn forest with this charming miniature scene featuring an inquisitive fox and trio of spotted mushrooms. Mounted on a textured sandy base, this self-contained diorama makes a perfect desk companion or shelf accent.
Step-by-Step
Materials
- Air dry clay (white or terracotta)
- Acrylic paints (orange, white, dark brown, green, red)
- Small round wooden slice or coaster (for the base)
- Fine craft sand or beige texture paste
- Craft glue or PVA glue
- Modeling tools (or toothpicks and a dull knife)
- Detail paintbrushes
- Aluminum foil (optional, for armature)
- Clear matte varnish spray
Step 1: Sculpting the Fox
-
Form the body:
Start with a golf-ball-sized lump of clay. Roll it into a smooth teardrop shape, flattening the bottom slightly so it sits upright. This will be the main body of the fox. -
Shape the head:
Roll a slightly smaller ball for the head. Pinch one side gently to create a pointed snout, giving it a soft, triangular silhouette. I find it helpful to constantly check the profile to ensure the snout isn’t too long. -
Add the ears:
Shape two small triangles for ears. Attach them to the top of the head using a tiny bit of water and a smoothing tool to blend the seams completely so they look like one piece. -
Attach head to body:
Score the top of the body and the bottom of the head (scratch hatch marks) and add a drop of water. Press the head onto the body, tilting it slightly upward for that curious look. -
Create the tail:
Roll a thick snake of clay, tapering it at both ends. Attach one end to the back of the body, wrapping it around the side so the bushy tip rests near the front paws. -
Add limbs:
Roll two small sausage shapes for the front legs and two larger, flattened ovals for the haunches. Attach the haunches to the sides and the legs to the front, blending all seams smooth.
Smoother Surfaces
Before drying, dip your finger in water and gently rub the clay to erase fingerprints. For a truly matte, plush look, sand the dried clay lightly before painting.
Step 2: Crafting the Accessories
-
Sculpt mushrooms:
Create three different sizes of mushrooms. Roll white stems first, then create red caps by rolling balls and flattening the underside. Join them with a dab of water. -
Make the leaf:
Flatten a tiny piece of clay into an oval. Pinch the ends to make points and use a needle tool or knife to score a central vein and diagonal details. -
Drying time:
Set the fox, mushrooms, and leaf aside to dry completely. Depending on your humidity and clay brand, this usually takes 24-48 hours. Turn them occasionally for even drying.
Step 3: Painting and Assembly
-
Base coat the fox:
Once dry, paint the main body, head, tail, and outer ears with a warm, rusty orange acrylic paint. Leave the chest, inner ears, and tail tip unpainted or paint them white. -
Detail the fur:
Paint the chest area, snout, inner ears, and tail tip with creamy white paint. Use a small brush to create a jagged, fur-like transition line where the white meets the orange. -
Add facial features:
Using your smallest brush or a dotting tool, paint the nose tip and two small eyes in black. Add tiny dark brown paws at the bottom of the legs. -
Paint the accessories:
Paint the mushroom caps a deep red and the leaf a muted sage green. Once the red is dry, careful add tiny white dots to the mushroom caps. -
Prepare the base:
Take your wooden coaster or round base. Spread a generous layer of craft glue over the top surface. -
Add texture:
Sprinkle fine craft sand over the wet glue, pressing it down lightly. Shake off the excess. Alternatively, spread a beige texture paste for a sand-like effect. -
Final assembly:
Glue the fox, mushrooms, and leaf onto the sandy base. Arrange them so the fox looks like it is gazing past the mushrooms.
Cracks Appearing?
If small cracks appear as the clay dries, mix a tiny amount of fresh clay with water to make a paste (slip) and fill the cracks. Smooth it over and let dry again.
Place your finished diorama on a windowsill or desk to bring a touch of woodland calm to your space