If you’re bored of the basic cylinder mug, you’re in the right place—I love when a mug feels like a tiny sculpture you can actually use. Here are my favorite cool clay mug ideas that turn simple forms into something playful, textured, and totally personal.
Classic Wheel-Thrown Mug With a Bold Dipped Glaze
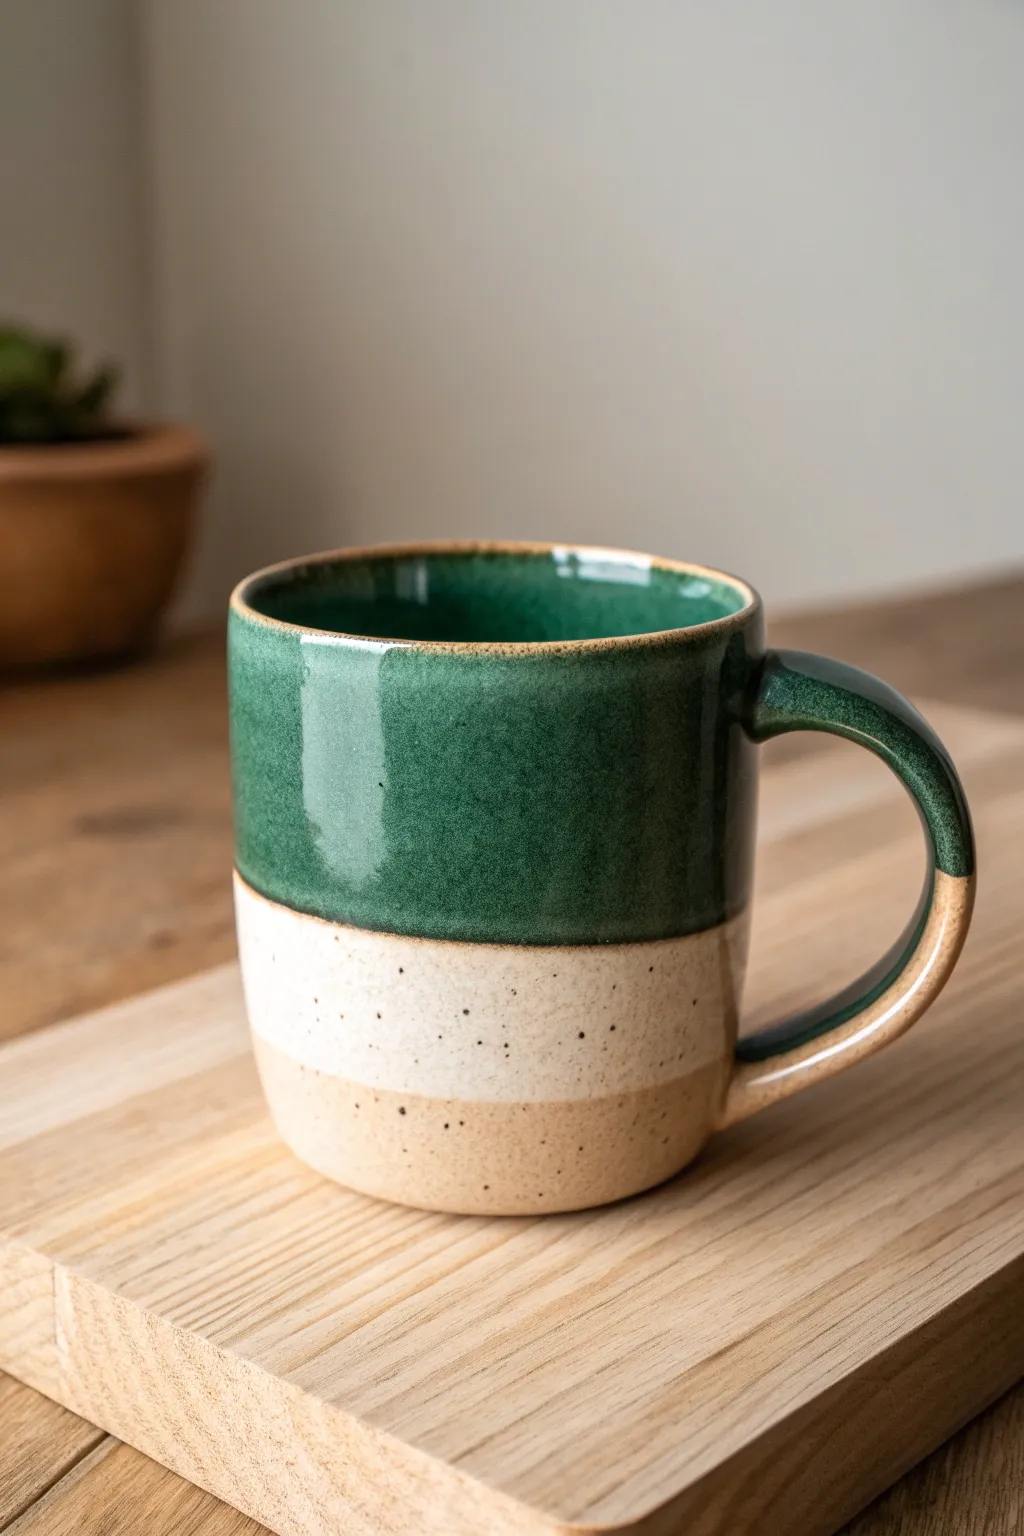
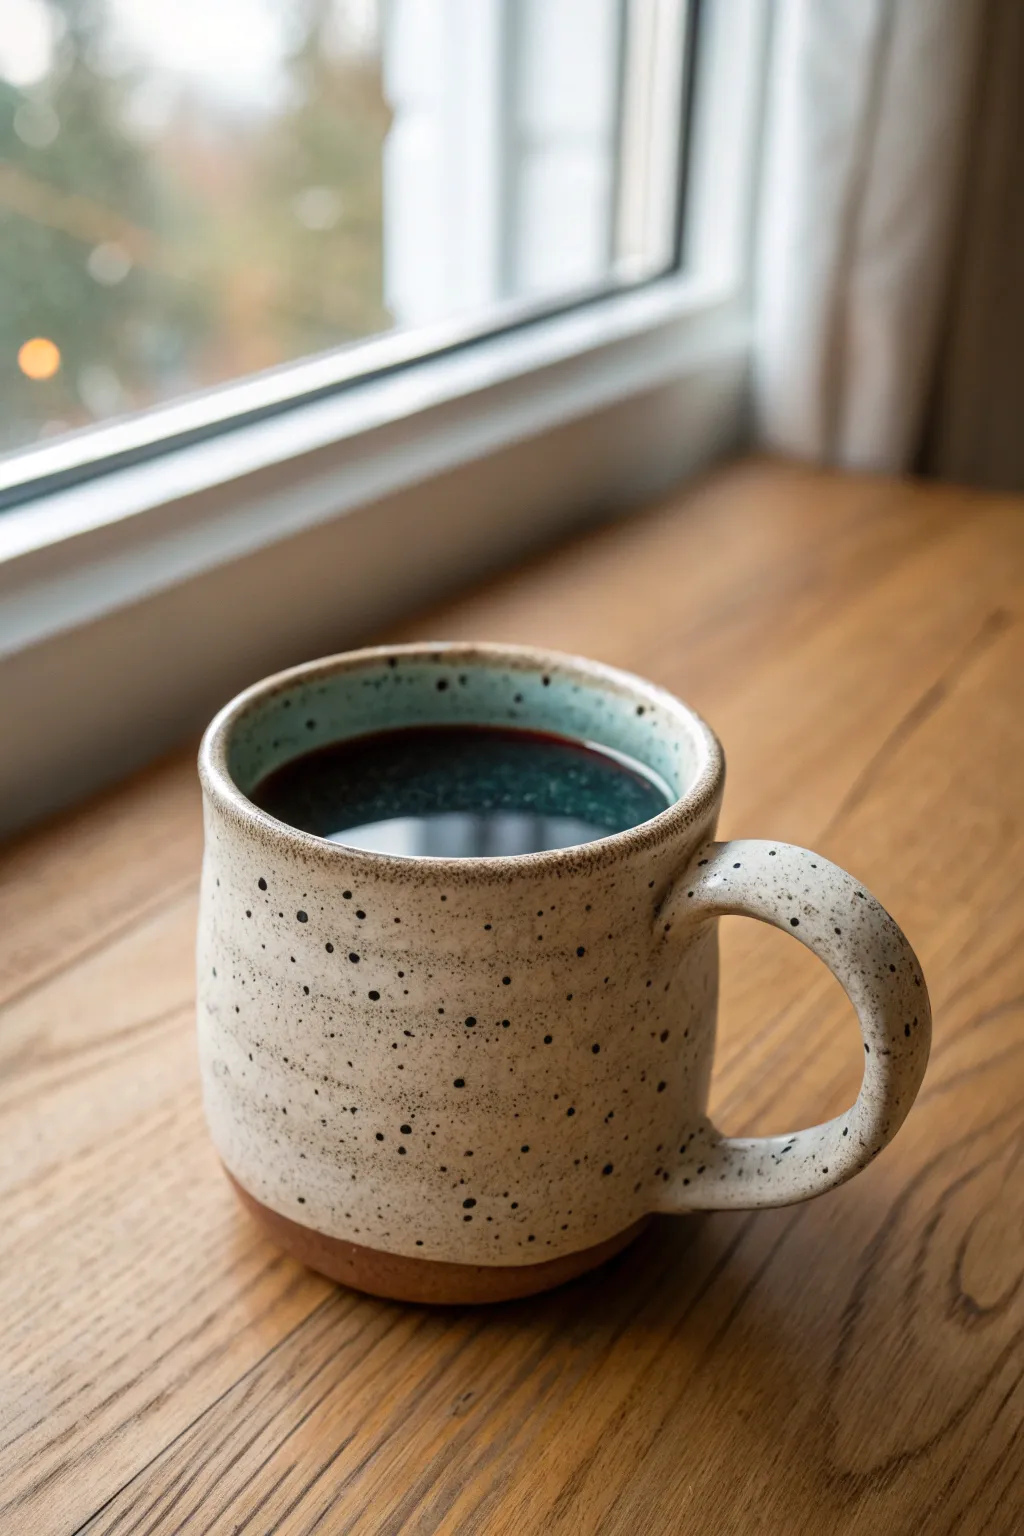
This classic wheel-thrown mug features a satisfyingly weighty base and a striking three-tone design that celebrates the raw beauty of clay. The deep forest green glaze drips elegantly over a creamy speckled band, leaving the natural stoneware exposed at the bottom for a lovely textural contrast.
How-To Guide
Materials
- Speckled stoneware clay (approx. 1 lb)
- Pottery wheel
- Throwing tools (sponge, needle tool, rib, wire cutter)
- Trimming tools
- Forest green dipping glaze
- Cream or white dipping glaze
- Wax resist and brush
- Kiln (bisque and glaze firing capabilities)
- Sponge for cleaning
Step 1: Throwing the Form
-
Prepare the Clay:
Begin by thoroughly wedging about one pound of speckled stoneware clay to remove air bubbles and ensure consistency. -
Center on the Wheel:
Slam the clay onto the bat and center it using water and firm pressure until it spins perfectly smooth without wobbling. -
Open the Form:
Drill your thumbs into the center to open the clay, leaving about a half-inch of thickness at the bottom for trimming later. -
Pull the Walls:
Pull the walls up into a straight cylinder. Aim for an even thickness from bottom to top, keeping the rim slightly compressed with a chamois or sponge. -
Shape the Belly:
Use a rib tool on the inside to gently push the walls outward, creating a subtle curve while maintaining vertical sides. -
Clean the Base:
Use an angled wooden tool to undercut the base slightly, removing excess clay and creating a guide for wire cutting. -
Cut and Dry:
Run a wire tool under the mug to separate it from the bat. I simply set it aside until it reaches a leather-hard state.
Uneven Glaze Lines?
If you struggle with straight dip lines, use masking tape or wax resist to define the boundaries before dipping. Remove tape immediately after dipping.
Step 2: Trimming and Handling
-
Trim the Foot:
Once leather hard, center the mug upside down on the wheel. Trim away excess weight from the bottom and carve a neat foot ring. -
Pull a Handle:
Pull a strap of clay using wet hands until it’s the desired thickness. Let it curve naturally and stiffen slightly on a board. -
Attach the Handle:
Score and slip both the attachment points on the mug and handle. Press firmly to join, smoothing the seams with a damp sponge or modeling tool. -
Bisque Fire:
Allow the mug to dry completely (bone dry) before loading it into the kiln for the bisque firing (usually cone 04).
Step 3: Glazing the Layers
-
Clean the Bisqueware:
Wipe the fired mug with a damp sponge to remove any dust that might resist the glaze. -
Wax the Bottom:
Apply wax resist to the bottom foot ring and up the side about 1.5 inches. This creates the ‘raw clay’ section and prevents glaze from running onto your kiln shelf. -
First Dip: Cream Base:
Hold the mug by the foot and dip it into the cream/white glaze, stopping just where the wax resist begins. Hold for 3 seconds and lift. Let this dry until chalky to the touch. -
Second Dip: Forest Green:
Hold the mug by the bottom again. Dip the top two-thirds into the forest green glaze. I like to lift it out slowly to encourage a smooth line. -
Handle Glazing:
Ensure the handle gets covered during the dipping process. You may need to pour glaze over the handle specifically if the dipping bucket is shallow. -
Clean Up:
Use a sponge to wipe away any rogue glaze droplets sitting on the wax resist area at the bottom. -
Glaze Fire:
Load the mug into the kiln for the final glaze firing (typically cone 5 or 6, depending on your clay and glaze specs).
Texture Twist
Before the first firing, gently press a piece of burlap or linen into the wet clay surface. The glaze will break beautifully over the texture.
Enjoy your morning coffee in a mug that feels grounded and earthy


Handbuilt Slab Mug With Crisp Modern Angles
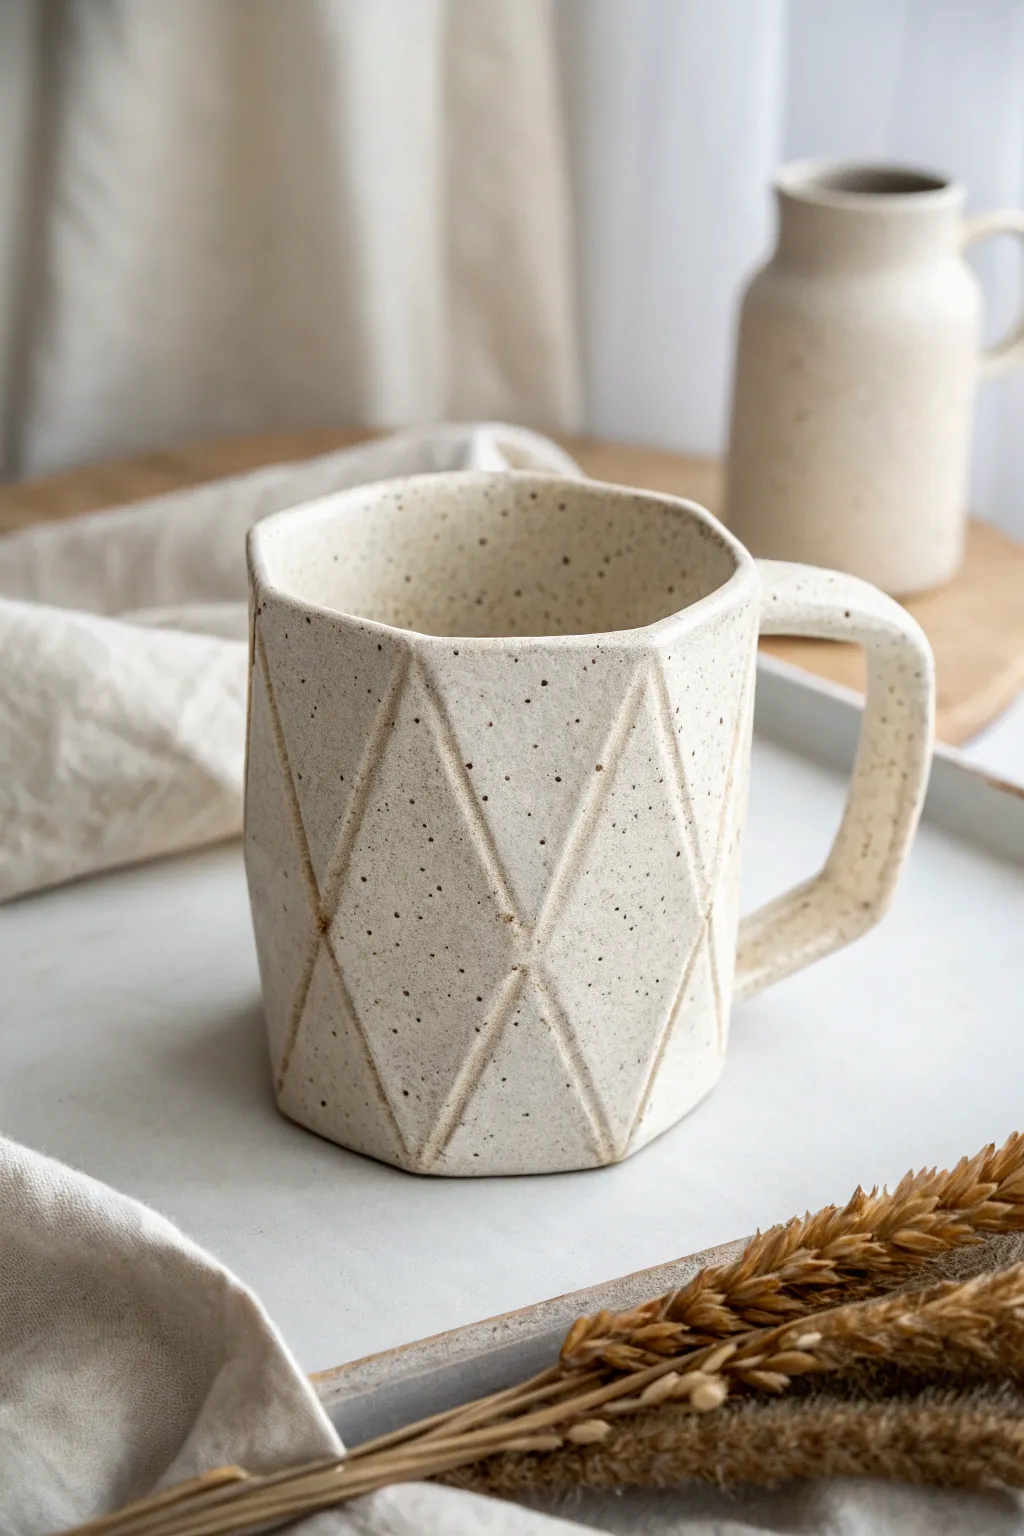
This project combines crisp, modern geometry with the organic warmth of speckled clay for a striking handbuilt piece. The interlocking diamond pattern creates a unique tactile experience, making it a joy to hold while sipping your morning coffee.
Step-by-Step
Materials
- Speckled stoneware clay (mid-fire)
- Slab roller or heavy rolling pin and canvas
- Fettling knife
- Paper template (diamond grid)
- Ruler
- Scoring tool or serrated rib
- Slip (clay slurry)
- Sponge
- Wooden modeling tool
- Matte white or clear glaze
Step 1: Designing the Template
-
Map out the geometry:
Before touching clay, sketch a long rectangle on paper that will become the wall of your mug. Divide this rectangle into a series of triangles that form diamonds to create the faceted look seen in the photo. -
Cut the template:
Cut out your paper template, ensuring the total length equals the desired circumference of your mug plus a small overlap for joining.
Slumping Walls?
If the facets collapse while you build, the clay is too wet. Let the slab stiffen to a firm leather-hard state before folding the angles.
Step 2: Forming the Body
-
Roll the slab:
Roll out a slab of speckled stoneware clay to a uniform 1/4 inch thickness on a piece of canvas to prevent sticking. -
Cut the shape:
Place your paper template onto the slab and carefully cut around the perimeter using a fettling knife. Don’t discard the scraps; you’ll need them for the base and handle. -
Define the facets:
Using the back of your knife or a dull modeling tool, gently press lines into the clay following the internal triangle/diamond pattern on your template. You want to compress the clay to create creases, not cut through it. -
Fold the angles:
Once the clay is leather hard (stiff but flexible), gently fold along your impressed lines. This pushes the ‘peaks’ of the diamonds outward and the valleys inward, establishing the sculptural relief. -
Join the cylinder:
Score the two short vertical ends of your slab aggressively. Apply slip, overlap the edges slightly, and press them firmly together to form a tube. Smooth the seam inside and out.
Sharpen the Angles
After the mug is built, use a metal rib or paddle to gently tap the flat planes. This sharpens the geometry and makes the ‘peaks’ crisper.
Step 3: Adding Base and Handle
-
Attach the bottom:
Place your faceted tube onto a fresh piece of rolled slab. Trace around the bottom, cut slightly outside that line, score and slip the contact points, and press the tube onto the base. -
Trim the excess:
Once joined securely, trim the excess clay from the base slab so it aligns perfectly with the faceted walls. -
Craft the handle:
Cut a strip of clay for the handle. To match the mug’s aesthetic, square off the edges rather than rounding them. Roughly shape it into a geometric ‘ear’ shape. -
Attach the handle:
Score and slip the attachment points on both the mug and the handle. Press the handle firmly onto the mug body, ensuring it’s straight. -
Refine the rim:
The rim in the reference is slightly rounded for drinking comfort despite the angular body. Run a damp sponge or a chamois cloth over the top edge to soften it.
Step 4: Finishing Touches
-
Smooth and sponge:
I always like to give the piece a final wipe-down with a barely damp sponge to remove any sharp burrs or clay crumbs, paying attention to the creases. -
Bisque fire:
Allow the mug to dry slowly under plastic to prevent warping, then bisque fire it according to your clay body’s instructions. -
Glaze application:
Dip or brush on a matte white or semi-transparent glaze. A thinner application works best here to emphasize the speckles and ensure the glaze doesn’t pool too thickly in the geometric recesses. -
Final firing:
Glaze fire the piece to the temperature recommended for your stoneware clay.
Enjoy using your new architectural mug knowing you built every angle by hand.


Cozy Pinch Mug With Thumbprint Texture
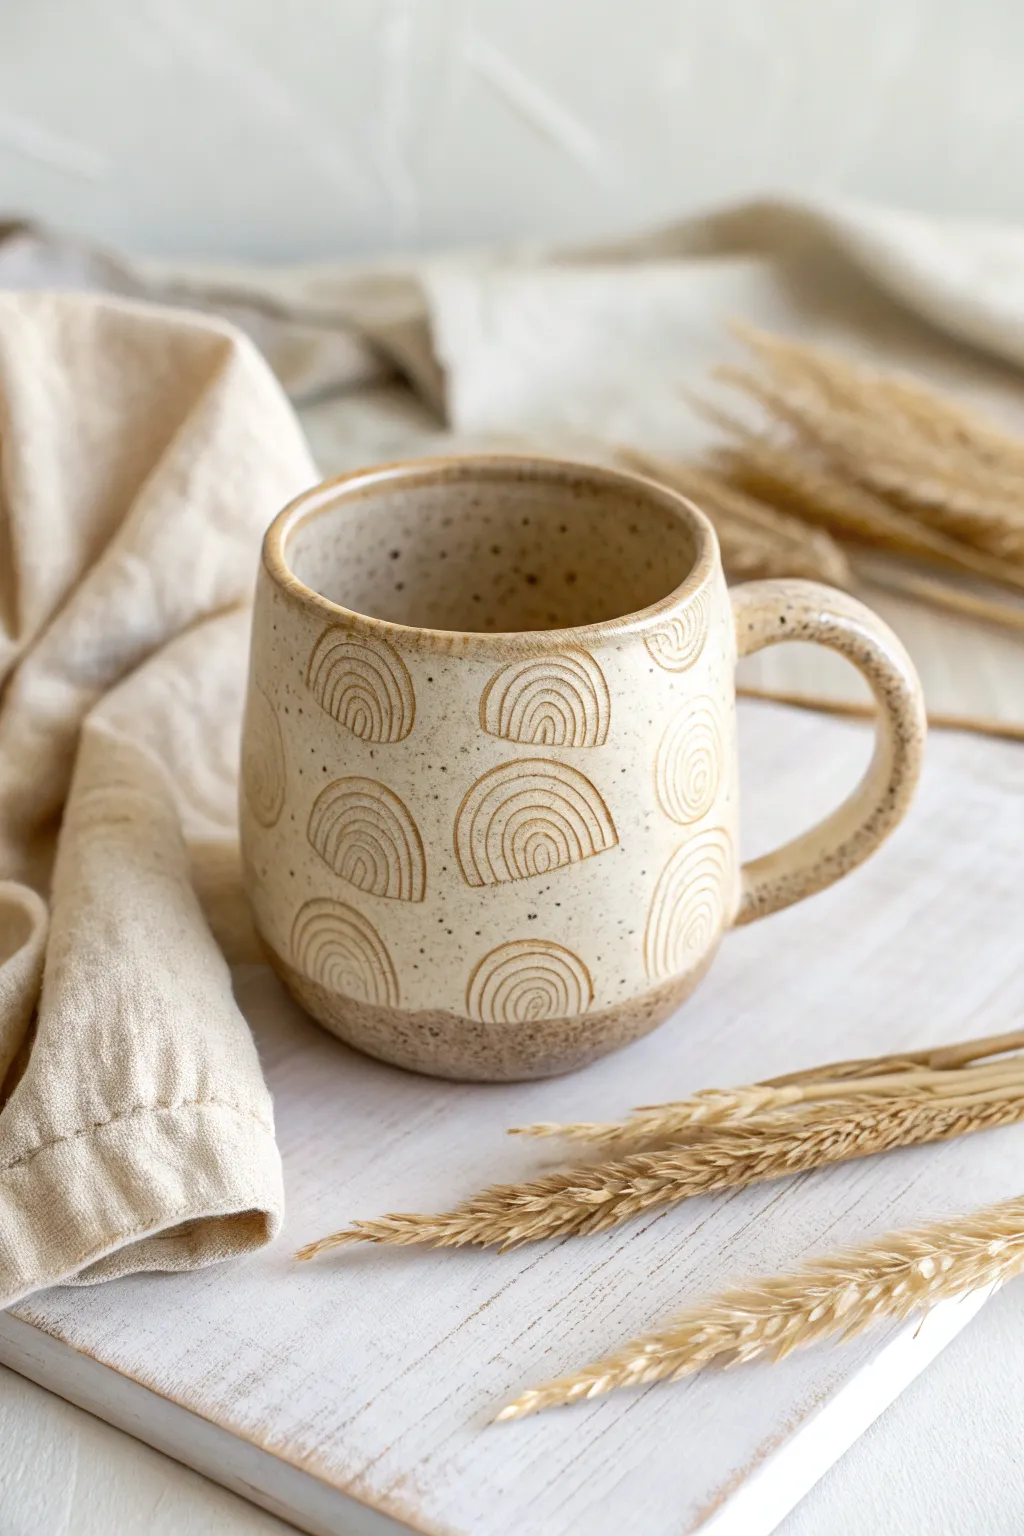
This rustic, speckled stoneware mug features a repetitive carved rainbow motif that adds tactile charm to your morning coffee routine. With its earthy glaze and unglazed raw clay base, it strikes a beautiful balance between modern design and organic warmth.
Detailed Instructions
Materials
- Speckled stoneware clay (mid-fire recommended)
- Pottery wheel (or hand-building tools if pinching)
- Loop carving tool (small U-shape)
- Sponge
- Wire cutter
- Rib tool (wooden and metal)
- Needle tool
- Scoring tool (serrated rib)
- Slip (clay and water mixture)
- Clear or semi-transparent matte white glaze
- Kiln
Step 1: Forming the Body
-
Prepare the Clay:
Begin by thoroughly wedging about 1 to 1.5 pounds of speckled stoneware clay to remove air bubbles and ensure consistency. -
Center and Open:
Throw the clay onto the wheel head and center it. Open the clay to create the floor, aiming for a flat bottom rather than a curve to match the straight-sided aesthetic. -
Pull the Walls:
Pull the walls up to create a cylinder. Aim for a slightly tapered shape that is wider at the bottom and gathers in just slightly at the rim to keep warmth in. -
Refine the Shape:
Use a metal rib on the exterior to smooth the surface and remove throwing lines. This creates a clean canvas for your carving later. Make sure the rim is rounded and comfortable for drinking. -
Trim the Base:
Undercut the base slightly with a wooden knife tool to create a defined shadow line where the mug meets the table. -
Dry to Leather Hard:
Cut the mug from the bat with a wire tool and set it aside. Wait until the clay reaches a firm leather-hard stage—it should be stiff enough to hold its shape but soft enough to carve without chipping.
Burr Removal Tip
Wait until the mug is bone dry, then lightly rub the carved area with a green scouring pad. This knocks off sharp clay burrs without smudging the design.
Step 2: Adding the Handle
-
Pull a Handle:
Pull a strap of clay for the handle. For this cozy look, aim for a medium thickness that feels substantial in the hand. -
Shape the Curve:
Curve the pulled strap into a ‘C’ shape and let it stiffen slightly on a ware board until it can support its own weight. -
Attach the Handle:
Score the attachment points on both the mug body and the handle ends. Apply slip, press firmly to attach, and smooth the seams with a small tool or your finger to ensure a strong bond.
Glaze Consistency
If your carved lines disappear, your glaze is too thick. Thin it slightly with water so it pools in the recesses but breaks away from the high points.
Step 3: Carving the Texture
-
Plan the Pattern:
Visualize the placement of your rainbows. You can lightly mark the center of each arch with a needle tool to ensure even spacing around the circumference. -
Carve the Arches:
Using a small, U-shaped loop tool, carve the first arch. Start from the bottom of the shape and curve up and over. The key is consistent pressure for even line depth. -
Layer the Lines:
Carve concentric arches inside your first line. I find it easier to work from the largest outer arch inward to the smallest center arch to keep the spacing uniform. -
Stagger the Rows:
Create a second row of rainbow arches above the first, staggering them so they sit in the gaps between the lower arches. -
Clean Up:
Once carved, use a soft brush or your finger to gently brush away the clay crumbs (burrs). Don’t use a sponge yet, or you’ll wash out the crisp details.
Step 4: Finishing and Glazing
-
Bisque Fire:
Allow the mug to dry completely to the bone-dry stage. Load it into the kiln for a bisque firing (usually to cone 04). -
Wax the Base:
Apply wax resist to the bottom inch of the mug’s exterior. This will create the raw clay ‘dipped’ effect seen in the photo. -
Glaze Application:
Dip the mug into a semi-transparent or matte white glaze. The glaze should cover the interior and the exterior down to the wax line. -
Reveal the Texture:
Because the glaze allows the speckles to show through and breaks over the carved edges, the rainbow texture will be subtly highlighted after firing. -
Glaze Fire:
Fire the mug to maturity (typically cone 5 or 6 for stoneware). Let the kiln cool completely before unloading.
Enjoy sipping from your handcrafted mug, knowing the texture is as unique as your morning brew


Speckled Clay Mug With a Smooth Glossy Interior
This project features a charming, handmade mug that balances rustic warmth with contemporary polish. The combination of gritty, speckled stoneware and a glossy teal interior creates a stunning contrast perfect for your morning brew.
Step-by-Step Tutorial
Materials
- Speckled buff stoneware clay (or white clay with groaned specks)
- Pottery wheel
- Throwing tools (sponge, needle tool, rib, wire cutter)
- Trimming tools
- Creamy white matte glaze (speckle-enhancing)
- Glossy teal or seafoam green glaze
- Small glaze brushes
- Wax resist
- Kiln
Step 1: Throwing the Form
-
Prepare the Clay:
Begin by wedging about 1 to 1.5 pounds of speckled buff clay. Wedging is crucial to remove air bubbles and align the clay particles, ensuring a smooth throwing experience. -
Center on the Wheel:
Throw the clay onto the wheel head and center it. Apply steady pressure with water until the mound is perfectly symmetrical and runs smooth against your hands. -
Open the Clay:
Press your thumbs into the center of the mound to open it, leaving about a quarter-inch of clay at the bottom for the base. Pull the floor outward to establish the width of your mug. -
Initial Pulls:
Slowly pull the walls upward. For this specific shape, you want a wider base that gently tapers inward toward the rim. Aim for an even thickness throughout the wall. -
Shaping the Belly:
Use a kidney rib on the inside to push the belly out slightly near the bottom, while keeping the top third straighter. This gives it that cozy, huggable shape. -
Refining the Rim:
Compress the rim with a chamois or sponge. A slightly thickened, rounded rim feels better on the lips and resists chipping. -
Removing from Wheel:
Wire cut the mug from the bat and carefully set it aside on a ware board. Let it dry to a leather-hard state.
Sticky Handle?
If your handle creates a crack where it joins the body during drying, your slip might be too dry. Wrap the joint in thin plastic for a day to equalize moisture.
Step 2: Trimming and Handling
-
Trimming the Foot:
Once leather hard, center the mug upside down on the wheel. Trim away excess weight from the bottom, creating a distinct foot ring. I like to leave the clay slightly rough here to highlight the raw texture later. -
Pull the Handle:
Using a separate lump of clay and plenty of water, pull a thick strap handle. Ensure it has a good curve that will accommodate two or three fingers. -
Attach the Handle:
Score and slip the attachment points on both the mug and the handle. Press the handle firmly onto the mug body, blending the seams totally smooth. -
Shape Check:
Adjust the curve of the handle so it mimics the ear-like C-shape seen in the photo. Make sure it’s aligned vertically. -
Bisque Fire:
Allow the mug to dry completely (bone dry). Load it into the kiln for a bisque firing to Cone 04 (or your clay body’s specifications).
Glaze Tip: Iron Specks
To get those lovely dark spots, use a clay body with iron pyrite or manganese speckles. As the clay fires, these minerals will bleed through your white glaze.
Step 3: Glazing
-
Wax the Foot:
Apply wax resist to the bottom half-inch of the exterior and the entire underside. This creates the visual break where the raw terracotta-colored clay meets the glaze. -
Interior Glaze:
Pour the glossy teal glaze inside the mug. Swirl it around to coat the entire interior surface evenly, then pour out the excess quickly. -
Clean the Rim:
Wipe away any teal drips that may have landed on the exterior rim to ensure a clean transition. -
Exterior Glaze:
Dip the exterior of the mug into the creamy white matte glaze. Hold it by the foot or use dipping tongs. The glaze should stop naturally where you applied the wax resist. -
Wipe the Foot:
Even with wax, small beads of glaze can stick. Use a damp sponge to wipe the unglazed foot ring completely clean. -
Glaze Firing:
Fire the mug again, this time to the maturity temperature of your clay and glazes (typically Cone 5 or 6 for stoneware). -
Final Sanding:
Once cool, use a diamond sanding pad or high-grit sandpaper to smooth the unglazed foot ring so it won’t scratch your table.
Now brew your favorite coffee and enjoy the warmth of your handmade creation

The Complete Guide to Pottery Troubleshooting
Uncover the most common ceramic mistakes—from cracking clay to failed glazes—and learn how to fix them fast.
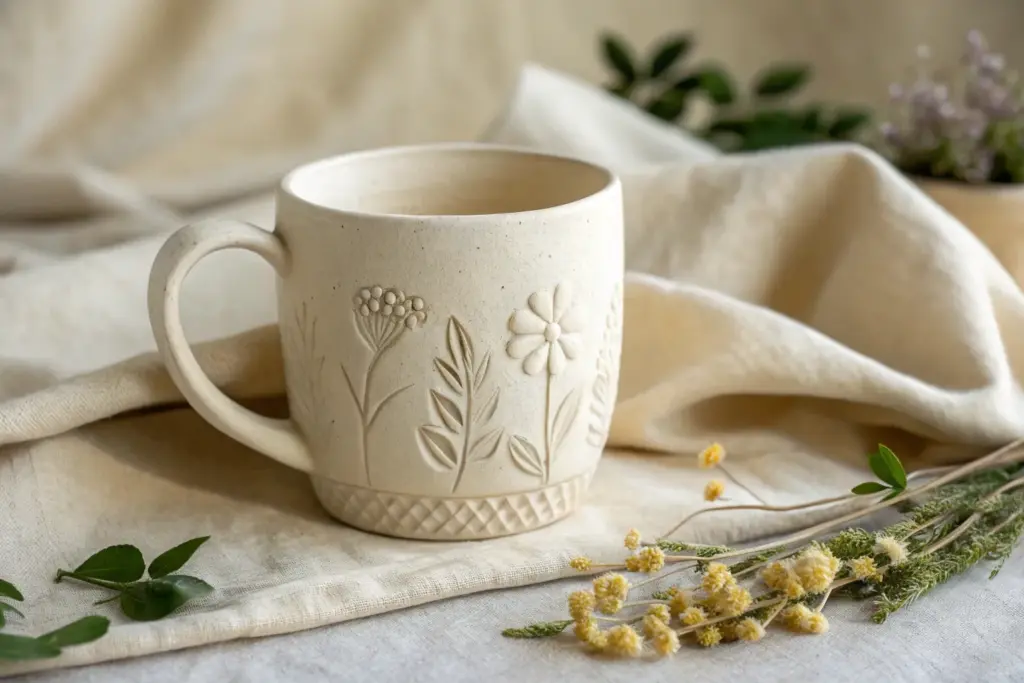
Sgraffito Carved Mug With Simple Line Art
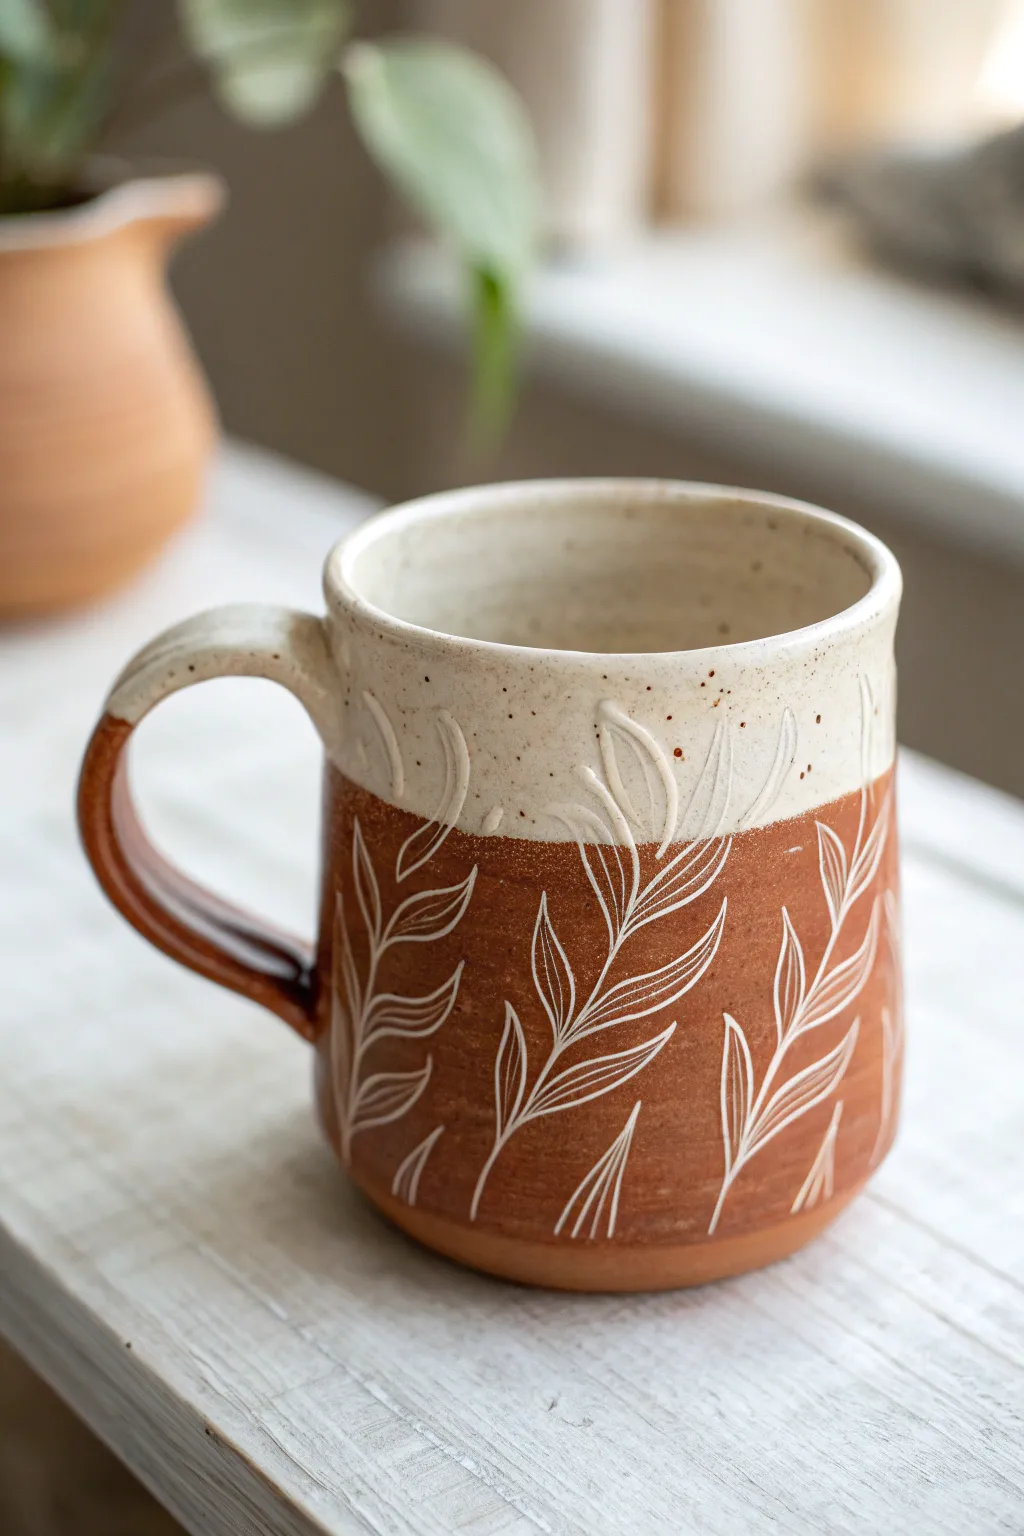
This rustic yet elegant mug combines the raw warmth of exposed terracotta with a smooth, speckled cream glaze. The highlight is the delicate sgraffito botanical design, where white lines are carved through the clay body to create stunning contrast.
Step-by-Step
Materials
- Stoneware clay (terracotta or red body recommended)
- White underglaze or white slip (consistency of heavy cream)
- Speckled cream or white glaze (for the top)
- Pottery wheel (or slab roller/hand-building tools)
- Sgraffito carving tool (small loop or needle tool)
- Wax resist
- Sponge
- Trimming tools
- Kiln
Step 1: Forming the Mug
-
Throw the cylinder:
Begin by centering your red stoneware clay on the wheel. Open the center and pull up the walls for a classic cylindrical mug shape, keeping the rim slightly thicker for comfort. -
Shape the belly:
Gently push the walls outward from the inside to create a subtle curve or ‘belly’ at the bottom of the mug, tapering slightly inward toward the top rim. -
Refine the rim:
Use a chamois or a piece of soft plastic to compress and smooth the rim. This makes drinking from the finished piece much more pleasant. -
Trim the foot:
Once leather hard, trim the bottom of the mug to create a defined foot ring. This elevates the form and gives it a professional finish. -
Pull and attach handle:
Pull a strap handle from a lug of clay. Score and slip the attachment points on both the mug and handle, then firmly press them together. Smooth the joints to ensure a seamless connection.
Clean Lines
If your carving tool is dragging or creating jagged edges, the clay is too dry. Mist it lightly with water and wrap it in plastic for an hour.
Step 2: Applying Slip & Carving
-
Apply white slip:
While the mug is still leather hard, brush a coat of white slip or underglaze ONLY on the handle and the top rim area if you want that base, although for this specific look, we are actually carving directly into the red clay body. Instead, let’s brush the white slip over the area where you want the leaves to appear white if you are doing misima, but this image is Sgraffito. Actually, looking closely, this is ‘Reverse Sgraffito’ or simply carving into white slip over red clay. Let’s correct: Apply white slip or underglaze over the *entire* exterior surface. -
Wait for slip to stiffen:
Allow the white coating to dry until it is no longer tacky but hasn’t become bone dry. It needs to be firm enough to carve without tearing. -
Plan your leaves:
Lightly sketch your vine pattern with a dull pencil directly onto the white slip. The pencil marks will burn off in the kiln. -
Carve the negative space:
Using a carving loop tool, gently scrape away the white slip *around* your leaf shapes. You want to expose the red clay background while leaving the leaves white. This is the reverse sgraffito method shown in lower sections. -
Refine the leaf veins:
Switch to a fine needle tool to carve tiny veins inside the white leaf shapes, revealing the red clay underneath for delicate detail. -
Clean up burrs:
Wait until the mug is bone dry, then lightly rub the surface with a dry scouring pad or stiff brush to knock off any clay crumbs or sharp edges from carving.
Add Texture
Before the final glaze firing, lightly sand the raw clay section for a smoother tactile experience, or leave it rough for a rustic grip.
Step 3: Glazing & Firing
-
Bisque fire:
Load the bone-dry mug into the kiln and bisque fire it to cone 04 (or your clay’s specific bisque temperature). -
Wash the surface:
Wipe the bisque-fired mug with a damp sponge to remove any dust, which ensures the glaze adheres properly. -
Wax the leaf section:
Apply wax resist over the entire bottom section where you carved the leaves. You want this area to remain matte and unglazed to highlight the clay texture. -
Dip the top:
Hold the mug by the foot and dip the top third into a speckled cream glaze. Alternatively, pour the glaze inside, swirl to coat, and pour out, then dip just the rim. -
Clean the foot:
Sponge off any glaze that may have dripped onto the foot ring or the waxed bottom section. -
Glaze fire:
Fire the mug to maturity (likely cone 5 or 6). This will melt the cream glaze and vitrify the exposed red clay body.
Enjoy your morning coffee in a mug that perfectly balances modern design with earthy textures
Stamped Pattern Mug With Repeating Texture Bands
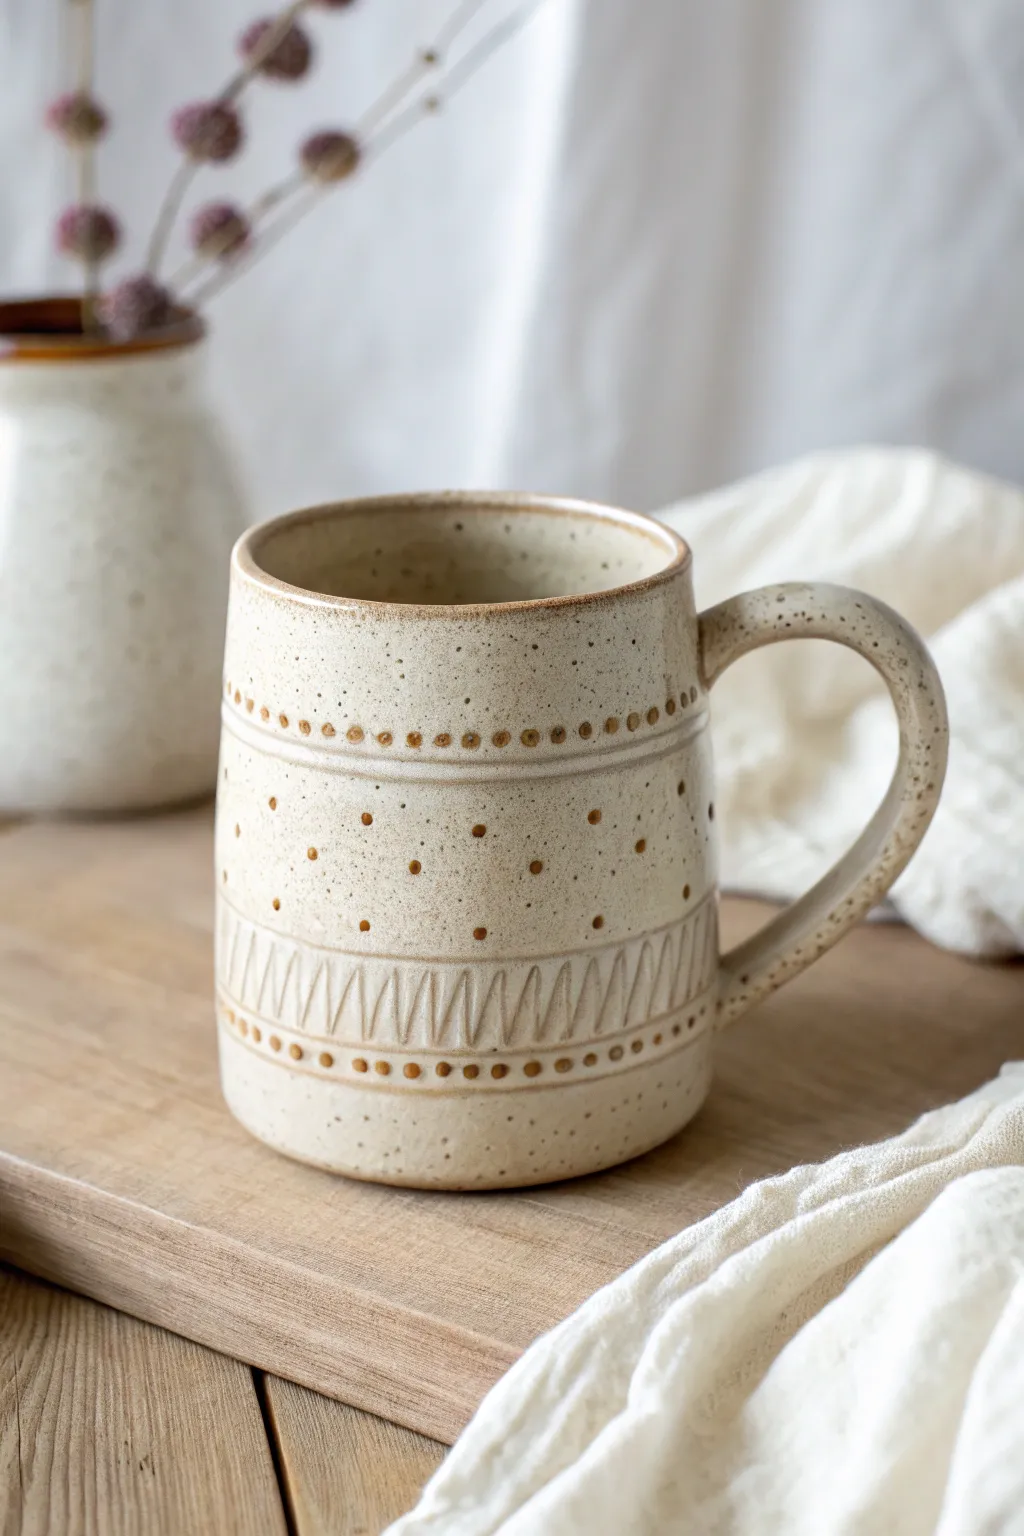
Embrace the beauty of repetition with this creamy, speckled stoneware mug featuring distinct bands of impressed texture. The combination of simple dot impressions and carved zig-zags creates a rhythmic, tactile surface that feels wonderful in the hand.
How-To Guide
Materials
- Speckled stoneware clay (buff or light brown)
- Pottery wheel and throwing tools (or rolling pin for handbuilding)
- Wire cutter
- Trimming tools
- Small wooden dowel or drill bit shank (approx. 3-4mm)
- Carving tool or sgraffito loop tool
- Metal rib
- Sponge
- Matte white or cream glaze (translucent/breaking)
Step 1: Forming the Cylinder
-
Prepare the clay:
Begin by wedging about 1 to 1.5 lbs of speckled stoneware clay to remove air bubbles and ensure consistency. -
Throw the base:
Center your clay on the wheel and open it up, compressing the floor well to prevent cracks later on. -
Pull the walls:
Pull the cylinder walls up to your desired height, keeping a straight profile. I like to leave the rim slightly thickened for a comfortable drinking edge. -
Shape the profile:
Use a rib to smooth the sides. You want a relatively straight-sided cylinder with a very subtle curve towards the bottom for this specific design. -
Dry to leather hard:
Cut the pot from the bat and let it dry until it reaches a sturdy leather-hard stage. It needs to be firm enough to handle pressing without warping the shape.
Step 2: Applying Texture
-
Mark your bands:
Place the mug back on a banding wheel. Lightly scratch horizontal guide lines to define the top band, the middle field, and the bottom band sections. -
Upper dot border:
Using the flat end of a small wooden dowel, press a row of dots just below the rim. Support the inside of the wall with your hand as you press to avoid deformation. -
Define the ridges:
Use a modeling tool or the edge of a rib to press a horizontal groove indentation just below your top row of dots. -
Middle scatter pattern:
In the large central band, use the same dowel to press random, scattered dots. Space them out generously to keep the design airy. -
Carve the zig-zags:
For the lower band, use a carving tool to scratch in a continuous zig-zag or saw-tooth pattern. Keep the lines close together for a dense texture. -
Lower dot border:
Finish the texture by pressing a final row of dots near the foot of the mug, mirroring the top pattern.
Clean Pressing
Apply a tiny amount of cornstarch or vegetable oil to your dowel tip. This prevents the tool from sticking to the clay and pulling up jagged edges.
Step 3: Handle and Finishing
-
Pull a strap handle:
Pull a handle from the same clay body. Aim for a medium-thickness strap that balances the visual weight of the mug. -
Attach the handle:
Score and slip the contact points on both the mug and handle. Attach the handle securely, smoothing the joins with a moist sponge. -
Clean up burrs:
Once the mug is fully bone dry, gently rub over the textures with a dry green kitchen scourer or stiff brush to remove any sharp clay crumbs or burrs. -
Bisque fire:
Fire the piece to cone 04 (or your clay’s specific bisque temperature). -
Glaze application:
Dip or pour a matte cream glaze over the entire piece. Using a glaze that ‘breaks’ over edges is crucial here; it will settle in the dots and pull away from the high points. -
Glaze wiping (optional):
If your glaze is very opaque, you might want to gently wipe the textured areas with a damp sponge to expose more of the raw speckled clay. -
Final firing:
Glaze fire to maturity (likely cone 5 or 6 depending on your stoneware). Ensure the foot is wiped clean before loading the kiln.
Two-Tone Twist
Paint a dark iron oxide wash into the carved zig-zags and wipe it back before glazing. This will make the geometric pattern pop aggressively against the cream glaze.
Enjoy your morning coffee with the satisfaction of holding a piece of art you crafted by hand


What Really Happens Inside the Kiln
Learn how time and temperature work together inside the kiln to transform clay into durable ceramic.
Mug With a Faceted Carved Exterior
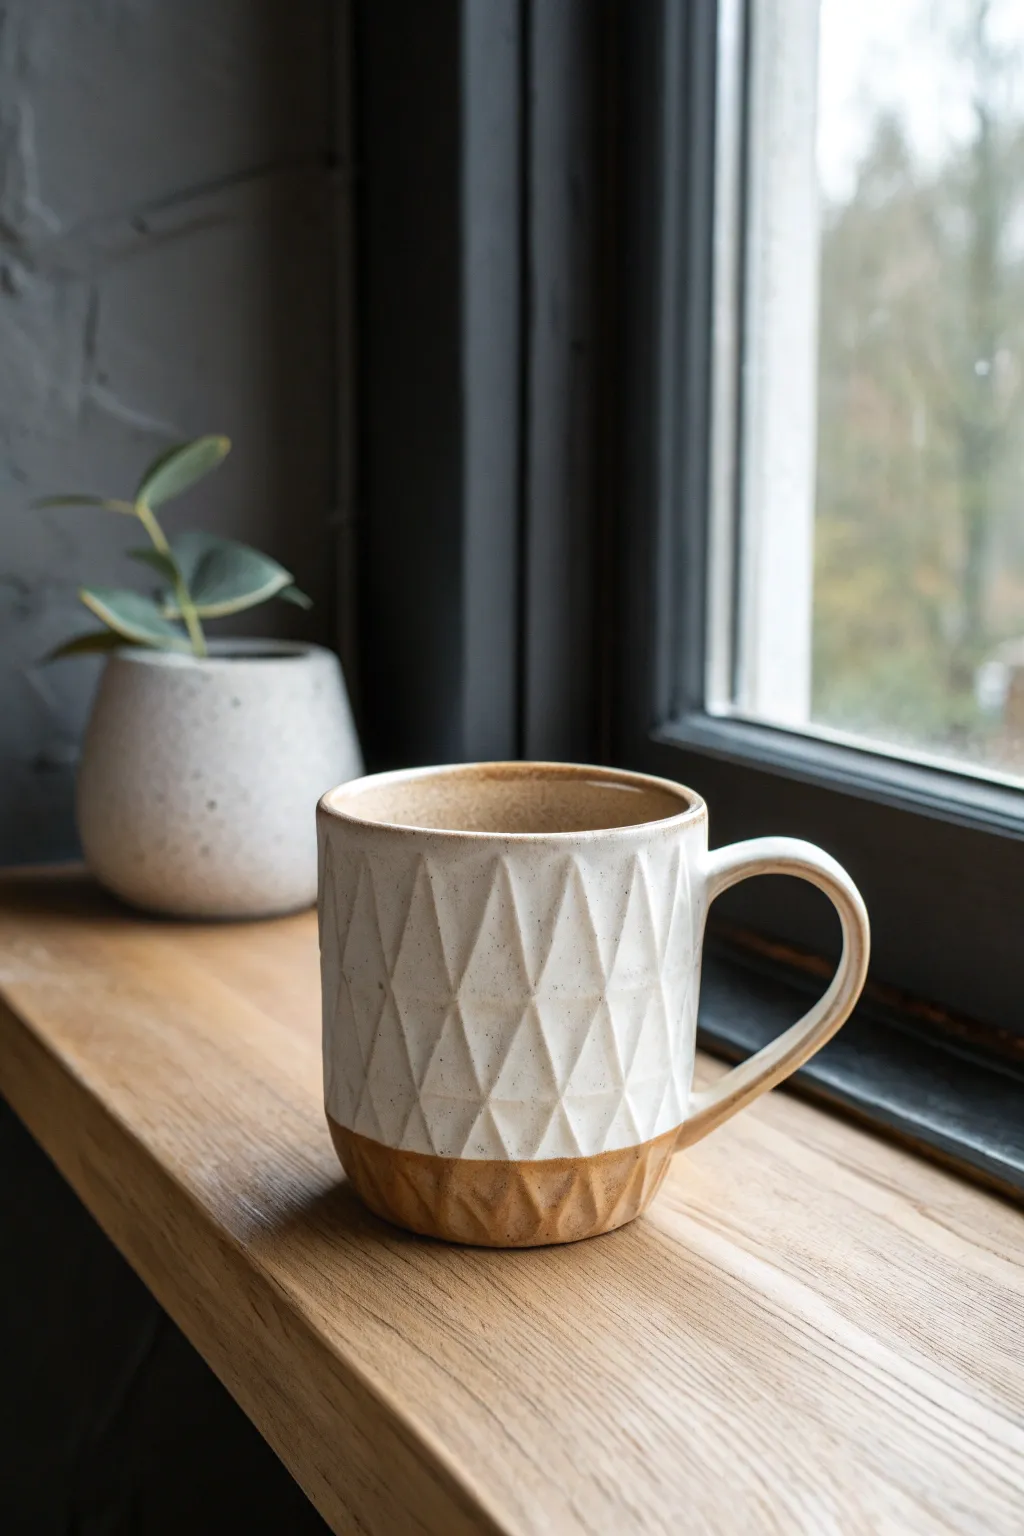
This project features a stunning two-tone mug with a rhythmic, geometric texture that feels wonderful in the hand. The diamond facets catch the light beautifully, while the exposed raw clay base adds a rustic, grounding warmth to the modern design.
Step-by-Step Guide
Materials
- Stoneware clay (speckled or tan)
- Fettling knife
- Loop tool (flat profile)
- Small sponge
- Rolling pin or slab roller
- Circular template or cookie cutter (for base)
- Rectangular paper template (for wall)
- Scoring tool or serrated kidney
- Clay slip
- Wooden modeling tool
- Matte white glaze
- Wax resist
- Kiln
Step 1: Forming the Mug Body
-
Roll the slab:
Begin by rolling out an even slab of stoneware clay to about 1/4 inch thickness. Compress the clay on both sides with a rib to align the particles and prevent warping. -
Cut the components:
Using your templates, cut out a rectangular strip for the mug’s wall and a circle for the base. Ensure the length of the rectangle matches the circumference of your circle plus a little overlap. -
Bevel the edges:
On the short ends of your rectangular strip, cut 45-degree bevels in opposite directions. This allows for a seamless join when you roll the clay into a cylinder. -
Score and slip:
Score the beveled edges aggressively and apply a generous amount of slip. Score the edge of the circular base as well. -
Assemble the cylinder:
Roll the rectangle into a tube, pressing the beveled ends together firmly. I like to use a wooden tool on the inside seam to really knit the clay together. -
Attach the base:
Place the cylinder onto the scored base. Smooth the clay from the wall down onto the base on the outside, and use a long tool or your finger to smooth the inside seam where the wall meets the floor.
Step 2: Carving the Facets
-
Leather hard stage:
Allow the mug to dry slowly until it reaches a firm leather-hard state. It needs to be stiff enough to hold its shape during carving but soft enough to cut cleanly. -
Mark the grid:
Lightly scratch a vertical and horizontal grid onto the surface with a needle tool to guide your carving. This ensures your diamonds stay uniform. -
Carve the first row:
Using a sharp loop tool or a fettling knife, slice away triangles of clay to start forming the diamond peaks. Aim for consistent depth with each cut. -
Complete the pattern:
Continue carving, alternating the angles to create the raised diamond shapes. Leave the bottom half-inch of the mug uncarved if you want a solid footer, or carve all the way down as shown in the image. -
Attach the handle:
Pull a strapped handle or roll a coil. Score and slip the attachment points on the mug and handle, then press firmly. Smooth the joins well. -
Smooth the texture:
Once the carving is complete, use a slightly damp sponge to soften the sharpest ridges of your facets just a touch, blending any tool marks.
Crisp Carving Pro-Tip
Wait until the clay is stiff leather-hard—almost too dry. The loop tool will shear through cleanly without dragging, leaving crisp, sharp geometric facets.
Step 3: Glazing and Finishing
-
Bisque fire:
Let the mug dry completely before firing it in a bisque kiln to cone 04 (or your clay’s specific temperature). -
Wax the base:
Apply wax resist to the bottom inch of the mug’s exterior. Follow the line where you want the glaze to stop, ensuring you leave that lovely raw clay exposed at the bottom. -
Apply the glaze:
Dip the mug into a matte white glaze. Hold it upside down and submerge it until the glaze meets your wax line. Hold for 3 seconds and lift. -
Clean up:
Wipe away any glaze beads that may have stuck to the waxed area with a damp sponge. -
Final firing:
Fire the glazed mug to maturity (likely cone 5 or 6 depending on your clay body). The heat will break the glaze over the facets, highlighting the texture.
Level Up: Texture Pop
Use a glaze that is known to ‘break’ over edges. A translucent celadon or a breaking brown will tint the recesses dark while leaving the sharp ridges bright.
Once cooled, your mug is ready for a warm beverage and a cozy spot by the window
Dimensional Floral Appliqué Mug
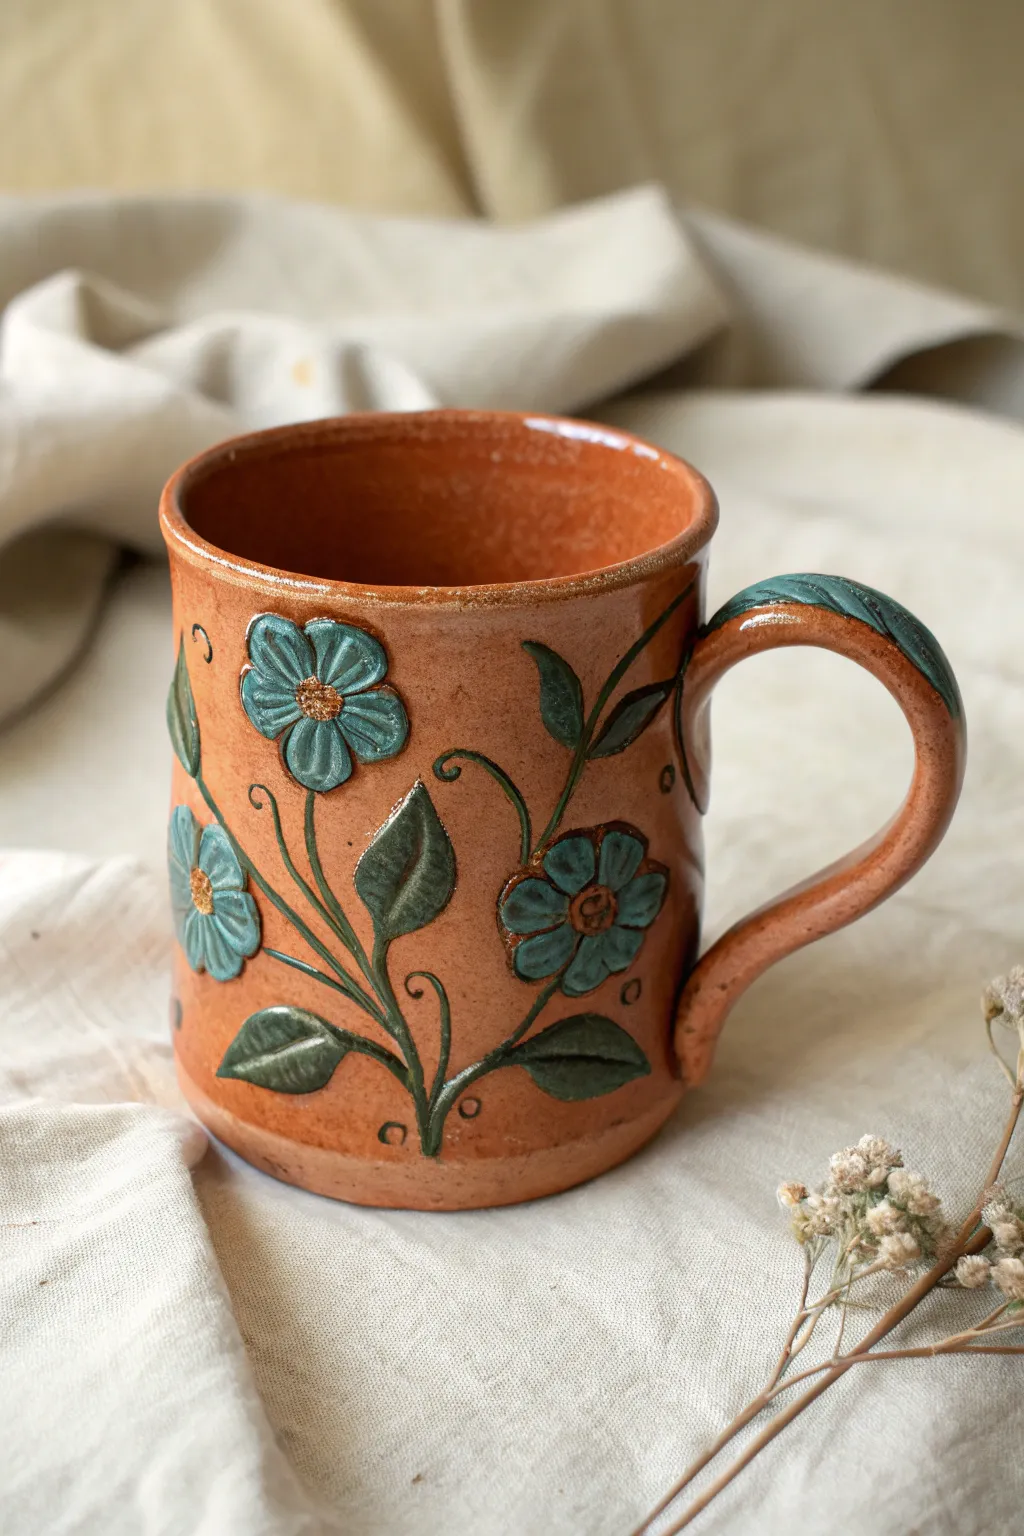
This charming project combines the warmth of red terracotta with dimensional floral appliqués for a tactile, folk-art inspired finish. The teal flowers pop beautifully against the earthy orange clay, creating a cozy vessel perfect for your morning brew.
How-To Guide
Materials
- Red earthenware or terracotta clay body
- Pottery wheel (or rolling pin for slab building)
- Needle tool
- Rib tool (rubber or wood)
- Slip (made from the same clay body)
- Underglazes: Teal/Turquoise and Dark Green
- Small brushes for underglaze
- Clear transparent glaze (food safe)
- Scoring tool or serrated rib
- Sponge
Step 1: Forming the Mug Base
-
Throw the body:
Begin by centering about 1-1.5 lbs of red clay on your wheel. Throw a cylinder with straight, vertical walls and a flat interior bottom. Aim for a height of about 4-5 inches. -
Refine the shape:
Use a rib tool to smooth the outside walls, removing throwing lines to create a clean canvas for your flowers. Compress the rim with a chamois or sponge for a comfortable drinking edge. -
Trim the foot:
Once the mug is leather hard, trim a clean foot ring at the bottom to define the base. Smooth any rough edges with a damp sponge. -
Pull and attach handle:
Pull a strap of clay for the handle. Attach it to the leather-hard mug by scoring and slipping the contact points. Create a comfortable C-curve shape, blending the attachment points seamlessly.
Cracking Appliqués?
If flower petals crack off during drying, your base mug was likely too dry. Score the area deeply and use vinegar slip (magic water) to re-attach securely.
Step 2: Creating Floral Appliqués
-
Roll small coils:
For the flower stems, roll out very thin, worm-like coils of moist clay. They should be delicate, roughly 1-2mm thick. -
Attach stems:
Score the mug surface lightly where you want the design. Using a brush with a tiny bit of slip (or water), press the thin coils onto the mug in curving, organic lines to form the main stems. -
Sculpt petals:
To make flower petals, roll tiny balls of clay and flatten them into teardrop shapes. Arrange five teardrops in a circle directly on the mug surface to form a flower head. Press them gently to adhere. -
Add leaves:
Shape larger teardrops for the leaves. Attach these near the base of your stems, pressing them flat so they look embossed but still have dimension. -
Detailing the clay:
Once attached, use a needle tool to press a center indentation into each flower. For the leaves, gently scribe a central vein line to add realism. -
Handle embellishment:
Don’t forget the handle! Add a single small leaf or petal shape to the top curve of the handle where your thumb might rest, tying the design together. -
Drying:
Allow the mug to dry slowly to the bone-dry stage. Cover it loosely with plastic for the first day to ensure the added clay pieces don’t pop off due to uneven shrinkage.
Step 3: Color and Glazing
-
Bisque fire:
Fire the mug to bisque temperature (usually Cone 04 or 06). This prepares the clay for underglaze application. -
Apply teal underglaze:
Using a small detail brush, paint the flower petals with a teal or turquoise underglaze. I like to let the first coat dry briefly before adding a second for opacity. -
Paint foliage:
Switch to a dark green underglaze for the leaves and stems. Use a very fine liner brush for the thin stems to avoid messy edges. -
Add flower centers:
Dab a small spot of yellow or ochre underglaze into the center indentation of each flower for contrast. -
Wax resist (optional):
If you want the background to remain completely raw clay texture, carefully wax over your painted flowers. Otherwise, you can skip this step for a fully glossy finish. -
Clear glaze application:
Dip the entire mug into a clear, gloss glaze. If you prefer the raw clay look on the outside, only pour clear glaze inside the liner and brush a clear coat just over the painted flowers. -
Final firing:
Fire the mug to the maturity temperature of your clay and glaze (likely Cone 04 for earthenware or Cone 5/6 for stoneware).
Make it Antique
After the final firing, rub a dark brown acrylic wash over the flowers and wipe it back. This settles into crevices, making the relief pop.
Enjoy the cozy feeling of holding your handmade art every time you take a sip

TRACK YOUR CERAMIC JOURNEY
Capture glaze tests, firing details, and creative progress—all in one simple printable. Make your projects easier to repeat and improve.
Twisted Vine Handle Mug
This earthy, rustic mug combines a cozy two-tone glaze design with a unique tactile element: a handle made to look like thick, twisted rope. It’s the perfect vessel for wrapping your hands around a warm drink on a quiet morning.
Step-by-Step Guide
Materials
- Stoneware clay (speckled clay body recommended)
- Pottery wheel
- Throwing tools (sponge, needle tool, wire cutter)
- Rib tool (wooden or metal)
- Scoring tool or serrated rib
- Slip
- Kiln
- Glazes (glossy speckled cream & transparent amber/brown)
Step 1: Throwing the Cylinder
-
Center the clay:
Start with a well-wedged ball of speckled stoneware clay. Slam it onto the wheel head and center it thoroughly, ensuring there are no wobbles before you begin creating the opening. -
Open and pull walls:
Create your central opening and pull up the walls to form a tall cylinder. Aim for straight, vertical sides rather than a curved bowl shape, keeping the rim slightly thicker for durability. -
Create texture:
While the wheel is spinning slowly, press your finger or a rounded trimming tool gently into the bottom half of the exterior wall to create subtle spiral ridges. Smooth the top half with a rib tool so it remains flat and clean. -
Refine the rim:
Compress the rim using a chamois or a small strip of plastic to ensure it is smooth and pleasant to drink from. Wire the mug off the wheel and set it aside to stiffen to a leather-hard state.
Twist Consistency
When rolling your initial coils, place a flat board on top of the clay ropes and roll back and forth. This ensures perfectly even thickness before twisting.
Step 2: Crafting the Braided Handle
-
Roll coils:
Roll out two long, even coils of clay about the thickness of a pencil. I usually roll them a bit longer than necessary so I can trim the ends later for a cleaner look. -
Twist tightly:
Lay the coils side by side and gently twist them over each other to form a tight rope pattern. Be consistent with your twisting tension so the ‘braid’ looks uniform. -
Shape the arch:
Gently curve the twisted rope into a ‘C’ shape or ear shape appropriate for a handle. Let this set up slightly on a board until it holds its curve without sagging. -
Score and slip:
Identify where you want the handle to attach on your leather-hard mug. Score the attachment points on the mug and the ends of the handle aggressively, then apply a generous amount of slip. -
Attach firmly:
Press the handle onto the mug body firmly. Use a small modeling tool to blend the very ends of the coils into the mug body, but try to keep the twisted texture intact right up to the join.
Step 3: Glazing and Firing
-
Bisque fire:
Allow the mug to dry completely, which may take up to a week depending on humidity. Once bone dry, bisque fire it in the kiln according to your clay body’s specifications. -
Wax the bottom:
Apply wax resist to the bottom of the mug and slightly up the foot to prevent glaze from running onto your kiln shelf. -
Dip the bottom:
Dip the bottom half (the textured section) into a transparent amber or light brown glaze. This highlights the ridges you created earlier while letting the clay’s natural color show through. -
Dip the top and handle:
Dip the top half and the handle into a creamy, speckled white glaze. Overlap slightly with the bottom glaze for a nice transition line. -
Clean up:
Wipe away any glaze drips on the foot or bottom with a damp sponge. Any stray droplets can stick to the kiln shelf, so be thorough here. -
Final firing:
Load the mug into the kiln for the glaze firing. Fire to the cone temperature recommended for your specific glaze and clay combination (typically Cone 5 or 6 for stoneware).
Three-Strand Braid
Instead of a simple two-strand twist, try a classic three-strand plait for a bulkier, more intricate handle that feels extra secure.
Once cool, your mug is ready to add a touch of handcrafted warmth to your daily coffee routine
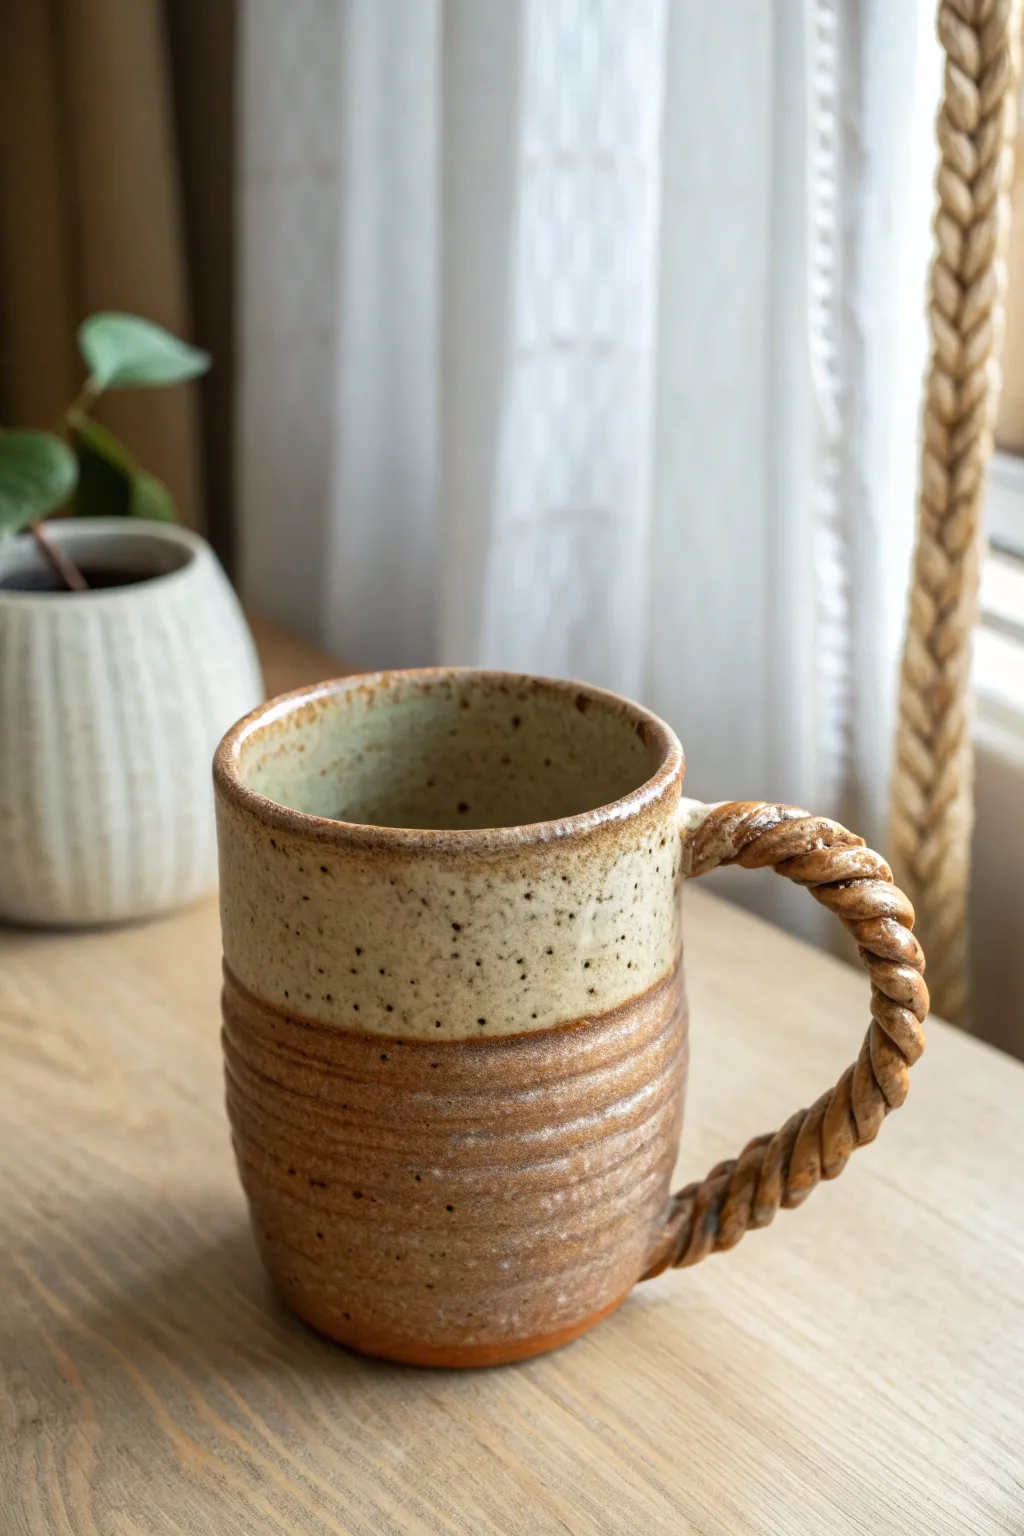
Branch-Inspired Handle Mug With Natural Texture

Bring the woods into your kitchen with this earthy, handmade mug featuring a speckled cream glaze and a unique handle that mimics twisted tree bark. The contrast between the smooth body and the rugged, branch-like handle creates a stunning tactile experience perfect for morning coffee.
How-To Guide
Materials
- Speckled stoneware clay (buff or white)
- Pottery wheel
- Throwing tools (sponge, needle tool, rib, wire cutter)
- Trimming tools
- Scoring tool or serrated kidney
- Slip (clay slurry)
- Wooden modeling tool
- Small stiff-bristled brush
- Iron oxide wash or dark brown underglaze
- Creamy satin-matte glaze (semi-opaque)
- Kiln
Step 1: Throwing the Body
-
Prepare the clay:
Wedge about 1 to 1.5 lbs of speckled stoneware clay thoroughly to remove air bubbles. Center the ball firmly on the wheel head. -
Open and pull:
Open the clay and pull up the walls to create a cylinder. Aim for a slightly taller form than you need, as the clay will shrink. Keep the silhouette straight-sided with a very subtle curve inward at the bottom. -
Refine the rim:
Compass gently with a chamois or sponge to round off the rim. This makes for a comfortable sipping experience later. -
Cut and dry:
Use your wire cutter to slice under the mug, but leave it on the bat until it reaches leather-hard consistency. This usually takes a day depending on humidity.
Handling the Handle
Make the handle slightly thicker at the top attachment point. This mimics how branches naturally thicken where they join the trunk.
Step 2: Sculpting the Branch Handle
-
Roll a coil:
While the body firms up, roll out a thick coil of fresh clay by hand. Make it slightly thicker than a standard handle to mimic a sturdy branch. -
Add texture:
Twist the coil gently to creative natural grooves. Use a wooden modeling tool to carve deeper ‘bark’ striations and small knotholes. I like to press a real piece of bark or a rough stone against it for organic texture. -
Shape the ear:
Curve the textured coil into a ‘C’ shape or ear shape. Allow this handle to stiffen up slightly so it holds its curve without flopping. -
Trim the mug:
Once the mug body is leather-hard, center it upside down on the wheel and trim the bottom. Create a clean foot ring or a flat bottom, smoothing away any throwing marks.
Step 3: Assembly and Decoration
-
Score and slip:
Hold the handle against the mug to find the perfect placement. deeply score the attachment points on both the mug and the handle ends, then apply a generous amount of slip. -
Attach firmly:
Press the handle firmly onto the mug body. Wiggle it slightly to lock the clay particles together. Clean up excess slip, but smooth it in a way that looks like the branch is growing out of the mug. -
Refine the join:
Use a small modeling tool to blend the seams, maintaining the bark texture right up to the mug wall. -
Bisque fire:
Let the mug dry slowly under loose plastic to prevent the handle from cracking. Once bone dry, bisque fire it to Cone 04 (or your clay’s specific bisque temperature).
Level It Up
Add a tiny sculpted clay leaf or acorn to the base of the handle before firing for an extra touch of forest whimsey.
Step 4: Glazing
-
Apply oxide wash:
Mix iron oxide with water (or use a dark underglaze). paint this wash specifically onto the textured handle and the rim of the mug. Wipe it back with a damp sponge so the dark color stays only in the deep grooves. -
Wax resist (optional):
If you want the handle to remain raw and unglazed like real wood, carefully paint liquid wax resist over the entire handle. -
Dip into glaze:
Dip the entire mug into a cream-colored satin matte glaze. If you waxed the handle, the glaze will bead off. If you didn’t, the glaze will break over the texture, revealing the iron oxide underneath. -
Clean the foot:
Wipe the bottom of the mug (and the foot ring) completely clean of glaze with a damp sponge to prevent it from sticking to the kiln shelf. -
Final firing:
Fire the mug to maturity (likely Cone 5 or 6 for stoneware). Allow the kiln to cool completely before opening to see your woodland creation.
Enjoy the warmth of your new favorite mug during your next cozy coffee break
Two-Tone Raw Clay and Gloss Contrast Mug
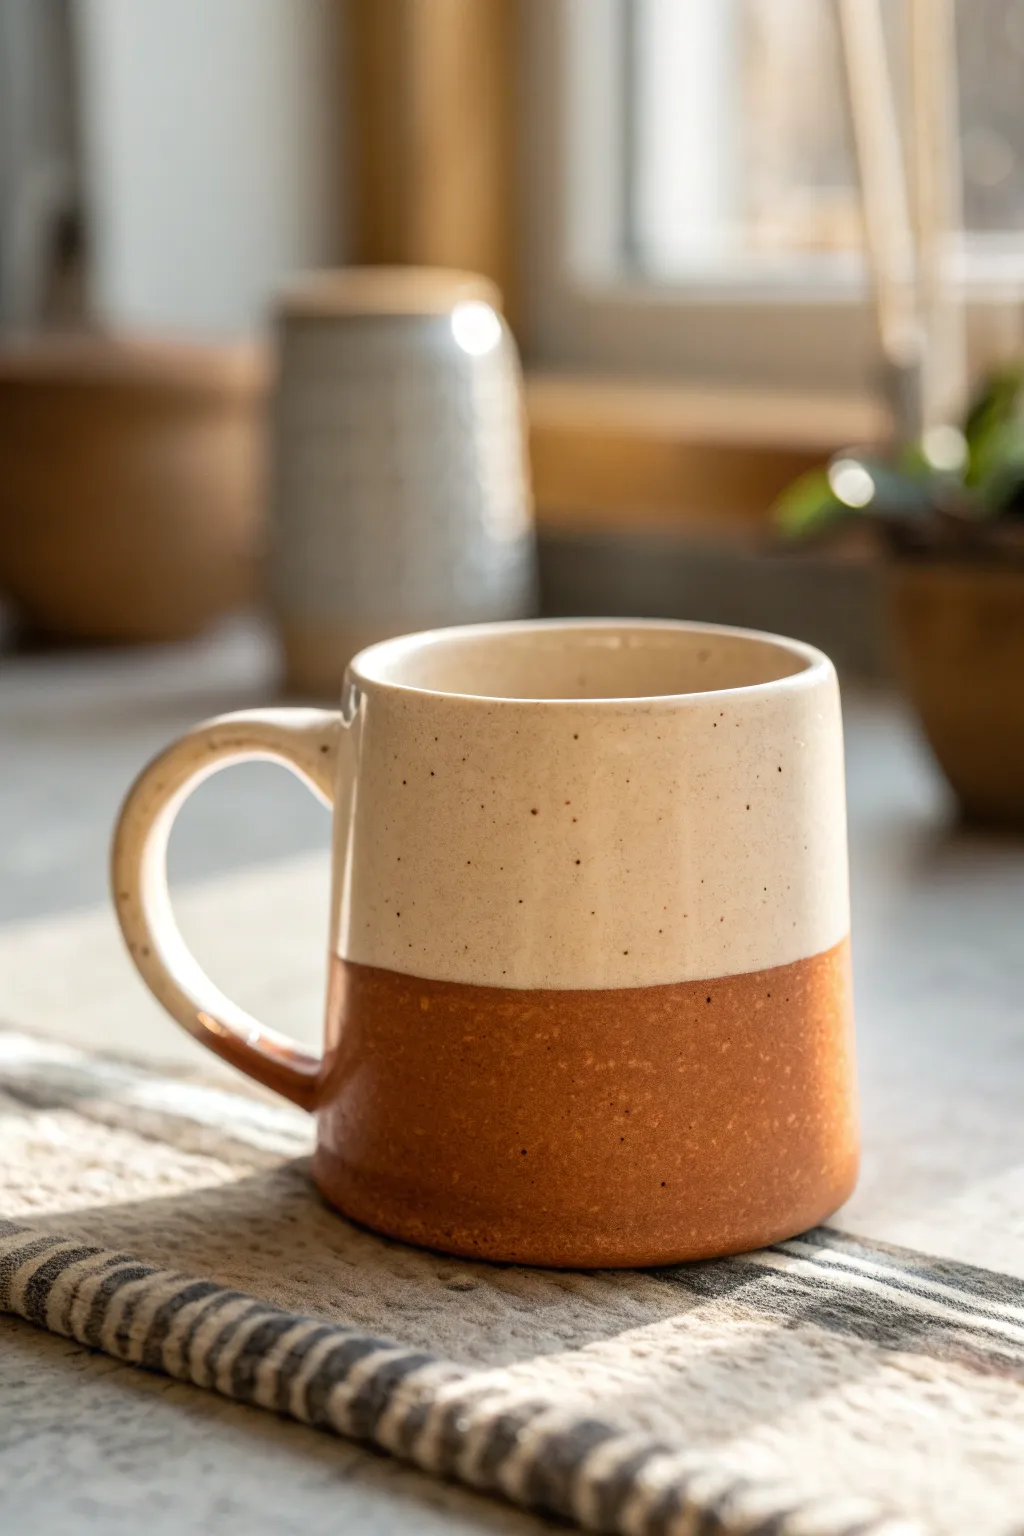
This project celebrates the beautiful contrast between raw, speckled clay and a smooth, creamy glaze. The result is a modern farmhouse aesthetic that highlights the natural warmth of the stoneware while providing a comfortable, food-safe drinking lip.
Step-by-Step Tutorial
Materials
- Speckled stoneware clay (mid-fire cone 5-6)
- Pottery wheel
- Throwing tools (sponge, needle tool, rib, wire cutter)
- Trimming tools
- Opaque cream or white gloss glaze
- Wax resist (liquid wax)
- Glazing brush or dipping tongs
- Kiln
- Clean bucket of water
Step 1: Throwing the Form
-
Prepare the Clay:
Begin by wedging about 1 to 1.5 pounds of speckled stoneware clay. Thorough wedging is crucial to remove air bubbles and ensure the speckles are evenly distributed. -
Center on the Wheel:
Throw the clay onto the wheel head and center it using firm pressure. The clay needs to be perfectly centered to achieve the clean, cylindrical lines seen in this design. -
Open the Clay:
Open the centered ball of clay, pressing down until you are about a quarter-inch from the bat. Compress the floor with a flat rib or sponge to prevent cracking later. -
Pull the Cylinder:
Slowly pull the walls upward. Unlike a bowl, aim for vertical sides. Keep your pulls steady and consistent to maintain an even thickness from bottom to top. -
Shape the Walls:
While keeping the general shape cylindrical, gently belly out the bottom half slightly and taper the rim inward just a hair to hold heat better. -
Refine the Rim:
Compress the rim with a chamois or a damp sponge. A rounded, smooth rim is essential for drinking comfort, especially since the glaze will be thick here. -
Remove from Wheel:
Use your wire cutter to slice underneath the pot. Slide it onto a ware board and let it dry to leather-hard consistency.
Step 2: Trimming and Handle
-
Trim the Base:
Once leather hard, center the mug upside down on the wheel. Trim away excess clay from the bottom to create a defined foot, giving the mug a slight lift. -
Smooth the Surface:
Use a smooth metal rib to burnish the bottom half of the exterior while it’s spinning. This compresses the particles and makes the raw clay portion feel nice to hold. -
Pull a Handle:
Pull a strap of clay for the handle. For this modern look, aim for a C-shape or a modified ear shape that allows two or three fingers to grip comfortably. -
Attach the Handle:
Score the mug wall and the messy ends of the handle aggressively. Apply slip and press the handle firmly onto the mug. -
Clean Up:
Wipe away excess slip with a sponge. I like to use a damp brush to really smooth the connection points so the handle looks like it grew out of the mug. -
Bisque Fire:
Allow the mug to dry completely (bone dry). Load it into the kiln for a bisque fire (usually cone 04 or 06) to permanentize the shape.
Uneven Glaze Line?
If your hand shakes while waxing, place the mug on a banding wheel. Spin the wheel and hold your brush steady against the spinning pot for a perfect circle.
Step 3: Glazing the Two-Tone Look
-
Wax the Bottom:
This is the critical design step. Apply liquid wax resist to the bottom third (or half) of the mug’s exterior. Create a clean, straight horizontal line where you want the raw clay to end and the glaze to begin. -
Prepare the Glaze:
Stir your cream gloss glaze thoroughly. It should be the consistency of heavy cream to ensure it’s opaque enough to hide the speckles slightly but show their texture. -
Dip the Mug:
Hold the mug by the foot and dip it upside down into the bucket of glaze. Submerge it past the wax line. The wax will repel the glaze instantly. -
Inside Glazing:
Ensure the inside is fully coated. If you didn’t dip deeply enough to fill the interior, pour glaze inside, swirl it to coat, and pour the excess out. -
Clean the Line:
Once the glaze is dry on the wax, use a damp sponge to wipe any stray droplets off the waxed area. This ensures that crisp, sharp transition line. -
Final Fire:
Load into the kiln for the glaze firing (cone 5 or 6 depending on your clay body). Ensure no glaze touches the kiln shelf.
Speckle Pop Secret
Choose a glaze meant for dark clay bodies. Translucent whites often turn grey on speckled brown clay; an opaque cream keeps the nice contrast bright.
Enjoy your morning coffee with the tactile pleasure of raw earth meeting smooth glass
Marbled Glaze Mug With Stone-Like Swirls
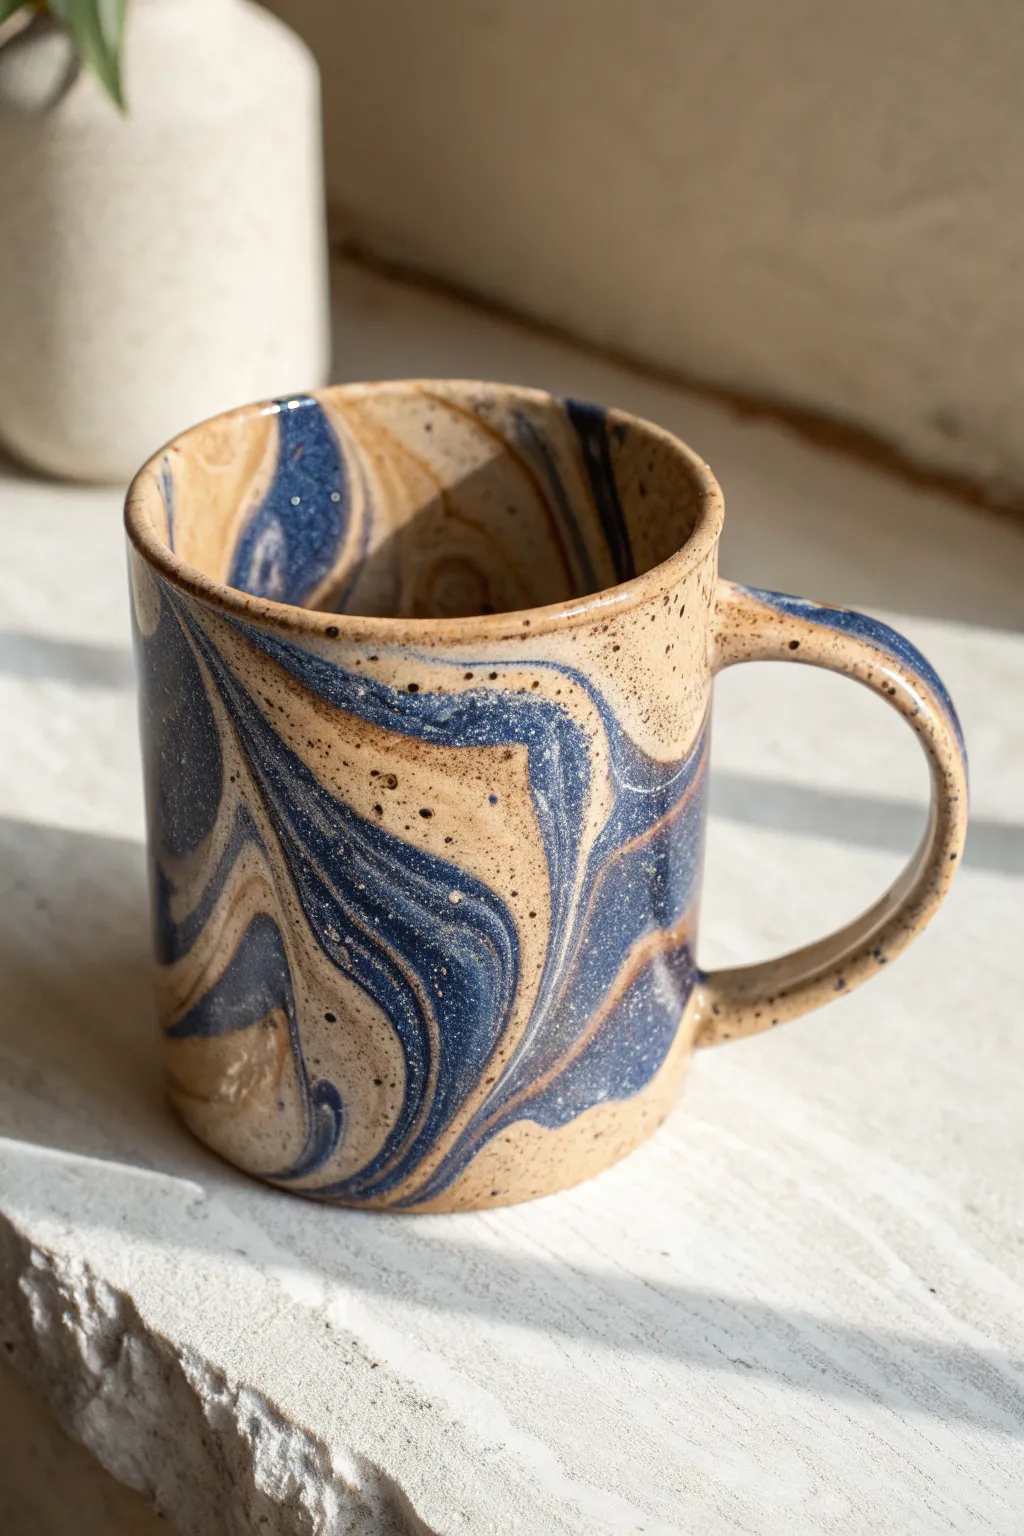
Achieve the organic elegance of natural stone with this marbled mug project. Combining warm sandy beige with deep denim blue creates a mesmerizing, fluid pattern that ensures no two pieces are ever exactly alike.
Step-by-Step Guide
Materials
- White stoneware clay body (cone 6)
- Blue mason stain (Cobalt or similar)
- Speckled buff stoneware clay (or add granular ilmenite to white clay)
- Pottery wheel
- Wire cutter
- Rib tool (metal and rubber)
- Sponge
- Needle tool
- Trimming tools
- Clear transparent glaze (cone 6)
- Kiln
Step 1: Preparing the Clay
-
Wedge the Base Clays:
Start by thoroughly wedging about 1 pound of your speckled buff clay to remove air bubbles. This will be the primary warm tone in your mug. -
Tint the Accent Clay:
Take a smaller portion of white stoneware (about 1/3 pound) and wedge in your blue mason stain. Wear gloves for this part to avoid staining your hands. Keep wedging until the color is uniform and deep blue. -
Layer the Colors:
Form both clay balls into thick logs. Slice the beige log in half lengthwise and sandwich the blue log inside, or stack them in alternating thick slabs. -
The Wedging Twist:
Here is the critical moment: wedge the combined lump ONLY 3-4 times. You want to swirl the clays together without blending them into a single muddy color. Slice the clay in half with a wire to check the cross-section; if the swirls look good, slam the halves back together.
Muddy colors?
If your blue and beige are blending into a gray mess, simple: stop wedging so much! You only need 3 or 4 turns to marble. Less is more.
Step 2: Throwing the Form
-
Center the Marble:
Center your marbled ball on the wheel head. Work efficiently here—excessive centering and coning can over-mix the colors, dulling the crisp definition of the swirls. -
Open the Floor:
Open the clay to create the floor of your mug. Compress the bottom well with a sponge to prevent S-cracks later, aiming for a flat but slightly rounded interior transition. -
Pull the Walls:
Pull the walls up into a cylinder. As you pull, the pressure will stretch the clay streaks, elongating the marble pattern into beautiful, sweeping waves around the body. -
Shape the Belly:
Using a rib tool on the inside, gently balloon the walls out slightly to create a comfortable, straight-sided mug shape. Use a metal rib on the outside to scrape off the slurry, which reveals the pattern distinctly. -
Refine the Rim:
Chamois or gently sponge the rim to make it smooth for drinking. A slightly rounded lip feels best. -
Cut Off:
Run your wire tool under the base and carefully remove the cylinder from the wheel. Let it dry to leather-hard.
Galaxy Mode
Add 5% gold mica to your blue clay portion. When fired under clear glaze, the dark blue swirls will have subtle, shimmering stardust trails.
Step 3: Trimming and Handle
-
Trim the Foot:
Once leather-hard, standard trim the bottom to create a clean foot ring. Trimming actually reveals the most beautiful part of the marbling, as it cuts through the surface smear. -
Pull a Handle:
using a leftover piece of the marbled clay, pull a strap handle. Try to keep the marbling visible here too. Let it stiffen slightly. -
Attach the Handle:
Score and slip the attachment points on both the mug body and handle. Press the handle firmly onto the mug, smoothing the joints with a modeling tool or your finger so it looks seamless.
Step 4: Finishing
-
Bisque Fire:
Allow the mug to dry completely (bone dry) before loading it into the kiln for a bisque fire to cone 04. -
Clear Glaze:
Dip the entire mug into a clear transparent glaze. A clear glaze is essential because it seals the clay while letting the colored clay body remain the star of the show. I prefer a glossy finish to make the blue pop. -
Final Fire:
Fire the mug to maturity (likely cone 6, depending on your clay body). Let it cool slowly in the kiln. -
Sand the Bottom:
After the firing, use fine-grit sandpaper or a diamond pad to smooth the unglazed foot ring, ensuring it won’t scratch your table.
Using this mug for your morning coffee will give you a moment of terrestrial calm before the day begins
Color-Blocked Painted Underglaze Mug With Clean Shapes
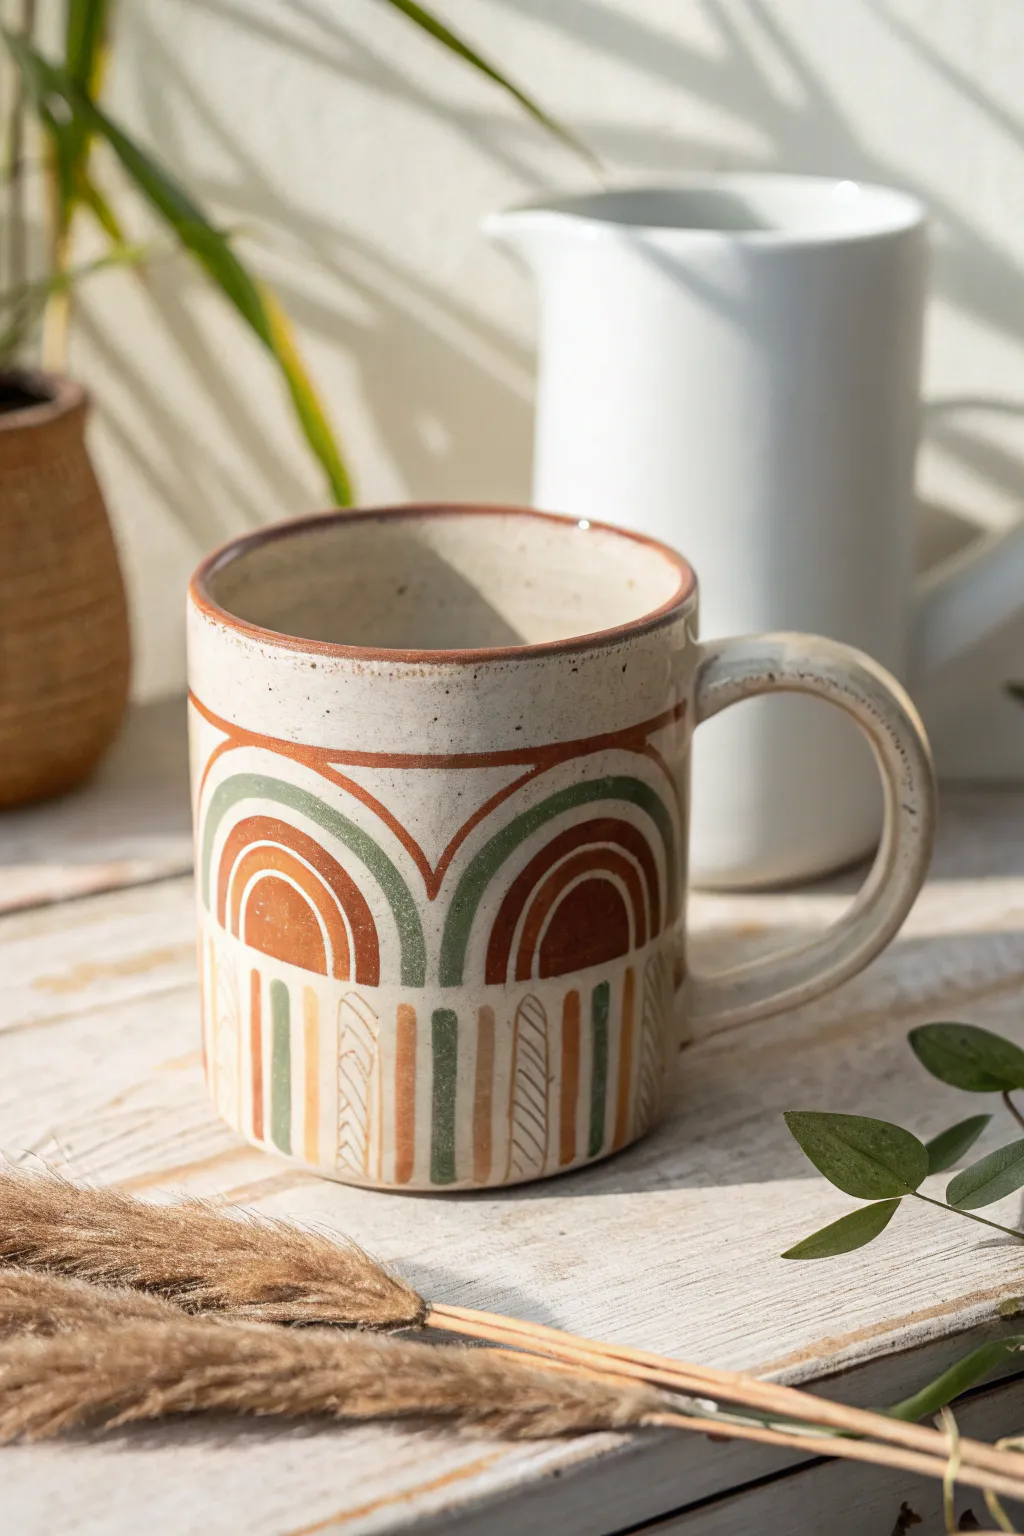
Embrace the warmth of desert hues with this hand-painted ceramic mug featuring structural rainbow arches. The speckled clay body peeking through cream glaze creates a lovely rustic canvas for the clean, geometric lines.
Step-by-Step
Materials
- Speckled stoneware clay (mid-fire)
- Pottery wheel (or slab rolling equipment)
- Loop trimming tools
- Sponge
- Underglaze colors: Terracotta/Rust, Sage Green, Deep Green, Cream/White
- Fine detail brushes (liner and small round)
- Wax resist (optional but helpful)
- Clear or translucent satin glaze
- Kiln
Step 1: Forming the Canvas
-
Throw the cylinder:
Begin by centering about 1 pound of speckled stoneware clay on your wheel. Pull up a simple, straight-walled cylinder with a flat bottom, aiming for a height of about 4 inches. -
Refine the rim:
While the wheel is spinning slowly, compress the rim with a chamois or your finger to ensure it’s smooth and pleasant for drinking. -
Trim the foot:
Once the mug is leather hard, trim the bottom to create a clean foot ring. This helps define the mug’s shape and gives you a stopping point for your glaze later. -
Create and attach handle:
Pull a strap of clay for the handle. Cut it to size and attach it firmly using the score-and-slip method. Smooth the connection points well so they look seamless. -
Shape the handle curve:
Make sure you create a generous ‘ear’ shape for the handle that invites the fingers in. I like to check the comfort of the grip before setting it aside to dry. -
First firing:
Let your greenware dry completely, then bisque fire it to cone 04 (or your clay’s specific bisque temperature).
Step 2: Painting the Design
-
Base coat application:
Wipe the bisque mug with a damp sponge to remove dust. Apply a layer of cream or white underglaze over the main body where you plan to paint, but leave some speckled clay exposed near the rim if desired. -
Sketch guides:
Lightly sketch your design pattern directly onto the underglazed surface using a regular pencil. The graphite will burn off in the kiln. -
Map out the arches:
Draw two large semi-circles touching in the middle of the mug face. These will be the foundation for your rainbow shapes. -
Paint the top border:
Using a rust-colored underglaze, paint a horizontal line just below the rim. Add a second curved line connecting the rim to the center dip of your arches. -
Fill the primary arches:
Paint the outermost arch band in sage green. Use a steady hand to keep the edges crisp against the cream background. -
Add inner semi-circles:
Inside the green arch, paint a solid semi-circle using the rust/terracotta underglaze. Leave a thin negative space line between the green and rust sections. -
Define the structure:
Using a very fine liner brush and the rust color, outline the white space inside your rust semi-circle to create a clean, defined arc. -
Paint vertical stripes:
Below the arches, measure out vertical columns. Alternate painting them with solid sage green, solid rust, and open cream spaces. -
Detail the cream columns:
In the cream vertical spaces, use a thin brush to add delicate hatching or diagonal lines in a light tan or diluted rust color for texture. -
Rim finish:
Apply a final thin line of rust underglaze directly on the drinking rim to frame the entire composition.
Smudged Lines?
If you mess up a crisp line, don’t panic. Let the underglaze dry completely, then gently scratch the mistake away with a needle tool or stiff brush.
Step 3: Glazing and Finishing
-
Clear coat:
Once the underglaze is fully dry, dip the entire mug into a clear or satin translucent glaze. This will seal the clay and make the colors pop. -
Bottom wipe:
Sponge off any glaze from the foot ring of the mug to prevent it from sticking to the kiln shelf. -
Final Fire:
Fire the mug to maturity (usually Cone 5 or 6 for stoneware). Wait for the kiln to cool completely before unloading to avoid thermal shock.
Carved Texture
Make the design tactile! Instead of painting the white lines, apply wax resist over the colored sections and carve through the clay for sgraffito details.
Pour your favorite warm beverage into your new mug and enjoy the handmade comfort
Face Mug With Simple Eyes and a Playful Expression
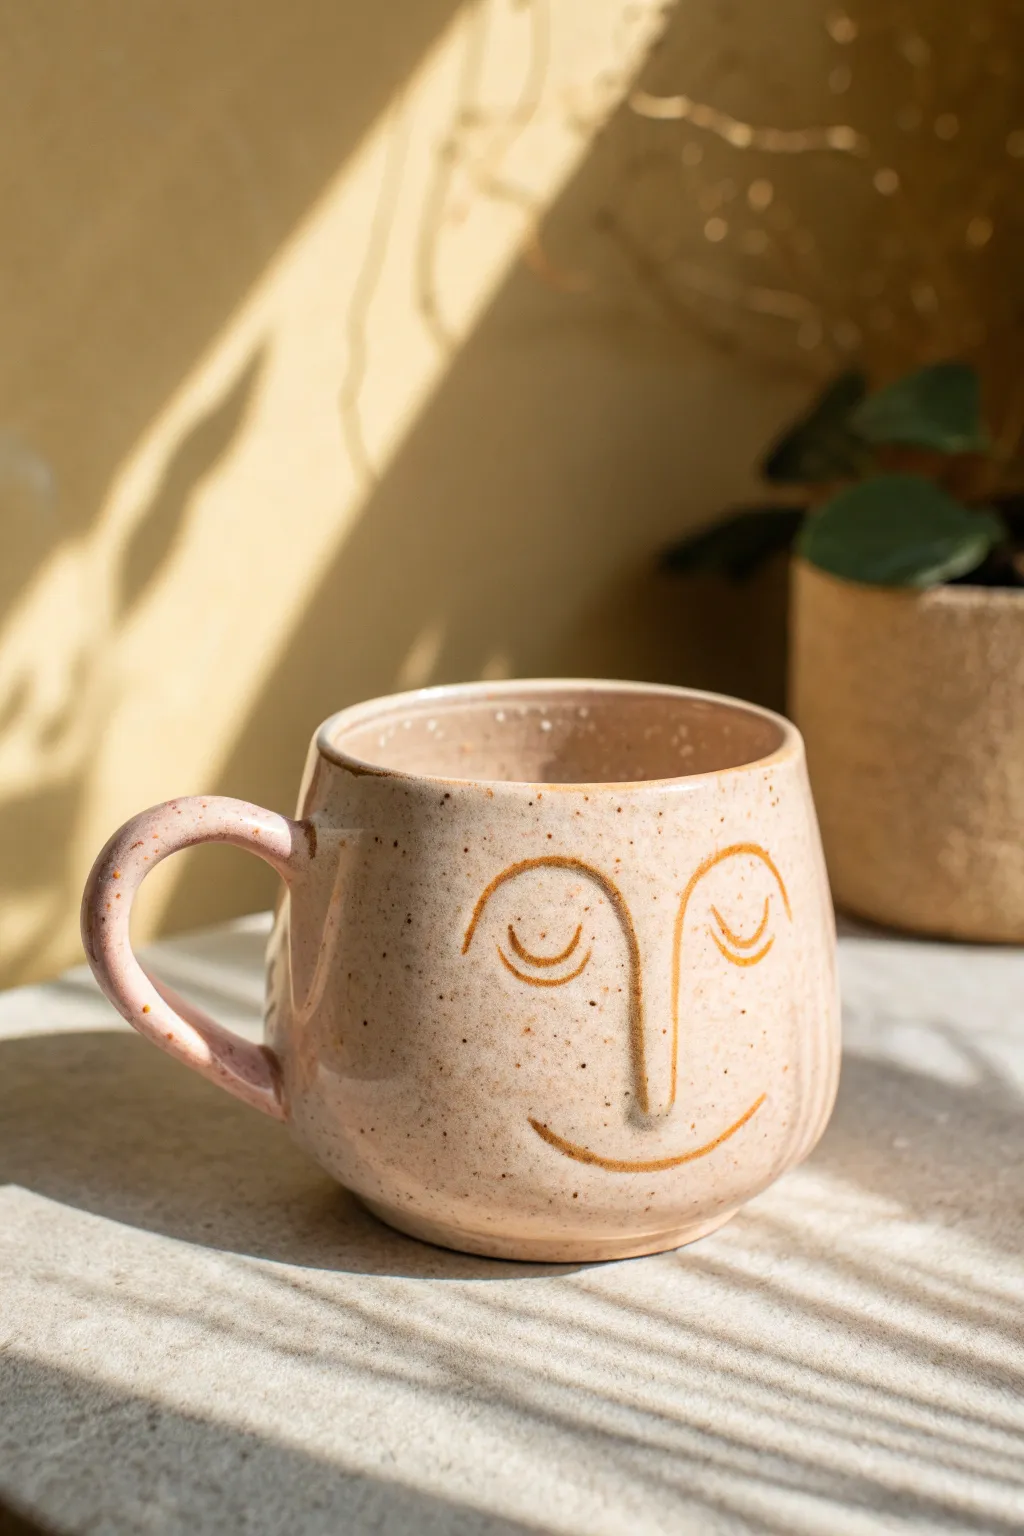
This charming ceramic mug features a warm, speckled clay body adorned with a delightfully simple relief face. The closed eyes and gentle smile create a serene, playful expression that transforms a functional vessel into a comforting friend for your morning coffee.
Step-by-Step Tutorial
Materials
- Speckled buff stoneware clay (suitable for Cone 6)
- Pottery wheel (or rolling pin for hand-building)
- Needle tool
- Small loop tool or carving tool
- Sponge
- Cutting wire
- Rib tool
- Scoring tool
- Slip
- Clear glossy glaze
- Kiln
Step 1: Forming the Body
-
Prepare the Clay:
Begin by thoroughly wedging about 1 to 1.5 pounds of speckled buff stoneware clay. Wedging removes air bubbles and aligns the clay particles, which is crucial whether you are throwing or hand-building. Aim for a smooth, uniform consistency. -
Center and Open:
Throw the ball of clay onto your wheel head and center it. Open the clay to create the floor of your mug, leaving about a 1/4 inch thickness for the base. If hand-building, roll a slab for the base and a larger slab for the walls. -
Pull the Walls:
Gently pull the clay upwards to form a cylinder. For this specific style, aim for a slightly rounded bottom that tapers slightly inward toward the rim. The form should feel cozy and rounded, not strictly vertical. -
Shape the Belly:
Use a rib tool on the outside while supporting the inside with your hand to push the belly of the mug out slightly. This creates that lovely organic curve you see in the photo. Smooth the rim with a chamois or sponge. -
Dry to Leather Hard:
Cut the mug from the wheel using a wire tool. Allow it to dry slowly until it reaches a leather-hard state. The clay should be firm enough to handle without deforming but soft enough to carve and attach handles.
Pro Tip: Clean Lines
Use a soft, damp paintbrush to run over your attached coils. This smooths the clay without flattening the relief, keeping the face distinctive but refined.
Step 2: Sculpting the Face
-
Sketch the Design:
Lightly trace the facial features onto the mug surface using a needle tool. You want a long, continuous line for the nose that connects to the eyebrows, and two simple curved lines for the closed eyes. -
Roll the Coils:
Roll out very thin, uniform coils of clay, roughly the thickness of spaghetti. These will become the raised lines that form the face. Keep them consistent so the expression looks cohesive. -
Score and Slip:
Carefully score the traceable lines you made on the mug. Brush a small amount of slip over the scored areas. This ‘glue’ is essential for ensuring your delicate facial features don’t pop off during firing. -
Attach the Nose and Brows:
Place a long coil for the nose and eyebrow line. Gently press it onto the scored area. Use a damp brush or your finger to smooth the edges slightly so it looks integrated, not just stuck on. -
Add the Eyes:
Shape two small U-shaped coils for the closed eyelids and attach them on either side of the nose bridge. Add tiny, individual lashes if you want extra detail, though the photo shows a simpler, clean look. -
Form the Smile:
Roll a slightly longer coil for the mouth. Curve it into a gentle, contented smile and attach it below the nose. Ensure the ends taper off naturally into the cheek area.
Step 3: Handle & Finishing
-
Pull a Handle:
Pull a strap of clay for the handle. For this mug, a simple C-shape or ear-shape works best. Let the handle stiffen up slightly on a board until it holds its curve. -
Attach the Handle:
Score and slip the attachment points on both the mug and the handle. Press the handle firmly onto the side of the mug, opposite the face. Smooth the joints with a modeling tool to ensure a seamless connection. -
Clean Up:
Once everything is attached, inspect the mug. Use a slightly damp sponge to smooth out any rough fingerprints or sharp edges on the relief coils. I like to give the rim one final check for smoothness here. -
Bisque Fire:
Allow the mug to bone dry completely. This can take several days depending on humidity. Once dry, load it into the kiln for a bisque fire (usually Cone 04 or 06). -
Glazing:
After the bisque fire, wipe the piece down with a damp sponge to remove dust. Dip the entire mug into a clear, glossy glaze. This transparency highlights the natural speckles of the clay body without obscuring the face. -
Final Firing:
Fire the mug again to the maturity temperature of your clay and glaze (likely Cone 6). The heat will bring out the iron speckles and melt the clear glaze into a smooth, shiny finish.
Troubleshooting: Cracking Coils
If facial features crack or detach as they dry, your base mug was likely too dry. Cover the repair with wax resist to slow drying or construct on fresher clay next time.
Once cooled, your charming face mug is ready to be filled with your favorite hot beverage for a cozy moment
Monster Mouth Mug With Tiny Teeth Details
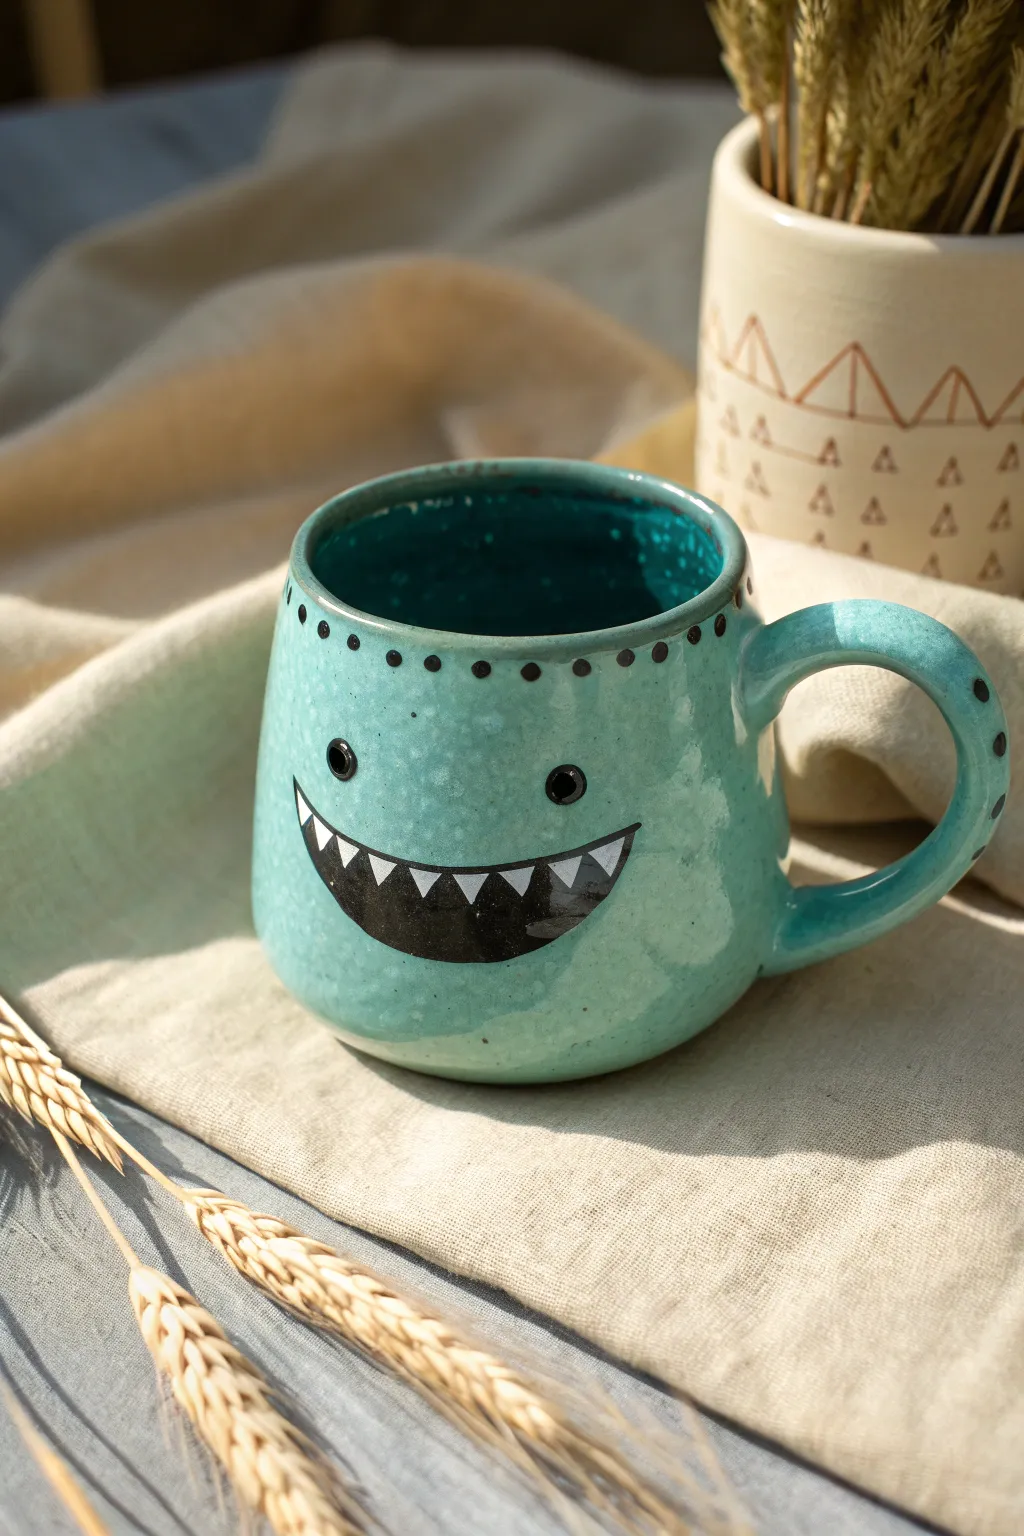
This whimsical turquoise mug brings a playful bite to your morning coffee with its charmingly toothy grin. Featuring a vibrant speckled glaze and hand-painted monster details including a jagged smile and dotted rim, it’s the perfect blend of spooky and sweet.
Detailed Instructions
Materials
- Stoneware clay body
- Pottery wheel or rolling pin (for hand-building)
- Rib tool
- Needle tool
- Loop tool (for trimming)
- Sponge
- Black underglaze
- White underglaze
- Turquoise speckled glaze (glossy)
- Small fine-point paintbrush
- Medium round paintbrush
- Clear glaze (optional, depending on turquoise glaze transparency)
Step 1: Forming the Mug Body
-
Prepare your clay:
Begin by wedging about 1 to 1.5 pounds of stoneware clay to remove air bubbles and ensure a consistent texture. -
Throw or build the cylinder:
Whether throwing on the wheel or slab-building, form a cylinder that is slightly rounded at the bottom for a friendly, organic shape. Aim for straight walls that gently curve outward near the base. -
Smooth the surface:
Use a rib tool to compress the walls and ensuring the surface is totally smooth, which is crucial for the face detail later. -
Refine the rim:
Chamois or sponge the rim to make it rounded and comfortable for drinking. It should be slightly distinct from the walls. -
Dry to leather hard:
Allow the cylinder to dry slowly until it reaches a leather-hard state where it is firm but can still be joined.
Clean Teeth Tip
If painting white triangles over black is difficult, outline the teeth first and fill the black around them. It avoids smudging layers.
Step 2: Adding the Handle and Trimming
-
Trim the foot:
Flip the mug over and trim a clean foot ring using a loop tool to define the bottom edge. -
Pull a handle:
Pull a strap of clay for the handle. For this design, a simple C-shape works best. Let it stiffen slightly so it holds its arch. -
Attach the handle:
Score and slip both the attachment points on the mug and the handle ends. Press firmly to join, smoothing the seams with your thumb or a modeling tool. -
Clean up surfaces:
Wipe down the entire piece with a damp sponge to remove any joining slip or rough spots before the decoration phase.
Wax Resist Issues
If glaze sticks to your wax resist, your wax might be too thin. Apply a second coat or wipe the glaze off very immediately with a damp sponge.
Step 3: Painting the Monster Details
-
Draft the face:
Once the mug is bone dry (or leather hard depending on your underglaze preference), lightly pencil in the smile and eyes. The pencil marks will burn off in the kiln. -
Paint the background smile:
Using black underglaze and a medium brush, fill in the crescent shape of the mouth. You will likely need two coats for solid opacity. -
Add the teeth:
I prefer to wait until the black underglaze is dry to the touch, then use white underglaze and a fine-point brush to carefully paint small, sharp triangles along the top and bottom of the black mouth. -
Dot the eyes:
Paint two small black circles for eyes just above the corners of the mouth. Keep them simple and wide-set for a cute look. -
Decorate the rim:
Using the back end of a small paintbrush dipped in black underglaze, stamp evenly spaced dots just below the rim of the mug. Continue this dot pattern down the spine of the handle. -
Bisque fire:
Load the mug into the kiln and fire to cone 04 (or your clay’s specific bisque temperature) to intricate the underglaze permanently.
Step 4: Glazing and Final Fire
-
Wax resist face details:
Apply wax resist carefully over the black eyes, the entire mouth area, and the rim dots. This prevents the top glaze from obscuring your design. -
Dip in turquoise glaze:
Once the wax is dry, dip the entire mug into a glossy turquoise speckled glaze. Shake gently to remove excess drips. -
Wipe the resist areas:
Use a damp sponge to gently wipe any beads of glaze off the waxed areas (eyes, mouth, dots) to ensure the black and white details pop through clearly. -
Final glaze fire:
Fire the mug to cone 6 (or the temperature required by your stoneware and glaze combination) to finish the piece.
Enjoy sipping from your friendly little monster creation once it has cooled completely from the kiln
Charm-Covered Clay Mug With Mini Sculpted Toppers
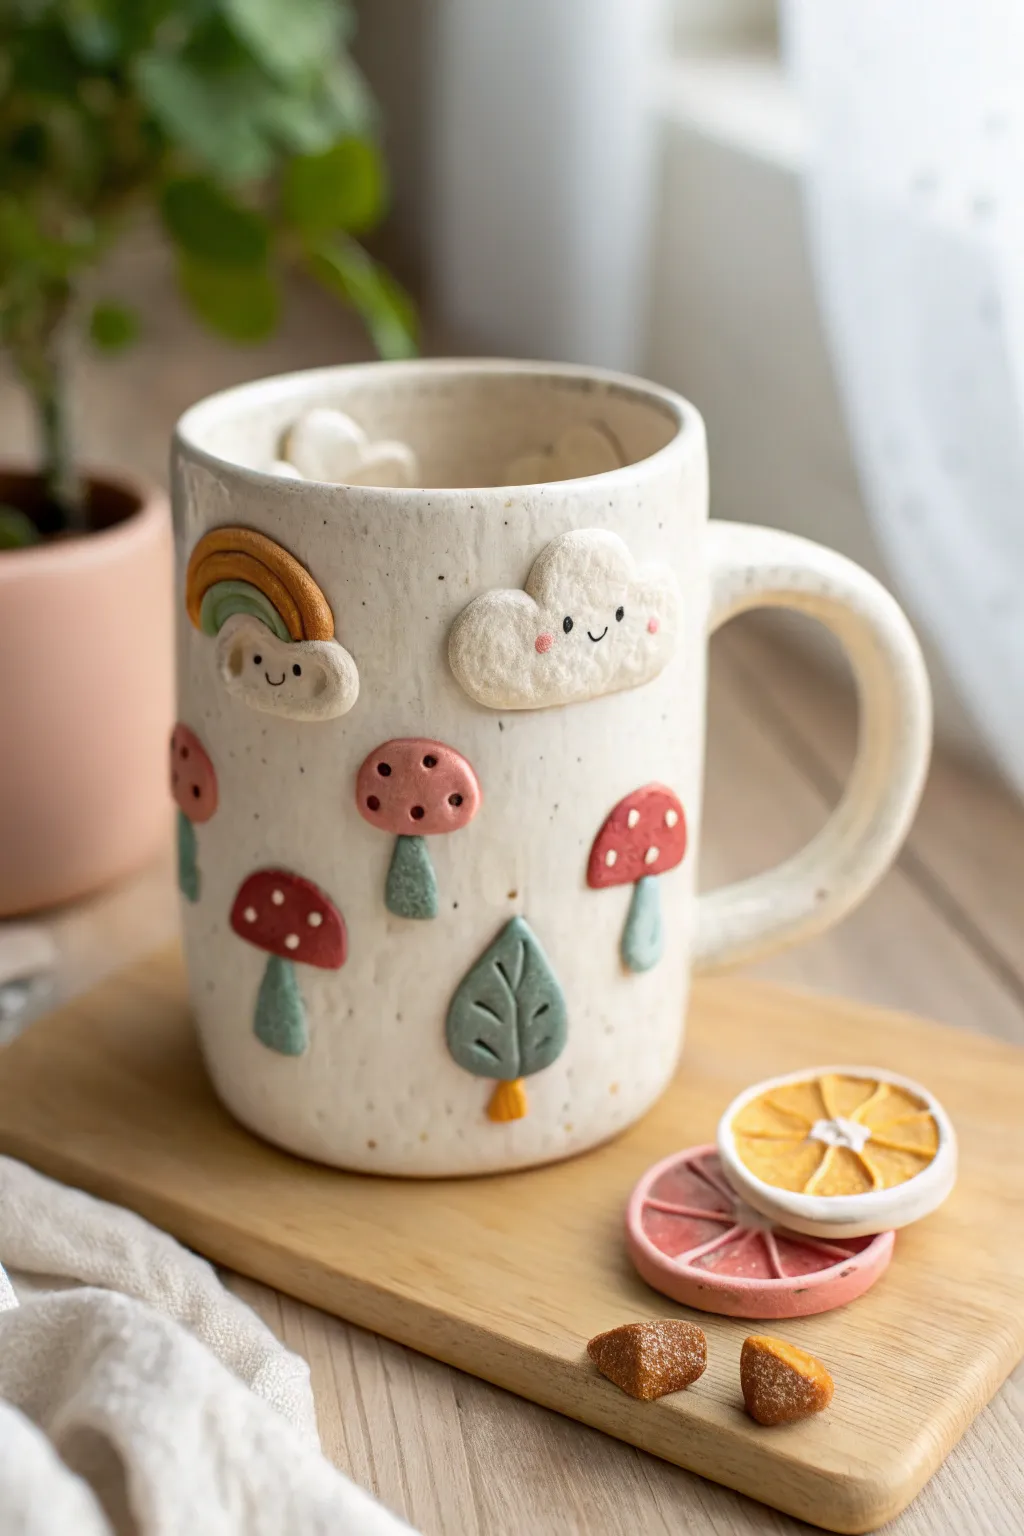
Bring a touch of enchanted forest magic to your morning coffee with this delightful speckled mug. Featuring raised, hand-sculpted motifs of smiling clouds, rainbows, and mushrooms, this project turns a simple vessel into a tactile storytelling piece.
How-To Guide
Materials
- White stoneware or polymer clay (if not making functional ware)
- Speckled clay body (or speckles to mix in)
- Ceramic tools (needle tool, rib, scoring tool)
- Underglazes (red, pink, teal, green, mustard yellow, black)
- Clear food-safe glaze
- Slip (liquid clay)
- Paintbrushes (fine detail)
- Rolling pin
- Sponge
Step 1: Building the Mug Base
-
Prepare the Clay Slab:
Begin by rolling out a slab of speckled white stoneware clay to an even thickness of about 1/4 inch. If you are using plain clay, wedge in some speckles beforehand to get that lovely organic texture. -
Cut the Body:
Measure and cut a rectangle that corresponds to your desired mug height and circumference. Don’t forget to account for shrinkage if you are firing this piece. -
Create a Cylinder:
Score and slip the short ends of your rectangle, then join them together to form a cylinder. Gently smooth the seam inside and out with a rib tool so it becomes invisible. -
Attach the Base:
Cut a circle for the bottom of the mug. Score and slip the bottom edge of your cylinder and the edge of the circle, then press them firmly together. Use a wooden tool to blend the clay upwards to seal the join. -
Add the Handle:
Pull or roll a coil of clay to create a sturdy C-shaped handle. Attach it securely to the side of the mug using the score-and-slip method, blending the connection points until seamless.
Charms Popping Off?
If charms detach during drying, you likely didn’t score deeply enough. Re-attach bone-dry clay with ‘paper clay slip’ (slip mixed with toilet paper pulp) for a stronger bond.
Step 2: Sculpting the Charms
-
Shape the Mushrooms:
Roll tiny balls of clay and flatten them slightly into domes for mushroom caps. Create separate small stems that widen slightly at the base. Score and slip to attach the caps to the stems directly on the mug surface. -
Create the Clouds:
Form fluffy cloud shapes by pressing together three or four small spheres of clay, then flattening the back. Smooth the front seams so it looks like one puffy unit. -
Form the Rainbows:
Roll very thin coils of clay. Arch them over one another to create rainbow shapes. I like to trim the bottom edge flat with a knife for a clean look before attaching. -
Add Foliage:
Shape a simple teardrop for a leaf. Flatten it gently and use a needle tool to impress a central vein and smaller branching veins. -
Attach Motifs:
Arrange your charms around the mug. Score the back of each charm and the spot on the mug where it will go. Apply slip and press firmly to ensure no air is trapped behind them. -
Detail Faces:
Using a very fine needle tool, gently poke two eyes and a smile into the clouds and the mini cloud at the end of the rainbow. Be gentle so you don’t distort the shape.
Step 3: Glazing and Finishing
-
Bisque Fire:
Allow the mug to dry very slowly to prevent cracks around the added charms. Once bone dry, bisque fire the piece according to your clay’s instructions. -
Apply Underglaze Colors:
Paint the raised charms with 2-3 coats of underglaze. Use dusty pink and red for mushroom caps, teal for stems and leaves, and mustard yellow for rainbow stripes. -
Add Fine Details:
Using a super-fine brush or an underglaze applicator bottle, paint tiny black dots for eyes and thin lines for mouths on the happy faces. -
Dot the Texture:
Add small white dots to the mushroom caps and pink cheeks to the clouds to enhance the whimsical style. -
Clear Glaze:
Dip the entire mug into a clear, food-safe glaze. Wipe the bottom of the mug clean with a damp sponge. -
Final Fire:
Glaze fire the piece to the temperature required for your specific clay body and glaze combination.
Pro Tip: Drying Speed
Dry this mug under a loose plastic bag for the first 2-3 days. This slows evaporation, ensuring the thick charms and thin mug walls dry at the same rate to prevent cracking.
Enjoy sipping from your cheerful new creation, knowing it’s truly one of a kind