Whenever I’m staring at a lonely cup and saucer from a thrifted set, my brain instantly goes to tea cup decor instead of “missing piece.” These tea cup decoration ideas are the kind of playful, doable projects I’d happily set out on a studio table for a weekend of relaxed making.
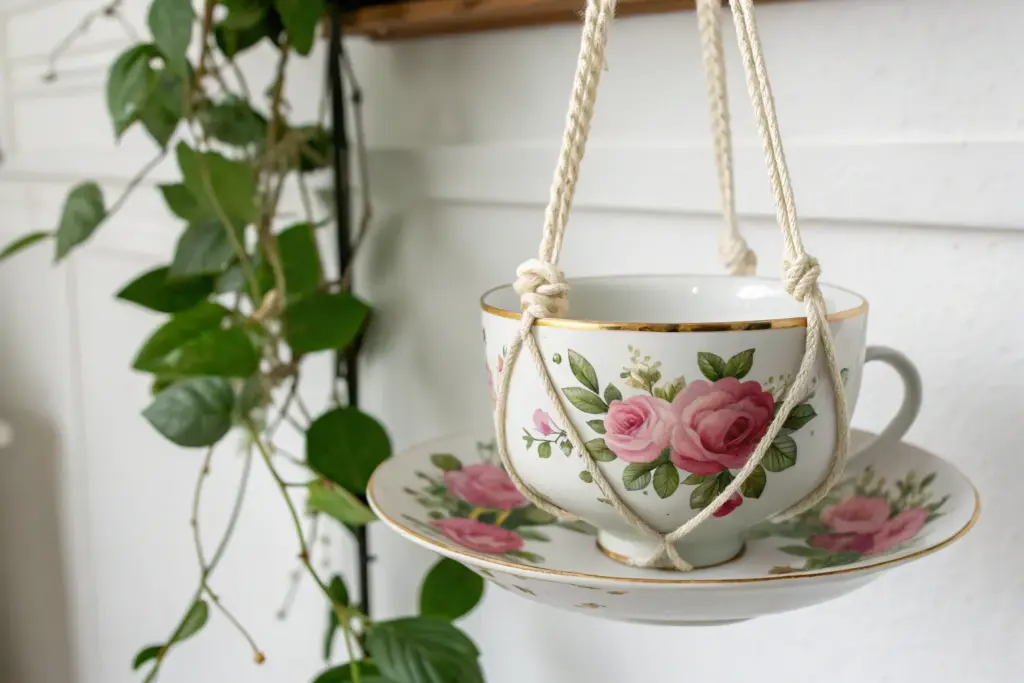
Classic Teacup Planter With Succulents

Transform a classic floral teacup into a delightful miniature garden that brings a touch of whimsy to any windowsill. This project combines the delicate beauty of vintage china with rugged succulents and polished stones for a timeless, elegant display.
Step-by-Step Tutorial
Materials
- Vintage floral teacup and matching saucer
- Small drill with a ceramic/glass bit (optional but recommended)
- Small layer of activated charcoal
- Cactus or succulent potting soil mix
- Two small succulents (e.g., Echeveria, Haworthia)
- Small white and beige gravel/grit
- Large polished white decorative stones
- Medium grey smooth river stones
- Small pink decorative accent stones
- Spoon or miniature gardening tools
Step 1: Preparation & Drainage
-
Prepare the vessel:
Begin by cleaning your vintage teacup and saucer thoroughly with warm soapy water to remove any dust or residue, then dry them completely. -
Add drainage (method A):
If you have a drill and a ceramic bit, carefully drill a small hole in the bottom center of the cup. Place a piece of masking tape over the spot first to prevent the glaze from cracking. -
Add drainage (method B):
If you prefer not to drill, you must create a drainage layer. Place a half-inch layer of small pebbles or activated charcoal at the very bottom of the cup to keep roots out of standing water. -
Fill with soil:
Spoon in your cactus or succulent potting mix until the cup is about three-quarters full. I like to gently tap the cup on the table to settle the soil without packing it too tightly.
Watering Woes
If you didn’t drill a hole, be extremely careful not to overwater. The cup has no escape for liquid, and soggy soil will rot succulent roots quickly.
Step 2: Planting
-
Unhouse the plants:
remove your succulents from their nursery pots. Gently massage the root ball to loosen the soil and remove excess dirt, being careful not to damage the delicate roots. -
Arrange the main succulent:
Create a small divot in the soil on the right side of the cup. Place your larger rosette-style succulent (like the Echeveria shown) into the spot, tilting it slightly outward. -
Add the companion plant:
On the left side, plant the darker, spikier succulent (like a Haworthia). Nestle it close to the first plant so they look cozy together, but ensuring their leaves aren’t crushing each other. -
Secure the roots:
Add small amounts of soil around the roots of both plants, pressing down gently with your thumb or the back of a spoon to secure them in place. -
Check the level:
Ensure the soil level is slightly below the rim of the teacup to leave enough room for your decorative top dressing later.
Placement Pro Tip
Rotate your teacup a quarter turn every week. Since the light comes from one direction on a windowsill, this ensures your succulents grow straight and even.
Step 3: Decoration & Styling
-
Apply base gravel:
Using a small spoon, carefully pour the small beige and white gravel over the exposed soil. Cover the surface completely so no dark soil is visible. -
Position feature stones:
Place two smooth, white stones prominently near the front center of the arrangement. These act as a bright focal point against the green leaves. -
Add color accents:
Tuck a few small pink decorative stones near the darker succulent on the left and behind the feature stones to pick up the pink tones in the teacup’s floral pattern. -
Texture with grey stones:
Add a medium-sized grey stone towards the back or side to provide visual contrast against the white pebbles and bright green foliage. -
Place the saucer accents:
Set the finished teacup onto its matching saucer. Place one medium grey stone and one white stone on the saucer itself, just in front of the cup handle, to tie the whole scene together. -
Final clean up:
Use a soft, clean paintbrush or a puff of air to gently dusting any stray soil particles or gravel dust off the succulent leaves. -
Initial watering:
Wait about a week before watering to allow any broken roots to callus over, then water sparingly using a pipette or squeeze bottle directly onto the soil, avoiding the leaves.
Now you have a charming living ornament ready to brighten up your favorite sunny nook


Fresh Flower Teacup Arrangement for a Table
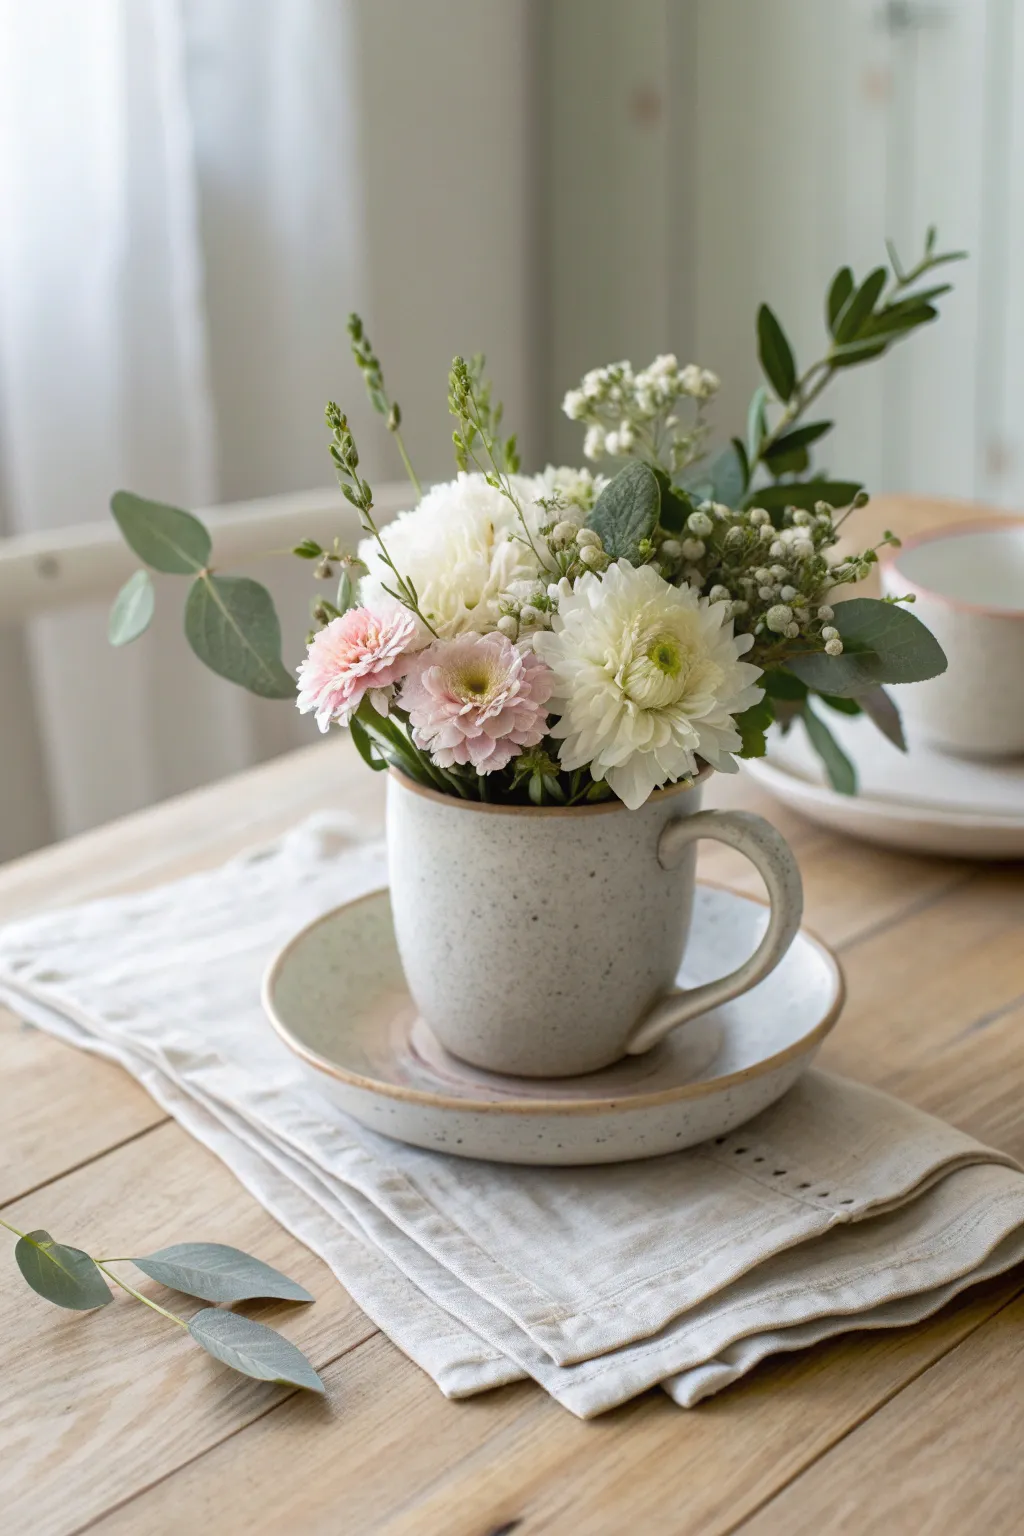
Transform a simple ceramic teacup into a charming centerpiece bursting with soft textures and delicate blooms. This arrangement pairs rustic speckled stoneware with pink and white flowers for a look that feels fresh, airy, and effortlessly elegant.
Detailed Instructions
Materials
- Speckled ceramic teacup and matching saucer
- Floral foam (wet foam) or a small flower frog
- Sharp floral shears or scissors
- Small pink chrysanthemums or dahlias
- Creamy white chrysanthemums
- Baby’s breath or waxflower (small white filler)
- Fresh silver dollar eucalyptus stems
- Small green vertical accents (like seeded grass or veronica)
- Water
Step 1: Preparing the Vessel
-
Soak the foam:
Cut a small block of floral foam that will fit snugly inside your teacup. Soak it in a bowl of water until it is fully saturated and sinks to the bottom naturally—don’t force it down, or dry pockets may remain. -
Fit the foam:
Place the saturated foam into the teacup. It should be secure and rise just slightly above the rim of the cup, which allows stems to be inserted from the sides for a fuller look. -
Secure the base:
If the foam feels loose, you can use a small strip of waterproof floral tape across the top to anchor it to the rim, though a tight cut usually suffices for small cups. -
Add water:
Pour a little extra water into the cup around the edges of the foam to ensure maximum hydration for your stems.
Keep it Fresh
To double the lifespan of your arrangement, place the entire teacup in the fridge overnight. The cool air keeps blooms crisp much longer.
Step 2: Building the Green Foundation
-
Trim the eucalyptus:
Select fresh eucalyptus stems with nice movement. Cut them into shorter pieces, roughly 4-6 inches long, stripping off leaves that would fall below the foam line. -
Establish the shape:
Insert the eucalyptus sprigs around the perimeter of the foam first. I personally angle these downward slightly so they drape over the edge of the cup, softening the ceramic rim. -
Add height:
Place one or two taller sprigs of eucalyptus or the vertical grassy stems towards the back-left or center to create a subtle asymmetric shape. -
Create a nest:
Continue filling in with small greenery pieces until the mechanics (the foam) are largely hidden from view, creating a lush green nest for your blooms.
Foam Crumbled?
If your foam degrades or crumbles from too many re-insertions, switch to a ‘frog’ or use clear waterproof tape to make a tic-tac-toe grid over the cup rim instead.
Step 3: Adding the Focal Flowers
-
Cut the main blooms:
Take your largest white chrysanthemum. Cut the stem at a sharp 45-degree angle so the flower head will sit just an inch or two above the rim. -
Place the centerpiece:
Insert this main white bloom slightly off-center to the right. It should face forward and slightly upward. -
Add pink accents:
Trim two small pink chrysanthemums or dahlias to varying lengths. Nestled them next to the white bloom, placing one slightly lower to create depth. -
Cluster the flowers:
Group these main flowers relatively close together rather than scattering them evenly; this clustering technique mimics how flowers grow in nature and looks more modern.
Step 4: Detailed Fillers & Finishing
-
Insert vertical texture:
Insert thin, tall stems of green buds or grass sticking straight up near the back. This breaks up the roundness of the flower heads. -
Add delicate filler:
Cut small sprigs of baby’s breath or waxflower. Tuck these into any gaps between the larger flowers to add textural contrast and lightness. -
Check the profile:
Spin the saucer slowly to view the arrangement from all sides. Fill any visible ‘holes’ in the back with extra greenery or small filler flowers. -
Clean up:
Gently wipe away any pollen or water droplets from the delicate speckled glaze of the cup and saucer. -
Final hydration:
Use a small vessel with a spout to trickle a tiny bit more water into the cup to top it off now that the stems are displacing space. -
Staging:
Place the finished teacup on its matching saucer. For the full effect shown in the image, set it atop a folded textured linen napkin.
Now you have a serene, garden-inspired accent perfect for a bedside table or breakfast tray


Cozy Teacup Candle With a Soft Glow
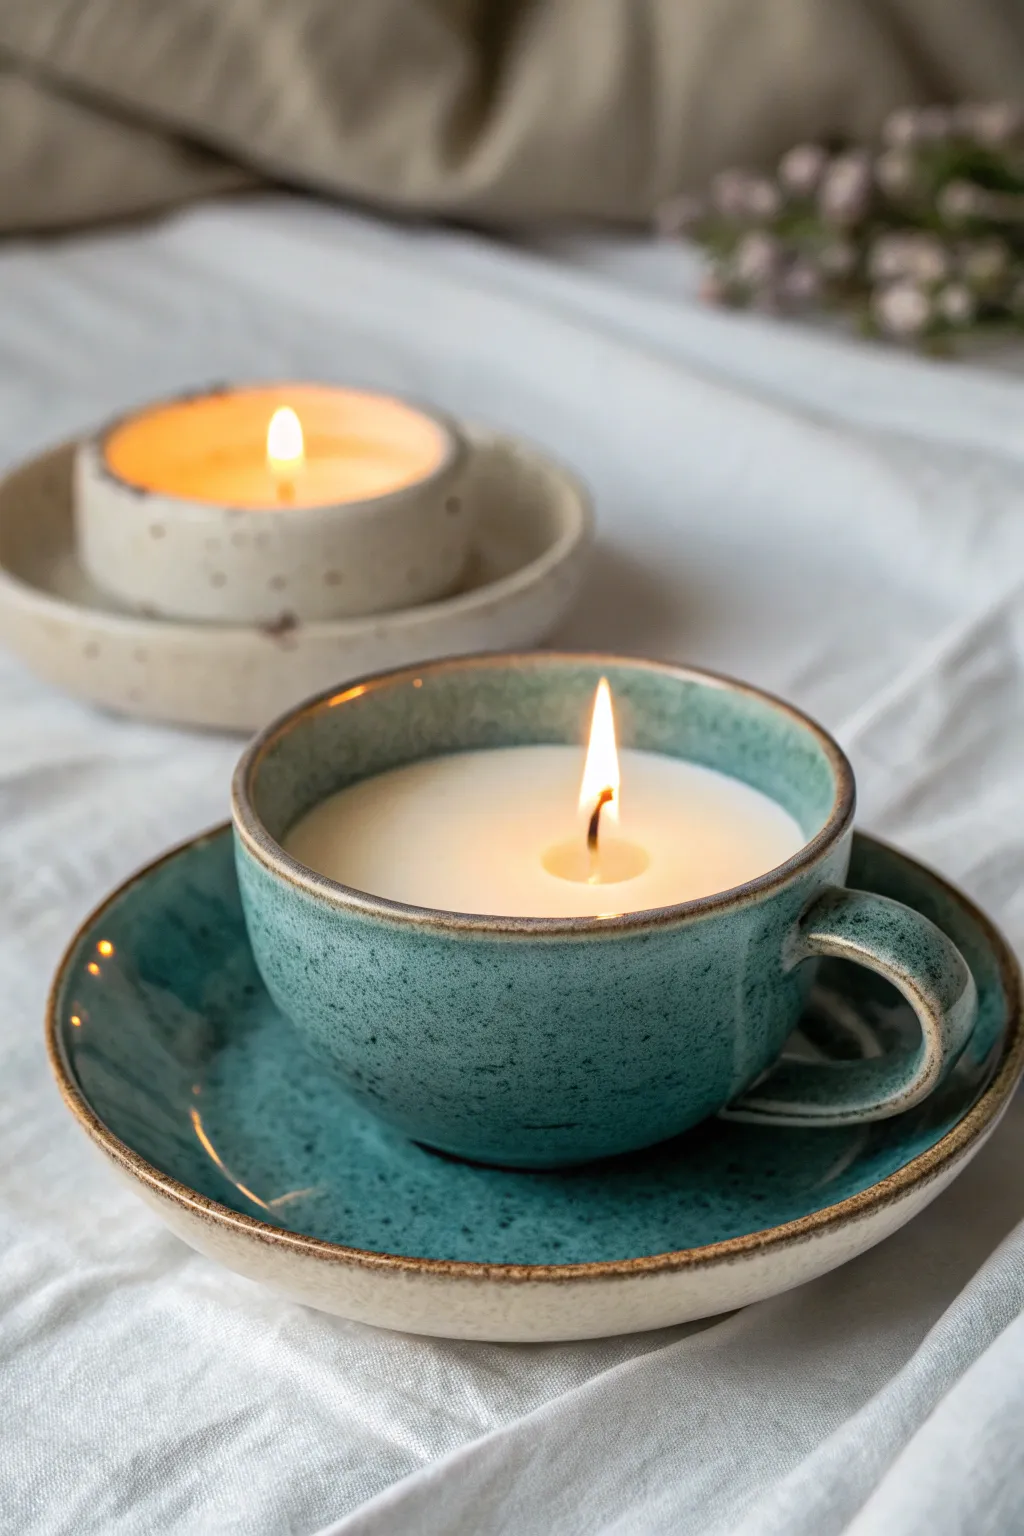
Transform a charming ceramic teacup into a source of warm, flickering light with this simple candle-making project. The result is a stunning piece of functional decor where the speckled teal glaze contrasts beautifully with the creamy white wax.
Step-by-Step Tutorial
Materials
- Vintage or ceramic teacup with matching saucer (speckled teal glaze preferred)
- Soy wax flakes (approximately 2 cups, depending on cup size)
- Pre-tabbed candle wick suitable for the cup’s diameter
- Wick sticker or hot glue gun
- Wooden wick holder or chopsticks to center the wick
- Double boiler or heat-safe pouring pitcher
- Fragrance oil (optional, vanilla or linen works well)
- Thermometer
- Scissors
Step 1: Preparation
-
Clean the Vessel:
Before beginning, ensure your chosen tea cup is thoroughly clean and completely dry. Any dust or residue can prevent the wick sticker from adhering properly to the bottom of the cup. -
Secure the Wick:
Peel the backing off a wick sticker or apply a small dot of hot glue to the bottom of the metal wick tab. Press this firmly into the absolute center of the teacup’s base. -
Center the Wick:
Keep the wick standing straight up by threading it through a wooden wick holder resting across the cup’s rim. If you don’t have a holder, I like to sandwich the wick between two chopsticks secured with rubber bands on the ends.
Step 2: Melting and Mixing
-
Measure the Wax:
Estimate the volume of your teacup and measure out almost double that amount in dry wax flakes, as they shrink when melted. Place the flakes into your pouring pitcher. -
Heat the Wax:
Place your pitcher into a double boiler setup on the stove. Heat the water gently, allowing the wax to melt slowly until it becomes completely liquid and transparent. -
Monitor Temperature:
Use your thermometer to check the wax temperature. You are generally aiming for around 185°F (85°C) to ensure it is hot enough to bind with fragrance but not so hot that it discolors. -
Add Fragrance:
If you are scenting your candle, remove the wax from the heat source now. Stir in your chosen fragrance oil gently for about two minutes to ensure it is totally incorporated.
Fixing Frosting
If white crystal patterns appear on the wax top or sides (common with soy), gently blast the surface with a heat gun on low to re-melt the very top layer, then let it cool slowly.
Step 3: Pouring and Setting
-
Cool Slightly:
Let the wax cool down to approximately 135°F (57°C) before pouring. Pouring at a cooler temperature helps prevent sinkholes and ensures smooth adhesion to the ceramic sides. -
First Pour:
Slowly and steadily pour the wax into the teacup, being careful not to splash the sides. Stop pouring when the wax is about a half-inch from the rim. -
Reserve Some Wax:
Don’t clean your pitcher yet. Save a very small amount of wax in the bottom; you might need this later to fix any surface imperfections. -
Initial Cure:
Allow the candle to sit undisturbed at room temperature. Avoid moving the saucer or cup during this time, as vibrations can cause ripples in the drying surface. -
Check for Sinkholes:
As the wax hardens, it may shrink slightly around the wick. If you see a dip or a hole near the center, remelt your reserved wax and carefully pour a thin layer on top to level it out. -
Full Cure:
Let the candle cure completely for at least 24 hours. For soy wax, waiting a few days longer often results in a better scent throw when burning. -
Trim the Wick:
Once fully cured, remove the wick holder. Use scissors to trim the wick to about 1/4 inch above the wax surface to ensure a clean, safe burn.
Decorate the Saucer
To elevate the presentation, use ceramic paint markers to add gold detailing or personal messages along the rim of the saucer to match the warm glow of the flame.
Enjoy the gentle ambiance your new custom candle brings to your favorite relaxation spot


Teacup Display on Shelves With Layered Patterns
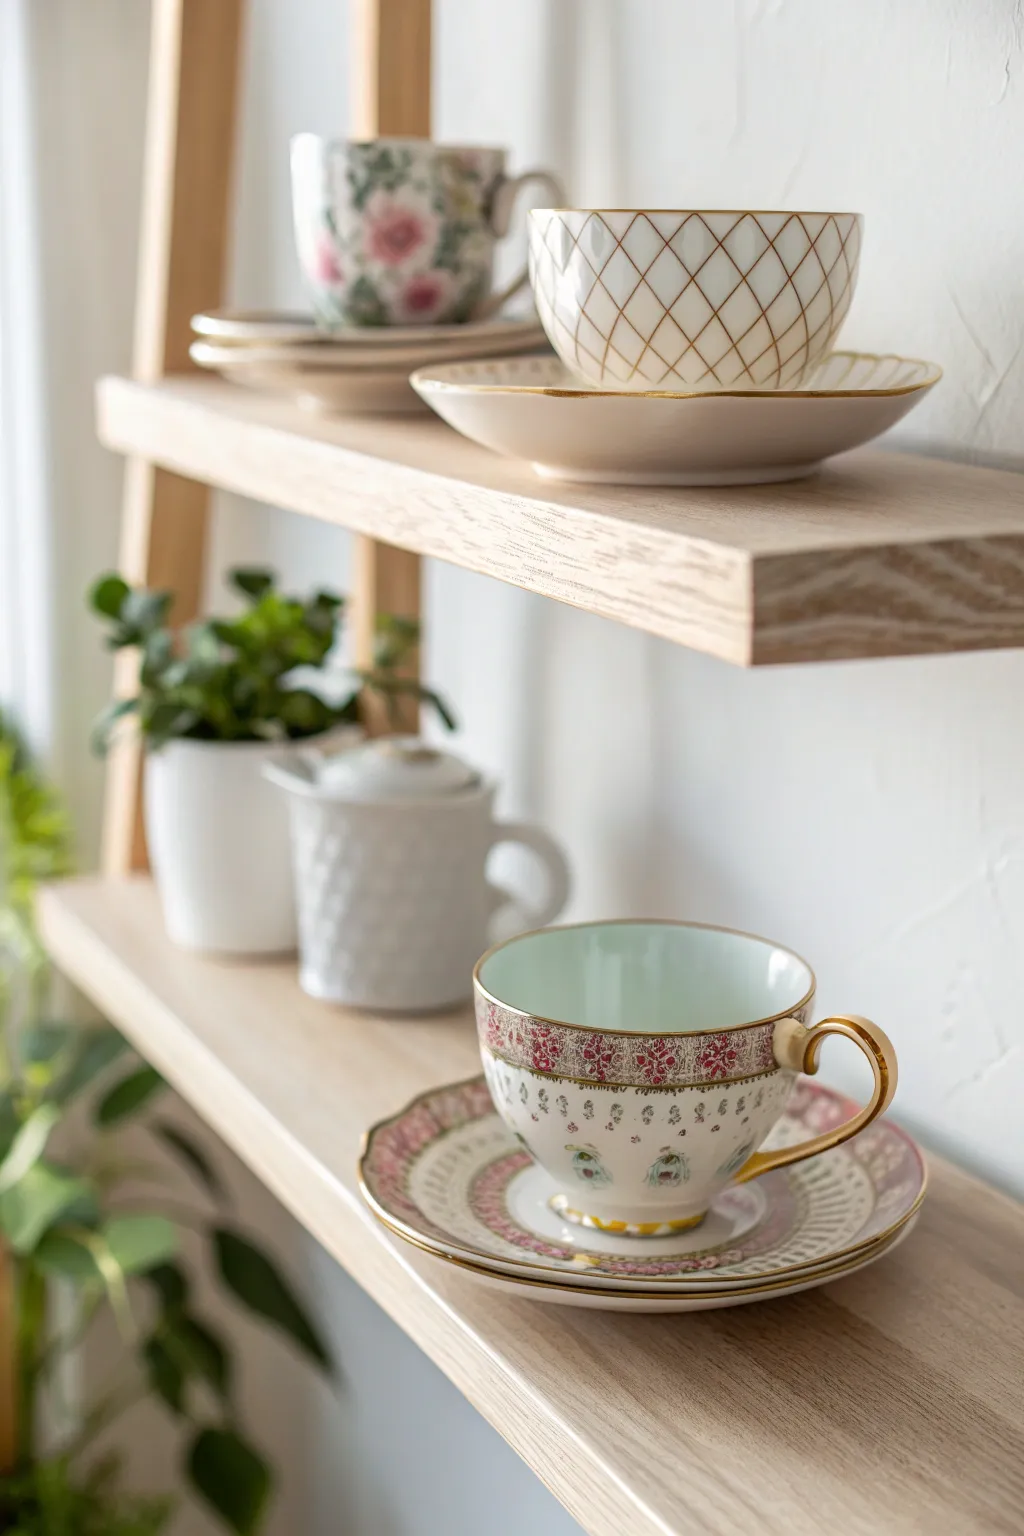
Transform a simple wooden ladder shelf into a stunning showcase for your mismatched china with this layered display technique. By carefully balancing patterns, heights, and greenery, you will create a vignette that feels curated yet cozy.
Detailed Instructions
Materials
- Light wood ladder shelf (freestanding or leaning)
- Variety of vintage teacups and saucers (floral, geometric, china)
- Small potted indoor plants (peperomia or succulents work well within white pots)
- White ceramic creamer or sugar bowl
- Microfiber cleaning cloth
- Museum wax or clear adhesive putty (optional for stability)
Step 1: Preparation & Selection
-
Assess your shelf:
Begin by cleaning your wooden ladder shelf thoroughly. Ensure the light wood finish is dust-free and dry, as this neutral backdrop is crucial for making the china patterns pop. -
Curate your collection:
Gather a selection of teacups and saucers. You don’t need a matching set; in fact, this look relies on mixing aesthetics. Look for one distinct floral pattern, one geometric grid pattern (like the gold trellis cup shown), and one with intricate borders. -
Group by height:
Separate your items into two groups: ‘statement pieces’ for the foreground and ‘supporting actors’ for the background. Note which shelves are at eye level, as these will hold your most detailed pieces.
Wobbly stacks?
If stacked saucers slide, place a small felt dot or a loop of masking tape between them. This creates friction without damaging the fragile glaze or gold rims.
Step 2: Styling the Upper Shelf
-
Place the anchor saucers:
On the top shelf, place a stack of two plain or subtly rimmed saucers on the left side. This slight elevation adds visual weight without distracting from the cups. -
Position the geometric cup:
Set your geometric or trellis-patterned teacup on its matching saucer toward the right-center of the shelf. This brings a modern, structured element to the display. -
Add the floral contrast:
Place a floral teacup on the stack of saucers you created on the left. The floral softness perfectly balances the rigid lines of the geometric cup next to it. -
Check the spacing:
Ensure there is about two to three inches of breathing room between the two cup arrangements so the shelf doesn’t look cluttered.
Step 3: Styling the Middle & Lower Shelves
-
Introduce greenery:
On the shelf below, place a small potted green plant on the far left. A white pot is essential here to keep the look cohesive and bright. -
Add a neutral bridge:
Place a white ceramic creamer or textured sugar bowl next to the plant. This white-on-white layering provides a visual ‘rest’ for the eye between the busy patterned shelves. -
Highlight the star piece:
On the lowest or most prominent shelf, position the most intricate teacup and saucer set you have—like the wide-brimmed floral and gold-rimmed cup shown in the image. -
Angle the handle:
Turn the handle of this main cup outward to the right at a 45-degree angle. This small detail makes the setup look inviting, as if ready to be picked up. -
Layer the bottom saucers:
If you have extra saucers, place the main cup on a double stack. The bottom saucer should ideally have a contrasting pattern (like the pink border shown) to frame the cup.
Seasonal Switch
Change the vibe instantly by swapping the green plant for seasonal flora—try dried lavender in autumn or a small red poinsettia during the holidays.
Step 4: Final Touches
-
Secure the delicate items:
If your shelf is in a high-traffic area, I like to apply a tiny pea-sized amount of museum wax to the bottom of the saucers to prevent accidental slips. -
Adjust lighting:
Ensure the shelf is positioned near natural light but out of direct harsh sun, which can fade vintage china patterns over time. -
Review the balance:
Step back five feet. Check if the visual weight feels distributed—the heavy plant on the left should be balanced by the delicate china on the right.
Your beautiful, tiered display is now ready to spark conversation and admiration during your next tea time

The Complete Guide to Pottery Troubleshooting
Uncover the most common ceramic mistakes—from cracking clay to failed glazes—and learn how to fix them fast.
Teacup Pincushion for a Sweet Craft Corner
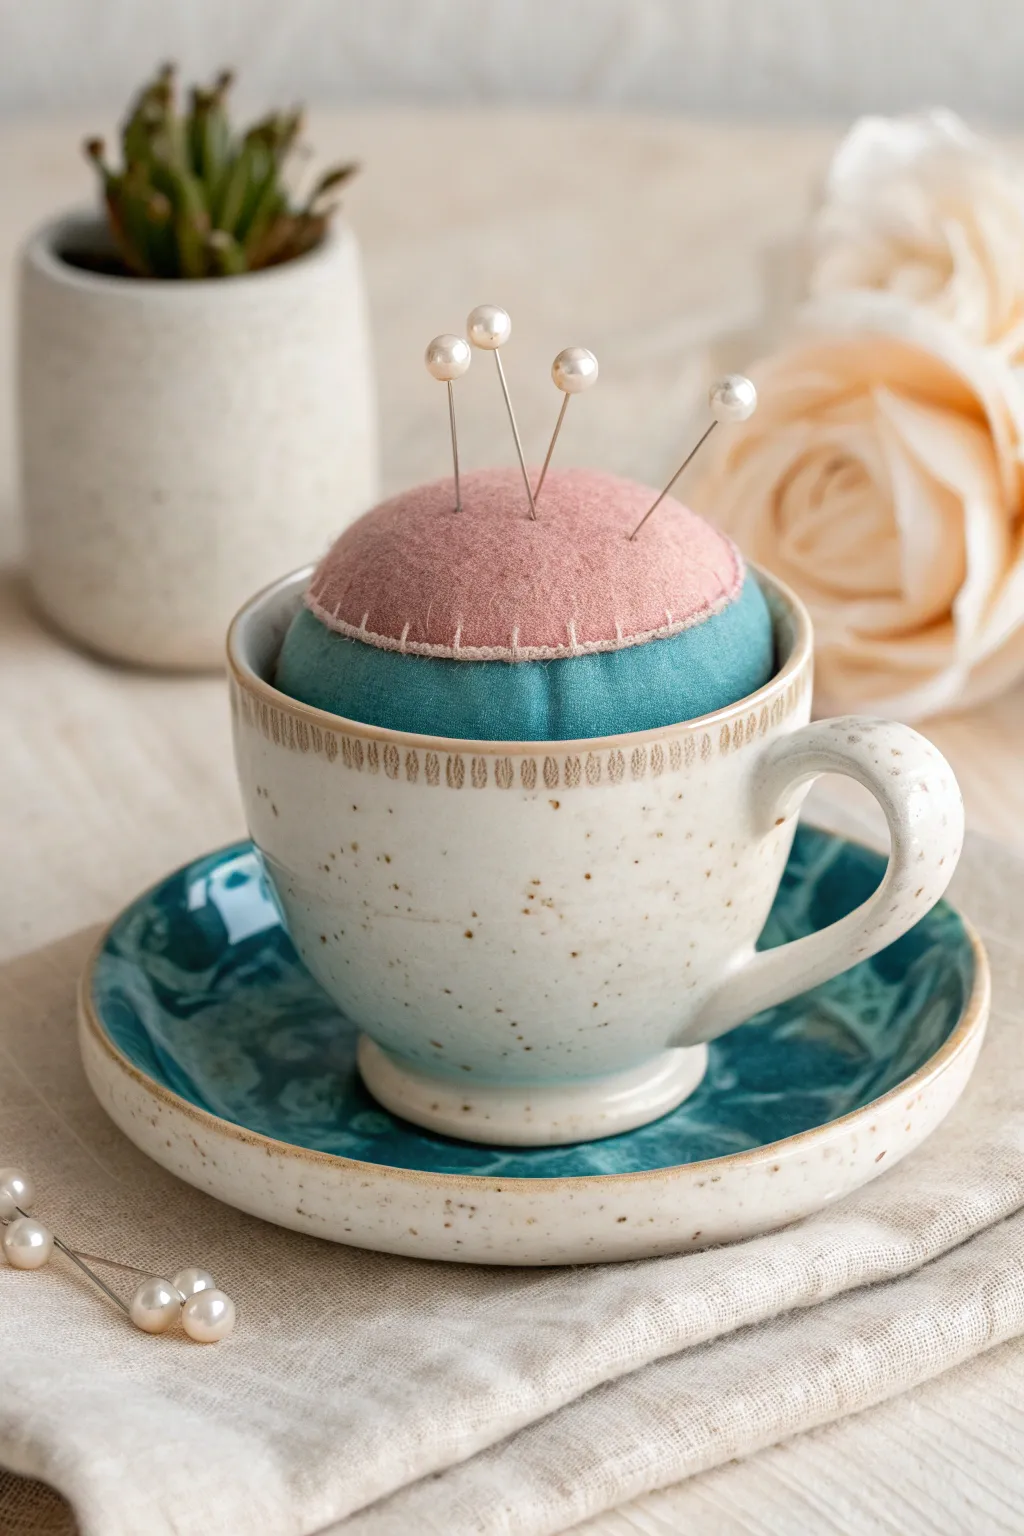
Transform a beloved solitary teacup into a practical sewing accessory with this delightful pincushion project. The soft combination of dusty pink felt and teal fabric nestled inside a speckled ceramic cup creates a cozy, cottage-core aesthetic perfect for any craft room.
Step-by-Step Guide
Materials
- Speckled ceramic teacup and matching saucer
- Dusty pink wool felt
- Teal cotton or linen fabric
- Polyester fiberfill stuffing
- Coordinating embroidery floss (cream or beige)
- Embroidery needle
- Sewing thread (matching teal)
- Sewing needle
- Fabric scissors
- Hot glue gun and glue sticks
- Cardboard (scrap piece)
- Pearl-headed pins (for decoration)
Step 1: Preparing the Base
-
Measure the Cup:
Start by measuring the diameter of your teacup’s opening. You want the pincushion to sit snugly inside but puff out over the rim slightly. -
Cut the Top Circle:
Cut a circle from the dusty pink wool felt. It should be approximately 3/4 the diameter of your cup opening—this will form the decorative ‘cap’ of the cushion. -
Cut the Bottom Fabric:
Cut a significantly larger circle from the teal fabric, roughly double the diameter of the cup opening. This extra material allows for the puffiness of the stuffing.
Stuffing Secret
Pack the fiberfill much tighter than you think you need to. A firm cushion keeps pins sharp and holds them securely.
Step 2: Assembling the Cushion
-
Create a Gathering Stitch:
Thread a sewing needle with strong thread. Sew a running stitch around the outer edge of the large teal circle, leaving long tails on both ends for gathering later. -
Form the Ball:
Place a generous handful of polyester fiberfill into the center of the teal circle. Pull the thread tails to gather the fabric around the stuffing, creating a tight ball. -
Test the Fit:
Before closing it completely, test the fit by placing the ball into your teacup. Add or remove stuffing until you achieve a firm, domed shape that sits at the desired height. -
Secure the Base:
Once happy with the size, pull the gathering threads tight and knot them securely. Stitch back and forth across the gathered opening to lock the stuffing in place. -
Add Stability:
Cut a small circle of cardboard that fits into the bottom of the cup. Glue this to the bottom (gathered side) of your fabric ball to give it a flat, stable surface for gluing later.
Weighted Base Upgrade
Add a small bag of crushed walnut shells or sand at the bottom of the cushion before sealing for extra weight and stability.
Step 3: Attaching the Decorative Top
-
Position the Felt:
Center the pink felt circle on top of the teal stuffed ball. Pin it in place temporarily to ensure it stays centered while you work. -
Prepare Embroidery Floss:
Thread your embroidery needle with the cream or beige floss. I usually separate the strands and use three for a delicate but visible stitch. -
Stitch the Perimeter:
Sew a decorative running stitch around the edge of the pink felt circle, attaching it securely to the teal base underneath. Keep your stitch lengths even for a polished look. -
Remove Pins:
Once you have stitched all the way around, remove the temporary positioning pins.
Step 4: Final Assembly
-
Apply Glue:
Apply a generous amount of hot glue to the bottom of the cushion (on the cardboard base) and around the lower sides of the fabric ball. -
Insert Cushion:
Quickly press the cushion into the teacup, ensuring the pink cap is perfectly level. Hold it firmly for a minute while the glue sets. -
Secure the Saucer:
For a permanent display, place a ring of hot blue on the bottom of the teacup and press it firmly onto the center of the saucer. -
Add Pins:
Finish by inserting several pearl-headed pins into the top at varying angles to mimic the look in the reference photo.
Place this darling creation on your work table and enjoy a touch of vintage elegance every time you reach for a pin
Mini Teacup Fairy Garden Diorama
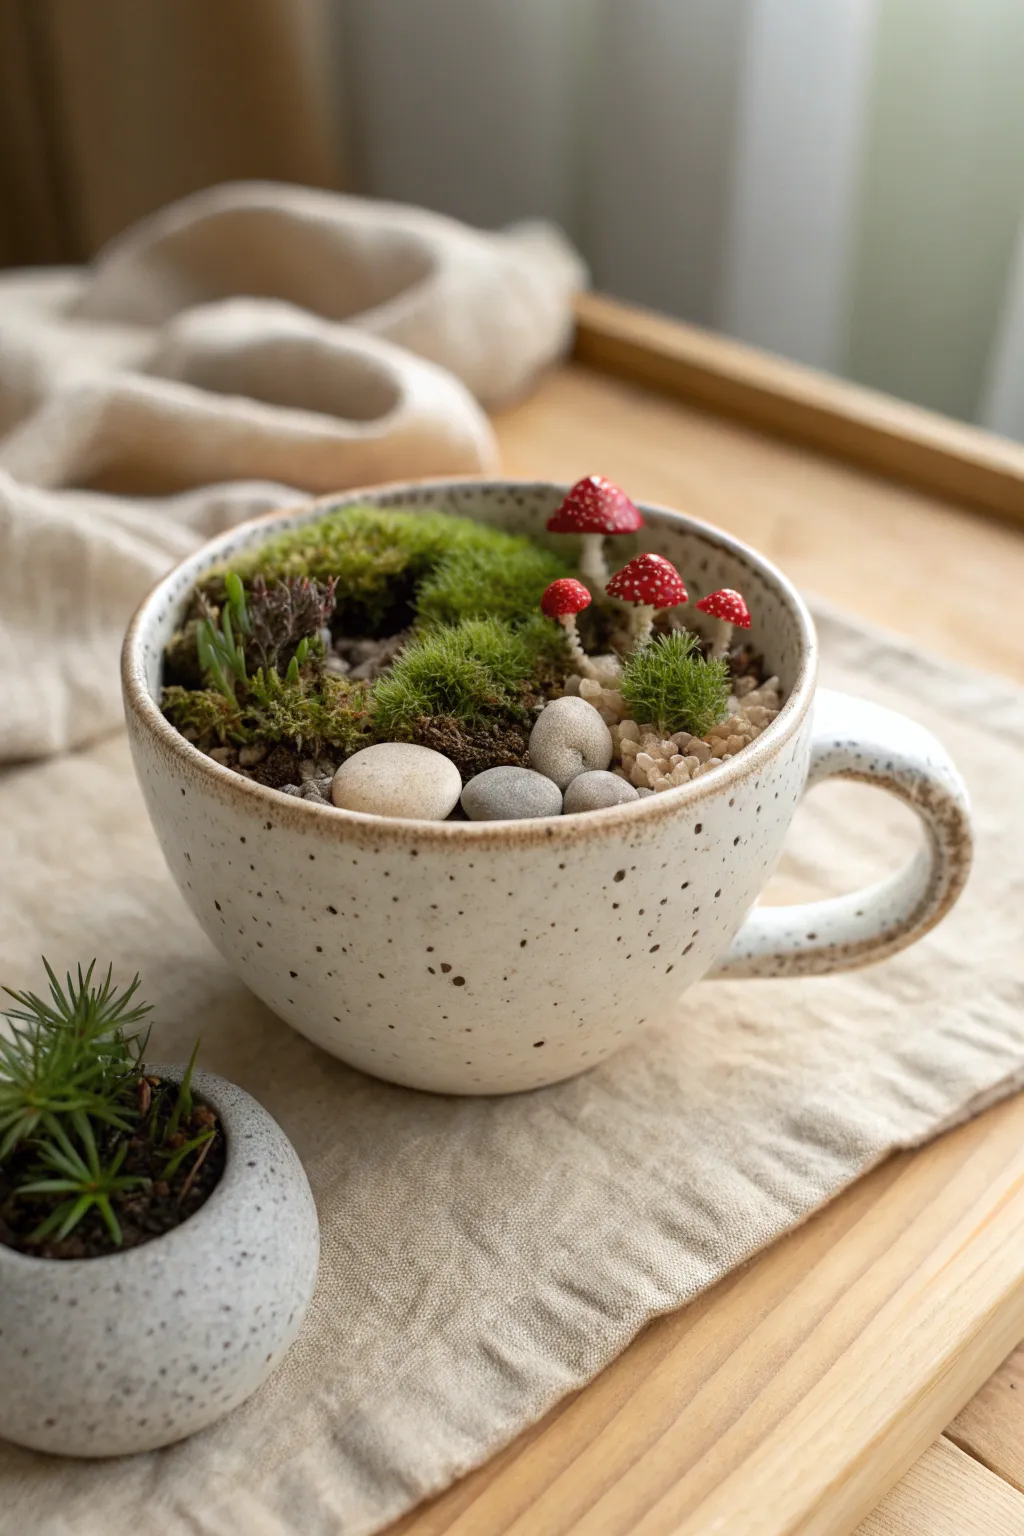
Transform a simple ceramic mug into a lush, miniature forest floor scene perfect for a desk or windowsill. This tiny diorama features velvety moss, delicate succulents, and enchanting red toadstools nestled among river stones.
How-To Guide
Materials
- Wide-rimmed speckled ceramic teacup (cream or beige)
- Small gravel or potting grit (drainage layer)
- Activated charcoal (optional, for soil freshness)
- Succulent potting mix or terrarium soil
- Live cushion moss (Leucobryum glaucum) or preserved moss patches
- Small succulent cutting (like Sedum or Crassula)
- Miniature red mushroom figurines (polymer clay or plastic)
- Smooth river pebbles (grey and beige tones)
- Beige decorative sand or fine grit
- Tweezers
- Small spoon or scoop
- Spray bottle with water
Step 1: Base Preparation
-
Clean the Container:
Start by thoroughly cleaning your speckled ceramic teacup with soap and water to ensure no residue harms the plants. Dry it completely. -
Add Drainage Layer:
Since teacups rarely have drainage holes, pour a layer of small gravel or potting grit into the bottom. Aim for about half an inch of depth. -
Charcoal Addition:
Sprinkle a thin layer of activated charcoal over the gravel. This is a crucial step for closed-bottom containers as it keeps the soil sweet and prevents mold. -
Soil Layering:
Spoon in your succulent potting mix. Fill the cup until it is about three-quarters full, leaving enough rim space for the decorative elements. -
Contour the Landscape:
I like to push the soil slightly higher towards the back of the cup to create a gentle slope. This adds visual depth to the tiny scene.
Soil Moisture Tip
Since there is no drainage hole, water very sparingly. Misting the moss daily is usually safer than pouring water, which can rot roots.
Step 2: Planting & Scenery
-
Place Key Moss:
Take a large clump of cushion moss. Gently tease the roots apart slightly and nestle it firmly into the back-left quadrant of the soil, pressing down edges. -
Add Texture:
Place a second, smaller patch of slightly different moss texture near the center. Variety in green hues makes the scene look more natural. -
Plant the Succulent:
Using your tweezers, dig a tiny hole on the far left edge. Insert your small succulent sprig, ensuring the roots are covered, and backfill gently. -
Create a Path:
On the right side of the cup where the soil is exposed, carefully spoon in some beige decorative sand or fine grit to create a sandy clearing. -
Position River Stones:
Select three or four smooth, rounded pebbles. Nest them into the foreground, right at the transition between the moss and the sandy clearing. -
Secure the Stones:
Push the stones slightly into the soil so they look like partially buried boulders rather than objects just sitting on the surface.
Magical Glow Up
Hide a tiny waterproof LED fairy light under the moss layer or behind the mushrooms to give your garden an ethereal glow at night.
Step 3: Finishing Touches
-
Insert Mushrooms:
Take your miniature red mushroom figurines. Push their stems into the soil behind the pebble cluster on the right side. -
Vary Height:
Arrange the mushrooms so they stand at different heights and angles, mimicking how fungi grow in the wild. -
Fill Gaps:
Inspect the edges. If you see bare soil you don’t want, use small pinches of sand or tiny moss fragments to fill the gaps near the rim. -
Clean Up:
Use a soft, dry paintbrush to gently sweep any stray dirt particles off the moss and the inside rim of the teacup. -
Initial Watering:
Mist the moss heavily with your spray bottle, but aim to keep the succulent relatively dry. Avoid pouring water directly into the cup.
Place your finished teacup garden in bright, indirect light to keep the moss vibrant and green