Clay rings are the quickest way to turn a little lump of clay into a wearable mood—bold, colorful, and totally you. I’m sharing my favorite clay ring ideas that range from classic chunky bands to playful mini-sculptures you’ll want to stack on every finger.
Pastel Swirl Marble Clay Rings
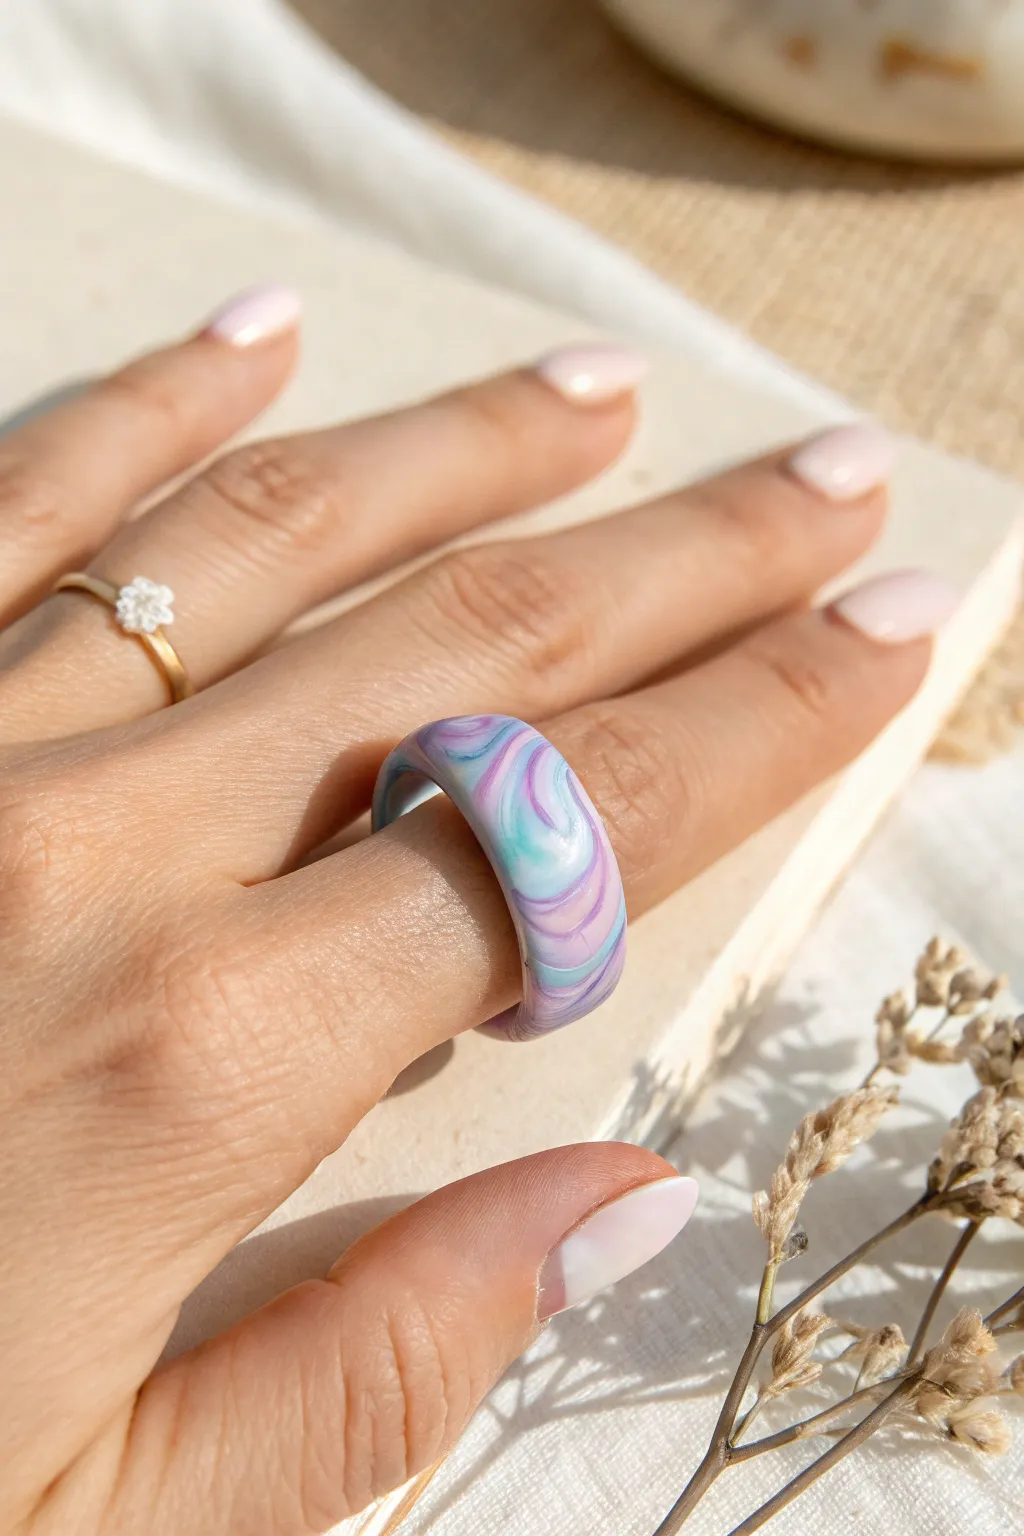
Create a whimsical accessory with this tutorial for a pastel swirled polymer clay ring. The design features soft ribbons of lavender, baby blue, and white marbled together to create a fluid, dreamlike pattern that looks elegant on any hand.
How-To Guide
Materials
- Polymer clay (white, lavender purple, baby blue, light turquoise)
- Clay roller or pasta machine
- Tissue blade or X-Acto knife
- Ring sizing mandrel (or a lipstick tube/thick marker)
- Small circle cutter (optional)
- Fine-grit sandpaper (400-1000 grit)
- Oven and baking tray
- Gloss glaze or UV resin (optional for shine)
Step 1: Preparing the Clay
-
Condition the white base:
Start by thoroughly conditioning a medium-sized chunk of white polymer clay until it is soft and pliable. This will act as the bulk of your mixture to keep the colors pastel. -
Prepare colored clays:
Condition smaller amounts of lavender, baby blue, and light turquoise clay. You want about one part color to three parts white to achieve the soft look in the photo. -
Create snakes:
Roll each color, including the white, into long, thin snakes or ropes of equal length.
Muddy Colors?
If your colors turn gray or muddy, you over-mixed. Stop twisting earlier next time. The distinct lines come from partial mixing, not full blending.
Step 2: Marbling the Pattern
-
Twist the colors:
Gather all your clay snakes together into one bundle. Twist them tightly together like a candy cane. -
Fold and roll:
Fold the twisted rope in half and roll it out into a snake again. Repeat this twisting and folding process 3-4 times. -
Check the swirl:
Stop mixing before the colors muddy together; distinct lines of color should still be visible. -
Form a ball:
Roll the mixed clay into a smooth ball. -
Flatten the slab:
Using a roller or pasta machine, flatten the ball into a strip about 3-4mm thick. Check the pattern to ensure you have the desired swirl effect.
Super Smooth Seams
Cut the overlapping ends of the ring band at a 45-degree angle. This creates more surface area for the clay to bond, making the seam stronger and invisible.
Step 3: Shaping the Ring
-
Cut the strip:
Use your tissue blade to cut a clean, straight strip of clay from your slab. The width should be roughly 1cm, or your desired ring band width. -
Size the band:
Wrap the strip around your ring mandrel or sizing tool to measure the correct fit. I find it helpful to make it slightly larger than my finger size to account for minor shrinkage. -
Join the seam:
Cut the excess clay where the ends overlap. Push the two ends together gently and smooth the seam with your finger or a clay tool until it disappears. -
Round the edges:
While still on the mandrel, gently tap the edges of the ring to round them off slightly, creating a comfortable ‘comfort fit’ profile rather than sharp corners.
Step 4: Baking and Finishing
-
Bake firmly:
Follow the temperature instructions on your specific brand of clay. Bake the ring while strictly adhering to the recommended time (usually 15-30 minutes). -
Cool down:
Let the ring cool completely before removing it from the mandrel or tray to prevent warping. -
Sand for smoothness:
Using fine-grit sandpaper, gently sand the inside and outside of the ring under running water to remove any fingerprints or rough spots. -
Buff or glaze:
For a matte finish like stone, buff vigorously with a denim cloth. For the high-gloss look in the photo, apply a thin layer of gloss glaze or UV resin and cure.
Now you have a custom piece of jewelry that mimics the beauty of polished agate.


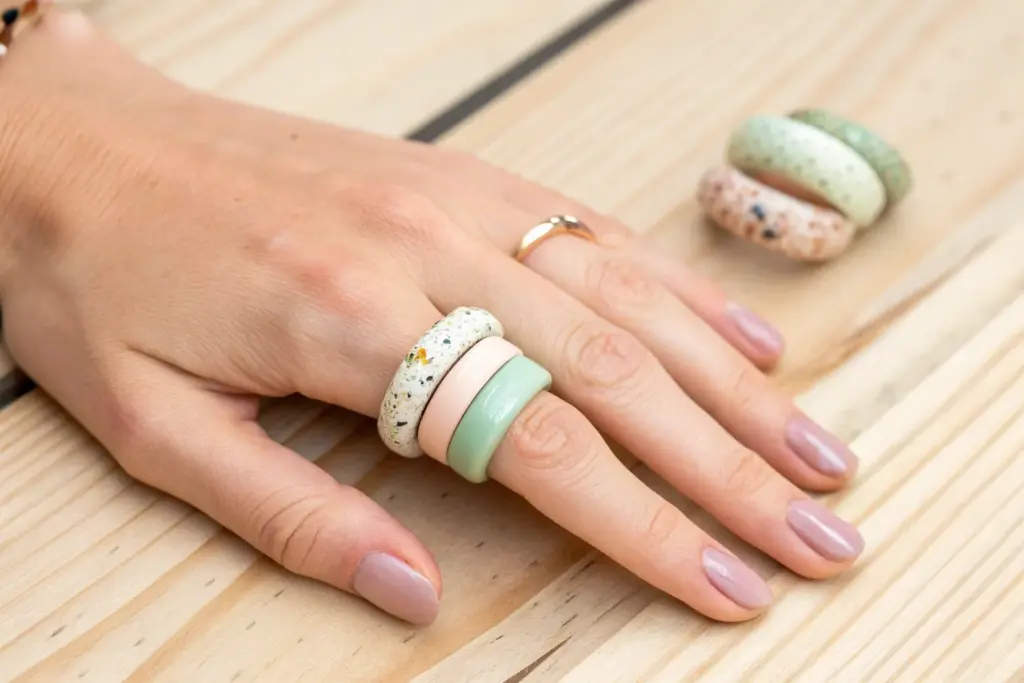
Terrazzo Speckle Statement Rings
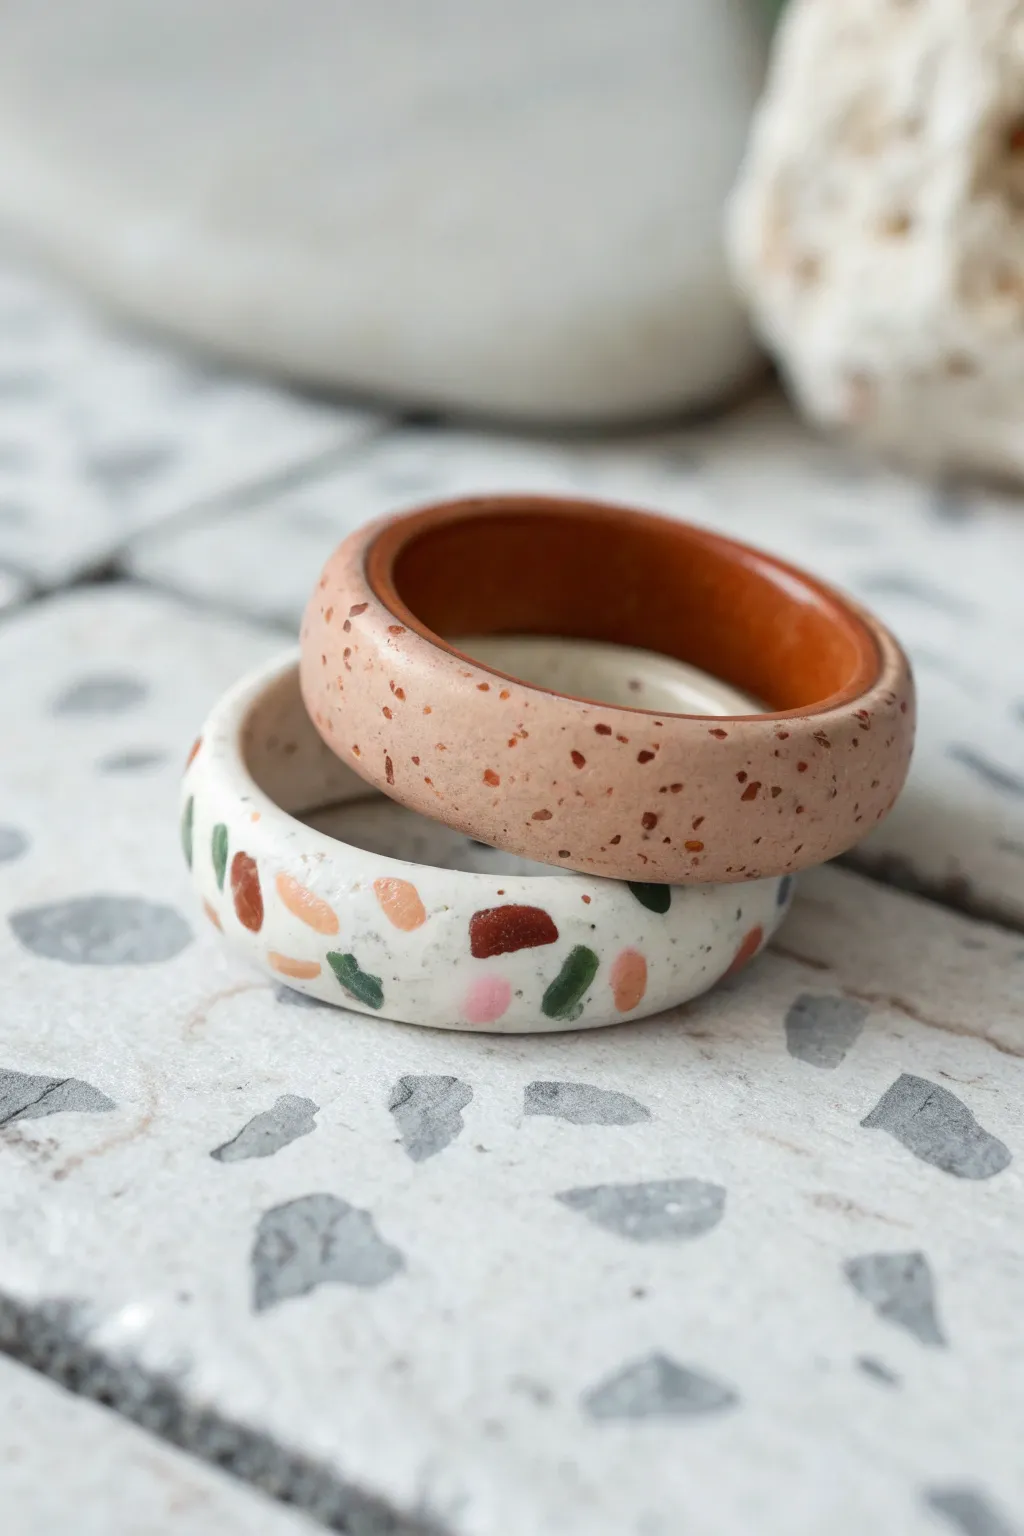
Embrace the trendy terrazzo aesthetic with these bespoke polymer clay rings, featuring two distinct styles: a fine warm sand speckle and a bold, colorful chunk terrazzo. These statement pieces combine earthy tones with playful pops of color for a modern, architectural look.
Step-by-Step
Materials
- Polymer clay (colors: white, tan/beige, dark brown, green, terracotta/rust, pink)
- Acrylic rolling pin or clay machine
- Tissue blade or X-Acto knife
- Ring mandrel (metal or wood)
- Oven for baking polymer clay
- Fine grit sandpaper (400 to 1000 grit)
- Heavy grit sandpaper (optional, for shaping)
- Baking tile or parchment paper
- UV resin or polyurethane gloss varnish (optional for shine)
Step 1: Creating the Speckle Ring
-
Prepare the base color:
Start by conditioning a mix of beige and a tiny dot of translucent clay to create a stony, natural base. Roll this out into a medium-thick sheet. -
Create the speckle mix:
Finely chop up very small shavings of dark brown and rust-colored clay until they resemble coarse pepper or sand. I find using a rigid blade and a chopping motion works best here. -
Embed the speckles:
Sprinkle your ‘clay pepper’ over the beige sheet. Gently roll over the sheet with your acrylic roller to press the speckles flat into the surface, embedding them completely. -
Form the inner band:
Condition a piece of solid terracotta/rust clay and roll it into a strip. Wrap this strip around your ring mandrel to size the interior of the ring, smoothing the seam where the ends meet. -
Apply the outer layer:
Cut a strip from your speckled beige sheet. Carefully wrap this over the terracotta inner band on the mandrel, trimming away excess and blending the seam for a continuous look. -
Shape the profile:
Using your fingers and the flat surface of your work area, gently shape the ring to have a slightly domed or flat exterior, ensuring the layers are bonded.
Uneven Seams?
If your ring seams are visible after baking, use a bit of liquid polymer clay as a grout before baking, or sand the area heavily post-bake to disguise the join line.
Step 2: Creating the Terrazzo Ring
-
Prepare terrazzo chips:
Roll out very thin sheets of green, rust, brown, and pink clay. Bake these sheets for just 5-10 minutes to partially harden them, making them easier to chop. -
Chop the chips:
Once cooled, chop the thin baked sheets into irregular geometric shards. Aim for varied sizes to mimic real stone aggregate. -
Mix the base:
Condition a block of white polymer clay. Mix your chopped colored shards into the raw white clay, folding it over a few times to distribute them randomly without crushing them. -
Form the ring log:
Roll the terrazzo-filled clay into a thick snake or log. The chips will be hidden inside at this stage, which is perfectly normal. -
Size the ring:
Wrap the log around your mandrel at the desired ring size. Cut the ends at an angle to create a seamless join, blending the clay together until the line disappears. -
Shave to reveal:
This is the magic step. Once the ring shape is smooth, use your tissue blade to gently shave off thin slices from the surface. This reveals the colorful chips hidden inside the white clay.
Gold Flake Glam
Mix small pieces of gold or silver leaf into your terrazzo clay base before rolling. The metallic flecks add a luxurious, high-end stone effect to the final piece.
Step 3: Baking and Finishing
-
Bake carefully:
Place your rings (still on the mandrel if it is oven-safe, or carefully removed) on a baking tile. Bake according to your clay package instructions, usually around 275°F (135°C) for 30-45 minutes. -
Cool down:
Allow the rings to cool completely before handling. Polymer clay is slightly soft when hot and achieves its full hardness only after cooling. -
Sand for smoothness:
Dip the ring and sandpaper in water. Sand the surface vigorously with wet/dry sandpaper, starting with a lower grit to smooth bumps and moving to higher grits for a polished feel. -
Buff to shine:
Rub the sanded rings with a piece of denim or a soft cloth to bring out a natural sheen. -
Seal (optional):
If you prefer a glossy, ceramic-like finish, apply a thin coat of UV resin or polyurethane varnish to protect the surface and make the terrazzo colors pop.
Wear your new stone-effect rings stacked together or hand them out as stylish, modern gifts


Daisy and Tiny Flower Topper Rings
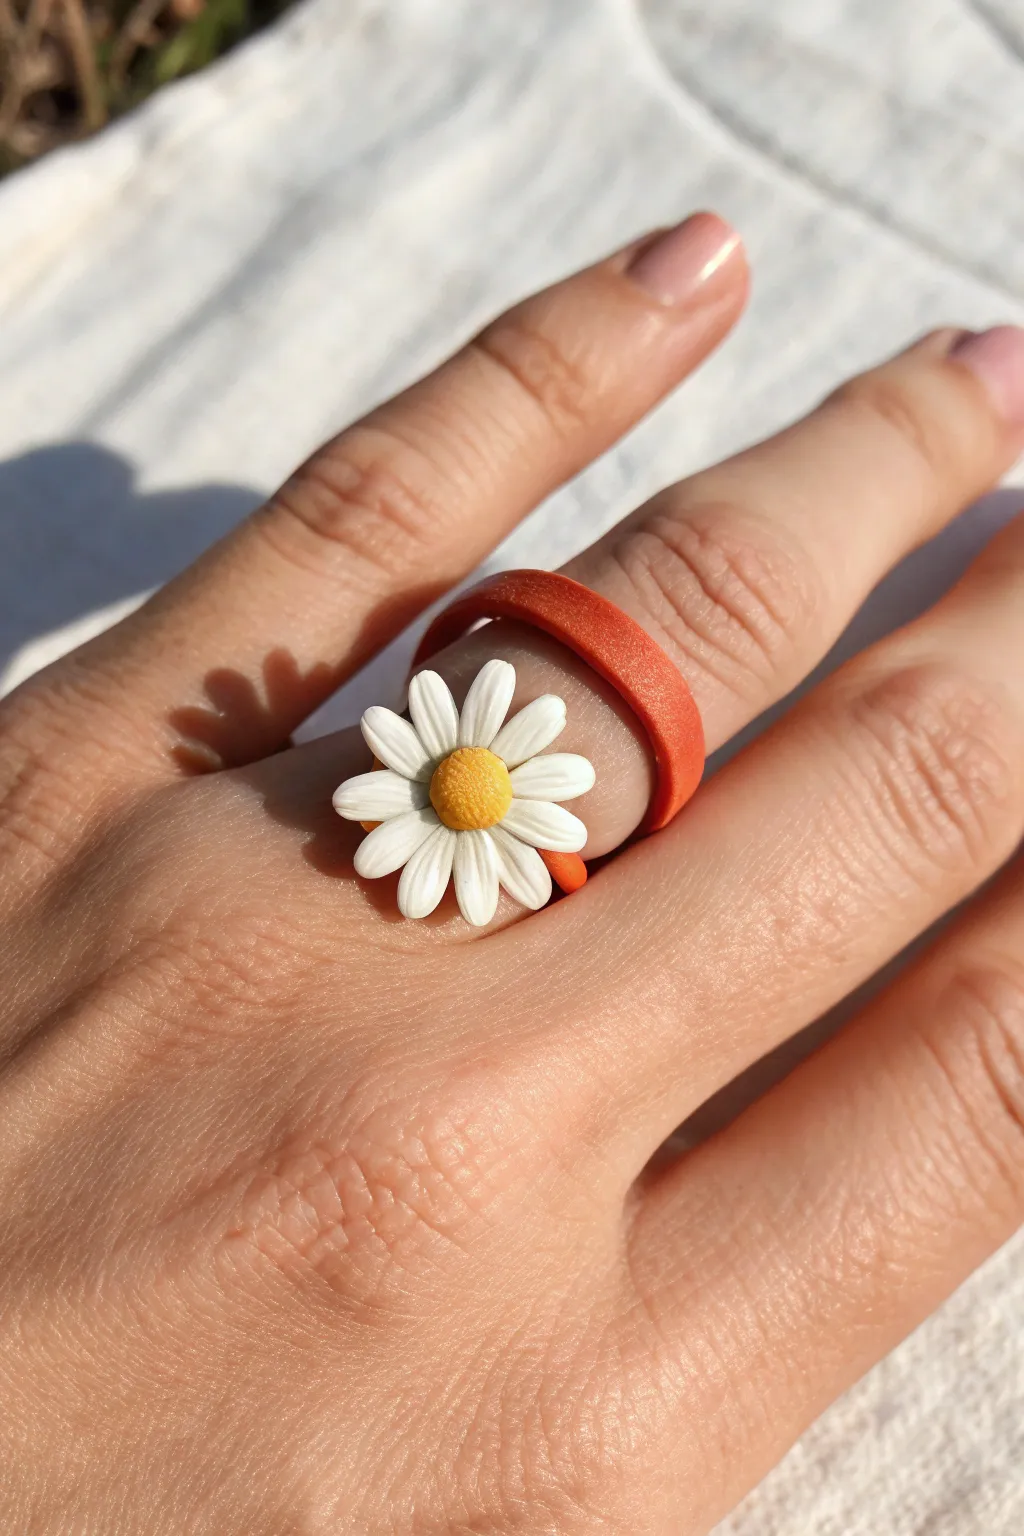
Brighten up your jewelry collection with this cheerful polymer clay ring featuring a classic white daisy topper. The contrast between the warm orange band and the crisp white petals creates a fresh, retro-inspired look that captures the essence of summer.
How-To Guide
Materials
- Polymer clay (Orange, White, Yellow)
- Ring mandrel (or a lipstick tube/dowel of appropriate size)
- Acrylic rolling pin or pasta machine
- Craft knife or scalpel
- Strip cutter or ruler
- Needle tool or toothpick
- Dotting tool (small)
- Baking tile or parchment paper
- Liquid polymer clay (translucent or white)
- Oven
Step 1: Forming the Band
-
Condition the orange clay:
Begin by thoroughly conditioning your orange polymer clay until it is soft and pliable. This prevents cracks from forming when you bend it into a circle. -
Roll out a strip:
Roll the clay into a flat sheet, approximately 2-3mm thick. You want it sturdy enough to hold its shape but not too bulky on the finger. -
Cut the band:
Use a strip cutter or a ruler and craft knife to cut a clean, even strip. I generally aim for about 5-6mm in width for a comfortable fit. -
Size the ring:
Wrap the strip around your ring mandrel at the desired size mark. Cut the excess clay where the ends meet, creating a butt joint rather than an overlap for a smoother finish. -
Smooth the seam:
Gently gently blend the clay across the seam with your finger or a smoothing tool until the join is invisible. Double-check the size on the mandrel.
Droopy Petals?
If the daisy petals droop down the sides of the band too much during baking, prop them up with tiny bits of tissue paper or cornstarch to maintain their shape.
Step 2: Creating the Daisy Topper
-
Make the center:
Roll a small ball of yellow clay, slightly flattening it into a dome shape. Keep it proportionate to the size of daisy you want. -
Texture the center:
Using a needle tool or a very small toothbrush, gently stipple the surface of the yellow dome to mimic a real flower’s pollen texture. -
Create teardrop petals:
Roll a thin snake of white clay. Cut it into roughly 10-12 equal small segments. Roll each segment into a ball, then taper one end to form a teardrop shape. -
Flatten the petals:
Gently press down on each teardrop to flatten it. Use a needle tool to create a subtle central vein down the middle of each petal if you want extra detail. -
Assemble the flower base:
On your baking tile, arrange the white petals in a circle with the pointed ends touching in the center. Gently press them together so they fuse slightly. -
Attach the center:
Place a tiny drop of liquid polymer clay in the middle of the petal ring. Press your textured yellow dome firmly onto the center, covering the petal join points.
Step 3: Assembly and Baking
-
Prepare the connection:
Look at your orange ring band on the mandrel. Apply a small dab of liquid polymer clay where you want the flower to sit (often best right over the seam to hide it reinforced). -
Mount the daisy:
Carefully lift the daisy (an old razor blade helps here) and place it onto the liquid clay spot on the band. Curve the flower slightly so it hugs the contour of the ring. -
Final check:
Inspect the ring from all angles to ensure the flower isn’t crooked and the band hasn’t warped. Smooth any fingerprints lightly. -
Bake:
Bake the ring according to your clay manufacturer’s instructions (usually around 275°F or 130°C for 15-30 minutes). I recommend baking it right on the mandrel if it’s oven-safe, or supported by cornstarch. -
Cool and finish:
Let the ring cool completely before removing it from the mandrel or support. The clay needs to reach room temperature to fully harden.
Clean Cuts
Chill your clay in the fridge for 10 minutes before cutting the petal segments. This prevents the clay from dragging and ensures uniform petal sizes.
Slip on your new floral ring and enjoy the touch of handmade nature on your hand


Heart Imprint and Puffed Heart Rings
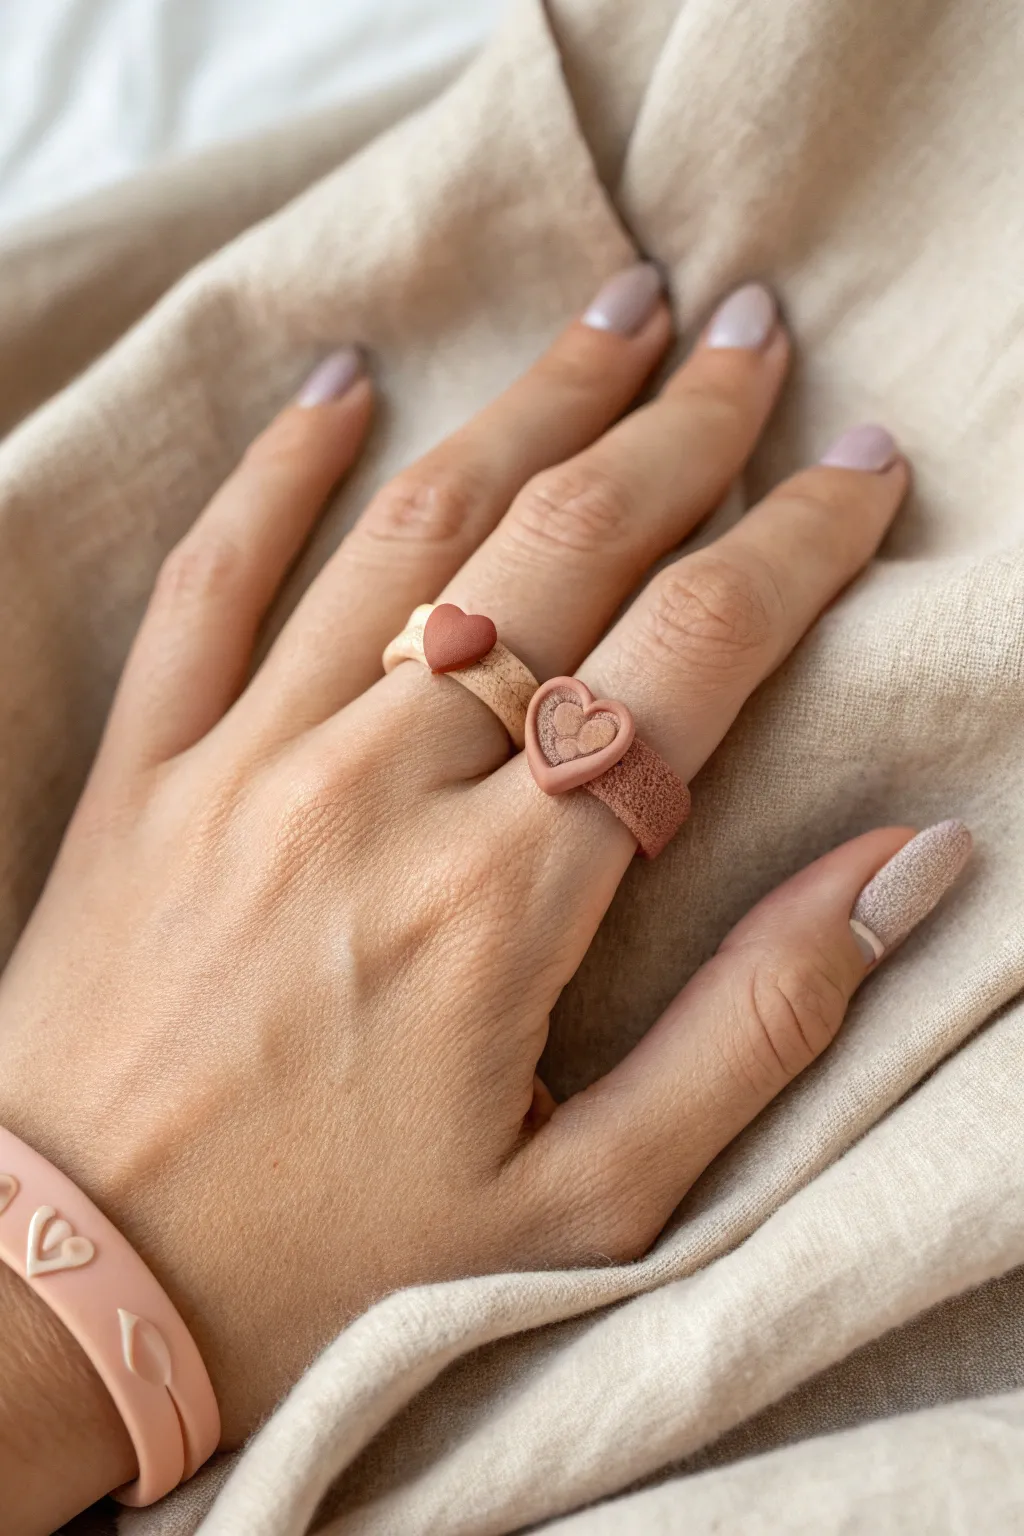
These charming polymer clay rings showcase two contrasting yet complementary textures and styles: a smooth, puffed heart on a beige band and a recessed heart imprint on a textured taupe band. Together, they create a sweet, romantic stack perfect for Valentine’s Day or everyday wear.
Step-by-Step Tutorial
Materials
- Polymer clay in beige/cream, terracotta/rust, and dusty rose
- Ring mandrel or ring sizing cone
- Rolling pin or clay machine
- Clean sandpaper, toothbrush, or stiff brush (for texturing)
- Small heart-shaped cutter
- Needle tool or toothpick
- X-acto knife or clay blade
- Liquid clay or Bake & Bond
- Oven and baking sheet
- Cardstock or paper strip
Step 1: Preparing the Bands
-
Size the band:
Begin by measuring the finger you intend to wear the rings on. Wrap a strip of cardstock around the sizing mandrel at your size to prevent the clay from sticking to the tool later. -
Mix colors:
Condition your clay thoroughly. For the beige ring, use a creamy beige tone. For the darker ring, mix a terracotta or rust color with a touch of translucent clay to give it depth. -
Roll strips:
Roll out both clay colors into long, flat strips, approximately 3mm thick. You want them substantial enough to hold their shape but not too bulky. -
Add texture:
Before cutting, give the strips a rustic finish. Lightly press a piece of coarse sandpaper or a clean toothbrush onto the surface of the clay to create a consistent, stone-like texture. -
Cut to size:
Use your clay blade to cut clean, straight strips. The width should be about 5-6mm. Wrap the strips around your paper-covered mandrel, cutting the excess and smoothing the seam carefully with a modeling tool so it becomes invisible.
Step 2: Creating the Puffed Red Heart Key
-
Shape the heart:
Take a small ball of the terracotta/rust clay. Press it into a small heart cutter or mold, or sculpt it by hand into a teardrop shape and indent the top to form a heart. -
Round the edges:
Gently smooth the edges with your fingertip to create a ‘puffed’ lozenge look rather than a sharp cutout. It should look soft and pillowy. -
Attach to band:
Apply a tiny dot of liquid clay to the center of the beige textured ring band. Press the puffed heart gently onto the band, ensuring it curves slightly to follow the ring’s arc.
Seamless Seams
Cut your ring band at a 45-degree angle (a bevel cut) rather than straight down. The overlapping angled clay creates a much stronger bond and is easier to smooth invisibly.
Step 3: Creating the Imprinted Heart Bezel
-
Make the bezel base:
For the second ring, create a slightly larger heart shape using the dusty rose or light terracotta clay. This will serve as the frame or ‘bezel.’ Keep it flat. -
Create the center indentation:
Using a smaller heart cutter or a steady hand with a needle tool, press firmly into the center of this flat heart to create a recessed area. Don’t cut all the way through. -
Fill the recess:
Take a tiny amount of very light beige clay—almost white—and press it into the recessed heart shape you just created. Flatten it so it sits inside the bezel. -
Add detail:
Use a needle tool to gently stipple the light beige center, giving it a porous, stony texture. -
Attach the bezel:
Like the first ring, apply liquid clay to the darker textured band and press this bezel piece firmly onto it. Smooth the connection points carefully.
Fixing Distortion
If pressing the hearts onto the band squishes the band’s round shape, put the mandrel back onto a stand or hold it vertically while working, rather than laying it flat on a table.
Step 4: Baking and Finishing
-
Final check:
Inspect both rings on the mandrel. Ensure the seams are hidden and the hearts are centered. If any fingerprints appeared during assembly, lightly tap them out with your texture tool. -
Bake:
Bake the rings according to your clay manufacturer’s specific instructions (usually 275°F/135°C for 30 minutes). I usually bake them right on the mandrel to keep the perfect circle shape. -
Cool down:
Let the rings cool completely before attempting to slide them off the mandrel. The clay is fragile when hot. -
Sand edges:
Once cool, use fine-grit sandpaper to smooth just the inner rims of the rings for a comfortable fit against your skin.
Now you have a custom set of textured heart rings ready to stack or share with a friend

The Complete Guide to Pottery Troubleshooting
Uncover the most common ceramic mistakes—from cracking clay to failed glazes—and learn how to fix them fast.
Smiley Face Clay Rings
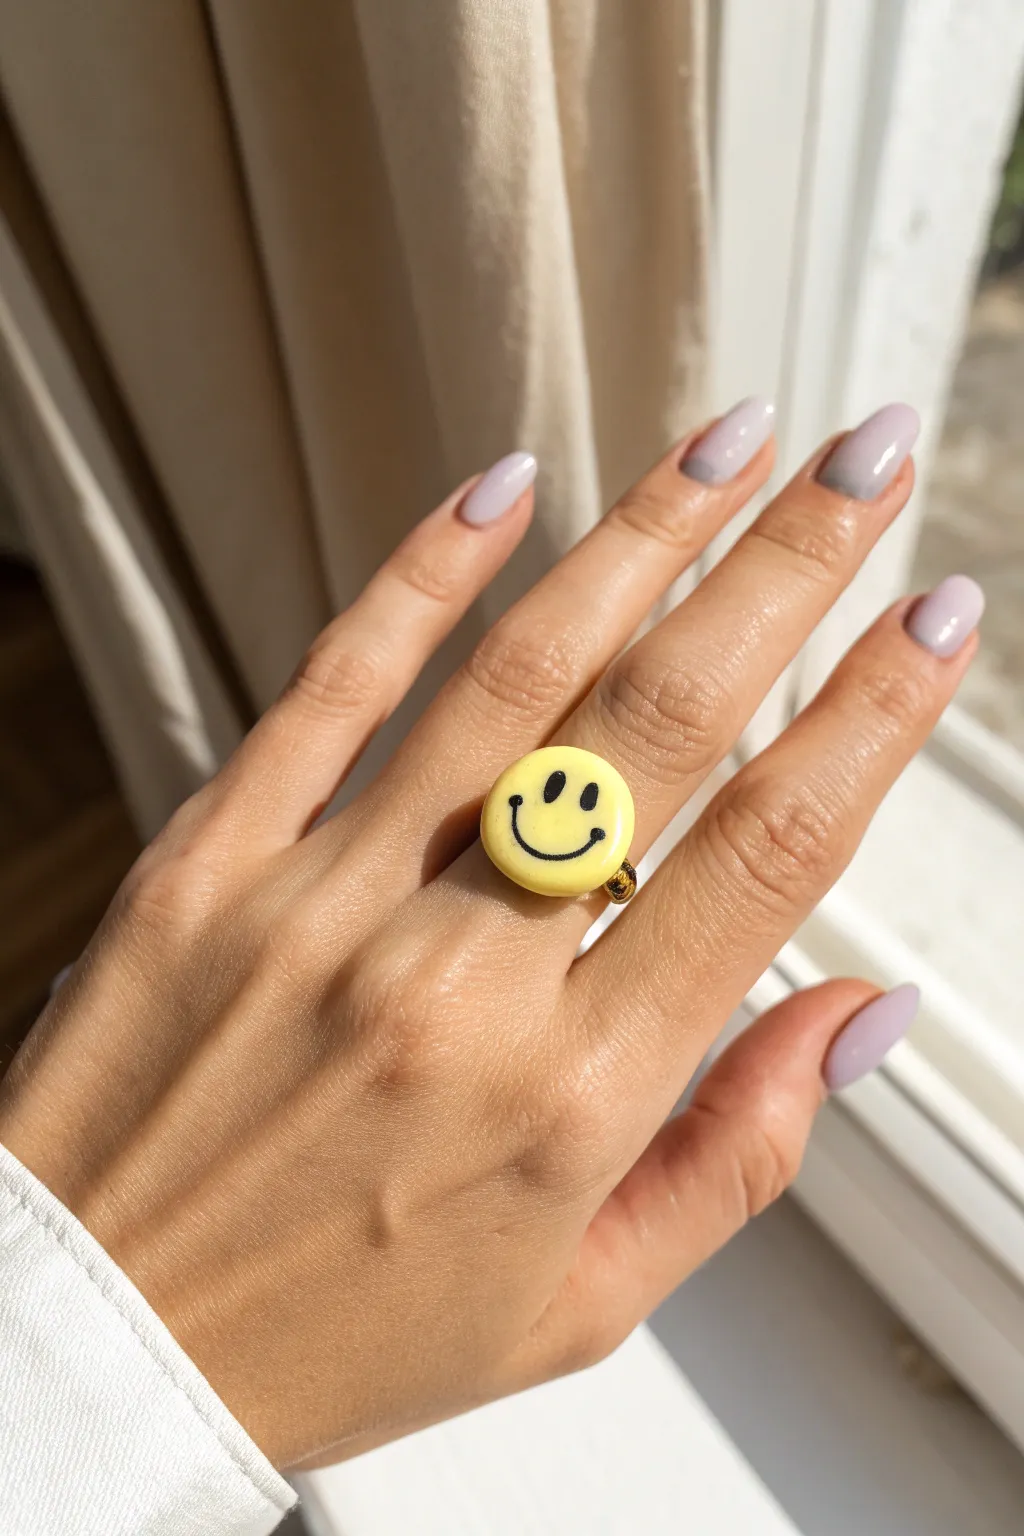
Capture a bit of pure sunshine on your finger with this adorable polymer clay smiley face ring. The design features a smooth, glazed yellow disc with a classic grin, attached to a delicate beaded band for a comfortable and adjustable fit.
Step-by-Step Guide
Materials
- Yellow polymer clay
- Black liquid clay or black acrylic paint
- Fine detail paintbrush
- Small round cutter (approx. 1cm – 1.5cm)
- Stretch cord or elastic beading thread
- Small gold seed beads
- UV resin or high-gloss clay glaze
- UV lamp (if using resin)
- Super glue (cyanoacrylate)
- Ceramic tile or baking sheet
- Needle tool or toothpick
- Sandpaper (fine grit)
Step 1: Sculpting the Face
-
Condition the clay:
Start by taking a small amount of yellow polymer clay and kneading it in your hands until it becomes soft and pliable. -
Roll and flatten:
Roll the clay into a smooth ball, then place it on your work surface or tile. Flatten it gently with an acrylic roller or your finger until it’s about 3-4mm thick. -
Cut the shape:
Using your small round cutter, punch out a perfect circle. You can smooth the edges with your finger if the cutter leaves any sharp ridges. -
Bake the base:
Place your yellow circle on a baking sheet or ceramic tile. Bake according to the manufacturer’s instructions for your specific brand of clay—usually around 275°F (135°C) for 15-30 minutes. -
Cool and prep:
Allow the clay disc to cool completely before moving on to the decoration phase.
Step 2: Painting and Glazing
-
Paint the eyes:
Using a very fine paintbrush and black acrylic paint (or liquid black clay), carefully dab two small oval shapes near the top center of the disc for the eyes. -
Draw the smile:
Paint a wide U-shape underneath the eyes. I find it helps to start in the middle of the smile and work outward to keep it symmetrical. -
Dry or cure:
If using acrylic paint, let it dry completely. If using liquid clay, bake the piece again briefly to set the design. -
Apply resin:
Pour a small drop of UV resin onto the center of the face. Use a toothpick to spread it to the edges, creating a domed, glossy effect. -
Cure the finish:
Place the piece under a UV lamp for 1-2 minutes until the surface is hard and non-tacky. Alternatively, apply a coat of high-gloss glaze and let it air dry.
Keep it clean
Before rolling your yellow clay, wipe your hands and work surface with a baby wipe. Yellow clay picks up dust and lint easily, and cleaning first keeps the color bright.
Step 3: Assembling the Ring
-
Measure the cord:
Cut a piece of stretch cord about 6 inches long. This gives you plenty of room to work comfortably. -
String the beads:
Thread your gold seed beads onto the cord. Periodically wrap it around your finger to check the sizing, aiming for a length that fits cleanly around your finger minus the width of the smiley face. -
Tie the knot:
Tie the two ends of the cord together securely using a square knot or surgeon’s knot. Pull tight to ensure it won’t slip. -
Secure with glue:
Add a tiny dot of super glue to the knot to lock it in place. Let this dry fully before trimming the excess cord ends. -
Attach the face:
Flip your smiley face over. Add a drop of super glue or a dab of mixed epoxy to the back center. -
Final assembly:
Press the knotted section of your beaded ring into the glue on the back of the clay disc. Hold it steady for a minute until it bonds securely.
Fixing a shaky smile
If your painted smile looks wobbly, use a toothpick or Q-tip dipped in rubbing alcohol (for paint) or baby oil (for liquid clay) to gently clean up the edges before curing.
Slip on your new ring and enjoy the extra dose of happiness it brings to your hand styling
Cow Print Clay Rings With Bold Spots
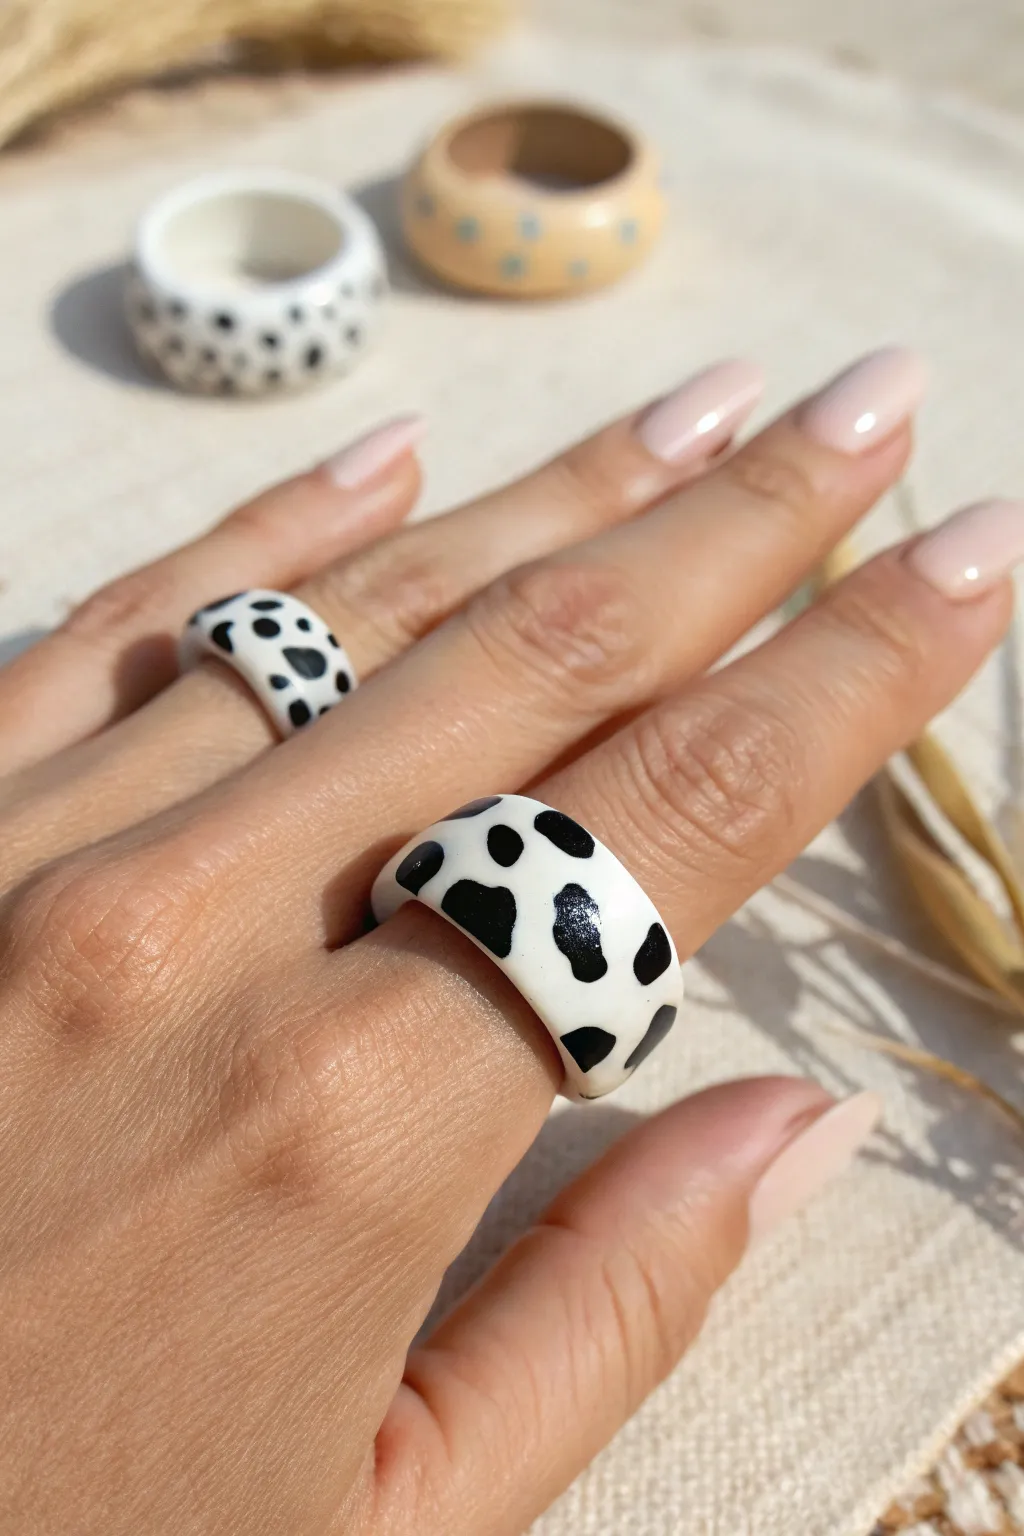
These chunky, playful rings combine a classic modern shape with the timeless fun of an animal print. The high-contrast black and white design makes them a bold accessory that pops against any outfit.
Step-by-Step Tutorial
Materials
- White polymer clay
- Black polymer clay
- Acrylic rolling pin or clay machine
- Ring sizing mandrel (or a DIY paper tube)
- Blade or X-Acto knife
- Cornstarch (for non-stick)
- Gloss glaze or UV resin (optional for shine)
- Paintbrush (if glazing)
- Oven for baking
Step 1: Preparing the Base
-
Condition the white clay:
Start by kneading a block of white polymer clay until it is soft, warm, and pliable. This conditioning step is crucial to prevent cracks later on. -
Roll out a slab:
Using your acrylic roller or clay machine, flatten the conditioned white clay into a thick, even strip. You want it to be about 3mm to 4mm thick to achieve that chunky look seen in the photo. -
Measure the length:
Wrap a strip of paper around your finger to find your size, or use a ring mandrel as a guide. Cut the white clay strip to the appropriate length, leaving a tiny bit of extra room for joining the ends.
Smudged Spots?
If black smears onto the white during rolling, use a Q-tip dipped in rubbing alcohol or acetone to gently wipe the white areas clean before baking.
Step 2: Creating the Cow Print
-
Prepare black spots:
Condition a small amount of black polymer clay. Break off tiny, irregular pieces; you want them to vary in size and shape to look organic. -
Flatten the spots:
Roll these tiny black pieces into balls, then smash them flat between your fingers until they are paper-thin. -
Apply the pattern:
Place the flattened black spots randomly onto your white clay strip. I like to let some spots go over the edge of the strip, wrapping around to the sides for a realistic textile look. -
Embed the design:
Gently roll over the strip with your acrylic roller one more time. This presses the black clay flush into the white clay so the surface is smooth and seamless. -
Trim the edges:
Use your blade to trim the long edges of the strip again. This creates crisp, clean lines and slices through those spots that were hanging off the edge.
Step 3: Forming and Baking
-
Wrap the ring:
Carefully lift your patterned strip and wrap it around your ring mandrel or forming tube. Dust the mandrel with a little cornstarch first so the clay doesn’t stick. -
Join the seam:
Cut straight through both overlapping ends of the clay strip with your heavy blade. Remove the excess scraps and push the two fresh cut ends together. -
Blend the join:
Gently smooth the seam with your finger or a clay tool. If the seam disrupts a black spot, you can add a tiny new patch of black clay over the area to hide the connection. -
Smooth the edges:
Run your finger slightly moistened with water or baby oil along the top and bottom rims of the ring to soften any sharp corners. -
Bake:
Bake the ring on the mandrel (if it’s oven-safe) or stand it up on a baking sheet. Follow the temperature instructions on your specific brand of clay, usually baking for 30 minutes to ensure durability. -
Cool down:
Let the ring cool completely before trying to remove it from the mandrel.
Make it Matte
For a velvety modern finish instead of glossy, skip the resin and buff the baked clay with a piece of denim or a microfiber cloth.
Step 4: Finishing Touches
-
Sand (optional):
If there are any rough spots or fingerprints, use a high-grit wet sandpaper to gently buff the surface. -
Glaze:
To get that glossy finish shown in the photo, apply a thin coat of polyurethane gloss varnish or UV resin. This also deepens the black color. -
Cure or Dry:
Allow the glaze to dry fully or cure the UV resin under a lamp according to the product instructions.
Now you have a funky, custom piece of jewelry that adds a pop of pattern to your hand


What Really Happens Inside the Kiln
Learn how time and temperature work together inside the kiln to transform clay into durable ceramic.
Frog Face Clay Rings
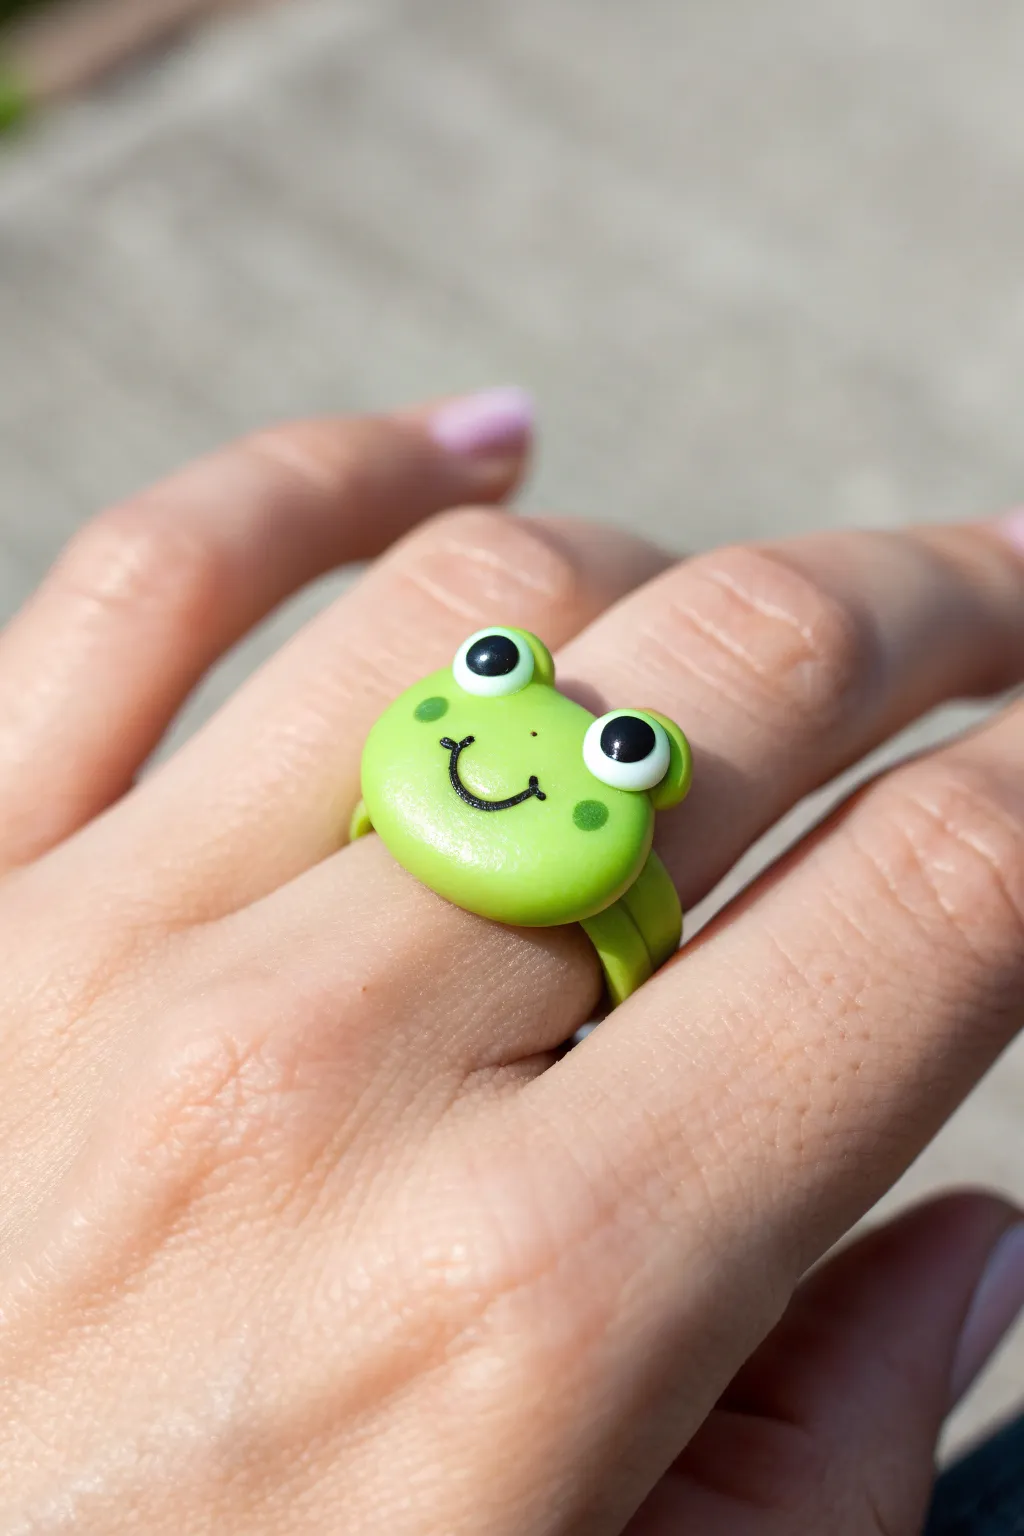
This adorable polymer clay ring features a glossy green frog face with big, friendly eyes and a shy little smile. It’s a whimsical accessory that adds a pop of vibrant color and personality to any hand.
Step-by-Step Guide
Materials
- Green polymer clay (bright leaf green)
- White polymer clay
- Black polymer clay
- Darker green polymer clay (for cheeks) or acrylic paint
- Strong jewelry glue or liquid clay
- Ring mandrel or thick marker
- Rolling pin or pasta machine
- X-acto knife or clay blade
- Small dotting tool or toothpick
- Needle tool
- Gloss glaze or UV resin
- UV lamp (if using resin)
Step 1: Creating the Band
-
Measure your size:
Begin by determining the size of the ring you need. Wrap a thin strip of paper around your finger and mark the overlap, or use a ring sizing chart if you have one handy. -
Roll the clay strip:
Condition a small amount of your green clay until soft. Roll it out into a flat, even sheet about 2-3mm thick. It needs to be sturdy enough to hold its shape but comfortable to wear. -
Cut the band:
Using your clay blade or knife, cut a clean, straight strip of clay. The width should be relatively narrow, roughly 5-7mm, so it sits comfortably under the frog head. -
Form the circle:
Wrap the strip around your ring mandrel or a marker that matches your finger size. Gently press the overlapping ends together and blend the seam until it disappears. Bake this band according to your clay package instructions to create a solid base.
Fixing Fingerprints
If you see fingerprints on the smooth green face before baking, lightly brush the raw clay with a little baby oil or clay softener to melt them away.
Step 2: Sculpting the Frog Face
-
Shape the head:
Roll a smooth ball of green clay, slightly larger than a pea. Flatten it gently into a thick oval or rounded bean shape. This will be the main face. -
Add eye sockets:
Roll two smaller balls of green clay for the eye mounds. Attach them to the top edge of the head shape, smoothing the clay downward into the face so they are securely joined but still raised. -
Create the eyes:
Take tiny bits of white clay and roll them into balls. Press these into the center of the green eye mounds you just created. Flatten them slightly so they look like discs. -
Add pupils:
Roll even tinier specks of black clay. With a light touch, place these onto the white discs. I find placing them slightly cross-eyed or varying the position gives the frog a goofier expression. -
Make the smile:
Roll a very thin snake of black clay—as thin as a thread. Cut a small curved section and gently press it into the center of the face to form a smile. Alternatively, you can embed a thin wire or paint this later. -
Blush the cheeks:
Take two miniature dots of darker green clay (or even pink if you prefer) and press them onto the face right next to the corners of the smile for cute cheeks.
Make it a Prince
Add a tiny yellow clay crown on top of the head between the eyes, or add a tiny red bowtie under the chin to turn this frog into a gentleman.
Step 3: Assembly and Finishing
-
Attach to band:
Apply a dab of liquid clay or strong jewelry glue to the top of your baked ring band. Center the raw frog head on top and press gently to ensure good contact without squishing the face features. -
Secure the join:
Use a silicone tool or your finger to smooth a tiny bit of fresh green clay underneath where the head meets the band for extra reinforcement. -
Final bake:
Place the assembled ring back into the oven. Propping it on a bit of batting or cornstarch can help the heavy head stay upright. Bake for the full recommended time. -
Cool down:
Let the ring cool completely before handling. Polymer clay is slightly fragile when warm. -
Glaze it up:
For that wet, amphibian look seen in the photo, apply a coat of UV resin or high-gloss polyurethane varnish over the entire frog head. Cure under a UV lamp or let dry to achieve a glass-like shine.
Enjoy wearing your new little green friend and showing off that glossy smile
Bear and Bunny Face Clay Rings
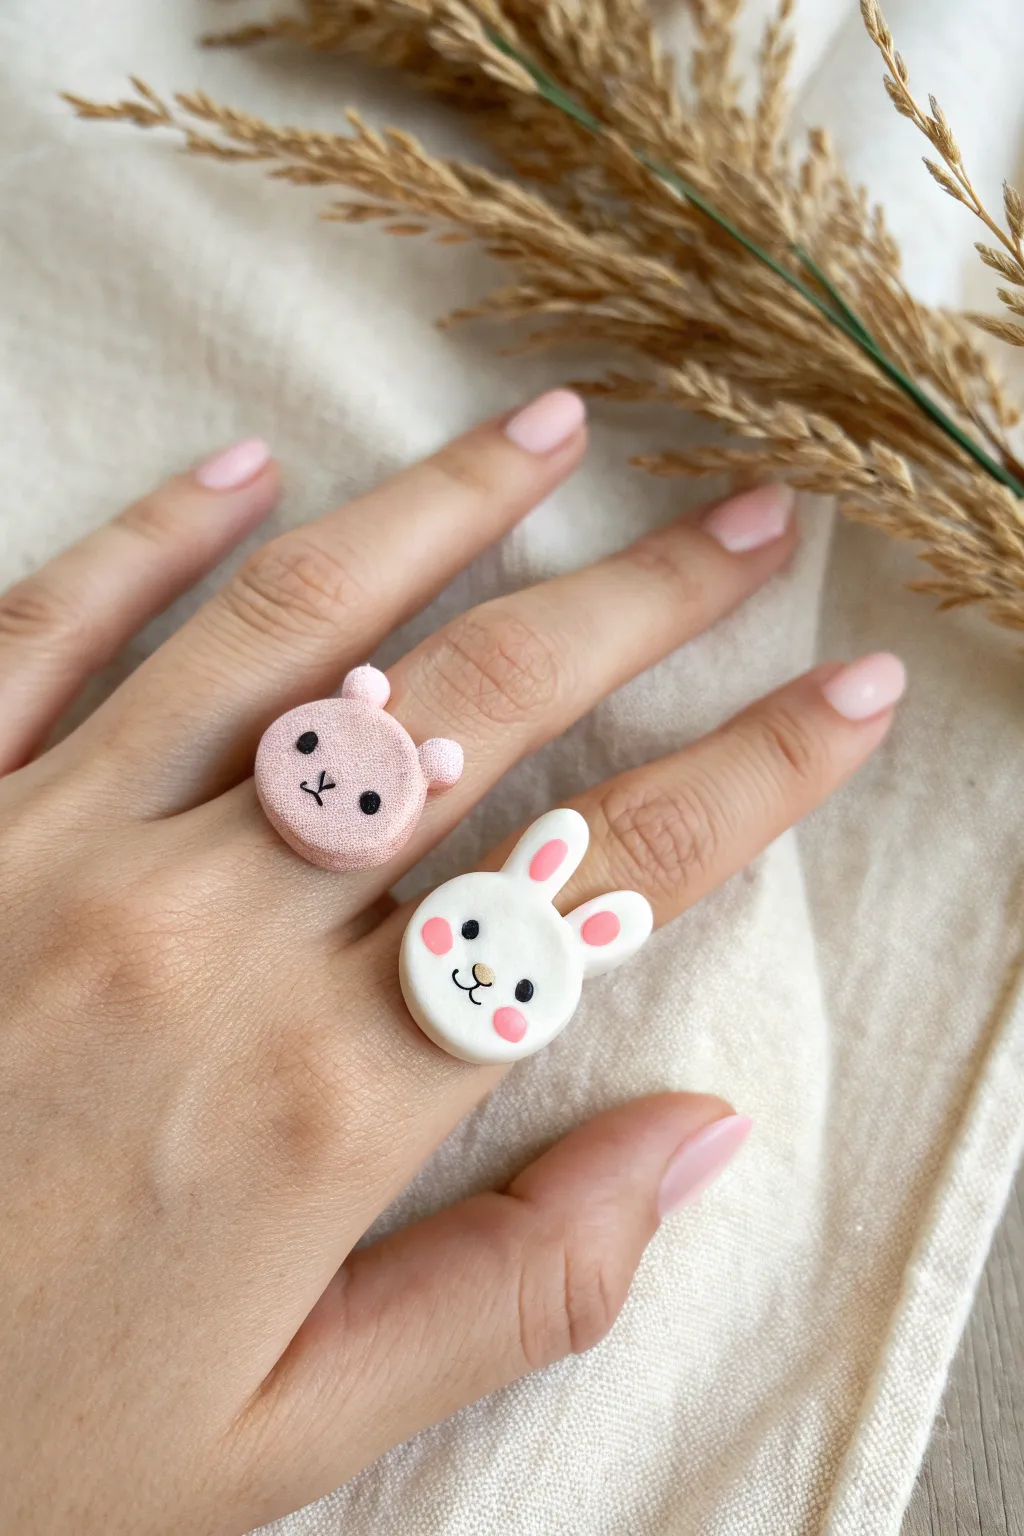
These adorable face rings are small treasures that bring a playful touch to any outfit. Using soft polymer clay, you can sculpt these sweet bear and bunny companions with simple shapes and delicate painted details.
Detailed Instructions
Materials
- Polymer clay in white, soft pink, and beige/tan
- Liquid polymer clay (optional, for bonding)
- Acrylic paint in black and white
- Small dotting tool or toothpick
- Fine detail paintbrush
- X-acto knife or clay blade
- Ring base blanks (adjustable metal bases recommended) OR clay needed to make a band
- Gloss or matte varnish (optional)
- Oven for baking
Step 1: Shaping the Base Faces
-
Condition the clay:
Begin by warming the white and pink polymer clay in your hands until it becomes soft and pliable. Properly conditioned clay is essential to prevent cracking later. -
Form the main shapes:
Roll two small balls of clay—one white for the bunny and one pink for the bear. Flatten them gently between your thumb and forefinger into thick, rounded discs about the size of a dime. -
Smooth the edges:
inspect the edges of your discs. If there are fingerprints or sharp ridges, gently smooth them out with your fingertip to create a soft, pillowy look.
Smooth Surface Secret
Before baking, lightly brush your clay with a drop of baby oil or cornstarch. This removes fingerprints and creates that professional, flawless matte finish seen in the photo.
Step 2: Adding Ears and Details
-
Create the bear ears:
Roll two tiny balls of the same pink clay used for the bear’s head. Press them gently onto the top left and right sides of the pink disc. -
Blend the seams:
Use a clay tool or the back of a toothpick to gently blend the bottom of the ears into the head so they don’t fall off during baking. I find a tiny dab of liquid clay here helps secure them perfectly. -
Form the bunny ears:
Roll two small white logs for the bunny ears. Flatten them slightly to create long ovals. -
Attach bunny ears:
Press the white ears onto the top of the white disc. Unlike the bear, these should stand up slightly. -
Add inner ear color:
Take extremely tiny amounts of pink clay, flatten them into teardrop shapes, and press them into the center of the white bunny ears.
Accessorize Your Animals
Give your characters personality! Add a tiny clay bow to the bunny’s ear, sculp a miniature party hat, or paint tiny flowers around the bear’s ears.
Step 3: Baking and Assembly
-
Prepare the ring bands:
If you are making the ring band out of clay, roll a strip of clay, wrap it around a ring mandrel (or a roll of paper sized to your finger), and bake it first. If using metal blanks, proceed to the next step. -
Bake the faces:
Place your clay faces on a baking sheet lined with parchment paper. Bake according to your clay manufacturer’s instructions (usually 275°F/135°C for 15-30 minutes). Let them cool completely. -
Attach to base:
If using metal ring blanks, glue the cooled clay faces onto the flat pad of the ring using strong jewelry glue like E6000.
Step 4: Painting the Features
-
Paint the eyes:
Using a small dotting tool dipped in black acrylic paint, place two small dots for the eyes on both the bear and bunny. -
Draw the bear’s nose:
With a very fine brush or toothpick, paint a tiny ‘Y’ shape or a small triangle with a line coming down to create the bear’s nose and mouth. -
Draw the bunny’s face:
Paint a small black nose and a curved ‘w’ shape for the mouth. For the bunny, you can also add a tiny dot of white inside the black eyes for a sparkle effect. -
Add rosy cheeks:
Mix a tiny amount of pink paint with water to make a glaze, or use pink clay dust. Dab this gently onto the cheeks of the bunny for a blushing look. -
Seal the piece:
Once the paint is fully dry, coat the clay faces with a thin layer of matte or gloss varnish to protect the paint from scratching.
Enjoy wearing your new sweet animal friends on your fingers or gift them to someone special

TRACK YOUR CERAMIC JOURNEY
Capture glaze tests, firing details, and creative progress—all in one simple printable. Make your projects easier to repeat and improve.
Stackable Mini-Set Rings With Mix-and-Match Themes
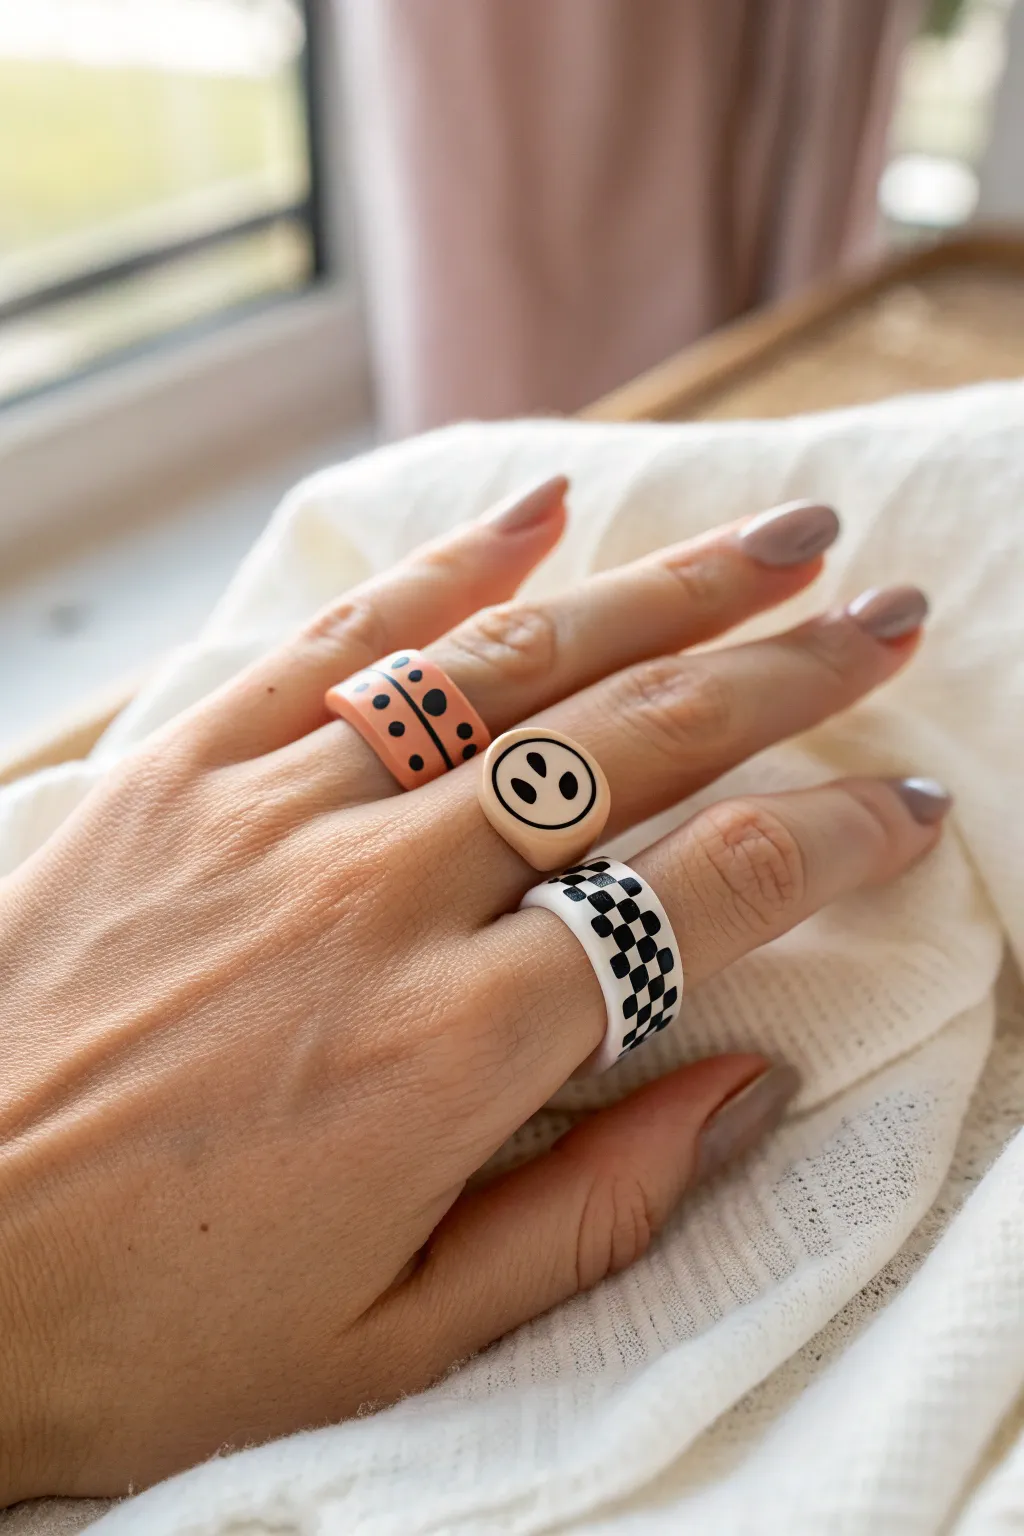
These trendy, chunky rings bring a playful y2k aesthetic to your jewelry collection with their bold patterns and pastel tones. Using polymer clay, you’ll sculpt three distinct designs—a dotted peach band, a cheeky smiley face signet, and a classic checkerboard wrap—that look perfectly curated when worn together.
Step-by-Step
Materials
- Polymer clay in peach/salmon, beige/tan, white, and black
- Acrylic rolling pin or clay machine
- Needle tool or toothpick
- Small round clay cutter (approx 10-12mm for the smiley face)
- X-Acto knife or sharp clay blade
- Ring sizing mandrel (or a paper tube sized to your finger)
- Black acrylic paint
- Fine detail paintbrush (size 00 or 000)
- Wet sanding paper (400-1000 grit)
- UV resin or gloss glaze (optional for finish)
- Oven for baking
Step 1: The Dotted Peach Band
-
Condition and Roll the Base:
Begin by conditioning the peach polymer clay until it’s soft and pliable. Roll it out into a long snake about 5mm thick, then flatten it slightly with your acrylic roller until you have a strip approximately 8mm wide. -
Size and Form the Ring:
Wrap the flattened strip around your ring mandrel at your desired size for your middle finger. Cut the excess clay at an angle where the ends meet and smooth the seam together carefully so it’s invisible. -
Add Pattern Guides:
Using the back of your knife blade or a needle tool, gently impress a very shallow line running horizontally through the center of the entire band. This will serve as a guide for your painting later. -
Bake the Base:
Bake this first ring according to your clay package instructions (usually 275°F/135°C for 15-30 minutes). Let it cool completely before painting.
Clean Lines Secret
If your hand is shaky while painting the checkerboard grid, use thin strips of nail art tape or washi tape to mask off the squares you want to keep white.
Step 2: The Smiley Signet Ring
-
Form the Shank:
Condition the beige/tan clay. Roll a snake and flatten it slightly to create the ring band, similar to the first ring but perhaps slightly narrower. Wrap it around the mandrel size for your ring finger. -
Create the Faces:
Roll out a small sheet of the same beige clay (about 3mm thick). Use your small round cutter to punch out a circle. -
Assemble the Signet:
Place the clay circle onto the seam of the band you created on the mandrel. Gently blend the clay from the underside of the circle onto the band so they fuse into one solid piece without distorting the round top. -
Smooth and Bake:
Use your finger or a silicone tool to ensure the transition is seamless. Bake this ring following the manufacturer’s instructions and let it cool.
Step 3: The Checkerboard Band
-
Prepare the Base:
Condition the white clay. Roll it into a strip approximately 6mm wide and 3mm thick. Form it around the mandrel for your ring finger (or whichever finger you prefer for stacking), joining the seam smoothly. -
Bake the Blank:
Bake the white ring fully. I find painting the checkerboard pattern is much easier on a hard surface than on raw clay.
Sculpted Variation
Instead of painting the smiley face, try embedding tiny snakes of black clay into the beige base before baking for a tactile, slight 3D effect.
Step 4: Painting and Finishing
-
Paint the Dotted Ring:
On the cooled peach ring, use your fine brush and black acrylic paint to fill in the horizontal center line. Then, carefully paint small dots on either side of the line, spacing them evenly around the band. -
Paint the Checkerboard:
For the white ring, use a pencil to lightly sketch a grid. Then, grab your fine brush and fill in alternating squares with black paint to create the checkerboard pattern. Work slowly to keep edges crisp. -
Paint the Smiley:
On the beige signet, paint two localized ovals for eyes and a small, curved line for the smile. Keep the features centered on the round face. -
Seal the Rings:
Once the paint is fully dry, apply a coat of UV resin or gloss varnish to all three rings. This protects the acrylic paint from chipping and gives them a professionally polished, shiny look. -
Final Cure:
Cure the resin under a UV lamp or let the varnish dry completely according to bottle instructions before wearing.
Once sealed and cured, mix and match your new chunky rings for a personalised stack that pops