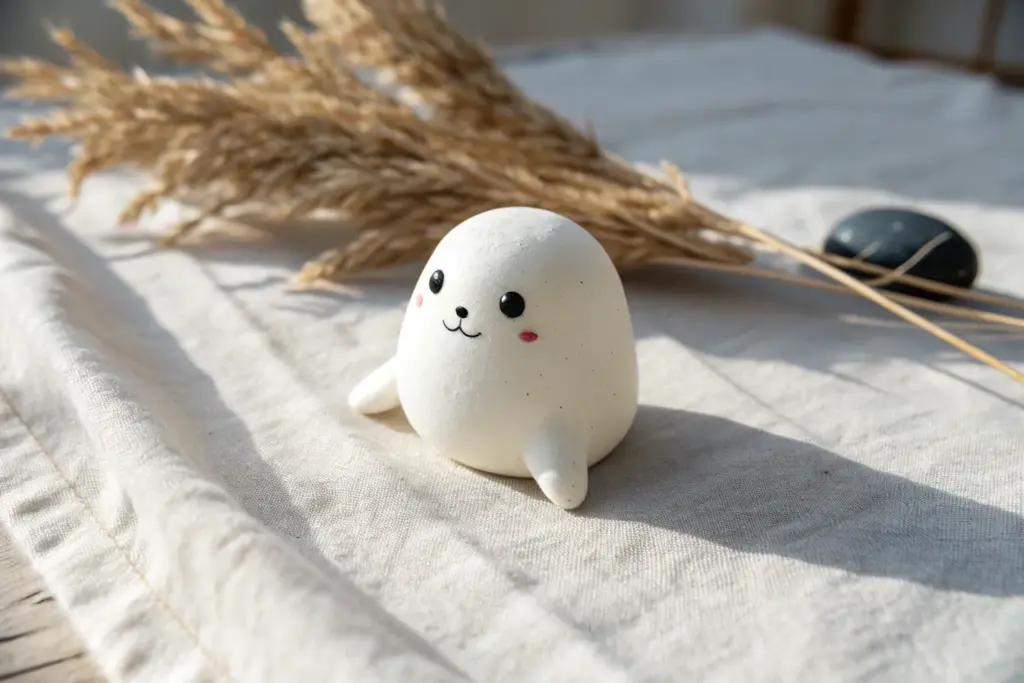
Whenever I’m craving a quick win at the clay table, I reach for cute clay projects—those sweet little shapes that practically make themselves and still look totally irresistible. These ideas are all about kawaii-style charm, simple details, and that “I made this!” joy you get from polymer clay or air-dry clay.
Chubby Cat Figurines With Dot Eyes
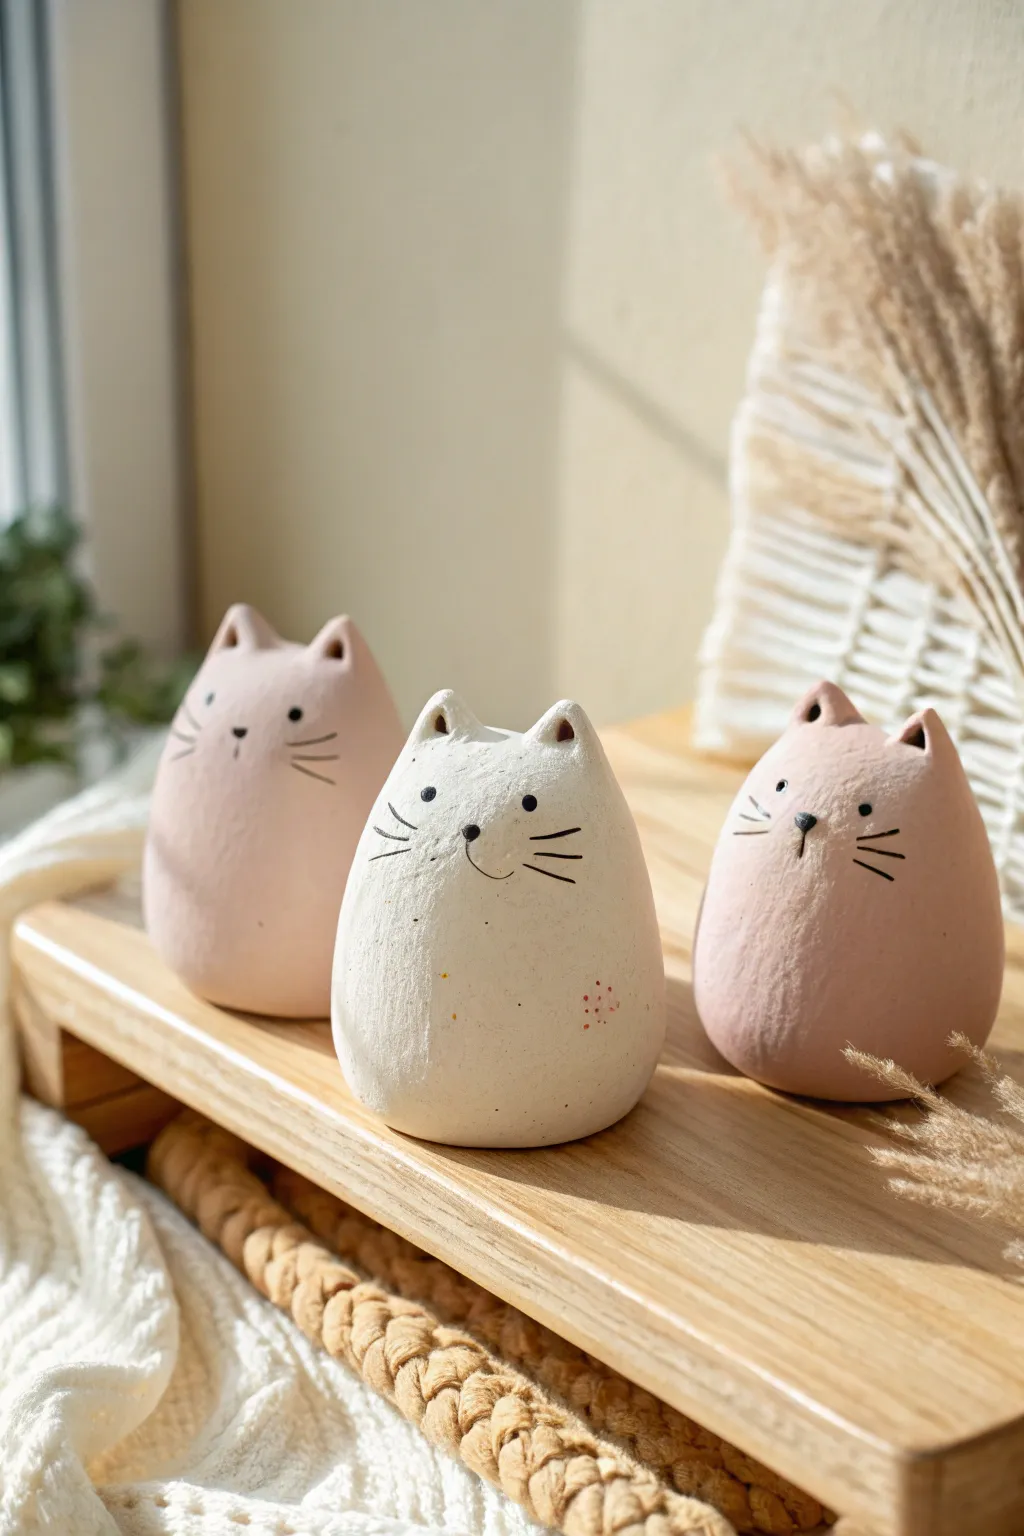
These delightfully chubby cat figurines rely on simple shapes and minimalist features to achieve maximum cuteness. With their smooth, rounded bodies and tiny painted faces, they make for perfect desktop companions or sweet handmade gifts.
Step-by-Step Guide
Materials
- Air-dry clay (stone or white color)
- Acrylic paints (pastel pink, warm terracota, black)
- Fine grit sandpaper
- Small bowl of water
- Needle tool or toothpick
- Fine detail paintbrush (size 0 or 00)
- Matte varnish or sealant
- Sponge or lint-free cloth
Step 1: Shaping the Body
-
Prepare the clay:
Begin with a ball of clay roughly the size of a tangerine. Knead it in your hands to warm it up and remove any potential air bubbles, ensuring the consistency is smooth and pliable. -
Form the base shape:
Roll the clay into a smooth sphere first, then gently roll it back and forth on your work surface to elongate it slightly into a stout egg shape. The bottom needs to be wider than the top. -
Create stability:
Tap the wider bottom end of your egg shape firmly against your table to flatten it. This ensures your figurine will stand upright without wobbling. -
Smooth the surface:
Dip your finger in a little water and run it over the entire surface of the clay. You want to eliminate any fingerprints or cracks now, aiming for a texture that looks like smooth river stone.
Cracks Appearing?
If small cracks appear while drying, mix a tiny bit of fresh clay with water to make a paste (slip) and fill the cracks. Smooth over and let dry again.
Step 2: Adding Ears and Details
-
Pinch the ears:
At the narrower top of the egg shape, use your thumb and forefinger to gently pinch up two small triangles of clay. Keep them relatively small and close together to match the reference style. -
Refine the ear shape:
Use your water-dampened finger to smooth the transition between the head and the ears. The ears shouldn’t look stuck on; they should look like they grew organically from the main shape. -
Indent the ears:
Take the rounded end of a paintbrush handle or a modeling tool and press gently into the front center of each ear triangle to create the inner ear depression. -
Final smoothing:
Do one last check for fingerprints. Because the design is so simple, imperfections in the clay surface will show up clearly, so take your time smoothing everything out with a damp sponge or finger. -
Dry completely:
Set the cats aside to dry. Depending on your humidity and the clay brand, this usually takes 24 to 48 hours. Turn them occasionally to ensure the bottom dries too.
Texture Twist
Before the clay dries, gently press a piece of lace or textured fabric onto the back of the cat to add a surprise tactile element to the smooth design.
Step 3: Decoration and Finishing
-
Sand for perfection:
Once fully dry, the clay will be lighter in color. Gently sand the surface with fine-grit sandpaper to remove any lingering bumps or rough textures. -
Base coat mix:
For the pink cats, mix a touch of warm terracotta acrylic into white paint to get that dusty, earthy pink tone. For the white cat, use an off-white or cream color rather than stark bright white. -
Apply base color:
Paint the entire body of the cat. I usually do two thin layers rather than one thick one to avoid brush strokes, letting the first layer dry for about 15 minutes before adding the second. -
Paint the nose:
Using your finest detail brush and black acrylic paint, create a tiny inverted triangle or heart shape for the nose. Place it slightly higher than halfway up the body to give that ‘looking up’ appearance. -
Add the mouth:
Paint a very fine, small anchor shape extending down from the nose. For the white cat in the photo, give it a slightly quirky, lopsided smile for extra character. -
Dot the eyes:
Dip the non-brush end of your paintbrush into black paint. Dot the eyes onto the face, spacing them wide apart and level with the top of the nose. -
Whiskers and freckles:
With the detail brush, flick three very thin lines outward from each cheek area for whiskers. Optionally, add tiny colored dots on the cheeks for blush or freckles. -
Seal the piece:
Once all paint is bone dry, apply a coat of matte varnish. This protects the paint and gives the clay a lovely finished look without making it too shiny.
Group your finished trio together on a shelf or windowsill to enjoy their quiet, calming presence every day


Blushing Frog Desk Buddy Sculptures
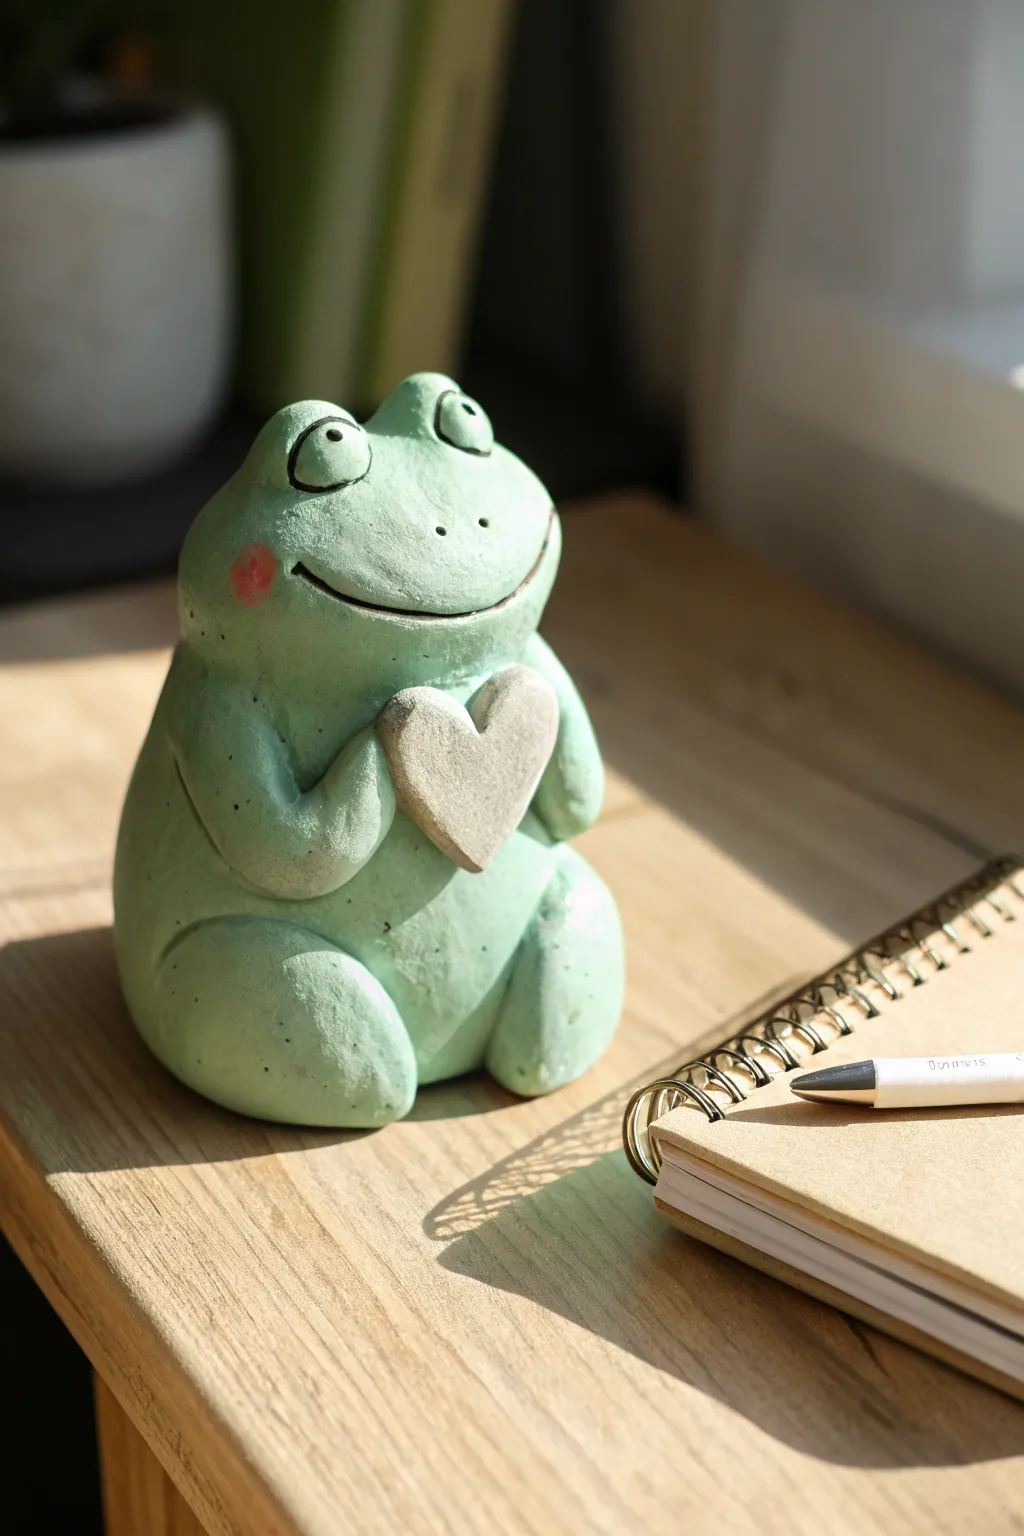
This adorable blushing frog desk buddy is perfect for holding down your papers or just brightening your workspace with a smile. Sculpted from air-dry clay with a stone-like texture, this chunky amphibian holds a tiny heart close to its chest.
How-To Guide
Materials
- Air-dry clay (white or light grey)
- Acrylic paints (pastel green, dark grey, stone/beige, pink)
- Small sponge or texture tool
- Sculpting tools (needle tool, ball stylus)
- Water cup and slip
- Fine grit sandpaper
- Matte varnish or sealant
- Paintbrushes (flat shader and fine liner)
Step 1: Forming the Body Base
-
Create the core:
Start by rolling a large ball of conditioned clay about the size of a tennis ball. Gently taper the top slightly to create a pear shape, which will be the frog’s body and head combined. -
Flatten the base:
Tap the wider bottom of your pear shape firmly against your work surface. You want a broad, flat base so your frog sits stably without rolling over. -
Add texture:
Before adding limbs, gently dab the entire surface with a small, coarse sponge. This creates that lovely organic, slightly stony texture seen in the photo instead of a perfectly smooth plastic look.
Cracks in the Clay?
If small cracks appear while drying, don’t panic. Mix a tiny bit of fresh clay with water to make a paste and fill the cracks, then smooth over.
Step 2: Sculpting the Legs and Arms
-
Shape the thighs:
Roll two medium-sized balls of clay into thick ovals. Flatten them slightly and score the sides of the frog’s lower body. Attach these ovals using a bit of water or slip to form the chunky thighs. -
Blend the seams:
Use a modeling tool or your finger to smooth the edges of the thighs into the main body, ensuring they look integrated rather than just stuck on. Re-texture the seams with your sponge. -
Create the arms:
Roll two smaller sausage shapes for the arms. They need to be long enough to reach from the shoulder area to the center of the chest. -
Position the arms:
Attach the arms starting near the top of the ‘pear’ shape, curving them inward so the hands will eventually meet at the center of the chest. Don’t fuse the hands together yet.
Step 3: Adding the Face and Heart
-
Make the eyes:
Roll two small balls of clay. Attach them to the very top of the head, spacing them slightly apart. Blend the bottom of the eye balls into the head so they look like protrusions rather than separate spheres. -
Carve the mouth:
Using a needle tool or a clay knife, carve a long, wide, upward-curving line for the smile. I find it helps to rock the tool gently to create a deep, visible groove. -
Sculpt the heart:
Fashion a small, flat heart shape from a separate piece of clay. It should fit comfortably between the frog’s arms. -
Attach the heart:
Place the heart on the chest. Bring the ends of the arm ‘sausages’ over the edges of the heart to make it look like the frog is clutching it tight. Blend the clay where the hands touch the heart for a secure bond. -
Refine details:
Use a needle tool to poke two small nostrils above the smile. Check your texturing again and fix any spots you might have smudged while handling.
Natural Stone Look
For a realistic finish, mix a tiny pinch of sand or baking soda into your green paint. This adds extra grit and mimics real stone texture beautifully.
Step 4: Painting and Finishing
-
Dry completely:
Allow the sculpture to dry fully, which may take 24-48 hours depending on thickness. Sand any unintentional rough spikes lightly, but keep the sponge texture. -
Base coat:
Paint the frog’s body with a soft, pastel mint green. You may need two coats for opaque coverage. Avoid painting the heart. -
Paint the heart:
Use a warm stone or beige color for the heart to create a nice natural contrast against the green skin. -
Add facial details:
Using a fine liner brush and dark grey or black paint, outline the eyes and paint small pupils. Carefully run the dark paint into the mouth groove to emphasize the smile. -
Apply the blush:
Mix a very watery pink or red paint. Gently dab or dry-brush this onto the cheeks to create that sweet, blushing effect. -
Seal the work:
Once all paint is dry, coat the entire piece in a matte varnish. This mimics the stone look and protects your new desk friend.
Place your blushing frog on your desk and enjoy the cheerful vibe it brings to your study sessions


Sweet Axolotl Minis in Pastel Colors
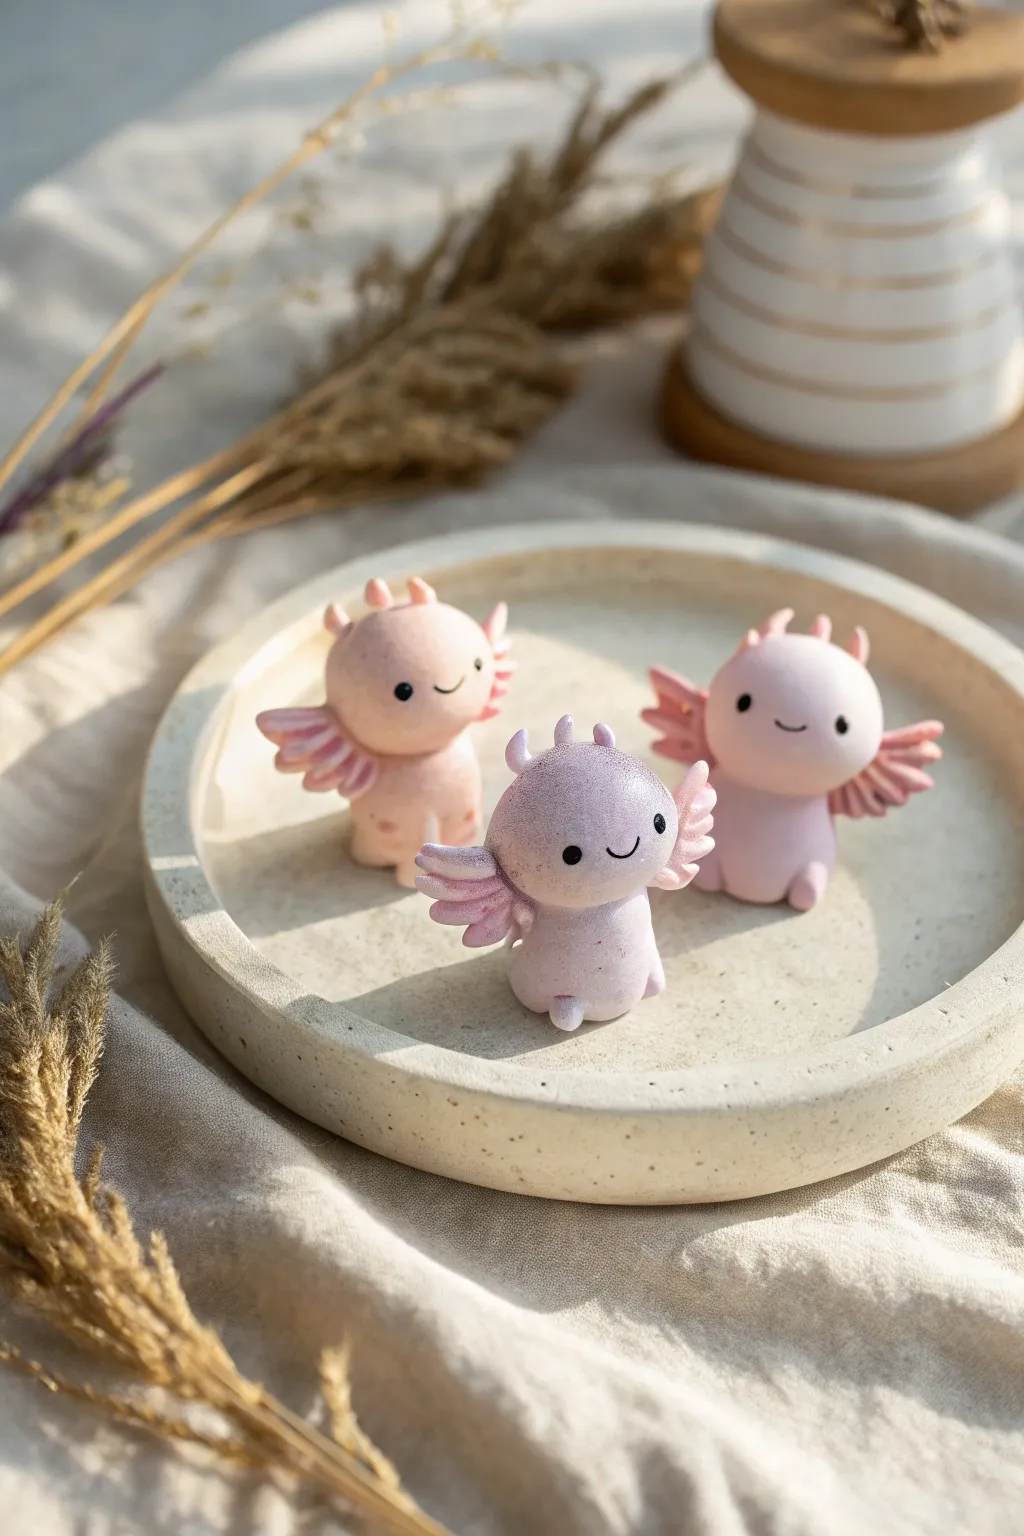
These adorable, palm-sized axolotl figurines are crafted in soft pastel pinks and lilacs, featuring delightful textured gills and friendly little smiles. They make perfect desk companions and bring a whimsical touch of sweetness to any collection.
Step-by-Step
Materials
- Polymer clay in pale pink, lilac, and darker rose pink
- Aluminum foil (for bulk)
- Small dotting tool or needle tool
- Black acrylic paint
- Fine detail paintbrush
- Pearl ex powder or glossy glaze (optional for shimmer)
- Clay sculpting tools (silicone shapers)
- Baking tray and parchment paper
Step 1: Shaping the Bodies
-
Prepare the foil core:
Crumple a small amount of aluminum foil into a rough egg shape, about the size of a walnuts. This saves clay and helps the figure bake evenly. -
Cover the core:
Condition your pale pink or lilac clay until soft. Roll it into a sheet and wrap it completely around your foil core, smoothing out any seams until you have a flawless, slightly elongated egg shape for the body and head combined. -
Add chubby legs:
Roll two small balls of the same base color clay. Press them gently onto the bottom front of the body to form little round feet, blending the seams upward so they stay attached. -
Refine the posture:
Tap the bottom of the figure gently on your work surface to create a flat base, ensuring your little axolotl sits upright without tipping over.
Step 2: Creating the Signature Gills
-
mix the accent color:
For the gills, create a slightly darker or contrasting pink. I like to mix a tiny bit of translucent clay here to give the gills a more delicate, aquatic look. -
Form the gill base:
Roll six small teardrop shapes from your accent color. You will need three for the left side and three for the right side of the head. -
Texture the gills:
Flatten the teardrops slightly. Using a knife tool or heavy card stock, press distinct parallel lines into the flattened shapes to create a ridged, fin-like texture. -
Attach the gills:
Press the narrow end of the gills onto the sides of the head. Arrange them in a fan shape—one pointing up, one out, and one slightly down—blending the attachment point smoothly into the head.
Clean Clay Pro-Tip
Pastel clay shows dust easily! Keep a pack of baby wipes or rubbing alcohol nearby to clean your hands and tools often while sculpting light colors.
Step 3: Face and Finishing Details
-
Mark the eye sockets:
Use a medium-sized ball tool to press two indentations into the face where the eyes will go. Spacing them widely apart increases the cute factor. -
Sculpt the mouth:
Use a needle tool or a small curved tool to impress a simple, tiny smile right between the eyes. Keep the line clean and shallow. -
Add shimmer (optional):
Before baking, you can lightly brush a pearlescent powder over the head or gill tips to give them that subtle magical sheen seen in the photo. -
Bake the clay:
Bake the figures according to your clay manufacturer’s instructions (usually 275°F/130°C for 15-30 minutes). Let them cool completely before painting. -
Paint the eyes:
Using a very fine brush or a toothpick, dip into black acrylic paint and carefully fill the eye indentations. You can add a tiny white dot for a catchlight once the black is dry.
Droopy Gills?
If the gills are sagging before baking, prop them up with a small piece of tissue or polyester fiberfill. The support can be removed easily after the clay hardens.
Place your trio of sweet axolotls on a shelf or gift them to a friend as a pocket-sized surprise


Smiling Mushroom Buddies for Shelves
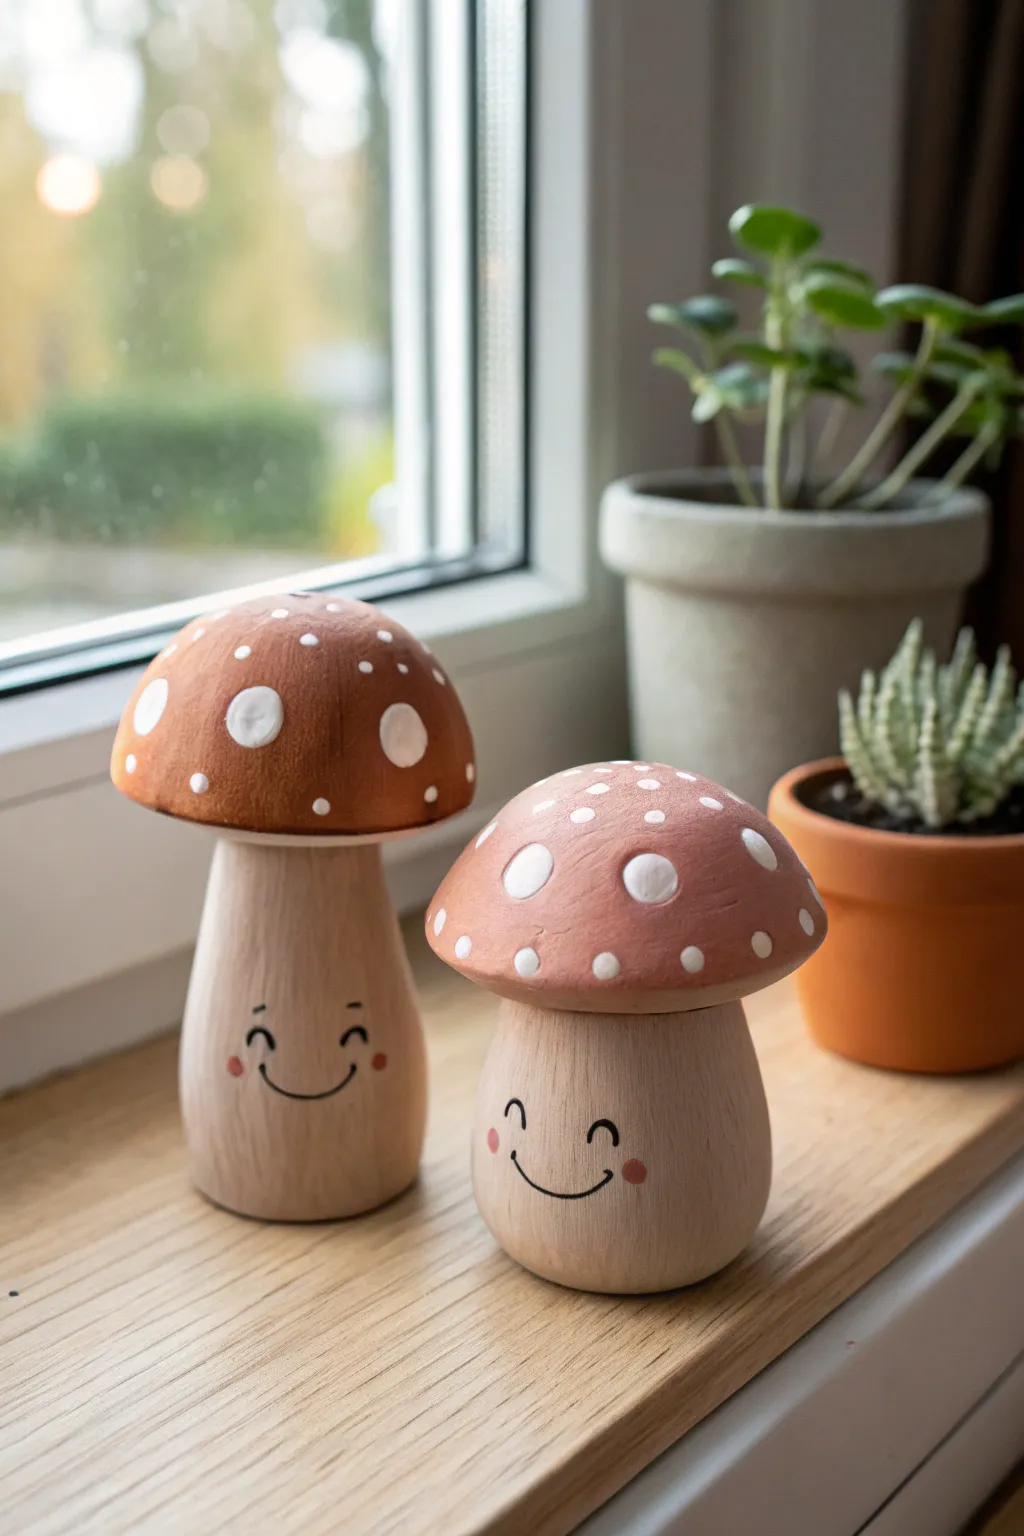
These charming mushroom figurines bring a touch of woodland magic to any windowsill with their delightful smiles and earthy tones. By combining smooth polymer clay with careful painting techniques, you’ll create a textured, wood-like finish that makes these buddies feel organic and warm.
Step-by-Step Guide
Materials
- Polymer clay (beige or light brown)
- Acrylic paints (terracotta, white, black, pink)
- Foil or foam armature (cone shape)
- Rolling pin
- Sculpting tools (needle tool, ball stylus)
- Fine grit sandpaper
- Small paintbrush
- Sponge or stiff brush for texturing
- Matte varnish
Step 1: Sculpting the Stems
-
Prepare the armature:
Start by creating a solid core for your mushrooms to save clay and reduce weight. Crumple aluminum foil into two cone shapes—make one taller for the larger mushroom and a shorter, stouter one for the small buddy. Compress them tightly so they are firm. -
Cover the stems:
Condition your beige polymer clay until it’s soft and pliable. Roll it into a sheet about 1/4 inch thick. Wrap the clay around your foil cones, smoothing the seams together with your fingers until the foil is completely hidden. -
Shape the base:
Tap the bottom of the stems gently on your work surface to flatten them so the mushrooms stand up straight without wobbling. Shape the taller stem to bell out slightly at the bottom, and make the shorter stem round and bulbous. -
Add wood texture:
To mimic the look of wood grain shown in the photo, take a stiff bristle brush or a needle tool and drag vertical lines gently down the length of the stems. Keep the texture subtle and organic rather than perfectly straight.
Natural Wood Effect
Before painting the stems, sand them vertically with coarse sandpaper. This creates micro-scratches that grip the paint wash, simulating real wood grain much better than smooth clay.
Step 2: Creating the Caps
-
Form the caps:
Roll two balls of clay. For the taller mushroom, flatten the ball into a thick dome shape. For the smaller one, create a slightly flatter, wider dome. Ensure the underside is flat where it will attach to the stem. -
Attach to stems:
Score the top of the stems and the underside of the caps with a needle tool. Press them firmly together. You can add a drop of bake-and-bond or liquid clay for extra security if you like. -
Refine the shape:
Smooth out the connection point under the cap so it looks seamless, or leave a slight overhang for a more cartoonish look. Gently press on the top of the domes to ensure they aren’t too pointy. -
Baking:
Bake the figures according to your clay package instructions (usually 275°F/135°C for 15-30 minutes per 1/4 inch of thickness). Let them cool completely before painting.
Wobbly Mushrooms?
If your mushrooms tip over easily, glue a heavy metal washer into the base of the clay (covering it with a thin clay sheet) before baking to add weight and stability.
Step 3: Painting & Details
-
Base coat the caps:
Mix a warm terracotta or rust-colored acrylic paint. Apply this to the mushroom caps using a sponge or brush. Dab the paint on to create a slightly uneven, matte texture rather than a glossy plastic look. -
Adding gradients:
For the taller mushroom, deepen the color slightly near the top with a tiny bit of darker brown. For the shorter one, mix in a little white for a softer, pinker terracotta tone. -
Painting the spots:
Once the base color is dry, use a small round brush or a dotting tool dipped in white paint. Paint irregular circles on the caps. Make some large and some tiny, keeping the edges slightly soft to look natural. -
Refining the stems:
If your clay color isn’t quite ‘woody’ enough, apply a very watery wash of light brown paint over the stems and immediately wipe it off with a paper towel. This will settle into the vertical texture lines you made earlier. -
Drawing the face:
Using a very fine liner brush or a black paint pen, draw the facial features on the lower half of the stems. Start with two small, curved ‘u’ shapes for the smiling eyes. -
Adding the smile:
Paint a simple curved line connecting the area between the eyes for the mouth. Add tiny tick marks at the ends of the smile for cheeks to give them that happy expression. -
Rosy cheeks:
Dip the end of a paintbrush or a ball stylus into pink paint. Dab a small dot onto the ‘cheeks’ right next to the smile lines. -
Finishing touches:
Add tiny white highlights to the eyes if you drew them open, or tiny white dots on the cheeks for cuteness. Seal the entire piece with a matte varnish to protect the paint and eliminate any clay shine.
Set your smiling mushroom buddies on a sunny windowsill near some plants and enjoy their cheerful company

The Complete Guide to Pottery Troubleshooting
Uncover the most common ceramic mistakes—from cracking clay to failed glazes—and learn how to fix them fast.
Mini Fruit Friends With Cute Faces
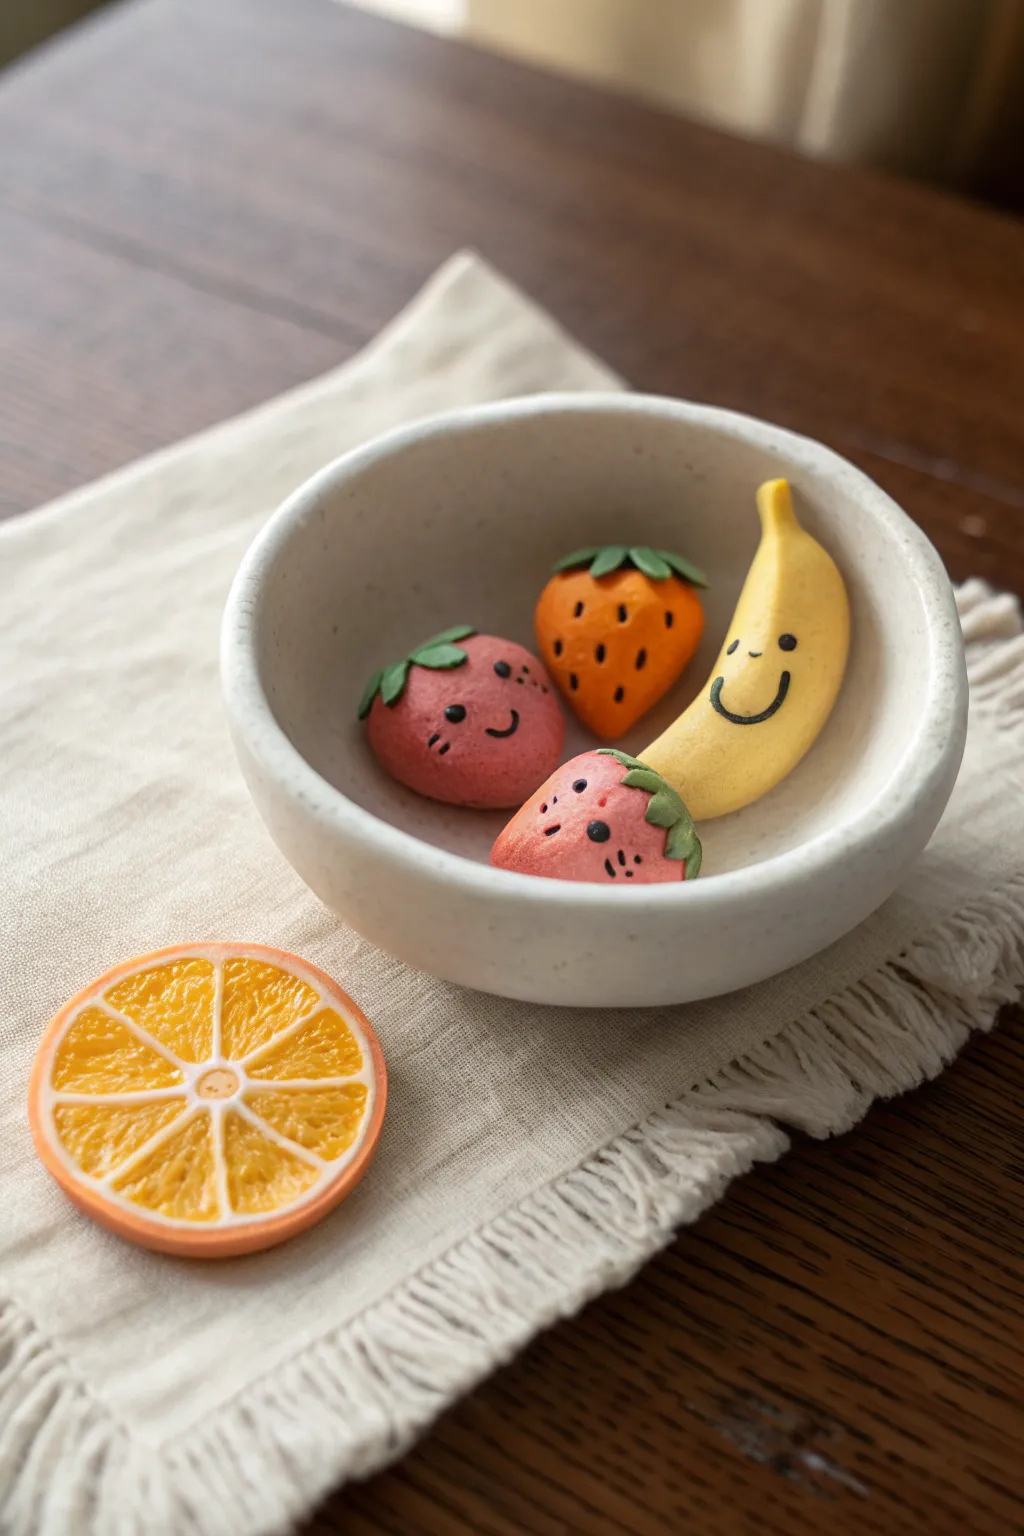
Brighten up your desk with this adorable bowl of polymer clay fruit characters. These tiny bananas and berries feature charming hand-painted expressions that turn simple shapes into sweet little personalities.
Step-by-Step
Materials
- Polymer clay (yellow, pink, red, orange, green, white, translucent)
- Black acrylic paint or fine-tip black marker
- Small ball stylus or needle tool
- Clay blade or craft knife
- Gloss varnish or glaze
- Fine detail paintbrush
- Oven for baking
- Small ceramic bowl for display (optional)
Step 1: Sculpting the Banana Friend
-
Prepare the clay:
Begin by conditioning a piece of yellow polymer clay until it is soft and pliable. Roll it into a smooth log about 2 inches long. -
Shape the curve:
Gently taper both ends of the log, making one end slightly longer and thinner for the stem. Bend the log into a classic crescent banana shape. -
Define the stem:
Pinch the thinner top end to create a distinct stem section. You can lightly flatten the very tip to make it look like where it was snapped from the bunch. -
Smooth the surface:
Check for any fingerprints on the yellow clay and smooth them out with your fingertip or a soft silicone tool. The surface needs to be flawless for the face later.
Step 2: Creating the Berry Trio
-
Form the base shapes:
Take small portions of pink, red, and orange clay. Roll each one into a ball, then gently taper the bottom to create a soft, rounded strawberry or teardrop shape. -
Add texture:
Using a needle tool or a small ball stylus, gently press tiny indentations all over the surface of the berries to mimic seeds. Keep the front area smooth where the face will go. -
Create the leaves:
Roll out a thin sheet of green clay. Use a small cutter or your craft knife to cut out star shapes or individual teardrop leaves. -
Attach the greenery:
Press the green leaves onto the top of each berry shape. Use a tool to gently curve the leaf tips downward so they hug the fruit. -
Make the stems:
Roll a tiny snake of green clay and cut small segments. attach one to the center of each leaf cluster to serve as the stem.
Clean Clay Pro-Tip
Keep baby wipes nearby to clean your hands when switching colors. Red and green pigments love to stick to fingers and will ruin the bright yellow of your banana if you aren’t careful.
Step 3: The Orange Slice (Bonus)
-
Create the rind:
Roll a snake of orange clay, flatten it into a long strip, and create a ring. Inside this ring, place a thinner layer of white clay for the pith. -
Make the segments:
Mix translucent clay with a tiny bit of orange. Shape this into a cane with thin white lines dividing the segments like a wheel. -
Assemble the slice:
Place the segment wheel inside the rind ring. Gently compress everything together, reducing the cane if necessary, and slice a clean cross-section. -
Texture the flesh:
I prefer to use a needle tool to gently scratch the translucent orange sections to give them that juicy, fibrous citrus texture.
Level Up: Magnets
Before baking, press a small, strong neodymium magnet into the back of each fruit. After baking, glue the magnet in place to create the world’s cutest refrigerator set.
Step 4: Baking and Detailing
-
Bake the clay:
Arrange your fruits and the slice on a tile or baking sheet. Bake according to your brand of polymer clay instructions (usually 275°F/135°C for 15-30 minutes). -
Cool down:
Allow the pieces to cool completely before touching them. The clay hardens fully only after it returns to room temperature. -
Paint the faces:
Using a very fine brush and black acrylic paint (or a marker), draw two small dots for eyes and a u-shape for the smile on the banana and berries. -
Add extra details:
For the berries, you can add tiny painted ‘seeds’ or eyelashes if you want extra character. Keep the lines very thin for a cute look. -
Seal the work:
Protect your painting by applying a coat of matte or gloss varnish. A gloss finish makes the fruit look perpetually fresh and juicy.
Arranging these little friends together in a bowl creates an instant dose of happiness
Pastel Macaron and Cookie Trinket Charms
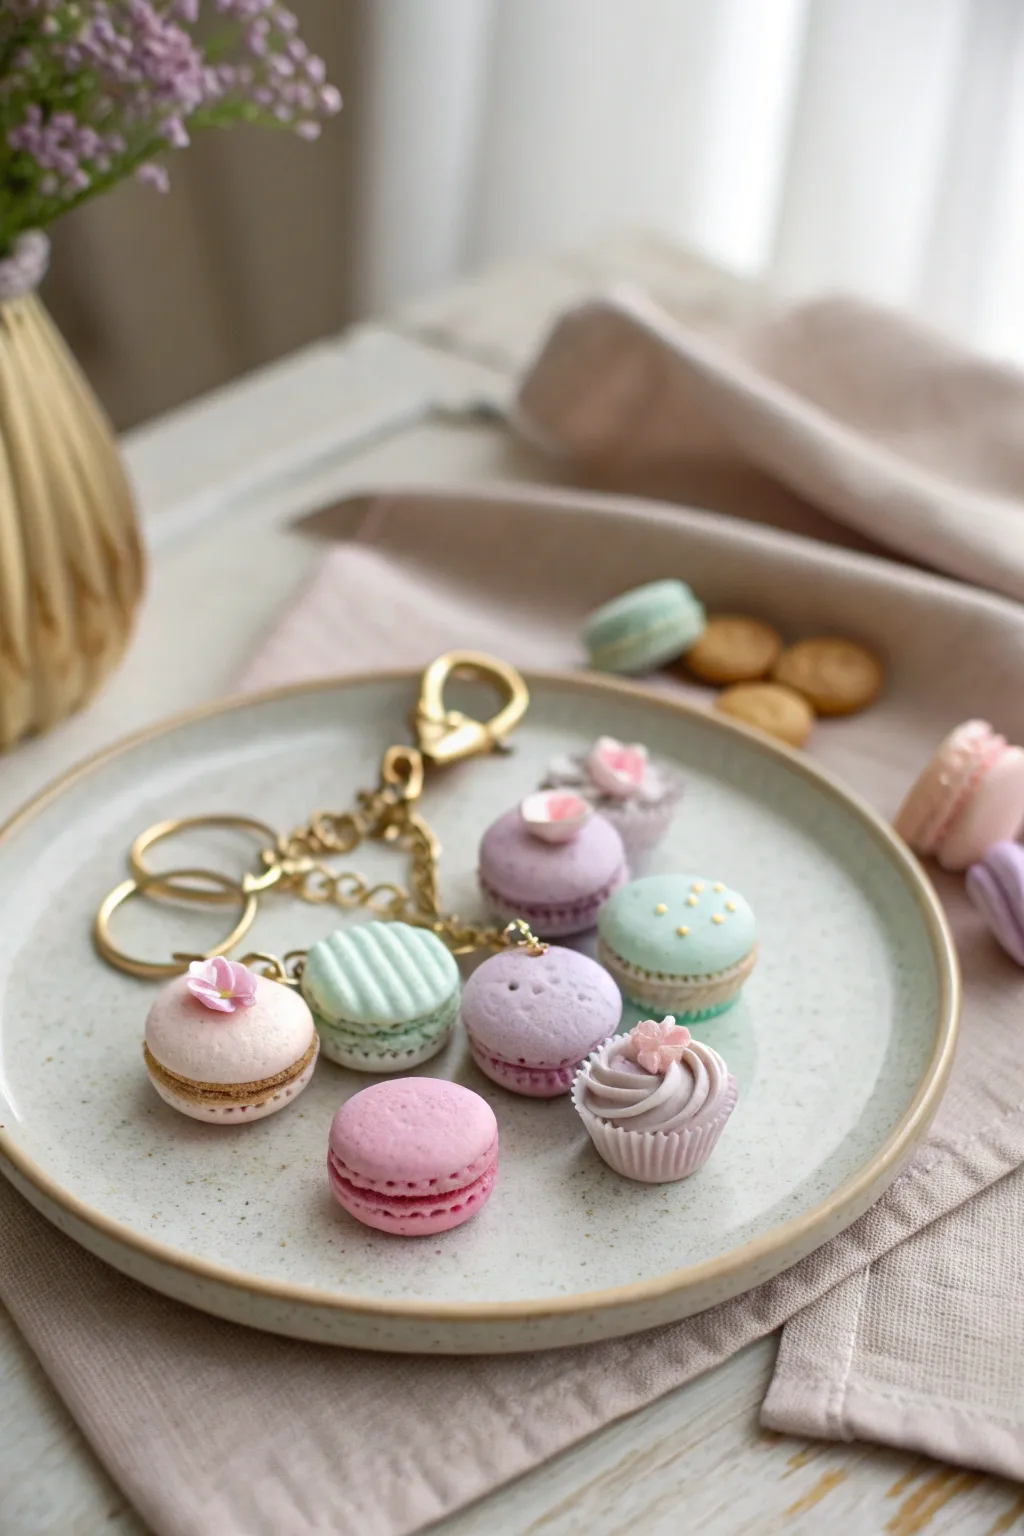
Create a delicate assortment of polymer clay sweets that look good enough to eat but are designed to accessorize your keys or bags. This project combines soft pastel hues with realistic textures like macaron feet and piped frosting swirls for a whimsical, gourmet touch.
Step-by-Step Guide
Materials
- Polymer clay (pale pink, lavender, mint green, white, beige/tan)
- Circle cutters (approx. 1 inch diameter)
- Needle tool or toothpick
- Ball stylus tool
- Liquid polymer clay (Translucent or white)
- Gold jewelry headpins or eye screws
- Gold keychain hardware with chain links
- Jump rings (gold)
- Jewelry pliers (round nose and needle nose)
- Soft pastel chalks (optional for shading)
- Small paintbrush
- Detailing tool or toothbrush (for texturing)
- Oven baking sheet and parchment paper
Step 1: Preparing the Macaron Shells
-
Mix pastel shades:
Begin by conditioning your clay. Mix small amounts of white into your pink, purple, and mint clays to achieve that soft, airy pastel look shown in the photo. -
Cut the shapes:
Roll out the clay to a medium thickness (about 1/4 inch). Use a small circle cutter to punch out two identical circles for each macaron color you intend to make. -
Soften the edges:
Gently smooth the top edge of each circle with your finger to create the classic domed macaron shape. Place a piece of plastic wrap over the clay before cutting for an even softer, puffier dome. -
Create the ‘feet’:
Use a needle tool to score a line around the circumference of the shell, near the bottom edge. Then, use the needle tool to gently pick and loosen the clay below that line, creating the crumbly texture known as ‘feet’.
Texture Secret
For ultra-realistic macaron feet, use a stiff toothbrush to tap the clay below the score line instead of just a needle. This creates a more organic ‘baked’ crumb look.
Step 2: Assembling the Macarons
-
Make the filling:
Roll out a sheet of white or beige clay slightly thinner than the shells. Cut out circles using the same cutter. -
Stack the layers:
Sandwich the filling circle between two matching shells. Press them together gently enough to bond but not so hard that you crush the textured feet. -
Add striped details:
For the mint macaron variant, roll tiny, thin snakes of lighter mint or white clay. Lay them across the top shell in parallel lines and gently roll over them to embed them flush with the surface. -
Attach hardware:
Insert a gold eye screw into the top center of each macaron. I like to dip the screw in a tiny bit of liquid clay first to ensure it acts as a glue during baking.
Sticky Situation?
If your clay gets too soft and sticky to handle, pop it in the fridge for 10 minutes. This firms it up, making it easier to texture and cut without distortion.
Step 3: Crafting the Mini Cupcake
-
Form the base:
Take a small ball of beige or pale pink clay and press it into a mini cupcake mold, or shape it by hand into a tapered cylinder. Use a needle tool to press vertical ridges around the side for the wrapper effect. -
Add the frosting:
Roll a snake of lavender clay. Beginning at the outer edge of the base, coil the snake inward and upward to create a swirl. Taper the end to a point at the center. -
Top it off:
Create a tiny flower by flattening three tiny pink balls of clay and pressing them together at the peak of the frosting swirl.
Step 4: Decorating and Finishing
-
Apply floral accents:
For the plain macarons, sculpt tiny three-petal flowers from pink clay. Place a minuscule white ball in the center and press this onto the top of a shell using a dab of liquid clay. -
Gold detailing:
If desired, use a dotting tool to add tiny indentations on the mint macaron to mimic gold dragees, or wait until after baking to paint small gold dots. -
Baking:
Arrange all charms on a baking sheet lined with parchment paper. Bake according to your clay manufacturer’s instructions (usually around 275°F for 15-30 minutes). Let them cool completely. -
Assembly:
Open a jump ring with your pliers. Loop it through the eye pin of a macaron and then attach it to a link on the gold keychain chain. -
Cluster the charms:
Attach the remaining charms at different heights along the chain to create a clustered, jingly effect.
Once assembled, clip your sweet new accessory onto a tote bag or set of keys to add a charming touch of pastry perfection


What Really Happens Inside the Kiln
Learn how time and temperature work together inside the kiln to transform clay into durable ceramic.
Cute Onigiri-Style Rice Snack Keychains
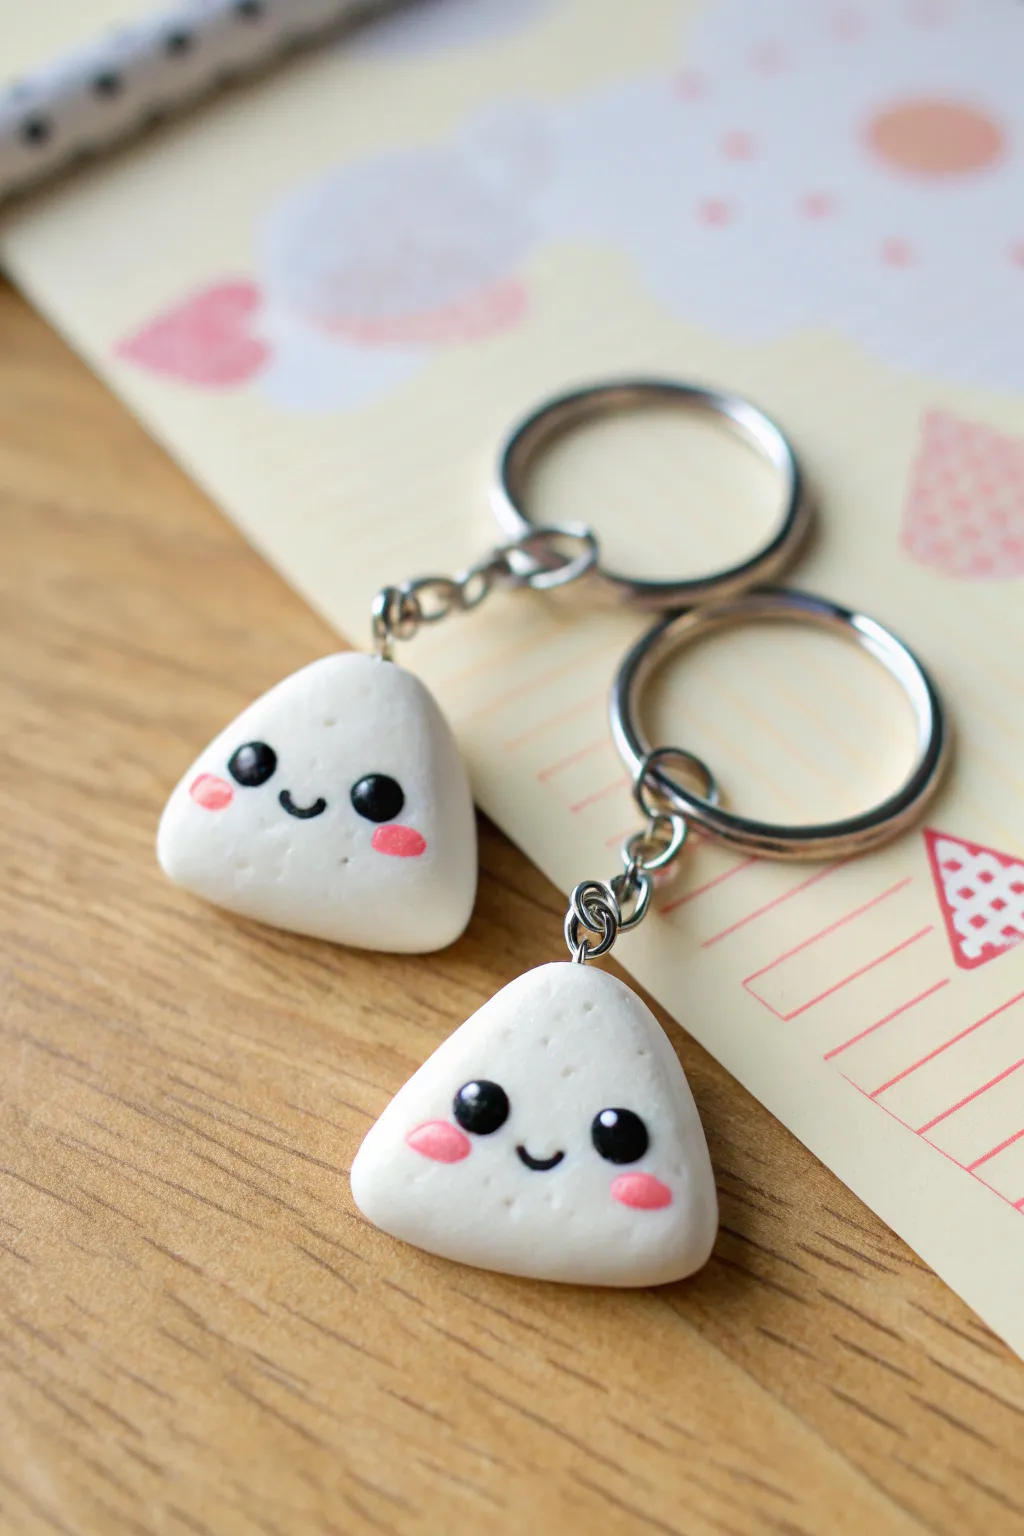
These adorable onigiri snack keychains capture the simple joy of Japanese rice balls with sweet, smiling faces. Their smooth, rounded triangular shapes and cheeky pink cheeks make them perfect companions for your backpack or keys.
Step-by-Step Tutorial
Materials
- White polymer clay
- Black polymer clay
- Pink polymer clay or acrylic paint
- Clear gloss glaze or UV resin
- Eye pins (2)
- Jump rings
- Keychain rings
- Needle tool or toothpick
- Dotting tool or ball stylus
- Soft paintbrush
- Oven for baking
Step 1: Shaping the Rice Base
-
Condition the white clay:
Start by taking a chunk of white polymer clay and kneading it thoroughly in your hands until it becomes warm, soft, and pliable. -
Form a smooth ball:
Roll the conditioned clay between your palms to create a perfect sphere, ensuring there are no cracks or visible seams. -
Divide the clay:
Since we are making a pair, cut your sphere in half or use two equal portions of clay to ensure your buddies are the same size. -
Create the triangle shape:
Gently press the ball onto your work surface to flatten the bottom, then use your fingers to pinch the top into a rounded point, forming a soft triangle. -
Soften the edges:
Onigiri aren’t sharp tools! Keep patting and smoothing the corners with your fingertips so the triangle looks puffy and organic, just like real rice. -
Add texture:
Take a toothbrush or a needle tool and very gently tap the surface of the white clay all over. This mimics the grain texture of rice rather than leaving it perfectly smooth.
Step 2: Creating the Face
-
Mark the eye placement:
Using a needle tool, make two tiny indentations where you want the eyes to go. Placing them slightly lower on the triangle makes them look cuter. -
Make the eye sockets:
Widen those indentations slightly with a small ball tool to create a snug home for the black clay eyes. -
Roll tiny eyes:
Take the tiniest amount of black clay and roll two identical spheres. They should be small enough to fit into your sockets. -
Insert the eyes:
Place the black spheres into the sockets and gently press them flat so they are flush with the surface of the rice ball. -
Roll a mouth coil:
Roll an incredibly thin snake of black clay. Cut a tiny segment about 2-3mm long. -
Shape the smile:
Curve the tiny black segment into a ‘U’ shape on your fingertip or tool, then carefully press it onto the face between the eyes. -
Add rosy cheeks:
I prefer using tiny flattened ovals of pink clay placed just under the eyes, but you can also wait until after baking to paint these on.
Rice Texture Secret
Use an old toothbrush to tap the white clay surface. It creates a perfect, subtle rice grain texture instantly.
Step 3: Assembly and Finishing
-
Insert the hardware:
Take an eye pin and trim it if it’s too long. Push it gently into the top center of the onigiri triangle. -
Bake the charms:
Bake your pieces according to the instructions on your specific brand of polymer clay. Usually, this is around 275°F (135°C) for 15-30 minutes. -
Cool down:
Let the pieces cool completely before handling them. They are fragile while warm. -
Add the shine:
Paint a dot of white acrylic paint on the black eyes for a highlight (if you didn’t use clay), then coat the eyes and cheeks with gloss glaze to make them sparkle. -
Attach the keychain:
Jpen a jump ring using pliers, loop it through the eye pin on your charm and the chain of the keyring, then close it securely.
Dirty Clay?
White clay picks up lint easily. Keep baby wipes nearby to clean your hands and tools often while working.
Now you have a charming set of snack buddies ready to brighten up your day
Mini Heart Magnets With Blush Cheeks
Create a charming collection of tiny heart-shaped magnets with these simple polymer clay characters. Their varied shades of pink, peach, and rust create a warm palette, while their minimalist smiley faces add instant personality to any magnetic surface.
Detailed Instructions
Materials
- Polymer clay in various warm colors (pale pink, peach, terracotta, red, dusty rose)
- Black polymer clay (very small amount) or black acrylic paint
- Heart-shaped clay cutter (approx. 1 inch wide)
- Rolling pin or pasta machine
- Ceramic tile or baking sheet
- Parchment paper
- Needle tool or toothpick
- Ball stylus tool (small)
- Small round magnets
- Strong craft glue (e.g., E6000 or superglue gel)
- Gloss glaze (optional)
Step 1: Prepping and Cutting
-
Condition the Clay:
Begin by thoroughly conditioning your various colors of polymer clay. Knead each color in your hands until it becomes soft, pliable, and warm to the touch. -
Create Custom Shades:
To match the subtle palette in the photo, try mixing colors. Blend a little white into bright red for a soft pink, or mix orange with a touch of brown for that earthy terracotta tone. -
Roll out Sheets:
Roll each color out into a sheet of even thickness. Aim for about 1/4 inch (6mm) thick—you want them sturdy enough to hold a magnet but not too heavy. -
Cut the Hearts:
Using your heart-shaped cutter, press firmly into the clay sheets to cut out your shapes. Lift the cutter straight up to keep the edges clean. -
Smooth the Edges:
Gently tap the edges of each heart with your finger to soften the sharp cut lines. I like to give them a slightly rounded, pillowy look rather than a sharp, cookie-cutter edge.
Fixing Wonky Smiles
If your clay mouth keeps distorting when you move it, try pre-baking just the tiny black mouth for 5 minutes first, then press it into the raw heart clay.
Step 2: Adding Faces
-
Mark Eye Positions:
Using a needle tool, make two tiny guide dots where you want the eyes to go. Keep them wide-set for that cute ‘kawaii’ aesthetic. -
Create Eye Sockets:
Press a small ball stylus gently into your guide marks to create small indentations. This helps the black clay sit flush with the surface later. -
Roll Tiny Eyes:
Take the tiniest pinch of black clay and roll it into a microscopic snake, then cut barely-visible slices. Roll these slices into tiny spheres between your fingers. -
Place the Eyes:
Pick up the black spheres with the tip of your needle tool/toothpick and press them gently into the eye sockets you created. -
Make the Mouth:
You can either use a very thin snake of black clay curved into a ‘U’ shape, or simply press a small curved tool (like a cut straw or U-shaped wire) into the clay to make an impressed smile. -
Apply the Smile:
If using clay for the mouth, carefully lay the thin black strand onto the face and tap it gently to bond it to the raw heart. -
Check for Lint:
Before baking, inspect your hearts for any fingerprints or dust. A q-tip dipped in a little rubbing alcohol or baby oil can smooth these away.
Step 3: Baking and Assembly
-
Bake the Pieces:
Arrange the hearts on a parchment-lined baking sheet or ceramic tile. Bake according to your brand of clay’s instructions—usually around 275°F (135°C) for 15–30 minutes. -
Cool Completely:
Allow the hearts to cool completely in the oven with the door cracked open, or simply let them rest on the counter until they are room temperature. -
Optional Glazing:
For the shiny finish seen in the photo, apply a thin coat of polymer clay gloss glaze. Let it dry fully before handling. -
Prepare the Backs:
Flip the hearts over. If the backs are uneven, you can lightly sand them so the magnet will sit flat. -
Add Magnets:
Apply a small dot of strong craft glue to the center of the back of each heart. -
Secure the Magnets:
Press a magnet firmly into the glue. Let these cure undisturbed for at least 24 hours to ensure a permanent bond.
Add Rosy Cheeks
Before baking, brush a tiny amount of soft pink chalk pastel dust onto the cheeks using a dry paintbrush for an adorable, blushing effect.
Arrange your happy new friends on the fridge and enjoy their cheerful smiles every time you pass by

TRACK YOUR CERAMIC JOURNEY
Capture glaze tests, firing details, and creative progress—all in one simple printable. Make your projects easier to repeat and improve.
Cute Cloud Pins With Star Sprinkles
Create these adorable, puffy cloud pins that seem to be drifting off to sleep with sweet smiles and golden star freckles. The soft, rounded edges and simple facial details make this a perfect project for beginners looking to add a touch of whimsy to their jacket or tote bag.
How-To Guide
Materials
- White polymer clay (or air-dry clay)
- Small cloud-shaped cookie cutter (optional)
- Rolling pin or smooth glass jar
- Fine-point black permanent marker or acrylic paint pen
- Gold star glitters or small star confetti
- Gold leaf adhesive (if using loose glitter) or clear varnish
- Glossy glaze or UV resin (optional for finish)
- Pin backs or magnet discs
- Strong craft glue (e.g., E6000)
- Needle tool or toothpick
- Sandpaper (fine grit)
Step 1: Shaping the Clouds
-
Condition the Clay:
Begin by kneading your white polymer clay in your hands until it becomes soft, pliable, and free of cracks. Warm hands make this process much easier. -
Roll It Out:
Flatten the clay on a clean, smooth surface using a rolling pin. Aim for a thickness of about 1/4 inch (6mm)—you want the clouds to look chubby and puffy, not flat like paper. -
Cut the Shape:
Press your cloud-shaped cutter firmly into the clay. If you don’t have a cutter, you can sketch a cloud shape lightly with a needle tool and carefully cut it out with a craft knife. -
Soften the Edges:
Once cut, the edges will be sharp and squared off. Gently use your fingertip to smooth and round over every edge. This ‘marshmallow’ look is key to the cute aesthetic. -
Inspect for Imperfections:
Check the surface for any lint or fingerprints. I like to gently run a little baby oil or water (if using air-dry clay) over the surface to make it perfectly smooth before curing.
Smudged Ink?
If your marker bleeds into the clay, the clay might be too porous. Try sealing the area with a tiny layer of matte varnish first, let it dry, then draw the face on top.
Step 2: Adding the Stars
-
Embed the Stars:
While the clay is still raw, carefully place five or six tiny gold star glitters onto the cloud’s face. Press them gently into the clay so they sit flush with the surface but don’t disappear inside. -
Cure the Clay:
Bake your polymer clay pieces according to the manufacturer’s instructions (usually 275°F/135°C for 15-30 minutes). If using air-dry clay, let them sit in a dry spot for 24-48 hours. -
Cool Down:
Allow the clouds to cool completely before moving on. Polymer clay is slightly fragile when hot, so patience here prevents breakage.
Step 3: Detailing and Assembly
-
Sketch the Face:
Lightly mark where you want the eyes and mouth using a pencil. Placing the eyes low on the cloud shape often makes it look cuter. -
Draw the Features:
Using a fine-point black paint pen or permanent marker, carefully draw two curved lines for sleepy eyes. Add three tiny lashes to each eye. -
Add the Smile:
Draw a tiny ‘U’ shape exactly between and slightly below the eyes for the mouth. -
Seal the Stars:
If your stars feel loose after baking, dab a tiny amount of clear glaze or varnish over them to secure them permanently. -
Attach the Hardware:
Flip the cloud over. Apply a strong dab of E6000 or super glue to the back of a pin mechanism or magnet. -
Secure and Dry:
Press the hardware firmly onto the center of the cloud’s back. Let the glue cure fully (usually 24 hours for maximum strength) before pinning it to fabric.
Night Sky Variation
Use dark blue or black clay instead of white. Use white paint for the face and mix in gold and silver star glitters for a beautiful midnight sky version.
Now you have a sweet little companion to brighten up your backpack or jacket collar
Tiny Animal Ring Holders (Bunny, Cat, Bear)
This charming project features a minimalist bunny sculpture sitting atop a shallow trinket dish, perfect for keeping rings safe. The natural speckled finish and simple black line-work give it a modern, handmade ceramic feel without needing a kiln.
Step-by-Step Guide
Materials
- Air-dry clay (stone or speckled effect preferred)
- Small rolling pin
- Clay knife or craft blade
- Water and a small sponge
- Fine-grit sandpaper
- Black acrylic paint
- Very fine detail paintbrush (size 0 or 00)
- Matte sealant or varnish
- Circle cutter or a round bowl (approx. 4-5 inches)
- Toothpick or needle tool
Step 1: Sculpting the Base Dish
-
Roll out the clay:
Begin by taking a handful of your speckled clay and kneading it until soft. Roll it out on a flat surface to a thickness of about 1/4 inch. -
Cut the circle:
Use a circle cutter or place a small bowl upside down on the clay as a template. Cut around it with your knife to create a perfect circle for the tray base. -
Create the rim:
Roll a long, thin snake of clay, aiming for an even thickness of about 1/4 inch. It needs to be long enough to wrap around the circumference of your circle base. -
Attach the rim:
Score the outer edge of your base and one side of the clay snake with a needle tool. Apply a little water to the scored areas (your ‘slip’) and press the coil onto the edge of the base. -
Blend the seams:
Using your thumb or a modeling tool, smooth the coil into the base on both the inside and outside until the seam disappears completely. Smooth the rim with a damp sponge.
Smooth Operator
Use a wet finger to smooth the clay before it dries. This reduces sanding time later and keeps that surface looking like fired ceramic.
Step 2: Forming the Bunny
-
Shape the body:
Form a ball of clay roughly the size of a large egg. Gently roll it into a pear shape, flattening the bottom so it stands steadily on its own. -
Form the ears:
Take two smaller pieces of clay and roll them into elongated teardrop shapes. Slightly flatten them to create the bunny ears. -
Attach the ears:
Score the top of the head and the bottom of the ears. Add water and press the ears firmly onto the head. Use a tool to drag clay from the base of the ears down onto the head to blend the seam seamlessly. -
Refine the shape:
Smooth out any fingerprints with a little water. If you want a tiny companion, roll a small semi-circle dome and attach two tiny ears to make the mini bunny head shown in the photo. -
Dry the pieces:
I prefer to let the pieces dry separately before assembly to ensure the bottom of the bunny dries fully. Place everything in a cool, dry spot for 24-48 hours until bone dry and hard.
Step 3: Finishing Touches
-
Sand for smoothness:
Once fully dry, gently sand any rough edges, especially around the rim of the dish and the bunny’s ears. Wipe away dust with a barely damp cloth. -
Attach bunny to dish:
If you want the bunny permanently fixed, apply a strong craft glue to the bottom of the bunny and press it onto the dish (off-center usually looks best). Alternatively, leave it loose. -
Paint the face:
Using your finest brush and black acrylic paint, carefully dot two eyes wide apart. Add a small ‘Y’ shape for the nose and mouth, and three delicate whiskers on each cheek. -
Paint the paws:
Near the bottom of the bunny’s body, paint two simple ‘U’ shapes or curved lines to suggest little paws tucked in. -
Add blush details:
Mix a tiny amount of red or pink paint with water to create a wash. layout delicate pink cheeks on the tiny bunny head if you made one. -
Seal the project:
Apply a coat of matte varnish over the entire piece to protect the clay and paint. This is especially important for ring holders to prevent tarnishing or moisture damage.
Texture Tech
If you can’t find speckled clay, mix used coffee grounds or cracked black pepper into plain white air-dry clay for an instant faux-stone effect.
Now your jewelry has the sweetest little guardian to keep it safe and organized
Cute Toothbrush Holder With a Little Animal Face
Bring a smile to your morning routine with this adorable speckled panda cup. This simple slab-built or pinch-pot project features a sweet, minimalist animal face that adds instant charm to any bathroom counter.
Step-by-Step Guide
Materials
- White polymer clay or air-dry clay (approx 500g)
- Faux granite/speckled clay effect medium (or black pepper/dried tea leaves)
- Rolling pin
- Cylindrical mold (like a glass jar or PVC pipe)
- Clay knife or craft blade
- Slip and scoring tool (if using air-dry clay)
- Smooth work surface or clay mat
- Sponge and water
- Black acrylic paint
- Soft pink acrylic paint
- Fine detail paintbrush
- Water-resistant varnish or sealant (essential for bathroom use)
Step 1: Preparing the Speckled Clay
-
Create the base:
Start by conditioning your white clay until it is soft and pliable. If you are using pre-speckled clay, you can skip to the rolling step. -
Add the speckles:
To achieve that natural granite look with plain clay, I like to knead in a small amount of ‘granite effect’ inclusion. Alternatively, mix in a pinch of coarsely ground black pepper or dried tea leaves for an organic speckled texture. -
Roll the slab:
Roll the clay out into a long playful rectangle, aiming for a consistent thickness of about 1/4 inch (6mm). This sturdy thickness ensures the cup won’t be too fragile. -
Cut to size:
Measure your cylindrical mold to determine the circumference. Cut a clean rectangle from your clay slab that is slightly longer than the circumference of your mold and about 4-5 inches tall.
Step 2: Forming the Cup
-
Wrap the cylinder:
Gently wrap your clay rectangle around your chosen mold. If using air-dry clay, wrap a piece of paper around the mold first to prevent sticking. -
Seam the edges:
Where the two ends of the clay meet, cut through both layers simultaneously at an angle to create a perfect bevel joint. Remove the excess scraps. -
Join the sides:
Score the edges (scratch them up) and add a little water or liquid clay. Press the edges together firmly. Use a modeling tool or your finger to smooth the seam until it’s invisible. -
Create the base:
Roll out a small circle of clay for the bottom. Place your cylinder on top of it and trace around the edge, then cut out the circle. -
Attach the bottom:
Score and slip the bottom edge of your cylinder and the edge of the base circle. Press them together, smoothing the clay upwards from the base to the wall to create a watertight seal. -
Smooth the exterior:
Dip a sponge in a little water and gently wipe the entire surface to remove fingerprints and refine the shape. Round off the top rim slightly for a soft, finished look.
Seam Smoothing
If the vertical seam keeps cracking open, your clay might be too dry. Add a tiny snake of fresh wet clay over the seam and blend it outwards for reinforcement.
Step 3: Finishing and Painting
-
Allow to dry:
Let the clay dry completely according to the manufacturer’s instructions. If baking polymer clay, remove the mold carefully and bake now. -
Outline the face:
Lightly sketch the panda features with a pencil. Place the eyes about halfway down the cup, spacing them widely for that cute character aesthetic. -
Paint the heavy features:
Using a small brush and black acrylic paint, fill in two large organic oval shapes for the eye patches. Add small, rounded ears near the top rim on the sides. -
Add the nose:
Paint a small, soft triangle or oval for the nose right between the eye patches, slightly lower down. -
Smile detail:
Using your finest brush tip, paint a very thin ‘w’ shape extending from the nose to create the mouth. -
Eye expressions:
Once the black eye patches are fully dry, use white paint to add curved upward crescents at the bottom of the black spots. This creates the ‘smiling eyes’ look. -
Rosy cheeks:
Dip the tip of a finger or a round sponge brush into the pink paint. Dab off the excess, then gently stamp small pink circles just below the eye patches. -
Seal the piece:
Since this will live in a bathroom, apply 2-3 coats of a high-quality water-resistant varnish or sealant inside and out.
Paint Perfect Eyes
For the crisp white crescents inside the panda’s eyes, use a white paint pen instead of a brush. It offers much better control for those delicate curves.
Now your bathroom has a cheerful new guardian ready to keep your toothbrush safe and organized
Tiny Planters With Chibi Faces (For Small Plants)
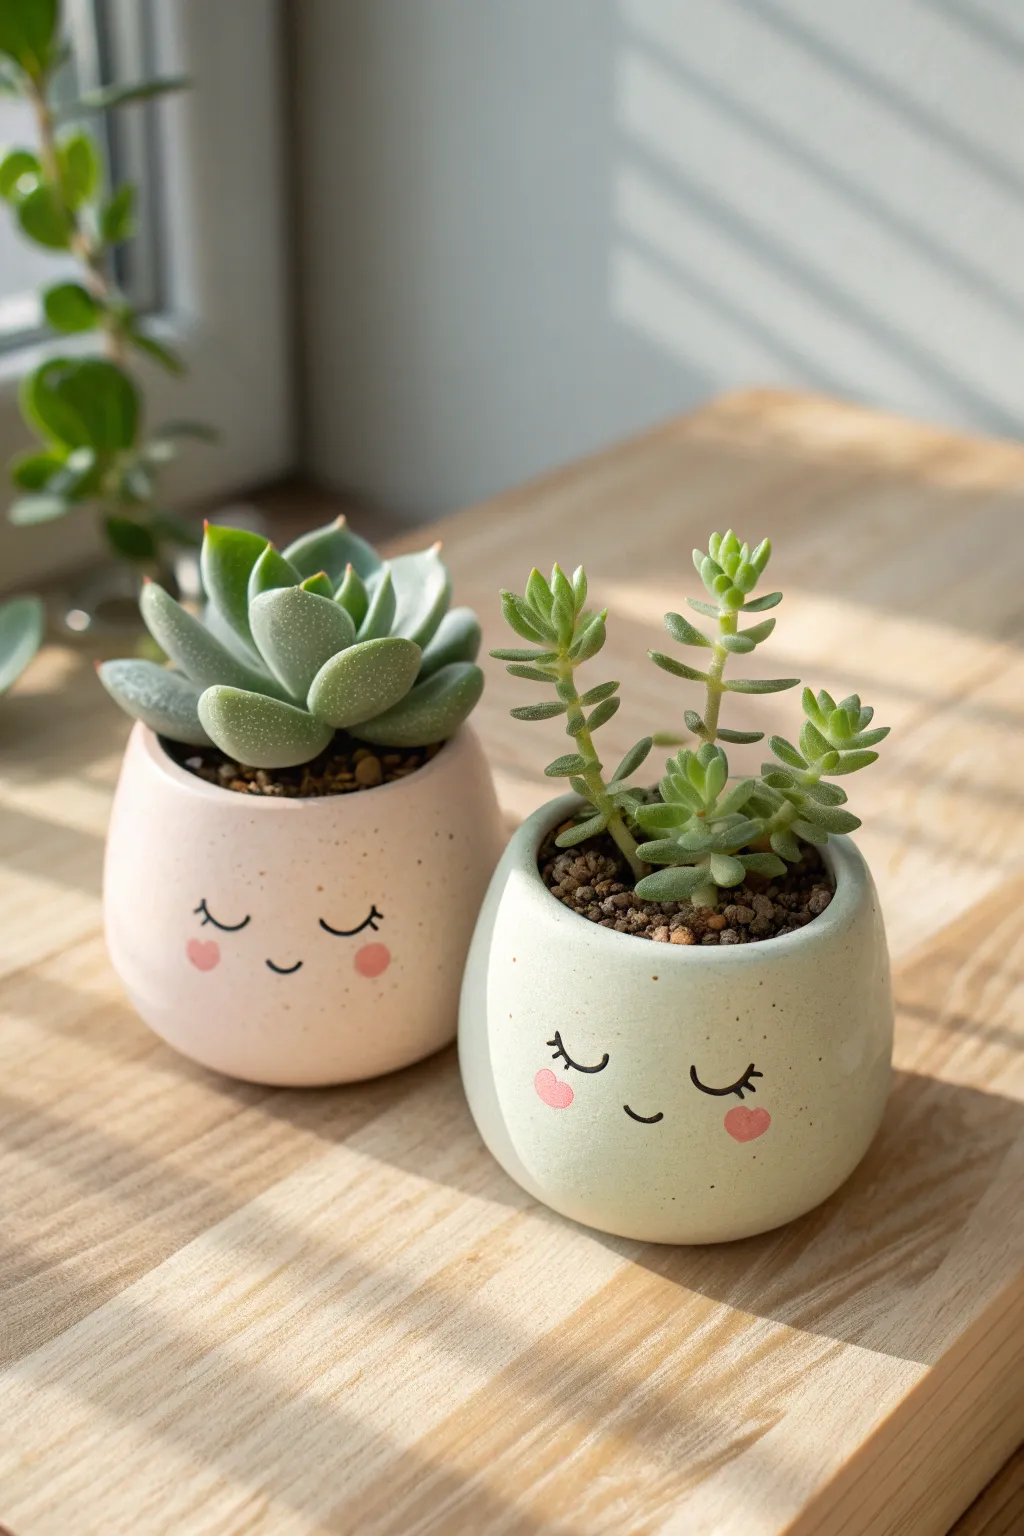
Bring a touch of whimsy to your windowsill with these adorable, palm-sized planters featuring sweet, sleepy faces. The smooth, rounded forms and soft pastel finishes make them the perfect cozy homes for your tiniest succulents.
Step-by-Step
Materials
- Air-dry clay or polymer clay (white)
- Small rolling pin
- Clay cutting tool or knife
- Sphere mold or foam ball (approx. 3 inches diameter)
- Fine-grit sandpaper (400-600 grit)
- Acrylic paints (pale pink, sage green, black, bright pink)
- Fine detail paintbrush (size 00 or 0)
- Flat shader paintbrush (size 6 or 8)
- Matte or satin varnish/sealer
- Succulent potting soil
- Small succulents
Step 1: Shaping the Base
-
Condition the clay:
Start by kneading your clay until it is soft, pliable, and free of air bubbles. If you are using polymer clay, the warmth of your hands will help soften it. -
Form a ball:
Roll a fist-sized amount of clay into a smooth, seamless ball. Ensure there are no cracks, as these can expand during drying or baking. -
Create the hollow:
Use your thumb to press deeply into the center of the ball. Gently pinch and rotate the clay between your thumbs and fingers to thin out the walls, aiming for a consistent thickness of about 1/4 inch. -
Smooth the shape:
Instead of straight sides, cup the clay to maintain a rounded, bowl-like bottom, gently tapering the rim inward slightly to mimic the egg-like shape seen in the photo. -
Flatten the bottom:
Tap the pot gently onto your work surface to create a small, flat base. This ensures your planter will sit stability without wobbling. -
Refine surface:
Dip your finger in a little water (for air-dry clay) or baby oil (for polymer) and smooth out any fingerprints or tool marks on the exterior. -
Drainage hole:
Use a straw or a small circular cutter to punch a drainage hole in the very center of the bottom. This is crucial for succulent health.
Uneven Drying?
If air-dry clay cracks while drying, mix a small amount of fresh clay with water to make a paste (slip) and fill in the cracks. Sand smooth once dry.
Step 2: Finishing and Decoration
-
Dry or bake:
If using air-dry clay, let it sit for 24-48 hours until fully white and hard. If using polymer, bake according to the package instructions (usually 275°F for 15-30 mins). -
Sand for smoothness:
Once fully cured and cool, take your fine-grit sandpaper and gently buff the exterior. You want a surface as smooth as an eggshell for the best painting results. -
Mix your base colors:
Mix white acrylic paint with a tiny dot of red to create a pale baby pink. For the second pot, mix white with a drop of green and a speck of yellow for a soft sage color. -
Apply base coat:
Using the flat shader brush, paint the entire exterior of the pots. I like to apply two to three thin coats rather than one thick one to avoid brush strokes. -
Sketch the face:
Lightly trace the facial features with a pencil. Place the eyes wide apart and low on the pot to achieve that cute ‘chibi’ aesthetic. -
Paint the eyes:
Using your finest detail brush and black paint, carefully trace the curved lines for the sleeping eyes. Add three tiny lashes to the outer corner of each eye. -
Paint the mouth:
Add a tiny, shallow U-shape between the eyes for the smile. Keep the line thin and delicate. -
Add rosy cheeks:
Dip the back end of your paintbrush (the wooden handle) into bright pink paint. Dabbing this onto the pot creates perfect circular cheeks just below the eyes. -
Seal the work:
Once the paint is completely dry, apply a coat of matte or satin varnish to protect the paint from moisture and soil. -
Planting:
Fill the pots with succulent soil and gently nestle your small plants inside. Add a few small pebbles on top if desired for a finished look.
Speckled Finish
To get the stone-like texture seen on the pink pot, dip an old toothbrush in brown paint and flick the bristles to spray tiny specks over the dry base coat.
Now you have a charming set of sleepy planters ready to brighten up your desk or shelf.
Mini Desk Sign Holders With Cute Characters
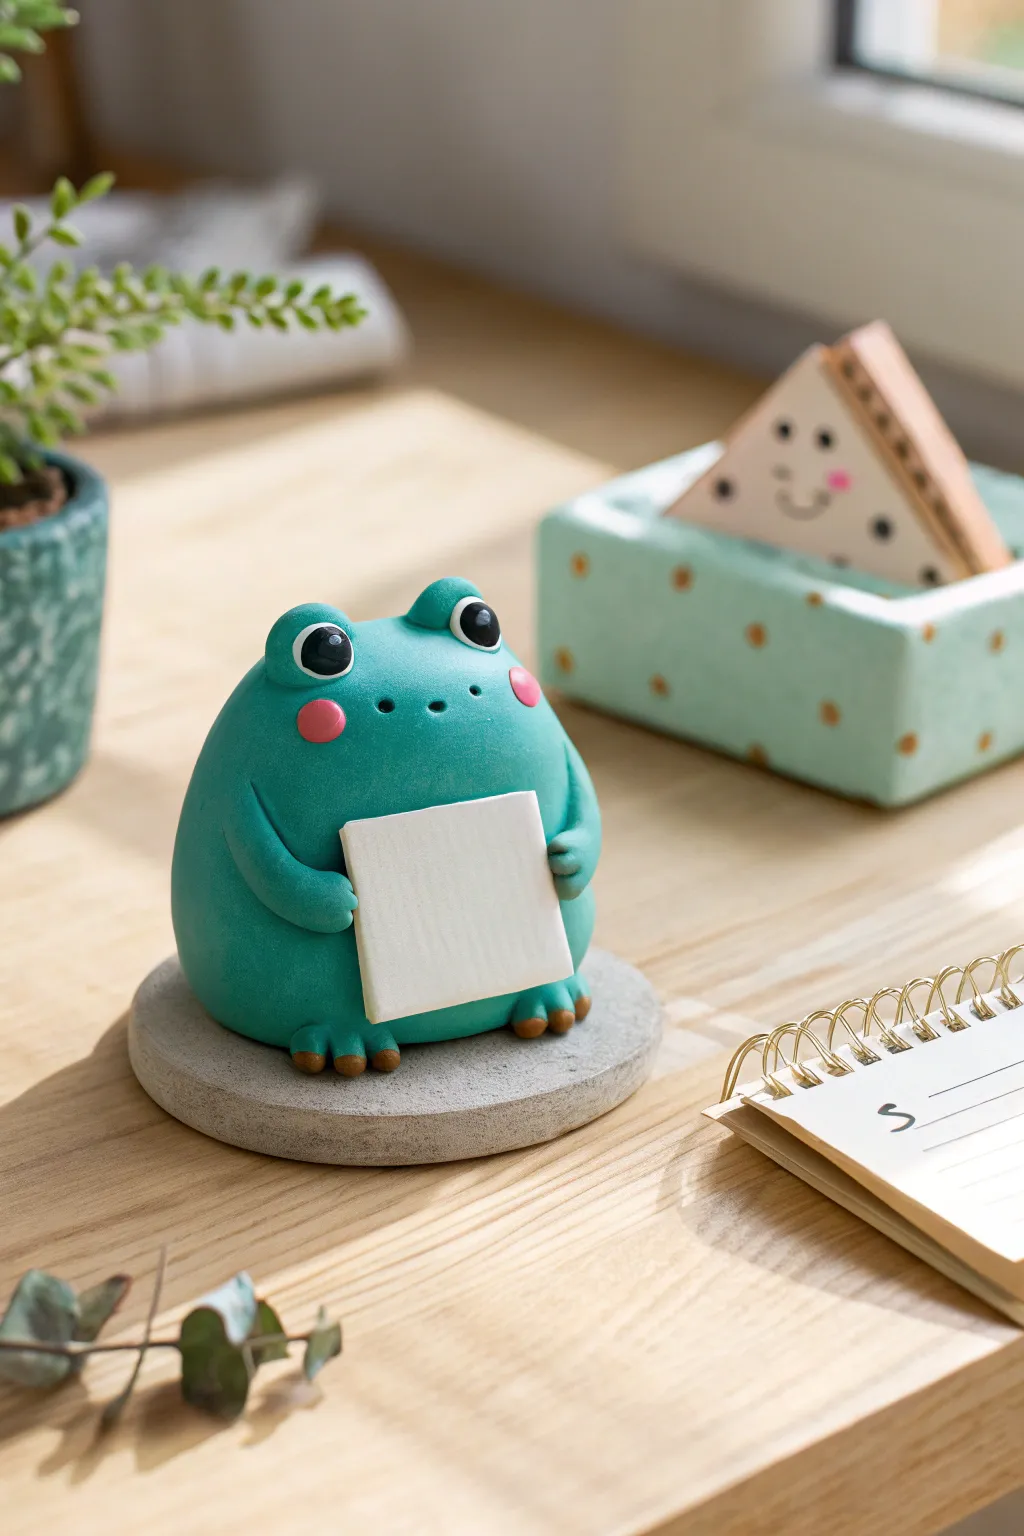
This adorable desk companion combines functionality with charm, featuring a chubby teal frog ready to hold your important reminders. With its smooth matte finish and rosy cheeks, this polymer clay project brings a cheerful pop of color to any workspace.
How-To Guide
Materials
- Polymer clay (Teal/Green, White, Black, Pink, Grey, Brown)
- Clay roller or pasta machine
- Ball stylus tools (various sizes)
- Needle tool or toothpick
- Circle cutter (approx. 2.5 inches)
- Blade or craft knife
- Ceramic tile or glass work surface
- Oven for baking
Step 1: Forming the Base & Body
-
Prepare the Base:
Start by conditioning your grey clay until soft. Roll it out into a thick slab, about 1/4 inch thick. Use your circle cutter to punch out a neat disc. I like to texture the edges slightly with a toothbrush to make it look like stone. -
Shape the Body:
Take a large portion of teal clay and roll it into a smooth ball. Gently shape it into a rounded gumdrop or mound shape, flattening the bottom so it sits securely on the grey base. -
Attach Body to Base:
Center the teal body onto your grey disc. Press down gently to ensure a good bond without distorting the shape too much.
Step 2: Adding the Sign & Arms
-
Create the Sign:
Roll out white clay into a thin sheet. Cut a precise square or rectangle using your blade. Smooth the edges with your finger to remove any sharpness. -
Position the Sign:
Place the white square against the frog’s belly. Don’t press too hard yet; we want it to look like it’s being held. -
Make the Arms:
Roll two small snakes of teal clay for the arms. They should be slightly tapered at one end. -
Attach the Arms:
Attach the thicker end of the arms to the sides of the body, blending the seam with a silicone tool or your finger so it looks like one piece. -
Hold the Sign:
Curve the arms forward so the ends wrap slightly over the edges of the white square. This secures the ‘paper’ in place.
Clean Clay Only
White clay picks up dust easily. Clean your hands and work surface thoroughly with a baby wipe before rolling out the white sign piece to keep it pristine.
Step 3: Facial Features & Feet
-
Form the Frog Eyes:
Roll two small balls of teal clay and place them on top of the head for the eye sockets. Use a ball tool to create an indentation in the center of each. -
Insert the Eyes:
Place a smaller ball of black clay into each socket. Add a tiny speck of white clay to the top right of each black pupil for a life-like highlight. -
Cheeks and Nostrils:
Flatten two tiny discs of pink clay and press them onto the face for blush. Use a needle tool to poke two small holes between the eyes for nostrils. -
Create the Feet:
Make two small, flattened ovals of teal clay for the feet. Using a needle tool, press three indentations into the front of each to create toes. -
Add Toe Details:
Roll extremely tiny balls of brown clay. Press one onto the tip of each toe on the feet, and also onto the ‘hands’ holding the sign. -
Final Polish:
Check the figure for any fingerprints. You can smooth them away with a tiny bit of baby oil on your finger before baking. -
Bake:
Bake the figure according to your clay manufacturer’s instructions, typically at 275°F (130°C) for about 30 minutes depending on thickness.
Pro Tip: Matte Finish
To get that soft, non-shiny look seen in the photo, lightly dust the unbaked clay with cornstarch before baking. It removes sheen and prevents fingerprints.
Place this little green friend on your desk to hold your daily affirmation or to-do list
Kawaii-Style Coasters With Tiny Faces
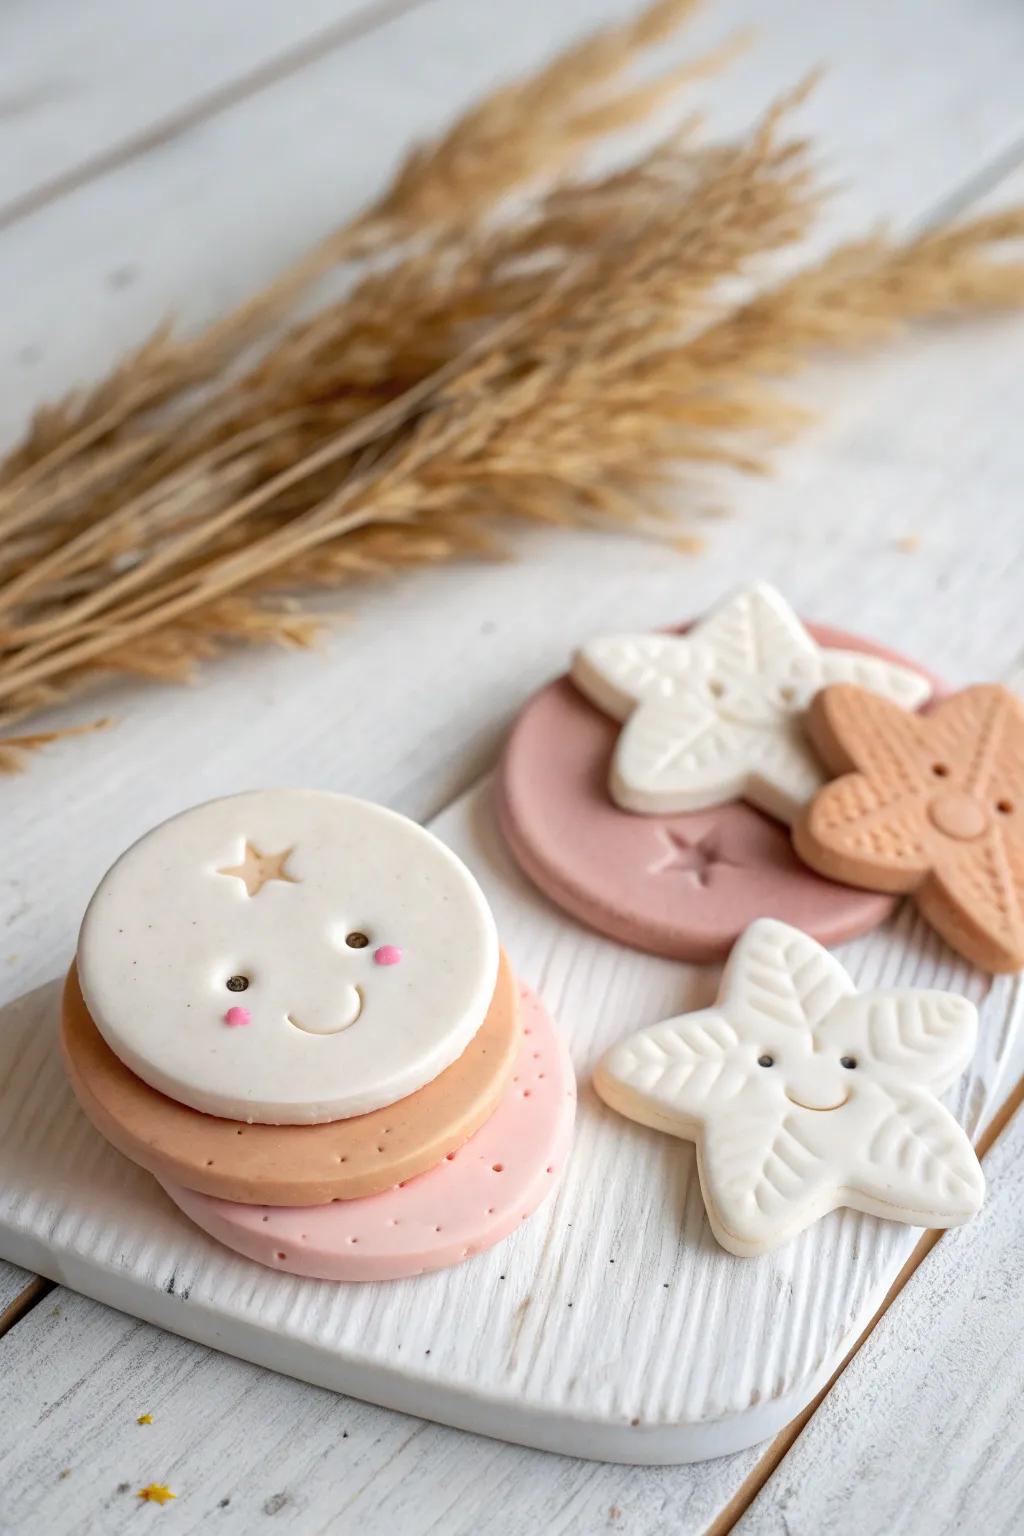
Create a dreamy set of polymer clay coasters and decorations featuring adorable smiling faces. This project combines soft pastel tones with tactile textures to make a sweet addition to any desk or nursery.
Detailed Instructions
Materials
- Polymer clay (white, beige, muted pink)
- Acrylic rolling pin
- Circular cookie cutter (approx. 3-4 inches)
- Star-shaped cookie cutter
- Needle tool or toothpick
- Ball stylus tool (small)
- Small star stamp involved or tiny star cutter
- Black acrylic paint
- Pink acrylic paint
- Fine detail paintbrush
- Parchment paper based work surface
- Oven for baking
Step 1: Prepping the Clay
-
Condition the clay:
Begin by kneading each color of polymer clay—white, beige, and pink—separately until they are soft and pliable. Wash your hands between colors to avoid transferring pigments, especially onto the white clay. -
Roll out the sheets:
Roll each color into a smooth, even sheet about 1/4 inch thick. I like to use depth guides or playing cards on either side of the roller to ensure the thickness is perfectly uniform.
Step 2: Shaping the Coasters
-
Cut the circles:
Using your circular cutter, punch out one circle from the white clay, one from the beige, and one from the pink clay to create your coaster stack. -
Cut the star shapes:
From the remaining white and beige clay, cut out several star shapes. These will become the cute 3D decorative elements. -
Texture the pink base:
Take the pink circle coaster. Use a needle tool or toothpick to gently poke a ring of small dots around the outer perimeter, spacing them evenly. -
Add star detail:
On the white circle coaster, press a tiny star stamp or cutter near the upper left side to create a small indentation. Don’t cut all the way through; just make a clear impression.
Fixing Dust Specks
White clay loves to attract dust! If you see specks before baking, dip a Q-tip in rubbing alcohol or acetone and gently wipe the surface to clean it.
Step 3: Adding Kawaii Details
-
Sculpt the faces:
On the white circle coaster and the star cutouts, use a small ball stylus to press two eye sockets. Then, use the edge of a curved tool or a small cutter to impress a sweet, U-shaped mouth. -
Detail the stars:
For the star shapes, use a needle tool to draw leaf-like veins or stitching patterns on the points of the star, radiating outward from the center face area. -
Smoothing edges:
Gently run your finger around the cut edges of all pieces to soften any sharpness or burrs left by the cutters. -
Layering test:
Before baking, quickly stack your circles to see how they look together, then separate them onto a parchment-lined baking sheet.
Make it Magnetic
Glue strong ceramic magnets to the back of the smaller star pieces after baking to turn them into adorable fridge magnets that match your coasters.
Step 4: Baking and Finishing
-
Bake the pieces:
Bake all clay pieces according to your specific brand’s package instructions. Usually, this is around 275°F (135°C) for 15-30 minutes. -
Cool down:
Allow the pieces to cool completely on a flat surface. Moving them while warm can warp the shape. -
Paint the eyes:
Dip a fine detail brush or a toothpick into black acrylic paint. Carefully fill in the indented eye sockets on the white coaster and stars. -
Add rosy cheeks:
Using a very small amount of pink paint, dab cute little cheeks under the eyes. For the white coaster, I prefer painting small oval dots. -
Seal (Optional):
If these will be used heavily as coasters, apply a matte varnish to protect the paint and clay from moisture.
Stack your finished pieces to create a charming little vignette on your coffee table or desk