Whenever you’re craving a low-pressure, feel-good project, easy cute clay ideas are my favorite way to get something adorable on the table fast. Think tiny shapes, sweet little faces, and mini creations you can actually finish in one sitting.
Smiling Fruit Mini Charms
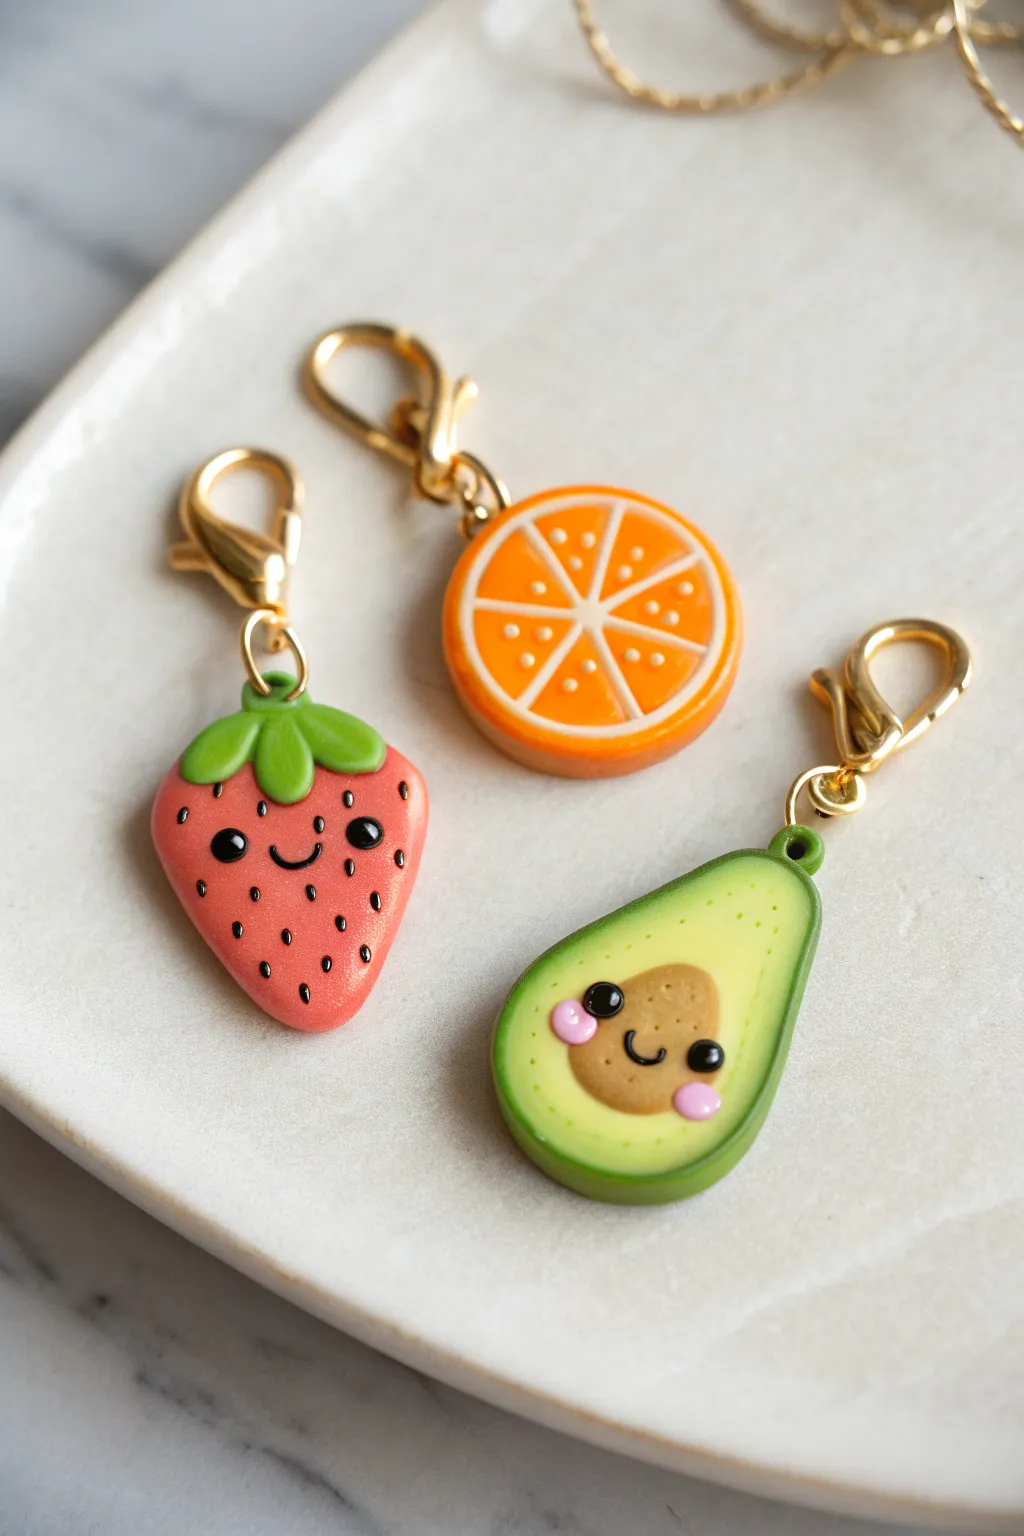
Brighten up your keyring or stitch markers with these adorable kawaii-inspired fruit charms. Made from polymer clay with sweet little faces, they add a cheerful pop of color to any accessory.
Detailed Instructions
Materials
- Polymer clay (red, various greens, orange, white, dark brown, tan, pink)
- Clay roller or pasta machine
- Small round cutter (approx. 1 inch)
- Needle tool or toothpick
- Dotting tool or ball stylus
- X-Acto knife or clay blade
- 3 Gold screw eye pins
- 3 Gold lobster clasps with jump rings
- Gloss glaze or UV resin (optional)
- Oven for baking
Step 1: Sculpting the Strawberry
-
Shape the Base:
Condition a small ball of red clay until soft, then roll it into a smooth sphere. Gently pinch and roll one end to create a tapered strawberry shape, slightly flattening it so it isn’t round. -
Create the Cap:
Flatten a small piece of bright green clay. Use a small cutter or knife to cut out a star or flower shape for the leaves. Place this on the wide top of your strawberry. -
Detail the Stem:
Roll a tiny log of the same green clay and press it into the center of the leaves to make the stem. Smooth the seams where the stem creates a secure connection. -
Add Texture:
Using a needle tool, gently poke small indentations all over the red surface to mimic seeds. Keep the very center smooth—this is where the face will go. -
Make the Face:
Roll two impossibly tiny balls of black clay and press them into the smooth center area for eyes. Roll a microscopic thin snake of black clay for a smiling mouth and gently apply it between the eyes.
Uneven Faces?
If tiny clay details mimic a Picasso painting, bake the charm first without a face. Paint the eyes and mouth afterward using a fine toothpick and acrylic paint.
Step 2: Crafting the Orange Slice
-
Form the Rind:
Roll a snake of orange clay and flatten it into a long strip. Do the same with a thinner strip of white clay. Wrap the white strip around a disk of orange clay, then wrap the orange strip around the outside. -
Create Segments:
Alternatively, using a cane method is easier for beginners: Create a thick disk of orange clay. Roll very thin strings of white clay. -
Detailed Segments:
Lay the thin white strings across the orange disk like slicing a pie—one vertical, two diagonal—to create six segments. Gently roll over the top with an acrylic roller to embed the white lines flush with the surface. -
Wrap the Edge:
Wrap a final thin sheet of white clay around the circumference, followed by a slightly thicker sheet of orange clay to complete the rind. -
Texture:
Use a needle tool to prick tiny texture holes into the orange segments to look like juicy pulp.
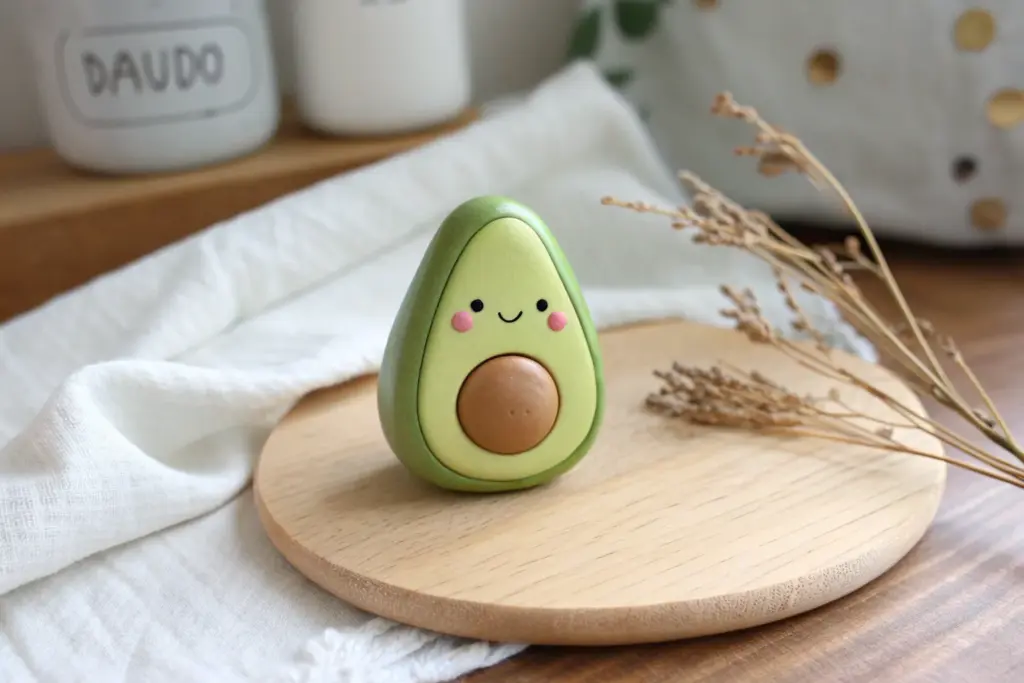
Step 3: Assembling the Avocado
-
Shape the Body:
Start with a light yellow-green clay for the interior. Shape it into a pear or oval, flattening the front and back surfaces. -
Add the Skin:
Roll out a thin sheet of darker green clay. Wrap this strip around the edge of your light green pear shape, blending the seam at the bottom. -
Pit Placement:
Press a small indentation into the lower wide part of the avocado. Roll a ball of tan or light brown clay, flatten it slightly, and press it into this hollow for the pit. -
Avocado Face:
Apply the face directly onto the tan pit. Use two tiny black balls for eyes and a small smile. Add blush using two tiny flattened disks of pink clay on the cheeks.
Design Remix
Try slicing the avocado pit in half to make matching ‘best friend’ necklaces, or turn the orange slice into a lemon or lime by swapping the clay colors!
Step 4: Finishing Touches
-
Insert Hardware:
Screw a gold eye pin into the top center of each fruit. For the orange, place it in the rind; for the avocado, at the top loop; for the strawberry, through the stem. I like to add a dab of liquid clay to the screw for extra grip. -
Bake:
Place your charms on a index card or ceramic tile. Bake according to your clay manufacturer’s instructions (usually 275°F for 15-30 minutes depending on thickness). -
Glaze and Assemble:
Once completely cool, paint a thin layer of gloss glaze or UV resin over the charms to make them shine and protect the paint details. Attach the lobster clasps using jump rings.
Clip these cheerful mascots onto your zipper or bag for a daily dose of sweetness


Mini Mushroom Buddies
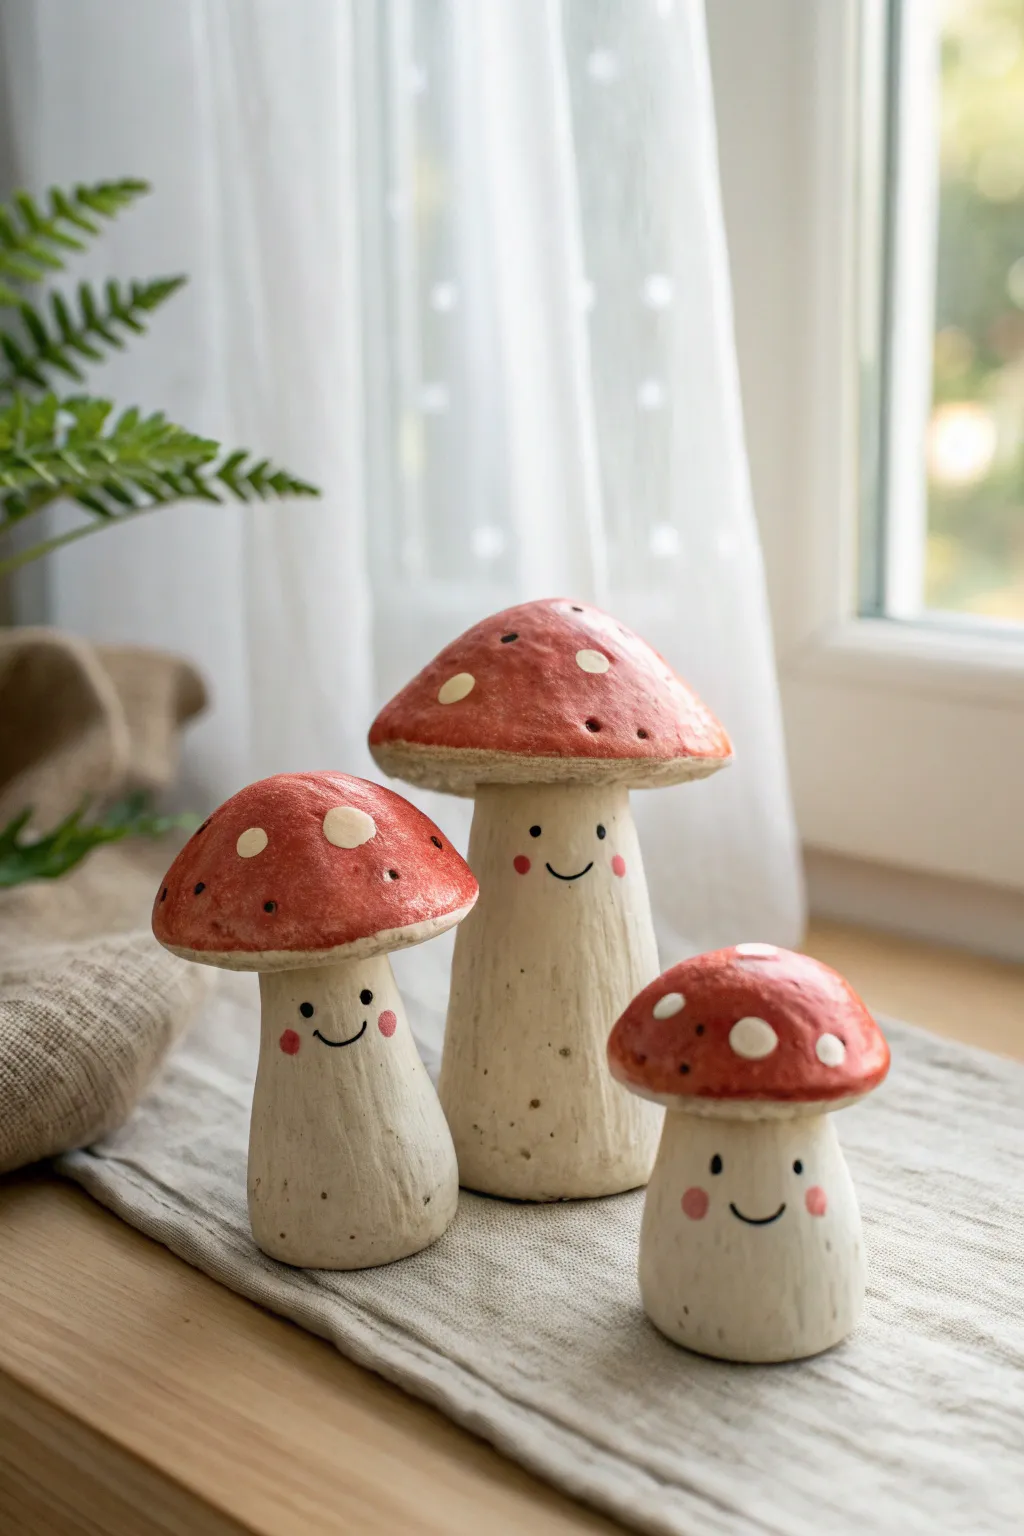
These charming little fungi friends bring a touch of woodland magic to any windowsill or shelf. With their textured stems, vibrant red caps, and sweet smiling faces, they make for a delightful beginner-friendly sculpting project.
Step-by-Step Tutorial
Materials
- Air-dry clay (white or natural)
- Acrylic paints (Red, Antique White/Cream, Black, Pink)
- Sculpting tools (needle tool, ball tool)
- Aluminum foil
- Fine grit sandpaper
- Paintbrushes (detail brush and medium flat brush)
- Water cup
Step 1: Sculpting the Shapes
-
Create the armatures:
Start by crumpling three pieces of aluminum foil into rough cone shapes. Make three different sizes: a tall one, a medium one, and a short, stout one. This saves clay and keeps the mushrooms lightweight. -
Cover the stems:
Roll out slabs of clay to about 1/4 inch thickness. Wrap the clay around your foil stems, smoothing the seams with a bit of water. Shape them so they taper slightly upward, like natural mushroom stalks. -
Texture the stalks:
Before the clay hardens, take a needle tool or a stiff bristle brush and drag it vertically down the stems. create gentle grooves and ridges to mimic organic bark-like texture rather than a perfectly smooth surface. -
Form the caps:
Roll three balls of clay corresponding to your stem sizes. Press them into domed shapes, hollowing out the underneath slightly so they can sit securely on top of the stems. -
Attach cap to stem:
Score the top of each stem and the underside of each cap with a needle tool. Apply a little water or slip (clay mixed with water) and press them firmly together. Smooth the joint underneath if necessary, but a slight overhang looks natural. -
Dry thoroughly:
Set your mushroom trio aside to dry completely. Depending on your humidity and clay brand, this usually takes 24-48 hours. I like to rotate them occasionally so the bottoms dry evenly.
Step 2: Painting and Details
-
Base coat the stems:
Paint the stems with an antique white or cream acrylic paint. Don’t worry about perfect coverage; letting the texture show through adds character. -
Weather the stalks:
Mix a tiny amount of brown or grey into water to create a thin wash. Brush this over the dried cream paint and wipe away the excess with a paper towel, leaving darker pigment in the vertical grooves for depth. -
Paint the caps:
Coat the mushroom caps in a warm, earthy red. You might need two coats for a solid, opaque look. Leave the undersides cream or paint them to match the stems. -
Add the spots:
Using a creamy off-white paint, dip the end of a paintbrush handle or a small dotting tool into the paint. Press gently onto the red caps to create varied sizes of polka dots. -
Create the faces:
Using your finest detail brush and black paint, carefully draw a simple ‘U’ shape for the smile and two small dots for eyes on the upper third of the stem. Position them high up, tucked under the cap, for maximum cuteness. -
rosy cheeks:
Dip a cotton swab or a dry stencil brush into a small amount of pink paint. Dab off most of the paint on a paper towel first, then gently buff two soft circles on either side of the smile for blush. -
Final touches:
For extra whimsy, add a few tiny black speckles to the red caps using a toothbrush splatter technique or a fine marker, though this is optional.
Cracked Clay?
If small cracks appear as the clay dries, mix a small amount of fresh clay with water to make a paste. Fill the cracks, smooth over with a damp finger, and let it dry again.
Weighted Base
Before wrapping the foil stems in clay, press a heavy washer or a small stone into the bottom of the foil. This lowers the center of gravity so your mushrooms won’t tip over easily.
Arranging your finished trio near a window creates a cozy, magical corner in your home


Chubby Dinosaur Desk Friends
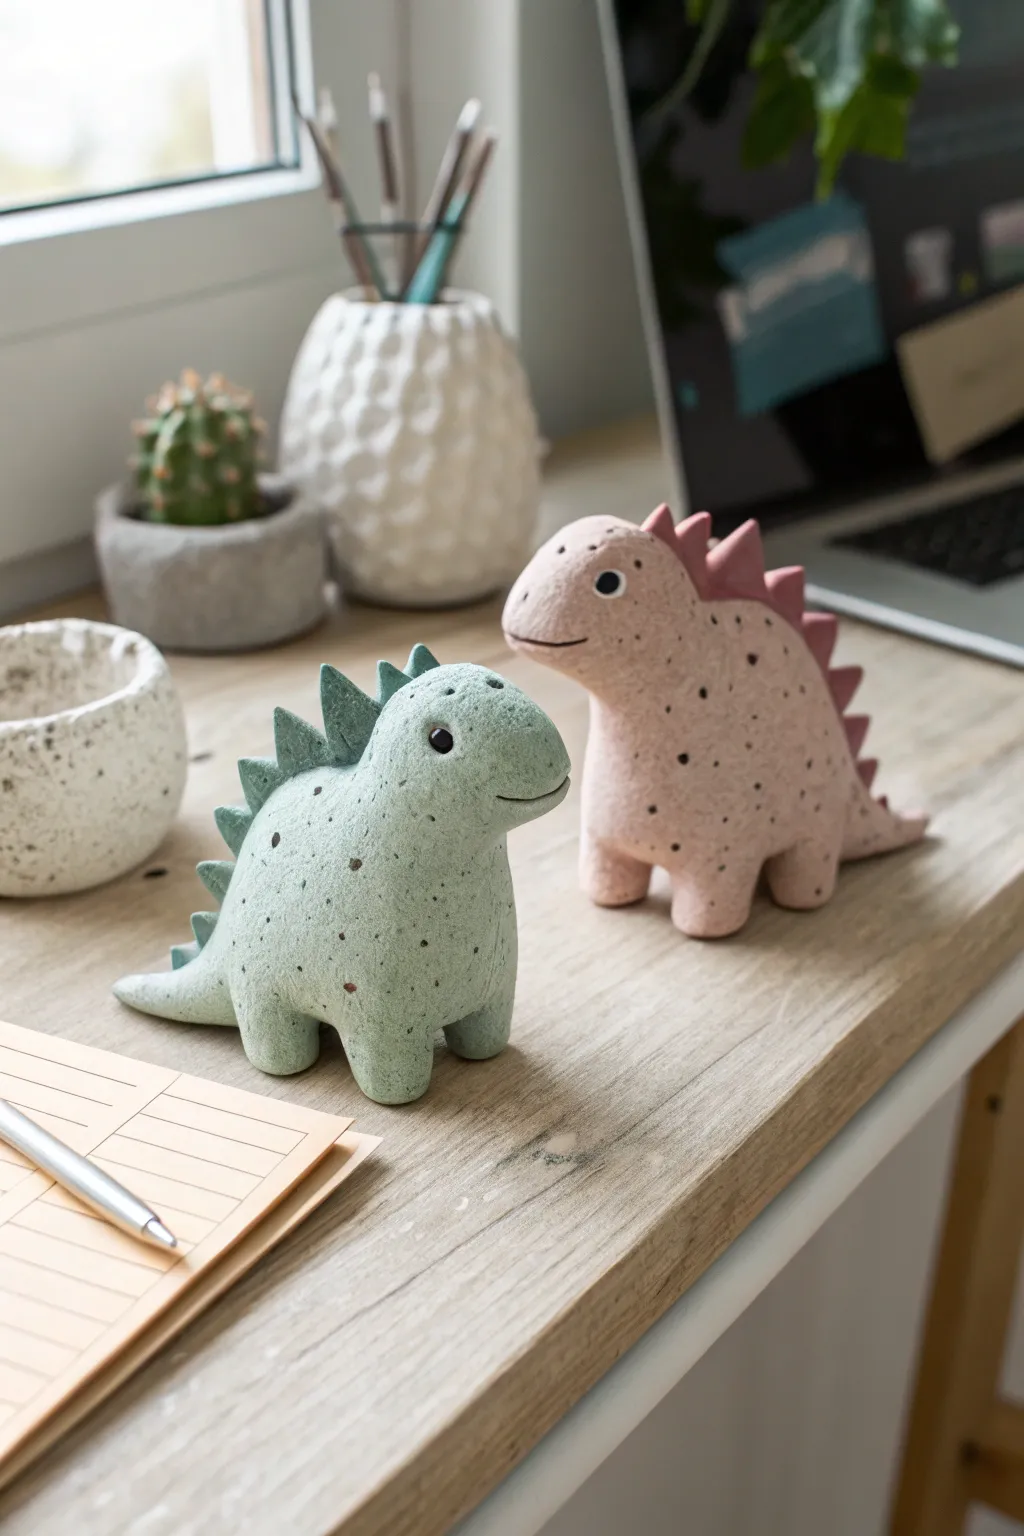
These adorable, chunky dinosaur figurines make the perfect desk companions with their speckled, stone-like finish and friendly expressions. Their simple, rounded shapes make them an ideal project for beginners looking to create stylish, modern decor.
Step-by-Step
Materials
- Polymer clay or air-dry clay (mint green and dusty pink)
- Black acrylic paint
- Stiff bristle toothbrush or stiff paintbrush
- Clay sculpting tools (needle tool, smoothing tool)
- Small black beads or black clay for eyes
- Rolling pin
- Gloss glaze (optional for eyes)
- Aluminum foil (for core structure)
- Toothpicks
Step 1: Shaping the Bodies
-
Create the core:
Crumple a small piece of aluminum foil into a quirky, rounded L-shape. This will act as the armature for the dinosaur’s body and neck, saving clay and reducing weight. -
Prepare the clay:
Condition your mint green or dusty pink clay by kneading it until it is warm and pliable. Divide it into one large ball for the body and smaller portions for the legs and spikes. -
Speckle effect:
Before shaping, flatten your clay slightly. Dip a stiff toothbrush into watered-down black acrylic paint and flick fine speckles onto the raw clay. Fold the clay and knead it gently to distribute the speckles throughout the material, creating a stone-like texture. -
Cover the armature:
Flatten the large ball of speckled clay and wrap it completely around your foil core. Smooth out any seams with your thumbs, ensuring no foil is visible. -
Refine the shape:
Mold the clay into a chubby dinosaur form. Pull gently to elongate the neck and round out the tummy so it sits heavily and cutely on your work surface.
Clean Start
Keep baby wipes or a damp cloth nearby. Cleaning your hands between handling the colored clay and the black accents prevents smudging and keeps colors crisp.
Step 2: Adding Extremities
-
Form the legs:
Roll four small, equal-sized cylinders of clay. They should be short and stout to support the ‘chubby’ look. -
Attach the legs:
Press the cylinders onto the bottom of the body. Blend the seams upwards into the body using a smoothing tool or your finger so they look like one continuous piece. -
Check balance:
Set the figure down on a flat surface to ensure it stands stable. Tap the feet gently against the table to flatten the bottoms. -
Make the tail:
Roll a small cone of clay. Attach the wider end to the dinosaur’s rear and smooth the join, curving the tip slightly to one side for character.
Magnetize It
Flatten onto the back of the dinosaur and embed a strong neodymium magnet before baking. Now your chubby prehistoric friend can guard your fridge.
Step 3: Details & Features
-
Create the spikes:
Roll a darker shade of clay (or the same shade) into a sheet about 3mm thick. Cut out small triangles, graduating from small to large and back to small. -
Attach the spine:
Starting at the top of the head and working down to the tail, gently press the triangular spikes onto the dinosaur’s back. I find using a tiny dab of liquid clay or water helps them stick better. -
Add the eyes:
Use a ball tool to make two small indentations on the face. Insert small black glass beads or tiny balls of black clay into these sockets. -
Carve the smile:
Use a needle tool or a thin clay knife to slice a simple, long curved line for the mouth. Keep it low on the snout for that sweet, innocent expression. -
Final texture check:
If the handling has smoothed out your stone texture too much, gently pat the surface with a coarse sponge or the bristles of a clean toothbrush. -
Surface speckling:
For extra dimension, flick a final, very light layer of paint speckles onto the finished surface before baking or drying.
Step 4: Finishing Touches
-
Propping:
If using polymer clay, prop the head or tail with a bit of scrap clay or cornstarch to keep it from drooping while in the oven. -
Bake or dry:
Follow the specific instructions for your clay type. Air-dry clay will need 24-48 hours; polymer clay usually bakes at 275°F (130°C) for 15-30 minutes per 1/4 inch of thickness. -
Glaze the eyes:
Once cool and fully cured, apply a tiny drop of high-gloss glaze or UV resin just to the black eyes to give them a lively spark.
Now you have a pair of prehistoric friends ready to keep you company while you work


Blob Frogs With Big Eyes

These delightfully chunky frogs are defined by their smooth, egg-shaped bodies and comically large eyes that stare right into your soul. With their simple construction and expressive faces, they make for a perfect beginner clay project that instantly adds charm to any desk or shelf.
Step-by-Step Tutorial
Materials
- Polymer clay or air-dry clay (Green, White, and Black)
- Clean work surface (ceramic tile or silicone mat)
- Clay roller or acrylic rolling pin
- Small ball tool or glossy toothpick
- Needle tool or fine-point detailing tool
- Aluminum foil (optional, for filler core)
- Gloss varnish (optional)
Step 1: Shaping the Main Body
-
Prepare your green clay:
Start by conditioning your green clay well. Knead it in your hands until it is warm, soft, and pliable to prevent cracking later. -
Form the base blob:
Roll a large handful of green clay into a smooth ball. If you want to save clay on larger frogs, you can wrap a crumpled ball of aluminum foil with a thick layer of rolled-out clay. -
Refine the shape:
Gently shape the ball into a slightly tapered oval or gumdrop shape. The bottom should be wide and flat so it sits securely, while the top tapers in just a bit where the eyes will go. -
Smooth it out:
Run your fingers over the surface to remove any fingerprints. A tiny drop of water (for air dry clay) or baby oil (for polymer) can help achieve that seamless, matte finish.
Dirty Clay Fix
White clay picks up dust easily. Keep a scrap piece of white clay to roll in your hands—it acts like a lint roller, pulling off dust and dirt before you handle the actual eyeballs.
Step 2: Adding the Limbs
-
Create the arms:
Roll two small sausage shapes of green clay, roughly an inch long depending on your frog’s size. Taper one end of each roll slightly so it blends better. -
Attach the arms:
Press these rolls vertically onto the sides of the body. They shouldn’t stick out much; instead, smooth the edges so they look like slight protrusions or ridges on the side of the blob. -
Add tiny feet (optional):
For the smaller sitting frog, roll two tiny balls of green clay, flatten them slightly, and press them under the front bottom edge of the body to create nubby feet.
Make It A Trio
Make a whole family by varying the sizes. For the smallest frog, try positioning the pupils looking upward toward the bigger frog to create a cute interaction between them.
Step 3: Creating the Face
-
Make the eye sockets:
Using your thumb or a large ball tool, make two shallow indentations on the very top of the head where you want the eyes to sit. -
Form the eyeballs:
Roll two balls of white clay. They should be quite large relative to the body to get that cartoonish look. Ensure they are equal in size. -
Attach the whites:
Press the white balls firmly into the indentations you made on top of the head. I find pressing gently from the top down ensures they adhere without losing their roundness. -
Add the pupils:
Roll two tiny specks of black clay. Press these into the center (or slightly off-center for a goofy look) of the white eyeballs. Flatten them gently so they don’t protrude too much. -
Sculpt the smile:
Use a needle tool or the edge of a clay knife to carve a wide, shallow ‘U’ shape for the mouth. Keep the line clean and simple. -
Add the smile curve:
Black clay is notoriously messy, so carefully roll a microscopically thin snake of black clay. Lay it inside the carved mouth groove to create a distinct, black smile line. -
Nostrils details:
Using a needle tool, poke two tiny holes just above the smile for the nostrils. Keep them small and spaced slightly apart. -
Rosy cheeks (optional):
If making the smaller frog, add two minuscule flattened dots of orange or pink clay just under the eyes at the corners of the mouth.
Step 4: Finishing Up
-
Final inspection:
Check your frog from all angles. Smooth out any accidental indents or fingerprints that happened during the facial detailing. -
Bake or dry:
Follow the instructions for your specific clay. If baking polymer clay, create a little tent with foil over the frog to prevent the white eyes from scorching or yellowing. -
Varnish:
Once fully cured and cool, consider adding a spot of gloss varnish just to the eyes to make them look wet and lively, while keeping the body matte.
Now you have a charming little green friend to keep you company on your desk

The Complete Guide to Pottery Troubleshooting
Uncover the most common ceramic mistakes—from cracking clay to failed glazes—and learn how to fix them fast.
Tiny Cat Pinch Pots
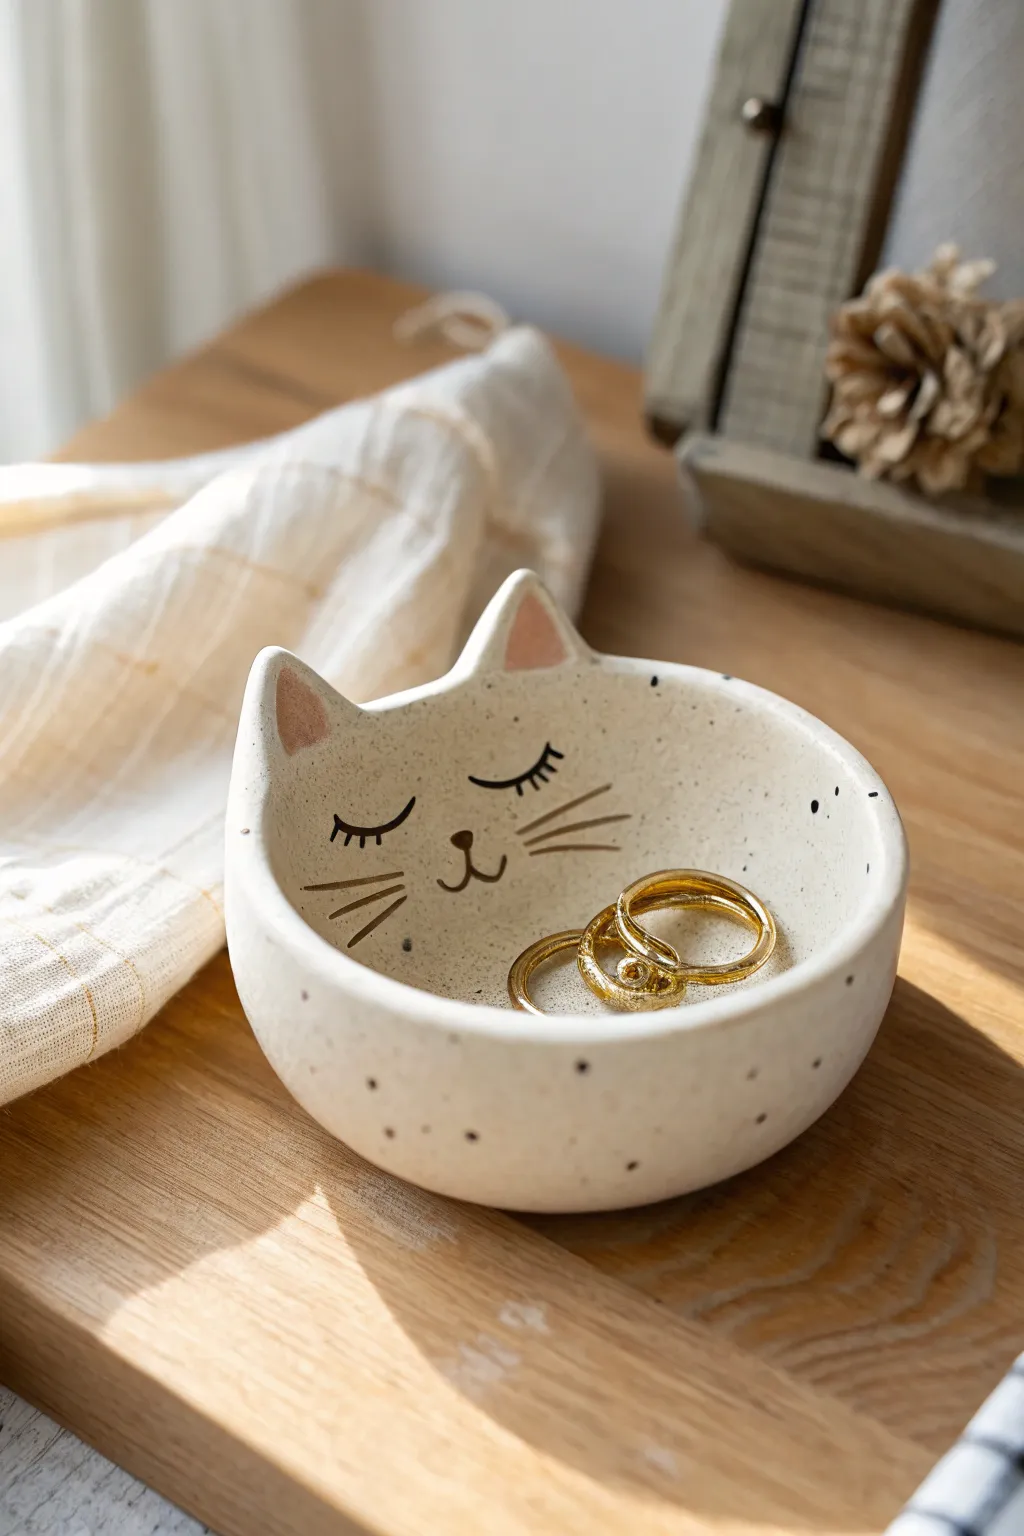
This adorable little trinket dish combines the simplicity of a classic pinch pot with charming feline details. The creamy, speckled clay body and minimal lined face give it a modern handmade aesthetic perfect for holding rings or small treasures.
Detailed Instructions
Materials
- Speckled stoneware clay or air-dry clay
- Small bowl of water
- Sponge
- Needle tool or toothpick
- Modeling tool (rounded)
- Black underglaze or acrylic paint (if using air-dry)
- Pink underglaze or acrylic paint
- Fine detail brush
- Clear glaze (or varnish for air-dry clay)
- Rolling pin (optional)
Step 1: Forming the Base
-
Prepare the Clay:
Start with a ball of clay roughly the size of a tangerine. Pat it back and forth between your hands to ensure it is round and free of air bubbles. -
Open the Pot:
Hold the ball in one hand and gently press your thumb into the center, stopping about a half-inch from the bottom. This establishes the floor of your dish. -
Pinch the Walls:
Using your thumb on the inside and fingers on the outside, gently pinch and rotate the clay. Work your way from the bottom up to thin out the walls evenly. -
Shape the Bowl:
As you pinch, aim for a wide, shallow bowl shape rather than a tall cup. The walls should be about 1/4 inch thick throughout. -
Smooth the Surface:
Use a slightly damp sponge to wipe away fingerprints and smooth out any bumps on both the interior and exterior surfaces. I find this step crucial for that polished look. -
Flatten the Base:
Gently tap the pot on your work surface to create a flat, stable bottom so it won’t wobble.
Smooth Operator
Use a damp chamois leather strip instead of a sponge for the final rim smoothing. It compresses the clay particles perfectly for a professional, professional-grade finish.
Step 2: Adding Feline Features
-
Form the Ears:
Take two small balls of leftover clay and shape them into triangles. These should be roughly proportional to the bowl size. -
Score and Slip:
Score (scratch) the bottom of the ears and the rim of the bowl where you want them to sit. Apply a dab of water or slip (liquid clay) to join them securely. -
Blend the Seams:
Use a modeling tool or your finger to smooth the clay from the ear down onto the bowl, blending the seam completely so the ears look like they grew out of the rim. -
Curve the Rim:
Gently press down on the rim between the ears to create a slight dip, mimicking the shape of the cat’s forehead. -
Refine the Shape:
Go over the entire piece one last time with your damp sponge, softening any sharp edges on the ears and ensuring the rim is smooth.
Step 3: Painting and Finishing
-
Dry the Piece:
Allow your clay to dry to the ‘leather hard’ stage if you are firing it, or fully dry if using air-dry clay. -
Paint the Inner Ears:
Using a soft pink underglaze or paint, fill in the triangular inner ear shapes. Keep the application soft and slightly faded at the edges. -
Outline the Eyes:
With a fine detail brush and black paint, draw two curved, closed eyelids on the interior wall of the bowl. Add three small lashes to the outer corner of each eye. -
Add Nose and Whiskers:
Paint a small inverted triangle for the nose centered below the eyes, with a little ‘J’ hook mouth. Finish with three thin whiskers on each cheek area. -
Glaze or Seal:
If using ceramic clay, apply a clear glaze and fire according to your clay’s instructions. For air-dry clay, seal the entire piece with a glossy varnish to protect it.
Make it a Set
Create a trio of dishes in graduating sizes. Paint different expressions on each face—one sleeping, one winking, and one wide awake—for a cute stackable family.
Now you have a sweet little companion to keep your rings safe and sound
Mini Bear Trinket Dishes
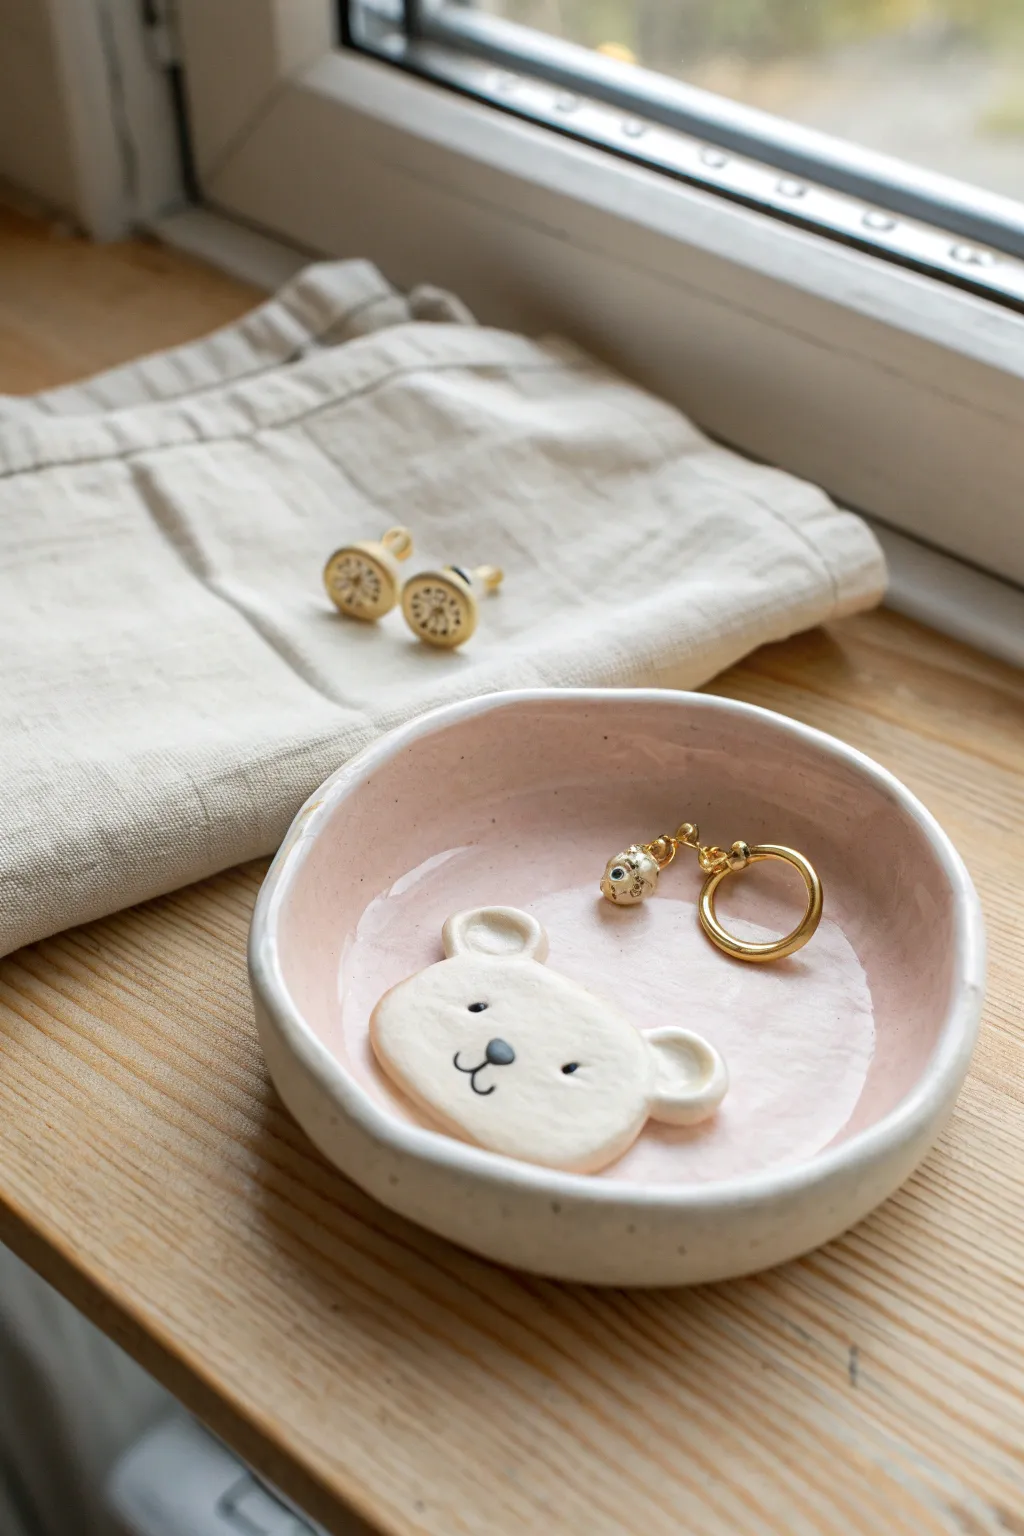
This adorable mini trinket dish features a glossy pale pink interior and a charming raised bear face right in the center. It’s the perfect size for holding your favorite rings or daily earrings, adding a touch of whimsy to your bedside table.
Step-by-Step
Materials
- White air-dry clay or polymer clay
- Rolling pin
- Small bowl (for shaping)
- Circle cutter (or a large glass)
- Pottery tool or knife
- Water (for smoothing)
- Pale pink acrylic paint
- Black acrylic paint
- Fine detail paintbrush
- High-gloss varnish or glaze
- Sandpaper (fine grit)
Step 1: Shaping the Dish
-
Roll the Base:
Start by conditioning your white clay until it is soft and pliable. Roll it out into an even slab, approximately 1/4 inch thick. Aim for a consistent thickness to prevent cracking while it dries. -
Cut the Circle:
Use a large circle cutter or trace around the rim of a glass to cut out a perfect circle from your clay slab. This will become the main body of the dish. -
Form the Bowl Shape:
Gently lift the edges of the circle to create a shallow bowl shape. You can place the clay circle inside a small bowl to help it hold its curved form while you work on the next steps. -
Smooth the Edges:
Dip your finger in a little water and run it along the rim of the dish to smooth out any rough cuts or cracks. I like to take my time here to ensure the lip feels nice and organic.
Smooth Seams
To make the bear look like it is emerging from the glaze rather than sitting on top, use a wet paintbrush to smooth the clay connection point until the seam disappears entirely.
Step 2: Creating the Bear
-
Shape the Bear Head:
Take a small amount of leftover white clay and flatten it into a slightly oval shape. It should be proportional to fit comfortably inside your dish without touching the edges. -
Add the Ears:
Roll two tiny balls of clay for the ears. Attach them to the top of the bear head. Use a small ball tool or the rounded end of a paintbrush to make indentations in the center of each ear. -
Attach to the Dish:
Score the back of the bear head and the center of the dish (make little scratches with your tool). Apply a dab of water or liquid clay as ‘glue’ and press the bear head firmly into the center of the dish. -
Blend the Seams:
Use a modeling tool to gently blend the edges of the bear head into the dish surface slightly, ensuring it doesn’t pop off later. Smooth everything down with a wet finger. -
Dry Completely:
Let the dish dry completely according to your clay’s package instructions. Air-dry clay usually takes 24-48 hours; bake polymer clay as directed.
Metallic Touch
Once the glaze is dry, paint the very rim of the dish with liquid gold leaf or metallic gold paint for a sophisticated, high-end finish.
Step 3: Painting and Finishing
-
Sand Imperfections:
Once fully cured, use fine-grit sandpaper to gently buff away any fingerprints or rough spots on the rim and exterior. -
Paint the Background:
Using a soft brush, paint the entire interior of the dish with pale pink acrylic paint. Carefully paint around the white bear head—we want him to stay the natural clay color. -
Second Coat:
Let the first layer dry, then apply a second coat of pink to ensure solid, opaque coverage without streaks. -
Detail the Face:
Using your finest detail brush and black acrylic paint, add two small dots for eyes. Then, paint a small inverted triangle for the nose and a simple anchor shape for the mouth. -
Apply Glaze:
Finish by applying a thick coat of high-gloss varnish or glaze over the entire interior, covering both the pink paint and the bear. This gives it that ceramic-like shine and protects the paint.
Place your new ring dish near a window to catch the light and show off that glossy finish


What Really Happens Inside the Kiln
Learn how time and temperature work together inside the kiln to transform clay into durable ceramic.
Bunny Ring Holders
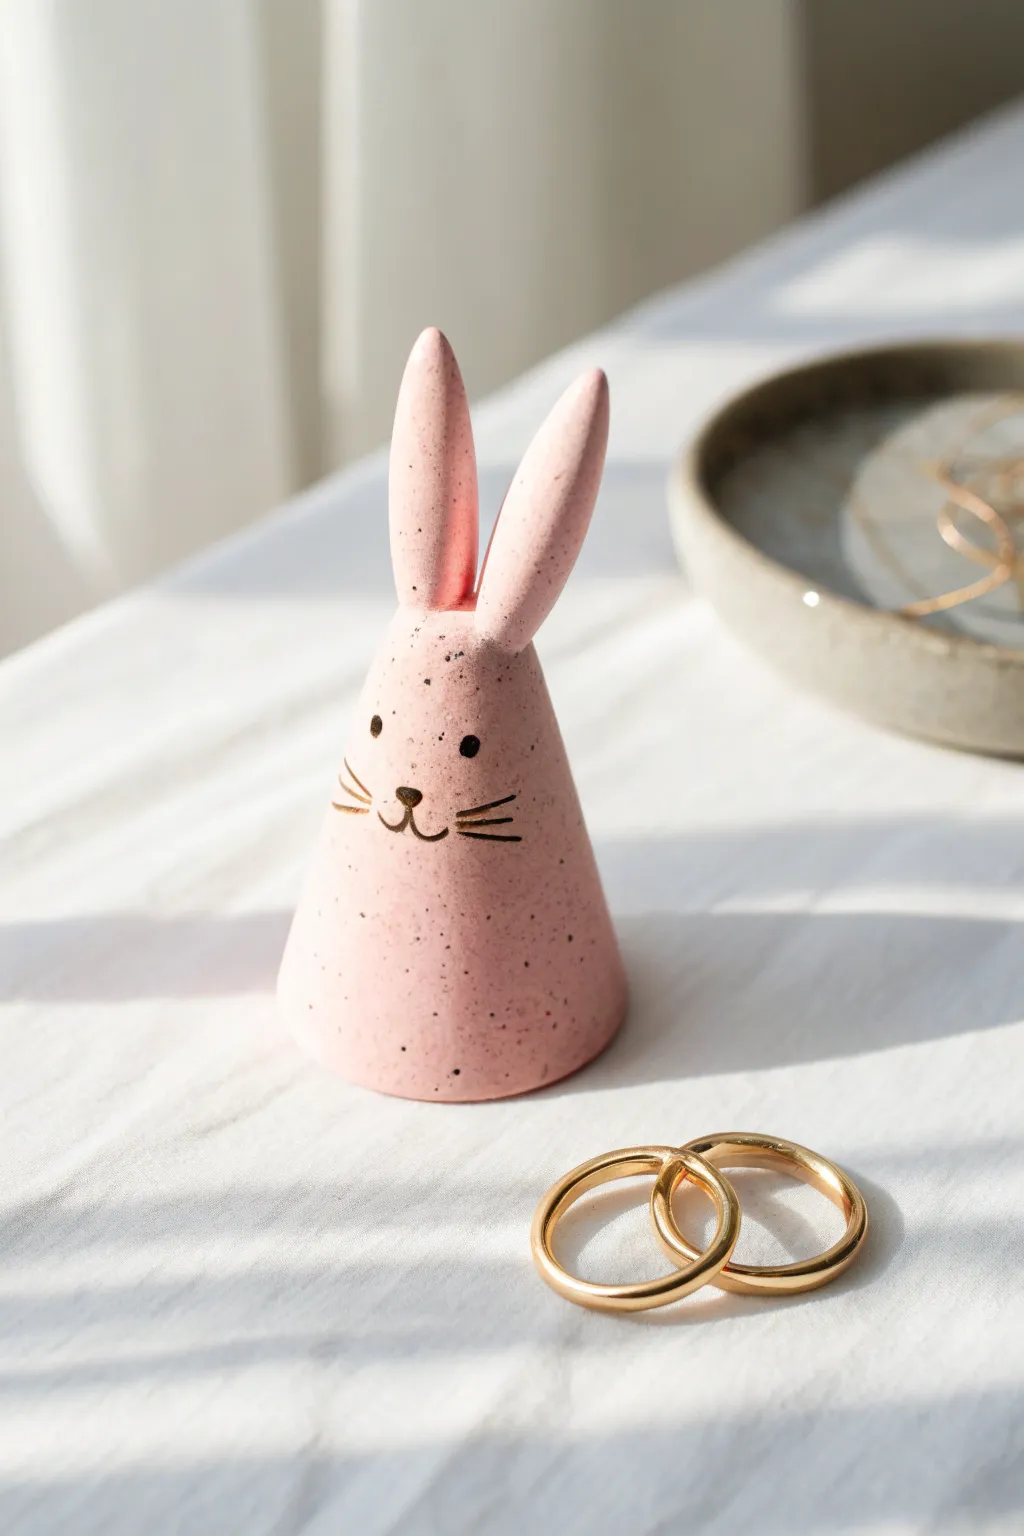
This adorable bunny ring holder combines functionality with minimalism, featuring a soft pink finish and charming speckles that mimic ceramic stoneware. Its conical shape is perfect for stacking your favorite rings while keeping them safe and on display.
Step-by-Step Tutorial
Materials
- Polymer clay (white or translucent)
- Acrylic paint (pale pink, black, gold)
- Paintbrushes (flat shader and fine liner)
- Old toothbrush
- Rolling pin
- Needle tool or toothpick
- Baking sheet and parchment paper
- Sandpaper (fine grit)
- Gloss or matte varnish (optional)
Step 1: Sculpting the Base
-
Condition the Clay:
Start by warming a chunk of polymer clay in your hands. Knead it thoroughly until it is soft, pliable, and free of any air bubbles. -
Roll a Ball:
Roll the clay into a smooth ball about the size of a golf ball. Ensure there are no cracks on the surface before proceeding. -
Form the Cone:
Place the ball on your work surface and use the palm of your hand to roll one side of the ball back and forth, applying more pressure to one end. -
Shape the Body:
Continue rolling and shaping until you have formed a smooth cone. Tap the bottom flat against the table so it stands up straight without wobbling. -
Refine the Shape:
Use your fingers to smooth out any fingerprints. The cone should be sturdy but not too wide, tapering gently to a rounded point at the top.
Droopy Ears?
If the ears won’t stand up while you work, prop them up with small pieces of cardstock or foil while baking. Remove the supports only after the clay has fully cooled and hardened.
Step 2: Adding the Ears
-
Create Ear Pieces:
Take two smaller balls of clay, roughly the size of peas, and roll them into elongated teardrop shapes. -
Flatten and Sculpt:
Gently flatten the teardrops slightly so they look like bunny ears. You can curve one slightly if you want a more expressive look. -
Attach the Ears:
Press the wider bottom of the ears onto the top side of the cone. I find using a needle tool to blend the seams downward into the cone creates the strongest bond. -
Smoothing Seams:
Use your finger or a smoothing tool to completely erase the join lines where the ears meet the head. The transition should be seamless. -
Final Shape Check:
Make sure the ears are standing up straight and aren’t drooping. If the clay is too soft, pop it in the fridge for 10 minutes to firm up. -
Bake:
Place your bunny on a parchment-lined baking sheet and bake according to your package instructions (usually 275°F/135°C for 15-30 minutes).
Step 3: Painting and Finishing
-
Sand and Prep:
Once fully cooled, lightly sand any bumps or fingerprints with fine-grit sandpaper to achieve a porcelain-like finish. -
Base Coat:
Apply two to three thin coats of pale pink acrylic paint, allowing each layer to dry completely in between. -
Create the Speckles:
Dilute a small amount of black paint with water. Dip an old toothbrush into the mixture and run your thumb across the bristles to flick tiny speckles onto the bunny. -
Draw the Face:
Using a very fine liner brush and black paint, carefully paint two dots for eyes and a small ‘w’ shape for the mouth. -
Add Details:
Paint a small nose just above the mouth. For a touch of elegance, use gold paint or a gold marker to add the whiskers on either side of the nose. -
Seal the Piece:
Protect your paint job with a coat of matte or satin varnish. This is especially helpful if you plan to use this in a bathroom where it might get splashed.
Clean Lines
For the finest whisker lines, switch from a brush to an ultra-fine tip permanent marker or paint pen. It gives you much more control than a brush on a curved surface.
Now you have a charming little guardian ready to watch over your jewelry collection
Cloud and Star Fridge Magnets
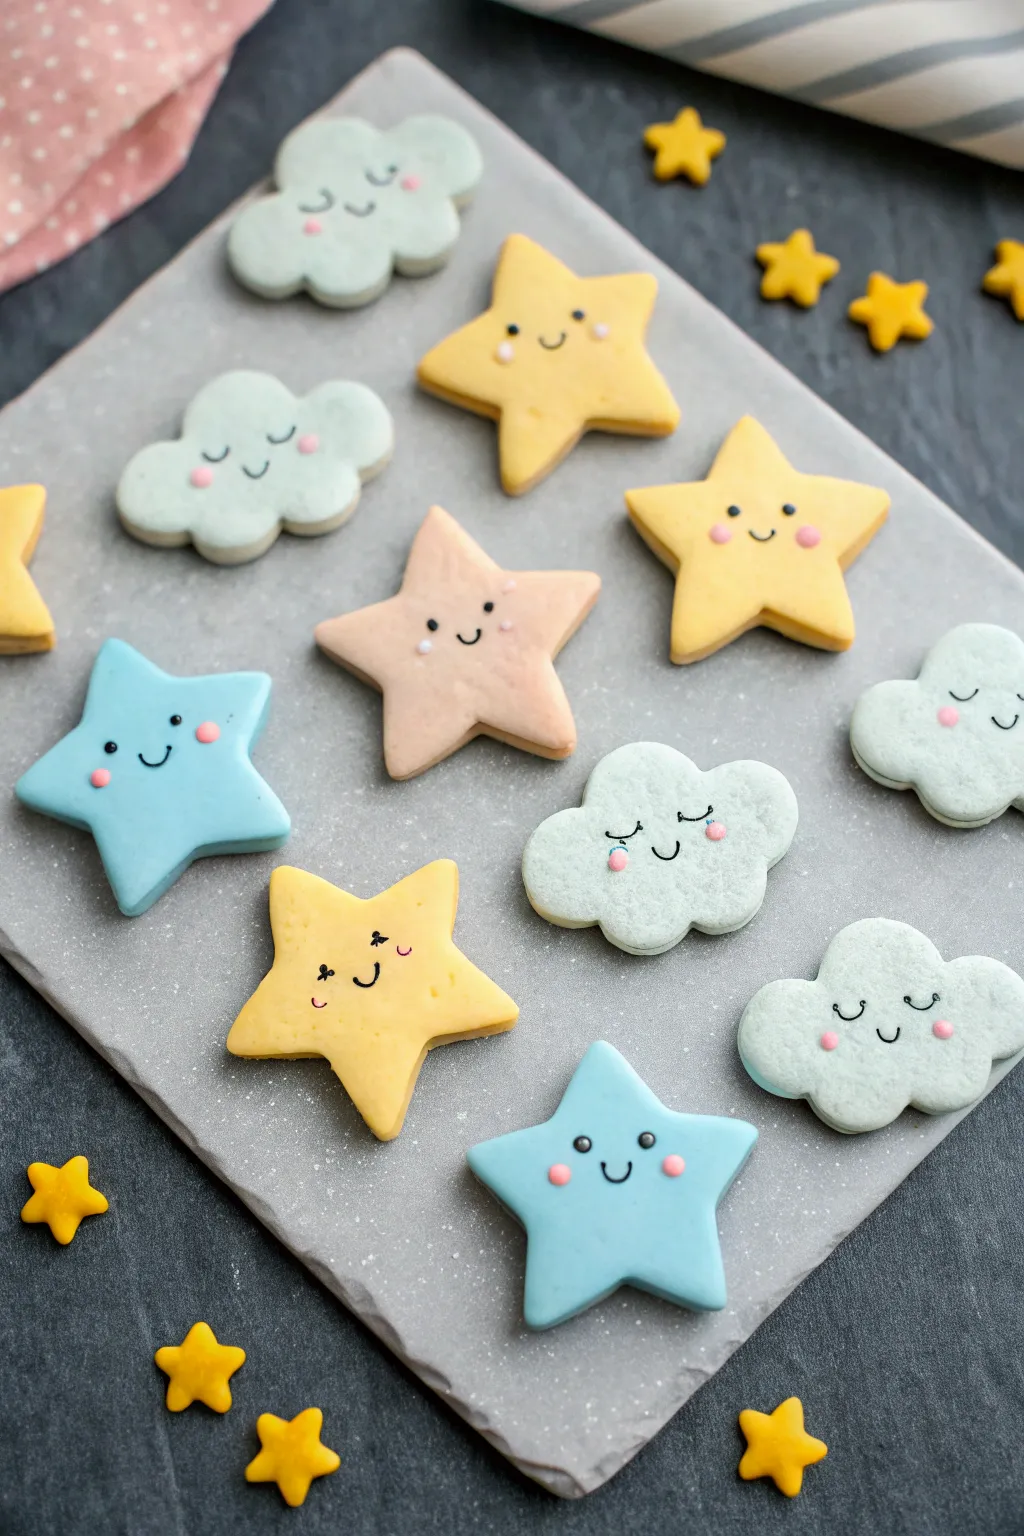
Brighten up your kitchen with these adorable cloud and star magnets that look good enough to eat. With their soft pastel colors and sweet kawaii expressions, they add a touch of dreamy charm to any magnetic surface.
How-To Guide
Materials
- Polymer clay (white, pastel yellow, light blue, peach)
- Star and cloud cookie cutters (small size)
- Rolling pin
- Parchment paper or baking mat
- Baking sheet
- Black acrylic paint or fine-tip black permanent marker
- Pink acrylic paint or a dab of pink clay
- Small dotting tool or toothpick
- Fine detail paintbrush
- Strong craft glue (E6000 recommended)
- Small round magnets
Step 1: Shaping the Sky
-
Condition the clay:
Begin by kneading your polymer clay in separate batches until it is soft and pliable. If the clay feels too stiff, warm it up in your hands for a few minutes to make it easier to work with. -
Create custom shades:
Mix a small amount of yellow or blue into a larger ball of white clay to achieve those soft, airy pastel tones shown in the photo. Aim for a milky, muted look rather than bright primaries. -
Roll it out:
Place your clay onto parchment paper and use your rolling pin to flatten it into a sheet about 1/4 inch thick. You want them thick enough to hold the magnets securely but not too chunky. -
Cut the shapes:
Press your star and cloud cutters firmly into the clay. Gently wiggle the cutter before lifting to ensure clean edges, then carefully remove the excess clay around the shapes. -
Soften the edges:
After cutting, run your finger lightly around the edges of each shape to smooth out any sharpness or burrs left by the cutter. This gives the ‘cookie’ a softer, more finished look.
Step 2: Adding Personality
-
Pre-bake prep:
Arrange your clay pieces on a baking sheet lined with parchment paper, ensuring they aren’t touching. Check the package instructions for your specific brand of clay regarding temperature and timing. -
Bake the batch:
Bake the pieces in the oven as directed. Once the timer goes off, let them cool completely on the baking sheet before handling; warm clay is fragile and can easily warp. -
Paint the eyes:
Dip a fine-tip paintbrush or a dotting tool into black acrylic paint. Carefully create two small dots for eyes on some stars, or draw gentle downward curves for sleeping eyelashes on the clouds. -
Add the smile:
Using the very tip of your brush or a fine marker, draw a tiny u-shape mouth between the eyes. Keep it small and centered to maintain that cute kawaii aesthetic. -
Rosy cheeks:
Dip a dotting tool or the head of a pin into pink paint. Gently dab a small pink dot right next to the outer corner of each eye or just below them to give your characters a sweet blush. -
Tiny details:
For extra charm, you can add tiny white highlights to the black eye dots once dry, or paint tiny freckles. I sometimes like to vary the expressions, making some wink or smile sideways.
Smooth Surface
Before baking, wipe the clay surface gently with a baby wipe or a bit of rubbing alcohol to remove any fingerprints or dust specks.
Step 3: Assembly
-
Seal the surface:
This step is optional, but if you want to protect the paint, apply a thin layer of matte glaze or varnish over the faces once the paint is completely dry. -
Flip and glue:
Turn your finished clay pieces face down. Apply a pea-sized amount of strong craft glue to the center of the back. -
Attach magnets:
Press a magnet firmly into the glue. If using very strong magnets, ensure you space the drying pieces far apart so they don’t snap together and pull the glue loose. -
Final cure:
Allow the glue to cure fully (usually 24 hours for maximum strength) before placing them on your fridge.
Texture Play
Before baking, texture the shapes with a toothbrush or sandpaper for a realistic stone or sugar-cookie finish.
Now your fridge has a forecast of sunny smiles and charming clouds to hold your most important notes

TRACK YOUR CERAMIC JOURNEY
Capture glaze tests, firing details, and creative progress—all in one simple printable. Make your projects easier to repeat and improve.
Mini Succulent Pots With Faces

Brighten up your windowsill with this adorable little pot that beams right back at you. Its simple cylinder shape, speckled texture, and minimal rosy-cheeked face make it the perfect home for a tiny succulent.
Step-by-Step
Materials
- White polymer clay or air-dry clay (approx. 200g)
- Speckled clay additive (or black pepper/dried vanilla bean for faux speckles)
- Small rolling pin
- Circle cutter or jar (approx. 3-4 inches diameter)
- Craft knife or clay blade
- Small paintbrush (fine tip)
- Black acrylic paint
- Terracotta or peach acrylic paint
- Sage green acrylic paint (optional for base)
- Matte finish varnish or sealant
- Sandpaper (fine grit)
Step 1: Prepping and Shaping
-
Prepare the Clay:
Start by conditioning your white clay until it is soft and pliable. If you aren’t using pre-speckled clay, knead in a tiny pinch of speckled additive or ground black pepper now to achieve that organic, stone-like texture. -
Roll the Base:
Roll out a slab of clay to about 1/4 inch thickness. Use your circle cutter or a jar to cut out a perfect circle for the base of the pot. -
Create the Wall:
Roll out the remaining clay into a long, rectangular strip. It should be the same 1/4 inch thickness and long enough to wrap around the circumference of your base circle. -
Trim to Size:
Measure the strip against your base circle. Trim the ends of the rectangle straight so they will meet flush when wrapped around, forming a cylinder. -
Assemble the Cylinder:
Wrap the rectangular strip around the base circle. Gently press the clay together where the wall meets the base, and where the two ends of the wall meet. -
Blend the Seams:
Using a clay tool or your finger, smooth the seams on both the inside and outside. I find a little bit of water helps blend air-dry clay seams invisible, while baby oil works best for polymer. -
Refine the Shape:
Gently curve the walls slightly outward if you want a rounder, bowl-like shape, or keep them straight for a modern feel. Smooth the top rim with a wet finger to remove any sharp edges. -
Add Drainage (Optional):
If you plan to plant directly into the pot, use a straw to poke a small drainage hole in the center of the bottom.
Step 2: Painting and Finishing
-
Dry or Bake:
Follow the instructions for your specific clay. Bake polymer clay in the oven as directed, or let air-dry clay sit for 24-48 hours until completely hard and white. -
Smooth the Surface:
Once fully cured, use fine-grit sandpaper to gently smooth out any fingerprints or rough bumps on the exterior, wiping away the dust with a damp cloth afterward. -
Paint the Base Effect:
To mimic the dipped look in the photo, mix a very diluted wash of sage green paint. Use a brush to apply this only to the bottom third of the pot, blending the top edge so it looks soft and hazy. -
Draft the Face:
Lightly sketch the placement of the eyes and smile with a pencil. Aim for the center of the ‘white’ section of the pot. -
Paint the Features:
Using a very fine detail brush and black acrylic paint, create two small upward-curving arcs for the smiling eyes. Make them slightly thick in the middle and tapered at the ends. -
Add the Smile:
Paint a small, simple ‘U’ shape for the mouth exactly centered between the eyes. -
Rosy Cheeks:
Dip the backend of a brush or a matchstick into the terracotta or peach paint. Dot this onto the clay just outside and slightly below the eyes to create perfect circular cheeks. -
Seal the Pot:
Once the paint is totally dry, coat the entire pot (inside and out) with a matte varnish. This is crucial for waterproofing, especially if you used air-dry clay.
Faux Speckle Tip
No speckled clay? Mix used, dried coffee grounds or coarse black pepper into white clay. It creates a convincing ceramic stoneware look without special supplies.
Add Little Legs
Before baking or drying, roll three tiny balls of clay and attach them to the bottom as tripod feet. It adds height and matches the cute character vibe perfectly.
Pop in your favorite succulent and enjoy your cheerful new desk companion
Tiny Ghost Pocket Buddies
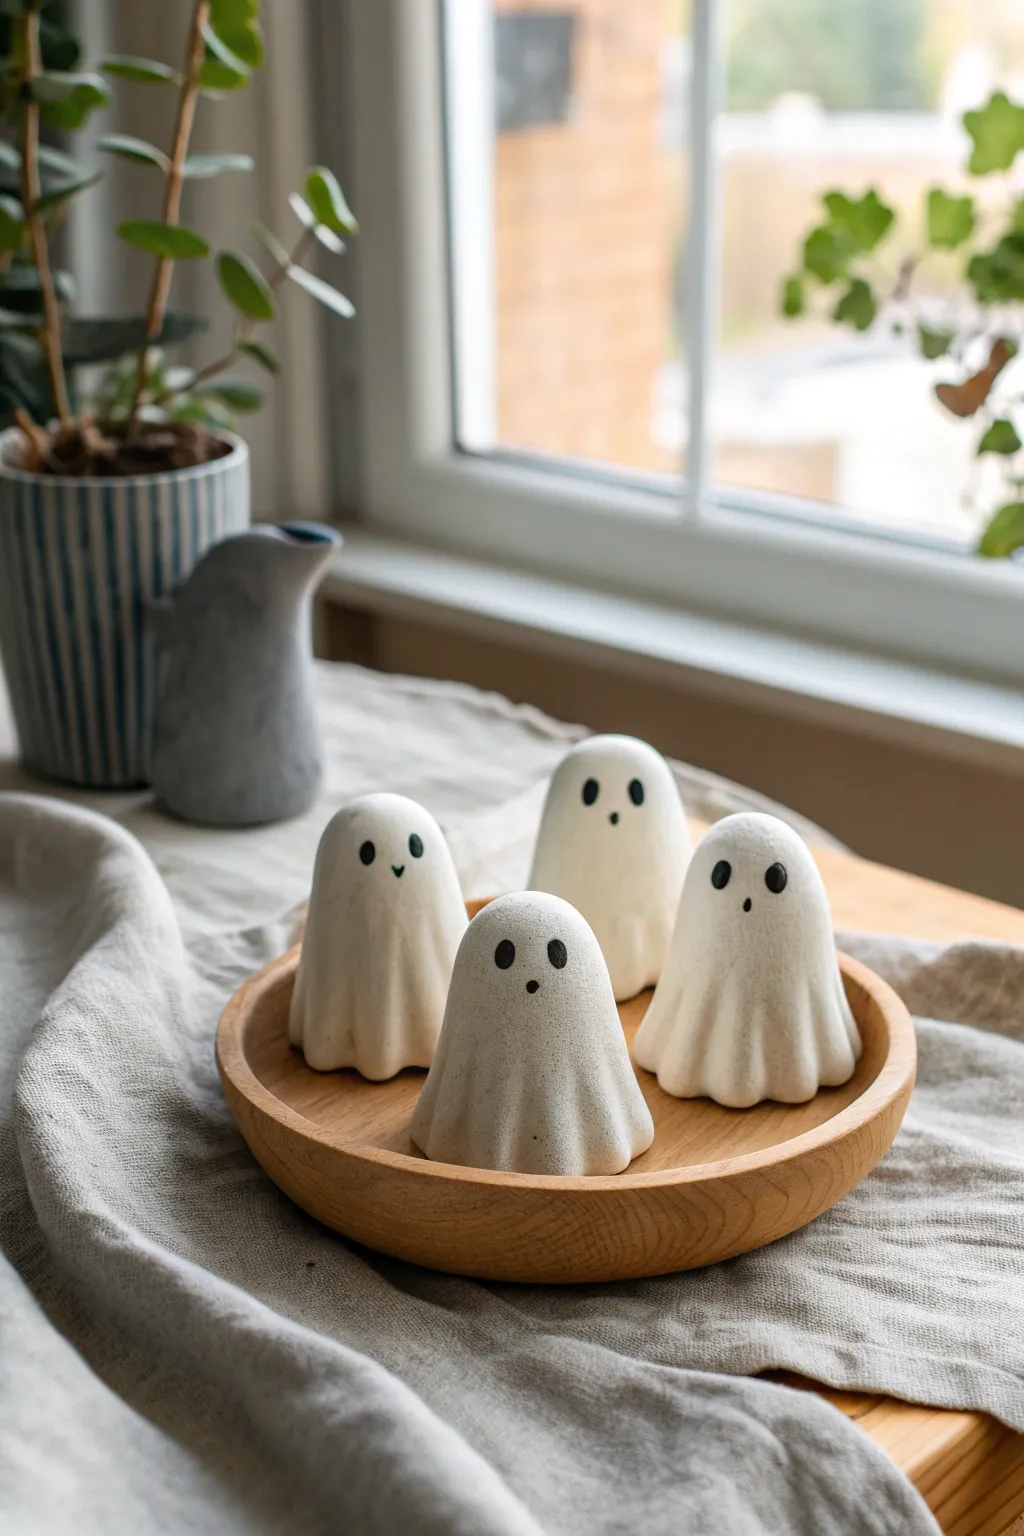
These adorable, minimalist ghosts are perfect for pocket-sized whimsy or subtle Halloween decor. With their smooth, matte finish and simple expressions, they have a charming, handmade ceramic look that fits right into a cozy home.
Step-by-Step Guide
Materials
- White polymer clay or air-dry clay (approx. 50g per ghost)
- Black acrylic paint
- Small round detail brush (size 0 or 00)
- Parchment paper or silicone baking mat
- Optional: Clay sculpting tool or toothpick
- Matte varnish or sealant
- Fine grit sandpaper (optional)
Step 1: Shaping the Bodies
-
Prepare the Clay:
Start by conditioning your white clay. Knead it in your hands until it becomes soft, pliable, and free of any cracks. Rolling it into a smooth ball is a great starting shape. -
Create the Base Form:
Take a ball of clay roughly the size of a golf ball and gently roll it into a thick log shape, pressing slightly harder on one end to create a tapered, rounded top. -
Flatten the Bottom:
Press the wider base of your clay form onto your work surface to create a flat bottom. This ensures your ghost will stand upright securely without wobbling. -
Form the Bell Shape:
Using your thumb and forefinger, gently pinch and smooth the clay from the top down, widening it as you reach the bottom to create a classic bell or gumdrop silhouette. -
Create the Drapes:
To mimic the look of fabric, use your thumb to push indentations up from the bottom edge. I like to imagine a sheet draping over a ball and push the clay inwards to create soft vertical folds. -
Refine the Edges:
Smooth out the ridges of your folds with your finger. The folds should look soft and organic, not sharp. Gently flare the bottom edge outwards slightly for a flowing effect. -
Check Stability:
Stand the ghost up and view it from all angles. Adjust the base if it’s leaning; you want a sturdy little companion that won’t tip over easily. -
Smooth the Surface:
Use a tiny bit of water (if using air-dry clay) or baby oil (if using polymer) on your finger to buff away any fingerprints or imperfections until the surface is silky smooth.
Step 2: Finishing and Details
-
Cure the Clay:
Depending on your clay type, either bake it according to the package instructions or let it air dry completely. Air-dry clay usually needs 24-48 hours to fully harden. -
Paint the Eyes:
Dip your smallest detail brush into black acrylic paint. Paint two small, vertical oval shapes for eyes. Place them slightly wide apart for a cuter, more innocent expression. -
Add the Mouth:
Directly below and between the eyes, paint a small circle or a tiny oval for the mouth. Keep it smaller than the eyes to maintain the surprised, ‘ooh’ expression. -
Variation: The Smile:
For a different personality, skip the open mouth and paint a tiny ‘v’ shape between the eyes to create a sweet little smile, like the ghost on the far left. -
Let Paint Dry:
Allow the black paint to dry completely. Avoid touching the face area during this time to prevent smearing. -
Apply Varnish:
To protect your ghost and give it that finished ceramic look, apply a coat of matte varnish. A glossy finish works too, but the matte finish shown in the photo looks particularly modern. -
Final Sand (Optional):
If the base feels rough after drying, you can very gently rub the bottom on fine-grit sandpaper to ensure it sits perfectly flush on shelves or tables.
Wobbly Ghost?
If your ghost won’t stand straight, gently tap the base on a table while the clay is still soft to flatten it. For baked clay, just sand the bottom until level.
Glow Up Idea
Knead glow-in-the-dark powder into your polymer clay before shaping. Your little pocket buddies will look cute by day and gently illuminate your nightstand by night.
Place your tiny ghost squad on a windowsill or desk for a touch of year-round spirit
One-Shape Blob Monsters Collection
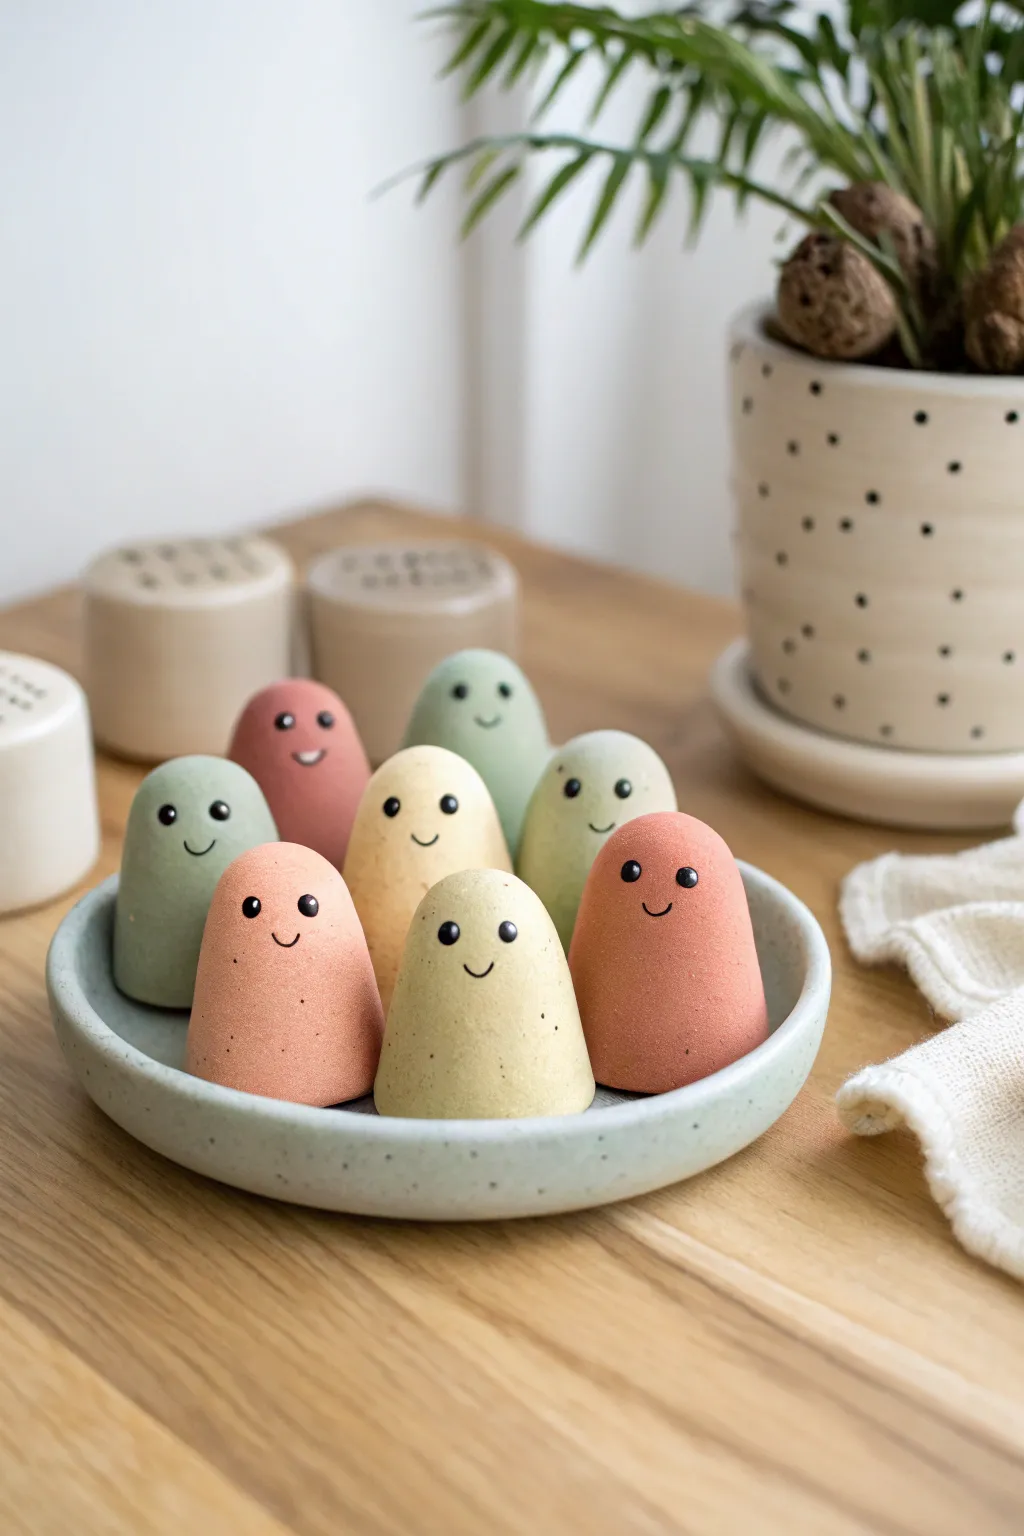
These charming little blob creatures prove that the simplest shapes often have the most personality. With their soft, muted tones and tiny speckled details, this collection creates an adorable desk display that is incredibly relaxing to sculpt.
How-To Guide
Materials
- Polymer clay (sage green, pale yellow, terracotta/peach)
- Black acrylic paint
- Fine-grit sandpaper (optional)
- Old toothbrush
- Brown acrylic paint (for speckles)
- Small dotting tool or toothpick
- Fine detail paintbrush
- Gloss or matte varnish (optional)
- Baking sheet and parchment paper
- Shallow oven-safe bowl (optional, for display)
Step 1: Shaping the Blobs
-
Condition the clay:
Start by taking a chunk of your first clay color—perhaps the sage green—and kneading it in your hands until it becomes soft and pliable. This conditioning step is crucial to prevent cracks later on. -
Roll a smooth ball:
Roll the clay between your palms to create a perfectly smooth sphere about the size of a walnut. Ensure there are no folded lines or creases visible on the surface. -
Form the tapered shape:
Place the ball on your work surface. Uses the palms of your hands to gently roll just the top half of the sphere, elongating it slightly into a rounded cone or gumdrop shape. -
Flatten the base:
Tap the bottom of your shape firmly against the table to create a flat, stable base so your buddy won’t wobble. Smooth out the bottom edge with your fingertip. -
Soften the peak:
If the top point became too sharp during rolling, gently tap it down with your finger to create that signature rounded, dome-like head. -
Repeat for the group:
Create 6-8 more figures in varying sizes using your different clay colors. I find that varying the heights slightly makes the group look more organic and friendly when gathered together.
Clean Clay Tip
Keep separate baby wipes nearby for each color. Cleaning your hands thoroughly between switching from green to yellow prevents muddy streaks and keeps your pastel tones bright.
Step 2: Adding Texture & Baking
-
Prepare the speckle mix:
Dilute a tiny drop of brown acrylic paint with water until it has an inky consistency. You want it fluid enough to flick, but not so watery that it runs. -
Apply the speckles:
Dip an old toothbrush into your brown wash. Hold it near your clay figures and run your thumb across the bristles to flick tiny dots onto the raw clay. Go lightly—less is more effectively here. -
Bake the figures:
arrange your buddies on a parchment-lined baking sheet. Bake according to your polymer clay package instructions (usually around 275°F/135°C for 15-30 minutes depending on thickness). -
Cool completely:
Allow the figures to cool fully on the baking sheet. They are fragile while warm, so resist the urge to move them until they have hardened completely.
Step 3: Bringing Faces to Life
-
Mark the eye placement:
Using a very light pencil mark or just by eyeing it, decide where the faces will sit. Placing the features slightly lower on the body often results in a cuter look. -
Paint the eyes:
Dip a dotting tool or the blunt end of a toothpick into undiluted black acrylic paint. Press gently onto the clay to create two small, solid round eyes. -
Paint the smile:
Using your finest detail brush, paint a simple, small ‘U’ shape between and slightly below the eyes. Keep the line thin and delicate. -
Add eye highlights (optional):
If you want extra sparkle, wait for the black paint to dry, then use a pin to add a microscopic dot of white paint to the upper corner of each eye. -
Seal the work:
Once all paint is bone dry, apply a thin coat of matte varnish to protect the surface, or leave them natural if you prefer the raw clay texture.
Make Clustered Displays
Before baking, press your raw clay figures gently into each other’s sides. They will bake fused together, creating a permanent group hug that’s perfect for a paperweight.
Now you have a whole family of quiet, happy little observers to keep you company on your desk