When I’m building with clay coils, I love how every pot shows the path your hands took to get there. Here are my favorite coil pot ideas—starting with the classics and ending with the kind of projects that make you say, “Okay, I have to try that.”
Classic Ribbed Coil Bowl
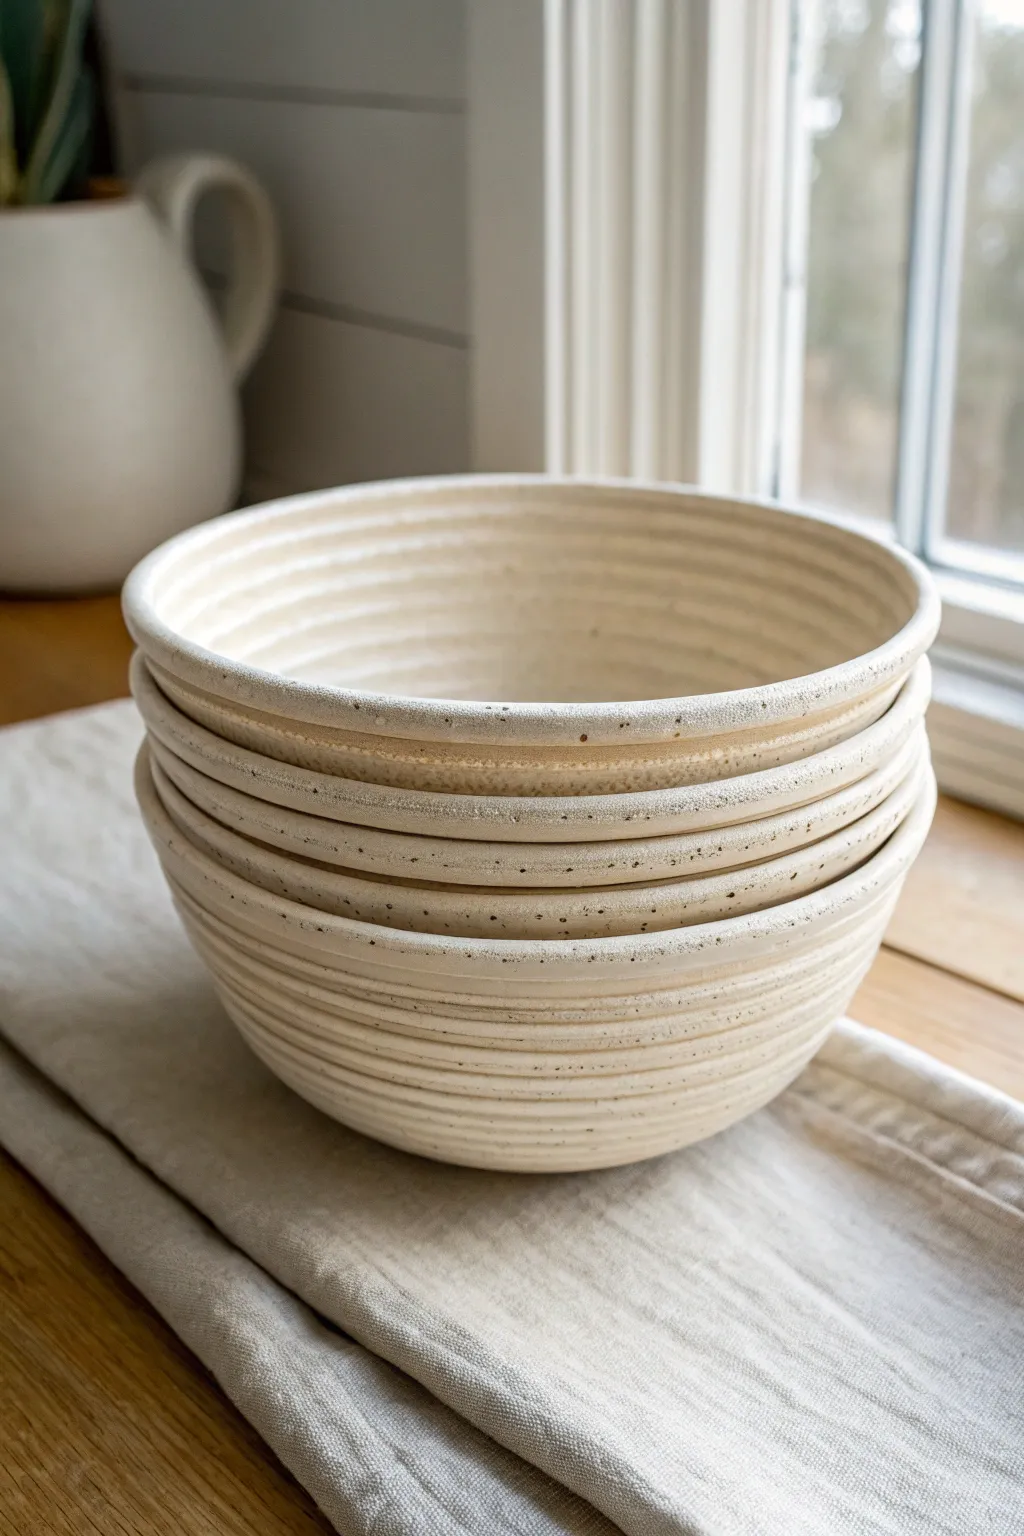
Achieve the sophisticated look of wheel-thrown pottery with a simple hand-building technique that highlights the beauty of the coil. These nesting bowls feature a sleek, speckled cream glaze and a satisfying tactile texture created by carefully stacking and smoothing layered clay.
Detailed Instructions
Materials
- Speckled buff stoneware clay (or white clay with speckles)
- Small banding wheel (optional but recommended)
- Wooden modeling tool
- Metal or rubber rib tool
- Slip (clay mixed with water) and scoring tool
- Sponge
- Cream or matte white dipping glaze
Step 1: Forming the Base
-
Prepare the slab:
Start by rolling out a small slab of clay, roughly 1/4 inch thick. This will serve as the smooth, flat bottom of your bowl. -
Cut the circle:
Use a needle tool or a cookie cutter to cut a perfect circle from the slab. For the medium bowl shown in the image, a 4-inch wide base is a good starting point. -
Score the edge:
Take your scoring tool (or a fork) and rough up the outer edge of the clay circle where the first coil will attach. Apply a generous amount of slip.
Step 2: Building the Walls
-
Roll consistent coils:
Roll out several long ropes of clay on your work surface. Aim for a thickness similar to your pinky finger. Consistency is key here to get that uniform ribbed look later. -
Attach the first coil:
Place the first coil directly on top of the scored edge of the base. Gently press it down to ensure a bond. -
Stack and join:
Continue adding coils, stacking them one directly on top of the other to build height. For a gently flaring bowl shape, place each new coil slightly darker outside the center of the one beneath it. -
Blend the interior:
I recommend pausing every 3-4 coils to blend the inside seams completely smooth. Use your thumb or a wooden tool to smear the clay downward, erasing the lines on the interior while keeping the exterior coils distinct. -
Refine the shape:
As you build upward, use one hand on the outside to support the wall while you smooth the inside. This pressure helps compress the clay and prevents the bowl from flopping.
Smoother Coils
For ultra-consistent ribs, extrude your coils using a clay extruder gun rather than hand-rolling. It ensures every layer is perfectly identical in thickness.
Step 3: Refining and Texture
-
Accentuate the ribs:
Once the bowl reaches your desired height (about 4-5 inches), use a damp sponge or your finger to gently round over the exterior of each individual coil. -
Clean the lines:
Run a wooden modeling tool lightly in the grooves between the exterior coils. This sharpens the shadows and gives it that machined, wheel-thrown appearance. -
Level the rim:
Check the top rim. If it’s uneven, you can slice it level with a needle tool or simply smooth the final coil into a rounded, comfortable lip. -
Slow drying:
Wrap the bowl loosely in plastic to dry slowly. This is crucial for coil pots to prevent cracking at the seams where thickness might vary.
Wobbly Walls?
If the bowl starts slumping outward as you build, stop adding coils. Let the clay stiffen for 30-60 minutes under a loose plastic sheet before continuing.
Step 4: Finishing
-
Bisque fire:
Fire the bone-dry piece in a kiln to bisque temperature (usually cone 04) to prepare it for glazing. -
Wax the foot:
Apply wax resist to the bottom of the bowl and roughly 1/4 inch up the side to prevent the glaze from adhering to the kiln shelf. -
Dip glazing:
Using a matte cream or white glaze, dip the entire bowl. The glaze should naturally pool slightly in the coil grooves, highlighting the texture. -
Final clean up:
Wipe away any stray glaze drips from the waxed bottom with a damp sponge. -
Glaze fire:
Fire the piece again to the maturation temperature of your specific clay and glaze body (likely Cone 5 or 6 for stoneware).
Once fired, these bowls look stunning stacked on a kitchen counter or filled with fresh fruit


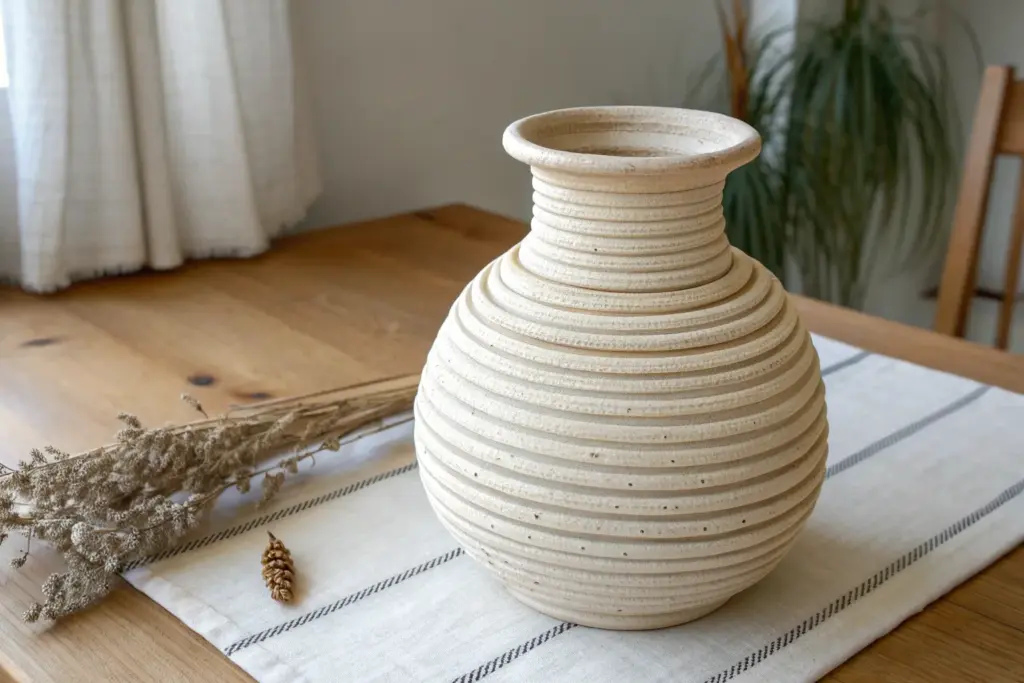
Easy Coil Vase With a Soft Tapered Neck
This elegant vase balances a bulbous, earthy form with a graceful, slender neck, all built using the timeless coil method. Its distinctive look comes from leaving the coils exposed and gently textured, creating a finish that feels both rustic and refined.
How-To Guide
Materials
- Light stoneware or speckled clay (approx. 3-4 lbs)
- Wooden modeling tool or old credit card
- Serrated metal rib (kidney scraper)
- Sponge
- Slip (clay slurry)
- Needle tool
- Banding wheel (lazy susan)
- Canvas or wooden bat to work on
Step 1: Building the Base and Body
-
Form the base:
Begin by rolling out a slab of clay about 3/8 inch thick. Cut out a circle approximately 4 inches in diameter to serve as the sturdy foundation for your vase. -
Prepare your first coils:
Roll out several long, even snakes of clay roughly the thickness of your pinky finger. Try to keep them consistent to ensure the walls rise evenly. -
Score and slip:
Deeply score the outer edge of your base and apply a generous amount of slip. Lay your first coil on top, gently pressing it down to create a seal. -
Build outward:
Add the next few rows of coils, placing each one slightly to the outside of the coil beneath it. This stacking technique will cause the walls to flare outward, creating the wide, bulbous belly of the vase. -
Blend the interior:
Stop every 3-4 layers to smooth the inside of the pot. Support the outside with one hand while dragging clay down from the upper coil to the lower coil on the inside using your thumb or a wooden tool. This structural integration is crucial since we are leaving the outside unblended. -
Continue expanding:
Keep stacking coils outward until you reach the desired maximum width of the belly, which appears to be about 7-8 inches high in the reference.
Step 2: Creating the Taper and Neck
-
Start tapering in:
Gradually shift your stacking strategy. Place each new coil slightly to the *inside* of the one below it. Do this slowly; a sharp inward turn can cause the clay to collapse. -
Shape the shoulder:
Continue tapering inward until the opening narrows significantly to form the shoulder of the vessel. I find stepping back frequently helps me check that the curve is symmetrical on all sides. -
Build the vertical neck:
Once the opening is roughly 2-3 inches wide, stack the coils directly vertically on top of one another to build the neck. Add height until the neck is proportional to the body, roughly 4-5 inches tall. -
Flare the rim:
For the final coil, attach it slightly outward to create a gentle, inviting lip at the very top.
Wobbly Walls?
If the clay starts sagging as the belly gets wide, stop building. Use a heat gun or hair dryer to stiffen the lower walls slightly before adding more weight.
Step 3: Refining and Texturing
-
Refine the overall shape:
While supporting the wall from the inside, gently paddle the exterior with a wooden paddle or flat hand to correct any lumpy areas without destroying the coil definition. -
Add horizontal texture:
Spin your banding wheel slowly. Take a serrated metal rib and gently drag it horizontally across the surface of the coils. This enhances the linear look and adds that scratchy, sandy texture seen in the photo. -
Create the speckled look:
If your clay isn’t naturally speckled, you can flick iron oxide or a manganese wash onto the surface using an old toothbrush for that spotty, organic finish. -
Clean the rim:
Smooth the final lip with a damp sponge so it looks finished and soft, rather than sharp. -
Dry slowly:
Loosely cover the vase with plastic to let it dry very slowly. This prevents the coils from cracking apart where they were joined. -
Fire and finish:
Once bone dry, bisque fire the piece. Apply a clear matte glaze or a very light wash to preserve the raw clay texture, then fire to the final temperature required by your clay body.
Define the Groove
To make the coil lines pop like the photo, run a rounded modeling tool horizontally between each layer on the outside before texturing with the serrated rib.
Now you have a stunning, sculptural vessel ready to hold dried grasses or stand alone as a statement piece


Lidded Coil Jar With a Gallery Rim
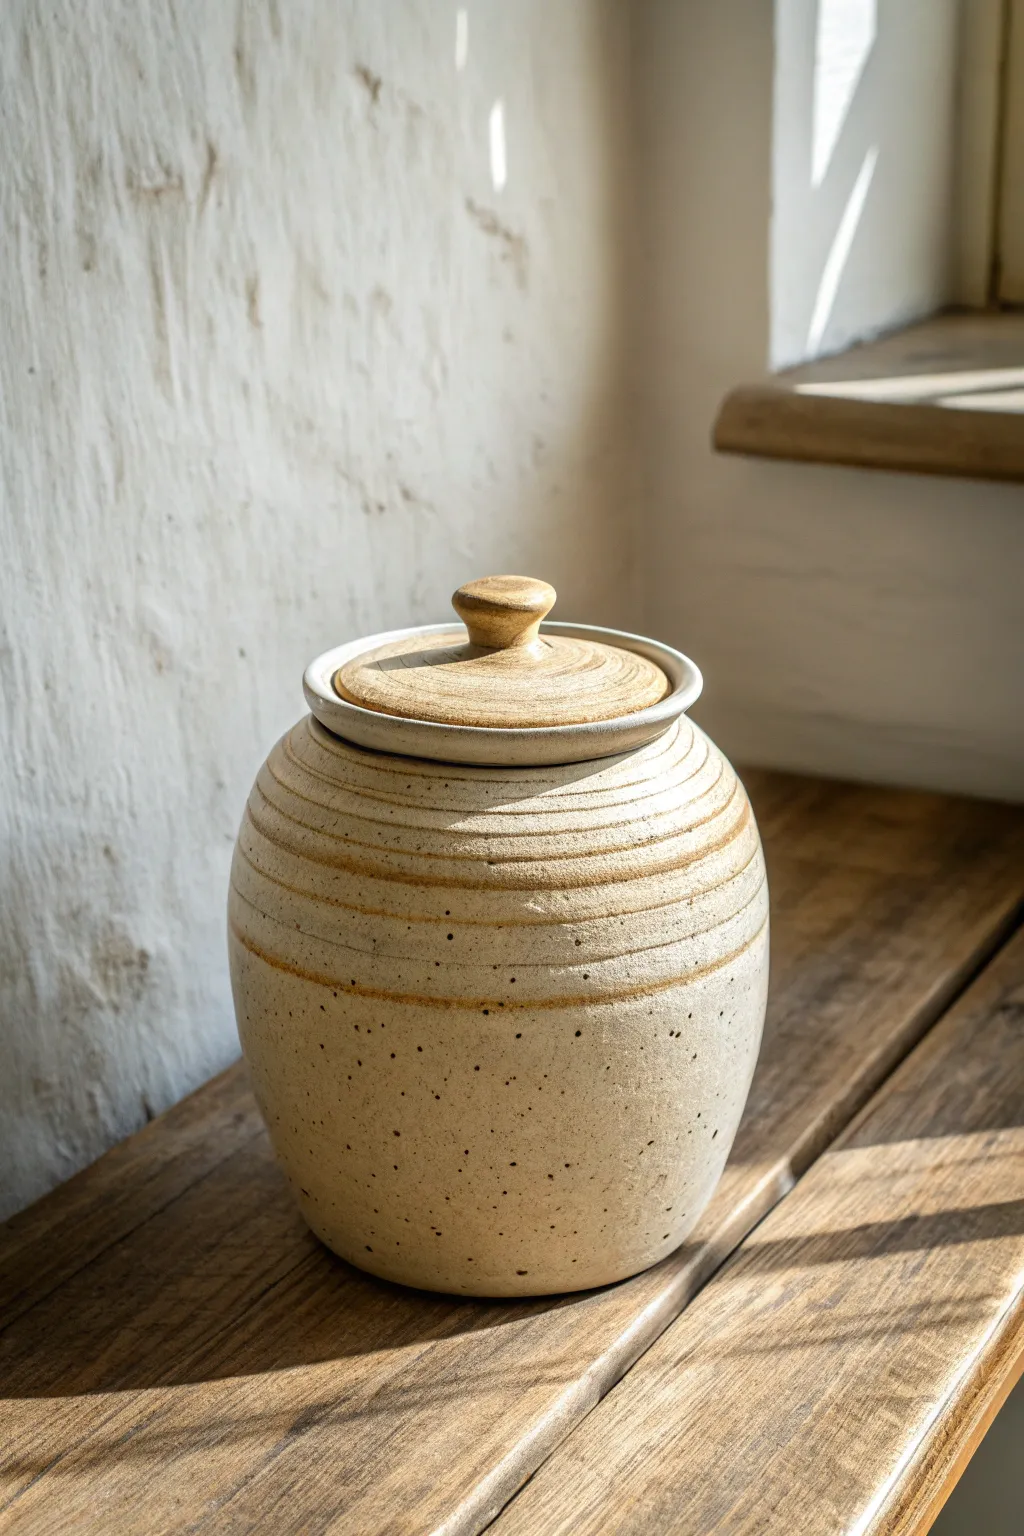
Embrace the organic beauty of hand-building with this sturdy, speckled coil jar featuring a precise gallery rim and a perfectly fitted lid. The subtle horizontal ridges left untouched near the top create a beautiful textural contrast against the smooth, swollen belly of the form.
Step-by-Step Tutorial
Materials
- Speckled stoneware clay (mid-fire)
- Canvas work surface
- Rolling pin
- Circle template or compass
- Needle tool
- Serrated rib or scoring tool
- Slip (clay mixed with water)
- Wooden modeling tool
- Flexible metal rib
- Sponge
- Clear matte glaze
Step 1: Building the Base and Body
-
Create the floor:
Begin by rolling out a slab of clay to approximately 3/8-inch thickness. Use a circle template or a bowl to cut out a perfect circle, about 5 inches in diameter, which will serve as the base of your jar. -
Prepare the first coil:
Score the outer edge of your base thoroughly and apply a generous amount of slip. Roll a snake of clay about the thickness of your thumb. -
Attach the base coil:
Lay the coil onto the scored edge. Secure it by smearing the clay from the coil down onto the base on the inside, and from the base up onto the coil on the outside. -
Build outward:
Continue adding coils, stacking them slightly outward with each layer to create the swelling belly of the jar. Be sure to score and slip between every single layer to prevent cracking later. -
Smooth the form:
Once you have built up the rounded belly shape, use a flexible metal rib to smooth the exterior walls. Gently push from the inside while ribbing the outside to create a nice, taut curve. -
Taper inward:
As you reach the upper third of the jar, begin stacking your coils slightly inward to narrow the opening. This is where precision matters—take your time to keep the circle symmetrical. -
Leave texture:
For the upper section shown in the photo, refrain from perfectly smoothing the coils on the outside. Simply press them together firmly, leaving the horizontal lines visible for that distinct, ribbed aesthetic.
Keep it Separate
Fire the lid on the pot during the bisque fire to help them maintain the same shape, but fire them side-by-side during the glaze fire to prevent sticking.
Step 2: Forming the Gallery and Lid
-
Create the gallery seat:
Add a final, thick coil to the rim. Instead of smoothing it round, use your fingers or a wooden tool to flatten the top edge and press a ‘step’ or shelf into the inside rim. This shelf (the gallery) will support your lid. -
Measure for the lid:
Once the gallery is formed and slightly stiffened, measure the interior diameter of the opening precisely. You want your lid to fit snugly here. -
Roll the lid slab:
Roll out a small slab for the lid, slightly thicker than the jar walls. Cut a circle that matches the measurement of your gallery opening, perhaps adding 1/8 inch to account for shrinkage. -
Dome the lid:
Gently press the slab over a slump mold or simply cup it in your hands to give it a slight convex curve. This prevents the lid from sagging during firing. -
Add the flange:
Flip the lid over. Score and slip a small coil ring onto the underside. This ring should fit *inside* the jar opening to stop the lid from sliding off the gallery. -
Sculpt the knob:
Form a small ball of clay into a knob shape. I prefer to pinch the stem slightly to make it easy to grip. Score and slip the center of the lid profoundly, then attach the knob firmly. -
Refine the fit:
Place the lid onto the jar gently. If it’s too tight, carefully shave down the edge of the lid with a fettling knife or rib until it sits flat on the gallery shelf.
Make it a Set
Create three jars in graduating sizes to form a kitchen canister set. Use slightly different knob shapes for each to distinguish flour, sugar, and coffee.
Step 3: Finishing and Glazing
-
Bisque fire:
Let the piece dry slowly under plastic to even out moisture content, then bisque fire it to cone 04 (or your clay body’s specifications). -
Wax parts:
Apply wax resist to the gallery shelf on the jar and the underside rim of the lid. This is crucial—glaze in these areas will fuse the lid to the pot forever. -
Apply glaze:
Dip or brush a thin layer of clear matte glaze over the exterior. The clear glaze will reveal the beautiful speckles in the clay body while sealing the surface. -
Final fire:
Glaze fire the piece to maturity (likely cone 5 or 6). Once cool, sand the bottom if needed to ensure it doesn’t scratch your table.
Now you have a timeless, functional vessel ready to hold dry goods or treasures


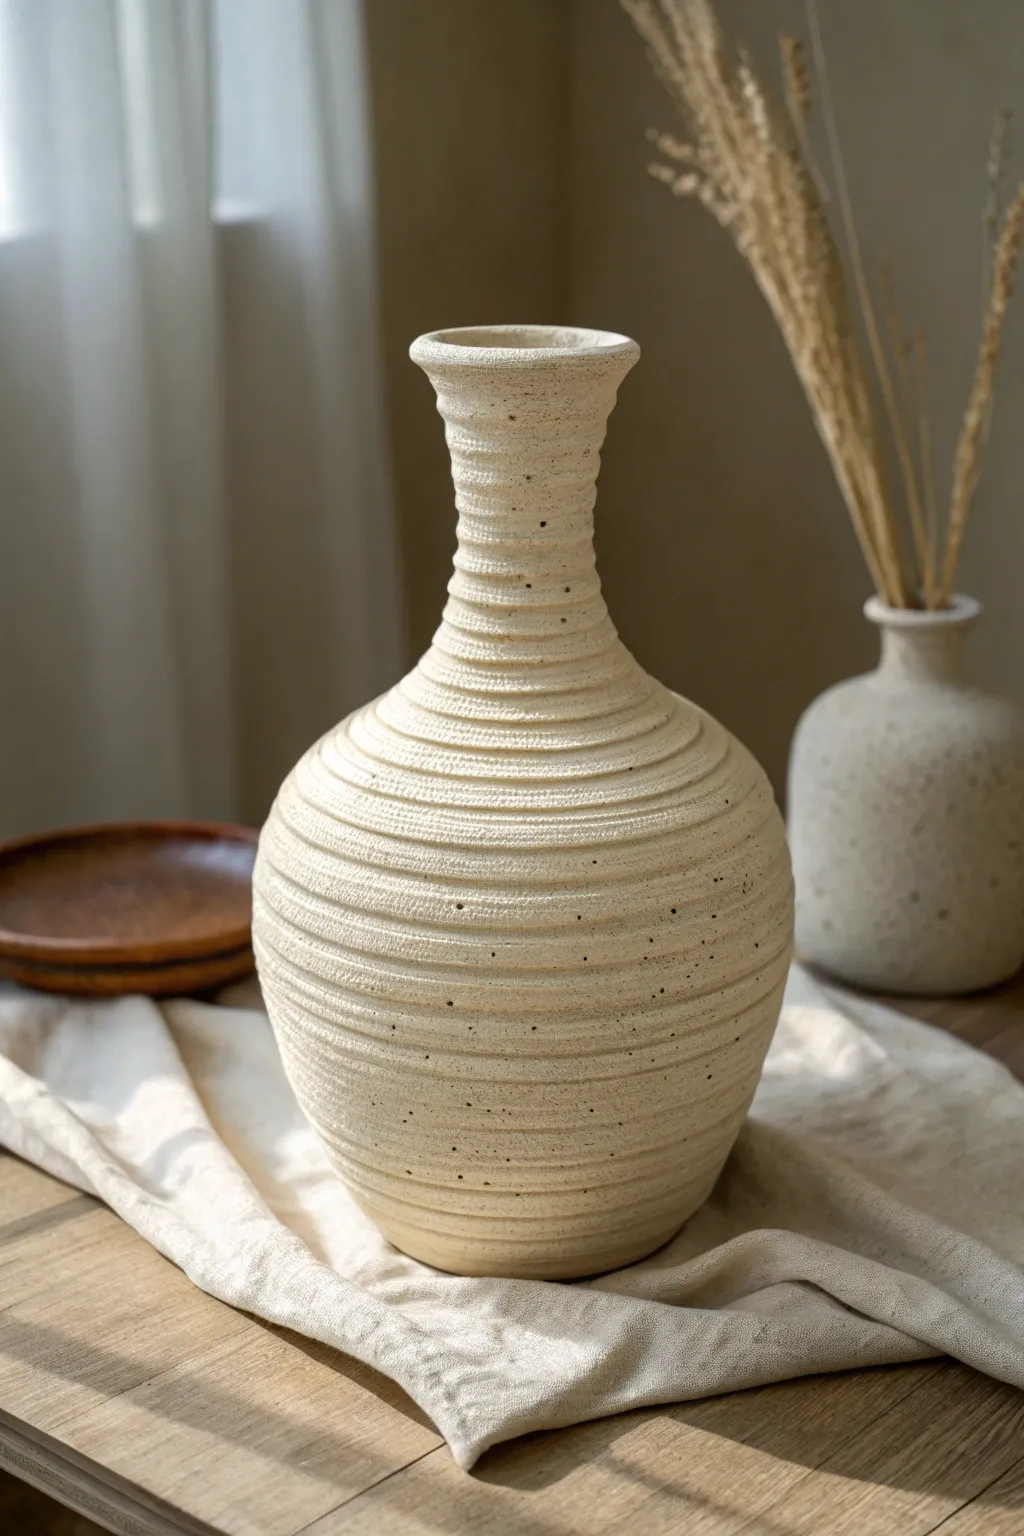
Small-Mouth Coil Water Jar Shape
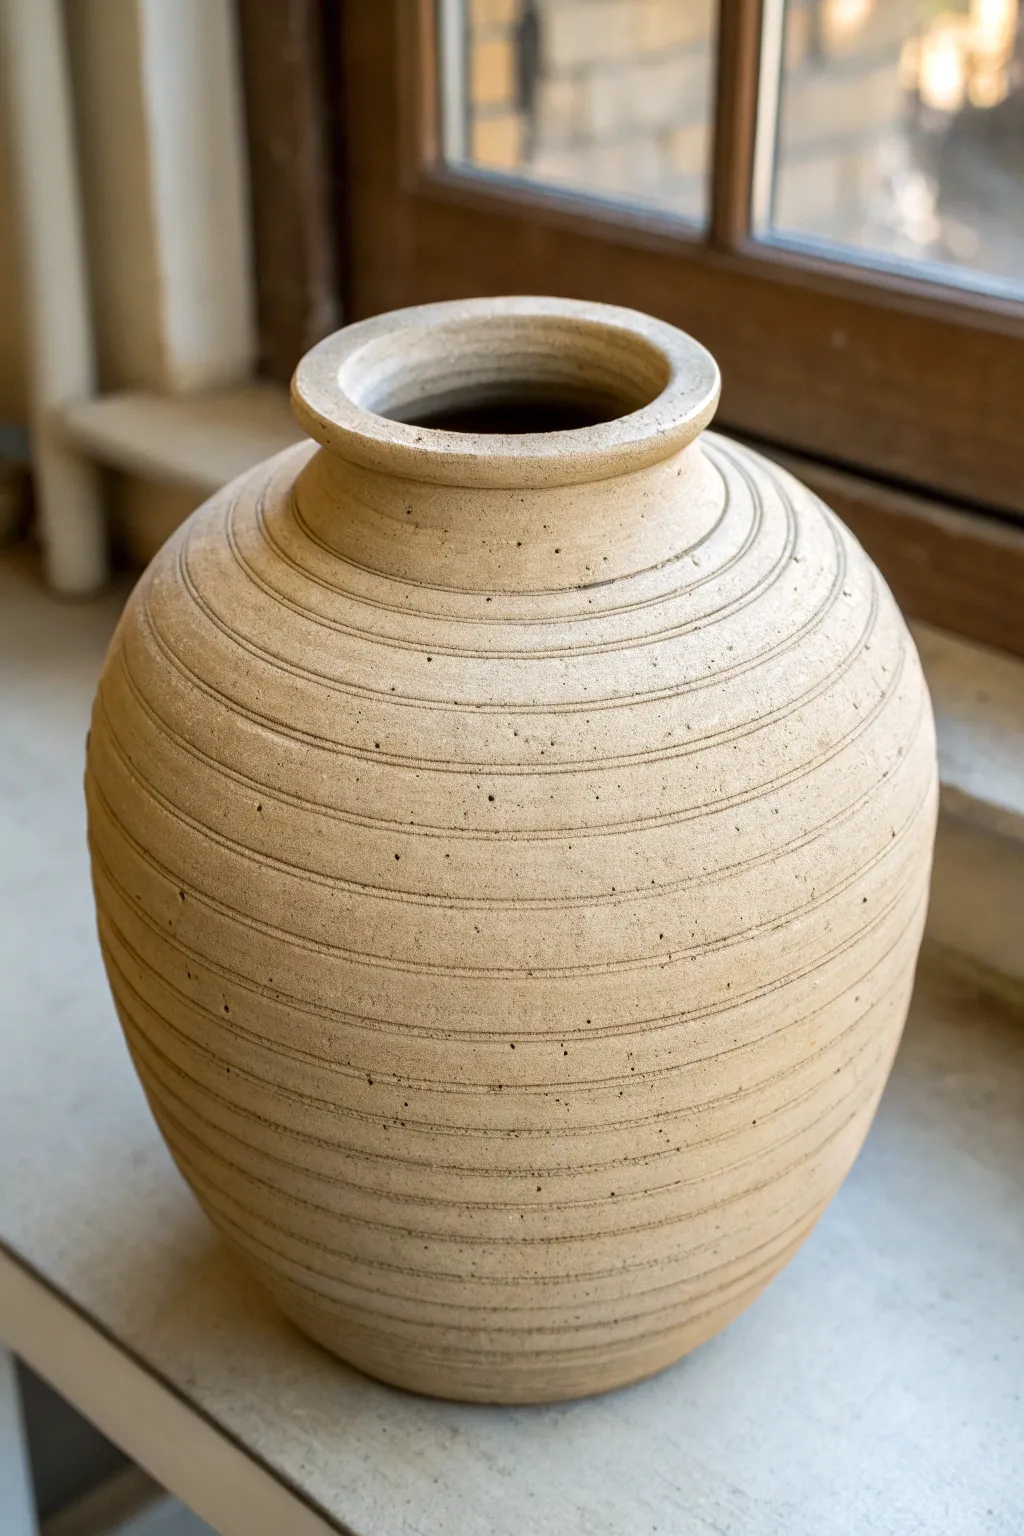
This elegant vessel combines the ancient charm of coil building with precise surface texture to create a timeless water jar silhouette. The unglazed finish highlights the natural beauty of the clay body, while the horizontal striations offer a tactile quality reminiscent of a beehive.
Detailed Instructions
Materials
- Stoneware clay (buff or beige firing)
- Pottery wheel (or banding wheel for hand-building)
- Needle tool
- Wooden rib tool
- Serrated metal rib or textured scraper
- Sponge
- Cutting wire
- Calipers (optional)
- Bucket of water
Step 1: Forming the Base
-
Prepare the Clay:
Begin by thoroughly wedging about 5-7 pounds of stoneware clay to remove air bubbles and ensure a consistent texture. Form it into a uniform ball. -
Center and Open:
Secure the clay to the wheel head. Center the mass using firm pressure, then open the center to create the floor of your pot, keeping it about half an inch thick. -
Establish the Foot:
Compress the floor with a damp sponge to prevent S-cracks later. Define the initial width of the base, keeping it narrower than the intended belly of the jar.
Step 2: Building the Body
-
Initial Pulls:
Slowly pull the walls of the cylinder upward. Keep the walls relatively thick at the bottom to support the height and weight of the form. -
Shape the Belly:
As you continue to pull the clay upward, apply gentle pressure from the inside to bulb out the form. You want a generous, rounded profile that starts widening almost immediately from the base. -
Refine the Curve:
Use a wooden rib on the exterior while pushing from the interior to smooth the curve and remove excess slip. The widest point should be just below the midpoint of the jar’s height. -
Collar the Neck:
As you reach the upper third of the vessel, gently collar the clay inward. Use both hands to compress the rim towards the center, creating the tapering shoulder. -
Form the Narrow Mouth:
Continue collaring until the opening is significantly smaller than the body. Leave enough clay at the top to form a distinct, thickened rim.
Groove Consistency
Rest your texturing arm against your body or a splash pan for stability. A steady hand creates the mesmerizing, endless spiral effect without jittery lines.
Step 3: Texturing and Finishing
-
Define the Rim:
Using a chamois or your sponge, compress and round over the lip of the jar. Create a slight overhang or ‘roll’ to give the mouth visual weight. -
Apply the Texture:
While the wheel is spinning at a slow-to-medium speed, take a needle tool or a pointed wooden tool. Starting from the bottom, press gently to create a continuous spiral groove up the side of the pot. -
Vary the Pressure:
I like to vary the pressure slightly as I move up; notice how the grooves in the image are consistent but organic. They shouldn’t be mechanically perfect. -
Clean the Surface:
Once the grooving is complete, lightly run a damp sponge over the surface to knock down any sharp burrs of clay without erasing the texture. -
Trim the Foot:
Let the pot dry to leather-hard. Turn it over on the wheel and trim the base to create a clean, distinct foot ring that lifts the curve off the table.
Collaring Collapse?
If the walls buckle while narrowing the neck, the clay is too tired or wet. Use a heat gun to stiffen the shoulder area slightly before attempting to collar further.
Step 4: Drying and Firing
-
Slow Drying:
Cover the jar loosely with plastic to ensure even drying, especially since the rim is thicker than the walls. This helps prevent warping. -
Bisque Fire:
Once bone dry, fire the piece to bisque temperature (usually cone 04 or 06). This prepares it for the final firing. -
Final Firing:
Since this project aims for a raw finish, skip the glazing step. Fire the piece to the maturation temperature of your specific clay body (e.g., Cone 5, 6, or 10) to achieve that stony, matte look. -
Post-Fire Polish:
After the final firing, sand the bottom of the foot with high-grit sandpaper to ensure it won’t scratch your furniture.
This vessel’s simple form and tactile surface make it a stunning centerpiece perfectly suited for dried floral arrangements

The Complete Guide to Pottery Troubleshooting
Uncover the most common ceramic mistakes—from cracking clay to failed glazes—and learn how to fix them fast.
Flattened Coil Canteen With Side Spout
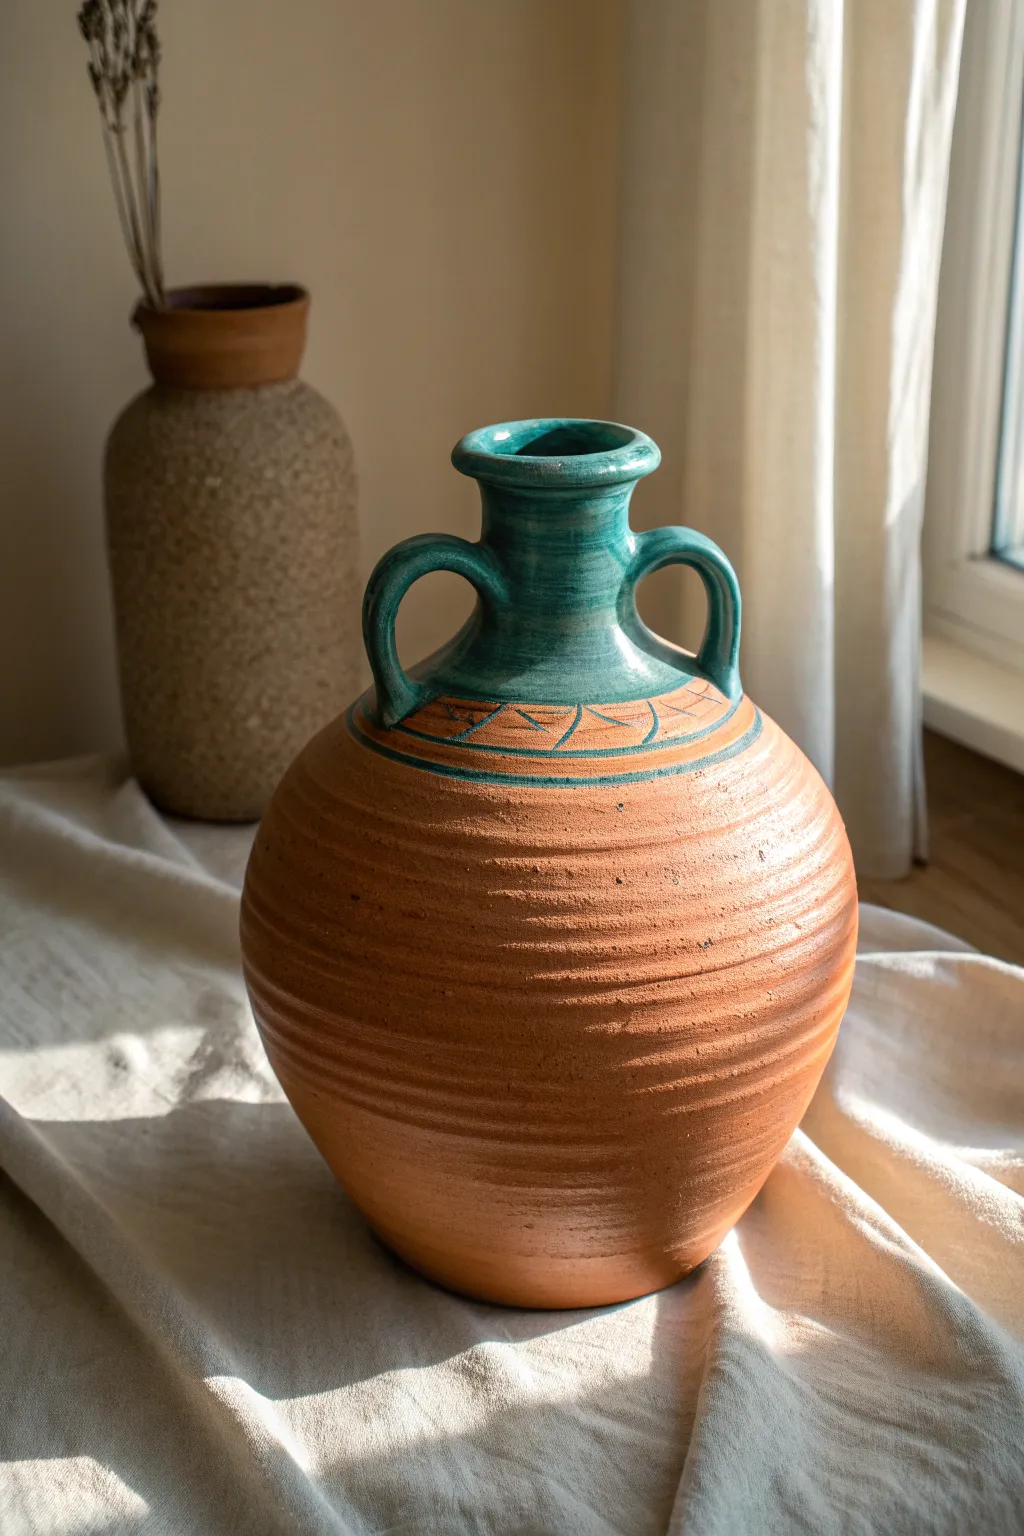
This stunning vessel combines the rough, earthy texture of unglazed terracotta with a striking pop of teal glaze on the neck and handles. The horizontal ridges celebrate the coil building process, giving the piece a timeless, artifact-like quality that catches the sunlight beautifully.
How-To Guide
Materials
- Earthenware or stoneware clay (terracotta color recommended)
- Pottery wheel (optional, can be fully hand-built)
- Rolling pin and guide strips (for coils)
- Serrated rib tool
- Wooden modeling tool
- Smoothed rib tool (metal or rubber)
- Sponge
- Teal gloss glaze
- Clear matte glaze (optional for body)
- Wax resist
- Kiln
Step 1: Building the Base Body
-
Create the base:
Start by rolling out a circular slab of clay about 1/2 inch thick to serve as the floor of your pot. Score and slip the outer edge thoroughly. -
Roll your coils:
Roll out several long, even ropes of clay. I find that keeping them slightly thicker than a finger works best for a pot of this scale to ensure stability. -
Build the belly:
Begin stacking coils on the base, angling them slightly outward with each layer to create the widening belly of the amphora. Score and slip between every single layer. -
Blend the interior:
As you build, firmly blend the coils together on the *inside* of the pot using a wooden tool or your thumb. This is crucial for structural integrity, even if you want the outside to look ridged. -
Shape the exterior texture:
On the outside, gently blend the coils downward just enough to seal them, but leave distinct horizontal ridges. Use a moistened finger or a soft rib to smooth the sharp edges of the coils while preserving the grooved pattern. -
Close the form:
Once you reach the widest point, begin stacking the coils slightly inward to taper the shoulders. Continue until the opening is narrow enough for the neck.
Step 2: Neck, Handles, and Sgraffito
-
Construct the neck:
Add smaller coils vertically to build a cylindrical neck. Flair the rim outward slightly at the very top for a classic traditional finish. -
Smooth the neck:
Unlike the body, use a rib tool to completely smooth the neck surface. This contrast between the smooth neck and textured body is key to the design. -
Pull the handles:
Pull two identical handles from a lump of clay. Allow them to stiffen slightly into a curve before attaching. -
Attach handles:
Score and slip the contact points on the neck and shoulder. Attach the handles firmly, blending the clay smoothly at the joy to make them look seamless. -
Add geometric carving:
Using a needle tool or small carving loop, incise a simple geometric band around the shoulder, just below where the neck texture changes. A pattern of triangles or zig-zags works perfectly. -
Dry and Bisque:
Allow the piece to dry slowly to avoid cracking, especially around the handles. Once bone dry, fire the piece to bisque temperature.
Wobbly Walls?
If your coil pot starts sagging or losing shape while building, stop adding height. Stuff the inside with newspaper for support or use a hair dryer to stiffen the lower clay before continuing.
Step 3: Glazing and Finishing
-
Apply wax resist:
Paint liquid wax resist over the textured body of the pot, stopping carefully at the line where the smooth neck begins. This protects the raw clay look. -
Glaze the interior:
Pour a liner glaze inside the vessel, swirl it to coat the entire interior, and pour out the excess. This makes the pot functional and waterproof. -
Glaze the neck:
Dip simple the neck and handles into a vibrant teal or turquoise gloss glaze. The wax resist should prevent the glaze from running down the textured body. -
Clean up:
Use a damp sponge to wipe away any stray droplets of glaze that may have beaded up on the waxed section or the incised shoulder band. -
Inlay the carving:
If you want the carved geometric lines to stand out, brush a little teal glaze into the grooves and wipe the surface clean so the color remains only in the recessed lines. -
Final Fire:
Fire the kiln to the maturity temperature of your clay and glaze. Let it cool completely before removing.
Antique Wash
To enhance the ridges on the unglazed body, apply a black iron oxide wash and wipe it back with a sponge. This darkens the deep grooves and makes the texture pop.
Place your finished amphora near a window to let the light play across those beautiful horizontal ridges
Spiral Coil Appliqué Accent Pot
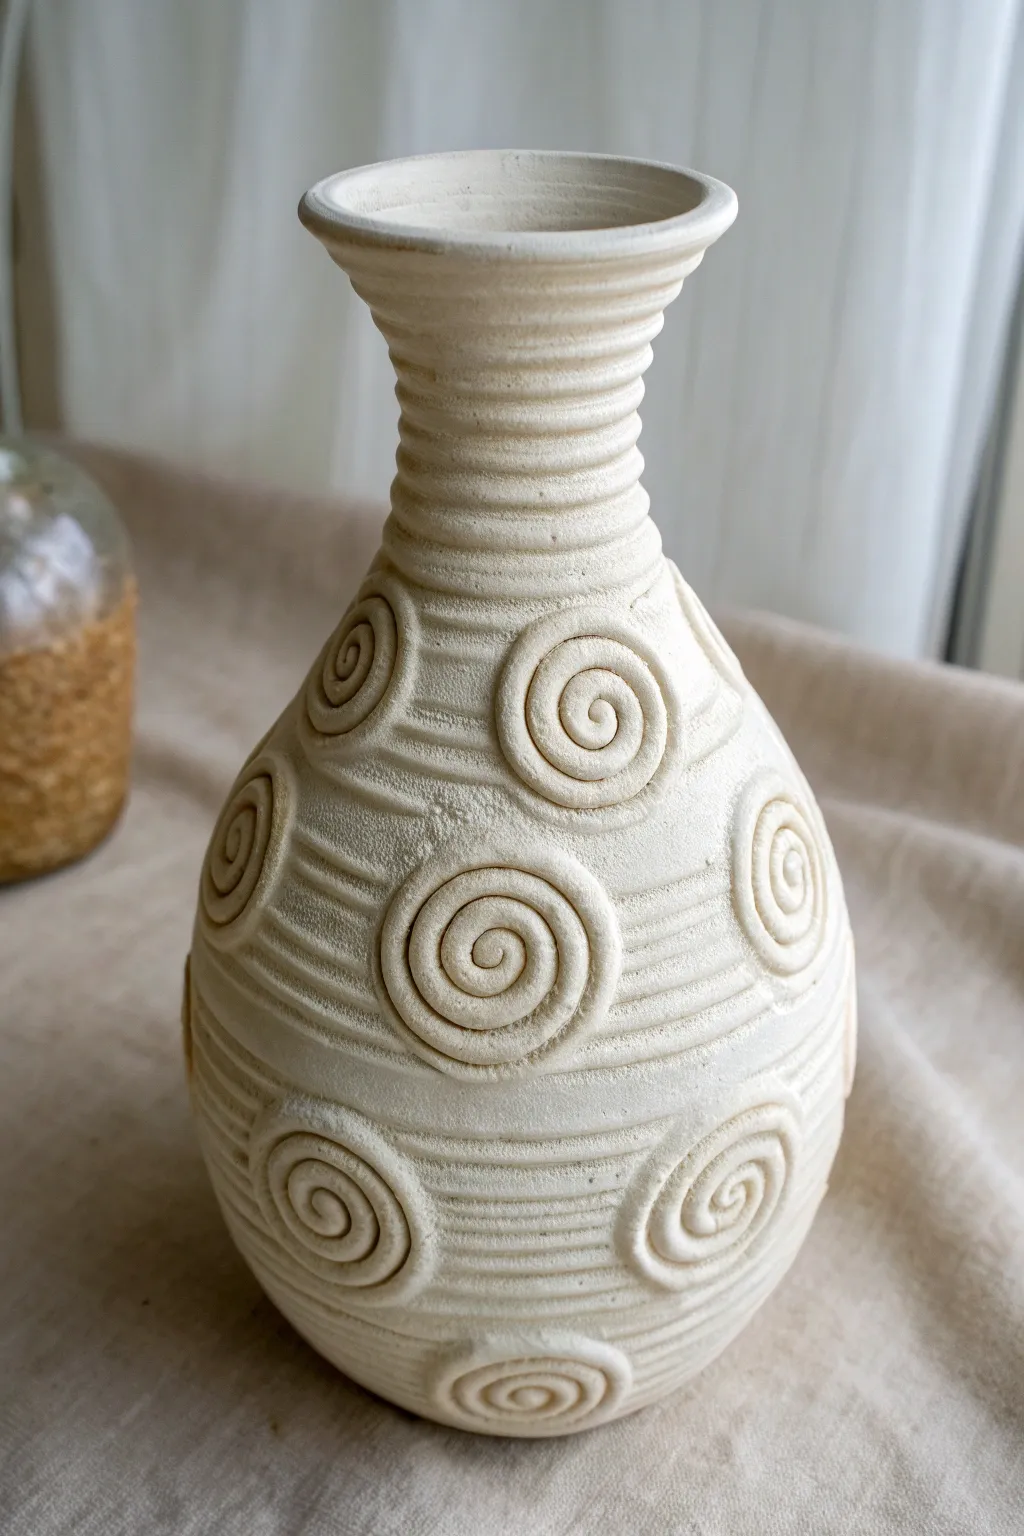
This elegant vessel combines the meditative process of coil building with striking geometric texture, featuring raised spiral embellishments against a horizontally ridged background. The natural, unglazed finish highlights the play of light and shadow across the clay’s surface, creating a timeless, organic look.
Step-by-Step
Materials
- White or speckled buff stoneware clay (about 3-4 lbs)
- Pottery wheel (optional, can be coil-built entirely)
- Wooden sculpting tool with a curved edge
- Metal rib or serrated rib
- Loop tool (small)
- Needle tool
- Slip and scoring tool (or a fork)
- Small sponge
- Canvas work surface
Step 1: Forming the Base Vessel
-
Establish the Foundation:
Begin by creating the main body of the vase. You can either throw a bulbous cylinder on the wheel or build up coils by hand to form a rounded belly that tapers inward for the neck. Aim for a height of about 8-10 inches. -
Refine the Silhouette:
If you are hand-building, smooth the coils on the inside for strength, but leave the exterior slightly rough. If throwing, leave the walls a little thicker than usual (about 1/4 inch) to support the appliqués later. -
Add Surface Texture:
While the clay is leather-hard but still pliable, use a serrated rib or a wooden tool to create the horizontal striations. Gently press the tool against the spinning pot (or walk it around the hand-built form) to carve consistent, parallel grooves around the entire circumference. -
Define the Neck:
Pay special attention to the neck area. Accentuate the ridges here to mimic the look of stacked coils. I like to use a rounded wooden tool to deepen the grooves slightly more than on the body, creating a distinct visual separation. -
Smooth the Rim:
Finish the top opening by slightly flaring the rim outward. Use a damp chamois or sponge to compress the lip, ensuring it is smooth and comfortable to the touch.
Cracking Spirals?
If spirals crack away from the pot during drying, your clay was too dry when attaching. Use vinegar in your slip next time for a stronger chemical bond.
Step 2: Creating the Spirals
-
Roll Smooth Coils:
Roll out several thin, even coils of clay on your canvas. These should be roughly pencil-thick (about 1/4 inch diameter). Try to keep them consistent so your spirals look uniform. -
Form the Spirals:
Take a coil and gently roll it into a tight spiral shape on the table, like a snail shell or cinnamon roll. You will need roughly 10-15 spirals depending on the size of your pot. -
Vary the Sizes:
Make the majority of your spirals the same medium size, but create a few slightly smaller ones for the upper areas near the neck transition. -
Flatten Slightly:
Once rolled, gently tap the top surface of each spiral with a flat wooden paddle or your palm. This ensures they aren’t too bulky and creates a nice flat surface for adhesion.
Step 3: Assembly and Refining
-
Plan the Placement:
Before attaching, hold the spirals up to the vase to visualize the pattern. An alternating, staggered pattern works best to fill the negative space comfortably. -
Score and Slip:
Aggressively score the back of a spiral and the corresponding spot on the vase. Apply a generous amount of slip to both surfaces. This is critical because the applique is thick and needs a strong bond. -
Attach the Motifs:
Press the spiral firmly onto the vase wall. Wiggle it slightly to lock the clay particles together and release any trapped air bubbles. -
Blend the Edges:
Using a small modeling tool, gently blend the very outer edge of the spiral base into the vase wall just enough to seal it, while keeping the main spiral definition sharp. -
Clean Up:
Use a small, damp brush to clean up any excess slip that squeezed out around the edges. Re-carve any horizontal lines on the vase body that got smudged during the attachment process. -
Slow Drying:
Cover the finished piece loosely with plastic. Because the spirals are thicker than the walls, the pot needs to dry very slowly to prevent cracking or warping. -
Bisque Fire:
Once bone dry, bisque fire the piece to Cone 04. The vase in the image is left unglazed to show off the natural clay texture, but you could apply a clear matte glaze if you want it to be watertight.
Pro Tip: Consistent Rolling
Use two flat wooden slats (like paint stirrers) as thickness guides when rolling your initial coils. This ensures every spiral starts with the exact same diameter.
Place your finished vessel in a spot with good natural light to let the shadows accentuate your beautiful spiral work