Pot painting is one of my favorite ways to turn a plain planter into something that feels totally you, even if you’re brand-new to painting. Grab a simple terra cotta pot or ceramic planter, and let’s play with color, pattern, and a few easy tricks that look way fancier than they are.
Classic Polka Dots in Two Colors
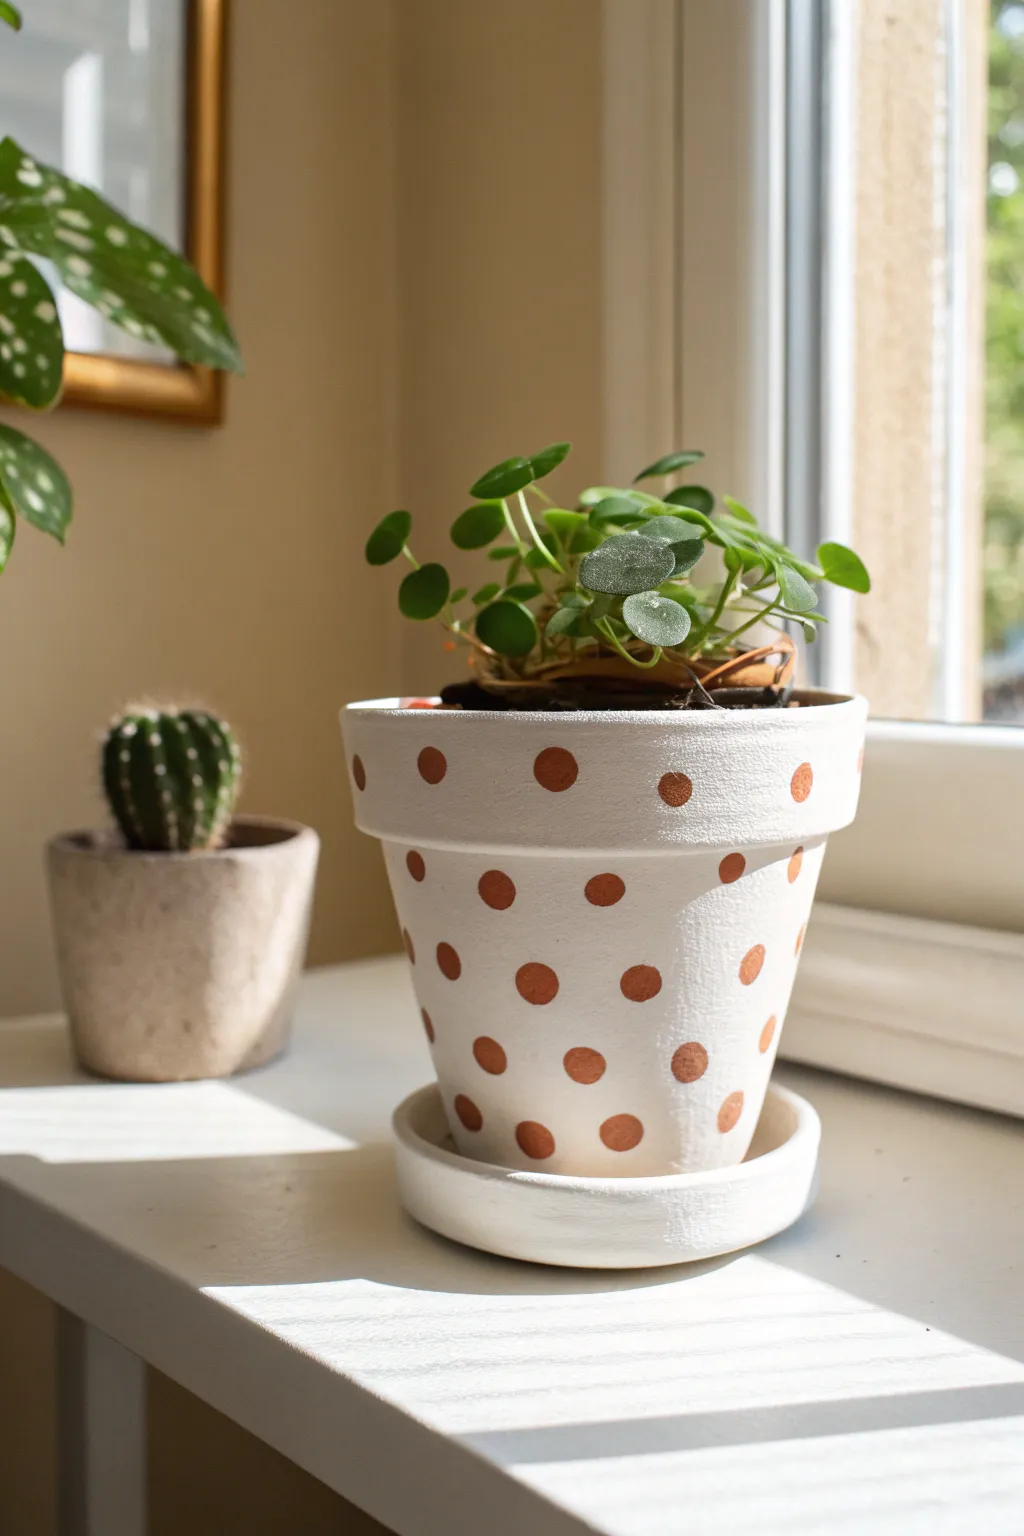
Transform a standard terracotta planter into a chic, modern home for your Pilea with nothing but a bit of paint and geometric precision. This project combines a crisp white matte background with the natural warmth of metallic copper dots for a playful yet sophisticated look.
How-To Guide
Materials
- Terracotta pot (4-6 inch diameter)
- Matching terracotta saucer
- White acrylic paint (matte finish)
- Metallic copper or bronze acrylic paint
- Flat paintbrush (1 inch)
- Round foam pouncer (0.5 – 0.75 inch diameter)
- Small detail brush
- Paper plate or palette
- Clear acrylic sealer spray (matte or satin)
- Damp cloth or sponge
Step 1: Preparation & Base Coat
-
Clean surface:
Begin by wiping down your terracotta pot and saucer with a damp cloth to remove any dust or oils. Let them air dry completely, as trapped moisture can cause the paint to bubble later. -
First white layer:
Squeeze a generous amount of white matte acrylic paint onto your palette. Using the 1-inch flat brush, apply a thin, even coat over the entire exterior of the pot, including the top rim. -
Inner rim:
Paint just inside the top rim of the pot (about 1 inch down) so the terracotta color won’t show once soil is added. -
Saucer work:
Paint the exterior and interior of the saucer with the same white paint. Don’t worry if the terracotta color shows through slightly on this first pass. -
Dry and repeat:
Allow the first coat to dry for about 20-30 minutes. Apply a second coat to both the pot and saucer to ensure solid, opaque coverage where no orange peeks through. I find a third thin coat is sometimes necessary for a truly crisp white.
Uneven Circles?
If your sponge dots look messy or fuzzy at the edges, wait for them to dry fully. Then, use a small detail brush with the white base paint to carefully ‘cut in’ and reshape the circle edges.
Step 2: Creating the Polka Dots
-
Load the pouncer:
Pour a small puddle of metallic copper paint onto your palette. Dip your round foam pouncer straight down into the paint, ensuring the entire foam face is covered but not dripping. -
Test spacing:
Dab the pouncer onto a scrap piece of paper a few times to get a feel for how much pressure is needed and to remove excess globby paint. -
Start at the rim:
Begin beneath the rim of the pot. Press the pouncer firmly against the surface to create your first dot. Lift it straight off to keep the edges clean. -
Top row spacing:
Continue creating dots around the top section of the pot, spacing them roughly 1.5 inches apart horizontally. Try to keep them level. -
Second row placement:
Move down to the next row. Position these dots in the ‘windows’ of the row above (staggered spacing), rather than directly underneath the previous dots. -
Continue pattern:
Repeat this staggered pattern all the way down the tapered body of the pot. As the pot gets narrower near the bottom, you may need to adjust the spacing slightly to make them fit visually. -
Touch-ups:
Inspect your dots. If the foam sponge left any bubbles or uneven texture, use a small detail brush to smooth out the metallic paint while it’s still wet or fill in any bare spots.
Level Up: Ombré Dots
Mix a tiny bit of white into your copper paint for the bottom rows, gradually lightening the color of the dots as you move up the pot for a subtle gradient effect.
Step 3: Finishing
-
Final drying time:
Let the polka dots dry completely, usually at least an hour depending on the thickness of the metallic paint. -
Sealing the project:
Take the pot and saucer to a well-ventilated area outside. Spray a light, even coat of clear acrylic sealer over the entire project to protect the paint from water damage and chipping. -
Curing:
Allow the sealer to cure for 24 hours before you pot your plant, ensuring the finish is hard and durable.
Your stylish new planter is ready to add a pop of pattern to your windowsill


Simple Stripes Around the Rim
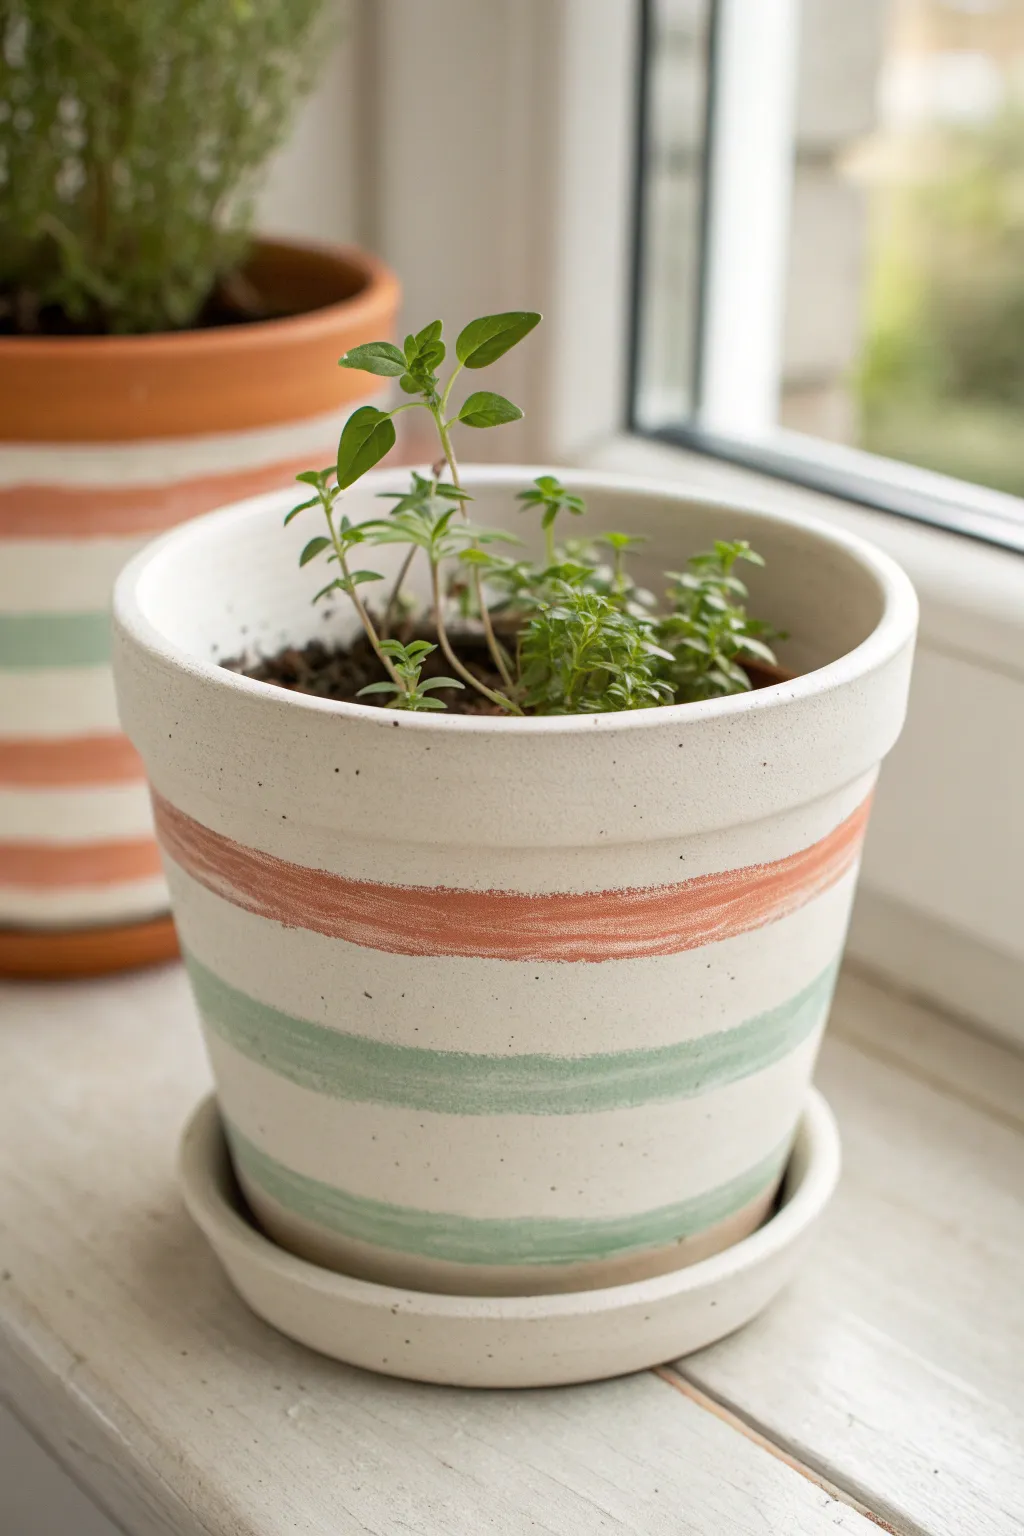
Transform a plain clay pot into a charming, farmhouse-style planter with soft, muted stripes. This project uses a creamy base coat and gently imperfect bands of color to create a hand-painted look that feels cozy and organic.
Step-by-Step Tutorial
Materials
- Terracotta pot and saucer
- White or cream chalk paint (or matte acrylic)
- Peachy-coral acrylic paint
- Mint green or sage acrylic paint
- Medium flat paintbrush (approx. 1 inch)
- Small round detail brush (optional)
- Painter’s tape (optional, for crisp lines)
- Old cloth or rag
- Small bowl of water
- Matte sealer or varnish spray
Step 1: Preparing the Base
-
Clean the surface:
Begin by thoroughly wiping down your terracotta pot and saucer with a damp cloth to remove any dust or manufacturing residue. Let it dry completely before starting. -
Apply the creamy base:
Load your medium flat brush with the white or cream chalk paint. Unlike standard acrylics, chalk paint gives that lovely matte, pottery feel we want. -
Paint the exterior:
Cover the entire outside of the pot, brushing horizontally to minimize visible strokes. Don’t forget to paint the top inch of the inner rim where the soil line will stop. -
Coat the saucer:
Paint the saucer to match the pot. It usually takes two coats to get solid coverage over the darker terracotta color. -
Let it cure:
Allow the base coat to dry fully. Chalk paint dries fast, but give it about 30-45 minutes to be safe so your stripe colors don’t muddy the white.
Spin It to win it
For straighter freehand lines, place the pot on a lazy susan or turntable. Hold your brush hand still against a stack of books and spin the wheel.
Step 2: Adding the Stripes
-
Plan your placement:
Visualize three horizontal bands on the lower half of the pot. We want one peachy band near the middle, and two minty bands below it. -
Mix the peach tone:
If your coral paint is too bright, mix in a tiny drop of white or brown to mute it down to a soft, earthy clay tone. -
Paint the top stripe:
Using your flat brush, paint the first stripe around the middle of the pot’s body. I prefer doing this freehand by rotating the pot slowly while holding the brush steady, as it creates a charming, organic edge. -
Correcting edges:
If the line feels too wobble, you can tidy it up slightly with a damp brush, but remember that the imperfection is part of the style. -
Mix the green tone:
Prepare your mint or sage green paint. Again, if it looks too neon, a touch of white or gray will soften it. -
Paint the middle stripe:
Leave a gap of white space below the peach line, then paint your first green stripe underneath it. -
Add the bottom stripe:
Paint the final green stripe near the very bottom edge of the pot. Try to keep the white spacing between the stripes relatively consistent. -
Mirror the saucer:
If you like, add a very thin stripe of either color to the rim of the saucer, though leaving it plain white works beautifully too.
Step 3: Finishing Touches
-
Check consistency:
Look over your stripes. If the color looks too sheer in places, gently dab on a second layer of paint, being careful not to widen the lines. -
Dry completely:
Let the painted stripes dry for at least an hour. This ensures the pigments are set before sealing. -
Apply sealer:
Take your pot outside and apply a coat of matte spray varnish. This protects the paint from water damage when you water your plants. -
Wait for the sealer:
Allow the sealer to cure according to the can’s instructions—usually 24 hours—before adding soil. -
Plant:
Fill your new custom pot with soil and your favorite herb or succulent.
Shaky hands?
If you’re nervous about freehanding, use painters tape. Press edges down firmly to stop bleed-through, but remove the tape while the paint is still wet.
Now you have a refreshing, custom-designed home for your favorite indoor plants


Bold Color-Blocked Triangles
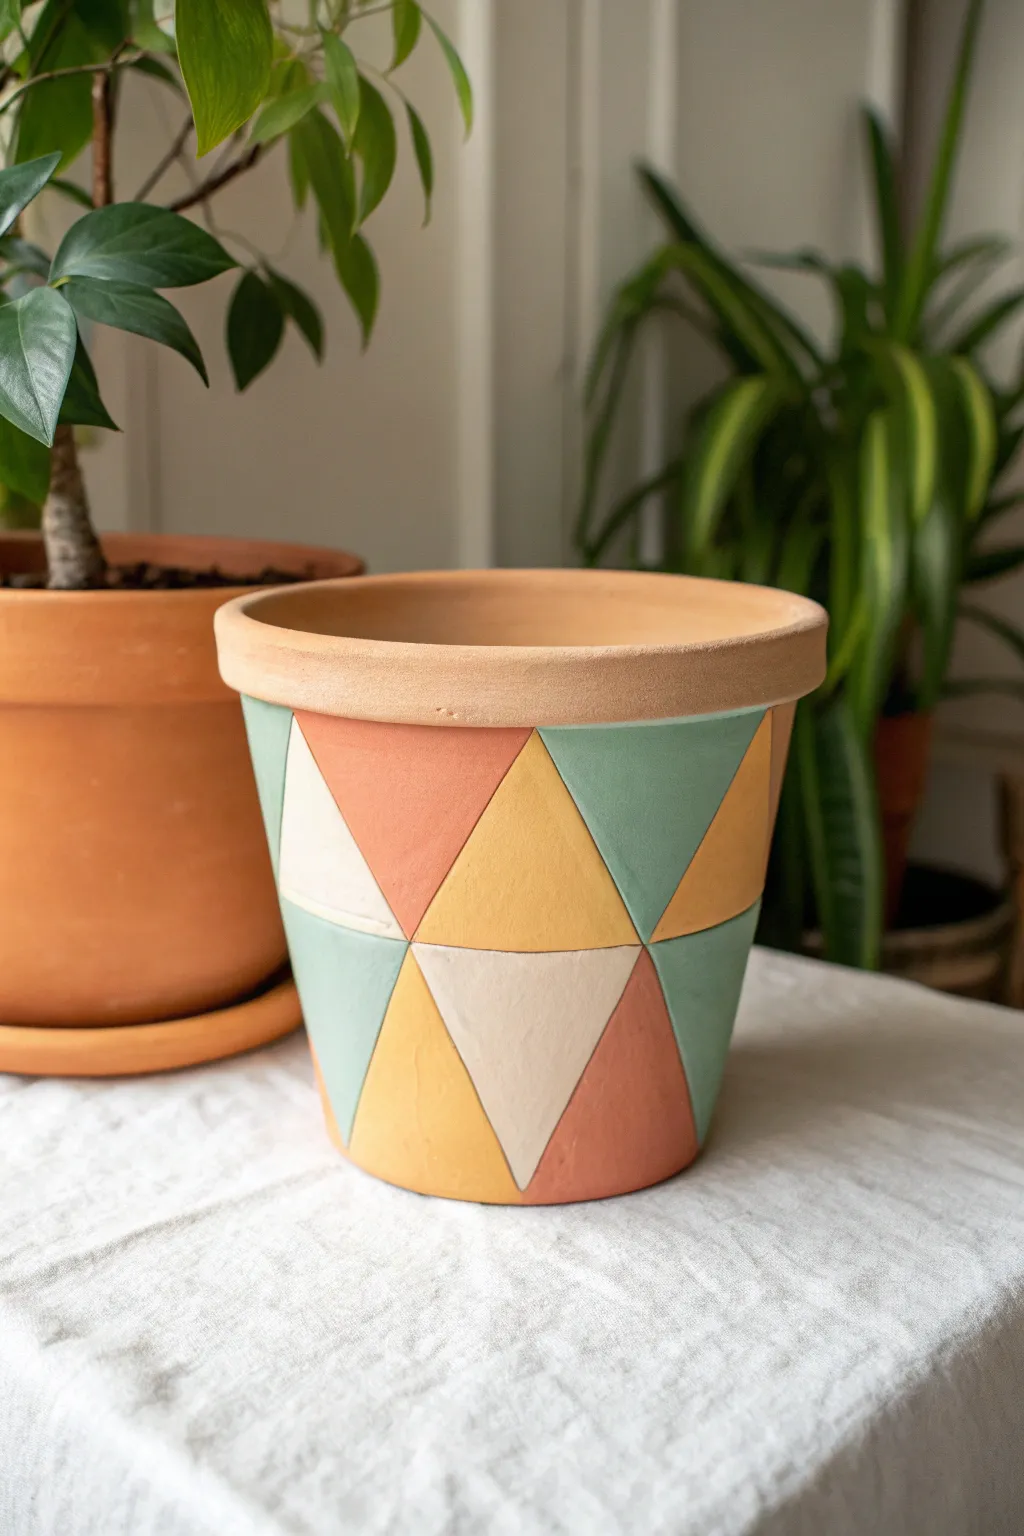
Transform a standard terracotta pot into a modern home accent with this triangle motif featuring earthy, muted tones. The pattern relies on crisp lines and a warm palette of sage, mustard, cream, and peach to create a sophisticated geometric look.
How-To Guide
Materials
- Terracotta pot (standard size)
- Painter’s tape (0.5 inch or thinner works best)
- Acrylic craft paints (Sage Green, Mustard Yellow, Peach/Terracotta, Cream/Off-White)
- Small flat angled paintbrush (1/4 inch)
- Pencil
- Ruler (flexible tape measure is ideal)
- Palette or paper plate
- Water cup and paper towels
- Clear acrylic sealer spray (matte finish)
Step 1: Preparation and Mapping
-
Clean surface:
Begin by wiping down your terracotta pot with a damp cloth to remove any dust or debris. Let it dry completely before starting, as moisture will prevent the paint from adhering properly. -
Tape the rim:
Apply a strip of painter’s tape just below the rim of the pot. We want to keep the rim original terracotta for that nice contrast, so verify the tape edge is sealed tightly against the clay to prevent leaks. -
Measure circumference:
Measure the circumference of the pot just under the rim. Divide this number by an even number (like 6 or 8) to determine how wide the base of your top triangles should be. -
Mark vertical guides:
Using a pencil, make small tick marks around the top edge (just under your tape line) based on your calculation. These marks will be the top points of your inverted triangles. -
Draw the grid:
Lightly sketch a horizontal line around the middle of the pot’s body. I find resting my pencil on a stack of books at the right height and rotating the pot against it helps get a perfectly straight line. -
Sketch the triangles:
Connect your top tick marks to points on the middle line to form a row of inverted triangles. Then, use those same bottom points to draw the second row of upright triangles reaching toward the bottom edge.
Clean Lines Hack
If steady hands are tricky, use thin masking tape or washi tape to block off each triangle individually. Paint, let dry, and re-tape for the next shape.
Step 2: Painting the Pattern
-
Select your palette:
Squeeze out your four acrylic colors: sage green, mustard yellow, peach, and cream. Keep them separate on your palette. -
Outline the first shape:
Choose a specific triangle to start with—perhaps a top-row one. Using your small angled brush, carefully paint the outline of the triangle first. The angled bristles help you get sharp corners. -
Fill in the color:
Once outlined, fill in the center of the triangle with smooth, even strokes. Don’t worry if the coverage looks thin; multiple thin coats are better than one thick, goopy one. -
Rotate colors:
Move to an adjacent triangle and switch colors. If you painted the first one peach, paint the neighbor sage green. Try to ensure no two touching triangles are the same color. -
Mind the gap:
For the cleanest look, leave a extremely thin hairline of unpainted terracotta between the triangles. This acts as a ‘grout line’ and makes the geometric shapes pop without needing black outlines. -
Paint the bottom row:
Continue the process on the bottom row of triangles. Be mindful of where the pot curves under; you don’t need to paint the very bottom base that sits on the saucer. -
Touch up edges:
Inspect your lines. If any edges are wobbly, use a clean, slightly damp brush to gently tidy them up while the paint is still tacky, or wait until dry to correct with fresh paint.
Step 3: Finishing Touches
-
Apply second coat:
Once the first layer is dry to the touch (usually 15-20 minutes), apply a second coat to any colors that look streaky or transparent. The cream and yellow often need that extra boost. -
Remove tape:
Carefully peel off the painter’s tape beneath the rim. Pull it away at a 45-degree angle to ensure a crisp line. -
Erase pencil lines:
If any pencil layout lines are still visible in the unpainted gaps, gently erase them with a soft white eraser. -
Seal the work:
Take the pot to a well-ventilated area and spray it with a clear matte acrylic sealer. This protects the paint from water damage when you water your future plant.
Paint Peeling?
Terracotta is porous. If paint lifts off, prime the area first with a clear acrylic medium or a 50/50 mix of white glue and water before painting colors.
Pop in your favorite leafy green plant and enjoy the warm, structured vibe this planter brings to your space.


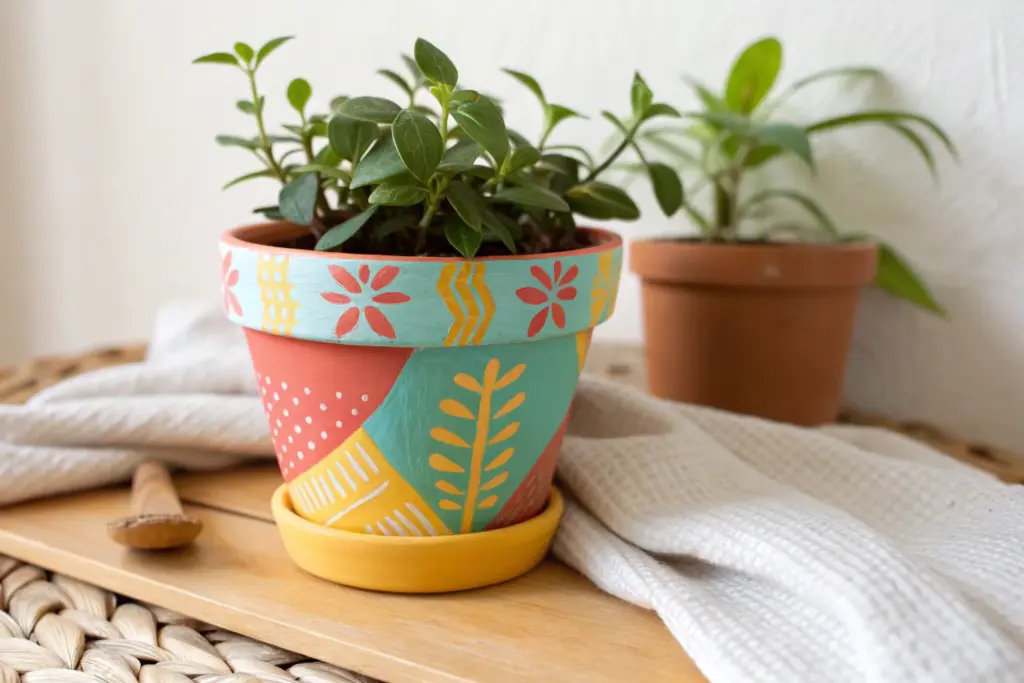
Sweet Hand-Painted Floral Sprays
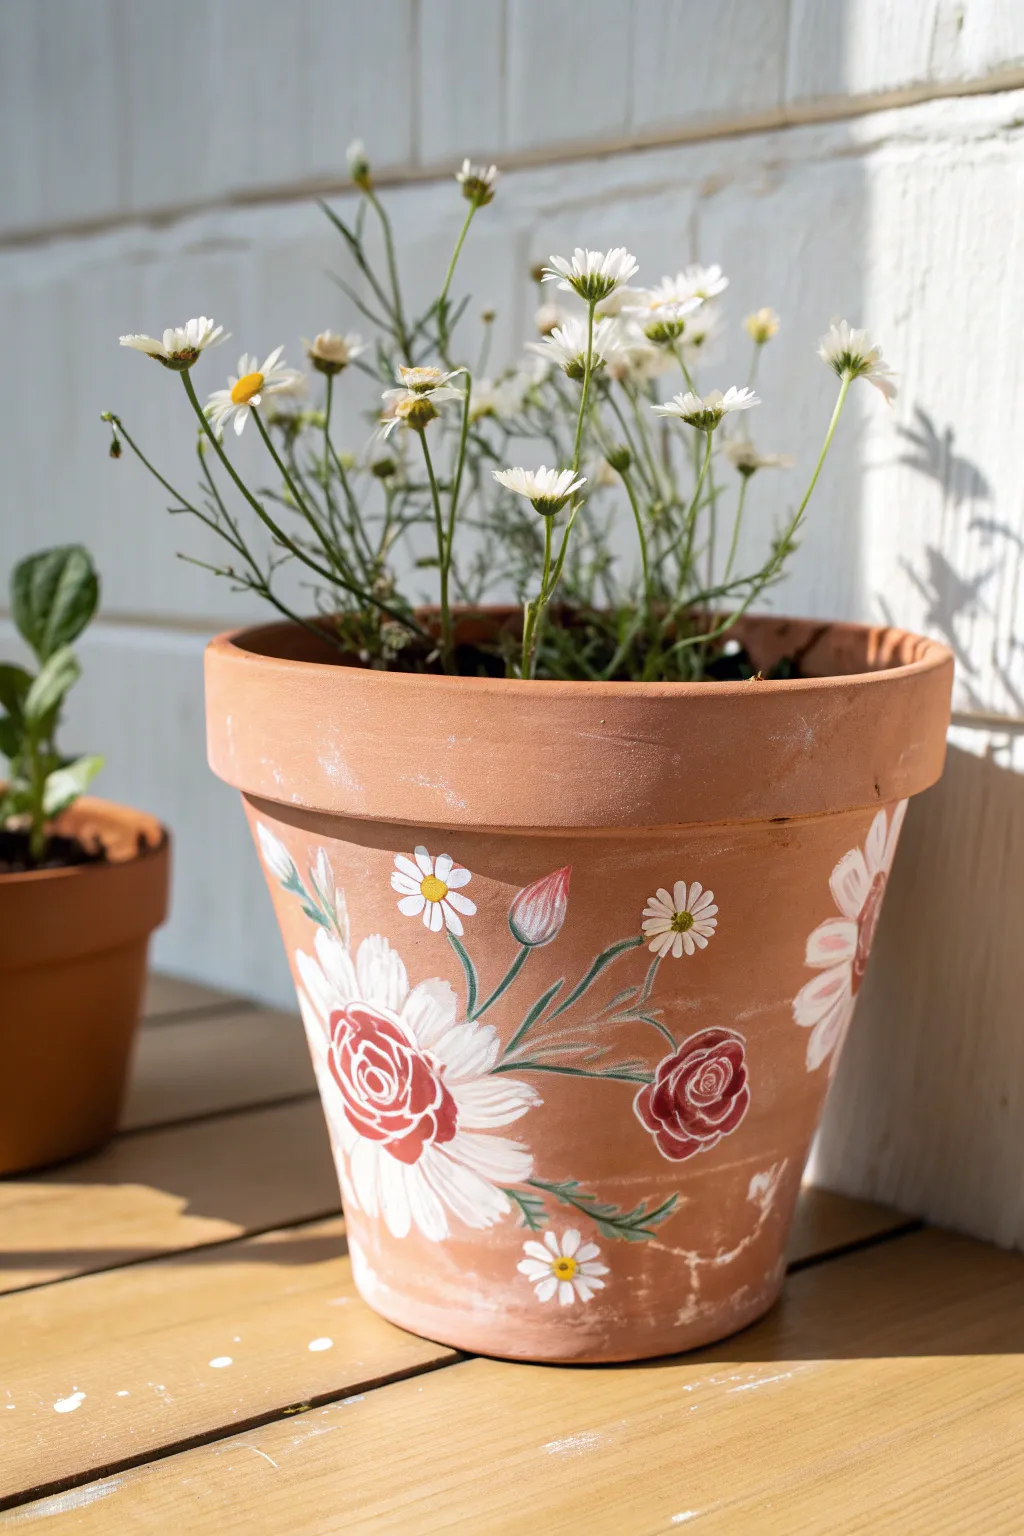
Transform a plain terracotta pot into a charming garden accent with delicate roses and daisies. This design combines loose, folk-art style florals with crisp white petals for a look that feels both vintage and fresh.
Detailed Instructions
Materials
- Medium-sized terracotta pot (cleaned and dried)
- White acrylic paint
- Red or deep rose acrylic paint
- Yellow ochre or mustard yellow acrylic paint
- Sage green acrylic paint
- Round synthetic brushes (sizes 2 and 6)
- Fine liner brush (size 0 or 00)
- Palette or paper plate
- Paper towels
- Water cup
- Clear matte or satin spray sealer
Step 1: Painting the Large Blooms
-
Start with the base:
Begin by painting the large white flower shapes. Using your size 6 round brush, create a loose, uneven circle for the main flower center on the front of the pot. Don’t worry about perfect edges; a slightly wavy perimeter helps the petals look natural later. -
Add first petals:
While the center is still wet or just starting to tack up, paint large, sweeping petals radiating outward. Use a fair amount of white paint so the terracotta color doesn’t show through too strongly. -
Create the rose centers:
Load your cleaned size 6 brush with the red or deep rose paint. In the middle of your white flower shape, paint a rough circle. The wet white paint underneath might blend slightly, creating a soft pink transition which is lovely. -
Detail the roses:
Switch to your size 2 brush and dip it into fresh white paint. While the red is still tacky, paint curved ‘C’ shapes and swirls inside the red circle to mimic the folded petals of a rose. -
Paint standalone roses:
Repeat this process for the smaller red rosebuds that sit apart from the main white flowers. Paint a solid red circle first, let it simply exist for a moment, then add the white swirl details on top.
Step 2: Adding Daisies and Buds
-
Paint small daisy petals:
Scatter small daisies around your main floral clusters. Using the tip of your size 2 brush, press and drag small strokes of white paint radiating from an imaginary center point. -
Add daisy centers:
Once the white petals are dry to the touch, use the back end of your brush handle or a small brush to dot a circle of yellow ochre in the center of each daisy. -
Create rosebuds:
Paint unfinished rosebuds by creating tear-drop shapes in pink (mix your red and white) or soft red. Position these near the ends of where your stems will eventually go.
Brush Loading Tip
For the two-tone rose effect, double-load your brush. Dip one corner in red and the other in white, then paint your swirl. The colors will blend beautifully on the pot.
Step 3: Stems, Leaves, and Finishing
-
Draft the stems:
Mix a little water into your sage green paint to make it fluid. Using your fine liner brush, paint thin, curving lines connecting your flowers and buds. I like to let my hand tremble slightly here to give the stems an organic, vine-like feel. -
Add leaves:
With the size 2 brush and sage green, add small, simple leaves along the stems. For the larger leaves near the base of the white flowers, press the belly of the brush down to create a wider leaf shape. -
Highlight the greenery:
While the green is still wet, add a tiny streak of white or yellow to the upper edge of a few leaves to simulate sunlight hitting the foliage. -
Refine the white petals:
Go back to your large white flowers. If the terracotta is showing through too much, add a second coat of white to the outer petals to make them pop against the clay background. -
Add small dots:
To fill empty spaces and add whimsy, use the tip of your liner brush or a toothpick to add tiny white dots in groups of three around the floral sprays. -
Let it cure:
Allow the pot to dry completely for at least 24 hours. Terracotta is porous, so ensuring the paint is fully dry is crucial before sealing. -
Seal the work:
Take the pot to a well-ventilated area and apply two light coats of clear matte spray sealer. This protects your artwork from watering accidents and soil moisture.
Level Up: Aged Effect
Before sealing, lightly sand the painted flowers with fine-grit sandpaper. This distresses the paint slightly for a true vintage, weathered garden look.
Now you have a custom planter ready to showcase your favorite herbs or blooms to the world

The Complete Guide to Pottery Troubleshooting
Uncover the most common ceramic mistakes—from cracking clay to failed glazes—and learn how to fix them fast.
Leafy Botanicals With Loose Brushstrokes
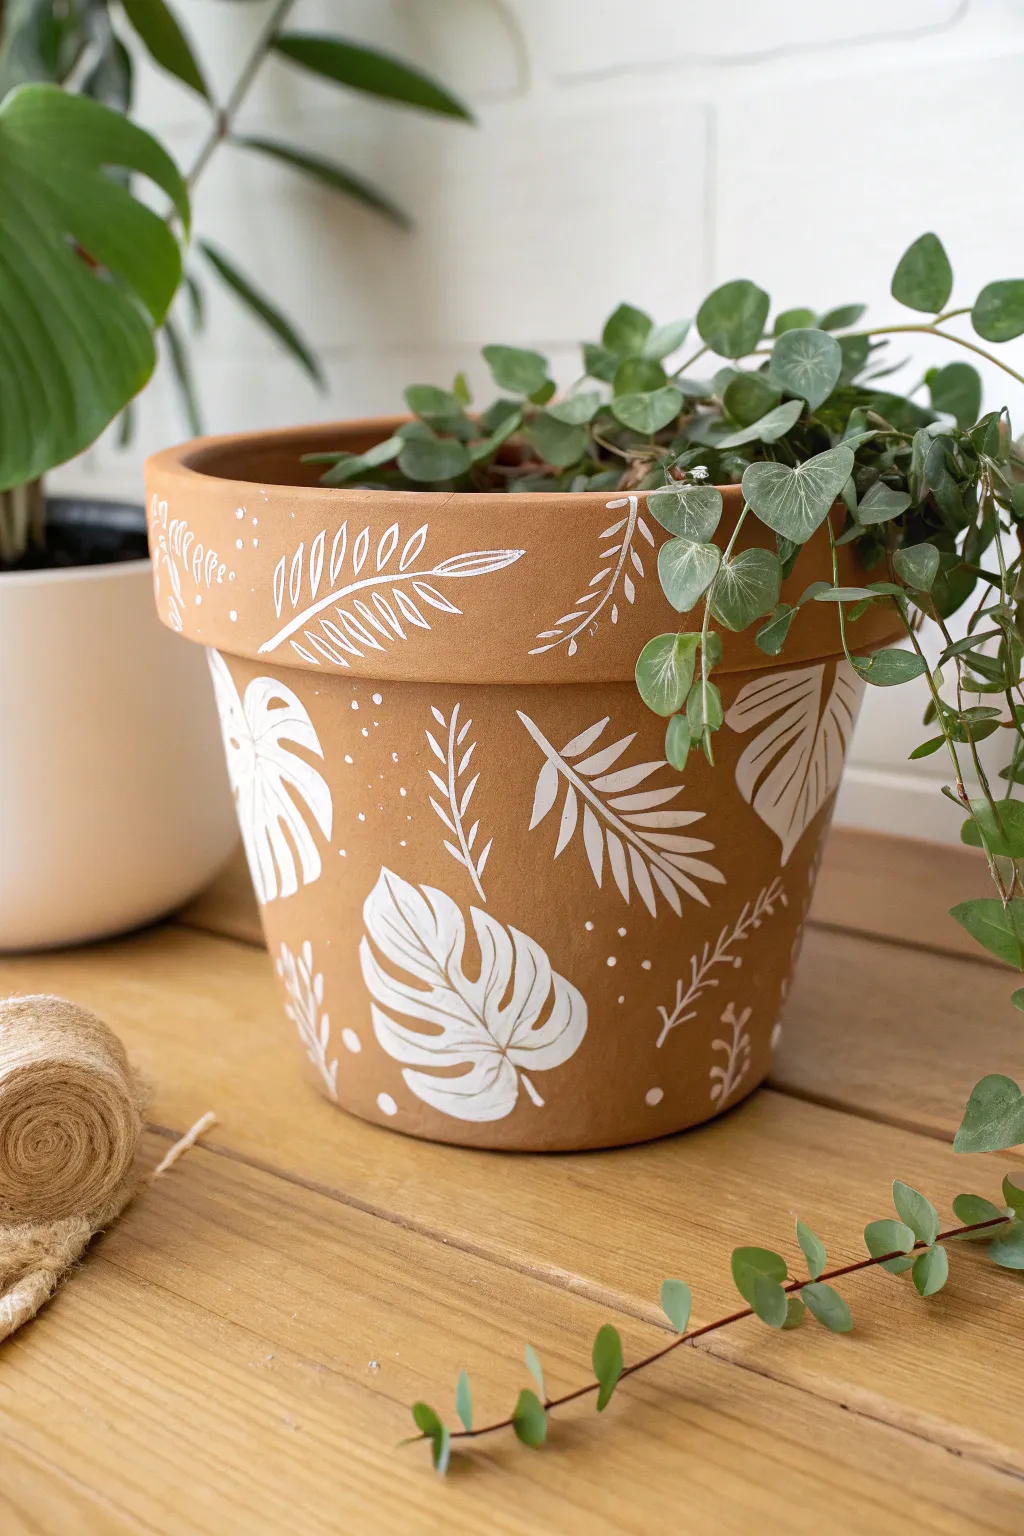
Transform a plain terracotta pot into a chic, modern planter with nothing but white paint and a steady hand. The contrast of crisp white botanical illustrations against the warm, raw clay creates an organic look that suits any plant collection.
Step-by-Step Guide
Materials
- Clean terracotta pot (any size)
- White acrylic paint (outdoor or multi-surface preferred)
- Small round paintbrush (size 1 or 2)
- Small liner brush (size 0 or 00)
- Pencil or white chalk (optional)
- Paper plate or palette
- Clear acrylic sealer spray (matte finish)
- Damp cloth
- Water cup
Step 1: Preparation
-
Prepare the surface:
Before you start painting, ensure your terracotta pot is completely clean and dry. Wipe it down with a damp cloth to remove any dust or loose clay particles that could interfere with the paint adhesion. -
Map out your design:
If you’re nervous about freehanding, use a pencil or a piece of white chalk to lightly sketch the placement of your largest leaves. Keep these sketches very faint so they don’t show through the paint later. -
Load your brush:
Squeeze a small amount of white acrylic paint onto your palette. Dip your small round brush into the paint and twist it slightly on the palette to create a nice, sharp point.
Clean Lines Trick
If your paint feels too thick and drags on the clay, mix in a tiny drop of water. The paint should be the consistency of heavy cream for the smoothest lines.
Step 2: Painting the Main Leaves
-
Outline the Monstera leaves:
Start with the large, Monstera-style leaves on the main body of the pot. Using the round brush, paint the outer contour of a heart-shaped leaf first. -
Add leaf splits:
While the outline is wet, paint the characteristic splits or notches into the sides of the leaf shape. These don’t need to be perfectly symmetrical; organic variation looks better. -
Fill in the shape:
Fill the inside of the leaf shape with solid white paint. You might need two coats here to get a solid, opaque white against the dark clay. Let the first coat dry for about 10 minutes before adding the second. -
Detail the veins:
Once the white fill is completely dry, mix a tiny drop of water into your white paint to make it fluid. Use your liner brush to paint very thin lines over the white leaf to suggest veins, leaving tiny gaps of unpainted terracotta showing through if you’re skilled, or simply paint thicker white veins over the top for texture. -
Paint fern fronds:
Next to your Monstera leaves, add large fern-style leaves. Paint a long, curved central stem first. -
Add leaflets:
along the stem, paint small, elongated oval shapes for the leaflets. Make the ones near the base larger and taper them smaller as you reach the tip of the stem.
Add Dimension
Once the white silhouettes are dry, use a very fine black permanent marker to outline just one side of the leaves for a subtle shadow effect.
Step 3: Adding Delicate Details
-
Switch to the liner brush:
For the finer vines and twigs, switch to your size 0 or 00 liner brush. This tool gives you much more control over thin lines. -
Create wispy vines:
Paint thin, vertical or curved lines rising between the larger leaves. Add tiny ‘V’ shapes along these lines to create small sprigs of foliage. -
Decorate the rim:
Move to the rim of the pot. Paint a repeating pattern of simple leaf outlines here. I like to paint a central vein and then just outline the leaf shape around it without filling it in, keeping the look airy. -
Add variety to the rim:
Intersperse the outlined leaves on the rim with small, solid fern branches similar to what you painted on the body, but smaller in scale. -
Fill empty spaces:
Look at the main body of the pot again. Identify any large empty gaps between your main botanical elements. -
Dot work:
Dip the handle end of your paintbrush (or a toothpick) into the white paint. Gently dot the paint into the empty spaces to create whimsical clusters of ‘snow’ or pollen.
Step 4: Finishing Touches
-
Review and refine:
Spin the pot slowly and look for any uneven lines or areas where the white paint looks translucent. Touch up these spots carefully with a fresh layer of paint. -
Let it cure:
Allow the pot to dry completely for at least 24 hours. Acrylic paint needs time to fully bond with the porous terracotta surface. -
Seal the deal:
To protect your artwork from water damage when watering your plants, take the pot outside and spray it with a clear matte acrylic sealer. Apply two light coats, letting it dry in between.
Now you have a custom planter ready to showcase your favorite greenery
Modern Geometric Lines With Tape
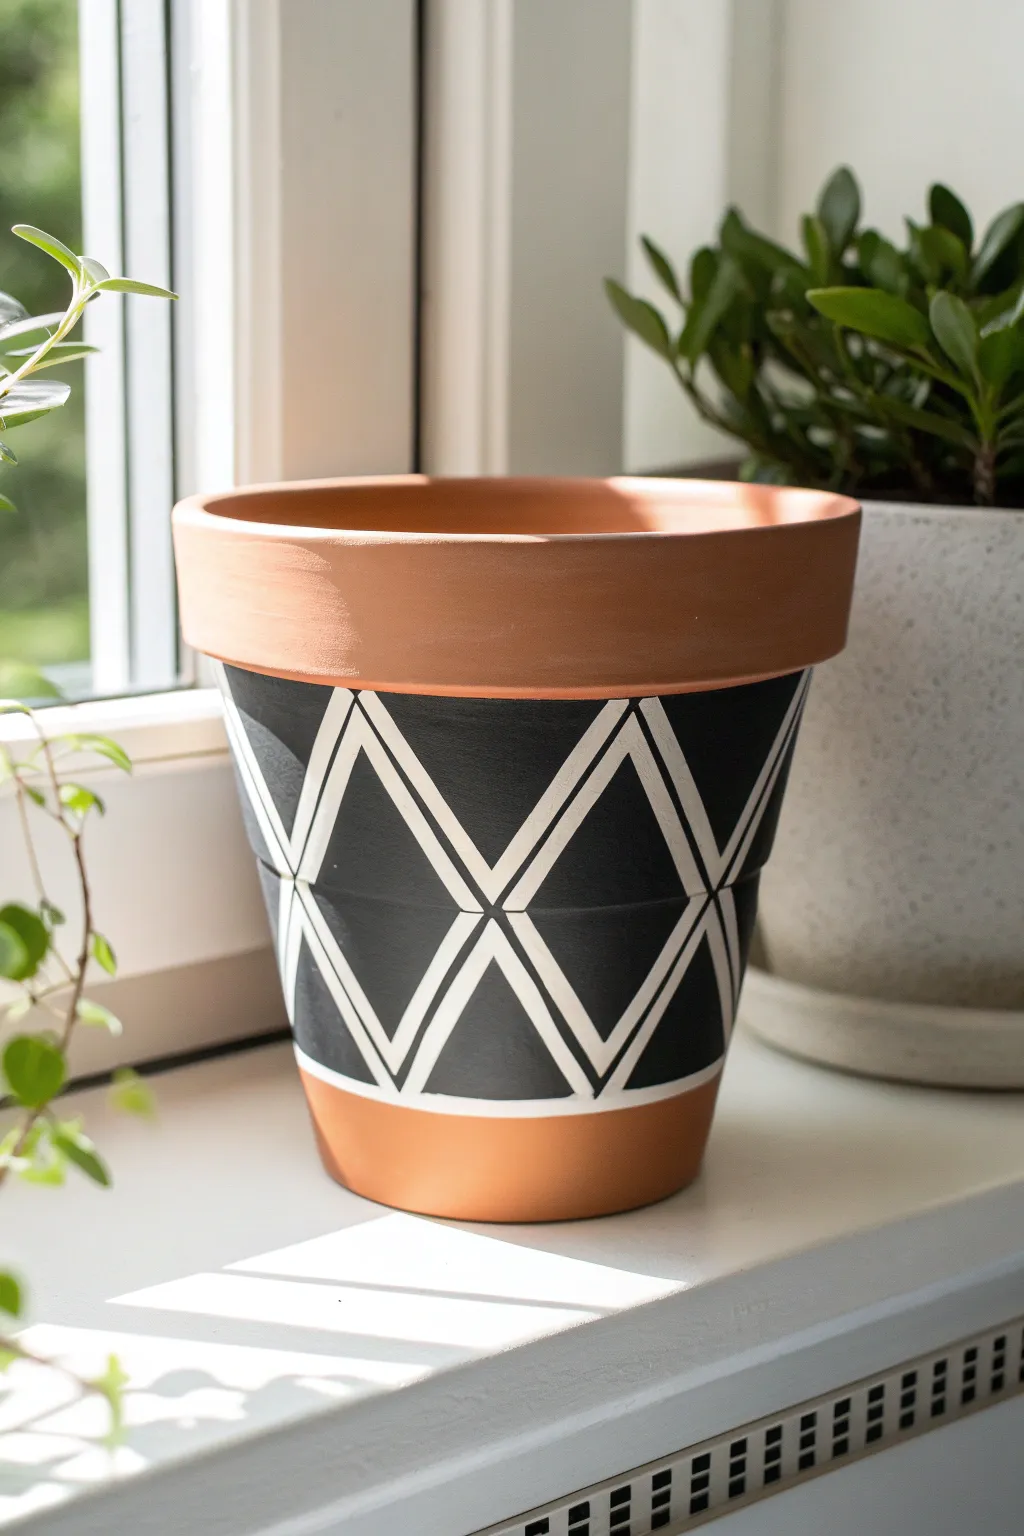
Transform a plain terracotta pot into a modern statement piece with this bold geometric design. Using painter’s tape and high-contrast black and white acrylics, you’ll create crisp, striking diamond patterns that highlight the natural warmth of the clay.
Detailed Instructions
Materials
- Terracotta pot (clean and dry)
- Black acrylic paint (outdoor or multi-surface)
- White acrylic paint (outdoor or multi-surface)
- Painter’s tape or graphic art tape (very narrow width, approx. 1/4 inch)
- Flat paintbrushes (medium and small)
- Sealer (matte or satin finish spray)
- Scissors
Step 1: Preparation and Taping
-
Clean the surface:
Ensure your terracotta pot is completely clean and dry before starting. If it’s an old pot, scrub away any mineral deposits or dirt and let it dry overnight to prevent moisture from getting trapped under the paint. -
Define the painting area:
Decide how much of the natural rim and base you want to leave exposed. Apply a horizontal strip of painter’s tape around the pot just below the rim to create a crisp upper border. -
Tape the lower border:
Apply a second horizontal strip of tape near the bottom of the pot to define the lower edge of your painted section. Make sure this line is parallel to the top tape line. -
Create the first diamond zig-zag:
Using your narrow tape, create a zig-zag pattern around the circumference of the pot. Start from the top tape line, angling down to the middle, then back up. Press the tape down firmly to ensure sharp lines later. -
Complete the diamond structure:
Add a second zig-zag pattern that mirrors the first but starts from the bottom tape line, angling up to intersect the first line. This should create a series of large ‘X’ shapes or diamonds around the pot. -
Double up the lines:
To create the thick white outlines shown in the photo, you need to preserve the space *between* the black shapes. Place a second layer of tape directly next to your zig-zag lines, or if your tape is the perfect width, simply ensure the tape you already placed represents the white lines. -
Seal the tape edges:
A crucial trick I use is to paint a very thin layer of your base color (or clear matte medium) over the edges of the tape. This seals the tape and prevents the black paint from bleeding underneath.
Step 2: Painting the Design
-
Paint the black sections:
Using your black acrylic paint and a flat brush, carefully fill in the diamond and triangle shapes distinct from the taped lines. You are painting the ‘negative space’ black. -
Apply a second coat:
Black paint can sometimes be streaky on porous terracotta. Let the first coat dry to the touch, then apply a second coat for solid, opaque coverage. -
Paint the white lines:
If you taped off specific areas for the white lines (rather than just revealing the clay underneath), paint those specific strips white now. However, looking at the reference, the white lines are painted on top. You can remove the tape now to reveal narrow clay lines, then repaint them white carefully. -
Alternative method: Painting over:
In the reference image, the white lines look painted. If you prefer this look, wait for the black paint to fully dry. Then, using a fine flat brush or a white paint pen, trace over the negative space lines you created with the tape. -
Refining intersecting points:
Pay close attention to where the lines cross. Use a detail brush to sharpen the corners of the diamonds so the points are distinct and don’t look rounded. -
Remove the border tape:
While the paint is slightly tacky but mostly dry, carefully peel off the horizontal tape bands at the rim and base. Pull the tape away from the wet paint at a 45-degree angle to keep the edge clean.
Pro Tip: Burnish the Tape
To get razor-sharp geometric lines on textured terracotta, run the back of a spoon or your fingernail firmly along the edges of the tape to bond it tightly to the clay before painting.
Step 3: Finishing Touches
-
Touch ups:
Inspect your lines. If any black paint bled onto the white lines or the natural terracotta, use a small craft knife to gently scrape it away or touch it up with white paint. -
Dry completely:
Allow the pot to dry for at least 24 hours. Terracotta is porous and holds moisture, so ensure the paint is fully cured before sealing. -
Apply sealer:
Take the pot outside or to a well-ventilated area. Spray the entire painted surface with a clear matte or satin sealer. This protects the design from water damage when you water your plants.
Level Up: Metallic Accents
Instead of white paint for the lines, switch to a metallic gold or copper leafing pen. The metallic sheen creates a stunning, luxe contrast against the matte black and natural clay.
Now your pot is ready to house your favorite succulent or indoor houseplant


What Really Happens Inside the Kiln
Learn how time and temperature work together inside the kiln to transform clay into durable ceramic.
Boho Dot Mandala Bands
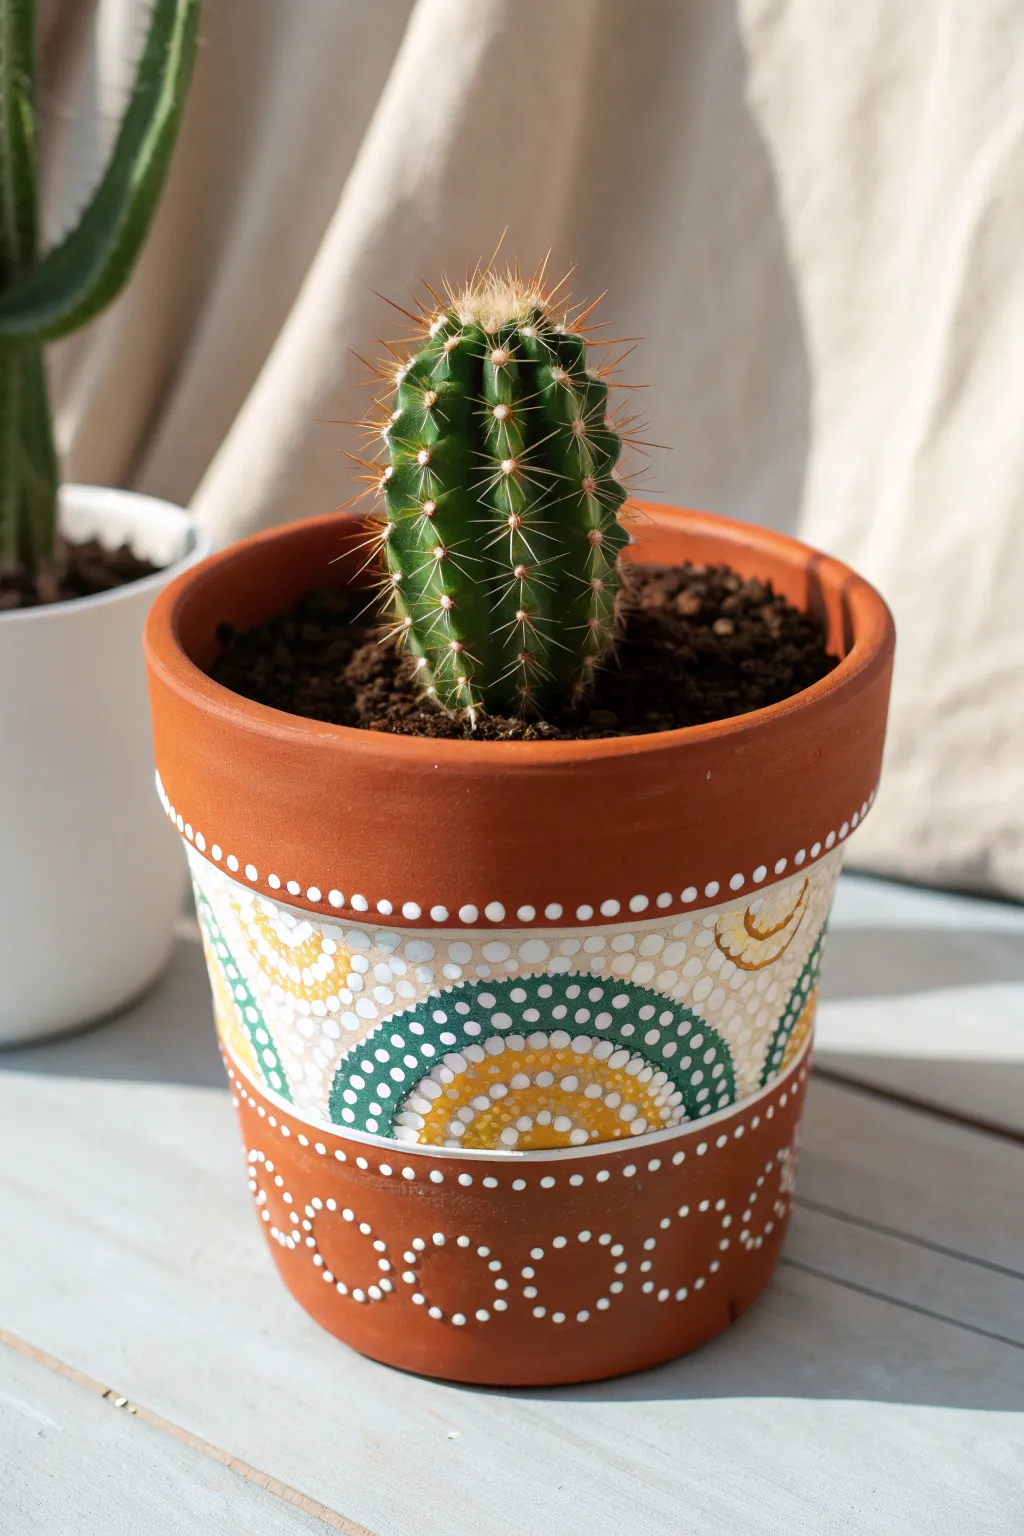
Transform a plain terracotta planter into a bohemian masterpiece with this cheerful dot mandala design. By layering simple dots in arches of gold, green, and white, you create a rhythmic pattern that mimics rising suns or abstract rainbows.
Step-by-Step
Materials
- Terracotta pot (cleaned and dried)
- Acrylic paints: White, Golden Yellow/Ochre, Deep Green
- Dotting tools (various sizes) or makeshift tools (pencil erasers, cotton swabs, toothpicks)
- Flat paintbrush (medium width)
- Ruler or measuring tape
- Pencil
- Acrylic sealer or varnish (matte or satin finish)
Step 1: Preparation & Base Band
-
Clean surface:
Ensure your terracotta pot is completely free of dust and dirt. Wipe it down with a damp cloth and let it dry fully before starting. -
Mark the band:
Using a ruler and pencil, lightly mark horizontal lines around the pot to define the wide central band where the main pattern will go. A width of about 2-3 inches works well for standard pots. -
Paint the background:
Use your flat paintbrush to fill in this central band with white acrylic paint. You may need two coats to get a solid, opaque finish over the red clay. Let this dry completely.
Uneven Dots?
If your paint is too thick, dots create peaks. Dilute acrylics slightly with a drop of water or pouring medium so the dots settle flat and smooth.
Step 2: Dotting the Arches
-
Plan the arches:
Lightly sketch semi-circle bottom lines along the white band with a pencil to guide your painting. Space them evenly so they touch at the corners. -
Start the center:
Dip a medium-sized dotting tool into the golden yellow paint. Place a single dot at the bottom center of your first arch area. -
Form the first arch:
Switch to a slightly smaller tool. Dot a curved line of yellow over that center dot, initializing the rainbow shape. -
Yellow layer:
Create another row of larger yellow dots above the previous one. Try to stagger the dots slightly so they nest between the dots in the row below. -
Green transition:
Clean your tool and switch to deep green paint. Create a distinct row of green dots arching over the yellow section. -
Refining the green:
Add a second, outer row of green dots. I find using a slightly smaller tool for the outer edge gives the arch a cleaner, more delicate look. -
Fill the gaps:
Using a very small tool or toothpick and white paint (or a creamy off-white), fill the remaining background space between the tops of the green arches with tiny, dense stippling dots.
Step 3: Borders & Accents
-
Top border:
Dip a small tool in white paint. Create a simple line of evenly spaced dots along the top rim of the terracotta, just above the painted white band. -
Bottom border line:
Repeat this process to create a matching white dotted line directly underneath the main painted band. -
Lower loops:
In the bare terracotta space near the bottom, visualize a chain or loop pattern. Start by dotting white circles to form the ‘links’ of a chain wrapping around the base. -
Connect the loops:
Continue dotting the loops until they connect around the circumference. Keep these dots slightly larger than your border dots for visual weight.
Level Up
Add a 3D effect by placing a tiny ‘top dot’ of a lighter shade on top of your largest dots once the base layer is completely dry.
Step 4: Finishing Touches
-
Erase markings:
Once the paint is absolutely bone dry, check for any visible pencil lines and gently erase them. -
Seal the pot:
Apply a coat of clear acrylic sealer or varnish over the entire exterior. This protects your hard work from water damage and fading.
Place your favorite succulent inside to enjoy the warm, handmade vibes of your new pot
Minimalist Arches and Rainbows
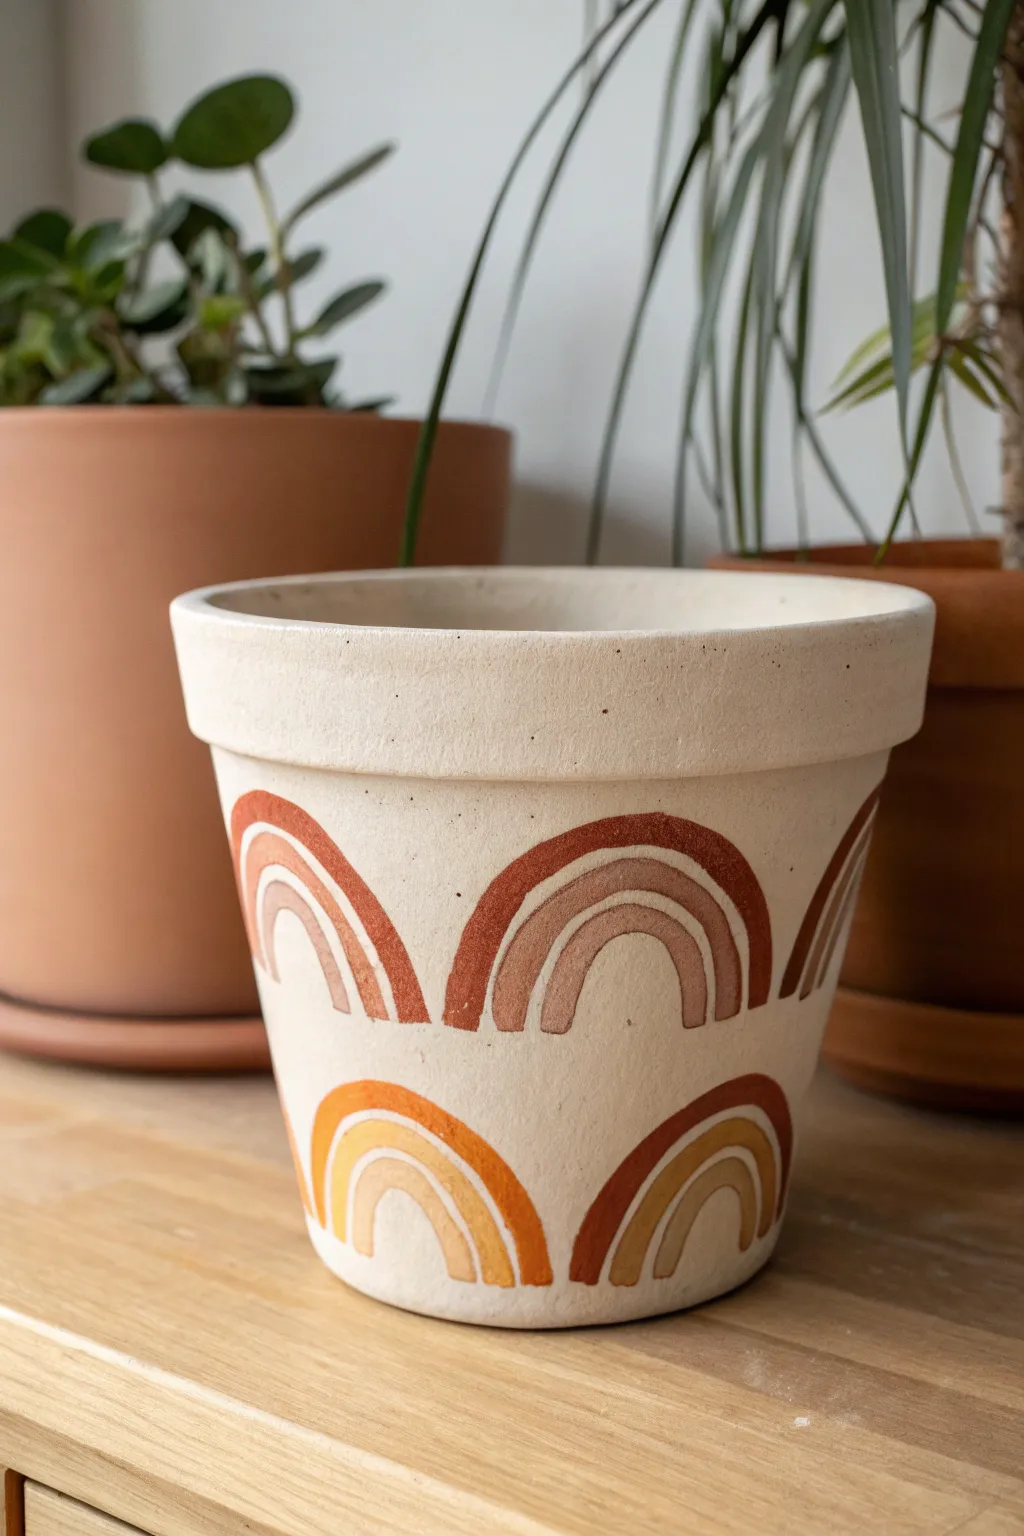
Bring a touch of modern bohemian style to your plant corner with this hand-painted pot featuring repeating rainbow arches. Using a palette of warm, sun-baked earth tones against a creamy matte base creates a look that is both trendy and timeless.
Detailed Instructions
Materials
- Terra cotta pot (standard 6-inch size)
- White acrylic paint (priming)
- Cream or off-white acrylic paint (base coat)
- Acrylic paints in earthy tones: burnt sienna, rust
- mustard yellow, and terracotta orange
- Flat shader paintbrush (medium size)
- Fine round detail brush (size 1 or 2)
- Pencil (optional)
- Paper plate or palette
- Cup of water and paper towels
- Matte clear sealant spray
Step 1: Preparing the Canvas
-
Clean the surface:
Before you start, ensure your terra cotta pot is free of dust and stickers. Wipe it down with a damp cloth and let it dry completely so the paint adheres properly. -
Prime the pot:
Apply a thin layer of white acrylic paint over the entire exterior of the pot, including the inner rim. This primer layer helps neutralize the strong orange tone of the clay so your cream base coat will look true to color. -
Apply the base coat:
Once the primer is dry, paint the entire exterior with your cream or off-white acrylic paint. I find a flat shader brush gives the smoothest coverage here. -
Add a second coat:
Let the first layer dry for about 20 minutes, then apply a second coat of cream paint to ensure solid, opaque coverage. Allow this to dry fully before moving on to the designs.
Steady Hand Trick
Rest your pinky finger on the dry surface of the pot while you paint the arches. This anchors your hand and acts as a pivot point, making curves much smoother.
Step 2: Planning the Pattern
-
Visualize the spacing:
Examine the spacing on your pot. The design features a top row of larger rainbows and a bottom row of slightly smaller rainbows, offset in a brick-lay pattern. -
Sketch lightly:
Using a pencil, very lightly sketch the placement of your rainbows. Don’t worry about drawing every single arch line perfectly; just mark the bottom width and top height of each rainbow to ensure they are evenly spaced around the circumference. -
Check the offset:
Ensure the bottom row of rainbows is positioned in the empty spaces between the top row’s rainbows, creating a balanced, alternating pattern.
Level It Up
Mix baking soda into your acrylic paint (1 part soda to 2 parts paint) for the rainbow arches. It imparts a gritty, ceramic texture that looks amazing on terracotta.
Step 3: Painting the Upper Arches
-
Mix your palette:
Squeeze out your earth tones: burnt orange/rust, a lighter terracotta, and a muted brown-pink. You want a gradient of warm, desert-inspired colors. -
Paint the outer arch:
Starting with the top row, mix a deep rust or burnt sienna color. Using your fine round brush, paint the outermost arch of the rainbow first. Keep your hand steady and use the tip of the brush for clean edges. -
Fill the outer band:
Thicken the line you just painted to create a solid band of color about 1/4 inch thick. This establishes the size of the rainbow. -
Paint the middle arch:
Switch to a lighter terracotta or dusty pink shade. Paint a second arch nested just inside the first one, leaving a very thin sliver of the cream background showing between the bands for definition. -
Paint the inner arch:
Using a slightly lighter or distinct shade (like a soft peach or beige), paint the smallest, innermost arch. Leave the center of the rainbow empty, showing the cream base. -
Repeat around the rim:
Continue this process for all the rainbows in the top row, rotating the pot as you go. Try to keep your color order consistent for a uniform look.
Step 4: Painting the Lower Arches
-
Switch color palette:
For the bottom row, shift the colors slightly towards yellows and oranges to create visual interest. Mix a mustard yellow, a bright tangerine, and a soft yellow-ochre. -
Paint the bottom outer arch:
Locate the space between two top rainbows. Paint the outermost arch of the bottom rainbow using the darkest color in your new yellow-orange grouping. -
Layer the inner bands:
Just like before, paint the middle and inner arches, working inward with your lighter yellow shades. Remember to leave that tiny gap of negative space between the bands to keep the design airy. -
Complete the bottom row:
Finish painting all the rainbows on the bottom half of the pot. Let the paint dry completely, preferably overnight, to prevent smudging. -
Seal the deal:
Once fully cured, take the pot to a well-ventilated area and spray it with a clear matte sealant. This protects your artwork from water drips when you water your plants.
Pop your favorite succulent inside and admire your stylish new decor piece

TRACK YOUR CERAMIC JOURNEY
Capture glaze tests, firing details, and creative progress—all in one simple printable. Make your projects easier to repeat and improve.
Fruit Slice Planters (Lemons, Oranges, Strawberries)
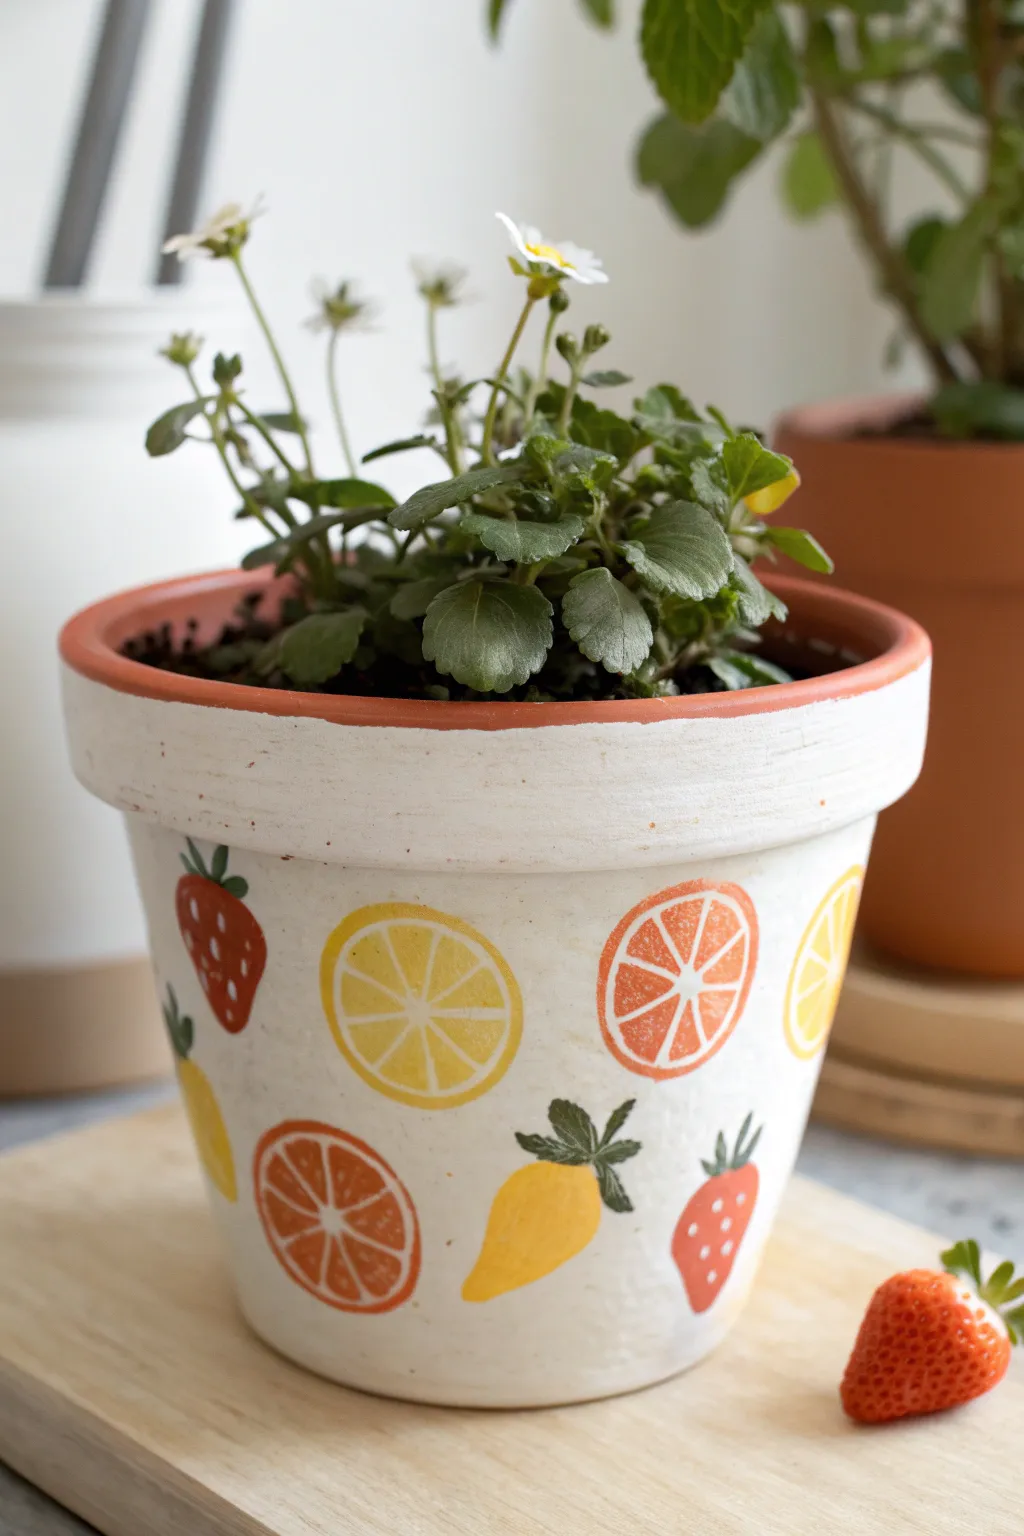
Transform a plain terracotta pot into a refreshing summer accent piece with this simple fruit-stamped design. The crisp white background makes the bright citrus slices and juicy berries pop, creating a playful home for your favorite herbs or small plants.
How-To Guide
Materials
- Terracotta pot (standard size)
- White acrylic paint (matte or satin finish)
- Acrylic paints: Bright Red, Golden Yellow, Orange, Deep Green
- Foam brushes or wide flat brush
- Small pointed detail brushes (sizes 0 and 2)
- Potato or density foam (for stamping)
- Sharp knife
- Paper plate or palette
- Clear acrylic sealer spray (matte or gloss)
- Pencil
Step 1: Base Preparation
-
Clean the surface:
Before you begin painting, ensure your terracotta pot is clean, free of dust, and completely dry. Give it a quick wipe with a damp cloth if needed. -
Prime the pot:
Using a foam brush or wide flat brush, apply a coat of white acrylic paint to the entire exterior of the pot, including the rim. Don’t forget to paint just inside the top rim where the soil line will be. -
Build opaque coverage:
This rustic look works well if some terracotta peeks through, but for a solid white background like the photo, apply a second and possibly third coat. Allow the paint to dry fully between layers—usually about 20 minutes.
Step 2: Creating the Fruit
-
Prepare your stamps:
You can hand-paint circles, but stamping is easier for uniform shapes. Cut a small potato or a piece of high-density foam into a circle shape (about 1.5 inches in diameter). -
Stamp citrus bases:
Pour some yellow and orange paint onto your palette. Dip your circular stamp into the paint (don’t overloaded it) and press circles randomly around the body of the pot. Alternate between yellow and orange colors. -
Paint berry shapes:
While the circles dry, use a medium round brush to hand-paint strawberry shapes. These are essentially rounded triangles. Paint some in red and, for a fun variety like the project image, obscure shapes in yellow. -
Add detail to citrus:
Once your yellow and orange circles are dry to the touch, mix a slightly lighter shade of the base color (or use white). Using a fine liner brush, paint a ‘hub and spoke’ pattern inside the circles to create the segments of the fruit slices. -
Define the rind:
With the same fine brush and white paint, carefully outline the inner edge of your citrus circles to create the look of the white pith found in lemons and oranges.
Stamp Master
Make your own reusable stamps by cutting shapes out of craft foam and gluing them onto bottle caps. This makes handling small fruit shapes much easier and keeps your fingers clean.
Step 3: Finishing Touches
-
Add strawberry seeds:
Using your smallest detail brush (size 0) and white paint, add tiny teardrop or dot shapes onto the red strawberries to represent seeds. -
Give the yellow fruit texture:
If you painted yellow berry shapes, add very faint white or pale yellow dots to give them texture without being overwhelming. -
Paint the leaves:
Load a small round brush with deep green paint. Add a leafy cap to the top of every strawberry shape. Usually, three small jagged leaves fanning out from the top works best. -
Create stems:
Attach the fruit to imaginary vines or just give them a finished look by painting a tiny green stem extending from the center of the leaf clusters. -
Check for gaps:
Step back and look at the pattern. If there are large empty white spaces, you can add tiny green leaves or small dots of color to balance the composition. -
Apply sealer:
Protect your artwork from water damage by spraying the entire pot with a clear acrylic sealer. I prefer a matte finish to keep the natural pottery vibe, but gloss works too. Let it cure for 24 hours. -
Plant:
Once fully cured, pot your plant directly inside or place a nursery pot inside the decorated vessel.
Add Dimension
Mix a tiny drop of white into your fruit colors and dab it on the top left of each fruit slice or berry. This creates a ‘highlight’ that makes the painted fruit look juicy and 3D.
Now you have a cheerful custom planter ready to brighten up your windowsill
Bee and Honeycomb Garden Pots
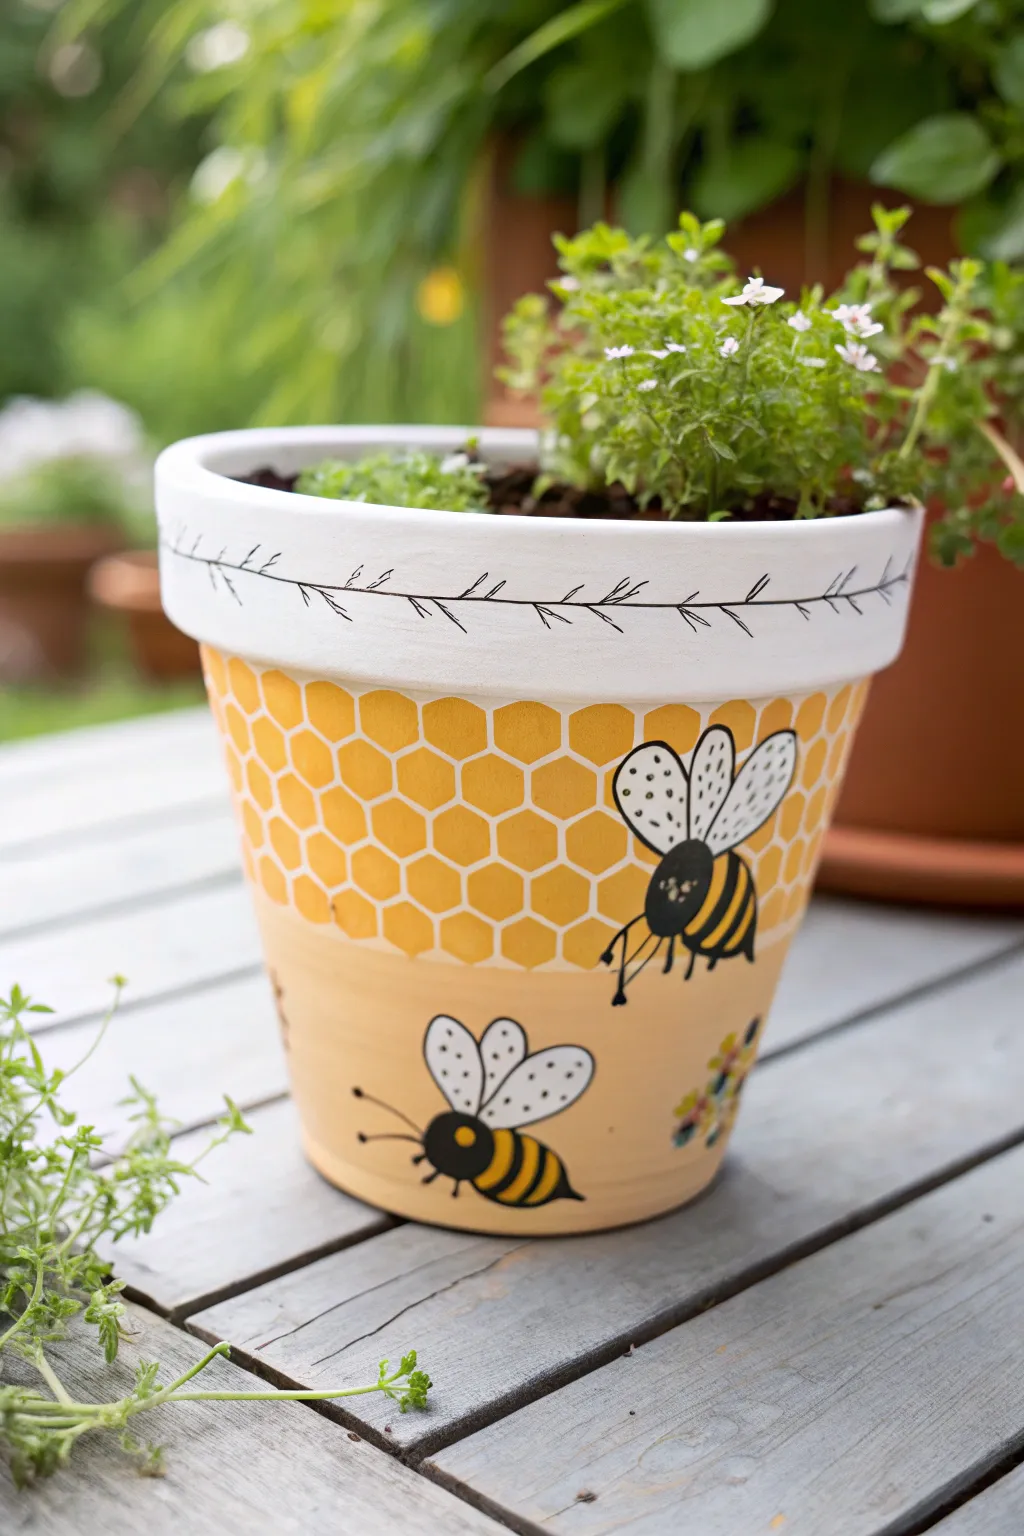
Brighten up your garden space with this buzzing terra cotta pot design featuring playful bees and a geometric honeycomb pattern. The contrast between the crisp white rim, sunny yellow honeycombs, and the soft peach base makes for a cheerful home for your favorite herbs.
Step-by-Step Guide
Materials
- Terra cotta pot (clean and dry)
- White acrylic paint
- Yellow acrylic paint (golden yellow or honey shade)
- Light peach or beige acrylic paint
- Black acrylic paint or black paint marker
- Flat paintbrush (medium size)
- Small round detail brush
- Pencil
- Ruler or hexagon stencil (optional)
- Acrylic sealer spray (clear)
Step 1: Base Coat and Blocking
-
Prepare the rim:
Start by painting the entire rim of the terra cotta pot with white acrylic paint. You may need two or three coats to get a solid, opaque coverage over the reddish clay. -
Paint the base color:
For the main body of the pot, apply a coat of light peach or beige paint. This softens the terra cotta color and provides a smooth background for your bees. Let this dry completely before moving on. -
Define the honeycomb area:
Visualise a horizontal line dividing the pot’s body. The upper half, just below the rim, will be the honeycomb section. You can lightly mark a faint line with a pencil if it helps you stay organised.
Step 2: Creating the Honeycomb Pattern
-
Sketch the hexagons:
Using a pencil, lightly draw a grid of interlocking hexagons around the upper half of the pot. A stencil works wonders here for uniformity, but freehand drawing adds a charming organic feel. -
Paint the honey cells:
Fill inside the hexagon shapes with your yellow acrylic paint. Use a small flat brush to stay within the lines. -
Vary the saturation:
To add depth, I like to paint some hexagons with a second coat of yellow for a rich honey look, while leaving others slightly translucent or mixing a bit of white into the yellow for variety. -
Outline the grid:
Once the yellow paint is dry, use a fine detail brush and white paint to trace over your pencil grid lines. This creates the white mortar look between the honey cells. Keep these lines relatively thin and consistent.
Paint Slipping?
If your acrylic paint is streaking or not sticking to the clay, the pot might be too porous. Prime the area first with a mix of white glue and water.
Step 3: Adding the Bees and Details
-
Paint bee bodies:
Decide on the placement for your bees—one overlapping the honeycomb and one below in the open space looks balanced. Paint an oval shape using black paint for the main body. -
Add yellow stripes:
Once the black oval is dry, carefully paint two curved yellow stripes across the bee’s abdomen. Let the black show through between them. -
Draw the wings:
Using white paint, add two tear-drop shaped wings to the top of each bee. They should be sized generously relative to the body. -
Outline and detail:
Use a black paint marker or a very fine brush with black paint to outline the white wings. Add tiny dots inside the wings for texture and draw thin legs and antennae coming off the body. -
Rim decoration:
around the white rim, draw a simple horizontal line with your black marker or fine brush. Add small V-shaped dashes along the line to resemble a minimalist vine or twig. -
Floral touches:
If you have empty space near the bottom, dab small clusters of yellow and blue dots to suggest tiny wildflowers, giving your lower bees something to buzz around.
Easy Hexagons
Don’t have a stencil? Cut a hexagon shape out of thick cardstock or a cereal box and simply trace around it repeatedly for a perfect grid.
Step 4: Finishing Touches
-
Wait for full cure:
Ensure every part of your design is bone dry. Acrylics can feel dry to the touch quickly but leaving it for a few hours is safer. -
Seal the pot:
Take the pot to a well-ventilated area and apply a clear acrylic sealer spray. This protects your hard work from water damage and UV fading when the pot is used outdoors.
Now your garden is ready to welcome real pollinators with this charming new addition
Playful Animal Print (Cow, Leopard, Zebra)
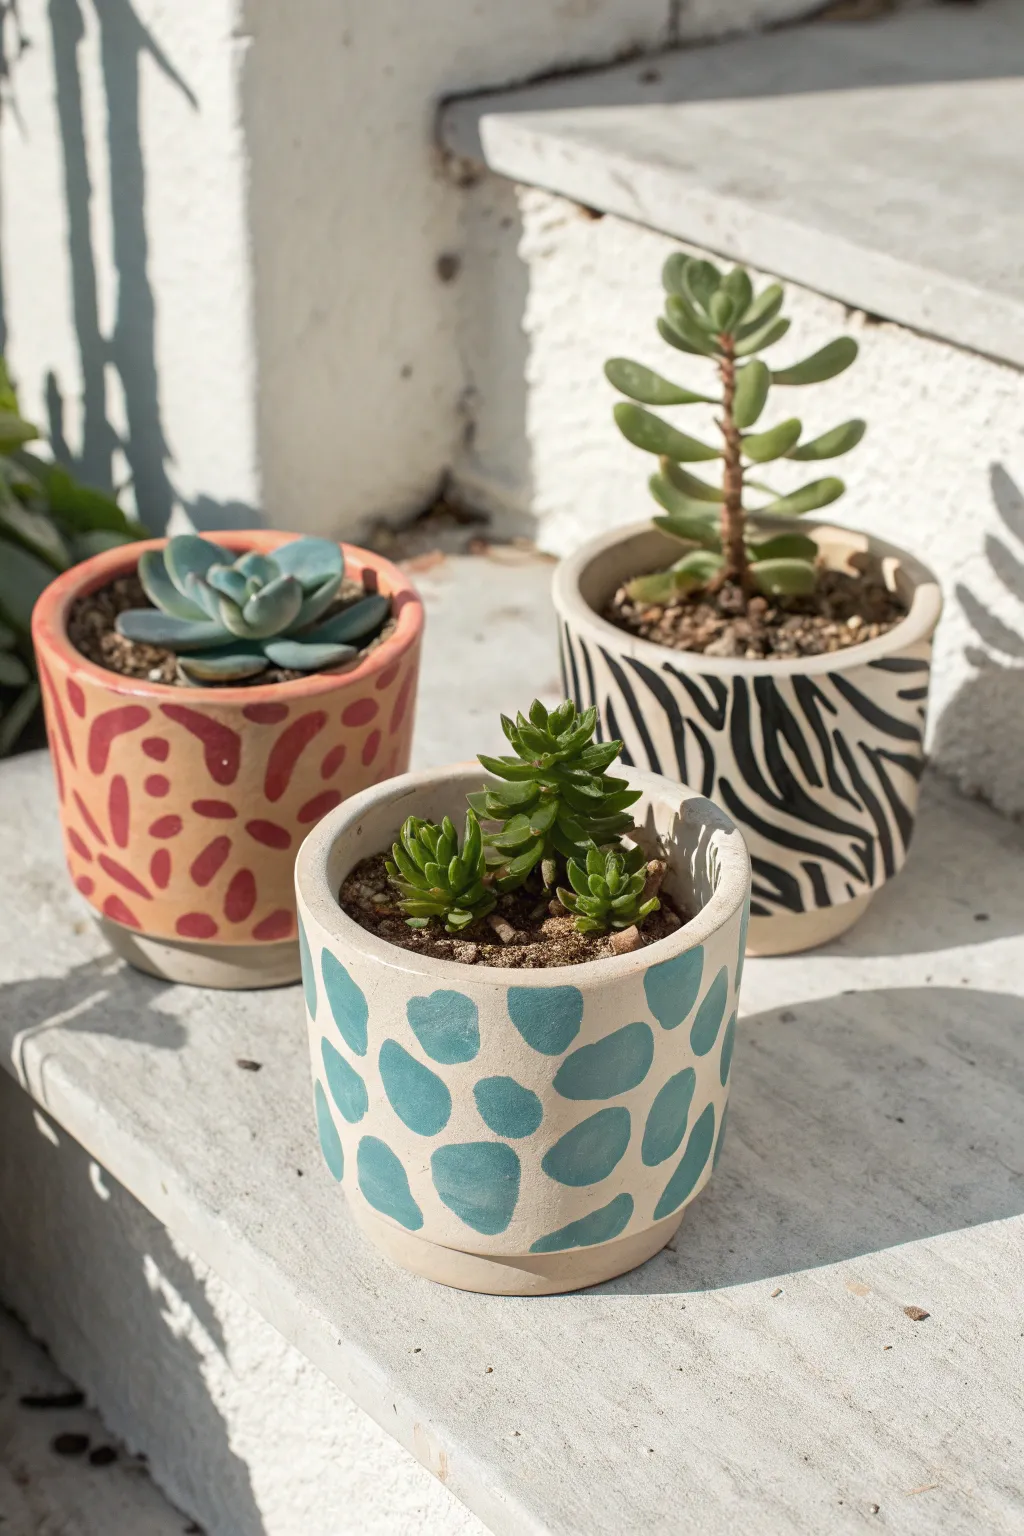
Bring a touch of the savannah to your windowsill with these playful animal print planters. This trio features a charming mix of zebra stripes, abstract leopard spots, and bold cow-style patches in a modern, earthy color palette.
How-To Guide
Materials
- 3 Small terra cotta pots (approx. 4-inch diameter)
- Acrylic craft paints: Cream/Off-White, Black, Teal/Aqua, Terracotta/Burnt Orange, Deep Red
- Flat paintbrush (medium size)
- Small round detail brush
- Water cup and paper towels
- Palette or paper plate
- Clear acrylic sealer spray (matte or satin finish)
Step 1: Preparation & Base Coats
-
Clean the pots:
Start by wiping down your terra cotta pots with a damp cloth to remove any dust or debris. Let them dry completely before applying any paint. -
Mix the cream baselayer:
Pour out a generous amount of cream or off-white acrylic paint. If the paint is too thick, I like to thin it slightly with a drop of water to help it spread evenly over the porous surface. -
Paint the Zebra and Cow pots:
Take two of the pots and paint their exteriors entirely with the cream color. Don’t forget to paint the top rim and just inside the lip for a polished look. -
Apply the Terracotta base:
For the third pot, use a terracotta or burnt orange paint as your base color. This creates a warm background for the abstract red spots. -
Let dry and repeat:
Allow the first coat to dry for about 15-20 minutes. Apply a second coat to all three pots to ensure solid, opaque coverage where no original clay shows through.
Uneven Coverage?
If the terra cotta absorbs too much paint initially, apply a layer of white primer or gesso first. This seals the clay and makes your subsequent colors pop with fewer coats.
Step 2: Painting the Patterns
-
Start the Zebra stripes:
On one of the cream pots, switch to your small round brush and black paint. Begin at the rim and paint wavy, irregular lines that taper to a point as they move down the pot. -
Vary the stripes:
Make some stripes start from the bottom moving up, and add small “V” or “Y” shapes branching off. The key to zebra print is ensuring the lines don’t look too uniform or parallel. -
Create the Cow/Giraffe spots:
On the second cream pot, use your teal paint and a medium flat brush. Dab on irregular, soft-edged shapes scattered randomly around the surface. -
Refine the spots:
Make sure some spots are larger and others smaller to create a natural organic pattern. Leave plenty of cream background visible between the teal shapes. -
Paint the abstract red marks:
Move to the orange/terracotta pot. Using deep red paint and a small brush, paint short, fluid dashed lines and small bean-like shapes. -
Create movement:
Orient these red marks in different directions—some vertical, some horizontal, some diagonal—to give the pattern a sense of energy and movement. -
Touch up edges:
Once your patterns are painted, examine the bottom edge of the pots. You can leave a small unpainted strip at the very bottom for a dipped look, or clean up any messy lines with your base color.
Step 3: Finishing Touches
-
Dry completely:
Let all the detail work dry for at least one hour. Acrylic paint needs to be fully set before sealing to prevent smearing. -
Seal the pots:
Take the pots to a well-ventilated area and apply a light coat of clear acrylic sealer spray. This protects the design from water damage when you water your plants. -
Final cure:
Allow the sealer to cure according to the can’s instructions (usually 24 hours) before potting your plants.
Pattern Pro Tip
Don’t overthink the spots! Nature is perfectly imperfect. Holding your brush loosely and further back on the handle helps create more organic, relaxed shakes and lines.
Now you have a stylish home for your favorite succulents that adds a pop of personality to any room
Cute Cat Face Pots With Whiskers
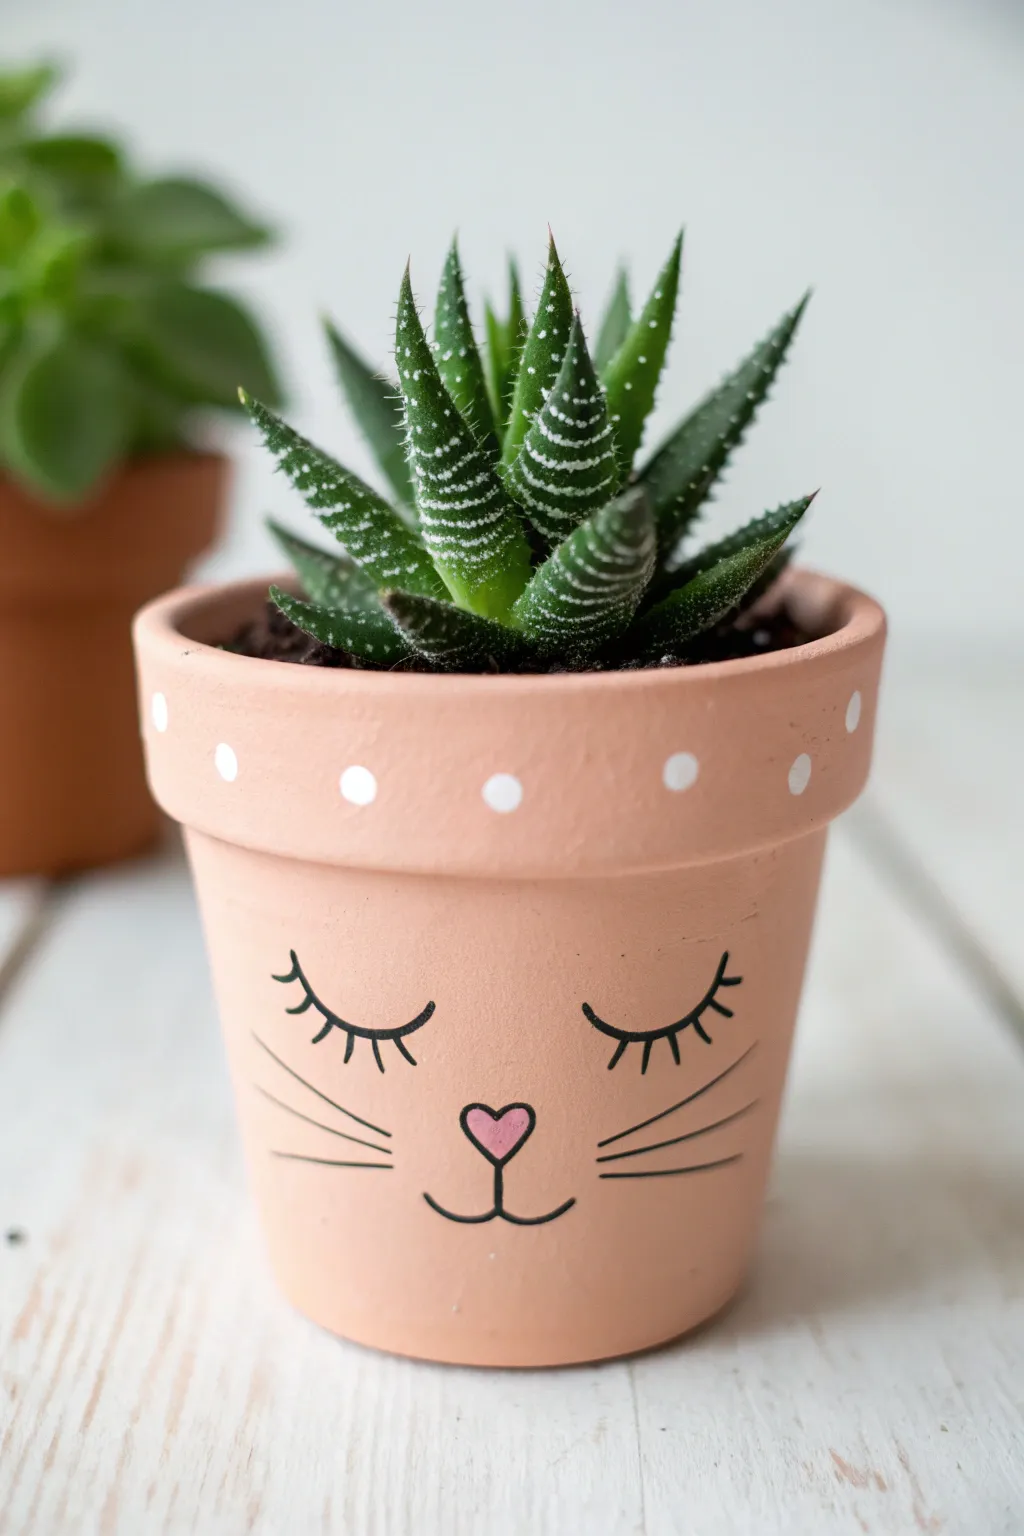
This adorable planter transforms a plain terracotta pot into a sweet sleeping kitty using soft pastel tones and simple line work. The matte peach finish paired with delicate whiskers makes it a charming home for small succulents like Haworthia.
Step-by-Step Tutorial
Materials
- Small terracotta pot (clean and dry)
- Acrylic craft paint: Light peach/salmon pink, white, black, dark pink
- Flat paintbrush (medium width)
- Small round paintbrush or dotting tool
- Fine liner brush or black paint marker
- Pencil
- Matte spray sealer (optional)
Step 1: Setting the Base
-
Prepare the Surface:
Begin by wiping down your terracotta pot with a damp cloth to remove any dust or debris. Let it dry completely so the paint adheres properly. -
Mix the Base Color:
If you don’t have the exact shade of peachy-pink shown, mix a little bit of white into a standard terracotta orange or salmon paint to soften it. You want a pastel, creamy look. -
Apply First Coat:
Using a flat paintbrush, apply an even coat of the peach paint to the entire exterior of the pot. Don’t forget to paint the inside of the rim, as this will be visible once planted. -
Let Dry:
Allow the first layer to dry for about 15-20 minutes. Terracotta absorbs moisture quickly, so the first coat might look streaky. -
Apply Second Coat:
Paint a second coat to achieve a solid, opaque finish. I like to brush in a different direction than the first coat to smooth out texture. -
Dry Completely:
Let the base coat cure fully. It needs to be dry to the touch before you sketch the face to avoid smudging.
Step 2: Adding the Details
-
Sketch the Face:
Lightly sketch the sleeping eyes, nose, mouth lines, and whiskers with a pencil. Center the nose first to help align the rest of the features symmetrically. -
Dot the Rim:
Dip the handle end of a paintbrush or a dotting tool into white acrylic paint. Press gently onto the rim to create evenly spaced polka dots. -
Paint the Nose:
Using a small detail brush, fill in the heart-shaped nose with a darker pink paint. It acts as the focal point of the face. -
Outline the Nose:
Once the pink nose is dry, carefully outline it with black paint using a fine liner brush or a black paint marker. -
Draw the Eyes:
Draw the two curved semi-circles for the sleeping eyes. Make sure the curves dip downwards. -
Add Eyelashes:
Add three to four small lashes radiating from the bottom of each eye curve. Keep your hand steady and use light pressure for thin lines. -
Create the Mouth:
From the bottom point of the nose, draw a small vertical line down, then curve outwards to the left and right to create the classic cat smile. -
Add Whiskers:
Paint three long, thin whiskers on each cheek area. Try to make them parallel and slightly angled upwards. -
Clean Up:
If any pencil lines are still visible after the paint dries, gently erase them. -
Seal (Optional):
To protect your artwork from water damage, spray the pot with a clear matte sealer, especially if it will live outdoors.
Uneven Dots?
If your polka dots look messy, use the top of a Q-tip or a pencil eraser dipped in paint. Stamp once and lift straight up for perfect circles.
Use a Marker
Struggling with a thin brush for the whiskers? A fine-tip black oil-based paint pen or permanent marker offers way more control for fine lines.
Now your painted pot is ready to be filled with a spiky succulent that mimics cute kitty ears
Night-Sky Galaxy Speckle Pots
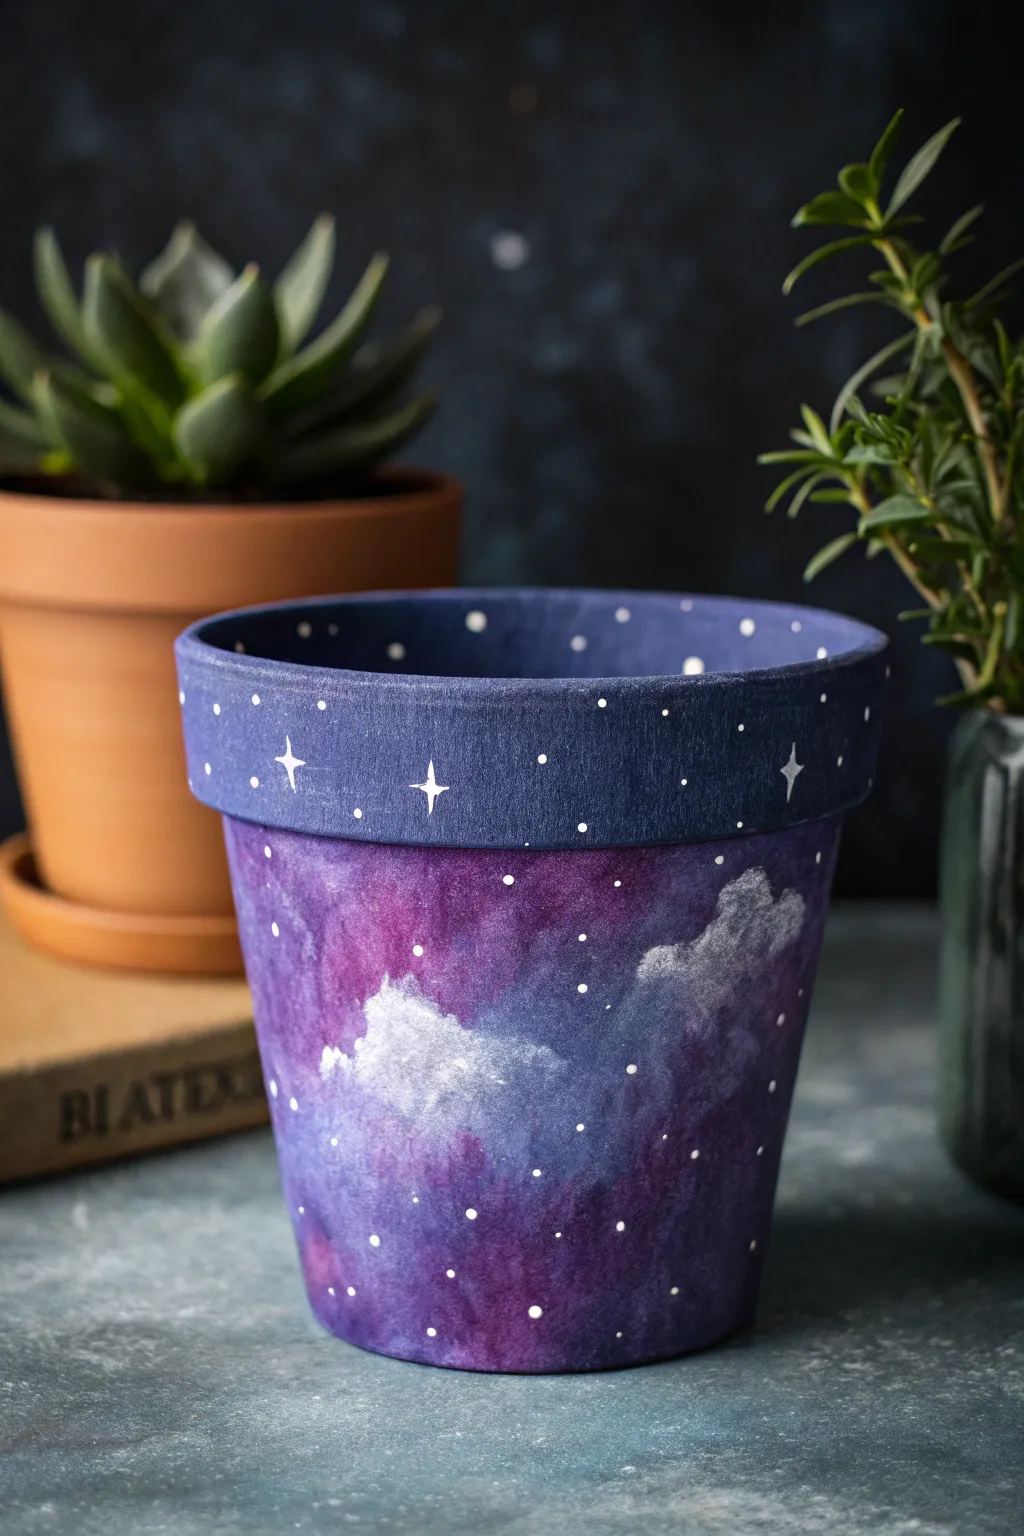
Transform a plain terracotta pot into a cosmic masterpiece with deep, swirling purples and a star-studded rim. This project uses blending techniques to create a soft nebula effect that contrasts beautifully with crisp white celestial details.
How-To Guide
Materials
- Terracotta pot (clean and dry)
- Acrylic paints: Navy Blue, Deep Violet, Magenta, White, and Black
- Paint brushes: Wide flat brush, small round brush, and a detail liner brush
- Sponges (makeup sponges or kitchen sponge scraps)
- Palette or paper plate
- Water cup and paper towels
- Matte or glossy spray sealer (optional)
Step 1: Preparing the Base
-
Base Coat:
Begin by painting the entire exterior of the pot with a solid coat of Navy Blue. This ensures no orange terracotta peeks through your galaxy later. -
Dry and Repeat:
Let the first coat dry completely. If the coverage looks uneven, apply a second coat for a fully opaque, dark foundation. -
Rim Definition:
Mix a tiny drop of black into your Navy Blue to create a slightly darker shade. Paint the rim of the pot with this color to distinguish it from the body. Using a piece of painter’s tape below the rim can help you keep a sharp line if you have a shaky hand.
Step 2: Creating the Nebula
-
Sponge Loading:
Take a damp sponge and dab it into the Deep Violet paint. Tap off the excess on your palette until the texture is misty rather than gloppy. -
First Nebula Layer:
Gently dab the violet sponge in random patches around the body of the pot. Leave some distinct areas of the dark blue base showing through for depth. -
Adding Magenta Highlights:
While the violet is still slightly tacky, switch to a fresh corner of the sponge (or a new one) and pick up the Magenta. Dab this into the center of the violet patches, blending outward softly. -
Blending the Hues:
Use a clean, barely damp sponge to tap over the edges where the magenta, violet, and dark blue meet. This softens the transitions so the galaxy looks gaseous and smoky rather than blocky. -
Deepening Shadows:
If the colors look too bright, go back in with a little sponge of Navy Blue to cut into the bright shapes and create irregular, organic borders.
Patchy Nebula?
If sponge marks look too harsh, wait for the paint to dry fully. Then, apply a very thin ‘glaze’ of watered-down black or navy over the area to unify the colors.
Step 3: Painting the Clouds
-
Cloud Placement:
Identify two or three spots on the nebula where you want a cloud cluster. I find they look best near the brightest magenta sections. -
Base Cloud Shape:
Mix a little white with violet for a pale lavender. Using a small round brush, scumble (scrub lightly) irregular cloud shapes onto the pot. -
Adding Dimension:
While the lavender is wet, pick up pure White paint. Dab the tops and centers of the clouds to create highlights, letting the bottom edges remain darker and shadowy. -
Softening Edges:
Use a dry brush to feather the edges of the white paint out into the galaxy background so the clouds don’t look like stickers.
Glow Up
Mix glow-in-the-dark medium into your white paint for the stars. By day it looks crisp white, but at night your plant pot becomes a glowing constellation.
Step 4: Celestial Details
-
Rim Stars:
Back to the dark rim: use your smallest detail brush or a toothpick dipped in White paint to create tiny dots scattered around the band. -
Bigger Stars:
Paint a few larger, four-pointed ‘cross’ stars on the rim for variety. To keep them sharp, wipe your brush frequently. -
Galaxy Speckling:
Move to the body of the pot. Add tiny white dots throughout the purple and blue areas. Focus clusters of dots near the clouds for a magical effect. -
Flicking Technique:
For faint, distant stars, dilute a little white paint with water. Load a toothbrush or stiff brush and flick the bristles to spray fine mist over the darker areas. -
Final Sealing:
Once absolutely dry (give it a few hours), spray the pot with a clear sealer to protect your painting from water damage and soil.
Place your favorite succulent inside to complete this out-of-this-world creation
Ocean Wraparound Scene With Waves and Fish
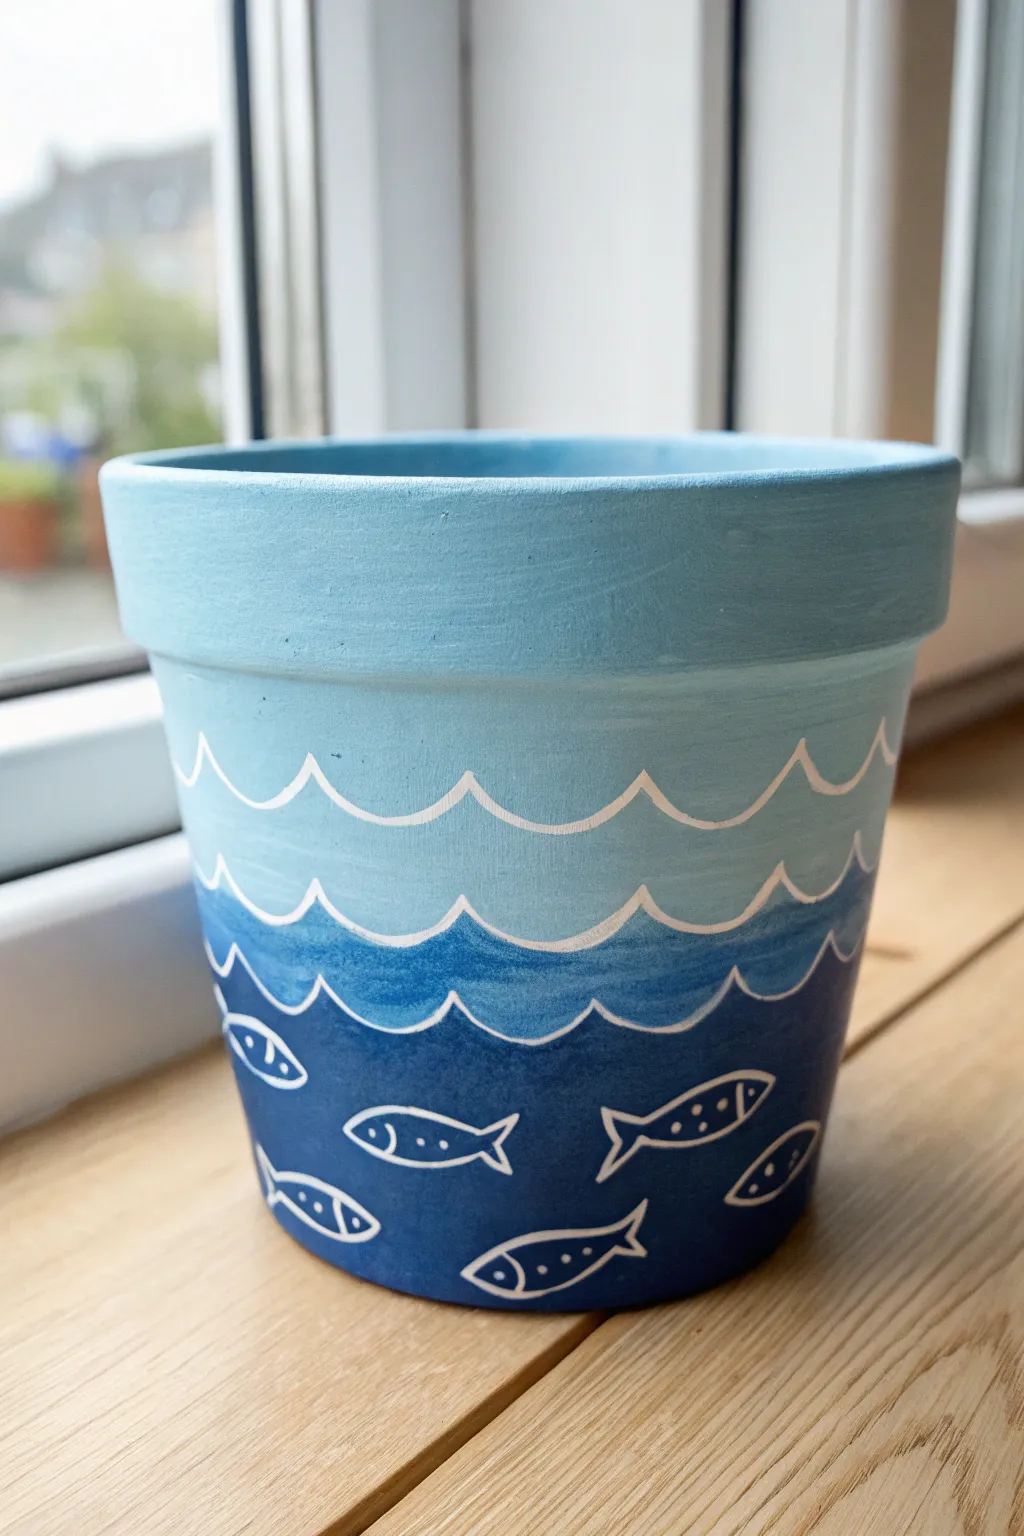
Transform a plain terracotta pot into a tranquil seascape with this gradient layered design. This project features distinct bands of blue that deepen like the ocean itself, finished with charming hand-painted white fish.
Step-by-Step
Materials
- Terracotta pot (clean and dry)
- Acrylic paints: White, Light Blue, Medium Blue, Dark Navy Blue
- Flat paintbrushes (medium and small)
- Fine liner brush or white paint marker
- Palette for mixing paint
- Cup of water and paper towels
- Clear acrylic sealer (spray or brush-on)
Step 1: Painting the Base Layers
-
Prepare your base:
Before you start painting, ensure your terracotta pot is wiped clean of any dust. If the surface is very rough, a light sanding can help the paint glide on smoother. -
Define the sections:
Visualize your pot divided into three horizontal bands. You don’t need to measure; rough estimation works best for an organic look. -
Paint the top band:
Using a medium flat brush, apply your Light Blue paint to the rim and the top third of the pot’s body. Paint the inside of the rim as well for a polished finish. -
Add the middle layer:
Mix a small amount of Light Blue with your Medium Blue to create a transition shade if needed, or simply use the Medium Blue straight from the tube. Paint the middle band of the pot. -
Paint the bottom depth:
Apply the Dark Navy Blue to the bottom third of the pot. Don’t worry about perfect straight lines between colors yet; we will cover the transitions with waves later. -
Apply second coats:
Acrylics on terracotta often need two coats for full opacity. Let the first layer dry completely, then add a second coat to each color band to make the blues vibrant and solid.
Step 2: Adding the Wave Details
-
Mix lighter shades:
For the wave transitions, you’ll need slightly lighter versions of your base colors. Mix a little White into your Medium Blue and a little White into your Dark Navy Blue on your palette. -
Create the top wave border:
Using a fine liner brush and white paint, carefully draw a scalloped ‘wave’ line right over the border where the Light Blue top meets the Medium Blue section. -
Thicken the wave line:
Go over your white scalloped line again to ensure it is bright and opaque. The contrast is key to the design. -
Add the middle wave border:
Repeat the process where the Medium Blue meets the Dark Navy Blue at the bottom. Draw another scalloped line using white paint to separate these two deep color zones. -
Soften the transitions:
This is a subtle detail: just below your white wave lines, you can lightly blend a slightly lighter shade of the textured blue below it to mimic the movement of water, though the sharp white line is the main feature.
Wobbly Lines?
If your scalloped wave lines look shaky, try rotating the pot slowly with one hand while holding your brush hand steady against the table for support.
Step 3: Painting the Fish
-
Outline the fish bodies:
Switch to your finest detail brush or a white paint marker. In the dark navy bottom section, draw simple almond or football shapes for the fish bodies. Scatter them randomly around the pot. -
Add tail fins:
At the back of each almond shape, paint a simple ‘V’ or triangle shape to create the tail fins. Keep the lines crisp. -
Paint the heads:
Draw a small curved vertical line near the front of each fish to separate the head from the body. -
Add facial details:
Place a single dot in the head area for the eye. It gives them instant personality. -
Decorate the bodies:
Add three or four small dots in a line along the center of the fish’s body for a stylized scale effect. -
Seal your work:
Once everything is completely dry (give it a few hours), apply a coat of clear acrylic sealer. This protects the paint from water damage when you water your plant.
Make It Sparkle
Mix a tiny amount of silver glitter paint into the dark navy bottom section before sealing to make the deep ocean water look like it’s catching the light.
Now your pot is ready to be a beautiful new home for your favorite houseplant