Whenever I’m stuck on what to make next, I lean on a mix of quick wins and slightly braver builds to keep my ceramic ideas fresh. Here are my go-to projects and techniques that feel doable, satisfying, and perfect for making your shelves look way cooler.
Pinch Pot Bowls With Personality
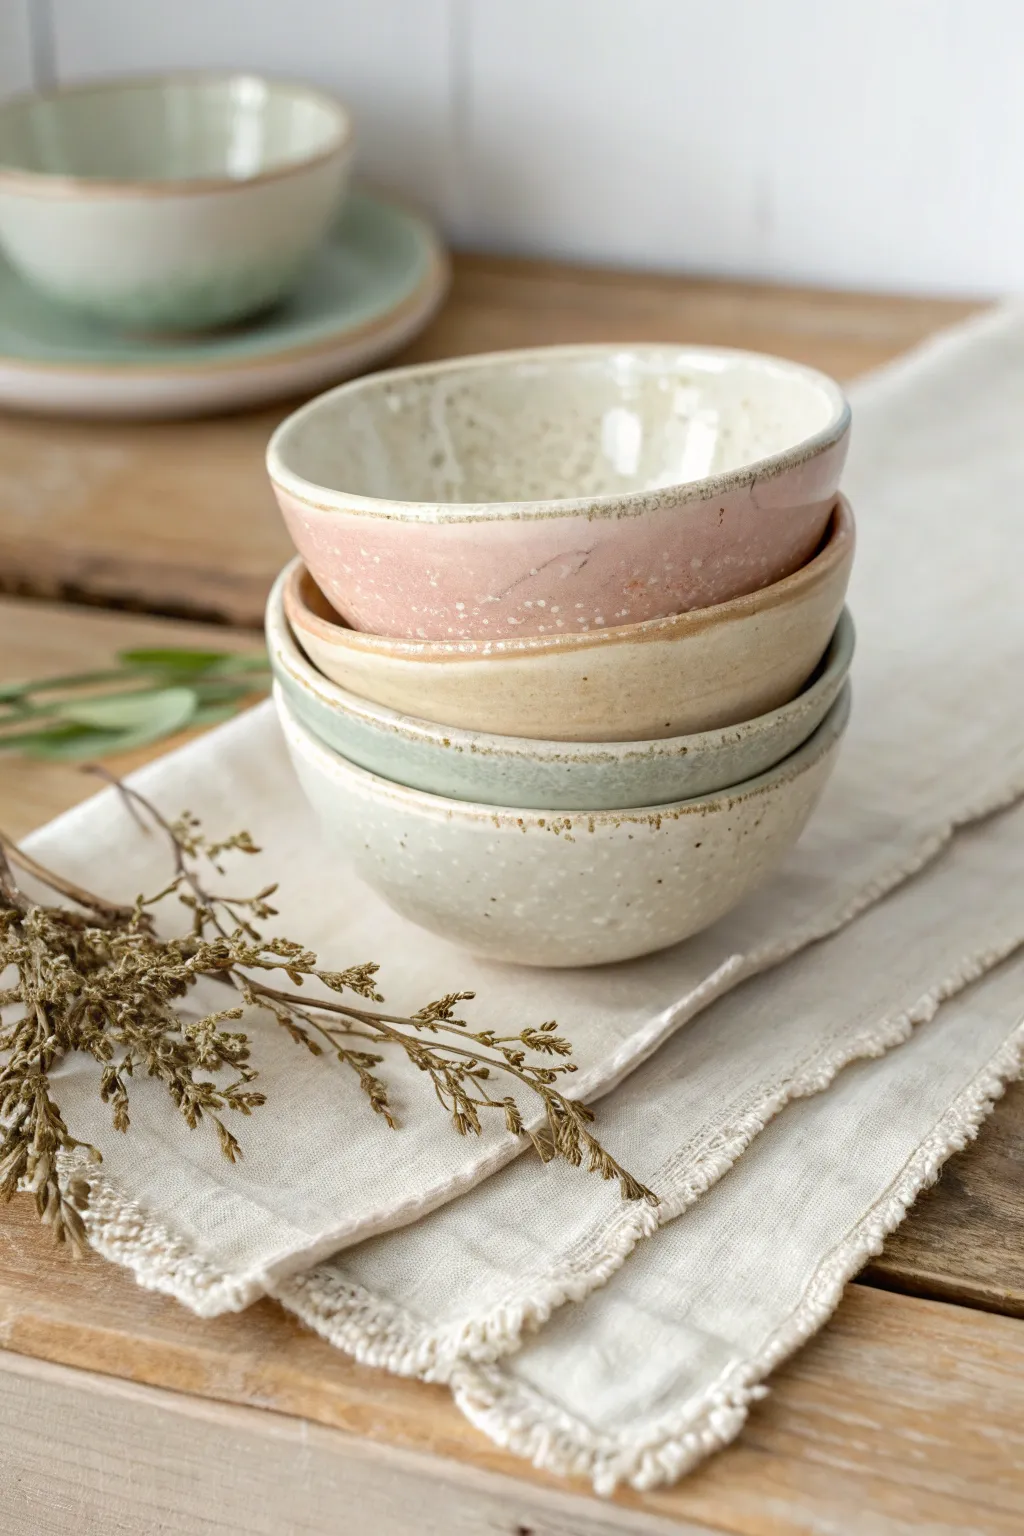
Embrace the rustic charm of hand-building with these organic, earthy bowls that feature soft pastel glazes and a raw clay rim. Their perfectly imperfect shapes and speckled finish make them ideal for trinkets, dips, or simply as a cozy display piece.
How-To Guide
Materials
- Speckled stoneware clay (mid-fire)
- Fettling knife
- Loop tool (small)
- Metal rib or kidney scraper
- Sponge
- Bucket of water
- Pastel glazes (blush pink, oatmeal/sand, sage green, and soft grey)
- Wax resist
- Small paintbrush for wax
- Fan brush for glazing
- Kiln (or access to firing services)
Step 1: Forming the Pots
-
Prepare Clay Balls:
Start by wedging your speckled stoneware clay thoroughly to remove air bubbles. Separate the clay into four equal portions, each roughly the size of a tennis ball, to match the set shown. -
Create the Initial Well:
Hold a ball of clay in your non-dominant hand. Gently press your thumb into the center, stopping about a half-inch from the bottom. This establishes the bowl’s depth. -
Pinch the Walls:
Using a rhythmic pinching motion, rotate the clay while pressing between your thumb (inside) and fingers (outside). I like to start at the bottom and work my way up to ensure an even thickness. -
Shape the Rim:
As you pinch upward, allow the rim to flare out slightly. Don’t worry about making it perfectly level; the organic, slightly wavy edge adds to the handmade ‘personality’ we are aiming for. -
Refine the Interior:
Use a damp sponge to smooth out any deep finger marks inside the bowl, compressing the clay to prevent cracks. You can also use a metal rib to gently scrape and smooth the inner curve. -
Define the Foot:
Once the basic shape is formed, gently tap the bottom of the bowl on your work surface to create a flat base so it sits vividly without rocking.
Smooth Operator
To reduce warping, dry your pinch pots upside down for the first few hours. This uses gravity to keep the rim circular while the clay stiffens.
Step 2: Refining and Bisque Firing
-
Dry to Leather Hard:
Allow your bowls to dry slowly under loose plastic until they reach a leather-hard state. The clay should range from firm but still cool to the touch. -
Trim the Exterior (Optional):
If your walls feel too thick or heavy near the base, use a small loop tool to carve away excess clay. This is a good moment to refine the outer curve. -
Smooth the Rim:
Run a damp sponge or your finger along the rim one last time. While we want an organic look, sharp edges can be uncomfortable to hold, so soften them slightly. -
Bone Dry:
uncover the bowls and let them dry completely until they are bone dry. They will become lighter in color and very fragile. -
Bisque Fire:
Load the bone-dry greenware into the kiln for a bisque fire (usually Cone 04). This hardens the clay and prepares it for glazing.
Speckle Magic
Don’t have speckled clay? Mix a teaspoon of granular manganese or ilmenite into plain white clay while wedging to create your own bespoke speckled body.
Step 3: Glazing Technique
-
Clean the Bisque:
Once fired, wipe the bowls down with a damp sponge to remove any kiln dust. Dust can prevent glaze from adhering properly. -
Wax the Rim:
To achieve the exposed clay look seen in the image, apply a line of wax resist along the very top edge of the rim. This prevents glaze from sticking there later. -
Wax the Foot:
Apply wax resist to the bottom of the bowl and about 1/4 inch up the side. This ensures the pot won’t fuse to the kiln shelf during firing. -
Apply Interior Glaze:
Pour a glossy, milky white glaze into the interior of the bowl. Swirl it around to coat completely, then pour the excess back into your glaze bucket. -
Select Exterior Pastels:
Choose a different pastel shade for each bowl—pink, beige, sage, and grey. Shake or stir your glazes thoroughly to ensure the colorants are mixed. -
Dip the Exterior:
Holding the bowl by the foot (or using glazing tongs), dip the exterior into your chosen pastel glaze. Dip up to the rim, but let the wax resist do the work of keeping that edge clean. -
Clean Up:
Use a sponge to wipe away any wayward beads of glaze on the waxed rim or foot. The wax repels glaze, but small droplets can sometimes sit on top.
Step 4: Final Firing
-
Load the Kiln:
Place the glazed bowls into the kiln, ensuring they don’t touch each other. Even with wax, it’s safer to keep a small distance between pots. -
Glaze Fire:
Fire to your clay body’s maturation temperature (usually Cone 5 or 6 for mid-fire stoneware). Follow the firing schedule recommended for your specific glazes. -
Cool and Sand:
Once the kiln is cool enough to unload, check the bottoms. If the unglazed clay on the foot feels rough, sand it briefly with wet sandpaper for a professional finish.
Stack your finished set on a linen cloth to admire how the soft tones play against the raw, speckled clay.


Coil-Built Planters for Chunky Texture

Embrace the raw, tactile beauty of hand-building with this stacked-coil planter project. By leaving the thick coils exposed rather than smoothing them out, you create a satisfying ribbed texture that highlights the construction process and adds organic charm to any windowsill.
Step-by-Step Tutorial
Materials
- Speckled stoneware clay (mid-fire recommended)
- Clay scoring tool or serrated rib
- Slip (clay mixed with water to a yogurt consistency)
- Wooden modeling tool
- Sponge
- Rolling pin (optional)
- Canvas or cloth-covered work board
- Fettling knife
- Needle tool
Step 1: Creating the Base
-
Prepare the slab:
Start by rolling out a slab of clay to approximately 1/4 inch thickness. You can use a rolling pin or simply flatten a ball of clay with your palm for a more organic feel. -
Cut the base:
Use a needle tool or fettling knife to cut a perfect circle from your slab. A diameter of about 4-5 inches is a good starting size for a small planter. -
Score the edge:
Take your scoring tool and rough up the outer edge of the circular base where the first coil will sit. Apply a generous amount of slip to the scored area.
Cracking Coils?
If horizontal cracks appear between coils as it dries, your clay was likely too dry when joining. Score deeper and use more slip next time.
Step 2: Rolling and Attaching Coils
-
Roll the first coil:
Take a chunk of clay and roll it on your work surface into a long, snake-like coil. Aim for a consistent thickness of about 3/4 inch—you want these to be quite chunky. -
Place the first ring:
Lay the coil onto the scored edge of your base. Cut the ends at an angle where they meet to ensure a seamless join. -
blend the interior:
Secure the coil by smoothing the clay downwards on the *inside* of the pot only. Use your thumb or a wooden tool to smudge the coil onto the base, ensuring a strong bond without disturbing the outer rounded texture. -
Prepare the next layer:
Score the top surface of the coil you just placed and apply slip. Repeat the rolling process for your next coil. -
Stacking up:
Place the second coil directly on top of the first. Again, cut the ends to join them seamlessly, staggering the join location so it doesn’t align with the one below. -
Blend firmly:
Firmly blend the inside of this new coil down into the one below it. I find support the outside with my other hand helps prevent the wall from bulging out while blending. -
Build height:
Continue this process—score, slip, place, and blend the inside—until you have stacked about 6 to 8 coils, or reached your desired height.
Go Speckled
Use a heavy grog or speckled clay body and a semi-transparent white glaze. The dark specks will show through for that trendy vanilla-bean look.
Step 3: Refining and Finishing
-
Clean the exterior:
Run a damp (not soaking) sponge gently over the outside coils. The goal here is just to smooth away any sharp crumbs or heavy fingerprints, not to flatten the beautiful rounded shape. -
Check the rim:
Examine the top coil. If it’s uneven, you can gently pat it level with a paddle or flat piece of wood. Smooth the rim with your sponge so it’s pleasant to the touch. -
Add drainage:
Flip the pot over gently or work from the inside to poke a drainage hole in the center of the base using a small round cutter or the back of a tool. -
Dry slowly:
Cover the pot loosely with plastic to let it dry slowly. Because the coils are thick and the connection points vary, slow drying prevents cracking between layers. -
Bisque fire:
Once bone dry, fire the piece to bisque temperature (usually varying by clay body, often Cone 04). -
Glazing:
For the look in the photo, apply a matte white or very light grey glaze. A glaze that breaks over texture is perfect as it will settle in the grooves between coils, accentuating the construction. -
Final wipe:
Wipe the bottom of the pot clean of any glaze with a sponge to prevent it from sticking to the kiln shelf. -
Glaze fire:
Fire the piece again to the maturation temperature of your specific clay and glaze combination.
Once fired, fill your new architectural planter with potting mix and a small green friend to bring the white ceramic to life


Slab-Built Mugs With Big Handles
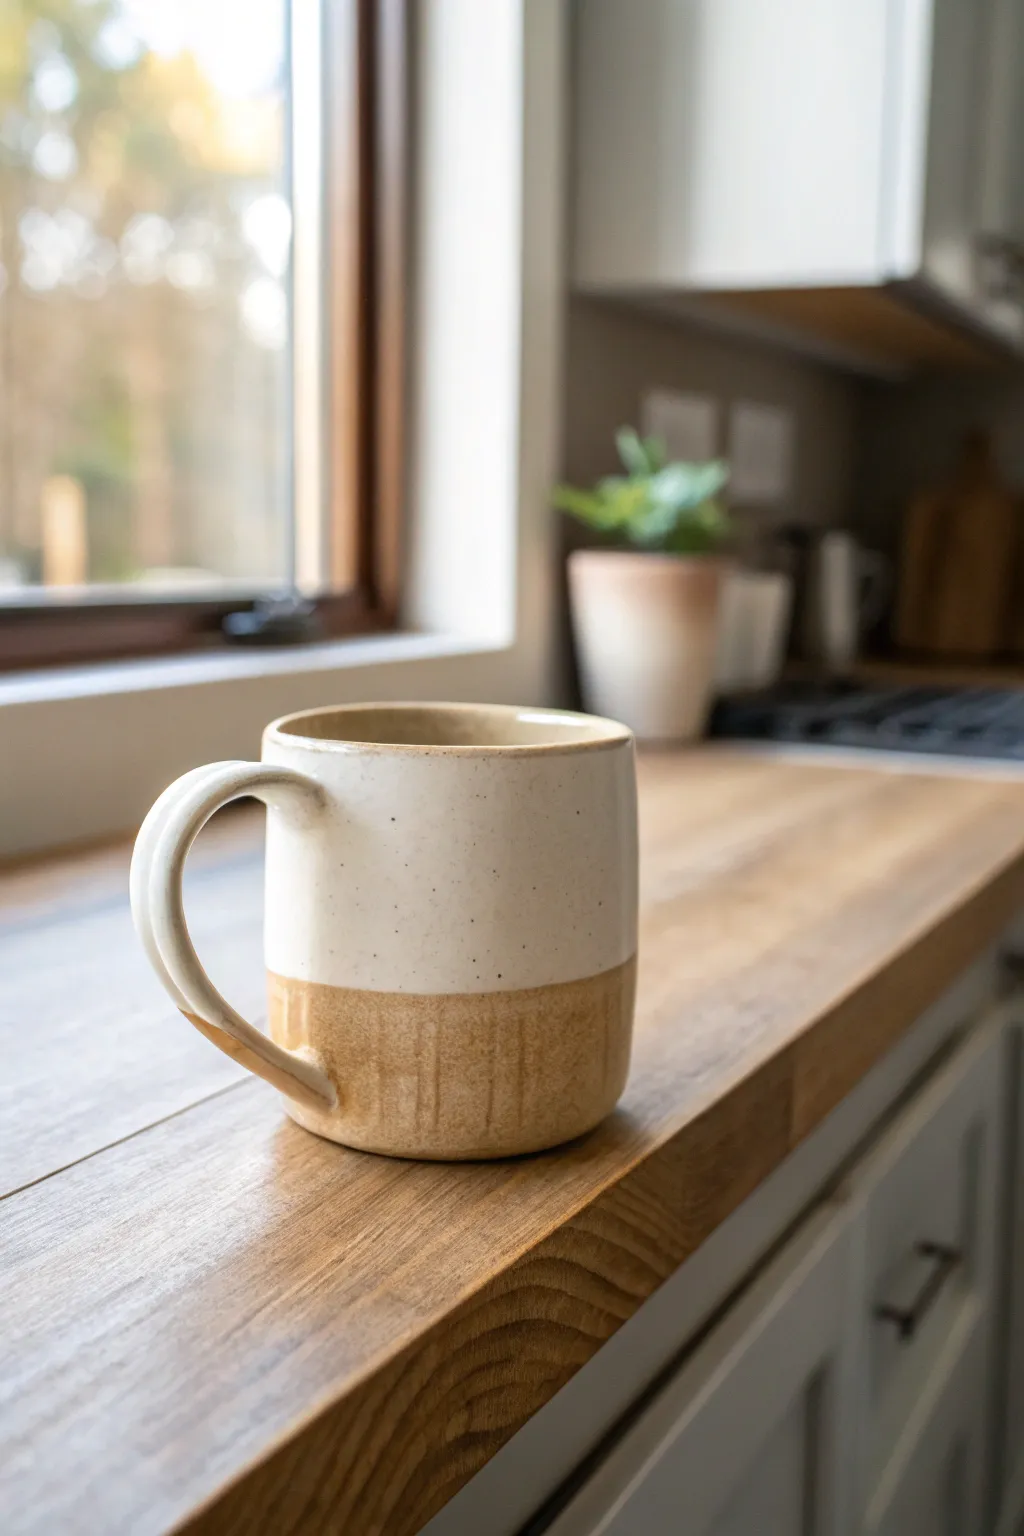
Embrace the rustic charm of hand-building with this sturdy slab mug, featuring a generous handle perfect for wrapping your hands around. The design highlights a lovely contrast between a smooth, creamy upper glaze and a textured, raw-clay aesthetic at the base.
Step-by-Step Guide
Materials
- Stoneware clay (speckled or buff)
- Rolling pin
- Canvas or slab mat
- Guide sticks (1/4 inch thick)
- Fettling knife or needle tool
- Serrated rib or fork
- Scoring tool
- Slip (clay mixed with water)
- Cylindrical form for template (optional)
- Wooden modeling tool
- Sponge
- Cream/Oatmeal glaze
- Wax resist
Step 1: Creating the Body
-
Roll the Slab:
Begin by wedging your stoneware clay to remove air bubbles. Roll it out on your canvas between two 1/4 inch guide sticks to ensure an even thickness throughout the entire slab. -
Texturize the Base:
Before cutting your shape, focus on the bottom 2 inches of the slab. Use a wooden modeling tool or the edge of a credit card to press vertical, slightly irregular lines into the clay to mimic the texture seen in the photo. -
Cut the Rectangle:
Measure a rectangle approximately 10-12 inches long and 4.5 inches tall. Use your fettling knife and a ruler to cut this shape cleanly. -
Bevel the Edges:
On the short ends of your rectangle, cut 45-degree bevels in opposite directions. This will allow the seam to overlap smoothly without creating a thick lump. -
Form the Cylinder:
Stand the slab up and curve it into a cylinder. Score the beveled edges aggressively and apply a generous amount of slip. -
Join the Seam:
Press the beveled ends together firmly. I like to use a wooden pony roller inside the cylinder against my hand on the outside to compress the seam properly. -
Add the Base:
Roll out a small separate piece of clay for the floor. Place your cylinder on top, trace around it, and cut out the circle. Score and slip both the bottom of the cylinder walls and the edge of the circle, then join them.
Warped Rim?
If your cylinder goes oval during handling, gently gently push it back to round once it’s leather hard. You can also rest a light board on the rim while drying.
Step 2: The Big Handle
-
Pull or Roll a Coil:
For that substantial handle look, roll a thick coil or pull a strap of clay. It should be roughly 3/4 inch wide and slightly flattened rather than perfectly round. -
Shape the Curve:
Curve the clay into a large ‘C’ shape. Let it stiffen up slightly on your board until it can hold its own shape without drooping, usually about 20-30 minutes. -
Attach the Handle:
Score and slip the attachment points on the mug body and the handle ends. Press the handle firmly onto the mug, ensuring the top attachment is near the rim and the bottom attaches just above the textured section. -
Reinforce the Join:
Use a damp brush or a small coil of clay to smooth out the connection points, blending the clay so it looks seamless.
Step 3: Finishing & Glazing
-
Smooth the Rim:
Run a damp sponge or a piece of chamois leather over the rim of the mug. A rounded, smooth rim is crucial for a comfortable drinking experience. -
Bisque Fire:
Allow the mug to dry slowly under plastic for a day, then completely uncovered until bone dry. Fire it to cone 04 (or your clay body’s bisque temperature). -
Apply Wax Resist:
Paint liquid wax resist over the bottom textured area and the very bottom of the handle. We want this area to remain unglazed to show off the clay’s natural tan color and tooling marks. -
Dip Glaze:
Hold the mug by the foot (or use glazing tongs) and dip it into a creamy, speckled white glaze. Stop the dip right where the wax resist begins, creating a crisp horizontal line. -
Wipe and Fire:
Use a damp sponge to wipe any glaze droplets off the waxed, textured area. Fire to the final glaze temperature (likely cone 5 or 6 depending on your clay).
Pro Tip: Handle Comfort
When attaching the handle, flatten the clay slightly where your thumb will naturally rest at the top curve. This tiny adjustment makes the mug joy to hold.
Now you have a beautifully functional piece of art ready for your morning coffee routine


Tiny Trinket Dishes for Everyday Little Things

This charming little catch-all combines a distinct, flower-like scalloped form with a mesmerizing crackle glaze that deepens the teal hue. It is the perfect size for holding your rings or earrings by the bedside and adds a touch of handmade elegance to any surface.
Detailed Instructions
Materials
- Low-fire white earthenware clay
- Rolling pin
- Canvas work surface
- Rib tool (rubber or silicone)
- Needle tool
- Small sponge
- Scalloped slump mold (or a small bowl lined with plastic)
- Teal crackle glaze (low fire)
- Translucent or clear glaze (optional, for mixing)
- Gold wax paste or gold luster overglaze
- Soft fan brush
- Small detail brush
- Kiln
Step 1: Forming the Dish
-
Wedging and flattening:
Begin with a ball of clay roughly the size of a tangerine. Wedge it thoroughly to remove air bubbles, then press it onto your canvas board with your palm to start flattening it. -
Rolling the slab:
Use your rolling pin to roll the clay out into a consistent slab, aiming for about 1/4 inch thickness. Rotate the clay frequently to ensure an even circle. -
Smoothing the surface:
Using a soft rubber rib, compress the clay surface on both sides. This aligns the clay particles and removes any canvas texture, which is crucial for a smooth final glaze finish. -
Cutting the shape:
If you have a scalloped cookie cutter, press it into the slab. If not, lightly trace a 4-5 inch circle with a needle tool, then hand-draw the scalloped petal edges before cutting the shape out cleanly. -
Softening edges:
Dip your finger or a small piece of chamois in water and run it gently along the cut rim to round off the sharp angles left by the needle tool. -
Slumping the form:
Place your clay slab into your slump mold or bowl. Gently press the center down so it takes the curved shape. Don’t press too hard on the rim, or you might flatten the beautiful scallops. -
Refining the curves:
Use a damp sponge to smooth the interior. If you want more defined ridges like the reference image, use a modeling tool to gently press indentations radiating from the center toward the dips between scallops. -
Drying:
Allow the dish to dry slowly to the leather-hard stage. Once firm enough to hold its shape, remove it from the mold and let it dry completely to bone dry.
Uneven Crackle?
If the crackle effect doesn’t appear, the glaze application was likely too thin. Apply three coats next time, crossing the direction of your brushstrokes.
Step 2: Firing and Glazing
-
Bisque fire:
Load the bone-dry piece into the kiln and bisque fire it to Cone 04 (or the temperature specific to your clay body). -
Cleaning:
Once cool, wipe the bisque ware with a damp sponge to remove any kiln dust. This ensures the glaze adheres properly without crawling. -
Applying the glaze:
Stir your teal crackle glaze very well. Using a soft fan brush, apply a generous first coat to the interior of the dish. I prefer to use confident, sweeping strokes from the center outward. -
Layering:
Let the first coat dry until it’s no longer tacky, then apply a second coat. Crackle glazes often rely on thickness to develop their texture, so ensure you have good coverage, but avoid the very rim if you plan to add a raw accent. -
Glaze firing:
Fire the piece to the temperature recommended for your specific crackle glaze—usually around Cone 06 for low-fire earthenware. -
Enhancing the crackle:
Once the piece is cool and unloaded, you can highlight the cracks by rubbing a little india ink or strong tea over the surface and wiping away the excess, though the glaze naturally deepens nicely on its own.
Level Up: Texture
Press a piece of lace into the wet clay slab before cutting out the scallop shape. The glaze will pool in the lace impressions, creating deeper teal accents.
Step 3: Finishing Touches
-
Applying the rim:
For that antique look seen in the photo, apply a gold wax paste to the rim using your finger or a dry cloth. If you want a permanent food-safe finish, use a gold luster overglaze instead. -
Final cure (if using luster):
If you used gold luster, the piece requires a third firing at a much lower temperature (usually Cone 018) to fuse the metal to the glaze. -
Buffing:
If you used gold wax, let it cure for 24 hours and then gently buff it with a soft cloth to bring out a subtle sheen.
Place your finished dish on your dresser to enjoy a pop of color every time you take off your jewelry

The Complete Guide to Pottery Troubleshooting
Uncover the most common ceramic mistakes—from cracking clay to failed glazes—and learn how to fix them fast.
Soap Dishes That Actually Drain

This charming, oval-shaped soap dish combines rustic speckled clay with practical design elements. Its gentle curve and drainage holes ensure your soap stays dry, while the subtle ridges add a lovely textural detail that separates the soap from pooling water.
How-To Guide
Materials
- Speckled Stoneware Clay (light buff color)
- Oval paper template
- Rolling pin
- Wooden guide strips (1/4 inch thick)
- Small circular hole cutter or straw
- Rib tool (soft kidney)
- Modeling tool or dull pencil
- Sponge
- Bisque mold or foam cushion
- Clear or transparent matte glaze
Step 1: Forming the Base
-
Prepare your clay:
Cut a manageable chunk of speckled stoneware clay and wedge it thoroughly to remove air bubbles and align the particles. -
Set your thickness:
Place your wooden guide strips on either side of the clay. Using your rolling pin, roll the clay into a smooth, even slab about 1/4 inch thick. -
Smooth the surface:
Take a soft rib tool and gently compress the surface of the slab. This aligns the clay platelets and removes canvas texture, which I find makes the final glazing much smoother. -
Cut the shape:
Lay your oval paper template onto the slab. Using a needle tool or fettling knife, cut vertically around the template to create your base shape. -
Create the curve:
Gently lift the clay oval and place it into a shallow bisque slump mold or onto a piece of soft foam. Press the center down gently so the edges rise up, creating a shallow bowl shape.
Step 2: Adding Details
-
Refine the rim:
Use a damp sponge or your finger to round over the sharp cut edge of the rim. A rounded rim is more durable and less likely to chip than a sharp one. -
Plan the drainage:
Mark the positions for your drainage holes in the center of the dish. Aim for a grid or scattered pattern concentrated at the lowest point of the curve. -
Punch the holes:
Using a small circular clay cutter or a sturdy straw, punch out the marked holes. Be sure to remove the little clay plugs cleanly. -
Clean the holes:
Flip the dish over carefully and smooth out any burrs around the exit points of the holes with your finger or a tool. -
Mark the ridges:
On one side of the interior, use a dull modeling tool to impress a series of parallel lines. These shouldn’t cut through the clay, just dent it to create raised ridges. -
Soften the ridges:
Run a damp finger over the impressed lines to ensure there are no sharp edges where soap scum could get trapped later.
Uneven Drying?
If the edges of your oval curl up too much while drying, weigh them down gently with small bean bags or dry slowly under plastic to keep moisture levels even across the slab.
Step 3: Finishing and Firing
-
Dry slowly:
Cover the dish loosely with plastic and let it dry slowly to the leather-hard stage. This prevents warping as the clay shrinks. -
Trim the bottom:
Once leather hard, check the bottom. If needed, gently rasp or sponge the underside to ensure it sits stable without rocking. -
Bisque fire:
Allow the piece to become bone dry, then load it into the kiln for a bisque firing. -
Glaze application:
After the bisque fire, wipe the piece down with a damp sponge to remove dust. I prefer dipping this piece into a transparent matte glaze to let those beautiful speckles show through. -
Checking the holes:
Double-check that no glaze has clogged the drainage holes. If it has, clear it with a small drill bit or needle tool. -
Final wipe:
Wipe the foot (bottom) of the dish completely clean of glaze to prevent it from sticking to the kiln shelf. -
Glaze fire:
Fire the piece to the maturity temperature of your clay body (usually Cone 5 or 6 for stoneware).
Pro Tip: Feet
Add 3 tiny balls of clay to the underside as ‘feet’ before drying. This lifts the dish off the counter, allowing air to circulate and water to drain away freely.
Enjoy the functional beauty of your new piece every time you wash your hands
Spoon Rests That Make Cooking Feel Nicer
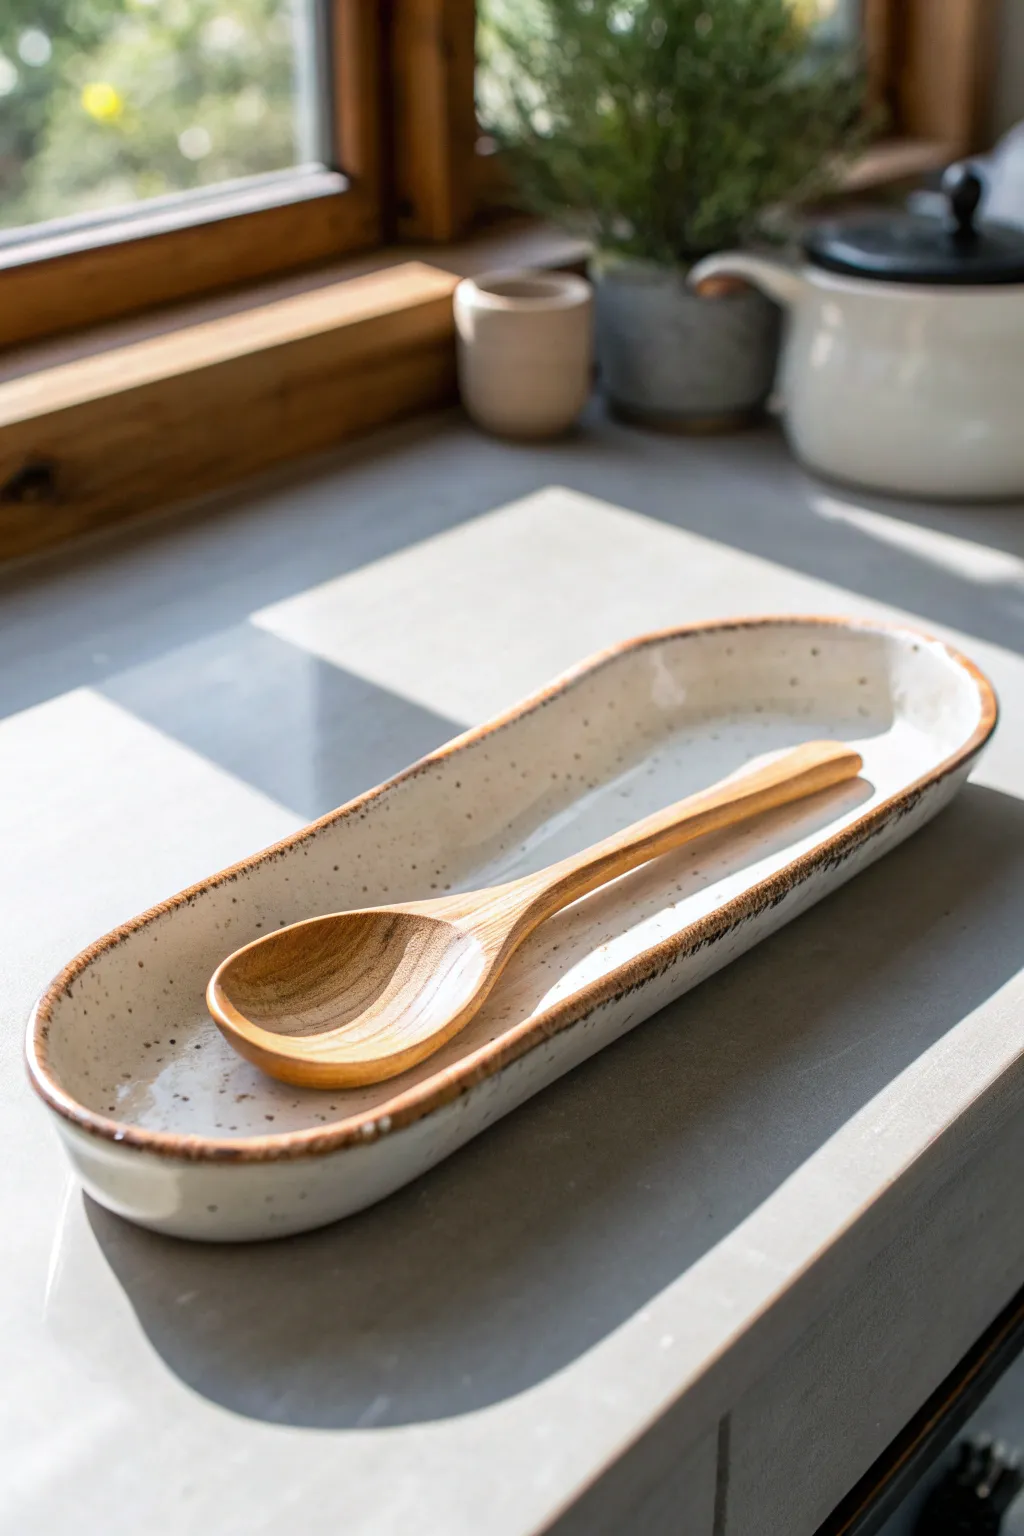
This minimalist spoon rest combines functionality with earthy charm, featuring a soft, elongated oval shape and a speckled, milky-white glaze finish. The rustic brown rim adds a lovely contrast that makes this piece feel grounded and handmade, perfect for cradling your favorite wooden spoon.
Step-by-Step Tutorial
Materials
- White stoneware clay (speckled clay body highly recommended)
- Rolling pin
- Canvas mat or slab roller
- Needle tool or fettling knife
- Paper template (oval shape, approx. 9-10 inches long)
- Rib tool (soft kidney)
- Sponge
- Banding wheel (optional but helpful)
- Milky white glaze (gloss or satin)
- Oxide wash (iron oxide or rutile) or brown underglaze
- Medium brush for glazing
- Small liner brush for rim
Step 1: Shaping the Form
-
Prepare the slab:
Begin by wedging your white stoneware clay thoroughly to remove air pockets. Roll it out into a smooth slab about 1/4 inch thick. If you want those lovely natural specks to show through later, using a clay body that already has iron pyrite specs is the easiest route. -
Cut the shape:
Place your paper oval template onto the slab. Using a needle tool, trace around the template to cut out your base shape. Remove the excess clay and set it aside for recycling. -
Smooth the surface:
Take a soft rib tool and gently compress the surface of the clay on both sides. This aligns the clay particles which helps prevent warping and creates a nice, smooth canvas for your glaze. -
Lift the edges:
To create the shallow bowl shape necessary for holding a spoon, gently lift the edges of the oval with your fingertips. Work your way around the piece, curving the clay upwards. -
Refine the curve:
Use a slightly damp sponge to smooth out the transition from the flat base to the raised walls. You want a gentle, organic slope rather than a sharp 90-degree angle. -
Level the rim:
Check the rim height as you work. It should be consistent all the way around. If one side is drooping, support it with a small coil of clay underneath until it firms up slightly. -
Soften the lip:
Run a damp sponge or a piece of chamois leather over the very top edge of the rim. This rounds it off nicely so it isn’t sharp to the touch after firing. -
Add a foot (optional):
For better stability, you can score and slip a small, very low coil ring onto the bottom, or just leave it flat. If leaving it flat, ensure the bottom is perfectly smooth. -
Dry slowly:
Place the spoon rest on a board and cover it loosely with plastic. Let it dry slowly to the bone-dry stage to minimize any potential warping of that long oval shape. -
Bisque fire:
Once fully dry, fire the piece in the kiln to cone 04 (or your clay body’s specific bisque temperature). I usually prefer a slightly slower ramp speed here to be safe.
Step 2: Glazing and Finishing
-
Clean the bisque:
After the kiln has cooled, wipe the bisque ware down with a damp sponge to remove any kiln dust. This ensures the glaze adheres properly without crawling. -
Apply base glaze:
Pour your milky white glaze (I love a satin finish for this look) into the center of the spoon rest. Tilt and rotate the piece to coat the interior evenly before pouring out the excess. -
Glaze the exterior:
Carefully brush or dip the exterior of the spoon rest with the same white glaze. Be sure to wipe the foot or the very bottom clean so it doesn’t stick to the kiln shelf. -
Check coverage:
Look closely for any pinholes or missed spots. Dab a little extra glaze on these areas with your finger to smooth them over. -
Prepare the rim color:
Mix a small amount of iron oxide wash or use a dark brown underglaze. You want a consistency similar to watercolor paint. -
Paint the rim:
Using a steady hand and a small liner brush, paint a thin line along the very edge of the rim. Don’t worry if it’s not perfect—a little variation adds to the rustic feel. -
Create the bleed effect:
If you want the rim color to bleed slightly into the white glaze as seen in the photo, you can gently dab the wet oxide line with a tiny bit of clear glaze or water. -
Final wipe:
Do one last check of the bottom to ensure absolutely no glaze is where it shouldn’t be. A clean bottom saves your kiln shelves. -
Glaze fire:
Load the kiln and fire to the maturity temperature of your clay and glaze (typically cone 6 or cone 10 depending on your materials). -
Sand the bottom:
Once the firing is complete and the kiln is unloaded, use a sanding block or diamond pad to smooth the unglazed bottom, ensuring it won’t scratch your countertop.
Rim Perfection
For a distinctive rustic rim, layer two different oxides (like iron and rutile) on the edge. This creates depth and variation where the glaze breaks over the lip.
Texture Twist
Before drying, gently press a piece of coarse linen or canvas into the wet clay. The glaze will pool in the texture, highlighting the weave pattern beautifully.
Place this beautiful piece next to your stovetop and enjoy the handmade warmth it brings to your daily cooking routine


What Really Happens Inside the Kiln
Learn how time and temperature work together inside the kiln to transform clay into durable ceramic.
Bud Vases for Single-Stem Magic
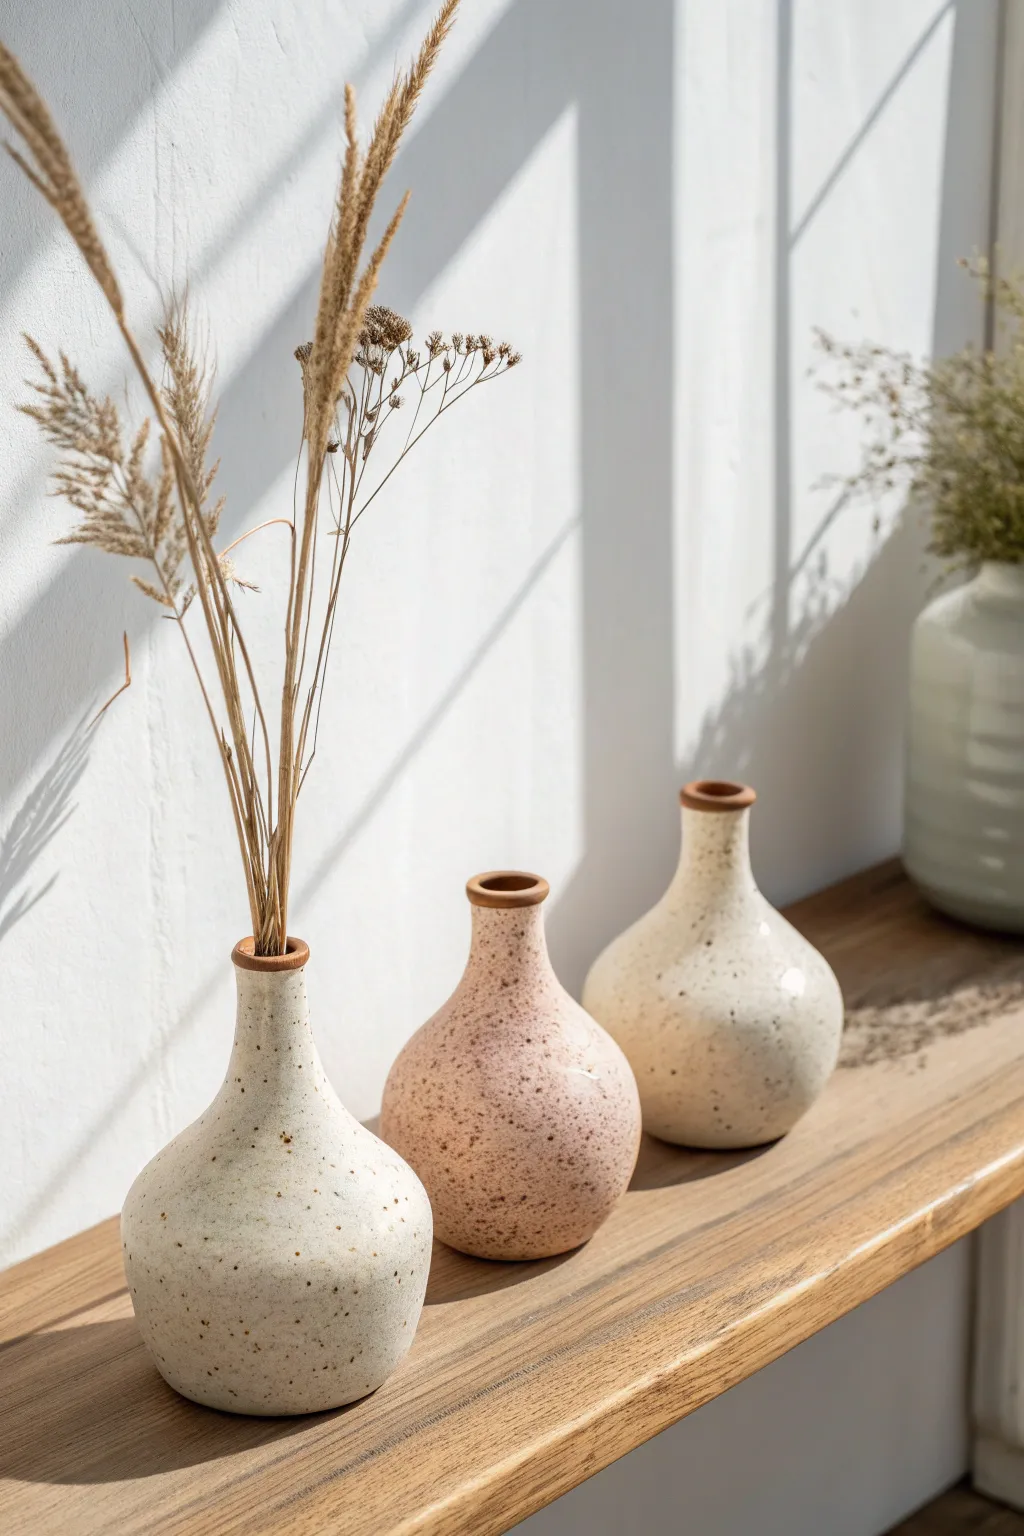
These charming, petite vessels are the perfect entry point for wheel-throwing or could even be adapted for coil building. Their speckled, matte finish and narrow necks make them ideal for displaying dried grasses or single wildflowers.
Step-by-Step
Materials
- Speckled stoneware clay (e.g., Laguma Speckled or a similar groggy clay body)
- Pottery wheel
- Throwing sponge
- Pin tool
- Wire cutter
- Wooden rib tool
- Trimming tools
- Chamois cloth
- Matte white glaze (or clear matte if the clay body is white)
- Terracotta-colored underglaze or slip (optional for the rim)
Step 1: Throwing the Form
-
Center the clay:
Start with a small ball of clay, roughly 1 to 1.5 lbs per vase. Center it firmly on the wheel head, ensuring there is no wobble before you begin opening. -
Open the vessel:
Drill your thumbs into the center and open the floor, but keep it narrow. You want a tight base about 2-3 inches wide to support the bulbous form. -
Pull the cylinder:
Pull the walls up into a cylinder, slightly thicker than you would for a mug, as you’ll be stretching the belly out. Focus on keeping the top rim slightly gathered inward to utilize centripetal force. -
Shape the belly:
From the inside, use your fingers or a rounded rib to gently push the clay outward near the bottom third to create that distinct, rounded bulb shape. Support the outside with a sponge to prevent collapse. -
Collar the neck:
Using both hands in a tripod grip, gently squeeze and collar the clay inward as you move up the vessel to form the narrow neck. Do this in several passes to avoid twisting the clay. -
Refine the lip:
Once the neck is sufficiently narrow (about 1 inch wide), use a chamois cloth or a wet finger to compress and slightly flare the very top edge, creating a distinct, smooth rim. -
Dry partially:
Wire the vase off the wheel and allow it to dry to a leather-hard state. This usually takes a day wrapped loosely in plastic.
Collaring Tip
Keep the clay wet and speed up the wheel slightly when collaring the neck. This prevents torque from twisting the clay and ensures the neck stays centered.
Step 2: Trimming and Finishing
-
Secure for trimming:
Place the vase upside down on the wheel. Because of the narrow neck, you might need a chuck or a foam bat to hold it steady without damaging the rim. -
Trim the foot:
Using a sharp trimming tool, remove excess weight from the bottom and carve a clean, subtle foot ring. This lifts the bulbous shape slightly off the table surface. -
Smooth the surface:
Once trimmed, use a damp sponge to wipe away any trimming lines or rough texture, though leaving some natural clay variation adds character. -
Bisque fire:
Let the vases dry completely to the bone-dry stage. Load them into the kiln for a bisque firing (usually Cone 04 or 06).
Step 3: Glazing
-
Wax the foot:
Apply wax resist to the bottom foot ring to prevent glaze from sticking to the kiln shelf. -
Applying the rim accent:
To achieve the look in the photo, leave the very top rim unglazed if your clay fires to a nice terracotta brown. Alternatively, brush a thin ring of iron oxide or terracotta underglaze on the rim before glazing. -
Dip into glaze:
Grip the vase by the foot and dip it quickly into a matte white or creamy satin glaze. I prefer a quick 3-second dip to ensure the coating isn’t too thick, which lets the clay’s natural speckles show through. -
Clean the rim:
Wipe the very top edge of the rim with a damp sponge if you want to expose the raw clay body for that contrast detail. -
Final glaze fire:
Fire the pieces to maturity (likely Cone 5 or 6, depending on your clay and glaze). The heat will fuse the glaze and bring out the iron speckles in the stoneware.
Try Asymmetry
Make a grouping of three vases but vary the height of the neck on each one. This creates a more dynamic, sculptural arrangement on your shelf.
Now you have a trio of earthy vases ready to hold your favorite dried botanicals
Everyday Plates With Clean Rims
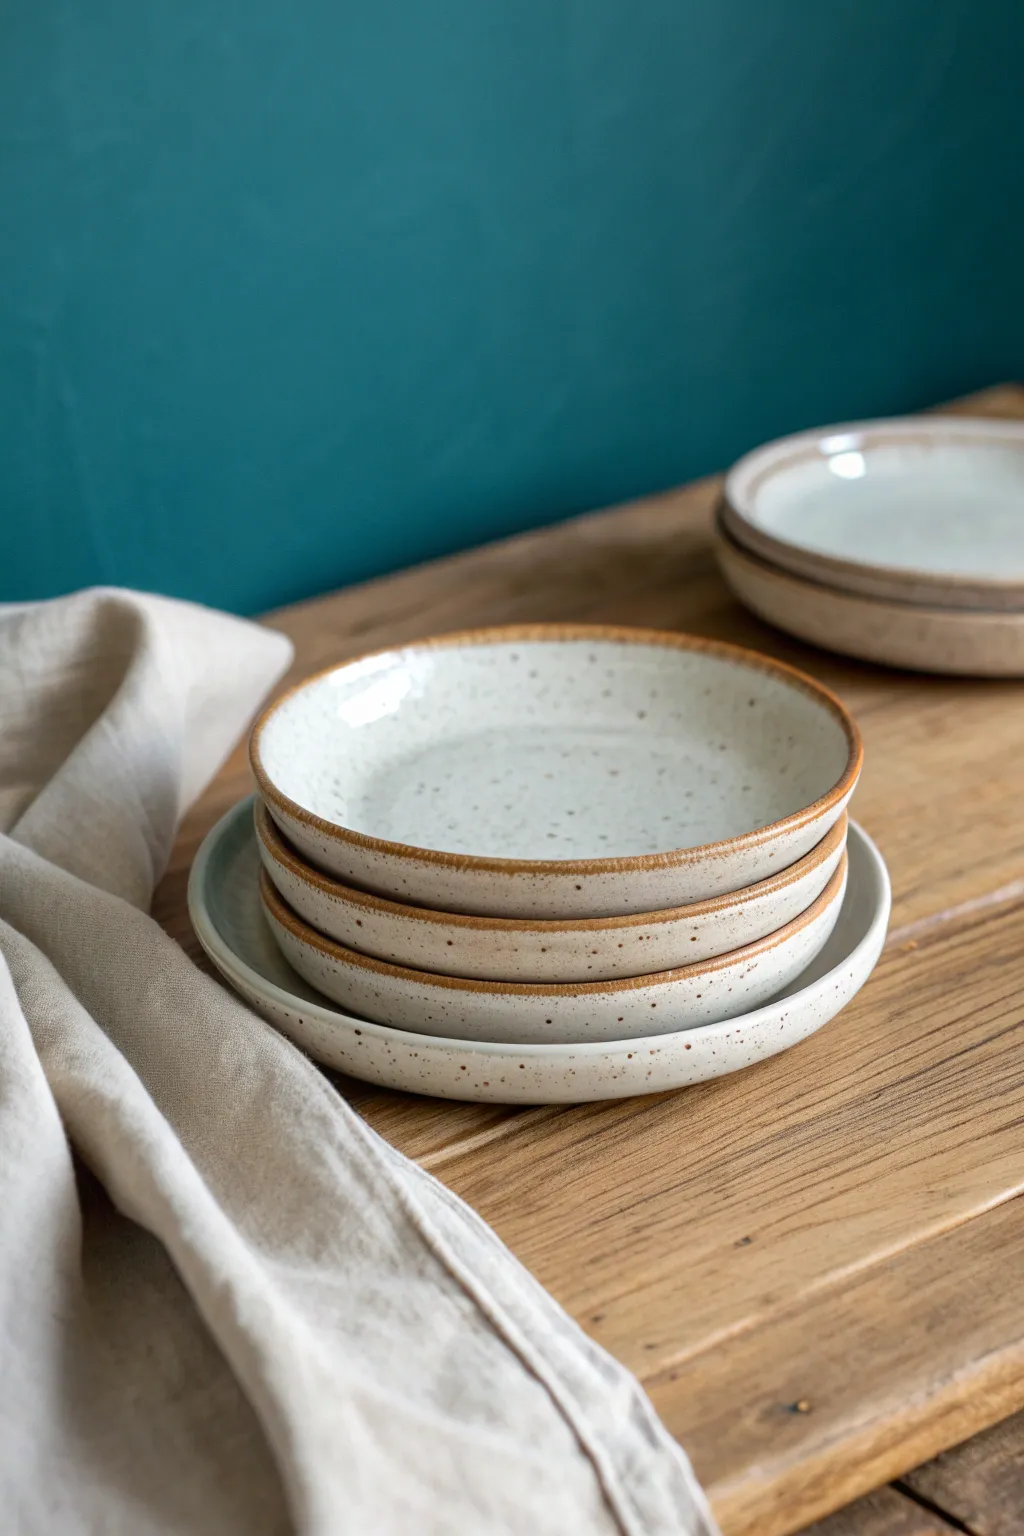
These charming everyday plates balance rustic warmth with modern simplicity, featuring a speckled creamy white glaze that contrasts beautifully against an exposed toasted clay rim. By leaving the lip unglazed, you create a defined frame for your food while highlighting the natural beauty of the stoneware clay body beneath.
Step-by-Step Guide
Materials
- Speckled buff stoneware clay (mid-fire)
- Potter’s wheel
- Throwing sponge
- Wooden ribs (various profiles)
- Wire cutter
- Needle tool
- Trimming tools (large loop and small detail tool)
- Chamois leather strip
- Cream/White speckled matte glaze
- Wax resist (liquid)
- Soft fan brush
- Kiln (set for cone 5/6)
Step 1: Throwing the Forms
-
Preparation:
Begin by wedging your speckled buff clay thoroughly to remove air pockets. Ideally, you want 2-3 pounds of clay per plate, depending on your desired final size. Form these into balls. -
Centering:
Secure a ball of clay onto the center of your wheel head. Using medium-high speed and wet hands, apply consistent pressure to center the clay until it runs smooth without wobbling. -
Opening the Floor:
Open the centered mound by pressing your thumbs into the center, leaving about 1/4 inch of thickness for the base. Pull the floor out horizontally to establish the width of your plate. -
Compressing:
Using a wooden rib or a flat sponge, compress the floor of the plate by moving from the center out to the rim several times. This is crucial for preventing chaotic S-cracks during drying. -
Pulling the Walls:
Slow the wheel down. Gently pull up a low wall, angling it slightly outward. For this specific style, you want a shallow bowl-like hybrid shape rather than a perfectly flat plate, so lift the rim about an inch high. -
Refining the Shape:
Use a kidney-shaped rib on the interior to embrace the curve, removing slip and smoothing the surface perfectly. I prefer to compress the rim lightly with a chamois piece at this stage to make it rounded and durable. -
Cutting Off:
Run a wire cutter under the base of the plate while the wheel rotates slowly to free it. Carefully transfer the wet plate to a ware board and allow it to dry to a leather-hard state.
Rim Compression
Use a strip of chamois leather held over the rim while throwing. This compresses the clay particles, making the exposed edge stronger and less prone to chipping later.
Step 2: Trimming and Finishing
-
Centering for Trim:
Once leather hard, place the plate upside down on the wheel. Center it perfectly and secure it using small lugs of soft clay around the rim. -
Defining the Foot:
Using a sharp loop tool, trim away excess clay from the outside wall to mirror the interior curve. Carve a distinct foot ring into the base, which adds stability and creates a stopping point for the glaze later. -
Smoothing:
Run a damp sponge or a smooth metal rib over the trimmed areas to erase any tool chatter marks and seal the clay pores. -
Bisque Fire:
Let the plates dry completely (bone dry). Load them into the kiln and bisque fire to Cone 04. This prepares the clay to accept glaze.
Warping Woes
If plates warp in the firing, ensure your drying process is slow and even. Don’t let the rims dry faster than the heavy center; cover rims loosely with plastic if needed.
Step 3: Glazing the Rustic Rim
-
Cleaning:
Wipe the bisque-fired plates with a damp sponge to remove kiln dust. This ensures the glaze adheres properly without crawling. -
Waxing the Rim:
This is the signature step. Using a steady hand or a banding wheel, carefully apply liquid wax resist to the very top edge (the lip) of the plate. Apply wax to the foot ring as well. -
Glaze Consistancy:
Stir your cream speckled glaze thoroughly. It should be the consistency of heavy cream. Pour the glaze into a wide container if dipping, or prepare a large soft brush. -
Application:
Dip the plate fully into the glaze, or pour glaze inside and swirl to coat, then pour out. If dipping, the wax on the rim will resist the glaze. -
Cleaning the Edge:
Even with wax, beads of glaze might form on the rim. Once the glaze is dry to the touch, use a damp sponge to wipe the rim firmly, ensuring a crisp, clean line where the raw clay meets the white glaze. -
Final Fire:
Load the glazed plates into the kiln. Fire to Cone 5 or 6 (depending on your clay body specifications) to vitrify the stoneware. -
Sanding:
After the kiln cools, remove the plates. The unglazed clay rim might feel slightly rough; sand it lightly with 400-grit wet/dry sandpaper under running water for a silky soft finish.
Enjoy styling your table with these custom handmade pieces that celebrate the raw beauty of clay

TRACK YOUR CERAMIC JOURNEY
Capture glaze tests, firing details, and creative progress—all in one simple printable. Make your projects easier to repeat and improve.
Nesting Bowl Sets to Practice Consistency
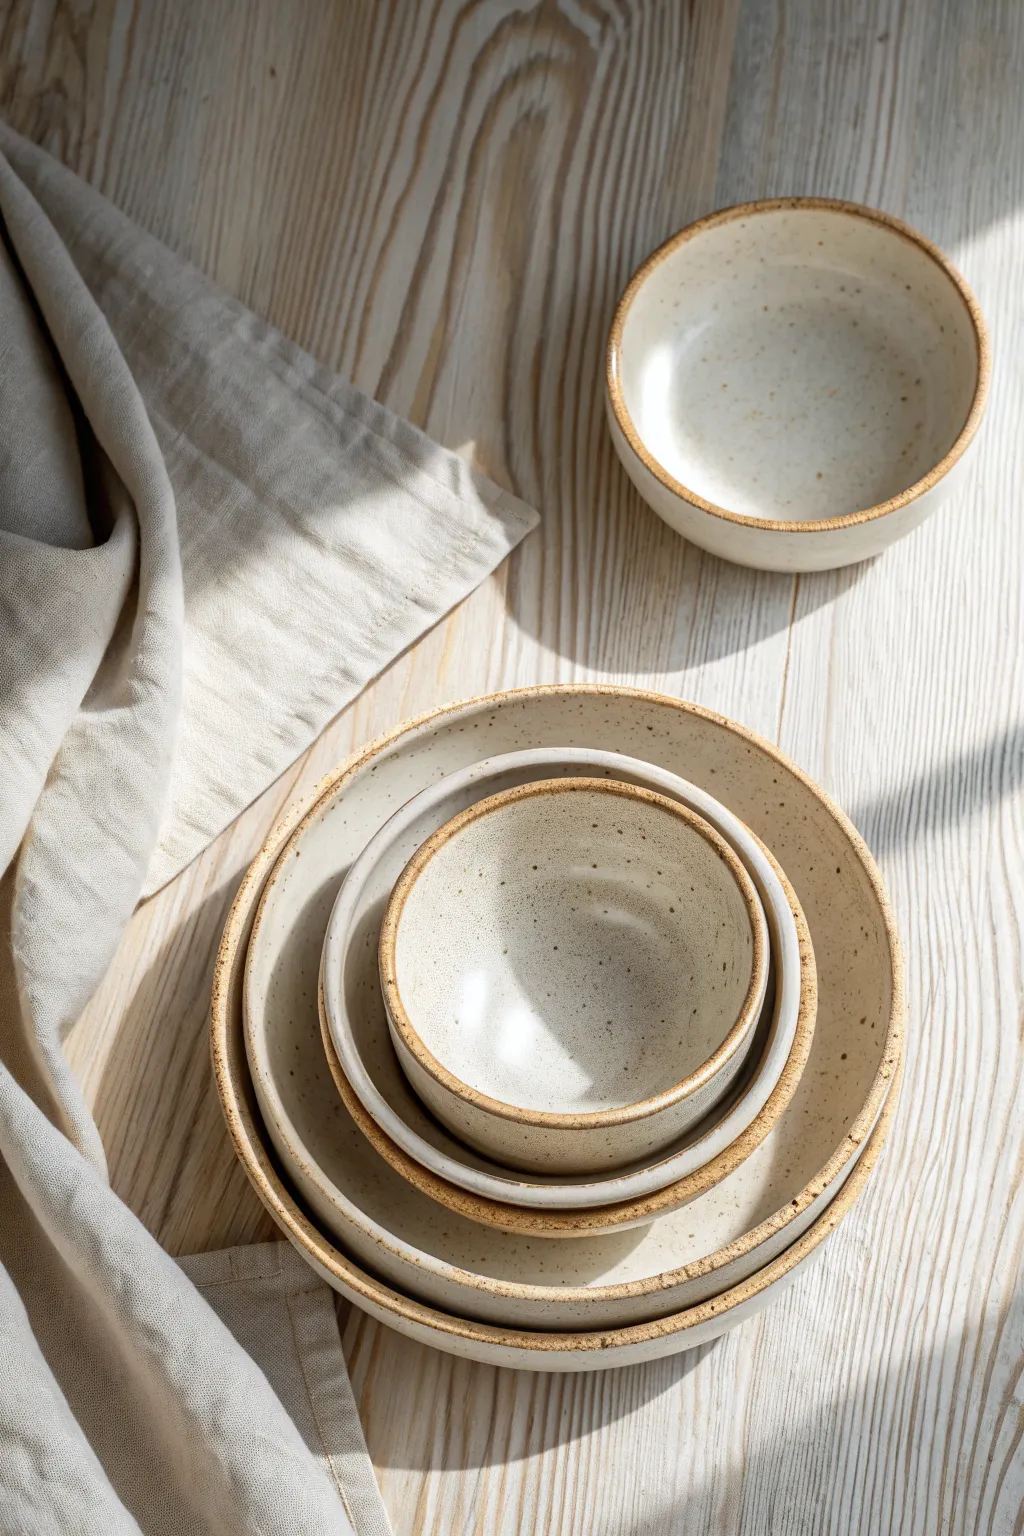
This project focuses on the timeless beauty of a nesting set, featuring a creamy, speckled glaze that contrasts elegantly with raw clay rims. The repetition required to throw graduating sizes makes this an excellent exercise for refining your consistency and measurements on the wheel.
Step-by-Step
Materials
- Speckled buff stoneware clay (or white clay with added grog)
- Pottery wheel
- Throwing tools (sponge, needle tool, rib)
- Wire cutter
- Calipers or a ruler
- Trimming tools (loop tool)
- Creamy white dipping glaze (semi-opaque)
- Wax resist (optional)
- Sponge for wiping rims
Step 1: Planning and Throwing
-
Calculate clay weights:
Before sitting at the wheel, determine the graduation of your set. For a three-piece nesting bowl set like the one shown, prepare clay balls in increasing weights, such as 1 lb, 2 lbs, and 3.5 lbs (adjusting for your desired final size). -
Center the first ball:
Start with your smallest clay ball. Secure it firmly to the wheel head and center it using steady pressure and water for lubrication. -
Open and pull:
Open the clay and pull the walls up and slightly outward to form a classic bowl shape. Aim for a smooth, continuous interior curve that matches the profile you want for the entire set. -
Refine the rim:
The rims in this set are rounded and smooth. Use a small piece of chamois or a damp sponge to compress the rim, creating a soft, rounded lip. -
Measure dimensions:
Use calipers to measure the height and width of your first bowl. Record these numbers; they are crucial for ensuring the next bowl is proportionally larger. -
Throw the subsequent bowls:
Repeat the process with the larger clay balls. I find it helpful to aim for a diameter increase of about 1.5 to 2 inches per bowl to ensure they nest comfortably without getting stuck. -
Throw the plate:
For the bottom plate, use a larger amount of clay (approx. 4 lbs). Center it low and wide, pulling the rim up just slightly to create a shallow lip rather than a high wall. -
Wire off:
Run a wire cutter under each piece to separate them from the bat or wheel head, and set them aside to dry to a leather-hard state.
Rim Consistency
When wiping the rim, spin the piece on a banding wheel while holding the sponge steady. This ensures a perfectly even clay line around the entire circumference.
Step 2: Trimming and Finishing
-
Center for trimming:
Once leather-hard, place the smallest bowl upside on the wheel. Secure it with clay wads or a Giffin Grip. -
Trim the foot:
Using a sharp loop tool, trim away excess clay from the base. Define a clean foot ring that mirrors the curve of the bowl’s interior. -
Smooth the exterior:
Use a smooth metal rib to burnish the exterior slightly if you want a very sleek surface, or leave slight throwing lines for texture. -
Repeat for all pieces:
Trim the foot rings for the remaining bowls and the large plate. Try to keep the foot style consistent across all pieces to unify the set. -
Bisque fire:
Allow all pieces to dry completely (bone dry) before loading them into the kiln for a bisque firing (usually Cone 04 or 06).
Step 3: Glazing
-
Prepare the glaze:
Mix your creamy white glaze thoroughly. If you are using a clear glaze over speckled clay, ensure it’s mixed well to avoid cloudiness. -
Wax the foot:
Apply wax resist to the bottom foot rings of all pieces to prevent glaze from sticking to the kiln shelf. -
Dip the pieces:
Using glazing tongs or your hands, dip each piece into the glaze bucket. Hold it for 3-5 seconds to achieve an even coverage, then lift and let the excess drip off. -
Wipe the rim:
This is the signature step for this specific look. Immediately after the glaze loses its sheen (but before it’s fully dry), use a damp—not dripping—sponge to wipe the glaze off the very top edge of the rim, revealing the raw clay body underneath. -
Clean up:
Check the sides for any drips and smooth them out with your finger. Ensure the foot ring is completely clean of glaze. -
Glaze fire:
Load the kiln carefully, ensuring pieces aren’t touching. Fire to the maturity temperature of your clay and glaze (typically Cone 5 or 6 for stoneware).
Make it a Full Set
Expand this project by throwing a small pouring pitcher or tumbler in a matching profile. A spout adds a new technical challenge while keeping the aesthetic.
Once fired, stack your new set to admire how the graduated sizes and matching raw rims create a cohesive and harmonious collection
Tile Coasters With Stamps and Botanicals
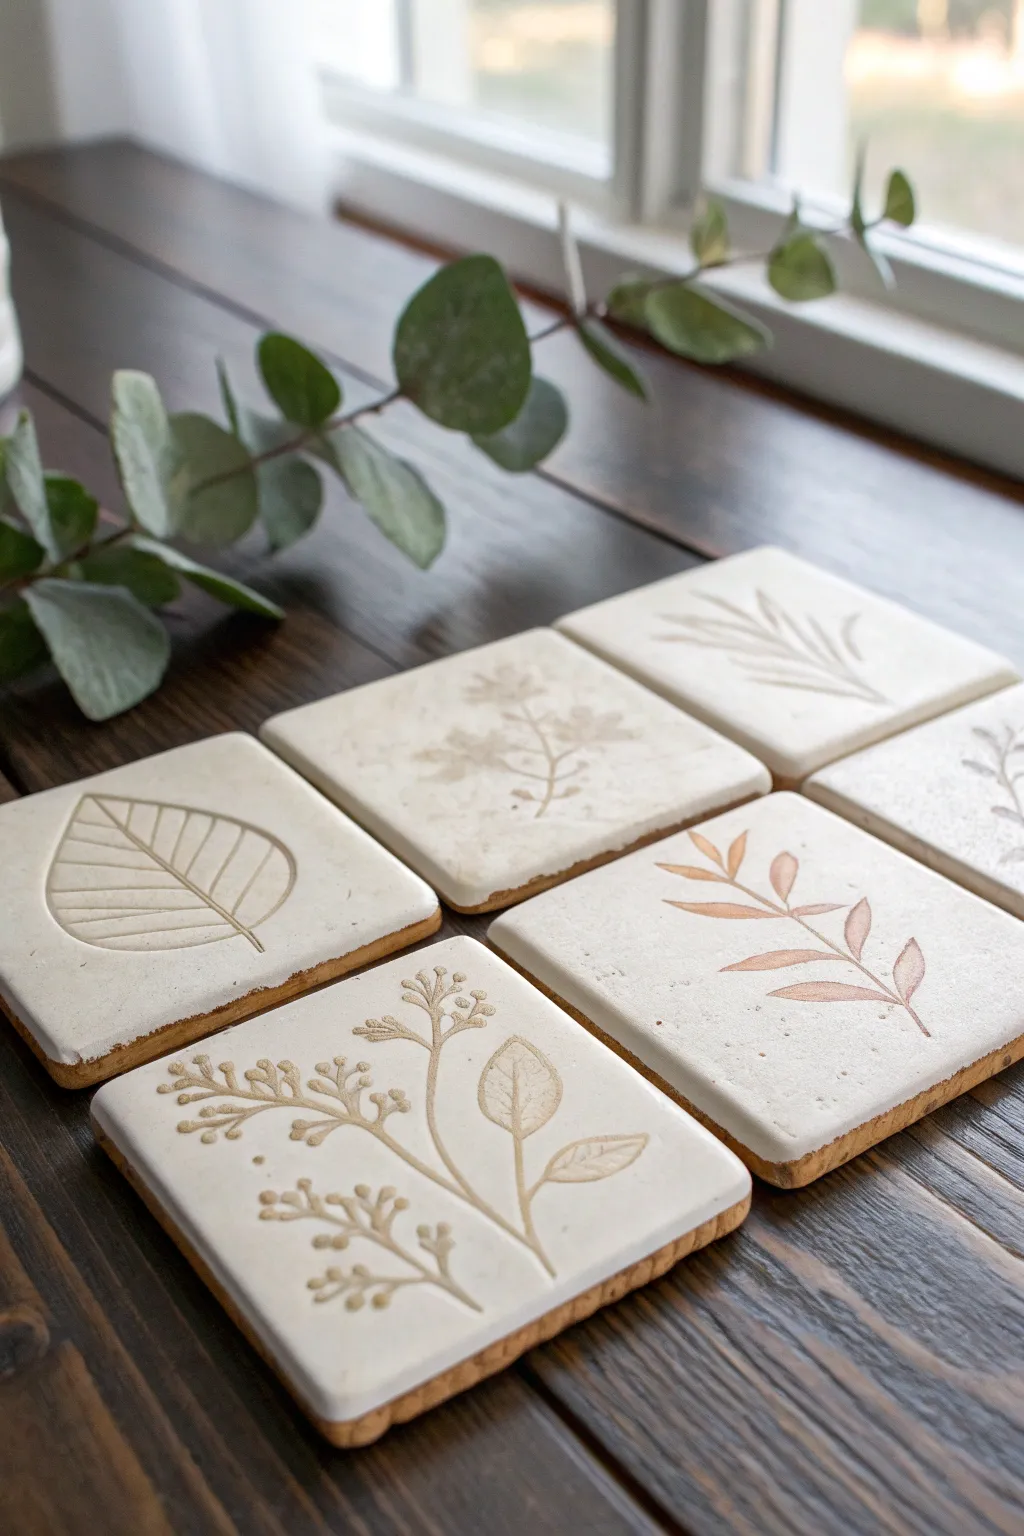
Bring the elegance of nature indoors with these handcrafted ceramic coasters featuring delicate botanical impressions. The clean white clay contrasts beautifully with warm cork backing and subtle oxide washes, creating a functional piece of art perfect for any coffee table.
Step-by-Step Guide
Materials
- White air-dry clay or polymer clay (oven-bake)
- Square cookie cutter (approx. 4 inches)
- Rolling pin
- Parchment paper or canvas mat
- Rubber botanical stamps or fresh sprigs/leaves
- Brown acrylic paint or oxide wash
- Paper towels or sponge
- Small paintbrush
- Cork sheet (adhesive-backed preferred)
- Craft knife or scissors
- Fine-grit sandpaper
- Matte spray sealant or varnish
Step 1: Shaping the Base
-
Prepare the workspace:
Lay down a sheet of parchment paper or a canvas mat to prevent the clay from sticking to your table. This also makes moving the wet clay much easier later on. -
Condition the clay:
Take a generous amount of white clay and knead it in your hands until it becomes soft, pliable, and free of any air bubbles. -
Roll out the slab:
Using your rolling pin, flatten the clay into an even slab. Aim for a thickness of about 1/4 inch to ensure the coasters are sturdy but not too heavy. -
Cut the squares:
Press your square cookie cutter firmly into the clay slab. If you don’t have a cutter, you can make a paper template and carefully cut around it with a craft knife. -
Smooth the edges:
Dip your finger in a little water and gently run it along the cut edges of each square to smooth out any sharpness or roughness.
Uneven Impressions?
If your stamp didn’t press evenly, don’t panic. Place a piece of plastic wrap over the clay before stamping next time; it softens the edges and helps distribute pressure.
Step 2: creating the Impressions
-
Select your design:
Choose a rubber stamp with a botanical motif or select a fresh, sturdy leaf. Ferns, eucalyptus, or simple branch designs work wonderfuly for this look. -
Press the design:
Position your stamp or botanical element in the center of a clay square. Press down firmly and evenly. I like to rock the stamp slightly to ensure the entire image transfers. -
Check the depth:
Lift the stamp carefully. The impression needs to be deep enough to hold the wash later, but not so deep that it thins the coaster dangerously. -
Repeat for the set:
Continue stamping the remaining squares. Feel free to use different botanical designs on each coaster for a varied, organic set. -
Allow to dry or bake:
If using air-dry clay, let the tiles dry for 24-48 hours until completely hard and white. If using polymer clay, bake according to the manufacturer’s instructions on the package.
Add Subtle Shimmer
Mix a tiny pinch of gold mica powder into your brown paint wash. The sediment will settle in the grooves, giving a hidden metallic sparkle in the light.
Step 3: Finishing Touches
-
Sand imperfections:
Once fully cured or dried, use fine-grit sandpaper to briefly sand the edges and surface, removing any fingerprints or rough spots. -
Apply the wash:
Dilute a small amount of brown acrylic paint with water create a thin wash. Using a small brush, paint this liquid into the indented lines of your botanical design. -
Wipe back the excess:
Immediately use a damp paper towel or sponge to wipe across the surface of the tile. This removes the paint from the raised flat areas but leaves the color settled deep in the botanical grooves. -
Let the paint dry:
Allow the accent paint to dry completely. This usually takes only about 15-20 minutes since the layer is very thin. -
Seal the surface:
Spray the tops of the coasters with a matte sealant. This protects the clay from moisture, coffee drips, and scratches. -
Prepare the cork:
While the sealant dries, cut squares from your cork sheet. Make them slightly smaller than your clay tiles so they don’t peek out from the sides. -
Attach the backing:
Peel the backing off the adhesive cork (or use strong craft glue) and press it firmly onto the bottom of each ceramic coaster.
Now you have a stunning set of custom coasters ready to protect your surfaces with style
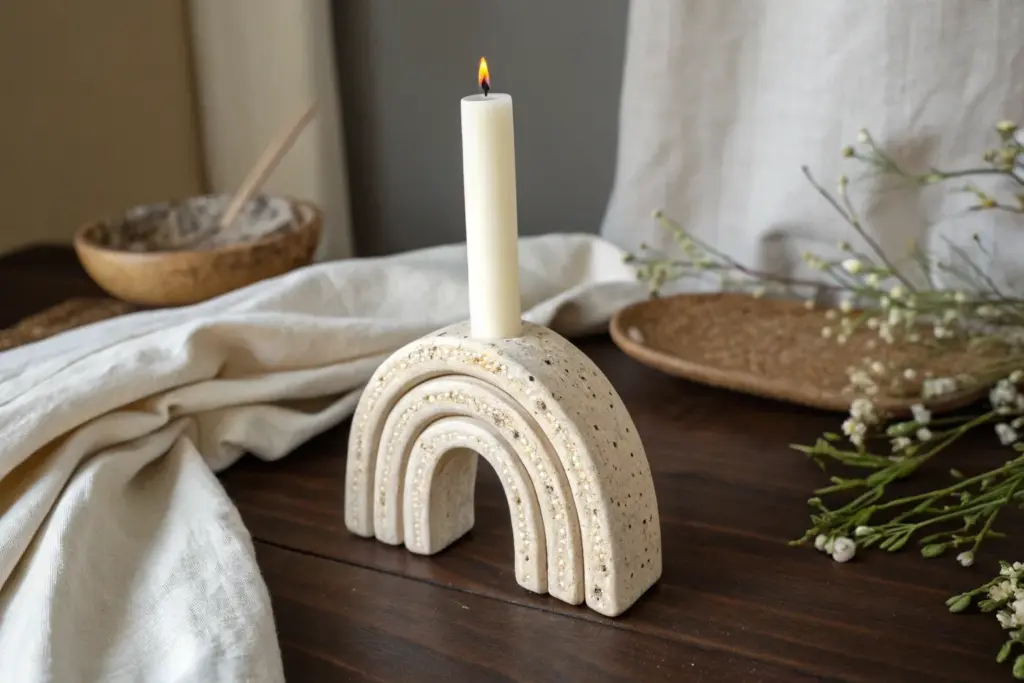
Candle Holders That Feel Sculptural

Create a unified tablescape with this three-piece ceramic set featuring two sculptural taper holders and a matching display tray. The creamy, speckled clay body brings an organic, earthy warmth that feels both modern and timeless.
Detailed Instructions
Materials
- Speckled cream stoneware clay (e.g., Laguna Speckled Buff or similar)
- Potter’s wheel
- Pin tool
- Wire cutter
- Wooden rib
- Sponge
- Calipers
- Trimming tools (loop tool)
- Clear glaze or transparent matte glaze
- Kiln
- Standard taper candle (for sizing)
Step 1: Throwing the Candlesticks
-
Prepare the Clay:
Weigh out two equal balls of clay, approximately 1.5 lbs each. Wedge them thoroughly to remove air bubbles and ensure the speckles are evenly distributed. -
Center the Tower:
Secure the first ball on the wheel head. Instead of opening wide like a bowl, center the clay into a tall, narrow cone shape, keeping the base slightly wider for stability. -
Draft the Shape:
Open the center only about an inch deep to create the cup. Then, collar the neck in significantly, leaving a bulbous form at the top for the candle cup and pulling the rest into a tapered stem. -
Refine the Profile:
Use a wooden rib to smooth the exterior lines. The shape should flow seamlessly from the wider base up the stem to the rounded cup. I like to keep the transition smooth rather than angular. -
Measure the Opening:
Use calipers set to the width of your standard taper candle. Double-check the opening size while the clay is wet, accounting for about 12% shrinkage during firing. -
Cut and Repeat:
Wire the piece off the wheel and set it aside. Repeat the process for the second candlestick, aiming for a similar height and profile, though slight variations add handmade charm.
Wobbly Candles?
If your fired opening is slightly too large, use a dab of ‘Stick-Um’ wax or melt a few drops of the candle bottom into the holder to secure it perfectly upright.
Step 2: Creating the Tray
-
Throw the Base:
Center a larger ball of clay (about 2 lbs) and flatten it into a wide pancake shape. This will be the tray to hold the candlesticks. -
Lift the Rim:
Gently pull up a low, vertical rim—no more than half an inch high. This frames the set without obscuring the base of the holders. -
Compress the Floor:
Use a rib to compress the flat floor of the plate firmly. This is crucial to prevent S-cracks during drying and firing.
Step 3: Trimming and Finishing
-
Leather Hard Stage:
Allow all three pieces to dry to a leather-hard state. They should be firm enough to handle without warping but soft enough to carve. -
Trim the Bases:
Invert the candlesticks on the wheel (using a chuck if necessary) and trim away excess weight from the bottom. Carve a small foot ring to give them a lifted appearance. -
Smooth the Edges:
Use a damp sponge to soften any sharp angles on the rims specifically where the candle will sit. -
Bisque Fire:
Load the bone-dry pieces into the kiln and fire to Cone 04 (or your clay’s specific bisque temperature). -
Glazing:
Since the clay body provides the color and texture, dip or brush the pieces with a clear or transparent matte glaze. This seals the surface while letting the natural speckles shine through. -
Final Firing:
Glaze fire the pieces to the maturity temperature of your stoneware (typically Cone 5 or 6). Ensure the candlestick openings are free of glaze drips.
Shrinkage Rates
Always measure your wet clay opening slightly larger than the actual candle (approx. 1 inch wet for a standard 7/8 inch taper) to account for clay shrinkage.
Once cooled, arrange your set with tonal tapers for a stunning, sculptural centerpiece.
Lidded Keepsake Boxes for Tiny Treasures
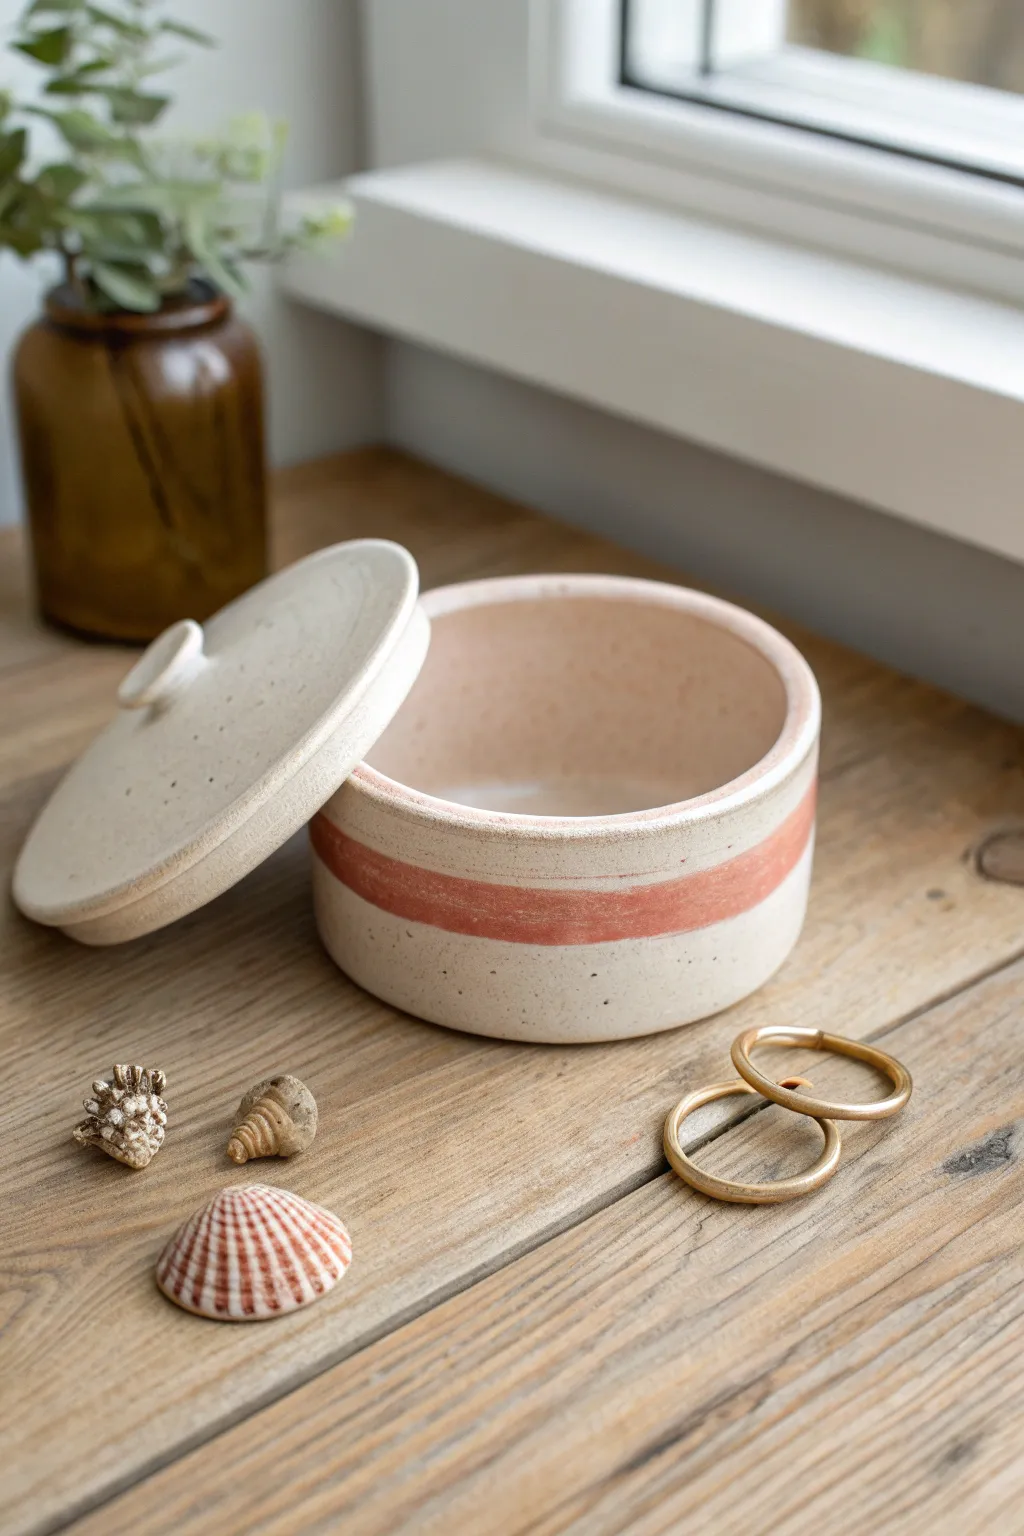
Capture the serenity of the seaside with this simple, speckled ceramic box featuring a gentle terracotta accent stripe. Its petite size makes it perfect for housing rings, small shells, or cherished mementos on a bedside table.
How-To Guide
Materials
- Speckled buff stoneware clay
- Rolling pin
- Canvas work surface
- Circular cookie cutters (approx. 3.5” and 4” or similar ratios)
- Fettling knife
- Scoring tool or serrated rib
- Slip (clay and vinegar/water mix)
- Wooden modeling tool
- Sponge
- Terracotta or coral underglaze
- Clear glossy glaze
- Soft fan brush
- Detail brush
Step 1: Forming the Base
-
Roll the slab:
Begin by wedging your speckled clay to remove air bubbles, then roll out a slab to a uniform thickness of about 1/4 inch. Smooth both sides with a damp sponge or rib to compress the clay. -
Cut the components:
Using your circular cutters or a paper template, cut out two identical circles for the base and lid. Then, cut a long rectangular strip for the walls—measure the circumference of your base circle to determine the length needed. -
Attach the wall:
Score the top edge of your base circle and one long edge of your rectangular strip thoroughly. Apply generous amounts of slip to the scored areas. -
Join the seam:
Carefully wrap the wall strip around the base circle. Where the two ends of the wall meet, cut them at a 45-degree angle (beveled cut) for a stronger connection. Score, slip, and press the ends together. -
Reinforce the interior:
Roll a very thin coil of clay and press it into the bottom interior seam where the wall meets the floor. I like to use the rounded end of a wooden tool to blend this coil seamlessly into the surrounding clay.
Warped Lids?
Dry the lid while it is sitting on the box to keep the shapes matching. If drying separately, flip the lid upside down occasionally so air hits both sides evenly.
Step 2: Creating the Lid
-
Add a flange:
To keep the lid from sliding off, you will need a flange. Roll a small coil or cut a thin strip of clay and attach it to the underside of your second circle, inset slightly so it fits snugly inside the box walls. -
Check the fit:
Test the lid on the box gently. It should sit securely without wiggling, but leave a tiny bit of wiggle room to account for shrinkage during drying. -
Add the knob:
Roll a small ball of clay and flatten it slightly into a disc. Score and slip the center of the lid top and attach the disc to create a minimal, modern handle. -
Refine the edges:
Once the clay is leather hard, use a damp sponge to round over any sharp edges on the rim of the box and the lid. This ensures the glaze breaks beautifully over the curves later.
Clean Lines
For a super crisp stripe edge like the photo, apply automotive detailing tape or thin washhi tape to mask off the area before painting your underglaze band.
Step 3: Glazing and Finishing
-
Bisque fire:
Allow the piece to dry completely slowly to prevent warping. Fire to bisque temperature (usually cone 04 or 06) in your kiln. -
Apply the stripe:
Using a soft detail brush, paint a single, bold band of terracotta or coral underglaze around the middle of the box exterior. I recommend using a banding wheel if you have one to keep the line steady as you rotate the piece. -
Glaze the interior:
Pour clear glossy glaze inside the box, swirl it to coat all surfaces, and pour out the excess immediately. Wipe the rim clean with a sponge. -
Glaze the exterior:
Brush or dip the exterior of the box and the entire lid in clear glossy glaze. This will seal the clay while letting the natural speckles of the stoneware shine through. -
Clean the foot:
Wipe the bottom of the box completely clean of glaze to prevent it from fusing to the kiln shelf. -
Final firing:
Fire the piece again to glaze maturity (typically cone 5 or 6 for stoneware). Let the kiln cool completely before retrieving your new treasure box.
Once cooled, your box is ready to hold your favorite jewelry pieces or sit prettily on a shelf
A Handmade Ceramic Paint Palette for Your Desk
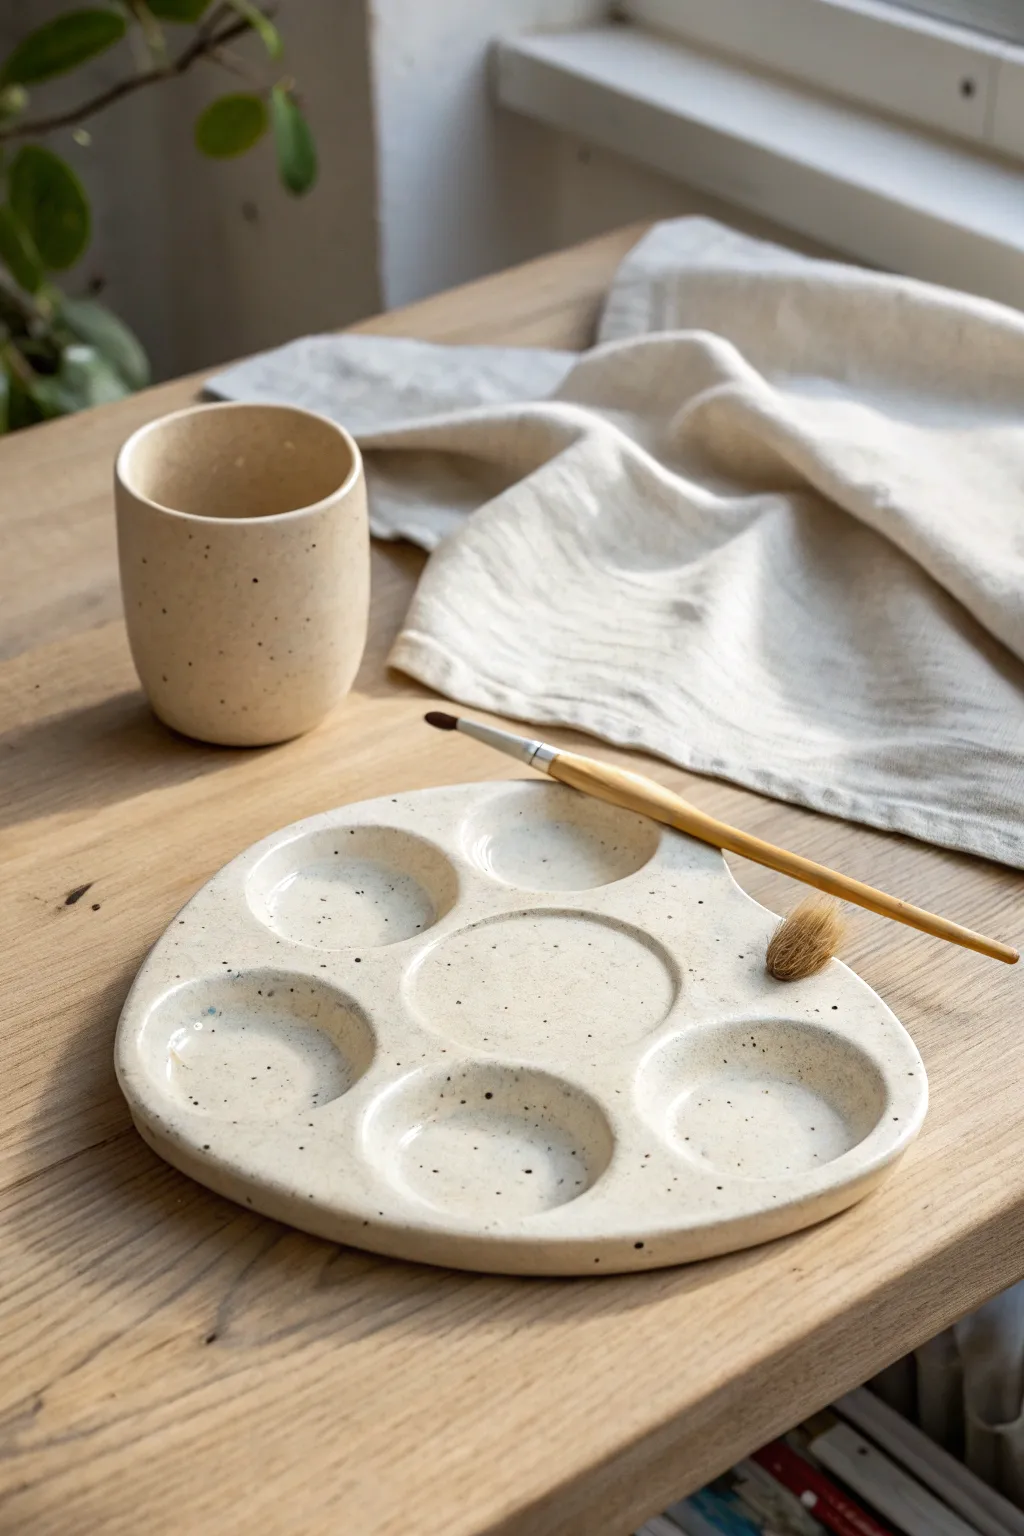
Elevate your desktop studio with this organic, handmade ceramic paint palette featuring a soft cream speckled glaze. Its gentle curves and deep wells make it perfect for watercolor artists or gouache enthusiasts looking for functional beauty.
Step-by-Step Guide
Materials
- White or speckled stoneware clay body (approx. 1.5 lbs)
- Rolling pin
- Canvas mat or wooden board
- Needle tool
- Rib tool (wooden or silicone)
- Sponge
- Circular cookie cutters or small jar lids (various sizes)
- Loop tool for carving (optional)
- Speckled cream or ‘oatmeal’ brush-on glaze
- Kiln access
Step 1: Shaping the Base
-
Prepping the clay:
Begin by wedging your clay thoroughly to remove any air bubbles. Form it into a smooth, slightly flattened ball. -
Rolling the slab:
Roll out a slab of clay to a thickness of approximately 3/4 inch. You want this base to be substantial enough to support carving out the wells later without becoming too thin. -
Cutting the organic shape:
Using your needle tool, freehand cut a soft, rounded triangular shape or an irregular oval. Avoid sharp corners; aim for the fluid, organic silhouette seen in the photo. -
Smoothing the edges:
Immediately run a damp sponge or your finger along the cut edge to soften the rim. This prevents sharp edges from forming and becoming brittle after firing.
Weighted Stability
Don’t make the slab too thin! A heavier, thicker palette stays put on the table better when you are mixing vigorous washes.
Step 2: Creating the Wells
-
Drafting the layout:
Lightly press your circle cutters or lids onto the surface of the clay to map out where your paint wells will go. I like to place a larger mixing area in the center surrounded by smaller wells. -
Pressing the indentations:
For a smooth, uniform well, you can press a rounded object (like the back of a measuring spoon or a smooth stone) firmly into the clay. Alternatively, use a loop tool to gently carve out the clay circular depressions. -
Refining the depth:
Ensure each well is about 1/4 to 1/2 inch deep. You want enough depth to hold water and pigment, but not so deep that you poke through the bottom. -
Smoothing the interiors:
This is crucial: use a slightly damp sponge or your finger to meticulously smooth the inside of every well. Any roughness here will tear up your paintbrushes later. -
Including a brush rest:
On the right side of the palette, use your thumb or the handle of a paintbrush to create a small, shallow notch on the rim. This serves as a convenient resting spot for your brush.
Step 3: Finishing and Firing
-
Slow drying:
Cover the piece loosely with plastic and let it dry slowly for several days until bone dry. This thick slab needs time to dry evenly to prevent warping. -
Bisque firing:
Fire the piece to bisque temperature (usually cone 04) according to your clay body’s specifications. -
Glazing preparation:
Wipe the bisque-fired piece with a damp sponge to remove dust. Wax the very bottom of the palette to prevent it from sticking to the kiln shelf. -
Applying the glaze:
Apply 2-3 coats of a speckled cream or oatmeal glaze. If using a dipping glaze, dip once and let dry. Ensure the glaze doesn’t pool too thickly in the bottom of the wells. -
Checking the wells:
Inspect the wells before firing; if the glaze is too thick, pinholes might form. Smooth out any drips with a finger. -
Glaze firing:
Fire the piece again to the maturation temperature of your glaze and clay (typically cone 5 or 6 for stoneware). -
Sanding the bottom:
Once cool, use high-grit sandpaper to smooth the unglazed bottom of the palette so it won’t scratch your desk surface.
Make a Set
Use extra clay to create a simple cylindrical water cup glazed in the same finish for a cohesive studio set.
Enjoy mixing your colors on this beautiful surface that will last a lifetime
Animal Planters That Double as Cute Decor
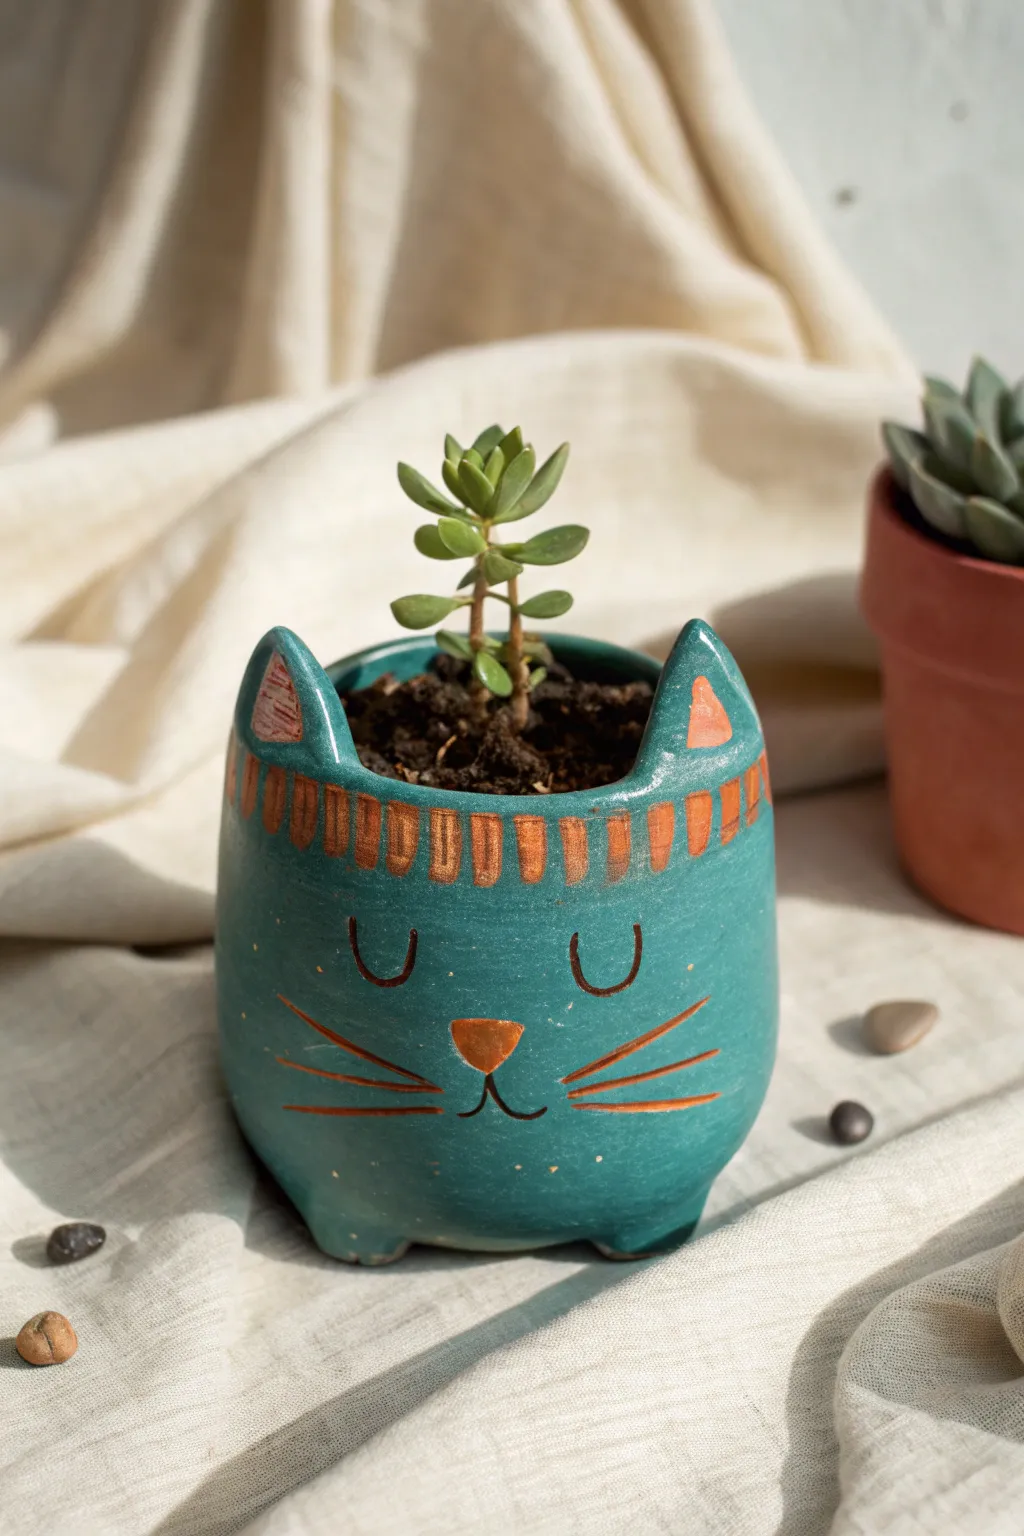
Bring a touch of playful charm to your windowsill with this adorable hand-built ceramic cat planter. Featuring a vibrant teal glaze with earthy terracotta accents, this pot is the perfect cozy home for a small succulent.
How-To Guide
Materials
- Stoneware clay (smooth or fine grog)
- Pottery tools (needle tool, rib tool, sponge)
- Rolling pin and guide sticks
- Slip and scoring tool
- Underglaze (Teal/Turquoise)
- Wax resist
- Clear glaze (transparent)
- Small carving tool or sgraffito loop
- Kiln access
Step 1: Forming the Body
-
Create the base:
Start with a ball of clay roughly the size of a large orange. Using the pinch pot method, insert your thumb into the center and gently pinch the walls while rotating the ball to create an even, cup-like shape. -
Refine the shape:
Continue pinching and smoothing until the walls are about 1/4 inch thick. Gently paddle the outside with a wooden spoon or flat tool to give the pot a slightly rounded, organic silhouette rather than a perfect cylinder. -
Level the rim:
Place the pot on a flat surface. Use a needle tool to trim the top rim unevenly if needed, aiming for a straight horizontal edge, then smooth it with a damp chamois or sponge. -
Shape the feet:
Roll three small balls of clay. Flatten them slightly and attach them to the bottom of the pot using the scratch-and-slip method to create stable little feet.
Uneven drying?
If the ears seem to be drying faster than the thick body, cover them with small bits of damp paper towel while the rest of the pot catches up.
Step 2: Adding Character Details
-
Form the ears:
Roll out a small slab of clay and cut two identical triangles. Curve them slightly to mimic the natural cupping of a cat’s ear. -
Attach the ears:
Score the top rim of your pot where the ears will sit. Slip and attach the triangles, blending the clay downwards on the back and inside so they become seamless with the main body. -
Carve the rim texture:
Using a small carving tool, carefully incise vertical lines all around the upper rim, just below the ears, creating a decorative band about half an inch wide. -
Detail the face:
With a needle tool or small loop tool, carve two U-shapes for the closed sleeping eyes. Carve a small triangle for the nose and add three whiskers on each cheek ensuring the lines are deep enough to hold glaze later. -
Dry and Bisque:
Let the piece dry slowly under plastic to prevent cracking, especially around the added ears. Once bone dry, fire the piece to bisque temperature (usually Cone 04).
Step 3: Glazing and Finishing
-
Apply wax resist:
Paint liquid wax resist carefully over the areas you want to remain the raw clay color: the inner triangles of the ears, the carved vertical ban at the rim, the nose triangle, and the whisked lines. -
Apply teal underglaze:
Using a soft brush, apply 2-3 coats of teal underglaze to the entire exterior of the pot. Avoid the waxed areas, though the wax will naturally repel the color. -
Clean up details:
Once the underglaze is dry, use a damp sponge to gently wipe away any stray specks of teal from the waxed areas to ensure the raw clay color remains crisp. -
Glaze the interior:
Fill the inside of the pot with a clear or dark liner glaze, swirl it around to coat the interior fully, and pour out the excess. This waterproofs the planter. -
Final clear coat:
I like to apply a thin layer of clear transparent glaze over the entire exterior to give it a glossy finish and seal the underglaze. -
Final firing:
Fire the piece to the maturation temperature of your clay and glaze (typically Cone 5 or 6 for stoneware).
Add a Tail
Before firing, create a small coil tail and attach it to the back of the pot, curling it around the side for an extra 3D element.
Once cooled, pot up your favorite small succulent and find a sunny spot for your new feline friend
Slip-Trailed Squiggles for Instant Wow Texture
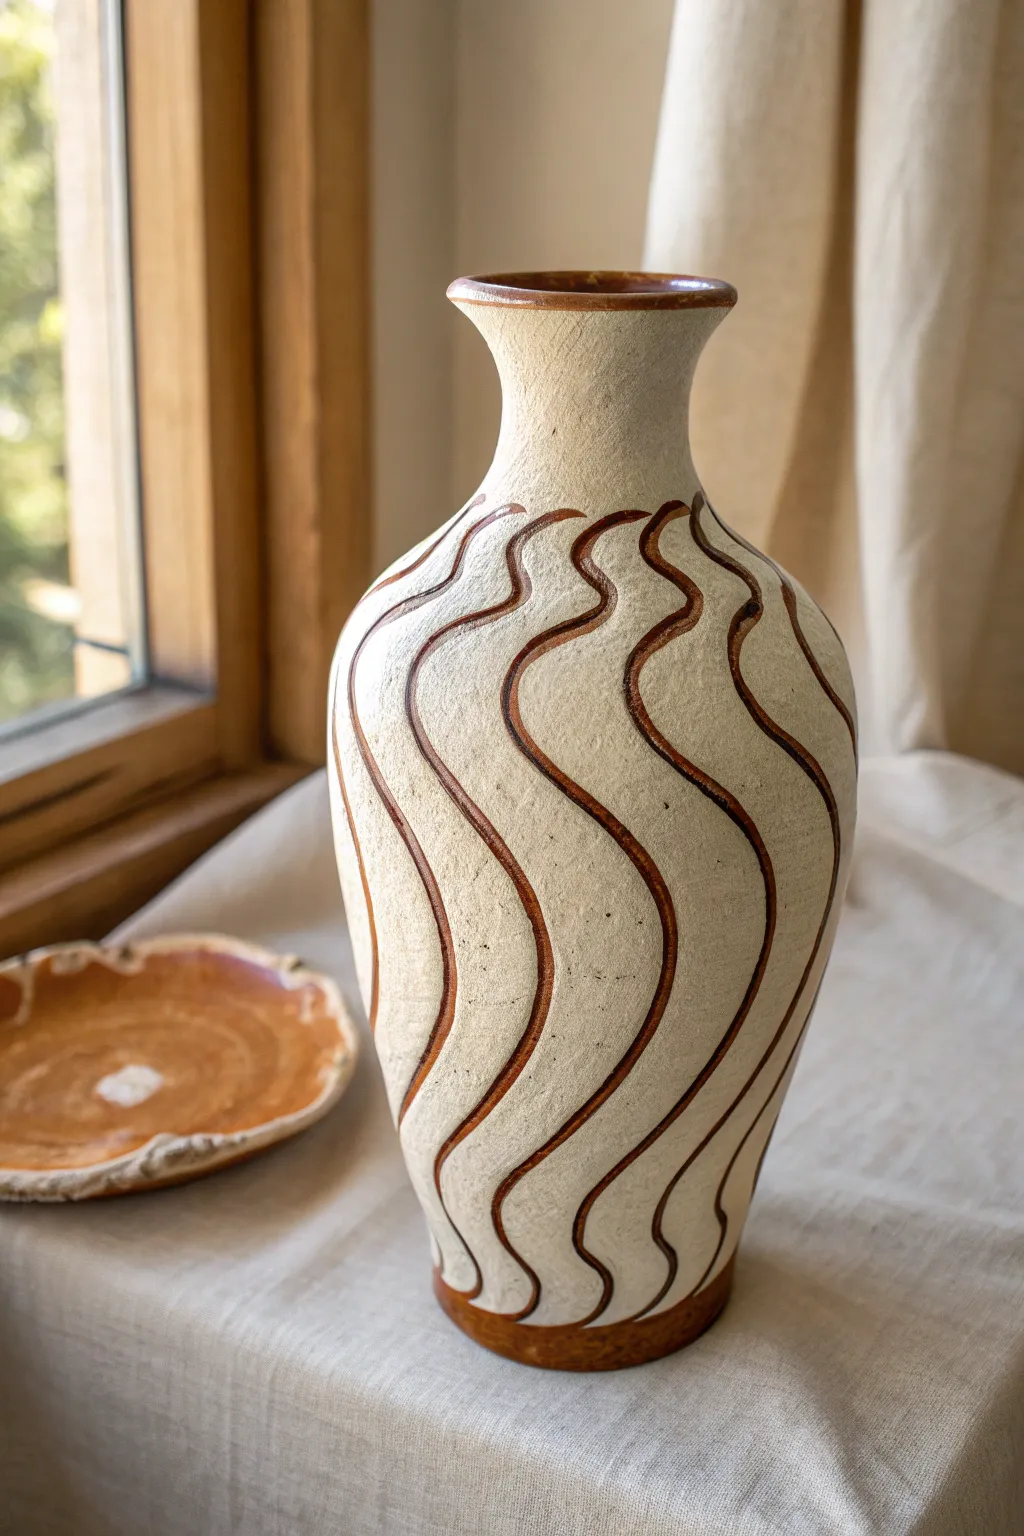
Achieve a sophisticated, organic look by combiningsgraffito-like texture with bold slip-trailing techniques. This project features rhythmic, vertical brown squiggles over a textured cream base, punctuated by a rich amber rim and foot.
Detailed Instructions
Materials
- Stoneware clay body
- Pottery wheel and tools (or coil-building supplies)
- White or cream slip (thick consistency)
- Iron oxide wash or dark brown underglaze
- Sponge
- Slip-trailing bulb or squeeze bottle with a medium nozzle
- Rib tool (serrated and smooth)
- Clear glaze (optional)
Step 1: Shaping the Vessel
-
Throw the base form:
Begin by centering your clay on the wheel and opening it up. Aim for a baluster shape: a wider body that tapers gently into a narrow neck before flaring slightly at the rim. -
Refine the curve:
Use a rib to smooth the exterior, pushing from the inside to create a volumetric, rounded belly. Ensure the transition to the neck is smooth and not angular. -
Form the rim and foot:
Define a distinct, slightly rolled rim at the top. At the bottom, trim or shape a clear foot ring that will separate the body from the table surface. -
Dry to leather hard:
Allow the vase to dry slowly until it reaches a sturdy leather-hard stage. It needs to be firm enough to handle surface decoration without warping.
Steady Hands
Rest your pinky finger against the dry surface of the pot as a stabilizer while you trail the slip. This acts as a pivot point for smoother curves.
Step 2: Creating the Textured Base
-
Apply the base slip:
If your clay isn’t naturally cream-colored like the photo, brush or dip the entire exterior (stopping at the foot) in a thick white or cream slip. -
Add surface texture:
While the slip is still damp but not wet, use a sponge or a slightly rough scouring pad to dab the surface. This creates the ‘stucco’ or grainy look seen between the lines. -
Clean the boundaries:
Wipe away any slip from the very top rim and the bottom foot ring to expose the raw clay body, which will later be colored dark brown.
Step 3: Slip-Trailing the Design
-
Prepare the brown slip:
Mix a dark brown slip or thicken a dark underglaze. It should be the consistency of heavy cream or yogurt—thick enough to hold a raised line. -
Load the trailer:
Fill your slip trailer or squeeze bottle. Test the flow on a spare piece of clay to ensure it doesn’t sputter. -
Map out the waves:
Visualize the vertical S-curves. You can lightly scratch guide lines with a needle tool if you are nervous about freehanding. -
Apply the first wave:
Start from the shoulder (just below the neck) and squeeze a continuous, confident wavy line down to the bottom of the belly. Maintain steady pressure for an even thickness. -
Complete the pattern:
Work your way around the pot, spacing the waves evenly. I like to rotate the wheel or banding wheel slowly as I work to keep the rhythm consistent. -
Let the slip set:
Allow the raised slip lines to dry until they are no longer shiny. Do not touch them while wet or they will smear.
Dual-Tone Effect
Try layering a lighter slip color underneath the brown trail line. As the brown melts slightly in the kiln, a halo effect can emerge around the squiggles.
Step 4: Finishing and Firing
-
Color the accents:
Brush an iron oxide wash or a dark amber underglaze onto the exposed rim and the foot ring to match the color of the slip-trailed lines. -
Bisque fire:
Once bone dry, load the vase into the kiln for a bisque firing (usually Cone 06/04). -
Glaze application:
Apply a clear matte or satin glaze over the entire piece. This protects the textured surface while preserving the contrast between the rough cream base and the smooth brown lines. -
Final firing:
Fire the piece to the maturity temperature of your clay body (e.g., Cone 6 or 10).
Place your finished vase near a window where the natural light can catch the ridges of your slip-trailing work
Miniature Vase Collections for Glaze Testing
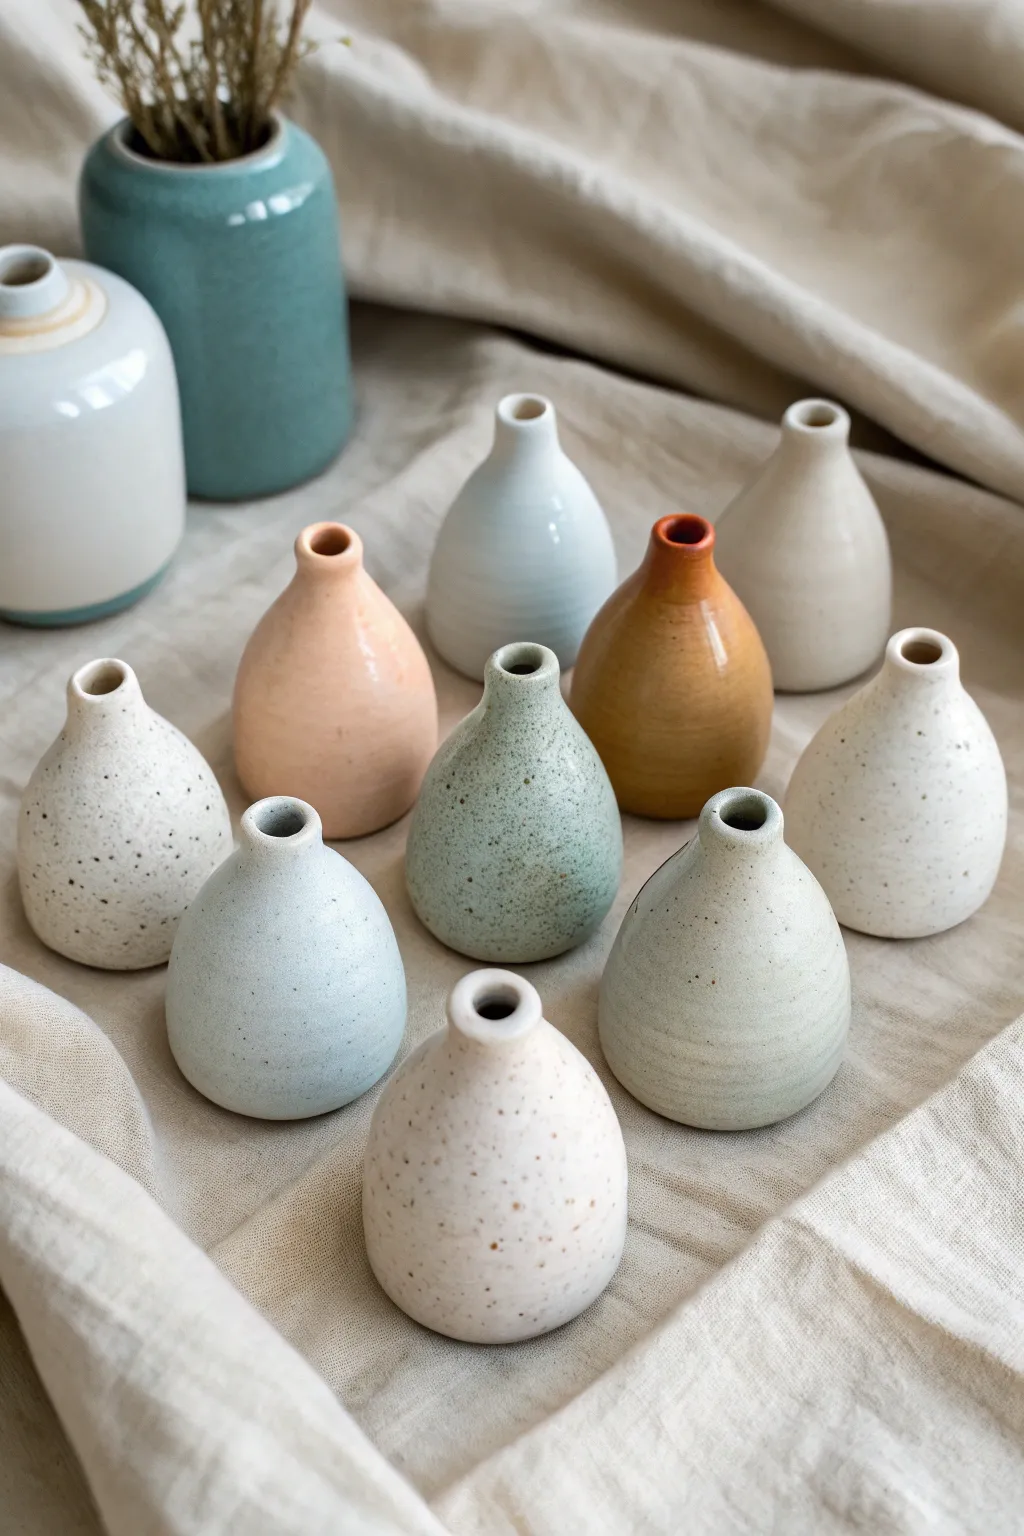
Create a charming collection of miniature vases that double as functional glaze tests and adorable decor. These tiny, bottle-shaped vessels allow you to experiment with various clay bodies and glaze combinations on smaller forms before committing to larger pieces.
Step-by-Step Tutorial
Materials
- Stoneware or porcelain clay (approx. 100-150g per mini vase)
- Pottery wheel
- Small throwing tools (rib, sponge, wooden knife)
- Needle tool
- Cutting wire
- Assorted glazes (glossy amber, speckled white, matte blue, etc.)
- Kiln for bisque and glaze firing
- Bat or throwing surface
Step 1: Throwing the Miniatures
-
Prepare Clay Balls:
Weigh out small balls of clay, approximately 100 to 150 grams each. Wedge them thoroughly to remove air pockets, which is especially critical for tiny forms where walls will be thin. -
Center the Clay:
Secure a clay ball on the wheel head. Using slightly higher wheel speed than usual for large pots, center the clay into a low, wide mound rather than a tall cone. -
Open the Form:
Open the center hole, leaving a slightly thicker floor (about 1cm) to provide stability. Pull the floor outward only slightly; the base of these vases is intended to be narrow. -
Pull the Walls:
Collar the clay inward immediately to establish a conical shape. Perform small, controlled pulls to raise the walls while maintaining a bulbous bottom section. Don’t worry about height yet. -
Shape the Belly:
Use a small rib or your fingers inside the pot to push the belly of the vase outward gently. This creates the rounded, organic teardrop shape seen in the reference. -
Collar the Neck:
Gently squeeze the clay at the shoulder inward to narrow the opening significantly. I find using just my fingertips here gives the most control for these tiny necks. -
Refine the Rim:
Once the neck is sufficiently narrow (about 1-2cm diameter), compress the rim with a chamois or sponge. Keep the lip simple and rounded. -
Cut and Remove:
Undercut the base slightly with a wooden knife to create a shadow line. Run your wire tool underneath and carefully lift the pot off the wheel using dry hands or pot lifters. -
Repeat for Variation:
Continue throwing the remaining clay balls. Vary the shapes slightly—make some squat and round, others taller and more slender—to create an interesting grouping.
Throwing Off the Hump
For tiny items, try “throwing off the hump.” Center a large mound of clay and throw individual mini vases from the top section, cutting each one off as you go.
Step 2: Trimming and Firing
-
Drying:
Allow the pots to dry to a leather-hard stage. Because they are small, cover them loosely with plastic to ensure they dry evenly from rim to foot. -
Trim the Foot:
Invert the vases onto a chuck or secure them to the wheel. Trim excess weight from the bottom and carve a neat foot ring, ensuring the wall thickness feels consistent. -
Bisque Fire:
Once bone dry, load the vases into the kiln for a bisque firing (typically Cone 04 or 06, depending on your clay).
Step 3: Glazing and Finishing
-
Plan Your Palette:
Select a variety of glazes to test. The example collection uses a mix: speckled whites, matte pastel blues, a glossy amber/brown, and a soft matte pink. -
Wax the Bottoms:
Apply wax resist to the foot ring and slightly up the side of the base of each vase to prevent glaze from running onto the kiln shelf. -
Dip Glazing:
Using glazing tongs or your fingers (if touching the waxed areas), dip each vase into its designated glaze bucket. Hold for 3 seconds for standard coverage. -
Clean the Rims (Optional):
For some vessels, you might want to wipe the rim slightly with a sponge to expose the clay body, creating a nice contrast line. -
Glaze Fire:
Load the glazed miniatures into the kiln. Ensure they aren’t touching each other. Fire to your clay’s maturity temperature (e.g., Cone 5, 6, or 10). -
Sand the Bottoms:
After firing, check the bottoms for any sharp bits of glaze or rough clay. Use sandpaper or a sanding stone to smooth the foot rings so they sit flat without scratching surfaces.
Glaze Crawling Issues
If the glaze looks like it pulled away leaving bare spots, the bisque ware might have been dusty. Always wipe bisque pots with a damp sponge before dipping.
Arrange your finished miniatures on a linen cloth to admire the beautiful variety of textures and colors you created
Cutout Lanterns That Glow at Night
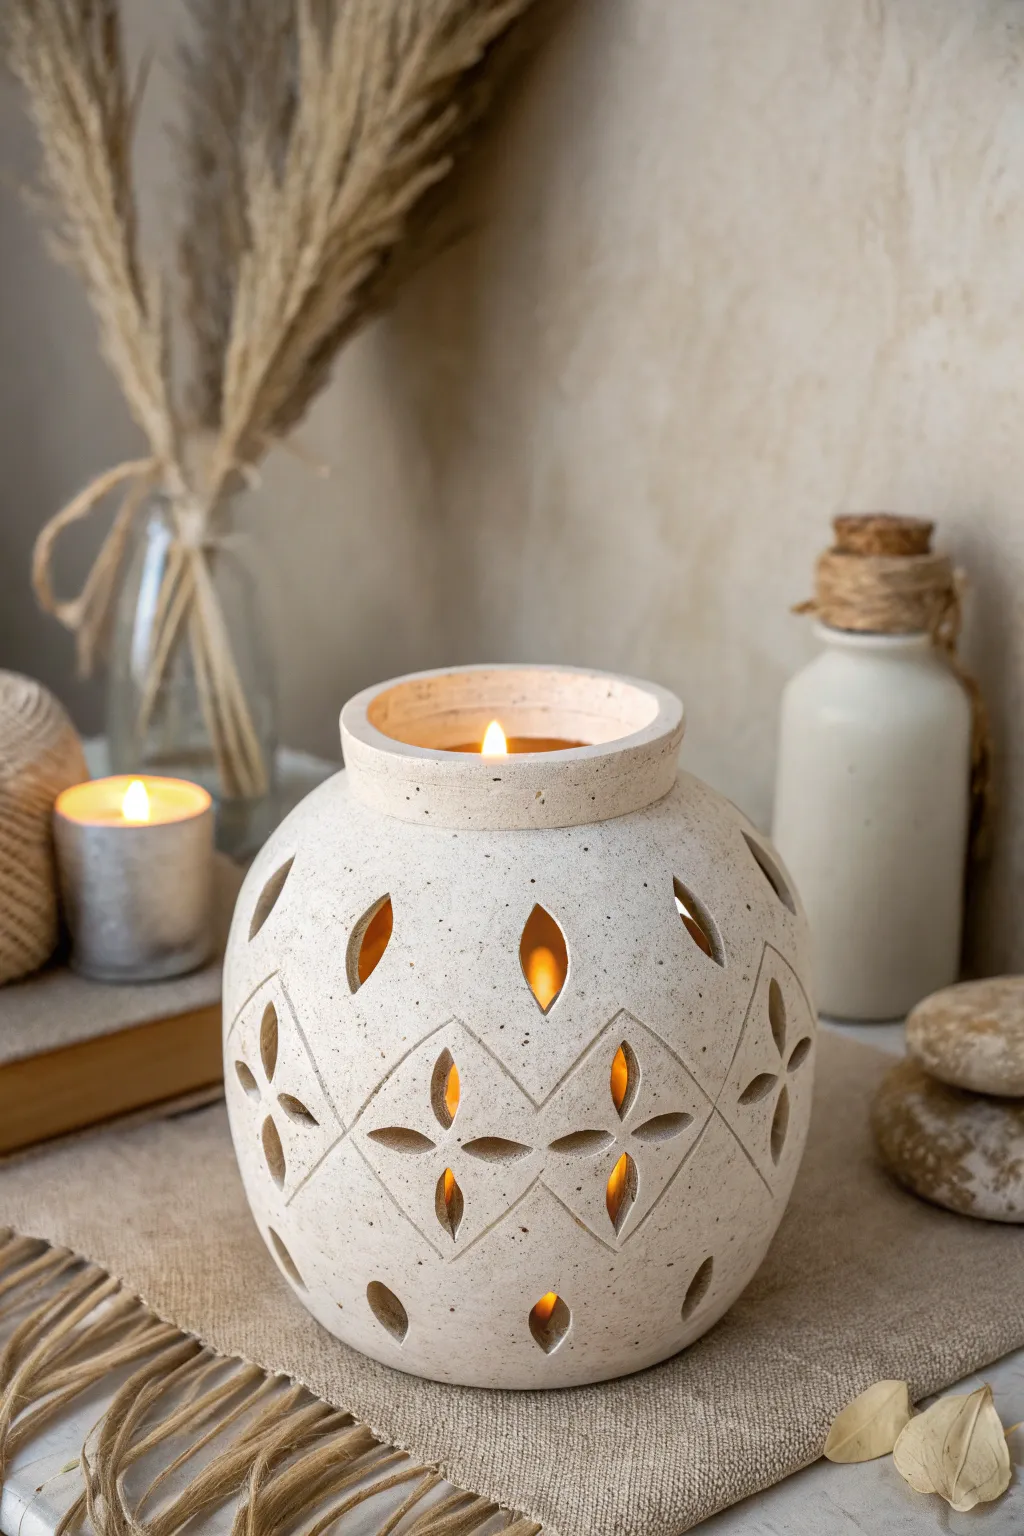
Craft a serene focal point for your evenings with this spherical ceramic lantern, featuring delicate geometric cutouts that cast soothing shadows when lit. The natural, speckled white clay body adds an organic touch, making it perfect for minimalist or boho decor.
Step-by-Step Guide
Materials
- Speckled white stoneware clay (cone 5/6)
- Pottery wheel (or slat/coil building tools)
- Needle tool
- Metal kidney rib
- Small geometric clay cutters (teardrop and diamond shapes)
- X-Acto knife or fettling knife
- Sponge
- Wire cutter
- Wooden modeling tool
- Clear matte glaze (or leave unglazed for texture)
Step 1: Forming the Globe
-
Center the clay:
Start with a generous ball of speckled stoneware clay, roughly 2-3 pounds. Center it firmly on the wheel head, ensuring it feels stable and balanced before opening. -
Open and widen:
Open the clay down to within a half-inch of the bat. Pull the floor outward to establish the base width, keeping in mind that the widest part of the belly will extend beyond this footprint. -
Pull the cylinder:
Begin pulling the walls upward into a cylinder. Keep the walls even; consistency is crucial here because thin spots might collapse when we bell it out later. -
Shape the belly:
Gradually push the walls outward from the inside using your left hand, while your right hand supports the outside. Create a volumetric, spherical shape, moving slowly to maintain structural integrity. -
Collar the neck:
Once the belly is round, collar the top in significantly to create a narrower opening. Use both hands to gently squeeze the clay inward as the wheel spins. -
Create the gallery rim:
At the narrowed opening, form a distinct, flat vertical rim about an inch high. I like to use a wooden tool here to define a sharp groove or ‘step’ at the base of the rim for visual interest. -
Smooth the surface:
While spinning, run a metal kidney rib over the exterior to remove throwing lines and compress the clay, highlighting the natural speckles. -
Trim the foot:
Once leather hard, trim away excess weight from the bottom and carve a neat foot ring.
Use a Template
Draw your repetitive pattern on a strip of paper first. Wrap this around the leather-hard pot and trace through it with a needle tool for perfectly spaced cutouts.
Step 2: Carving the Pattern
-
Outline the grid:
Lightly sketch horizontal guide lines around the belly of the pot. Divide the circumference into equal vertical sections to map out where your main floral motifs will sit. -
Pierce the main diamonds:
Using a diamond-shaped cutter or a steady knife hand, cut a row of diamond shapes connected point-to-point along the center line. This creates the ‘belt’ of the design. -
Add the petals:
Around the intersection points of the diamonds, cut teardrop shapes radiating outward. These act as petals, forming a four-point flower or star pattern. -
Cut the accent drops:
In the negative space above and below the main band, cut freestanding teardrop shapes. Alternate their orientation to flow with the curve of the sphere. -
Bevel the cuts:
After cutting, hold the knife at a slight angle to bevel the interior edges of the thick clay wall. This lets more candlelight escape and gives a cleaner look.
Step 3: Finishing Touches
-
Refine the edges:
Once the clay is bone dry, take a slightly damp sponge to soften the sharp edges of every cutout. Be gentle to avoid cracking the delicate bridges between holes. -
Bisque fire:
Load the piece into the kiln for a bisque firing to cone 04. This prepares the clay to accept glaze without turning to mud. -
Glaze application:
For this natural look, you can leave the exterior unglazed to show off the raw stone texture. Alternatively, apply a very thin coat of clear matte glaze. Always glaze the interior if you plan to use real candles, as wax cleanup is easier on glazed surfaces. -
Final wipe down:
Ensure no glaze is clogging the cutout holes. Use a small brush to clear any droplets from the openings. -
Final firing:
Fire the kiln to the maturity temperature of your clay body (likely cone 5 or 6). Once cool, place a tea light or LED votive inside to test the glow.
Aromatherapy Lantern
Create a small, shallow dish that fits perfectly into the top rim. Fill it with water and essential oils; the heat from the candle below will diffuse the scent.
Now you have a custom luminary ready to add warmth to your home