Whenever I need a quick creative win, I reach for air-dry clay or polymer clay and make something small that feels instantly satisfying. Here are my favorite clay ideas to make—starting with the classic go-tos and ending with a few delightfully unexpected projects.
Polymer Clay Statement Earrings in Easy Shapes
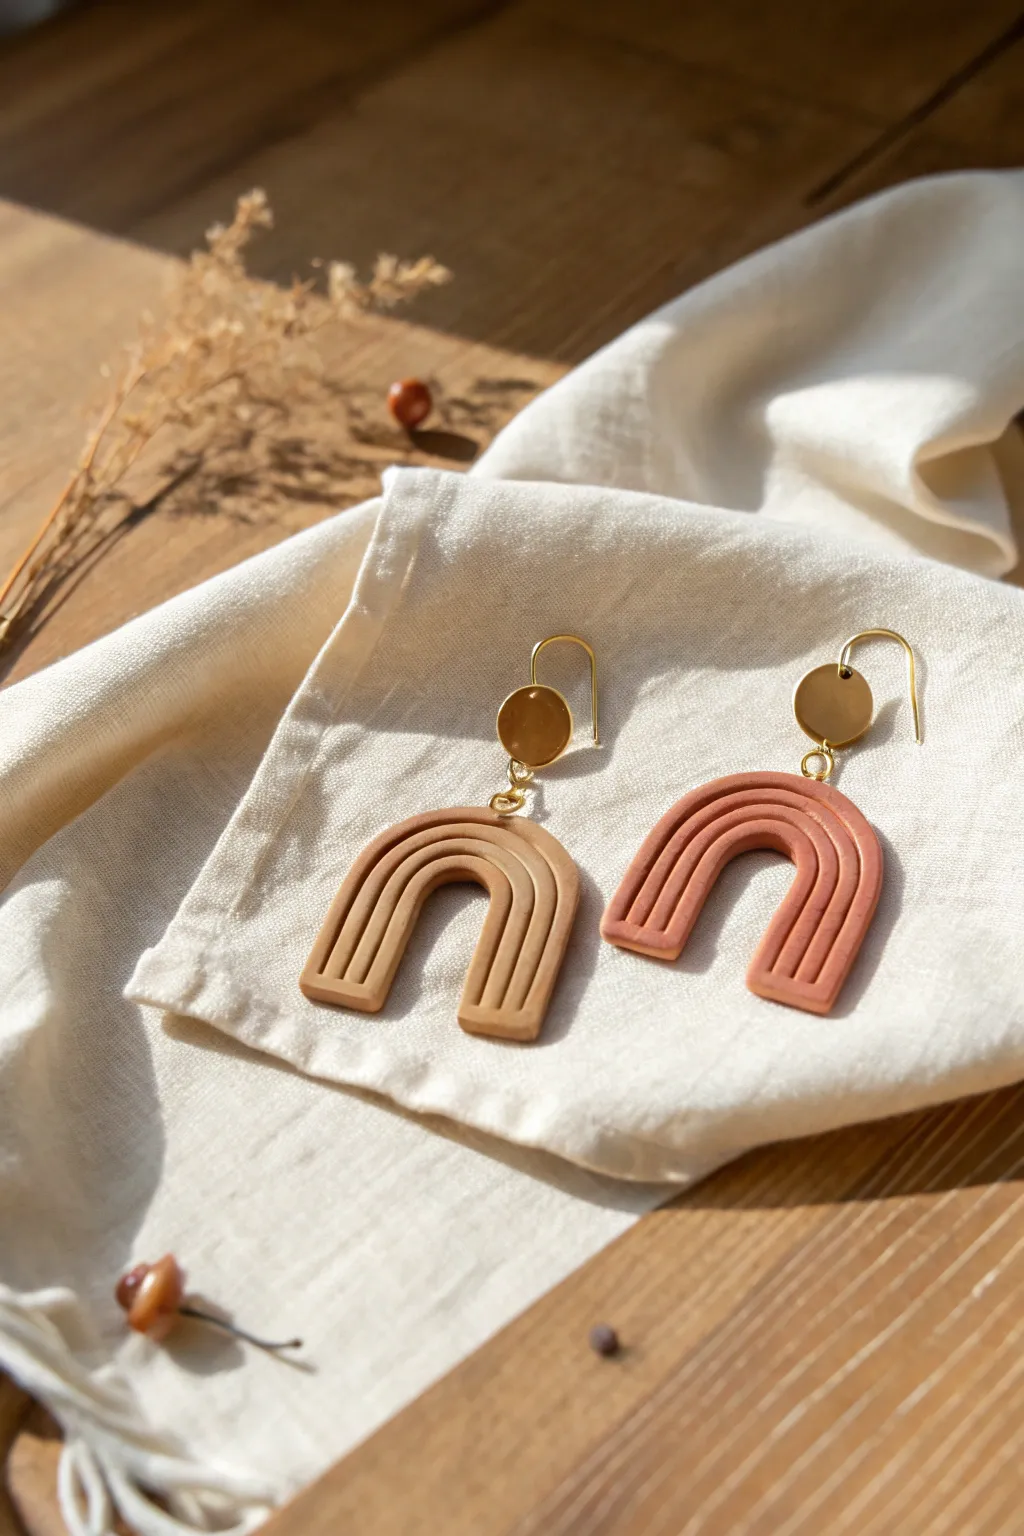
These minimalist arch earrings combine earthy tones with a simple, modern silhouette perfect for everyday wear. Using polymer clay and a clever texturing technique, you’ll create professional-looking jewelry that feels lightweight and stylish.
Step-by-Step
Materials
- Polymer clay in beige/sand and terracotta/burnt orange
- Pasta machine or acrylic roller
- Clay extruder (optional, but helpful for even snakes)
- Sharp tissue blade
- Two gold jump rings (6mm or 8mm)
- Two gold flat-disk earring studs with loop
- Jewelry pliers (round nose and flat nose)
- Parchment paper or ceramic tile for baking
- Oven
Step 1: Preparing the Clay
-
Condition the clay:
Start by kneading your chosen clay colors—beige for one earring and terracotta for the other—until they are soft and pliable. Warm hands make this process much faster. -
Create clay snakes:
Roll out long, thin snakes of clay. You can do this by hand on a flat surface or use a clay extruder with a small round disc for perfectly uniform strands. -
Check thickness:
Ensure your snakes are about 2-3mm in diameter. Consistency is key here so the arches stack neatly together without gaps.
Clean Cuts Pro Tip
Chill the clay in the fridge for 10 minutes before trimming the bottom. Firm clay slices much cleaner than warm, soft clay, preventing the strands from smushing.
Step 2: Forming the Arches
-
Form the inner arch:
Take a strand of clay and bend it into a tight U-shape on your work surface or tile. This will be the innermost layer of your arch. -
Add layers:
Take another strand of the same color and gently press it against the outside of your first U-shape. Repeat this process until you have stack of three or four strands forming a rainbow shape. -
Secure the strands:
Gently press the strands together from the top and sides to ensure they adhere to one another without distorting the rounded shape. -
Trim the bottom:
Use your sharp tissue blade to cut straight across the bottom of the legs, creating a clean, flat base for your arch. I like to do a quick visual check here to make sure both legs are even. -
Create the second earring:
Repeat the entire arch-building process with your second color of clay, using the first finished arch as a size guide.
Texture Level Up
Before baking, gently roll a textured roller or a piece of sandpaper over the flat surfaces to give the clay a stone-like, matte finish.
Step 3: Assembly & Baking
-
Add a hole:
Using a needle tool or a toothpick, carefully poke a hole at the very center top of the outermost arch strand. Make sure the hole is wide enough for your jump ring. -
Smooth imperfections:
Lightly brush your finger over any fingerprints or rough edges. A tiny drop of baby oil can help smooth the clay surface perfectly. -
Bake:
Place your clay pieces on a ceramic tile or baking sheet lined with parchment paper. Bake according to your brand of polymer clay instructions (usually around 275°F/135°C for 30 minutes). -
Cool down:
Allow the pieces to cool completely in the oven or on a wire rack before handling, as the clay is fragile while hot. -
Attach jump rings:
Open a jump ring by twisting it sideways with your pliers. Thread it through the hole you made in the clay arch. -
Connect the stud:
Before closing the jump ring, slide on the loop of your gold disk stud component. -
Secure the finding:
Close the jump ring securely using your pliers, ensuring the gap is fully shut so the clay piece doesn’t slip off. -
Final check:
Give the earrings a gentle shake to ensure all connections are secure and the movement feels right.
Now you have a chic pair of handmade earrings ready to gift or wear


Tiny Clay Charms for Keychains and Bags
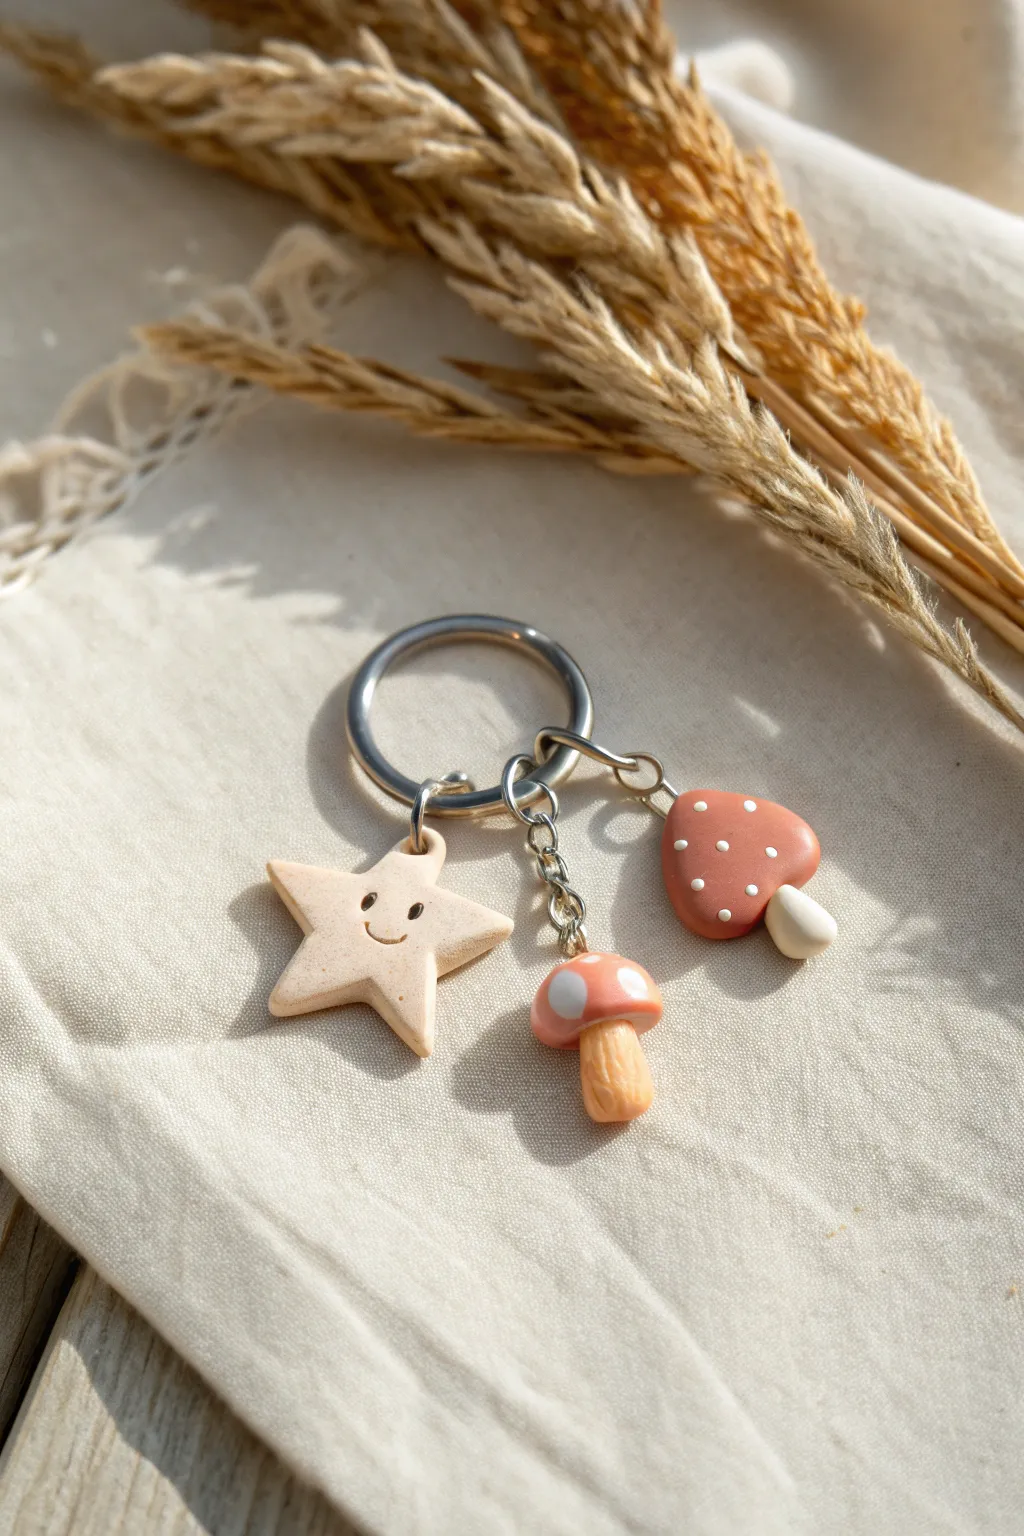
This delightful keychain features three distinct yet harmonious charms: a friendly smiling star, a classic toadstool, and a flat-cap mushroom. The soft peach and beige color palette gives these tiny clay creations a warm, earthy aesthetic perfect for adorning your favorite bag.
How-To Guide
Materials
- Polymer clay (beige/sand, terracotta/light rust, white)
- Small metal keychain ring and chain links
- Headpins or eye pins (silver tone)
- Needle tool or toothpick
- Small ball stylus tool
- Black acrylic paint
- Glaze or varnish (gloss or satin)
- Jewelry pliers (round nose and flat nose)
- Baking sheet and parchment paper
- Oven
Step 1: Creating the Smiling Star
-
Shape the base:
Condition a small ball of beige clay until it’s soft and pliable. Flatten it slightly into a thick disc. -
Form the points:
Using your fingers, gently pinch the edges of the disc to pull out five points. Keep the edges rounded and soft rather than sharp for a cute, puffy look. -
Add facial details:
Use a needle tool or small ball stylus to carefully impress two small dots for eyes. Below them, press a tiny curved line to create a gentle smile. -
Paint the face:
Take a tiny amount of black acrylic paint on a fine tip brush or toothpick and carefully fill in the eye indents and the smile line. -
Insert hardware:
Trim an eye pin if it’s too long, leaving about half an inch of stem. Look for the top point of your star and gently push the stem down into the clay until the loop rests flush against the top.
Step 2: Sculpting the Toadstool Mushroom
-
Make the stem:
Roll a small snake of beige clay—the same color you used for the star. Thicken slightly at the base and create textural lines running vertically up the stem using a needle tool. -
Create the cap:
Roll a ball of terracotta or light rust clay. Flatten the bottom against your work surface and round the top into a dome shape. -
Add polka dots:
Roll two or three tiny balls of white clay. Press them gently onto the mushroom cap, flattening them so they look painted on rather than protruding. -
Assemble the mushroom:
Press the stem firmly onto the underside of the cap. I like to twist gently as I push to secure the bond without squishing the shapes. -
Attach the hardware:
Insert an eye pin straight down through the center of the cap into the stem.
Smoother Surfaces
Before baking, brush a tiny amount of baby oil or clay softener over your unbaked charms with your finger to erase any fingerprints or lint.
Step 3: Crafting the Flat-Cap Mushroom
-
Shape the flat cap:
Take a slightly larger piece of terracotta clay than you used for the toadstool. Flatten it into a rounded triangle or heart-like shape with soft corners. -
Texture the top:
Using a small dotting tool, press several tiny indentations randomly across the surface of the flat cap for texture. -
Fill the textures:
Roll extremely tiny balls of white clay and place them into the indentations you just made. Press them flat so they are flush with the cap surface. -
Add the stem:
Form a short, stout stem from white or very light beige clay. Attach it to the bottom point of the flat cap, angling it slightly to the side for character. -
Hardware placement:
Carefully insert a jump ring or eye pin into the top corner of the flat mushroom cap.
Loose Eye Pins?
If a pin pulls out after baking, pull it all the way out, put a dab of superglue on the end of the wire, and slide it back into the existing hole.
Step 4: Baking and Assembly
-
Bake the charms:
Place all three charms on a parchment-lined baking sheet. Bake according to your polymer clay package instructions (usually around 275°F or 135°C for 15-30 minutes). -
Let them cool:
Allow the pieces to cool completely before handling. This hardens the clay and prevents fingerprints. -
Glaze (Optional):
For extra durability and shine, brush a thin coat of gloss glaze over the colored parts of the mushrooms and the star. -
Prepare the keychain:
Open your jump rings using two pairs of pliers. Twist the rings open sideways rather than pulling them apart to maintain their shape. -
Attach to ring:
Slide the charms onto the jump rings or small chain lengths. Vary the length of the chains slightly so the charms hang at different heights. -
Final secure:
Attach the jump rings to the main large split ring. Close the jump rings securely, ensuring there are no gaps for the charms to slip through.
Now you have a charming, handmade accessory ready to brighten up your keys or backpack


Cute Animal Figurines Using Basic Shapes

Create a charming set of minimalist animal friends using simple spherical and cylindrical forms. These matte-finish figurines—a textured frog, a soft pink bear, and a classic white cat—add a touch of playful serenity to any shelf.
Step-by-Step
Materials
- Polymer clay or air-dry clay (Sage Green, Pastel Pink, Off-White)
- Clay sculpting tools (needle tool, ball stylus)
- Black acrylic paint
- Fine detail paintbrush (size 000)
- Fine-grit sandpaper (optional)
- Matte varnish or sealant
- Toothbrush or stiff bristle brush (for texture)
Step 1: Sculpting the Frog
-
Body Base:
Start with a golf-ball-sized piece of sage green clay. Roll it into a smooth sphere, then gently flatten the bottom so it sits upright without rolling. -
Forming the Head:
Pinch the top half of the sphere gently to define a wide, flat head shape. It should merge seamlessly into the body without a distinct neck. -
Adding Eyes:
Roll two very small balls of green clay. Attach them to the top of the head, spaced widely apart, blending the clay at the bottom of the eye mounds slightly so they don’t pop off. -
Creating the Mouth:
Use a needle tool or the edge of a clay knife to impress a long, gentle smile horizontally across the face, just below the eye mounds. -
Adding Texture:
To mimic the frog’s bumpy skin shown in the photo, poke shallow, random holes on the belly using a needle tool or small ball stylus. -
Arm Nubs:
Attach small, flattened ovals to the sides of the body for the arms, keeping them flush against the torso for a streamlined look.
Step 2: Sculpting the Bear
-
Head and Body:
Using pastel pink clay, roll a larger sphere for the head and a slightly elongated cylinder for the body. Join them firmly; I like to insert a small piece of toothpick or wire between the two for extra stability. -
Ears and Limbs:
Attach two small half-circles to the top of the head for ears. Press a ball stylus into the center of each ear to create depth. -
Limbs:
Roll four sausages of clay for the arms and legs. Attach the legs to the bottom so the bear stands, and press the arms vertically against the sides of the body. -
Surface Texture:
Before the clay hardens, gently tap the entire surface with an old toothbrush. This removes fingerprints and gives that soft, stone-like texture visible in the image.
Seamless Smoothness
To blend joined pieces like the bear’s head and body, use a little water (for air-dry) or baby oil (for polymer) on your finger to smudge the seams until they vanish.
Step 3: Sculpting the Cat
-
Unified Shape:
Take the off-white clay and form a pear shape, where the top is smaller (head) and the bottom is wider (body), molding them as one continuous piece. -
Ears and Tail:
Pinch the top of the head on the left and right sides to pull up two triangular ear shapes. Smooth them so they look integrated, not attached. -
Defining the Shape:
Use a modeling tool to create small vertical indentations at the bottom front to suggest paws, separating them slightly from the main body mass.
Wobbly Figures?
If your animals keep falling over, gently tap the bottom of the raw clay figure onto your table to create a flat base before letting it dry or baking.
Step 4: Finishing Touches
-
Drying or Baking:
Follow your specific clay’s instructions to cure the pieces. For air-dry clay, allow 24-48 hours; for polymer, bake at the recommended temperature. -
Face Painting:
Once cool and dry, use a fine detail brush and black acrylic paint. For the frog, paint the eye mounds black. For the bear and cat, paint tiny dot eyes and a small nose/mouth combo. -
Whiskers:
For the cat specifically, carefully paint three very thin horizontal lines on each cheek for whiskers. -
Sealing:
Finish with a coat of matte varnish. This protects the paint and preserves the natural, earthy look of the clay without making it glossy.
Arrange your new little friends together for a display that is sure to bring a smile to anyone’s face.


Character Magnets With Faces and Simple Details
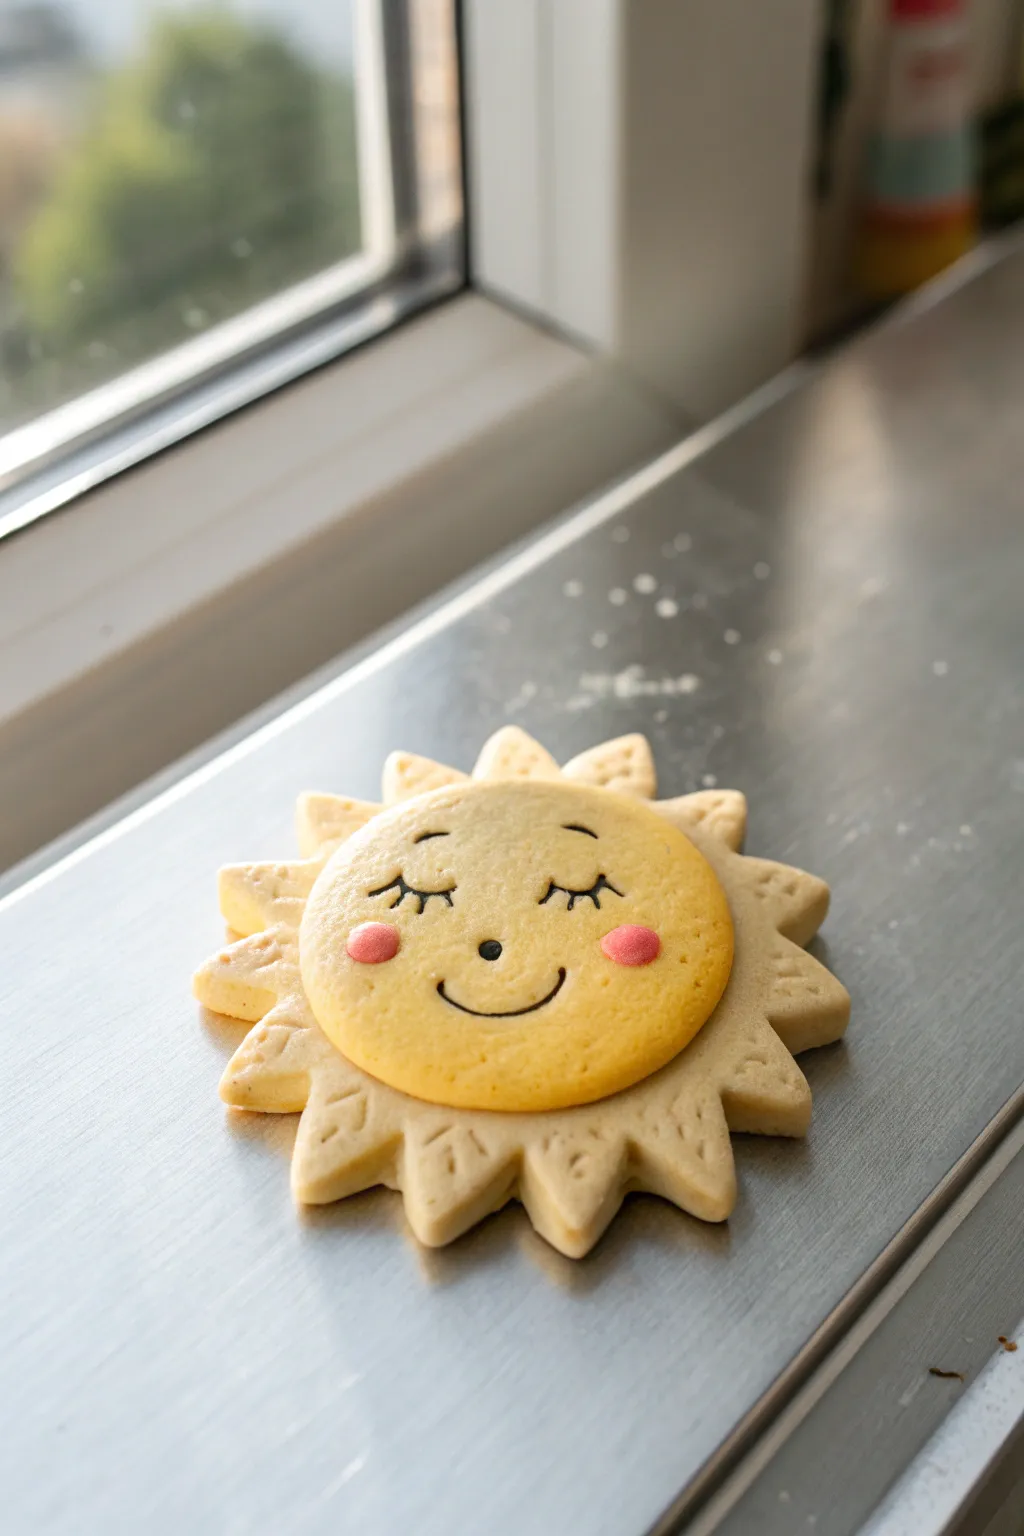
Brighten up your fridge or workspace with this adorable sun magnet, designed to look like a sweet, smiling cookie. With its layered design and gentle sleeping expression, it adds a warm and cheerful touch to any magnetic surface.
Step-by-Step Guide
Materials
- Polymer clay (pale beige/cream, bright yellow, soft pink, black)
- Circle cookie cutter (approx. 2 inches)
- Detail knife or X-Acto blade
- Acrylic rolling pin
- Needle tool or toothpick
- Ball stylus tool
- Strong round magnet
- Super glue or E6000
- Parchment paper
Step 1: Creating the Base
-
Prepare the base color:
Start by conditioning your pale beige or cream-colored clay until it is soft and pliable. Roll it out into a sheet approximately 1/4 inch thick. -
Cut the primary shape:
The base isn’t a perfect circle; it needs points. Cut a rough circle shape slightly larger than your final desired size to ensure you have enough material to carve the rays. -
Carve the sun rays:
Using your detail knife, carefully cut triangular notches all around the edge of the clay circle to create the pointed sun rays. Keep the points slightly rounded for a softer finish. -
Add texture to rays:
Take your needle tool and gently press small scratch marks or simple V-shaped indentations into each ray tip. This gives it that textured, baked-good appearance seen in the photo.
Clean Clay Pro-Tip
Keep baby wipes or rubbing alcohol handy. Wiping your hands and tools before handling the yellow clay ensures no dark lint or beige residue ruins the bright face.
Step 2: Forming the Face
-
Roll the yellow layer:
Clean your hands and rolling pin thoroughly to avoid color transfer. Condition the bright yellow clay and roll it out slightly thinner than the base layer. -
Cut the face circle:
Use your circle cookie cutter to punch out a perfect yellow disc. This will be the main face of the sun. -
Texture the yellow clay:
Before attaching it, lightly dab the surface of the yellow circle with a stiff brush or a crumpled ball of foil to mimic a soft, cookie-like crumb texture. -
Combine the layers:
Center the yellow circle directly on top of your beige sunburst base. Press down gently around the edges to fuse the clays without distorting the shape.
Step 3: Adding Personality
-
Create the eye sockets:
Plan where the face goes. Using a needle tool, lightly sketch two crescent shapes for the sleeping eyes to guide your clay placement. -
Make the lashes:
Roll an incredibly thin snake of black clay. Cut two small arched segments for the eyelids and six tiny pieces for the eyelashes. -
Attach the eyes:
Carefully place the thin black arches onto your sketched guides, pressing them gently with a tool to adhere. Add three tiny lashes to the outer corner of each eye. -
Form the cheeks:
Condition a tiny amount of soft pink clay. Roll two small balls, flatten them into discs, and place them just below the outer corners of the eyes for rosy cheeks. -
Add the nose:
Roll a tiny speck of black clay into a ball for the nose and place it right in the center of the face. -
Create the smile:
Roll another very thin snake of black clay. Shape it into a gentle U-curve and press it onto the face centered below the nose. Use your needle tool to create small termination points at the corners of the mouth.
Make It Sparkle
Before baking, brush a tiny amount of pearl mica powder over the sun rays. This adds a subtle shimmer that catches the light beautifully on the fridge.
Step 4: Finishing Up
-
Bake the project:
Place your creation on a parchment-lined baking sheet. Bake according to your polymer clay package instructions (usually around 275°F for 15-30 minutes). -
Cool completely:
Allow the clay to cool completely before handling. It is fragile while warm and needs to harden fully. -
Attach the magnet:
Flip the cooled sun over. Apply a dab of strong adhesive like E6000 or super glue to the back center. -
Secure the backing:
Press your round magnet firmly into the glue. Let it cure flat for several hours to ensure a permanent bond.
Now you have a cheerful little companion to hold up your notes and photos

The Complete Guide to Pottery Troubleshooting
Uncover the most common ceramic mistakes—from cracking clay to failed glazes—and learn how to fix them fast.
Modern Photo Holder With a Slot
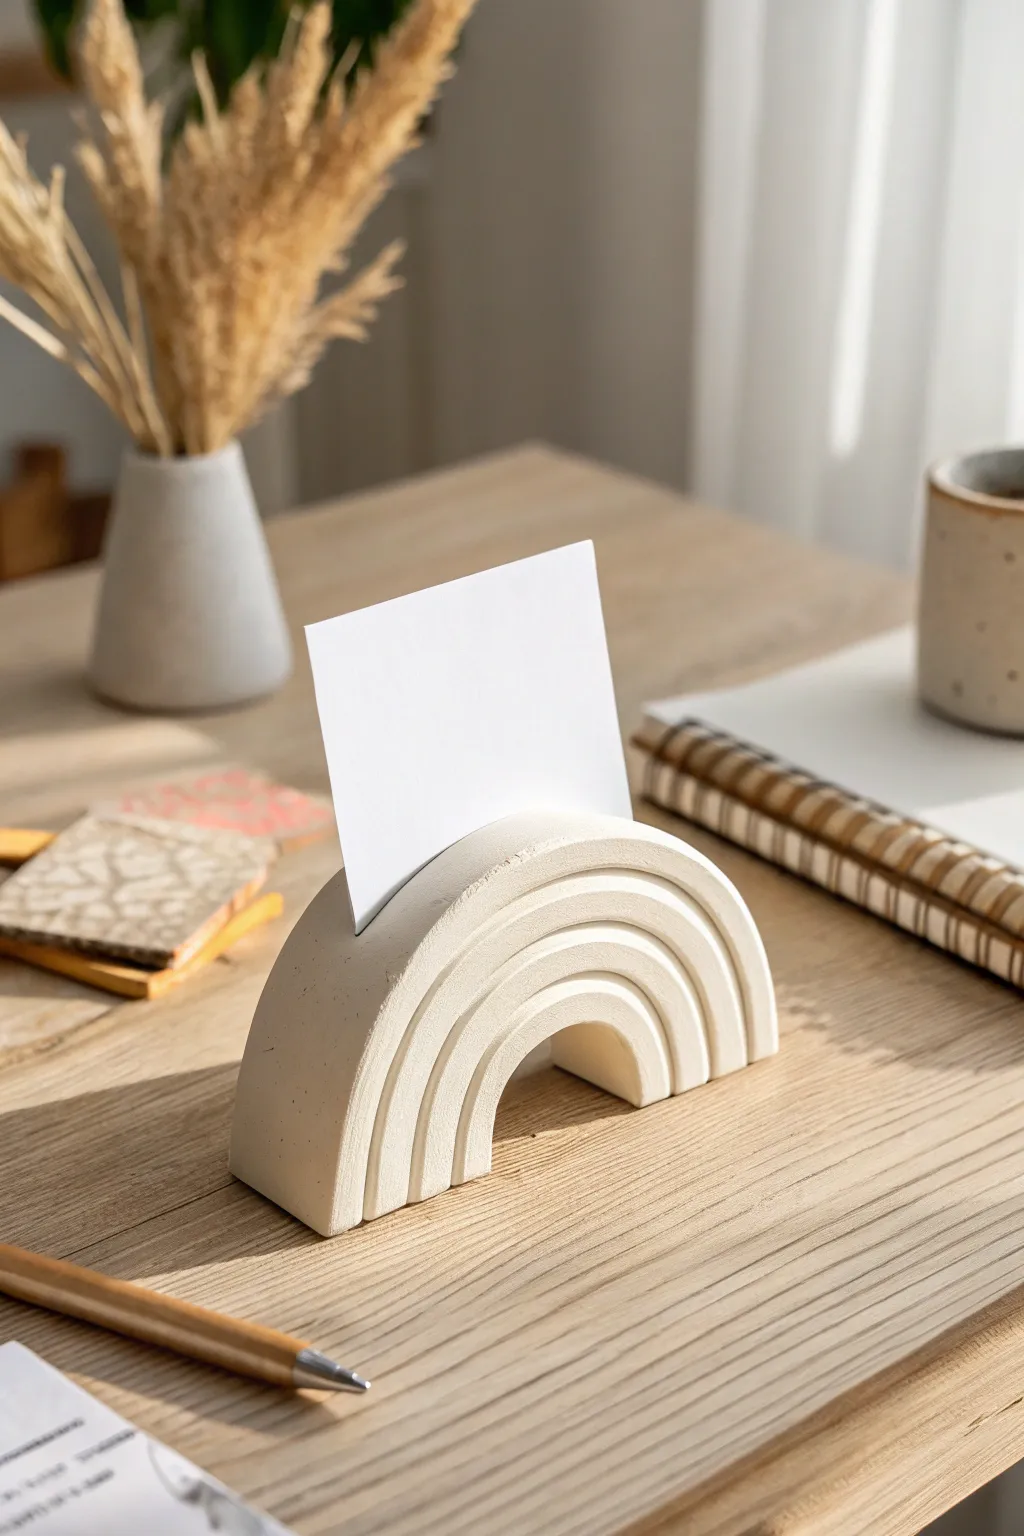
Bring a touch of modern charm to your desk with this cream-colored rainbow arch photo holder. Its clean lines and subtle texture make it a functional piece of art perfect for displaying memories or daily reminders.
How-To Guide
Materials
- White or cream-colored air-dry clay (or polymer clay)
- Rolling pin
- Clay knife or craft blade
- Ruler
- Sandpaper (fine grit)
- Water in a small cup
- Smooth work surface or silicone mat
- Old credit card or rigid cardstock (for measuring the slot)
Step 1: Preparing the Clay
-
Condition the clay:
Start by taking a generous amount of air-dry clay and kneading it in your hands until it becomes soft, pliable, and free of cracks. This warming process is crucial for a smooth finish later. -
Roll out a slab:
Using your rolling pin, roll the clay out into a thick, even slab. You want this base piece to be about 1 inch thick to ensure the holder is stable enough to stand upright. -
Cut the main arch:
Freehand or use a circular template to cut out a large semi-circle shape. This solid block will form the core of your rainbow arch. Smooth the cut edges with a damp finger to remove any jagged bits.
Fixing Cracks
If hairline cracks appear as the clay dries, mix a tiny bit of fresh clay with water to make a paste (slip) and fill them in, then sand smooth once dry.
Step 2: Forming the Layers
-
Roll coils:
Take fresh clay and roll out three long, even snakes or coils. Flatten them slightly with the rolling pin so they resemble rectangular strips rather than round tubes. -
Attach the first layer:
Score the front face of your main arch block lightly with your knife. Apply a tiny bit of water as glue, then press your first flattened strip onto the face of the arch, following the curve. -
Trim the excess:
Once the strip is attached, use your knife to trim the excess clay at the bottom so it sits flush with the base of the main block. -
Add subsequent layers:
Repeat the process with the remaining two strips. Layer them one inside the other to create that cascading rainbow effect. I find it helpful to press gently but firmly to bond the layers without distorting the shape. -
Cut the center arch:
Use a round cutter or your knife to carefully cut out the small semi-circle empty space at the very bottom center, creating the ‘legs’ of the rainbow.
Step 3: Refining and Finishing
-
Smooth the seams:
Dip your finger in water and run it along all the seams where the layers meet the main block. You want the transition to look deliberate but clean. -
Create the card slot:
While the clay is still wet, take your ruler or a thick piece of cardstock. Press it firmly into the top center of the arch, pressing down about half an inch deep. Wiggle it slightly to ensure the opening is wide enough for a photo. -
Initial drying:
Place the piece on a flat surface to dry. If you used air-dry clay, let it sit for at least 24 hours away from direct heat to prevent cracking. -
Sanding:
Once completely dry, take fine-grit sandpaper and gently buff the surface. Focus on the edges of the rainbow layers to make them crisp and uniform. -
Dust and display:
Wipe away any sanding dust with a slightly damp cloth or a dry brush. Your modern photo holder is now ready to use.
Speckled Stone Look
Knead in some ground black pepper or dried tea leaves before rolling your slab to give the clay a trendy, organic terrazzo or speckled ceramic effect.
Place your favorite instant photo or business card in the slot and enjoy your handmade desk accessory
Hanging Clay Suncatcher With Cutout Shapes
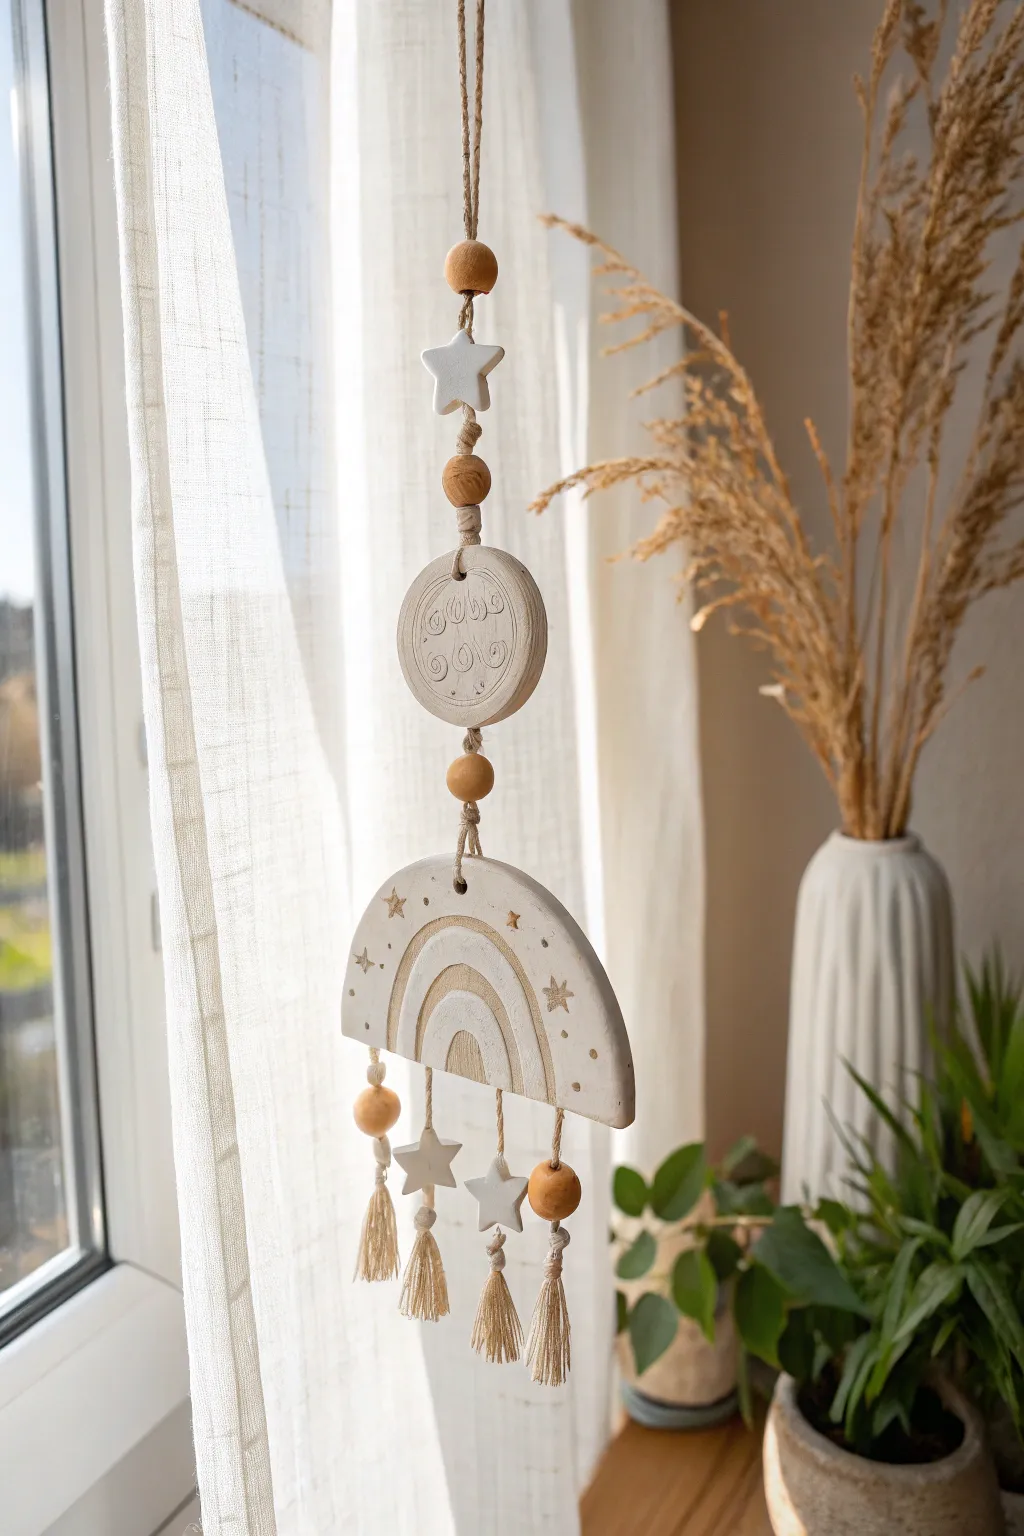
Bring serene vibes to your space with this layered, nature-inspired hanging mobile. Featuring earthy wood beads, stamped clay motifs, and whimsical tassels, this piece captures the essence of modern bohemian décor.
Step-by-Step
Materials
- Air-dry clay (white or light grey)
- Wooden rolling pin
- Circle cookie cutters (one medium ca. 2-3 inches, one larger ca. 4-5 inches)
- Small star-shaped cookie cutter
- Clay sculpting needle tool or toothpick
- Alphabet clay stamps or textured stamp
- Natural jute twine or hemp cord
- Wooden craft beads (natural finish)
- Beige or off-white embroidery floss or thin yarn
- Sandpaper (fine grit)
- Small paintbrush
- Water cup
Step 1: Shaping the Clay Components
-
Roll the clay:
Begin by conditioning a handful of air-dry clay until it is soft and pliable. Roll it out on a smooth surface to an even thickness of about 1/4 inch. -
Cut the star:
Use your small star cutter to punch out one star shape. Smooth the edges gently with a finger dipped in a little water to remove any rugged bits. -
Cut the central disc:
Using the medium circle cutter, press firmly into the clay to create the central round component. -
Stamp the pattern:
While the clay is still fresh, press your alphabet stamps or a textured stamp into the center of the circle disc to create a subtle, debossed design. -
Create the rainbow arch:
Cut a large circle using your biggest cutter, then use a knife or clay blade to slice off the bottom third, creating a rainbow arch shape. -
Carve the rainbow details:
Use a needle tool or the back of a paintbrush to carefully carve concentric arches into the rainbow piece. I find that pressing gently rather than dragging creates smoother lines. -
Cut lower embellishments:
Cut two additional small stars for the bottom dangles using your smallest cutter. -
Pierce holes:
Using a toothpick or needle tool, poke holes for assembly. You need: one hole in the top and bottom of the top star, top and bottom of the middle circle, and one hole at the top peak of the rainbow with three evenly spaced holes along the bottom edge. Also pierce the tiny stars for hanging. -
Dry completely:
Place all clay pieces on a wire rack or clean paper towel. Let them dry for 24-48 hours until they are hard and white.
Cracking Prevention
If your clay cracks while drying, you can repair it by mixing a tiny bit of clay with water to make a paste (slip) and filling the crack, then sanding smooth once dry.
Step 2: Finishing Touches and Assembly
-
Sand the edges:
Once fully dry, lightly sand any rough edges or uneven surfaces with fine-grit sandpaper for a professional, matte finish. -
Add gold stars (optional):
If desired, use a small tool to press tiny star indentations into the rainbow before drying, or simply paint small gold stars on the surface now. -
Make the tassels:
Wrap your beige embroidery floss around three fingers about 15 times. Tie a piece of floss through the loop at one end and wrap another piece around the ‘neck’ to secure it, then cut the bottom loops to create fringe. Make four of these. -
Prepare the main cord:
Cut a long length of jute twine. Fold it in half to create a loop for hanging at the very top. -
Thread the top section:
Thread a wooden bead onto the double strand of twine, securing it against the knot of your loop. -
Attach the top star:
Thread one strand of twine through the top hole of your clay star and down through the bottom hole. Tie a knot underneath to secure it. -
Add the middle tier:
Thread another wooden bead onto the twine, followed by the stamped circle disc. Tie knots above and below components as needed to keep them spaced. -
Connect the rainbow:
Add a final spacer bead, then thread the twine through the top hole of the rainbow arch. Knot it securely on the back or underneath. -
Assemble the dangles:
Cut three separate, shorter pieces of twine for the bottom. Tie each to the three bottom holes of the rainbow. -
Attach ornate ends:
On the outer two strings, thread a wooden bead and tie on a tassel. On the center string, thread a clay star, a wooden bead, and then a tassel. For variety, add clay stars to the outer strings if you made extras. -
Trim and secure:
Trim any excess twine tails close to the knots. Double-check that all connections are tight before hanging.
Scented Clay
Before the clay dries, add a few drops of essential oil to the raw dough or onto the unfinished wood beads later to turn your wall hanging into a passive room diffuser.
Hang your new creation near a window to let the light play across the textured clay surface