Whenever I’m planning a new piece, I start by collecting a handful of pottery design ideas that feel doable and fun. Here are my favorite shapes-and-surface combos—classic first, then more playful—so you can decorate your next mug, bowl, or vase with confidence.
Clean Stripes and Lines on Bowls
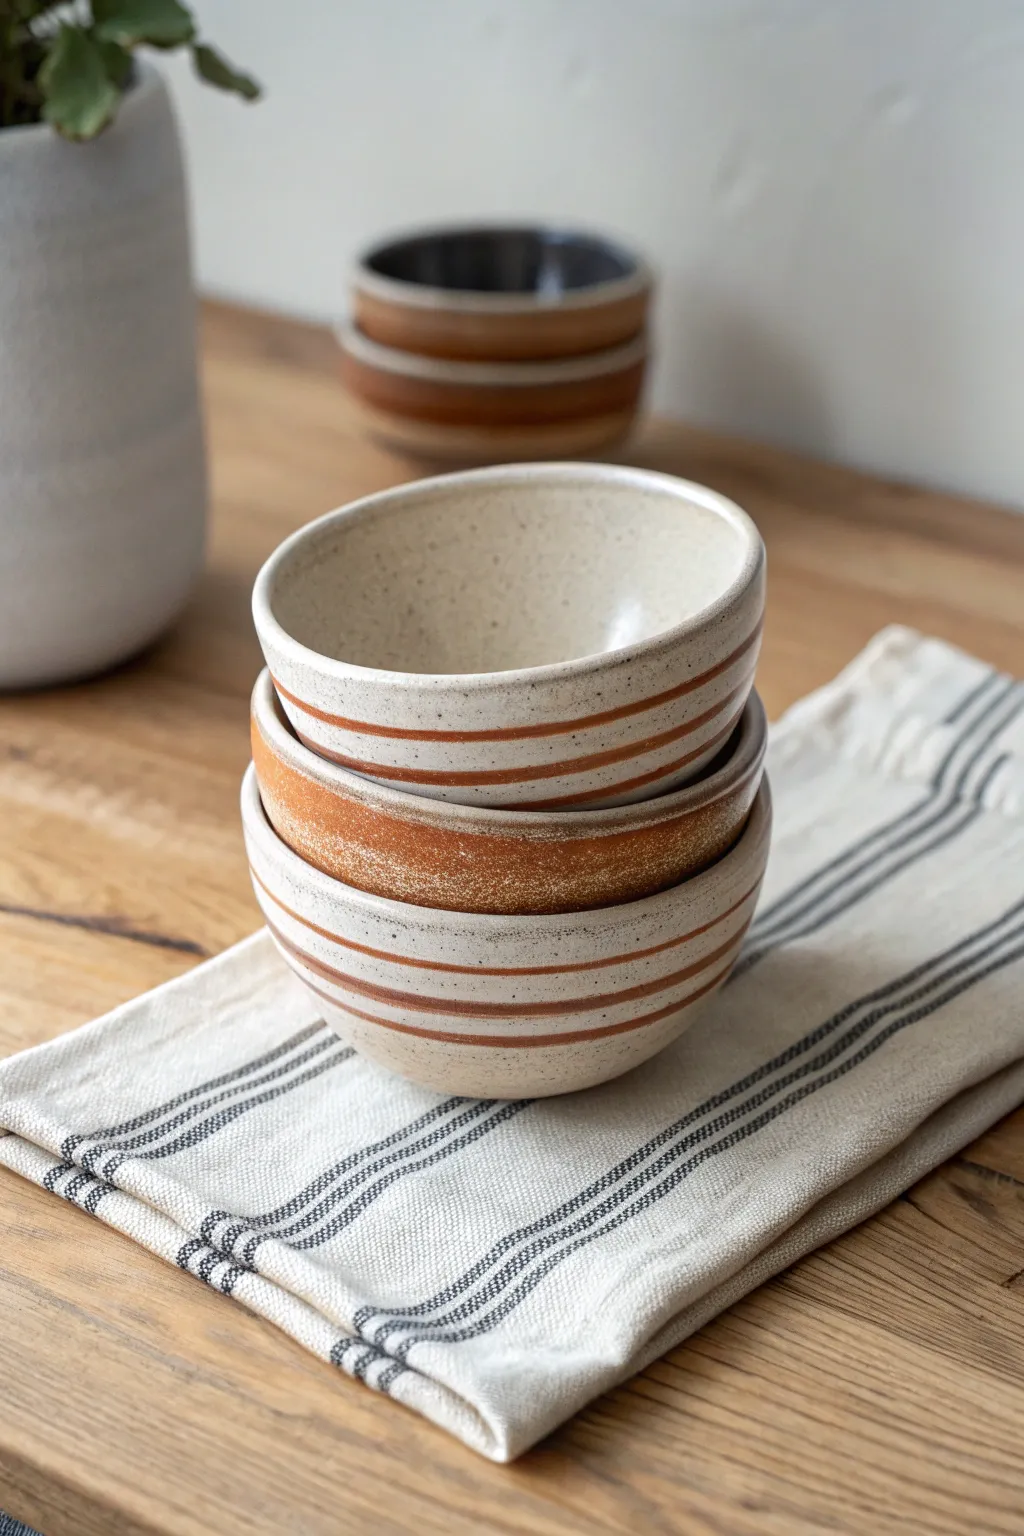
Embrace the beauty of simplicity with these wheel-thrown bowls, featuring a lovely speckled clay body and warm rust-colored accents. The clean lines and earthy tones create a modern yet rustic aesthetic perfect for everyday dining.
Detailed Instructions
Materials
- Speckled stoneware clay (mid-fire)
- Pottery wheel
- Throwing tools (sponge, ribs, wire cutter)
- Trimming tools
- Underglaze (terra cotta or rust color)
- Banding wheel
- Fine detail brush or stripping brush
- Clear transparent glaze (mid-fire)
- Kiln
Step 1: Throwing and Shaping
-
Prepare the Clay:
Begin by wedging your speckled stoneware clay thoroughly to remove air bubbles. Weigh out three equal balls of clay, approximately 1-1.5 lbs each, depending on your desired bowl size. -
Center and Open:
Attach a clay ball to the wheel head and center it securely. Open the clay, establishing a flat bottom about 3-4 inches wide. -
Pull the Walls:
Pull up the walls into a gentle curve. Aim for a consistent thickness, tapering slightly towards the rim. The shape should be a classic cereal bowl profile—rounded at the bottom and opening up towards the top. -
Refine the Profile:
Use a flexible rib (metal or rubber) on the inside and outside to smooth the walls and define the curve. This compresses the clay and removes throwing lines for a cleaner surface. -
Define the Rim:
Using a chamois or a small sponge, gently round and compress the rim. I like to make sure the rim is slightly thickened for durability. -
Repeat for Set:
Cut the bowl off the wheel with a wire tool and set it aside on a ware board. Repeat the process for the other two balls of clay, aiming for consistent size and shape. -
Drying Stage:
Allow the bowls to dry slowly to a leather-hard state. They should be firm enough to handle without deforming but still hold moisture.
Clean Line Pro Tip
Rest your painting hand on a steady object like a paint can or stack of books while spinning the banding wheel. This stabilizes your brush for razor-sharp lines.
Step 2: Trimming and Painting Designs
-
Trim the Foot:
Center a leather-hard bowl upside down on the wheel. Trim excess clay from the bottom to create a defined foot ring, mirroring the interior curve of the bowl. -
Smooth the Surface:
After trimming, run a damp sponge or a soft rib over the trimmed area to smooth out any tool marks and bring the grog or speckles to the surface. -
Set Up for Decorating:
Place your trimmed bowl right-side up on a banding wheel. Ensure it is perfectly centered so your stripes will be level. -
Paint Thin Stripes (Top & Bottom Bowls):
Load a fine lining brush with rust-colored underglaze. While slowly spinning the banding wheel, touch the brush tip to the exterior wall to create thin, continuous horizontal lines. Vary the spacing slightly for visual interest. -
Paint the Solid Band (Middle Bowl):
For the middle bowl design, use a wider brush. Apply a thick band of the rust underglaze around the lower half or middle section of the bowl while spinning the wheel, creating a solid block of color. -
Refine Edges:
If any lines look shaky or uneven, you can carefully scratch away excess underglaze with a needle tool once it has dried slightly.
Step 3: Glazing and Firing
-
Bisque Fire:
Load the bone-dry bowls into the kiln and bisque fire them to cone 04 (or your clay’s specific bisque temperature). -
Clean the Bisque:
Once cooled, wipe down the bowls with a damp sponge to remove any dust or debris that could prevent the glaze from adhering. -
Apply Clear Glaze:
Dip the bowls into a bucket of clear transparent glaze. Alternatively, pour the glaze inside, swirl to coat, pour it out, and then dip the exterior. -
Wipe the Foot:
Using a wet sponge or waxed foot technique, ensure the bottom foot ring is completely free of glaze so it doesn’t stick to the kiln shelf. -
Glaze Fire:
Load the kiln again and fire to the maturity temperature of your clay and glaze (typically cone 5 or 6 for mid-fire stoneware). -
Final Inspection:
Unload the kiln once cool. Check for any sharp spots on the foot and sand them down with a diamond pad if necessary.
Wobbly Lines?
If your stripes look wavy, your bowl isn’t centered on the banding wheel. Spend extra time tapping it into perfect center before your brush touches the clay.
Now you have a stunning set of custom bowls ready for your morning cereal or evening soup


Simple Botanical Leaf Plates
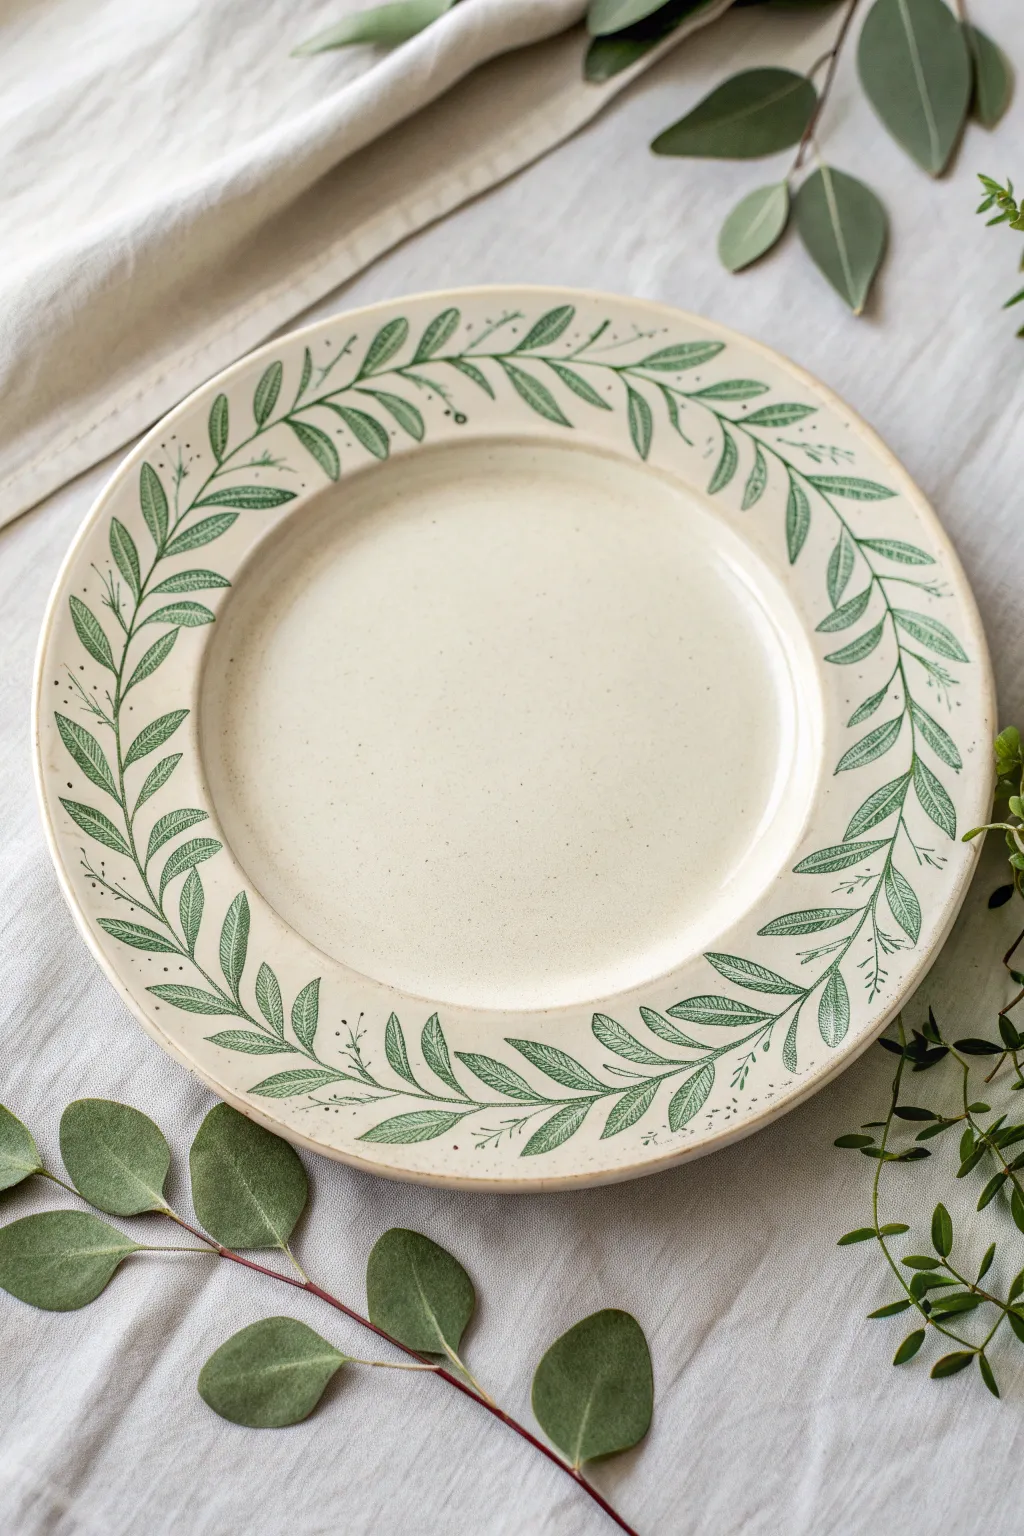
Bring nature to your dining table with this elegant stoneware plate featuring a hand-painted botanical rim. The design pairs a creamy, speckled clay body with a delicate leafy vine pattern for a timeless, organic look.
Step-by-Step Guide
Materials
- Stoneware clay (preferably a speckled buff body)
- Pottery wheel
- Throwing tools (sponge, wire cutter, ribs)
- Trimming tools
- Underglaze (dark forest green)
- Small round detail brush (size 0 or 1)
- Clear matte or satin glaze
- Kiln
- Pencil (optional)
Step 1: Forming the Plate
-
Wedge the Clay:
Start by thoroughly wedging about 1.5 to 2 lbs of speckled stoneware clay to remove air bubbles and ensure consistency. -
Center on the Wheel:
Throw the clay onto the wheel head and center it into a low, wide puck shape rather than a tall cone. -
Open the Form:
Open the clay gradually, pulling the floor out to your desired diameter, leaving about 1/4 inch thickness for the base. -
Establish the Rim:
Pull the walls out horizontally rather than vertically. Distinctly separate the flat eating surface from the rim by pressing gently with your finger or a rib to create a slight indentation where the rim begins. -
Refine the Edge:
Compress the rim with a chamois or sponge to ensure it is smooth and resistant to chipping. -
Dry to Leather Hard:
Cut the plate from the wheel and let it dry slowly until it reaches the leather-hard stage, where it is stiff but still cool to the touch. -
Trim the Foot:
Place the plate upside down on the wheel, center it, and trim a clean, defined foot ring to give the plate lift and stability.
Smudged Lines?
If you make a painting mistake on raw clay, gently scratch the error away with a needle tool rather than wiping, which can smear the pigment into the clay pores.
Step 2: Painting the Botanical Design
-
Plan the Layout:
Lightly sketch a flowing vine line around the center of the rim using a dull pencil. Don’t worry about erasing; the graphite will burn off in the kiln. -
Mix Underglaze:
Prepare your dark forest green underglaze. If it’s too thick, add a drop of water to improve flow. -
Paint the Central Vine:
Using your fine detail brush, paint a thin, continuous line over your pencil sketch to act as the main stem. -
Add Leaf Structure:
Paint small, paired leaves extending from the stem. I find it works best to paint the outline of the leaf shape first. -
Fill in Leaves:
Gently fill the leaf outlines with hatched strokes or solid color, depending on the texture you want. -
Create Movement:
Vary the angle of the leaves slightly so they follow the curve of the rim, ensuring the pattern feels organic rather than rigid. -
Add Tiny Details:
Paint minute dots or tiny branching twigs sporadically along the vine to fill empty spaces and add delicacy. -
Bisque Fire:
Allow the underglaze to dry completely, then load the plate into the kiln for a bisque firing (usually Cone 04).
Brush Control
Load your brush fully but wipe the excess on the palette edge. Use just the very tip for stems and press down slightly for the wider leaf bodies.
Step 3: Glazing and Finishing
-
Apply Clear Glaze:
Once the bisque firing is complete, dip the plate into a clear satin or matte glaze. Alternatively, brush on three even coats. -
Wipe the Foot:
Use a damp sponge to completely wipe any glaze off the foot ring to prevent the plate from sticking to the kiln shelf. -
Final Fire:
Fire the plate to maturity (typically Cone 5 or 6 for stoneware) to melt the glaze and seal the clay body.
Now you have a stunning, nature-inspired plate ready for your next homemade meal


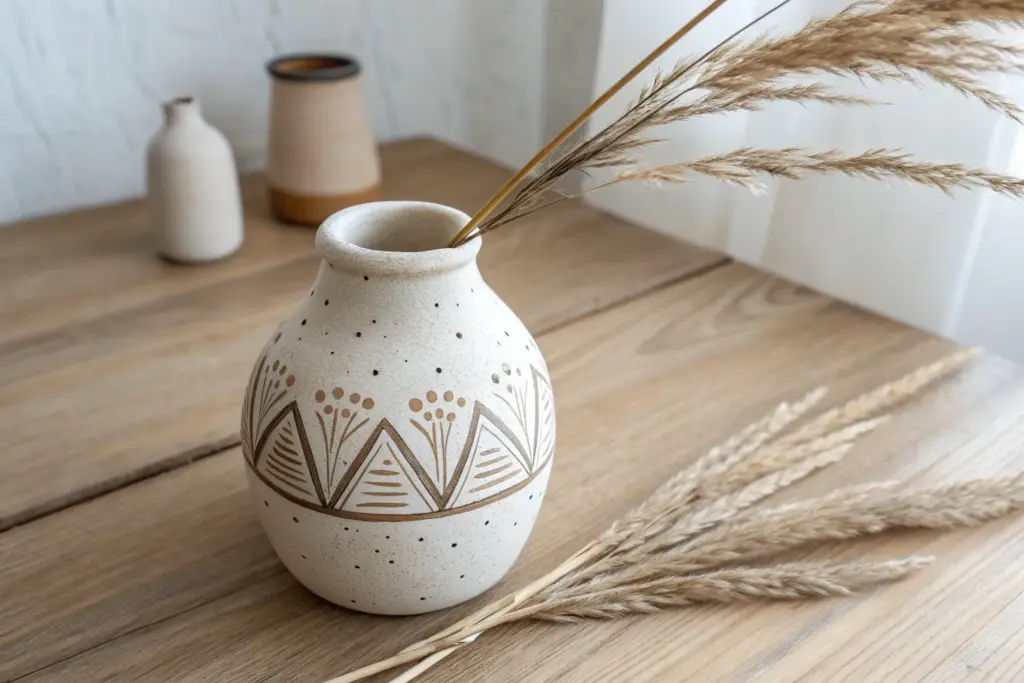
Easy Floral Sprigs on Vases
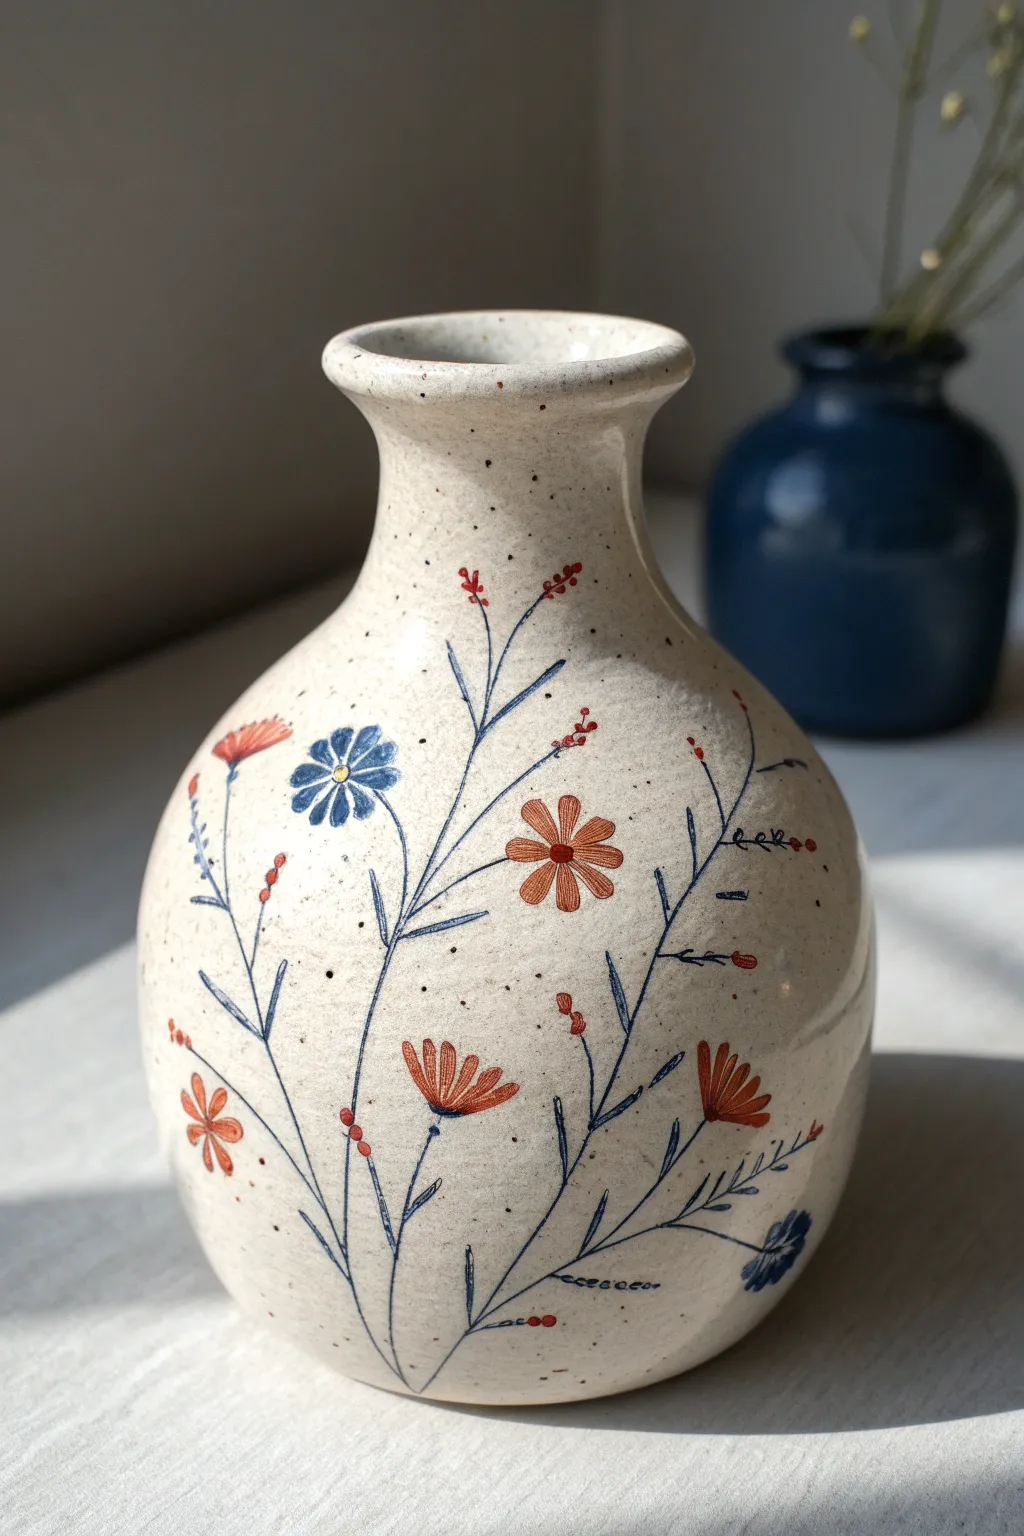
Capture the charm of a sun-drenched meadow with this delicate floral pottery design. Using underglazes on a speckled clay body, you’ll create airy sprigs of wildflowers that feel organic and hand-touched, perfect for bringing a bit of nature indoors.
How-To Guide
Materials
- Bisque-fired ceramic vase (preferably speckled buff clay)
- Underglazes: Navy Blue, Rust Orange, Bright Red, Yellow
- Clear transparent glaze (cone 5/6 recommended)
- Fine liner brush (size 0 or 00)
- Small round brush (size 2)
- Pencil
- Sponge and water
- Palette or tile for mixing
Step 1: Preparation and Sketching
-
Surface Prep:
Begin by wiping down your bisque-fired vase with a damp sponge. This is crucial as it removes any kiln dust or oils from your hands that might repel the underglaze. -
Planning the Flow:
Lightly sketch your main stems using a regular pencil. Don’t worry about mistakes; the graphite will burn off completely in the kiln. Aim for long, sweeping curves that start from the bottom third and reach upward toward the neck. -
Varying Heights:
Ensure your sketched stems end at different heights to create a natural, gathered look. Some should be short and clustered near the base, while others should stretch tall.
Step 2: Painting the Stems
-
Mixing the Ink Consistency:
Dilute a small amount of Navy Blue underglaze with a drop or two of water. You want an ink-like consistency that flows smoothly off the brush without dragging. -
Lining the Stems:
Using your fine liner brush, trace over your pencil lines. Apply gentle pressure to keep lines hair-thin, lifting the brush slightly at the tapered ends of the branches. -
Adding Branching:
paint small offshoot stems coming off the main lines at 45-degree angles. These will serve as anchors for your leaves and flower buds later.
Smudged Lines?
If you smear wet underglaze, let it dry completely. Then, scratch the mistake off gently with a needle tool or an X-Acto knife rather than wiping, which can stain the clay.
Step 3: Adding the Blooms
-
Painting the Daisy:
For the blue daisy shape, use the Navy Blue straight from the bottle (undiluted) for opacity. Paint teardrop shapes radiating from a central point. I like to leave a tiny gap in the center for the yellow dot later. -
Creating Rust Flowers:
Switch to your Rust Orange and the round brush. Press the belly of the brush down to create petal shapes for the larger open flowers, pulling slightly inward toward the center to create a natural taper. -
Detailing Side Blooms:
For the flowers seen from the side profile, paint three or four elongated oval strokes fanning out from a stem tip using the Rust Orange underglaze. -
Buds and Berries:
Dip a detail brush into Bright Red underglaze. Dot tiny circles at the very tips of the thinnest upper branches to create berries or tightly closed buds. -
Adding Centers:
Once the blue daisy petals are dry to the touch, add a small dot of Yellow underglaze in the center. If the blue is still wet, the colors might muddy, so patience is key here.
Level Up: Sgraffito
Paint a solid block of color first, let it dry to leather hard, and scratch the flower design through it to reveal the speckled clay beneath for a negative-space effect.
Step 4: Final Glazing
-
Checking Coverage:
Look over your design. If any petal looks too translucent, carefully dab a second coat of underglaze over it, but leave the stems thin and delicate. -
Bisque Firing (Optional):
If your underglaze is thick or you are worried about smudging, you can do a firing now to set the color. However, applying clear glaze directly over dry underglaze works fine if you are careful. -
Applying Clear Glaze:
Dip the vase into a clear transparent glaze or brush it on fan-style. Ensure the application is even; on speckled clay, a clear glaze really makes those iron spots pop. -
Wiping the Foot:
Thoroughly wipe the bottom of the vase (the foot ring) with a sponge to ensure no glaze is left, or it will fuse to your kiln shelf. -
Final Fire:
Fire the piece to the temperature recommended for your clay body and clear glaze (typically Cone 5 or 6 for stoneware).
Enjoy your beautiful new vase filled with fresh stems or simply as a standalone piece of art


Modern Color-Block Tumblers
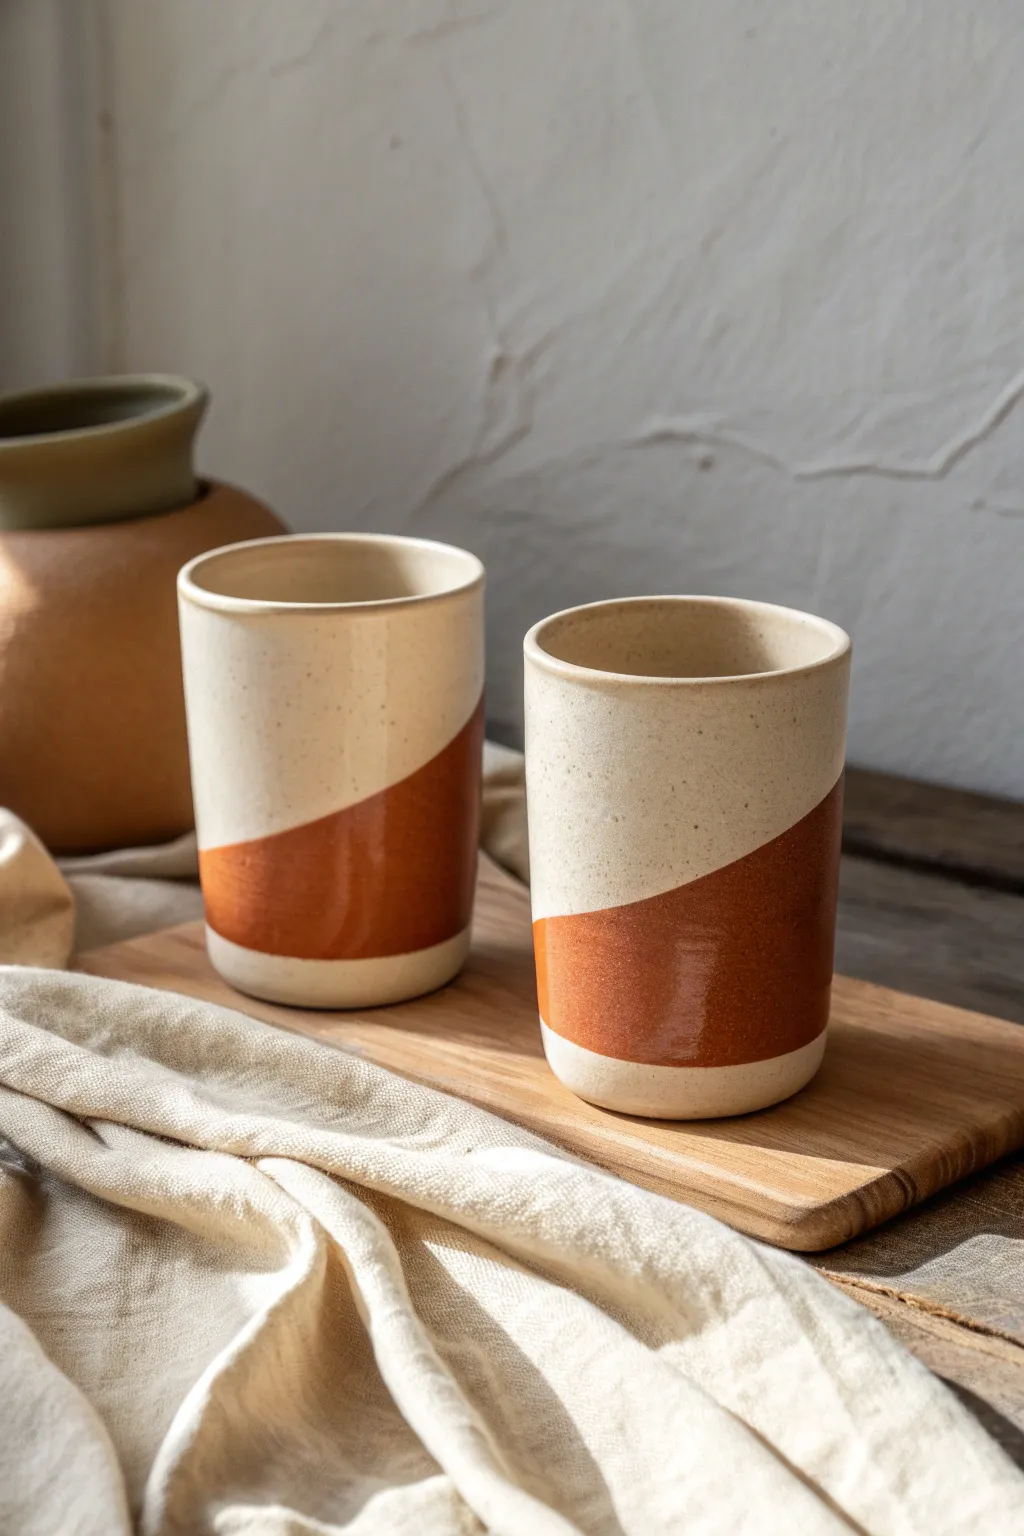
These minimalist tumblers feature a striking diagonal color-block design that perfectly balances rustic warmth with modern geometry. The combination of a speckled cream base and a rich terra-cotta dip creates an inviting vessel perfect for your morning coffee.
Step-by-Step Guide
Materials
- Stoneware clay (preferably speckled)
- Pottery wheel
- Throwing tools (sponge, rib, wire cutter)
- Trimming tools
- Wax resist or masking tape
- Creamy semi-matte speckled glaze
- Rust or terra-cotta colored gloss glaze
- Kiln
- Clean bucket for dipping
- Fine grit sandpaper
Step 1: Throwing and Shaping
-
Prepare the Clay:
Begin by wedging about 1 pound of speckled stoneware clay for each tumbler to remove air bubbles. -
Center on the Wheel:
Center your clay firmly on the wheel head, ensuring it spins smoothly without wobbling. -
Open and Lift:
Open the clay and pull up the walls to create a cylinder. Aim for straight vertical sides with a consistent thickness of about 1/4 inch. -
Define the Rim:
Compress the rim with a chamois or sponge to ensure it is smooth and pleasant to drink from. -
Refine the Shape:
Use a metal rib on the exterior to remove throwing lines and create that sleek, modern cylindrical silhouette shown in the photo. -
Wire Off:
Cut the pot from the wheel using your wire tool and set it aside to dry to a leather-hard state.
Uneven Dipping Lines?
If you struggle to get a crisp line by dipping, use masking tape or electrical tape to block off the area before dipping. Peel the tape immediately after glazing.
Step 2: Trimming and Bisque
-
Trim the Base:
Once leather hard, center the tumbler upside down on the wheel. Trim the bottom to create a clean, flat foot or a slight undercut depending on your preference. -
Smooth the Surface:
Use a slightly damp sponge to wipe away any coarse grog or trimming marks for a pristine surface. -
Bisque Fire:
Place the bone-dry tumblers in the kiln and bisque fire them to Cone 04 (or your clay body’s recommendation).
Step 3: Glazing the Diagonal Design
-
Wax the Foot:
Apply wax resist to the very bottom of the tumbler to prevent glaze from sticking to the kiln shelf. -
First Dip: Cream Base:
Dip the entire interior of the cup into the cream speckled glaze first, pouring out the excess immediately. -
Glaze the Exterior Top:
Hold the tumbler by the foot and dip the exterior into the cream glaze, stopped just short of the bottom if you want raw clay, or coating the whole thing if overlapping. -
Create the Angle:
Here I prefer to let the first coat dry completely. Then, prepare your rust-colored glaze in a wide bucket that allows for an angled dip. -
Dip the Diagonal:
Hold the tumbler at a distinct angle (about 30-45 degrees). Dip the bottom portion into the rust glaze to create that sharp diagonal line. -
Clean the Line:
Hold the cup steady for a few seconds to let excess drip off the angle, then flip it right side up quickly to prevent runs. -
Touch Ups:
If there are any drips that ruin the sharp geometry, carefully scrape them away with a razor blade or fettling knife once the glaze is powdery. -
Glaze Fire:
Load the kiln carefully and fire to the maturity temperature of your clay and glaze (typically Cone 5 or 6 for stoneware). -
Sand the Bottom:
After firing, use wet sanding paper to smooth the unglazed foot ring so it doesn’t scratch your table.
Layer Textures
Try using a matte glaze for the top cream section and a high-gloss glaze for the rust bottom. The contrast in texture feels amazing in the hand.
Enjoy your morning brew in these stylish, handcrafted vessels

The Complete Guide to Pottery Troubleshooting
Uncover the most common ceramic mistakes—from cracking clay to failed glazes—and learn how to fix them fast.
Soft Ombre Gradient on Cups
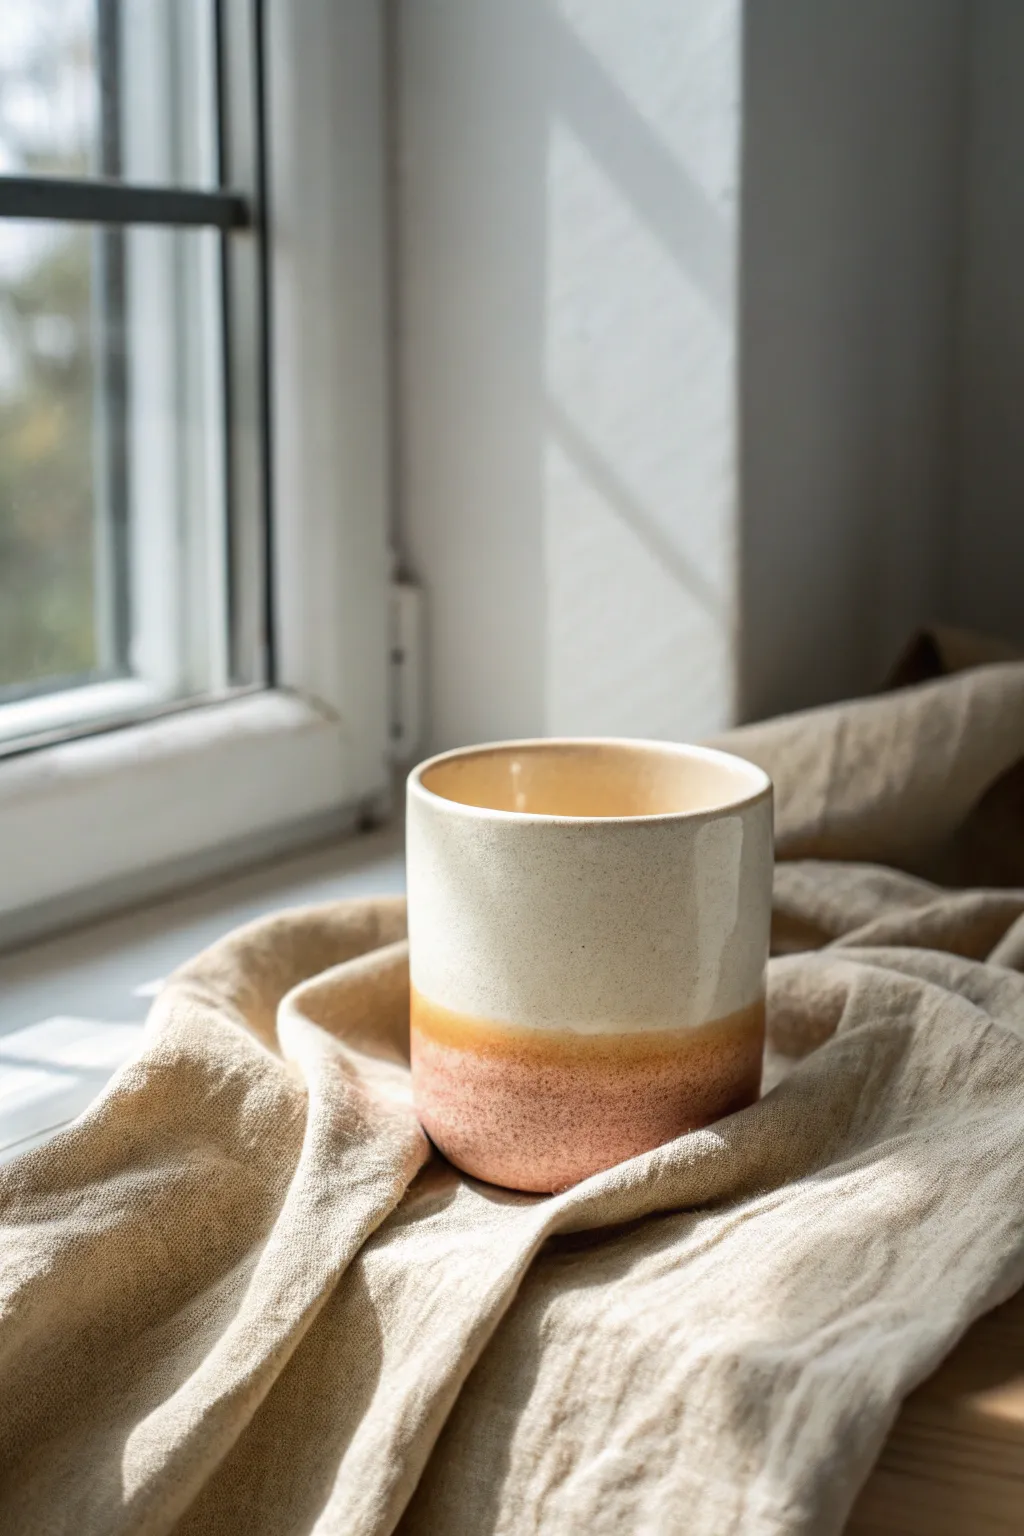
Achieve a warm, earthy aesthetic with this gentle two-tone design that mimics the soft glow of morning light. By layering reactive glazes, you create a subtle transition from creamy speckle to a grounded terracotta base on a simple cylindrical form.
Step-by-Step Tutorial
Materials
- White stoneware clay body
- Pottery wheel (or slab roller for hand-building)
- Rib tool (metal or wood)
- Wire cutter
- Trimming tools
- Sponge
- Creamy white speckled glaze (opaque)
- Terracotta or warm blush pink glaze (matte finish preferred)
- Wax resist
- Large glazing tongs
- Clean bucket for water
- Kiln
Step 1: Forming the Cylinder
-
Center the clay:
Start with about 1 lb of white stoneware clay. Center it firmly on the wheel head, ensuring there is no wobble before opening. -
Open and pull:
Open the clay to create a flat inside bottom. Begin pulling the walls straight up. Aim for a simple, handle-less cylinder shape with straight sides, keeping the walls relatively thin and even. -
Refine the shape:
Use a metal or wooden rib on the exterior while supporting the interior with your hand to smooth out any throwing lines. The goal is a clean, modern canvas for the glaze. -
Finish the rim:
Compress the rim gently with a chamois or a wet sponge to round it off. A smooth rim is crucial for a comfortable drinking experience. -
Cut and dry:
Wire the pot off the wheel and let it dry to leather-hard consistency.
Step 2: Trimming and Bisque
-
Trim the foot:
Once leather-hard, center the cup upside down on the wheel. Trim away excess clay from the bottom, creating a slight curve at the base where the terracotta color will eventually sit. -
Smooth the surface:
Burnish the surface slightly with a smooth rib or the back of a spoon if you want an extra smooth finish, or leave it as-is for texture. -
Bisque fire:
Let the piece dry completely to the bone-dry stage. Load it into the kiln and bisque fire to cone 04 (or your clay body’s recommendation).
Uneven Dipping Line?
If your dip line is crooked or messy, don’t wipe it all off. Let it dry, then use a stiff brush or a green kitchen scouring pad to gently sand the dried glaze edge into a straight line.
Step 3: Glazing the Gradient
-
Clean the bisque:
Wipe the bisque-fired cup with a damp sponge to remove any kiln dust. This ensures the glaze adheres properly without crawling. -
Wax the foot:
Apply a thin layer of wax resist to the very bottom foot ring and about 2mm up the side to prevent glaze from fusing the cup to the kiln shelf. -
Dip the base color:
Hold the cup by the rim using glazing tongs or your fingers (if you’re careful). Dip the entire cup, inside and out, into the Creamy White Speckled glaze. Hold for 3 seconds and lift out. -
Clean the rim:
If you used tongs, touch up the tong marks immediately with a drop of glaze on your finger. Let this base layer dry until it is powdery to the touch. -
Prepare the second glaze:
Thoroughly mix your Terracotta/Blush glaze. Sometimes I like to add a tiny bit of water to thinning it out just slightly, which helps create a softer transition line. -
Dip the ombre bottom:
Invert the cup so the bottom is facing down. Dip the bottom third of the cup into the Terracotta glaze. Do this quickly—in and out in 1-2 seconds—to avoid the glaze getting too thick. -
Soften the line (Optional):
If the line between white and terracotta looks too harsh, you can gently sponge the transition area while the glaze is still damp to blend them slightly. -
Final wipe:
Check the waxed foot again. Use a damp sponge to wipe away any beads of glaze that might be sitting on the wax.
Add Texture
Before the first firing, gently press a rough linen cloth into the soft clay surface. The glaze wil pool in the fabric texture, enhancing the rustic look.
Step 4: Final Firing
-
Load the kiln:
Place the cup on the kiln shelf. Make sure it isn’t touching any other pots. -
Glaze fire:
Fire the kiln to the maturity temperature of your clay and glaze (typically Cone 5 or 6 for stoneware). Allow the kiln to cool naturally before opening to prevent thermal shock.
Enjoy your morning coffee in a cup that feels as warm and grounding as the earth it came from
Swirled Marbled Serving Bowls
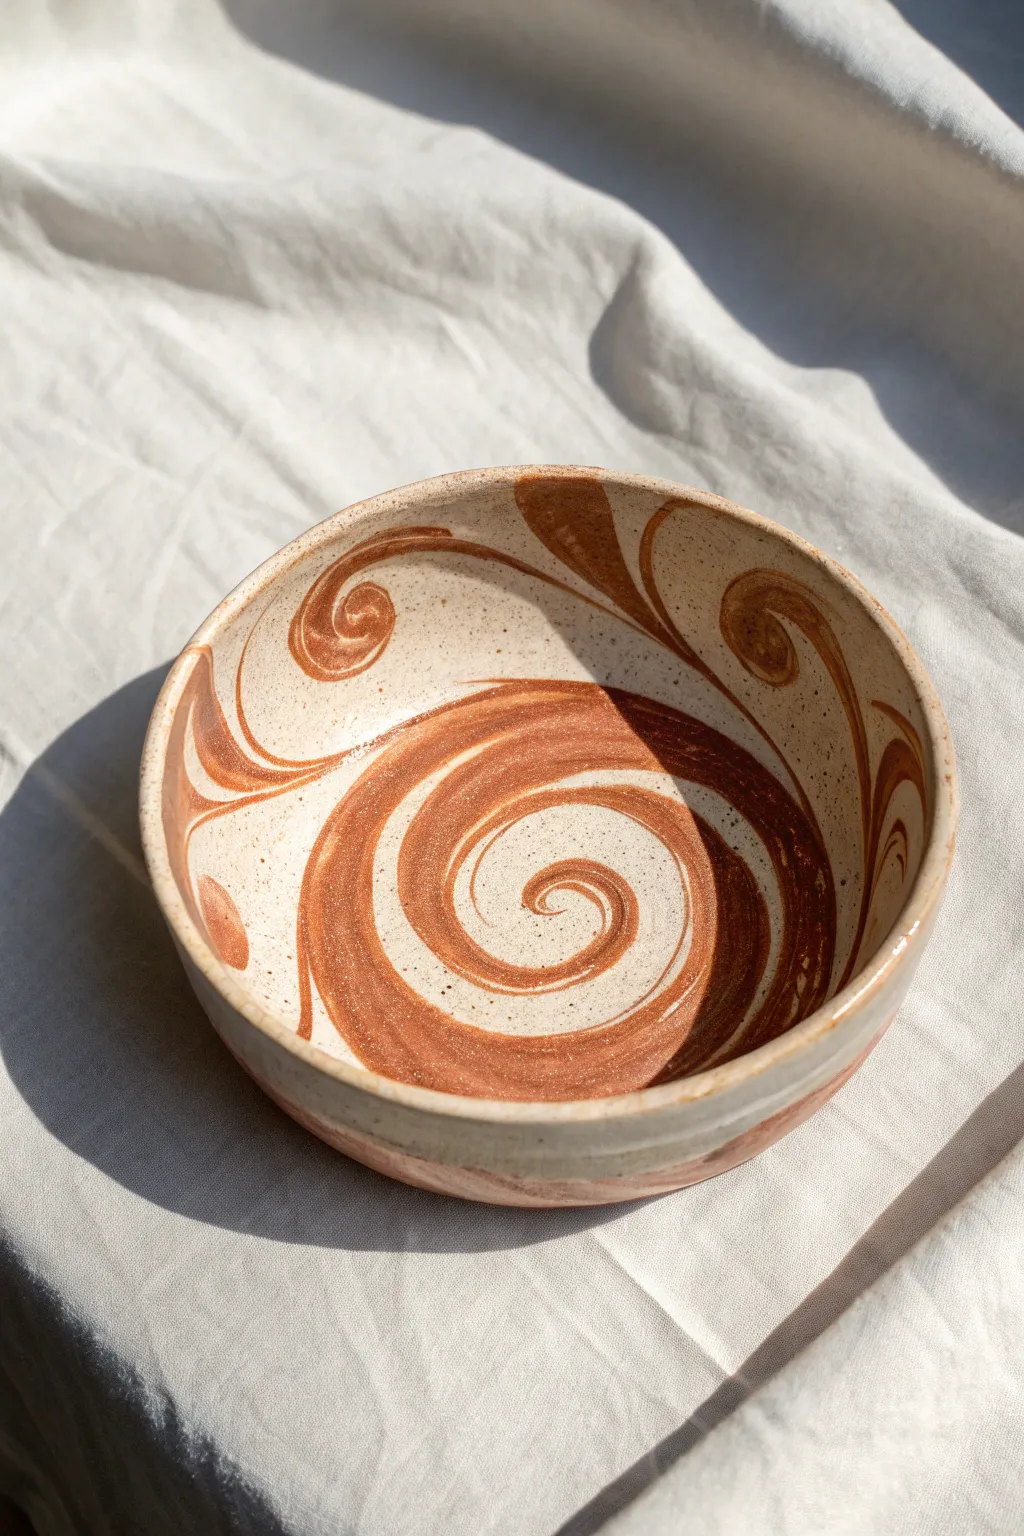
This striking bowl combines the warmth of terracotta with the clean look of white stoneware to create organic, swirling patterns reminiscent of latte art. The result is a smooth, functional piece where the design is baked right into the clay body itself rather than painted on top.
Step-by-Step
Materials
- White stoneware clay body
- Red earthenware or terracotta clay body
- Potter’s wheel
- Wire cutting tool
- Rib tool (metal or rubber)
- Sponge
- Trimming tools
- Clear glaze (food safe)
Step 1: Preparing the Clay
-
Weigh your clay:
Cut a larger portion of white stoneware (about 70% of your total weight) and a smaller portion of red clay (about 30%). A total of 2-3 lbs is good for a medium serving bowl. -
Create the loaf:
Flatten the white clay slightly into a thick slab. Break the red clay into small chunks or rolls and place them sporadically on top of the white slab. -
Fold and wedge:
Roll the white clay up to enclose the red chunks. Wedge the combined lump, but be careful not to over-wedge. You want to stretch the colors together, typically wedging 5-10 times is enough to create streaks without blending everything into a solid pink. -
Shape the ball:
Pat the wedged clay into a round ball, ready for the wheel. You should see distinct streaks of red and white on the outside.
Step 2: Throwing on the Wheel
-
Center the clay:
Slam the ball onto the wheel head. Use plenty of water and center the clay. As you apply pressure, you will see the colors begin to spiral on the surface. -
Open the form:
Open the clay down to the base. I like to compress the floor immediately with a flat tool to ensure the spiral pattern on the bottom is tight and avoids S-cracks later. -
Pull the walls:
Begin pulling up the walls. This is where the magic happens; as the wheel spins and you pull upward, the red inclusions will stretch into long, elegant swirls. -
Observe the pattern:
Keep an eye on the rim. If the marbling creates a weak spot or an air pocket between clay types, compress the rim gently with a sponge or chamois. -
Shape the bowl:
Push from the inside to create a gentle, open curve. Use a rib tool on the inside surface to smooth out throwing lines and reveal the clean marble pattern more clearly. -
Refine the surface:
Use a metal rib on the exterior to scrape away the resulting ‘slurry’ (the muddy water). This is crucial because the slurry often muddies the crisp lines between the white and red clays. -
Wire off:
Run a wire tool under the base to separate the bowl from the wheel head. Let the bowl dry to a leather-hard state.
Pro Tip: Surface Scraping
After throwing, while the clay is still wet, gently scrape the surface with a metal rib. This removes the surface ‘mud’ that blurs the colors, instantly making the swirl pattern appear crisper and brighter.
Step 3: Trimming and Finishing
-
Center for trimming:
Once leather hard, place the bowl upside down on the wheel. Center it and secure it with lugs of clay. -
Trim the foot:
Use a sharp trimming tool to carve away excess clay from the base. This will reveal the internal grain of the marbling on the outside of the bowl, often showing a different pattern than the inside. -
Smooth the transition:
Carve a defined foot ring. Burnish the trimmed areas slightly with a smooth stone or the back of a spoon if you want extra smoothness before firing. -
Bisque fire:
Load the bone-dry bowl into the kiln for a bisque firing (typically cone 04 or 06). Note that different clay bodies shrink differently, so fire slowly to prevent separation cracks. -
Glazing:
Dip or brush a coat of clear glaze over the entire piece. A clear glaze is essential to showcase the clay contrast; opaque glazes would hide your hard work. -
Final wipe:
Wipe the foot ring clean of any glaze with a damp sponge. -
Glaze fire:
Fire the bowl again to the maturity temperature of your highest-fire clay (usually Cone 6 or 10 for stoneware). Ensure both clay bodies are compatible at this temperature.
Troubleshooting: Cracking?
If the red and white clays separate or crack apart during drying, they likely have different shrinkage rates. Test your clay bodies beforehand or add grog to help equalize them.
Now you have a unique centerpiece that highlights the natural beauty of the earth materials.


What Really Happens Inside the Kiln
Learn how time and temperature work together inside the kiln to transform clay into durable ceramic.
Classic Blue-and-White Motif Sets
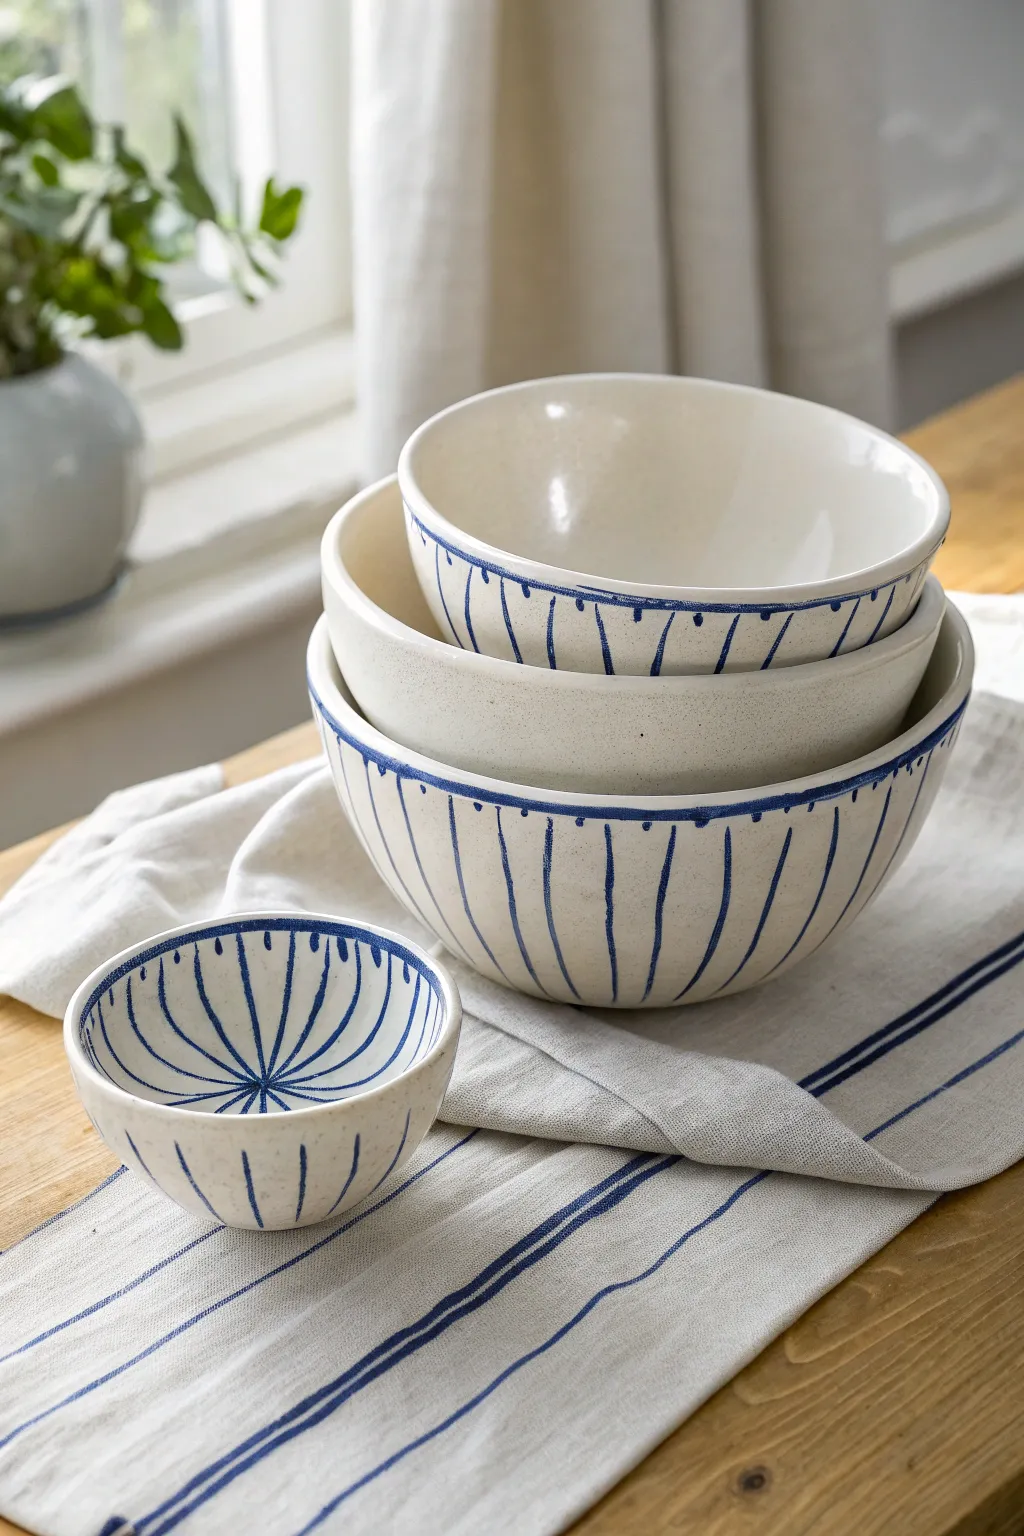
These charming nesting bowls combine a rustic, speckled cream base with crisp cobalt blue lines for a look that feels both modern and traditionally handmade. The design relies on simple radial brushstrokes that highlight the form of the pottery.
Step-by-Step Tutorial
Materials
- Wheel-thrown or hand-built clay bowls (nesting sizes)
- Speckled cream or matte white glaze
- Cobalt oxide wash or blue underglaze
- Fine liner brush (size 0 or 1)
- Banding wheel
- Clear transparent glaze (if using underglaze)
- Wax resist (optional)
- Small sponge
Step 1: Forming the Base
-
Throw your forms:
Create a set of three or four nesting bowls on the potter’s wheel. Aim for a simple, hemispherical curve for each bowl to best display the radial pattern. -
Bisque fire:
Once your bowls are bone dry, fire them to bisque temperature (usually Cone 04 or 06) to prepare them for glazing. -
Clean the surface:
Wipe the bisque ware down with a damp sponge to remove any kiln dust, which ensures your glaze adheres perfectly.
Smudged Lines?
If your cobalt lines look fuzzy after firing, your glaze might be too fluid. Try a stiffer matte glaze next time, or apply the cobalt on the bisque *under* a clear glaze instead.
Step 2: Applying the Base Glaze
-
Glaze preparation:
Stir your speckled cream glaze thoroughly. If you don’t have a speckled glaze, you can mix a small amount of granular ilmenite into a standard white glaze. -
Dip the bowls:
Dip each bowl into the base glaze. Hold it submerged for about 3 seconds to get an even coat, then shake off the excess gentleness as you lift it out. -
Clean the foot:
Immediately wipe the bottom foot ring of each bowl with a wet sponge to prevent it from fusing to the kiln shelf. -
Let it dry:
Allow the base glaze to dry completely until it is powdery to the touch. This prevents your brush from dragging through the raw glaze in the next steps.
Level Up: Oxide Wash
Instead of commercial blue underglaze, mix pure Cobalt Carbonate with water. This creates a more organic, watercolor-style bleed that interacts beautifully with speckled clay bodies.
Step 3: Painting the Motif
-
Prepare your cobalt:
Mix your cobalt oxide with a little water until it reaches an ink-like consistency. If using underglaze, ensure it flows smoothly off the brush. -
Position the bowl:
Place your first bowl on a banding wheel. While I usually work freely, the wheel helps you visualize the spacing before you paint. -
Paint the rim:
Load your fine liner brush and carefully paint a thin, continuous blue line along the very edge of the rim. -
Start the exterior lines:
Starting just under the rim line you just painted, pull a vertical stroke downward toward the foot. Let the line tape off naturally as the brush runs out of pigment. -
Establish quadrants:
To keep spacing even, paint four main lines at 12, 3, 6, and 9 o’clock positions. -
Fill the gaps:
Fill the spaces between your quadrant lines with evenly spaced vertical strokes. Imperfection is part of the charm here, so don’t stress if they wiggle slightly. -
Decorate the interior:
For the inside, especially on smaller bowls, paint lines radiating from the very center of the bowl bottom upward toward the rim. -
Create the center star:
Where the lines meet in the bottom center, allow them to touch or cross slightly to create a starburst effect. -
Add rim dots (optional):
Looking at the reference, notice the tiny dots beneath the rim line. Use the tip of your brush to place a small dot at the top of every other vertical line.
Step 4: Final Firing
-
Check the foot again:
Give the bottom one last check to ensure no cobalt dripped onto the unglazed potential contact points. -
Glaze fire:
Fire the bowls to the maturity temperature of your clay and glaze (typically Cone 6 for stoneware). The cobalt will fuse into the cream glaze, softening the lines slightly.
Once cooled, stack your bowls to admire how the vertical lines create a rhythm that ties the whole set together
Hand-Drawn Doodle Sketchware
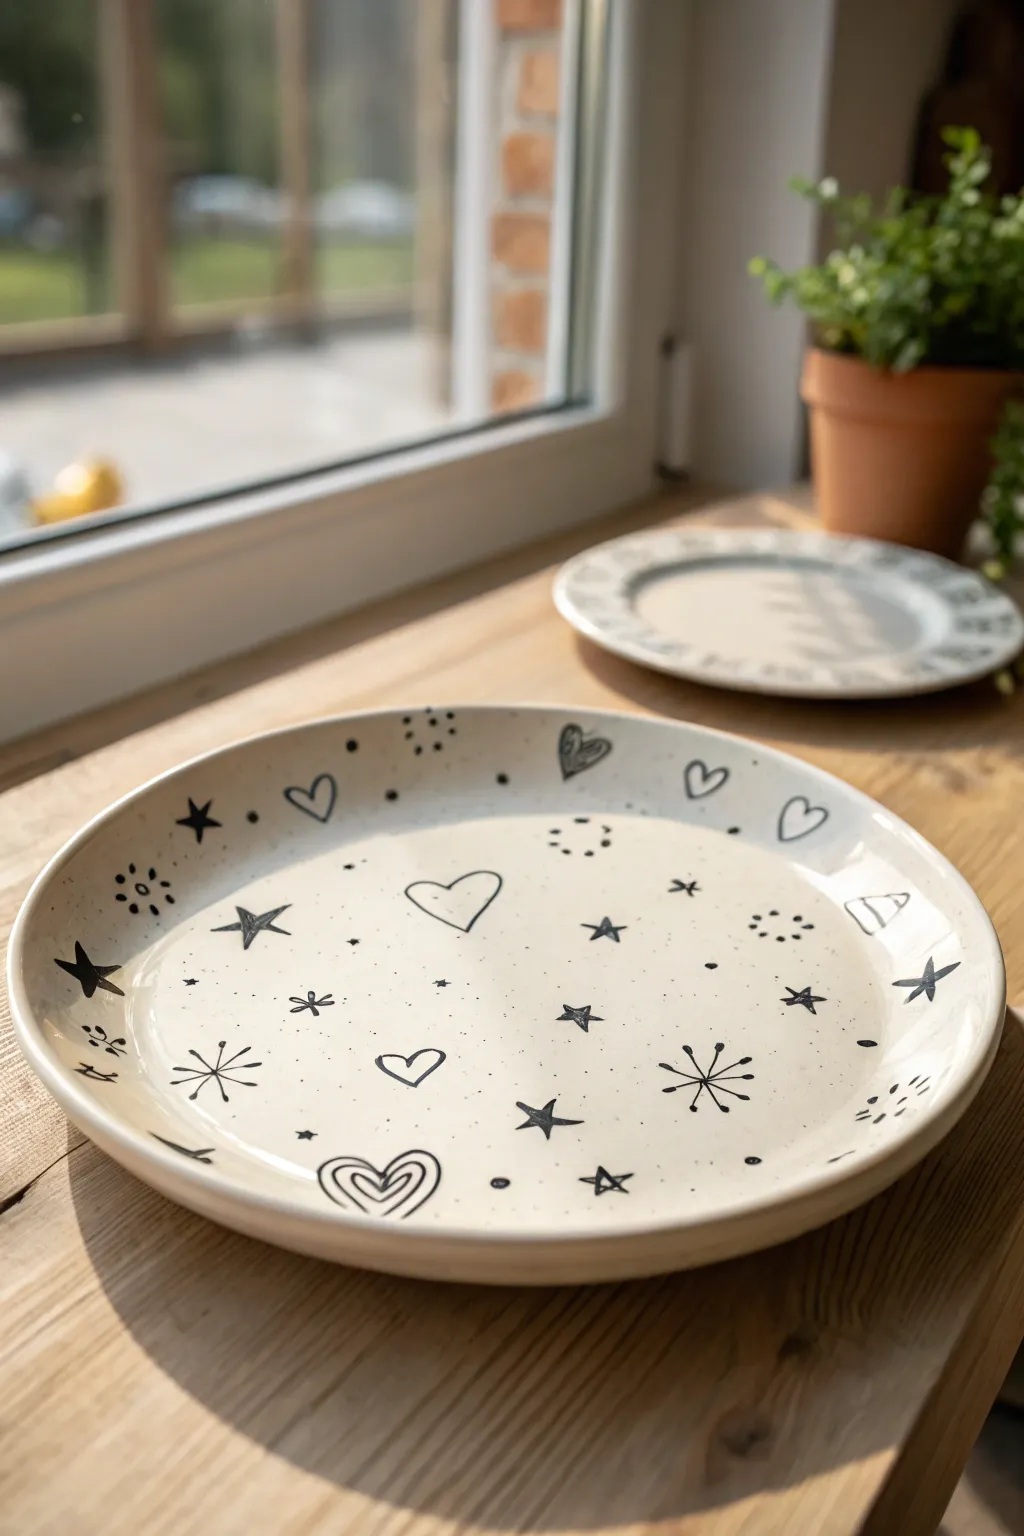
Transform a simple ceramic blank into a playful piece of art with this hand-drawn sketchware technique. Featuring charming doodles of stars, hearts, and geometric shapes, this project mimics the casual elegance of a sketchbook page on a creamy glazed surface.
Step-by-Step
Materials
- Bisque-fired ceramic plate (cream or white clay body)
- Black underglaze pencil or underglaze applicator with a fine needle tip
- Clear transparent dipping glaze or brush-on clear glaze
- Damp sponge
- Soft fan brush (if brushing glaze)
- Clean water
- Kiln (or access to a firing service)
Step 1: Preparation & Planning
-
Clean the bisque:
Begin with your bisque-fired plate. Wipe the entire surface gently with a damp sponge to remove any dust or oils from handling, which can repel underglaze. -
Map out your spacing:
Before committing to ink, visualize where your main elements will go. I like to mentally divide the plate into quadrants to ensure the design feels balanced but random.
Pencil vs. Applicator
Pencils give a textured charcoal look but can smudge. Fine-tip applicators create bolder, liquid ink lines that are more stable.
Step 2: Drawing the Motifs
-
Draw primary stars:
Using your black underglaze pencil or fine applicator, draw a few five-pointed stars scattered near the rim. Fill them in solidly with black. -
Add open hearts:
Sketch simple outlines of hearts in various sizes. Keep the lines loose and sketch-like; perfection isn’t the goal here. -
Create the striped heart:
Near the bottom edge, draw a larger heart contour and fill the inside with concentric heart shapes or stripes to create a focal point. -
Draw starbursts:
Add retro-style starbursts by drawing a central dot and radiating straight lines outward. Add tiny dots at the end of some lines for mid-century flair. -
Incorporate linear stars:
Draw several ‘stick figure’ stars made of crossed lines (an asterisk shape) to add variety to your celestial theme. -
Sketch whimsical spirals:
Add a scribbled, spiral heart or loose coil shape to emphasize the hand-drawn, doodle aesthetic. -
Add detail dots:
Place clusters of three or four small dots in the empty negative spaces to tie the larger elements together. -
Include tiny crosses:
Draw very small ‘x’ or ‘+’ shapes sporadically across the surface for texture. -
Create circle clusters:
Draw small circles arranged in a flower-like or ring pattern for geometric variety.
Add a Splash of Color
Before the clear glaze, water down a pastel underglaze (like pink or teal) and loosely fill inside the open hearts for a watercolor effect.
Step 3: Refining & Finishing
-
Clean up smudges:
If you smudge any underglaze pencil, gently dab—don’t rub—the area with a slightly damp Q-tip or sponge corner to lift the dust. -
Set the underglaze:
Allow the design to dry completely. If using a pencil, you can lightly mist it with water or a fixative specifically for ceramics to prevent smearing during glazing. -
Apply clear glaze:
Once the design is set, dip the plate into a clear transparent glaze. If brushing, apply 2-3 even coats with a soft fan brush, letting each coat dry in between. -
Check the rim:
Wipe the foot of the plate clean with a sponge to prevent it from sticking to the kiln shelf. -
Fire the piece:
Load the plate into the kiln and fire to the temperature recommended for your specific clay and clear glaze combination (usually Cone 06 or Cone 6).
Enjoy using your custom doodle plate for your next casual lunch or snack

TRACK YOUR CERAMIC JOURNEY
Capture glaze tests, firing details, and creative progress—all in one simple printable. Make your projects easier to repeat and improve.
Geometric Tape-Resist Platters
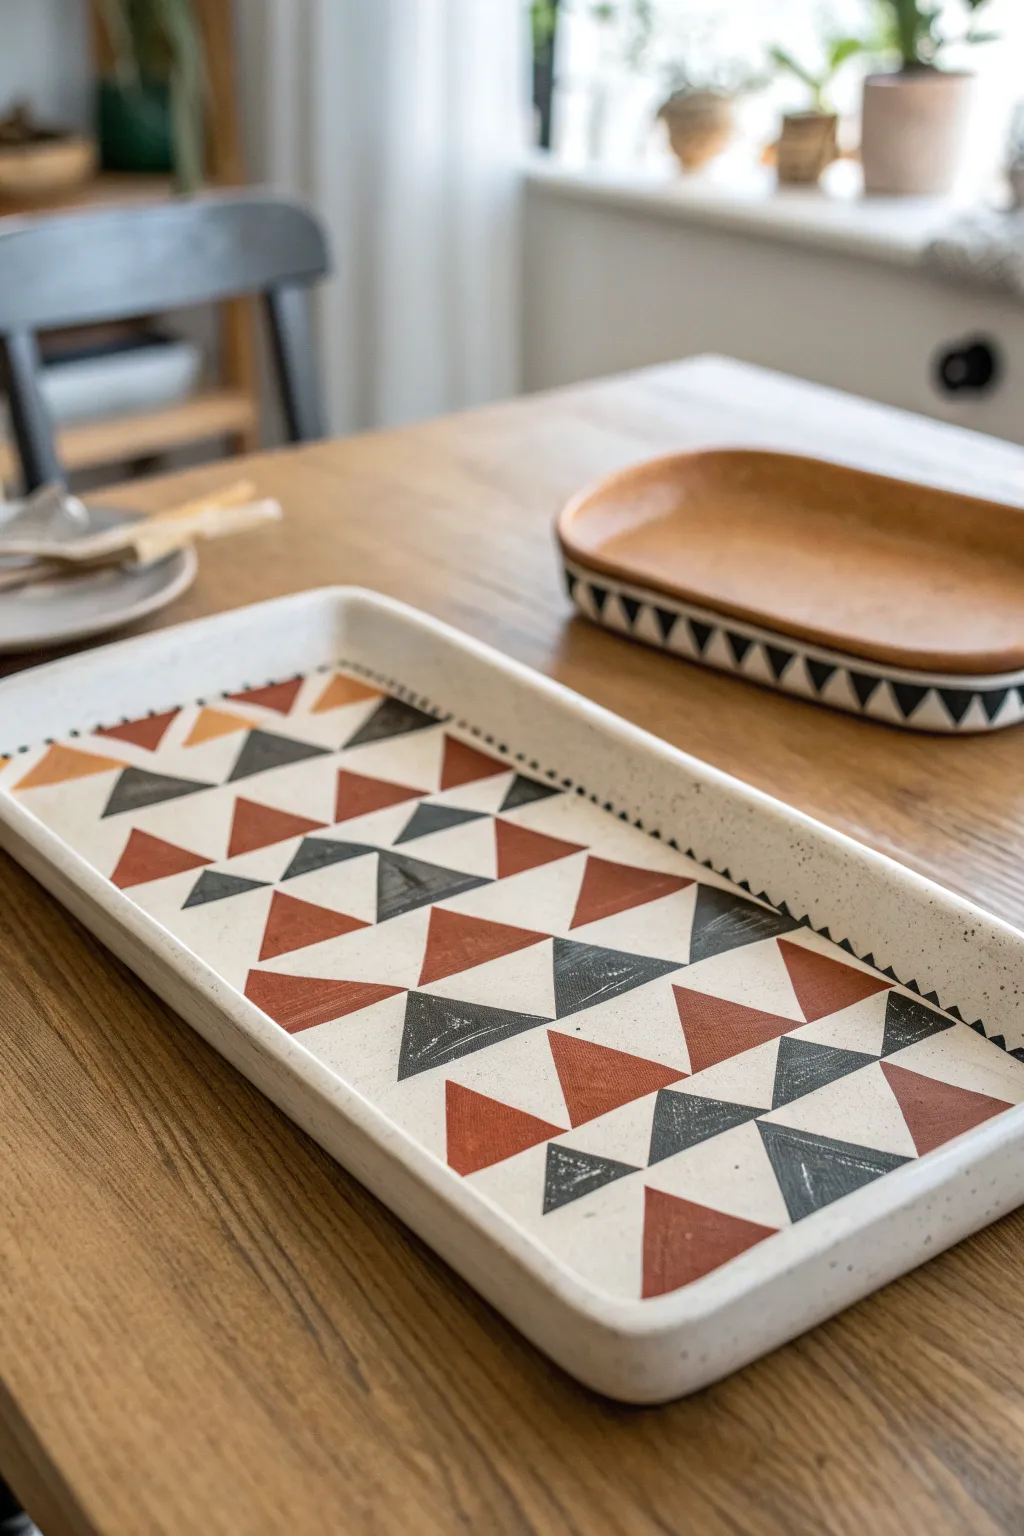
This project combines sleek modern lines with rustic earthy tones, using a tape-resist technique to achieve crisp triangular patterns. By alternating terracotta and charcoal glazes against a speckled white clay body, you will create a stunning functional centerpiece for your table.
Step-by-Step Tutorial
Materials
- Speckled stoneware clay (white or light buff)
- Rectangular slump mold (or wooden form)
- Rolling pin and guide strips (approx. 1/4 inch thick)
- Needle tool
- Rib tool (smooth wood or rubber)
- Fettling knife
- Sponge
- Underglazes: Rust/Terracotta and Charcoal/Black
- Clear matte or satin glaze
- Masking tape or graphic art tape (1/4 inch width)
- Flat shader paintbrush
- X-Acto knife or sharp craft blade
Step 1: Building the Form
-
Roll out the slab:
Wedge your speckled clay thoroughly to remove air bubbles. Using your guide strips and rolling pin, roll out a slab that is roughly 1/4 inch thick. Make sure the slab is large enough to drape over your chosen mold with at least an inch of excess on all sides. -
Compress the clay:
Run a rubber rib tool firmly over the surface of the slab on both sides. This aligns the clay particles, preventing warping later, and smooths out the canvas texture from rolling. -
Drape over mold:
Carefully lift your slab and place it over your rectangular slump mold. Gently press the clay into the bottom and corners, ensuring it conforms to the shape without stretching it too thin. -
Trim the edges:
Once the clay is settled, use your fettling knife held at a 90-degree angle to trim the excess clay from the rim. I like to run a damp sponge along this cut edge immediately to round it off slightly and remove any sharp burrs.
Bleeding Lines?
If underglaze seeps under the tape, wait until it’s bone dry. Gently scratch the error off with a needle tool rather than wiping, which can smear the pigment.
Step 2: Designing the Pattern
-
Dry to leather hard:
Allow the platter to dry slowly until it reaches a leather-hard state. It should be firm enough to handle without deforming but still retain some moisture. -
Apply the tape grid:
Apply strips of crafting tape across the width of the platter to create distinct rows. Leave approximately 1.5 to 2 inches of space between each strip of tape to define the height of your triangle rows. -
Create the triangles:
Using additional pieces of tape, create the diagonal sides of the triangles within the horizontal rows. You are essentially masking off the ‘negative space’ between the triangles. Ensure the tape edges are pressed down very firmly to prevent underglaze bleeding. -
Add rim details:
For that subtle border seen in the image, apply small triangles of tape or use a stencil along the very edge of the inner rim.
Step 3: Glazing and Finishing
-
Apply first color:
Select your Rust or Terracotta underglaze. Using a flat shader brush, fill in alternating triangles. Apply 2-3 coats for opaque coverage, letting each coat dry briefly in between. -
Apply second color:
Rinse your brush well and switch to the Charcoal or Black underglaze. Paint the remaining triangles, being careful near the tape edges. Again, use 2-3 coats for solid color depth. -
Remove the tape:
Once the underglaze is dry to the touch (but before bisque firing), carefully peel away the tape. Use an X-Acto knife to gently lift the corners if they are stubborn. -
Clean up edges:
If any underglaze bled under the tape, gently scrape it away with a sharp cleanup tool or a slightly damp stiff brush to reveal crisp lines. -
Bisque fire:
Load the platter into the kiln and bisque fire to Cone 04 (or your clay body’s recommended temperature). -
Apply clear glaze:
After the bisque fire, wipe the piece with a damp sponge to remove dust. Dip or brush on a clear matte or satin glaze over the entire interior. This seals the underglaze and makes the platter food safe. -
Final firing:
Glaze fire the piece to the maturity temperature of your clay (typically Cone 5 or 6 for stoneware). Allow the kiln to cool completely before removing your finished platter.
Tape Removal Timing
Don’t leave tape on during the bisque fire! The adhesive burns away messy. Remove it when the clay is bone dry or just before firing for cleanest lines.
Serve your favorite appetizers on this geometric beauty and enjoy the contrast of sharp design against organic clay
Checkerboard Snack Plates
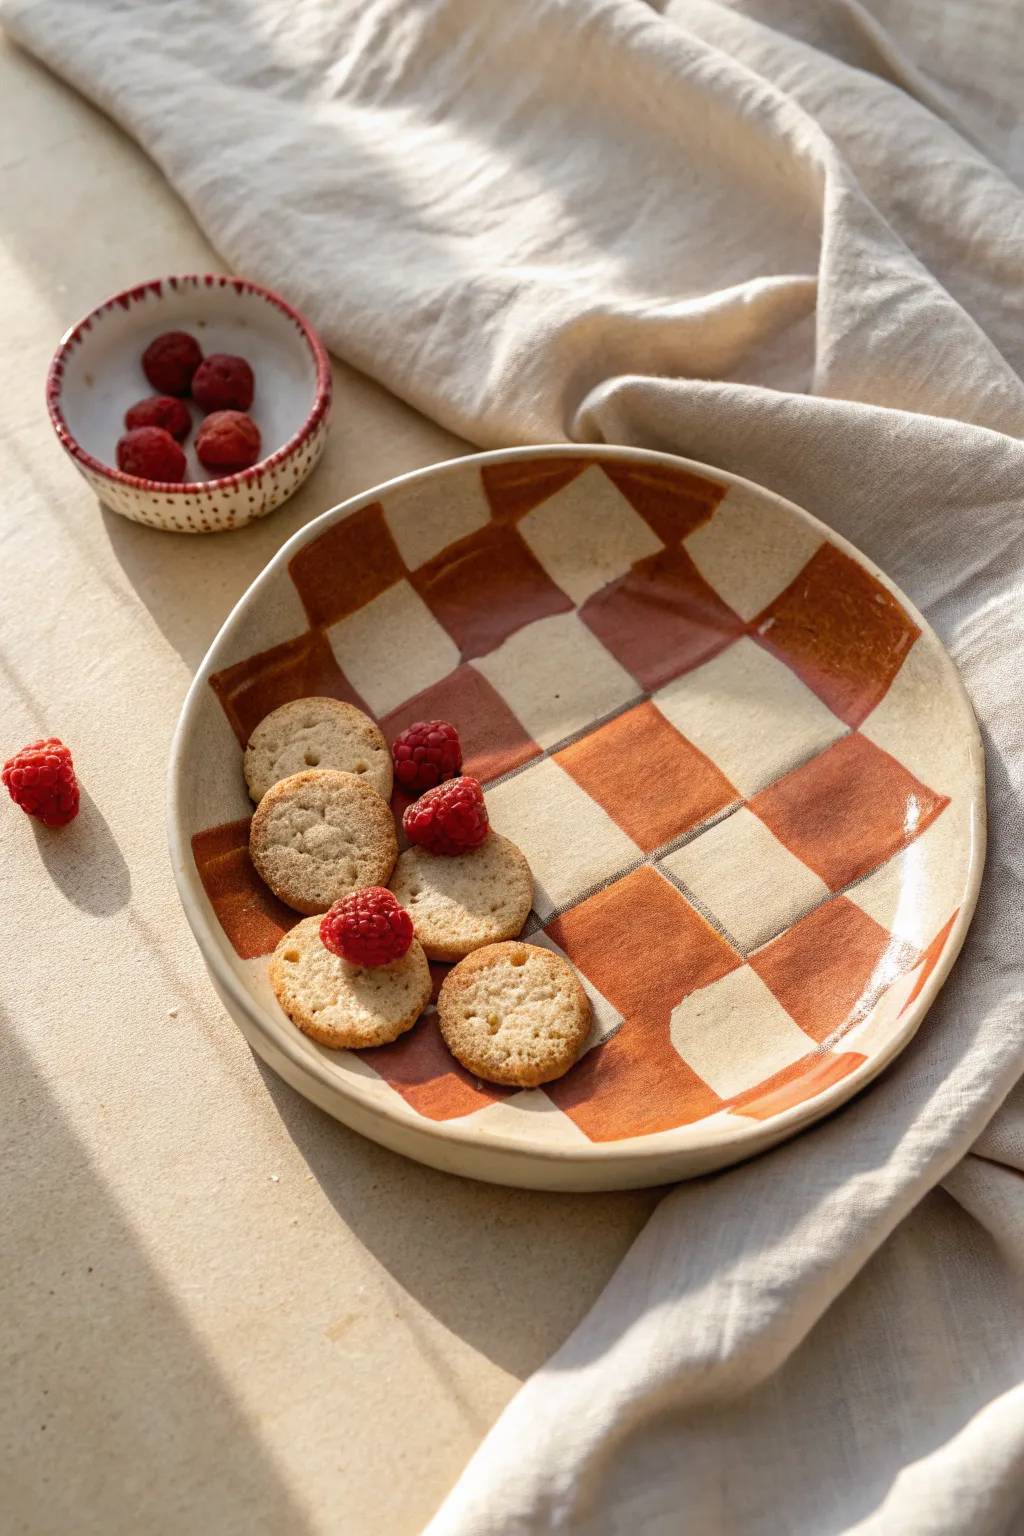
Bring warmth to your table setting with this handmade ceramic plate featuring a rustic, hand-painted checkerboard design. The earthy terracotta tones against a creamy white glaze create a cozy, artisanal feel that is perfect for serving afternoon snacks.
Step-by-Step Guide
Materials
- Light-colored stoneware clay (smooth or fine grog)
- Rolling pin
- Canvas working mat
- Circular slump mold or a large bowl
- Pottery knife or needle tool
- Sponge
- Terracotta-colored underglaze (or red iron oxide wash)
- Clear transparent glaze
- Flat shader brush (approx. 1/2 to 3/4 inch)
- Small round brush for touch-ups
- Pencil (optional)
- Kiln
Step 1: Forming the Plate
-
Roll the Slab:
Begin by wedging your stoneware clay thoroughly to remove air bubbles. Roll it out on your canvas mat to an even thickness of about 1/4 inch using your rolling pin. Compress the slab on both sides with a rib tool to align the clay particles and prevent warping. -
Cut the Shape:
Place a circular template (or a dinner plate) gently on top of your slab. Use your needle tool to trace and cut out a perfect circle. Remove the excess clay. -
Smooth the Edges:
Before shaping, take a damp sponge and run it along the cut rim of your circle to soften the sharp edge. This simple step saves a lot of sanding time later. -
Shape the Curve:
Lift your clay circle carefully and lay it inside your slump mold or bowl. I like to gently press a separate dry sponge into the center and work outward to ensure the clay conforms to the curve without stretching it too thin. -
Let it Dry:
Allow the clay to dry to a ‘leather hard’ stage. This means it is stiff enough to hold its shape but still cool to the touch. Remove it from the mold once it pops out easily.
Uneven Color?
If your terracotta checks look streaky after firing, you likely applied the underglaze too thinly. Always build up 3 smooth layers for full opacity.
Step 2: Painting the Design
-
Bisque Fire:
Place your greenware plate into the kiln for a bisque firing (usually cone 04 or 06). This prepares the clay to accept the underglaze without getting muddy. -
Clean the Surface:
Once the bisque firing is complete and the kiln has cooled, wipe the plate down with a damp sponge to remove any kiln dust. This helps the glaze adhere properly. -
Plan the Grid:
Using a regular graphite pencil, lightly sketch a large checkerboard grid directly onto the bisque. Don’t worry about being perfectly geometric; part of the charm is the slightly wavy, hand-drawn look. The pencil marks will burn away in the kiln. -
Paint the Checks:
Dip your flat shader brush into the terracotta underglaze. Start filling in alternating squares of your grid. The flat edge of the brush helps you create those crisp, yet painterly lines. -
Control the Saturation:
Apply the underglaze in two to three thin coats rather than one thick gloop. This ensures the orange-brown color is solid and opaque without visible brush strokes showing through. -
Tidy the Edges:
If you go outside the lines, use a clean, stiff damp brush to wipe away mistakes. You can leave the rim raw or paint a thin uneven line around the edge for definition. -
Dry Completely:
Let the underglaze dry completely until it’s chalky and matte. This usually takes about 20-30 minutes depending on humidity.
Step 3: Glazing and Finishing
-
Apply Clear Glaze:
Dip the entire plate into a bucket of clear transparent glaze using glazing tongs. Alternatively, you can brush on a clear brushing glaze. Ensure the coat is even. -
Wipe the Foot:
Clean the bottom (foot) of the plate thoroughly with a sponge so no glaze touches the kiln shelf. -
Glaze Fire:
Load the kiln for your final glaze firing (often cone 5 or 6 for stoneware). Follow your specific clay and glaze firing schedules. -
Cool and Inspect:
Wait until the kiln reaches room temperature before opening. Remove your plate and inspect the beautiful interaction between the creamy clay body and the terracotta checks.
Tape it Off
For sharper lines, use thin automotive masking tape or wax resist to block out the white squares before painting. Peel tape before firing!
Enjoy styling your new handmade plate with colorful fruits and crackers at your next gathering
Dot-Mandala Rim Designs
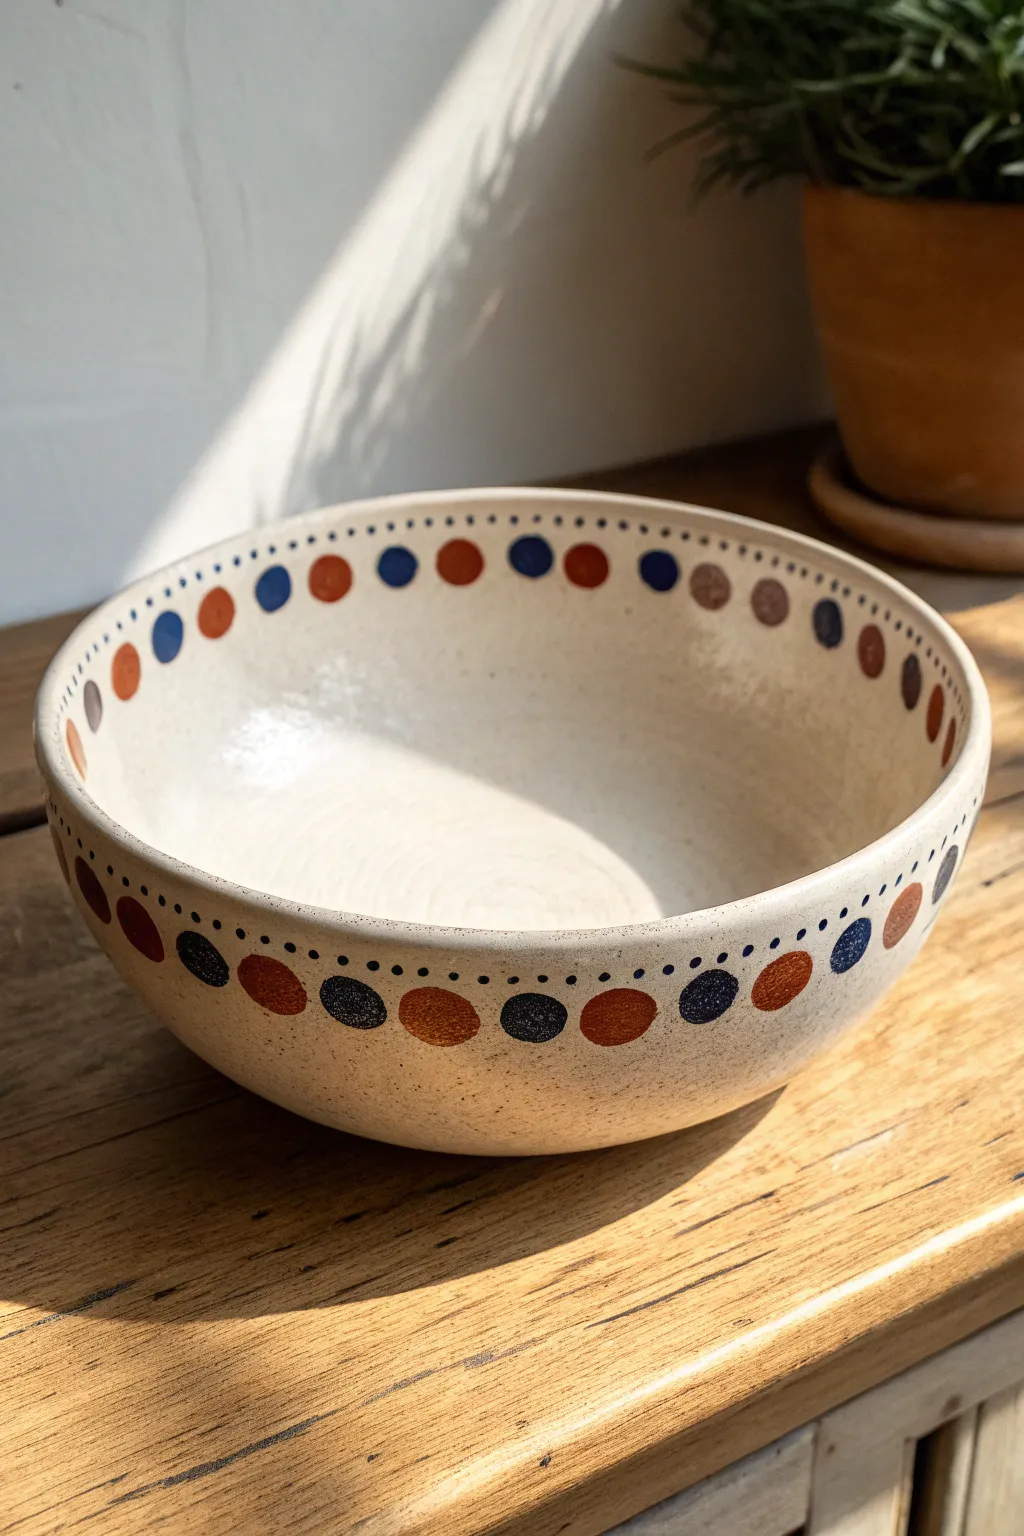
This charming ceramic bowl features a warm, creamy speckled glaze adorned with a playful alternating dot pattern along the rim. The clean lines and retro color palette of burnt orange and deep indigo make it a perfect statement piece for any modern farmhouse kitchen.
Step-by-Step
Materials
- Bisque-fired ceramic bowl (stoneware)
- Speckled cream or white glaze (for base)
- Underglazes: Burnt Orange/Terracotta
- Underglazes: Deep Indigo/Navy Blue
- Wax resist emulsion
- Sponge
- Soft fan brush (for glaze application)
- Small round detail brush (size 2 or 4)
- Very fine liner brush (size 00)
- Pencil (optional for marking)
- Clear transparent glaze (if using underglazes on top of bisque)
Step 1: Preparation & Base Glaze
-
Wipe the bisque:
Start by wiping down your bisque-fired bowl with a damp sponge to remove any kiln dust; this ensures your glaze adheres perfectly without pinholing. -
Apply wax resist (optional):
If you want an unglazed foot ring, carefully paint wax resist on the bottom of the bowl and let it dry completely. -
Glaze the interior:
Pour your speckled cream glaze inside the bowl, swirl it around to coat the entire interior surface evenly, and pour out the excess. -
Glaze the exterior:
Using a soft fan brush or by dipping, apply two to three smooth coats of the same speckled cream glaze to the exterior. I find that brushing in alternating directions helps achieve a uniform thickness. -
Clean the rim:
Check the rim for drips or heavy spots and smooth them out with a finger or damp sponge.
Brush Tip
For perfectly round dots without tracing, use the end of a drill bit or the handle of a paintbrush as a stamp. Dip the flat end into underglaze and press onto the clay.
Step 2: Designing the Dot Pattern
-
Plan the spacing:
Visualize the placement of your large colored dots along the upper exterior rim. You can lightly mark equal intervals with a pencil if you’re worried about spacing, though pottery permits a little organic irregularity. -
Paint the orange dots:
Dip your small round brush into the burnt orange underglaze. Press the brush gently against the rim to form a circle, lifting straight off. Space these out allowing room for a blue dot in between each one. -
Paint the indigo dots:
Using the same technique with a clean brush, paint the deep indigo dots in the gaps you left. Aim for a consistent size, roughly the diameter of a fingertip. -
Repeat on the interior:
Since this design wraps around the rim, mirror this pattern on the inside of the bowl’s rim. Align the interior dots directly behind their exterior counterparts for symmetry. -
Refine the shapes:
If any dots look a bit wonky, use a damp clean brush to tidy up the edges while the underglaze is still damp.
Color Shift
Swap the indigo for a forest green or mustard yellow to change the seasonal vibe. Try varying the dot sizes to create a gradient effect around the rim.
Step 3: Adding Delicate Details
-
Load the liner brush:
Switch to your very fine liner brush and load it with the indigo underglaze. You want a flowing consistency, so add a drop of water if the underglaze feels too thick. -
Paint the micro-dots:
Above the main row of large dots, paint a tiny micro-dot. Place two to three tiny dots in the space between the larger circles. -
Create the delicate border:
Continue this pattern of tiny dots all the way around the very top edge of the rim, creating a delicate dotted line that frames the bolder pattern below. -
Double-check density:
Step back and rotate the bowl to ensure the density of the tiny dots looks consistent all the way around.
Step 4: Finishing & Firing
-
Dry thoroughly:
Let all your underglaze decoration dry completely. It should look chalky and matte. -
Apply clear coat (if needed):
If your cream base glaze is matte and you want a glossy finish, or if you applied the dots on top of raw bisque instead of glaze, apply a thin layer of clear transparent glaze over the decoration. -
Clean the foot:
Give the bottom foot ring one final wipe to ensure no glaze is where it shouldn’t be, preventing it from sticking to the kiln shelf. -
Glaze fire:
Fire the bowl in the kiln according to the clay and glaze temperature specifications (typically Cone 5 or 6 for stoneware).
Once cooled, your bowl is ready to bring a touch of handmade warmth to your table
Minimal Negative Space Silhouettes
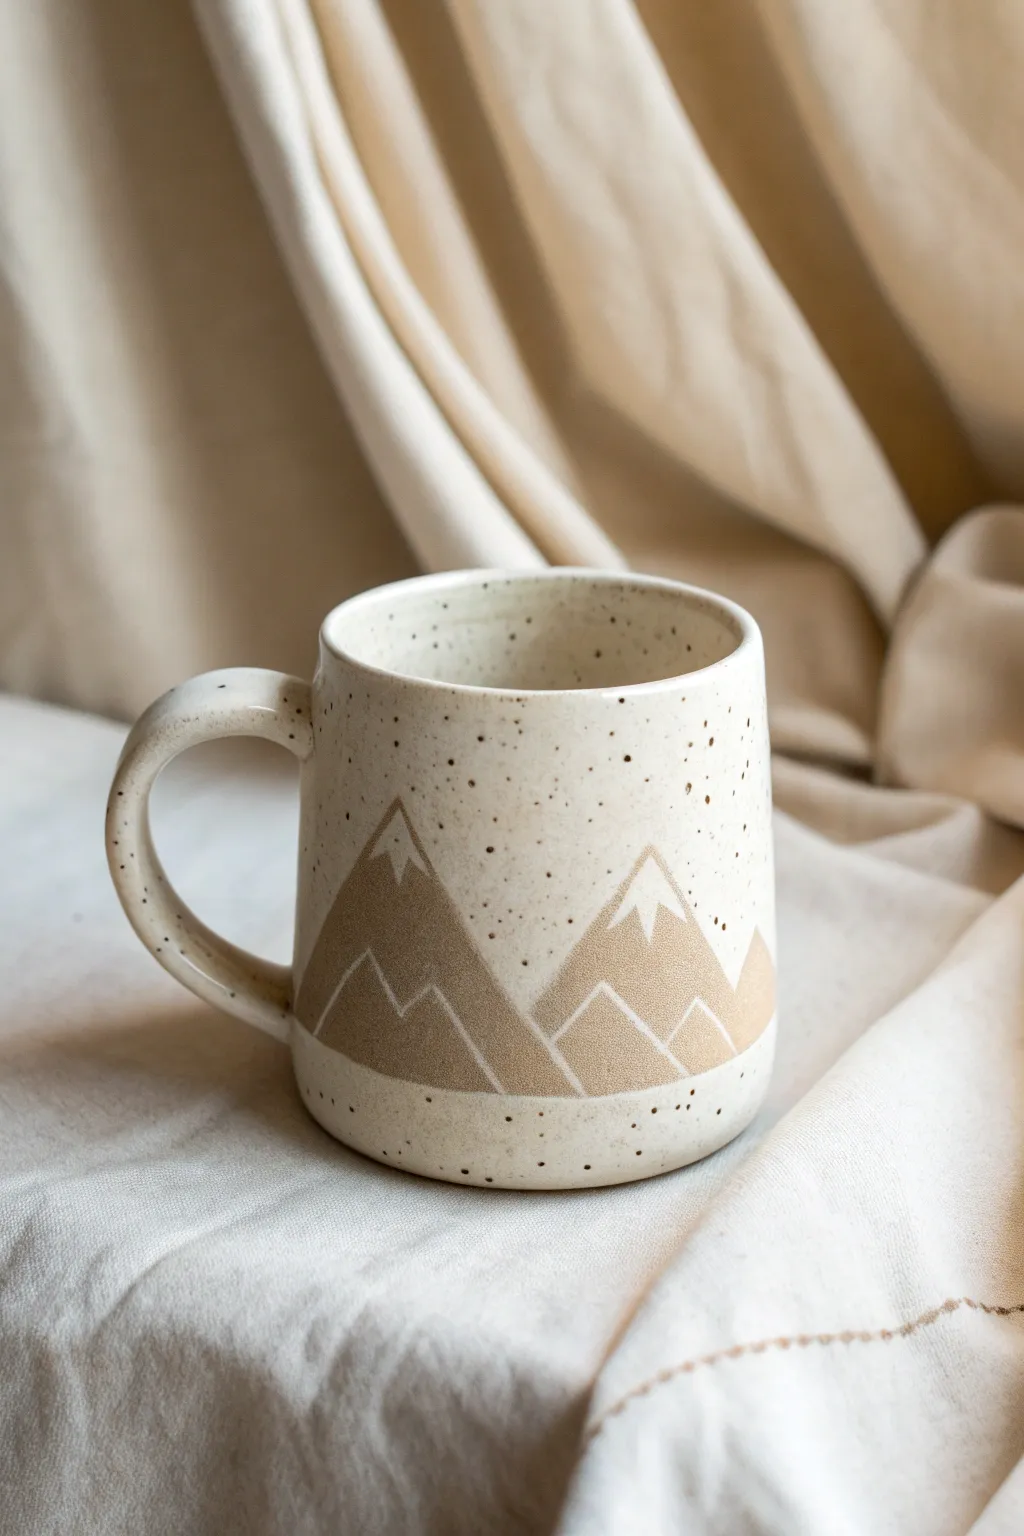
Embrace the serenity of the peaks with this earthy, minimalist mug design featuring a geometric mountain range. The rugged, unglazed texture of raw clay contrasts beautifully with a creamy speckled glaze, using negative space to tell a story of high altitudes.
Detailed Instructions
Materials
- Speckled buff stoneware clay
- Pottery wheel (or slab roller for hand-building)
- Wooden modeling tool
- Needle tool
- Sponge
- Wire cutter
- Wax resist (liquid wax)
- Fine paintbrush for wax application
- Creamy white matte or satin glaze
- Trimming tools
- Kiln
Step 1: Forming the Body
-
Prepare the Clay:
Begin by wedging about 1 to 1.5 pounds of speckled buff clay. It’s crucial to remove all air bubbles to ensure the walls of your mug are consistent and sturdy. -
Center and Open:
Throw the clay onto the wheel head and center it. Open the clay up, creating a flat floor that is about 3 inches wide. Compress the floor with a rib or sponge to prevent future S-cracks. -
Pull the Walls:
Pull the walls up into a simple cylinder shape. Aim for a height of about 3.5 to 4 inches. Keep the walls even, tapering slightly inward at the top to help keep heat in your future beverages. -
Refine the Rim:
Use a chamois or a small strip of plastic to smooth and round the rim. This makes the mug comfortable to drink from. -
Trim and Clean:
UnderCut the base with a wooden knife to create a tidy foot. Wire the mug off the wheel and set it aside until it reaches leather-hard consistency.
Uneven Wax Lines?
If your wax lines look shaky, use a precision applicator bottle instead of a brush for the resist. You can also scrape away unwanted dried wax with an exacto knife for sharper edges.
Step 2: Handle and Trimming
-
Trim the Foot:
Once leather-hard, center the mug upside down on the wheel and trim the bottom. Carve a small foot ring if you desire, or keep a flat bottom for a modern look. Smooth any rough grog with a damp sponge. -
Pull a Handle:
Using a small lump of clay, pull a strip for the handle. Use plenty of water to keep it smooth. I like to curve it into a ‘C’ or ear shape and let it stiffen slightly on a board so it holds its arch. -
Attach the Handle:
Score the side of the mug and the attachment points of the handle. Apply slip and press the handle firmly onto the mug body. Smooth the seams with a modeling tool or your finger for a seamless transition.
Step 3: Glazing the Mountainscape
-
Bisque Fire:
Load the thoroughly dried mug into the kiln for a bisque firing (usually Cone 04 or 06). This prepares the clay to accept glaze. -
Clean the Bisqueware:
Wipe the fired mug with a damp sponge to remove any kiln dust, which can cause pinholes in your glaze. -
Outline the Graphic:
Use a pencil to lightly sketch your mountain range design directly onto the bisqueware. Draw three triangular peaks of varying heights. Within the mountains, sketch zigzag lines near the top to indicate snow caps and zigzag lines lower down to suggest shadows or ridges. -
Apply Wax Resist:
Dip a fine paintbrush into liquid wax resist. Carefully paint over the mountain shapes you just drew. This is the negative space technique: anywhere you paint wax, the glaze will not stick, revealing the raw speckled clay underneath. -
Detail the Snow Caps:
This is the tricky part. You need to leave the ‘snow caps’ and the dividing lines UNWAXED. Paint the wax on the body of the mountain triangles only, leaving thin lines of bare bisque for the white glaze to eventually fill in. Refer to the image: the white lines define the peaks. -
Wait for Drying:
Allow the wax to dry completely. It should feel firm to the touch and not tacky so it effectively repels the glaze. -
Dip Glazing:
Stir your creamy white speckled glaze thoroughly. Holding the mug by the foot (or using glazing tongs), dip the entire mug into the bucket for about 3 seconds. Pull it out and shake off excess drips. -
Clean Up:
The wax will resist the glaze, but beads of glaze might sit on top of the waxed areas. Use a damp sponge to gently wipe these droplets off the mountain designs, ensuring the lines are crisp. -
Glaze Fire:
Load the mug into the kiln for the final glaze firing (match the temperature to your clay and glaze, typically Cone 5 or 6 for stoneware). Ensure the foot is wiped clean so it doesn’t stick to the shelf.
Get Creative
Try using a different clay body, like a dark chocolate stoneware. The negative space mountains will appear dark brown, creating a stunning high-contrast ‘night scene’ against a light glaze.
Now you have a cozy vessel perfect for sipping warm drinks while dreaming of your next hike
Sgraffito Scratch-Back Illustrations
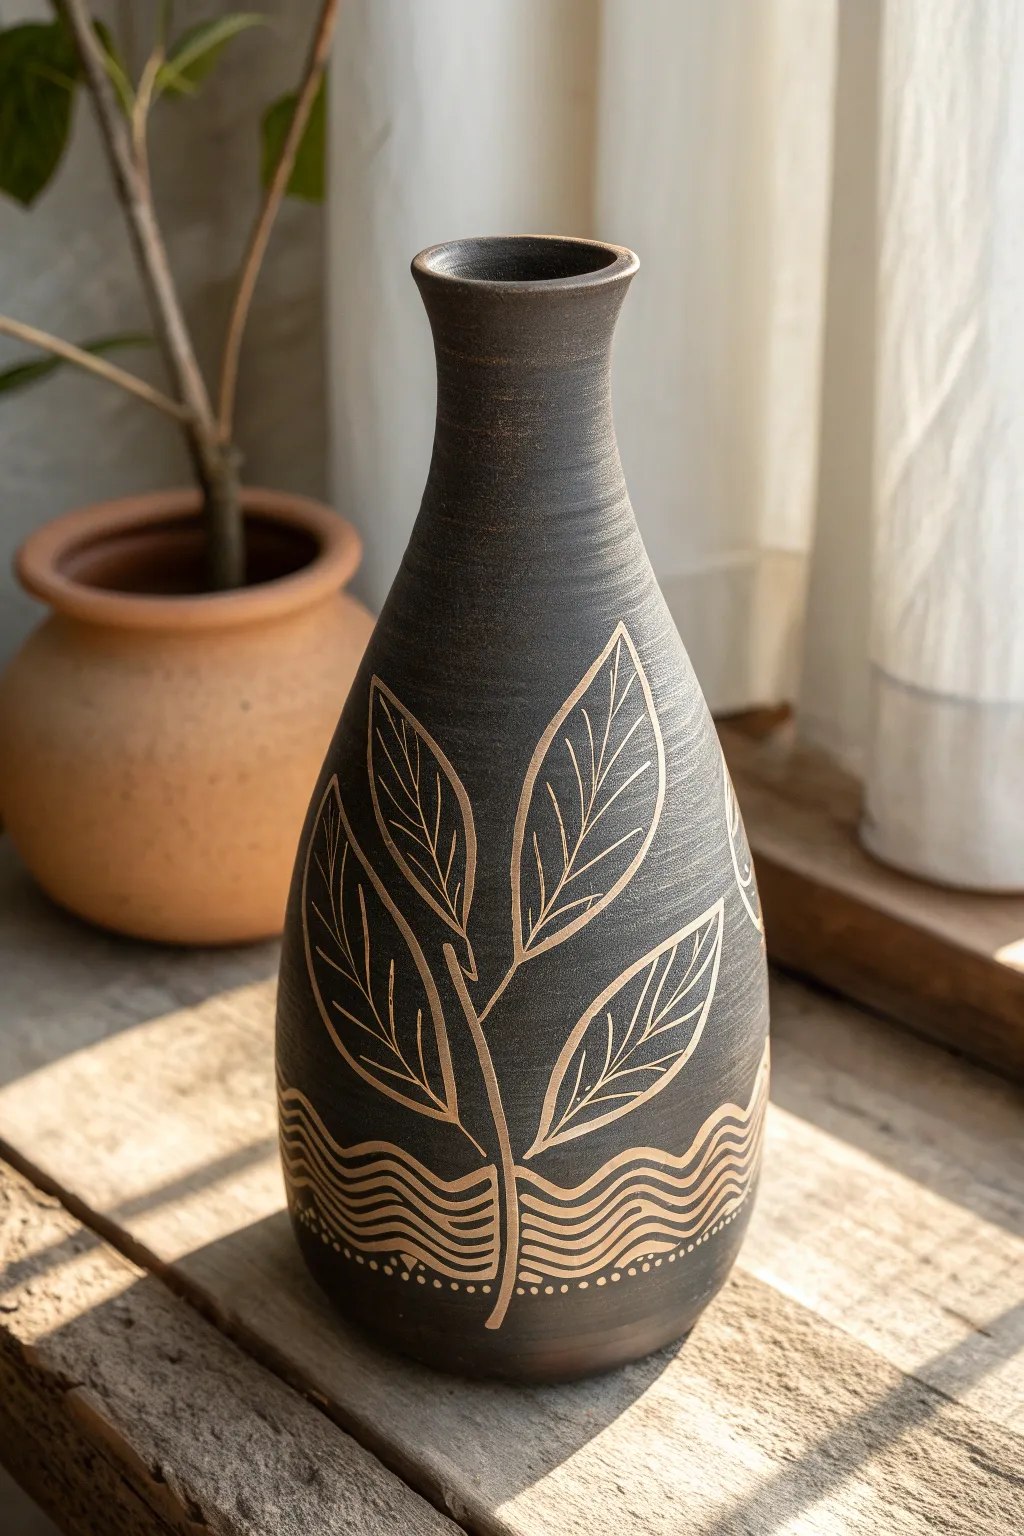
This project showcases the striking contrast of sgraffito, where a dark slip is carved away to reveal the warm clay body beneath. The design features graceful trailing leaves rising from stylized undulating waves, perfect for adding a touch of natural elegance to any room.
How-To Guide
Materials
- Tall stoneware vase (leather hard)
- Black underglaze or engobe
- Wide hake brush or fan brush
- Sgraffito loop tool (small)
- Needle tool or fine point stylus
- Pencil (optional)
- Tracing paper (optional)
- Soft sponge
- Clear matte or satin glaze
- Kiln
Step 1: Preparation and Application
-
Prepare the form:
Begin with a wheel-thrown or hand-built vase that has dried to a firm leather-hard state. The surface should be smooth and free of grog or debris to ensure clean carving lines. -
Clean the surface:
Wipe the vase gently with a slightly damp sponge to remove any dust. This helps the underglaze adhere properly without peeling later. -
Apply the first coat:
Using a soft hake or fan brush, apply a smooth, even coat of black underglaze or engobe to the entire exterior. Brush horizontally to follow the form. -
Layer up:
Wait until the sheen disappears from the first coat, then apply a second layer. I find using strokes in a different direction (vertical) ensures solid coverage. -
Final coat:
Apply a third coat if your underglaze is thin. Allow the piece to dry back to a workable leather-hard state; it shouldn’t be sticky to the touch.
Clean Lines Tip
Work when the pot is leather hard. If the clay is too dry, chipping occurs. If too wet, the sticky clay won’t carve cleanly. The ‘cheese-hard’ stage is perfect.
Step 2: Drafting the Design
-
Plan the layout:
Visualize where the central stem will travel. The design works best if it follows the vertical curve of the vase. -
Sketch lightly:
Use a regular pencil to lightly sketch the design onto the black surface. The graphite will shine against the matte black, making it visible, but will burn off in the kiln. Don’t press hard; just graze the surface. -
Outline the waves:
Draw three to four undulating wavy lines near the base to represent water or earth layers. -
Position the leaves:
Sketch four large, pointed oval leaves extending from a central stem. Ensure they curve gracefully upwards.
Step 3: Carving the Sgraffito
-
Carve the main stem:
Using a small loop tool, carve out the central stem first. Maintain a consistent width as you drag the tool through the black layer to reveal the clay. -
Outline the leaves:
Switch to a fine point tool or stylus to outline the exterior shape of each leaf. Keep your hand steady and pull the tool towards you for better control. -
Detail the veins:
Carve the central vein of each leaf, then add the smaller diagonal veins. These lines should be thinner than the main stem to create visual hierarchy. -
Carve the waves:
Return to the base and carve out the wavy lines using the loop tool. The variation in line thickness here adds movement to the piece. -
Add the dots:
Using the tip of a needle tool or a small drill bit twisted by hand, create a row of small dots just below the lowest wave line for a decorative border.
Level Up: Color Tint
Instead of clear glaze, use a very transparent celadon. The blue or green tint will pool slightly in the carved lines, adding subtle depth to the cream clay body.
Step 4: Finishing and Firing
-
Clean up burrs:
Once the carving is complete and the pot is bone dry, very gently brush away any clay crumbs or ‘burrs’ using a soft, dry brush. Be careful not to smudge the black slip. -
Bisque fire:
Load the vase into the kiln and bisque fire it according to your clay body’s specifications (usually Cone 04 or 06). -
Glazing:
After the bisque firing, wipe the piece down to remove dust. Dip or spray a clear matte or satin glaze over the entire piece. A glossy glaze can sometimes cause glare that obscures the fine lines. -
Final fire:
Glaze fire the piece to the final maturity temperature of your clay (e.g., Cone 6 or Cone 10).
Enjoy the rhythmic process of carving and the beautiful contrast revealed in your finished piece
Carved Texture Bands and Faceted Forms
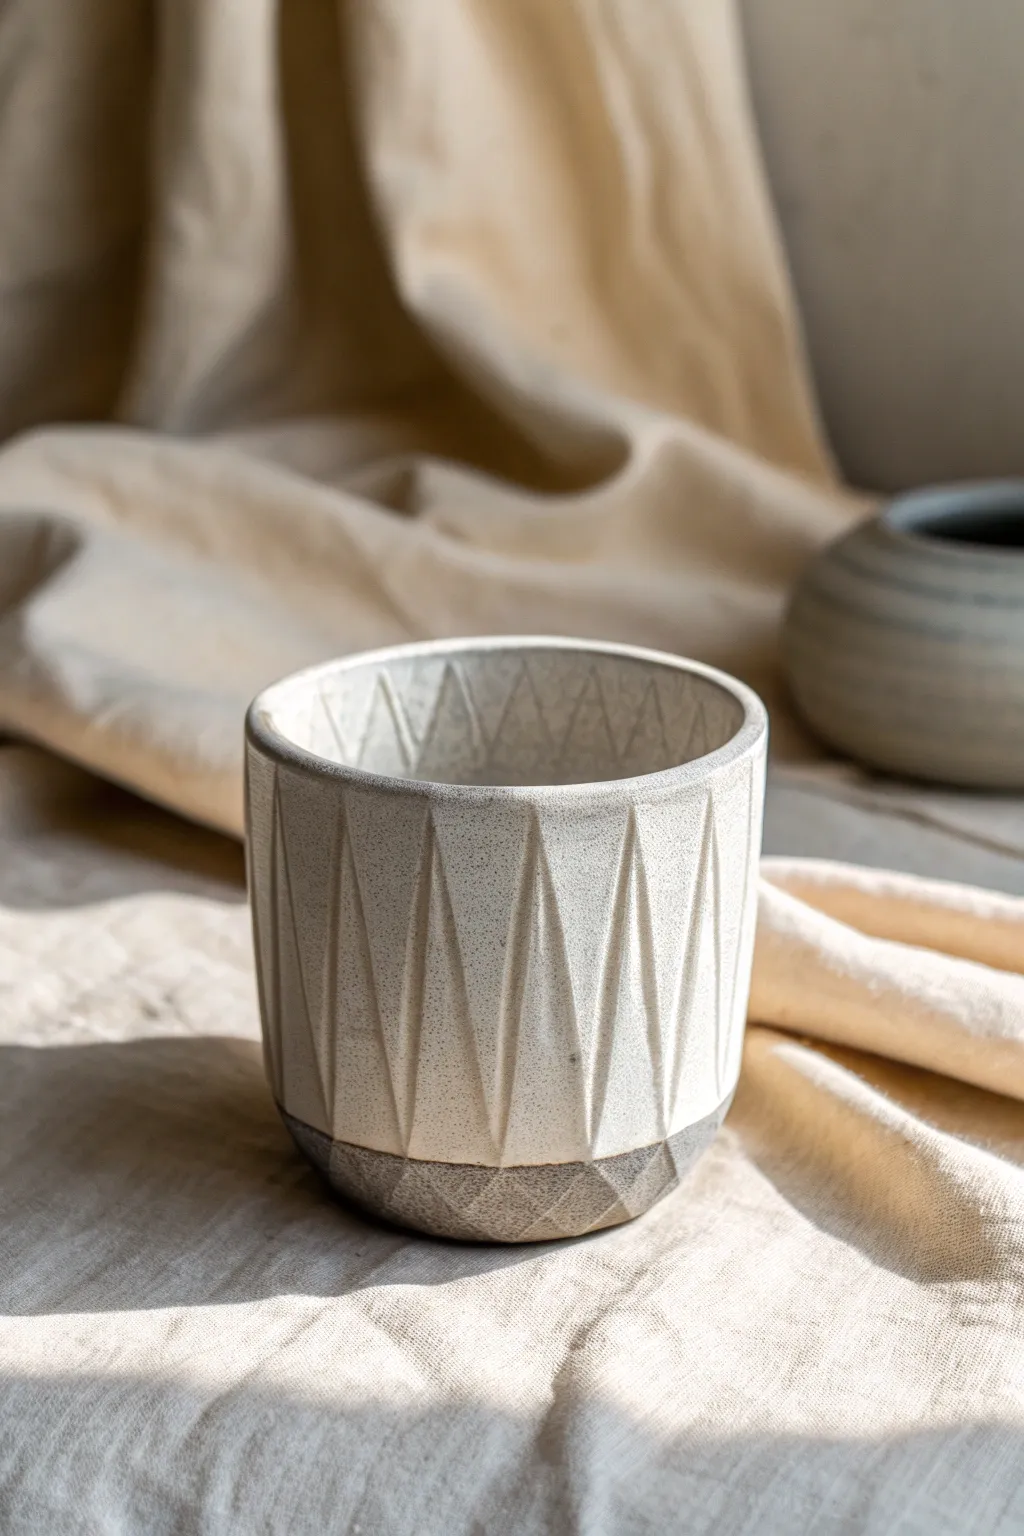
This elegant ceramic vessel features a rhythmic pattern of incised triangles, creating a striking contrast between deep relief and smooth surfaces. The dual-finish design pairs a speckled creamy glaze with a raw, textured base for a modern yet earthy aesthetic.
Step-by-Step Guide
Materials
- Stoneware clay (speckled or buff)
- Pottery wheel
- Throwing tools (sponge, rib, wire cutter)
- Trimming tools (loop tool, needle tool)
- Diamond-core carving tool or small loop tool
- Wax resist
- Creamy white matte glaze
- Soft brush
- Damp sponge
Step 1: Throwing and Shaping
-
Center the clay:
Start with a well-wedged ball of stoneware clay. Center it firmly on the wheel head, ensuring there is no wobble before opening. -
Open and pull:
Open the clay and pull the walls up into a cylinder. Aim for walls that are slightly thicker than a standard mug—around 3/8 of an inch—to accommodate the deep carving you’ll do later. -
Final shaping:
Using a rib on the inside and outside, refine the shape into a straight-walled cylinder with a very subtle outward taper. Smooth the rim with a chamois or sponge. -
Wire off:
Run a wire cutter underneath the pot to separate it from the wheel head, but leave it on the bat or board to reach leather-hard consistency.
Step 2: Trimming and Planning
-
Dry generally:
Monitor the drying carefully. The clay needs to be leather-hard—firm enough to handle without deforming, but soft enough to carve cleanly. -
Trim the foot:
Place the pot upside down on the wheel center. Trim the bottom to create a defined foot ring or a clean, flat base, mirroring the slight angle at the very bottom of the cup shown in the image. -
Mark the grid:
Using a needle tool, lightly scratch a horizontal guide line around the circumference where you want the carving to stop near the rim. Divide the rim into equal segments to guide your vertical spacing. -
Sketch the triangles:
Lightly incise a zig-zag pattern around the cylinder to map out the tall, narrow triangles. Precise spacing helps, but organic irregularity adds charm.
Clean Cuts Only
Carve when the clay is leather-hard, almost approaching stiff. If it’s too wet, the tool will drag and create ragged edges that are hard to smooth.
Step 3: Carving the Facets
-
Select your tool:
Choose a sharp carving tool with a V-tip or a small, squared loop. A sharp tool is crucial here to prevent dragging the clay. -
Carve downward strokes:
Starting at the top point of your sketched triangle, carve downward with confident pressure. The cut should be deepest in the middle of the stroke and taper out at the bottom. -
Carve upward strokes:
For the adjacent triangles pointing upward, reverse your direction or adjust your hand position to carve from the bottom up, maintaining the sharp ridges between cuts. -
Refine the ridges:
Go back over any rough edges. I like to use a stiff brush or a damp finger to gently soften any dangerously sharp clay burrs without losing the crisp definition. -
Carve the base:
Extend the geometric faceting slightly onto the lower curve of the pot so the texture wraps underneath visually.
Highlight the Texture
Use a glaze known to ‘break’ over edges. Translucent or semi-opaque glazes will pool in the recesses and thin out on ridges, emphasizing your carving work.
Step 4: Glazing and Finishing
-
Bisque fire:
Once the pot is bone dry, fire it to bisque temperature (usually cone 04 or 06) to prepare it for glazing. -
Apply wax resist:
Carefully paint wax resist on the bottom inch of the cup, following the zig-zag pattern of your carving. This ensures the raw clay remains visible at the base. -
Wax the foot:
Don’t forget to wax the entire underside/foot of the pot to prevent glaze from fusing it to the kiln shelf. -
Glaze dip:
Dip the cup into a creamy white matte glaze. Hold it for about 3 seconds to get good coverage, then lift and shake off the excess. -
Clean up:
Use a damp sponge to wipe away any glaze beads that may have stuck to the waxed areas at the bottom. The line between glaze and raw clay should be crisp. -
Final firing:
Fire the piece to your clay body’s maturity temperature (likely cone 5/6 or cone 10), allowing the glaze to melt and break beautifully over the sharp carved edges.
Enjoy the tactile sensation of your new geometric cup every time you hold it
Celestial Stars and Moons on Bowls
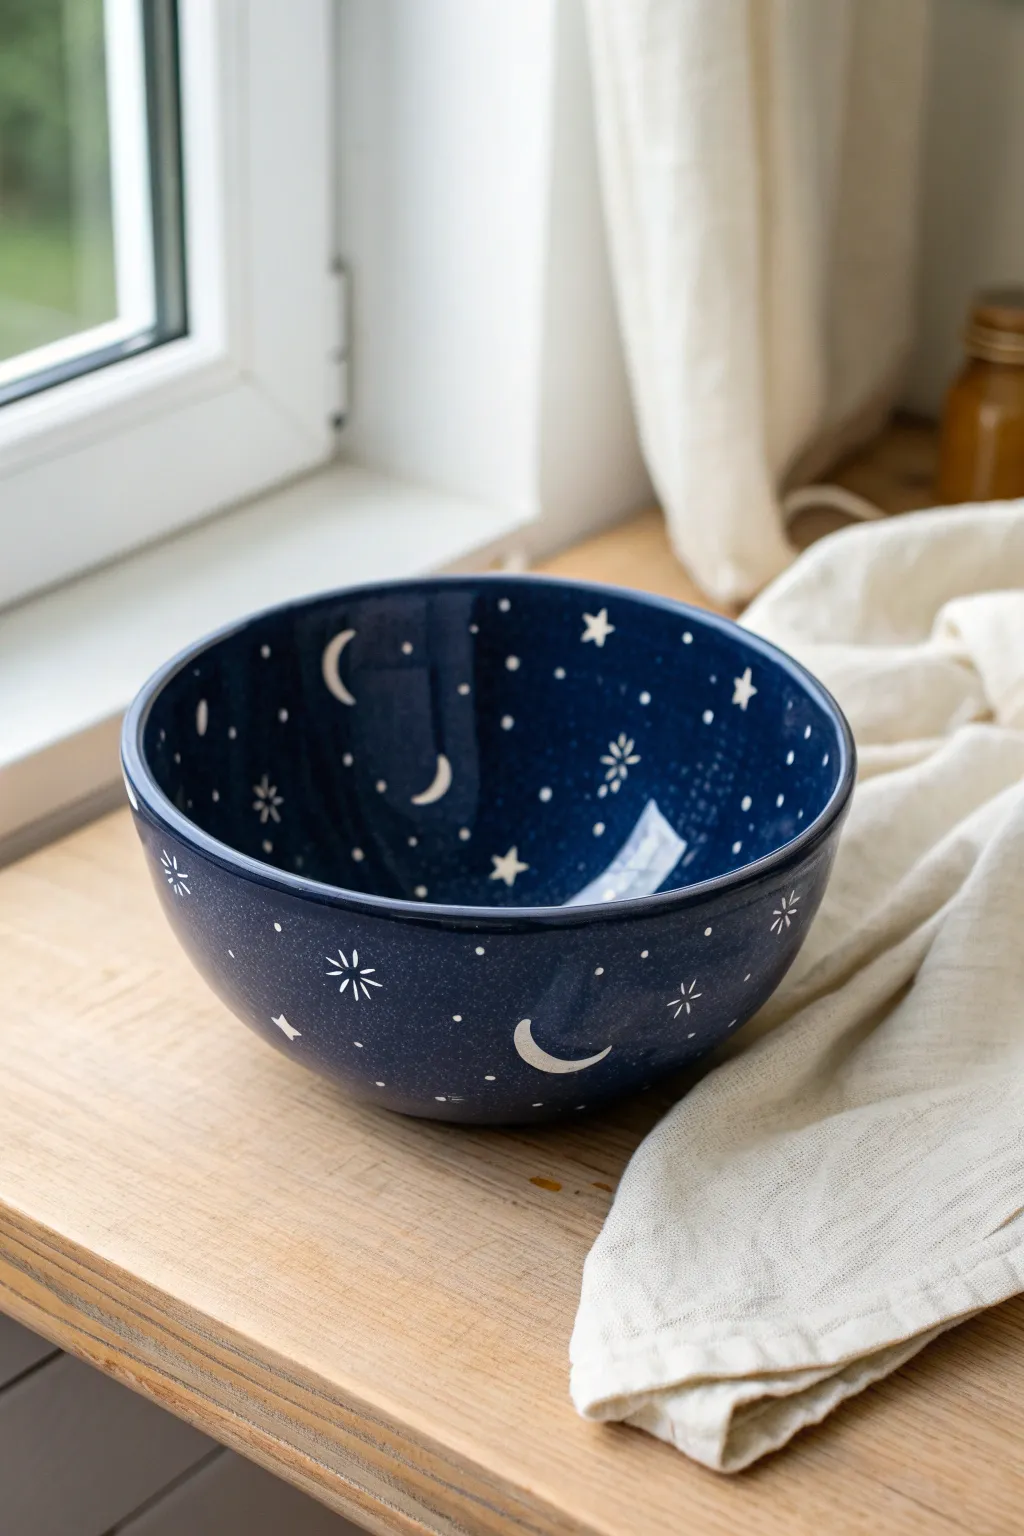
Transform a plain bisque bowl into a dreamy piece of tableware featuring a deep, glossy midnight blue glaze adorned with crisp white celestial motifs. This design captures the magic of a clear night sky, with crescent moons and twinkling stars scattered across both the interior and exterior surfaces.
How-To Guide
Materials
- Bisque-fired ceramic bowl (wheel-thrown or cast)
- Underglaze pencil or graphite pencil
- Wax resist (liquid emulsion)
- Deep blue dipping glaze (midnight or cobalt)
- White underglaze
- Small round brush (size 0 or 1)
- Medium soft fan brush
- Clean sponge and water
- Clear transparent glaze (optional, if using a different base technique)
- Kiln for firing to appropriate cone (likely Cone 5/6 or 06/04 depending on clay/glaze compatibility)
Step 1: Preparation and Sketching
-
Surface Prep:
Begin by wiping down your bisque-fired bowl with a damp sponge. This removes any dust or debris that could interfere with glaze adhesion and ensures a smooth application. -
Planning the Layout:
Lightly sketch your celestial design directly onto the bisque using a graphite pencil. The pencil marks will burn off in the kiln, so don’t worry about being messy. Place larger crescent moons first to balance the composition. -
Adding Stars:
Fill the gaps between moons with scattered five-pointed stars and small eight-pointed starbursts. Vary the sizes slightly for a more organic, natural sky feel.
Glaze Beading Up?
If glaze sticks stubbornly to the wax resist, your wax might be too thin. Let the wax dry longer next time or apply a second coat before glazing.
Step 2: Applying Resist and Glaze
-
Painting the Motifs:
Using a fine detail brush (size 0 or 1), carefully paint your sketched moons and stars with wax resist. The wax will repel the glaze later, revealing the bare clay or underglaze underneath. -
Waxing the Rim:
If you want a raw clay rim or a specific white rim effect, carefully apply a thin line of wax resist along the very edge of the bowl’s lip. -
Checking Coverage:
Hold the bowl up to the light to ensure your wax application is solid. Any missed spots in the moons or stars will be covered by the blue glaze, losing the design. -
Drying Time:
Allow the wax resist to dry completely. It should feel firm to the touch and not tacky before you proceed to the glazing step.
Step 3: Glazing Process
-
Preparing the Glaze:
Stir your deep midnight blue glaze thoroughly. Ensure it has the consistency of heavy cream for the best coverage without running. -
Dipping the Interior:
Pour the blue glaze inside the bowl, roll it around to coat the entire interior surface, and pour out the excess quickly to ensure an even coat. -
Dipping the Exterior:
Hold the bowl by the foot (or use glazing tongs) and dip the exterior into the blue glaze bucket. Hold for just a few seconds to achieve the right thickness, then lift and let it drip dry. -
Wiping the Decor:
Once the glaze is dry to the touch, use a damp sponge or your fingertip to gently wipe any glaze beads off the waxed areas. The wax resists the glaze, but small droplets often sit on top and need removal.
Add Gold Accents
For a luxe touch, apply a gold luster overglaze to the moons and stars strictly after the main glaze firing, then re-fire at a low temperature (Cone 018).
Step 4: Finishing Touches
-
Applying White Details:
This is crucial for the bright white look: If you want the stars to be pure white rather than raw clay color, carefully paint white underglaze *into* the waxed areas now that the blue glaze has been wiped away. This technique is sometimes called inlay. -
Alternative: Majolica Style:
Alternatively, if you didn’t use wax resist, you could glaze the whole bowl blue first, then paint the white stars on top using a specialized opaque white overglaze (Majolica style), though the wax resist method gives cleaner lines. -
Adding Stardust:
Dip a stiff bristle brush or a toothbrush into white underglaze (or diluted white glaze). Run your thumb over the bristles to flick tiny speckles of ‘stardust’ across the blue night sky background. Keep this subtle. -
Cleaning the Foot:
Use a damp sponge to completely wipe away any glaze from the bottom foot ring of the bowl. This prevents the pot from fusing to the kiln shelf during firing. -
Final Inspection:
Check for any pinholes or thick drips in the blue glaze and smooth them out gently with a dry finger before firing. -
Firing:
Load the bowl into the kiln and fire to the temperature specified by your clay and glaze manufacturer (typically Cone 6 for stoneware).
Unloading the kiln will reveal a stunning, glossy night sky captured forever on your handmade ceramic bowl
Terrazzo Speckle Surfaces for a Playful Twist
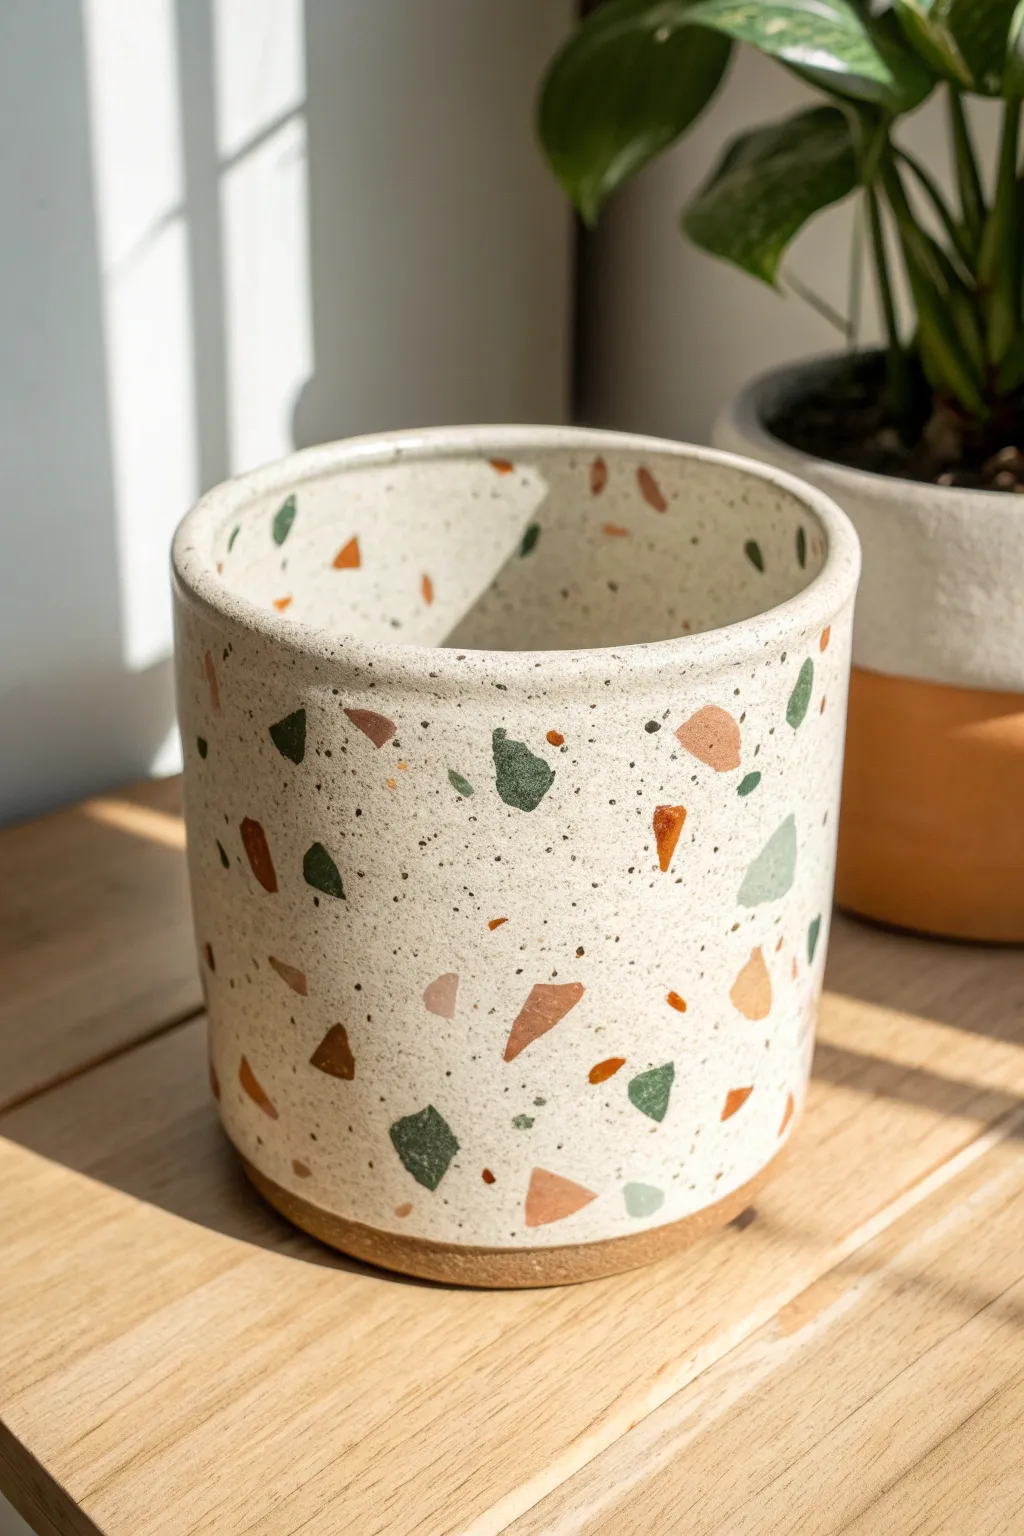
Bring the lively, modern charm of Italian terrazzo flooring to your ceramics with this delightful planter project. By embedding colorful clay chips into a speckled white body, you create a tactile, confetti-like surface that instantly brightens any room.
Step-by-Step
Materials
- White stoneware clay with speckles (or plain white clay + granular ilmenite)
- Small amounts of colored clay (stained mason stains or pre-mixed colored porcelain)
- Rolling pin
- Guide sticks or slab roller
- Fettling knife
- Needle tool
- Metal rib tool
- Rubber rib tool
- Scoring tool (serrated rib)
- Slip (clay and water slurry)
- Sponge
- Clear matte or satin glaze
- Kiln
Step 1: Preparing the Terrazzo Chips
-
Roll Colored Slabs:
Begin by taking your small balls of colored clay—earthy greens, rust oranges, and soft pinks work beautifully for this look. Roll each color out into a thin slab, approximately 1/8 inch thick. -
Dry and Crumble:
Let these thin colored slabs dry until they are leather hard or slightly stiffer. This makes them easier to break cleanly. -
Create Chips:
Break or cut the colored slabs into irregular geometric shards. Aim for a mix of sizes, from tiny specks to larger triangles, to mimic the random beauty of true terrazzo.
Clean Chip Definition
If your colored chips look blurry after rolling, let the pot dry to leather hard and scrape heavily with a metal rib. This removes the ‘smear’ layer.
Step 2: Building the Cylinder
-
Roll the Main Slab:
Roll out your speckled white clay body into a large, consistent slab about 1/4 inch thick. Ensure it’s long enough to form the circumference of your desired pot size. -
Apply the Chips:
Scatter your prepared colored chips randomly across the surface of the wet white slab. Don’t overthink the placement; randomness is key to the aesthetic. -
Embed the Pattern:
Using your rolling pin, firmly roll over the slab again to press the colored chips flush into the white clay. Roll in multiple directions to ensure the slab stays relatively even. -
Cut to Size:
Measure a rectangle for the pot’s wall and a circle for the base. Use your fettling knife and a straight edge to cut these shapes cleanly from the terrazzo-embedded slab. -
Bevel the Edges:
Cut a 45-degree angle on the short ends of your rectangular wall slab. This beveling helps create a stronger, more seamless vertical seam. -
Score and Slip:
Vigorously score the beveled edges and apply a generous amount of slip. I find using a serrated rib creates the best texture for this bold join. -
Form the Cylinder:
Stand the rectangle up and curve it into a cylinder, pressing the beveled edges together firmly. Smooth the seam inside and out. -
Attach the Base:
Score and slip the bottom edge of the cylinder and the outer edge of your circular base. Press them together, smoothing the clay up from the base onto the wall to seal it tight.
Make it Shine
After the final firing, sand the unglazed exterior with wet-dry sandpaper (400 grit) under running water. It makes the raw clay incredibly soft to hold.
Step 3: Refining and Revealing
-
Compress the Surface:
Once the pot is assembled, use a metal rib to scrape the exterior surface while firmly supporting the wall from the inside. This compresses the clay and removes excess slip. -
Reveal the Terrazzo:
As the pot dries to leather hard, continue scraping or ribbing the surface. This step is crucial as it scrapes away the thin layer of white clay smudged over the colored chips, revealing sharp, distinct shapes. -
Smooth the Rim:
Use a damp sponge or a piece of chamois leather to gently round and smooth the top rim of the pot for a finished look. -
Slow Drying:
Cover the pot loosely with plastic to let it dry slowly. Uneven drying can cause warping, especially where the different clay bodies meet. -
Bisque Fire:
Once bone dry, fire the piece to bisque temperature (usually roughly cone 04, depending on your clay). -
Glazing:
Apply a clear satin or matte glaze to the interior and exterior. Leave the bottom half-inch unglazed if you want that raw clay detail shown in the image. -
Final Firing:
Fire the piece to the maturity temperature of your stoneware clay (typically cone 5 or 6) to vitrify the body and melt the glaze.
Enjoy your durable, handmade planter that captures the timeless spirit of confetti and stone