When I’m in the studio playing with polymer clay beads, I always start by picking a color story and a bead shape that feels good in your hands. Here are my favorite polymer clay bead ideas—from classic heishi bead stacks to statement shapes—so you can string something that looks totally you.
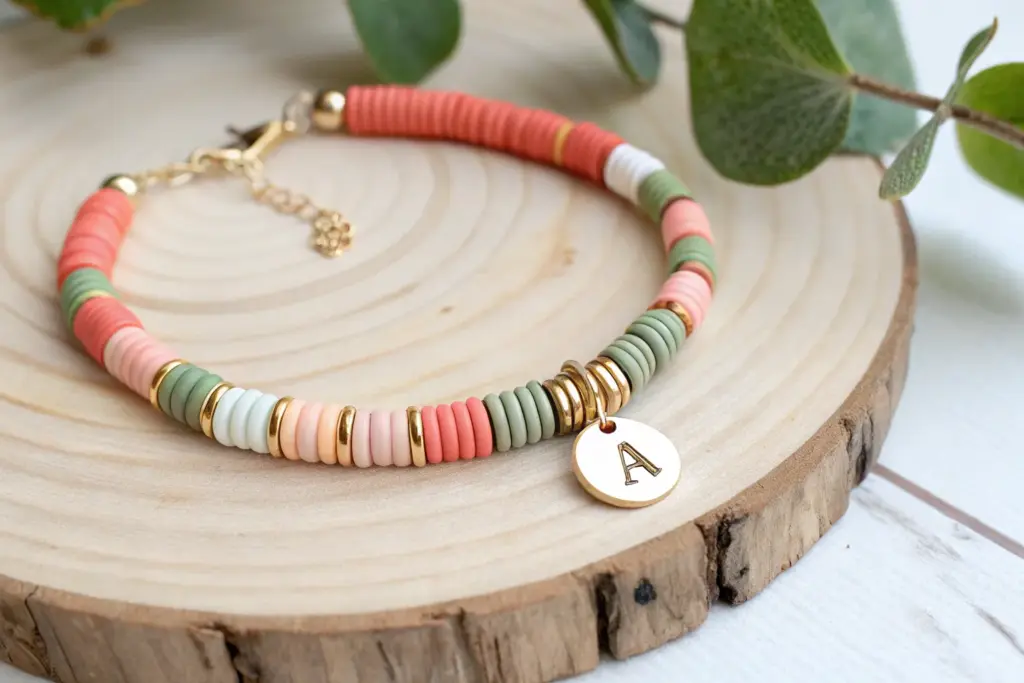
Classic Color-Blocked Heishi Bracelets

Embrace the effortless charm of summer with this stack of heishi bead bracelets featuring crisp color blocking. Mixing vibrant polymer clay discs with sparkling gold accents creates a versatile set that looks just as good solo as it does layered.
How-To Guide
Materials
- 6mm polymer clay heishi beads (white, coral, turquoise, yellow)
- 6mm gold rhinestone or textured spacer beads
- 0.8mm clear elastic stretch cord
- Hypo-cement or jewelry glue
- Scissors
- Bead stopper or binder clip
- Ruler or measuring tape
Step 1: Planning Your Stack
-
Measure your wrist:
Before cutting any cord, measure your wrist and add about 1/2 inch to determine your ideal bracelet length for a comfortable fit. -
Prepare the cord:
Cut four lengths of elastic cord, each about 10-12 inches long. This extra length makes tying the final knots much easier. -
Secure the ends:
Attach a bead stopper or a simple binder clip to one end of each cord to prevent beads from sliding off while you work. I like to prep all four cords at once so I can see how the colors play together.
Knot Hiding Trick
If the hole of your gold spacer bead is large enough, try to position your knot right next to it so you can slide the bead over to hide the knot.
Step 2: Creating the Solid White & Coral Bracelets
-
Start the white strand:
For the first bracelet, begin threading white heishi beads. Thread about 1.5 inches of white beads. -
Add a gold accent:
Slide on one gold rhinestone spacer bead to break up the color. -
Continue the pattern:
Continue threading sections of white beads, separating them with a gold spacer every 1.5 to 2 inches until you reach your desired length. -
Create the coral strand:
Repeat this exact process for the second bracelet, using only the coral-colored heishi beads and gold spacers. Aim for the spacers to land at different intervals than the white bracelet for a staggered look.
Step 3: Designing the Mixed Color Bracelets
-
Start the third bracelet:
For the split-pattern bracelet (white and coral), create a large block of white beads covering about half the bracelet’s length. -
Transition with gold:
Place a gold spacer bead at the center point. -
Finish with coral:
Fill the rest of the cord with coral beads. You can add another gold spacer in the middle of this coral section if you like extra sparkle. -
Begin the multi-color strand:
For the final bracelet, start with a section of turquoise beads (approx. 1.5 inches). -
Add the white section:
Place a gold spacer, then add a long section of white beads (approx. 2-3 inches). -
Inject the yellow pop:
Add another gold spacer, followed by a small 1-inch block of bright yellow beads. -
Complete the loop:
Finish the strand with more turquoise beads to meet the beginning, ensuring the total length matches your other bracelets.
Texture Play
Mix in a few matte finish polymer clay beads alongside the standard smooth ones to add a subtle tactile contrast to your color blocks.
Step 4: Finishing Touches
-
Check the fit:
Wrap each bracelet around your wrist to verify sizing before tying. They should sit comfortably without pinching. -
Pre-stretch the cord:
Gently tug on the ends of the elastic cord a few times. This pre-stretching prevents the bracelet from loosening up after you wear it. -
Tie the knot:
Remove the bead stopper and tie a surgeon’s knot (right over left, left over right, looping through twice on the second pass). Pull it tight. -
Secure with glue:
Dab a tiny drop of jewelry glue or hypo-cement onto the knot. Let it dry completely before trimming the excess cord close to the knot.
You now have a chic, custom-fit stack ready to brighten up any outfit


Soft Pastel Rainbow Gradient Strands
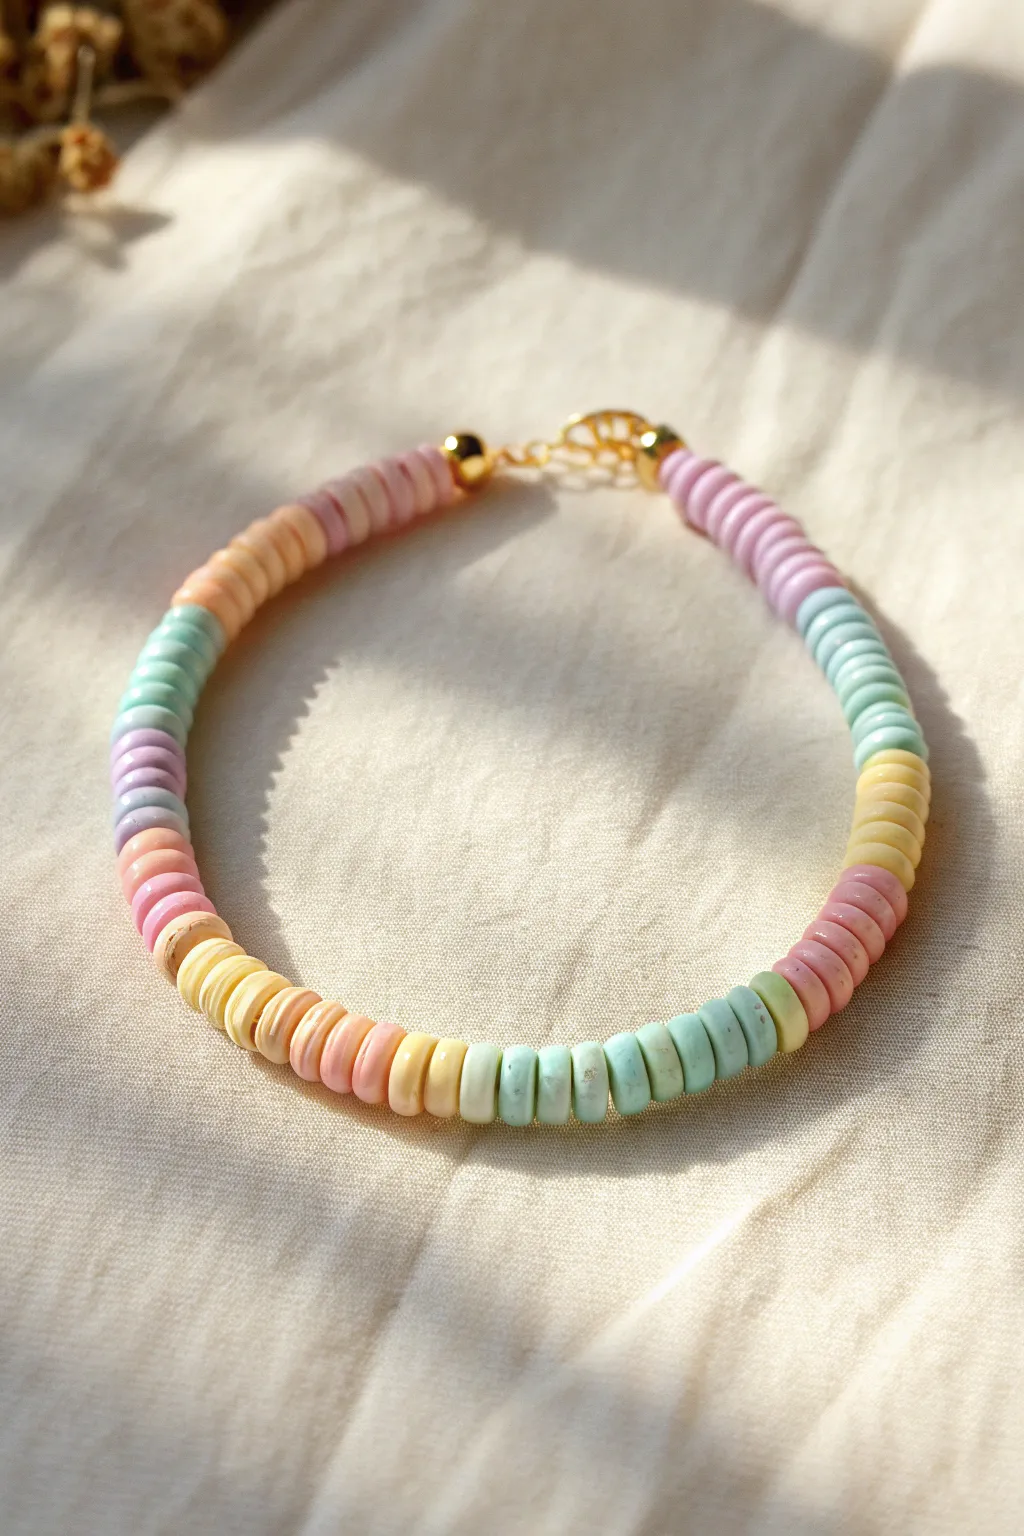
Capture the soft hues of a sunrise with this gentle gradient necklace featuring handmade polymer clay heishi beads. The smooth transition between peach, pink, lavender, and mint creates a serene, wearable piece of art perfect for layering.
Detailed Instructions
Materials
- Polymer clay in pastel shades (peach, dusty pink, violet, light blue, mint green, pale yellow)
- Clay roller or pasta machine
- Small round clay cutter (approx. 6-8mm diameter)
- Toothpick, needle tool, or bead piercing pins
- Baking tray and parchment paper
- Oven
- Beading wire or strong elastic cord
- 2 Gold crimp beads (or crimp covers)
- 2 Gold wire guardians (optional but recommended)
- Gold lobster clasp and jump ring
- Jewelry pliers (flat nose and cutting pliers)
Step 1: Prepping the Clay Discs
-
Condition the colors:
Begin by thoroughly kneading each of your pastel polymer clay colors until they are soft and pliable. If a color feels too bright, mix in a tiny amount of white or translucent clay to mute it slightly for that soft, milky look. -
Roll out sheets:
Roll each color into a flat sheet using a clay roller or pasta machine. Aim for a uniform thickness of about 2-3mm. I find that using the medium setting on a pasta machine ensures every bead is perfectly even. -
Cut the discs:
Using your small round cutter, punch out numerous discs from each color sheet. You’ll need roughly 15-20 discs per color block, depending on your desired necklace length. -
Pierce center holes:
Carefully pick up each disc and pierce a hole directly in the center using a needle tool or toothpick. Twisting the tool gently as you push through helps prevent the clay from distorting. -
Smooth the edges:
If cutting or piercing created any jagged edges, gently tap the sides of the clay disc with your finger to smooth them back into a perfect round shape.
Uneven Edges?
If your bead edges look rough after baking, sand the whole strand! String them tightly on a skewer and rub the column of beads against fine-grit sandpaper to smooth them all at once.
Step 2: Baking & Assembly
-
Arrange for baking:
Place your raw clay beads onto a parchment-lined baking tray. Spread them out so they aren’t touching, which ensures they bake evenly without sticking together. -
Bake the beads:
Bake in a preheated oven according to your specific clay brand’s package instructions (usually around 275°F/135°C for 15-30 minutes). Let them cool completely before handling. -
Plan the gradient:
Lay out your cooled beads on a bead board or towel. Arrange them in color blocks to establish your gradient—start with pinks, move to peaches, then yellows, greens, blues. and lavenders. -
Prepare the wire:
Cut a length of beading wire about 4 inches longer than your desired finished length to allow room for finishing the ends. -
Start the strand:
String a crimp bead and a wire guardian onto one end of the wire. Loop the wire through the guardian, back through the crimp bead, and flatten the crimp with pliers to secure the first end. -
String the gradient:
Begin threading your beads onto the wire, following the color pattern you laid out. Group about 10-15 beads of one color before switching to the next hue to create distinct blocks. -
Check the transitions:
As you transition between colors (like yellow to green), you can mix one or two beads of the outgoing color into the start of the new color for a softer blend, or keep the blocks distinct like the reference image. -
Add gold accents:
For a professional touch shown in the photo, add a small gold bead cap or spacer bead just before the clasp hardware on both ends. -
Secure the end:
Once all beads are strung, thread a crimp bead and the second wire guardian onto the remaining tail. Loop the wire back through the crimp bead. -
Attach the clasp:
Before tightening the crimp, attach your jump ring (on one side) or lobster clasp (on the other) to the wire guardian loops. -
Final crimping:
Pull the wire taut so there are no gaps between beads but the strand remains flexible. Flatten the final crimp bead securely. -
Trim excess wire:
Use your cutting pliers to snip off any excess wire tail close to the crimp bead for a neat finish.
Pro Tip: Custom Textures
Before cutting your circles, gently press a piece of coarse fabric or sandpaper onto the raw clay sheet. This adds a subtle, stone-like texture that makes the simple colors look high-end.
Now you have a serene, candy-colored accessory ready to brighten up any neutral outfit


Monochrome Stacks With Shade Shifts
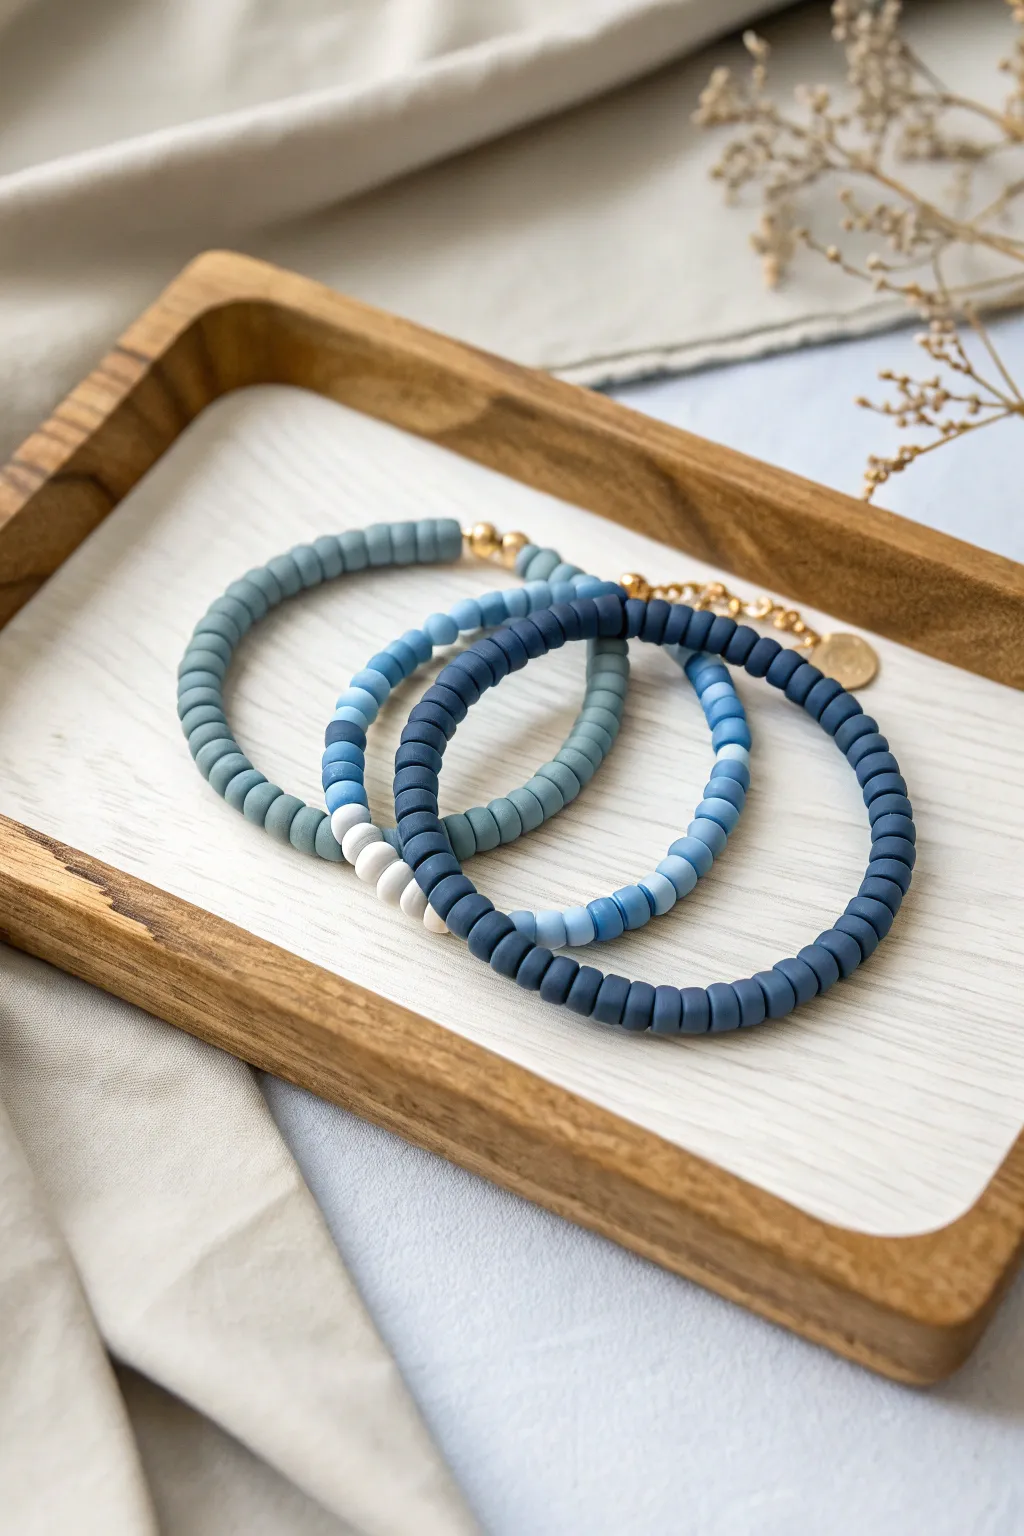
Embrace the soothing power of blue with this set of three coordinated bracelets featuring matte polymer clay disc beads. By playing with subtle shade shifts and high-contrast accents, you’ll create a sophisticated monochromatic stack that feels both modern and timeless.
Step-by-Step Tutorial
Materials
- Polymer clay Heishi beads (6mm or 4mm) in: Navy Blue, Denim Blue, Slate Blue, Teal/Grey Blue, and White
- Strong elastic stretch cord (0.8mm or 1mm transparent)
- Gold tone crimp covers (3mm)
- Small gold spacer beads (round, 2-3mm)
- Gold extension chain (optional)
- Small gold charm tag (optional)
- Jewelry glue or clear nail polish
- Scissors or jewelry snips
- Pliers (flat nose)
Step 1: Planning Your Gradient
-
Measure your wrist:
Before you start stringing, wrap a piece of string around your wrist to find your comfortable size. Add about half an inch to this measurement to account for the thickness of the disc beads. -
Layout: The Solid Navy:
For the first bracelet, you’ll want a strong foundation. Pour out your darkest Navy Blue beads. This design is almost entirely solid, relying on the deep richness of the color. -
Layout: The Patterned Denim:
For the middle bracelet, mix your Denim Blue and Slate Blue beads. Plan for a pattern that alternates blocks of color—try ten beads of Denim followed by ten beads of Slate to create a chunky striped effect. -
Layout: The Color Block:
For the third bracelet, use the muted Teal/Grey Blue beads as your main color. Set aside about 10-15 White beads to create a striking contrast section. This pop of white really wakes up the monochrome palette.
Keep It Flat
When stringing flat heishi beads, they can sometimes twist. Periodically roll the strand between your fingers to ensure all discs are nesting perfectly flat against their neighbors.
Step 2: Stringing the Beads
-
Prepare the cord:
Cut three lengths of elastic cord, each about 10 inches long. I always like to pre-stretch the elastic by giving it a few firm tugs; this prevents the bracelet from stretching out permanently later. -
String the Navy bracelet:
Begin threading the Navy beads onto your first cord. Keep tension consistent so the discs sit flat against each other. -
Add gold accents:
Once you have about 2-3 inches of Navy beads, slide on a small gold spacer bead, followed by 3-4 more Navy beads, and another gold spacer. This adds a subtle metallic shimmer without breaking the solid color too much. -
Finish the Navy strand:
Continue filling the rest of the cord with Navy beads until you reach your measured length. Use a bead stopper or piece of tape to hold the ends. -
Assemble the Denim mix:
On the second cord, string your alternating pattern of Denim and Slate beads. Watch as the slight variation in blue tones creates visual texture. -
Construct the White-accented strand:
For the final bracelet, string the main Teal/Grey beads for about three-quarters of the length. Then, switch to your White beads for a 1-inch block before finishing with the remaining Grey beads.
Step 3: Finishing Touches
-
Tie the knots:
Take the ends of your first bracelet and tie a surgeon’s knot (loop the elastic twice instead of once before pulling tight). Pull the cord firmly to secure the knot. -
Secure with glue:
Dab a tiny drop of jewelry glue or clear nail polish directly onto the knot. Let it dry for a minute or two to ensure it won’t slip. -
Hide the knot:
Take a gold crimp cover and place it over the knot you just made. Using your flat nose pliers, gently squeeze the cover closed until it looks like a round gold bead. -
Attach the extension chain:
On the bracelet with the gold spacers, you can attach a small jump ring and gold extension chain to the crimp cover loop if your cover has one, or simply incorporate the chain hardware into the stringing loop before knotting. -
Trim excess cord:
Once the glue is fully cured and the knot is hidden or covered, trim the excess elastic tail close to the bead or crimp cover. -
Final inspection:
Give each bracelet a gentle tug to test the security. Arrange them together on your wrist to see how the different shades of blue play off one another.
Texture Play
To level up this look, try swapping some of the matte polymer clay beads for a few glass or ceramic disc beads in the same blue tones. The mix of matte and shiny surfaces adds instant luxury.
Wear your new monochrome stack with denim or neutrals for an effortlessly chic accessory


Name and Word Mixes With Letter Beads
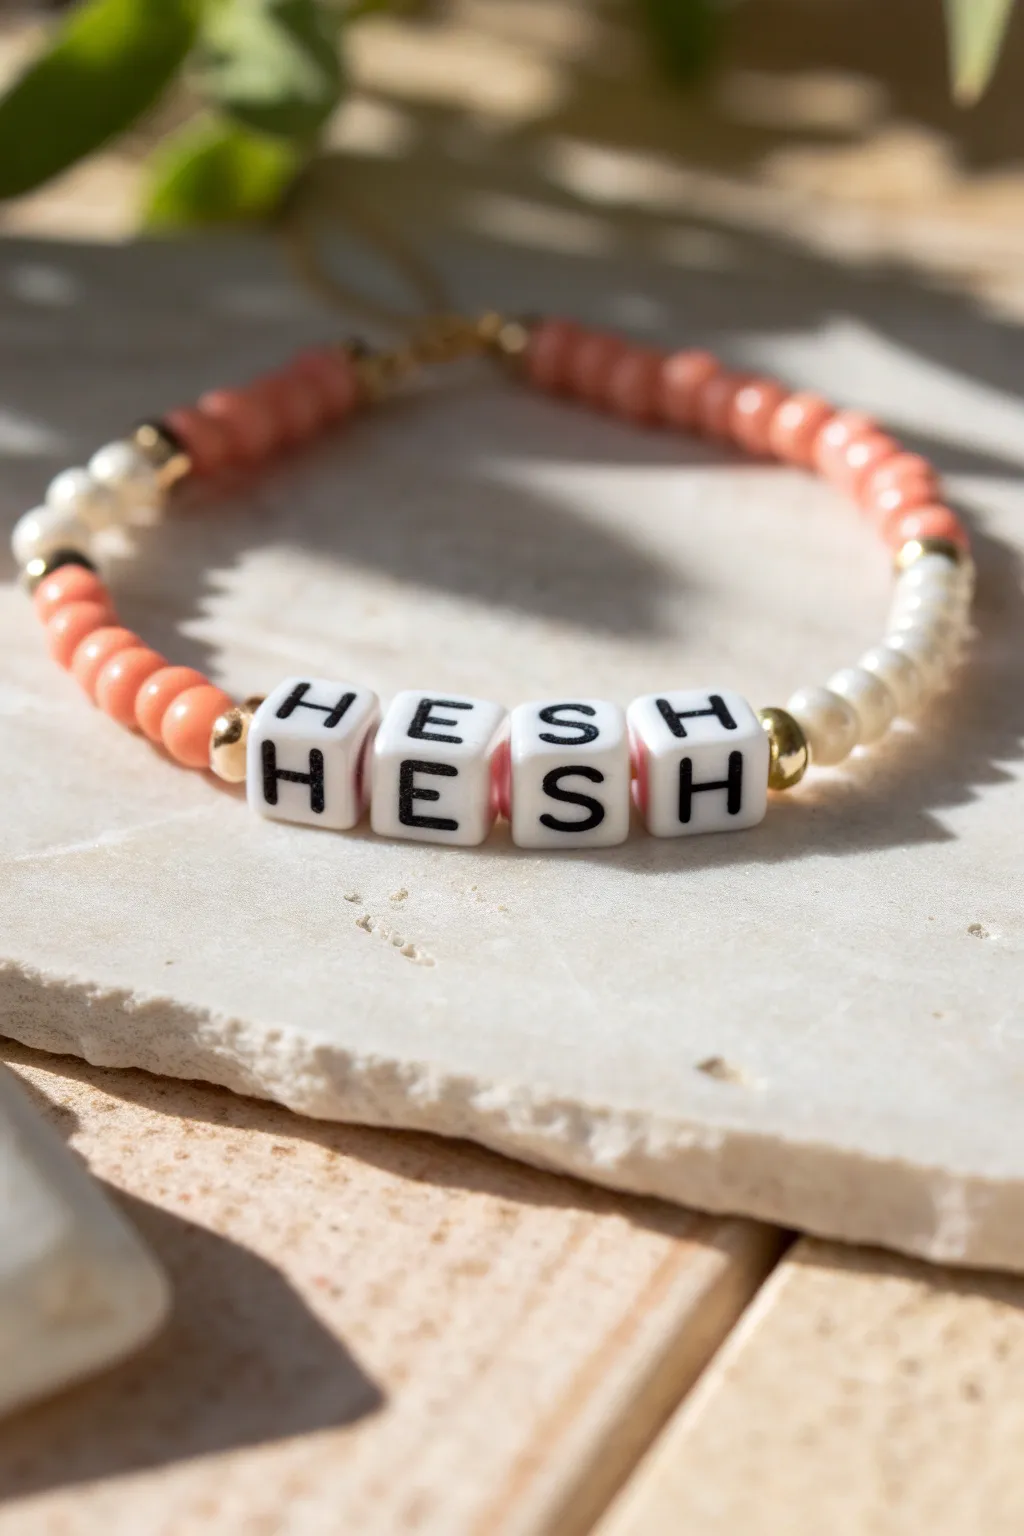
Capture the essence of summer with this chic personalized bracelet featuring a mix of textures and warm coral tones. Combining classic letter beads with lustrous pearls and vibrant coral accents creates a sophisticated yet playful accessory.
Step-by-Step Guide
Materials
- Elastic beading cord (0.5mm – 0.8mm clear)
- White square letter beads (H, E, S, H)
- Coral/Peach colored round glass seed beads (size 6/0 or 4mm)
- Small white faux pearl beads (4mm)
- Small round gold spacer beads (3mm)
- Jewelry glue or clear nail polish
- Scissors
- Tape or a bead stopper clip
Step 1: Planning Your Layout
-
Measure your wrist:
Wrap a piece of string around your wrist to find your size, then add about half an inch for a comfortable fit. -
Cut the cord:
Cut a piece of elastic cord approximately 10-12 inches long. It is always better to have too much cord than too little when trying to tie the final knot. -
Secure the end:
Place a piece of tape or a bead stopper clip on one end of the cord to prevent your beads from sliding off while you work. -
Arrange the pattern:
Lay out your beads on a flat surface or bead board to visualize the design before stringing. The pattern shown uses a central word flanked by gold accents, followed by pearls on one side and coral beads on the other.
Step 2: Stringing the Core Design
-
Start with the word:
This design centers the text, so begin by threading the letter beads spelling ‘HESH’ (or your chosen word) onto the middle of the cord. -
Add gold accents:
Slide one small gold spacer bead onto the cord immediately before the first letter and another one immediately after the last letter. -
Verify orientation:
Double-check that your letter beads are all facing the correct direction and aren’t upside down relative to each other.
Knot Slipping?
If your elastic knot feels insecure, try a square knot instead of a surgeon’s knot, and pull all four strands (the two tails and the two bracelet loops) tight simultaneously.
Step 3: Building the Sides
-
String the pearl side:
On the right side of the word, begin threading the small white pearl beads. Add enough pearls to cover about half of the remaining length needed for your wrist size. -
Add a gold transition:
Once the pearl section is complete, add one gold spacer bead, followed by one pearl, another gold spacer, and finally a single coral bead to transition smoothly into the back section. -
String the coral side:
On the left side of the word (the beginning of the word), thread your coral/peach round beads. -
Create symmetry:
Continue adding coral beads until this side matches the length of the pearl side. Ensure the total beaded length matches your wrist measurement. -
Add mixed accents:
To mirror the other side’s transition, finish the coral strand with a gold spacer, a single pearl, and a final gold spacer.
Level Up: Texture Mix
Swap the smoothness of round coral beads for polymer clay heishi discs or faceted crystals to add exciting textural contrast against the smooth pearls.
Step 4: Finishing Touches
-
Pre-stretch the cord:
Gently pull on both ends of the elastic cord to pre-stretch it. This prevents the bracelet from sagging or loosening after the first time you wear it. -
Tie the knot:
Bring the two ends together and tie a surgeon’s knot. This is like a standard overhand knot, but you loop the cord through twice before pulling tight. -
Secure with glue:
Apply a tiny dab of jewelry glue or clear nail polish directly onto the knot. I like to let this dry briefly, usually about 5 minutes, before trimming anything. -
Hide the knot:
Once the glue is tacky but not fully hard, pull the knot gently so it slides inside the hole of one of the nearest beads to hide it. -
Trim excess cord:
Use your scissors to trim the remaining cord tails close to the bead, being careful not to cut the main knot.
Enjoy styling your new custom bracelet solo or stacked with other favorites

What Really Happens Inside the Kiln
Learn how time and temperature work together inside the kiln to transform clay into durable ceramic.
Smiley Face Focal Beads That Pop
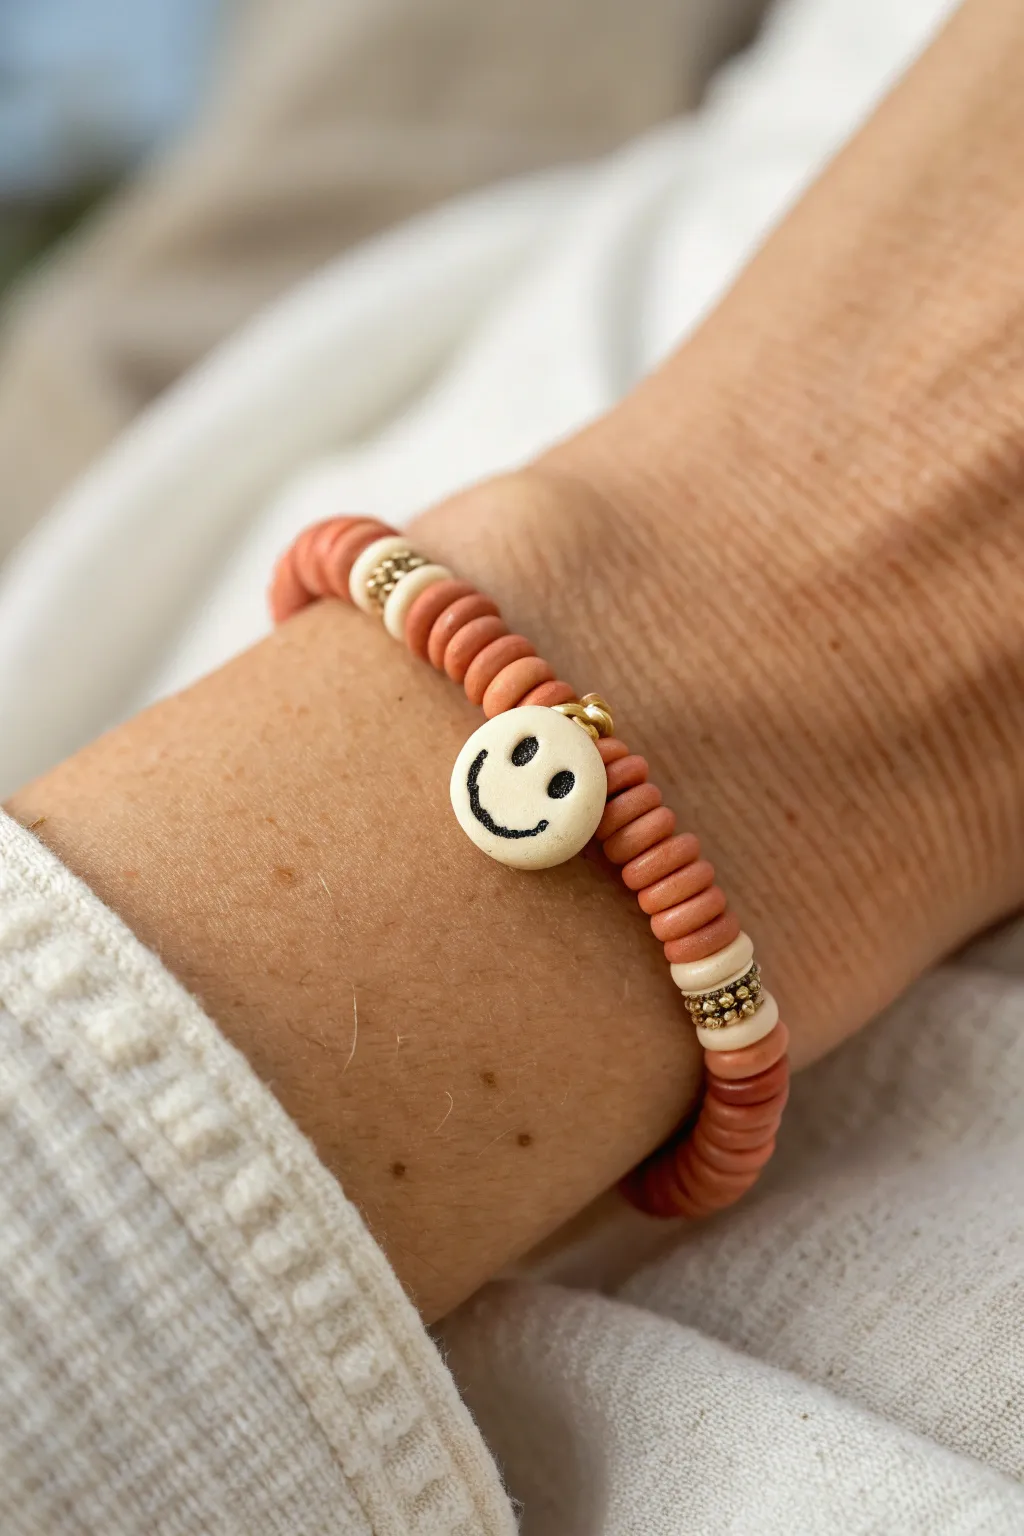
This trendy, cheerful bracelet combines earthy terracotta tones with a playful smiley face charm that doubles as the perfect focal point. The mix of matte heishi discs and textured gold accents creates a piece that feels both handcrafted and high-end.
Step-by-Step Tutorial
Materials
- Elastic beading cord (0.8mm or 1mm thickness)
- 6mm flat disc polymer clay beads (Terracotta/Burnt Orange)
- 6mm flat disc polymer clay beads (Cream/Off-White)
- Small gold spacer beads (round or faceted)
- Textured gold rondelle spacer beads
- Ceramic or polymer clay smiley face bead (Cream with black print)
- Jewelry glue or clear nail polish
- Scissors
Step 1: Planning & Preparation
-
Measure your wrist:
Before cutting any string, gently wrap the elastic cord around your wrist to find the perfect length. Add about 2-3 inches of extra length to this measurement to ensure you have enough slack for tying the final knot comfortably. -
Prepare the cord:
Cut your elastic cord according to your measurement. Give the cord a gentle tug to pre-stretch it; this simple trick helps prevent the bracelet from sagging or stretching out permanently after you wear it a few times. -
Secure the end:
Attach a piece of tape or a bead stopper to one end of the cord. This acts as a safety net so your beads don’t slide right off while you are stringing them.
Knot Slipping?
If your elastic knot feels loose, try pulling the cord tight while tying. A surgeon’s knot is best, but adding a second drop of glue adds extra security.
Step 2: Creating the Pattern
-
Start with the main color:
Begin stringing your terracotta polymer clay heishi beads. You’ll want to thread on about 2 to 2.5 inches of these beads to form the first solid block section of the bracelet. -
Add an accent section:
Slide on one cream heishi bead, followed by a textured gold rondelle spacer, and then another cream heishi bead. This creates a stylish little sandwich that breaks up the solid color. -
Continue the main color:
Resume stringing the terracotta beads. Add another section roughly the same length as your first one, or adjust until you reach the point where you want your centerpiece to sit. -
Position the focal bead:
Now for the star of the show. Thread on a small gold spacer bead, followed by your smiley face bead. I like to double-check ensuring the face is oriented correctly before adding another small gold spacer bead on the other side. -
Mirror the pattern:
Continue adding terracotta beads on the other side of the smiley face. Aim to make this section symmetrical to the one on the left of the focal bead. -
Add the final accent:
Once you have enough terracotta beads to nearly complete the circle, replicate the accent pattern: one cream bead, one textured gold rondelle, and one cream bead. -
Close the loop:
Finish stringing any remaining terracotta beads needed to fit your wrist size. Lift the strand up and carefully wrap it around your wrist to check the fit one last time before tying.
Step 3: Finishing Touches
-
Tie the knot:
Remove the tape or bead stopper. Bring the two ends of the elastic together and tie a strong surgeon’s knot (right over left, left over right, and loop through an extra time). -
Secure with glue:
Apply a tiny dab of jewelry glue (or clear nail polish) to the knot. Let it dry completely to ensure it won’t unravel during wear. -
Hide the knot:
Once the glue is dry, trim the excess tails of the cord close to the knot. Gently pull the adjacent beads over the knot to hide it inside one of the larger hole beads if possible.
Make It Yours
Swap the terracotta for sage green or dusty rose beads for a totally different vibe, or use alphabet beads instead of accents to spell a name.
Your wrist now has a happy new accessory that’s ready to brighten up any outfit
Mini Daisy Beads for Sweet, Springy Jewelry

Capture the warmth of spring with this cheerful polymer clay necklace featuring handmade daisy focal beads. This project combines simple cane work with bead rolling techniques to create a sweet, nature-inspired accessory perfect for sunny days.
Detailed Instructions
Materials
- White polymer clay
- Translucent white or soft beige polymer clay
- Yellow polymer clay (sunny yellow shade)
- Round bead rolling tool (optional but helpful)
- Needle tool or toothpick
- Baking tile or parchment paper
- Oven
- Beading wire or strong nylon cording
- Crimp beads
- Lobster clasp and jump rings
- Yellow seed beads or spacer beads
- Round nose pliers and wire cutters
- Sandpaper (fine grit)
Step 1: Creating the Daisy Focal Beads
-
Prepare the base:
Start by conditioning a mix of translucent white and a tiny bit of beige clay. Roll this into several equal-sized balls, roughly 10-12mm in diameter, to serve as the base for your flower beads. -
Flatten the discs:
Gently press each ball into a thick, flattened disc shape. These don’t need to be perfectly round, as a slightly organic edge adds natural charm. -
Shape the petals:
Condition your opaque white clay and roll it into a thin log or snake. Cut small, equal segments from this log. -
Form teardrops:
Roll each small white segment into a tiny ball, then pinch one end to create a teardrop shape. You will need about 7-9 of these for each flower. -
Assemble the flower:
Place the white teardrops onto the beige base disc in a radial pattern, with the pointed ends meeting in the center. Press them down gently to adhere them to the base. -
Make the centers:
Roll small balls of yellow clay. Using a needle tool, poke the surface repeatedly to create a textured, pollen-like appearance. -
Attach the centers:
Press a textured yellow center into the middle of each flower, covering the points where the white petals meet. -
Piercing the beads:
carefully use your needle tool or a bead pin to pierce a hole horizontally through the beige base of the flower. Do this slowly to avoid distorting the petals.
Needle Tool Pro Tip
When piercing the holes, rotate the needle tool like a drill rather than pushing straight through. This prevents the bead from squishing and keeps the hole round.
Step 2: Crafting Accent Beads
-
Simple round spacers:
Create a set of simple round beads using white and soft yellow clay. I recommend making them slightly smaller than your flower focal beads for visual balance. -
Textured berry beads:
To make the yellow textured beads seen in the design, roll a base ball of yellow clay. Then, roll very tiny micro-balls of yellow and white clay. -
Coating the berry:
Roll the base yellow bead in the pile of micro-balls until it is completely covered, pressing gently so they stick. -
Piercing accents:
Pierce holes through all your round spacer beads and textured berry beads. -
Baking:
Arrange all your daisy beads and accent beads on a baking tile. Bake according to your clay manufacturer’s instructions (usually 275°F/130°C for 15-30 minutes). -
Cooling and finishing:
Allow the beads to cool completely. If there are any fingerprints, lightly buff them away with fine-grit sandpaper.
Level Up: Petal Detail
Use a dull knife or a specialized clay tool to gently indent a line down the center of each white petal before baking for a more realistic floral effect.
Step 3: Final Assembly
-
Cut the cord:
Measure and cut a length of beading wire or cord to your desired necklace length, adding about 4 inches for finishing. -
Secure the start:
String a crimp bead and one half of your clasp onto the wire. Thread the wire back through the crimp bead and use flat-nose pliers to flattened it securely. -
Stringing pattern:
Begin stringing your beads. Start with the smaller spacers and textured beads near the clasp, gradually moving toward the larger focal beads. -
Center arrangement:
Place your daisy beads in the center of the necklace. Alternate them with simple white or yellow round beads to let each flower stand out. -
Finish the strand:
Mirror your bead pattern on the second half of the necklace until you reach the end. -
Attach closure:
Finish by adding a crimp bead and a jump ring (or the other half of the clasp). Loop the wire back through the crimp, pull tight, and crush the crimp bead to secure the strand.
Now you have a charming, handmade accessory that brings a touch of eternal spring to any outfit


The Complete Guide to Pottery Troubleshooting
Uncover the most common ceramic mistakes—from cracking clay to failed glazes—and learn how to fix them fast.
Fruit Slice Cane Beads for Playful Color
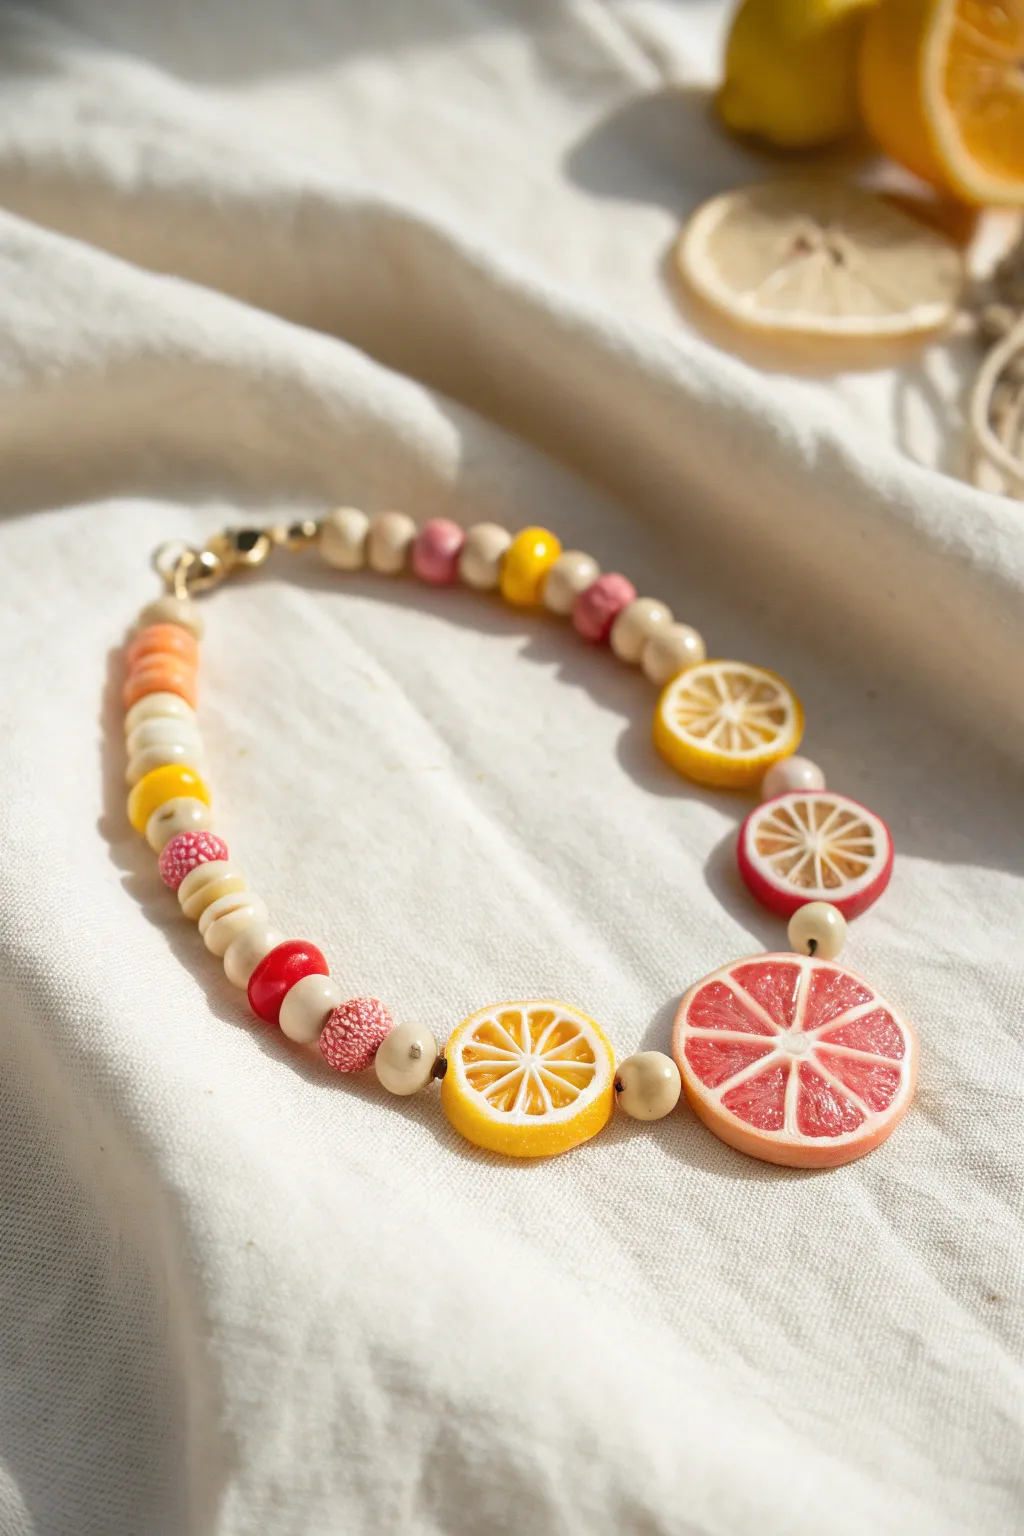
Brighten up any outfit with this juicy, summery necklace featuring realistic citrus slices made from polymer clay canes. The combination of vibrant fruit sections and natural wooden accents creates a playful yet polished accessory perfect for warm weather.
Step-by-Step Tutorial
Materials
- Polymer clay (translucent, white, yellow, orange, grapefruit pink, red)
- Pasta machine or acrylic roller
- Tissue blade or flexible clay blade
- Needle tool or bead piercing pins
- Round wooden beads (approx. 6mm and 8mm)
- Small colorful spacer beads (pink, yellow, textured)
- Beading wire or strong jewelry cord
- Crimp beads and crimp tool
- Jewelry clasp (lobster claw) and jump rings
- Gloss glaze (optional)
Step 1: Creating the Fruit Canes
-
Mix the colors:
Begin by conditioning your clay. For the fruit flesh, mix translucent clay with a very small amount of color (yellow for lemon, pink for grapefruit, orange/red for blood orange). The goal is a semi-transparent, juicy look. -
Form the segments:
Roll the colored translucent clay into a thick log. Wrap this log in a thin sheet of white clay (this is the pith). Shape the wrapped log into a teardrop or triangular prism shape by pinching one side. -
Assemble the center:
Cut the triangular log into 8-10 equal lengths. Arrange these wedges in a circle with the points facing inward to form the wheel of fruit segments. Place a very thin snake of white clay in the absolute center if there’s a gap. -
Wrap the fruit:
Wrap the assembled circle of segments with a layer of white clay for the inner rind. Then, wrap that with a layer of the solid fruit skin color (yellow, orange, or pink) to complete the cane. -
Reduce the cane:
Gently squeeze and pull the cane from the center outwards to elongate it and reduce its diameter. Aim for a diameter of about 1 inch for the main focal beads, and slightly smaller for the side beads. -
Slice the beads:
Let the cane rest for an hour to firm up. Use a sharp tissue blade to slice discs about 4-5mm thick. I find cutting slowly helps prevent distorting the round shape.
Cold Cuts
Put your finished cane in the fridge for 20 minutes before slicing. Cold clay is much firmer, allowing for paper-thin slices without squishing the intricate design.
Step 2: Refining and Baking
-
Pierce the beads:
Using a needle tool, carefully pierce a hole through the side of each fruit slice. Twist the needle gently as you push through to avoid squishing the perfectly round shape. -
Texture the rind:
For extra realism, gently tap the outer colored skin of the slices with a toothbrush or sandpaper to mimic the texture of citrus peel. -
Bake the clay:
Arrange your slices on a baking tile or parchment paper. Bake according to the manufacturer’s instructions for your specific brand of clay, usually around 275°F (135°C) for 30 minutes. -
Cool and finish:
Allow the beads to cool completely. If you want a ‘freshly cut’ juicy look, apply a thin coat of gloss glaze to just the fruit flesh segments, leaving the white pith and outer rind matte.
Smudged Colors?
If your white pith looks smeared creating the cane, your clay was too soft or you squeezed too hard. Let the cane rest longer before reducing, and clean your blade between every single slice.
Step 3: Assembly
-
Layout the design:
Lay out your beads on a bead board or towel. Place the largest grapefruit slice in the center, flanked by the medium slices, and then the smaller fruit slices. -
Add spacer beads:
Intersperse the fruit slices with the wooden beads and small colored spacer beads. Use the wooden beads to separate the bold fruit colors and add a natural, bohemian touch. -
String the necklace:
Cut a length of beading wire. Secure one end with a piece of tape or a bead stopper. Thread your pattern onto the wire, starting from one end of the clasp assembly. -
Attach the clasp:
Once all beads are strung, thread a crimp bead and one half of the clasp onto the end. Loop the wire back through the crimp bead and use crimping pliers to flatten it securely. -
Finish the second side:
Repeat the crimping process on the other end with the other half of the clasp (or a jump ring). Trim any excess wire and tuck the tail into the adjacent beads.
Now you have a refreshing, handmade accessory that captures the best vibes of summer
Swirled Marble Beads in Psychedelic Palettes
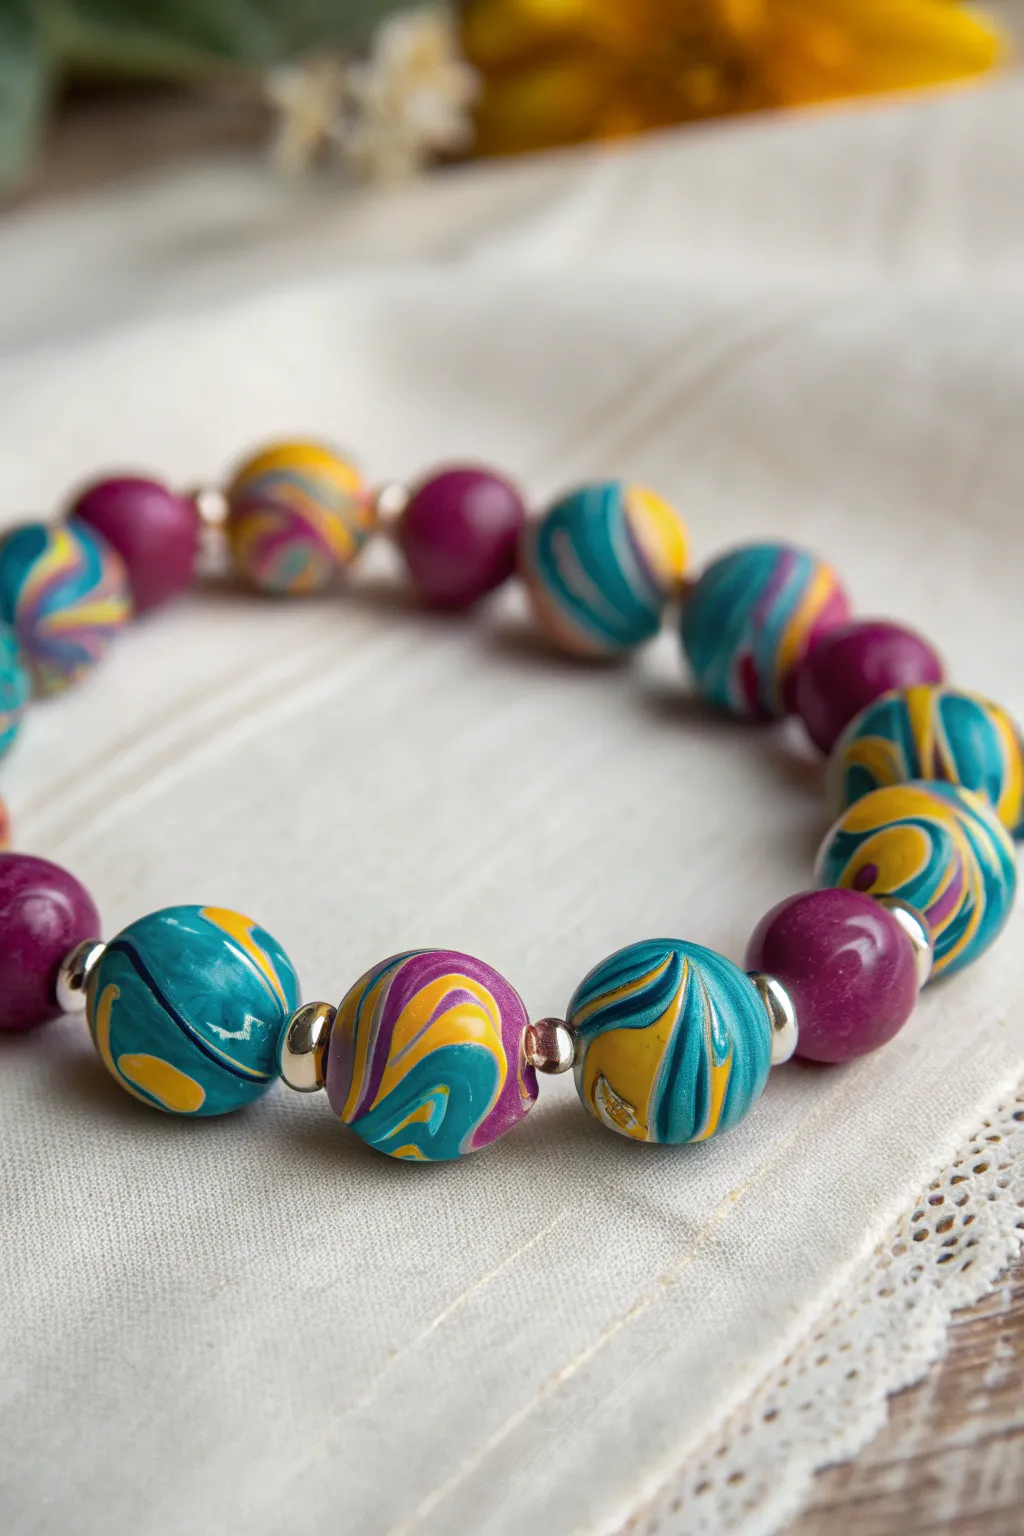
Capture the groovy spirit of the 60s with these vibrant, gemstone-like beads featuring electric swirls of teal, yellow, and magenta. The marbled effect creates unique, one-of-a-kind patterns on every single bead, perfectly balanced by solid spacer beads for a polished finish.
Step-by-Step
Materials
- Polymer clay in teal, bright yellow, deep magenta, and white
- Silver spacer beads (small round)
- Small silver bead caps
- Elastic stretch cord (0.8mm or 1mm)
- Clay roller or pasta machine
- Needle tool or bead piercing pins
- Bead rack or baking tray with parchment paper
- Wet/dry sandpaper (400, 600, 1000 grit)
- Jewelry adhesive (e.g., E6000 or Hypo Cement)
- Gloss glaze or resin (optional)
Step 1: Prepping the Clay Cane
-
Condition the Clay:
Begin by thoroughly conditioning each color of polymer clay—teal, yellow, magenta, and a small amount of white—until they are soft and pliable. This prevents cracking later. -
Create Snakes:
Roll each color into long snakes of roughly equal thickness, about 1/4 inch in diameter. Roll two snakes of teal, one of yellow, one of magenta, and a very thin snake of white to add highlights. -
Twist the Bundle:
Gather all the snakes together into a single thick log. Holding each end of the log, twist your hands in opposite directions to spiral the colors together tightly resulting in a candy-cane look. -
Fold and Roll:
Fold the twisted log in half and roll it smooth on your work surface to lengthen it again. Repeat this twisting, folding, and rolling process 2-3 times. -
Assess the Pattern:
Be careful not to over-mix, or the colors will turn muddy. Stop when you see distinct, fine lines of color swirling together without blending into a new shade.
Keep it Clean
Wash hands or use baby wipes when switching between dark and light clay colors. Dark pigments love to transfer to yellow clay!
Step 2: Forming the Beads
-
Sectioning:
Slice your marbled cane into equal-sized segments using a tissue blade. Aim for chunks of clay roughly the size of a large hazelnut. -
Rolling Rounds:
Take a segment and roll it between your palms using a circular motion. Apply gentle pressure initially, then lighten your touch to perfect the sphere shape without distorting the swirl pattern too much. -
Creating Solid Spacers:
Take your solid magenta clay and roll smaller spheres, slightly smaller than your marbled beads. These will serve as resting points for the eye in the final design. -
Piercing:
I like to let the raw beads sit for 10 minutes to cool before piercing; this prevents fingerprints. Gently twist a needle tool or bead pin through the center of each bead to create the stringing hole.
Muddy Colors?
If your swirls turn brown or grey, you twisted the cane too many times. Stop mixing while distinct stripes are still clearly visible.
Step 3: Baking and Finishing
-
Baking:
Arrange the beads on a bead rack or a parchment-lined baking sheet. Bake according to your clay manufacturer’s instructions (usually 275°F/135°C for 30-60 minutes). -
Cooling:
Allow the beads to cool completely in the oven with the door cracked open. This gradual cooling tempers the clay for maximum strength. -
Sanding:
Once cool, wet-sand the beads under running water. Start with 400 grit to remove minor blemishes, then work up to 1000 grit for a silky smooth finish. -
Buffing:
Vigorously rub the beads with a piece of denim or a soft cotton cloth to bring out a natural sheen. Optionally, apply a thin coat of gloss glaze for a glass-like look.
Step 4: Assembly
-
Layout:
Arrange your beads on a design board. Use a pattern like: one marbled bead, one silver spacer, one solid magenta bead, one silver spacer, repeated. -
Stringing:
Cut a piece of elastic cord about 10-12 inches long. Pre-stretch the cord by pulling it gently a few times to prevent it from sagging later. -
Threading Beads:
Thread your pattern onto the elastic. Check fit around your wrist periodically, adding or removing beads as needed. -
Knotting:
Tie off the elastic with a surgeon’s knot (right over left, left over right twice).Add a dab of jewelry adhesive to the knot for security. -
Hiding the Knot:
Trim the excess cord and gently tug the knot inside one of the larger marbled beads or a bead cap to hide it.
Slip on your new bracelet and enjoy the burst of retro color on your wrist.

TRACK YOUR CERAMIC JOURNEY
Capture glaze tests, firing details, and creative progress—all in one simple printable. Make your projects easier to repeat and improve.
Faux Agate-Inspired Beads for a Gemstone Look
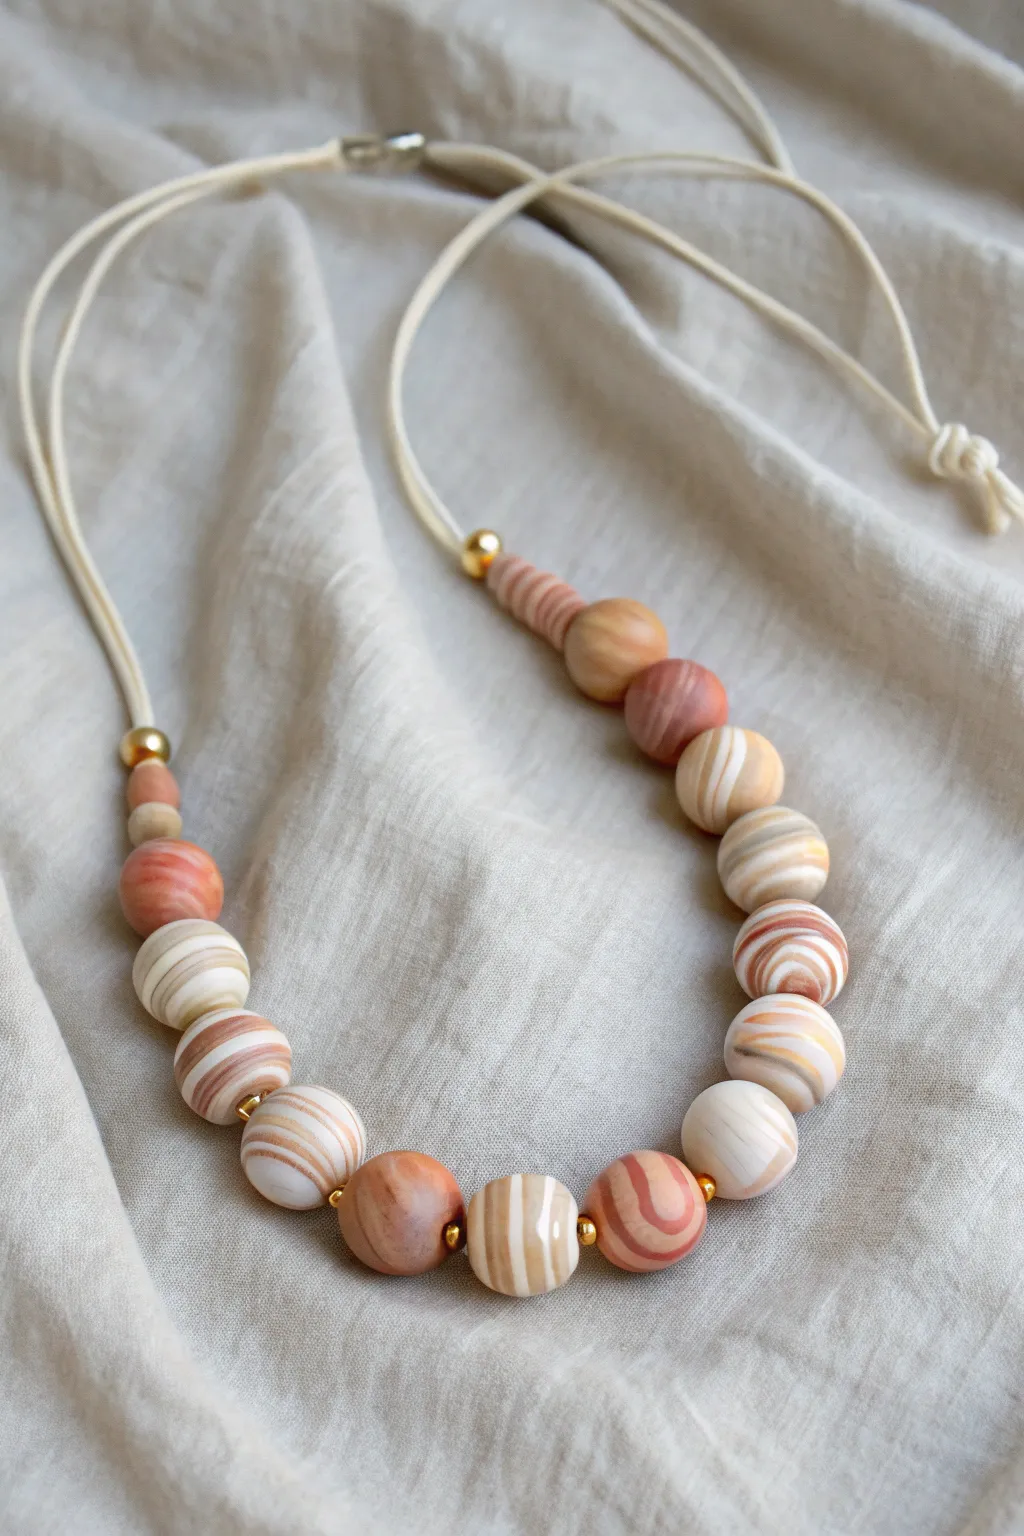
Capture the organic elegance of natural gemstones with this polymer clay project mimicking banded agate. By swirling translucent and opaque clays together, you’ll create beads with stunning depth and intricate, earthy patterns that look incredibly high-end.
Step-by-Step Guide
Materials
- Polymer clay in translucent white
- Polymer clay in opaque white
- Polymer clay in beige or tan
- Polymer clay in terracotta or brick red
- Acrylic roller
- Tissue blade or craft knife
- Bead piercing pins or toothpicks
- Wet/dry sandpaper (400 to 1000 grit)
- Buffing wheel or denim cloth
- Beige or off-white waxed cotton cord (approx. 1.5mm)
- Small gold spacer beads (approx. 3-4mm)
- Jewelry clasp (lobster or toggle)
Step 1: Creating the Agate Cane
-
Condition the Clay:
Begin by thoroughly conditioning all your clay colors until they are soft and pliable. You will need roughly equal parts of translucent and opaque white, with smaller amounts of beige and terracotta. -
Mix Custom Shades:
Create variations in tone by mixing a little translucent into the terracotta to make it less dense. I like to mix a tiny bit of beige into the white to create a creamy off-white layer as well. -
Create Sheets:
Roll each color into flat sheets of varying thickness. Keep the translucent sheets slightly thicker than the opaque colors to add depth to the final stone effect. -
Stack the Clay:
Layer the sheets on top of each other in a somewhat random order. Aim for high contrast by placing darker terracotta layers next to white or beige layers. -
Form a Block:
Cut the stack in half and layer it upon itself to double the stripe count. Gently compress the stack into a rectangular block, ensuring no air is trapped between layers. -
Distort the Layers:
Using the handle of a paintbrush or a dowel, press down into the stack vertically to push layers into one another. This creates the wavy, organic lines found in natural agate. -
Consolidate the Cane:
Squeeze the block back together to close the holes you just made. Roll and stretch the block into a thick log or cane, twisting it slightly if you want more swirl.
Muddy colors?
If your stripes look smeared, your clay might be too soft. Pop the cane in the fridge for 15 minutes before slicing to keep lines crisp.
Step 2: Forming the Beads
-
Cut Bead Portions:
Slice the cane into segments. Since the necklace features graduated sizes, cut larger chunks for the center beads and smaller pieces for the ends close to the clasp. -
Roll spheres:
Roll each chunk between your palms to form a smooth ball. As you roll, the interior layers will come to the surface, revealing the banded pattern. -
Refine the Shape:
Check the symmetry of your spheres. For the smaller connector beads near the cord ends, you can roll slightly smaller or more cylindrical shapes if desired. -
Pierce the Holes:
Carefully pierce a hole through the center of each bead using a bead pin. Rotate the pin as you push through to avoid distorting the bead’s shape. -
Baking:
Arrange the beads on a baking sheet or bead rack. Bake according to your clay manufacturer’s instructions, usually around 275°F (130°C) for 30-60 minutes depending on size.
Step 3: Finishing and Assembly
-
Cool and Sand:
Allow the beads to cool completely. Sand each bead under water using wet/dry sandpaper, starting with 400 grit and working up to 1000 grit to remove fingerprints and surface imperfections. -
Buffing:
Vigorously buff the beads with a piece of denim or a buffing wheel on a rotary tool. This step is crucial for making the translucent clay look like real stone. -
Layout Design:
Lay out your beads on a work surface in your desired order, placing the largest beads in the center and graduating to smaller ones at the ends. -
Stringing:
Cut a long length of waxed cotton cord. Begin stringing your beads, inserting a small gold spacer bead between every few clay beads to add a touch of metallic elegance. -
Secure the Beads:
If you want the beads to stay centered, you can tie a simple overhand knot in the cord before the first bead and after the last bead. -
Add Clasp:
Attach your jewelry clasp to the ends of the cord. Alternatively, for an adjustable length, use a sliding knot technique with the excess cord.
Ice Water Shock
Plunge hot baked beads directly into ice water. This ‘shocks’ the translucent clay, making it clearer and more stone-like immediately.
Enjoy wearing your new earthy statement piece that pairs perfectly with casual linen or cozy knits.
Faux Coral and Lava Texture Beads for Beachy Vibes
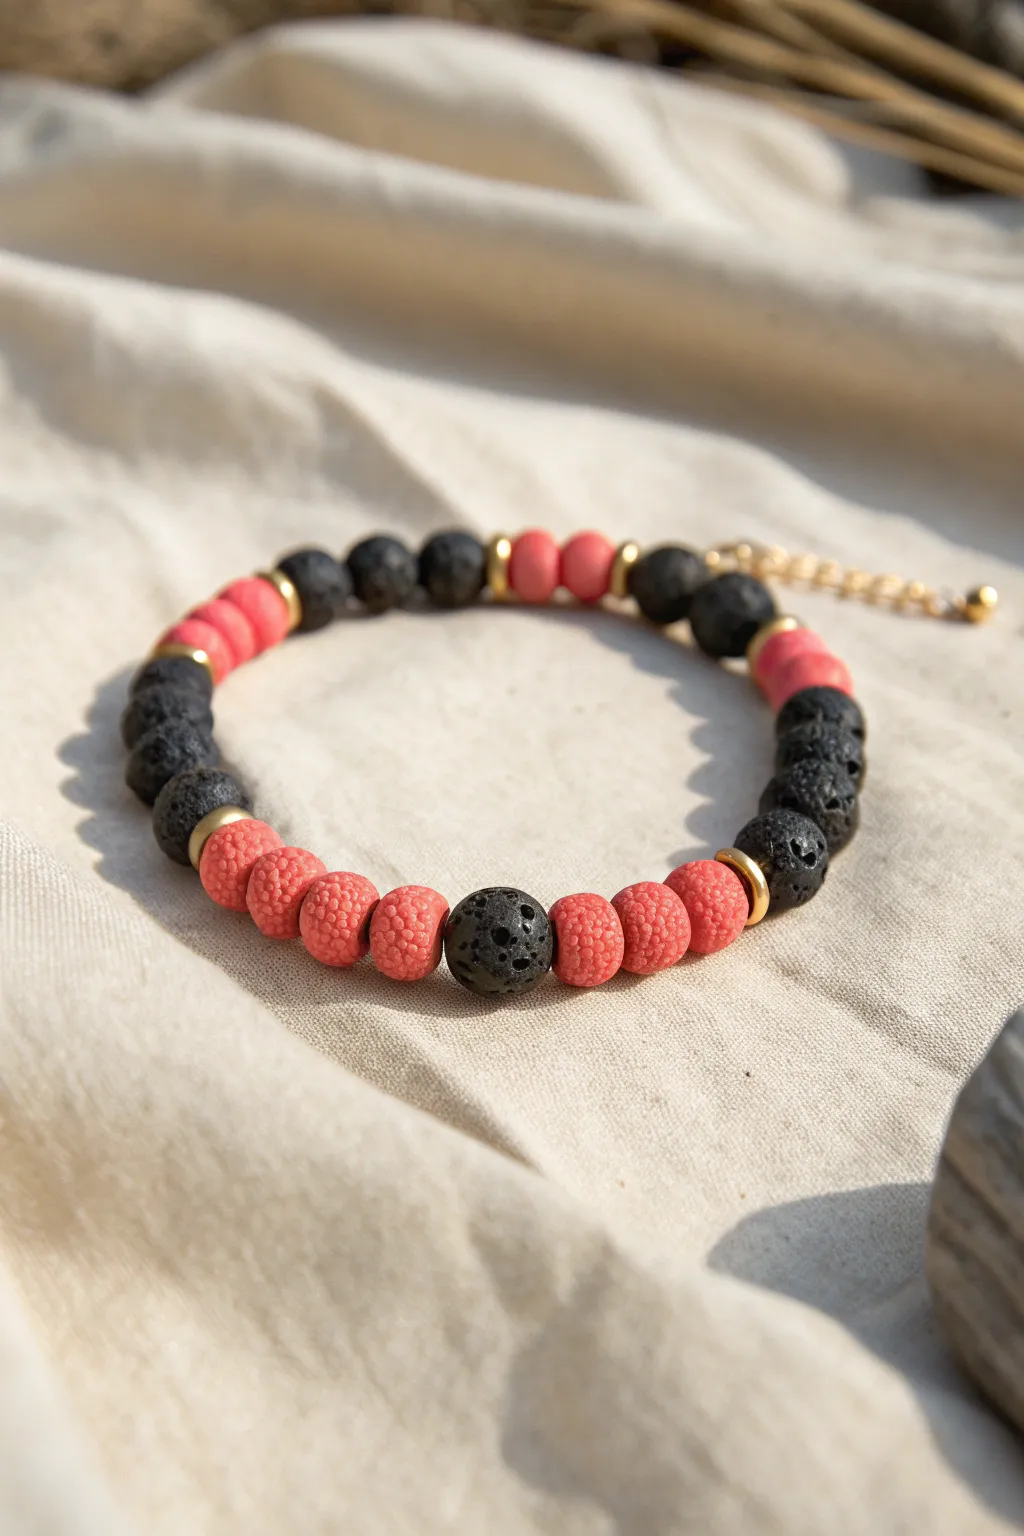
Capture the raw beauty of the coast with this striking bracelet that combines rugged lava textures with delicate faux coral. The contrast between the porous black stones and the intricate pink stippled beads creates a sophisticated yet organic piece perfect for summer styling.
Detailed Instructions
Materials
- Black polymer clay
- Coral or salmon-pink polymer clay
- Gold spacer beads (small discs or rondelles)
- Elastic jewelry cord (0.8mm or 1mm)
- Needle tool or toothpick
- Small ball tool or stiff bristle brush
- Toothbrush or crumpled aluminum foil (for texturing)
- Bead piercing pin or thin skewer
- Oven for baking
- Jewelry glue (optional)
Step 1: Creating the Lava Beads
-
Condition the clay:
Start by thoroughly conditioning your black polymer clay until it is soft and pliable. This ensures the beads won’t crack during piercing. -
Form base spheres:
Roll the black clay into a uniform log and cut equal segments. Roll each segment between your palms to create smooth, round spheres, aiming for about 8-10mm in diameter. -
Texture the surface:
To mimic real lava stone, take a needle tool or toothpick and prick the surface of each black bead deeply and randomly. You want significant pits and craters, not just surface scratches. -
Add fine texture:
Roll the pitted beads gently over a piece of sandpaper or press a stiff toothbrush against them to add finer, grainy texture between the larger craters. -
Pierce the holes:
Gently insert your bead piercing pin through the center of each black bead. Rotate the pin as you push to avoid squishing the shape you just texturized.
Sticky Situation?
If your needle tool sticks to the clay while texturing, dip the tip in a little water or cornstarch before pricking the beads to keep lines clean.
Step 2: Crafting the Faux Coral Beads
-
Prepare coral clay:
Condition the coral-colored clay. If you don’t have the exact shade, mix a little translucent clay into standard pink or orange to give it a more organic, stony look. -
Shape the beads:
Roll this clay into spheres that are slightly smaller or the same size as your lava beads. Uniformity is nice, but slight organic variation works well here too. -
Stipple the texture:
Using a small ball tool or a blunt needle, press tiny, shallow indentations all over the surface of the pink beads. Unlike the lava beads, these marks should be uniform, close together, and less jagged. -
Refine the surface:
I find that lightly rolling the textured bead in your palm just once can soften any sharp ridges created by the took, giving it a weathered coral appearance. -
Pierce the holes:
Carefully pierce holes through the center of these beads, ensuring the opening is wide enough for your elastic cord.
Go Pro
Mix black sand or coarse black pepper into the black clay before rolling. This adds genuine grit and sparkle that mimics volcanic rock perfectly.
Step 3: Baking and Assembly
-
Bake the beads:
Arrange all beads on a baking sheet, ideally resting on a bed of cornstarch or accordion-folded paper to prevent flat spots. Bake according to your clay manufacturer’s instructions (usually 275°F/135°C for 30 minutes). -
Cool down:
Allow the beads to cool completely. The polymer clay hardens fully as it returns to room temperature. -
Plan the layout:
Lay out your design on a bead board or soft cloth. Follow the pattern from the photo: groups of 3-4 coral beads separated by a single black bead, using gold spacers to frame sections. -
Integrate spacers:
Place a gold spacer bead between color transitions—specifically flanking the black accent beads or separating the pink sections—to add a touch of elegance. -
String the beads:
Cut a length of elastic cord about 10 inches long. Thread your beads onto the cord, maintaining your planned patterns. -
Test the fit:
Wrap the strung beads around your wrist to check the size. Add or remove a bead if necessary for a comfortable fit. -
Tie the knot:
Tie a strong surgeon’s knot (right over left, left over right) with the elastic. Pull tight to secure. -
Hide the knot:
Apply a tiny dot of jewelry glue to the knot. once dry, trim the excess cord and gently tug the knot inside one of the larger black lava beads to hide it.
Now you have a stunning, tactile accessory that brings a bit of volcanic drama to your everyday look
Terrazzo-Style Scrap Beads With Confetti Speckles
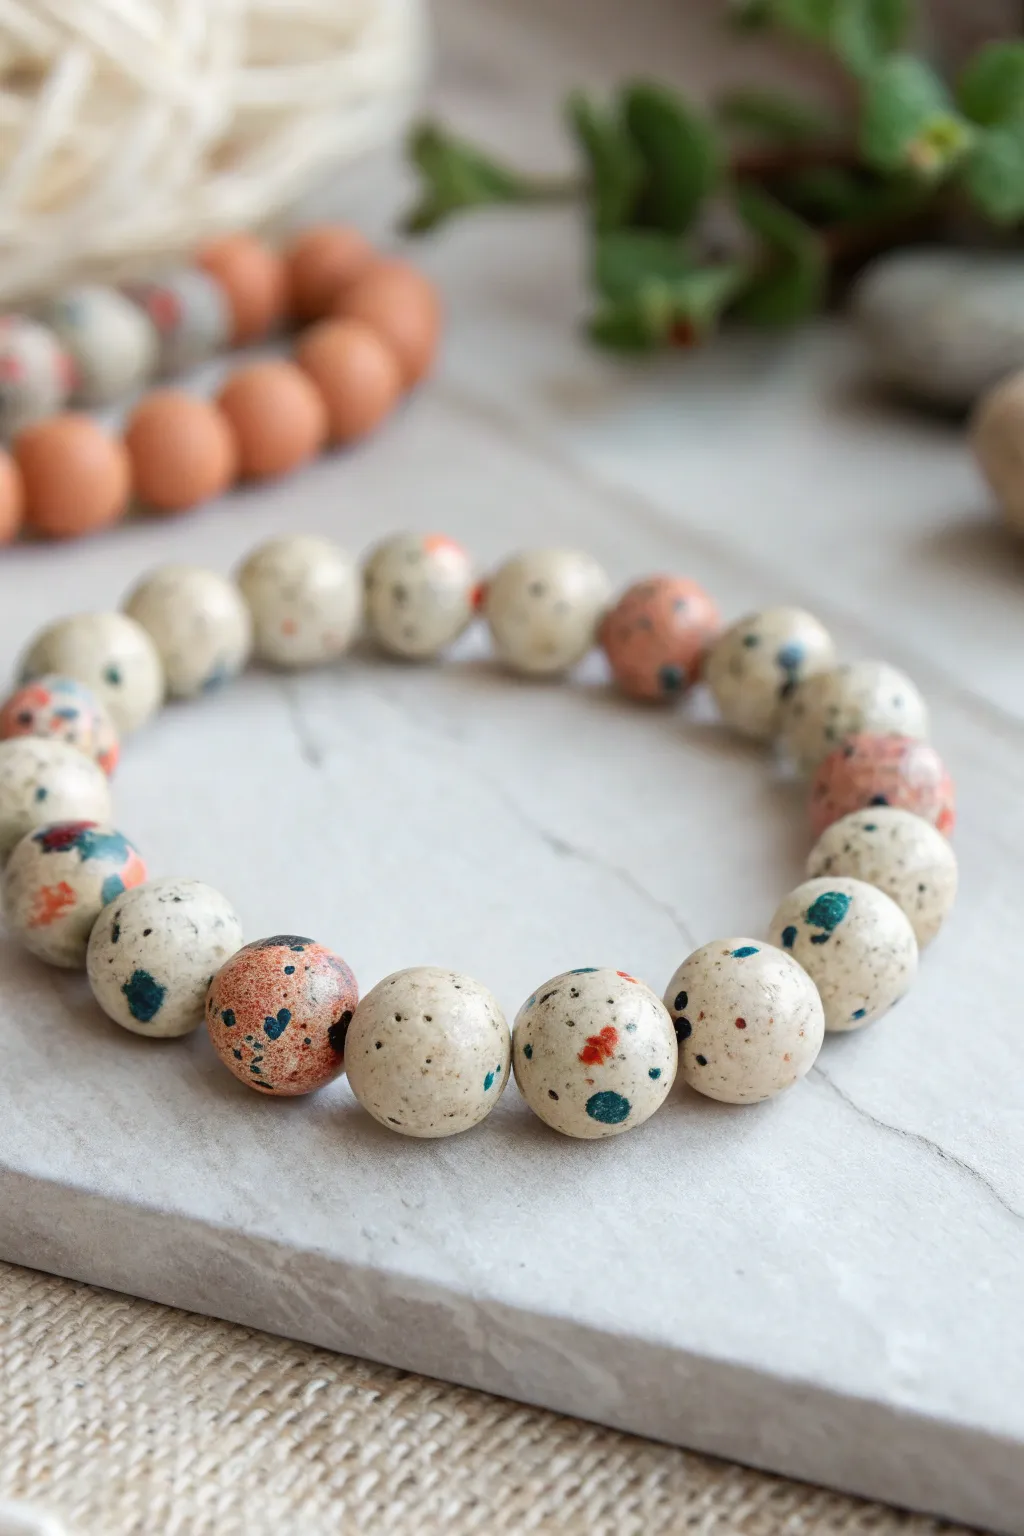
Transform your leftover polymer clay scraps into a chic, natural-looking accessory with this clever terrazzo technique. These round beads mimic the look of speckled ceramic or stone, featuring a creamy base dotted with pops of teal, rust, and navy.
How-To Guide
Materials
- Polymer clay in White or Ecru (for the base)
- Polymer clay scraps in Teal, Rust/Terracotta, and Navy Blue
- Rolling pin or acrylic roller
- Tissue blade or sharp clay knife
- Bead piercing pins or toothpicks
- Wet/dry sandpaper (400, 600, and 800 grit)
- Buffing cloth or denim scrap
- Elastic cord (0.8mm or 1mm)
- Super glue (optional)
Step 1: Preparing the Confetti
-
Condition the colors:
Start by conditioning your colored clay scraps—the teal, rust, and navy—until they are pliable. You don’t need much; a pea-sized amount of each goes a long way. -
Create thin sheets:
Roll each colored piece into a very thin sheet. The thinner the sheet, the more delicate your final speckles will look. -
Bake the sheets:
Place these thin colored sheets on a tile or baking tray and bake them according to the package instructions for about 10–15 minutes. We want these to be fully cured and hard. -
Chop into confetti:
Once the baked sheets have cooled completely, use your tissue blade to chop them into tiny, irregular bits. Aim for a mix of sizes, mostly dust-like specks with a few slightly larger chunks.
Sticky Situation?
If your raw clay becomes too soft and sticky while rolling, pop it in the fridge for 10 minutes. Cooler clay holds its round shape better during piercing.
Step 2: Forming the Beads
-
Prepare the base:
Condition a large block of your white or ecru clay. It needs to be soft and sticky enough to grab onto the baked inclusions. -
Mix in the speckles:
Flatten your base clay slightly and sprinkle your chopped clay confetti over it. Fold the clay over to trap the pieces inside. -
Incorporate thoroughly:
Knead and twist the clay repeatedly to distribute the cured specs evenly throughout the raw white clay. I usually cut the log in half and stack it a few times to ensure an even mix. -
Section the clay:
Roll the mixed clay into a thick log. Use your blade to cut equal-sized segments. For the bracelet shown, you’ll want roughly 18–20 segments, each about 1/2 inch thick. -
Roll into spheres:
Roll each segment between your palms to create a smooth, round ball. Apply gentle pressure to avoid creating air pockets. -
Add surface interest:
If some beads look too plain on the outside, press a few larger reserved chips of the baked colored clay directly into the surface of the raw bead, rolling again to smooth them in.
Step 3: Piercing and Finish
-
Pierce the holes:
While the beads are still raw, gently twist a bead pin or toothpick through the center of each sphere. Rotate the clear as you pierce to prevent flattening the ball shape. -
Bake the beads:
Arrange the beads on your baking surface. You can use a folded piece of cardstock like an accordion to keep them from rolling. Bake according to your clay manufacturer’s instructions, typically for 45–60 minutes to ensure durability. -
Cool down:
Allow the beads to cool completely before handling them. They are fully hardened only when cool. -
Sand for stone effect:
This is the most crucial step for the terrazzo look. Wet sand each bead under water using 400 grit, then 600, then 800 grit paper. This removes fingerprints and reveals the crisp edges of the colored speckles inside. -
Buff to a sheen:
Vigorously rub the dried beads with a piece of denim or a buffing cloth. This gives them a natural, stone-like satin finish rather than a high gloss. -
String the bracelet:
Thread your finished speckled beads onto the elastic cord. Check that the fit is comfortable on your wrist. -
Secure the knot:
Tie a secure surgeon’s knot (right over left, left over right, iterate twice). Add a tiny drop of super glue to the knot before trimming the excess cord and sliding the knot inside a drilled hole.
Natural Texture
Before baking, gently roll the raw beads over a texture sponge or coarse sandpaper. This adds tiny pits that mimic real porous stone or volcanic rock.
Wear your new eco-chic bracelet solo or stack it with solid colors to really make those speckles pop
Striped Tube Beads for Bold Statement Necklaces
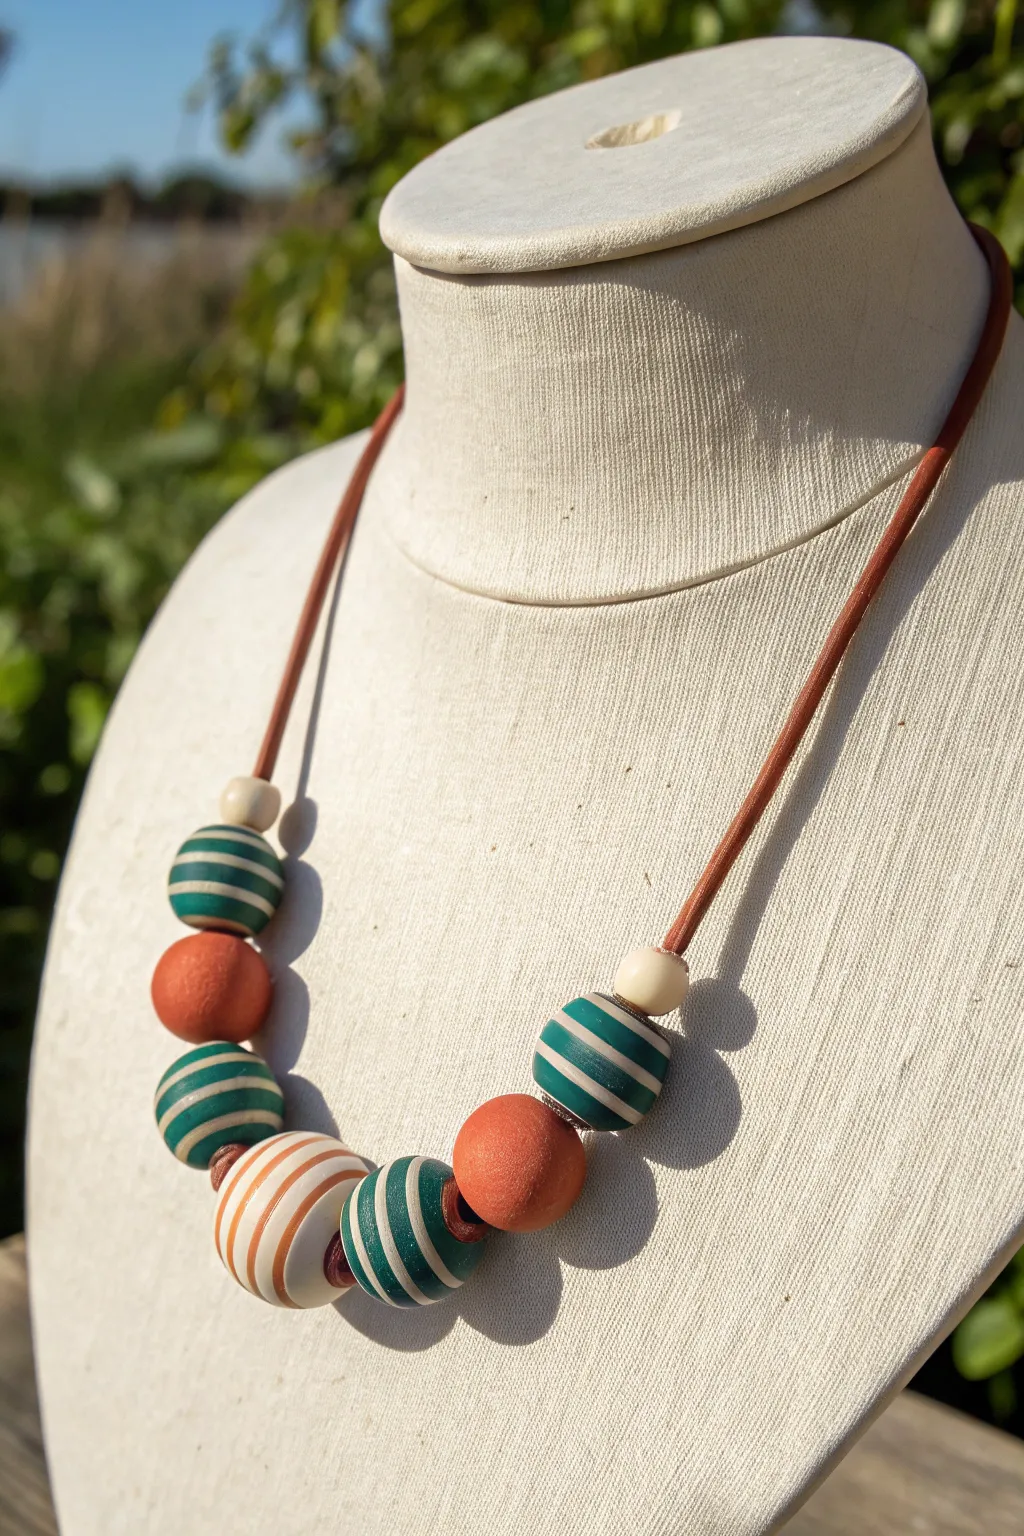
Create a stunning focal point for any outfit with this chunky, bohemian-inspired necklace featuring striped polymer clay beads. The mix of earthy burnt orange and teal green creates a warm, natural palette that looks complicated but relies on simple cane-making techniques.
Step-by-Step
Materials
- Polymer clay in teal/forest green, burnt orange, and cream/white
- Acrylic rolling pin or pasta machine
- Round bead rollers (large size) or clear acrylic block
- Tissue blade or sharp clay slicer
- Bead piercing pins or toothpicks
- Wet/dry sandpaper (400 to 1000 grit)
- Round leather or faux leather cord (2mm-3mm)
- Jewelry findings (clasp and jump rings)
- Oven for baking
Step 1: Preparing the Clay
-
Conditioning:
Begin by thoroughly conditioning each color of clay—teal, burnt orange, and cream—until they are soft and pliable. This prevents cracking later. -
Rolling Sheets:
Roll out sheets of the teal and cream clay. Aim for a thickness of about 2-3mm for the colored bands and slightly thinner for the cream bands if you want varied stripe widths. -
Creating the Stack:
Layer the sheets of teal and cream on top of each other in an alternating pattern. Press them firmly together to eliminate air bubbles.
Step 2: Forming the Striped Beads
-
Cutting the Cane:
Use your tissue blade to slice a strip off your stacked slab. The width of your slice will determine the basic size of your bead. -
Rough Shaping:
Take the sliced section and gently compress the corners to roughly form a cube or lump, being careful not to distort the stripes too much yet. -
Rolling the Sphere:
Place the clay between your palms or use a bead roller. Roll gently in a circular motion. I usually control the pressure carefully here to make sure the stripes swirl nicely around the sphere. -
Repeat for Variety:
Make about four or five of these striped teal beads. Then, repeat the stacking process with burnt orange and cream to make a large central focal bead.
Smudged Stripes?
If stripes smear during rolling, pop the clay stack in the fridge for 15 minutes before slicing. Keep hands cool and use light touch when rolling.
Step 3: Solid Beads and Spacers
-
Orange Accent Beads:
Roll two solid balls of the burnt orange clay. These should be approximately the same size as your teal striped beads. -
Texture Option:
For a matte, organic look like the photo, lightly roll the solid orange beads on a piece of coarse sandpaper or sponge before baking. -
Small Spacers:
Create two smaller, simple spheres from the plain cream clay to sit at the top ends of the beaded section. -
Piercing:
Carefully pierce a hole through the center of every bead using a bead pin. Rotate the pin as you push to avoid squashing the bead’s shape.
Matte Finish
To get that earthy stone feel, sand beads after baking but do not buff or glaze them. The raw, sanded clay mimics natural ceramic beautifully.
Step 4: Baking and Assembly
-
Baking:
Arrange the beads on a baking sheet or suspended on bead pins. Bake according to your clay manufacturer’s instructions (usually 275°F/130°C for 30-60 minutes). -
Cooling and Sanding:
Allow beads to cool completely. Wet sand them lightly to remove any fingerprints or imperfections, then buff with a soft cloth for a subtle sheen. -
Stringing:
Cut a length of leather cord to your desired necklace length. Thread the beads in a symmetrical pattern: cream spacer, teal striped, solid orange, teal striped, large orange striped center bead, and then mirror the pattern back up the other side. -
Finishing:
Attach your clasp ends to the leather cord using crimps or glue-in end caps to finish the necklace securely.
Wear your new geometric statement piece with a simple linen top to let the colors truly pop
Lentil Beads That Sit Perfectly on the Wrist
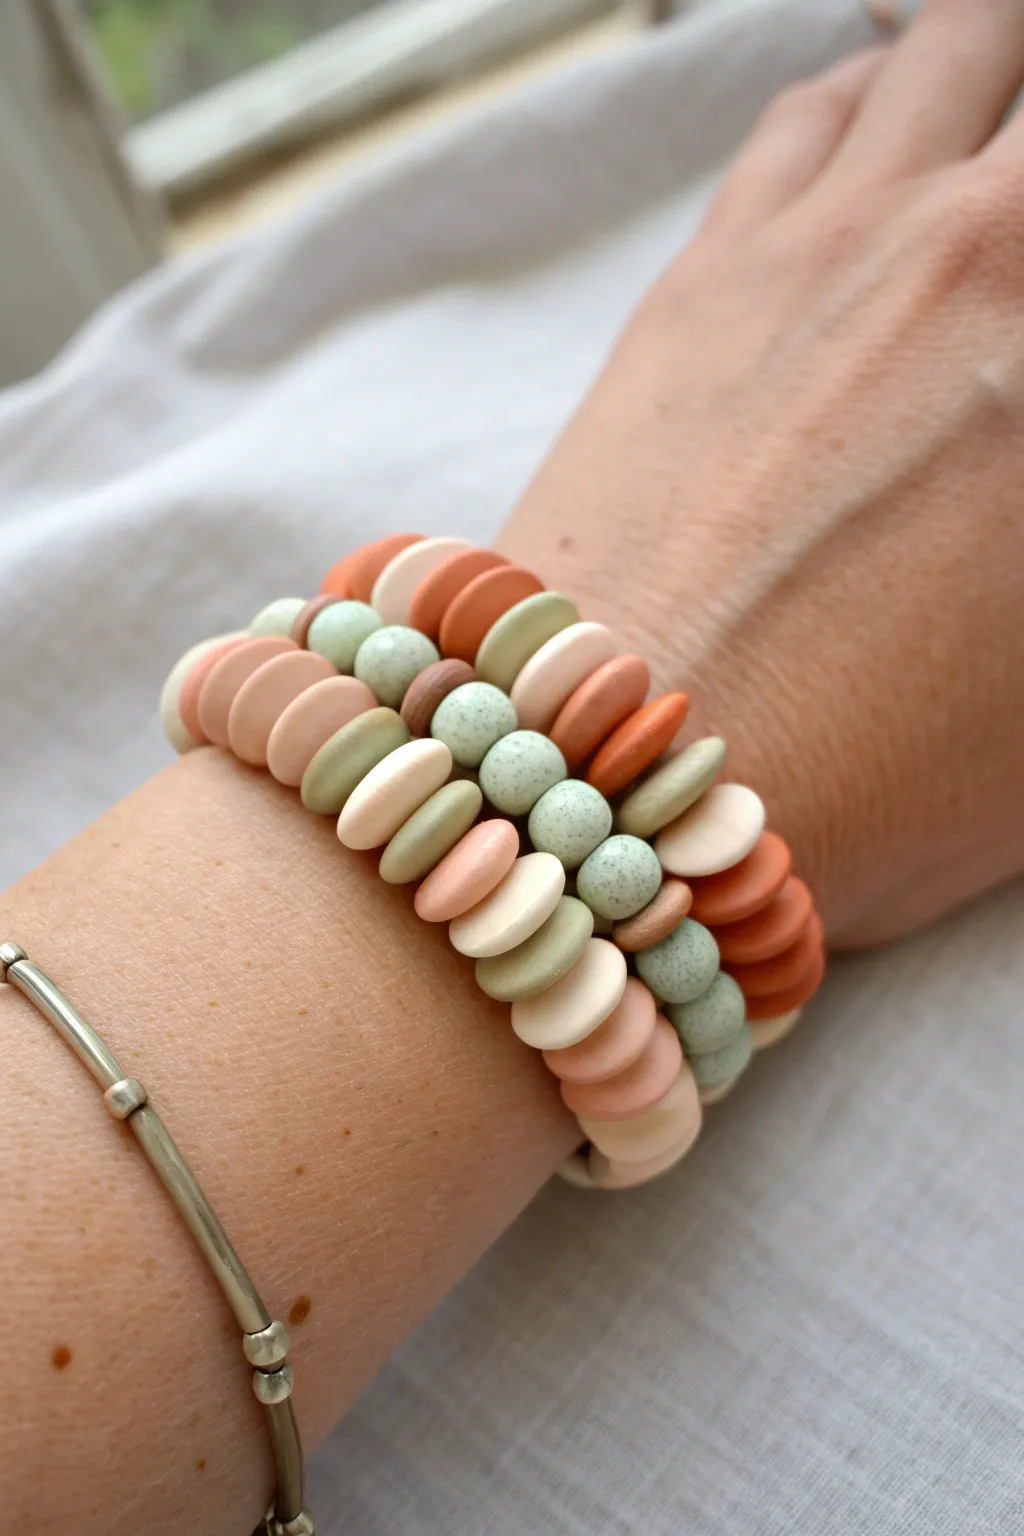
Embrace organic textures and soothing colors with this stackable bracelet set featuring handmade polymer clay lentil beads. The unique bi-cone shape allows the beads to nestle perfectly against one another, creating a fluid, comfortable fit for everyday wear.
Step-by-Step Tutorial
Materials
- Polymer clay in muted tones (terracotta, peach, beige, sage green)
- Granitex or speckled polymer clay (or black pepper for DIY speckles)
- Acrylic roller or pasta machine
- Circle cutters (small diameter, approx 1cm)
- Acrylic block or flat piece of glass
- Bead pins or skewers
- Wet/dry sandpaper (400-800 grit)
- Elastic beading cord (0.8mm or 1mm)
- Super glue or jewelry glue
Step 1: Color Mixing and Preparation
-
Condition the clay:
Start by thoroughly conditioning each color of your polymer clay until it is soft and pliable. If the clay involves mixing custom shades, like blending white into terracotta for a softer peach, do this now. -
Create the stone effect:
For the speckled green beads, mix a small amount of granite-effect clay into your sage green. Alternatively, I like to knead in a tiny pinch of ground black pepper into plain clay to achieve an organic, stony look without buying specialty colors. -
Roll out sheets:
Roll your conditioned clay into slabs. For consistent sizing, aim for a thickness of about 3mm to 4mm (usually setting #3 or #4 on a pasta machine).
Uneven Swirling?
If your lentil beads are coming out lopsided, you’re pressing too hard. Lighten your touch significantly and let the circular motion of the block do the shaping work.
Step 2: Shaping the Lentil Beads
-
Cut circles:
Use your small circle cutter to punch out discs from the clay sheets. You will need a significant number of these to fill a bracelet, so cut more than you think you need. -
Initial rounding:
Take a clay circle and smooth the sharp cut edges slightly with your finger to round them off just a bit. -
Swirl the lentils:
Place a clay circle on a smooth surface. Place your acrylic block directly on top. Apply gentle pressure and move the block in a circular motion. The friction will cause the edges of the disc to taper, creating a bi-cone ‘lentil’ shape. -
Check the profile:
Lift the block occasionally to check the shape. The bead should be thicker in the center and sharp at the edges. Repeat this process for all your solid-colored discs. -
Make the round beads:
For the speckled spacer beads, simply roll pieces of the granite-mix clay between your palms to create varying sizes of round spheres.
Pro Tip: Bead Rack
Bake your beads on a bead rack or unraveled paper clips suspended over a foil tray. This keeps the round lentils from getting flat spots on the bottom during baking.
Step 3: Piercing and Baking
-
Refrigerate briefly:
If your clay has become too warm and soft from handling, place the beads in the fridge for 10 minutes. This prevents fingerprint distortion during piercing. -
Pierce the beads:
Hold a lentil bead gently by the edges. Using a bead pin or needle tool, drill a hole through the thickest center part of the bead. Twist the tool as you push to avoid squashing the shape. -
Bake the clay:
Arrange your beads on a baking sheet lined with parchment paper or cardstock. Bake according to the manufacturer’s instructions for your specific brand of clay (typically 275°F/130°C for 30-45 minutes). -
Cool down:
Allow the beads to cool completely in the oven or on the counter before handling them to ensure they reach full hardness.
Step 4: Assembly
-
Sand for smoothness:
Once cool, use wet/dry sandpaper to buff away any fingerprints or rough spots near the bead holes. A matte finish looks best for this earthy style. -
Plan your pattern:
Lay out your beads on a bead board or towel. Experiment with grouping colors together—try blocks of 5-6 peach lentils followed by a single green lentil, or mix them randomly. -
String the bracelet:
Cut a piece of elastic cord about 10 inches long. Pre-stretch the cord by pulling it firmly a few times; this prevents the bracelet from loosening later. -
Thread the beads:
String the beads onto the elastic. Incorporate the round speckled beads occasionally between sections of flat lentil beads to add texture and break up the uniformity. -
Tie the knot:
Check the fit on your wrist. Tie a surgeon’s knot (right over left, left over right twice).Add a tiny drop of super glue to the knot for security. -
Hide the knot:
Trim the excess cord and gently tug the elastic so the knot slides inside the hole of one of the larger beads.
Enjoy mixing and matching these soothing colors to create a stack that feels uniquely yours
Mixed-Shape Bead Salad With Clay Spacers
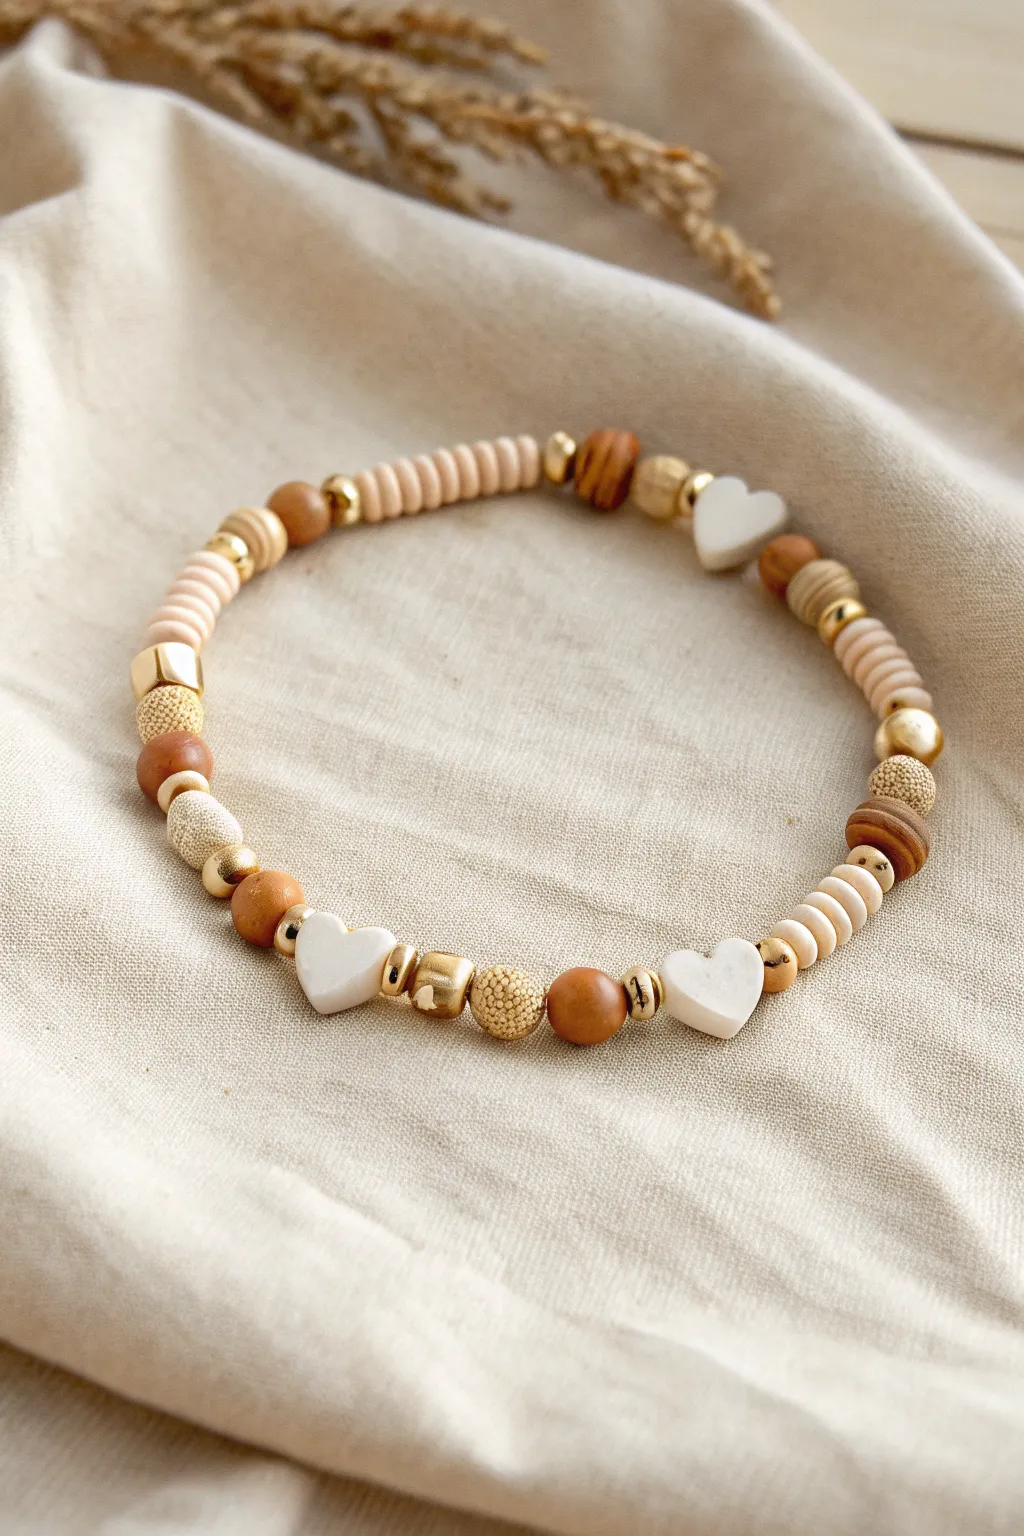
This charming bracelet combines the trendy look of polymer clay heishi beads with the natural warmth of wood and the elegance of gold accents. The result is a sophisticated ‘bead salad’ design featuring three sweet white heart focal points.
Step-by-Step
Materials
- Beige or oatmeal polymer clay heishi disc beads (approx. 4-6mm)
- White heart-shaped beads (shell, ceramic, or polymer clay)
- Round caramel-colored wooden beads (8mm)
- Gold tone stardust/textured round beads (6mm)
- Gold tone smooth round spacer beads (3-4mm)
- Gold tone tube or cylinder beads
- Elastic beading cord (0.8mm clear)
- Beading needle (optional but helpful)
- Scissors
- Hypo-cement or strong jewelry glue
Step 1: Planning and Preparation
-
Measure your wrist:
Before you begin stringing, wrap the elastic cord loosely around your wrist and add about 3-4 inches of extra length on each side to make tying the knot easier. Cut the cord. -
Pre-stretch the cord:
Give the cut piece of elastic a few gentle tugs. This pre-stretching step is crucial because it prevents the bracelet from loosening up and sagging after you wear it a few times. -
Layout your design:
Lay your beads out on a bead board or a piece of felt. This bracelet relies on a ‘planned random’ or asymmetrical repeating pattern. Divide your layout into three main sections separated by the three white heart beads.
Keep It Tidy
Use a piece of masking tape on the end of your elastic cord while stringing. It acts as a bead stopper so your beads don’t slide off the other end while you work.
Step 2: Stringing the Patterns
-
Start the first section:
Begin stringing with a gold stardust bead followed by a large wooden bead. This creates a solid anchor for your knot later. -
Add heishi stacks:
Thread on a stack of about 8-10 beige heishi disc beads. These clay spacers act as the neutral ground that makes the feature beads pop. -
Incorporate gold accents:
Place a small gold spacer, then a wooden bead, then another small gold spacer. This little gold-wood-gold sandwich adds a nice rhythm. -
String the first heart:
Add a small gold spacer bead, followed by your first white heart bead, and immediately cap it with another gold spacer. The gold brackets frame the heart perfectly. -
Build the second section:
For variety, try a different sequence here. Thread a gold tube bead, followed by a gold stardust bead, and then a wooden bead. -
Layer textures:
Follow that with a ‘snowball’ textured bead (either cream or textured gold) to introduce a new surface finish. -
Add the second heart:
Repeat the framing technique: Gold spacer, white heart bead, gold spacer. Ensure the heart is facing the same direction as the first one if it has a specific front. -
Construct the third section:
Create another stack of heishi beads, perhaps slightly shorter than the first group—maybe 5 or 6 discs this time. -
Mix the bead salad:
Add a wooden bead, a gold stardust bead, and final small heishi stack. This randomness is key to the ‘bead salad’ aesthetic. -
Place the final heart:
Add your third and final white heart bead, again bracketed by tiny gold spacers. -
Check the fit:
Wrap the unfinished strand around your wrist to check the size. If it’s too tight, add a few extra heishi discs near the ends; if too loose, remove a wooden bead.
Stack Em Up
Make 3-4 variations of this bracelet using different color palettes (like sage green and cream) to create a trendy cohesive stack to wear all at once.
Step 3: Finishing Touches
-
Prepare to knot:
Bring the two ends of the elastic together, ensuring there is no slack in the line but not stretching it tight yet. -
Tie the surgeon’s knot:
Perform a surgeon’s knot: Make a regular overhand knot, then loop the end through the circle one extra time before pulling tight. This extra pass adds friction and security. -
Secure with glue:
Dab a tiny drop of jewelry glue or Hypo-cement directly onto the knot. I find waiting about 30 seconds for the glue to get tacky helps it set better. -
Hide the knot:
While the glue is still slightly wet, pull the knot gently inside the hole of the nearest large bead (the wooden one or stardust bead from step 1 works best). -
Trim the ends:
Once the glue is fully dry, use sharp scissors to trim the excess elastic cord as close to the bead as possible without cutting the knot.
Now you have a beautifully textured, neutral bracelet that pairs perfectly with any casual outfit
Yin-Yang and Half-and-Half Beads for Graphic Contrast

Embrace duality with this sleek black-and-white bracelet featuring a handmade Yin-Yang charm as its focal point. This project is perfect for practicing precision rolling and simple cane work to create striking graphic contrast.
Detailed Instructions
Materials
- Black polymer clay
- White polymer clay
- Silver eye pin (approx. 25mm)
- Silver jewelry chain (small links)
- Lobster clasp and jump rings
- Beading wire/stringing cable
- 2 Crimp beads
- Needle tool or toothpick
- Clay blade
- Jewelry pliers (round nose and flat nose)
- Rolling pin or pasta machine
- Black acrylic paint and fine detail brush (optional for painted details)
Step 1: Crafting the Beads
-
Prepare Your Clay:
Condition both the black and white polymer clay separately until they are soft and pliable. Ensure your hands are clean when switching to white to avoid smudging. -
Roll Solid Beads:
Create approximately 15 small spheres (about 6-8mm) from black clay. Repeat this process with the white clay to make about 10-12 similar-sized spheres. Try to keep them as uniform as possible. -
Create Patterned Beads:
Take a small amount of white clay and roll 2-3 beads. Using a tiny bit of black clay, roll miniscule balls and press them gently onto the surface of these white beads to create polka dots. Gently roll the bead between your palms to smooth the dots flat. -
Add Graphic Details:
For the scribbled look seen on the white accent beads, you can either embed thin threads of black clay now or bake them plain and paint the black squiggles later with acrylic paint. I find painting after baking gives finer control. -
Piercing:
Using your needle tool, carefully pierce a hole through the center of every bead. Rotate the bead on the needle slightly to ensure the hole is clean and wide enough for your stringing wire.
Smudge Alert
White clay picks up lint and dye easily. Wipe your work surface with alcohol or use baby wipes between switching colors to keep your white crisp and bright.
Step 2: Making the Yin-Yang Charm
-
Form the Base:
Roll a flat sheet of white clay, about 3mm thick. Use a small circle cutter (or a bottle cap) to punch out a perfect circle. -
Create the Division:
Use your flexible clay blade to cut a curved ‘S’ line through the center of the circle, separating it into two teardrop-like shapes. Remove one half. -
Add the Dark Side:
Roll a sheet of black clay to the same thickness. Cut a circle of the same size, then cut the matching ‘S’ curve. Fit the black half into the empty space of your white circle like a puzzle piece. -
Smoothing the Seam:
Gently rub the seam with your finger to bond the two halves together without distorting the round shape. You can use a piece of paper over the clay while rubbing to prevent fingerprints. -
Adding the dots:
Use a small ball tool to make an indentation in the center of the bulbous part of each color. Place a tiny ball of the contrasting color into each indentation and press flat. -
Inserting the Eye Pin:
Trim a silver eye pin short (about 1cm). Carefully insert the straight end into the top edge of the yin-yang disc. Ensure it goes deep enough to be secure but doesn’t poke out. -
Baking:
Bake all your beads and the charm according to your clay manufacturer’s instructions (usually around 275°F/130°C for 15-30 minutes). Let them cool completely.
Glossy Finish
For a pro look, coat the yin-yang charm with UV resin or gloss varnish after baking. It makes the black deeper and protects the connection point.
Step 3: Assembly
-
Start Stringing:
Cut a length of beading wire. Secure one end by threading a crimp bead and one half of your clasp (or a jump ring), then looping the wire back through the crimp bead and flattening it with pliers. -
Pattern Layout:
Begin stringing your beads. The design shown uses an asymmetrical pattern: start with a run of black beads, then introduce a few white ones, followed by your patterned beads. -
Attaching the Charm:
When you reach the desired spot for the focal point—usually slightly off-center for a modern look—slide on a patterned bead, a silver spacer bead (if desired), and then your Yin-Yang charm using a jump ring. -
Finish Stringing:
Continue the pattern on the other side, perhaps transitioning back to solid black beads to mirror the start. -
Closing the Loop:
Finish the strand by adding a crimp bead and a jump ring. Loop the wire back through the crimp and a few adjacent beads. Pull tight (but leave a little slack for flexibility) and crush the crimp bead. -
Adding the Extender:
Attach a short length of small-link chain to the jump ring on one end. This acts as an adjustable extender, making the bracelet versatile for any wrist size.
Now you have a stylish, customized accessory that perfectly balances graphic design with handmade charm
Dagger and Spike Statement Beads for Edgy Accents
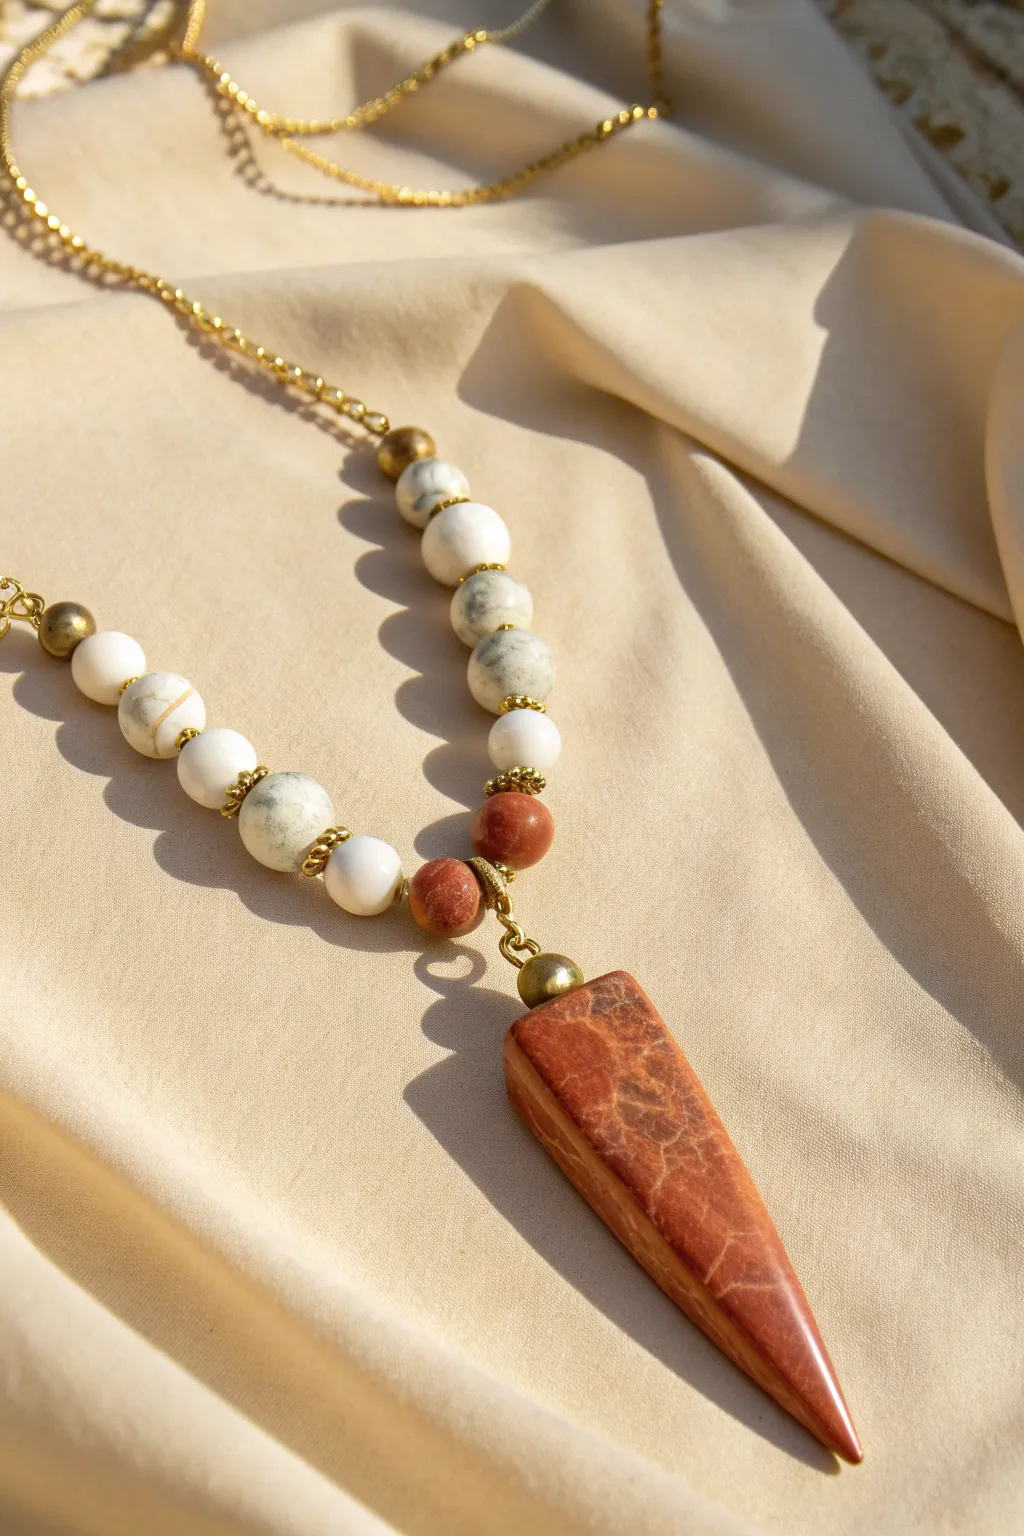
Embrace earthy elegance with this statement necklace featuring a bold, dagger-style focal point that mimics natural red jasper stone. The combination of warm Terracotta tones, creamy marbled whites, and gold accents creates a sophisticated piece that looks surprisingly high-end but is completely achievable with polymer clay.
Step-by-Step Tutorial
Materials
- Polymer clay in Terracotta (or Burnt Sienna)
- Polymer clay in White and Translucent
- Polymer clay in Grey or Granite effect
- Acrylic roller
- Tissue blade
- Bead piercing pins or toothpicks
- Wet/dry sandpaper (400-1000 grit)
- Polyurethane varnish (satin or gloss) or UV resin
- Gold jewelry chain (approx. 18-20 inches)
- Gold spacer beads & bead caps
- Gold headpins and eye pins
- Jewelry pliers and wire cutters
Step 1: Creating the Faux Red Jasper Mix
-
Prepare the base colors:
Condition your terracotta clay until it is soft and pliable. Separately, condition a small amount of translucent clay and a tiny pinch of white clay. -
Chop and mix:
Chop the terracotta, translucent, and white clays into small, irregular chunks. Use a ratio of about 80% terracotta to 20% mixed accents. -
Form the block:
Squish all the chopped pieces together into a rough block. Don’t knead it excessively, as you want to preserve the distinct chunks for a stone-like appearance. -
Simulate veins:
To create the realistic hairline fractures seen in jasper, maintain distinct boundaries between the clay bits rather than blending them into a smooth gradient.
Stone Texture Trick
Before baking, lightly roll over your clay with course sandpaper or a texture sponge. This creates microscopic divots that matte down the shine and look incredibly like real rock.
Step 2: Shaping the Dagger Pendant
-
Cut the triangular form:
Roll your faux jasper block into a thick log, approximately 1/2 inch thick over. Use your tissue blade to cut a long, tapered triangle shape. The top should be wider, tapering down to a distinct point. -
Refine the edges:
Gently tap the cut sides with your finger or acrylic block to soften the sharp edges slightly, mimicking a polished stone finish rather than a raw cut. -
Drill the hole:
Insert a piercing pin or toothpick horizontally through the top, widest part of the triangle. Ensure the hole is centered to help the pendant hang straight later.
Make it Matte
Skip the gloss varnish entirely and buff vigorously with a piece of denim fabric after baking. This gives a silky, organic sheen that looks and feels exactly like genuine polished jasper.
Step 3: Creating the Marbled Round Beads
-
Mix the faux marble:
Condition white clay and mix in very small streaks of grey or granite-effect clay. Twist the colors together just enough to create marble-like veins without turning the whole ball grey. -
Roll the beads:
Pinch off equal amounts of clay and roll them into smooth spheres between your palms. Create a graduation of sizes if desired, or keep them uniform. -
Create accent jasper beads:
Use the remaining faux jasper mix from your dagger setup to roll two small, round accent beads to sit directly above the pendant. -
Pierce the beads:
Using your bead pin, carefully pierce a hole through the center of each bead. I find twisting the pin as you push helps prevent the bead from squishing out of shape.
Step 4: Baking and Finishing
-
Bake the clay:
Place your beads and dagger pendant on a ceramic tile or baking sheet. Bake according to your brand’s specific instructions (usually around 275°F/130°C for 30 minutes). -
Cool and sand:
Let the pieces cool completely. Once cool, use wet/dry sandpaper under running water to gently buff out any fingerprints or rough spots, starting with 400 grit and moving to 1000 grit. -
Apply varnish:
Coat the pendant and beads with a thin layer of satin or gloss varnish to bring out the depth of the faux stone colors and protect the surface. Let dry thoroughly.
Step 5: Assembly
-
Connect the pendant:
Slide a gold headpin or wire through the hole in your dagger pendant. Form loops at the top to attach it to the rest of the necklace structure. -
String the beads:
Begin stringing your beads onto beading wire or eye pins. Intersperse gold spacer beads or bead caps between the clay beads for that professional jewelry look. -
Create the sequence:
Follow the pattern in the reference: place the two red jasper round beads closest to the pendant, followed by gold spacers, and then the white marbled beads ascending the chain. -
Attach the chain:
Connect your beaded section to the gold chain using jump rings or by closing the eye pin loops directly onto the chain links.
Now you have a stunning, handcrafted necklace that captures the raw beauty of natural stone.
Watercolor-Wash Beads With Translucent Layers
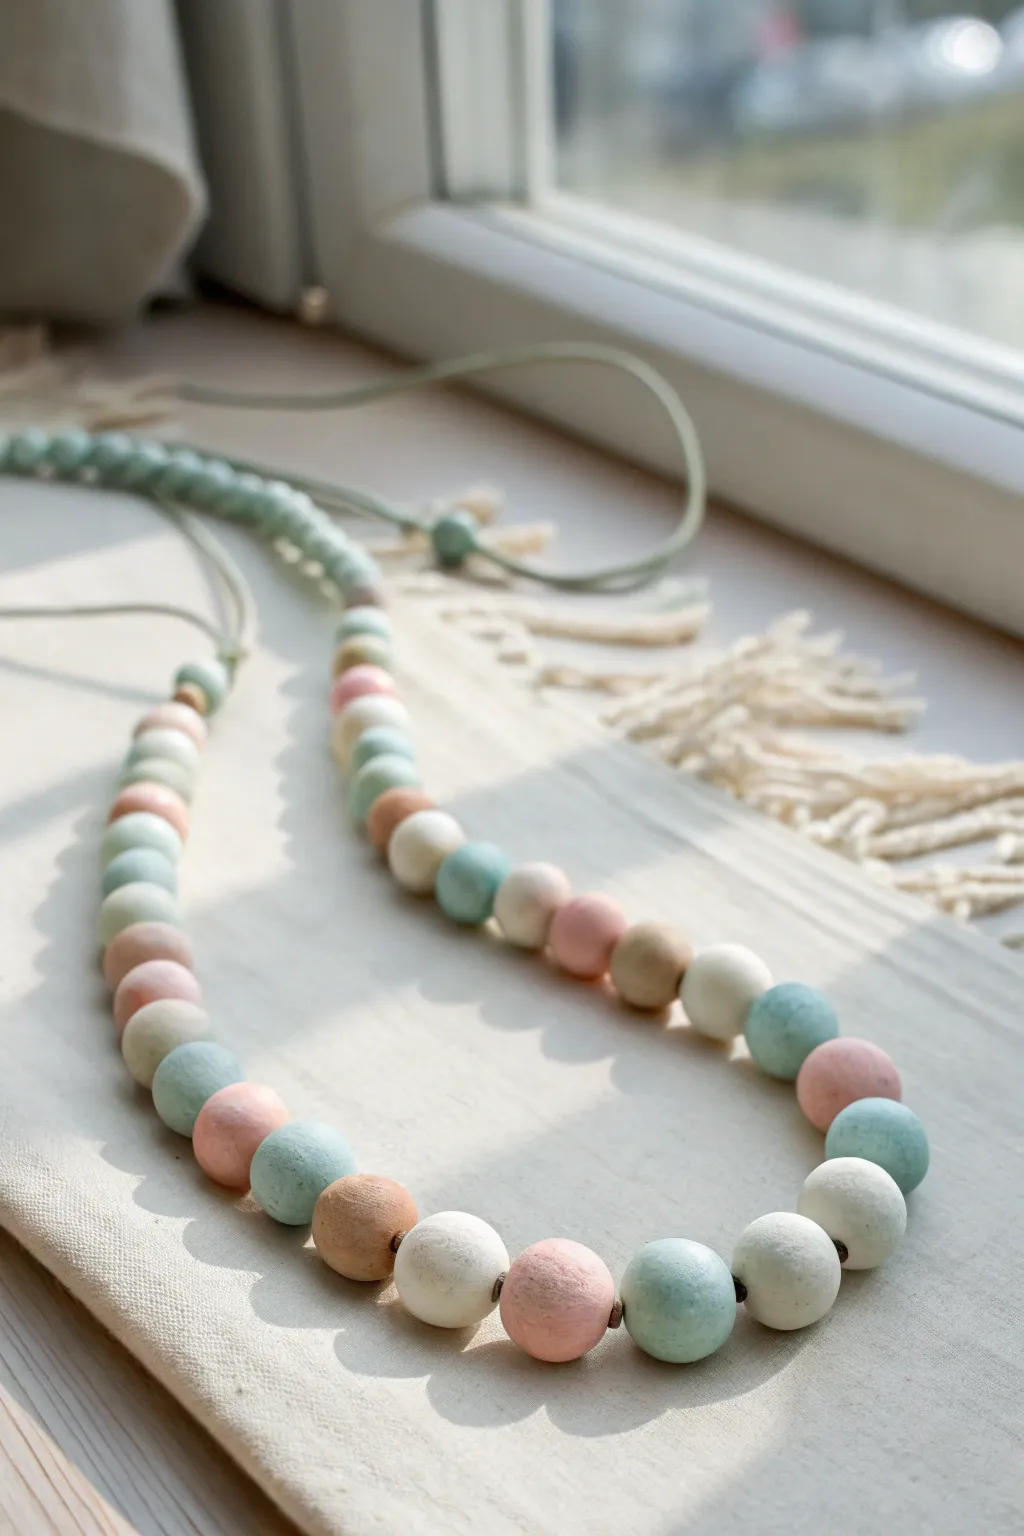
Create a stunningly soft and organic necklace by combining the natural warmth of wood with translucent washes of polymer clay-inspired colors. This project creates a gentle, matte finish that lets the wood grain peek through, resulting in a sophisticated, beach-glass effect.
Detailed Instructions
Materials
- Unfinished round wooden beads (various sizes, approx. 16mm-20mm)
- Acrylic paints (Mint green, dusty rose pink, white, cream)
- Water for thinning paint
- Paintbrushes (small flat or round synthetic)
- Wooden skewers or toothpicks
- Floral foam or a cardboard box (for drying)
- Sealant (matte or satin varnish – optional)
- Cotton or leather cord (light grey or sage green)
- Scissors
Step 1: Preparation and Mixing
-
Set up your drying station:
Before you start painting, prepare a drying rack by sticking skewers into a block of floral foam or poking holes into a cardboard box. This ensures your beads dry evenly without touching surfaces. -
Mount the beads:
Place each wooden bead onto a skewer. If the bead hole is too large and the bead slips, wrap a small piece of masking tape around the skewer first to create a snug fit. -
Create the color washes:
On your palette, place small dollops of your mint, dusty rose, and white acrylic paints. The goal is a translucent wash, not an opaque coat, so mixing is key. -
Dilute the paint:
Dip your brush in water and mix it into the paint until you achieve a consistency similar to skim milk or watercolor. I like to test the transparency on a spare bead or piece of paper first; it should stain the surface rather than cover it completely.
Step 2: Applying the Wash
-
Paint the first color:
Starting with the mint green wash, apply the paint to about one-third of your beads. Use long, smooth strokes and work quickly so the wood absorbs the pigment evenly. -
Wipe for texture:
Immediately after painting a bead, take a lint-free cloth or paper towel and gently dab or wipe off excess moisture. This reveals the wood grain and gives that classic ‘watercolor’ look. -
Paint the second color:
Repeat the process with the dusty rose wash on another third of the beads. Remember to wipe them back slightly to maintain a consistent texture across the necklace. -
Paint the neutrals:
For the remaining beads, use the white or cream wash. These will serve as bright spacers that make the colors pop. -
Leave some natural:
Consider leaving 3-5 beads completely unpainted or giving them a very sheer wash of watered-down brown paint to enhance the raw wood look, adding earthy contrast to the pastels. -
Let them dry:
Place the skewers back into your drying block. Allow the beads to dry completely, which should take about 30-45 minutes depending on humidity.
Paint looking chalky?
If your wash looks powdery after drying, you likely used too much water breaking down the acrylic binder. Mix a drop of matte medium into your water jar to keep the paint adhering strong.
Step 3: Layering and Sealing
-
Optional second coat:
Once dry, inspect your color depth. If you want a more vibrant hue, apply a second thin wash of the same color, again wiping off the excess. -
Seal the beads:
To protect the finish and prevent color transfer, apply a thin coat of matte varnish. A matte finish is crucial here to maintain the soft, velvety appearance shown in the image.
Pro Tip: Ombré Effect
Create a gradient by adding a tiny drop of white to your mix for every 2-3 beads you paint. This creates a beautiful, subtle fade from dark to light within the same color family.
Step 4: Assembly
-
Plan your design:
Lay your dried beads out on a table or bead board. Arrange them in a repeating pattern (e.g., mint, pink, white, natural) or a random organic sequence until you are happy with the flow. -
Prepare the cord:
Cut a length of cotton or leather cord. For a long necklace like this, you’ll need about 36-40 inches, or more if you plan to add knots between beads. -
String the beads:
Thread the beads onto the cord according to your planned design. If the cord frays, wrap a tiny piece of tape around the tip to make it act like a needle. -
Secure the ends:
Once all beads are strung, tie the ends of the cord together securely. You can use a sliding knot for adjustable length or a simple square knot if it’s long enough to slip over your head. -
Trim and finish:
Trim any excess cord close to the knot. If you used synthetic cord, you can briefly singe the ends with a lighter to prevent fraying.
Wear your beautiful new muted rainbow necklace and enjoy the natural feel of the wood against your skin