When I’m craving a quick, satisfying project, I always reach for clay bracelets—they’re colorful, forgiving, and instantly wearable. Here are my favorite clay bracelet ideas that you can mix, match, and stack until they feel totally you.
Classic Color-Blocked Heishi Bead Bracelet
This elegant bracelet balances earthy terracotta and soft rose sections with flashes of gold and cream. The structured color-blocking technique gives it a high-end look that transforms simple clay discs into wearable art.
Detailed Instructions
Materials
- Polymer clay Heishi beads (colors: deep terracotta/rust, soft dusty rose, cream/off-white, light beige)
- Small gold ribbed spacer beads (approx. 4mm)
- Gold tone lobster clasp
- Gold tone jump rings (4mm and 6mm)
- Elastic beading cord (0.8mm) or beading wire with crimp beads
- Jewelry pliers (round nose and flat nose)
- Sharp scissors or wire cutters
- Clean towel or beading tray
Step 1: Preparation & Layout
-
Measure your wrist:
Wrap a flexible measuring tape around your wrist to find your size. Add about half an inch to this measurement to ensure the bracelet fits comfortably without pinching. -
Cut the cord:
Cut a length of elastic or beading wire about 10-12 inches long. Having this extra length makes it much easier to tie knots or attach clasps at the end. -
Secure the end:
If using beading wire, attach one half of your clasp now using a crimp bead. If using elastic, simply place a piece of tape or a binder clip on one end to stop beads from sliding off.
Sticky Situation
Is your elastic knot slipping? A surgeon’s knot is key: loop the elastic through twice on the first pass, then tie normally. The extra friction holds it tight while glue dries.
Step 2: The Main Rust Section
-
Start the rust block:
Begin by stringing on approximately 1.5 inches of the deep terracotta/rust colored Heishi beads. This will be the largest block of solid color on the bracelet. -
Check for consistency:
Ensure all the beads are facing the same direction if they are slightly uneven, and discard any that look broken or too thin. -
Add gold accents:
Slide on two of the gold ribbed spacer beads. These act as luxurious brackets that define the start of the patterned section.
Chain Reaction
Add a gold extension chain to the clasp. This not only makes the fit adjustable for gifts but adds a dangling gold element that looks very chic.
Step 3: Creating the Pattern
-
Begin the transition:
Thread on two cream/off-white beads, followed by one light beige bead. This starts a gradient effect. -
Introduce the rose tone:
Add three to four beads of the dusty rose color. Notice how this softens the transition from the white to the next section. -
Second gold accent:
Place one single gold ribbed spacer on the cord. This acts as a centerpiece for the transitional area. -
Mirror the transition:
Reverse the previous small pattern: add three dusty rose beads, then one beige bead, followed by two cream beads. -
Close the pattern block:
Finish this specific design segment by adding two more gold ribbed spacers.
Step 4: The Dusty Rose Section & Finishing
-
String the rose block:
Create a solid block of the dusty rose beads, matching the length of your initial rust block (approx. 1.5 inches). -
Repeat pattern until full:
Continue alternating between these solid color blocks (separated by the gold/white/beige transition sequences) until the bracelet reaches your desired length. -
Tie the knot:
If using elastic, tie a strong surgeon’s knot. Pull the elastic tight enough to create tension but not so tight that the beads buckle. -
Secure the knot:
I always place a tiny dot of super glue or jewelry cement on the knot before trimming the excess string to ensure it never slips. -
Hide the mechanism:
If possible, slide the knot gently inside one of the larger gold spacer beads or heishi beads to conceal it. -
Attach hardware (optional):
If you used beading wire instead of elastic, use your pliers to attach the final crimp bead and jump ring to close the loop effectively.
Slip on your new creation and enjoy the sophisticated pop of color it adds to your wrist


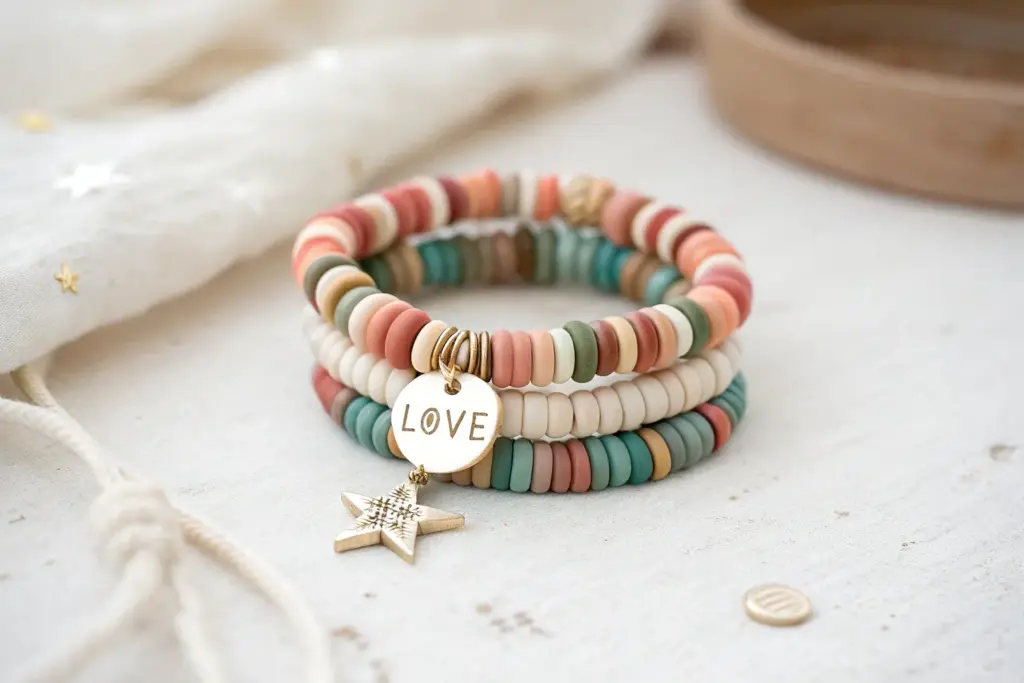
Happy Random Mix Clay Bead Bracelet
These cheerful wrist candies embrace the chaos of color, stacking together to create a vibrant statement piece. The look features a playful mix of flat heishi clay disc beads in bright, matte hues alongside neutral tones for a balanced but eclectic summer style.
How-To Guide
Materials
- Polymer clay heishi beads (6mm or similar)
- Color palette: bright pink, mustard yellow, teal, sky blue, muted green, orange, white, and cream
- Elastic stretch cord (0.8mm or 1mm)
- Super glue or jewelry glue
- Scissors
- Bead stopper or masking tape
- Ruler or measuring tape
Step 1: Planning Your Stack
-
Measure your wrist:
Before you start stringing, wrap a measuring tape around your wrist to find your size. Add about half an inch to this measurement so the bracelets fit comfortably without digging in. -
Prepare the cord:
Cut three lengths of elastic cord, each about 10-12 inches long. This gives you plenty of extra room for knotting later. -
Secure the ends:
Attach a bead stopper or a piece of masking tape to one end of each cord to prevent your colorful creations from sliding off while you work.
Knot Slipping?
If your elastic is slippery and the knot won’t hold tight while gluing, try a square knot followed by a surgeon’s knot for extra grip before applying the glue.
Step 2: Creating the ‘Confetti’ Bracelet
-
Start the random mix:
For the first bracelet (closest to the hand in the image), begin grabbing beads without looking too closely. The goal is a true random mix. -
Check the pattern:
While it’s random, try to avoid more than two of the exact same color touching. If you see three pinks in a row, break it up with a teal or yellow. -
Fill the length:
Continue stringing until you reach your measured length. I like to wrap it around my wrist quickly to double-check the fit before tying off.
Add Some Shine
Elevate the casual look by swapping out every 10th clay bead for a small 4mm gold-filled spacer bead. It adds a touch of luxe to the playful colors.
Step 3: Creating the Patterned Bracelets
-
Start the second bracelet:
For the middle bracelet, focus on a more structured pattern. This one uses segments of solid color rather than a pure mix. -
Create color blocks:
String 3 to 5 beads of the same color (e.g., three yellows), followed by a contrasting color block (e.g., three pinks). Repeat this loosely. -
Incorporate neutrals:
To break up the brightness, insert a single cream or white bead between every few color blocks. -
Begin the third bracelet:
For the final bracelet (furthest up the arm), you will use white/cream as your main base color. -
Add accent pops:
String about an inch of only white beads. Then, add a small ‘pop’ section consisting of 3-4 colored beads in a random order. -
Finish the third strand:
Continue adjusting the ratio of white space to colored accents until the bracelet looks balanced and matches the length of the others.
Step 4: Securing the Stack
-
Pre-stretch the cord:
Gently give the beaded sections a little pull. Pre-stretching the elastic helps prevent the bracelet from growing loose after the first time you wear it. -
Tie the surgeon’s knot:
Remove the tape/stopper. Cross the ends, loop one under twice, and pull tight. Just like tying shoelaces, but with an extra loop for security. -
Apply adhesive:
Dab a tiny drop of super glue or jewelry cement directly onto the knot. Be careful not to glue the beads to the cord. -
Let it cure:
Allow the glue to dry completely according to the package instructions—usually at least 15 minutes—before touching it again. -
Hide the knot:
Trim the excess string close to the knot, then gently slide an adjacent bead over the knot to conceal it inside the bead hole.
Slide your new stack onto your wrist and enjoy the instant pop of happy color


Minimal Monochrome Matte Bracelet Stack
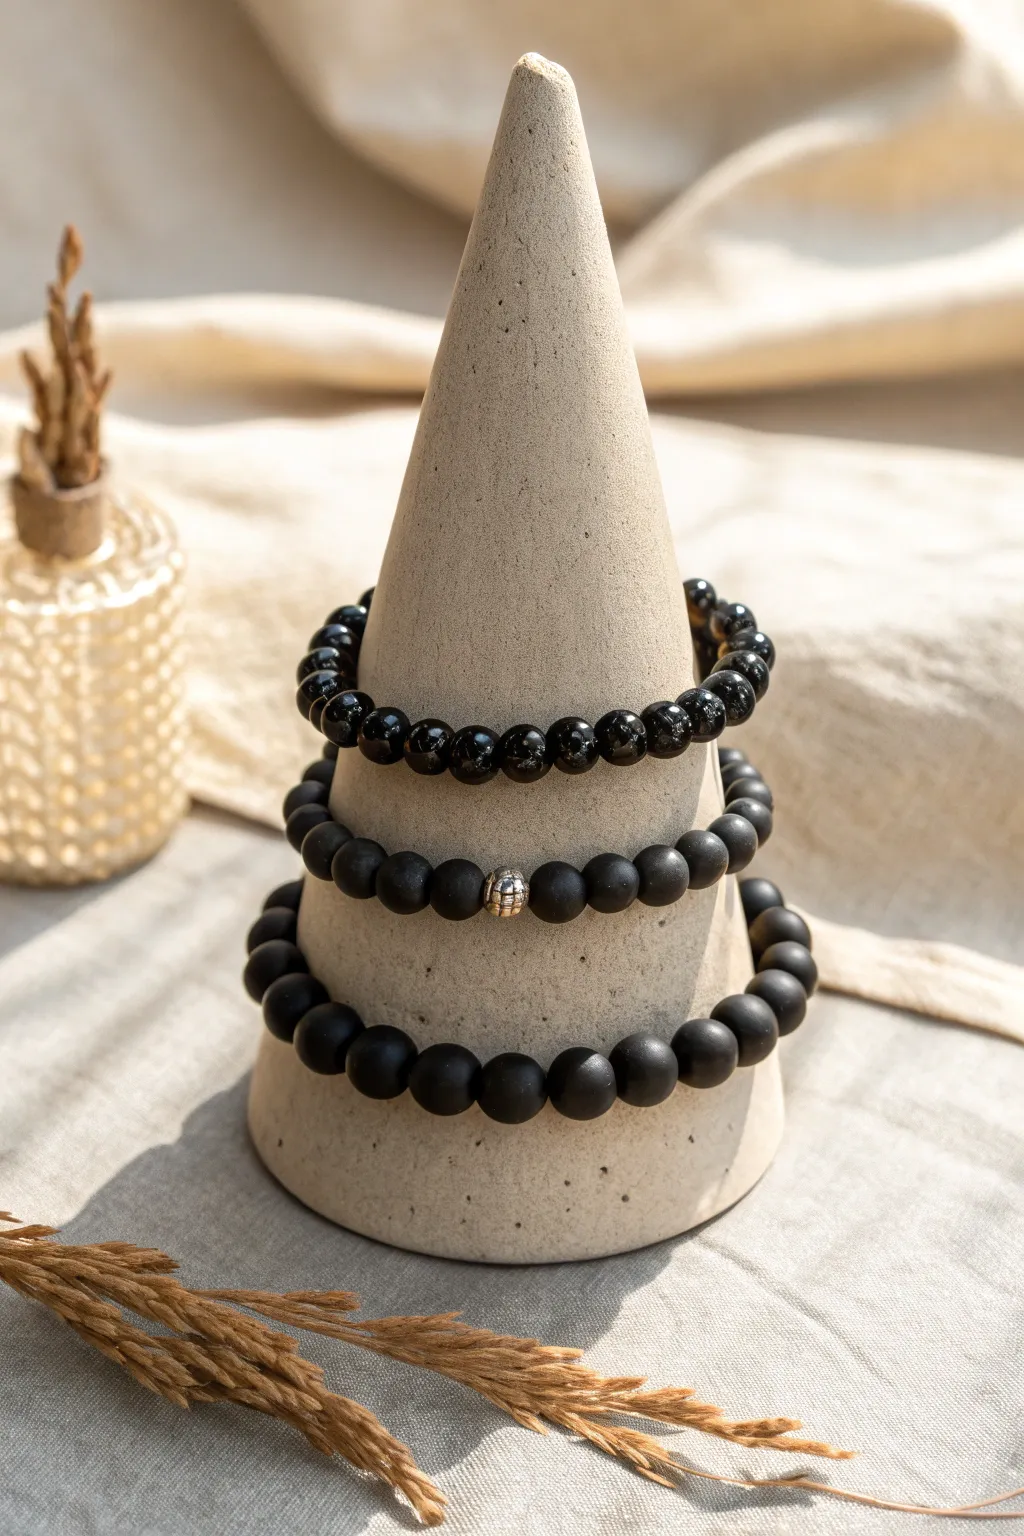
Achieve a sophisticated, understated look with this trio of black bracelets that plays with finish and scale. By combining high-gloss shine with velvety matte textures and a single metallic pop, you create a stack that feels curated rather than cluttered.
Step-by-Step Tutorial
Materials
- 8mm glossy black beads (onyx, agate, or polished clay)
- 6mm matte black beads (frosted agate or matte clay)
- 10mm matte black beads
- One 6mm textured silver or chrome spacer bead
- 0.8mm clear elastic stretch cord
- Jewelry adhesive (e.g., G-S Hypo Cement)
- Small scissors
- Bead stopper or masking tape
- Optional: Bead design board
Step 1: Planning and Layout
-
Measure your wrist:
Wrap a flexible measuring tape around your wrist where you want the bracelets to sit. Add about half an inch to this measurement to determine your finished length for a comfortable fit. -
Prepare the cord:
Cut three lengths of elastic cord, each about 10-12 inches long. This excess length is crucial for tying secure knots later without struggling. -
Secure the ends:
Attach a bead stopper or simply place a piece of masking tape on one end of each cord segment to prevent beads from sliding off while you work. -
Pre-stretch the elastic:
Gently tug on your cords a few times before stringing. Pre-stretching helps prevent the bracelets from sagging or loosening immediately after you wear them.
Step 2: Stringing the High-Gloss Bracelet
-
Select glossy beads:
Gather your 8mm shiny black beads. This strand will sit at the top of the stack and catches the light beautifully. -
String the beads:
Thread the glossy beads onto the first piece of cord until you reach your desired length. Double-check the fit by wrapping it around your wrist. -
Knotting technique:
Remove the stopper and tie a surgeon’s knot. This involves looping the cord over and under twice (like the first part of a shoelace knot), pulling tight, and then tying a standard overhand knot on top. -
Secure the knot:
Add a tiny dab of jewelry adhesive to the knot. Let it dry for a distinct moment before trimming the excess tails close to the knot.
Sticky Situation
If glue gets on a matte bead, it will leave a shiny spot. Wipe it instantly with a damp cloth or use a toothpick to apply glue strictly to the knot only.
Step 3: Creating the Centerpiece Accent
-
Arrange the pattern:
For the middle bracelet, use the smaller 6mm matte beads. Lay them out on a board or cloth first. -
Insert the accent:
Position your single silver/chrome textured bead exactly in the middle of your layout. It acts as the focal point for the entire stack. -
String the strand:
Thread half of your matte beads, then the silver accent bead, followed by the remaining matte beads onto the second cord. -
Hide the knot:
After tying your surgeon’s knot and gluing, try to pull the knot inside the hole of the silver bead or an adjacent black bead for a seamless look.
Knot Hider
Drill the hole of just one bead slightly larger using a bead reamer. This extra space allows you to tuck the knot inside easily for an invisible finish.
Step 4: Assembling the Matte Base
-
Choose larger beads:
Use the 10mm matte black beads for the final bracelet. The larger scale adds visual weight to the bottom of the stack. -
String loosely:
String these larger beads onto your final cord. Because the beads are larger, they take up more inner circumference, so you might need slightly more length than the smaller bead strands. -
Final check:
Before tying off, hold all three strands together to ensure they nestle nicely without significant gaps. -
Tie and glue:
Perform the final surgeon’s knot, apply your adhesive, and trim the ends carefully once fully cured.
Now you have a sleek, versatile stack ready to elevate any casual outfit


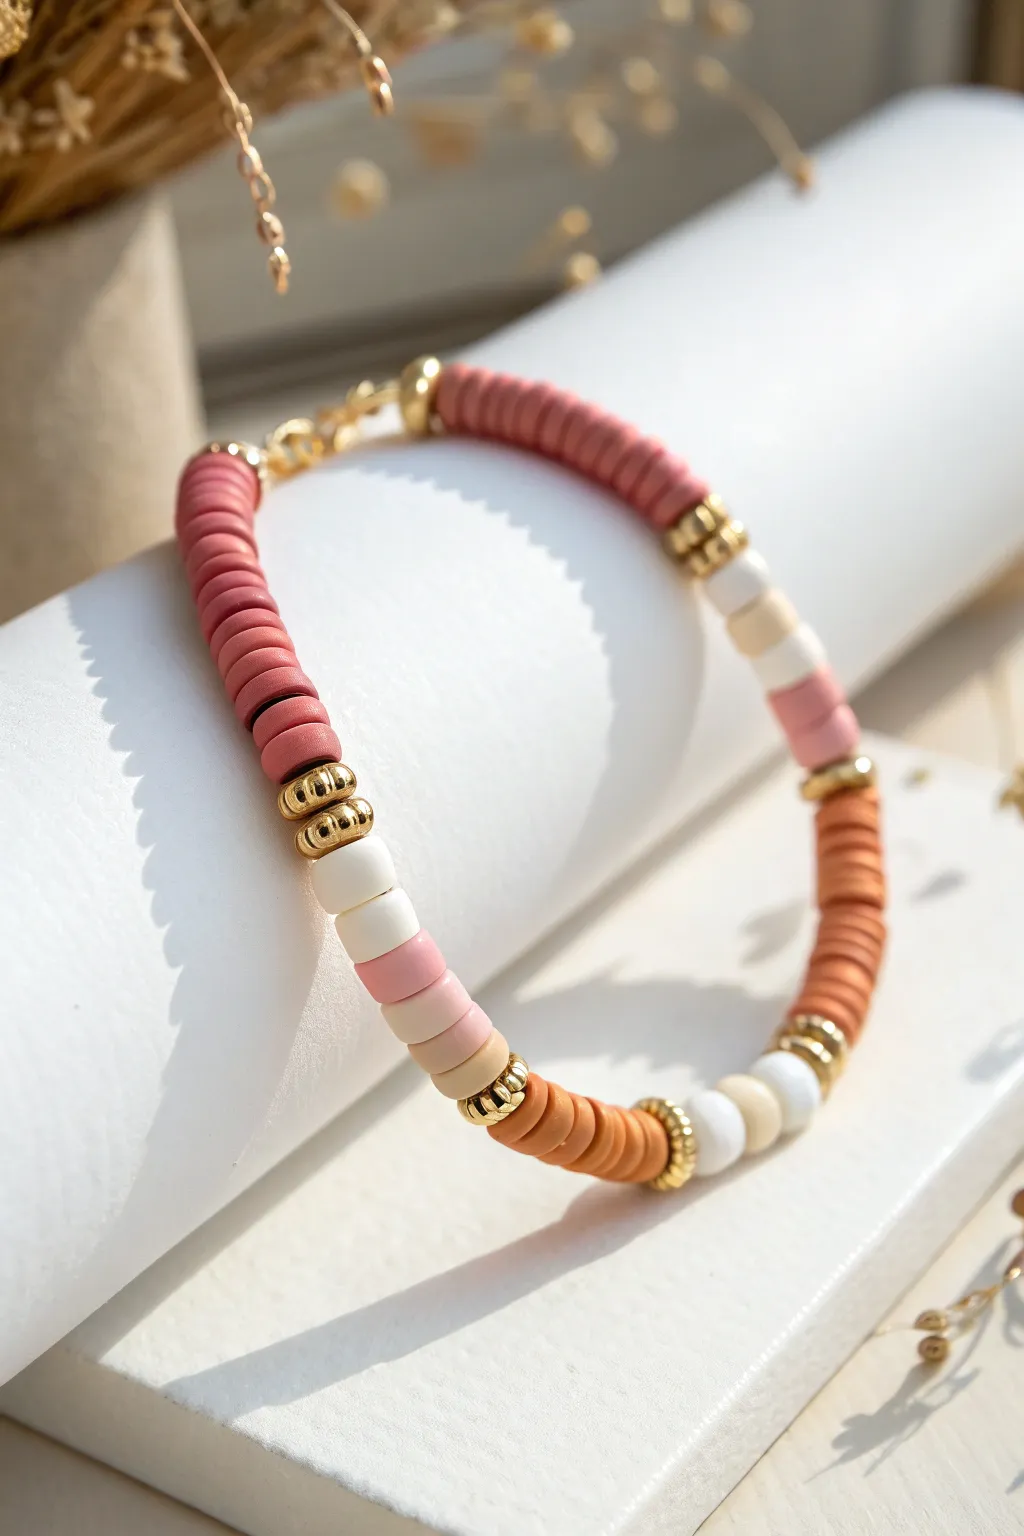
Neutral Earth-Tone Bracelet With Gold Spacers
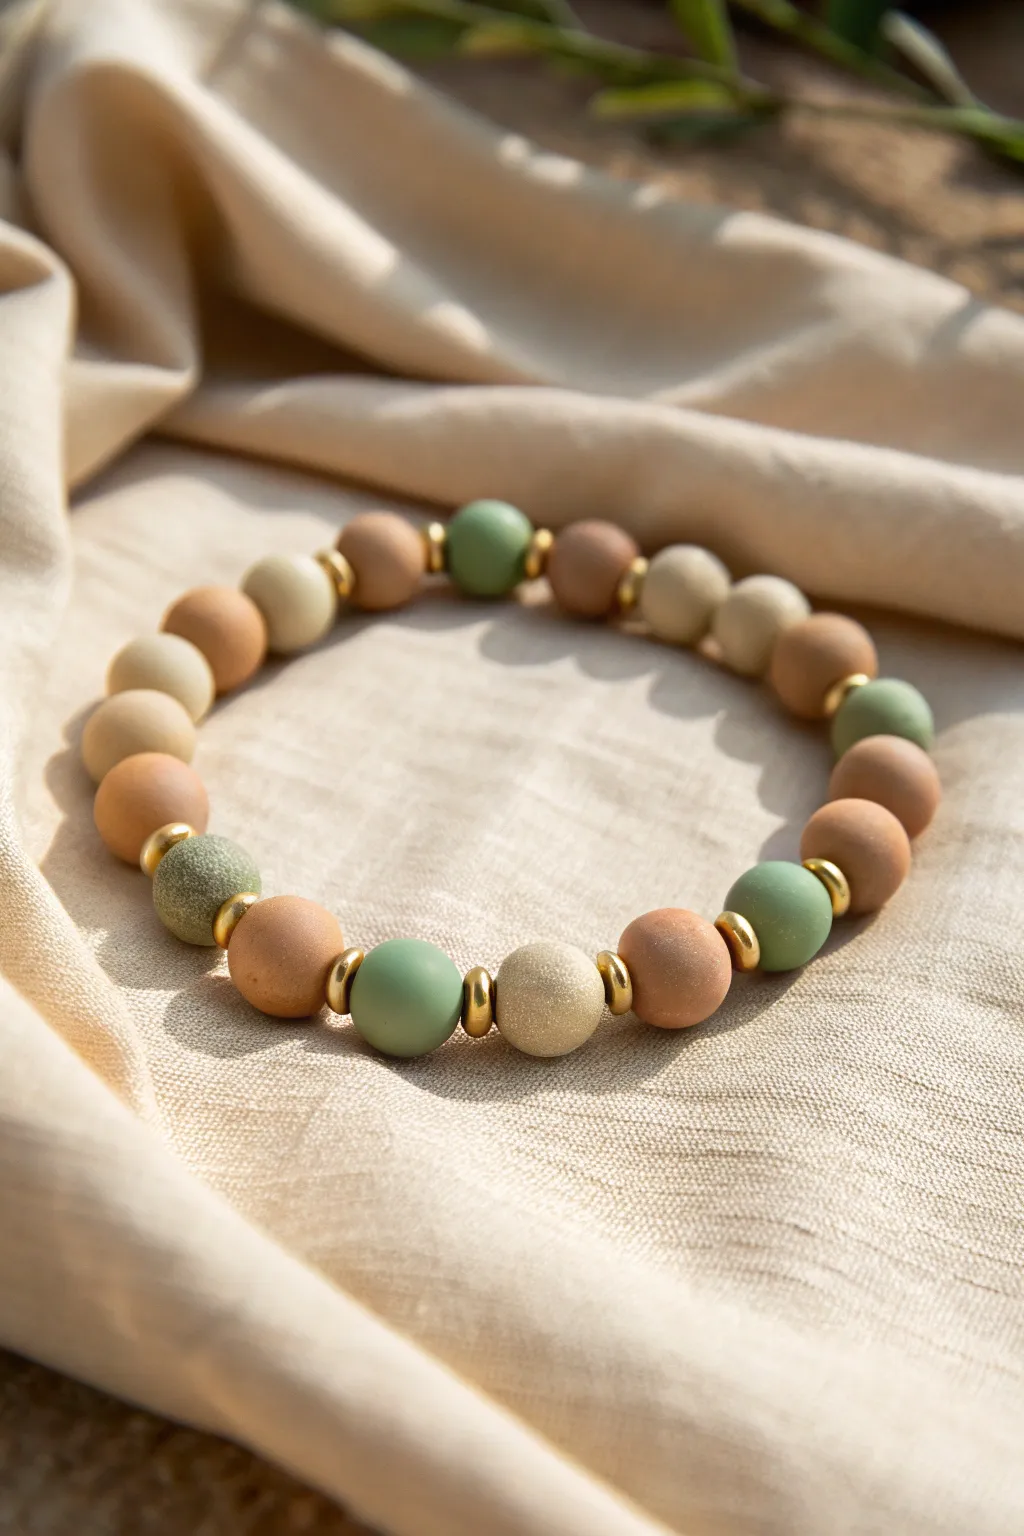
Embrace nature’s palette with this sophisticated polymer clay bead bracelet, featuring a calming mix of sage, sand, and terracotta hues. The addition of small gold saucer beads between select clay rounds adds a touch of elegant shine that elevates the entire design.
Step-by-Step Guide
Materials
- Polymer clay in neutral colors (Terracotta/Burnt Sienna, Sage Green, Beige/Cream, White, and Granite/Speckled Tan)
- Gold tone disk/saucer spacer beads (approx 4mm)
- Elastic beading cord (0.8mm or 1mm)
- Bead roller tool or acrylic block
- Pin drill or toothpick
- Oven for baking
- Baking sheet/tile
- Ceramic fiber paper (optional, to prevent shiny spots)
- Strong jewelry glue (GS Hypo Cement recommended)
- Scissors
Step 1: Prepping and Mixing Clay
-
Condition the clay:
Start by warming up your polymer clay in your hands. Knead each color separately until it is soft, pliable, and free of cracks. This ensures the beads won’t be brittle later. -
Create custom shades:
To achieve the specific organic palette shown, you may need to mix colors. Mix a little white into your terracotta for a softer clay pot look, or blend sage green with a tiny pinch of brown for a muted olive tone. -
Form the speckled texture:
For the textured beads shown in the image (like the sandy-colored ones), mix a granite or translucent clay with coarse black pepper or actual sand into your beige clay. Knead thoroughly until the specks are evenly distributed. -
Portion the clay:
Roll each color into a uniform snake or log shape. Use a tissue blade or cutter to slice off equal-sized segments. Keeping the volume consistent here is key to having uniform bead sizes later.
Step 2: Rolling and Piercing
-
Roll spheres:
Take a clay segment and roll it between your palms to form a rough ball. Then, use an acrylic block or a bead roller for a perfectly round finish. -
Refine the shape:
Continue rolling gently until no seams or fingerprints are visible. I find that wearing latex finger cots can help reduce fingerprint marks on the final surface. -
Refrigerate briefly:
If the clay has become too soft from the heat of your hands, pop the balls in the fridge for 10 minutes. This makes piercing them much easier without squashing the round shape. -
Pierce the holes:
Holding the bead gently, insert a pin drill or a toothpick through the center. Twist as you push through to avoid deforming the sphere. -
Inspect the exit hole:
Once the tool pokes through the other side, smooth down any clay that might have puckered out to ensure a flat surface for the spacers to sit against.
Smooth Finish Trick
Before baking, lightly dust your raw clay beads with cornstarch or baby powder. This allows you to smooth out fingerprints completely for a professional matte finish.
Step 3: Baking
-
Arrangement:
Place your pierced beads on a baking tile or a sheet lined with ceramic fiber paper. Avoid a regular baking sheet if possible, as it can leave shiny flat spots on the bottom of the beads. -
Bake:
Bake according to your clay manufacturer’s instructions (usually around 275°F or 135°C for 30-45 minutes). Don’t rush this step; fully cured clay is strong, while under-baked clay is brittle. -
Cool down:
Allow the beads to cool completely in the oven with the door cracked open. This gradual cooling helps prevent thermal shock and cracking.
Stone Effect
For a true ‘earth’ look, use coarse sandpaper to scuff the baked beads gently. This removes the plastic sheen and makes them look and feel like tumbled river stones.
Step 4: Final Assembly
-
Measure the cord:
Cut a piece of elastic cord about 10-12 inches long. This gives you plenty of slack for tying the knot later without struggling. -
Pre-stretch:
Give the elastic cord a few firm tugs. This pre-stretching prevents the bracelet from becoming loose and droopy after you wear it a few times. -
Plan the pattern:
Lay out your cooled beads on a design board. Follow the image’s organic pattern: alternate colors randomly, but insert a gold spacer bead roughly every 1-2 clay beads. -
Create focus points:
Notice how the source image groups two gold spacers around singular ‘feature’ beads (like the green or textured sand ones). Replicate this ‘sandwiching’ technique periodically for visual balance. -
String carefully:
Thread the beads onto the elastic. If the cord frays, put a dab of superglue on the tip to create a makeshift needle. -
Check fit:
Wrap the strand around your wrist to check the size. Add or remove beads until it sits comfortably without digging into your skin. -
Secure the knot:
Tie a surgeon’s knot (right over left, left over right, forming an extra loop). Pull tight and apply a tiny drop of jewelry glue to the knot. -
Hide the mechanics:
Once the glue is dry, trim the excess cord and gently tug the knot inside one of the larger clay beads to hide it.
Enjoy styling this versatile piece that brings a grounded, natural elegance to any outfit you wear

The Complete Guide to Pottery Troubleshooting
Uncover the most common ceramic mistakes—from cracking clay to failed glazes—and learn how to fix them fast.
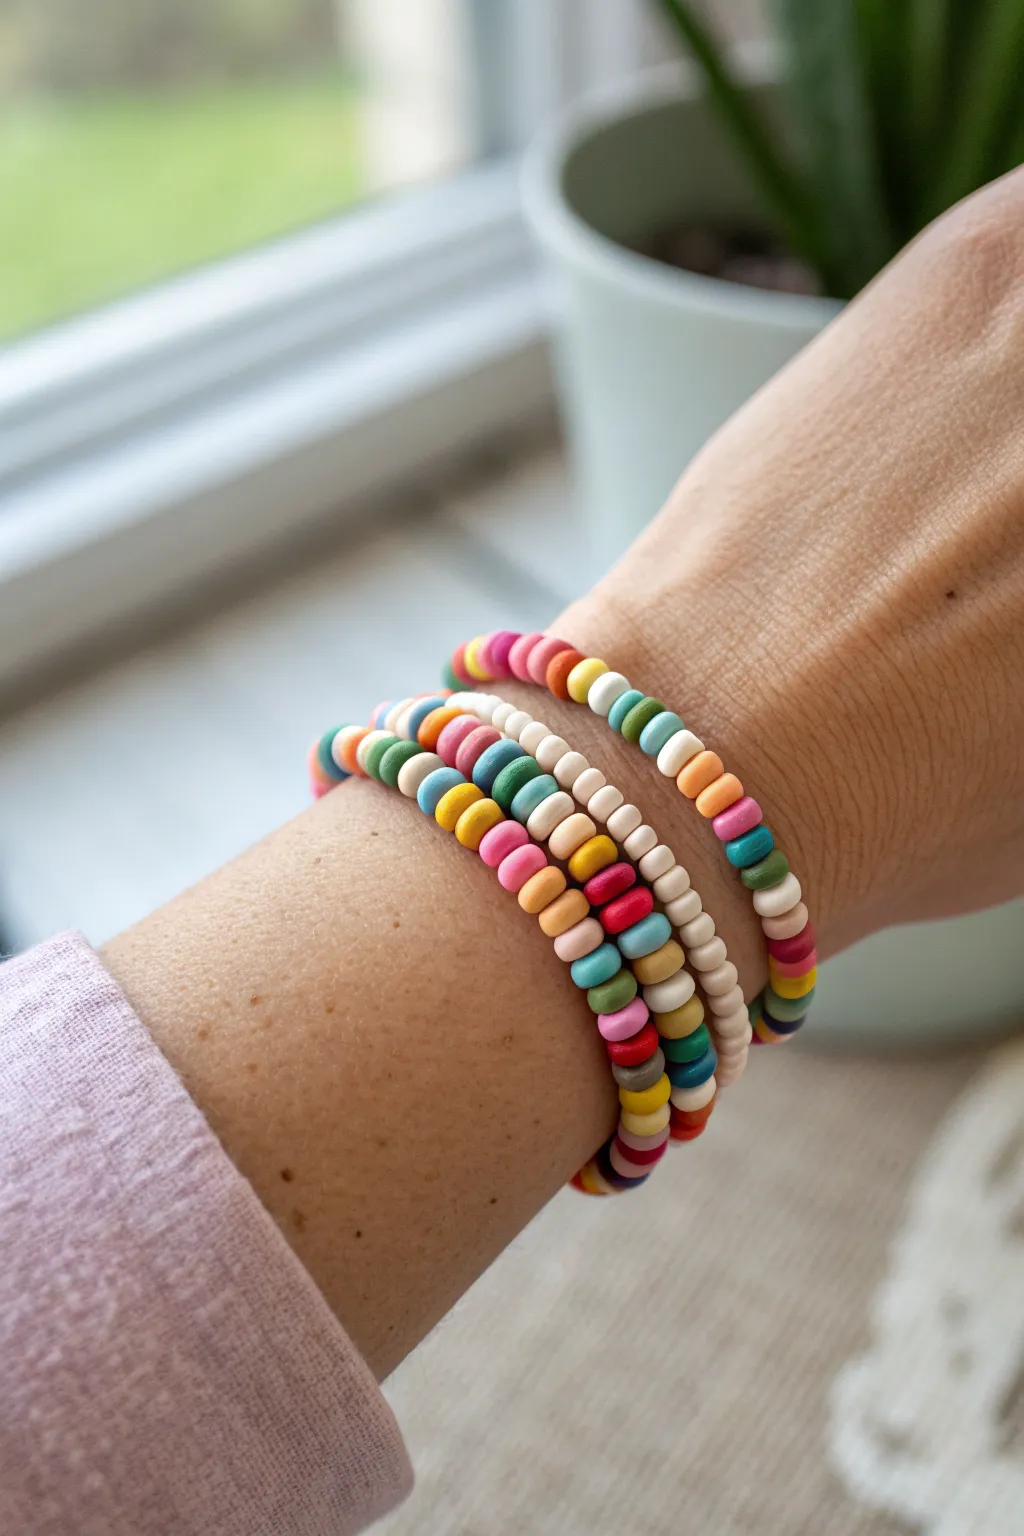
Soft Pastel Ombre Gradient Clay Bracelet
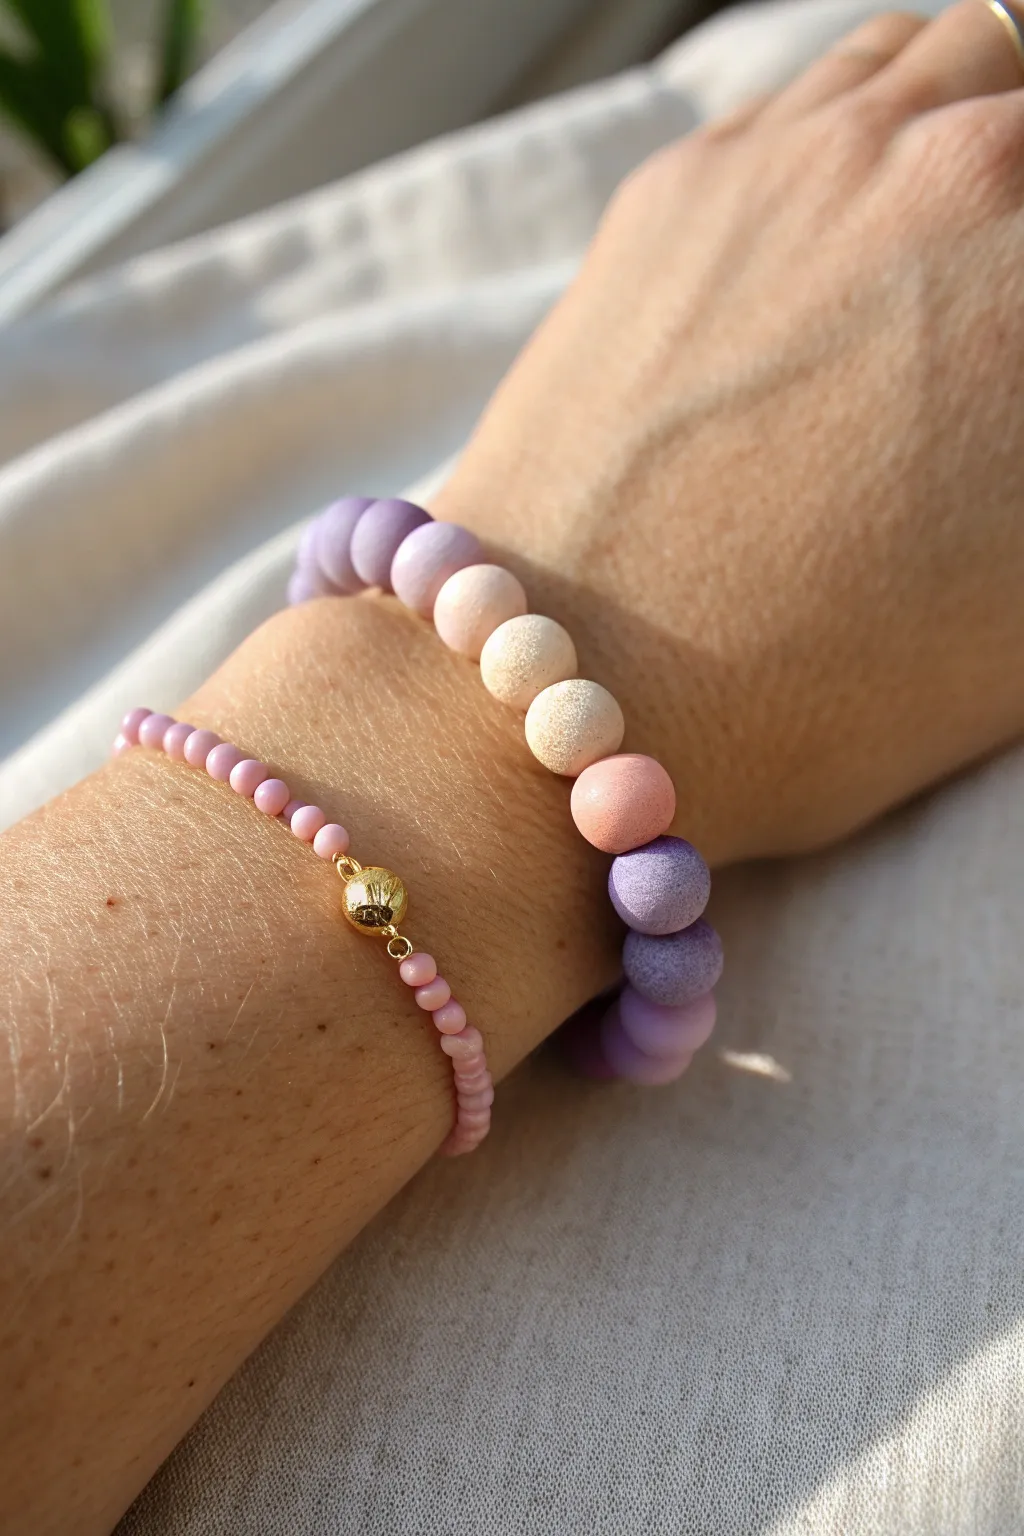
Create a sophisticated, soft-touch accessory set featuring a chunky polymer clay bead bracelet with a seamless purple-to-peach gradient alongside a delicate companion piece. The matte finish of the clay beads gives them a modern, organic look that contrasts beautifully with the shiny gold accent on the smaller strand.
How-To Guide
Materials
- Polymer clay in muted purple, white, peach, and blush pink
- Small pink seed beads (size 11/0 or 8/0)
- Strong elastic cord (0.8mm or 1mm)
- Thinner elastic cord for seed beads (0.5mm)
- Gold tone accent bead (round or geometric)
- Gold crimp beads or knot covers (optional)
- Needle tool or toothpick for piercing
- Bead roller (optional, for uniform sizing)
- Cornstarch or baby powder
- Oven and baking tray
- Fine grit sandpaper (400-600 grit)
- Jewelry glue
Step 1: Creating the Clay Gradient
-
Prepare your base colors:
Condition your polymer clay by kneading it until soft. You will need a distinct purple, a soft peach/blush, and a large amount of white to create the transitional shades. -
Mix the intermediate shades:
To achieve the ombre effect seen in the photo, you need to mix custom colors. Start by mixing a tiny bit of purple into a large ball of white to create a very pale lavender. Do the same with the peach for a creamy off-white tone. -
Form the gradient lineup:
Arrange your clay balls in a line to test the gradient: Dark Purple, Medium Purple, Pale Lavender, Off-White/Cream, Pale Peach, Medium Peach, Darker Blush. I like to lay them out on my work surface first to ensure the color flow looks natural. -
Roll the beads:
Pinch off equal amounts of clay from each color mix. Roll them between your palms to create smooth, round spheres approximately 10-12mm in diameter. Using a bead roller here ensures they are perfectly uniform. -
Texture the surface (optional):
The beads in the image have a slightly speckled, stone-like matte texture. You can achieve this by lightly rolling the raw beads in a tiny bit of salt or sugar before baking, which is washed off later, or by using clay that already has granite-style inclusions. -
Pierce the holes:
Dip your needle tool or toothpick in a bit of cornstarch to prevent sticking. Gently pierce the center of each bead, twisting the tool as you push through to avoid deforming the sphere. -
Bake the beads:
Place your beads on a baking tray lined with parchment paper. Bake according to your clay manufacturer’s instructions (usually 275°F/130°C for 15-30 minutes). Let them cool completely. -
Sand for a matte finish:
Once cool, buff the beads lightly with fine-grit sandpaper to remove any fingerprints or shine. This is crucial for getting that soft, matte look shown in the photo.
Clean Bead Holes
If drilling holes distorted your round beads, gently re-roll them between your fingers *while* the toothpick is still inside the bead to smooth the shape back out.
Step 2: Assembling the Clay Bracelet
-
Cut the cord:
Cut a piece of the thicker elastic cord about 10 inches long. Pre-stretch the elastic by pulling it firmly a few times; this prevents the bracelet from stretching out later. -
String the gradient:
Thread your clay beads onto the elastic, following the color order you planned earlier (Purple -> Light Purple -> Cream -> Peach -> Pink -> Purple). Repeat the pattern until the bracelet fits your wrist comfortably. -
Knot the ends:
Tie a surgeon’s knot (loop the elastic through twice on the first pass, then tie a standard overhand knot). Pull tight. -
Secure the knot:
Add a tiny drop of jewelry glue to the knot. Once dry, trim the excess cord and tuck the knot inside one of the bead holes.
Step 3: Creating the Seed Bead Companion
-
Prepare the thin cord:
Cut a 10-inch piece of the thinner (0.5mm) elastic cord and pre-stretch it. -
Start beading:
String the small pink seed beads onto the cord. Fill about half the length required for your wrist. -
Add the focal point:
Thread on the single gold accent bead. This gold bead acts as the visual center, mirroring the warmth of the peach tones. -
Finish the strand:
Continue adding pink seed beads until you reach the desired length. It should sit slightly looser than the chunky clay bracelet. -
Final knotting:
Tie off this bracelet using the same surgeon’s knot method. Apply a dot of glue, let dry, and trim the ends close to the knot.
Add Texture
For the sandy look in the photo, mix clear embossing powder or fine white sand into your clay before rolling. This creates an authentic stone-like texture.
Wear your stacked set together to show off that beautiful transition from cool lavender to warm peach
Personalized Name Clay Bracelet With Letter Beads
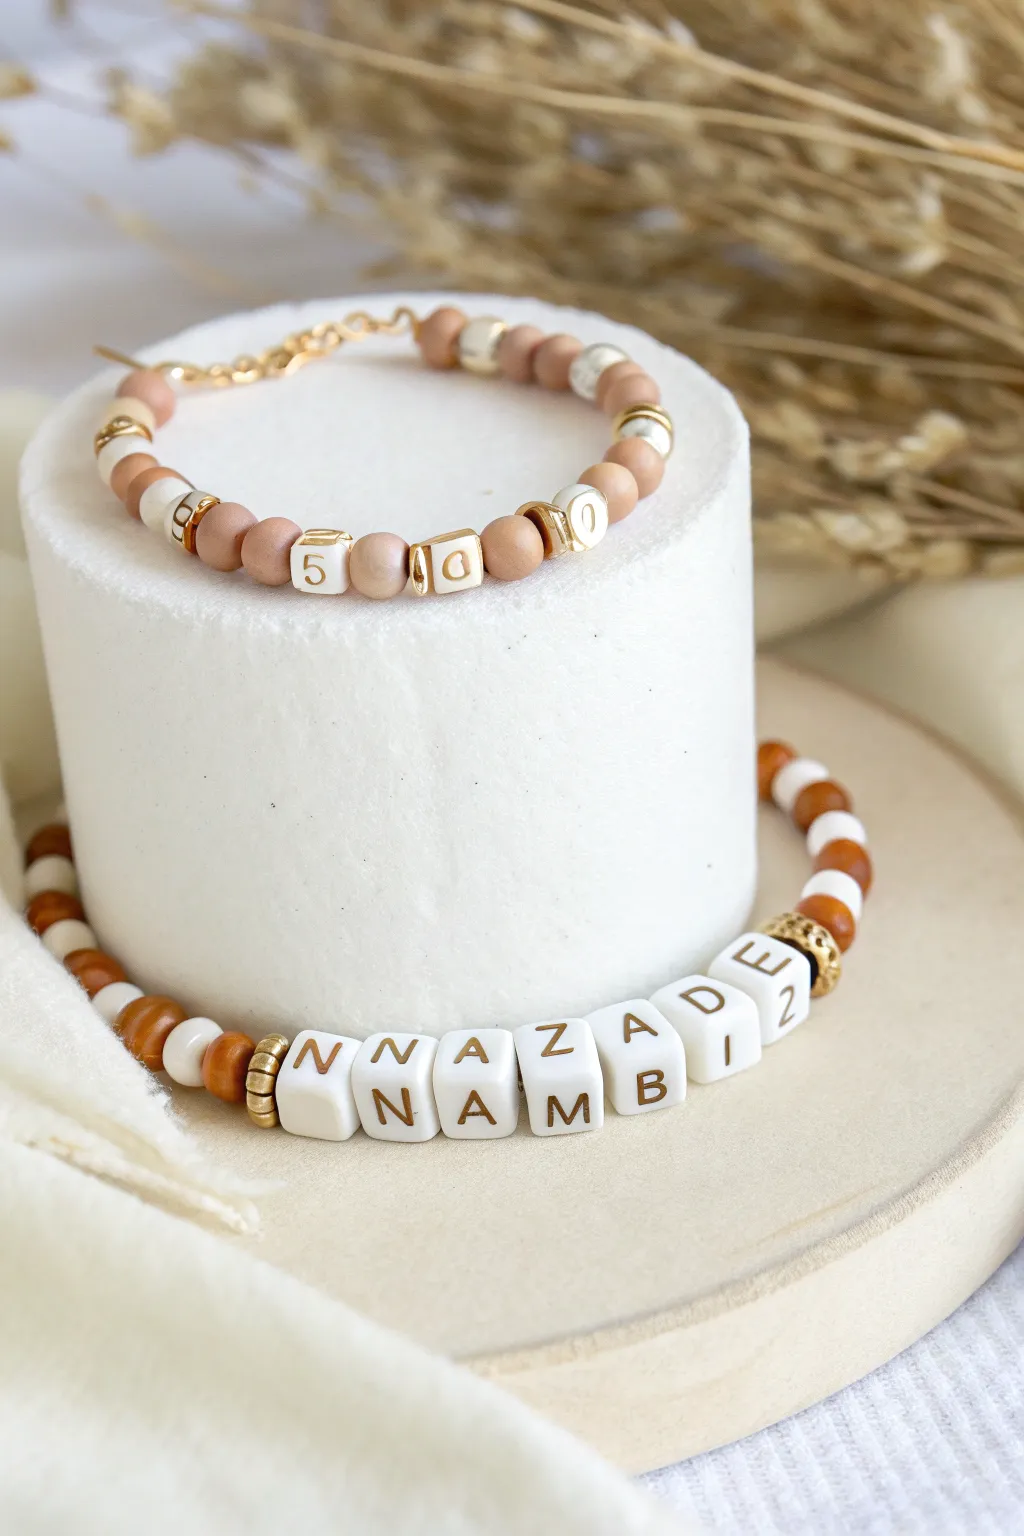
These charming, personalized bracelets blend the rustic warmth of wooden and clay-toned beads with the customizable flair of gold-lettered cubes. Perfect for stacking or gifting, this project allows you to create meaningful accessories that carry names, dates, or special words.
Step-by-Step Tutorial
Materials
- Elastic jewelry cord (0.8mm or 1mm thickness)
- Small round beads in warm terracotta/brown tones (approx. 6mm, matte finish)
- Small round beads in white/cream (approx. 6mm)
- White cube letter beads with gold lettering
- Gold tone spacer beads (flat discs and small round balls)
- Gold tone crimp bead covers (optional)
- Jewelry glue (e.g., E6000 or Hypo Cement)
- Scissors
- Bead stoppers or masking tape
Step 1: Planning Your Design
-
Measure your wrist:
Start by measuring your wrist with a flexible measuring tape. Add about half an inch to this measurement to ensure a comfortable fit that isn’t too tight. -
Select your message:
Gather the white cube letter beads needed for your chosen name or date. In the photo, we see a date style like ‘5.10’ and a longer name configuration. -
Layout the pattern:
Lay your beads out on a bead board or a soft towel to prevent rolling. Planning the sequence beforehand is crucial for a balanced look. -
Establish the rhythm:
For the larger bracelet, create a pattern of alternating sections: groups of terracotta beads, followed by single white beads, and gold spacers.
Pro Design Tip
Use gold disk spacers between every 3-4 colored beads. This breaks up the solid color blocks and elevates the bracelet from a simple craft to a chic accessory.
Step 2: Stringing the Bracelet
-
Prepare the cord:
Cut a piece of elastic cord about 10-12 inches long. This extra length makes tying the final knot much easier. -
Secure the end:
Place a bead stopper or a piece of tape on one end of the cord so your beads don’t slide off as you work. -
Start with the back section:
Begin stringing with the beads that will sit at the back of the wrist. I suggest starting with the terracotta round beads mixed with white accents. -
Incorporate gold accents:
Add visual interest by slipping on gold spacer beads. Using a gold disc bead or a textured rondelle bead right before the name section frames the text beautifully. -
Add the name:
String your letter beads in the correct order. Double-check the spelling now before proceeding further. -
Double-row name technique (optional):
If you are recreating the stacked name look seen in the larger bracelet, simply string the beads normally; they will naturally rotate on the wrist, but ensure you have enough slack so they don’t pinch. -
Complete the loop:
Continue stringing the rest of your pattern until you reach the desired length, mirroring the design from the first side if you want symmetry.
Step 3: Finishing Touches
-
Pre-stretch the elastic:
Hold both ends of the cord and give the bracelet a gentle tug to pre-stretch the elastic. This prevents the bracelet from loosening up permanently after the first wear. -
Tie the knot:
Tie a surgeon’s knot (right over left, left over right, and loop through an extra time). Pull the ends tight to secure the beads significantly. -
Secure with glue:
Apply a tiny dab of jewelry glue specifically to the knot. Let it tack up for a moment before moving on. -
Hide the knot:
If one of your beads has a larger hole (like the gold spacers often do), gently pull the knot inside that bead to hide it. -
Trim excess:
Once the glue is fully dry, trim the excess cord carefully with sharp scissors, being sure not to clip the knot itself.
Level Up Your Look
Customize the spacers! Swap standard gold discs for tiny freshwater pearls or crystal rondelles on either side of the name to add a touch of luxe sparkle.
Enjoy wearing your custom stack or gift them to a friend as a thoughtful personal treasure


What Really Happens Inside the Kiln
Learn how time and temperature work together inside the kiln to transform clay into durable ceramic.
Centered Focal Bead Bracelet With Symmetrical Spacing
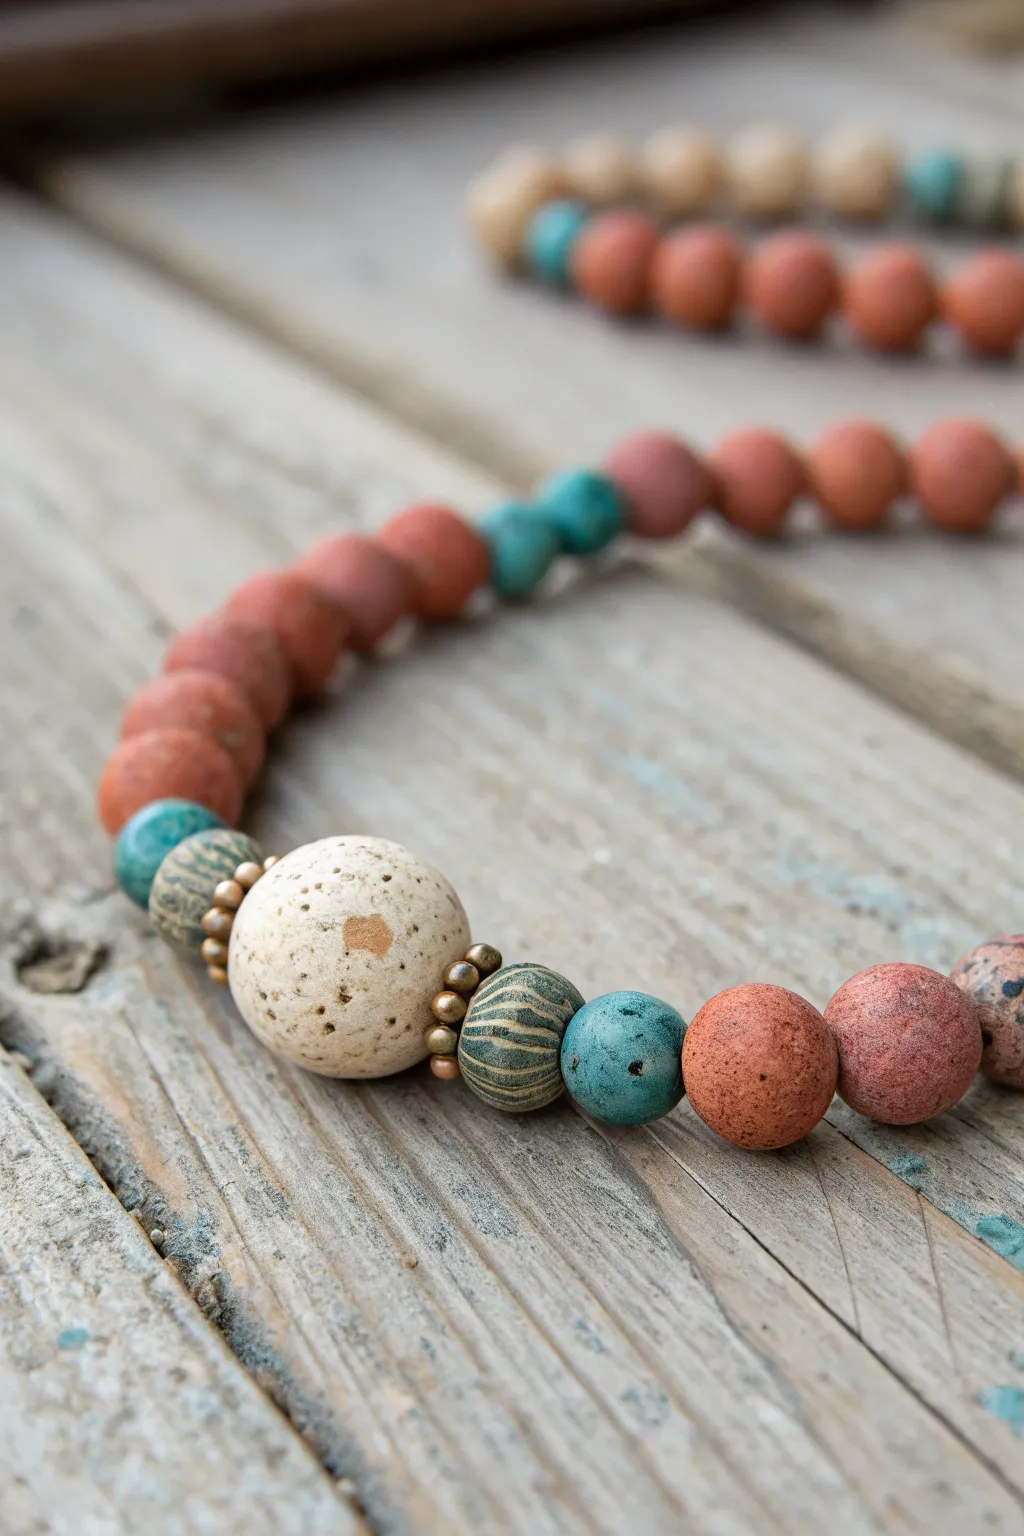
This rustic bracelet design highlights a large, speckled clay bead as the centerpiece, flanked by intricate spacers and matte finish rounds. The symmetrical arrangement creates a balanced, calming rhythm that feels grounded and natural.
Step-by-Step Tutorial
Materials
- Polymer clay (terracotta/rust orange, turquoise/teal, beige/white granite effect)
- Acrylic paint (black or dark brown for antiquing)
- Acrylic paint (gold or metallic bronze)
- Elastic cord or beading wire (0.8mm or 1mm)
- Small gold or brass spacer beads (approx. 2-3mm)
- Bead rolling tool or clear acrylic block
- Pin tool or toothpick for piercing
- Texture tools (optional: comb, rough sponge)
- Fine grit sandpaper
- Gloss or matte varnish (optional)
- Jewelry glue (if using elastic)
Step 1: Creating the Focal Bead
-
Condition the granite clay:
Start by taking a chunk of your beige or white granite-effect polymer clay. Condition it by kneading it in your hands until it becomes soft and pliable, which prevents cracking later. -
Form the central sphere:
Roll the clay into a smooth ball, approximately 12-14mm in diameter. I like to use an acrylic block to roll it on a flat surface to ensure it is perfectly round. -
Add surface texture:
Using a coarse sponge or a toothbrush, gently tap the surface of the bead to give it a porous, stone-like texture similar to the example image. You don’t want deep gouges, just a subtle organic feel. -
Create the piercing hole:
Carefully twist your pin tool or toothpick through the center of the bead. Rotate the bead as you push through to keep the hole centered and prevent distortion.
Sticky Situation?
If your bead holes close up during baking, don’t force a needle through. Use a small manual hand drill or a heated needle to carefully re-open the hole without cracking the hardened clay.
Step 2: Crafting the Accent Beads
-
Make the patterned spacers:
Condition a small amount of teal or dark green clay. Roll two small balls, about 8-9mm in size, slightly smaller than your focal bead. -
Apply the ribbed texture:
Take a needle tool or the edge of a credit card and press parallel lines into the surface of these two teal beads. Alternatively, roll the bead gently over a fine comb to create uniform indentations. -
Highlighting with gold:
Once you have your ribbed texture, lightly brush a tiny amount of gold mica powder or paint onto the raised areas. This mimics the metallic sheen visible on the green beads in the photo. -
Piercing the accents:
Pierce holes through these textured beads, ensuring the channel runs perpendicular to your textured lines so they sit correctly on the string.
Pro Tip: Antique It
To get that weathered ‘excavated’ look, rub diluted brown acrylic paint over the baked terracotta beads and immediately wipe it off. Ideally, paint stays only in heavy textures.
Step 3: Forming the Main Strand Beads
-
Prepare the terracotta clay:
Condition a larger block of the rust or terracotta-colored clay. This will form the majority of the bracelet strap. -
Roll consistent rounds:
Divide the clay into equal portions. Roll about 14-18 smooth, round beads, aiming for approximately 8mm in diameter. Consistency is key here for a neat look. -
Create teal accent rounds:
Roll 4 additional smooth round beads using your solid teal/turquoise clay. These should match the size of the terracotta beads. -
Texture the solid rounds:
To achieve the matte, stone-like efficacy seen in the photo, gently roll these beads over fine-grit sandpaper or a piece of denim before baking. This removes the glossy fingerprint sheen. -
Piercing the batch:
Use your piercing tool to create holes in all the round beads. If the beads deform slightly while handling, gently roll them again between your fingers to reshape.
Step 4: Baking and Assembly
-
Bake the clay:
Arrange all your beads on a baking sheet lined with plain paper or cardstock. Bake according to your specific clay brand’s instructions (usually 275°F/130°C for 15-30 minutes). -
Cool and inspect:
Allow the beads to cool completely. If any hole edges are sharp or jagged, twist a small drill bit by hand inside the hole to smooth them out. -
Start the stringing pattern:
Cut a length of elastic cord about 10 inches long. Start by threading the large granite focal bead into the center. -
Build the focal section:
On both sides of the focal bead, add two small brass spacer beads. Next, thread on your textured/ribbed green accent beads, followed by one smooth teal bead on each side. -
Complete the strand:
Finish stringing the rest of the bracelet symmetrically. Alternate correctly as shown: usually a run of terracotta beads, interrupted by a teal accent bead about halfway down the side. -
Tie the knot:
Check the fit on your wrist. Tie a strong surgeon’s knot with the elastic, pull it tight, and secure it with a tiny dab of flexible jewelry glue before trimming the excess.
Wear your new earthy creation stacked with other bracelets or solo for a grounded, bohemian touch
Fruit Slice Clay Charm Bracelet for Summer Vibes
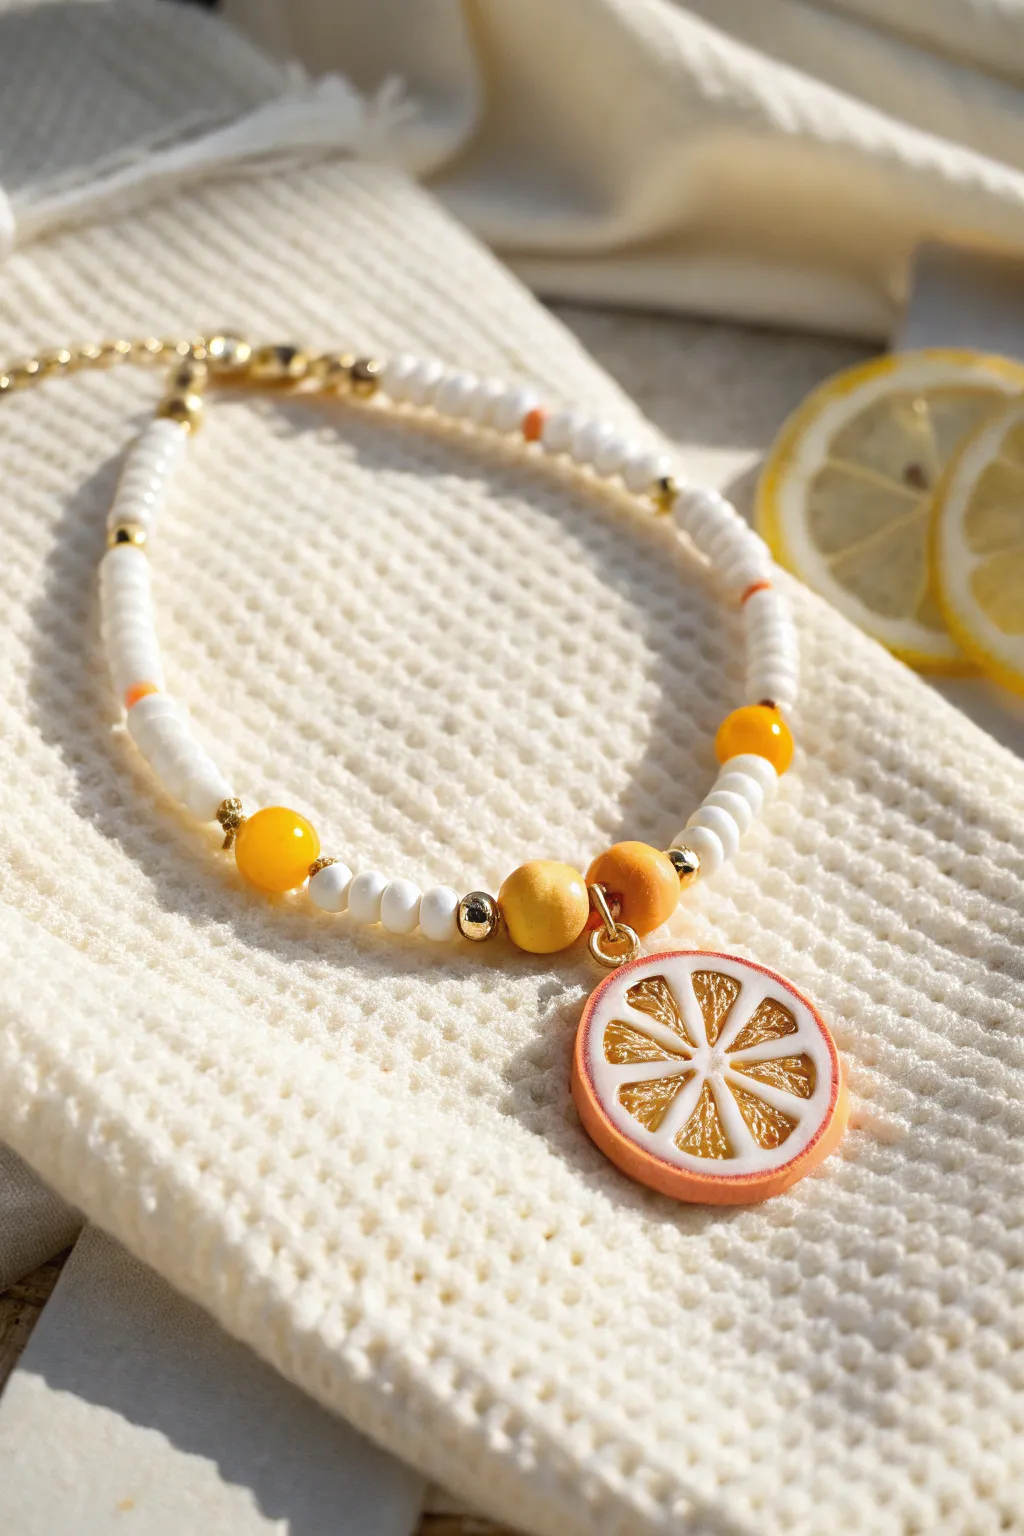
Capture the zest of summer with this cheerful beaded bracelet featuring a handmade polymer clay orange slice. The combination of white Heishi beads, golden accents, and vibrant citrus tones creates a fresh, playful accessory perfect for sunny days.
Step-by-Step
Materials
- Polymer clay (translucent white, orange, white)
- White or cream disc beads (Heishi style)
- Yellow and orange round beads (approx. 6-8mm)
- Gold tone spacer beads (small rounds)
- Gold tone metal tube beads or crimp covers (optional accents)
- Gold jewelry wire or eye pin
- Gold jump ring (approx. 6mm)
- Jewelry extension chain and clasp
- Beading wire or elastic cord
- Liquid polymer clay (translucent)
- Needle tool or toothpick
- Round nose pliers
- Wire cutters
- Blade or craft knife
- Oven for baking
Step 1: Sculpting the Citrus Cane
-
Prepare the segments:
Start by conditioning your orange clay and rolling it into a small log. Wrap this log in a thin sheet of white clay. This will form the pith of one fruit segment. -
Shape the wedge:
Pinch the wrapped log into a teardrop or triangular ‘wedge’ shape, ensuring the white outline stays intact. Stretch this cane out and cut it into eight equal lengths. -
Assemble the center:
Roll a very thin snake of white clay to act as the central core. Assemble your eight orange wedges around this core to form a wheel shape. -
Add the rind:
Wrap the entire wheel in a thin sheet of white clay, followed by a slightly thicker sheet of orange clay to create the outer rind. -
Reduce the cane:
Gently squeeze and roll the cane to reduce its diameter until it matches the size you want for your charm (about 2cm diameter). I find it helps to start squeezing from the middle and work outward to prevent distortion.
Step 2: Creating the Charm
-
Slice the charm:
Use a sharp blade to slice a neat, even cross-section from your cane. It should be thick enough to be durable, roughly 4-5mm. -
Texture the fruit:
Using a needle tool, gently prick the surface of the orange segments to create a realistic, juicy fruit texture. Leave the white pith lines smooth. -
Add hardware:
Insert a small golden eye pin into the top of the rind (avoiding the fruit detail) or create a hole with your needle tool large enough for a jump ring. -
Bake carefully:
Bake the charm according to your clay manufacturer’s instructions. Usually, this is around 275°F (130°C) for 15-30 minutes. -
Finish the surface:
Once cooled, you can apply a thin layer of gloss glaze or translucent liquid clay to the fruit segments to make them look wet and juicy.
Cane Cutting Tip
Let your clay cane rest in the fridge for 20 minutes before slicing. Cold clay is firmer and won’t smush or distort the intricate fruit pattern when the blade cuts through.
Step 3: Assembling the Bracelet
-
Start the stringing:
Cut a length of beading wire or elastic cord. Secure one end with a crimp bead or knot if using elastic. String on a sequence of white Heishi beads. -
Create the pattern:
After about an inch of white beads, add a small gold spacer, followed by a larger yellow round bead, and another gold spacer. -
Center the design:
Continue the pattern until you reach the center. Thread on the larger orange and yellow focal beads, placing gold spacer beads between them for definition. -
Attach the charm:
Using your pliers, open the jump ring and attach your baked orange slice charm to the center of the bracelet, between the focal beads. -
Finish the strand:
Complete the beading pattern on the other side to mirror the first half. Ensure the length fits your wrist comfortably. -
Add the closure:
Attach a clasp and an extension chain to the ends of your wire using crimp tubes and pliers, ensuring a secure hold.
Level Up: Lemon Twist
Replicate the process using translucent yellow clay instead of orange to create a matching lemon slice, or try pink for a grapefruit version to make a full fruit salad stack.
Wear your new piece to add a bright pop of handmade color to any outfit

TRACK YOUR CERAMIC JOURNEY
Capture glaze tests, firing details, and creative progress—all in one simple printable. Make your projects easier to repeat and improve.
Shell-Inspired Beachy Clay Bracelet Stack
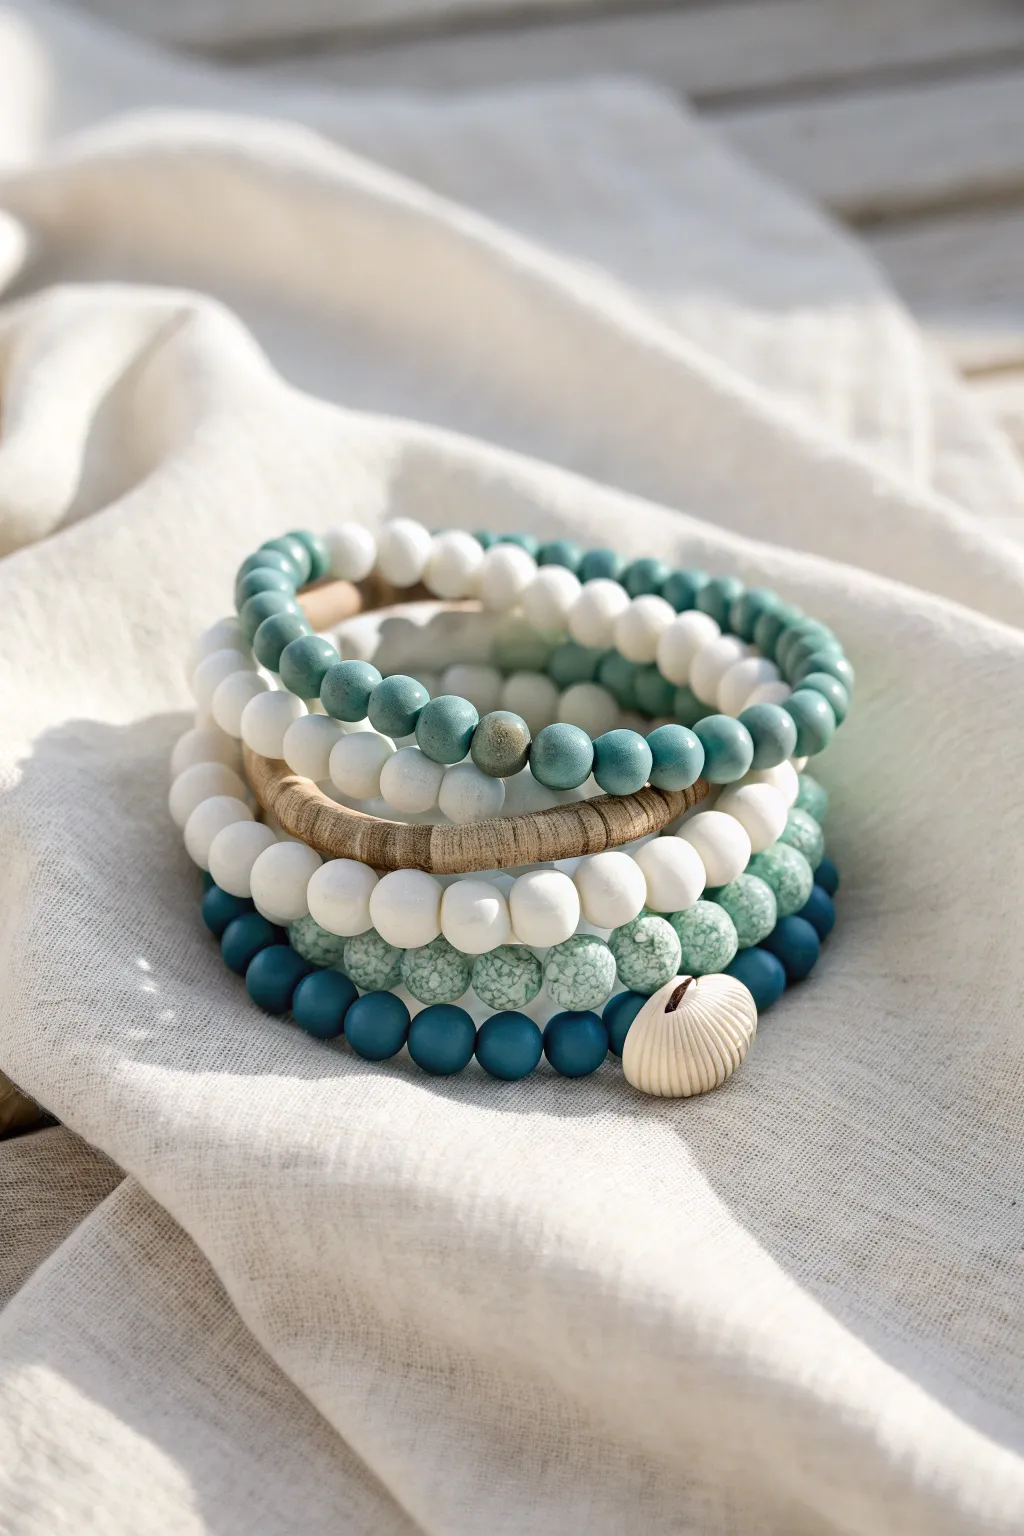
Capture the essence of a tranquil day at the shore with this gorgeous stack of polymer clay bracelets. Featuring a mix of matte teal, crisp white, and textured faux-stone beads, this set is accented by a natural shell charm for the ultimate beachy vibe.
How-To Guide
Materials
- Polymer clay (White, Teal, Granite/Speckled effect)
- Wooden disc beads (natural finish)
- Small natural seashell charm with hole
- Elastic beading cord (0.8mm or 1mm)
- Bead rolling tool or flat acrylic sheet
- Toothpicks or bead pins
- Oven for baking clay
- Super glue or jewelry adhesive
- Scissors
- Baking sheet and parchment paper
- Optional: Cornstarch or baby powder (to prevent sticking)
Step 1: Creating the Clay Beads
-
Prepare your clay:
Begin by conditioning your polymer clay blocks (white, teal, and granite) until they are soft and pliable. If the clay feels too sticky, a light dusting of cornstarch on your hands works wonders. -
Roll spheres:
Pinch off small pieces of clay and roll them between your palms to create uniform spheres. You’ll need about 25-30 beads per bracelet. Aim for a size of roughly 8mm to 10mm for a chunky look. -
Create the faux-stone look:
For the speckled beads seen at the bottom of the stack, mix a small amount of granite-effect clay with white clay. Don’t over-mix; let the marbling show through slightly for organic texture. -
Make the holes:
Use a toothpick or bead pin to pierce the center of each sphere. Gently twist the tool as you push it through to avoid squashing the bead’s round shape. I usually pierce halfway from one side, then flip and meet in the middle. -
Smooth the edges:
After piercing, gently roll the bead one last time to smooth out any fingerprints or distortions around the hole. -
Bake the beads:
Arrange your beads on a baking sheet lined with parchment paper. Bake according to your brand of clay’s instructions (typically 275°F/135°C for 15-30 minutes). -
Cool down:
Let the beads cool completely before handling. They will harden fully as they return to room temperature.
Pro Tip: Matte Finish
To get that ultra-matte, beach-glass look on your clay beads, lightly buff them with a piece of denim or very fine-grit sandpaper after they have baked and cooled.
Step 2: Assembling the Stack
-
Plan the designs:
Lay out your cooled beads on a soft cloth to plan your patterns. You are making four distinct strands: one solid white, one teal/white mix, one faux-stone/teal mix, and one wooden accent strand. -
String the white strand:
Cut a length of elastic cord about 10 inches long. Thread your solid white clay beads onto the cord until it fits comfortably around your wrist. -
Tie the knot:
Secure the bracelet with a surgeon’s knot (looping the elastic twice before pulling tight). Add a tiny drop of super glue to the knot for extra security, let it dry, then snip the excess cord. -
Create the teal mix:
For the second bracelet, alternate sections of teal beads with sections of white beads. As seen in the photo, irregular groupings (like 5 teal followed by 5 white) create a more relaxed, organic feel than a strict 1-to-1 pattern. -
Assemble the wooden strand:
Thread your pre-purchased wooden disc beads onto a new piece of elastic. These flat, natural elements provide a great textural contrast to the smooth round clay beads. -
Build the bottom strand:
For the final bracelet, use your darker solid teal beads and the speckled faux-stone beads. Thread the majority of the strand with teal beads, leaving a focal section for the lighter stone beads. -
Attach the shell charm:
Before tying off the bottom strand, slide your seashell charm onto the cord so it sits centrally among the lighter speckled beads. -
Final assembly:
Tie and glue the knots for the remaining three bracelets just as you did the first one. Hide the knots inside a bead if the hole is large enough.
Troubleshooting: Wonky Holes
If your bead holes are closing up during baking, bake the beads directly on the piercing pins or toothpicks. Suspend the pins across a baking dish so the beads don’t develop flat spots.
Now you have a stunning set of textured bracelets perfect for wearing with any summer outfit
Bold Checkerboard Pattern Clay Disc Bracelet
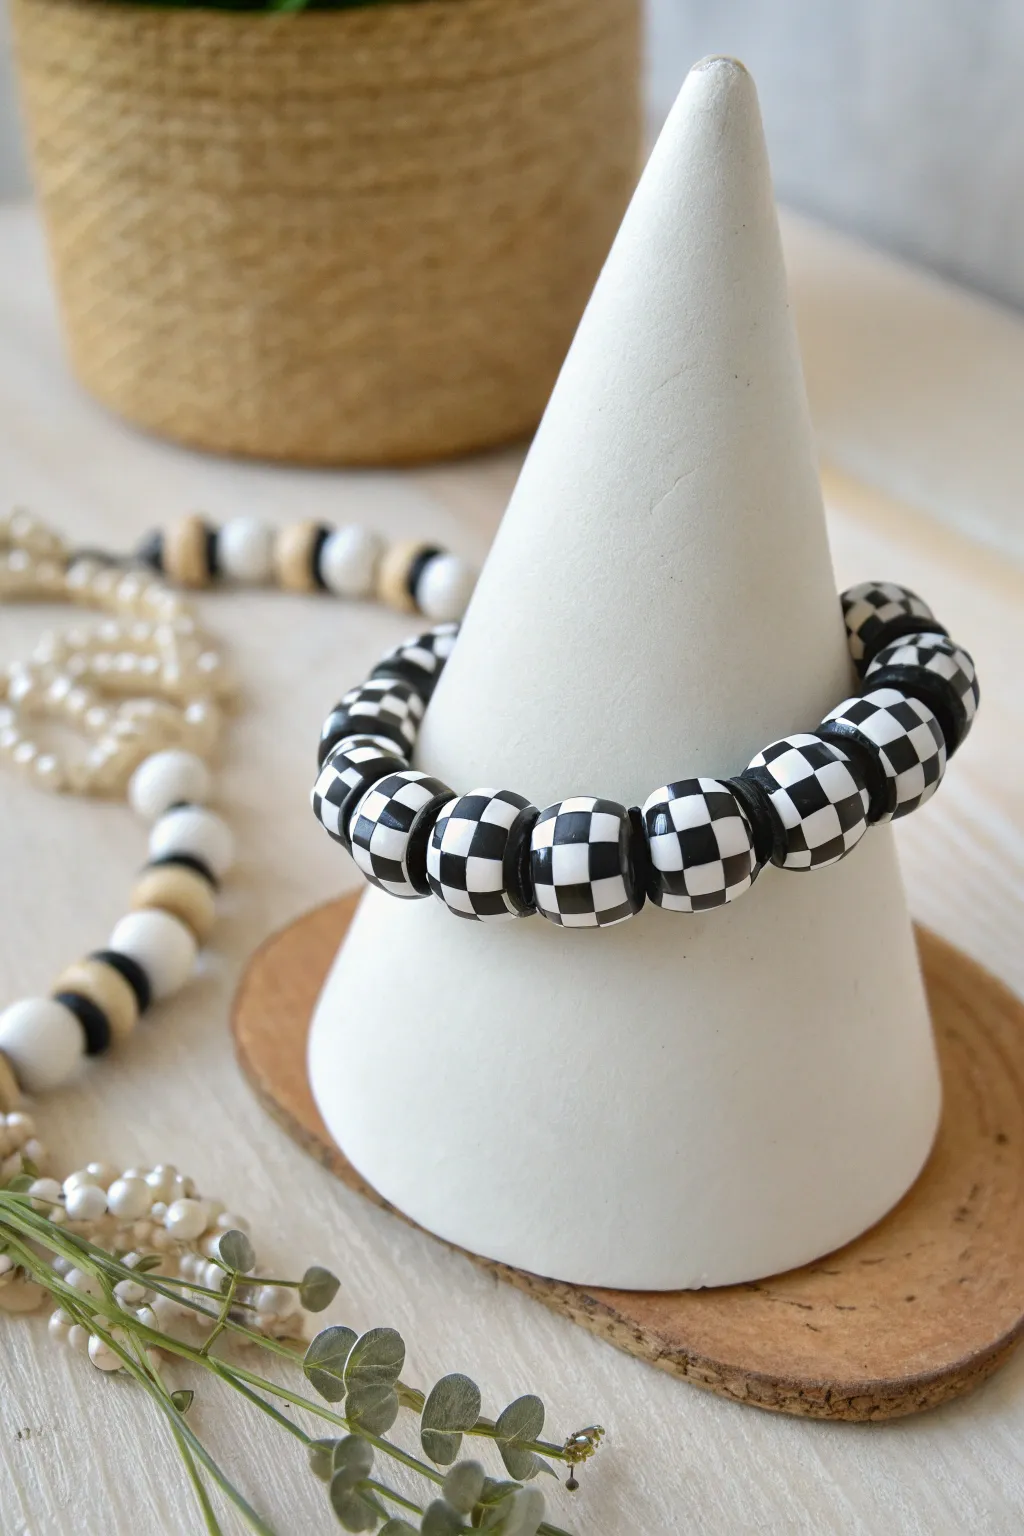
Embrace the timeless appeal of black and white with this bold checkerboard bracelet. Using polymer clay to create custom patterned beads results in a polished, high-contrast accessory that looks professionally made but is surprisingly achievable at home.
Step-by-Step Tutorial
Materials
- White polymer clay (approx. 2 oz)
- Black polymer clay (approx. 2 oz)
- Clay roller or pasta machine
- Tissue blade or sharp clay knife
- Small round cutter (approx. 1/2 inch) or bead roller
- Bead piercing pins or toothpicks
- Elastic jewelry cord (0.8mm or 1mm)
- Super glue or jewelry cement
- Ruler
- Oven for baking
- Optional: Gloss glaze or resin for finish
Step 1: Building the Checkerboard Cane
-
Condition the Clay:
Begin by thoroughly conditioning both the black and white polymer clay separately until they are soft and pliable. Ensure your hands are clean when switching between colors to avoid smudging the white clay. -
Create Flat Sheets:
Roll out both the black and white clay into thick sheets of equal thickness, aiming for about 1/4 inch (6mm) thick. Use the thickest setting on a pasta machine if you have one. -
Cut Square Strips:
Using your tissue blade, cut the sheets into long, even square logs or strips. You want the cross-section of each strip to be a perfect square. -
Assemble the First Row:
Lay a white strip next to a black strip, pressing them gently together. Repeat this alternating pattern until you have a row of four to five strips. -
Stack the Subsequent Rows:
Build upward by placing a black strip on top of a white strip, and a white strip on top of a black strip. Continue stacking until you have formed a large block that looks like a checkerboard from the end view. -
Consolidate the Cane:
Gently squeeze the square cane from all sides to ensure the strips adhere to each other and to eliminate air gaps. Keep the square shape intact.
Step 2: Forming the Beads
-
Slice the Cane:
Cut slices from your checkerboard cane. The thickness of the slice will determine the size of your bead, so aim for a chunky slice. -
Shape the Bead:
Take a slice and gently manipulate it into a round shape. If the pattern distorts too much, you can wrap a thinner slice of the checkerboard pattern around a core ball of scrap clay instead. -
Refine the Sphere:
Roll the clay gently between your palms to smooth out seams and create a perfect sphere. Be careful not to twist, which would swirl the checkerboard pattern. -
Repeat for All Beads:
Continue cutting and rolling until you have enough beads for your wrist size, usually about 15-20 beads. -
Pierce the Holes:
Using a bead piercing pin, carefully poke a hole through the center of each bead. Twist the pin as you push to prevent flattening the bead. I prefer to pierce halfway from one side, then flip and finish from the other side for a clean exit.
Keep it Clean
White clay picks up lint easily. Wipe your hands and work surface with a baby wipe or rubbing alcohol before handling the white clay to keep the contrast sharp.
Step 3: Baking and Assembly
-
Bake the Clay:
arrange your beads on a baking sheet or bead rack. Bake according to the manufacturer’s instructions for your specific brand of polymer clay (usually around 275°F/135°C for 15-30 minutes). -
Cool Down:
Allow the beads to cool completely before handling. They are slightly soft when hot and harden as they cool. -
Glaze (Optional):
For a shiny finish like the reference photo, apply a coat of gloss glaze or UV resin to each bead and let it cure or dry. -
String the Beads:
Cut a piece of elastic cord about 10 inches long. Thread your checkerboard beads onto the cord until the bracelet reaches your desired length. -
Tie the Knot:
Tie a secure surgeon’s knot (right over left, left over right) with the elastic. Pull it tight to secure. -
Secure and Trim:
Add a tiny drop of super glue or jewelry cement to the knot for extra security. Once dry, trim the excess cord and tuck the knot inside one of the bead holes.
Smeared Pattern?
If the checkerboard looks messy after rolling, let the cane rest in the fridge for 20 mins before slicing. Firm clay holds the sharp geometric lines better.
Now you have a striking, mod-style accessory ready to wear or gift
Tiny Daisy Spacer Flower Bead Clay Bracelet
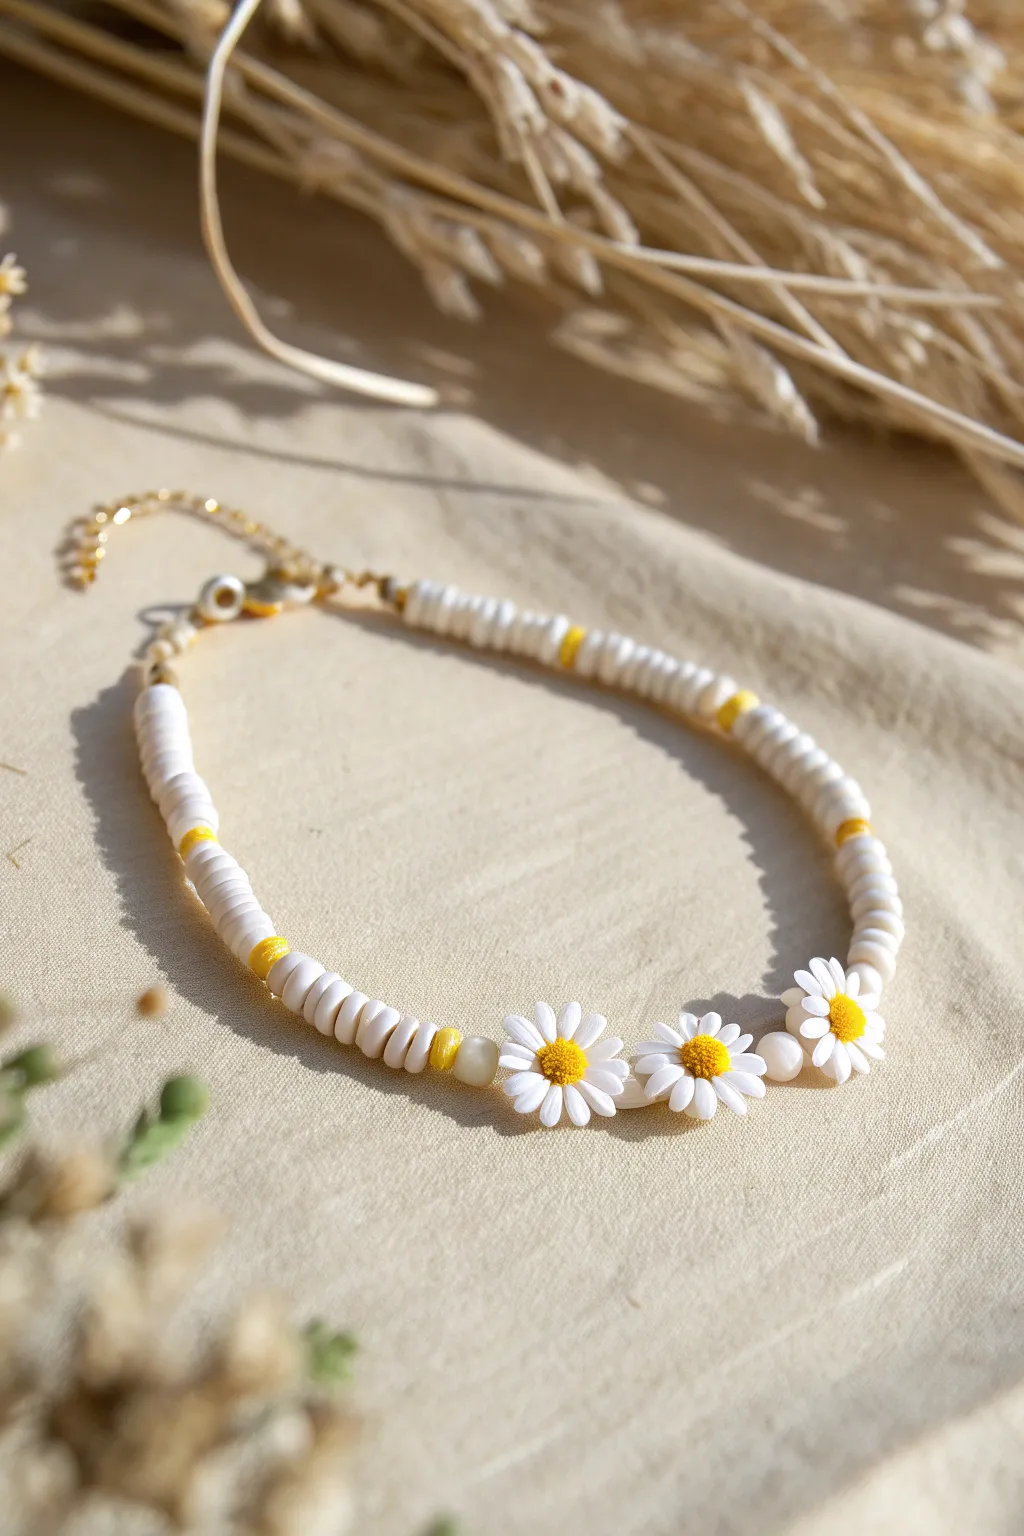
Brighten up your accessories collection with this cheerful bracelet featuring dainty daisy beads and crisp white clay discs. The rhythmic pattern of yellow spacers and heishi beads creates a sunny, casual look that’s perfect for stacking or wearing solo.
Step-by-Step Guide
Materials
- 6mm or 4mm flat round white polymer clay heishi beads
- Small yellow seed beads (approx. 11/0 size)
- 3 white and yellow polymer clay daisy spacer beads
- Beading wire (approx. 0.38mm or 0.45mm)
- 2 gold clam shell bead tips (calottes) or crimp covers
- 2 crimp beads suitable for your wire size
- Gold lobster claw clasp
- Gold extender chain (approx. 1-2 inches)
- 2 gold jump rings (4mm or 5mm)
- Flat-nose pliers
- Wire cutters
- Bead stopper or tape
Step 1: Setting the Pattern
-
Prepare your wire:
Cut a length of beading wire about 9 to 10 inches long. This gives you plenty of extra room to work with the clasps later without beads sliding off. -
Secure the end:
Attach a bead stopper to one end of the wire. If you don’t have one, a piece of masking tape folded over the end works just fine to catch runaway beads. -
Start the sequence:
Begin threading your beads with a pattern of white heishi beads. Thread on approximately 5 to 6 white clay discs. -
Add a pop of color:
Slide on one yellow seed bead. This little burst of yellow breaks up the white and ties in perfectly with the daisy centers coming later. -
Establish the rhythm:
Repeat the pattern: add another set of 5 to 6 white heishi beads, followed by a single yellow seed bead. Continue this sequence until you have completed about one-third of your desired bracelet length.
Step 2: Creating the Centerpiece
-
Transition to flowers:
After your last section of white discs, slide on one additional yellow seed bead to act as a distinct border before the floral section. -
Add the first bloom:
Thread on your first polymer clay daisy bead. Make sure the hole runs horizontally through the flower so it sits flat against the wrist. -
Space the flowers:
Between the daisies, add a small grouping of beads to separate them slightly. I like to use one white clay disc sandwiched between two yellow seed beads here for a delicate join. -
Thread the second daisy:
Add the second daisy bead, orienting it the same way as the first so the petals align nicely. -
Repeat the spacer group:
Add your separator pattern again: one yellow seed bead, one white heishi bead, and one yellow seed bead. -
Finish the floral trio:
Slide on the third and final daisy bead to complete the charming centerpiece of the bracelet.
Uneven Daisies?
If the daisy beads flip over or twist too much, try stringing them on a slightly thicker wire or use two strands of beading thread to fill the hole better and stabilize them.
Step 3: Finishing Touches
-
Mirror the pattern:
Now, reverse your original pattern. Start with a yellow seed bead, then 5 to 6 white heishi beads. Continue repeating this sequence until the second side matches the length of the first side. -
Check the fit:
Wrap the unfinished strand around your wrist to check the size. Remember the clasp will add about half an inch, so stop beading slightly short of your full wrist measurement. -
Prepare the first closure:
Remove the bead stopper. Thread the end of the wire through the small hole in the bottom of a clam shell bead tip, so the cup faces the beads. -
Crimp firmly:
Thread a crimp bead onto the wire, nestled inside the clam shell cup. Use your flat-nose pliers to smash the crimp bead flat and secure it tight against the wire. -
Close the shell:
Trim the excess wire very close to the crimp bead. Gently use your pliers to close the two halves of the clam shell over the smashed crimp, forming a neat gold ball. -
Repeat on the other side:
Repeat the clam shell and crimp process on the other end of the bracelet. Ensure you pull the wire taut so there are no gaps between beads before crimping. -
Attach hardware:
Using your pliers, open a jump ring and hook it through the loop of one clam shell tip. Slide on your lobster clasp before closing the ring securely. -
Add the extender:
Open a second jump ring, hook it through the other clam shell loop, and attach your extender chain. Close the ring to finish the project.
Make It a Set
Create a matching choker necklace using the same pattern but spacing the daisies further apart (every 2 inches) for a dainty ‘station’ necklace look.
Now you have a sweet, sunny accessory ready to wear for brunch or a day at the beach
Speckled Terrazzo-Style Polymer Clay Bead Bracelet
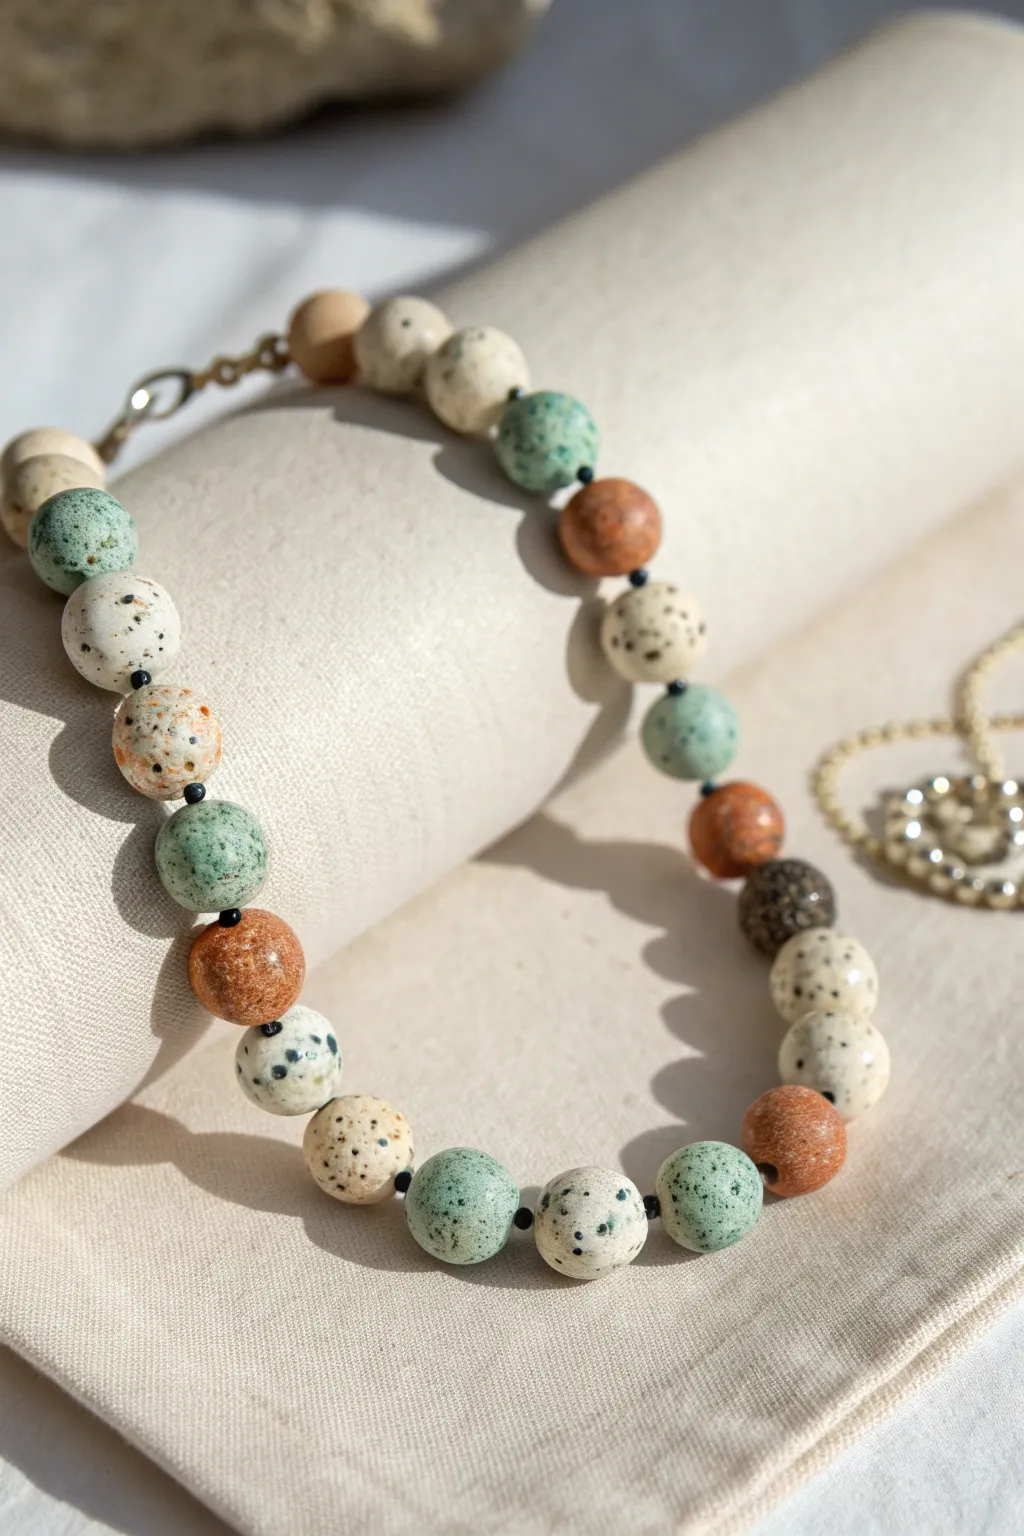
Mimic the organic beauty of granite and river rock with this stunning terrazzo-style bead bracelet. By mixing polymer clay with spices and pigments, you can achieve a realistic stone-like finish that pairs perfectly with warm earth tones.
How-To Guide
Materials
- Polymer clay (white, beige, translucent, terracotta, teal)
- Black pepper (finely ground and coarse)
- Dried oregano or dried parsley flakes
- Acrylic paint (black and brown)
- Bead piercing pins or toothpicks
- Sandpaper (various grits from 400 to 1200)
- UV resin or gloss varnish
- Elastic beading cord (clear or black)
- Small black seed beads (spacer beads)
- Jewelry clasp and crimp beads (optional, if not using elastic knot)
- Oven for baking
Step 1: Creating the Clay Mixtures
-
Base Color Prep:
Condition your polymer clay blocks by kneading them until soft. You will need three primary base colors for this specific look: a creamy white, a warm terracotta rust, and a muted sage-teal. -
Simulating Granite (White Beads):
Take your white clay and mix in a pea-sized amount of translucent clay. Sprinkle in coarse black pepper and a tiny pinch of dried oregano. Knead thoroughly until the spices are evenly distributed, creating a speckled ‘Dalmatian’ stone effect. -
Mixing Earthy Rust:
For the terracotta beads, use the rust-colored clay as a base. To give it depth, I like to mix in a tiny streak of translucent clay and a very light dusting of fine black pepper. This subtle texture prevents the bead from looking too flat and plastic-like. -
Creating the Sage Stone:
Blend the teal clay with a substantial amount of white to mute the color into a soft sage green. Add a pinch of coarse pepper or even dark craft sand to mimic the texture of mossy river stones. -
The Dark Stone Accent:
Create a small amount of dark, brownish-grey clay for the accent bead. Mix brown and black clay leftovers together, not fully blending them, to create a marbled, rocky appearance.
Step 2: Forming and Baking
-
Rolling Uniform Spheres:
Pinch off equal amounts of clay from your various mixtures. Roll them between your palms to create smooth, round spheres approximately 10-12mm in diameter. Aim for variation in color pattern, alternating between the white, rust, and sage mixtures. -
Piercing the Beads:
Gently twist a bead piercing pin or toothpick through the center of each sphere. Rotate the bead as you push the tool through to prevent distorting the round shape. -
Texturing (Optional):
For an extra rugged look on the rust and sage beads, gently roll them over a piece of coarse sandpaper before baking to imprint a pitted texture. -
Baking:
Place your pierced beads on a baking sheet lined with cardstock or folded parchment paper to prevent flat spots. Bake according to the manufacturer’s instructions for your specific brand of clay (usually 275°F/135°C for 30-45 minutes). -
Cooling and Sanding:
Allow the beads to cool completely. Once hard, wet-sand the white ‘granite’ beads under running water using fine-grit sandpaper to buff away any fingerprints and reveal the spice inclusions more clearly. -
Adding Paint Specs:
For extra detail, flick a stiff toothbrush loaded with watered-down black acrylic paint over the cooled beads to add tiny external speckles.
Sticky Spices?
If your peppercorns or spices keep falling out of the clay while rolling, the clay might be too dry. Add a drop of clay softener or baby oil to help the inclusions stick.
Step 3: Assembly
-
Planning the Pattern:
Lay out your beads on a bead board or towel. The pattern shown uses an alternating sequence: White granite, Sage green, Rust, White granite, Sage green… and so on. -
Stringing the Beads:
Cut a length of elastic cord about 10 inches long. Begin threading the beads, placing a tiny black seed bead between each large clay bead. These spacers act as darkened mortar and help the main colors pop. -
Checking the Fit:
Wrap the strung beads around your wrist to check the size. Add or remove beads as necessary for a comfortable fit. -
Securing the Knot:
If using elastic, tie a surgeon’s knot (looping through twice) and pull tight. Add a drop of superglue or clear nail polish to the knot for security before trimming the excess cord. -
Alternative Clasp Finish:
If you prefer a non-stretchy bracelet, use beading wire and attach a lobster clasp and jump ring to the ends using crimp beads and pliers.
Matte vs. Gloss
Keep the finish matte for a natural rock look, or coat the ‘granite’ beads in UV resin to make them look like polished quartz counter-tops.
Now you have a sophisticated, nature-inspired accessory that looks like it came straight from a boutique
Two-Color Marble Swirl Clay Bead Bracelet
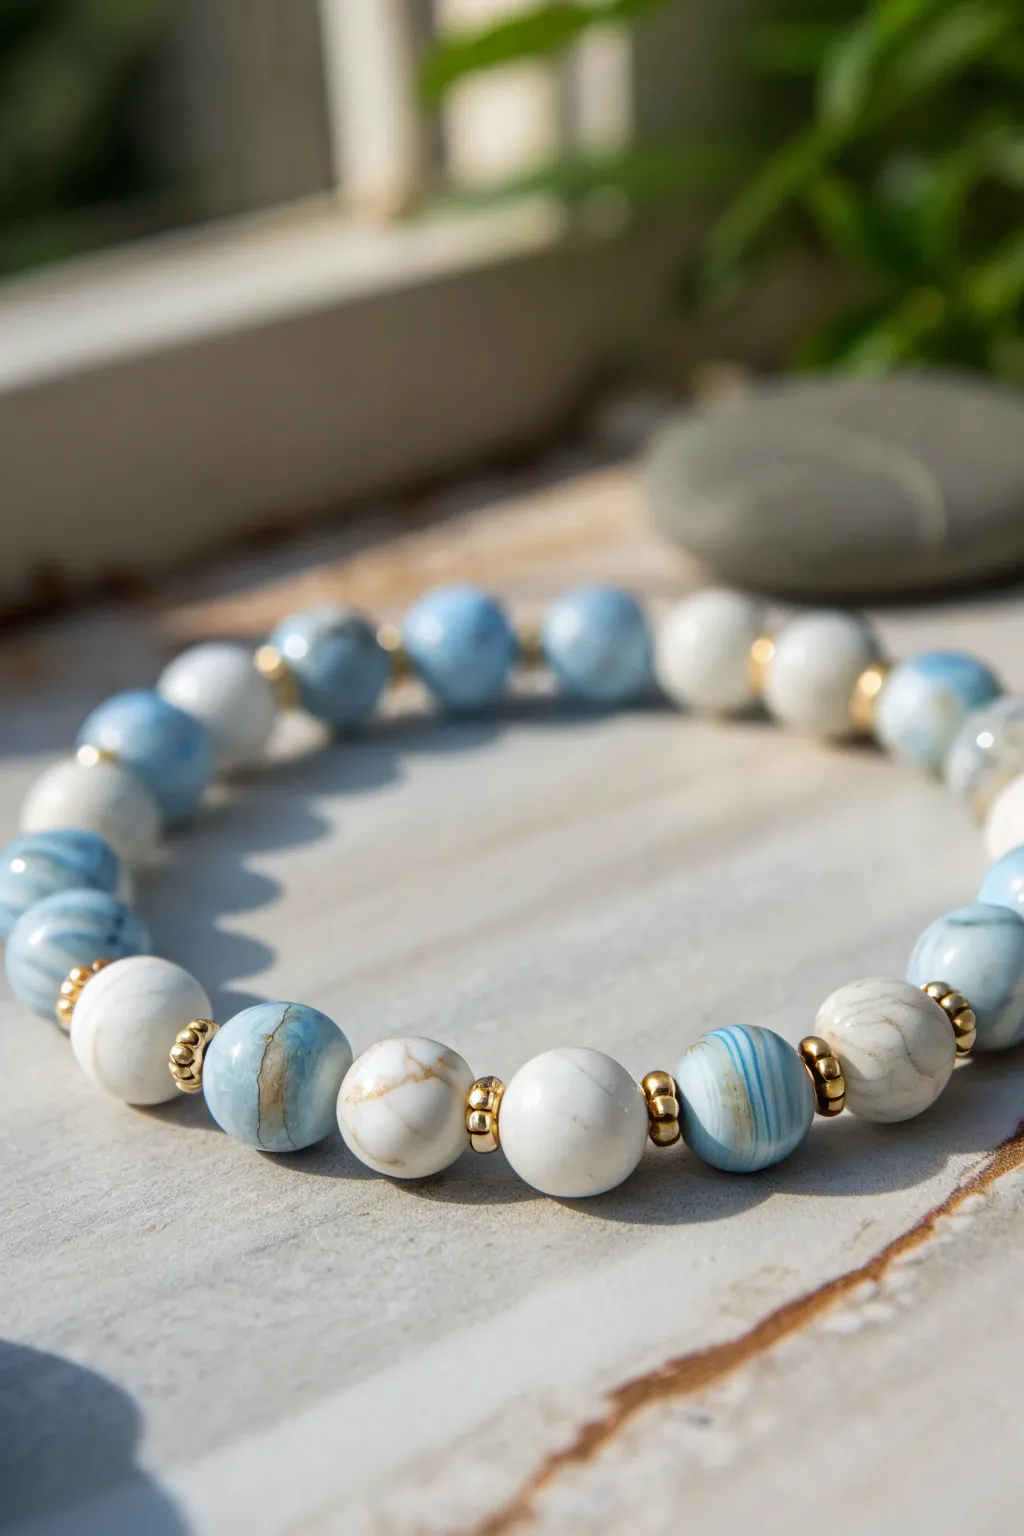
Create a sophisticated piece of jewelry that mimics high-end gemstones using only polymer clay. This project features stunning sky-blue and white marbled beads accented with gold spacers for a polished, professional finish.
Step-by-Step
Materials
- Polymer clay (White)
- Polymer clay (Translucent)
- Polymer clay (Light Blue or Turquoise)
- Polymer clay (Gold metallic – optional for veining)
- Gold seed beads or spacer rondelles
- Elastic stretch cord (0.7mm or 0.8mm)
- Bead piercing pins or toothpicks
- Ceramic tile or glass work surface
- Clay roller or pasta machine
- Tissue blade or sharp craft knife
- Wet/dry sandpaper (400-1000 grit)
- Gloss glaze or resin (optional)
- Super glue (gel formula)
Step 1: Preparing the Clay
-
Conditioning:
Start by warming up your white, translucent, and blue clay separately in your hands. Knead them until they are soft, pliable, and free of cracks. -
Creating the base logs:
Roll each color into a long snake or log, roughly the thickness of a pencil. Aim for equal amounts of white and blue, with a slightly smaller amount of translucent clay. -
Twisting the colors:
Lay the three logs side-by-side and twist them together tightly like a candy cane. This initiates the blending process that creates the marble effect. -
Folding and rolling:
Fold the twisted log in half and roll it out again. Repeat this twist-fold-roll process 3-4 times. Stop when you see distinct swirls but before the colors mush into a solid light blue.
Cold Water Shock
Only twist the clay when it’s warm! If your swirls get muddy, pop the log in the fridge for 5 mins before slicing. Cold clay holds the pattern sharper.
Step 2: Forming the Beads
-
Sizing the portions:
Roll your marbled log into a consistent thickness. Use your tissue blade to slice the log into equal-sized segments to ensure your beads are uniform. -
Rolling spheres:
Take a segment and roll it briskly between your palms. Use a light touch at first to form a ball, then apply slightly more pressure to smooth out any seams. -
Adding gold veins (Optional):
For the subtle veining seen in the image, roll a very thin thread of metallic gold clay. Wrap tiny bits around your beads and gently re-roll the bead to embed the gold flush with the surface. -
Checking the shape:
Inspect each bead. If the marble pattern looks too linear, give the bead a slight pinch to distort the clay, then roll it back into a sphere.
Glazed Finish
For a high-shine look like polished stone, coat each bead in UV resin or water-based polyurethane gloss after baking and before stringing.
Step 3: Piercing and Baking
-
Piercing the holes:
Hold a bead gently without squishing it. Using a bead pin or toothpick, slowly drill a hole through the center. I find twisting the pin as you push helps prevent the exit hole from distorting. -
Refining the hole:
Before removing the pin, smooth the clay around the entry and exit points with your finger to ensure a clean edge. -
Arranging for baking:
Place your pierced beads on a ceramic tile or baking sheet. You can arrange them on a bed of cornstarch or accordion-folded cardstock to prevent flat spots from forming on the bottom. -
Baking:
Bake the beads according to your specific brand of clay’s instructions (usually around 275°F/135°C for 30 minutes). Let them cool completely before handling.
Step 4: Finishing and Assembly
-
Sanding:
Once cool, submerge beads in a small bowl of water and sand them with wet/dry sandpaper. Start with 400 grit to remove fingerprints and finish with 1000 grit for a silky smooth feel. -
Buffing (Optional):
Rub the beads vigorously with a piece of denim or a soft cloth to bring out a natural sheen. -
Measuring the cord:
Cut a piece of elastic cord about 10-12 inches long. Pre-stretch the cord by pulling it firmly a few times; this prevents the bracelet from drooping later. -
Check the pattern:
Lay out your design on a bead board or towel. Alternate one clay bead with one gold spacer bead, just like the image shows. -
Stringing:
Thread the beads onto the elastic cord, maintaining your alternating pattern. Check the length around your wrist to ensure a comfortable fit. -
Tying the knot:
Secure the bracelet with a surgeon’s knot (loop the right end over the left, then loop it through twice before pulling tight). Add a tiny drop of super glue to the knot. -
Final trim:
Allow the glue to dry completely for a few minutes, then trim the excess cord ends carefully close to the knot. Hide the knot inside one of the clay beads if the hole is large enough.
Now you have a stunning, professional-looking bracelet that captures the elegance of natural stone with the versatility of clay
Stamped Texture Air-Dry Clay Bead Bracelet With Rustic Finish
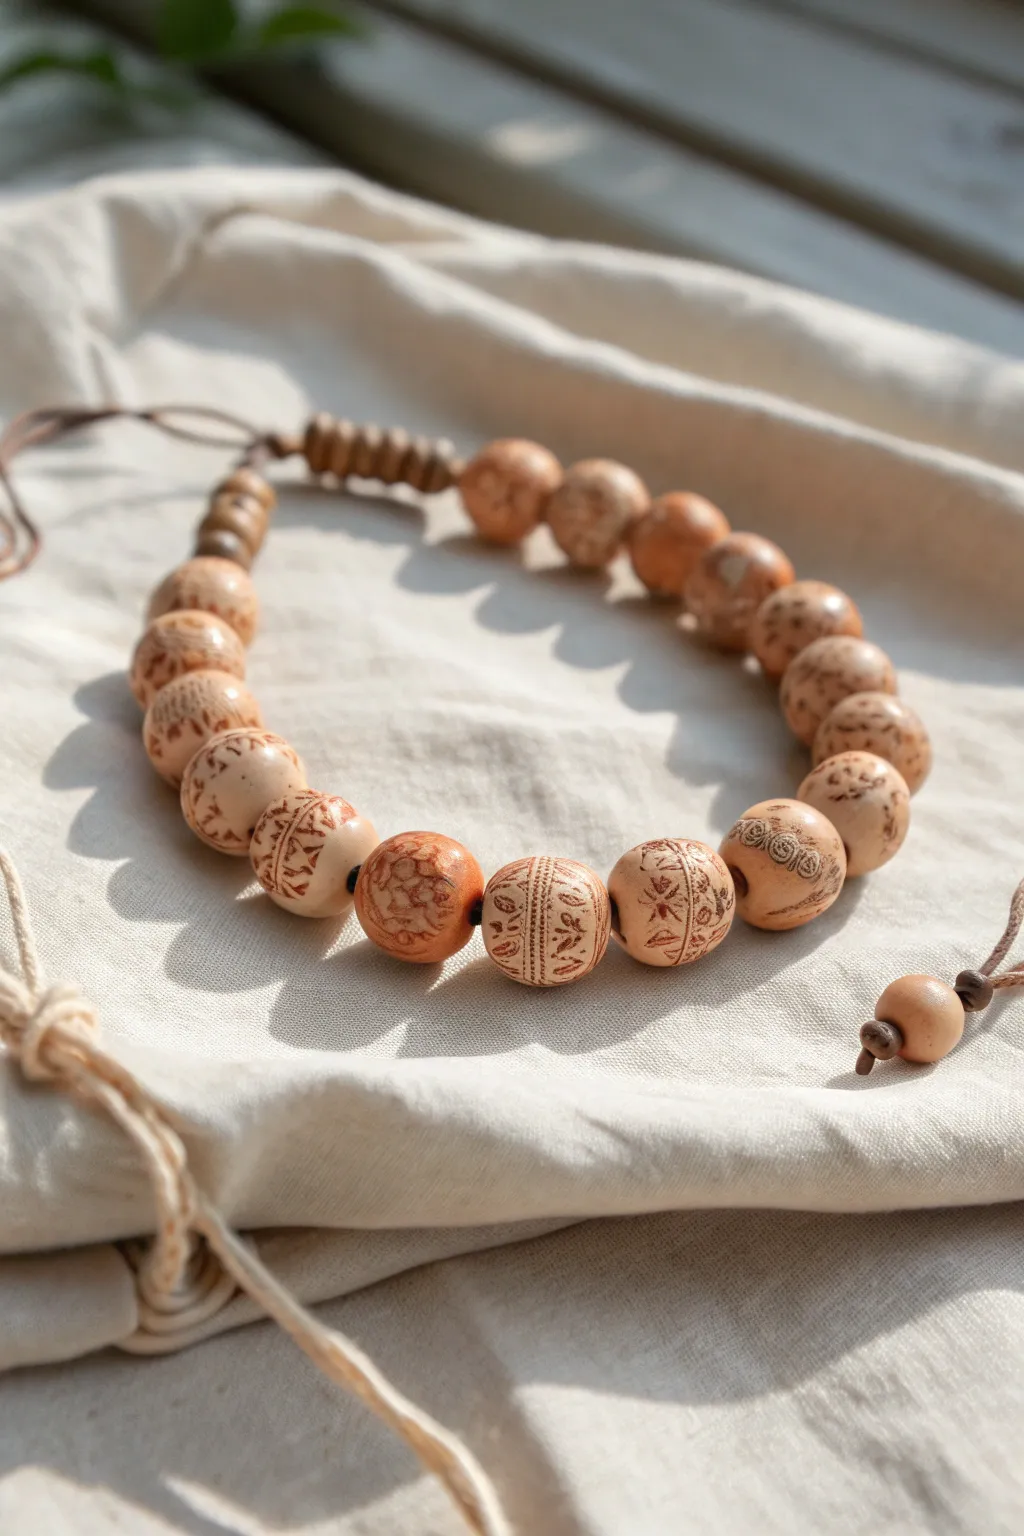
Create a stunning statement piece with the warm, earthy look of ancient pottery using simple air-dry clay. These stamped beads feature intricate, textured patterns and a natural antiqued finish that pairs perfectly with casual linen or denim outfits.
Step-by-Step Tutorial
Materials
- White or terracotta air-dry clay (e.g., DAS or Crayola Air Dry)
- Rubber stamps with small floral or geometric motifs
- Acrylic paint (burnt umber or deep brown)
- Matte sealant or Mod Podge
- Waxed cotton or hemp cord (1mm thickness)
- Knitting needle, wooden skewer, or bead reamer
- Fine-grit sandpaper (320-400 grit)
- Water and sponge
- Soft cloth or rag
- Small bowl of water
Step 1: Shaping the Beads
-
Condition the clay:
Begin by kneading a chunk of your air-dry clay until it is soft, pliable, and free of cracks. If it feels too dry, dip your fingers in water and work the moisture in. -
Portion the spheres:
Pinch off equal amounts of clay, roughly the size of a large grape or cherry tomato. Roll them between your palms to create smooth, consistent spheres. You’ll need about 15-18 main beads. -
Create smaller spacer beads:
Make about 6-8 much smaller balls of clay for the ends and closure mechanism. These should be about a quarter of the size of your main beads. -
Pierce the holes:
While the clay is still soft, gently pierce the center of each bead with a knitting needle or skewer. Rotate the tool as you push through to prevent the bead from squashing, ensuring the hole is large enough for your cord.
Stamp Source Secret
Don’t have rubber stamps? Buttons with raised intricate patterns work perfectly. Press the button face into the clay to leave a unique detailed impression.
Step 2: Adding Texture & Pattern
-
Prepare for stamping:
Let the beads sit for about 15-20 minutes. You want the surface to firm up slightly so it takes an impression without deforming the entire sphere. -
Apply the stamps:
Gently press your small rubber stamps into the surface of the larger beads. Rotate the bead to stamp different sides, creating a continuous pattern band or random motifs depending on your preference. -
Add detail by hand:
For variety, use the tip of your skewer or a needle tool to etch lines, dashes, or dots around the stamped images on selected beads. This etched look adds to the primitive aesthetic. -
Refine the shape:
The stamping process might have slightly misshapen the holes. Gently re-insert your skewer to ensure the pathways remain clear and round. -
Dry completely:
Place the beads on a clean cloth or parchment paper. Let them dry for at least 24-48 hours. I find turning them over halfway through helps them dry evenly.
Step 3: Finishing the Surface
-
Smooth imperfections:
Once bone dry, lightly sand any rough edges or fingerprints with fine-grit sandpaper. Be careful not to sand away your stamped textures. -
Apply the antiquing wash:
Mix a small amount of burnt umber acrylic paint with water (about a 1:1 ratio). Brush this dark wash over the entire bead, ensuring it gets deep into the stamped crevices. -
Wipe back:
Immediately wipe the surface with a damp cloth. The paint will stay in the recessed lines but wipe off the high points, highlighting the pattern beautifully. -
Seal the beads:
Protect your work with a coat of matte sealant. This mimics the look of unglazed pottery while making the beads more durable against moisture.
Fixing Crack Lines
If hairline cracks appear while drying, don’t panic. Mix a tiny bit of fresh clay with water to make a paste (slip) and fill the crack, then smooth it over.
Step 4: Assembly
-
Measure the cord:
Cut a length of cord approximately 24 inches long. Fold it in half if you want a double-strand look, or use a single thicker strand. -
String the beads:
Thread your beads onto the cord. You can alternate the heavily patterned beads with simpler ones or use the small spacer beads between the larger focal beads. -
Create the closure:
Thread the smaller end beads onto the cord tails. Tie overhand knots at the very ends to secure them. -
Adjustable knot:
Cross the two cord ends and use a separate short piece of cord to tie a square knot or macrame sliding knot over the crossed strands. This allows the bracelet to expand.
Enjoy wearing your handcrafted jewelry that carries a touch of artistic history on your wrist
Mixed-Shape Statement Clay Bracelet With Dangling Tassel
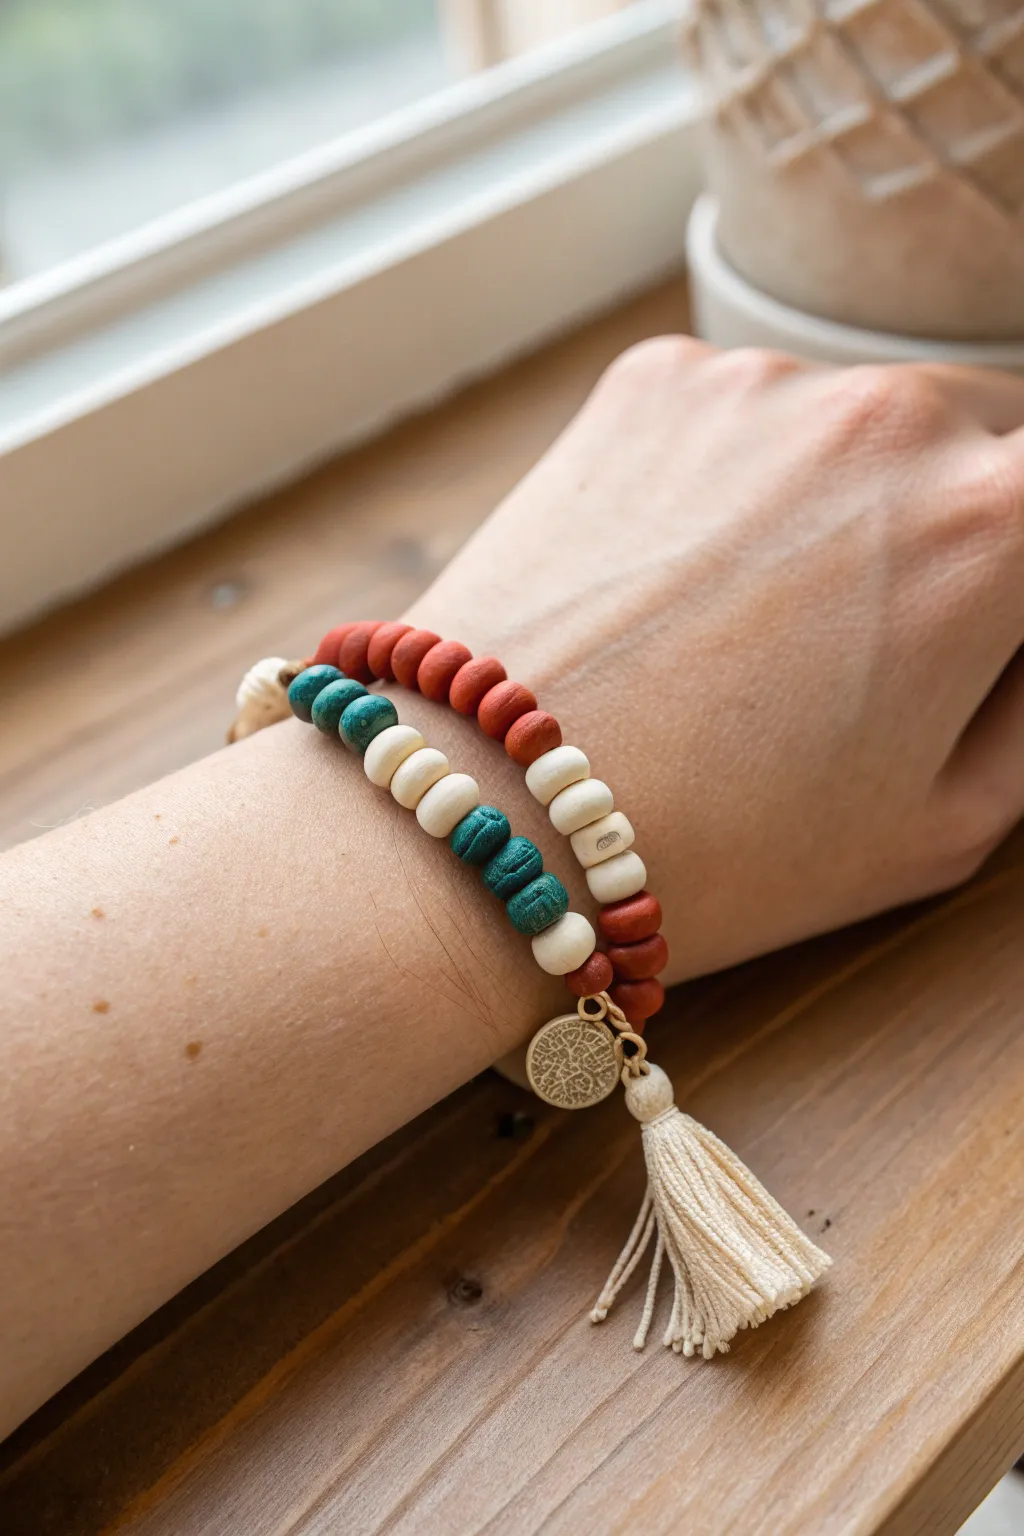
Embrace an earthy, bohemian vibe with this double-strand bracelet featuring handmade-style clay disc beads in rust, teal, and cream. The organic texture of the beads combined with a soft tassel and gold charm creates a relaxed yet stylish accessory perfect for stacking.
Step-by-Step
Materials
- Polymer clay in three colors: terracotta/rust, deep teal, and cream/off-white
- Elastic stretch cord (0.7mm or 0.8mm)
- Small round clay cutter or a drinking straw (for consistent bead size)
- Needle tool or toothpick (for piercing holes)
- Baking sheet and parchment paper
- Cotton embroidery floss (cream color) for the tassel
- Gold tone jump rings (4mm and 6mm)
- Gold tone ‘Tree of Life’ or coin charm
- Jewelry pliers (flat nose)
- Super glue or jewelry cement
- Scissors
- Small piece of cardboard (approx. 1.5 inches wide)
Step 1: Crafting the Clay Beads
-
Condition and Roll the Clay:
Start by conditioning your terracotta, teal, and cream polymer clay separately until they are soft and pliable. Roll each color out into a thick snake, then flatten it slightly or use a rolling pin to create a slab about 3-4mm thick. -
Cut the Disc Shapes:
Using a small round cutter or a modified plastic straw, punch out numerous small circles from each color slab. You will need about 30-40 beads for a double-wrap bracelet, depending on your wrist size, but it’s always smart to make extras. -
Shape the Edges:
Take each clay circle and gently roll the edges between your thumb and forefinger to soften the sharp cuts. This gives them that organic, worn-stone look seen in the photo rather than a perfectly sharp factory-made appearance. -
Pierce the Holes:
Use a needle tool or toothpick to carefully pierce a hole through the center of each bead. Rotate the tool gently as you push through to prevent distorting the bead’s round shape. -
Bake the Beads:
Arrange your beads on a baking sheet lined with parchment paper. Follow the baking temperature and time instructions specific to your brand of polymer clay (usually around 275°F for 15-30 minutes). Let them cool completely before handling.
Step 2: Creating the Tassel
-
Wrap the Floss:
Cut a piece of cardboard to about 1.5 inches wide. Wrap your cream embroidery floss around this cardboard piece approximately 20-30 times, depending on how full you want the tassel to be. -
Secure the Top:
Slide a separate 6-inch piece of floss under the wrapped loops at one end of the cardboard. Tie it tightly in a double knot to secure the top of your tassel bundle. -
Cut the Loops:
Slide the bundle off the cardboard. Taking your scissors, cut through all the loops at the bottom end opposite of where you just tied your knot. -
Create the Neck:
Cut another piece of floss about 10 inches long. Wrap this piece tightly around the bundle about 1/4 inch down from the top knot to create the tassel’s head. Tie it off securely and trim the excess ends or tuck them inside the tassel with a needle. -
Trim to Size:
Comb through the strands with your fingers and trim the bottom of the tassel evenly so it looks neat and uniform.
Smoother Sliding Beads
After baking, ream the bead holes slightly with a small round file or a drill bit twisted by hand. This removes any internal clay burrs, ensuring they slide smoothly on the elastic.
Step 3: Assembly
-
Prepare the Charm Assembly:
Using your pliers, open a large jump ring. Slide on your finished tassel and your gold coin charm. leave the ring open for a moment. -
Measure the Elastic:
Cut a piece of elastic cord about 10 inches longer than your double-wrist measurement. This extra length makes tying the knot much easier later on. -
Begin Stringing Patterns:
Start threading your cooled clay beads onto the elastic. I like to lay out my pattern first: try sections of solid rust, followed by alternating patterns of cream, teal, and cream. -
Build the Double Strand:
Continue stringing until you have enough length to wrap around your wrist twice comfortably. The pattern in the image uses large blocks of color (like 10 rust beads) broken up by smaller striped sections (cream-teal-cream). -
Add the Focal Point:
Once your strands are fully beaded, slide the open jump ring carrying the tassel and charm onto the elastic cord. Ideally, place this between two contrasting beads for a nice visual break. -
Close the Jump Ring:
Use your flat nose pliers to securely close the jump ring so the charm and tassel can’t slip off the cord. -
Tie the Knot:
Bring the two ends of the elastic cord together. Tie a surgeon’s knot (a square knot with an extra pass through the loop) and pull it tight. Ensure there are no gaps between the beads, but not so tight that the bracelet buckles. -
Secure the Knot:
Place a tiny drop of super glue or jewelry cement directly onto the knot. Let it dry for a minute before trimming the excess elastic tails close to the knot.
Level Up: Texture Play
Before baking, gently press a piece of coarse sandpaper or a rough sponge onto the surface of your rust-colored clay beads to mimic the porous texture of real terracotta or lava stone.
Wear your new bracelet alone as a statement piece or craft a few more in different color palettes for a full arm party