Whenever I need a quick creative win, I reach for polymer clay because it’s perfect for small, satisfying projects with big personality. Here are my favorite polymer clay ideas—starting with the classics and drifting into the delightfully unexpected.
Modern Polymer Clay Earrings with Simple Arch Shapes
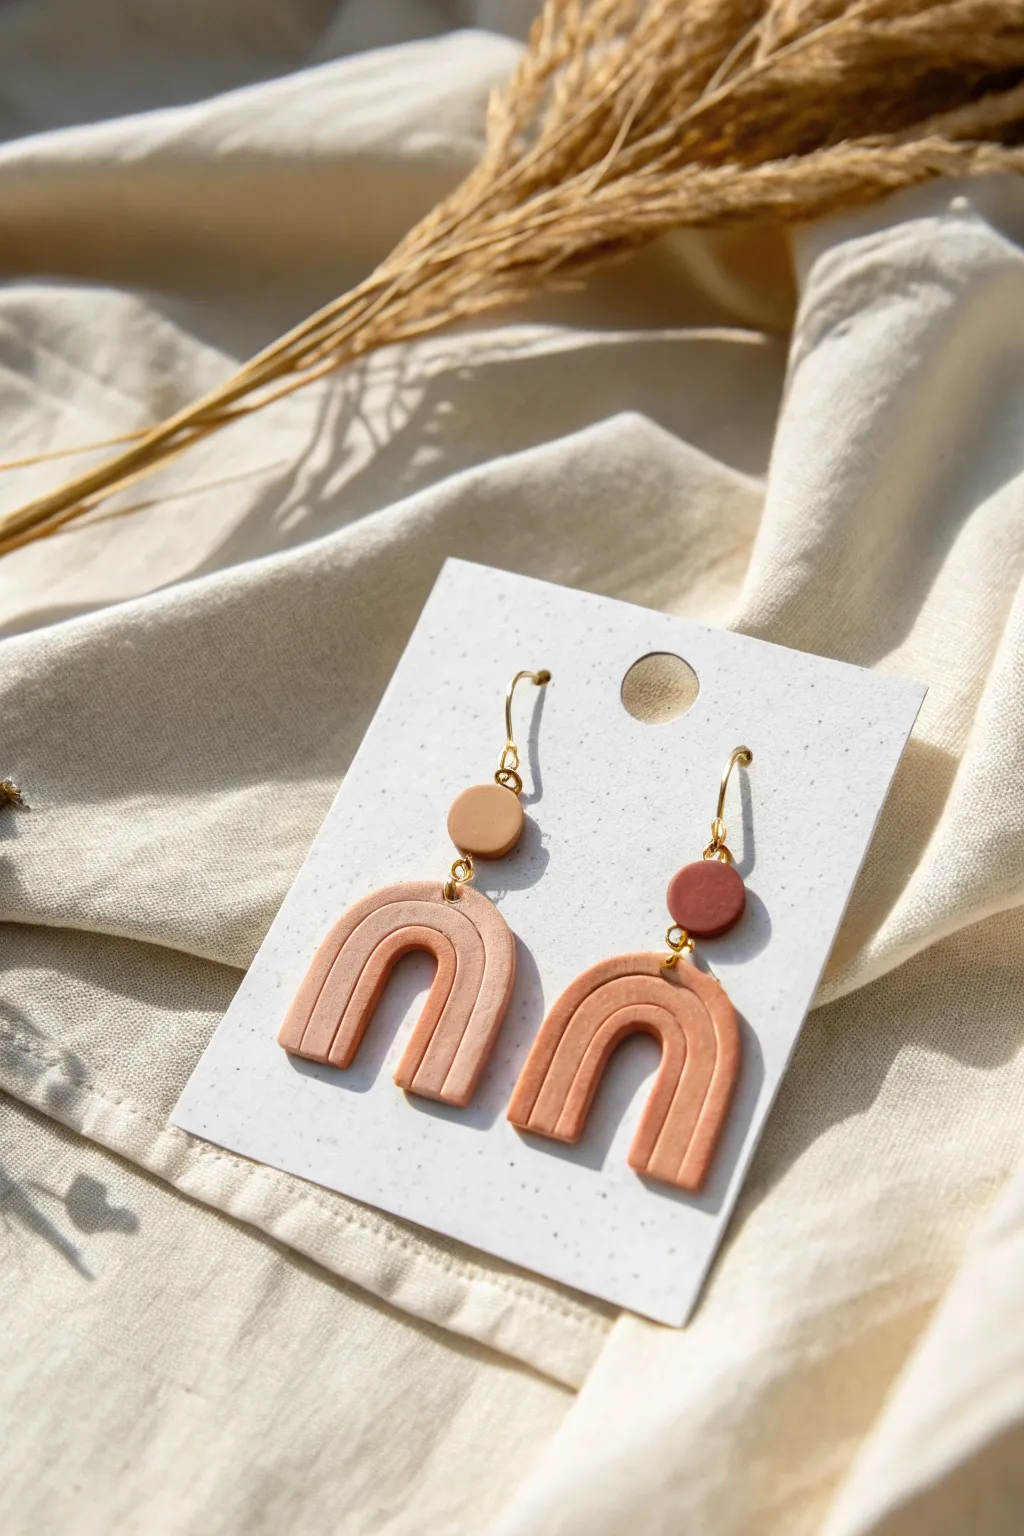
Embrace earthy warmth with these minimalist arch earrings, featuring a lovely textured groove design that mimics hand-carved pottery. The soft terracotta and muted clay tones make them a versatile accessory perfect for an understated, boho-chic look.
Step-by-Step
Materials
- Polymer clay in terracotta/brick red and beige/light tan colors
- Rolling pin or pasta machine
- Arch-shaped clay cutter (approx. 1 inch wide)
- Small circle cutter (approx. 0.25 inch diameter)
- Needle tool or toothpick
- Detailed clay carving tool or a very thin round object (like a blunt needle)
- Jump rings (gold finish)
- Earring hooks (gold finish)
- Jewelry pliers (flat nose and round nose)
- Small hand drill or piercing tool
- Smooth ceramic tile or glass work surface
- Oven for baking
Step 1: Preparing the Clay
-
Condition the Clay:
Begin by warming the terracotta clay in your hands, kneading it thoroughly until it is soft, pliable, and free of cracks. Do the same for a small amount of the lighter beige clay. -
Mix Custom Shades:
To achieve the subtle two-tone look seen in the connectors, you might want to mix a tiny bit of the beige into a portion of the terracotta to create a slightly lighter, muted accent color for the top circles. -
Roll Out the Slab:
Using your rolling pin or a pasta machine on a medium setting (approx. 3mm thick), roll out your main terracotta clay into a smooth, even sheet. Place it on your tile or glass work surface so you don’t have to move the raw shapes later.
Clean Edges Pro Tip
Before baking, dip your fingertip in cornstarch or water and gently run it along the cut edges of your clay shapes. This smooths out any harsh cutter lines for a polished finish.
Step 2: Cutting and Texturing
-
Cut the Arches:
Press your arch-shaped cutter firmly into the clay slab to create two identical arch shapes. Lift the cutter straight up to ensure clean edges. -
Create the Top Circles:
Roll out a small slab of your slightly lighter or contrasting clay color. Use the small circle cutter to punch out two discs that will serve as the connectors. -
Mark the Guidelines:
Lightly trace the shape of the inner arch onto the clay surface using a needle tool, just to give yourself a guide for where the grooves will go. Don’t dig deep yet. -
Carve the Detail Lines:
Using a dull needle tool or a specialized carving tool, carefully press or drag lines following the curve of the arch. You want to create three distinct raised channels, so you’ll need two deep grooves separating them. -
Smooth the Grooves:
If I notice the clay piling up on the edges of my lines, I gently pat it down with a fingertip to soften the look. The goal is a molded, organic appearance rather than a sharp, jagged cut.
Level Up: Speckled Effect
Mix black pepper or dried used coffee grounds into your clay before rolling it out. This creates a stunning faux-stone or ceramic granite look without needing special paints.
Step 3: Baking and Assembly
-
Pierce Holes:
Before baking, use a needle tool or toothpick to poke holes at the very top center of each arch and at the bottom and top of each circle piece. Ensure the holes are large enough for your jump rings. -
Final Inspection:
Check for any lint or fingerprints. You can gently wipe the surface with a tiny amount of baby oil or rubbing alcohol to smooth out imperfections. -
Bake:
Place your tile with the clay pieces into the oven. Bake according to your brand of clay’s specific instructions—usually around 275°F (135°C) for 30–45 minutes. Longer baking makes the clay stronger. -
Cool Down:
Allow the clay to cool completely inside the oven or on the counter before handling. The clay is fragile while hot but hardens as it cools. -
Open Jump Rings:
Using two pairs of pliers, twist your jump rings open sideways (never pull them apart outward) to preserve their circle shape. -
Connect Pieces:
Thread an open jump ring through the top hole of the arch and the bottom hole of the circle component. Close the jump ring securely using the pliers. -
Attach Earring Hooks:
Open the loop at the bottom of your earring hook (or use a small jump ring if needed) and attach it to the top hole of the circle component. -
Secure Everything:
Give all rings a final squeeze with your pliers to ensure no gaps are left where the components could slip out.
Now you have a gorgeous pair of modern, earthy earrings ready to wear or gift to a friend


Tiny Polymer Clay Charms for Keychains and Zippers
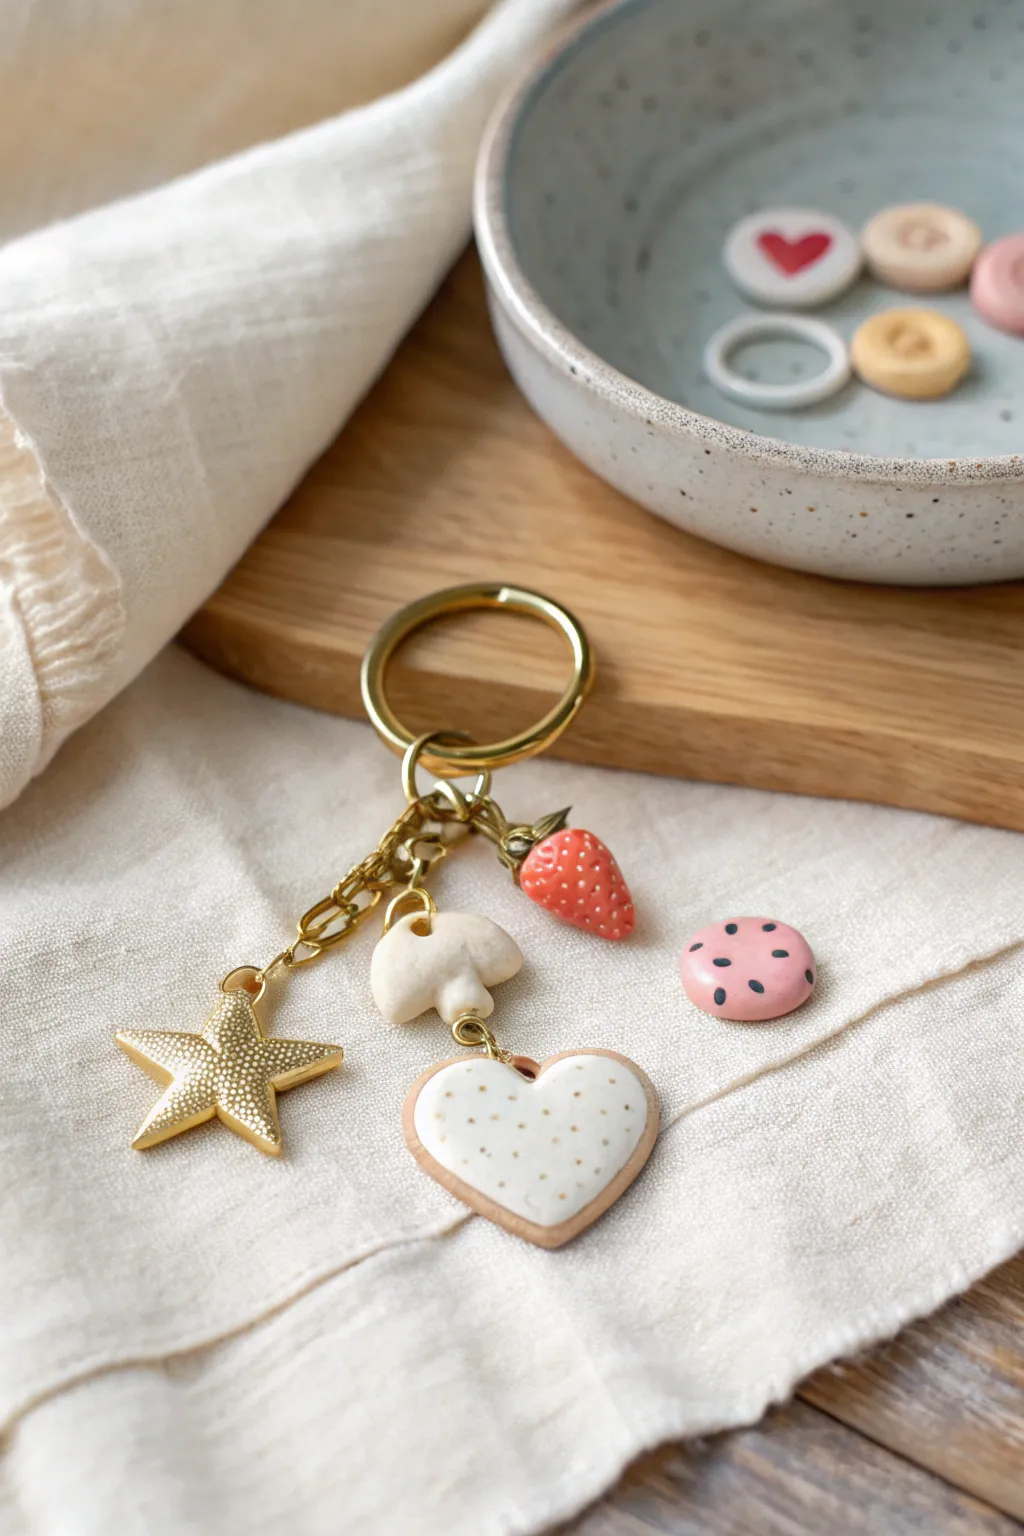
Create a delightful collection of miniature charms including a classic iced heart cookie, a tiny strawberry, a whimsical mushroom, and a textured star. These sweet, durable charms are finished with gold findings for a polished look perfect for keys or zipper pulls.
Step-by-Step Tutorial
Materials
- Polymer clay (White, Red, Beige/Tan, Pink, Gold/Metallic)
- Gold keychain ring with chain links and jump rings
- Eye pins (gold tone)
- Liquid polymer clay (white)
- Sculpting tools (needle tool, ball stylus)
- Texture sponge or sandpaper
- Gold acrylic paint or gold mica powder (if not using metallic clay)
- Gloss glaze (optional)
- Oven and baking sheet
Step 1: Sculpting the Heart Cookie
-
Shape the base:
Condition a small ball of beige or tan clay. Flatten it gently to about 4mm thickness and use a small heart cutter or a blade to shape it into a heart biscuit. -
Texture the edges:
Use a toothbrush or a texture sponge to gently tap the sides and edges of the heart, giving it a realistic baked cookie texture. -
Add the icing:
Mix a small amount of liquid polymer clay with white solid clay until you have a thick paste (like frosting), or simply cut a thinner white heart shape and press it onto the beige base. Smooth the edges so it looks like royal icing. -
Create gold sprinkles:
Using a needle tool, make tiny indentations or dots across the white icing. I prefer to bake the piece first, then fill these dots with gold paint later, but you can also add tiny flecks of gold clay now. -
Insert hardware:
Trim an eye pin to size and carefully insert it into the top center of the heart. Smooth the clay around the wire to secure it.
Step 2: Making the Strawberry & Mushroom
-
Form the strawberry:
Roll a small piece of red clay into a teardrop shape. Use a needle tool to gently poke shallow holes all over the surface to mimic seeds. -
Add the leaves:
Create a tiny star shape from green or gold-painted clay (the example uses a brass-like finish) and press it onto the top of the strawberry. Insert an eye pin through the leaves. -
Shape the mushroom cap:
Roll a ball of white clay and flatten the bottom to create a dome shape. Gently pinch the edges to soften the curve. -
Make the stem:
Roll a small cylinder of white clay, slightly wider at the base. Press this firmly onto the underside of the cap. Use a blending tool to smooth the seam so the two parts become one solid unit. -
Secure the pin:
Insert an eye pin through the top of the mushroom cap, ensuring it goes deep enough into the stem for stability.
Eye Pin Keep Slipping?
If pins pull out after baking, pull them all the way out, add a drop of superglue to the wire, and push them back in. This locks them permanently.
Step 3: Creating the Gold Star
-
Cut the star:
Roll out gold metallic clay (or regular scrap clay you plan to paint). Use a small star cutter to punch out the shape. Soften the sharp edges with your fingertip. -
Add metallic texture:
Press a piece of coarse sandpaper or a texture sponge firmly against the front surface to create a stippled, metal-cast effect. -
Add the loop:
Either insert an eye pin at the top point or use a small tool to carefully bore a hole through the top point for a jump ring later.
Make It Sparkle
Dust the unbaked clay charms with Pearl Ex or mica powder before baking. This gives a subtle shimmer that won’t flake off like glitter.
Step 4: Baking and Assembly
-
Bake the charms:
Arrange all your creations on a baking sheet or tile. Bake according to your brand of clay’s instructions (usually 275°F/130°C for 15-30 minutes). Let them cool completely. -
Add details:
If you defined dots on the cookie or star earlier, use a fine detail brush to dap tiny amounts of gold paint into the recesses. Paint the strawberry seeds white or cream if desired. -
Glaze:
Apply a thin coat of gloss glaze to the strawberry and the white icing part of the cookie to make them look wet and sweet. -
Assemble the keychain:
Open your jump rings using two pairs of pliers. Attach one charm to the end of a varying length of chain, then attach the chain to the main keyring loop.
Now you have a personalized set of charms ready to brighten up your daily routine


Marble Effect Polymer Clay Pendants That Look Fancy Fast
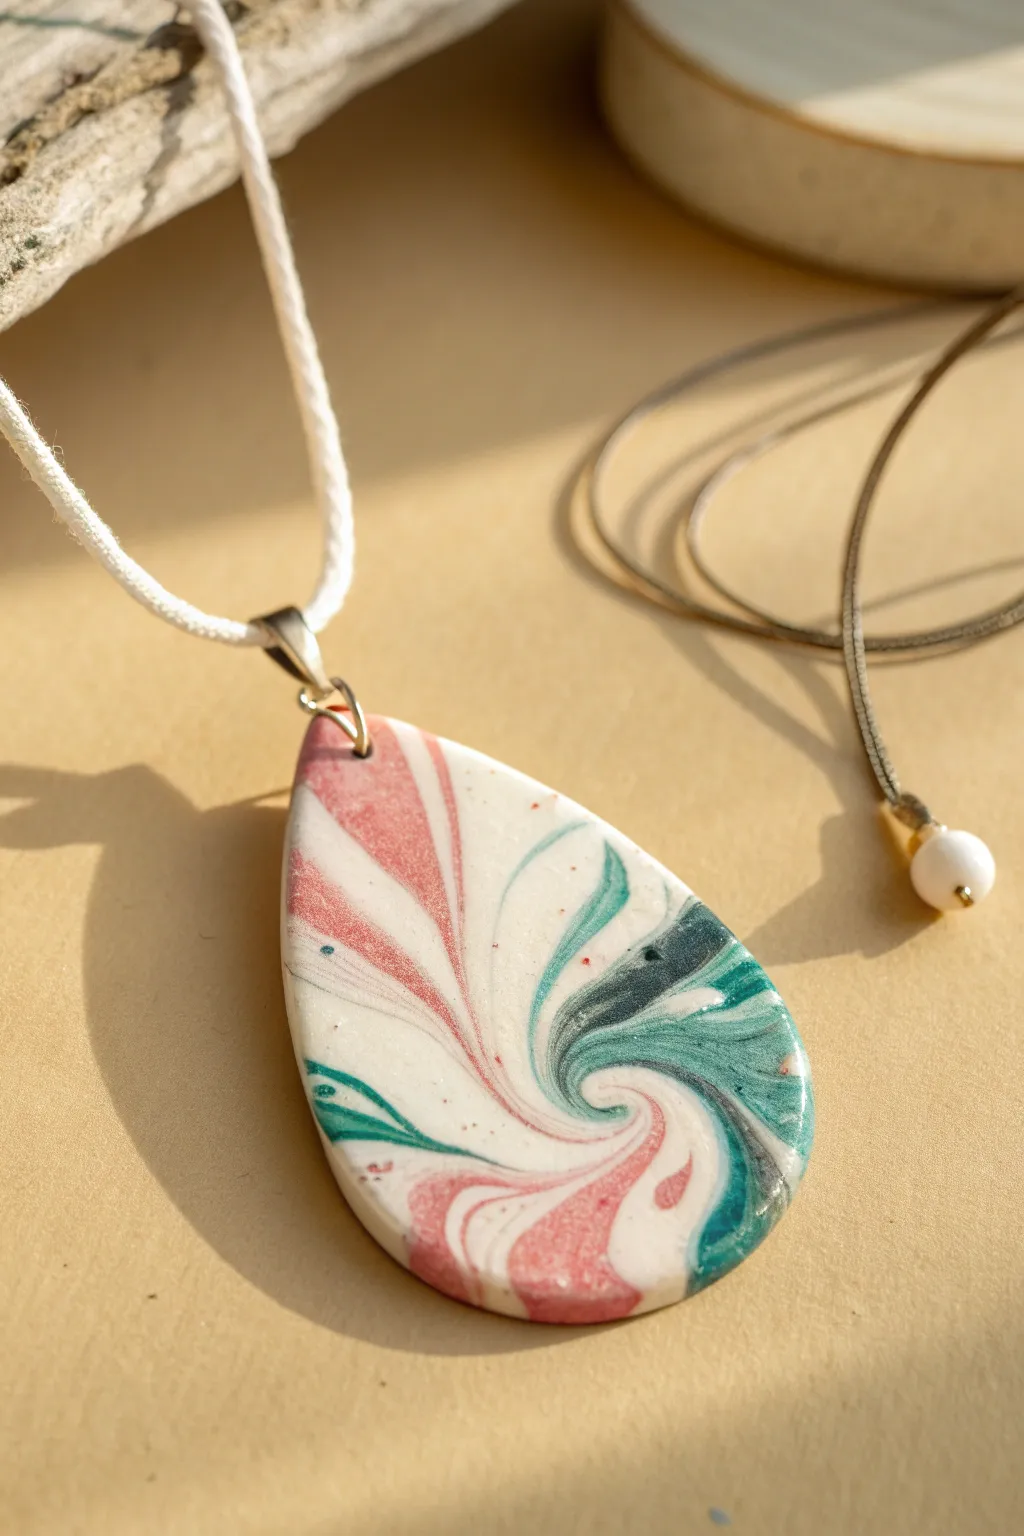
Capture the elegance of natural stone with this striking polymer clay pendant that combines dusty pinks, deep teals, and crisp white in a mesmerizing swirl. This project uses a simple twisting technique to create organic veins of color, resulting in a high-end look that is surprisingly easy to achieve.
Step-by-Step
Materials
- Polymer clay (White, Dusty Pink, Emerald Green)
- Acrylic rolling pin or pasta machine
- Teardrop shape cutter (approx. 2 inches long)
- Clay looping tool or needle tool
- Precision craft knife
- Wet/dry sandpaper (400, 600, and 1000 grit)
- UV resin or glossy polyurethane varnish
- Small UV lamp (if using resin)
- Jewelry hanging bail
- Jump ring (6mm or 8mm)
- White twisted cord necklace
- Parchment paper or ceramic tile for baking
Step 1: Creating the Marble Patterns
-
Condition the clay:
Start by thoroughly conditioning your three colors of clay—white, dusty pink, and emerald green—until they are soft and pliable. The white should be your largest portion, roughly double the amount of the colored clays. -
Log formation:
Roll each color into a long, thin log or “snake” shape. The white log should be thicker than the colored ones. I find that varying the thickness slightly helps create more natural-looking veins. -
Twist and combine:
Lay the three logs side-by-side and twist them together into one large rope. Fold this rope in half and twist it again. Repeat this twist-and-fold process about 3-4 times. Be careful not to over-twist, or the colors will turn muddy instead of distinct. -
Ball technique:
Roll the twisted rope into a tight ball. This helps to further distort the straight lines into curves. -
Flatten the slab:
Use your acrylic roller to flatten the ball into a sheet approximately 3-4mm thick. If you have a pasta machine, pass it through on a medium-thick setting. -
Check the pattern:
Examine your slab. If you want more swirl definition, you can gently distort the surface dragging a needle tool lightly across the clay to pull colors into each other.
Step 2: Shaping and Curing
-
Select your area:
Look for the most interesting section of your marble slab where the teal and pink swirl nicely against the white background. -
Cut the shape:
Press your teardrop cutter firmly into the clay. Lift the cutter and carefully peel away the excess clay from the outside. -
Smooth the edges:
Before baking, gently run your finger along the cut edges to soften any sharp ridges left by the cutter. -
Pilot hole:
Use a needle tool to pierce a hole at the very top point of the teardrop. Ensure it is large enough for your jump ring to pass through later. -
Bake:
Place the pendant on parchment paper or a ceramic tile. Bake according to your clay package instructions (usually 275°F/135°C for 30 minutes). -
Cool down:
Allow the piece to cool intimately inside the oven or on the tile until it reaches room temperature.
Adding Glitter Sparkle
For a subtle granite look, knead a very small pinch of black pepper or fine glitter into the white clay before twisting the colors together.
Step 3: Finishing Touches
-
Sand for smoothness:
Using water to reduce dust, wet-sand the edges and surface starting with 400 grit, moving to 600, and finishing with 1000 grit for a silky feel. -
Clean surface:
Wash the pendant with a drop of dish soap and dry it completely with a lint-free cloth. -
Apply gloss:
Apply a generous, domed layer of UV resin or several coats of gloss varnish to the front surface to make the marble colors pop and shine. -
Cure the finish:
If using UV resin, place the piece under a UV lamp for 2-3 minutes until hard and tack-free. If using varnish, let it air dry completely between coats. -
Assemble hardware:
Open a jump ring using two pliers (twist, don’t pull). Thread it through the hole you made earlier and attach the pendant bail. -
Final assembly:
Thread your white twisted cord through the bail to complete your necklace.
Muddy Colors?
If your colors are blending into grey instead of distinct swirls, you are over-mixing. Stop twisting sooner and simply slice the log to reveal the pattern.
Wear your beautiful new faux-stone pendant with pride, knowing no two pieces will ever be exactly alike


Cute Polymer Clay Animal Studs with Minimal Details
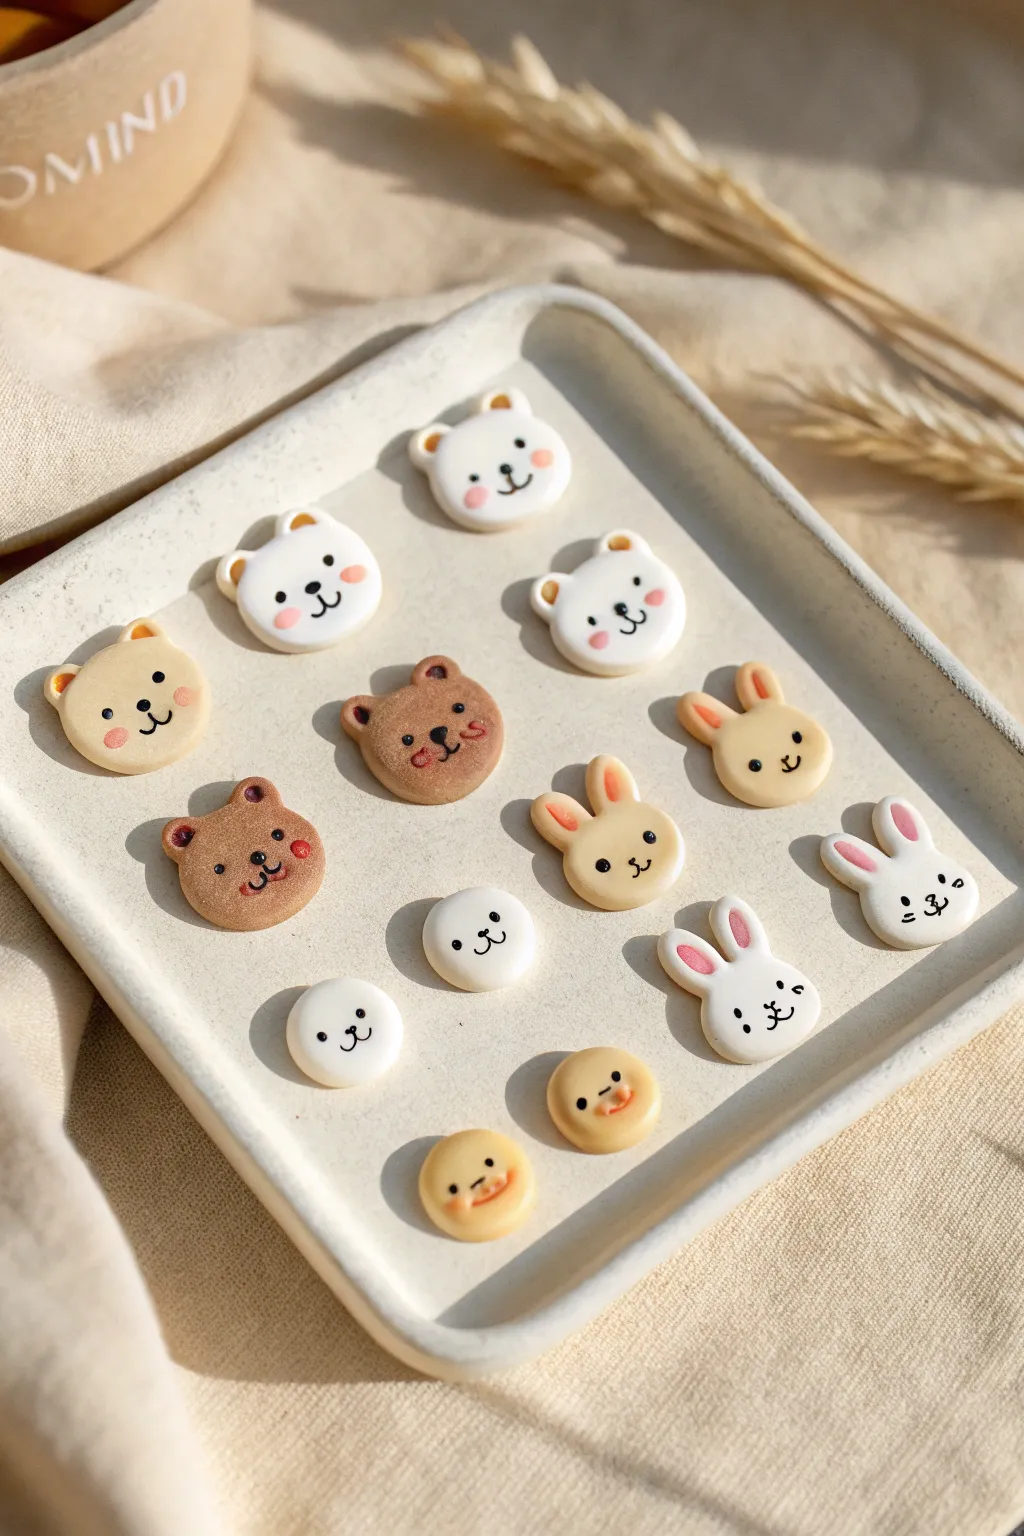
These adorable animal faces are the perfect introduction to miniature polymer clay crafting, featuring simple shapes and charming, minimalist expressions. You’ll create a collection of bunnies, bears, and pups using basic colors and easy techniques that result in incredibly sweet accessories.
Step-by-Step
Materials
- Polymer clay (white, beige, light brown, dark brown)
- Black acrylic paint or fine detail pen
- Pink soft pastel chalk (for cheeks)
- Small dotting tool or toothpick
- Small paintbrush (fine tip)
- Rolling pin or pasta machine
- Circle cutters (approx. 1cm diameter)
- Needle tool
- Liquid polymer clay (optional, for adhesion)
- Earring posts and superglue (E6000 recommended)
- Baking tile or parchment paper
Step 1: Preparing the Base Shapes
-
Conditioning:
Start by thoroughly conditioning your clay colors (white, beige, and browns) until they are soft and pliable. This prevents cracks later. -
Rolling out:
Roll your clay into a sheet approximately 3mm to 4mm thick. You want them thick enough to be sturdy but light enough for ears. -
Cutting circles:
Use your small circle cutter to punch out the main face shapes. If you don’t have a cutter, roll small balls and flatten them gently with your finger against your work surface. -
Smoothing edges:
Gently tap the edges of your cut circles to round them off. We want a soft, marshmallow-like look, not sharp cookie-cutter edges.
Clean Clay Tip
Keep baby replace or alcohol wipes nearby. Clean your hands or tools when switching between the brown clay and the white clay to avoid dark smudges on your pristine white bunnies.
Step 2: Sculpting the Animal Features
-
Bear ears:
For the bears, roll two tiny balls of matching clay. Place them on the top left and right of the head. Use a dotting tool to gently press them into the head shape to bond them. -
Bunny ears:
For bunnies, roll two small tear-drop shapes. Flatten them slightly and attach them to the top of the head. I find pressing the base of the ear to the back of the head creates a seamless transition. -
Inner ear details:
For the bunnies, take tiny snakes of pink or lighter clay and press them into the center of the ear shapes for depth. -
Indenting the ears:
For the bears, use the small end of your dotting tool to create a small depression in the center of each round ear. -
Simple snouts:
For the puppies (bottom left), add a very small, flattened oval of lighter clay to the lower half of the face to create a snout area. -
Secure bonds:
If your clay is dry, add a tiny dot of liquid clay before attaching ears to ensure they don’t pop off after baking.
Texture It Up
Before baking, use an old toothbrush to gently tap the surface of the bear faces. This creates a subtle ‘furry’ texture that looks amazing once baked.
Step 3: Details and Baking
-
Shading cheeks:
Scrape a little pink pastel chalk into a powder. Dip a dry brush or cotton swab into the powder and gently dab ‘blush’ onto the cheeks before baking. -
Baking:
Bake the pieces according to your specific clay brand’s instructions (usually 275°F/130°C for 15-30 minutes). Let them cool completely before handling. -
Painting eyes:
Using a very fine detail brush and black acrylic paint, add two small dots for eyes. Keep them widely spaced for that cute ‘kawaii’ look shown in the photo. -
Adding noses:
Paint a small oval or rounded triangle between the eyes for the nose. -
Drawing mouths:
Paint a small ‘w’ shape connects to the nose for the mouth. For the simplest faces, just a nose and eyes are enough. -
Finishing touch:
Once the paint is fully dry, glue earring posts to the back using strong jewelry glue.
Enjoy wearing your tiny menagerie or gifting a pair to a friend who loves animals

What Really Happens Inside the Kiln
Learn how time and temperature work together inside the kiln to transform clay into durable ceramic.
Beginner-Friendly Ocean Creature Polymer Clay Miniatures
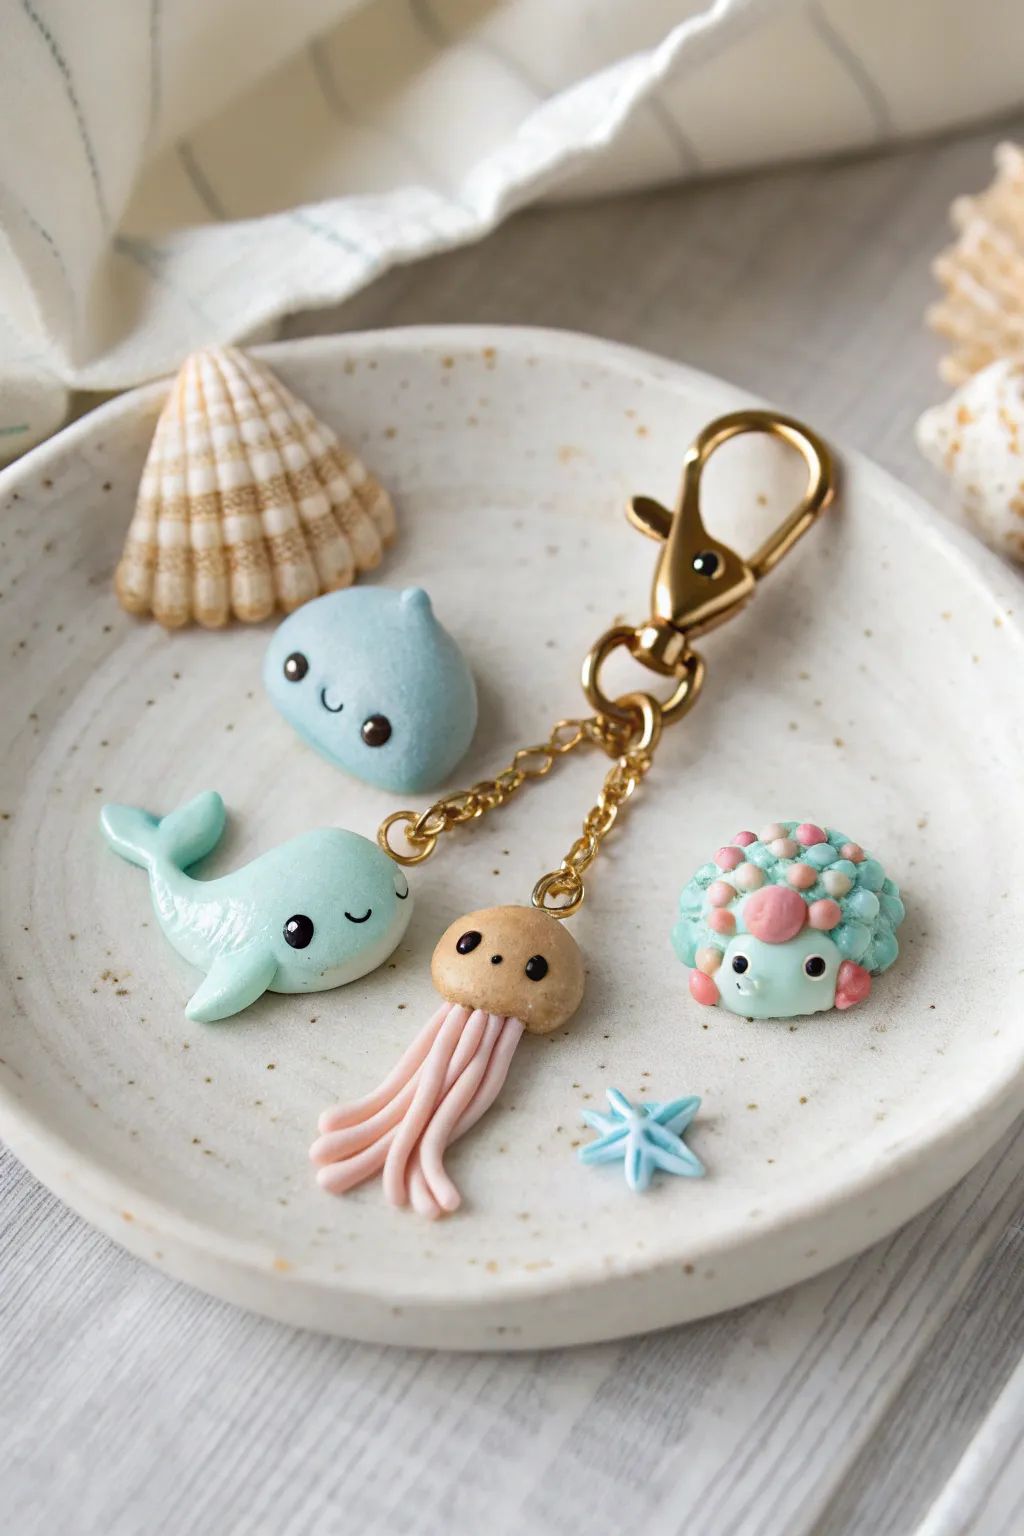
Dive into this delightful collection of mini sea creatures, featuring a tiny whale, a soft jellyfish, a spiky pufferfish, and a serene blue drop. These charming pieces are perfect for attaching to a gold keychain or turning into delicate jewelry.
How-To Guide
Materials
- Polymer clay (pale blue, bright mint green, caramel/tan, light pink, dark pink/magenta, white, black)
- Small ball stylus or dotting tool
- Blade or X-Acto knife
- Needle tool
- Eye pins (gold)
- Gold chain and lobster clasp keychain finding
- Jump rings (gold)
- Gloss glaze or UV resin (optional for wet look)
- Baking surface (ceramic tile or parchment paper)
Step 1: Shaping the Happy Whale
-
Base shape:
Start with a small ball of mint green clay. Gently roll it into a teardrop shape, flattening the bulbous end slightly to form the head. -
Tail formation:
Pinch the tapered end of the teardrop and flatten it horizontally. Use your needle tool to cut a small ‘V’ notch in the center to create the tail flukes. -
Adding flippers:
Make two tiny teardrops from the same mint clay, flatten them, and attach one to each side of the body, smoothing the seam with a silicone tool or your finger. -
Face details:
Create two tiny indentations for eyes using a ball tool. Roll teeny balls of black clay and press them into the sockets. Add a minuscule white highlight dot to each eye for a reflective look. -
Finishing the whale:
Use a needle tool or small blade to impress a curved smile. Insert an eye pin into the top of the head before baking.
Clean Clay Tip
Keep wet wipes nearby! Switch wipes when changing from dark to light colors (especially white) to avoid color transfer and dirty fingerprints.
Step 2: Crafting the Jellyfish
-
Creating the bell:
Roll a ball of caramel or tan clay and flatten the bottom against your work surface to create a dome shape. -
Making tentacles:
Switch to light pink clay. Roll out several very thin snakes or logs. Cut them into equal lengths, roughly twice the height of the bell. -
Assembling:
Bundle the pink strands together at one end and press this cluster firmly into the center of the underside of the tan dome. -
Adding the face:
Place two black clay dots for eyes wide apart on the dome. Add a tiny black dot between them for the mouth. Insert an eye pin deeply into the top center.
Step 3: Sculpting the Pufferfish & Drop
-
Pufferfish body:
Form a flattened dome using mint green clay, similar to the whale’s color but slightly rounder. -
Spike details:
Roll many tiny balls of mint green, light pink, and darker pink clay. Press these all over the back of the fish, alternating colors randomly to create a textured, bumpy surface. -
Puffer face:
Leave the front face area smooth. Add your black eye beads and a tiny smiling mouth. Use flattened pink balls for blushing cheeks and side fins. -
The blue drop:
Take pale blue clay and form a soft triangular shape with rounded corners, resembling a water droplet or a slime character. Pinch the top slightly to form a peak. -
Drop expression:
Add the standard wide-set kawaii eyes and a small smile. This simpler shape is great for practicing your facial placement.
Make It Sparkle
Brush a tiny amount of mica powder or pearl ex powder onto the mint whale or the pufferfish bumps before baking for a shimmering, scale-like effect.
Step 4: Baking and Assembly
-
Baking:
Arrange all your creatures on a tile. Bake according to your clay manufacturer’s instructions (usually 275°F/130°C for 15-30 minutes). -
Cooling:
Allow the pieces to cool completely. The clay is fragile while hot, so resist the urge to touch them until they are room temperature. -
Sealing eyes:
I like to add a tiny drop of gloss glaze or UV resin just to the eyes to make them shine and ensure the small black bits stay secure. -
Attaching hardware:
Using pliers, open a jump ring and thread it through the eye pin loop of the whale. Connect this to a short length of gold chain. -
Final connection:
Repeat for the jellyfish. Attach the loose ends of the chains to the main jump ring on the lobster clasp mechanism.
Clip your new ocean friends onto your bag or keys and enjoy carrying a little piece of the sea with you everywhere.
Sweet Polymer Clay Food Miniatures with Tiny Faces
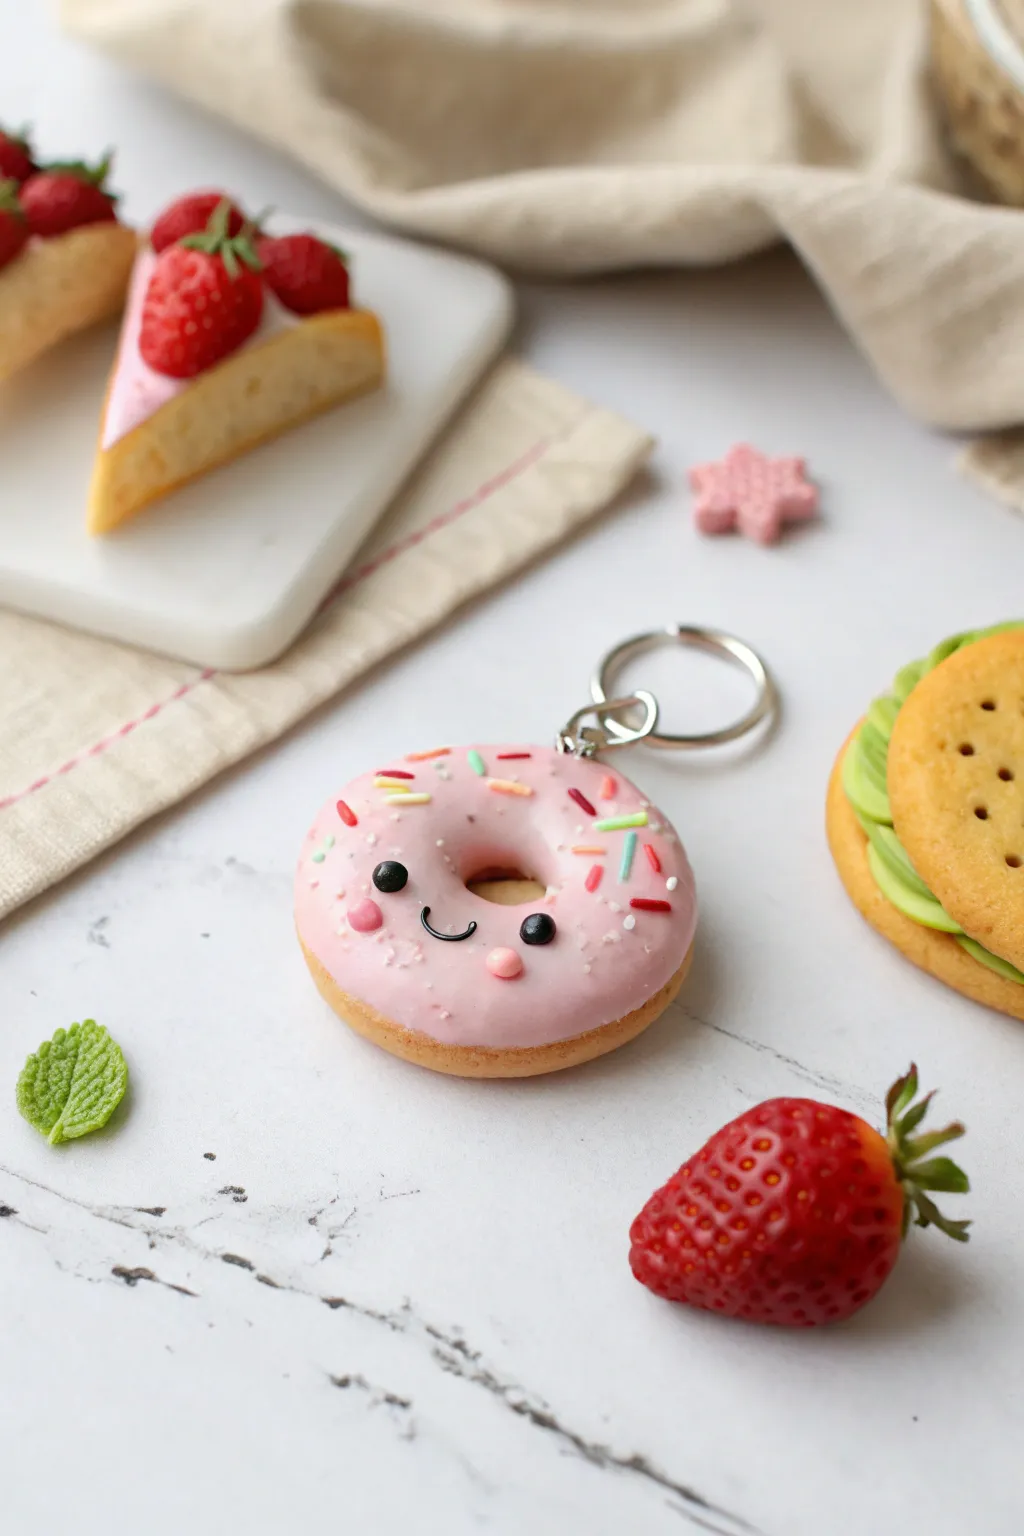
Transform simple polymer clay balls into an adorable donut character that smiles back at you. This sweet little charm features realistic texture, pastel pink icing, and a tiny, cheerful face that adds personality to your keys or bag.
Step-by-Step
Materials
- Polymer clay (beige/tan, pastel pink, black, brown)
- Small amount of liquid poymer clay (optional but helpful)
- Small jewelry eye pin
- Keychain ring and jump ring
- Texture tool or clean toothbrush
- Dotting tool or ball stylus
- Needle tool
- Baby powder or cornstarch (release agent)
- Gloss glaze or UV resin
- Small paintbrush
- Circle cutter (small, approx 1 inch)
Step 1: Shaping the Base
-
Mix the dough color:
Start by conditioning your beige or tan polymer clay until it’s soft and pliable. If the color looks too flat, mix in a tiny speck of translucent clay to give it a more realistic baked-good depth. -
Form the donut shape:
Roll the clay into a smooth ball free of cracks, then gently flatten it into a thick disc. It should be puffy, not flat like a pancake—think of a nice, risen yeast donut. -
Create the center hole:
Use the back end of a paintbrush, a dotting tool, or a small circular cutter to press a hole directly in the center. Gently widen the hole slightly by rotating the tool, smoothing out the inner edges so they look baked, not cut. -
Texture the dough:
Take a clean toothbrush or a crumpled ball of aluminum foil and gently tap it all over the surface of the beige clay. Focus on the bottom half and the sides where the actual ‘dough’ will show, leaving the top smoother for now. -
Add the golden bake line:
For extra realism, you can lightly brush some soft pastel chalk (in a toasted orange shade) around the sides of the donut to mimic the golden-brown ring often seen on fried donuts.
Fingerprint Troubles?
If you keep leaving fingerprints on the smooth icing, lightly dust your fingertip with cornstarch or baby powder before smoothing the clay.
Step 2: Icing and Face
-
Prepare the pink icing:
Condition your pastel pink clay. Roll it out into a thin sheet, or flatten a ball with your fingers until it is significantly thinner than your donut base. -
Shape the glaze:
Using a small scalloped cutter or just your fingers, create a wavy, irregular edge on the pink clay. This mimics how glaze naturally drips and settles. -
Apply the icing:
Gently lay the pink layer over the top of your textured donut base. Press it down lightly so it conforms to the rounded shape, ensuring the hole in the center matches up. -
Refine the edges:
Use a smoothing tool or your finger to gently smudge the edges of the pink clay downward slightly, making it look like liquid icing that has stopped flowing. -
Create the eyes:
Roll two extremely tiny balls of black clay. Position them wide apart on the pink icing to create that classic ‘kawaii’ wide-set look. Press them in gently so they don’t fall off. -
Add the smile:
Roll a microscopically thin snake of black clay. Cut a tiny U-shape and place it centered between the eyes. Use a needle tool to curve it into a perfect smile. -
Blush those cheeks:
To make it extra cute, take two tiny bits of pink clay (slightly darker than the icing) and press them flat just below and outside the eyes.
Pro Tip: Liquid Clay
Mix the pink clay with liquid polymer clay to create a ‘frosting’ paste. You can drip this onto the donut for an ultra-realistic, melty look.
Step 3: Details and Assembly
-
Make the sprinkles:
Roll very thin snakes of variously colored clays (mint green, white, bright red). Bake these strands separately for 5 minutes just to harden them, then chop them into tiny bits with a blade. Alternatively, you can use pre-made polymer clay sprinkles. -
Apply sprinkles:
Dab a tiny amount of liquid clay or translucent Sculpey on the pink icing where you want sprinkles. Pick up your chopped sprinkles with a needle tool and place them randomly around the face, avoiding the eyes and mouth. -
Insert the hardware:
Take your metal eye pin and dip the end in a little liquid clay or super glue gel. Push it straight down into the top of the donut (the top edge, not the face) until only the loop is visible. -
Final texture check:
Do one last pass with your texture tool on the beige parts, making sure you didn’t smudge the ‘bread’ texture while applying the face. -
Baking time:
Bake the donut according to your clay manufacturer’s instructions (usually 275°F/135°C for about 15-20 minutes depending on thickness). -
Cooling and glazing:
Let the piece cool completely. I like to brush a coat of gloss glaze or UV resin specifically over the pink icing and the eyes to make them shiny and wet-looking, while keeping the dough matte. -
Attach the keychain:
Once dry, use pliers to open a jump ring, thread it through the eye pin loop and your keychain ring, and close it securely.
Clip this delightful charm onto your keys and enjoy your zero-calorie sweet treat every day


The Complete Guide to Pottery Troubleshooting
Uncover the most common ceramic mistakes—from cracking clay to failed glazes—and learn how to fix them fast.
Polymer Clay Hair Accessories Like Barrettes and Pins
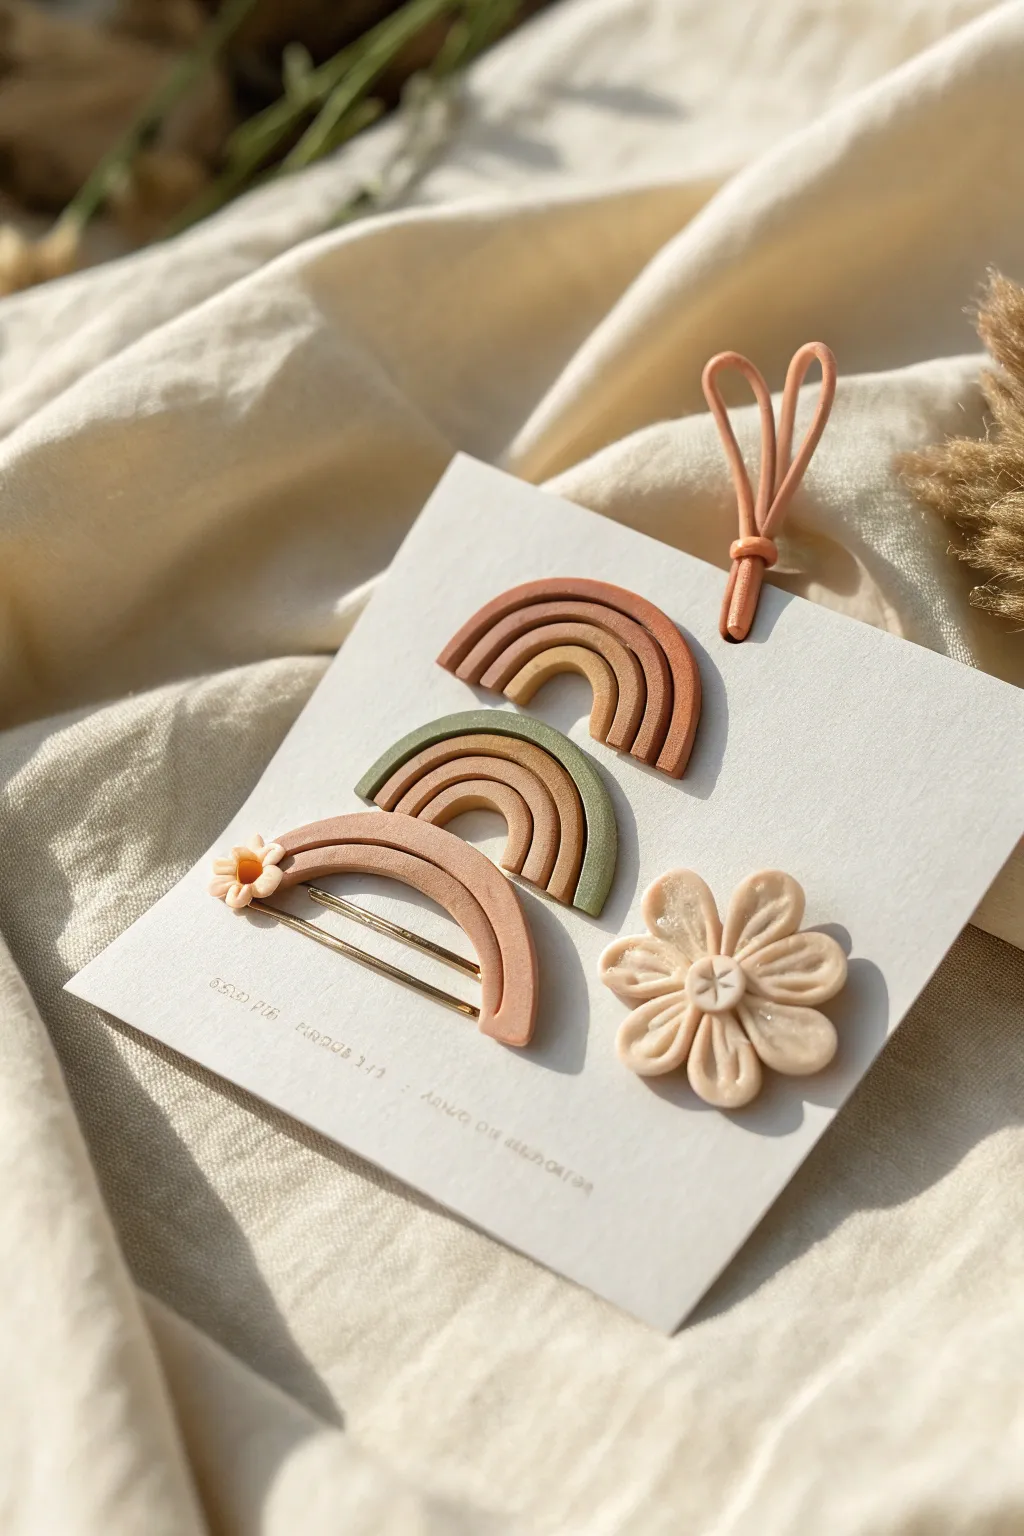
Embrace earthy, natural tones with this charming set of polymer clay hair accessories featuring muted rainbows and a sculpted daisy. These pieces have a soft matte finish that perfectly complements the boho aesthetic, making them ideal for everyday wear or special occasions.
Step-by-Step Tutorial
Materials
- Polymer clay (Terracotta, Mustard Yellow, Beige/Tan, Sage Green, White)
- Liquid polymer clay (clear or translucent)
- Hair clip blanks (alligator clips or snap clips)
- Clay extruder (optional but helpful)
- Acrylic roller or pasta machine
- Modeling tools (dotting tool, needle tool)
- Craft knife or tissue blade
- Superglue or heavy-duty craft adhesive
- Baking tile or parchment paper
- Oven
Step 1: Prepping and Mixing
-
Condition the clay:
Start by kneading each color of clay thoroughly until it’s soft and pliable. This prevents cracking and ensures smooth lines later. -
Mix custom shades:
To achieve the muted, earthy look in the photo, mix a tiny amount of beige or white into your terracotta and sage green clays. This softens the colors for that perfect matte boho vibe.
Step 2: Sculpting the Rainbows based on Top/Middle Designs
-
Roll your coils:
Roll out long, even snakes of clay for your rainbow arches. You can do this by hand on a flat surface or use a clay extruder with a large round disc for perfectly uniform thickness. -
Form the first arch:
Take your innermost color (like the mustard yellow) and bend a small section into a tight U-shape. Place this on your work tile. -
Build the layers:
Wrap the next color (beige) snugly around the first arch. Repeat with the final outer color (terracotta or sage green), gently pressing them together so the coils adhere without flattening their round shape. -
Trim the base:
Use your sharp tissue blade to cut straight across the bottom of the arches, creating a clean, flat base for the rainbow. -
Smooth the back:
Gently flip the rainbow over. Use your finger or a roller to lightly flatten the back side just enough so it will sit flush against the metal hair clip later.
Uneven Arches?
If gaps appear between your rainbow arches, brush a tiny amount of liquid clay or baby oil between the coils before baking to help them fuse together seamlessly.
Step 3: Creating the Daisy & Floral Rainbow
-
Create petal shapes:
For the daisy, roll eight small balls of beige clay. Flatten them slightly into teardrop shapes. -
Assemble the flower:
Arrange the teardrops in a circle with points meeting in the center. Use a modeling tool to press an indentation down the center of each petal for texture. -
Add the center:
Place a small flattened ball of clay in the center. Use a knife or needle tool to press an ‘X’ or star pattern into it. -
Assemble the floral rainbow:
For the bottom rainbow design shown, create a single large arch using beige clay. Attach a tiny sculpted flower (made using the same method as the large daisy, just much smaller) to one end of the arch.
Make it Sparkle
Before baking, lightly brush pearl ex powder or mica powder over the daisy petals to give them a subtle, iridescent shimmer that catches the light.
Step 4: Baking and Assembly
-
Bake the pieces:
Arrange your rainbows and daisy on a baking tile. Bake according to your clay manufacturer’s instructions (usually 275°F/130°C for 15-30 minutes). -
Cool down:
Let the clay cool completely in the oven or on a rack. Do not handle them while hot, as the clay is still fragile. -
Sand edges (optional):
If there are any rough spots or fingerprints, lightly sand them with fine-grit sandpaper for a professional finish. -
Prepare the adhesive:
Apply a strong superglue or two-part epoxy to the flat surface of your metal hair clip. -
Attach the clay:
Press the cooled clay piece firmly onto the clip. I find holding it in place for 30 seconds ensures a bond starts to form securely. -
Reinforce the back:
For extra durability, you can spread a small amount of liquid polymer clay or a strip of raw clay over the metal clip on the back (sandwiching the metal) and re-bake briefly, though strong glue usually suffices.
Clip these into a messy bun or side sweep for instant artistic flair
Cheery Polymer Clay Magnets for Fridges and Lockers
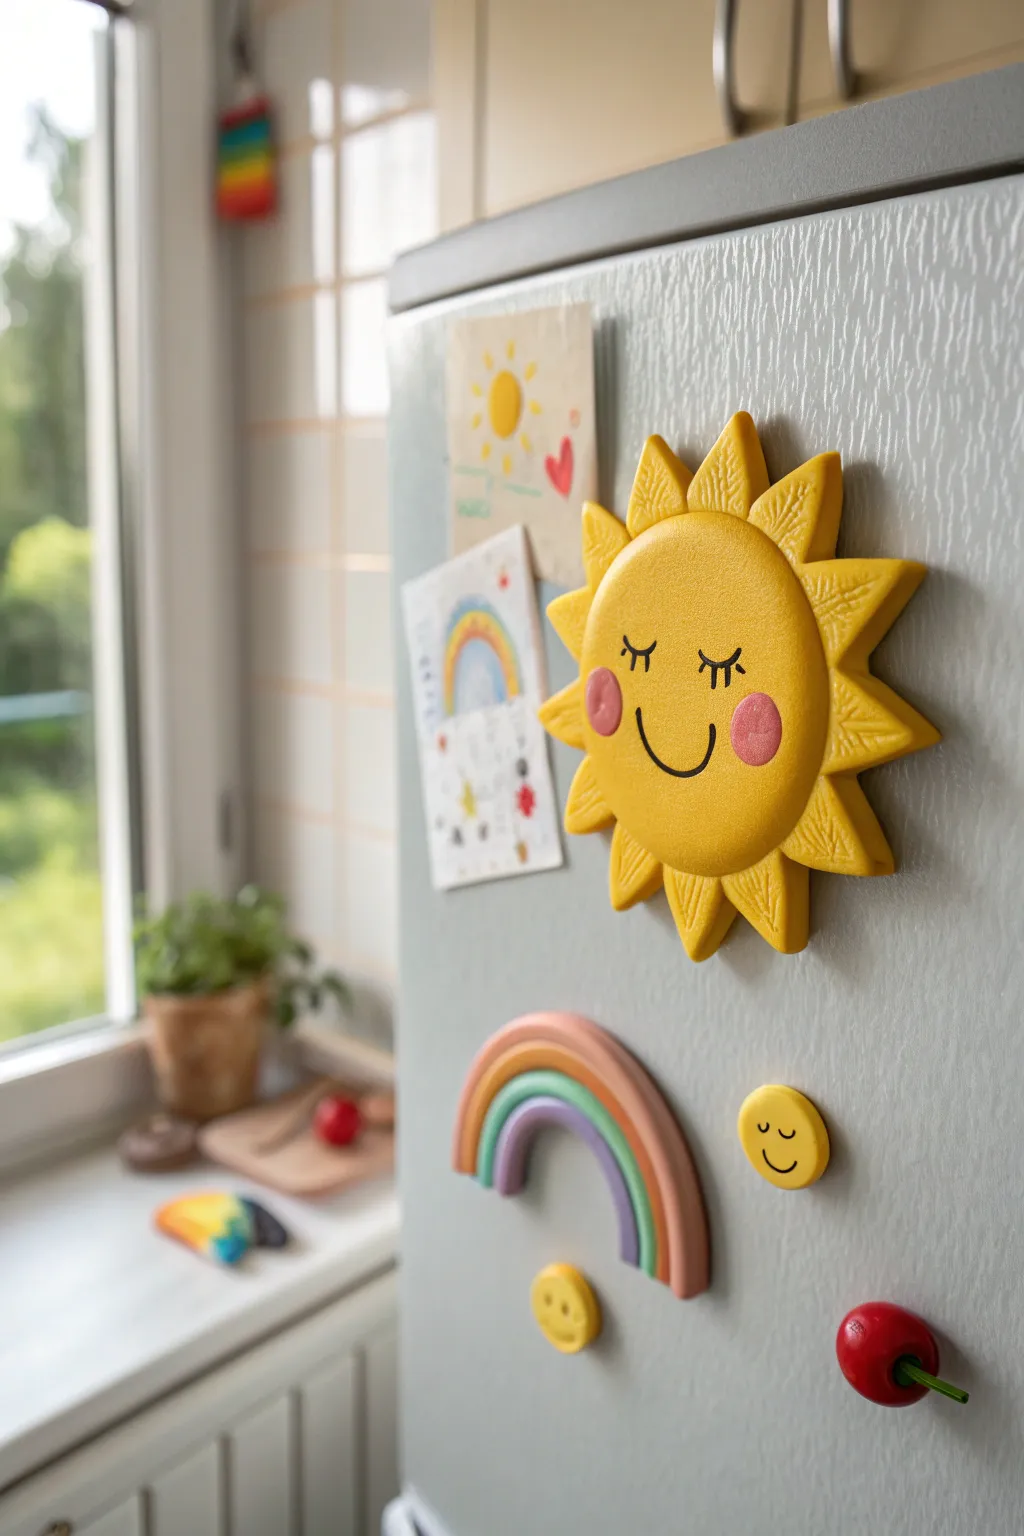
Brighten up your kitchen with this cheerful yellow sun magnet featuring a sweet, sleepy face and rosy cheeks. This textured polymer clay project adds a burst of warmth to any fridge or locker door.
Detailed Instructions
Materials
- Yellow polymer clay (sunny golden shade)
- Pink polymer clay (pastel shade)
- Black acrylic paint or fine tip marker
- Texture sponge or stiff bristle brush
- Needle tool or toothpick
- Clay roller or pasta machine
- Circle cutter (approx. 3 inches)
- Craft knife
- Strong craft glue (E6000 or similar)
- Round ceramic or neodymium magnet
- Oven for baking
Step 1: Base Construction
-
Condition the yellow clay:
Start by warming the yellow clay in your hands until it is pliable and soft, ensuring there are no air bubbles trapped inside. -
Roll the main circle:
Roll out a slab of yellow clay to about 1/4 inch thickness. Use your circle cutter to punch out a perfect round shape for the sun’s face. -
Create the sun rays:
Roll a slightly thinner sheet of yellow clay. Use a craft knife to cut out 10-12 triangle shapes. They don’t need to be identical; a little variation adds charm. -
Add texture to the rays:
Before attaching them, press a stiff texture sponge or a clean toothbrush onto the surface of each triangle to give them a rough, organic look seen in the photo. -
Detail the rays:
Using a needle tool, gently score straight lines radiating outward on some of the triangles to mimic vein-like patterns or sunbeams. -
Assemble the sun:
Arrange the triangles in a circle on your work surface. Place the main face circle on top of the inner edges of the triangles, pressing gently to bond the raw clay together. You can use a little liquid clay as ‘glue’ if needed. -
Smooth the seams:
On the back of the magnet, smooth the clay where the rays meet the face to ensure the structure is solid.
Secret Texturing Tool
For the specific stippled texture on the sun’s face, a balled-up piece of aluminum foil rolled gently over the raw clay creates random, natural-looking indents.
Step 2: Face & Details
-
Texturize the face:
Take your texture sponge again and gently dab the entire surface of the central circle. This gives it that specific matte, porous finish shown in the example. -
Add rosy cheeks:
Take two tiny balls of pink polymer clay and flatten them into thin disks. Press them firmly onto the yellow face, positioning them somewhat wide apart. -
Integrate the cheeks:
Lightly texture the pink circles as well so they look like part of the sun’s surface rather than just sitting on top. -
Bake the clay:
Place your creation on a parchment-lined baking sheet. Bake according to your specific clay manufacturer’s instructions (usually 275°F/135°C for 15-30 minutes). -
Cool down:
Allow the piece to cool completely in the oven with the door cracked open. This prevents thermal shock and cracking.
Step 3: Finishing Touches
-
Paint the expression:
Using a very fine brush and black acrylic paint, carefully paint two U-shaped curves for the closed eyes. Add three tiny lashes to each eye for a sleepy look. -
Add the smile:
Paint a simple, wide U-shape curve between the pink cheeks for the smile. I like to steady my hand on the table while doing this to keep the line smooth. -
Dry the paint:
Let the paint dry completely. If you prefer a protective finish, you can add a matte varnish now, though the raw texture looks great on its own. -
Attach the magnet:
Apply a dab of strong glue to the back center of the sun. Press your magnet firmly into the glue. -
Final cure:
Let the glue cure fully (usually 24 hours) before testing it out on your fridge door.
Fixing Fingerprints
If you smudge the texture while handling, lightly brush the area with a little baby oil or cornstarch before re-texturing to prevent the tool from sticking.
Now you have a happy piece of sunshine to hold up your favorite photos and notes

TRACK YOUR CERAMIC JOURNEY
Capture glaze tests, firing details, and creative progress—all in one simple printable. Make your projects easier to repeat and improve.
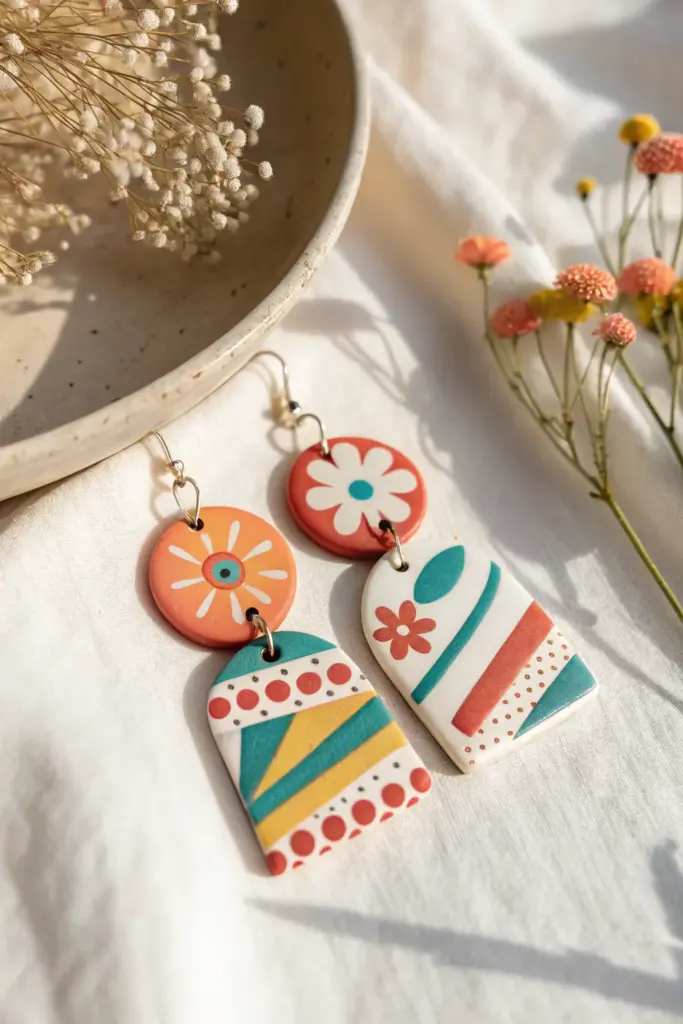
Patterned Polymer Clay Cane Slices for Instant Designs

These vibrant, mismatch-style earrings capture a playful folk-art spirit with their bold reds, teals, and sunny yellows. Using a combination of cane slicing techniques and slab building, you can create wearable art that feels both modern and handcrafted.
Step-by-Step Guide
Materials
- Polymer clay (burnt orange, teal/turquoise, mustard yellow, white, red, deep blue)
- Clay roller or pasta machine
- Tissue blade (flexible and rigid)
- Small round cutter (approx. 15mm) and arch cutter (approx. 25-30mm)
- Needle tool or toothpick
- Hand drill or pin vise
- Jump rings (gold finish)
- Earring hooks (gold finish)
- Jewelry pliers
- Ceramic tile or baking sheet
- Optional: UV resin or gloss varnish for finish
Step 1: Creating the Pattern Components
-
Prepare the flower cane:
Start by making a simple flower cane. Create a log of teal clay for the center and wrap it in a thin sheet of white. Form five or six teardrop-shaped petals using white clay, arranged around the center. Pack the spaces between petals with red clay to form a round log. -
Reduce the cane:
Gently squeeze and roll the flower cane to reduce its diameter to about 1 cm. Let it rest in the fridge for 10 minutes to firm up, which prevents distortion when slicing. -
Make the tiny star flower:
Create a miniature version of a flower or star pattern using red clay for petals and a tiny dot of yellow for the center. Reduce this cane until it is very small, roughly 4-5mm in diameter. -
Construct the striped block:
To make the striped sections seen on the arch shapes, stack alternating sheets of teal, white, and yellow clay. Slice thin cross-sections from this stack to create striped veneers.
Smudged Cane Slices?
If your flower cane slices look smeared when you cut them, the clay is too warm. Put the cane in the freezer for 5-10 minutes, then try slicing again with a sharp blade.
Step 2: Assembling the Base Shapes
-
Condition base sheets:
Roll out a sheet of burnt orange clay and a sheet of white clay on a medium setting (around 2-3mm thick). These will form the base for your studs and dangles. -
Create the orange sun stud:
On the orange sheet, use tiny bits of white clay to create radiating tear drops. Place a small slice of a blue-and-teal bullseye cane in the center to mimic the eye/sun design. Gently roll over it to embed the pattern. -
Cut the stud shapes:
Cut one circle from the patterned orange clay for the left stud. For the right stud, slice a thin wafer from your main red flower cane and place it onto a backing sheet of red clay, then cut your circle. -
Design the first arch:
For the left arch (teal/yellow/red geometric), lay a base of white clay. Arrange strips of your striped veneer, solid blocks of teal, and sections of white with red polka dots. I like to use a straight blade to cut clean angles before placing them on the base. -
Refine the first arch:
Once the geometric pattern is arranged on the base clay, gently roll over it with an acrylic roller to smooth the seams. Use your arch cutter to punch out the shape. -
Design the second arch:
For the right arch (white floral), start with a clean white slab. Apply a slice of your tiny red star flower cane. Add a curved strip of teal clay and a strip of red clay. Use a needle tool to add texture dots to a small white section if desired. -
Cut the second arch:
Position your cutter to capture the best part of your white floral composition and press down firmly to cut the shape.
Step 3: Finishing and Assembly
-
Smooth the edges:
Before baking, gently rub the cut edges of your clay pieces with your finger or a bit of cornstarch to remove any sharp ridges left by the cutters. -
Bake the pieces:
Place all four pieces on a ceramic tile. Bake according to your clay manufacturer’s instructions (usually 275°F/130°C for 30 minutes). Let them cool completely. -
Drill holes:
Using a hand drill or pin vise, carefully drill a hole at the bottom of each circle stud and the top of each arch piece. Ensure the holes are close to the edge but not so close that they might break. -
Sand and buff:
If there are rough spots, wet sand the edges and back with high-grit sandpaper (400 to 1000 grit). Wipe distinct clean. -
Connect the components:
Open a jump ring with your pliers (twist, don’t pull). Thread it through the hole in the stud and the corresponding arch, then close it securely. -
Attach earring hooks:
Open the loop on your earring hook and attach it to the top of the circle studs. Double-check that your patterns are facing forward.
Pro Tip: Seamless finish
Place a piece of cling wrap over your clay slab before pressing down your cutters. This creates a beautiful, rounded ‘domed’ edge on the clay, reducing the need for sanding later.
Wear your new mismatched masterpieces with pride or gift them to a friend who loves colorful accessories