When I’m craving a quick creative win, air dry clay is my favorite grab-and-make material because it turns into something cute and useful so fast. These air dry clay ideas are all beginner-friendly, small-scale, and designed to look polished enough to actually live on your shelves (not hide in a drawer).
Classic Stamped Trinket Dishes
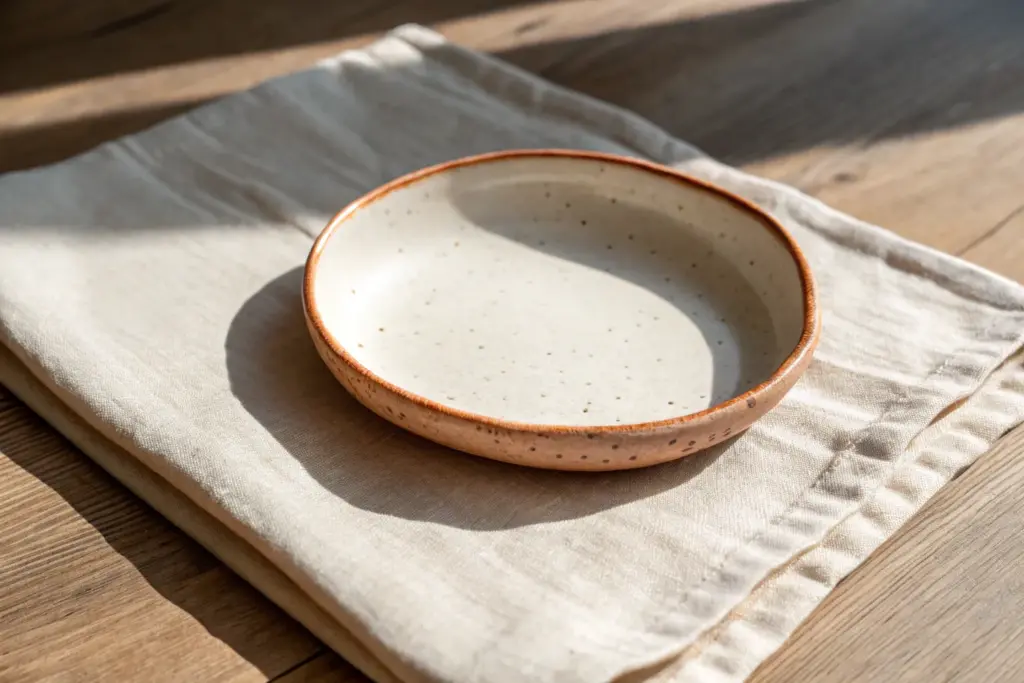
Achieve the high-end look of fired stoneware using simple air-dry clay with this charming speckled trinket dish project. The minimalist design features organic, hand-formed edges and delicate brown spatter that mimics natural pottery glazes.
Step-by-Step
Materials
- White polymer or air-dry clay
- Rolling pin
- Circle cutter or circular template (bowl/jar lid)
- Craft knife
- Small bowl for shaping (optional)
- Sandpaper (fine and medium grit)
- Brown acrylic paint
- Old toothbrush or stiff bristle brush
- Gloss varnish or sealant
- Water and sponge for smoothing
Step 1: Shaping the Clay Base
-
Condition the clay:
Begin by taking a handful of white air-dry clay and kneading it in your hands until it becomes soft, pliable, and free of cracks. Warm clay is much easier to work with. -
Roll it out:
Place your clay on a smooth work surface or silicone mat. Use a rolling pin to flatten the clay evenly until it is about 1/4 inch thick. Try to keep the thickness consistent across the entire slab. -
Cut the circle:
Place your circular template or bowl lid onto the rolled clay. Use a craft knife to trace around the edge, cutting out a perfect circle. -
Smooth the edges:
Dip your finger in a little bit of water and run it along the cut edge of the circle to smooth out any harsh lines or roughness left by the knife. -
Form the lip:
Gently curve the outer perimeter of the circle upwards to create a raised lip. You can pinch it lightly between your thumb and forefinger to define the wall height. -
Refine the shape:
For a truly organic, hand-thrown look, use your thumbs to gently press the center down while supporting the outer wall. I like to rotate the dish slowly as I work to ensure it stays relatively symmetrical. -
Smooth the surface:
Use a slightly damp sponge to wipe the entire surface of the dish. This eliminates fingerprints and creates that professional, smooth ceramic finish. -
Let it dry completely:
Place the dish in a dry, cool area for 24-48 hours. Flipped it over halfway through the drying process can help the bottom dry evenly and prevent warping.
Step 2: Sanding and Speckling
-
Sand for perfection:
Once fully dry, the clay will be hard and chalky. Use medium-grit sandpaper to remove any large bumps, then switch to fine-grit to buff the surface until it feels silky smooth. -
Clean dust away:
Wipe the dish thoroughly with a dry cloth or a slightly damp paper towel to remove all sanding dust before painting. -
Prepare the splatter paint:
Squeeze a small amount of brown acrylic paint onto a palette. add a few drops of water to thin it down until it has an inky consistency. -
Test your splatter:
Dip an old toothbrush into the thinned paint. Hold it over a scrap piece of paper and run your thumb across the bristles to flick paint. Adjust the distance and consistency until you get fine, random dots. -
Apply the speckles:
Hold the brush over your clay dish and flick the bristles to create the speckled pattern. Aim for an uneven, natural distribution—some areas can have more dots than others. -
Add larger spots:
If you want a few larger, distinct spots like in the photo, dip the rounded end of a paintbrush handle into the paint and gently dot it onto the surface in random places. -
Allow paint to dry:
Let the paint dry completely. Since acrylic dries fast, this should only take about 15-20 minutes.
Water Smoothing Trick
Keep a small bowl of water nearby while shaping. A wet finger acts like a potter’s sponge, erasing fingerprints and micro-cracks instantly.
Step 3: Seal and Finish
-
Apply varnish:
To get that glazed ceramic look, brush on a coat of high-gloss varnish. Ensure you cover the inside, the rim, and the outside walls. -
Second coat for durability:
Let the first coat dry according to the manufacturer’s instructions, then apply a second coat for extra shine and protection against moisture. -
Final cure:
Allow the final coat of sealant to cure fully before placing any jewelry or trinkets inside to avoid tackiness.
Rim Elegance
After shaping, try painting just the very edge of the rim with liquid gold leaf for a luxurious, modern finish that pops against the white clay.
Now you have a stylish, minimalist catch-all that looks like it came straight from a pottery studio.


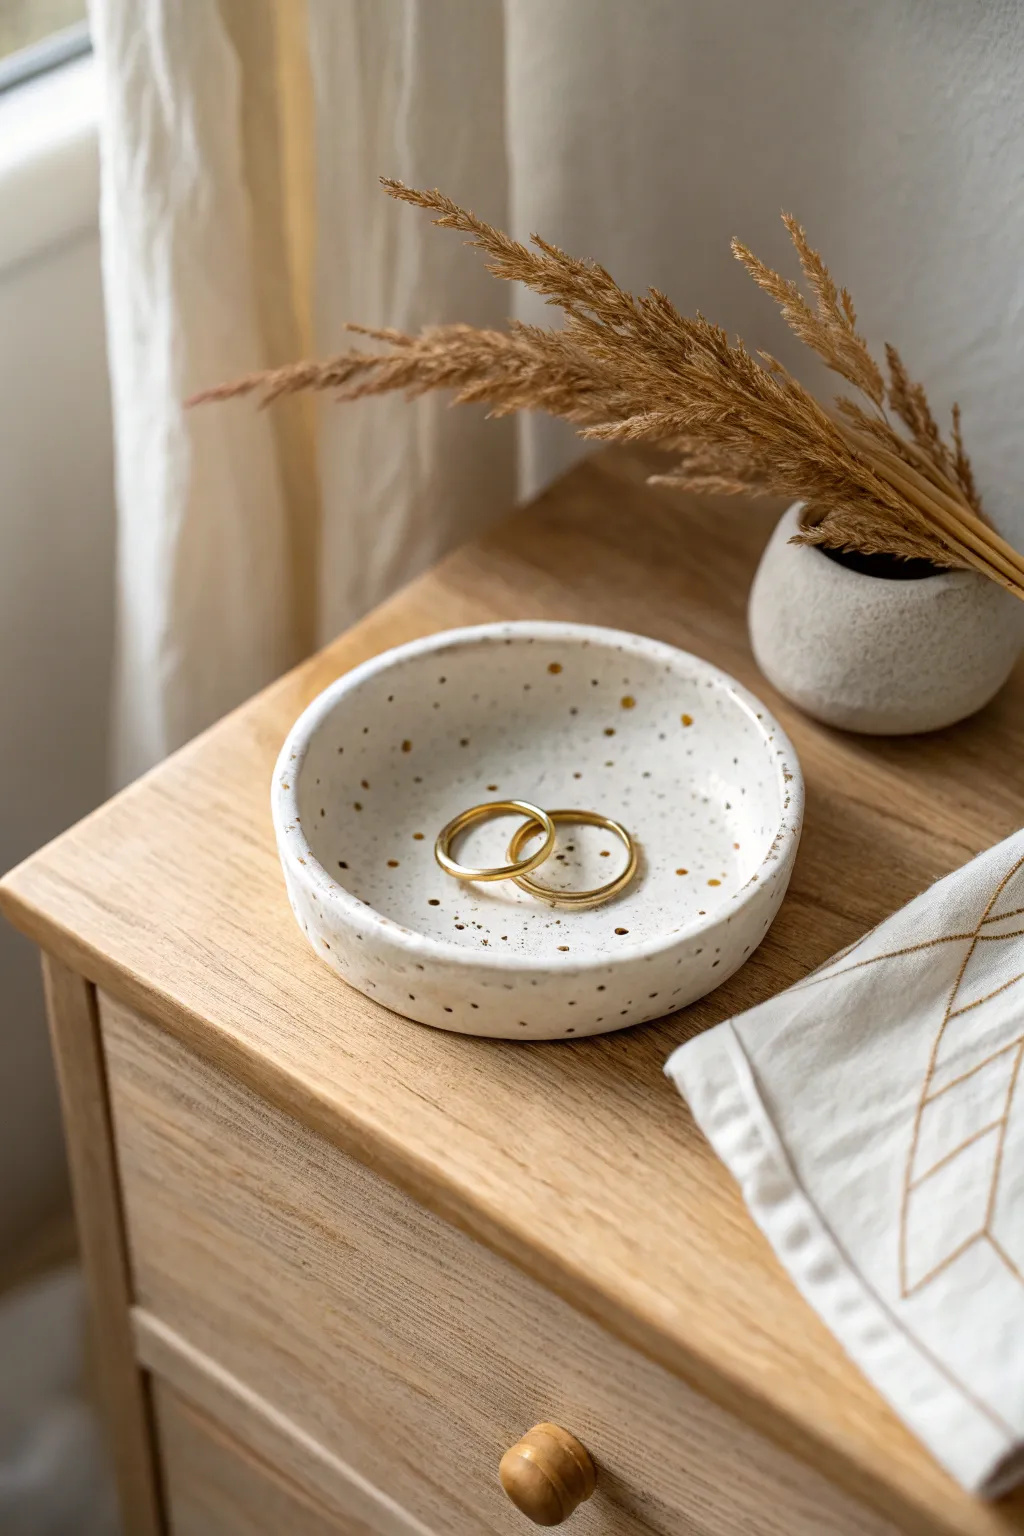
Minimal Ring Cones and Holders
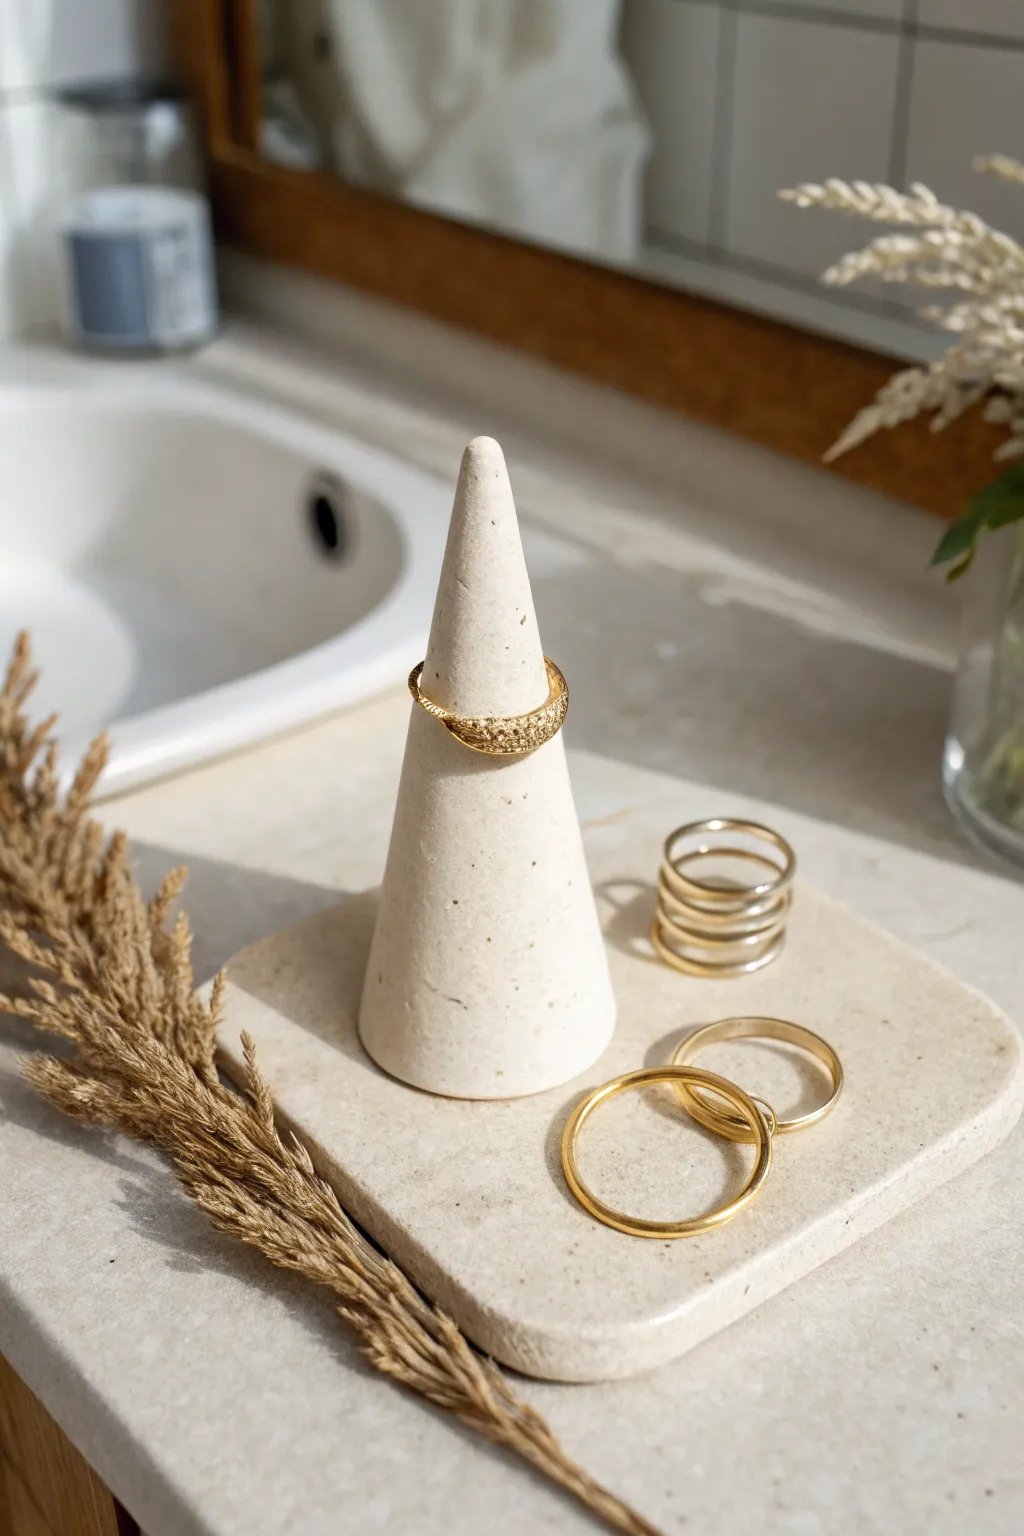
Achieve the high-end look of speckled ceramic without a kiln using this simple air dry clay project. This two-part set features a sleek cone for stacking rings and a matching tray for catching studs and bands.
Detailed Instructions
Materials
- White air dry clay
- Faux stone spray paint (or acrylic paint and an old toothbrush)
- Sandpaper (fine grit)
- Rolling pin
- Sharp craft knife
- Small bowl of water
- Gloss or matte varnish (optional)
- Parchment paper
Step 1: Shaping the Cone
-
Prepare the Clay:
Pinch off a lump of air dry clay about the size of a golf ball. Knead it in your hands for a minute or two to warm it up and make it pliable. -
Roll a Ball:
Roll the clay between your palms until you have a smooth, consistent sphere with no cracks. -
Form the Cone:
Place the ball on your work surface. Using the flat of your palm, roll the clay back and forth while applying more pressure to one side only. This asymmetrical rolling technique naturally creates a tapered cone shape. -
Refine the Shape:
Once you have the basic cone, stand it up. Tap the bottom gently on the table to flatten the base so it stands perfectly straight. -
Smooth the Surface:
Dip your finger in a little bit of water and run it over the cone to smooth out any fingerprints or minor bumps. You want a sleek, modern silhouette.
Cracking Up?
If small cracks appear while drying, mix a tiny bit of fresh clay with water to make a paste (slip) and fill the cracks, then sand smooth once dry.
Step 2: Creating the Tray
-
Roll the Slab:
Take a larger larger chunk of clay and roll it out on parchment paper until it is an even slab, approximately 1/4 inch thick. -
Cut the Base:
Use a craft knife to cut a square shape. For the organic look in the photo, freehand the cut rather than using a ruler, keeping the corners softly rounded rather than sharp. -
Soften the Edges:
Dip your finger in water again and run it along the cut edges of your square tray. Round them over slightly so the tray looks like tumbled stone rather than a sharp cut. -
Dry Completely:
Set both the cone and the tray aside to dry. This typically takes 24-48 hours depending on humidity. Rotate the pieces occasionally to ensure even airflow.
Make it Marble
Knead grey and white clay together stop just before they fully blend to create a luxe marble swirl effect instead of the speckled stone look.
Step 3: Faux Stone Finish
-
Sand for Perfection:
Once bone dry, take your fine-grit sandpaper and lightly buff the surface. Focus on the tip of the cone and the edges of the tray to get them buttery smooth. -
Wipe Down:
Use valid dry cloth or a slightly damp paper towel to remove all the sanding dust before painting. -
Apply Base Coat:
If your clay isn’t already a creamy off-white, paint both pieces with a layer of cream or warm white acrylic paint and let dry. -
Create the Speckles:
To mimic the stone look seen here, you can use a specialty ‘granite’ spray paint. I prefer to hold the can about 12 inches away and do very light mists to avoid heavy blobs. -
Alternative Splatter Method:
If you don’t have spray paint, dip an old toothbrush into diluted brown or grey acrylic paint. Run your thumb over the bristles to flick tiny specks onto the clay for a similar effect. -
Seal the Deal:
Finish with a coat of matte or satin varnish to protect your jewelry holder from scratches and moisture.
Now you have a chic, functional display piece that looks straight out of a boutique


Flower-Shaped Coasters for the Coffee Table
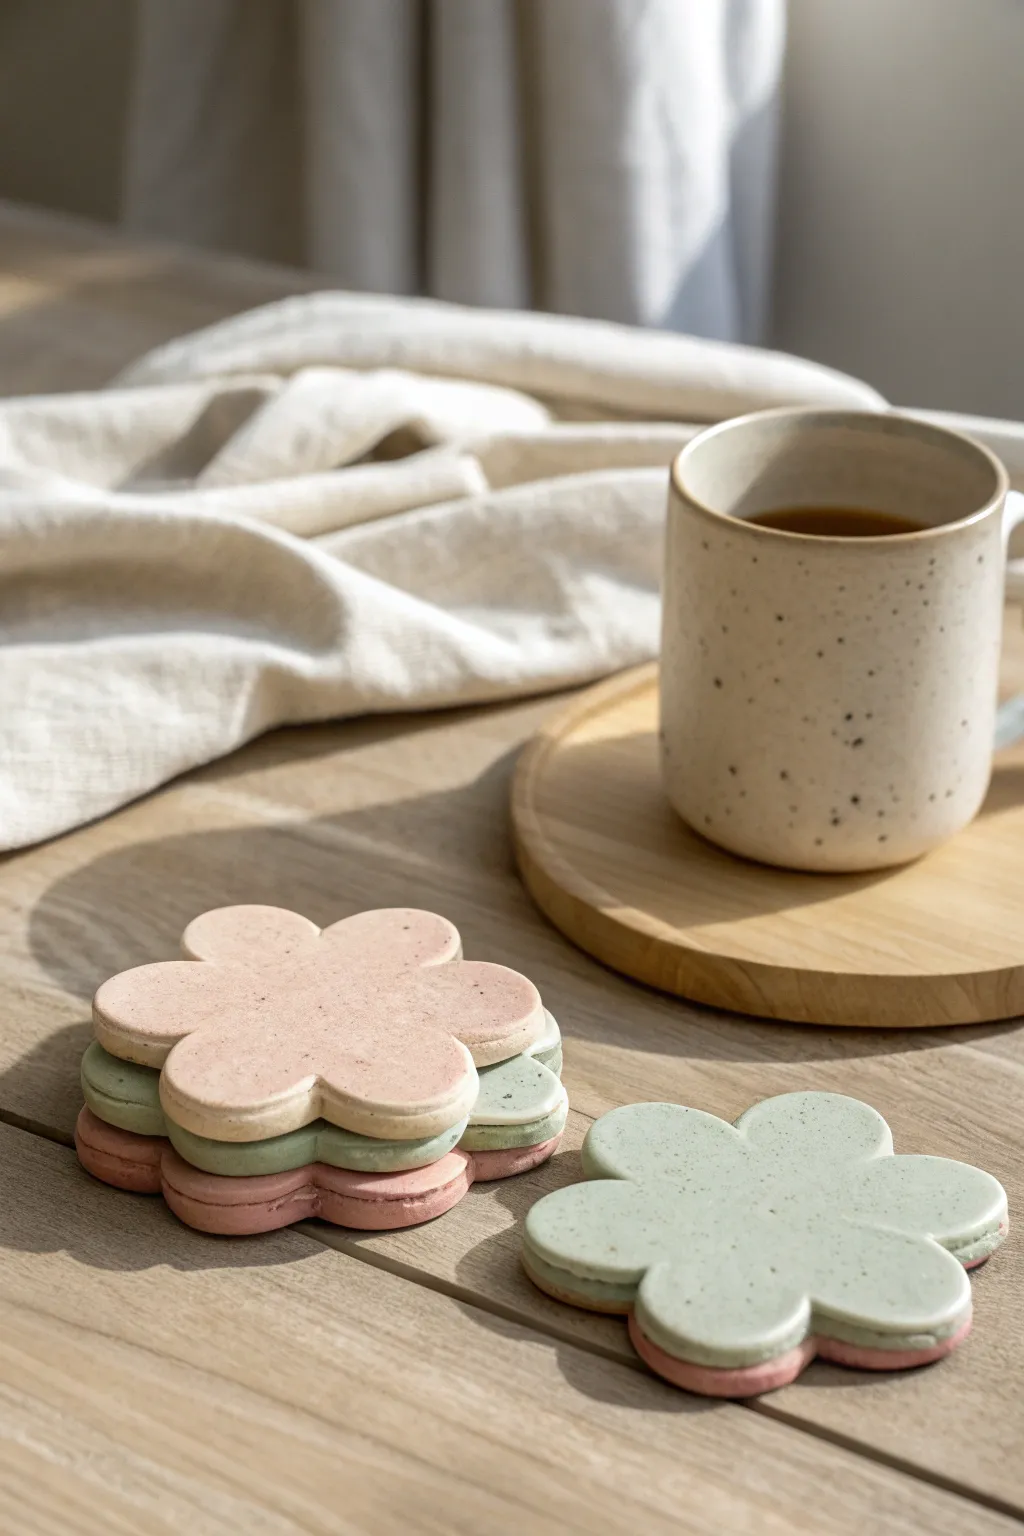
Bring a soft, organic touch to your coffee table with these charming flower-shaped coasters. Their matte finish and subtle speckled texture mimic the look of natural stone while keeping things playful and sweet.
Step-by-Step
Materials
- White air-dry clay
- Acrylic paints (Soft Pink, Sage Green, Beige/Tan)
- Black acrylic paint or black pepper (for speckles)
- Rolling pin
- Flower-shaped cookie cutter (approx. 3.5-4 inches)
- Fine-grit sandpaper (220-400 grit)
- Matte acrylic varnish or sealant
- Toothbrush or stiff bristle brush
- Parchment paper or silicone mat
- Two wooden guide strips (approx. 0.5cm thick)
Step 1: Preparing and Coloring the Clay
-
Portion the clay:
Start by dividing your white air-dry clay into two large balls. Cover one ball with a damp cloth or plastic wrap to keep it fresh while you work on the first color. -
Mix the pink shade:
Take the first ball and make a small well in the center. Add a generous drop of soft pink acrylic paint. Knead the clay thoroughly until the color is uniform and streak-free. If it’s too pale, add tiny dots of paint gradually. -
Mix the green shade:
Repeat the coloring process with the second ball of day, this time using sage green acrylic paint. Aim for a calming, earthy tone rather than a bright lime green. -
Create the speckles:
To achieve that faux-stone look, flatten your colored clay slightly. Sprinkle a tiny pinch of coarse black pepper or dried coffee grounds onto the clay, or flick tiny droplets of black paint onto it. Fold the clay over and knead just enough to distribute the speckles throughout the mass without blending them away.
Fixing Curled Petals
If petals curl up while drying, slightly dampen the concave side with a sponge, place face down on a flat surface, and weight it down heavily overnight to flatten it back out.
Step 2: Shaping the Coasters
-
Set up your workspace:
Lay down parchment paper or a silicone mat. Place your wooden guide strips on either side of your working area to ensure an even thickness for every coaster. -
Roll out the slab:
Place the pink clay between the guides and use your rolling pin to roll it flat. The guides will stop the rolling pin, creating a perfect slab that’s about 0.5cm thick. -
Cut the shapes:
Press your flower-shaped cookie cutter firmly into the clay. Give it a tiny wiggle to ensure it cuts all the way through, then lift straight up. -
Refine the edges:
After removing the excess clay, dip your finger in a little bit of water and gently smooth out the raw edges of your flower cut-out. This saves a lot of sanding time later. -
Repeat for green:
Repeat the rolling and cutting process with your sage green clay. You can re-roll scraps, but try to handle them as little as possible to prevent drying.
Two-Tone Effect
Make a marbled version by twisting a rope of pink and a rope of green clay together before rolling out your slab for a beautiful swirled effect.
Step 3: Drying and Finishing
-
Initial drying:
Carefully transfer your cut shapes onto a clean sheet of parchment paper. Place another sheet lightly on top, followed by a light book or board. This weight helps prevent the petals from curling up as they dry. -
Flip and wait:
After about 12 hours, remove the weight and flip the coasters over to let the bottom side breathe. Allow them to dry for another 24-48 hours until they are fully hard and chalky white (or pale pastel) in appearance. -
Sand for smoothness:
Once fully dry, take your fine-grit sandpaper and gently buff the edges and surface. Focus on the curves of the petals to get them perfectly round and soft to the touch. -
Add surface texture:
If your internal speckles aren’t showing enough, mix a tiny bit of diluted black or dark brown paint. Dip a toothbrush into it and run your thumb over the bristles to flick a very fine mist of speckles onto the surface. -
Seal the coasters:
Apply a coat of matte acrylic varnish to the top and sides. I prefer matte over gloss here to keep that natural stone aesthetic. -
Seal the bottom:
Once the top is dry, flip them over and seal the bottom. This waterproofing is crucial since they will be holding drinks. -
Final cure:
Let the varnish cure completely according to the manufacturer’s instructions before placing a hot mug on them, usually about 24 hours.
Stack your finished coasters on the table and enjoy their soft, blooming colors with your next cup of tea


Arch or Wave Incense Holders
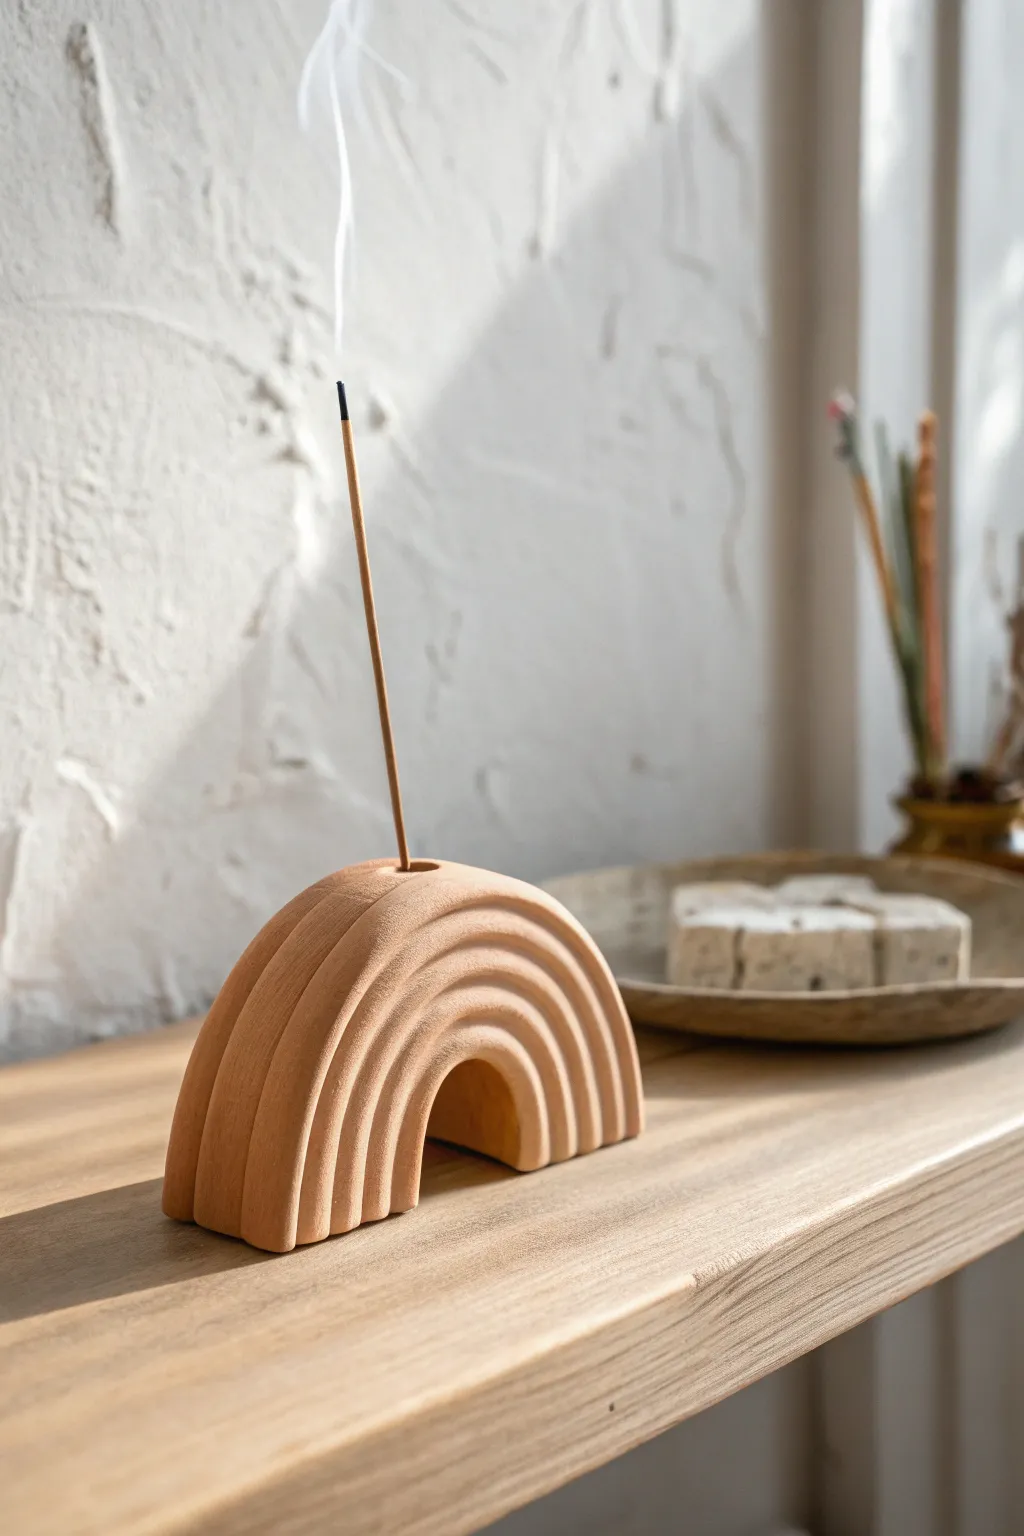
Bring a touch of minimalist warmth to your space with this terra cotta-style incense holder. The unique arched design features deep, rhythmic grooves that catch the light and the ash perfectly, creating a functional piece of art.
How-To Guide
Materials
- Air dry clay (terracotta color or white to paint later)
- Rolling pin
- Sharp craft knife or clay slicing blade
- Wooden skewer or chopstick
- Small bowl of water
- Fine-grit sandpaper
- Ruler
- Piece of cardboard (scrap)
- Matte sealant (optional)
Step 1: Prepping the Base Shape
-
Condition the clay:
Begin by taking a substantial chunk of air dry clay and kneading it in your hands to warm it up. This conditioning process prevents cracks later on. -
Roll a thick slab:
Use your rolling pin to flatten the clay into a thick, even slab. Aim for a thickness of about 1.5 to 2 inches; this project needs depth to stand upright stably. -
Create a template:
Sketch a simple arch shape on your scrap cardboard—think of a half-circle or a stylized rainbow. Cut this out to use as your cutting guide. -
Cut the arch:
Place your cardboard template onto the thick clay slab. Using your sharp knife or blade, slice vertically down into the clay to cut out the basic arch silhouette. -
Refine the edges:
Dip your finger in a little water and smooth out any rough cut marks on the front, back, and sides of the arch.
Clean Lines Secret
Use a damp paintbrush instead of your finger to smooth inside the deep grooves. It reaches narrow crevices without smudging the sharp ridges you just carved.
Step 2: Carving the Ridges
-
Mark your guidelines:
Using a ruler and a the tip of your knife, lightly score parallel lines across the curved top edge of the arch. These will determine where your ridges go. -
Carve the first groove:
Carefully carve out a V-shaped or U-shaped channel along your first guideline. Go slowly to ensure the line stays distinct and smooth. -
Create the tiered effect:
Instead of just cutting lines, try to bevel the clay between the grooves. You want each segment to look like a separate rounded ‘tube’ stacked together. -
Detail the inner arch:
Don’t forget the negative space. Ensure the inner curve of the arch is smooth and possibly carve a matching groove pattern on the inside face if accessible. -
Smooth with water:
Dip a soft brush or your finger in water and run it along the grooves you just carved to soften any sharp clay crumbs.
Try a Speckled Look
Mix dried coffee grounds or cracked black pepper into the wet clay before rolling it out. This creates a stunning faux-stone texture once dried and sanded.
Step 3: Finishing Touches
-
Add the incense hole:
Take your wooden skewer or chopstick and press it deeply into the very center of the top arch. Twist it slightly as you pull it out to ensure a clean hole. -
Check the angle:
I always test fit an actual incense stick (unlit!) at this stage to make sure it stands at the angle I want, rather than leaning too far sideways. -
Final smoothing:
Give the entire piece one last check for fingerprints or imperfections, smoothing them away with a damp sponge. -
Let it dry:
Place the holder on a clean surface to dry. Because the clay is thick, this may take 48 to 72 hours. Turn it occasionally for even airflow. -
Sand for perfection:
Once fully dry and chalky hard, use fine-grit sandpaper to buff away any remaining roughness, especially inside the grooves. -
Seal the piece:
Apply a matte varnish or sealant to protect the clay from ash stains and moisture, keeping that natural earthy look intact.
Your modern arch is now ready to hold your favorite scents and center your space with its calm design

What Really Happens Inside the Kiln
Learn how time and temperature work together inside the kiln to transform clay into durable ceramic.
Chunky Tea Light and Taper Candle Holders
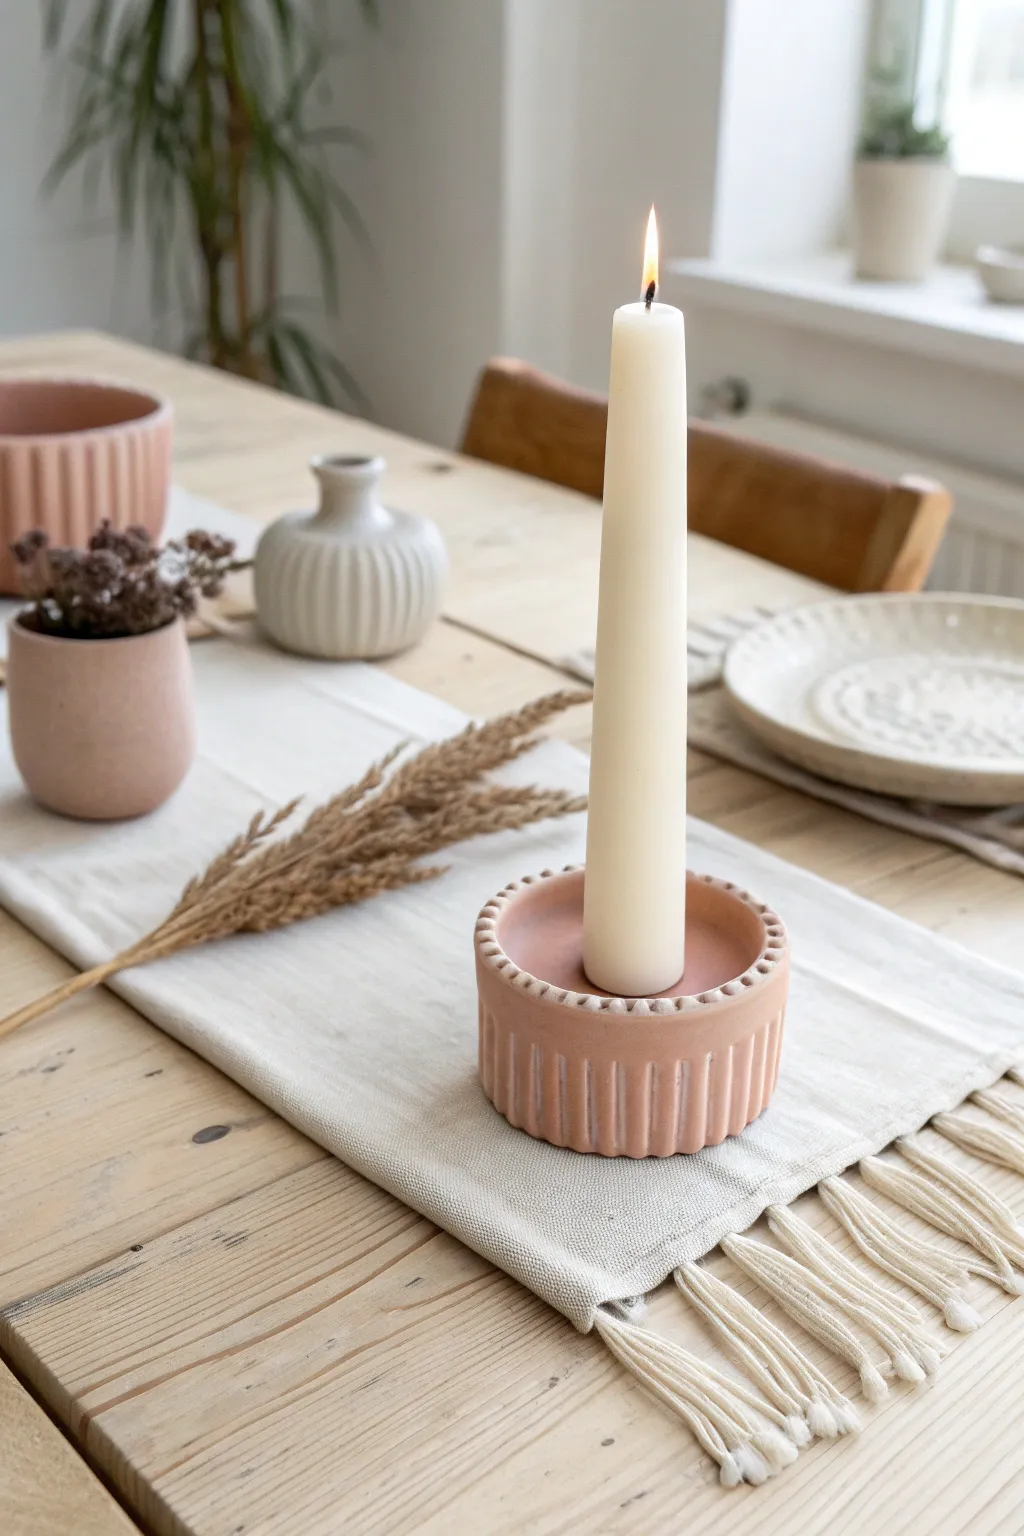
This project combines minimal, modern aesthetics with the rustic warmth of terracotta tones. You will create a sturdy, fluted candle holder that perfectly cradles a standard taper candle, adding a cozy vibe to any table setting.
Step-by-Step Guide
Materials
- Air dry clay (white or terracotta)
- Acrylic rolling pin
- Rolling pin guide rings (1cm thickness)
- Circle cutter (approx. 10cm/4in diameter)
- Smaller circle cutter (approx. 8cm/3in diameter)
- Standard taper candle (for sizing)
- Clay knife or craft knife
- Ruler
- Small bowl of water
- Sponge
- Terracotta or dusty pink acrylic paint
- Matte varnish
- Paintbrushes
- Sandpaper (fine grit)
Step 1: Forming the Base
-
Prepare the clay:
Start by conditioning a large handful of air dry clay until it is warm and pliable. This prevents cracks later on. -
Roll out the slab:
Using your rolling pin and guide rings, roll the clay out to an even thickness of about 1cm. Uniform thickness is key for a stable base. -
Cut the base circles:
Use your larger circle cutter to punch out two identical discs. These will form the foundation and the top surface of your holder. -
Create the taper hole:
Take one of the discs and find the exact center. Gently press the base of your taper candle into it to mark the size, then cut out this inner circle so the candle fits snugly. Wiggle it slightly to ensure a loose fit, as clay shrinks when drying.
Shrinkage Check
Make the candle hole slightly larger than your candle. Air dry clay shrinks about 5-10% when drying, so a snug fit wet becomes too tight dry.
Step 2: Building the Walls
-
Measure the circumference:
Measure around your base circle to determine the length needed for the side wall. Cut a long rectangular strip of clay, about 4cm high and slightly longer than your circumference measurement. -
Add texture:
Before attaching the wall, use a modeling tool or the handle of a paintbrush to press vertical indentations along the entire length of the strip. These ridges create that lovely ribbed effect seen in the photo. -
Attach the wall:
Score the edge of the solid base disc and apply a little water or slip. Wrap your textured strip around the base, joining the ends together smoothly with a little extra water to hide the seam. -
Reinforce the inside:
I like to add a thin coil of clay to the inside seam where the wall meets the base, smoothing it down to ensure a watertight bond.
Step 3: Assembly and Details
-
Mount the top:
Take your second disc (with the hole) and place it on top of your cylinder walls. Score and slip the contact points to secure it firmly. -
Refine the edges:
If there is any overhang, trim it carefully with your knife. Use a damp sponge to smooth the transition between the top disc and the side walls. -
Create the beaded rim:
Roll tiny balls of clay, about the size of a pea. Place them evenly around the top rim of the holder. -
Secure the beads:
Press each small ball gently into the clay rim using water to adhere them. You can use a small tool to press a tiny dimple into the center of each bead for extra detail. -
Final smooth:
Run a damp finger or sponge over the entire piece one last time to remove fingerprints and sharp edges.
Faux Ceramic Look
Mix baking soda into your acrylic paint. This creates a grainy, matte texture that mimics real terracotta pottery instantly.
Step 4: Finishing
-
Dry thoroughly:
Let the piece dry for 24-48 hours. Turn it upside down halfway through the drying process to ensure the base dries evenly. -
Sand imperfections:
Once bone dry, take fine-grit sandpaper and gently buff away any rough spots or uneven textures, paying attention to the rim. -
Apply paint:
Paint the entire holder with a dusty pink or terracotta acrylic paint. You may need two coats for full opacity. -
Seal the piece:
Finish with a coat of matte varnish to protect the paint and give it a professional, finished look.
Place this on your dining table or mantle for an instant touch of handcrafted warmth
Personalized Initial Ornaments and Gift Tags
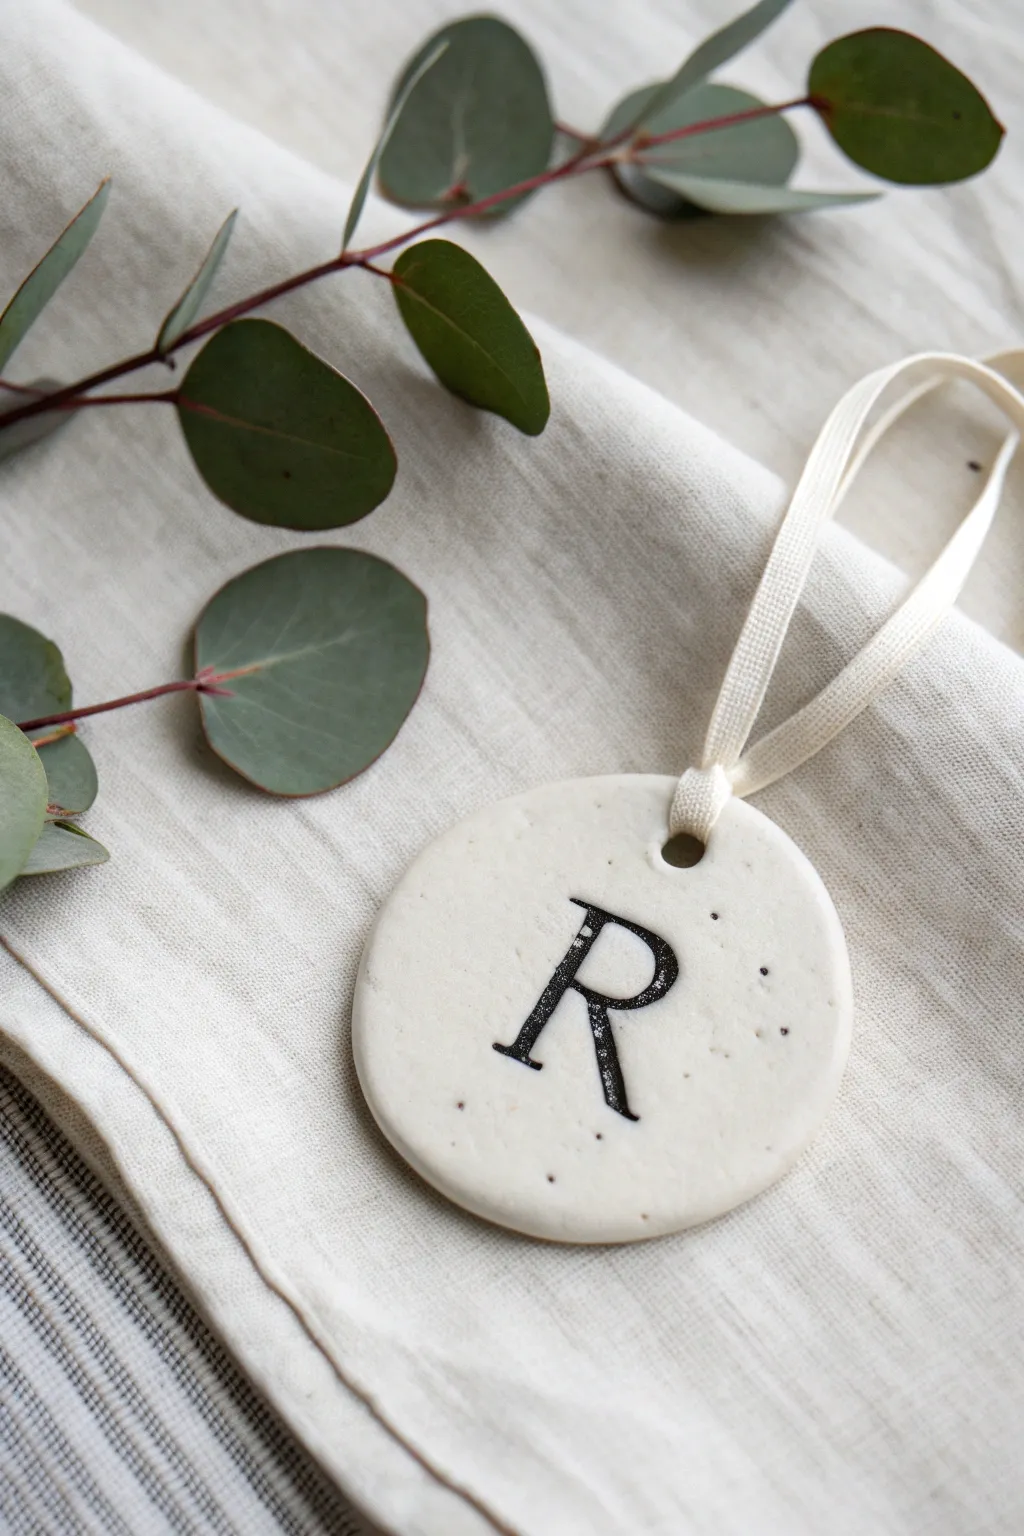
These elegant clay ornaments feature a stamped serif initial on a speckled, creamy white base, tied off with a soft cotton ribbon. They make sophisticated gift tags or custom holiday decor that looks surprisingly high-end despite the simple materials.
How-To Guide
Materials
- White stone-effect or speckled air dry clay
- Rolling pin
- Circle cookie cutter (approx. 3 inches)
- Rubber letter stamps (serif font)
- Black ink pad (permanent or archival)
- Straw or small circular cutter (for the hole)
- Sandpaper (fine grit)
- Cream cotton ribbon or twill tape
- Matte varnish or sealant (optional)
- Wax paper or craft mat
Step 1: Shaping the Clay
-
Prepare your workspace:
Lay down a sheet of wax paper or a dedicated craft mat to prevent the clay from sticking to your table. -
Condition the clay:
Take a handful of air dry clay and knead it briefly in your hands to warm it up and make it pliable. -
Roll it out:
Use your rolling pin to flatten the clay. Aim for a consistent thickness of about 1/4 inch (4-5mm)—too thin and it might crack; too thick and it will be heavy. -
Cut the shape:
Press your circle cookie cutter firmly into the clay. Give it a tiny wiggle to ensure a clean cut, then lift the cutter away. -
Create the hanging hole:
Use a drinking straw or a very small circular cutter to punch a hole near the top edge. Make sure it’s not too close to the rim, or the clay might snap later. -
Smooth the edges:
Dip your finger in a little water and gently run it around the cut edge of the circle to smooth out any roughness or loose bits of clay.
Stamp Smudged?
If the ink bleeds into wet clay, let the clay dry for an hour until ‘leather hard’ before stamping. This keeps lines crisp.
Step 2: Stamping and Drying
-
Ink the stamp:
Select your letter stamp. Press it gently but firmly onto your black ink pad, ensuring the letter surface is evenly coated but not dripping with ink. -
Test the impression:
I always recommend doing a quick test stamp on a scrap piece of clay first to check that the letter is oriented correctly and not upside down. -
Stamp the ornament:
Position the stamp in the center of your clay circle. Press down straight and lift straight up to avoid smudging the sharp lines of the letter. -
Add texture (optional):
If your clay isn’t naturally speckled, you can flick a tiny bit of diluted brown or black paint onto the surface using an old toothbrush for that stone-like effect. -
Let it dry:
Place the ornament on a flat surface to dry. Flip it over carefully after about 12 hours to ensure the bottom side dries evenly as well. Total drying time usually takes 24-48 hours.
Elevate It
Add a gold leaf rim! Use a small brush and gilding glue to apply gold leaf along the outer edge for a luxe finish.
Step 3: Finishing Touches
-
Sand imperfections:
Once fully dry and hard, use fine-grit sandpaper to gently buff the edges if they are sharp or uneven. -
Seal the surface:
Apply a thin coat of matte varnish or sealant to protect the clay and the ink from moisture. Let this coat dry completely. -
Prepare the ribbon:
Cut a length of cream cotton ribbon or twill tape, approximately 8-10 inches long. -
Thread the loop:
Fold the ribbon in half. Push the folded loop end through the hole from the front to the back. -
Secure the tie:
Pull the loose ends of the ribbon through the loop you just created and tighten it gently to create a lark’s head knot at the top of the ornament.
Now you have a set of personalized ornaments ready to elevate your gift wrapping or tree decor


The Complete Guide to Pottery Troubleshooting
Uncover the most common ceramic mistakes—from cracking clay to failed glazes—and learn how to fix them fast.
Modern Clay Earrings in Geometric Shapes
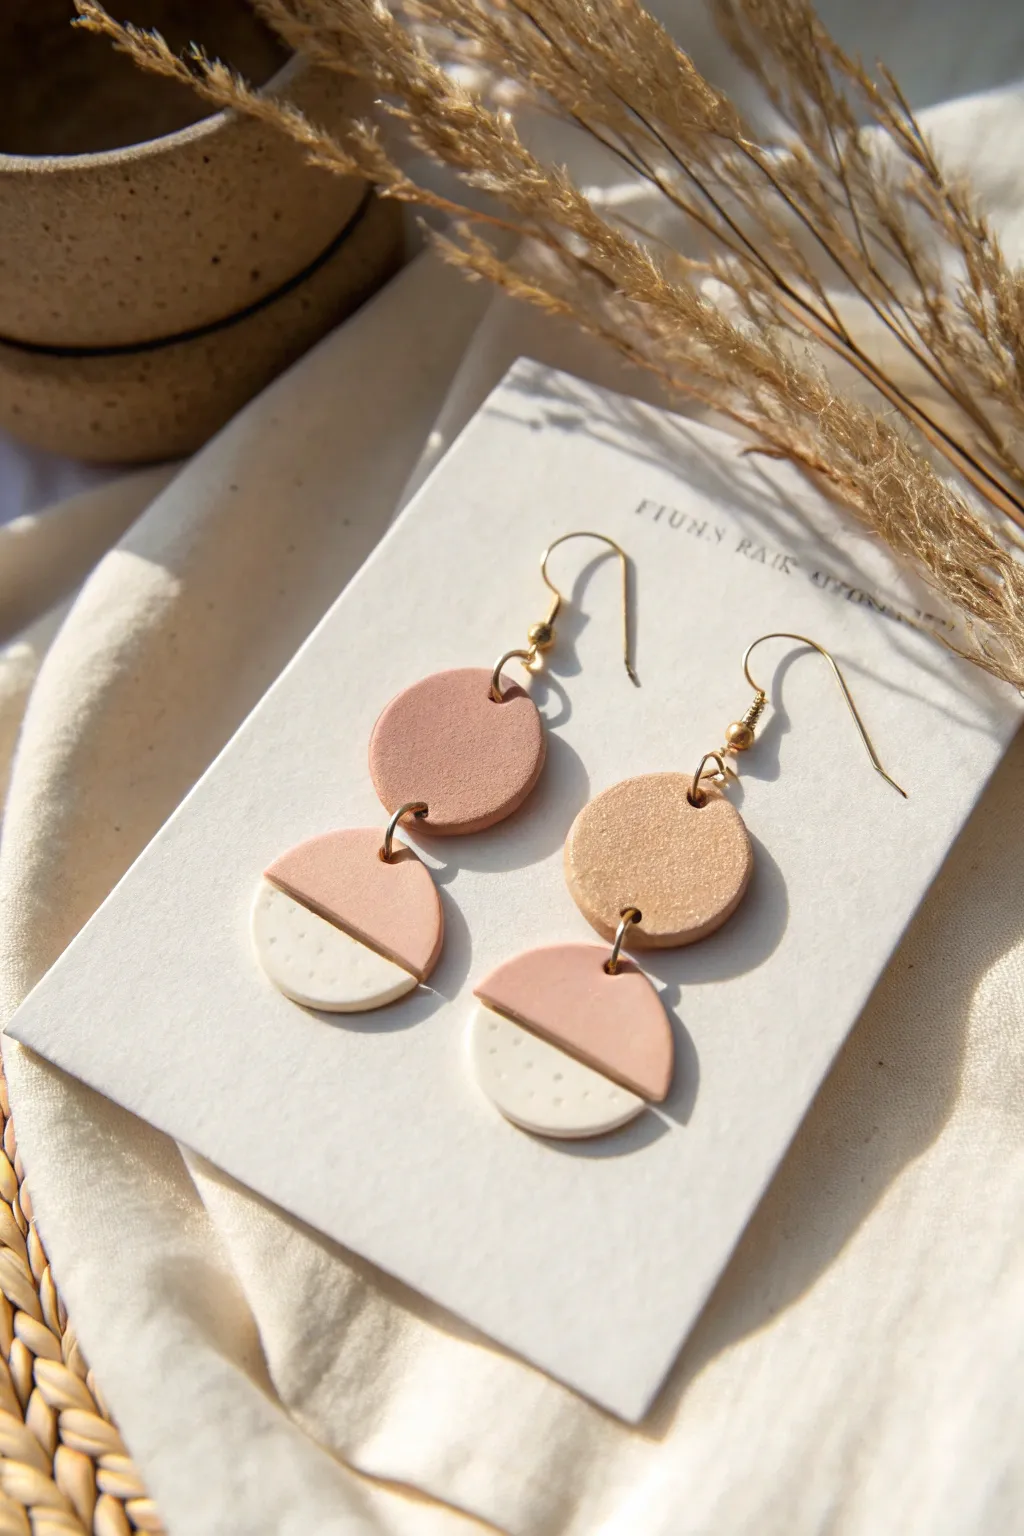
These stunning geometric earrings combine modern simplicity with an artisanal feel, featuring soft terracotta tones and speckled white details. Their lightweight construction and stylish split-circle design make them the perfect everyday accessory that looks deceptively high-end.
Step-by-Step Tutorial
Materials
- Air dry clay (terracotta/pink and white)
- Acrylic rolling pin
- Circle clay cutters (approx. 1.5cm and 2.5cm)
- Sharp craft knife or clay blade
- Needle tool or toothpick
- Coarse sandpaper or a nail file
- Gloss varnish or clear sealant (optional)
- 4 Gold jump rings (6mm)
- 2 Gold earring hooks
- 2 pairs of jewelry pliers
Step 1: Shaping the Clay Components
-
Condition the terra cotta clay:
Start by taking a small amount of your terracotta or dusty rose colored clay. Knead it in your hands until it’s warm, pliable, and free of any large cracks. -
Roll out the slab:
Place the conditioned clay on a smooth surface or a silicone mat. Use your acrylic rolling pin to roll it into an even slab, aiming for a thickness of about 3mm. Consistency is key here for professional-looking edges. -
Cut the top circles:
Using your smaller circle cutter (approx. 1.5cm), firmly punch out two circles. These will form the top stud or connector piece of your earring. -
Prepare the bottom shape:
Punch out two larger circles (approx. 2.5cm) from the same terracotta clay slab. Use your sharp blade to cut each circle exactly in half horizontally, creating four semi-circles. -
Create the white contrast:
Clean your hands and tools to avoid color transfer. Roll out a small amount of white clay to the exact same 3mm thickness as your terracotta pieces. -
Cut and trim white sections:
Cut out two large circles from the white clay using the 2.5cm cutter. Slice these in half just like the others. You will only need two of these white semi-circles. -
Create the two-tone effect:
Now, take two of your terracotta semi-circles and use your blade to trim off the bottom third. Take your white semi-circles and trim off the top two-thirds. The goal is to make the white piece fit perfectly below the trimmed terracotta piece to reform a complete semi-circle shape.
Cracked Clay?
If edges crack while drying, mix a tiny bit of clay with water to make a paste (slip). Fill the cracks, let dry, then sand smooth.
Step 2: Details and Assembly
-
Join the seams:
Gently press the cut edge of the white clay against the cut edge of the terracotta clay. You can use a tiny bit of water on your finger to help smooth the seam together on the back so they bond as they dry. -
Add texture:
To mimic the speckled ceramic look in the photo, take your needle tool and gently poke shallow, random holes into the white section of the clay. Don’t go all the way through. -
Pierce holes for hardware:
Using your needle tool, poke a hole near the top of the small circles (for the hook) and at the bottom (to connect to the lower piece). Then, poke a hole at the top center of your two-tone semi-circles. -
Ensure hole size:
Make sure your holes are large enough for your jump rings to move freely. I always give the needle tool a little wiggle to widen them slightly before drying. -
Dry completely:
Set all pieces on a flat surface away from direct heat. Let them dry for at least 24-48 hours. Flip them occasionally so both sides dry evenly. -
Sand and refine:
Once fully rock hard, use fine-grit sandpaper to gently smooth out any rough edges or fingerprints. Pay special attention to the transition line between the two clay colors. -
Seal the surface:
Apply a very thin coat of matte or gloss varnish to protect the clay from moisture, which is especially important for jewelry. -
Attach the jump rings:
Use two pairs of pliers to twist open a jump ring (twist ends away from each other, don’t pull apart). Thread it through the bottom hole of the top circle and the top hole of the semi-circle, then close it securely. -
Finish with hooks:
Open the loop on your earring hook slightly with pliers. Slide it through the top hole of the small circle and close the loop tight.
Add Sparkle
Before the clay dries, brush a tiny amount of gold mica powder onto the terracotta sections for a beautiful shimmering finish.
Wear your new handmade statement earrings with pride or gift your creation to a lucky friend
Layered Pendant Charms for Necklaces
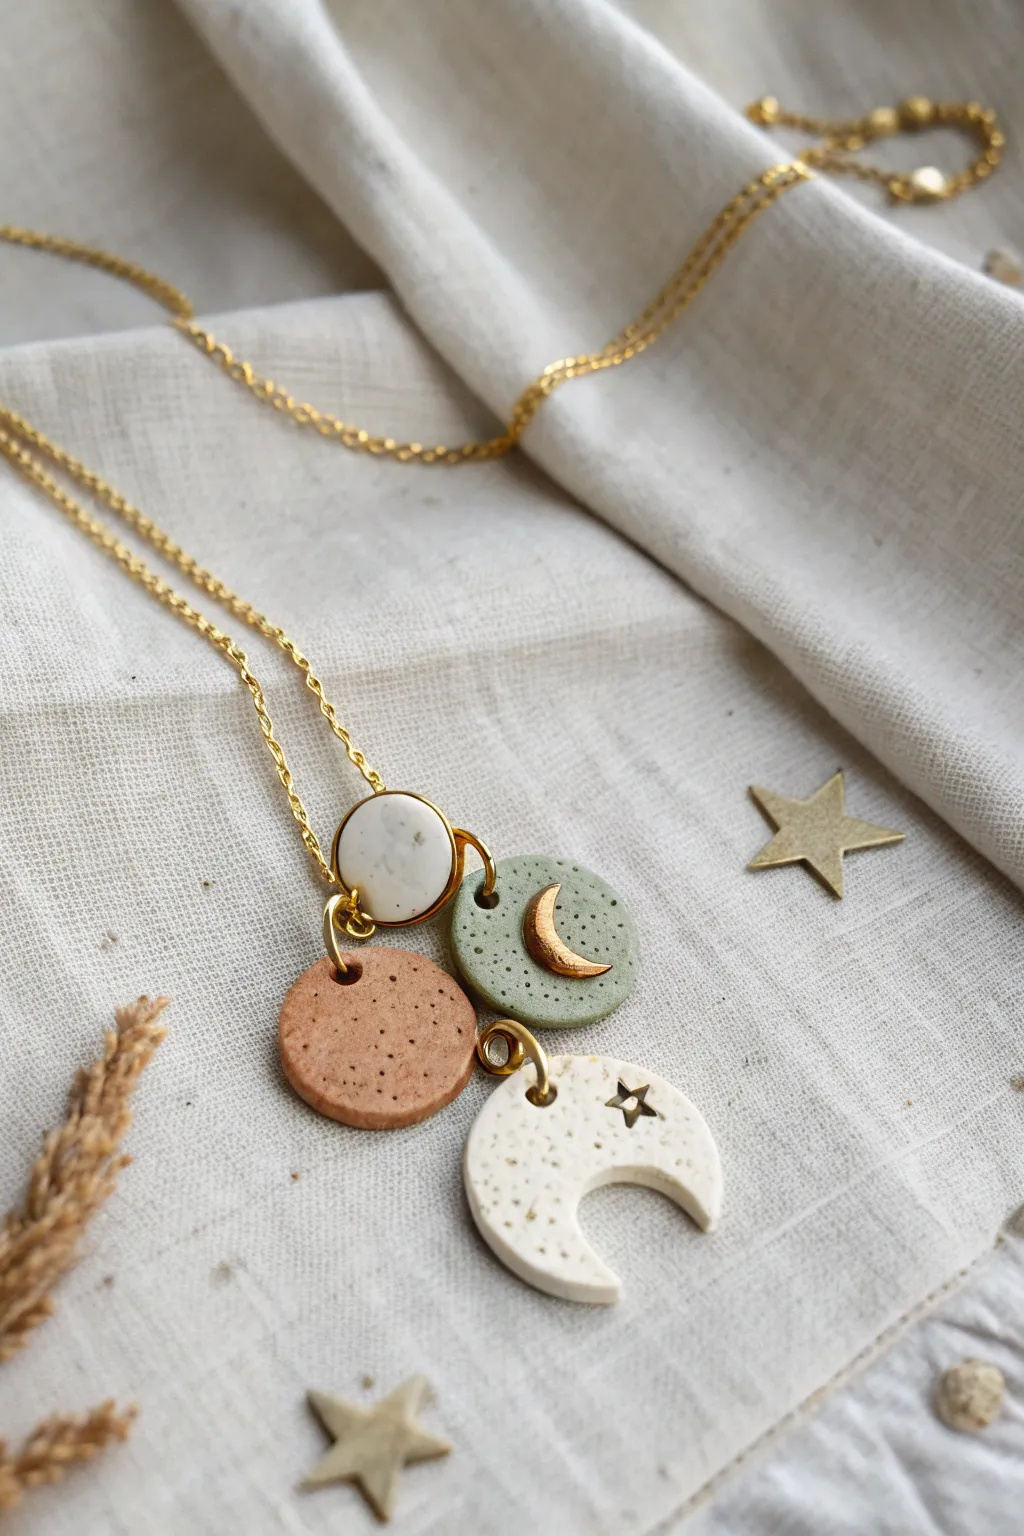
Create a delicate, bohemian-inspired accessory with this tutorial for layered pendant charms. The combination of earthy terracotta, sage green, and speckled white clay, accented with gold celestial motifs, results in a piece that feels both grounded and magical.
Step-by-Step
Materials
- Air dry clay (white, terracotta, and sage green/grey)
- Acrylic rolling pin
- Small circle cutters (various sizes)
- Crescent moon cutter (or template)
- Star shaped stamp or tiny cutter
- Texturing tools (sandpaper, toothbrush, or crumpled foil)
- Gold acrylic paint
- Fine detail paintbrush
- Gloss varnish or resin (optional)
- Jump rings (gold)
- Gold chain necklace
- Needle tool or toothpick
- Super glue (gel type)
Step 1: Shaping the Charms
-
Prepare the Clay:
Begin by conditioning your air dry clay. You will need three colors: a terracotta orange, a sage green, and a white. If you only have white clay, you can either paint it later or mix in a tiny drop of acrylic paint into the wet clay to tint it beforehand. -
Roll Out Slabs:
Roll each color of clay out onto a non-stick surface or parchment paper. Aim for an even thickness of about 3-4mm for the smaller discs and perhaps slightly thicker for the large moon. -
Add Texture:
Before cutting, gently press a texturing tool into the surface of the clay slabs. A clean toothbrush or a ball of crumpled aluminum foil works beautifully to create that organic, stone-like speckling seen in the photo. -
Cut the Base Circles:
Use a small circle cutter (approx. 1.5cm) to cut one disc from the terracotta clay and one from the sage green clay. Cut a slightly smaller circle (approx. 1cm) from the white clay. -
Cut the Crescent Moon:
Using the white textured clay, cut out a crescent moon shape. If you don’t have a specific cutter, use a large circle cutter to make a round shape, then offset the cutter and cut again to slice out a moon. -
Create Holes:
While the clay is still wet, use a needle tool or toothpick to pierce a hole near the top edge of each charm. Make sure the hole is large enough for your jump rings to pass through comfortably.
Keep it Flat
To prevent charms from warping while drying, place a piece of parchment paper over them and weigh them down with a heavy book after the first hour of drying.
Step 2: Adding Details
-
Insert Celestial Details:
For the green circle, you can press a small metal moon charm directly into the clay now, or leave it flat to paint later. For the large white moon, press a tiny star stamp or cutter into the upper corner to create an impression. -
Drying:
Set all your pieces on a flat surface to dry completely. This usually takes 24-48 hours depending on humidity. Flip them occasionally to ensure even drying and prevent curling. -
Sanding Edges:
Once bone dry, use fine-grit sandpaper to gently smooth the edges of your charms. Remove any sharp burs or irregularities from the cutting process.
Step 3: Finishing Touches
-
Painting the Gold Accents:
Using a fine detail brush and metallic gold acrylic paint, carefully fill in the star impression on the white moon. Paint a crescent moon shape onto the center of the green disc. -
Gilding the Edges:
For the smallest white circle, paint the entire outer rim with gold paint to mimic a bezel setting. You can also add speckles to the other charms by flicking a brush loaded with watered-down brown or grey paint for a faux-stone look. -
Sealing:
Apply a coat of satin or gloss varnish to seal the clay and protect the paint. This step is crucial for air dry clay to prevent it from softening with moisture. -
Attaching Jump Rings:
Using jewelry pliers, open your jump rings. Thread a separate jump ring through the hole of each individual charm and close them securely. -
Assembly:
Slide all the charm jump rings onto your gold necklace chain. Arrange them so they overlap slightly—usually with the smallest circle on top and the large moon at the bottom for visual balance.
Cracked Clay?
If small cracks appear as the clay dries, mix a tiny bit of fresh clay with water to make a paste (slip) and smooth it into the cracks with your finger.
Layer these handmade charms over a simple tee or a linen blouse for an effortlessly chic look

TRACK YOUR CERAMIC JOURNEY
Capture glaze tests, firing details, and creative progress—all in one simple printable. Make your projects easier to repeat and improve.
Photo and Place Card Holders for the Table
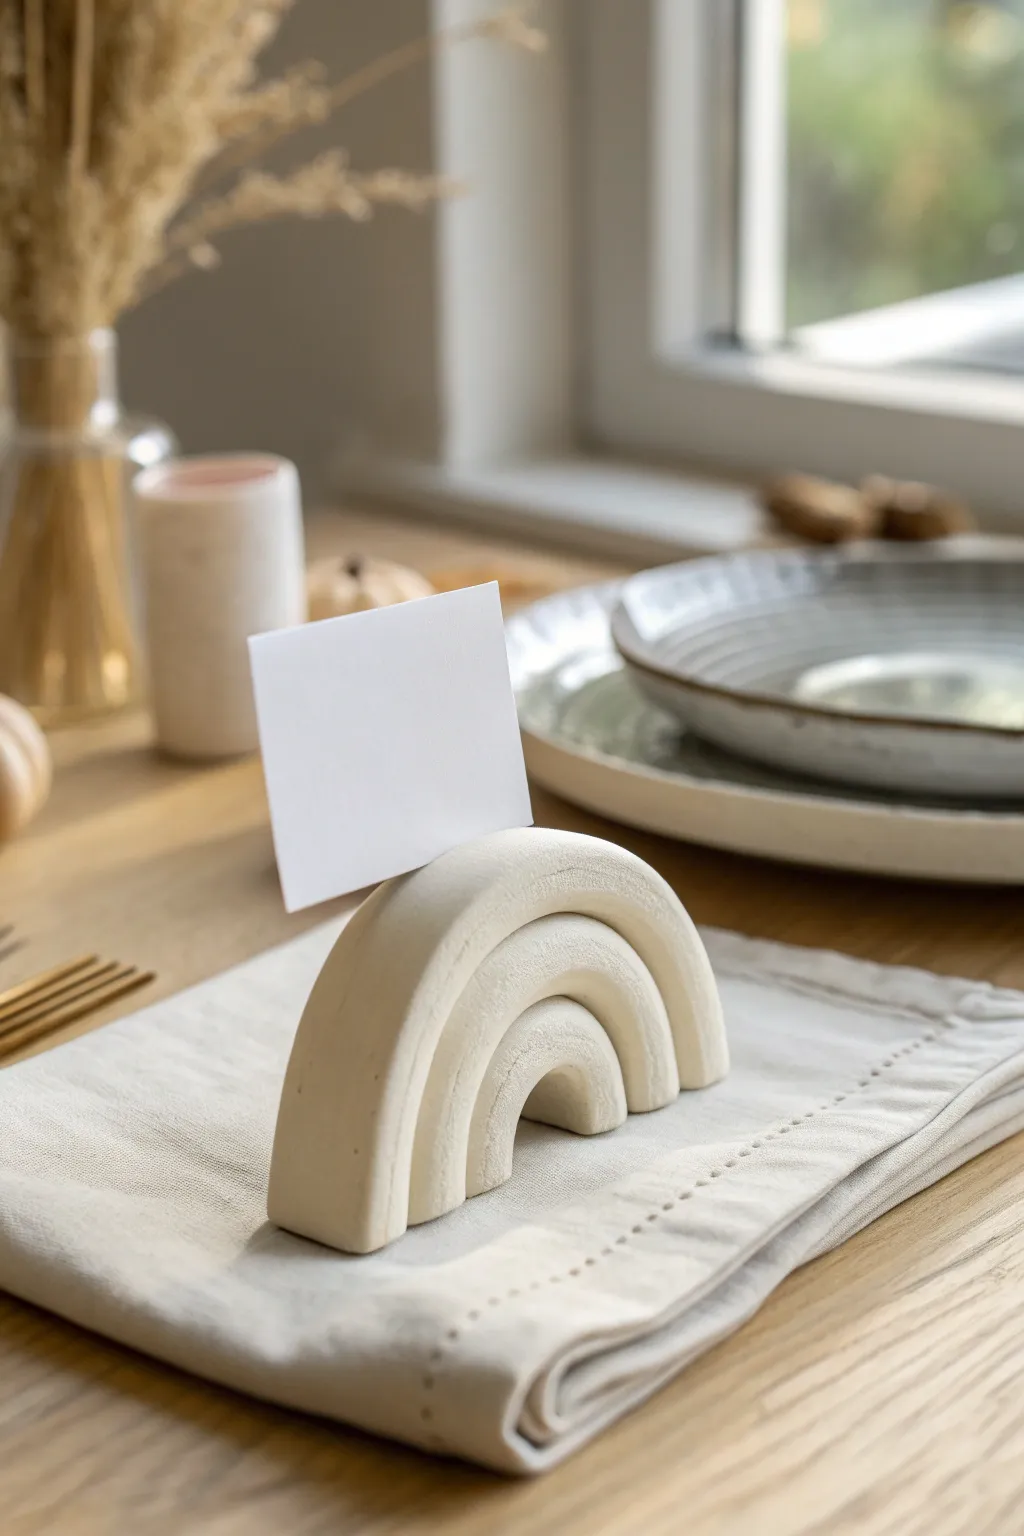
Bring a touch of organic warmth to your tablescape with these minimalist clay rainbow holders. Their soft curves and neutral tone make them perfect for supporting everything from wedding place cards to cherished family photos.
Step-by-Step Guide
Materials
- White or cream air dry clay
- Rolling pin
- Sharp craft knife or clay blade
- Smooth work surface (acrylic sheet or canvas mat)
- Small cup of water
- Fine-grit sandpaper (220-400 grit)
- Ruler
- Optional: Acrylic sealant (matte)
Step 1: Preparing the Arches
-
Condition the Clay:
Begin by taking a generous handful of air dry clay. Knead it in your hands for a minute or two until it feels pliable and warm, which helps prevent cracks later on. -
Roll the Primary Coil:
On your smooth work surface, roll the clay into a long, even snake roughly equal to the thickness of a magic marker (about 1/2 inch thick). Use your palms to roll from the center outwards to keep the width consistent. -
Cut the Largest Arch:
Cut a section of the coil to form the largest outer arch. Bend it gently into a U-shape to test the size, aiming for about 3-4 inches wide at the base. -
Form the Inner Arches:
Roll out two more coils of the exact same thickness. Cut the second one slightly shorter to nest inside the first, and the third one even shorter to sit in the very center. -
Test the Fit:
Lay the three arches flat on your table, nesting them inside one another. Ensure there are no large gaps between the curves, gently nudging them until they sit flush together.
Crack Control
If tiny cracks appear during drying, don’t panic. Mix a tiny bit of fresh clay with water to make a paste and fill the crack, then smooth it over with your finger
Step 2: Assembly and Shaping
-
Create a Flat Base:
To make sure the holder stands upright, you need a flat bottom. While the arches are nested, use your long blade or a ruler to slice straight across the bottom of all three legs simultaneously, creating a clean, level base. -
Scoring the Edges:
Separate the arches slightly. Use your craft knife to make tiny hash marks (scoring) on the inner curve of the large arch and the outer curve of the middle arch where they will touch. -
Applying Slip:
Dip your finger in water and run it over the scored areas to create a sticky ‘slip’ that acts as glue. -
Joining the Layers:
Press the arches back together firmly but gently. Repeat the scoring and slipping process for the smallest inner arch. -
Smoothing the Seams:
On the front and back flat faces of the rainbow, use a wet finger or a clay tool to blend the clay slightly across the seams if you want a solid unit, or simply press firmly enough that they adhere while keeping the defined lines visible, as shown in the inspiration photo. -
Creating the Card Slot:
This is the most crucial step. Take your craft knife and carefully slice directly into the top center of the rainbow, going down about half an inch. Wiggle the blade ever so slightly to widen the gap just enough to hold a piece of cardstock. -
Refining the Shape:
Stand the rainbow up to ensure it doesn’t wobble. If it leans, gently tap the base against the table to flatten it further. -
Final Smoothing:
I always do a final pass with a damp finger to smooth out any fingerprints or stray bumps on the surface before setting it aside.
Textured Twist
Before assembling, roll the clay coils over a textured surface like linen fabric or a basket weave mat to imprint a subtle, organic pattern onto the arches
Step 3: Finishing Touches
-
Drying Time:
Let the piece dry upright in a cool, dry place for at least 24-48 hours. Turn it over gently halfway through if you feel the bottom isn’t getting air flow. -
Checking the Slot:
As clay shrinks when drying, the card slot might tighten. About 4 hours into drying, gently slide a folded piece of paper into the slot to keep it open, then remove it. -
Sanding:
Once fully bone dry, use fine-grit sandpaper to buff away any rough edges or unevenness on the bottom, giving it a professional, matte smoothness. -
Sealing (Optional):
For longevity, brush on a coat of matte varnish. This protects the clay from humidity without altering that lovely raw ceramic look. -
Insert Card:
Place your name card or photo into the slot and arrange on your table.
Now you have a set of charming, handmade holders ready to greet your guests at your next gathering
Desk Organizer Cups and Catch-All Tray Sets

This sophisticated desk set combines deep navy tones with a raw stone aesthetic to bring order to your workspace. Featuring a sleek catch-all tray, a textured pencil cup, and a small contrasting pinch pot, it looks like high-end ceramic but is easily achievable with air-dry clay.
Step-by-Step
Materials
- White or grey air-dry clay (approx. 1kg)
- Rolling pin
- Sharp craft knife or clay blade
- Rectangular template (cardboard)
- Two cylindrical objects for molds (e.g., a jar and a small votive glass)
- Acrylic paint: Navy blue, black, white, and metallic gold
- Texturing tool (coarse sponge, sandpaper, or fabric)
- Small paintbrush
- Water and sponge for smoothing
- Fine-grit sandpaper
- Matte varnish or sealant
Step 1: Forming the Catch-All Tray
-
Roll the base:
Start by rolling out a generous slab of clay to a consistent thickness of about 0.5cm. Use two wooden rulers as depth guides on either side of your rolling pin to keep it perfectly even. -
Cut the rectangle:
Place your cardboard template on the slab and cut a clean rectangle for the tray base. Save the excess clay for the walls. -
Create the walls:
Roll out a long snake of clay and flatten it into a long strip, roughly 1.5cm high. Cut this strip into four sections to match the perimeter of your rectangular base. -
Attach the sides:
Score the edges of the base and the bottom of the wall strips with a needle tool or fork. Apply a little water or ‘slip’ (clay mixed with water) to the scored areas. -
Blend the seams:
Press the walls firmly onto the base. Use your thumb or a clay tool to smooth the clay upwards from the base to the wall on both the inside and outside, erasing the seam completely so it looks like one solid piece. -
Refine the edges:
Smooth the top rim of the tray with a damp sponge to remove any sharpness. Set this aside on a flat board to dry slowly.
Seamless Joints
When blending seams, support the clay wall from the opposite side with your hand to prevent collapsing or warping the shape.
Step 2: Sculpting the Cups
-
Prepare the pencil holder base:
Roll out another slab and cut a circle slightly larger than the diameter of your large jar mold. This will be the bottom of your pencil holder. -
Build the cylinder:
Roll a large rectangular slab that is tall enough for your pencils and long enough to wrap around your jar mold. Wrap the clay around the jar (loosely enough that you can remove it later) and join the vertical seam by scoring and blending. -
Add texture:
Before the clay hardens, press a coarse sponge or a piece of crumpled fabric into the middle section of the cylinder to create a pitted, organic texture band. Leave the top and bottom smooth. -
Attach the base:
Score and slip the bottom edge of your cylinder and attach it to the circular base you cut earlier. Blend the seams thoroughly. Carefully slide the jar mold out. -
Create the small pot:
Repeat the cylinder process using a smaller mold (like a votive glass) to create the short, stout pot. Keep the walls thick and chunky for a stone-like appearance. -
Dry thoroughly:
Let all three pieces—tray, tall cup, and small pot—dry for 24-48 hours. Turn them occasionally to ensure the bottoms dry evenly.
Step 3: Painting and Finishing
-
Sand for perfection:
Once fully dry, use fine-grit sandpaper to smooth out any unintentional bumps or rough edges on the rims. -
Apply the navy base:
Mix a deep navy blue acrylic paint. Paint the entire tray and the large pencil cup. You may need two coats for full opacity. -
Create the stone effect:
For the small pot, mix a light grey paint. Once dry, protect your work surface and use an old toothbrush to flick tiny speckles of black and dark grey paint onto it, mimicking granite. -
Highlight the texture:
On the navy pencil cup, take a tiny amount of metallic gold paint on your brush. Gently dab it into the deepest recesses of the textured band you created earlier. Less is more here; you want subtle glimmers, not solid gold. -
Seal the set:
Finish everything with a coat of matte varnish to protect the paint and give the pieces a professional, unified finish.
Faux Concrete Look
Mix a small amount of baking soda into your acrylic paint. This creates a grainy, gritty texture that looks exactly like real stone or concrete.
Now you have a custom organization station that brings a calm, artistic vibe to your daily work
Faux Ceramic Bud Vases With a Glaze-Look Finish
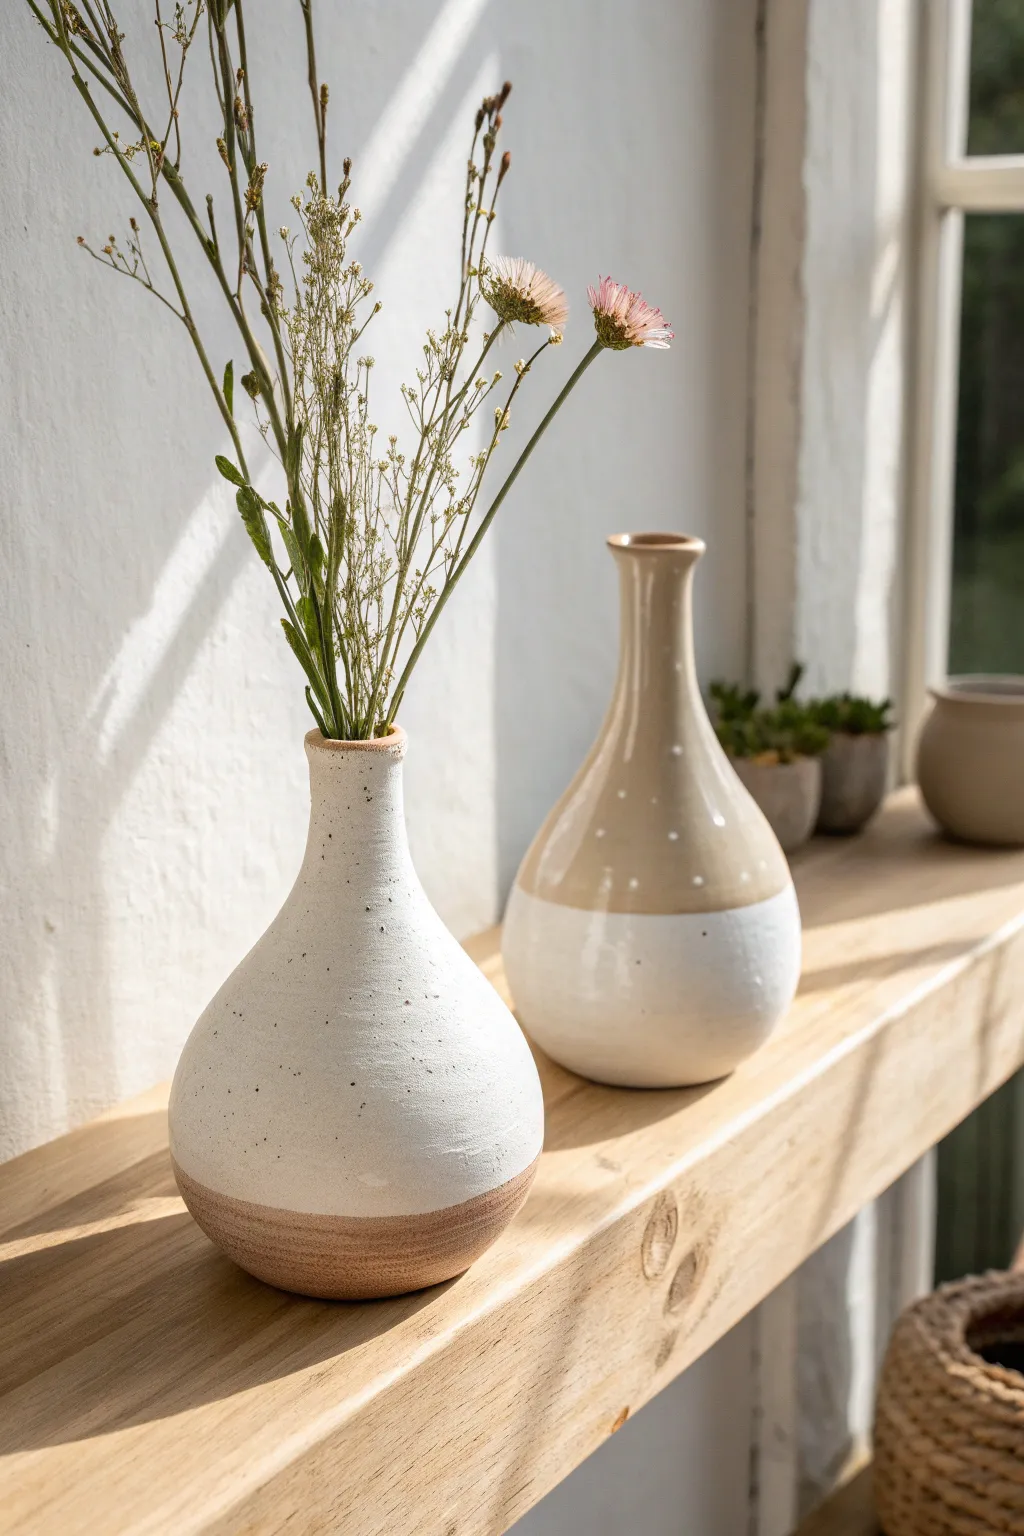
Achieve the high-end look of wheel-thrown pottery without a kiln using air-dry clay and a clever painting technique. These elegant bud vases feature a dual-texture finish that mimics raw clay and smooth glazed ceramic, perfect for displaying dried stems.
Detailed Instructions
Materials
- Air-dry clay (white or natural)
- Glass bottle or jar (for armature)
- Rolling pin
- Craft knife
- Water and sponge
- Sandpaper (fine grit)
- Acrylic paint (warm white, beige/tan)
- Baking soda
- Dark brown or black acrylic paint (for speckling)
- Old toothbrush
- High-gloss varnish or Triple Thick glaze
- Paintbrushes (flat and detail)
Step 1: Shaping the Form
-
Prepare the Armature:
Since air-dry clay is not waterproof, you’ll need a watertight core if you plan to use fresh flowers. Select a small glass bottle or jar with a narrow neck to serve as your permanent internal structure. -
Roll Out the Slab:
Roll your air-dry clay into a uniform slab about 1/4 inch thick. Ensure it’s large enough to wrap entirely around your glass vessel with some overlap. -
Wrap the Vessel:
Gently lift the clay slab and wrap it around the glass bottle. Press the vertical seam together firmly to join the edges. Trim away any massive excess clay at the seam with a craft knife. -
Smooth the Join:
Dip your fingers in a little water and smooth out the seam until it disappears completely. The clay should look like a continuous cylinder. -
Shape the Neck:
Mold the clay up and around the neck of the bottle. Create a gentle, organic flair at the rim. I find smoothing the rim with a damp sponge helps prevent sharp edges. -
Form the Base:
Trim the excess clay at the bottom so it sits flush with the glass base, or fold it under slightly to create a clay foot. Ensure the vase stands stable on a flat surface. -
Refine the Silhouette:
Before the clay dries, use wet hands to refine the curve of the vase. For the teardrop shape shown, smooth the transition from the wider belly to the narrow neck. -
Dry and Sand:
Allow the vase to dry completely for 24-48 hours. Once bone dry, use fine-grit sandpaper to remove any fingerprints or bumps, creating a flawless surface for painting.
Cracking Clay?
Make a “slip” paste by mixing clay scraps with water. Apply this paste into any cracks, let dry, and sand smooth before painting
Step 2: Faux Glazing and Finishing
-
Create the Texture Paint:
Mix your base acrylic paint (warm white for one vase, beige for the other) with a teaspoon of baking soda. This mixture creates a gritty, matte texture that resembles unglazed bisque ware. -
Apply the Base Coat:
Paint the entire vase with your baking soda mixture. You may need two coats to fully cover the greyish tone of the dried clay. Let this dry completely. -
Paint the ‘Raw’ Section:
Decide on your color blocking. For the left vase design, paint a band of terracotta or darker beige around the bottom to mimic exposed raw clay. Use the baking soda mix here too for texture. -
Add the Speckles:
Dilute a tiny amount of dark brown or black paint with water. Dip an old toothbrush into it, and run your thumb across the bristles to flick tiny speckles onto the vase. Practice on paper first to control the spray. -
Protect the Matte Areas:
If you want the bottom section to remain matte (like the left vase), you can leave it as-is or apply a very matte varnish. -
Apply the Faux Glaze:
For the shiny ‘glazed’ look (like the top of the right vase or the main body of the left), apply a thick coat of high-gloss varnish or Triple Thick glaze. The contrast between the shiny and matte areas is what sells the ceramic illusion. -
Final Styling:
Let the varnish cure explicitly according to the bottle instructions. Once non-tacky, arrange your dried stems or fresh flowers inside.
Terra Cotta Tint
Mix cinnamon or paprika into your beige paint to give the exposed clay section a surprisingly realistic, earthy warmth and texture
Enjoy styling these beauties on a sunny shelf to catch the light on that glossy finish
Boho Wall Hanging With Beads and Clay Shapes
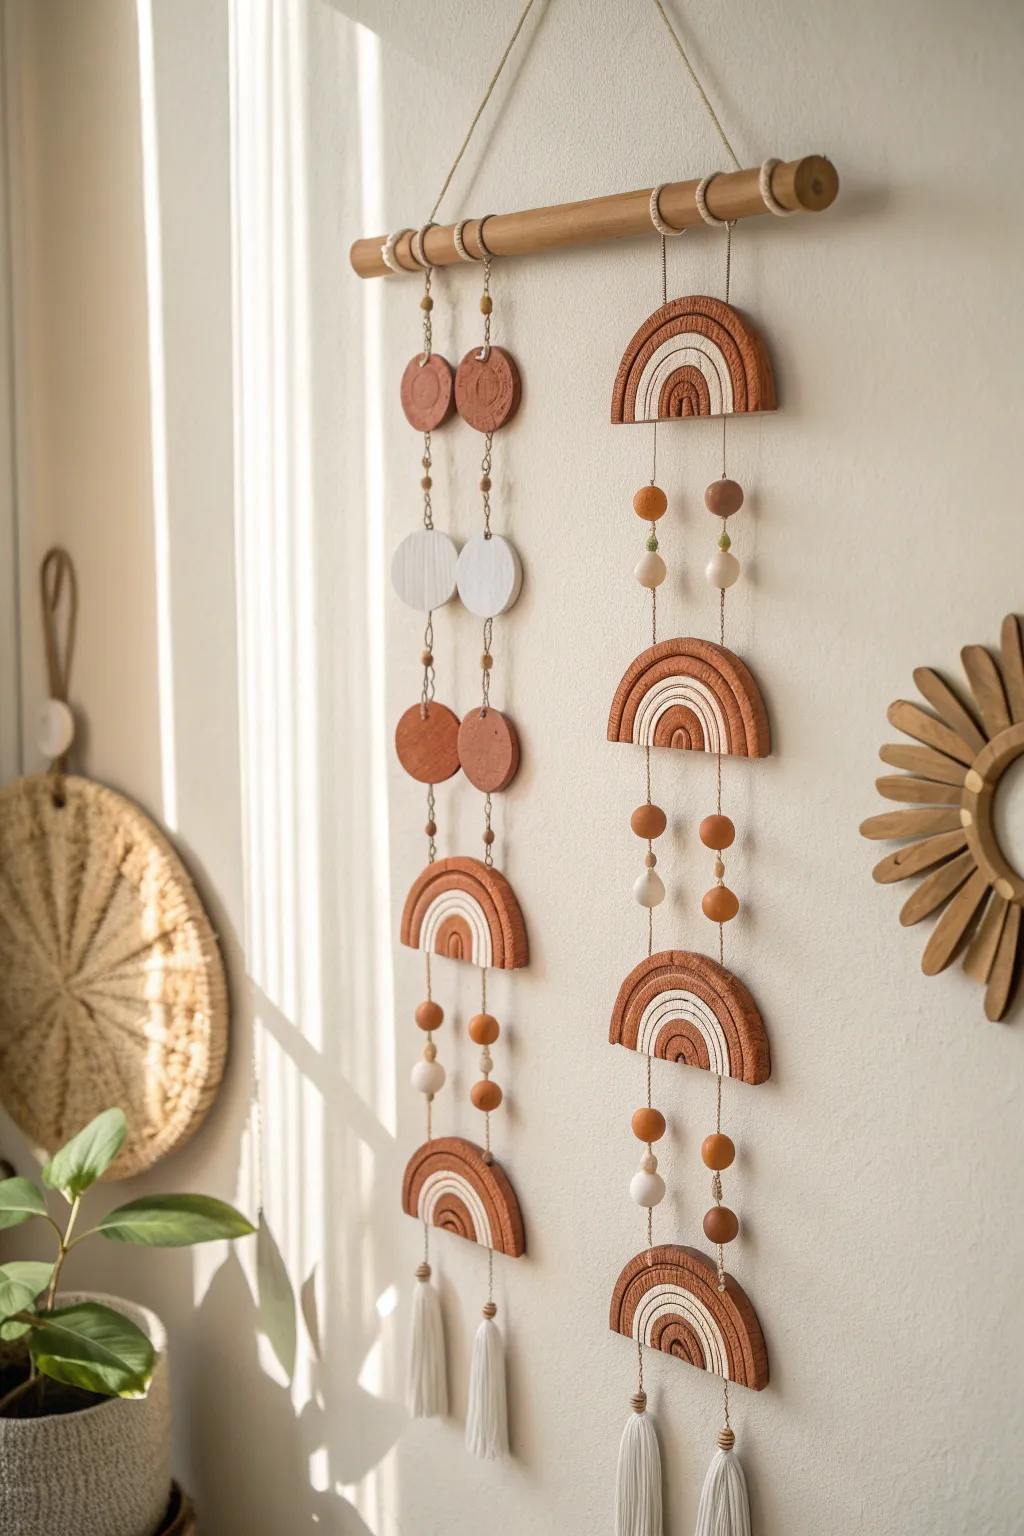
Embrace warm, earthy tones with this stunning wall hanging that combines the rustic texture of terracotta-colored air dry clay with natural wood elements. The cascading design features charming clay rainbows and discs interspersed with beads, creating a rhythmic and calming piece of decor.
Step-by-Step
Materials
- Air dry clay (terracotta/brown and white colors)
- Rolling pin
- Circle cookie cutters (various sizes)
- Clay knife or craft scalpel
- Wooden dowel (approx. 12-14 inches)
- Wooden beads (assorted sizes: large, medium, small)
- Jute twine or strong cotton cord (cream color)
- Tassel making yarn (white or cream)
- Parchment paper or silicone mat
- Straw or toothpick (for poking holes)
- Fine grit sandpaper
- White acrylic paint (optional, if not using white clay)
Step 1: Sculpting the Clay Elements
-
Roll out the clay:
Begin by rolling out your terracotta-colored air dry clay on a non-stick surface to a uniform thickness of about 1/4 inch. If you want a perfectly smooth surface, you can dampen your fingertips slightly to smooth out any cracks. -
Cut the base circles:
Using your largest circle cutter, punch out circles that will become your rainbows. You’ll need about 4-5 large circles for the rainbows and smaller cutters for the plain discs. -
Form the rainbows:
Cut the large circles in half using a sharp clay knife to create semi-circles. Use smaller circle cutters or a steady hand with a knife to carve out the inner arches, creating that distinct rainbow shape. -
Add white details:
Roll out thin snakes or small arches of white clay. Gently press these into the negative spaces of your terracotta rainbows to create the two-tone effect seen in the image. I like to score both surfaces slightly with a needle tool before pressing them together for a better bond. -
Texture the rainbows:
Use a needle tool or toothpick to gently scratch vertical lines or ridges into the terracotta sections of the rainbow to mimic a ribbed texture. -
Create the discs:
Cut out several smaller circles from both white and terracotta clay. You will need about 4 terracotta circles (some larger, some smaller) and 2 white circles for the left strand. -
Add suspension holes:
This is crucial: before the clay dries, use a straw or toothpick to poke holes at the top and bottom of every piece (except the bottom-most rainbows, which only need top holes). Make sure the holes are large enough for your cord. -
Dry and refine:
Let all pieces dry completely for 24-48 hours on a flat surface, flipping them halfway through to prevent warping. Once dry, lightly sand any rough edges.
Cracking Clay?
If your clay cracks while drying, mix a tiny amount of fresh clay with water to make a paste (slip). Fill the cracks with this paste and smooth it over with your finger.
Step 2: Assembly and Finishing
-
Prepare the dowel:
Cut a length of twine to serve as the main hanger and tie it securely to both ends of your wooden dowel. -
Cut suspension cords:
Cut two long lengths of cord, roughly 30 inches each. Fold them in half and attach them to the dowel using a lark’s head knot, spacing them out evenly. -
Start the left strand:
On the left cord, begin threading. Start with the smaller terracotta discs. Tie a knot below each element to hold it in place, leaving a small gap of exposed cord between items. -
Continue the pattern:
Thread the white discs next, followed by larger terracotta discs. Finally, attach two rainbow shapes near the bottom, separating them with wooden beads. -
Build the right strand:
For the right strand, focus on the rainbows. Thread a rainbow, then add a sequence of wooden beads (large, small, large) before tying a knot and adding the next rainbow. Repeat until you have three rainbows in a vertical line. -
Incorporate beads:
Throughout both strands, intersperse plain wooden beads between the clay shapes to add visual breathing room and varied texture. -
Make the tassels:
Create three fluffy tassels using white or cream yarn. Wrap yarn around your hand 20-30 times, tie off the top, and cut the bottom loops. -
Attach tassels:
Tie the tassels to the very bottom of the lowest clay pieces on each strand. The image shows two tassels on the right strand rainbows and two on the left. -
Final adjustments:
Hang the piece on a wall and adjust the knots or beads slightly to ensure everything hangs straight and the balance feels right.
Pro Tip: Balanced Weight
When assembling, ensure the left and right strands have roughly similar weights. If one side is much heavier, the dowel will tilt. Add extra beads to the lighter side to balance.
Hang your beautiful new mobile in a sunny spot to enjoy the interplay of shadows and earthy textures
Sculpted Bookends With Bold, Blocky Forms
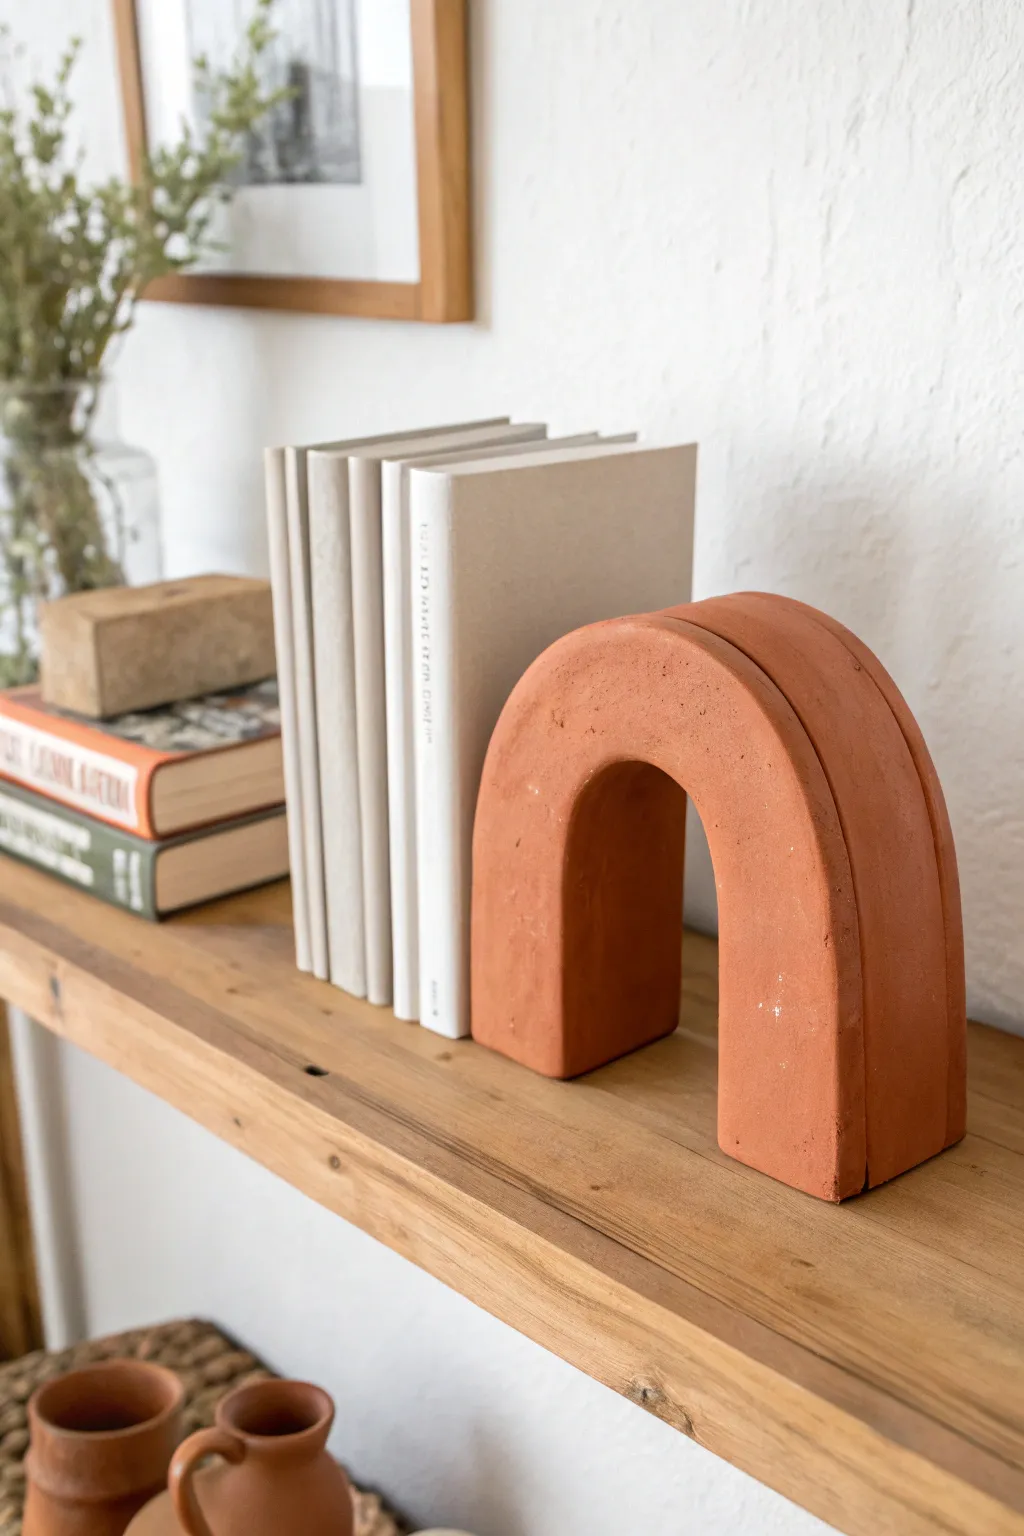
Create a sleek, modern statement for your bookshelf with these geometric arch bookends. Their warm, terracotta finish and substantial, blocky form add an organic yet architectural touch to any vignette.
Step-by-Step Guide
Materials
- Air dry clay (white or terracotta colored)
- Parchment paper or craft mat
- Rolling pin
- Sharp knife or craft blade
- Ruler
- Small bowl of water
- Sponges or smoothing tools
- Sandpaper (fine grit)
- Terracotta acrylic paint
- Baking soda (optional for texture)
- Paintbrush
Step 1: Shaping the Form
-
Prepare the workspace:
Lay down parchment paper or a craft mat to protect your table and prevent the clay from sticking. Tape down the corners if necessary. -
Create a slab:
Take a large chunk of air dry clay and begin rolling it out. You want a very thick slab for stability, aiming for at least 1 inch in thickness. -
Cut the primary strip:
Using a ruler and a sharp knife, cut a long, straight rectangular strip from your slab. The width of this strip will determine the depth of your bookend, roughly 2.5 to 3 inches wide. -
Form the arch:
Gently bend the thick clay strip into a ‘U’ shape to form the arch. Stand it up vertically to check if the height suits your bookshelf needs. -
Square the edges:
Use your ruler or a flat tool to gently press against the sides and top of the arch. This helps create that blocky, geometric look rather than a soft, rounded organic shape. -
Trim the base:
Ensure the bottom of both legs is perfectly flat so the bookend stands independently. You can slice off a thin layer from the bottom with your knife to get a clean edge.
Weight Hack
Air dry clay can be light. To make functional bookends for heavy books, bury a few large metal nuts or clean rocks inside the base of the legs before the clay dries.
Step 2: Adding Weight and Stability
-
Double up (optional):
If your arch feels flimsy, repeat the process to create a second identical arch. Score the touching surfaces with a tool and use a little water as slip to bond them together side-by-side for a double-wide bookend. -
Smooth the seams:
Dip your finger or a small sponge into water and run it over any cracks, seams, or rough edges. You want the surface to look unified and clean. -
Add internal weights:
If using hollow construction or if the clay is too light, you can embed heavy washers or small stones into the base of the legs while the clay is still wet, covering them smoothly with extra clay. -
Final shaping check:
Place the bookend against a true 90-degree angle (like a box or book) to ensure the back is flat enough to sit flush against your books.
Faux Stone Effect
Mix different shades of orange, brown, and cream paint together but don’t blend them fully. This creates subtle streaks that mimic natural terracotta variations.
Step 3: Refining and Finishing
-
Drying time:
Allow the piece to dry completely. Because this project uses thick clay, I recommend letting it sit for at least 48 to 72 hours. Rotate it occasionally so all sides get airflow. -
Sand for smoothness:
Once fully cured, use fine-grit sandpaper to buff away any fingerprints or uneven bumps. A smooth surface mimics the look of honed stone. -
Prepare the paint:
Mix terracotta acrylic paint with a teaspoon of baking soda. This mixture creates a thick, textured paste that looks remarkably like real ceramic or earthenware. -
Apply the first coat:
Brush the paint mixture onto the bookend, using dabbing motions if you want to enhance the stone-like texture. Let this layer dry to the touch. -
Second coat and detailing:
Apply a second coat to ensure full coverage. Pay special attention to the inner curve of the arch, which often gets missed. -
Seal (optional):
If you want extra protection, apply a matte varnish spray over the dried paint, though leaving it unsealed preserves the raw, chalky texture shown in the photo.
Place your new sculptural arch on your shelf to bring warmth and order to your favorite reads
Window Suncatchers With Cutout Shapes
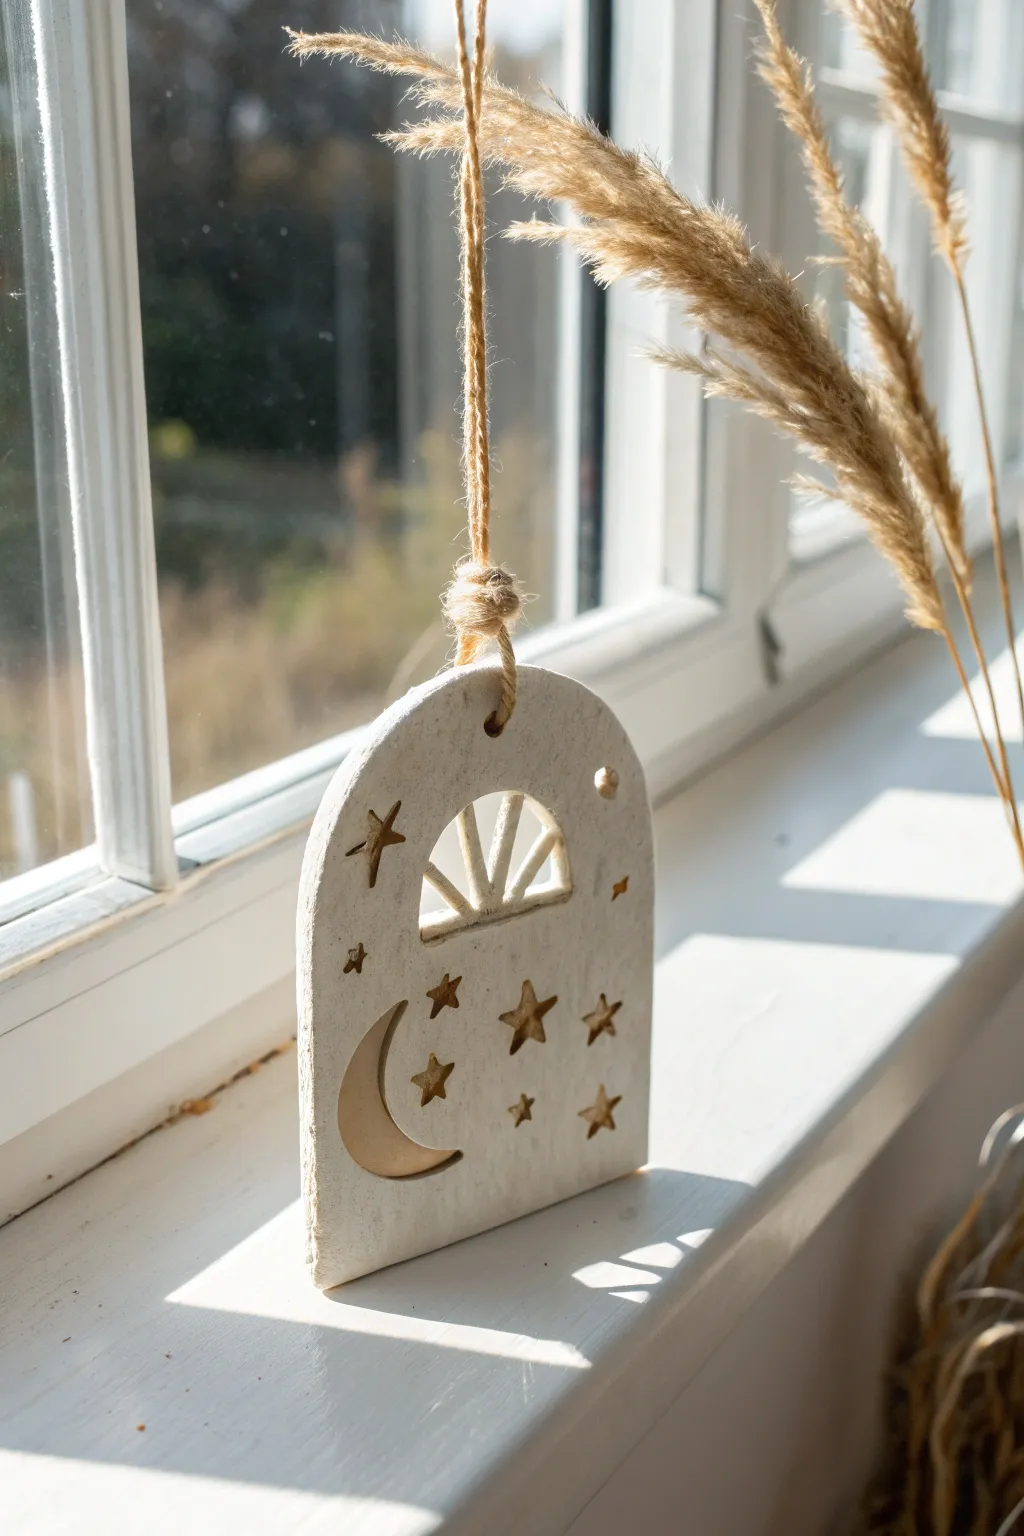
Capture the magic of the night sky with this minimalist air dry clay suncatcher. Featuring cutout stars, a crescent moon, and a radiant sunburst, this textured arch creates beautiful light play when hung in a sunny window.
Detailed Instructions
Materials
- White air dry clay
- Rolling pin
- Clay knife or X-Acto knife
- Parchment paper or silicone mat
- Small star-shaped cookie cutters (optional)
- Small straw or skewer
- Sandpaper (fine grit)
- Jute twine
- Ruler
- Small bowl or cup (for water)
- Acrylic paint or sealant (optional)
Step 1: Shaping the Arch
-
Prepare your surface:
Lay down a piece of parchment paper or a silicone mat to prevent the clay from sticking to your table. Take a handful of air dry clay and knead it until it’s soft and pliable. -
Roll the slab:
Roll out the clay to an even thickness of about 1/4 inch. Try to keep it uniform so it dries evenly and doesn’t crack. -
Create the outline:
Use a clay knife to cut a rectangle shape, roughly 3 inches wide by 4 inches tall. Then, carefully curv the top cuts to form a smooth arch shape. -
Smooth the edges:
Dip your finger in a little bit of water and run it along the cut edges of the arch to smooth out any roughness or loose bits of clay.
Clean Lines
If your knife drags through the clay, let the slab sit for 10-15 minutes to firm up slightly before attempting intricate cuts like the sun rays.
Step 2: Carving the Celestial Details
-
Mark the sunburst:
Near the top of the arch, lightly sketch a semi-circle with three or four radiating lines using a needle tool or toothpick. This acts as your guide. -
Cut the sun window:
Use your knife to carefully cut out the negative space between the sun rays, leaving the clay rays intact within the arched window opening. -
Add the moon:
In the lower left quadrant, carve out a crescent moon shape. Using a small circular cutter or a bottle cap to press the initial curve can help get a clean line. -
Add the stars:
Cut out several small stars scattered around the moon and right side of the arch. If you have tiny cutters, use them; otherwise, carefully cut 5-point stars freehand with your knife. -
Create the hanging hole:
Poke a hole at the very top center of the arch using a straw. Make sure the hole goes all the way through and is wide enough for your twine. -
Refine the cutouts:
Use a damp brush or your finger to smooth the inside edges of all your cutout shapes so they look polished.
Step 3: Finishing Touches
-
Let it dry:
Allow the piece to dry flat on the parchment paper for 24-48 hours. I like to flip it over gently halfway through the drying process to prevent curling. -
Sand for smoothness:
Once fully hard and white, use fine-grit sandpaper to gently smooth the surface and edges, removing any imperfections. -
Dust off debris:
Wipe the ornament with a dry cloth or soft brush to remove any clay dust from sanding. -
Tie the knot:
Cut a length of jute twine. Fold it in half and thread the loop through the top hole. -
Secure the hanger:
Pull the loose ends of the twine through the loop to create a lark’s head knot, then tie the ends together at your desired hanging length.
Cracking Issues
Small cracks during drying can be fixed by mixing a tiny bit of fresh clay with water to make a paste and filling the crack, then smoothing it over.
Hang your new piece in a bright window and enjoy the shadows it casts