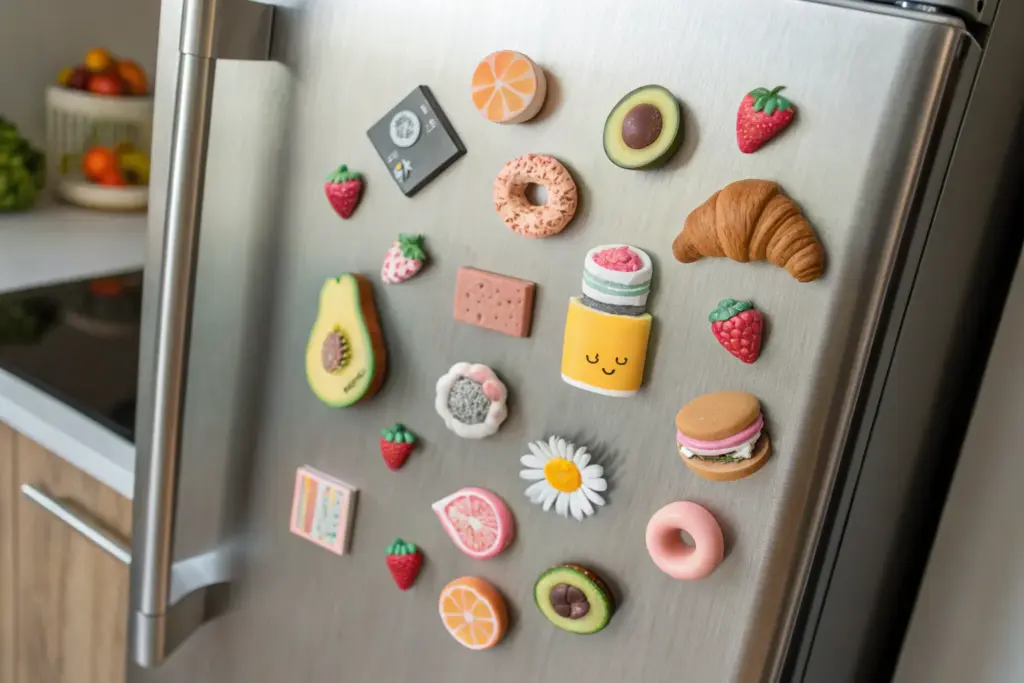
If you’ve got a little bit of clay and a little bit of patience, you’ve got the perfect recipe for tiny art that lives right on your fridge. These clay magnet ideas are all about small, satisfying projects you can finish in a sitting—and then smile at every day.
Fruit Slice Magnets That Look Fresh and Juicy
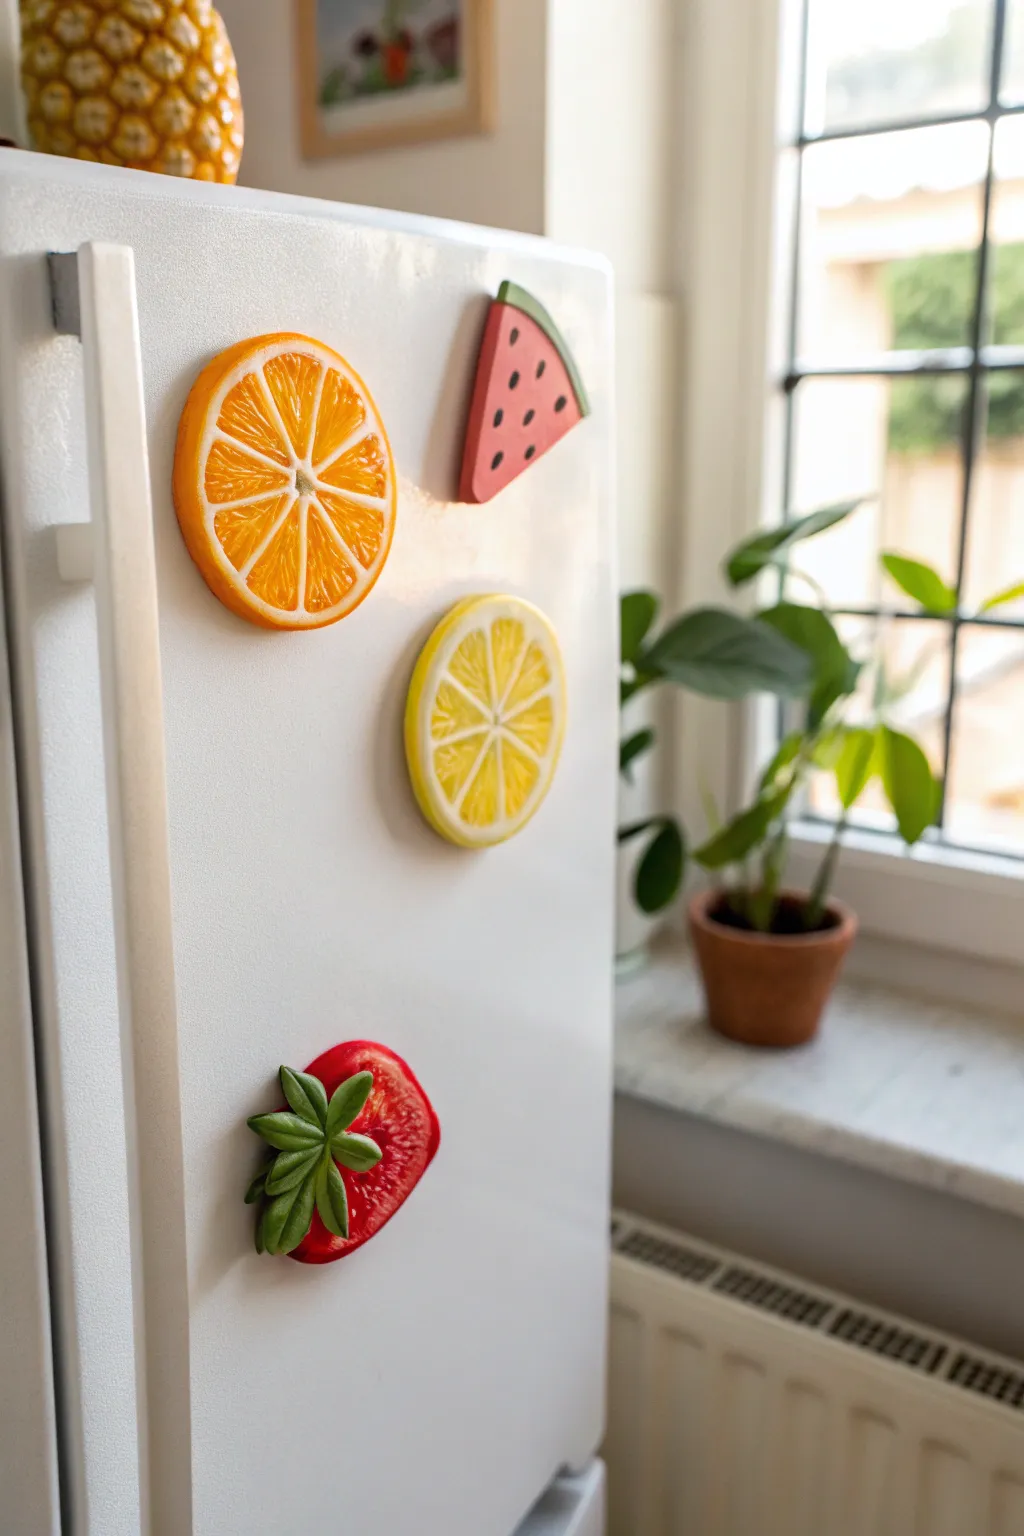
Bring a splash of summer to your kitchen with these incredibly realistic fruit clay magnets. Modeled after fresh citrus, watermelon, and berries, these durable charms look good enough to eat and are surprisingly simple to sculpt.
Detailed Instructions
Materials
- Polymer clay (orange, yellow, white, red, green, black)
- Circle cutters (approx. 2.5 inches)
- X-Acto knife or sharp crafting blade
- Liquid polymer clay or translucent liquid sculpey
- Needle tool or toothpick
- Gloss glaze or UV resin
- Strong magnets (neodymium recommended)
- Super glue (E6000 or similar)
- Acrylic rolling pin or pasta machine
- Small paintbrush
Step 1: Citrus Slices (Orange & Lemon)
-
Preparing the Rinds:
Start by conditioning your orange or yellow clay until soft. Roll it into a long, thin snake about 1/4 inch thick. Separately, roll out a thin sheet of white clay (about 1-2mm). Wrap the white sheet completely around the colored snake to create the pith layer. -
Creating the Segments:
Slice your wrapped snake into 8 equal lengths. Pinch one side of each length to form a teardrop or triangular wedge shape, resembling fruit segments. -
Assembling the Cane:
Arrange the 8 wedges in a circle with the pointy ends meeting in the center. Gently press them together so they adhere without crushing the shape. -
Adding Outer Skin:
Roll out a final thin layer of the matching fruit color (orange or yellow). Wrap this around the entire assembled circle to form the outer zest skin. Roll the entire cane gently on your work surface to smooth the seams. -
Slicing:
Using your blade, slice the cane into disks about 1/4 inch thick. If the clay squishes, let the cane rest in the fridge for 20 minutes first. -
Developing Texture:
Take a needle tool and gently prick the colored inner segments of each slice. Disturbing the surface creates that realistic, juicy pulp texture.
Step 2: Watermelon Wedge
-
Layering Colors:
Roll a thick log of red clay. Wrap a thin sheet of white clay around it, followed by a thin sheet of green clay for the rind. -
Shaping the Wedge:
Cut a slice from this log. Cut that slice in half to create a semi-circle, or into thirds for a narrower wedge like the one in the photo. Smooth the cut edges with your finger. -
Adding Seeds:
Roll tiny specks of black clay into teardrops. Press them gently into the red flesh of the watermelon, pointing the narrow ends inward.
Pro Tip: Cane Cutting
To prevent your round citrus canes from flattening on the bottom while you slice them, rotate the log a quarter turn after every single cut.
Step 3: Strawberry Half
-
Sculpting the Berry:
Form a ball of red clay and flatten one side against your work surface so it will sit flush against the fridge. Pinch the bottom slightly to create the classic strawberry heart shape. -
Texturing the Surface:
Use a ball tool or the tip of a small brush handle to make small indents all over the red surface for the seed pockets. -
Leafy Greens:
Roll small teardrops of green clay and flatten them. Use a knife to score a center vein on each leaf. Press a cluster of these onto the top of the strawberry.
Troubleshooting: Dirty Clay
White clay picks up dust easily. Clean your hands and work surface with a baby wipe or alcohol before handling the white pith layers to keep them crisp.
Step 4: Finishing Touches
-
Baking:
Bake all your fruit pieces according to the instructions on your specific package of polymer clay (usually 275°F for 15-30 minutes). -
Adding Shine:
Once cool, coat the fruit flesh areas (avoiding the rinds if you want a matte contrast) with gloss glaze or UV resin. I find this step crucial for achieving that fresh-cut look. -
Attaching Magnets:
Apply a dot of strong super glue to the back of each fruit slice and press your magnet firmly into place. Let dry completely before placing on the fridge.
Now you have a refreshing set of fruit magnets that add a vibrant pop of color to your kitchen decor


Panda Face Magnets With Clean Black-and-White Shapes
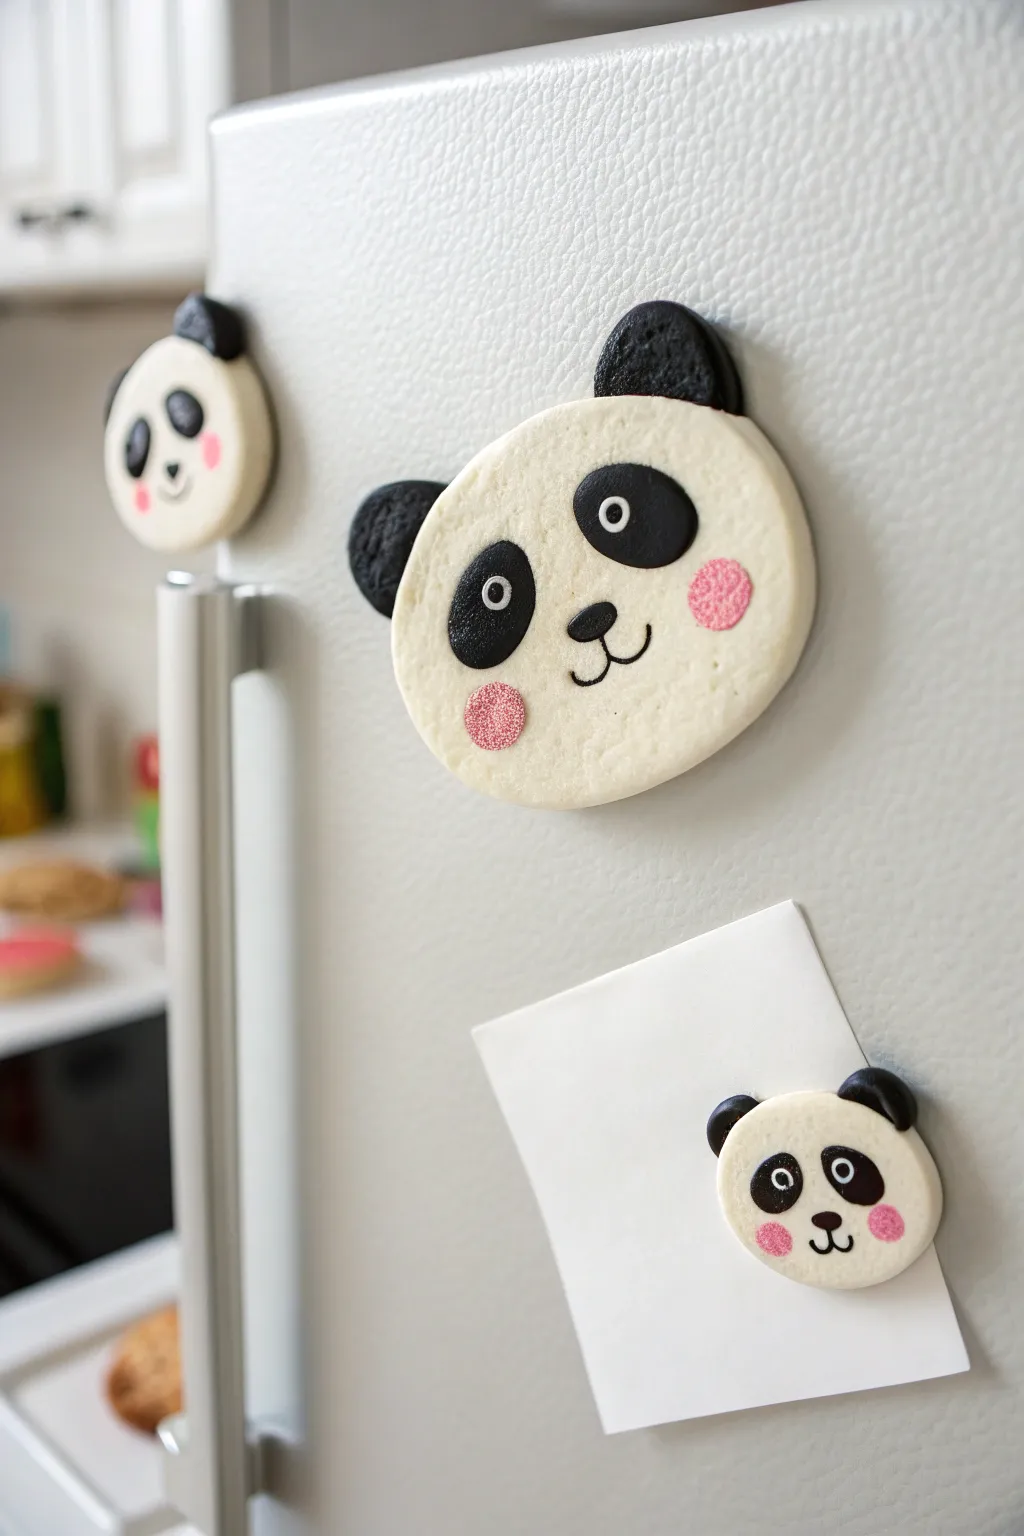
Brighten up your refrigerator with these adorable, minimalist panda face magnets. Using simple polymer clay shapes and clean black-and-white contrast, you can create a durable and charming set of kitchen accessories.
Step-by-Step
Materials
- White polymer clay
- Black polymer clay
- Pink polymer clay (soft pink)
- Circle cookie cutter (approx. 2-3 inches)
- Small circle cutter or piping tip (for ears/eyes)
- Acrylic rolling pin
- Modeling tool or toothpick
- Liquid polymer clay (optional, for adhesion)
- Black acrylic paint or fine-tip permanent marker
- White acrylic paint (for eye highlights)
- Fine detail paintbrush or dotting tool
- Strong round magnets
- Super glue or E6000 adhesive
- Baking sheet and parchment paper
- Oven
Step 1: Creating the Base
-
Condition the white clay:
Begin by kneading a portion of white polymer clay until it is soft and pliable. This conditioning step prevents cracks during baking. -
Roll out the face sheet:
Use your acrylic rolling pin to roll the white clay into a smooth, even sheet about 1/4 inch thick. You want it substantial enough to hold the magnet firmly. -
Cut the face shape:
Take your main circle cookie cutter and press it firmly into the white clay sheet to create a perfect round disc. Peel away the excess clay and smooth the edges with your finger. -
Texture the surface (optional):
For a subtle cookie-like texture as seen in the photo, gently tap the surface of the white disc with a stiff toothbrush or a crumpled ball of aluminum foil. This step is purely aesthetic but adds a nice matte finish.
Clean Clay Genius
Black clay stains white clay easily! Always use baby wipes or wash your hands thoroughly between handling the black and white colors to keep the face crisp.
Step 2: Adding Features
-
Form the ears:
Condition a small amount of black clay. Roll it into a sheet slightly thinner than the face base. Cut two small circles using a mini cutter or firmly roll two small balls and flatten them into discs. -
Attach the ears:
Press the black ear discs securely onto the back edge of the white face circle at the 10 o’clock and 2 o’clock positions. I find using a tiny drop of liquid clay here helps ensure they bond permanently during baking. -
Create the eye patches:
Roll two small balls of black clay into oval shapes. Flatten them significantly so they look like slanted teardrops or ovals. -
Place the eye patches:
Position these black ovals on the white face, angling them slightly downward towards the center to give that classic sad-panda expression. -
Add the cheeks:
Using the pink clay, roll two very tiny balls and flatten them into thin circles. Press these onto the lower outer ‘cheeks’ of the face for a rosy blush effect. You can texture these slightly to match the face if desired.
Step 3: Baking and Finishing Details
-
Bake the clay:
Place your assembled panda faces on a parchment-lined baking sheet. Bake according to your clay manufacturer’s specific instructions, usually around 275°F (135°C) for 15-30 minutes depending on thickness. -
Cool completely:
Remove the tray from the oven and allow the clay pieces to cool completely before handling. The clay is fragile while hot and hardens as it cools. -
Paint the nose and mouth:
Using black acrylic paint and a fine brush, or a fine-tip permanent marker, draw a small rounded triangle nose between the eyes. Connect a small ‘w’ shape beneath it for the mouth. -
Detail the eyes:
Dip a dotting tool or the back of a paintbrush into white paint. Place a small dot in the upper center of each black eye patch to bring the character to life with a ‘catchlight’. -
Add pupil details:
Once the white dots are dry, add a tiny black dot in the center of the white adjustment to create an open, staring eye look. -
Attach the magnet:
Flip the finished panda over. Apply a strong adhesive like E6000 or super glue to the center of the back and press your round magnet firmly into place. -
Final drying time:
Let the glue cure fully according to the adhesive’s package directions, usually 24 hours for maximum strength, before sticking it to your fridge.
Textured Finish
To mimic the porous texture shown in the photo, gently dab the white clay with a stiff toothbrush before baking. It creates a soft, felt-like appearance.
Once dry, these friendly faces are ready to hold up your grocery lists and photos with style


Sea Turtle Magnets With Sweet Shell Patterns

Bring a little ocean charm to your kitchen with this textured sea turtle magnet. The distinct shell segments and speckled flippers give this clay creation a delightful, handcrafted feel that looks perfect on any fridge.
Step-by-Step Tutorial
Materials
- Polymer clay (white or beige)
- Acrylic paints (mint green, dark teal, cream/tan)
- Small round magnet
- Rolling pin or pasta machine
- Clay carving tools (needle tool and small blade)
- Texture sponge or sandpaper
- Fine-point black marker or paint pen
- Small paintbrush
- Strong craft glue (E6000)
- Gloss varnish or resin (optional)
Step 1: Shaping the Base
-
Prepare the Clay:
Begin by conditioning the white or beige polymer clay until it is soft and pliable. Roll it out into a sheet approximately 1/4 inch thick. -
Body Outline:
Using a needle tool, lightly sketch the oval shape of the turtle’s body directly onto the clay sheet. The body should be about 2 inches long. -
Cut the Shape:
Use a sharp craft blade to cut out the oval body shape. Smooth the raw edges gently with your fingertip to round them off. -
Form the Head:
Roll a smaller ball of clay for the head. Flatten it slightly into a rounded dome shape and press it firmly against the top of the body oval to attach it. -
Create Flippers:
Shape four teardrop-shaped pieces of clay. Make the front two flippers larger and slightly curved, and the back two smaller. Attach these to the sides of the body, blending the seams underneath.
Uneven Seams?
If the head or fins feel loose before baking, add a drop of liquid polymer clay or ‘Bake & Bond’ to the connection points to act as a specialized adhesive.
Step 2: Adding Details & Texture
-
Texturizing the Fins:
Take a texture sponge or a piece of rough sandpaper and gently press it onto the four flippers and the head. This creates a realistic, bumpy skin texture. -
Carving the Shell:
For the shell pattern, use a needle tool to carve deep lines. Start with a central vertical line, then add curved horizontal lines to create the geometric plates (scutes) seen in the photo. -
Deepening Grooves:
Go back over your carved lines with a slightly wider tool to ensure the grooves are deep enough to hold paint later without disappearing. -
Baking:
Preheat your oven according to the clay manufacturer’s instructions. Bake the turtle on a tile or parchment-lined tray. Let it cool completely before painting.
Make it Sparkle
Mix a tiny amount of fine iridescent glitter into your gloss varnish before applying it to the shell. This mimics the way wet shells catch the sunlight.
Step 3: Painting & Finishing
-
Base Coat:
Paint the entire turtle with a cream or light tan acrylic paint. This serves as a neutral primer and will show through as the ‘grout’ lines between the shell plates. -
Painting the Shell:
carefully paint the raised shell segments with mint green. I prefer to use a very small flat brush here to keep the paint on the raised surfaces only, leaving the cream grooves visible. -
Speckling the Fins:
Paint the flippers mint green. While the paint is still wet, you can dab just a tiny bit of white or lighter green with a sponge to enhance the texture. -
Defining the Eyes:
Use a fine-point black marker or a tiny dot of black paint to draw the eyes on the side of the head. -
Adding Dimension:
Mix a very watery dark teal wash. Lightly brush this over the textured flippers and immediately wipe the surface with a paper towel. The dark paint will stay in the tiny texture pits. -
Sealing:
Apply a coat of gloss varnish to the shell segments to make them look wet and shiny. You can use a matte varnish for the skin if you prefer a contrast. -
Attaching the Magnet:
Flip the turtle over once dry. Apply a strong dab of E6000 glue to the center of the back and press your magnet firmly into place. -
Final Dry:
Allow the glue to cure fully for at least 24 hours before sticking your new friend to the fridge.
Now you have a charming little sea creature to guard your groceries and hold up your photos


One-Eyed Monster Magnets With Mix-and-Match Expressions
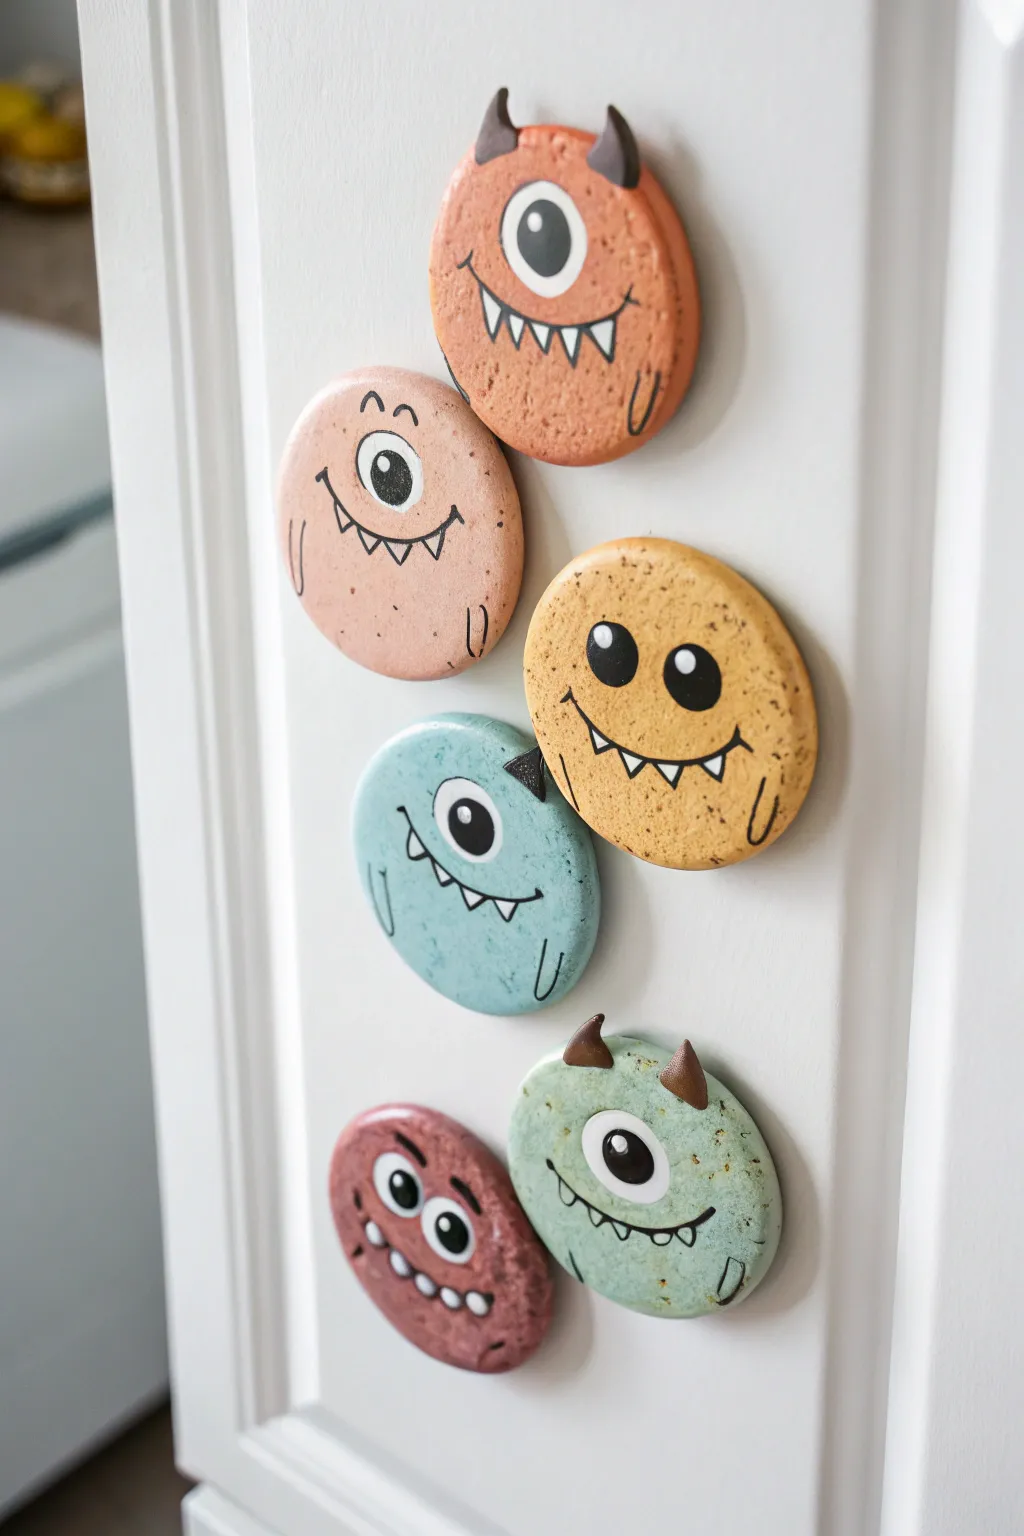
These quirky monster magnets add a playful pop of color to your fridge while keeping all your important notes in check. Customizable with different horns, eyes, and goofy smiles, each little creature has its own unique personality.
Detailed Instructions
Materials
- Polymer clay (assorted colors: orange, pink, yellow, blue, teal, maroon, brown)
- Circle cookie cutter (approx. 2-3 inches)
- Rolling pin (specifically for clay or acrylic)
- Parchment paper or baking mat
- Strong craft glue (E6000 or similar)
- Round ceramic or ferrite magnets (strong enough to hold the clay)
- Black and white acrylic paint
- Fine tip paintbrush or paint pens (black)
- Dotting tool or toothpick
- Clear matte varnish (optional)
- Clay sculpting tools (optional)
Step 1: Shaping the Bodies
-
Prepare your clay:
Begin by conditioning your polymer clay until it is soft and pliable. Start with your lightest colors first (like yellow or pale pink) to avoid color transfer on your hands. -
Roll it out:
On a sheet of parchment paper or a silicone mat, roll the clay out to a thickness of about 1/4 inch. You want them thick enough to be sturdy but not so heavy they slide down the fridge. -
Cut the shapes:
Use your circle cookie cutter to punch out nice, clean rounds for the monster bodies. If the edges are a simplified circle, you can smooth them slightly with your finger to round off the sharp cut. -
Add texture (optional):
For a stone-like or organic look visible in the photo, gently tap the surface with a stiff toothbrush or a ball of aluminum foil to create tiny pockmarks and imperfections.
Clean Edges Trick
Before baking, dip your finger in a little baby oil or cornstarch and rub it gently along the cut edges of the clay circles to instantly smooth out any roughness or fingerprints.
Step 2: Adding 3D Details
-
Create horns:
Take a contrasting color of clay (like brown or black) and roll tiny cones between your fingers. Attach these to the top of the circles by pressing them gently against the edge. You can use a tiny dab of liquid clay for a stronger bond. -
Add spikes:
For variety, fashion small triangles for spikes and press them onto the sides or tops of other monster bodies, just like the blue monster in the example. -
Bake the clay:
Place your clay creations on a baking sheet lined with parchment paper. Bake according to the manufacturer’s instructions for your specific brand of polymer clay (usually around 275°F for 15-30 minutes). -
Cool down:
Allow the pieces to cool completely before moving on to painting. The clay hardens fully as it cools.
Step 3: Painting the Expressions
-
Paint the eyes:
Using white acrylic paint, paint a large circle directly onto the clay for the eye. Some monsters can have one large cyclops eye, while others get two standard eyes. Let the white dry completely. -
Add the pupils:
Once the white is dry, paint a smaller black circle inside. I like to vary the pupil placement—looking up, sideways, or cross-eyed—to give them goofy attitudes. -
Add the highlights:
This is the secret to life-like eyes: use a dotting tool or toothpick to place a tiny white dot in the black pupil area as a reflection. -
Draw the mouths:
Use a fine-tip black paint pen or a very steady hand with a liner brush to draw the mouths. Create curved lines for smiles and add jagged zig-zags for teeth. -
Outline details:
Use the black pen to add small U-shaped lines for arms at the sides. You can also outline the eyes if you want them to pop more against the colored clay.
Glow in the Dark
Mix glow-in-the-dark powder into your white paint for the eyes and teeth. When the lights go out, a bunch of glowing monster eyes will be staring back from the fridge.
Step 4: Assembly
-
Seal the surface:
If you want to protect the paint, apply a thin coat of matte varnish over the face. This prevents scratches over time. -
Flip and glue:
Turn your monsters over. Apply a generous dab of strong craft glue (like E6000) to the center of the back. -
Attach magnets:
Press your round magnet firmly into the glue. Let the glue cure undisturbed for at least 24 hours to ensure a permanent hold.
Now your fridge is guarded by a whole squad of colorful, friendly little monsters

The Complete Guide to Pottery Troubleshooting
Uncover the most common ceramic mistakes—from cracking clay to failed glazes—and learn how to fix them fast.
Alphabet Letter Magnets With Chunky Clay Typography
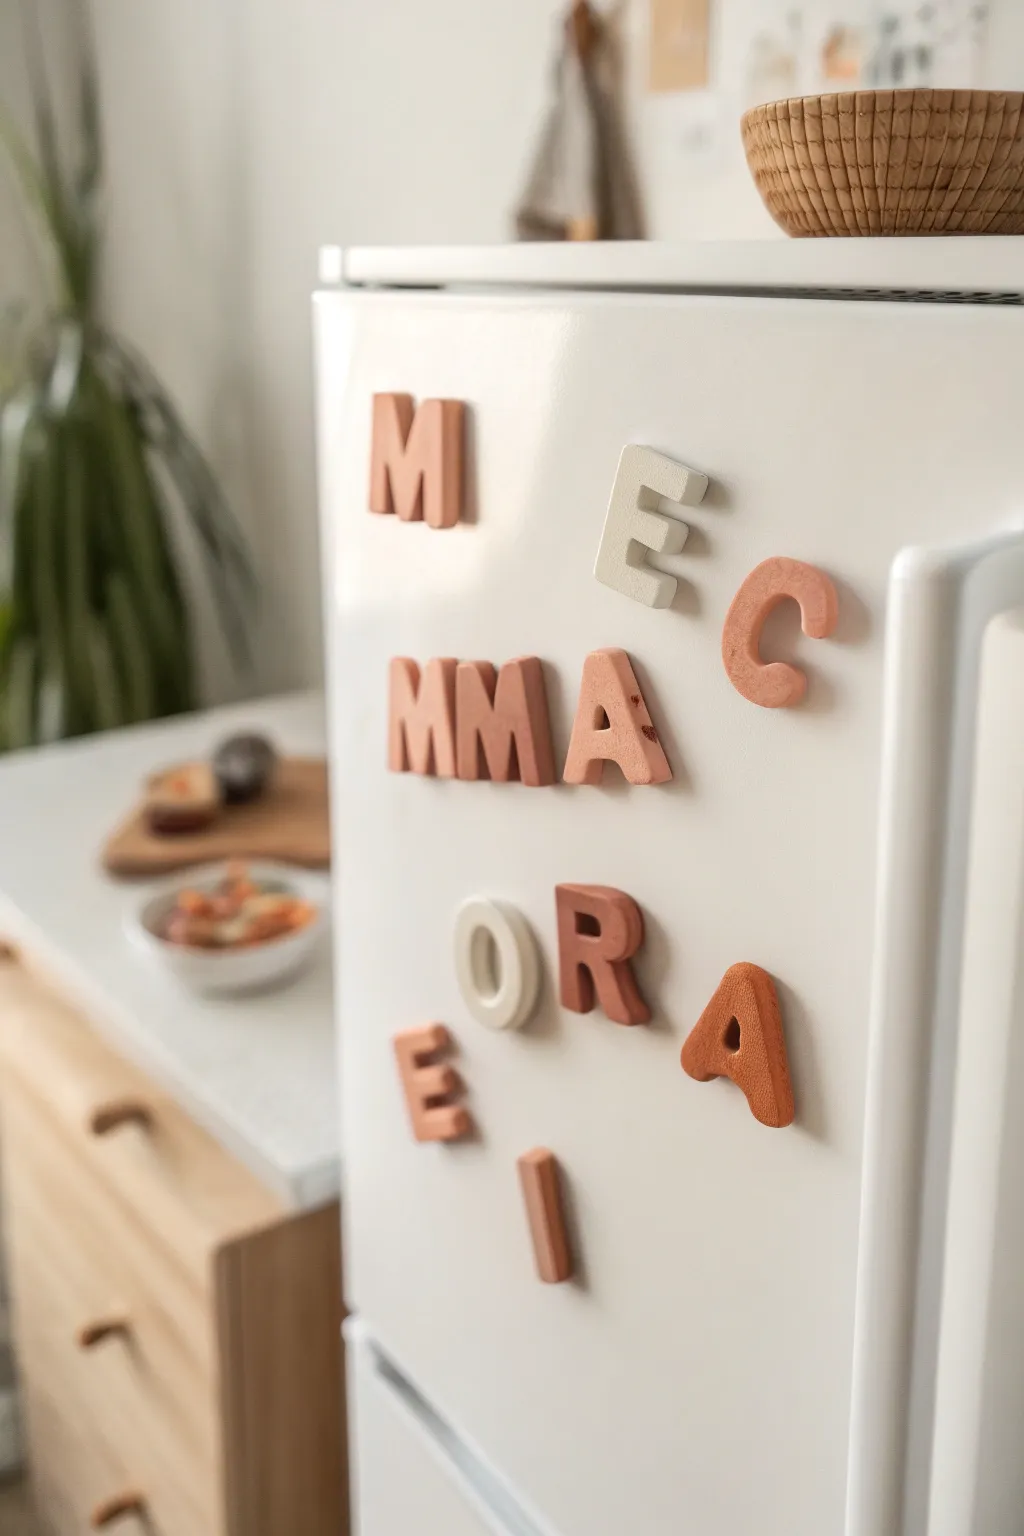
Transform simple polymer clay into these trendy, chunky alphabet magnets that bring a modern, typographical touch to your fridge. With a soft, earthy color palette and a thick, sculptural feel, they are as much about decor as they are about function.
How-To Guide
Materials
- Polymer clay in warm tones (terracotta, peach, cream, white)
- Small round craft magnets (neodymium preferred for strength)
- Rolling pin (acrylic or wood)
- Letter cookie cutters (sans-serif, roughly 2 inches tall)
- Cornstarch or baby powder (for release)
- Craft knife or X-Acto blade
- Super glue or E6000 adhesive
- Fine-grit sandpaper (400 to 600 grit)
- Baking sheet
- Parchment paper
- Optional: Clean ceramic tile for working surface
Step 1: Preparing the Clay
-
Condition the Clay:
Begin by warming the polymer clay in your hands. Knead each color separately until it becomes soft, pliable, and easy to shape without cracking. -
Mix Custom Colors:
To achieve the muted, earthy look shown in the photo, try mixing bright orange clay with a bit of brown or white. You want a cohesive palette of terracottas, pale pinks, and creams. -
Roll It Out Thick:
Place your conditioned clay on a clean work surface. Roll it out into a slab that is approximately 1/4 inch to 1/3 inch thick. The key to the “chunky” look is keeping the slab substantial, not thin.
Step 2: Cutting and Shaping
-
Dust the Surface:
Lightly dust your clay surface or the cutting edge of your cookie cutters with cornstarch. This prevents the clay from sticking inside the cutter, which is common with thicker slabs. -
Cut Out Letters:
Press your letter cutters firmly into the clay slab. Wiggle them slightly to ensure a clean cut all the way through to the bottom. -
Remove Excess Clay:
Instead of lifting the letter out, peel the excess clay away from the outside of the cutter first. This helps preserve the sharp edges of the letter shape. -
Gently Release:
Push the clay letter gently out of the cutter. If it warps slightly, use your fingers to reshape it immediately while it’s still soft. -
Smooth the Edges:
Use your fingertip, dipped in a tiny bit of baby oil or cornstarch if needed, to gently smooth the sharp top edges and any rough spots on the sides of the letters. -
Embed the Magnet (Option A):
If your magnets are oven-safe and you want a flush look, press the magnet firmly into the back of the letter now, burying it flush with the clay surface.
Clean Cuts Every Time
Place a sheet of cling film over the clay slab before pressing your cutter down. This creates a beautiful, rounded ‘pillowed’ edge completely eliminating the need for sanding later.
Step 3: Baking and Finishing
-
Prepare for Baking:
Arrange the cut letters on a baking sheet lined with parchment paper. Ensure they aren’t touching each other. -
Bake the Clay:
Bake according to your specific brand of polymer clay’s instructions (usually around 275°F or 135°C). Since these are thick, ensure you bake for the full recommended time, often 30 minutes per 1/4 inch of thickness. -
Cool Down:
Allow the letters to cool completely on the baking sheet. They will be slightly soft when hot but will harden as they return to room temperature. -
Sand Imperfections:
Once cool, inspect the edges. Use fine-grit sandpaper to lightly buff away any fingerprints or sharp ridges left from the cutter. -
Attach the Magnet (Option B):
If you didn’t embed the magnet earlier, apply a small dot of strong adhesive (like super glue or E6000) to the back of the letter. -
Secure the Magnet:
Press the magnet onto the glue dot. Let the adhesive cure fully according to the manufacturer’s instructions before placing them on your fridge.
Textured Terrazzo
Before rolling your slab, mix in tiny chopped bits of contrasting colored clay (like white chunks in terracotta clay) to create a trendy terrazzo stone effect.
Arranging your new custom typography on the fridge makes every grocery list look a little more artistic
Rainbow and Cloud Magnets for Instant Happy Color
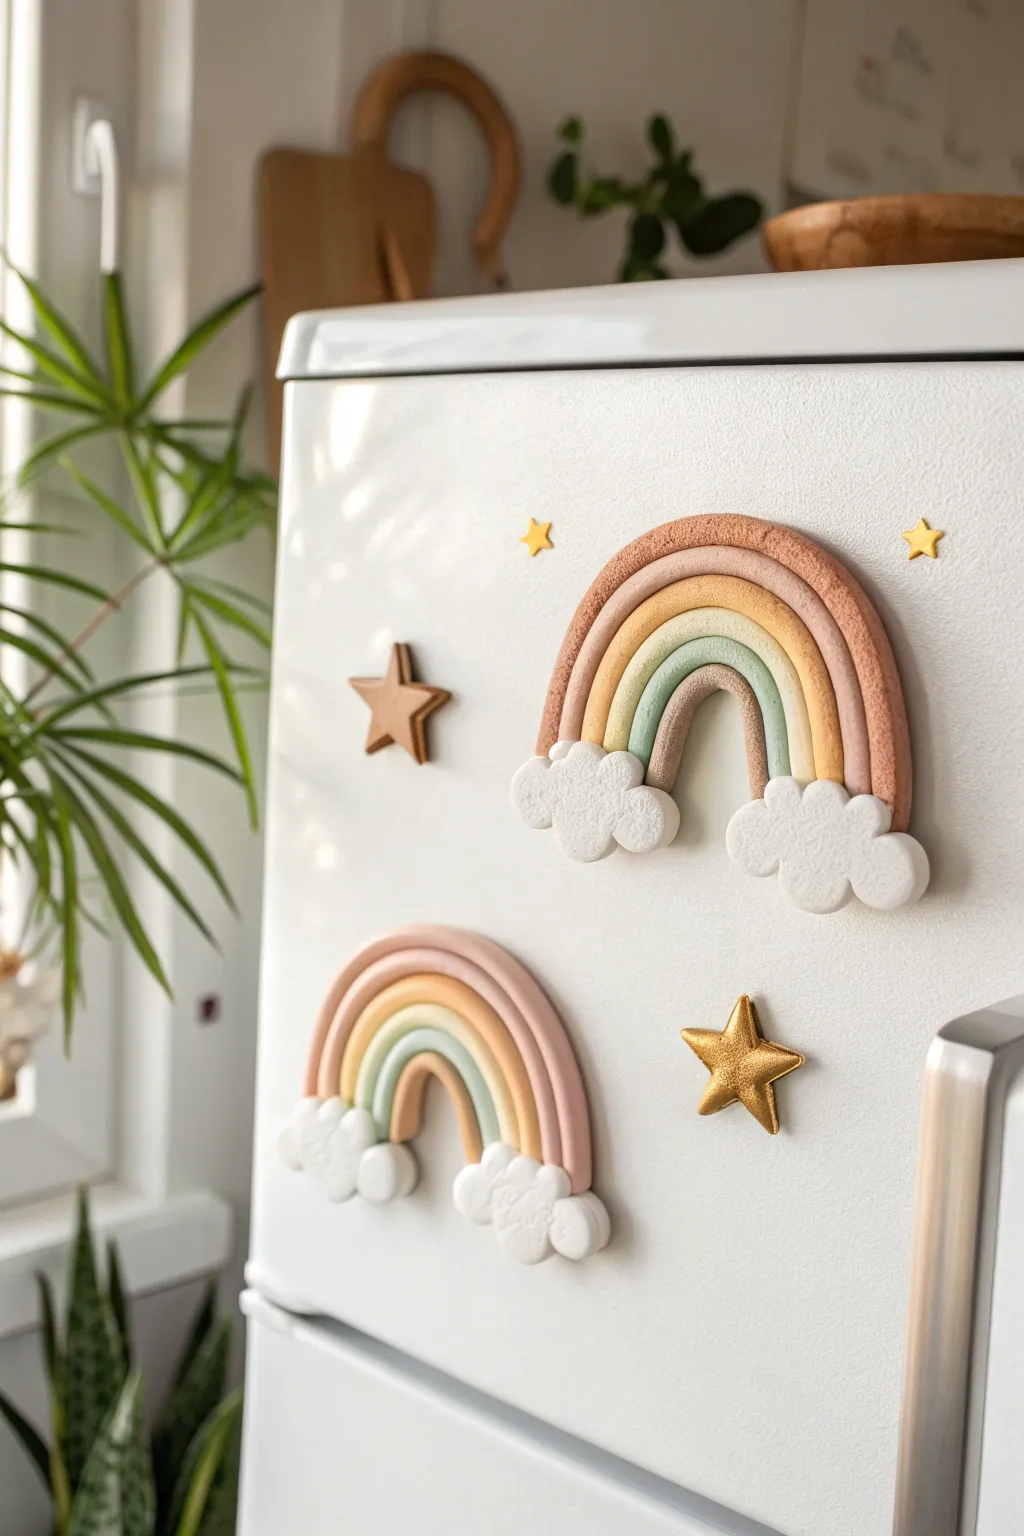
Brighten up your kitchen with these charming, textured polymer clay rainbow magnets featuring soft, earthy tones and fluffy cloud bases. They add a perfect pop of whimsical color to any appliance while keeping your important notes secure.
Step-by-Step Tutorial
Materials
- Polymer clay (terracotta, mute yellow, sage green, white)
- Acrylic rolling pin
- Clay extruder (optional, but helpful for even coils)
- Clay blade or craft knife
- Texture sponge or toothbrush
- Strong round ceramic or neodymium magnets
- Super glue or E6000
- Baking sheet
- Parchment paper
- Gold acrylic paint (for stars)
- Small star cookie cutter (optional)
Step 1: Preparing the Arches
-
Condition the clay:
Start by warming up your terracotta, muted yellow, and sage green polymer clay in your hands. Knead each color separately until it is soft, pliable, and easy to work with. -
Roll the coils:
Roll each colored ball into a long, thin snake on a clean surface. Aim for a consistent thickness of about 1/4 inch for each strand. -
Get uniform thickness:
If you struggle with hand-rolling, I find using a clay extruder creates perfectly uniform snakes that fit together seamlessly. -
Form the rainbow arch:
Take the sage green coil and bend it into a tight U-shape to form the inner arch. Next, wrap the yellow coil snugly around the green one, followed by the terracotta coil on the outside. -
Trim the ends:
Use your clay blade to cut the bottom of the rainbow legs in a straight line so all three colors end at the exact same point.
Use Liquid Clay
Apply a tiny drop of liquid polymer clay or ‘Bake & Bond’ between the rainbow strands and the clouds before baking. This acts as a supreme glue.
Step 2: Creating Clouds & Stars
-
Make the cloud base:
Condition a chunk of white clay and roll it into a slightly flattened log, then cut it in half so you have two pieces. -
Shape the fluff:
Form each white piece into a bubbly cloud shape. You can do this by merging small balls of clay together or sculpting a single piece to have rounded lumps. -
Add texture:
To get that realistic fluffy look, gently press a texture sponge, stiff toothbrush, or a crumpled ball of aluminum foil all over the surface of the white clouds. -
Attach clouds to arch:
Press a cloud onto the bottom of each side of the rainbow arch. Ensure the colored strands adhere firmly to the top edge of the white clay. -
Smooth the seams:
Flip the rainbow over gently and use a smoothing tool or your finger to blend the clay where the clouds meet the arches on the back for structural integrity. -
Cut out stars:
Roll out a scrap of leftover clay (or fresh tan clay) to about 1/4 inch thick. Use a small star cutter or knife to create star shapes. -
Soften star edges:
Gently tap the sharp edges of your stars with your finger to give them a softer, puffier appearance like the ones in the photo.
Add Glitter Dust
Before baking, lightly brush white mica powder or fine glitter onto the clouds. It adds a magical shimmer without looking messy.
Step 3: Baking and Assembly
-
Prepare for baking:
Place your finished rainbows and stars on a baking sheet lined with parchment paper. -
Bake the clay:
Bake according to your specific polymer clay’s package instructions. Usually, this is around 275°F (135°C) for 15-30 minutes depending on thickness. -
Cool down:
Let the pieces cool completely on the baking sheet before handling them, as the clay is fragile while hot. -
Paint the stars:
If you didn’t use gold clay, paint your stars with metallic gold acrylic paint now. Give them two coats for a rich shine. -
Glue the magnets:
Apply a dab of strong adhesive like E6000 to the back of your rainbows and stars, then press a round magnet firmly into the glue. -
Final cure:
Allow the glue to cure fully—usually 24 hours—before sticking your new art onto the fridge.
Your fridge is now ready to showcase your grocery lists with a lovely handmade touch