When I’m craving a quick, satisfying make, I grab some modeling clay and head straight for tiny, happy little projects. These ideas lean into beginner-friendly miniatures you can finish fast, gift easily, or keep on your desk for daily joy.
Mini Food Charms With Simple Faces
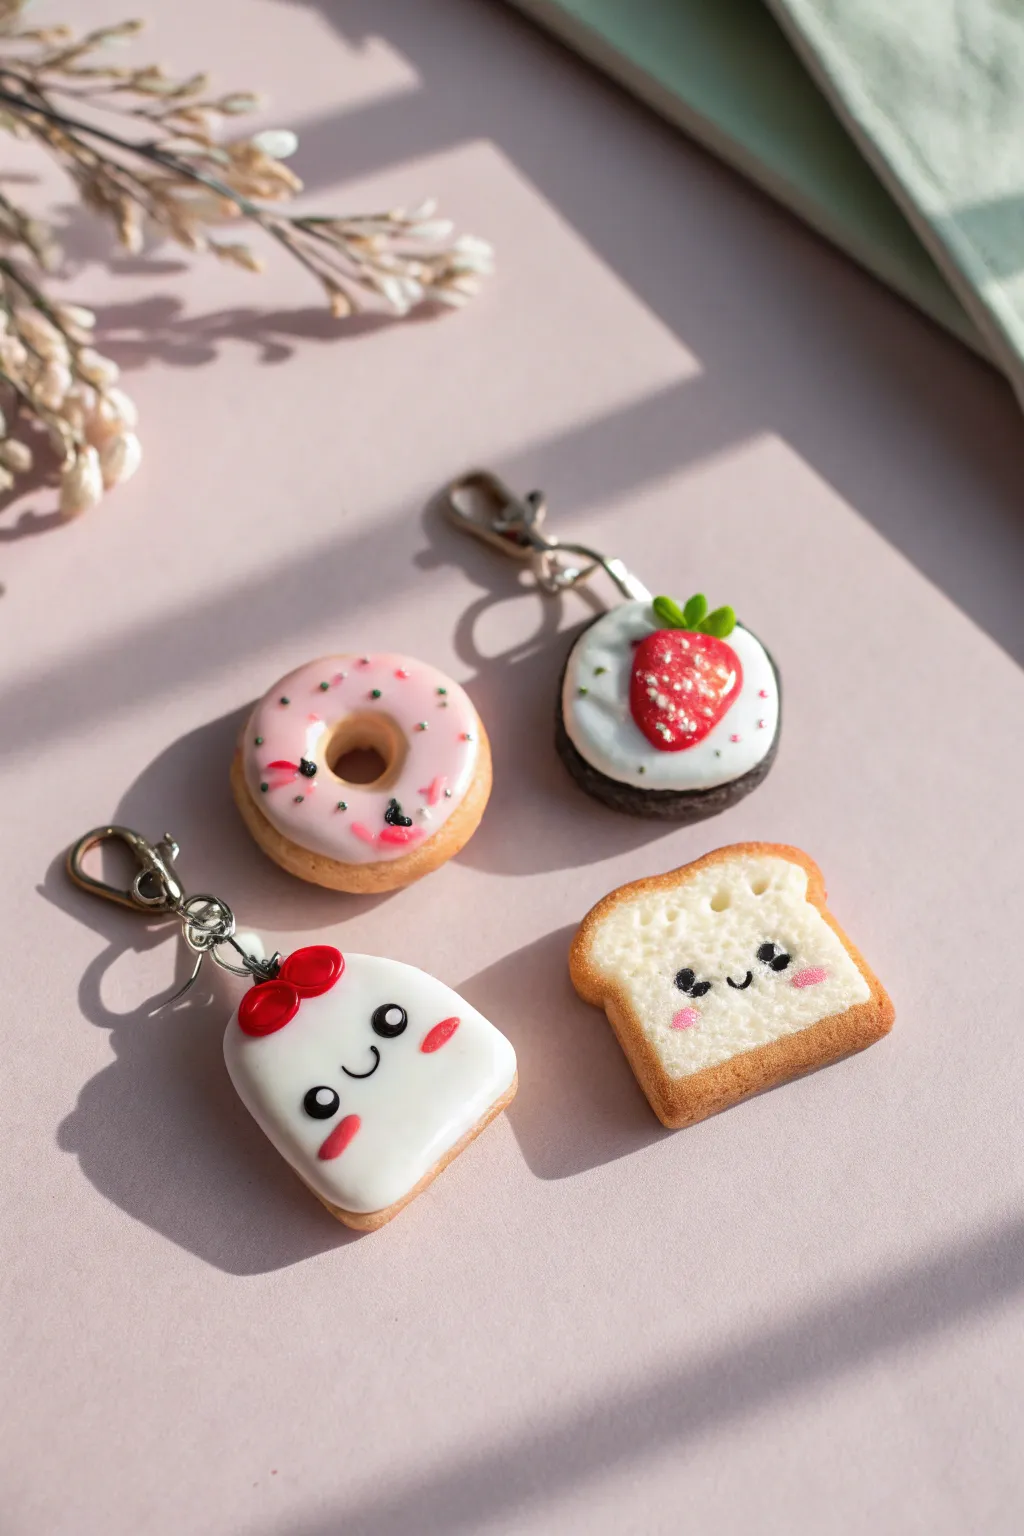
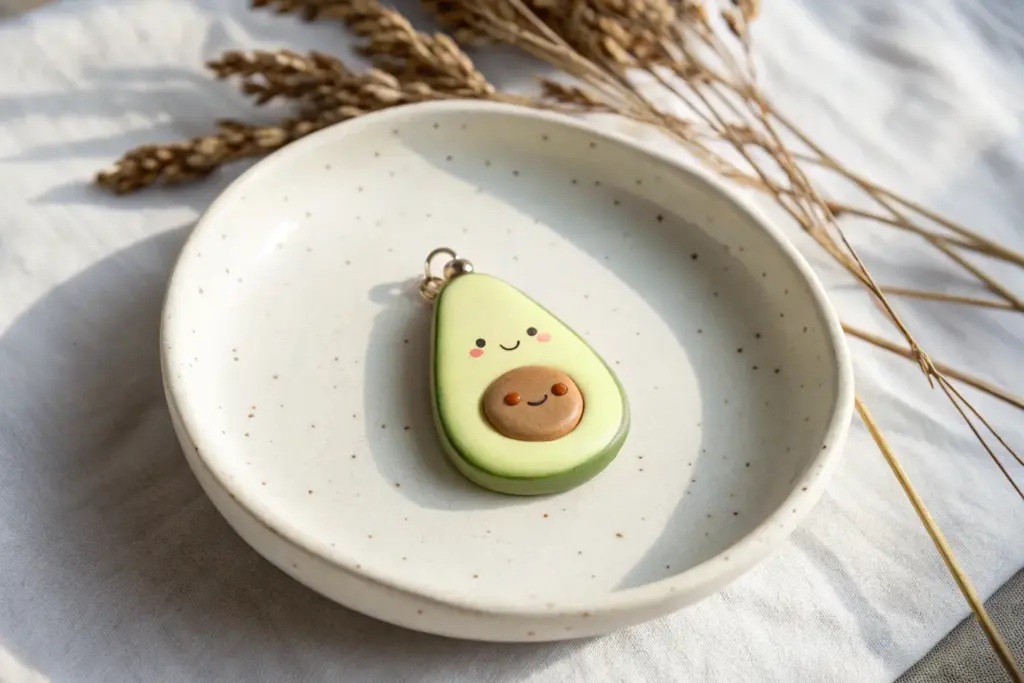
These adorable polymer clay charms capture the sweetness of your favorite treats with a dash of kawaii personality. They feature realistic textures, glossy finishes, and tiny smiling faces that turn everyday snacks into delightful accessories.
How-To Guide
Materials
- Polymer clay (tan, white, pink, dark brown, red, green, black)
- Liquid polymer clay (translucent or white)
- Clay tools (ball tool, needle tool, texturing brush)
- Eye pins or screw eyes
- Jump rings and lobster clasps
- Soft pastel chalks in brown/orange tones
- Small paintbrush
- Gloss glaze or UV resin
- Oven for baking
Step 1: Shaping the Dough Bases
-
Mix the perfect dough color:
Start by mixing white clay with a small amount of tan or ochre to achieve a realistic baked bread color. You’ll need enough for the toast, the donut base, and the ghost character. -
Form the toast shape:
Flatten a small ball of dough-colored clay into a square with rounded corners. Pinch the top gently to create the signature ‘muffin top’ shape of a bread slice. -
Texture the bread:
Use a toothbrush or a crumpled ball of aluminum foil to gently tap texture all over the sides and crust of the toast. Leave the center face area relatively smooth. -
Create the donut base:
Roll another portion of the dough mix into a flattened sphere. Use a large ball tool or the end of a paintbrush to poke a hole through the center, smoothing the edges to round them out. -
Make the ghost shape:
For the character with the red bow, shape a piece of dough clay into a rounded rectangle, slightly wider at the bottom like a little ghost or blob shape.
Realistic Texture Trick
Use an old toothbrush to tap texture onto the ‘bread’ parts before baking. This mimics the porous surface of baked goods better than any sculpted line.
Step 2: Adding Toppings and Frosting
-
Apply shading:
Shave some brown and orange soft pastels into a powder. Use a dry brush to gently dust the edges of your toast, donut, and cookie pieces to give them a golden-baked look. -
Frost the donut:
Mix pink clay with a drop of liquid clay or clay softener until it’s a spreadable paste, or simply flatten a thin sheet of pink clay. Apply it to the top of the donut, letting the edges be slightly uneven for realism. -
Create the chocolate cookie:
Form a dark brown disc for the cookie base. Texture the sides to look crumbly. Add a layer of white clay on top for the cream, swirling it slightly or texturing it with a needle tool. -
Sculpt the strawberry:
Shape a tiny teardrop of red clay. Use a needle to poke shallow seed indents all over. Flatten a tiny bit of green clay and cut small star shapes for the leaves, placing them on the wide end. -
Assemble the cookie:
Press the strawberry slice firmly into the white cream layer of your chocolate cookie charm. -
Ice the ghost toast:
Flatten a thin layer of white clay to mimic icing and drape it over the top 2/3 of your ghost-shaped base, smoothing the edges so it looks dipped.
Smudged Faces?
If tiny black clay eyes smudge onto the white clay, clean it up with a cotton swab dipped in rubbing alcohol or baby oil before baking.
Step 3: Adding Details and Faces
-
Add sprinkles:
Roll incredibly thin snakes of pink, dark brown, and green clay. Cut tiny segments and gently press them into the pink donut frosting and the white cookie cream. -
Sculpt the bow:
Create two tiny flattened red ovals and a small center dot. Press them together to form a bow and attach it to the top left of the ghost-toast character. -
Make the faces:
Roll tiny spheres of black clay for eyes and press them onto the toast and ghost charms. Roll extremely thin black threads for the smiling mouths and press them gently into place. -
Add blush:
Use a tiny dot of pink clay or a dab of pink pastel dust on the cheeks of your characters to give them a rosy glow. -
Insert hardware:
Carefully screw an eye pin into the top of each charm. I find adding a tiny dab of liquid clay to the screw threads helps it bond permanently during baking.
Step 4: Baking and Finishing
-
Bake carefully:
Place your charms on a ceramic tile or baking sheet lined with parchment paper. Bake according to your clay package instructions (usually 275°F/130°C for 15-30 minutes). -
Cool down:
Let the charms cool completely inside the oven or on the counter before handling to prevent cracking. -
Glaze for shine:
Apply a coat of gloss glaze or UV resin specifically to the ‘wet’ parts: the strawberry, the donut icing, the white cream, and the eyes. Leave the bread parts matte for contrast. -
Attach clasps:
Once dry, use pliers to open a jump ring, thread it through the eye pin and the lobster clasp, and close it securely.
Clip these sweet little friends onto your bag or keys and enjoy their cheerful company all day long


Chubby Animal Miniatures Built From Basic Shapes
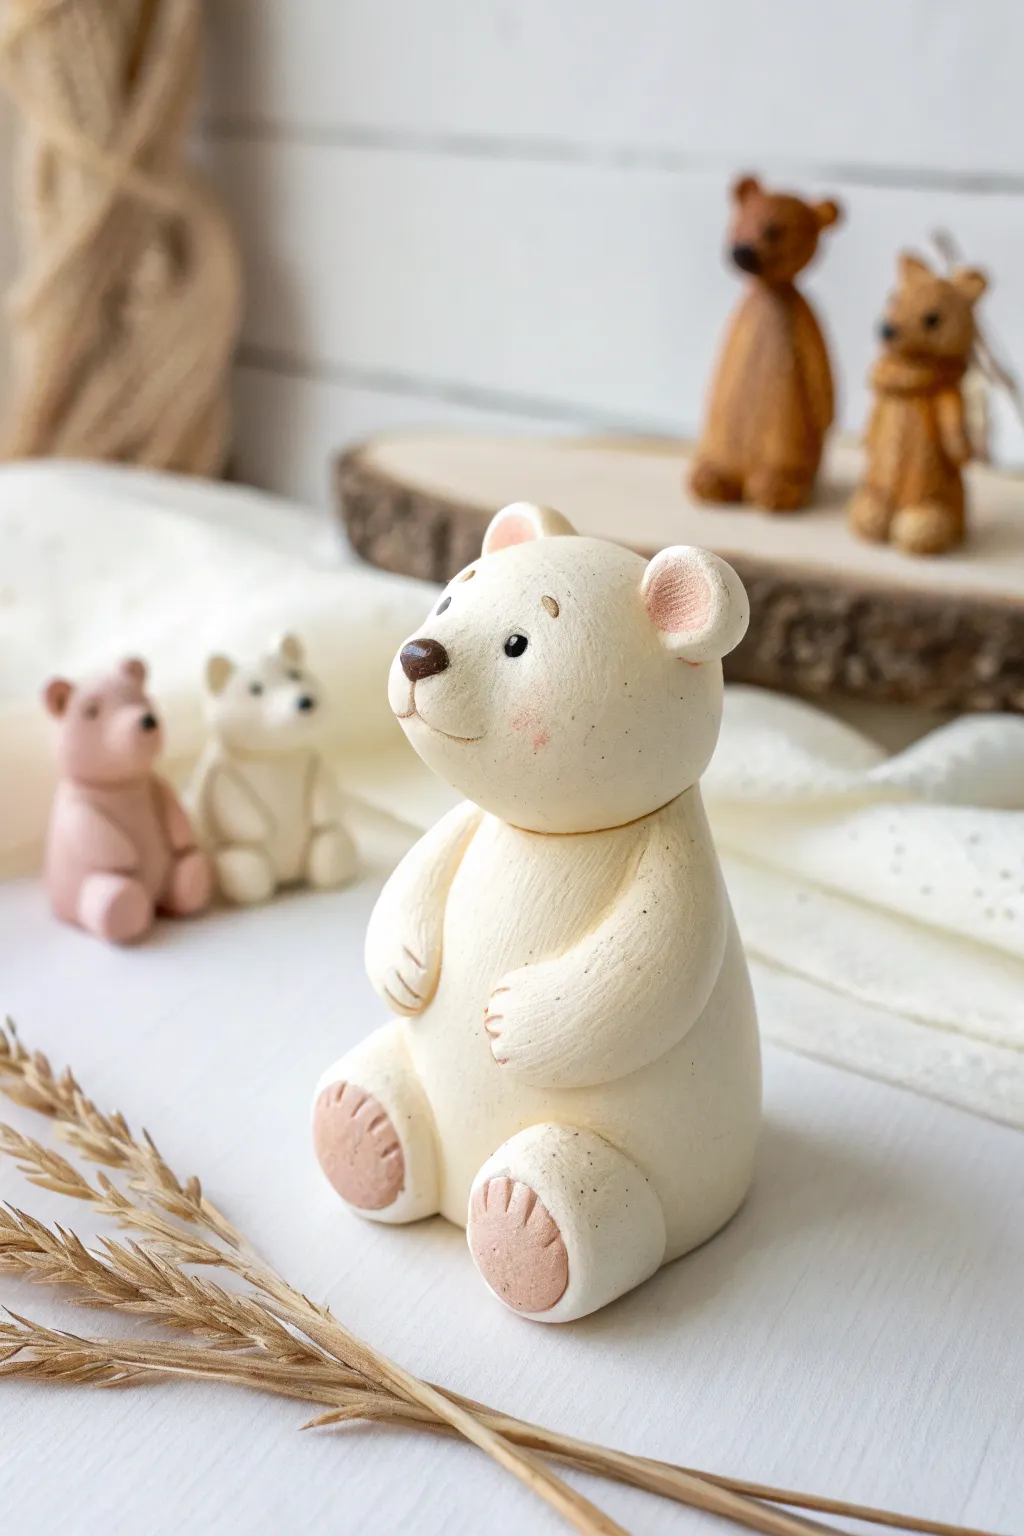
This adorable bear figurine is a perfect study in simplifying complex animals into basic, manageable forms. With its smooth curves, rosy cheeks, and matte finish, it has a charming, rustic pottery feel that looks wonderful on a shelf.
Detailed Instructions
Materials
- White polymer clay or air-dry clay
- Soft pink pastel chalk (for shading)
- Brown clay (for nose)
- Black acrylic paint or fine-tip black marker
- Modeling tools (needle tool, ball tool)
- Small paintbrush (for pastels)
- Matte varnish (optional)
Step 1: Shaping the Core Body
-
Form the base:
Start with a large ball of white clay about the size of a golf ball. Roll it until it is perfectly smooth and free of any cracks. -
Create the heavy shape:
Gently taper the top third of the ball to create a rounded pear or teardrop shape. This will be the bear’s body, sitting solidly on its wider base. -
Make the head:
Roll a second, slightly smaller ball for the head. It shouldn’t be a perfect circle; flatten the front slightly where the face will be to give it some character. -
Attach head to body:
Place the head securely onto the tapered neck of the body. If using polymer clay, blend the seam at the back of the neck downward for structural integrity; if using air-dry clay, use a little water and scoring to join them.
Step 2: Crafting the Face & Ears
-
Shape the muzzle:
Roll a small pea-sized ball of white clay and flatten it into an oval. Press this onto the lower center of the face area to create a distinct muzzle. -
Add the nose:
Take a tiny pinch of brown clay, roll it into a small triangle or oval, and position it at the very top of the muzzle. Press it down gently so it sticks. -
Sculpt the mouth:
Using a needle tool or a sharp blade, carefully press a vertical line under the nose, then curve it outwards slightly to form a subtle, happy smile. -
Form the ears:
Create two small semi-circles of white clay. Use a ball tool to create a depression in the center of each, making them cup-shaped. -
Position the ears:
Attach the ears to the top sides of the head. I like to place them slightly back to give the bear an innocent, listening expression.
Cracks Appearing?
If you see cracks forming while shaping the body, moisture is key. For polymer clay, knead in a tiny drop of baby oil. For air-dry clay, dip your finger in water and smooth over the fissure immediately.
Step 3: Limbs and Details
-
Make the legs:
Roll two medium cylinders for the hind legs. Flatten one end of each cylinder to create the foot surface. -
Attach the legs:
Press the legs against the lower sides of the body. The feet should stick out forward so the bear looks like it is sitting comfortably. -
Add foot pads:
Using pink pastel chalk, dust the flat soles of the feet. Use a needle tool to impress three or four small lines into the toes to simulate claws or paw definition. -
Form the arms:
Roll two smaller elongated teardrop shapes for the arms. Flatten them slightly so they aren’t perfectly round. -
Attach the arms:
Attach the arms to the sides of the body, curving them forward as if the bear is holding its belly. Use a sculpting tool to create small indentations for the claws.
Texture It Up
Before curing, gently tap the entire surface of the bear with a stiff toothbrush. This creates a subtle ‘fur’ texture that makes the final piece look like matte ceramic or stone.
Step 4: Color and Finish
-
Apply shading:
Before baking or drying, use a dry fluff brush to dab pink pastel dust inside the ears and lightly onto the cheeks for a soft blush effect. -
Add the eyes:
Use a dotting tool dipped in black paint (or a fine marker after drying) to create two small, widely spaced eyes above the muzzle. Add tiny eyebrows for expression if desired. -
Final texture check:
Look over your bear for fingerprints. Gently smooth them away with a finger or a soft brush dipped in baby oil (for polymer) or water (for air-dry). -
Cure the project:
Bake according to your polymer clay package instructions, or allow your air-dry clay to sit undisturbed for 24-48 hours until fully hardened.
Now you have a charming little bear companion ready to sit on your desk


Fruit Slice Earrings in Bright, Punchy Colors
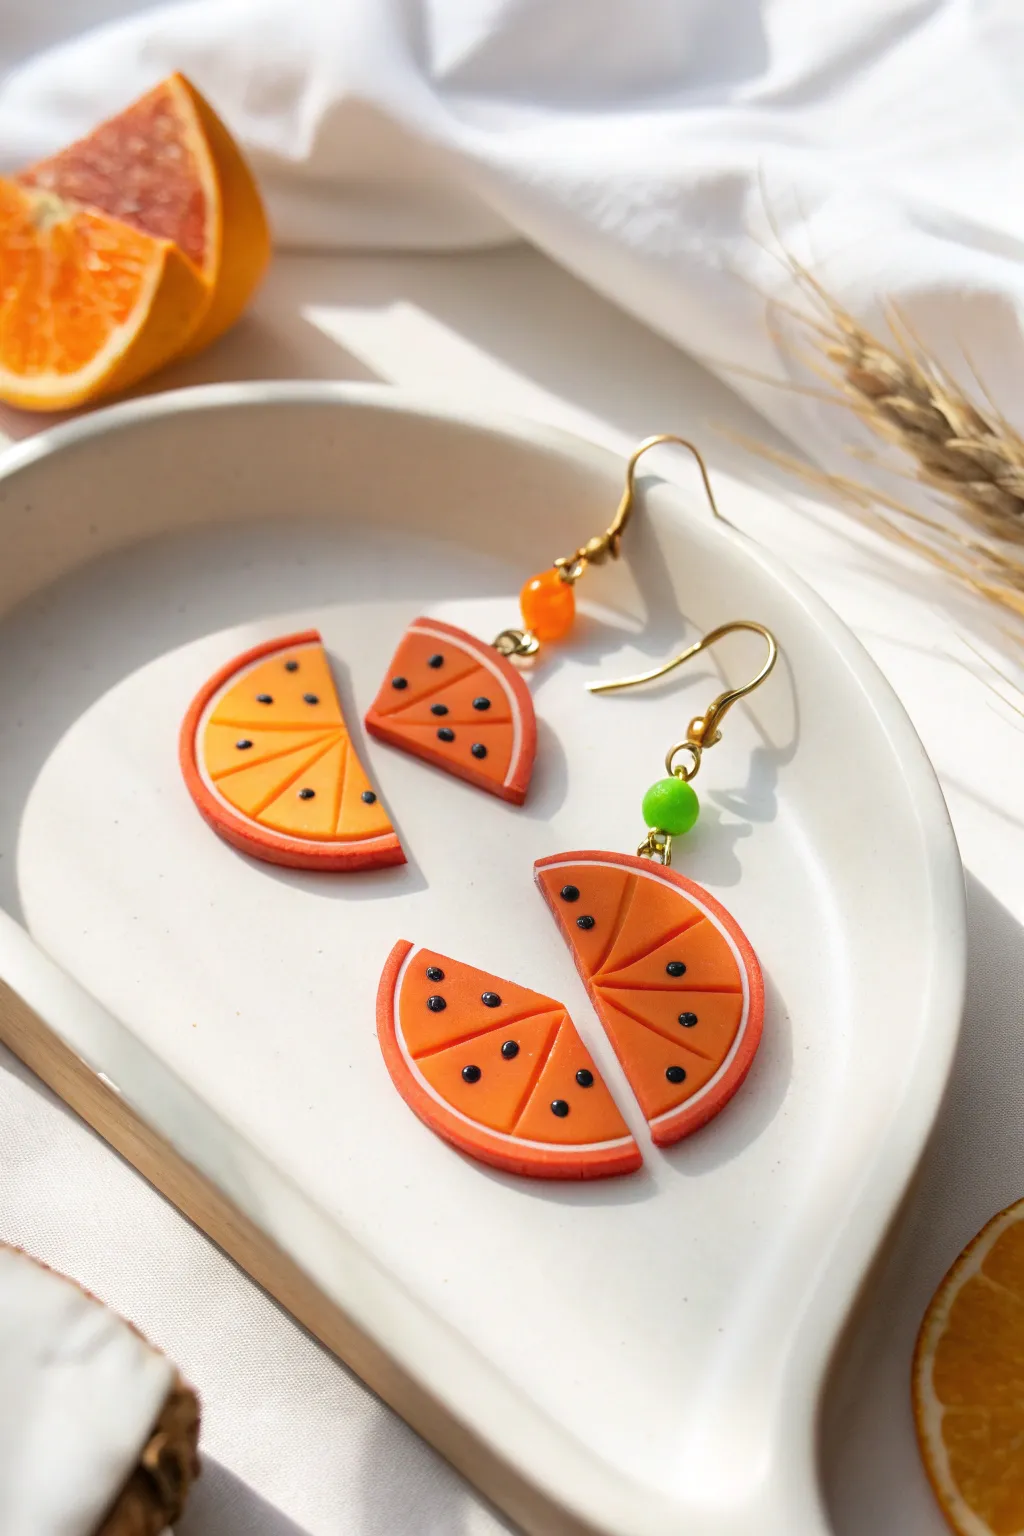
These vibrant orange slice earrings are a burst of summery fun, featuring a clever segmented design that allows them to swing playfully. The bright orange clay contrasts beautifully with the white rind and tiny black seeds for a fresh, realistic look.
How-To Guide
Materials
- Polymer clay (Bright Orange, White, Black)
- Liquid polymer clay (Translucent or Orange)
- Clay roller or pasta machine
- Tissue blade or X-Acto knife
- Needle tool or toothpick
- Small round cutter (approx. 2 inches)
- Eye pins (gold tone)
- Jump rings (gold tone, approx. 5mm)
- Earring hooks (gold tone)
- Small spacer beads (1 orange, 1 green)
- Jewelry pliers (round nose and flat nose)
- Oven for baking
Step 1: Creating the Orange Cane
-
Prepare the segments:
Start by conditioning your bright orange clay. Roll a log about 1 inch thick. Then, roll out a thin sheet of white clay (about 1-2mm thick). Wrap the white sheet entirely around the orange log and trim the excess. -
Stretch the cane:
Gently roll and stretch this log until it is about 1/2 inch in diameter. This creates the basic orange segment with its white pith. -
Shape the wedges:
Pinch one side of the log along its entire length to create a teardrop or wedge shape. Slice this long strip into equal lengths—you will need about 8-10 wedge pieces total. -
Reassemble the slice:
Arrange the wedge pieces in a circle, with the pointy orange ends meeting in the center. The white sides should touch, creating the internal segments of the fruit. -
Wrap the rind:
Roll a thicker sheet of orange clay for the outer peel. Wrap this around your assembled circle of segments to bind them all together. -
Reduce to size:
Gently squeeze and roll the entire cane to reduce its diameter to your desired earring size (about 1.5 to 2 inches).
Step 2: Slicing and Texturing
-
Cut the slices:
Using your tissue blade, slice two even circles from your cane, about 3-4mm thick. Keep the blade steady to ensure an even thickness. -
The segmented cut:
This design requires a split look. For each circle, cut off a slice that represents about 1/4 of the fruit. This smaller piece will be the top section, and the larger 3/4 piece will be the bottom. -
Add texture:
Use a needle tool to gently poke and drag texture onto the orange pulp areas. I like to do this lightly to mimic the juicy vesicles of a real orange. -
Insert the seeds:
Take tiny pinched specks of black clay and roll them into teardrops. Press 3-4 seeds onto the surface of the pulp on each earring section.
Clean Slice Secret
Chill your clay cane in the fridge for 20 minutes before slicing. Firm clay resists squishing, keeping your fruit segments sharp and circular.
Step 3: Assembly and Baking
-
Insert eye pins:
Carefully insert a trimmed eye pin into the top center of the large slice. Insert another eye pin into the bottom center of the small slice, and a third into the top of the small slice. -
Secure pins:
Add a tiny dab of liquid clay to the pin shafts before inserting them to ensure they bond permanently during baking. -
Bake:
Bake the clay pieces according to the manufacturer’s instructions (usually 275°F/135°C for 15-30 minutes). Let them cool completely. -
Connect the sections:
Use a jump ring to connect the bottom of the small slice to the top of the large slice. This allows the earring to articulate and swing. -
Add beads:
Thread a colored bead (orange for one, green for the other) onto the eye pin protruding from the top of the small slice. Form a loop above the bead with round nose pliers. -
Final attachment:
Attach your earring hooks to the new loop you just created above the bead.
Glossy Juice Finish
After baking, coat just the orange pulp sections (avoiding the white rind) with UV resin or gloss glaze for a fresh, juicy, wet-fruit appearance.
Wear your fresh citrus creations to add a pop of color to any outfit


Tiny Mushroom Friends for Shelves and Plant Pots
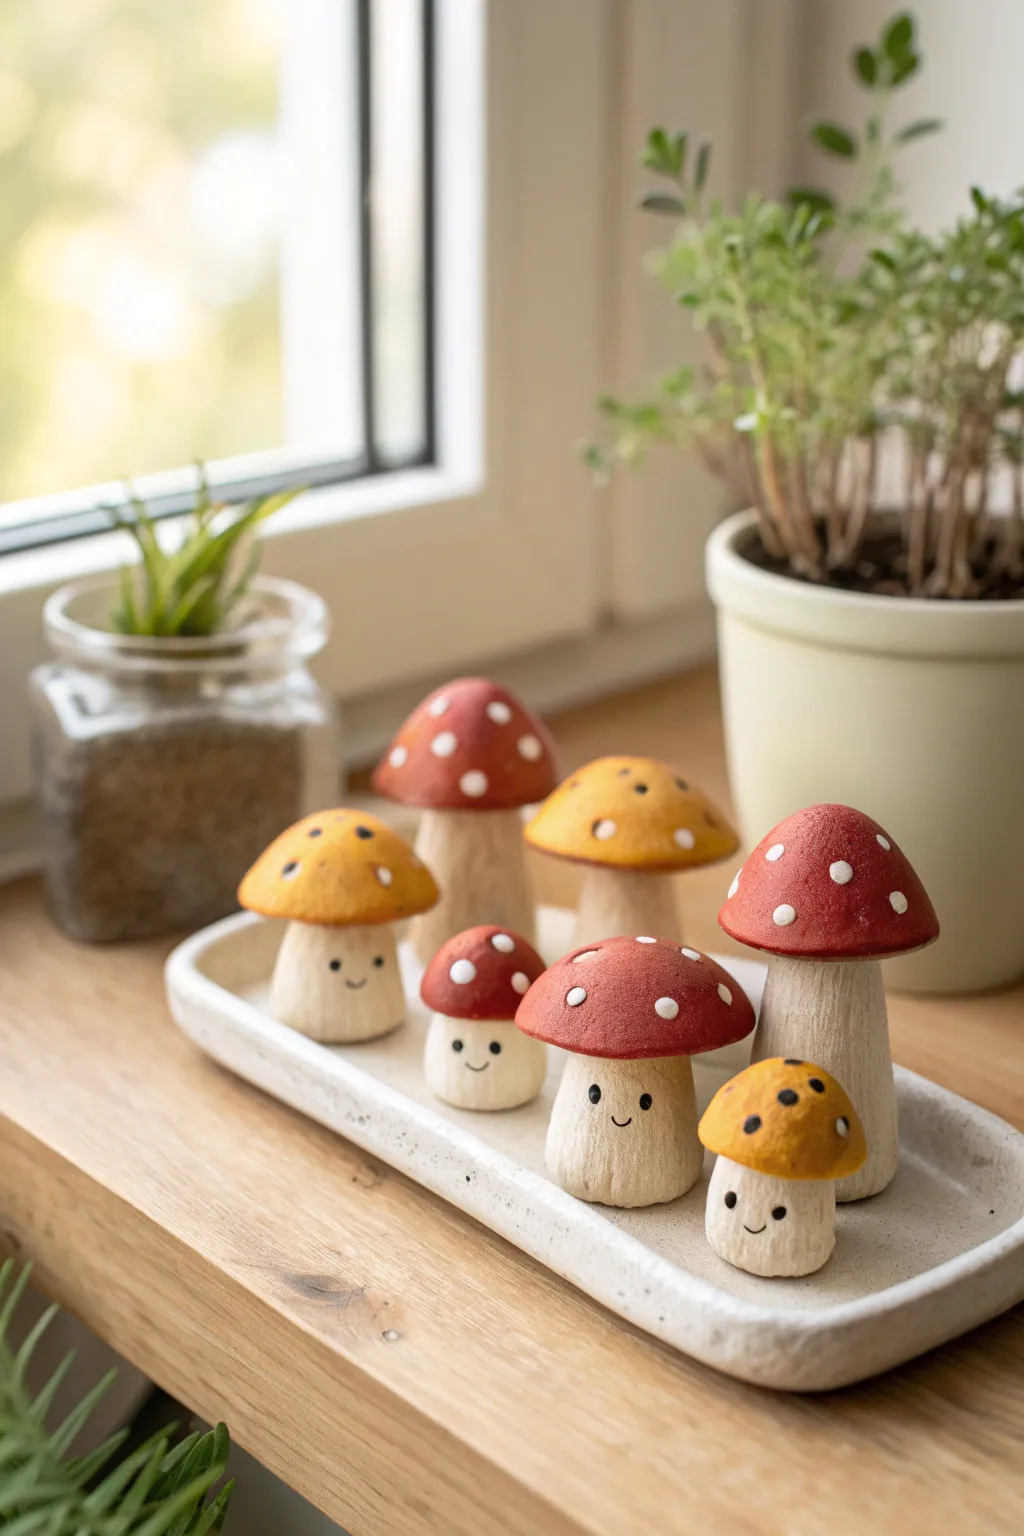
Create a cheerful family of mushroom figurines to add a touch of whimsy to your windowsill or plant pots. These sculpts combine earthy textures with playful, painted smiles for a charming finished look.
Step-by-Step
Materials
- White air-dry clay or polymer clay
- Sculpting tool with a fine point (or a toothpick)
- Acrylic paints (Red, Ochre/Mustard Yellow, White, Black)
- Fine detail paintbrush
- Medium flat paintbrush
- Matte clear sealant or varnish
- Water cup (for smoothing)
- Aluminum foil (optional, for armature)
Step 1: Sculpting the Stems
-
Shape the base:
Begin by rolling a ball of clay between your palms, roughly the size of a walnut. Roll it into a thick cylinder shape, tapering slightly towards the top to form the mushroom stalk. Flatten the bottom so it stands independently. -
Vary sizes:
Repeat this process to make several stalks of varying heights and widths. Some should be short and chubby, while others can be tall and lean to create a diverse group. -
Round the tops:
Gently smooth the top of each cylinder into a dome shape so the cap will sit securely later. Use a drop of water on your finger to smooth out any cracks in the clay. -
Add vertical texture:
Using your fine-point sculpting tool or a toothpick, gently score vertical lines down the length of the stalk. These lines should be slightly wavy and uneven to mimic natural mushroom fibers. -
Create the faces:
Decide which side of the textured stalk looks best. In the center of that area, gently smooth away the texture with your fingertip to create a small, flat ‘face’ zone where you will paint the features later.
Smoother Surfaces
Before painting, you can use a fine-grit sandpaper (like 400 grit) to specific spots on the hardened clay if you want the caps to be ultra-smooth.
Step 2: Forming the Caps
-
Shape the domes:
Roll fresh balls of clay, slightly larger than the width of your stalks. Press your thumb into the center of the ball and pinch the edges while rotating to form a hollow dome or cap shape. -
Refine the edges:
Smooth the edges of the caps. For some, curl the edges slightly inward for a button mushroom look; for others, curve them outward or keep them flatter. -
Check the fit:
Place the caps onto the stalks to ensure they balance well. If using air-dry clay, you can attach them now by scoring both connecting surfaces and using a little water slurry. If using polymer clay, press them firmly together to bond. -
Final drying or baking:
Follow the manufacturer’s instructions for your specific clay. Let air-dry clay sit for 24-48 hours until fully hard, or bake polymer clay in the oven at the recommended temperature.
Make Them Realistic
Instead of dots, try painting gradient colors on the caps—darker at the top and lighter at the rim—for a more realistic, forest-floor appearance.
Step 3: Painting and Details
-
Base coat the stems:
Mix a tiny amount of ochre paint with plenty of white to create a warm, off-white cream color. Paint the entire stem, working the paint into the textured grooves. -
Dry brush texture:
Once the base is dry, take a slightly darker beige on a dry brush and lightly sweep it over the vertical lines. This highlights the texture while keeping the crevices lighter. -
Paint the red caps:
Paint the caps of your taller mushrooms with a deep, matte red acrylic. You may need two thin coats for opaque coverage. -
Paint the yellow caps:
For the smaller mushrooms, use a mustard or ochre yellow. I find that mixing a tiny speck of brown into bright yellow gives it that perfect natural, earthy tone. -
Add polka dots:
Dip the non-brush end of your paintbrush into white paint. Gently stamp dots onto the red caps. For the yellow caps, use black or dark brown paint for the dots to create variety. -
Paint the faces:
Using your finest detail brush and black paint, carefully add two small dots for eyes and a simple U-shape for a smile in the smooth area you prepared earlier. -
Seal the work:
Once all paint is completely dry, apply a coat of matte varnish to protect your new friends from dust and moisture.
Arrange your little clay family on a shelf or tuck them into a flower pot to brighten your day

The Complete Guide to Pottery Troubleshooting
Uncover the most common ceramic mistakes—from cracking clay to failed glazes—and learn how to fix them fast.
Mini Dessert Toppers for Gifts and Party Decor
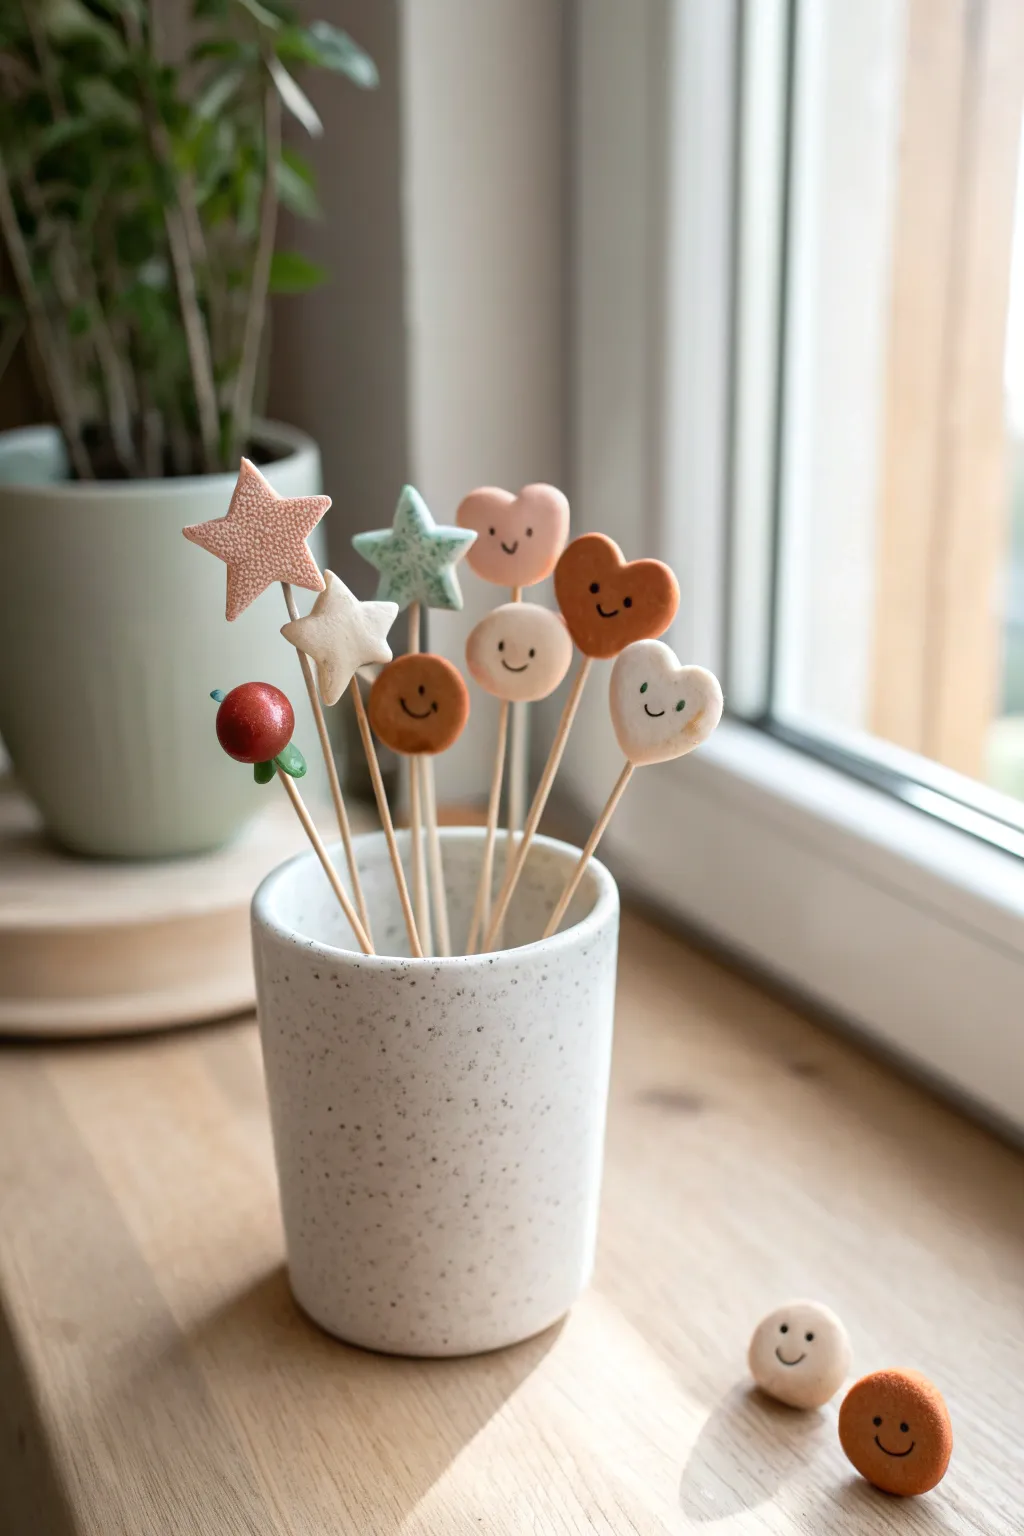
Transform simple balls of clay into a charming bouquet of dessert toppers featuring cheerful hearts, lucky stars, and friendly faces. These rustic, matte-finish decorations add a dash of sweetness to cupcakes or can serve as an adorable potted gift.
Step-by-Step Guide
Materials
- Air-dry clay or polymer clay (white, terracotta, peach, red, pale green)
- Wooden skewers or sturdy toothpicks
- Rolling pin
- Small cookie cutters (star, heart, circle)
- Fine-grit sandpaper
- Black fine-point marker or black acrylic paint with a detail brush
- Parchment paper
- Small bowl of water (for smoothing)
- Craft glue (optional)
Step 1: Prepping and Shaping
-
Condition the clay:
Begin by kneading your clay until it is soft, pliable, and free of cracks. If you are using white clay, separate it into portions and mix in small amounts of acrylic paint to create pastel peach, mint green, and terracotta shades, kneading until the color is uniform. -
Roll it out:
Place a sheet of parchment paper on your work surface to prevent sticking. Roll a portion of the clay to an even thickness of about 1/4 inch (6mm). Avoid rolling it too thin, as the toppers need enough volume to hold the skewer securely. -
Cut the shapes:
Use your small cookie cutters to punch out hearts, stars, and circles. For the berry shape, roll a small ball of red clay by hand instead of cutting it. -
Softening edges:
Dip your finger in a little water and gently run it along the cut edges of each shape to smooth out any sharpness or burrs left by the cutter. This gives the clay a soft, pillowy look. -
Add texture (optional):
For the pink star shown in the image, gently press a piece of coarse sandpaper or a textured fabric onto the wet clay surface to create a speckled, stone-like effect.
Cracking Clay?
If cracks appear while drying, mix a tiny bit of fresh clay with water to make a paste (slip). Fill the cracks, smooth with a finger, and let dry again.
Step 2: Assembly and Drying
-
Create the insertion point:
While holding a clay shape gently in your palm to avoid crushing it, carefully twist the pointed end of a wooden skewer into the bottom. Push it in about halfway through the shape. -
Secure the hold:
If the clay feels loose on the stick, remove the skewer, dip the tip in a tiny dot of craft glue, and reinsert it. Gently pinch the clay around the entry point to seal it. -
Detail the berry:
For the round red berry topper, flatten a tiny piece of green clay into a leaf shape. Press it onto the bottom of the red ball where the stick enters, molding it slightly up the sides. -
Drying setup:
Stick the skewers into a block of floral foam or a jar filled with rice to keep them upright while drying. This ensures the back of the shape doesn’t get flattened. -
Allow to cure:
Let the toppers dry completely according to your clay package instructions. For air-dry clay, this usually takes 24-48 hours. I find flipping them occasionally helps them dry evenly.
Make it Sweet
Before drying, press small seed beads or real sprinkles into the clay surface to mimic confetti cake textures for a festive birthday version.
Step 3: Adding Personality
-
Sand for smoothness:
Once fully hardened, inspect your shapes. If there are any rough spots on the edges, lightly buff them away with fine-grit sandpaper for a professional finish. -
Draw the faces:
Using a fine-point permanent marker or a very thin brush with black acrylic paint, add simple faces to the hearts and circles. Two small dots for eyes and a tiny ‘u’ shape for a smile works perfectly. -
Seal (optional):
To protect the faces and keep the matte look, you can spray a light coat of matte varnish over the clay. Avoid glossy sealers if you want to maintain the natural, earthy aesthetic shown in the photo. -
Arrange the display:
Place your finished skewers into a ceramic cup or plant pot. You can fill the vessel with sand or floral foam covered in moss to keep the arrangement styling sturdy and upright.
Enjoy arranging these cheerful little characters to brighten up your desk or next celebration
Smiley Magnet Set for the Fridge or Locker
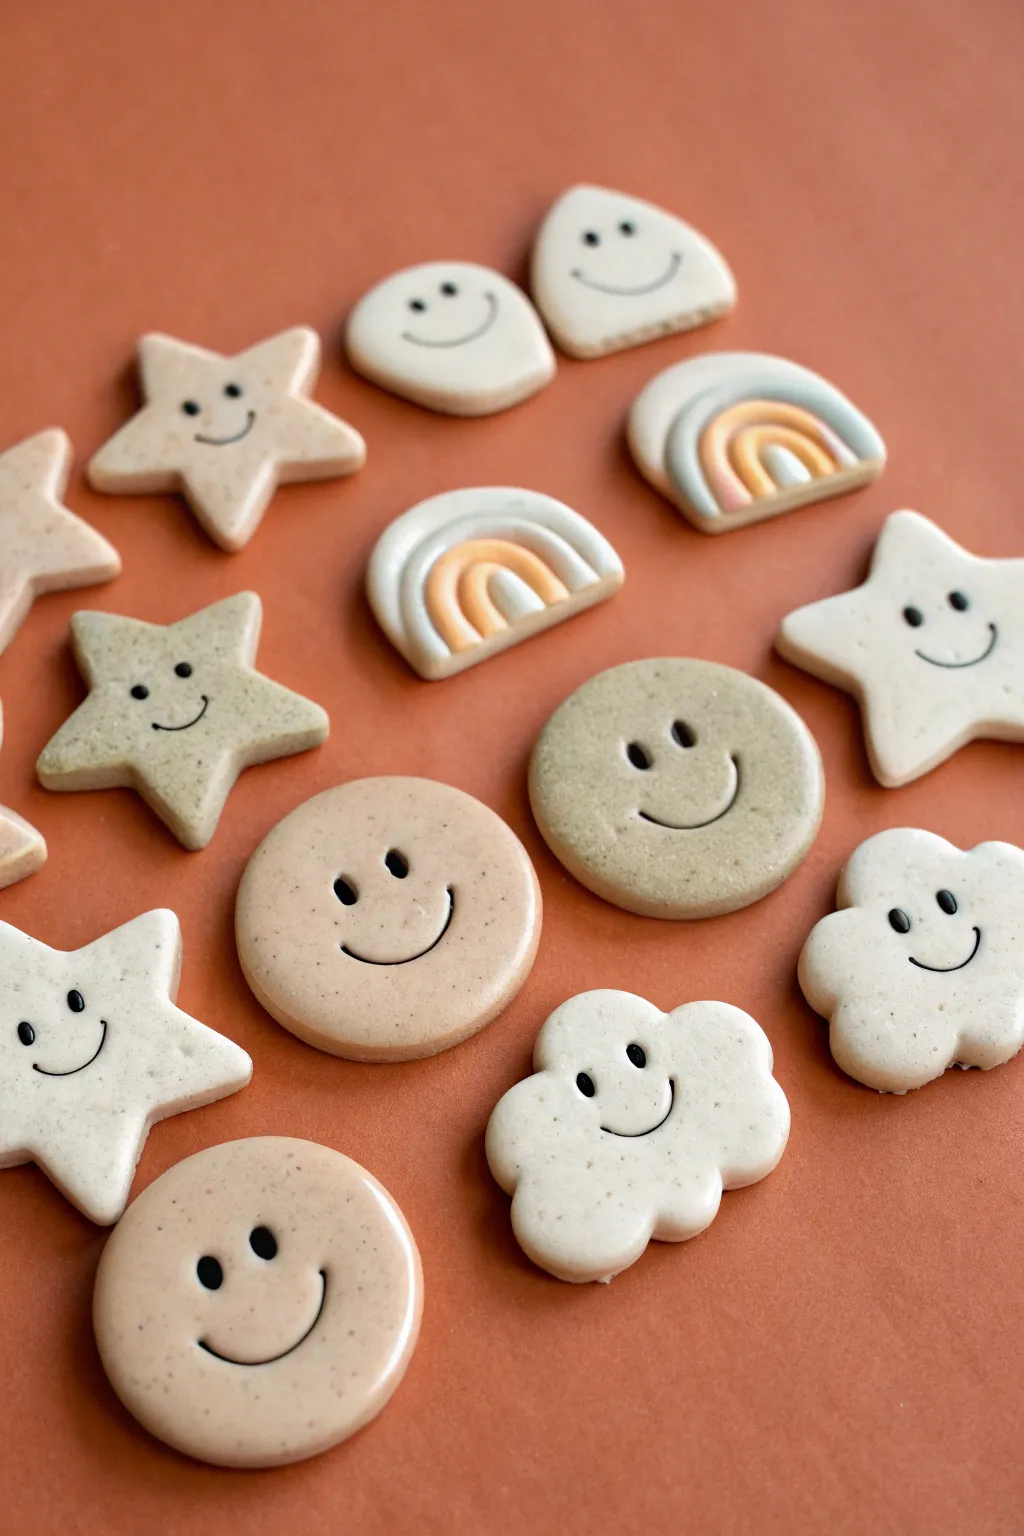
Brighten up any magnetic surface with these adorable, minimalist clay magnets featuring a soft boho color palette. This project combines simple shapes like stars, clouds, and rainbows with charming little smiley faces for a cheerful, modern look.
Detailed Instructions
Materials
- Polymer clay (white, beige, tan, speckled/granite effect, light blue, muted orange)
- Acrylic rolling pin
- Shape cutters (small circle, star, cloud, teardrop)
- Black polymer clay or black acrylic paint
- Small dotting tool or toothpick
- Sharp craft knife
- Strong craft glue (e.g., E6000)
- Small round magnets
- Gloss or matte varnish (optional)
- Baking sheet and parchment paper
Step 1: Preparing the Base Shapes
-
Condition the Clay:
Begin by kneading your chosen clay colors until they are soft and pliable. For the speckled look seen in the photo, use a ‘granite’ or ‘stone’ effect polymer clay, or mix a tiny bit of black pepper or sand into beige clay for a DIY version. -
Roll It Out:
Roll your clay out on a clean surface to an even thickness of about 1/4 inch (6mm). Using depth guides can help ensure every magnet has a uniform thickness. -
Cut the Circles:
Use a small circle cutter to punch out the round smiley faces from the tan and speckled beige clay. Smooth the edges gently with your finger to remove any sharp cut marks. -
Create the Stars:
Using a star-shaped cutter, cut out several stars from the speckled and plain beige clay. If the points look too sharp, gently tap them against your work surface to round them off slightly for a softer aesthetic. -
Form the Clouds:
Cut out cloud shapes using white clay. I find that slightly flattening the puffy edges with a fingertip gives them a more organic, bubbly look. -
Shape the Ghosts:
For the teardrop or ‘ghost’ shapes, you can use a teardrop cutter or hand-shape a flattened ball of white clay, pinching the top slightly.
Step 2: Making the Rainbows
-
Roll Coils:
Roll thin snakes of clay in three alternating colors: white, muted orange, and light blue. Keep them relatively thin and consistent in width. -
Assemble the Arches:
Cut the coils to length and curve them into arches, pressing them gently side-by-side so they bond. You’ll need an outer arch (blue or white), a middle arch (orange), and an inner arch. -
Trim the Bottom:
Once assembled, use your sharp craft knife to slice straight across the bottom of the rainbow so it has a flat base. -
Flatten Slightly:
Gently roll over the assembled rainbow once with your rolling pin to flatten the surface and ensure the coils are securely joined.
Smudged Faces?
To fix smudges from black clay on light backgrounds, dip a Q-tip in rubbing alcohol or nail polish remover and gently wipe the stain away before baking.
Step 3: Adding Faces & Finishing
-
Create Eyes Using Clay:
Roll extremely tiny balls of black clay. Press two onto each face shape (circle, star, cloud, ghost) to form eyes. Make sure they are embedded flush with the surface. -
Make the Smile:
Roll a very thin, short thread of black clay. Curve it into a ‘U’ shape and gently press it onto the face below the eyes. Alternatively, use a needle tool to indent a smile. -
Bake:
Arrange all your pieces on a baking sheet lined with parchment paper. Bake according to your clay manufacturer’s instructions (usually around 275°F or 130°C for 15-30 minutes). -
Cool Down:
Allow the clay pieces to cool completely on the baking sheet to harden fully before handling them. -
Paint Option:
If you didn’t use black clay for the faces, now is the time to paint the eyes and mouths using a fine detail brush or a toothpick dipped in black acrylic paint. -
Varnish (Optional):
For the shiny finish seen in the image, apply a thin coat of gloss varnish or resin to the cooled pieces. Let this dry thoroughly. -
Attach Magnets:
Flip the shapes over. Apply a dab of strong craft glue to the back of each piece and press a round magnet firmly into the glue. -
Final Dry:
Let the glue cure for at least 24 hours to ensure the magnets won’t pop off when you stick them to your fridge.
Level-Up Idea
Make them into pins! Instead of gluing a magnet to the back, attach a butterfly clutch pin back with E6000 glue to wear your art on a denim jacket.
Now your space is ready to be filled with these cheerful little personalities


What Really Happens Inside the Kiln
Learn how time and temperature work together inside the kiln to transform clay into durable ceramic.
Cute Toothbrush or Soap Holders Shaped Like Animals
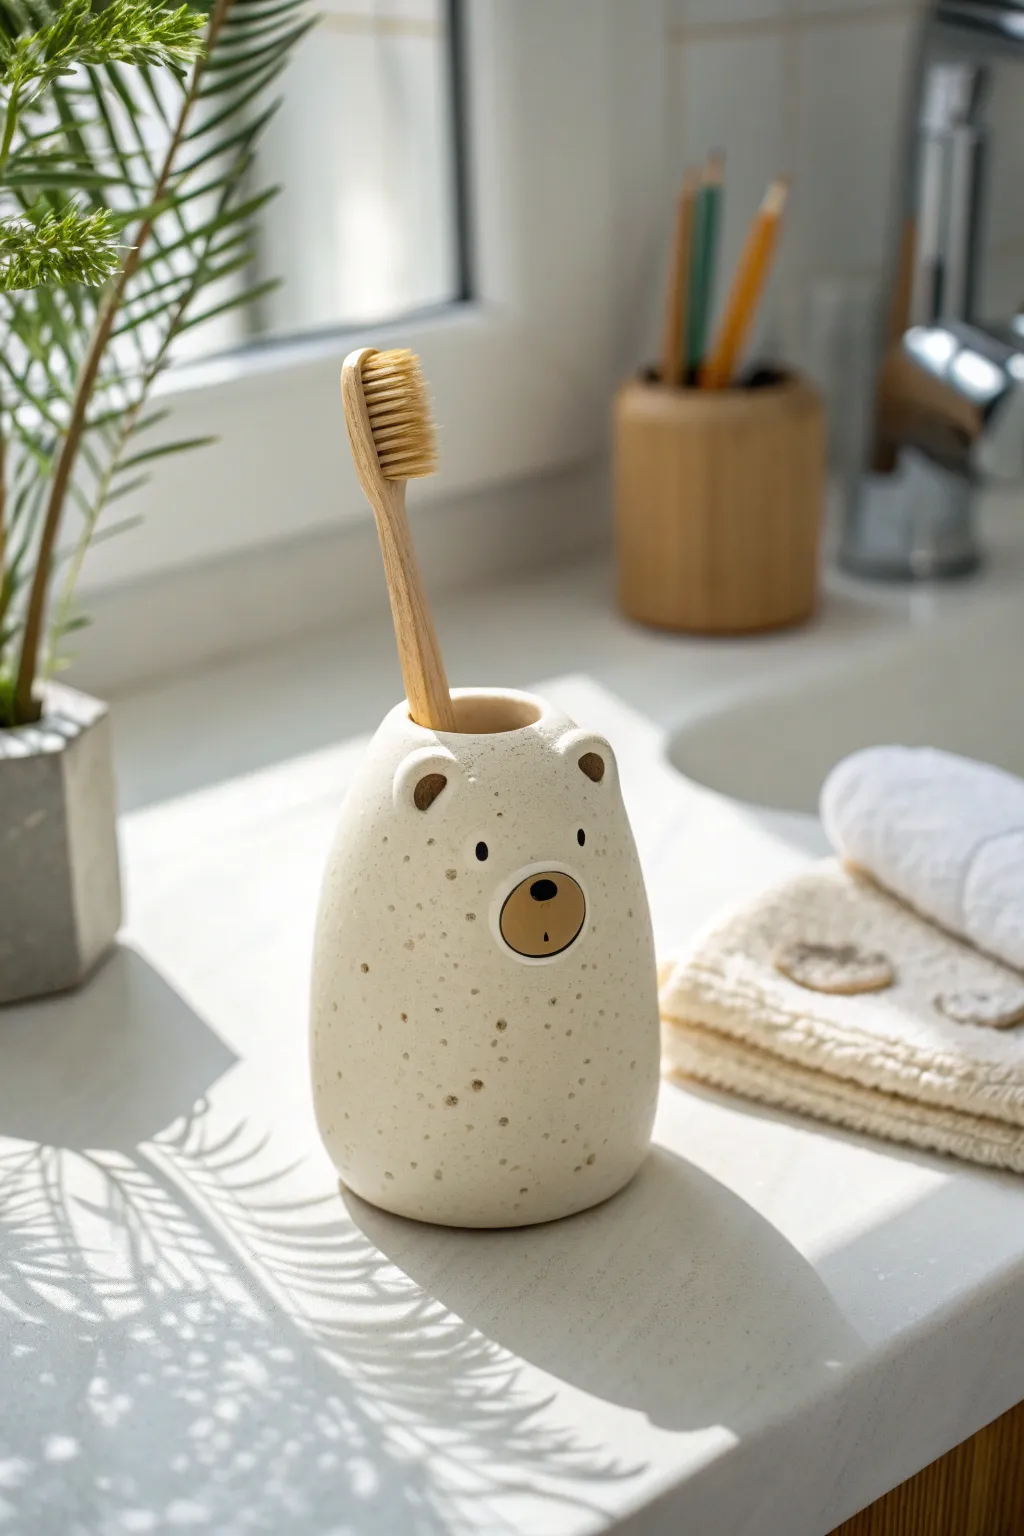
Brighten up your morning routine with this adorable bear-shaped toothbrush holder that features a trendy speckled ceramic look. Its minimalist face and gentle curves make it a perfect beginner-friendly project that brings a touch of nature-inspired charm to any bathroom sink.
How-To Guide
Materials
- Air-dry clay or polymer clay (white or cream)
- Acrylic rolling pin
- Aluminum foil (for armature)
- Small circle cutter
- Smoothing tool or sponge
- Sandpaper (fine grit)
- Acrylic paints: Black, Mocha Brown, Cream (optional)
- Old toothbrush (for the speckling technique)
- Matte waterproof sealant or varnish
- Paintbrushes (fine detail and medium)
Step 1: Shaping the Base
-
Create the core:
Crumple a piece of aluminum foil into an elongated egg shape. This acts as an armature to save clay and keep the holder lighter. -
Roll out the clay:
Condition your white or cream clay until it is pliable, then roll it out into a slab about 1/4 inch thick using your acrylic rolling pin. -
Cover the form:
Wrap the clay slab around your foil armature. Gently smooth the seams together with your fingers or a smoothing tool until the foil is completely hidden and the surface is uniform. -
Form the body:
Shape the clay-covered form into a smooth, rounded pillar that tapers slightly toward the top, resembling a sitting bear’s body. Make sure the bottom is flat and stable so it doesn’t tip over. -
Make the opening:
Using your thumb or a modeling tool, press a deep, vertical indentation into the top center of the shape. Ensure it is wide and deep enough to hold a toothbrush handle securely.
Step 2: Adding Details
-
Form the ears:
Roll two small balls of clay, flatten them slightly, and attach them to the top of the head on either side of the opening. Blend the clay at the base of the ears downwards into the head so they are securely attached. -
Refine the ears:
Use a small ball tool or your pinky finger to create a shallow depression inside each ear for dimension. -
Smooth everything out:
Dip a sponge or your finger in a little water (if using air-dry clay) or baby oil (if using polymer) and go over the entire piece to remove fingerprints and minor bumps. -
Let it cure:
Allow your bear to dry (for air-dry clay typically 24-48 hours) or bake it according to the manufacturer’s instructions for polymer clay. -
Sand for perfection:
Once fully cured, use fine-grit sandpaper to gently buff away any remaining roughness, giving it that smooth, manufactured ceramic feel.
Master the Speckle
Stand back about 12 inches when flicking the toothbrush bristles. Being too close creates large globs rather than a fine, ceramic-style mist.
Step 3: Painting and Finishing
-
Base coat touches:
If your clay isn’t the creamy off-white you desire, paint the entire bear with a cream acrylic paint and let it dry completely. -
Paint the snout:
Using a mocha brown color, paint a medium-sized circle in the center of the face area for the snout. I like to apply two thin coats here for solid coverage. -
Add facial features:
With a fine detail brush and black paint, carefully add two small dots for eyes just above the snout, a small horizontal oval nose inside the brown snout area, and a tiny vertical line below the nose for the mouth. -
Paint the inner ears:
Add a touch of the mocha brown paint inside the depressions of the ears to match the snout. -
Create the speckles:
Dilute a small amount of mocha brown or grey paint with water on a palette. Dip an old toothbrush into the mixture, aim it at the bear, and run your thumb across the bristles to flick tiny specks of paint all over the body. Practice on paper first to control the spray. -
Seal the deal:
Since this will live in a bathroom, apply at least two coats of a matte, waterproof varnish or sealant to protect the paint and clay from moisture.
Make It a Set
Create a shorter, wider bear using a larger foil ball to create a matching holder for a bar of soap, or a tiny cub for holding dental floss picks.
Place your charming new bear on the sink edge and enjoy the organized cuteness every morning
Chubby Phone Stands That Double as Desk Buddies
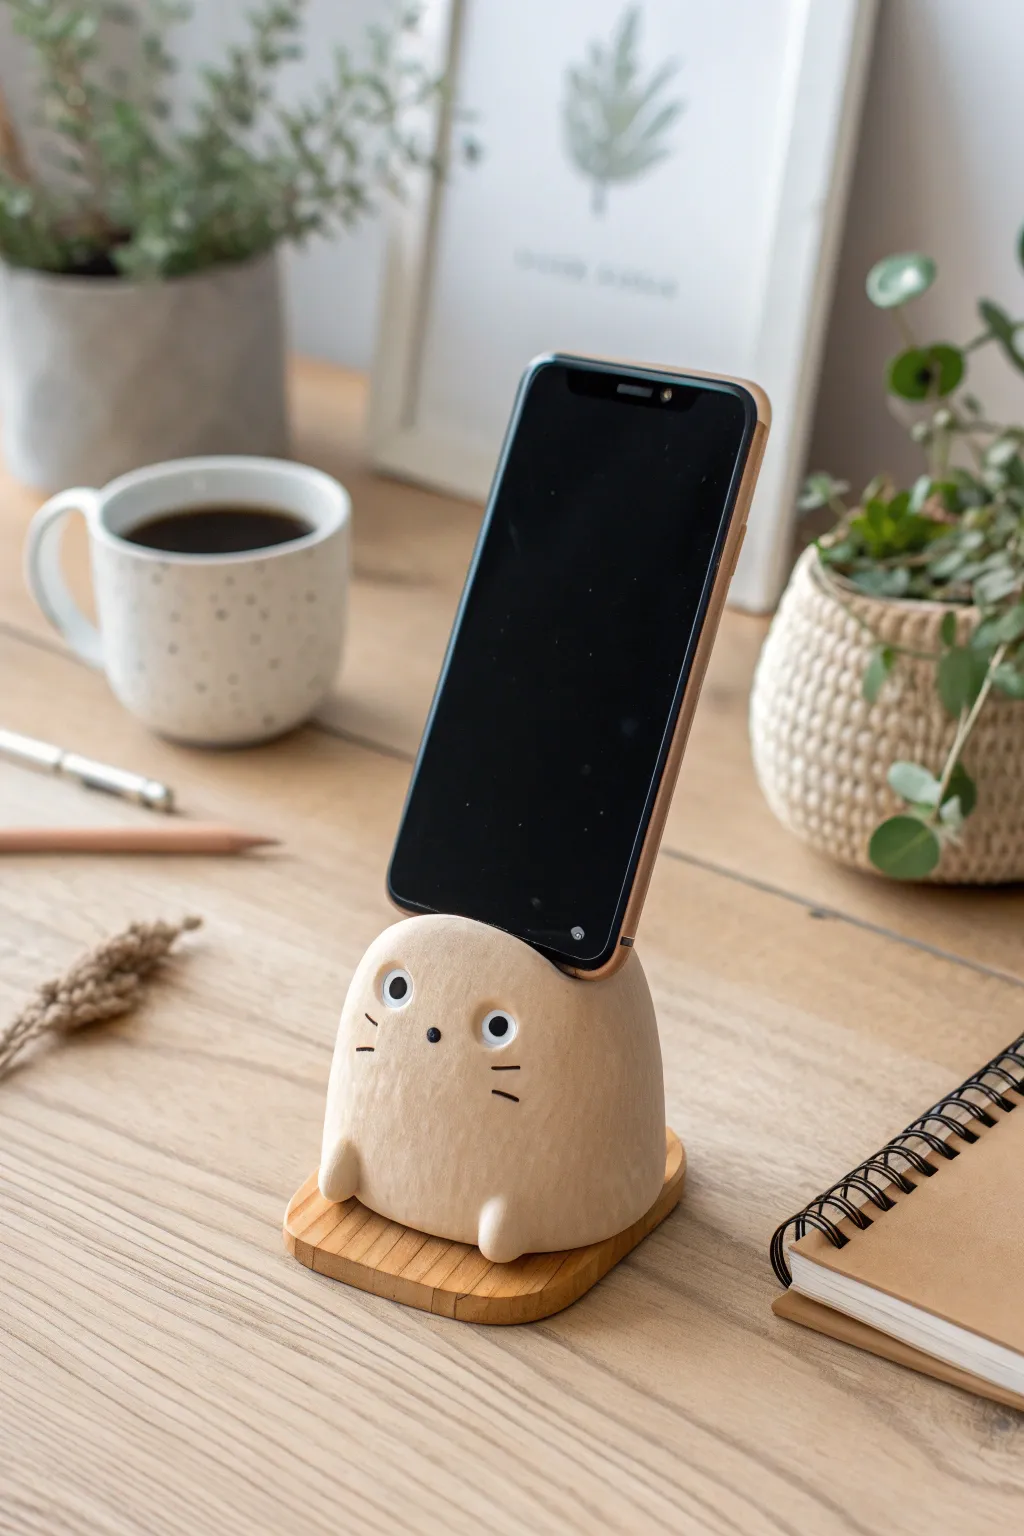
Transform a lump of clay into this utterly adorable, potato-shaped friend that keeps your phone upright and your spirits high. With simple, clean lines and a soft matte finish, this functional sculpture brings a touch of organic warmth to any workspace.
Step-by-Step Guide
Materials
- Air-dry clay or polymer clay (beige or light brown)
- Wooden coaster or sealed wood slice (rounded square)
- Acrylic paints (black, white)
- Fine detail paintbrush
- Rolling pin
- Modeling tools (or a butter knife and toothpick)
- Fine-grit sandpaper
- Strong craft glue or E6000
- Matte varnish or sealant
- Your phone (for sizing)
Step 1: Basic Form
-
Conditioning:
Start by kneading your clay thoroughly until it’s warm and pliable. This prevents cracks later on. -
Main shape creation:
Roll a large handful of clay into a smooth ball, then gently flatten the bottom against your work surface so it stands stably. -
Refining the dome:
Shape the ball into a rounded, slightly elongated dome. It should look a bit like a sturdy gumdrop or a very rounded potato. -
Creating the slot:
Wrap your phone loosely in plastic wrap to protect it. Press the phone firmly into the top-center of the dome to create a deep groove. -
Angle adjustment:
Wiggle the phone slightly backward to ensure the viewing angle is correct. Ensure the groove is deep enough to hold the device securely without it tipping. -
Smoothing the groove:
Remove the phone and carefully smooth the edges of the indentation with a wet finger or a clay tool so there are no sharp ridges.
Weighted Wonder
If using air-dry clay, which is lightweight, hide a smooth stone or a ball of aluminum foil inside the core while sculpting. This adds weight and prevents the stand from tipping over when holding a phone.
Step 2: Feet and Details
-
Forming the feet:
Roll two small marble-sized balls of clay for the feet. -
Attaching appendages:
Press these balls onto the lower front of the body. Blend the clay upwards into the body using a sculpting tool so they look like seamless bumps rather than stuck-on balls. -
Creating stability:
Check the balance again. If the front feet make it tilt, gently tap the whole sculpture on the table to flatten the bottom surface again. -
Drying or baking:
Allow the piece to dry completely (for air-dry clay, this takes 24-48 hours) or bake according to your polymer clay package instructions. -
Sanding:
Once fully cured, use fine-grit sandpaper to buff away any fingerprints or rough distinct textures, aiming for a stone-smooth finish.
Step 3: Painting and Assembly
-
Base coloration:
If you didn’t use colored clay, paint the entire body a soft, sandy beige. I like to sponge the paint on for a more natural, textured look. -
Painting the eyes:
Using a very fine brush or a dotting tool, paint two small white circles for the eyes. Let them dry, then add smaller black dots in the center. -
Adding whiskers and nose:
paint a tiny black dot for the nose centered between the eyes. Add three short, thin strokes on each cheek for facial whiskers. -
Sealing:
Apply a coat of matte varnish over the entire clay piece to protect the paint and give it a finished, ceramic-like quality. -
Preparing the base:
Take your wooden coaster and ensure the surface is clean and dry. -
Final assembly:
Apply a generous amount of strong craft glue to the bottom of your clay hamster and press it firmly onto the center of the wooden coaster. -
Curing time:
Let the glue set completely overnight before placing your phone in its new home.
Tail Variation
Before drying, add a small, rounded tail to the back of the figure. If you sculpt it to curl slightly upwards, it can act as extra support for the back of the phone, allowing for a more reclined viewing angle.
Enjoy the gentle company of your new desk buddy every time you check a notification

TRACK YOUR CERAMIC JOURNEY
Capture glaze tests, firing details, and creative progress—all in one simple printable. Make your projects easier to repeat and improve.
Mini Calendar Critters With Swap-Out Number Tiles
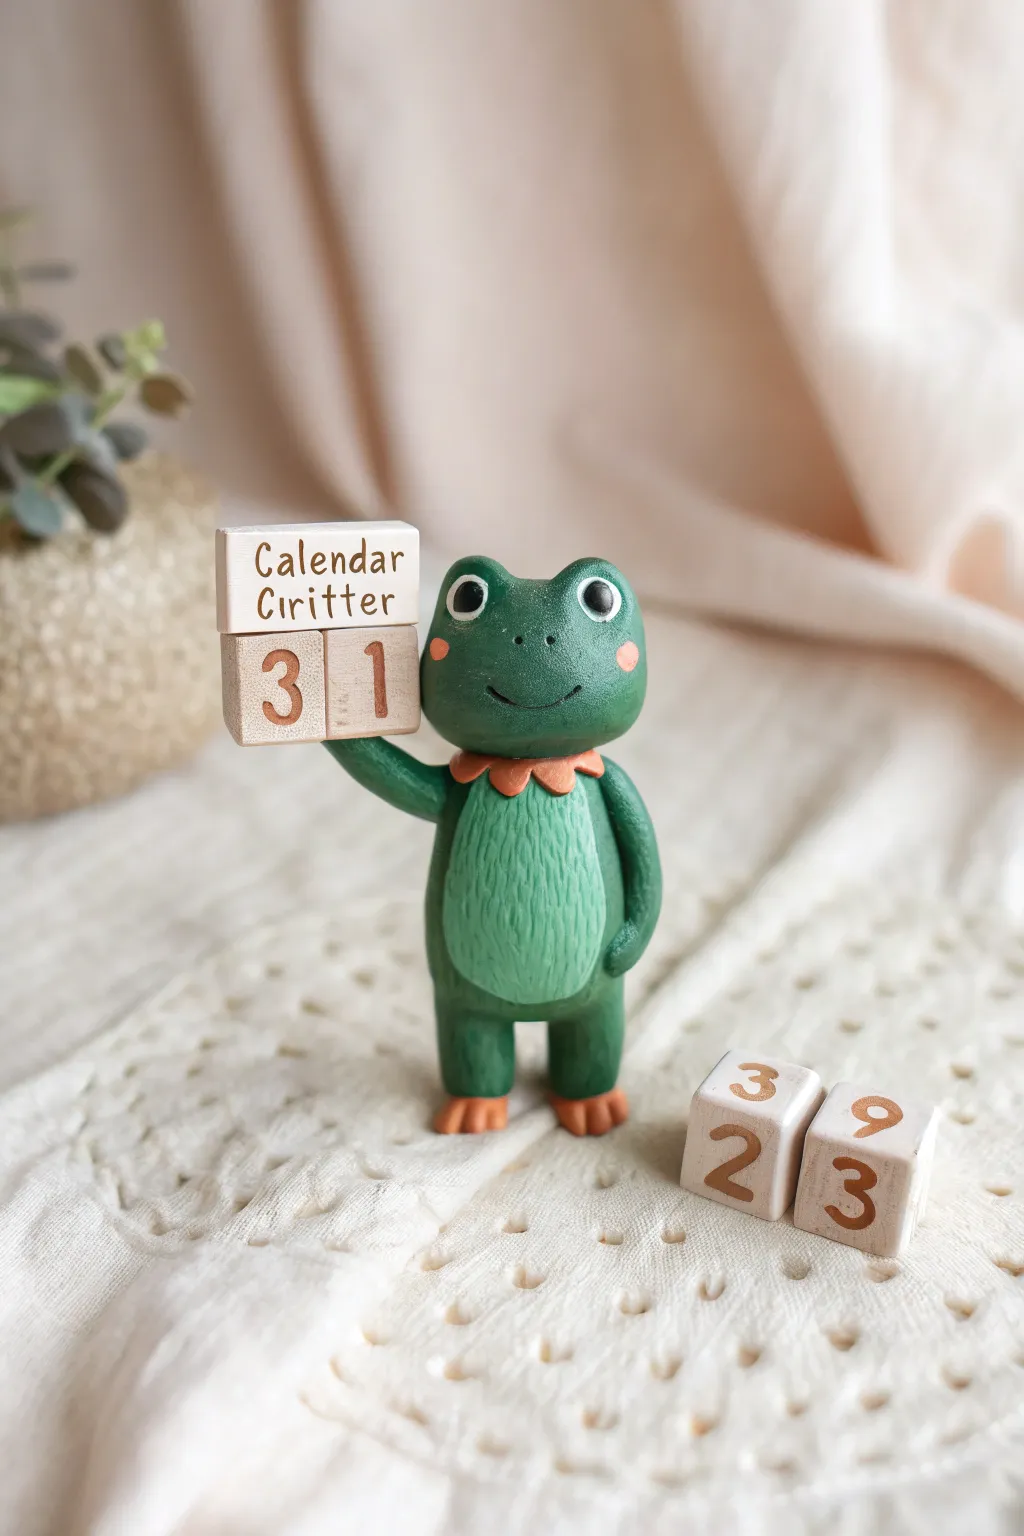
This adorable desk companion combines a practical perpetual calendar with the charm of hand-sculpted clay. With its textured tummy and eager expression, this little green frog holds interchangeable wooden blocks to mark the passing days.
Detailed Instructions
Materials
- Polymer clay (forest green, lighter mint green, orange/terracotta, white, black, pink)
- Small wooden craft cubes (approx. 1cm or 1/2 inch)
- Small rectangular wooden block (for the sign)
- Acrylic paint (brown or dark bronze)
- Fine-point paintbrush or paint pen
- Sculpting tools (needle tool, ball stylus)
- Texture tool (or a clean toothbrush/stiff brush)
- Wire armature or toothpicks (optional for internal support)
- Matte varnish or glaze
Step 1: Sculpting the Frog Base
-
Form the body:
Start with a chunk of forest green clay and roll it into a smooth, upright oval shape, roughly the size of a large egg. Flatten the bottom gently so it stands on its own. -
Create the tummy patch:
Roll out a thin sheet of the lighter mint green clay. Cut/tear an oval shape and press it onto the front of the body. -
Texture the tummy:
I like to use a needle tool or a stiff brush to scratch vertical fur-like lines into the light green tummy patch for a cute, fuzzy texture. -
Add the collar:
Roll a small snake of orange/terracotta clay. Flatten it slightly and wrap it around the ‘neck’ area (just above the tummy patch). Use a tool to indent the edges to look like a ruffled collar or flower petals. -
Shape the legs:
Create two thick cylinders of forest green clay for the legs. Attach them to the bottom of the body, blending the seams so they look seamless. -
Make the feet:
Shape two small flat ovals of orange clay. Use a knife tool to cut notches for toes and attach these under the green legs.
Sticky Situation
If the clay arm droops while holding the weight of the blocks before baking, prop it up with a crumpled ball of aluminum foil until it hardens in the oven.
Step 2: Head and Features
-
Shape the head:
Roll a slightly flattened sphere of forest green clay. It should be proportional to the body but distinct. -
Add the eyes:
Form two small mounds on top of the head for eye sockets. Press a white ball of clay into each, then add a smaller black pupil in the center. Use a tiny speck of white for a highlight. -
Create the face:
Use a needle tool or clay knife to carve a wide, happy smile. Add two tiny pink circles for cheeks just below the eyes. -
Attach the head:
Place the head securely onto the neck ruffle. You can insert a trimmed toothpick through the neck into the head for extra stability before baking.
Customize It
Create different rectangular blocks for seasons or moods like ‘Happy Birthday,’ ‘Vacation Mode,’ or ‘Monday Blues’ to swap out alongside the dates.
Step 3: Arms and Accessories
-
Form the arms:
Roll two tapered logs of forest green clay for the arms. The right arm (frog’s left) should hang down against the body, hand resting on the hip. -
Position the holding arm:
The left arm (frog’s right) needs to be raised. Attach it to the shoulder and bend it upward at the elbow, creating a flat palm that will support the blocks. -
Baking:
Bake the clay figure according to the manufacturer’s instructions (usually 275°F/130°C for 15-30 minutes per 1/4 inch thickness). Let it cool completely. -
Prepare the blocks:
While the frog cools, take your wooden cubes and rectangular block. Lightly sand them if they have rough edges. -
Paint the text:
Using a fine brush and brown paint (or a paint pen for easier control), write ‘Calendar Critter’ on the rectangular block. Paint numbers on the cubes (0-9) to create date combinations. -
Assembly:
Once everything is dry, stack the prompt block and two date blocks. Glue the stack into the frog’s raised hand using strong craft glue or super glue for a permanent hold, or leave them loose to change daily.
Place your little amphibian on your desk and enjoy changing the date every morning
Simple Incense Holders With Cozy, Rounded Shapes
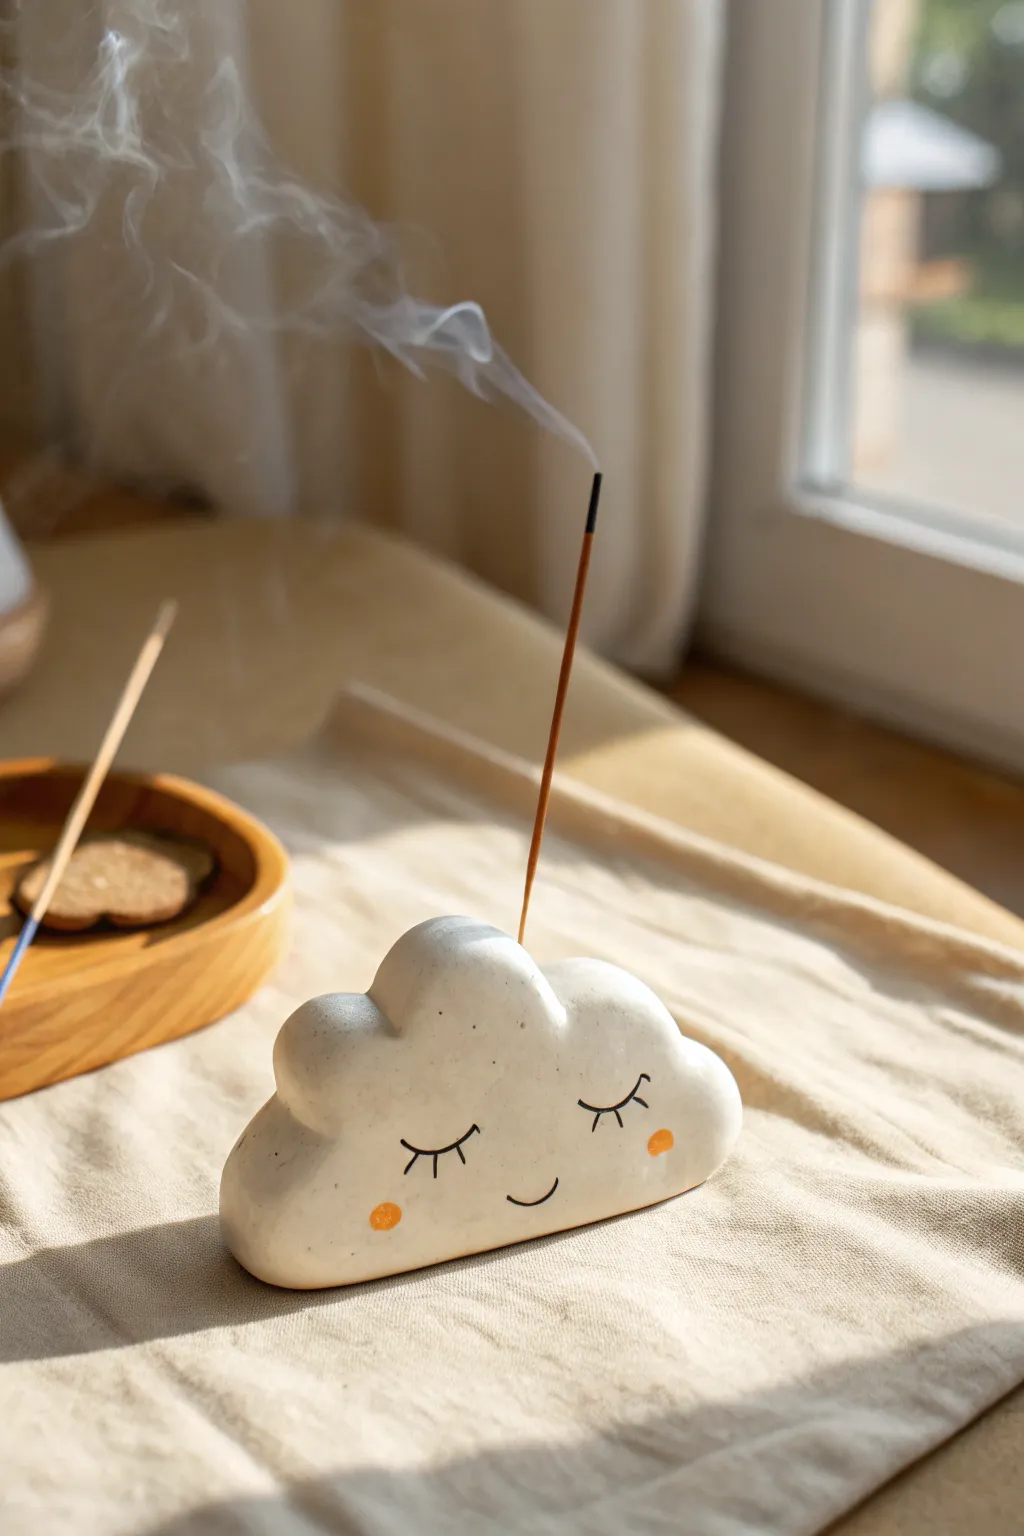
This adorable little cloud brings a sense of calm to any room even before you light the incense. With its gentle curves and sweet, sleepy expression, it’s the perfect beginner project for working with air-dry or polymer clay.
Step-by-Step
Materials
- White modeling clay (air-dry or polymer)
- Acrylic rolling pin
- Pointed sculpting tool or toothpick
- Fine-grit sandpaper
- Black fine-tip permanent marker or acrylic paint
- Small paintbrush
- Orange or peach acrylic paint
- Incense stick (for sizing)
- Matte varnish (optional)
Step 1: Shaping the Cloud
-
Prepare the clay:
Start by conditioning your clay. Knead a ball of white clay about the size of a lemon until it is warm, soft, and pliable. This prevents cracks later on. -
Form the base log:
Roll your clay ball into a thick log shape. It should be roughly 4 to 5 inches long and about 1.5 inches tall—thick enough to stand upright on a table without tipping over. -
Create the bumps:
Using your fingers, gently press down into the top edge of the log to create the cloud’s fluffy bumps. I like to make three distinct rounded sections: a larger central one and two slightly smaller ones on the sides. -
Smooth the surface:
Run your thumb over the entire shape to smooth out any fingerprints or sharp ridges. The goal is a soft, organic look, so round off the corners at the base as well. -
Check stability:
Tap the bottom of the cloud firmly on your work surface to flatten it. Ensure the cloud stands solid and straight; adjust the bottom if it leans too far forward or backward.
Step 2: Adding Function & Details
-
Create the incense hole:
Take your actual incense stick (or a tool of the same thickness) and poke a hole into the top of the central cloud bump. Ideally, angle it slightly so the ash will fall properly. -
Test the depth:
Push the hole deep enough to hold the stick securely, but be careful not to poke all the way through the bottom. Wiggle the stick very slightly to ensure the fit isn’t too tight, especially if using clay that shrinks. -
Dry or Bake:
If using air-dry clay, set the piece aside in a cool, dry place for 24-48 hours. If using polymer clay, bake it according to the manufacturer’s instructions on the package. -
Sand imperfections:
Once fully cured and hard, check for any rough spots. Use a fine-grit sandpaper to gently buff the surface until it feels smooth like porcelain.
Uneven Bottom?
If your cloud wobbles after drying, tape a sheet of sandpaper to a flat table. Rub the base of the cloud back and forth securely over the paper until perfectly flat.
Step 3: Painting the Face
-
Outline the eyes:
Using a fine-tip black marker or a very thin brush with black paint, draw two wide ‘U’ shapes for the sleepy, closed eyes. Place them fairly low on the cloud face for maximum cuteness. -
Add the lashes:
Draw three tiny, delicate lashes extending from the outer corner of each eye. Keep your hand steady and use light pressure. -
Draw the smile:
Right between the eyes, add a small, gentle upward curve for the mouth. It should be subtle and centered. -
Paint the cheeks:
Dip the end of a paintbrush handle or a small dotting tool into orange or peach paint. Stamp two small, perfect circles just below and outside the eyes for rosy cheeks. -
Seal the work:
Once the paint is completely dry, apply a coat of matte varnish. This protects the face from fading and makes the holder easier to wipe clean of ash later.
Make it a Set
Create a tiny matching sun or a small raindrop companion piece to hold rings or trinkets next to your incense holder.
Now you have a serene little companion to hold your favorite scents during relaxation time
Tiny Cable Organizers That Look Like Little Creatures
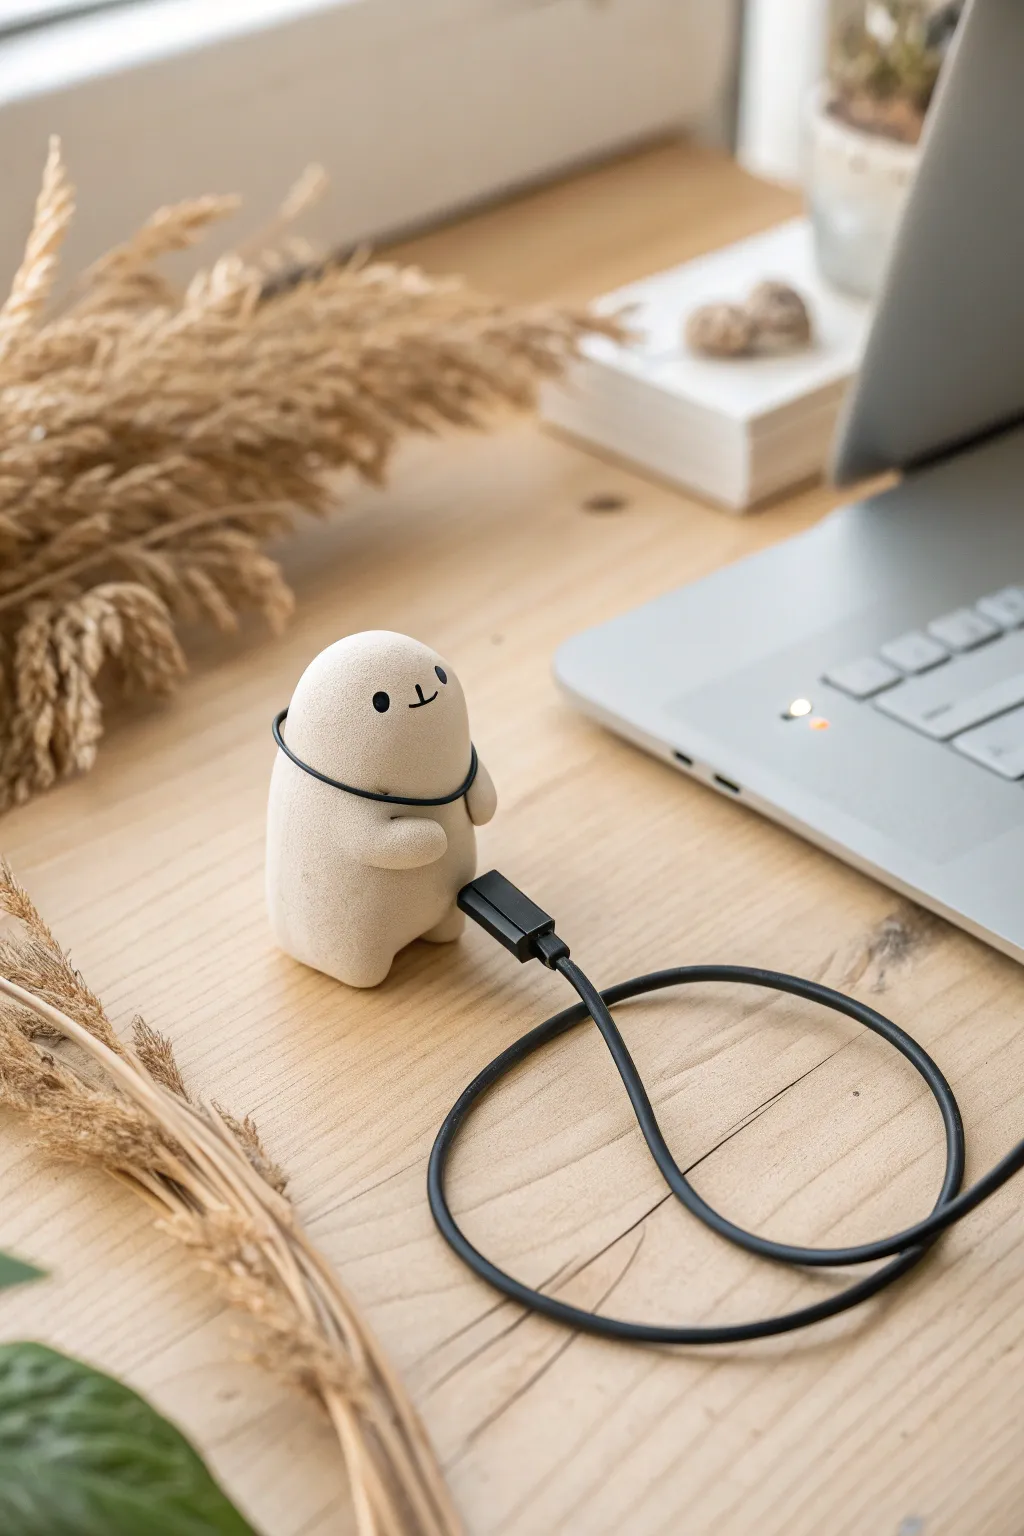
This adorable little desktop companion isn’t just for show; it’s designed to keep your charging cables within easy reach. With its smooth, stone-like texture and sweet minimalist face, this clay creation adds a touch of calm whimsy to any workspace while solving the eternal problem of the falling cord.
Step-by-Step Tutorial
Materials
- Polymer clay (beige, sand, or granite effect)
- Black acrylic paint
- Fine-point detail brush (size 000)
- Basic sculpting tools (ball stylus, needle tool)
- Aluminum foil (for the core)
- Rolling pin or pasta machine
- Sandpaper (fine grit, 400-800)
- Matte spray varnish
- Charging cable (to test sizing)
Step 1: Sculpting the Base Form
-
Prepare the foil core:
Crumple a small piece of aluminum foil into a compact oval shape about the size of a large walnut. This saves clay and keeps the figurine lightweight. -
Condition the clay:
Take your beige or granite-effect polymer clay and knead it thoroughly until it is soft and pliable. If it feels too stiff, the warmth of your hands will help loosen it up. -
Cover the core:
Flatten a portion of clay into a sheet about 1/4 inch thick. Wrap this sheet fully around your foil core, pressing the seams together and smoothing them out until you have a seamless, pill-shaped lump. -
Shape the body:
Gently roll the clay form on your work surface to create a smooth, standing oval. Tap the bottom lightly so it sits flat and stable without wobbling. -
Add the feet:
Roll two very small balls of clay. Press them onto the bottom front corners of the body and blend the upper edges into the main form, creating two stubby little feet that peek out. -
Refine the silhouette:
Look at the figure from all angles. Smooth out any fingerprints with a drop of baby oil on your finger if needed, aiming for that organic, river-stone smoothness.
Stone Texture Secret
Before baking, gently dab the surface with an old toothbrush or a ball of crumpled foil to simulate a realistic, porous stone texture.
Step 2: Creating the Cable Grip
-
Form the arms:
Roll a small snake of clay about an inch long and slightly thinner than a pencil. Cut this in half to make two equal arms. -
Position the arms:
Attach the arms to the sides of the body, roughly in the middle. Blend the shoulder area into the body seamlessly, leaving the hands free. -
Create the holding pose:
Curve the arms forward so the hands meet in the center of the belly. Press the hands together firmly, creating a closed loop. -
Size the gap:
Using the handle of a paintbrush or your actual charging cable, verify that there is enough space between the body and the locked arms for a cable to slide through, but not so much that the cable head falls out. -
Strengthen the bond:
Since the arms are the functional part, I like to use a tiny bit of liquid polymer clay or ‘bake and bond’ at the shoulder joints and where the hands clasp to ensure they don’t snap off later.
Step 3: Finishing Touches
-
Baking:
Place your creation on a ceramic tile or baking sheet covered in parchment paper. Bake according to your specific clay package instructions—usually around 275°F (130°C) for 15-30 minutes. -
Cooling:
Allow the piece to cool completely inside the oven if possible. This slow cooling helps prevents cracks. -
Sanding for texture:
Once cold, lightly sand the surface with fine-grit sandpaper. This removes any lingering fingerprints and gives the clay that matte, unglazed ceramic look seen in the photo. -
Face placement:
Using a pencil, lightly mark two dots for eyes and a small vertical line for the mouth/nose. Keep the features wide-set and high on the face for maximum cuteness. -
Painting the details:
Dip a fine-point brush into black acrylic paint. Paint two small solid circles for the eyes and a simple ‘T’ or ‘Y’ shape for the nose and mouth. -
Sealing:
Protect your paint job with a light coat of matte spray varnish. Avoid glossy finishes if you want to maintain the natural stone aesthetic.
Make it Weighted
Replace the foil core with a smooth river rock or a large glass marble. This adds significant weight, preventing heavy cables from tipping the figure over.
Pop this little guardian on your desk and enjoy a tidy, tangle-free workspace
The Miniature Variety Grid Challenge for Endless Ideas
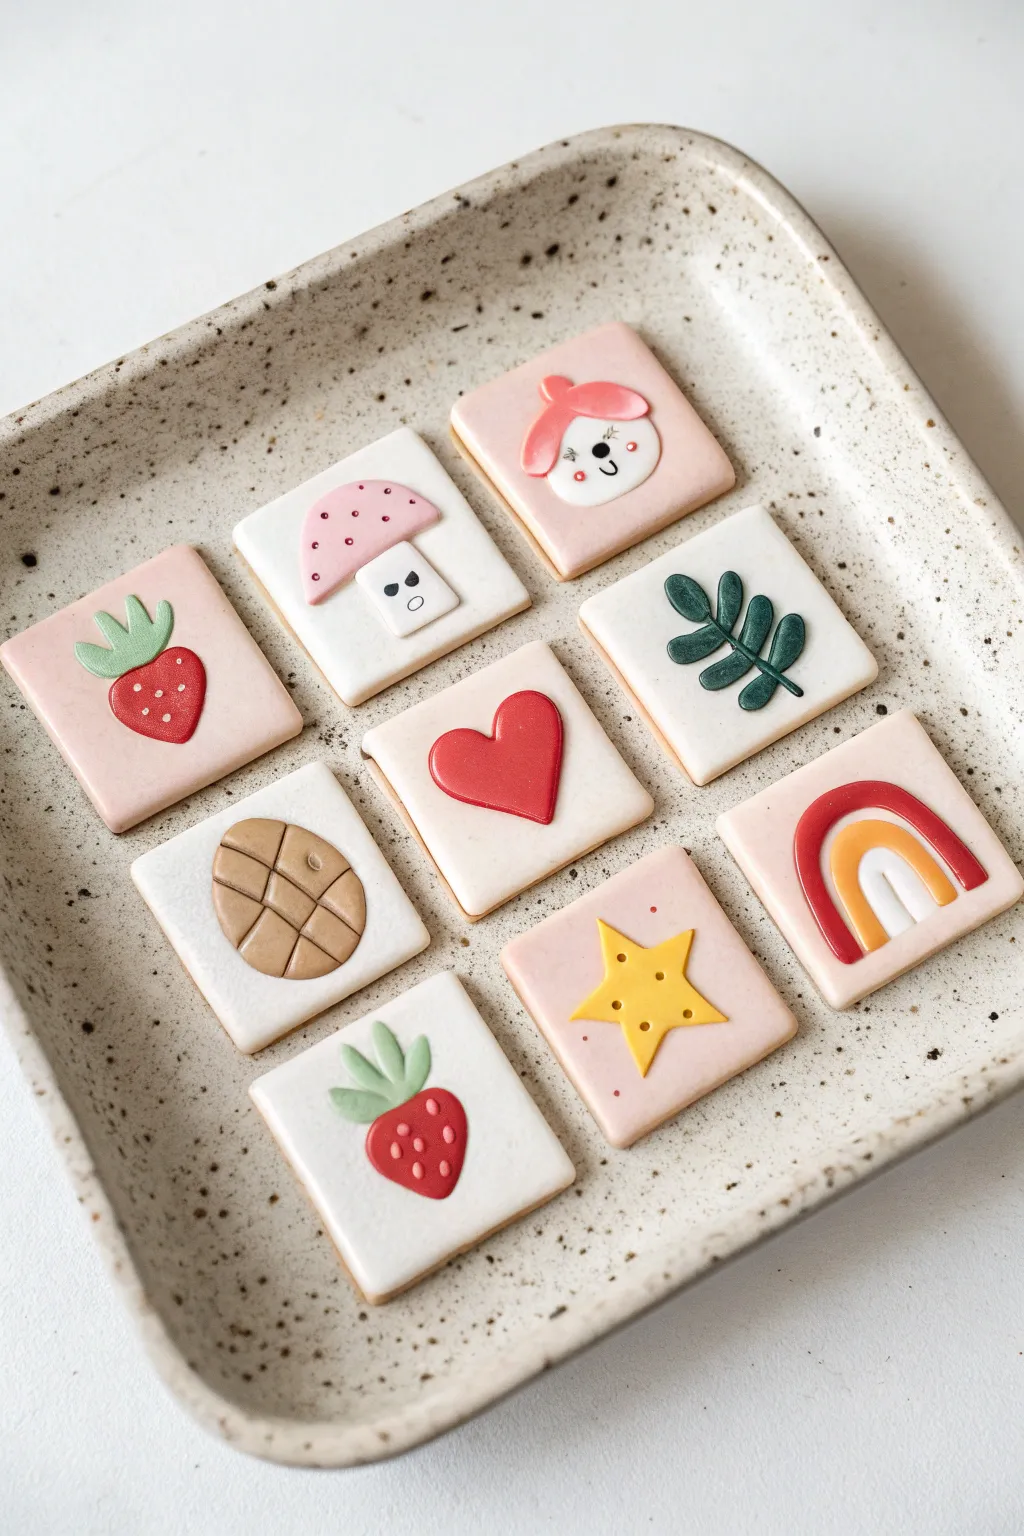
Create a charming collection of miniature square tiles, each featuring a unique, minimalist icon made from polymer clay. These simplified designs, from tiny strawberries to cheerful faces, sit atop pastel bases to create a cohesive and sweet grid suitable for magnets or jewelry.
Detailed Instructions
Materials
- Polymer clay (white, dusty pink, red, green, yellow, brown, burnt orange)
- Square clay cutter (approx. 1.5 inch)
- Acrylic rolling pin and depth guides
- Detailing tools (needle tool, small ball stylus)
- Small craft knife or scalpel
- Baking sheet and parchment paper
- Gloss glaze (optional)
Step 1: Creating the Base Tiles
-
Condition the clay:
Begin by conditioning your white and dusty pink clay until it is soft and pliable. This prevents cracks during baking. -
Roll the sheets:
Roll out the white and pink clay to a uniform thickness, about 1/4 inch thick. Using depth guides will ensure every tile is perfectly level. -
Cut the squares:
Use your square cutter to punch out nine tiles: five white and four pink (or mix and match as you prefer). Arranging them in a 3×3 grid on your work surface helps you visualize the final set. -
Smooth the edges:
Gently tap the cut edges with your finger to remove any sharpness left by the cutter, giving them a soft, finished look.
Smudged Colors?
Use a cotton swab dipped in rubbing alcohol to wipe away lint or accidental color smudges from the white backgrounds before baking.
Step 2: Sculpting the Icons (Row by Row)
-
The Pink Strawberry:
On a pink tile, press a small flat red strawberry shape. Add a green three-leaf top. Use a needle tool to poke tiny ‘seed’ indentations across the red surface. -
The Mushroom:
On a white tile, place a small white rectangle for the stem and a pink semi-circle cap on top. Poke dots into the cap for texture, and add a tiny, surprised face to the stem using a needle tool or black clay bits. -
The Girl Face:
For the pink tile, make a small white circle. Add a pink ‘hair’ swoosh and a tiny bow. Use a needle tool to indent a happy face, or use microscopic bits of black clay for the eyes. -
The Leafy Branch:
Roll a very thin snake of dark green clay for the stem and place it diagonally on a white tile. Attach small, flattened tear-drop shapes along the stem to form leaves, pressing a central vein into each with your knife. -
The Heart:
Center a flat red heart on a white tile. I find it helpful to shape the heart in my hand first before pressing it down to ensure symmetry. -
The Rainbow:
Roll thin snakes of red, orange, and white clay. Arch them together on a pink tile to form a rainbow. Trim the bottom edges straight with your craft knife. -
The Pineapple Pattern:
On a white tile, place an oval of light brown clay. Use a knife to gently score diagonal cross-hatching lines to mimic pineapple skin or a pinecone texture. -
The Star:
Cut a five-point star from yellow clay and center it on a pink tile. Use a small ball tool to indent dots near the points for a whimsical touch. -
The White Strawberry:
Repeat the strawberry process on a white tile, using the same red body and green leaves, ensuring the seed texture is consistent.
Step 3: Finishing Touches
-
Final inspection:
Check for any fingerprints. You can lightly brush the clay with a bit of cornstarch or baby oil to smooth them away before baking. -
Bake:
Bake the tiles on parchment paper according to your clay manufacturer’s instructions (usually 275°F/135°C for 15-30 minutes). -
Cool and Glaze:
Let the tiles cool completely. If you want a shiny finish like ceramic, apply a thin coat of gloss glaze to the raised icons only, leaving the base matte.
Make Them Magnets
Once baked and cooled, glue strong neodymium magnets to the back of each tile to turn your grid into an adorable fridge set.
Arrange your finished tiles on a small tray or mounting board to admire your handiwork