Air dry clay is my favorite “grab it and make something” material—no kiln, no fuss, just pure creative play. If you’re craving air clay ideas that feel doable but still look special, these projects will keep your hands happily busy.
Easy Trinket Dishes With Clean, Minimal Shapes
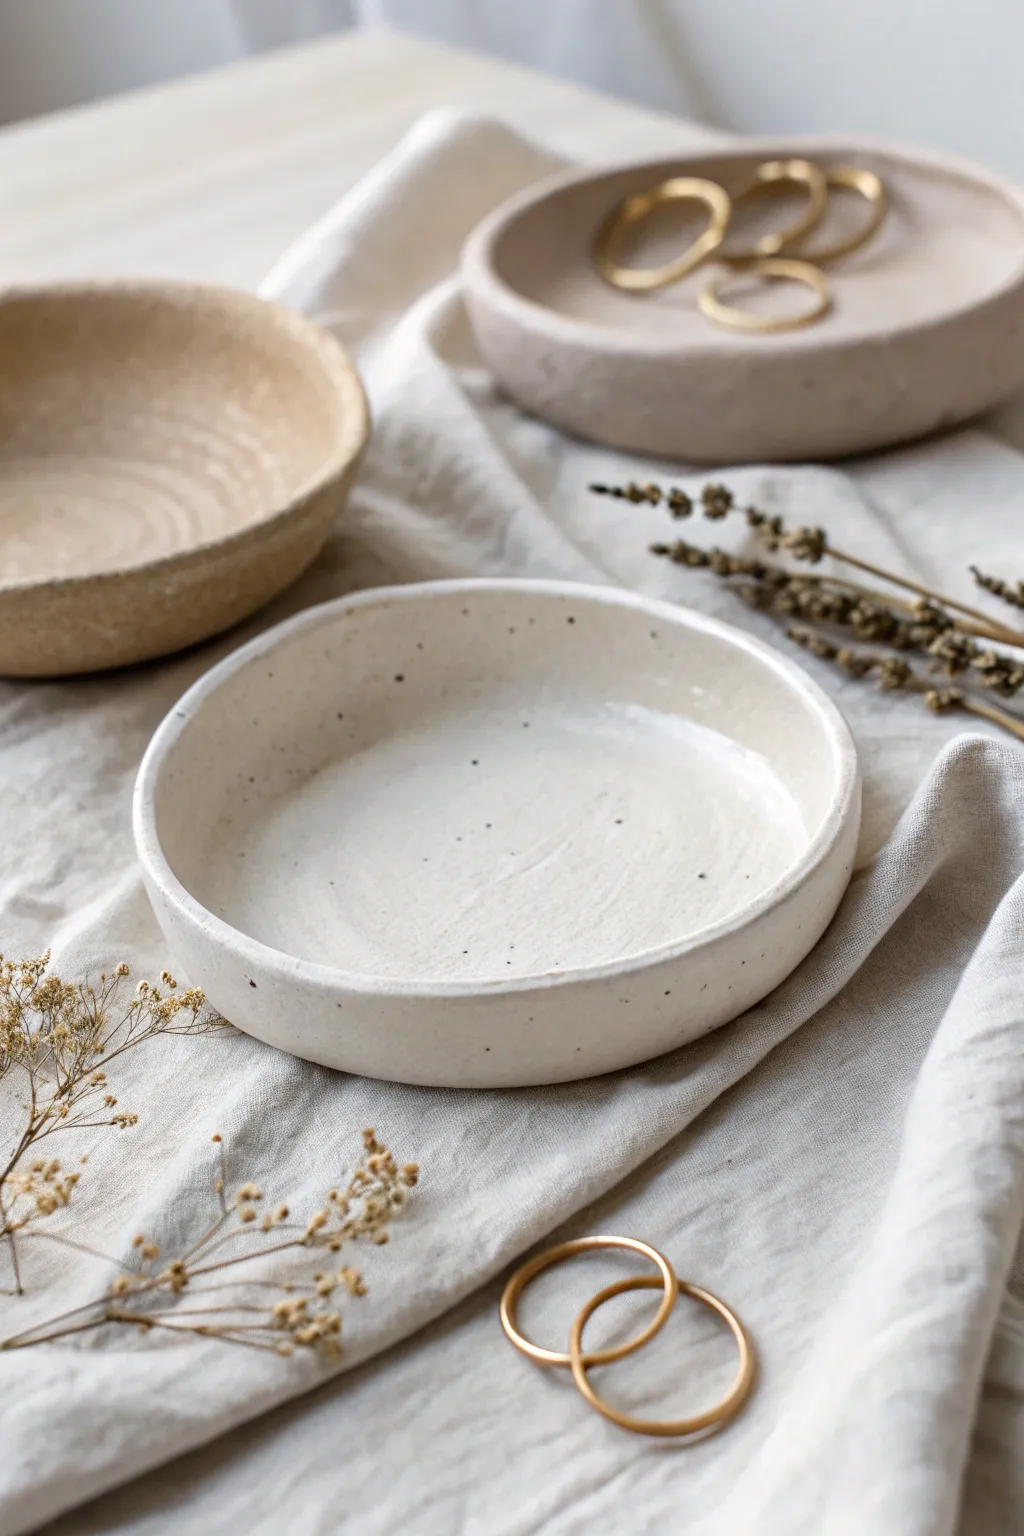
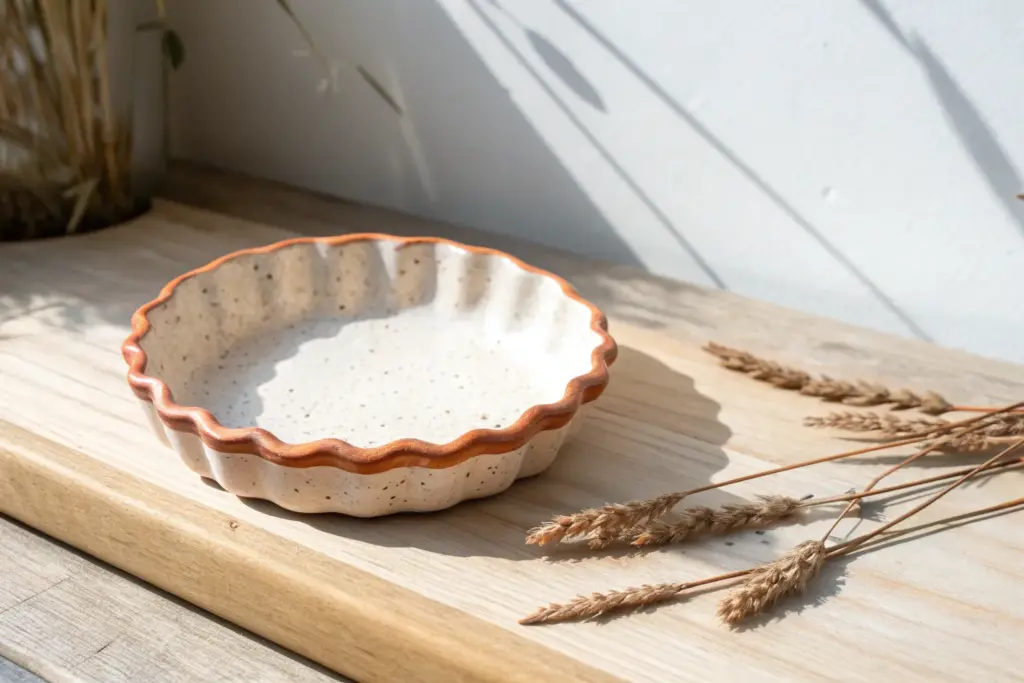
Capture the elegance of modern pottery with this simple air-dry clay project that mirrors the look of speckled stoneware. With just a few basic shaping techniques and a clever finishing glaze, you can create a sophisticated trinket dish perfect for holding your favorite rings or dried florals.
Step-by-Step Guide
Materials
- White air-dry clay
- Rolling pin
- Canvas mat or parchment paper
- Bowl (about 5-6 inches wide) to use as a template
- Craft knife
- Small sponge and water cup
- Fine-grit sandpaper (220-400 grit)
- White or cream liquid acrylic paint
- Glossy varnish or glaze (specifically for air-dry clay)
- Black acrylic paint
- Old toothbrush or stiff bristle brush
Step 1: Shaping the Base
-
Condition the clay:
Begin by taking a handful of white air-dry clay and kneading it in your hands to warm it up. This conditioning process helps prevent cracks later on. -
Roll the slab:
Place your clay on a canvas mat or parchment paper. Using a rolling pin, roll the clay out evenly until it is about 1/4 inch thick. Try to keep the thickness consistent across the entire surface. -
Cut the circle:
Place your bowl upside down on the flattened clay to act as a cutting template. Use the craft knife to trace around the rim, cutting a clean circle. -
Create the rim:
Gently lift the edges of the circle with your fingers to create a shallow curve. I like to pinch the clay upwards slightly to form a distinct vertical lip, about half an inch high, giving it that modern, straight-sided look. -
Smooth the surfaces:
Dip your finger or a small sponge into a little bit of water and run it over the rim and the interior of the dish. This erases any fingerprints and seals small micro-cracks.
Cracked edges?
If cracks appear while drying, mix a small amount of clay with water to create a paste (slip). Fill the crack, smooth it over, and let it dry again before sanding.
Step 2: Refining and Drying
-
Check symmetry:
Rotate the dish slowly and look at it from eye level. Gently push any uneven sections of the rim so the height is consistent all the way around. -
Initial drying:
Let the dish sit undisturbed in a cool, dry place. Avoid direct sunlight or heat, which can cause warping. -
Flip for flat bottoms:
After about 12 hours, when the top feels firm, gently flip the dish over so the bottom can dry evenly. This helps keep the base flat. -
Full cure:
Wait 24-48 hours for the clay to be bone dry. The clay will turn bright white and feel room temperature (not cold) to the touch when it is ready. -
Sand for perfection:
Use fine-grit sandpaper to gently smooth the rim and any rough patches on the surface. Wipe away the dust with a slightly damp cloth.
Go Botanical
Before the clay dries, gently press a dried lavender sprig or leaf into the bottom to leave a subtle fossil-like impression, then paint over it for texture.
Step 3: Faux Glazing Technique
-
Base coat mixing:
Mix a small amount of white acrylic paint with a drop of warm cream or beige to soften the stark white color slightly. -
Apply base color:
Paint the entire dish, inside and out, with your cream mixture. This provides a uniform canvas and seals the porous clay. -
The speckled effect:
Dilute a tiny amount of black acrylic paint with water until it is very runny. Dip an old toothbrush into it. -
Flicking the specks:
Hold the toothbrush over the dish and run your thumb across the bristles to flick tiny droplets of paint onto the surface. Practice on a paper towel first to control the spray. -
Gloss finish:
Once the paint is fully dry, apply two to three thick coats of high-gloss varnish. This mimics the look of fired ceramic glaze and gives the piece that glassy, wet shine seen in the center dish.
Place your finished dish on a linen cloth and display your favorite delicate jewelry pieces inside for a serene vignette


Terrazzo-Style Coasters With Speckled Clay Confetti
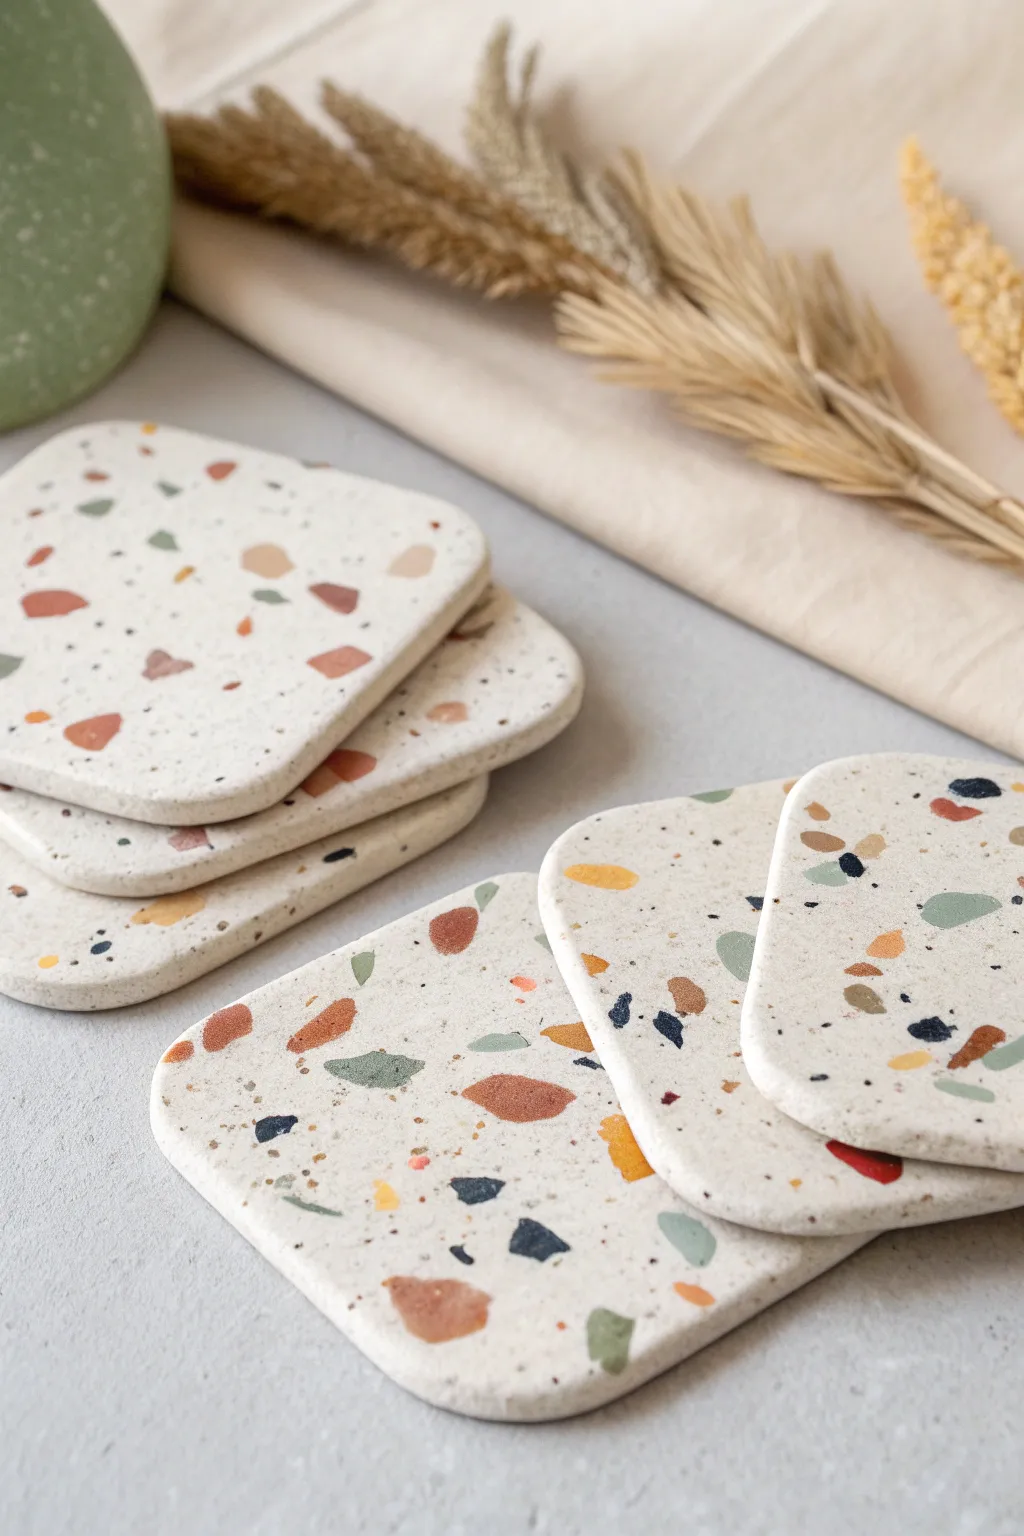
Bring the timeless elegance of Italian terrazzo into your living space with these handmade air-dry clay coasters. Featuring earthy confetti chips embedded in a smooth cream base, this project balances modern design with a satisfyingly tactile crafting process.
How-To Guide
Materials
- White or cream air-dry clay
- Colored air-dry clay (terracotta, slate blue, mustard yellow, sage green)
- Acrylic rolling pin
- Square cookie cutter (approx. 3.5-4 inches) or a knife and ruler
- Parchment paper or craft mat
- Fine-grit sandpaper (400-600 grit)
- Gloss or matte varnish (sealant)
- Small bowl for water
- Craft knife
Step 1: Making the Confetti
-
Prepare the colored clay:
Begin by taking small pinches of your colored clays—terracotta, blue, mustard, and green. If you only have white clay, you can mix in a tiny drop of acrylic paint to dye small batches before starting. -
Flatten the colors:
Roll each colored piece out very thinly on your parchment paper. You want these to be almost paper-thin, as they will need to embed into the base clay later. -
Create the chips:
Once rolled, use your fingers or a craft knife to tear or cut these thin sheets into random, irregular shapes. These are your terrazzo chips. -
Let them firm up:
Set these colored fragments aside for about 10-15 minutes. They don’t need to be fully dry, but letting them stiffen slightly makes them easier to handle.
Step 2: Forming the Base
-
Roll the white base:
Take a large chunk of your white or cream clay and knead it until soft. Roll it out on parchment paper to a thickness of about 1/4 inch. -
Add the confetti:
Scatter your prepared colored chips randomly over the surface of the white clay slab. I like to overlap some pieces slightly and leave gaps in others for a natural look. -
Embed the pattern:
Gently roll over the slab again with your rolling pin. Press firmly enough so the colored chips sink flush into the white base, creating a uniform surface. -
Smooth the surface:
If you see any tiny cracks forming around the chips, dip your finger in water and gently smooth the clay surface to bond everything together seamlessly.
Prevent Curling
If your coasters start lifting at the corners while drying, gently place a light book on top of them (with parchment paper in between) during the final stages of drying.
Step 3: Cutting and Finishing
-
Cut the shapes:
Place your square cookie cutter onto the clay slab and press down to cut out your coasters. Alternatively, measure squares with a ruler and cut cleanly with a craft knife. -
Soften the edges:
Lift the squares carefully. Use a water-dampened finger to gently round off the sharp cut corners and smooth the vertical edges of each coaster. -
Dry thoroughly:
Place the coasters on a flat, clean surface to dry. Flip them over every 12 hours to ensure even drying and prevent curling. This usually takes 24-48 hours. -
Sand for clarity:
Once fully dry, take your fine-grit sandpaper and lightly sand the surface. This removes any haziness and makes the colors of the terrazzo chips pop vividly. -
Seal the deal:
Apply two to three thin coats of varnish to seal the clay. This is crucial for coasters to protect them from moisture and condensation. -
Final dry:
Let the varnish cure completely according to the manufacturer’s instructions before using your new coasters.
Add Texture
For a luxe finish, mix in tiny bits of gold leaf or metallic flakes along with your colored clay chips before the final roll-out.
Enjoy your chic new home accessories or bundle them up as a lovely handmade gift


Ring Cones and Ring Dishes for Nightstand Organization
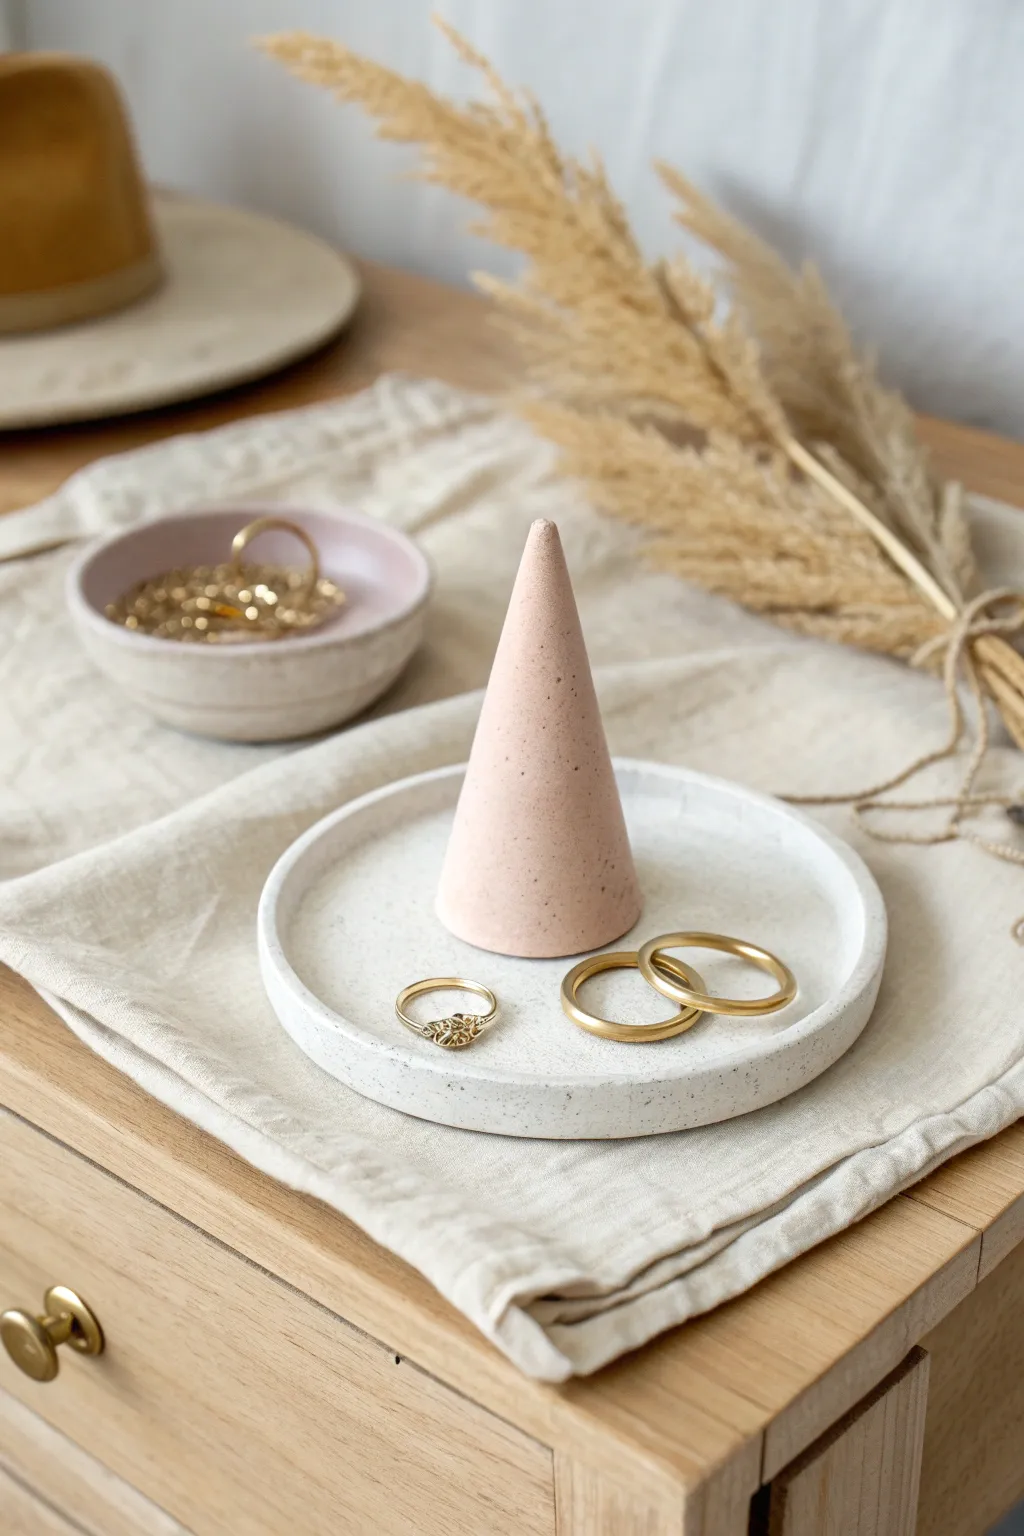
Elevate your nightstand organization with this minimalist jewelry duo featuring a smooth, terracotta-hued ring cone and a matching speckled tray. The sleek, conical shape is perfect for stacking bands, while the shallow dish keeps loose earrings and necklaces secure and beautifully displayed.
Step-by-Step
Materials
- White air-dry clay (approx. 500g)
- Pink or terracotta acrylic paint
- Small rolling pin
- Round cookie cutter or bowl (approx. 4-5 inches diameter)
- Craft knife or clay wire
- Fine-grit sandpaper (220-400 grit)
- Used coffee grounds or black pepper (for speckling)
- Small bowl of water
- Sponge or paintbrushes
- Clear matte varnish or sealant
Step 1: Shaping the Ring Cone
-
Prep the clay:
Start by pinching off a ball of white clay roughly the size of a golf ball or slightly larger, depending on your desired height. Knead it in your hands until it’s pliable and warm. -
Mix in color:
Add a small drop of pink or terracotta acrylic paint directly into the clay. Knead thoroughly until the color is evenly distributed and no streaks remain. You can add more paint gradually for a deeper hue. -
Add texture:
Sprinkle a pinch of dry used coffee grounds or cracked black pepper onto the clay and knead again. This creates the subtle, organic speckled stone effect seen in the project. -
Form the basic cone:
Roll the clay into a smooth ball first, then gently begin rolling it back and forth on your work surface while applying more pressure to one side to create a tapered carrot shape. -
Refine the shape:
Stand the cone upright on a flat surface. Use your fingers to smooth out any bumps and gently tap the tip to round it off slightly so it isn’t dangerously sharp. -
Flatten the base:
Pick up the cone and press the bottom onto your table firmly to ensure it sits perfectly flat. If it wobbles, slice a thin layer off the bottom with a clay wire or knife. -
Smooth the surface:
Dip your finger in a little water and run it over the entire surface of the cone to remove fingerprints and create a silky finish.
Seamless Speckles
Using dry tea leaves instead of coffee grounds creates a lighter, more botanical speckle pattern that looks great on pastel clay.
Step 2: Crafting the Speckled Dish
-
Prepare the tray clay:
Take a larger portion of white clay for the base. Add your speckling agent (coffee or pepper) just like before, but skip the pink paint to keep the natural white stone look. -
Roll it out:
Roll the clay onto a smooth surface or canvas mat until it is an even slab, approximately 1/4 inch thick. -
Cut the circle:
Place your round cutter or a bowl upside down on the slab. Use it as a stencil to cut out a perfect circle with your craft knife. -
Create the rim:
Roll a long, thin snake of clay from the scraps. It should be long enough to go around the circumference of your circle base. -
Attach the rim:
Score the outer edge of the base and the underside of the clay snake with a needle tool or knife. Apply a little water to the scored areas (slip) and press the snake firmly onto the edge of the base. -
Blend the seams:
Using a modeling tool or your fingers, blend the clay snake downward into the base on both the inside and outside until the seam disappears completely. This takes patience but creates that seamless, stone-carved look. -
Refine edges:
Run a damp sponge along the top rim to level it out and soften any sharp angles.
Step 3: Finishing Touches
-
Let it dry:
Place both the cone and the dish in a safe, dry area away from direct sunlight. I like to let them dry for at least 24 to 48 hours, flipping the dish occasionally to prevent warping. -
Sand for perfection:
Once fully cured, use fine-grit sandpaper to buff away any remaining uneven spots or rough edges on both pieces. Wipe away the dust with a dry cloth. -
Seal the set:
Apply two thin coats of clear matte varnish to protect the clay from moisture and dirt, allowing drying time between coats.
Make it Luxe
Paint the very rim of the dish with liquid gold leaf or a metallic gold paint pen for a chic, high-end finish.
Arrange your favorite rings on your new modern display for an instant bedroom upgrade


Pinch Pots That Turn Into Tiny Catch-All Bowls
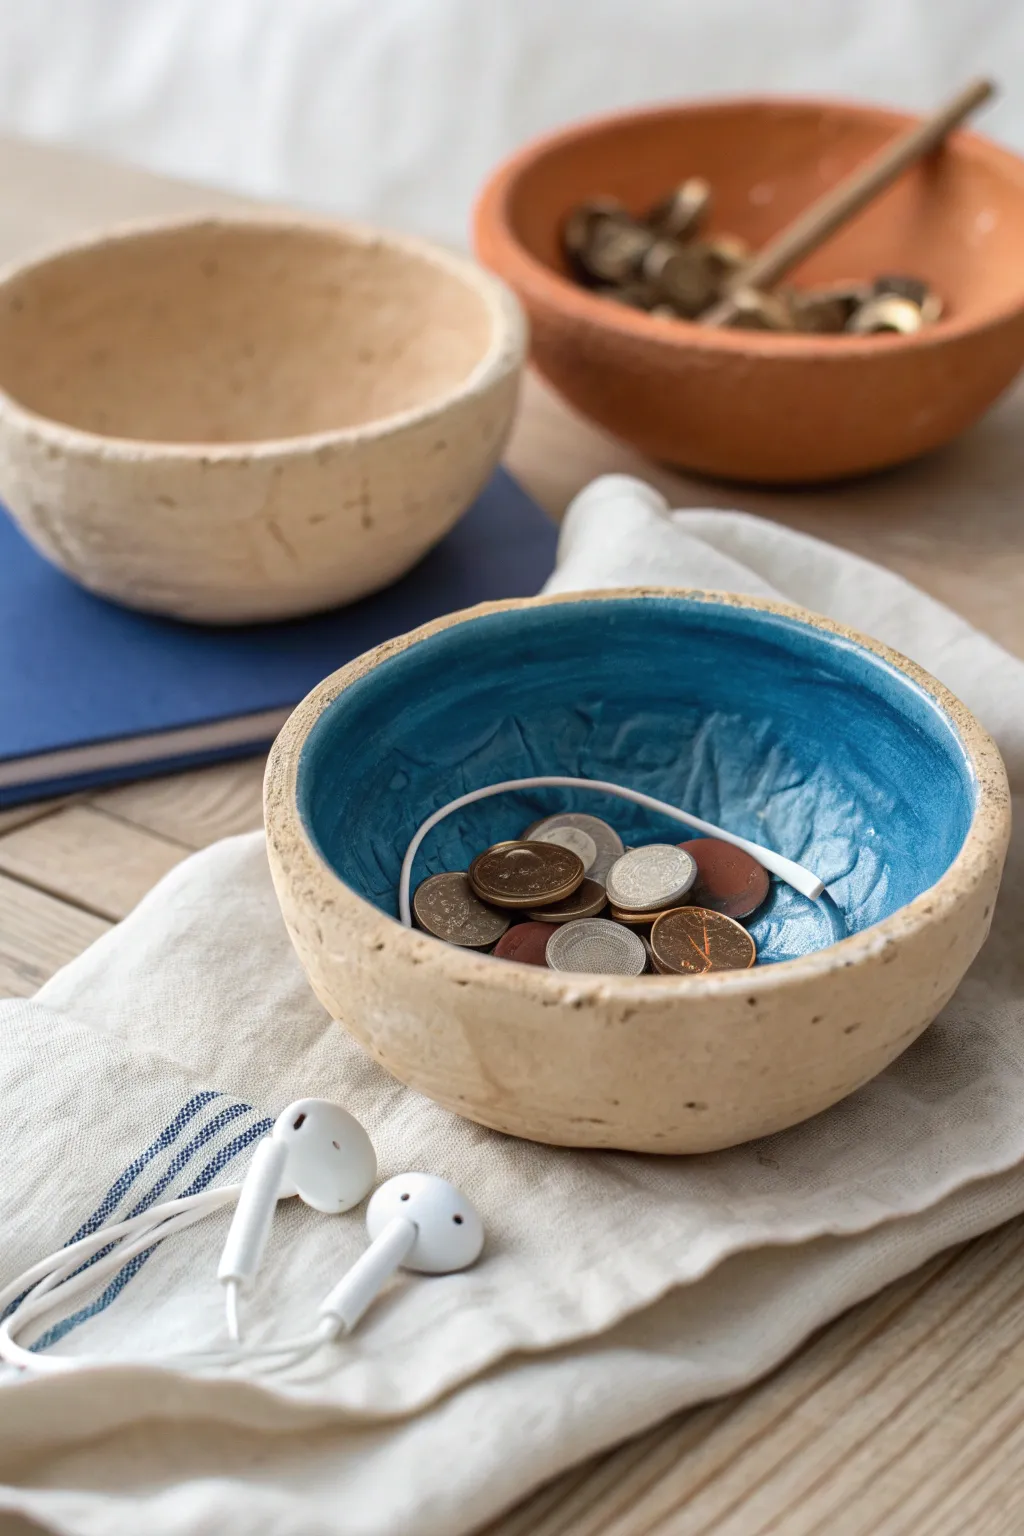
These charming catch-all bowls combine a rustic, textured exterior with a glossy, vibrant splash of color inside. They are perfect for collecting life’s little loose ends, like coins, earbuds, or jewelry, and make for a stylish, modern addition to any tabletop.
Detailed Instructions
Materials
- Air-dry clay (white or natural)
- Small bowl of water
- Medium-grit sandpaper
- Gesso primer
- Teal or turquoise high-gloss acrylic paint
- Gloss acrylic varnish or sealer
- Small flat paintbrush
- Texturing tool (optional, like a sponge or coarse fabric)
Step 1: Shaping the Clay
-
Prepare the ball:
Start with a fist-sized lump of air-dry clay. Knead it in your hands for a minute to warm it up and ensure it’s pliable, then roll it into a smooth, tight sphere. -
Start the pinch:
Hold the sphere in your non-dominant hand. Gently press your thumb into the center of the ball until you are about half an inch from the bottom. -
Open the walls:
Begin pinching the clay between your thumb and fingers, rotating the ball as you go. Work your way from the bottom up to the rim. -
Even the thickness:
Continue pinching and rotating until the walls are an even thickness—roughly a quarter-inch is sturdy enough. -
Flatten the base:
To ensure the bowl sits flat on a table, gently tap the bottom of the pot against your work surface. You don’t want it to rock. -
Smooth the exterior texture:
While many pinch pots are perfectly smoothed, this look requires a bit of rustic charm. Smooth the cracks with a little water on your finger, but leave the slight finger impressions and bumps for character. -
Refine the rim:
Run a damp finger along the top rim to soften any sharp edges, but keep the rim slightly uneven to maintain that handmade aesthetic. -
Dry completely:
Set the bowl aside to dry. This typically takes 24 to 48 hours depending on humidity. Flip it over halfway through the process to let the bottom dry evenly.
Cracks Appearing?
If small cracks form while drying, mix a tiny bit of fresh clay with water to make a paste (slip) and fill them in. Let it dry again, then sand smooth.
Step 2: Finishing and Painting
-
Sand the interior:
Once fully dry, use medium-grit sandpaper to smooth out the *inside* of the bowl. We want the interior to look sleek and finished compared to the rougher outside. -
Prime the inside:
Apply a coat of gesso primer only to the interior of the bowl. This seals the clay and ensures your blue paint pops without soaking into the porous material. -
Dry the primer:
Let the gesso dry completely, which usually happens quite fast—about 20 minutes. -
Paint the first coat:
Using a small flat brush, apply your teal or turquoise acrylic paint to the inside. I like to stop the paint right at the inner edge of the rim, leaving the very top edge natural. -
Layer the color:
Allow the first coat to dry, then apply a second or even third coat until the color is opaque and vibrant. No clay color should show through. -
Leave the exterior raw:
For this specific project, leave the outside unpainted to show off the natural clay tone. If you want a slight sheen, you can buff it with a soft cloth. -
Apply varnish:
To mimic that fired ceramic glaze look, apply two thick coats of high-gloss varnish over the painted interior. This creates that ‘wet’ look seen in the photo. -
Cure:
Let the varnish cure for at least 24 hours before placing any metal coins or keys inside to prevent them from sticking to the finish.
Faux Speckle Effect
Flick a toothbrush dipped in diluted brown paint over the dry exterior before sealing to create a trendy ceramic speckle pattern.
Place your new creation on your entryway table and enjoy the satisfaction of organizing your space with handmade art

What Really Happens Inside the Kiln
Learn how time and temperature work together inside the kiln to transform clay into durable ceramic.
Leaf-Impressed Bowls for Instant Texture
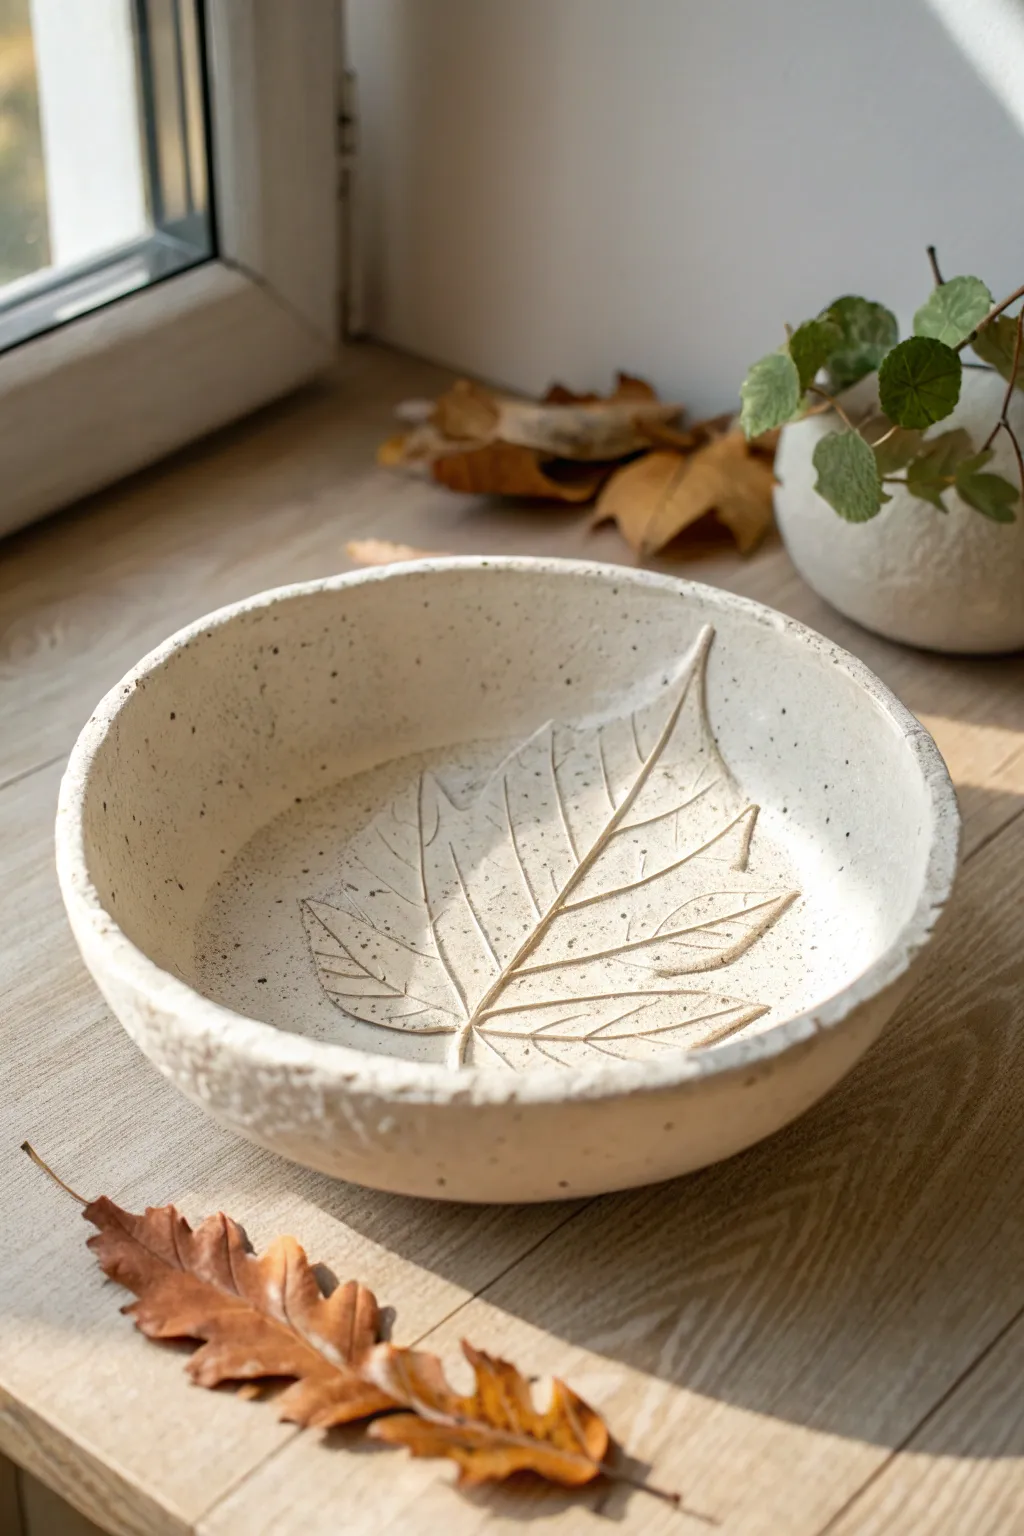
Capture the delicate details of nature in a functional piece of decor with this simple air clay project. The natural specks and organic leaf impression give this shallow bowl a sophisticated, earthy feel that looks beautiful on any windowsill.
Step-by-Step Guide
Materials
- White or cream air-dry clay (stone effect or standard)
- Dried tea leaves or coffee grounds (for speckling, if using plain clay)
- A rolling pin
- A large, fresh leaf with prominent veins (maple or sycamore work well)
- A medium-sized bowl (to use as a mold)
- Plastic wrap or cling film
- A craft knife or pin tool
- Fine-grit sandpaper
- Clear matte varnish or acrylic sealer
- Sponge and water
Step 1: Preparing and Rolling
-
Prepare the Clay:
Begin by kneading a large handful of air-dry clay to warm it up. If your clay isn’t pre-speckled, I like to knead in a pinch of dried tea leaves or used coffee grounds at this stage to achieve that organic, stony texture seen in the photo. -
Roll the Slab:
Place the clay on a smooth surface or canvas mat. Roll it out evenly until you have a slab that is approximately 1/4 inch (6mm) thick. Ensure the thickness is consistent to prevent cracking later. -
Smooth the Surface:
Take a slightly damp sponge and gently wipe the surface of the clay slab. This removes canvas marks and any tiny cracks, creating a pristine canvas for your leaf.
Vein Definition Tip
Fresh leaves work better than dried ones for impressions because they are flexible and won’t crumble into the clay surface when rolled over.
Step 2: Impressing the Design
-
Position the Leaf:
Take your fresh leaf and place it vein-side down onto the center of the clay slab. The vein side will create the deepest, most detailed impression. -
Embedding the Leaf:
Gently roll your rolling pin over the leaf with firm, even pressure. You want to press the leaf flush into the clay without making the slab too thin. -
Check the Impression:
Use your fingers to press down on the leaf stem and edges to ensure every part makes contact. This is crucial for capturing the fine network of veins. -
Remove the Leaf:
Carefully lift the leaf by the stem and peel it away to reveal the impression. Do this slowly to avoid tearing the leaf or disturbing the clay design.
Step 3: Shaping the Bowl
-
Cut the Circle:
Find a bowl or round template that fits nicely around your leaf design. Place it lightly on the clay and use a craft knife to cut a clean circle around the perimeter. -
Initial Smoothing:
Dip your finger in water and run it along the cut edge of the circle to smooth out any sharpness or rough bits from the knife. -
Prepare the Mold:
Take the bowl you are using as a mold and line the inside with plastic wrap. This prevents the clay from sticking as it dries. -
Form the Curve:
Carefully lift your clay circle and gently place it inside the lined bowl. Let it slump naturally into the curve. -
Refine the Shape:
Press gently around the edges to ensure the clay takes the shape of the bowl, but avoid pressing directly on the leaf design so you don’t flatten the details.
Natural Tinting
For a darker impression, dilute a tiny drop of brown acrylic paint in water and wash it over the veins, wiping the surface clean immediately.
Step 4: Finishing Touches
-
Slow Drying:
Allow the bowl to dry inside the mold for at least 24 hours. Drying it slowly away from direct heat prevents warping. -
Remove and Air Dry:
Once the clay is firm enough to hold its shape, lift it out of the mold using the plastic wrap. Remove the plastic and let the bowl dry completely, likely another 24 hours. -
Sand the Edges:
Once bone dry, use fine-grit sandpaper to smooth the rim of the bowl. You can also lightly sand the underside if it feels rough. -
Enhance Texture (Optional):
If you want the rim to look rocky and rustic like the example, tap the edges lightly with a dry, coarse stone or a stiff brush before sealing. -
Seal the Piece:
Apply a coat of clear matte varnish to protect the clay. This seals the surface while maintaining that raw, natural stone appearance.
Place your finished bowl near a window where the sunlight can highlight the beautiful textures you’ve created
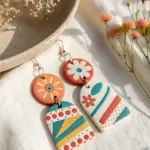
Stamped Letter Ornaments for Personalized Decor

These elegant, minimalist ornaments bring a custom touch to your holiday decor with embossed typography and natural textures. Ranging from smooth creamy whites to speckled stone finishes, they are perfect for use as gift tags, place settings, or timeless tree decorations.
How-To Guide
Materials
- Air-dry clay (white and terracotta)
- Small letter stamps (serif font recommended)
- Round cookie cutter (approx. 2-3 inches)
- Rolling pin
- Parchment paper or canvas mat
- Jute twine or thin ribbon
- Straw or skewer (for hole punching)
- Fine grit sandpaper
- Small bowl of water
- Optional: Dried herbs or spices (for texture)
Step 1: Preparing the Clay
-
Condition the clay:
Start by taking a handful of air-dry clay and kneading it in your hands until it becomes soft, pliable, and free of cracks. -
Create custom textures:
To achieve the speckled look seen in some ornaments, sprinkle a pinch of dried spices (like pepper or dried tea leaves) or sand into the white clay and knead until distributed. -
Mix colors:
For the warm, beige tones, try mixing a very small amount of terracotta clay into your white clay, stopping before it fully blends if you want a marbled effect. -
Roll it out:
Place your clay on a sheet of parchment paper. Use a rolling pin to flatten the clay to an even thickness of about 1/4 inch. If you want a smooth surface, ensure your rolling pin is clean; for a rustic look, you can roll nicely on a canvas mat which transfers a subtle woven texture.
Stamp Release Trick
Dust your rubber stamp with cornstarch or baby powder before pressing into the clay. This prevents sticking and ensures a crisp, clean letter impression.
Step 2: Shaping and Stamping
-
Cut the circles:
Press your round cookie cutter firmly into the rolled clay. Give it a tiny wiggle to separate it from the surrounding clay before lifting. -
Smooth the edges:
Dip your finger in a little water and run it gently around the circumference of the cut circle to soften any sharp ridges left by the cutter. -
Position the stamp:
Select your letter stamp. Center it visually on the clay round. I find looking directly from above helps align it better than looking from an angle. -
Press the impression:
Press the stamp down firmly and evenly. You want a deep, clean impression, but be careful not to push all the way through the clay. -
Add decorative details:
For the terracotta-style ornament shown, use a small tool or edge of a stamp to gently press simple geometric lines or floral sprigs alongside the letter. -
Punch the hanging hole:
Use a drinking straw or a skewer to punch a hole near the top edge of the circle. Twist the straw as you pull it out to get a clean hole.
Step 3: Drying and Finishing
-
Initial drying:
Leave the ornaments on a flat surface lined with parchment paper. Let them air dry away from direct heat sources. -
Flip for flat drying:
After about 12 hours, flip the ornaments over. This is crucial as it helps preventing curling edges as the moisture evaporates from the bottom. -
Sand the surface:
Once fully dry (usually 24-48 hours, when the clay turns chalky white), use fine-grit sandpaper to gently smooth any rough edges or surface imperfections. -
Clean dust:
Wipe the ornaments with a dry cloth or a soft brush to remove any sanding dust from the stamped crevices. -
Add loops:
Cut lengths of jute twine or thin ribbon approximately 6 inches long. -
Tie the knots:
Thread the twine through the hole and tie a secure knot at the ends to create a hanging loop. For a rustic finish, overlap the two ends and tie a simple overhand knot.
Fixing Cracks
If small hairline cracks appear while drying, mix a tiny bit of fresh clay with water to make a paste (slip) and smooth it over the crack with your finger.
Enjoy hanging these personalized keepsakes on your tree or using them to make your gift wrapping extra special


The Complete Guide to Pottery Troubleshooting
Uncover the most common ceramic mistakes—from cracking clay to failed glazes—and learn how to fix them fast.
Mini Photo or Place Card Holders With Simple Shapes
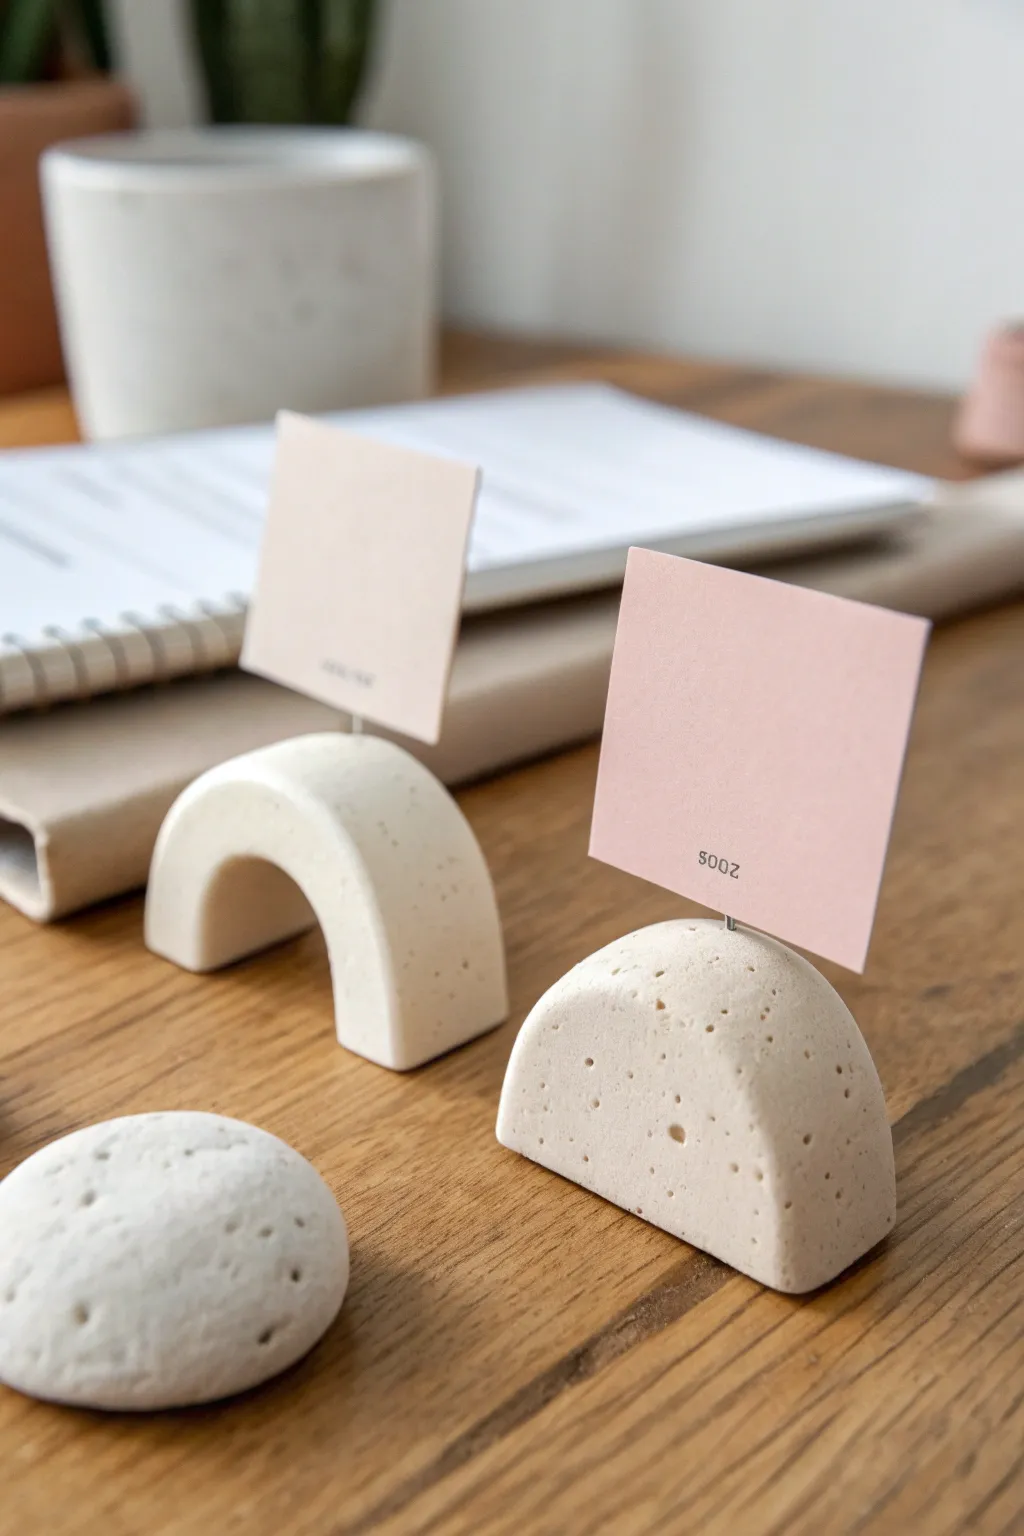
These understated photo or place card holders bring a trendy, organic aesthetic to your desk or event table. Using air-dry clay to form simple geometric shapes like arches and semi-circles creates a clean, modern look that perfectly mimics stone or ceramic.
Step-by-Step Guide
Materials
- White air-dry clay
- Rolling pin
- Craft knife or clay cutter
- Medium-gauge crafting wire (silver or gold)
- Needle nose pliers
- Wire cutters
- Sandpaper (fine grit)
- Speckled additive (optional: dried coffee grounds, black pepper, or faux-granite sandy bits)
- Small bowl of water
- Parchment paper or craft mat
Step 1: Preparing the Clay Body
-
Condition the clay:
Start by taking a handful of white air-dry clay and kneading it in your hands until it becomes soft, pliable, and free of initial cracks. -
Add the speckled texture:
To recreate the stone-like look in the photo, flatten your clay slightly and sprinkle in fine black pepper, dried coffee grounds, or dedicated granite clay inclusions. -
Blend the speckles:
Fold the clay over the additives and knead thoroughly again. Continue folding and pressing until the speckles are evenly distributed throughout the entire ball of clay. -
Check consistency:
If the clay feels too dry after adding the dry speckles, wet your fingertips with a drop of water and work it back in to maintain plasticity.
Use A Pilot Hole
If using thick wire, poke a ‘pilot hole’ with a toothpick first. This prevents the dense clay shape from distorting or squishing down when you push the wire in.
Step 2: Shaping the Geometric Forms
-
Form the base log:
Roll your clay into a thick, even log on your work surface. Aim for a thickness of about 1 inch to ensure the holder is heavy enough to be stable. -
Create the arch shape:
Cut a section of the log about 4 inches long. Gently bend it into a ‘U’ or rainbow shape. Use your fingers to flatten the bottom ends so it stands upright securely. -
Refine the arch:
Smooth the curve of the arch with a little water on your finger, erasing any fingerprints or deep creases caused by bending. -
Create the semi-circle:
Take another ball of clay and shape it into a thick, flat circle, almost like a hockey puck but with rounded edges. Cut it exactly in half with your craft knife. -
Stand and smooth:
Stand the semi-circle on its cut edge. Use your wet finger to round over the sharp cut edge until it looks like a soft, organic dome. -
Create the pebble:
Roll excess clay into a ball and flatten it gently with your palm to create the organic stone shape seen in the foreground. -
Add surface texture:
For that porous, coral-like texture, lightly prick the surface of the wet shapes with a needle tool or an old toothbrush. Vary the pressure to create random, natural-looking pits.
Step 3: Insert Hardware and Finishing
-
Cut the wire:
While the clay is still wet, cut a piece of crafting wire approximately 3-4 inches long. -
Create the heavy coil:
Using your needle nose pliers, curl one end of the wire into a tight double-coil. This coil will act as the clip that holds your paper. -
Insert the wire:
Push the straight end of the wire directly into the top center of your clay shapes. Insert it deep enough (at least half an inch) so it won’t wobble once dry. -
Smooth the entry point:
The clay might bulge slightly where the wire entered. Gently push the clay back around the base of the wire to secure it. -
Initial drying phase:
Place your shapes on parchment paper in a cool, dry place. Rotate them every few hours so the bottom dries evenly. -
Full cure:
Allow the pieces to dry for 24-48 hours. The clay will turn a bright matte white when fully cured. -
Sanding:
Once bone dry, take your fine-grit sandpaper and gently buff out any sharp edges or uneven spots on the bottom to ensure they sit perfectly flat.
Make It Glossy
For a ceramic look rather than raw stone, finish your dried piece with two coats of high-gloss polyurethane varnish or a glassy resin topcoat.
Slide your favorite photo or a name card into the wire coil to complete your stylish display
Modern Incense Holders With Scallops or Grooves

This elegant incense holder combines modern geometry with an organic, earthy texture. Its tall, tapered cone shape features gentle vertical grooves that catch the light, creating a sophisticated centerpiece for your calming rituals.
Detailed Instructions
Materials
- Terracotta-colored air-dry clay (approx. 200g)
- Small rolling pin
- Clay knife or craft blade
- Wooden skewer or chopstick (for hole)
- Ruler
- Small cup of water
- Fine-grit sandpaper
- Carving tool (U-gouge or similar)
- Sponge
Step 1: Shaping the Base Cone
-
Condition the clay:
Start by taking a generous handful of terracotta air-dry clay. Knead it thoroughly in your hands to warm it up and remove any air bubbles, ensuring a smooth, pliable working consistency. -
Form a cylinder:
Roll your clay into a thick, even cylinder on your work surface. Aim for a log that is approximately 4-5 inches tall and about 1.5 inches in diameter. -
Taper the shape:
Begin gently rolling just the top two-thirds of the cylinder with your palm, applying slightly more pressure as you move upward. You want to create a conical shape that is wider at the base and narrower at the top. -
Flatten the ends:
Once you have your desired taper, tap the wide base firmly on your table to create a flat, stable bottom. Gently tap the top as well to create a flat upper surface rather than a sharp point. -
Refine the silhouette:
Roll the cone vertically on your surface one last time to ensure it is symmetrical. I like to wet my fingers slightly here to smooth out any small bumps or fingerprints before moving on.
Straight Lines Secret
Rest your hand on a stack of books equal to the height of the cone while carving. This stabilizes your arm for perfectly vertical grooves.
Step 2: Adding the Flutes
-
Mark your guidelines:
Using a needle tool or toothpick, lightly mark a small dot on the top rim where you want your first groove to start. Continue marking evenly spaced dots around the circumference—about 6 to 8 marks usually look balanced. -
Carve the first groove:
Take a U-shaped carving gouge or a modeling tool with a rounded tip. Start at the top mark and drag the tool downward in a straight, confident line to the base. Apply even pressure so the groove depth remains consistent. -
Continue carving:
Rotate the cone and repeat the carving process for each mark. Try to keep your hand steady and follow the tapering angle of the cone shape. -
Refine the ridges:
Once all primary grooves are carved, use a slightly damp finger or a soft, damp brush to smooth inside the grooves. This removes little crumbs of clay and softens the sharp edges between the ridges. -
Deepen if necessary:
If the grooves look too shallow after smoothing, gently run your tool through them one more time to redefine the scalloped look.
Color Wash Upgrade
Before sealing, apply a watered-down white acrylic wash into the grooves and wipe the surface. This highlights the texture beautifully.
Step 3: Finishing Touches
-
Create the incense hole:
Take your wooden skewer or chopstick. Identify the exact center of the flat top surface. Press the tool straight down into the clay, going about 1 inch deep. -
Check the fit:
Wiggle the stick slightly to widen the hole just a tiny bit, ensuring it will accommodate standard incense sticks even if the clay shrinks slightly during drying. -
Final smoothing:
Using a lightly dampened sponge, give the entire piece a final wipe-down. Pay special attention to the top rim and the base edge to ensure they look polished. -
Drying process:
Set the holder aside in a cool, dry place away from direct sunlight. Let it dry slowly for 24-48 hours. Rotating it occasionally helps it dry evenly. -
Sanding:
Once bone dry, use fine-grit sandpaper to gently buff away any remaining roughness, particularly around the top hole and the bottom edge.
Place your finished holder on a wooden tray for a serene, minimalist display

TRACK YOUR CERAMIC JOURNEY
Capture glaze tests, firing details, and creative progress—all in one simple printable. Make your projects easier to repeat and improve.
Candle Holders With Pressed Patterns and Soft Edges
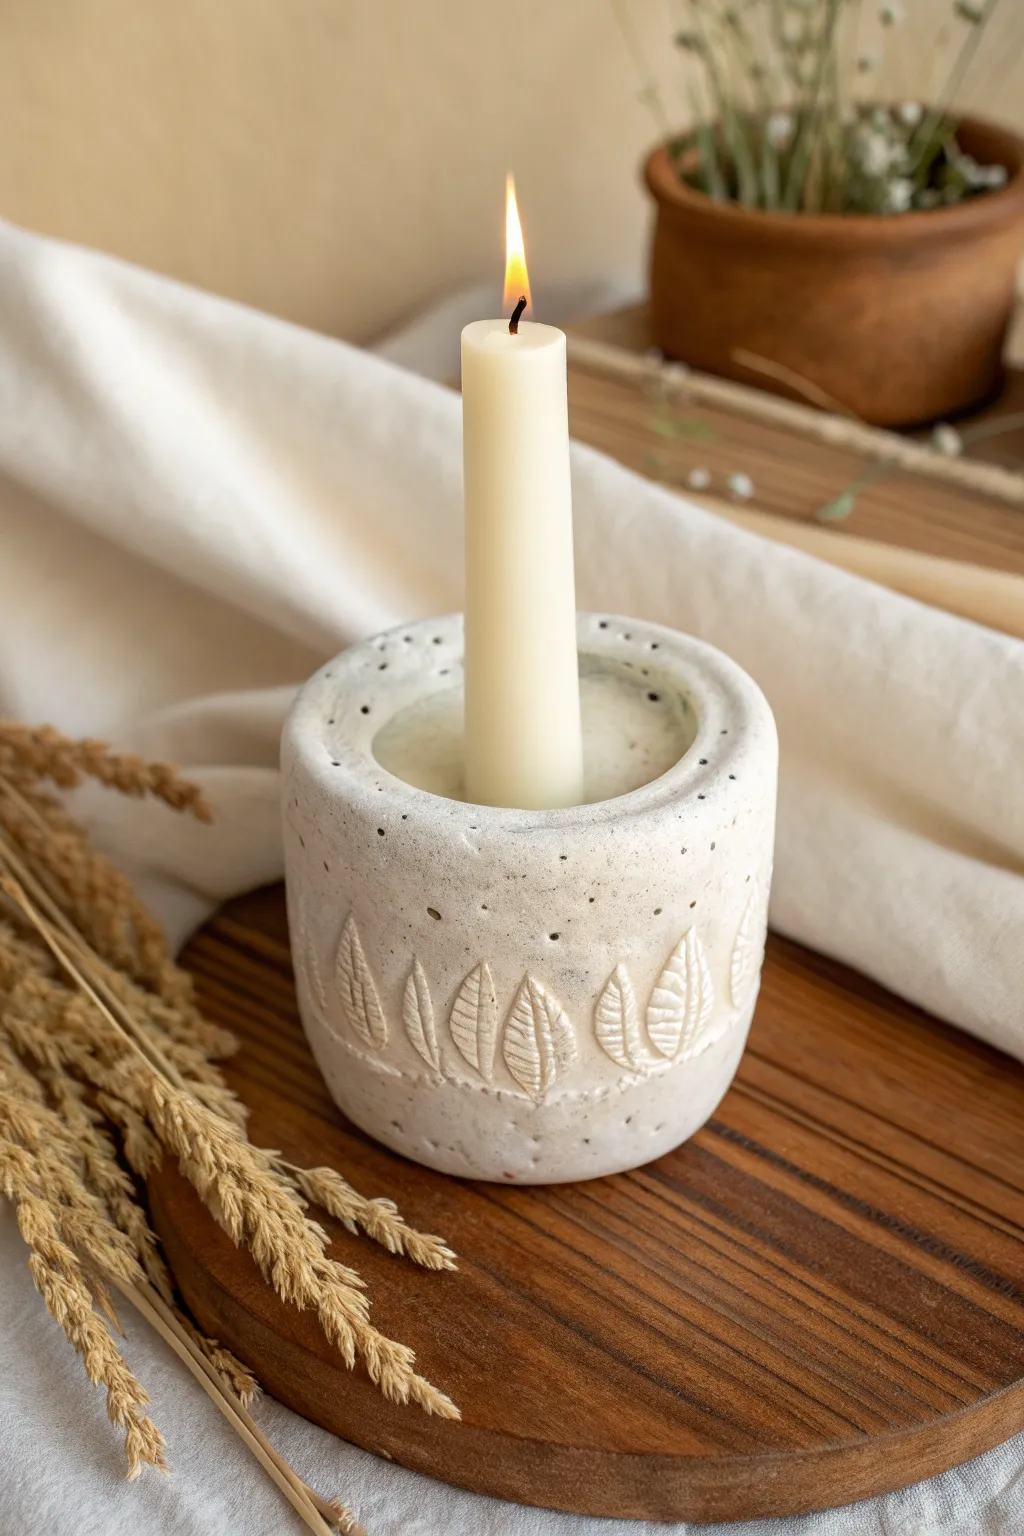
Enhance your table setting with this rustic, nature-inspired candle holder featuring delicate leaf impressions and a faux stone finish. The speckled texture and soft, rounded edges give it a grounded, artisanal quality that looks beautiful with a simple taper candle.
How-To Guide
Materials
- White or light grey air-dry clay
- Rolling pin
- Small real leaves (waxy, sturdy leaves like boxwood or fern tips work best)
- Craft knife or clay cutter
- Circular cookie cutter or template (approx. 3-4 inches diameter)
- Small jar or tube form (for shaping the inside)
- Taper candle (for size testing)
- Black and brown acrylic paint
- Old toothbrush
- Matte sealant or varnish
- Water and sponge
- Liquid clay or slip (made by mixing clay scraps with water)
Step 1: Shaping the Base and Cylinder
-
Condition the Clay:
Begin by kneading a substantial chunk of air-dry clay until it is warm, pliable, and free of cracks. -
Create the Base:
Roll out a slab of clay to about 1/2 inch thick and cut out a circle using your cookie cutter or template to form the base. -
Form the Walls:
Roll a thick snake of clay, then flatten it into a long rectangular strip, approximately 3 inches tall and long enough to wrap around the circumference of your base. -
Add Texture:
Before assembling, gently press your real leaves into the bottom third of the rectangular strip to create the embossed pattern. I find rolling over them once lightly with the rolling pin ensures a deep, crisp impression. -
Remove Leaves:
Carefully peel the leaves away to reveal the botanical design. -
Join the Ends:
Wrap the strip into a cylinder. Score (scratch) and add slip (clay glue) to the short ends, then press them together to close the loop, smoothing the seam with your finger or a wet sponge.
Clean Impressions
If the leaves are sticking to the clay, lightly dust them with cornstarch before pressing. This acts as a release agent for sharper details.
Step 2: Assembly and Refining
-
Attach to Base:
Score the bottom edge of your cylinder and the outer edge of your circular base. Apply slip and press the cylinder firmly onto the base. -
Blend the Seams:
Use a modeling tool or your finger to blend the clay from the cylinder down onto the base on the outside, ensuring a seamless, watertight bond. -
Create the Candle Wel:
Fill the interior with additional clay until it’s nearly solid, or insert a smaller cylinder form. Press your actual taper candle (wrapped in plastic wrap to prevent sticking) into the center to create the perfectly sized socket. -
Soften the Rim:
Using a wet sponge, smooth the top rim of the holder. It should look thick and slightly rounded rather than sharp. -
Add Decorative Poking:
Use a needle tool or toothpick to poke small, random holes along the top rim and scattered around the body for texture. -
Initial Drying:
Let the piece dry for about 24-48 hours away from direct heat to prevent cracking.
Step 3: The Stone Finish
-
Sanding:
Once fully dry, lightly sand any rough spots, but keep the organic unevenness intact. -
Base Wash (Optional):
If you want an aged look, water down some brown paint to a very thin wash and paint it over the leaves, then wipe it back immediately with a cloth so the pigment just sits in the crevices. -
Prepare the Splatter:
Mix a small amount of black acrylic paint with water until it is the consistency of ink. -
Speckle Effect:
Dip an old toothbrush into the watery black paint. Hold it near the clay piece and run your thumb across the bristles to flick tiny specks of paint onto the surface. -
Seal:
After the paint is completely dry, apply a coat of matte varnish to protect the surface and seal the clay.
Layered Texture
Mix clean sand or used coffee grounds directly into your white clay before sculpting. It creates a genuine gritty stone texture without painting.
Place a cream-colored taper candle inside and enjoy the soft glow of your new handmade accent piece
Tiny Magnet Vases for Single-Stem Florals
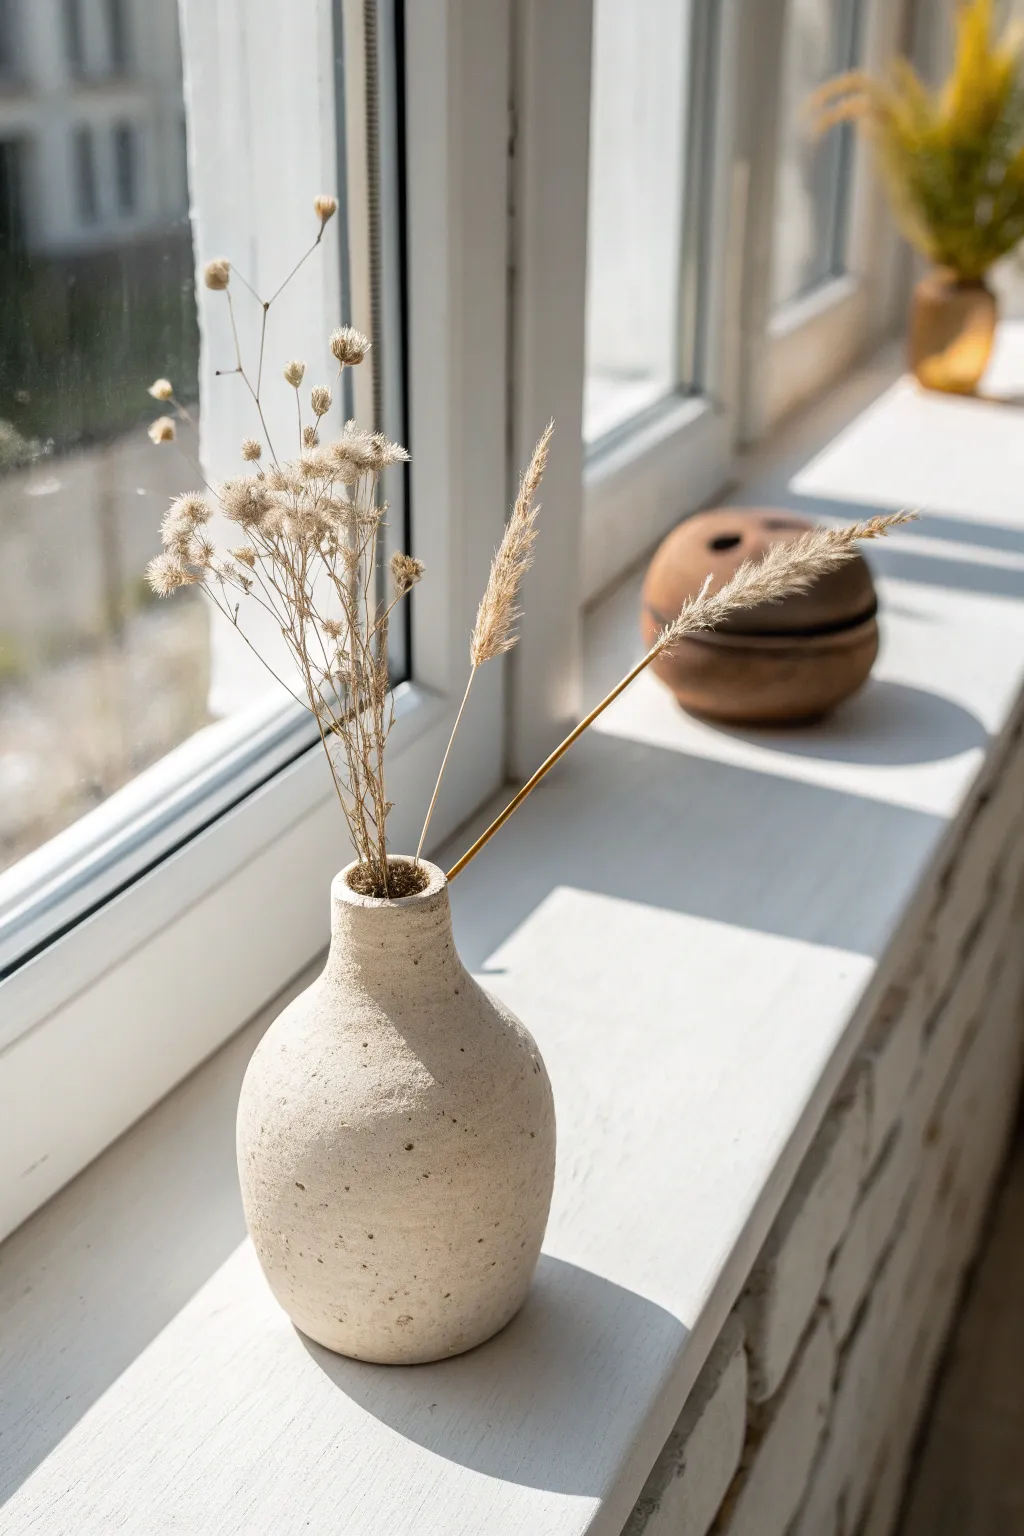
Achieve the look of high-fired stoneware using simple air-dry clay with this charming miniature project. The textured finish and faux-speckle effect give this tiny vase an earthy, organic feel perfect for holding delicate dried blooms.
Step-by-Step Tutorial
Materials
- White or natural air-dry clay
- Small magnets (neodymium recommended)
- Water in a small cup
- Acrylic paint (cream/beige, brown, black)
- Old toothbrush
- Sponge or stiff bristle brush
- Clay carving tools or a toothpick
- Matte varnish or sealant
- Fine-grit sandpaper
- Dried florals for display
Step 1: Shaping the Form
-
Condition the Clay:
Start by taking a walnut-sized ball of air-dry clay. Knead it in your hands for a few moments to warm it up and ensure there are no air bubbles, which helps prevent cracks later. -
Form the Base:
Roll the clay into a smooth sphere. Gently flatten the bottom against your work surface so it stands upright on its own without wobbling. -
Create the Opening:
Using your thumb or a rounded clay tool, press into the center of the sphere to create the hollow inside. Leave the walls somewhat thick—about a quarter of an inch—to maintain that sturdy, rustic pottery look. -
Shape the Neck:
Gently pinch and pull the clay upwards around the opening to form a short, tapered neck. I like to keep this transition smooth but slightly irregular to emphasize the handmade aesthetic. -
Embed the Magnet:
If you plan to use this as a fridge magnet, press a small neodymium magnet flat into the back side of the vase while the clay is still wet. Smooth a thin layer of clay over the edges of the magnet to secure it, or leave an indentation to glue it in later after drying. -
Add Texture:
Before the clay dries, take a stiff bristle brush or a crumpled ball of aluminum foil and tap it gently all over the surface. This creates a porous, stonelike texture that removes the clearly synthetic smoothness of air-dry clay.
Natural Texture
Mix dried coffee grounds or sand directly into your wet clay before sculpting. This creates authentic, embedded texture that looks incredible once painted.
Step 2: Decoration and Finishing
-
Dry Completely:
Set your vase in a cool, dry place. Let it dry for at least 24-48 hours. The clay will turn lighter in color and feel hard to the touch when it is ready for the next steps. -
Sand Imperfections:
Once fully dry, use fine-grit sandpaper to lightly smooth the rim of the vase mouth. You want the body to remain textured, but a smooth rim looks more professional. -
Base Coat:
Mix a warm cream or beige acrylic paint. Apply a solid coat over the entire exterior (and just inside the rim). You may need two coats to get full opaque coverage. -
Create the Speckle Mix:
To mimic ceramic firing spots, dilute a small amount of dark brown or black acrylic paint with water until it is quite runny. -
Apply the Speckles:
Dip an old toothbrush into the watered-down dark paint. Hold it near the vase and run your thumb across the bristles to flick tiny droplets onto the surface. Practice on a paper towel first to control the spray size. -
Antique the Surface:
For a weathered look, dab a slightly darker beige paint onto a sponge and lightly pat focused areas, blending it quickly so it looks like natural discoloration rather than paint. -
Seal the Project:
Protect your work with a coat of matte varnish. This seals the paint and gives the ‘pottery’ a finished, non-chalky feel. -
Final Arrangement:
Since air clay isn’t waterproof, select dried grasses, baby’s breath, or small faux stems. Trim them to size and arrange them in your new miniature vessel.
Ombre Effect
Create a gradient set by making three vases, painting the base color of each slightly darker than the last for a cohesive, modern trio.
Place your tiny vase on a metal surface or shelf to enjoy a touch of rustic charm
Boho Rainbow Arches in Muted, Earthy Paint Colors
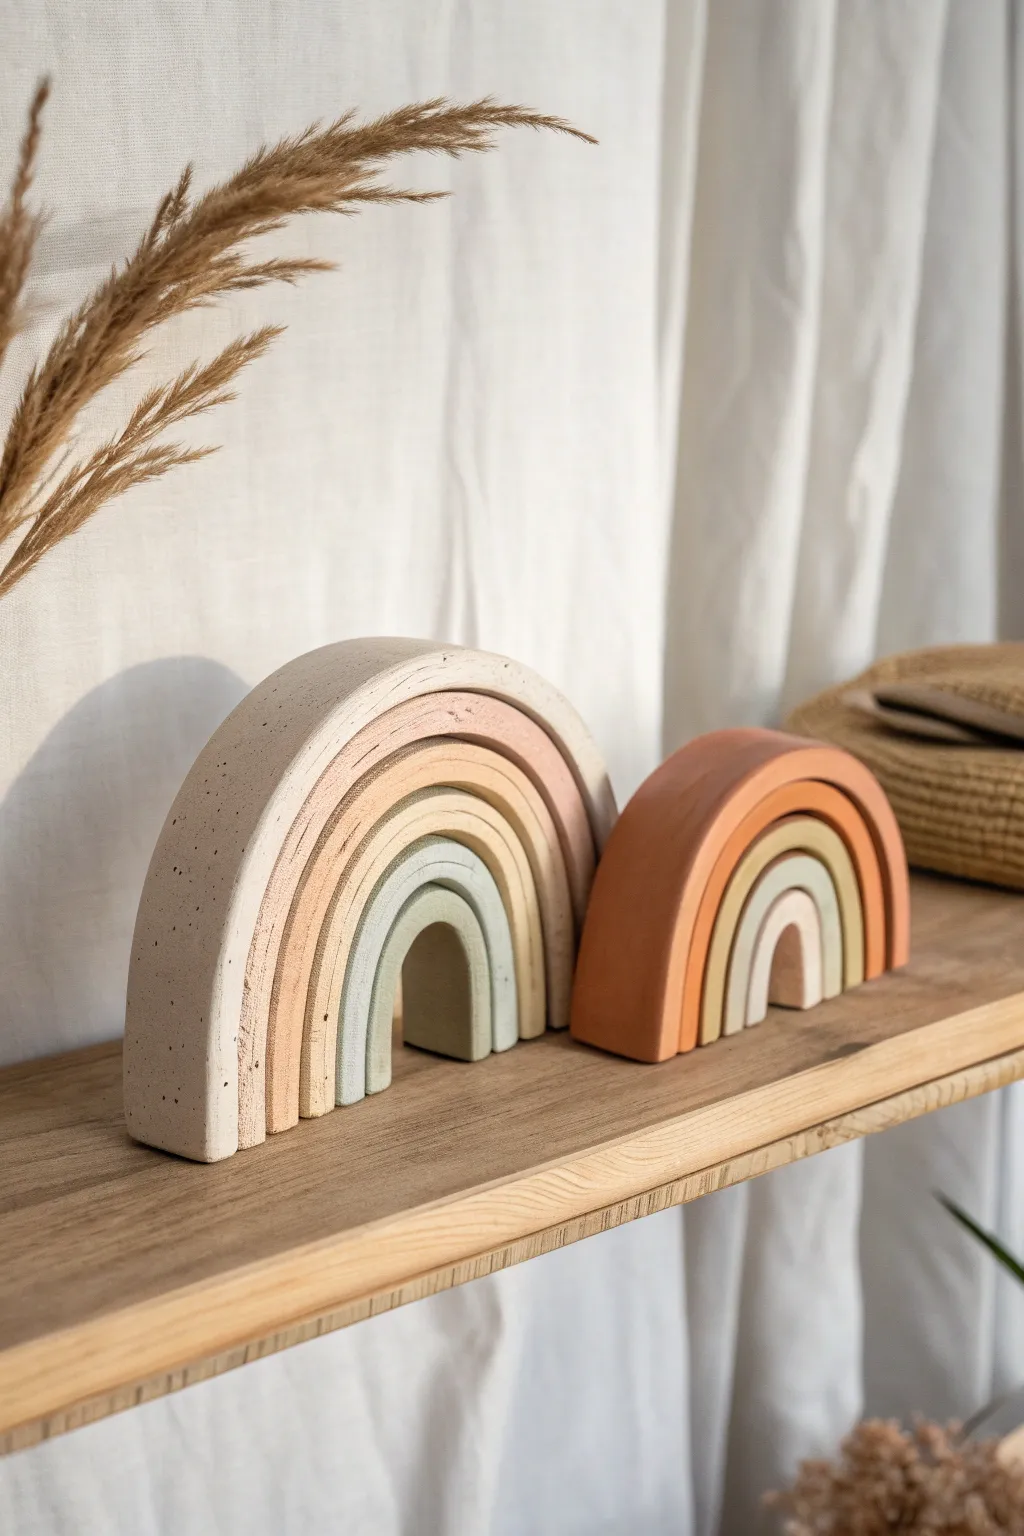
Capture the essence of minimalistic beauty with these free-standing rainbow sculptures. Featuring a soothing palette of muted earth tones and a uniquely tactile stone-like texture, these arches add a calm, modern touch to any shelf or nursery.
How-To Guide
Materials
- Air-dry clay (white or natural)
- Acrylic paints (terracotta, beige, sage green, cream, white, rust)
- Baking soda or fine sand (for texture)
- Rolling pin
- Sharp craft knife or clay slicer
- Ruler
- Small cup of water
- Fine-grit sandpaper
- Paintbrushes (flat and detail)
- Parchment paper or non-stick mat
Step 1: Shaping the Arches
-
Prepare your workspace:
Lay down parchment paper or a non-stick mat to prevent the clay from sticking to your table. Take a substantial chunk of air-dry clay and knead it until it is soft and pliable. -
Roll out the slab:
Using a rolling pin, flatten the clay into a uniform slab. Aim for a thickness of about 3/4 inch (approximately 2 cm) so your arches will be sturdy enough to stand upright on their own. -
Cut the clay strips:
Use a ruler and a sharp craft knife to cut long, straight strips from your slab. The width of these strips will determine the depth of your rainbow, so keep them consistent. -
Form the smallest arch:
Take one strip and bend it gently into a tight “U” shape to create the center arch. Place it flat on your work surface. If the clay cracks slightly, smooth it over with a wet finger. -
Layer subsequent arches:
Take the next strip and curve it over the first arch. Press it gently to ensure it holds the shape but leave a tiny hairline gap if you want them to separate easily later, or press them taller if you are making a solid piece. -
Build the full rainbow:
Continue adding strips, increasing the size for each layer. For the larger rainbow shown, aim for 5 to 6 layers. For the smaller terracotta one, stop at 4 or 5 layers. -
Trim the base:
Once all layers are nested, use your long blade or craft knife to slice across the bottom of the entire rainbow. This ensures a perfectly flat base so the sculpture stands without wobbling. -
Dry completely:
Carefully separate the arches slightly to allow airflow if you plan to paint them individually, or leave them together. Let them dry for 24-48 hours. I recommend flipping them gently halfway through to dry the bottom evenly.
Pro Tip: No Cracking
To prevent warping or cracking while drying, drape a slightly damp paper towel over the clay for the first 12 hours to slow down the drying process.
Step 2: Refining and Painting
-
Sand the edges:
Once the clay is fully hardened, use fine-grit sandpaper to smooth out any sharp edges or rough spots on the front and back faces. Wipe away the dust with a barely damp cloth. -
Mix your base colors:
Prepare your palette with earthy, muted tones. For the large rainbow, you’ll need a gradient: start with a cream tone, moving into beige, soft pink-sand, and a muted sage green for the center. -
Create the stone texture:
To mimic the speckled, stone-like finish seen in the photo, mix a teaspoon of baking soda or a pinch of fine sand into your acrylic paints. This thickens the paint and adds instant grit. -
Paint the outer arch:
Start painting the largest arch of the big rainbow in a speckled cream color. Apply the textured paint thickly, dabbing it on to enhance the stone effect rather than brushing smoothly. -
Paint the middle layers:
Move inward with your colors. Paint the second arch a sandy beige, and the third a soft, muted blush pink. Remember to paint the inner curves and the flat bottom edges if they will be visible. -
Paint the center arch:
Finish the large rainbow by painting the smallest central arch in a muted sage green. The contrast between the cool green and warm outer layers creates that signature boho look. -
Paint the smaller rainbow:
For the second, smaller rainbow, use warmer, richer tones. Use terracotta or rust for the outer layer, transitioning to a golden ochre, and finally a pale cream for the smallest center arch. -
Add speckles (Optional):
If your texture mix wasn’t gritty enough, you can flick a toothbrush dipped in watered-down dark brown or grey paint over the dried pieces to create tiny faux-stone speckles. -
Assemble and seal:
Once the paint is dry, re-stack your arches. You can leave them loose as an interactive decor piece or use a dab of superglue between the layers to fix them permanently in place.
Level Up: Essential Oil Diffuser
Leave the clay unsealed and apply a few drops of essential oil to the back of the arches. The porous clay acts as a passive scent diffuser for your room.
Arrange your beautiful new arches on a shelf alongside some dried grasses and enjoy the serene atmosphere they create
Moon Phase Wall Hanging With Simple Cutout Shapes
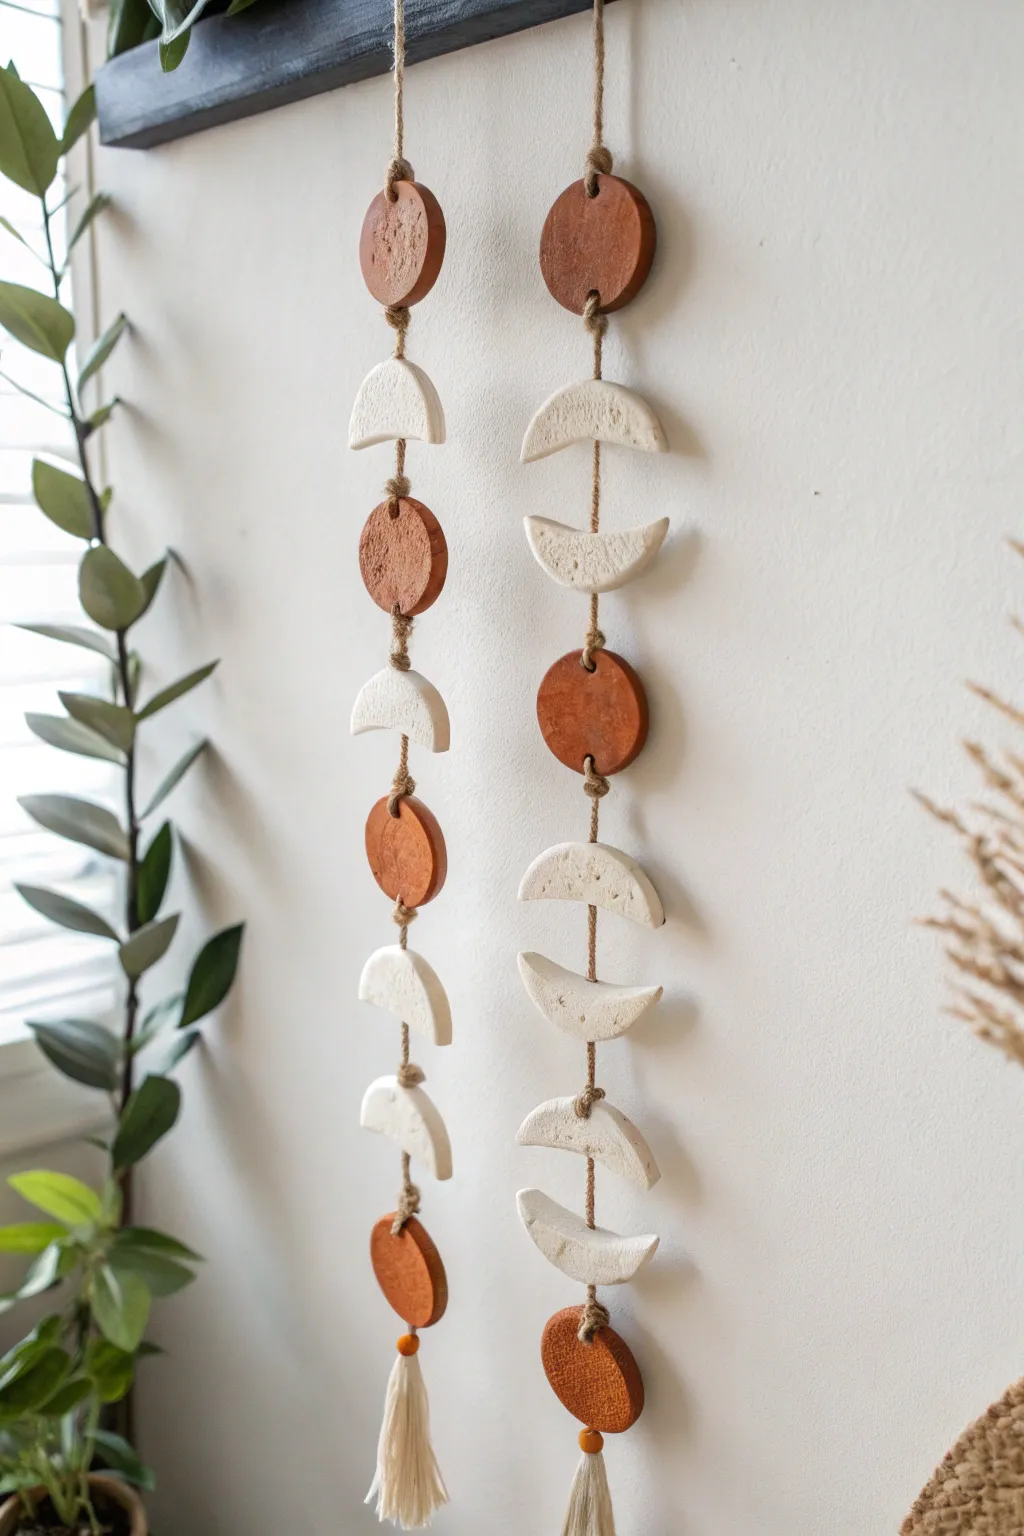
Bring a touch of celestial charm to your walls with these warm, earthy moon phase mobiles. Using contrasting terracotta and white air-dry clay creates a modern, sculptural look that feels both organic and refined.
Detailed Instructions
Materials
- White air-dry clay
- Terracotta air-dry clay (or white clay painted later)
- Rolling pin
- Circle cookie cutters (two sizes: approx. 2-inch and 3-inch)
- Craft knife or clay trimming tool
- Jute twine or hemp cord
- Wooden skewer or drinking straw (for making holes)
- Fine-grit sandpaper
- Small wooden beads
- Needle nose pliers (optional)
- Scissors
- Bowl of water (for smoothing)
Step 1: Shaping the Moons
-
Roll the terracotta clay:
Start by rolling out a slab of your terracotta-colored clay on a flat surface to an even thickness of about 1/4 inch. If the clay is sticky, lay down parchment paper first. -
Cut the full moons:
Using your medium-sized circle cutter, press firmly into the clay to create perfect circles. For the design shown, you will need about 6-8 terracotta circles total for two strands. -
Roll the white clay:
Clean your rolling pin, then roll out the white air-dry clay to the same 1/4 inch thickness. -
Create the crescent shapes:
Cut out several white circles. To make the crescent/half-moon shapes, use the same circle cutter to slice off a portion of the circle you just cut, or simply cut the circle in half with a craft knife for a semicircle look. -
Pierce holes for hanging:
Before the clay dries, use a skewer or straw to poke holes. Full circles need a hole at the top and bottom (12 to 6 o’clock). Crescents need a hole in the center of the arch and the center of the flat side. -
Smooth the edges:
Dip your finger in a little water and gently run it along the cut edges of each shape to soften any sharpness or stray bits of clay. -
Allow to dry completely:
Lay all pieces flat on a drying rack or parchment paper. Let them air dry for 24-48 hours, flipping them occasionally to prevent warping.
Cracked Clay Fix
If you spot tiny cracks as the clay dries, don’t panic. Mix a small amount of fresh clay with water to make a paste (slip) and fill in the cracks, then smooth it over with a finger.
Step 2: Assembly and Finishing
-
Sand for perfection:
Once fully dry, lightly sand the edges with fine-grit sandpaper if you notice any rough spots or unevenness. -
Cut the main cord:
Cut a long length of jute twine, roughly double the desired finished length of your hanging. Fold it in half to find the center. -
Create the top loop:
Tie a simple overhand knot at the folded end to create a loop for hanging the mobile on the wall. -
Thread the first piece:
Thread the loose ends of the twine through the top hole of your first clay piece (usually a top circle). I find twisting the twine ends helps them pass through easier. -
Secure the piece:
Tie a knot directly underneath the hole on the backside or bottom edge to keep the clay piece in place. Alternatively, tie a knot above AND below the clay if the holes are large. -
Add visual spacing:
Tie another knot about 1.5 to 2 inches down the twine where you want the next piece to sit. Consistency is key here for a balanced look. -
Continue patterning:
Thread your next shape (alternating colors or shapes as seen in the photo) and secure it against the knot you just made. -
Repeat until complete:
Continue this knot-and-thread process until all your planned clay pieces are attached in a pleasing vertical line. -
Attach the final tassel:
At the very bottom, thread a small wooden bead beneath the last clay circle. Then, create a tassel using extra twine and tie it securely to the end of the cord.
Texture Twist
Before cutting your shapes, press a piece of lace, burlap, or even a dried leaf into the wet clay slab. This leaves a subtle, beautiful imprint that catches the light once dry.
Hang your new moon phases near a window where the natural light can highlight the matte texture of the clay
Fairy Garden Mini Houses With Natural Add-Ons
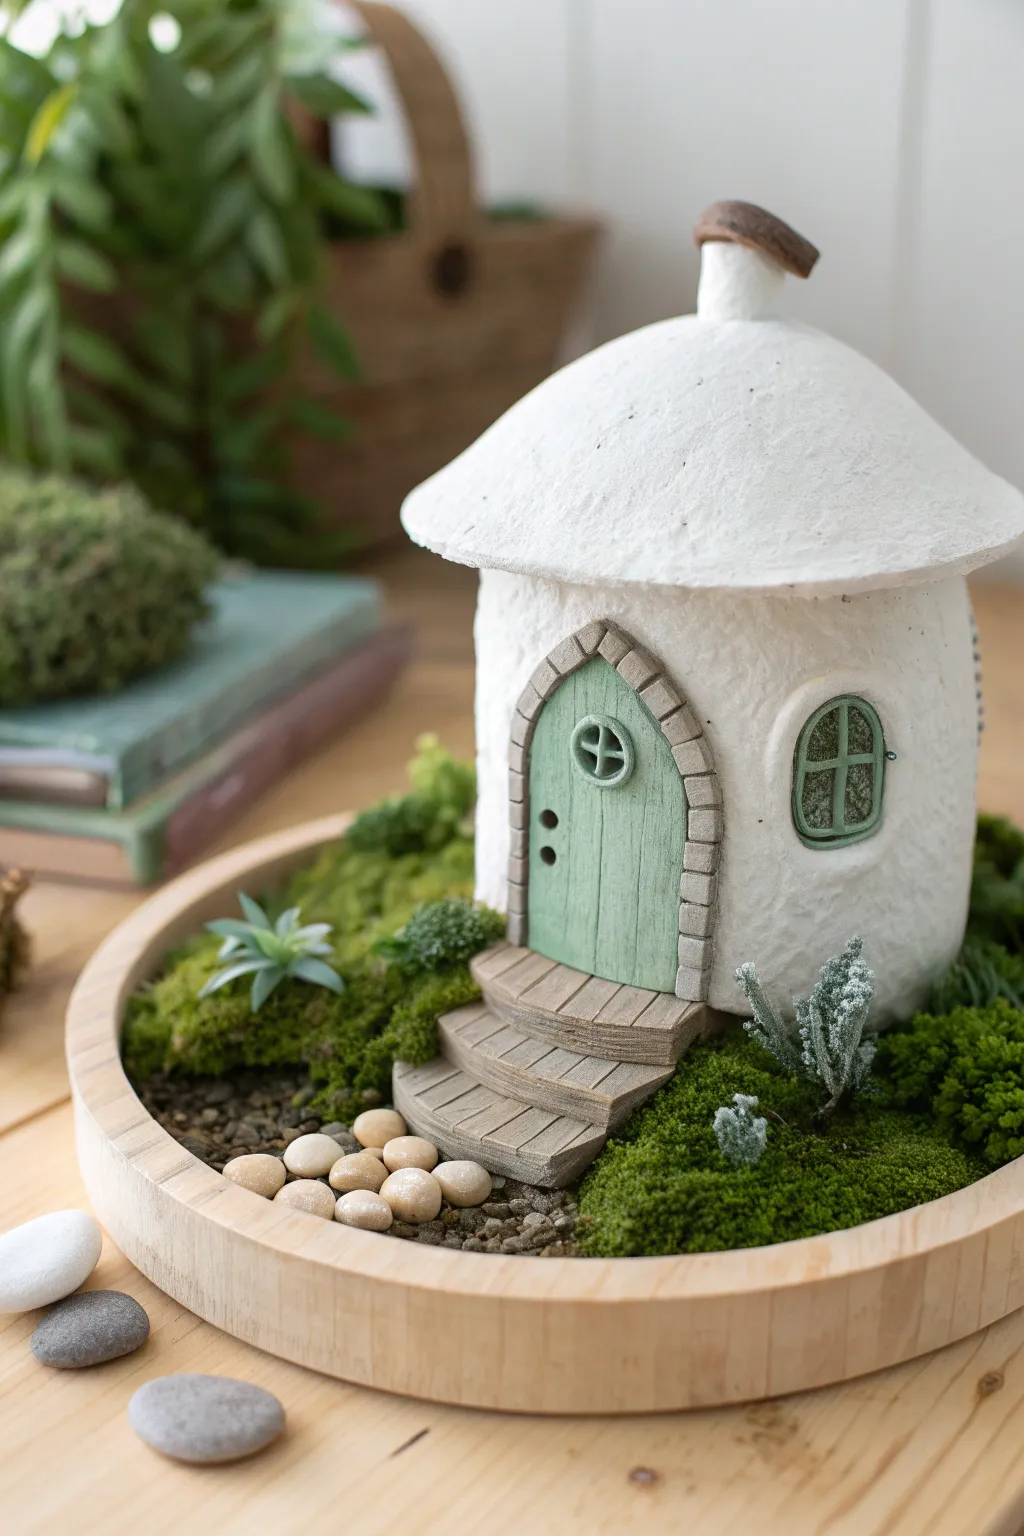
Create a serene, storybook escape right on your desk with this charming miniature cottage. The textured white finish and soft sage green accents give it an organic feel, perfectly nestled in a bed of moss.
How-To Guide
Materials
- Air dry clay (white)
- Small glass jar or strong cardboard tube (armature)
- Acrylic paints: White, Sage Green, Beige/Tan, Charcoal Grey
- PVA glue or clay slip
- Rolling pin
- Clay tools (needle tool, modeling tool)
- Aluminum foil
- Fine-grit sandpaper
- Preserved moss (various textures)
- Small pebbles or gravel
- Wooden tray or base
- Matte sealant spray
Step 1: Building the Structure
-
Prepare the Armature:
Select a clean small jar or a sturdy cardboard tube as your base structure. If using glass, coat the outside thinly with PVA glue and let it get tacky; this helps the clay adhere better to the slick surface. -
Roll the Walls:
Roll out a slab of white air dry clay to about 1/4 inch thickness. I find it helpful to cut a long rectangle that is slightly taller than your jar and long enough to wrap completely around it. -
Wrap the Base:
Carefully wrap the clay sheet around your armature. Use a little water or slip (clay mixed with water) to join the seam, smoothing it down with your finger or a modeling tool until the join is invisible. -
Create Texture:
Instead of smoothing the walls perfectly, take a stiff bristle brush or a crumpled ball of aluminum foil and gently press it all over the wet clay to create a stucco-like, rustic stone texture. -
Form the Roof Shape:
Create a cone shape using aluminum foil to act as the roof support. Place this on top of your main structure. Roll out a circle of clay, drape it over the foil cone, and press gently to shape the roof, allowing the edges to overhang slightly for eaves. -
Add the Chimney:
Roll a small snake of clay and shape it into a tiny cylinder. Attach this to the peak of the roof using slip, slightly flattening the top.
Step 2: Details & Doorway
-
Sculpt the Door Frame:
Roll small, flattened rectangles of clay to create ‘stones.’ Arrange these in an arch shape on the front of the house to form the door frame, pressing them firmly into the wall. -
Create the Door:
Roll a small slab of clay needed for the door, texture it with vertical lines to mimic wood planks, and trim it to fit snugly inside your stone arch. Attach it with slip. -
Add the Window:
On the side of the house, create a smaller arch shape. Roll very thin snakes of clay to form a cross-hatch window pane and press them gently into the window indentation. -
Build the Steps:
Form two or three semi-circles of clay, graduating in size. Stack them leading up to the door, texturing the tops with parallel lines to look like wooden steps. -
Dry Completely:
Allow the entire structure to dry for at least 24-48 hours. Turn it occasionally if possible to ensure even drying.
Make It Sparkle
Mix a tiny pinch of white glitter into your white wall paint. It creates a magical, glistening stucco effect that catches the light beautifully.
Step 3: Painting & Scene Setting
-
Base Coat:
Paint the entire house (walls and roof) with a matte white acrylic paint. You may need two coats to get that bright, clean finish. -
Detail Painting:
Paint the door a soft sage green. Use a diluted beige or tan wash for the stone arch and steps to give them depth without being too dark. Paint the window frame sage green and fill the panes with a dark charcoal grey. -
Prepare the Base:
Take your wooden tray and fill the bottom with a layer of small gravel or sand to create a foundation. -
Position the House:
Place your finished house near the back of the tray, ensuring it sits level on the gravel. -
Add Landscaping:
Tuck clumps of preserved moss around the base of the house and fill the rest of the tray, varying the textures to look like a forest floor. You can add small artificial succulents for extra greenery. -
Lay the Path:
Create a walkway leading from the front of the tray to the wooden steps using small, smooth pebbles or clay ‘stones’ you’ve made and painted beige.
Secret Lighting
Leave the bottom open and cut a hole in the back of the jar/armature. Insert a battery-powered tea light to make the windows glow!
Place your finished fairy garden on a bookshelf or desk for a peaceful, miniature escape.
Texture-Rolled Wall Tiles for a Mini Gallery Moment
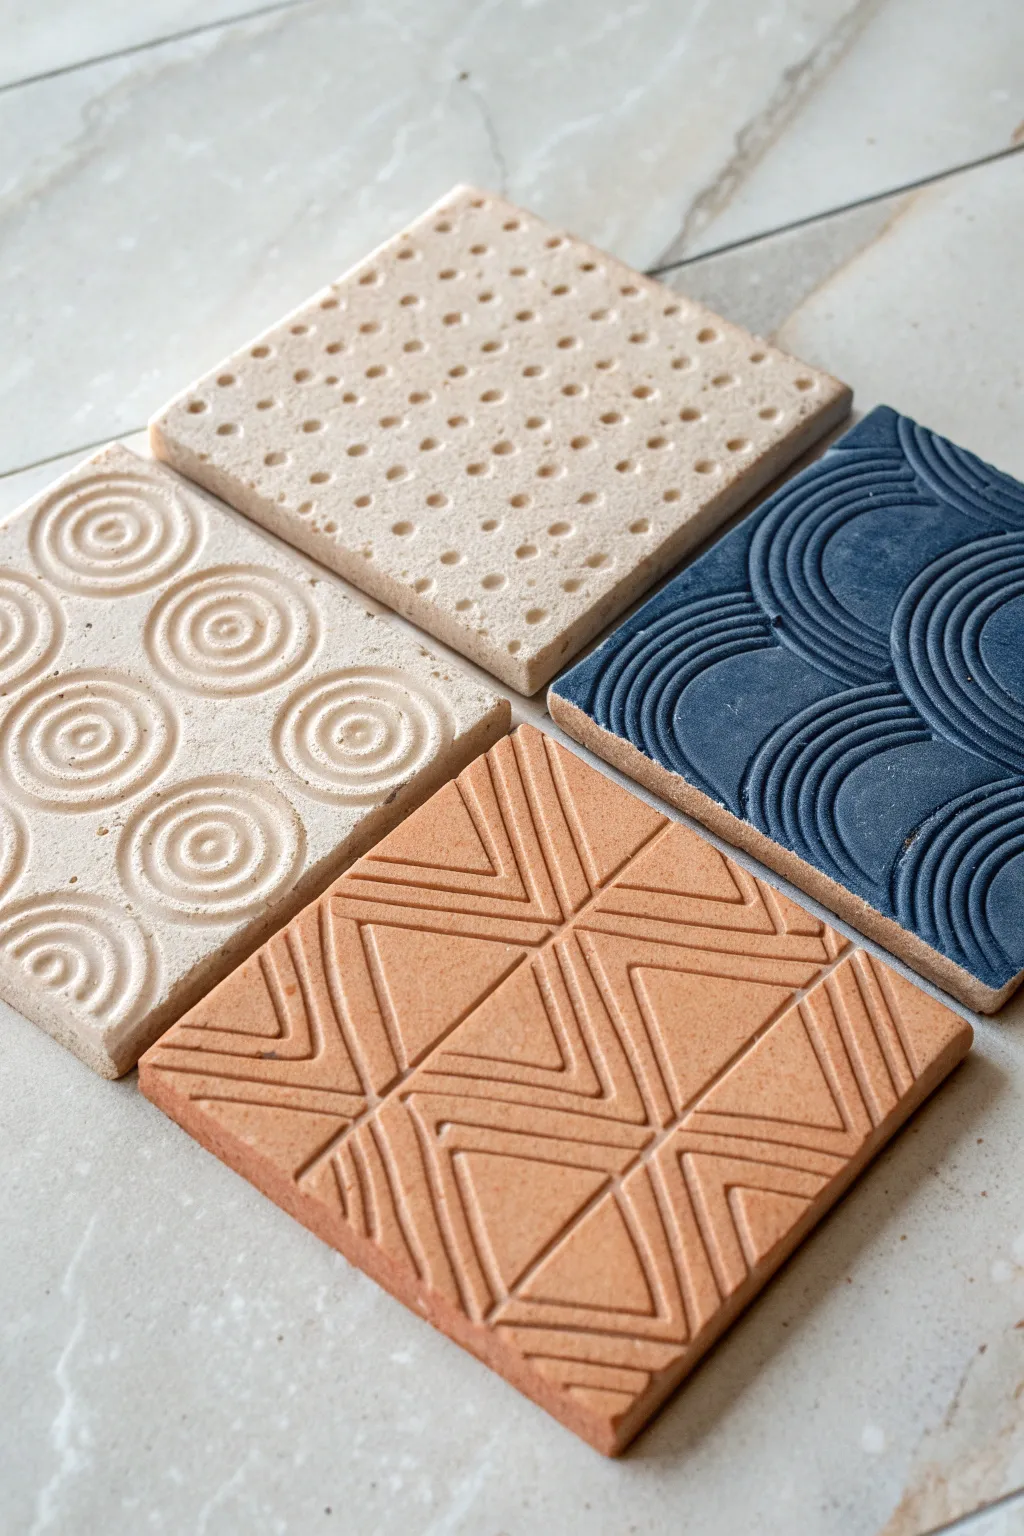
Transform simple squares of air-dry clay into a sophisticated mini wall gallery using basic household textures and bold colors. These four distinct designs combine organic patterns with geometric precision, creating a striking textural interplay perfect for modern decor.
Detailed Instructions
Materials
- White air-dry clay (approx. 1kg)
- Rolling pin
- Square cookie cutter (approx. 10x10cm) or ruler and craft knife
- Canvas or parchment paper (work surface)
- Wooden dowel or pencil end (for dot texture)
- Found objects for textures (small lid, comb, geometric stamp)
- Fine grit sandpaper (220-400 grit)
- Acrylic paints (Cream, Terracotta, Deep Indigo Blue)
- Matte sealant or varnish
- Paintbrushes (flat and detail)
- Strong adhesive strips or mounting putty
Step 1: Preparing the Clay Base
-
Knead the clay:
Begin by taking a large chunk of white air-dry clay and kneading it in your hands until it becomes soft, pliable, and free of air bubbles or cracks. -
Roll out the slab:
Place the clay on a piece of canvas or parchment paper to prevent sticking. Use a rolling pin to flatten it into an even slab, aiming for a consistent thickness of about 0.5 to 0.7 centimeters. A consistent thickness ensures they dry without warping. -
Cut the squares:
Using a square cookie cutter or a ruler and craft knife, cut out four identical squares. Remove the excess clay from around the edges, but don’t move the squares yet to avoid distorting their shape. -
Smooth the edges:
Dip your finger in a tiny amount of water and gently run it along the cut edges of each square to soften any sharp corners or jagged bits.
Step 2: Creating the Textures
-
Design 1: The Dot Grid:
On the first square, use the flat end of a wooden dowel or an unsharpened pencil. Press gently into the clay to create indentations, working in diagonal rows to form a uniform grid pattern across the entire surface. -
Design 2: Concentric Circles:
For the second square, you’ll need three circular objects of descending sizes (like pen caps, marker lids, or small piping tips). Press the largest circle first, then center the medium one inside it, and finally the smallest one. Repeat this bullseye pattern in a 3×3 layout. -
Design 3: Geometric Triangles:
On the third square, use a ruler or a stiff card edge to impress straight lines. Create a pattern of nested triangles, alternating their orientation (some pointing up, some down) to create a dynamic, zig-zag geometric relief. -
Design 4: Curved Raked Waves:
For the final square, use a texture comb or a improvised tool made of cardboard with notches cut into it. Drag the tool through the clay in curved, sweeping semi-circles that overlap slightly, mimicking Japanese wave patterns.
Depth Perception
When painting textured clay, water down your paint slightly. This allows it to pool in the recesses, naturally creating shadows and highlighting the 3D effect of your stamping.
Step 3: Drying and Refining
-
Slow drying process:
Place the tiles on a wire rack or leave them on the parchment in a cool, dry place. I prefer to flip them over gently after 12 hours to ensure the bottom dries evenly. Let them dry fully for 24-48 hours. -
Check for dryness:
The clay should feel room temperature (not cold) and look chalky white when completely dry. -
Sanding the edges:
Once bone dry, take your fine-grit sandpaper and lightly buff the edges and corners to ensure a professional, clean finish. Dust off any powder with a dry brush.
Preventing Curling
If your tile edges curl up while drying, place a lightweight book or board gently on top of them once they are ‘leather hard’ (firm but not fully dry) to keep them flat.
Step 4: Painting and Finishing
-
Base coat for light tiles:
For the dot grid and concentric circle tiles, apply a wash of cream or off-white acrylic paint. You want a matte, natural stone look, so don’t apply it too thickly. -
Highlighting the texture:
If the paint fills the holes too much, quickly blot the surface with a paper towel to lift the pigment from the high points, leaving the recesses slightly darker for depth. -
Painting the terracotta tile:
Mix orange, brown, and a touch of red to create a warm terracotta hue. Paint the geometric triangle tile completely, ensuring you get into the deep grooves of the lines. -
Painting the blue wave tile:
Use a deep indigo or navy blue for the waved tile. Apply two thin coats for opaque coverage, allowing the first coat to dry before applying the second. -
Effect for the blue tile:
Once the blue paint is dry, you can very lightly dry-brush a tiny bit of white or light blue over the very tops of the ridges to accentuate the wave pattern. -
Sealing the tiles:
Protect your artwork with a layer of matte spray varnish or sealant. This prevents future moisture absorption and keeps the colors true. -
Mounting:
Apply strong adhesive mounting strips to the back of each tile and arrange them in a 2×2 grid or a linear row on your wall to display your mini gallery.
Now you have a set of custom-textured art pieces that add an artisanal touch to your space
Mixed Mini Project Collage Set for a Weekend Clay Sampler
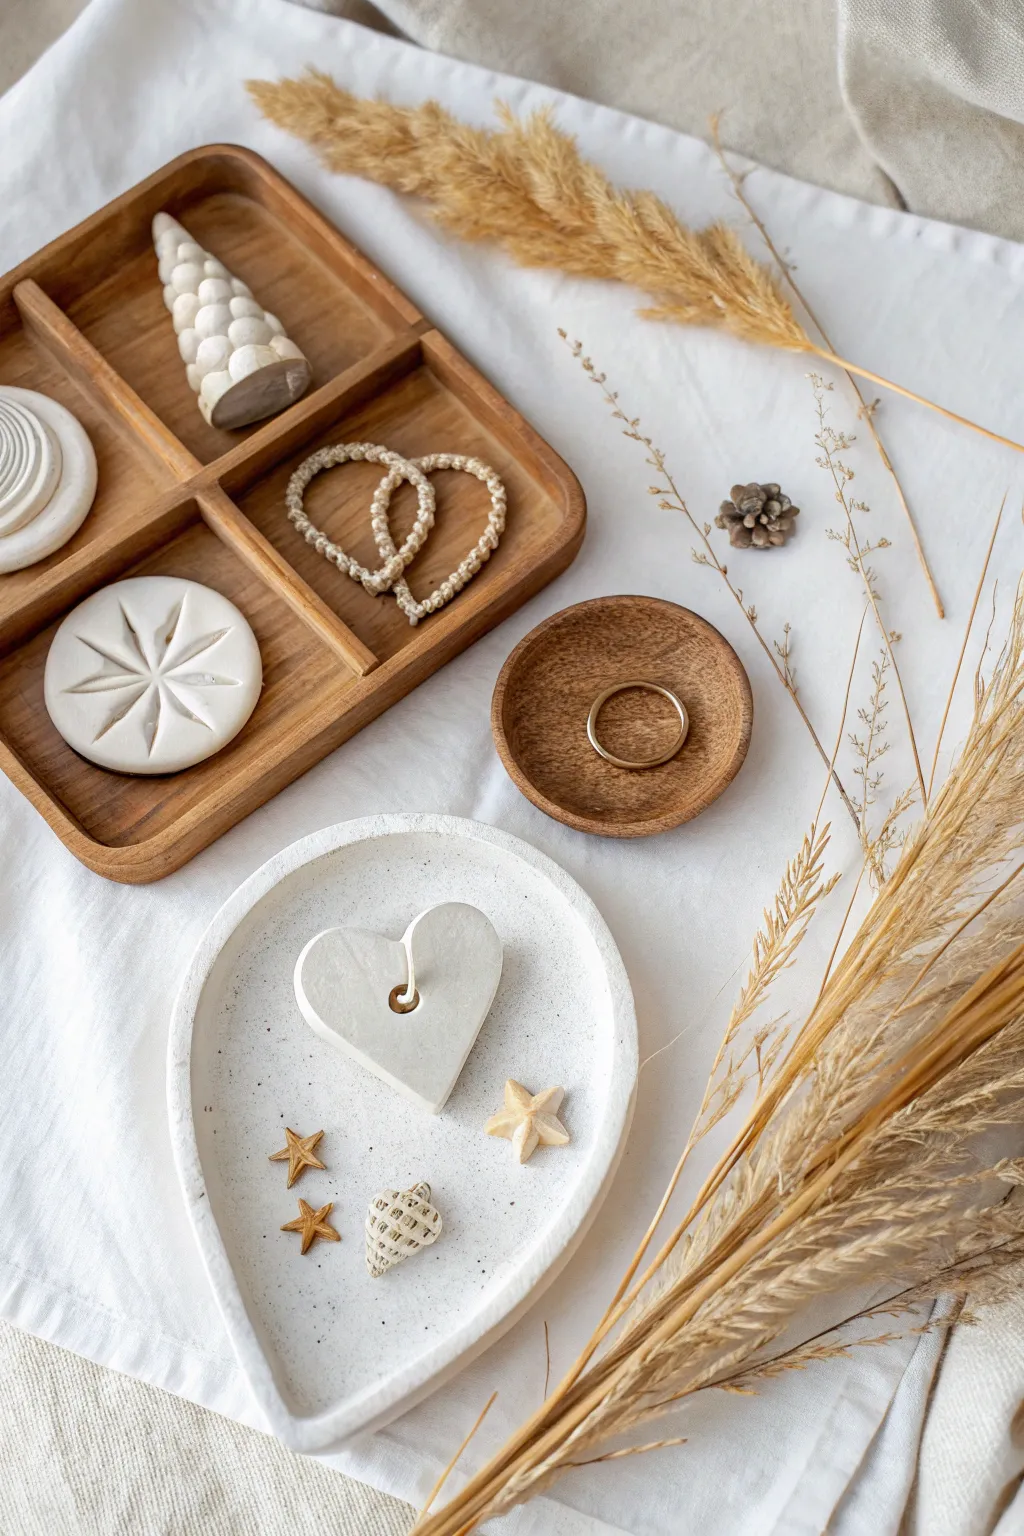
Embrace the calm of the coast with this curated set of white air-dry clay miniatures. From a delicate teardrop trinket dish to tactile, geometric tokens, this project lets you explore various texturing and shaping techniques in one relaxing weekend session.
How-To Guide
Materials
- White air-dry clay (smooth texture)
- Small rolling pin
- Modeling tools (or kitchen knife/toothpicks)
- Teardrop-shaped cookie cutter (or paper template)
- Hemp or jute twine (for braiding)
- Small candle wick
- Sandpaper (fine grit)
- Clear matte varnish (optional)
- Small wooden compartmentalized tray (for display)
- Small wooden bowl (optional)
Step 1: Teardrop Tray & Candle
-
Roll the base:
Start with a medium ball of clay and roll it out to an even thickness of about 1/4 inch. If you don’t have a cutter, trace a teardrop shape onto paper, cut it out, and use it as a guide to slice the clay with a craft knife. -
Form the rim:
Roll a long, thin snake of clay. Score the outer edge of your teardrop base and dampen it slightly with water. Gently press the snake onto the edge to create a raised rim, smoothing the seam with your finger or a modeling tool so it looks like one solid piece. -
Shape the heart candle:
Take a smaller chunk of clay and shape it into a thick heart. Poke a hole directly in the center for the wick. I like to make the hole slightly larger than the wick to account for shrinkage as it dries. -
Add sea-inspired details:
Using tiny bits of leftover clay, mold two small five-pointed stars and a small spiraled shell. Use a needle tool to scratch texture into the shell and stars to mimic real sea life. -
Speckle effects:
For the speckled look seen in the tray, you can either mix dried tea leaves into the clay before rolling or wait until the piece is dry and flick diluted black paint over it with a toothbrush.
Step 2: Geometric Tokens
-
Create the Starburst Disc:
Roll a ball of clay and flatten it into a perfect circle, about 2 inches wide. Using a modeling tool or the back of a knife, press deep indentations radiating from the center to the edge to create an eight-point startburst pattern. -
Form the Spiral Puck:
Make another circular disc similar to the first. Using a clay extruder or rolling by hand, create a long, very thin string of clay. Coil this string tightly on top of the disc, starting from the center and winding outward to create a raised spiral texture. -
Sculpt the Textured Cone:
Roll a cone shape approximately 3 inches tall. Starting from the bottom, press small balls of clay onto the surface in rows, slightly flattening them as you go up, to create a scale-like or stylized pinecone texture.
Smooth Surface Secret
Keep a small bowl of water nearby while sculpting. Dip your finger in and lightly glide over the clay to erase fingerprints instantly.
Step 3: Braided Accents & Finishing
-
Prepare the braid:
While your clay pieces are setting up, cut three strands of hemp or jute twine. Braid them tightly together. -
Coat with clay:
Take a small amount of very wet clay (slip) or water-downed clay paste. Dip your braided twine into this mixture, ensuring the fibers are completely coated in white clay mud. -
Shape the hearts:
While wet and pliable, arrange the clay-coated braid into two connected heart shapes. Let them dry flat on wax paper so they hold their shape perfectly. -
Drying phase:
Allow all clay components to dry for at least 24-48 hours. Turn the flat pieces over halfway through to ensure even drying and prevent warping. -
Sand and smooth:
Once fully dry, use fine-grit sandpaper to gently smooth out any rough edges on the tray rim or the geometric tokens. -
Seal the deal:
Apply a coat of clear matte varnish to protect your pieces, especially if you plan to use the tray for holding jewelry. Insert the wick into the heart candle block.
Level Up: Scented Clay
Add drops of essential oil (like lavender or sea salt) into the clay while kneading for pieces that smell as calming as they look.
Arrange your finished miniatures on a wooden tray or shelf to bring a breath of fresh coastal air to your space