When you want cute, doable clay figures that actually look good without advanced sculpting skills, it helps to lean into simple shapes and big personality. Here are my favorite clay figure ideas I keep coming back to in my studio—easy to start, hard to stop once you get rolling.
Chibi Kitty Minis With Round Heads
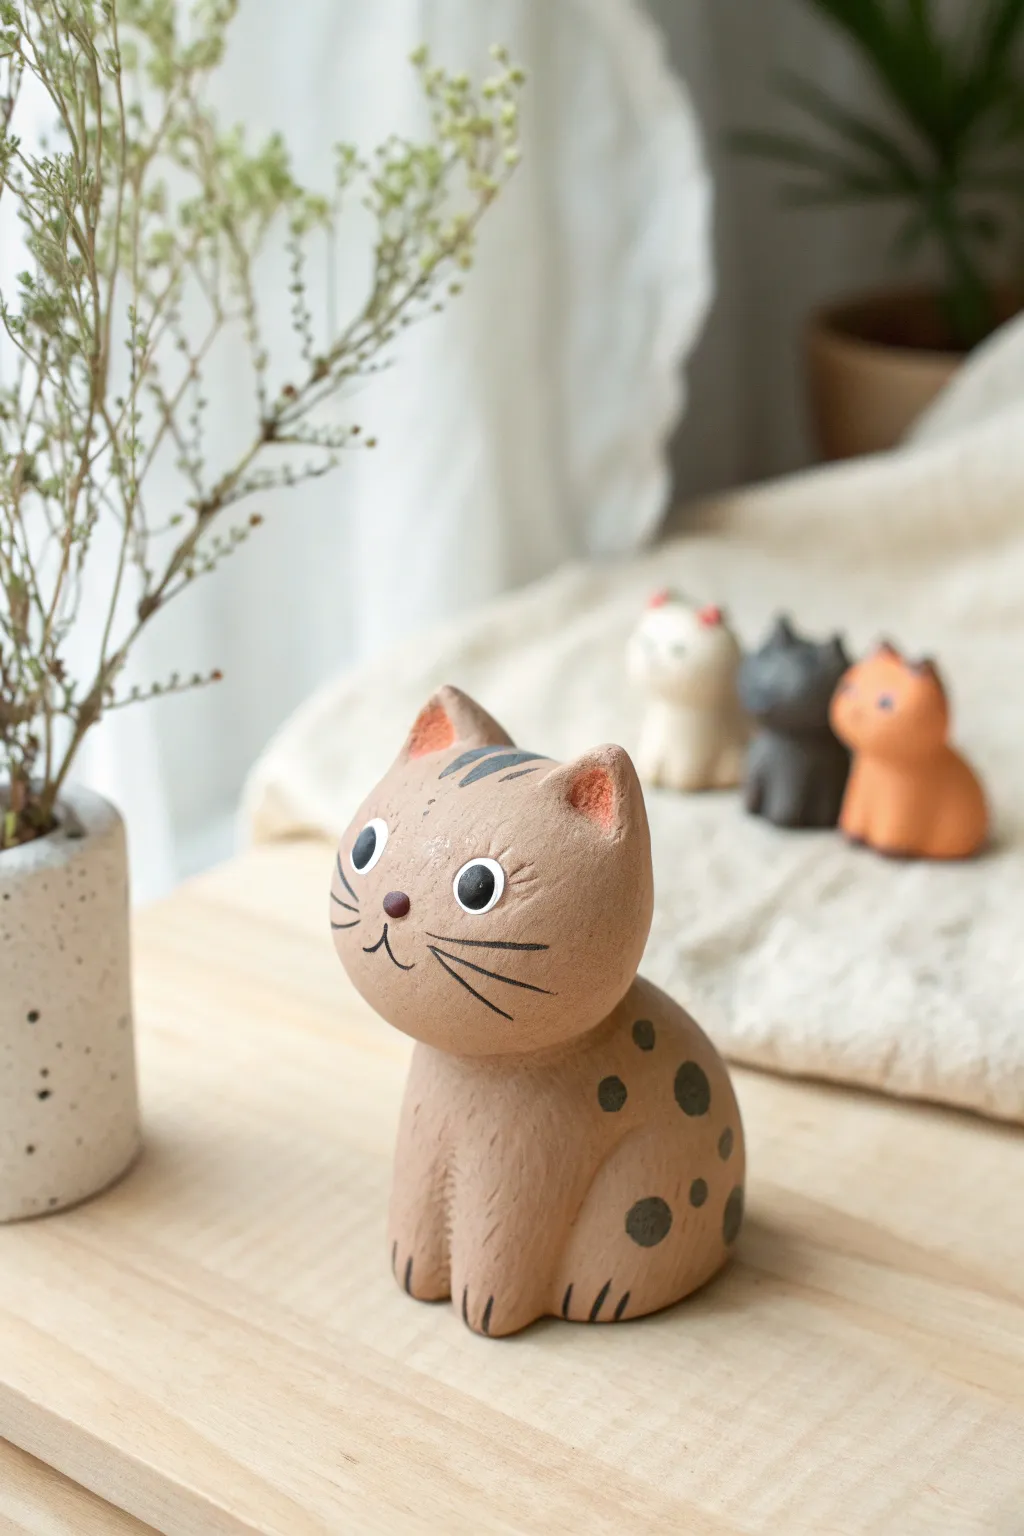
These delightful mini figurines capture the essence of a cat with a stylized, oversized head and a compact, rounded body. The natural, earthy finish and simple hand-painted details give them a charming, rustic aesthetic perfect for any shelf.
Detailed Instructions
Materials
- Beige or tan polymer clay (or air-dry clay)
- Black acrylic paint
- White acrylic paint
- Terracotta or rust-orange acrylic paint
- Fine-grit sandpaper or a stiff bristle brush (for texture)
- Fine detail paintbrush (size 0 or 00)
- Ball stylus tool or toothpick
- Clay sculpting tools (needle tool, smoothing tool)
- Matte varnish (optional)
Step 1: Sculpting the Base Form
-
Prepare the clay:
Start by conditioning your beige clay until it is soft and pliable. Roll two balls of clay: one slightly larger for the head (about the size of a walnut) and a slightly smaller, egg-shaped one for the body. -
Shape the body:
Take the egg-shaped piece and flatten the bottom gently against your work surface so it stands upright. Slightly taper the top where the neck will be. -
Create the front legs:
Instead of attaching separate legs, use a smoothing tool to press two vertical indentations into the front of the body. This suggests the front paws are tucked neatly underneath the chest. -
Attach the head:
Press the larger ball onto the tapered neck area of the body. You can insert a small piece of toothpick or wire between the two for extra stability. Blend the seam at the back of the neck slightly for a smooth transition. -
Form the ears:
Pinch two small, triangular pieces of clay. Attach them to the top of the head, spacing them widely apart. Use a ball tool to create a shallow depression inside each ear triangle. -
Refine the face:
Gently press the front of the face to flatten it just a tiny bit, giving it that sweet ‘chibi’ profile. Use a small ball tool to create a tiny indentation for the nose. -
Add surface texture:
To mimic the matte, slightly rough look of the reference, gently tap the entire surface of the cat with a stiff bristle brush or a crumpled ball of aluminum foil. This removes fingerprints and adds an organic feel.
Step 2: Curing and Painting
-
Bake or dry:
If using polymer clay, bake according to the manufacturer’s instructions (usually around 275°F/135°C for 15-30 minutes). If using air-dry clay, let it sit for 24-48 hours until fully hardened. -
Paint the ears:
Once cool, mix a small amount of terracotta or rust-orange paint. Use a fine brush to dab this color into the inner depressions of the ears. -
Add head stripes:
Using a dark grey or black paint, create two or three short, tapered brushstrokes on the top of the head, between the ears. -
Paint the eyes:
For the eyes, paint two solid black circles. They should be relatively large and spaced wide apart. Let this layer dry completely. -
Eye highlights:
Dip the tip of a toothpick into white paint. Gently dot a small highlight onto the upper right side of each black pupil to bring the cat to life. -
Nose and mouth:
Paint a tiny inverted triangle or oval for the nose using brown or rust paint. Below it, use your finest brush or an ultra-fine black marker to draw a simple ‘w’ shape for the mouth. -
Whiskers and toes:
Sweep three long, thin black lines outwards from each cheek for whiskers. Add tiny vertical ticks at the base of the body to define the toes. -
Body spots:
Finish by painting irregular black or dark grey spots on the cat’s back and sides. Vary the sizes to make the pattern look natural. -
Seal (optional):
If you want to protect the paint, apply a thin coat of matte varnish. I find that skipping gloss keeps that nice, earthy pottery look intact.
Wobbly Head?
If the head feels too heavy for the body before baking, create a foil armature core for the head. This reduces weight and saves clay.
Make a Family
Vary the clay colors for the base—try dark grey or white—or switch the ear shape to rounded curves to create a Scottish Fold version.
Group several of these little felines together for a cozy and adorable display


Chunky Puppy Figures With Floppy Ears
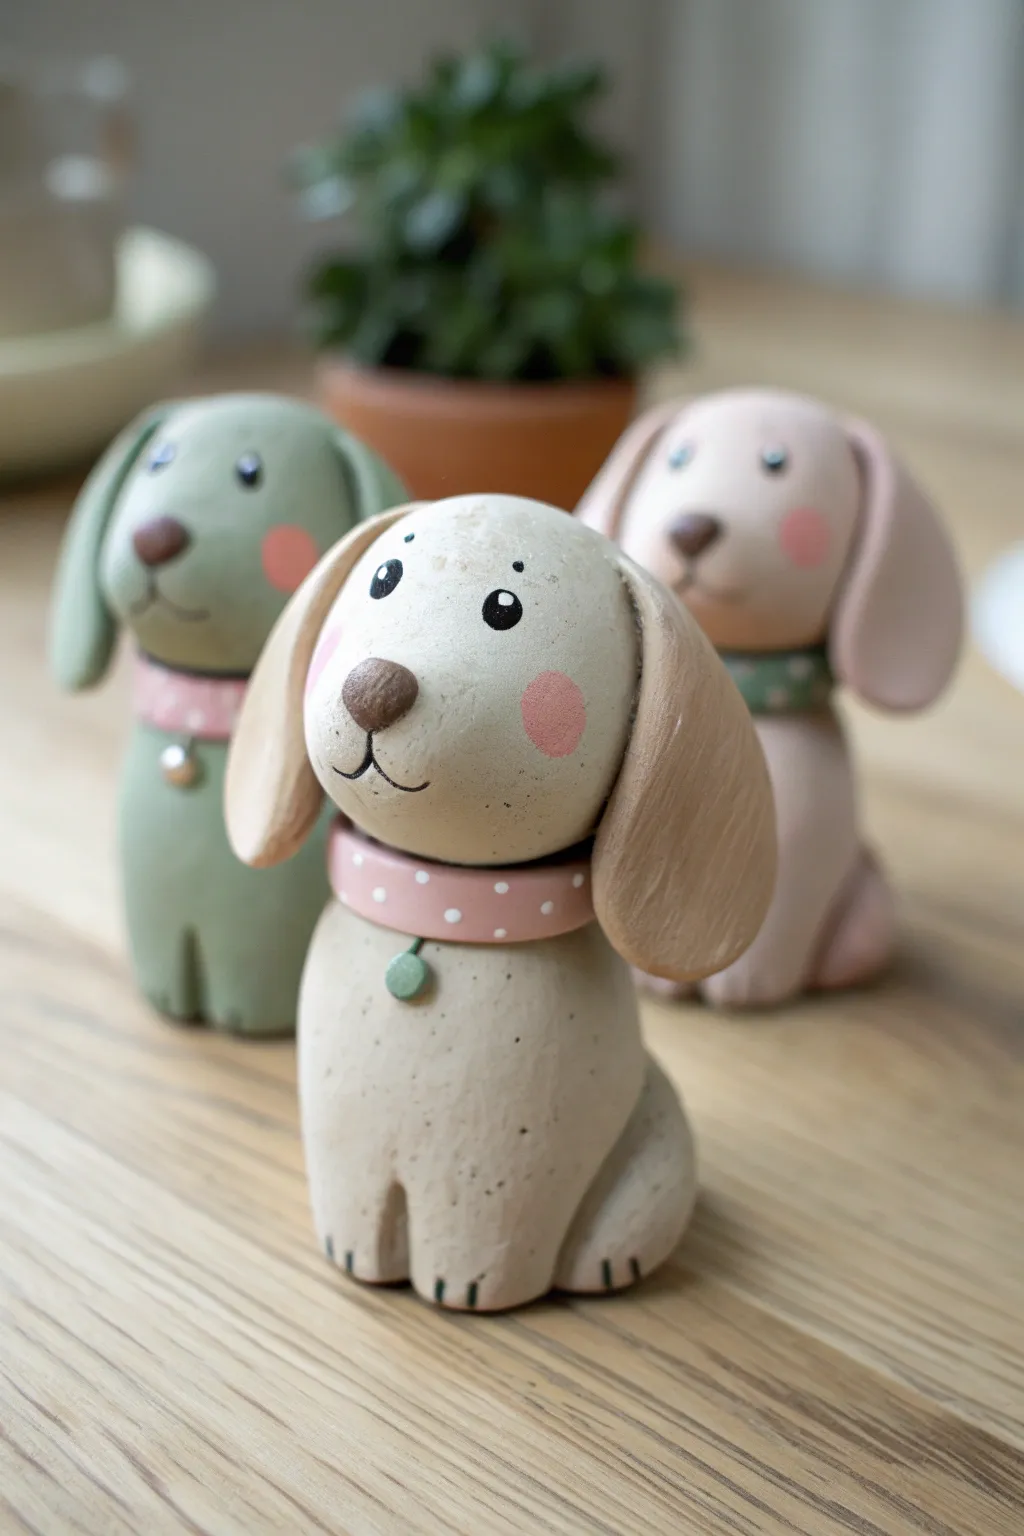
These adorable chunky puppy figures feature smooth, rounded forms and charming painted details for a sweet, cartoony look. With their oversized ears and pastel collars, they make perfect desk companions or nursery decor.
Step-by-Step
Materials
- Polymer clay (beige, light pink, sage green, brown)
- Acrylic paints (black, white, pink, green)
- Fine detail paintbrush (size 0 or 00)
- Dotting tool or toothpick
- Rolling pin
- Clay blade or craft knife
- FolkArt matte varnish (optional)
- Needle tool
Step 1: Shaping the Base Structures
-
Forming the body:
Start with a golf-ball-sized amount of beige clay. Roll it into a smooth ball, then gently taper the top third to create a very subtle pear shape. Flatten the bottom against your work surface so it stands stably on its own. -
Creating the feet:
For the front paws, use a modeling tool or the back of a knife to press two vertical indentations at the bottom front of the body. Don’t cut all the way through; just create deep grooves to suggest separation. -
Adding paw details:
Use a needle tool to scratch three tiny lines on each ‘paw’ section to mimic toes. Repeat this process on the sides near the back to suggest hind legs sitting in a crouch. -
The head shape:
Roll a second ball of beige clay, slightly smaller than the body. It should be a slightly flattened sphere, wider than it is tall, to give that cute puppy look. -
Attaching the head:
Insert a short piece of toothpick or wire into the neck of the body for support. Press the head firmly onto the body, ensuring the connection is seamless but distinct.
Smooth Operator
Before baking, lightly brush the unbaked clay with a little baby oil or clay softener. This removes fingerprints and leaves a flawless, professional finish.
Step 2: Features & Accessories
-
Making the ears:
Take two equal pieces of beige clay and roll them into teardrop shapes. Flatten them significantly so they look like long, floppy paddles. I prefer to curve the tips slightly outward for a bit of movement. -
Attaching the ears:
Press the narrow end of each ear to the sides of the head. Blend the seam at the attachment point using a silicone tool so the ears look like they grow naturally from the head. -
Adding the nose:
Roll a tiny triangle of brown clay. Soften the corners and press it right in the center of the face, slightly lower than the halfway line. -
Fashioning the collar:
Roll a thin snake of pink (or green) clay and flatten it into a ribbon. Wrap this strap around the neck seam, trimming any excess at the back. -
The collar charm:
Roll a tiny ball of contrasting clay (like green or silver) and flatten it into a disc. Press it onto the front center of the collar to create a tag. -
Baking:
Bake the figure according to your polymer clay package instructions (usually 275°F/135°C for 15-30 minutes). Let it cool completely before painting.
Step 3: Painting the Details
-
The eyes:
Using a fine paintbrush and black acrylic paint, create two small oval eyes above the nose. Keep them widely spaced for a sweet expression. -
Eye sparkles:
Dip a needle tool or toothpick in white paint and add a tiny dot to the upper right corner of each black eye oval. This ‘catchlight’ brings the character to life. -
Brows and mouth:
Paint tiny floating eyebrows with black paint. For the mouth, paint an inverted ‘Y’ shape extending down from the brown nose. -
Rosy cheeks:
Mix a very watery pink paint or use a dry-brush technique to dab soft, circular pink spots onto the cheeks. The key is subtlety, so build the color slowly. -
Collar pattern:
Using a dotting tool or the end of a paintbrush, stamp small white dots around the colored collar band. -
Finishing touches:
Once all paint is dry, apply a coat of matte varnish to protect the surface while maintaining that soft, non-glossy clay finish.
Head Slump?
If the head feels too heavy and starts to tilt before baking, prop it up with a small wedge of crumpled aluminum foil or cardstock until the clay hardens in the oven.
Group these little dogs in different colors for a delightful display on your shelf


Tiny Frogs on Lily Pad Bases
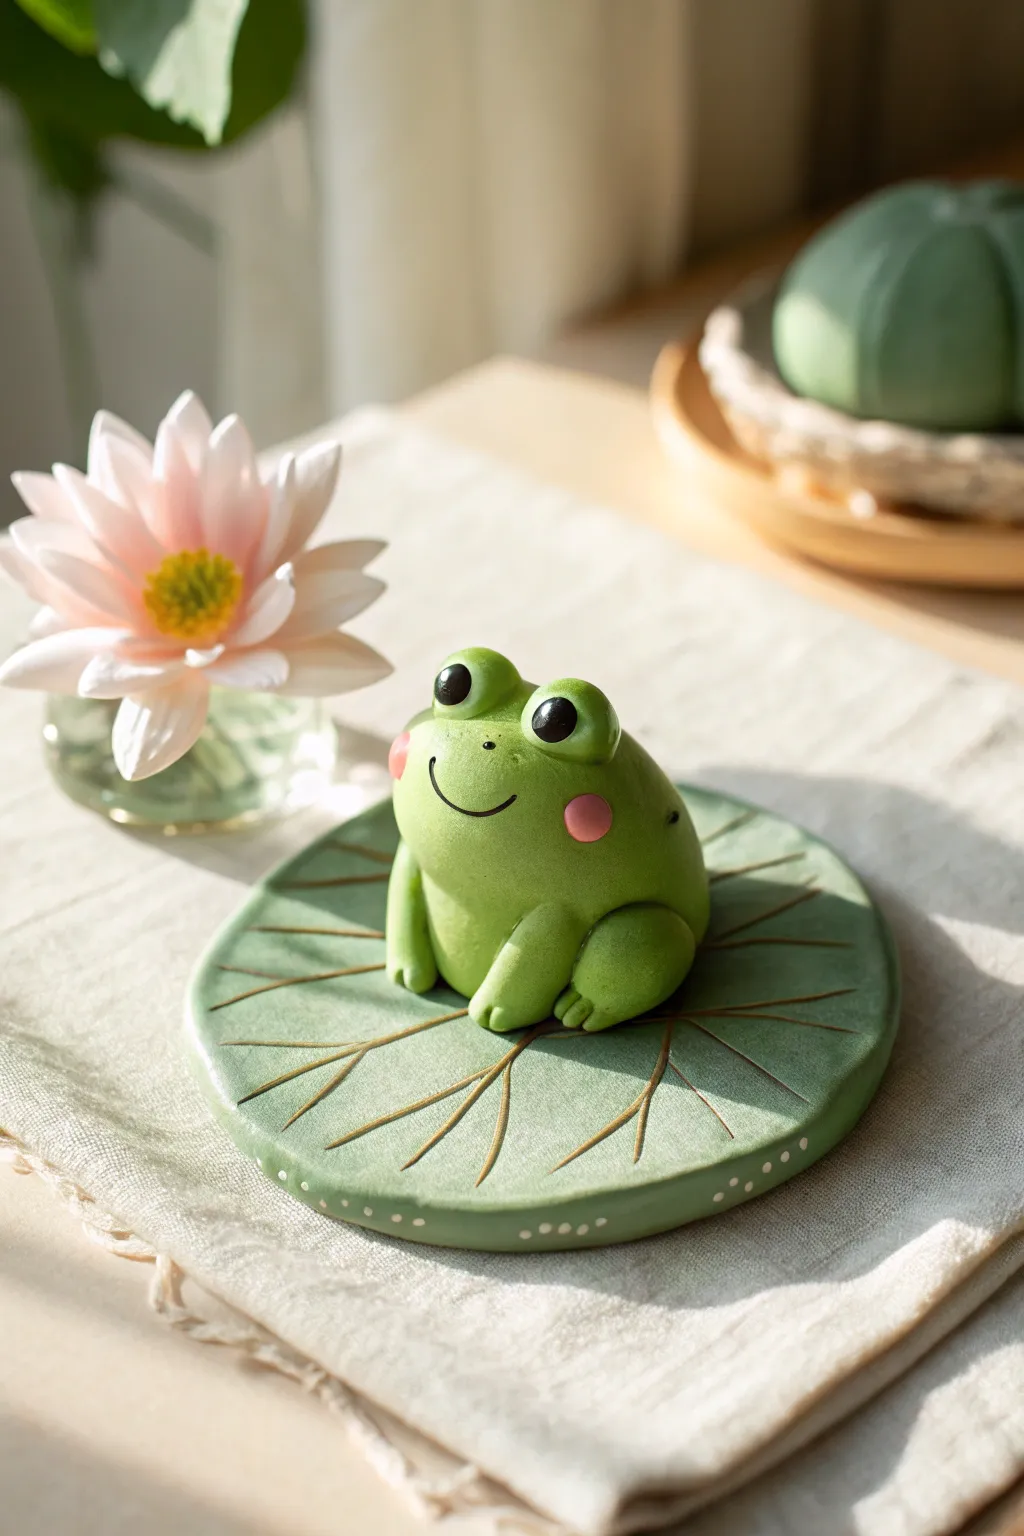
This adorable project features a bright green, stylized frog perched peacefully atop a carved lily pad base, making for a charming desk companion. The smooth matte finish and gentle face sculpting give it a professional yet whimsical look.
Step-by-Step Guide
Materials
- Polymer clay (Bright Green, Moss Green, White, Black, Pink)
- Clay sculpting tools (needle tool, ball stylus, rubber shaper)
- Acrylic rolling pin
- Circle cutter (approx. 3-4 inches diameter)
- Baking sheet and parchment paper
- Clean work surface (glass or tile recommended)
- Optional: Matte varnish for finishing
Step 1: Creating the Lily Pad Base
-
Prepare the base color:
Start by conditioning a chunk of Moss Green clay until it is soft and pliable. Roll it out into a flat, even sheet, approximately 1/4 inch thick. Aim for a smooth surface without air bubbles. -
Cut the shape:
Use your large circle cutter to punch out a perfect round shape from the green sheet. If you don’t have a cutter, trace a jar lid and carefully cut around it with a craft knife. -
Create the notch:
Cut a small ‘V’ shape out of one side of the circle to give it that characteristic lily pad silhouette. Smooth the cut edges gently with your finger so they aren’t sharp. -
Texturing the veins:
Using a needle tool or a dull knife, gently score lines radiating from the center of the pad out towards the edges. Vary the pressure slightly so the lines look organic, branching out near the ends. -
Adding decorative dots:
Roll tiny, almost microscopic balls of white clay. Press them gently onto the vertical edge (the rim) of the lily pad at even intervals. Alternatively, you can paint these white dots on after baking.
Dusted with Lint?
Light clay attracts dust like a magnet! Keep handy wipes nearby to clean hands between colors. Use a piece of scotch tape to lift stray dust specs off the raw clay before baking.
Step 2: Sculpting the Frog Body
-
Form the main body:
Take a large ball of Bright Green clay and roll it into a smooth, slightly squat egg shape. The bottom should be flattened so it sits stably on the lily pad. -
Shape the legs:
Roll two smaller balls of the same green clay for the hind legs. Flatten them slightly into ovals and attach them to the lower sides of the body, blending the seams at the back but leaving the front curve defined to look like folded legs. -
Add front arms:
Create two small snake-like rolls of green clay. Attach them to the front of the body, positioned so they look like the frog is resting on its hands. Use a small tool to press indentations for toes. -
Sculpt the eye sockets:
On the top of the head, use a large ball stylus or your thumb to create two shallow indentations where the eyes will sit. This helps integrate the eyes rather than having them look stuck on. -
Make the eyes:
Roll two balls of green clay for the eye mounds and place them on the head. Press a smaller white ball into the center of each, followed by an even smaller black ball for the pupil. Add a tiny white spec for a highlight.
Step 3: Adding Details and Finishing
-
Blushing cheeks:
Flatten two very small discs of pink clay. Press them gently onto the frog’s cheeks, just below the eyes. Smooth the edges so they look like a natural flush. -
Carve the smile:
Use a needle tool or a curved blade to carefully press a smile into the face. I find a slow, rocking motion helps create a clean curve without dragging the clay. -
Add nostrils:
Poke two tiny holes above the smile with a fine-point needle tool for the nostrils. -
Assemble the piece:
Place the finished frog onto the center of your prepared lily pad base. Press down gently to ensure a good bond between the two clay pieces. -
Final smooth:
Check the entire sculpture for fingerprints. You can brush it lightly with a little bit of baby oil or cornstarch to smooth them away before baking. -
Bake the project:
Bake according to your clay manufacturer’s instructions (usually around 275°F or 130°C for 15-30 minutes). Let it cool completely in the oven to prevent cracking.
Level Up: Water Effect
After baking, pour a thin layer of clear UV resin over the green lily pad (avoiding the frog) to make it look wet and shiny like real aquatic leaves.
Once cooled, your little green friend is ready to bring a touch of Zen to your shelf


Baby Turtle Figures With Textured Shells
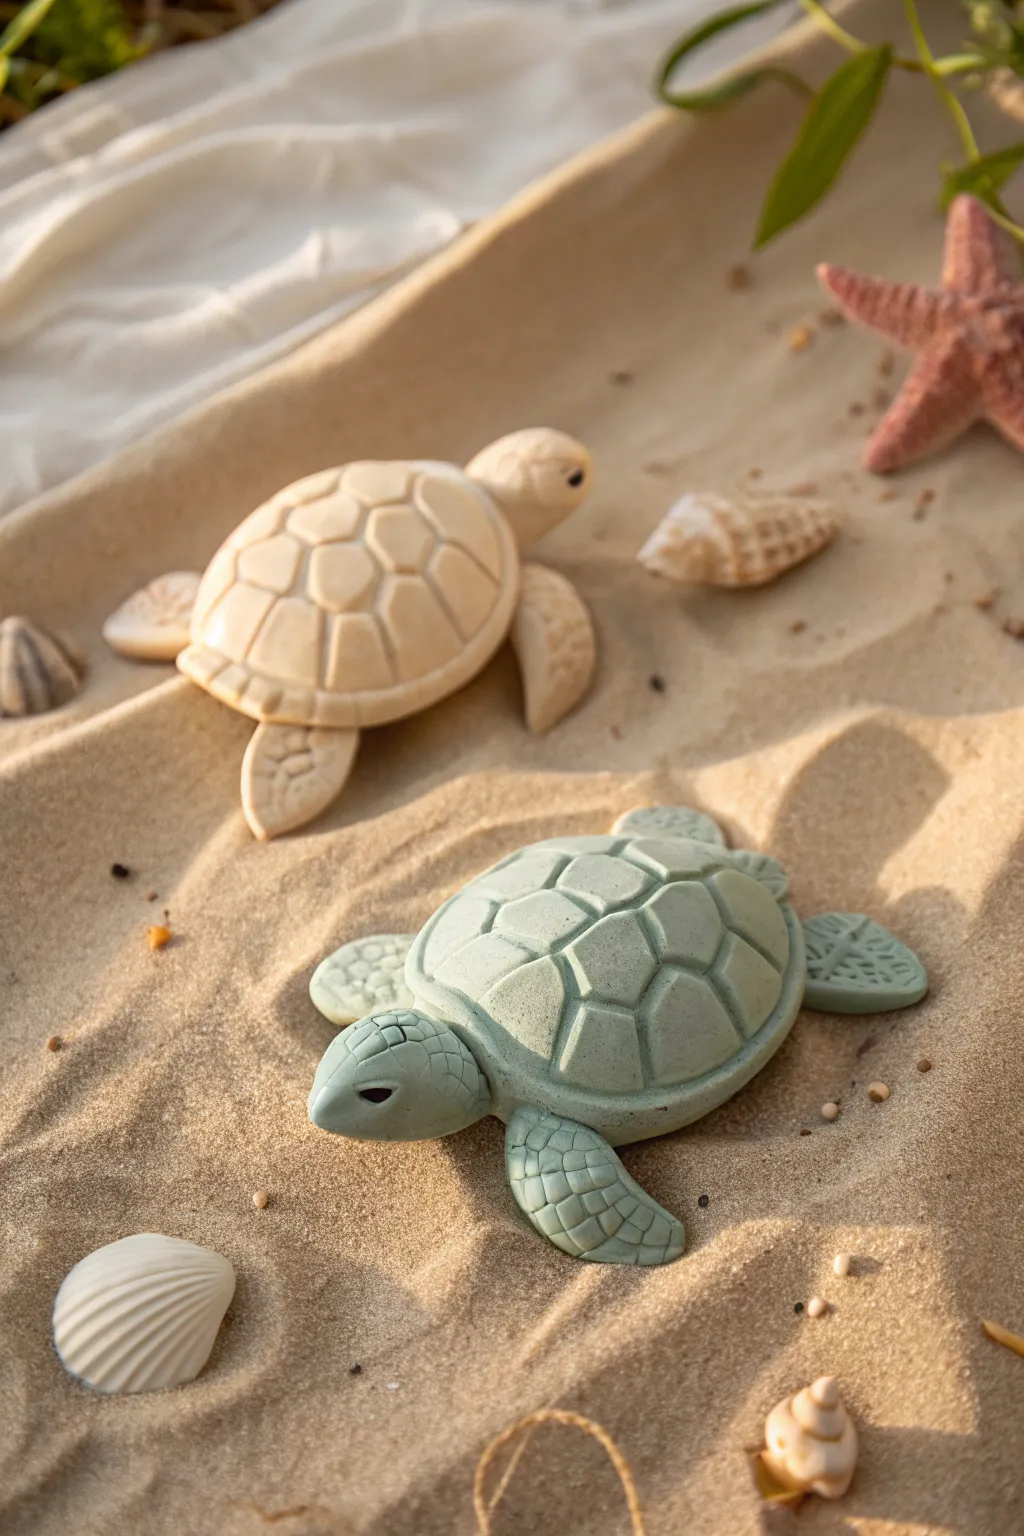
These charming baby turtle figures feature beautifully sculpted geometric shells and delicate flipper details, making them a perfect addition to any coastal-themed decor. Their smooth, matte finish and soft pastel tones give them a refined, artisanal look that is surprisingly easy to achieve.
How-To Guide
Materials
- Polymer clay (cream and sage green)
- Clay sculpting tools (specifically a needle tool and a small flat-bladed tool)
- Small ball stylus tool
- Rolling pin or pasta machine
- Aluminum foil (for armature)
- Soft brush (for smoothing)
- Baking sheet and parchment paper
- Oven (per clay manufacturer instructions)
- Fine grit sandpaper (optional)
Step 1: Forming the Body and Head
-
Create the core:
Start by scrunching a small piece of aluminum foil into a flattened oval shape about the size of a walnut. This will serve as a lightweight core for the shell and prevent the clay from being too thick. -
Sheet the clay:
Condition your chosen color of clay—either the cream or sage green—until it is soft and pliable. Roll it out into a sheet approximately 1/4 inch thick. -
Cover the armature:
Drape the clay sheet over the foil core, smoothing it down the sides and tucking it underneath. Trim any excess clay from the bottom and roll the form gently on your work surface to ensure it is smooth and shaped like a domed oval. -
Sculpt the head:
Roll a separate, smaller ball of clay into a teardrop shape. Flatten the wider end slightly to form the head and keep the tapered end for the neck. -
Attach the head:
Press the tapered neck end firmly against the front underside of the shell. Use a sculpting tool or your thumb to smudge the clay from the neck onto the underside of the body to create a seamless bond. -
Detail the face:
Using a needle tool or small blade, draw a horizontal line for the mouth. Gently press a small indentation for the eye socket, and insert a tiny spectator bead or a speck of black clay for the eye.
Fixing Cracks
If you see tiny cracks after baking, mix a small amount of raw clay with liquid polymer clay to make a paste. Fill the crack, smooth it, and rebake for 15 minutes.
Step 2: Sculpting the Geometric Shell
-
Mark the central scutes:
On the top center of the shell, lightly sketch a row of hexagons (or irregular polygons) running from the neck to the tail using the tip of your needle tool. -
Define the pattern:
Once you are happy with the spacing, deepen these lines using a small flat-bladed tool. Press the tool into the clay at an angle to create beveled edges, giving the scutes a raised, 3D appearance. -
Add side scutes:
Continue the pattern down the sides of the shell, creating a ring of pentagons or trapezoids that surround the central row. Ensure the lines connect cleanly. -
Create the rim:
Roll a very thin snake of clay and flatten it slightly. Wrap this strip around the very bottom edge of the shell to create a distinct rim. Blend the upper edge of this strip into the shell, but leave the bottom edge defined. -
Texture the rim:
Use a small knife tool to press vertical notches evenly around this rim strip, mimicking the marginal scutes of a turtle’s shell.
Step 3: Adding Flippers and Finishing
-
Shape the flippers:
Shape four pieces of clay into flattened, elongated tear shapes. Make the front two flippers significantly larger than the rear two. -
Attach the limbs:
Turn the turtle upside down and press the wide ends of the flippers onto the underside of the body. Smooth the clay seams so they are securely attached. -
Curve the flippers:
Flip the turtle back over. Gently curve the front flippers outwards to simulate a swimming motion or a natural resting pose. -
Texture the skin:
I like to use a small ball stylus or a blunt needle tool to press a scale pattern onto the top of the head and the flippers. Create a mix of larger scales near the shell and smaller ones towards the tips. -
Smooth the surface:
Before baking, brush the entire figure lightly with a little baby oil or clay softener on a finger to remove any fingerprints and soften sharp sculpted edges. -
Bake firmly:
Place the turtles on parchment paper and bake according to your polymer clay package directions. Let them cool completely before handling.
Natural Sand Texture
For a sandy beach look, brush liquid clay onto the baked shell and sprinkle heavily with fine embossing powder or actual clean sand before a final short bake.
Now you have a delightful pair of sea turtles ready to bring a calm ocean vibe to your home

The Complete Guide to Pottery Troubleshooting
Uncover the most common ceramic mistakes—from cracking clay to failed glazes—and learn how to fix them fast.
Penguin Pals With Cozy Scarves
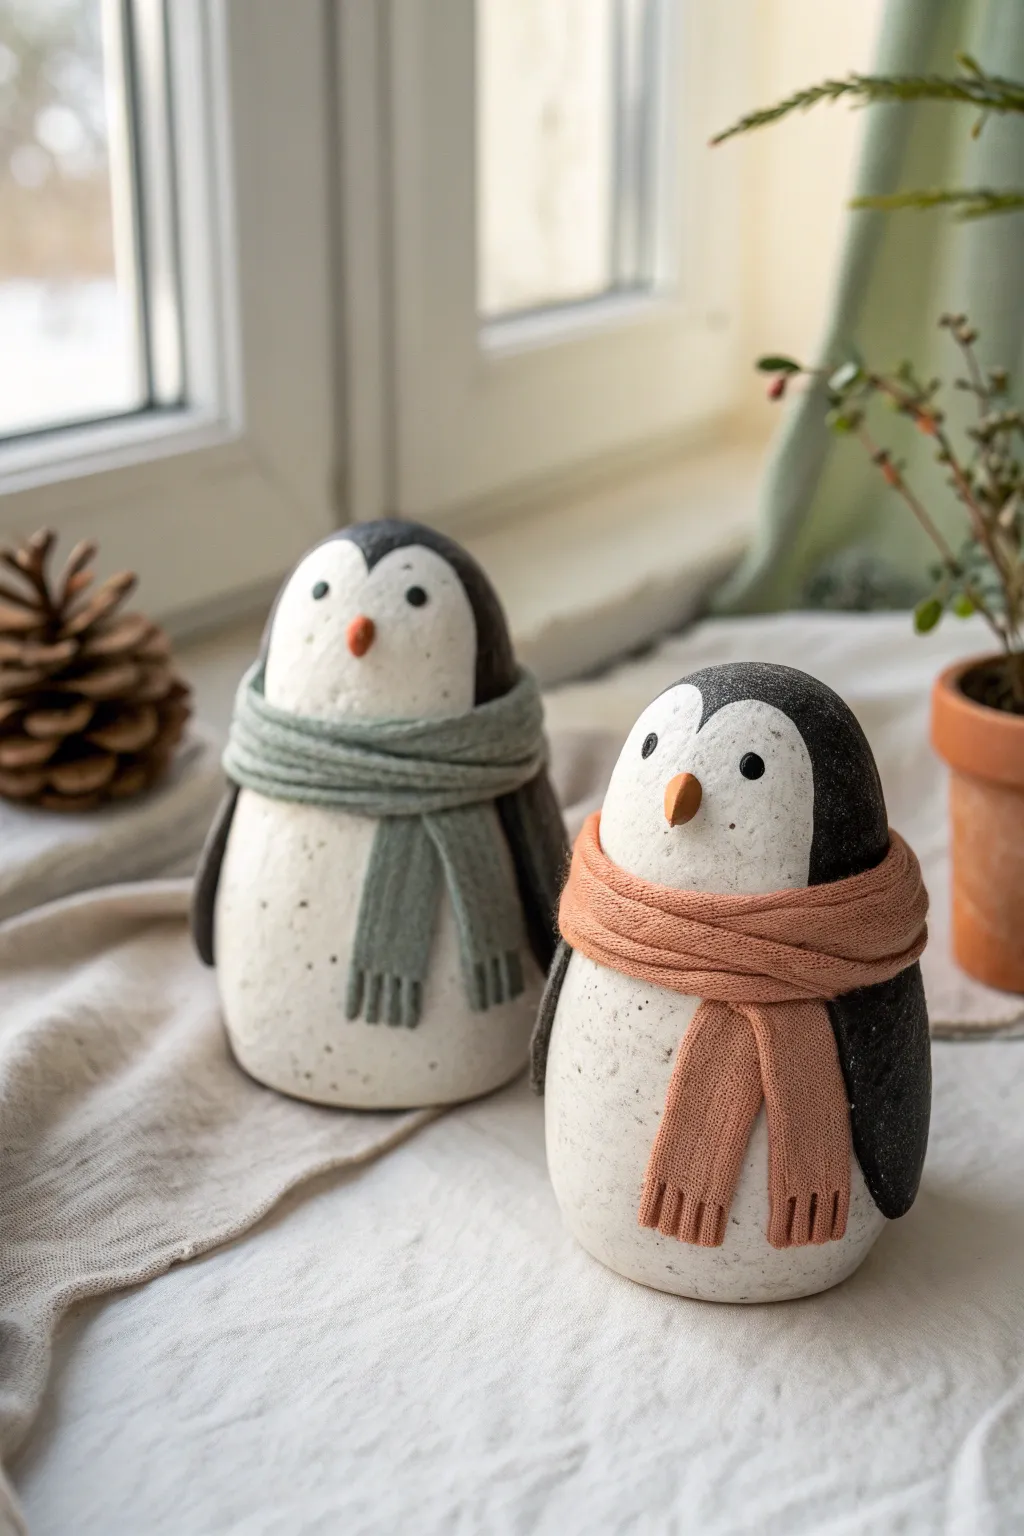
These charming penguin figurines feature simple egg-shaped bodies with a beautiful speckled finish and textured clay scarves. Their minimalist design and soft color palette make them perfect for a modern winter display.
Step-by-Step Tutorial
Materials
- Stone-effect polymer clay (granite or white with speckles)
- Black polymer clay
- Orange polymer clay
- Sage green polymer clay
- Muted coral or terracotta polymer clay
- Rolling pin
- Clay knife or craft blade
- Fine-point modeling tool or needle tool
- Aluminum foil (for core)
- Oven (for baking according to clay package instructions)
Step 1: Shaping the Bodies
-
Prepare the core:
Crumple a piece of aluminum foil into a tight egg shape. This saves clay and keeps the figurine lightweight. Aim for a height of about 3 inches for a standard penguin. -
Roll the body clay:
Condition your stone-effect or speckled white clay until it is pliable. Roll it into a sheet about 1/4 inch thick. -
Cover the core:
Wrap the clay sheet around your foil egg, smoothing the seams completely with your thumb so they disappear. Roll the shape gently on your work surface to ensure it is perfectly round and smooth. -
Flatten the base:
Gently tap the bottom of the egg shape on your table to create a flat surface so the penguin stands up straight without wobbling.
DIY Granite Texture
If you don’t have stone-effect clay, mix translucency clay with white clay and add a pinch of ground black pepper or dried tea leaves.
Step 2: Adding Key Features
-
Create the black hood:
Roll out a thin sheet of black clay. Cut a large oval shape, then use your blade to cut a heart-like curve into the bottom edge to frame the face. -
Attach the hood:
Drape this black piece over the top and back of the egg shape. Smooth the edges down so it looks painted on rather than a thick layer. The ‘widow’s peak’ of the black hood should center on the forehead. -
Form the wings:
Shape two flattened teardrops from black clay. Press these onto the sides of the body where the black hood meets the white belly, blending the top seam slightly so it looks seamless. -
Add the beak:
Take a tiny amount of orange clay and roll it into a small cone. Press this onto the center of the face, pointing slightly downward. -
Place the eyes:
Roll two minuscule balls of black clay. Press them firmly onto the face on either side of the beak, flattening them slightly so they look inset.
Step 3: Making the Textured Scarves
-
Roll the scarf strip:
Choose your scarf color (sage green or coral) and roll it into a long, thin snake, then flatten it into a ribbon about 1/2 inch wide. -
Add knit texture:
Before attaching, use a needle tool to scratch fine parallel lines along the length of the ribbon to mimic yarn strands. I like to do this lightly so it doesn’t distort the shape. -
Wrap the neck:
Wrap the textured strip around the penguin’s neck area, crossing it over itself at the front. -
Create the tails:
Cut two shorter rectangular pieces of the same colored clay for the scarf tails. Texture them with vertical lines to match the neck piece. -
Detail the fringe:
Use your knife to cut small slits at the bottom of these rectangular tails to create a fringe effect. Press markings just above the cuts to simulate the weave. -
Attach the tails:
Tuck the top edges of the tails under the crossed section of the neck wrap so they hang naturally down the penguin’s front.
Sticky Clay Support
If the clay gets too soft or warmth makes it sticky, put it in the fridge for 10 minutes to firm up before shaping the detailed scarf.
Step 4: Finishing Up
-
Final inspection:
Check for any fingerprints. You can light brush the white areas with a little cornstarch or baby oil if needed to smooth them out before baking. -
Bake:
Bake the figures according to the specific temperature and manufacturing time listed on your package of polymer clay. -
Cool down:
Allow the penguins to cool completely in the oven with the door slightly ajar to prevent cracking from thermal shock.
Once cooled, these little friends are ready to bring a touch of snowy charm to your shelf
Sleepy Seal Figures With Blushy Cheeks
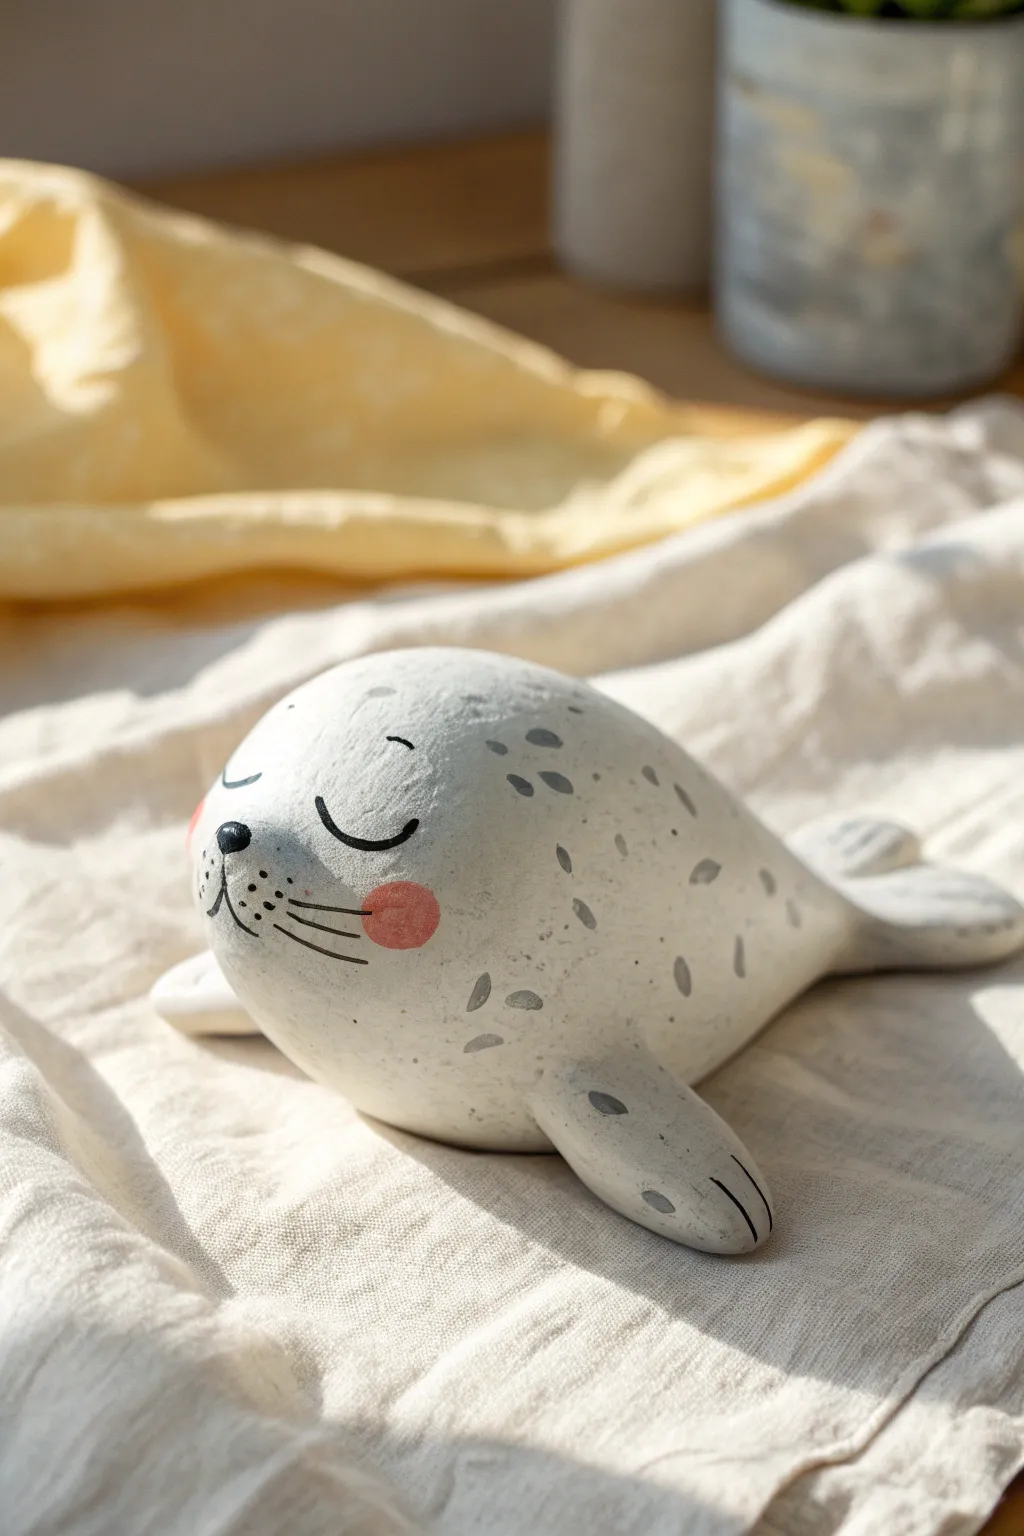
Capture the serene sweetness of a sleeping harp seal with this charming clay project. Featuring soft grey speckles and blushing pink cheeks, this rounded, matte-finish sealant makes for an adorable desk companion or shelf accent.
Detailed Instructions
Materials
- White polymer clay or air-dry clay (approx. 200g)
- Acrylic paints (black, light grey, soft pink)
- Fine detail paintbrush (size 0 or 00)
- Small flat paintbrush
- Ball stylus tool or rounded toothpick
- Matte varnish or sealant
- Smooth work surface
- Aluminum foil (for armature, optional)
Step 1: Sculpting the Form
-
Prepare the core:
Start by conditioning your clay until it is soft and pliable. If you want a lighter figure, you can crumple a small ball of aluminum foil to use as a core, wrapping the clay around it. -
Shape the body:
Roll the clay into a large, smooth egg shape. This seal is very chubby and simplified, so focus on keeping the main body extremely round, tapering slightly towards the tail end. -
Create the flippers:
Take two smaller balls of clay and flatten them into teardrop shapes for the front flippers. Create two more slightly flatter ones for the tail flippers. -
Attach the front flippers:
Press the front flippers onto the sides of the body, fairly low down so the seal looks like it’s resting heavily. Blend the seams smoothly into the body using your thumb or a modeling tool. -
Attach the tail:
Attach the rear flippers to the tapered end of the body. Angle them slightly outward and blend the connection point carefully so it looks like one continuous shape. -
Add flipper details:
Use a knife tool or the edge of a credit card to gently impress three simple lines into the end of each flipper to suggest toes/webbing. -
Refine the surface:
I find that smoothing the clay with a tiny bit of water (for air dry) or baby oil (for polymer) right now saves a lot of sanding later. Ensure the surface is perfectly smooth and round.
Step 2: Painting the Features
-
Dry or bake:
Follow the manufacturer instructions for your specific clay. If baking polymer clay, let it cool completely before painting. If using air-dry clay, wait 24-48 hours until fully cured. -
Base coat (optional):
If your clay isn’t bright white, apply a coat of white acrylic paint to create a clean canvas. Let this layer dry completely. -
Paint the eyes:
Using your finest brush and black paint, draw two downward-curving crescents for the sleeping eyes. Keep them widely spaced for a cuter look. -
Add the nose and mouth:
Paint a small, rounded triangle for the nose just between and below the eyes. extend two small curved lines downward from the nose to create a smiling mouth. -
Detail the whiskers:
On the cheeks near the mouth, paint three black dots on each side. Add three very thin horizontal lines extending outward from these dots for whiskers. -
Apply the blush:
Dip a flat brush or your fingertip into soft pink paint. Dab off most of the paint onto a paper towel, then gently stipple a round, rosy circle on each cheek. -
Create the speckles:
Mix a watery light grey paint. Using a small brush, paint random oval-shaped spots across the seal’s back and head. Vary the direction and size of the spots for a natural look. -
Add fin accents:
Paint a few grey spots on the tops of the front flippers as well to tie the pattern together.
Smooth Surface Secret
Before baking or drying, wipe the entire clay surface with a damp sponge or finger to remove fingerprints. This step is vital since the white surface shows every imperfection.
Step 3: Finishing
-
Seal the work:
Once all paint is perfectly dry, apply a coat of matte varnish. A matte finish is crucial here to mimic the soft, velvety look of a real seal and the stone-like quality in the inspiration photo.
Make it a Set
Create a whole colony by varying the sizes! Try making a tiny pup with no spots, or a larger parent seal with darker grey markings.
Place your sleeping seal on a soft cloth or a sunny windowsill to enjoy its peaceful presence


What Really Happens Inside the Kiln
Learn how time and temperature work together inside the kiln to transform clay into durable ceramic.
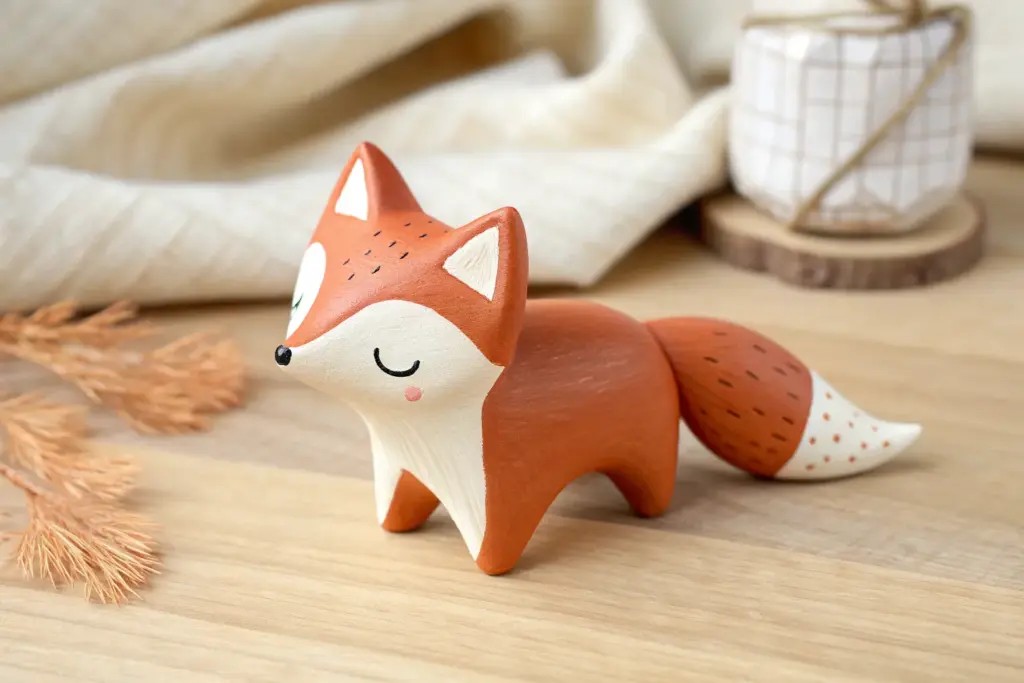
Woodland Fox Cub Figures With Big Tails
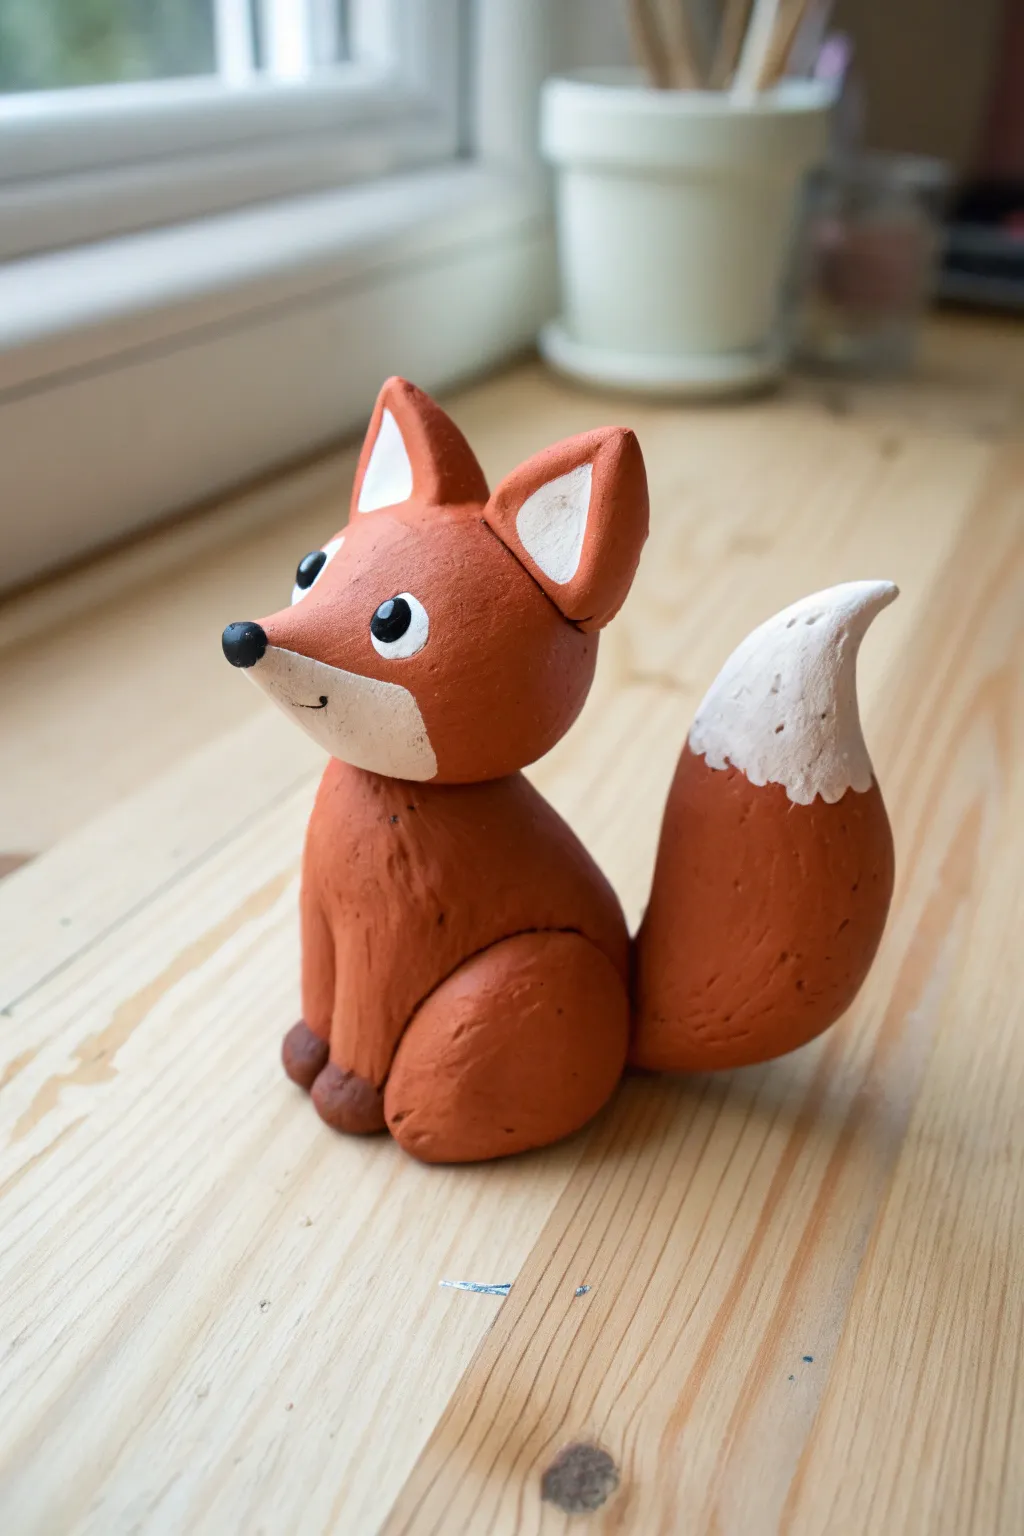
This adorable clay fox cub features oversized ears and a magnificently fluffy-looking tail, perfect for adding a touch of woodland charm to your desk. Its simple shapes make it an approachable project, while the painted details bring its sweet personality to life.
Step-by-Step
Materials
- Terracotta or orange polymer clay (approx. 2oz)
- White acrylic paint
- Black acrylic paint
- Dark brown polymer clay (small amount)
- Needle tool or toothpick
- Small ball stylus tool
- Fine detail paintbrush
- Gloss varnish (optional)
- Aluminum foil (for armature core, optional)
Step 1: Shaping the Head
-
Form the Base:
Start by rolling a ball of orange clay about the size of a walnut. Gently press one side flat to create the back of the head. -
Pinch the Muzzle:
On the opposite side, pinch and pull the clay forward to create a triangular snout. Smooth the transition so it slopes gently from the forehead down to the nose tip. -
Add Ears:
Form two smaller triangles of orange clay. Press a thumb or large ball tool into the center of each to create a slight indentation. Attach these firmly to the top of the head, blending the clay at the base so they don’t fall off. -
Refine the Shape:
Use your fingers to smooth out any fingerprints. The head should look slightly oversized and cartoonish.
Head Drooping?
If the heavy head keeps tilting forward, insert a short piece of toothpick or crumpled foil into the neck joint as an internal skeleton to hold it upright while baking.
Step 2: Building the Body
-
Create the Torso:
Roll a slightly larger ball of orange clay slightly into an egg shape. This will be the main body. Flatten the bottom so it sits securely on your work surface. -
Attach the Leg:
Roll a thick sausage shape for the visible rear leg. Curve it into a ‘C’ shape and press it onto the side of the body, blending the upper edge into the torso seamlessly. -
Form Front Paws:
For the front legs, roll two smaller cylinders. Attach them vertically to the front of the chest, blending the top connection points. They should look like little pillars supporting the chest. -
Add Paws:
Take tiny balls of dark brown clay and press them onto the bottom of the front legs and the rear leg to simulate little paws. These contrast nicely with the orange fur. -
Connect Head and Body:
Place the head onto the neck area of the body. You might want to insert a small piece of toothpick or wire between the two pieces for structural integrity before pressing them together.
Step 3: The Big Tail
-
Roll the Tail:
Roll a large cone shape of orange clay. The base should be thick and taper to a curved point. This should be almost as large as the body itself for that cute, exaggerated look. -
Positioning:
Attach the thick end of the tail to the lower back of the figure. Curve the tail upwards so the tip points towards the sky. -
Texturing:
I like to use a needle tool to gently scratch faint lines into the tail and chest area to mimic the look of fur texture, though keeping it smooth is also a stylistic choice shown here.
Clean Lines
For crisp paint lines on the tail tip, apply a thin strip of masking tape around the tail before painting the white tip. Remove it gently while the paint is still slightly tacky.
Step 4: Finishing Details
-
Add the Nose:
Roll a tiny ball of black clay (or paint it later) and press it onto the very tip of the muzzle. -
Baking:
Bake your figurine according to the specific instructions on your package of polymer clay. Let it cool completely before painting. -
Painting White Accents:
Using white acrylic paint, carefully paint the tip of the tail, the insides of the ears, and the lower half of the face (muzzle and jawline). You may need two thin coats for opacity. -
Painting Eyes:
Paint two round black circles for eyes. Once dry, add a tiny white dot in the upper corner of each eye for a reflection. -
The Smile:
Using your finest brush or a fine-tip marker, draw a very subtle, thin smile line just under the muzzle area.
Once the paint is dry, your little fox is ready to sit guard on your bookshelf
Bunny Figures Hugging Tiny Carrots
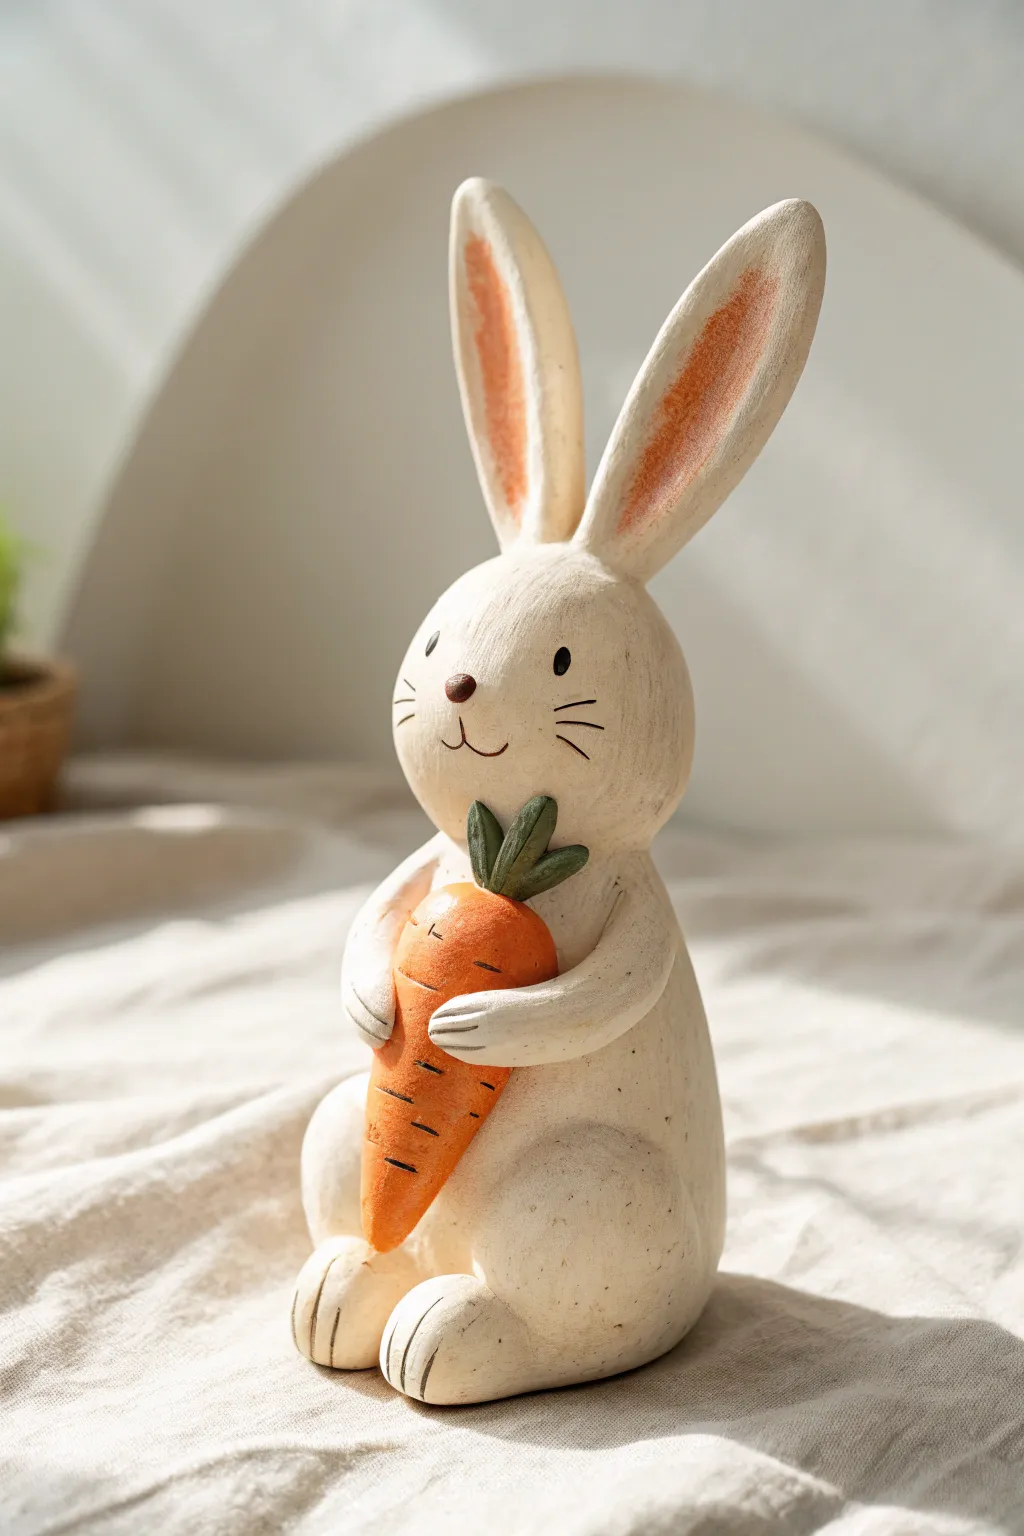
This charming, rustic rabbit figurine features an adorable textured finish and huggable design perfect for spring decor. With its soft white clay body and vibrant carrot accent, it brings a touch of handmade warmth to any shelf or mantelpiece.
Step-by-Step Tutorial
Materials
- Air-dry clay (white or stone color)
- Wire armature or toothpicks (for internal support)
- Sculpting tools (needle tool, modeling tool)
- Acrylic paints (Titanium White, Orange, Deep Green, Black, soft Pink/Peach)
- Paintbrushes (medium flat, fine detail)
- Fine-grit sandpaper
- Matte varnish or sealant
- Texture sponge or bristly brush
- Water cup
Step 1: Sculpting the Base Form
-
Core Structure:
Begin by firmly kneading a fist-sized ball of clay to remove air bubbles. Shape it into a smooth, slightly elongated pear shape. This will form the combined body and head of the bunny. The bottom should be wider and flattened so the figure sits stable on your work surface. -
Defining the Head:
About one-third of the way down from the top, gently pinch and roll your fingers around the form to create a subtle neck indentation. Don’t make it too deep; you just want to suggest a separation between the round head and the chubby body. -
Adding Legs:
Roll two smaller balls of clay into thick teardrop shapes for the hind legs. Press these onto the lower sides of the body, blending the seams thoroughly with a modeling tool or your finger so they look like part of the main form. Flatten the ‘feet’ area slightly. -
Creating the Toes:
Use a needle tool or a dull knife to press two vertical lines into the front of each foot. These indentations create the adorable paw appearance.
Cracking Issues?
If small cracks appear as the clay dries, mix a tiny amount of fresh clay with water to make a paste and fill them in before painting.
Step 2: Adding Features & Carrot
-
Ears Assembly:
Roll two tall, tapered sausages of clay for the ears. Flatten them slightly. Insert a short length of wire or a toothpick into the bunny’s head where each ear will go, leaving half exposed. Push the ears onto these supports to keep them upright. -
Smoothing the Ears:
Blend the clay at the base of the ears downward into the head for a seamless connection. I prefer to curve the ears apart slightly to give the bunny a more alert, friendly expression. -
Carrot Creation:
Take a piece of fresh clay and roll it into a classic carrot cone shape. It should be large enough to look substantial in the bunny’s arms. Use your needle tool to score horizontal, uneven lines across the carrot for realistic texture. -
Attaching the Carrot:
Position the carrot vertically against the bunny’s chest. Use a dab of water or clay slip (clay mixed with water) to help it adhere securely to the body. -
Sculpting the Arms:
Roll two long, thin rope shapes for the arms. Attach them at the bunny’s shoulders and curve them around the carrot so the hands meet or overlap slightly on the front. Blend the shoulder seams completely smooth. -
Carrot Top Detail:
Form 3-4 small, leafy shapes from tiny bits of clay. Attach these to the very top of the carrot, tucking them just under the bunny’s chin if necessary.
Step 3: Refining & Painting
-
Surface Texturing:
Before the clay dries, take a stiff bristle brush or a texture sponge and gently dab the entire surface of the bunny (avoiding the sleek carrot). This creates a fur-like, matte texture characteristic of the reference image. -
Drying Time:
Allow the sculpture to dry completely. Depending on the thickness and brand of clay, this can take 24-48 hours. Turn it occasionally if possible to ensure the bottom dries too. -
Sanding:
Once bone dry, use fine-grit sandpaper to smooth out any unintentional rough patches, fingerprints, or sharp edges on the ears and base. -
Base Coat:
Paint the entire bunny (excluding the carrot) with an off-white or creamy white acrylic. You may need two coats for opaque coverage. Let this dry fully. -
Painting the Carrot:
Paint the carrot body with a bright orange. Mix a little white into the orange for a highlight on the curved front to add dimension. Paint the leafy greens a muted deep green. -
Blushing the Ears:
Mix a very watery wash of pink or peach paint. Gently brush this into the inner concave parts of the ears. The watery paint will settle into the texture you created earlier, looking very natural. -
Facial Details:
Using your finest detail brush, paint two small black ovals for eyes and a small brownish nose. Paint thin, delicate lines for the whiskers and a small anchor shape for the mouth. -
Final Sealing:
Protect your work with a matte varnish spray or brush-on sealer. This preserves the ‘chalky’ texture look while keeping the paint safe from dust.
Make It Seasonal
Swap the carrot for a painted Easter egg or a heart shape to adapt this bunny figure for different holidays and gifts.
Place your finished bunny in a sunny spot to enjoy your handiwork.

TRACK YOUR CERAMIC JOURNEY
Capture glaze tests, firing details, and creative progress—all in one simple printable. Make your projects easier to repeat and improve.
Kawaii Mushroom People in a Mini Patch
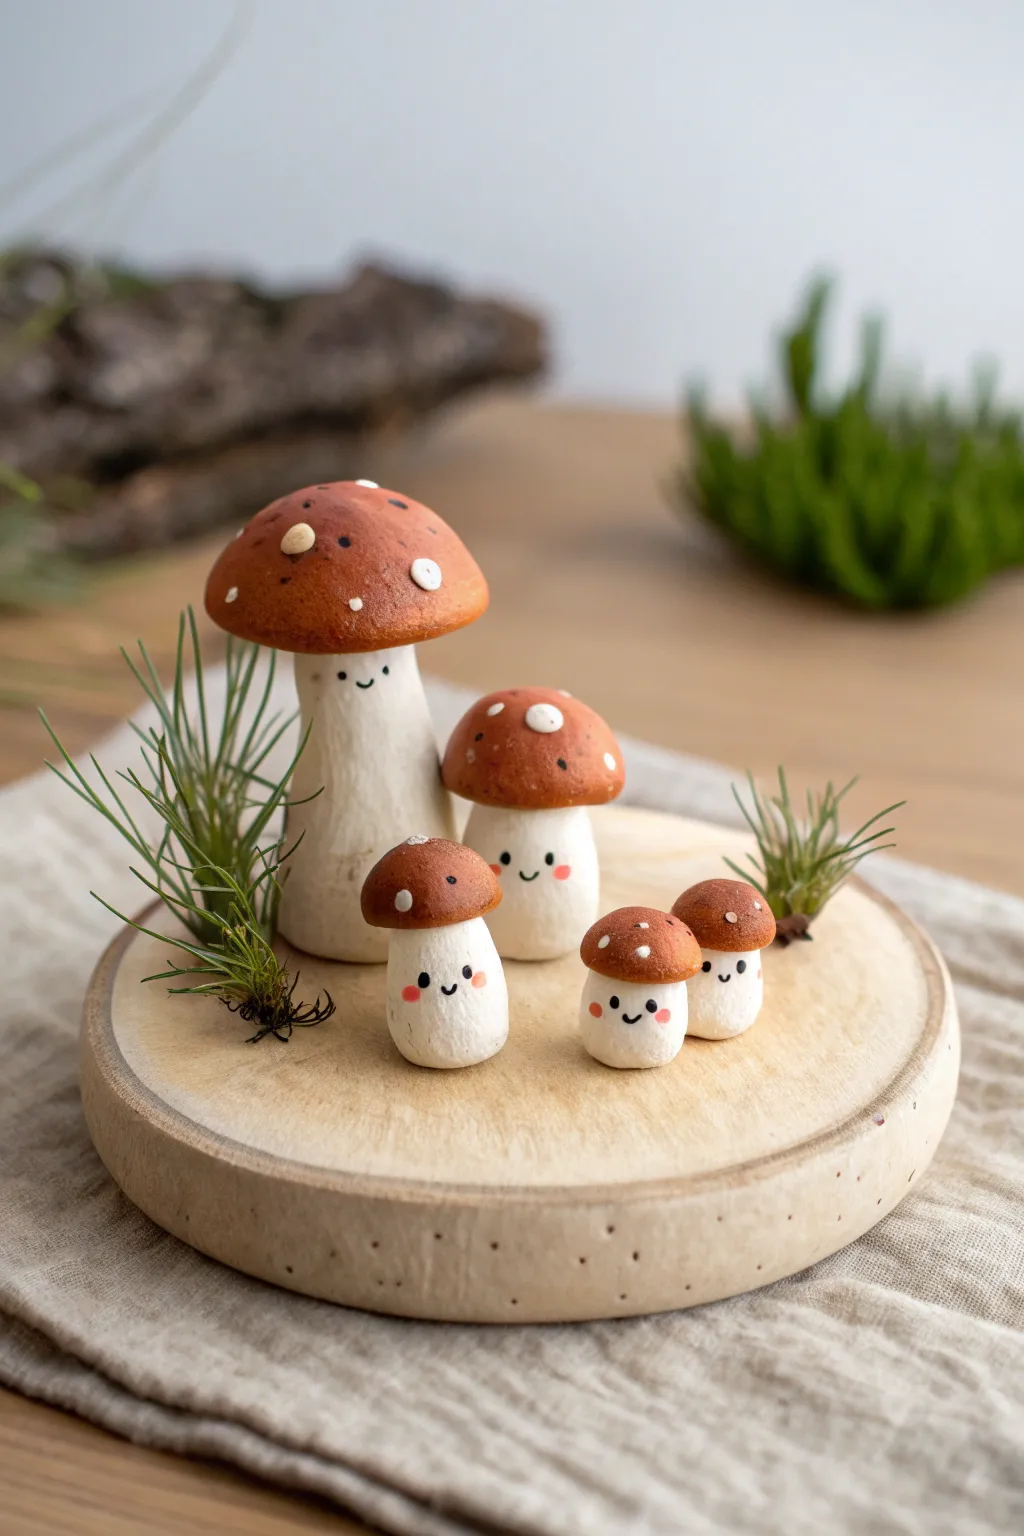
Create your own adorable woodland family with this set of five smiling mushroom figures arranged on a rustic wooden slice. These polymer clay miniatures feature warm, toasted brown caps, sweet painted expressions, and tiny faux air plant accents for a touch of greenery.
Step-by-Step
Materials
- Polymer clay (white and translucent)
- Acrylic paint (warm brown, terracotta, dark brown, black, white, pink)
- Round wooden slice (approx. 4-5 inches diameter)
- Small faux air plants or preserved moss
- Aluminum foil (for bulking)
- Mod Podge or satin varnish
- Sculpting tools (needle tool, ball stylus)
- Fine detail paintbrush (000 size)
- Super glue or strong craft glue
- Small piece of sandpaper
Step 1: Sculpting the Mushrooms
-
Prepare the Clay:
Begin by conditioning the white polymer clay until it is soft and pliable. For a slightly more natural, porcelain look, I sometimes mix in a tiny pinch of translucent clay with the white. -
Shape the Stems:
Roll out five cylinders of clay in varying sizes—one large (about 2 inches tall), one medium, and three quite small. Taper the tops slightly so they are narrower than the base. -
Add Texture:
Gently gently roll the stems against a piece of fine sandpaper or dab them with a stiff toothbrush to create a subtle, organic texture rather than a perfectly smooth surface. -
Form the Caps:
Create five balls of white clay corresponding to the stem sizes. Flatten the bottom of each ball and gently curve the top to creating a dome shape. The largest cap should overhang its stem significantly. -
Assemble the Figures:
Press the stems firmly into the underside of the caps. If the clay isn’t sticking, use a drop of liquid clay or ‘Bake and Bond’ to secure the connection. -
Refine the Connection:
Smooth the seam where the stem meets the cap slightly, but keep a distinct lip so the cap looks separate. Ensure the bottoms are completely flat so they will stand upright later. -
Baking:
Place your five mushrooms on a ceramic tile or baking sheet. Bake according to your specific clay package directions (usually around 275°F/135°C for 15-30 minutes). Let them cool completely before painting.
Uneven Standing?
If a mushroom wobbles after baking, rub the bottom against a sheet of rough sandpaper placed on a flat table until the base is perfectly level.
Step 2: Painting and Detailing
-
Base Coat the Caps:
Mix a warm brown acrylic paint with a touch of terracotta. Paint the tops of all the mushroom caps, extending slightly under the rim. You can sponge the paint on for a textured, ‘toasted’ look. -
Shading:
While the base coat is still slightly tacky, dab a darker brown very lightly near the very top center of the caps to add depth and roundness. -
Adding Spots:
Using a small dotting tool or the back of a paintbrush, add irregular dots to the caps using a mix of white and cream paint. Vary the sizes for a natural appearance. -
Painting Faces:
Use your finest detail brush and black paint to add tiny, wide-set eyes. For the mouth, paint a small, delicate ‘u’ shape between the eyes. -
Rosy Cheeks:
Dip a ball stylus or cotton swab into watered-down pink paint. Apply soft circular blushes under the eyes to give them their kawaii personality. -
Sealing:
Once the paint is fully dry, coat the caps with a satin varnish to make them look slightly dewy. Leave the stems matte for contrast.
Textured Caps
Before baking, gently press a piece of real sponge onto the unbaked clay caps. When painted later, the paint will settle into the pores.
Step 3: Creating the Scene
-
Prepare the Base:
Take your wooden slice and ensure the surface is clean. Arrange your mushroom family without glue first to find the best composition. -
Glue the Figures:
Apply a dab of super glue or strong craft adhesive to the bottom of each stem and press them firmly onto the wood slice. -
Add Greenery:
Tuck small sprigs of faux air plants or preserved moss around the base of the larger mushrooms. Use a tiny dot of glue to secure them in place. -
Final Touches:
Check for any visible glue strings and remove them with tweezers. Ensure all figures are stable on the base.
Place your delightful mushroom patch on a desk or shelf to bring a smile to your face every day
Smiling Fruit Figures With Simple Faces

Brighten up your desk or shelf with this adorable polymer clay strawberry, featuring a sweet smile and realistic seed textures. This miniature fruit figure captures a perfect balance between cartoonish charm and tactile detail, making it a delightful project for beginners.
Step-by-Step Tutorial
Materials
- Red polymer clay
- Green polymer clay (leaf shade)
- Black acrylic paint
- White acrylic paint
- Needle tool or toothpick
- Ball stylus tool (small)
- Small detail paintbrush
- Clay roller or pasta machine (optional)
- Oven for baking
- Gloss glaze (optional)
Step 1: Shaping the Base
-
Prepare the red clay:
Start by conditioning a chunk of red polymer clay until it is soft and pliable. Roll it into a smooth ball between your palms to remove any cracks or lines. -
Form the strawberry shape:
Gently taper the bottom of the red ball to create a rounded cone shape. The top shoulders should remain broad and rounded, mimicking the natural shape of a plump strawberry. -
Flatten the base:
Tap the bottom point of your cone gently against your work surface. This creates a small flat area so your figure stands upright securely without wobbling. -
smooth imperfections:
Use your finger to gently smooth out any fingerprints on the surface. If the clay gets too warm and sticky, I like to let it sit for a few minutes before proceeding.
Seed Depth Tip
When making seed holes, angle your tool slightly upward rather than straight in. This creates a teardrop-shaped hole that catches light better.
Step 2: Adding Texture & Details
-
Create the seeds:
Using a needle tool or a toothpick, press small indentations all over the surface of the strawberry. Press gently but deep enough to create a shadow. -
Refine the texture:
Try to space the seed indentations somewhat evenly, but don’t worry about perfect symmetry; a little randomness looks more natural. -
Prepare the leaves:
Condition a small amount of green clay. Divide it into 4 or 5 tiny pea-sized balls. -
Shape the leaves:
Flatten each green ball into a teardrop shape using your fingers. Use your needle tool to press a central vein line down the middle of each leaf for added realism. -
Attach the calyx:
Arrange the green leaves in a star pattern on top of the red strawberry body. Press them down gently so they adhere well to the red clay. -
Make the stem:
Roll a tiny cylinder of green clay for the stem. Place it right in the center where all the leaves meet, blending the bottom of the stem slightly into the leaves. -
Create face indentations:
Before baking, use a small ball stylus to deeper press two small sockets where you want the eyes to sit. This helps guide your painting later.
Freckle Fun
Mix a tiny bit of brown paint into glaze and wash it over the strawberry before sealing to fill the seed holes, making them pop like real seeds.
Step 3: Baking & Finishing
-
Bake the figure:
Bake your creation according to your specific clay package instructions. Usually, this is around 275°F (135°C) for 15-30 minutes depending on thickness. -
Cool down:
Let the strawberry cool completely before you start painting. Painting on hot clay can make the paint dry clumpily. -
Paint the eyes:
Dip a fine detailing brush or the tip of a toothpick into black acrylic paint. Carefully fill in the eye indentations you made earlier to create two solid black ovals. -
Add the smile:
Using the very tip of your finest brush or a toothpick, draw a tiny, thin ‘U’ shape between the eyes for the mouth. -
Add highlights:
Once the black paint is fully dry, dip a toothpick into white paint. Dot a tiny speck of white onto the top corner of each black eye to bring the character to life. -
Seal properly:
If you want a shiny finish like a fresh fruit, apply a thin coat of gloss glaze over the red part of the strawberry, avoiding the green leaves for a matte texture contrast.
Place your little fruit friend near a window plant for the perfect cheerful companion
Cheerful Veggie Figures as a Little Gang
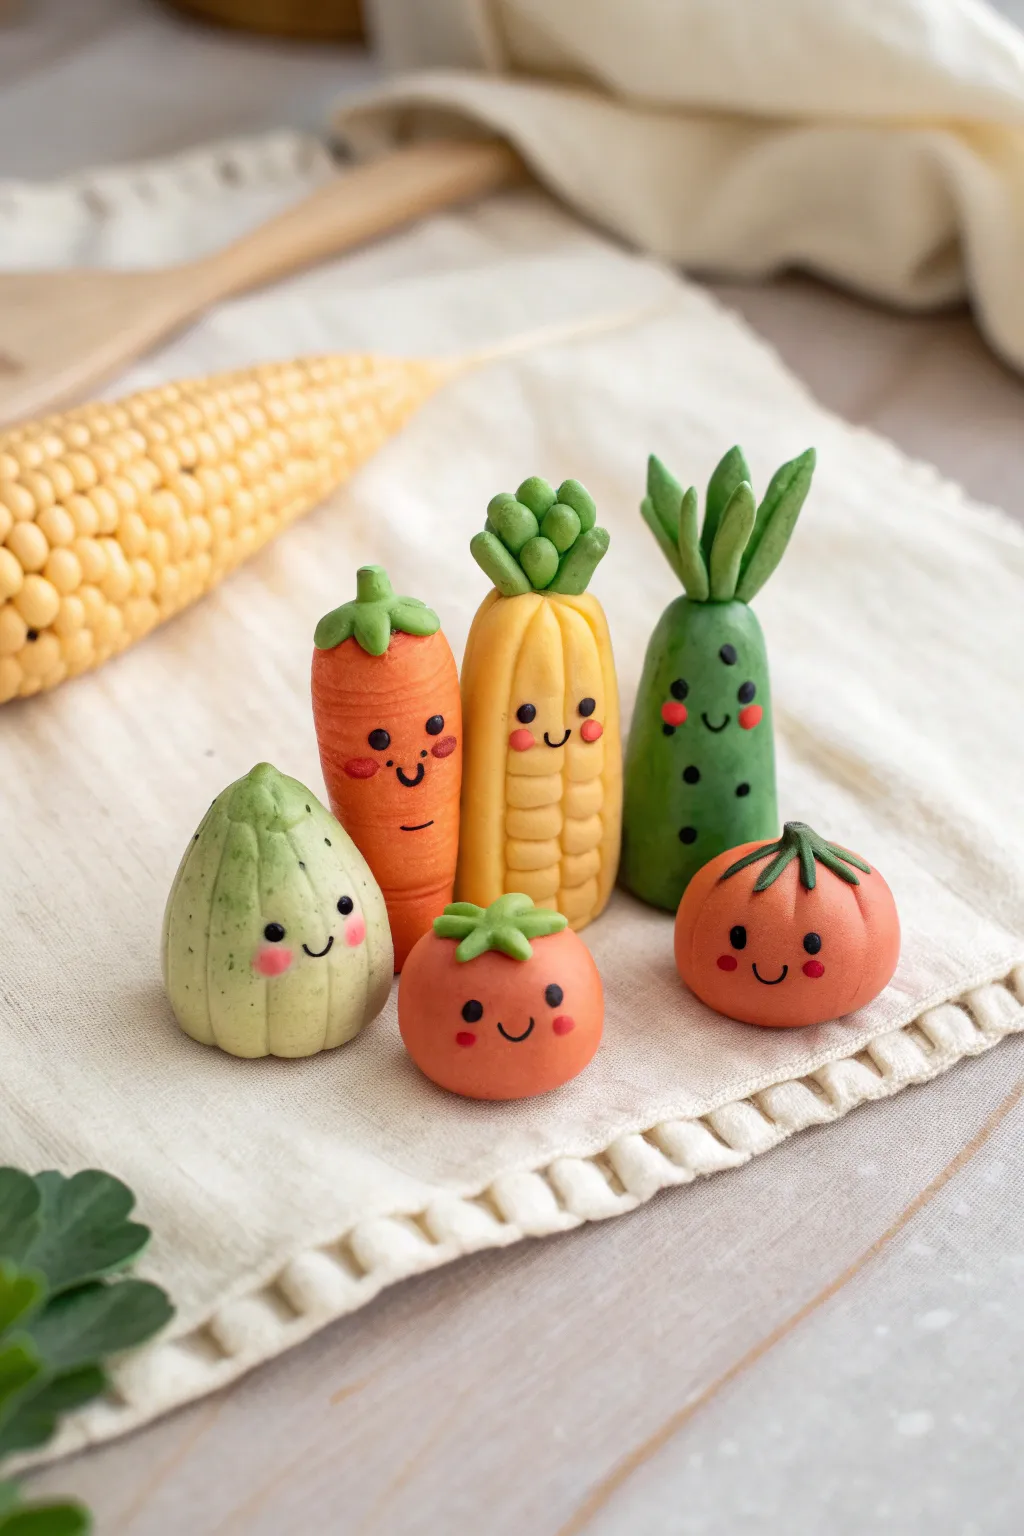
Bring your kitchen to life with this adorable set of smiling vegetable friends, featuring friendly faces and vibrant colors. This project uses polymer clay to sculpt a cheerful carrot, corn, cucumber, gourd, and a pair of tomatoes that look cute enough to eat—but don’t.
How-To Guide
Materials
- Polymer clay (orange, yellow, light green, dark green, red, pale green)
- Black liquid clay or fine-tip black acrylic marker
- Pink chalk pastel or blush
- Assorted clay sculpting tools (needle tool, ball tool, knife)
- Small clean paintbrush
- Baking sheet and parchment paper
- Optional: Gloss glaze for eyes
Step 1: Sculpting the Root Vegetables
-
Shape the Carrot:
Start with a cylindrical log of orange clay, tapering it gently towards the bottom to create a carrot shape. Flatting the top slightly gives you a place to attach the greens later. -
Texture the Carrot:
Using a dull knife tool or a needle, gently press horizontal lines across the orange body to mimic the natural ridges found on carrots. -
Add Carrot Greens:
Create a small, flat star shape from green clay and press it onto the flat top of the carrot. Add a tiny green stem emerging from the center. -
Form the Cucumber:
Roll a log of dark green clay that is slightly thicker at the bottom than the top. Smooth out any fingerprints to keep the surface sleek. -
Form Cucumber Leaves:
Fashion three or four long, pointed leaves from the same green clay and attach them vertically to the top of the cucumber’s head, pressing firmly to bond them.
Clean Hands, Clean Clay
White and pale green clay pick up dust easily. Keep a pack of baby wipes nearby and clean your hands and tools thoroughly before switching to lighter colors.
Step 2: Creating the Corn and Gourd
-
Mold the Corn Cob:
Shape yellow clay into a tall, oblong cylinder with a rounded top. This will serve as the base for your corn kernels. -
Add Corn Kernels:
Instead of rolling individual balls, use a knife tool to score a grid pattern across the yellow body. Deepen the horizontal and vertical lines to create the illusion of individual kernels. -
Top the Corn:
Roll several small balls of light green clay and stack them in a cluster on top of the yellow cob to represent the husk tuft. -
Shape the Gourd:
Take pale green clay and roll it into a teardrop shape with a wide bottom and a pointed top. I like to gently press vertical indentations around the shape to give it a segmented, pumpkin-like look.
Step 3: Making the Tomatoes
-
Roll the Tomatoes:
Create two round balls from red or reddish-orange clay. Make one slightly larger than the other for variety. -
Indent the Tops:
Use a medium ball tool to press a small dimple into the very top of each tomato sphere. -
Attach Tomato Calyx:
Form tiny green stars for the leaves. Place one into the dimple of each tomato, bending the points of the star down to hug the curve of the fruit.
Toppling Veggies?
If your tall figures (like the corn or cucumber) won’t stand, gently tap the bottom of the raw clay figure against your table to create a wider, flat base.
Step 4: Bringing Faces to Life
-
Mark Eye Positions:
Before adding color, gently mark where the eyes will go with a needle tool to ensure they are level and symmetrical. -
Add Cheeks:
Dip a soft, dry brush into shaved pink chalk pastel or blush. Gently dust small circles onto the clay cheeks below the eye markings for a soft, rosy glow. -
Bake carefully:
Preheat your oven according to the clay manufacturer’s instructions. Place all figures on parchment paper and bake. Let them cool completely before proceeding. -
Draw Faces (Option 1):
Once cool, use a fine-tip black acrylic marker to draw simple dot eyes and tiny smiles. Add small freckles to the cucumber for extra character. -
Apply Faces (Option 2):
Alternatively, you can use tiny bits of black clay for eyes and mouths before baking, but paint often gives a finer ‘kawaii’ expression. -
Finishing Touches:
If desired, add a tiny dot of white paint to the black eyes for a ‘sparkle’ highlight and seal the eyes with a drop of gloss varnish.
Set your little veggie gang on a windowsill or shelf to brighten up your room with their contagious smiles
Dessert Mascot Figures With Sprinkles and Swirls
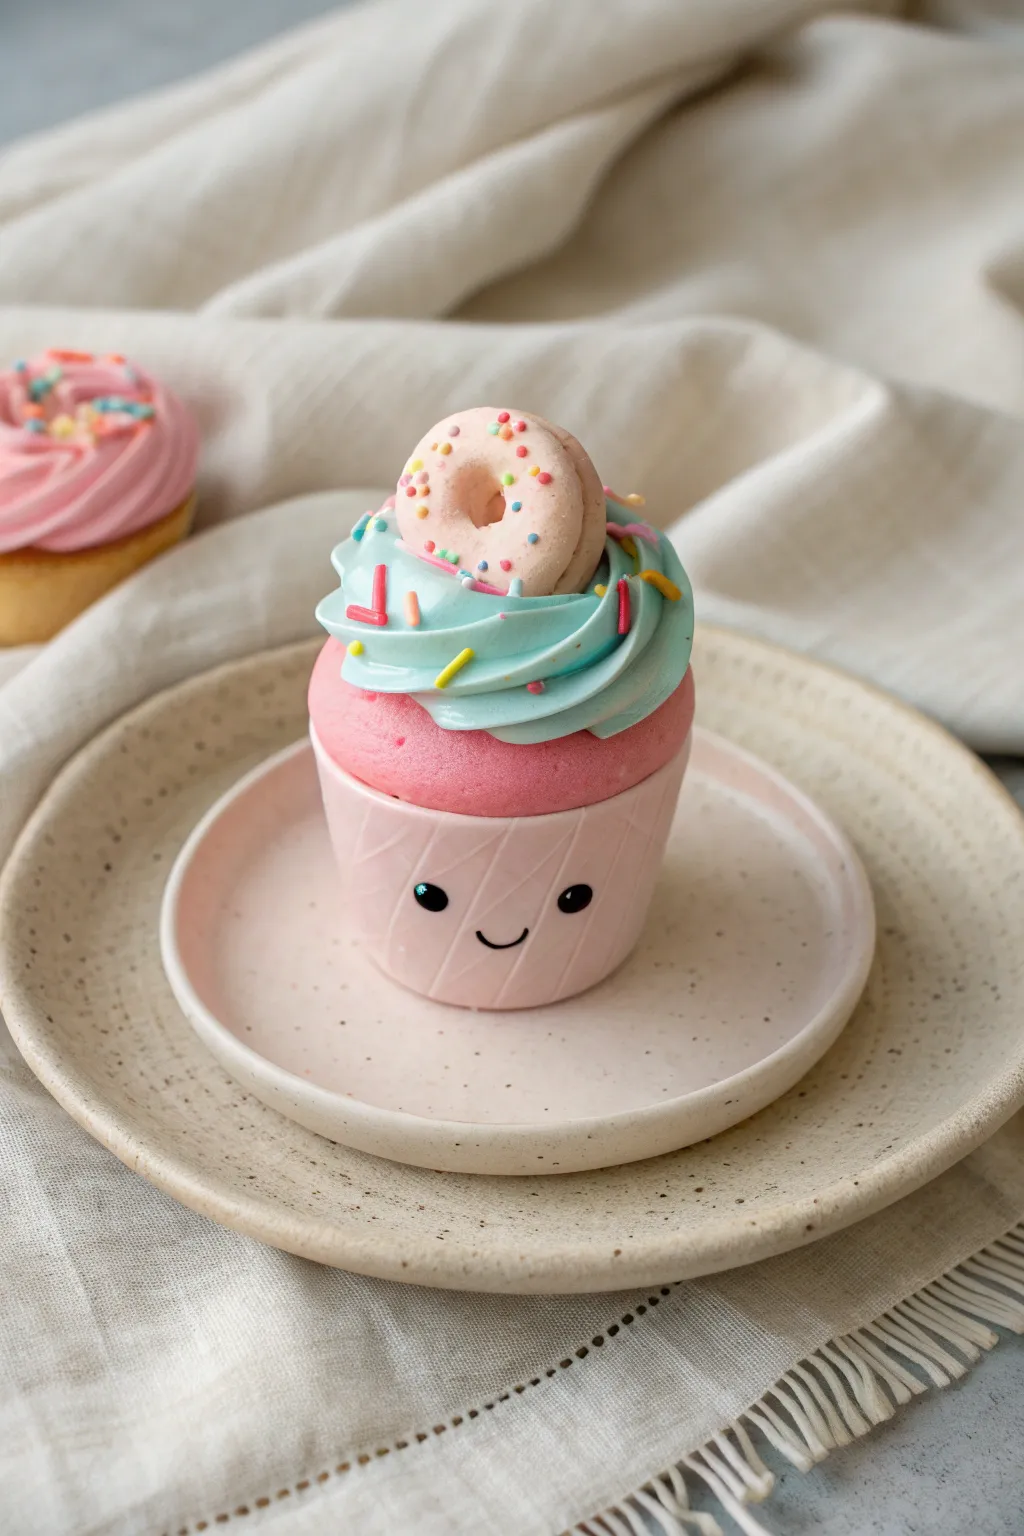
This adorable anthropomorphic cupcake captures the sweetness of a bakery treat with the personality of a tiny friend. Featuring a textured sponge, swirled frosting, and a cheery donut hat, this project combines simple shaping techniques with charming details.
Detailed Instructions
Materials
- Polymer clay: Light pink
- Polymer clay: Bright pink (for the sponge)
- Polymer clay: Light blue (for frosting)
- Polymer clay: Beige (for the donut)
- Acrylic paint: Black
- Soft chalk pastels or powdered pigment (pink)
- Various clay sprinkles (pre-baked or cut clay bits)
- Texturizing tool (needle tool, stiff toothbrush, or balled foil)
- Detailing tool or dotting tool
- Clay blade or knife
- Oven for baking
Step 1: Shaping the Base
-
Form the cup:
Begin by conditioning a sphere of light pink clay until it is pliable. Roll it into a smooth ball and then gently flatten the bottom and top to create a cylinder shape that tapers slightly toward the base, resembling a baking cup. -
Add texture lines:
Using a clay blade or the back of a butter knife, gently press diagonal indentations around the side of the cup to mimic the folded paper of a cupcake liner. Keep the pressure light so you don’t warp the cylinder’s shape. -
Create the face:
Before adding the ‘cake’, decide where the front of your mascot is. Use a small dotting tool to gently press two shallow indents for the eyes and smile, mapping out the face placement.
Keep it Clean
Light clay acts like a magnet for dust! Keep baby wipes or rubbing alcohol nearby to clean your hands and tools often, especially before handling the white or light pink clay parts.
Step 2: Building the Cake Layer
-
Shape the sponge:
Take your bright pink clay and flatten it into a thick disc that is slightly wider than the top of your cup base. Place it on top of the cup, smoothing the edges downward so it looks like the batter created a slight ‘muffin top’ overhang. -
Texturize the surface:
This is a crucial step for realism. Take a stiff toothbrush, a ball of aluminum foil, or a needle tool and stipple the surface of the bright pink clay repeatedly. This creates that fluffy, aerated sponge cake texture. -
Add tonal depth:
I like to scrape a little pink chalk pastel into powder and brush it lightly over the textured ‘sponge’ area. This enhances the depth of the texture before we add the frosting.
Frosting Troubles?
If your frosting snake keeps breaking or cracking while you coil it, the clay isn’t conditioned enough. Add a drop of clay softener or baby oil and knead it until it’s super stretchy.
Step 3: Frosting and Decoration
-
Prepare the frosting:
Roll a snake of light blue clay. You want it to be thick—about half the diameter of your pinky finger—and taper it to a point at one end. -
Swirl the frosting:
Starting from the outer edge of the pink sponge layer, coil the blue clay snake inwards and upwards. Gently press it down as you go to ensure it adheres to the cake below. -
Refine the swirls:
If the snake looks too round, use a sculpting tool to gently press indentations along the sides of the coil, giving it that classic piping-bag definition. -
Apply base sprinkles:
While the blue clay is still soft, gently press elongated ‘sprinkle’ shapes of pink, yellow, and red clay into the frosting. You can also use pre-made polymer clay sprinkles for this step.
Step 4: The Donut Topper & Face
-
Shape the donut:
Form a small ball of beige clay and flatten it into a thick disk. Use a small round tool or the end of a paintbrush to punch a hole strictly through the center to create the donut shape. -
Glaze the donut:
Take a tiny amount of very light pink clay, flatten it very thinly, and drape it over the top of the donut. Use a needle tool to drag the edges down slightly so it looks like dripping glaze. -
Decorate the donut:
Add tiny micro-sprinkles to the top of the donut glaze. Press them in securely so they don’t fall off after baking. -
Mount the donut:
Place the finished mini donut at a jaunty angle right on top of your blue frosting swirl. Press down gently to secure the bond. -
Bake the figure:
Follow the baking instructions on your specific brand of polymer clay. Usually, this means baking at 275°F (130°C) for about 15-20 minutes depending on thickness. Let it cool completely. -
Paint facial features:
Once cool, use a fine detail brush or a paint pen to fill in the eye indents with black acrylic paint. Paint a simple ‘U’ shape for the smile. -
Add eye highlights:
Dip the very tip of a toothpick into white paint and place a tiny dot in the upper corner of each black eye. This ‘catchlight’ brings the character to life immediately.
Place your finished mascot on a desk or shelf to add a permanent touch of sweetness to your room
Tiny Ghost Figures With Mini Pumpkins
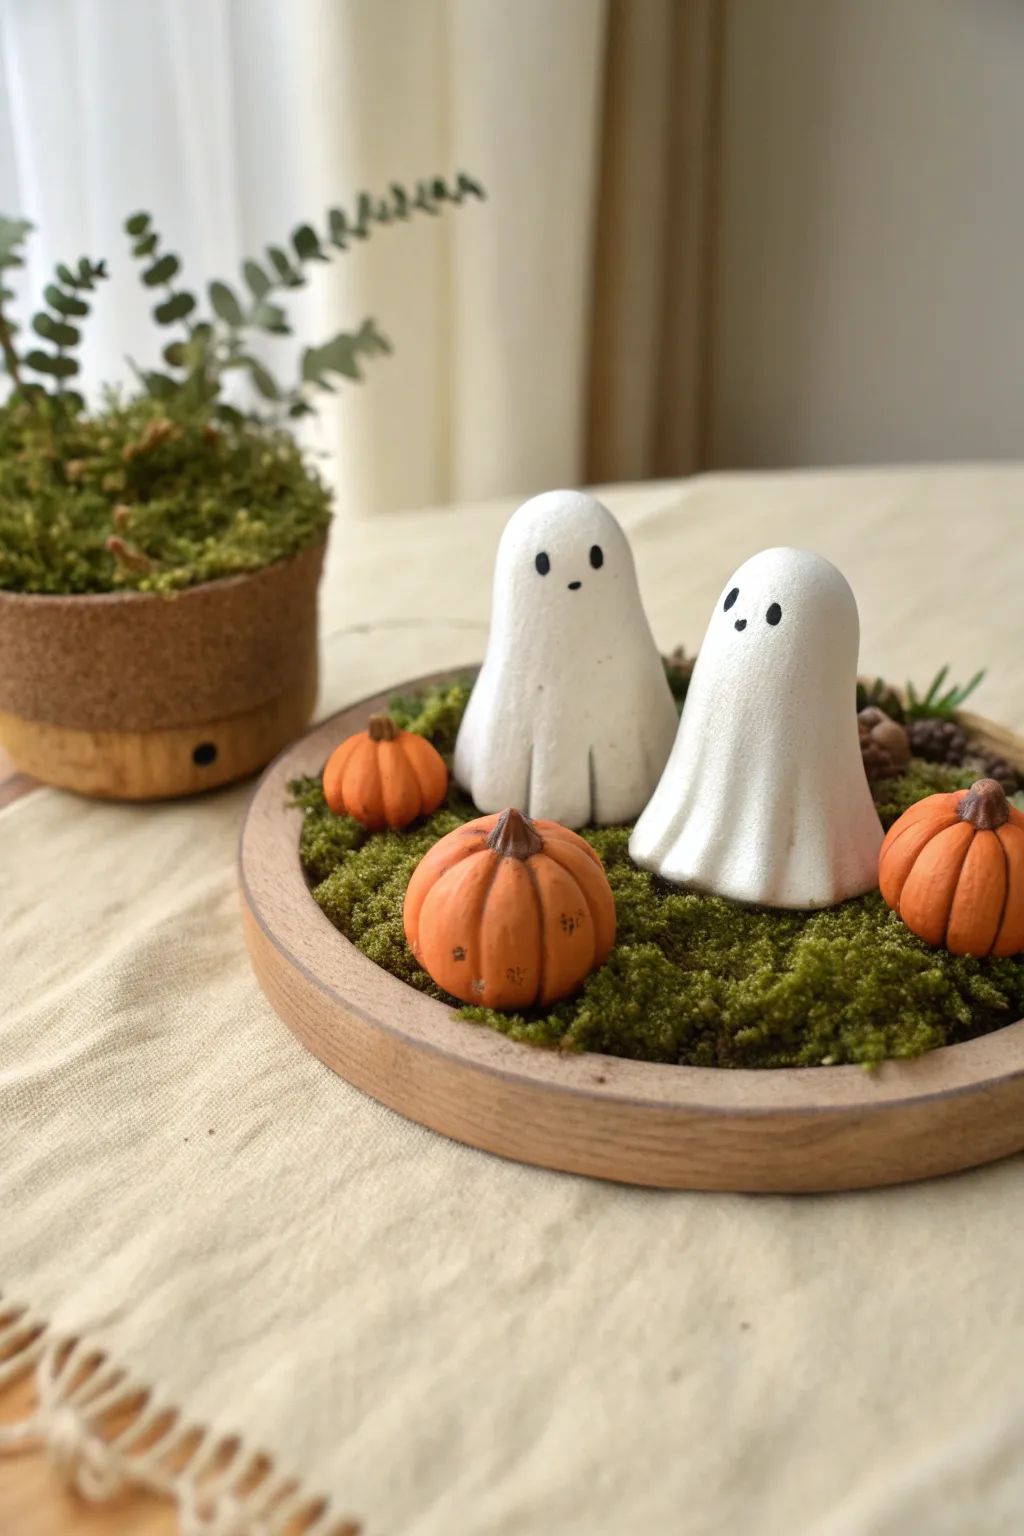
These charming little ghosts bring a touch of whimsical Halloween spirit to any table setting without being too scary. Perched on a mossy base alongside miniature pumpkins, this sculpted scene captures a cozy, autumnal vibe perfectly.
Step-by-Step
Materials
- White polymer clay
- Orange polymer clay
- Brown polymer clay
- Black acrylic paint
- Small detail paintbrush or dotting tool
- Sculpting tools (needle tool, ball stylus)
- Wooden tray or coaster (approx. 4-6 inches)
- Preserved moss (various shades of green)
- Craft glue or hot glue gun
- Aluminum foil (for armature)
- Matte varnish (optional)
- Oven for baking
Step 1: Sculpting the Ghosts
-
Prepare the core:
Start by crumpling a small piece of aluminum foil into a cone shape. This saves clay and helps the figures bake evenly. Make one slightly taller than the other for variety. -
Cover with clay:
Condition your white polymer clay until pliable, then roll it into a sheet about 1/4 inch thick. drape the clay over your foil cone, smoothing the seams gently with your thumbs. -
Form the shape:
Gently pull the bottom edges of the clay outward create a flowy, draped fabric look. I like to give the base a little wiggle so it looks like the ghost is floating just above the ground. -
Refine the surface:
Use a smooth tool or your finger to erase any fingerprints. The surface should look like a smooth sheet. Create soft folds near the bottom hem by pressing indentations with a sculpting tool. -
Create the face:
Using a small ball stylus, gently press two indentations where the eyes will go. This helps the paint sit better later.
Step 2: Crafting the Pumpkins
-
Roll the base shapes:
Take your orange polymer clay and roll three small balls varying slightly in size. Slightly flatten the top and bottom of each ball. -
Add ribs:
Use a needle tool or the side of a toothpick to press vertical lines around the pumpkin from top to bottom to create the classic ribbed pumpkin texture. -
Shade the pumpkins:
For a realistic touch, you can lightly brush some brown pastel dust into the crevices you just made, though this is optional. -
Make the stems:
Roll tiny snakes of brown clay. Cut small pieces and attach them to the center of each pumpkin, twisting the top slightly for a natural, organic look. -
Bake the clay:
Place your ghosts and pumpkins on a baking sheet. Bake according to the manufacturer’s instructions on your specific package of clay (usually 275°F for 15-30 minutes).
Fixing Cracks
If your clay cracks while baking, mix a tiny bit of raw clay with liquid clay or baby oil to make a paste. Fill the crack, smooth it out, and re-bake for 10 minutes.
Step 3: Assembly & Finishing
-
Paint the eyes:
Once the ghosts are completely cool, dip a fine brush or a dotting tool into black acrylic paint. carefully dab two dots for eyes and a tiny dot for a mouth on each ghost. -
Prepare the base:
Take your wooden tray or coaster. Apply a generous layer of craft glue or hot glue to the inside surface. -
Add the moss:
Press clumps of preserved moss firmly into the glue. Mix different shades of green moss to create depth and a realistic forest floor texture. -
Attach the figures:
Apply a dab of glue to the bottom of your ghosts and nestle them securely into the moss. Position them slightly off-center for a dynamic composition. -
Place the pumpkins:
Glue the pumpkins around the ghosts. Try placing one near the front and a couple tucked towards the back or sides to balance the scene. -
Final touches:
Add tiny bits of dried florals or tiny pinecones if you have them to fill any gaps in the moss.
Glow Up
Use glow-in-the-dark polymer clay for the ghosts instead of plain white. They will look adorable in the daylight but reveal a spooky surprise when the lights go out.
Now you have a timeless little Halloween vignette to display year after year
Snowy Winter Buddy Figures With Hats
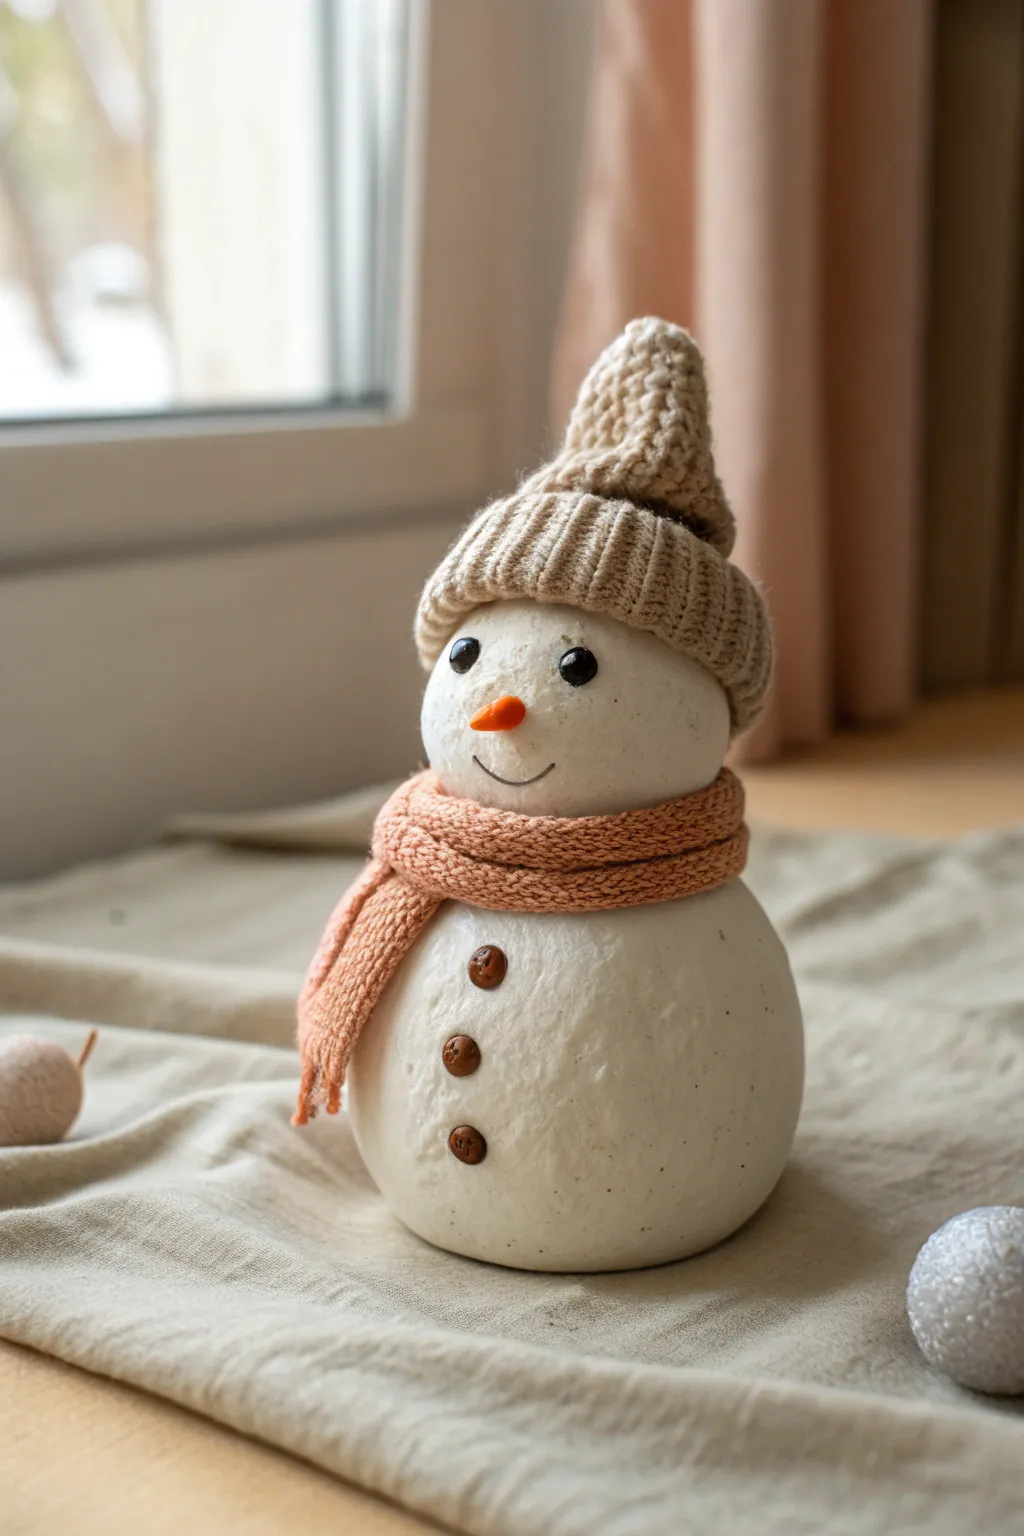
This adorable winter figurine combines the smooth, tactile nature of clay with the cozy warmth of real textiles. With its friendly expression and miniature winter accessories, this snowman makes a perfect shelf sitter or heartfelt holiday gift.
How-To Guide
Materials
- White polymer clay or air-dry clay (approx. 200g)
- Small amount of orange clay
- Small amount of brown clay
- Two small black beads (4-6mm)
- Texture tool (toothbrush or ball of foil)
- Basic sculpting tools (needle tool, smoother)
- Miniature beige knit hat
- Miniature peach/orange knit scarf
- Fine-grit sandpaper
- Clear matte varnish
- Super glue or strong craft glue
- Fine-tip black permanent marker or acrylic paint
Step 1: Sculpting the Base
-
Condition the clay:
Start by kneading your white clay thoroughly until it is soft, pliable, and free of any air bubbles. If the clay feels too stiff, warm it up in your hands for a few minutes. -
Form the body:
Roll about two-thirds of the white clay into a large, smooth ball for the snowman’s lower body. Gently flatten the bottom against your work surface so it stands upright securely. -
Create the head:
Roll the remaining third of the white clay into a slightly smaller sphere for the head. Place it on top of the body to check proportions, ensuring it looks balanced but slightly rounded and cute. -
Secure the pieces:
Once happy with the size, join the head to the body. You can use a small piece of toothpick inserted halfway into the body as an internal armature, then press the head down onto it. Blend the seam slightly if you want a fused look, or leave it distinct. -
Add surface texture:
To mimic the look of packed snow, gently tap the entire surface of the white clay with an old toothbrush or a crumpled ball of aluminum foil. This removes fingerprints and adds a lovely organic matte finish.
Step 2: Adding Clay Details
-
Make the carrot nose:
Take a tiny pea-sized amount of orange clay and roll it into a small cone. Pinch the wide end slightly to flatten it. -
Attach the nose:
Press the orange cone onto the center of the face. Curve the tip slightly upward for a cheerful expression. -
Create the buttons:
Roll three tiny balls of brown clay. Flatten them into small discs and press four tiny holes into each using a needle tool to simulate buttonholes. -
Place the buttons:
Evenly space the three brown buttons down the center of the snowman’s lower body, pressing them gently into the textured surface so they bond well. -
Insert the eyes:
Press the two black beads into the face above the nose. Push them deep enough so they look embedded, rather than just resting on the surface. If using air-dry clay, remove them, add a dab of glue, and replace them. -
Cure the figure:
Bake the figure according to your polymer clay package instructions (usually 275°F/130°C for 15-30 minutes) or let air-dry clay harden fully for 24-48 hours.
Snowy Sparkle Secret
Before baking or drying, lightly dust the white clay with clear embossing powder or fine white glitter. It melts slightly, creating an icy, glistening snow effect.
Step 3: Finishing Touches
-
Draw the smile:
Once the figure is completely cool or dry, use a fine-tip black permanent marker to carefully draw a simple, curved line for the smile just below the nose. -
Seal the surface:
Apply a thin layer of clear matte varnish over the clay parts to protect the texture and give it a finished, professional look. Avoid painting over the knitted accessories if you’re glueing them on later. -
Dress the snowman:
Wrap the miniature peach scarf around the neck area. Tie it loosely so one end hangs down the front, just to the left of the buttons. -
Secure the scarf:
I like to add a tiny drop of super glue under the knot of the scarf to keep it perfectly draped and prevent it from slipping off. -
Add the hat:
Place the beige knit hat onto the head. Pull it down slightly so the brim sits just above the eyes, giving the snowman a cozy, bundled-up appearance.
Clay Picking Up Lint?
White clay shows every spec of dust! Keep a pack of baby wipes nearby to clean your hands frequently, and roll a piece of scrap clay over your palms first to pick up lint.
Now you have a charming winter companion ready to brave the cold on your mantelpiece
Plant Pot Pal Figures That Sit on Rims
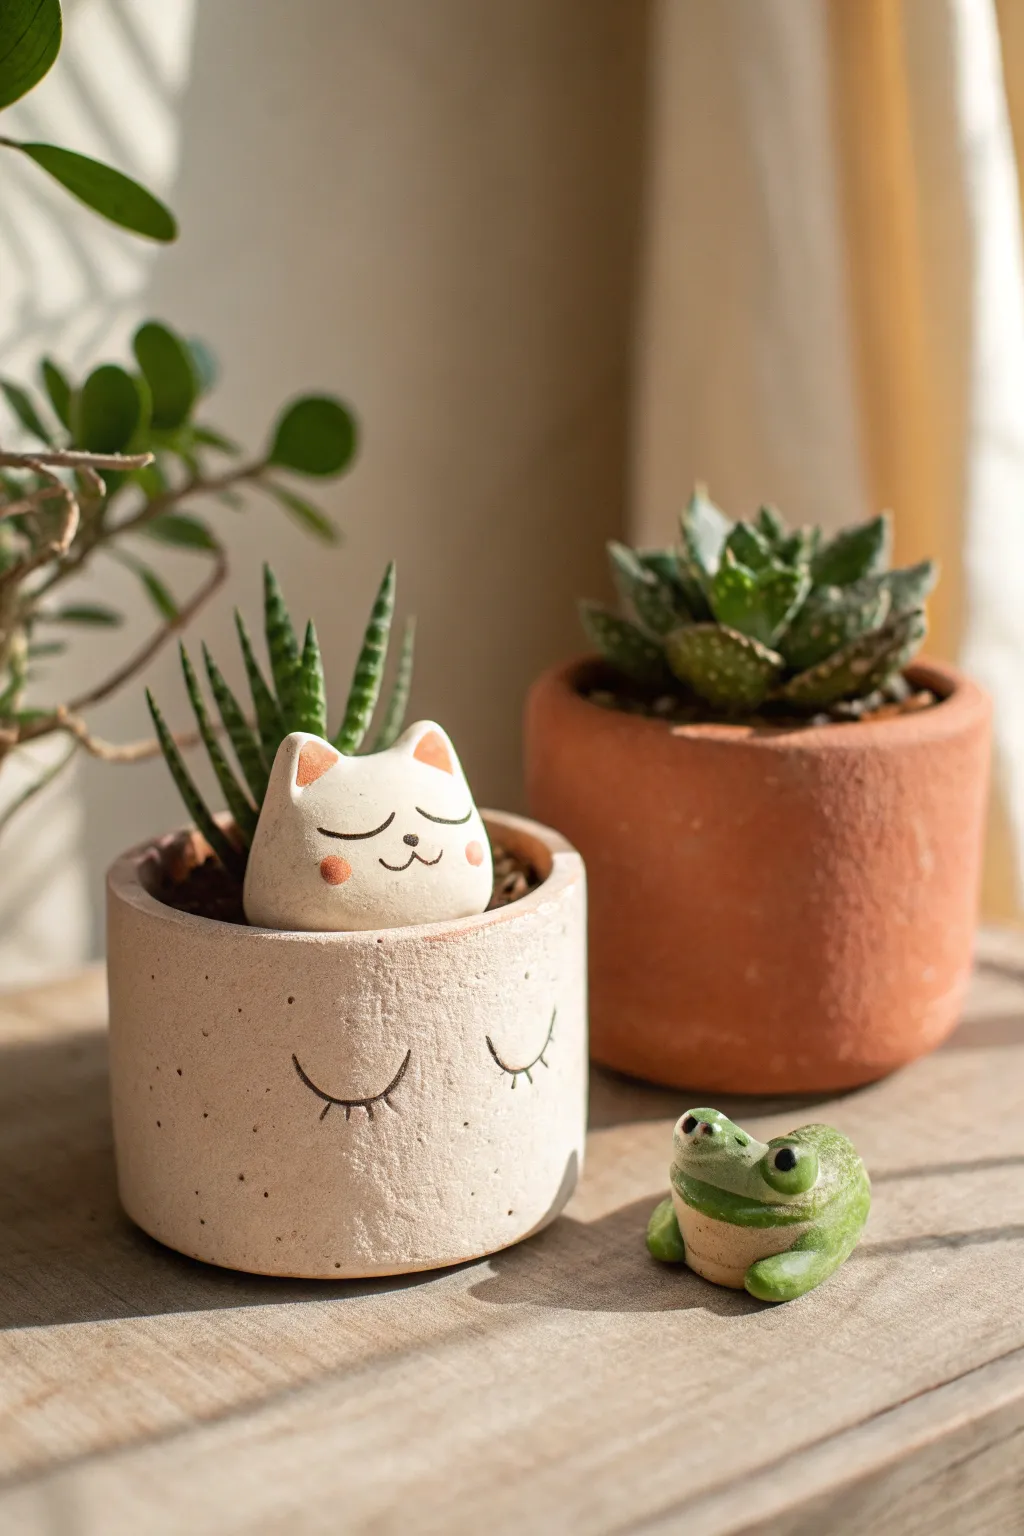
Bring your indoor garden to life with these adorable ceramic-style clay companions. This project guides you through sculpting a serene, sleeping cat head nestled in soil and a quirky little green frog that sits beside your favorite succulents.
Step-by-Step Guide
Materials
- Polymer clay (white, green, light beige)
- Acrylic paints (black, pink, white, moss green)
- Small detail paintbrushes (size 0 and 00)
- Clay sculpting tools (ball stylus, needle tool)
- Aluminum foil (for armature core)
- Oven or toaster oven (for curing polymer clay)
- Matte garnish or glaze (optional)
- Fine-grit sandpaper
Step 1: Sculpting the Sleeping Cat
-
Create the core:
Start by crumpling a small piece of aluminum foil into a flattened sphere shape, about the size of a ping pong ball but slightly compressed. This saves clay and keeps the figure lightweight. -
Cover with clay:
Sheet out your white or light beige polymer clay to about 1/4 inch thickness. Wrap it completely around the foil core, smoothing the seams with your thumb until the surface is uniform. -
Shape the head:
Gently gently press the ball onto your work surface to flatten the bottom. Use your palms to smooth the top into a soft dome, refining the shape to mimic a resting cat head. -
Add the ears:
Pinch off two small, equal-sized triangles of clay. Attach them to the top of the head using a small blending tool or your finger to smooth the clay downward so the seams disappear. -
Refine the ears:
Use a small ball stylus to gently indent the front of each ear triangle, creating the inner ear cavity. Keep the edges soft and rounded for a cute, cartoony look.
Step 2: Sculpting the Frog Companion
-
Form the body:
Take a walnut-sized chunk of green clay. Roll it into a smooth ball, then flatten the bottom base so it sits stable. Pinch the sides slightly to suggest a wide, squat frog body. -
Add frog eyes:
Roll two small pea-sized balls of green clay. Attach them sitting high on top of the head, close together but distinct. Blend the clay at the connection point so they don’t fall off. -
Create the legs:
Roll two small logs of green clay for the back legs. Curve them into a ‘C’ shape and press them against the sides of the body, blending the upper thigh into the torso. -
Sculpt the mouth:
I find using a needle tool works best here to slice a wide, happy grin across the front of the face. Gently pull the clay upwards at the corners for a smile. -
Add the belly detail:
Take a tiny amount of beige clay, flatten it into an oval, and press it onto the chest area for a contrasting underside. -
Cure the clay:
Place both figures on a baking sheet. Bake according to your specific polymer clay manufacturer’s instructions (usually around 275°F for 15-30 minutes per 1/4 inch of thickness). Let them cool completely.
Clay Cracking?
If your clay cracks while smoothing, add a drop of clay softener or baby oil. Knead it thoroughly to restore flexibility before reshaping.
Step 3: Painting & Finishing Details
-
Sand for texture:
Once cool, lightly scuff the surface of your cat with fine-grit sandpaper. This mimics the rough, stone-like pottery texture seen in the inspiration photo. -
Paint the cat features:
Using a size 00 brush and black acrylic paint, carefully draw two drooping semi-circles for closed eyes and a small ‘w’ shape for the mouth. Keep lines thin and delicate. -
Add rosy cheeks:
Dip a fingertip or a dry brush into pink paint, dab most of it off, and gently stamp two circles beneath the cat’s eyes for a blushing effect. -
Color the cat ears:
Paint the inside of the triangular ears with a soft terracotta or orange-brown hue to add warmth. -
Detail the frog:
Paint the center of the frog’s eyes glossy black. Add tiny white highlight dots once the black is dry to make them look alive and wet. -
Final touches:
If desired, protect your work with a matte varnish. Avoid glossy finishes on the cat to maintain that natural ceramic aesthetic.
Make it Functional
Before baking, insert a stiff wire into the base of the cat head. After baking, this spike lets you anchor the head securely into the potting soil.
Nestle your new sleeping cat into the soil of an aloe plant and set the frog nearby to keep watch over your botanical collection.
Stackable Capsule Figures for Quick Collections
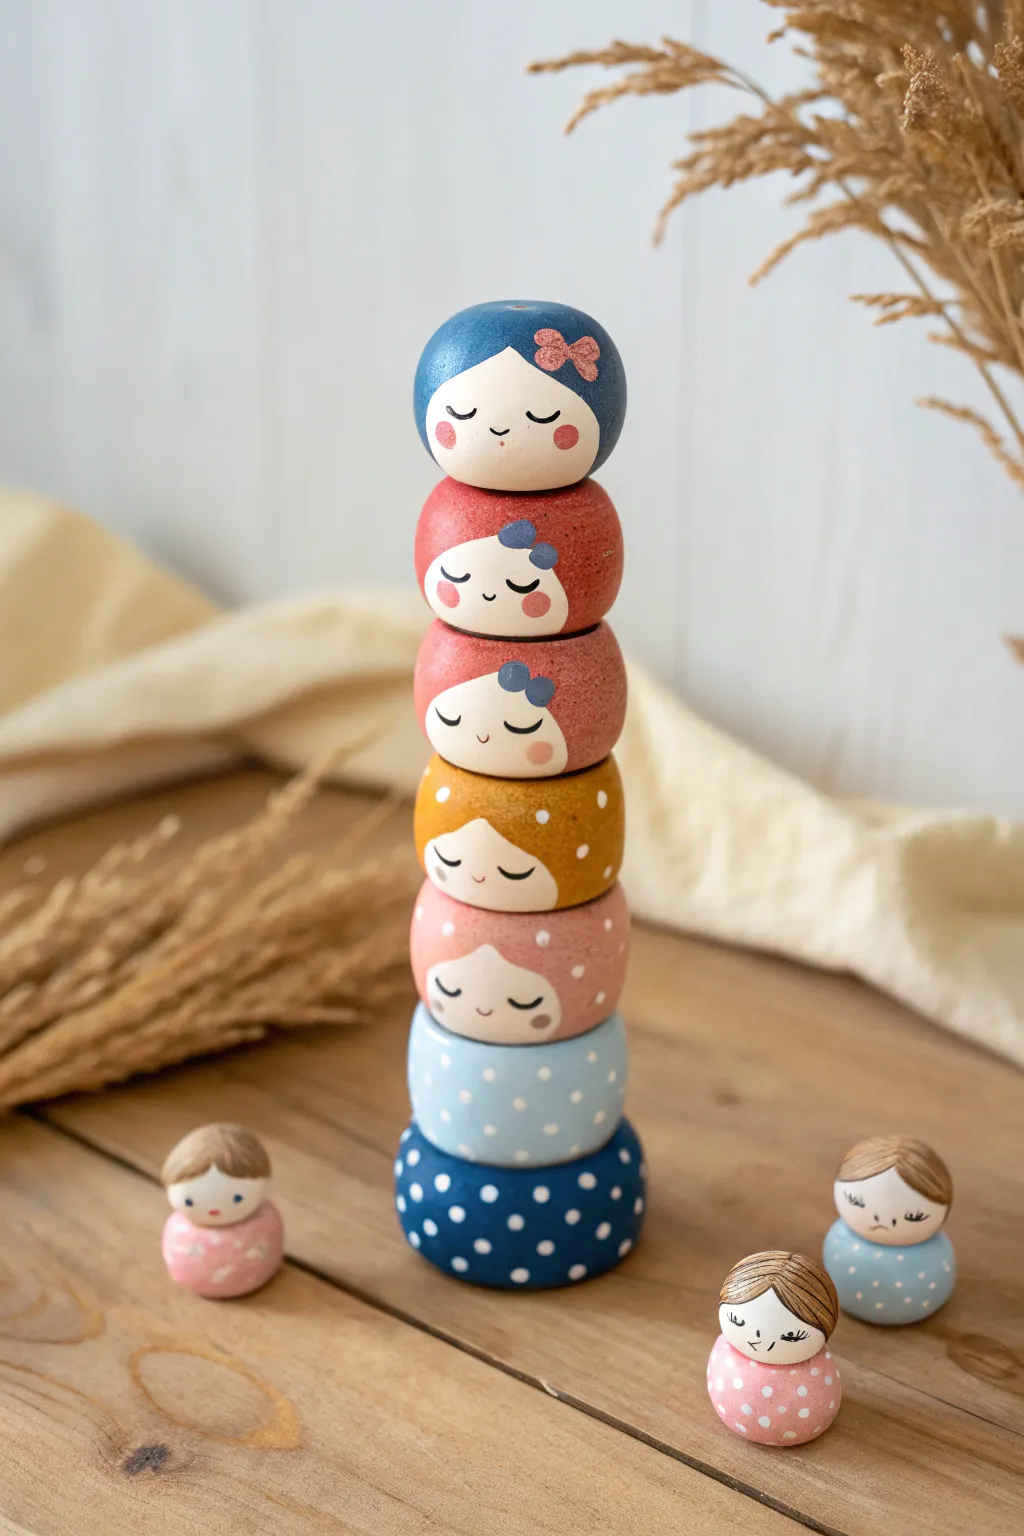
Create a charming set of stackable figures that double as a playful balancing game or sweet nursery decor. Using wood or clay beads, you’ll paint serene, sleepy expressions and soft patterns to bring these nesting-style characters to life.
Detailed Instructions
Materials
- Large wooden beads or spun cotton balls (approx. 1.5 – 2 inches diameter)
- Small wooden peg doll bodies (for the side characters)
- Acrylic paints (navy blue, red, coral, mustard yellow, light blue, white, flesh tone)
- Fine detail paintbrushes (sizes 00 and 1)
- Sponge dabber or small round foam brush
- Matte spray varnish or sealant
- Pencil
- Palette for mixing
Step 1: Preparation and Base Coating
-
Assess your beads:
If using wooden beads with large holes, you might need to fill one side with wood filler to create a flat top for the ‘head’ doll, or simply position the holes to be hidden at the bottom. Sand any rough spots lightly. -
Sketch the hairlines:
Using a pencil, lightly draw a curved line on the front of each bead to delineate the face area. Make this ‘face window’ slightly flattened at the bottom, resembling a wide U-shape. -
Mix the skin tone:
Create a soft, pale flesh tone using white with a tiny drop of peach or brown. Apply this to the face area you just sketched. -
Paint the hair/scarf colors:
Paint the rest of the bead (the back and the area surrounding the face) in your chosen colors. For the stack shown, use navy blue for the top, followed by red, coral, mustard, and dusty pink. -
Paint the body segments:
For the bottom two segments of the stack, paint the entire bead in a solid color (light blue and navy blue) since these represent the dresses rather than heads. -
Let it dry completely:
Ensure the base coats represent a solid, opaque layer. You may need a second coat for lighter colors like the yellow or pink.
Step 2: Adding Details and Personality
-
Draw the faces:
Once the skin tone is fully dry, use a very sharp pencil to lightly sketch the facial features. Position the eyes low on the face for a cute, youthful look. -
Paint the eyes and mouth:
Using a 00 brush and dark grey or brown paint (black can be too harsh), carefully paint the U-shaped closed eyes with little eyelashes. Add a tiny curved mouth or a simple dot. -
Add rosy cheeks:
Mix a translucent wash of pink paint or use a dry-brush technique. Gently dab two soft circles on the cheeks. I prefer to use my pinky finger to smudge this slightly for a natural blush effect. -
Detail the hair accessories:
On the ‘head’ beads, paint small bows or flowers near the hairline. Use contrasting colors like light blue on the red head, or pink on the navy head. -
Create the polka dots:
For the mustard head and height ‘dress’ segments, add polka dots. Dip the non-brush end of your paintbrush into white paint and stamp it onto the surface for uniform dots.
Stability Secret
To make stacking easier, adhere a small, flat magnet or a dab of beeswax inside the rim of each bead so they ‘grip’ each other gently.
Step 3: Finishing the Mini Dolls
-
Base coat the mini dolls:
For the small side figures, paint the round head portion in skin tone and the body portion in a solid color (pink, light blue, dusty blue). -
Paint the hair caps:
Paint hair onto the top of the small heads using brown paint, creating bangs or a side-swept look. -
Add mini faces:
Replicate the sleepy faces on a smaller scale. Keep it simple—just two lash lines and a tiny mouth. -
Pattern the mini bodies:
Add tiny white dots to the bodices of the small dolls to tie them into the main stack’s design theme. -
Seal the project:
Once all paint is cured (give it at least an hour), spray the entire set with a matte varnish. This protects the paint from chipping when the pieces are stacked and unstacked.
Shaky Hands?
If painting tiny eyelashes is difficult with a brush, use a superfine tip archival ink pen (0.05 size) after the base paint is 100% dry.
Enjoy arranging your new little family in different orders to change up their outfits and expressions
Mood Blob Figures With Different Expressions
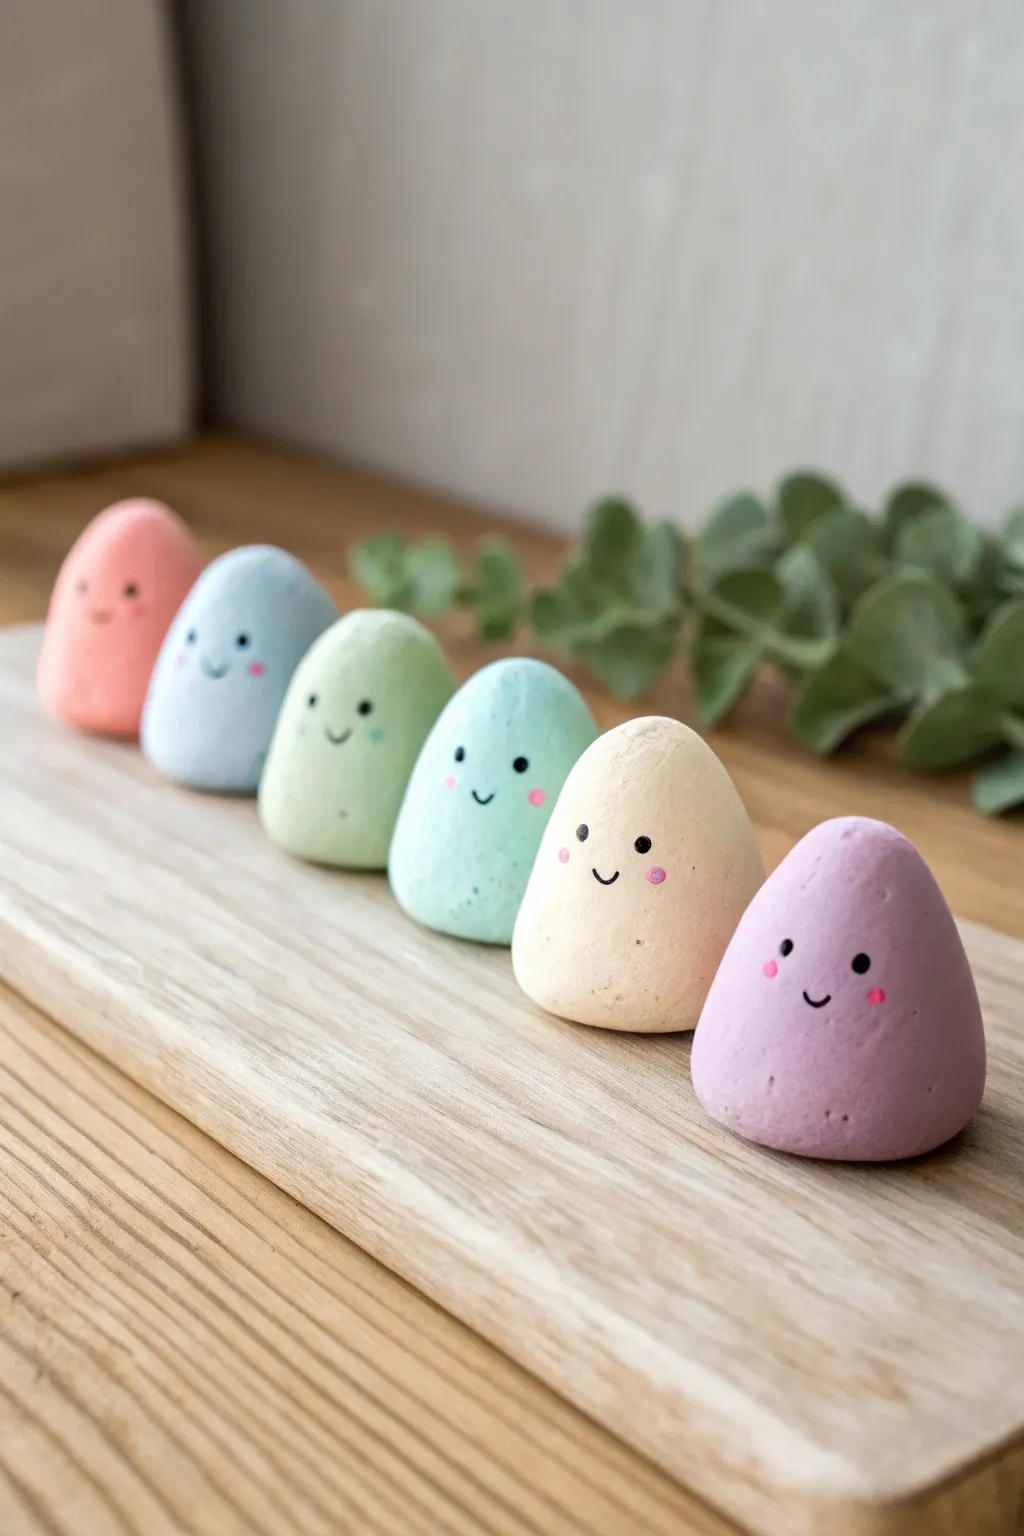
These charming little figures are the perfect introduction to working with clay, featuring a soft matte finish and simple, calming expressions. Their smooth, stone-like shapes and gentle pastel palette make them adorable desk companions or worry stones.
Step-by-Step Guide
Materials
- Air-dry clay (white) or polymer clay
- Acrylic paints (pastel set including coral, baby blue, mint, pale yellow, lavender)
- Fine-grit sandpaper (400-600 grit)
- Small round paintbrush (size 2 or 4)
- Ultra-fine tip black permanent marker or fine liner brush with black paint
- Dotting tool or toothpick
- Pink paint marker or pink acrylic paint
- Matte spray varnish
Step 1: Shaping the Clay
-
Portioning:
Begin by pulling off six equal-sized chunks of your white clay, each roughly the size of a walnut or a golf ball. -
Conditioning:
Knead each portion of clay thoroughly in your hands to warm it up and remove any air bubbles, ensuring the material is pliable and smooth. -
Rolling spheres:
Roll each piece between your palms to create a perfect sphere, applying gentle pressure to smooth out any creases or fold lines. -
Forming the teardrop:
Ideally, you want a shape halfway between an egg and a rounded pyramid. Gently roll the top half of the sphere slightly more to taper it, leaving the bottom wide and grounding the shape. -
Flattening the base:
Tap the bottom of each figure firmly against your work surface so they sit flat and stable without rocking. -
Smoothing the surface:
Dip your finger in a tiny bit of water and glide it over the clay to erase any fingerprints. The surface needs to be pristine for that stone-like effect. -
Drying or baking:
If using air-dry clay, let them sit for 24-48 hours until fully hardened. If using polymer clay, bake according to the package instructions and let cool completely.
Step 2: Painting and Details
-
Sanding:
Once fully cured, use fine-grit sandpaper to gently buff the surface. This removes any final imperfections and creates a better tooth for the paint to adhere to. -
Base coat application:
Paint each blob a different pastel color. I find it helps to hold the figure by the top and paint the bottom half first, let it dry, then flip it to paint the top. -
Second coat:
Apply a second layer of paint to ensure solid, opaque coverage without brushstrokes showing through. Allow this to dry completely. -
Facial placement:
Visualize the face low on the shape to increase the cuteness factor. Aim for the eyes to be just below the vertical center line. -
Drawing the eyes:
Using your ultra-fine black marker or a fine brush, place two small dots for eyes. Keep them relatively wide apart for that innocent look shown in the photo. -
Adding the smile:
Draw a tiny, shallow ‘U’ shape right between the eyes. A smaller mouth makes the expression sweeter. -
Rosy cheeks:
Dip a dotting tool or a toothpick into pink paint (or use a paint marker) and place two tiny dots just outside and slightly below the eyes. -
Sealing:
Finish the project with a light coat of matte spray varnish. This protects the paint while maintaining that soft, non-glossy, stone-like texture.
Stone Texture Tip
For a textured look, mix baking soda into your acrylic paint before applying. It creates a grainy, faux-ceramic finish that looks great on simple shapes.
Custom Characters
Give them personalities by varying the eyebrows! Slanted lines for angry, high arches for surprised, or flat lines for annoyed blobs.
Line up your finished mood blobs on a shelf or windowsill to bring a gentle pop of color to your room
Animal Toothbrush Holder Figures for Bathroom Cheer
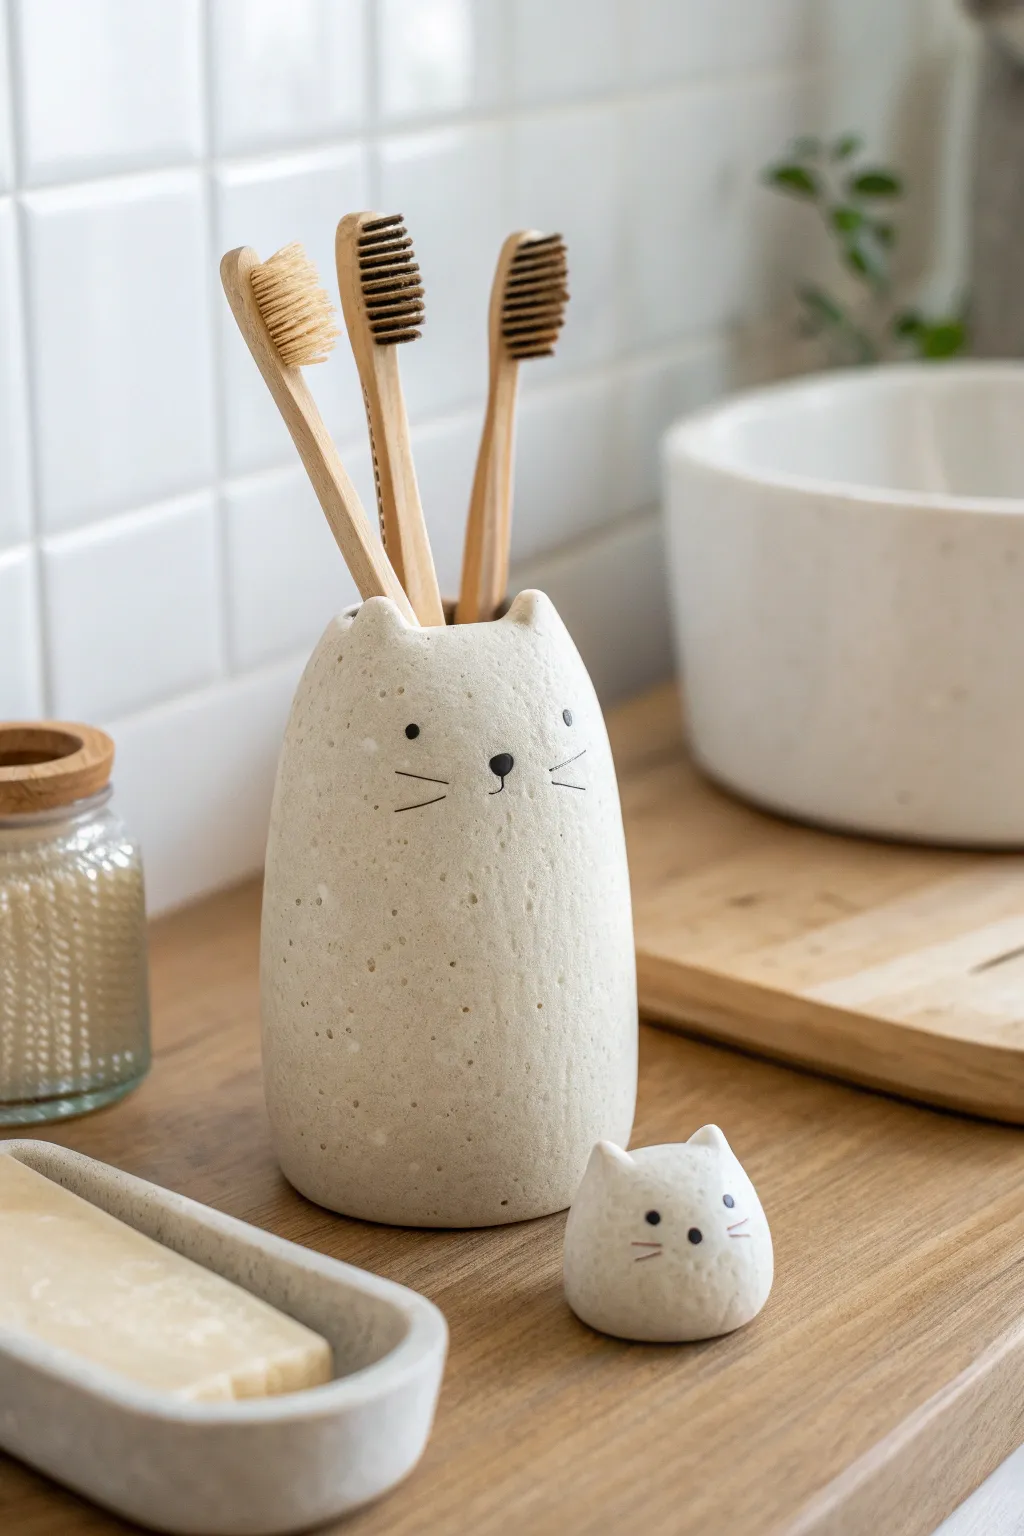
Bring a touch of whimsical charm to your morning routine with this adorable cat-shaped toothbrush holder and matching figurine. Created with speckled stoneware clay and minimal details, this set perfectly balances cute character design with modern, earthy ceramics.
How-To Guide
Materials
- Speckled stoneware clay (approx. 2 lbs)
- Rolling pin
- Fettling knife
- Score and slip tool (or serrated rib)
- Wooden modeling tool
- Sponge
- Black underglaze
- Fine detail paintbrush
- Clear glaze (matte or satin finish)
- Cylindrical form (like a PVC pipe or rolling pin) for support
Step 1: Forming the Body
-
Prepare the slab:
Begin by rolling out your speckled clay into an even slab, approximately 1/4 inch thick. Compress the clay on both sides with a rib to prevent warping later. -
Cut the rectangle:
Measure and cut a rectangle from your slab. The height should be about 4-5 inches, and the width should be enough to wrap around your chosen circumference (roughly 8-9 inches). -
Create the cylinder:
Stand the rectangle up and curve it into a cylinder. Bevel the vertical edges at opposite 45-degree angles to create a stronger seam. -
Join the seam:
Score the beveled edges aggressively and apply slip. Press the edges together firmly to create a seamless cylinder, smoothing the join on both the inside and outside with a wooden tool. -
Add the base:
Place your cylinder on a fresh piece of slab and trace around the bottom. Cut out this circle, score and slip the contact points, and attach the base firmly. Smooth the clay upward from the base onto the wall to seal it.
Step 2: Shaping the Character
-
Close the top:
Gently dart or pinch the top rim of the cylinder inward slightly to create a tapered shoulder, giving the form a softer, more organic silhouette rather than a straight pipe. -
Form the ears:
Pinch the front rim upward at two points to create triangular ears. I like to keep these relatively small and rounded at the tips for a sweeter expression. -
Refine the shape:
Use a damp sponge to smooth the transition between the ears and result in a continuously flowing rim. Ensure the opening is wide enough for 2-3 toothbrushes. -
Create the mini companion:
With leftover clay, form a small, solid mound shape about 1.5 inches wide. Pinch two tiny ears at the top to mirror the larger holder. -
Smooth surfaces:
Once the clay is leather hard, use a sponge or a smooth rib to burnish the surface, revealing the natural speckles in the clay body.
Keep it Clean
Since this is a bathroom item, glaze the *inside* first by pouring glaze in and swirling it. This ensures it’s fully waterproof and easy to clean.
Step 3: Decoration and Firing
-
Initial bisque fire:
Allow your pieces to dry slowly and completely before firing them in a kiln to bisque temperature (usually Cone 04 or 06). -
Paint the face:
Using a fine detail brush and black underglaze, carefully paint small dots for eyes widely spaced apart. -
Add nose and whiskers:
Paint a small, inverted triangle for the nose centered below the eyes. Add three thin, distinct lines on each side for whiskers. -
Glazing:
Dip or brush the entire piece in a clear matte or satin glaze. This seals the clay and makes it waterproof without hiding the beautiful speckles or the underglaze details. -
Final wipe:
Wipe the bottom of the holder clean with a sponge to prevent it from sticking to the kiln shelf. -
Glaze fire:
Fire the piece a second time to the maturity temperature of your specific speckled clay body (typically Cone 5 or 6).
Uneven Drying?
If the rim dries faster than the heavy base, drape a piece of plastic loosely over the top while the bottom stiffens to prevent cracking.
Place your new ceramic friends by the sink and enjoy their charming company every time you brush your teeth