When you’re craving cool clay ideas, the trick is picking projects that feel playful right away and still look great on your shelf or in your everyday routine. Here are my go-to favorites that keep things beginner-friendly while still giving you that “I made this!” kind of magic.
Pinch Pot Trinket Bowls With a Wavy Rim
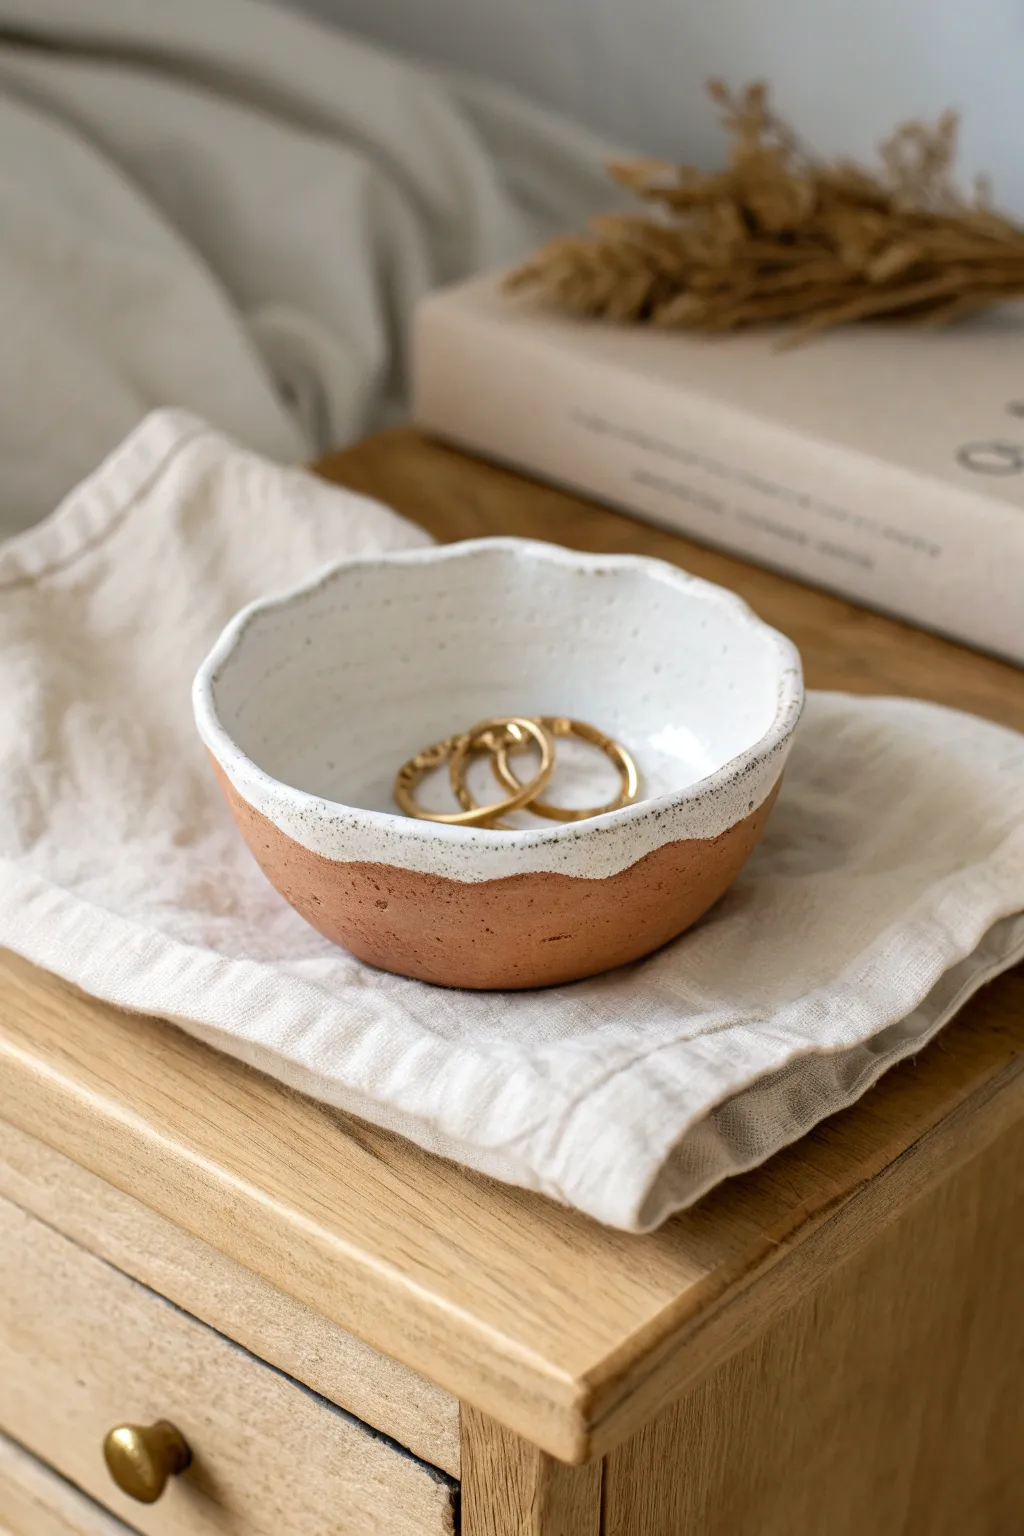
This charming little trinket dish combines raw, earthy terracotta warmth with a creamy, speckled glaze for a modern bohemian look. The freeform, wavy rim gives it an effortless, handmade quality perfect for holding your favorite jewelry on a bedside table.
How-To Guide
Materials
- Red earthenware or terracotta clay (low fire)
- White or cream speckled glaze (compatible with your clay’s cone)
- Potter’s wire or cutting string
- Sponge
- Small bowl of water
- Modeling tool or old credit card (for smoothing)
- Soft fan brush for glazing
- Kiln (or access to a firing service)
Step 1: Forming the Pinch Pot
-
Prepare the clay ball:
Start by cutting a piece of red clay about the size of a tennis ball. Roll it firmly between your palms until it is a smooth, round sphere with no cracks. -
Open the form:
Hold the clay ball in your non-dominant hand. Gently press your thumb into the center, pushing down until you are about half an inch from the bottom. -
Pinch the walls:
Using your thumb on the inside and fingers on the outside, start pinching the clay walls gently. Rotate the ball slightly with each pinch to ensure even thickness. -
Shape the bowl:
Continue pinching and rotating, pulling the clay upward and slightly outward. Aim for walls that are roughly 1/4 inch thick to prevent cracking during drying. -
Create the flat base:
Once you have the general height, gently tap the bottom of your pot against your work surface to create a flat, stable foot so the bowl won’t wobble.
Step 2: Refining the Rim
-
Establish the wave:
Instead of smoothing the rim perfectly flat, use your index finger to gently push down on the rim at random intervals to create a subtle, organic wave pattern. -
Smooth the edges:
Dip your finger slightly in water and run it along the rim to round off any sharp edges. The rim should feel soft to the touch, not jagged. -
Surface smoothing:
Use a damp sponge or a flexible rib tool to smooth the interior of the bowl. For the exterior, smooth the clay but leave some of that natural finger texture if you like the handmade look. -
Dry partially:
Let the bowl sit until it is ‘leather hard’—stiff enough to handle without deforming, but still cool to the touch. -
Final refining:
Give the piece one last wipe with a slightly damp sponge to remove any dust or crumbs before it fully dries. -
Bone dry drying:
Allow the clay to dry completely until ‘bone dry’. The clay will turn a lighter color and feel room temperature. This usually takes a few days.
Cracking Control
If you see tiny cracks forming on the rim while drying, your clay is drying too fast. Score the crack, add a tiny bit of slip (wet clay), smooth it over, and cover the bowl loosely with plastic.
Step 3: Firing and Glazing
-
Bisque fire:
Load the bone-dry bowl into the kiln for the requisite bisque firing (usually around Cone 04, depending on your clay body). -
Clean the bisque:
Once fired and cooled, wipe the bisque ware with a damp sponge to remove any kiln dust that might resist the glaze. -
Apply interior glaze:
Using a soft fan brush, apply a generous coat of white speckled glaze to the entire interior of the bowl. -
Glaze the exterior rim:
Bring the glaze over the wavy rim and down the outside about half an inch. I like to purposefully make this line uneven to match the organic vibe of the pinch pot. -
Add second coat:
Allow the first coat to dry, then apply 1-2 more coats to ensure an opaque, creamy white finish that hides the red clay underneath. -
Clean the foot:
Ensure the bottom of the bowl and the lower red clay section are completely free of glaze. Wipe away any drips with a clean sponge. -
Glaze fire:
Fire the piece again to the temperature recommended on your glaze bottle (typically Cone 05 or 06 for low fire).
Rim Variation
For a ‘flower petal’ look, make the waves more pronounced. Use the handle of a paintbrush to gently roll indentations into the rim at evenly spaced intervals before drying.
Place your favorite rings inside your finished bowl and admire the beautiful contrast between the raw earth and the glossy speckles


Simple Geometric Polymer Clay Earrings
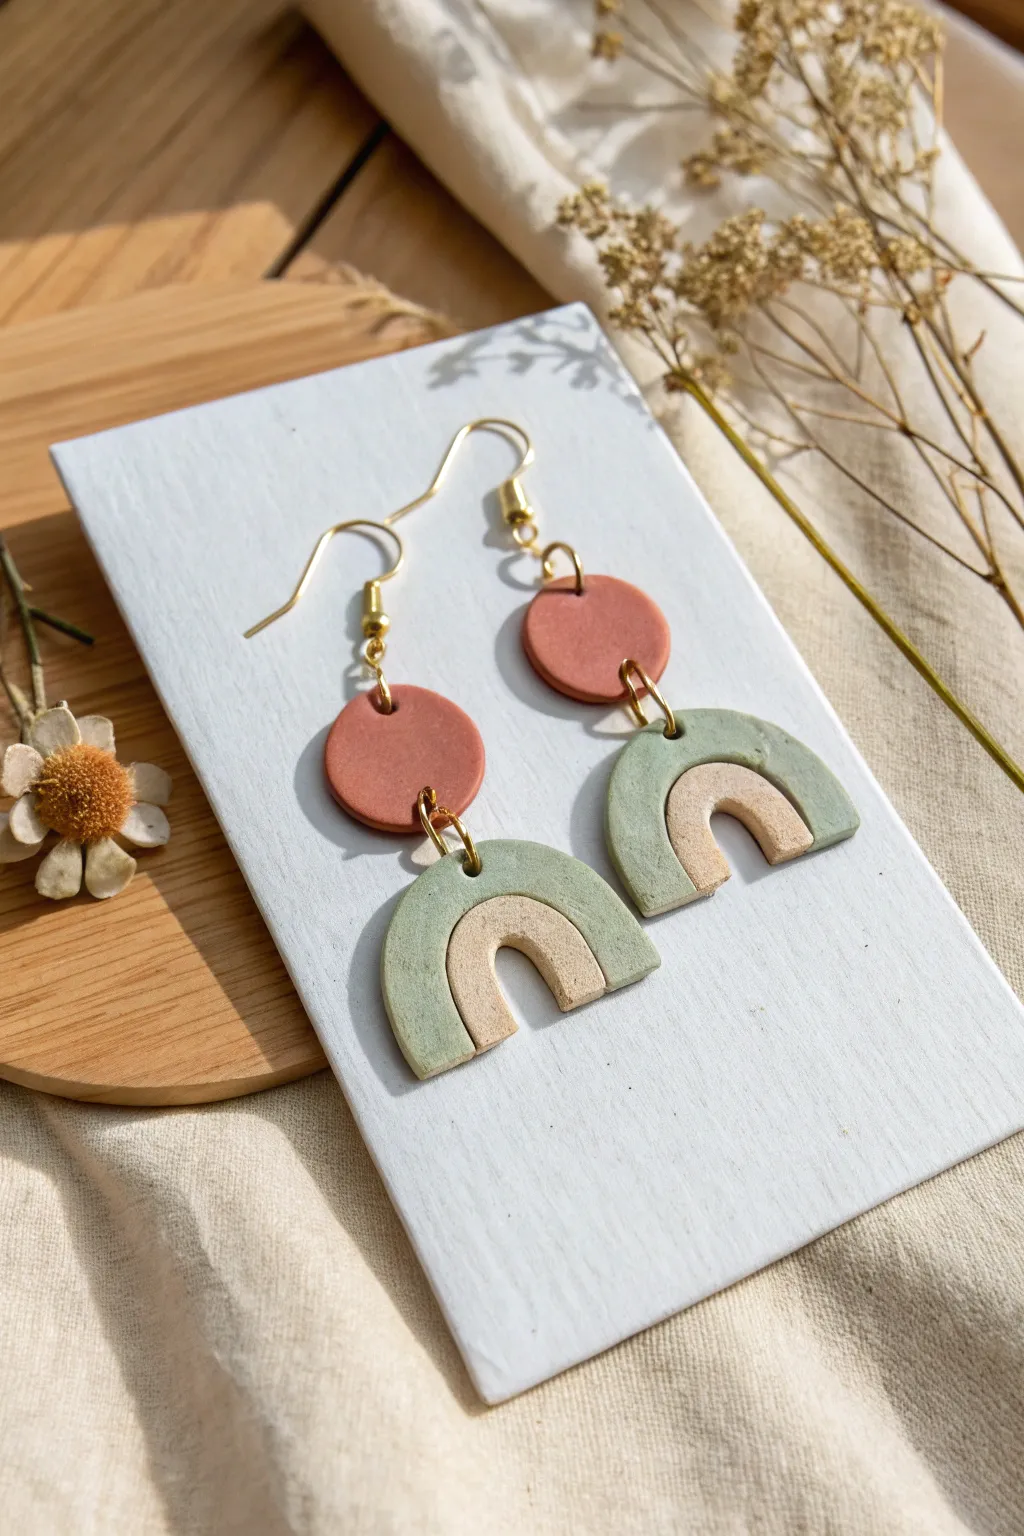
These charming polymer clay earrings combine earthy terracotta tones with soft sage green and creamy beige in a modern geometric design. With their matte finish and subtle stony texture, they offer a sophisticated yet playful addition to your accessory collection.
Step-by-Step Tutorial
Materials
- Polymer clay in terracotta, sage green, and beige/cream
- Acrylic roller or pasta machine
- Circle cutter (approx. 1 cm diameter)
- Arch cutter set (or a larger arch cutter and a craft knife)
- Small round cutter (for the arch cutout)
- Texture sponge or coarse sandpaper (optional)
- Needle tool or toothpick
- Jump rings (gold tone, approx. 6-7mm)
- Earring hooks (gold tone)
- Jewelry pliers (flat nose and round nose)
- Baking sheet and parchment paper
- Oven
Step 1: Preparing the Clay
-
Condition the colors:
Start by kneading each block of clay—terracotta, sage, and beige—separately until they are soft, pliable, and free of cracks. -
Roll out the sheets:
Using your acrylic roller or pasta machine on a medium setting (approx. 3mm thick), roll out each color into a smooth, even sheet. Ensure no air bubbles are trapped underneath. -
Add texture (optional):
To mimic the stony look in the photo, gently press a texture sponge or a piece of coarse sandpaper onto the surface of the green and beige clay sheets. This gives them a natural, matte finish.
Sticky Situation?
If clay sticks to your cutters, dip the cutter edges into cornstarch or water before pressing down. This acts as a release agent for clean cuts.
Step 2: Cutting the Shapes
-
Cut the top circles:
Take your small circle cutter and punch out two circles from the terracotta clay sheet. These will be the top connector pieces. -
Create the large arches:
Using your arch cutter on the sage green sheet, cut out two large arch shapes. Keep the cutter straight down to ensure clean edges. -
Cut the inner void:
Use a smaller arch cutter or a craft knife to remove the center of the green arches, creating a rainbow shape. Save the removed clay for other projects. -
Create the inner arches:
From the beige sheet, cut out two smaller arch shapes that fit snugly inside the void of the green arches. -
Assemble the double arch:
Gently press the beige inner arch into the space of the green outer arch. I usually place them simply side-by-side on the work surface and press the seams together slightly from the back to bond them without distorting the front.
Seamless Bonding
Apply a tiny amount of liquid polymer clay (like Bake & Bond) between the beige and green arches before baking to ensure they fuse permanently together.
Step 3: Finishing and Baking
-
Pierce the holes:
Using your needle tool, carefully poke a hole at the top center of each green arch and at the top and bottom of each terracotta circle. Ensure the holes are large enough for your jump rings. -
Smooth the edges:
Dip your finger in a tiny bit of rubbing alcohol or cornstarch and gently rub the edges of your cut shapes to smooth away any rough spots or fingerprints. -
Bake the components:
Place all pieces on a parchment-lined baking sheet. Bake according to your brand of clay’s specific instructions (usually 275°F/130°C for 15-30 minutes). -
Cool down:
Allow the pieces to cool completely on the baking sheet before handling them, as warm clay is fragile.
Step 4: Assembly
-
Open the jump rings:
Using two pairs of pliers, twist your jump rings open sideways (never pull them apart outward) to maintain their round shape. -
Connect the pieces:
Thread an open jump ring through the top of the green arch and the bottom of the terracotta circle. Twist the ring closed securely. -
Attach the hooks:
Open the small loop on your earring hook (or use a small jump ring if needed) and attach it to the top hole of the terracotta circle. -
Final check:
Ensure all rings are fully closed so the pieces don’t slip out. Give the earrings a gentle shake to make sure they move freely.
Enjoy wearing your handcrafted geometric accessories which carry a lovely balance of color and texture


Ring Cone With a Mini Catch Dish
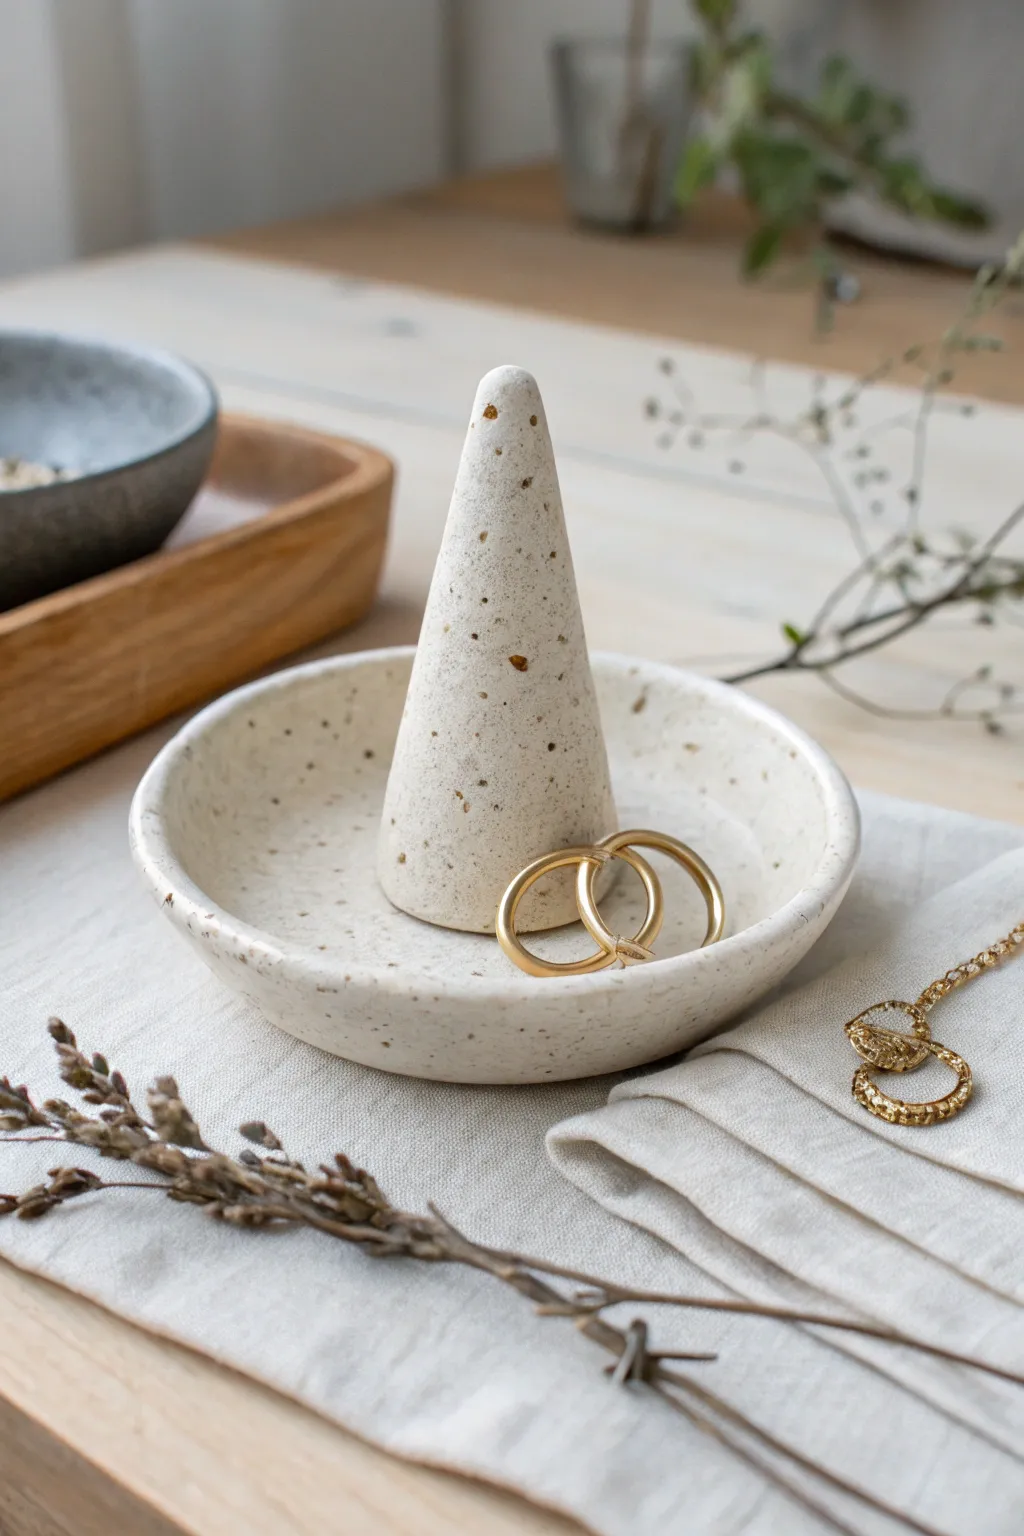
Bring a touch of organic elegance to your dresser with this two-piece jewelry holder that mimics the look of real speckled stoneware without needing a kiln. This beginner-friendly project combines a functional ring cone with a shallow catch dish, perfect for keeping your daily accessories safe and organized.
Detailed Instructions
Materials
- White polymer clay (cernit, fimo, or sculpey)
- Speckled clay inclusions (or fine ground black pepper/dried coffee grounds)
- Rolling pin or acrylic roller
- Circle cutter (approx. 4-5 inches diameter)
- Small sponge or foam piece
- Cutting blade or craft knife
- Sandpaper (fine grit)
- Matte varnish or glaze (optional)
- Oven for baking
Step 1: Preparing the Speckled Clay
-
Condition the clay:
Start by warming the white polymer clay in your hands, kneading it until it becomes soft, pliable, and free of cracks. -
Add texture:
If you aren’t using pre-speckled clay, flatten your white clay and sprinkle a tiny pinch of ground black pepper or dried coffee grounds onto it. -
Mix thoroughly:
Fold the clay over the speckles and knead repeatedly until the particles are evenly distributed throughout the batch to create that faux-stone effect. -
Roll it out:
Divide your clay into two uneven balls—one larger for the dish and one smaller for the cone. Roll the larger ball into a flat, even sheet about 1/4 inch thick.
Step 2: Forming the Catch Dish
-
Cut the base:
Use your circle cutter or a bowl as a template to cut a perfect circle from the rolled clay sheet. -
Soften the edges:
Gently run your finger around the cut edge of the circle to smooth out any sharpness or irregularities from the cutter. -
Shape the curve:
Place the clay circle into a slightly larger, oven-safe bowl to give it a curved shape, or simply cup it gently in your palm to curve the edges upward. -
Refine the rim:
Use a damp sponge to lightly tap the rim, creating a smooth, rounded lip that looks like thrown pottery.
Stone Texture Secret
Mix different sizes of ‘speckles’ (like coarse pepper and fine vanilla bean seeds) to make the faux ceramic look much more convincing.
Step 3: Sculpting the Ring Cone
-
Create a basic shape:
Take the smaller ball of clay and roll it between your palms to form a thick log. -
Taper the form:
Focus your rolling pressure on just one end of the log, tapering it until it forms a smooth cone shape with a rounded point. -
Flatten the base:
Pound the wider end of the cone gently onto your work surface to create a completely flat bottom so it stands up straight without wobbling. -
Check the fit:
I always place the raw cone into the center of the raw dish momentarily to ensure the proportions look balanced, adjusting the height if necessary.
Uneven Rim Fix
If your dish warps while baking, sanding the bottom rim against a flat sheet of coarse sandpaper will level it out perfectly.
Step 4: Baking and Finishing
-
Bake the pieces:
Place both the dish (still in its support bowl if necessary) and the cone on a baking sheet and bake according to your clay package’s specific temperature and time instructions. -
Cool down:
Allow the pieces to cool completely in the oven with the door slightly ajar to prevent any thermal shock or cracking. -
Sand for smoothness:
Once cool, use fine-grit sandpaper wet with a little water to buff out any fingerprints or rough spots on the surface of both pieces. -
Seal the surface:
Apply a thin coat of matte varnish if you want to protect the ‘stone’ finish from oils and dirt, or leave it raw for a more rustic texture. -
Assemble:
You can now place the cone freely in the dish, or use a dab of strong superglue to permanently fix it to the center of the bowl.
Now you have a chic, modern spot to store your favorite rings and trinkets


Botanical-Stamped Clay Coasters
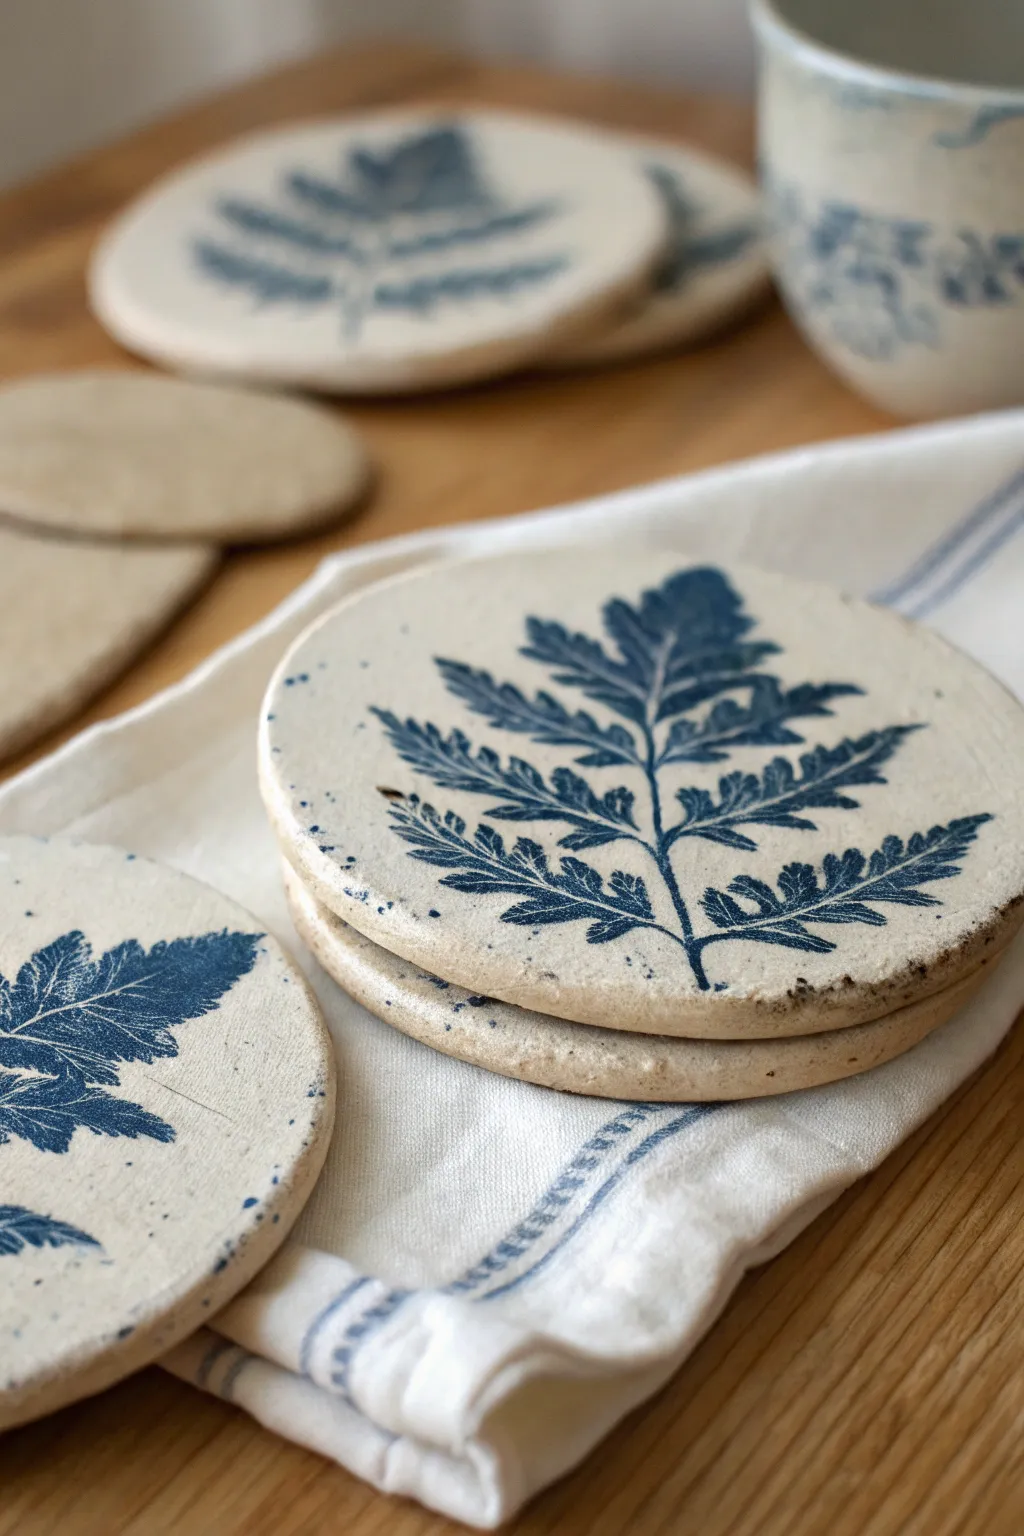
Capture the delicate details of nature with these rustic, handmade clay coasters featuring vibrant blue fern impressions. They combine the raw, organic beauty of unglazed clay with a striking cyanotype-style botanical print, perfect for adding an earthy touch to your coffee table.
Step-by-Step Guide
Materials
- Air-dry clay or white earthenware clay (if you have kiln access)
- Fresh fern leaves or similar flat botanical specimens
- Rolling pin
- Circle cookie cutter or a bowl/glass to trace (approx. 4-inch diameter)
- Canvas or heavy cloth (to roll clay on)
- Cobalt blue underglaze (for kiln firing) or blue acrylic paint (for air-dry)
- Small foam roller or sponge brush
- Potter’s needle tool or old loyalty card (for smoothing)
- Spray bottle with water
- Clear acrylic sealer (for air-dry clay) or clear glaze (optional for kiln firing)
- Fine-grit sandpaper
Step 1: Preparing the Clay Base
-
Prepare your workspace:
Lay down your canvas or heavy cloth on a flat table. This prevents the clay from sticking to your work surface and adds a subtle texture to the back of your coasters. -
Portion the clay:
Cut off a chunk of light-colored clay roughly the size of a grapefruit. Knead it briefly in your hands to warm it up and ensure there are no air bubbles trapped inside. -
Roll out the slab:
Place the clay on the cloth and use your rolling pin to flatten it into an even slab. You are aiming for a thickness of about 1/4 inch (6mm)—thick enough to be sturdy but not chunky. -
Smooth the surface:
Before cutting, take a slightly damp sponge or your fingers and gently smooth out any cracks or rolling pin lines on the surface of the clay slab.
Step 2: Creating the Botanical Impression
-
Select your foliage:
Choose fresh fern leaves with well-defined veins. If they are too stiff, gently massage them to flatten them out; placing them under a heavy book for ten minutes can help. -
Arranging the composition:
Lightly place your fern onto the rolled clay slab. Don’t press it in yet; just ensure it is positioned where you want the final design to be relative to where you will cut the circle. -
Rolling the texture:
Take your rolling pin and roll directly over the leaf. Apply firm, consistent pressure in a single pass to embed the leaf flush into the clay surface without shifting it. -
Cutting the shape:
Position your round cutter or guide over the embedded leaf to frame your composition. Press down firmly to cut the coaster shape. Wait to remove the excess clay until after the next steps to keep the edge shapely. -
Applying the color:
Pour a small amount of cobalt blue underglaze (or acrylic paint) onto a palette. Load your small foam roller evenly, ensuring it isn’t dripping wet. -
Rolling the color:
Gently roll the color over the entire surface of the clay, covering both the clay and the embedded leaf. The leaf acts as a resist, protecting the veins and lower areas. -
The reveal:
Using a needle tool or tweezers, carefully lift the stem of the fern and peel the leaf away from the clay. This reveals the crisp, unpainted impression of the fern against the blue background.
Crisp Print Secret
For the sharpest image, lay a piece of paper towel over the leaf before the final rolling. This absorbs excess moisture from the plant matter so it doesn’t stick to your roller.
Step 3: Finishing Touches
-
Clean the edges:
Peel away the excess clay scrap from outside your cut line. Carefully lift the coaster and smooth the cut rim with a damp finger to remove any sharp burrs. -
Initial drying:
Place the coasters on a flat board or wire rack to dry. To prevent curling, I like to place a light board on top of them once they are leather-hard. -
Sanding:
Once fully bone dry (24-48 hours depending on humidity), take your fine-grit sandpaper and gently sand the edges and the rim to make them perfectly smooth. -
Distressing (Optional):
If you want that rustic, worn look seen in the photo, lightly sand the surface of the dried blue paint in random spots to reveal a bit of the raw clay underneath. -
Adding speckles:
Dilute a tiny bit of your blue paint/underglaze with water. Dip a stiff brush (like an old toothbrush) into it and flick the bristles to create tiny splatters across the white and blue areas. -
Sealing or Firing:
If using ceramic clay, bisque fire and then glaze fire (clear glaze is optional if you want a matte finish). If using air-dry clay, apply two thin coats of acrylic sealer to protect against moisture.
Fixing Curled Edges
If your air-dry clay coasters curl up while drying, lightly dampen the concave side with a sponge and place them under a heavy stack of books overnight to flatten them back out.
Enjoy using your beautiful new coasters for your morning coffee or gifting a set to a nature-loving friend

The Complete Guide to Pottery Troubleshooting
Uncover the most common ceramic mistakes—from cracking clay to failed glazes—and learn how to fix them fast.
Mini Bud Vases for Single Stems
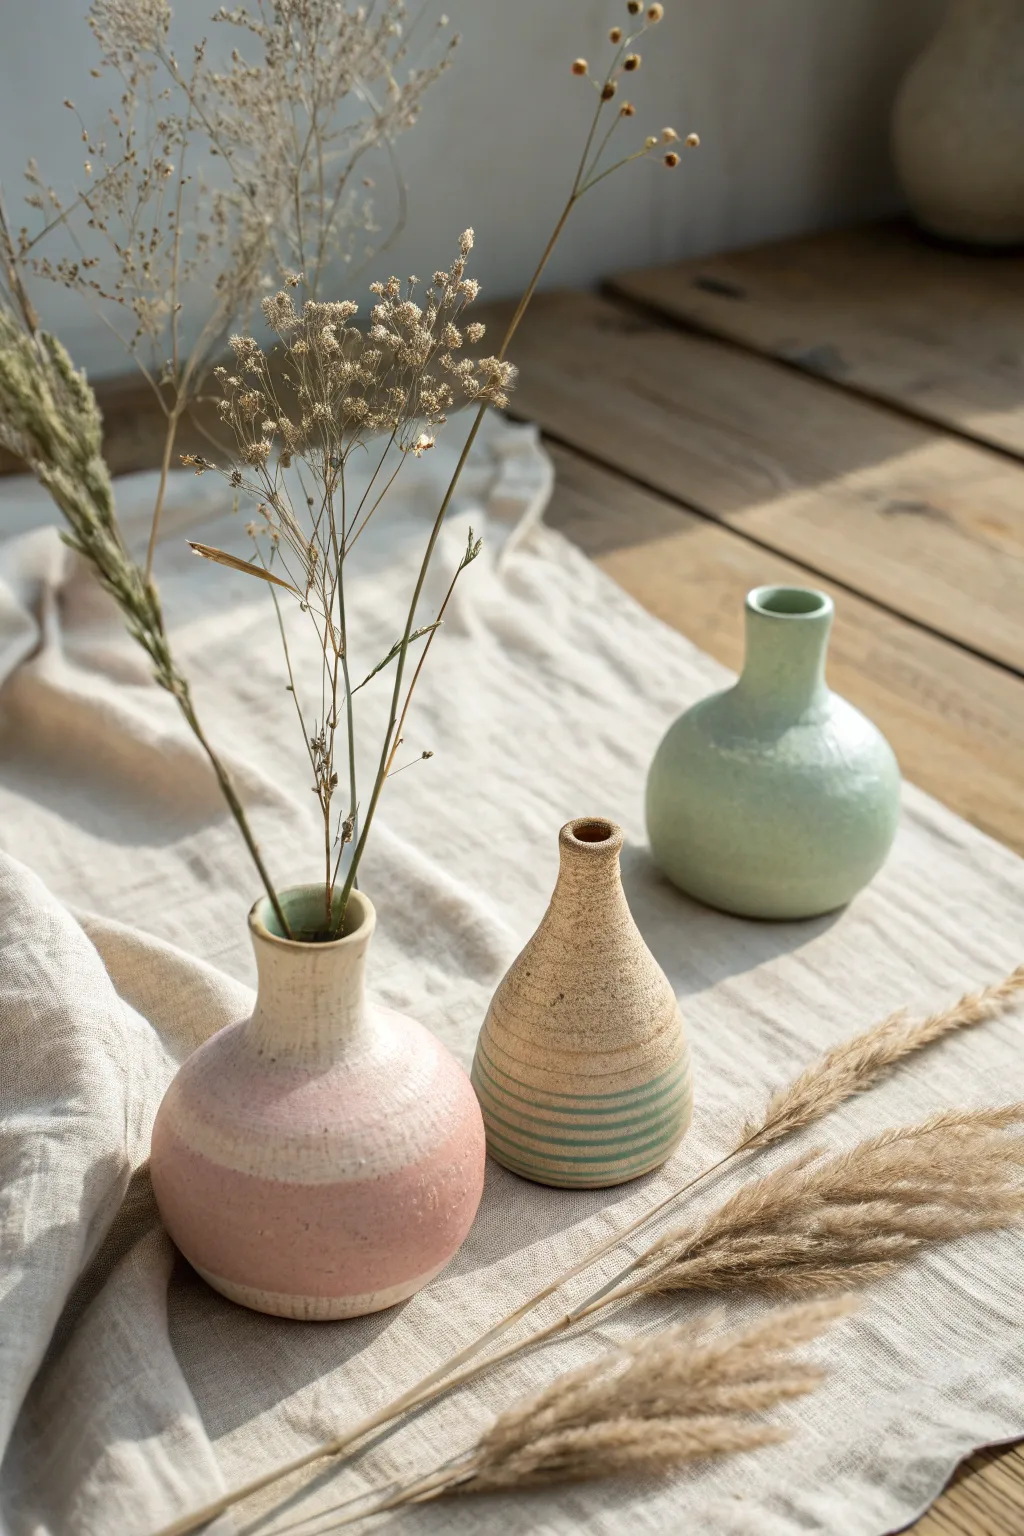
These charming miniature vessels are perfect for displaying dried grasses or single fresh stems, adding a touch of rustic elegance to any table. Using simple pinch pot and coil techniques, you can shape this trio of organic forms with textured clay and soft, matte glazes.
How-To Guide
Materials
- Stoneware clay (speckled or buff)
- Pottery wheel (optional, can be hand-built)
- Sponge
- Rib tool (wooden or metal)
- Needle tool
- Wire cutter
- Underglaze pencil or fine brush
- Matte glazes (mint green, blush pink, clear/transparent)
- Wax resist
- Kiln
Step 1: Shaping the Bulbous Base
-
Prepare the clay:
Start with three balls of clay, roughly the size of a tennis ball or slightly smaller. Wedging the clay thoroughly is key to prevent air bubbles. -
Form the pinch pot:
Take the first ball and press your thumb into the center, stopping about a half-inch from the bottom. Gently pinch and rotate the clay to open it up into a round, cup-like shape. -
Refine the walls:
Continue pinching evenly from bottom to top to thin the walls. Aim for a consistent thickness of about 1/4 inch. Keep the belly of the pot round and full for that organic look. -
Smooth the exterior:
Use a flexible rib tool or a slightly damp sponge to smooth out finger marks on the outside, creating a clean, continuous curve.
Smooth Moves
Use a damp chamois strip draped over the rim while spinning the vase (or rotating by hand) to get a perfectly rounded, professional lip finish.
Step 2: Adding the Neck
-
Collaring the opening:
Gently squeeze the top rim of your pinch pot inward to narrow the opening. Keep your hands lubricated with a little slip or water so the clay doesn’t drag. -
Add a coil:
Roll a small coil of clay. Score and slip the rim of your narrowed pinch pot, then attach the coil on top to begin building the neck. -
Blend the coil:
Using your thumb or a modeling tool, blend the coil downward on the inside and upward on the outside until the seam is invisible. This strengthens the join. -
Shape the neck:
Pull the clay of the neck upward gently. For the pink vase, flare the rim slightly outward. For the green vases, keep the neck straight or slightly tapered inward. -
Clean up the rim:
Use a damp sponge or chamois leather to compress and smooth the very top edge of the rim. This prevents sharp edges after firing.
Nature Stamping
Before the clay dries, press a real dried flower or leaf into the side of the vase for an imprinted fossil look that matches the botanical theme.
Step 3: Texturing and Firing
-
Bisque fire:
Allow your three vases to dry slowly until bone dry, covering loosely with plastic for the first day. Fire them to bisque temperature (usually Cone 04). -
Clean bisque ware:
Wipe down the fired pieces with a damp sponge to remove any dust, which can prevent glaze from adhering properly. -
Create lines (Striped Vase):
For the vase with stripes, use a small brush to paint thin horizontal bands using a teal or mint underglaze around the base. I sometimes rotate the vase on a banding wheel for steadier lines.
Step 4: Glazing
-
Mask the raw clay:
For the pink vase, apply wax resist or masking tape across the middle if you want a sharp line, or dip just the bottom half for a more organic transition. -
Dip glazing:
Dip the solid green vase entirely into a matte celadon or mint glaze. For the striped vase, apply a clear matte glaze over the underglaze stripes to let the raw clay texture show through. -
Partial glazing:
Dip the bottom two-thirds of the pink vase into a blush glaze. Leave the neck and shoulder unglazed to reveal the speckled clay body. -
Clean the feet:
Wipe the bottom of each vase thoroughly with a sponge to ensure no glaze touches the kiln shelf. -
Final firing:
Fire the pieces to the maturity temperature of your clay and glaze (typically Cone 5 or 6 for stoneware). Let the kiln cool completely before unloading.
Fill your new collection with dry grasses or wildflowers to bring a bit of the outdoors inside.
Desk Tray for Clips, Coins, and Tiny Tools
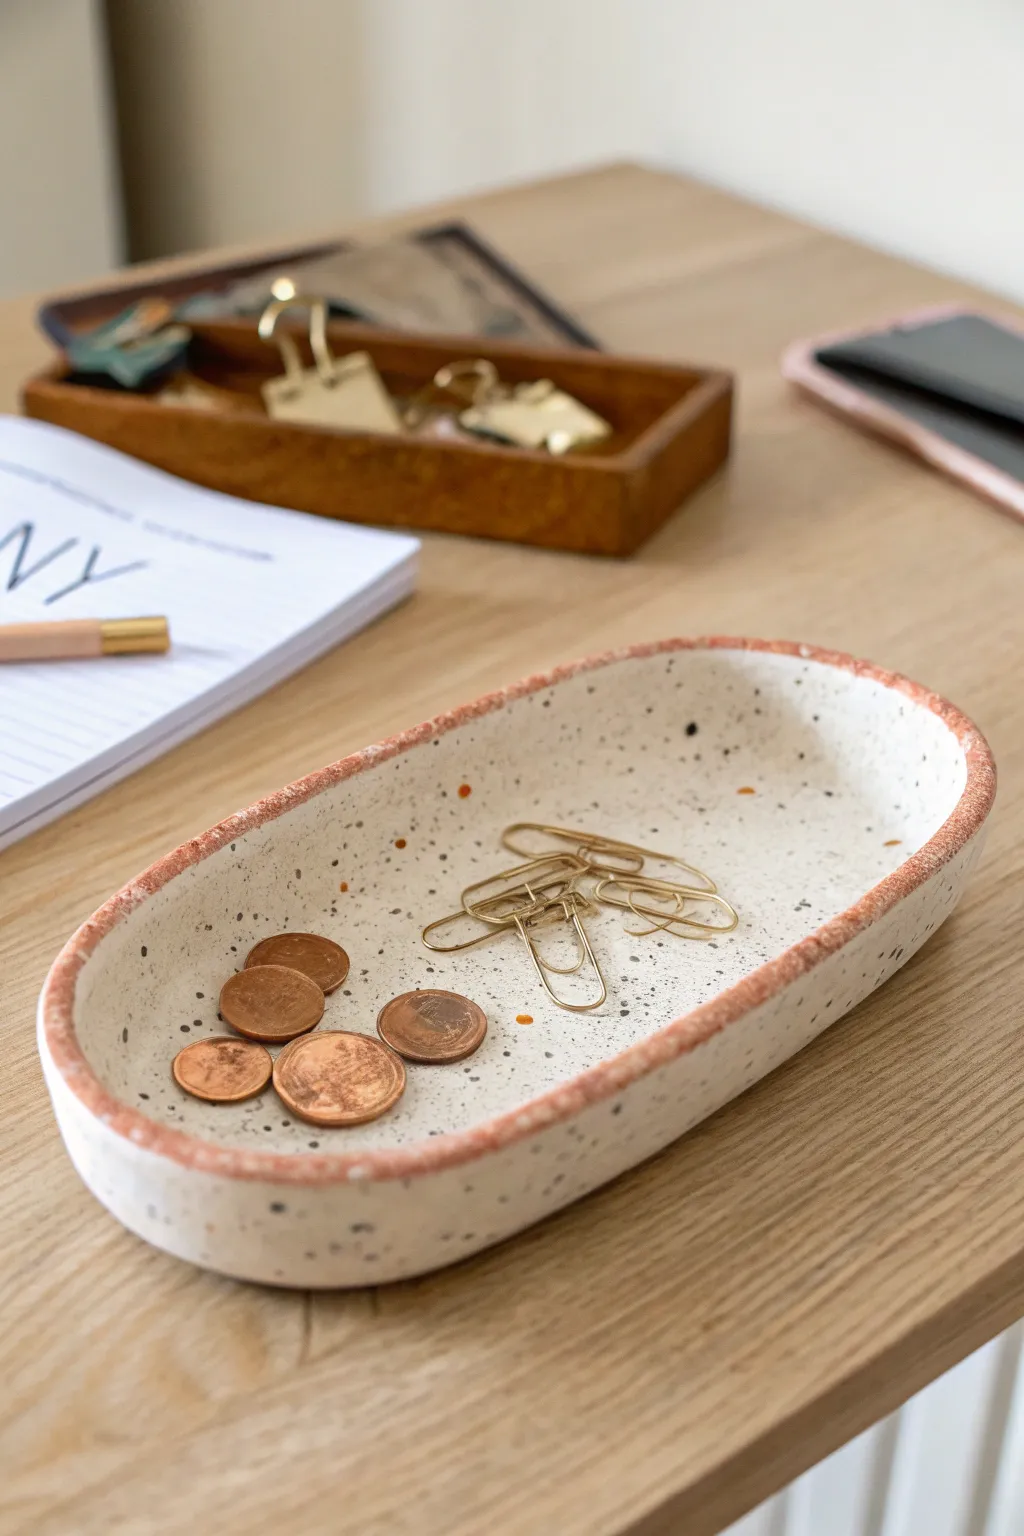
This minimalist desk tray combines the organic charm of hand-formed clay with a chic, speckled finish that mimics natural stone without the weight. The subtle terracotta-colored rim adds a warm pop of contrast, making it the perfect landing spot for your daily odds and ends.
Step-by-Step Guide
Materials
- White air-dry clay or polymer clay
- Rolling pin
- Craft knife or clay cutter
- Oval template (paper or cardstock)
- Small bowl with water (for smoothing)
- Fine-grit sandpaper
- Black acrylic paint
- Old toothbrush or stiff bristle brush
- Terracotta or copper acrylic paint
- Fine detail paintbrush
- Matte or satin varnish/sealant
- Cardboard or drop cloth (for splatter protection)
Step 1: Shaping the Base
-
Prepare your template:
Before touching the clay, draw and cut out an oval shape from cardstock or paper to serve as your guide. A size around 6-8 inches long works well for a desk accessory. -
Roll the slab:
Take a generous ball of white clay and knead it until soft. Roll it out on a flat surface to an even thickness of approximately 1/4 inch. -
Cut the shape:
Place your paper template onto the rolled clay slab. Use your craft knife to carefully trace around the edge, cutting out your clean oval base. -
Make the walls:
Roll a long snake or coil of clay, slightly thinner than a pencil. This will become the raised edge of your tray. -
Attach the coil:
Score the outer edge of your oval base and the bottom of your coil with a craft knife to create texture. Apply a tiny bit of water (or slip) to the scored areas and press the coil firmly onto the rim of the base. -
Blend the seams:
Using your thumb or a modeling tool, drag the clay from the coil down onto the base on the inside, and from the base up onto the coil on the outside. Smooth until the seam is completely invisible. -
Refine the shape:
Use a damp sponge or finger to smooth out any fingerprints or bumps. Gently pinch the rim to get that slightly uneven, handmade lip shown in the photo. -
Let it cure:
Allow the tray to dry completely. If using air-dry clay, this takes 24-48 hours; for polymer clay, bake according to package instructions.
Natural Texture
Instead of smoothing the rim perfectly, gently pat it with a crumpled piece of aluminum foil before the clay dries. It creates a stone-like texture that holds the rim paint beautifully.
Step 2: Adding the Speckles
-
Sand for smoothness:
Once fully cured, gently sand any rough edges or high spots with fine-grit sandpaper to ensure a professional finish. Wipe away dust with a damp cloth. -
Prepare the splatter station:
Set up a protective area with cardboard or a drop cloth. This step can get messy. -
Mix the paint:
Dilute a small amount of black acrylic paint with water until it has a fluid, ink-like consistency. -
Apply the speckles:
Dip an old toothbrush into the watered-down paint. Hold it over the tray and run your thumb across the bristles to flick tiny droplets onto the surface. I prefer to practice on a scrap paper first to gauge the density. -
Vary the texture:
Aim for a random distribution. Some areas can have denser clusters of dots, while others remain sparse to keep the look natural. -
Dry the dots:
Let the black speckles dry completely before moving to the next step so you don’t smudge the pattern.
Level Up: Chips
For a true terrazzo look, mix tiny colorful chips of dried clay into your wet white clay base before rolling it out, instead of painting the speckles on later.
Step 3: Finishing Touches
-
Paint the rim:
Using a fine detail brush and your terracotta or copper paint, carefully paint the top edge of the rim. Don’t worry about a perfectly straight line; a slightly organic edge adds character. -
Add random accents:
Take the same terracotta color and add just a few tiny stray dots inside the bowl using the tip of your brush, mimicking the random flecks found in real stone. -
Seal the piece:
Once all paint is dry, apply a coat of matte or satin varnish over the entire piece. This protects the paint from scratching and makes the tray easier to clean.
Now your desk is organized with a stylish piece that looks like authentic ceramic stone


What Really Happens Inside the Kiln
Learn how time and temperature work together inside the kiln to transform clay into durable ceramic.
Chunky Little Garden Gnome for a Flower Pot
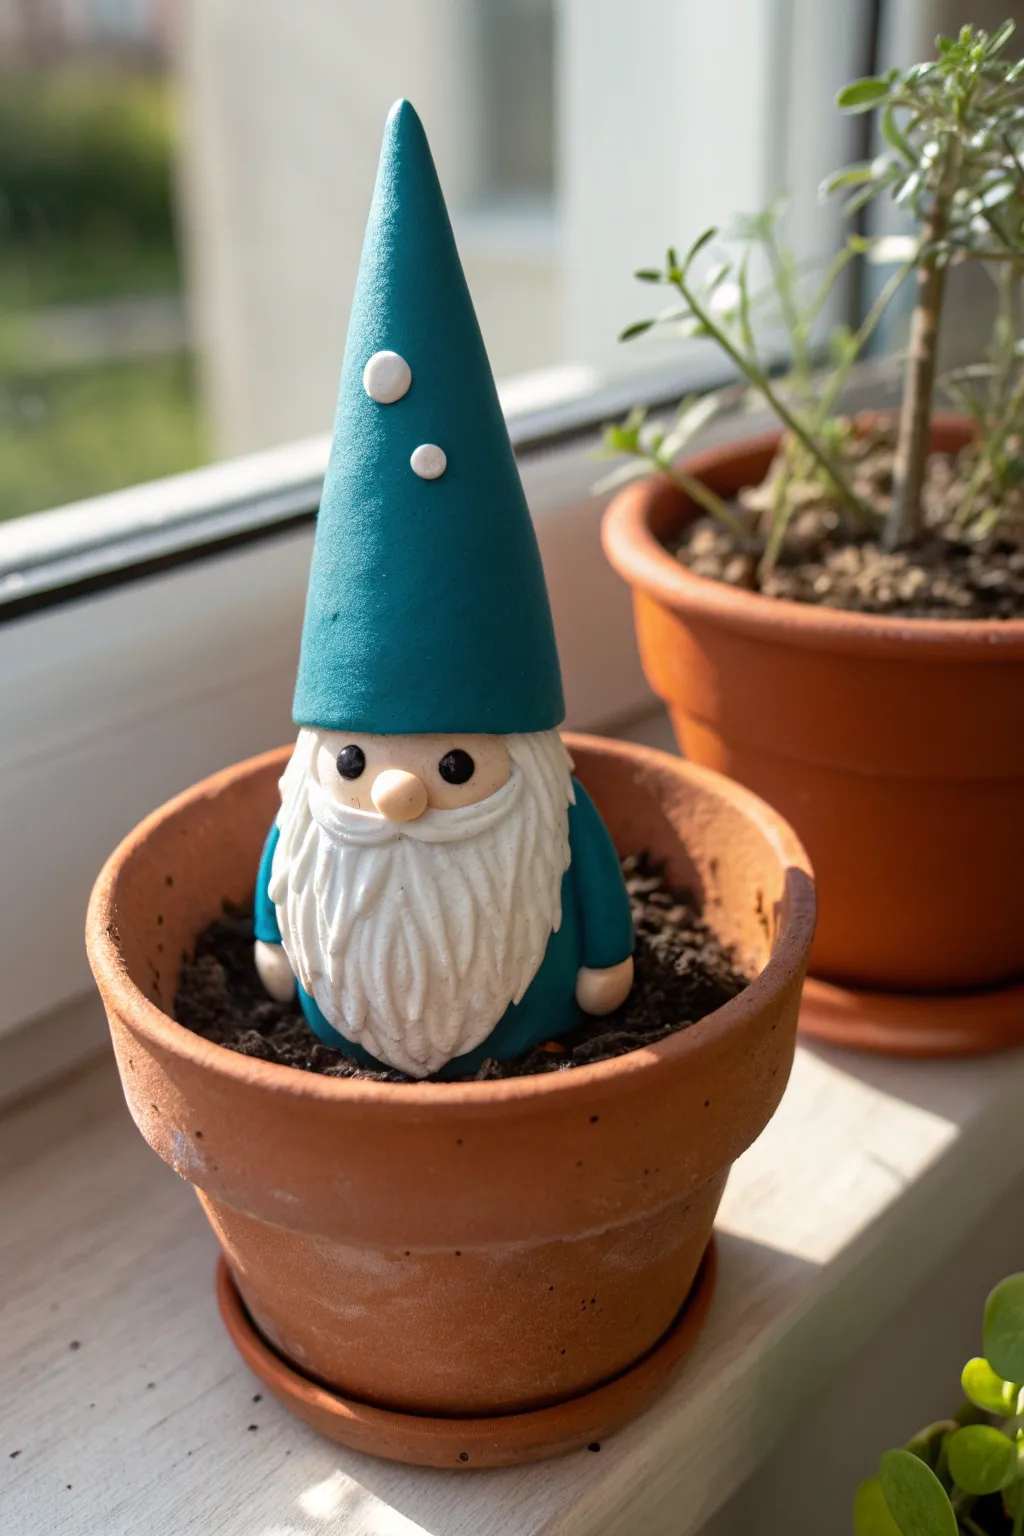
Brighten up your indoor plants with this adorable, chunky garden gnome featuring a tall teal hat and a flowing white beard. This simple clay sculpting project creates a charming little guardian that sits perfectly inside a small terra cotta pot.
Step-by-Step
Materials
- Polymer clay (Teal/Dark Turquoise, White, Beige/Flesh tone)
- Clay sculpting tools (needle tool, ball stylus)
- Small rolling pin
- Blade or craft knife
- Aluminum foil (optional, for armature)
- Oven for baking
- Clear matte varnish (optional)
Step 1: Forming the Body and Head
-
Create the base:
Start with a chunk of teal clay and roll it into a short, smooth cylinder. Flatten the bottom gently so it stands upright securely. This will serve as the gnome’s body and coat. -
Add the arms:
Roll two small sausage shapes from the same teal clay. Attach them vertically to the sides of the body, blending the top seams into the ‘shoulder’ area so they look like sleeves. -
Make the hands:
Form two tiny balls of beige clay. Press these onto the bottom ends of the teal sleeves to create little hands peeking out. -
Shape the head:
Roll a medium-sized ball of beige clay for the head. Place it centered on top of the teal body cylinder.
Step 2: Creating the Beard and Face
-
Prepare the beard base:
Roll out a flat, thin sheet of white clay. Cut a rough U-shape or bib shape that will cover the lower face and chest. -
Attach the beard:
Press the white clay shape onto the face and upper chest area. Smooth the edges carefully around the sides of the face. -
Texture the beard:
Using a needle tool or a clay knife, draw many vertical wavy lines into the white clay to simulate hair strands. I like to vary the pressure to create depth and realism. -
Add the mustache:
Roll a small, thin snake of white clay, taper the ends, and curve it slightly. Attach this horizontally across the face, just above the main beard section. -
Sculpt the nose:
Roll a small oval of beige clay and place it directly in the center of the mustache. Press it down gently so it looks cozy and nestled in the hair. -
Add the eyes:
Create two tiny balls of black clay (or paint them later). Press them into the beige face area just above the mustache on either side of the nose.
Use a Foil Core
To save clay and reduce baking time, scrunch aluminum foil into a cone shape and build the teal hat around it, rather than using solid clay.
Step 3: The Hat and Finishing Touches
-
Form the tall cone:
Take a larger amount of teal clay and roll it into a tall, smooth cone shape. Ensure the base of the cone is wide enough to fit over the gnome’s head. -
Position the hat:
Place the cone onto the head, pulling it down slightly until it rests just above the eyes and covers the top of the beard hair. -
Blend the hat rim:
Gently press the rim of the hat onto the head to secure it, but keep a distinct edge to show it is a separate piece of clothing. -
Add decorative dots:
Flatten two or three tiny balls of white clay into discs. Press them randomly onto the teal hat for a playful pattern. -
Final inspection:
Check your gnome from all angles. Smooth out any unintentional fingerprints using a tiny drop of baby oil or a soft brush. -
Bake:
Follow the specific temperature and time instructions on your package of polymer clay to bake the figure. -
Cool and protect:
Let the gnome cool completely before moving it. If desired, apply a clear matte varnish to protect the surface from moisture if it will live near real plants.
Seasonal Swaps
Make the hat red and the tunic green for a Christmas version, or create a yellow hat and blue coat for a sunny spring look.
Place your new little friend into a small pot with some soil and watch him guard your greenery
Faux Ceramic Paint Palette With Finger Dips
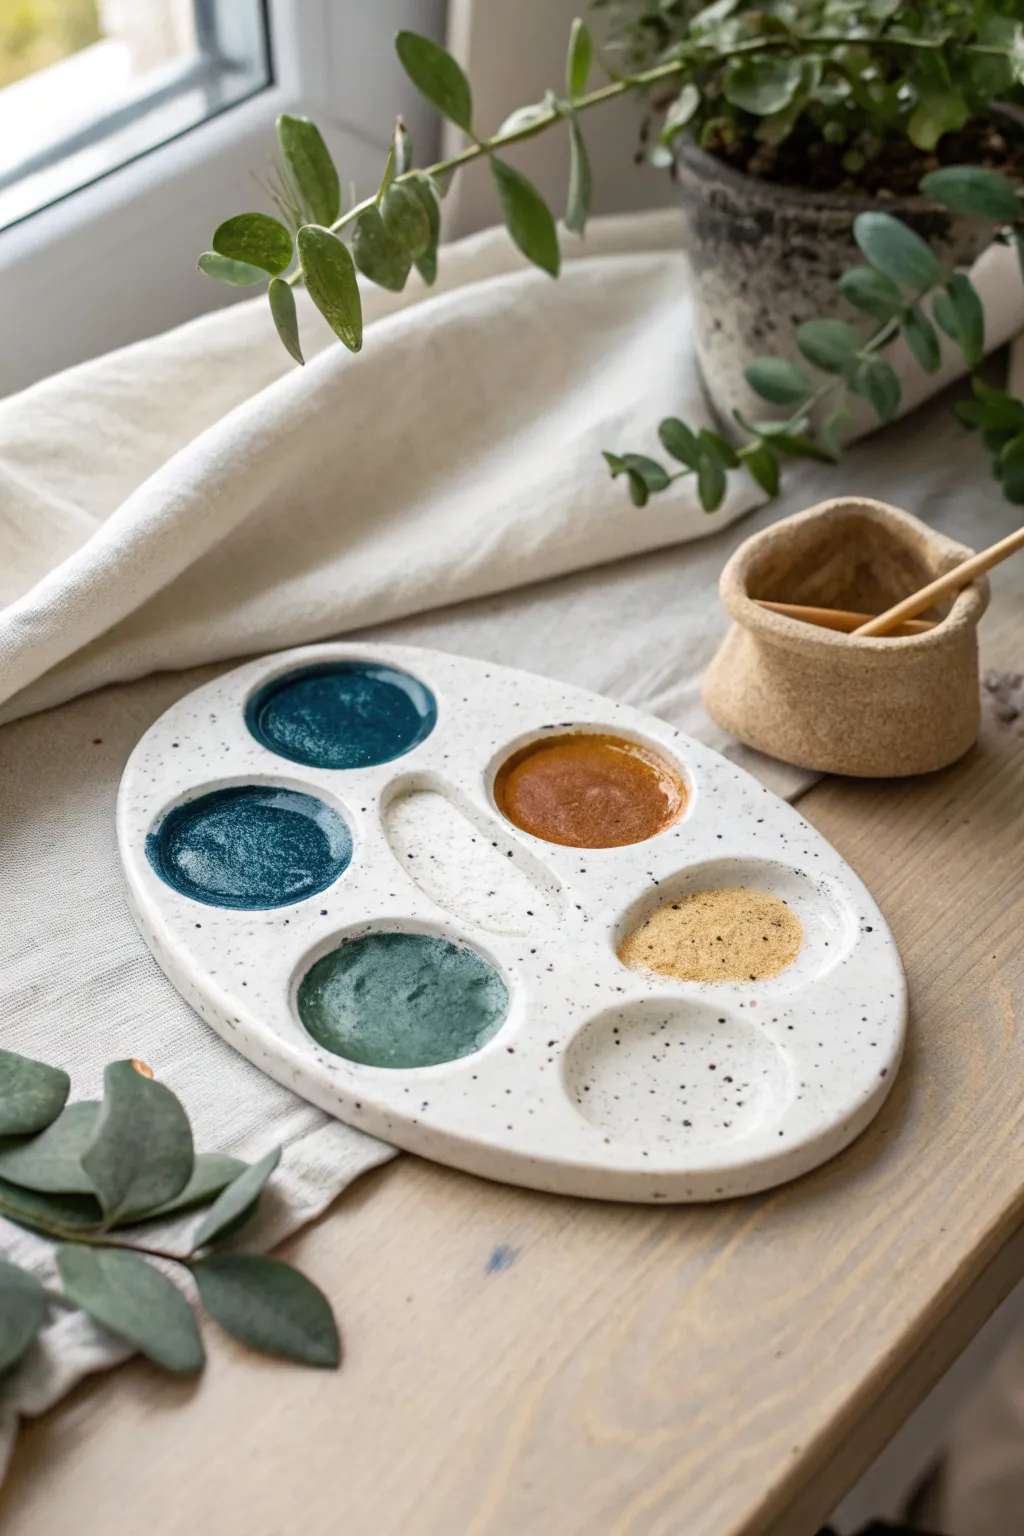
Recreate the charm of handmade ceramics without a kiln using this elegant air-dry clay project. This oval palette features six pigment wells and a thumb hole, finished with a delightful speckled glaze effect that mimics high-end stoneware.
Step-by-Step
Materials
- White air-dry clay (approximately 1 lb)
- Rolling pin
- Parchment paper or canvas mat
- Oval paper template (approx. 6×9 inches)
- Small round measuring spoon or melon baller
- Craft knife
- Cup of water
- Small sponge
- Fine-grit sandpaper (220 and 400 grit)
- White acrylic paint
- Black acrylic paint
- High-gloss varnish or polyurethane sealer
- Old toothbrush
- Two paintbrushes (one flat, one detail)
Step 1: Shaping the Clay Base
-
Condition the Clay:
Start by kneading your white air-dry clay until it is smooth, pliable, and free of any air bubbles. -
Roll Out the Slab:
Place the clay on parchment paper and roll it out into an even slab, approximately 1/4 to 1/3 inch thick. Keep the thickness consistent to prevent cracking during drying. -
Cut the Oval Shape:
Lay your oval paper template lightly onto the slab. Using a craft knife, carefully trace around the edge to cut out the palette shape. Remove excess clay. -
Smooth the Edges:
Dip your finger in a little water and run it along the cut edges to round them off. You want a soft, organic look rather than sharp, machined angles.
Fixing Cracks
Make a ‘slip’ paste mixture of clay and water. Fill any cracks that appear during drying, let it dry again, and sand smooth.
Step 2: Creating the Wells
-
Mark Well Positions:
Lightly visualize or mark where your six paint wells will go—three on either side of the center. Leave room in the middle for the thumb hole. -
Press the Indentations:
Using the back of a measuring spoon or your thumb, gently press into the clay to form shallow, round depressions. Support the underside with your other hand to keep the slab flat. -
Refine the Wells:
Dip your sponge in water and smooth the inside of each well, ensuring there are no fingernail marks or rough textures. This step is crucial for easy cleaning later. -
Cut the Thumb Hole:
In the center space, cut an oblong or kidney-bean shape using your craft knife. This serves as a grip or a brush rest. Smooth these cut edges with water as well.
Step 3: Drying and Sanding
-
Slow Drying:
Place the palette on a flat surface away from direct heat. Let it dry for 24-48 hours, flipping it occasionally to ensure even drying and prevent warping. -
Initial Sanding:
Once bone dry, use 220-grit sandpaper to smooth out any bumps on the surface and edges. Be gentle around the rim of the wells. -
Final Polish:
Switch to 400-grit sandpaper for a silkier finish. Wipe away all dust with a slightly damp cloth or sponge before painting.
Level Up: Gold Rim
Paint the very edge of the palette with liquid gold leaf before the final varnish step for a luxe, dipped-gold aesthetic.
Step 4: The Faux-Ceramic Finish
-
Base Coat:
Apply two coats of white acrylic paint to the entire piece, front and back. I like to let the first coat dry completely before adding the second for better opacity. -
Create the Speckle Mix:
Dilute a small amount of black acrylic paint with water until it has an inky consistency. -
Splatter Technique:
Dip an old toothbrush into the watery black paint. hold it over the palette and run your thumb across the bristles to flick tiny speckles onto the surface. Aim for random, uneven distribution. -
Sealing:
Once the paint is fully dry, apply 2-3 coats of high-gloss varnish. This mimics the shine of glazed ceramic and makes the palette water-resistant and wipeable. -
Water Cup Bonus:
Use leftover clay to pinch a small, rustic pot for water. Repeat the sanding, painting, speckling, and sealing process to create a matching set.
Now you have a stunning, functional art tool that looks like it came straight from a pottery studio

TRACK YOUR CERAMIC JOURNEY
Capture glaze tests, firing details, and creative progress—all in one simple printable. Make your projects easier to repeat and improve.
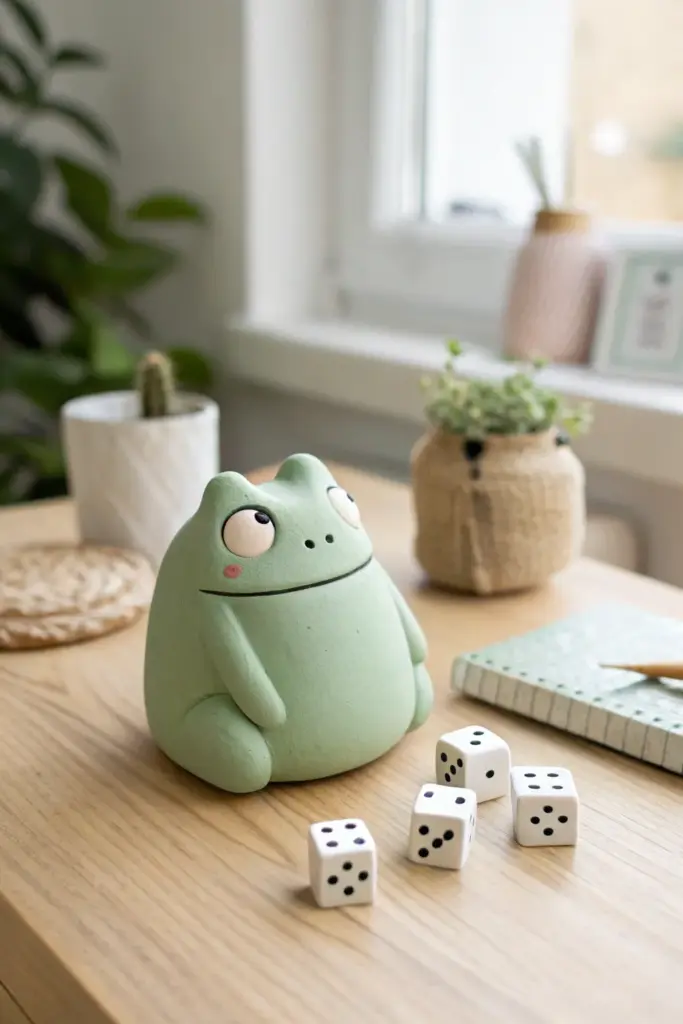
Date-Dice Desk Buddy With a Silly Character Face
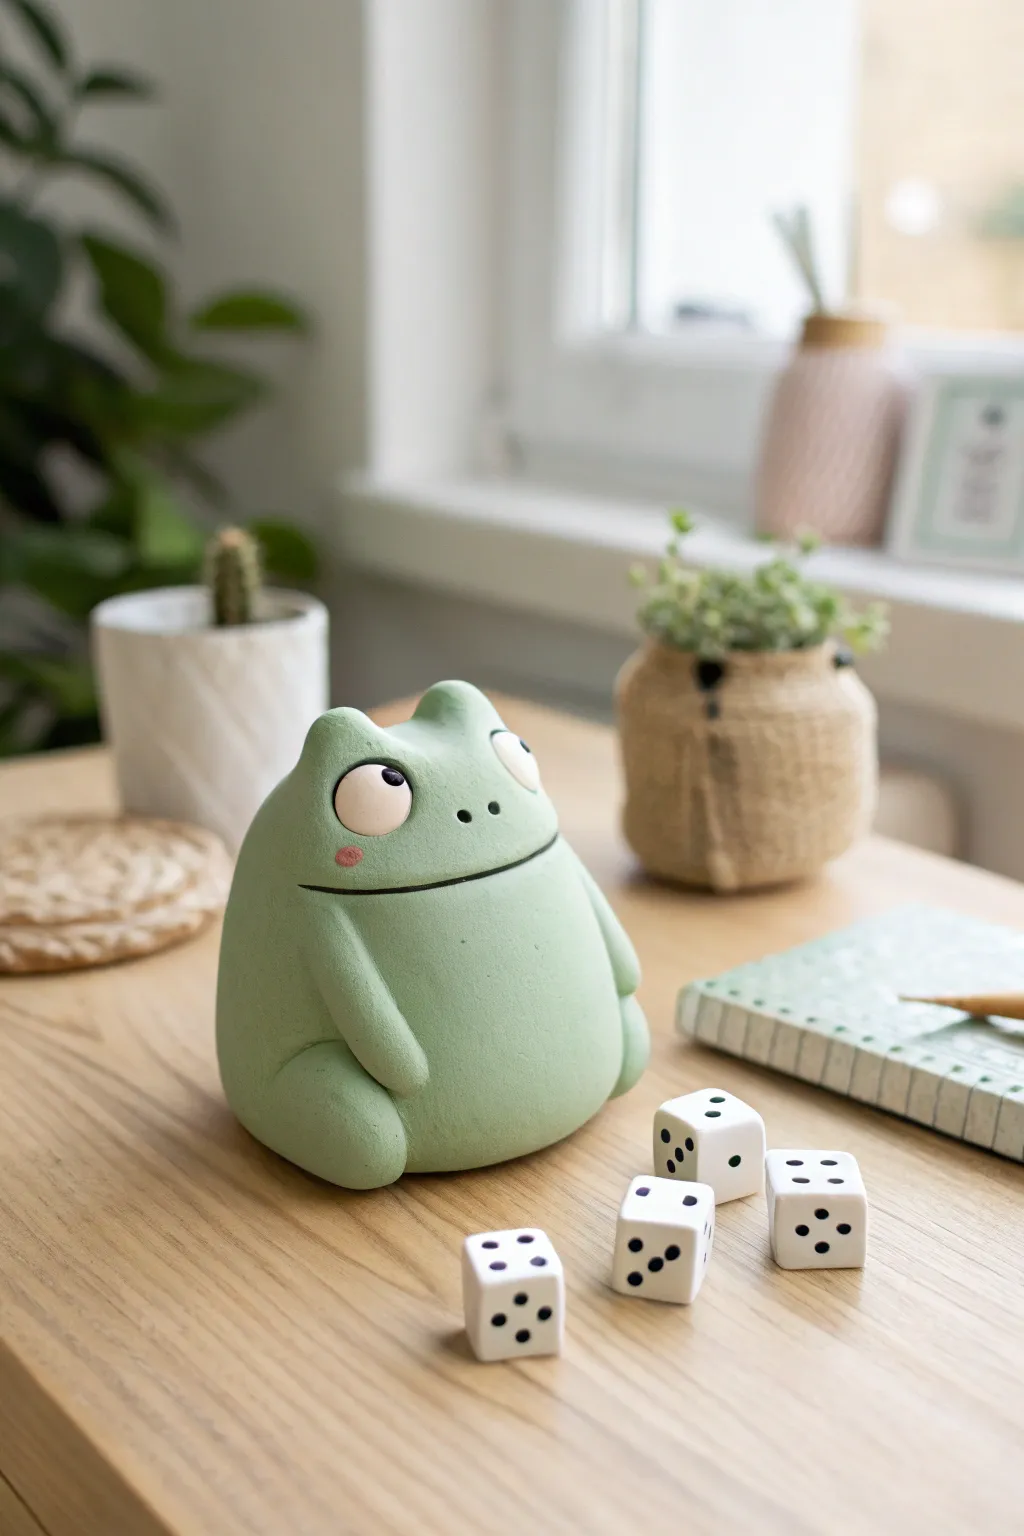
Sculpt your own adorable, chunky frog companion to keep you company during work or gaming sessions. This smooth, matte-finished friend features a goofy expression and a satisfyingly round shape perfect for sitting on your desk.
Step-by-Step
Materials
- Polymer clay (Sage Green, White, Black, Pink)
- Aluminum foil
- Clay sculpting tools (ball stylus, needle tool)
- Smoothing oil or baby oil
- Soft paintbrush
- Baking sheet and parchment paper
- Oven (for curing)
- Matte varnish (optional)
Step 1: Forming the Body Base
-
Create the core:
Start by crumpling a piece of aluminum foil into a tight ball, slightly flattened at the bottom. This saves clay and keeps the figurine lightweight. -
Prepare the green clay:
Condition your sage green polymer clay until it is soft and pliable. Roll it into a large, smooth ball, ensuring there are no cracks. -
Cover the core:
Flatten the green clay slightly and wrap it completely around your foil core. Roll it gently between your palms to smooth out any seams. -
Shape the silhouette:
Gently tap the bottom against your work surface to create a flat base so the frog sits independently. Taper the top slightly to define the head area without creating a separate neck.
Uneven Eyes?
If the eyes look lopsided, don’t restart. Gently slice off the uneven mound with a tissue blade and re-attach a new one. Polymer clay is forgiving until baked.
Step 2: Sculpting the Features
-
Make the eye sockets:
Using a large ball stylus or your thumb, create two shallow indentations on the top of the head where the eyes will sit. -
Add the eye mounds:
Roll two medium-sized balls of green clay. Attach them to the indentations you made, blending the clay downwards into the main body so they look integrated, not just stuck on. -
Create the arms:
Roll two thick, sausage-like shapes of green clay. Attach these vertically to the front of the body, curving them slightly inward as if the frog is resting its hands on its belly. -
Blend the seams:
Use a clay sculpting tool or your finger to smooth the edges of the arms into the body, leaving the front rounded surfaces distinct. -
Add the feet:
Form two flattened ovals of green clay. Attach them to the bottom front of the body, just slightly protruding out from under the belly curve.
Fingerprint Eraser
Before baking, dampen a soft paintbrush with baby oil and verify gently sweep it over the clay. It melts away fingerprints like magic and leaves a flawless finish.
Step 3: Detailing the Face
-
Create the whites of the eyes:
Flatten two small circles of white clay. Press these gently onto the front of the green eye mounds you sculpted earlier. -
Add the pupils:
Roll tiny balls of black clay. Press them onto the white circles. I like to place them looking off to the side to give the frog a silly, distracted expression. -
Carve the mouth:
Use a needle tool or flexible blade to press a long, slightly curved line across the face for the mouth. Gently widen it just a hair so it’s visible. -
Add blushing cheeks:
Take extremely tiny amounts of pink clay, flatten them into ovals, and press them onto the cheeks just below the eyes. -
Sculpt the nostrils:
Use a small needle tool to poke two tiny holes between the eyes for the nose.
Step 4: Finishing Touches
-
Smooth the surface:
Lightly brush a tiny amount of baby oil over the green clay to remove any fingerprints or dust. This gives that professional, smooth look. -
Bake:
Place your frog on parchment paper and bake according to your polymer clay package instructions (usually 275°F/135°C for 15-30 minutes depending on thickness). -
Cool down:
Let the figurine cool completely in the oven before moving it to prevent cracking. -
Seal (optional):
If you want extra durability, apply a thin coat of matte varnish. Avoid glossy finishes to keep the soft, natural look shown in the image.
Place your new green buddy on your desk to guard your dice and bring a smile to your face