If you’re craving cute ceramic ideas, think tiny details, soft colors, and pieces that feel like they have their own sweet little personality. These projects are all about turning everyday pottery into playful companions you’ll actually use and smile at.
Smiley Face Pinch-Pot Mugs
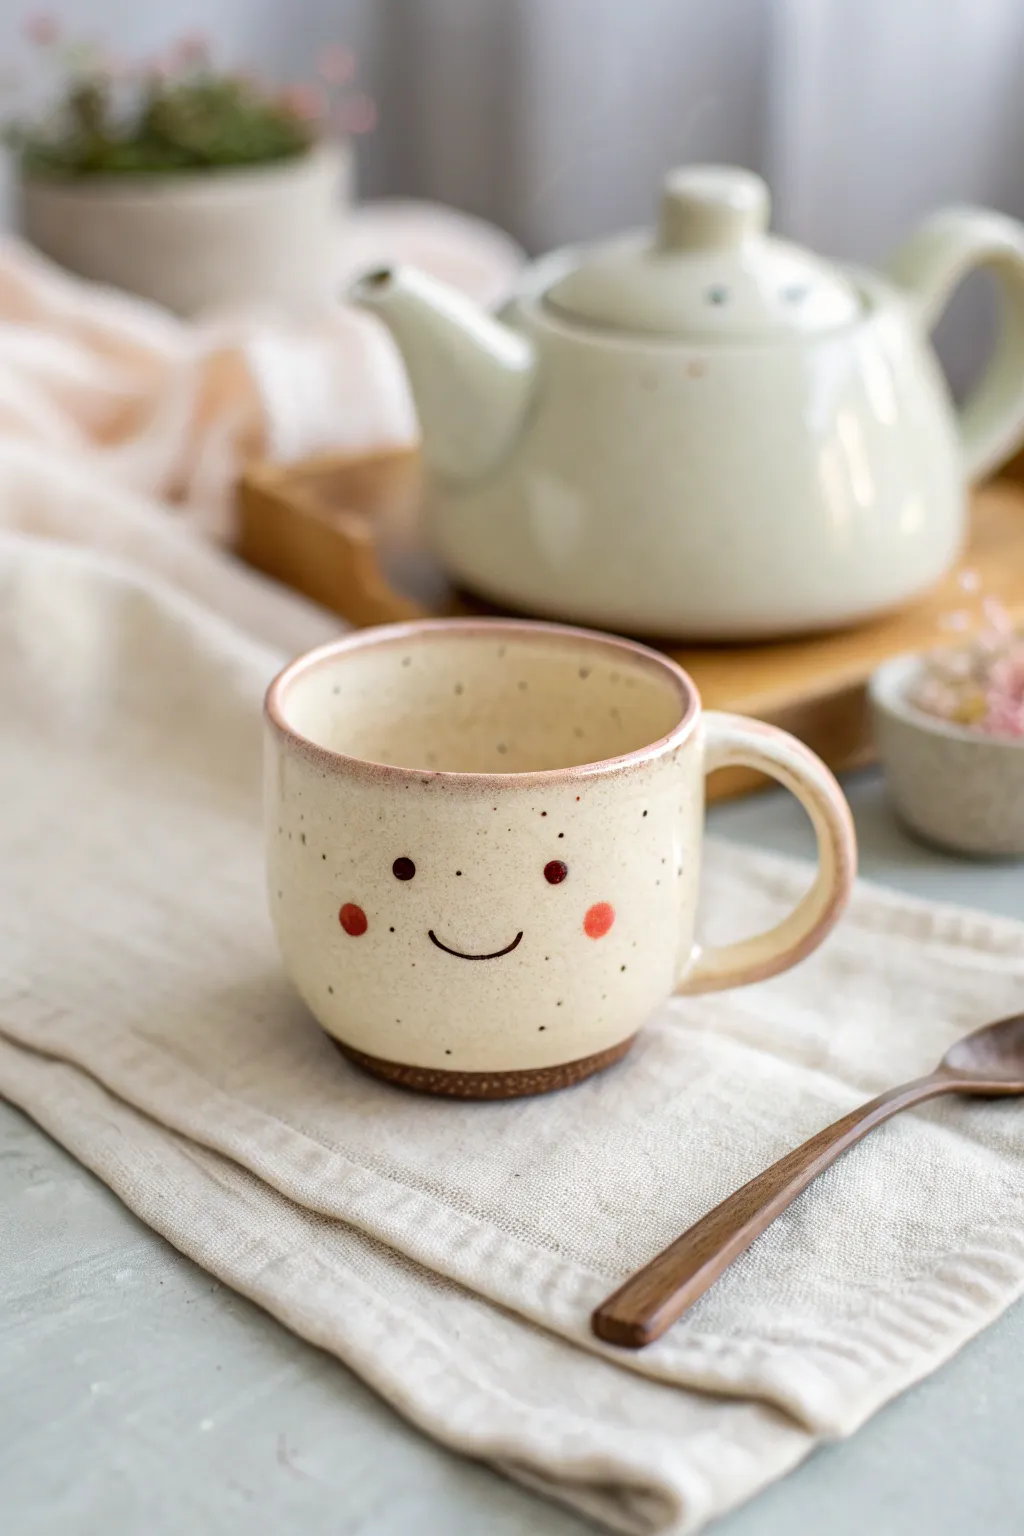
This charming, speckle-glazed mug features a simple, irresistible smiley faye that adds a dose of joy to your morning routine. With its classic pinch-pot shape and rustic unglazed base, it perfectly balances modern cuteness with earthy, handmade warmth.
Step-by-Step
Materials
- Speckled Stoneware Clay (2 lbs)
- Pottery wheel (optional, can be hand-built)
- Needle tool
- Sponge
- Rib tool (wooden and rubber)
- Scoring tool
- Slip (clay mixed with water)
- Underglaze (Red/Pink for cheeks, Black/Brown for eyes/mouth)
- Small fine-point liner brush
- Clear or Cream Glossy Glaze (food safe)
- Kiln
Step 1: Forming the Base
-
Center constraints:
Begin with a well-wedged ball of speckled stoneware clay. Whether throwing on the wheel or hand-building, start by centering your clay mass or forming a perfect sphere if constructing a pinch pot manually. -
Open the form:
Create the central opening. If pinching, gently rotate the ball while pressing your thumb into the center, stopping about a half-inch from the bottom to leave a sturdy base. -
Build the walls:
Pull up the walls to create a cylindrical shape that bows out slightly in the middle. Aim for an even thickness of about 1/4 inch throughout the vessel walls. -
Refine the shape:
Use a rubber rib on the inside relative to your hand on the outside to smooth the walls. I like to gently push the belly of the mug outward from the inside to create that friendly, rounded silhouette. -
Trim the rim:
Level off the top rim with a needle tool. Use a small piece of chamois leather or a damp sponge to compress and round the lip so it’s comfortable for drinking.
Smudged Smile?
If underglaze smears during glazing, lightly sponge it off and let it dry. Next time, try a thin coat of clear glaze over the face first to seal it before the main dip.
Step 2: Attaching the Handle
-
Pull the handle:
Take a separate lump of clay and pull a handle, or roll a coil that tapers slightly. Use plenty of water to keep it smooth and work it into a gentle ‘ear’ shape. -
Checking consistency:
Allow both the mug body and the handle to dry to a leather-hard state. They need to be stiff enough to hold their shape but moist enough to join. -
Score and slip:
Mark the attachment points on the mug body and the ends of the handle with a scoring tool. Apply a generous amount of slip to these rough areas. -
Secure the join:
Press the handle firmly onto the mug body. Use a wooden tool or your thumb to blend the clay seams together until they are invisible, then wipe smooth with a damp sponge.
Step 3: Adding the Face
-
Map the features:
Once the mug is bone dry, lightly sketch the placement of the eyes and mouth with a pencil. The graphite will burn off in the kiln, leaving no trace. -
Paint the cheeks:
Dip a small round brush into red or pink underglaze. Dab two circle cheeks onto the pot. You may need 2-3 coats for opaque coverage. -
Detail the expression:
Switch to a very fine liner brush and dark brown or black underglaze. Create two small dots for eyes just above the cheeks and a simple, thin ‘U’ shape for the smile. -
Bisque fire:
Load the mug into the kiln for the first firing (bisque fire), usually to cone 04. This hardens the clay and sets the underglaze decoration.
Make it a Family
Create a whole set by varying the sizes and expressions. Try a winking face, a sleepy face, or adding tiny 3D clay noses before the bisque firing.
Step 4: Glazing and Finishing
-
Wax resist:
Paint liquid wax resist on the bottom ½ inch of the mug exterior. This will create the raw clay ‘foot’ shown in the image and prevent the piece from sticking to the kiln shelf. -
Apply the glaze:
Dip the mug into a clear or semi-opaque cream glaze. Ensure the inside is fully coated. If your clay isn’t naturally speckled, choose a glaze with ‘speckles’ added. -
Clean the foot:
Use a sponge to wipe away any glaze beads that may have dripped onto the waxed bottom area. -
Final wipe:
Gently rub the painted face area with your finger while the glaze is powdery to ensure the glaze layer isn’t too thick, which maximizes the visibility of your cute design. -
Glaze fire:
Fire the mug a second time to the maturation point of your clay and glaze (typically cone 5 or 6). Let the kiln cool completely before opening.
Now fill your adorable new mug with tea and enjoy the warm company of your handmade friend


Tiny Animal Planters With “Plant Hair”

This adorable bear-head planter brings a touch of whimsy to any windowsill with its sweet, simple expression and speckled ceramic finish. Perfect for housing a tiny succulent, the design turns the plant itself into a funky, spiky hairdo for your new forest friend.
Step-by-Step Tutorial
Materials
- White stoneware clay with grog/speckles
- Rolling pin
- Needle tool
- Small kidney scraper (rib)
- Small spherical mold or styrofoam ball (approx. 3-4 inches)
- Slip (clay slurry)
- Scoring tool
- Underglaze (black and brown)
- Fine detail brush
- Clear or speckled white glossy glaze
- Pottery sponge
Step 1: Basic Form Construction
-
Prepare the Clay:
Begin by wedging a softball-sized piece of white stoneware clay. If you want the natural speckles shown in the photo, choose a clay body specifically formulated with grog or speckles, often called ‘Speckled Buff’ or similar. -
Roll a Slab:
Roll out a slab of clay to an even thickness of about 1/4 inch. Ensure the surface is smooth by compressing it gently with a rubber rib. -
Form the Pinch Pot Base:
Alternatively, you can start with a pinch pot method. Roll a ball of clay, press your thumb into the center, and gently pinch the walls while rotating the ball until you have a smooth, cup-like shape. This creates a more organic, hand-built feel suitable for the bear. -
Smoothing the Shape:
Using your kidney scraper or a damp sponge, smooth out the exterior of your pot. You want a slightly rounded, chubby cylinder shape that tapers just slightly at the rim. -
Leveling the Rim:
Set the pot on a flat surface. If the top rim is uneven, use your needle tool to trim it level, or gently paddle it down for a softer edge.
Smooth Surface Trick
Burnish the clay with the back of a spoon when leather-hard. This compresses the particles for a silky finish even under the glaze.
Step 2: Adding Character
-
Shape the Ears:
Roll two small balls of clay, roughly the size of marbles. flatten them slightly and use your thumb to create a small indentation in the center of each, forming a cup shape for the ears. -
Attach the Ears:
Score the bottom of the ears and the corresponding spots on the rim of the pot. Apply a dab of slip and press the ears firmly onto the rim. Smooth the seams with a modeling tool so they look integrated, not just stuck on. -
Refining the Face:
While the clay is leather hard, you can gently push from the inside to slightly protrude the snout area where the nose will go, though simply painting it on a flat surface works beautifully too. -
Drainage Hole:
Don’t forget to push a hole through the bottom center of the planter using a hole cutter or the back of a paintbrush. This is crucial for succulent health. -
Bisque Fire:
Allow the bear to dry slowly to the bone-dry stage. Once dry, fire it in the kiln to cone 04 (bisque).
Change the Species
Elongate the ears for a bunny, or flatten them for a cat. Change the underglaze nose shape to pink triangles for a kitten variation.
Step 3: Glazing and Decoration
-
Painting the Face:
On the bisque-fired ware, use a fine detail brush and black underglaze to paint two small vertical ovals for the eyes. They should be wide-set. -
Adding the Nose and Mouth:
Paint an inverted bubbly triangle for the nose using a dark brown underglaze. From the bottom point of the nose, draw a small vertical line connecting to a simple curved smile line. -
Wax Resist (Optional):
If you want the facial features to remain extremely crisp, I prefer to apply a tiny bit of wax resist over the underglazed eyes and nose before the main glaze dip. -
Glazing:
Dip the entire pot into a clear glaze or a ‘speckled white’ transparent glaze. If you used plain white clay but want the look in the photo, choose a glaze that has iron speckles suspended in it. -
Cleaning:
Wipe the bottom of the pot clean with a wet sponge to prevent it from sticking to the kiln shelf. -
Final Fire:
Fire the piece to the maturity temperature of your clay and glaze (typically Cone 5 or 6 for stoneware). Let it cool completely before planting a rosette-shaped succulent inside.
Pop in your favorite succulent and enjoy your new ceramic companion on the windowsill


Heart-Shaped Trinket Dishes With Sweet Faces
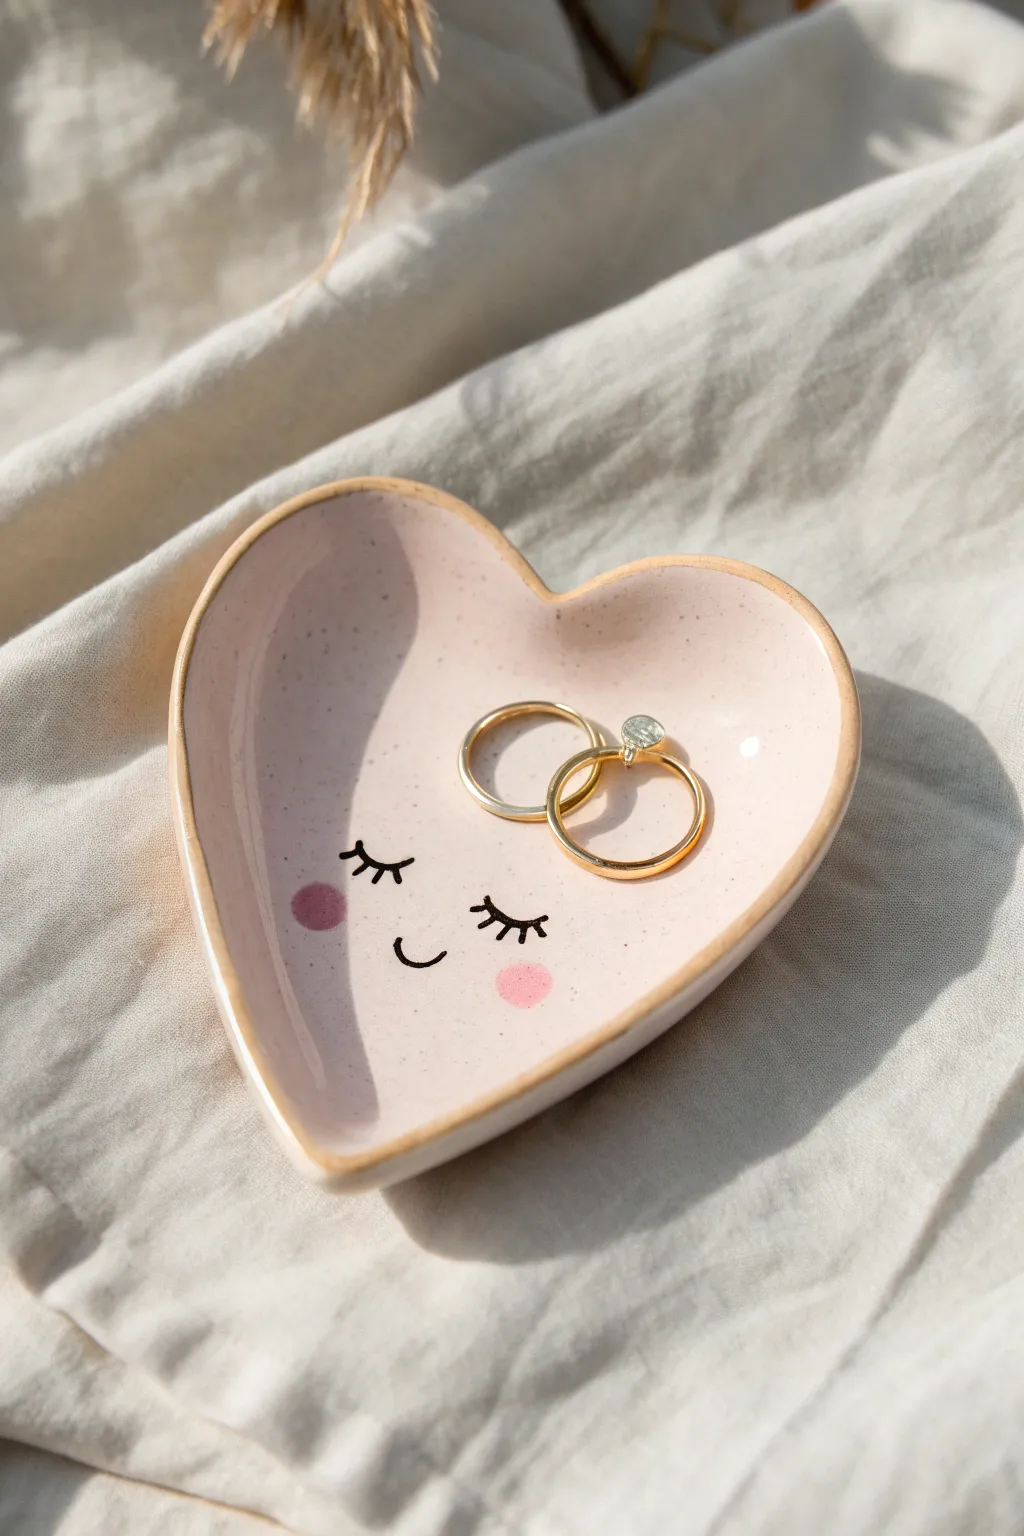
Give your favorite rings a cozy place to rest with this adorable heart-shaped ceramic dish. Featuring a gentle speckled pink glaze, a sleepy smiling face, and a touch of gold luster, it brings a serene sweetness to any bedside table.
How-To Guide
Materials
- White earthenware or stoneware clay
- Rolling pin and guide sticks (about 6mm thickness)
- Heart-shaped template or cookie cutter (approx 4-5 inches)
- Fettling knife or needle tool
- Small smooth sponge
- Soft rib tool (silicone or rubber)
- Speckled pink underglaze or glaze
- Black underglaze pencil or fine liner brush
- Clear glossy glaze (if using underglaze)
- Gold luster (overglaze)
- Small fine-point liner brush
- Kiln access
Step 1: Shaping the Clay
-
Roll out the slab:
Begin by wedging your white clay to remove air bubbles, then roll it out into a smooth slab. Use guide sticks on either side of your rolling pin to ensure an even thickness of about 6mm (1/4 inch). -
Cut the heart shape:
Place your heart-shaped template or large cookie cutter onto the slab. If using a template, trace around it carefully with a needle tool or fettling knife. Remove the excess clay. -
Smooth the edges:
Dip your finger or a small sponge in a little water and gently run it along the cut edges of the heart to soften any sharp corners left by the knife. -
Create the curve:
To transform the flat slab into a dish, gently lift the edges of the heart upward with your fingertips. You can cup it in the palm of your hand to create a shallow, concave bowl shape. -
Refine the form:
Use a soft rib tool on the interior surface to smooth out any fingerprints and ensure the curve is continuous and gentle. -
Dry properly:
Let the piece dry slowly to the bone-dry stage. I prefer to cover it loosely with plastic for the first day to prevent the rim from drying too fast and cracking. -
Bisque fire:
Once fully bone dry, fire the piece in the kiln to bisque temperature (usually Cone 04) to prepare it for glazing.
Clean Lines Pro-Tip
If you’re nervous about painting the face freehand, lightly sketch it first with a standard graphite pencil. The graphite will burn away completely in the kiln, leaving just your perfect design
Step 2: decorating and Glazing
-
Apply base color:
Apply 2-3 coats of a speckled pink glaze to the entire surface of the dish. If using a regular pink glaze, you can flick a stiff toothbrush with brown glaze over it to create the speckled effect manually. -
Draw the face features:
Using a very fine liner brush and black underglaze (or a black underglaze pencil), carefully draw the sleepy face. Paint two semi-circles curving downward for eyes, adding small lashes, and a tiny ‘u’ shape for the smile. -
Add rosy cheeks:
Dip a small round brush or even the tip of a cotton swab into a deeper pink glaze. Dab two small circles on either side of the smile to create the blushing cheeks. -
Glaze firing:
If you used underglazes, apply a layer of clear glaze over the top. If you used a colored gloss glaze, you are ready to fire. Fire the piece to the temperature required by your specific glaze (usually Cone 5 or 6).
Level Up: Texture
Before cutting your heart shape, gently roll a piece of lace or a texture mat over your clay slab. The glaze will break beautifully over the texture for added depth
Step 3: The Golden Touch
-
Prep the luster:
Once the piece has been glaze fired and cooled, clean the rim with alcohol to remove any oils or dust. Mix your gold luster well. -
Paint the rim:
Using a dedicated luster brush, carefully paint a thin, steady line of gold along the very edge of the rim. A steady hand is key here. -
Final firing:
Place the dish back in the kiln for a third firing—the luster firing. This is typically a much lower temperature (around Cone 018).
Now you have a charming little spot to keep your treasures safe


Mini Bud Vases That Look Like Little Characters
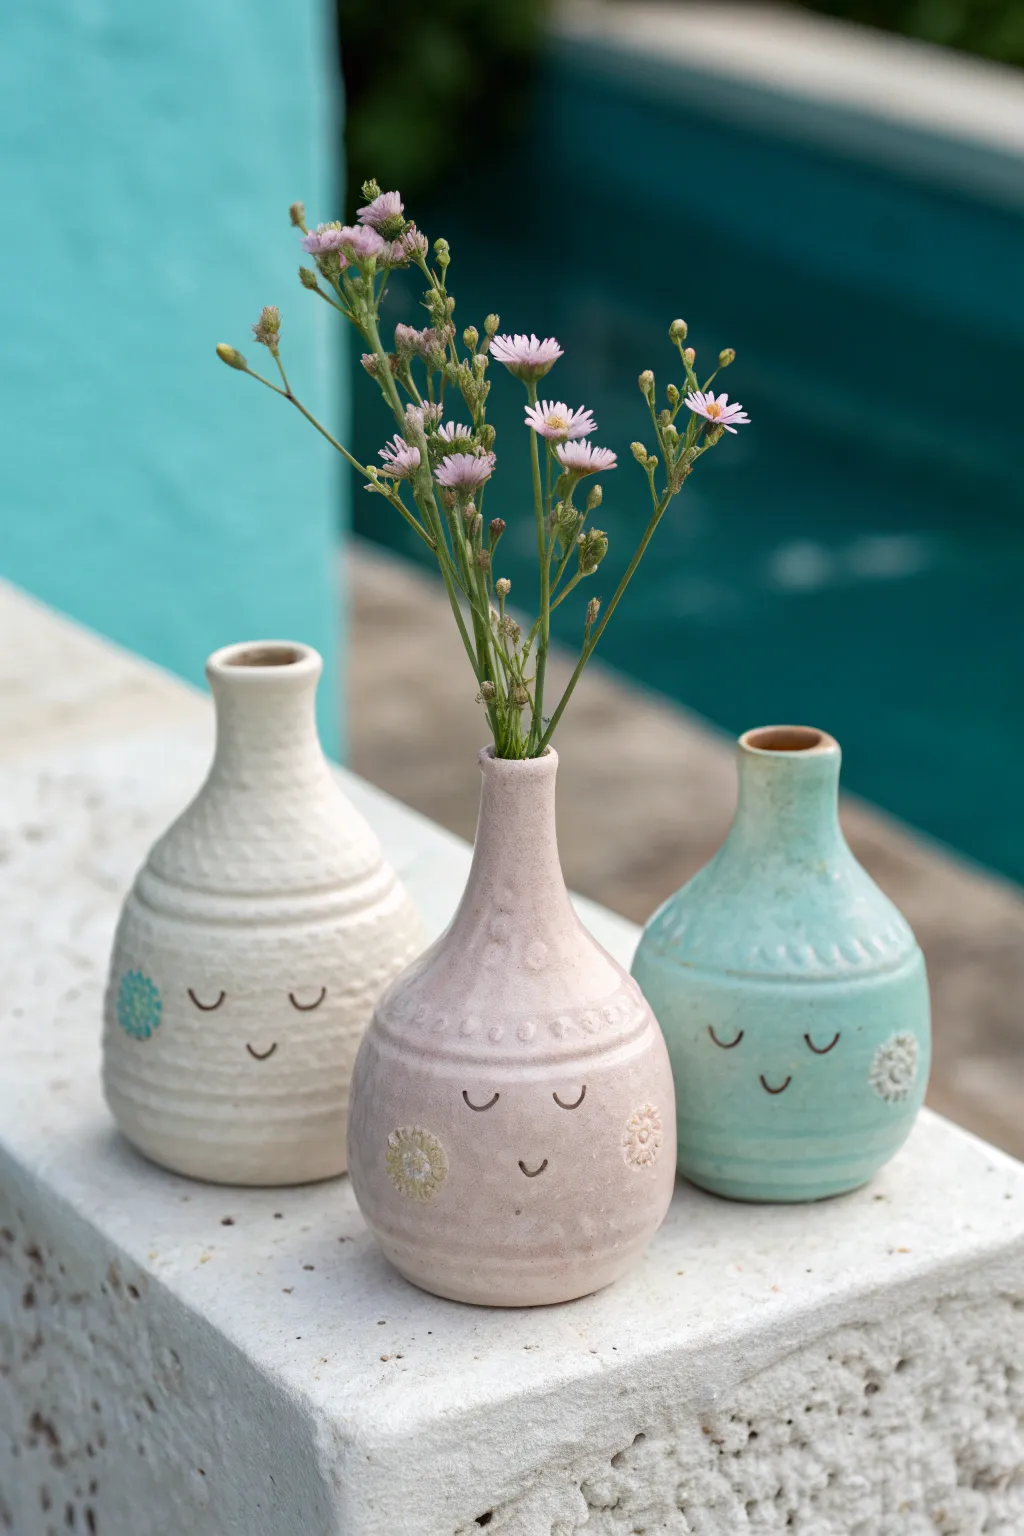
Bring a touch of personality to your decor with these adorable ceramic bud vases, featuring sleepy, smiling faces and soft pastel glazes. Perfect for holding tiny wildflowers or dried stems, these miniature characters add a sweet, handmade charm to any windowsill or shelf.
Step-by-Step
Materials
- White stoneware clay or porcelain
- Pottery wheel (or hand-building tools if pinching)
- Needle tool
- Small sponge
- Modeling tool with a small curved end
- Clay stamps (floral or geometric)
- Underglaze (black or dark brown)
- Pastel glazes (cream, soft pink, aqua/mint)
- Clear transparent glaze (optional, depending on finish desired)
- Kiln
- Small fine-point paintbrush
- Rib tool
Step 1: Forming the Shape
-
Center the clay:
Start with a small ball of clay, roughly the size of a tennis ball or smaller (about 0.5 to 0.75 lbs). Secure it firmly onto the wheel head and center it carefully. -
Open the form:
Create the opening, keeping it quite narrow since this is a bud vase. Pull the floor out slightly, but remember the base will be relatively bulbous. -
Throw the belly:
Pull up the walls, pushing gently from the inside to create a rounded, pear-shaped bottom. Keep the walls even, tapering them slightly inward as you move up. -
Shape the neck:
Collar the clay in significantly as you reach the top third of the vessel. Use your fingertips to gently squeeze and lift, creating a distinct, narrow neck that flares very slightly at the rim for a soft finish. -
Refine the surface:
While the wheel is spinning slowly, use a rib tool to smooth the belly of the vase. You can leave faint throwing rings for texture if desired, like the ones seen on the pink vase.
Stamp Clarity
Make your own stamps by carving patterns into a small coil of blending clay, then bisque firing it. This creates custom textures perfectly scaled for mini items.
Step 2: Adding Character Details
-
Create texture lines:
Using a needle tool or a trimming tool while the wheel spins slowly, incise two or three distinct horizontal lines around the middle or lower section of the vase belly to act as a decorative border. -
Dry to leather hard:
Allow the vases to dry until they are leather hard—firm enough to handle without deforming but still soft enough to carve. -
Stamp the cheeks:
Press a small floral or sunbust stamp gently onto the sides of the vase, placed somewhat low on the ‘face’ area to act as rosy cheeks or decorative side motifs. -
Carve the eyes:
Find the center front of your vase. Using a needle tool or a small curved carving tool, carefully press in two ‘U’ shapes for the sleepy, closed eyes. -
Add the smile:
Just below the eyes, carve a smaller, simple ‘U’ shape for the smiling mouth ensuring it’s centered. -
Clean up burrs:
Where you carved the face, small crumbs of clay might remain. Wait a moment for them to dry slightly, then brush them away with a soft brush or smooth them gently with a fingertip.
Glaze Filling Grooves?
If glaze fills the eye carvings too much, wax resist the carved lines after applying the underglaze but before dipping in the main color.
Step 3: Glazing and Firing
-
Bisque fire:
Place your bone-dry vases into the kiln and bisque fire them according to your clay body’s specifications (usually Cone 04 or 06). -
Highlight the face:
Mix a small amount of black or dark brown underglaze with water. Paint it into the carved eyes and mouth lines, then wipe the surface with a damp sponge so the color remains only in the recesses. -
Apply base color:
Dip or brush your pastel glazes onto the vases. Use a creamy white for one, a dusty rose pink for another, and a watery mint green for the third. Ensure an even coat. -
Reveal the texture:
If your glaze is thick, you might want to gently wipe the area over the stamped cheek patterns to ensure the glaze breaks over the texture, or use a semi-opaque glaze that naturally highlights relief. -
Clean the foot:
Wipe the bottom of the vase clean of any glaze to prevent it from sticking to the kiln shelf. -
Glaze fire:
Load the kiln again for the final glaze firing (Cone 5, 6, or 10 depending on your materials).
Group your little character vases together to create a charming family portrait on your table

The Complete Guide to Pottery Troubleshooting
Uncover the most common ceramic mistakes—from cracking clay to failed glazes—and learn how to fix them fast.
Cat Paw Spoon Rests
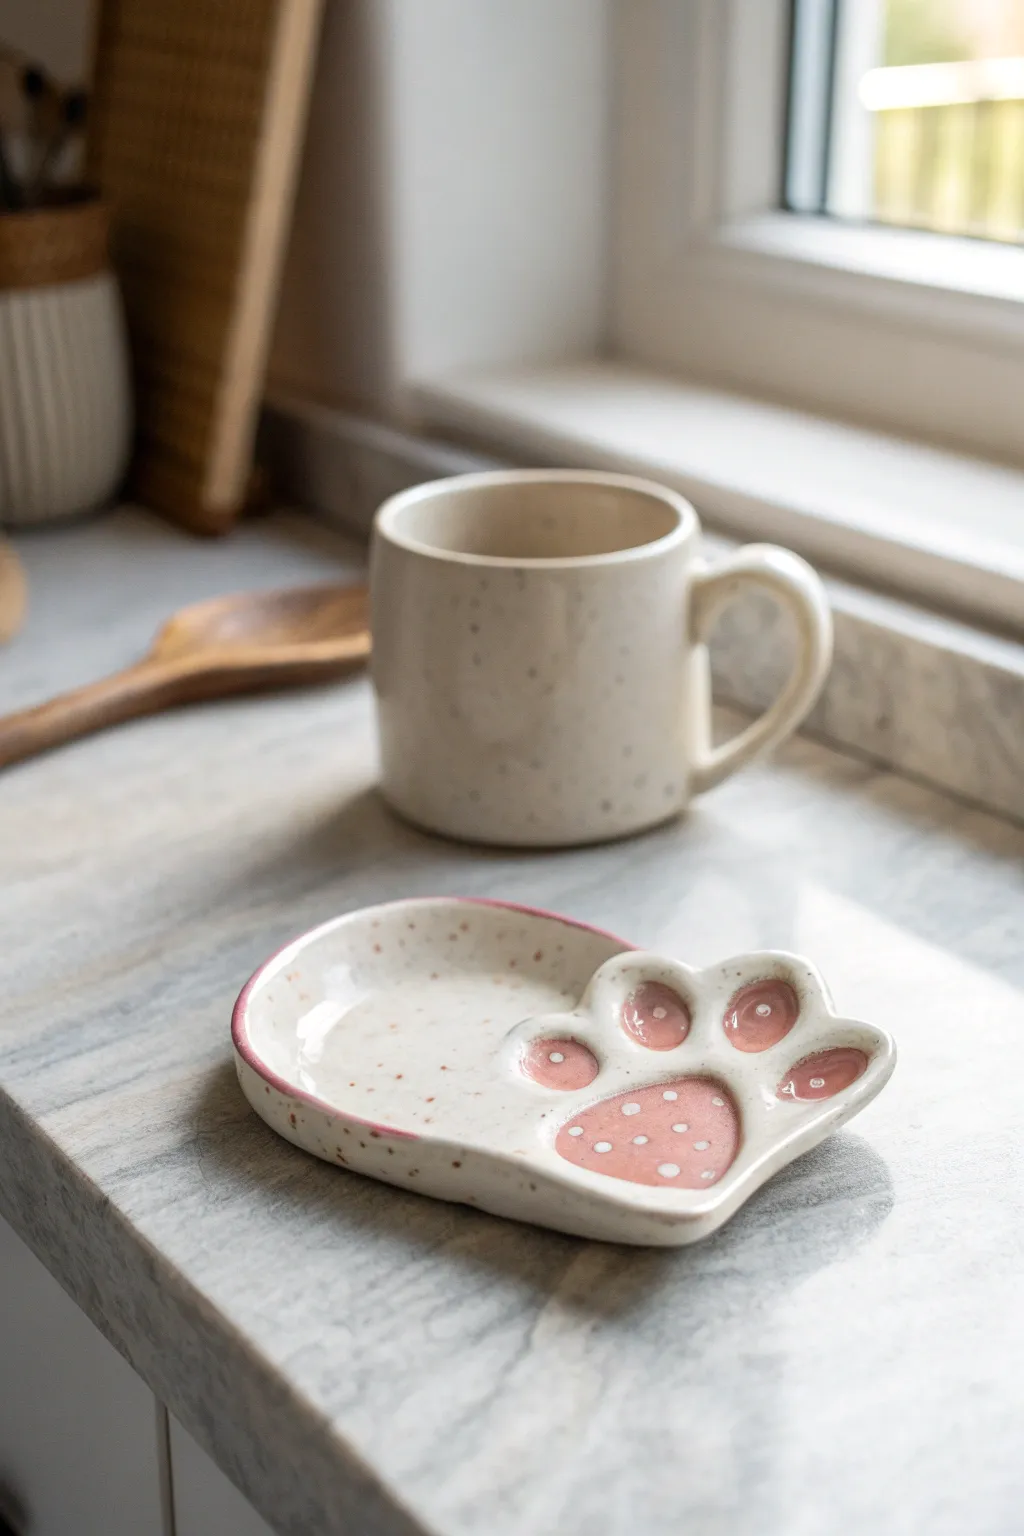
This adorable spoon rest features a creamy, speckled finish with sweet pink paw pads, perfect for adding a touch of whimsy to your kitchen counter. Its gentle curve and slight texture give it a distinctly handmade feel that makes everyday cooking just a little more playful.
How-To Guide
Materials
- Speckled stoneware clay (white or cream base)
- Small rolling pin
- Rolling slats or guide sticks (approx. 1/4 inch)
- Needle tool or fettling knife
- Small sponge
- Modelling tool with a rounded end (or a thumb)
- Pink underglaze
- Clear transparent glaze
- Fine paintbrush
- Kiln access
Step 1: Shaping the Paw
-
Prepare your clay:
Wedge a ball of speckled stoneware clay thoroughly to remove air bubbles. Since this clay body has built-in speckles, you won’t need to paint them on later, which saves a step and looks more natural. -
Roll out a slab:
Place the clay between your guide sticks and roll it out into a smooth, even slab about 1/4 inch thick. Make sure the surface is free of deep scratches or canvas marks. -
Cut the basic shape:
Using a needle tool, cut out an oval shape that widens slightly at one end. This wide end will become the toes, while the narrower end forms the heal of the paw. Aim for a shape about 4-5 inches long. -
Smooth the edges:
Take a damp sponge and gently run it along the cut edges. This softens the sharp angles left by the knife and prevents future chipping. -
Form the toes:
On the wider end of the oval, make small V-shaped indentations with your needle tool or fingers to separate the clay into four distinct toe sections. -
Create the pads:
Gently press your thumb or a rounded modelling tool into the center of each toe section to create a shallow depression. Do the same for the large main pad in the center of the paw. -
Refine the form:
Use your fingers to round over the tops of the toes so they look puffy and soft. I like to push from the underside slightly to give the pads a bit more outward volume. -
Lift the edges:
Gently curve the outer edges of the entire spoon rest upward. This containment lip is crucial for holding messy spoons and sauces later.
Uneven Glaze?
If your clear glaze looks cloudy or milky after firing, you likely applied it too thickly. Aim for the consistency of heavy cream when dipping, or brush out thin layers.
Step 2: Decorating and Glazing
-
Bisque fire:
Allow the piece to dry completely to the bone-dry stage. Fire it in the kiln to bisque temperature (usually cone 04 or 06). -
Paint the rim:
Using a small brush and pink underglaze, carefully paint a thin line along the very top edge of the rim. A shaky hand here actually adds to the organic charm. -
Fill the pads:
Paint the recessed paw pads with the same pink underglaze. Apply 2-3 coats for solid, opaque coverage, letting each coat dry briefly in between. -
Add white details:
Once the pink underglaze is dry, dip the handle end of a paintbrush into white underglaze (or just leave unpainted if using a white clay) to dot small highlights onto the pink pads. -
Wax resist (optional):
If you are dipping your glaze, apply wax resist to the painted pink areas so the clear glaze doesn’t smudge your design. If brushing glaze, you can skip this. -
Apply clear glaze:
Coat the entire piece in a clear transparent glaze. This will seal the clay and make the spoon rest food-safe and easy to wash. -
Wipe the foot:
Use a sponge to wipe any glaze off the very bottom of the piece where it will touch the kiln shelf. -
Final firing:
Fire the piece to the maturity temperature of your clay (typically cone 5 or 6 for stoneware). The speckles in the clay will burst through the glaze during this firing.
Texturizing Tip
Before the clay dries, tap the unpainted areas gently with a stiff bristle brush. This adds subtle pitting that catches the glaze and enhances the speckled, stone-like look.
Place your finished paw print next to your stove and enjoy the cozy vibes it brings to your cooking routine
Chubby Frog Toothbrush Holders
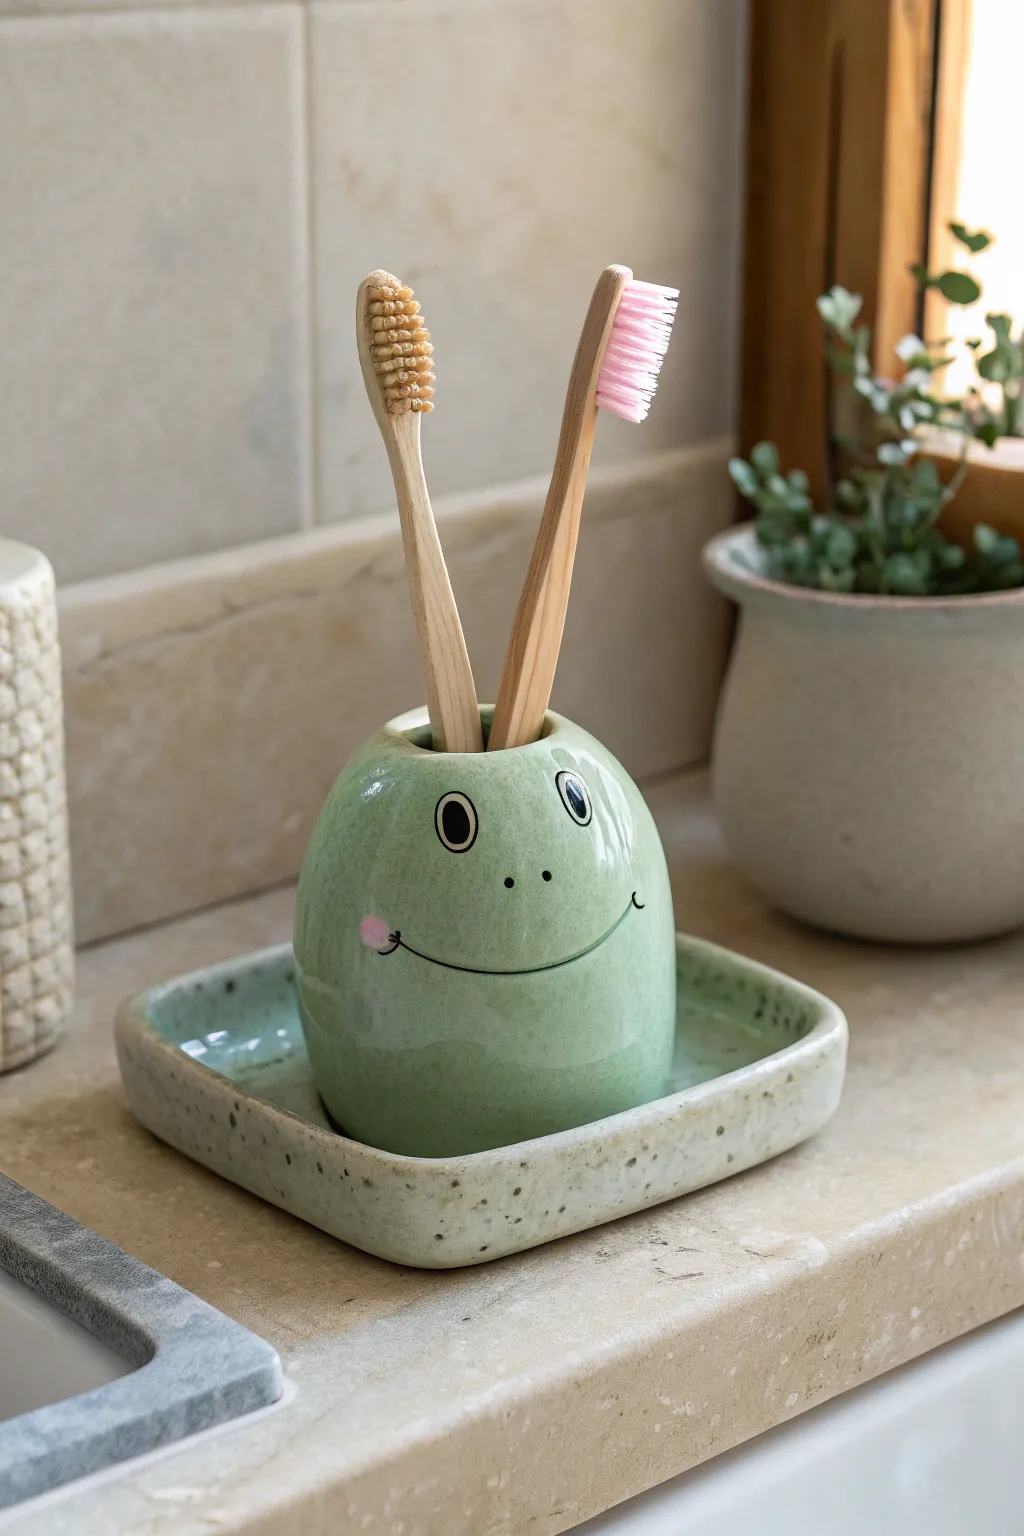
Bring a little swampy charm to your bathroom counter with this adorable ceramic frog toothbrush holder. The set features a rounded, glossy frog body perfect for holding two brushes, resting on a speckled, moss-green square tray.
Step-by-Step
Materials
- Light colored stoneware clay (about 1.5 lbs)
- Pottery wheel (optional, can be hand-built)
- Needle tool
- Rib tool (rubber or metal)
- Sponge
- Wire cutter
- Underglazes (Black, Pink, White)
- Celadon glaze (Green)
- Speckled glaze (for the tray)
- Small paintbrushes
- Modeling tool (rounded tip)
- Kiln
Step 1: Shaping the Frog Body
-
Wedge the clay:
Begin by thoroughly wedging about 1 lb of clay to remove air bubbles and ensure a uniform consistency. This is crucial for structural integrity during firing. -
Form the base cylinder:
Throw a small cylinder on the wheel, or use the pinch pot method if hand-building. You want a closed form or a very narrow opening at the top. -
Shape the belly:
Gently push the walls outward from the inside to create a round, chubby belly shape. Keep the walls even, roughly 1/4 inch thick. -
Close the form:
Collar the neck in significantly until the top is nearly closed. If throwing, close it completely to make a hollow bubble; if pinching, just leave a flat top surface. -
Smooth and refine:
Use a rubber rib to smooth the exterior, removing finger marks and refining that perfect round frog silhouette. Cut it off the bat and let it firm up to leather-hard. -
Creating the holes:
Once leather-hard, use a circular hole cutter or a fettling knife to carve two distinct holes in the top for the toothbrushes. Smooth the raw edges with a damp sponge.
Smooth Operator
Burnish the leather-hard clay with a soft rib or the back of a spoon before firing. A super smooth surface makes the final glaze feel more gem-like.
Step 2: Crafting the Catch Tray
-
Roll a slab:
Roll out the remaining clay into a flat slab, approximately 1/4 inch thick. Compress the slab on both sides with a rib. -
Cut the square:
Cut a soft square shape with rounded corners, slightly larger than the diameter of your frog’s base. This will catch any water drips. -
Lift the edges:
Gently lift the edges of the slab to create a shallow rim. You can pinch them slightly or use a small coil to build a defined lip. -
Combine (Optional):
I usually prefer to keep these separate for easier cleaning, but you can score and slip the frog to the tray now if you want a single solid piece.
Functionality Upgrade
Poke a small drainage hole in the bottom of the frog body so water doesn’t pool inside. The tray below will catch the drips perfectly.
Step 3: Decorating and Glazing
-
Bisque fire:
Allow both pieces to dry slowly and completely before loading them into the kiln for a bisque fire (usually Cone 04). -
Apply the face:
Using a fine brush and black underglaze, paint two large oval eyes and a wide, quirky smile. Add tiny white dots inside the black eyes for a ‘sparkle’ effect. -
Add rosy cheeks:
Dab two small circles of pink underglaze at the corners of the smile for blushing cheeks. -
Wax resist:
Once the underglaze is dry, apply wax resist carefully over the eyes, mouth, and cheeks. This prevents the green glaze from obscuring your design. -
Glaze the frog:
Dip the frog body into a semi-transparent green celadon glaze. Wipe the bottom clean with a sponge. -
Glaze the tray:
Dip or brush the tray with a speckled green or white glaze that complements the frog’s body. Ensure the foot includes a wax ring or is wiped clean. -
Final wipe down:
Check the waxed areas on the face; if any green glaze beads up on top of the wax, gently wipe it away with a damp sponge. -
Glaze fire:
Load the kiln for the final glaze firing (often Cone 5 or 6, depending on your clay and glaze specs).
Now you have a functional, amphibious friend to greet you every morning while you brush


What Really Happens Inside the Kiln
Learn how time and temperature work together inside the kiln to transform clay into durable ceramic.
Stacking “Bear Cups” That Make a Little Totem
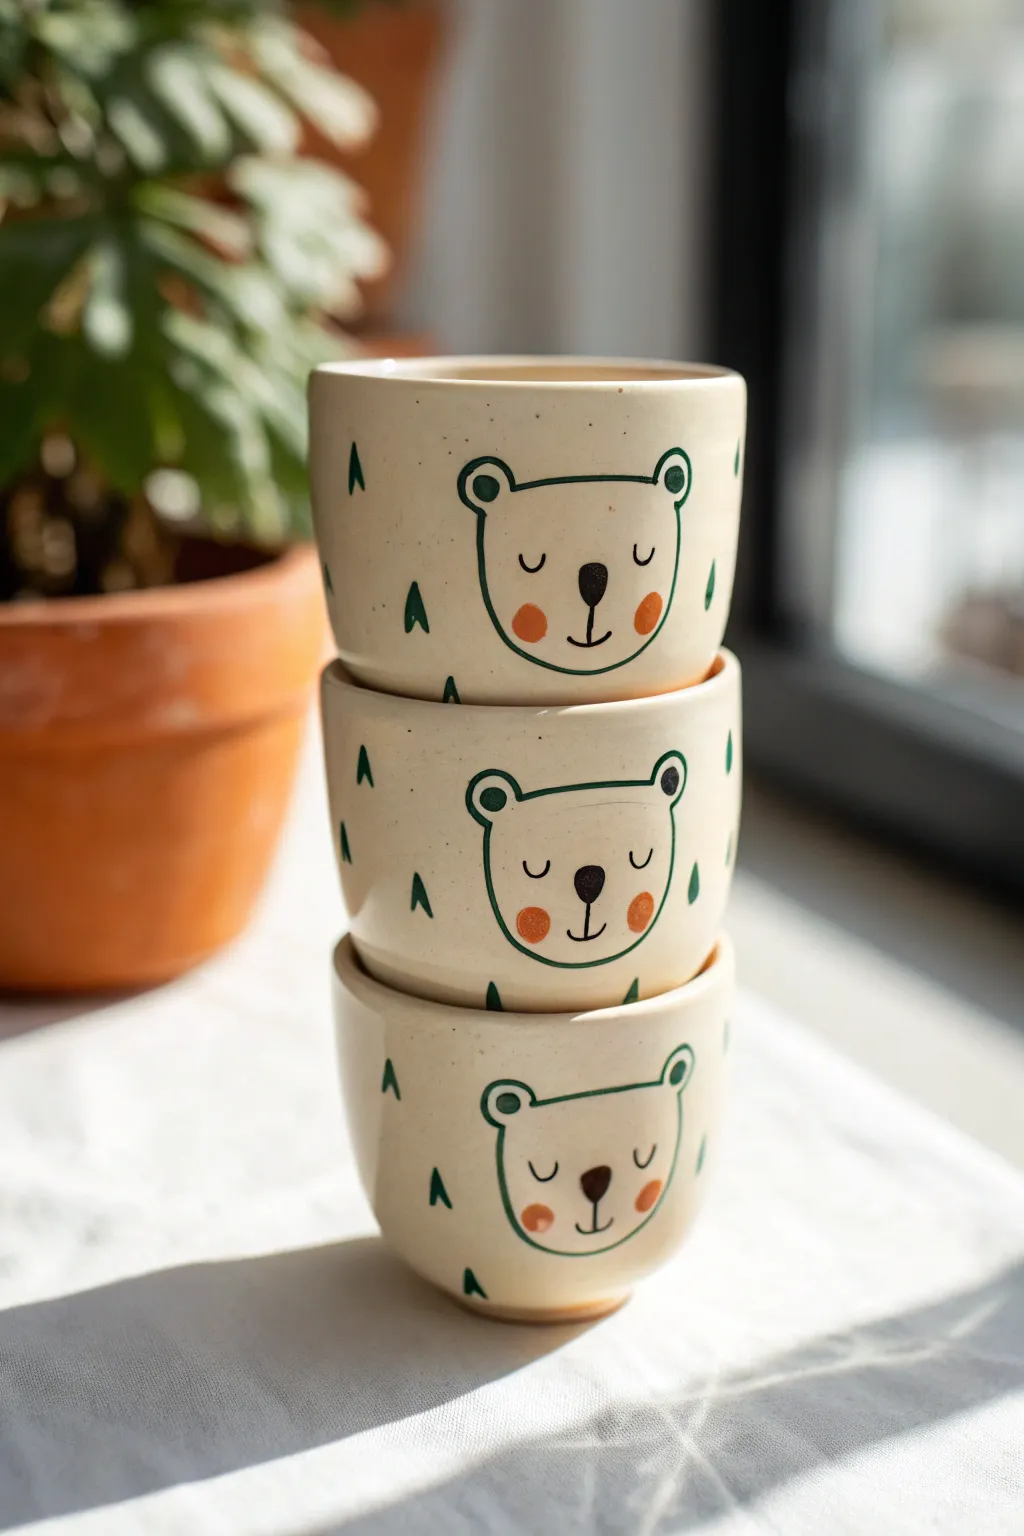
These adorable handle-free cups stack perfectly to create a charming bear totem for your kitchen shelf. With their warm oatmeal glaze and minimalist line-drawn faces, they bring a cozy forest vibe to your morning coffee routine.
Step-by-Step
Materials
- Stoneware clay (buff or speckled)
- Pottery wheel (or rolling pin for hand-building)
- Throwing tools (sponge, rib, cutoff wire)
- Trimming tools
- Underglaze pencil or fine brush (black)
- Underglaze (forest green, terracotta orange)
- Small round paintbrush
- Clear or transparent matte glaze
- Kiln
Step 1: Forming the Vessels
-
Prepare the Clay:
Wedge three equal balls of clay, roughly 1 lb each, ensuring there are no air bubbles for consistent throwing. -
Center and Open:
Center your first ball on the wheel and open it up, keeping the floor flat and somewhat narrow to create a tumbler shape rather than a bowl. -
Pull the Walls:
Pull the walls straight up to a height of about 3-4 inches. Aim for a slightly tapered cylinder that is wider at the top rim than the base. -
Shape the Curve:
Use a rib tool to gently smooth the outside, creating a very subtle, rounded curve at the bottom for a comfortable hand-feel. -
Check for Stacking:
Repeat this process for the next two cups. I like to keep a caliper handy to measure the rim of the first cup, ensuring the subsequent bases will nestle securely inside or sit stable on top. -
Dry to Leather Hard:
Wire the cups off the wheel and let them dry to a leather-hard state, where they are firm enough to handle without warping.
Wobbly totem?
If the cups don’t stack stably, try trimming the foot ring slightly wider on your next batch. A wider base provides more surface area for the cup below to grip.
Step 2: Trimming and refining
-
Trim the Foot:
Place the cups upside down on the wheel. Trim a clean, defined foot ring on each one. Crucially, make sure the bottom inside of the foot is slightly concave so it sits flat. -
Test the Stack:
Before moving on, stack the leather-hard cups gently to ensure they align well. If one wobbles, refine the foot ring now. -
Smooth the Surface:
Wipe the exterior with a barely damp sponge to smooth out any grog or trimming lines, providing a clean canvas for your illustration.
Step 3: Painting the Design
-
Draft the Bear:
Lightly sketch the bear face with a pencil. Start with a wide U-shape for the head, adding small round ears at the top corners. -
Outline in Black:
Using black underglaze and a fine liner brush (or an underglaze pencil), trace over your sketch. Draw two U-shapes for sleeping eyes and a small vertical line connecting to a nose. -
Add Cheeks:
Dip a small round brush into terracotta orange underglaze. Dab two soft circles on either side of the nose for rosy cheeks. -
Fill the Nose:
Paint a solid black oval or rounded triangle for the nose, sitting right between the eyes. -
Paint the Trees:
Surround the bear face with small, simple triangles using forest green underglaze to represent trees. Scatter them randomly around the rest of the cup. -
Bisque Fire:
Let the underglaze dry completely, then load the cups into the kiln for a bisque firing (usually to cone 04).
Mix it up
Create a ‘family’ stack by varying the sizes! Make a larger papa bear cup for the bottom, a medium mama bear, and a small baby bear cup for the top.
Step 4: Glazing and Finishing
-
Wax the Foot:
Apply wax resist to the bottom foot ring of each cup to prevent glaze from sticking to the kiln shelf. -
Apply Clear Glaze:
Dip each cup into a transparent or semi-transparent matte glaze. A creamy, off-white glaze works best to warm up the clay body while letting the bear design show through clearly. -
Wipe the Rim:
Check the rim for any drips and smooth them out with your finger to ensure a pleasant drinking experience. -
Final Fire:
Fire the cups again to glaze temperature (often cone 6 for stoneware). Once cool, sand the bottoms if necessary to ensure they don’t scratch your table.
Enjoy using your new stackable set for morning juice or simply admiring them on your shelf
Pocket-Sized Lucky Animal Figurines
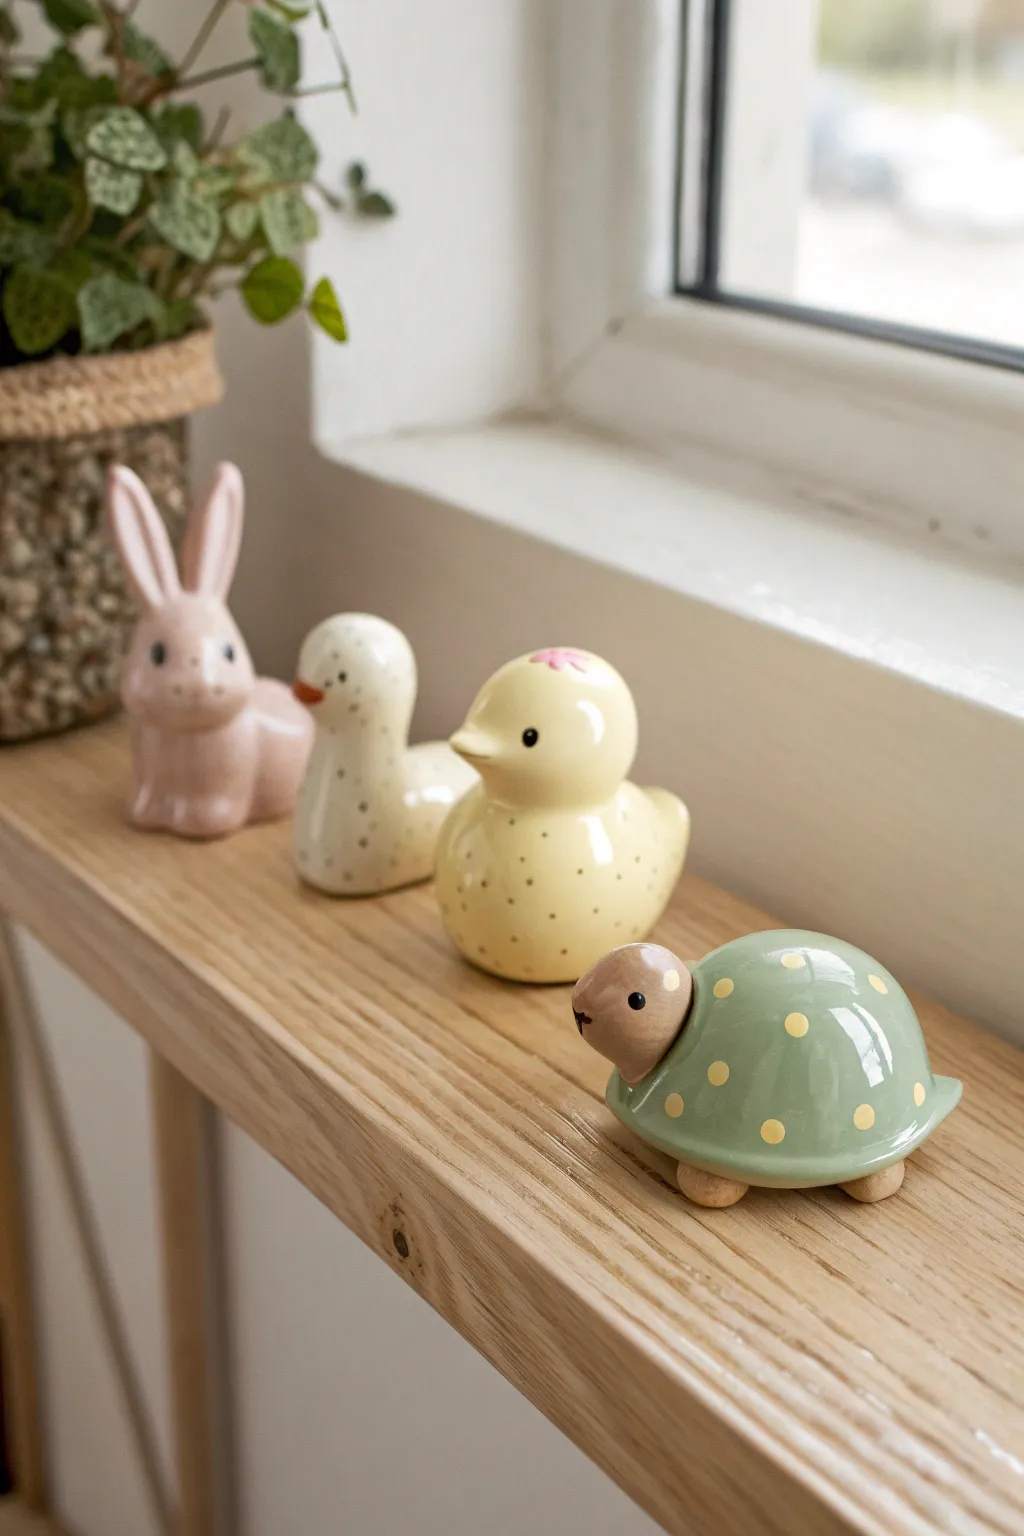
Brighten up any windowsill with this adorable quartet of ceramic pocket pets. These stylized, high-loss figurines—a bunny, duck, chick, and turtle—are perfect for beginners to hand-build and glaze with sweet, minimal details.
Step-by-Step Guide
Materials
- White earthenware clay
- Basic sculpting tools (needle tool, rib, sponge)
- Slip and scoring tool
- Ceramic underglazes (pastel pink, soft yellow, white, sage green, brown)
- Fine detail paintbrush
- Clear transparent glaze
- Kiln access
Step 1: Sculpting the Shapes
-
Prepare variable clay balls:
Start by wedging your white earthenware clay to remove air bubbles. Divide the clay into four portions. The bunny and chick will need slightly more clay than the turtle and duck to account for height. -
Form the bunny body:
Roll a smooth, egg-shaped oval for the bunny’s body. Pinch the top section gently to define a head, keeping the transition smooth rather than creating a separate ball. -
Add bunny ears:
Roll two small coils and taper them at the top. Flatten slightly and attach them to the top of the head using the score-and-slip method. Smooth the seams completely with your thumb or a modeling tool so they look seamless. -
Sculpt the chick:
Roll a round ball for the chick. Gently pinch one side to pull out a small, pointed tail. On the opposite side, pinch a tiny amount of clay to form the beak, keeping the overall shape very rotund. -
Shape the duck:
Create an elongated S-curve shape. The bottom should be wide and stable, tapering up into a neck and a rounded head. Define the bea more prominently than the chick’s beak. -
Build the turtle base:
Roll a flattened hemisphere for the turtle’s shell. For the head, roll a separate small ball of clay. I find it easiest to score and slip this directly onto the front of the shell, blending only the underside to keep the ‘head sticking out’ look. -
Add turtle feet:
Roll four tiny balls of clay for the turtle’s feet. Attach them to the underside of the shell so they just barely peek out, lifting the body slightly off the surface. -
Smooth surfaces:
Use a slightly damp sponge to wipe down all four figures. This step is crucial for achieving that manufactured, super-smooth look shown in the photo. Remove any fingerprints or tool marks. -
Dry and bique fire:
Allow the figurines to dry slowly under plastic for a day, then uncovered until bone dry. Fire them in the kiln to bisque temperature (usually Cone 04).
Glaze Crawling?
If your clear glaze separates or ‘crawls’ leaving bare spots, it might be because the underglaze wasn’t fully dry, or you applied lotion to your hands before handling the bisque. Keep hands clean.
Step 2: Glazing and Decorating
-
Apply base colors:
Using underglazes, paint each animal: pastel pink for the bunny, white for the duck, soft yellow for the chick, and sage green for the turtle shell (keep its head unpainted or use a light tan). Apply 2-3 coats for solid coverage. -
Dot the turtle shell:
Use the back end of a paintbrush dipped in yellow underglaze to stamp polka dots onto the green turtle shell. Keep the spacing random but balanced. -
Detail the beaks:
Paint the duck’s beak a soft orange and add a tiny pink flower or feather detail to the top of the chick’s head if desired. -
Paint facial features:
With your finest brush and black underglaze, dot the eyes. Make them small and wide-set for a ‘kawaii’ look. Add tiny noses or mouths only where necessary, like a ‘Y’ shape for the bunny. -
Clear glaze application:
Once the underglaze details are completely dry, dip each figurine into a clear transparent glaze. Ensure the coating is even and shake off any excess drips gently. -
Clean the bottoms:
Wipe the bottom of each figurine (and the turtle’s feet) with a sponge to remove all glaze. This prevents them from sticking to the kiln shelf. -
Final firing:
Fire the pieces a second time to the maturation temperature of your glaze and clay body (typically Cone 05 or 06 for low fire). The result should be a shiny, glass-like finish.
Personalize It
Turn these into functional pieces by pressing a hole into the top before firing to make incense holders, or add a magnet to the flat back of the turtle for fridge decor.
Arranging your glossy new friends on a sunny ledge serves as a cheerful reminder of your creativity

TRACK YOUR CERAMIC JOURNEY
Capture glaze tests, firing details, and creative progress—all in one simple printable. Make your projects easier to repeat and improve.
Wavy Rim Snack Bowls With Confetti Dots
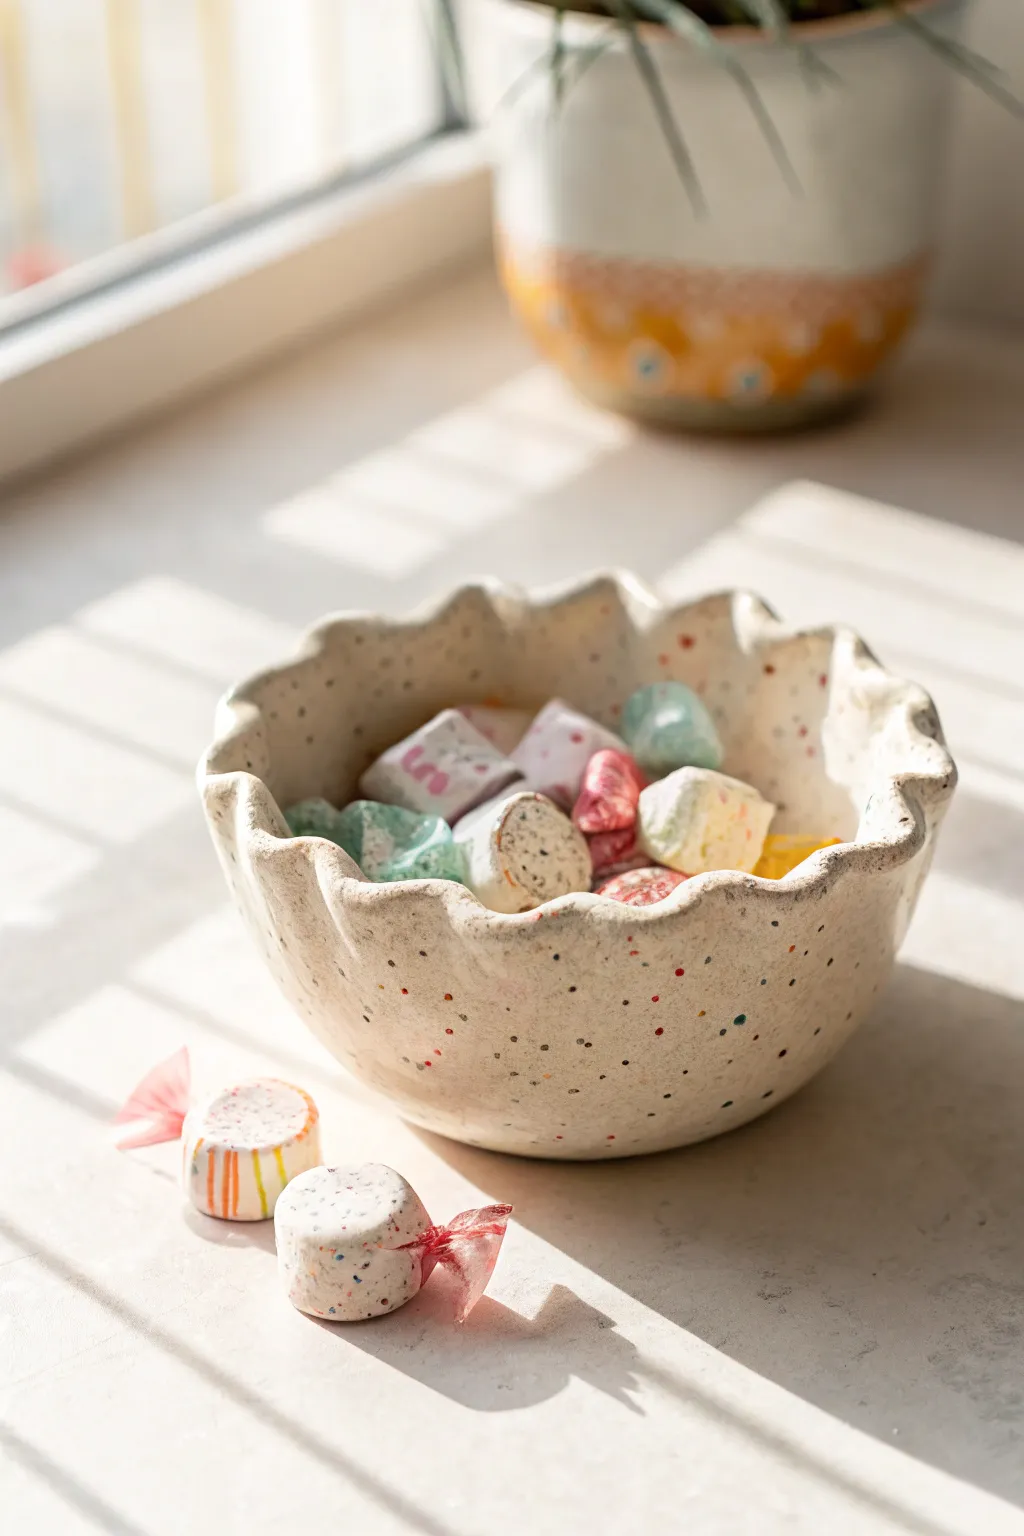
Bring a playful touch to your snack table with this charming handmade bowl featuring a whimsical wavy rim and colorful confetti speckles. Whether you’re tossing in sweet candies or savory nuts, the organic shape and cheerful dots make every handful feel like a celebration.
Step-by-Step
Materials
- White stoneware clay or porcelain (approx. 1-2 lbs)
- Rolling pin
- Canvas work surface or slab mat
- Needle tool
- Rib tool (soft kidney)
- Sponge
- Underglaze in assorted bright colors (red, blue, yellow, green)
- Small stiff-bristle brush (like a toothbrush) or splatter tool
- Clear or transparent glossy glaze
- Small bowl or mold (for shaping)
- Plastic wrap
Step 1: Preparing the Slab
-
Wedge the clay:
Begin by thoroughly wedging your clay to remove any air bubbles, which is crucial for preventing cracks during firing. -
Roll out the slab:
On your canvas surface, roll the clay out into an even slab. Aim for a thickness of about 1/4 inch (6mm). Rotate the clay periodically so it doesn’t stick to the surface. -
Compress the slab:
Take your rib tool and gently drag it across the surface of the clay in multiple directions. This compression aligns the clay particles, strengthening the finished piece and creating a smooth canvas for your confetti.
Step 2: Shaping the Bowl
-
Cut the rough shape:
Using a needle tool, cut out a large circle from your slab. It doesn’t need to be geometrically perfect, as the next steps will add organic movement. -
Prepare the mold:
Select a bowl from your cupboard that has a shape you like to use as a slump mold. Cover the inside of this bowl loosely with plastic wrap to prevent sticking. -
Slump the clay:
Gently lift your clay circle and centre it inside the mold. Let it slump naturally into the curve. Use a soft sponge to gently press it against the bottom and sides without thinning the clay.
Cracking Rims?
To prevent rim cracks while drying, loosely cover only the rim with a strip of plastic, or dry the whole piece very slowly under a tent of plastic for the first 24 hours.
Step 3: Creating the Wave
-
Pinch the rim:
While the clay is still soft in the mold, use your thumb and forefinger to gently pinch sections of the rim inward and outward. -
Refine the waves:
Work your way around the circumference, creating gentle undulations. Vary the height slightly for that handmade, organic look seen in the photo. -
Smooth the edge:
Run a damp sponge or a piece of chamois leather over the sharp edges of the rim to round them off. A smooth rim is much nicer to touch when you’re reaching for snacks.
Level Up: Texture
Mix colored mason stains directly into small bits of clay, dry them, and crush them. Sprint these ‘clay sprinkles’ into your wet slab effectively creating real embedded terrazzo.
Step 4: Adding the Confetti
-
Leather hard stage:
Allow the bowl to dry slightly until it reaches a ‘leather hard’ stage. It should be firm enough to hold its shape but still cool to the touch. -
Prepare the splatter:
Dilute small amounts of your colored underglazes with a tiny bit of water. You want a consistency that will flick easily off a brush. -
Splatter technique:
Dip a stiff brush or toothbrush into your first color. Hold it near the bowl and run your thumb across the bristles to flick tiny droplets onto the clay surface. Repeat with other colors. -
Hand-painting dots:
For larger, specific dots like the red ones in the inspiration image, use a fine-tip brush to deliberately place round marks among the splatter. -
Bisque fire:
Once fully bone dry, fire the piece in the kiln to a bisque temperature (usually cone 04).
Step 5: Glazing and Finishing
-
Clean the bisque:
Wipe the bisque-fired bowl with a damp sponge to remove any kiln dust, which can prevent glaze from adhering properly. -
Apply clear glaze:
Dip the bowl into a clear transparent glaze, or brush on three even coats. This will seal the clay and make the colorful underglaze confetti pop. -
Clean the foot:
Wipe the glaze off the very bottom of the bowl (the foot ring) so it doesn’t fuse to the kiln shelf. -
Final fire:
Fire the bowl again to your clay body’s maturity temperature (typically cone 5 or 6 for stoneware).
Once cooled, fill your new speckled creation with your favorite treats and enjoy the sweet results of your hard work
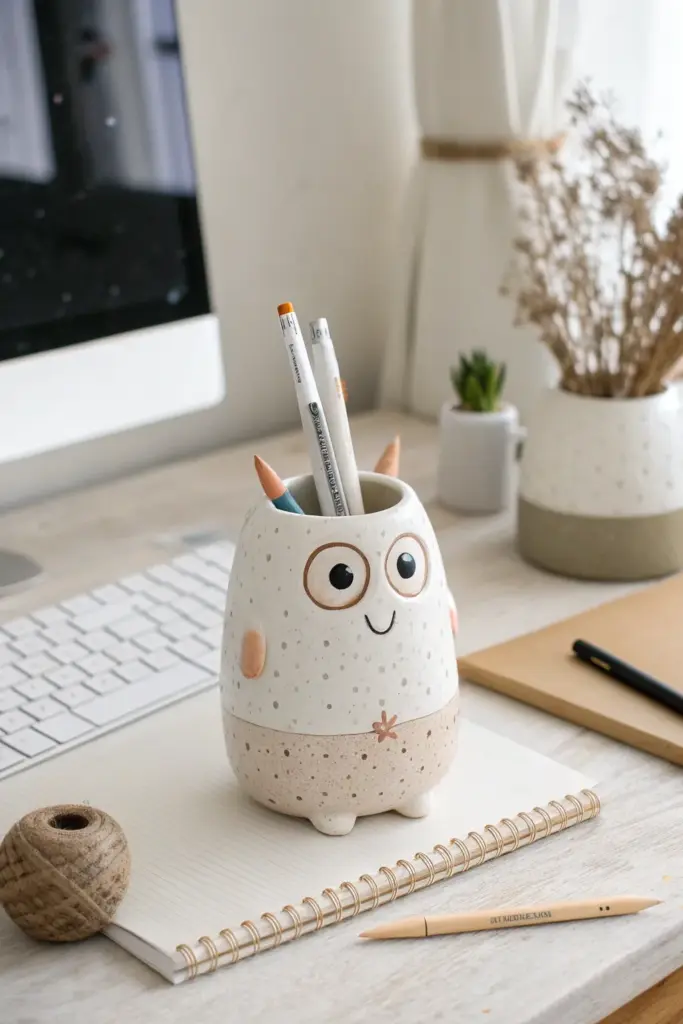
Little Monster Desk Organizers With Big Eyes

This adorable desk companion combines functionality with whimsical charm, featuring a speckled two-tone glaze and expressive features. Its upright, cylindrical shape is perfect for holding pens and pencils, while its friendly face adds a burst of personality to any workspace.
Step-by-Step
Materials
- White stoneware clay body
- Rolling pin
- Canvas work surface
- Cylindrical form or drinking glass (for template)
- Fettling knife or craft knife
- Scoring tool (or fork)
- Slip (clay and water mixture)
- Underglazes (Black, White, Burnt Orange/Tan)
- Clear matte glaze
- Speckled clay additive or speckled glaze (semi-transparent)
- Fine-point paintbrush
- Sponge
Step 1: Forming the Body
-
Roll out the slab:
Begin by wedging your white stoneware clay to remove air bubbles, then roll it out into a smooth, even slab about 1/4 inch thick. -
Cut the rectangle:
Using a ruler and fettling knife, cut a rectangle approximately 4 inches tall and 9 inches long (adjust based on your desired circumference). -
Form the cylinder:
Wrap the clay rectangle around your cylindrical form or simply curl it by hand to create a tube where the ends meet. -
Join the seam:
Thoroughly score both ends of the clay rectangle, apply slip, and press them firmly together. Smooth the seam inside and out with a rib or your finger so it disappears. -
Curve the top:
Gently gently press the upper rim inward with your fingers to create a slightly tapered, dome-like curve at the top of the monster’s head. -
Add the base:
Cut a circle standard to the diameter of your cylinder from the remaining slab to create the floor. Score, slip, and attach it to the bottom of the tube.
Clean Lines Tip
Use painter’s tape or wax resist around the ‘waist’ of the monster when glazing the bottom tan section to ensure a perfectly straight, crisp horizon line.
Step 2: Sculpting the Features
-
Indent the eyes:
Use your thumbs or a small rounded tool to gently press two large, shallow circular indentations where the eyes will go. -
Attach the feet:
Roll two small balls of clay, flatten them slightly, and attach them to the front bottom edge of the cylinder for the monster’s feet. -
Add arm nubs:
Create small, flattened ovals for the little arm stubs and attach them midway up the sides of the body using the score-and-slip method. -
Form the horns:
Roll two tiny cones of clay for the horns. Attach them near the back rim of the opening to give it character without blocking the pencil space. -
Smooth the surface:
Wipe the entire piece down with a barely damp sponge to smooth any rough edges or fingerprints before letting it dry to bone dry.
Wobbly cylinder?
If your cylinder is slumping while you work, stuff it gently with crumpled newspaper or plastic bags to support the walls until the clay stiffens up.
Step 3: Glazing and Finishing
-
Bisque fire:
Fire the piece in the kiln to cone 04 (or your clay’s specific bisque temperature). -
Paint the bottom section:
Apply a tan or light brown underglaze to the bottom third of the monster, mimicking a pants or dipped look. -
Detail the eyes:
Paint large white circles in the eye indentations. Once dry, outline them in brown and add large black pupils with a tiny white reflection dot. -
Add the smile:
Using a very fine liner brush and black underglaze, paint a simple, small ‘U’ shape between the eyes for the mouth. -
Color the accents:
Paint the little arm nubs and the horns in a burnt orange or soft terracotta color to make them pop. -
Add speckles:
For that textured look, lightly flicker a stiff brush loaded with thinned grey or brown underglaze over the white upper body. -
Apply clear glaze:
Once all underglaze is dry, coat the entire piece in a clear matte glaze to seal the design without making it too shiny. -
Final firing:
Fire the piece again to the final glaze temperature (likely cone 5 or 6) consistent with your clay and glaze specifications.
Now you have a charming little desk buddy ready to keep your stationery organized