A good clay box is that perfect mix of practical and playful—like a tiny treasure chest you made with your own two hands. Here are my favorite clay box ideas that start simple and get progressively more fun and unexpected as you go.
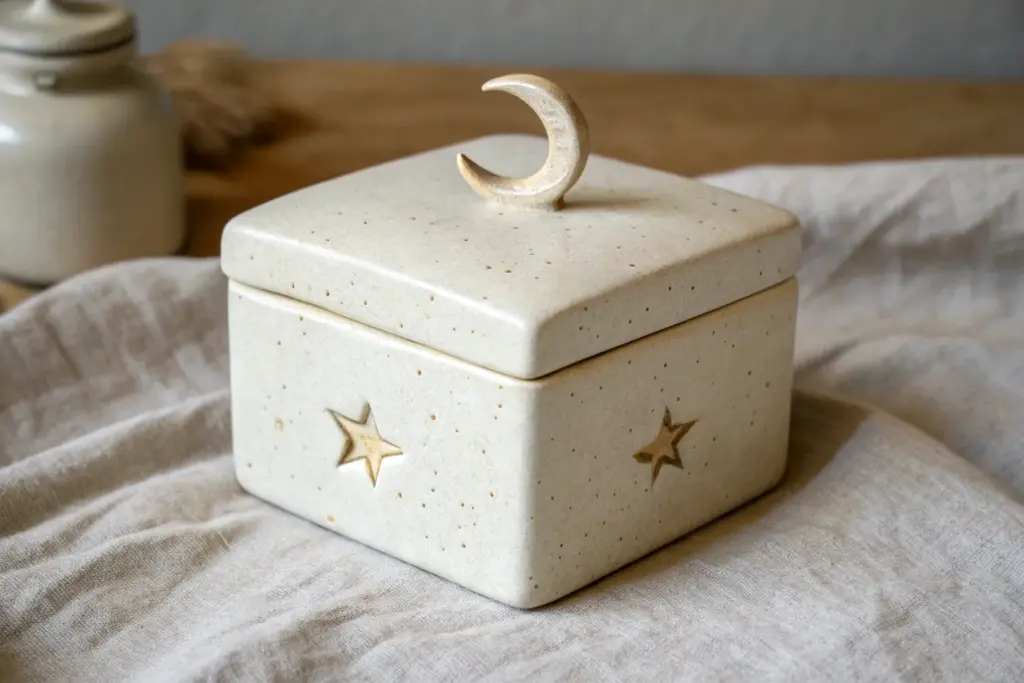
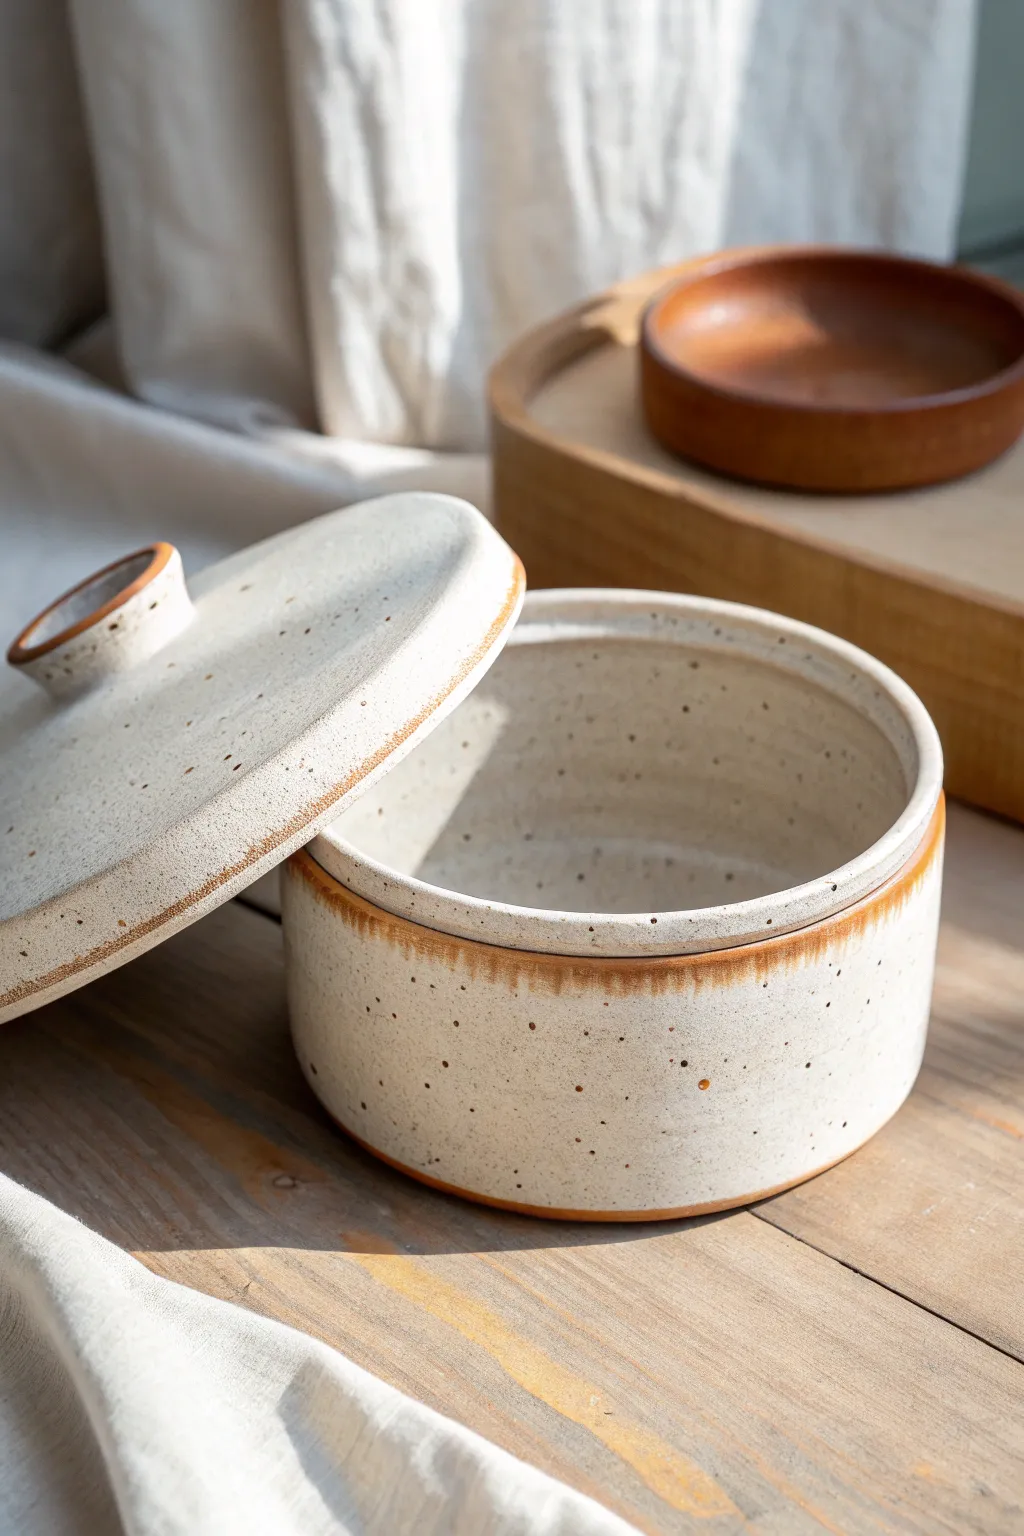
Classic Slab-Built Square Box With a Fitted Lid
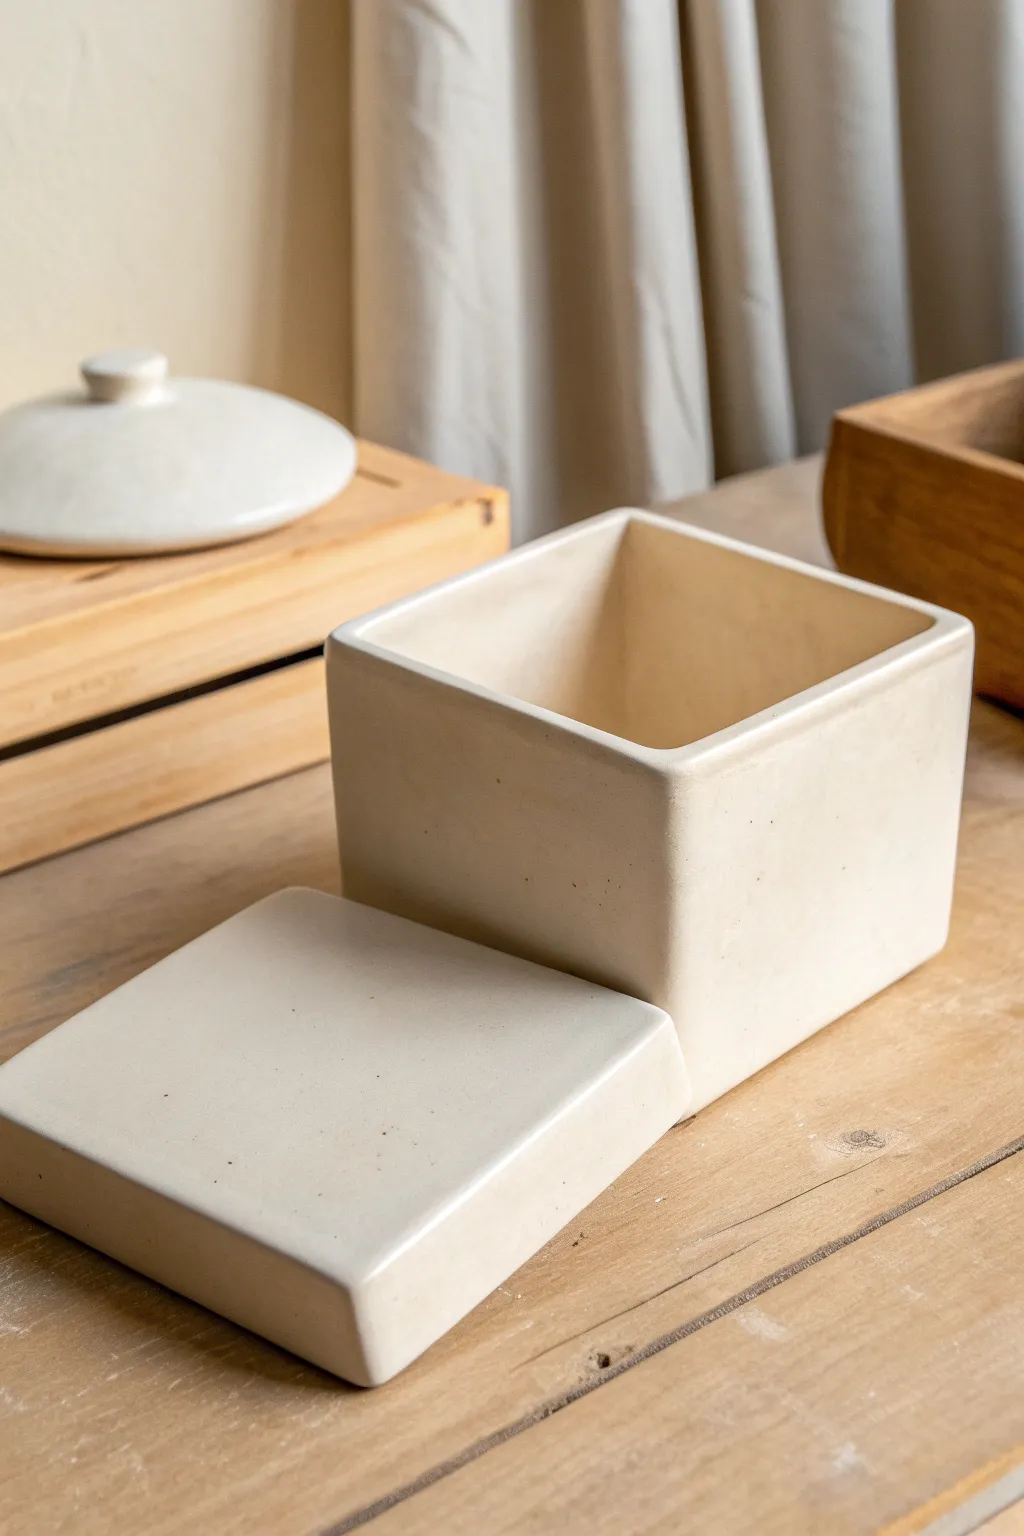
This tutorial guides you through crafting a sleek, square vessel with a precisely fitted flat lid, perfect for storing tea or small treasures. The design relies on clean lines and a smooth, speckled finish that highlights the raw beauty of the clay.
Step-by-Step
Materials
- Light-colored stoneware clay (speckled optional)
- Roller or rolling pin
- Wooden guide strips (1/4 inch thickness)
- Fettling knife or X-Acto blade
- Square template (paper or cardstock)
- Scoring tool or serrated rib
- Slip (clay mixed with water)
- Surform tool or rasp
- Rubber kidney rib
- Sponge
Step 1: Preparing the Slabs
-
Wedge the Clay:
Begin by thoroughly wedging your clay to remove any air bubbles, which is critical for flat slabs. Aim for a consistent consistency. -
Roll Out the Slab:
Using your roller and 1/4 inch guide strips on either side of the clay, roll out a large, even slab. I like to flip the clay over halfway through the rolling process to ensure the particles are compressed on both sides. -
Smooth the Surface:
Before cutting, take a rubber kidney rib and compress the surface of the slab. Drag it firmly across the clay in multiple directions to align the particles and create that silky finish seen in the photo. -
Cut the Templates:
Using your square paper template, cut out five identical squares for the box (one base, four walls) and one slightly larger square for the lid top. -
Leather Hard Stage:
Let the cut pieces sit until they reach a ‘leather hard’ state. They should be stiff enough to hold their shape without bending but still dark with moisture. This is crucial for crisp, straight walls.
Clean Bevels
Use a dedicated bevel cutter tool instead of a knife for your 45-degree angles. It guarantees perfectly consistent miters, making assembly much easier and your corners significantly sharper.
Step 2: Assembling the Box
-
Miter the Edges:
For the cleanest seams, cut a 45-degree angle (miter) on the vertical edges of your wall pieces and all four edges of the base piece. This creates a stronger joint that hides the seam better than a butt joint. -
Score and Slip:
Vigorously score (scratch) all the mitered edges that will touch. Apply a generous amount of slip to the scored areas. -
Attach Walls to Base:
Press one wall firmly onto the base. Add a second wall, pressing the vertical seam together. Continue until all four walls are attached to the base and each other. -
Reinforce the Seams:
Roll very thin coils of soft clay. Press these into the interior corners of the box to reinforce the joints, then smooth them out completely with a modeling tool or your finger so they disappear. -
Paddle into Shape:
Using a flat wooden paddle, gently tap the outside walls to sharpen the corners and ensure the box is perfectly square. This also helps compress the joints from the outside.
Step 3: Creating the Fitted Lid
-
Measure the Opening:
Measure the exact inner dimensions of your assembled box opening. -
Cut the Flange:
Cut a thick square of clay that is slightly smaller than the inner opening (about 1/8 inch gap total). This will act as the stopper or flange underneath the lid. -
Assemble the Lid:
Score and slip the center of your lid slab and the stopper piece. Press them together firmly, ensuring the stopper is perfectly centered so the lid sits evenly. -
Check the Fit:
Once the lid has stiffened slightly, gently test the fit on the box. It should slide in easily without forcing. If it’s too tight, shave down the stopper edges with a rasp.
Fixing Warped Lids
If your lid rocks after firing, use circular motions to grind the lid and box rim against each other with a little grinding paste or wet sandpaper. It creates a perfect, airtight seal.
Step 4: Refining and Finishing
-
Surfacing:
Use a damp sponge to smooth out any sharp edges on the rim of the box and the lid. You want a crisp look, but not sharp enough to chip easily. -
Dry Slowly:
Place the lid on the box and wrap the entire piece loosely in plastic. Let it dry very slowly over several days to prevent warping. -
Bisque Fire:
Fire the piece to bisque temperature (Cone 04 or 06) once it is bone dry. -
Glaze or Sand:
For the look in the image, you can leave the exterior unglazed (raw clay) or apply a clear matte glaze. Use a fine-grit sandpaper on the dry clay before firing if you want an ultra-smooth tactile experience. -
Final Firing:
Fire to the maturation temperature of your specific clay body. If using a speckled clay, this is when those beautiful iron spots will pop out.
Now you have a timeless ceramic box perfect for organizing your space or gifting to a friend


Rectangular Keepsake Box With Soft Rounded Corners
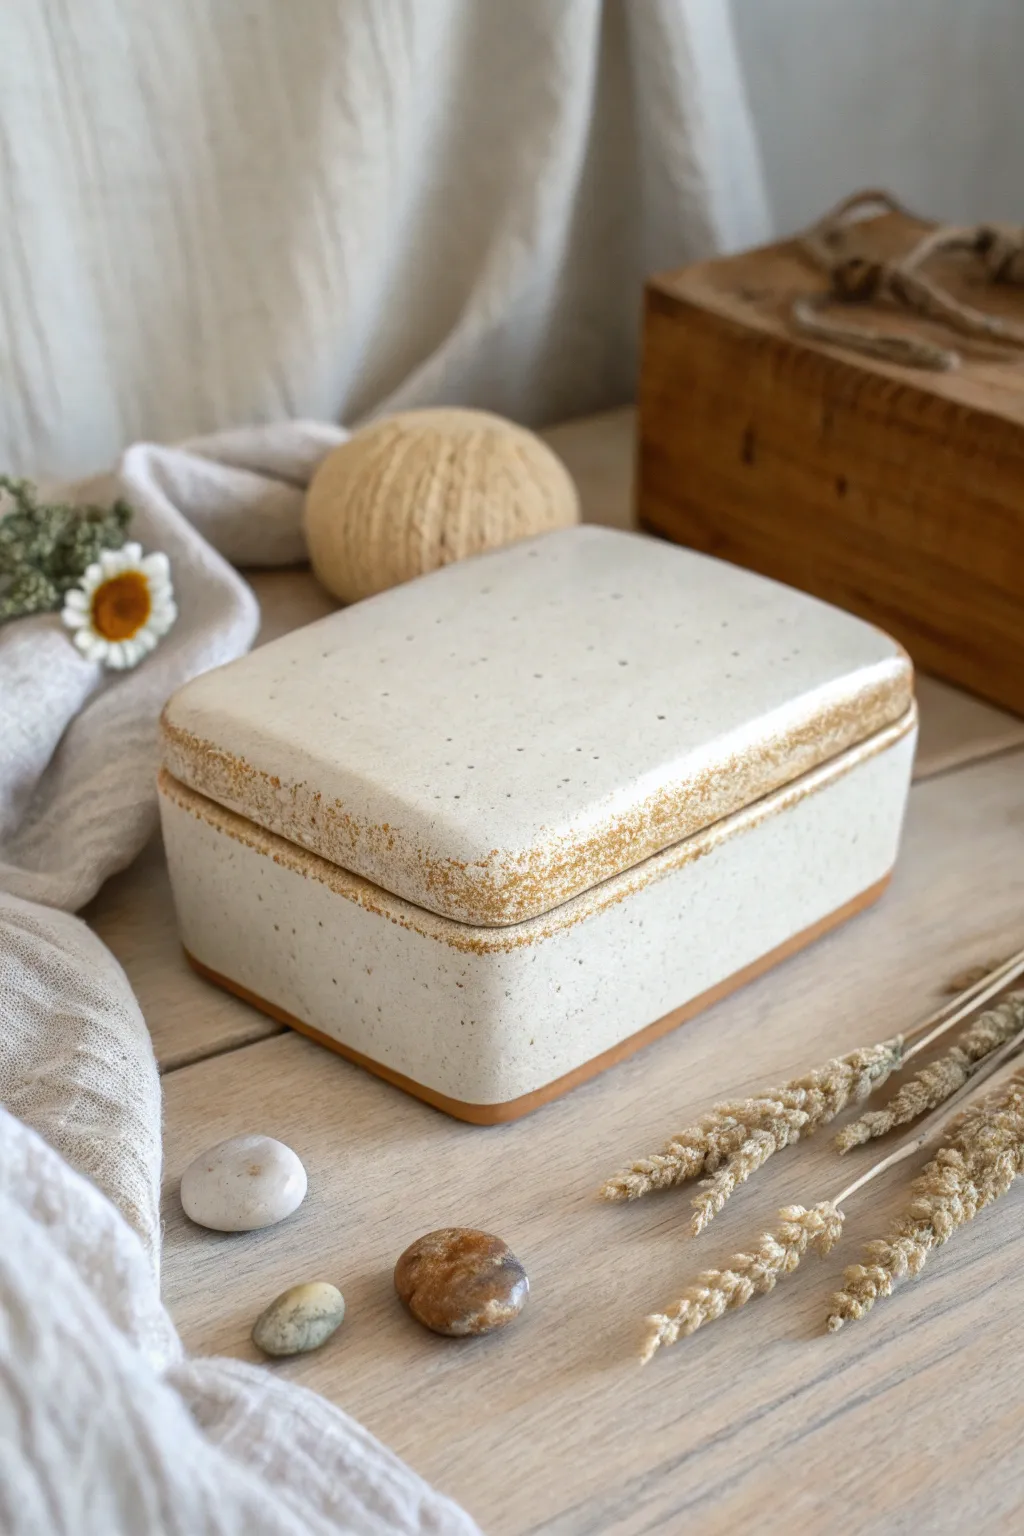
This charming rectangular keepsake box features soft, rounded corners and a cozy, speckled finish that feels wonderful to hold. The design highlights the natural beauty of the clay with toasted, unglazed rims that add a rustic warmth to the clean white glaze.
Step-by-Step Tutorial
Materials
- Speckled stoneware clay (mid-fire)
- Rolling pin
- Canvas work surface or slab mat
- Two wooden guide strips (approx. 1/4 inch thick)
- Fettling knife or needle tool
- Flexible rib (rubber or metal)
- Scoring tool or serrated rib
- Slip (clay and water slurry)
- Sponge
- Matte white glaze (semi-opaque)
- Small brush for wax resist
Step 1: Creating the Slabs
-
Roll the clay:
Begin by wedging your speckled clay to remove air bubbles. Place it between your wooden guide strips on the canvas and roll it out into a large, even slab. For a sturdy box like this, a thickness of about 1/4 inch works perfectly. -
Smooth the surface:
Before cutting anything, take your flexible rib and compress the clay slab on both sides. This aligns the clay particles, preventing warping later, and creates that smooth canvas for your glaze. -
Cut the components:
Using a paper template or a ruler, cut out two identical rectangles for the floor and lid (e.g., 4×6 inches). Then, cut long strips for the walls of the box and the flange of the lid. Ensure the wall strips are wide enough for your desired height. -
Set to leather hard:
Let your slab pieces sit until they reach a firm leather-hard state. I find that if they are too soft, the walls will slump; if they are too dry, they won’t join well. They should hold their shape without bending easily.
Clean Rims
After waxing, wipe the rims with a slightly damp sponge. This removes invisible glaze residue that can fire into rough, glassy spots on your raw clay.
Step 2: Assembling the Box
-
Prepare the base:
Take one of your rectangular slabs to serve as the base. Score the perimeter thoroughly using a serrated rib and apply a generous amount of slip. -
Attach the walls:
Score and slip the bottom edge of your wall strip. Place it onto the base, wrapping it around the perimeter. Where the ends of the wall strip meet, cut them at a bevel (45-degree angle) for a stronger seam, score, slip, and press them firmly together. -
Reinforce the interior:
Roll a very thin coil of clay and press it into the interior seam where the wall meets the floor. Smooth this coil down with a modeling tool or your finger to create a seamless, watertight joint. -
Round the corners:
Once assembled, the box will likely look sharp and geometric. Use a paddle or flat board to gently tap the corners from the outside, pushing them in slightly to create that soft, rounded silhouette seen in the photo. -
Smooth the exterior:
Use your rib tool to smooth the exterior walls, blending the seam where the wall meets the floor so it looks like a single carved piece of stone.
Level Up: Texture
Before rolling your slabs, sprinkle coarse sand or grog onto your canvas. This embeds extra texture into the clay surface for a deeper rustic feel.
Step 3: Creating the Lid
-
Construct the lid slab:
Take your second rectangular slab. To ensure it fits snugly, measure the *interior* dimensions of your finished box base. You will need to create a flange (a smaller inner wall) that fits inside the box. -
Attach the flange:
Cut a strip of clay about 1/2 inch tall. Form this into a rectangle that is slightly smaller than your lid slab, testing it against the box opening to ensure a good fit. Score, slip, and attach this strip to the underside of the lid slab. -
Check the fit:
Gently place the lid onto the box. It should seat comfortably without forcing. If it’s too tight, shave a little clay off the flange with a rasp or knife. If it’s too loose, you can flare the flange out slightly. -
Refine the shape:
With the lid on the box, use a rasp or surfacing tool to ensure the exterior walls of the lid are perfectly flush with the box walls. Round off the top edges of the lid to match the soft curves of the base.
Step 4: Finishing and Glazing
-
Dry slowly:
Place the lid on the box and wrap the whole piece loosely in plastic. Let it dry very slowly to prevent warping. Once bone dry, bisque fire the piece to cone 04. -
Wax the rims:
To achieve the toasted rim effect, apply wax resist carefully to the top rim of the box and the bottom rim of the lid (where they touch). Also wax the flange area. This prevents glaze from adhering to these contact points. -
Apply the glaze:
Dip the box and lid into a matte white glaze. The iron speckles in the clay body will naturally bleed through the white glaze during firing, creating the spotted texture. -
Clean up:
Use a damp sponge to wipe any stray glaze droplets off the waxed rims. You want a clean, sharp line where the glaze meets the raw clay. -
Final fire:
Glaze fire the piece to cone 5 or 6 (depending on your clay specification). The raw clay rims will toast to a warm golden-brown color in the kiln, contrasting beautifully with the creamy white surface.
Now you have a serene, custom vessel perfect for storing tiny treasures or gifting to someone special


Pinch-and-Coil Trinket Box With an Organic Rim
This charming, round lidded vessel combines the wonderful tactility of speckled clay with a warm, dual-tone glaze finish. Its organic shape and snug-fitting lid make it perfect for storing everything from precious jewelry to kitchen spices.
How-To Guide
Materials
- Speckled stoneware clay (mid-fire)
- Pottery wheel (or banding wheel for hand-building)
- Throwing sponge
- Wire cutter
- Needle tool
- Wooden rib tool
- Trimming tools (loop tool)
- Calipers
- Clear glaze
- Rust/Tenmoku glaze (translucent brown/orange)
- Kiln
Step 1: Throwing the Base
-
Center the clay:
Begin with a ball of well-wedged speckled clay—about 1 to 1.5 pounds is sufficient. Slam it onto the wheel head and center it using firm pressure and water. -
Open the form:
Press your thumbs into the center to open the clay, leaving about a half-inch of thickness at the bottom for trimming later. Pull the floor outward until it reaches your desired width. -
Pull the walls:
Slowly pull the walls upward. Unlike a cylinder, you want to gently belly the walls out as you rise to create that rounded, spherical curve shown in the image. -
Form the gallery:
At the rim, use a wooden rib or your fingers to split the clay slightly or push it inward to create a ‘gallery’—a small internal ledge where the lid will eventually sit. Smooth the rim with a chamois. -
Measure the opening:
Before removing the pot from the wheel, use your calipers to measure the exact inner diameter of the gallery ledge. Lock the calipers in place. -
Cut and dry:
Run a wire underneath the pot to release it. carefully set it aside on a ware board to firm up to a leather-hard state.
Lid Fit Issues?
If the lid rattles after firing, mix a tiny bit of grinding paste with water, apply it to the rim, and twist the lid back and forth to grind snugly.
Step 2: Creating the Lid
-
Throw the lid off the hump:
Using a larger lump of clay, center just the top portion. Flatten it into a thick disk wider than your caliper measurement. -
Define the flange:
Using the calipers as a guide, carve or push the clay to create a flange that will fit inside the gallery you made on the base. It’s better to make it slightly too wide than too narrow, as you can trim it later. -
Shape the dome:
Curve the top of the lid into a gentle dome. I like to smooth it with a metal rib to compress the particles and prepare the surface for the glaze. -
Form the knob:
Pinch a small amount of clay at the very center to pull up a knob. Shape it into a rounded button or mushroom shape that feels comfortable to grip. -
Cut the lid:
Use your needle tool to undercut the lid from the main hump of clay, then slice it free with a wire or thin fishing line.
Step 3: Trimming and Assembly
-
Trim the base:
Once the base is leather hard, center it upside down on the wheel. Trim away excess weight from the bottom and carve a neat foot ring to give the pot some lift. -
Fit the lid:
Test the lid fit. If it’s too tight, center the lid upside down and carefully trim the flange until it slots perfectly into the gallery ledge. -
Bisque fire:
Let both pieces dry completely (bone dry). Fire them in the kiln to bisque temperature (usually cone 04 or 06).
Level Up: Texture
Before the clay dries, gently press a rough sponge or fabric against the belly of the pot to enhance the speckled, earthy texture under the clear glaze.
Step 4: Glazing
-
Wax resist:
Apply wax resist to the bottom foot of the jar and the contact points where the lid meets the jar (the flange and gallery) to prevent them from fusing together. -
Apply clear glaze:
Dip the entire outside of the base into a clear glaze first. Wipe away any drips. This highlights the natural speckles of the clay body. -
Apply the warm band:
Using a rust or amber-colored glaze, carefully dip just the top rim of the jar and the entire lid. You can overlap the clear glaze slightly for a nice transition. -
Clean up:
Sponge off any glaze that may have gotten onto the waxed areas or the very bottom foot ring. -
Final firing:
Load into the kiln for the final glaze firing (tpyically cone 5 or 6 depending on your clay). Ensure the lid is fired separately or on the pot only if you are certain the wax job is perfect.
Once cooled, your jar is ready to hold small treasures or serve sugar at your next coffee break


Two-Tone Box With a Clean Color-Block Divider
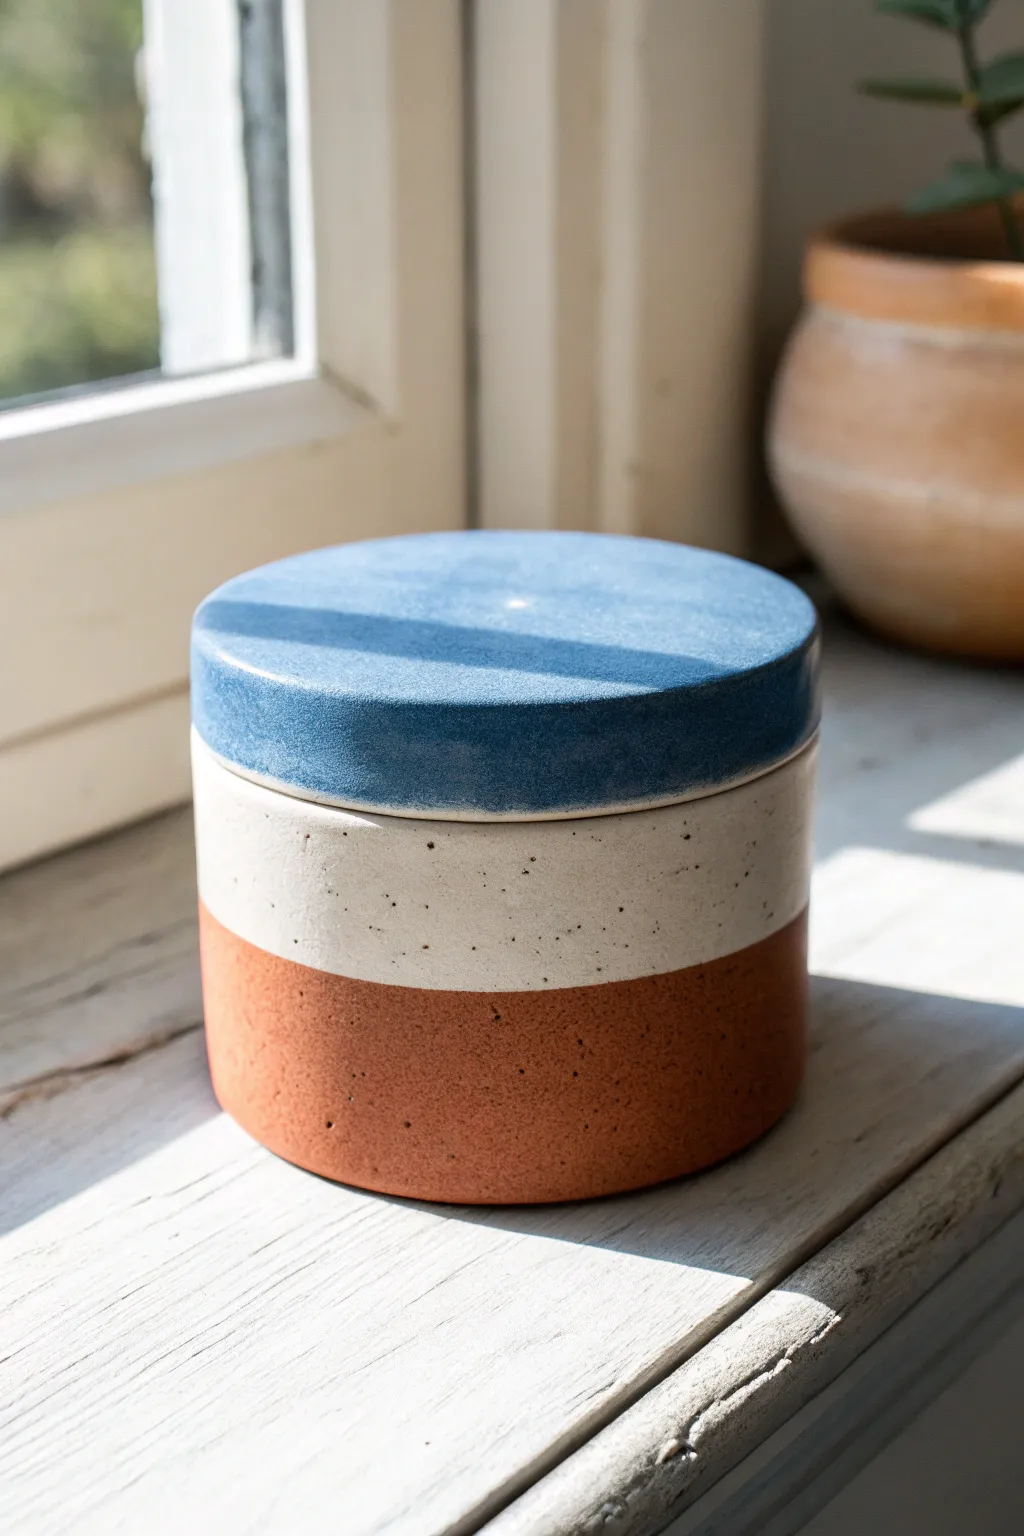
This modern, cylindrical jar brings a touch of geometric simplicity to any space with its striking three-tone palette. By combining exposed raw clay texture with smooth, clean bands of color, you’ll create a sophisticated storage vessel that looks beautifully handcrafted.
Step-by-Step
Materials
- Stoneware clay (preferably speckled or iron-rich for the base)
- Pottery wheel (or slab roller for hand-building)
- Throwing tools (rib, sponge, wire cutter)
- Needle tool
- Calipers
- Underglaze (Navy Blue and Matte White)
- Tape measure or ruler
- Wax resist
- Clear matte glaze (optional, for the interior)
- Fettling knife
- Sandpaper or green scrubby
Step 1: Throwing the Base Form
-
Prepare your clay:
Wedge a ball of speckled stoneware clay thoroughly to remove air bubbles. Ensure it is centered firmly on the wheel head before opening. -
Open and pull the cylinder:
Open the centered clay and pull up the walls to create a cylinder. Aim for vertical walls with a consistent thickness, keeping the rim slightly thicker for structural integrity. -
Measure the opening:
Before finishing the rim, use calipers to measure the diameter carefully. You will need this measurement to throw a lid that fits perfectly later. -
Refine the surface:
Use a metal or wooden rib to smooth the outside walls, removing throwing lines to create a clean, modern silhouette. This is crucial for that sharp color-block look. -
Cut from the bat:
Run a wire tool under the base to separate it from the wheel head, but leave it on the bat or transfer carefully to a ware board to stiffen to leather hard.
Step 2: Creating the Fitted Lid
-
Throw the lid:
Using a smaller amount of clay, center it on the wheel. Throw a flat disc shape that is slightly wider than your measured caliper width. -
Form the flange:
Create a downward-facing flange (or throwing a gallery inside the lid) that corresponds to your caliper measurements. I prefer to check the fit frequently while the clay is still wet to ensure it isn’t too tight. -
Refine the lid profile:
Use a straight rib to flatten the top surface and smooth the sides perfectly vertical to match the wall profile of the base.
Straight Lines Secret
Use ‘automotive detailing tape’ instead of regular masking tape. It creates a much sharper seal on leather-hard clay and bends easily around curves without buckling.
Step 3: Trimming and Assembly
-
Trim the base:
Once leather hard, center the cylinder jar upside down on the wheel. Trim the bottom to create a flat, stable base and refine the wall thickness if needed. -
Trim the lid:
Place the lid upside down (or use a chuck) to trim away excess weight from the top, ensuring a flat, crisp surface. -
Test the fit:
Gently place the lid on the jar. It should slot in comfortably. If it’s too snug, lightly sand or sponge the contact points now, as it will only shrink further.
Add a Handle
Before the lid dries completey, attach a small leather loop or a raw wooden knob to the center. The mix of textures adds a wonderful mixed-media element.
Step 4: Applying Color and Finishing
-
Mark your dividing line:
With the jar on a banding wheel, hold a pencil steady at the halfway mark of the cylinder’s height and spin the wheel to create a perfect guide line for your colors. -
Tape off the base:
If you want an ultra-crisp line and aren’t confident with a steady hand, apply automotive masking tape just below your pencil line to protect the raw clay section. -
Apply white underglaze:
Brush three even coats of matte white underglaze onto the upper half of the cylinder body. Allow each coat to dry to the touch before applying the next. -
Paint the lid:
Apply three coats of navy blue underglaze to the entire top and side of the lid. Be careful near the flange area so you don’t build up too much thickness that effects fit. -
Reveal the raw clay:
Remove the tape (if used) immediately after painting. Use a damp sponge to clean up any smudges on the bottom half, leaving the beautiful speckled clay body exposed. -
Bisque fire:
Load the pieces into the kiln and fire to cone 04 (or your clay’s bisque temperature). -
Glaze the interior:
Pour clear glaze inside the jar and swirl to coat, then pour out the excess. Leave the exterior unglazed to maintain the matte, tactile texture of the underglaze and raw clay. -
Final firing:
Fire the piece to cone 6 (or your clay’s maturity temperature). Sand the bottom lightly after firing if there are any rough spots.
Enjoy using your new color-block container to keep your treasures organized

The Complete Guide to Pottery Troubleshooting
Uncover the most common ceramic mistakes—from cracking clay to failed glazes—and learn how to fix them fast.
Stamped Texture Box Using Lace, Leaves, or Fabric
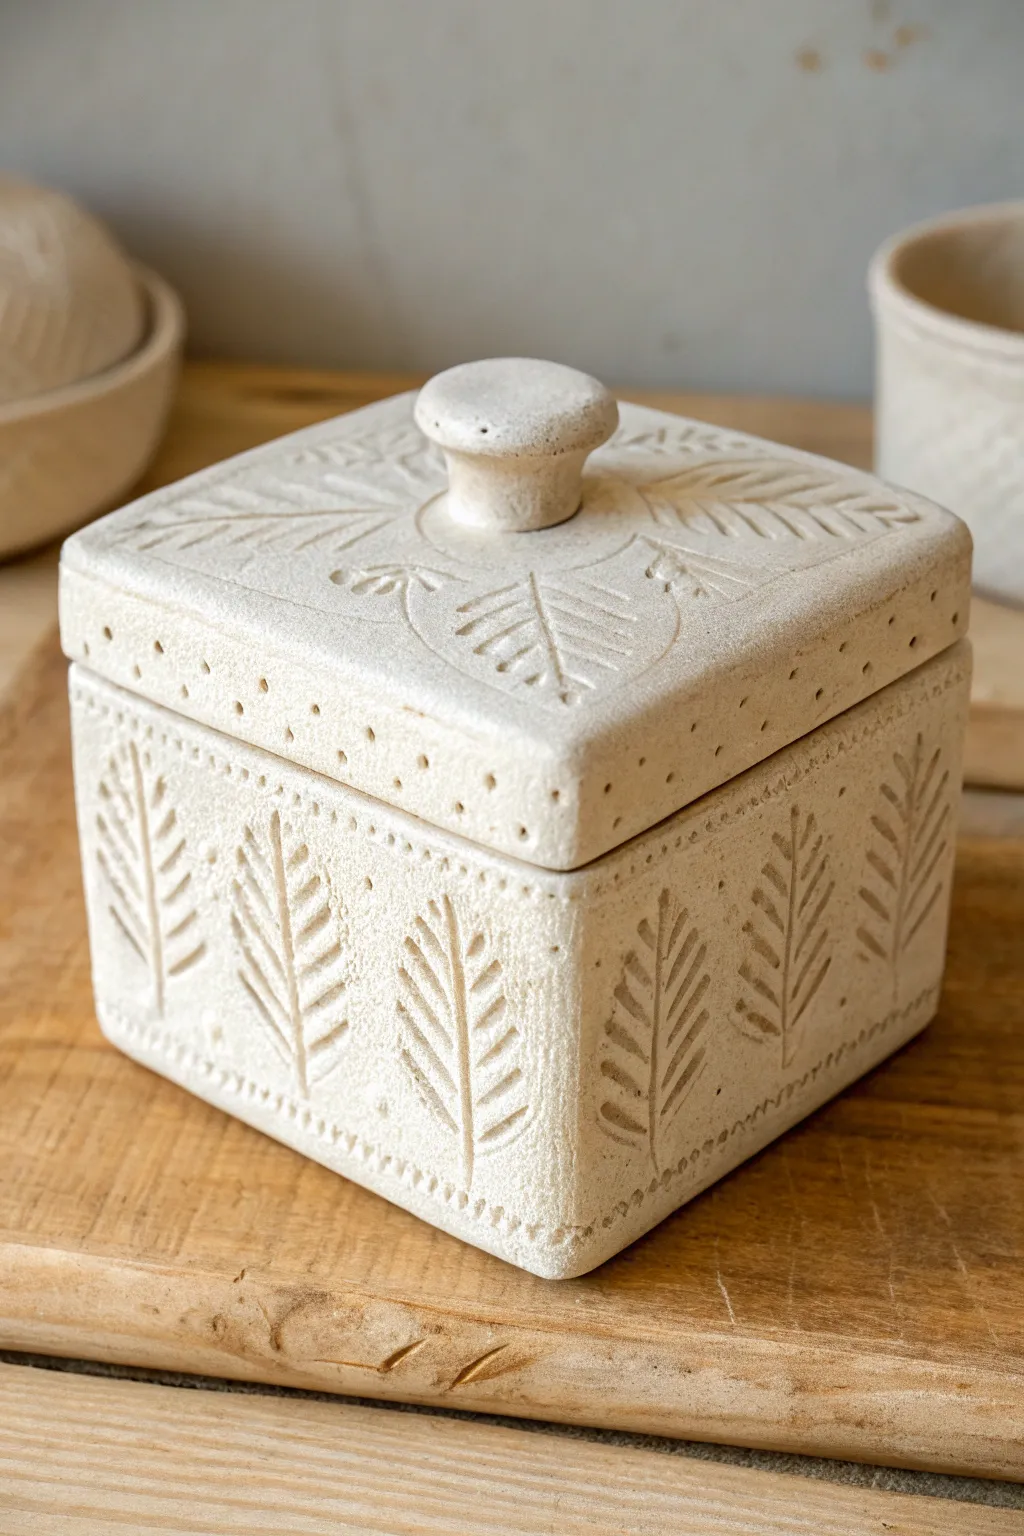
This project transforms simple earthenware or polymer clay into an elegant storage vessel reminiscent of carved limestone. The design features repeat leaf motifs pressed into the surface and delicate dotted borders, creating a handcrafted piece perfect for holding trinkets or salt.
Step-by-Step Tutorial
Materials
- Light colored earthenware clay or white polymer clay
- Rolling pin
- Two 1/4-inch wooden slats (depth guides)
- Square cookie cutter (approx. 3-4 inches) or ruler and craft knife
- Leaf rubber stamp or custom 3D printed leaf stamp
- Small round stylus tool or toothpick
- Pottery knife or fettling knife
- Slip (clay slurry) and scoring tool
- Small sponge
- Sandpaper (fine grit)
Step 1: Preparing the Slabs
-
Roll the clay:
Begin by wedging your clay to remove air bubbles, then place it between your wooden slats. Roll the clay out into a smooth, even slab. This thickness ensures the walls are sturdy enough to stand without sagging. -
Cut the components:
Using a square cutter or a ruler and craft knife, cut out six identical squares. You will need one for the base, four for the walls, and one for the lid. Set the lid piece aside on a flat board so it doesn’t warp.
Stamp Stuck?
If your stamp pulls up clay, dust the clay surface lightly with cornstarch (for ceramics) or brush the stamp with water (for polymer) before pressing.
Step 2: Creating the Texture
-
Plan the layout:
Before assembling, lay your four wall pieces in a row. Lightly mark where the leaf pattern will go to ensure the design flows visually around the box. -
Stamp the walls:
take your leaf stamp and press firmly into the center of each wall panel. I like to rock the stamp slightly to ensure the stem and tip details transfer cleanly. Ensure the leaves are upright relative to the bottom edge. -
Decorate the lid:
For the lid, lightly mark an ‘X’ to find the center. Stamp four leaves radiating outward from the center point toward the corners, creating a starburst effect. -
Add dotted details:
Using a small stylus tool or the blunt end of a toothpick, press a row of small dots along the top and bottom borders of the wall panels. Add a matching dotted border around the perimeter of the lid.
Pro Tip: Clean Texture
Wait until the clay is ‘leather hard’ (stiff but cool) to crave or clean up the stamped lines. It prevents smearing and yields crisp, professional details.
Step 3: Assembly
-
Score the edges:
Take your base square and the four wall panels. Rough up the connecting edges (where the clay will join) using a scoring tool or a serrated rib. -
Apply slip:
Dab a generous amount of clay slip onto the scored areas. This acts as the glue for your ceramics. -
Construct the box:
Attach the walls to the base first, pressing them firmly. Then, join the vertical seams where the walls meet. Use a small coil of soft clay on the interior seams to reinforce the corners. -
Smooth the seams:
On the outside, carefully smooth the join lines with your finger or a rib so the box looks like a solid block, but be careful not to smudge your stamped texture. -
Refine the lid fit:
Check that your lid still fits squarely on top of the box. If the walls have warped, gently reshape them now while the clay is leather-hard. -
Add a flange (optional):
To keep the lid secure, you can add small tabs or a smaller square of clay to the underside of the lid that fits just inside the box opening.
Step 4: Finishing Touches
-
Make the handle:
Roll a small ball of clay resulting in a mushroom shape. Flatten the bottom stem slightly and round out the top cap. -
Attach the knob:
Score and slip the center of the lid and the bottom of the knob. Press firmly to attach. Create a clean transition by smoothing the clay around the base of the knob. -
Dry slowly:
Cover the box loosely with plastic to let it dry slowly over several days. This prevents the corners from curling up or cracking. -
Sanding:
Once bone dry (or after baking if using polymer), gently sand any sharp edges or rough spots on the rim and corners using fine-grit sandpaper. -
Firing:
If using ceramic clay, bisque fire the piece. You can leave it unglazed for a stony, matte look as shown, or apply a clear matte glaze to seal it while keeping the natural color.
Once fired or cured, this textured box makes a beautiful, functional display piece for your home
Carved Vine and Leaf Relief Box for a Heirloom Feel
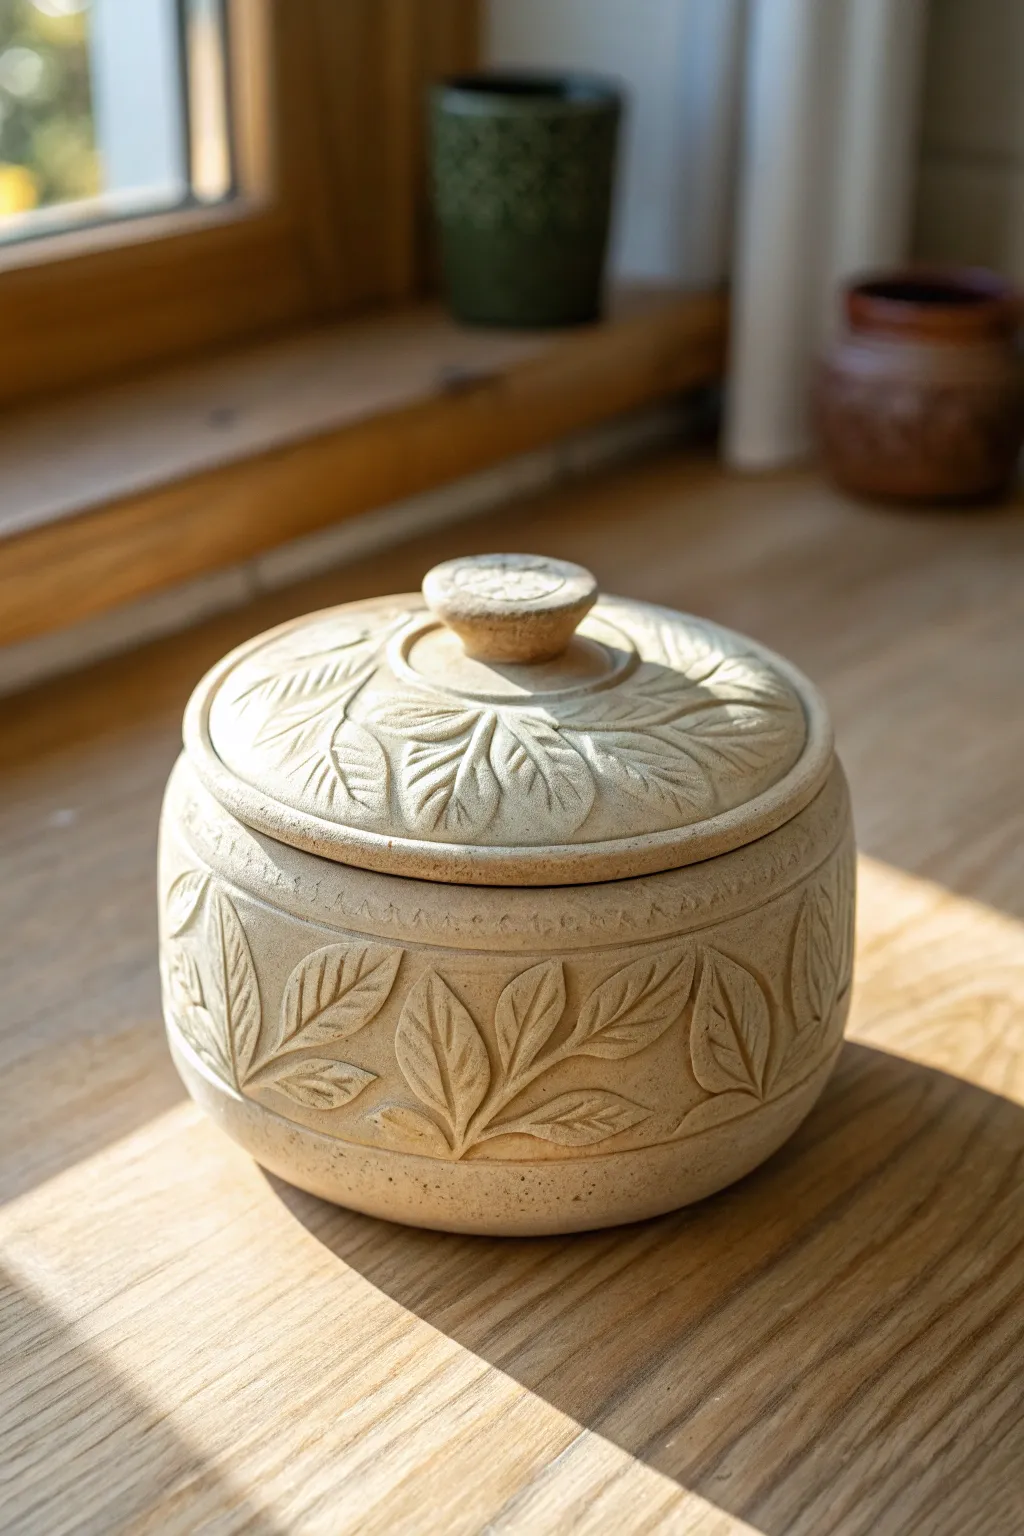
This elegant lidded box captures the timeless beauty of nature with its deep relief carving and warm, speckled stoneware finish. Perfect for storing trinkets or dry tea, the piece relies on precise carving techniques to create a shadow-catching surface that feels both rustic and refined.
Step-by-Step Guide
Materials
- Speckled stoneware clay (mid-fire)
- Potter’s wheel (or rolling pin and slab templates for hand-building)
- Needle tool
- Loop carving tools (small and medium)
- Wood modeling tool
- Metal kidney rib
- Sponge
- Wire cutter
- Calipers
Step 1: Forming the Base and Lid
-
Throw the Body:
Begin by wedging your clay thoroughly to distribute the speckles evenly. Throw a cylinder on the wheel, approximately 4 inches wide and 3 inches tall. Gently belly out the walls from the inside to create a pleasing rounded curve, keeping the rim slightly thicker to support the lid. -
Refine the Gallery:
Using a wooden modeling tool or the corner of a rib, create a clean, recessed gallery inside the rim of the pot. This shelf is where the lid will sit, so ensure it is flat and level. -
Measure for the Lid:
Before removing the pot from the wheel, use calipers to measure the exact interior diameter of the gallery shelf. -
Throw the Lid:
Using a separate ball of clay, throw a low, domed lid upside down. Ensure the flange (the part that fits into the pot) matches your caliper measurements. Smooth the underside curve with a rib. -
Trim and Add Knob:
Once both pieces are leather-hard, trim the foot of the box and the top of the lid. Attach a small nub of clay to the center of the lid using slip and scoring. Shape this into a flattened, ergonomic knob.
Step 2: Carving the Relief Pattern
-
Plan the Layout:
Lightly trace a horizontal guideline around the upper third of the box using a needle tool. This will separate the rim border from the main botanical pattern. -
Sketch the Vines:
Using the needle tool again, very lightly scratch sweeping leaf shapes onto the leather-hard clay surface. Alternate the direction of the leaves to create a sense of organic movement around the circumference. -
Carve the Outlines:
Take a small, sharp loop tool and carve along your sketched lines. I find it helpful to angle the tool slightly outward to create a beveled edge, which catches the light better than a straight cut. -
Excavate the Negative Space:
Use a larger loop tool to gently remove clay from the ‘background’ spaces between the leaves. You don’t need to go deep; removing just 1-2mm of clay is enough to make the leaves pop forward. -
Detail the Leaves:
Switch back to a fine point tool or needle. Carve the central vein down the middle of each leaf, followed by delicate, angled lines for the smaller veins. Keep your hand steady and confident. -
Decorate the Rim:
For the band near the rim, use a small stamp or make repeated tiny triangular indentations with a tool tip to create the delicate border pattern seen in the reference. -
Carve the Lid:
Repeat the leaf motif on the lid, radiating the leaves outward from the center knob like a sunburst. Carve a small flower or geometric motif into the top of the knob itself.
Pro Tip: Leather Hard Timing
Carve when clay is ‘firm leather hard’—tough like cheddar cheese. Too wet, and lines get mushy; too dry, and the clay chips.
Step 3: Finishing and Firing
-
Smooth the Burrs:
Let the piece dry until it is bone dry. Gently rub the carved areas with a scouring pad or your finger to knock off any sharp little clay crumbs or “burrs” created during carving. -
Bisque Fire:
Fire the piece to cone 04 (or your clay’s bisque temperature). Ensure the lid is placed on the pot during firing to ensure they warp together if any warping occurs. -
Glaze Application:
For this natural look, you want to accentuate the texture. Apply a thin wash of iron oxide or a transparent matte glaze. Wipe back the glaze with a damp sponge so it stays darker in the carved recesses and lighter on the raised leaves. -
Final Fire:
Glaze fire to maturity (likely cone 5 or 6 for stoneware). Check that no glaze has dripped onto the gallery or flange, or the lid will fuse shut.
Troubleshooting: Stuck Lids
If you fire with the lid on, apply a wax resist containing alumina hydrate to the gallery/rim to prevent fusing.
Once cooled, your box is ready to hold small treasures while displaying a lovely, handcrafted texture


What Really Happens Inside the Kiln
Learn how time and temperature work together inside the kiln to transform clay into durable ceramic.
Sgraffito Pattern Box With Bold Lines and Contrast
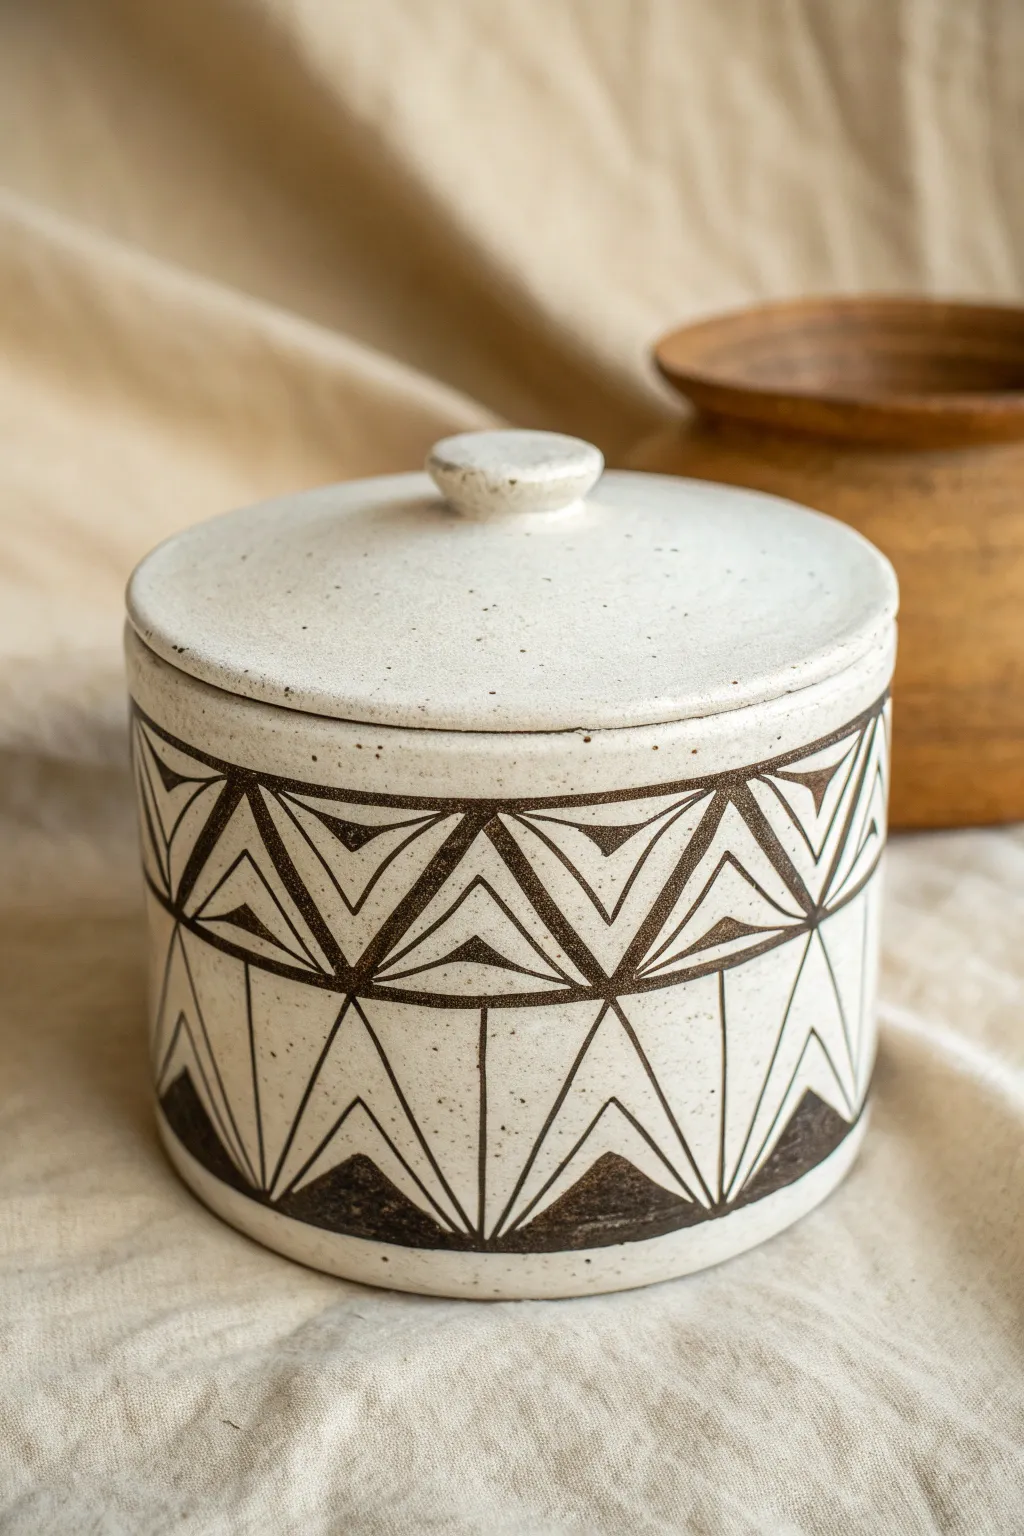
This stunning ceramic jar features bold, geometric contrast achieved through the sgraffito technique, where dark underglaze is carved away to reveal the white clay body beneath. The design relies on repeating triangular motifs and sharp lines, creating a modern, tribal-inspired aesthetic perfect for storing small treasures.
Step-by-Step Tutorial
Materials
- White or speckled stoneware clay
- Black underglaze
- Sgraffito tool (loop tool or carving needle)
- Fettling knife
- Rolling pin and guide strips (3/8 inch thickness)
- Scoring tool or serrated rib
- Slip (made from your clay body)
- Clear matte glaze
- Sponge
- Soft fan brush
- Ruler or flexible measuring tape
Step 1: Forming the Box Body
-
Roll the slab:
Begin by rolling out your clay slab to an even thickness of about 3/8 inch. Using guide strips helps ensure the walls are perfectly uniform, which is crucial for a clean, cylindrical shape. -
Cut the components:
Measure and cut a long rectangle for the walls (for a jar this size, aim for about 12 inches long by 4 inches high) and two circles—one for the base and one for the lid. -
Assemble the cylinder:
Bevel the short edges of your rectangular slab at 45-degree angles. Score and slip these distinctive edges, then bring them together to form a tube, compressing the seam firmly from both inside and out. -
Attach the base:
Score and slip the bottom edge of your cylinder and the outer edge of your base circle. Press the cylinder onto the base, smoothing the clay upward from the base onto the wall to creating a seamless join.
Step 2: Creating the Lid
-
Create the gallery:
To make the lid sit securely, roll a small coil of clay and attach it to the underside of your lid circle, inset slightly from the edge so it fits snugly inside the jar opening. -
Form the knob:
Shape a small, flattened button of clay. Score and slip the center of the lid top and attach this knob, smoothing the connection point so it looks integrated rather than just stuck on. -
Refine the surface:
Once the clay is leather-hard, sponge the entire piece smooth. You need a perfect, blemish-free surface before applying the black underglaze for the sharpest lines.
Clean Lines Only
If your carving tool is tearing the clay rather than slicing it, your pot is likely too dry. Mist it lightly with water and wrap it in plastic for an hour to rehydrate the surface slightly.
Step 3: Applying the Sgraffito Design
-
Apply underglaze:
Using a soft fan brush, apply 2-3 even coats of black underglaze to the exterior of the jar body. Let each coat dry until it loses its sheen before applying the next to avoid dragging the brush marks. -
Wait for ideal dryness:
Wait until the underglaze is dry to the touch but the clay is still firm leather-hard. If the clay is too dry, it will chip; if too wet, the lines will be mushy. -
Mark horizontal guides:
Lightly scratch or use a pencil to mark two horizontal bands around the cylinder—one near the top rim and one near the bottom—to define the central design area. -
Carve the main triangles:
Carve a continuous zigzag line between your horizontal guides to form a row of large triangles. I usually use a small loop tool here to remove ribbons of black clay cleanly. -
Detail the triangles:
Inside each large triangle, carve smaller, nested triangles. Leave bands of black between your carved lines to create the bold, dark geometric structure seen in the image. -
Carve the vertical lines:
In the lower section of the jar (below the zigzag band), carve vertical lines dropping down from the triangular points to the bottom edge, creating vertical panels. -
Add bottom accents:
At the base of those vertical panels, carve inverted V-shapes or small filled triangles to ground the design visually. -
Clean up crumbs:
Use a large, fluffy, dry brush to gently sweep away the clay burrs and crumbs. Do not rub them with your finger, or you might smudge the black dust into the white clay.
Level Up: Color Pop
Instead of black underglaze, try a deep navy or forest green. You can also paint the interior of the carved lines with a contrasting clear celadon glaze for a subtle glossy effect.
Step 4: Finishing and Firing
-
Bisque fire:
Allow the piece to dry completely (bone dry) before loading it into the kiln for a bisque fire (usually cone 04). -
Apply clear glaze:
Once bisque fired, dip or brush a clear matte glaze over the entire piece. The matte finish complements the earthy feel of the exposed clay texture. -
Final firing:
Fire the piece to maturity (Cone 5 or 6 depending on your clay body). Ensure the lid is fired separately or with wax resist on the contact points to prevent sticking.
Once fired, you will have a striking, heritage-style vessel ready to hold tea leaves or keepsakes
Icing-Drip Rim Box Inspired by Melted Frosting

Capture the whimsy of a bakery window with this delightful slab-built clay box. Featuring a soft, speckled cream glaze and playful terracotta red drips, it looks just like a square cake covered in melting frosting.
How-To Guide
Materials
- White or speckled stoneware clay
- Rolling pin with guide sticks (approx. 1/4 inch)
- Fettling knife or craft knife
- Ruler
- Score and slip tool (serrated rib or needle tool)
- Clay slip
- Soft sponge
- Small round knob of vibrant red or terracotta underglaze
- Fine liner brush
- Speckled cream or semi-transparent white glaze
- Kiln access
Step 1: Building the Box
-
Prepare your slabs:
Roll out your clay to an even thickness using guide sticks, aiming for about a 1/4 inch thick. Compress the clay with a rib on both sides to prevent warping later. -
Cut the components:
Use a ruler and fettling knife to cut five squares. For this specific look, aim for roughly 4-inch squares for the base and four walls. -
Bevel the edges:
For cleaner corners, cut 45-degree angles on the sides of your wall pieces where they will join. This miter joint creates a stronger, boxier shape than overlapping. -
Score and slip:
Thoroughly score the edges of your base and the beveled sides of your walls. Apply slip generously and press the walls onto the base and against each other. -
Reinforce the interior:
Roll a very thin coil of clay and press it into the interior corners of the box. Smooth it out with a modeling tool or your finger to ensure the seams are watertight and sturdy. -
Construct the lid:
Cut a sixth square slightly larger than your box opening (about 1/8 inch overhang on all sides). Attach a smaller square or flange underneath that fits snugly inside the box opening to keep the lid from sliding off. -
Add the knob:
Form a small, organic pebble shape for the handle. Score the center of the lid and attach the knob securely. Smooth the connection point so it looks seamless.
Warped Walls?
If your square box looks wonky, try drying it with a light weight (like a small board) on top of the rim to keep the walls straight as moisture evaporates.
Step 2: Glazing and Decorating
-
Bisque fire:
Allow your box to dry slowly under clumsy plastic for a few days to prevent warping, then bisque fire it according to your clay body’s instructions. -
Apply base glaze:
Dip or brush your entire piece (lid and base) with a speckled cream or milky white glaze. I find three brushed coats usually gives that perfect opaque icing look. -
Map out the design:
Once the base glaze is dry to the touch, mentally visualize where the ‘drips’ will fall. The design relies on varying lengths to look natural. -
Paint the lid scallops:
Using a fine liner brush and red underglaze (or glaze, depending on what you have), paint a scalloped line along the very edge of the lid. Keep the arches small and tight. -
Create the main drips:
On the box body, paint loops that start at the top rim and extend downwards. Vary the length of these U-shapes significantly—some should be short, others long and dramatic. -
Thicken the lines:
Go back over your red lines to ensure they are solid and opaque. The contrast between the red line and the cream background is key to the style. -
Add the knob detail:
Paint a small dollop of the red color directly on top of the knob handle to tie the design together. -
Clean the foot:
Wipe away any glaze from the bottom of the box and the flange of the lid to prevent them from fusing to the kiln shelf. -
Final firing:
Fire the piece to the maturity temperature of your glaze and clay. This fuses the design into that sleek, shiny finish.
Add Texture
Before glazing, gently press a clean sponge into the clay surface. This subtle texture breaks up the glaze just enough to look like fluffy cake crumb.
Fill your new ceramic box with trinkets or treats and enjoy the sweet aesthetic

TRACK YOUR CERAMIC JOURNEY
Capture glaze tests, firing details, and creative progress—all in one simple printable. Make your projects easier to repeat and improve.
Cookie Jar Mini Box With a Bite-Mark Lid Handle
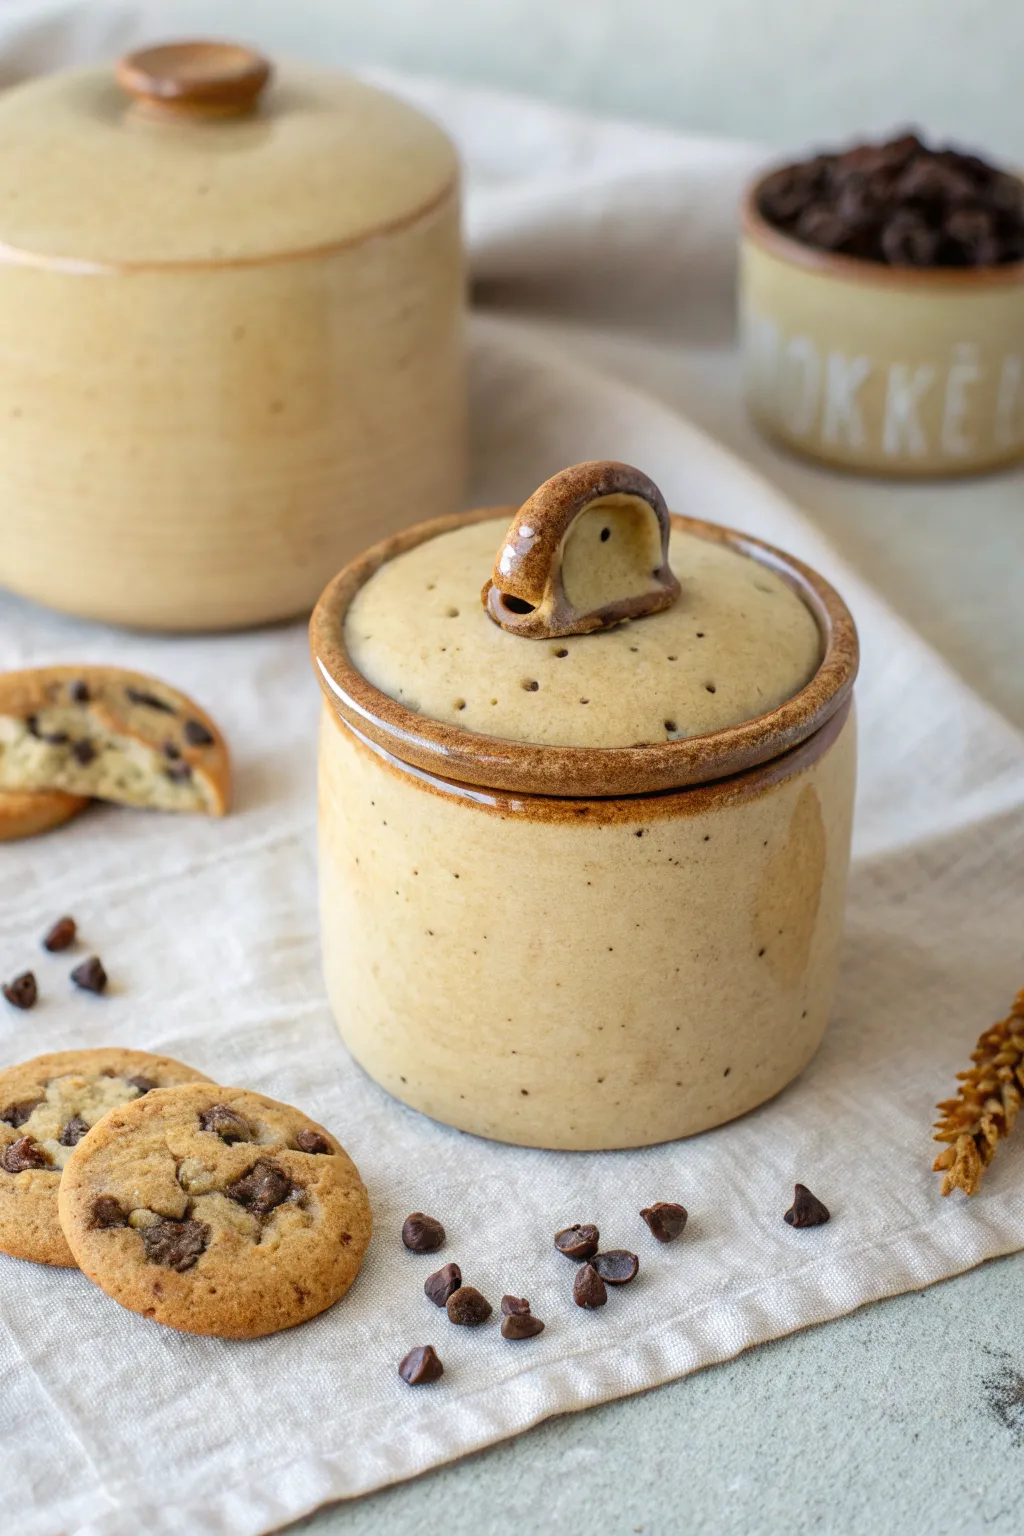
Create a charming home for your sweet treats with this hand-built ceramic canister. Featuring speckled clay and a whimsical handle that looks like a cookie with a bite taken out, this jar is as functional as it is adorable.
Step-by-Step Guide
Materials
- Speckled buff stoneware clay
- Rolling pin
- Canvas work surface
- Circle cutter or circular template (approx. 4-inch diameter)
- Fettling knife or needle tool
- Scoring tool (serrated rib or needle tool)
- Slip (clay mixed with water)
- Sponge
- Wooden modeling tool
- Clear transparent food-safe glaze
- Iron oxide wash (optional for rim definition)
- Kiln for firing
Step 1: Forming the Canister Body
-
Prepare the slab:
Begin by wedging your speckled stoneware clay thoroughly to remove air pockets. Roll it out on your canvas surface into an even slab, approximately 1/4 inch thick. Compress the clay with a rib tool on both sides to prevent warping later. -
Cut the components:
Using your circle template, cut out a base for the jar. Next, measure the circumference of your base circle. Cut a long rectangular strip for the walls that matches this length, plus a tiny bit extra for the overlap. Cut a second, slightly larger circle for the lid. -
Score and slip:
Score the outer edge of your base circle and one long edge of your rectangular wall strip. Apply clay slip generously to these scored areas. -
Assemble the cylinder:
Carefully wrap the rectangular wall around the base circle. Join the two short ends of the wall first by scoring and slipping the overlap, pressing them firmly together. Then, press the wall down onto the base. -
Reinforce the seams:
Use a wooden modeling tool to smooth the seams on both the inside and outside of the jar. I like to roll a very thin coil of clay and press it into the interior bottom seam for extra strength. -
Refine the rim:
Smooth the top rim of the jar with a damp sponge or a piece of chamois leather to ensure it’s rounded and pleasant to touch.
Don’t Rush the Dry
Lids often warp if they dry unevenly. Dry your lid specifically ON the jar body with a piece of paper towel in between to keep the fit perfect.
Step 2: Creating the Lid and Cookie Handle
-
Shape the lid:
Take your larger clay circle and gently curve it over a mold or simply press the center with your thumb to create a slight dome shape. It should sit comfortably on top of your jar body. -
Add a flange:
Roll a small coil of clay. Flip the lid upside down and attach this coil in a circle that fits just inside the jar’s opening. This flange prevents the lid from sliding off. -
Sculpt the cookie handle:
Roll a small, thick slab of clay and cut out a small circle. Use a small round cutter or knife to remove a ‘bite’ shape from one side. Smooth the edges to soften the look. -
Add texture:
Use a needle tool to gently poke small, shallow holes all over the handle to mimic the texture of a baked cookie. Do the same texturing on the top surface of the lid itself for a cohesive look. -
Attach the handle:
Score the bottom of your cookie handle and the center of the lid heavily. Apply slip and press the handle vertically onto the center of the lid. Clean up any excess slip with a brush.
Make it Chocolatey
Before the final glaze, paint small dots of dark brown underglaze onto the ‘handle’ to look like actual melting chocolate chips.
Step 3: Firing and Glazing
-
Bisque fire:
Allow your piece to dry slowly under plastic for a few days to prevent cracking, then uncover to bone dry. Fire it in the kiln to bisque temperature (usually Cone 04). -
Accentuate the rims:
Once bisqued, mix a small amount of iron oxide wash. Use a small brush to paint a thin line along the rim of the jar and the edge of the lid. Wipe away any excess with a sponge, leaving just a hint of color to define the edges. -
Apply clear glaze:
Dip the entire jar and lid into a clear, transparent glaze. This will seal the clay, make it food safe, and allow the natural speckles of the clay body to shine through as ‘chocolate chips’. -
Wipe the foot:
Carefully wipe all glaze off the bottom of the jar and the rim where the lid sits to prevent them from fusing together in the kiln. -
Glaze fire:
Fire the piece again to the maturity temperature of your clay and glaze (typically Cone 5 or 6). Let the kiln cool completely before opening.
Now you have a delightful, custom-made jar perfect for storing your favorite cookies
Flower Knob Lid Box for Easy, Pretty Personalization
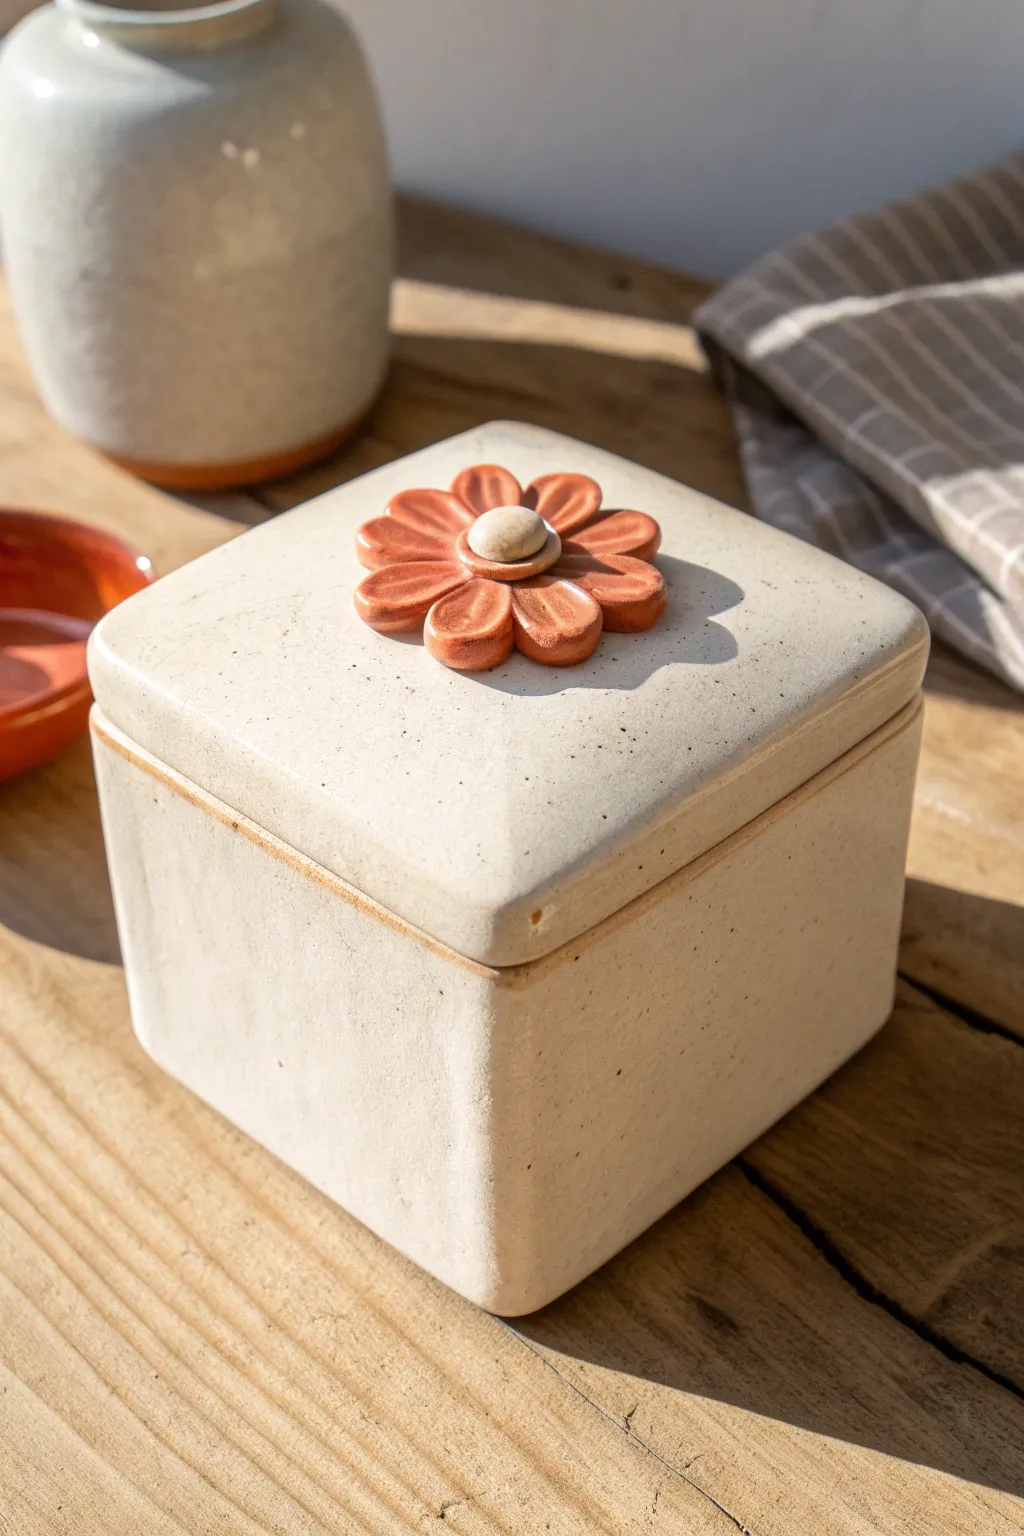
This charming ceramic box combines simple slab building with a delicate floral touch, creating a functional piece that feels both rustic and refined. With its creamy speckled glaze and contrasting terracotta flower knob, it’s the perfect hidden spot for small treasures or jewelry.
Step-by-Step Tutorial
Materials
- White or buff stoneware clay (speckled optional)
- Small amount of terracotta clay (for the flower)
- Rolling pin
- Two 1/4-inch wooden guide strips
- Fettling knife or needle tool
- Ruler
- Scoring tool (or serrated rib)
- Slip (clay mixed with water)
- Cardboard or poster board (for templates)
- Sponge
- Small paintbrush
- Matte cream glaze
- Clear glaze (optional for flower)
Step 1: Forming the Box Base
-
Roll the Slabs:
Begin by wedging your white stoneware clay to remove air bubbles. Place the clay between your wooden guide strips and roll it out into an even slab. Smooth the surface with a damp sponge or a rubber rib to compress the clay particles. -
Cut the Walls:
Using a ruler and a sharp knife, cut out five squares of equal size. A 4×4 inch square is a manageable size for beginners. Set one aside for the base and the other four for the walls. -
Hardening Off:
Let these slabs sit until they are ‘leather hard’—stiff enough to hold their shape but still flexible. This usually takes a few hours depending on humidity. -
Bevel the Edges:
For clean corners, cut the vertical edges of your wall pieces at a 45-degree angle. You can maintain a straight edge for the bottom where it meets the floor slab. -
Score and Slip:
Rough up the edges you plan to join using your scoring tool, then apply a generous amount of slip. This acts as the glue for your clay. -
Assemble the Walls:
Press the walls together on top of the base slab. Use a small wooden tool or your finger to smooth the seams on the inside and outside, reinforcing the joints. I like to roll a tiny coil of clay and press it into the interior corners for extra strength. -
Refine the Shape:
Once assembled, use a paddle or flat board to gently tap the sides, ensuring the box is perfectly square and the walls are straight.
Step 2: Creating the Lid and Flower
-
Cut the Lid:
Roll another slab slightly larger than your box opening. Place your assembled box upside down on this slab and trace around it, then cut along the line so the lid sits flush with the walls. -
Add the Flange:
To keep the lid from sliding off, attach small strips of clay or a square coil to the underside of the lid slab, inset about 1/4 inch from the edge. Test the fit on your box base to ensure it sits snugly. -
Shape the Petals:
Switch to your terracotta clay. Roll small balls of clay and flatten them into teardrop shapes to form the petals. You’ll need about 8 petals for a full flower. -
Form the Center:
Roll a small ball of white clay for the flower’s center. Create a small indentation in its middle to mimic a natural stamen. -
Assemble the Flower Knob:
Score and slip the center of your lid heavily. Arrow the terracotta petals in a circle, pressing them down firmly. Add the white center ball on top, ensuring good contact so it functions as a sturdy handle. -
Detailing:
Use a needle tool to gently press lines into the petals for texture. Smooth any rough edges on the lid with a damp sponge.
Clean Lines Pro Tip
To get softer, pillowy edges like the photo, gently run a damp chamois leather strip over the rim of the box and lid after assembling but before firing.
Step 3: Finishing and Glazing
-
Bisque Fire:
Allow the box to dry slowly under loose plastic to prevent warping, then fire it in the kiln to bisque temperature. -
Wax Resist:
Once fired, apply wax resist to the bottom of the box and the contact points where the lid meets the rim to prevent them from fusing together during the glaze firing. -
Glaze Application:
Dip the box and lid into a matte cream glaze. If your clay isn’t naturally speckled, choose a glaze with iron speckles to get that rustic look. -
Reveal the Flower:
Using a damp sponge, carefully wipe the glaze off the terracotta petals. You can leave a thin layer of clear glaze on them if you want a shine, or leave them raw for a matte contrast. -
Final Fire:
Fire the piece for the final time according to your clay and glaze specifications.
Level Up: Surprise Inside
Before the first firing, paint a tiny flower or secret message on the interior floor of the box using underglaze for a hidden pop of joy when opened.
Now you have a sweet, handcrafted vessel ready to hold your favorite little things
Frog Character Box With Feet, Eyes, and a Smiley Lid
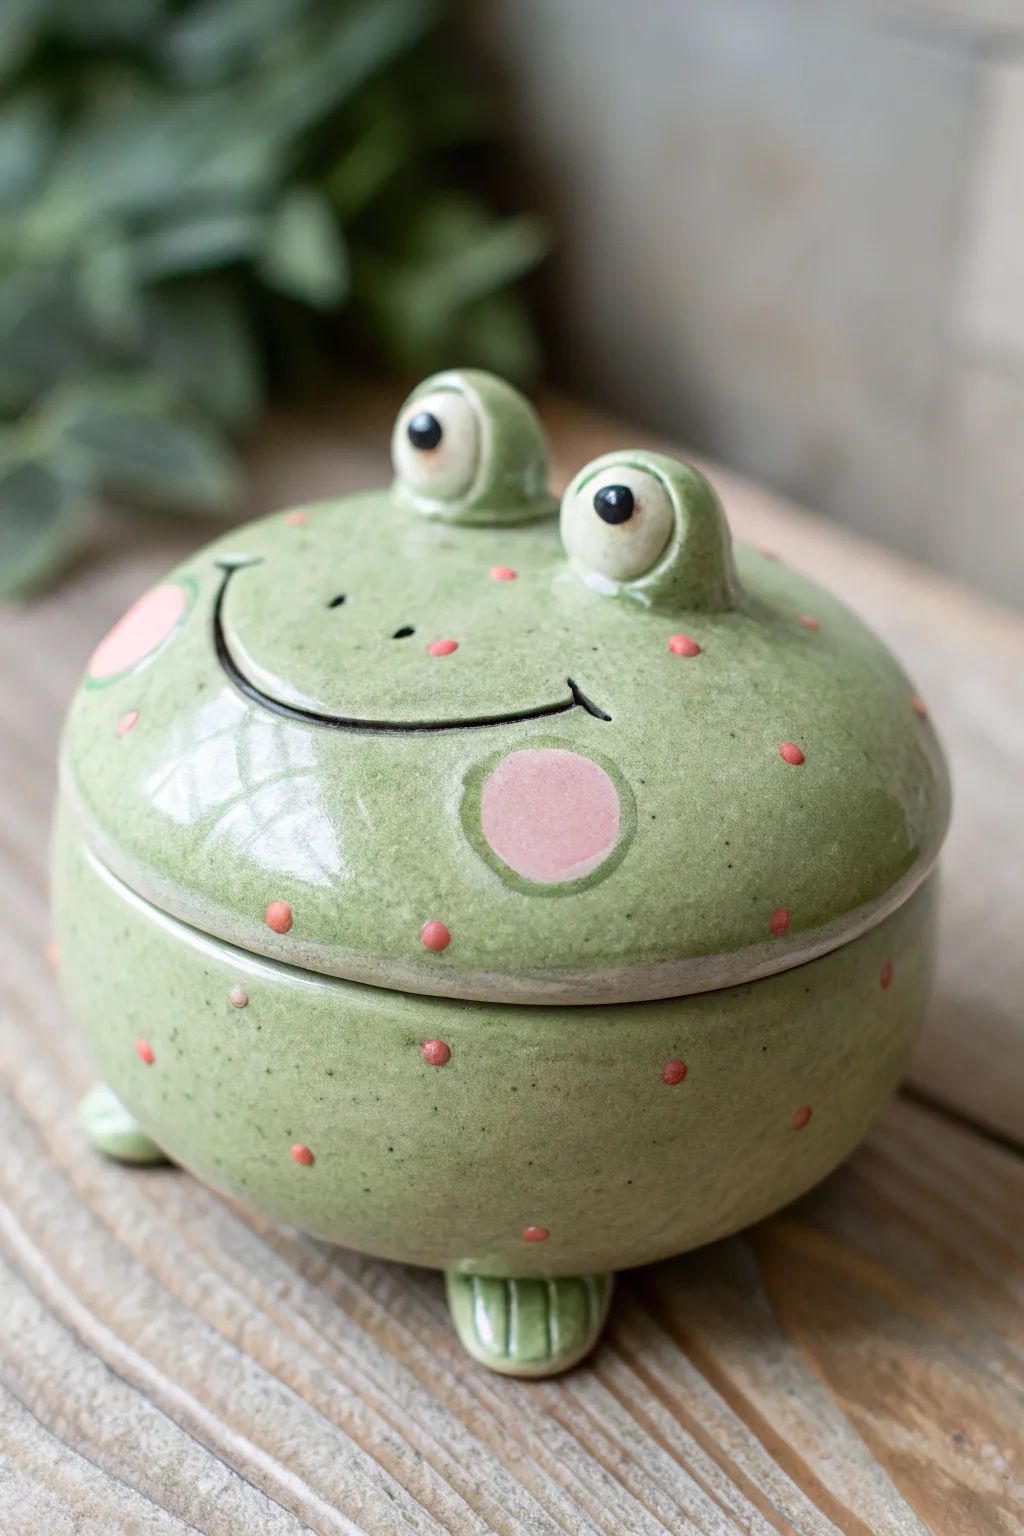
Bring a little swamp charm to your shelf with this adorable, rotund frog box featuring happy eyes and a wide, friendly grin. The speckled green glaze and cheerful pink cheeks make this lidded container perfect for holding little treasures while adding a pop of whimsy to your decor.
How-To Guide
Materials
- Low-fire white earthenware clay
- Rolling pin
- Circular cookie cutter (approx. 4 inches) or needle tool
- Small bowl (for use as a slump mold)
- Scoring tool and slip
- Wooden modeling tools
- Sponge
- Underglazes: Light Green, Pink/Coral, Black
- Clear dipping glaze or brush-on gloss glaze
- Kiln (or access to a firing service)
Step 1: Forming the Body and Lid
-
Roll the Slabs:
Start by rolling out your clay into a smooth, even slab about 1/4 inch thick. Ensure you compress the clay on both sides with a rib tool to prevent warping later. -
Cut the Circles:
Cut two identical circles from your slab. One will form the bottom bowl, and the other will become the domed lid. -
Shape the Bottom Bowl:
Gently press one clay circle into a small, plastic-lined bowl to act as a mold. Smooth the inside with a damp sponge to create a nice curve. Let this stiffen to leather-hard. -
Shape the Lid:
Drape the second circle over the *outside* of a similar-sized overturned bowl (covered in plastic wrap) to create a matching dome shape. Allow this to firm up as well. -
Check the Fit:
once both pieces are leather-hard, remove them from their molds and test the fit. They should sit flush against each other like a hollow sphere. -
Create the Flange:
Roll a small coil of clay and attach it to the underside of the lid, just inside the rim. Smooth it onto the lid surface so it locks the lid in place when sitting on the bottom bowl.
Air Escape Pro-Tip
Always poke a tiny, hidden pinhole on the underside of hollow added parts (like the eye sockets) before attaching. This prevents trapped air from expanding and cracking the piece in the kiln.
Step 2: Sculpting the Frog Features
-
Form the Feet:
Roll three small balls of clay and flatten them slightly into ovals. Score and slip them onto the bottom of the bowl piece to act as tripod feet. Use a modeling tool to press lines into the front of each foot for ‘toes’. -
Make the Eye Sockets:
Create two half-domes of clay and attach them to the top of the lid where the eyes will go. Blend the seams seamlessly into the lid surface. -
Add the Eyeballs:
Roll two smaller balls of clay for the actual eyes. Score and slip these into the half-dome sockets you just made, pressing gently to secure them. -
Carve the Smile:
Using a needle tool or a small loop tool, carve a wide, U-shaped smile across the front of the lid. Make the line deep enough that the glaze won’t fill it in completely. -
Refine the Surface:
Go over the entire piece with a damp sponge to remove any fingerprints or rough textures. Usually I like to do a final pass with a soft rubber rib for an ultra-smooth finish.
Level Up: Texture
Before glazing, gently splatter iron oxide wash or a darker green glaze with a stiff toothbrush to create natural-looking organic speckles on the frog’s skin.
Step 3: Decoration and Glazing
-
Bisque Fire:
Let the piece dry completely (bone dry) and fire it to cone 04. -
Apply Base Color:
Apply 2-3 coats of a light green underglaze to the entire exterior of the frog. Sponge off any excess from the foot bottoms. -
Paint the Details:
Using a small brush, paint two large pink circles for cheeks on either side of the smile. Add small pink dots scattered across the body and lid for a speckled texture. -
Define the Face:
Use a fine detail brush and black underglaze to paint the pupils on the eyes. If you want the smile to pop, run a very thin wash of black into the carved groove. -
Glaze and Final Fire:
Once the underglaze is dry, dip the entire piece in clear glaze or brush on a clear gloss. Fire to cone 05/06 (or according to your clay body specs) to achieve that shiny, finished look.
Place your finished frog on the counter to keep your keys safe or simply to make you smile every day
Mountain Landscape Lid Box With a Sculpted Peak Handle
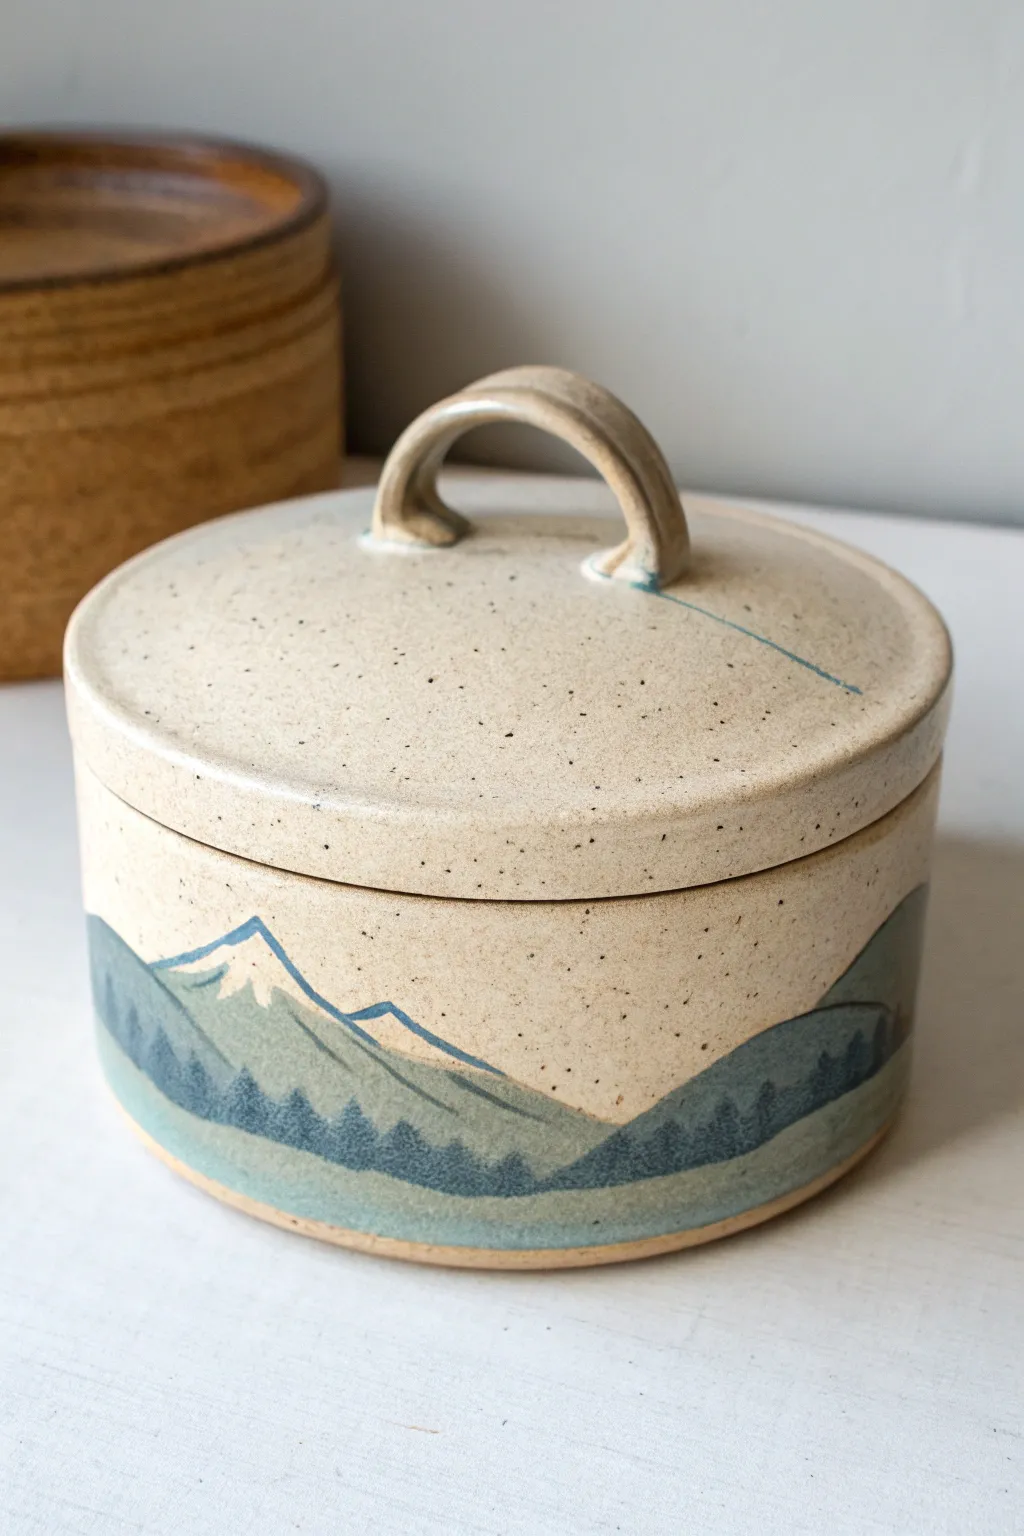
This elegant lidded jar brings the calm of a mountain range into your home, featuring a speckled clay body adorned with painted peaks and pines. The understated handle and clean cylindrical form make it a perfect functional canvas for illustrating your favorite landscape.
Step-by-Step Tutorial
Materials
- Speckled stoneware clay (mid-fire)
- Pottery wheel (or rolling pin and slab templates)
- Needle tool
- Trimming tools
- Ribs (metal and rubber)
- Underglazes (Slate Blue, Forest Green, White)
- Fine detail brush
- Medium round brush
- Clear glaze (transparent)
- Scoring tool and slip
Step 1: Forming the Body and Lid
-
Throw the cylinder:
Begin with about 1.5 lbs of speckled clay centered on your wheel. Open and pull the walls to create a straight-sided cylinder roughly 4-5 inches wide and 3 inches tall, keeping the rim slightly thicker to support the lid later. -
Create the gallery:
Using a wooden tool or your thumb, split the rim to create an inset gallery—a small shelf on the inside edge where the lid will sit. Compress this area well to prevent warping. -
Throw the lid:
Using a separate lump of clay (about 0.75 lb), throw a flat lid. Measure carefully with calipers to ensure it fits the gallery of your cylinder. I usually make it a hair wider to account for trimming later. -
Trim the base:
Once leather hard, trim the bottom of the cylinder to create a clean, flat foot ring or a flat bottom, depending on your preference. Smooth the sides with a rubber rib to erase any throwing lines. -
Trim the lid:
Place the leather-hard lid upside down on the wheel (or use a chuck) and trim the top into a gentle, pleasing curve. Ensure the fit is snug but not tight against the jar’s gallery.
Step 2: Adding Features and Decoration
-
Pull the handle:
Pull a small strap handle from a lug of clay. It should be delicate, roughly 2-3 inches long. Let it curve naturally into an arch shape and stiffen slightly so it holds its form. -
Attach the handle:
Score and slip the center of the lid and the ends of your handle arch. Press firmly to attach, blending the clay at the connection points with a small modeling tool for a seamless look. -
Clean surface for painting:
Wipe the exterior of the jar with a damp sponge to remove dust. A smooth surface is crucial for the underglaze details to stand out. -
Outline the mountains:
Using a pencil (the graphite will burn off), lightly sketch a rolling mountain range around the circumference of the jar. Vary the heights to create visual interest. -
Paint the background peaks:
Mix a diluted slate blue underglaze. Paint the furthest mountain range shapes, keeping the color somewhat translucent to suggest atmospheric depth. -
Layer the foreground:
With a deeper forest green mixed with a touch of blue, paint the closer hills in front of the distant peaks. Let the layers overlap naturally. -
Add snow caps:
Using pure white underglaze and a steady hand, paint the snow caps on the highest peaks. Use slightly thicker application here so the white pops against the speckles. -
Detail the treeline:
Switch to your finest detail brush. Using a dark forest green or deep teal, dab tiny vertical strokes along the lower hills to create the texture of a distant pine forest. -
Define the edges:
If you want a crisper look like the example, use a very thin line of watery dark blue to outline the main mountain ridges, giving them a graphic, illustrative quality. -
Bisque fire:
Let the piece dry completely, covering it loosely with plastic if the handle seems to be drying too fast. Fire to cone 04 (or your clay’s bisque temperature).
Lid Fit Pro-Tip
Make the lid fit slightly loose at the leather-hard stage. Glaze adds thickness, and a tight clay fit often means a lid that won’t close after the glaze firing.
Step 3: Glazing and Finishing
-
Wax resist:
Apply wax resist to the bottom of the jar and the contact points where the lid touches the gallery. This prevents the lid from fusing shut during the glaze firing. -
Apply clear glaze:
Dip the entire piece (lid separately) into a transparent clear glaze. This will seal the clay and maximize the visibility of the beautiful speckled clay body. -
Wipe back drips:
Check the rim and handle for any thick glaze drips. Smooth them out with a finger so the glaze fires evenly. -
Final firing:
Fire the kiln to the maturity temperature of your clay and glaze (typically cone 5 or 6 for stoneware). Allow the kiln to cool naturally before unloading.
Smudged Underglaze?
If you smudge a line while painting, let it dry completely. Once dry, gently scrape the mistake away with an X-Acto knife rather than wiping it wet.
Once cooled, fill your new mountain jar with tea, treasures, or keep it empty as a miniature landscape sculpture.
Pixel-Inspired Box With Blocky Painted Squares
Channel a bit of retro gaming nostalgia or modern geometric design with this handcrafted clay box featuring a bright, blocky mosaic pattern. The simple slab-building technique creates a sturdy form, while the hand-painted grid brings a playful pop of color to your shelf.
Detailed Instructions
Materials
- Low-fire white earthenware clay
- Rolling pin and guide strips (approx. 1/4 inch thickness)
- Fettling knife or clay cutting tool
- Score and slip tool (serrated rib or needle tool)
- Ruler and square
- Underglazes in orange, deep blue, teal/green, and red-orange
- Clear transparent glaze
- Small square-tipped paintbrush
- Detail brush
- Sponge
- Kiln access
Step 1: Slab Building the Form
-
Prepare your slabs:
Begin by wedging your white earthenware clay thoroughly to remove air bubbles. Roll it out into a large, even slab using 1/4 inch guide strips to ensure uniform thickness. -
Cut the components:
Using a ruler and fettling knife, measure and cut five identical squares for the box base (bottom and four sides). I usually make these 4×4 inches, but adjust to your preference. Cut a slightly larger square for the lid to account for overhang. -
Dry slightly to leather hard:
Allow your cut slabs to stiffen up to a ‘leather hard’ state. They should be firm enough to hold their shape when stood up, but still soft enough to join. -
Bevel the edges:
For cleaner corners, cut 45-degree bevels on the vertical edges of your side walls and the perimeter of the base. This creates stronger miter joints. -
Score and slip:
Rough up the beveled edges with your scoring tool and apply a generous amount of clay slip (liquid clay) to the joints. -
Assemble the box:
Press the walls onto the base and against each other. Reinforce the inside corners by pressing a thin coil of clay into the seams and smoothing it out completely. -
Refine the lid:
On the underside of your lid slab, attach a smaller square or flange made of clay strips that will fit *inside* the box opening to keep the lid from sliding off. -
Add a knob:
Form a small ball of clay for the knob. Flatten the bottom, score and slip it onto the center of the lid, and smooth the connection point so it looks seamless.
Straight Lines Only
Make clean lines easier: apply thin automotive detailing tape (1/8 inch) to mask the ‘grout’ lines before painting. Peel it off after the underglaze dries.
Step 2: The Pixel Design
-
Bisque fire:
Once your box is fully dry (bone dry), fire it in the kiln to a bisque temperature (usually witness cone 04). This hardens the clay for glazing. -
Draw the grid:
Using a pencil, lightly draw a grid pattern across the exterior faces and the top of the lid. A standard 3×3 or 4×4 grid works best for this blocky look. The pencil lines will burn off in the kiln. -
Plan your palette:
Select your underglaze colors. The example use a specific rotation of cadmium orange, cobalt blue, sea green, and a reddish-orange. Arrange them randomly or in a repeating pattern. -
Paint the squares:
Using a small square-tipped shader brush, fill in the grid squares. Leave a distinct dividing line of raw white bisque between each colored block to create the ‘grout’ look. -
Layering color:
Apply 2-3 coats of underglaze for solid, opaque coverage. Let each coat dry to the touch before adding the next one to avoid dragging the pigment. -
Clean up edges:
If any paint smudged into the white lines, use a damp detail brush or the corner of a clean sponge to wipe it away, keeping the geometric lines crisp. -
Clear glaze application:
Once the underglaze is fully dry, dip the entire piece (or brush on) a clear transparent gloss glaze. This will seal the clay and make the colors vibrant. -
Final firing:
Stilt the box and lid in the kiln so the glaze doesn’t stick to the shelf. Fire to the maturity temperature of your clay and glaze (often cone 05 or 06).
Make it Matte
For a more modern, stone-like texture, skip the clear gloss glaze and just use high-quality velvet underglazes on the outside, glazing only the interior.
Once cooled, fill your new geometric container with tea bags, trinkets, or simply let it stand as a statement piece
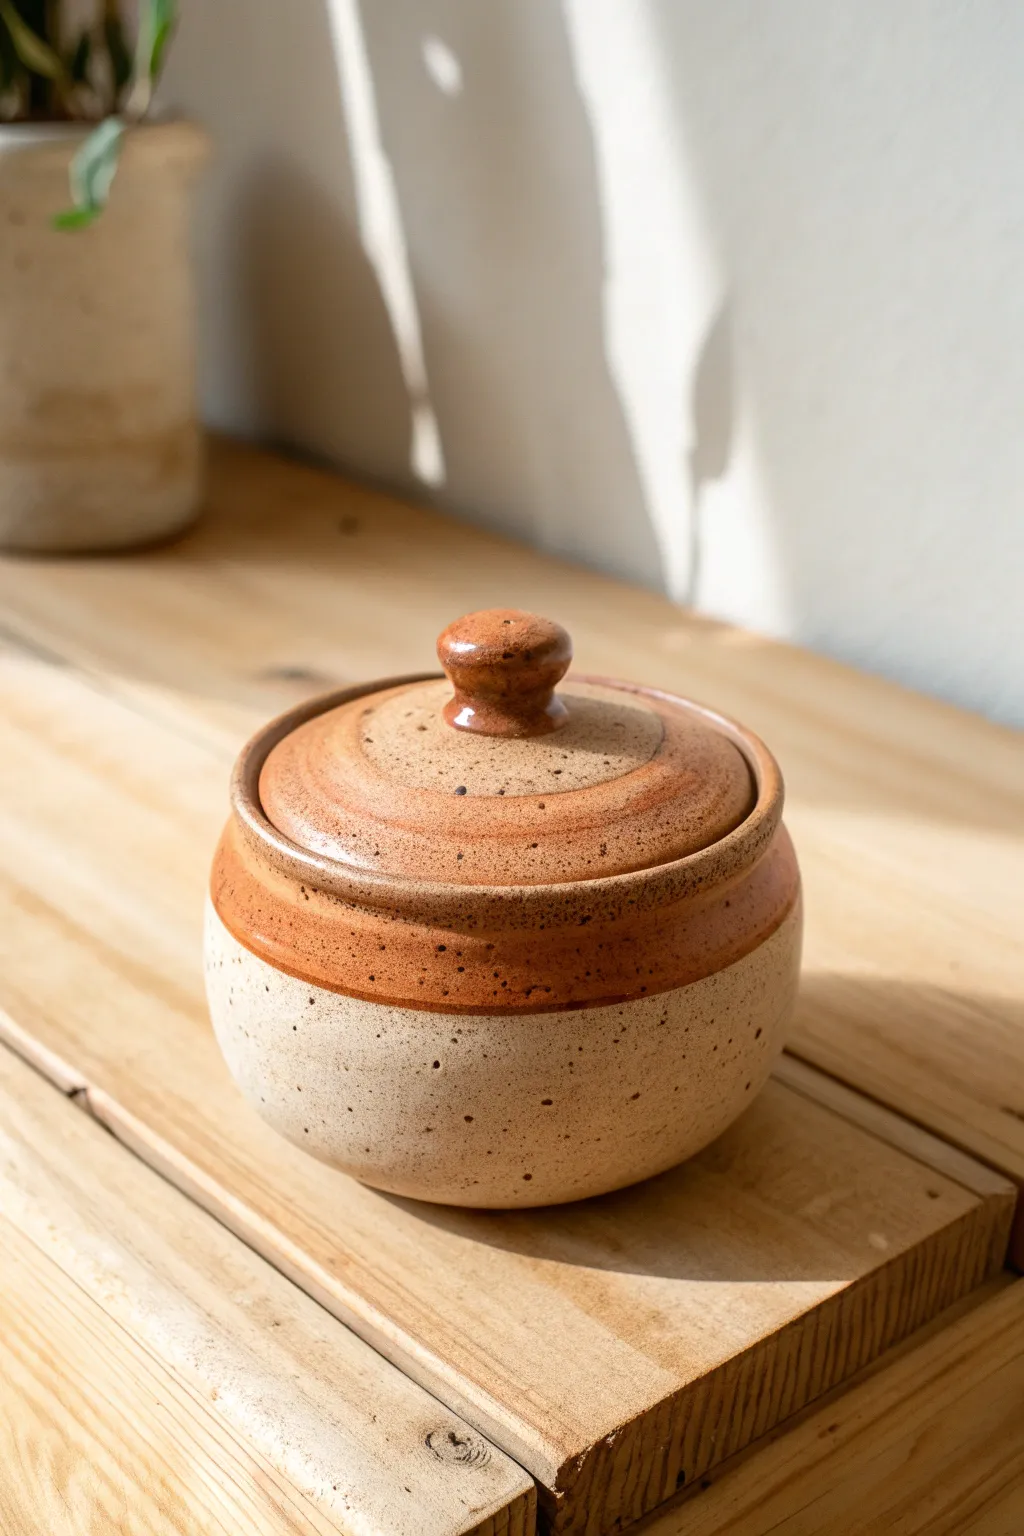
Surprise Compartment Box With a Hidden False Bottom
This charming ceramic jar features a warm, creamy glaze with natural speckles and rustic terracotta accents, looking deceptively simple on the outside. Inside, however, lies the real secret: a clever false bottom compartment perfect for stashing tiny treasures or secret notes.
How-To Guide
Materials
- Speckled stoneware clay (white or light buff)
- Pottery wheel (or can be hand-built using slab/coil method)
- Wooden throwing ribs
- Wire clay cutter
- Needle tool
- Trimming tools (loop tools)
- Calipers
- Creamy white matte glaze
- Iron oxide wash or brown underglaze
- Sponge
- Kiln
Step 1: Forming the Main Vessel
-
Center and open:
Begin with a ball of well-wedged speckled clay on your wheel. Center it firmly and open the vessel, but leave the floor significantly thicker than usual—aim for about 3/4 inch thickness to accommodate the hidden chamber. -
Pull the walls:
Pull the walls up to create a cylindrical shape. Keep the sides relatively straight with a slight vertical rise, smoothing them with a wooden rib to remove throwing lines for a clean, modern profile. -
Create the gallery:
At the rim, use your thumb or a gallery tool to press inward and down gently, creating a distinct shelf (gallery) where the lid will eventually sit. Ensure this ledge is flat and wide enough to support the lid. -
Define the false bottom:
Instead of trimming away all the excess clay at the bottom later, use a needle tool or a small loop tool to carefully carve out a recess in the thick floor from the *inside* if you want access from the top, or leave it solid now to carve from underneath during trimming. -
Measure for the lid:
Use calipers to measure the exact diameter of your gallery shelf. This measurement is crucial for a snug lid fit.
Step 2: Creating the Lid
-
Throw the lid:
Using a smaller amount of clay, throw a flat lid (right side up or off the hump). Use your caliper measurement to ensure the outer edge matches the gallery of your jar. -
Shape the curvature:
Create a gentle, shallow dome shape for the top of the lid. It shouldn’t be completely flat; a slight curve adds elegance and strength. -
Form the knob:
While the clay is still plastic, pinch and throw a small, raised ring or button shape in the center to serve as the handle. Keep the edges crisp. -
Initial drying:
Cut the lid from the bat and let both the jar and lid dry to a firm leather-hard state.
Wobble Watch
If the lid rattles or doesn’t sit flat in the gallery, use a small amount of grinding paste and rotate the lid back and forth in the gallery after firing to sand them into a perfect fit.
Step 3: Refining and The Secret Compartment
-
Invert and center:
Place your leather-hard jar upside down on the wheel head and secure it with lugs of soft clay. -
Carve the hidden chamber:
Trim into the base of the jar to create the false bottom. Carve a deep recessed circle, leaving a rim around the edge for the jar to stand on. This hidden cavity is your secret compartment. -
Fit the false bottom cap:
Roll a small slab of clay and cut a circle that fits snugly into the recess you just trimmed. This creates the removable ‘floor’ that hides the compartment. -
Refine the surface:
Sponge over any rough edges on the jar, lid, and false bottom cap to smooth the texture.
Clean Lines
For the crisp brown rim, I prefer wiping away a millimeter of the white glaze at the very edge to let the iron oxide or bare clay really pop through without getting muddy.
Step 4: Glazing and Finishing
-
Bisque fire:
Fire all pieces in the kiln to cone 04 (or your clay’s specific bisque temperature). -
Wipe down:
Wipe the bisqueware designed with a damp sponge to remove any dust, which ensures better glaze adhesion. -
Apply rim accents:
Dip a small sponge or brush into iron oxide wash or brown underglaze. carefully run it along the rim of the jar, the edge of the lid, and the top of the knob to create that rusty, burnt-orange detailed ring. -
Glaze the body:
Pour your creamy white matte glaze inside the jar and swirl to coat. Dip the exterior and the lid. Be careful to wax the gallery and the lid’s contact points so they don’t fuse shut. -
Final fire:
Fire the piece to the glaze temperature (usually Cone 5 or 6 for stoneware). The iron oxide will interact with the glaze to create the beautiful bleeding edge effect.
Once cooled, your jar is ready to hold everyday items while keeping your tiny valuables safely tucked away underneath