If you’re new to clay, the quickest wins come from simple shapes you can actually finish and feel proud of. These pottery ideas for beginners are the exact kinds of projects I start students with—low-stress, super customizable, and full of little skill-building moments.
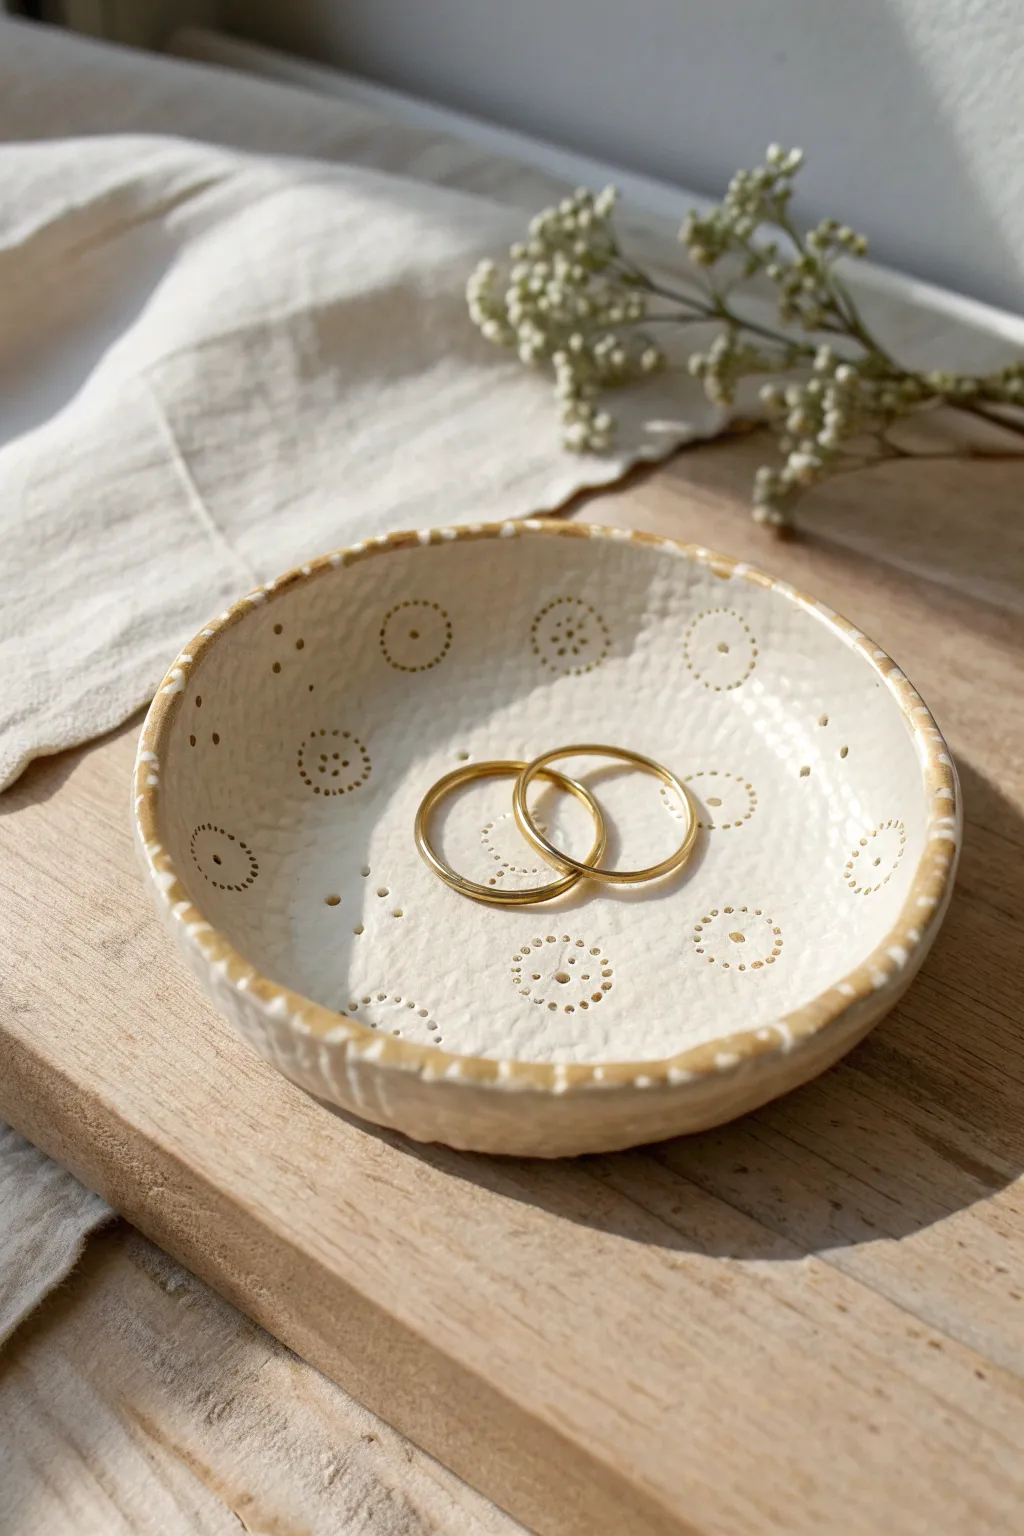
Pinch Pot Trinket Bowl
Elevate a simple clay ball into a stunning jewelry holder with this beginner-friendly project. The speckled clay body and organic, wavy rim are perfectly accented by a touch of liquid gold luster, giving it a sophisticated finish.
How-To Guide
Materials
- Speckled cone 6 stoneware clay
- Pottery sponge
- Rib tool (wood or rubber)
- Needle tool
- Clear dipping glaze or brush-on gloss glaze
- Gold luster (overglaze)
- Small liner brush
- Lavender oil or luster thinner (for cleanup)
- Kiln access
Step 1: Forming the Bowl
-
Prepare the Clay:
Start with a ball of speckled clay about the size of a tangerine. Wedge it thoroughly to remove air bubbles, then roll it between your palms until it is perfectly smooth and round. -
Open the Center:
Hold the ball in your non-dominant hand. Press your thumb gently into the center of the ball, stopping about a half-inch from the bottom to ensure the base is sturdy. -
Pinch the Walls:
Begin gently pinching the clay between your thumb and fingers, rotating the ball as you go. Work from the bottom up, gradually thinning the walls. Aim for an even thickness of about 1/4 inch. -
Shape the Curve:
As you pinch upward, gently flare the walls outward to create an open bowl shape rather than a cup. I find that keeping my touch light prevents the clay from getting too thin too quickly. -
Create the Wavy Rim:
Instead of smoothing the rim perfectly flat, use your finger to gently push down at irregular intervals along the top edge. This creates the organic, undulating wave pattern seen in the photo. -
Smooth the Surface:
Using a slightly damp sponge, wipe down the exterior and interior to remove any fingerprints or cracks. Be careful not to use too much water, as this can weaken the walls. -
Refine the Bottom:
Tap the bottom of the bowl gently on your table to flatten the base so it sits securely without rocking. You can also lightly sponge this area smooth. -
Slow D ry:
Cover the bowl loosely with plastic and let it dry slowly to the leather-hard stage. Once leather hard, you can tidy up the rim with a damp sponge one last time before letting it dry completely to bone dry.
Cracking Up?
If you see tiny cracks forming on the rim while shaping, your clay is too dry or you are pinching too aggressively. Smooth them immediately with a damp finger or a tiny bit of slip.
Step 2: Firing and Glazing
-
Bisque Fire:
Load your bone-dry piece into the kiln for a bisque firing (usually Cone 04). This hardens the clay and prepares it for glazing. -
Clean the Bisque:
Once fired, wipe the bisqueware with a clean, damp sponge to remove any kiln dust. This ensures the glaze adheres properly to the surface. -
Apply Clear Glaze:
Dip the entire bowl into a clear gloss glaze. If you don’t have a dipping setup, brush on three even coats of clear brush-on glaze. Let each coat dry before applying the next. -
Wipe the Foot:
Using a wet sponge, meticulously clean the glaze off the very bottom of the pot where it touches the table. This prevents it from fusing to the kiln shelf. -
Glaze Fire:
Fire the piece again, this time to the maturity temperature of your clay and glaze (likely Cone 6 for stoneware). Allow the kiln to cool completely.
Step 3: Adding the Gold Artistry
-
Prep the Luster:
Work in a well-ventilated area and wear a mask, as gold luster fumes can be strong. Dip a small liner brush into your gold luster. -
Paint the Rim:
Carefully paint a thin, steady line of gold along the very top edge of the undulating rim. Let the brush naturally follow the organic waves you created earlier. -
Refine the Line:
If the line looks too perfect, you can intentionally widen it in spots to match the rustic aesthetic. Clean up any accidental drips immediately with a Q-tip dipped in luster thinner. -
Third Firing:
Place the bowl back in the kiln for a third and final firing, usually much lower (around Cone 018-020) to set the gold. Check your specific luster bottle for the exact temperature.
Make It a Set
Create three pinch pots in varying sizes—small, medium, and large—that can nest inside each other. Paint the gold rims on all three for a cohesive vanity set.
Once the final firing is complete, your shimmering trinket dish is ready to hold your favorite rings and charms


Pinch Pot Mini Animal Figure
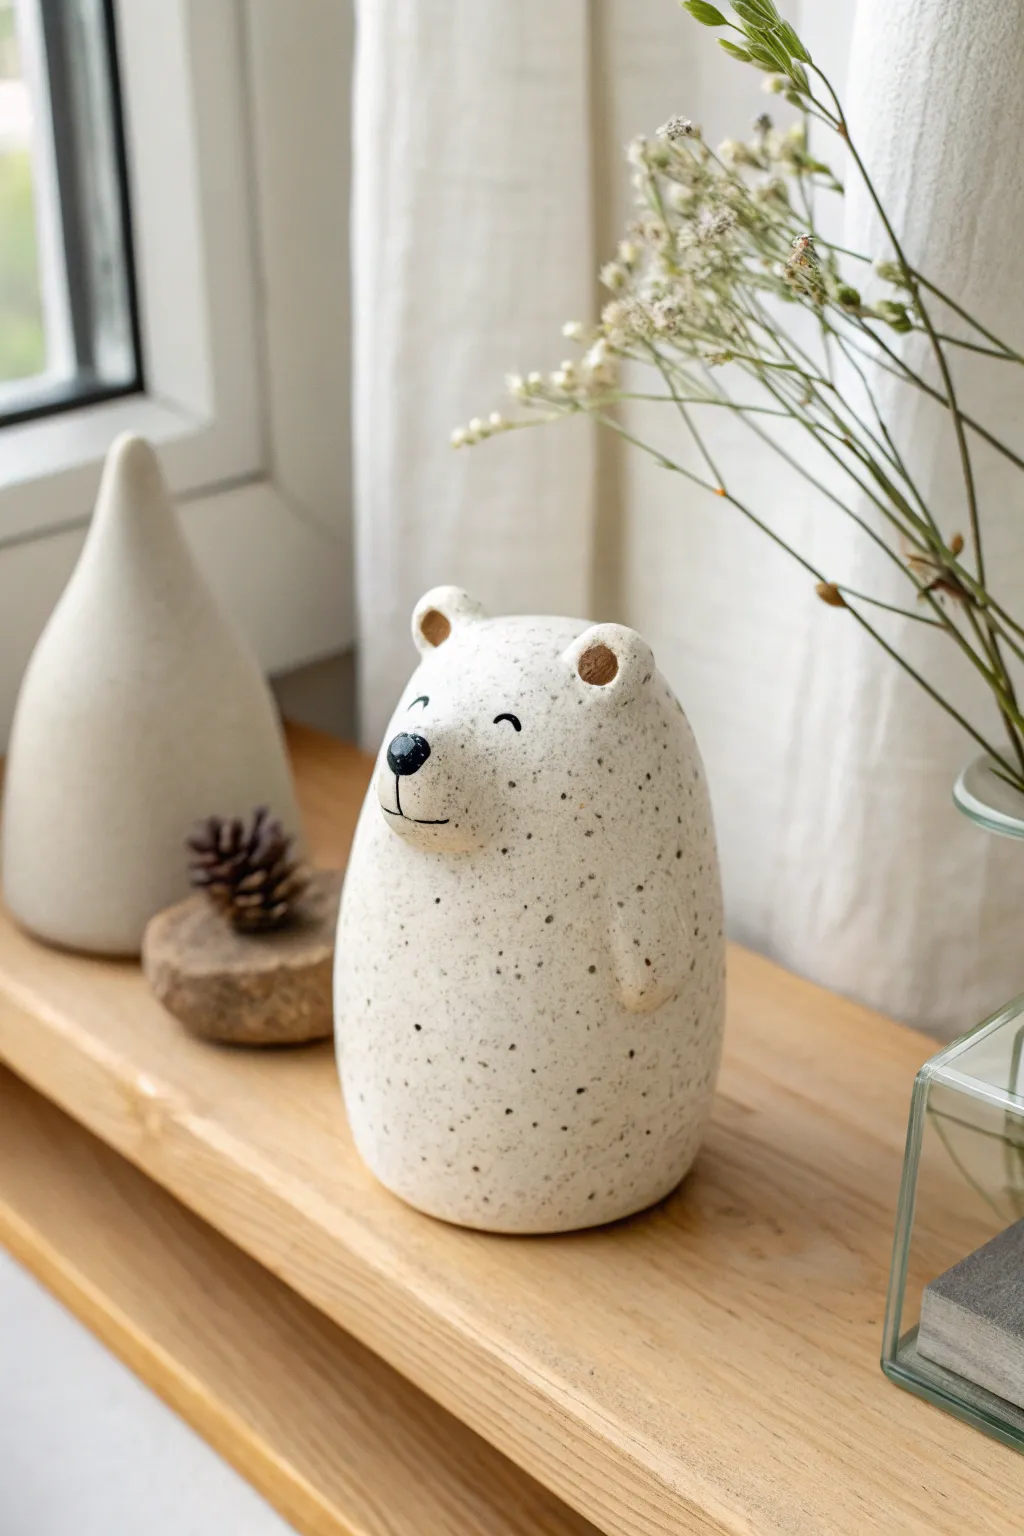
This charming, minimalist bear figure is a perfect beginner project that relies on simple pinch and coil techniques to create a smooth, rounded form. The speckled clay body and touches of raw, unglazed accents give it a warm, modern farmhouse aesthetic.
Step-by-Step
Materials
- Speckled Stoneware Clay (e.g., Laguna Speckled Buff)
- Fettling knife
- Pin tool
- Serrated rib or kidney tool
- Sponge
- Slip (clay mixed with water)
- Underglaze (black)
- Fine detail brush
- Clear matte or satin glaze (optional, depending on desired finish)
Step 1: Forming the Body
-
Estimate the clay needed:
Start with a ball of clay roughly the size of a large orange. This will become the main body of the bear, so ensure it is well-wedged to remove air bubbles. -
Create a pinch pot base:
Push your thumb into the center of the ball and gently pinch the walls while rotating the clay. You want to create a tall, elongated pinch pot rather than a wide bowl shape. -
Close the form:
Gradually pinch the top rim inward to close the hollow form completely. A trapped pocket of air inside will help the bear hold its shape while you work. -
Shape the silhouette:
Gently paddle or roll the closed form on your table to create a smooth, egg-like shape that is wider at the bottom and slightly tapered at the top for the head. -
Flatten the base:
Tap the bottom of the figure firmly against your work surface so it sits flat and stable without rocking.
Uneven Walls?
If one side feels heavier, use a needle tool to check thickness. Gently scrape away excess clay from the outside or paddle the thick side to reshape it before closing the form.
Step 2: Sculpting Details
-
Pull out the snout:
Instead of attaching a separate piece, gently push from the inside (if accessible) or carefully pinch and pull a small amount of clay from the ‘face’ area to form a subtle, protruding snout. -
Form the ears:
Roll two small, pea-sized balls of clay. Flatten them slightly and press your pinky or a small modeling tool into the center of each to create the inner ear vibe. -
Score and slip:
Score the top of the head and the bottom of the ears with your pin tool. Apply a dab of slip and press the ears firmly onto the head, smoothing the seam with a modeling tool so they look integrated. -
Add the arms:
Create two small coils or elongated teardrops for arms. Attach them flush against the sides of the body using the score-and-slip method. I prefer to blend the clay downward so the arms look like they are resting by the bear’s side. -
Make the air hole:
Use a pin tool to poke a discreet hole in the bottom of the figure. This allows the trapped air to escape during firing so the piece doesn’t explode.
Step 3: Refining and Decorating
-
Smooth the surface:
Once the clay is leather hard, use a serrated rib to gently scrape away lumpy areas, followed by a smooth rib or a slightly damp sponge to polish the surface. -
Paint facial features:
Using a fine detail brush and black underglaze, paint two small arches for closed, happy eyes. Paint a soft line for the mouth. -
Define the nose:
Paint a rounded triangle or oval on the protruding snout for the nose. Ensure the black is opaque. -
Glazing considerations:
After the first firing (bisque), dip the bear in a clear matte or satin glaze to let the speckles shine through. Alternatively, leave the inner ears unglazed for a textural contrast. -
Color the nose connection:
Ensure the vertical line connecting the nose to the mouth is thin and deliberate to maintain that minimalist cute expression. -
Dry and fire:
Let the piece dry completely before bisque firing, then glaze and glaze fire according to your clay’s temperature specifications.
Make it Yours
Try leaving the clay raw (unglazed) on the outside for a stone-like texture, or use a wax resist over the nose and eyes before dipping in glaze to keep them crisp.
Place your finished bear on a shelf near a window to let the natural light catch those lovely clay speckles


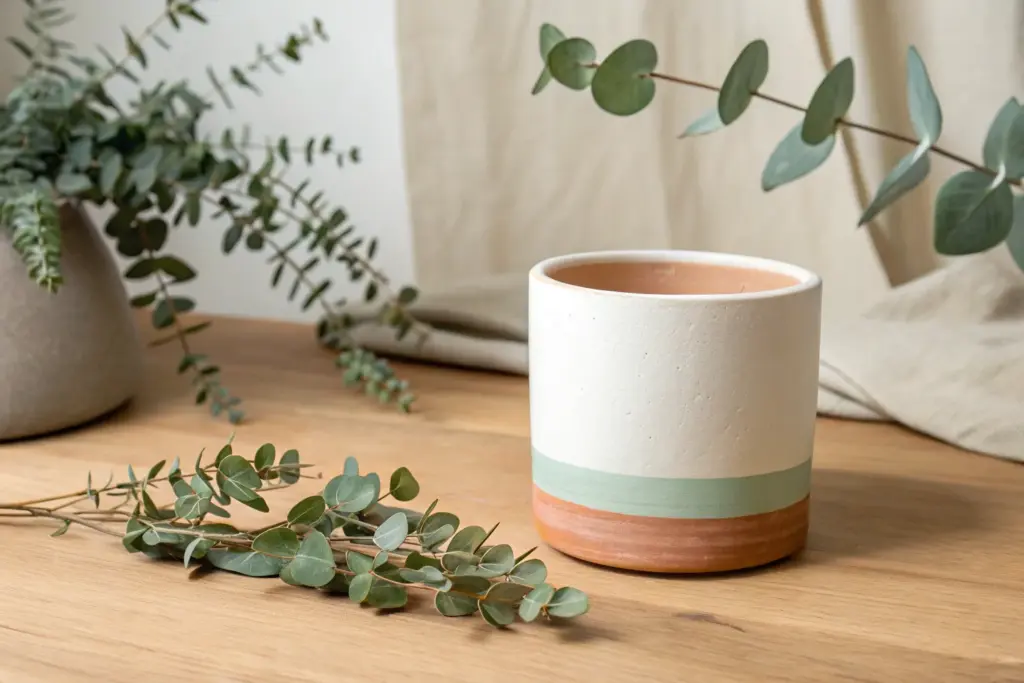
Coil-Built Succulent Planter
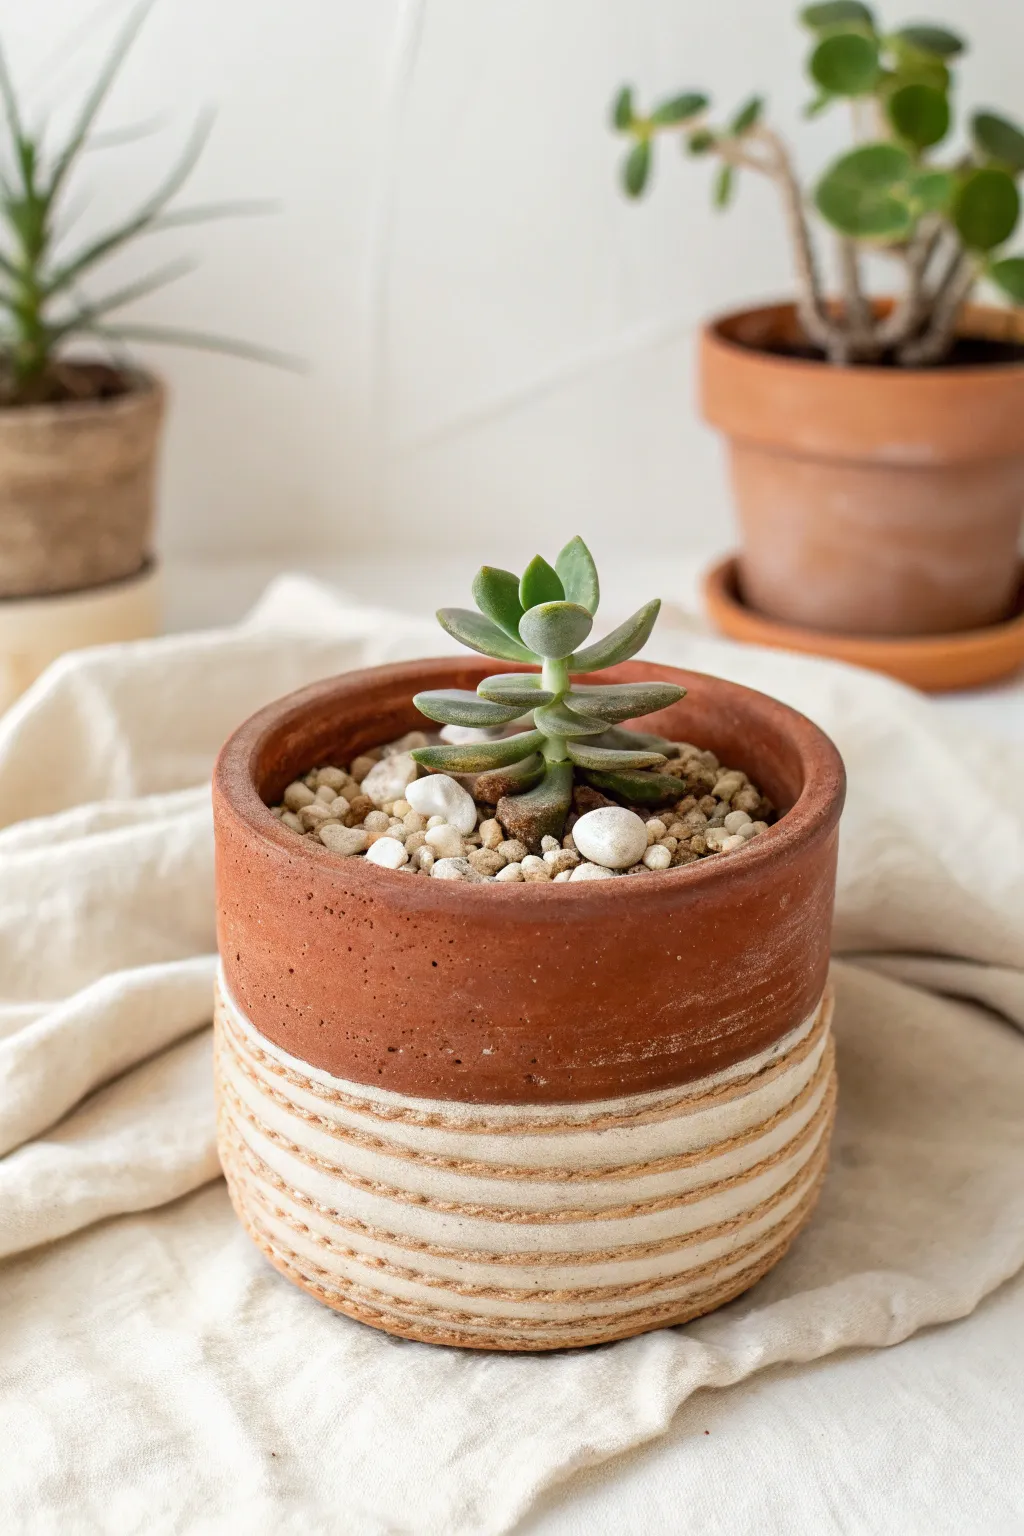
This charming succulent planter combines the rustic warmth of terracotta with a modern, textural design. By leaving the coil structure visible on the bottom half while smoothing the top, you create a beautiful focus on the construction process itself.
Step-by-Step Tutorial
Materials
- Terracotta clay (low-fire or mid-fire)
- Clay scoring tool or serrated rib
- Slip (clay mixed with water)
- Wooden modeling tool
- Sponge
- Rolling pin
- Canvas mat or work board
- Fettling knife
- White underglaze (optional, for the bands)
Step 1: Creating the Base
-
Roll the slab:
Begin by flattening a small amount of terracotta clay onto your canvas mat. Use a rolling pin to create an even slab about 1/4 inch thick. -
Cut the circle:
Use a round cookie cutter or a needle tool to cut out a circle roughly 3-4 inches in diameter. This will serve as the floor of your pot. -
Prepare the edge:
Score the outer perimeter of your clay circle with your serrated rib tool and dab a small amount of slip over the scratched area.
Pro Tip: Coil Evenness
Apply even pressure and move your hands from the center outward while rolling coils. If a coil gets flat, twist it slightly and keep rolling to round it out.
Step 2: Building the Coils
-
Roll your first coils:
Take a chunk of clay and roll it between your hands or on the table to create a long snake-like coil. Aim for a thickness of about a pencil. -
Attach the first layer:
Place the coil onto the slipped edge of your base. Cut the ends at an angle where they meet to ensure a seamless join, then gently press down. -
Smooth the inside:
While supporting the outside with one hand, use your thumb or a wooden tool to smear the inside of the coil down onto the base floor. This bonds the clay together. -
Stack upwards:
Score and slip the top of the first coil, then add your second coil layer. I find it helpful to stagger the joining points of each ring so they don’t line up vertically. -
Create the texture:
For the bottom half of the pot (about 5-6 coils high), do not smooth the outside. Instead, gently press the coils together just enough to adhere, leaving the deep grooves visible. -
Refine the lines:
Use a rounded wooden tool to gently press into the seams between the coils on the outside, emphasizing the horizontal striped pattern.
Step 3: Forming the Rim
-
Transition to smooth:
Once you reach the halfway point, add 3 or 4 more coils for the top rim section. This time, smear the clay both on the inside AND the outside to blend the coils together. -
Refining the band:
Use a flexible rib tool or your dampened thumb to smooth the exterior of this top section until it is flat and seamless. -
Level the rim:
Check that the top of the pot is level. You can gently tap the pot upside down on the table or trim the excess with a fettling knife. -
Dry and Bisque:
Let the pot dry slowly under plastic to prevent warping. Once bone dry, fire it in the kiln to the bisque temperature appropriate for your clay body.
Troubleshooting: Cracking
If the coils are cracking while you shape them, your clay is too dry. Spritz it with water and wedge it briefly, or wrap a damp paper towel around the coil.
Step 4: Finishing Touches
-
Highlight the grooves:
To achieve the look in the photo, brush a white underglaze or a white slip into the deep grooves of the lower coil section. -
Wipe back:
Take a damp sponge and gently wipe the surface of the coils. This removes the white from the high points of the terracotta but leaves it in the recesses. -
Glaze (Optional):
Apply a clear matte glaze to the inside to make it waterproof, or trigger a final firing if you prefer the raw, unglazed terracotta look for breathability. -
Final Fire:
Fire the piece one last time based on your clay and glaze specifications.
Plant your favorite succulent in this handmade home and enjoy the natural beauty of exposed clay.


Coil-Built Vase With Visible Coils
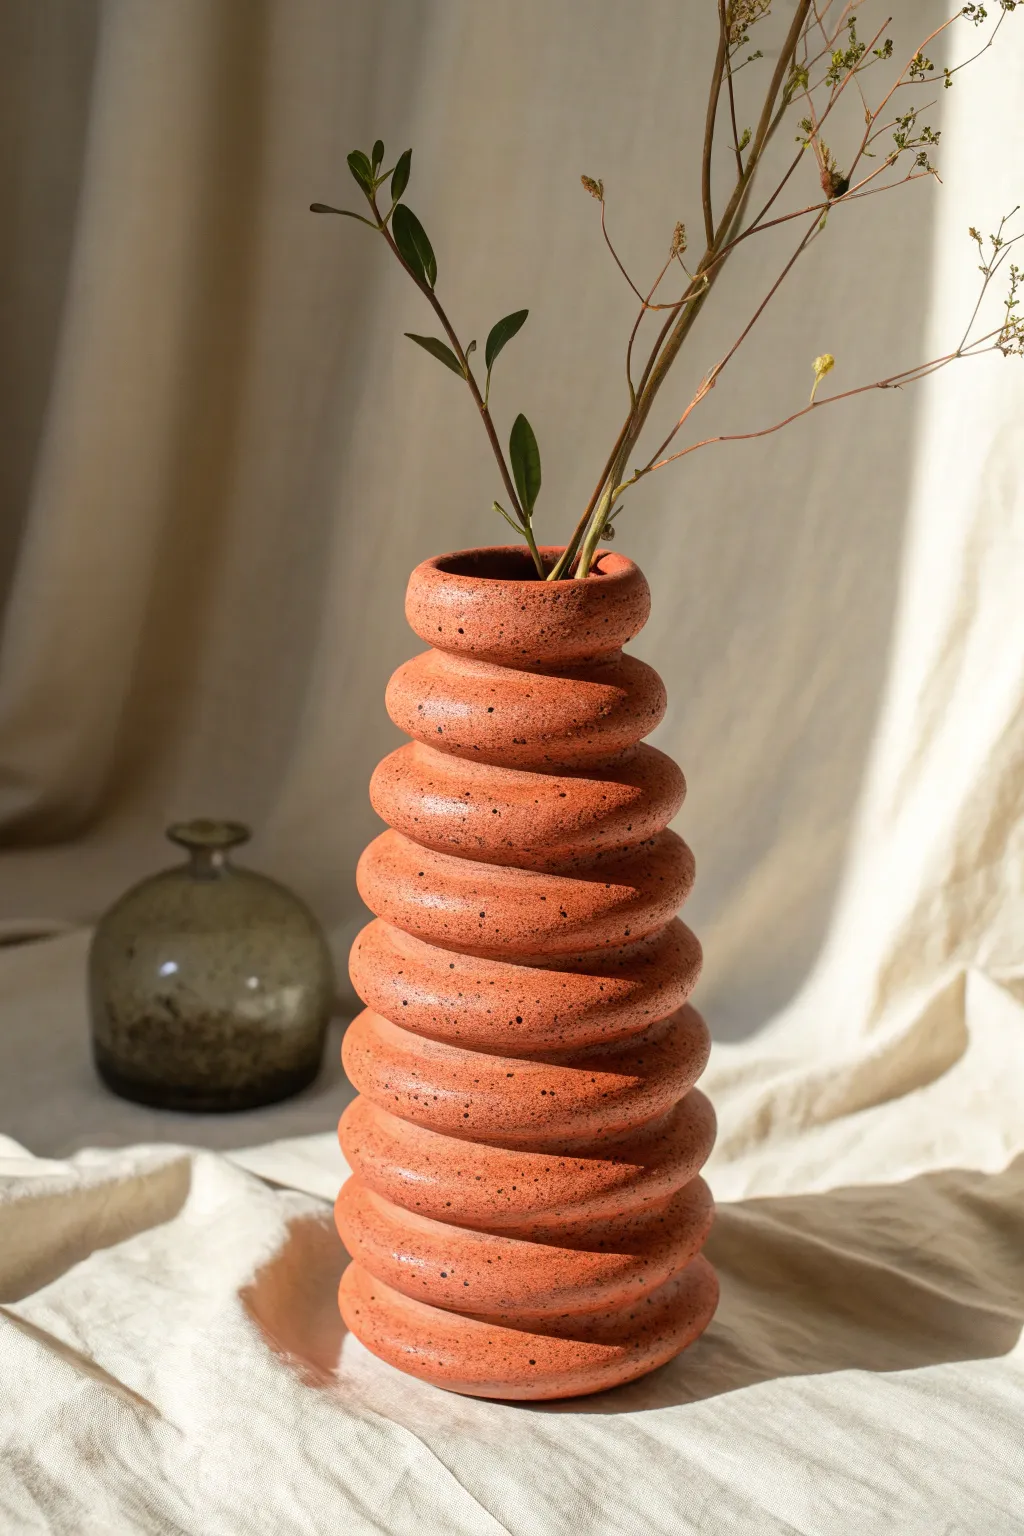
This rustic, textured vase celebrates the simple beauty of exposed coils, creating a rhythmic, ribbed profile that feels both modern and ancient. The warm terracotta clay, speckled with natural iron or grog, gives the piece an organic, grounded character perfect for dried florals.
Step-by-Step
Materials
- Speckled terracotta or stoneware clay (approx. 3-4 lbs)
- Scoring tool or serrated rib
- Slip (clay mixed with water)
- Wooden modeling tool
- Finishing sponge
- Banding wheel (optional but recommended)
- Cutting wire
- Canvas or wooden work board
Step 1: Base Construction
-
Prepare the Clay:
Begin by wedging your clay thoroughly to remove air bubbles and ensure an even consistency. This is crucial for structural integrity. -
Through the Wire:
Slice off a small chunk of clay for the base and several larger chunks to be rolled into coils. -
Create the Slab Base:
Flatten the small chunk into a slab about 1/4 to 1/3 inch thick. You can use a rolling pin or pat it out by hand. -
Cut the Circle:
Cut a circle approximately 4-5 inches in diameter from your slab. This will be the footprint of your vase. -
Score the Edge:
Using your scoring tool, scratch up the outer perimeter of the base where the first coil will sit. Apply a generous dab of slip to the scored area.
Clean Connections
When joining coil ends, cutting them at a 45-degree angle rather than straight across creates a stronger bond and hides the seam much better.
Step 2: Coiling and Shaping
-
Roll Your Coils:
Roll out several thick coils of clay. Aim for a consistent thickness, roughly that of a thick thumb or a breakfast sausage (about 3/4 inch diameter). -
Attach First Coil:
Place your first coil on the slipped edge of the base. Cut the ends at an angle to overlap them slightly, joining them securely. -
Blend the Interior:
This step is vital: using your thumb or a wooden tool, smear the clay from the *inside* of the coil down onto the base to lock it in place. Leave the outside rounded and untouched to maintain the look. -
Continue Stacking:
Score and slip the top of the first coil. Add the second coil directly on top. Again, blend the clay downwards on the interior only. -
Form the Shape:
To create the slightly tapered, beehive shape seen in the image, place each subsequent coil slightly inward compared to the one below it. -
Maintain Thickness:
Try not to pinch the coils too thin as you stack. The beauty of this piece relies on that plump, rounded profile remaining visible. -
Check Symmetry:
Pause periodically and rotate your banding wheel. Ensure the vase isn’t leaning and that your inward taper is consistent on all sides. -
Refine the Joins:
As the vase grows taller, reach inside with a long wooden tool or a rib to smooth the interior connections completely, reinforcing the wall strength.
Add Color Depth
Rub a black or dark brown oxide wash into the crevices between coils before firing. Wipe the high points clean to exaggerate the separation and depth.
Step 3: Finishing Touches
-
The Rim:
For the top rim, you can leave the final coil round, or gently flatten it with a sponge for a more finished lip. -
Exterior Smoothing:
Take a slightly damp sponge and run it gently over the exterior coils. You want to soften any sharp fingerprints without erasing the distinct separation between the rings. -
Let it Rest:
Cover the piece loosely with plastic and let it dry slowly to the leather-hard stage. This prevents uneven shrinkage. -
Bisque Fire:
Once bone dry, fire the piece to bisque temperature (usually Cone 04). -
Glaze or Wash:
To replicate the image, the exterior is likely unglazed to show the raw clay texture, or treated with a very thin matte oxide wash. Glaze the interior if you want it to hold water. -
Final Fire:
Fire again to the maturity temperature of your specific clay body (e.g., Cone 5 or 6 for stoneware).
Now you have a structured piece of pottery ready to display dried botanicals

The Complete Guide to Pottery Troubleshooting
Uncover the most common ceramic mistakes—from cracking clay to failed glazes—and learn how to fix them fast.
Slab-Built Mug With Simple Handle
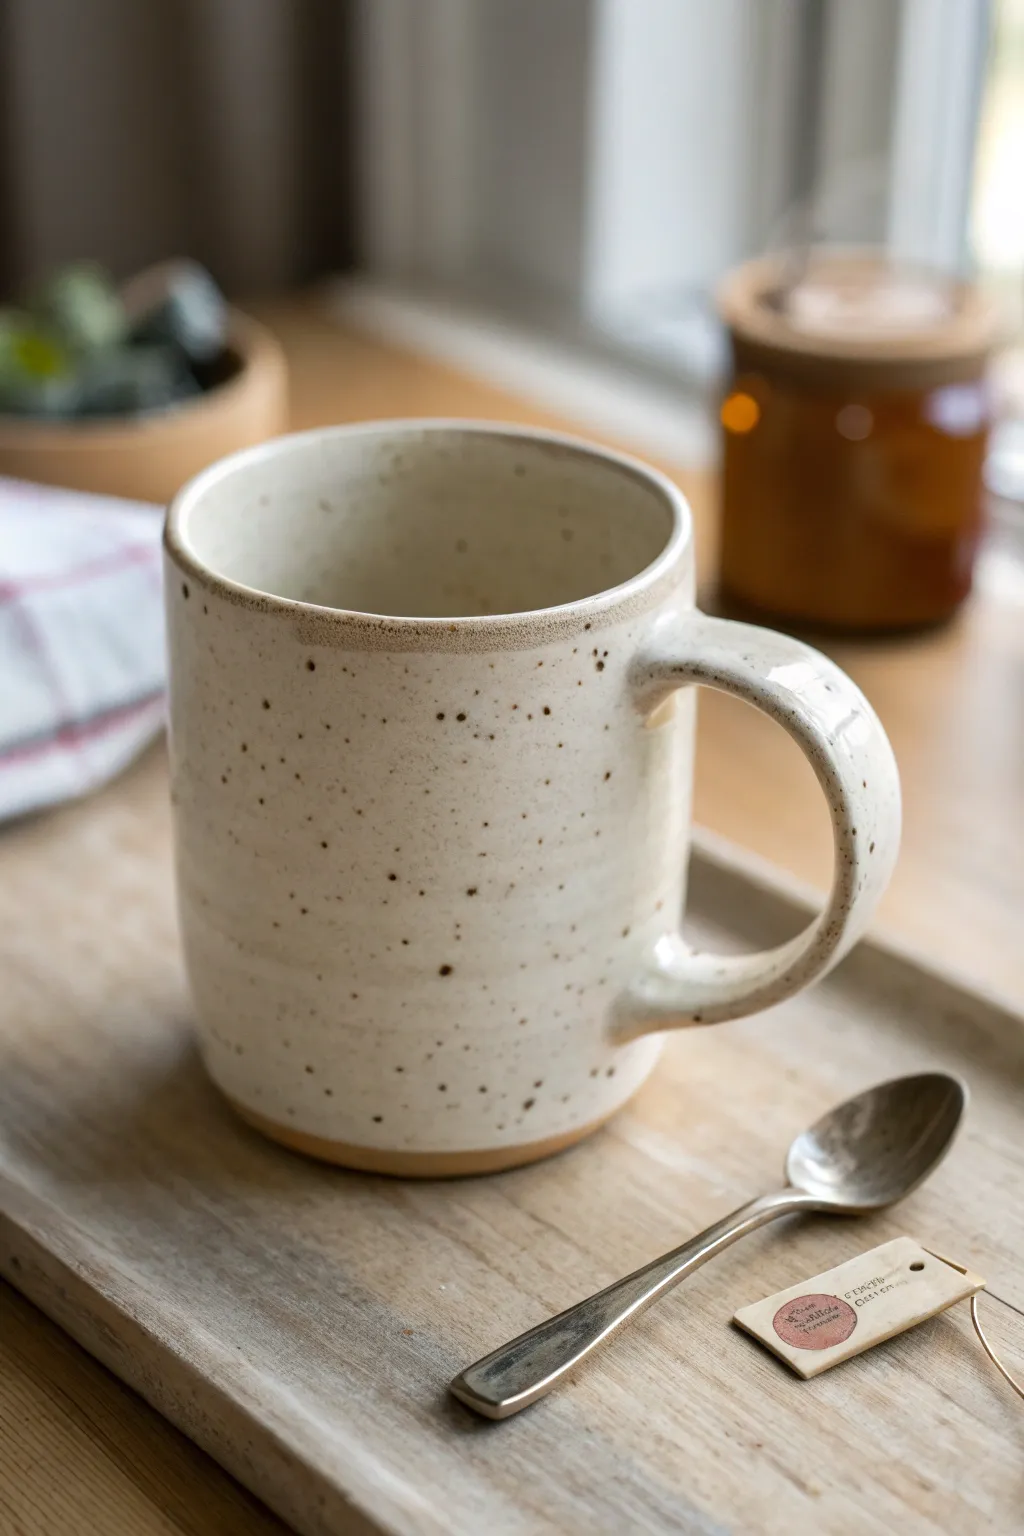
This rustic, cozy mug features a creamy glaze over speckled clay, perfect for sipping warm tea on a slow morning. The slab-building technique gives it a handmade, organic feel while maintaining a classic coffee cup silhouette.
Step-by-Step Tutorial
Materials
- Speckled stoneware clay (mid-fire)
- Rolling pin
- Canvas mat or slab roller
- Clay knife or fettling knife
- Serrated rib or scoring tool
- Slip (clay mixed with water)
- Wooden spoon or dowel (for handle handle)
- Rectangular template (approx. 10×4 inches for a standard mug)
- Circular cookie cutter or template (for base)
- Soft sponge
- Cream or off-white glaze
- Clear glaze (optional)
Step 1: Forming the Body
-
Roll the slab:
Begin by rolling out a piece of speckled stoneware clay on your canvas mat until it is an even ¼-inch thickness. Try to keep the pressure consistent so the walls of your mug will be uniform. -
Cut the shapes:
Using your rectangular template, cut out the main body of the mug. Then, use a circular cutter or template slightly larger than the diameter of the rolled cylinder to cut the base. -
Bevel the edges:
For a seamless join, cut the short ends of your rectangular slab at a 45-degree angle. This allows the clay to overlap cleanly without creating a thick lump at the seam. -
Score and slip:
Rough up the beveled edges with your serrated tool and apply a generous amount of slip. Bring the ends together to form a cylinder, pressing the beveled edges firmly against each other. -
Secure the seam:
Gently smooth the seam inside and out using a wooden rib or your finger. I like to use a soft sponge here to erase any visible join lines while keeping the surface smooth. -
Attach the base:
Score and slip the bottom edge of your cylinder and the outer edge of your circular base. Press the cylinder onto the base firmly, smoothing the clay from the base up onto the wall to seal it.
Master the Seam
Reinforce the interior vertical seam by rolling a tiny ‘snake’ of clay, placing it into the corner of the seam, and smoothing it flat.
Step 2: Adding the Handle
-
Cut a strip:
From your remaining slab, cut a strip of clay about ¾-inch wide and 5 inches long. This will become your handle. -
Shape the curve:
Gently bend the strip into a ‘C’ shape, or use the handle of a wooden spoon to create a nice curve. Let it stiffen slightly—this is crucial so it doesn’t flop when attached. -
Attach points:
Mark where you want the handle to sit on the mug body. Score these spots and the ends of your handle, then apply slip. -
Press and smooth:
Press the handle firmly onto the mug body. Use a small modeling tool or your finger to smooth the clay around the attachment points, ensuring a strong bond without gaps.
Step 3: Finishing and Glazing
-
Smooth the rim:
Run a damp sponge or a piece of chamois leather over the top rim to make sure it’s rounded and comfortable for drinking. -
Bisque fire:
Allow the mug to dry slowly under plastic for a day, then uncover until bone dry. Fire it in the kiln to bisque temperature (usually cone 04). -
Wax the foot:
Before glazing, wipe off any dust with a damp sponge. Apply wax resist to the very bottom of the mug and a few millimeters up the side to show off the raw clay foot. -
Dip into glaze:
Dip the mug into a bucket of cream or off-white glaze. Hold it upside down for a few seconds to let the excess drip off before turning it right side up. -
Clean connection points:
Check the handle attachments; sometimes glaze pools here. Gently rub any thick drips with your finger to ensure an even coat. -
Glaze fire:
Fire the mug again to the glaze temperature recommended for your specific clay and glaze combination (likely cone 5 or 6).
Rim Effect
After dipping the main glaze, quickly dip just the rim into a darker brownish glaze to create that subtle toasted edge effect.
Once cooled, your mug is ready for your favorite hot beverage, bringing a touch of handmade warmth to your table
Easy Slab Snack Plate With Rim
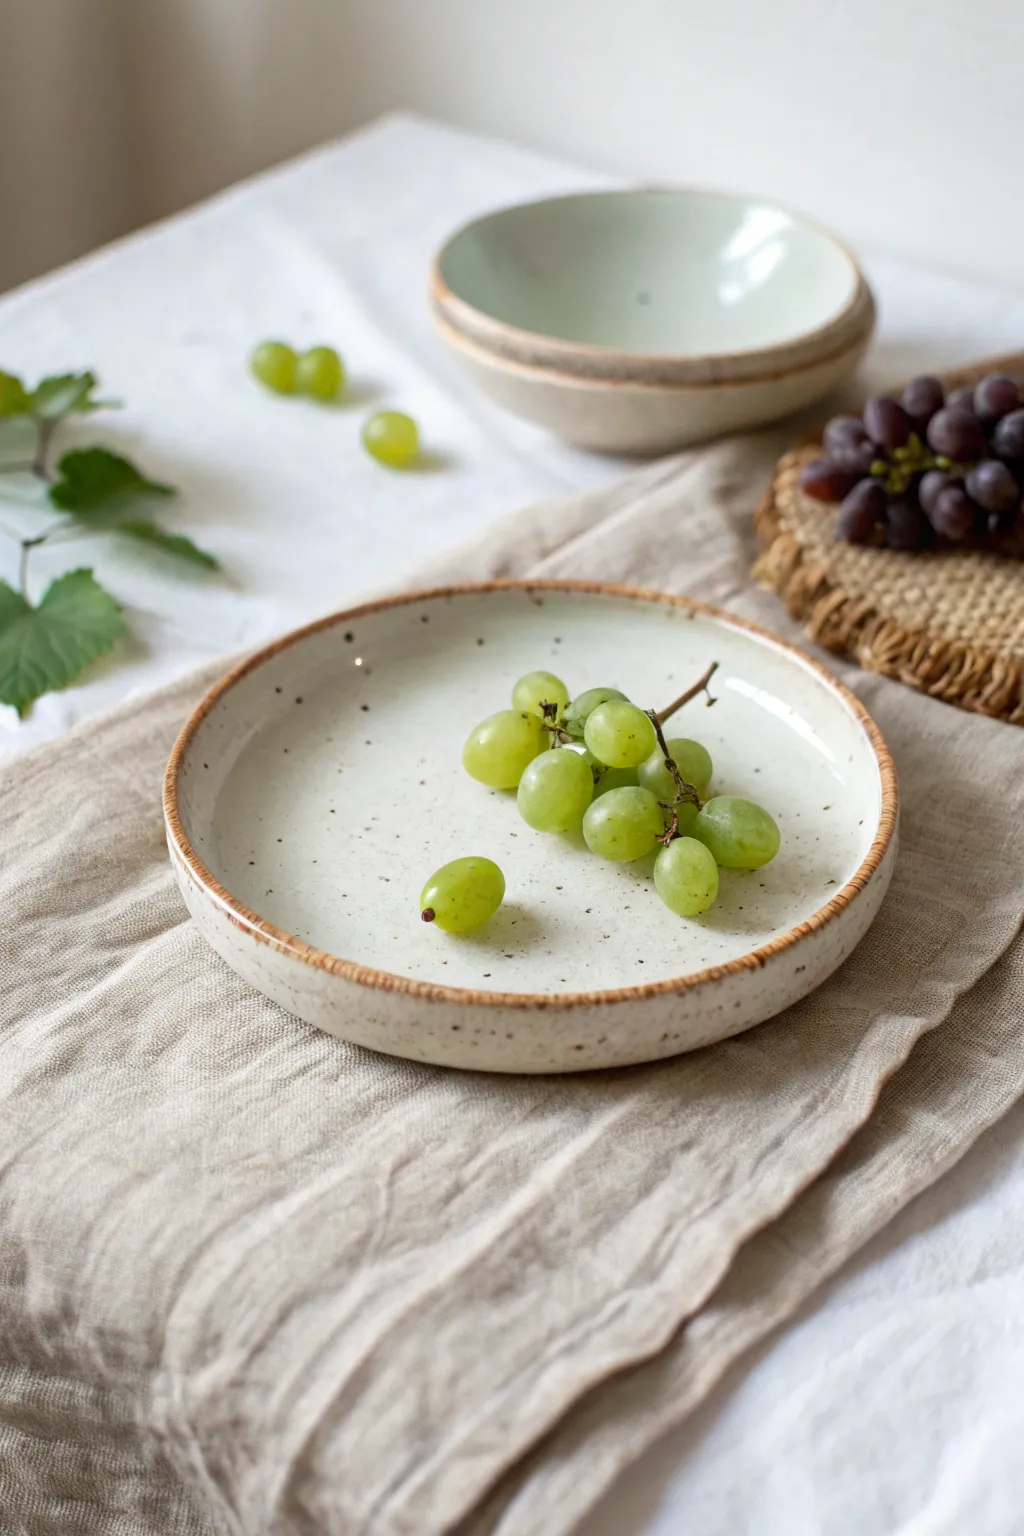
This charming, low-profile snack plate features a gentle rim and a speckled glaze that gives it a cozy, earthy feel. Its handcrafted imperfection is part of the appeal, making it a perfect beginner project that looks professionally artisanal.
Step-by-Step Guide
Materials
- Speckled Stoneware Clay (or white clay with grog)
- Rolling pin
- Canvas mat or slab roller
- Two wooden guide strips (approx. 1/4 inch thick)
- Needle tool
- Rib tool (flexible metal or rubber)
- Sponge
- Round template (paperplate or bowl)
- Slip (clay and water slurry)
- Clear or semi-transparent white glaze
- Scoring tool (or fork)
- Kiln
Step 1: Preparing the Slab
-
Wedge the clay:
Begin by thoroughly wedging a ball of speckled stoneware clay to remove any air bubbles and ensure the moisture is evenly distributed. -
Set up your workspace:
Place your canvas mat on a flat work surface. Lay your two wooden guide strips parallel to each other, slightly wider apart than the desired width of your plate. -
Roll the slab:
Place the clay ball between the guides. Using the rolling pin, roll the clay out until the pin rides on top of the wooden strips, ensuring an even thickness of about 1/4 inch. -
Compress the clay:
Take your flexible rib tool and gently drag it across the surface of the slab in several directions. This aligns the clay particles and prevents warping later.
Step 2: Shaping the Form
-
Cut the circle:
Place your round template on the slab. Holding the needle tool vertically, trace around the template to cut out your perfect circle. -
Smooth the edges:
Dip a sponge in water and squeeze it out well, then run it along the cut edge to soften the sharpness and erase the cut marks. -
Create the rim coil:
Roll out a separate long, thin coil of clay, roughly the thickness of a pencil, long enough to encircle the plate’s perimeter. -
Score the connection points:
Using your scoring tool, scratch up the very outer edge of your circular slab and one side of your long coil. -
Apply slip:
Dab a small amount of slip onto the scored areas of the slab base to act as glue. -
Attach the rim:
Place the coil onto the edge of the slab. Press it down firmly but gently to ensure a tight bond without squashing the height completely.
Iron Spot Magic
Using a clay body with heavy iron flecks is crucial here. If you only have white clay, mix in granular manganese or iron oxide.
Step 3: Refining and Glazing
-
Blend the coil:
Using your thumb or a modeling tool, smudge the inside seam where the coil meets the base until the transition is smooth and invisible. -
Shape the rim profile:
Pinch the coil slightly to create that vertical rise seen in the photo. I suggest using a wet sponge to run around the rim while spinning the plate (if you have a banding wheel) for uniformity. -
Final smoothing:
Go over the entire piece with a damp chamois or sponge to remove fingerprints and ensure the rim has a soft, rounded lip. -
Bisque fire:
Allow the plate to dry slowly under plastic for a day, then fully air dry before firing it in a bisque kiln to prepare it for glazing. -
Apply the glaze:
Dip or brush a clear or milky white semi-transparent glaze over the entire piece. The transparency is key to letting the natural clay speckles show through. -
Wipe the rim (optional style):
To achieve the specific look in the photo where the rim is darker, gently wipe some glaze off the very top edge of the rim with a sponge, revealing the raw clay body. -
Glaze fire:
Fire the plate a second time according to your clay and glaze manufacturer’s temperature guidelines (typically Cone 5 or 6 for stoneware).
Rim Variation
Instead of a coil, try folding up the edges of the slab itself for a more organic, undulating rim that feels even more handmade.
Once cooled, your sturdy little plate is ready to elevate your afternoon snack time


What Really Happens Inside the Kiln
Learn how time and temperature work together inside the kiln to transform clay into durable ceramic.
Draped Slab Bowl Using a Mold

Embrace the beauty of imperfection with this charmingly rustic bowl, characterized by its wavy, freeform rim and lovely speckled finish. This project uses a simple hump mold technique to transform a flat slab of clay into a functional piece of art that looks wonderful on any table.
Detailed Instructions
Materials
- Speckled buff stoneware clay
- Rolling pin
- Canvas or slab mat
- Wooden guide strips (1/4 inch thick)
- Hump mold (a plaster mold or a plastic bowl)
- Newsprint or plastic wrap (if using a non-porous mold)
- Needle tool
- Rib tool (rubber or silicone)
- Sponge
- Sandbag or small towel (for support)
- High-gloss clear or white speckled glaze
Step 1: Preparing the Slab
-
Wedge the clay:
Begin by thoroughly wedging a ball of speckled stoneware clay to remove any air bubbles. A ball about the size of a grapefruit should be sufficient for a medium-sized bowl. -
Set up your workspace:
Lay out your canvas or slab mat. Place your wooden guide strips on either side of where you will roll to ensure an even thickness across the entire slab. -
Roll out the clay:
Using your rolling pin, roll the clay out into a large, consistent circle. Rotate the clay periodically to keep the shape round and prevent it from sticking to the canvas. -
Smooth the surface:
Take a soft rib tool and gently compress the surface of the slab on both sides. This aligns the clay particles, preventing warping later, and creates that smooth canvas for your glaze.
Step 2: Shaping the Bowl
-
Prepare the mold:
If you are using a plastic bowl as a hump mold, cover it with a layer of newsprint or thin plastic so the clay doesn’t stick. If using plaster, you can apply the clay directly. -
Drape the slab:
Carefully lift your clay slab and drape it over the mold. Let gravity do the initial work, then gently pat the clay down to fit the curve of the mold. -
Trim the excess:
Using a needle tool, cut away the excess clay around the base of the mold. Don’t worry about being perfectly circular; an organic shape adds character. -
Create the wave:
Now for the fun part: use your fingers to gently push and pull the rim to create undulations. I find that lifting sections slightly and letting them fall back creates the most natural-looking wave. -
Refine the rim:
Take a damp sponge and run it along the cut edge of the rim to smooth it out. You want a soft, rounded edge, not a sharp sliced look. -
Add a foot ring (optional):
If you want a foot, score a circle on the bottom, roll a small coil, attach it, and smooth it carefully. Alternatively, simply flatten the bottom slightly so the bowl sits stable.
Rim Perfection
Compress the rim with a chamois strip immediately after cutting. This tightens the clay pores and prevents those tiny hairline cracks from forming during drying.
Step 3: Finishing and Firing
-
Dry slowly:
Let the bowl dry on the mold until it is leather hard. Removing it too early can cause it to collapse, but leaving it too long on a rigid mold creates tension cracks. -
Remove and clean:
Once leather hard, gently remove the bowl from the mold. Use a sponge to smooth out any marks on the interior surface. -
Bisque fire:
Allow the bowl to become bone dry, which may take several days depending on humidity. Fire it in the kiln to a bisque temperature (usually cone 04). -
Wipe down:
After the bisque fire, wipe the piece with a damp sponge to remove any dust that might interfere with glaze adhesion. -
Glaze application:
Pour a creamy white or clear glaze into the bowl, swirl to coat the inside, and pour out the excess. Dipping the exterior ensures an even coat. -
Wipe the foot:
Use a wax resist on the bottom or carefully wipe away any glaze from the foot ring with a sponge to prevent it sticking to the kiln shelf. -
Final smooth:
Check the rim one last time. If the glaze is too thick on the sharpest peaks of your wave, gently rub it back slightly with a finger. -
Glaze fire:
Fire the bowl to the maturity temperature of your clay and glaze combination (often cone 5 or 6 for stoneware).
Slumping Issues?
If your clay is slumping too much on the mold, let the slab stiffen up on a flat board for 20-30 minutes before draping it. It needs to hold its own weight.
Once cooled, your bowl is ready to hold fresh fruit or serve as a stunning standalone centerpiece on your dining table
Simple Spoon Rest With a Notch
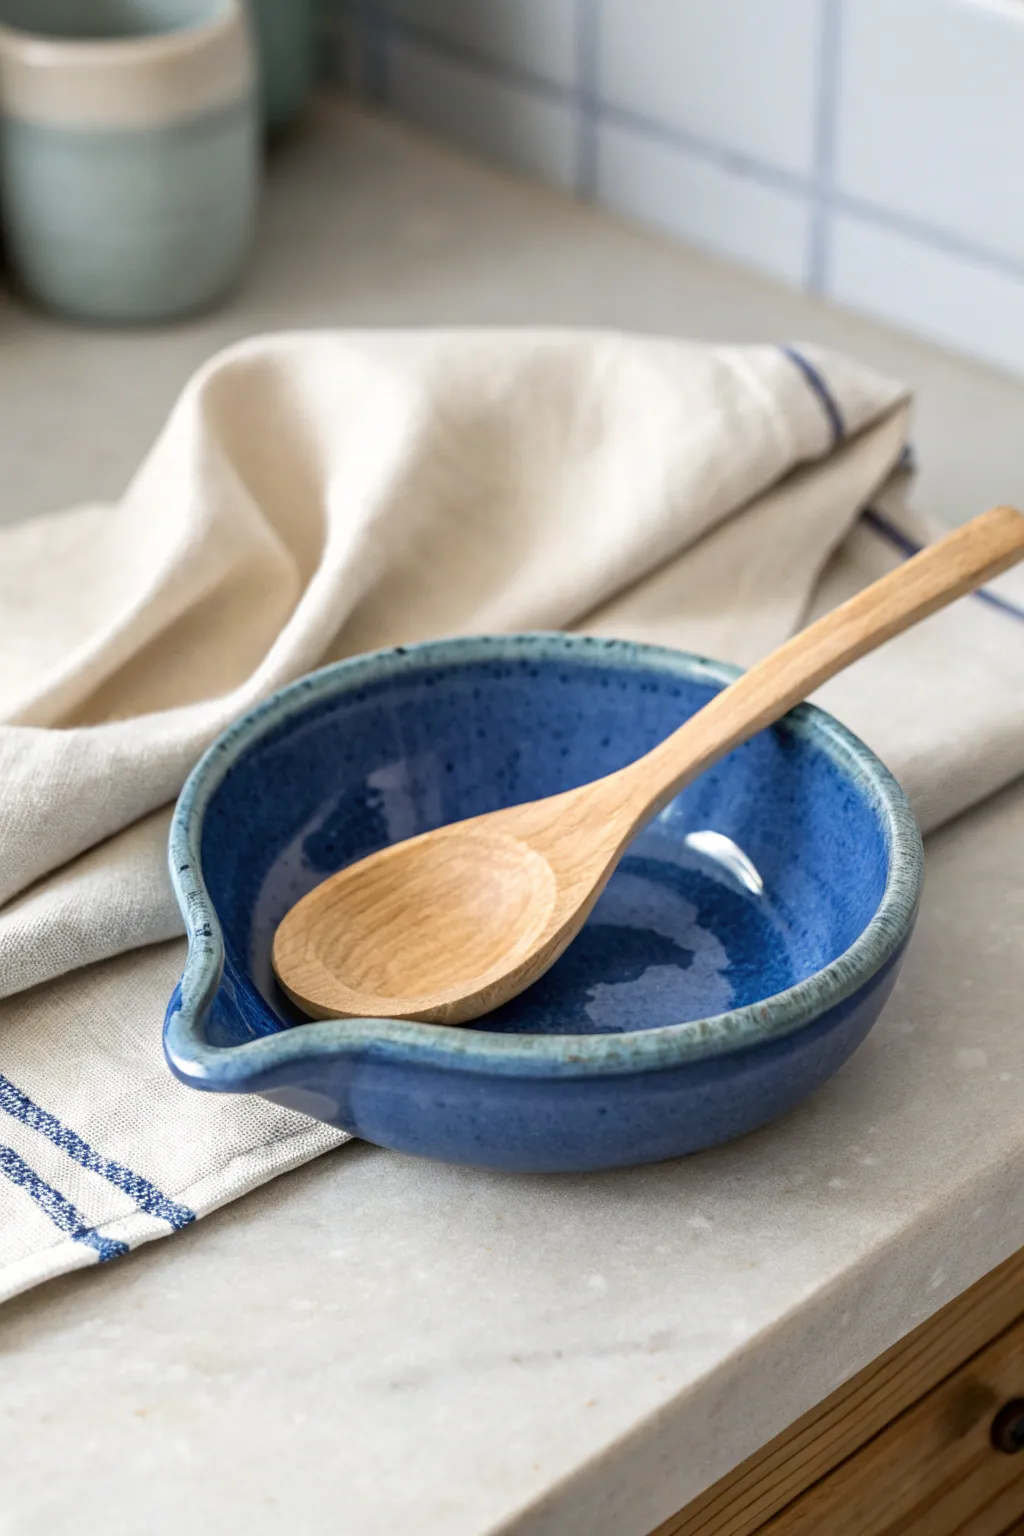
This charming, functional spoon rest features a deep, glossy blue glaze with a lighter, speckled rim that adds rustic character to any kitchen. Its distinct pouring spout doubles perfectly as a sturdy notch to keep your cooking wooden spoons right where you need them.
Step-by-Step Guide
Materials
- Stoneware clay (smooth or speckled)
- Pottery wheel (or slab roller/rolling pin)
- Small wooden throwing rib
- Needle tool
- Sponge
- Wire cutter
- Loop trimming tool
- Deep blue gloss glaze
- Light blue or clear glaze (for rim)
- Kiln
Step 1: Throwing or Forming the Base
-
Prepare the clay:
Begin with a ball of well-wedged clay, roughly the size of a large orange (about 1 lb). Center it firmly on your pottery wheel bat. -
Open the form:
Open the centered clay low and wide. You are aiming for a plate-like bottom rather than a tall bowl. Keep the floor thickness to about ¼ inch. -
Compress the floor:
Use your sponge or a wooden rib to compress the floor thoroughly. This prevents S-cracks during firing, which is especially important for flat pieces like spoon rests. -
Pull up the walls:
Pull up a short wall, approximately 1.5 to 2 inches high. Keep the rim slightly thicker than the wall itself to give it that substantial, rustic look seen in the photo. -
Curve the profile:
Gently shape the walls into a continuous curve using a rib on the inside. The transition from floor to wall should be seamless and rounded, making it easier to wipe clean later.
Step 2: Creating the Notch
-
Locate the spout area:
Identify where you want your spoon handle to rest. Support the outside of the rim with two fingers of your left hand, leaving a gap between them. -
Form the spout:
With your right index finger, gently press down and outward on the rim between your supporting left fingers. I like to use a wet sponge for this step to smooth the clay as it stretches. -
Refine the shape:
Smooth the edges of this new spout-like notch. Ensure the curve is wide enough to comfortably cradle the handle of a standard wooden spoon. -
Cut from the bat:
Run a wire cutter underneath the piece to separate it from the bat, then let it dry to leather-hard consistency.
Troubleshooting: Warping
If the rim warps into an oval during drying, avoid lifting the piece by the rim. Slide it onto a ware board instead, and dry it slowly under loose plastic.
Step 3: Trimming and Bisque Firing
-
Center for trimming:
Once leather hard, flip the piece over and center it on the wheel. Secure it with small clay lugs. -
Trim the foot:
Use a loop tool to trim away excess weight from the bottom. Carve a distinct foot ring so the glaze won’t touch the kiln shelf later. -
Smooth the surface:
Burnish the trimmed areas with a damp sponge or a smooth stone to remove any grog or rough texture. -
Bisque fire:
Load the bone-dry piece into the kiln and bisque fire to Cone 04 (or your clay body’s specifications).
Make It Yours
Try carving texture onto the exterior before glazing. The glaze will break beautifully over the high points, emphasizing the relief pattern.
Step 4: Glazing
-
Wipe down:
Wipe the bisqued piece with a damp sponge to remove dust, which ensures the glaze adheres properly. -
Apply the main color:
Dip the entire piece (using tongs) or pour a deep blue gloss glaze over the interior and exterior sides. Avoid the foot ring. -
Accent the rim:
Once the base coat is dry to the touch, wipe the very edge of the rim with a damp sponge to thin the blue glaze slightly. -
Layer the rim:
Dip just the rim into a lighter blue or a reactive clear glaze. This interaction creates the beautiful, lighter ‘break’ effect seen on the edges. -
Glaze fire:
Fire the piece again to the maturation temperature of your glaze and clay (typically Cone 5 or 6 for stoneware).
This sturdy spoon rest will quickly become one of the most useful items on your countertop

TRACK YOUR CERAMIC JOURNEY
Capture glaze tests, firing details, and creative progress—all in one simple printable. Make your projects easier to repeat and improve.
Soap Dish With Drainage Holes
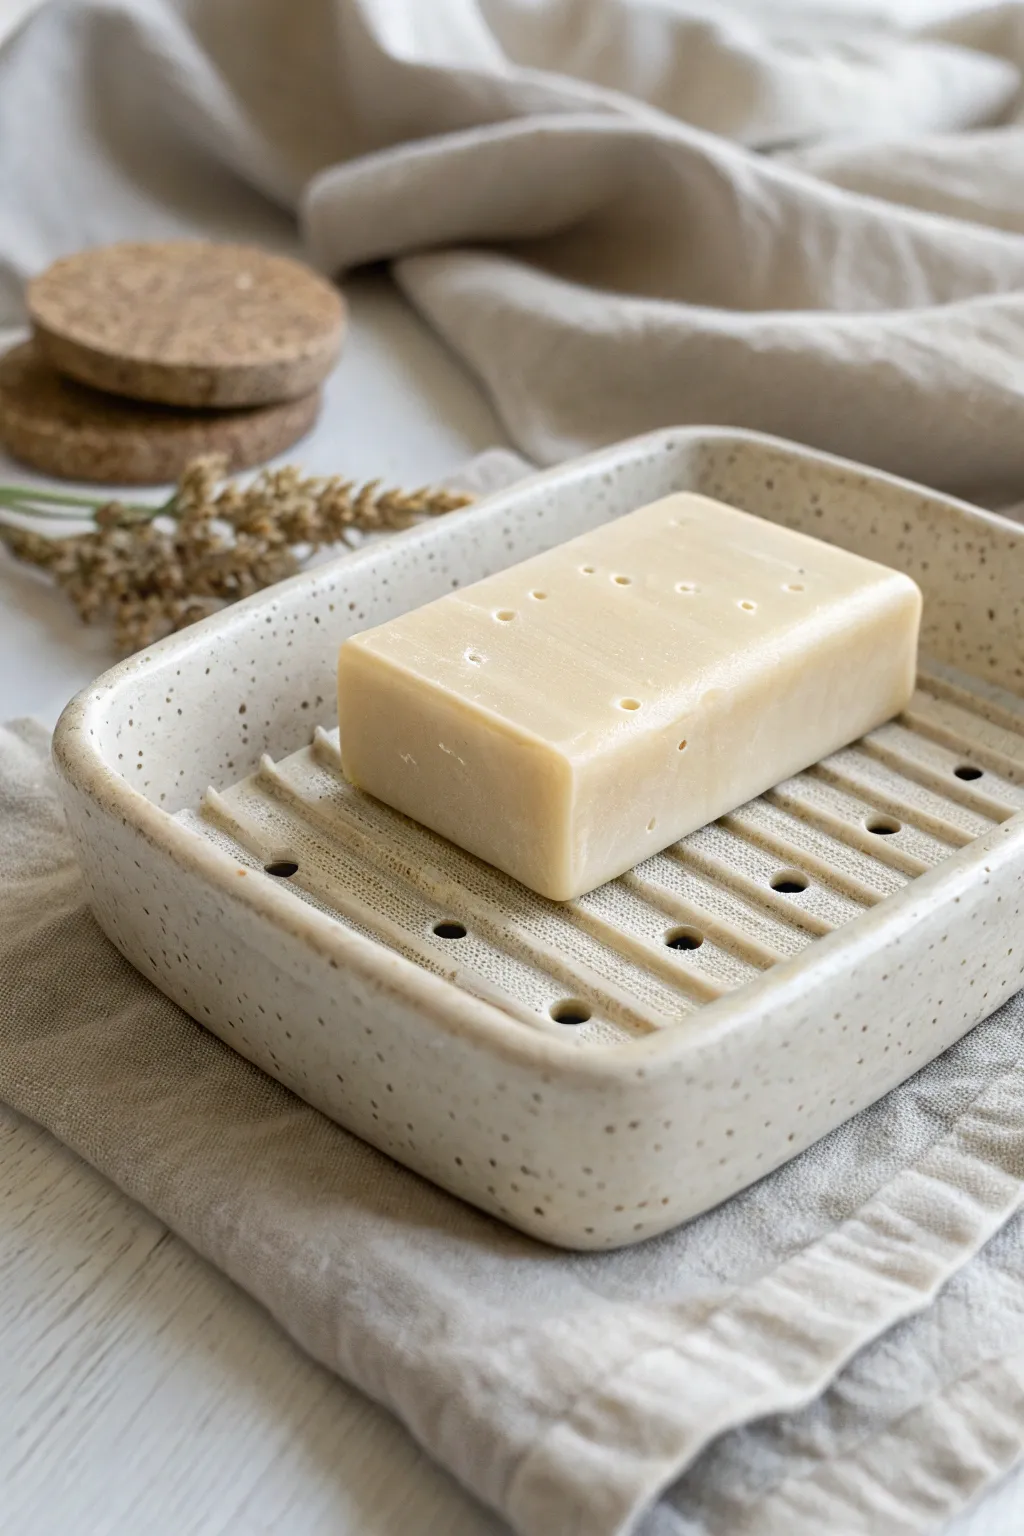
This minimalist, rectangular soap dish features a clever two-part design with a textured grate and an integrated basin. The speckled clay body and soft, milky white glaze give it a modern, spa-like aesthetic perfect for any bathroom.
Step-by-Step Tutorial
Materials
- Speckled stoneware clay (approx. 1 lb)
- Rolling pin
- Two wooden guide slats (approx. 1/4 inch thick)
- Needle tool or fettling knife
- Rectangular template (card stock or paper)
- Score and slip tool (or serrated kidney)
- Clay slip/slurry
- Sponge
- Round hole cutter or drill bit (approx. 5mm)
- Wooden modeling tool or popsicle stick
- Milky white or semi-transparent satin glaze
Step 1: Did the Base Slab
-
Roll the Slab:
Begin by wedging your speckled clay to remove air bubbles. Flatten it slightly with your palm, place it between your two wooden guide slats, and roll it out into a smooth, even sheet about 1/4 inch thick. -
Compress the Clay:
Take a rib tool (rubber or metal) and drag it firmly across the surface of the slab in multiple directions. This aligns the clay particles, preventing warping later on. -
Cut the Base Shape:
Using your rectangular template, cut out the main base piece. For this design, you’ll want a rectangle approximately 4×6 inches. Smooth the cut edges with your finger or a damp sponge.
Clean Lines Pro-Tip
When cutting drainage holes, wait until the clay is leather-hard rather than soft. The holes will be much cleaner and won’t deform the surrounding clay ridges.
Step 2: Constructing the Walls
-
Cut Strips for Walls:
Roll out more clay to the same thickness or used the leftovers from your slab. Cut long strips that are about 1 inch tall. These will form the sides of the dish. -
Angle the Ends:
Cut the ends of your wall strips at 45-degree angles (miter cuts) where they will meet at the corners. This creates a cleaner, stronger joint than simply butt-jointing them. -
Score and Slip:
Score (scratch) the outer perimeter of your base slab and the bottom edge of your wall strips. Apply a generous amount of slip to the scored areas. -
Attach the Walls:
Press the walls firmly onto the base. Where the mitered corners meet, score and slip those edges as well, pressing them together to seal the box shape. -
Reinforce the Seams:
Run a thin coil of soft clay along the inside bottom seam where the wall meets the floor. Smear this coil down into the floor and up into the wall using a wooden tool to ensure a watertight bond. -
Smooth the Rim:
Use a damp sponge to round over the top rim of the walls. I prefer to do this now while the clay is soft so it doesn’t become sharp after firing.
Warping Woes?
If your slab walls are bowing inward while drying, place a block of foam or crumpled newspaper inside the box to support the shape until it stiffens up.
Step 3: Creating the Drainage Insert
-
Measure the Interior:
Carefully measure the interior dimensions of your box. You need to create a second slab that fits snugly inside, or just slightly smaller to account for shrinkage. -
Cut the Insert Slab:
Roll out another slab and cut it to your interior measurements. Test the fit gently—you want it to sit inside, but don’t let it get stuck yet. -
Create the Ridges:
To make the raised ridges for the soap, create several thin coils or cut very narrow strips of clay. Score and slip them onto the insert slab in parallel lines, leaving even gaps between them. -
Smooth the Ridges:
Once attached, gently flatten the tops of the ridges with a small flat board or your finger so the soap will sit level. Use a damp brush to clean up any excess slip between the rails. -
Punch Drainage Holes:
Using a hole cutter or a small drill bit, punch holes in the valleys between the ridges. This is crucial for allowing water to drain away from the soap bar. -
Refine the Holes:
After punching the holes, flip the insert over and clean up the ‘burrs’ or messy bits of clay that pushed through the back. Smooth the edges of each hole.
Step 4: Assembly and Finishing
-
Add Support Ledges:
Inside the main box, attach small lugs or a thin coil of clay halfway up the interior walls. This will act as a shelf for your drainage insert to sit on, keeping it elevated above the bottom. -
Dry Slowly:
Place the insert inside the box (checking fit one last time) or dry them side-by-side. Cover loosely with plastic for the first day to ensure even drying and prevent warping. -
Bisque Fire:
Once bone dry, bisque fire the pieces to Cone 04 (or your clay’s specific temperature). -
Glaze Application:
Dip or brush on your milky white glaze. A satin or matte finish works best to highlight the speckles. Ensure you don’t glaze the bottom of the insert or the ledge it sits on to prevent them fusing together. -
Final Fire:
Glaze fire to maturity (likely Cone 5 or 6). Once cool, sand the bottom if necessary to protect your countertop.
Now you have a functional, stylish piece of pottery that keeps your soap dry and lasts for years
Tea Light Holder With Cutout Shapes
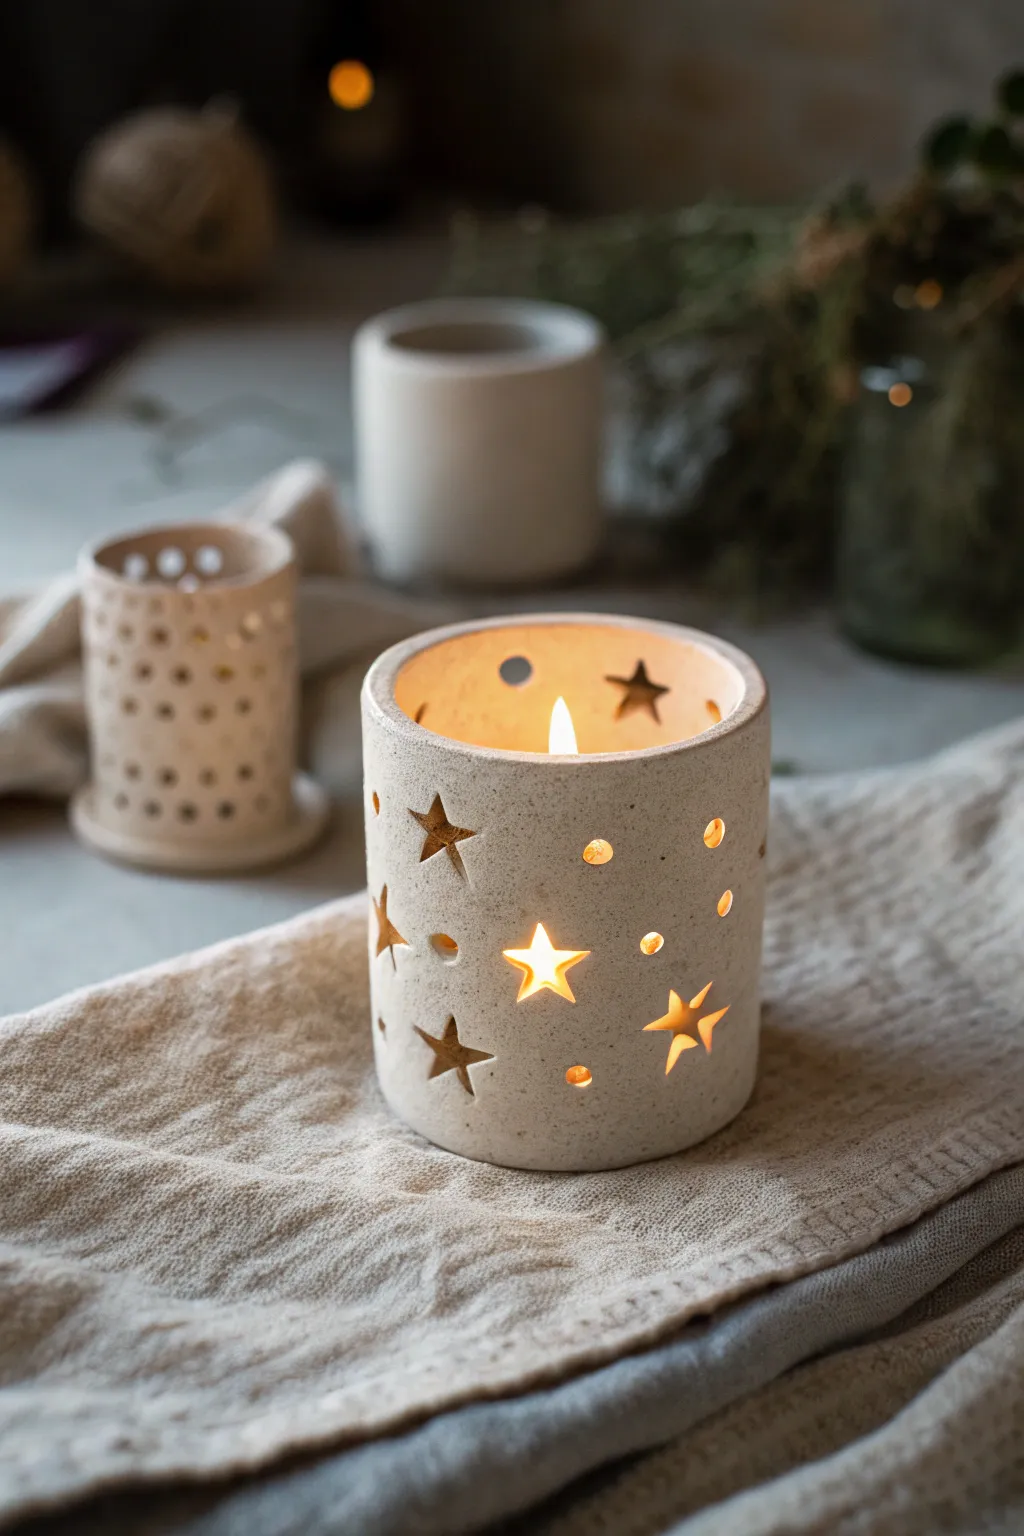
Illuminate your space with the warm glow of this celestial tea light holder, crafted from speckled white clay. The simple cylinder shape provides the perfect canvas for whimsical star and moon-like cutouts that cast dancing shadows when lit.
Step-by-Step
Materials
- Speckled white stoneware clay (cone 5/6)
- Canvas rolling surface
- Rolling pin
- Wooden guide strips (1/4 inch thick)
- Fettling knife or needle tool
- Small star-shaped cookie cutters (various sizes)
- Circular hole punch or straw
- Scoring tool (serrated rib)
- Slip (clay and water mixture)
- Sponge
- Banding wheel (optional)
- Clear matte glaze
Step 1: Preparing the Slab
-
Wedge the Clay:
Begin by wedging a ball of speckled clay roughly the size of a grapefruit to remove air bubbles and ensure particle alignment. -
Roll the Slab:
Place your clay on a canvas surface between two 1/4 inch wooden guide strips. Roll the clay out firmly until your rolling pin rests flat on the guides, creating an even thickness. -
Smooth the Surface:
Take a soft rib tool or a slightly damp sponge and compress the slab on both sides. This removes the canvas texture and strengthens the clay particles, preventing cracking later. -
Cut the Rectangle:
Measure a rectangle approximately 4 inches high by 10 inches long (adjust based on your desired diameter). Use a ruler and needle tool to cut clean, straight edges.
Step 2: Forming the Cylinder
-
Bevel the Edges:
On the two short ends of your rectangle, cut 45-degree bevels in opposite directions. This scarf joint creates a seamless connection point. -
Curve the Slab:
Gently lift the slab and curve it around a cylindrical form (like a PVC pipe or rolling pin) or simply curve it by hand to help it remember the round shape without cracking. -
Score and Slip:
Rough up the beveled edges with a scoring tool or fork. Apply a generous amount of slip to the scored areas. -
Join the Seam:
Bring the two ends together to form a cylinder. Press the seam firmly from both the inside and outside to ensure a strong bond. -
Smooth the Joint:
Use a wooden modeling tool or your thumb to blend the clay across the seam line until it disappears completely. Supporting the wall from the inside with your other hand is crucial here.
Warped Walls?
If your cylinder turns into an oval while cutting, your clay was too wet. Let it stiffen longer next time, or insert a foam cylinder inside for support while you cut.
Step 3: Designing and Cutting
-
Add the Base:
Roll a small separate piece of slab for the floor. Place your cylinder on top, trace around it with a needle tool, and then score and slip both the cylinder bottom and the new base to attach them. -
Let it Stiffen:
Allow the piece to dry to a ‘soft leather hard’ stage. If you cut too soon, the cylinder will warp; wait too long, and the clay will be brittle. -
Plan the Pattern:
Lightly sketch your star placement on the surface with a needle tool if you want a guide, or rely on distinct freehand placement for a more organic feel. -
Punch the Cutouts:
Gently press your star cutters and circular hole punch through the wall. Support the cylinder wall from the inside with your hand to prevent it from collapsing under the pressure. -
Remove Debris:
Carefully push the cutout shapes through to the inside or pick them out with a needle tool. I like to keep a few of these tiny clay stars for testing glazes later. -
Refine the Edges:
once the clay is fully leather hard, use a small, damp sponge or a soft brush to smooth the sharp edges of your cutouts. Sharp burrs can become very jagged after firing.
Pro Tip: Sharp Edges
Don’t over-clean cutouts while wet! Wait until the clay is bone dry, then very gently use a dry paintbrush to sweep away crumbs. It’s cleaner than sponging.
Step 4: Finishing
-
Bisque Fire:
Let the piece dry slowly and completely before loading it into the kiln for a bisque firing (usually Cone 04). -
Glaze Application:
Dip the piece into a clear matte glaze, or brush on three even coats. The clear glaze allows the beautiful natural speckles of the clay body to shine through. -
Clean the Cutouts:
Check that no glaze has bridged across your star holes. If it has, clear it out with a needle tool or small brush so the light can shine through unobstructed. -
Final Firing:
Fire the piece to maturity (Cone 5 or 6 depending on your clay body) to vitrify the stoneware.
Place a tea light inside and enjoy the magical atmosphere you’ve created.
Mini Bud Vase Set in Mixed Shapes
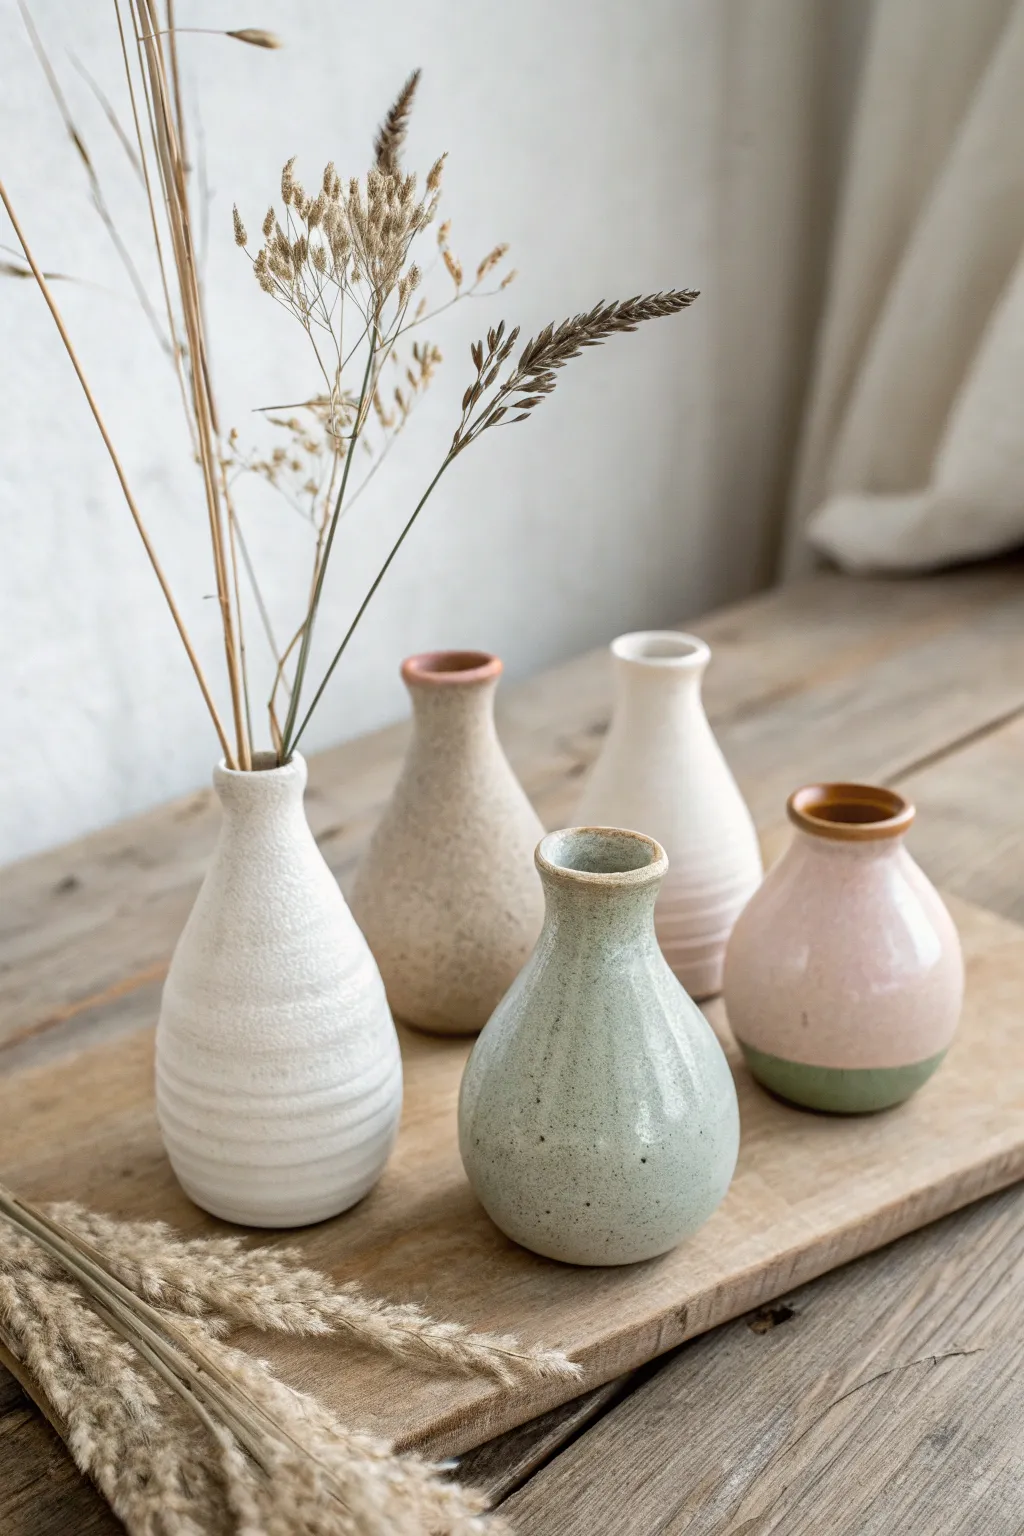
These delightful miniature vases are perfect for showcasing single stems or dried grasses, bringing a touch of organic warmth to any shelf. The project focuses on throwing or pinching varied small forms with diverse textures and soft, earthy glaze combinations.
Step-by-Step Tutorial
Materials
- Stoneware clay (speckled or buff preferred)
- Pottery wheel (or hand-building tools for pinch pots)
- Small sponges and throwing ribs
- Wire cutter
- Loop trimming tools
- Carving tool for texture
- Underglazes or dipping glazes (Pastel pink, Sage green, Matte white, Speckled cream)
- Wax resist (optional)
- Kiln
Step 1: Forming the Bodies
-
Prep the Clay:
Begin by wedging roughly 1 lb of clay, separating it into distinct balls ranging from 3 to 5 ounces each. These small amounts are perfect for bud vases. -
Center and Open:
If throwing, center a small ball on the wheel. Open the clay deeper than you might for a bowl, leaving about a half-inch floor. -
Pull the Walls:
Pull the walls up into a basic cylinder first. Since these are small, use your fingertips rather than your whole hand for better control. -
Shape shape 1: The Bulbous Bottle:
For the green vase, belly out the bottom section by pushing from the inside. Then, collar the neck inward significantly to create a narrow opening. -
Shape 2: The Ribbed Teardrop:
For the white vase, gently belly the form, then taper it slowly towards the top. While the wheel is spinning slowly, press a dull tool or finger against the clay to create subtle spiral ribs from bottom to top. -
Shape 3: The Classic Taper:
For the beige vases, create a wider base that slopes gently inward all the way to the rim, creating a smooth, elegant mountainous silhouette. -
Shape 4: The Round Bud:
For the pink vase, focus on a very round, ball-like body with a short, distinct vertical neck rim. -
Refine and Dry:
Smooth the rims with a chamois or sponge. Cut the pots off the wheel and let them dry to a leather-hard state.
Collaring Woes?
If the neck twists or collapses while narrowing it, you’re collaring too fast or the clay is too dry. Add a drop of water and squeeze gently in small increments.
Step 2: Trimming and Texturing
-
Trimming the Feet:
Once leather hard, center the vases upside down on the wheel (you might need a chuck or a jar lid for support because of the narrow necks). -
Define the Profile:
Trim away excess weight from the bottom and define a small, clean foot ring for each vase. This elevates the shape visually. -
Bisque Fire:
Ensure the pieces are bone dry, then load them into the kiln for a bisque firing to Cone 04 (or your clay’s specification).
Pro Tip: Weighted Bottoms
Leave the bottoms slightly thicker than a standard mug. Since these hold tall stems, the extra weight at the base prevents them from tipping over easily.
Step 3: Glazing Techniques
-
Wipe Down:
Wipe the bisque-fired vases with a damp sponge to remove dust, which helps the glaze adhere properly. -
Glaze the Interiors:
Pour a clear or white liner glaze inside each vase, swirl to coat the interior, and pour out the excess. -
The Speckled Green Vase:
Dip the bulbous vase into a semi-translucent sage or celadon glaze. If using a speckled clay body, the iron spots will show through beautifully. -
The Textured White Vase:
Dip the ribbed vase into a matte white glaze. The glaze should break slightly over the ribbed texture, highlighting the ridges. -
The Two-Tone Dip:
For the pink vase, dip the bottom third into a sage green glaze first and let it dry. Then, dip the top two-thirds into a soft pastel pink, allowing a slight overlap or gap depending on your preference. -
The Rustic Beige Vases:
Apply a sandy or oatmeal glaze to the remaining vases. Leave the very rim unglazed or dipped in a contrasting terra cotta color to mimic the raw clay look seen in the photo. -
Clean the Feet:
Wipe the foot rings completely clean of glaze with a damp sponge to prevent them from sticking to the kiln shelf. -
Final Fire:
Fire the vases to the glaze maturity temperature (usually Cone 5 or 6). Once cool, sand the bottoms if needed for a smooth finish.
Arrange your finished set together on a tray or scatter them throughout your home for little pockets of calm beauty
Beginner Egg Cup
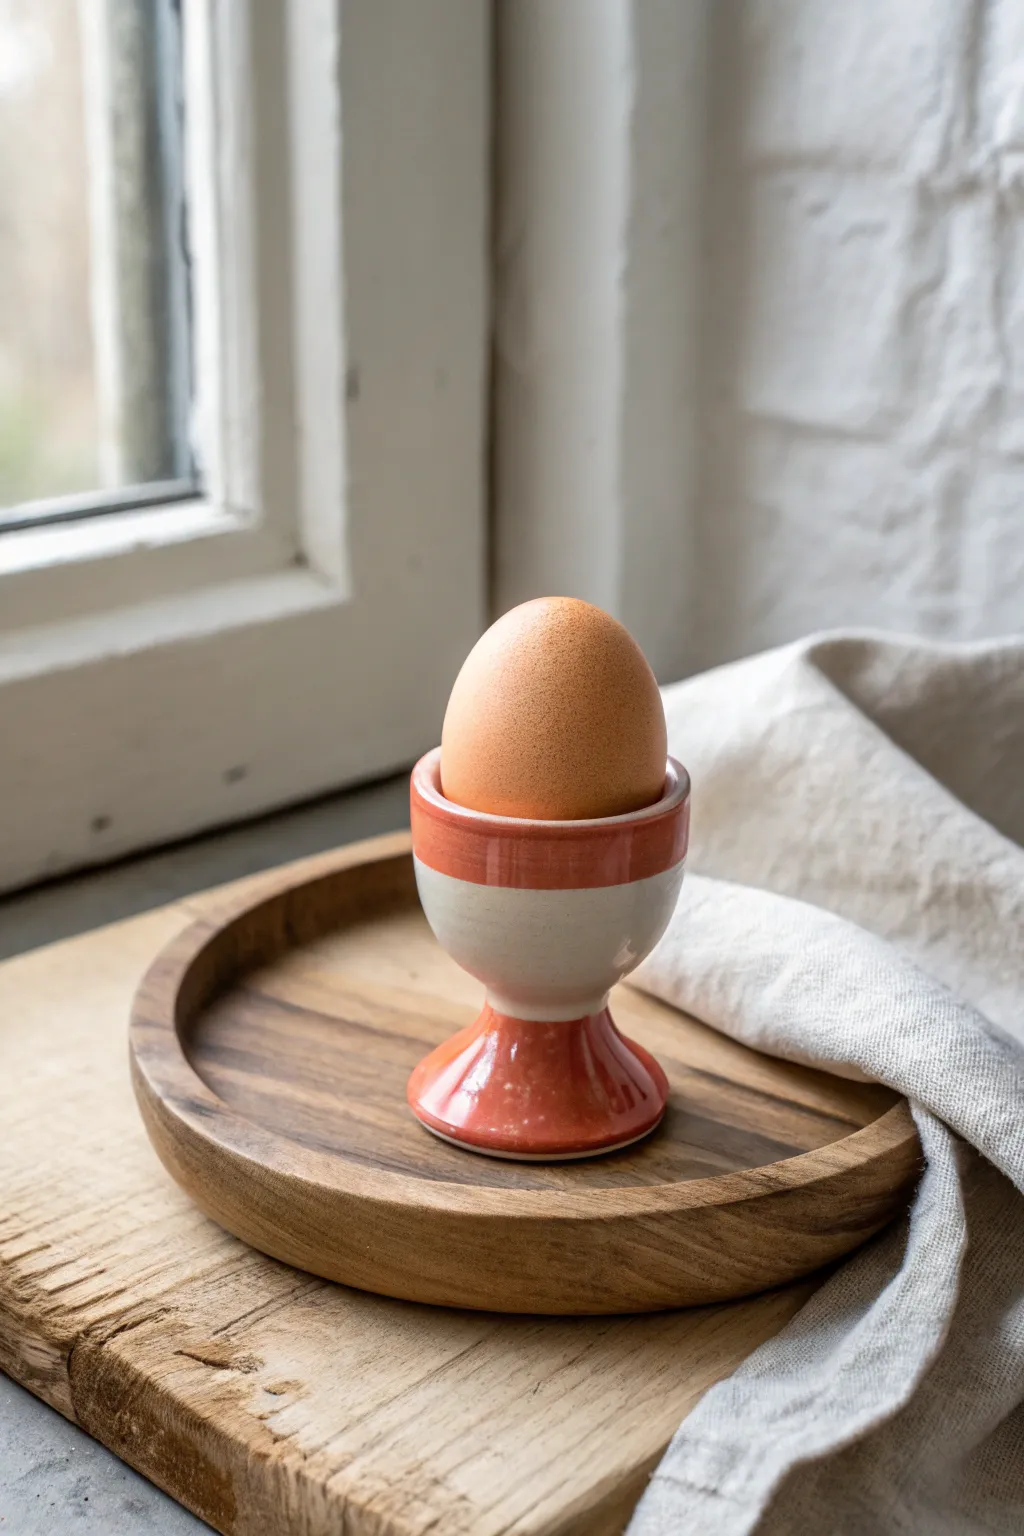
This charming, rustic egg cup features a sturdy pedestal base, a comfortable waist for gripping, and a wide rim perfect for holding soft-boiled eggs. The simple two-tone glaze design highlights the natural warmth of the clay while adding a pop of color to your morning table.
Step-by-Step
Materials
- Stoneware or earthenware clay (approx. 200g)
- Potter’s wheel
- Small sponge
- Pin tool
- Wooden modeling tool
- Wire cutter
- Rib tool (metal or rubber)
- Trimming tools
- Underglaze or glaze (terracotta/orange-red)
- Glossy clear glaze (optional, depending on your firing temp and clay body)
- Small paintbrush
Step 1: Throwing the Form
-
Center the clay:
Start with a small ball of well-wedged clay, about the size of a tangerine. Center it on the wheel head, ensuring it feels stable and doesn’t wobble at high speed. -
Open the clay:
Using your thumbs, press down into the center of the mound to create an opening, leaving about 1/2 inch of clay at the bottom for the foot. -
Pull the wall:
Gently pull the clay upward into a thick, short cylinder. You don’t need much height here—aim for about 2.5 to 3 inches tall. -
Shape the cup:
Using one finger inside and one outside, gently flair the top third of the cylinder outward to create the bowl shape that will hold the egg. Check the width frequently; an egg is roughly 1.75 inches wide. -
Form the stem:
Collar in the middle section of the cylinder slightly to create a ‘waist’ or stem. This distinguishes the cup from the base. -
Shape the base:
Flare the bottom third of the clay outward, mirroring the curve of the top cup but slightly wider for stability. Use a wooden tool to clean up the very bottom edge where it meets the bat. -
Refine the rim:
Use a small piece of chamois or your sponge to gently round over the top rim so it’s smooth to the touch. -
Cut off:
Run a wire cutter underneath the base and set the piece aside to dry until leather-hard.
Step 2: Trimming & Refining
-
Center for trimming:
Once leather-hard, place the egg cup upside down on the wheel. Use small clay lugs to secure it in place. -
Trim the foot:
Carve away excess clay from the bottom of the base to create a defined foot ring. I like to hollow out the underside slightly to reduce weight. -
Refine the waist:
If the stem feels too thick, carefully trim away clay at the narrowest point to make the silhouette more elegant. -
Smooth the surface:
Use a damp sponge or a soft rib to smooth out any trimming lines or rough textures on the exterior.
Wobbly Egg Problem?
If the cup is too wide and the egg rattles, simply fold a small paper towel into the bottom. In your next attempt, use calipers to measure a real egg for a snug fit.
Step 3: Glazing & Firing
-
Bisque fire:
Load the bone-dry egg cup into the kiln for the initial bisque firing (usually Cone 04 or 06). -
Wax resist the middle:
If you want a precise unglazed band like the photo, you can apply wax resist to the middle section, or simply rely on careful brushwork. -
Glaze the rim:
Paint or dip the top cup section (rim and interior) with your terracotta or orange-red glaze. Let it drip slightly or wipe precisely depending on the look you want. -
Glaze the foot:
Paint the bottom flared base with the same glaze color, leaving the middle ‘waist’ section bare to show the natural white or cream clay body. -
Clear coat (optional):
If your colored glaze isn’t glossy, or if you want the bare clay band to be sealed and shiny, dip the entire piece in a clear transparent glaze. -
Wipe the foot:
Crucial step: wipe the very bottom of the foot ring clean with a dedicated sponge so it doesn’t stick to the kiln shelf. -
Glaze fire:
Fire the piece again to the maturation temperature of your specific clay and glaze (e.g., Cone 5 or 6).
Make It a Set
Create a matching saucer or tray. Throw a small, flat plate with a slight indentation in the center that perfectly fits the foot of your egg cup.
Enjoy your handmade piece at your next brunch or give it as a delightful, personalized gift
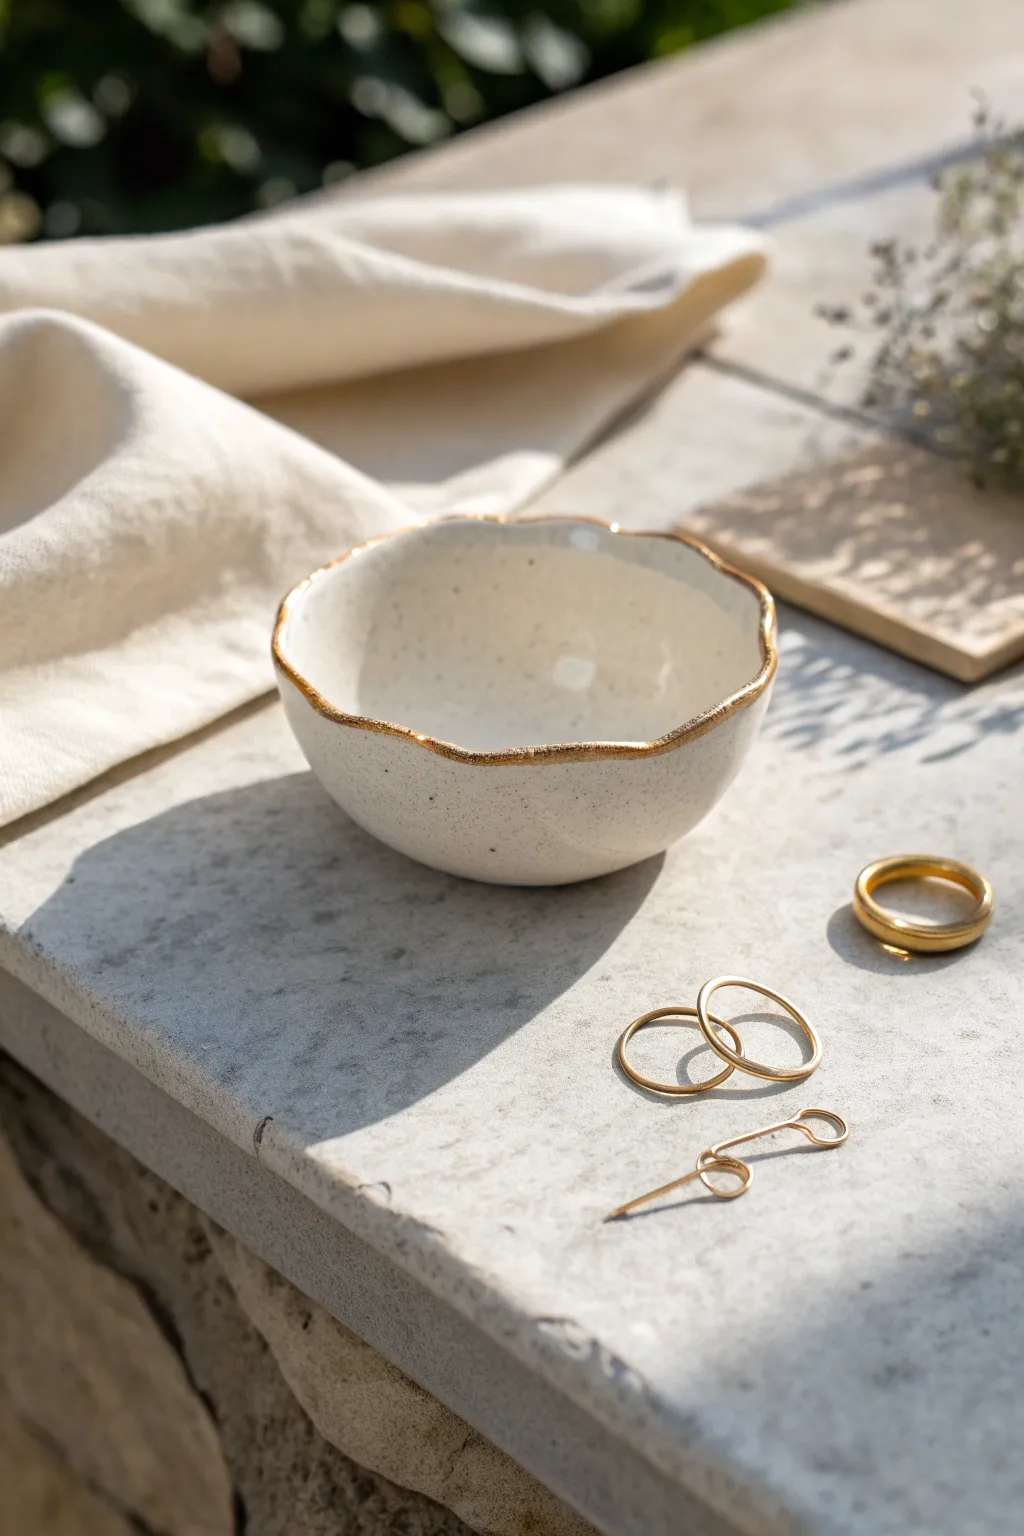
Jewelry Dish With Stamped Texture
This charming, shallow dish captures a rustic elegance with its creamy glaze and delicate, sun-like stamped patterns. It’s the perfect beginner project to practice surface texture while creating a functional home for your favorite rings.
How-To Guide
Materials
- White stoneware or porcelain clay body
- Rolling pin
- Canvas mat or slab roller
- Needle tool or fettling knife
- Small circular slump mold or a small bowl
- Small circular stamps (can be handmade or store-bought)
- Sponge
- Rib tool (flexible)
- Small paint brushes
- White glaze (glossy or satin)
- Red iron oxide wash or brown underglaze (optional for rim)
Step 1: Forming the Dish
-
Prepare the slab:
Begin by wedging a small ball of white clay to remove air bubbles. Roll it out into a smooth slab that is approximately 1/4 inch thick, ensuring even thickness throughout. -
Smooth the surface:
Take a soft rib tool and gently compress both sides of your slab. This aligns the clay particles, preventing warping later, and creates a pristine canvas for your texture. -
Cut the circle:
Place a circular template (a lid or bowl works great) onto the clay. Use your needle tool to cut straight down around the edge to create a perfect circle, about 4-5 inches in diameter. -
Address the rim:
With a slightly damp sponge or your fingertip, gently round over the sharp cut edge of the circle. This makes the finished piece feel much nicer to hold. -
Shape the curve:
Lift your clay circle and gently press it into a shallow slump mold or a foam bowl. You want a gentle curve, not a deep cup, so don’t press too hard in the center.
Step 2: Adding Texture and Detail
-
Select your stamps:
Identify a circular stamp with a dotted or radial pattern. If you don’t have one, I like to make my own by carving the end of a wine cork or using the cap of a marker. -
Plan placement:
Visualize a random, floating pattern. The beauty of this piece is the airy, irregular spacing of the motifs. -
Stamp the clay:
Support the clay from underneath with your hand to prevent deforming the curve. Press your stamp firmly into the interior surface to leave a crisp impression. -
Add detail dots:
Using a smaller tool, like the back of a drill bit or a dull pencil, add tiny standalone dots scattered between the larger stamped circles to fill empty negative space. -
Create the rim texture:
Using a small carving tool or the edge of a popsicle stick, press small notches vertically along the entire rim of the dish to create that rugged, dashed border. -
Dry slowly:
Cover the dish loosely with plastic and let it dry slowly to the leather-hard stage before removing it from the mold to fully dry for bisque firing.
Glaze Too Thick?
If you notice your glaze pooling too heavily in the stamped areas, gently dab the wet glaze with a stiff, dry brush to lift the excess liquid out of the recesses before firing.
Step 3: Glazing and Finishing
-
Bisque fire:
Fire the piece to cone 04 (or your clay’s specific bisque temperature) to prepare it for glazing. -
Clean the bisque:
Wipe the fired piece with a damp sponge to remove any kiln dust, which helps the glaze adhere properly. -
Apply the glaze:
Dip or brush a creamy white glaze over the entire piece. Ensure the glaze isn’t too thick, or it might fill in your delicate stamped textures. -
Highlight the rim:
Dip a small brush into iron oxide wash or a diluted brown underglaze. Gently run it along the textured rim notches, letting the color settle into the grooves. -
Wipe back the rim:
With a damp sponge, lightly wipe the rim. This removes the brown from the high points but leaves it in the crevices, accentuating the rustic edge. -
Wipe the foot:
Clean the bottom of the dish thoroughly with a sponge so no glaze touches the kiln shelf. -
Glaze fire:
Fire the piece again to the maturity temperature of your clay and glaze combination (likely cone 5 or 6).
Try Gold Luster
For an extra touch of luxury, apply a ring of real gold luster to the textured rim after the glaze firing and refire at a lower temperature (usually cone 018).
This little dish makes a lovely handmade gift or a sweet spot to keep your treasures safe
Pinch Bowl Salt Cellar
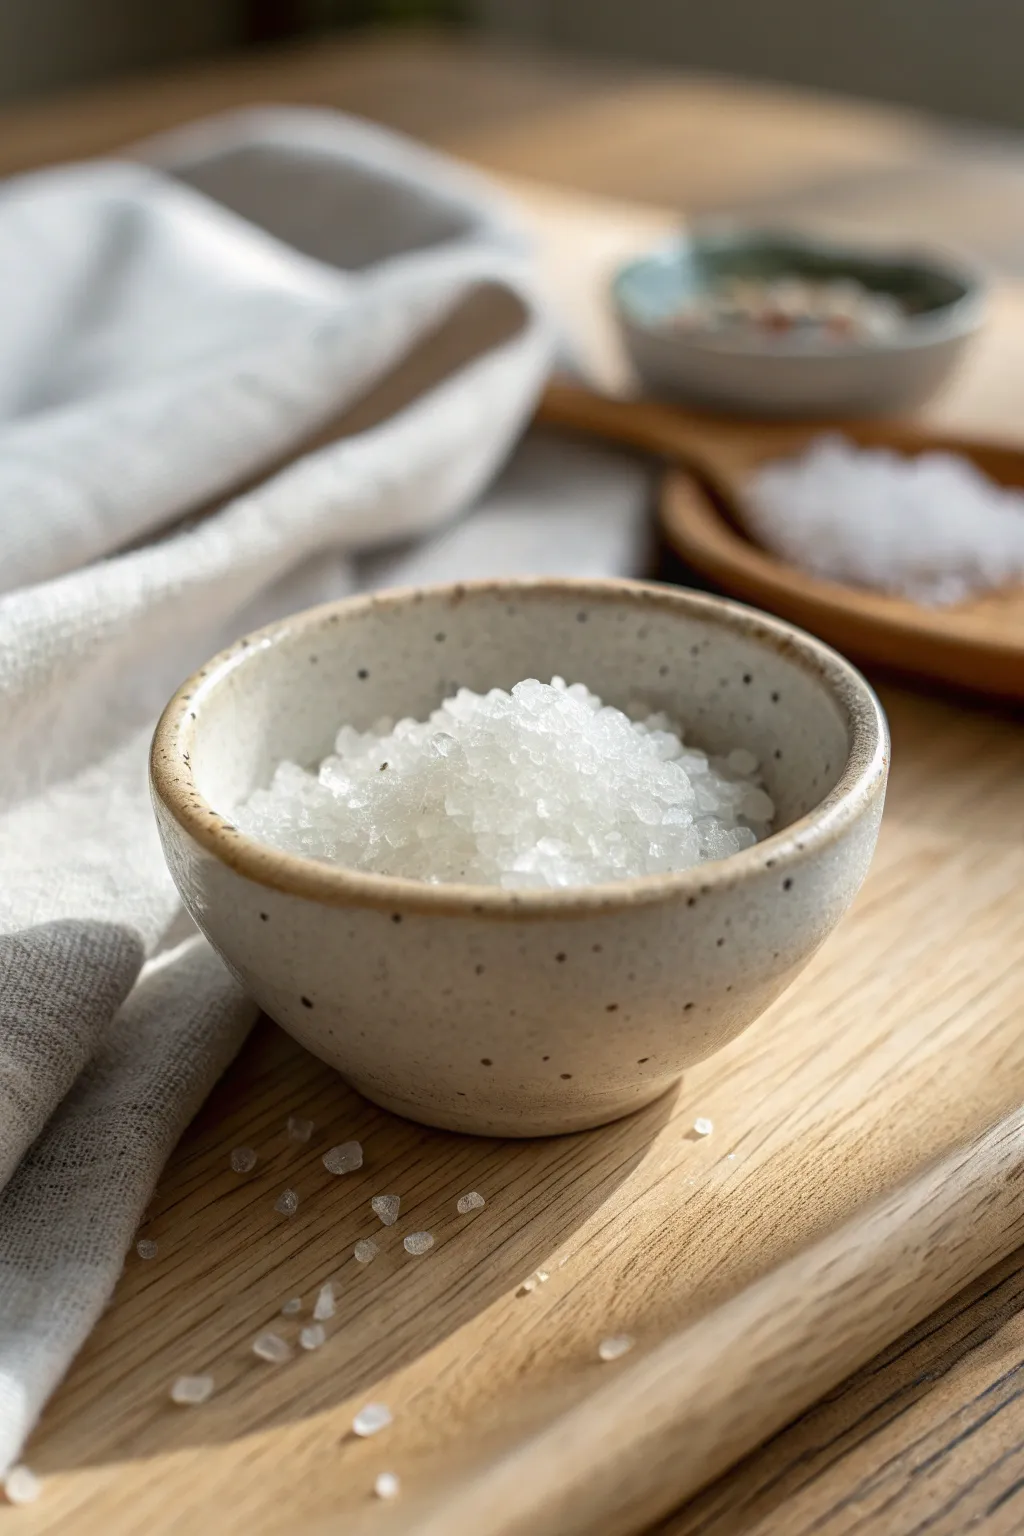
This charming, rustic salt cellar is the perfect beginner project to get acquainted with clay. The finished piece features a beautiful speckled glaze and a natural, unglazed rim that adds a wonderful tactile contrast.
Step-by-Step
Materials
- Speckled Stoneware Clay (e.g., Laguna Speckled Buff)
- Small Container of Water
- Sponge
- Potter’s Needle Tool or Wooden Knife
- Rib Tool (Rubber or Wood)
- White or Clear Gloss Glaze (cone 5/6)
- Wax Resist (optional)
- Kiln access
Step 1: Forming the Pinch Bowl
-
Prepare the Clay:
Start by cutting a piece of speckled stoneware clay about the size of a golf ball or a small tangerine. Wedge it briefly to ensure there are no air bubbles. -
Create the Sphere:
Roll the clay between your palms until you have a smooth, round ball. Try to smooth out any major cracks or creases now while the clay is still plastic. -
Open the Form:
Hold the clay ball in your non-dominant hand. Take your dominant thumb and press it gently but firmly into the center of the ball, stopping about a half-inch from the bottom. -
Pinch the Walls:
Begin pivoting the ball in your hand while using your thumb and fingers to pinch the clay wall. Start at the bottom and work your way up to the rim in a spiral motion. -
Establish Thickness:
Aim for an even wall thickness of about 1/4 inch throughout. Check the bottom thickness occasionally to ensure it isn’t too heavy. -
Shape the Curve:
As you pinch, gently push the walls outward to create a rounded, open bowl shape rather than a tall cylinder. It should comfortably hold about 1/4 cup of salt.
Uneven Walls?
If one side feels thicker, pinch that specific area gently moving upward. Don’t overwork the clay or it may become tired and crack. Let it rest for 15 mins if it gets floppy.
Step 2: Refining and Drying
-
Smooth the Rim:
The rim in the reference photo has a soft, rounded edge. Use a moist sponge or a chamois cloth to compress the rim, smoothing away any cracks. -
Refine the Surface:
If you want a smoother exterior, use a rubber rib tool to gently scrape and smooth the outside walls, removing your fingerprints. I personally like using a slightly damp sponge here to bring out the grog texture. -
Create a Foot (Optional):
gently tap the bottom of the bowl on your work surface to create a small flat spot so it sits stably without rocking. -
Slow Dry:
Loosely cover the bowl with plastic to let it dry slowly to the leather-hard stage. This prevents warping. -
Final Smoothing:
Once bone dry, take a slightly damp sponge and wipe away any sharp bits or dust. This is your last chance to perfect the shape before the first firing. -
Bisque Fire:
Fire the piece in a kiln to cone 04 (or your clay body’s bisque temperature).
Step 3: Glazing and Finishing
-
Clean the Bisqueware:
Wipe the fired bowl with a damp sponge to remove any kiln dust. This ensures the glaze adheres properly. -
Wax the Rim:
To recreate the unglazed rim shown in the image, carefully paint a line of wax resist along the top edge of the rim. Alternatively, simply dip carefully and wipe the rim clean later. -
Glaze the Interior:
Pour a glossy white or clear glaze inside the bowl. Roll it around to coat the entire interior surface, then pour the excess back into your bucket. -
Glaze the Exterior:
Hold the bowl by the foot (or use tongs) and dip the exterior into the glaze. If you waxed the rim, the glaze will bead off that area. -
Clean the Rim and Foot:
Immediately use a damp sponge to wipe the glaze cleanly off the rim to expose the raw clay body. Also, meticulously wipe the bottom of the foot so it doesn’t stick to the kiln shelf. -
Check for Pinholes:
Rub the dry glaze surface gently with your finger to smooth out any bubbles or pinholes before firing. -
Glaze Fire:
Fire to cone 5 or 6 (mid-range). The heat will melt the glaze and bring out the iron speckles in the clay body to create that scattered dot effect.
Enhance the Speckle
A standard speckled clay body works best, but you can also wedge granular ilmenite or manganese created specifically for pottery into plain white clay for a custom speckle effect.
Once cooled, fill your new handmade cellar with coarse sea salt and give it a place of honor on your kitchen counter