Whenever adults tell me they “aren’t crafty,” I hand them a lump of clay and watch the tension melt right out of their shoulders. These ideas are all about making sophisticated, functional pieces you’ll actually use and feel proud to leave out on display.
Minimal Ring Cone for Nightstand Organization
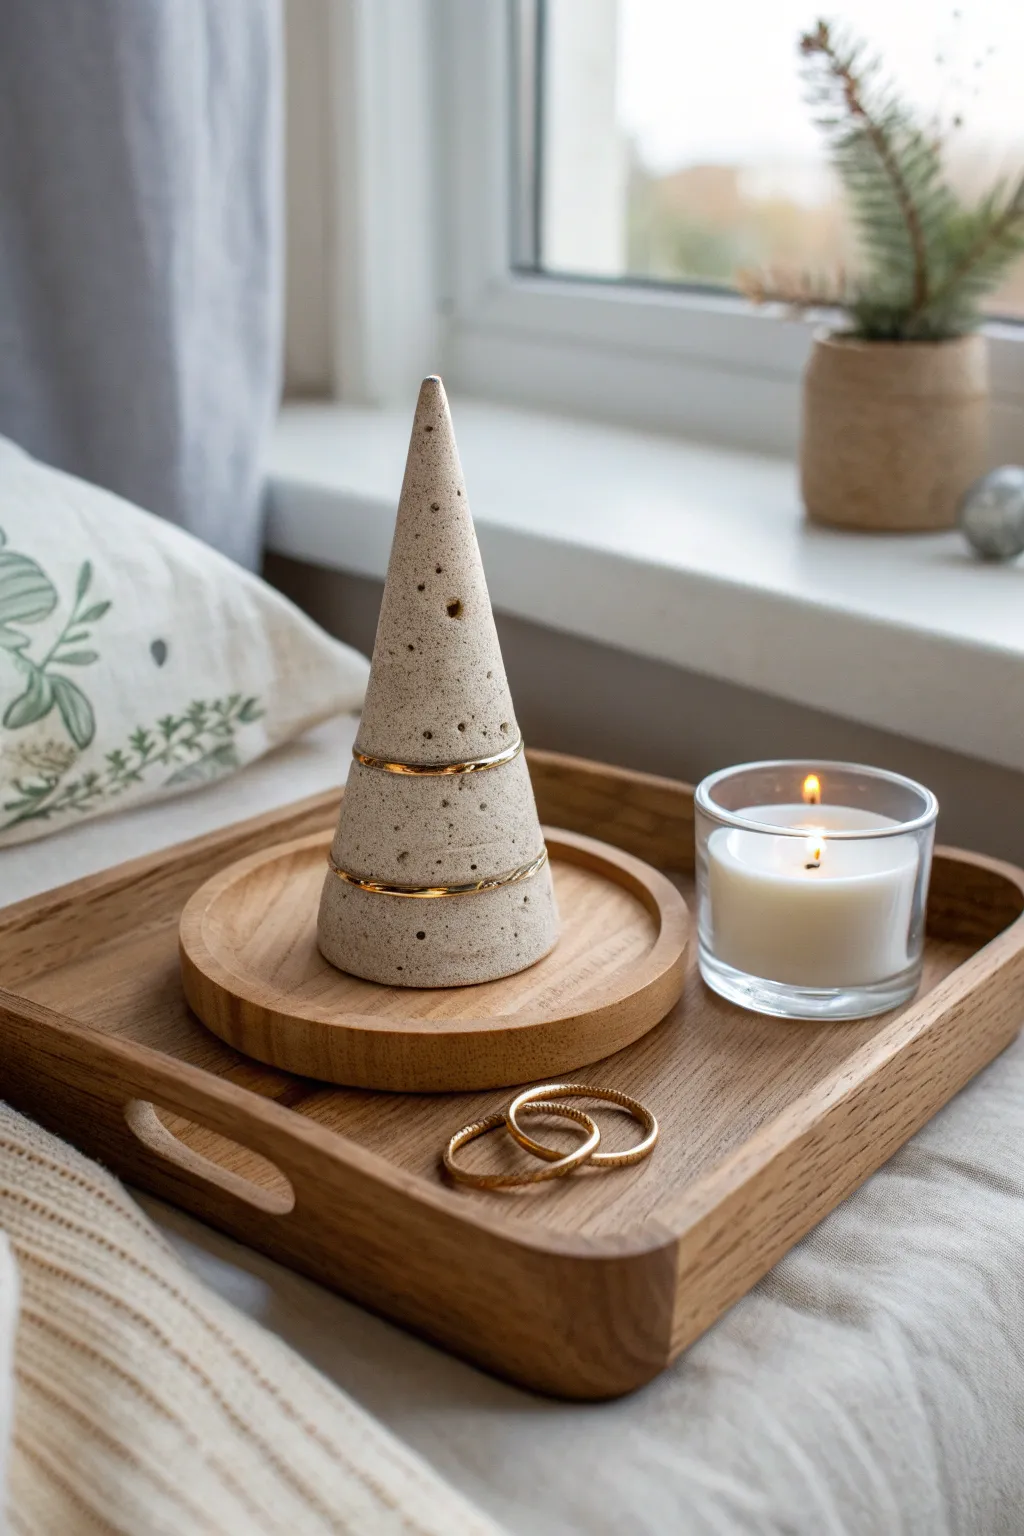
Bring a touch of organic minimalism to your bedside table with this elegant jewelry organizer that perfectly mimics the look of speckled stone. This simple conical form is designed to keep your favorite rings safe and accessible while adding a sculptural element to your decor.
Detailed Instructions
Materials
- Air-dry clay (white or light grey)
- Used coffee grounds (dry) or black pepper
- Rolling pin
- Cardstock or thick paper
- Tape
- Craft knife
- Small bowl of water
- Fine-grit sandpaper (220-400 grit)
- Matte sealant spray or matte varnish
Step 1: Preparing the Clay
-
Condition the clay:
Start by taking a handful of air-dry clay and kneading it in your hands until it becomes warm and pliable. If the clay feels stiff, you can dip your fingers in water to help soften it. -
Add the texture:
To achieve that realistic speckled stone look, sprinkle a pinch of dried coffee grounds or coarse black pepper onto your workspace. Press the clay into these speckles. -
Incorporate the speckles:
Fold the clay over itself and knead thoroughly. Repeat this process until the speckles are evenly distributed throughout the entire ball of clay. I find coffee grounds give a slightly warmer, earthier look than pepper. -
Create the base shape:
Roll the clay into a smooth ball first to remove any major cracks, then begin rolling it between your palms into a thick cylinder/carrot shape.
Cracks happen?
Mix a tiny bit of fresh clay with water to make a paste (slip). Fill any cracks, smooth with a damp finger, and let re-dry before sanding.
Step 2: Forming the Cone
-
Make a paper template:
Twist a piece of cardstock into a cone shape to the height and width you desire for your final piece. Tape it securely so it holds its shape. -
Roll out a slab:
Flatten your clay cylinder with a rolling pin until it is about 1/4 inch thick. Aim for an elongated shape rather than a perfect circle. -
Wrap the template:
Gently drape the clay slab over your cardstock cone. Carefully mold the clay around the form, bringing the edges together to meet in a seam. -
Seal the seam:
Score the meeting edges with your craft knife (make small hatch marks), apply a tiny bit of water, and press them firmly together. Smooth the clay over the seam with your finger until it disappears. -
Refine the shape:
Roll the clay-covered cone gently on your work surface to smooth out fingerprints and ensure an even, conical shape. Check the bottom to ensure it sits flat. -
Add character:
For a more organic, stone-like feel, you can intentionally poke a few random, tiny pinholes into the surface with a needle tool or toothpick. This mimics natural porosity.
Add a luxe detail
Paint the very tip of the cone or a thin horizontal stripe with liquid gold leaf for a chic, modern contrast against the raw concrete look.
Step 3: Finishing Touches
-
Slow drying:
Stand the cone upright in a cool, dry place away from direct sunlight. Let it dry for 24-48 hours. If feasible, loosely tent a plastic bag over it for the first 12 hours to prevent cracking. -
Remove the core:
Once the exterior feels firm but not bone dry, gently twist and pull out the cardstock template from underneath. Allow the piece to dry completely, inside and out. -
Sand the surface:
Using fine-grit sandpaper, gently buff the surface of the fully dried cone. This will reveal more of the coffee/pepper speckles and create a velvety stone texture. -
Level the base:
Place a sheet of sandpaper on a flat table and rub the bottom of the cone against it in a circular motion until perfectly flat and stable. -
Seal the piece:
Finish with a coat of matte spray sealant or varnish. This protects the clay from moisture and prevents the speckles from rubbing off, without adding an artificial shine.
Now you have a functional piece of art ready to organize your jewelry


Botanical-Imprint Coasters for a Coffee Table Set
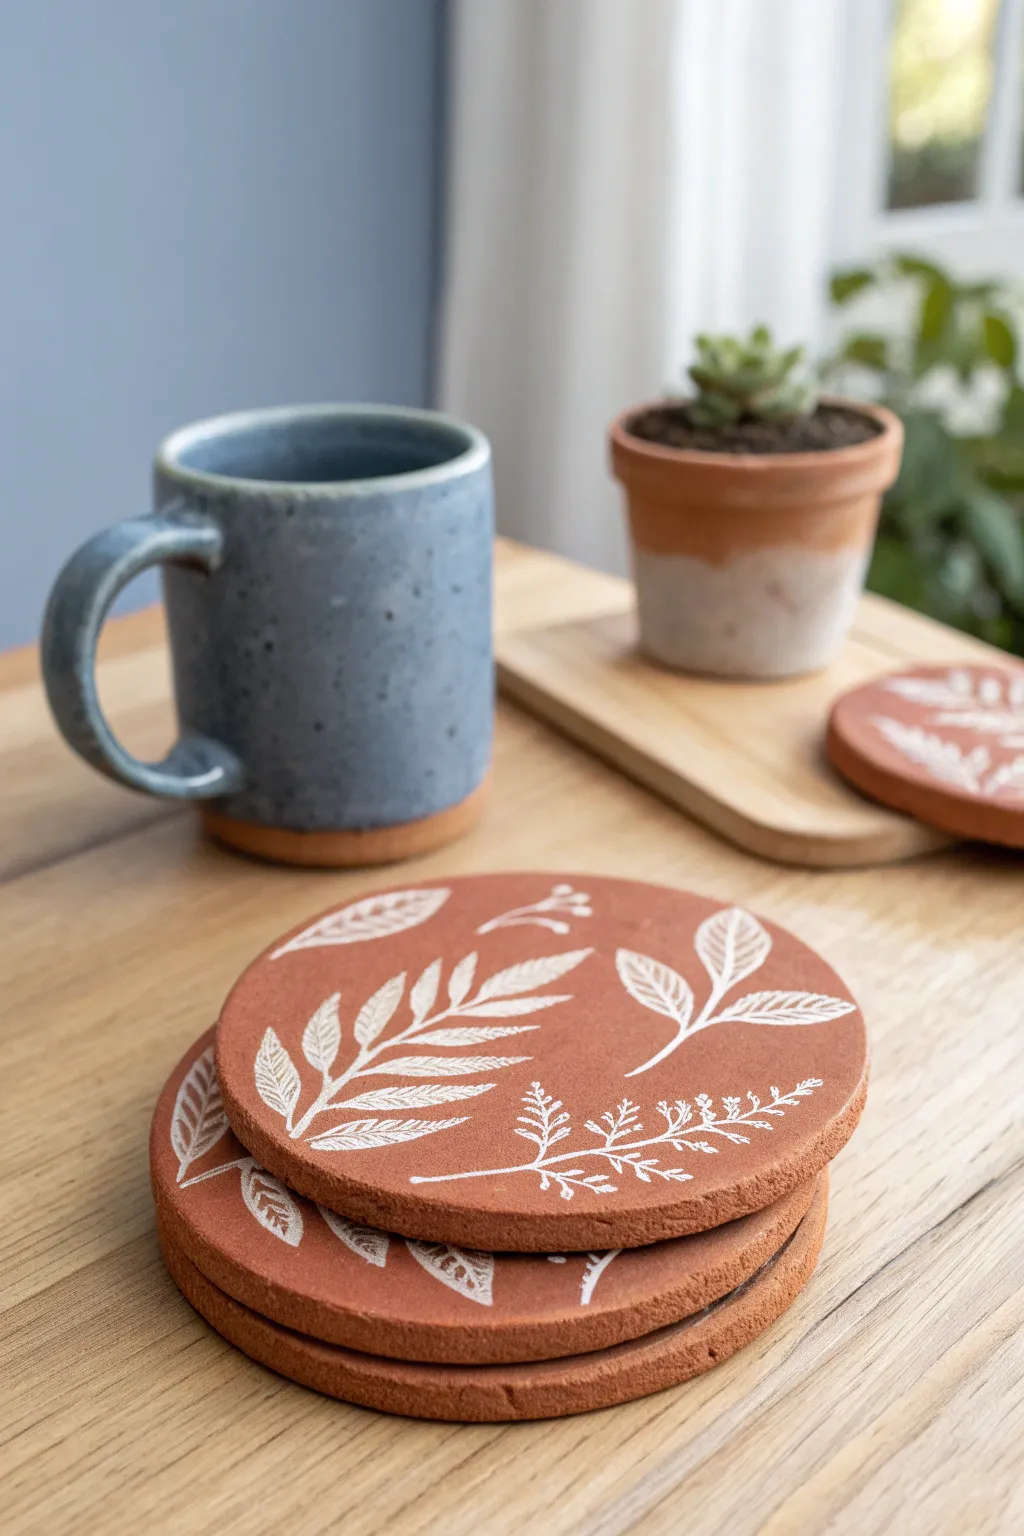
Bring the outdoors in with this charming coaster set that combines the warmth of red clay with delicate white botanical illustrations. These sturdy coasters feature a raw, earthy finish that perfectly complements the simple, hand-painted leaf motifs.
Step-by-Step Tutorial
Materials
- Air-dry red clay or polymer clay (terracotta color)
- Round cookie cutter or a glass to use as a template
- Rolling pin
- Fine-grit sandpaper
- White acrylic paint or a white paint pen
- Fine detail paintbrush (size 0 or 00)
- Matte sealant or varnish
- Parchment paper or canvas mat
Step 1: Shaping the Base
-
Prepare your workspace:
Lay down a sheet of parchment paper or a canvas working mat. This prevents the red clay from staining your table and makes it easier to peel the coasters off later. -
Condition the clay:
Take a handful of your red clay and knead it thoroughly in your hands. Working the clay warms it up, removing potential air bubbles and making it pliable enough to roll without cracking. -
Roll it out:
Using your rolling pin, flatten the clay to an even thickness of about 1/4 inch (approx. 6mm). Don’t go too thin, or the coasters might be brittle; too thick, and they will take forever to dry. -
Cut the circles:
Press your round cookie cutter or an inverted wide-mouthed glass firmly into the clay to cut your shapes. Wiggle it slightly to ensure a clean cut before lifting. -
Smooth the edges:
Dip your finger in a little water and gently run it around the circumference of each disc to smooth out any rough cutting marks or jagged bits. -
Let them dry:
Place the clay discs on a flat surface to dry completely. If using air-dry clay, leave them for 24-48 hours, flipping them halfway through to prevent warping. If using polymer clay, bake according to package instructions.
Warping Woes?
To stop air-dry clay from curling edges while drying, place a flat board and a heavy book gently on top of the discs once they are semi-dry to the touch.
Step 2: Refining and Decorating
-
Sand the surface:
Once fully cured or dry, inspect the coasters. Use fine-grit sandpaper to buff away any uneven spots on the surface or sharp edges on the rim to achieve that professional matte look. -
Plan your design:
Before painting slightly, I find it helpful to lightly sketch the botanical shapes with a pencil directly on the clay, or practice on a scrap piece of paper first. -
Paint the stems:
Load your fine detail brush with white acrylic paint. Start by painting the central vein or stem of your leaf design using a gentle, sweeping stroke. -
Add the leaves:
Along the stem, paint small, elongated almond shapes to create the leaves. Vary the pressure on your brush—light at the tip, pushing down for the middle, and lifting for the base—to get an organic shape. -
Add texture details:
For a fern-like look, use quick, short dashes branching off the main stem. Alternatively, fill in larger leaf shapes with tiny white veins or cross-hatching for variety. -
Create variety:
Don’t make every coaster identical. Paint a sprig of berries on one, a fern on another, and broad leaves on a third to create a cohesive but varied set. -
Fix mistakes:
If you make a smudge with the acrylic paint, quickly wipe it away with a damp cotton swab or wait for it to dry and gently scrape it off with a craft knife. -
Seal the deal:
Apply a coat of matte spray varnish or brush-on sealant over the entire top surface. This protects the clay from moisture condensation from your cold drinks. -
Finish the bottom:
For extra protection for your furniture, you can glue a circle of felt or cork to the bottom of each coaster once the sealant is dry.
Level Up: Impressed Texture
Instead of painting, press real leaves into the wet clay before drying. Then, after drying, whitewash the indented texture for a gorgeous relief effect.
Stack your new creations on the coffee table and enjoy the natural, artisanal vibe they bring to your living space.


Sleek Bud Vase Covered in Air-Dry Clay Texture
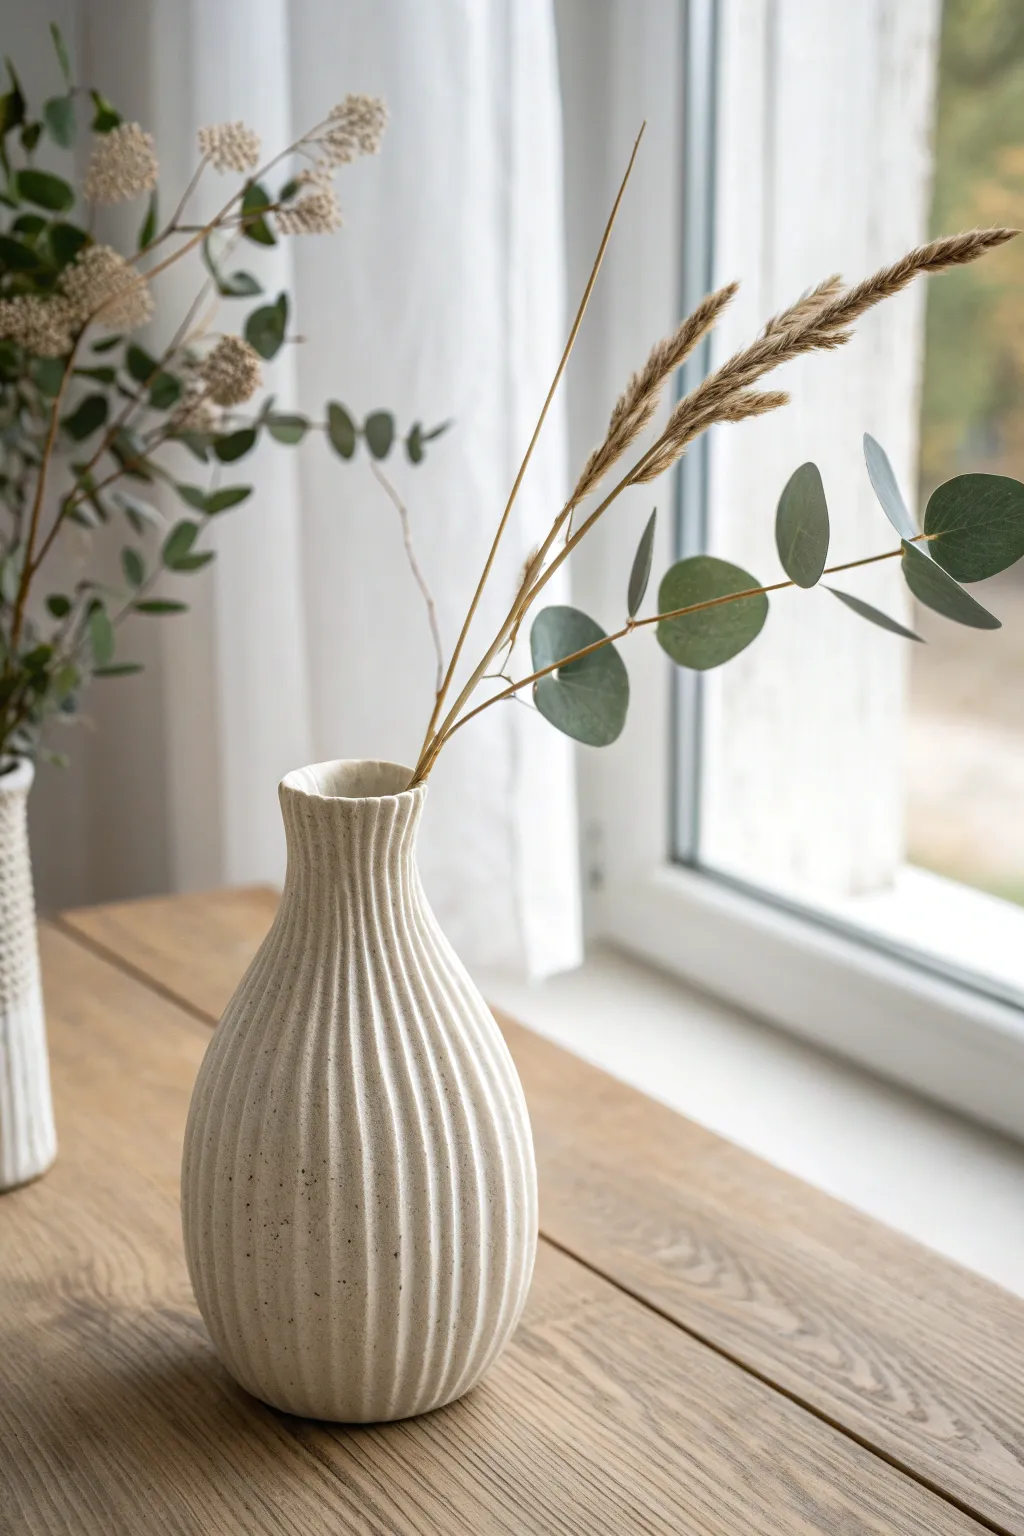
Transform a plain glass bottle or recycled jar into a high-end decor piece using nothing but air-dry clay and a simple carving technique. This project mimics the look of expensive stoneware with a satisfying, tactile vertical rib pattern that catches the light beautifully.
Step-by-Step Guide
Materials
- Glass bud vase or narrow bottle (recycled)
- White or light grey air-dry clay
- Rolling pin
- Craft knife or clay knife
- Cup of water and sponge
- Modeling tool with a small loop or a rounded wooden stick
- Fine-grit sandpaper (optional)
- Acrylic sealer (matte spray or Mod Podge)
Step 1: Preparation and Base Layer
-
Clean your vessel:
Begin by thoroughly washing your glass vase or bottle to remove any oils or labels. Dry it completely so the clay will adhere properly. -
Condition the clay:
Take a large chunk of air-dry clay and knead it in your hands to warm it up. This makes it pliable and prevents cracks from forming later. -
Roll a slab:
I like to roll the clay out on a flat surface until it’s about 1/4 inch thick. Aim for a long rectangular shape that is wide enough to wrap around your bottle. -
Wrap the bottle:
Carefully lift your clay slab and wrap it around the glass vessel. Cut off any excess overlap with a craft knife, leaving just enough to join the edges. -
Seam the edges:
Use a little bit of water on your finger to blend the seam where the clay edges meet. Smooth it out until the line disappears completely. -
Cover the rim:
Fold the clay slightly over the top rim of the bottle for a polished look. You can trim away excess at the bottom so it sits flat. -
Smooth the surface:
Dip your fingers or a sponge in water and run them over the entire clay surface to erase fingerprints and create an even canvas for your texture.
Step 2: Texturing and Finishing
-
Plan your vertical lines:
Visualize vertical lines running from the top rim to the base. They don’t need to be geometrically perfect; a hand-carved look adds character. -
Carve the first groove:
Using a loop tool or the rounded end of a wooden stick, press gently into the clay at the top rim and drag downward to the base in a single, confident stroke. -
Continue the pattern:
Repeat this vertical dragging motion around the entire circumference of the vase. Try to keep the spacing relatively consistent, but don’t stress over minor variations. -
Refine the ridges:
If the clay pushed up on the sides of your grooves, you can gently tap them down with a damp finger to soften the sharp edges. -
Create the stone effect:
To get that speckled, stony look seen in the photo, you can flick a stiff toothbrush dipped in diluted brown or black paint over the wet clay, or simply press coarse sand into the surface before carving. -
Let it dry slowly:
Place the vase in a cool, dry spot away from direct sunlight. Let it dry for at least 24-48 hours. Drying too fast can cause cracking. -
Sand for smoothness:
Once bone dry, use fine-grit sandpaper to lightly buff any rough bits on the rim or base, being careful not to sand away your beautiful ribbed texture. -
Seal the work:
Apply a coat of matte acrylic sealer or Mod Podge. This protects the clay from moisture and gives it a finished, professional sheen. -
Add botanicals:
Style your new vase with dried eucalyptus or tall grasses to complete the organic, serene aesthetic.
Fixing Cracks
If small cracks appear while drying, mix a tiny bit of fresh clay with water to make a ‘slip’ paste. Fill the cracks, smooth with a finger, and let dry again.
Pro Tip: Consistent Depth
Use your pinky finger as a depth gauge or guide against the table surface while you carve to keep your vertical lines straight and even all the way around.
Enjoy the calm, organic beauty this textured vase brings to your windowsill or table setting


Modern Tea Light Holders in a Matching Set
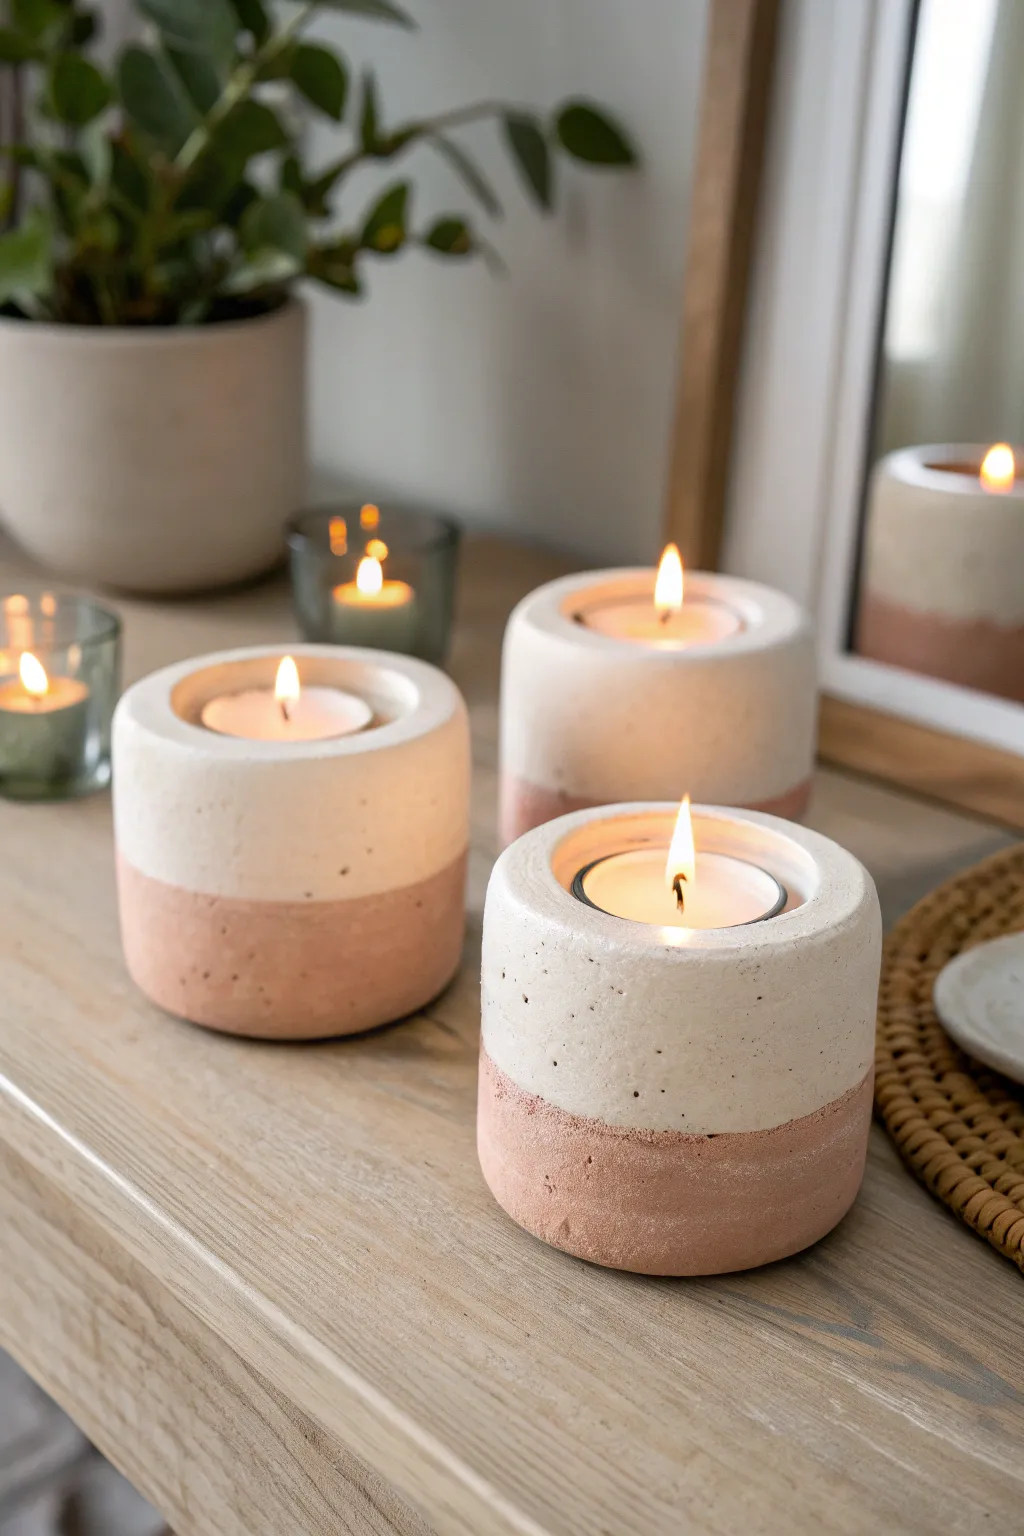
Achieve a high-end boutique look with these minimalist tea light holders that blend industrial chic with warm earthy tones. The distinct color-blocking creates a modern aesthetic, perfect for styling a mantle or dining table.
Detailed Instructions
Materials
- White cement or fine-grain concrete mix
- Terracotta pigment powder or acrylic paint (burnt sienna)
- Small plastic cups or silicone cylinder molds (approx. 3-inch diameter)
- Smaller weighted inserts (like shot glasses or votive holders)
- Cooking spray or mold release agent
- Mixing bowls and stir sticks
- Fine-grit sandpaper (220-400 grit)
- Painter’s tape
- Water
Step 1: Mold Preparation
-
Clean your molds:
Ensure your plastic cups or silicone molds are perfectly clean and dry. Any dust will show up on the smooth surface of the finished holder. -
Apply release agent:
Lightly mist the inside of your main molds and the outside of your smaller inserts with cooking spray. Wipe away any excess so it doesn’t leave bubbles.
Step 2: Mixing and Pouring
-
Prepare the white mix:
In a mixing bowl, combine the white cement with water according to package directions until you reach a pancake batter consistency. -
Prepare the colored mix:
In a separate container, mix a smaller batch of cement. Add your terracotta pigment powder or a dab of acrylic paint until you achieve a warm, dusty pink hue. -
Pour the base layer:
Pour the terracotta-colored cement into the bottom of each mold. You want this layer to be about one-third of the total height. -
Tap out bubbles:
Gently tap the molds on your work surface to release air bubbles and level the mix. Let this layer set for about 15-20 minutes until it’s firm but still tacky. -
Pour the top layer:
Gently pour the white cement mixture over the terracotta layer. Pour slowly to avoid disturbing the line between the colors. -
Final tap:
Tap the mold again vigorously to bring bubbles to the surface and ensure the two layers bond tightly.
Layer Separation?
If layers separate after drying, you waited too long between pours. Pour the second layer while the first is ‘green’ (firm but still damp) to bond them chemically.
Step 3: Setting the Shape
-
Insert the void:
Press your smaller weighted insert (shot glass or votive) into the center of the wet cement. Push down until the displacement lifts the cement to your desired rim height. -
Secure the insert:
Use strips of painter’s tape across the top of the mold to hold the insert in place so it doesn’t float back up while curing. -
Let it cure:
Allow the projects to sit undisturbed for at least 24 to 48 hours. I find that patience here ensures the sharpest edges later.
Make it Luxe
Mix gold mica powder into the white concrete or paint a thin gold leaf strip right at the seam where the two colors meet for an elegant metallic accent.
Step 4: Finishing Touches
-
Demold:
Gently wiggle the center insert out first. Then, carefully invert the main mold and tap or squeeze to release the concrete cylinder. -
Sand the rim:
Place a sheet of fine-grit sandpaper flat on the table and rub the top rim of the holder against it in circular motions to smooth it out. -
Refine the surface:
Lightly sand around the sides if there are any rough seams, but keep the texture natural. -
Add protection:
Stick small felt pads or cork circles to the bottom to protect your furniture surfaces from scratches.
Enjoy the cozy ambiance created by your new handmade decorative set

The Complete Guide to Pottery Troubleshooting
Uncover the most common ceramic mistakes—from cracking clay to failed glazes—and learn how to fix them fast.
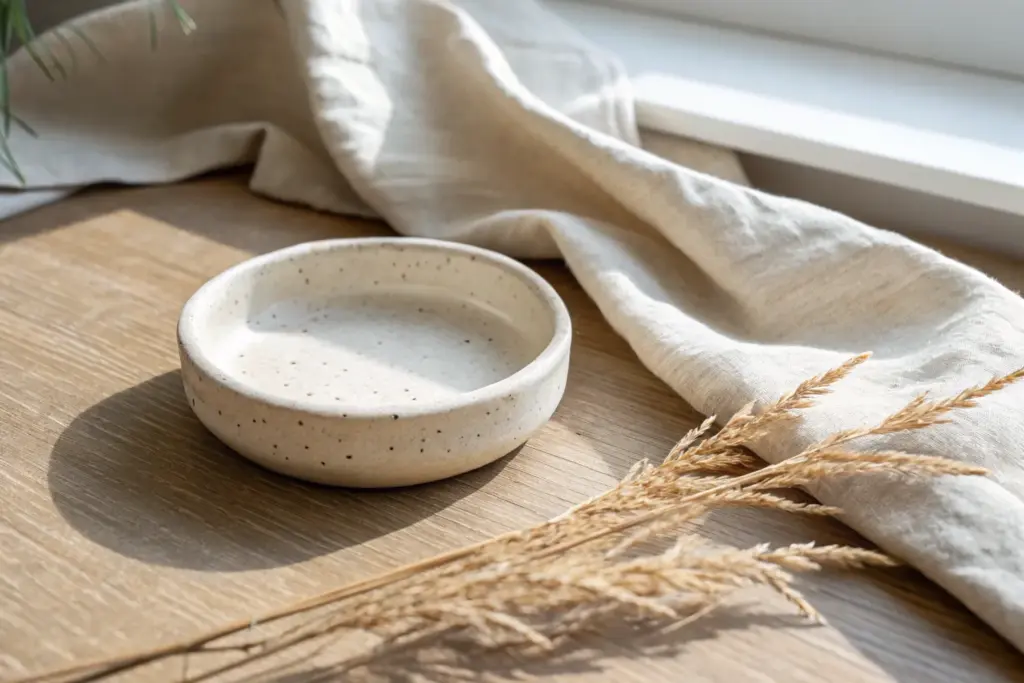
Catch-All Desk Tray for Pens, Clips, and Keys
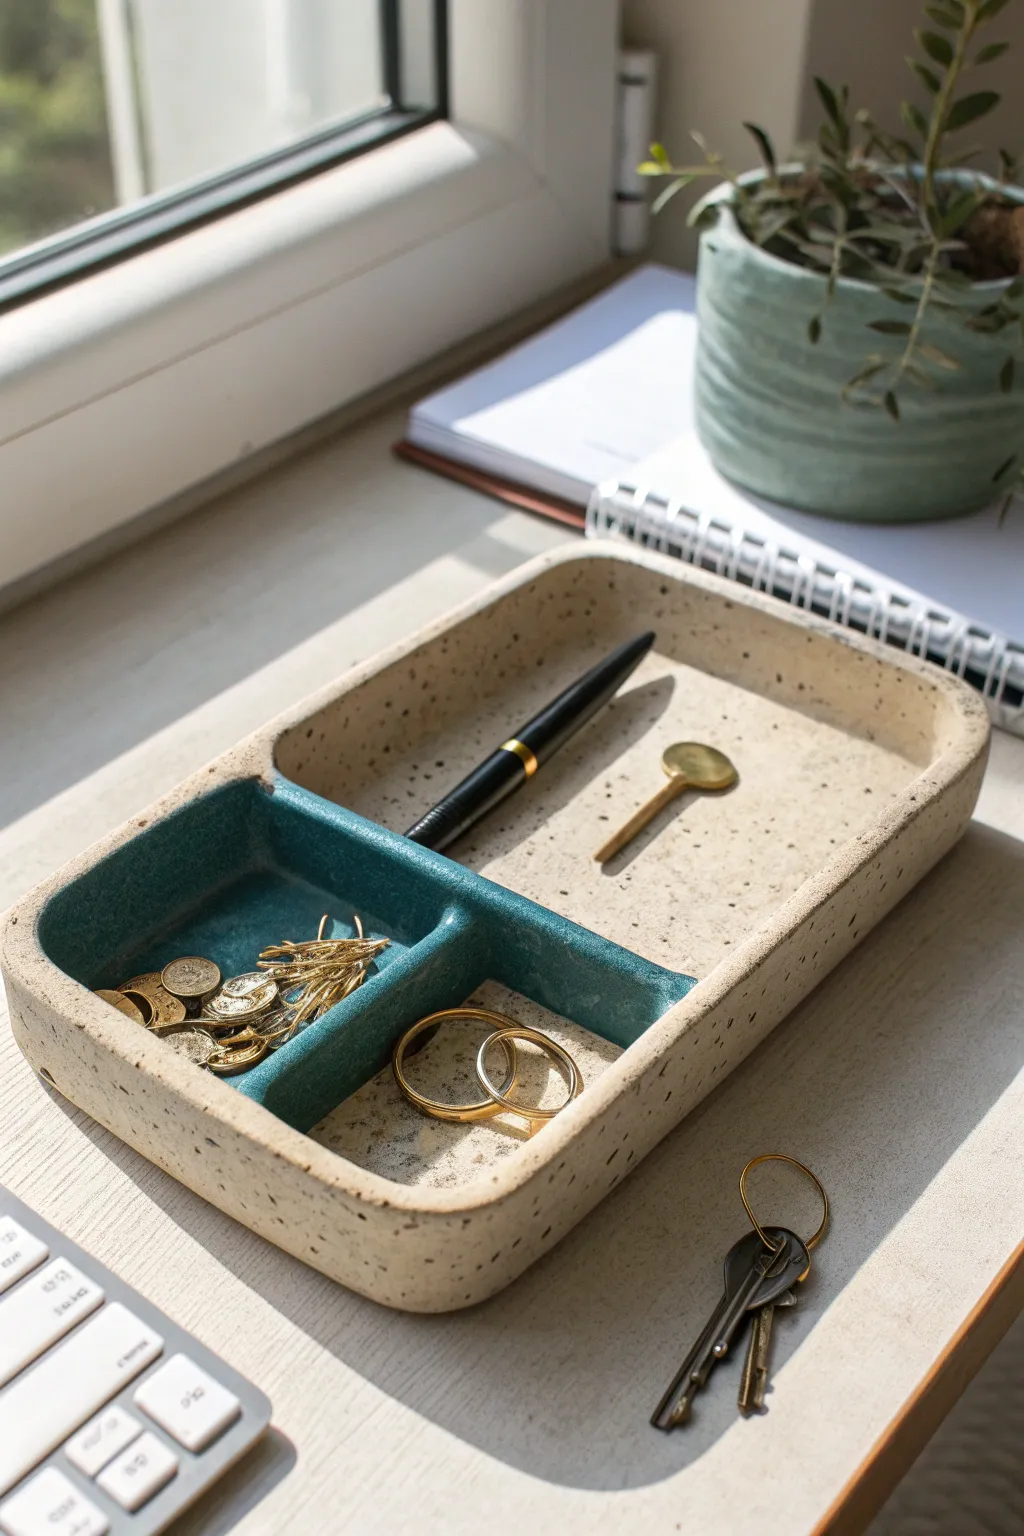
Keep your workspace tidy with this elegant, speckled catch-all tray featuring partitioned sections for optimal organization. The combination of raw, speckled stoneware and a glossy teal glaze creates a modern, sophisticated contrast perfect for holding pens, clips, and jewelry.
Step-by-Step
Materials
- Speckled stoneware clay (or polymer clay with faux granite effect)
- Rolling pin
- Guide sticks or slats (approx. 1/4 inch thick)
- Clay knife or needle tool
- Rectangle template (cardboard or paper)
- Slip and scoring tool (if using ceramic clay)
- Small sponge
- Modeling tool or wooden rib
- Teal or emerald green glaze (glossy)
- Clear matte glaze (optional, for the raw clay look)
- Kiln (if using ceramic clay) or oven (if using polymer)
Step 1: Forming the Base
-
Prepare the Clay:
Begin by wedging your speckled stoneware clay thoroughly to remove any air bubbles. This ensures a strong, crack-free foundation. -
Roll the Slab:
Set up your guide sticks on a canvas or cloth surface. Roll the clay out into a smooth, even slab about 1/4 inch thick. -
Cut the Base:
Using your rectangular paper template, cut the main base shape with your clay knife. A size of roughly 5×9 inches works well for a desk organizer like this. -
Smooth the Surface:
Take a damp sponge or a soft rib tool and gently smooth the surface of the slab to compress the clay particles and remove any canvas texture.
Warping Walls?
If long walls start bowing inward while wet, place a dry sponge or crumpled paper inside the tray to support the straight lines until the clay stiffens.
Step 2: Building the Walls
-
Cut Strips:
Roll out remainders of your clay to the same thickness and cut long strips for the outer walls, approximately 1 inch tall. -
Score and Slip:
Score the outer perimeter of your base slab and the bottom edge of your wall strips. Apply a generous amount of slip (liquid clay) to the scored areas. -
Attach the Walls:
Place the strips onto the base, pressing down firmly to bond them. Where the strips meet, cut them at an angle for a seamless join. -
Reinforce Seams:
Use a modeling tool to blend the clay from the wall down into the base on both the inside and outside. I like to run a small coil of clay along the inside seam for extra stability before blending. -
Create the Divider:
Cut a shorter strip of clay to fit the width of the tray. Score detailed placement lines about one-third of the way deeply into the tray. -
Install Partition:
Slip, score, and attach this divider strip just like the outer walls. This creates the smaller compartment for clips and coins. -
Secondary Divider:
Add a final small perpendicular wall inside the smaller section to create two distinct square-ish pockets, leaving the large section open for pens.
Step 3: Refining and Drying
-
Round the Corners:
Gently shape the outer corners of the tray with your hands or a sponge to create that soft, rounded rectangular look rather than sharp 90-degree angles. -
Smooth the Rim:
Run a damp sponge or a chamois cloth over the top rim of all walls to ensure they are smooth and comfortable to the touch. -
Slow Dry:
Loosely cover the tray with plastic and let it dry slowly over several days to the ‘bone dry’ stage to prevent warping. -
Bisque Fire:
Load the thoroughly dried piece into the kiln for the initial bisque firing (usually Cone 04).
Pro Tip: Clean Lines
Use wax resist on the top rim and partitions before glazing. This repels the teal glaze, ensuring perfectly sharp edges where the color meets the raw clay.
Step 4: Glazing
-
Clean the Bisque:
Wipe the fired piece with a damp sponge to remove any kiln dust before glazing. -
Apply Color:
Pour a glossy teal or emerald glaze into the two smaller compartments. Carefully brush the glaze up the inner walls of these sections, keeping a clean line at the top rim. -
Expose the Speckle:
Leave the large pen compartment and the entire exterior unglazed to show off the natural speckled clay body. You can apply a clear matte glaze if you want sealed protection without shine. -
Clean Margins:
Use a damp sponge to wipe away any stray glaze drips effectively, ensuring the division between the glazed pockets and the raw clay remains crisp. -
Final Fire:
Fire the piece again to the maturation temperature of your specific clay and glaze combination (often Cone 5 or 6 for stoneware).
Place this beautiful organizer on your desk to enjoy a clutter-free and stylish workday
Vanity Brush Cup That Looks Like Studio Pottery
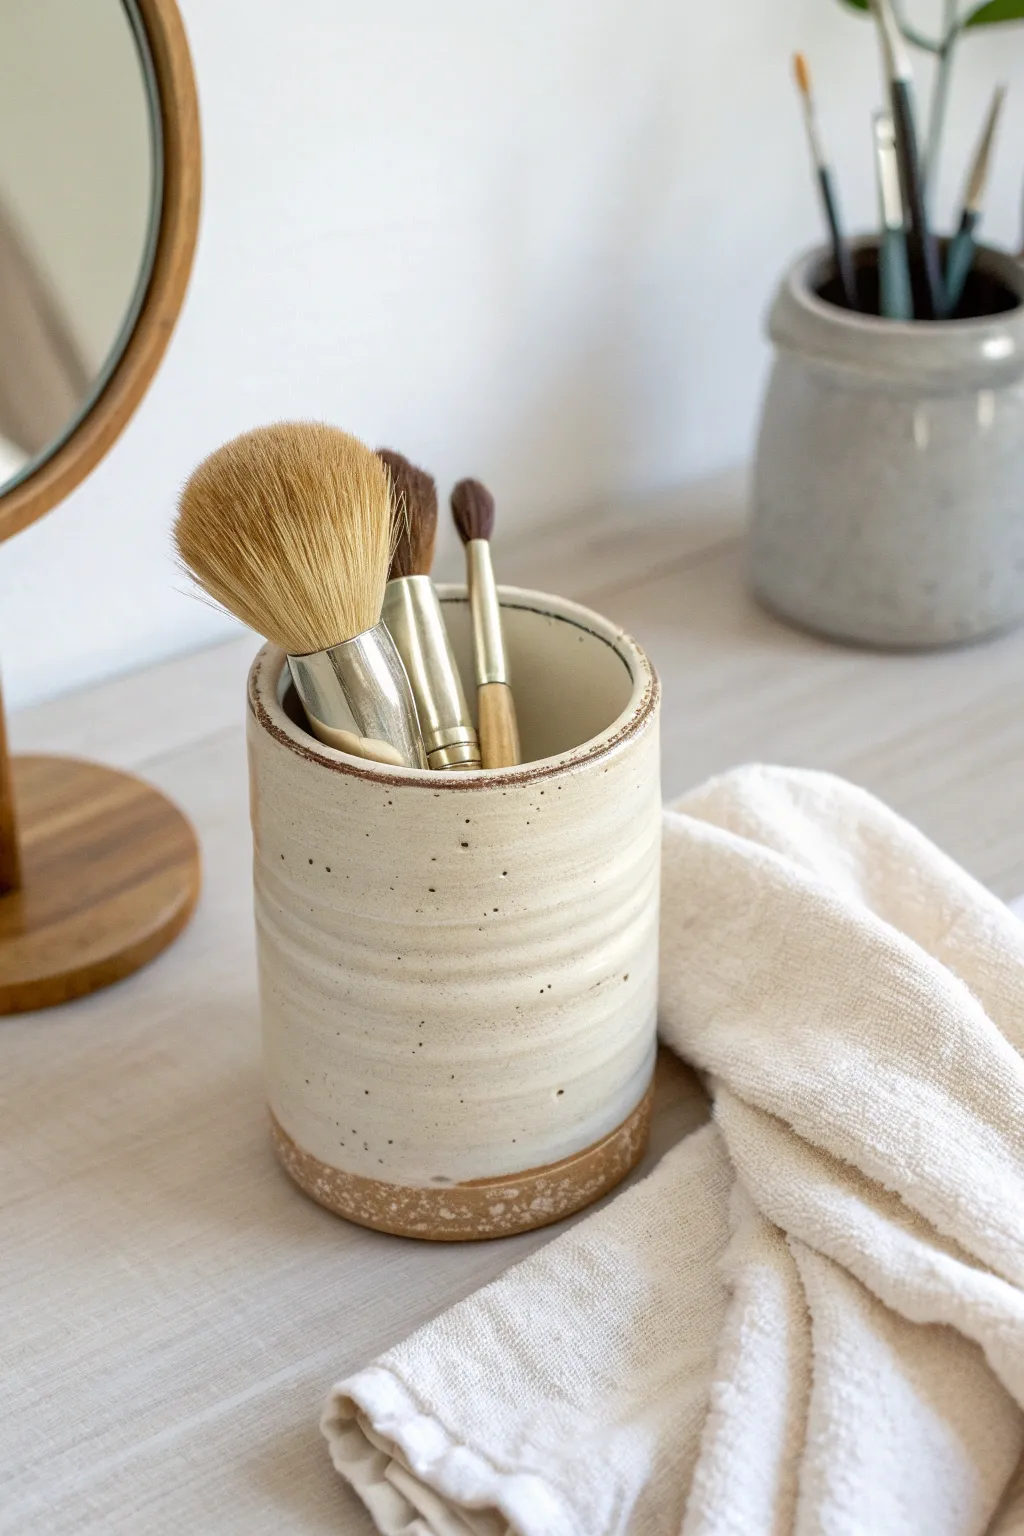
Bring the warmth of professional studio pottery to your bathroom counter with this beautifully textured brush holder. Featuring natural clay accents and subtle horizontal ridges, this hand-built vessel offers a clean, organic aesthetic that elevates any vanity.
Step-by-Step Guide
Materials
- Stoneware clay (speckled or tan variety recommended)
- Pottery wheel (or slab roller for hand-building)
- Needle tool
- Wire cutter
- Wooden rib tool
- Metal kidney rib
- Throwing sponge
- Creamy white dipping glaze (semi-opaque)
- Wax resist (optional)
- Kiln access
Step 1: Forming the Cylinder
-
Prepare the clay:
Begin by wedging about 1.5 to 2 lbs of stoneware clay thoroughly to remove any air bubbles. Form it into a smooth, round ball. -
Center on the wheel:
Slam the clay onto the center of your wheel head. Using wet hands and steady pressure, cone the clay up and down until it is perfectly centered and spinning without a wobble. -
Open the form:
Press your thumbs into the center of the mound to open it, stopping about 1/4 inch from the bottom wheel head to leave a sufficient floor. -
Pull the walls:
Slowly pull the clay upward to create a cylinder. Aim for straight, vertical walls rather than a bowl shape. This cup doesn’t taper much, so keep your pulls consistent from bottom to top. -
Refine the height:
Continue pulling until the cylinder reaches your desired height—about 5 inches is ideal for makeup brushes—ensuring the walls are even in thickness.
Step 2: Texturing and Trimming
-
Create the ridges:
While the wheel is spinning slowly, gently press your finger or the corner of a wooden rib into the exterior wall. Start from the bottom and slowly move up to create a continuous, subtle spiral or distinct horizontal rings. Don’t smooth this out; these ridges are key to the look. -
Define the rim:
Compress the rim with a chamois or your sponge to make it smooth and rounded. Slightly bevel the edge so the glaze will break beautifully over it later. -
Clean the base:
Use a wooden modeling tool to undercut the bottom edge of the pot, creating a slight shadow line where it meets the wheel. -
Wire off:
Run a wire cutter underneath the pot to release it from the wheel head. -
Leather hard stage:
Allow the piece to dry to a leather-hard state. I usually cover it loosely with plastic for a day to ensure it dries evenly without cracking. -
Trim the foot:
Flip the pot over and center it on the wheel. Trim away excess clay from the bottom to create a clean, flat foot, leaving about 1/2 inch of vertical surface at the base untextured.
Clean Lines
For a sharper line between the glazed body and the raw base, use masking tape instead of freehanding the wax. Removing the tape gives a crisp, modern edge.
Step 3: Glazing and Firing
-
Bisque fire:
Once the piece is bone dry, fire it in the kiln to a bisque temperature (usually cone 04 or 06). -
Resist the base:
Apply wax resist to the bottom of the cup and up the side about 1/2 inch. This creates that distinct line of exposed raw clay seen in the finished piece. -
Dip the rim:
Before full glazing, you can quickly dip just the very rim into wax if you want that raw clay accent at the top, or simply wipe the glaze off later. -
Apply the glaze:
Stir your creamy white glaze well. Hold the cup by the foot (or use glazing tongs) and dip it fully into the bucket for 3-4 seconds. -
Clean the accents:
If you didn’t use wax on the rim, take a damp sponge and carefully wipe the glaze off the very top edge to expose the clay body. -
Final wipe:
Wipe any glaze beads off the waxed bottom area to prevent sticking to the kiln shelf. -
Glaze fire:
Fire the piece to the maturity temperature of your clay and glaze (typically cone 5 or 6 for stoneware).
Speckle Surprise
If you don’t have speckled clay, mix a small amount of granular ilmenite or manganese into your white clay body before throwing to get those lovely dark spots.
Now you have a custom, minimalist vessel that holds your brushes in style and adds a serene touch to your space


What Really Happens Inside the Kiln
Learn how time and temperature work together inside the kiln to transform clay into durable ceramic.
Wall Hook Tiles for Jewelry and Everyday Bags
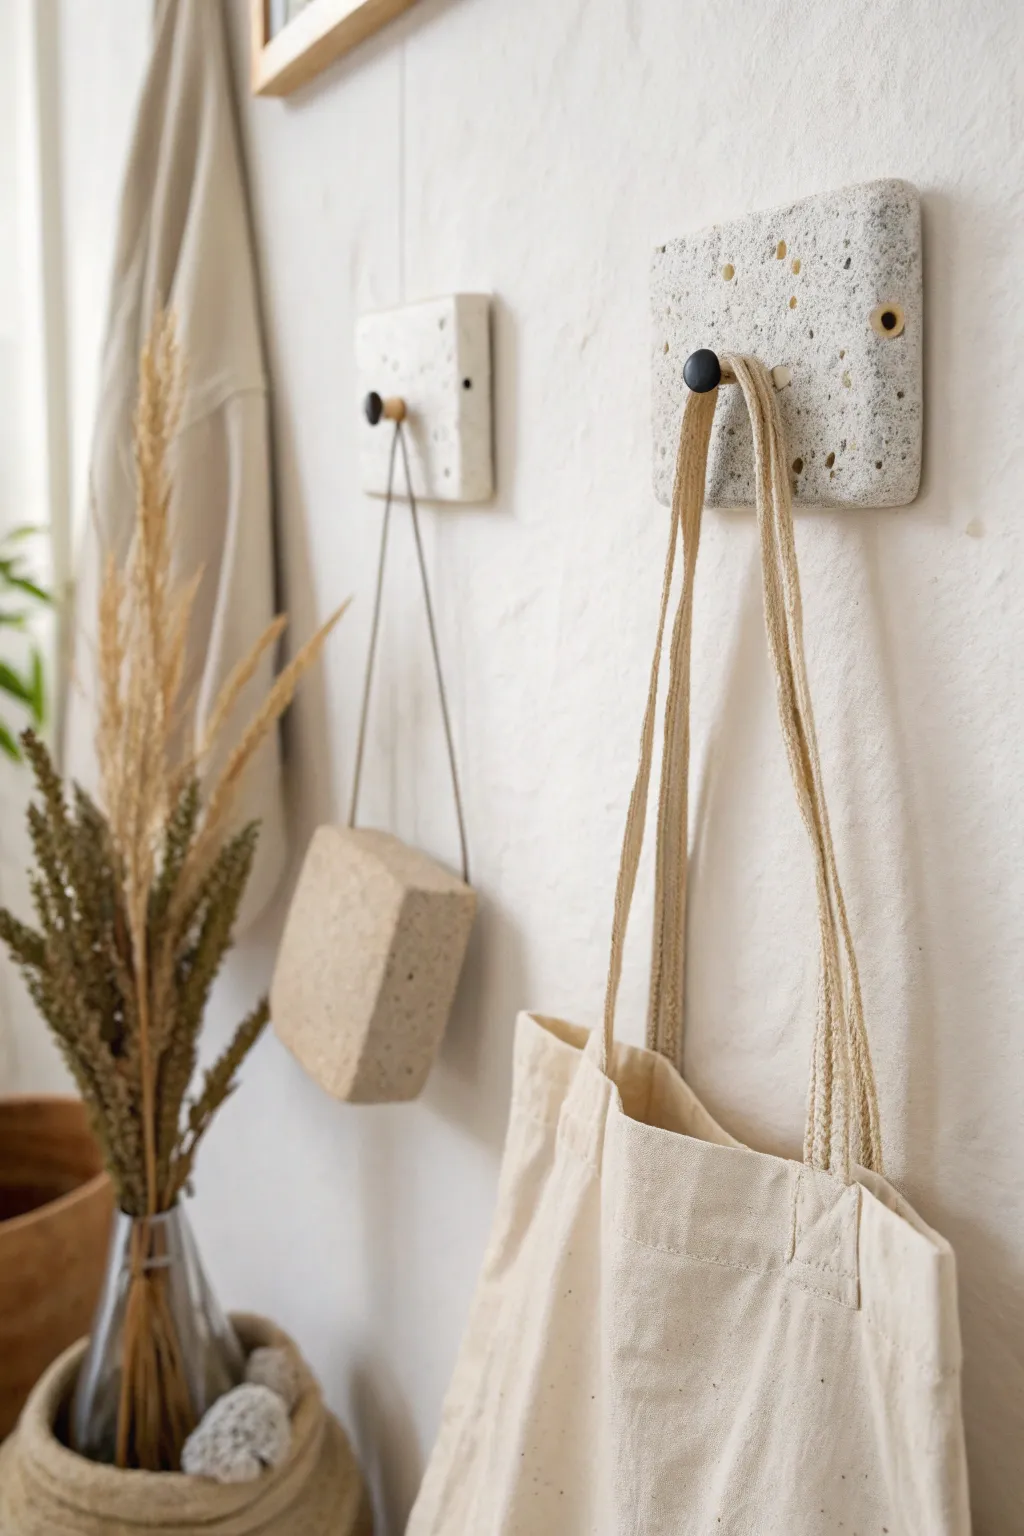
These sturdy, minimalist wall hooks combine the raw beauty of stone with the functional simplicity of modern design. Using air-dry clay with a stone texture, you’ll create durable tiles perfect for displaying jewelry, light bags, or scarves in your entryway.
Step-by-Step
Materials
- Stone-effect air-dry clay (or polymer clay with granite inclusions)
- Wooden dowel or pre-made drawer knob with screw
- Sandpaper (medium and fine grit)
- Rolling pin
- Two flat wooden slats (for thickness guides)
- Ruler
- Craft knife
- Strong adhesive (epoxy or heavy-duty craft glue)
- Matte spray varnish
- Black acrylic paint (optional, for the knob)
- Wall-mounting strips or D-ring hangers
Step 1: Shaping the Tile Base
-
Prepare your workspace:
Lay down a clean mat or parchment paper to prevent sticking. Place your two wooden slats on either side of your working area to serve as guides for an even thickness. -
Condition the clay:
Take a generous handful of stone-effect clay and knead it until it’s pliable. This helps distribute the textural elements evenly throughout the block. -
Roll the slab:
Place the clay between your wooden guides and use the rolling pin to flatten it. Aim for a thickness of about 1.5 to 2 centimeters to ensure the hook is sturdy enough to hold weight. -
Measure the square:
Using a ruler, lightly mark a square shape on the surface of the clay. A size of about 10×10 cm (4×4 inches) works well for a standard tote bag hook. -
Cut the tile:
Use a sharp craft knife to slice cleanly along your measured lines. Keep the knife vertical to ensure square edges rather than beveled ones. -
Create mounting holes (optional):
If you plan to screw these into the wall, use a straw or small tube to poke holes in the corners now. If using adhesive strips later, skip this step. -
Smooth the edges:
Dip your finger in a little water and run it along the cut edges to soften any sharp corners or drag marks left by the knife.
Stone Texture Hack
Can’t find stone clay? Mix coarse black pepper, used coffee grounds, or fine sand into plain white air-dry clay to create your own organic speckled finish.
Step 2: Adding the Hook Mechanism
-
Mark the center:
Find the center point of your clay square and make a small indentation. -
Create the insertion point:
If you are using a screw-in knob, gently press the screw end into the wet clay to create a pilot hole, then remove it. If using a wooden dowel, press the dowel in about halfway through the tile’s thickness to form a socket. -
Dry the tile:
Let the clay dry completely according to the package instructions. I like to flip the tile over halfway through the drying process to prevent curling. -
Prepare the knob:
While the clay dries, sand your wooden knob or dowel smooth. Paint it with black acrylic paint for that modern contrast seen in the photo, and let it dry. -
Refine the surface:
Once the clay is fully hardened, use sandpaper to smooth the flat surfaces and edges. This reveals more of the ‘stone’ speckles in the clay texture. -
Secure the hook:
Apply a strong epoxy or heavy-duty glue into the center hole or socket you created earlier. Insert your painted knob or dowel firmly and let the glue cure completely.
Fixing Cracks
If small drying cracks appear, mix a tiny amount of fresh clay with water to make a paste (slip). Fill the cracks, smooth it over, and let it dry again before sanding.
Step 3: Finishing Touches
-
seal the surface:
Spray the entire piece with a matte varnish. This brings out the stone texture without making it look glossy and protects the clay from moisture and dirt. -
Attach mounting hardware:
Glue a strong D-ring hanger to the back using industrial strength adhesive, or apply heavy-duty removable wall strips if you want a rental-friendly option.
Now you have a stylish, functional piece of wall art ready to organize your space
Stamped Planter With Subtle Pattern and Matte Finish
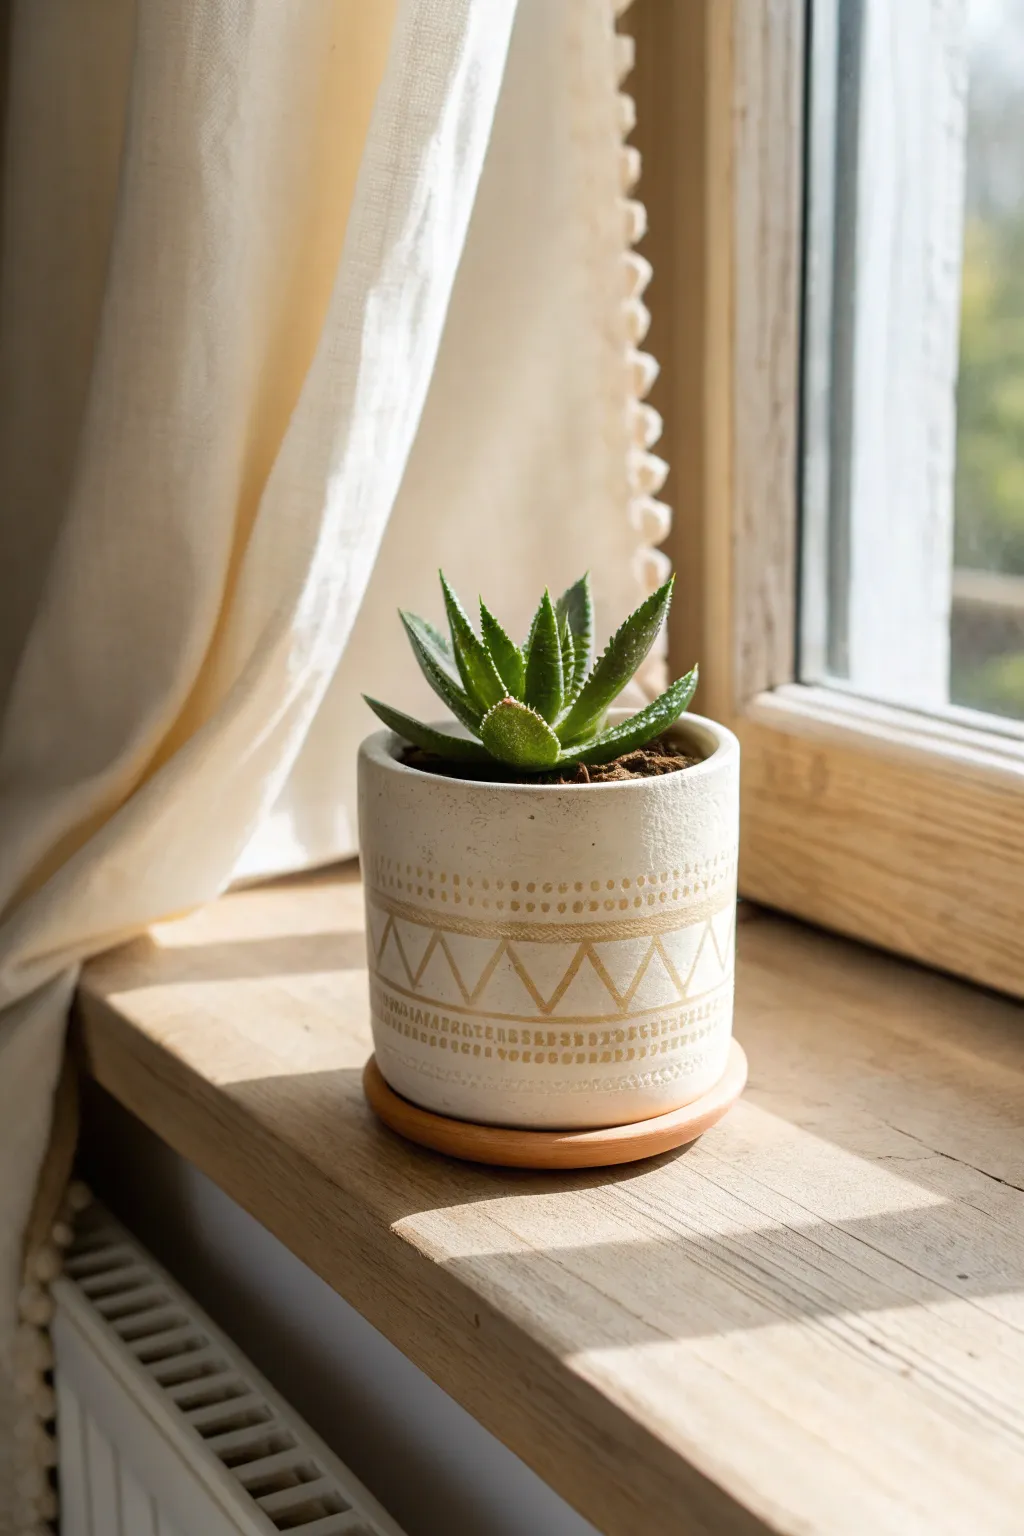
Achieve a high-end artisanal look with this simple yet elegant cylinder planter featuring delicate gold geometric patterns. This project combines the clean aesthetic of matte white pottery with the warmth of metallic accents for a understated statement piece.
How-To Guide
Materials
- White polymer clay or air-dry clay (approx. 1-1.5 lbs)
- Clay roller or rolling pin
- Cylindrical mold (like a large can or glass jar)
- Parchment paper
- Craft knife or clay blade
- Small geometric stamps (dots and triangles)
- Gold acrylic paint or gold leafing pen
- Fine-point paintbrush
- Matte sealant or varnish
- Sanding sponge (fine grit)
- Small terracotta saucer (optional, for base)
Step 1: Forming the Base
-
Condition the clay:
Begin by kneading your white clay thoroughly until it is warm, pliable, and free of air bubbles, which is crucial for a smooth finish. -
Roll the slab:
Roll out the clay on a sheet of parchment paper to an even thickness of about 1/4 inch. Ensure the strip is long enough to wrap around your chosen cylindrical mold. -
Cut the rectangle:
Measure the height of your desired pot and use a straight edge and craft knife to cut a clean, long rectangular strip from your rolled slab. -
Prepare the mold:
Wrap your cylindrical mold (can or jar) with a piece of parchment paper to prevent the clay from sticking to it during the forming process. -
Create the cylinder:
Carefully lift your clay strip and wrap it around the mold. Bring the two short ends together. -
Seal the seam:
Using a small amount of water (for air-dry) or liquid clay (for oven-bake), blend the seam together with your fingers or a modeling tool until it disappears completely. -
Add the bottom:
Roll a separate piece of clay for the base. Place your mold (with the clay cylinder on it) onto this piece and cut around the circle. Blend the bottom circle into the cylinder walls securely.
Uneven Seams?
If the vertical seam is still visible after smoothing, try cross-hatching the edges with a needle tool before applying water or slip. This creates a stronger mechanical bond.
Step 2: Creating the Pattern
-
Apply the stamps:
While the clay is still soft, gently press your geometric stamps into the surface. Create a row of dots near the top rim, followed by a middle band of zig-zags or triangles, and a final bottom row of dots. -
Check depth:
Ensure the impressions are deep enough to hold paint later but not so deep that they distort the cylinder’s shape. I sometimes support the inside wall with my hand while stamping. -
Smooth imperfections:
Lightly run a wet finger over any rough edges created by the stamping process to soften the clay burrs.
Stamp spacing secret
Before stamping the clay, lightly mark your spacing with a disappearing ink marker. This ensures your pattern meets perfectly at the back without an awkward gap.
Step 3: Finishing and Painting
-
Dry or Bake:
Follow the manufacturer’s instructions for your specific clay. If baking, remove the internal mold first. If air-drying, let it sit for 24-48 hours until fully hardened. -
Sand the surface:
Once fully cured, use a fine-grit sanding sponge to buff the exterior. This creates that high-quality matte porcelain look seen in the photo. -
Prepare the gold:
Dip a very fine paintbrush into your metallic gold acrylic paint. You want a creamy consistency that flows easily into the grooves. -
Fill the impressions:
Carefully paint inside the stamped indentations. Don’t worry if you get a little paint on the surface; the recessed design is the priority. -
Clean the lines:
If paint strayed outside the lines, quickly wipe the surface with a barely damp cloth. This leaves paint only in the recessed stamped areas, creating a crisp pattern. -
Create the bands:
Using a steady hand or a guide, paint delicate horizontal gold lines above and below your triangle pattern to frame the design. -
Seal the piece:
Apply a coat of matte spray varnish or sealant to protect the planter from moisture without adding unwanted gloss. -
Add the saucer:
Pair your finished white cylinder with a simple terracotta or wood saucer to complete the warm, natural aesthetic.
Place a succulent inside and enjoy the modern warmth this planter brings to your windowsill

TRACK YOUR CERAMIC JOURNEY
Capture glaze tests, firing details, and creative progress—all in one simple printable. Make your projects easier to repeat and improve.
Air Plant Wall Pocket for a Tiny Botanical Moment
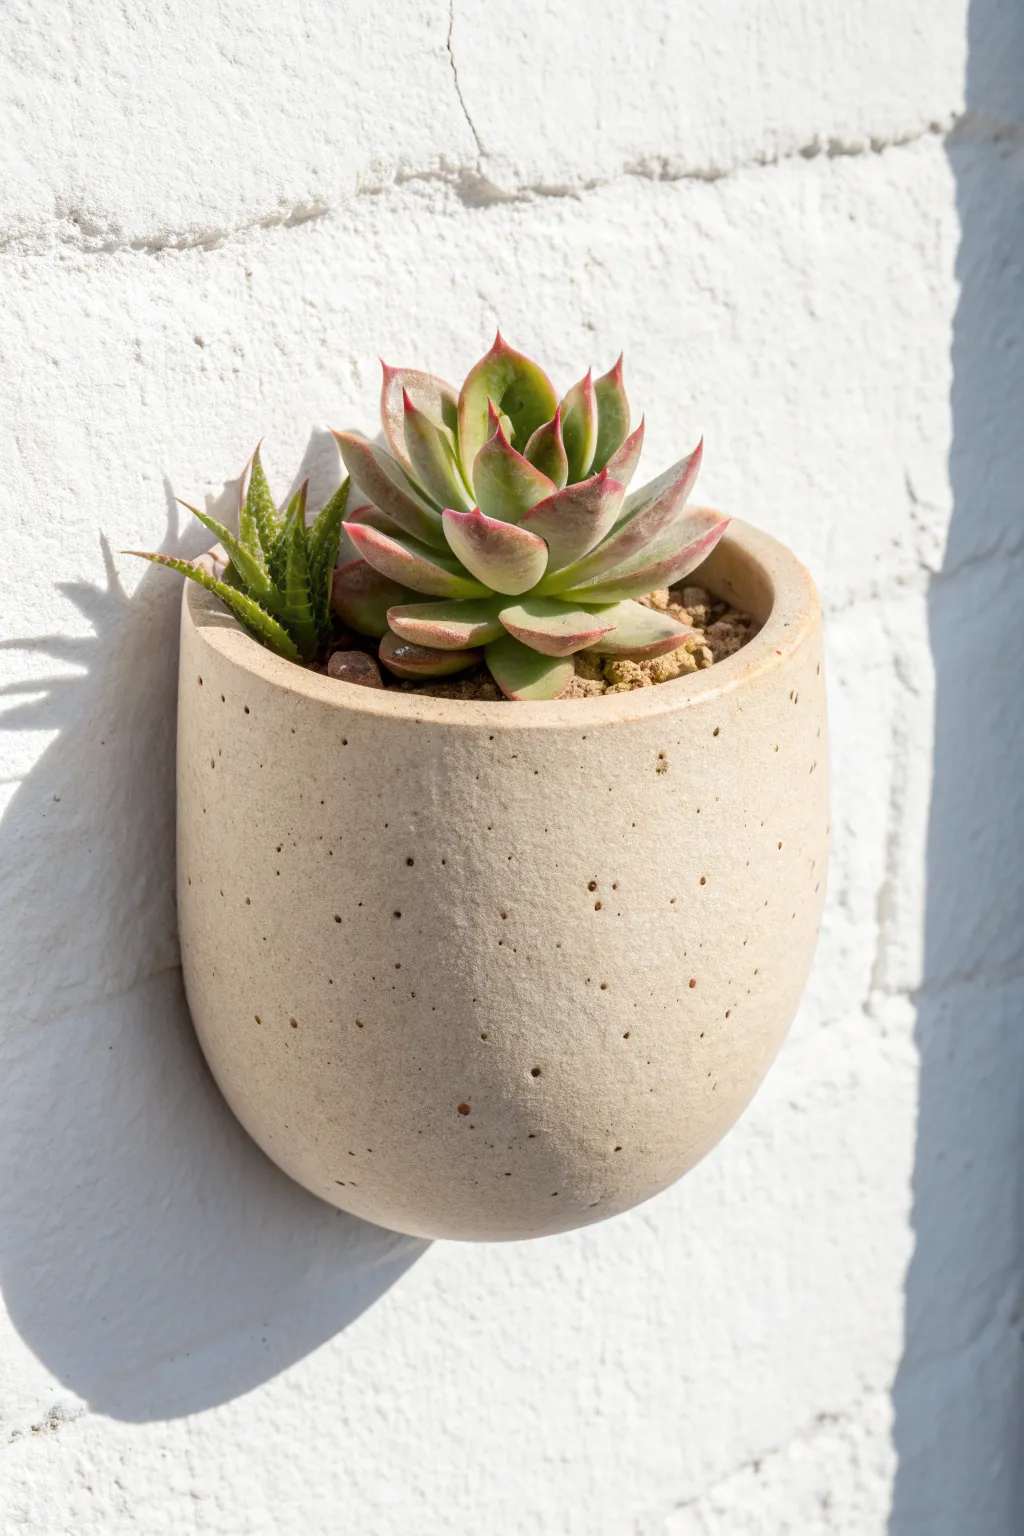
Create a stunning botanical moment on your wall with this half-sphere clay pocket that perfectly mimics the texture of natural stone. The speckled, sandy finish provides an organic backdrop for air plants or small succulents, proving that functional decor can be deceptively simple to make.
Step-by-Step Tutorial
Materials
- Polymer clay (white or beige base)
- Speckled clay inclusions (dried coffee grounds, black pepper, or specific ‘granitex’ clay)
- Rolling pin
- Medium-sized styrofoam ball (cut in half) or a smooth bowl to use as a rounded mold
- Craft knife or scalpel
- Sandpaper (fine grit)
- Small straw or drill bit (for the hanging hole)
- Matte varnish (optional)
- Super glue or strong craft adhesive (if mounting hardware separately)
Step 1: Preparing the Clay Body
-
Condition the base:
Start by warming up a significant block of white or beige polymer clay in your hands until it becomes soft and pliable. -
Add texture:
To achieve that natural speckled look shown in the photo, knead in your speckling agent. You can mix a small amount of black polymer clay, dried coffee grounds, or coarse black pepper into the light clay until it’s evenly distributed but still distinct. -
Roll it out:
Roll the clay out into a thick, even slab, aiming for about 1/4 inch thickness to ensure the wall pocket will be sturdy enough to hold soil and plants.
Slumping Issues?
If the clay sags during baking, create a supportive nest using crumpled aluminum foil or polyester batting directly under the curve to hold its shape in the oven.
Step 2: Shaping the Pocket
-
Prepare the mold:
Take your styrofoam half-sphere or the back of a rounded bowl. If using a non-porous mold like metal or glass, lightly dust it with cornstarch so the clay doesn’t stick. -
Drape the clay:
Gently lay your rolled clay slab over the rounded form, smoothing it down with your palms to take the shape of the curve without thinning it out too much. -
Trim the excess:
Using your craft knife, trim the excess clay around the edge of the mold to create a clean, flat back rim. This flat edge will eventually sit flush against the wall. -
Create the back panel:
Roll out a second piece of clay for the back. Trace the outline of your molded piece onto this slab and cut out a ‘D’ shape or a circle segment that will seal the back of the pocket. -
Add a hanging point:
Before assembling, use a straw or tool to punch a clean hole near the top center of the back panel for hanging later.
Real Stone Look
Mix translucent clay into your beige base 50/50. When baked, the semi-transparency creates depth that looks much more like real quartz or sandstone.
Step 3: Assembly and Finishing
-
Join the pieces:
Score the edges of both the molded front and the flat back panel. Apply a tiny bit of liquid clay or water (for air-dry types) and press them firmly together. -
Smooth the seams:
Use your thumb or a clay tool to blend the seam where the front meets the back until it is invisible, creating a continuous stone-like surface. -
Texture the surface:
I like to take an old toothbrush or a crumpled ball of foil and gently press it all over the exterior to enhance that grainy, stone-like texture visible in the image. -
Bake or dry:
Follow the specific instructions for your clay type to bake or air-dry the piece. If baking, props the rounded front with batting so it doesn’t slump in the oven. -
Add indentations:
Once hardened, you can use a fine tool to add a few larger ‘pockmarks’ or decorative holes on the surface if you want to mimic the photo’s weathered look more closely. -
Sand for finish:
Lightly sand away any fingerprints or sharp edges, particularly around the rim, to soften the look. -
Planting:
Fill with a small amount of succulent soil and nestle your plants inside for a gravity-defying display.
Hang your new creation on a textured wall to enjoy a touch of desert greenery in any room
Essential Oil Diffuser Bead Garland for a Calm Corner
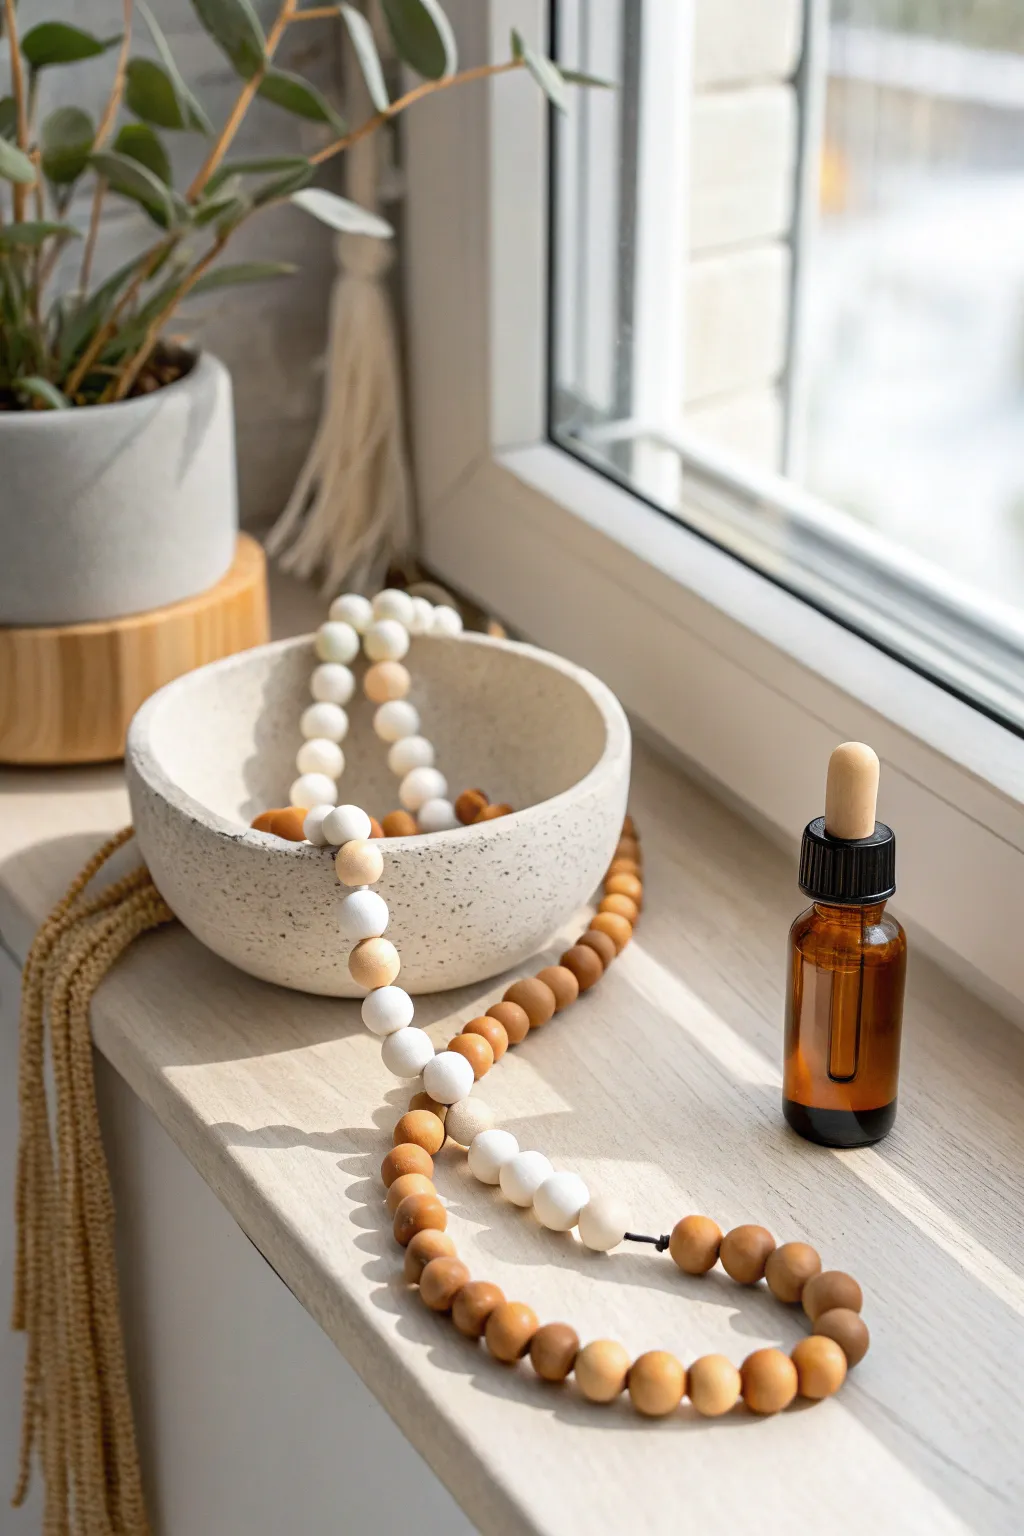
Create a serene corner with this minimalist project featuring hand-rolled polymer clay beads and a matching textured trinket bowl. The porous nature of the wooden beads pairs perfectly with the sleek clay, making it an ideal vessel for diffusing your favorite calming essential oils.
Step-by-Step
Materials
- White polymer clay (oven-bake)
- Wooden beads (assorted sizes, 12mm-20mm)
- Hemp or cotton wax cord (tan or brown)
- Large-eye tapestry needle
- Rolling pin or acrylic roller
- Small bowl mold (glass or metal bowl works well)
- Coarse salt or sand (for texture)
- Clear matte varnish (optional)
- Essential oils (for finishing)
- Sandpaper (fine grit)
- Tassel (pre-made) or embroidery floss to make one
Step 1: Crafting the Clay Beads
-
Condition the clay:
Start by warming a block of white polymer clay in your hands. Knead it thoroughly until it becomes soft and pliable, ensuring there are no air bubbles trapped inside. -
Portion the clay:
Pinch off small pieces of clay. To keep them uniform, roll the clay into a log first and slice off equal segments, aiming for about 15-20 marble-sized chunks. -
Roll spheres:
Roll each segment between your palms to create smooth, round spheres. Don’t worry if they aren’t factory-perfect; a little organic variation adds to the handmade charm. -
Pierce holes:
Using a toothpick or a bead piercing tool, gently create a hole through the center of each sphere. Use a twisting motion to avoid squashing the round shape. -
Verify hole size:
Check that the hole is large enough for your chosen cord to pass through twice if needed. I usually give the tool a little wiggle to widen it slightly before baking. -
First bake:
Arrangement the clay beads on a parchment-lined baking sheet. Bake according to your clay package instructions (usually 275°F/135°C for 15-30 minutes).
Step 2: Creating the Textured Bowl
-
Roll the slab:
While the beads bake, roll out a larger portion of white clay into a slab about 1/4 inch thick. Aim for a circle roughly 6 inches in diameter. -
Add texture:
Sprinkle coarse salt or press a textured sponge gently onto the surface of the clay slab. This creates the speckled, stony look seen in the inspiration image without needing special granite clay. -
Shape the bowl:
Drape your clay circle over the bottom of an upside-down glass or metal bowl (your mold). Gently press the clay down to take the shape of the mold. -
Refine the rim:
Use a knife to trim any uneven edges around the rim for a clean look, or leave it slightly wavy for a more organic feel. Smooth the cut edge with your finger. -
Bake the bowl:
Bake the bowl while it is still on the mold to ensure it holds its shape. Follow the package instructions for temperature and time. -
Remove salt:
Once cool, wash the bowl under warm water to dissolve the salt crystals, leaving behind beautiful divots and a stone-like texture.
Fingerprint Fix
Before baking, adhere a tiny bit of cornstarch to your finger and gently buff the raw clay beads. This smooths out any accidental fingerprints.
Step 3: Assembling the Garland
-
Prepare the cord:
Cut a length of hemp or cotton cord roughly 3 feet long. Tie a sturdy knot at one end, or attach your pre-made tassel securely to this starting point. -
Plan the pattern:
Lay out your beads on a table to design your pattern. I like to alternate between the white clay beads and the natural wooden beads to create visual rhythm. -
String the beads:
Thread your needle and begin restringing the beads according to your pattern. Ensure the fit is snug but allows the garland to drape naturally. -
Finish the strand:
Once you reach your desired length, tie a secure double knot at the end. You can hide the tail by threading it back through the last two beads and trimming the excess. -
Add scent:
Place your garland partway into the finished clay bowl. Add 2-3 drops of essential oil onto the porous *wooden* beads (not the clay ones) to turn your décor into a diffuser.
Pro Tip: Marbling
Mix a tiny speck of black or translucent clay into your white clay before rolling. Stop kneading halfway for a subtle marble effect.
Place your new creation on a windowsill to enjoy both the visual calm and the gentle aroma
Sculptural Face Vase That Doubles as Conversation Decor
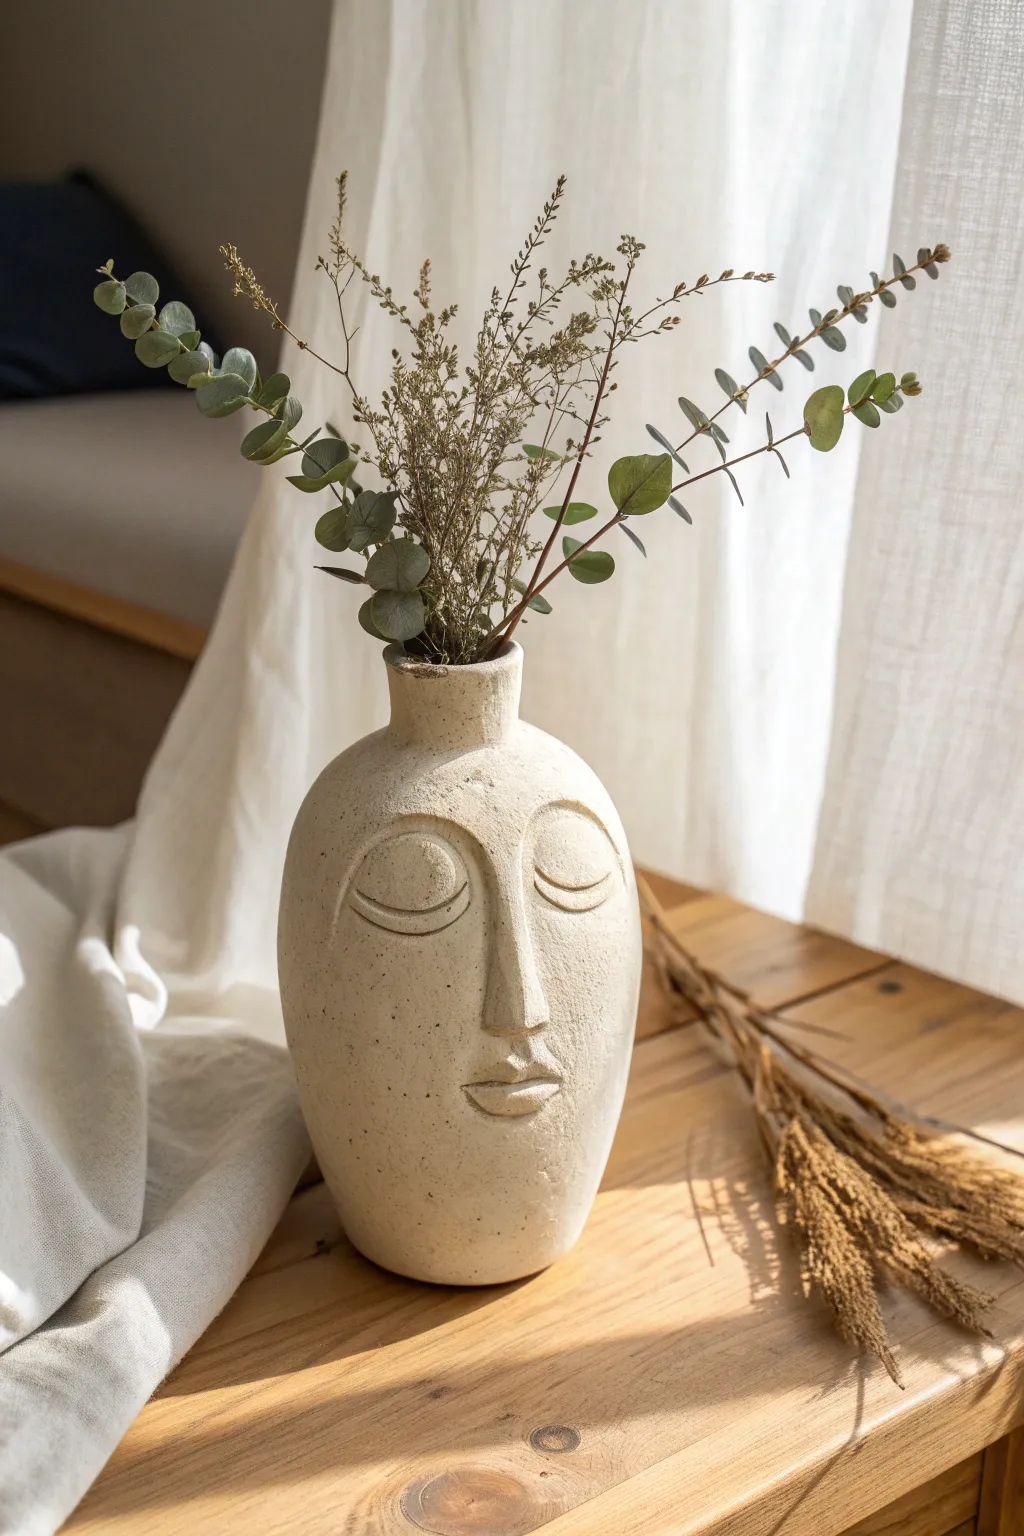
This sculptural vase transforms simple clay into a tranquil, art-deco-inspired centerpiece. With its calming, closed-eye expression and rough, stone-like texture, it brings an organic, meditative quality to any shelf or mantelpiece.
Step-by-Step Guide
Materials
- Air-dry clay (stone or white color)
- Small rolling pin
- Clay sculpting tools (needle tool, loop tool, smoothing rib)
- Empty glass bottle or tube (for armature)
- Slip (clay mixed with water)
- Sponge
- Water cup
- Sandpaper (fine grit)
- Matte acrylic varnish
- Speckled acrylic paint (optional, for stone effect)
Step 1: Building the Form
-
Prepare the Armature:
Begin by selecting an empty glass bottle or a sturdy cardboard tube to serve as the internal structure; this ensures your vase remains waterproof if using fresh flowers and provides stability while sculpting. -
Roll the Slab:
Roll out a large slab of air-dry clay to approximately 1/4 inch thickness, ensuring it is wide and tall enough to wrap completely around your chosen armature with a little overlap. -
Wrap and Seal:
Gently wrap the clay slab around the bottle. Score the overlapping edges with a needle tool, apply a little slip, and press them firmly together to create a seam. -
Smooth the Join:
Work the clay over the seam with your thumb or a smoothing tool until the join is invisible, blending the clay downwards to cover the bottom if necessary. -
Shape the Neck:
Mold the clay at the top of the bottle inward to create a narrower neck, ensuring smooth transitions from the main body to the smaller opening.
Cracking Up?
If small cracks appear during drying, make a paste of clay and vinegar (instead of water). Fill the cracks, smooth over, and let dry again.
Step 2: Sculpting the Features
-
Position the Nose:
Roll a small coil of clay for the nose. Attach it vertically to the center of the face using the score-and-slip method, blending the edges seamlessly into the main vase body. -
Define the Nose Bridge:
Use a modeling tool to carve out the sides of the nose, defining the bridge and creating the nostrils at the bottom for a stylized, elongated look. -
Add the Eye Mounds:
Create two half-oval shapes from clay slabs. Attach them symmetrically on either side of the nose bridge to form the heavy, closed eyelids. -
Refine the Eyelids:
Use a needle tool or small knife to incise a curved line along the bottom of each eye mound, emphasizing the ‘sleeping’ expression. -
Sculpt the Arch:
Roll thin, curved coils for the eyebrows. Attach these directly above the eye mounds, blending the top edge upward into the forehead while keeping the bottom edge distinct. -
Form the Mouth:
Add a small, flattened oval of clay below the nose. Use a tool to press a horizontal line across the center, creating the separation between the upper and lower lips.
Step 3: Texturing and Finishing
-
Initial Smoothing:
Dip a sponge in water and gently wipe the entire surface to remove harsh fingerprints, but don’t over-smooth; a little irregularity adds character. -
Create Stone Texture:
I like to take an old toothbrush or a stiff bristle brush and gently tap it over the clay surface to create a pitted, stone-like texture before the clay dries. -
Drying:
Allow the vase to dry completely in a cool, dry place for 24-48 hours. Turn it occasionally to ensure even drying and prevent cracking. -
Sanding:
Once bone dry, lightly sand any sharp burrs or overly rough patches with fine-grit sandpaper, focusing on the rim and the base. -
Faux Stone Finish:
If your clay is plain white, mix a tiny amount of black or brown paint with water and speckle it onto the vase using a flicked toothbrush to mimic natural stoneware. -
Seal:
Apply two coats of matte acrylic varnish to protect the surface and give it a finished, professional look.
Earthy Tones
Mix coffee grounds into your white air-dry clay before rolling. It creates a natural, speckled texture that looks like expensive ceramic clay.
Fill your new sculpture with dried eucalyptus or grasses to complete the serene, organic aesthetic
Moon Phase Wall Hanging With Textured Clay Discs
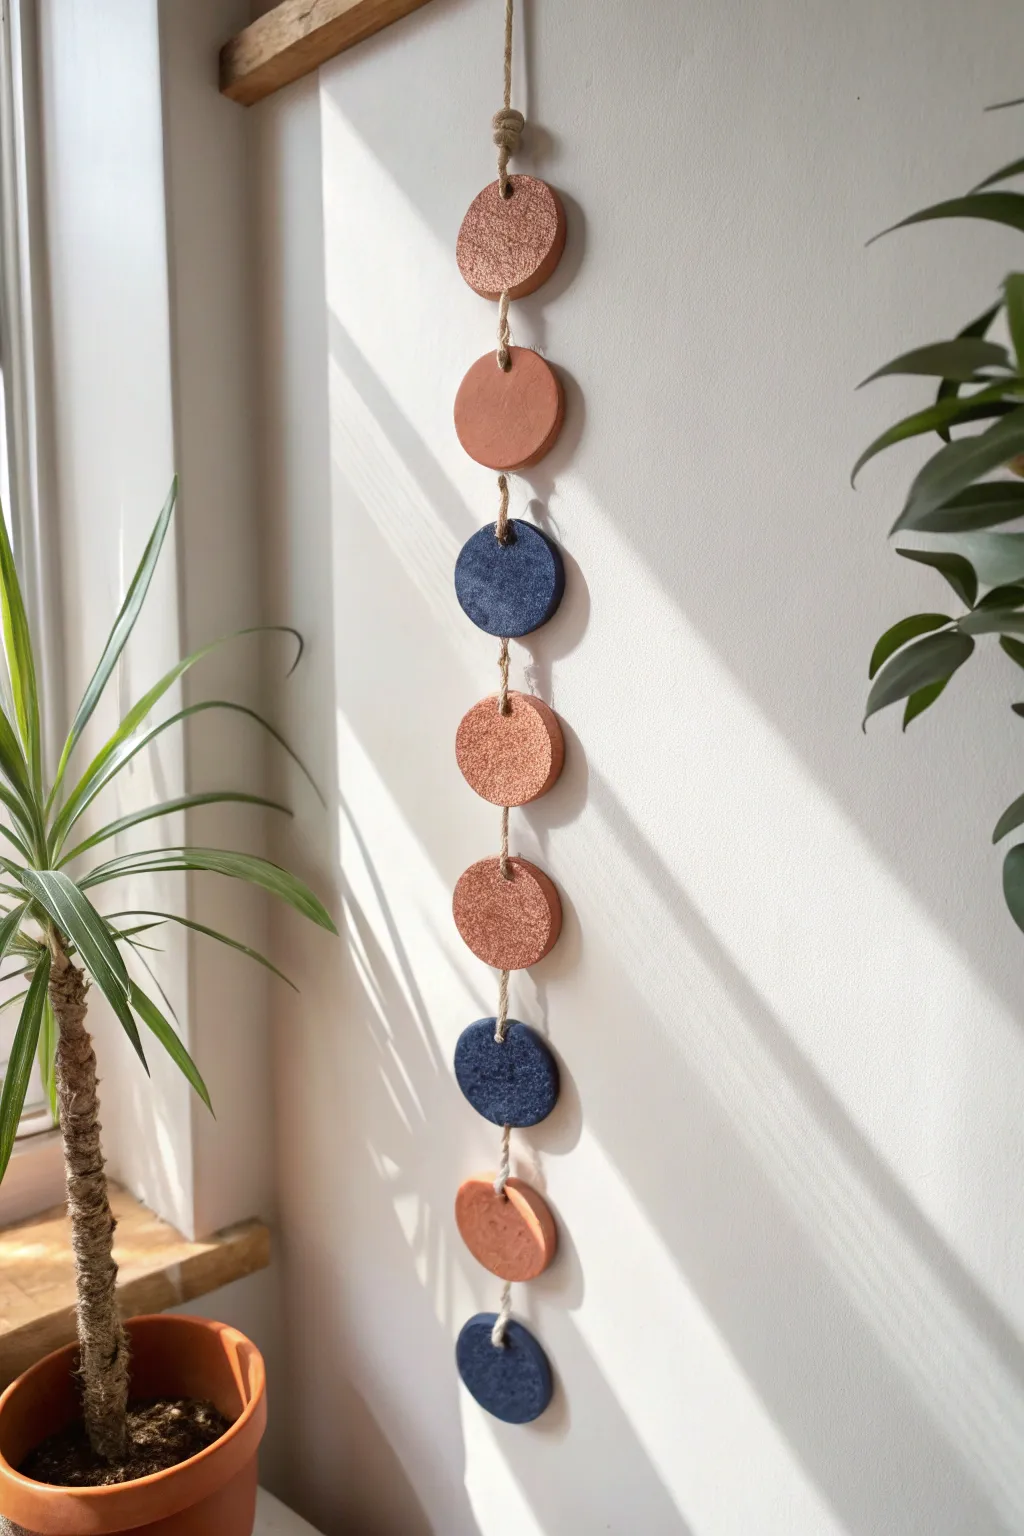
Bring celestial charm to any corner with this simple yet striking wall hanging that mimics the beauty of moon phases. Using textured clay and a mix of earthy terracotta and deep midnight blue tones, this vertical garland adds warmth and modern style to your decor.
How-To Guide
Materials
- Air-dry clay (terracotta or white)
- Circular cookie cutter (approx. 2-3 inches)
- Rolling pin
- Parchment paper or canvas mat
- Drinking straw or small dowel (for hole punching)
- Sandpaper (fine grit)
- Acrylic paint (midnight blue/navy)
- Copper or gold metallic acrylic paint (optional for sheen)
- Glitter spray or textured medium (optional)
- Jute twine or hemp cord
- Scissors
- Wooden dowel or driftwood branch (for hanging mechanism, optional)
Step 1: Shaping the Clay
-
Prepare your workspace:
Lay down a sheet of parchment paper or a canvas mat to prevent the clay from sticking to your table. Take a large ball of air-dry clay and knead it briefly in your hands to warm it up and remove air bubbles. -
Roll out the slab:
Using a rolling pin, flatten the clay to an even thickness of about 1/4 inch. If you want a perfectly uniform look, place two wooden rulers on either side of the clay to guide the rolling pin height. -
Create texture (optional):
If you want the rough, crater-like texture shown in some of the discs, gently press a piece of crumpled aluminum foil or coarse sandpaper into the surface of the wet clay slab before cutting. -
Cut the shapes:
Press your circular cookie cutter firmly into the clay to create your discs. For the design shown, you will need at least eight circles, but it’s always wise to cut a few extras in case of breakage. -
Pierce the hanging holes:
Using a drinking straw or a small dowel, poke a hole near the top edge and directly opposite near the bottom edge of each disc. Ensure the holes are large enough for your twine to pass through easily. -
Smooth the edges:
Dip your finger in a little water and gently run it along the cut edges of each circle to smooth out any roughness or loose clay bits. -
Let them dry:
Place the discs on a flat surface to dry for 24-48 hours. I recommend flipping them over halfway through the drying process to prevent curling and ensure even drying.
Texturing Tip
For an organic, stone-like surface on the blue discs, mix a teaspoon of baking soda into your acrylic paint. It creates a fluffy, matte texture that looks like slate.
Step 2: Decoration and Assembly
-
Sand imperfections:
Once fully dry, lightly sand the edges with fine-grit sandpaper to achieve a clean, professional finish. -
Paint the midnight moons:
Select three or four discs to be your ‘dark moons.’ Paint them completely with midnight blue acrylic paint. You can dab the paint on with a sponge rather than a brush to enhance the stone-like texture. -
Add shimmer details:
For the textured terracotta discs, you can leave them raw or brush on a light coat of copper metallic paint. If you want the sparkle seen in the image, apply a quick spritz of glitter spray while the paint is tacky. -
Seal the clay:
Apply a matte or satin varnish to all the discs. This protects the clay from moisture and gives the colors a cohesive finish. -
Cut the twine:
Cut a long length of jute twine, measuring about 4-5 feet depending on how much spacing you want between discs. -
Tie the top loop:
Create a hanging loop at one end of the twine. You can make a simple slip knot or wrap the twine around a small wooden ring if you prefer. -
String the first disc:
Thread the twine through the top hole of your first disc and out through the bottom hole. Slide it up near the top loop. -
Secure with knots:
To keep the disc in place, tie a knot in the twine immediately below the bottom hole of the disc. This acts as a stopper for the current disc and a spacer for the next one. -
Continue the pattern:
Tie another knot a few inches down the string where you want the top of the *second* disc to sit. Thread the second disc on, resting it on the next knot below it. Repeat this rhythm—knot, disc, knot—until all pieces are attached.
Celestial Upgrade
Before the clay dries, use a smaller cutter to slice crescent shapes out of a few discs, creating a true ‘phases of the moon’ progression down the string.
Hang your creation near a window where the sunlight can highlight the subtle textures and enjoy your handmade art piece