Clay time with kids is my favorite kind of creative chaos—simple shapes, big imaginations, and lots of proud grins. These ideas are all about easy clay projects that little hands can actually finish (and love showing off).
Pinch Pot Bowls for Tiny Treasures
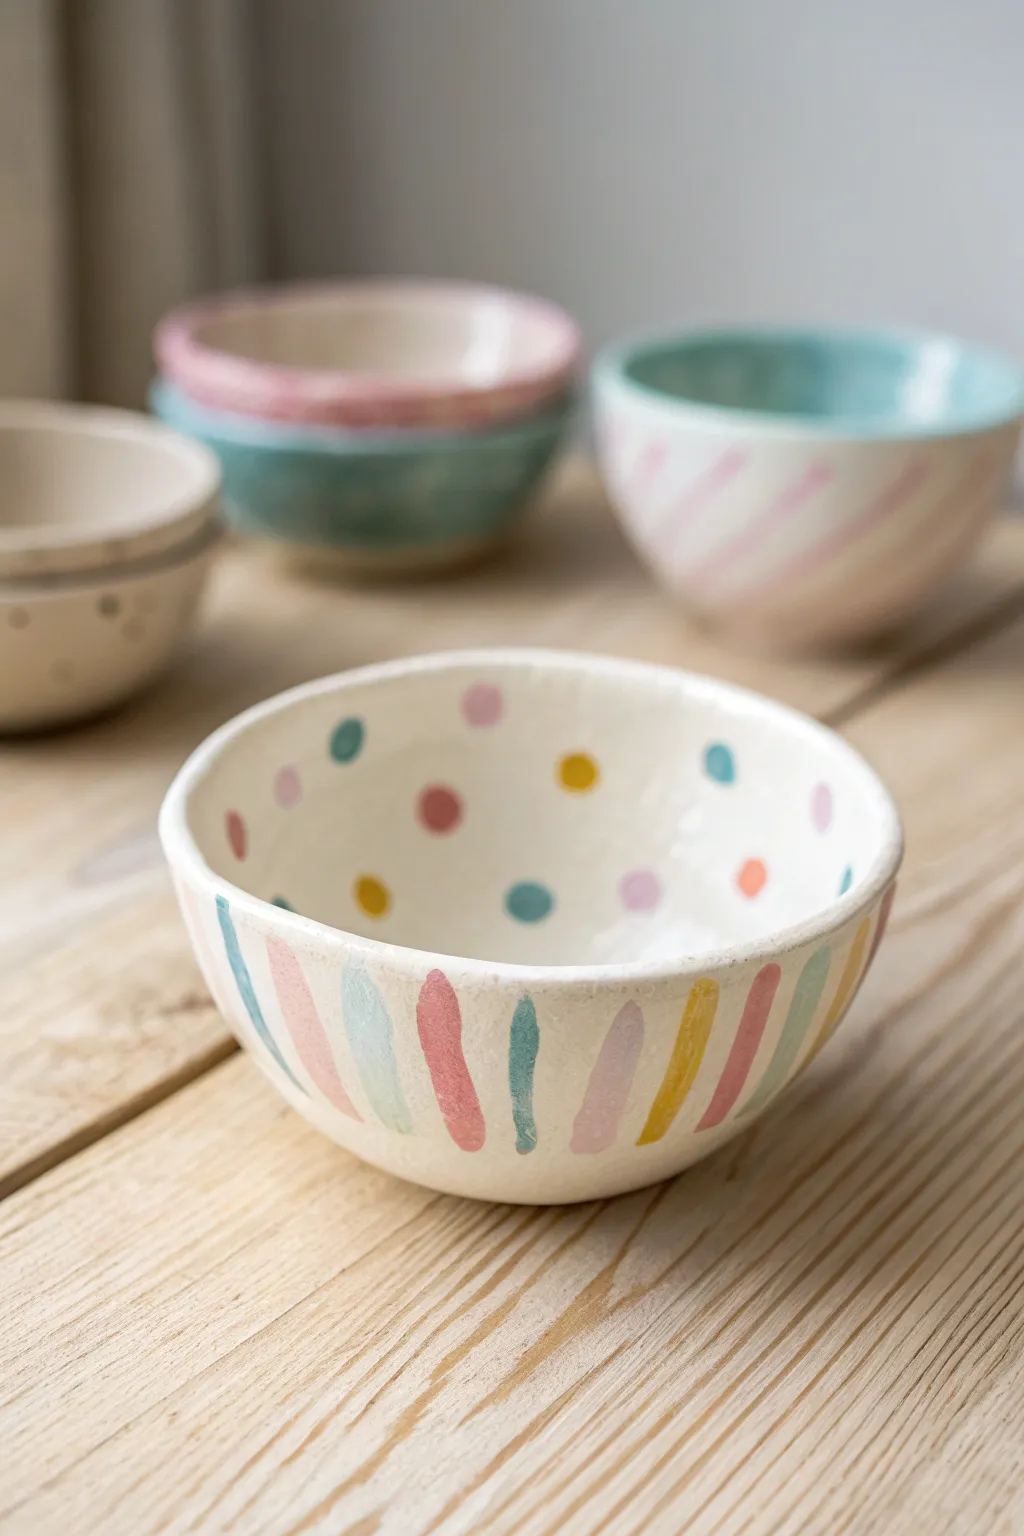
These adorable, hand-shaped clay bowls are perfect for holding rings, coins, or tiny treasures. With their cheerful pastel stripes on the outside and playful polka dots on the inside, they add a splash of handmade charm to any dresser or shelf.
How-To Guide
Materials
- Air-dry clay (white) or polymer clay
- Acrylic paints (pastel pink, blue, yellow, purple)
- Small round paintbrush
- Fine-detail paintbrush
- Cup of water
- Paper towel
- Gloss varnish or clear sealant (optional)
- Small sponge (optional for smoothing)
Step 1: Shaping the Bowl
-
Prepare the clay:
Start by taking a lump of white clay about the size of a tennis ball. Roll it back and forth in your palms until you have a smooth, round sphere with no cracks. -
Start the pinch:
Hold the sphere in your non-dominant hand. Gently press your thumb into the very center of the ball, pushing down about three-quarters of the way through. Be careful not to push all the way to the bottom. -
Pinch the walls:
Using your thumb on the inside and fingers on the outside, start pinching the clay wall gently. I like to rotate the ball slightly after every few pinches to keep the thickness even. -
Widen the form:
Continue pinching and turning until you have created a bowl shape. Aim for the walls to be about a quarter-inch thick—not too thin, or it might crack. -
Smooth the surface:
Dip your finger (or a small sponge) in a tiny bit of water and rub it over the clay to smooth out any fingerprints or rough edges. Focus on the rim to make sure it’s nice and rounded. -
Flatten the base:
Gently tap the bottom of your bowl against your table surface. This creates a flat base so the bowl will stand up straight without wobbling. -
Let it dry:
If using air-dry clay, set the bowl aside in a safe spot to dry completely. This usually takes 24-48 hours depending on humidity. If using oven-bake clay, follow the package instructions to bake it now.
Step 2: Painting the Design
-
Mix your palette:
Prepare your pastel acrylic paints. If you only have primary colors, mix them with plenty of white to achieve those soft, candy-colored hues seen in the photo. -
Paint the exterior stripes:
Load your small round brush with your first color (like pastel blue). Paint a vertical stripe starting from the bottom edge and stopping just at the rim. -
Add more colors:
Rinse your brush and switch to the next color (pink). Paint another stripe next to the blue one, leaving a small gap of white clay showing in between. -
Complete the pattern:
Continue adding stripes in alternating colors—yellow, purple, pink, teal—all the way around the outside of the bowl. Don’t worry if the lines are organic or slightly wobbly; that’s part of the charm. -
Dry the outside:
Let the outside stripes dry to the touch so you don’t smudge them while working on the interior. -
Paint the inside dots:
Using the same pastel palette, dip the tip of a smaller brush (or the handle end of a paintbrush) into the paint to create polka dots. -
Scatter the colors:
Randomly place dots of different colors all around the inside of the bowl. Leave plenty of white space between them to keep the look airy and light. -
Seal the deal:
Once all the paint is bone dry, apply a coat of gloss varnish or clear sealant. This gives the bowl a finished, ceramic-like shine and protects your paint job.
Cracked Clay?
If small cracks appear while shaping, dip your finger in a water-vinegar mix and rub gently over the crack to adhere the clay back together smoothly.
Make it Metallic
Swap one of the pastel paint colors for gold or silver metallic paint. Add a gold rim or random gold dots inside for a surprisingly fancy upgrade.
Enjoy using your cheerful new bowl to organize your favorite little things


Handprint Keepsake Plaques
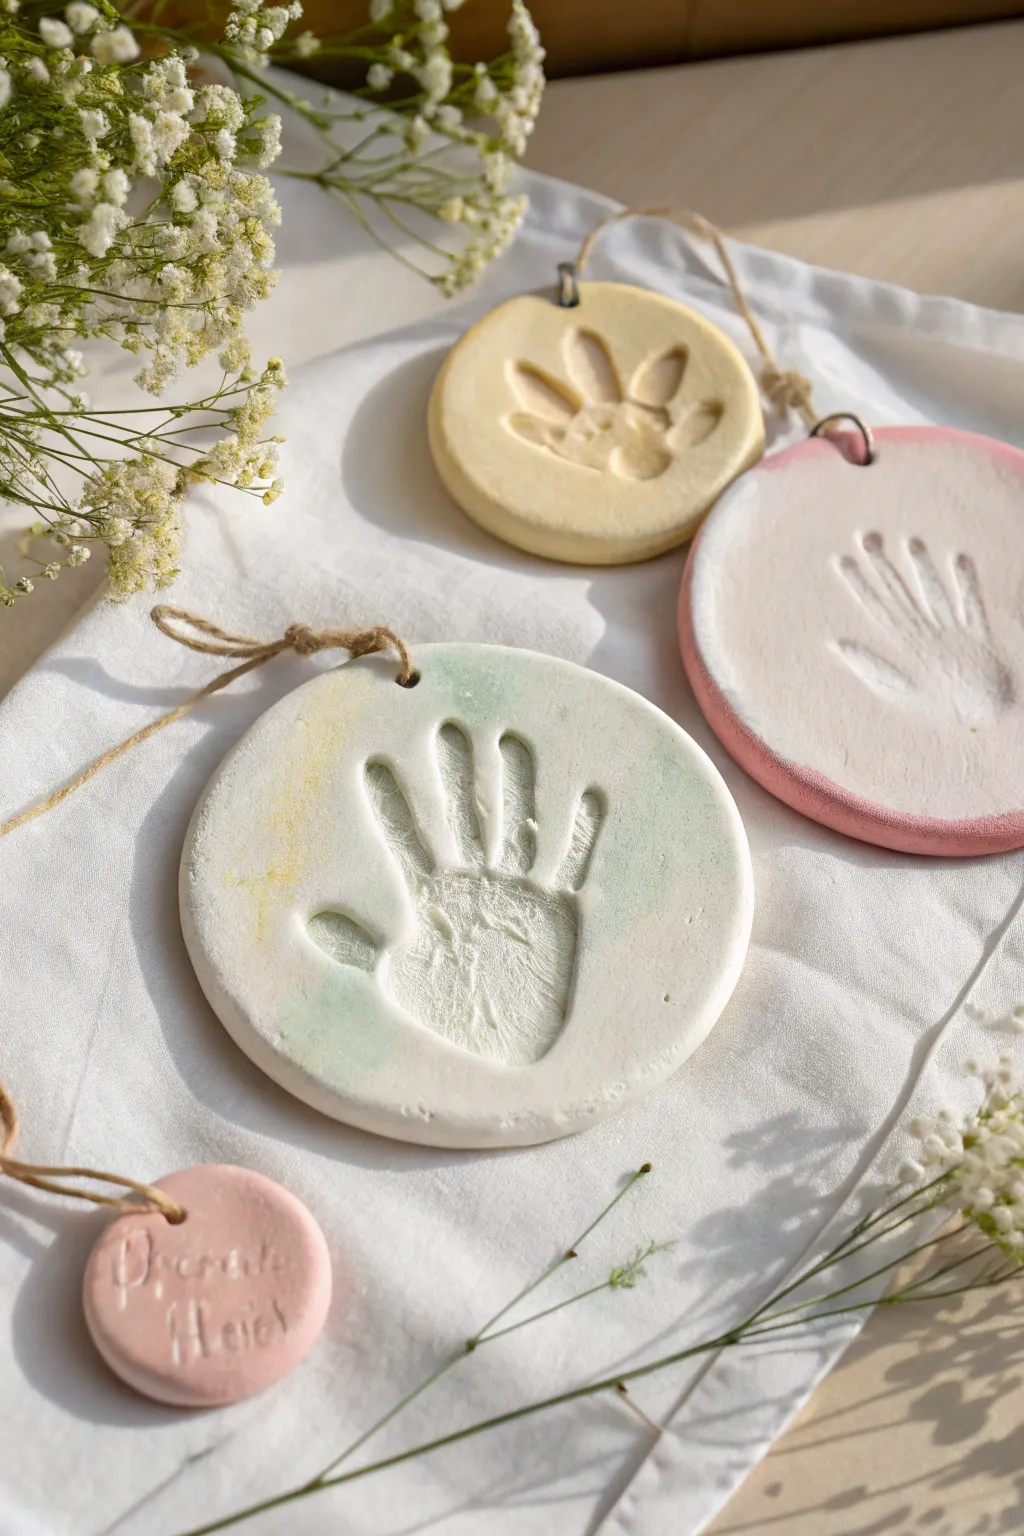
Capture a moment in time with these sweet, personalized clay plaques featuring the distinct impressions of little hands or paws. With their soft matte finish and delicate color accents, they make charming ornaments or heartfelt gifts for grandparents.
Step-by-Step Guide
Materials
- Air-dry clay (white)
- Rolling pin
- Round cookie cutters or bowls (various sizes)
- Straw or skewer (for hole punching)
- Fine-grit sandpaper
- Watercolors or diluted acrylic paints (pastels)
- Soft paintbrush
- Clear matte sealant or varnish spray
- Jute twine or ribbon
- Letter stamps (optional)
- Parchment paper
Step 1: Preparing the Clay Base
-
Condition the clay:
Start by taking a handful of air-dry clay and kneading it in your hands until it becomes warm, soft, and pliable. This prevents cracks later on. -
Roll it out:
Place the clay on a sheet of parchment paper. Use a rolling pin to flatten it to an even thickness of about 1/4 to 1/2 inch. You want it thick enough to take a deep impression without breaking. -
Cut the shape:
Using a large round cookie cutter or simply tracing around a kitchen bowl with a knife, cut out a perfect circle. Remove the excess clay from around the edges. -
Smooth the edges:
Dip your finger in a little water and run it along the cut edge of the circle to smooth out any roughness or jagged bits for a polished look. -
Make the hanging hole:
Before the clay creates a skin, use a straw or a skewer to poke a hole near the top edge. Make sure the hole is big enough for your twine to pass through later, keeping in mind clay shrinks slightly as it dries.
Step 2: Creating the Impressions
-
Position the hand:
Gently place the child’s hand (or pet’s paw) in the center of the clay circle. Ensure fingers are spread comfortably apart. -
Press firmly:
Press down on the palm and each individual finger to get a clear, deep print. I find it helpful to gently lift the fingers one by one while holding the palm down to ensure every detail transfers. -
Add text (optional):
If you want to add a name or date like the small pink tag in the photo, press small letter stamps into the clay now while it is still soft. -
Initial Drying:
Let the plaque dry flat on the parchment paper for at least 24-48 hours. Flip it over carefully halfway through the drying process to ensure the bottom dries evenly and to prevent curling.
Cracked Clay Fix
If small cracks appear while drying, make a paste of clay and water (called ‘slip’) and smooth it into the cracks with your finger, then let dry again.
Step 3: Finishing Touches
-
Sand imperfections:
Once fully dry and hard, take a piece of fine-grit sandpaper and very gently buff the edges or surface if there are any unwanted bumps or fingerprints. -
Prepare your paints:
Dilute your acrylic paints with water to create a watercolor effect, or use actual watercolors. You want soft, pastel shades like sage green, pale yellow, or blush pink. -
Apply a wash:
For the multi-colored look shown, dab patches of pale yellow and green randomly across the surface. Use a damp brush to blend the edges where colors meet for a cloudy, ethereal effect. -
Paint a rim (optional):
For a defined border like the pink plaque, use a smaller brush to paint just the outer rim and side edge with a solid pastel color. -
Seal the artwork:
Once the paint is completely dry to the touch, spray the entire piece with a matte clear sealant. This protects the clay from moisture and preserves the colors. -
Add the hanger:
Cut a length of natural jute twine, thread it through the hole you made earlier, and tie a secure knot to create a rustic hanging loop.
Gilded Edges
After the paint dries, use a metallic gold paint marker or liquid gold leaf just on the very edge of the rim to give the keepsake a luxurious finish.
Hang these charming keepsakes in a nursery or on a holiday tree to cherish those tiny prints forever


Silly Clay Monsters With Big Personalities
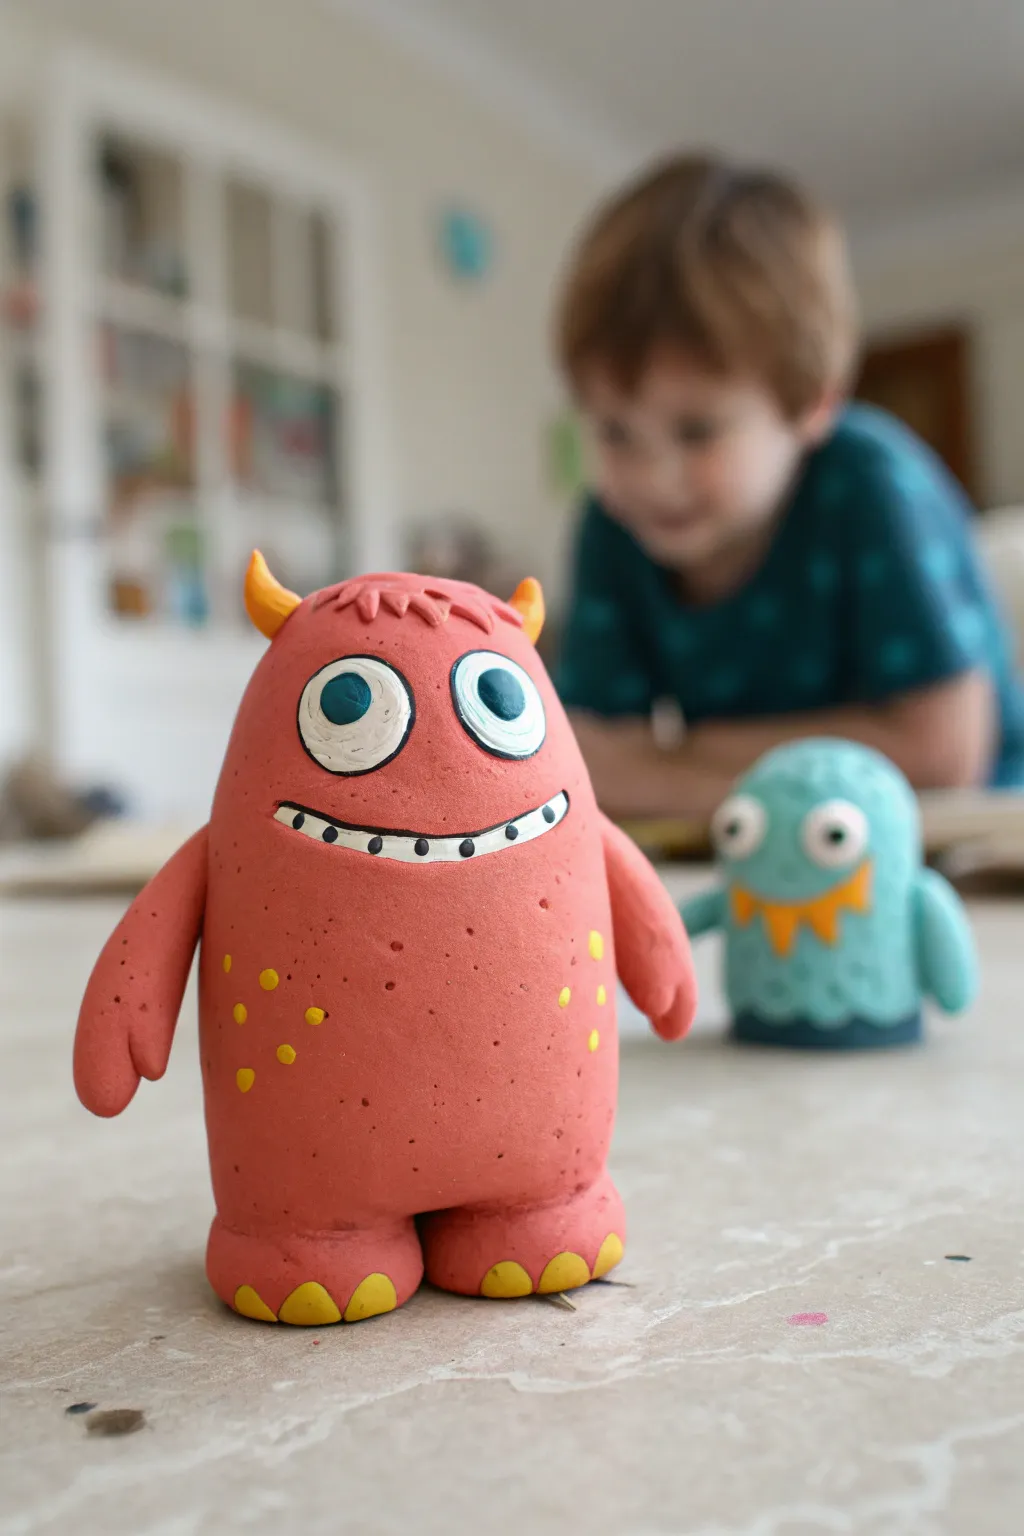
These quirky, chunky monsters are packed with personality and are surprisingly sturdy, making them perfect desk companions. With their oversized eyes and playful textures, they bring a splash of fun color to any room and are simple enough for beginners to sculpt.
Detailed Instructions
Materials
- Air-dry clay (terracotta/pink color or white clay painted later)
- Acrylic paints (teal, white, black, yellow)
- Sculpting tools or a toothpick
- Small paintbrush
- Bowl of water
- Rolling pin (optional)
Step 1: Sculpting the Body
-
Form the base:
Start with a large handful of clay and roll it into a smooth ball to warm it up. -
Shape the torso:
Gently roll the ball on your table to elongate it into a thick, rounded cylinder, slightly wider at the bottom than the top, resembling a gumdrop shape. -
Create the feet:
Roll two smaller balls of clay about the size of large grapes and flatten the bottoms slightly. -
Attach the feet:
Score (scratch) the bottom of the body and the tops of the feet, apply a dab of water, and press the feet firmly under the body base to create a stable stand. -
Make the arms:
Roll two sausage shapes for arms, tapering one end slightly. -
Add claw details:
Use a tool or toothpick to press a split into the tapered end of each arm to create a simple crab-claw hand shape. -
Attach the arms:
Score the sides of the body and the top of the arms, add water, and blend the clay using your thumb or a tool so the arms look like they grow seamlessly out of the body.
Cracks Appearing?
If you see cracks forming while the clay dries, mix a tiny bit of fresh clay with water to make a paste and smooth it into the cracks with your finger.
Step 2: Adding Personality
-
Define the mouth:
Use a sculpting tool to press a deep, curved line across the middle of the face for a wide smile. -
Sculpt the horns:
Roll two tiny cones of clay and attach them to the top corners of the head, blending the clay at the base. -
Add hair texture:
Using a toothpick or tool, make small scratches and divots on the very top of the head between the horns to simulate a furry tuft. -
Create the eyes:
Roll two flat circles of white clay (or regular clay to paint later) and press them firmly onto the upper face area; make them quite large for that goofy look. -
Smooth the surface:
Dip your finger in a little water and rub it over the entire figure to remove fingerprints and cracks. -
Texture the skin:
Take a stiff brush or a crumpled ball of foil and gently tap it against the body to create a subtle porous skin texture. -
Dry completely:
Set your monster aside in a dry area for 24-48 hours until it is hard to the touch.
Step 3: Painting the Details
-
Base coat (if needed):
If you used white clay, paint the body a salmon-pink or terracotta color now; if you used colored clay, you can skip this. -
Paint the eyes:
Paint the large eye circles white if they aren’t already. -
Add pupils:
Paint large teal circles inside the white eyes, then add smaller black pupils in the center. -
Highlight the eyes:
I like to add a tiny white dot in the black pupil to make the monster look alive and shiny. -
Outline details:
Use a very fine brush with black paint to outline the eyes and specific facial features for a comic-book style illustration look. -
Paint the teeth:
Fill the mouth smile line with white dots or a white strip, then outline with black to define the teeth. -
Final touches:
Paint the horns and toenails yellow, and add small yellow polka dots on the belly for extra decoration.
Make it a Duo
Create a friend like the blue monster in the background by making a shorter cylinder shape and painting a jagged mouth instead of a smiling one.
Place your finished monster on a shelf where its big eyes can watch over the room


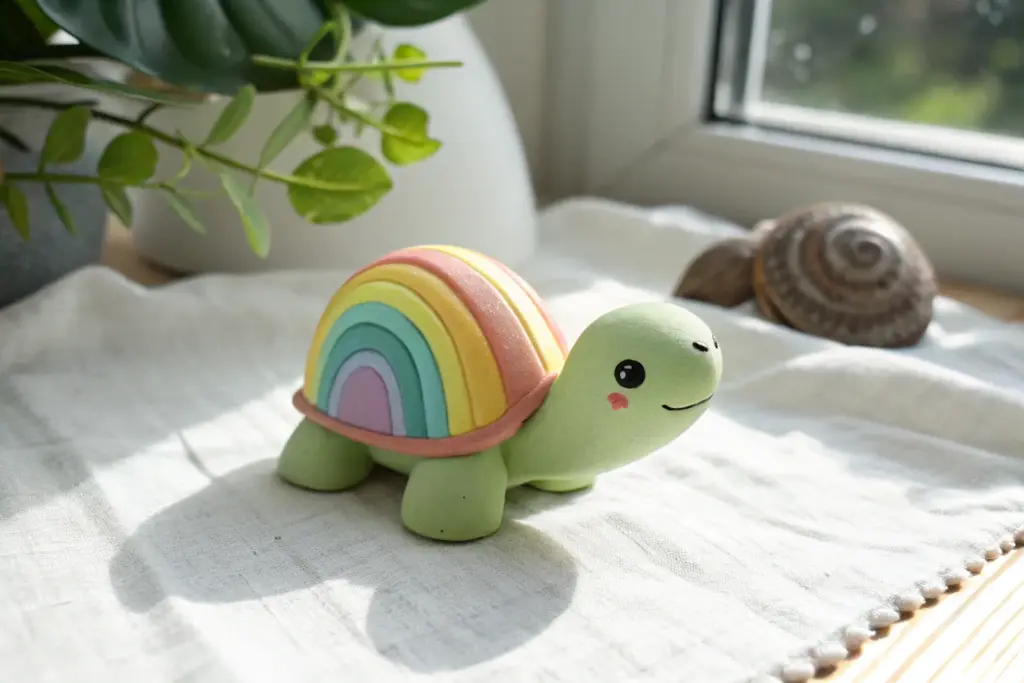
Cute Animal Figures Using Simple Shapes
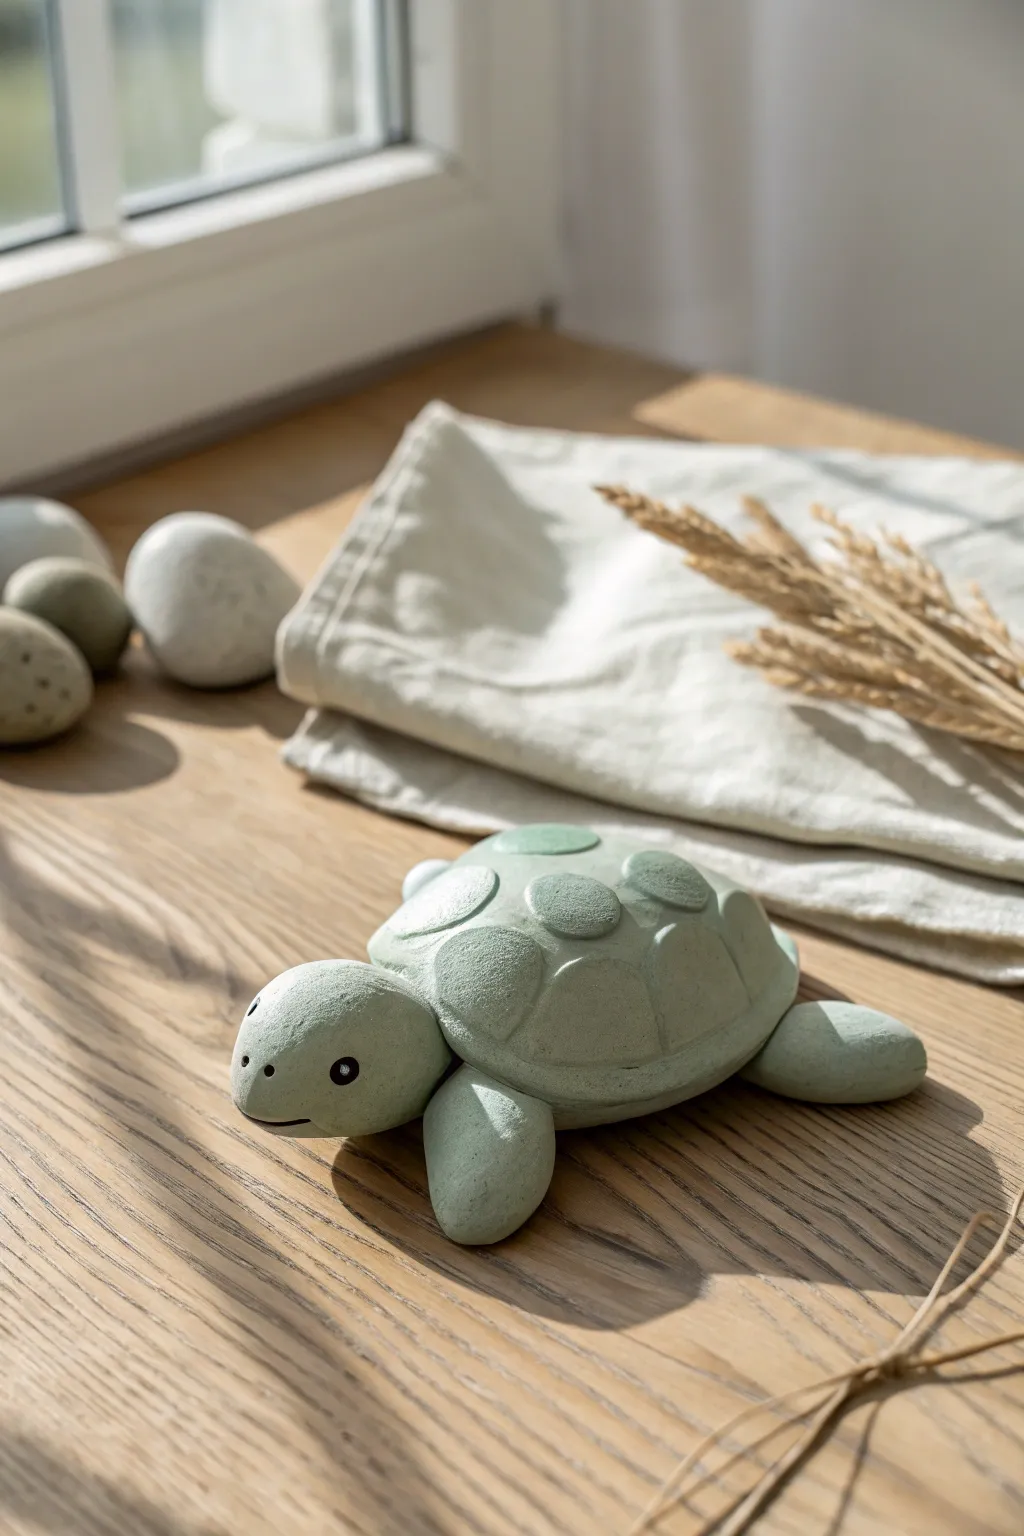
This adorable sage-green sea turtle is a calming, minimal sculpture that uses basic geometric shapes to great effect. With its gently rounded shell and simple flippers, it makes a charming paperweight or desk companion.
Step-by-Step Guide
Materials
- Air-dry clay or polymer clay (white or pale green)
- Acrylic paint (sage green, dark grey/black, white)
- Modelling tools (or a toothpick)
- Small round cutter or bottle cap
- Water bonding slip (if using air-dry clay)
- Fine grit sandpaper
- Matte varnish (optional)
Step 1: Shaping the Foundation
-
Prepare the clay:
Start by conditioning your clay until it is soft and pliable. If you are using white clay, you can mix in a small amount of green acrylic paint now to tint the clay itself, or plan to paint it later. Aim for a ball slightly larger than a golf ball for the main body. -
Form the shell base:
Roll your main clay ball into a smooth sphere, then gently flatten the bottom against your work surface to create a dome shape. I like to smooth the edges with a wet finger to ensure a seamless curve. -
Create the shell rim:
Using a flat tool or your thumb, gently press around the very bottom edge of the dome to create a subtle lip or rim where the shell would naturally flare out slightly. -
Shape the head:
Roll a smaller ball of clay, roughly one-third the size of the shell. Form it into a rounded teardrop shape. This will be the turtle’s head. -
Attach the head:
Score the clay (make scratching marks) where the head will join the shell. Apply a dab of water or liquid clay, then press the wider end of the teardrop firmly against the front of the shell shell base.
Step 2: Adding Fins and Details
-
Make the flippers:
Divide a lump of clay into four equal portions. Roll each into a thick oval or egg shape, then flatten them slightly to resemble flippers. The front flippers can be just a tiny bit larger than the rear ones. -
Attach the legs:
Position two flippers near the front (just behind the head) and two near the back. Attach them under the rim of the shell, blending the clay seams underneath so they are secure. -
Sculpt the face:
Use a rounded tool to create small indentations for the eyes on either side of the head. Use a knife tool or the edge of a credit card to press a gentle, horizontal curve for the smiling mouth. -
Create shell scutes:
Roll out a thin sheet of clay (about 2-3mm thick). Use a small round cutter or bottle cap to cut out 6-7 circles. -
Apply shell pattern:
Place one circle directly on the top center of the shell. Arrange the remaining circles around this central one. Press them down gently so they adhere but still retain a slightly raised, 3D texture. -
Refine the texture:
To mimic the matte, stone-like texture in the photo, gently tap the entire surface with a stiff bristle brush or a ball of crumpled aluminum foil. This removes fingerprints and adds natural character.
Seamless Smoothness
Keep a small bowl of water nearby. Dip your finger and run it over clay seams to blend parts together invisibly before drying.
Step 3: Finishing Touches
-
Dry the sculpture:
Allow the turtle to dry completely. For air-dry clay, this usually takes 24-48 hours depending on thickness. Ensure it is fully hardened before painting. -
Sand for smoothness:
Once dry, use fine-grit sandpaper to buff away any sharp edges or rough patches, particularly around the bottom of the flippers and the shell rim. -
Paint the base color:
If you didn’t tint your clay earlier, paint the entire turtle with a soft sage green acrylic paint. You may need two thin coats for opaque coverage. Let this dry fully. -
Paint the eyes:
Using a fine detail brush or a toothpick, paint the insides of the eye indentations black. Once the black is dry, add a tiny white dot to each eye for a spark of life. -
Highlight the shell:
This is optional, but adds depth: dry-brush a slightly lighter shade of green over the raised circles on the shell to make the pattern pop.
Stone Effect
Mix baking soda into your acrylic paint before applying. It creates a grainy, faux-stone texture that looks great on this turtle.
Place your finished turtle on a sunny windowsill or shelf to enjoy its calming presence every day

The Complete Guide to Pottery Troubleshooting
Uncover the most common ceramic mistakes—from cracking clay to failed glazes—and learn how to fix them fast.
Snail Buddies With Spiral Shells
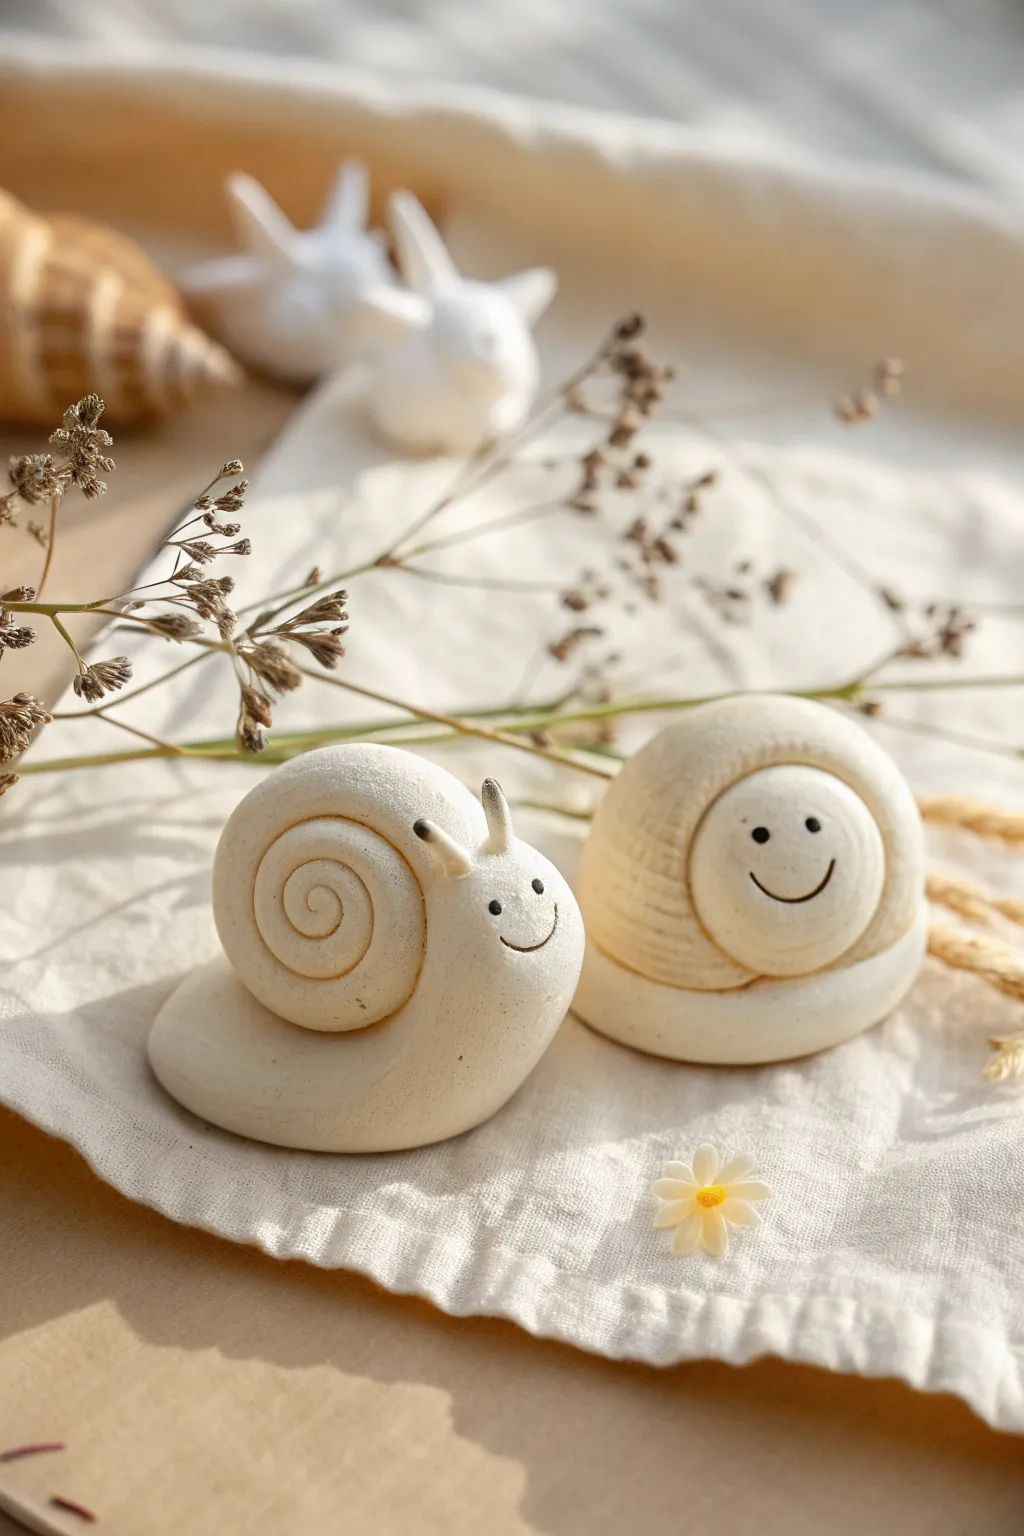
These delightful clay snails bring a touch of whimsy with their clean, creamy finish and sweet, simple smiles. Perfect for beginners, this project focuses on smooth forms and classic coil techniques to create expressive little characters.
Step-by-Step Tutorial
Materials
- White air-dry clay or polymer clay (white/cream)
- Small rolling pin
- Clay carving tool or toothpick
- Black fine-point marker or black acrylic paint
- Small ball tool (for eye indentations)
- Water (if using air-dry clay)
- Smooth work surface or clay mat
Step 1: Creating the Crawling Snail Body
-
Roll the base:
Start by rolling a ball of clay about the size of a golf ball, then gently roll it back and forth to create a thick, tapered sausage shape. -
Flatten the bottom:
Press the sausage shape gently onto your work surface to create a flat bottom so the snail stands up securely without tipping. -
Form the neck:
Bend the thicker end of the tapered roll upwards to create the head and neck area, smoothing out any cracks with a slightly damp finger. -
Make the shell coil:
Roll a second piece of clay into a long, even snake, roughly the thickeness of your pinky finger. -
Spiral the shell:
Starting from one end, roll the snake tightly into a spiral disc, keeping the coils close together. -
Attach the shell:
Score the side of the body and the back of your spiral shell slightly, add a drop of water (or slip), and press the shell firmly onto the snail’s back. -
Add antennae:
Roll two tiny, thin sausages of clay for the antennae and attach them to the top of the head. -
Detail the antennae:
Use a black marker or a tiny dab of black paint to color just the very tips of the antennae.
Seamless Smoothness
I like to dip my finger in a tiny bit of water (or baby oil for polymer clay) to buff out fingerprints before the clay hardens.
Step 2: Crafting the Resting Snail
-
Create the base mound:
For the second snail, roll a large ball of clay and flatten the bottom slightly so it looks like a dome. -
Indent the face:
Press your thumb gently into the front center of the dome to create a slight depression where the face will sit. -
Add texture lines:
Using your carving tool or toothpick, draw horizontal curved lines around the sides of the dome to mimic shell ridges. -
Make the face disc:
Roll a smaller ball of clay, flatten it into a thick disc, and press it into the thumb indentation you made earlier. -
Smooth the seams:
Go around the edge of the face disc and gently blend the back edge into the shell body for a seamless look.
Shell Slipping Off?
If the upright shell won’t stay put, insert a small piece of toothpick or wire as an internal dowel to connect the shell to the body.
Step 3: Adding Personality
-
Mark the eyes:
Use a small ball tool or the end of a paintbrush to make two small, shallow divots for the eyes on both snails. -
Fill the eyes:
Carefully use your black marker or a fine paintbrush to fill the eye divots with black ink. -
Draw the smile:
Draw a simple, curved U-shape between the eyes to give your snails their happy expressions. -
Refine the finish:
Rub your finger lightly over the clay surface to remove any fingerprints before setting the pieces aside to dry completely.
Let your little garden friends dry fully and enjoy their cheerful company on your desk or shelf
Food With Faces: Mini Clay Fruit and Veggie Friends
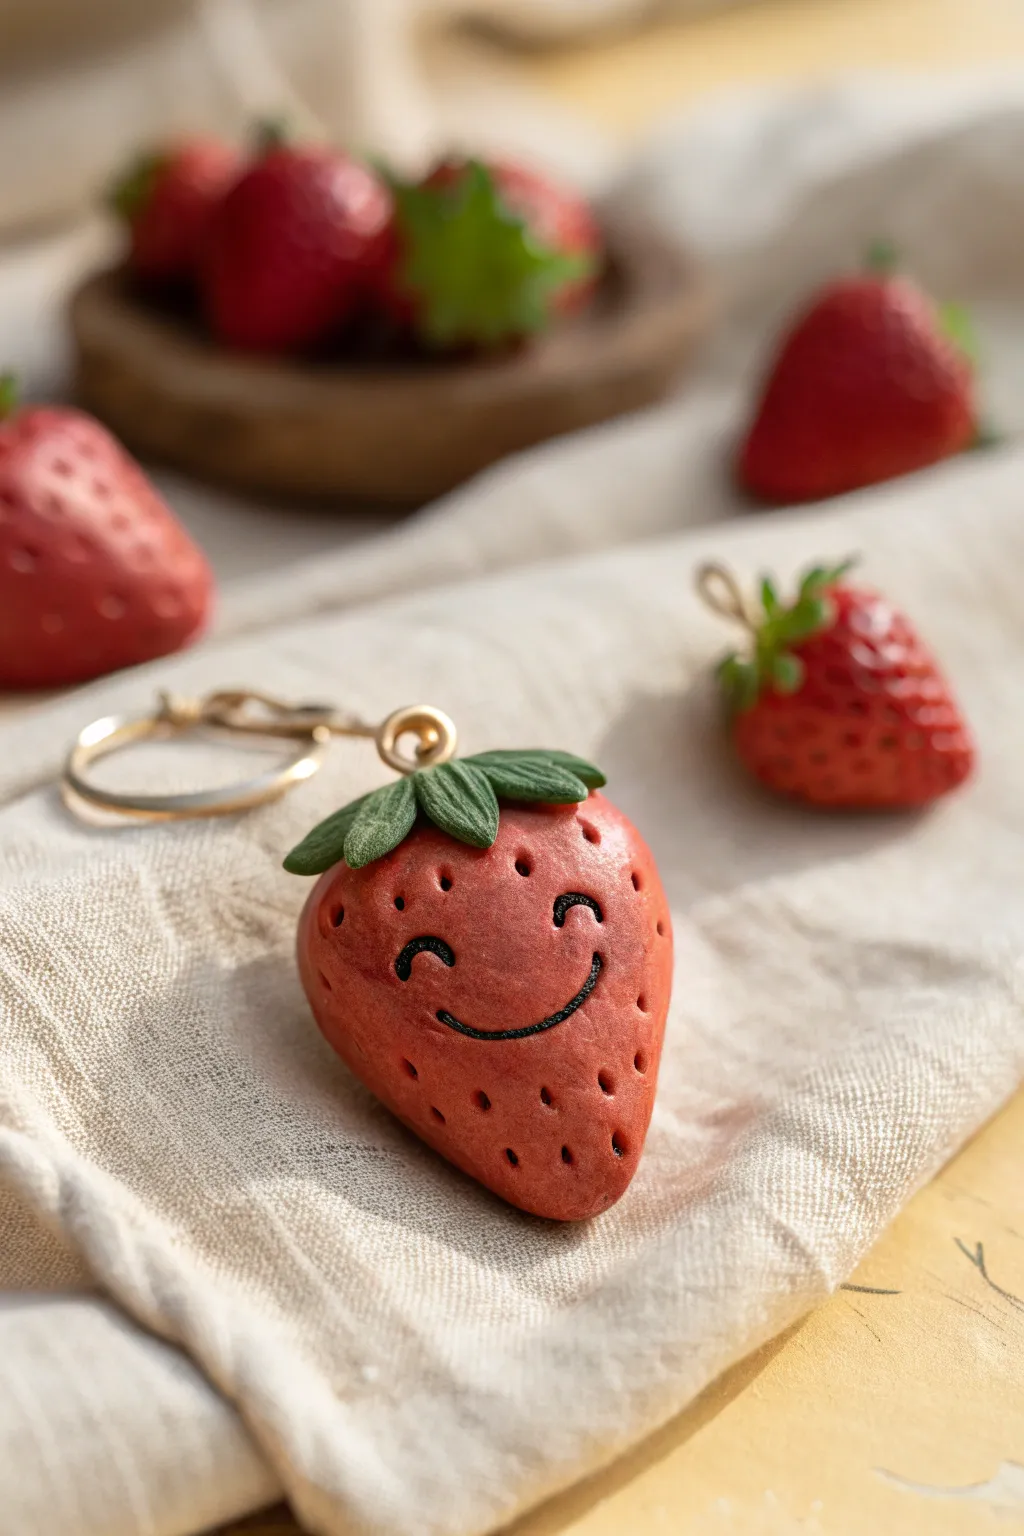
Create an adorable pocket-sized pal that looks good enough to eat but is actually made of clay. This cheerful strawberry charm features a textured surface, a cute leafy hat, and a heartwarming smile that makes it perfect for a keychain or backpack zipper.
How-To Guide
Materials
- Red polymer clay (strawberry color)
- Green polymer clay (leaf color)
- Black polymer clay or black acrylic paint fine-liner
- Sculpting tool with a small round point (or a toothpick)
- Texture tool or toothbrush (optional)
- Gold screw eye pin
- Gold jump ring and keychain clasp
- Oven for baking polymer clay
- Gloss glaze (optional)
Step 1: Basic Shape
-
Condition the clay:
Warm up a walnut-sized piece of red polymer clay in your hands by kneading it until it is soft, pliable, and free of cracks. -
Roll a ball:
Roll the red clay into a smooth, seamless sphere between your palms. -
Form the strawberry:
Gently taper one end of the ball by rolling it slightly more on one side, creating a soft, rounded cone shape that mimics a real strawberry. -
Flatten the top:
Press the wider top end slightly against your work surface to create a flat area where the leaves will eventually sit.
Step 2: Adding Texture & Features
-
Create seed indentations:
Take your pointed sculpting tool or a toothpick and gently press small holes all over the surface of the red clay. Avoid the center area where the face will go. -
Refine the texture:
I like to wiggle the tool slightly as I pull it out to create a more teardrop-shaped seed pocket rather than just a round hole. -
Make the smile:
Roll an incredibly thin snake of black clay—as thin as a thread. Cut a small curved section for the mouth and two tiny crescents for the eyes. -
Apply the face:
Carefully press the black clay thread onto the smooth front area of the strawberry. Use a soft touch to bond the clay without smashing the shape.
Sticky Situation?
If your black clay threads for the face won’t stick, add a microscopic dot of liquid clay or bake-and-bond to the back before pressing them down.
Step 3: Leafy Top & Finishing
-
Prepare the green clay:
Condition a small pea-sized amount of green clay. -
Form the leaves:
Flatten the green clay into a small disk, then use a craft knife or modeling tool to cut a 5-6 point star shape. -
Texture the leaves:
Use a needle tool to score a central vein down the middle of each leaf point for a realistic touch. -
Attach the cap:
Place the green star on the flat top of the strawberry. Gently drape the leaf points down over the red ‘shoulder’ of the fruit. -
Blend texturing:
Use your tool to create a tiny depression in the very center of the green stem where the hardware will go. -
Insert hardware:
Screw the eye pin directly into the center of the green leaves, pushing it down into the red body for a secure hold. -
Bake:
Bake the clay according to the manufacturer’s instructions on your package (usually about 275°F/135°C for 15-30 minutes). -
Cool down:
Allow the strawberry to cool completely before handling so it hardens fully. -
Assembly:
Use pliers to open the jump ring, attach your keychain clasp to the eye pin, and close the ring securely.
Make It Sparkle
Before baking, lightly brush pearl mica powder over the seeds for a dewy look, or coat the finished piece in UV resin for a glassy, hard candy shine.
Now you have a charming berry companion ready to tag along on your daily adventures


What Really Happens Inside the Kiln
Learn how time and temperature work together inside the kiln to transform clay into durable ceramic.
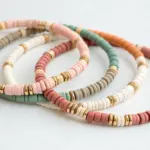
Rainbow Cloud Wall Hanging
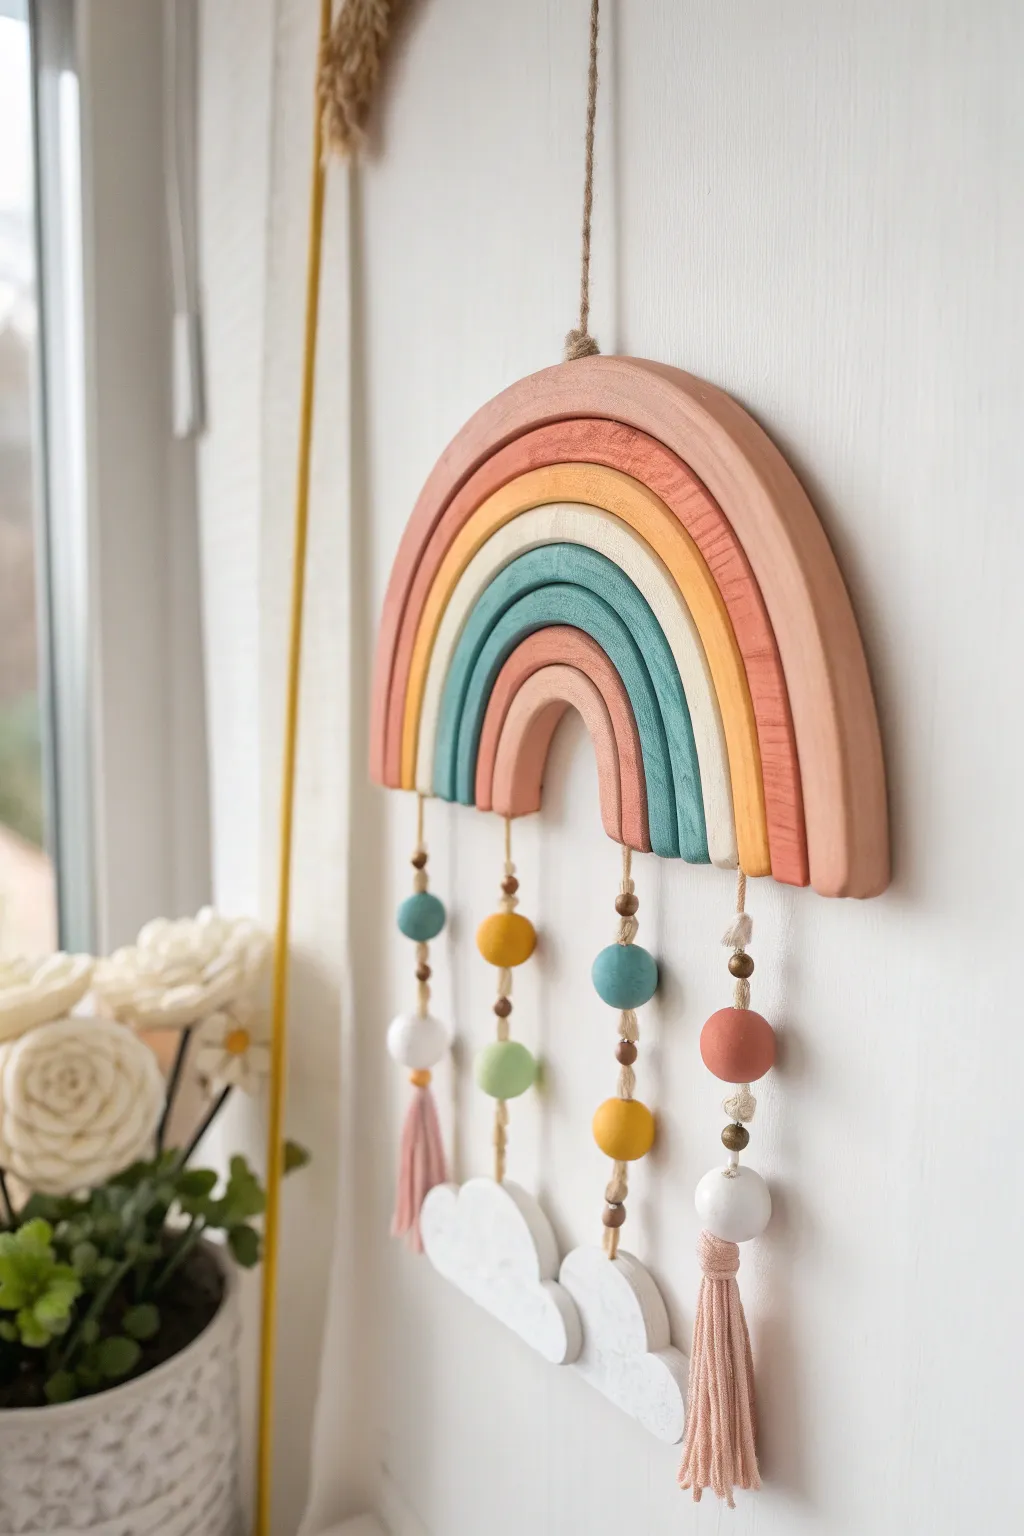
Brighten up any kid’s room with this charming pastel rainbow mobile made from simple clay pieces. It features gentle arches, colorful beads, fluffy cloud charms, and playful tassels for a textured, bohemian look that is surprisingly easy to create.
Step-by-Step
Materials
- Air-dry clay or polymer clay (white)
- Acrylic paints (terracotta, peach, mustard yellow, teal, sage green, cream)
- Rolling pin
- Sharp craft knife or clay tool
- Jute twine or thin cord
- Large wooden beads
- Yarn (pink/blush color)
- Strong craft glue (E6000 or hot glue)
- Drinking straw or skewer (for making holes)
- Paintbrushes
- Parchment paper or craft mat
Step 1: Shaping the Rainbow Arches
-
Prepare your workspace:
Lay down parchment paper or a craft mat to prevent the clay from sticking. This also makes cleanup much easier. -
Roll out the clay slabs:
Take a large chunk of clay and roll it out into a flat, even slab about 1/4 inch thick. Aim for consistent thickness so the arches dry evenly. -
Cut the largest arch:
Using a craft knife, carefully cut out your largest rainbow arch first. A semi-circle shape works best. Make it about 6-7 inches wide at the base. -
Create nesting arches:
Use the inner curve of your first arch as a guide to cut the next smaller arch. Continue this process until you have 5 distinct nesting arches. -
Add texture:
Gently smooth the cut edges with a finger dipped in a little water. If you want a wood-grain look like the photo, lightly drag a stiff brush across the surface. -
Create holes for hanging:
In the smallest (center) arch, poke two holes at the bottom edge for the cloud strings. For the outer arches, you might need small holes at the bottom to attach the beaded strings later, or we can glue them to the back. -
Cut out the clouds:
Roll out a bit more clay and freehand cut two cute, fluffy cloud shapes. Poke a hole at the top of each cloud for hanging. -
Let everything dry:
Allow all your clay pieces to dry completely according to the package instructions. Air-dry clay usually takes 24-48 hours; flip them halfway through to prevent curling.
Step 2: Painting and Assembly
-
Select your color palette:
Choose earthy, muted tones. I used terracotta, peach, mustard, teal, and cream to match the boho vibe. -
Paint the arches:
Paint each arch a different color. Apply two thin coats for opaque coverage, letting the first coat dry before adding the second. -
Paint the beads and clouds:
Paint your wooden beads in matching colors (teal, yellow, terracotta) and paint the clouds white. Leave some beads natural wood if you prefer. -
Glue the rainbow together:
Once dry, arrange the arches on a flat surface. Apply strong glue to the sides where the arches touch and press them together firmly. You can reinforce the back with a piece of cardboard or felt. -
Attach the hanging loop:
Cut a length of jute twine, fold it in half to make a loop, and glue the ends securely to the top center of the back of the rainbow.
Smooth Operator
Use a little bit of water on your fingertip to smooth out the edges of the clay arches before they dry for a professional finish.
Step 3: Adding the Dangles
-
Make the tassels:
Wrap yarn around three fingers about 15 times. Tie a piece of yarn through the top loop, cut the bottom loops, and wrap another piece around the ‘neck’ to form a tassel head. -
Prepare the dangle strings:
Cut four lengths of twine. Tie a knot at one end of each and thread through your clouds or tassels first. -
Thread the beads:
Add painted wooden beads onto the strings above the clouds or tassels. Tie knots between beads to keep them spaced out nicely. -
Attach dangles to the rainbow:
Tie or glue these beaded strings to the bottom of your rainbow. Place the cloud strings in the center and the tassel strings on the outer edges. -
Final touches:
Check that all knots are tight and trim any excess twine. Hang it up and adjust the dangles so they hang straight.
Texture Twist
Before the clay dries, gently press a piece of lace or fabric into the surface to create subtle, patterned textures on your arches.
Hang your beautiful new creation near a window to catch the light and enjoy the handmade charm
Flat Clay Ornaments Made With Cookie-Cutter Shapes
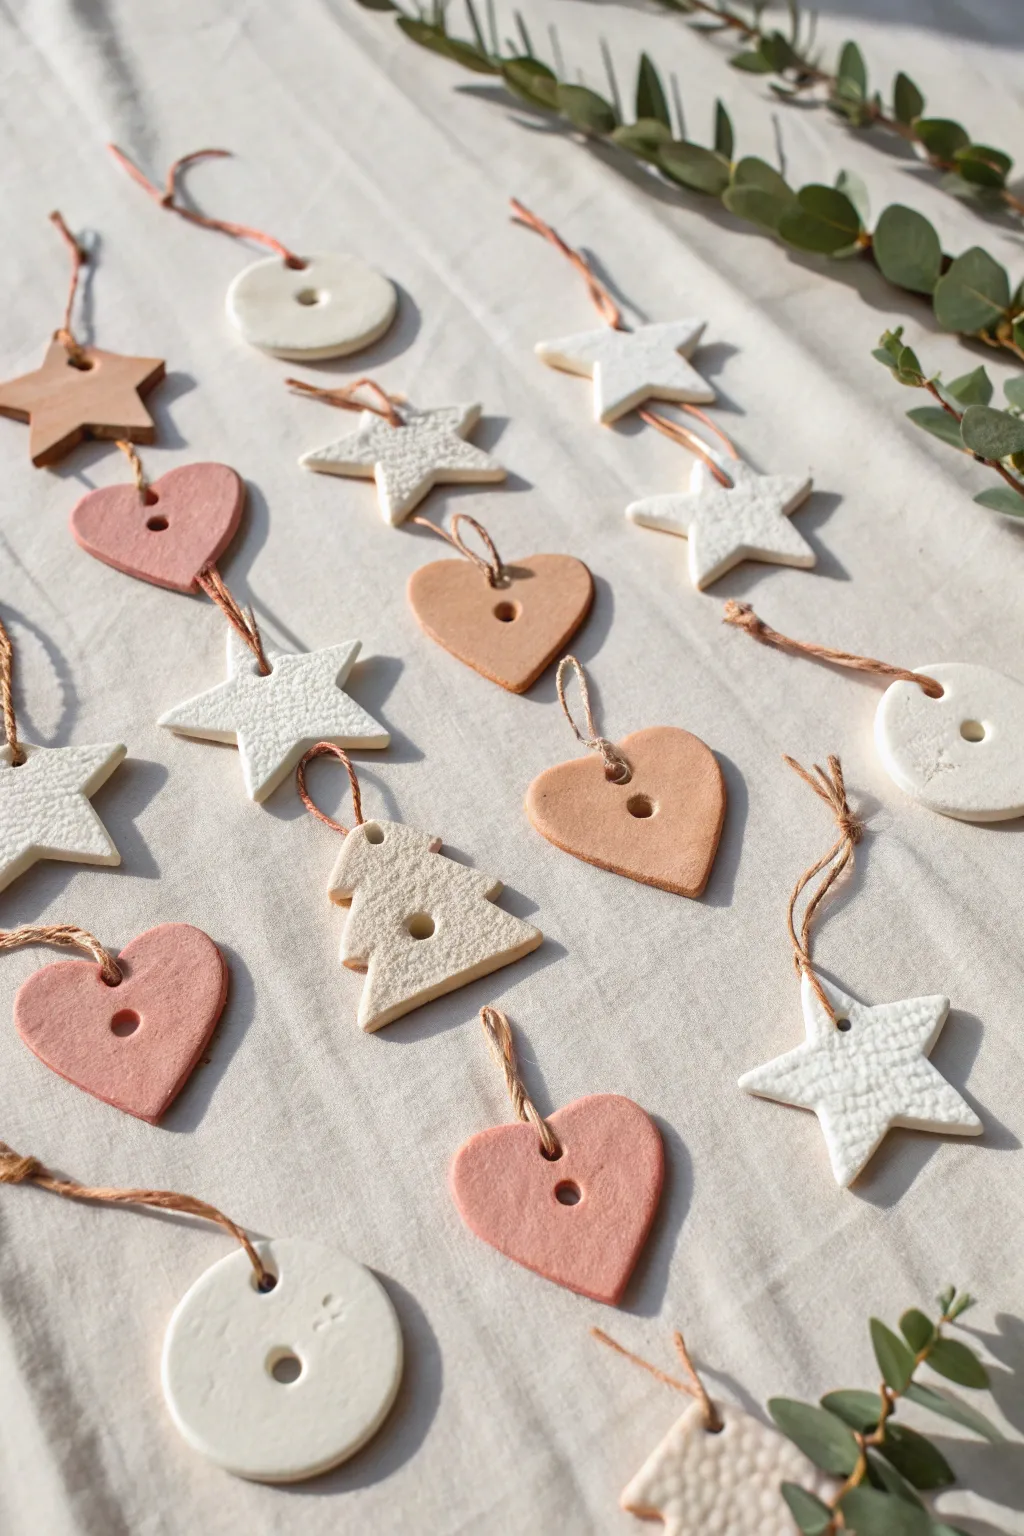
Create a charming set of minimalist ornaments that blend perfectly with a natural aesthetic, featuring soft pink, terracotta, and white tones. These simple flat shapes are elevated with beautiful textures and strung on rustic twine for a modern, handmade look.
How-To Guide
Materials
- Air-dry clay (white)
- Acrylic paint or clay pigment (terracotta, dusty pink)
- Rolling pin
- Cookie cutters (stars, hearts, circles, Christmas trees)
- Texture tools (lace, textured rolling pin, or burlap)
- drinking straw or bamboo skewer
- Fine grit sandpaper
- Twine or jute string
- Parchment paper or craft mat
- Scissors
Step 1: Preparing the Clay
-
Divide your batch:
Start by separating your white air-dry clay into three even portions. Keeping them covered with a damp cloth or plastic wrap while not in use helps prevent them from drying out too quickly. -
Tint the clay (optional):
If you want the color integrated directly into the clay like in the example, knead a small drop of acrylic paint or pigment into two of the portions—one for terracotta and one for dusty pink. Keep the third portion plain white. Alternatively, you can paint them after drying. -
Roll it out:
Take your first portion of clay and roll it out onto a piece of parchment paper. Use a rolling pin to achieve an even thickness, aiming for about 1/4 inch (6mm). Too thin, and they become fragile; too thick, and they get heavy.
Step 2: Adding Texture & Cutting
-
Add surface interest:
Before cutting your shapes, decide on the texture. For the smooth ornaments, skip this step. For the textured white stars and trees seen in the photo, gently press a piece of lace, burlap, or a textured patterned roller into the surface of the flattened clay. -
Cut the shapes:
Press your cookie cutters firmly into the clay. Try to maximize space to get as many ornaments as possible from one slab. The example uses a mix of five-point stars, simple hearts, circles, and evergreen trees. -
Release the shapes:
Gently peel away the excess clay from around your cut shapes. If a shape sticks to the cutter, I find a gentle push from the back usually pops it right out without distorting the edges. -
Smooth the edges:
Dip your finger in a tiny bit of water and run it along the cut edges of each ornament to smooth out any roughness or jagged bits left by the cutter. -
Create the hanging hole:
Using a drinking straw or a bamboo skewer, punch a consistent hole near the top of each shape. Make sure the hole isn’t too close to the edge to prevent tearing later. -
Repeat the process:
Repeat the rolling, texturing, and cutting steps with your other colors (pink and terracotta) to create a diverse collection.
Cracks while rolling?
If your clay edges are cracking as you roll, the clay is likely too dry. Dip your fingers in water and knead it into the clay to rehydrate it before trying to roll again.
Step 3: Drying and Finishing
-
Let them dry:
Arrange the cut shapes on a clean sheet of parchment paper in a cool, dry place. Let them air dry for at least 24-48 hours. Flip them over halfway through the drying time to ensure they stay flat and don’t curl at the edges. -
Sand for perfection:
Once fully cured and hard, use a piece of fine-grit sandpaper to lightly buff the edges. This gives them that professional, high-quality finish seen in the photos. -
Clean dust:
Wipe the ornaments with a dry cloth or a soft brush to remove any clay dust generated from sanding. -
Prepare the twine:
Cut lengths of jute or natural twine, approximately 8-10 inches long for each ornament. -
Loop the string:
Fold a piece of twine in half. Push the folded loop end through the hole in the ornament from front to back. -
Secure the hanger:
Thread the loose ends of the twine through the loop and pull tight to create a lark’s head knot, exactly like the ones shown in the project image. -
Tie the ends:
Tie the two loose ends of the twine together in a simple overhand knot to close the loop, trimming any excess string if necessary.
Add a scent
Add a drop of essential oil (like cinnamon or pine) to the clay during the kneading phase. Your ornaments will act as passive diffusers.
Hang these on a tree or string them together as a garland to enjoy their subtle, earthy beauty

TRACK YOUR CERAMIC JOURNEY
Capture glaze tests, firing details, and creative progress—all in one simple printable. Make your projects easier to repeat and improve.
Texture Stamps Using Leaves, Lace, and Found Items
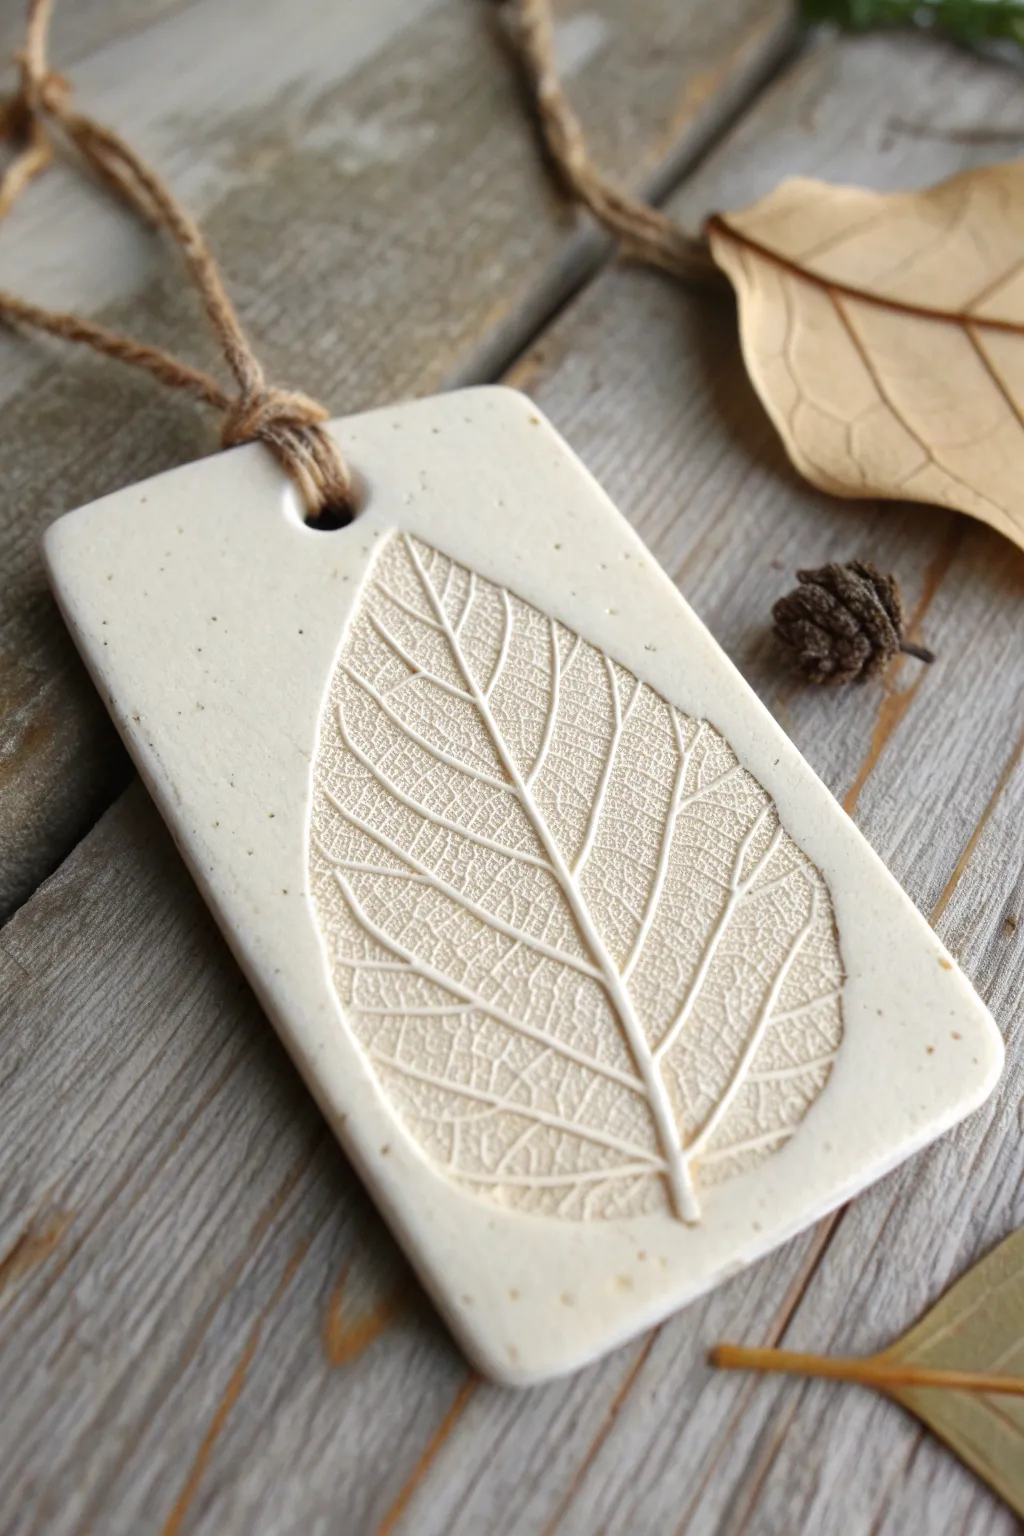
Capture the delicate beauty of nature with this simple yet stunning clay project. By pressing a real leaf into soft clay, you’ll create a perfectly detailed pendant or ornament that highlights every vein and contour.
Step-by-Step Tutorial
Materials
- White air-dry clay (or polymer clay)
- Fresh, sturdy leaf with prominent veins
- Rolling pin or smooth glass jar
- sharp knife or rectangular clay cutter tool
- Drinking straw or small skewer (for the hole)
- Jute twine or rustic string
- Parchment paper or non-stick craft mat
- Fine-grit sandpaper (optional)
- Clear matte sealant (optional)
Step 1: Preparing the Clay Canvas
-
Condition the clay:
Begin by taking a handful of white air-dry clay. Knead it in your hands for a minute or two until it feels warm, pliable, and free of cracks. -
Set up your workspace:
Lay down a sheet of parchment paper or a non-stick craft mat. This prevents the clay from sticking to your table and makes it easier to move later. -
Roll out a slab:
Place your clay ball on the mat and use a rolling pin to flatten it. Aim for a thickness of about 1/4 inch (approx. 6mm) to ensure the pendant feels substantial but not too heavy. -
Check for smoothness:
Look closely at the surface. If there are any air bubbles or textures from the rolling pin, gently smooth them out with a tiny bit of water on your fingertip.
Step 2: Creating the Leaf Impression
-
Select your leaf:
Choose a leaf that is fresh and flexible; brittle, dry leaves will crumble. Place the leaf face down onto the clay so the raised veins on the back are touching the surface. -
Press gently:
Use your rolling pin to firmly roll over the leaf once. Apply even pressure so the entire leaf shape and its internal veins are pressed deep into the clay. -
Remove the leaf:
Carefully lift the stem of the leaf and peel it away from the clay. Do this slowly to reveal the intricate impression left behind. -
Cut the shape:
Using a sharp knife or a rectangular cutter, cut a clean rectangle around the leaf impression. I prefer to leave a little extra space at the top for the hanging hole. -
Refine the edges:
Pull away the excess clay. If the cut edges look sharp or rough, dip your finger in water and gently run it along the perimeter to soften them.
Vein Definition Tip
Always place the leaf ‘back-side down’ onto the clay. The underside of a leaf usually has much more prominent veins than the top, giving you a deeper, sharper imprint.
Step 3: Finishing Touches
-
Add a hole:
Take a drinking straw or a small skewer and press a hole near the top center of the rectangle. Twist the tool slightly as you pull it out to get a clean opening. -
Dry the piece:
Let the clay dry completely according to the package instructions. This usually takes 24-48 hours. Flip it over halfway through to ensure even drying and prevent curling. -
Sand edges:
Once fully dry and hard, check the edges again. If there are any rough spots, use fine-grit sandpaper to smooth them down gently. -
Seal (optional):
To protect your work from moisture, apply a thin coat of clear matte sealant. This preserves the natural look while adding durability. -
Attach the cord:
Cut a length of jute twine. Fold it in half, push the loop through the hole, and pull the loose ends through the loop to create a lark’s head knot. -
Secure the knot:
Tighten the knot gently against the top of the clay pendant to secure it, leaving the long ends ready for hanging.
Color Wash Effect
After drying, paint a watered-down brown acrylic paint over the imprint, then immediately wipe the surface with a damp cloth. The dark paint will stay in the grooves.
Hang your nature-inspired creation in a window or use it as a special gift tag for a loved one
Name Letter Tiles for Room Decor
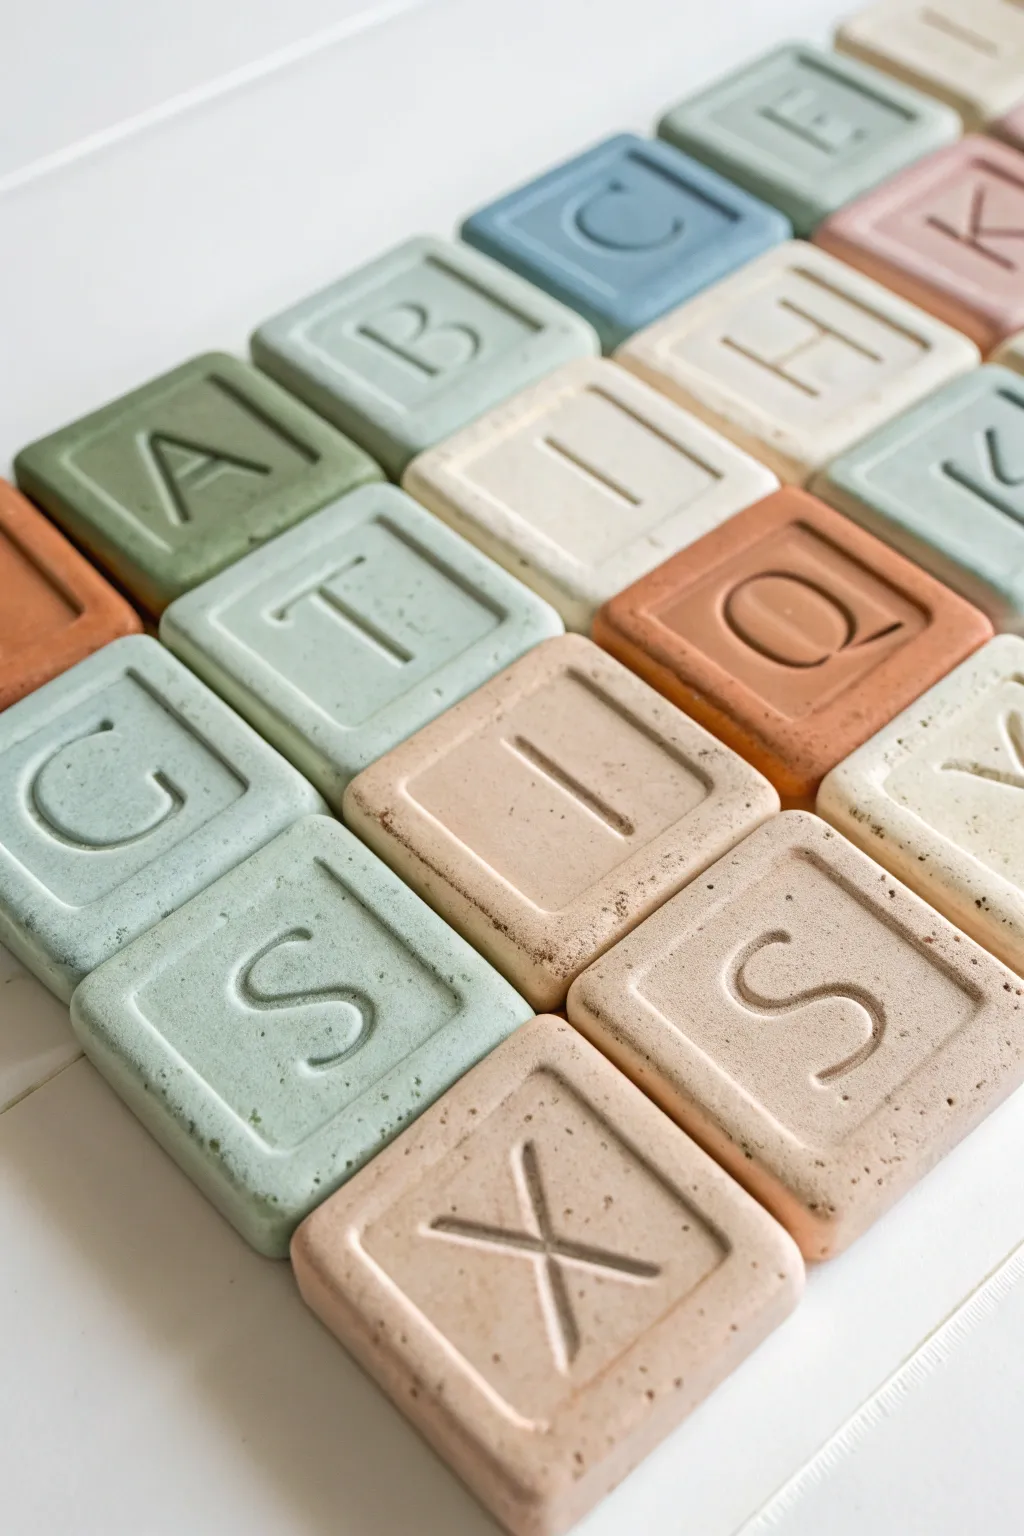
These charming, chunky letter tiles have a beautiful matte stone finish and soft pastel hues that make them perfect for personalized room decor. The embossed lettering creates a sophisticated, tactile effect that looks deceptively high-end but is simple enough for kids to master.
Step-by-Step Guide
Materials
- Air-dry clay (white or terracotta)
- Square cookie cutter (approx. 2-3 inches)
- Alphabet stamp set (large size) or clay tools for carving
- Rolling pin
- Parchment paper or non-stick mat
- Acrylic paints (muted pastels: sage green, dusty rose, pale blue, cream)
- Fine-grit sandpaper
- Matte sealant spray or matte mod podge
- Soft paintbrush
- Optional: Texture sponge
Step 1: Shaping the Tiles
-
Prepare your workspace:
Lay down parchment paper or a non-stick mat on a flat surface to prevent sticking. -
Condition the clay:
Take a large chunk of air-dry clay and knead it in your hands until it becomes soft, pliable, and free of cracks. -
Roll out the slab:
Use your rolling pin to flatten the clay into an even slab. Aim for a thickness of about 1/2 inch to give the tiles that chunky, substantial look seen in the photo. -
Cut the squares:
Press your square cookie cutter firmly into the clay slab to cut out your tile shapes. If you don’t have a cutter, you can measure squares with a ruler and cut carefully with a clay knife. -
Smooth the edges:
Dip your finger in a little bit of water and gently run it along the cut edges of each square to soften any sharp corners or jagged bits. -
Create the border:
Using a flat tool or the edge of a ruler, gently press an indentation about 1/4 inch from the edge all the way around each square to create a framed look.
Fixing Cracks
If small cracks appear as the clay dries, mix a tiny bit of fresh clay with water to make a paste (slip) and fill the cracks, then smooth over.
Step 2: Embossing and Drying
-
Add the letters:
Press a large alphabet stamp firmly into the center of each square. If carving by hand, use a needle tool to lightly sketch the letter first, then widen the lines with a sculpting tool. -
Add texture:
For that stone-like appearance, lightly dab a damp texture sponge or a crumpled ball of aluminum foil over the surface of the clay, avoiding the deep letter impressions. -
Initial drying:
Place the tiles on a wire rack to ensure airflow underneath. Let them dry for at least 24-48 hours. I find turning them over halfway through helps prevent warping. -
Sand for finish:
Once fully dry and hard, use fine-grit sandpaper to gently smooth the surface and edges, removing any unwanted bumps while keeping the texture.
Crisp Letters
Dust your letter stamps with cornstarch or baby powder before pressing them into the clay to prevent them from sticking and pulling up the material.
Step 3: Painting and Finishing
-
Mix pastel shades:
Prepare your palette with muted acrylics. If your colors are too bright, mix in a tiny drop of brown or gray to dusty them down, and plenty of white to lighten them. -
Apply the base coat:
Paint each tile in a single solid color. Use a soft brush to get paint into the recessed letter grooves without pooling. -
Create the speckled look:
To mimic the stone texture shown, dip an old toothbrush into diluted brown or dark grey paint. Run your thumb over the bristles to flicker tiny specks onto the painted tiles. -
Let paint cure:
Allow the paint to dry completely. The speckled effect needs to be totally set before sealing. -
Seal the tiles:
Apply a coat of matte sealant. A matte finish is crucial here to maintain the natural stone aesthetic rather than a glossy ceramic look. -
Final display prep:
If hanging these on a wall, attach adhesive mounting strips or glue strong magnets to the back once the sealant is dry.
Arrange your completed tiles on a shelf or mount them to spell out names for a personalized touch to any room
Thumbprint Animal Magnets
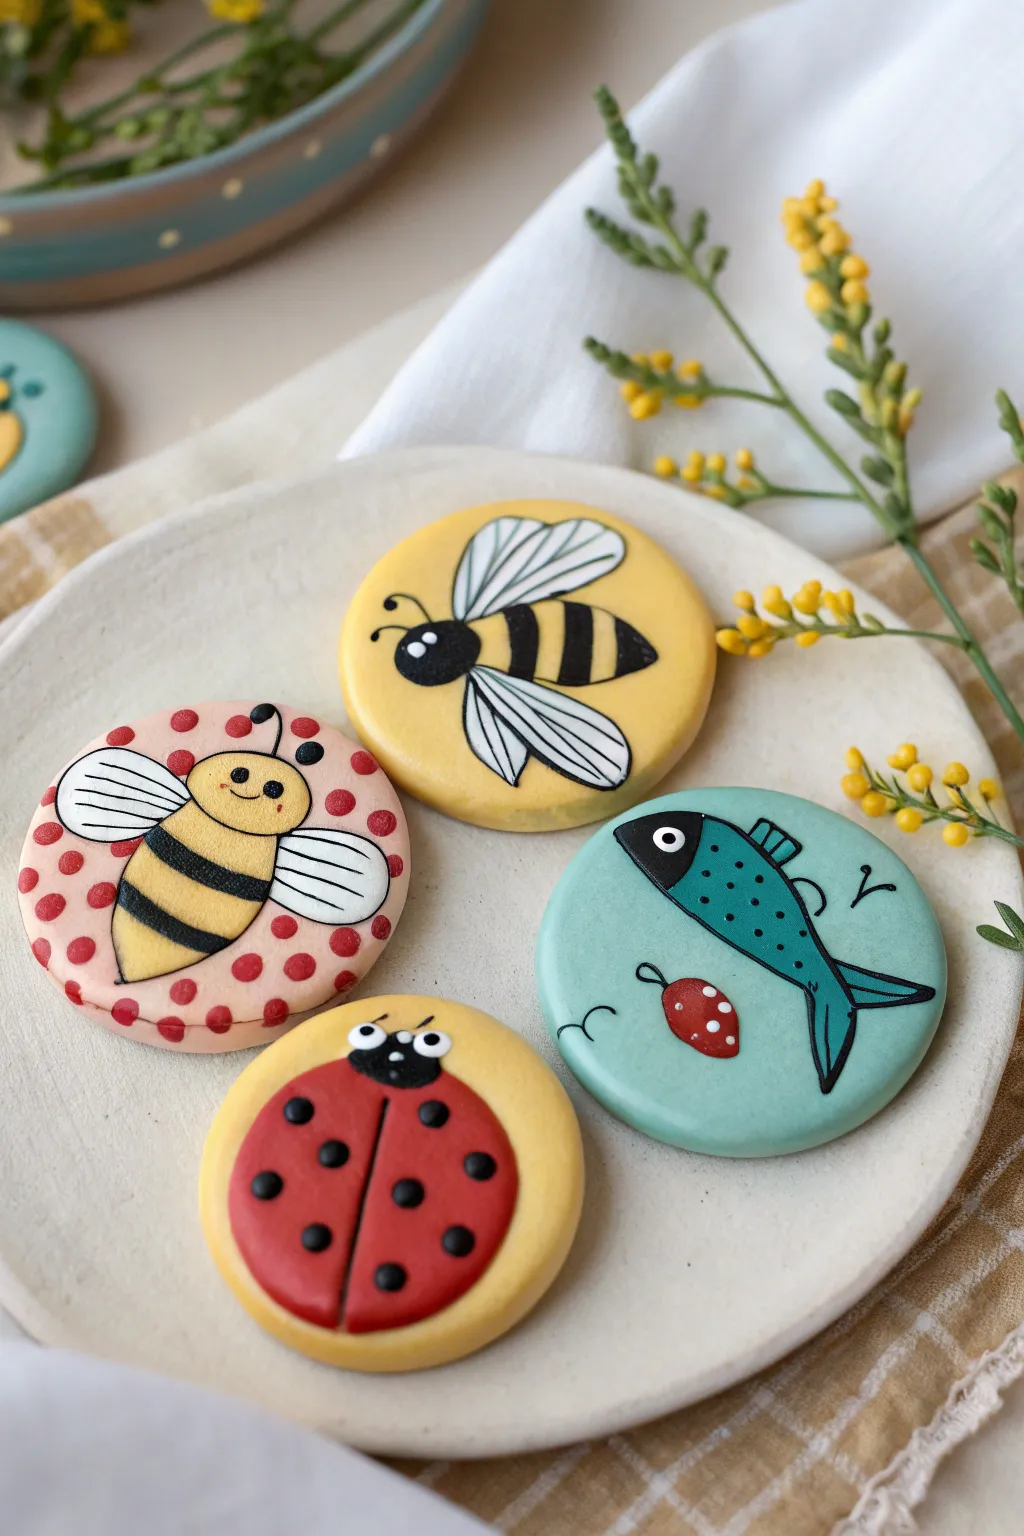
Bring the charm of a summer garden into your kitchen with these delightful hand-painted clay magnets. Featuring sweet bees, a ladybug, and a fish, these smooth, colorful discs make for a cheerful afternoon project.
Step-by-Step
Materials
- Air-dry clay (white)
- Circle cookie cutter (approx. 2-3 inches)
- Acrylic paints (yellow, soft pink, teal, red, black, white)
- Fine detail paintbrushes (sizes 0 and 00)
- Rolling pin
- Parchment paper
- Sandpaper (fine grit)
- Matte or satin varnish
- Strong craft magnets
- Strong craft glue (E6000 or similar)
Step 1: Shaping the Base
-
Roll the clay:
Take a handful of air-dry clay and knead it briefly to remove air bubbles. Roll it out on a piece of parchment paper until it is an even slab, about 1/4 inch thick. -
Cut the circles:
Using your circle cookie cutter, press firmly into the clay to create perfect rounds. You’ll need four distinct circles for this full set. -
Smooth the edges:
Dip your finger in a little water and run it gently around the cut edges of each circle to smooth out any roughness or loose bits of clay. -
Dry partially:
Allow the clay discs to dry for about 24-48 hours. I find flipping them over halfway through the drying process helps keep them perfectly flat. -
Sand for perfection:
Once fully cured and hard, use fine-grit sandpaper to buff the surface and edges until they are silky smooth and ready for paint.
Use a Smooth Surface
To get that super-flat, cookie-like surface, roll your clay out on a plastic placemat or wax paper. It prevents texture transfer from textured tables.
Step 2: Painting the Backgrounds
-
Base coats:
Paint the background colors for each magnet. Paint two yellow discs (one for the ladybug, one for the bee), one soft pink disc, and one teal disc. Let the first coat dry. -
Second coat:
Apply a second layer of the base colors to ensure opacity and a vibrant finish. Let this dry completely before starting the detailed designs.
Make Them 3D!
Before the clay dries, gently press small, separate balls of clay onto the discs to create raised bodies for the ladybug or bees for a tactile effect.
Step 3: Designing the Creatures
-
The Pink Polka Dot Bee:
Using the tip of a brush handle or a dotting tool, dab red dots all over the pink background. Then, paint a yellow oval in the center for the bee’s body. -
Yellow Bee Details:
On one yellow disc, paint a black oval for the bee’s main body, then add white teardrop shapes for wings. Outline the wings in black and add stripes to the body once the base layers are dry. -
The Ladybug:
On the second yellow disc, paint a large red circle occupying most of the space. Add a black semi-circle at the top for the head and paint a black line down the center of the red circle. -
The Teal Fish:
On the teal disc, use a darker teal or black outline to draw a fish shape. Fill in the body with a slightly darker shade if desired, and add a small red oval below it as a decorative element.
Step 4: Adding Fine Details
-
Character features:
Using your finest brush (size 00) and black paint, add the tiny details: eyes on the ladybug and bees, stripes on the pink-background bee, and scales on the fish. -
Highlighting:
Dip the very tip of a brush into white paint to add ‘gleam’ dots to the eyes of the creatures and small highlights on the ladybug’s shell. -
Final outlines:
Go over any outlines that need crisping up with black paint. Add little antennae to the bees and ladybug for extra personality.
Step 5: Finishing Up
-
Seal:
Once the paint is completely dry (give it a few hours), coat each disc with a matte or satin varnish to protect your artwork. -
Magnetize:
Flip the discs over. Apply a dab of strong craft glue to the back and press a magnet firmly into the center. Let the glue cure according to the package instructions.
Now you have a charming set of handmade magnets to brighten up your fridge or give as a thoughtful gift
Clay Hearts With Bead and Button Imprints
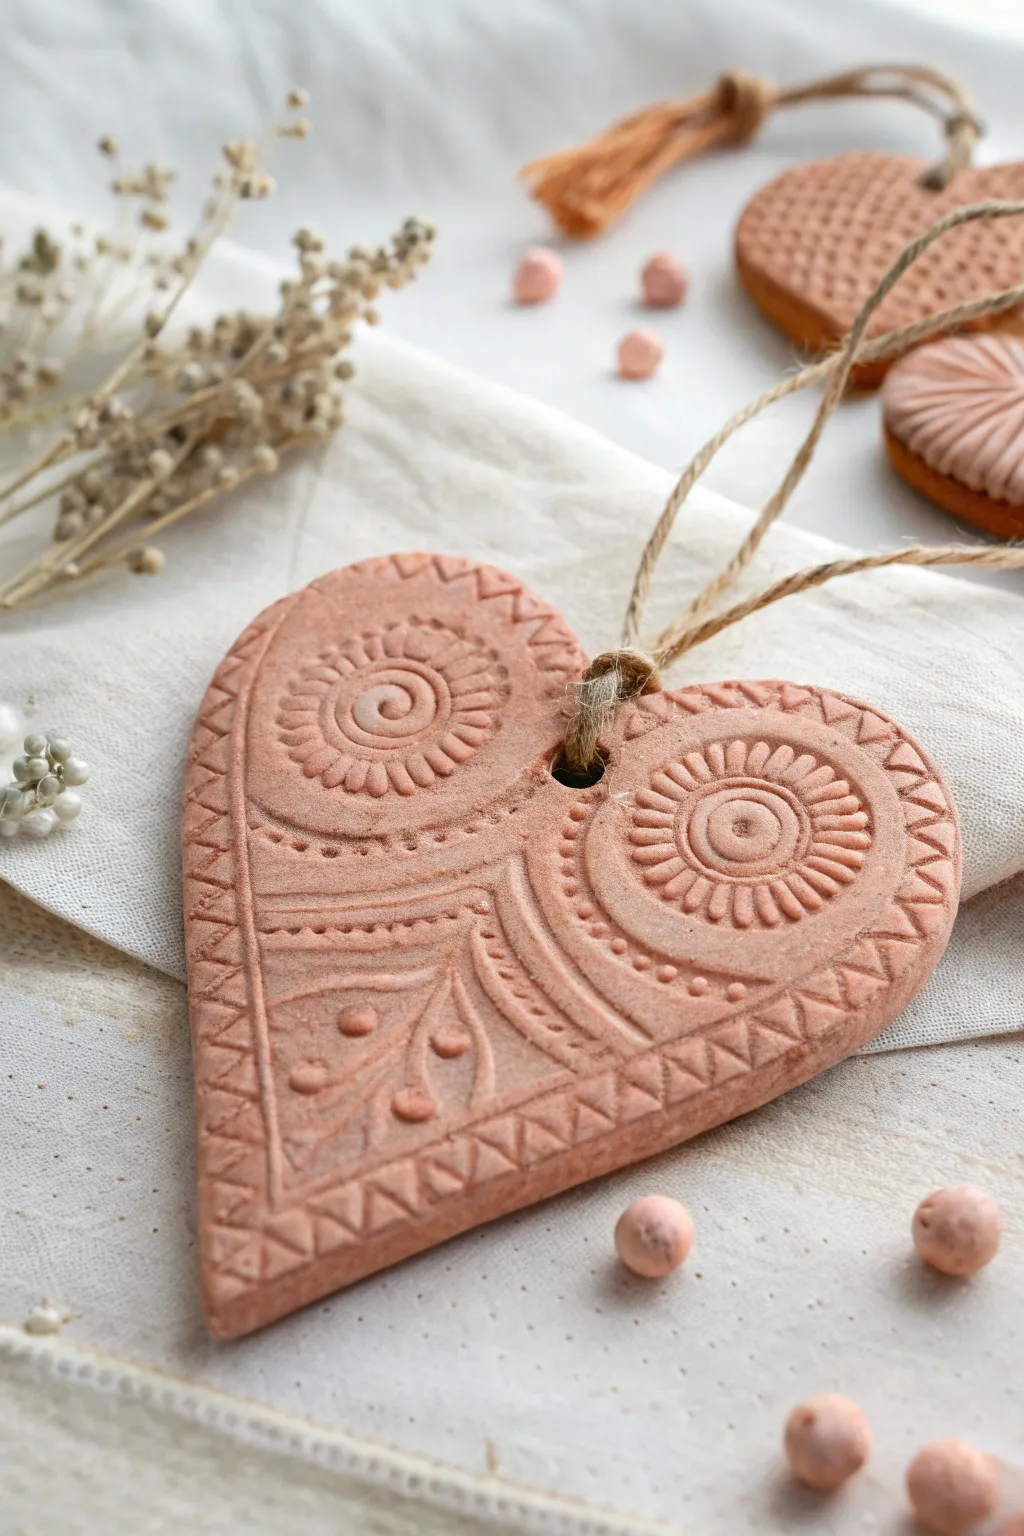
These simple yet elegant clay hearts are perfect for capturing intricate patterns using household items or stamps. The finished heart has a lovely, warm terracotta hue and features detailed radial designs that look much more complex than they actually are to create.
Step-by-Step Guide
Materials
- Air-dry clay or polymer clay (terracotta or reddish-brown color)
- Rolling pin
- Heart-shaped cookie cutter (large)
- Parchment paper or smooth work surface
- Small circular stamps or textured buttons
- Wooden skewer or clay needle tool
- Drinking straw (for the hole)
- Jute twine or rustic string
- Fine-grit sandpaper (optional)
- Small paintbrush (optional, for smoothing)
Step 1: Preparation and Cutting
-
Prepare your workspace:
Lay down a sheet of parchment paper on a flat surface. This prevents the clay from sticking and makes it easier to move the delicate heart later without distorting its shape. -
Condition the clay:
Take a handful of your terracotta-colored clay and knead it until it is soft, pliable, and free of cracks. Warm hands help this process go faster. -
Roll out the slab:
Using your rolling pin, flatten the clay into an even slab. Aim for a thickness of about 1/4 inch (6mm)—too thin and it might break; too thick and it will be heavy. -
Stamp the main pattern:
Before cutting the shape, gently press your circular stamps into the clay slab. Position two large circular patterns side-by-side where the ‘lobes’ of the heart will eventually be. -
Add bordering details:
Use a clay tool or the edge of a flat object to press a zig-zag or triangle border pattern into the clay area that will become the outline of your heart. -
Cut the heart shape:
Position your heart-shaped cookie cutter over your stamped design, ensuring the two circular patterns are centered in the top arches of the heart. Press down firmly to cut. -
Remove excess clay:
Carefully peel away the scrap clay from around the outside of the cutter before lifting the cutter itself. This keeps the edges of your heart clean.
Step 2: Detailing and Finishing
-
Refine the edges:
Dip your finger or a small paintbrush in a tiny bit of water and gently smooth the cut edges of the heart to remove any sharpness or crumbs. -
Add central details:
Using a small, blunt tool or the back of a paintbrush, press small dots or lines into the lower ‘V’ section of the heart to fill in any empty space. -
Define the center line:
Draw a soft, curved line separating the upper patterned section from the lower pointed section to give the design structure. -
Create the hanging hole:
Take a drinking straw and press it through the clay near the top center V-dip of the heart. twist slightly as you pull it out to get a clean hole. -
Check the back:
Even though this side won’t show, ensure the back is flat. If you manipulated the clay a lot, the edges might have lifted; gently press the heart flat against the table again. -
Dry the heart:
Allow the clay to dry according to the package instructions. For air-dry clay, turning it over halfway through the drying time helps prevent warping. -
Sand the surface:
Once fully cured and hard, you can use fine-grit sandpaper to very lightly buff the surface if you want a smoother, more stone-like finish. -
Attach the hanger:
Cut a length of jute twine or rustic string. Fold it in half to create a loop. -
Secure the twine:
Push the looped end through the hole in the heart from front to back, then pass the loose ends through that loop and pull tight to create a lark’s head knot.
Stamp Magic
No fancy stamps? Look in your kitchen! The textured bottom of a glass, meat tenderizers, or even ornate buttons make incredible impressions in clay.
Fixing Cracks
If small cracks appear while the clay dries, mix a tiny bit of fresh clay with water to make a paste and smooth it into the cracks with a finger.
Hang your beautiful textured heart in a window or on a gift to add a handmade touch of warmth
Finger-Painted Relief Tiles With Bold Color Blocks
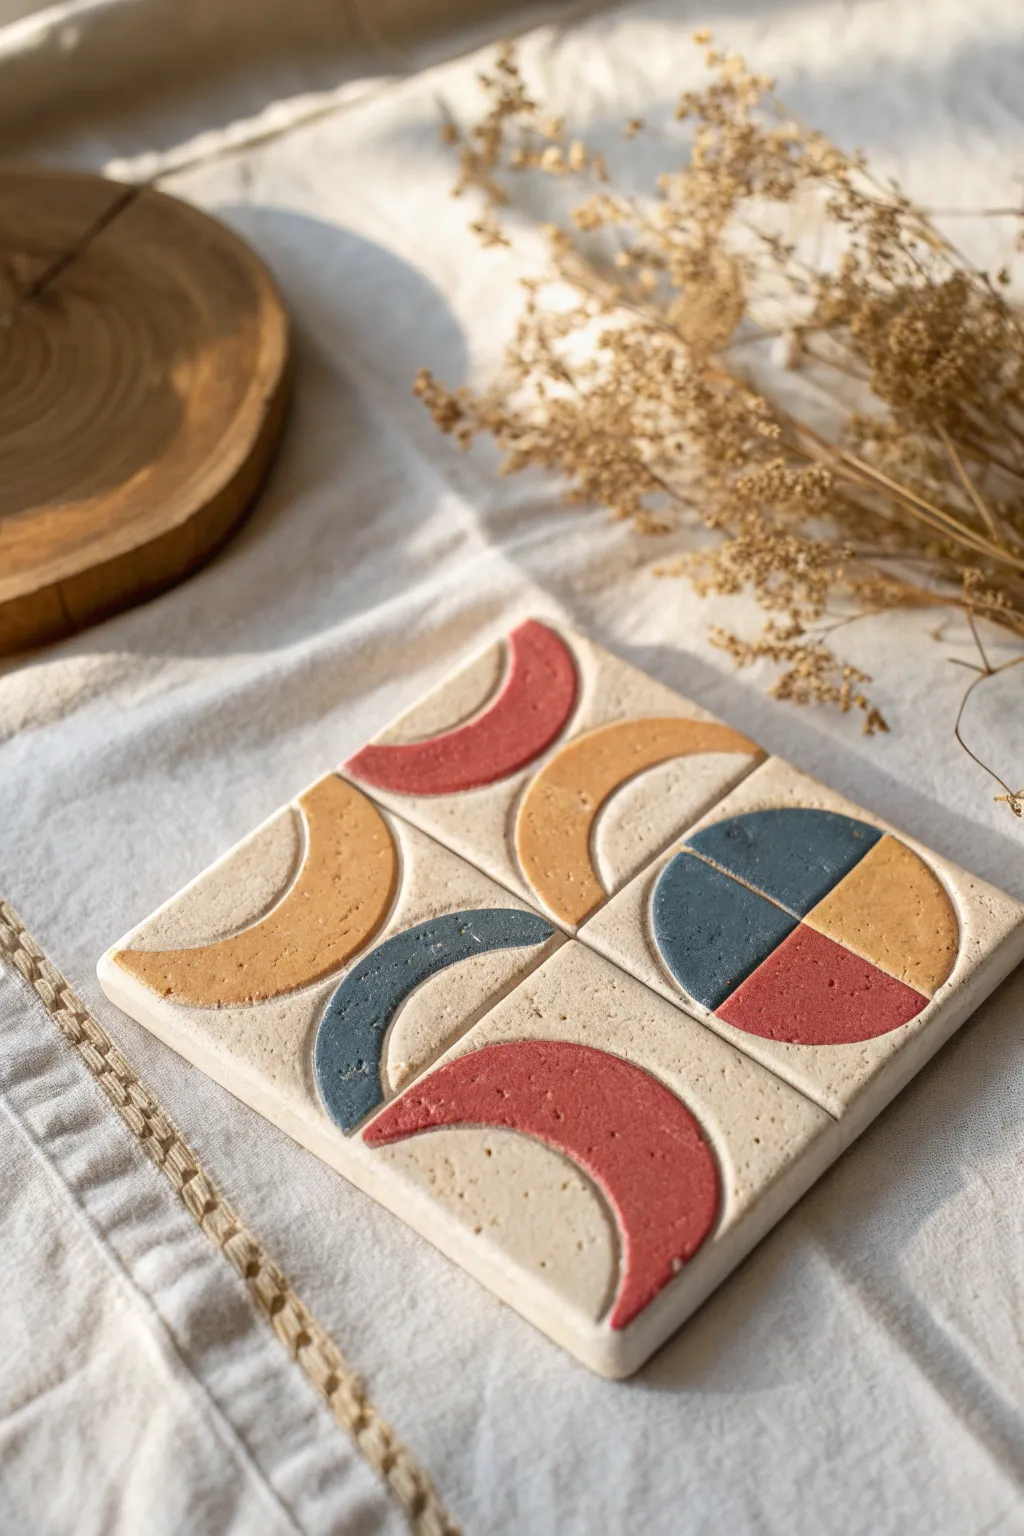
These charming relief tiles combine simple shapes with a warm, earthy color palette for a sophisticated yet playful look. By carving into thick slabs of clay and selectively painting the recessed areas, you create a beautiful dimensional effect perfect for coasters or wall art.
Step-by-Step
Materials
- White original Sculpey or air-dry clay
- Rolling pin
- Square cookie cutter (approx. 4×4 inches) or ruler and knife
- Compass or various circular lids for tracing
- Carving tools (loop tool or plastic clay knife)
- Acrylic paints (terracotta, mustard yellow, slate blue)
- Fine grit sandpaper
- Matte varnish or sealant (optional)
- Small flat paintbrush
Step 1: Shaping the Base
-
Condition the Clay:
Begin by warming up your clay in your hands until it is pliable and smooth. If you are using air-dry clay, ensure it’s fresh and moist to prevent cracking. -
Roll the Slab:
Roll the clay out into an even slab, approximately 1/4 inch thick. Use guide sticks on either side of your rolling pin if you have them to ensure uniform thickness across the entire piece. -
Cut the Square:
Using a square cookie cutter or a ruler and craft knife, cut out a perfect square. Smooth the edges with a finger dipped in a little water to soften any sharp cuts. -
Mark the Grid:
Lightly score a cross into the center of the square to divide it into four smaller, equal quadrants. Don’t cut all the way through; these lines are just guides for your pattern.
Uneven Carving Fix
If the bottom of your carved area looks bumpy, dip a brush in a tiny bit of water (for air-dry) or baby oil (for polymer) and smooth the recess before baking.
Step 2: Carving the Design
-
Outline the Shapes:
Use a compass or small lids to lightly impress circular shapes into the clay. Create crescents in three of the quadrants and a full circle divided into segments in the fourth quadrant, matching the reference image. -
Carve the Relief:
Using a loop tool or a small carving knife, gently scrape away the clay *inside* the shapes you just outlined. You want to lower the level of the crescents and circle segments by about 1-2 millimeters. -
Refine the Edges:
Go back over the edges of your carved areas to make them crisp and sharp. I find using a rubber-tipped clay shaper helps smooth the bottom of the carved recesses without leaving tool marks. -
Add Texture (Optional):
If you want that authentic stone feel, gently press a piece of coarse sandpaper or a textured sponge against the surface of the uncarved borders to remove the ‘perfect’ smooth look. -
Dry or Bake:
Follow the manufacturer’s instructions for your specific clay. If baking polymer clay, place it on a ceramic tile or baking sheet. If air-drying, let it sit for 24-48 hours, flipping it occasionally to prevent warping.
Create a Set
Make four tiles and vary which quadrant holds the circle design. When placed together on a table, they can form a large, striking geometric mosaic pattern.
Step 3: Adding Color
-
Sanding:
Once fully cured and cool, lightly sand the surface with fine-grit sandpaper to remove any burrs or sharp bits created during the carving process. -
Painting the Crescents:
Using a small flat brush, carefully fill in the recessed carved areas. Paint the top crescent a deep terracotta red. -
Painting the Side Crescents:
Paint the left crescent in mustard yellow and the bottom crescent in different sections of slate blue and terracotta red as shown in the design. -
Painting the Circle:
For the segmented circle quadrant, paint opposite sections in matching colors—slate blue and mustard yellow—to create a balanced geometric look. -
Clean Up Edges:
If any paint got onto the raised borders, wait for it to dry completely, then gently scrape it off with a craft knife or lightly sand it away to reveal the clean clay color again.
Step 4: Finishing Touches
-
Seal the piece:
To protect your paint and giving the tile a finished professional look, apply a coat of matte varnish. This keeps the earthy, natural vibe without making it look like shiny plastic. -
Backing:
Glue a square of felt or cork to the bottom of the tile to prevent it from scratching your furniture if used as a coaster.
Now you have a stylish piece of geometric decor to display on your coffee table or shelves
Quick Charms for Backpacks and Zippers
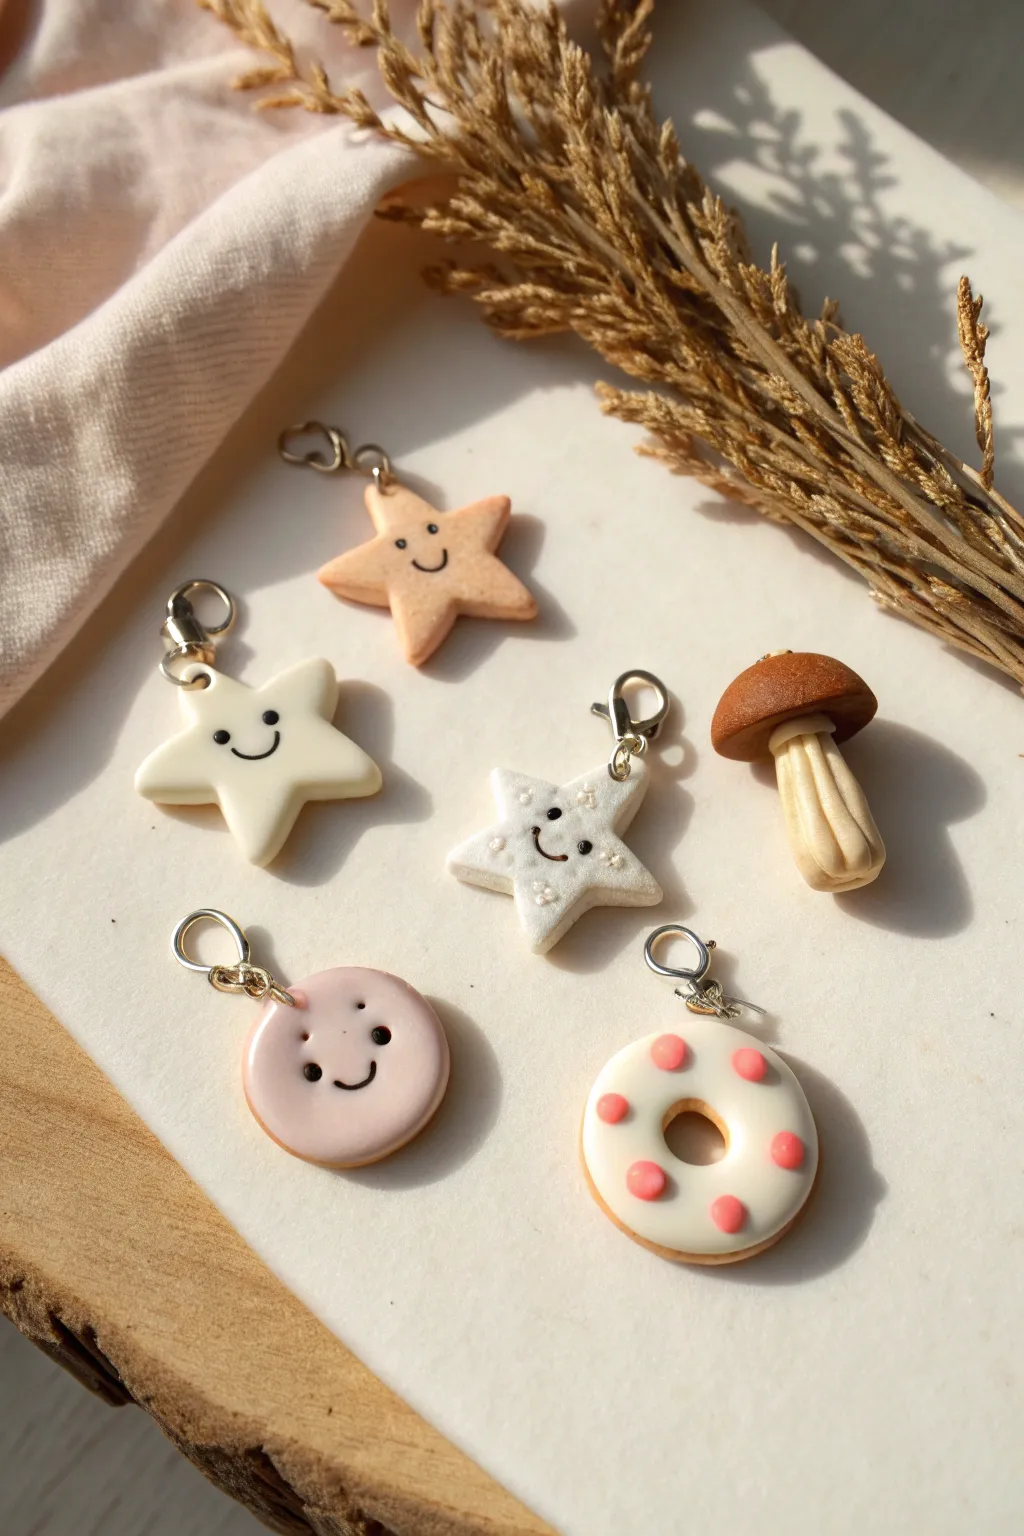
Add a dash of personality to any zipper pull with these adorable, lightweight clay charms. Featuring friendly stars, sweet treats, and a forest mushroom, this project uses simple shapes to create durable accessories that are as fun to make as they are to wear.
Detailed Instructions
Materials
- Polymer clay (beige, white, translucent sparkly white, soft pink, darker brown)
- Clay rolling pin or acrylic roller
- Small star cookie cutter (approx. 1 inch)
- Small round circle cutter
- Detailing tool or toothpick
- Black acrylic paint
- Fine-point paintbrush or toothpick
- Screw eye pins (silver or gold tone)
- Jump rings and lobster clasps
- Gloss glaze or polyurethane varnish (optional)
- Baking sheet and parchment paper
- Oven
Step 1: The Smiling Stars
-
Condition the Clay:
Begin by kneading your beige, cream, and sparkly white clay separately until each is soft and pliable. This step prevents cracking later on. -
Roll and Cut:
Roll each color into a slab about 1/4 inch thick. Use your small star cutter to punch out three star shapes. Smooth the sharp cut edges gently with your finger to give them a rounded, puffy look. -
Add Eyelets:
Take a metal screw eye pin and carefully twist it into the top point of each star. Ensure it goes in straight and deep enough to be secure. -
Create Faces:
Use a small dotting tool or the blunt end of a paintbrush to make two small indentations for eyes. Then, use a toothpick to gently carve a curved smile connecting the space below the eyes.
Smooth Operator Tip
Before baking, wipe your raw clay pieces with a little baby oil or rubbing alcohol on your finger. This removes fingerprints and dust for a professional finish.
Step 2: Sweet Treats & Forest Friend
-
Shape the Cookie Base:
Roll a small ball of beige clay and flatten it slightly into a thick disk for the smiling cookie charm. Insert the eye pin at the top. -
Frost the Cookie:
Roll a very thin sheet of pink clay. Cut a circle slightly smaller than your beige base, lay it on top, and gently smooth the edges down to look like icing. Add face indentations just like the stars. -
Form the Donut:
Roll a ball of beige clay and flatten it slightly. Use a smaller tool to poke a hole through the center. Stretch the hole gently to widen it. -
Glaze the Donut:
Create a white clay ‘icing’ layer following the same method as the pink cookie, poking the center hole to match. Add tiny flattened dots of pink clay on top for sprinkles. -
Sculpt the Mushroom Stem:
Take a piece of cream or beige clay and roll it into a thick cylinder that flares slightly at the bottom. Use a dull knife tool to press vertical lines into the stem for texture. -
Attach the Mushroom Cap:
Mold a semi-circle of brown clay for the cap and press it firmly onto the stem. You may want to use a drop of liquid clay or ‘bake and bond’ if you have it for extra security. Insert the eye pin into the top center of the cap.
Make It Sparkle
Mix just a pinch of fine glitter into your translucent clay before rolling it out to make ‘galaxy’ stars or ‘sugar-coated’ donuts without painting.
Step 3: Baking & Finishing Touches
-
Bake the Charms:
Arrange all your pieces on a parchment-lined baking sheet. Bake according to your clay manufacturer’s instructions (usually 275°F for 15-30 minutes). -
Cool Down:
Allow the charms to cool completely before handling. They are fragile while warm but harden as they return to room temperature. -
Paint the Faces:
Dip a toothpick or fine brush into black acrylic paint. Carefully fill in the eye indentations and the smile grooves you created earlier. Wipe away any excess on the surface with a damp paper towel immediately. -
Seal (Optional):
For extra durability, coat the charms with a thin layer of gloss glaze. This makes the eyes pop and protects the clay from backpack wear-and-tear. -
Assemble the Hardware:
Once dry, use pliers to open a jump ring. Slide it through the loop of the screw eye pin on your charm. -
Add the Clasp:
Before closing the ring, slide on a lobster clasp. Close the jump ring securely so there is no gap.
Your collection of charming characters is now ready to clip onto zippers and accompany you anywhere