Air dry clay is my favorite way to turn a quiet afternoon into a table full of tiny, adorable wins. If you’re craving projects that are simple, small, and seriously sweet, these cute air dry clay ideas will keep your hands busy and your shelves extra charming.
Chubby Kawaii Animal Figurines
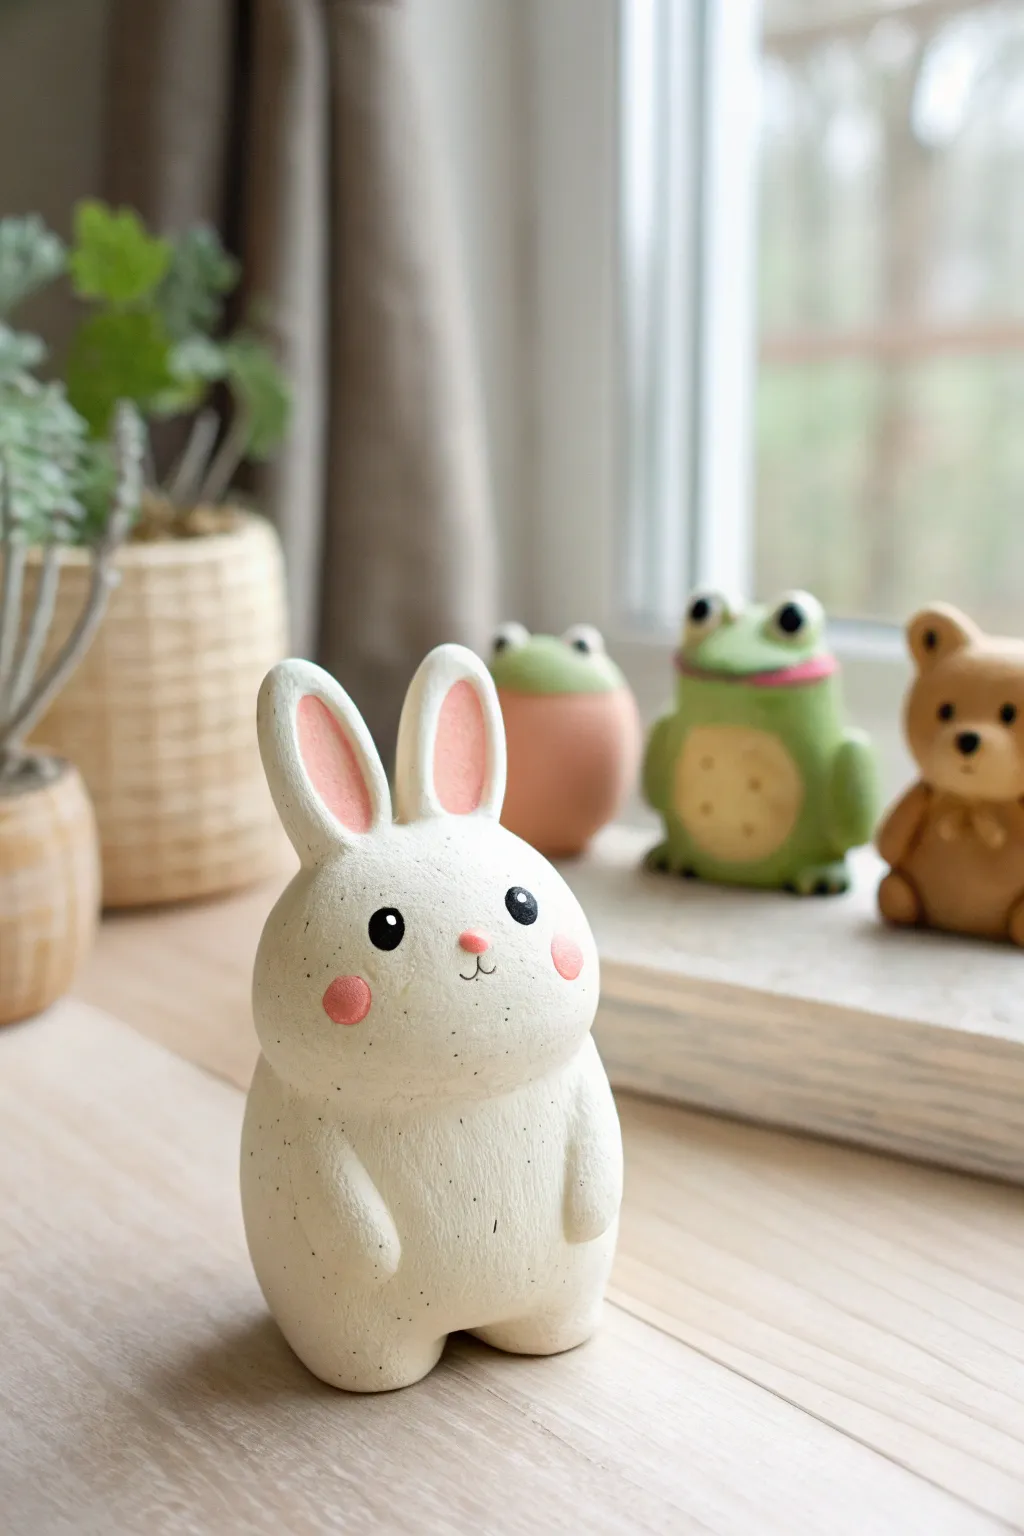
This adorable, chubby rabbit figurine captures the essence of kawaii style with its rounded belly and sweet expression. The smooth, matte finish and subtle speckled texture give it a delightful, organic look perfect for brightening up any desk or windowsill.
Step-by-Step
Materials
- White air dry clay
- Acrylic paints (pink, black)
- Small paintbrush or dotting tool
- Needle tool or toothpick
- Water
- Old toothbrush (optional for texture)
- Varnish (matte or satin)
- Sandpaper (fine grit)
Step 1: Shaping the Base
-
Prepare the clay:
Start by kneading a generous amount of white air dry clay until it feels soft, warm, and pliable to prevent cracking later. -
Form the main body:
Roll the clay into a smooth ball, then gently elongate it into a pear shape. You want a heavy bottom for stability and that cute ‘chubby’ aesthetic. -
Create the legs:
Pinch the bottom two corners of your pear shape to form two small, stubby legs. Gently tap the bottom on your work surface to flatten it so the bunny stands upright on its own. -
Add the arms:
Roll two small, equal-sized pieces of clay into teardrop shapes. Attach these to the sides of the belly using a tiny bit of water to blend the seams, pressing them flush against the body.
Seamless Smoothness
Keep a small bowl of water nearby. Dip your finger and rub it over cracks while the clay is wet to act as ‘eraser’ for imperfections.
Step 2: Adding Details
-
Sculpt the ears:
Roll two medium-sized sausage shapes for the ears. Flatten them slightly and use your thumb or a modeling tool to create shallow indentations down the center of each ear. -
Attach the ears:
Score the top of the head and the bottom of the ears with your needle tool. Apply a dab of water or slip, then press the ears firmly onto the head. Blend the clay at the join line until seamless. -
Refine the shape:
Use a little water on your finger to smooth out any fingerprints or bumps. I usually spend a few extra minutes here ensuring the transition between the ears and head is perfectly smooth. -
Add texture (optional):
To mimic the speckled look in the photo, you can gently tap the surface with an old toothbrush, or simply embrace the natural texture of stone-effect clay if you used it. -
Dry properly:
Set your bunny aside to dry completely. This usually takes 24-48 hours depending on humidity. Rotate it occasionally so the bottom dries evenly.
Accessory Upgrade
Before drying, sculpt a tiny carrot or flower and attach it between the bunny’s hands for an extra dose of personality.
Step 3: Painting & Finishing
-
Sand imperfections:
Once fully dry, use fine-grit sandpaper to gently buff away any rough spots or sharp edges for a professional finish. -
Paint the inner ears:
Mix a soft, pastel pink acrylic paint. carefully fill in the indented centers of the ears. -
Paint the face details:
Using the same pink, paint a tiny triangular nose and two round, rosy cheeks on the face. -
Add the eyes:
Use black acrylic paint and a dotting tool (or the back of a paintbrush handle) to create two bold black eyes. Add a tiny white highlight dot to each eye for sparkle if you wish. -
Draw the mouth:
With a super fine liner brush or a black fine-tip marker, draw the small ‘w’ shape for the mouth connecting to the nose. -
Create speckles:
If you want the speckled effect shown, dilute a tiny bit of black or grey paint and flick it very lightly onto the figurine with a toothbrush. -
Seal the piece:
Finish by applying a coat of matte or satin varnish to protect your paint job and give the clay a unified sheen.
Place your new clay companion on a shelf where it can bring a smile to your face every day


Mini Trinket Dish With a Smiley Face

This cheerful little trinket dish combines a trendy scalloped edge with a playful hand-drawn smiley face, perfect for holding your favorite rings. The speckled blush pink finish gives it a sophisticated ceramic look without needing a kiln, thanks to clever air-dry clay techniques.
Step-by-Step Guide
Materials
- White air-dry clay
- Rolling pin
- Round cookie cutter or bowl (approx. 4 inches)
- Modeling tool or dull knife
- Spherical tool or thumb for shaping
- Soft paintbrush
- Pink acrylic paint
- Black acrylic paint or Posca marker
- Old toothbrush (for speckling)
- High-gloss varnish or sealant
- Small cup of water
- Sandpaper (fine grit)
Step 1: Shaping the Base
-
Prepare the clay:
Start by taking a handful of white air-dry clay and kneading it until it is soft, warm, and pliable. This helps prevent cracks later on. -
Roll it out:
Roll the clay onto a smooth surface or canvas mat until it is an even slab, approximately 1/4 inch thick. Aim for a consistent thickness to ensure even drying. -
Cut the circle:
Use a round cookie cutter or place a small bowl upside down on the clay as a template. Cut around it with your modeling tool to create a perfect circle. -
Smooth the edges:
Dip your finger in a little water and gently run it along the cut edge of the circle to smooth out any roughness or loose bits of clay.
Crack Control
If small hairline cracks appear while drying, don’t panic. Mix a tiny bit of fresh clay with water to make a paste (slip) and fill them in, then sand smooth once dry.
Step 2: Creating the Fluted Rim
-
Form the curve:
Gently lift the clay circle and place it into a shallow bowl or curved saucer to help it hold a dish shape while you work. Alternatively, pinch up the edges slightly with your fingers. -
Mark the scallops:
Imagine the rim as a clock face. Use your finger to gently push the clay inward at regular intervals to start forming the indentations for the scalloped edge. -
Pinch the peaks:
Between each indentation where you pushed in, gently pinch the clay outward to form a rounded peak. Repeat this pattern all the way around the rim. -
Refine the shape:
Go around the rim again, smoothing the indentations and rounding the peaks so they look like soft flower petals rather than sharp spikes. I like to use the back of a paintbrush handle to press the inner curves evenly.
Step 3: Drying and Refining
-
Let it dry:
Leave the dish in a safe spot to dry completely. This usually takes 24-48 hours depending on humidity. Flip it over halfway through so the bottom dries evenly. -
Sand imperfections:
Once fully dry and hard, use fine-grit sandpaper to buff away any uneven spots on the rim or surface. Wipe away the dust with a slightly damp cloth.
Gold Accents
For an extra touch of elegance, paint just the very tips of the scalloped rim with liquid gold leaf or metallic gold paint before sealing.
Step 4: Painting and Finishing
-
Mix the base color:
Mix white acrylic paint with a tiny drop of red or pink to create a very pale blush tone. You want a soft, pastel pink. -
Apply base coat:
Paint the entire dish—front, back, and rim—with your blush pink mixture. Let it dry and apply a second coat for opaque coverage. -
Add the speckles:
Dilute a small amount of black or grey paint with water. Dip an old toothbrush into it, then run your thumb over the bristles to flick tiny speckles onto the dish. Practice on paper first to control the spray. -
Draw the face:
Using a thin black paint marker or a fine detail brush, draw two small ovals for eyes and a simple U-shape smile near the bottom center of the dish bowl. -
Seal the piece:
Once the paint is completely dry, apply two coats of high-gloss varnish. This protects the clay and gives it that shiny, ceramic-like finish visible in the photo.
Now you have a charming spot to keep your jewelry safe and smiling


Tiny Mushroom Trinket Bowl
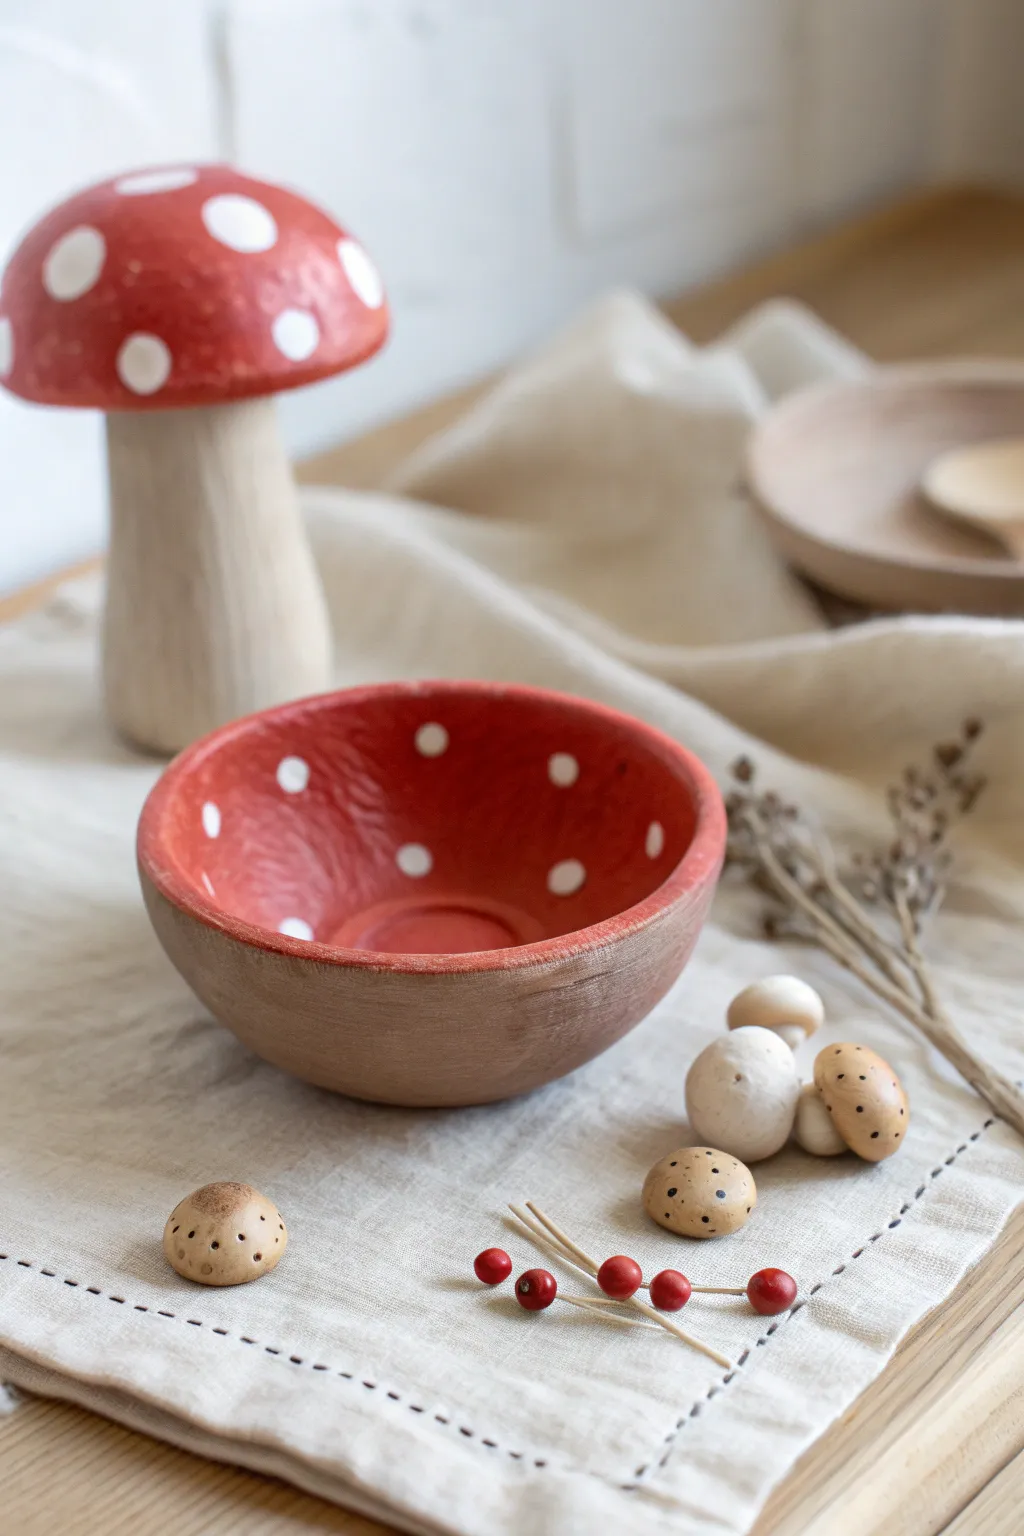
Bring the enchantment of the forest floor into your home with this charming trinket dish disguised as an upside-down mushroom cap. With its earthy, raw clay exterior and vibrant, spotted red interior, it’s the perfect spot to hold your favorite rings or treasures.
How-To Guide
Materials
- Air dry clay (white or terracotta)
- Acrylic paints: Bright red, white, brown, burnt umber
- Rolling pin
- Small bowl or half-sphere mold (for shaping)
- Clay sculpting tools (or a butter knife and toothpick)
- Fine-grit sandpaper
- Medium paintbrush
- Small round paintbrush or dotting tool
- Matte or satin sealant spray
Step 1: Shaping the Cap
-
Prepare the clay:
Start by taking a handful of air dry clay and kneading it in your hands until it becomes warm and pliable. This conditioning helps prevent cracks later on. -
Roll out a slab:
Using your rolling pin, roll the clay out to an even thickness of about 1/4 inch. If you want a more rustic look like the example, it doesn’t need to be perfectly mechanically smooth. -
Cut the circle:
Find a circular object slightly larger than your desired bowl size (like a large mug or small cereal bowl) to use as a template. Place it on the clay and cut around it with your knife tool to get a clean circle. -
Form the curve:
Gently press your clay circle into your chosen mold or small bowl. I prefer to line the mold with plastic wrap first so the clay pops out easily. -
Add texture:
Before the clay sets, use your fingers to gently uneven the rim. The goal is an organic, imperfect edge that mimics a real mushroom cap, rather than a perfect factory-made bowl. -
Create the interior reservoir:
Press a smaller circle indentation into the very bottom center of the bowl creates a nice little ‘well’ for tiny items, just like the stem attachment point would look on an inverted mushroom. -
Dry thoroughly:
Let the bowl dry completely in the mold for at least 24-48 hours. Carefully flip it halfway through if possible to let the bottom breathe.
Rim Realism
Don’t make the rim too thin! A thicker, slightly rounded rim looks more like a fleshy fungus and is much less likely to chip over time.
Step 2: Painting and Finishing
-
Sand the imperfections:
Once fully bone dry, take your fine-grit sandpaper and gently smooth out any sharp jagged bits on the rim, but leave the subtle surface texture alone. -
Base coat the exterior:
Mix brown and a touch of white paint to create a soft, earthy beige. Paint the entire exterior of the bowl and the rim edge. -
Add natural weathering:
While the beige is still slightly wet, dry-brush a tiny bit of darker brown or burnt umber horizontally around the outside to give it that wood-like, organic grain seen in the photo. -
Paint the red interior:
Switch to your bright red acrylic. Paint the entire inside of the bowl, being careful to keep a clean line where the red meets the beige rim. You may need two coats for full opacity. -
Create the polka dots:
Dip the handle end of a paintbrush or a dotting tool into white paint. Press dots randomly around the red interior. Vary the pressure slightly so some dots are larger than others. -
Texture the red paint:
For that specific textured look in the photo, you can gently dab the wet red paint with a crumpled paper towel or sponge before adding the dots, giving the ‘cap’ a fleshy mushroom texture. -
Seal the piece:
Finish by spraying the entire piece with a matte or satin sealant. This protects the paint from chipping and gives the clay a finished, durable surface.
Forest Floor Display
Make smaller clay ‘pebbles’ or miniature mushrooms using leftover scraps to scatter around your finished bowl for a complete woodland vignette.
Place your new mushroom cap on a shelf or bedside table to add a touch of woodland magic to your daily routine


Dainty Cloud and Star Wall Dangles
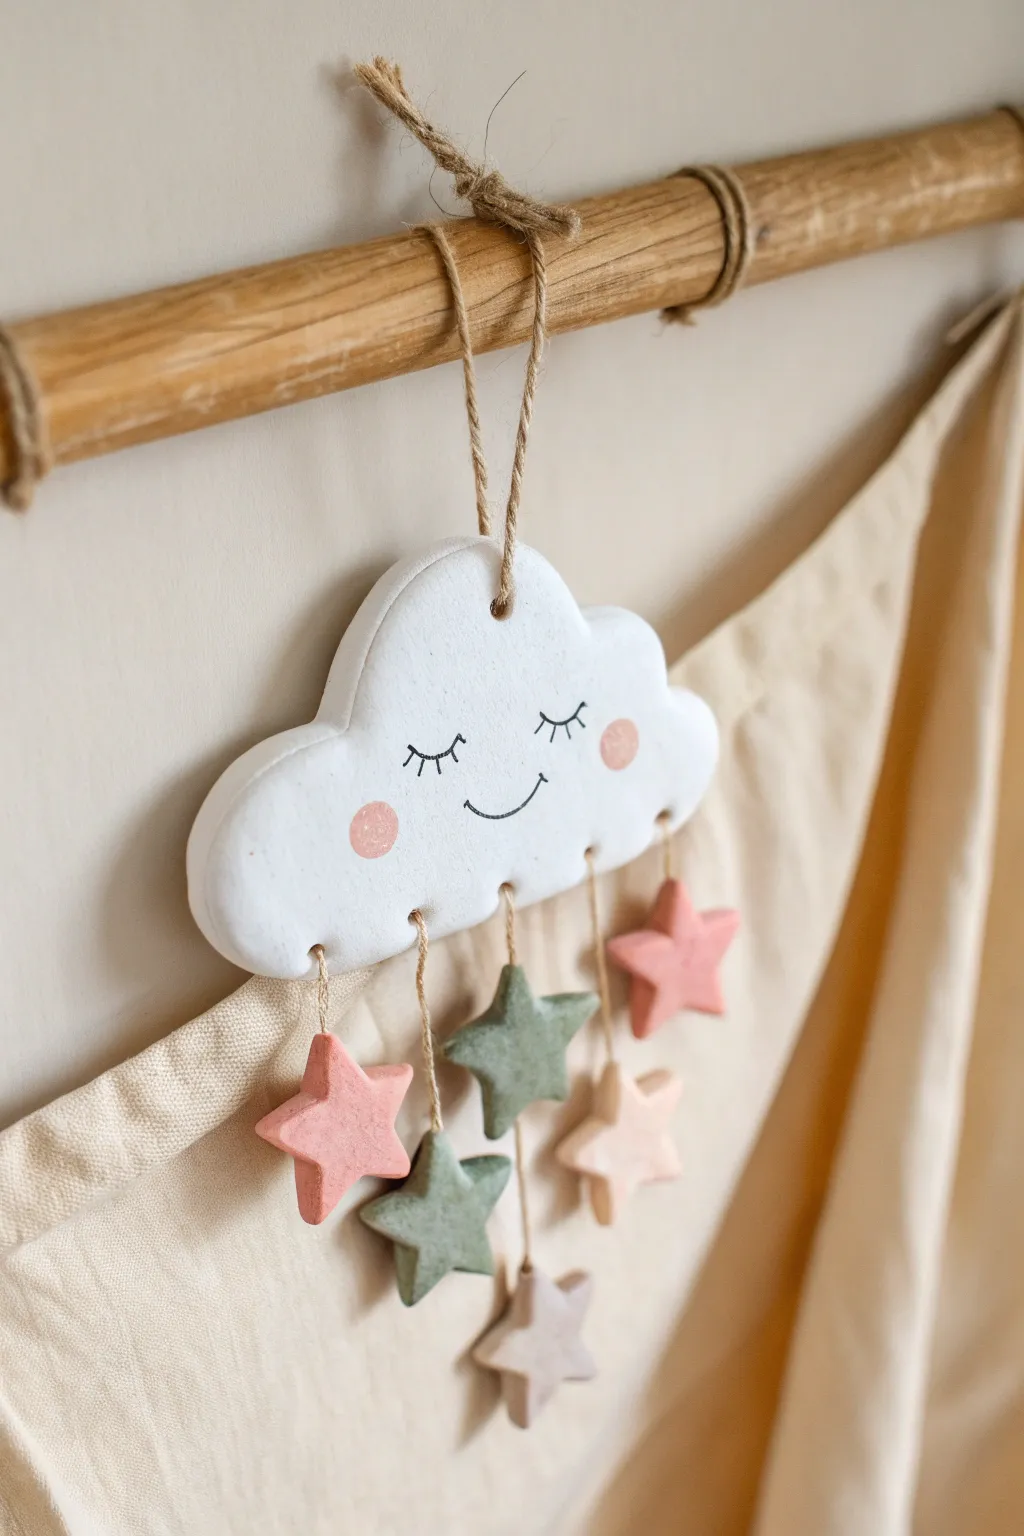
Bring a touch of sweetness to a nursery or bedroom wall with this charming cloud mobile made from air-dry clay. Featuring soft pastel stars and a sleepy cloud face, it creates a gentle and dreamy atmosphere.
Step-by-Step Guide
Materials
- White smooth air-dry clay
- Rolling pin
- Parchment paper or silicone mat
- Cloud cookie cutter (or paper template and knife)
- Small star cookie cutter
- Baking paper
- Fine-grit sandpaper
- Acrylic paints: White, soft pink, sage green, beige, black
- Small paintbrush and a fine detail brush
- Jute twine or thin hemp cord
- Straw or skewer (for making holes)
- Small wooden dowel or branch (for hanging)
- Scissors
- Craft glue or hot glue gun
Step 1: Shaping the Clay Elements
-
Condition the clay:
Begin by kneading a good chunk of air-dry clay in your hands until it feels warm, pliable, and smooth. This prevents cracks later on. -
Roll it out:
Place the clay between two sheets of parchment paper or directly on your mat. Roll it out evenly until it is about 1/4 inch (6mm) thick. You want it substantial enough to be sturdy but not too heavy. -
Cut the cloud:
Press your large cloud cutter firmly into the clay. If you don’t have a cutter, lightly trace a cloud shape onto the clay with a needle tool and carefully cut it out with a craft knife. Smooth the edges with a bit of water on your fingertip. -
Create the stars:
Gently reroll your scraps and cut out at least 5-6 small stars. I usually make a couple extra just in case one breaks or falls while drying. -
Add holes for hanging:
Using a straw or a skewer, poke a hole at the very top center of the cloud for the main hanger. Then, poke three evenly spaced holes along the bottom edge of the cloud where the stars will dangle. Be sure to wiggle the tool slightly so the holes don’t shrink too much as the clay dries. -
Pierce the stars:
Poke a single hole through the top point of each star. Make sure the hole isn’t too close to the edge to prevent the clay from snapping later. -
Dry thoroughly:
Lay all pieces on a flat surface lined with baking paper. Let them dry for 24-48 hours, flipping them halfway through to ensure the backs dry evenly.
Keep it Flat
If your cloud starts curling up at the edges while drying, place a lightweight book on top of it (with parchment paper in between) once it is partially dry to flatten it out.
Step 2: Painting and Decoration
-
Sand imperfections:
Once bone dry, gently run fine-grit sandpaper over any rough edges on the cloud and stars to create a professional, smooth finish. -
Base coat:
Paint the entire cloud shape with a coat of white acrylic paint for a crisp, clean look. Let it dry completely. -
Paint the stars:
Paint your stars in alternating colors. Use soft pink, sage green, and beige to match the example image. You might need two coats for opaque coverage. -
Add the face details:
Using a very fine detail brush and black paint, carefully paint two curved lines for sleepy eyes with little eyelashes. Add a small ‘u’ shape for the smiling mouth. -
Create rosy cheeks:
Dip a round brush or a cotton swab into the pink paint. Dab off most of the paint on a paper towel, then gently press circle cheeks onto the cloud face on either side of the smile.
Add Texture
Before the clay dries, gently press a piece of lace or textured fabric onto the stars to leave a subtle, imprinted pattern that catches the light wonderfully.
Step 3: Assembly
-
Prepare the strings:
Cut three lengths of jute twine. Vary the lengths slightly so the stars will hang at different heights, creating visual interest. -
Attach the stars:
Thread one end of a twine piece through the hole in a star. Tie a secure knot at the front or back, trimming any excess tail. -
Connect to the cloud:
Thread the other end of each twine piece through the corresponding bottom holes on the cloud. Adjust the length until you are happy with how the stars dangle, then knot securely on the back of the cloud. -
Add extra stars:
I like to attach a second star further up the same string for a fuller look. Simply thread the twine through a second star before tying it off at the cloud, securing the middle star with a small knot underneath it to hold it in place. -
Create the main hanger:
Cut a longer piece of jute twine. Loop it through the top hole of the cloud and tie it off. -
Mount on the dowel:
Tie the loose ends of the cloud’s top string around the center of your wooden dowel or branch. -
Final hanging loop:
Tie a piece of twine to both ends of the wooden dowel to create the final wall hanger.
Hang your lovely creation near a window or above a crib and enjoy the peaceful vibe it brings to the room

What Really Happens Inside the Kiln
Learn how time and temperature work together inside the kiln to transform clay into durable ceramic.
Mini Animal Planter for Succulents (Decor-Only)
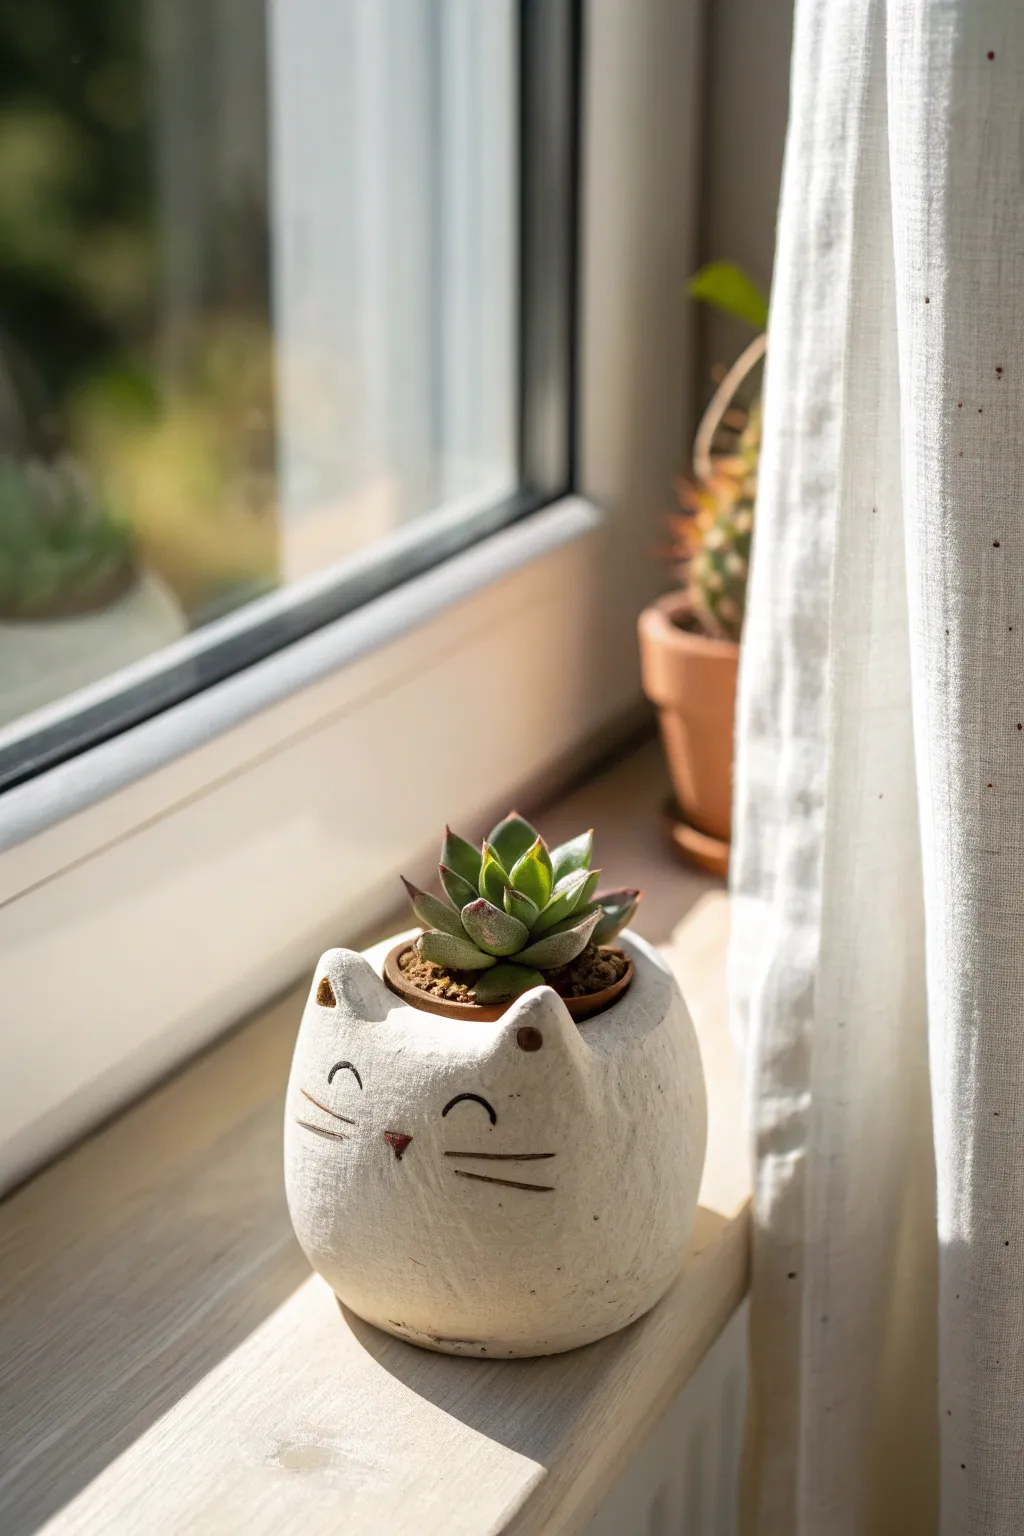
Brighten up your windowsill with this adorable, minimalist cat planter designed to hold a tiny succulent pot. Using basic shaping techniques and simple painted details, you’ll create a textured, matte-finish feline friend that adds charm to any corner.
Step-by-Step
Materials
- White classic air dry clay (approx. 300g)
- Small rolling pin
- Small succulent in a 2-inch plastic nursery pot
- Clay modeling tools or a plastic knife
- Water in a small cup
- Sponge or brush for smoothing
- Fine-grit sandpaper
- Acrylic paints: Black and Terracotta/Burnt Sienna
- Fine detail paintbrush
- Matte spray varnish or Mod Podge (optional)
Step 1: Shaping the Clay Base
-
Prepare the main shape:
Start by kneading your air dry clay until it is soft and pliable. Roll it into a smooth, solid ball slightly larger than a tennis ball, ensuring there are no deep cracks. -
Create the opening:
Using your thumbs, gently press into the center of the ball while rotating it in your hands. You are aiming to create a Pinch Pot shape. Keep pressing until the hole is deep enough to hide the rim of your small plastic nursery pot. -
Test the fit:
Insert your 2-inch nursery pot into the wet clay opening to check the size. I like to make the clay opening slightly larger than the pot, as air dry clay shrinks around 5-10% when drying. -
Thicken the walls:
Maintain a wall thickness of about 1/4 inch (0.6 cm). If the walls are too thin, the pot might crack; too thick, and it will take forever to dry. Smooth the rim so it’s rounded and neat. -
Shape the cat’s ears:
Pinch two small, triangular sections of clay upward from the front rim of the pot to form the ears. Gently curve the tips slightly to give them a soft, organic look rather than sharp points. -
Refine the body:
Tap the bottom of the pot gently on your work surface to create a flat base so the cat sits stable. Smooth the sides with a damp finger to remove fingerprints, but don’t worry about being perfect—the texture adds character.
Waterproofing Wisdom
Never plant directly into air dry clay, as water will turn it back into mush. Always use a plastic liner pot inside.
Step 2: Adding Details and Drying
-
Add texture (optional):
The planter in the image has a lovely, slightly rough stone feel. To achieve this, dab the surface lightly with a stiff sponge or a crumpled ball of aluminum foil before the clay hardens. -
Initial drying phase:
Set the planter in a cool, dry place away from direct sunlight. Rotate the piece every few hours to ensure even airflow, which helps prevent warping. -
Full cure time:
Allow the clay to dry completely for at least 24-48 hours. The clay will turn from a greyish tone to a bright bone white when it is fully cured. -
Smooth imperfections:
Once fully dry, check for any sharp edges or rough ridges. Use fine-grit sandpaper to gently buff these areas until they feel smooth to the touch.
Step 3: Painting and Finishing
-
Sketch the face:
Use a light pencil to barely sketch the placement of the eyes, nose, and whiskers. Position the eyes as simple arches (‘happy eyes’) centered below the ears. -
Paint the nose:
Using a fine detail brush, paint a small, inverted triangle for the nose using a terracotta or burnt sienna acrylic paint. This gives it a warm, earthy contrast against the white. -
Paint the eyes:
Switch to black acrylic paint. Carefully paint two small upward-curved arches for the closed eyes. Keep your hand steady and use just the very tip of the brush. -
Add whiskers:
Paint two or three straight horizontal lines on each cheek area for the whiskers. Keep the lines thin and float them slightly away from the nose. -
Seal the pot:
Since air dry clay is not waterproof, apply a coat of matte varnish or sealer. This step is crucial if you plan to keep this near a window where moisture might be present. -
Insert the plant:
Place your succulent—keeping it inside its plastic nursery pot—into your new clay cat. This ‘double potting’ method prevents water from degrading the clay over time.
Cracks on Drying?
If hairline cracks appear while drying, mix a tiny bit of fresh clay with water to make a paste and fill them in.
Enjoy the cozy vibe your new little kitty planter brings to your home decor
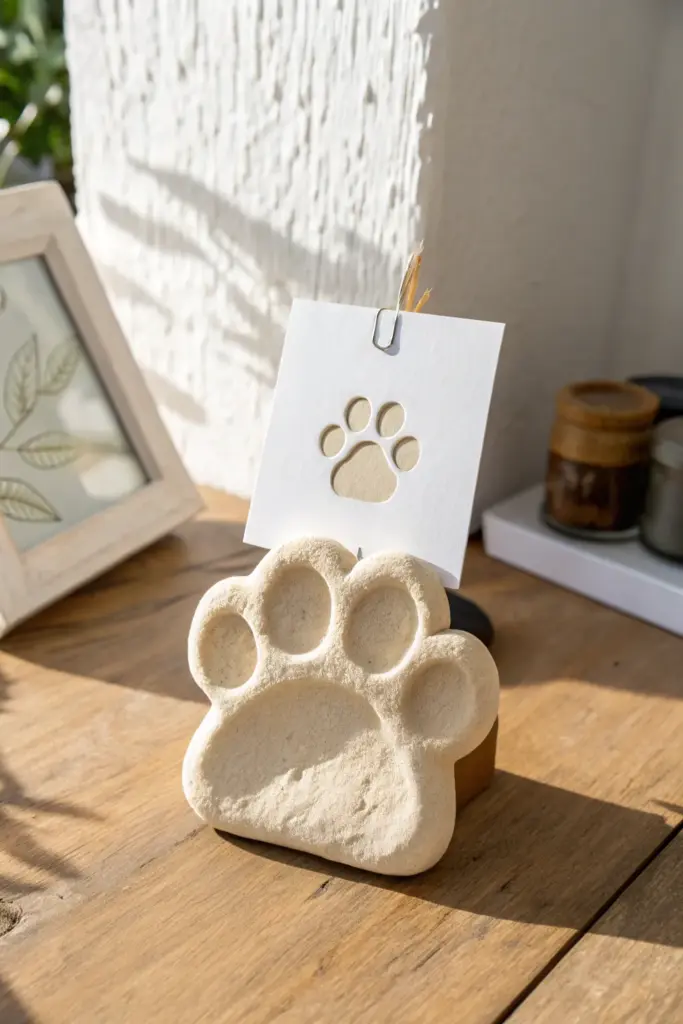
Cute Mini Picture Holders With Tiny Paws

Keep your furry friend close with this charming, rustic photo holder that mimics the look of natural carved stone. This functional piece features a satisfyingly chunky paw print base and a clever wire clip mechanism, perfect for displaying snapshots or tiny reminders.
Step-by-Step
Materials
- Air dry clay (preferably a natural or stone-colored variety)
- Textured stone spray paint (optional, for finish)
- Coarse sandpaper or a stiff bristle brush
- Craft wire (approx. 18-20 gauge)
- Wire cutters
- Pliers
- Small rolling pin
- Cookie cutter or knife (for base shape)
- Water in a small cup
- Needle tool or toothpick
Step 1: Shaping the Clay Paw
-
Prepare the clay:
Start with a ball of air dry clay about the size of a tangerine. Knead it well to warm it up and remove air bubbles, aiming for a smooth, pliable consistency. -
Form the base shape:
Flatten the ball into a thick, rounded slab approximately 1 inch thick. You can gently press it against your work surface to create a flat bottom which ensures stability. -
Outline the paw:
Using a needle tool, lightly sketch the outline of a paw print onto the flattened clay to guide your sculpting. If you aren’t confident freehanding, you can print a small template to trace. -
Refine the silhouette:
Use your fingers or a modeling tool to press in the indentations between the toes, giving the outer edge that characteristic scalloped paw shape. -
Create the main pad:
Press your thumb firmly into the center of the lower section to create the large, triangular heel pad depression. -
Create the toe pads:
Use your index finger or a ball-stylus tool to press deep, oval indentations for the four toes above the main pad. Smooth the edges of these depressions with a damp finger so they look soft and worn, not sharp. -
Add texture:
To achieve that weathered stone look before the clay dries, gently dab the surface with a stiff bristle brush or press coarse sandpaper against the clay.
Wire Wobble Fix
If the wire feels loose after drying, pull it out carefully, add a dab of superglue to the end, and reinsert it into the existing hole.
Step 2: Creating the Holder Mechanism
-
Cut the wire:
Cut a piece of craft wire approximately 4-5 inches long using your wire cutters. -
Form the coil:
Using the very tip of your pliers, twist one end of the wire into a double loop or spiral. This tight coil is where you will slide your photo or note in later. -
Insert the wire:
Push the straight end of the wire vertically into the back of your clay paw, positioning it centrally behind the toe pads. -
Secure the wire:
If the clay feels loose around the wire, pinch it slightly at the entry point or add a tiny drop of slip (watered-down clay) to act as glue.
Step 3: Finishing Touches
-
Let it dry:
Allow the piece to dry completely for 24-48 hours. I find that turning it over halfway through the process helps the bottom dry evenly. -
Sand for stone effect:
Once fully hard, lightly sand the surface. This highlights the texture you created earlier and mimics the erosion found on real rocks. -
Apply finish (optional):
For an even more realistic look, apply a light coat of textured stone spray paint in a beige or sandy color. If you prefer the natural clay color, a matte varnish will protect it without adding shine. -
Create the card insert:
Cut a square of heavy cardstock. Use a paw-print craft punch or a craft knife to cut a negative space paw shape in the center to mirror your clay base. -
Assemble:
Slide your decorative card or a favorite photo into the wire coil to complete your display.
Easy Texturing Hack
Don’t have a texture brush? Use a crumpled ball of aluminum foil. Press it gently all over the wet clay to create instant, realistic rock pores.
Place this sturdy little keepsake on your desk to bring a smile to your face every time you see it