Whenever I’m stuck in a creative rut, coil pottery is the thing that pulls me back in because it’s basically endless—one simple coil can turn into a hundred different vibes. Here are some of my favorite coil pottery ideas that you can totally make at a hobbyist pace, whether you love clean lines or bold, chunky texture.
Simple Coil Planter with a Drainage Foot Ring
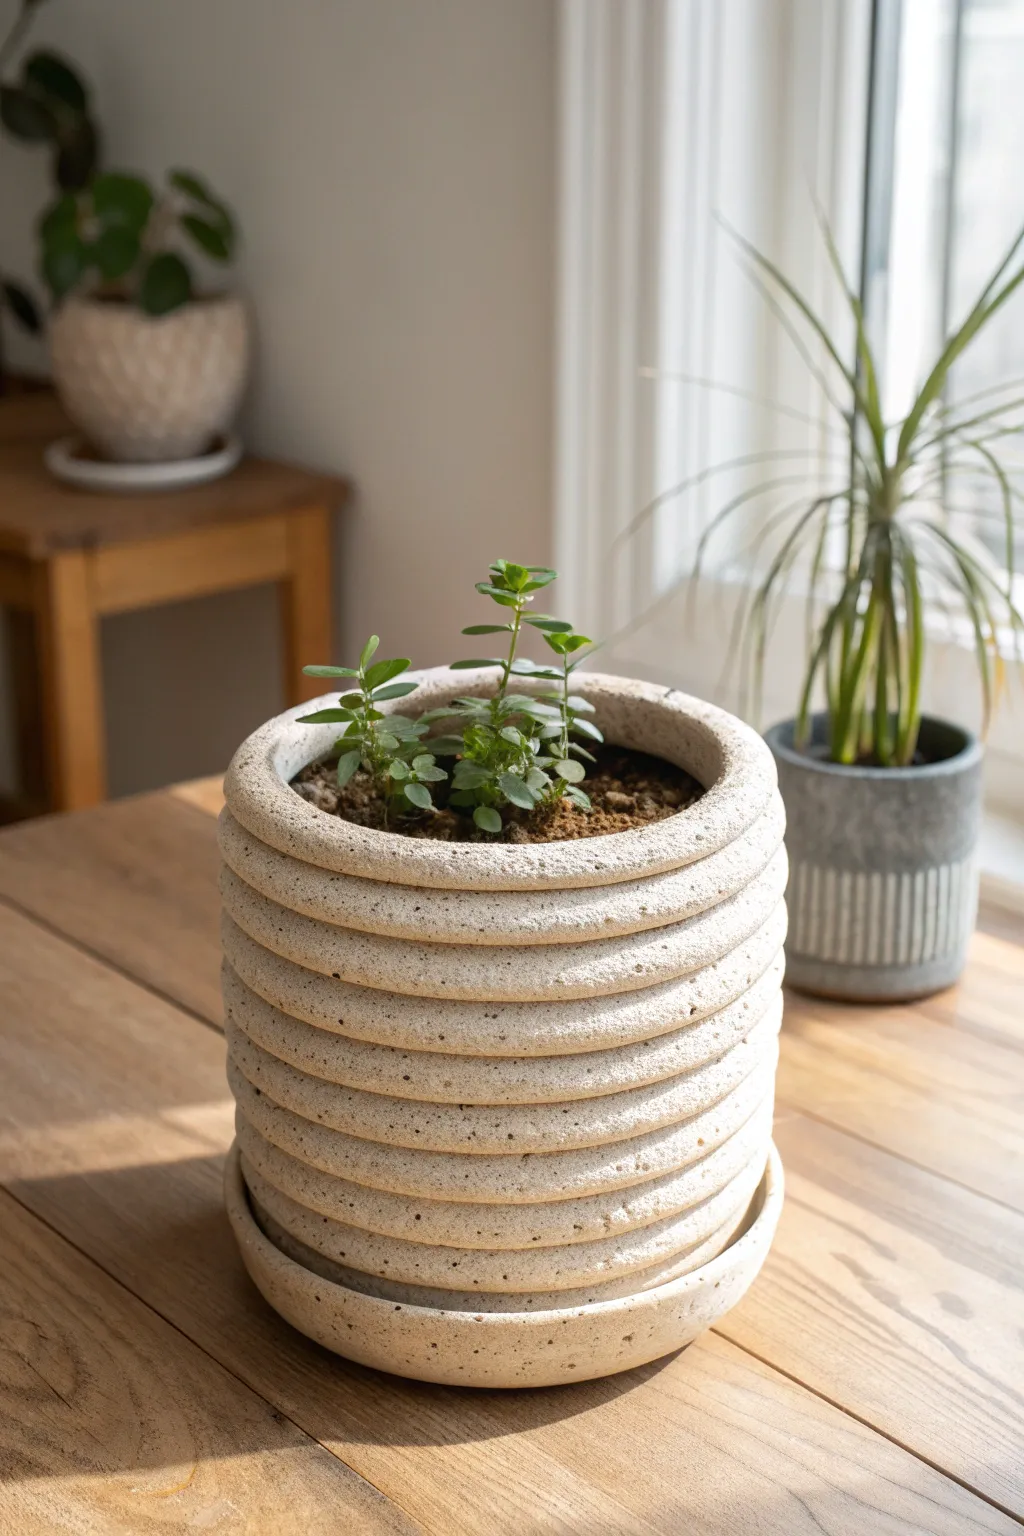
This project transforms the humble coil pot into a sleek, architectural home for your plants with a distinctively textured, uniform finish. The design features evenly stacked rings and a speckled, matte glaze that mimics the look of natural stone or concrete.
Detailed Instructions
Materials
- Cone 5-6 speckled buff clay (approx. 3-4 lbs)
- Pottery wheel (optional, but helpful for banding) or banding wheel
- Rolling pin or slab roller
- Metal rib tool
- Serrated rib or scoring tool
- Slip (clay and water slurry)
- Fettling knife
- Wooden modeling tool
- Sponge
- Matte white or off-white speckled glaze
- Canvas work surface
Step 1: Forming the Base
-
Prepare the base slab:
Roll out a slab of clay to approximately 1/4 inch thickness. Use a circle template or a bowl to cut out a round base roughly 6 inches in diameter. -
Create the saucer foundation:
Since this planter features an integrated saucer look, cut a second, slightly wider circle (about 6.5 inches) for the actual base. Score and slip the smaller circle on top of the larger one to create a lifted foot. -
Smooth the connection:
Use a wooden modeling tool to seal the seam between the two base circles, ensuring they are fused completely. This creates the bottom catch-plate structure.
Uneven Stacking?
If your pot starts tilting, stop adding height. Let the clay stiffen up for an hour under plastic, or use a heat gun briefly to firm up the lower coils before continuing.
Step 2: Building the Coils
-
Roll consistent coils:
Key to this look is uniformity. Roll out several long coils of clay. Aim for a thickness of about 3/4 inch; they need to be plump to create the ribbed effect seen in the photo. -
Score the perimeter:
Thoroughly score the outer edge of your base circle and apply a generous amount of slip. -
Lay the first coil:
Place your first coil onto the slipped edge. Instead of blending the clay completely smooth as you normally would, you want to maintain the roundness of the outside edge. -
secure the inside:
Blend the *inside* of the coil down into the base using your thumb or a wooden tool. It is crucial to smooth the interior completely for structural integrity while leaving the exterior rounded. -
Stack and join:
Score the top of the first coil and slip it. Add the next coil directly on top. Repeat the internal blending process, smoothing the clay downward into the previous row. -
Maintain vertical walls:
Continue stacking coils until the pot reaches a height of about 6-7 inches. Unlike a bowl, keep the walls vertical rather than flaring them out to achieve that cylinder shape.
Step 3: Refining and Sealing
-
Exterior refinement:
The exterior seams should remain visible to create the deep grooves. Run a damp finger or a slightly wet sponge horizontally along the grooves to clean them up without flattening the coils. -
Texture application:
If you want that grainy, stone-like texture before glazing, gently tap the exterior with a stiff-bristled brush or a scouring pad while the clay is leather hard. -
Rim finishing:
For the top rim, flatten the final coil slightly so it isn’t perfectly round. Use a damp sponge to smooth the lip so it is comfortable to touch. -
Dry slowly:
Cover the pot loosely with plastic to let it dry slowly. This prevents the coils from cracking apart as they shrink. -
Bisque fire:
Once bone dry, fire the piece to cone 04 (or according to your clay body’s specifications).
Go Geometric
Instead of round coils, try extruding square coils for a sharper, more modern architectural look, or alternate thick and thin coils for a rhythmic pattern.
Step 4: Glazing
-
Wax the bottom:
Apply wax resist to the very bottom of the foot ring to prevent the pot from sticking to the kiln shelf. -
Apply the glaze:
Dip or brush on a matte white speckled glaze. I prefer dipping for this style to ensure the glaze gets deep into the coil grooves without pooling too heavily. -
Clean the grooves:
Inspect the deep grooves between coils. If glaze has pooled too thickly, it might crawl or obscure the detail. Carefully wipe out excess glaze from the deepest cracks with a small brush. -
Final firing:
Glaze fire to cone 5 or 6 to mature the clay and melt the glaze into that durable, stone-like finish.
Once fired, pot your favorite greenery inside this textured vessel to bring a modern organic touch to your windowsill


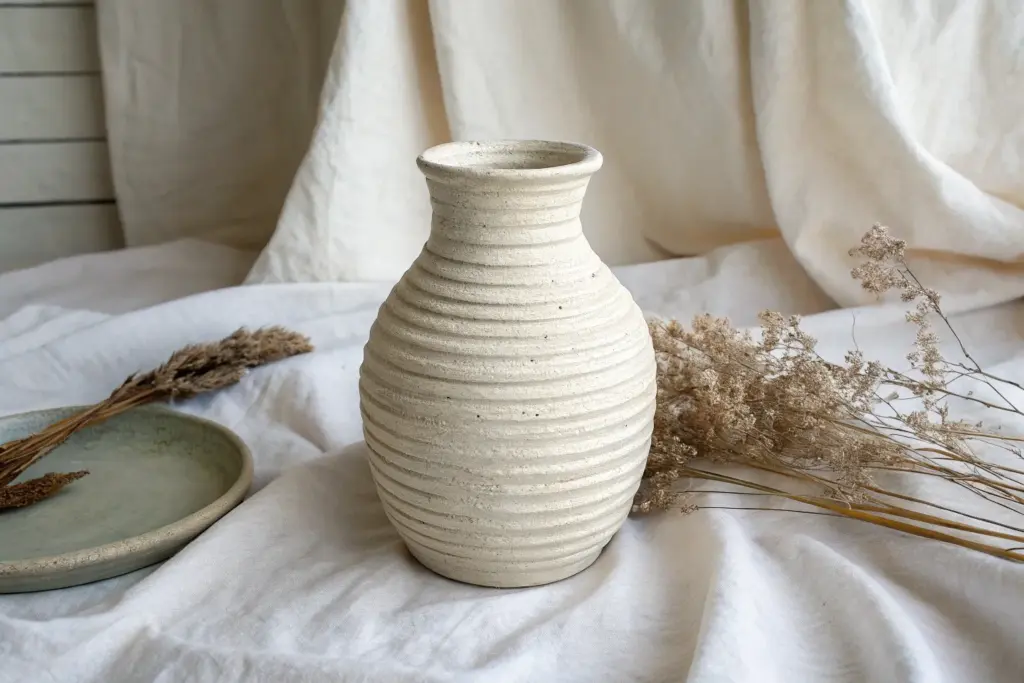
Corrugated Coil Pot with Finger-Pinched Texture
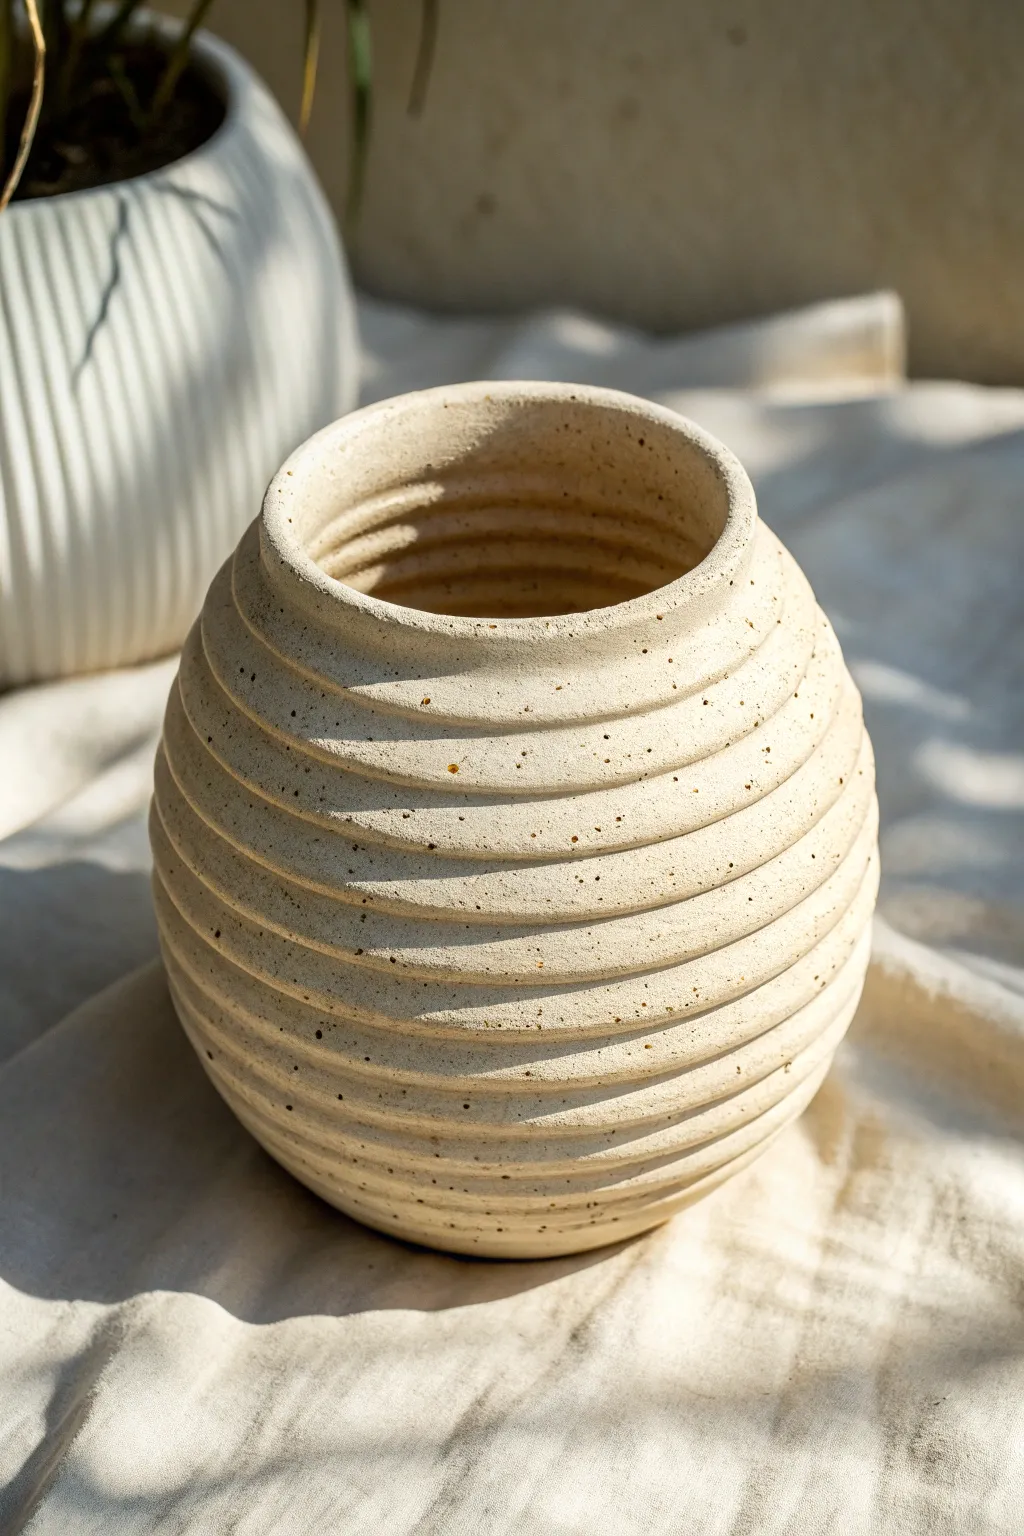
This project transforms the humble coil pot into a sophisticated piece of modern decor with a satisfyingly ribbed texture. By stacking thick coils and carefully blending only the interior, you create a structured, organic vessel that highlights the raw beauty of specked clay.
Step-by-Step Guide
Materials
- Speckled stoneware clay (white or cream)
- Potter’s wheel (optional, for banding wheel) or a simple banding wheel
- Wooden sculpting tool or serrated metal rib
- Smooth wooden rib tool
- Pin tool or needle tool
- Sponge
- Bowl of water
- Canvas or wooden bat to work on
Step 1: Preparation and Base
-
Prepare your clay:
Begin by wedging your speckled stoneware clay thoroughly to remove air bubbles. This step is crucial for coil building to ensure structurally sound walls. -
Roll the slab base:
Roll out a slab of clay approximately 1/4 to 3/8 inch thick. Using a needle tool, cut out a perfect circle about 4 inches in diameter to serve as the foot of your vase. -
Score and slip:
Score the outer edge of your circular base heavily with a serrated tool or fork. Apply a generous amount of slip (clay mixed with water) to the scored area to act as glue.
Step 2: Building the Form
-
Roll consistent coils:
Roll out several long coils of clay. Aim for a thickness of about 3/4 inch—slightly thicker than a standard pencil—to create those pronounced ridges seen in the reference photo. -
Attach the first coil:
Place your first coil onto the scored edge of the base. Gently press it down to adhere it. -
Blend the interior:
Using your thumb or a wooden modeling tool, smear the clay from the coil *downward* onto the base on the *inside* only. This locks the coil in place without ruining the exterior texture. -
Stack for the belly:
Continue adding coils, placing each one slightly outward from the center of the previous coil. This technique expands the form to create the spherical ‘belly’ of the vase. -
Maintain the ridge:
As you stack, do not blend the outside seams. Instead, use a damp sponge to gently round over the edge of each coil, keeping the distinct horizontal lines visible. -
Smooth the interior walls:
Every 2-3 layers, stop to smooth the interior completely with a wooden rib. I find it much easier to do this while the pot is short, rather than reaching deep inside later. -
Control the curve:
Once you reach the widest point of the vase, begin placing your coils slightly inward toward the center. This creates the upper curve that closes the form.
Pro Tip: Consistent Thickness
Use a wooden guide stick or ruler while rolling your coils. Checking them against a visual guide ensures every layer is uniform, preventing a lopsided pot.
Step 3: Refining and Finishing
-
Form the neck:
Continue tapering inward until the opening is your desired width (around 3-4 inches). Stack the final two coils vertically to create a short, straight neck. -
Clean the exterior:
Using a slightly damp sponge, run it gently along the grooves between coils. You want to soften any sharp crumbles of clay but preserve the distinct ‘stairstep’ look. -
Refine the rim:
Use a chamois cloth or a strip of plastic bag to compress and smooth the top rim. A smooth rim is essential for a professional finish and prevents future chipping. -
Dry slowly:
Cover the pot loosely with plastic to let it dry very slowly. Because the connections are only blended on the inside, uneven drying can cause the coils to crack apart. -
Bisque fire:
Once bone dry, bisque fire the piece to Cone 04 (or according to your clay body’s instructions). -
Glaze application:
For the look in the image, apply a matte cream or clear glaze that allows the iron speckles to show through. A matte finish accentuates the texture better than a high gloss. -
Final firing:
Glaze fire the vessel to maturity (likely Cone 5 or 6 depending on your stoneware).
Level Up: Interior Contrast
Glaze the interior with a glossy dark color like navy or forest green. This makes the pot watertight and adds a stunning surprise when looked into from above.
Place your finished vase in a spot where the sunlight can rake across the ridges, highlighting the beautiful texture you’ve created


Coil Luminary with Intentional Gaps and Cutouts
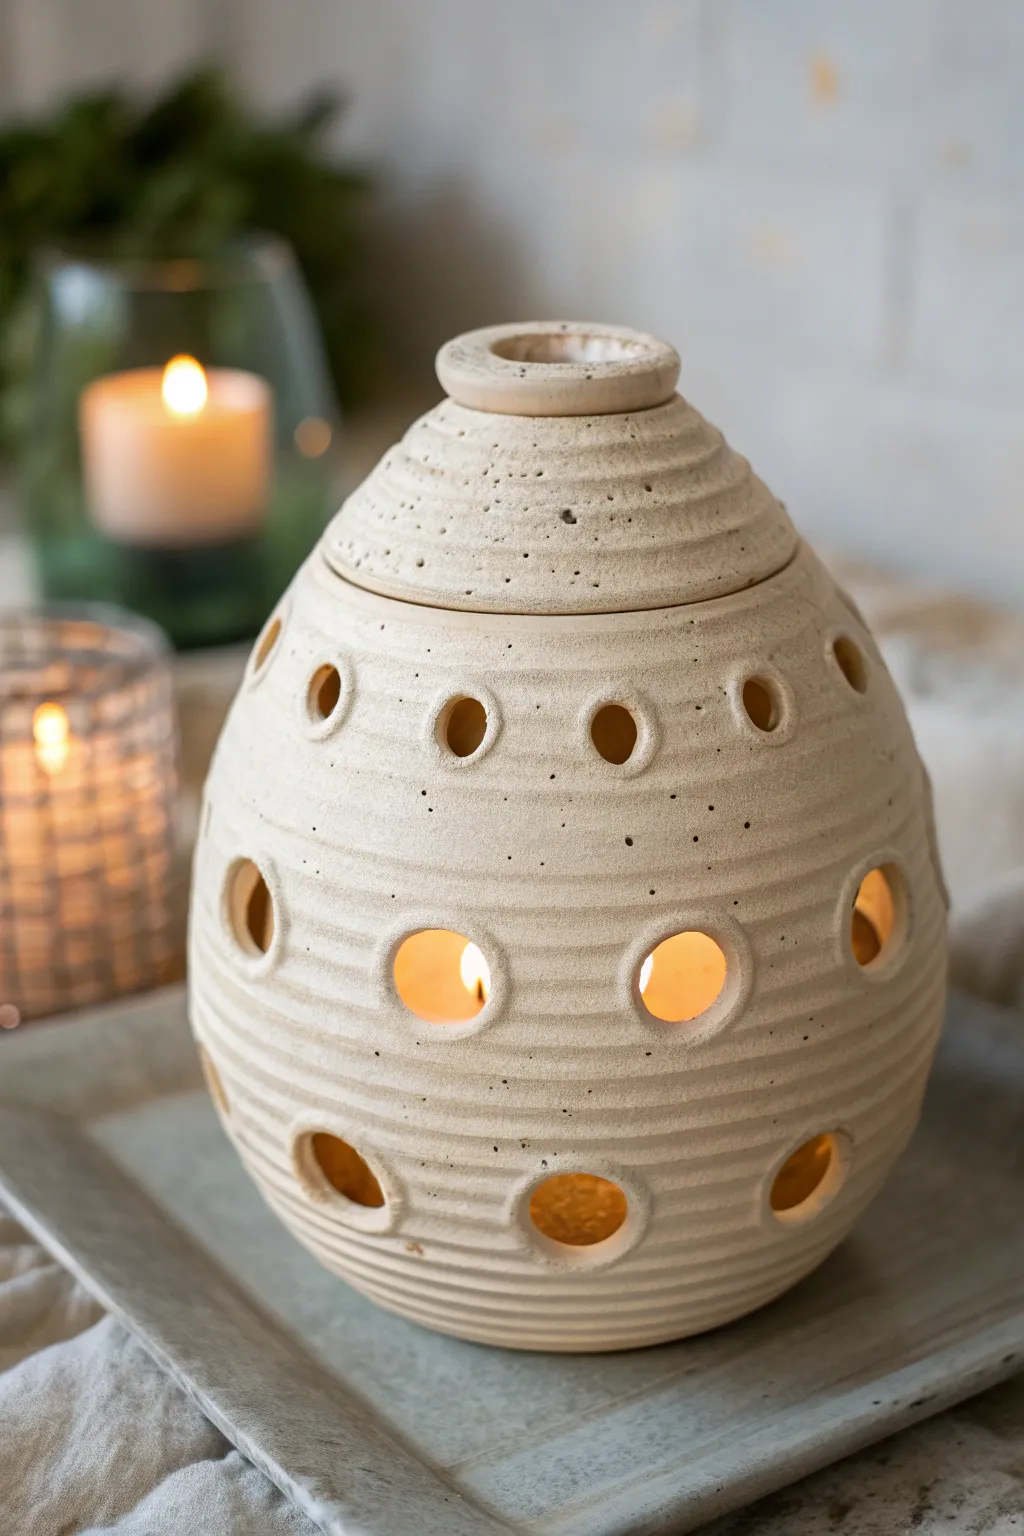
This charming, beehive-shaped luminary glows with warmth through its carefully placed circular cutouts. The textured surface, built from smoothed coils, adds an organic, handmade feel that perfectly diffuses candlelight.
Detailed Instructions
Materials
- Stoneware clay (buff or speckled)
- Clay rolling pin
- Wooden guide strips (1/4 inch thick)
- Scoring tool (needle tool or serrated rib)
- Slip (clay slurry)
- Circular clay cutters (various sizes)
- Smoothing tool or rib (wood or rubber)
- Fettling knife
- Sponge
- Small kiln-safe bowl (optional, for shaping lid)
Step 1: Base Construction
-
Prepare the base:
Start by rolling out a slab of clay to about a 1/4 inch thickness. Use a circular cutter to create a flat disc, approximately 4 inches in diameter, which will serve as the sturdy foundation for your luminary. -
Roll your coils:
Roll several long, even coils of clay. Aim for a thickness similar to a heavy pencil or your pinky finger. Keeping them consistent will make stacking much easier. -
Attach the first coil:
Score the outer edge of your base disc and apply a little slip. Lay your first coil around the perimeter, pressing it gently but firmly into the base. -
Build upward and outward:
Continue stacking coils one on top of another. To create the widening curve of the egg shape, place each new coil slightly further out than the one below it. -
Blend the interior:
After every 2-3 layers, pause to smooth the inside walls. Pull the clay downward from the upper coil to the lower one using your thumb or a wooden tool to bond them securely.
Collapsing Walls?
If walls start sagging as you build, stop immediately. Use a heat gun or hair dryer briefly to stiffen the lower clay, or stuff the inside with newspaper for support.
Step 2: Shaping the Dome
-
Refine the exterior texture:
On the outside, you can leave the coil texture visible for that ribbed look. Gently run a wet finger or a damp sponge along the grooves to soften them without erasing the horizontal lines entirely. -
Curve inward:
Once you reach the widest point of the belly, begin placing your coils slightly inward with each new layer. This will start closing the form into a tapered dome shape. -
Form the rim:
Stop coiling when the opening at the top is about 3 inches wide. Smooth the topmost coil to create a flat, even rim where the lid will eventually sit. -
Create the lid:
For the lid, either pinch a small bowl shape or coil a smaller dome that matches the opening of your main vessel. Add a small ring or knob on top for a handle. -
Add detail to lid:
I like to add similar ribbed texture to the lid so it visually integrates with the main body. Score slight grooves horizontally if you made the lid from a solid piece of clay.
Texture Play
Instead of smoothing the coils lightly perfect, press a textured fabric or lace into the soft clay coils before stacking them for an intricate surface design.
Step 3: Adding Cutouts and Finishing
-
Ideal dryness:
Let the piece dry until it is ‘leather hard.’ The clay should be firm enough to hold its shape when cut, but not so dry that it cracks. Usually, a few hours or overnight under loose plastic works well. -
Map out holes:
Lightly mark where you want your windows to be. A repeating pattern of three horizontal rows works beautifully, with larger holes near the bottom and smaller ones near the top. -
Cut the circles:
Using your circular clay cutters or a sharp knife, punch out the holes. Support the wall from the inside with your other hand to prevent the pot from warping under pressure. -
Clean the edges:
Once the holes are cut, use a damp sponge or fingertip to smooth the sharp edges of each cutout. This gives the piece a professional, finished look. -
Final drying:
Allow the luminary to dry slowly and evenly, away from drafts. If the bottom is thick, dry it upside down for part of the time to prevent cracks. -
Bisque fire:
Fire the piece in a kiln to cone 04 (or according to your clay body’s instructions) to prepare it for glazing. -
Glazing:
Apply a matte cream or speckled white glaze. If you want the raw clay texture to show through like the image, wipe back some of the glaze or leave the exterior unglazed if the clay body is attractive. -
Final firing:
Glaze fire the piece to the appropriate temperature for your clay and glaze combination.
Place a tea light inside your finished vessel and enjoy the patterned shadows it casts on your walls


Ring-Shaped Coil Vessel for a Big Wow Moment
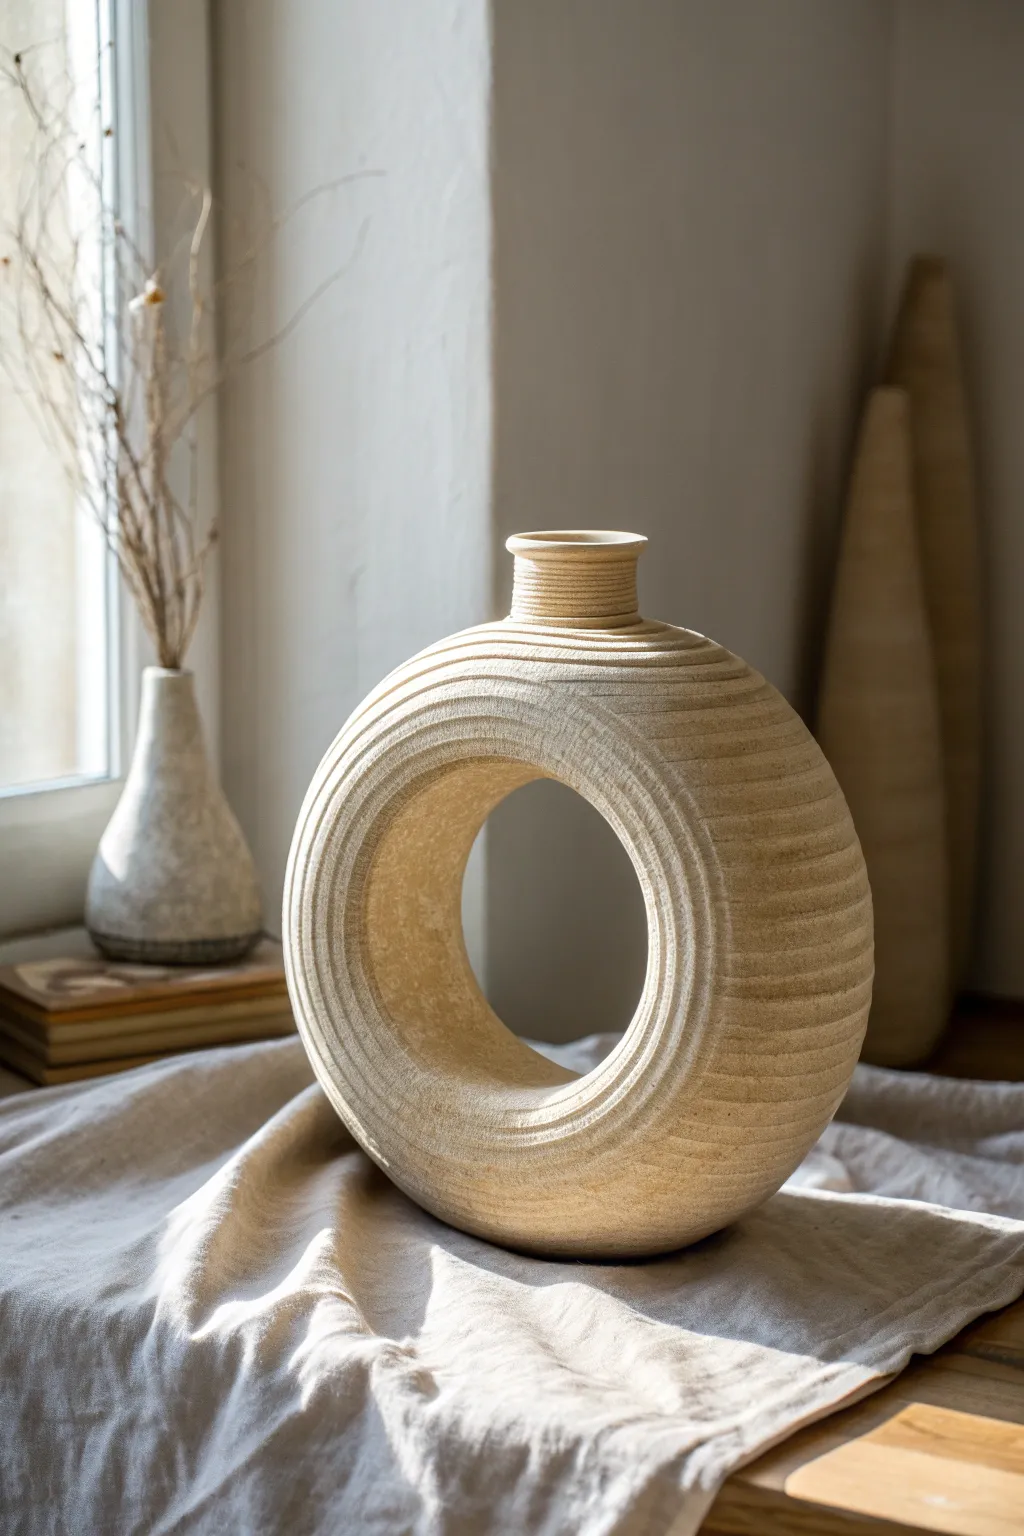
This striking ring-shaped vessel combines architectural geometry with the organic warmth of textured clay. Its dramatic negative space and rhythmic, ribbed surface make it a sophisticated centerpiece that looks far more complex to build than it actually is.
How-To Guide
Materials
- Stoneware clay (buff or beige grogged clay is best)
- Pottery wheel (optional, but recommended for the neck)
- Large wooden rib tool (serrated or textured)
- Needle tool
- Scoring tool or fork
- Slip (clay and water mixture)
- Rolling pin and guide strips (or slab roller)
- Extruder (optional for coils)
- Paddle tool
- Sponge
- Cutting wire
Step 1: Forming the Ring Base
-
Prepare the Base Form:
Start by deciding on the size of your ring. You can create a paper template or use a circular object as a guide to ensure your donut shape remains symmetrical as you build. -
Roll Out Slabs:
Roll out two large, even slabs of clay, approximately 1/4 to 3/8 inch thick. These will form the front and back ‘faces’ of the ring. Let them firm up to soft leather-hard consistency so they hold their shape. -
Cut the Rings:
Using your template, cut two identical large circles from the slabs. Then, cut a smaller circle out of the precise center of each, creating two large flat washers or donut shapes. -
Prepare the Spacers:
Roll out two long strips of clay that match the circumference of your outer and inner circles. These strips will determine the width or depth of your vase. -
Attach the Inner Wall:
Score and slip the inner edge of one ring face. Attach the shorter clay strip to form the inner cylinder of the donut hole, blending the seam thoroughly on the inside. -
Attach the Outer Wall:
Repeat the process with the longer strip on the outer edge. You now have an open, tray-like ring structure. Add a few small internal clay supports or crumpled newspaper inside the hollow space to prevent sagging.
Step 2: Closing and Refining
-
Seal the Form:
Score and slip the top edges of your inner and outer walls. Place the second ring face on top, sandwiching the walls. Press firmly to seal. -
Blend Seams:
Use a paddle to gently tap the form into a cohesive whole, then use a rib to smooth the clay over the seams on both the outer perimeter and the inner circle so no join lines are visible. -
Round the Edges:
While the clay is still workable, lay the ring flat. Use a damp sponge or soft rib to gently round over the sharp 90-degree angles where the faces meet the walls, creating that soft, continuous tubular look. -
Create the Neck Opening:
Stand the ring upright on a flat spot you’ve paddled slightly flat for stability. Cut a small hole at the very top where the neck will attach.
Weight Distribution Tip
Make the bottom wall slightly thicker than the top. Adding a small coil of clay inside the base before sealing adds weight and prevents tipping.
Step 3: Texturing and Finishing
-
Add Surface Texture:
This is the signature detail. I like to use a serrated rib or a custom-notched tool to drag horizontal lines across the surface. Rotate the form slowly and drag the tool continuously to create the ribbed, wheel-thrown appearance. -
Throw or Build the Neck:
Throw a small cylinder on the wheel or construct one from a small slab. It should flare out slightly at the rim and have fine horizontal grooves to match the body. -
Attach the Neck:
Score and slip the area around the hole on the main body and the base of your neck cylinder. Press the neck firmly into place. -
Detail the Connection:
Use a small modeling tool to blend the seam where the neck meets the body, ensuring the transition is clean and sharp. -
Dry Slowly:
Cover the piece loosely with plastic. Hollow ring forms are prone to cracking if they dry unevenly, so let this dry very slowly over several days. -
Bisque Fire:
Fire the piece to cone 04 (or your clay’s bisque temperature). -
Glaze Application:
Apply a matte, sandy beige or unglazed wash to highlight the texture. A high-gloss glaze would hide the subtle ribbing lines you created. -
Final Firing:
Fire to the maturation temperature of your clay body (likely Cone 5/6 for stoneware).
Make It Sculptural
Instead of horizontal ribs, try carving vertical fluting or pressing organic textures like dried flowers into the slab before assembly for a different vibe.
Place near a sunlit window where the shadows will catch the textured grooves perfectly