If you’re new to clay, the fastest way to feel confident is to make small, cute projects that come together with simple shapes like balls, coils, and slabs. These clay ideas for beginners are the kind I start my students with when we want big visual payoff without the stress.
Classic Pinch Pot Trinket Dish
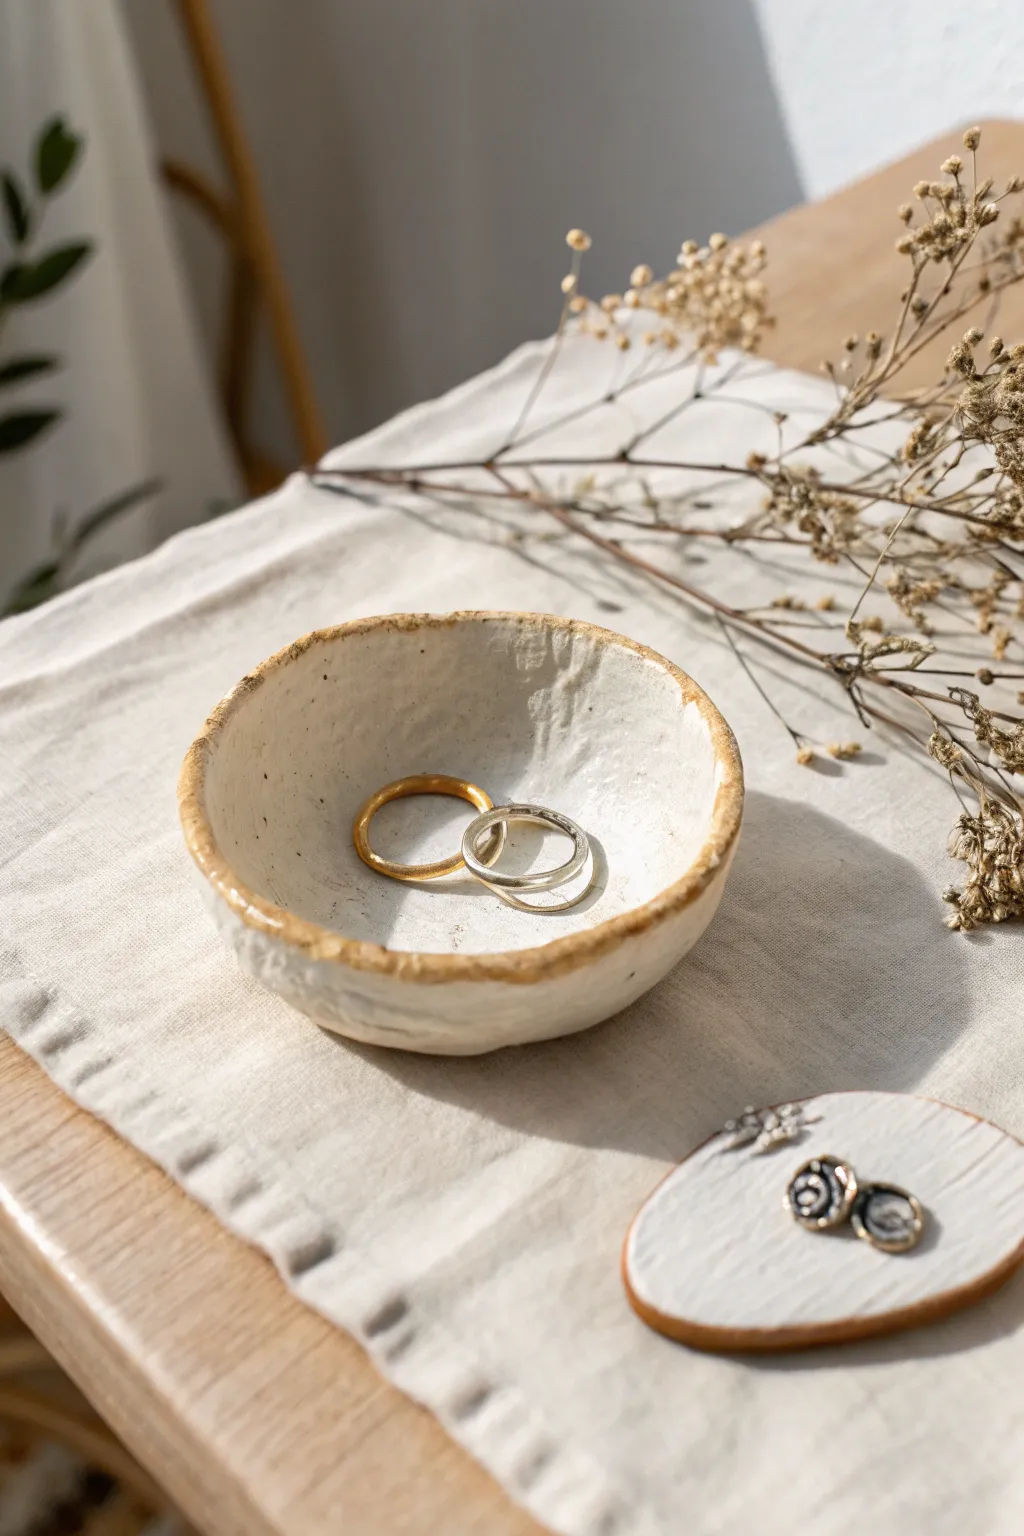
Embrace the beauty of imperfection with this charmingly rustic trinket dish. Using the classic pinch pot method, you’ll create a textured, organic form with a distinctive raw edge that highlights the warmth of the clay body beneath a milky white glaze.
Step-by-Step Tutorial
Materials
- White stoneware or earthenware clay
- Sponge
- Water cup
- Needle tool or toothpick
- Small rolling pin (optional)
- White or cream ceramic glaze (glossy or satin)
- Clear glaze (optional)
- Kiln (or access to a firing service)
- Paintbrush for glazing
- Iron oxide wash or brown underglaze (for rim)
Step 1: Forming the Base
-
Prepare the clay:
Start with a ball of clay roughly the size of a tangerine. Wedge it well to remove any air bubbles, which helps prevent cracking later. -
Open the form:
Hold the clay ball in the palm of one hand. With your other thumb, gently press into the center, stopping about a half-inch from the bottom. This establishes your floor thickness. -
Pinch the walls:
Rotate the ball slowly while rhythmically pinching the clay between your thumb (inside) and fingers (outside). Work from the bottom up, gradually thinning the walls. -
Shape the curve:
Aim for a shallow, open bowl shape rather than a tall cup. Gently push the walls outward with your thumb to widen the dish. -
Refine the thickness:
Check that the walls are relatively even in thickness, about 1/4 inch throughout. I find that feeling the wall thickness with my eyes closed helps identify thick spots to thin out.
Cracks on the rim?
Pinching can dry out clay edges quickly. If tiny cracks appear on the rim while shaping, dip your finger in water (or vinegar slurry) and compress the rim immediately to heal them.
Step 2: Texturing & Drying
-
Create the organic rim:
Instead of smoothing the lip perfectly, leave it slightly uneven. You can gently tap the rim with a wooden paddle or your fingers to create subtle undulations that give it character. -
Smooth the interior:
Use a slightly damp sponge to wipe the inside of the bowl. This compresses the clay particles and creates a smooth surface for your jewelry to rest on. -
Address the exterior:
Leave the exterior slightly textured if you like the hand-built look, or sponge it smooth. The dish in the image has a lovely, soft texture that catches the glaze. -
Flatten the base:
Gently tap the pot on your table to flatten the bottom so it sits securely without rocking. -
Slow drying:
Loosely cover your bowl with plastic and let it dry slowly to the leather-hard stage, then uncover to let it become bone dry. This is crucial to prevent warping. -
Bisque fire:
Fire the bone-dry piece in a kiln to bisque temperature (usually cone 04 or 06) to harden it for glazing.
Add a speckled finish
Use a clay body with grog or speckles, or choose a ‘speckled’ white glaze. This adds tiny dots throughout the surface for an even simpler, more natural aesthetic.
Step 3: Glazing & Finishing
-
Prep the rim:
To achieve that classic exposed rim look, you have two options. You can either apply a wax resist to the very edge of the rim before glazing, or simply wipe the glaze off later. -
Apply the wash:
Mix a small amount of iron oxide with water (or use a brown underglaze). delicately paint this onto just the rim to accentuate that earthy, golden-brown edge seen in the photo. -
Glaze the interior:
Pour a milky white or cream glaze into the bowl, swirl it to coat the entire inside, and pour the excess back out. This ensures an even interior coat. -
Glaze the exterior:
Brush or dip the exterior in the same white glaze. Ensure the coat isn’t too thick, as you want some of the clay’s texture to show through. -
Reveal the edge:
If you glazed over the rim, use a damp sponge to carefully wipe the white glaze off the lip, revealing the iron oxide or bare clay underneath. -
Clean the foot:
Wipe any glaze off the very bottom of the pot so it doesn’t stick to the kiln shelf. -
Final fire:
Fire the piece again to the maturation temperature of your specific clay and glaze (often cone 6 for stoneware).
Once cooled, your dish is ready to hold your favorite rings and studs on a bedside table


Easy Coil Bowl With a Wavy Rim
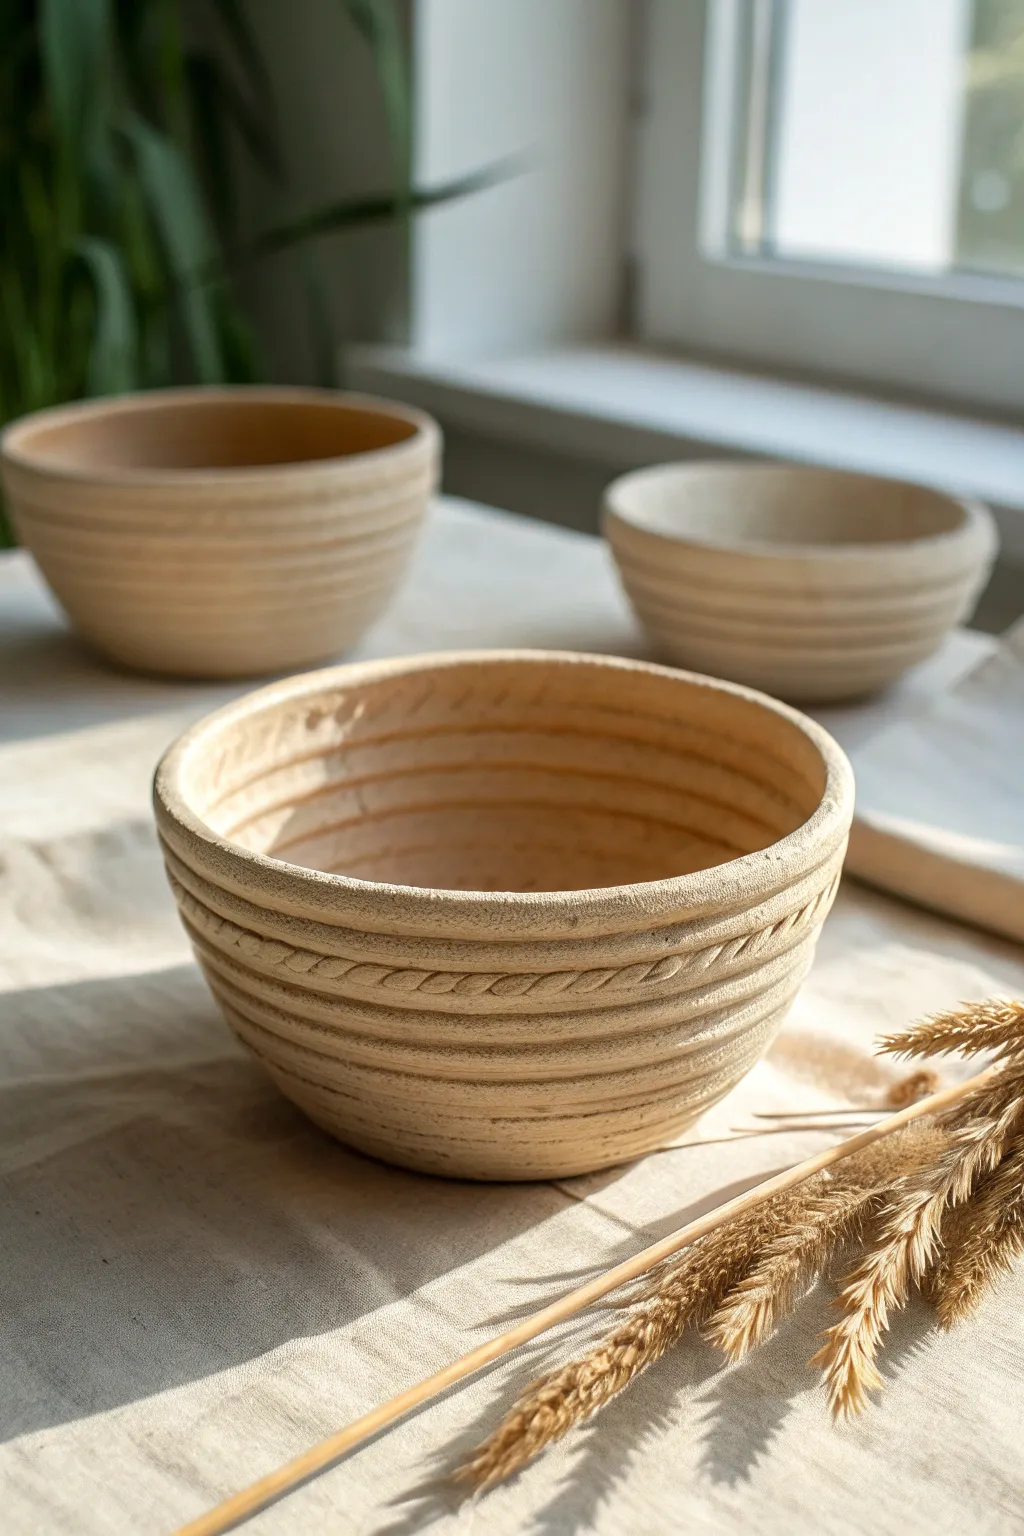
Embrace the natural texture of clay with these charming, earthy bowls that highlight the beauty of handcrafted imperfections. This beginner-friendly project uses the simple coil technique to create sturdy vessels with distinctive horizontal ribbing and a subtle twisted rim detail.
Step-by-Step Guide
Materials
- Light stoneware or earthenware clay (groggy clay works best for texture)
- Clay cutting wire
- Rolling pin or wooden dowel
- Wooden modeling tool or old spoon
- Serrated rib tool or fork (for scoring)
- Slip (clay mixed with water)
- Sponge
- Canvas mat or wooden board
Step 1: Creating the Base
-
Prepare the Clay:
Begin by wedging a softball-sized amount of clay to remove air bubbles and ensure an even consistency. -
Form the Slab:
Flatten a small portion of clay with your palm, then use a rolling pin to create a circular slab about 1/4 inch thick. This will be the floor of your bowl. -
Cut the Circle:
Use a needle tool or knife to cut a perfect circle from your slab. You can trace around a yogurt container or jar lid to get an exact size.
Step 2: Building the Walls
-
Roll the Coils:
Take remaining clay and roll it into long ‘snakes’ on your table. Aim for a thickness similar to your pinky finger. Try to keep them even from end to end. -
Score and Slip:
Rough up the outer edge of your base circle with your serrated tool and dab on a little slip. This acts as the glue. -
Attach the First Coil:
Place your first coil onto the scored edge of the base. Gently press it down to adhere it. -
Blend the Inside:
For structural integrity, smear the clay from the coil down onto the base on the *inside* of the bowl only. Leave the outside coils visible to create that ribbed texture shown in the photo. -
Stack Upwards:
Score the top of the first coil and add the next one. Continue stacking coils, placing each one slightly outward from the last to widen the bowl’s shape. -
Refine the Interior:
As you build, keep smoothing the interior seams with your thumb or a wooden rib tool. A smooth inside makes the bowl functional and easier to clean.
Coils Not Sticking?
If your coils are separating as you build, your clay might be too dry. Score the surfaces deeper and use a ample amount of slip (liquid clay) before pressing them together.
Step 3: Adding Detail & Finishing
-
Create the Twisted Rim:
For the specific detail seen on the focal bowl, take two thinner coils and twist them together gently like a rope. -
Attach the Decorative Coil:
Score the top rim of your bowl and attach this twisted rope. Press it firmly enough to stick, but gently enough to preserve the braid pattern. -
Add Height (Optional):
If you want a taller rim above the braid, add one or two plain coils on top of the twisted section, smoothing them on the inside just like before. -
Smooth the Exterior:
I like to take a slightly damp sponge and very gently run it over the exterior coils. You want to soften any sharp ridges without erasing the distinct lines. -
Refine the Lip:
Use your fingers to round off the very top edge of the bowl so it isn’t sharp or uneven. -
Dry Slowly:
Cover the bowl loosely with plastic so it dries slowly. Rapid drying can cause coils to separate or crack. -
Bisque Fire:
Once bone dry, fire the piece in a kiln to bisque temperature (usually Cone 04). -
Post-Fire Sanding:
After firing, use fine-grit sandpaper to smooth any rough spots on the unglazed exterior to achieve that matte, stone-like finish.
Pro Tip: Even Walls
Look at the bowl from directly above every few layers. If it looks oval instead of round, gently nudge the walls back into a circle while the clay is still plastic.
Fill your new rustic bowl with fruit or decorative items and enjoy the handmade warmth it brings to your table


Simple Slab Coasters With Leaf Imprints
Bring the beauty of nature indoors with these elegant, minimalist coasters. Featuring delicate leaf impressions on creamy white clay, they make a stunning addition to any coffee table or a heartfelt handmade gift.
Step-by-Step
Materials
- White stoneware or polymer clay (oven-bake)
- Rolling pin
- Two wooden guide strips (approx. 1/4 inch thick)
- Fresh leaves with prominent veins (like Beech or Hydrangea)
- Sharp craft knife or clay slicing blade
- Square template (cardstock or cardboard, approx. 4×4 inches)
- Sponge and water bowl
- Sandpaper (fine grit)
- Clear matte varnish or sealant (optional)
- Rolling canvas or parchment paper
Step 1: Preparation & Rolling
-
Gather your greenery:
Begin by foraging for leaves with raised, distinct vein structures on the back. Stiff, sturdy leaves work best for deep impressions that won’t tear during the process. -
Prepare your workspace:
Lay down a piece of canvas or parchment paper on a flat surface. This prevents the clay from sticking and picking up unwanted textures from your table. -
Wedge the clay:
Take a handful of your white clay and knead it thoroughly to remove air bubbles. This ensures a smooth, crack-free surface for your coasters. -
Set up guides:
Place your wooden guide strips on either side of the clay. These act as rails for your rolling pin to ensure an even, uniform thickness for every coaster in the set. -
Roll out the slab:
Roll the clay out smoothly until the rolling pin rests on the guide strips. You want a nice, even slab about 1/4 inch thick. -
Check for imperfections:
Inspect the surface for any air pockets or debris. Gently smooth them out with your finger or a slightly damp sponge before proceeding.
Step 2: Creating the Impression
-
Position the leaves:
Arrange your chosen leaves face down on the clay slab. I prefer placing them in a radial pattern, stem-to-stem in the center, to create a botanical motif. -
Secure the design:
Gently press the leaves down with your fingers first to tack them in place so they don’t slide around during the next step. -
Roll the texture:
Using the rolling pin, roll firmly over the leaves once. Do not roll back and forth; one committed pass ensures a crisp, double-image-free impression. -
Reveal the detail:
Carefully peel back the leaves by the stem to reveal the intricate vein patterns stamped into the clay surface.
Vein Definition
To make the veins pop, lightly brush a diluted wash of brown acrylic paint or oxide into the grooves, then wipe the surface clean with a damp sponge.
Step 3: Cutting & Finishing
-
Place the template:
Position your square cardstock template over the imprinted area, framing the leaf design exactly how you want it to appear on the finished coaster. -
Cut the shape:
Hold the craft knife vertically and trace around the template edge with a clean, continuous motion to cut out the square. -
Soften the edges:
Use a damp sponge or your fingertip to very gently round off the sharp cut edges. This prevents chipping later and gives the coaster a finished, professional look. -
Dry or bake:
If using air-dry clay, let it dry slowly on a wire rack for 24-48 hours. For polymer clay, bake according to the manufacturer’s instructions on the package. -
Sanding:
Once fully cured and dry, lightly sand the edges and corners with fine-grit sandpaper to remove any remaining burrs or sharpness. -
Dust off:
Wipe the coaster down with a slightly damp cloth to remove all sanding dust before applying any finish. -
Seal:
Apply a thin layer of matte varnish or sealant to protect the surface from moisture and stains, especially if these will be functional drink coasters.
Upgrade Your Edges
After baking, paint the outer rim with liquid gold leaf or metallic paint. This adds a subtle touch of luxury that contrasts beautifully with the raw clay texture.
Stack your set of coasters and enjoy the organic elegance they bring to your tea time


Tiny Ring Cone Holder for the Sink
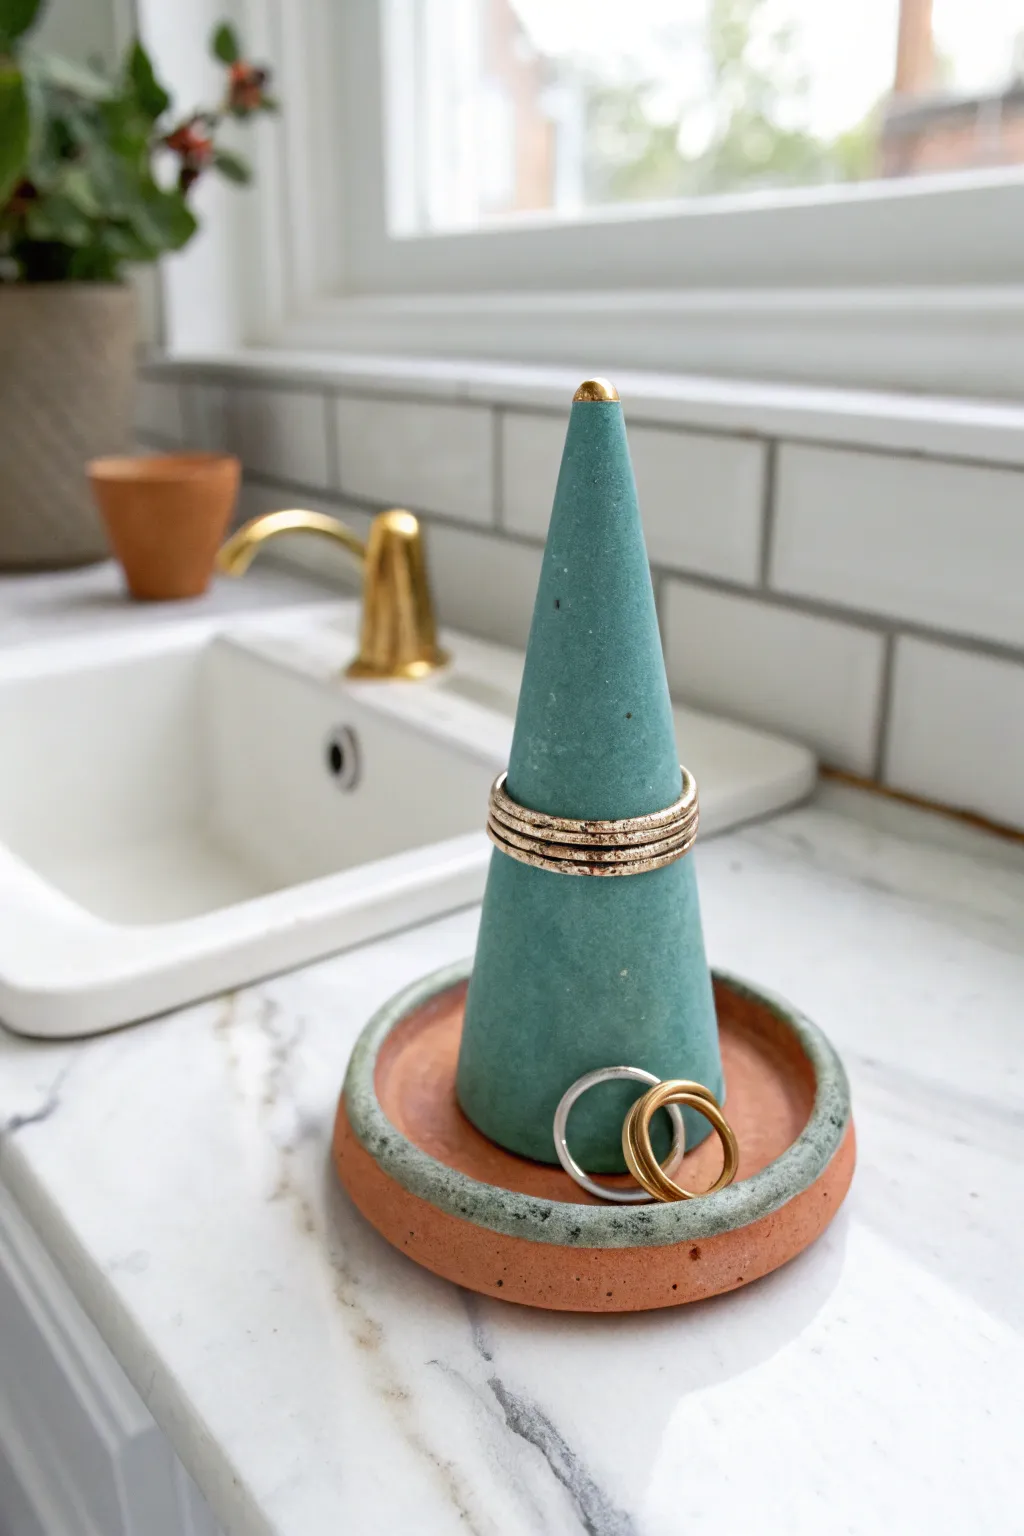
Keep your favorite jewelry safe and stylish near the sink with this sleek, geometric holder. Combining an earthy terracotta base with a cool teal cone, this project uses simple shapes to create a functional piece of modern decor.
Detailed Instructions
Materials
- Air-dry clay or polymer clay (Terracotta color)
- Air-dry clay or polymer clay (Teal/Green color)
- Rolling pin
- Circle cutter or a round glass/bowl (approx. 3-4 inches)
- X-acto knife or clay blade
- Small bowl of water (for smoothing)
- Fine-grit sandpaper
- Liquid gold leaf or gold acrylic paint
- Small detail paintbrush
- Clear sealant (matte or gloss)
Step 1: Forming the Base
-
Prepare the terracotta clay:
Begin by conditioning your terracotta-colored clay until it is soft and pliable. Roll it into a smooth ball to remove any air bubbles. -
Roll the slab:
Use your rolling pin to flatten the ball into an even slab, approximately 1/4 inch thick. Aim for a consistent thickness to ensure even drying. -
Cut the circle:
Press your circle cutter or round bowl firmly into the clay slab to cut out the base. Peel away the excess clay and set it aside. -
Create the rim base:
Take a separate piece of terracotta clay and roll it into a long, thin snake or coil. This will support the colored rim we’ll add later. -
Attach the coil:
Score the outer edge of your circle base and the bottom of your coil. Dampen the scored areas slightly with water (if using air-dry) or liquid clay (if using polymer) and press the coil onto the edge to create a raised lip.
Cone Won’t Stand Straight?
If your cone leans, slice a thin layer off the bottom with a sharp blade instead of squishing it down. This creates a perfectly flat surface without distorting the shape.
Step 2: Sculpting the Cone
-
Shape the teal clay:
Condition a large portion of the teal clay. Roll it into a thick cylinder first, then begin rolling one end with more pressure to taper it into a cone shape. -
Refine the cone:
Stand the cone up on your work surface. Gently tap the base to flatten it so it stands perfectly straight. Use your fingers to smooth the sides, ensuring a tall, elegant point. -
Make the rim accent:
Roll a very thin snake of teal clay. This will go on top of the terracotta rim you created earlier to tie the colors together. -
Apply the rim:
Place the thin teal snake on top of the terracotta rim. Press gently to adhere them, then smooth the seam slightly so they look like a single, two-tone unit. I like to run a wet finger over this join to make it seamless.
Pro Tip: Seamless Joins
To make the cone and base look like one solid piece, use a rubber-tipped clay shaper tool to drag a tiny bit of the cone clay down onto the base before smoothing it out.
Step 3: Assembly and Finishing
-
Center the cone:
Score the center of the terracotta base and the bottom of your teal cone. Apply a dab of water or liquid clay to the scored areas. -
Bond the pieces:
Press the cone firmly into the center of the dish. Use a sculpting tool or your finger to smooth the clay where the cone meets the base, ensuring a strong bond. -
Dry or Bake:
If using air-dry clay, let the piece sit undisturbed for 24-48 hours. If using polymer clay, bake according to the manufacturer’s instructions on the package. -
Sand the imperfections:
Once fully cured and cooled, use fine-grit sandpaper to gently smooth out any fingerprints or rough edges, particularly around the rim and the tip of the cone. -
Paint the gold tip:
Dip a small detail brush into your liquid gold leaf. Carefully paint just the very tip of the cone, creating a small metallic cap. -
Add gold splatter (optional):
For the speckled look seen in the photo, load your brush with gold paint and flick the bristles to lightly splatter the cone, or dab tiny dots randomly. -
Seal the piece:
Protect your work from moisture—especially important for a sink-side item—by applying two coats of clear sealant over the entire piece.
Now you have a chic spot to place your rings while you wash your hands or do the dishes

The Complete Guide to Pottery Troubleshooting
Uncover the most common ceramic mistakes—from cracking clay to failed glazes—and learn how to fix them fast.
Minimalist Incense Holder With One Clean Groove
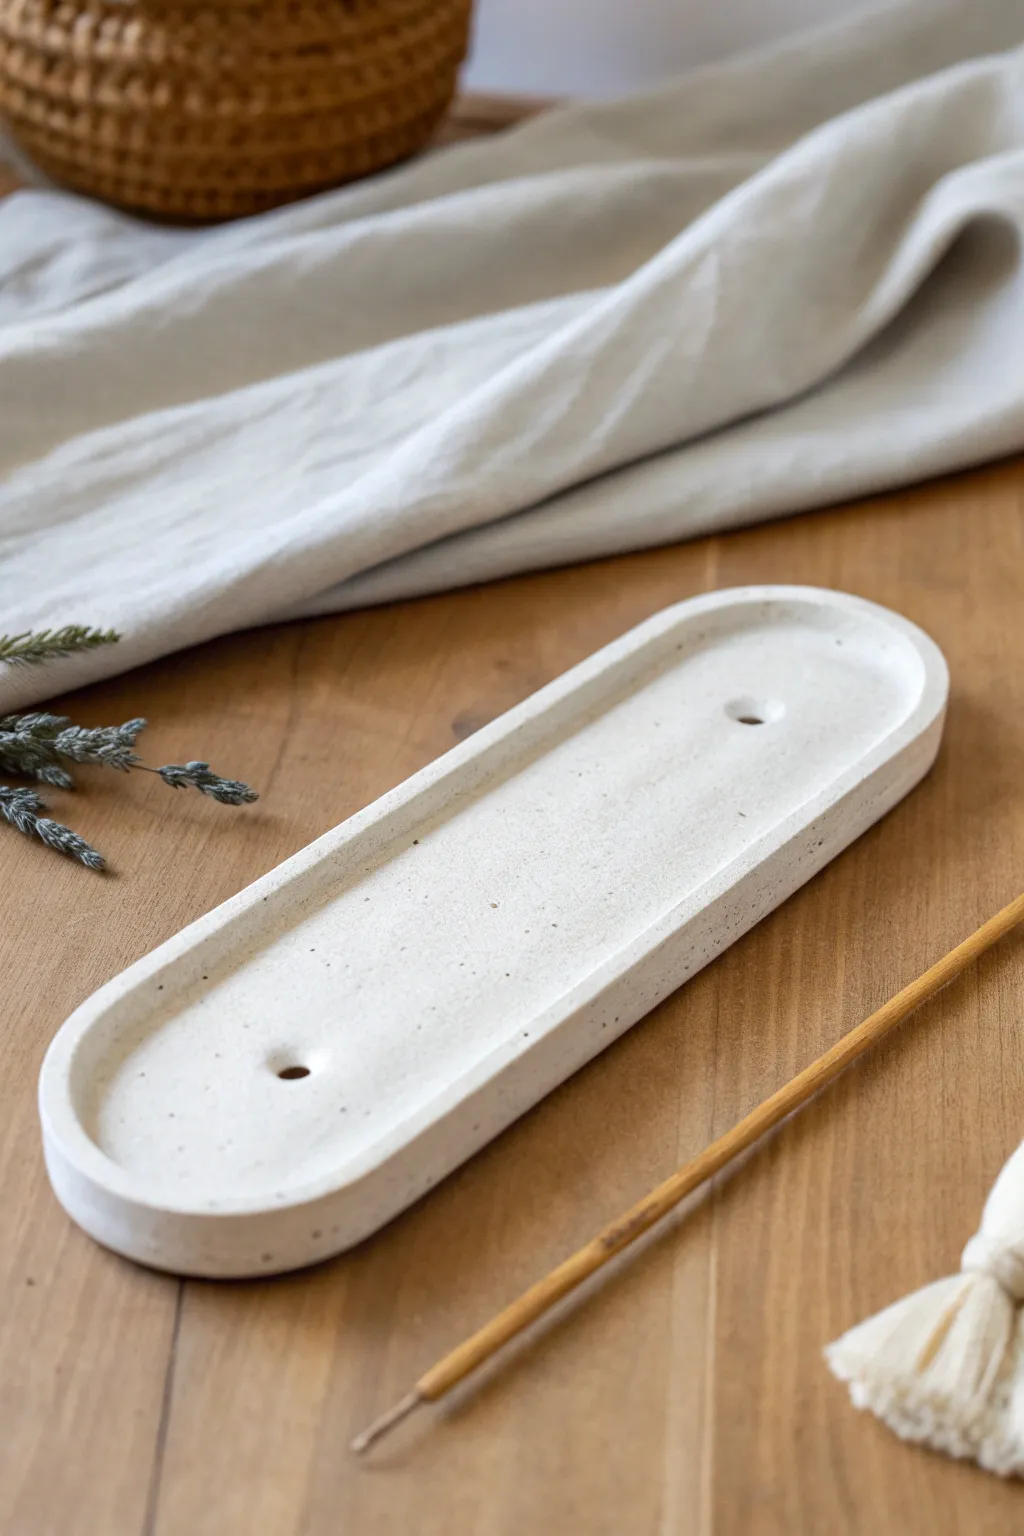
This minimalist incense holder features a sleek, elongated oval shape with a gentle rim and natural speckling that mimics stone. It serves as a calm, functional resting place for your favorite scents while adding a touch of modern simplicity to your space.
Step-by-Step Tutorial
Materials
- White polymer clay (approx. 200g) or air-dry clay
- Coarse black pepper or dried coffee grounds (for speckling)
- Acrylic rolling pin
- Long oval cookie cutter (or paper template and craft knife)
- Small round cutter or drinking straw
- Fine-grit sandpaper (400 and 800 grit)
- Matte varnish or sealant
- Parchment paper
Step 1: Preparation & Mixing
-
Condition the Clay:
Begin by warming the white polymer clay in your hands. Knead it thoroughly until it is soft, pliable, and free of any air bubbles or stiff lumps. -
Add Texture:
Flatten the clay slightly and sprinkle a small pinch of coarse black pepper or dried coffee grounds onto the surface. This creates that sophisticated faux-stone look. -
Integrate the Speckles:
Fold the clay over the inclusions and continue kneading. Repeat the folding process several times to ensure the specks are distributed evenly throughout the entire block.
Step 2: Shaping the Base
-
Roll out the Slab:
Place the clay on a sheet of parchment paper. Using your acrylic rolling pin, roll the clay out to an even thickness of approximately 1/4 inch (6mm). -
Cut the Shape:
Press your long oval cutter firmly into the clay. If you are using a paper template, lay it on top and carefully trace around it with a sharp craft knife held vertically. -
Smooth the Edges:
After removing the excess clay, dip your finger in a little water (or baby oil for polymer clay) and gently run it along the cut edges to soften any sharpness.
Uneven Rim?
If your coil wall is height-wobbly, place a book of uniform thickness on either side of the tray and lay a ruler across them to scrape the top clay level.
Step 3: Creating the Rim
-
Prepare the Coil:
Take the leftover clay scraps and roll them into a long, thin snake (coil). Aim for a consistent thickness of about 1/4 inch (6mm). -
Attach the Coil:
Lay the coil directly on top of the outer edge of your oval base. If using air-dry clay, score and slip the connection point first; for polymer, just press gently. -
Blend the Seams:
use a modeling tool or your thumb to drag the clay from the inside of the coil down onto the base floor. This merges the pieces into a single unit. -
Smooth the Exterior:
I find it helpful to repeat the blending process on the outside seam as well, ensuring the wall looks like an extension of the base rather than a separate piece. -
Refine the Shape:
Go around the rim with your fingers, pinching lightly to even out the height and width. Smooth the top edge so it feels pleasant to the touch.
Make it Marble
Instead of speckles, twist tiny logs of grey or black clay into your white block before rolling. Stop mixing when you see beautiful marble streaks form.
Step 4: Detailing & Finishing
-
Create Incense Holes:
Using a drinking straw or a small round tool, punch two holes into the floor of the tray. Place one near each end, centered width-wise. -
Check Hole Angle:
Wiggle the tool slightly to ensure the hole is wide enough to hold an incense stick, possibly angling it slightly outward so the ash falls into the tray. -
Final Smoothing:
Inspect the piece for fingerprints. Buff them out gently with a fingertip or a soft silicone tool before baking or drying. -
Bake or Dry:
If using polymer clay, bake according to the package instructions (usually 275°F/135°C for 15-30 mins). For air-dry clay, let it sit for 24-48 hours. -
Sand for Smoothness:
Once fully cured and cooled, wet-sand the piece under running water using 400 grit sandpaper, followed by 800 grit for a silky finish. -
Seal the Piece:
Apply a thin layer of matte varnish to protect the surface from ash stains and give it a finished, professional look.
Now you have a serene, custom-made spot to burn your daily incense
Cute Face Magnets Made From Basic Shapes
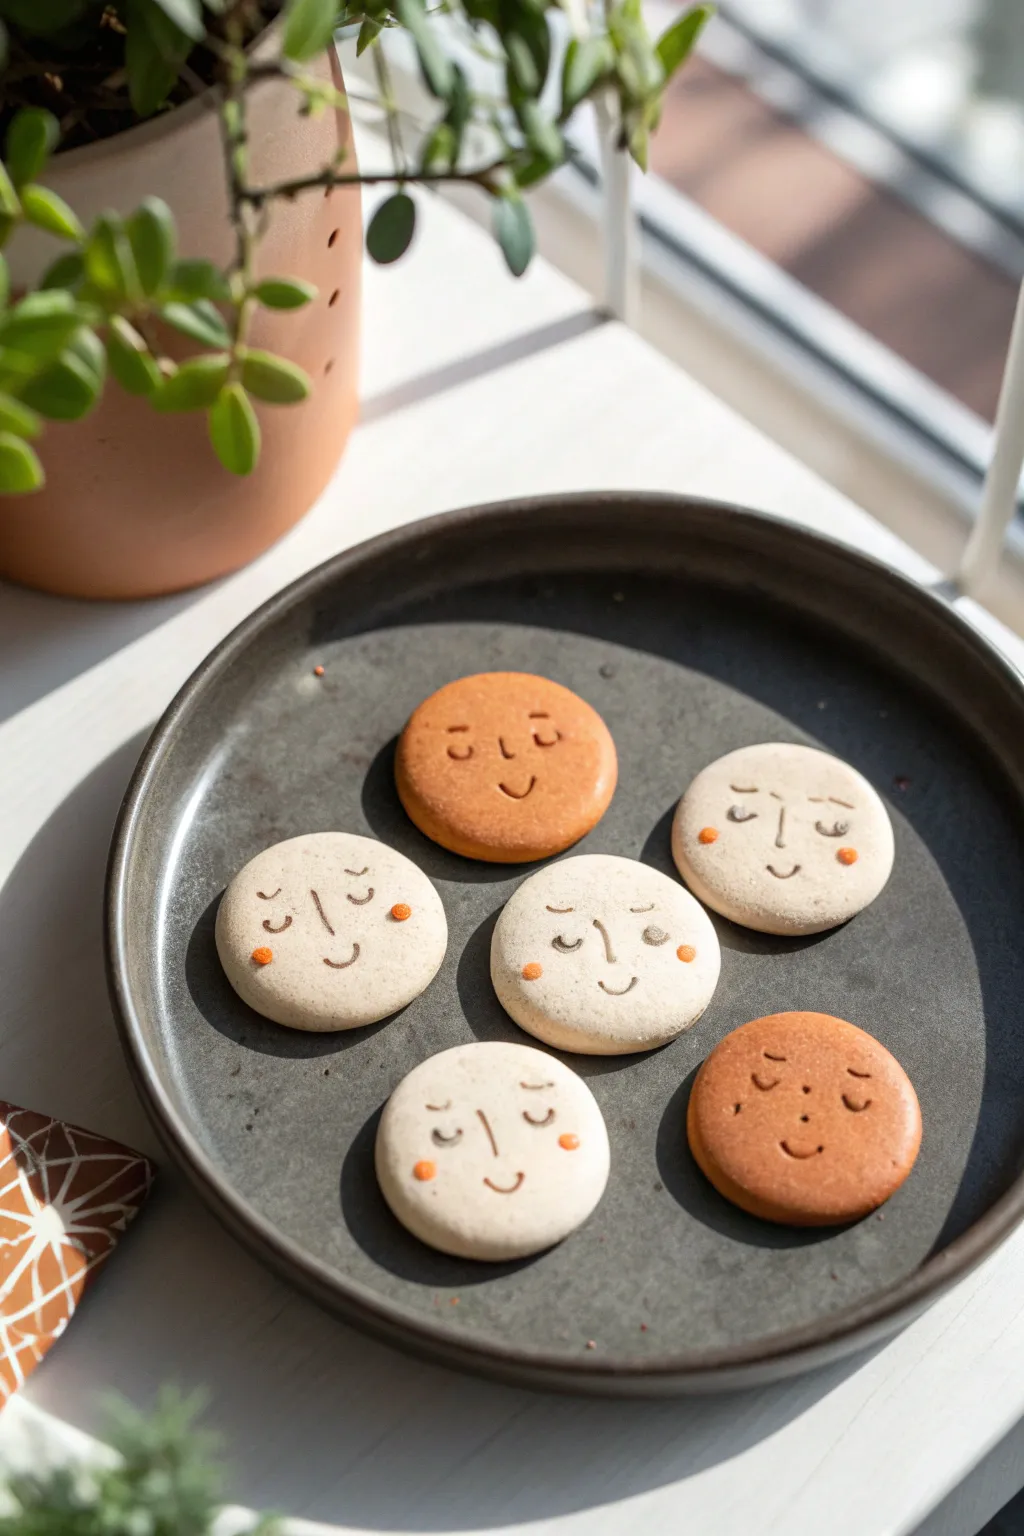
These charming little magnets bring a sense of calm to your fridge or workspace, featuring sweet, sleepy expressions on smooth clay discs. With their soft matte finish and minimalist line work, they look almost like artisanal ceramic cookies.
Step-by-Step
Materials
- Polymer clay or air-dry clay (cream and terracotta colors)
- Acrylic rolling pin
- Round cookie cutter (approx. 2 inches)
- Sandpaper (fine grit)
- Fine-point black or dark brown paint marker (or fine brush and acrylic paint)
- Small dotting tool or toothpick
- Orange or peach acrylic paint
- Strong craft magnets
- Strong craft glue (E6000 or similar)
- Matte varnish (optional)
Step 1: Shaping the Base
-
Condition the Clay:
Begin by taking a chunk of your cream-colored clay. Knead it thoroughly in your hands until it’s warm, pliable, and free of any cracks or stiff spots. -
Roll It Out:
Using your acrylic rolling pin, roll the clay out on a smooth work surface. Aim for a consistent thickness of about 1/4 inch—you want them to feel substantial, not flimsy. -
Cut the Circles:
Press your round cookie cutter firmly into the clay. Give it a little wiggle before lifting to ensure a clean cut. -
Smooth the Edges:
Gently pick up each circle. Use your finer tip to softly smooth the sharp edges created by the cutter. Following the curve of the circle, I like to tap the edges gently to give them a slightly rounded, ‘cookie-like’ look. -
Create Varied Colors:
Repeat the process with your terracotta-colored clay to create a mix of light and dark faces for variety. -
Dry or Bake:
If using polymer clay, bake according to the package instructions (usually 275°F for 15-30 minutes). If using air-dry clay, let them sit in a dry spot for 24-48 hours, flipping them occasionally for even drying.
Step 2: Adding the Details
-
Sand for Perfection:
Once your discs are fully cured and cool, take a piece of fine-grit sandpaper and lightly buff the surface. This creates that ultra-smooth, matte texture seen in the photo. -
Wipe Clean:
Use a slightly damp cloth to wipe away any sanding dust. The surface needs to be completely clean for the paint to adhere properly. -
Draft the Face:
If you’re nervous about freehanding, use a very light pencil to sketch the eye placement. The eyes should be closed curves (like a shallow ‘U’) placed slightly wide apart. -
Paint the Eyes:
Using your fine-point marker or a tiny brush with dark brown paint, carefully trace the closed eyelids. Add tiny perpendicular dashes for eyelashes if you want extra detail. -
Add the Nose:
Draw a simple vertical line for the nose right in the center. Keep it thin and straight for a minimalist aesthetic. -
Draw the Mouth:
Just below the nose, add a small, curved smile. It can be slightly off-center or connected to the nose line for a quirky, illustrative style. -
Apply the Cheeks:
Dip your dotting tool or the end of a toothpick into orange or peach paint. Dab two small dots on the outer edges of the face, aligned horizontally with the nose. -
Seal (Optional):
To protect your paint without adding shine, apply a thin coat of matte varnish. This keeps that natural, unglazed pottery look.
Smudged Ink?
If your marker bleeds into the clay, the surface might be too porous. Seal the clay with a thin layer of matte varnish first, let it dry, and then draw the face on top.
Step 3: Finishing Up
-
Attach the Magnet:
Flip the clay face over. Squeeze a pea-sized amount of strong craft glue onto the center of the back. -
Secure and Set:
Press your magnet firmly into the glue. Let the glue cure completely—usually overnight—before testing it on your fridge.
Make it a Set
Vary the expressions! Try open eyes, winking faces, or little glasses. You can also mix different shades of clay to create a diverse gradient of skin tones.
Now you have a set of friendly little faces to hold up your grocery lists and photos


What Really Happens Inside the Kiln
Learn how time and temperature work together inside the kiln to transform clay into durable ceramic.
Quick Toothbrush or Brush Cup From a Cylinder
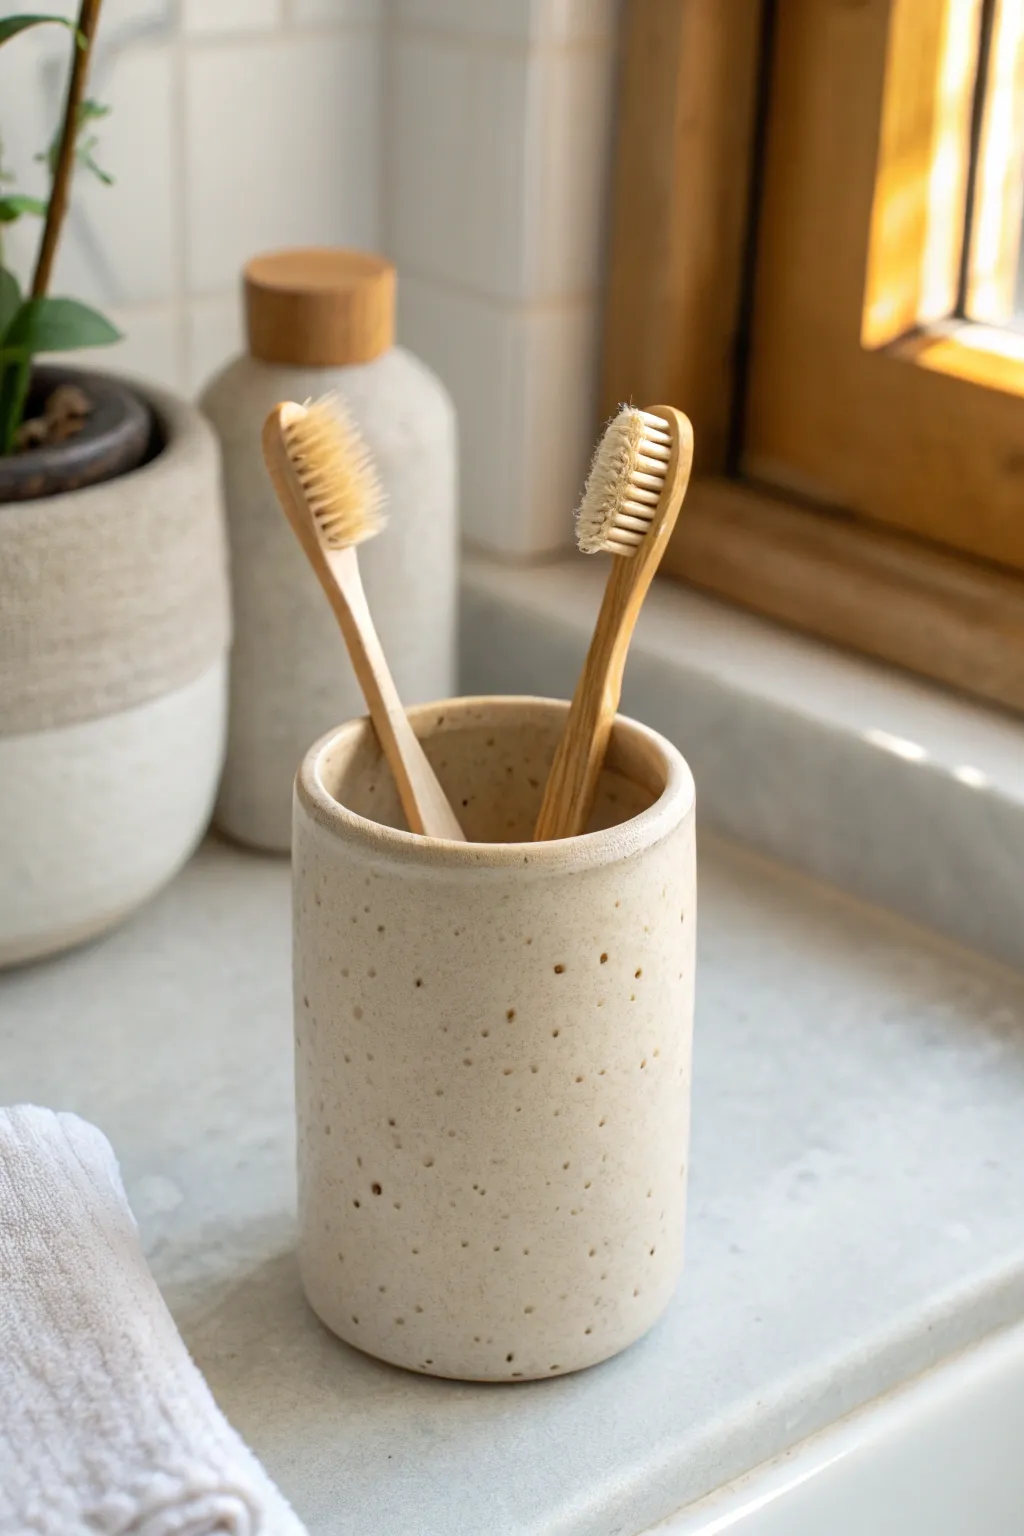
Create a minimalist bathroom essential that radiates organic charm with this simple cylindrical vessel. The finished piece features a soft cream glaze with natural speckling, perfect for holding toothbrushes or makeup brushes in style.
How-To Guide
Materials
- Speckled Stoneware Clay (e.g., buff or white with grog)
- Rolling pin
- Canvas or wooden board for rolling
- Fettling knife or needle tool
- Slip (clay mixed with water)
- Scoring tool (or an old fork)
- Small sponge
- Smooth wooden rib tool
- Clear or Cream Matte Glaze (cone 5/6 recommended)
- Kiln access
Step 1: Forming the Cylinder
-
Roll the Slab:
Begin by wedging your speckled clay to remove air bubbles, then roll it out into an even slab about 1/4 inch thick. I find using guide sticks on either side of the rolling pin helps keep the thickness perfectly consistent. -
Cut the Rectangle:
Measure and cut a rectangle from your slab. For a standard toothbrush holder like this, 10 inches long by 4.5 inches high is a great starting size. -
Cut the Base:
Use a circular cookie cutter or trace around a jar lid onto the remaining slab to create the round base for your cup. Ensure the circumference matches the length of your rectangle (minus a tiny overlap). -
Bevel the Edges:
On the short ends of your rectangle, cut the edges at a 45-degree angle in opposite directions so they will overlap seamlessly when rolled into a tube. -
Score and Slip:
Rough up the beveled edges and the outer edge of your circular base with your scoring tool, then apply a generous amount of slip to these textured areas. -
Assemble the Tube:
Carefully lift the rectangle and curve it into a cylinder, pressing the beveled edges together firmly to create a bond. -
Attach the Base:
Place the cylinder onto the scored base. Use your thumb or a wooden tool to smudge the clay from the wall down onto the base to seal the seam completely.
Seam Cracking?
If the vertical seam splits while drying, it wasn’t scored enough. Try wrapping tight with plastic to rehydrate, score deeper, add fresh slip, and compress firmly.
Step 2: Refining and Finishing
-
Blend the Vertical Seam:
Support the inside of the cylinder with one hand while using a wooden rib on the outside to smooth over the vertical join until it is invisible. -
Smooth the Rim:
Use a damp chamois or a wet fingertip to gently round off the top rim of the cup. You want a soft, comfortable edge rather than a sharp one. -
Surface Texture:
If you want that slightly organic, handmade feel shown in the photo, refrain from over-smoothing the surface. Let some of the grog (speckles) remain visible. -
Dry Slowly:
Loosely cover your piece with plastic for the first day to ensure even drying, which prevents warping. Then, uncover and let it dry to bone dry state. -
Bisque Fire:
Load your bone-dry piece into the kiln for a bisque firing (usually to cone 04) to prepare it for glazing. -
Clean the Bisque:
Wipe the fired piece with a damp sponge to remove any kiln dust, which can prevent glaze from adhering properly. -
Apply Glaze:
Dip the cup into a cream or clear matte glaze. If using a brush, apply 2-3 even coats. The speckled clay body will show through a semi-opaque cream glaze beautifully. -
Wipe the Foot:
Use a wet sponge to completely wipe any glaze off the bottom of the cup and about 1/8 inch up the side to prevent it from sticking to the kiln shelf. -
Glaze Fire:
Fire the piece again to the temperature required by your specific clay and glaze combination (often cone 5 or 6).
Add a Divider
Before attaching the base, insert a small rectangle of clay inside the cylinder to create two separate compartments for keeping toothbrushes apart.
Place your new ceramic cup on the bathroom counter for an instant upgrade in organization and aesthetics
Mini Bud Vase Built Around a Small Glass Insert
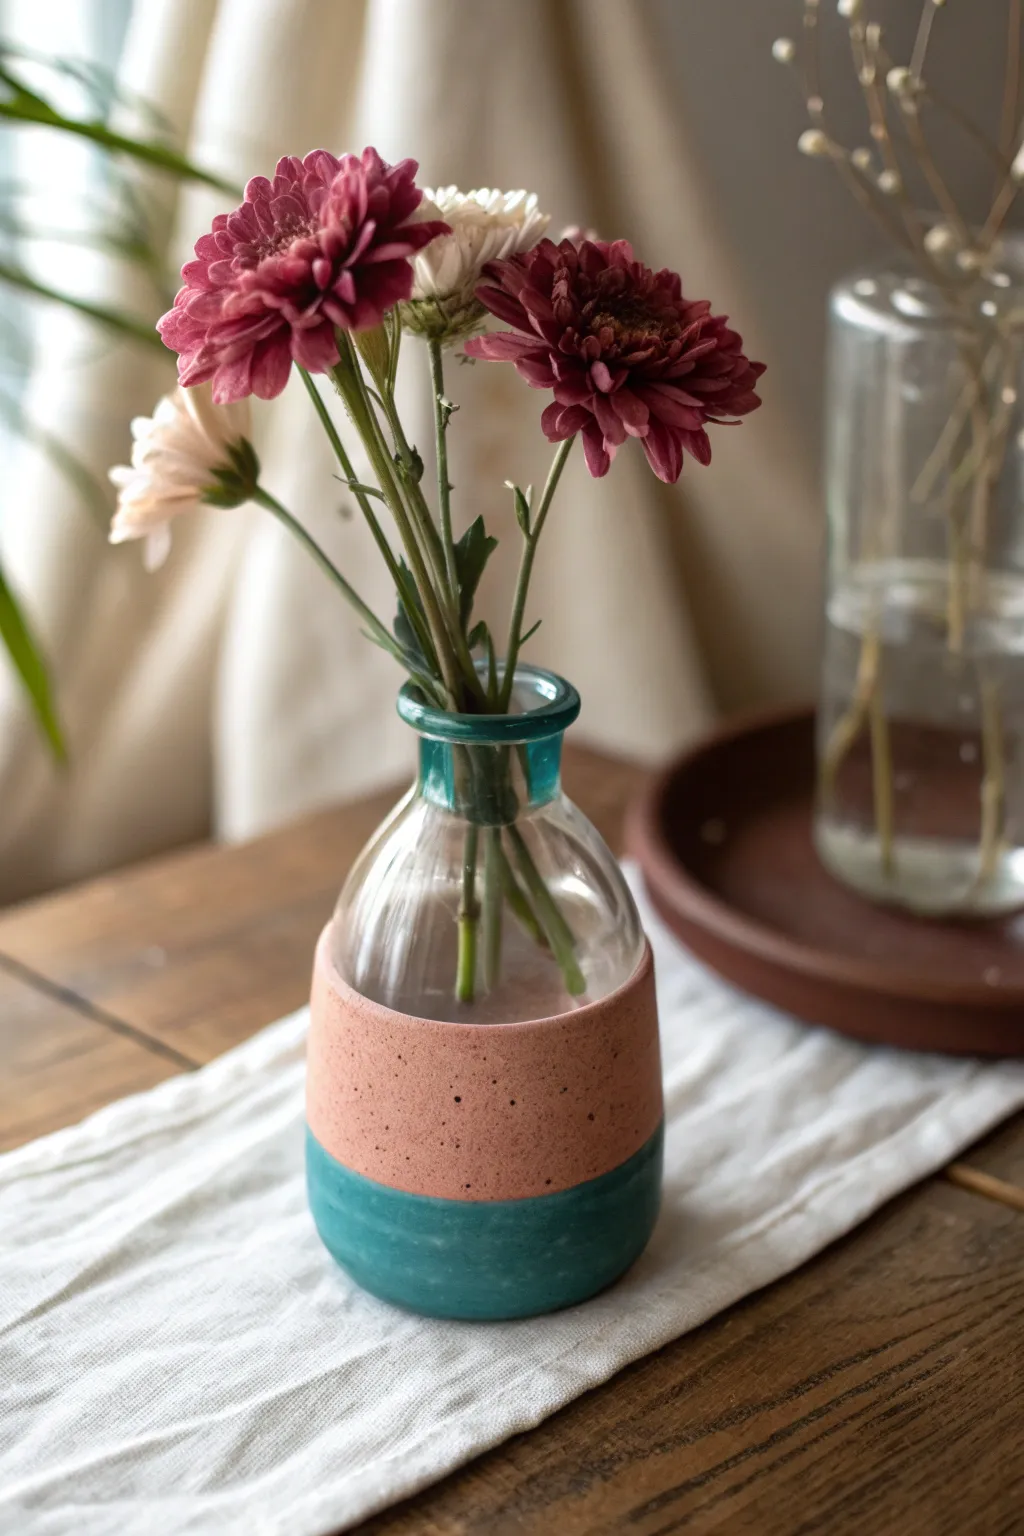
Marrying the transparency of glass with the earthy grounding of ceramic, this beginner-friendly project creates a chic, two-tone bud vase. By building clay directly onto a glass insert, you achieve a perfectly watertight vessel with a modern, speckled finish.
Step-by-Step
Materials
- Small glass bottle (recycled spice jar or craft store bud vase)
- Polymer clay or air-dry clay (terracotta or peach color)
- Acrylic paints (teal/turquoise)
- Black acrylic paint (for speckles)
- Matte sealant or varnish
- Rolling pin
- Craft knife
- Old toothbrush
- Painter’s tape
- Sandpaper (fine grit)
Step 1: Preparing the Base
-
Select your glass:
Choose a glass bottle with a narrow neck. A recycled vanilla extract bottle or a small craft store bud vase works perfectly. Ensure it is clean, dry, and free of any labels or sticky residue. -
Condition the clay:
Take your terracotta or peach-colored clay and knead it well until it is soft and pliable. If using polymer clay, the warmth of your hands is essential here to prevent cracking later. -
Roll out a slab:
use your rolling pin to flatten the clay into a long rectangular strip. Aim for an even thickness of about 1/4 inch (6mm). This needs to be thick enough to feel substantial but not so heavy it slides off the glass. -
Measure the wrap:
Hold the glass bottle next to your clay strip to gauge the height. You want the clay to cover approximately the bottom two-thirds of the glass, leaving the neck and shoulders exposed. -
Cut to size:
Using a craft knife and a straight edge (like a ruler), trim your clay slab into a neat rectangle that is tall enough to cover the bottom section and long enough to wrap fully around the bottle with a slight overlap.
Step 2: Building the Form
-
Wrap the glass:
Carefully wrap the clay strip around the bottom of the glass bottle. Press it firmly against the glass to remove any trapped air bubbles, which helps adhesion. -
Join the seam:
Where the clay ends meet, slice through both layers with your craft knife to create a perfect butt joint. Remove the excess scraps and gently smudge the clay across the seam with your finger or a modeling tool until the line disappears. -
Shape the bottom:
Depending on your glass shape, you may need to fold the excess clay at the bottom over the base. Smooth this completely flat so the vase stands stable. I usually tap the vase gently on the table to ensure a flat bottom. -
Refine the rim:
Check the top edge of the clay where it meets the exposed glass. Use your finger or a damp sponge to smooth this rim, ensuring it is level all the way around. -
Cure or dry:
If using polymer clay, bake according to the package instructions (usually 275°F/135°C for 15-30 mins per 1/4 inch). If using air-dry clay, let it sit for 24-48 hours until fully hardened.
Uneven Seam Line?
If your vertical seam won’t smooth out perfectly, turn it into a feature! Press a texture tool or stamp along the line to make it decorative, or position it as the ‘back’ of the vase.
Step 3: Decorating and Finishing
-
Sand for smoothness:
Once the clay is fully cured and cool (or dry), use fine-grit sandpaper to buff away any fingerprints or uneven spots, paying special attention to the seam area. -
Tape off the design showing:
Apply a strip of painter’s tape horizontally around the clay section, dividing it into two halves. Press the tape edge down firmly to prevent paint bleed. -
Paint the bottom section:
Paint the exposed bottom half of the clay with your teal or turquoise acrylic paint. You may need two coats for full opacity, letting the first coat dry before applying the second. -
Remove the tape:
Peel off the painter’s tape while the paint is still slightly tacky to get a crisp, clean line between the painted teal bottom and the bare clay top. -
Create the speckles:
Dilute a small amount of black acrylic paint with water. Dip an old toothbrush into the mixture, point it at the vase, and run your thumb across the bristles to flick tiny splatters over the entire clay surface. -
Final seal:
Protect your paint job and the raw clay look by applying a coat of matte sealant or varnish over the entire clay portion. Avoid getting varnish on the exposed glass neck.
Level Up: Texture Play
Before wrapping the clay around the glass, roll it onto a textured mat or lace. The raised pattern adds a tactile dimension that looks amazing when highlighted with a dry-brush paint technique.
Pop your favorite wildflowers into the glass insert and enjoy the beautifully modern contrast you’ve created

TRACK YOUR CERAMIC JOURNEY
Capture glaze tests, firing details, and creative progress—all in one simple printable. Make your projects easier to repeat and improve.
Flat Clay Earrings With Easy Cutout Shapes
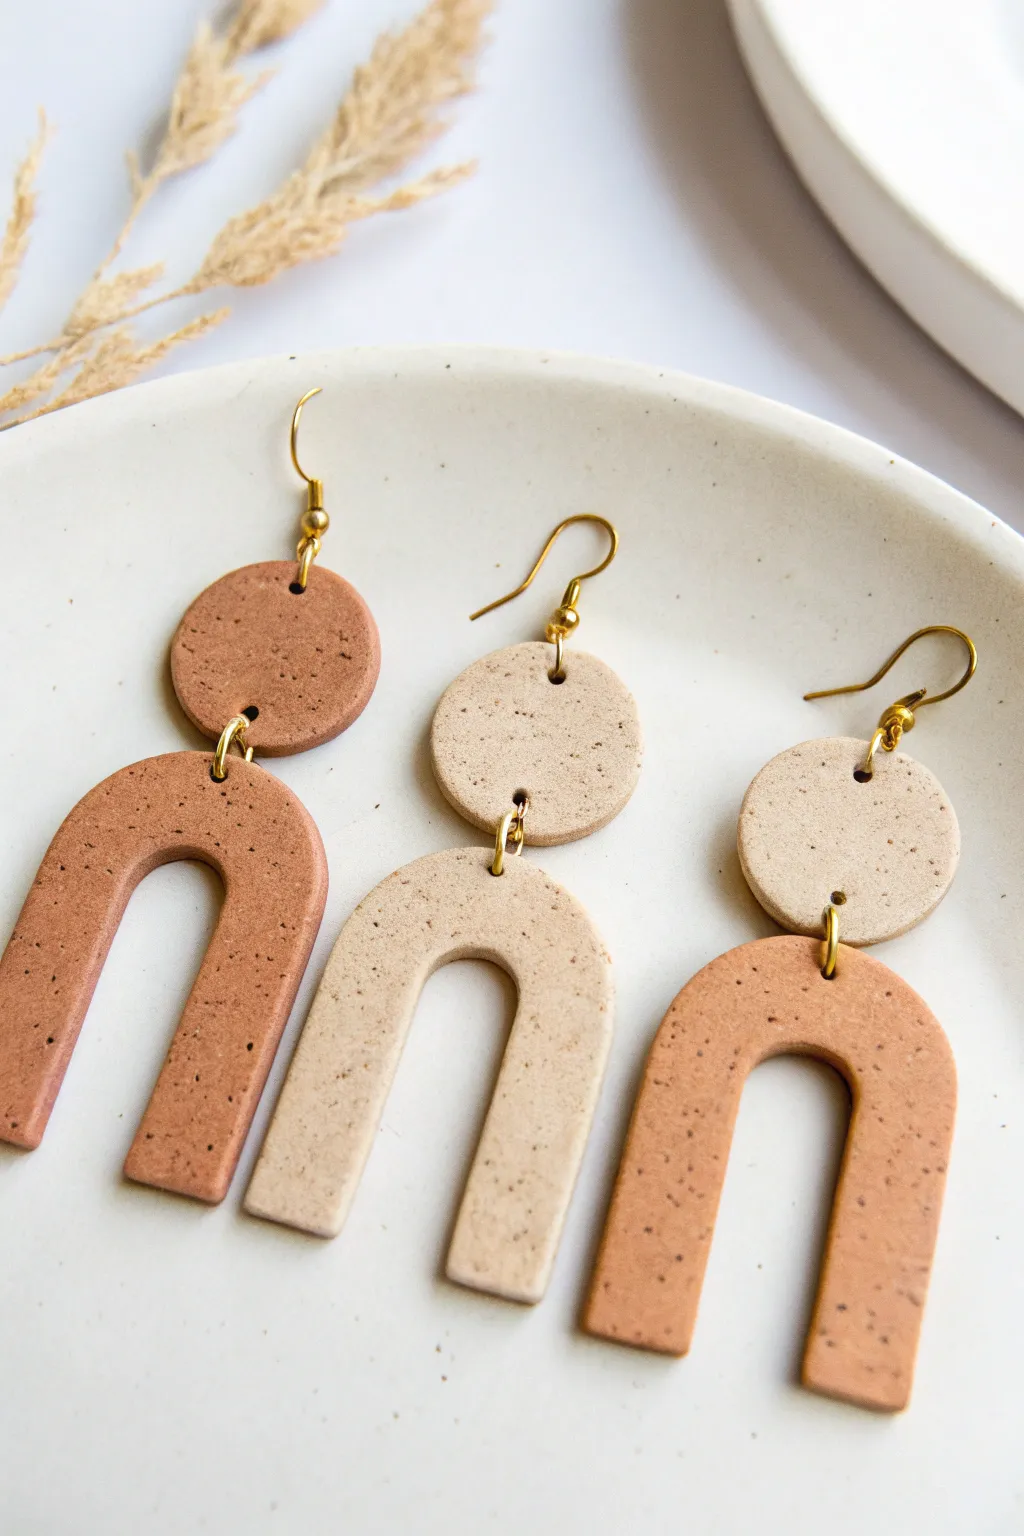
These minimalist arch earrings capture a modern desert aesthetic with their warm terracotta and sand tones, flecked with natural speckles. The simple geometric shapes—a circle stud connected to a graceful arch—create a lightweight, stylish accessory perfect for beginners.
Step-by-Step
Materials
- Polymer clay (terracotta, beige, and granite/speckled white)
- Clay roller or pasta machine
- Circle clay cutter (approx. 15mm)
- Arch or U-shape clay cutter (approx. 30mm tall)
- Needle tool or toothpick
- Parchment paper or ceramic tile
- Oven
- Fine grit sandpaper (400-600 grit)
- Needle-nose jewelry pliers
- Jump rings (gold, approx. 6-8mm)
- Earring hooks (gold, french wire style)
Step 1: Preparing the Clay
-
Conditioning:
Begin by warming up your polymer clay in your hands. Knead the terracotta and beige blocks separately until they are soft and pliable, which prevents cracking later. -
Creating the speckle effect:
If your clay isn’t pre-speckled, mix a very small pinch of black pepper or black embossing powder into the solid colors. Knead thoroughly until the specks are evenly distributed. -
Rolling out sheets:
Roll out your clay into even slabs. I aim for a thickness of about 3mm (or setting 1 on most pasta machines) to ensure the earrings are sturdy but not too heavy. -
Smoothing:
Gently run your fingers or a smooth roller over the surface to remove any fingerprints or air bubbles.
Fixing Flexible Clay
If your baked pieces bend too easily or feel rubbery, they likely weren’t baked long enough. Put them back in for another 15 minutes; you generally can’t ‘overbake’ polymer clay unless the temp is too high.
Step 2: Cutting and Shaping
-
Cutting the tops:
Use your small circle cutter to punch out two circles for each pair of earrings. Repeat this with your contrasting clay color. -
Cutting the arches:
Press your U-shaped cutter firmly into the clay slab to create the bottom dangling pieces. Wiggle the cutter slightly before lifting to get a clean edge. -
Refining edges:
Before baking, gently smooth the cut edges with your fingertip dipped in a tiny bit of cornstarch or baby oil to soften any sharp cutting ridges. -
Piercing holes:
Use a needle tool or toothpick to create a small hole at the very top of the arch shape. Ensure it’s centered and not too close to the edge. -
Piercing the circles:
Create a corresponding hole at the bottom of the circle shape (for the jump ring) and another hole at the top (for the earring hook).
Step 3: Baking and Finishing
-
Baking setups:
Transfer your clay pieces to a parchment-lined baking sheet or a ceramic tile. -
Oven time:
Bake according to the manufacturer’s instructions for your specific brand of clay (usually around 275°F or 135°C) for 30–45 minutes. -
Cooling down:
Allow the pieces to cool completely inside the oven if possible, or on a cooling rack. They are fragile while hot. -
Sanding:
Once cool, dip your sandpaper in a little water and gently buff the edges and back of the earrings to remove any imperfections or lint. -
Assembly prep:
Open your jump rings by twisting the ends away from each other (forward and backward, not pulling apart). -
Connecting pieces:
Thread an open jump ring through the bottom hole of the circle and the top hole of the arch. Close the ring securely with your pliers. -
Adding hooks:
Open the loop on your earring hook slightly. Feed it through the top hole of the clay circle. -
Final closure:
Use the pliers to gently close the loop around the clay, ensuring the hook faces the correct direction so the earring hangs flat.
Add Texture
Before baking, gently roll a piece of sandpaper or a textured fabric over the raw clay slab. This creates a realistic stone-like surface that enhances the speckled granite look.
Enjoy wearing your handcrafted, earthy accessories
Two-Color Marbled Clay Trinket Tray
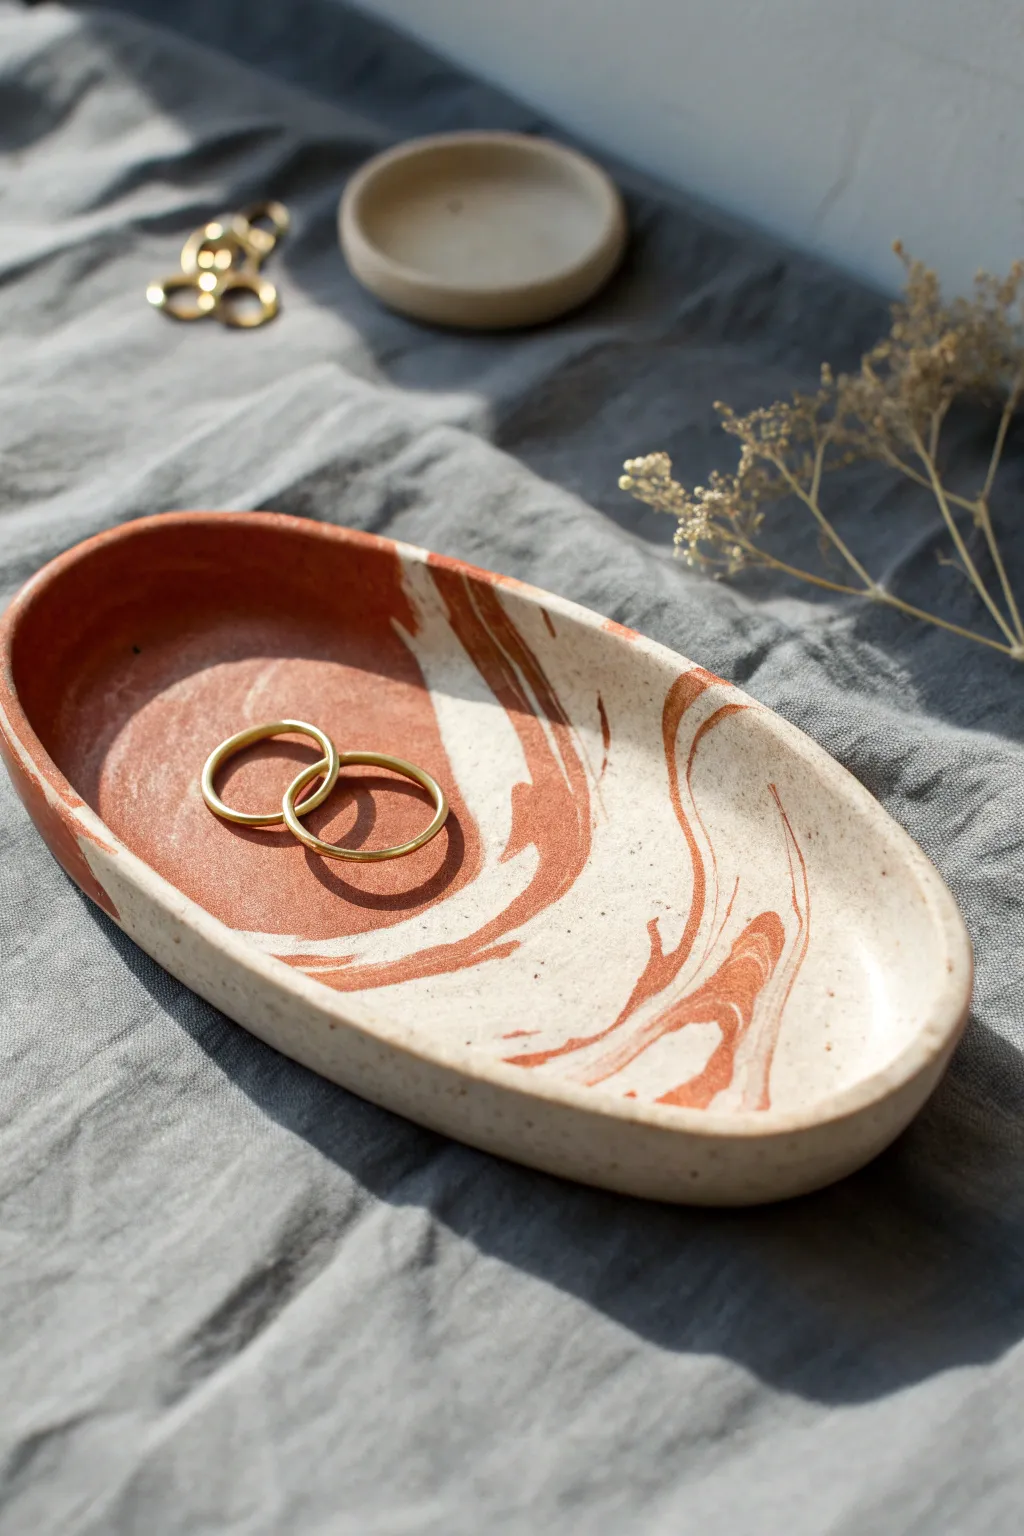
Achieve a sophisticated, high-end ceramic look using polymer or air-dry clay with this simple marbling technique. The organic swirls of burnt orange and speckled cream create a stunning home for your favorite everyday jewelry.
Detailed Instructions
Materials
- White or cream polymer clay (ideally with speckles)
- Terracotta or rust-colored polymer clay
- Rolling pin (acrylic or wooden)
- Oval cutter or paper template and craft knife
- Fine-grit sandpaper (400-600 grit)
- Small bowl or sponge for smoothing
- Matte or satin varnish (optional)
- Oven (if using polymer clay)
Step 1: Prepare the Clay
-
Condition the clay:
Start by kneading both the cream and terracotta clays separately until they are soft, pliable, and warm to the touch. -
Form ropes:
Roll each color into several long, snake-like ropes, roughly 1/4 inch in diameter. You will want about equal amounts of each color, or slightly more cream if you prefer a lighter look. -
Twist together:
Gather the ropes into a single bundle, alternating colors. Twist the entire bundle securely like a candy cane to begin merging the hues.
Step 2: Create the Marble Effect
-
Fold and roll:
Fold the twisted rope in half and roll it out again into a single log. Repeat this process of twisting, folding, and rolling. -
Check the pattern:
Stop mixing once you see distinct streaks. Over-mixing will result in a muddy, solid color rather than beautiful separation. -
Form a ball:
Roll your marbled log into a tight ball, smoothing out any seams with your thumbs. -
Flatten the slab:
Using your rolling pin, flatten the ball into an oval sheet about 1/4 inch thick. Roll in different directions to stretch the marble pattern organically.
Muddy Colors?
If your colors are blending into a single brown shade, you’ve over-mixed. Stop twisting sooner next time. The distinct streaks should still be very visible before you roll it flat.
Step 3: Shape the Dish
-
Cut the shape:
Place your oval template on the slab and trace around it with a craft knife, or use a large oval cutter to punch out the base shape. -
Smooth the edges:
Dip your finger in a little water (or baby oil for polymer clay) and run it along the cut edge to remove any sharpness or drag marks. -
Lift the rim:
Gently pinch the edges of the oval upward to create a rim. I find that using the pad of my thumb to press the center down while lifting the edge works best. -
Refine the curve:
Work your way around the perimeter, smoothing the transition from the base to the wall so it curves gently rather than sitting at a sharp angle. -
Check symmetry:
Look at the dish from eye level to ensure the rim height is relatively even all the way around.
Gold Rim Upgrade
Use a small brush to paint the very top edge of the rim with liquid gold leaf or metallic acrylic paint. This adds a luxurious detail that mimics real gold-rimmed ceramics.
Step 4: Finish and Bake
-
Final smooth:
Give the surface one last check for fingerprints. Lightly buff them away with a smooth cloth or your finger. -
Bake:
Bake the piece according to your clay package instructions (usually 275°F/135°C for 15-30 minutes for polymer clay). If using air-dry clay, let it sit for 24-48 hours. -
Sand edges:
Once fully cured and cooled, use fine-grit sandpaper to gently buff the rim and any rough spots on the bottom. -
Seal (optional):
Apply a thin coat of matte or satin varnish to protect the surface and deepen the contrast between the terracotta and cream tones.
Place your new marbled tray on a bedside table to keep your rings safe and stylish
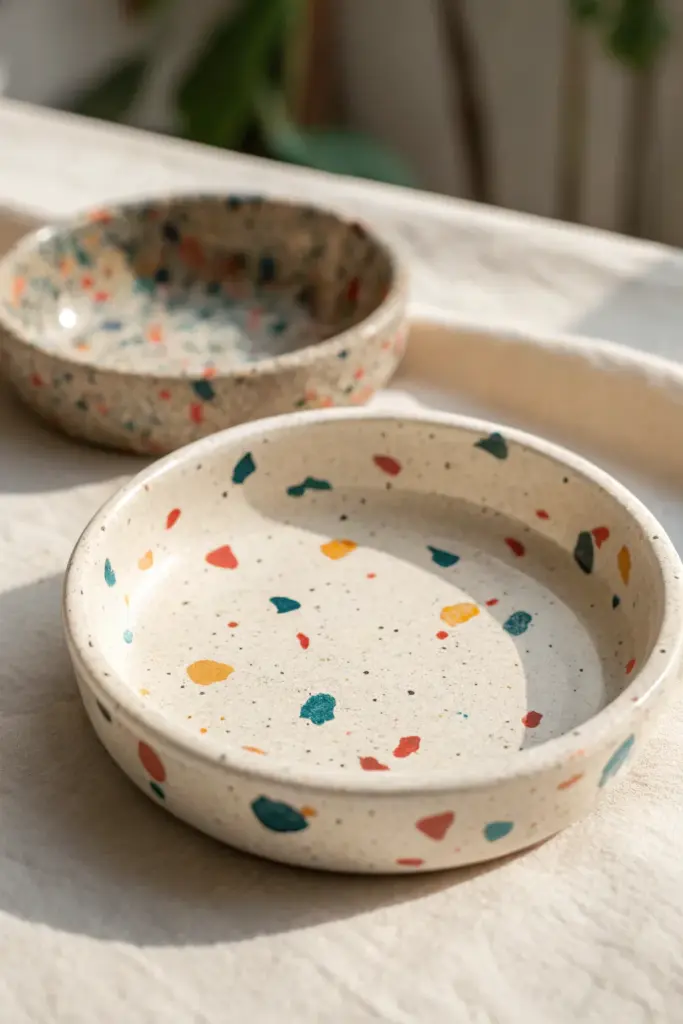
Terrazzo-Style Speckled Catchall Dish
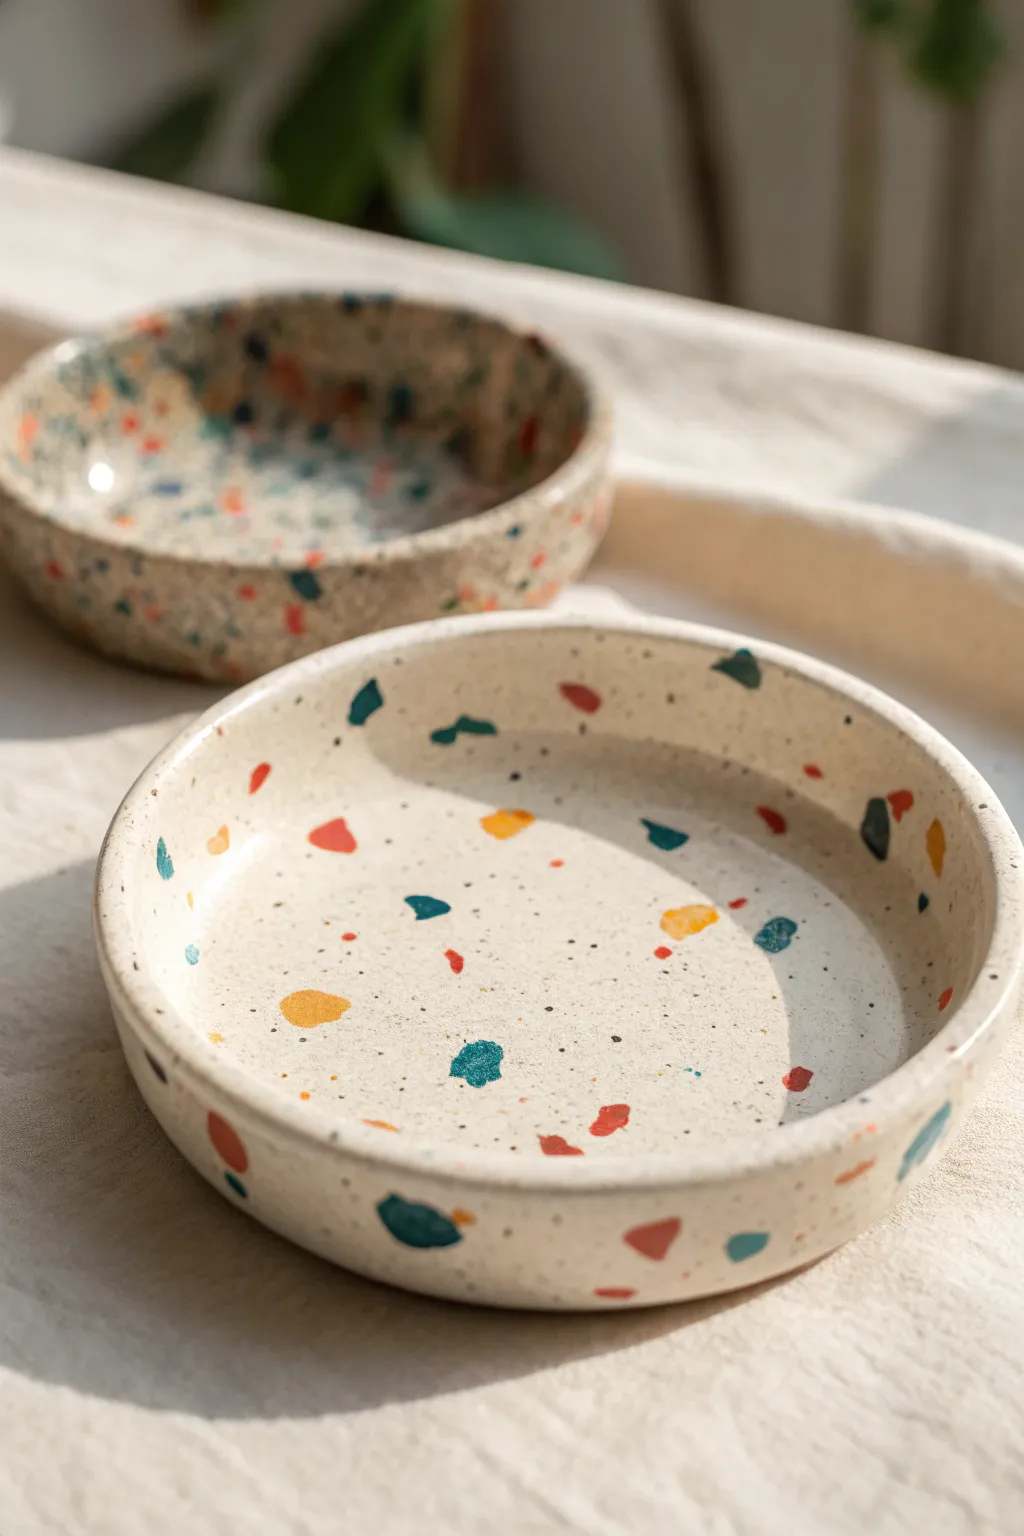
Achieve the high-end look of terrazzo stone without the weight or cost by using polymer clay. This project features a creamy base dotted with vibrant, playful chips of color to hold your trinkets in style.
Step-by-Step
Materials
- White or beige polymer clay (base color)
- Small amounts of colored polymer clay (teal, mustard yellow, brick red, dark blue)
- Clay roller or rolling pin
- Circle cutter or a bowl to trace
- Craft knife
- Smoothing tool or old credit card
- Oven-safe bowl (for shaping)
- Parchment paper
- Rolling guides (optional, for even thickness)
- Fine-grit sandpaper (400-800 grit)
- Matte or glossy clay sealant (optional)
Step 1: Prepping Your “Chips”
-
Flatten the colors:
Begin by taking your small amounts of colored clay (teal, mustard, red, blue). Roll each color out into a very thin sheet, slightly thinner than a dime. -
Create the chips:
Use your craft knife to chop these thin sheets into random, irregular shapes. Aim for varied sizes—some tiny specks and some larger, chunky triangles or jagged pieces. -
Separate and set aside:
Gently separate the chopped pieces so they don’t clump back together. I like to keep them on a piece of parchment paper ready for the next step.
Step 2: Creating the Base Slab
-
Condition the base clay:
Take your large block of white or beige clay. Knead and warm it in your hands until it is soft and pliable. -
Roll out the base:
Roll the base clay into a smooth slab about 1/4 inch thick. Using rolling guides here ensures the dish has a uniform wall thickness later. -
Apply the pattern:
Sprinkle your colored clay chips randomly over the surface of the white slab. Don’t overthink the placement; random scattering looks more authentic. -
Embed the chips:
Once you are happy with the density of the speckles, run your roller over the slab again. Press firmly enough to flatten the colored chips flush into the white base, creating a smooth surface.
Sticky Situation?
If the clay sticks to your roller when embedding the chips, place a sheet of parchment paper or wax paper over the clay before rolling to keep it clean.
Step 3: Shaping and Baking
-
Cut the circle:
Place your circle cutter or an overturned bowl onto the patterned slab. Cut out a perfect circle using your craft knife. -
Smooth the edges:
Run your finger or a smoothing tool gently around the cut edge to soften any sharp angles left by the knife. -
Form the curve:
Gently lift your clay circle and drape it inside an oven-safe bowl. Press it lightly so it takes the curved shape of the bowl’s bottom. -
Establish the rim:
If you want the vertical rim shown in the photo, gently press the edges of the clay upward against the sides of the bowl rather than letting it just slope. -
Bake carefully:
Place the clay-filled bowl on a baking sheet. Bake according to your brand of polymer clay instructions (usually around 275°F or 135°C for 15-30 minutes). -
Cool down:
Allow the piece to cool completely inside the bowl before attempting to remove it. This prevents warping while the clay is still warm.
Pro Tip: Pepper Look
Mix a tiny pinch of black pepper or used coffee grounds into your white base clay before rolling. It adds microscopic texture that mimics real stone.
Step 4: Finishing Touches
-
Create the stone texture:
Use fine-grit sandpaper to spot-sand the surface. This helps remove fingerprints and creates a matte, stone-like texture. -
Add faux speckles:
If your surface looks too clean, you can flick a tiny amount of diluted black or brown acrylic paint onto the surface with a toothbrush for extra ‘sand’ texture. -
Clean up:
Wipe the dish with a damp cloth to remove any sanding dust or loose paint particles. -
Seal (optional):
For a glossy finish like polished stone, apply a thin coat of polymer clay glaze. For a natural look, leave it raw or use a matte varnish.
Place your new dish on a bedside table or vanity to catch your favorite jewelry pieces