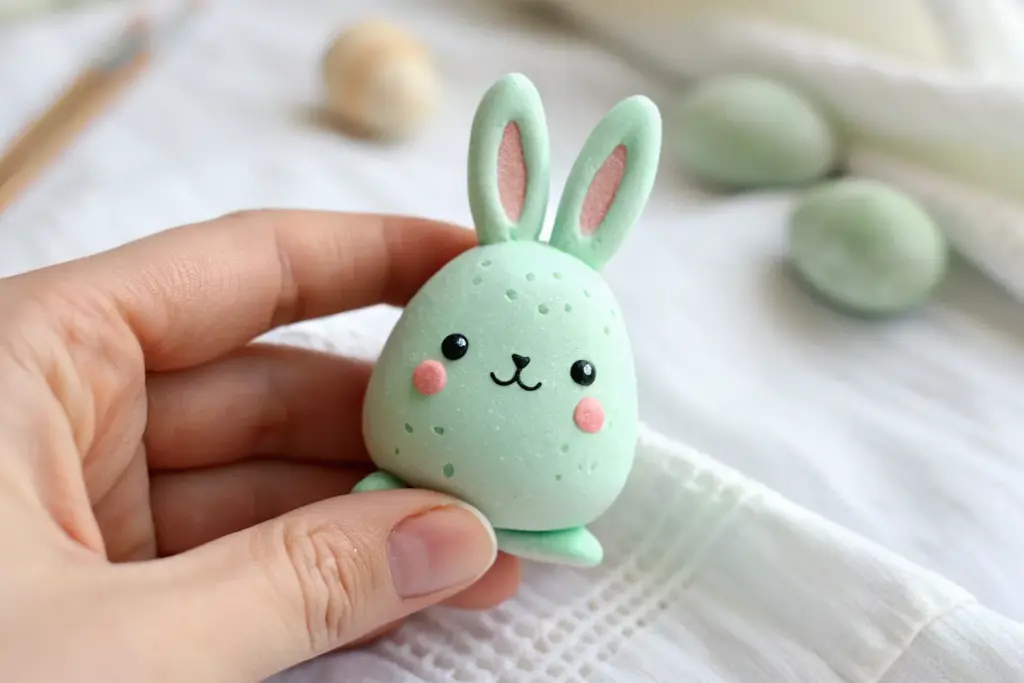
When I want a quick win in the studio, I reach for air dry clay and make something small, sweet, and totally doable in one sitting. These easy cute air dry clay ideas are all about simple shapes, happy faces, and that satisfying “I made this!” feeling.
Chibi Frog Figurines
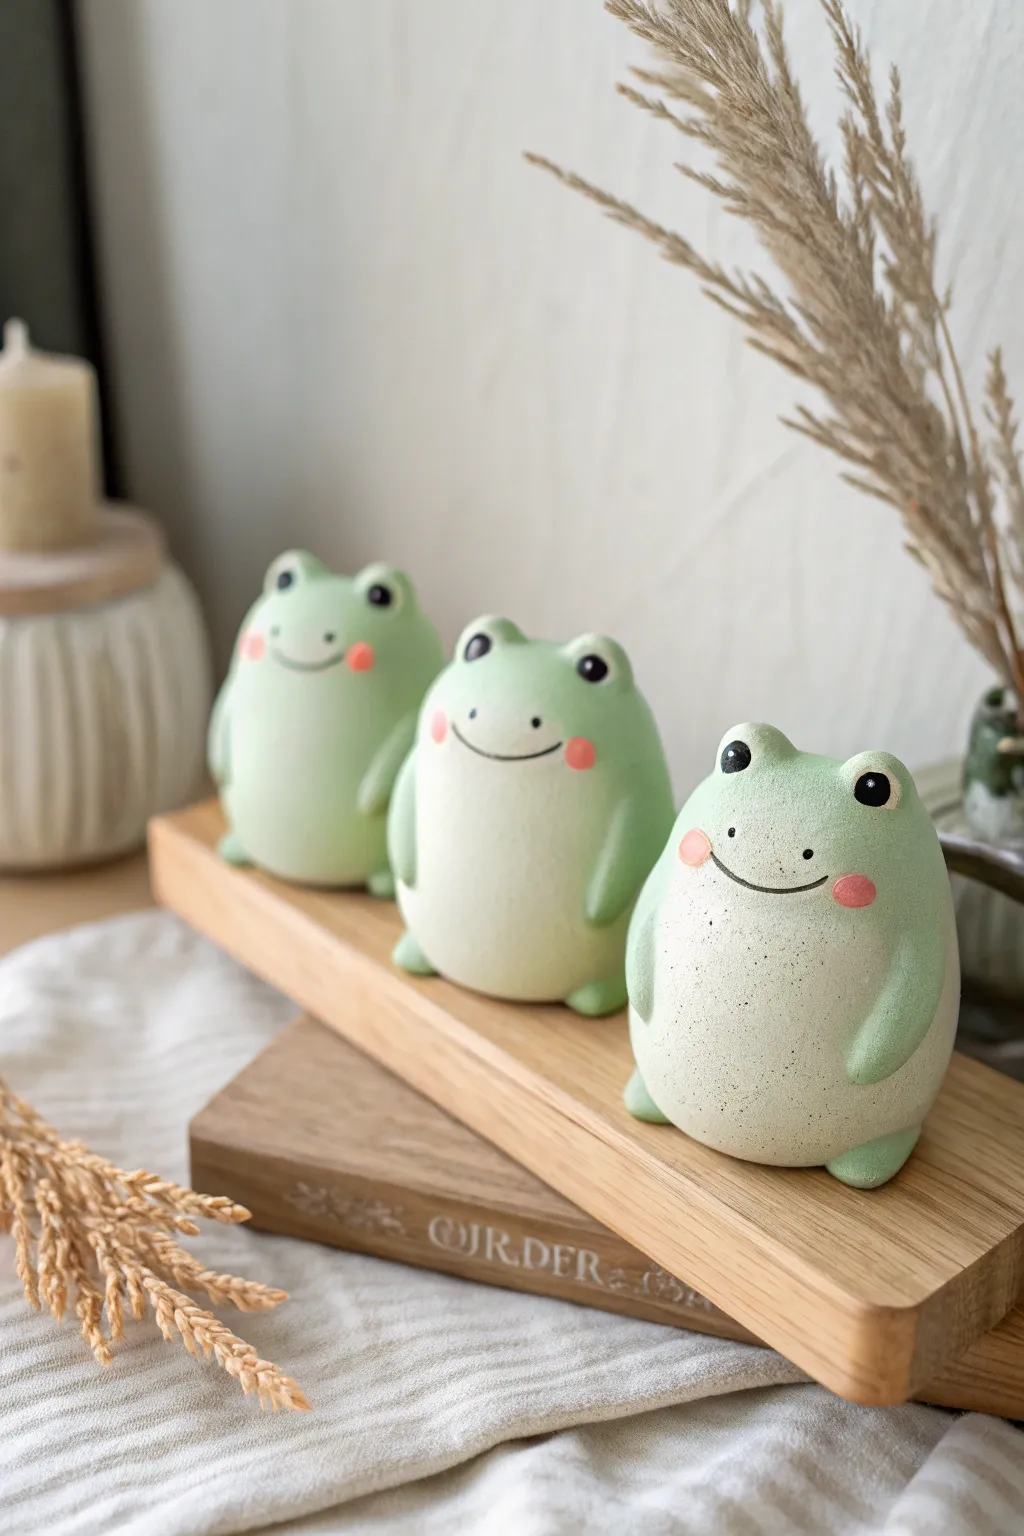
These adorable, chubby frog figurines capture a serene minimalist aesthetic with their smooth, stone-like texture and soft pastel green finish. Their perfectly round bodies and blushing cheeks make them an irresistible desk companion or shelf decoration.
Step-by-Step Guide
Materials
- Air dry clay (white)
- Acrylic paint (pastel green, white, black, pink)
- Fine-grit sandpaper
- Small cup of water
- Clay tools (needle tool, small ball tool)
- Matte varnish or sealant
- Old toothbrush (for speckling)
- Soft paintbrushes
Step 1: Shaping the Base
-
Condition the clay:
Start by kneading a golf-ball-sized amount of white air dry clay until it is warm and pliable. If it feels too dry, dip your finger in water and work it in to prevent cracks. -
Form the body:
Roll the clay into a smooth sphere between your palms. Gently tap the bottom against your work surface to create a flat base so the frog sits upright without wobbling. -
Shape the ovoid:
Using your palms, gently elongate the sphere just slightly upwards to create a very subtle egg shape, keeping the widest part at the bottom for that chubby look. -
Create eye sockets:
Use the tip of your pinky finger or a large ball tool to press two small, shallow indentations on the top of the head where the eyes will go. This creates the subtle brow ridges seen in the reference.
Seamless Blending
Use a wet paintbrush instead of your finger to smooth hard-to-reach seams around the arms and eyes. It acts like a mini mop to erase joint lines.
Step 2: Adding Details
-
Attach the eyes:
Roll two tiny, pea-sized balls of clay. Score the sockets you just made and the bottom of these balls, add a tiny dab of water, and press the eyes into place on top of the head. -
Blend the seams:
With a wet finger or a clay shaper, carefully smooth the seam where the eye meets the head so it looks like one continuous piece rather than an attached lump. -
Make the arms:
Roll two small, elongated teardrop or tic-tac shapes. These will be the arms. They should be quite small compared to the body to maintain the chibi proportions. -
Attach the limbs:
Score and wet the sides of the body. Press the arms flush against the sides, curving slightly forward. Blend the top shoulder joint into the body, but leave the hand area defined. -
Add feet:
Create two small flattened ovals for feet. Attach them to the bottom front of the body, tucking them slightly underneath so just the toes peek out. -
Smooth perfection:
Dip your finger in water and run it over the entire figurine to remove fingerprints and surface imperfections. Let the clay dry completely for 24-48 hours.
Step 3: Painting & Finishing
-
Sand for texture:
Once fully dry, essentially lightly buff the surface with fine-grit sandpaper. This isn’t just to smooth it but to give it that matte, stoneware ceramic feel. -
Base coat:
Mix white acrylic paint with a tiny drop of green to create a very pale, minty pastel shade. Apply two thin coats to the entire frog, letting it dry between layers. -
Create the belly:
Mix an even lighter shade of green (almost white). Paint a large, soft oval on the front of the belly. I find using a dry-brush technique here helps blend the edges for a natural gradient. -
Speckling technique:
Dilute a tiny amount of black or dark grey paint with water. Dip an old toothbrush into it, then run your thumb across the bristles to flick tiny specks onto the frog for a stone effect. -
Paint the face:
Use a fine liner brush or a needle tool dipped in black paint to draw a wide, simple U-shape smile and fill in the eyes. Keep the eyes solid black and round. -
Add blush:
Dip a rounded brush or a Q-tip into pink paint. Dab excess paint off onto a paper towel until the brush is nearly dry, then gently stipple rosy cheeks right at the corners of the smile. -
Seal the work:
Finish with a coat of matte varnish. Avoid glossy finishes, as the charm of this project relies on that soft, unglazed look.
Cracks Appearing?
If small cracks appear while drying, mix a tiny bit of clay with water to make a paste (slip). Fill the crack, smooth it over, and let it dry again.
Arrange your trio of frogs on a wooden block or near a plant for the ultimate peaceful vibe.


Mini Strawberry Charms With Sweet Faces
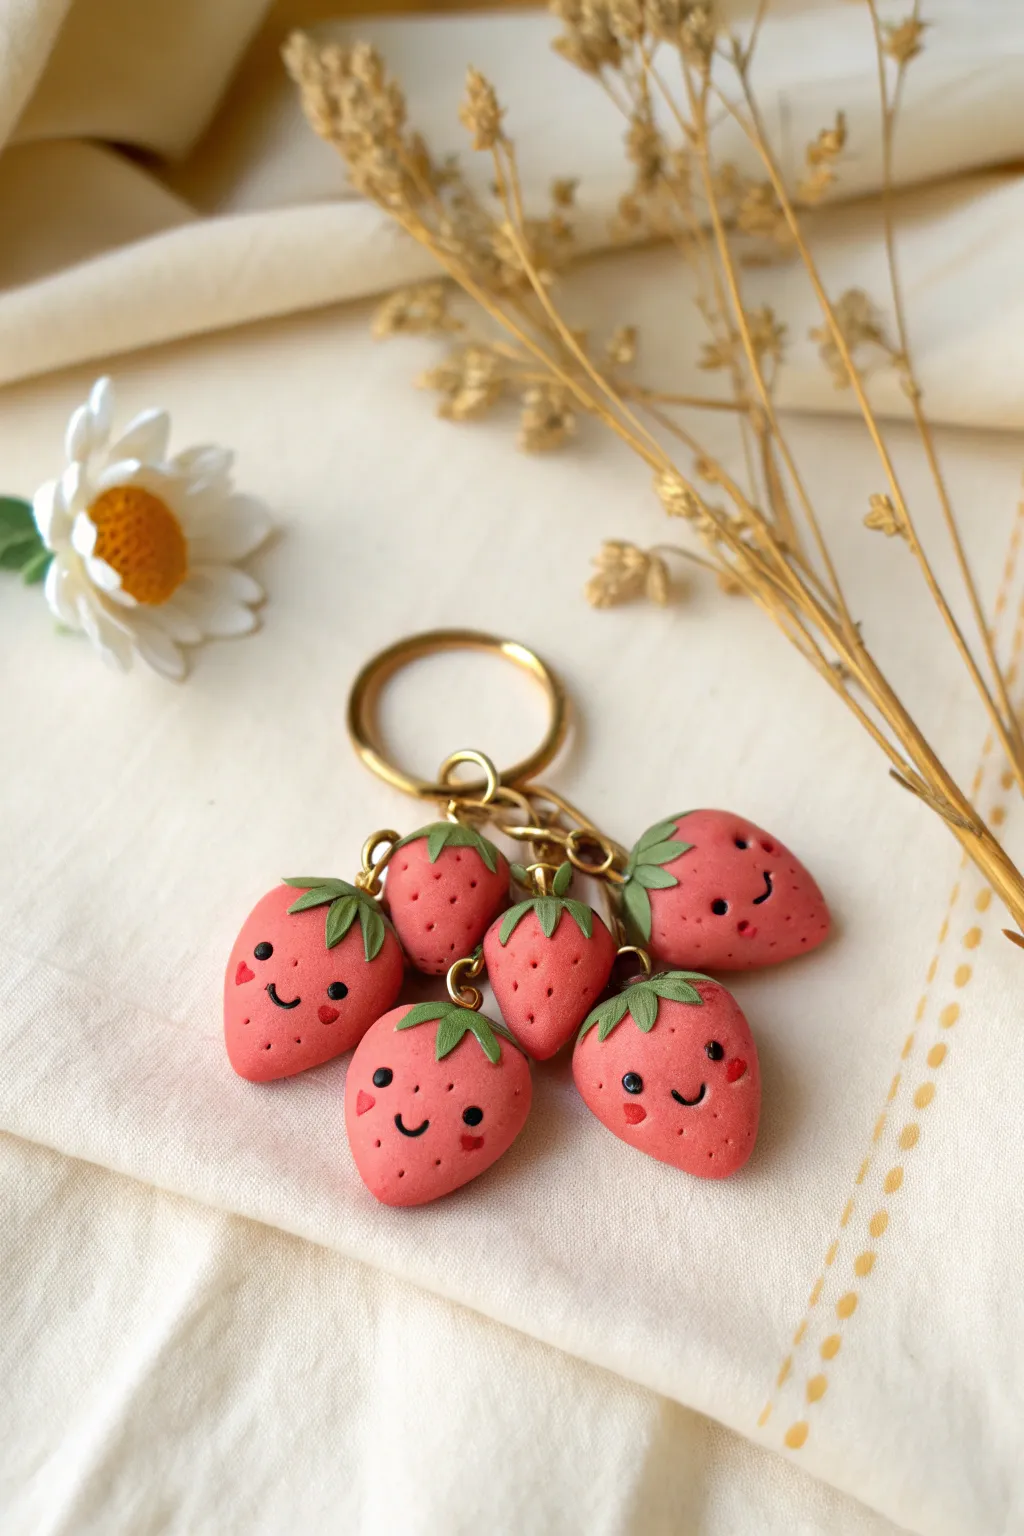
Brighten up your keys or backpack with this delightful cluster of smiling strawberries. These adorable air dry clay charms feature tiny expressive faces and textured details that make them look almost sweet enough to eat.
Step-by-Step
Materials
- Red air dry clay (or polymer clay)
- Green air dry clay
- Black acrylic paint or fine tip marker
- Pink acrylic paint
- Gold screw eye pins (one per strawberry)
- Gold jump rings
- Gold keychain ring with chain
- Needle tool or toothpick
- Small ball tool
- Gloss glaze or polyurethane varnish
- Pliers (flat nose and round nose)
- Super glue (optional)
Step 1: Shaping the Berries
-
Form the base:
Pinch off small pieces of red clay, about the size of a marble or slightly smaller. Roll each piece into a smooth ball between your palms to remove any cracks or seams. -
Create the taper:
Gently roll one side of the ball to narrow it into a rounded cone shape, mimicking a real strawberry. Flatten the wider top slightly so the leaves will have a place to sit. -
Add texture:
Using a needle tool or a toothpick, gently poke small indentations all over the surface of the red clay to create the seed texture. Be careful not to warp the shape you just made. -
Repeat the process:
Make about 4-6 strawberries in slightly varying sizes to give your keychain a natural, organic look. A mix of plump and slender berries looks best.
Step 2: Adding Greenery & Hardware
-
Make the leaves:
Take a tiny amount of green clay and flatten it into a thin pancake. Use a craft knife or needle tool to cut out small star shapes or individual teardrop shapes for the calyx (the leafy top). -
Attach the tops:
Press the green star shape onto the flat top of your strawberry. Use a tool to gently curve the leaf tips down onto the red fruit, securing them in place. -
Add the stem connection:
Roll a tiny snake of green clay for a stem and place it in the center of the leaves. While the clay is still wet, insert a gold screw eye pin directly through the stem and into the strawberry body. -
Secure the pin:
I like to twist the screw eye slightly as it goes in to help the clay grip the threads. If your clay is very soft, you can remove the pin, add a dot of super glue, and reinsert it for extra hold.
Seed Texture Hack
Instead of poking holes, roll the untextured berry in white glitter or sesame seeds before baking/drying for a realistic raised seed effect.
Step 3: Bringing Them to Life
-
Dry completely:
Let your strawberries dry fully according to your clay package instructions. This usually takes 24-48 hours depending on humidity. -
Paint the eyes:
Using a very fine detail brush and black acrylic paint, or a fine-tip permanent marker, add two small dots for eyes on the lower half of the berry. -
Add a smile:
Draw a tiny ‘U’ shape between the eyes for a smile. Vary the expressions—try some with side smiles or tiny open mouths. -
Add blush:
Dip a ball tool or a toothpick into pink paint and gently dab small circles on the cheeks giving them a rosy glow. You can also paint tiny red hearts on the cheeks for variety. -
Seal the charms:
Coat each strawberry with a gloss glaze or varnish. This protects the paint and gives the fruit a juicy, shiny appearance.
Berry Blossom
Create a tiny white flower charm with a yellow center using the same technique and add it to the charm cluster for extra botanical variety.
Step 4: Assembly
-
Prepare jump rings:
Use your pliers to twist open your gold jump rings. Remember to twist the ends away from each other sideways, rather than pulling them apart, to maintain the circle shape. -
Attach to chain:
Slide a strawberry charm onto a jump ring, then loop the jump ring onto the chain links of your keychain finding. -
Cluster them:
Attach the strawberries at different heights along the chain. Grouping them closely together creates that abundant, bunch-like effect. -
Close the rings:
Use pliers to twist the jump rings back into a closed position, ensuring the gap is fully sealed so your charms don’t slip off.
Now you have a handful of happy little berries ready to accompany you on your daily adventures


Mushroom Trinket Dish With Tiny Toadstools
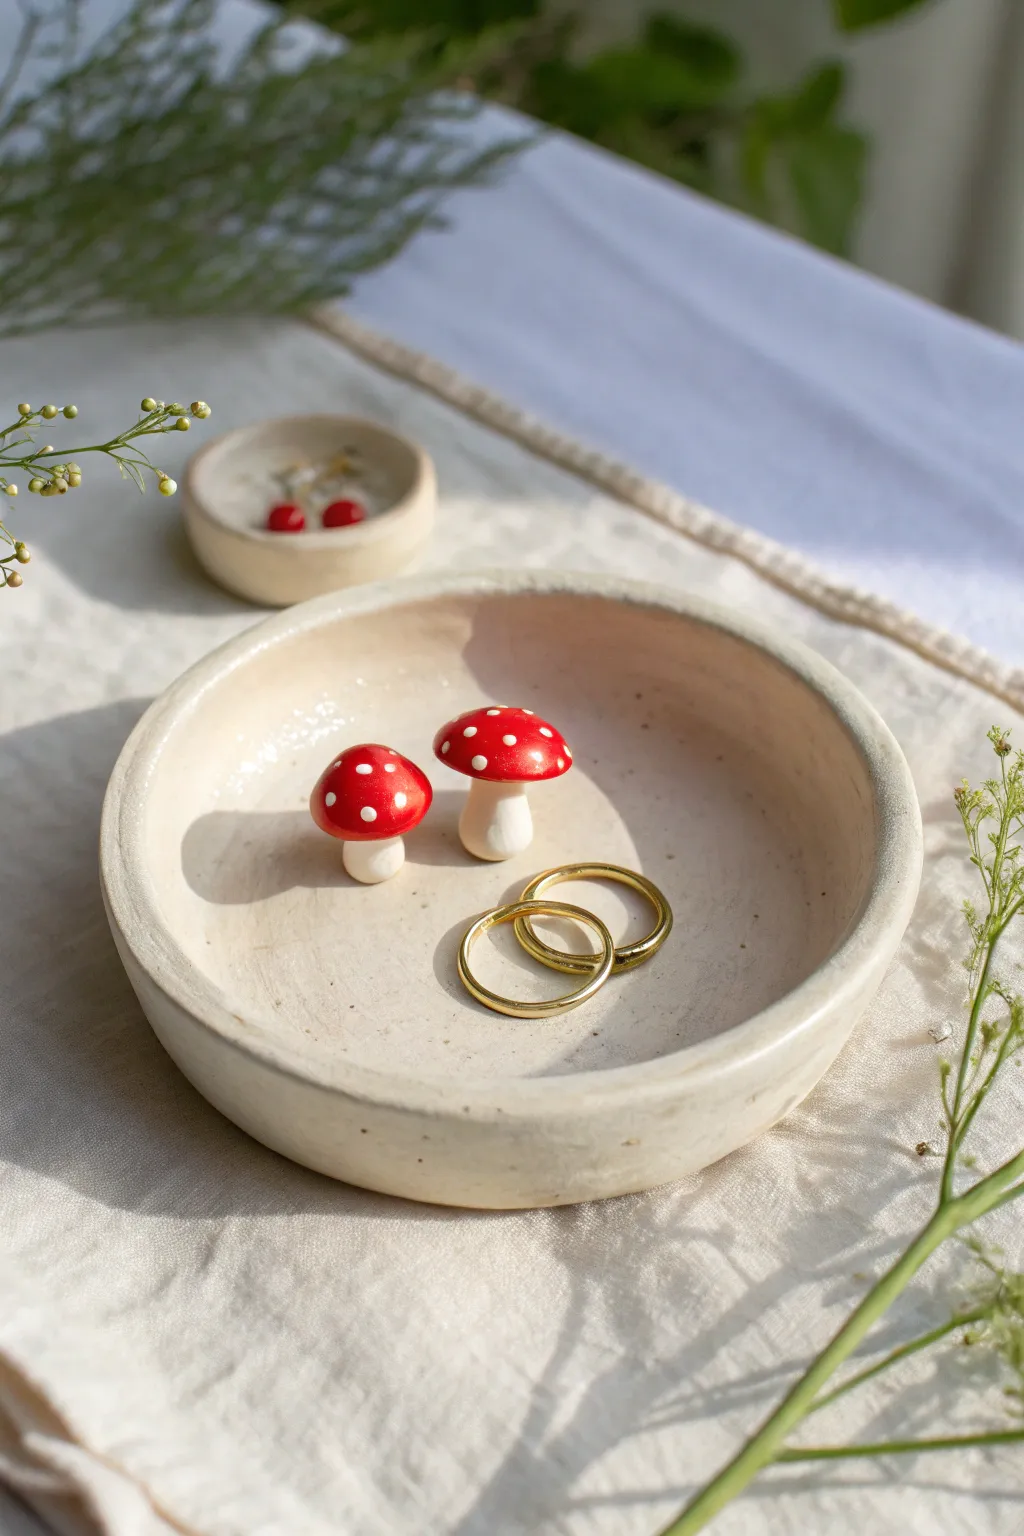
This charming little jewelry holder brings a touch of fairytale magic to your dresser with its simple, rustic form and vibrant toadstool accents. The creamy, matte finish of the clay provides a beautiful neutral backdrop for bright red mushrooms and your favorite gold accessories.
How-To Guide
Materials
- White or cream-colored air dry clay
- Rolling pin
- Circle cutter or small bowl (approx. 4 inches)
- Small sponge
- Water cup
- Sculpting tools (needle tool and smoother)
- Red acrylic paint
- White acrylic paint
- Detail brushes
- Gloss varnish or clear sealant (optional)
- Sandpaper (fine grit)
Step 1: Shaping the Base Dish
-
Prep the Clay:
Take a generous handful of air dry clay and knead it until it’s soft and pliable. This helps remove air bubbles and prevents cracking later on. -
Roll it Out:
Use your rolling pin to flatten the clay into a slab about 1/4 inch thick. Try to keep the thickness even across the entire surface. -
Cut the Circle:
Place your circle cutter or an upside-down bowl onto the clay slab passing it gently to mark the shape, then cut around it with a needle tool or knife to create a perfect disc. -
Form the Sides:
Gently pinch the edges of the circle upwards to create a raised rim. I like to rotate the dish slowly while pinching to keep the height consistent all the way around. -
Smooth the Rim:
Dip your finger or a small sponge in a little water and run it along the rim to smooth out any fingerprints or cracks. The goal is a soft, organic edge rather than a sharp one. -
Refine the Surface:
Use the damp sponge to smooth the interior floor of the dish, ensuring a flat surface for your rings.
Water Trick
Keep your fingers slightly damp while smoothing, but avoid soaking the clay. Too much water weakens the structure and can cause warping.
Step 2: Sculpting the Toadstools
-
Create the Stems:
Roll two small balls of clay into short, thick cylinders. One should be slightly taller than the other. Press them gently onto a flat surface to flatten the bottoms so they stand upright. -
Shape the Caps:
Roll two slightly larger balls of clay and flatten them gently into domes. Use your thumb to create a slight indentation underneath where the stem will attach. -
Assemble the Mushrooms:
Score (scratch) the top of the stems and the underside of the caps. Add a tiny dab of water or slip (clay mixed with water) and press the parts together firmly. -
Attach to Dish (Optional):
You can leave the mushrooms separate or attach them permanently to the dish floor using the same scoring and slip method. If attaching, place them slightly off-center.
Step 3: Finishing Touches
-
Dry Completely:
Let all pieces dry for 24-48 hours. Turn the dish over periodically so the bottom dries evenly. -
Sand for Smoothness:
Once bone dry, take fine-grit sandpaper and gently buff the edges of the dish and the mushroom surfaces to remove any rough texture. -
Paint the Caps:
Using a small brush, paint the mushroom caps a vibrant red. You may need two coats for opaque coverage. -
Add the Dots:
Dip the non-brush end (the handle) of a paintbrush into white acrylic paint and dot it onto the red caps to create perfect little circles. -
Leave Sides Natural:
Leave the dish itself and the mushroom stems unpainted to show off the natural, earthy tone of the clay, or apply a very light wash of cream paint if your clay dried greyish. -
Seal the Piece:
Apply a coat of varnish or clear sealant to protect the clay from moisture and give the mushrooms a slight sheen.
Make it Sparkle
Mix a tiny pinch of gold mica powder into your varnish for the red caps to give the toadstools a subtle, magical shimmer.
Place your favorite rings inside and enjoy your handcrafted forest scene


Cloud and Star Magnets With Blush Cheeks
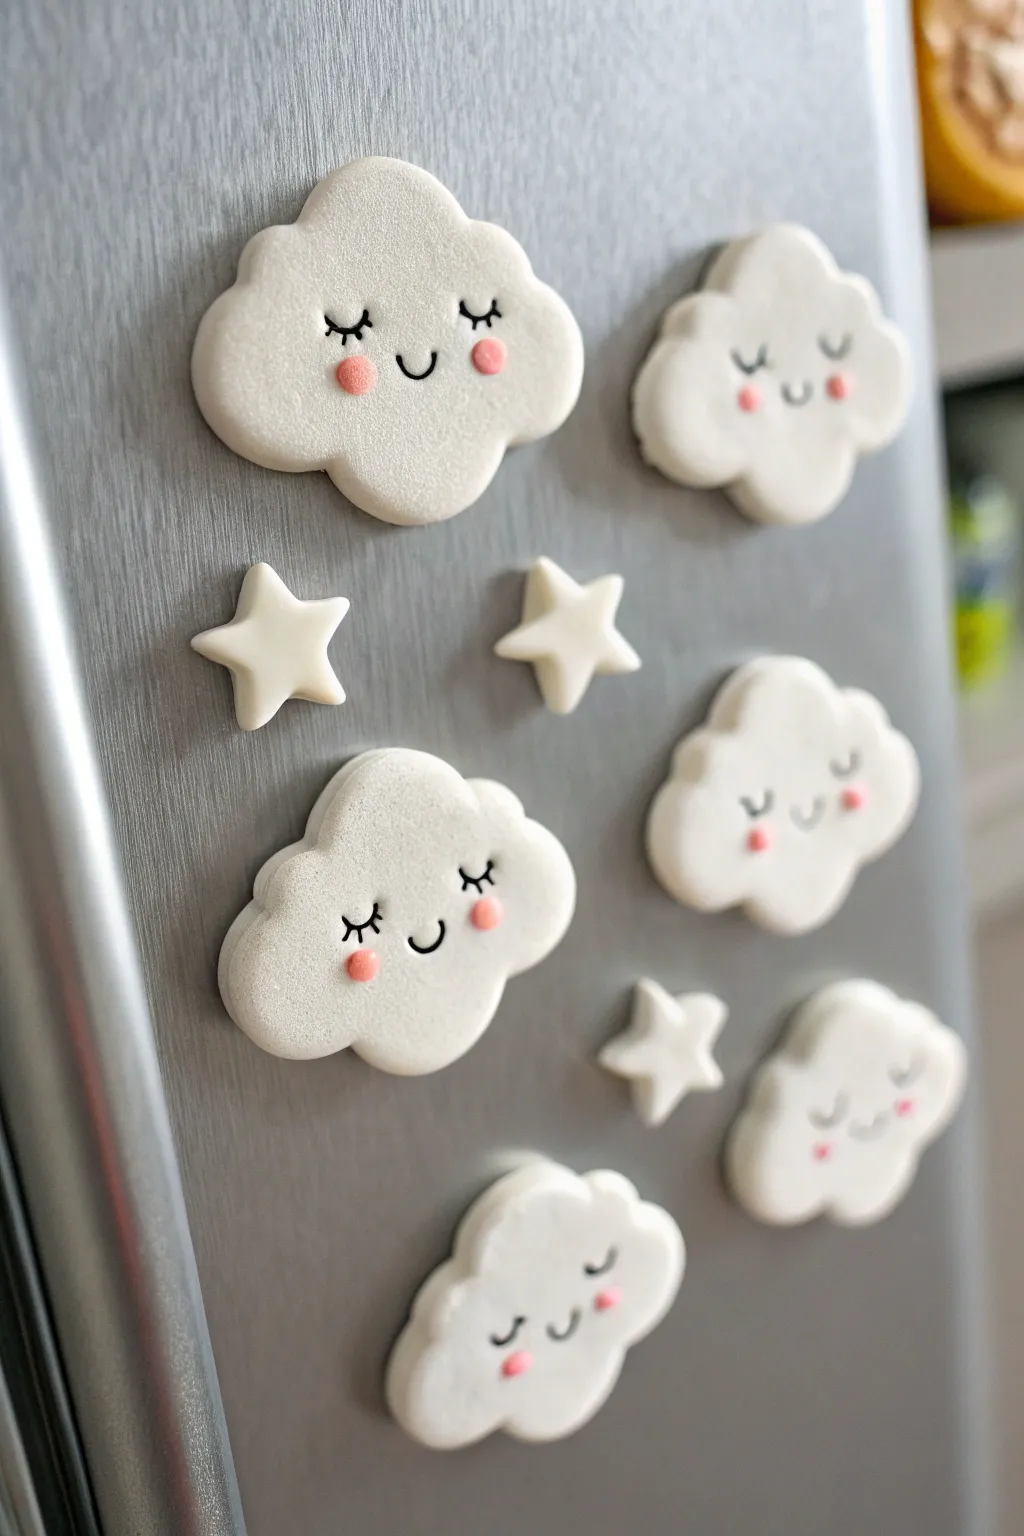
Transform ordinary white clay into a whimsical sky scene right on your refrigerator door. These puffy, sweet-faced clouds and simple stars add a touch of charming personality to any metallic surface.
Step-by-Step Tutorial
Materials
- White air dry clay
- Rolling pin
- Cloud cookie cutter (optional)
- Small star cookie cutter
- Clay knife or craft knife
- Fine grit sandpaper
- Black fine-tip permanent marker or acrylic paint pen
- Pink acrylic paint
- Small round paintbrush or dotting tool
- Strong craft magnets
- Super glue or strong craft adhesive
- Water (for smoothing)
Step 1: Shaping the Sky
-
Prepare the Clay:
Take a handful of white air dry clay and knead it well until it is soft and pliable. This conditioning step prevents cracks from forming later. -
Roll it Out:
On a clean, flat surface, roll out the clay to a thickness of about 1/4 inch (6mm). You want them thick enough to look puffy but not so heavy they slide down the fridge. -
Cut Out Clouds:
Press your cloud cookie cutter firmly into the clay. If you don’t have a cutter, use a clay knife to freehand a fluffy cloud shape with rounded bumps. -
Smooth the Edges:
Dip your finger in a tiny bit of water and gently run it along the cut edges of your cloud to round them off. This gives the cloud that soft, pillowy look rather than a sharp cookie-cutter edge. -
Cut the Stars:
Using the star cutter, press out several small star shapes from the remaining rolled clay. Smooth these edges with water just like the clouds. -
Refine the Surface:
Inspect your shapes for any fingernail marks or uneven spots. Gently rub them out with a damp finger until the surface is perfectly smooth. -
Initial Drying:
Place your shapes on a drying rack or a sheet of parchment paper. Let them dry undisturbed for at least 24 hours. Flip them over halfway through to ensure the backs dry evenly.
Step 2: Adding Personality
-
Sand Roughly:
Once fully dry, check the edges again. If any sharp bits remain, gently buff them away with fine-grit sandpaper until soft and smooth. -
Draw the Faces:
Using a fine-tip black marker or paint pen, carefully draw the facial features on the lower half of the cloud. Draw two curved ‘U’ shapes for sleeping eyes. -
Add Lashes and Smiles:
Add three tiny lashes to the outer corner of each eye. Between the eyes, draw a small, simple smiley mouth. -
Paint the Blush:
Dip a small round brush or a dotting tool into pink acrylic paint. Dab a small circle on each cheek, just below and outside the eyes. -
Let Paint Set:
Allow the marker and paint to dry completely. This usually only takes about 10–15 minutes. -
Prepare Magnets:
Flip all your clay pieces so the back side is facing up. Test your magnets against the back to find the center point. -
Glue Magnets:
Apply a drop of super glue or strong craft adhesive to the back of the magnet. Press it firmly onto the center of the clay shape. -
Final Cure:
Let the glue cure according to the package instructions before sticking them to your fridge.
Cracks happen?
If small cracks form while drying, mix a tiny bit of fresh clay with water to make a paste. Fill the crack, smooth it over, and let it dry again.
Super smooth finish
For a porcelain-like look, sand the entire surface lightly after it’s dry but before painting. Wipe away dust with a slightly damp cloth.
Now you have a cheerful little sky collection to brighten up your kitchen

The Complete Guide to Pottery Troubleshooting
Uncover the most common ceramic mistakes—from cracking clay to failed glazes—and learn how to fix them fast.
Smiley Flower Coasters With Simple Petals
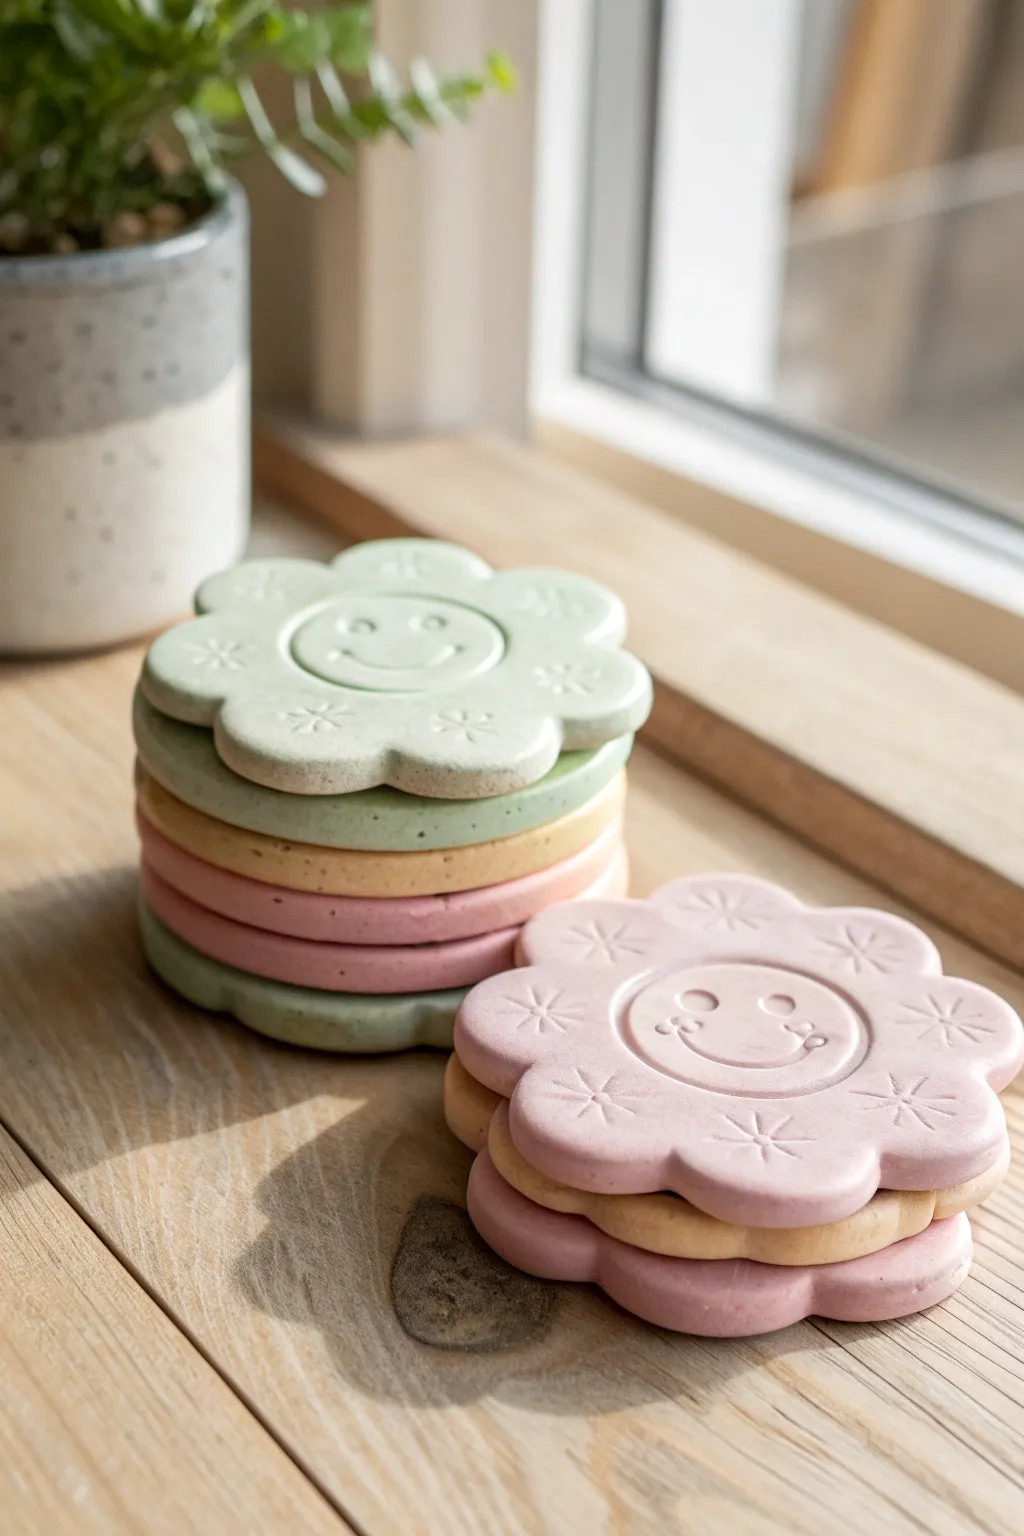
Brighten up your coffee table with these delightful flower-shaped coasters featuring a cheerful smiley face center. The matte, pastel finish and subtle speckled texture give them a trendy, high-end ceramic look without the need for a kiln.
Step-by-Step
Materials
- Air dry clay (white)
- Acrylic paints (sage green, dusty pink, muted yellow)
- Rolling pin
- Parchment paper or silicone mat
- Flower-shaped cookie cutter (large enough for a mug, approx. 3.5-4 inches)
- Circle cutter or small cup (to impress the center)
- Clay sculpting tools or a spoon
- Fine grit sandpaper
- Matte sealant or waterproof varnish
- Small star or snowflake stamp (optional)
- Speckled clay additive or black pepper (optional for texture)
Step 1: Preparing the Clay Base
-
Color the clay:
Start by tinting your white air dry clay. Mix a small dollop of acrylic paint directly into the raw clay, kneading firmly until the color is uniform. I usually aim for muted, pastel tones like sage green, blush pink, and mustard yellow. -
Add texture:
To achieve that beautiful faux-stone look seen in the photo, knead in a tiny pinch of speckled clay additive or even ground black pepper into your colored clay ball. -
Roll it out:
Place the clay between two sheets of parchment paper to prevent sticking. Roll it out to a consistent thickness of about 1/4 inch (6mm). You want them thick enough to be durable coasters. -
Cut the shape:
Press your large flower-shaped cookie cutter firmly into the slab. Wiggle it slightly to ensure a clean cut, then gently remove the excess clay from around the shape.
Smooth Operator
To prevent warping as the clay dries, place a light book on top of the coasters once they are semi-dry but still slightly cool to the touch.
Step 2: Adding the Smiley Details
-
Smooth the edges:
Dip your finger in a little bit of water and run it along the cut edges of the flower to smooth out any roughness or stray clay bits. -
Create the center boarder:
Take a circular cutter or a small glass that fits inside the flower petals. Press it gently into the center—do not cut all the way through! You just want to leave a clear circular impression to frame the face. -
Impress the face:
For the eyes, use the rounded end of a small paintbrush or dotting tool and press firmly. For the smile, use a curved clay tool or the edge of a spoon to press a deep, happy arc into the center circle. -
Stamp the petals:
If you have a small star or snowflake stamp, press it gently into the center of each petal. Alternatively, use a needle tool to scratch simple starburst patterns manually. -
Refine the surface:
Do a final check for fingerprints. Lightly brush over the surface with a barely damp sponge or finger to ensure everything is smooth before drying.
Gift Worthy
Tie a stack of 4 coasters together with a piece of twine and a dried flower sprig for an adorable, handmade housewarming gift.
Step 3: Drying and Finishing
-
Let them dry:
Transfer the coasters to a flat surface covered with clean parchment paper. Let them dry for 24-48 hours. I recommend flipping them over carefully halfway through the drying process to prevent curling. -
Sand the edges:
Once fully bone dry, take fine-grit sandpaper and gently buff the edges and the surface. This removes any sharp burrs and gives the clay that soft, professional stone-like feel. -
Clean off dust:
Wipe the coasters down with a dry cloth or a soft brush to remove all sanding dust before sealing. -
Seal for protection:
Since these are coasters, water protection is key. Apply 2-3 coats of a matte waterproof varnish or sealant, allowing ample drying time between coats. The matte finish preserves that natural, earthy aesthetic.
Now you have a charming stack of durable, happy coasters ready to protect your surfaces in style
Cute Animal Keychain Tags
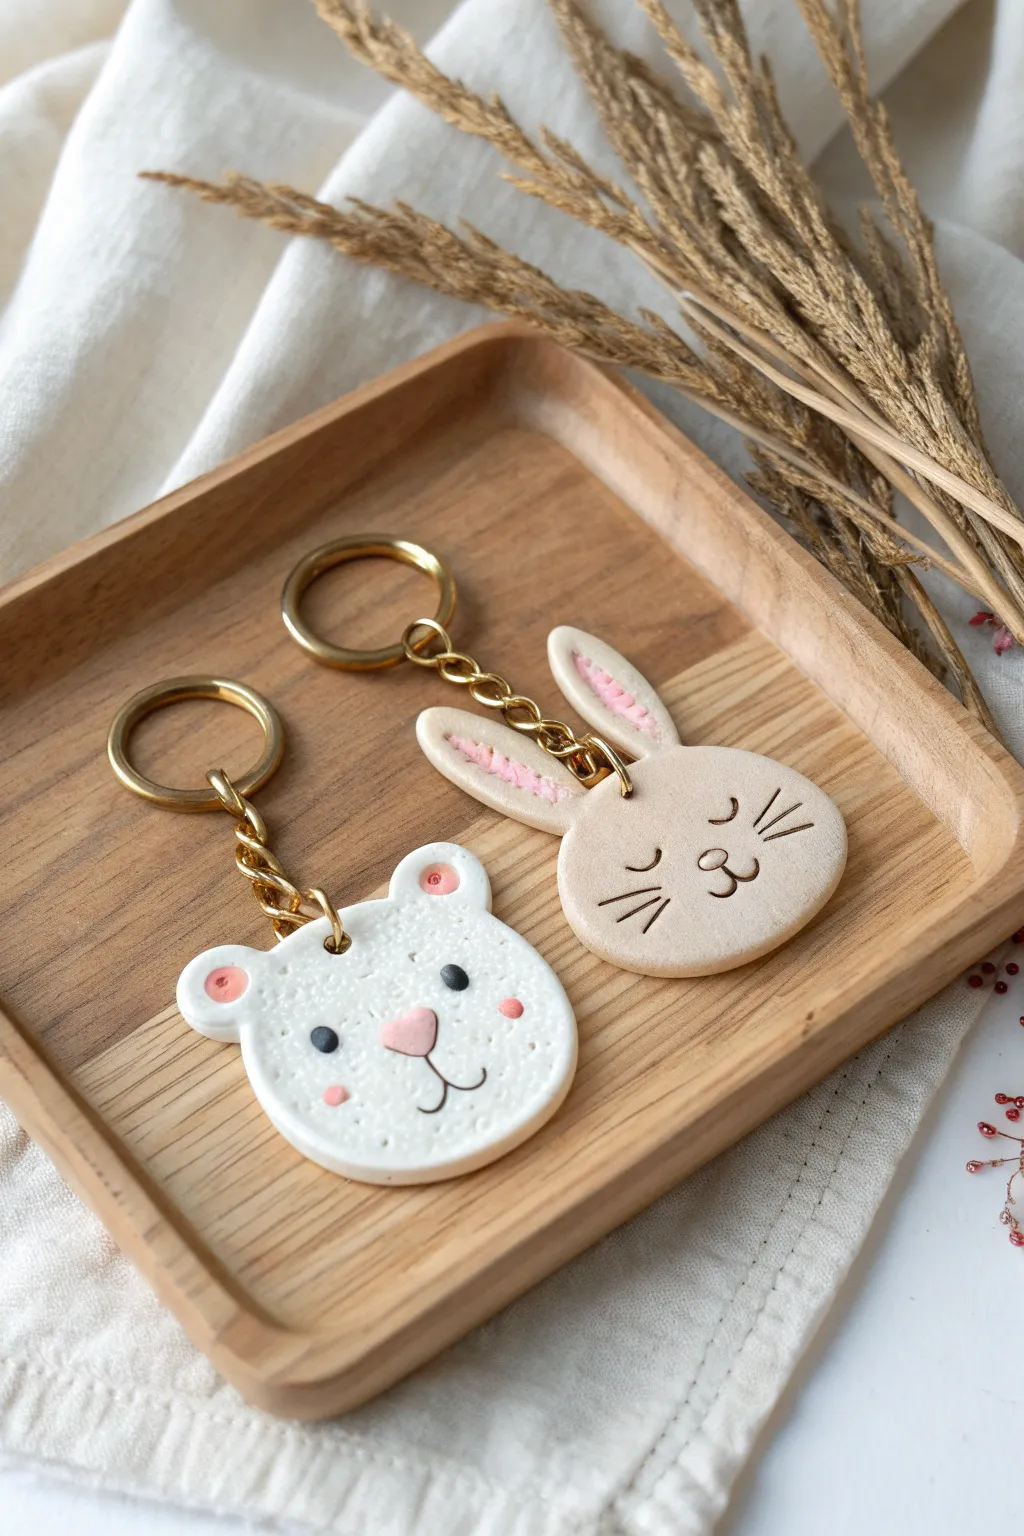
These adorable animal face charms—a sweet white bear and a sleepy beige bunny—make the perfect matching accessory for your keys or bag. Crafted from air-dry clay with simple sculpted details and hand-painted features, they have a soft, handmade texture that feels special and personal.
Step-by-Step Tutorial
Materials
- White air-dry clay
- Beige or tan air-dry clay (or mix white with a tiny bit of brown paint)
- Rolling pin
- Round cookie cutter (approx. 2 inches)
- Small eye pins (gold)
- Gold keychains with jump rings
- Sculpting tools (needle tool and ball stylus)
- Acrylic paints: Black, Pink
- Small detail paintbrush
- Fine-grit sandpaper (optional)
- Matte sealant or varnish
Step 1: Shaping the Bases
-
Roll out the clay:
Start by conditioning your white and beige clay until smooth and pliable. Roll each color out on a clean surface to about 1/4 inch thickness—you want them sturdy enough to hold hardware but not too heavy. -
Cut the circles:
Use your round cookie cutter to punch out two clean circles. One will become the bear (white) and the other the bunny (beige). -
Smooth the edges:
Dip your finger in a tiny bit of water and gently run it around the cut edges of your circles to soften any sharp ridges left by the cutter.
Pro Tip: Seamless Ears
To make ears virtually indestructible, use a little ‘slip’ (clay mixed with water into a paste) as glue between the pieces before smoothing the seams together.
Step 2: Adding the Bear Details
-
Form the ears:
For the bear, roll two small, equal-sized balls of white clay. Flatten them slightly into discs and attach them to the top left and right of the white circle. -
Blend the seams:
Use a sculpting tool or your finger to smooth the seam where the ear meets the head, ensuring a strong bond so they don’t pop off later. -
Indent the ears:
Take a ball stylus tool and press gently into the center of each bear ear to create a cute, cupped inner ear shape. -
Texture the fur (optional):
If you want the textured look seen in the photo, gently tap the surface of the clay with a stiff bristle brush or a crumpled ball of aluminum foil.
Step 3: Adding the Bunny Details
-
Shape bunny ears:
Roll two small logs of beige clay. Taper one end of each log to a point and slightly flatten them to create the long bunny ear shape. -
Attach the ears:
Press the wider bottom ends of the ears onto the top of the beige circle. I like to overlap them just slightly onto the back of the head as well for extra stability. -
Add ear details:
Use a needle tool or knife to score small, shallow lines down the center of the bunny ears to mimic the texture of inner fur.
Troubleshooting: Cracks
If small cracks appear as the clay dries, don’t panic. Mix a tiny bit of fresh clay with water to make a paste and fill in the cracks, then sand smooth once dry.
Step 4: Hardware & Drying
-
Insert eye pins:
While the clay is still wet, carefully screw a gold eye pin into the top center of each head. For better security, dip the screw end in a dab of white glue before inserting. -
Let them dry:
Place your charms on a flat surface lined with parchment paper. Allow them to dry completely for 24-48 hours, flipping them halfway through to ensure even drying.
Step 5: Painting & Assembly
-
Paint the bear face:
Using a fine detail brush, paint two small black dots for eyes. Add a pink inverted triangle nose and paint the inner circular indentations of the ears pink. Draw a thin black anchor shape for the mouth. -
Paint the bunny face:
For the bunny, paint two curved semi-circles with lashes for sleeping eyes. Add a small ‘w’ mouth and a tiny nose outline in black or dark brown. Paint the scored inside of the ears with a soft pink. -
Add rosy cheeks:
Dip a Q-tip or a dry brush into a very small amount of pink paint. Dab excess off on a paper towel, then gently stipple rosiness onto the cheeks of the bear. -
Seal the work:
Once the paint is fully dry, coat the front and back with a matte varnish to protect your artwork from scratches and moisture. -
Attach the keychain:
Open the jump ring on your gold keychain finding using pliers. Slide it through the eye pin loop on your charm and close the ring securely.
Clip these sweet creations onto your backpack or gift one to a friend to share the handmade charm


What Really Happens Inside the Kiln
Learn how time and temperature work together inside the kiln to transform clay into durable ceramic.
Kawaii Cat Paw Jewelry Tray
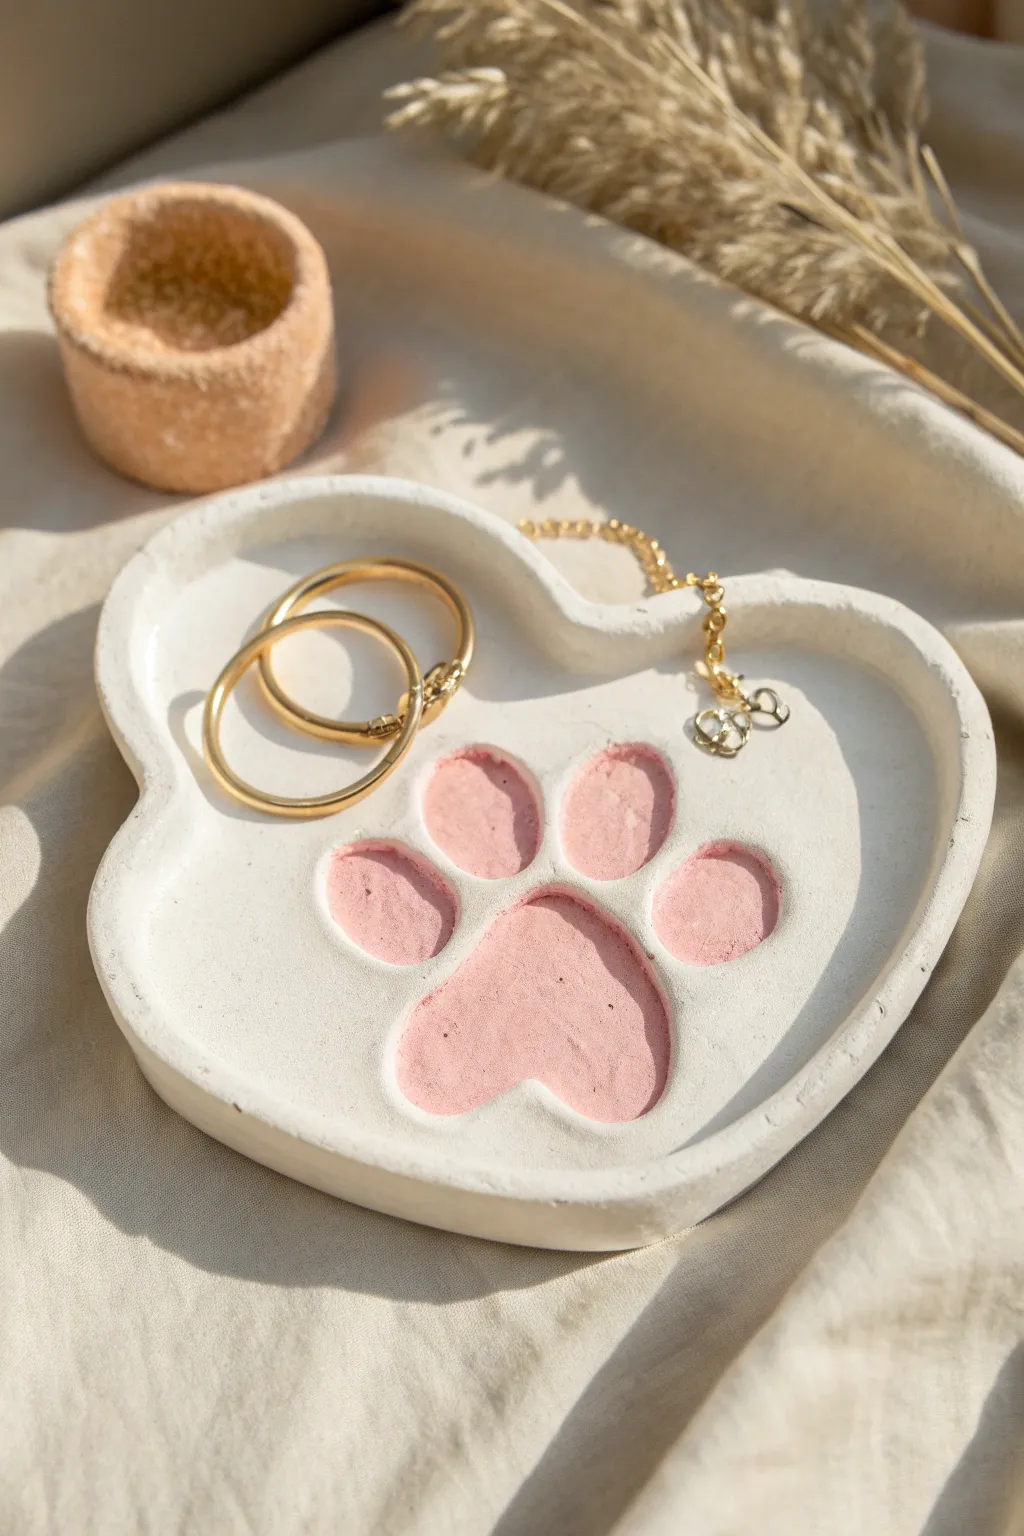
Keep your favorite rings and necklaces safe in this charming, heart-shaped trinket dish. With its debossed paw print and soft pink accents, it adds a touch of playful sweetness to any dresser or nightstand.
Step-by-Step
Materials
- White smooth air dry clay
- Rolling pin
- Heart-shaped cookie cutter (large)
- Parchment paper or craft mat
- Small bowl or cup of water
- Clay sculpting tools (or a toothpick)
- Sandpaper (fine grit)
- Pastel pink acrylic paint
- Small paintbrush
- Matte or glossy varnish (optional)
Step 1: Shaping the Clay
-
Condition the clay:
Begin by taking a handful of white air dry clay and kneading it in your hands to warm it up. This conditioning process makes the clay more pliable and less prone to cracking as you work. -
Roll it out:
Place the clay on a sheet of parchment paper. Using your rolling pin, roll the clay out into an even slab that is roughly 1/4 inch thick. Try to keep the thickness consistent so it dries evenly. -
Cut the heart:
Press your large heart-shaped cookie cutter firmly into the rolled clay. If you don’t have a cutter, you can lightly sketch a heart with a toothpick and cut it out carefully with a craft knife. -
Smooth the edges:
Remove the excess clay from around the heart. Dip your finger in a little bit of water and run it along the cut edges of the heart to smooth out any roughness or loose bits of clay.
Cracking Up?
If small cracks appear while drying, mix a tiny bit of fresh clay with water to make a paste (slip). Fill the cracks, smooth it over, and let dry again.
Step 2: Creating the Interior
-
Build the rim:
Roll a long, thin snake of clay about the thickness of a pencil. This coil needs to be long enough to go around the entire perimeter of your heart base. -
Attach the coil:
Score the top edge of your heart base and the bottom of your clay snake with a toothpick (make little scratch marks). Dab a little water on the scratches, then press the snake onto the edge of the heart base to form a raised rim. -
Blend the seams:
Using a modeling tool or your fingers, smooth the clay coil downwards onto the base on both the inside and outside. The goal is to make the rim and base look like one solid piece rather than two joined pieces. -
Refine the shape:
Once the walls are blended, gently pinch and shape the rim to ensure it stands up straight. Use a damp sponge or finger to smooth the entire surface until it looks seamless.
Level Up: Speckled Effect
Before drying, mix tiny specs of black clay or dried coffee grounds into your white clay for a trendy ‘stone’ or terrazzo look.
Step 3: The Paw Print Detail
-
Plan the print:
Find the center of your heart tray. Use a very light touch to mark where the main pad and the four toe beans of the paw print will go to ensure they are centered and symmetrical. -
Indent the main pad:
Press your thumb firmly into the center of the tray to create the large, triangular main pad. Wiggle your thumb slightly to widen the shape into a soft, rounded triangle. -
Add the toes:
Use your pinky finger or the rounded end of a paintbrush handle to press four smaller indentations above the main pad relative to the heart shape. -
Clean up:
If the indenting caused the clay to bulge up around the edges of the print, gently smooth those ridges back down flat with a damp finger so the surface remains level.
Step 4: Finishing Touches
-
Let it dry:
Move the tray (keeping it on the parchment paper) to a safe spot with good airflow. Allow it to dry completely for 24 to 48 hours. I usually flip it over gently halfway through so the bottom dries fully. -
Sand for perfection:
Once fully dry and hard, take your fine-grit sandpaper and gently buff away any fingerprints, bumps, or rough edges on the rim and sides. -
Paint the paw:
Dip a small brush into your pastel pink acrylic paint. Carefully fill in the indented paw print sections, painting the bottom of the depressions while trying to keep the top surface clean and white. -
Clean edges:
If any pink paint accidentally gets on the white surface, quickly wipe it away with a damp paper towel or wait for it to dry and gently sand it off. -
Seal (Optional):
To protect your jewelry tray from moisture and scratches, apply a thin coat of matte or glossy varnish over the entire piece once the paint is fully dry.
Now you have the perfect little spot to rest your trinkets at the end of the day
Rainbow Charm Set With Tiny Faces
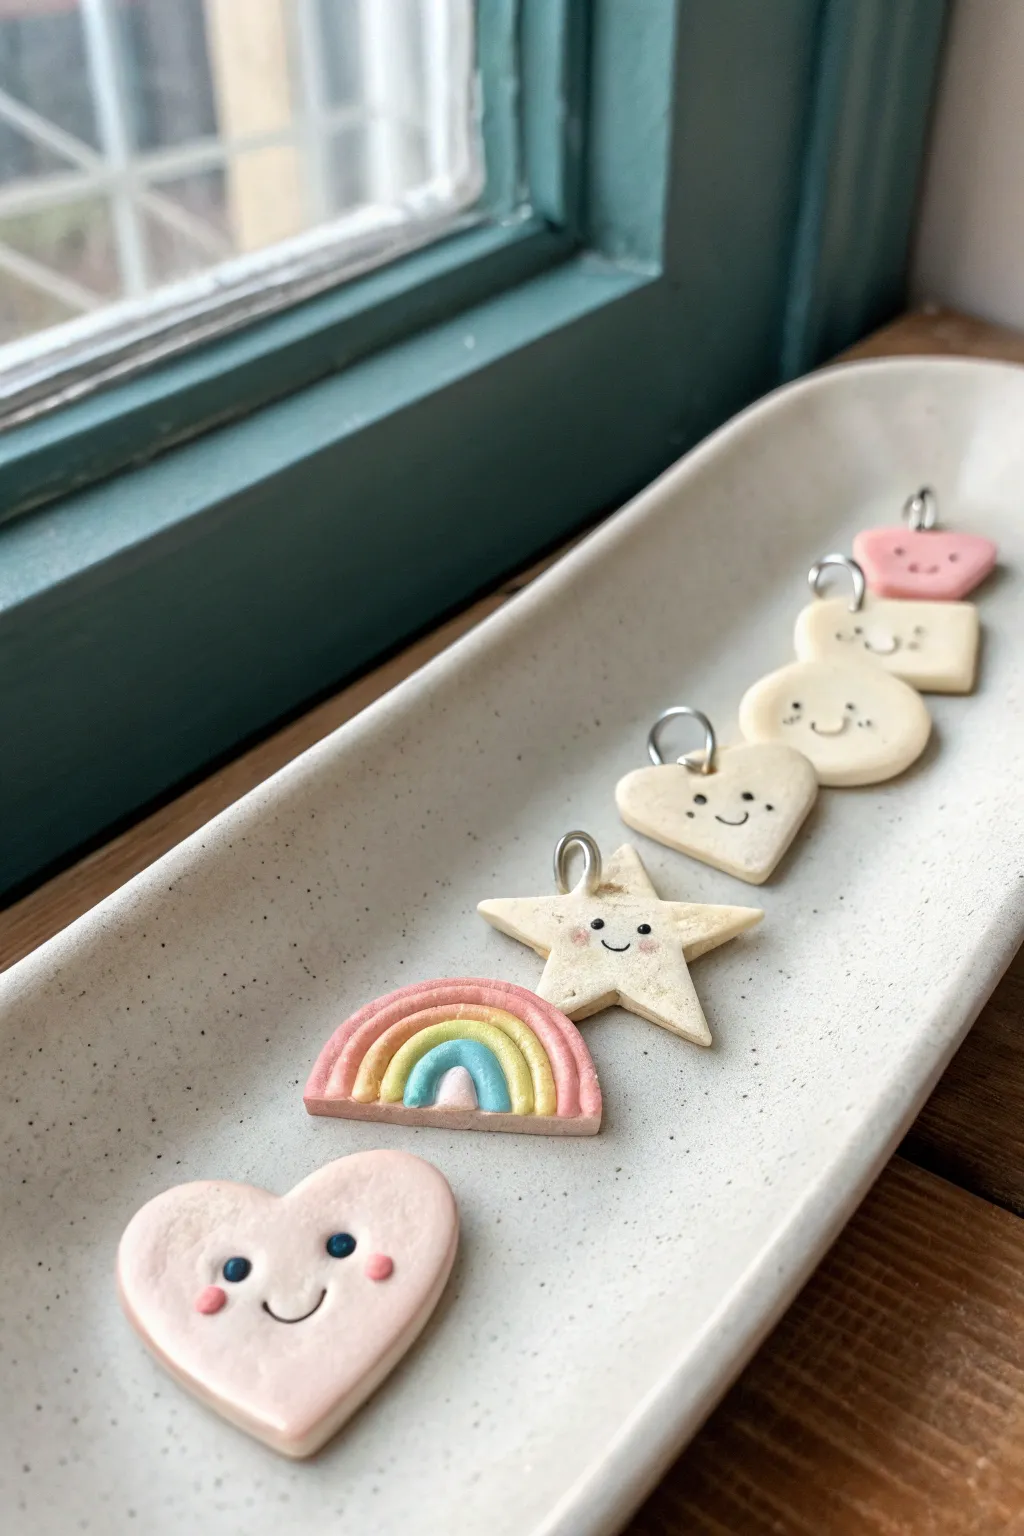
Brighten your day with this collection of delightful clay charms featuring sweet, tiny faces and pastel hues. From a classic rainbow arch to smiling hearts and stars, these pieces are perfect for creating custom jewelry or cheerful keychains.
Step-by-Step Tutorial
Materials
- White air-dry clay (or polymer clay)
- Acrylic paints (baby pink, pastel yellow, light blue, white, black)
- Fine-grit sandpaper
- Rolling pin
- Small cookie cutters (heart, star, circle, square)
- Clay knife or craft blade
- Fine-point detail brush or toothpick
- Needle tool
- Metal jump rings
- Gloss or matte varnish (optional)
Step 1: Shaping the Charms
-
Condition the clay:
Begin by kneading your clay until it is soft, pliable, and free of cracks. If the clay feels dry, add a tiny drop of water to smooth it out. -
Roll flattened sheets:
Roll out a portion of the white clay to an even thickness of about 1/4 inch (4-5mm). Try to keep the surface as smooth as possible. -
Cut basic shapes:
Using your small cookie cutters, press out a heart, a star, a circle, and a square. If you don’t have cutters, you can hand-cut these simple shapes with a craft knife. -
Form the rainbow base:
For the rainbow, cut a semi-circle shape from your flat sheet of clay. This will serve as the backing for the colorful arches. -
Roll rainbow coils:
Roll four very thin, even snakes of clay. Place them snugly next to each other over the semi-circle base to form the arches, trimming the ends so the bottom is flush. -
Insert jump rings:
While the clay is still wet, carefully push a metal jump ring into the top center of each shape. I find wiggling it slightly helps it seat firmly without distorting the clay. -
Smooth the edges:
Dip your finger in a little water and gently run it along the cut edges of each charm to round them off and remove any sharp burrs.
Cracked Clay?
If you see tiny cracks form while drying, mix a small amount of clay with water to make a paste (slip). Fill the cracks, let dry, and sand smooth.
Step 2: Drying and Refining
-
Let them cure:
Place all pieces on a flat surface lined with parchment paper. Let them dry completely according to your clay package instructions (usually 24-48 hours). Flip them halfway through for even drying. -
Sand for smoothness:
Once fully hard, inspect your charms. Use fine-grit sandpaper to gently buff away any fingerprints or rough edges, creating a pristine canvas for painting.
Make it a Mobile
Instead of separate charms, string these vertically on a piece of driftwood or dowel using fishing line to create a whimsical mini-mobile for a window.
Step 3: Painting the Details
-
Paint the base colors:
Paint the large heart charm a soft baby pink. For the rainbow, paint the arches in pastel pink, yellow, blue, and white. Leave the star, circle, square, and other heart in their natural cream clay color. -
Add rosy cheeks:
Using a very small dotting tool or the end of a paintbrush handle, dab two tiny spots of pink paint onto the cheeks of the star, hearts, and geometric shapes. -
Draw the eyes:
With an ultra-fine black marker or a thin brush with black paint, place two small dots for eyes just above the cheek line. -
Create the smiles:
Carefully draw a tiny, curved ‘u’ shape between the cheeks for a sweet smile. Vary the expressions slightly—maybe one smile is skewed or smaller for personality. -
Highlight the eyes:
For the larger pink heart, add a tiny speck of white paint inside the black eye dots to make them sparkle and look alive. -
Seal the work:
Allow all paint to dry completely. Finish by coating each charm with a layer of matte or gloss varnish to protect the paint and give them a professional finish.
String your adorable new friends onto a necklace or bracelet and enjoy the smiles they bring

TRACK YOUR CERAMIC JOURNEY
Capture glaze tests, firing details, and creative progress—all in one simple printable. Make your projects easier to repeat and improve.
Ladybug Bead Garland Wall Decor
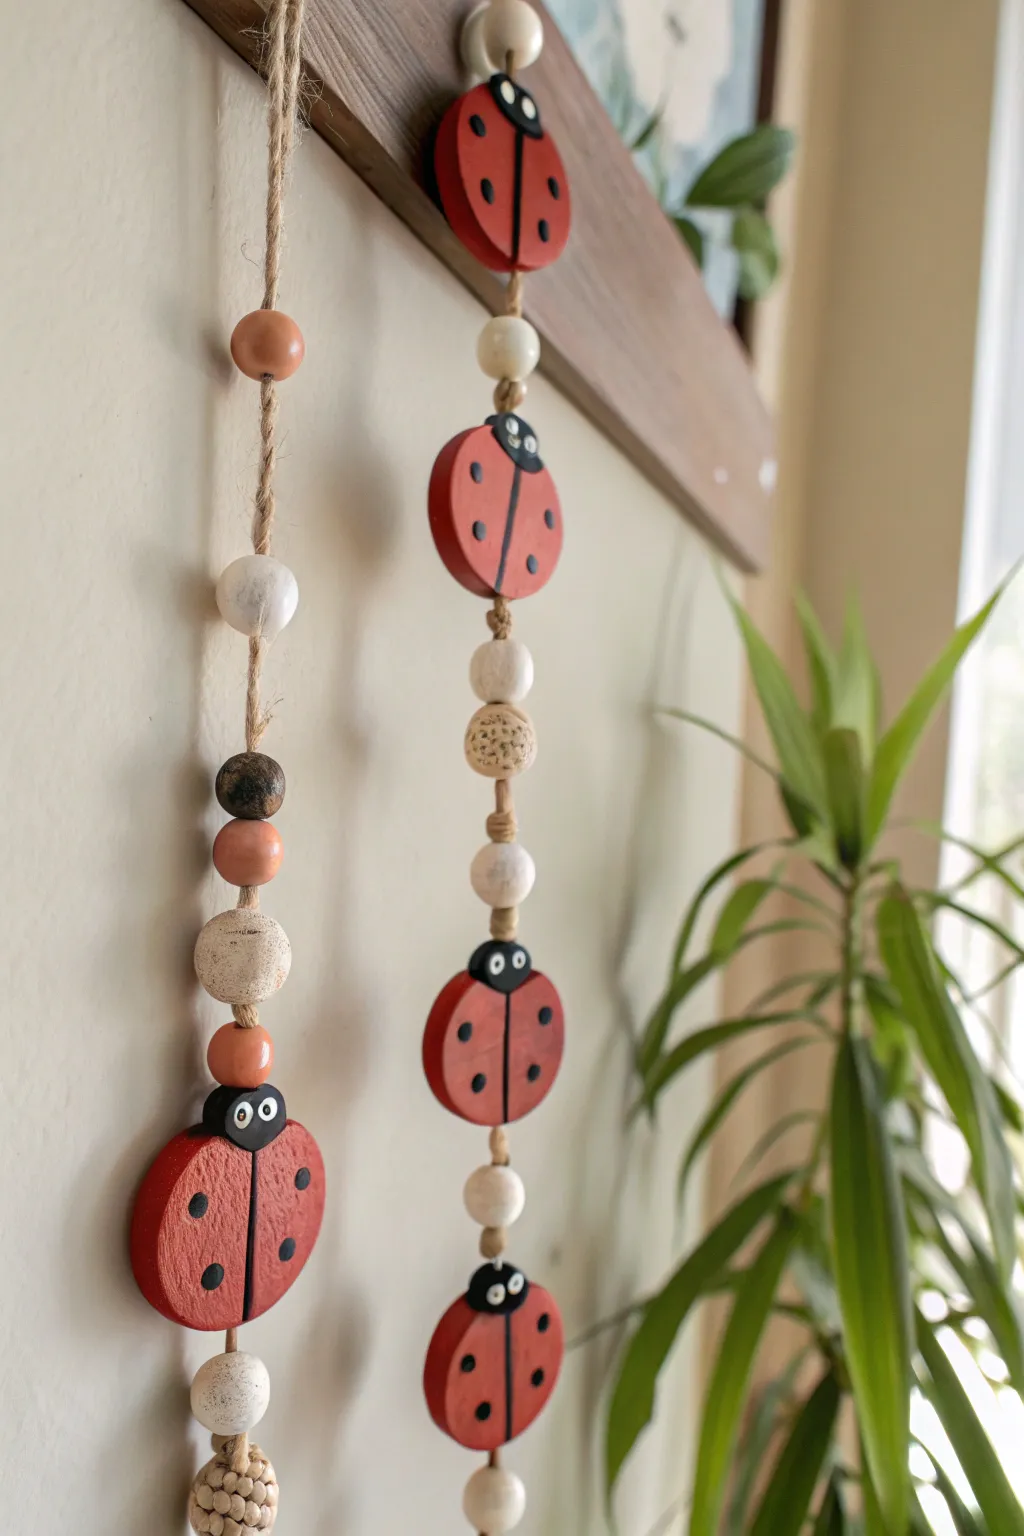
Bring a touch of garden charm indoors with this delightful hanging decoration featuring handcrafted ladybugs and rustic beads. The combination of bright red beetles and neutral wooden accents creates a playful yet earthy aesthetic perfect for a nursery or sunroom.
Step-by-Step Guide
Materials
- Air dry clay (white or terracotta)
- Round cookie cutter (approx. 2 inches)
- Acrylic paint (red, black, white, beige/tan)
- Jute twine
- Assorted wooden beads (varying sizes, 10mm-20mm)
- Paintbrushes (flat shader and fine detail liner)
- Wooden skewer or toothpick (for poking holes)
- Sandpaper (fine grit)
- Mod Podge or clear sealant (matte finish)
- Scissors
- Rolling pin
Step 1: Sculpting the Components
-
Roll out the clay:
Start by conditioning your air dry clay until it is soft and pliable. Use a rolling pin to flatten it into an even sheet, aiming for about 1/4 inch thickness to ensure the pieces are sturdy but not too heavy. -
Cut the shapes:
Using a round cookie cutter, punch out several circles for your ladybug bodies. For the pictured project, you will need at least four or five circles, but feel free to make extras just in case. -
Add dimension:
For the additional textured beads seen in the garland, hand-roll small spheres of clay. While they are soft, you can gently press a piece of textured fabric or a sponge against them to create a pitted, stone-like surface. -
Create holes:
This step is crucial: use a wooden skewer to poke a hole completely through the top and bottom of each flat ladybug circle (vertically aligned) and through the center of your clay beads. Make the holes slightly larger than your twine, as clay shrinks when drying. -
Dry completely:
Set all your clay pieces on a wire rack or parchment paper. Let them dry for 24-48 hours, flipping them occasionally to ensure even drying and prevent warping.
Clean Hole Tip
Twist the skewer gently as you push through the wet clay, rather than pushing straight down, to prevent the circle from deforming.
Step 2: Painting the Ladybugs
-
Base coat:
Once dry, lightly sand any rough edges. Paint the flat circular discs with a vibrant red acrylic paint. You may need two coats to get a solid, opaque coverage. -
Paint the head:
Using a smaller flat brush and black paint, create a semi-circle at the very top of the red disc where the top hole is located. This forms the ladybug’s head. -
Draw the wings:
Switch to a fine liner brush with black paint. Draw a straight vertical line down the center of the red body, starting from the bottom of the black head to the bottom edge of the circle. -
Add spots:
Dip the non-brush end of a paintbrush into black paint to execute perfect polka dots. Stamp three or four spots onto each side of the red wings. -
Bring it to life:
Use a small dotting tool or toothpick to add two white dots onto the black head area for eyes. Once dry, add a tiny black pupil inside the white dots to give them a cute expression. -
Paint the accent beads:
take your textured clay beads and paint them in neutral tones like beige, tan, or white to contrast with the bright red ladybugs. You can also leave some plain wooden store-bought beads unpainted for variety.
Step 3: Assembly
-
Seal the pieces:
Apply a coat of clear matte sealant or Mod Podge to your painted clay pieces. This protects the paint from chipping and gives them a finished look. -
Prepare the twine:
Cut a long length of jute twine, deciding how long you want your final garland to be plus an extra 6 inches for knotting. -
Create a base:
Tie a large knot at the bottom of your twine or attach a large decorative bead to act as the stopper. -
Start threading:
Begin threading your components. I like to alternate between a ladybug and a cluster of 2-3 beads (mixing the handmade clay beads with standard wooden ones) to create a balanced rhythm. -
Secure the bugs:
When threading a ladybug, pass the string through the bottom hole and out the top hole. If the ladybug slips down too easily, tie a small knot in the twine right underneath it to hold it in place. -
Finish the loop:
Continue the pattern until you reach the top. Tie a sturdy loop at the top for hanging and trim any excess twine.
Add Sparkle
Mix a tiny pinch of gold mica powder into your clear sealant for the beige beads to give them a subtle, magical shimmer.
Hang your charming new garland near a window or plant to enjoy a little piece of nature every day.
Tiny Cottage Ornament With Rounded Details
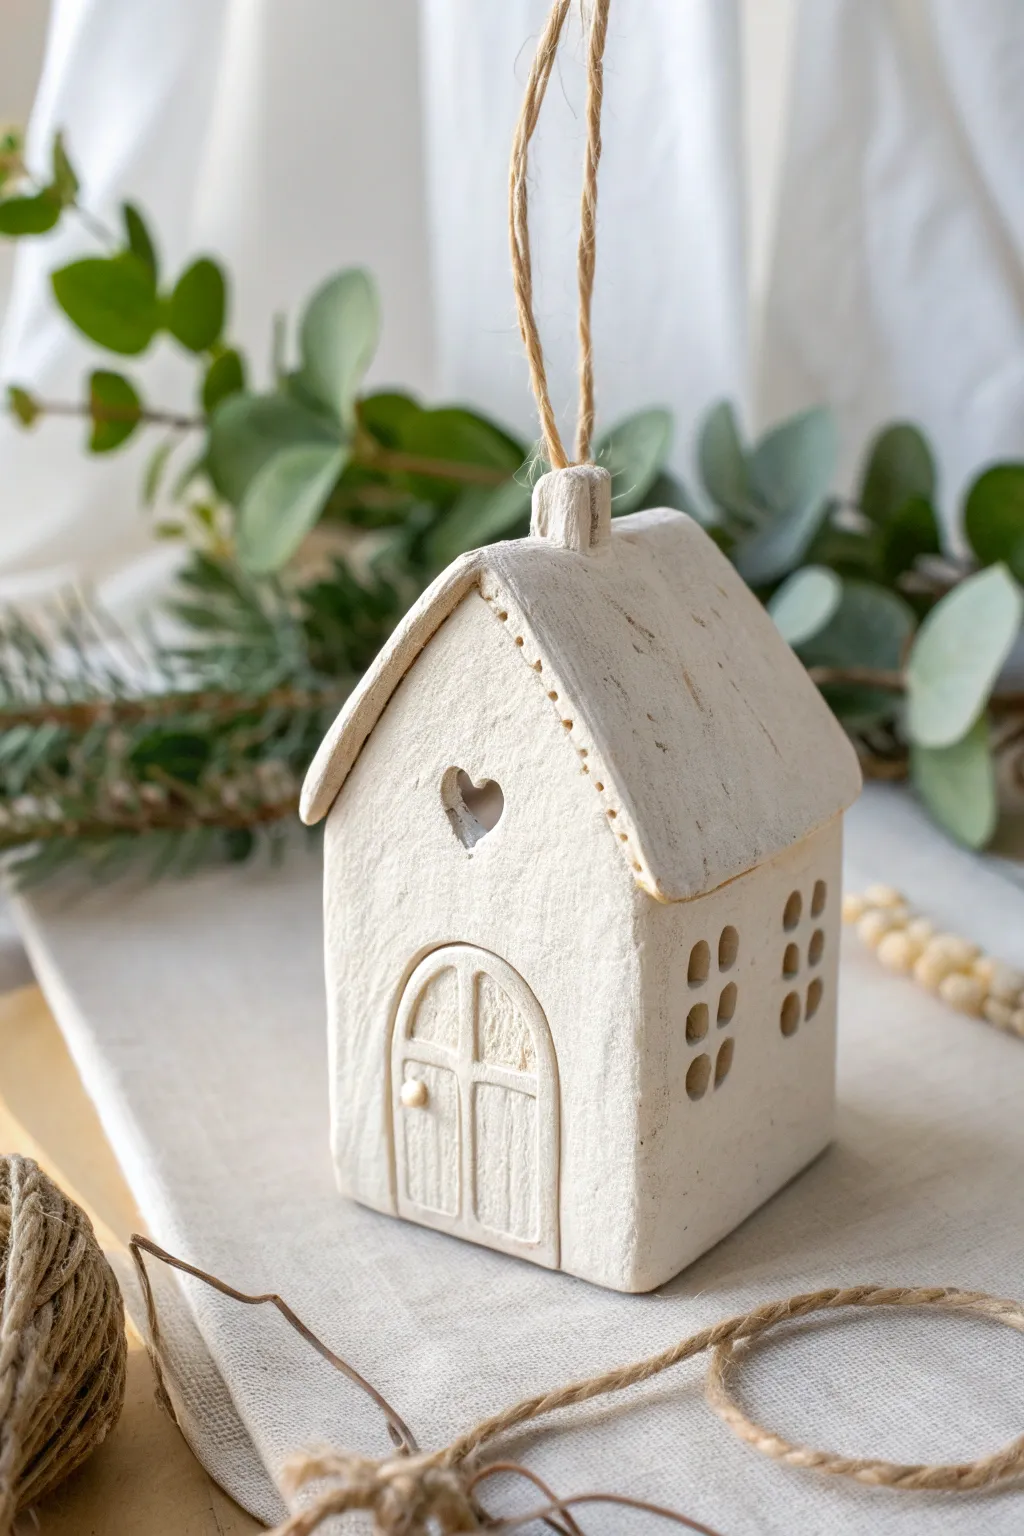
This charming little house ornament brings a cozy, handcrafted touch to your decor with its textured white finish and sweet heart cutout. It features an adorable arched door and tiny windows, all suspended by a simple piece of jute twine.
Step-by-Step
Materials
- White smooth air-dry clay
- Rolling pin
- House-shaped cookie cutter (or parchment paper template and craft knife)
- Small heart cutter (around 1cm)
- Small straw or cocktail stick
- Pottery needle tool or toothpick
- Water in a small dish
- Slip (clay mixed with water into a paste)
- Acrylic rolling guide or two popsicle sticks (optional, for even thickness)
- Small rounded spatula tool
- Fine-grit sandpaper
- Jute twine
Step 1: Shaping the Walls
-
Roll the Slab:
Begin by conditioning a handful of clay until it’s pliable. Roll it out into an even slab, approximately 1/4 inch thick. Using rolling guides ensures your walls are consistent, which helps the house stand straight later. -
Cut the Base Pieces:
Cut out two identical pentagon shapes for the front and back walls (the peaked pieces) and two rectangles for the side walls. If you don’t have a cutter, trace a simple paper template with a craft knife. -
Add the Details:
On the front wall piece, use the small heart cutter to punch a hole just below the roof peak. Smooth the edges of the cutout with a damp finger. -
Create Windows:
For the side walls, use a small square cutter or freehand cut small window openings. In the example, there are two columns of three tiny windows on the side, but simple squares work beautifully too.
Step 2: Assembling the Structure
-
Score and Slip:
Score the side edges of all your wall pieces with a needle tool—scratching up the surface creates a better bond. Apply a small amount of slip (clay paste) to these roughened areas. -
Join the Walls:
Stand the walls up and press the scored edges together to form a rectangular box. Use your fingers or a smoothing tool to blend the seams on both the inside and outside so the join becomes invisible. -
Smooth the Corners:
Gently gently run a damp sponge or finger over the corners to soften them, giving the cottage that rounded, organic look rather than sharp, architectural edges.
Clean Cuts
If your clay drags when cutting windows, wait 15 minutes for the slab to firm up slightly. It cuts cleaner when less sticky.
Step 3: Roofing and Chimney
-
Cut the Roof Slabs:
Roll out two rectangular slabs for the roof. They should be slightly wider than the house structure to create an overhang. -
Texture the Roof:
Before attaching, lightly distress the surface of the roof pieces with a toothbrush or crumpled foil for a weathered texture. I find this creates a nice contrast to the smoother walls. -
Detail the Eaves:
Use a needle tool or toothpick to press a row of small dots along the front-facing edge of the roof pieces for decorative trim. -
Attach the Roof:
Score and slip the top edges of the house walls and the underside of the roof pieces. Press them into place, ensuring they meet at the peak. -
Make the Chimney Loop:
Form a small rectangle of clay for the chimney. create a hole through it horizontally large enough for your twine. Attach this securely to the very peak of the roof with slip.
Glow Up
Leave the bottom of the house open so you can pop it over a battery-operated tea light. The light will shine through the heart and windows.
Step 4: The Door & Final Touches
-
Form the Door:
Roll a thin piece of clay and cut an arch shape slightly smaller than the bottom of your front wall. This will be the door relief. -
Carve Door Details:
Use a needle tool to gently carve a vertical line down the center and a horizontal curve near the top to mimic wooden panels. Add a tiny ball of clay for the doorknob. -
Attach the Door:
Score the back of the door and the spot on the house where it will sit. Press gently to adhere, making sure not to flatten your carved details. -
Final Smoothing:
Do a final once-over with a slightly damp brush to remove any fingerprints or rough crumbs of clay. -
Dry Completely:
Let the house dry slowly away from direct heat for 24-48 hours. Turn it occasionally if possible to let air reach the inside. -
Sand and String:
Once fully cured and hard, lightly sand any sharp spots. Thread a length of jute twine through the chimney hole and tie a knot to finish.
Hang this sweet little cottage on a branch or holiday tree to add instant warmth to your home
Chubby Bee Tea Light Holder
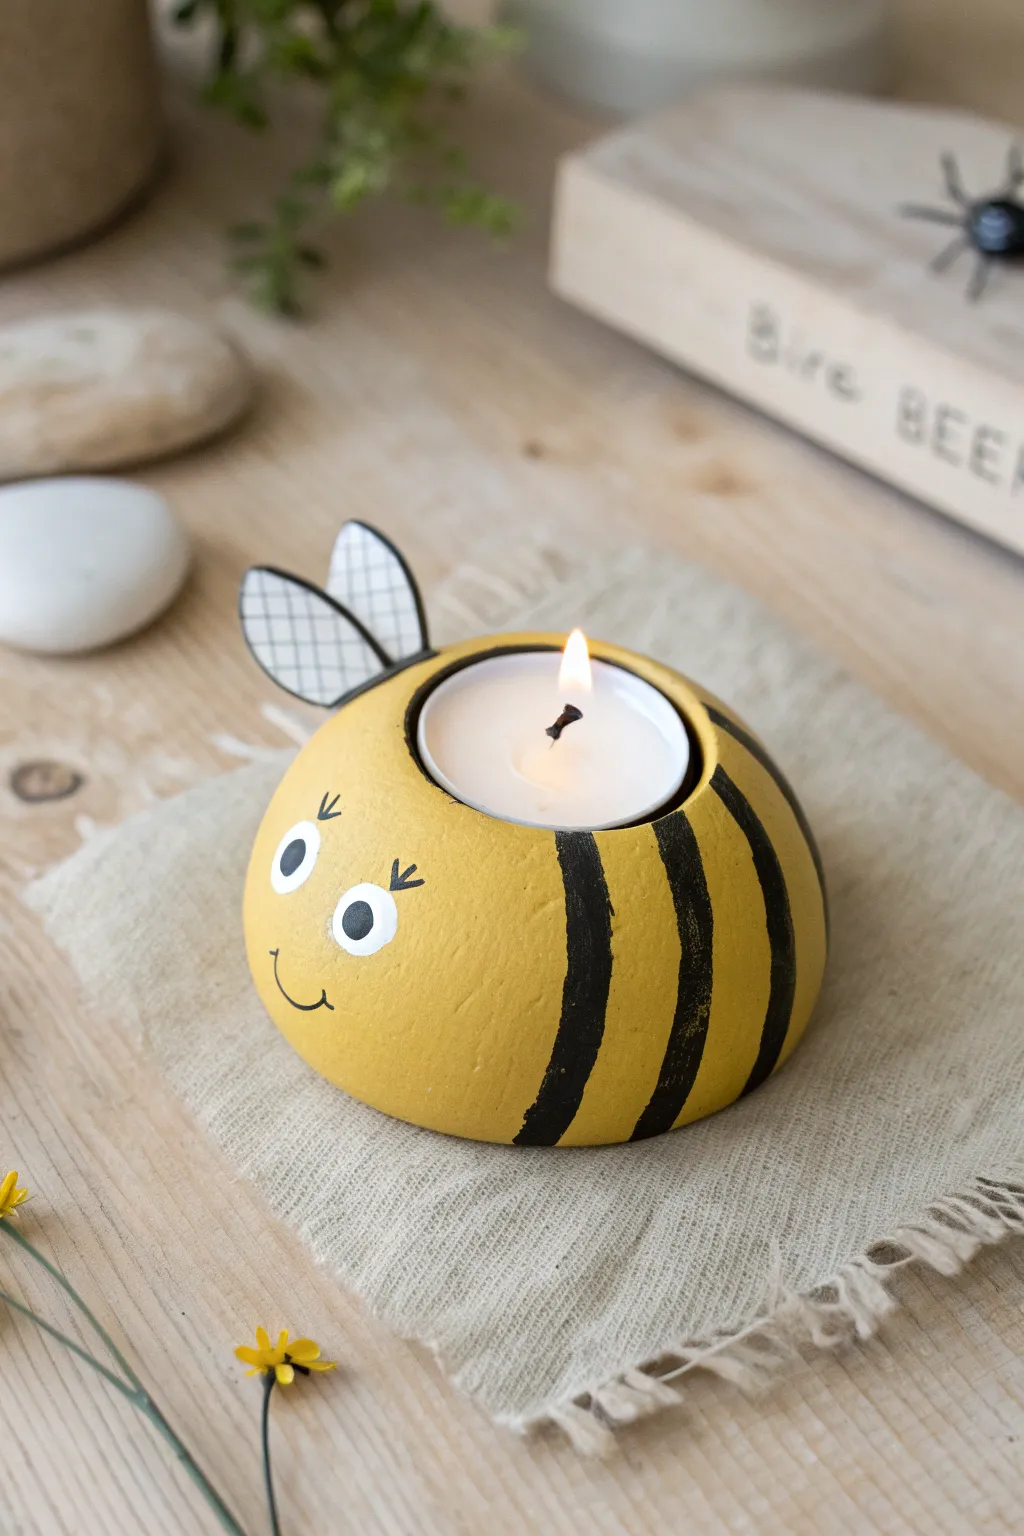
Bring a buzz of happiness to your home decor with this adorable, chunky bumblebee candle holder. This simple air-dry clay project combines cheerful yellow tones with sweet hand-painted details for a charming finish.
Step-by-Step Guide
Materials
- Air-dry clay
- Tea light candle (for sizing)
- Acrylic paints (yellow, black, white)
- Paintbrushes (medium flat, fine liner)
- Black wire
Step 1: Shaping the Bee
-
Form the base:
Take a generous handful of air-dry clay and roll it into a smooth, even ball. Gently flatten the bottom against your work surface so it sits stable and doesn’t wobble. -
Create the candle well:
Place your tea light candle on top of the dome to mark the center. Gently press the candle down into the clay to create an indentation. -
Refine the opening:
Remove the candle and use your fingers or a modeling tool to widen the hole slightly, ensuring it’s deep enough to hold the candle securely but slightly loose to account for clay shrinkage. -
Smooth the surface:
Dip your finger in a tiny bit of water and rub it over the clay dome to erase any cracks or fingerprints, creating a polished surface for painting later.
Shrinkage savvy
Make the candle hole about 10-15% larger than the actual tea light. Air-dry clay shrinks as it dries, and you don’t want the fit to become too tight.
Step 2: Adding Wings
-
Shape the wings:
Roll out a small piece of clay to about 1/4 inch thickness. Cut out two teardrop or oval shapes using a clay knife or cookie cutter. -
Attach to the body:
Score (scratch) the back of the bee body and the bottom edge of the wings. Apply a dab of water or clay slip to the scored areas. -
Secure the joint:
Press the wings firmly onto the back of the dome, smoothing the clay at the seam so they stand upright. I like to angle them slightly outward for a cuter look. -
Dry completely:
Let your bee sit undisturbed for 24-48 hours until the clay is rock hard and turns white.
Cracks happen
If small cracks appear while drying, mix a tiny bit of fresh clay with water to make a paste and fill them in. Smooth it over with a damp finger and let dry again.
Step 3: Painting & Details
-
Base coat:
Paint the entire body of the bee with a bright, sunny yellow acrylic paint. You may need two coats for full opacity. -
Paint the wings:
Paint the wings a solid white. Let this dry completely before adding outlines. -
Add stripes:
Using a medium brush and black paint, carefully paint two or three thick, vertical stripes wrapping around the bee’s body. -
Detail the wings:
With a fine liner brush or a black paint pen, draw a thin outline around the white wings and add a cross-hatch or grid pattern inside for texture. -
Paint the eyes:
Dip the handle end of a paintbrush into white paint and dot two large circles on the front for eyes. Once dry, add smaller black dots solely inside for pupils. -
Add facial features:
Use your finest brush to paint tiny eyelashes, eyebrows, and a simple curved smile. -
Insert antenna:
If your clay is still slightly soft, you can poke small holes for wire antenna now; otherwise, drill tiny holes or glue small wire pieces behind the eyes. -
Seal the piece:
Once all paint is visibly dry, apply a coat of matte or satin varnish to protect the clay and give it a finished sheen.
Pop in a tea light and enjoy the warm glow of your new buzzy friend
Desk Buddy Pen Cup With a Happy Face
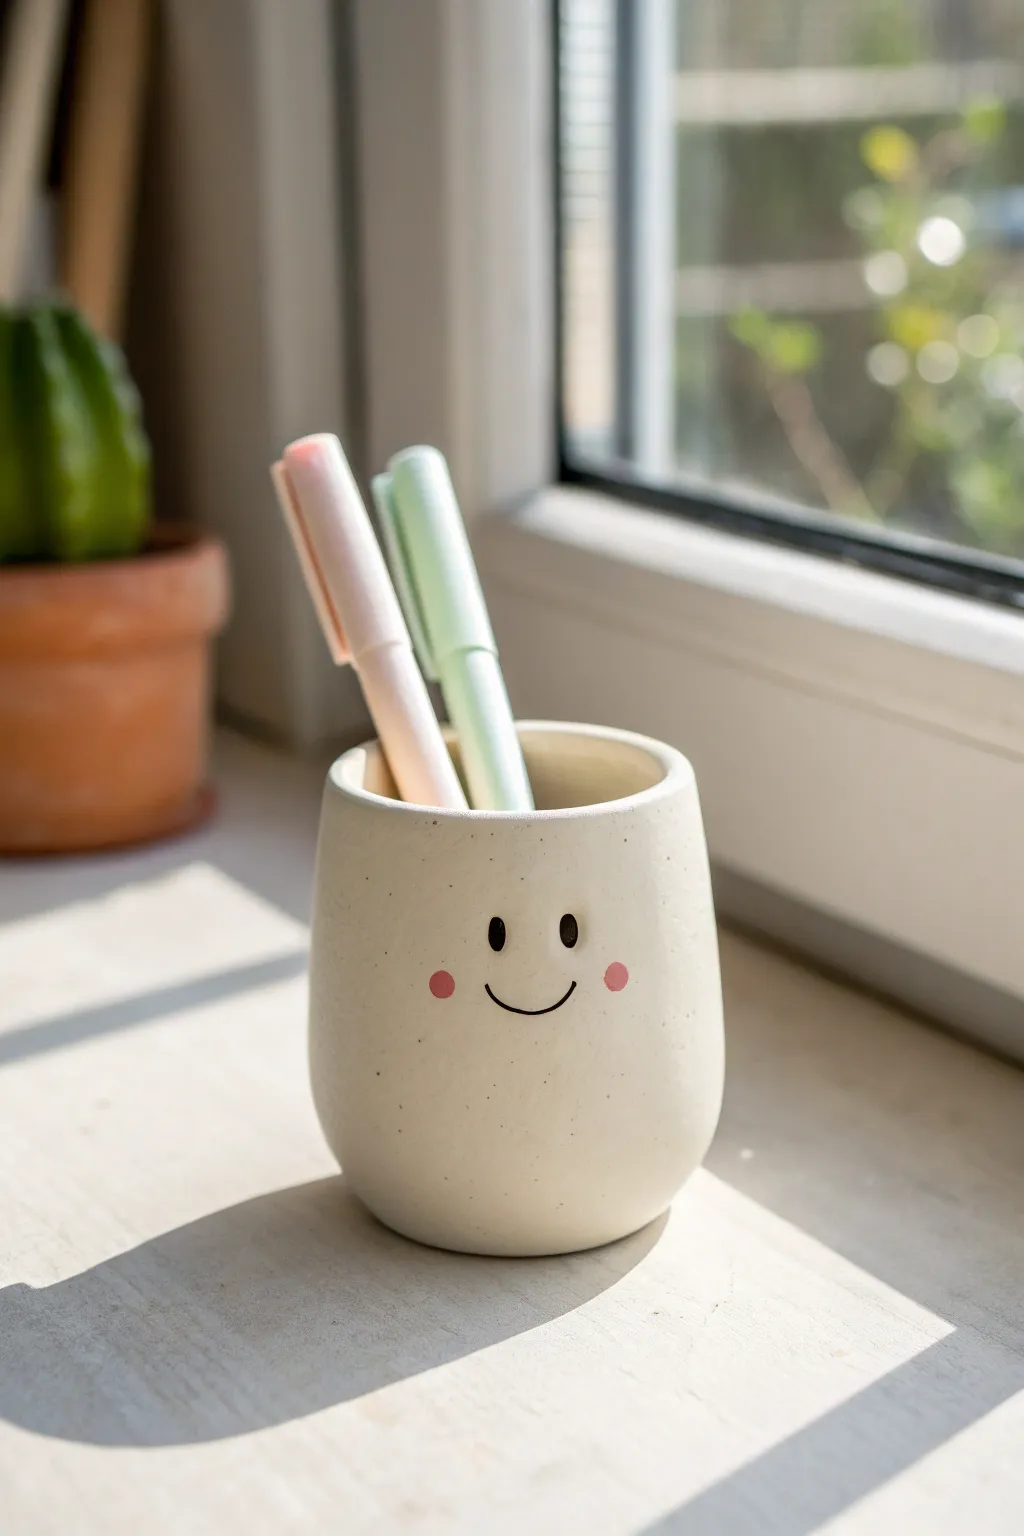
Brighten up your workspace with this adorable minimalist pen holder featuring a sweet, smiling face. Its speckled cream finish mimics real ceramic pottery, making it a stylish yet functional addition to any desk.
Step-by-Step
Materials
- White air dry clay (approx. 500g)
- Small rolling pin
- Empty cylindrical container (like a clean tin can or glass jar) for a mold
- Craft knife or clay cutter
- Water and a small sponge
- Fine-grit sandpaper
- Acrylic paint: Cream/Off-white, Black, Light Pink
- Paintbrushes: Large flat brush, fine detail brush
- Old toothbrush (for speckling)
- Matte varnish or sealant
Step 1: Building the Form
-
Roll the base:
Start by rolling out a ball of clay until it is about 1/4 inch thick. Use your cylindrical mold (tin can or jar) to trace and cut out a perfect circle for the base. -
Prepare the walls:
Roll out a separate, large rectangular slab of clay with the same 1/4 inch thickness. Ensure it is long enough to wrap entirely around your base mold with a little overlap. -
Wrap the mold:
Loosely wrap your rectangular clay slab around the tin can or jar. Trim the excess clay so the ends just meet without too much bulky overlap. -
Join the seam:
Score (scratch) both ends of the clay rectangle and add a dab of water. Press the ends together firmly to create a cylinder. -
Smooth the seam:
Use your finger or a modeling tool to smooth the vertical seam until it disappears completely. This takes patience, but it’s key for a seamless look. -
Attach the base:
Score the bottom edge of your cylinder and the outer edge of your circular base. Press them together firmly. -
Blend the bottom:
Use a modeling tool to drag clay from the wall down onto the base to lock them together, then smooth the transition with a wet finger. -
Round the rim:
Run a wet finger around the top rim of the cup to soften the sharp edges, giving it that rounded, pottery-like appearance shown in the photo. -
Remove the mold:
Gently slide the tin can or jar out of the clay cylinder. If it sticks, gently wiggle it or let the clay firm up for 15 minutes before trying again. -
Dry thoroughly:
Let the cup dry completely for 24-48 hours. Turn it upside down halfway through the drying process to ensure the bottom dries evenly.
Slumping Sides?
If your clay is too soft and the walls sag after removing the mold, crumple up a ball of newspaper and stuff it inside the cup to support the shape while it dries.
Step 2: Sanding and Decorating
-
Sand until smooth:
Once bone dry, take your fine-grit sandpaper and gently buff the entire surface. Focus on the rim and any bumps on the sides to get a sleek finish. -
Paint the base coat:
Apply two coats of cream or off-white acrylic paint to the entire cup, inside and out. Let the first coat dry fully before adding the second. -
Add the speckles:
Dilute a tiny drop of black or brown paint with water. Dip an old toothbrush into it and flick the bristles with your thumb to spray tiny speckles over the cup for a stone effect. -
Paint the face:
Using your finest detail brush and black paint, carefully paint two small ovals for eyes and a simple, thin U-shape for the smile centered on the cup. -
Add rosy cheeks:
Dip the back end of a paintbrush into light pink paint and stamp two dots on either side of the smile to create perfect circular cheeks. -
Seal the project:
Finish by applying a coat of matte varnish. This protects the paint from chipping and gives the pen holder a professional, finished texture.
Water Trick
Keep your fingers slightly damp while smoothing the clay, but avoid soaking it. Too much water can weaken the air dry clay and lead to cracking as it shrinks.
Pop your favorite pens inside and enjoy your cheerful new desk companion