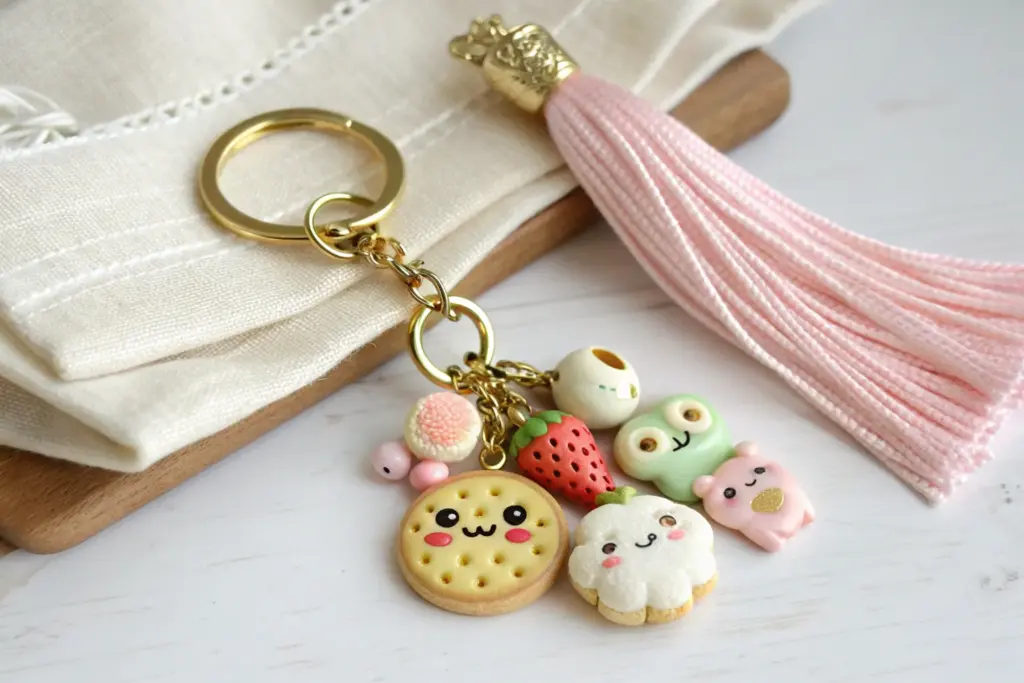
In my studio, I swear the fastest way to fall in love with polymer clay is to add two dot eyes and a tiny smile to literally anything. Here are my go-to cute polymer clay ideas for mini charms, chubby critters, and sweet little collectibles you can make without overthinking it.
Smiling Fruit Slice Charms
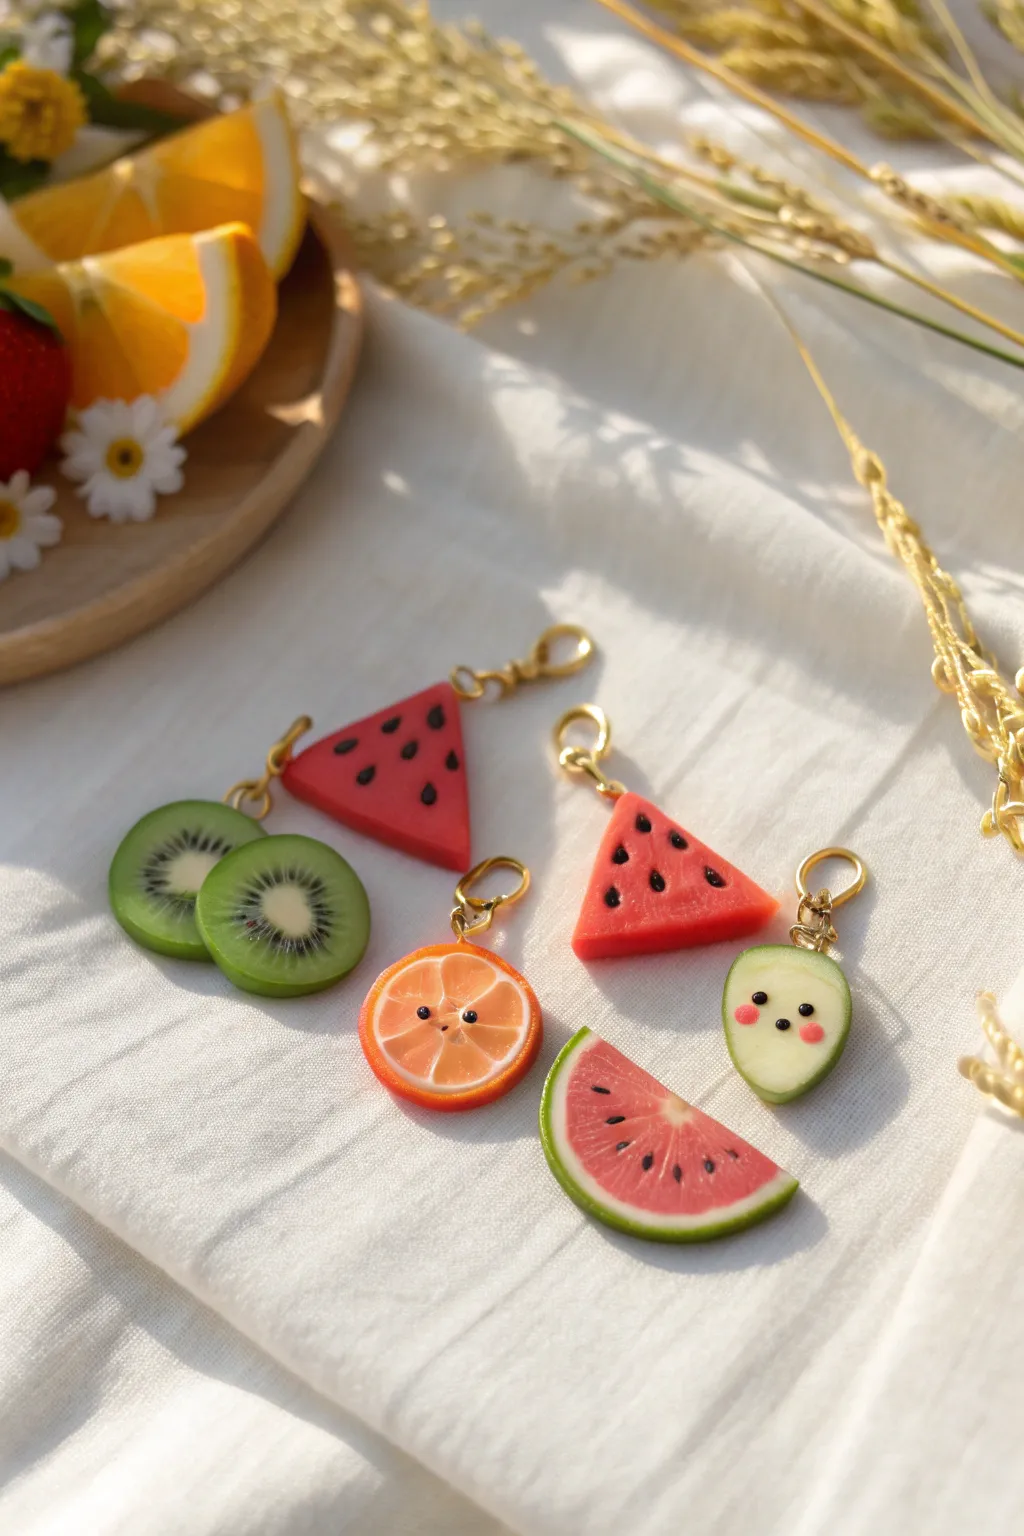
Brighten up your accessories with this collection of delightful fruit slice charms featuring realistic seeds and adorable kawaii expressions. From juicy watermelon wedges to friendly citrus faces, these miniature polymer clay creations are perfect for keychains, zipper pulls, or unique jewelry.
Step-by-Step
Materials
- Polymer clay (translucent white, opaque white, red, pink, green, orange, yellow, black)
- Fimo liquid gel or translucent liquid sculpey
- Rolling pin or pasta machine
- Circle cutters (various small sizes)
- Blade or X-Acto knife
- Needle tool or toothpick
- Gold screw eye pins
- Jump rings and lobster clasps
- Fine-grit sandpaper
- Gloss glaze or UV resin
- Soft pastel chalks (pink for blush)
- Small paintbrush
Step 1: Prepping the Canes
-
Mix Translucent Colors:
For the realistic fruit flesh look, mix a small amount of translucent clay into your red, orange, and light green clays. This gives that juicy, semi-transparent quality real fruit has. -
Create the Rhind:
Roll out a thin sheet of white clay and a slightly thicker sheet of green clay. These will form the inner pith and outer skin of your fruits.
Sticky Situation?
To avoid fingerprints on your smooth rinds, lightly dust your fingers with cornstarch or dip them in water before the final smoothing steps.
Step 2: Making the Watermelon Slices
-
Form the Center:
Roll a log of your translucent red clay mixture about 3/4 inch thick. Wrap this log first in a thin layer of white clay, smoothing the seam so it disappears. -
Add the Skin:
Wrap the white-covered log with a layer of dark green clay to create the outer rind. Roll the cane gently on your work surface to ensure all layers adhere tightly. -
Slice and Shape:
Use your sharp blade to cut thick slices from the log. Cut these circles in half to make semi-circles, or into quarters for triangular wedges. -
Texture the Flesh:
Use a needle tool or an old toothbrush to gently dab the red flesh, creating a rough, juicy texture while leaving the rind smooth. -
Plant the Seeds:
Roll tiny, elongated teardrops of black clay. Press them firmly into the red flesh using your needle tool. For the triangular slices, arrange them in a radiating pattern.
Step 3: Crafting the Kiwis
-
Build the Core:
Start with a small cylinder of white clay for the kiwi center. Surround this with a thick layer of translucent light green clay. -
Add Seeds:
Before wrapping the green layer, you can create a ‘seed ring’ by alternating thin strips of black and green clay around the white core, then wrapping with the thick green layer. -
Final Wrap:
Wrap the cane in a thin layer of brown or dark green clay for the skin. Slice into discs. -
Detailing:
Use a needle tool to drag lines from the white center outward into the green flesh to mimic the fibrous texture of a kiwi.
Sparkle Upgrade
Mix a tiny pinch of white iridescent glitter into your translucent fruit flesh clay before shaping. It mimics the glistening of fresh juice in the sun.
Step 4: Sculpting the Cute Faces
-
Orange Slice Structure:
Create an orange cane similar to the watermelon, but use cane-building techniques to include white dividing lines (segments) within the orange flesh before wrapping in white and orange rinds. -
Creating the Pear:
Shape a piece of pale green clay into a flat pear silhouette. Add a tiny green rind outline if desired. -
Add Expressions:
For the kawaii faces on the orange and pear, roll nearly microscopic balls of black clay for eyes and press them in. Add a tiny black snake for a smile between the eyes. -
Blushing Cheeks:
Scrape a bit of pink pastel chalk into dust. Use a small dry brush to gently dab pink circles onto the ‘cheeks’ of the fruit faces.
Step 5: Assembly and Finishing
-
Insert Hardware:
Carefully screw the gold eye pins into the top or corner of each fruit slice. Do this slowly to avoid distorting the shape. -
Bake:
Bake the pieces according to your clay manufacturer’s instructions (usually 275°F/130°C for 15-30 minutes). I like to tent them with foil to prevent scorching. -
Glaze:
Once cool, coat the fruit flesh (but not the rind) with gloss glaze or UV resin to make it look permanently wet and juicy. -
Attach Clasps:
Open your jump rings with pliers, slide on the fruit charms and a lobster clasp, then close the rings securely.
Now you have a refreshing set of fruit charms ready to sweeten up your day


Kawaii Toast and Breakfast Buddy Minis
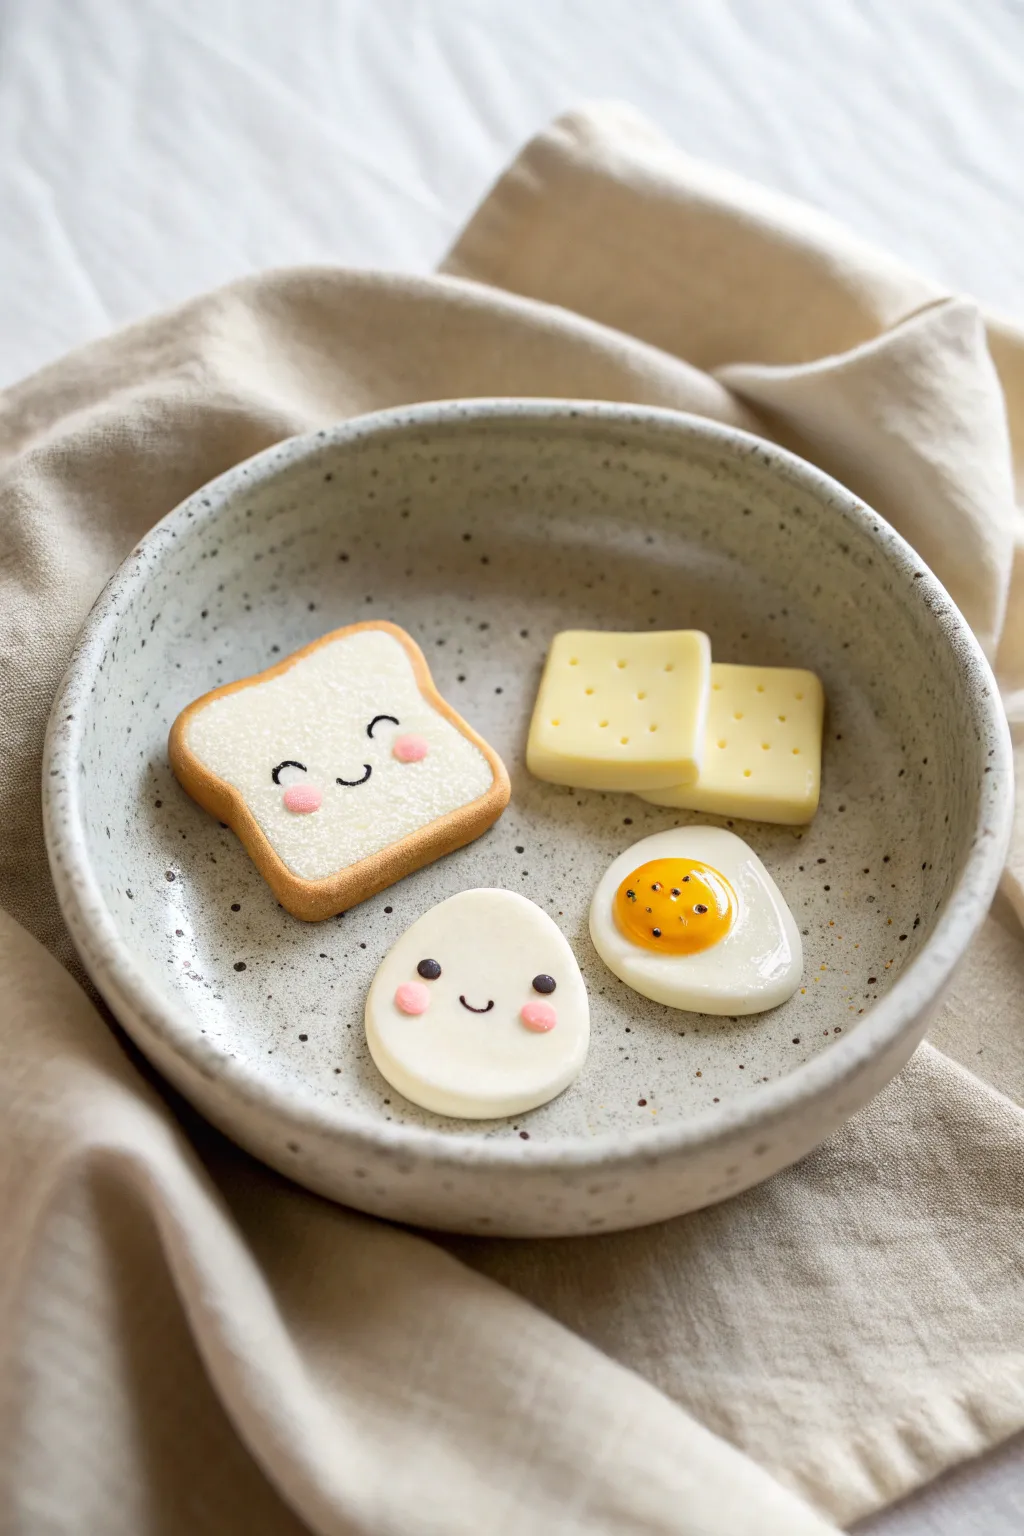
Start your day with a smile by crafting this adorable set of kawaii breakfast miniatures, featuring happy toast, a cheerful egg friend, a sunny-side-up buddy, and savory crackers. Their tiny faces and realistic textures make them perfect for charm bracelets or dollhouse displays.
Detailed Instructions
Materials
- Polymer clay (white, translucent, egg-yellow, ochre/tan, pale yellow)
- Soft pastels (brown, orange, pink)
- Black acrylic paint or clay
- Fine-grit sandpaper or toothbrush (for texturing)
- Needle tool or toothpick
- Dotting tools (various sizes)
- Liquid polymer clay (Fimo liquid or TLS)
- gloss glaze or UV resin
- Small craft knife or blade
Step 1: Toasty Perfection
-
Mix the Dough:
Start by mixing white clay with a tiny pinch of translucent and ochre to get a natural bread color. Condition the clay until it’s soft and pliable. -
Shape the Slice:
Form a small square roughly 2cm wide, then gently indent the top edge to create the classic ‘M’ shape of a bread slice. Soften the bottom corners slightly. -
Create the Crust:
Roll a thin snake of dark tan clay. Wrap this strip around the outer edge of your bread shape, smoothing the seam where the ends meet so it looks continuous. -
Texturing Time:
Use a clean toothbrush or a crumpled ball of aluminum foil to gently tap the white surface of the bread. This creates a realistic, airy crumb texture. -
Adding the Blush:
Scrape a little pink chalk pastel into a powder. Use a soft, dry brush to dust two rosy cheeks onto the lower half of the bread face.
Step 2: Egg-cellent Friends
-
Form the Boiled Egg:
Take a ball of white clay and flatten it into a smooth, rounded oval shape. This represents a peeled, whole egg character. -
Create the Fried Egg White:
For the sunny-side-up egg, flatten a piece of white clay into an irregular, organic shape. Make the edges slightly uneven like a real cracking egg. -
Add the Yolk:
Roll a small ball of yellow clay mixed with a touch of orange. Determine where you want the yolk on your fried egg white and press it down gently; don’t flatten it completely, keep it domed. -
Gloss the Yolk:
Mix a drop of yellow-orange chalk pastel dust with liquid clay. Carefully coat just the yolk to give it that wet, uncooked shine before baking. -
Make the Crackers:
Roll out pale yellow clay into a thin sheet. Cut two small rectangles and use a needle tool to poke a grid of tiny holes across the surface.
Pastel Shading Tip
Brush brown pastel dust around the very edges of the toast crust and the crackers before baking to give them a perfectly ‘toasted’ golden-brown look.
Step 3: Bringing Them to Life
-
Pre-Bake Instructions:
Arrange all your pieces on a ceramic tile or parchment-lined baking sheet. Double-check for fingerprints and smooth them away with a drop of baby oil if needed. -
Baking:
Bake the pieces according to your clay package instructions (usually 275°F/130°C for 15-30 minutes). Let them cool completely before handling. -
Painting Faces:
Using a very fine detail brush or a needle tool dipped in black paint, carefully draw the eyes and mouths. For the toast and boiled egg, place simple wide-set eyes and a tiny ‘u’ smile. -
Cheeky Details:
For the boiled egg, add tiny dabs of pink paint or clay for cheeks since pastel might not stick as well to the smooth surface. -
Finishing the Fried Egg:
To make the fried egg look freshly cooked, add tiny specks of ‘pepper’ using a needle tool and black paint on the yolk. -
Sealing the Deal:
Apply a coat of gloss glaze or UV resin to the fried egg yolk to make it look runny. Leave the toast and boiled egg matte for a soft, realistic finish.
Smudged Paint?
If you mess up the tiny painted faces, don’t panic. Use a cotton swab dipped in rubbing alcohol or acetone to gently wipe away the mistake and try again.
Now you have a charming breakfast set ready to brighten up any miniature scene


Bubble Tea Charms With Tiny Pearls
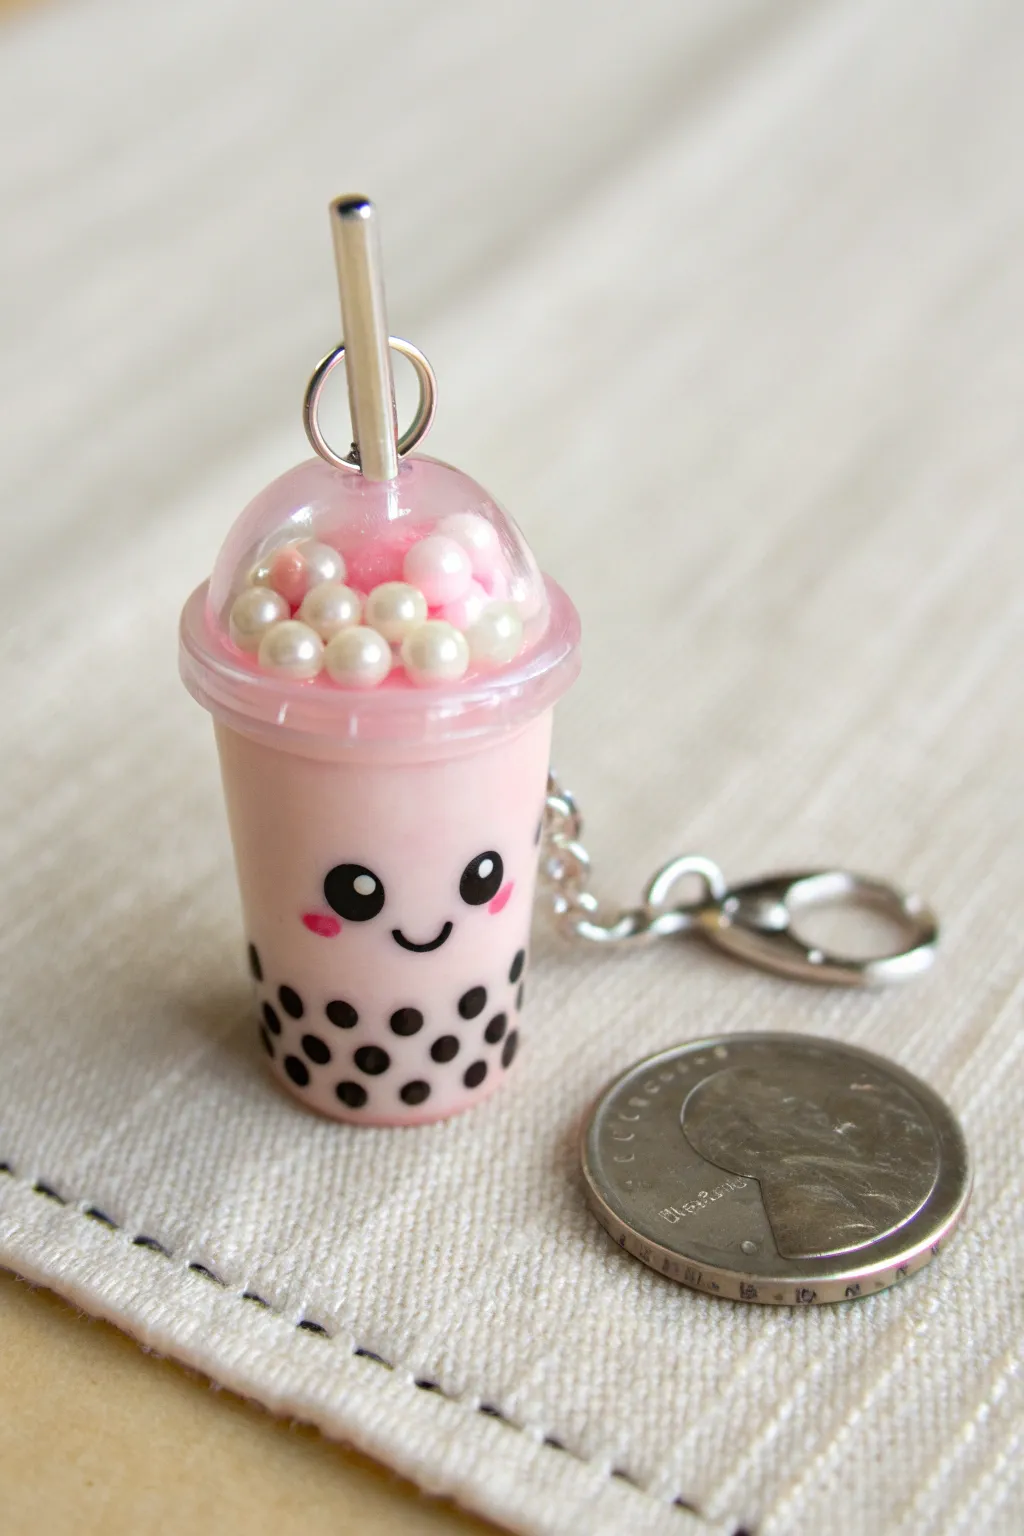
This adorable miniature replicates your favorite boba drink with a sweet pink hue and a happy little face. Topped with a clear dome and tiny pearlescent beads, it makes for a delightful keychain or zipper pull.
Step-by-Step Tutorial
Materials
- Polymer clay (light pink, black)
- Small clear plastic dome (or UV resin and a mold)
- Tiny faux pearl beads (white and pink)
- UV resin (clear)
- UV lamp
- Silver eye screw
- Metal straw piece (or silver wire)
- Acrylic paint (black and pink)
- Fine detail paintbrush or dotting tool
- Super glue or E6000
- Keychain hardware
- Clay blade
- Small round cutter (optional)
Step 1: Forming the Cup Base
-
Shape the clay log:
Start by conditioning your light pink polymer clay until it is soft and pliable. Roll it into a smooth cylinder that is slightly tapered at the bottom, mimicking the shape of a disposable drink cup. -
Flatten the ends:
Gently press the cylinder onto your work surface to ensure the bottom is perfectly flat so it stands upright. Flatten the top as well, creating a level surface for the lid. -
Add the rim:
Roll a very thin snake of pink clay. Wrap this around the top edge of your cup shape to create the rim where the lid would snap on. Smooth the seam carefully with a tool so it looks continuous. -
Bake the base:
Place your pink cup on a tile or baking sheet. Bake it according to your clay package instructions (usually 275°F/135°C for about 15-20 minutes). Let it cool completely before moving to the next step.
Step 2: Adding the Details
-
Paint the tapioca pearls:
Using black acrylic paint and a dotting tool (or the end of a toothpick), stamp rows of dots around the bottom third of the cup to represent the boba pearls. -
Draw the face:
With a fine brush or a black fine-tip marker, draw two larger black circles for eyes and a small ‘u’ shape for the smile. Add tiny white reflections in the eyes for that signature kawaii look. -
Add blushed cheeks:
Dip a toothpick into pink paint and dab two small ovals directly under the eyes to give the face rosy cheeks. Allow all paint to dry thoroughly. -
Prepare the whipped topping:
Mix a small amount of pink clay with liquid clay or use a pre-made pink deco cream. Spread a thin layer on the flat top of your cooled cup to act as ‘adhesive’ for the pearls. -
Arrange the pearls:
Carefully place your tiny faux pearl beads onto the top of the cup. I like to pile them slightly higher in the center to create a mounded look.
Dome Perfection
Can’t find a plastic dome? Use a spherical mold and clear UV resin to cast your own perfectly sized lid.
Step 3: Assembly and Finish
-
Seal the pearls:
Pour a small amount of clear UV resin over the pearls to lock them in place. Make sure not to let it drip down the sides of the cup. -
Attach the dome lid:
Take your small clear plastic dome. If it doesn’t have a hole for the hardware, drill a tiny one now. Place a ring of UV resin or super glue around the rim of the cup and press the dome firmly in place. -
Insert the straw and hardware:
Drill a hole through the top of the dome if needed. Insert your metal straw piece and a silver eye screw into the center, pushing them down into the clay or resin center. -
Secure with UV resin:
Apply a final drop of UV resin around the base of the straw and eye screw where they meet the dome to ensure they are secure. Cure everything under a UV lamp for 2-3 minutes. -
Attach keychain:
Once fully cured and cool, open a jump ring and attach your chain and clasp to the eye screw.
Cloudy Dome?
If your plastic dome looks foggy after gluing, it might be super glue residue. Use UV resin instead for a crystal-clear finish.
Your tiny bubble tea is now ready to add a splash of sweetness to your accessories


Chibi Frogs With Big Eyes
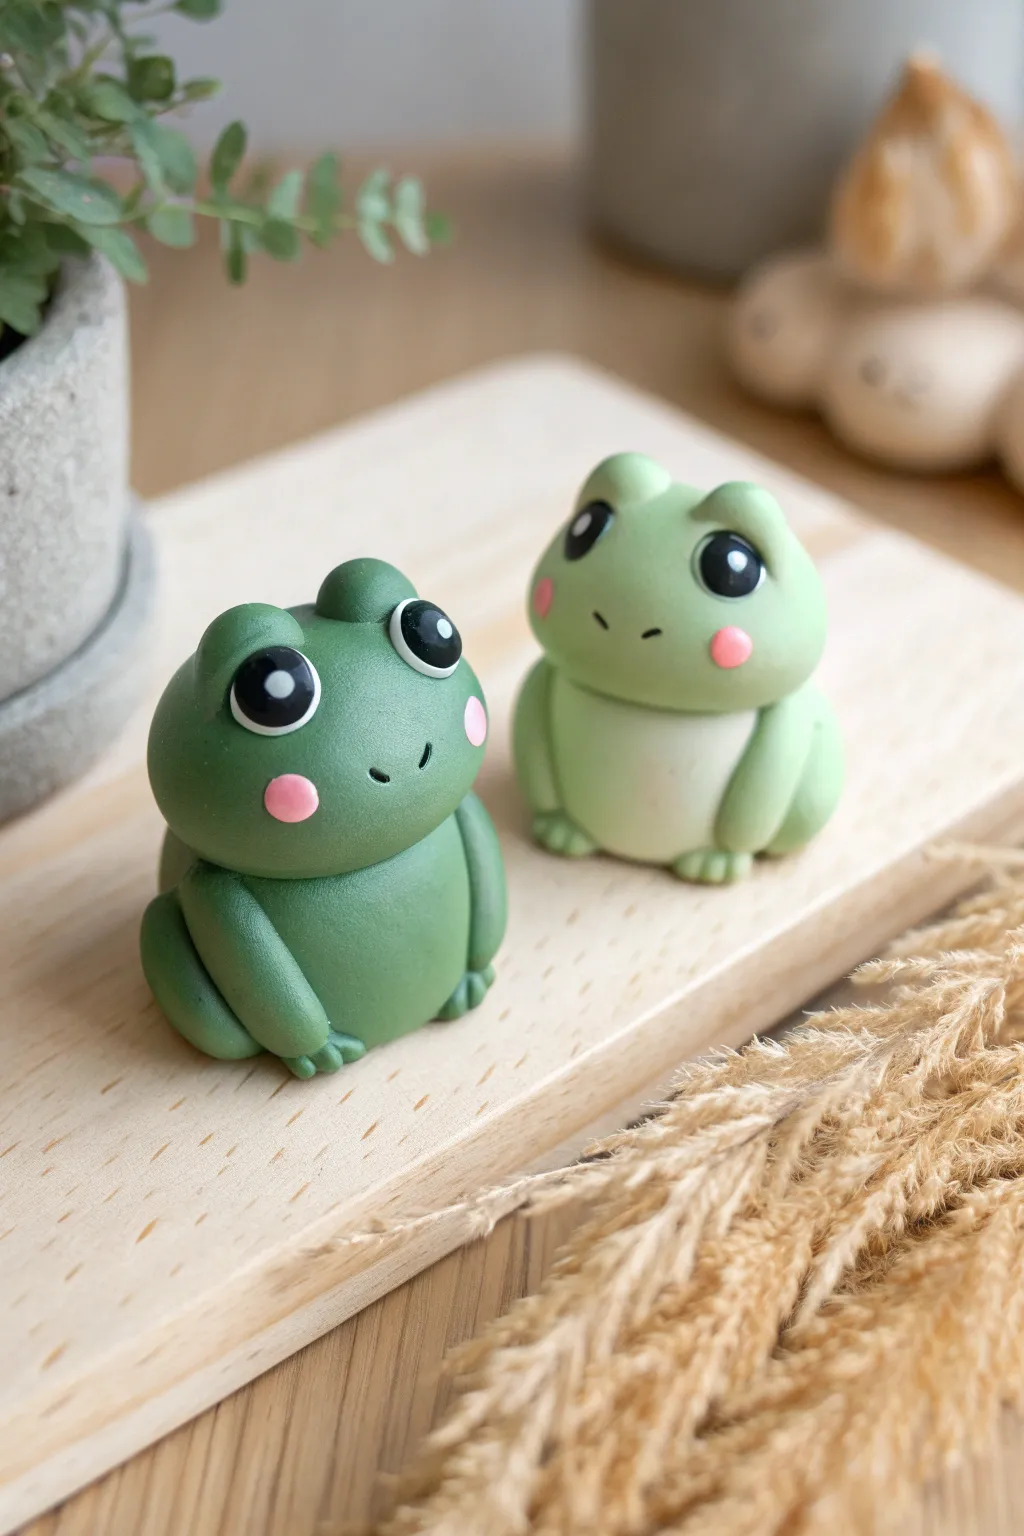
Create a pair of irresistibly cute frogs with oversized eyes and rosy cheeks using smooth polymer clay. These chubby amphibians, one in forest green and one in pastel, are perfect desk companions or tiny gifts.
How-To Guide
Materials
- Polymer clay in forest green, mint/pastel green, and white
- Back polymer clay (for the eyes)
- Small amount of pink clay (light and dusty rose)
- Dotting tools (various sizes)
- Needle tool or toothpick
- Ball stylus tool
- Smoothing oil (baby oil or clay softener)
- Small craft knife or blade
- Oven for baking
Step 1: Shaping the Bodies
-
Mix your greens:
Begin by conditioning your clay. For the lighter frog, mix white with a small amount of green until you achieve a soft mint shade. Keep the forest green pure for the second frog. -
Form the base:
Roll two large balls of clay, one in each green shade. These should be roughly an inch wide. Flatten the bottom slightly against your work surface so they sit stably without rolling away. -
Create the tummy:
Take a small pinch of white clay and mix it with the tiniest speck of green to make a very pale belly color. -
Attach the tummy patch:
Flatten the pale clay into a thin, broad oval. Gently press this onto the front lower half of each body, blending the edges smooth with your finger or a silicone tool.
Clean Clay Pro-Tip
White clay attracts dust like a magnet. Always wash your hands or use baby wipes before switching to the white clay for the tummy and eyes to keep it pristine.
Step 2: Sculpting the Head & Face
-
Add the head shape:
Roll a slightly smaller ball for the head and press it firmly onto the body. Gently blend the clay at the neck seam just slightly so they are securely attached but still look like two distinct shapes. -
Make eye sockets:
Using a large ball tool or the end of a paintbrush, press two deep indentations into the top sides of the head where the eyes will go. -
Form the eye mounds:
Roll two small balls of green clay (matching each frog’s skin tone). Place these into the indentations you made, smoothing the bottom seams into the head so they look like raised bumps. -
Add the eye whites:
Roll two balls of white clay and press them onto the front of the green eye mounds. Flatten them gently so they conform to the curve. -
Create the pupils:
Add smaller flat circles of black clay on top of the white circles. Position them looking slightly inward to increase the cuteness factor. -
Add the sparkle:
This is the most crucial step for life: place a tiny white speck of clay on the upper right side of each black pupil for a catchlight. -
Sculpt the mouth:
Use a needle tool to very gently etch a small, curved smile between the eyes. Keep it subtle and centered. -
Apply rosy cheeks:
Flatten tiny balls of pink clay into thin discs. Press these onto the face just below the outer corners of the eyes.
Step 3: Adding Limbs & Baking
-
Form the back legs:
Roll two medium-sized teardrop shapes for the thighs. Press these against the sides of the body, with the rounded part at the bottom. -
Add the feet:
Make small, flat ovals for feet. Use a knife or needle tool to press two lines into each foot to create three little toes. -
Attach the front arms:
Roll two thin logs of clay for arms. Attach them vertically along the sides of the belly so they look like they are propping the frog up. -
Define the hands:
Slightly flatten the ends of the arms and use your needle tool to indent tiny fingers, resting them on the ground or the belly. -
Smooth fingerprints:
Before baking, lightly brush the distinctive froggy curves with a little baby oil on your finger to remove any prints or dust. -
Bake:
Bake according to your polymer clay package instructions (usually 275°F/135°C for 15-30 minutes depending on thickness).
Head Slump Fix
If the head feels too heavy and starts to droop or squish the body, verify your clay isn’t too warm. You can insert a short piece of toothpick or wire as an internal spine.
Once cooled, your charming frog duo is ready to hop onto a shelf or brighten up your workspace

What Really Happens Inside the Kiln
Learn how time and temperature work together inside the kiln to transform clay into durable ceramic.
Round Bear Face Keychain Charms
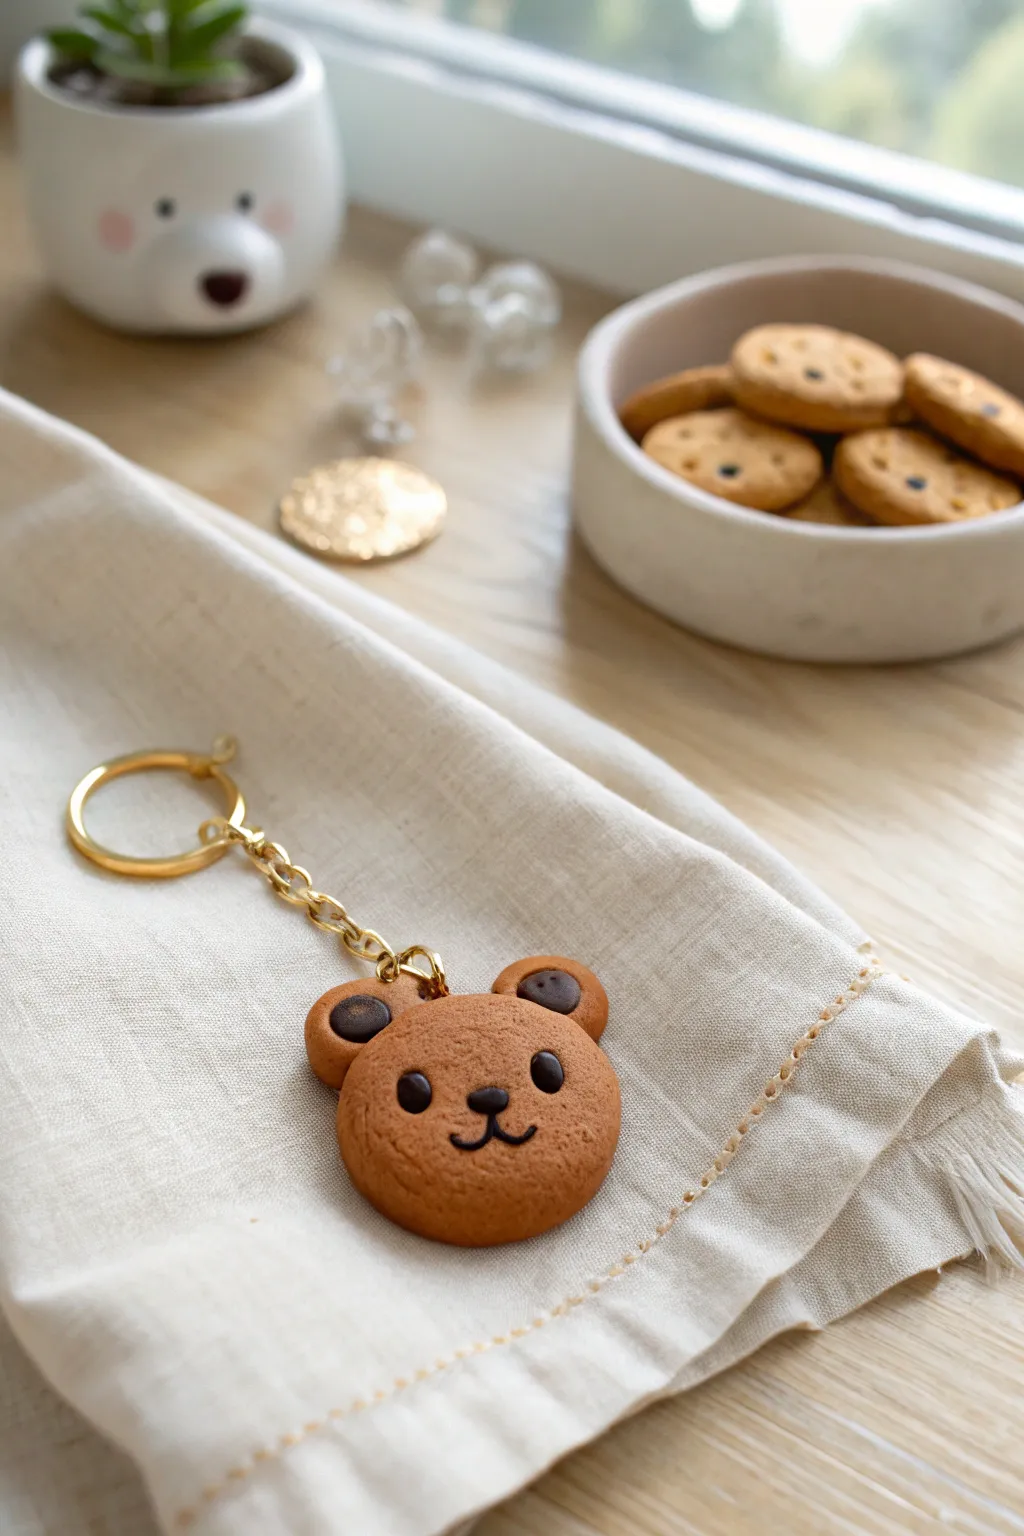
Create an adorable bear charm that looks sweet enough to eat, featuring a classic cookie-brown color and a simple, friendly face. This polymer clay project is perfect for beginners and makes a delightful addition to any keychain or zipper pull.
Step-by-Step Tutorial
Materials
- Polymer clay (light brown/cookie color)
- Polymer clay (dark brown/chocolate color)
- Polymer clay (black)
- Acrylic rolling pin
- Circle clay cutter (approx. 1.5 inch)
- Small ball tool or dotting tool
- Liquid polymer clay (translucent or Bake & Bond)
- Needle tool
- Keychain hardware with chain
- Gold screw eye pin
- Smooth work surface (ceramic tile or glass)
- Oven for baking
Step 1: Shaping the Base
-
Condition the Clay:
Begin by kneading your light brown polymer clay until it is soft and pliable. This conditioning step prevents cracks during baking. -
Roll the Sheet:
Using your acrylic rolling pin, flatten the conditioned clay into a sheet about 1/4 inch thick. You want it substantial enough to hold the hardware securely. -
Cut the Head:
Use your circle cutter to punch out a perfect round shape for the bear’s head. Set the scrap clay aside for later use. -
Smooth the Edges:
Gently run your finger around the cut edge of the circle to soften the sharp rim left by the cutter. This gives it that baked cookie look.
Pro Tip: Clean Surfaces
Keep baby wipes nearby to clean your hands between colors. Dark clay like black can easily smudge onto the light cookie dough color and ruin the finish.
Step 2: Adding Features
-
Prepare the Ears:
Take two small evenly sized balls of the light brown clay. Slightly flatten them against your work surface so one side is flat. -
Attach the Ears:
Apply a tiny dot of liquid clay to the top left and right curves of the head. Press the flattened balls firmly onto these spots to create the ears. -
Create Ear Detail:
Take two tiny balls of dark brown clay and press them flat. Stick these onto the front center of each ear to mimic the inner ear or chocolate chips. -
Make the Eyes:
Roll two very small balls of black clay. Position them on the face, spacing them apart generously for a cute, wide-set look. -
Embed the Eyes:
Use your ball tool to gently press the black clay balls flat into the face so they become flush with the surface rather than sticking out. -
Form the Nose:
Roll a slightly larger oval of black clay for the nose. Place it centrally between and slightly below the eyes, pressing it down gently.
Step 3: Finishing Touches
-
Draw the Mouth:
Roll an incredibly thin snake of black clay. Cut two tiny curved pieces and attach them below the nose to form the ‘w’ shape of the mouth. Alternatively, you can paint this on after baking. -
Insert the Eye Pin:
Take your gold screw eye pin. Dip the threaded end into liquid clay for extra security. -
Secure the Hardware:
Screw the pin into the top center of the bear’s head, right between the ears. Be careful not to distort the face shape as you push it in. -
Texture the Surface:
For a realistic cookie texture, I find that gently tapping the surface with an old toothbrush or a crumpled ball of aluminum foil works wonders. -
Bake the Charm:
Place your bear on a ceramic tile or baking sheet lined with parchment paper. Bake according to your clay manufacturer’s specific time and temperature instructions. -
Assemble the Keychain:
Once fully cooled, use pliers to open the jump ring on your keychain hardware and attach it to the screw eye pin on the bear.
Level Up: Cookie Effect
Before baking, use soft pastels or eyeshadow in a slightly darker brown. Brush it around the edges and ears to give it a ‘toasted’ baked cookie appearance.
Now you have a sweet little companion to keep your keys safe and stylish
Mushroom Friends With Blushing Cheeks
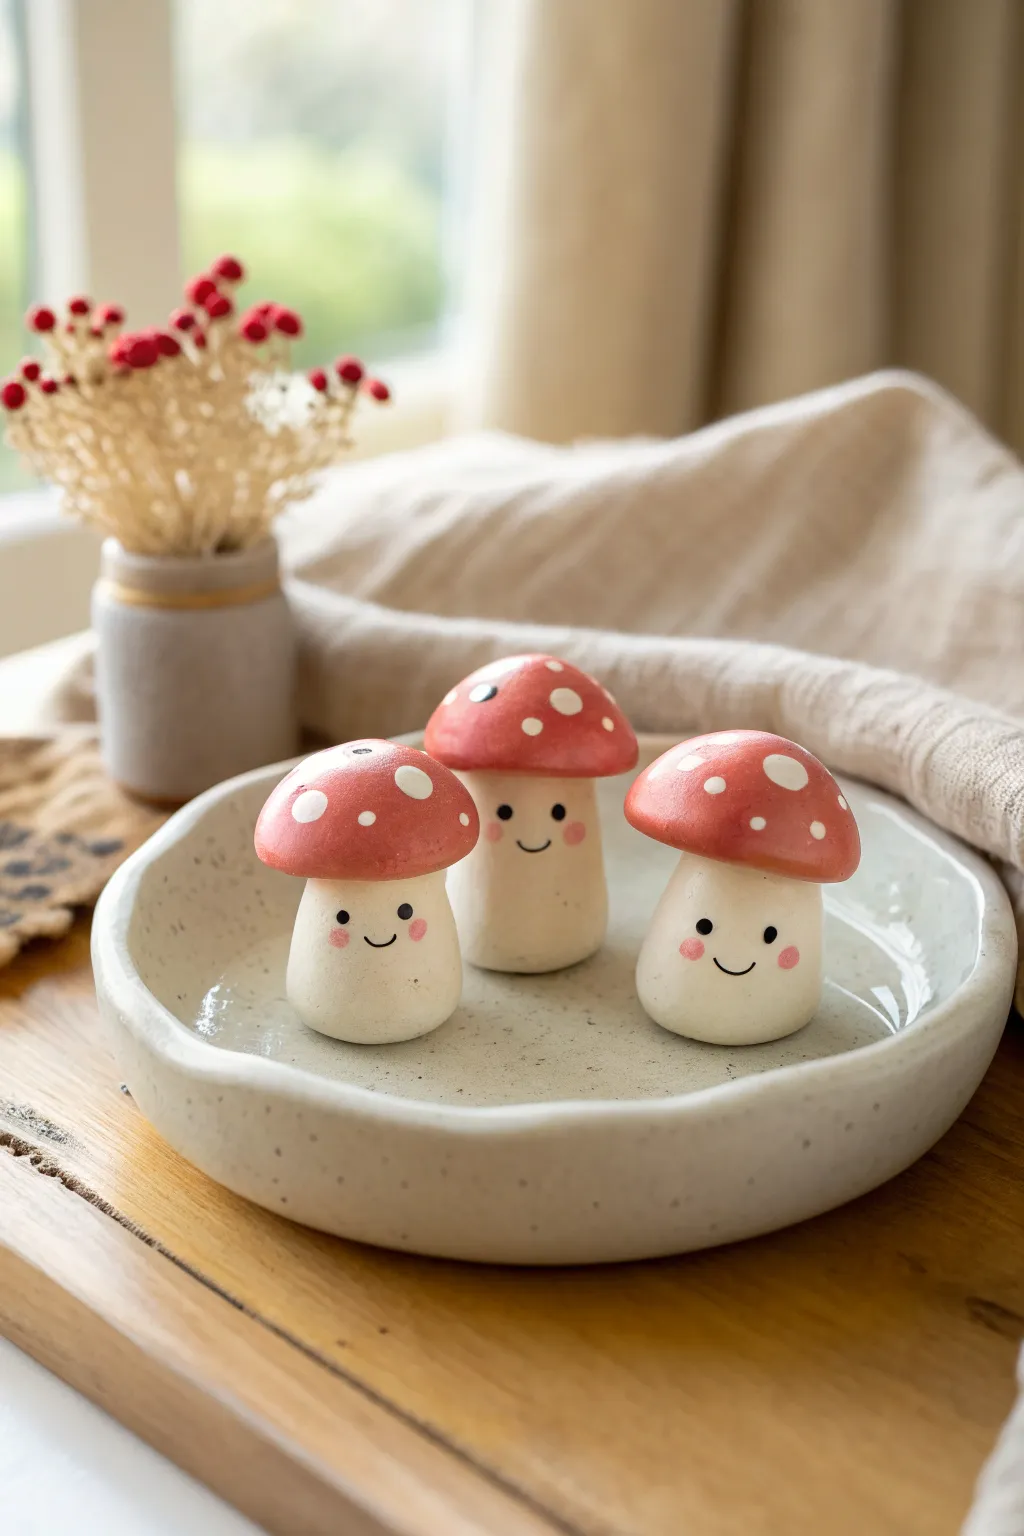
Create a whimsical little family of fungi that are sure to bring a smile to your face. These polymer clay mushrooms feature classic red caps, speckles, and the sweetest little blushing expressions.
How-To Guide
Materials
- White polymer clay
- Red polymer clay (or acrylic paint)
- Black acrylic paint
- Pink soft pastel chalk or pink blush powder
- White acrylic paint
- High-gloss varnish or glaze
- Small dotting tool or toothpick
- Fine detail paintbrush
- Soft fluffy paintbrush
- Craft knife or clay blade
- Oven for baking
Step 1: Sculpting the Shapes
-
Prepare the stalks:
Begin by conditioning your white polymer clay until it is soft and pliable. Roll three balls of clay, each roughly the size of a large marble or a walnut, depending on how big you want your mushrooms. -
Form the base:
Gently shape each white ball into a thick, slightly tapered cylinder. Flatten the bottom so they stand up straight on their own without wobbling. -
Create the caps:
Take your red clay (or white clay if you plan to paint it later) and roll three slightly smaller balls. Flatten the bottom of each red ball and gently dome the top with your fingers to create the mushroom cap shape. -
Attach cap to stalk:
Press the red cap firmly onto the top of the white stalk. To ensure a strong bond, you can scratch the connecting surfaces slightly with a toothpick before pressing them together. -
Refine the form:
Smooth out any fingerprints or seams. The transition from the cap to the stalk should be clean, but it doesn’t have to be perfect—organic shapes look more natural.
Uneven Paint?
If your white dots look transparent, don’t overload the brush. Instead, do one thin layer, let dry, and dot directly on top again for opacity.
Step 2: Baking and Base Layers
-
Bake the clay:
Place your mushroom trio on a baking sheet lined with parchment paper. Bake according to your clay manufacturer’s instructions (usually around 275°F or 130°C for 15-30 minutes). Let them cool completely. -
Painting the caps (optional):
If you used white clay for the caps, paint them now with two coats of bright red acrylic paint, allowing the first coat to dry fully before applying the second. -
Adding the dots:
Dip a medium-sized dotting tool or the back end of a paintbrush into white acrylic paint. Add scattered white dots all over the red caps. Vary the sizes slightly for a playful look. -
Drying time:
Allow the white dots to dry completely. This is crucial so you don’t smudge your work while handling the mushrooms for the face details.
Step 3: Bringing Them to Life
-
Prepare the blush:
Scrape a little bit of pink soft pastel chalk into a powder using your craft knife. If you don’t have pastels, real makeup blush works just as well. -
Apply the cheeks:
Dip a soft, dry paintbrush into the pink powder. Dab off the excess, then gently buff two round pink circles onto the white stalk to create rosy cheeks. -
Paint the eyes:
Using your smallest dotting tool or a toothpick, dip into black acrylic paint and place two small dots widely spaced on the stalk, sitting just slightly above the cheek area. -
Add the smile:
With an extremely fine detail brush or a fine-tip permanent marker, draw a tiny, thin ‘U’ shape between the eyes to create a simple smile. -
Highlight the eyes:
Once the black eye paint is dry, add a minuscule white dot to the top corner of each black eye. This ‘catchlight’ is what gives them that sparking personality. -
Seal the project:
Finish by applying a coat of gloss varnish to the red cap to make it look wet and shiny. You can leave the white stalk matte for a nice textural contrast.
Forest Floor Display
Before baking, press real dried moss or tiny pebbles into a small clay base and bake the mushrooms attached to it for a full diorama effect.
Arrange these little friends on a shelf or plant pot to add a touch of woodland magic to your home


The Complete Guide to Pottery Troubleshooting
Uncover the most common ceramic mistakes—from cracking clay to failed glazes—and learn how to fix them fast.
Cat Paw and Toe-Bean Charms
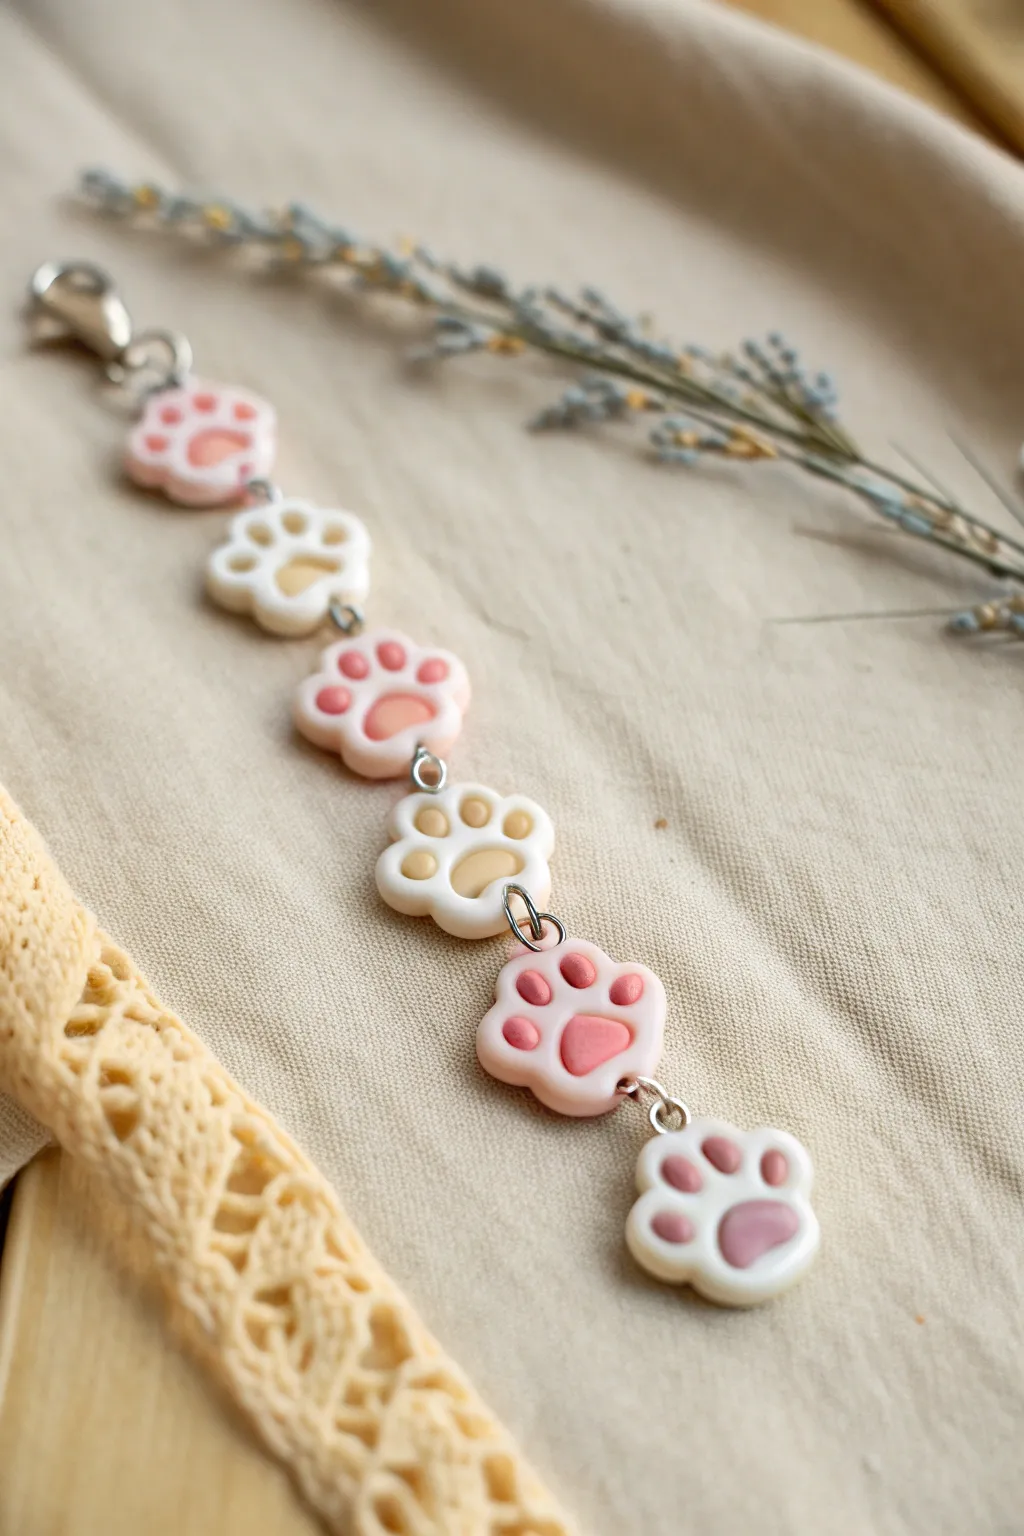
Create a delicate and adorable accessory featuring a string of alternating cat paw charms. These soft, pastel-colored charms mimic the irresistible cuteness of toe beans, linked together to form a sweet, wearable tribute to our feline friends.
Step-by-Step Tutorial
Materials
- Polymer clay (white, baby pink, blush pink, light tan/beige)
- Small eye pins (silver)
- Jump rings (4mm – 6mm, silver)
- Lobster clasp
- Jewelry pliers (round nose and flat nose)
- Clay sculpting tools (dotting tool or small ball stylus)
- Blade or craft knife
- Rolling pin or pasta machine
- Baking tile or parchment paper
- Gloss glaze or resin (optional)
Step 1: Prepping the Palette
-
Condition the Clay:
Start by thoroughly conditioning your white, baby pink, and beige clays until they are soft and pliable. This prevents cracking later. -
Mix Custom Shades:
If your store-bought pink is too bright, mix in a tiny amount of white or beige to achieve that soft, fleshy ‘toe bean’ shade visible in the image.
Loose Pins?
If an eye pin slides out after baking, don’t panic. Pull it out completely, add a drop of super glue to the pin shaft, and slide it back into the existing hole.
Step 2: Sculpting the Paws
-
Form the Base Balls:
Roll six equal-sized balls of clay roughly 1 cm in diameter. Alternate the base colors: create three white bases and three pink bases. -
Flatten and Shape:
Gently press each ball flat onto your work surface to form a thick disc. Use your fingers to subtly pinch the top side into three small scallops, creating the toes of the paw shape. -
Indenting the Pads:
Take a large dotting tool or the rounded end of a paintbrush. Press firmly into the center of the ‘palm’ area to create a large indentation for the main pad. -
Creating Toe Indents:
Use a smaller dotting tool to create four smaller indentations in an arc above the main pad, corresponding to the toes. -
Prepare the Beans:
Roll tiny balls of contrasting clay for the pads. For white paws, use pink or tan clay; for pink paws, use a slightly darker rose or mauve clay. -
Insert the Main Pad:
Place a larger contrasting ball into the central indentation and press it down gently so it flattens slightly but remains puffy. -
Insert the Toe Beans:
Place the tiny contrasting balls into the toe indentations. I find using a needle tool helps to position these tiny pieces accurately without squishing them.
Soft & Matte Finish
To get the soft look in the photo, skip the glossy glaze. Instead, buff the cured clay with a soft denim cloth or high-grit sandpaper for a velvety sheen.
Step 3: Assembly Prep & Baking
-
Insert Eye Pins:
Cut your eye pins short (about 0.5 cm). Carefully insert one pin into the top center and one into the bottom center of each paw charm. Ensure the loops are facing the same direction (e.g., flat against the table). -
Secure the Metal:
Gently pinch the clay around the inserted metal stem to secure it. You can add a drop of liquid clay or bake-and-bond on the pin shaft for extra durability. -
Bake:
Arrange the charms on a baking tile. Bake according to your brand’s instructions (usually 275°F/135°C for 15-30 minutes). Let them cool completely before handling.
Step 4: Linking the Bracelet
-
Check Orientation:
Lay out your cooled charms in the desired alternating color pattern to ensure the length fits your wrist. -
Open Jump Rings:
Using two pairs of pliers, twist open your jump rings sideways (never pull them apart outward) to maintain their circular shape. -
Connect Charms:
Hook a jump ring through the bottom loop of the first paw and the top loop of the second paw. Close the ring securely. -
Continue the Chain:
Repeat the linking process until all six paws are connected in a line. -
Add Clasp:
Attach a slightly larger jump ring to one end of the chain and a lobster clasp to the other end using a jump ring. -
Final Polish:
Optional: If you dragged any lint onto the light clay, use a cotton swab with rubbing alcohol or nail polish remover to gently wipe the baked clay clean.
Enjoy wearing your lovely handmade toe-bean bracelet or gift it to a cat lover
Tiny Sushi Characters With Faces
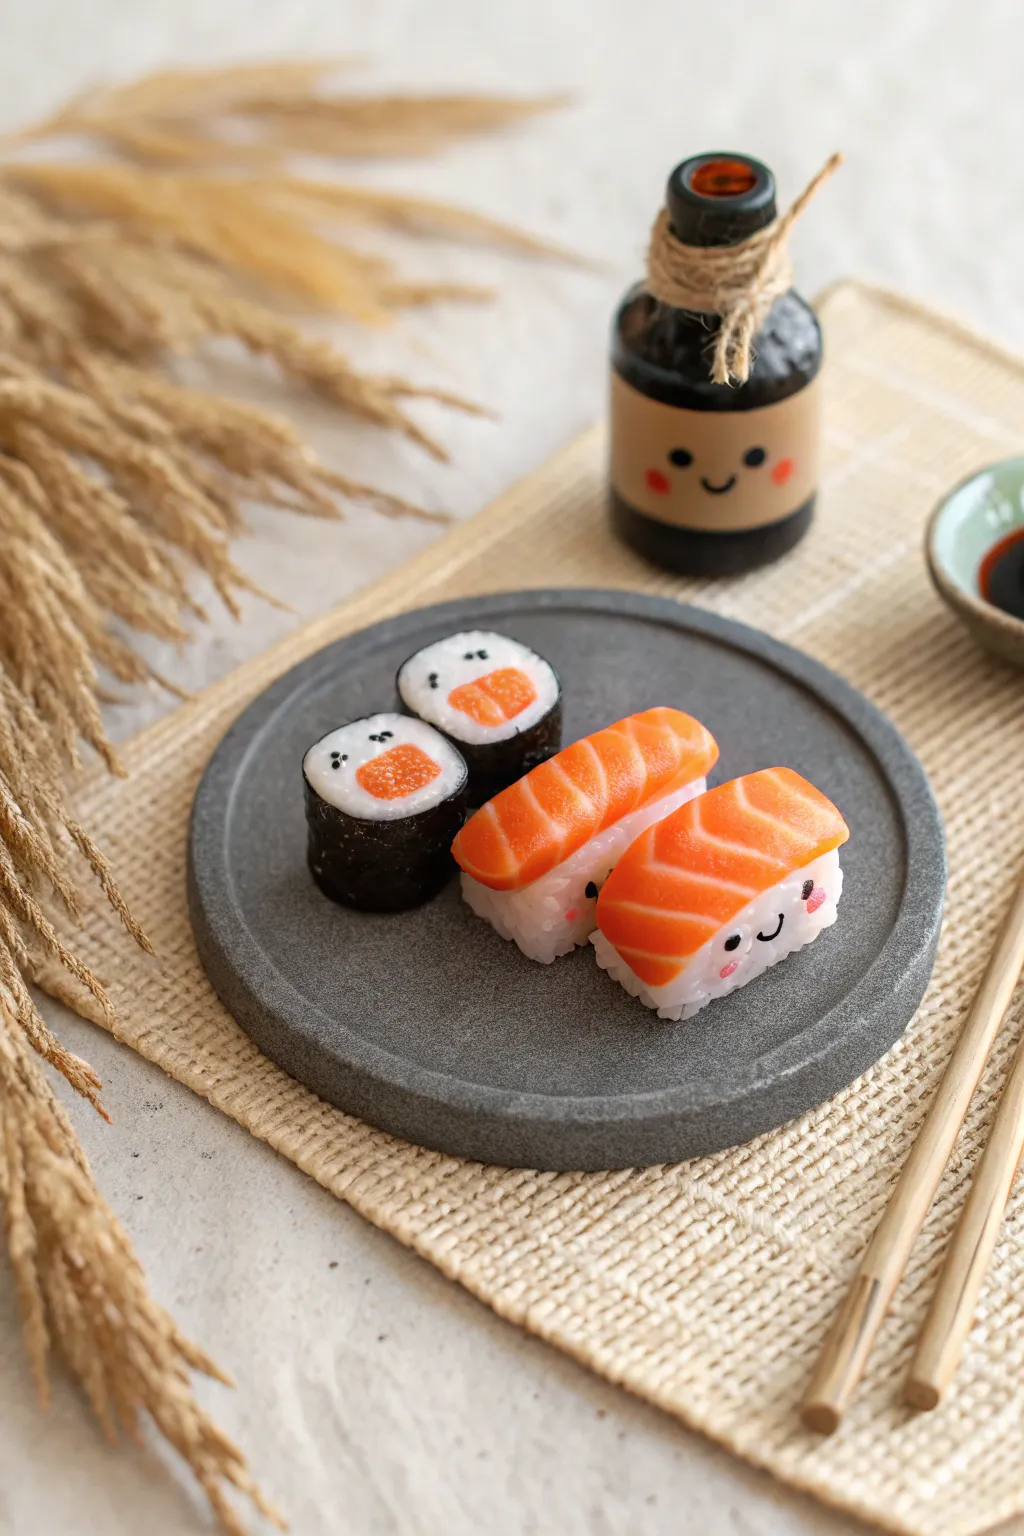
These adorable polymer clay sushi characters bring a playful twist to miniature food crafting, complete with tiny happy faces that are sure to make you smile. You’ll create a set of salmon nigiri and classic maki rolls, perfect for charms or dollhouse displays.
Step-by-Step
Materials
- Polymer clay (white, translucent, orange, black)
- Liquid polymer clay (optional)
- Black acrylic paint
- Pink chalk pastel or blush
- Fine detail paintbrush or dotting tool
- Needle tool or toothpick
- Toothbrush or texturing tool
- Clay blade or craft knife
- Gloss glaze or UV resin
- Small bottle for soy sauce prop (optional)
Step 1: Rice Preparation
-
Mix the perfect rice color:
Start by mixing a large portion of white polymer clay with a very small amount of translucent clay. This gives the ‘rice’ a realistic, slightly waxy finish rather than a flat, opaque white. -
Form the rice bases:
Divide your rice mixture into four equal parts. Shape two into rectangular blocks with rounded corners for the nigiri, and leave the other two for the maki rolls. -
Add texture:
Use a toothbrush or a crumpled ball of aluminum foil to gently dab all over the surface of your rice shapes. This creates the quintessential grainy texture of cooked sushi rice.
Don’t Smush The Rice
Work gently when holding the ‘rice’ parts. If you find you are smoothing out the texture too much, pop the clay in the fridge for 10 minutes to firm it up before handling.
Step 2: Creating the Maki Rolls
-
Make the filling:
Take a small bit of orange clay (or pink for tuna) and roll it into a short, thick cylinder. This will be the center filling of your maki roll. -
Wrap with rice:
Flatten a piece of your textured rice clay into a strip. Carefully wrap this strip around your colored filling, ensuring the seam is smooth and blended. -
Wrap with nori:
Roll out a very thin sheet of black clay to represent the seaweed (nori). Cut a strip that matches the height of your rice roll and wrap it around the outside. Trim any excess. -
Texture the top:
Gently re-texture the white rice area on the top and bottom of the roll using your needle tool to define individual grains, being careful not to mess up the black nori rim.
Step 3: Creating the Salmon Nigiri
-
Mix the salmon color:
Combine orange clay with a touch of translucent and a tiny speck of white. You want a vibrant, fatty salmon color. -
Shape the fish slices:
Form the orange clay into two oblong shapes that are slightly longer and wider than your rectangular rice bases. Flatten them gently so they drape naturally. -
Add fat lines:
Roll very thin threads of white or light translucent clay. Lay them diagonally across your orange slices to mimic the fatty striations of salmon. Gently roll over them with an acrylic roller to embed them into the surface perfectly flat. -
Assemble the nigiri:
Place the finished salmon slices on top of your textured rectangular rice blocks. Press down gently curve the fish over the sides of the rice.
Create a Scene
Make a tiny plate from gray granite-effect clay. Upcycle a tiny glass vial by painting a cream label and a smiley face to create a matching soy sauce character bottle.
Step 4: Bringing Them to Life
-
Paint the eyes:
Using a fine detail brush or a dotting tool dipped in black acrylic paint, add two small dots for eyes on the side of the nigiri rice and on the top face of the maki rolls. -
Draw the mouths:
With the finest brush tip or a needle tool, paint a tiny ‘U’ shape between the eyes for a happy smile. I like to vary the expressions slightly for character. -
Add blushing cheeks:
Scrape a bit of pink chalk pastel into a powder. Use a small, dry brush to gently dust rosy cheeks next to the eyes on both the rice and the nori. -
Secure the faces:
If you are worried about smudging, you can pre-bake the pieces for 5 minutes before painting, or just be very careful not to touch the wet paint before the final bake.
Step 5: Baking and Finishing
-
Bake:
Bake all your pieces according to your polymer clay package instructions (usually around 275°F or 130°C for 15-30 minutes). Let them cool completely. -
Glaze:
For a fresh, appetizing look, apply a coat of gloss glaze or UV resin specifically to the ‘fish’ part of the nigiri. This makes it look fresh and raw. Leave the rice matte for contrast.
Once the glaze is dry, your happy little sushi family is ready to be displayed on a miniature desk or turned into the cutest jewelry set you own

TRACK YOUR CERAMIC JOURNEY
Capture glaze tests, firing details, and creative progress—all in one simple printable. Make your projects easier to repeat and improve.
Ice Cream Cones With Animal Ears
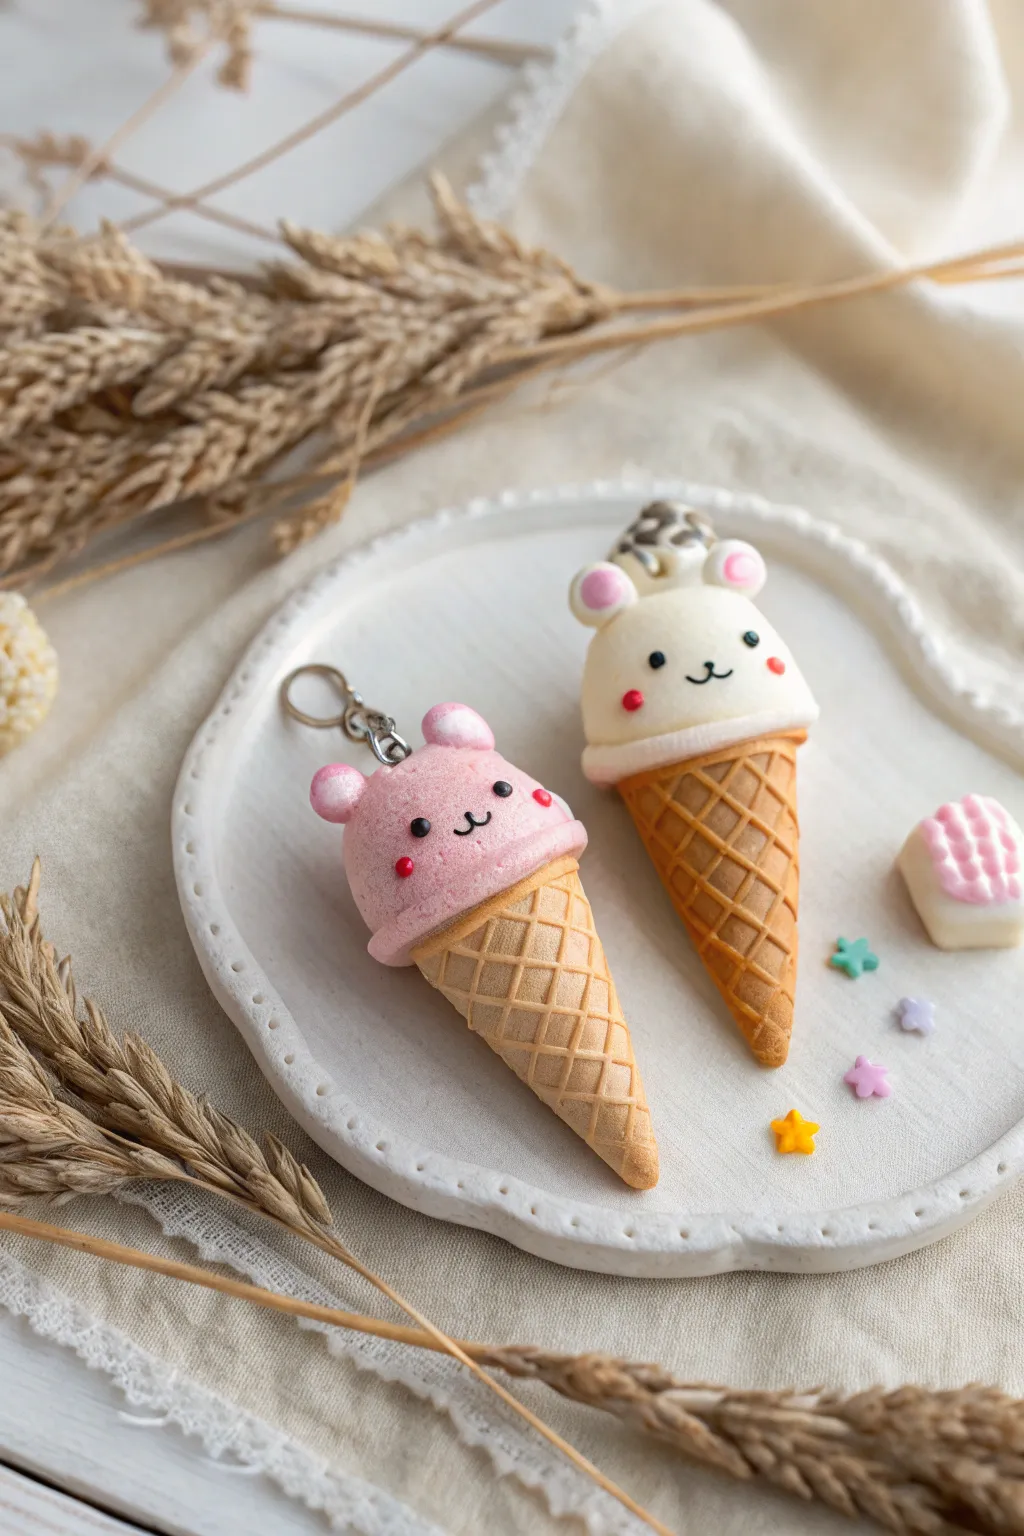
These adorable ice cream cone charms blend the sweetness of dessert with cute animal features. Featuring textured waffle cones and kawaii bear faces, they make perfect keychains or decorative accents.
Detailed Instructions
Materials
- Polymer clay (tan/biscuit, white, pale pink, dark brown, red)
- Liquid polymer clay (white/translucent)
- Needle tool or toothpick
- Ball stylus tool (small)
- Texture sheet or fine mesh (for ice cream texture)
- Craft knife or scalpel
- Eye pins (if making charms)
- Small paintbrush
- Gloss glaze (optional)
- Oven
Step 1: Crafting the Waffle Cone
-
Condition the Clay:
Start by conditioning your tan or biscuit-colored clay until it’s soft and pliable. Roll it into a smooth ball to remove any air bubbles. -
Form the Cone Base:
Roll the ball into a tapered log shape, creating a distinct cone silhouette. Flatten the top slightly where the ice cream scoop will eventually sit. -
Create the Grid Pattern:
Use the back of a craft knife or a needle tool to gently press diagonal lines into the clay surface. Rotate the cone and cross these lines in the opposite direction to form the classic diamond waffle pattern. -
Texture the Surface:
For a realistic baked look, lightly tap the surface of the cone with a toothbrush or piece of sandpaper, being careful not to ruin your grid lines. -
Pre-Bake (Optional):
I like to bake the cones alone for about 10 minutes at the recommended temperature. This firms them up so you don’t accidentally squash the waffle pattern while adding the ice cream later.
Clean Clay Tip
Use baby wipes or hand sanitizer to clean your hands between colors. White clay picks up lint easily, so handle the light scoop parts before touching dark colors.
Step 2: Sculpting the Animal Scoop
-
Roll the Scoop:
Take a portion of white or pink clay (slightly larger than the cone top) and roll a smooth ball. Flatten the bottom and press it gently onto your prepared cone. -
Create the Overhang:
Using a needle tool, gently pull the bottom edge of the ball downward slightly to mimic ice cream melting over the rim of the cone. Smooth this connection seamlessly. -
Add Texture:
Use a toothbrush or a crumpled ball of aluminum foil to stipple the surface of the round scoop. This gives it that fluffy, frozen dairy texture. -
Form the Ears:
Roll two tiny balls of the same color clay. Press a smaller ball stylus into the center of each to create an indentation, then attach them to the top of the head. -
Add Inner Ear Details:
Place a minuscule dot of pink clay inside the indentation of each ear and smooth it out with your smallest ball tool. -
Insert Hardware:
If you are turning this into a keychain or charm, insert an eye pin into the top center of the head now. Using a dab of liquid clay on the pin helps secure it permanently.
Step 3: Bringing the Face to Life
-
Place the Eyes:
Roll two impossibly tiny spheres of black clay. Position them wide apart on the face and press them in gently so they don’t protrude too much. -
Draw the Mouth:
Roll a very thin snake of black clay and shape it into a tiny ‘w’ or anchor shape for the mouth. Apply it centrally between the eyes. -
Add Cheeks:
Using red or dark pink clay, create two small dots and place them just below the eyes for that classic blushing look. -
The Final Topping:
For extra flair, like on the white bear, you can add a small swirl of ‘whipped cream’ (white clay) or a sprinkle pattern on top between the ears. -
Final Bake:
Bake the completed piece according to your clay manufacturer’s instructions, usually around 275°F (130°C) for 15-30 minutes. -
Shade and Glaze:
Once cool, use soft pastels to lightly brush a toasted brown color onto the waffle cone grid. Finish by glazing just the eyes and mouth for a wet, shiny look.
Flavor Variations
Swap the bear for a cat by making triangular ears, or drizzle liquid clay ‘sauce’ over the head before baking for a delicious chocolate-dipped effect.
Attach a ring to your new charm and enjoy carrying a little sweetness with you everywhere
Pastel Dino Minis in Plushy Shapes
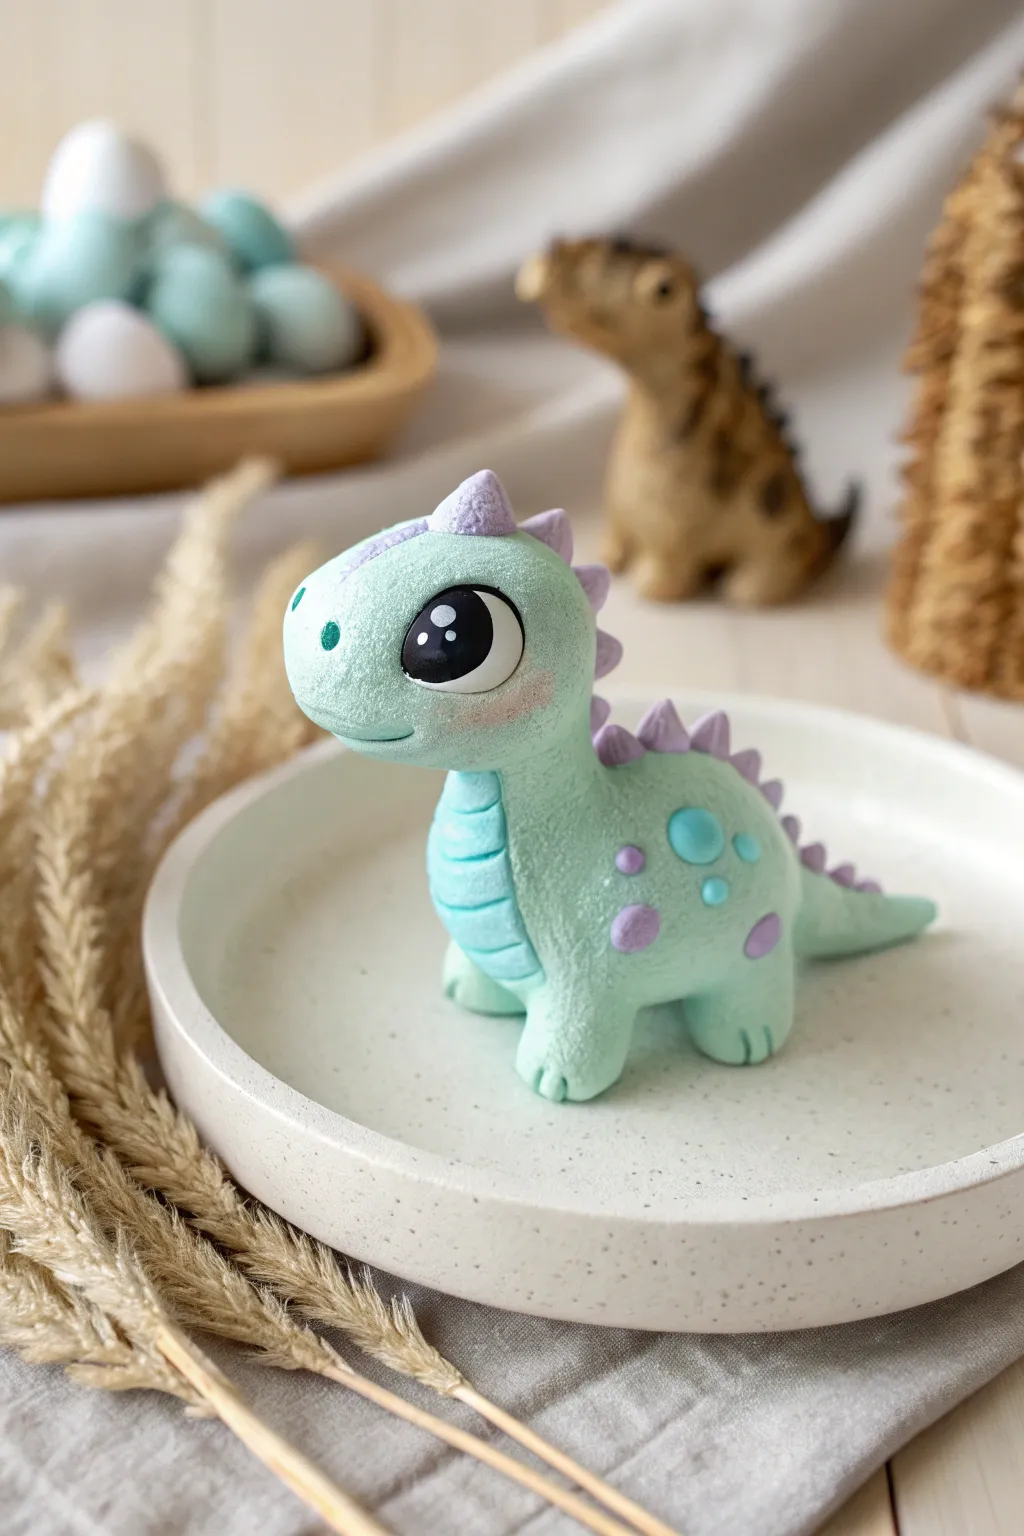
Create a sweet, mint-colored companion that looks soft enough to hug but is made entirely of polymer clay. This project features a clever texturing technique to mimic a fabric plush toy, finished with adorable painted eyes and pastel accents.
Step-by-Step Tutorial
Materials
- Polymer clay (Mint Green, Light Purple, White, teal/blue)
- Black acrylic paint
- White acrylic paint
- Gloss glaze (optional for eyes)
- Toothbrush or stiffness texturing tool
- Needle tool or toothpick
- Small ball tool
- Fine detail paintbrush
- Rubbing alcohol and cotton swabs
Step 1: Shaping the Base
-
Mix the Main Color:
Condition your mint green clay until it is soft and pliable. If the green is too saturated, mix in a generous amount of white clay to achieve that soft, pastel milkshake hue. -
Form the Body:
Roll a smooth ball of mint clay, then gently taper the top portion to create a slight pear shape. This will be the main torso of the dinosaur. -
Sculpt the Head:
Roll a second, slightly smaller ball for the head. Flatten the front face area just a tiny bit to create a snout, and use your thumb to smooth the connection area. -
Join Head to Body:
Press the head firmly onto the tapered top of the body. You can use a small piece of wire or a toothpick inside for extra stability if you’re worried about the weight. -
Add the Legs:
Create four small, squat cylinders from the mint clay. The back legs should be slightly chunkier. Press them onto the base of the body and smooth the seams carefully with a modeling tool so they look like one continuous piece. -
Create the Tail:
Roll a cone of mint clay and attach it to the lower back of the dinosaur. Smooth the seam completely, curving the tip slightly for a playful look.
Sticky Fingerprints?
If you smudge the texture while handling, just revisit that spot with your toothbrush before baking. A light dab of cornstarch can also help keep tools from sticking.
Step 2: Adding Details & Texture
-
Mark the Belly:
Take a lighter shade of mint or blue clay and flatten it into a thin oval. Press this onto the front chest/belly area. Use a needle tool to press horizontal lines across this patch to create glowing belly ridges. -
The Plush Texture:
This is the magic step. Take an old toothbrush or a stiff-bristle brush and gently tap it all over the green clay surfaces (head, body, legs, tail). Do not drag the brush; just tap-tap-tap to create a fuzzy, fabric-like stipple texture. -
Form the Spikes:
Roll tiny balls of light purple clay and pinch them into triangles. Carefully place a row of these spikes running from the top of the head down to the middle of the tail. -
Add Decorative Spots:
Create small flat circles using purple and teal clay. Press these randomly onto the dinosaur’s flank and leg to look like fabric polka dots. Gently texture these spots with your brush to match the body. -
Define the Face:
Use a ball tool to create shallow indents where the eyes will go. Use a needle tool to gently carve a simple, curved mouth line. -
Toe Details:
Use a needle tool or knife to make two small indentations on the front of each foot to suggest toes.
Pro Tip: Seamless
For invisible seams on the legs, use a silicone color shaper tool to drag the clay across the join, then texture over it completely to hide the connection.
Step 3: Finishing Touches
-
Bake the Clay:
Bake your dinosaur according to your clay manufacturer’s instructions (usually 275°F/135°C for 15-30 minutes). I recommend tenting foil over it to prevent browning the pastel colors. -
Paint the Eyes:
Once cool, paint the eye sockets black. Let dry, then add a large white circle in the upper corner and a tiny white dot opposite it for a ‘kawaii’ reflection. -
Rosy Cheeks:
Use a dry brush with a tiny amount of pink chalk pastel or blush powder to dust gentle rosy circles just below the eyes. -
Glaze the Eyes:
To make the eyes pop against the matte ‘plush’ texture, apply a drop of high-gloss glaze or UV resin only to the black eye area.
Now you have a tiny prehistoric friend that looks deceptively soft and cuddly.
Cloud and Rainbow Pocket Buddies
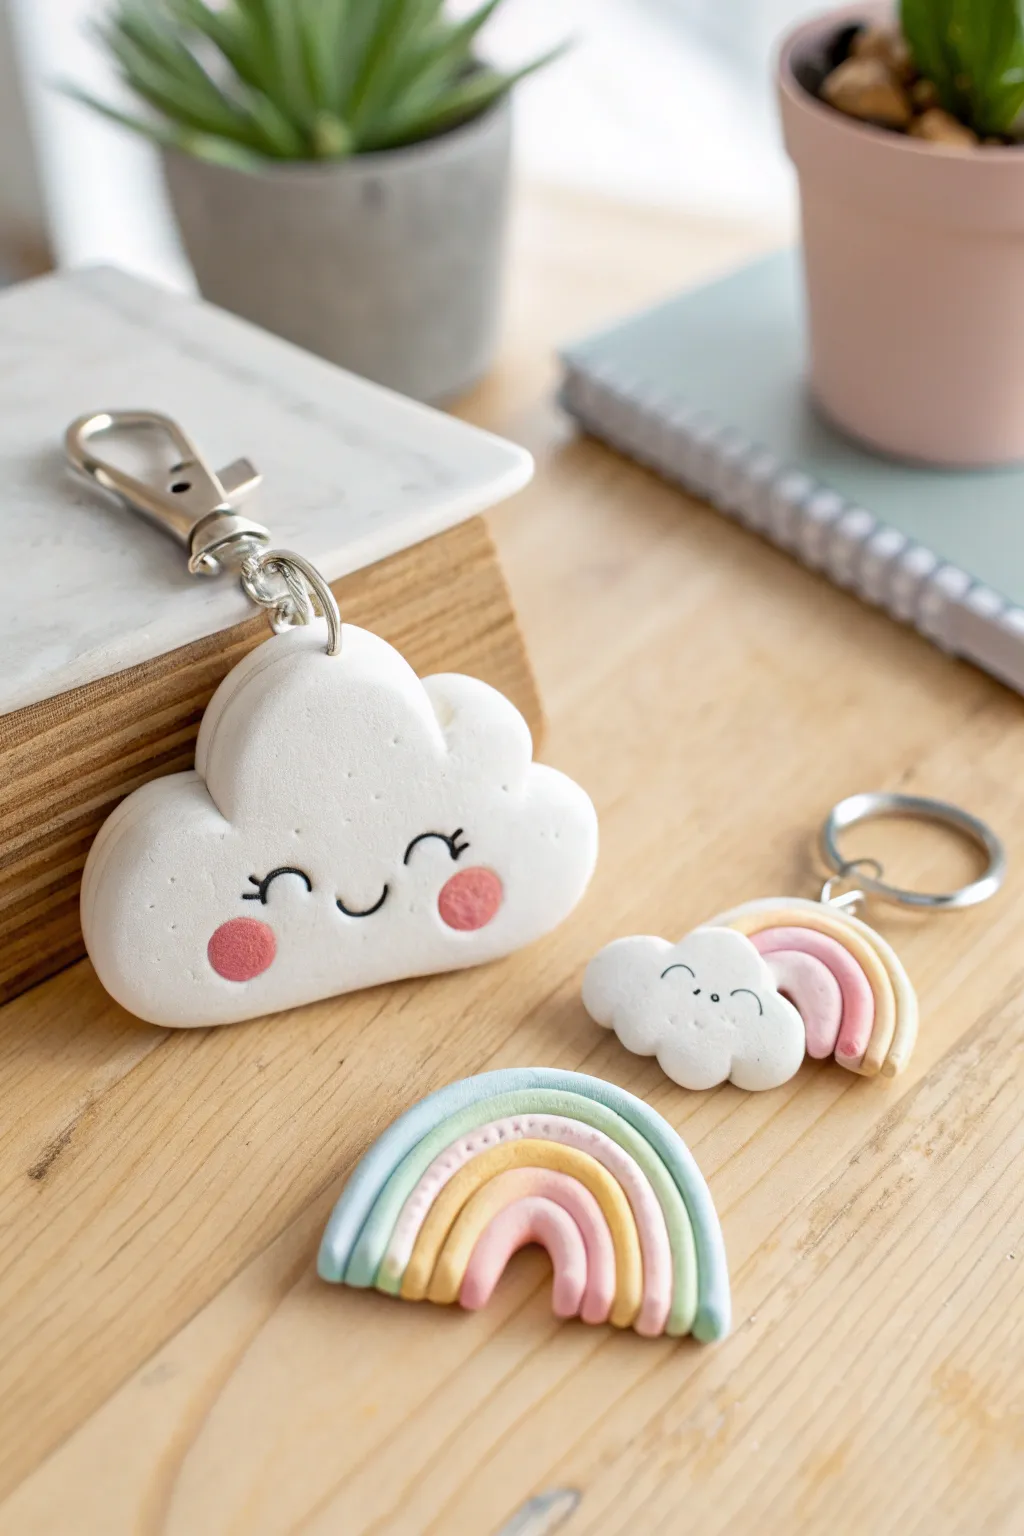
These adorable accessories bring a touch of sunshine to your day with their pastel hues and sweet, smiling faces. Perfect for beginners, this set includes a fluffy cloud keychain and a matching rainbow charm that can easily be gifted or kept as a cheerful pocket companion.
Step-by-Step Guide
Materials
- White polymer clay
- Pastel polymer clay pack (pink, yellow, mint green, light blue)
- Black acrylic paint or fine-point permanent marker
- Rolling pin or smooth jar
- Cloud-shaped cookie cutter (optional)
- Small eye screws
- Keychain hardware (lobsters clasps and split rings)
- Needle tool or toothpick
- Ball stylus tool
- Gloss glaze (optional)
- Clay adhesive or liquid clay
Step 1: Shaping the Happy Cloud
-
Condition the white clay:
Start by warming a generous block of white polymer clay in your hands until it becomes soft and pliable. Roll it into a smooth ball, ensuring there are no cracks. -
Form the cloud base:
Flatten the ball into a thick patty, about 1/4 inch thick. Use your fingers to gently push and mold the edges into fluffy, rounded bumps to create a classic cloud shape. If you have a cookie cutter, you can use that instead for uniformity. -
Refine the edges:
Smooth out the sides with your finger to remove any sharp angles or cutter marks. The goal is for the cloud to look soft and pillowy. -
Add rosy cheeks:
Take two tiny pinch-sized pieces of pastel pink clay. Roll them into spheres and flatten them slightly. Press these firmly onto the cloud’s surface where you want the cheeks to be. -
Insert the hardware:
Screw a small eye screw into the top center of the cloud. If the clay distorts, gently reshape it around the screw to secure it.
Dirty Clay Fix
White clay picks up dust easily. Keep baby wipes nearby to clean your hands and tools often. Use a q-tip with rubbing alcohol to wipe away lint before baking.
Step 2: Creating the Rainbow Charm
-
Roll the rainbow strands:
Select your four pastel colors (blue, green, yellow, pink). Roll each color into a long, thin snake or rope. Try to keep them all the same thickness for a neat finish. -
Assemble the arch:
Lay the pink rope down first as the inner arch. Curve the yellow rope over it, followed by the green, and finally the blue on the outside. Press them gently together side-by-side so they bond. -
Trim the ends:
Using a blade or a craft knife, cut the bottom of the rainbow straight across so all the strands are flush and even. -
Add a mini cloud:
Form a small, irregular blob of white clay into a mini cloud shape. Attach this to the bottom left corner of your rainbow, covering the raw ends of the clay ropes. -
Add hardware to rainbow:
Just like with the large cloud, careful insert an eye screw into the top center of the blue arch.
Make it a Magnet
Instead of keychain hardware, glue a strong neodymium magnet to the back of the large cloud after baking to turn it into adorable fridge decor.
Step 3: Baking and Detailing
-
Bake the pieces:
Place your clay creations on a baking sheet lined with parchment paper. Bake according to your specific brand of polymer clay’s instructions—usually around 275°F (135°C) for 15-30 minutes. -
Cool completely:
Let the pieces cool down entirely before handling. Polymer clay is slightly fragile while hot and hardens as it cools. -
Draw the faces:
Use a fine liner brush with black acrylic paint or a specialized marker to draw the sleepy eyes and wide smile. I find a toothpick dipped in paint works great for tiny details. -
Seal the paint:
Once the paint is totally dry, you can brush on a layer of gloss glaze if you want a shiny finish, though the matte look is also very cute. -
Attach keychains:
Use pliers to open the jump ring on your keychain hardware. Loop it through the eye screw on your clay piece and close the ring securely.
Step 4: The Standalone Rainbow
-
Create larger ropes:
For the standalone rainbow prop, use slightly thicker ropes of clay. Repeat the arching process used for the charm. -
Texture the back (optional):
If you plan to use this as a magnet, slightly flatten the back with your rolling pin so it sits flush against surfaces. -
Final bake:
Bake this piece alongside your other charms.
Now you have a set of delightful handmade charms ready to attach to your keys or backpack
Flower Bud Faces for Springy Charms
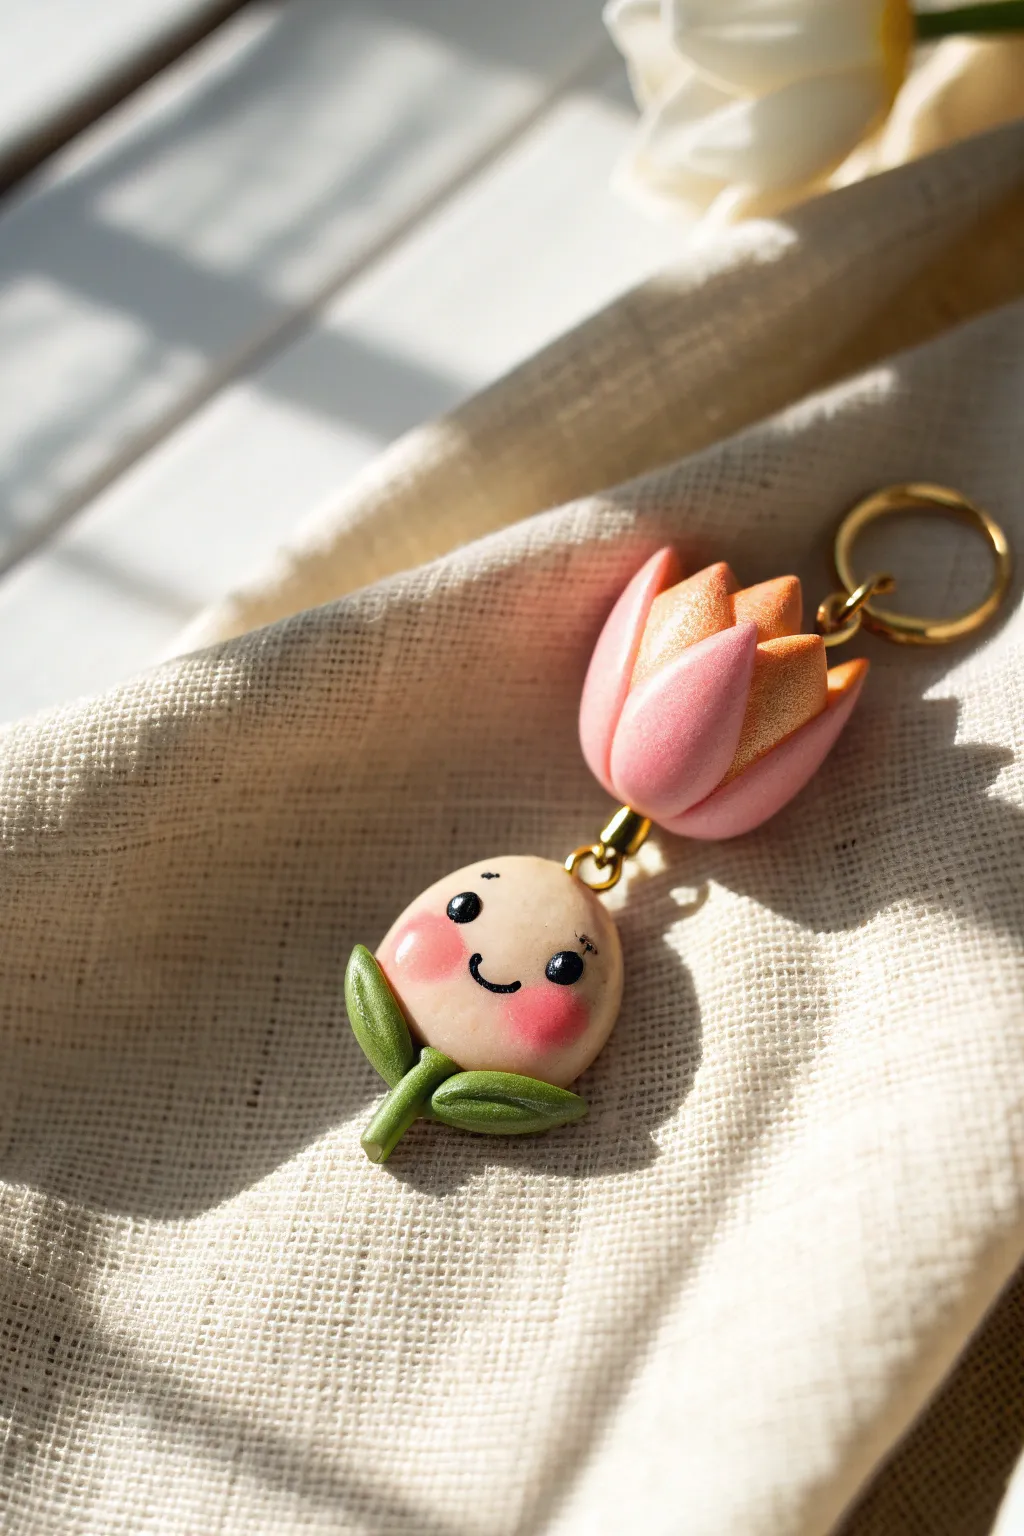
Capture the sweetness of spring with this adorable two-part polymer clay charm. Featuring a shimmering tulip bloom and a cheerful, blushing bud face, this project combines simple sculpting with delicate painting for a truly heartwarming accessory.
Step-by-Step Tutorial
Materials
- Polymer clay (beige/light skin tone, pink, translucent white, green)
- Gold mica powder or fine gold glitter
- Soft pastel chalks (pink, red)
- Acrylic paint (black, white)
- Fine detail paintbrush or dotting tool
- Eye pins (gold finish)
- Jump rings (gold finish)
- Keyring clasp
- Sculpting tools (needle tool, ball stylus)
- Gloss varnish or UV resin
- Oven for baking
Step 1: Sculpting the Tulip Bloom
-
Prepare the petal colors:
Mix a soft pink clay for the outer petals. For the inner petals, mix translucent clay with a pinch of gold mica powder or use a pre-mixed metallic gold clay to give it that inner glow. -
Form the inner core:
Create a small cone shape from your gold/translucent mix. This will be the center that the outer petals hug. -
Shape the petals:
Roll small balls of the pink clay and flatten them into teardrop shapes. Gently curve them so they become concave, like real petals. -
Assemble the flower:
Attach three to four pink petals around your central gold core, overlapping them slightly at the base. Pinch the bottom together to seal them. -
Add the hardware:
Trim the bottom of the flower to make it neat. Insert a gold eye pin through the center top or embed it securely into the base of the flower structure. -
Bake the flower:
Bake this piece according to your clay package instructions (usually 275°F/130°C for 15-30 minutes). Let it cool completely.
Step 2: Creating the Face Buddy
-
Shape the head:
Roll a smooth, round ball of beige or light skin-tone clay. Flatten it slightly into a rounded bun shape, ensuring it’s thick enough to hold an eye pin. -
Create the stem and leaves:
Take a small amount of green clay and roll a tiny log for the stem. Attach this to the bottom center of the head. Shape two small teardrops of green clay for leaves. -
Attach the leaves:
Press the green teardrops onto either side of the stem, curving them slightly upward to hug the bottom of the face. Use a needle tool to drag a gentle center vein line down each leaf. -
Insert the eye pin:
Insert a gold eye pin into the very top center of the beige head. You may want to add a drop of liquid clay or Bake & Bond on the pin for extra security. -
Apply the blush:
Shave a little pink soft pastel into a powder. using a soft, dry brush, gently dust rosy cheeks onto the raw clay face before baking. The powder bonds better to unbaked clay. -
Final bake:
Bake the face piece separately following the same temperature and time guidelines as before. Allow it to cool fully before painting.
Loose Eye Pins?
If your metal pin pulls out after baking, pull it all the way out, put a dab of superglue on the shaft, and slide it back into the hole for a permanent hold.
Step 3: Finishing Touches
-
Paint the face features:
Using a very fine detail brush or a needle tool dipped in black acrylic paint, carefully draw two small round eyes and a simple ‘U’ shape smile between the blushed cheeks. -
Add the highlights:
I like to use a toothpick to add a tiny dot of white paint to the upper right corner of each eye. This ‘catchlight’ brings the character to life. -
Seal the charm:
Once the paint is totally dry, coat the face and the flower petals with a gloss varnish or a thin layer of UV resin to protect the paint and add a ceramic-like shine. -
Assemble the keychain:
Use pliers to open a small jump ring. Connect the bottom loop of the flower’s eye pin to the top loop of the face buddy’s eye pin. -
Final attachment:
Attach a larger jump ring and your keyring clasp to the top of the flower bud. Ensure all rings are closed securely.
Level Up: Dew Drops
Add tiny drops of clear UV resin to the green leaves or flower petals and cure them hard. It mimics fresh morning dew and adds great texture.
Clip this delightful duo onto your bag or keys to keep a smiling adventurous spirit with you all day long
Mini Bento Box With Tiny Animal Foods
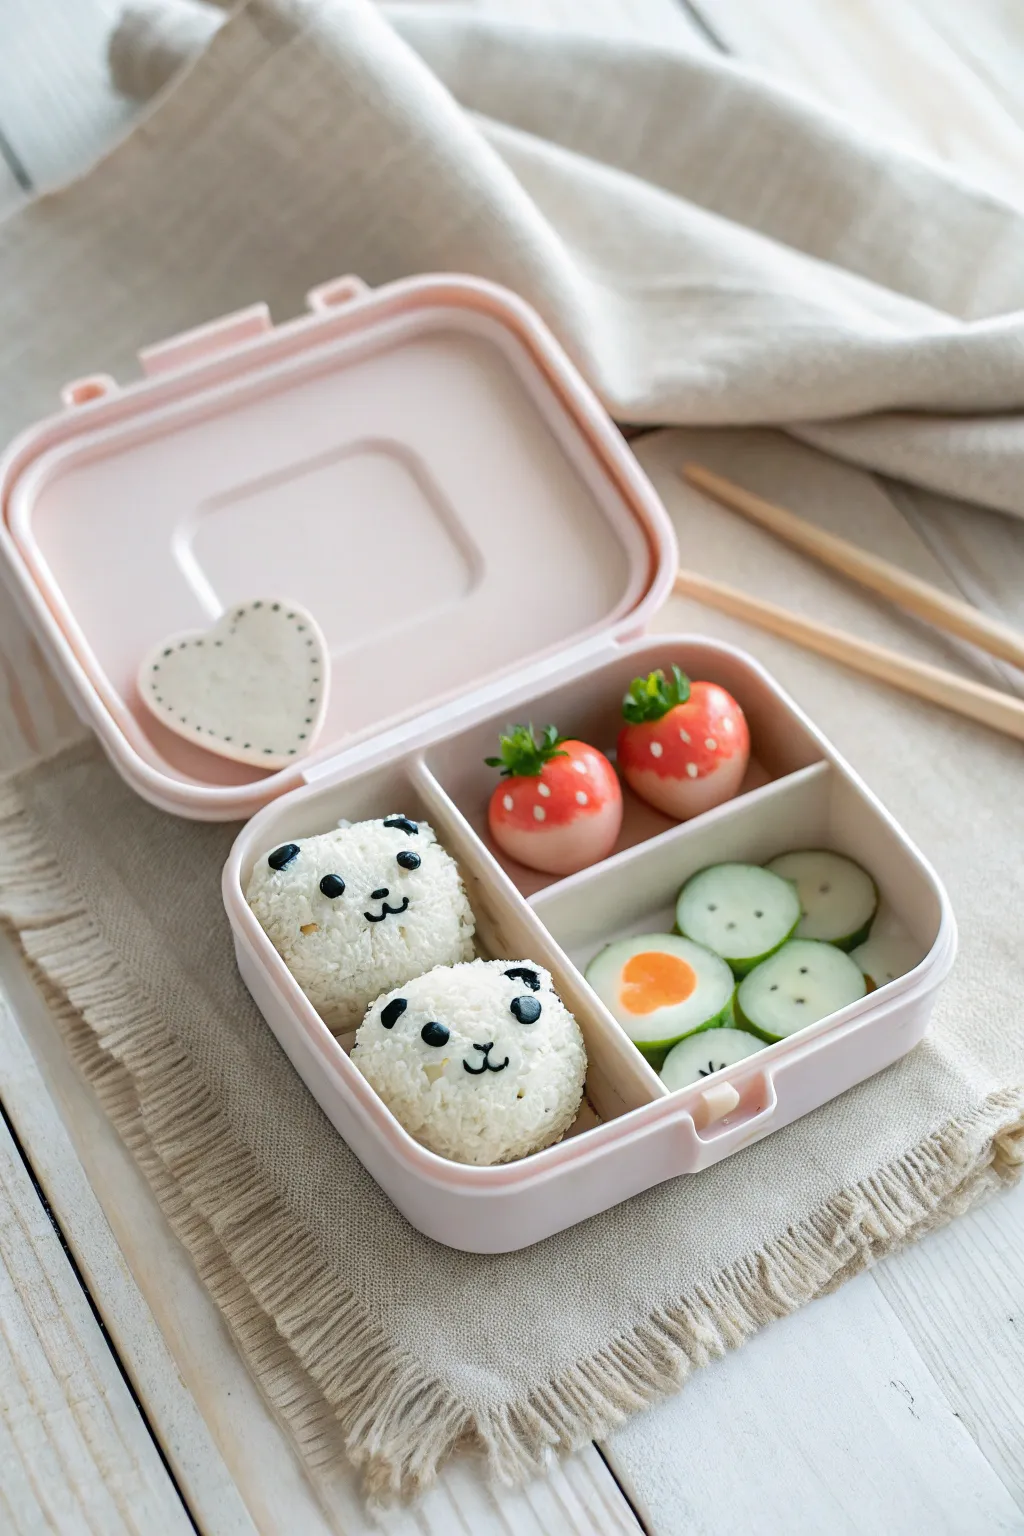
Treat your miniature collection to this adorable bento box featuring cheerful panda rice balls and tiny sides. This beginner-friendly project uses basic sculpting techniques to transform polymer clay into realistic-looking kawaii lunch items.
Step-by-Step
Materials
- Polymer clay (white, black, red, green, translucent, pale yellow)
- Small square cutter or blade
- Ball stylus tool
- Needle tool
- Toothbrush or texturing tool
- Chalk pastels (orange, pink)
- Soft brush
- Liquid polymer clay (optional)
- Gloss glaze or UV resin
Step 1: Sculpting the Bento Base
-
Form the base:
Start by conditioning a light pink clay for the container. Roll it into a thick sheet, about 4-5mm thick. Cut a rounded square shape, approximately 5cm x 5cm, to serve as the bottom of the box. -
Build the walls:
Roll a snake of the same pink clay and flatten it slightly to create the box walls. wrap this around the perimeter of your base, blending the seams on the inside and outside so it looks like one solid piece. -
Add dividers:
Create two small strips of pink clay to act as internal dividers. Place one down the center vertically, stopping halfway, and another horizontally to create three distinct compartments: one large section for the rice and two smaller ones for sides. -
Make the lid:
For the lid shown in the background, create a identical rounded square shape. Add a small ‘lip’ around the edge and two tiny hinge details on one side for realism.
Step 2: Creating the Panda Onigiri
-
Shape the rice balls:
Roll two balls of white clay and then gently flatten them into soft, rounded triangle shapes. These will be your onigiri heads. -
Texture the rice:
To mimic the texture of rice grains, gently tap the surface of the white clay all over with a toothbrush or a stiff bristle brush. Don’t press too hard; just enough to break up the smooth surface. -
Add panda features:
For the ears, attach two tiny black semi-circles to the top corners of each rice ball. Use a needle tool to press them securely into the textured clay. -
Create the faces:
Roll impossibly tiny snakes of black clay for the nose and mouth. Place these carefully with a needle tool. Add two small black dots for eyes. The placement is key for that “kawaii” look—keep the features low on the face. -
Place into the box:
Nestle the two finished pandas snugly into the largest compartment of your bento box.
Tiny Texture Tip
If the toothbrush texture isn’t distinct enough for the rice, try using a ball of aluminum foil rolled over the clay surface for deeper, irregular indentations.
Step 3: Crafting the Side Dishes
-
Form the strawberries:
Mix red clay with a tiny bit of white to get a soft strawberry pink-red. Roll two teardrop shapes. Flatten the bottom slightly so they stand up. -
Add greenery:
Using green clay, cut tiny star shapes or individual leaves and attach them to the top of each strawberry. Texture the leaves with a needle tool. -
Adding seeds:
For the white seed details, roll tiny specks of white clay and press them onto the red surface, or use a white paint marker after baking. -
Make cucumber slices:
Create a ‘cane’ by wrapping a log of translucent green (mixed with a little white for opacity) with a thin sheet of darker green clay. Slice thin rounds from this log. -
Create the egg slice:
Make a similar cane with a white outer ring and an orange-yellow center for the yolk. Slice one piece and place it amongst the cucumbers. -
Detail the cucumbers:
Using a needle tool, poke three tiny dots into some cucumber slices to make faces. Add tiny black clay seeds or eyes if desired. -
Assemble the sides:
Arrange the strawberries in one small compartment and layer the cucumber and egg slices in the remaining compartment. -
Finishing touches:
Bake the entire piece according to your clay manufacturer’s instructions. Once cool, you can garnish the red ‘strawberries’ and the egg yolk with a touch of gloss glaze for a fresh, wet look.
Level Up: Mix Media
Instead of clay seeds for the strawberries, bake them without seeds and use white acrylic paint applied with a toothpick afterwards for sharper, brighter details.
Enjoy displaying your tiny, delicious-looking masterpiece alongside your other miniature creations
Sleepy Stars and Tiny Moon Charms
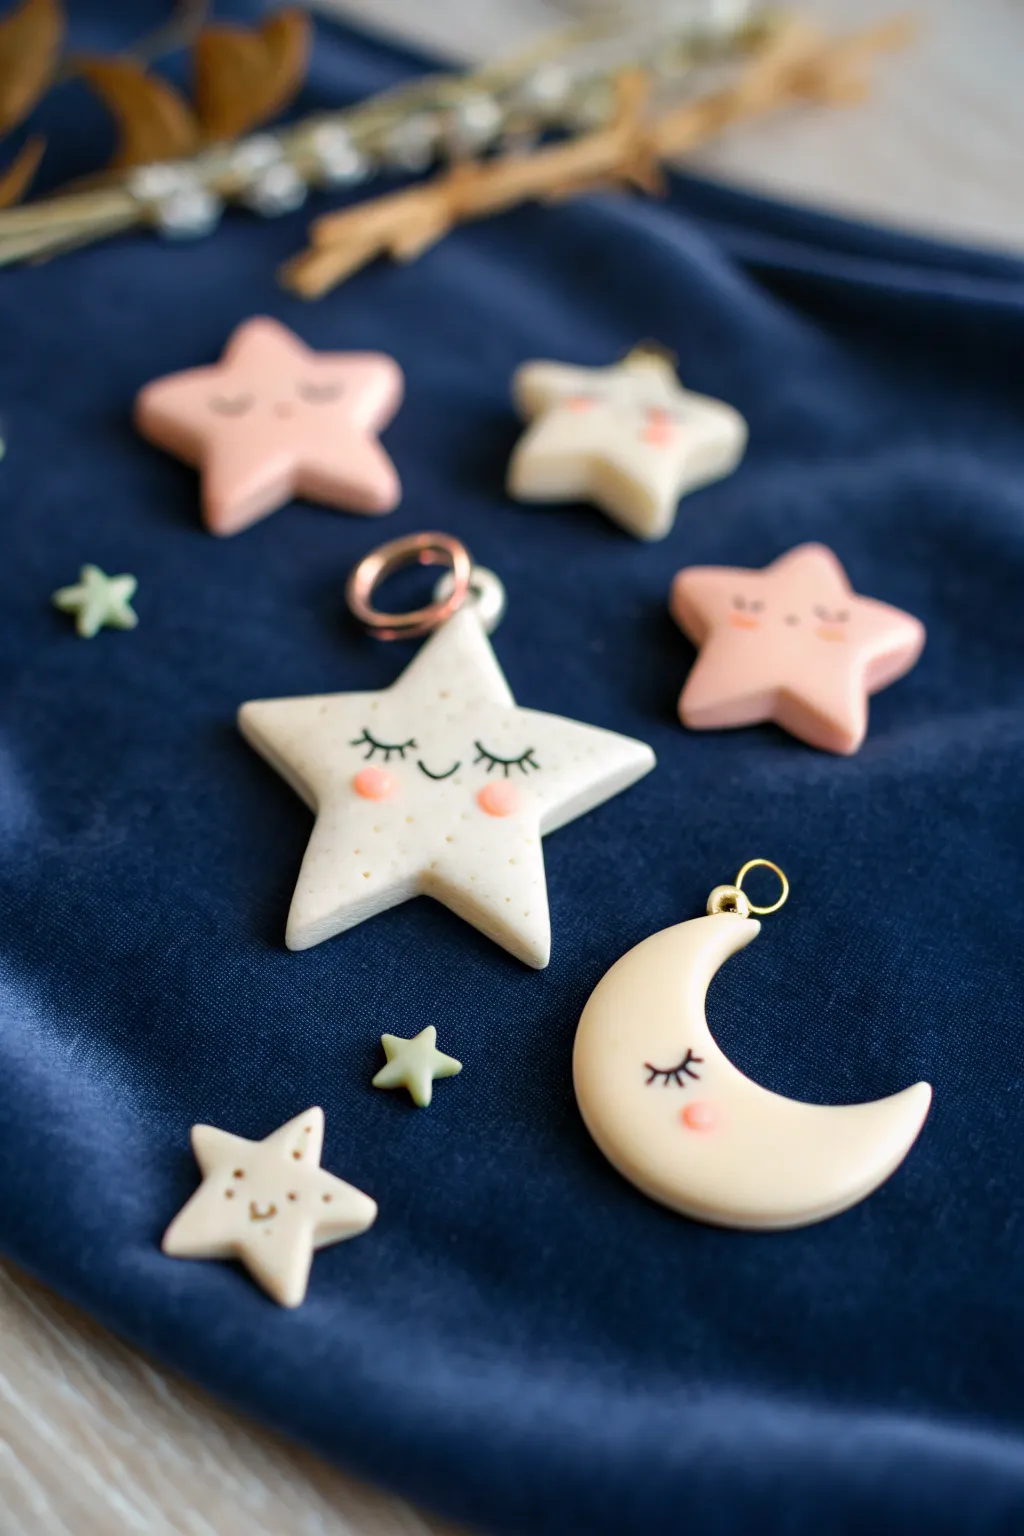
Bring the night sky down to earth with these adorable, sleepy-faced celestial charms. Perfect for beginners and experts alike, these polymer clay creations feature sweet expressions, gentle color palettes, and charming details that make lovely pendants or mobile decorations.
Step-by-Step Guide
Materials
- Polymer clay (white, beige, soft pink, pale yellow)
- Acrylic paint (black for eyes, brown for details)
- Soft artist pastels (pink or reddish hues)
- Fine detail paintbrush or needle tool
- Star-shaped cookie cutters (various sizes)
- Circular cutter (for the moon)
- Rolling pin or clay machine
- Jump rings and eye pins (gold or copper)
- Gloss or matte varnish (optional)
- Clay sculpting tools
- Oven for baking
Step 1: Shaping the Celestial Bodies
-
Condition the Clay:
Begin by thoroughly kneading your white or pale beige clay until it is soft and pliable. This prevents cracks during baking. I like to mix a tiny bit of translucent clay into the white for a more porcelain-like finish. -
Roll the Slab:
Roll out the clay on a clean surface to an even thickness of about 4-5mm. You want them thick enough to be sturdy but not too heavy. -
Cut Out Stars:
Using your star-shaped cutters, press firmly into the clay to create several star shapes. Wiggle the cutter slightly to release the clay cleanly. -
Soften the Edges:
Gently tap the edges of your cut-out stars with a fingertip to round them off slightly, removing the sharp ‘cookie-cutter’ look for a softer, puffier appearance. -
Form the Moon:
Use a round circle cutter to cut a circle, then offset the cutter and cut again to create a crescent moon shape. Alternatively, roll a thick log of yellow-tinted clay, taper the ends, and curve it into a ‘C’ shape. -
Create Smaller Stars:
For the tiny filler stars shown in the image, hand-mold very small bits of clay into star shapes or use a mini plunger cutter. These look great in pale green or yellow.
Smooth Surface Secret
Before baking, gently wipe your raw clay pieces with a baby wipe or a finger dipped in baby oil to remove fingerprints and dust.
Step 2: Adding Faces and Details
-
Molding Cheeks:
Take tiny, poppy-seed-sized balls of pink clay. Press them gently onto the ‘face’ area of your stars and moon to serve as rosy cheeks. Flatten them so they merge well with the base clay. -
Adding Speckles:
For the textured look on the large white star, use an old toothbrush or a stiff bristled brush to gently flick or stipple tiny indentations onto the surface. You can also mix in faux granite specks if you have special effect clay. -
Pre-Baking Hardware:
Insert a metal eye pin carefully into the top point of your stars or the top curve of the moon. A dab of liquid bakeable clay or TLS helps secure the pin inside the raw clay. -
Baking:
Place all your pieces on a baking tile or parchment-lined tray. Bake according to your brand of polymer clay instructions (usually around 275°F/135°C for 15-30 minutes). -
Cooling Down:
Allow the pieces to cool completely inside the turned-off oven or on a wire rack. Don’t touch them while hot, as they are fragile until fully cooled.
Glow in the Dark
Mix glow-in-the-dark pigment powder into your white clay before rolling it out so your stars actually shine at night.
Step 3: Painting and Assembly
-
Drawing the Eyes:
Using a very fine detail brush and black acrylic paint, carefully paint two closed, curved eyelids with tiny lashes. The expression should look peaceful and sleeping. -
Adding a Smile:
Paint a tiny ‘u’ shape between the cheeks for a sweet little smile. Keep the line thin for delicacy. -
Enhancing Cheeks:
If you didn’t use pink clay for cheeks earlier, or want more depth, scrape some pink soft pastel into a powder. Apply it gently over the cheek area with a dry soft brush for a blushing effect. -
Sealing the Charm:
Once the paint is fully dry, coat the charms with a thin layer of matte or gloss varnish to protect the surface, especially the painted details. -
Adding Hardware:
Open a jump ring with pliers and loop it through the eye pin you baked into the charm. Close the jump ring securely. -
Final Touches:
Attach a larger decorative ring or lanyard clasp if you plan to use these as keychains or zipper pulls.
Now your dreamy collection is ready to add a touch of calm magic to any accessory
Cute Ghosts and Happy Pumpkin Minis
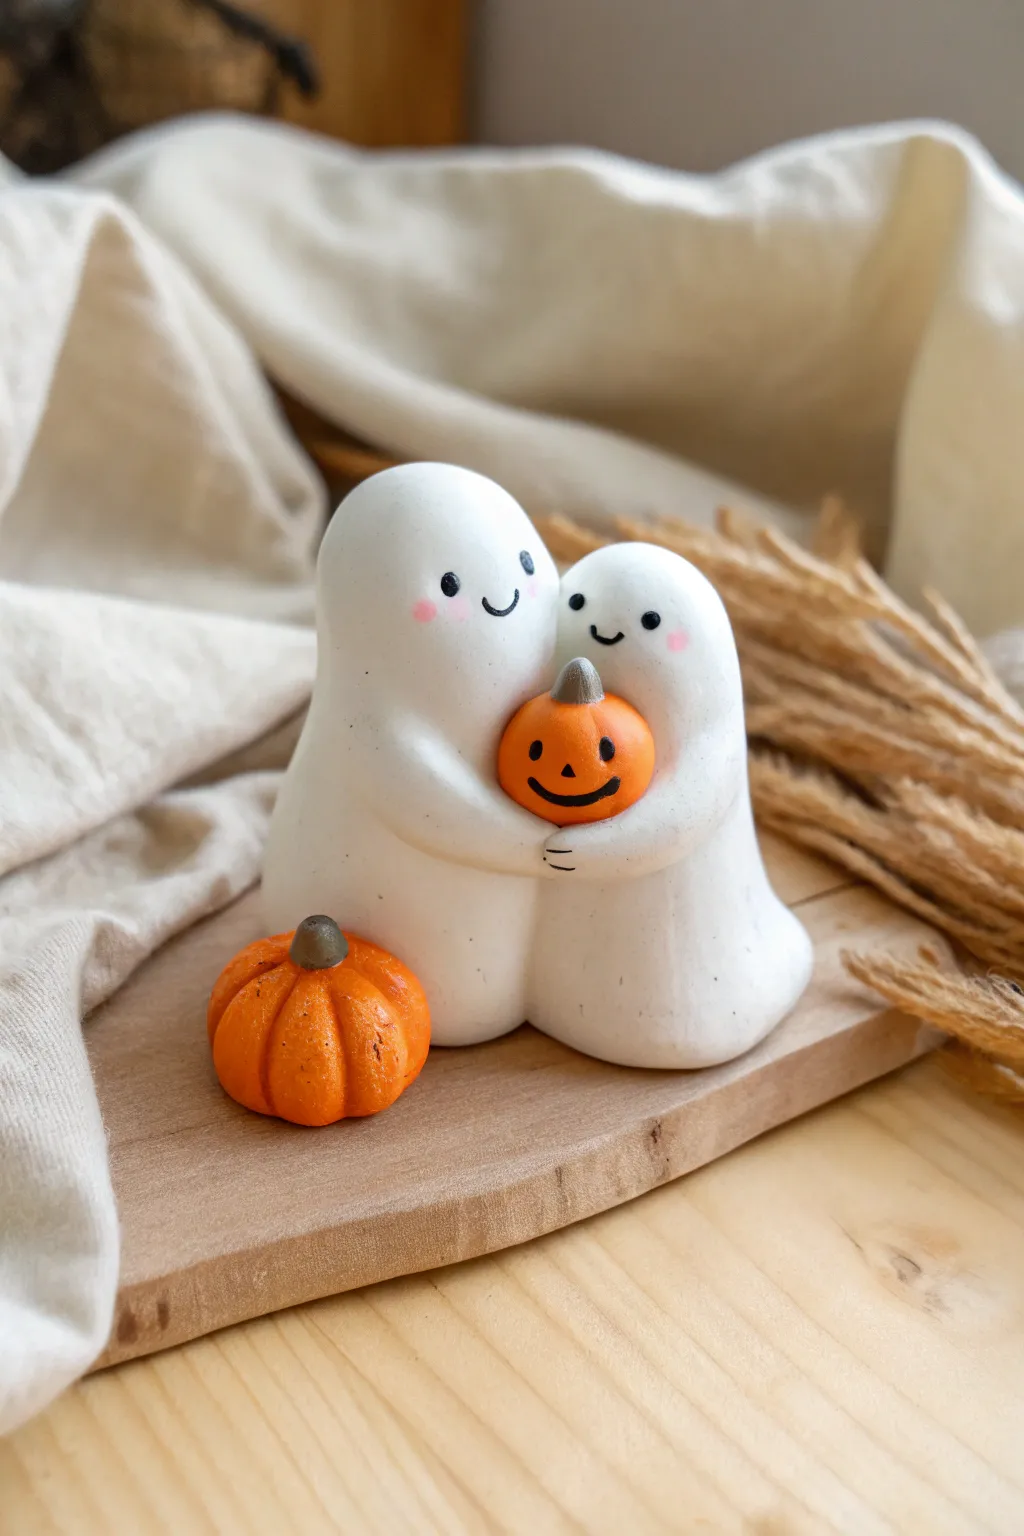
This adorable polymer clay project features a pair of friendly ghosts sharing an embrace while holding a tiny jack-o’-lantern. With their rosy cheeks and sweet expressions, they make for a charming, non-spooky Halloween decoration that sits perfectly on a mantle or shelf.
Step-by-Step Tutorial
Materials
- White polymer clay
- Orange polymer clay
- Grey or brown polymer clay (for stems)
- Black acrylic paint
- Pink soft pastel chalk or blush
- Modeling tools (ball tool, needle tool)
- Small paintbrush
- X-acto knife or clay blade
- Oven (for baking)
- Glaze or varnish (optional)
Step 1: Forming the Ghost Bodies
-
Condition the white clay:
Start by warming up a good chunk of white clay in your hands until it’s soft and pliable. This prevents cracking later on. -
Create the base shapes:
Roll two smooth balls of white clay, making one slightly larger than the other to represent the two different ghost sizes seen in the photo. -
Shape the ghosts:
Gently roll each ball into a rounded cone shape with a wide, flat bottom so they stand securely. Keep the tops nice and rounded for their heads. -
Join the pair:
Press the two ghost shapes together side-by-side. Use a modeling tool or your finger to smooth the seam slightly at the back and bottom where they touch, ensuring they are bonded as a single unit.
Step 2: Creating the Pumpkins
-
Roll orange spheres:
Take your orange clay and roll two small balls. One should be small enough for the ghosts to hold, and the other can be slightly larger to sit on the ground. -
Add pumpkin ribs:
Using a needle tool or the back of a knife, press vertical indentations all around the orange balls to create the ribbed texture of a pumpkin. -
Form the stems:
Roll tiny bits of grey or brown clay into small cones. Press them firmly onto the top center of each pumpkin. -
Position the main pumpkin:
Take the smaller pumpkin and press it gently into the chest area between the two ghosts. It should look like they are sandwiching it between them.
Fingerprints?
If you see fingerprints on your white clay before baking, lightly brush the surface with a little baby oil or cornstarch to smooth them away.
Step 3: Adding Arms and Embracing
-
Make the arms:
Roll small sausages of white clay for the arms. You will need four arms in total, though the inner arms might be hidden depending on how tight you want the hug. -
Attach the outer arms:
Attach one arm to the outer side of the larger ghost, wrapping it forward to rest on the pumpkin. Do the same for the smaller ghost’s outer arm. -
Blend the seams:
where the arms meet the body, use a sculpting tool to smooth the clay downward so the arms look seamlessly connected to the ghost bodies. -
Refine the hands:
I like to use a needle tool to make tiny indentations on the ends of the arms to suggest little fingers or just to flatten them slightly against the pumpkin.
Glow Up
Use glow-in-the-dark polymer clay for the ghost bodies so your creation lights up at night for an extra spooky effect.
Step 4: Details and Baking
-
Create the rosy cheeks:
Before baking, scrape a little pink pastel chalk into a powder. Use a soft brush to gently dab pink circles onto the cheek areas of both ghosts. -
Bake the project:
Place your sculpture and the extra pumpkin on a baking sheet. Bake according to your clay manufacturer’s instructions (usually 275°F/130°C for 15-30 minutes). -
Cool down completely:
Let the piece cool fully before painting. Painting on hot clay can make the acrylics dry clumpy. -
Paint the faces:
Using a very fine paintbrush or a dotting tool and black acrylic paint, add two small dots for eyes on each ghost. Paint a tiny smile between the cheeks. -
Paint the pumpkin face:
Carefully paint a simple jack-o’-lantern face on the pumpkin being held by the ghosts. Simple triangles and a curved line work best. -
Finish:
Once the paint is dry, you can position the loose pumpkin next to your finished ghost couple for display.
Enjoy displaying your sweet spectral duo during the spooky season
Mystery Capsule Charm Mini Collections
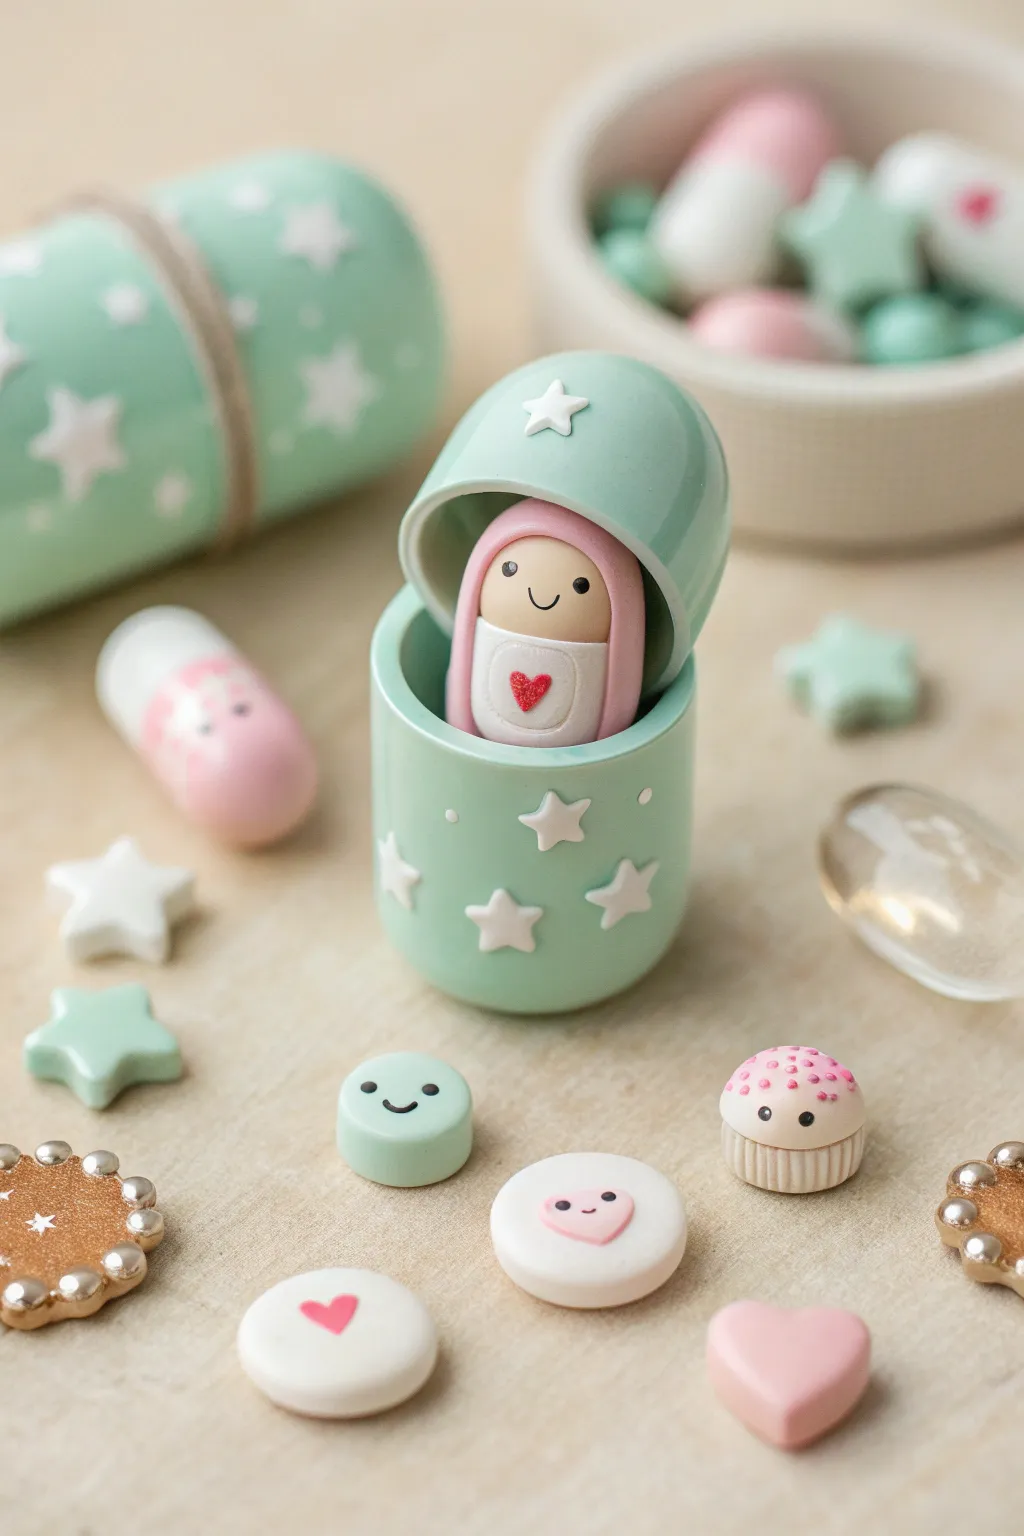
Create your own pocket-sized surprise with these adorable mystery capsule charms. This tutorial guides you through sculpting a hinged-style capsule container and a tiny, lovable character to hide inside, perfect for gifting or collecting.
How-To Guide
Materials
- Polymer clay (mint green, baby pink, bright white, red, tan/beige)
- Small circle cutters (various sizes)
- Needle tool or toothpick
- Ball stylus tool
- Small star plunger cutter (optional but helpful)
- Black acrylic paint or fine-tip black marker
- Liquid polymer clay (Translucent or Bake and Bond)
- Gloss glaze (optional)
- Small rolling pin
- Cornstarch (for release)
Step 1: Sculpting the Capsule Base
-
Prepare the mint clay:
Begin by conditioning your mint green clay until it is soft and pliable. Roll it into a smooth ball about the size of a large grape. -
Form the cylinder:
Gently shape the ball into a thick cylinder. You want the bottom to be slightly rounded but flat enough to stand on its own. -
Hollow the base:
Use the back end of a paintbrush, a large ball stylus, or your finger to gently press into the top center of the cylinder. Create a deep well, leaving the walls about 3mm thick. -
Smooth the interior:
Refine the inside walls with your finger or a smoothing tool, ensuring the opening is wide enough to fit your character later.
Hollow Help
To get a perfectly smooth hollow inside your capsule, lightly dust your finger or tool with cornstarch before pressing into the clay to prevent sticking.
Step 2: Creating the Capsule Lid
-
Shape the lid:
Take a slightly smaller amount of mint green clay and roll it into a ball, then flatten one side to create a hemisphere shape that matches the diameter of your base. -
Hollow the lid:
Just like the base, hollow out the inside of the lid. Test the fit frequently against the base to ensure they align perfectly when closed. -
Make the stars:
Roll out a very thin sheet of white clay. Use a tiny star plunger cutter or a craft knife to cut out several small stars. -
Decorate the exterior:
Gently press the white stars onto the outside of the mint capsule base and lid. I like to stagger them randomly for a whimsical look.
Step 3: Crafting the Hidden Character
-
Form the body:
Roll a small piece of white clay into a rounded cylinder shape. This should be significantly smaller than your capsule so it tucks inside comfortably. -
Create the face:
Roll a tiny ball of tan or beige clay and flatten it slightly. Press this onto the upper front of the white body cylinder to form the face area. -
Add the hood:
Wrap a thin flattened strip of pink clay around the sides and top of the face, blending the seams at the back to create a cozy hood. -
Add the mini heart:
Take a tiny speck of red clay, roll it into a ball, then pinch the bottom to make a teardrop. Press this onto the chest area to form a heart. -
Bake the components:
Place the capsule base, lid, and character on a baking tile. Bake according to your clay manufacturer’s instructions (usually 275°F/135°C for 15-30 minutes) and let cool.
Lid Won’t Fit?
If the lid deforms while hollowing, bake the base first. Adusting raw clay against a baked base makes fitting the lid much easier without squishing the bottom.
Step 4: Assembly and Finishing Touches
-
Paint the face:
Once cool, use a needle tool or fine paintbrush with black acrylic paint to create two tiny eyes and a small smile on the character’s face. -
Paint the capsule eyes:
If you want the capsule itself to have a personality (like the pink one in the background), add tiny eyes to the exterior now. -
Secure the character:
Put a drop of liquid clay or strong glue inside the bottom of the capsule base and press the character firmly inside. -
Making the extras:
Use leftover clay to make matching flat cookies or cupcakes. For the round charm, press a white circle onto a mint circle and add a smile. -
Final cure or seal:
If you used liquid clay to attach the figure, bake again briefly to set it. Finally, you can add a coat of gloss glaze to the eyes and heart for a wet look.
Display your mystery capsule open to reveal the sweet friend hiding inside